

Page 1
Contents
1. Description of the controls ________________________________ 2
2. Operating instructions ___________________________________ 11
3. Cleaning and maintenance _______________________________ 23
4. Troubleshooting _______________________________________ 28
Thank you for choosing one of our products.
You are advised to read this manual carefully; it contains all the
information you need to use your dishwasher safely, correctly and in the
most satisfactory manner.
Following the cleaning instructions provided here will keep your
dishwasher's performance at peak levels in the long term.
USER INSTRUCTIONS: these consist of recommendations for using the
appliance, a description of its controls and of the correct cleaning and
maintenance procedures.
1
Page 2
User instructions
1. Description of the controls
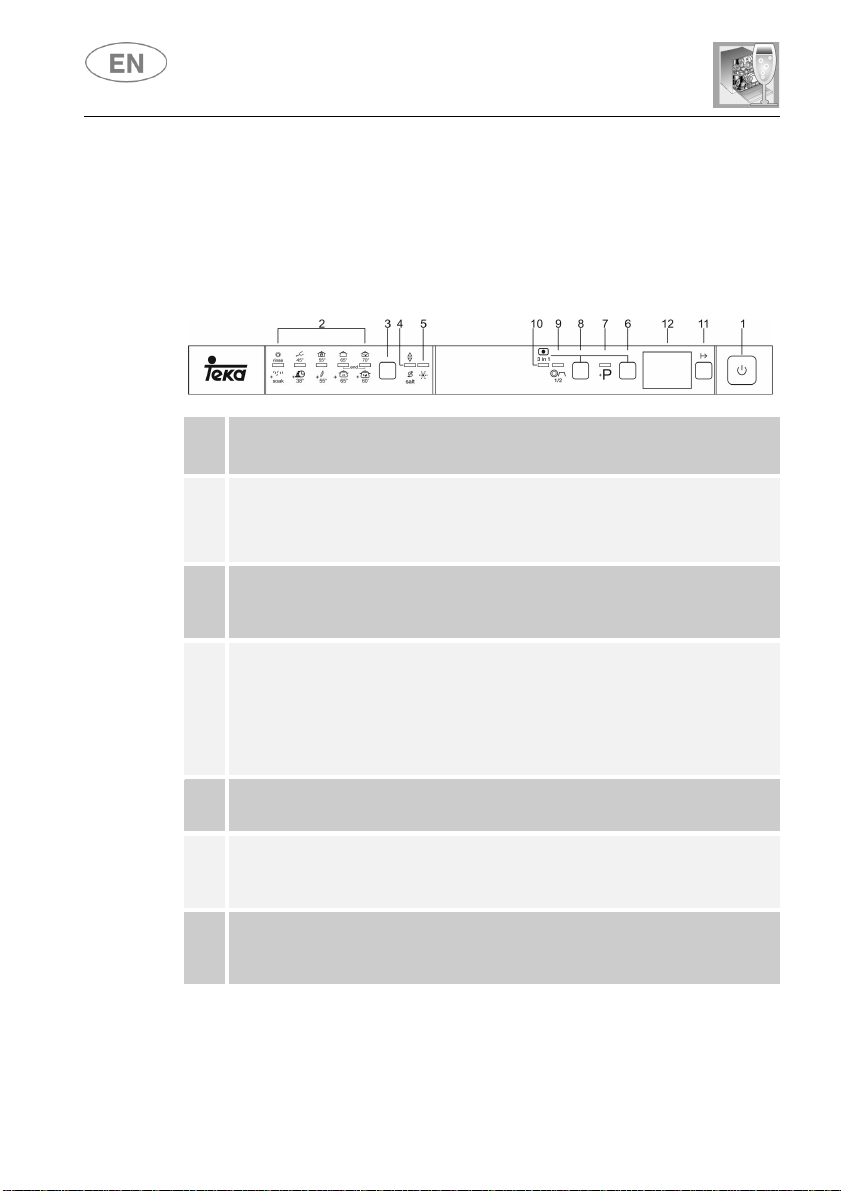
1.1 Upper panel
All the dishwasher controls are grouped on the upper panel. Switching on,
programming, switching off etc. are only possible when the door is open.
ON/OFF BUTTON
1
Press this button to switch the dishwasher on/off.
SELECTED PROGRAM INDICATOR LIGHTS
2
This light indicates the program selected and the occurrence of a
fault
(Troubleshooting).
PROGRAM SELECTION BUTTON
3
By pressing this button in sequence it is possible to select the
desired program.
WATER HARDNESS ADJUSTMENT ON INDICATOR LIGHT
The light flashes to indicate that the appliance is in “water hardness
4
adjustment” mode.
SALT WARNIN LIGHT
This light indicates the salt is finished.
RINSE AID WARNING LIGHT
5
This light indicates the rinse aid is finished..
EXTRA PROGRAM + EXTRA OPTION BUTTON
6
(see “EXTRA OPTIONS” section)
The button controls selection of the extra programs. (see table).
EXTRA PROGRAM LIGHT
7
Illuminates to indicate that one of the five extra programs (see
table) is going to be executed.
2
Page 3
User instructions
E
Err
SWITCHING ON, SETTING THE WASH PROGRAM AND STARTING
HALF LOAD OPTION + EXTRA OPTION BUTTON
8
(see “EXTRA OPTIONS” section)
Press the button to enable/disable the option.
HALF LOAD OPTION LIGHT
9
Illuminates to indicate that the function is activated.
"3/1" OPTION (EXTRA OPTION) LIGHT
10
Illuminates to indicate that the function is activated.
PROGRAM DELAY BUTTON
11
Press this button to delay the start of the program.
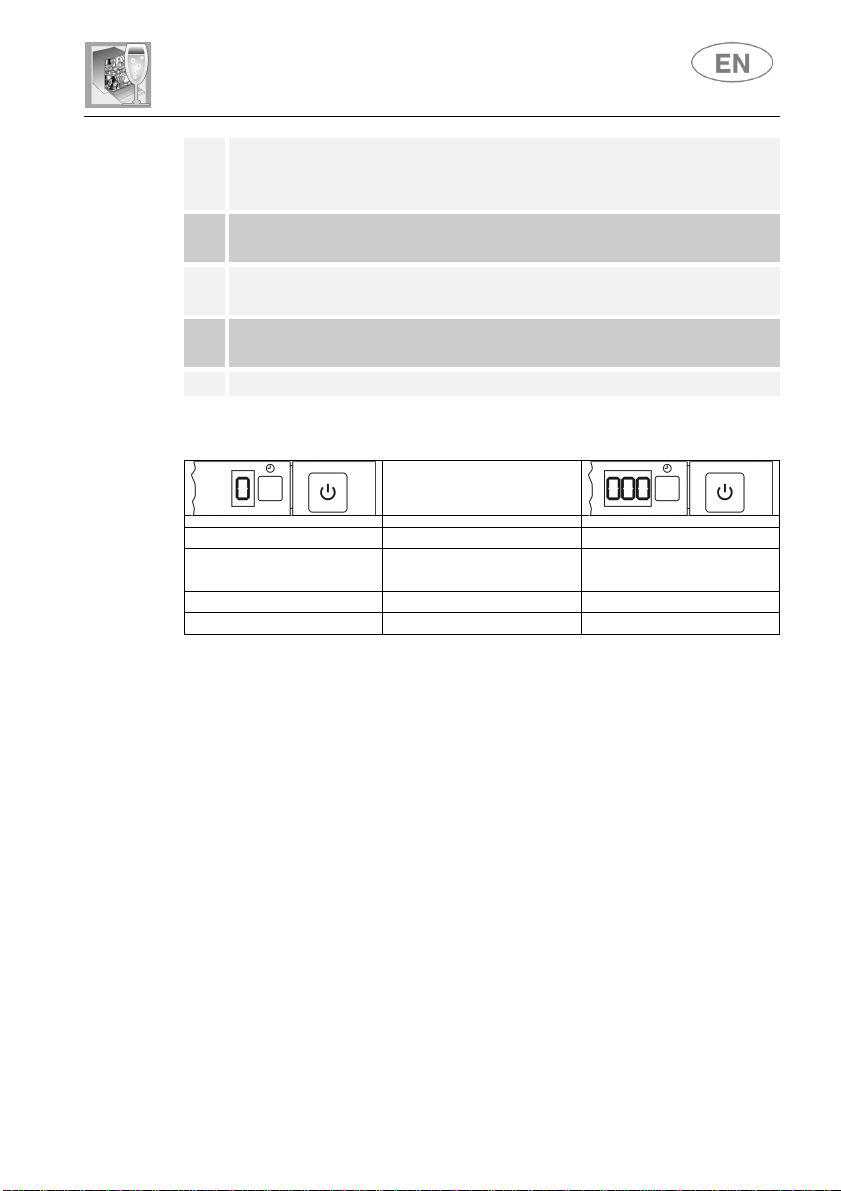
12 INFORMATION DISPLAY (1 or 3 digits depending on model)
N.B.: symbols and styling are guideline and may vary depending on
the model or version of the dishwasher purchased.
Information displayed
no Program duration yes
no Remaining program
yes
time
1 - 9 hours Delayed start 1 - 24 hours
Error message
THE PROGRAM
• Press the ON/OFF button (1); the PROGRAM INDICATOR LIGHT
(2) will come on
• Keep pressing the PROGRAM SELECTION button (3) until the
indicator light for the required program lights up
• Select the required option (if any, depending on model)
• Close the door and after about 2 seconds the program will start;
while it is running, the corresponding LIGHT will flash (program
running indicator).
3
Page 4
User instructions
PROGRAMME,
NUMBER &
SYMBOL
1
RINSE
2
GLASS
3 ECO (*)
EN 50242
4 NORMAL
5 SUPER
LOAD CROCKERY AND
Dishes with normal dirt, even
Dishes with normal dirt, even
CUTLERY
Pans and dishes for rinsing
and drying.
Glass, china and mixed
dishes, with light dirt.
with dried-on residues.
with dried-on residues.
Very dirty pans and dishes,
even with dried-on residues.
PROGRAM
PROGRESS
Cold rinse
Rinse at 70°C
Dry
Wash at 45°C
Cold rinse
Rinse at 70°C
Dry
Cold prewash
Wash at 45°C
Rinse at 65°C
Dry
Cold rinse
Wash at 65°C
Cold rinse
Rinse at 70°C
Dry
Hot prewash
Wash at 70°C
Cold rinse (2)
Rinse at 70°C
Dry
DURATION
MINUTES
(1)
CONSUMPTION
WATER
LITRES
45 9 0,90
59
12 0,90
**
** **
80
17 1,20
105
20 1,50
IMPORTANT: see “NOTES AND REFERENCES” table on the following pages.
The washing cycle will not take place if the dishwasher door is left open
or not properly closed.
POWER
KWh (1)
4
Page 5
User instructions
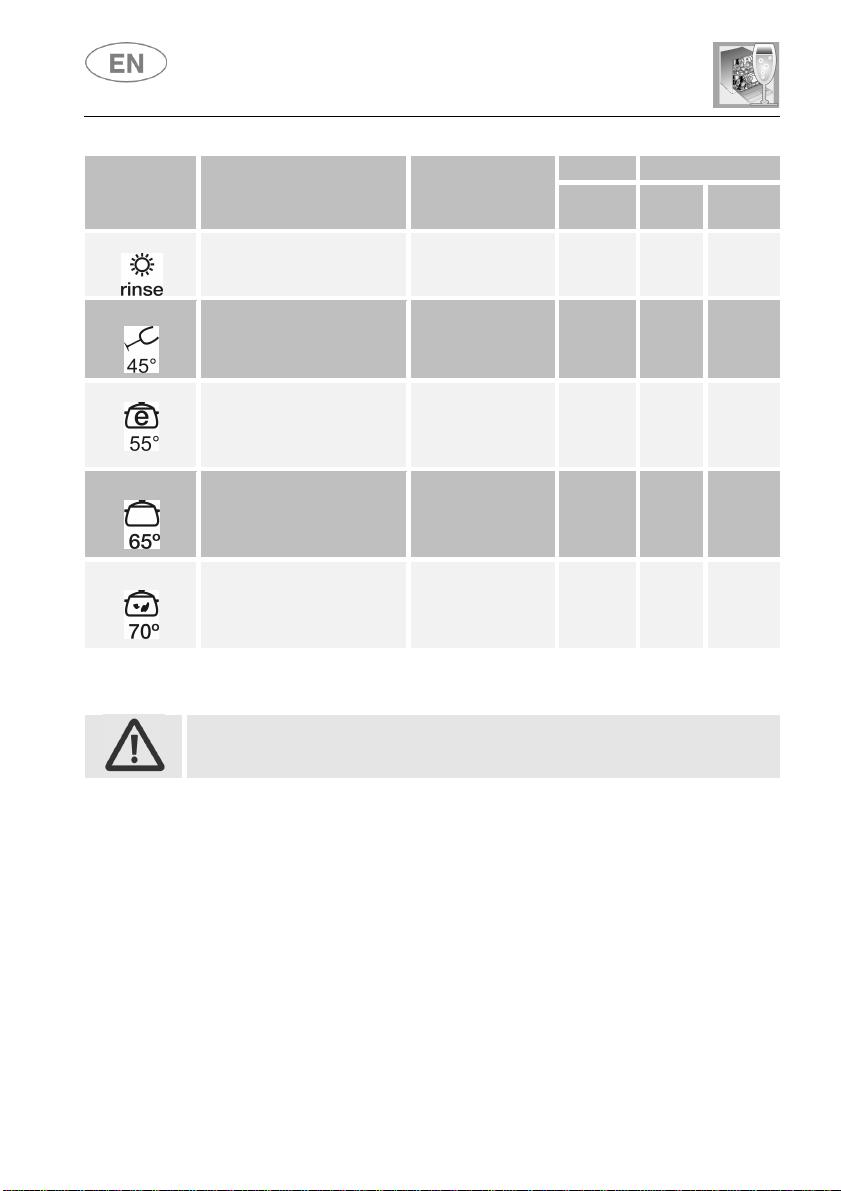
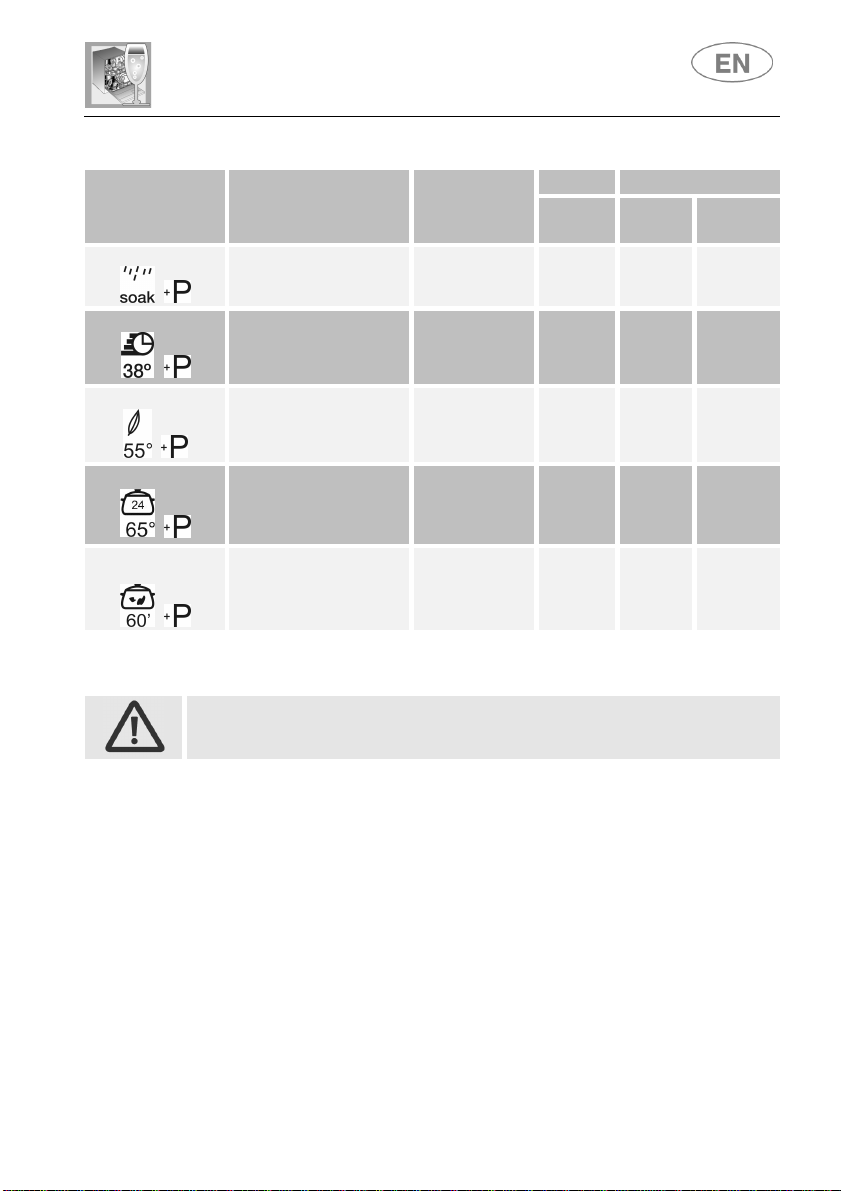
EXTRA PROGRAMS
PROGRAMME
NUMBER E
SYMBOL
6
SOAK
+
7
FAST
+
8
SOFT
+
9
DAILY
+
10
INTENSIVE
EXPRESS
+
(see relevant section for explanation of functioning modes)
LOAD CROCKERY AND
CUTLERY
Pans and dishes awaiting
completion of the load.
Delicate dishes, with light
dirt, washed immediately
after use.
Dishes with normal dirt,
washed immediately after
Pans and dishes with
normal dirt, washed
immediately after use
Mixed dishes with normal
dirt without dried-on
residues.
use.
PROGRAM
PROGRESS
Cold prewash
Wash at 38°C
Cold rinse
Rinse at 58°C
Wash at 55°C
Cold rinse
Rinse at 70°C
Dy
Wash at 65°C
Cold rinse
Rinse at 70°C
Dy
Wash at 65°C
Cold rinse
Rinse at 70°C
DURATION
MINUTI (1)
9 5 0,02
38
110
120
50 10 1,20
CONSUMPTION
WATER
LITRES
13 0,85
15 1,50
15 1,25
IMPORTANT: see “NOTES AND REFERENCES” table on the following pages.
The washing cycle will not take place if the dishwasher door is left open
or not properly closed.
POWER
KWh (1)
5
Page 6
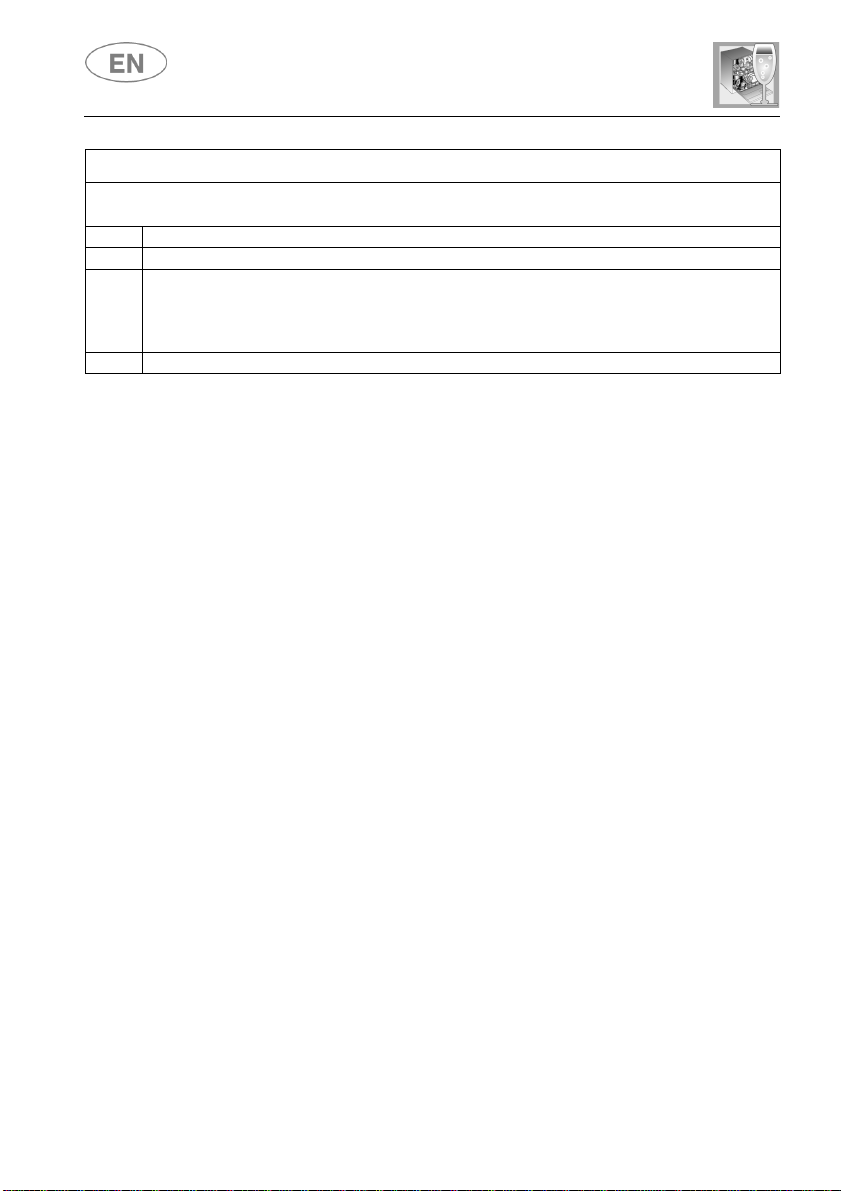
NOTES AND REFERENCES
EN
50242
Only run the soak program with half loads.
Options cannot be used with the soak program.
Standard programme under
*
** See information sheet provided
(1)
Program consumption and duration figures have been measured in
accordance with the EN 50242 standard. Values may vary depending on
intake water and room temperatures and the type and quantity of dishes
loaded.
(2)
1 or 2 cold rinses depending on the model.
User instructions
.
REFERENCES for the ENERGY LABEL supplied with the dishwasher:
- Annual energy consumption is based on 280 standard wash cycles with cold
water and consumption of low-energy operating modes. Actual consumption
depends on the way in which the appliance is used.
- Water consumption is based on 280 standard wash cycles. Actual
consumption depends on the way in which the appliance is used.
- Information refers to the EN 50242 STANDARD programme (identified in the
programmes table), which is the most effective in terms of combined energy
and water consumption. The programme is recommended for dishes with a
normal level of dirt.
- Drying efficiency class on a scale from “G” (minimum efficiency) to “A”
(maximum efficiency).
6
Page 7
User instructions
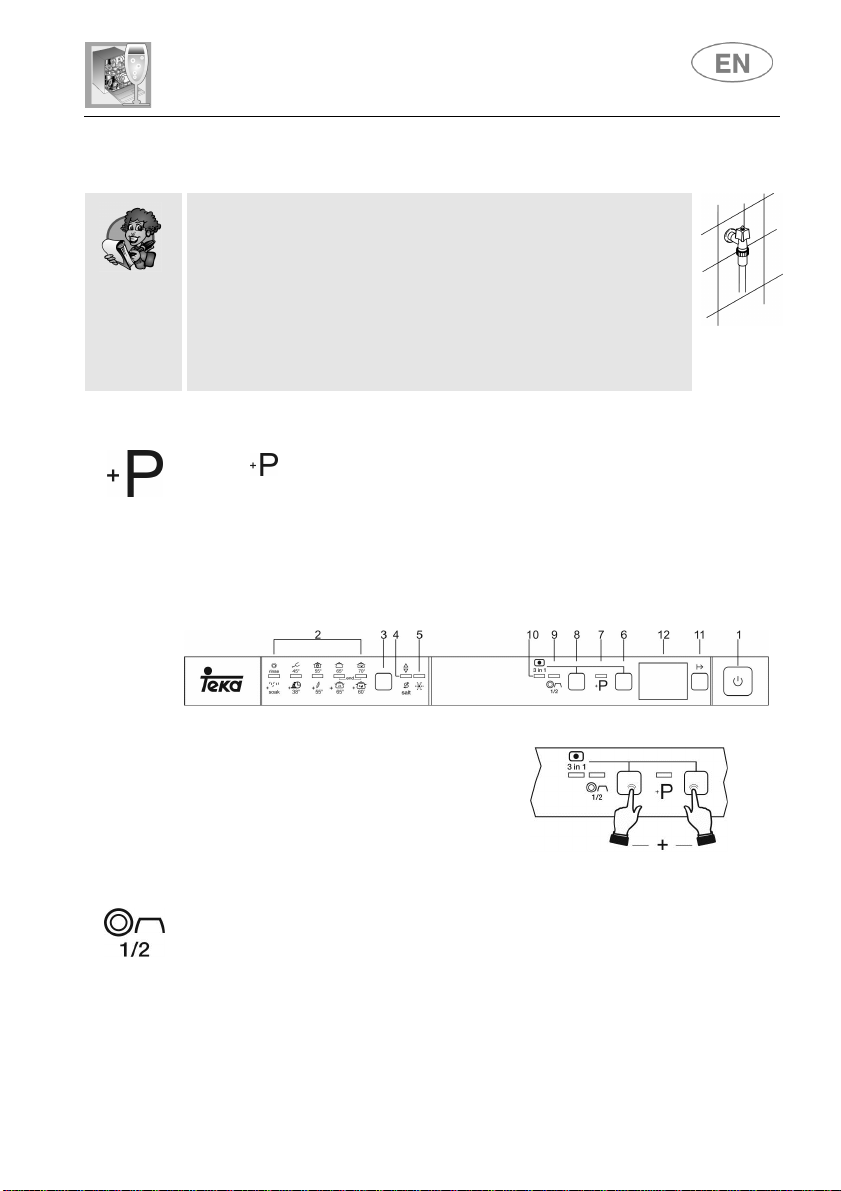
EXTRA PROGRAMS
ADDITIONAL OPTIONS (on some models only)
SPREAD HALF LOAD
1.2 Washing programs
Before starting a wash program, check that:
• The water supply tap is open.
• The softener container contains regenerating salt.
• The correct amount of detergent has been added to
the dispenser.
• The baskets have been correctly loaded.
• The spray arms are able to rotate freely and without
obstruction.
• The dishwasher door is securely closed.
Button gives access to the extra programs in addition to the ones
which can be selected directly using the program selector button.
This button must be pressed (the light comes on) after selection of the
“main” program (1,2,3,4 or 5).
This function is retained in the memory, so the button has to be pressed
again (the light goes out) if the user wishes to execute one of the 5 main
programs at the next cycle.
These are activated by pressing
two buttons simultaneously as
shown by the graphics on the
control panel (e.g. “3 in 1” in this
illustration)
Suitable when there are not many dishes to be washed, it saves energy
and reduces the program duration. Spread dishes across both baskets;
the detergent dispenser should be loaded with less than the normal
amount for a full load.
7
Page 8
are not suitable
excessively “hard”
DELAYED START
User instructions
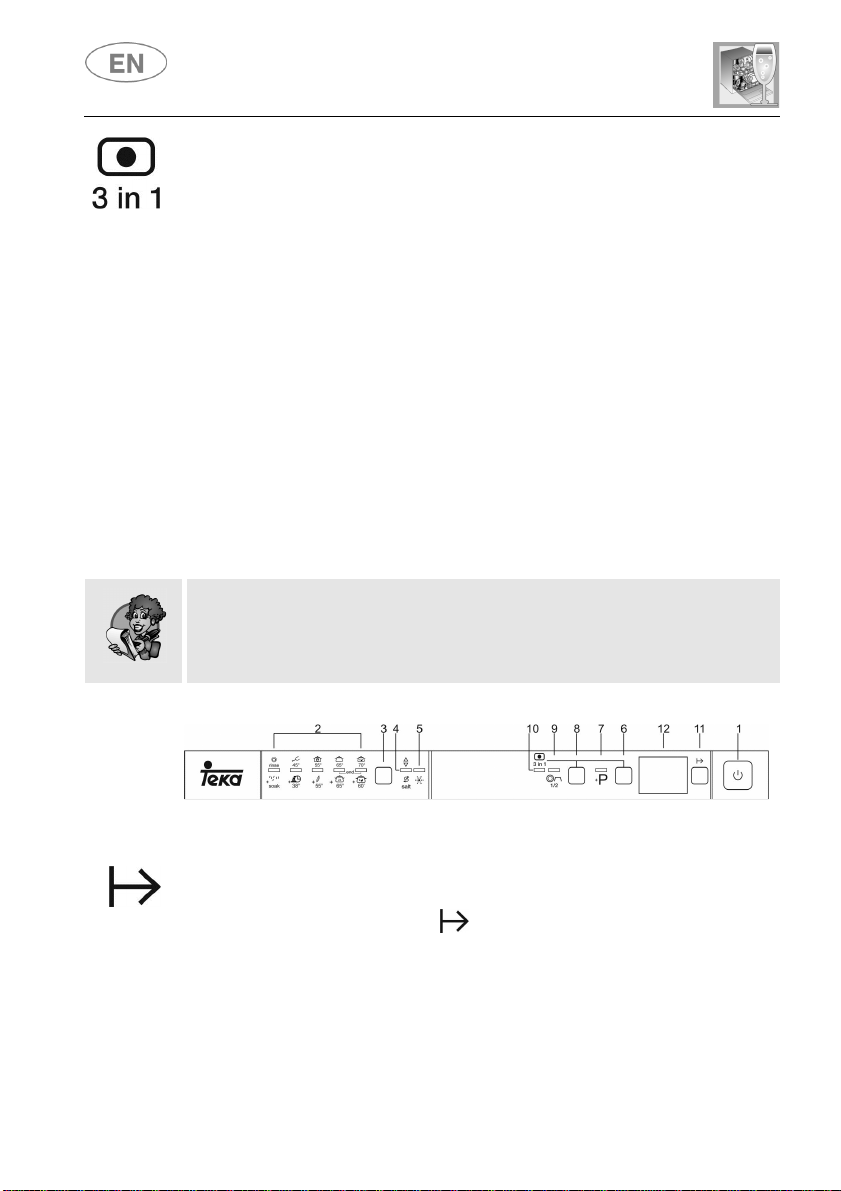
3 in 1
Specifically for washing with combination dishwasher tablets which also
contain salt and rinse aid (3in1) or other agents such as glass
protector, steel rinse aids etc. (4in1, 5in1…). When this option is
selected, salt and rinse aid will not be dispensed even if the relative
compartments are loaded. If the containers are empty, the lights will
remain on.
With short programs, because there is less time for them to dissolve,
tablets may fail to wash effectively and undissolved residues may be left.
Powder detergents are more suitable for these programs.
If this option is not provided with your dishwasher, we recommend the
use of conventional products (separate detergent, salt and rinse aid),
because with conventional wash cycles, combined products might create
problems such as a white deposit, poor drying results and residues on
dishes.
For further information, refer to the detergent pack.
IMPORTANT:
when no longer required, the option must be deactivated by pressing
the corresponding button (the light will turn off).
These products
for use with
water.
If the hardness level set is higher than H3, when the option is activated
the relative light flashes to indicate that the product is being used
incorrectly; the dishwasher will still work, but wash results may not be
ideal.
8
The start of the washing program can be delayed to program the
dishwasher to operate at the preferred time of day (e.g. overnight). Press
the PROGRAM DELAY button to activate the option and display a 1
hour delay. Keep pressing to select the delay required, which may be up
to 9, 12 or 24 hours depending on the model.
When the door is closed, the appliance will prewash the dishes, after
which the "program delay" set will come into effect.
Page 9
User instructions
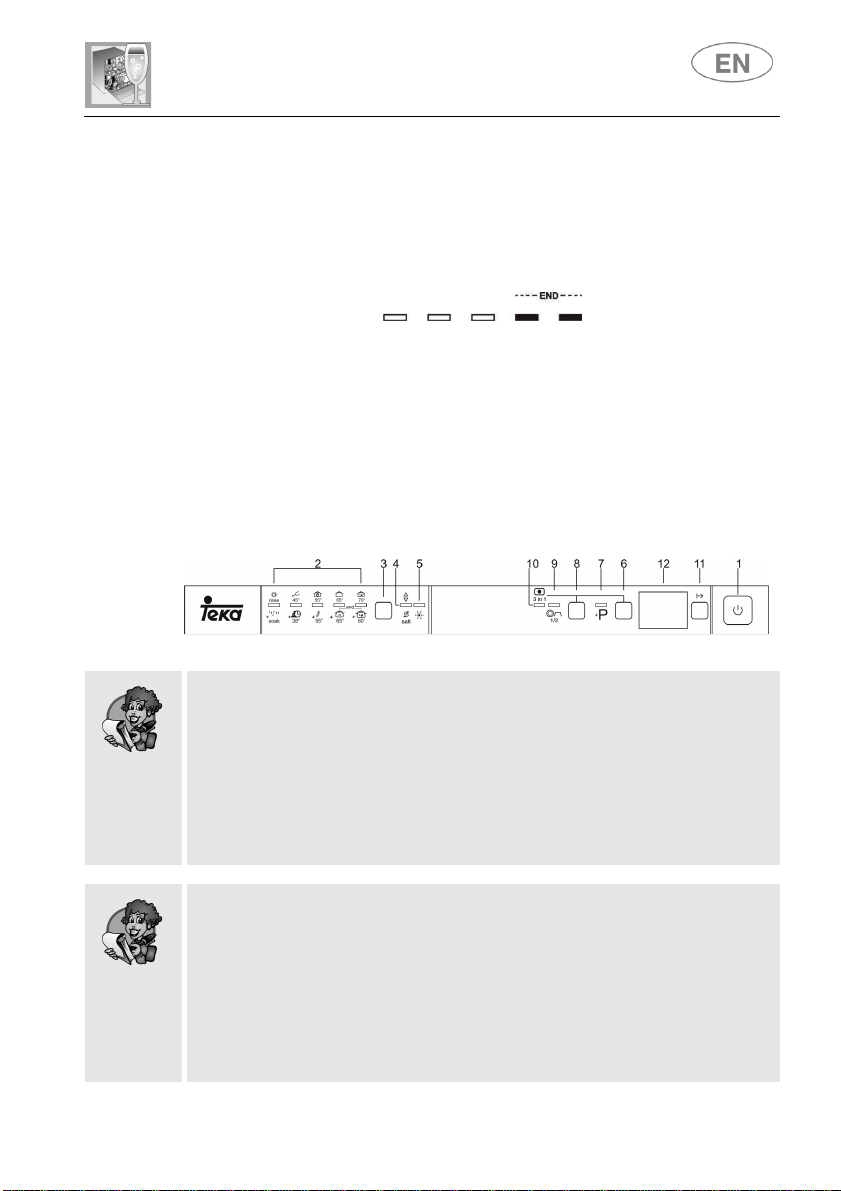
CANCELLING A PROGRAM IN PROGRESS
CHANGING THE PROGRAM
• Open the door, taking care to avoid splashes of water,
• and hold down the PROGRAM SELECTION (3) button for a few
seconds until the indicator lights for programs 4 and 5 come on
simultaneously (marked "end").
• Close the door.
• After approximately 1 minute the dishwasher will advance to the end
of cycle.
To change the program in progress, simply open the door and select a
new program. When the door is closed the dishwasher will automatically
run the new program.
TO SAVE ENERGY AND PROTECT THE ENVIRONMENT
• Always use the dishwasher with a full load.
• Do not wash the dishes in running water.
• Use the wash program that is most appropriate for each type of
load.
• Do not perform preliminary rinsing.
• If available, connect the dishwasher to a hot water supply up to
60°C.
TO REDUCE DETERGENT CONSUMPTION AND PROTECT THE
ENVIRONMENT
The phosphates contained in dishwasher detergents are harmful to the
environment. To avoid using excessive amounts of detergent save on
electricity as well, observe the following recommendations:
• Sort your dishes, washing delicate items separately from those
more resistant to strong detergents and high temperatures.
• Do not pour detergent directly onto dishes.
9
Page 10
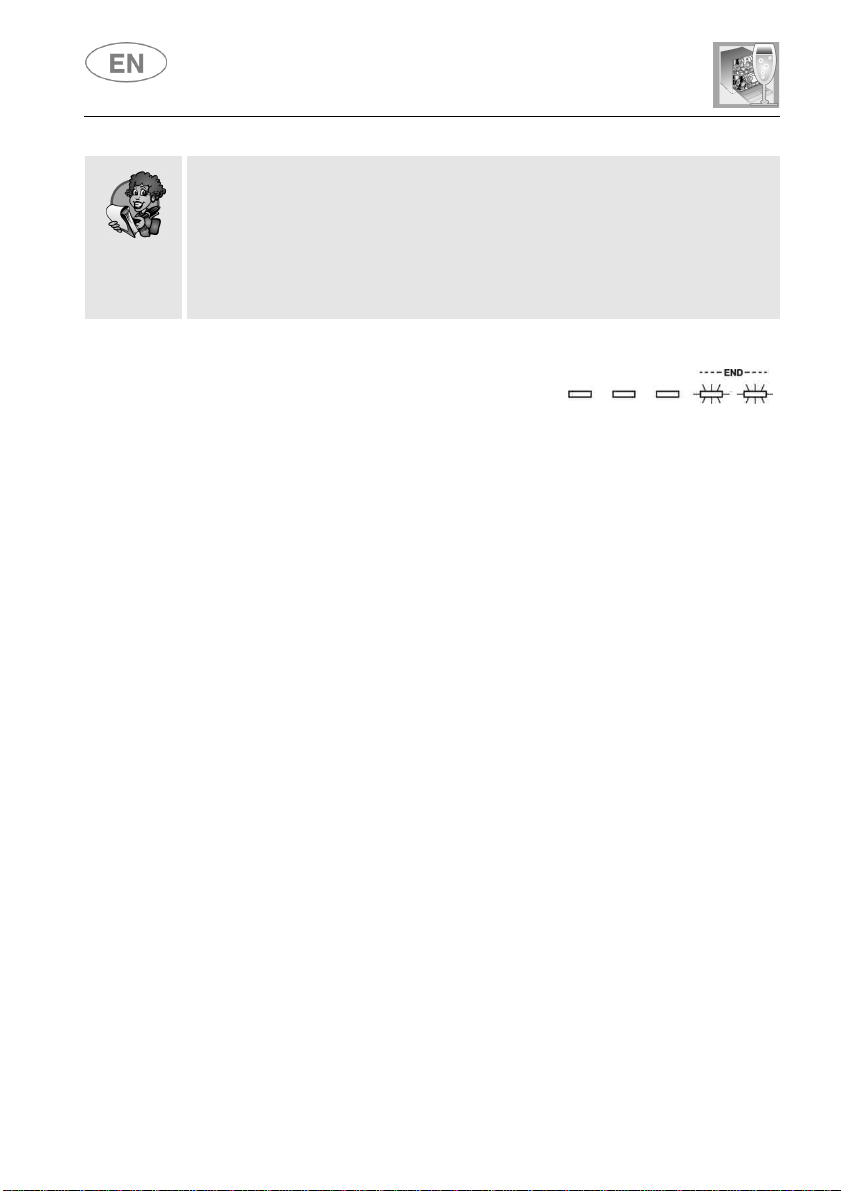
SWITCHING OFF
ON/OFF
ENERGY MANAGEMENT
REMOVING THE DISHES
User instructions
If the door must be opened while a wash cycle is in progress, the
program will be interrupted. The corresponding light will continue to flash
and a beeper will signal that the cycle has not been completed. You
must wait about 1 minute before closing the door to restart the program.
When the door is closed the program will continue from where it was
interrupted. This operation should only be carried out if strictly
necessary, as it could cause problems in running the program.
At the end of the program the beeper
sounds briefly and the lights of programs
no. 4 and 5 (marked "end") flash.
To switch off the dishwasher, open the door and press the
button (1).
After 5 minutes of inactivity (wash cycle completed, stopped or set but
not started), the dishwasher switches to standby mode to reduce energy
consumption.
In this mode, the dishwasher indicator panel (lights or display depending
on model) functions more slowly (switch-on once every 5 seconds).
At the end of the wash program, wait at least 20 minutes before
removing the dishes, to allow them to cool. To ensure that any drops of
water left in the top basket do not drip onto the dishes still in the bottom
basket, you are advised always to empty the bottom basket first.
10
Page 11
User instructions
2. Operating instructions
Once the dishwasher has been correctly installed, prepare it for use as
follows:
• Adjust the water softening system
• Add salt
• Add rinse aid and detergent
2.1 Using the water softening system
The dishwasher is equipped with an
automatic softening system which uses a
special regenerating salt to reduce the
hardness of the water, responsible for
whitish marks on dry dishes The
dishwasher is factory set for water
hardness level 3 (average hardness).
When using water of medium hardness, the salt container should be
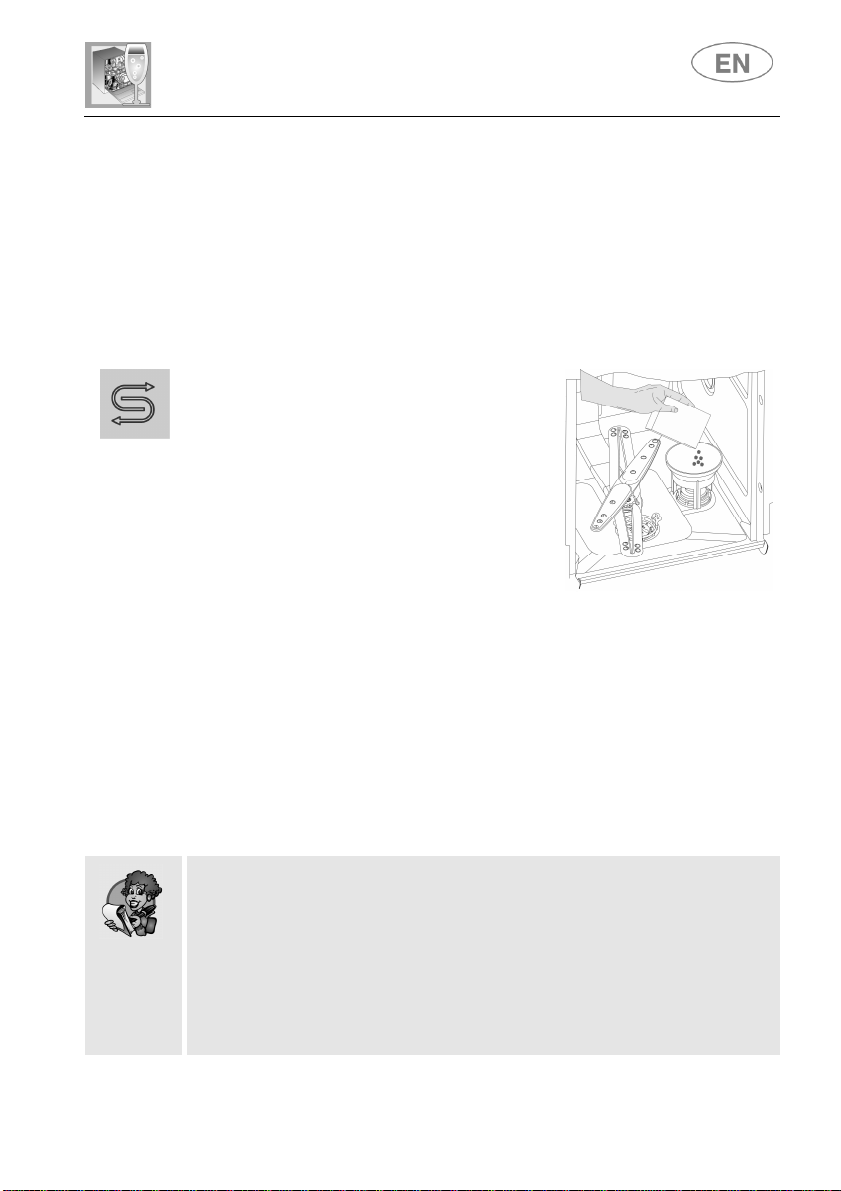
refilled after approximately 20 wash cycles. The salt container can hold
approximately 1.5 kg of salt grains. Some models are equipped with a
cap with a no-salt optical indicator containing a green float which
descends as the salt concentration in the water drops. When the green
float can no longer be seen through the transparent cap, salt must be
added. The container is situated at the bottom of the dishwasher. After
removing the lower basket, unscrew the salt container cap by turning it
anticlockwise and pour in the salt using the funnel supplied. Before
replacing the cap, remove any salt residues from around the opening.
• When using the dishwasher for the first time, in addition to the salt it
is also necessary to add one litre of water to the container.
• Each time the salt container is refilled, make sure that the cap is
securely closed. The mixture of water and detergent must never
enter the salt container, as this would compromise the operation of
the regeneration system. In the event of this occurring, the warranty
will be invalidated.
• Only use salt specially formulated for domestic dishwashers. If
using salt tablets, do not fill the container completely.
SALT
11
Page 12
ADJUSTING THE WATER SOFTENING SYSTEM
WATER
User instructions
• Do not use table salt, as it contains insoluble substances which,
over time, may damage the water softening system.
• The salt container should be refilled before starting the wash
program. This way, the excess saline solution will be immediately
removed by the water; prolonged presence of salt water inside the
tank may lead to corrosion.
Be careful not to confuse the salt and detergent packages; adding
detergent to the salt container will damage the water softening system.
The dishwasher is equipped with a device which allows the softener
setting to be varied to suit the hardness of the mains water. Adjustment
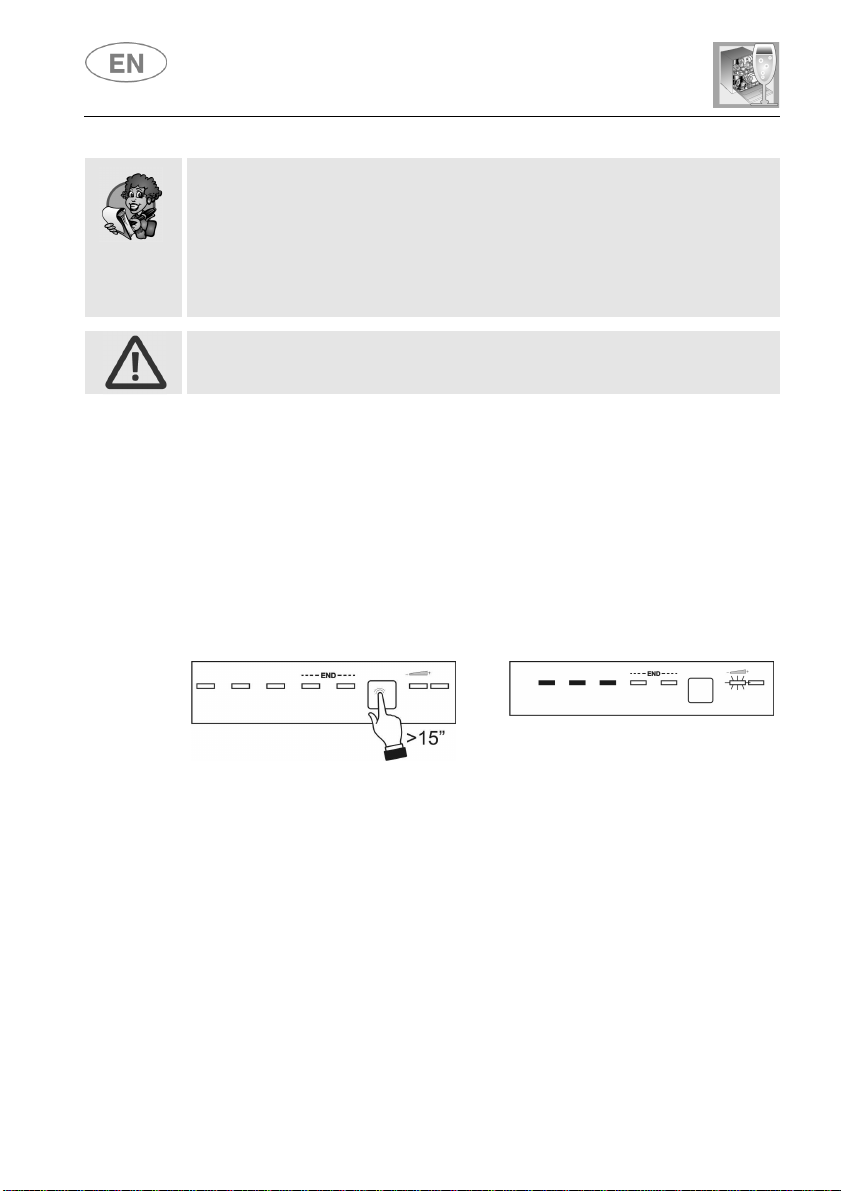
is made using the PROGRAM SELECTION BUTTON (3).
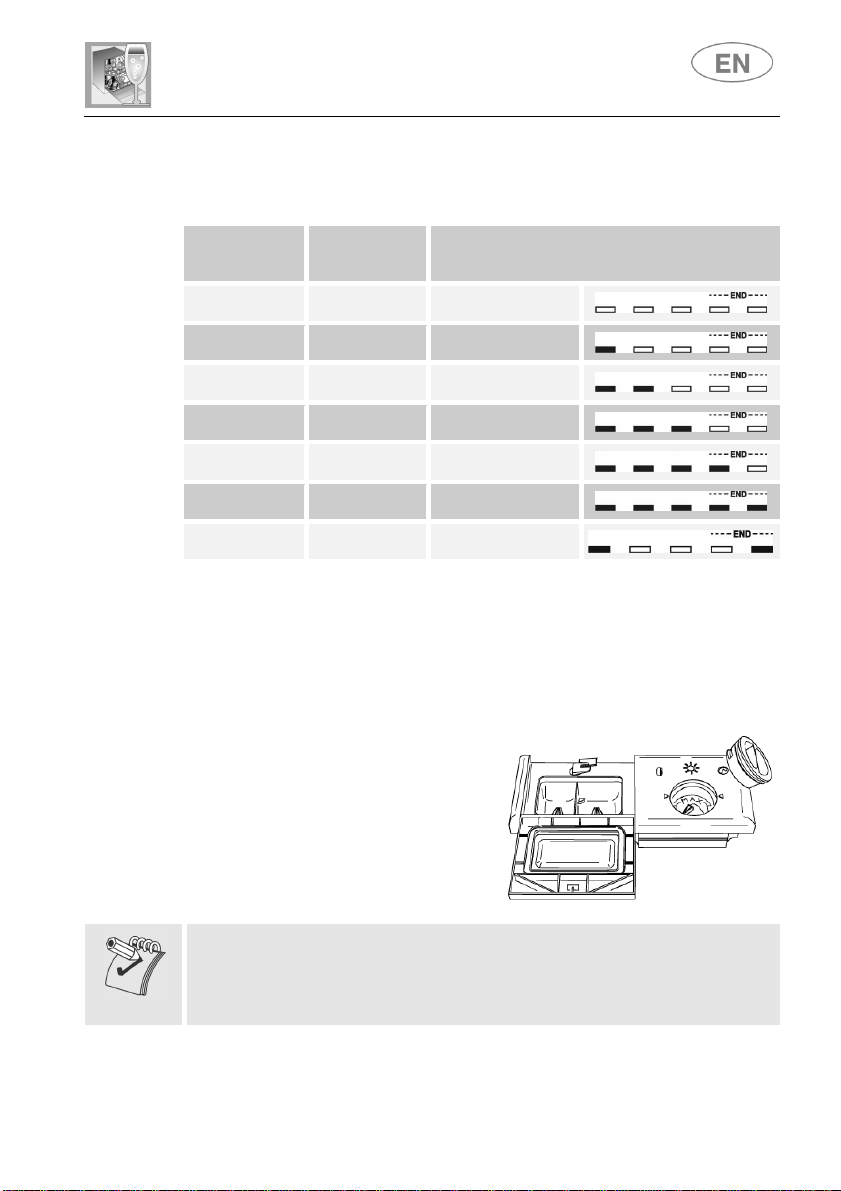
● Hold the button down for more than 15 seconds. The
HARDNESS ADJUSTMENT INDICATOR LIGHT (4) flashes, while the
SELECTED PROGRAM INDICATOR LIGHTS (2) show the current
setting.
● Each press of the button changes the selection, following the
sequence in the table below.
>
After adjusting or displaying the current setting, simply do not touch the
button for a few seconds; the dishwasher will automatically return to
standard mode, quitting the adjustment mode.
12
Page 13
User instructions
(no salt)
WATER HARDNESS TABLE
German
degrees (°dH)
0 - 6 0 - 11
7 - 10 12 - 18
11 - 15 19 - 27
16 - 21 28 - 37
22 - 28 38 - 50
29 - 35 51 - 62
36 - 50 63 - 90
French
Degrees (°dF)
SETTING
All lights off
One light on
Two lights on
Three lights on
Four lights on
Five lights on
Two lights on
Contact your local water board for information on the hardness of your
water supply.
2.2 Using the rinse aid and detergent dispensers
The detergent and rinse aid
dispensers are situated on the inner
part of the door: the detergent
dispenser is on the left, and the
rinse aid dispenser is on the right.
With the exception of the SOAK program, it is necessary to add the
required amount of detergent to the detergent dispenser before every
wash cycle. The rinse aid, on the other hand, should only be added as
required.
13
Page 14
ADDING RINSE AID
ADJUSTING THE RINSE AID DISPENSER SETTING
User instructions
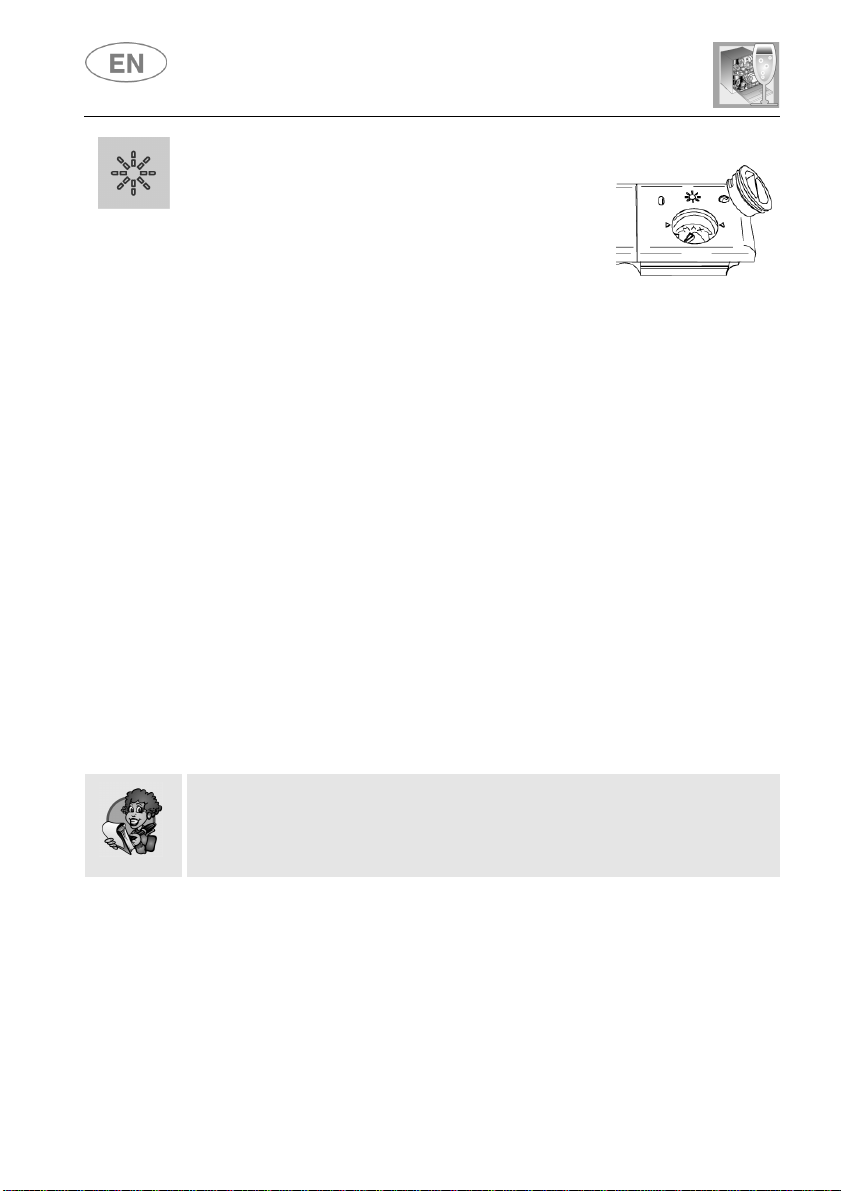
Rinse aid helps the dishes dry faster and
prevents the formation of scale deposits and
staining; it is automatically added to the water
during the final rinse cycle.
To add rinse aid:
• Open the door.
• Rotate the container cap anticlockwise by ¼ of a turn and remove it.
• Add the rinse aid until the container is full (approximately 140 ml).
The optical level indicator on the side of the cap should be
completely dark. Refill the rinse aid when the optical level indicator
turns clear again, or when the rinse aid warning light turns on.
• Replace the cover and turn it clockwise.
• Use a cloth to remove any spillage of rinse aid which might lead to
the formation of excess foam.
The dishwasher is factory set for medium water hardness. It is possible
to change this setting by turning the dispenser selector to the required
position: the amount of rinse aid dispensed depends on the selector
position.
• To adjust the rinse aid setting, rotate the dispenser cap a quarter of
a turn anticlockwise and remove it.
• Then rotate the rinse aid selector to the desired position.
• Replace the cap, turning it clockwise.
• The amount of rinse aid must be increased if the washed dishes
appear dull or have circular stains.
• If, on the other hand, the dishes are sticky or have white streaks, it
is necessary to reduce the rinse aid dosage.
14
Page 15
User instructions
ADDING DETERGENT
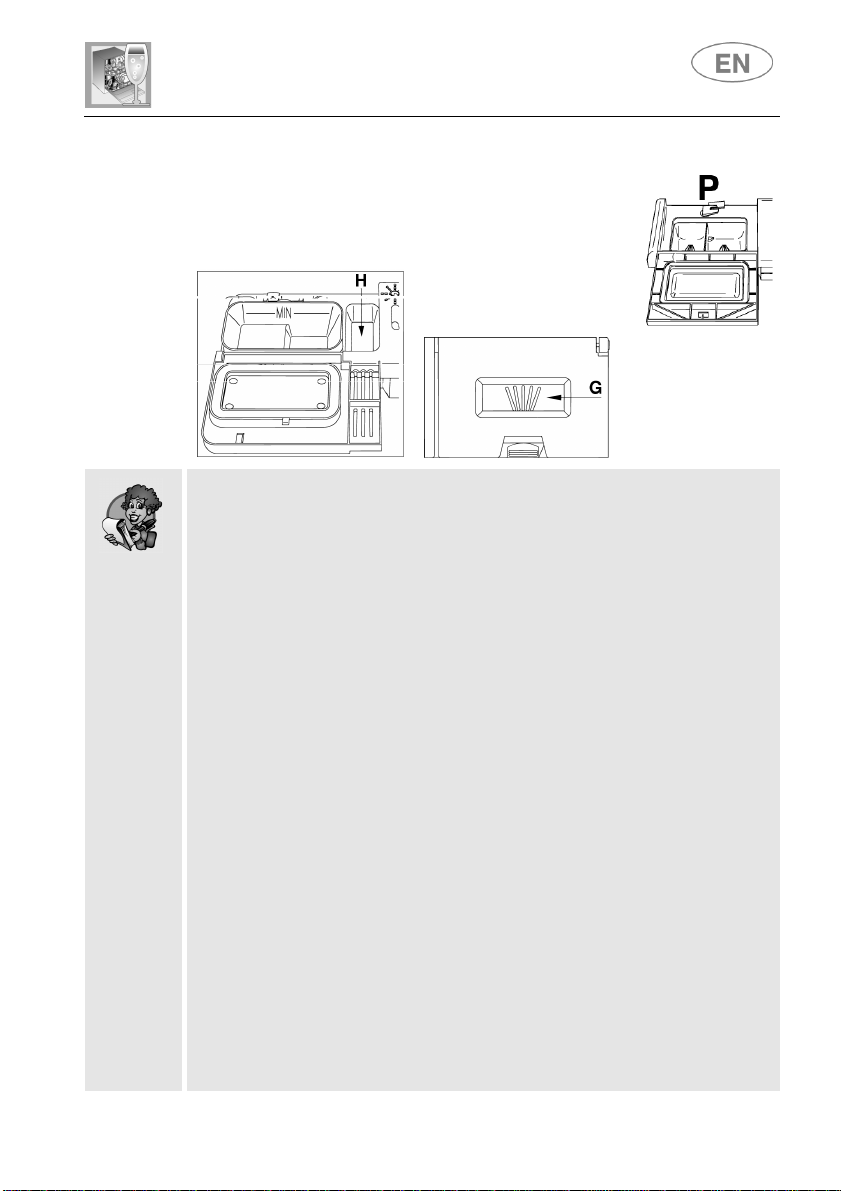
To open the detergent dispenser cap, lightly press
the button P. Add the detergent and close the cap
carefully.
During the wash cycle, the dispenser will open
automatically.
• When a program with hot prewash is selected (see program table),
extra detergent must be placed in the cavity G/H (depending on
model).
• Use only detergents specially formulated for dishwashers. For
optimal washing results it is important to use a good quality
detergent.
• The detergent packs must be sealed and stored in a dry place to
prevent the formation of lumps which may negatively affect wash
results. Once opened, the detergent packs should not be kept for
too long, otherwise the detergent will lose its effectiveness.
• Do not use detergents formulated for washing dishes by hand,
because they produce a great deal of foam and may negatively
affect the operation of the dishwasher.
• Add the correct amount of detergent. An insufficient amount of
detergent will result in a partial removal of dirt from the dishes,
whereas an excessive amount is wasteful and does not improve the
wash results.
• There are various liquid and powder detergents on the market with
differing chemical compositions, which may contain phosphates, or
be phosphate-free but contain natural enzymes.
- Detergents containing phosphates are more effective against
grease and starch at temperatures above 60°C .
- Enzyme detergents, on the other hand, are also effective at lower
temperatures (from 40 to 55°C) and are more easily
biodegradable. Enzyme detergents provide comparable results at
low temperatures to those which can only be achieved at 65°C
using traditional detergents.
To protect the environment, we recommend the use of phosphate-
and chlorine-free detergents.
15
Page 16
User instructions
The introduction of detergent into the rinse aid dispenser, even in
liquid form, will damage the dishwasher.
2.3 General warnings and recommendations
Before using the dishwasher for the first time, it is advisable to read the
following recommendations concerning dish types and loading.
There are generally no constraints on washing of domestic dishes, but
in certain cases it is necessary to take their characteristics into account.
Before loading the dishes into the baskets it is necessary to:
• Remove large food remains, particularly bones, which may clog the
filter or damage the pump.
• Soak any pots or pans with burnt-on food to facilitate its removal,
then load them into the LOWER BASKET.
There is no need to pre-wash the dishes under running water before
loading them into the baskets since this only wastes water.
Correct loading of the dishes helps ensure optimal wash results.
16
Page 17

User instructions
WARNING!
• Make sure that the dishes are securely in place so that they cannot
tip over or obstruct the rotation of the spray arms during the wash
cycle.
• Do not place very small objects in the baskets as these could fall
and obstruct the spray arms or the pump.
• Containers such as cups, bowls, glasses and pots should always
be loaded with the opening facing downwards and with any cavities
at an angle, to allow the water to drain out.
• Do not stack dishes or place them in such a way that they cover
each other.
• Do not place glasses too close together because they may knock
against each other and break, or stains may remain at the point
where they touch.
MAKE SURE that the items being washed are dishwasher-safe.
Items which are not dishwasher-safe:
• Wooden dishes, pots or pans: these may be damaged by the
high wash temperatures.
• Handmade items: these are rarely suitable for washing in a
dishwasher. The relatively high water temperatures and the
detergents used may damage them.
• Plastic dishes: heat resistant plastic dishes must be washed in the
upper basket.
• Dishes and objects in copper, tin, zinc or brass: these tend to
stain.
• Aluminium dishes: items made from anodised aluminium may
lose their colour.
• Silverware: silver items may stain.
• Glass and crystal: in general, glass and crystal objects can be
washed in the dishwasher. However, certain types of glass and
crystal may become dull and lose their clarity after many washes.
Therefore, for these items we recommend using the most gentle
program available.
• Decorated items are generally able to withstand washing in the
dishwasher, although the colours may fade with frequent washing.
If in doubt as to the fastness of the colours, it is advisable to wash
just a few items at a time for approximately one month.
17
Page 18
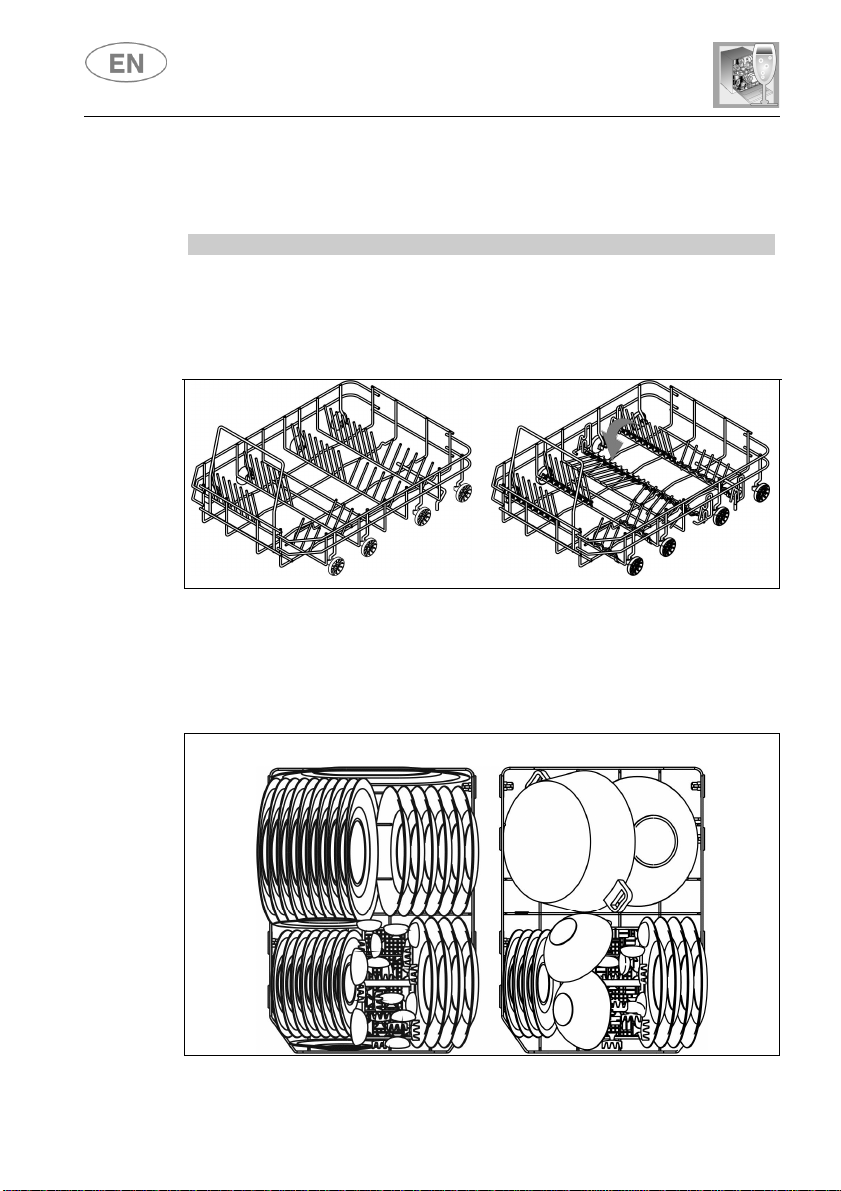
LOWER BASKET
LOADING THE LOWER BASKET
Loading examples:
2.4 Using the baskets
User instructions
The dishwasher has a capacity of 10 place-settings, including serving
dishes.
Used for items with a heavier degree of soiling.
All types and combinations of loads are permitted, provided that the
dishes, pots and pans are arranged with all the soiled surfaces exposed
to the water jets coming from the bottom. In some models the bottom
basket is fitted with racks which can be lowered to make better use of
the space available.
18
Carefully load flat plates, soup bowls, dessert and serving dishes,
positioning them vertically. Pots, pans and their lids must be loaded
upside down. When loading soup and dessert bowls, be sure to leave a
gap between them.
Page 19
User instructions
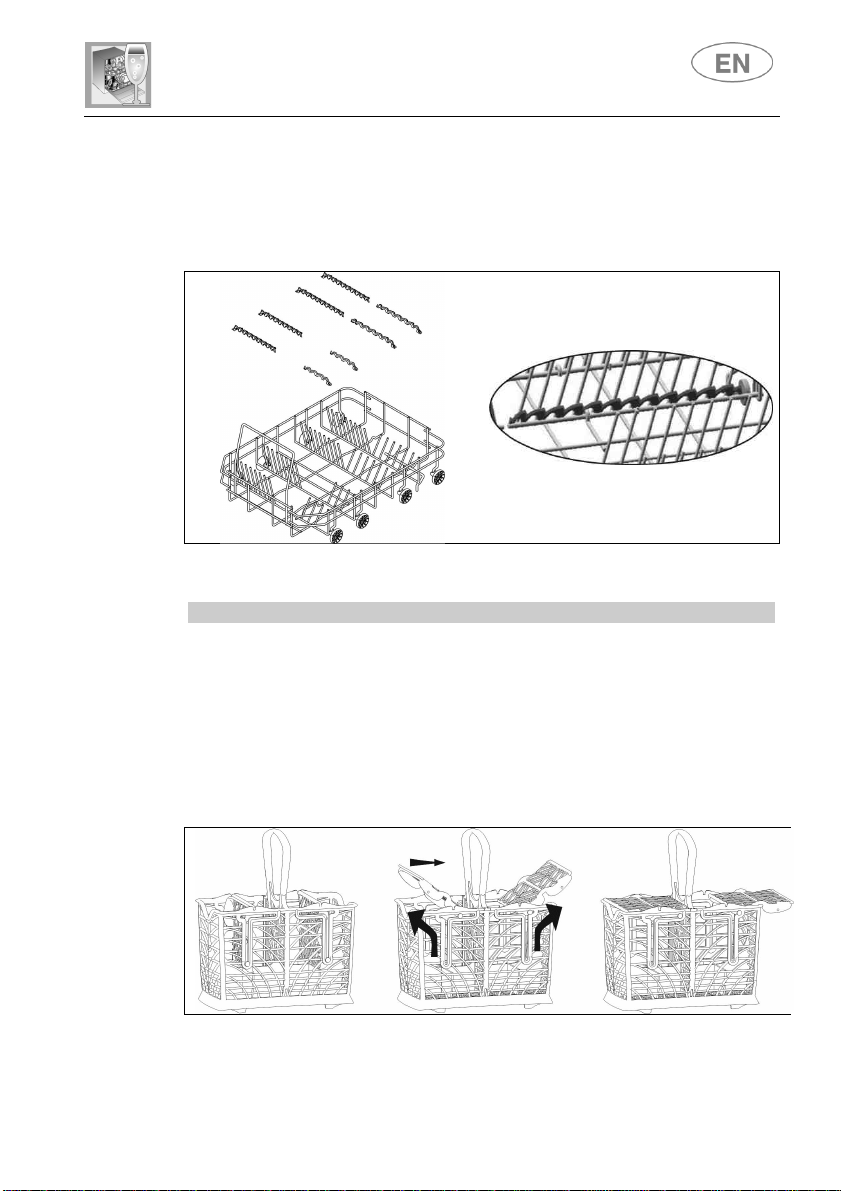
BOTTOM BASKET INSERTS
CUTLERY BASKET
Some models are equipped with bottom basket inserts which improve
the drying of dishes. The inserts are supplied in the accessories bag; to
use them, simply fit them into place as shown.
The cutlery should be arranged in an orderly manner inside the basket,
with the handles pointing downwards. Take care during loading to avoid
injury from the knife blades. The basket is suitable for all types of cutlery,
except those long enough to interfere with the upper spray arm. Ladles,
wooden spoons and kitchen knives can be placed in the upper basket,
making sure that the knife blades do not protrude from the basket.
The cutlery basket features an exclusive system of independent
sliding tip-up supports, offering a choice of possible combinations to
allow optimum use of the space available..
19
Page 20
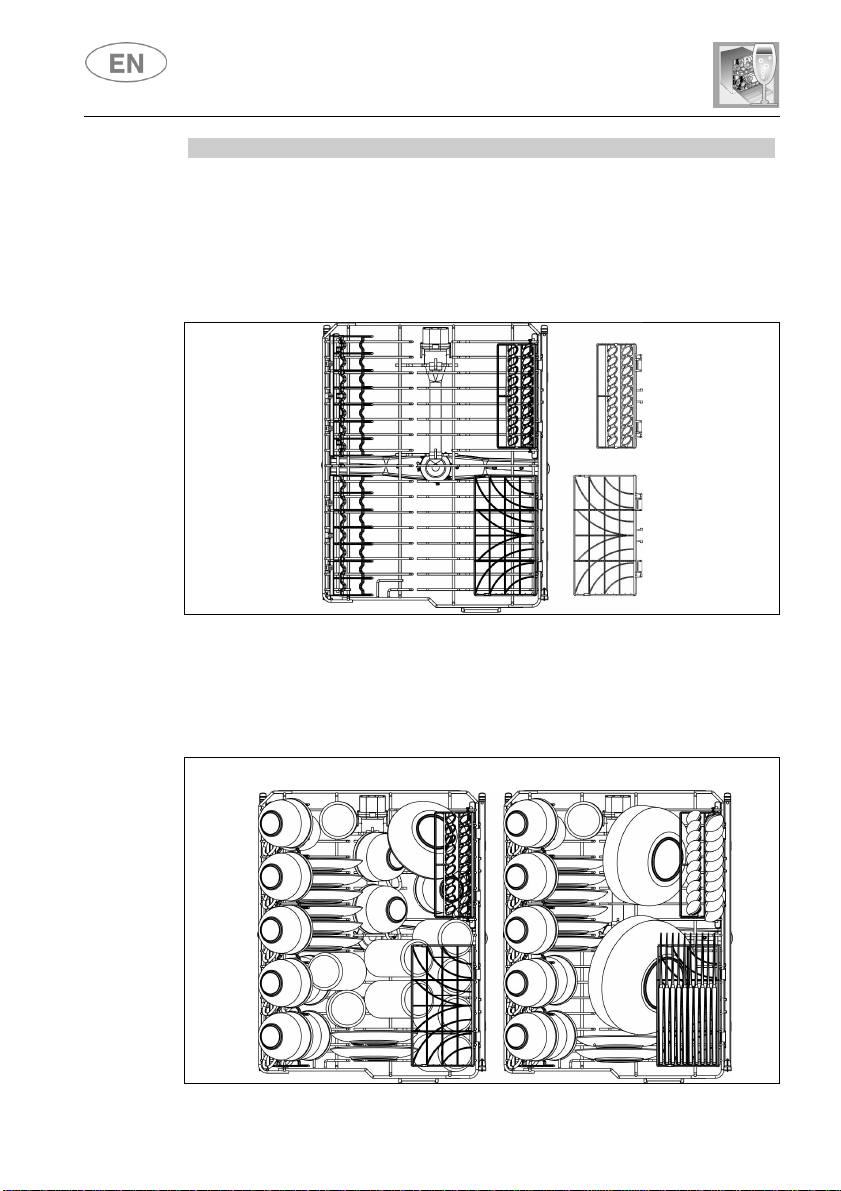
UPPER BASKET
LOADING THE UPPER BASKET
Loading
examples:
User instructions
It is recommended to load the upper basket with small or medium-sized
items such as glasses, small plates and saucers, tea or coffee cups,
shallow bowls and light objects made from heat resistant plastic. If the
upper basket is used in the lowermost position, it can also be loaded
with serving dishes, provided they are only lightly soiled.
The basket is equipped with two tip-up cutlery supports which can be
raised or lowered as required. See illustrations below.
Load plates facing forward; cups, bowls etc. must always be facing
downwards. The left-hand side of the basket can be loaded with two
layers of cups and glasses. On the right, plates and saucers can be
slotted vertically into the racks.
20
Page 21
User instructions
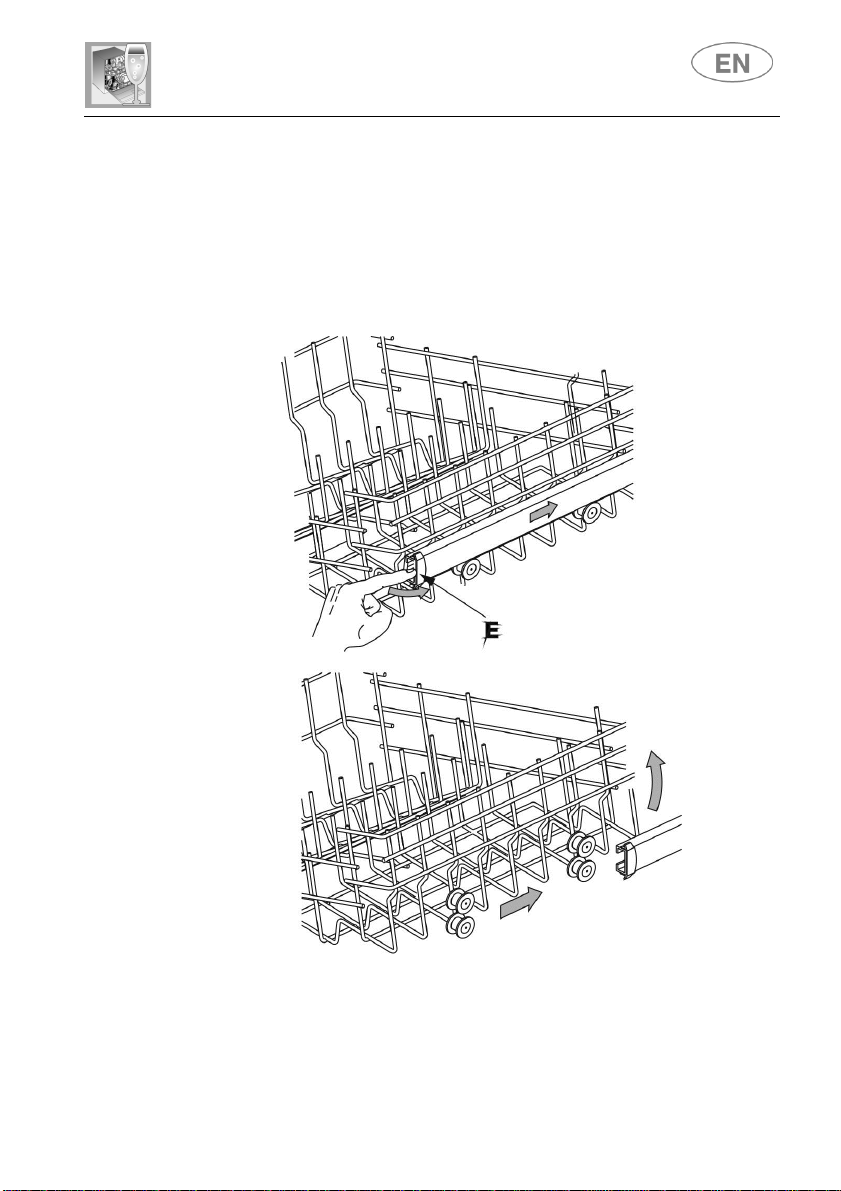
ADJUSTING THE UPPER BASKET
The height of the upper basket can be according to requirements and
the size of the dishes in the lower basket.
Pull-out adjustment system:
• Turn the retainer E on both runners, right and left, through 90°
• Remove the basket
• Lift the basket and fit the smaller pairs of wheels in the runners
• Return the retainers E to their original position
21
Page 22
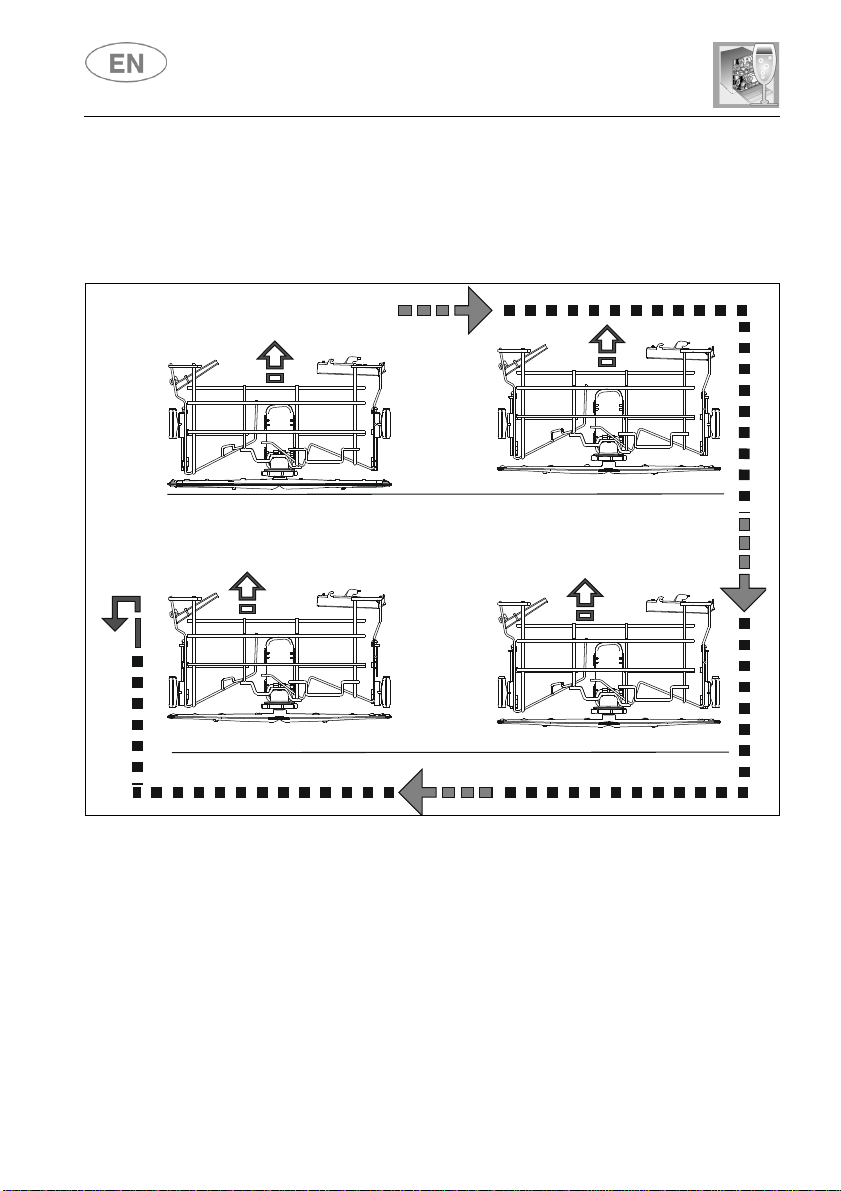
Quicklift
LOWEST
MEDIUM
HIGHEST
RELEASE
User instructions
system with 3 position settings (1 lowest, 3 highest). The basket is
snapped into the position required, lifting both sides simultaneously. To
return to the lowest position from any height, lift the basket to the
highest position and then release.
position setting system:
22
Page 23
User instructions
Avoid the use of acidic or abrasive detergents.
CLEANING THE WATER INTAKE FILTER
CLEANING THE SPRAY ARMS
3. Cleaning and maintenance
Before carrying out any work, always unplug the appliance from the
electrical supply or turn off the dual-pole dedicated switch.
3.1 General warnings and recommendations
Clean the outer surfaces and door-lining of the dishwasher regularly
using a soft, damp cloth or with a normal detergent suitable for painted
surfaces.
Clean the door seals with a damp sponge. Periodically (once or twice a
year) it is advisable to clean the tank and seals, using a soft cloth and
water to remove any deposits.
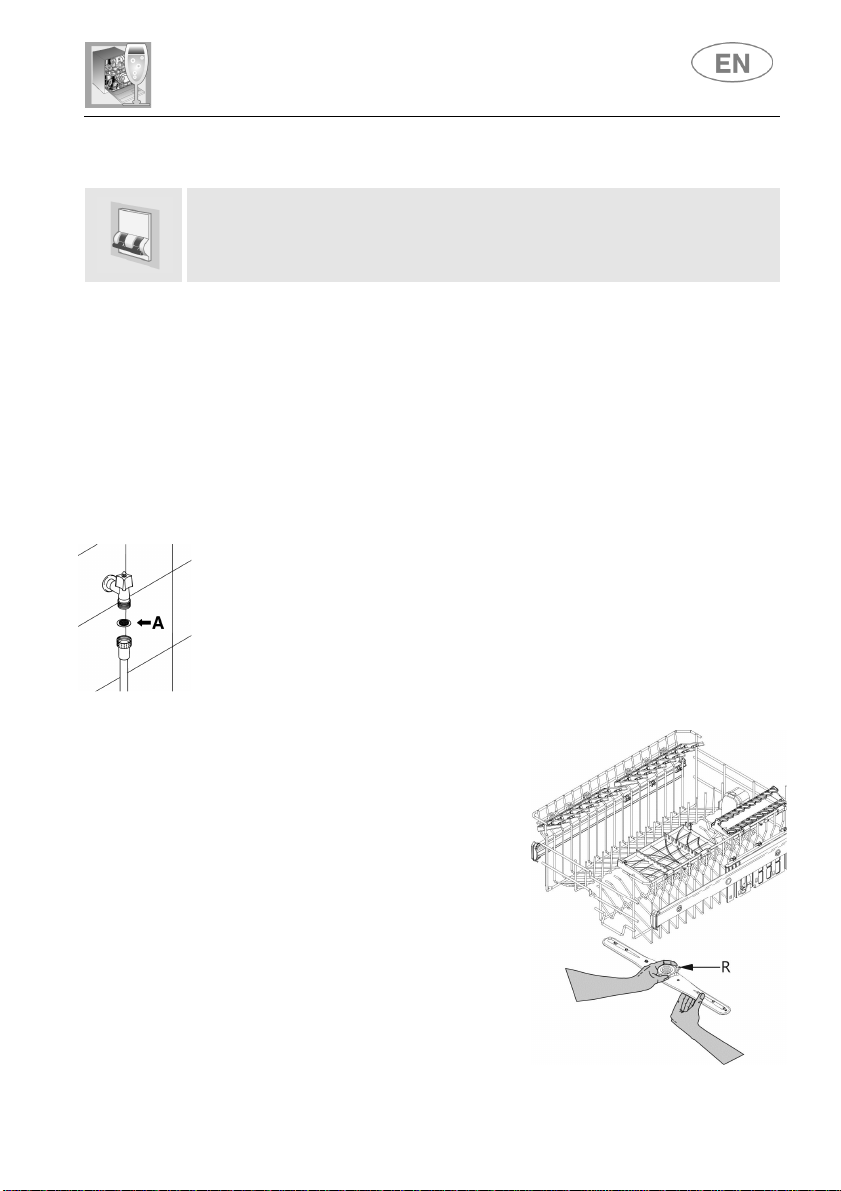
The water intake filter A located at the outlet of the water supply tap
needs to be cleaned periodically. After closing the water supply tap,
unscrew the end of the water intake hose, remove the filter A and clean
it carefully under running water. Reassemble filter A and carefully screw
the water intake hose back into position.
The spray arms can be easily removed
for periodic cleaning of the nozzles, to
prevent possible clogging. Wash them
under running water and carefully
reinstall them, checking that their
rotation is in no way impeded.
To remove the upper spray arm,
unscrew locking ring R.
23
Page 24
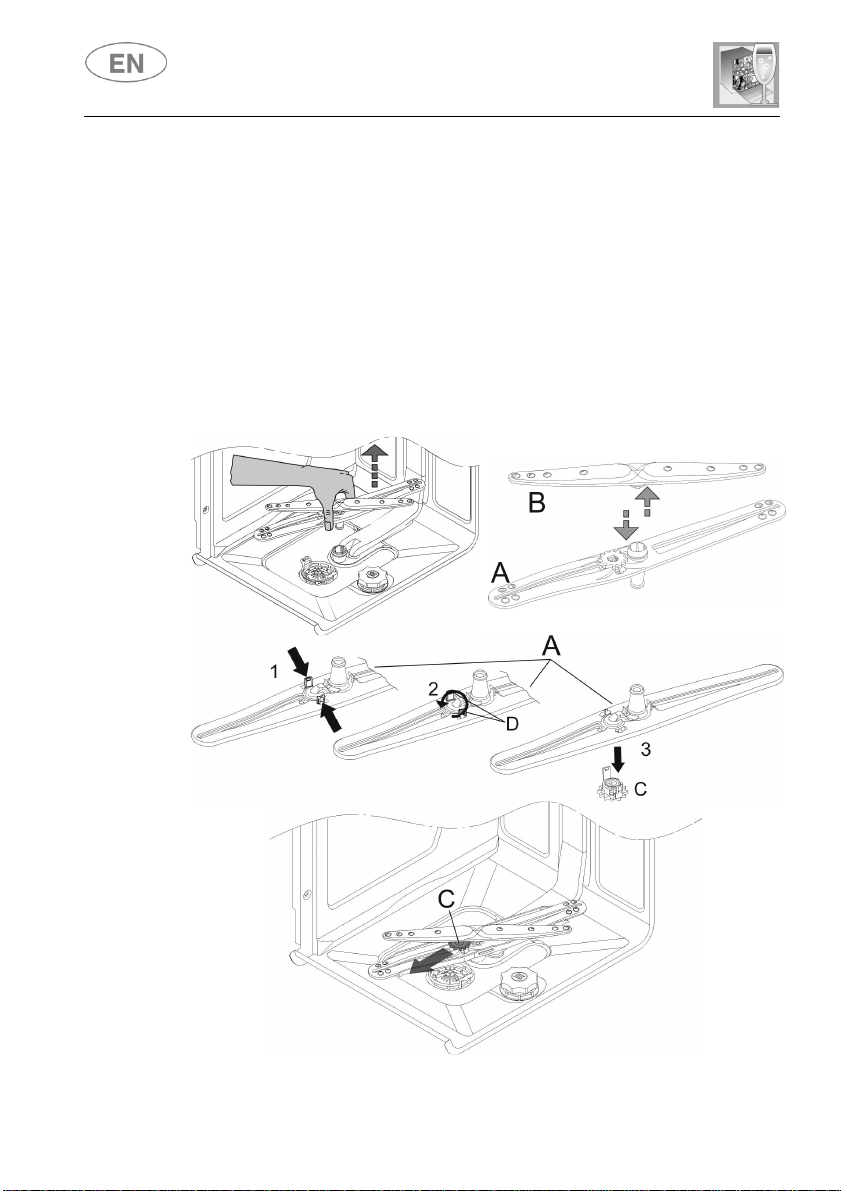
CLEANING THE OSCILLATING BOTTOM SPRAY ARM
User instructions
● Take hold of the bottom spray arm unit and pull it upward to release.
● Separate the oscillating arm A from the spray arm B.
● Turn the oscillating arm A upside down to release the toothed wheel C
by pressing the teeth D and turning them anticlockwise.
● Extract the wheel C and wash all components under running water.
Assemble the spray arm unit by reversing the sequence described
above.
Warning: The wheel C can only be mounted in one position; the teeth D
must engage properly.
Fit the unit so that the wheel C is facing towards the door of the
dishwasher.
24
Page 25
User instructions
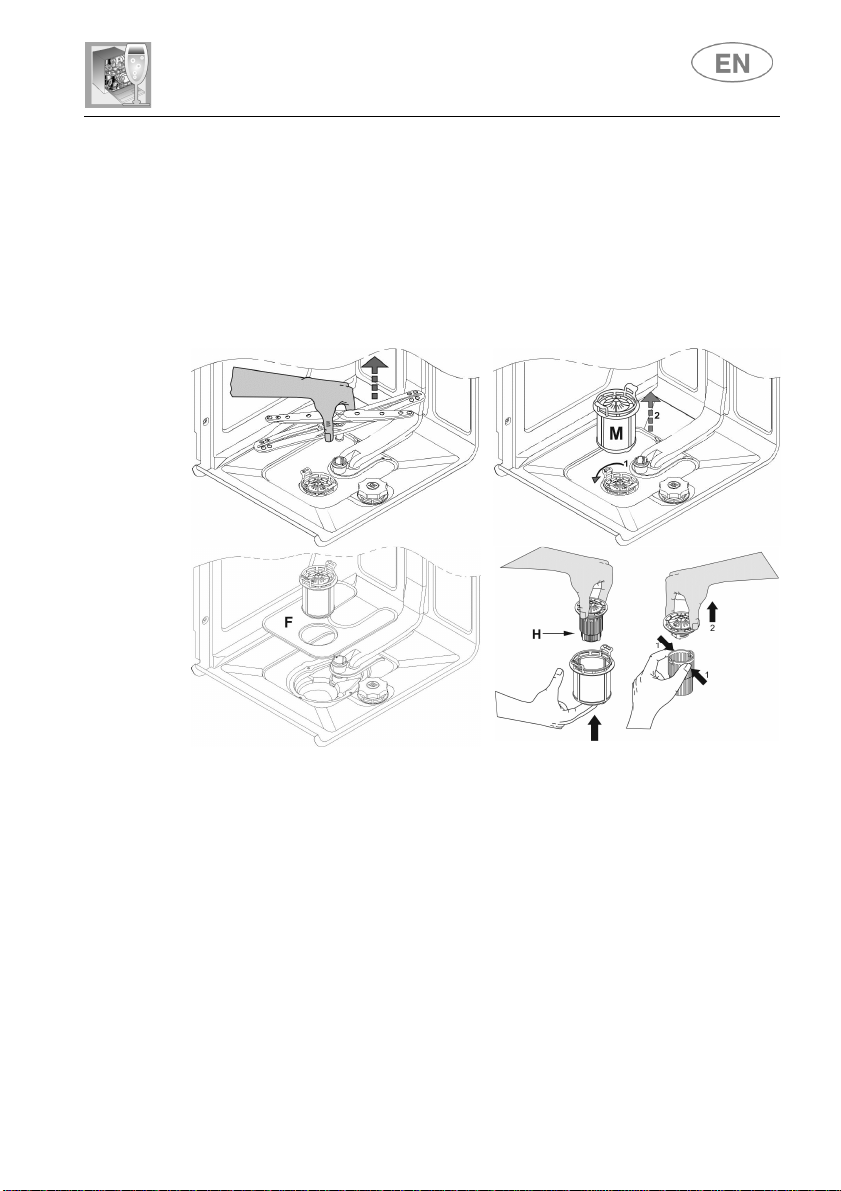
CLEANING THE FILTER UNIT
• The central filter should be cleaned regularly. To remove it, pull the
spray arm assembly upwards.
• Turn the microfilter M anticlockwise to release and extract it, then lift
the stainless steel filter F.
• Push the central filter H from below to extract it from the micro-filter.
• Separate the two parts of the plastic filter by pressing the body of
the filter in the zone shown by the arrows.
• Remove the central filter by lifting it.
25
Page 26
26
User instructions
GENERAL WARNINGS AND RECOMMENDATIONS FOR CORRECT
MAINTENANCE:
• The filters should be cleaned under running water using a stiff
brush.
• When removing the filter, take care that there are no food residues
on it. If any residues fall into the sump they might block hydraulic
components or the spray arm nozzles.
• It is essential to thoroughly clean the filters according to the
above instructions: the dishwasher cannot function if the filters are
clogged.
• Carefully replace the filters to avoid damaging the pump.
PROLONGED DISUSE:
• Run the soak program twice in succession.
• Unplug the power cord from the socket.
• Leave the door slightly open in order to prevent the formation of
unpleasant odours inside the wash tank.
• Fill the rinse aid dispenser.
• Shut off the water supply tap.
BEFORE STARTING THE DISHWASHER AFTER PROLONGED
DISUSE:
• Check that there are no deposits of sludge or rust inside the
water pipe: if there are, allow the water to run from the water supply
tap for a few minutes.
• Plug the power cord back into the socket.
• Reconnect the water intake hose and open the tap again.
TROUBLESHOOTING MINOR PROBLEMS
In some cases it is possible to remedy minor problems by referring to the
following instructions:
If the program fails to start, check that:
• The dishwasher is connected to the electricity supply
• There is no power outage
• The water tap is open
• The dishwasher door is properly closed
If water remains inside the dishwasher, check that:
• The drainage hose is not kinked
• The drainage trap is not blocked
• The dishwasher filters are not clogged
Page 27
User instructions
If the dishes do not come out clean, check that:
• The correct amount of detergent has been added
• The salt container is not empty
• The dishes have been loaded correctly
• The selected program is suitable for the dish types and their degree
of soiling
• All filters are clean and correctly installed
• The spray arm nozzles are not clogged
• There is nothing obstructing the rotation of the spray arms
If the dishes fail to dry or remain dull, check that:
• The rinse aid container is not empty
• The rinse aid dispenser setting is correct
• The detergent used is of good quality and has not lost its
effectiveness (for example, through incorrect storage, with the box
left open)
If the dishes show signs of streaking, staining etc., check that:
• The rinse aid dispenser setting is not too high
If there are visible traces of rust inside the tank:
• the tank is made of stainless steel, and therefore any rust marks are
due to external elements (fragments of rust from the water pipes,
pots, cutlery etc.). Special products are available to remove such
marks.
• Check that the detergent dose being used is correct. Certain
detergents can be more corrosive than others.
• Check that the cap of the salt container is securely closed, and that
the water softening setting is correct.
If the problem persists after following the troubleshooting instructions
above, call the nearest Authorised Service Centre.
WARNING: any operations performed on the appliance by
unauthorised technicians are not covered by the warranty and shall
be paid for by the user.
27
Page 28
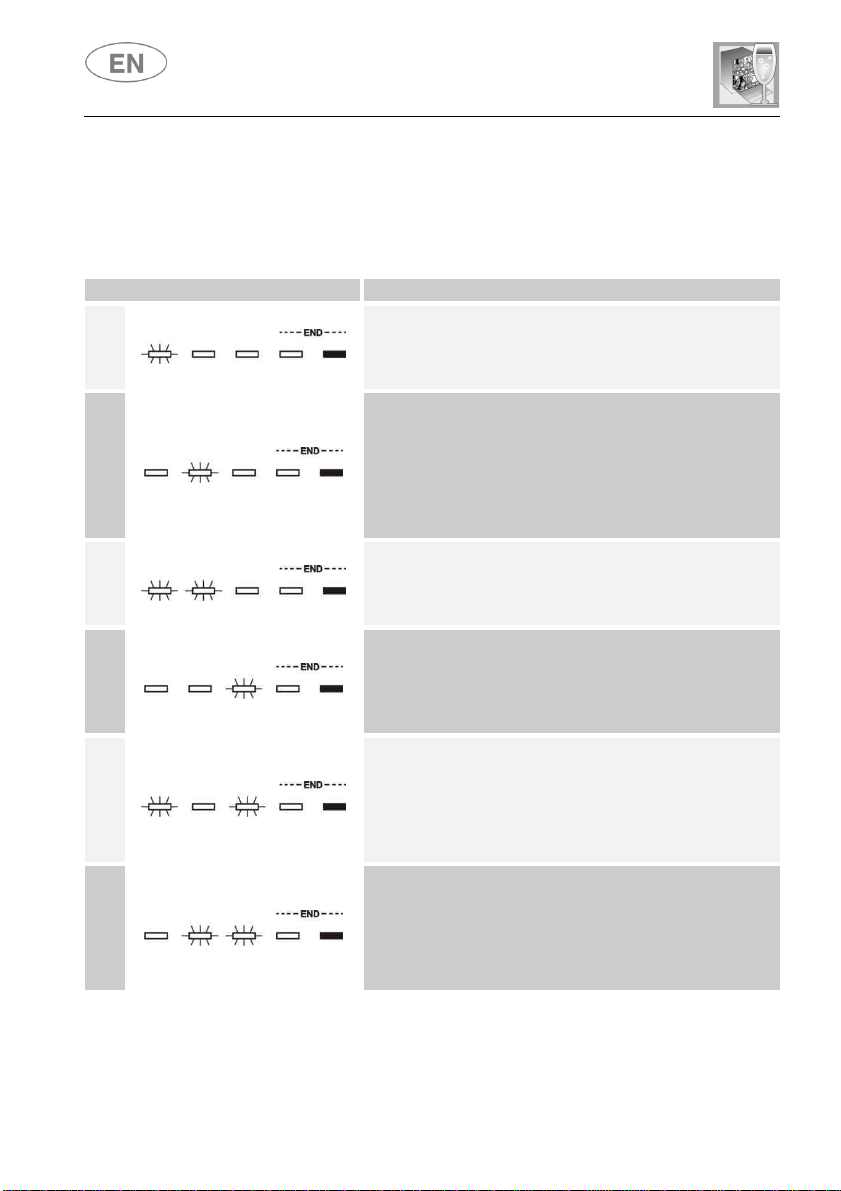
Aquastop failure
Safety level
Water heating malfunction
Water temperature monitoring malfunction
Water intake malfunction
Water pump
-
out malfunction
4. Troubleshooting
The dishwasher is capable of signalling a number of faults through the
User instructions
simultaneous illumination of several indicator lights, with the following
meanings:
FAULT
DESCRIPTION
E1
E2
E3
E4
E5
E6
The anti-flooding system has activated (relevant
models only). The system trips in case of water
leaks. Contact the after-sales service.
The system which limits the water level inside the
dishwasher has tripped. Interrupt the program and
switch off the dishwasher. Switch the dishwasher
back on, program it again and start the wash
cycle. If the problem persists, contact the aftersales service.
Water heating is not operating or operating
incorrectly. Repeat the wash program; if the
problem persists, contact the after-sales service.
Interrupt the program and switch off the
dishwasher. Switch the dishwasher back on,
program it again and start the wash cycle. If the
problem persists, contact the after-sales service.
The appliance is not taking in water or is not doing
so correctly. Check that the water connections are
correct, the water supply tap is turned on and the
filter is not clogged. If the problem persists,
contact the after-sales service.
The appliance is not pumping out the water or is
not doing so correctly. Check that the drain hose
is not kinked or crushed and that the trap or filters
are not clogged. If the problem persists, contact
the after-sales service.
28
Page 29
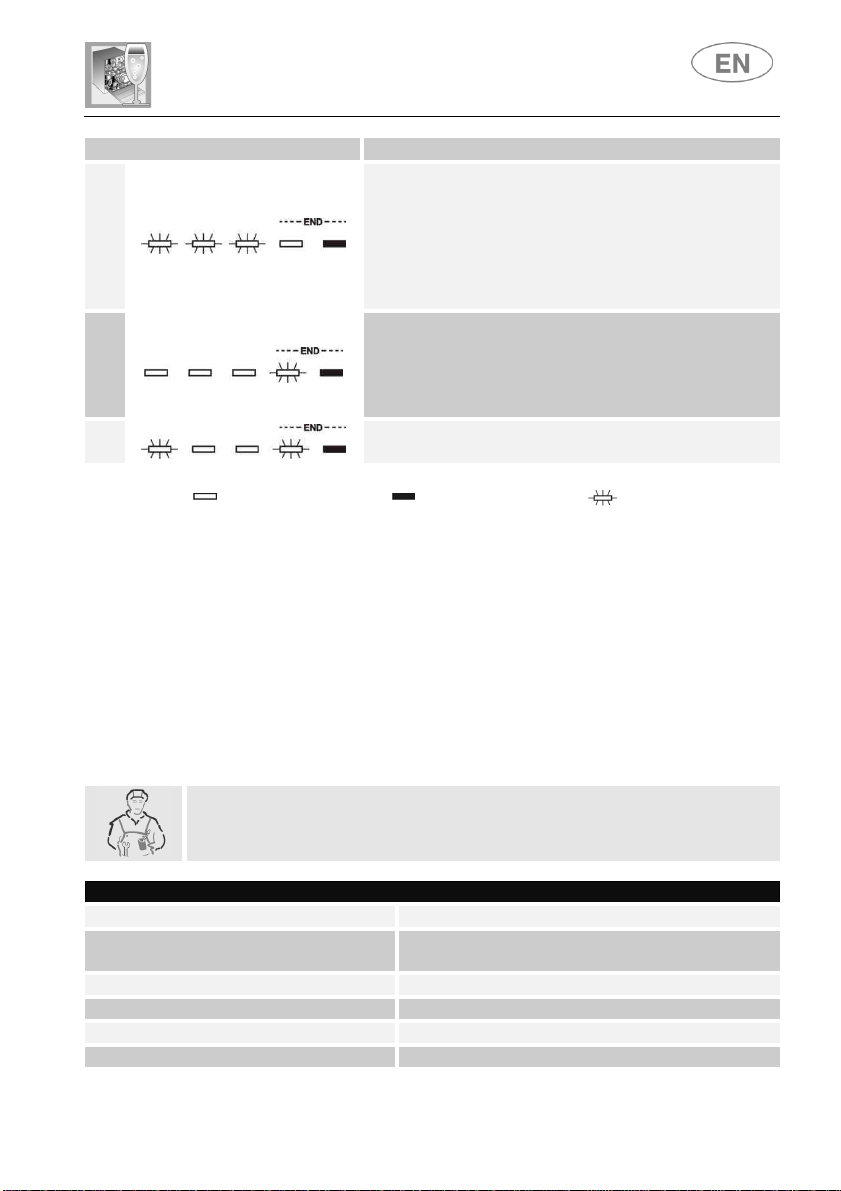
Alternate wash system malfunction
Water intake system malfunction
E7
E8
FAULT
User instructions
DESCRIPTION
Turbine flow-regulator malfunction (relevant
models only)
The intake water quantity is not being measured
accurately. Interrupt the program and switch off
the dishwasher. Switch the dishwasher back on,
program it again and start the wash cycle. If the
problem persists, contact the after-sales service.
Interrupt the program and switch off the
dishwasher. Switch the dishwasher back on,
program it again and start the wash cycle. If the
problem persists, contact the after-sales service.
E9
Contact the after-sales service.
Light off
Light on
Light flashing
If an alarm situation occurs, the appliance interrupts the program in progress
and signals a fault.
•
Alarms E1, E2, E3, E4, E8 and E9 interrupt the current program
immediately.
•
Alarms E5 and E6 interrupt the current program; once the problem is
solved, the program will finish running.
•
Alarm E7 is displayed at the end of the cycle which is finished
regardless of the problem, as operation of the dishwasher is not
affected.
To reset an alarm:
•
open and close the door, or turn the machine off and on again. The
dishwasher can now be programmed again.
If the malfunction persists, contact your Authorised Service Centre.
TECHNICAL DATA
Width
Depth measured flush with the
outer edge of the control panel
447 ÷ 449 mm
550 mm
Height from 820 mm to 870 mm
Capacity 10 Standard place settings
Water supply pressure min. 0,05 - max. 0,9 MPa (min. 0.5 – max. 9 bar)
Electrical characteristics See rating plate
29
 Loading...