

Page 1

User Manual
DW8 55 FI VR02
EN
www.teka.com
Page 2

Dear Customer ,
Please carefully read th is manual be fore usin g the
dishwas her, it will help you to use an d maintai n the
dishwas her prope rly.
Keep it to r efe r to it at a la ter date.
Pass it on to any subseq uent o wner of t he app lia nce.
This manual co ntains se cti ons on safety Instructio ns,
Operati ng Ins truction s, I nstal lat ion Instr uctions and
Tro ubl eshootin g Tips, etc .
Control Panel. ........ ........... ..... ........ ... ............. ..3
Dish was her Fe atu res... ... .. ... ..... ........ ............ .. .3
A Water Softener. ........... ........ ........ ... ..... ... ....4、
B Load ing th e Salt into the Soft ener.. ... ..... .......5、
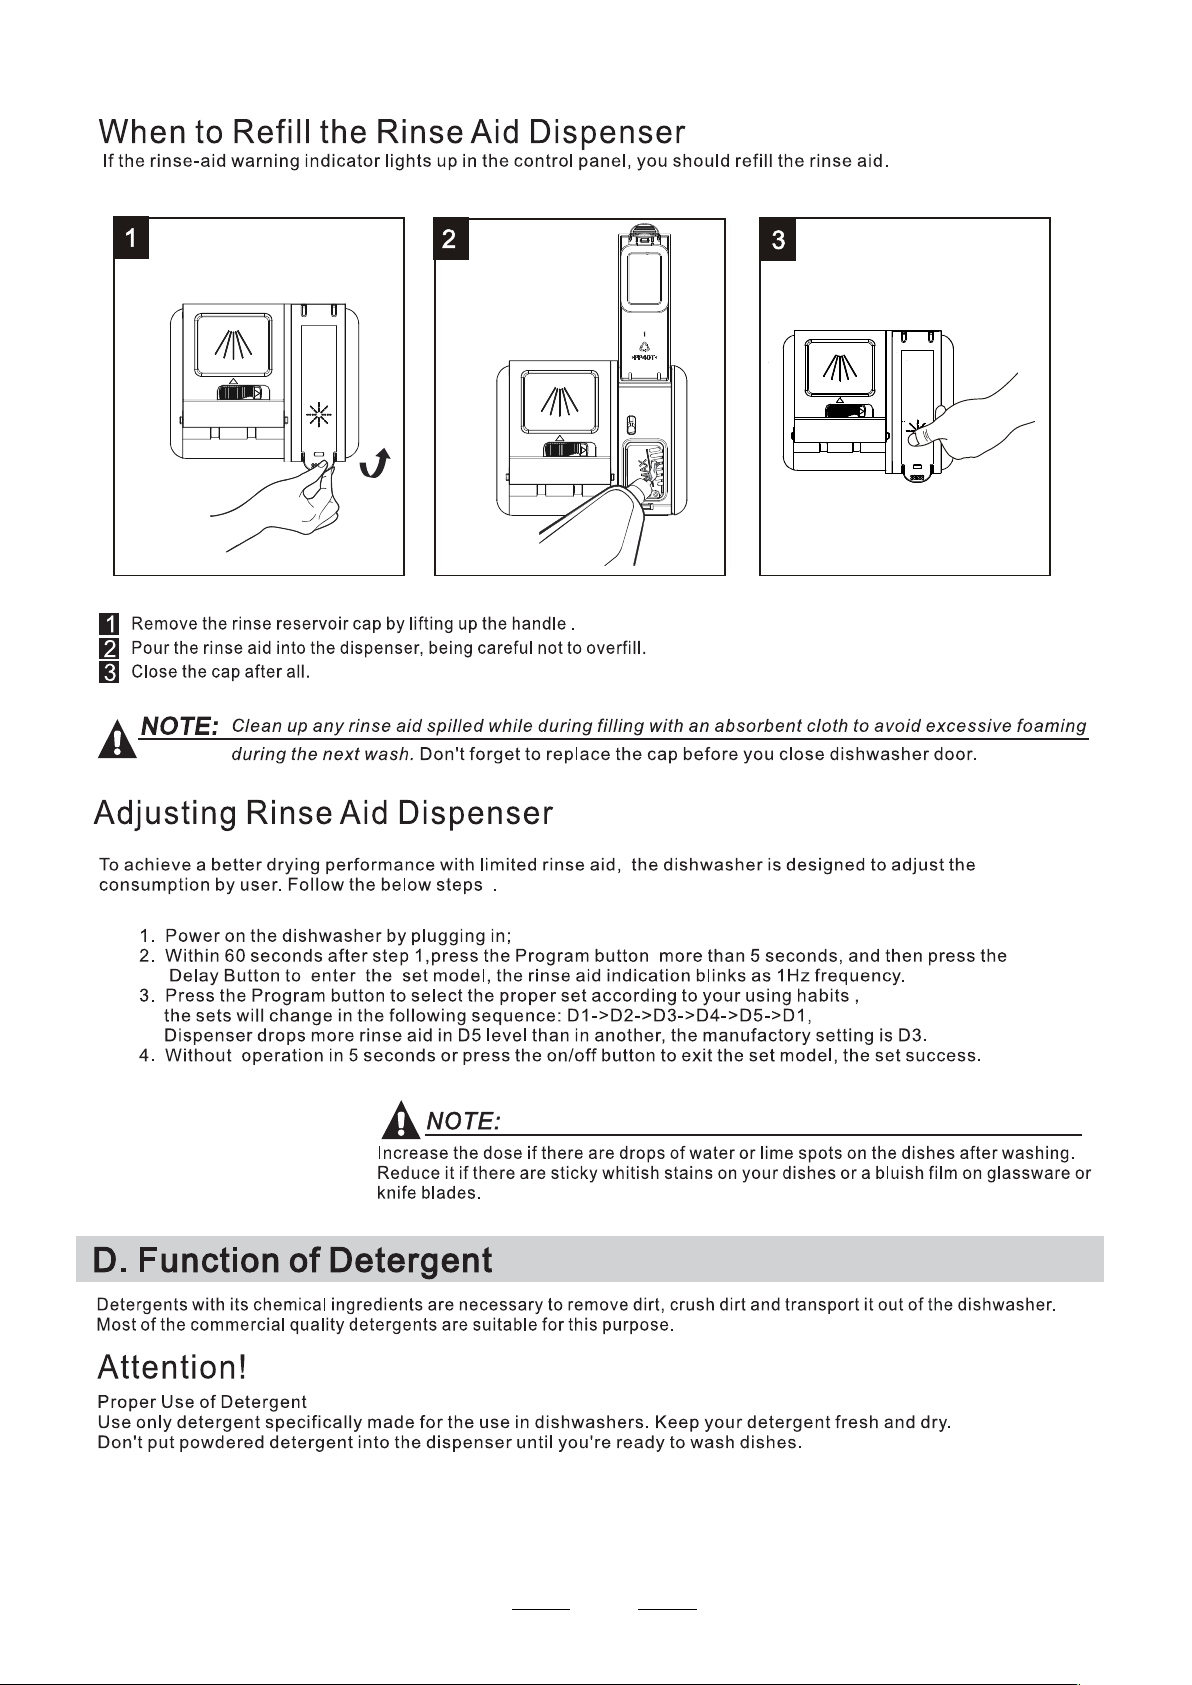
C Fill the Rins e Aid Dispe nser..... ..... .............. .5、
D Func tion of Deterge nt ... ... ...... .......... ..... ... ...6、
Atte ntion bef ore or aft er loa ding the Dish wa sher
Baskets ........ ..... ............. . ....... ... ........ .............9
The M ethod Loading Nor mal Dishw are..... ........ 10
To re view the secti on on tro ubl eshoo ting Tips
will help you to s olve s ome co mmon p rob lems
by you rself .
If yo u ca n not s olve the problems by yourself ,
pleas e a sk for the help of pro fessiona l te chnician s.
The m anu facturer, follo win g a policy of co nstant
deve lop men t an d u pda ting o f the product, may
make mod ifications wit hou t givi ng pri or notice.
This user ma nual s hall a lso be got fr om the
manu fac tur er or responsib le ven dor.
Was h Cycle Table.......... ... ..... ............. ... ... ......11
Turnin g on the Applian ce.... ..... ........ ........ .......1 2
Ch an ge the Programm e.. .. ... ....... ............... .12....
At th e end of the Wash Cycle........... ...... ..... ... ..12
Filt ering Sys tem. ..... ... ................ ........ .......... ..13
Cari ng for the Dis hw ash er....... ........ ...... ..... ....14.
Positioni ng the Applia nce... ..... ........... ....... ...15..
About Po wer Connection. ... ..... ... ........ .... ....... 15.
Water Con necti on..... ........ ........ ........ ..... .......1 6.
Star t of dishwash er.......... ........ ..... ... ..... . .... ..1 7..
Before callin g f or ser vice..... .. ...... ........... .. . ..... 18.
Erro r c odes... .. ...... ........ ..... ..... ...... . ....... .......1 9.
Technical infor mation..... ........ ........ ...... ... .... .20..
Page 3

When using your dishwasher,
follow the precautions listed below:
This appliance is intended to be used in household
and similar applications such as:
-staff kitchen areas in shops, offices and other
working environments;
-farm houses;
-by clients in hotels, motels and other residential type
environments;
-bed and breakfast type environments.
This appliance can be used by children aged from 8
years and above and persons with reduced physical,
sensory or mental capabilities or lack of experience
and knowledge if they have been given supervision
or instruction concerning use of the appliance in a
safe way and understand the hazards involved.
Children shall not play with the appliance. Cleaning
and user maintenance shall not be made by children
without supervision. For EN60335-1
( )
This appliance is not intended for use by persons
(including children )with reduced physical, sensory
or mental capabilities, or lack of experience and
knowledge ,unless they have been given supervision
or instruction concerning use of the appliance by a
person responsible for their safety. For IEC60335-1
( )
This appliance is for indoor use only, for household
use only.
To protect against the risk of electrical shock, do not
immerse the unit, cord or plug in water or other liquid.
Please unplug before cleaning and maintenance the
appliance .
Use a soft cloth moisten with mild soap, and then use
a dry cloth to wipe it again.
Page 4

This appliance must be earthed. In the event of a
malfunction or breakdown, earthing will reduce the risk
of anelectric shock by providing a path of least
resistance of electric current. This appliance is equipped
with a cord having an equipment-earthing conductor
and a grounding plug.
The plug must be plugged into an appropriate outlet that
is installed and earthed in accordance with all local
codes and ordinances.
Improper connection of the equipment-earthing
conductor can result in the risk of an electric shock.
Check with a qualified electrician or service
representative if you are in doubt whether the appliance
is properly grounded.
Do not modify the plug provided with the appliance;
If it does not fit the outlet.
Have a proper outlet installed by a qualified electrician.
Do not abuse, sit on, or stand on the door or dish rack of
the dishwasher.
Do not operate your dishwasher unless all enclosure
panels are properly in place.
Open the door very carefully if the dishwasher is
operating, there is a risk of water squirting out.
Do not place any heavy objects on or stand on the door
when it is open. The appliance could tip forward.
When loading items to be washed:
1) Locate sharp items so that they are not likely to
damage the door seal;
Page 5

2) Warning: Knives and other utensils with sharp points
must be loaded in the basket with their points down or
placed in a horizontal position.
Check that the detergent powder is empty after
completion of the wash cycle.
Do not wash plastic items unless they are marked
dishwasher safe or the equivalent.
For plastic items n
recommendations.
Use only detergent and rinse additives designed for
an automatic dishwasher.
Never use soap, laundry detergent, or hand washing
detergent in your dishwasher.
Children should be supervised to ensure that they do not
play with the appliance.
The door should not be left open, since this could increase
the risk of tripping.
If the supply cord is damaged, it must be replaced by the
manufacturer or its service agent or a similarly qualified
person in order to avoid a hazard.
During installation, the power supply must not be
ot so marked,
check the manufacturer's
excessively or dangerously bent or flattened.
Do not tamper with controls.
The appliance is to be connected to the water mains using
new hose sets and that old hose-sets should not be reused.
The maximum number of place settings to be washed
is 12.
The maximum permissible inlet water pressure is 1MPa.
The minimum permissible inlet water pressure is 0.04MPa.
Page 6

Dispose of the dishwasher packaging material
correctly.
All packaging materials can be recycled.
Plastic parts are marked with the standard
international abbreviations:
PE for polyethylene, e.g. sheet wrapping material
PS for polystyrene, e.g. padding material
POM polyoxymethylene, e.g. plastic clips
PP polypropylene, e.g. Salt filler
ABS Acrylonitrile Butadiene Styrene, e.g. Control
Panel .
Packaging material could be dangerous for children!
For disposing of package and the appliance please
go to a recycling centre. Therefore cut off the power
supply cable and make the door closing device
unusable.
Cardboard packaging is manufactured from recycled
paper and should be disposed in the waste paper
collection for recycling.
By ensuring this product is disposed of correctly, you
will help prevent potential negative consequences
for the environment and human health, which could
otherwise be caused by inappropriate waste handling
of this product.
For more detailed information about recycling of this
product, please contact your local city office and your
household waste disposal service.
DISPOSAL: Do not dispose this product as unsorted
municipal waste. Collection of such waste separately
for special treatment is necessary.
Page 7

2
Page 8

To get the best pe rfo rmance from your d ishwasher, read all operating i n struct ions
be fore using it for the first time.
1.Program ind icators: to show w hich progra m
you hav e chose;
2. Progr am Button : To Press the button t o s ele ct a
wa sh Program.
3.Delay ind ic ators : to show t he delay t ime
(3 h/6h/9h )
4.Delay Butto n : To P ress t he but ton to del ay.
5.Half loa d funct ion s B utton: To select Half load
functions. (With this Hal f lo ad functi on you can
only use it when you have o nly ab out or les s t han
7 pla ce set ting dish wave, and yo u w ill see less
wa ter an d energy consum ption , c an onl y be us ed
wi th Intensiv e, Normal, E CO, an d 90 min .)
Front view
6.Half loa d indicator : To sho w wh en you selec t the
ha lf load f unction .
7.On /Off Button : To turn on/off the po wer supply.
8.Salt and rinse aid wa rni ng lig hts: To sho w
when the salt container or dispenser need to be
refi lled
Rinse Aid indic ator:
Indicat es when the dispenser needs to be refill ed.
Add salt in dic ator:
Indicat es when the dispenser needs to be refill ed.
Back View
1
2
6
7
3
4
8
5
10
Upper Ba sket
1
Inner pi pe
2
Lower Ba sket
3
Salt Containe r
4
Dispens er
5
Cup S helf
6
9
Spray arms
7
Filter assemb ly
8
Inlet pi pe con necto r
9
10
Drai n pipe
Page 9

Before usi ng your dishwas her for th e firs t ti me:
A. Set the wa ter so ftener
B. A dd 1.5 Kg dis hwasher salt and then full f ill th e salt containe r w ith water
C. Fill t he rin se aid dispense r
D. Fill i n d ete rgent
The w ater s oftener must be se t manually, using the wat er hardness dial.
The w ater s oftener is designed to rem ove miner als and salts from the water, which would have
a detrimental or adverse eff ect on the opera tion o f the applia nce .
The higher the content of the se min erals and salts , th e h arder your water i s.
The s oftener should be adjusted accor din g t o the hardness of t he water in you r a rea. Your local Water Au thority
can a dvise you on the hardness of the wa ter in your area.
Adjusting Salt Consumption
The dishwashe r i s designe d to allow for ad jus tment in the amoun t o f salt consumed based on the hardn ess of
the w ater used. Thi s i s intended to op tim ise and cu stomise the level o f salt consum pti on.
Please follow the steps be low for adjus tment in sal t c ons umption.
1. Ope n t he door , Switch on the ap pliance;
2. Pre ss the Pr ogram button for more than 5 seconds to start the water softener
set m odel within 60seco nds after the ap pli ance w as switched on( The S alt and
Rinse ai d warning lights will be on period ically wh en it get in the set model );
3. Pre ss the Pr ogram button to selec t the p roper set ac cording to y our local envir onm ent,
the s ets will change in the follo wing s equence: H1->H2->H3->H4-> H5->H6;
4. Pre ss the Po wer button to end th e set up m ode l.
WATER H ARDNESS
dH
6- 11
18-2 2 31-40 22-2 8 3.1 -4 .0
23-3 4 4.1-6. 0
35-5 5 61-98 43-6 9 6.1 -9 .8
fH
0~90~5 0~0.94
10-20
21- 3012-1 7 2.1-3. 0
41- 60
Clarke
0~6
7-14
15-2 1
29-4 2
mm ol /l
1.0-2. 0
Selector Pos it ion
H1 R apid)(
H2(90m in )
H3(90m in +rap id)
H4(E CO )
H5(E CO +r apid)
H6(ECO +90m in)
Sa lt consumpti on
(gram/cy cl e)
0
9
12
20
30
60
dH =1.25 Cl arke= 1.7 8 fH=0. 178mmol/l1
dH: German de gree
fH: Fren ch degree
Clark: British de gr e e
The m anufa ctory setting: H3 (EN 50 242)
Contact your local w ater board f or information on the ha rdness of your water s upply.
If your mod el d oes not have any wat er soft ener, you may skip thi s section.
WATER S OFTENER
The h ardnes s o f t he water varie s fr om place to pla ce. If hard water is used in the dishw asher, deposi ts wil l
form on the dis hes and ut ensils.
The a ppliance is equipped with a special softener that u ses a salt container specif ica lly desig ned to elimin ate
lime and min erals fro m t he water.
4
Page 10

Alway s use the sa lt intended for use wi th dishwasher.
The salt conta iner i s l oca ted beneath the lower baske t an d s hould be fil led as explaine d
in th e fo llowing:
Attention!
Only use salt specifically desi g ned fo r the u se in dis hwashe rs! E very ot he r ty pe of
salt not specifically designed for the use i n a dis hwasher, e speciall y table salt, will
da mage t he wat er softener. In cas e o f damages cause d b y th e use of unsuit abl e
salt the manufacturer d oes not give any warranty nor is liabl e for a ny dam ages caused .
Only fil l with salt just befo re star ting one of the complete wa shi ng pro grams.
Th is wil l pr event any gr ains of sa lt or salty water, which may ha ve been spill ed,
re maining on t he bot to m of the machine for an y pe ri o d of time, which ma y c aus e
corro si on.
A After the lo wer baske t ha s been rem oved, un scr ew and remov e th e c ap fro m t he sal t cont ainer.
B Place the end of the fu nne l ( sup plied) into the ho le and intro duce a bout 1.5kg o f dish was her salt.
Full fill the s alt contain e r with water,It is normal for a small amoun t of water to com e o ut of the
C
salt containe r.
D After fill ing th e container , scre w the cap tightly back c lockwis e .
E Th e salt warnin g ligh t w ill stop b eing after the salt cont ainer has be e n f illed with s alt.
F Imm ediat ely after filling the salt i nto th e salt co n tainer, a washing progra m should be starte d
program Otherwise th e f ilter s ys tem, p ump or other impor t ant pa rts of the machine may be dam age d
by sal ty water. This is out o f wa rranty.
).
1. The salt contain er m ust only be r efi lled w hen th e s alt warning light in the contr ol panel comes on.
Depending on how well th e s alt di ssolves, the salt warnin g light ma y s till b e o n even thoug h th e
salt conta iner i s f illed.
If there is no salt warni ng lig ht in the control pan el (fo r some Models), you can es timate w hen to fill
the salt into the soften er by the cycle s that the dishw asher has ru n.
2. If the re are sp ills o f th e sa lt, a soak or a r apid p rogra m sh ould be run to r emove the excessi ve salt.
(We sug gest t o use a short
5
Page 11
678
Page 12
Page 13
Page 14
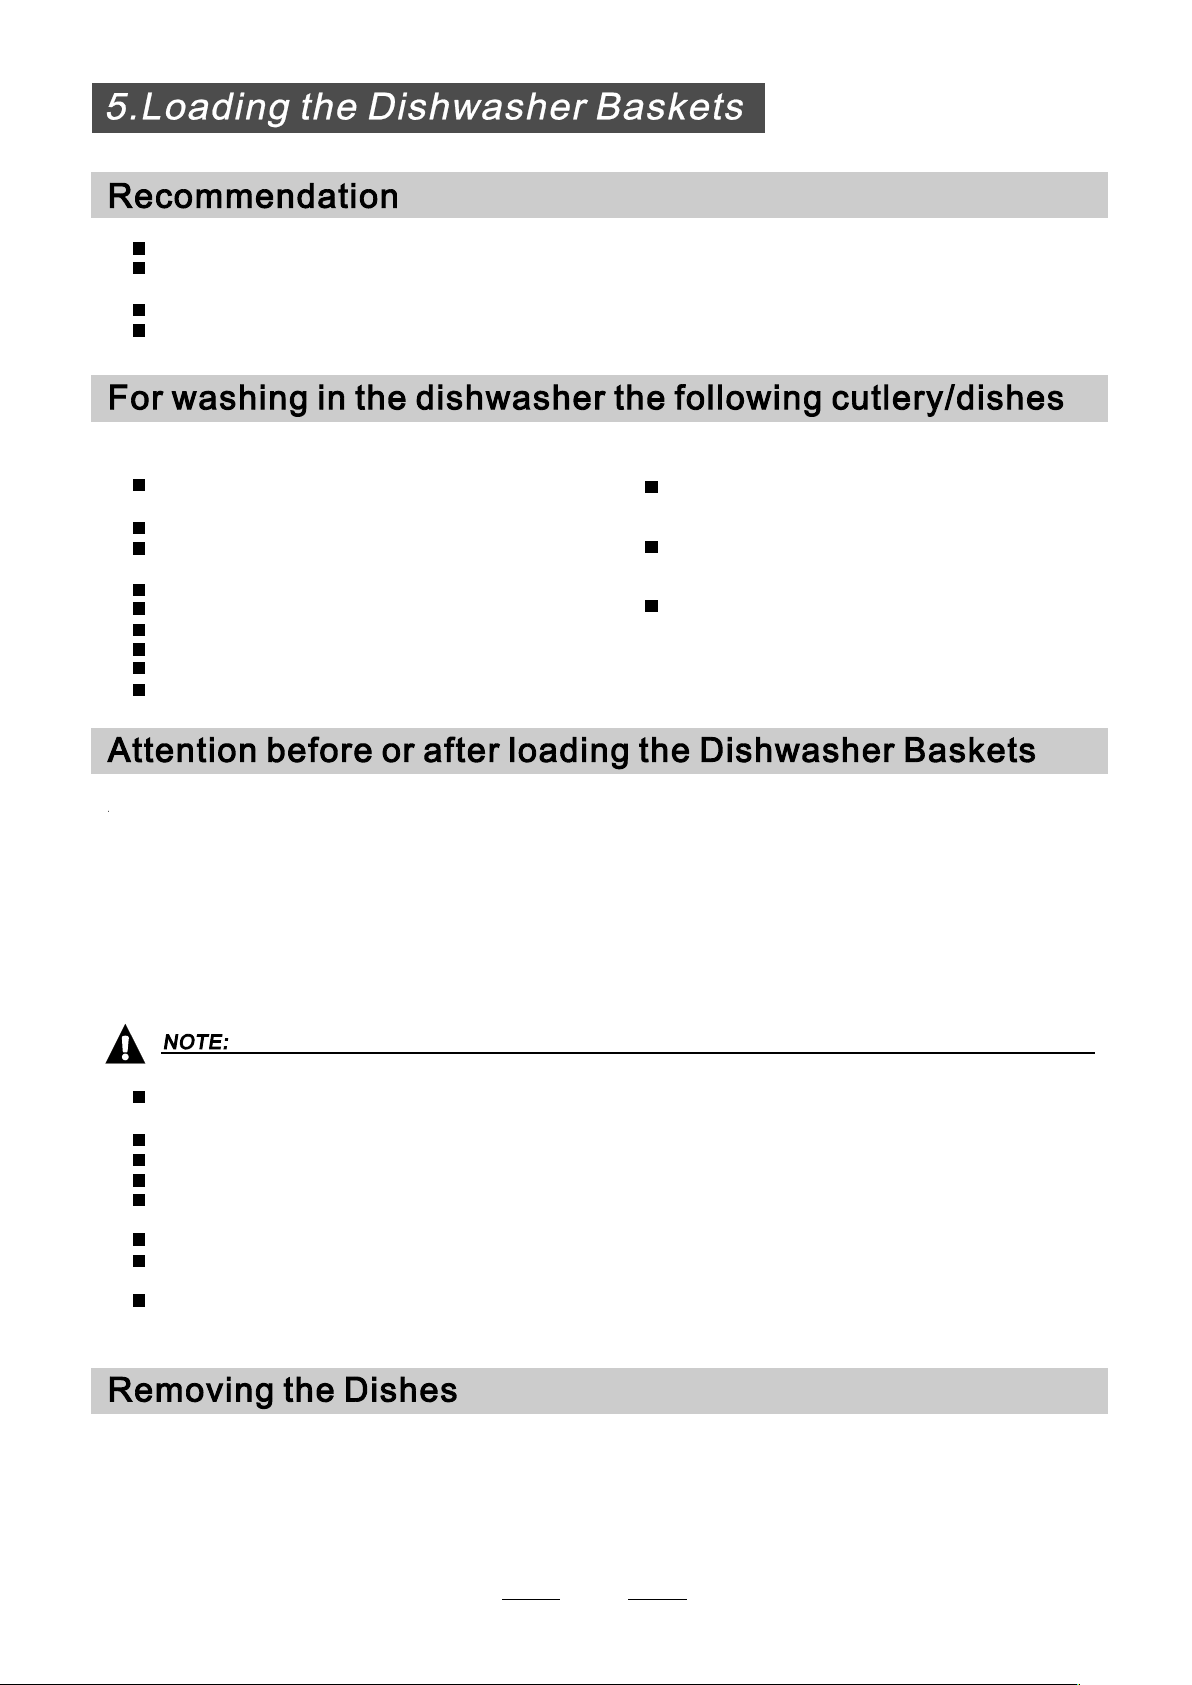
Conside r buyi ng ute nsi ls whi ch are id ent ified as dis hwasher- proof.
Use a mi ld det erg ent that is described as 'kind to dishes'. If nec essary, s eek furth er
info rma tion from the detergent manufacture rs.
For partic ular i tem s, select a progra m w ith as low a temperature as pos sible.
To prevent damage, do not take glass and cutle ry out of the di shw asher immediat ely
after the p rogramme has en ded .
Are not suitable Are of limited suitability
Cutlery with wooden, horn china or
mo ther- of- pearl han dles
Plastic items that a re not heat res istant
Older cutlery wit h g lue d p arts t hat are not
tempera ture r esistant
Bonded cutler y items or dishes
Pewt er or cooper items
Crystal glass
Steel items subject to rus tin g
Wooden platters
Items made fro m s ynthetic fibres
(For best p erformance of the dishwash er, fol low th ese loading guidelines.
Features and appearanc e of ba skets and cu tle ry bas kets may vary f rom your model.)
Some types of glasses can become
dull after a l arge n umb er of was hes
Silver and aluminum parts have a
tendenc y t o di scolour dur ing washi ng
Glazed patter ns may fade if m achine
washed fre que ntl y
Scrape off an y large amounts of lef tover food. Softe n re mnants of burnt food in p ans.
It is not ne cessary to r inse t he dis hes un der runni ng wat er.
Place ob jects in the dishwasher in fol low ing way:
1.Items such as cups, glasses, po ts/ pan s, etc. a re faced dow nward s.
2.Curved items, or ones with re cesses, should be loaded as lant s o t hat water can ru n o ff.
3.All utensils are stacked sec urely and can no t tip ove r.
4.All utensils are pl aced i n the w ay tha t the spray arms can r ota te freely du ring w ashing.
Very s mall i tems should not be washed in the di shwasher as the y c ould e asily fall out of the basket.
Load hollow items su ch as cups, glasse s, pan s e tc. With the ope ning f acing downward s s o that
water cannot collect in the co ntainer or a deep base.
Di shes and items of cutlery must no t li e i nside one an oth er, or cov er eac h othe r.
To avoid damage to gla sses, they must no t touch.
Load large ite ms whi ch are mo st difficul t t o clean into the lower bas ket.
The upper b asket is designed to hol d more delicate and lighter dishware such a s g lasses, c offee
and t ea cup s
Long bladed kn ives stored in an upr ight p osition are a p ote ntial hazar d!
Long and/or sh arp items of cut lery s uch as carvi ng kni ves must b e p ositi one d
horizontally in the upper basket.
Please do n ot ove rload your d ishwashe r. This is imp ortant fo r good results and for
reasonable consu mption of energy.
To prevent water dr ipping fr om the upper bas ket into the lower bas ket, we r ecommend that y ou
em pt y th e l ower b asket fir st and th en the upp er bas ket.
9
Page 15
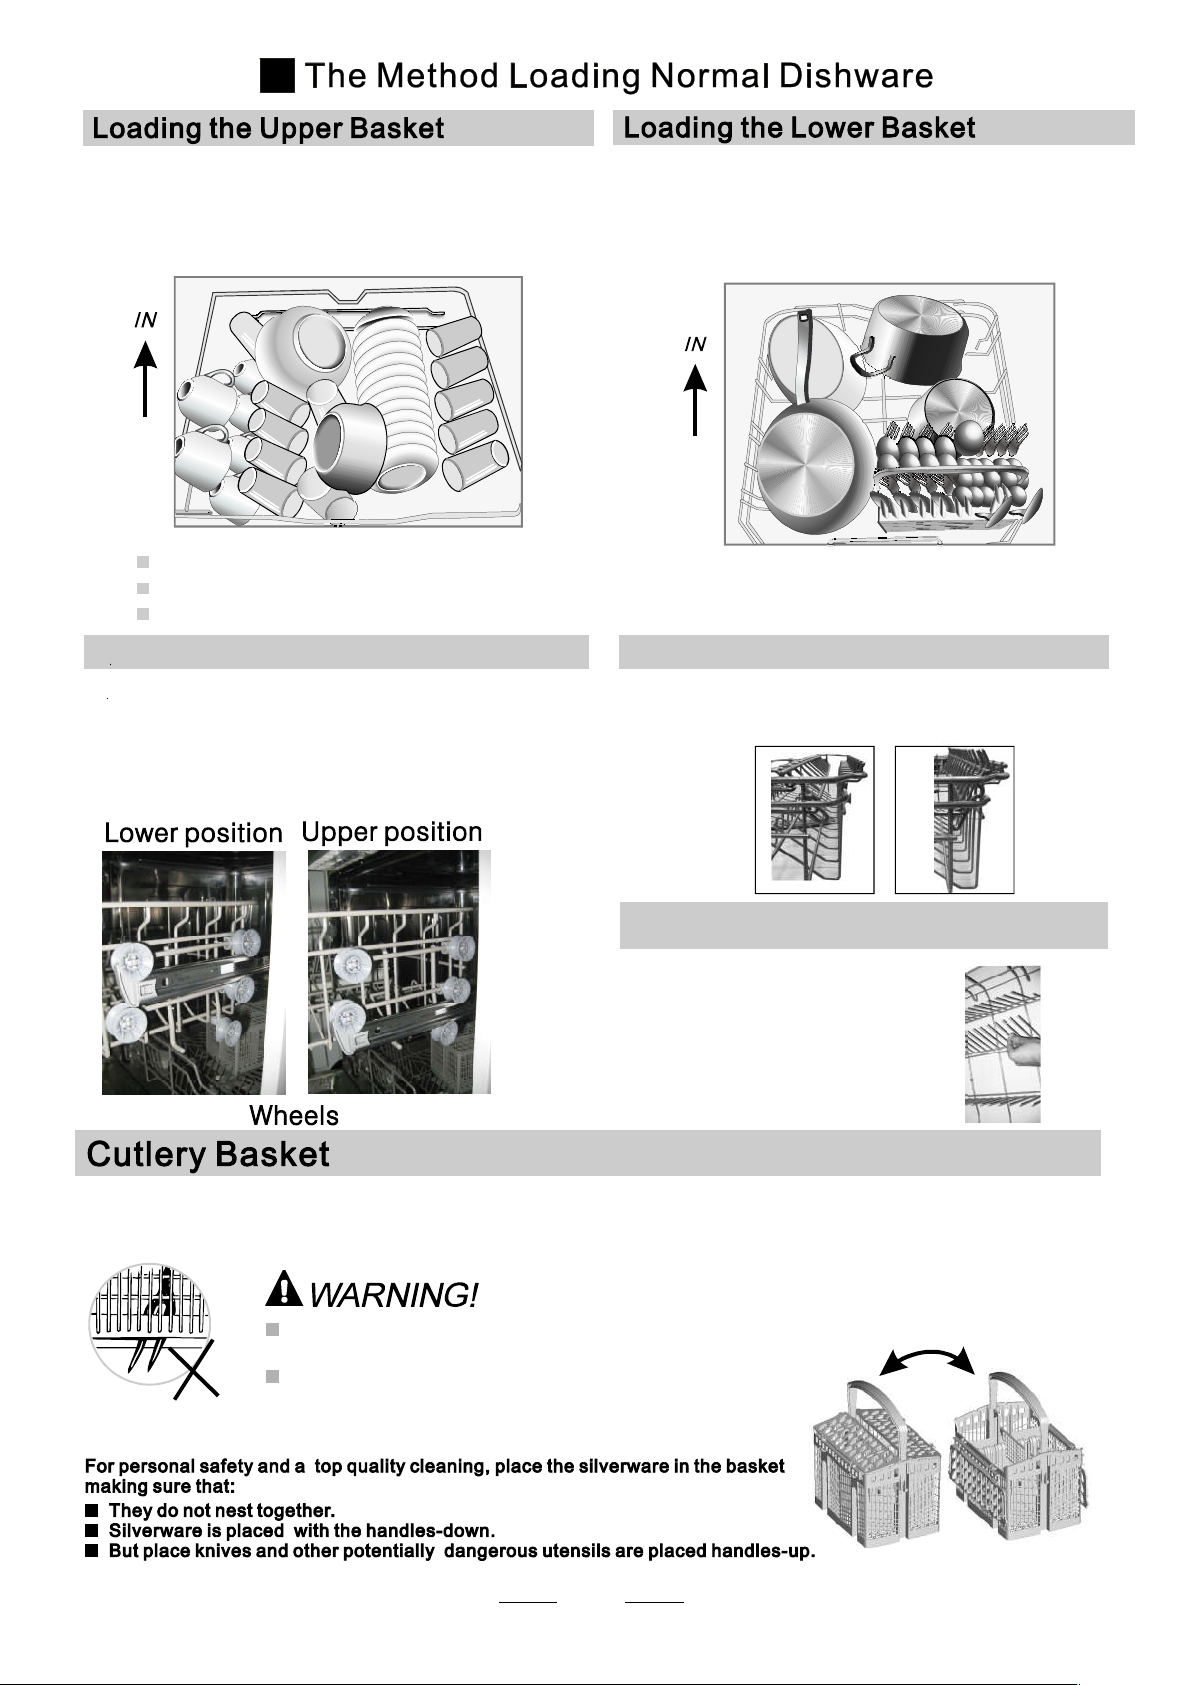
The upper b asket is designed to hol d more delicate
and l ighter dishware such as gla sses, coffe e an d
tea c ups an d saucers, as we ll as p lates , small bo wls
and s hallo w pa ns (as long as t hey ar e not t oo dirty).
Positio n the dishes and cookw are so that t hey wi ll
not get moved by the spray of wat er.
Please be r eminded tha t:
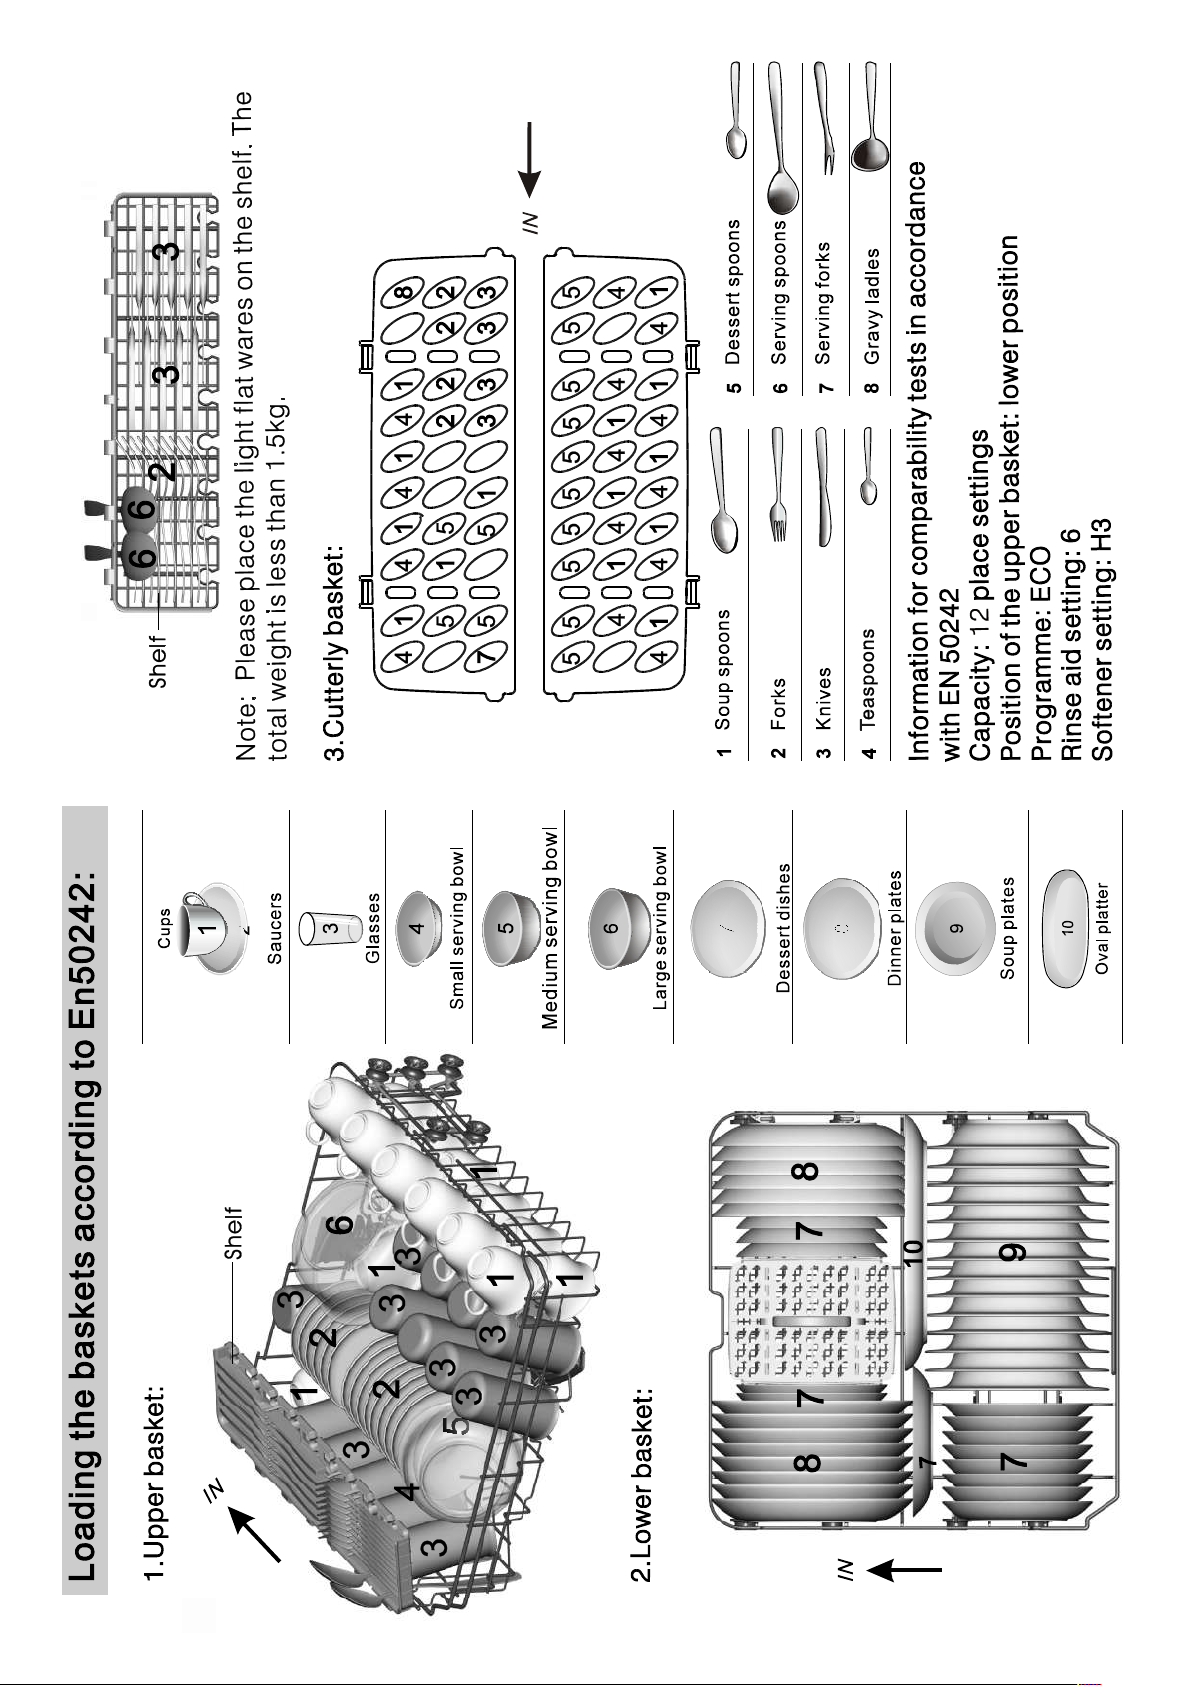
Pots, se rving bowls, et c, mus t a lwa ys be pla ced top do wn.
Deep pots should be slanted t o a llow w ater to f low out.
The B ottom Basket features fo lding spikes so that larger or mor e pots and pans can be loaded.
We suggest that y ou pla ce large items and th e most
difficult to clean items are to be placed in to the lower
bask et: suc h as po ts, pans, lids, servi ng d ishes and
bowls, as shown i n t he fig ure below. It is pre ferable to
place serving dishes an d l ids on the side of t he rac ks
in or der to avoid blocking the ro tat ion of the top spray
arm.
Adjusting the Upper Basket
The height of the upper basket ca n b e ad juste d i n or der to
create more sp ace fo r large ut ensils bo th for the upper
/lower bas ket . The height of the upper basket ca n b e
adjuste d by placing the wheels on different height of the
rails. Long it ems, s ervin g cutlery, sa lad serve rs and knives
shou ld be p laced on the shelf so tha t t hey do not ob str uct
the r otati on of the spray arms..
Folding back the cup shelives
For b etter sta cking of pot s a nd pan s,
the s pikes can be folded do wn as
show in the picture rig ht.
Folding Spikes of Lower Basket
For b etter sta cking of pot s a nd pan s,
the s pikes can be folded do wn as
show in the picture rig ht.
Cutlery should be placed in the cu tlery basket wi th the handles at t he bottom. If t he rac k h as sid e baskets , the
spoo ns should be loaded se parately into t he app ropriate slots, es pecia lly long utensi ls sho uld be placed in th e
horizon tal po sit ion at the fr ont of the upper basket as shown in the pictu re.
Do not let any item extend through the bottom.
Always load sharp utensils with
the sharp point down!
10
Page 16
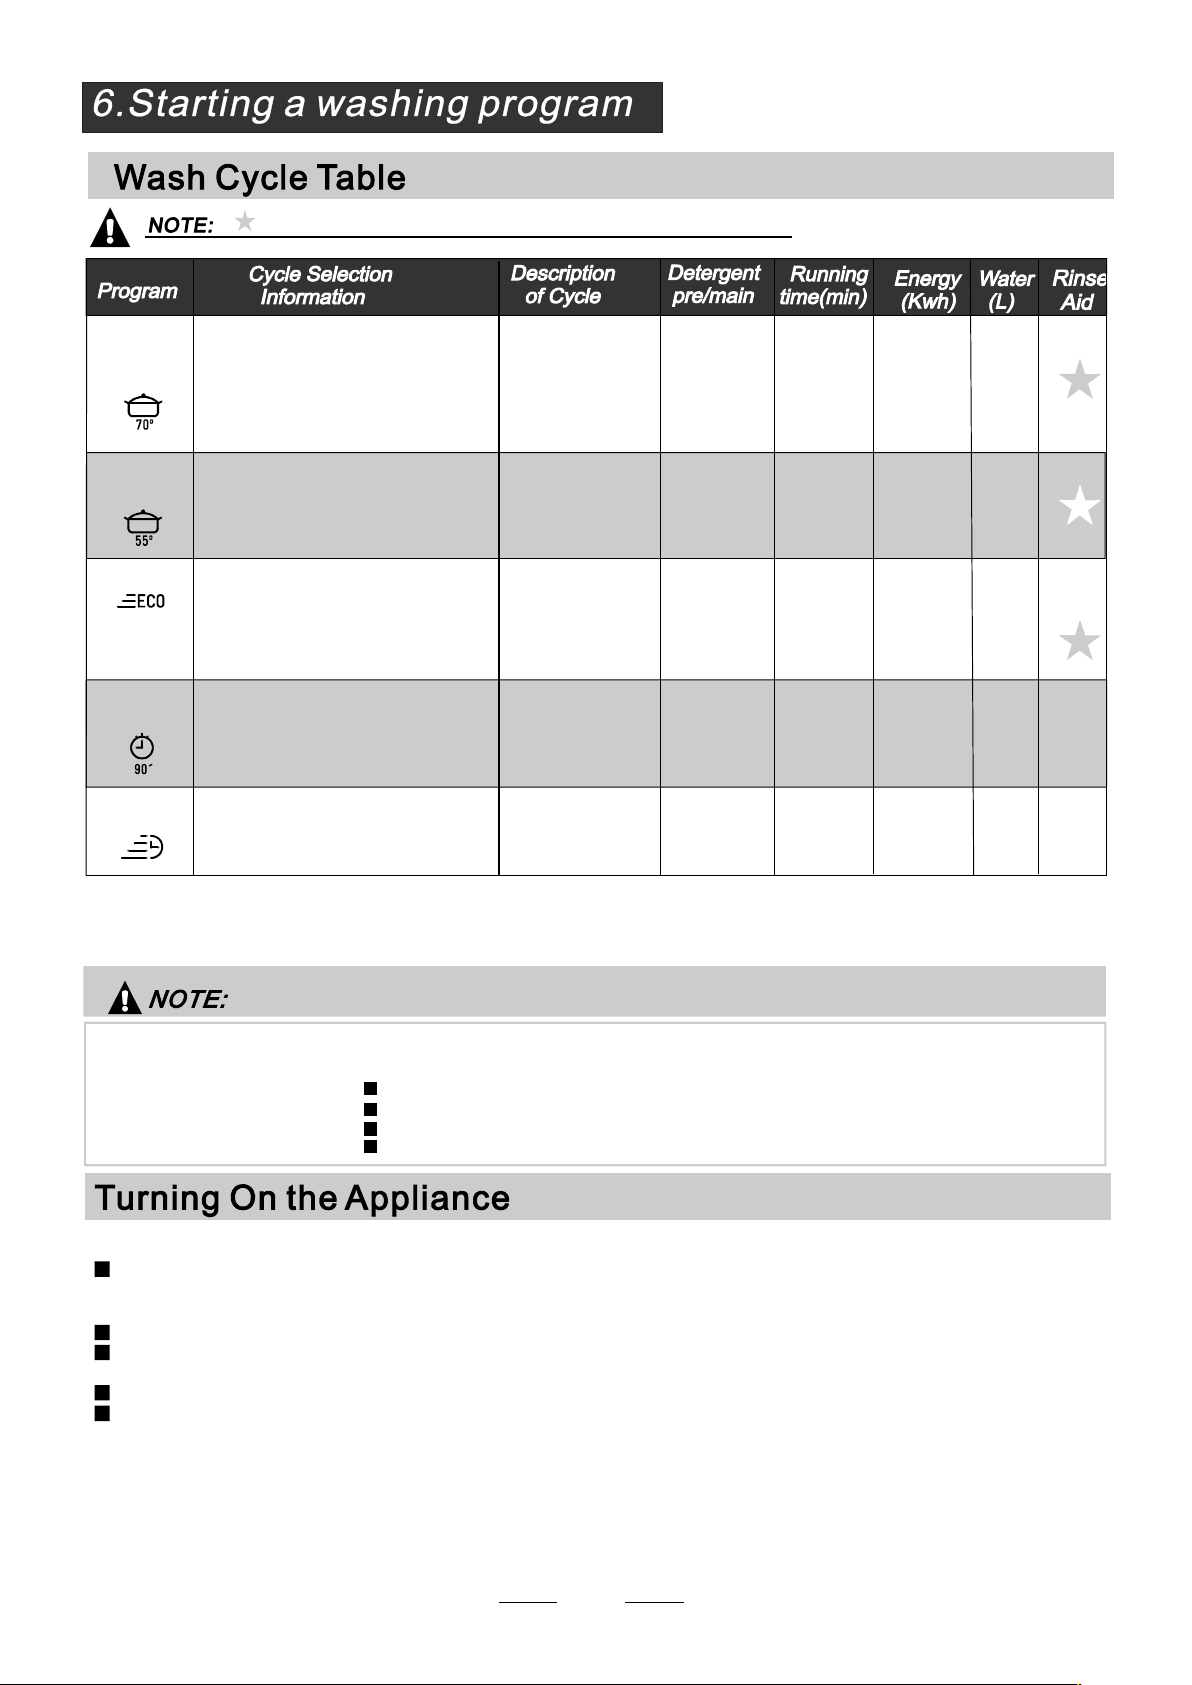
( )
Means: need to fill rinse into the Rinse -Aid Dispens er.
Intensive
No rma l
(*EN 50242)
90 m in
Ra pid
For heavie st soiled crocker y,
and n or mally soi led po ts
pans dis hes etc wi th dried
、
、
on soiling .
For n ormally soi led loads,
such as , pla tes ,glasses
pots
and lightl y soiled pans.
This i s st and ar d program me , it is
suitab le to c le an n ormally s oi led
tab lew are and i t is t he m ost effici en t
prog ra mme in te rms of it s combi ne d
ener gy a nd wa ter con sumptio n for
tha t type of ta blewa re .
For l ightly so iled l oads t hat
do no t ne ed excellent drying
efficiency.
A shorte r wash for light ly
soil ed loa ds and quick wash.
Prewash 50
Was h 60
(
(
℃)
Rinse
Rinse
(
℃)
Rinse 70
Dr ying
Prewash(45 )
Was h (5 5 )
℃
℃
Rinse
Rinse ( 65 )
℃
Dr ying
Prewash
Was h (4 5 )
Rinse(65 )
℃
℃
Dr ying
Was h(6 5 )
℃
Rinse
Rinse (65 )
℃
Drying
Was h (4 5 )
Rinse
(50 )℃
Rinse ( 55 )℃℃
℃ )
5/25 g
5/25 g
5/25 g
30g
25g
17 0
180
19 0
90
30
1. 6
1. 3
0. 91
1.35
0. 75
18 .5
15
11
12.5
11
*E N 5 0242 : This pro gramme is the te st cyc le. Th e in forma tio n f or comparability test
in ac cordance with E N 50242, as follows:
Capacit y: 12 setting
Positio n Upper ba sket: upper wheels on rails
Rinse ai d setting : 6
Pl:0.49 w; Po: 0.4 5w.
Startin g a cycle wash
Dr aw out the lo wer and upper baske t, loa d th e dish es and pus h t hem back.
1
It is commended t o l oad the lower ba ske t f irst, the n th e u pper o ne (se e t he section en title d
Loading the Dishw ash er ).
“ ”
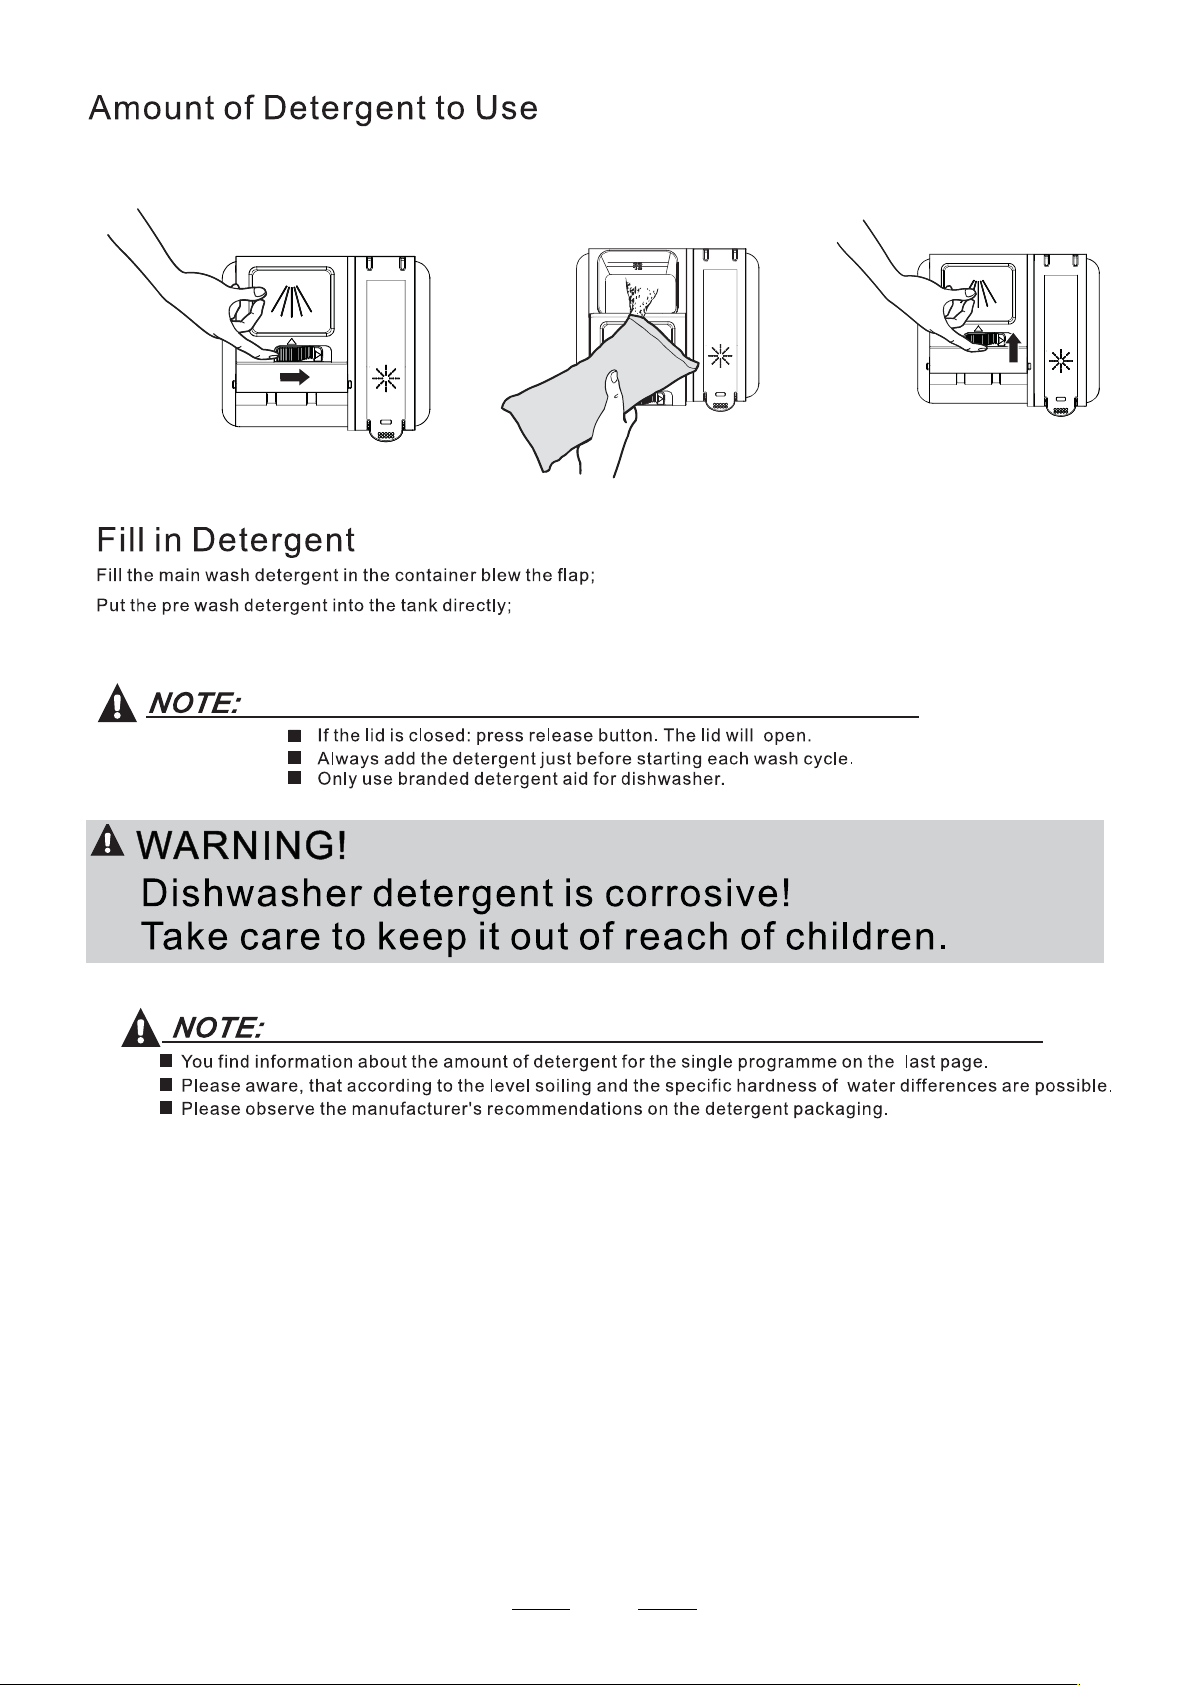
Pour in the deter gent ( see the section ent itl ed Salt, De terge nt and Ri nse Aid ).
2
Insert the plug i nto the socket. The po wer supply is 22 0-2 40 VAC /50 HZ, th e s pecification
3
“ ”
of the so cket is 10A 250VAC. Mak e su re that the water s upply is tur ned on to ful l p res sure.
Open the do or, press the ON/OF F Button, and the ON /OFF light w ill tu rn on.
4
Press the program Butto n , the wash p rogram wi ll be change d as follows direct ion:
5
Intensive->Nor mal->ECO->90 Min ;-> Rapid
If a program is sel ected , th e response lig ht will li ght . Then cl ose th e d oor, the dishw ash er
begins to s tart.
11
Page 17
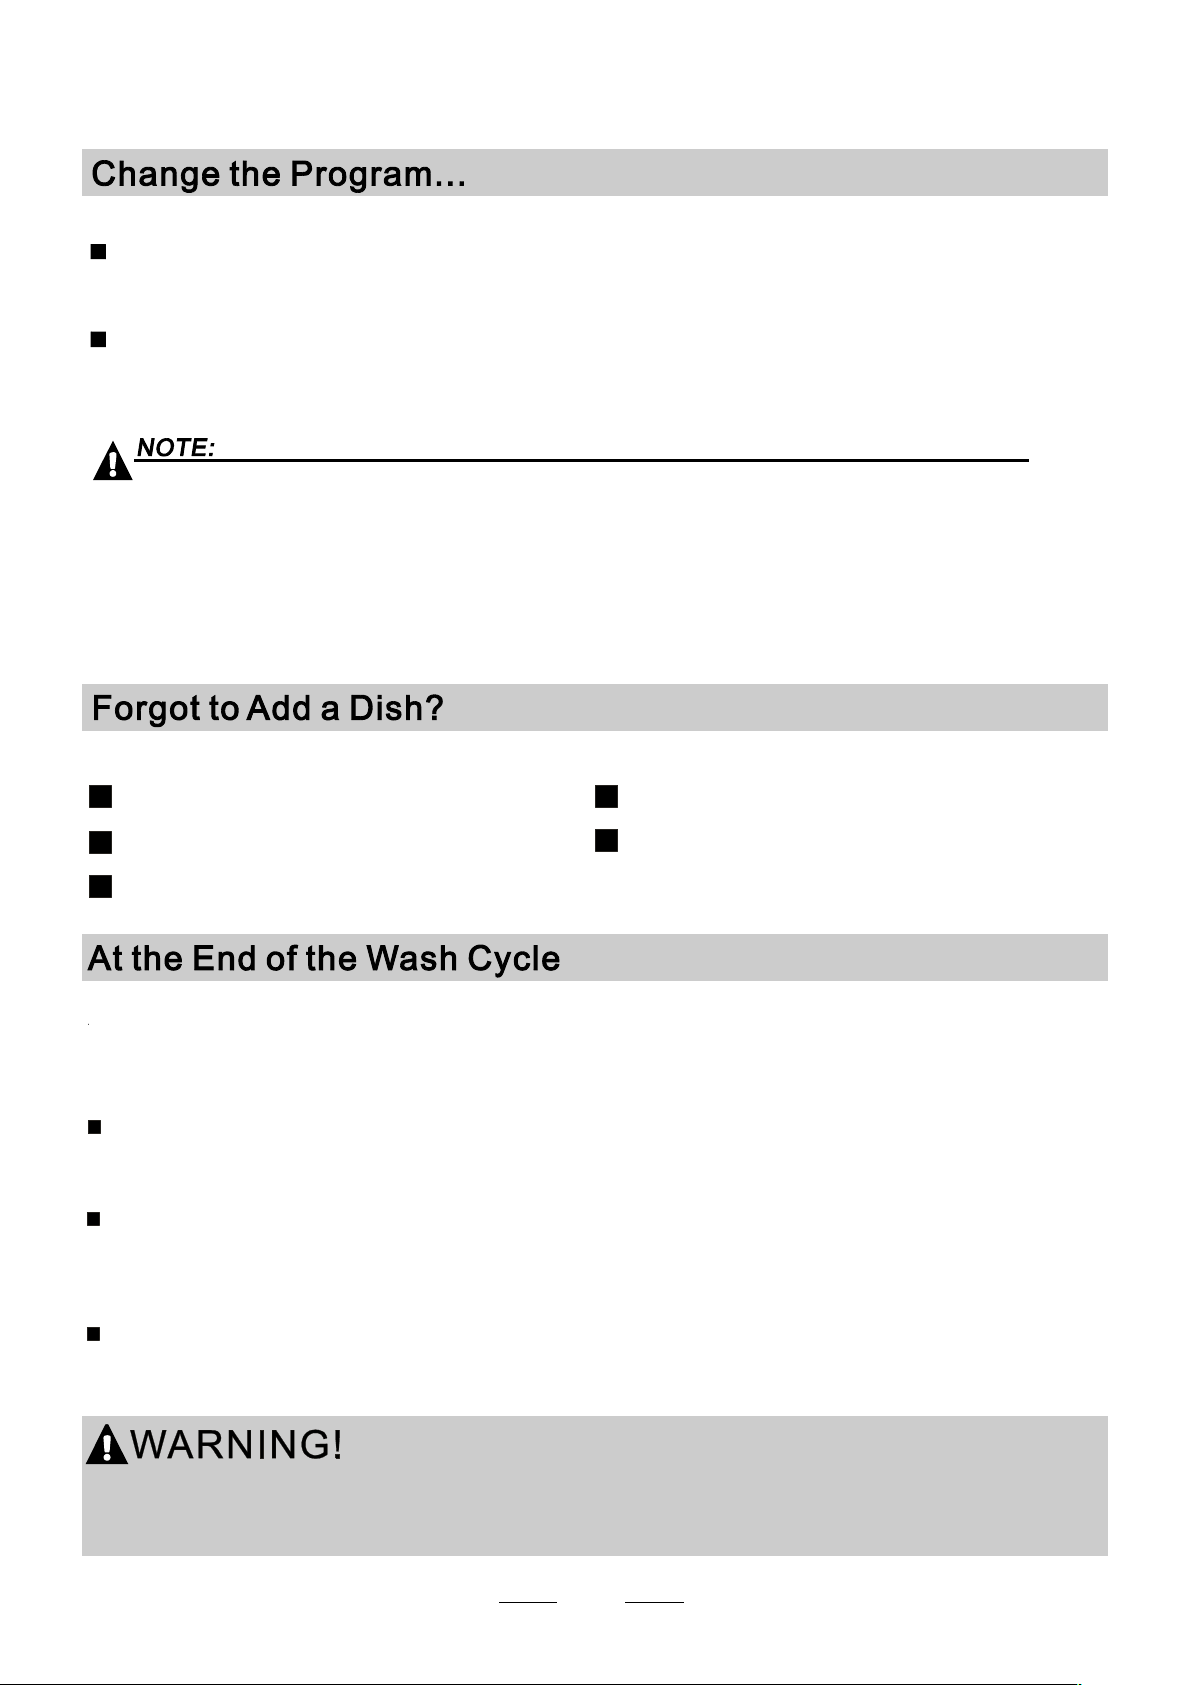
Prem ise:
A cycle that is under way can on ly be mod ified if it h as onl y b een ru nni ng for a s hort t ime . Othe rwi se, th e
1
deterge nt may have alr eady been released , an d t he appliance may have alr ead y d rai ned th e wa sh water.
If this is the cas e, the de tergen t disp enser must b e r efilled (see the secti on ent itled " Load ing the
Dete rge nt " ).
Open the do or , press the Progr am button , the machi ne will be in stand by state,
2
then you ca n change the pro gra m t o t he desire d cycl e setting (see the section e ntitled " St arting a
wash cycle . . ." ).
more than 3 secon ds
If y ou open t he door , the m achine will pause. The p rog ram ligh t will
stop blink i ng and th e buzzer will m ooing every minute unless you close t he do or . Aft er
you close th e door ,th e mac hine will keep on wo rking after 1 0 sec onds.
A forgotten dish can be added any time before the detergent cup opens.
Open the door a little .
1
After the spray arms stop working, you can open the door
2
completely.
Add forgotten dishes.
3
When the wo rki ng cycle has fi nis hed, t he buz zer of the dishw asher will s ound for 8 s eco nds, t hen stop. Turn off
the appliance using the ON /OFF b utton, sh ut off the w ate r s upply and op en the door of t he dis hwasher.
Wai t for a few mi nut es before un loa ding the dishwasher to avo id han dli ng the dishes and u tensils while they
are still hot and more suscep tible to bre akage. T hey wi ll als o dr y b ett er.
during a was h cycle
Close the door
4
The dishwasher will run after 10 seconds.
5
Switch Off the Dishwasher
The progra m light is on but is not blink ing, only in thi s c ase the programme has ended .
1.Switch off t he dishwasher b y p ressing the ON/ OFF button.
2.Turn off the water ta p!
Open the door carefully.
Hot d ishes are sensi tive to k noc ks. T he dis hes shoul d therefore be all owed to co ol dow n around 15 minutes
before rem ovi ng fro m t he app lia nce.
Open the di shw asher 's door, leave it ajar a nd wait a few mi nut es bef ore re mov ing th e dishes. In thi s w ay the y
will be cooler and the drying will b e i mpr oved.
Unloading the dishwasher
It is norma l th at the dishw asher is wet inside.
Empty th e l ower b asket first and th en the upper one. This will avoid water dripp ing from the upper Basket onto
the dishes in the lower on e.
It is dangerous to open the door when washing,
because the hot water may scald you.
12
Page 18
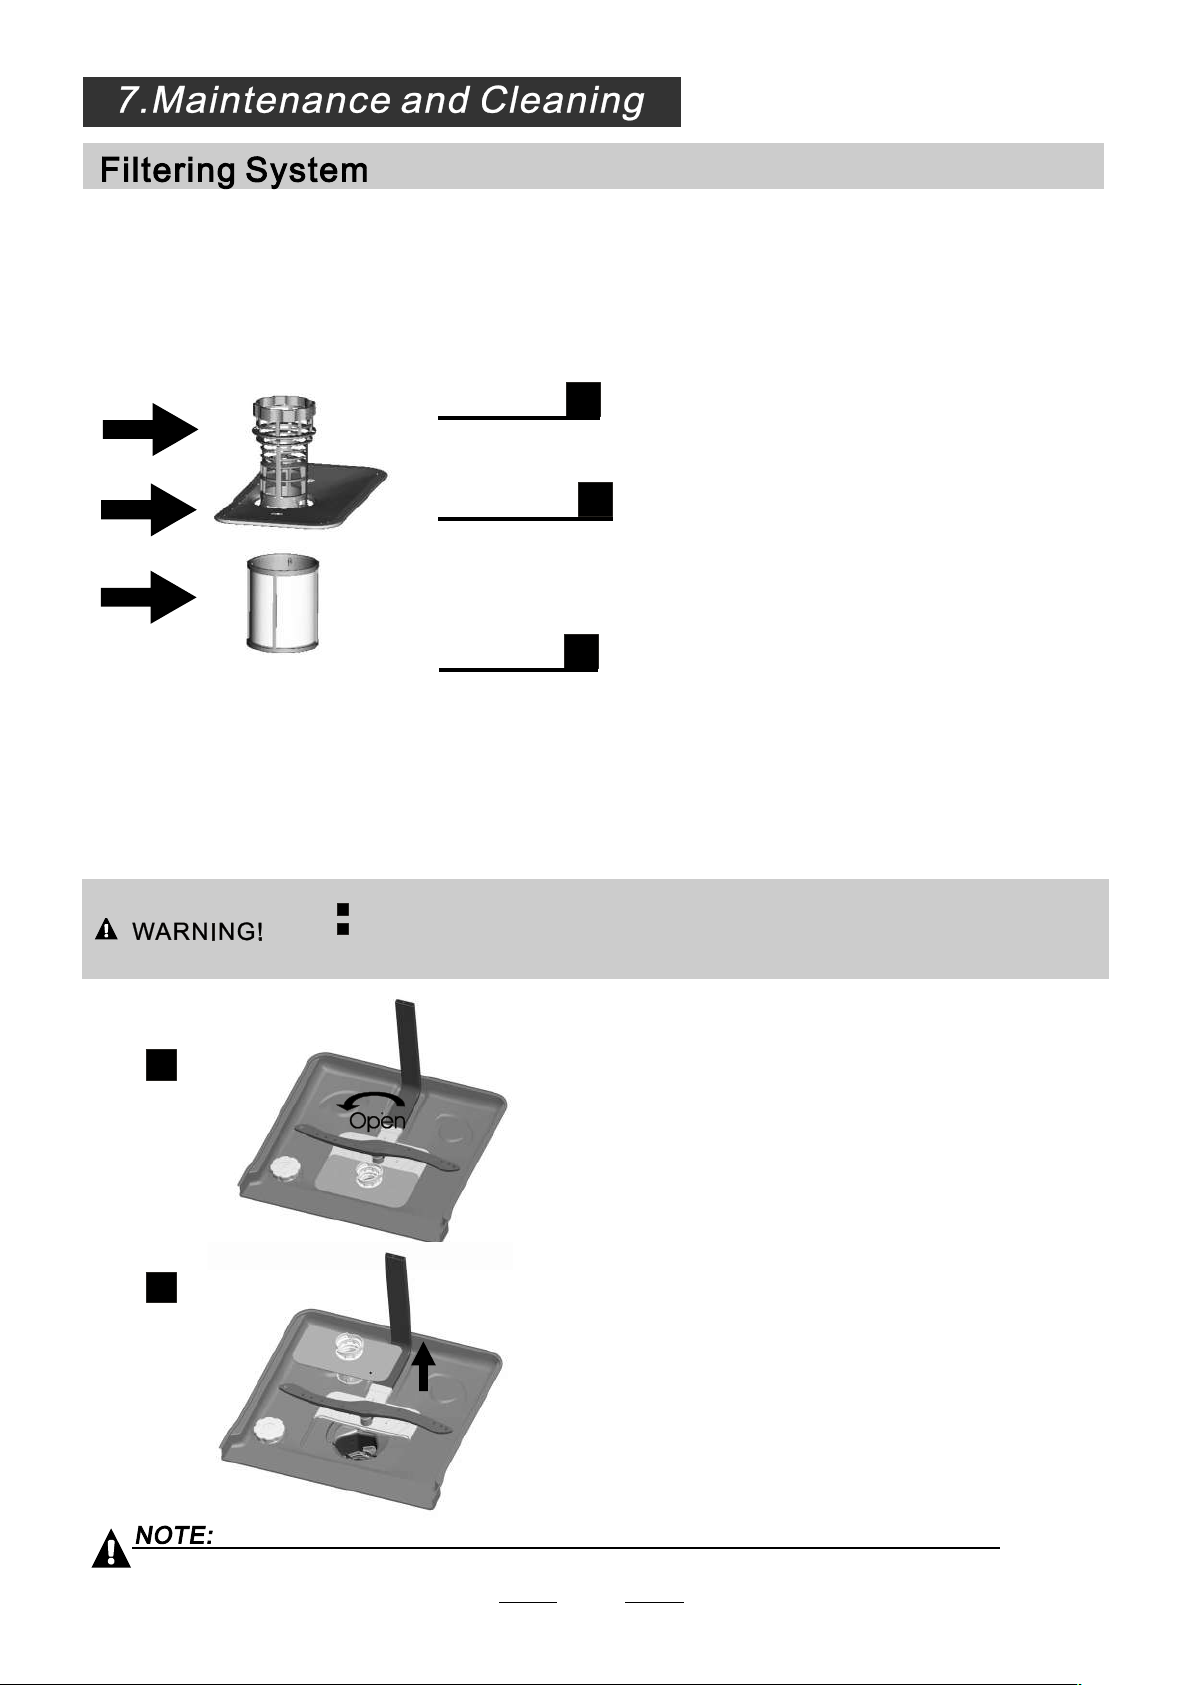
The filter preve nts large r remnant s o f fo od or oth er obj ect s f rom getti ng ins ide the pump.
The r esidues may block the filte r, in th is cas e they must b e remo ved .
The filter system consists of a c oarse filter,a flat (Main filter)
And a microfil ter(F ine filte r).
1
2
3
2
1
3
Main filter
Food and soil partic les trapped in thi s filter are pulve riz ed by a
spec ial jet on the lo wer spray arm an d w ash ed dow n t o drain.
Coarse filter
Larger ite ms, such as p ieces of bones or gla ss, that could block
the drain a re trapped in t he coa rse fi lte r. To rem ove th e items
caug ht by the filter, ge ntly s queez e the t ap on the top of this
filter and lift o ut.
Fine filter
This filter holds so il and food r esi dues in t he sump a rea and
prevent s i t from being deposite d on th e dishes during wa sh cycle.
Filter assembly
The filter efficientl y
For b est perfo rmanc e and resu lts , t he filter must be cleaned regular ly. this reason, i t is a g ood id ea to
remove the larger food particle s tr apped in the filte r af ter ea ch was h cycle by ri nsi ng the semicirc ular filter and
cup u nder r unning wa ter. To remove the fi lte r devi ce, pull the cup handl e in th e u pward dir ectio n.
remo ves food partic les from the wash water, a llowi ng it to b e r ecy cled during the cycle .
For
The dishwashe r must never be use d w ith out the filter s.
Imprope r replace men t o f the filter may reduce the per formance level of the applianc e
and d ama ge dishes an d ut ensils.
2
1
St ep 1 Tu rn the filte r in anti- clo ckwis e d ire ction ,:
Step 2 lif t the filter as sy up:
When following this procedure from step1 to step 2, the filter system will be removed;
when following it from Step 2 to Step 1, the filter system will be installed.
13
Page 19
Remarks:
- Inspect the fil ters f or blocking aft er eve ry time t he dis hwasher has be en use d.
- By uns crewing t he coa rse fi lte r, y ou can remove th e filter syste m. Remove any fo od remnan ts and
clea n the f ilt ers un der ru nni ng water.
The entire filter assembly should be cleaned once a week.
Cleaning the Filter
To clean the coarse fi lter and the fine fil ter, use a cleaning bru sh. Reass emble the filte r p art s a s s how n in th e figures
on th e la st pag e a nd rei nsert the entir e a ssembly in the dis hwasher, positioning it in its seat and pre ssing downw ard s.
When cleaning the filters, don't kno ck on them . Otherwise, the fi lte rs co uld be
contorted and the pe rformance of the dishwasher could be dec reased.
The c ontrol panel ca n b e cleaned by usi ng a lightly dampened cloth .
After cleaning, make su re to dry it thorough ly.
For t he exterior, use a good appliance p olish wax .
Never us e shar p ob jects , sc ou rin g pa ds or har sh cle ane rs on any part o f the dishwa sher.
Cleaning The Door
To clean the edge a round the do or, you should us e o nly a s oft wa rm, damp cloth.
To avoid penetration of water int o the d oor lo ck and electric al com pon ents, do not
use a spray cleaner of a ny kind.
Never us e a spr ay cleaner to c lea n t he door pan el a s i t may d amage the door lock
and e lec trica l compone nts .
Abrasive ag en ts o r s ome paper towels should not be use d b ecause of the risk of
scra tch ing or leaving spots on t he sta inless s teel s urf ace.
Protect Against Freezing
please take fr ost pr otection measures on the dishw asher in winter. Ev ery fter washi ng cycles ,
please ope rat e as fo llo ws
1.Cut off the electr ica l power to the di shwasher.
2.Turn off the water su pply and disconne ct the water inl et pipe from the water valve.
3.Drain the water fro m t he inl et pip e and water v alve. (Use a pan to gathe r th e w ate r)
4.Reconn ect th e water inlet pipe to t he water valve.
5.Remove the fi lte r a t the bottom of the tu b an d u se a sp onge to s oak up water in the sump.
:
If yo ur dis hwasher can not wo rk becaus e of th e ice,
please con tac t p rofessio nal service persons.
time a
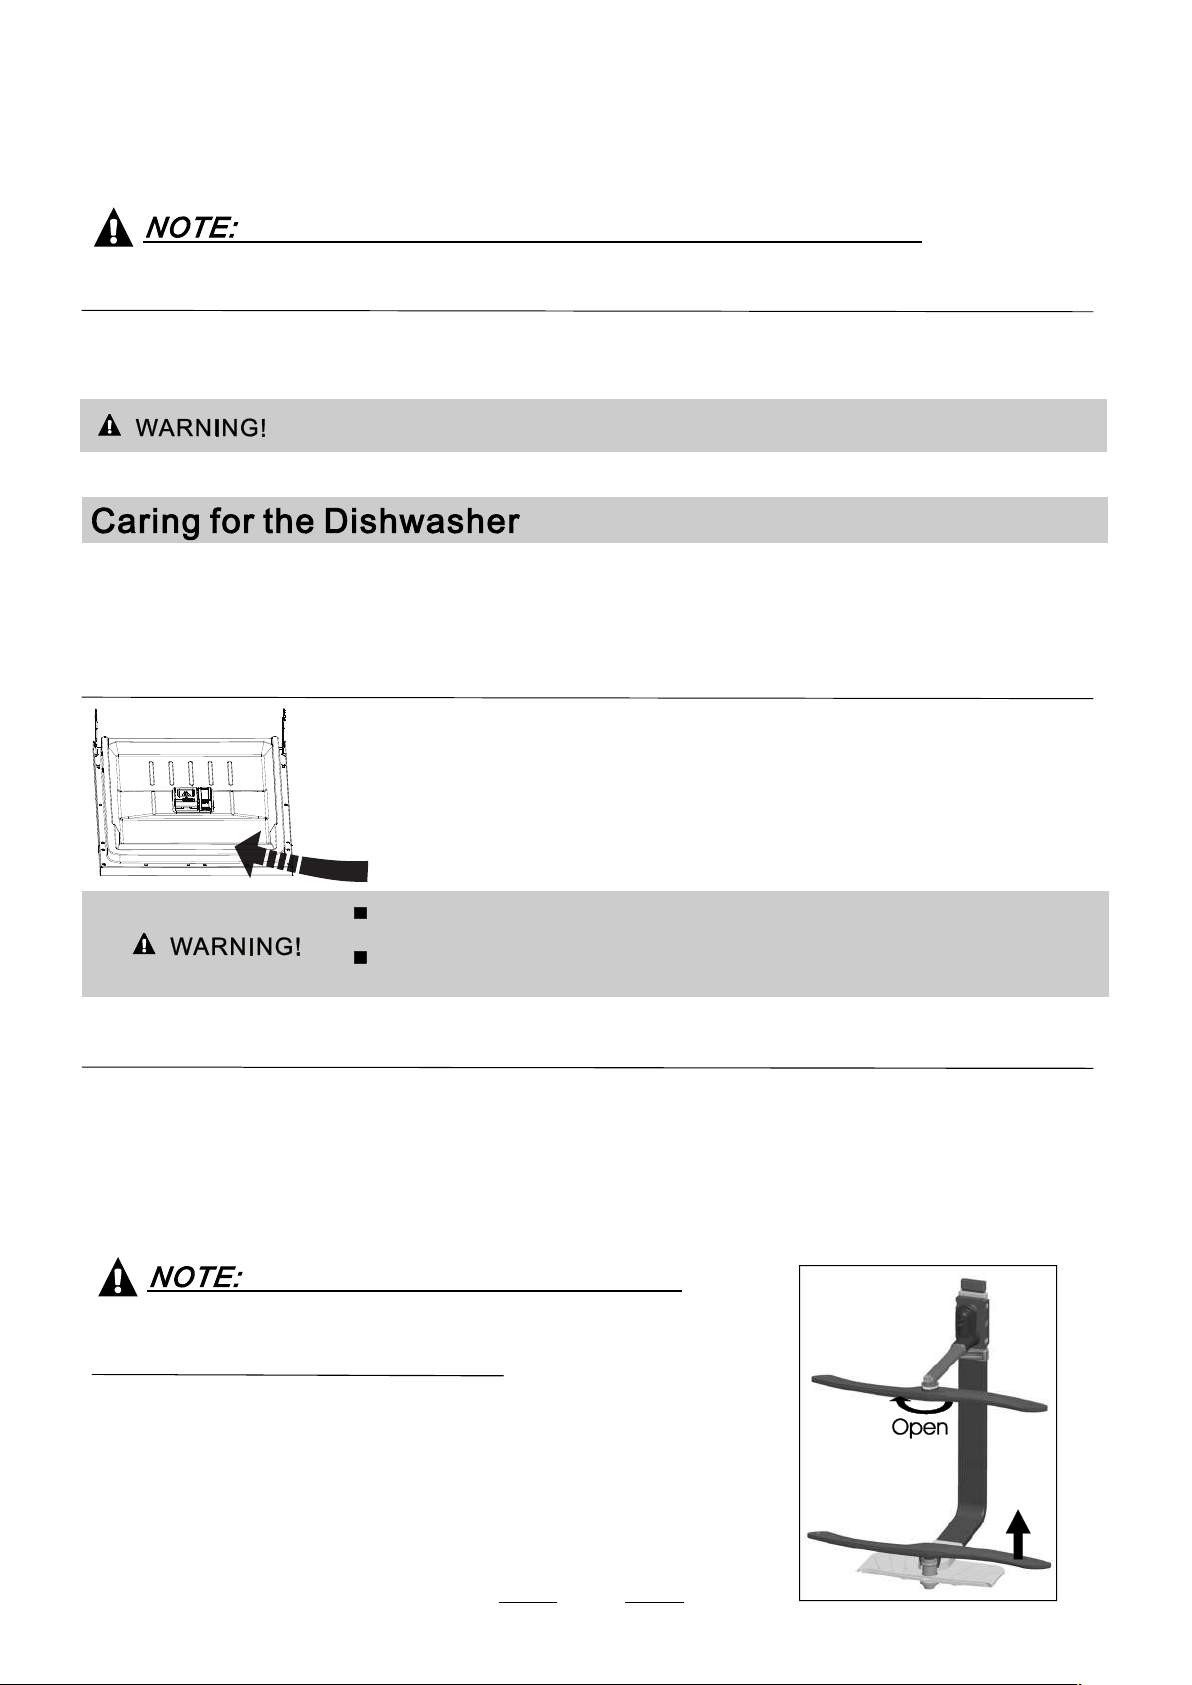
Cleaning the Spray Arms
It is necessar y to cl ean the spray ar ms reg ula rly fo r hard
water chemi cals will clog the spray arm jets a nd bearings .
To remove the up per spray arm, h old the nut, rotate the arm
cloc kwi se to remove it.
To remove the lo wer spray arm, pull ou t the s pray arm upw ard.
Was h the a rms in soapy and warm water and use a s oft brush to
clea n th e j ets . R eplace th em aft er rin sing t hem thoro ughly.
14
Page 20
After Every Wash
After every wa sh, turn off the wa ter su pply t o t he
applian ce and leave the do or sli ghtly open so t hat
mo is tur e and o dours are no t trapped insid e.
Remove the Plug
Before cleani ng or per for ming maintenance, al way s
remove the plug from th e sock et.
No Solvents or Abrasive Cleaning
To c lean the exterior and ru bbe r p art s of th e dishwasher,
do no t use s olvents or a bra sive clea ning p roduc ts.
Only use a cloth with wa rm soa py water.
To remove spots or sta ins from the sur fac e of th e
interior, use a cloth dampened with w ate r an a lit tle
vine gar, or a cleaning product made s pecifically for
dish was hers.
When not in Use for a LongTime
It is recomm end th at you run a wash cy cle with the
dish w asher empty and then rem ove the pl ug from the
socket, tur n off the water supply and l eav e t he door o f
the a ppl iance sli ghtly open. This will help the door
seal s to las t l ong er and preve nt odo urs from forming
within the applia nce.
Moving the Appliance
If the ap plian ce must be moved, try to kee p i t in the
ve rtica l positio n. If absolutely necessar y, i t can b e
posi tio ned on its back.
Seals
One o f t he fac tors t hat ca use odour s to fo rm in the
dish was her is food that re mains trapped in the seals .
Periodi c clea nin g w ith a damp sp ong e w ill preve nt this
from occur ring.
Electrical Shock HazardDisconnect electrical
power beforeinstalling dishwasher.
Failure to do so can result in death or
electrical shock.
The installation of the pipes
and electrical eq uip ments
shou ld be done by professiona ls.
●
Installation preparation
The installat ion po sit ion of dishw ash er sho uld be near t he exi sting inlet and drain hoses and
power cord.
One s ide of the cabinet sink s hould be cho sen to facilitate the connection of dra in hos es of
the dishwashe r.
Note: please check the acc ompan ying i nstallat ion acces sories(hook for aesthetic p anel,scr ew)
15
Page 21
Please carefully read the installat ion instruction.
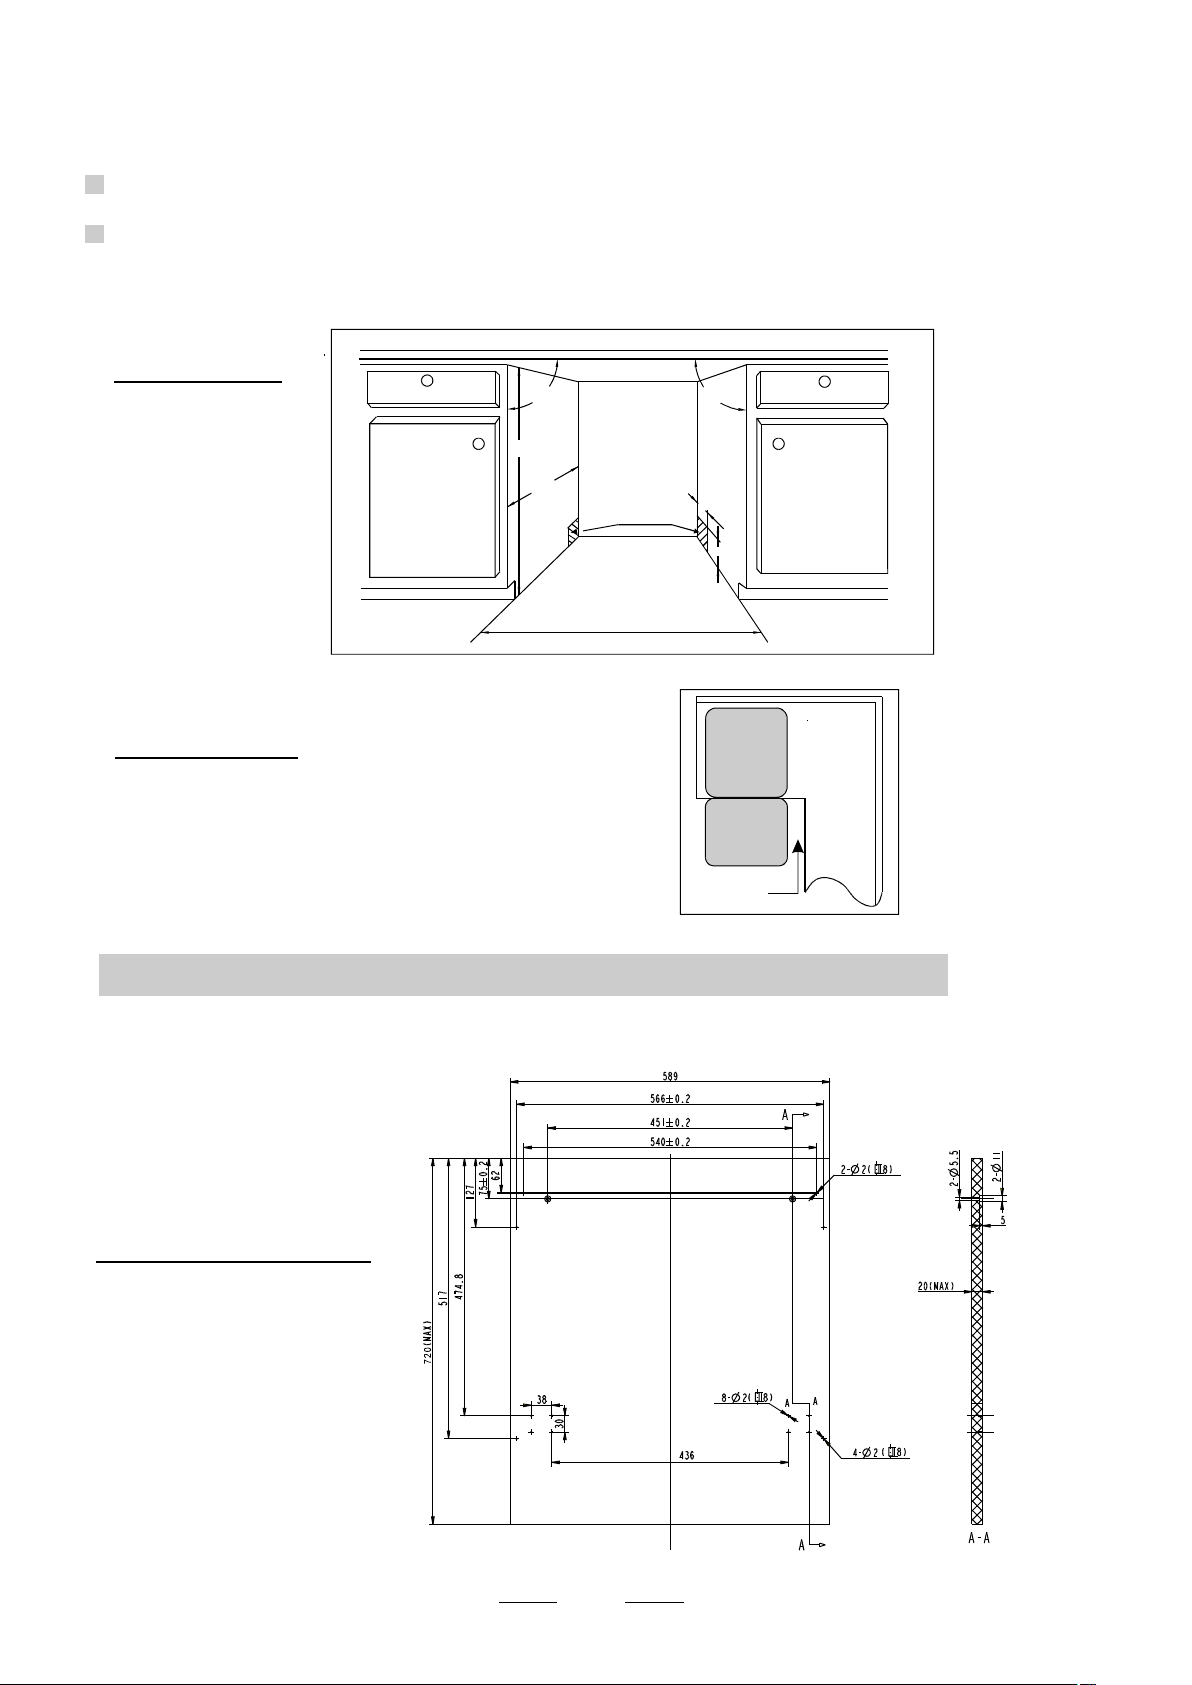
Illustr ations of cabinet dim ensions a nd ins talla tio n p osi tion o f the d ishwasher
Prepara tions shoul d be made bef ore mo ving t he dis hwa she r to th e in stall ati on pla ce.
Choose a place ne ar the sink to facili tate the installatio n of inlet and dr ain hoses
1
(see figure 1) .
2
If dishwasher is installe d at th e corner of the cabin et, the re sho uld be some space
(illust rated in fig ure 2) when t he door is o pened .
【 】Figure1
Cabinet dimensions
Less than 5m m
between the top
of d ishwasher a nd
cabinet an d the
outer door aligned
to cabinet.
820mm
580mm
90 °
Electrical, drai n and
water s upply line
entrances
Space between cabinet
bottom and floor
600 mm
90 °
80
100
【 】Figure2
Di shw as her
Minimum spa ce wh en
the door is o pened
Do or o f
dis hw as her
Minimum space of 50mm
Aesthetic panel's dimensions and installation
●
The aesthe tic wooden panel could b e pro ces sed according to the Figur e 3.
1
【 】Figure3
The aesthe tic panel should
be p rocessed in a ccordance
with the illust rate d dimension s
Cabinet
(Unit: mm)
16
Page 22
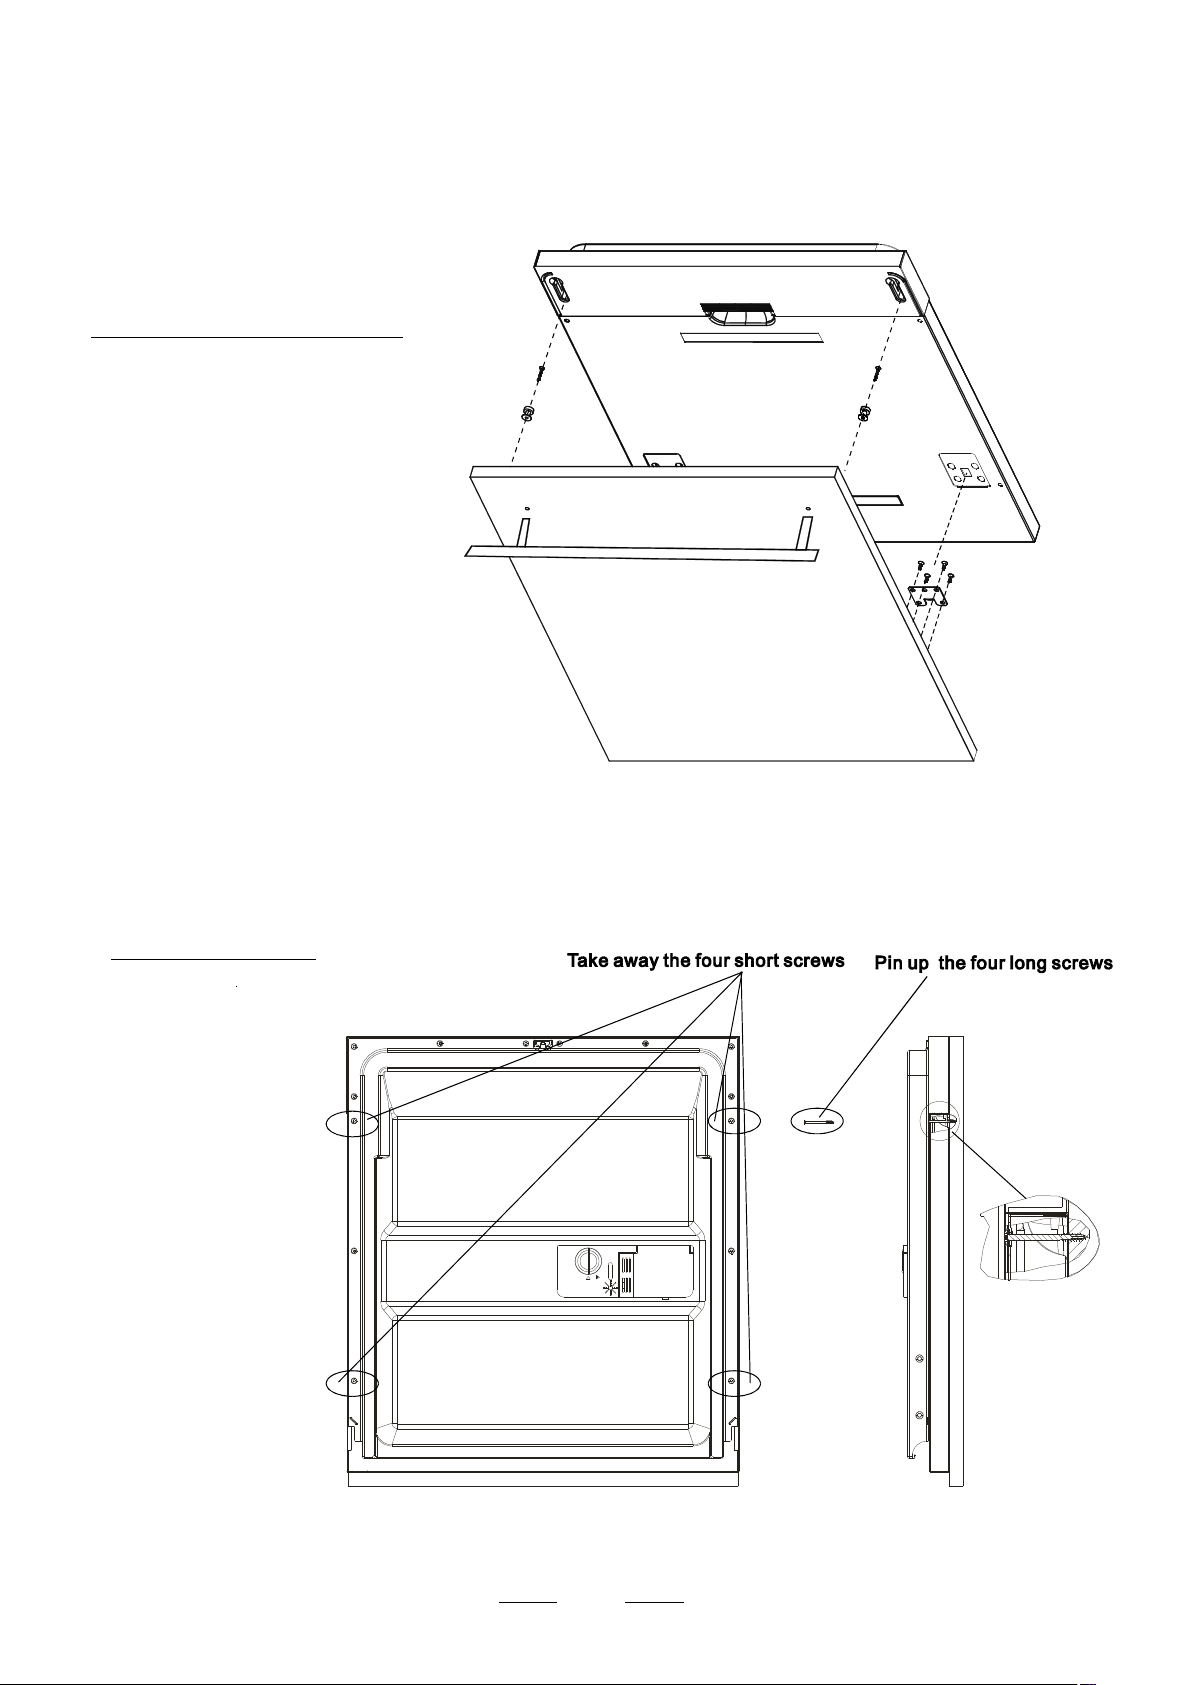
2 Ins tall the hook on th e aesthet ic woo den panel and put t he hoo k into the slot of t he out er door of
dishwasher(see fig ure 4a). Af ter po sit ioning of th e panel , fix the panel onto t he outer doo r by
sc rews and bolts(Se e fi gure 4 b) .
【 】Figure4a
Installation of aesthetic panel
【 】Figure4b
Installation of aesthetic
wooden panel
. take a way the four
1
short screw s
2
. pin u p the f our long
screw s
17
Page 23
●
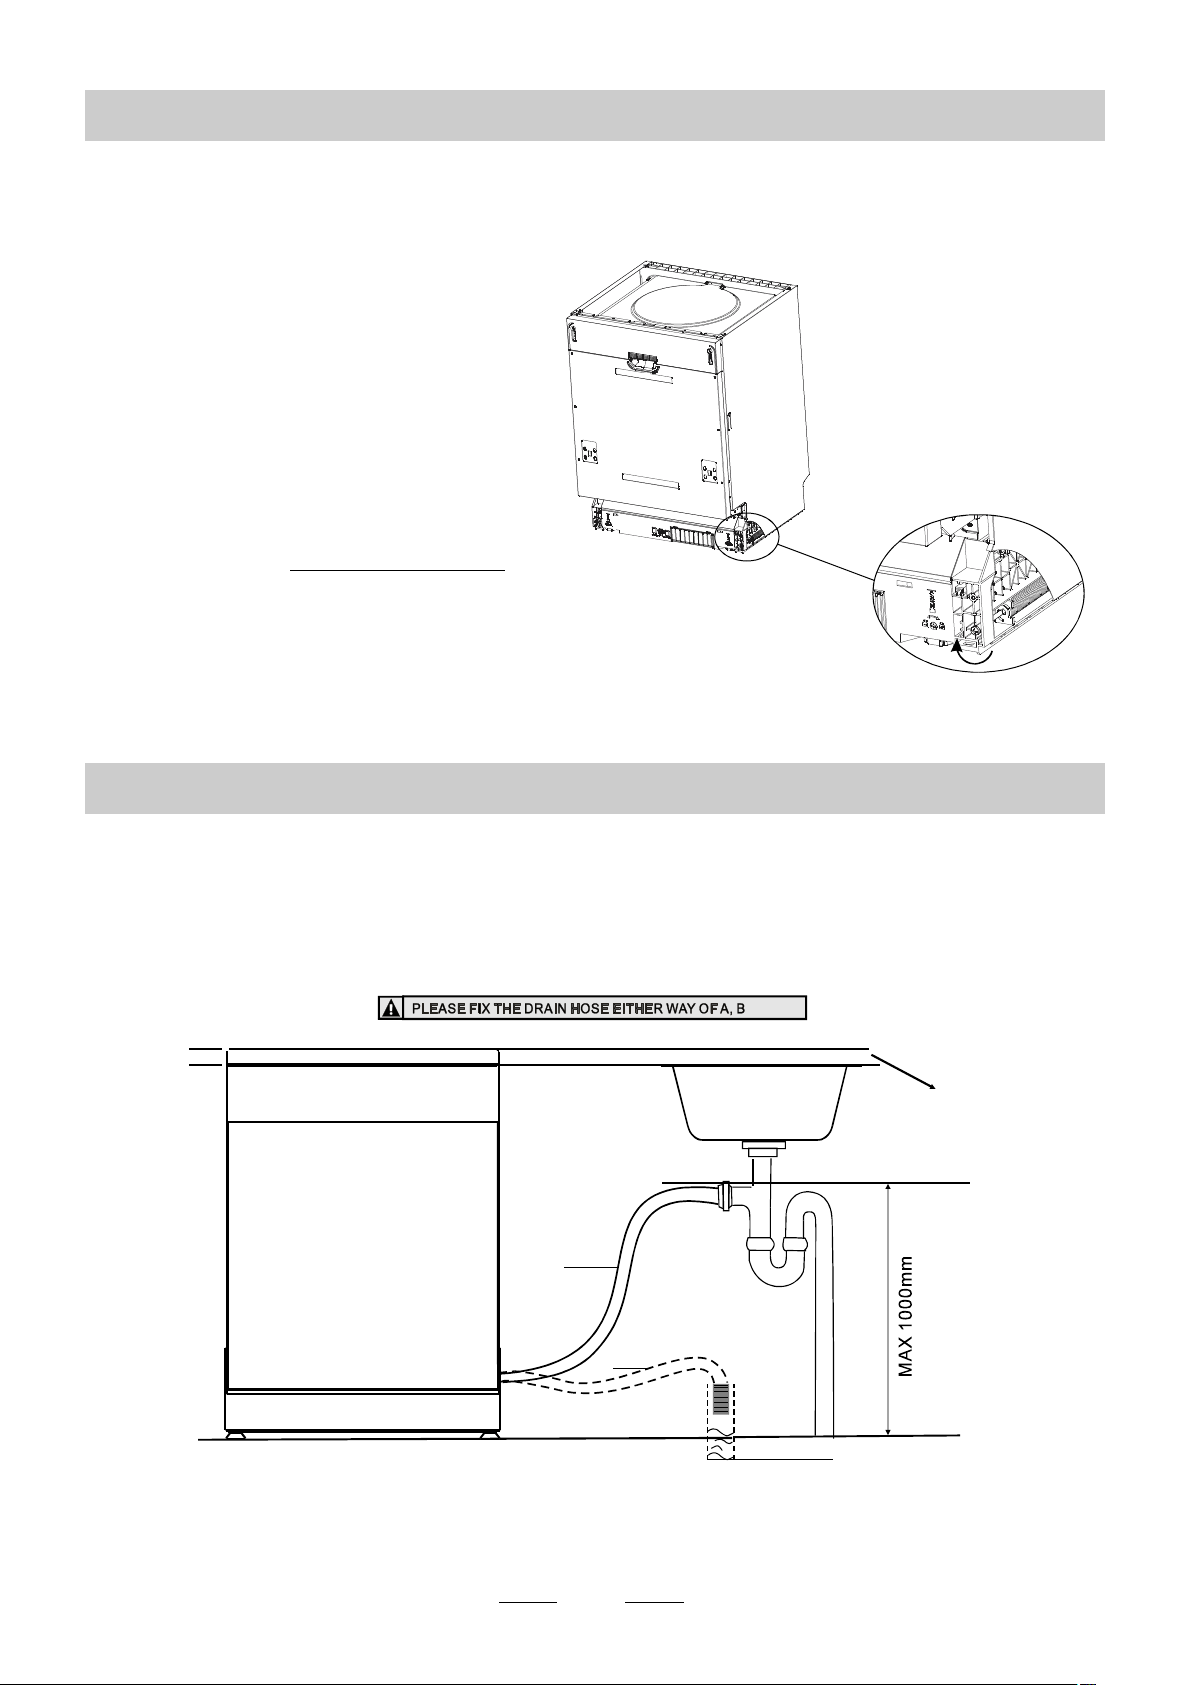
Tension adjustment of the door spring
The door springs are set at the factory to the proper tension for the outer door.
If aesthetic wooden panel are installed, you will have to adjust the door spring tension.
Rotate the adjusting screw to drive the adjustor to strain or relax the steel cable
(see figure 5).
Door spring tension is correct when
th e door remains horizontal in the
fu lly opened position yet rises
to a close with the slight lift of a
finger.
,
【 】Figure5
Tension adjustment
of the door spring
●
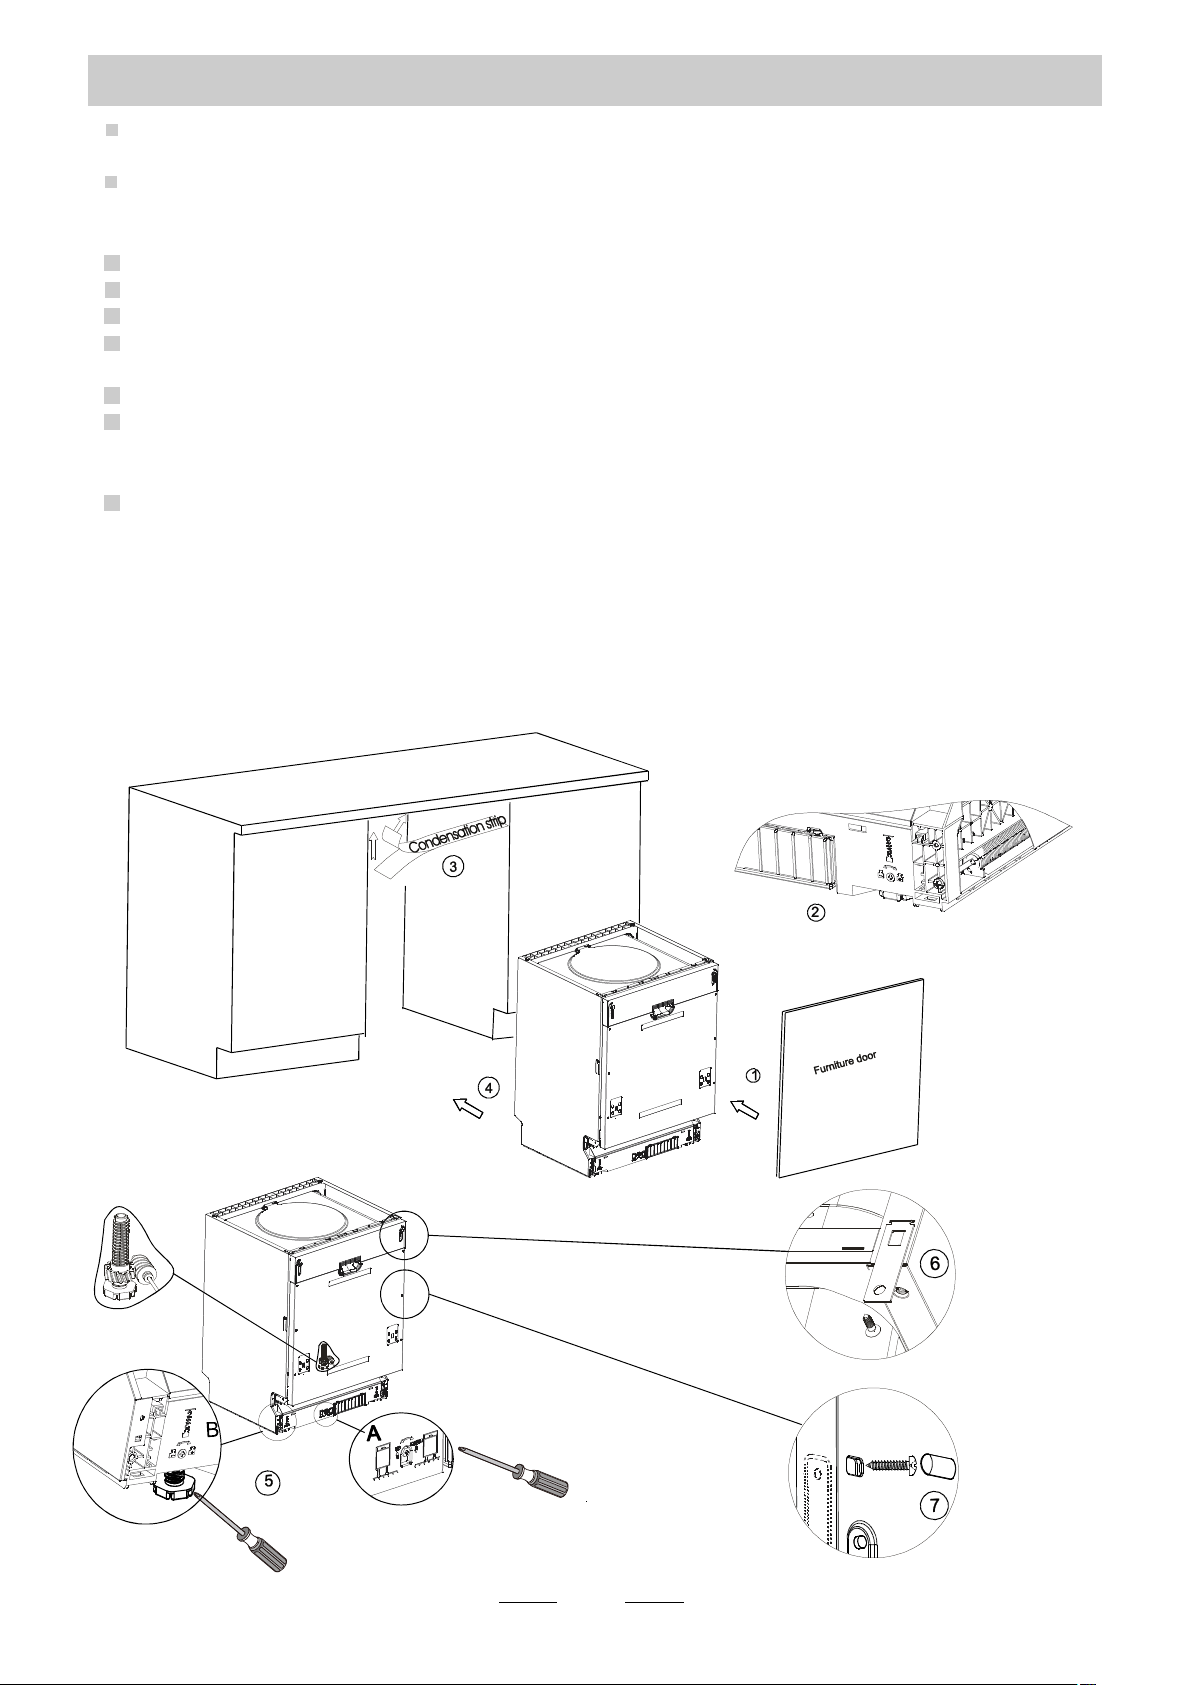
Connection of drain hoses
Insert the drain hose i nto a d rain p ipe wi th a mi nimum diameter of 40mm, or let it run in to the sink, making su re to
avoi d be nding or cri mping it. Th e t op of the hose m ust be less than 100 0mm.
Front
Counter
NOTE
The top of the hose
must be less than
A
1000mm.
Drain pipe
B
18
φ 40 mm
Page 24
●
Dishwasher installation steps
1
In stall the furniture d oor to the oute r doo r of t he dishwashe r using th e bra ckets provided. Refer
to the template for posit ioning of the brackets.
2
Adjust the tension of the door spri ngs b y using an Allen key t urning i n a clockw ise motion to
tight en the lef t and right door spring s. Fa ilure to do this could cause damage to your dishwasher
(Illu stration 2)
3 .
Co nne ct the inlet ho se to the cold water supply
4 .
Co nne ct the drain hose. Refer to diagram (Figure 6)
5 .
Co nne ct the pow er cord
6
Affix the condensation strip under the work surface of cabinet. Please ensure t he co ndensation
strip is flush with edge of work surf ace.
7
Place the dishwasher into positi on. (Illustration 4)
8
Level the dishwash er. The re ar fo od ca n be ad justed from the front of the dish was her by tur nin g
the Allen screw in the midd le of the base o f dis hwasher use an Alle n key ( Illustration 5A ). To a djust
the front feet, use a flat s crew driver and turn the front fe et until the dishwash er is level (Illustration 5B).
9 The dish was her must be secure d in place . There are two ways to do this:
A. Normal work surface:Put t he installation hook into the s lot of the side plane and secure it to the
wo rk surfa ce with th e wood screws (Illust ration 6).
B. Marble or granite work top:Fix t he side with Screw. ( Illustration 7).
.
【Figure 7
19
】
Page 25
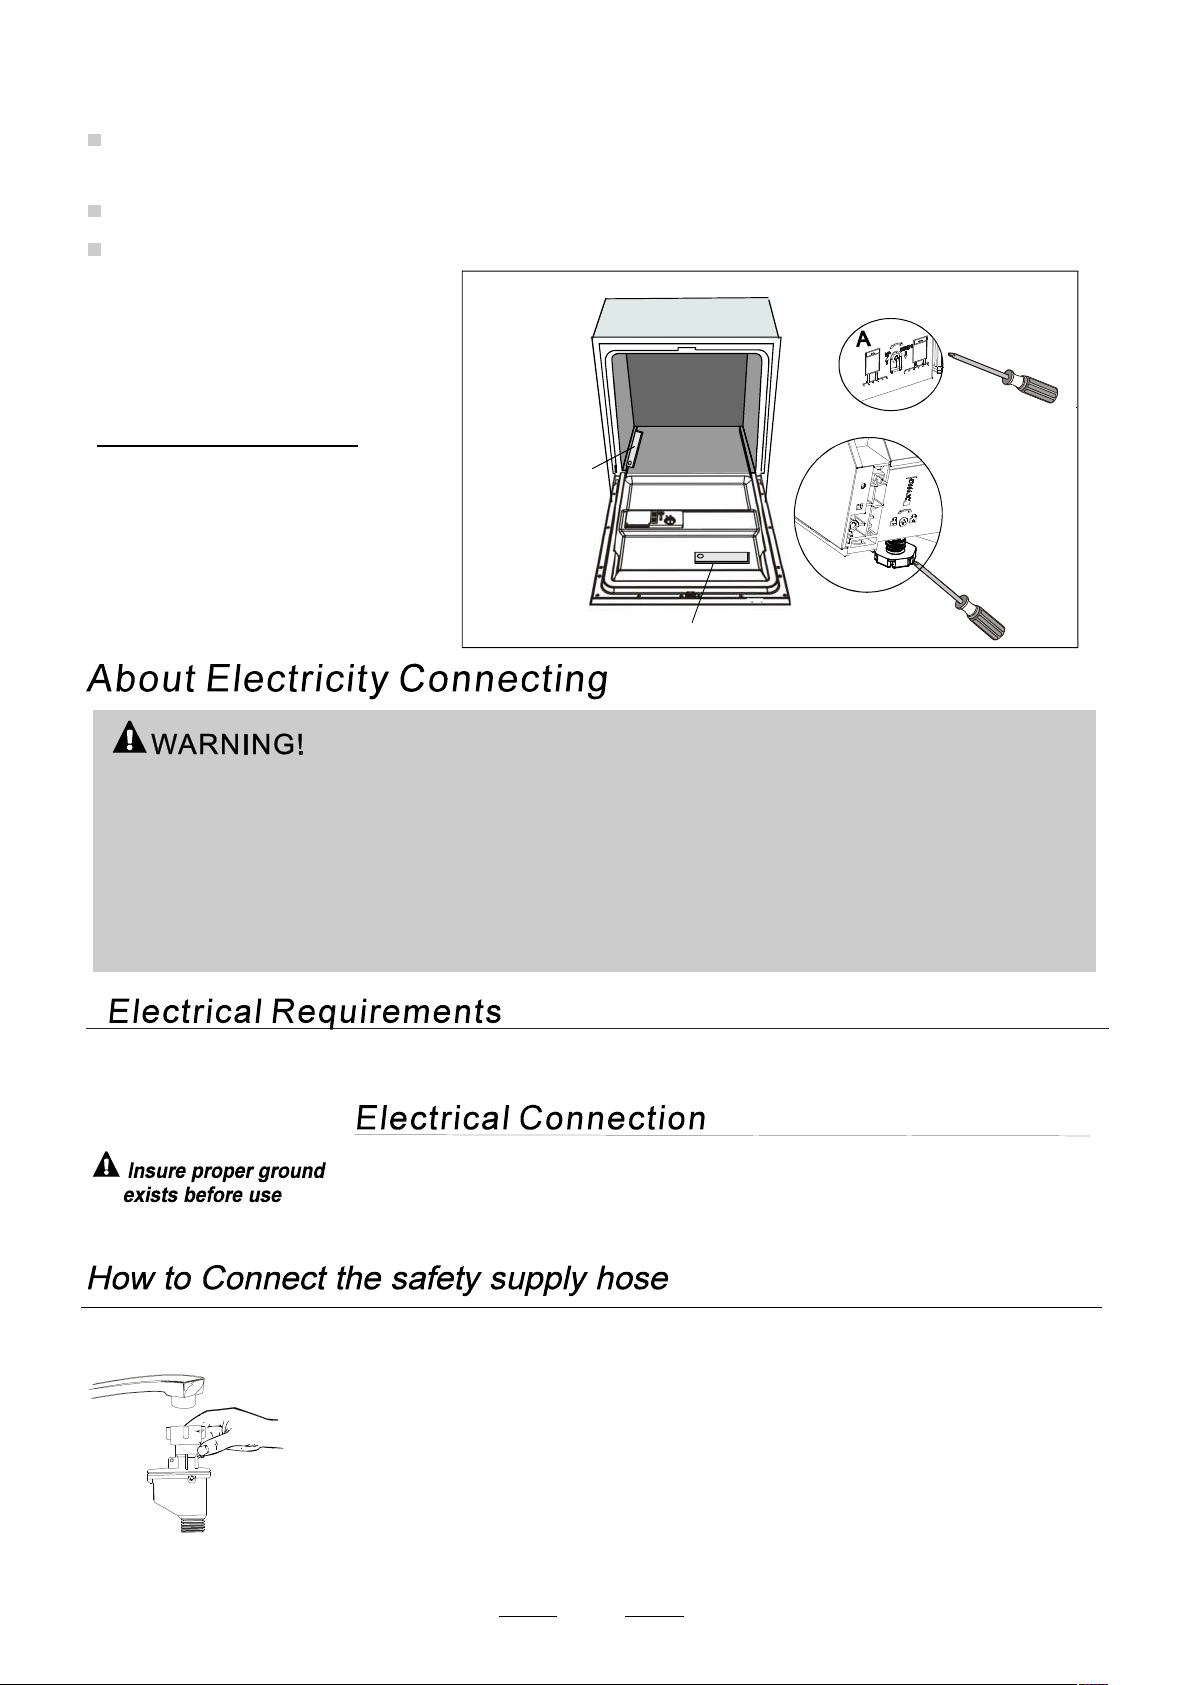
Dishwasher must be level for proper dish rack operation and wash performance.
Place a spirit level on door and rack track inside the tub as shown to check that the
1
dishwasher is level.
level the dishwasher by adjusting the three levelling legs individually.
2
When level the dishwasher, please pay attention not to let the dishwasher tip over.
3
【 】Figure 8
Illustration of feet adjustment
NOTE:
The maximum adjustment
height of the feet is 50 mm.
For personal safety:
Do not use an extension cord or an adapter plug
with this appliance.
Do not, under any circumstances, cut or remove the
earthing
Connection from the power cord.
Ch eck l evel F ron t t o B ac k
Sp iri t le vel
Che ck le vel s ide to s ide
Please l ook at the rat ing label to k now the ra tin g vo ltage and connect t he dishwash er to t he approp ria te power s upply.
Use the req uir ed fuse 10 amp , t ime delay fus e o r ci rcu it breake r re commende d an d provide sep arate cir cui t serving
only thi s a ppl ian ce.
Ensur e t he voltag e an d freq uency o f the powe r b ein g corresponds to
those on the rating plate. Only insert the plug i nto an ele ctr ica l so cke t w hich is e arthed
properly. If the electrical soc ket to which t he applia nce must be co nnected is n ot
appropriate for th e pl ug , r epl ace th e socket, r ather tha n us ing a a dap tor s or t he lik e as
they cou ld cause o ver he ating and burns.
The appliance must be c onnected to the water mains using new hose- sets.
The old hose-sets sh ould n ot be reused.
Wat er pressu re mus t b e between 0,04 MPa and 1 MPa. If the pr ess ure is below the
mini mum consult our Service Depart ment f or adv ice .
Pull The safety supply hoses completely out from storage compartment located at rear of dishwasher.
1
Tighter the screws of the safety supply hose to the faucet with thread 3/4inch.
2
Turn water fully on before starting the dishwasher.
3
20
Page 26
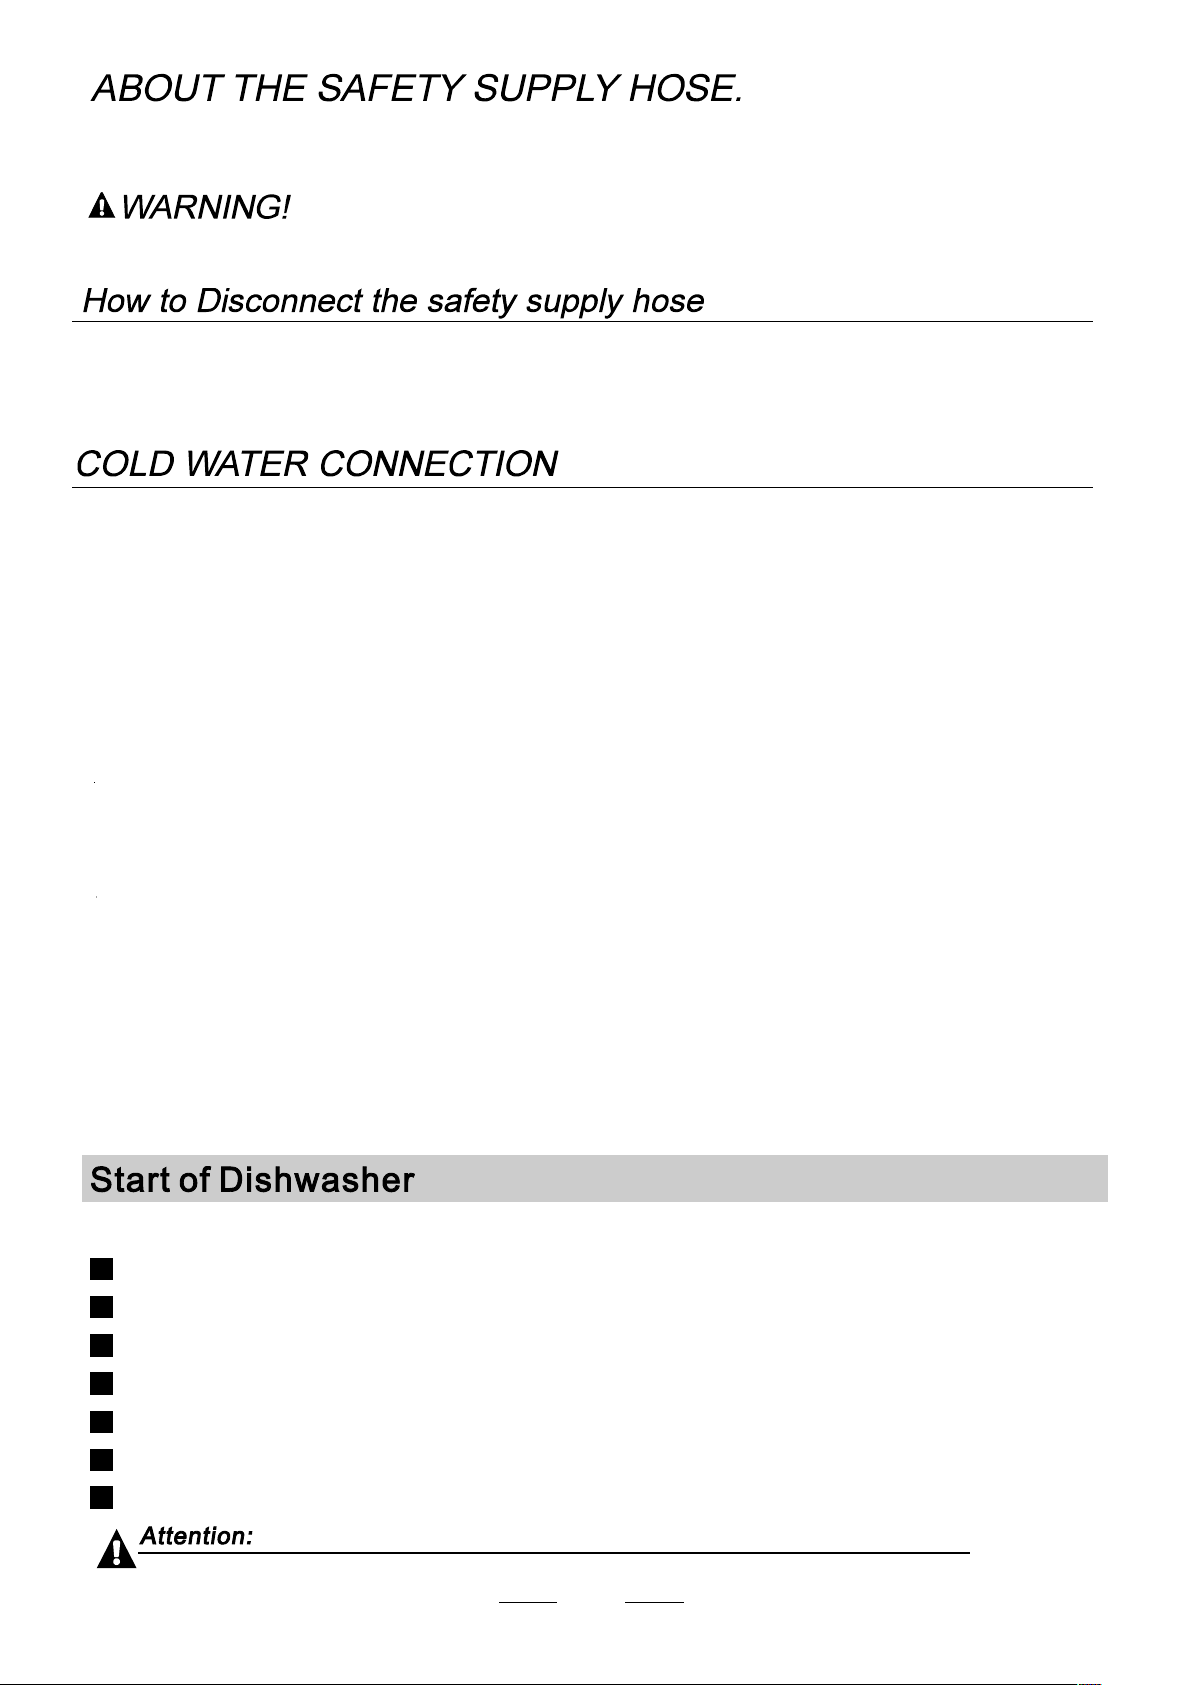
The s afety suppl y hose consists of the double wa lls. The hose' s system guarantees i ts int erventio n by bl ocking the
flow of water in cas e o f th e s upp ly hose b rea king and when the air space bet ween the supply ho se its elf an d the o ute r
corruga ted hose is full of water.
A h ose th at att aches to a sink spray can bu rst if it is instal led on the same water lin e as the di shwasher. If you r sink
has o ne, it is rec ommended that the hose b e disconn ected and the hole plugged.
Turn off the water.
1
Release the water pressure by depressing the pressure release button. This relieves water pressure and protects you, and the
2
room, from severe splashing.
Unscrew the safety supply hose from the faucet.
3
Connect the co ld water supply hose to a threade d 3/4(i nch) c onnector an d make sure t hat it is fas tened tightly i n plac e.
If the water pi pes are n ew or have not b een us ed for an extend ed per io d of time, let th e water run to mak e sure that the
water is clear and fr ee of imp urities. If this precaut ion is not ta ken, t here is a risk that the w ater inlet can g et blocked
and damage the appliance.
Positioning the Appliance
Positio n the appliance in the de sir ed loc ation . The back shou ld rest agains t the w all be h ind it, and t he sid es,
along th e a dja cent c abine ts or wal ls. Th e d ish washe r is equippe d wi th wat er supply an d drain hoses that can
be po sit ioned either to the ri ght or the le ft sid es to facili tate proper insta llation.
How to Drain Excess Water From Hoses
If the si nk is 100 0 h igh er from the floor, the excess water in hoses cannot be drained dir ect ly
into the si nk. It will be n ecessary to drain excess wa ter from hos es into a bow l o r suitabl e
cont ain er that i s held outside and lower than the sink.
Water Outlet
Connect th e wa ter dr ain hose. Th e drain ho se must b e correct ly fit ted to avoid wat er leaks.
Ensure tha t th e w ater i nlet h ose is not ki nke d o r squa she d.
Extension Hose
If you need a drain hos e ex tension, make s ure to use a si milar dra in hose.
It must b e n o lo nge r than 4 me tres; oth erw ise th e cl ean ing effec t o f th e dishw asher could be reduced.
Syphon Connection
Insert the drain hose i nto a d rain p ipe wi th a mi nimum diameter of 40mm, or let it run in to the sink, making su re to
avoi d be nding or cri mping it. Th e t op of the hose m ust be less than 100 0mm.
The following things should be checked before starting the dishwasher.
1 The dishwasher is level and fixed properly
2 The inlet valve is ope n
3 Inlet
hose c o nnect ions a re full y ti ghtened a n d not leakin g
4 The wires are tightly connected
5 The power is switched on
6 The inlet and drain hoses are knotted
7 All packing materials and printings should be taken out from the dishwasher
After installation, please make sure to keep this manual.
The content of this manual is very helpful to the users.
21
Page 27
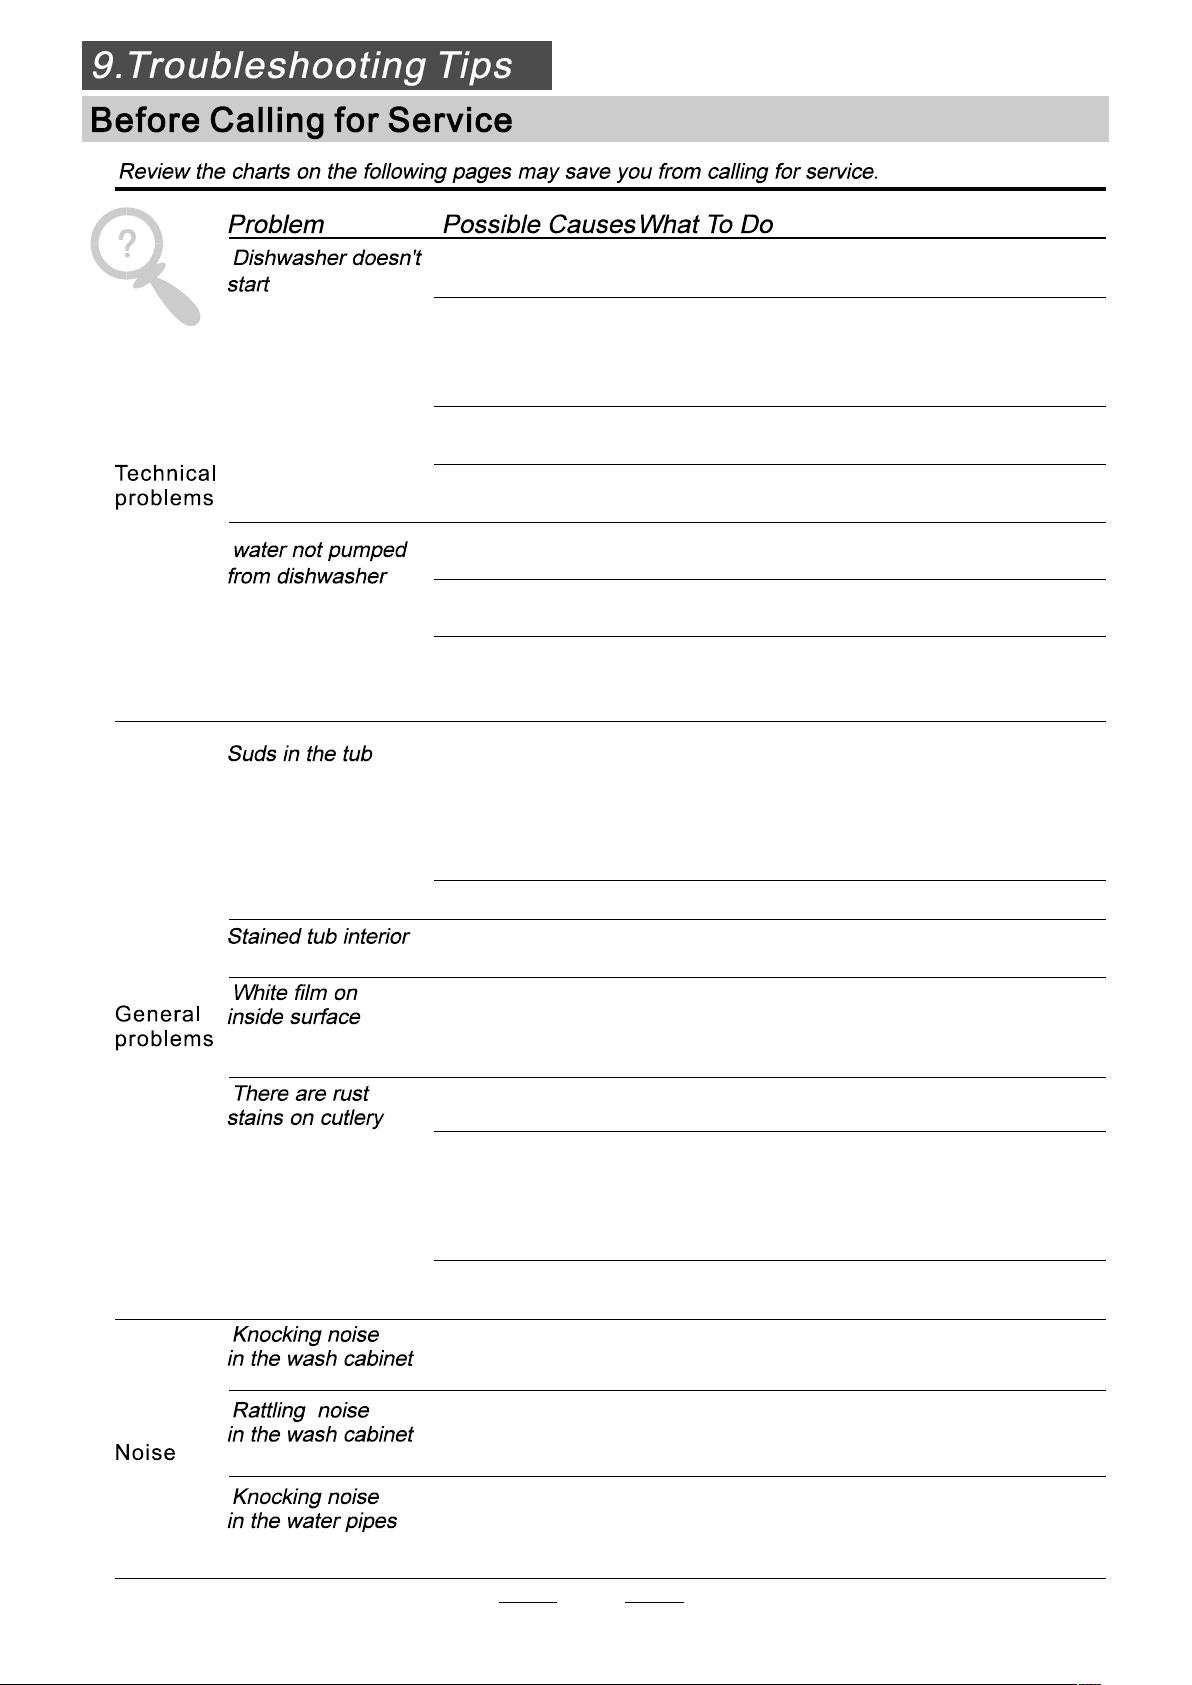
Fuse blown, or the
circuit breaker acted
Replace fuse or reset circuit breaker. Remove any other
appliances sharing the same circuit with the dishwasher
Power supply is not
turned on
Water pressure is low
Door of dishwasher
not properly closed.
Kink in drain hose
Filter clogged
Kitchen sink clogged
Improper detergent
Spilled rinse-aid
Make sure the dishwasher is turned on and the door is
closed securely.
Make sure the power cord is properly plugged into the
wall socket.
Check that the water supply is connected properly and
the water is turned on.
Make sure to close the door properly and latch it.
Check drain hose.
Check coarse filter
the
(see section titled )
Check the kitchen sink to make sure it is draining well.
If the problem is the kitchen sink not draining ,you may
need a plumber rather than a serviceman for dishwashers.
" Cleaning The Filter "
Use only the special dishwasher detergent to avoid suds.
If this occurs, open the dishwasher and let suds evaporate.
Add 1 gallon of cold water to the tub. Close and latch the
dishwasher, then select any cycle. Dishwasher will drain
out the water at the first step.Open the door after draining
is stop and check if the suds is disappeared.
Repeat if necessary.
Always wipe up rinse-aid spills immediately.
Detergent with
colourant was used
Hard water minerals
The affected items are
not corrosion resistant.
A programme was not
run after dishwasher
salt was added.
Traces of salt have
gotten into the wash cycle.
The lid of the softer
is loose
A sp ay arm is
r
knocking against
an item in a basket
Items of crockery
are loose in the
wash cabinet
This may be caused
by on-site installation
or the cross-section of
the piping.
Make sure that the detergent is the one without
colourant.
To clean the interior, use a damp sponge with
dishwasher detergent and wear rubber gloves.
Never use any other cleaner than dishwasher
detergent for the risk of foaming or suds.
Always run the quick wash programme .
without any crockery in the dishwasher and
without selecting the Turbo function (if present),
after adding dishwasher salt.
Check the lip .Ensure the fix is fine.
Interrupt the programme, and rearrange the items
which are obstructing the sp ay arm.r
Interrupt the programme,
and rearrange the items of crockery.
This has no influence on the dishwasher function.
if in doubt, contact a suitably qualified plumber.
22
Page 28
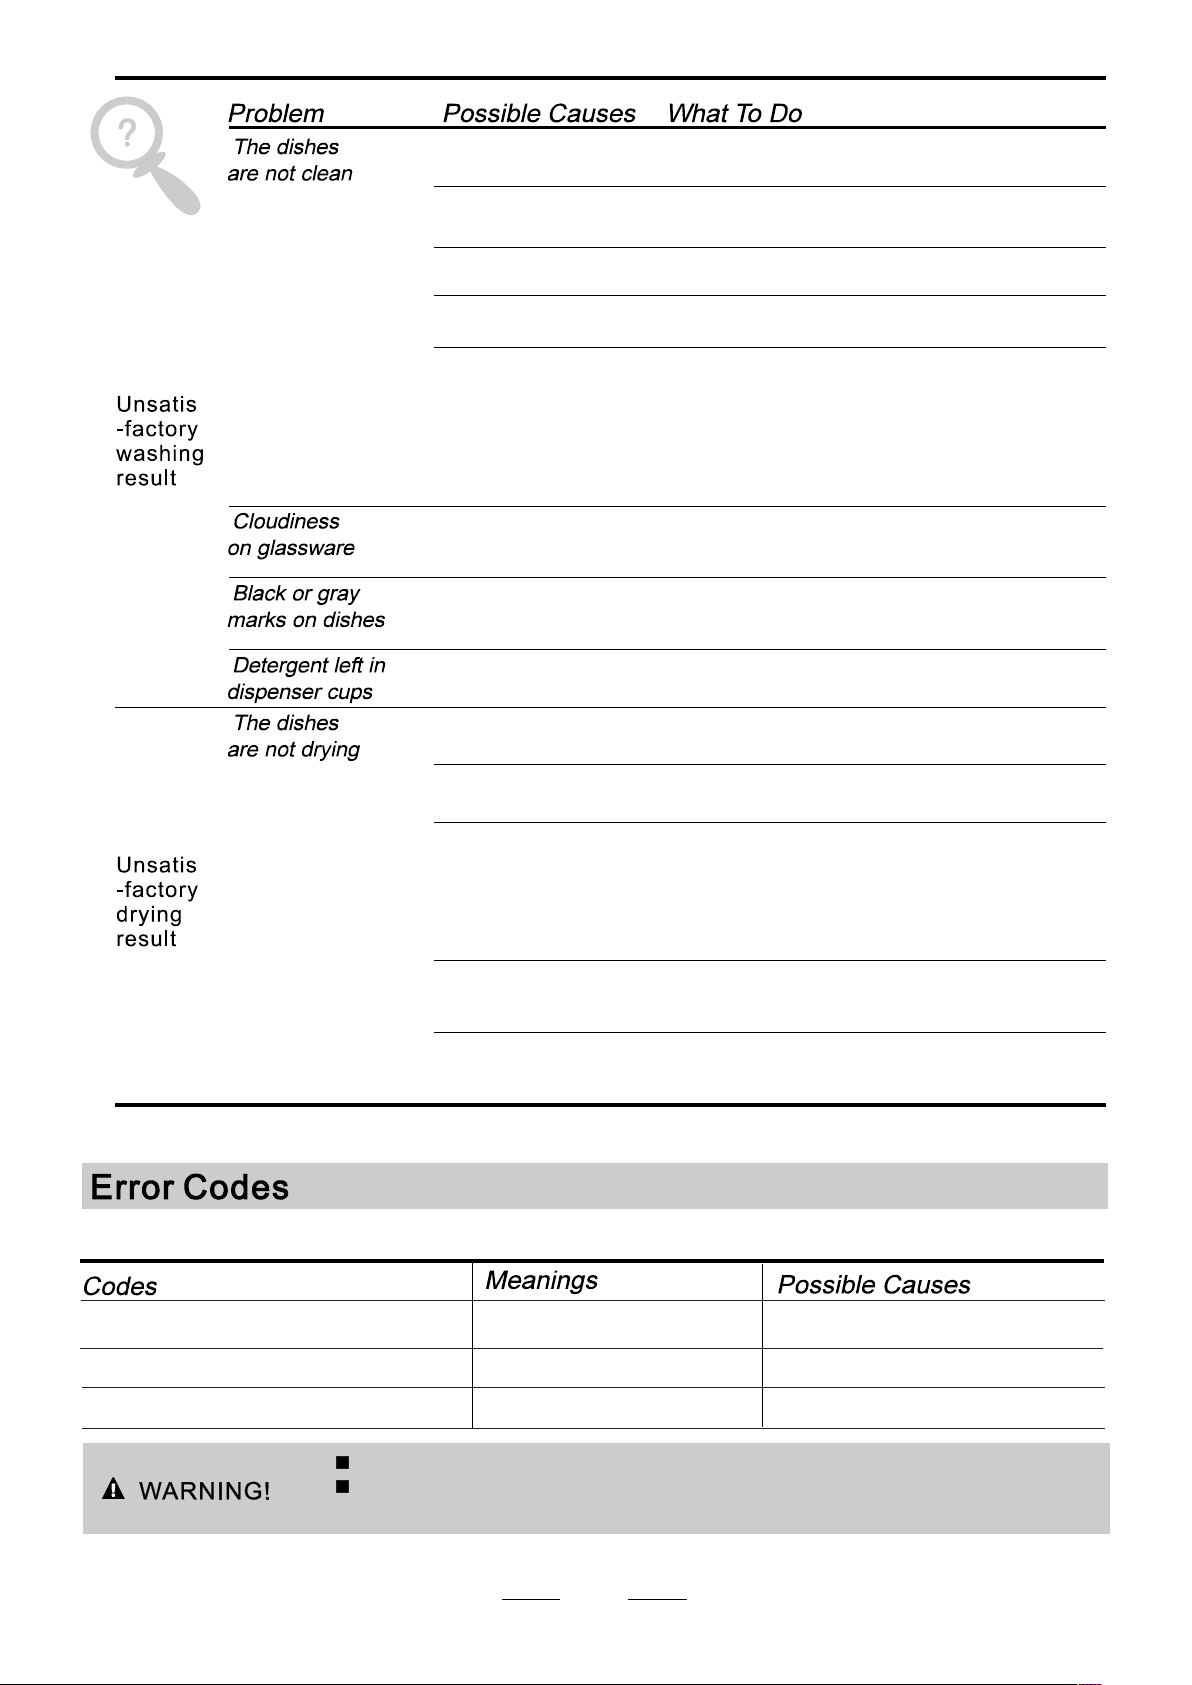
The dishes were not
loaded correctly.
See notes in " Loading the Dishwasher Baskets ".
The programme was
not powerful enough.
Not enough detergent
was dispensed.
Items are blocking
the path of sp ay arms.r
The filter combination
in the base of wash
cabinet is not clean or
is not correctly fitted.
This may cause
the sp ay arm jets
r
to get blocked.
Combination of soft
water and too much
detergent.
Aluminum utensils
have rubbed against
dishes.
Dishes block
detergent cups.
Improper loading
Too little rinse-aid
Select a more intensive programme.
See" Wash Cycle Table ."
Use more detergent, or change your detergent.
Rearrange the items so that the sp ay can rotate freely.r
Clean and/or fit the filter combination correctly.
Clean the sp ay arm jets. See "Cleaning the Spray
Arms".
Use less detergent if you have soft water and select
a shortest cycle to wash the glassware and to get
them clean.
Use a mild abrasive cleaner to eliminate those marks.
Re-loading the dishes properly.
Load the dishwasher as suggested in the directions.
Increase the amount of rinse-aid/refill the rinse-aid
dispenser.
r
Dishes are removed
too soon
Wrong program
has been selected
Use of cutlery with
a low-quality coating
Do not empty your dishwasher immediately after
washing. Open the door slightly so that the steam can
escape. Begin unloading the dishwasher only once t
he dishes are barely warm to the touch. Empty the low
basket first. This prevents water form dropping off
dishes in the upper basket.
In short program the washing temperature is lower.
This also lowers cleaning performance. Choose
a program with a long washing time.
Water drainage is more difficult with these items.
Cutlery or dishes of this type are not suitable for
washing in the dishwasher.
When some malfunctions come on, the appliance will display error codes to warn you:
The Rapid l ight flicker fleet ly
Th e 90mi n l igh t andRapi d light fli cker fleetly
Th e E CO light fli cker f leetl y
Longer inlet time.
Not reaching required temperature.
Overflow.
Faucets is not opened, or water intake is
restricted,or water pressure is too low.
Malfunction of heating element.
Some element of dishwasher leaks .
If overflow occurs, turn off the main water supply before calling a service.
If there is water in the base pan because of an overfill or small leak,
the water should be removed before restarting the dishwasher.
23
Page 29
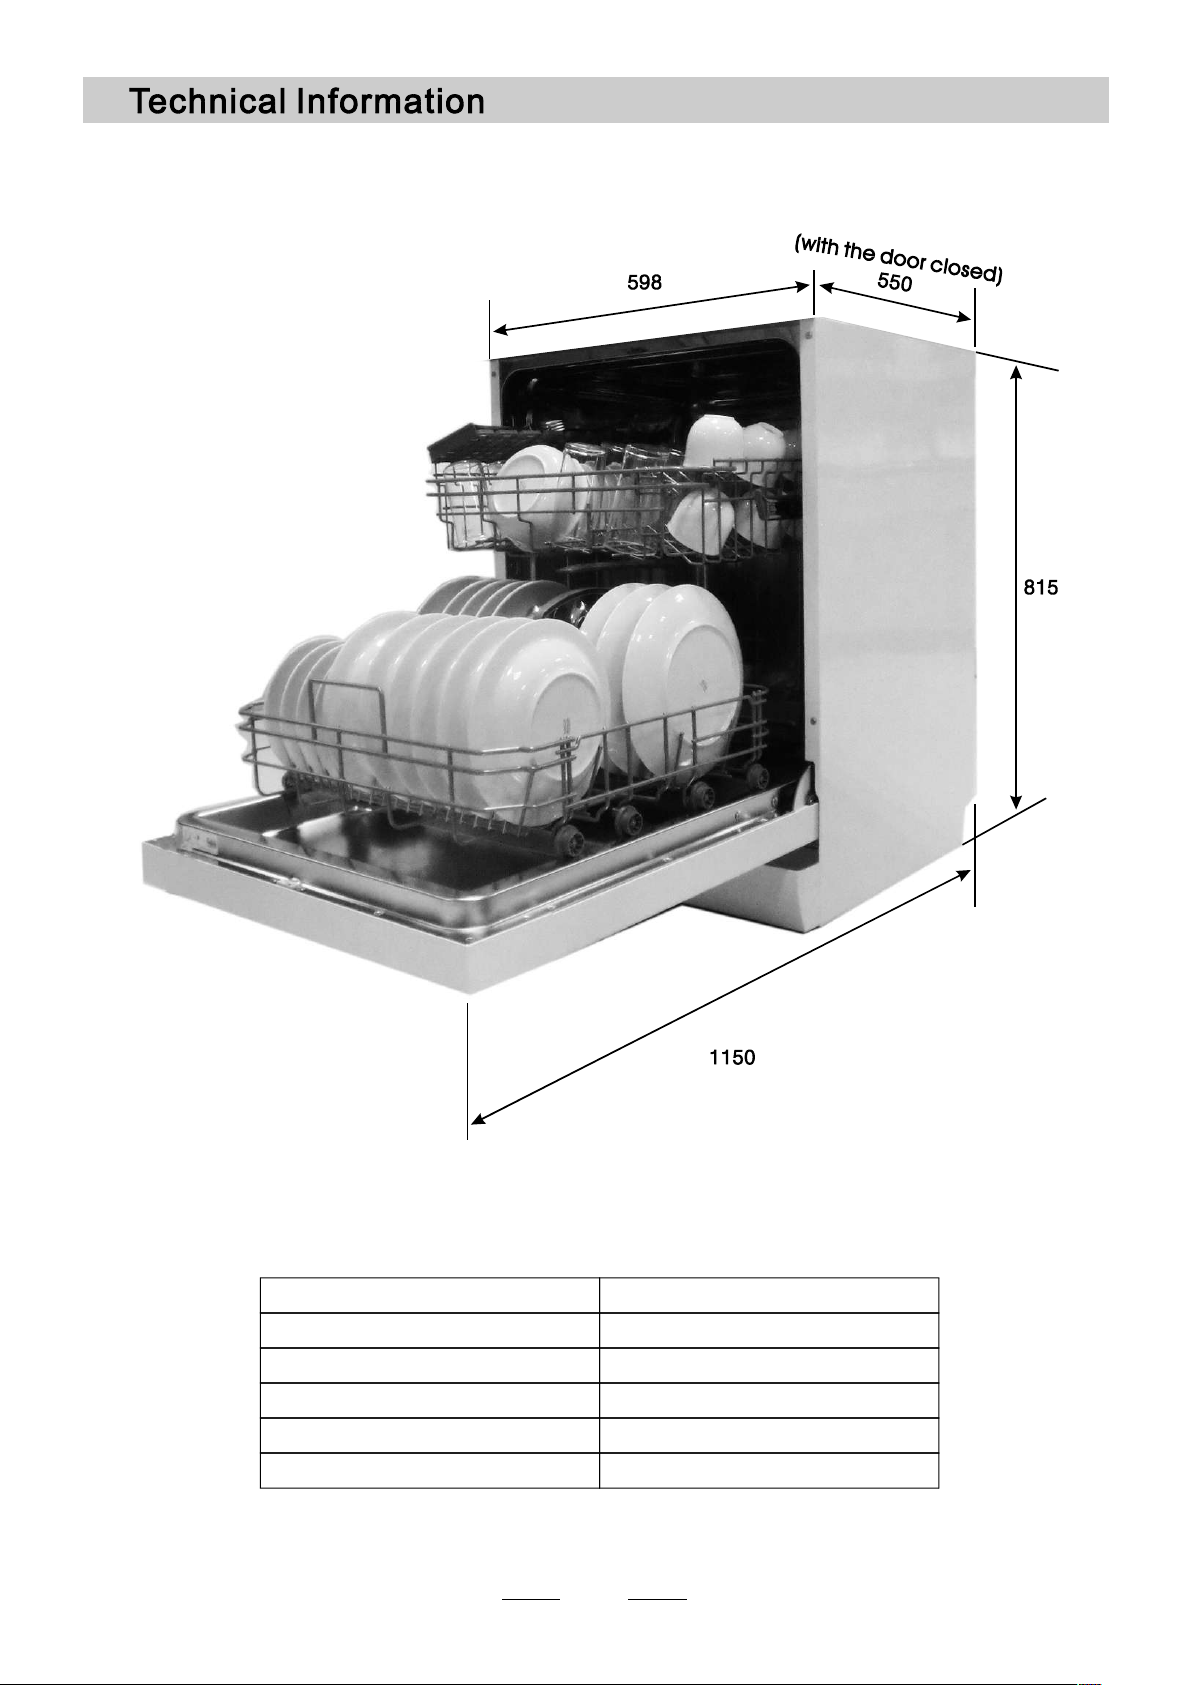
Height : 815mm
Width : 598 mm
wi th the doo r cl osed
Depth : 550mm
( )
Water pressure: 0.04-1.0MPa
Power supply: see rating label
Capacity: 12 place settings
24
Page 30
Page 31
Technical Data Sheet
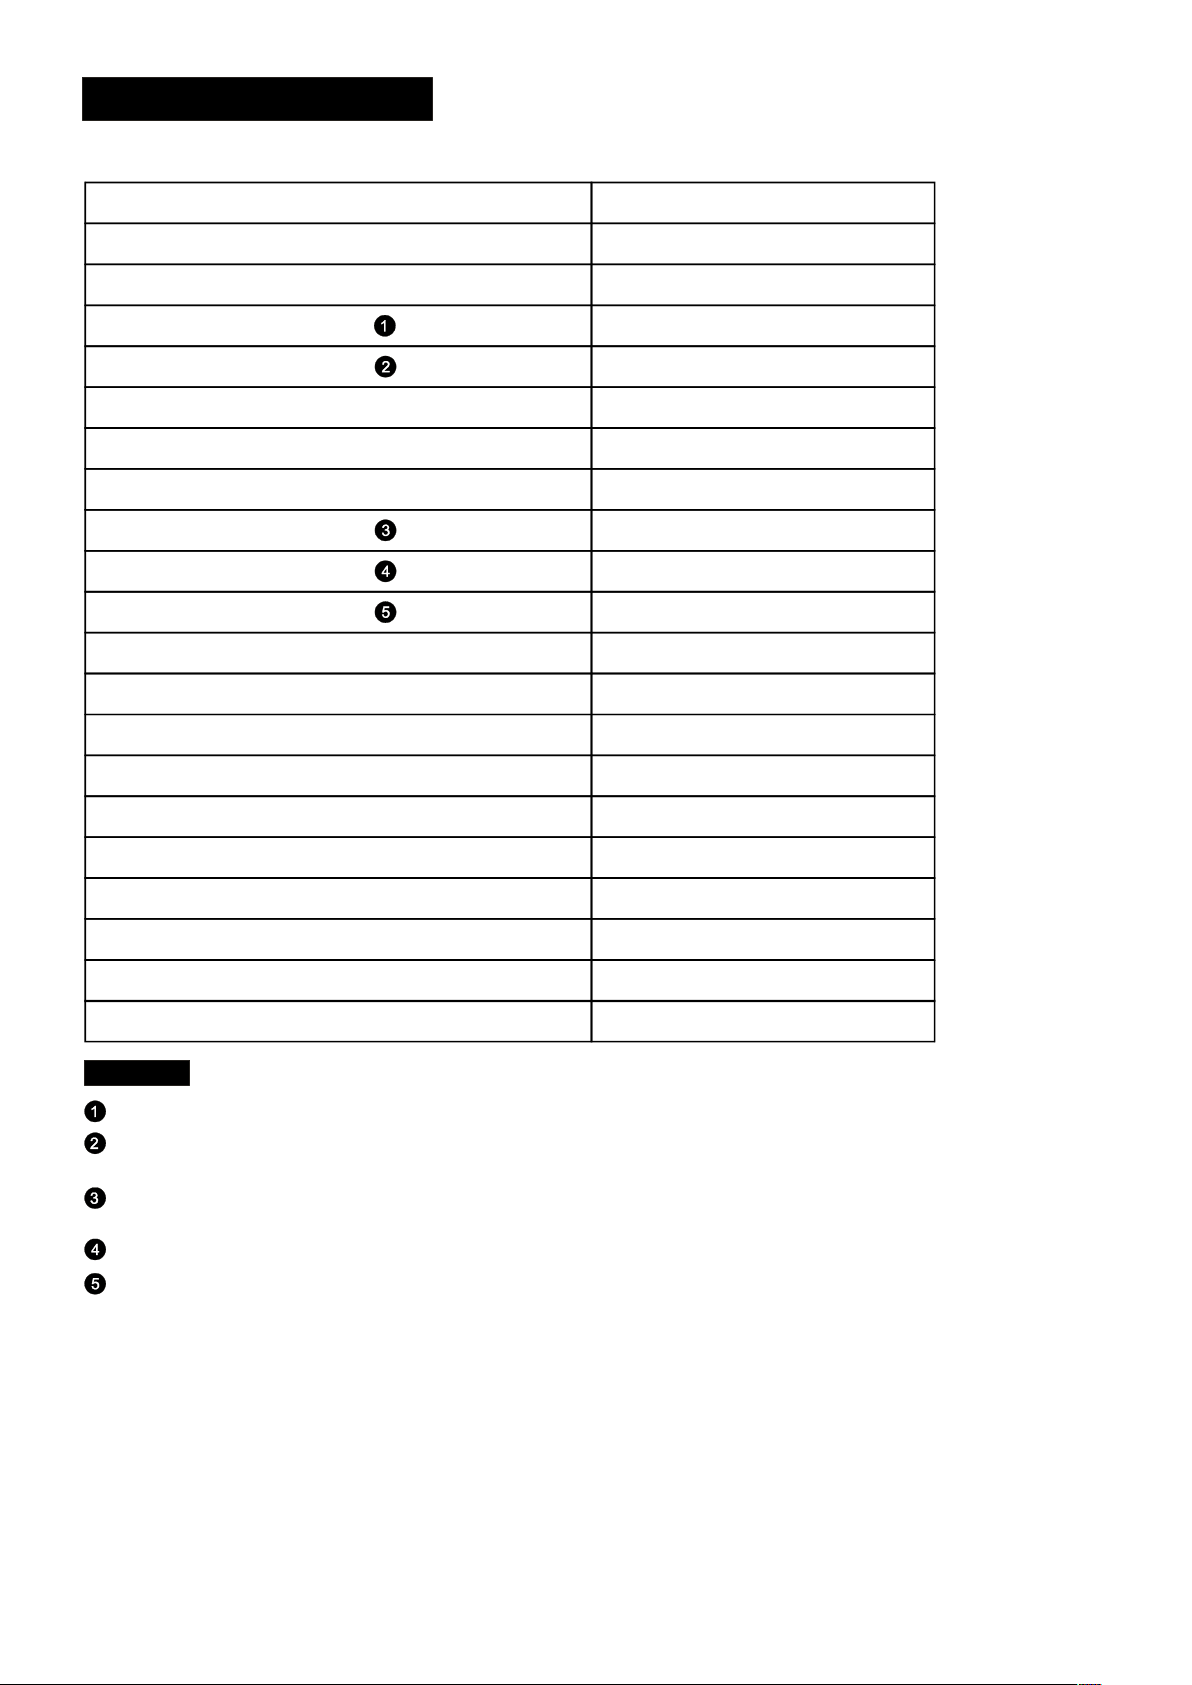
Sheet of house hol d d ish washe r ac cordi ng to EU D irective 1059/201 0:
Ma nu fac turer
Type / Descr ipt ion
Standar d p lac e s ett ings
Energy efficien cy cla ss
Annual energy consu mpt ion
Energy consum ption of the stand ard clean ing cycle
Powe r co nsumptio n of off-mode
Powe r co nsumptio n of le ft-on mode
Annual wat er consum ption
Drying efficien cy class
Standar d c lea ning cycle
Program duration of the stand ard clean ing cy cle
Noise le vel
Mo un tin g
Could be build -in
TEKA
DW8 5 5 F I VR02
12
A++
258 k Wh
0.91 kWh
0.45 W
0.49 W
3080 litre
A
EC O 4 5℃
190 m in
49dB(A) re 1 pW
Build-i n
Yes
Height
Width
Depth (w ith co nne ctors )
Powe r co nsumptio n
Rated vo ltage / f req uency
Wat er pressu re (fl ow pressure) 0.4-1 0 b ar = 0.04-1 M pa
NOTE:
A + + + (high est efficie ncy) t o D (lo wes t e fficiency)
Energy consum ption 258 kW h per y ear, ba sed on 280 st andard cl ean ing cy cles u sing c old wa ter fill and
the c onsum pti on of the low po wer mo des . Ac tua l en ergy c onsumption wil l d epe nd on how the appli anc e i s u sed .
Wat er con sumption 3080 litre per year, b ased o n 2 80 sta nda rd cleaning cycles. Actu al water con sumption
will depend on how the applian ce is use d.
A (highe st efficien cy) to G (lowest efficiency)
This program is suitable for clean ing soile d norm all y soil ed tab leware and that it is the
mo st efficient progra mme in terms of its combi ned energ y a nd water con sum ption for
that type of t abl eware .
The device meets the Europ ean stand ard s a nd the direc tiv es in the curre nt ver sio n a t de livery:
- LVD 201 4/35/EU
- EMC 2014/ 30/ EU
- ErP 2009/125/E C
“ ”
“ ”
81.5 cm
59.8 cm
55 cm
1760-2100 W
AC 22 0-2 40 V/ 50 Hz
The above v alues have b een measu red in accordan ce wit h stan dar ds und er specifie d operati ng con dit ions.
Results may va ry gre atly a ccording to quantity and pollu tion of t he dis hes, w ater hardne ss,
am ou nt of deterg ent , e tc.
The m anual is bas ed on the European Union 's standa rds an d ru les.
Page 32
Page 33

www.teka.com
Asped mos eriatius sit atet hicil et velit
 Loading...