

Page 1
Live 9 Lite Quick Start Guide
We do not support Ableton Live 9 Lite. For how to use, refer to the help
menu of Live 9 Lite.
Contents
Notations in this manual ..........................................................................................1
About trademarks ......................................................................................................1
How to install ...............................................................................................................2
Downloading Live 9 Lite .....................................................................................2
Installing Live 9 Lite ..............................................................................................2
How to authorize ........................................................................................................3
Authorizing Live 9 Lite .........................................................................................3
How to record ..............................................................................................................4
Audio recording .....................................................................................................7
MIDI recording ........................................................................................................8
Notations in this manual
In this manual, we use the following conventions:
•
Words that appear on the computer display are shown in quotation
marks like this: “OK”
•
Additional information is provided as necessary as tips, notes and
cautions.
Tip
Describes a tip such as how the device can be used.
About trademarks
•
TASCAM is a trademark of TEAC CORPORATION, registered in the U.S.
and other countries.
•
Microsoft, Windows, Windows 7 and Windows 8 are either registered
trademarks or trademarks of Microsoft Corporation in the United
States and/or other countries.
•
Apple, Macintosh, Mac OS, Mac OS X and Lightning are trademarks of
Apple Inc.
•
Ableton and the Ableton logo are trademarks of Ableton AG.
•
Other company names, product names and logos in this document
are the trademarks or registered trademarks of their respective
owners.
Note
Gives a supplementary explanation, an explanation of special
cases, etc.
Caution
Described when failure to follow the instruction may cause injury
to a person, damage to the device, or a data loss.
TASCAM
1
Page 2
Live 9 Lite Quick Start Guide
How to install
To get Live 9 Lite, you need to download it from the website of Ableton.
The software is provided by downloading so that you can always use the
latest version.
Live 9 Lite runs on either Windows or Mac.
Downloading Live 9 Lite
Access the following URL.
https://www.ableton.com/en/products/live-lite/
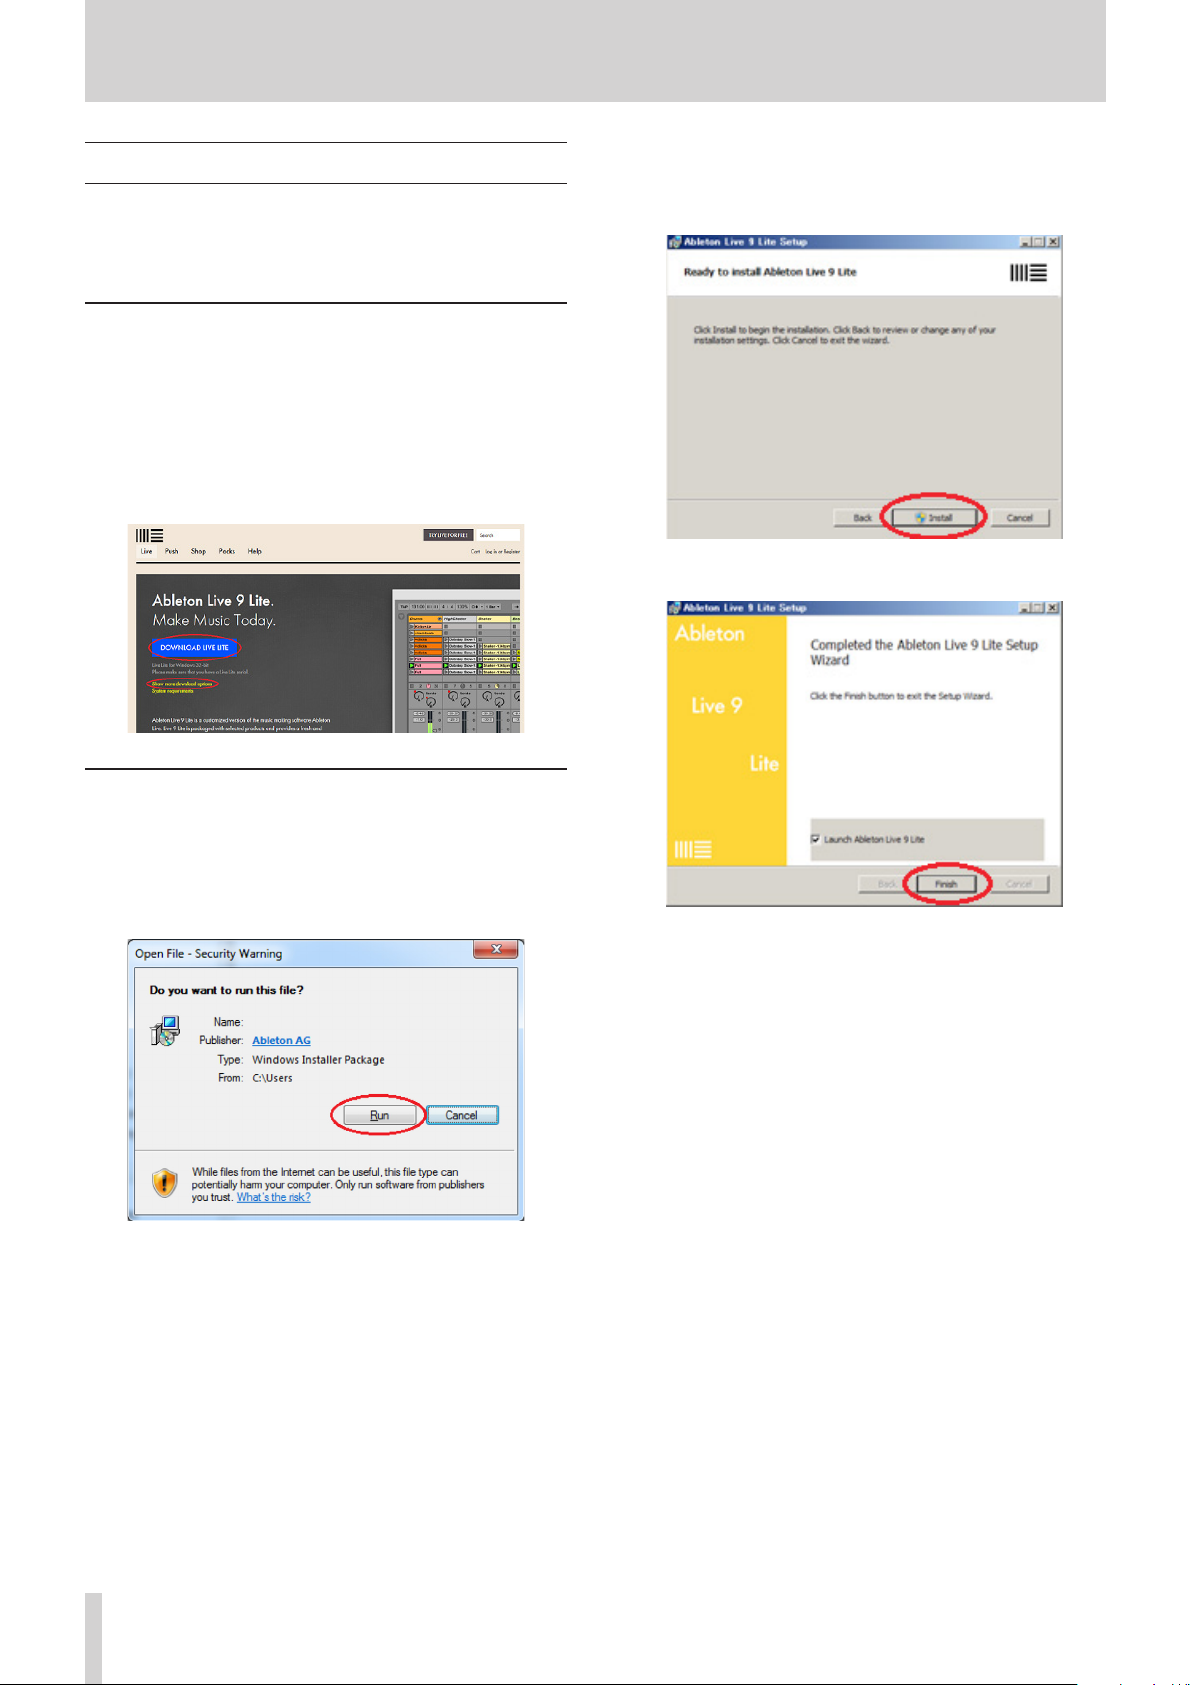
If your operating system is a 32-bit Windows, simply click
“DOWNLOAD LIVE LITE” to start downloading.
If it is other than 32-bit Windows, click “Show more download
options” and click the name of your operating system from
displayed names of operating systems to start downloading.
Follow the instruction on the screen and click “Next” button to
3.
proceed.
Click the “Install” button to start installation.
4.
Click the “Finish” button to finish the installation.
5.
Installing Live 9 Lite
For Windows
The downloaded file is a .zip file. Decompress the .zip file and
1.
double-click the decompressed “Setup.msi” file.
An installer is started up. Click “Run”.
2.
2
TASCAM
Page 3
Live 9 Lite Quick Start Guide
For Mac
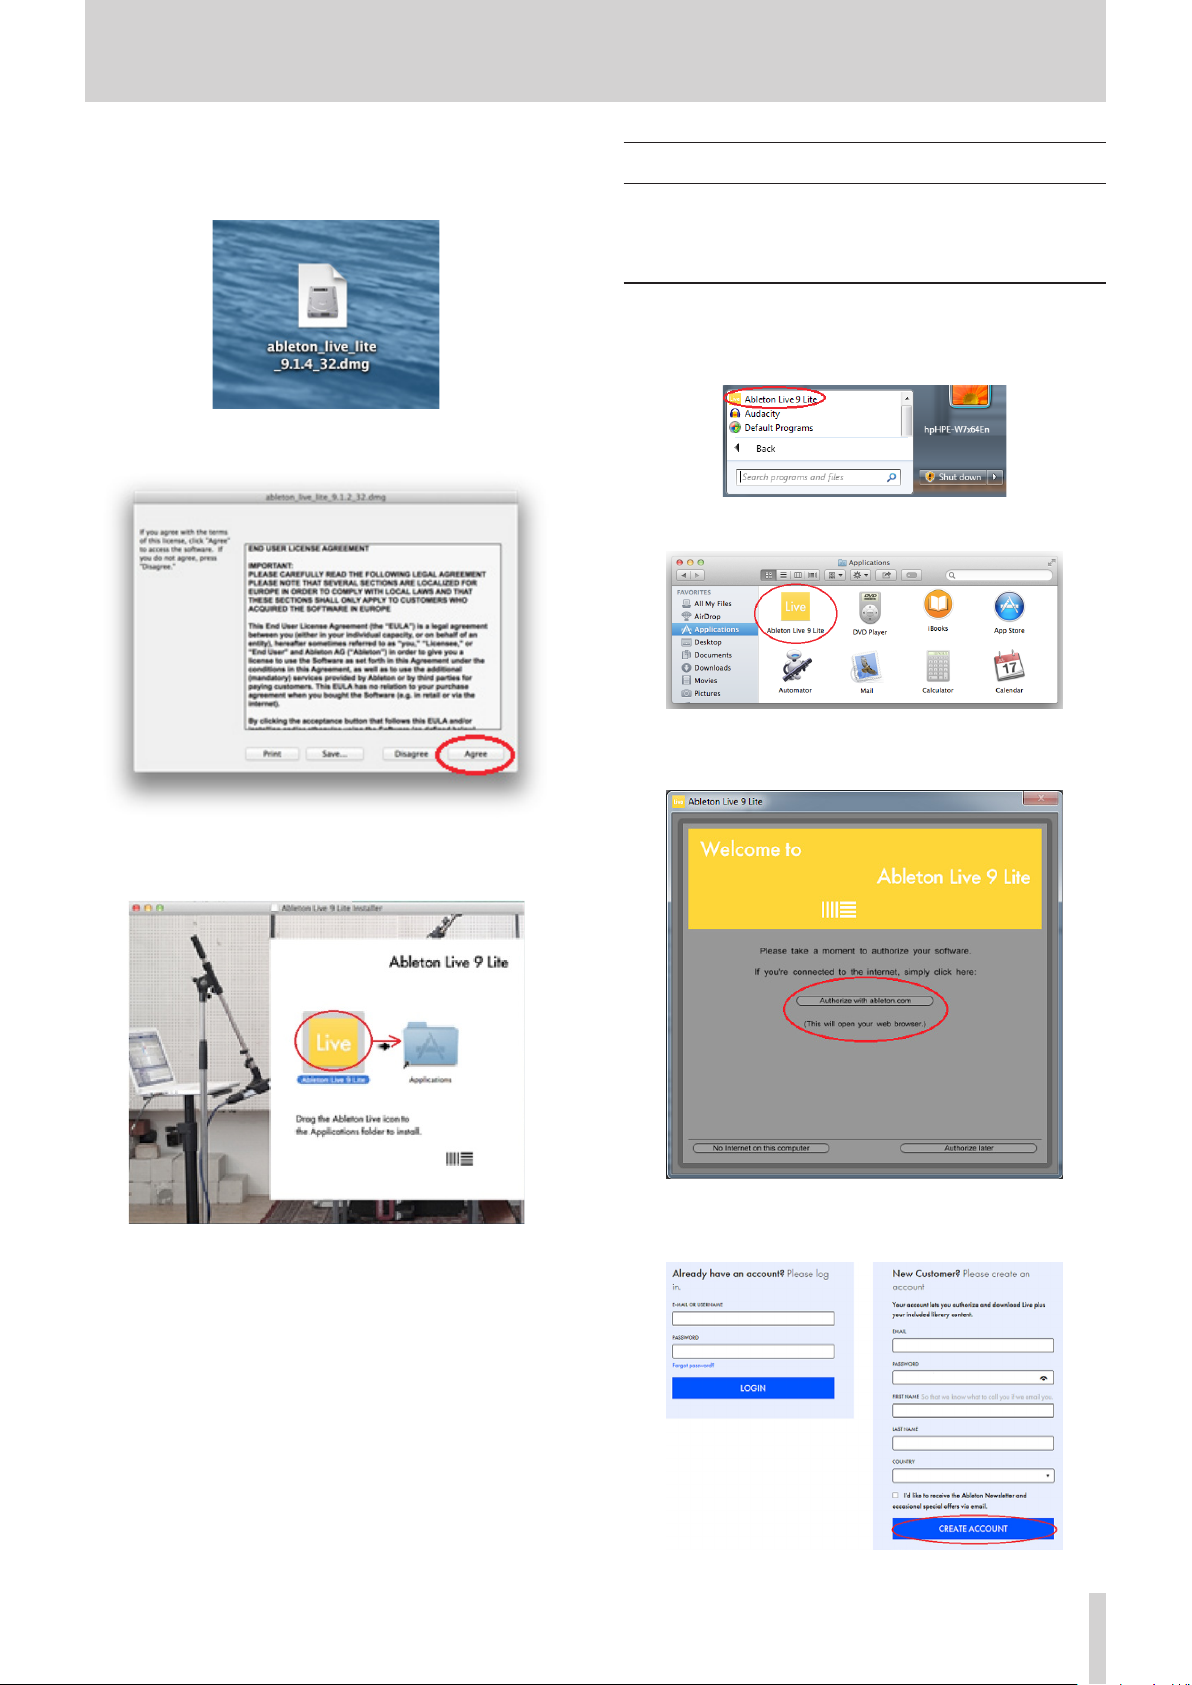
Double-click the downloaded .dmg file.
1.
Click the “Agree” button. An installer is automatically started up.
2.
How to authorize
We request you to authorize Live 9 Lite to distinguish authorized users.
The software cannot be used without authorization.
An Internet connection is required for the authorization.
Authorizing Live 9 Lite
On Windows, launch Live 9 Lite from “All Programs” of the start
1.
menu.
On Mac, double-click the “Ableton Live 9 Lite” icon in the
“Application” folder to start up the software.
When the software is launched, a screen for authorization is
2.
displayed. Click “Authorize with ableton.com”.
An webpage of Ableton is displayed.
On the displayed screen of the installer, drag the “Ableton Live Lite”
3.
icon to the “Applications” folder to copy.
When the copying is finished, the installation is completed.
4.
If you have an account of Ableton, enter your login name and
3.
password to log in.
If you do not have, enter the information to create an account.
TASCAM
3
Page 4

Live 9 Lite Quick Start Guide
Enter the serial number described on the license card included with
4.
the TASCAM audio interface product and click “REGISTER SERIAL”.
A screen for selecting a product to be authorized is displayed.
5.
Select “Live 9 Lite” from the pull-down menu and click “AUTHORIZE”.
How to record
Settings of Live 9 Lite are almost the same on Windows and Mac. The
following images are examples of screens where a US-2x2 is used on
Windows 7.
The following describes procedures until recording, however, for
detailed functions and operations, refer to the manual that is displayed
by selecting the “Read the Live Manual” of the “Help” menu.
Preparation (enabling the device)
Launch Live 9 Lite. Select “Option” q “Preferences...” from the pull-
1.
down menu.
Note
Authorization may not be possible depending on the security
environment of your computer. In this case, stop the security
software and then try again.
Note
On Windows, if the security warning “Do you want to view only the
webpage content that was delivered securely?” is displayed, click
the “No” button and then “Allow” on the subsequent screen.
When the following screen is displayed, the authorization is
6.
completed. Click “OK” to finish the authorization.
Note
On Mac, select “Live” q “Preferences...”.
Select “Audio” on the left side and then select your audio interface
2.
(“US-2x2 & US-4x4” in this case) from the “Audio Device” pull-down
menu on the right side.
4
TASCAM
Page 5

Live 9 Lite Quick Start Guide
Configure the input and output.
3.
Click “Input Config”, click “1(mono) & 2(mono)” and “1/2(stereo)” on
the displayed input configuration screen so that both of them are
selected, and press the “OK” button.
Set a sampling rate.
4.
Select the sampling rate to be used from the pull-down menu.
Note
Selectable sampling rates vary depending the connected audio
interface.
Next, configure the MIDI input and output.
5.
Click “MIDI/Sync” on the left side of the “Preferences” screen to
display settings of MIDI on the right side.
The input and output of your audio interface (US-2x2 in this case)
are displayed in “MIDI Ports”. Click each “Track” field to turn on.
Similarly, click “Output Config”, click “1(mono) & 2(mono)” and
“1/2(stereo)” on the displayed output configuration screen so that
both of them are selected, and press the “OK” button.
Note
The numbers of channels displayed on the input and output
configuration screens vary depending on your audio interface.
The device configuration has been completed. Close the
6.
“Preferences” screen.
Next, create a Live Set (work project for recording) for recording
sounds.
Live 9 Lite opens a Live Set with 2 MIDI tracks and 2 audio tracks by
default, but you can create a new Live Set which is suited for the
piece of music you are going to compose. Create a new Live Set
composed of 4 audio tracks and 2 MIDI tracks here.
Tip
Use audio tracks when recording the audio input of the interface
and use MIDI tracks when using a MIDI keyboard or a MIDI sound
source connected to MIDI IN.
TASCAM
5
Page 6

Live 9 Lite Quick Start Guide
From the “File” menu, select “New Live Set”.
7.
By default, a Live Set with 2 MIDI tracks (Tracks 1 and 2) and 2 audio
tracks (Tracks 3 and 4) is created.
Next, select “Insert Audio Track” from the “Create” menu to add the
“5Audio” track.
Select “Insert Audio Track” again to add the “6 Audio” track.
Tip
To add a MIDI track, select “Insert MIDI Track” from the “Create”
menu.
Configure the input port and output port assignments in each
9.
track.
A track has an input port and an output port. The input port is
where signals to be recorded enter and the output port is where
signals are output for listening sounds which are recorded or
reproduced.
From the pull-down menu just under “MIDI From” of the “1 MIDI”
track, select your audio interface (US-2x2 in this case). MIDI
commands input into the MIDI input terminal of the US-2x2 will be
input into the “1 MIDI” track.
Next, from the pull-down menu just under “MIDI To”, select US-2x2.
MIDI commands of the “1 MIDI” track will be output from the MIDI
output terminal of the US-2x2.
Add audio tracks to Tracks 5 and 6.
8.
First, click “4 Audio” so that Track 4 is selected.
Tip
If settings of the input and output ports are not displayed, check
“Input/Output” of the “View” menu to display them.
6
TASCAM
Page 7

Live 9 Lite Quick Start Guide
From the pull-down menu just under “Audio From” of the “3 Audio”
10.
track, select “Ext. In”.
Note
“Ext. In” means “the input of an external device”. In this case, as the
US-2x2 has been set in 2. and 3. of this chapter, it means “the input
of the US-2x2”.
Then select “1” from the pull-down menu under it. Signals input
from the input terminal 1 of the US-2x2 will be input into the track.
Tip
If you select “2”, signals input from the input terminal 2 of the US2x2 will be input into the track.
Next, set the audio output port. From the pull-down menu just
11.
under “Audio To” of the “3 Audio” track, select “Master”.
To use another track simultaneously, follow steps 9 to 11 to
12.
configure the track.
Set the output destination of the “Master” track to send stereo
13.
signals mixed in the master bus to the US-2x2.
On the “Master” track on the rightmost side, select “1/2” from the
pull-down menu just under “Master Out”.
Now everything is ready. Let's proceed to recording.
14.
Audio recording
Switch the display of Live 9 Lite so that you can see recording
1.
conditions.
Click the “circle with 3 horizontal lines” mark (circled in red) in the
top-right.
Note
To listen sounds of multiple tracks in stereo, it is necessary to mix
the output sounds of the multiple tracks and then output them to
the audio interface. Select “Master” as the output port in each track
to mix output signals of the multiple tracks into a stereo sound in
the master bus.
Tip
If you select “Ext. Out” from the pull-down menu just under “Audio
To”, output signals of the track will be directly output to the US2x2 without going through the master bus. If the connected audio
interface has 4 or more channels of output, you can select an
output destination from the pull-down menu under it.
The screen switches from the mixer view to the timeline view.
TASCAM
7
Page 8

Live 9 Lite Quick Start Guide
Note
The mixer view is convenient for operations of the mixer such as
adjusting the volume balance of each track, but the timeline view,
which allows you to see recording conditions, is convenient for
recording.
Record a sound in the “3 Audio” track. Click the “Arm” button (button
2.
with a black dot) for the “3 Audio” track to turn on (light up in red).
Tip
The 3 buttons, “In”, “Auto”, and “Off ” are monitoring setting buttons.
Output signals of the track change depending on the setting.
“In” Input signals of the track are output with no change.
It is convenient when you want to listen input sounds
at all times.
“Auto” When the “ARM” button is on, input signals of the track
are output with no change. When the “ARM” button
is off, reproduced sounds of the track are output. It
is convenient for normal recording because during
recording, input sounds are output, and during
reproduction of recorded sounds, reproduced sounds
are output.
“Off” Nothing is output. It is convenient when you use the
direct monitoring function of the audio interface.
Click the “Record” button of transport buttons on the top side of
3.
the screen to start recording and playing.
The waveform of the signal being recorded in the track is displayed.
When a signal is input to the input terminal 1 of the US-2x2 in this
condition, the meter on the left of the channel setting of the input
port lights in green.
This is the input meter, which indicates that a signal is input into
this track. The meter on the right side is the output meter of the
track, and lightning in gray indicates that there is an output signal
but it is not actually output.
That is because the monitoring setting of the track is off and you
cannot listen input sounds in this condition.
To listen input signals, click the “Auto” button for the monitoring
setting to turn on.
After the playing is finished, click the “Stop” button.
4.
It is recommended to click the “Arm” button for the track to turn
5.
off so that no sound is recorded in the track by mistake when
recording in another track.
It is recommended to save the set frequently by selecting “Save Live
Set” from the “File” menu.
Rewind the track and click the “Play” button to listen to the
6.
recorded sound.
Repeat 2. to 5. steps to record in multiple tracks and compose a
7.
piece of music.
MIDI recording
Record a MIDI sound in the “1 MIDI” track.
1.
This case assumes that an internal MIDI sound source (bass) built
into Live 9 Lite is used.
Click the “Arm” button for the “1 MIDI” track to turn on (light up in
red). Also, click the “Auto” button to turn on.
Now the output meter of the track lights in green. Output sounds
are mixed with other signals in the master bus and then output
from the output terminal of the US-2x2.
TASCAM
8
If you play a MIDI keyboard or a MIDI pad connected to the MIDI IN
terminal of the US-2x2 in this condition, the meter on the left of the
input MIDI channel lights in yellow. This is the input meter, which
indicates that a MIDI signal is input into this track. The meter on the
right side is the output meter of the track and lighting in yellow of
the meter indicates that a MIDI command is output from the track.
Page 9

Live 9 Lite Quick Start Guide
Next, set a MIDI sound source and generate a sound from the
2.
source.
Click the triangle button at the upper left of the screen. A browser
appears on the left side.
Select “ Sounds” in “CATEGORIES” on the left side and select “Bass”
3.
on the right side to show the list of bass sound sources.
Use “Analog Saw Bass.adg” at the top this time.
4.
Double-click “Analog Saw Bass.adg”.
The track name is changed to “1 Analog Saw Bass.adg”. Also, the
output destination of the sound source is set to “Master”.
When you tap the MIDI keyboard or MIDI pad in this condition, you
can hear the bass sound.
Tip
Parameters of Analog Saw Bass are displayed in the clip view in the
lower part of the screen. You can change the parameters to change
the tone as you like.
Click the “Record” button of transport buttons on the top side of
5.
the screen to start recording and playing.
The MIDI signal being recorded in the track is displayed.
After the playing is finished, click the “Stop” button.
6.
It is recommended to click the “Arm” button for the track to turn
7.
off so that no sound is recorded in the track by mistake when
recording in another track.
Rewind the track and click the “Play” button to reproduce the
8.
recorded MIDI signal and listen to the sound of Analog Saw Bass.
Repeat 2. to 7. steps to record in multiple tracks and compose a
9.
piece of music.
Tip
Live 9 Lite has many MIDI sound sources.
You can record sounds of various instruments by selecting other
sound sources in the browser.
Tip
To use an external MIDI sound source device instead of MIDI sound
sources of Live 9 Lite, connect the sound source device to the MIDI
output terminal of your MIDI interface (US-2x2 in this case). If you
do not select a MIDI sound source in 2, MIDI signals input into the
track are output from the track with no changes. The MIDI signal
is output from the MIDI output terminal of the US-2x2 to the MIDI
input terminal of the sound source device, and then the sound is
output from the audio output of the sound source device.
•
In this case, as the sound source is an external device, sounds of the
sound source are not output from your MIDI interface (US-2x2 in this
case).
Connect the output terminal of the sound source to the input
terminal of the US-2x2 or mix them using an external mixer to
monitor the sounds.
TASCAM
9
 Loading...