

Teac GRANDIOSO D1 User Manual [en, fr, es]

OWNER’S MANUAL .................... 3
MODE D’EMPLOI ...................... 25
MANUAL DEL USUARIO ........... 45
D01211021A

IMPORTANT SAFETY INSTRUCTIONS
IN USA/CANADA, USE ONLY ON 120 V SUPPLY.
CAUTION: TO REDUCE THE RISK OF ELECTRIC SHOCK,
DO NOT REMOVE COVER (OR BACK). NO USERSERVICEABLE PARTS INSIDE. REFER SERVICING TO
QUALIFIED SERVICE PERSONNEL.
The lightning flash with arrowhead symbol, within an
<
B
equilateral triangle, is intended to alert the user to the
presence of uninsulated “dangerous voltage” within the
product’s enclosure that may be of sufficient magnitude to constitute a risk of electric shock to persons.
The exclamation point within an equilateral triangle is
intended to alert the user to the presence of important
operating and maintenance (servicing) instructions in
the literature accompanying the appliance.
WARNING: TO PREVENT FIRE OR SHOCK HAZARD,
DO NOT EXPOSE THIS APPLIANCE TO RAIN OR
MOISTURE.
CAUTION
o DO NOT REMOVE THE EXTERNAL CASES OR CABINETS TO EXPOSE
THE ELECTRONICS. NO USER SERVICEABLE PARTS ARE INSIDE.
o IF YOU ARE EXPERIENCING PROBLEMS WITH THIS PRODUCT,
CONTACT THE STORE WHERE YOU PURCHASED THE UNIT FOR
A SERVICE REFERRAL. DO NOT USE THE PRODUCT UNTIL IT HAS
BEEN REPAIRED.
o USE OF CONTROLS OR ADJUSTMENTS OR PERFORMANCE OF
PROCEDURES OTHER THAN THOSE SPECIFIED HEREIN MAY RESULT
IN HAZARDOUS RADIATION EXPOSURE.
Model for USA
This equipment has been tested and found to comply with the
limits for a Class B digital device, pursuant to Part 15 of the FCC
Rules. These limits are designed to provide reasonable protection against harmful interference in a residential installation. This
equipment generates, uses, and can radiate radio frequency
energy and, if not installed and used in accordance with the
instructions, may cause harmful interference to radio communications. However, there is no guarantee that interference will
not occur in a particular installation. If this equipment does cause
harmful interference to radio or television reception, which can
be determined by turning the equipment off and on, the user is
encouraged to try to correct the interference by one or more of
the following measures:
• Reorient or relocate the equipment and/or the receiving
antenna.
• Increase the separation between the equipment and receiver.
• Connect the equipment into an outlet on a circuit different from
that to which the receiver is connected.
• Consult the dealer or an experienced radio/TV technician for
help.
CAUTION
Changes or modifications to this equipment not expressly
approved by TEAC CORPORATION for compliance will void the
user’s warranty.
Model for Canada
Industry Canada’s Compliance Statement:
This Class B digital apparatus complies with Canadian ICES-003.
Cet appareil numérique de la classe B est conforme à la norme
NMB-003 du Canada.
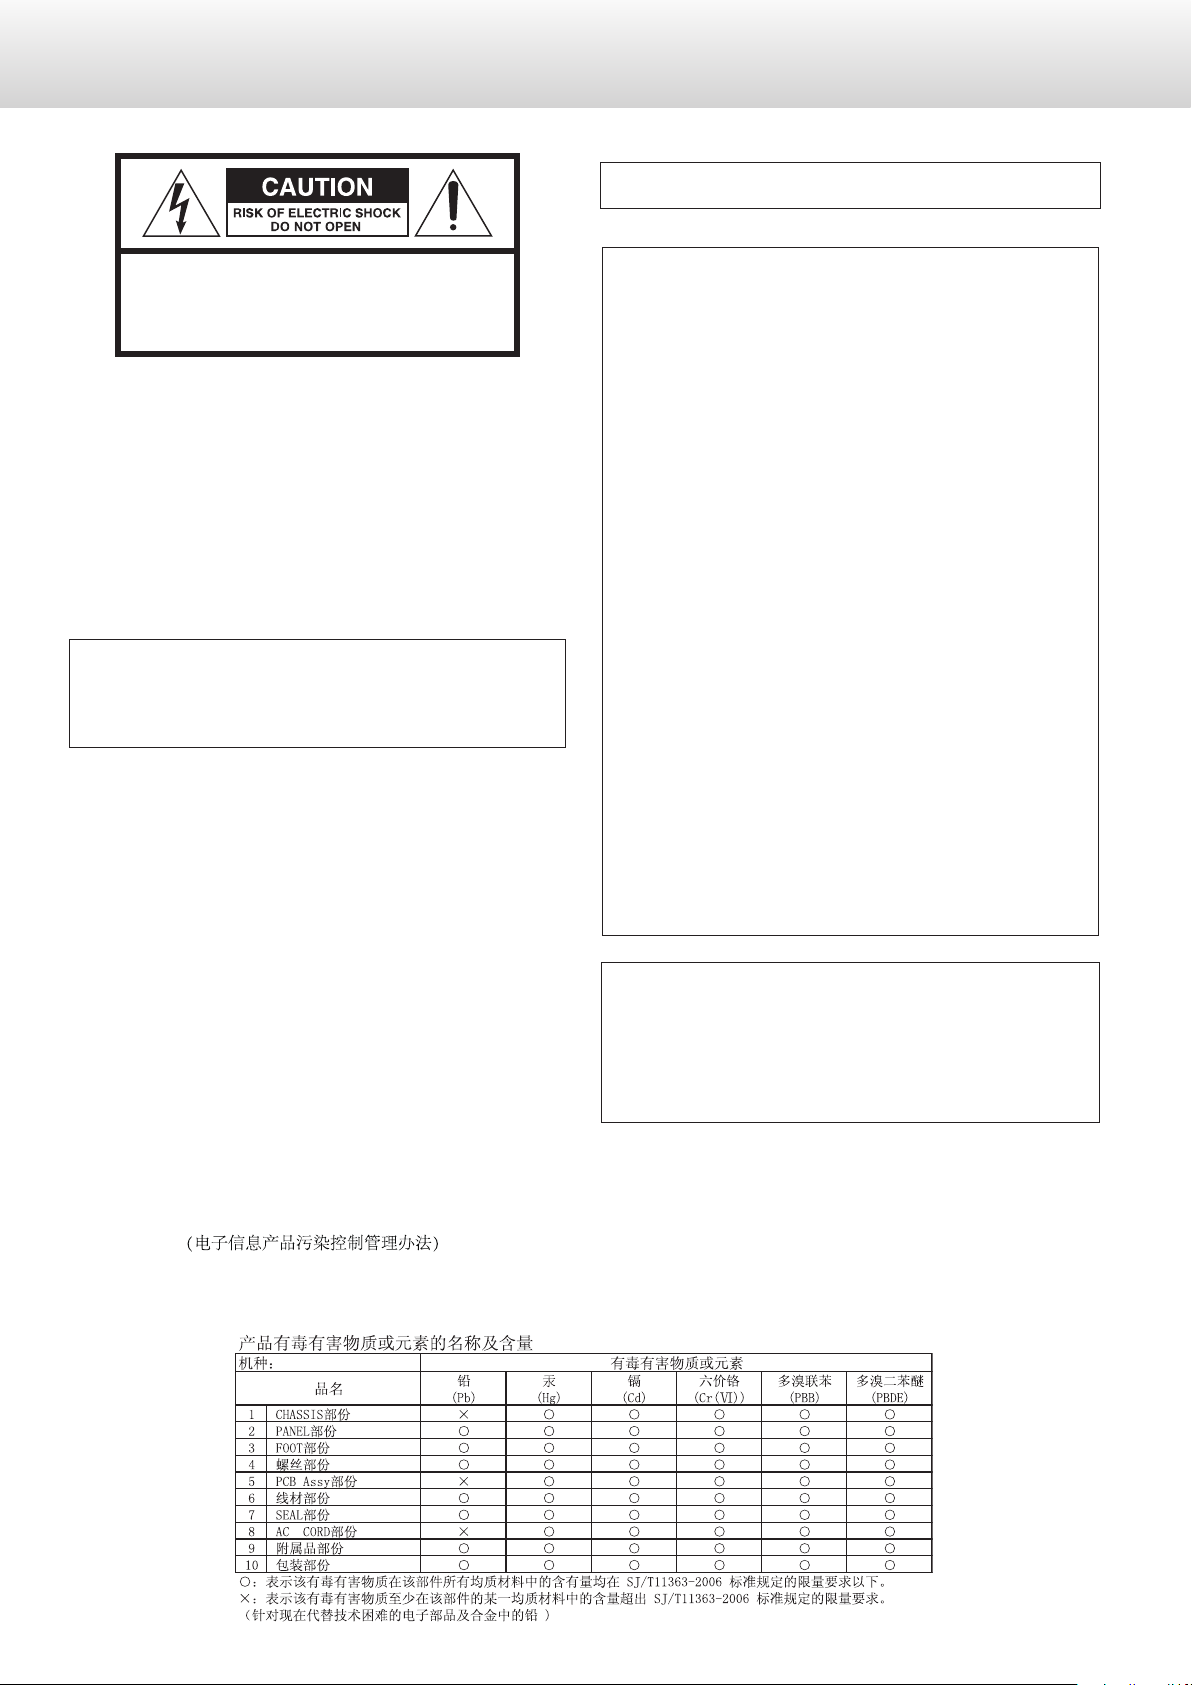
China RoHS
o The information in the following table is only applicable to products for sale in the People’s Republic of China.
o The products sold in the European area are manufactured in accordance with the European RoHS Directive.
*UDQGLRVR '
33
IMPORTANT SAFETY INSTRUCTIONS (continued)
1) Read these instructions.
2) Keep these instructions.
3) Heed all warnings.
4) Follow all instructions.
5) Do not use this apparatus near water.
6) Clean only with dry cloth.
7) Do not block any ventilation openings. Install in accordance with
the manufacturer's instructions.
8) Do not install near any heat sources such as radiators, heat registers, stoves, or other apparatus (including amplifiers) that produce
heat.
9) Do not defeat the safety purpose of the polarized or groundingtype plug. A polarized plug has two blades with one wider than
the other. A grounding type plug has two blades and a third
grounding prong. The wide blade or the third prong are provided
for your safety. If the provided plug does not fit into your outlet,
consult an electrician for replacement of the obsolete outlet.
10) Protect the power cord from being walked on or pinched particularly at plugs, convenience receptacles, and the point where they
exit from the apparatus.
11) Only use attachments/accessories specified by the manufacturer.
12) Use only with the cart, stand, tripod,
bracket, or table specified by the manufacturer, or sold with the apparatus. When a
cart is used, use caution when moving the
cart/apparatus combination to avoid injury
from tip-over.
13) Unplug this apparatus during lightning storms or when unused
for long periods of time.
14) Refer all servicing to qualified service personnel. Servicing is
required when the apparatus has been damaged in any way, such
as power-supply cord or plug is damaged, liquid has been spilled
or objects have fallen into the apparatus, the apparatus has been
exposed to rain or moisture, does not operate normally, or has
been dropped.
o The apparatus draws nominal non-operating power from the
AC outlet with its POWER or STANDBY/ON switch not in the ON
position.
o The mains plug is used as the disconnect device, the disconnect
device shall remain readily operable.
o Caution should be taken when using earphones or headphones
with the product because excessive sound pressure (volume) from
earphones or headphones can cause hearing loss.
CAUTION
o Do not expose this apparatus to drips or splashes.
o Do not place any objects filled with liquids, such as vases, on
the apparatus.
o Do not install this apparatus in a confined space such as a
book case or similar unit.
o The apparatus should be located close enough to the AC
outlet so that you can easily reach the power cord plug at any
time.
o If the product uses batteries (including a battery pack or
installed batteries), they should not be exposed to sunshine,
fire or excessive heat.
o CAUTION for products that use replaceable lithium batter-
ies: there is danger of explosion if a battery is replaced with
an incorrect type of battery. Replace only with the same or
equivalent type.
WARNING
Products with Class construction are equipped with a power
supply cord that has a grounding plug. The cord of such a product must be plugged into an AC outlet that has a protective
grounding connection.
“DSD” is a registered trademark.
“Super Audio CD” is a registered trademark.
Microsoft, Windows and Windows Vista are either registered
trademarks or trademarks of Microsoft Corporation in the United
States and/or other countries.
Apple, Macintosh and Mac OS X are trademarks of Apple Inc.,
registered in the U.S. and other countries.
“i.LINK” and the “i.LINK” Logo are trademarks.
MEXCEL is a registered trademark of Mitsubishi Cable Industries, Ltd.
in Japan and other countries.
ESOTERIC is a trademark of TEAC CORPORATION, registered in the U.S.
and other countries.
Other company names and product names in this document are the
trademarks or registered trademarks of their respective owners.
44
For European Customers
Pb, Hg, Cd
Disposal of electrical and electronic equipment
(a) All electrical and electronic equipment should be disposed
of separately from the municipal waste stream via collection
facilities designated by the government or local authorities.
(b) By disposing of electrical and electronic equipment correctly,
you will help save valuable resources and prevent any potential negative effects on human health and the environment.
(c) Improper disposal of waste electrical and electronic equip-
ment can have serious effects on the environment and human
health because of the presence of hazardous substances in the
equipment.
(d) The Waste Electrical and Electronic Equipment (WEEE)
symbol, which shows a wheeled bin that has been
crossed out, indicates that electrical and electronic
equipment must be collected and disposed of separately from household waste.
(e) Return and collection systems are available to end users. For
more detailed information about the disposal of old electrical and electronic equipment, please contact your city office,
waste disposal service or the shop where you purchased the
equipment.
English
Disposal of batteries and/or accumulators
(a) Waste batteries and/or accumulators should be disposed of
separately from the municipal waste stream via collection
facilities designated by the government or local authorities.
(b) By disposing of waste batteries and/or accumulators correctly,
you will help save valuable resources and prevent any potential negative effects on human health and the environment.
(c) Improper disposal of waste batteries and/or accumulators can
have serious effects on the environment and human health
because of the presence of hazardous substances in them.
(d) The WEEE symbol, which shows a wheeled bin that
has been crossed out, indicates that batteries and/
or accumulators must be collected and disposed of
separately from household waste.
If a battery or accumulator contains more than the specified
values of lead (Pb), mercury (Hg), and/or cadmium (Cd) as
defined in the Battery Directive (2006/66/EC), then the chemical symbols for those elements will be indicated beneath the
WEEE symbol.
(e) Return and collection systems are available to end users. For
more detailed information about the disposal of waste batteries and/or accumulators, please contact your city office, waste
disposal service or the shop where you purchased them.
DECLARATION OF CONFORMITY
We, TEAC AUDIO EUROPE, Liegnitzer Straße 6, 82194
Gröbenzell, Germany declare in own responsibility,
the TEAC product described in this manual is in compliance with the corresponding technical standards.
55
Contents
Before use
Thank you for purchasing this Esoteric product.
Read this manual carefully to get the best performance from this unit.
IMPORTANT SAFETY INSTRUCTIONS ................................3
Before use ..........................................................6
What's in the box ................................................6
Precautions for use ..............................................7
Note about pinpoint feet ........................................7
Maintenance ....................................................7
Connections ........................................................8
Names and functions of parts (main unit) .........................10
Names and functions of parts (display) ............................ 11
Basic operation ...................................................12
Setting mode ..................................................... 12
Meanings of items shown in setting mode .....................13
Upconversion setting .......................................... 13
DSD digital filter setting .......................................13
Clock setting ..................................................14
Clock input connector selection ...............................15
Clock output settings .......................................... 15
Playback channel setting ......................................15
DIMMER ....................................................... 16
Analog output setting ......................................... 16
Automatic display darkening setting ........................... 16
Automatic power saving setting ...............................16
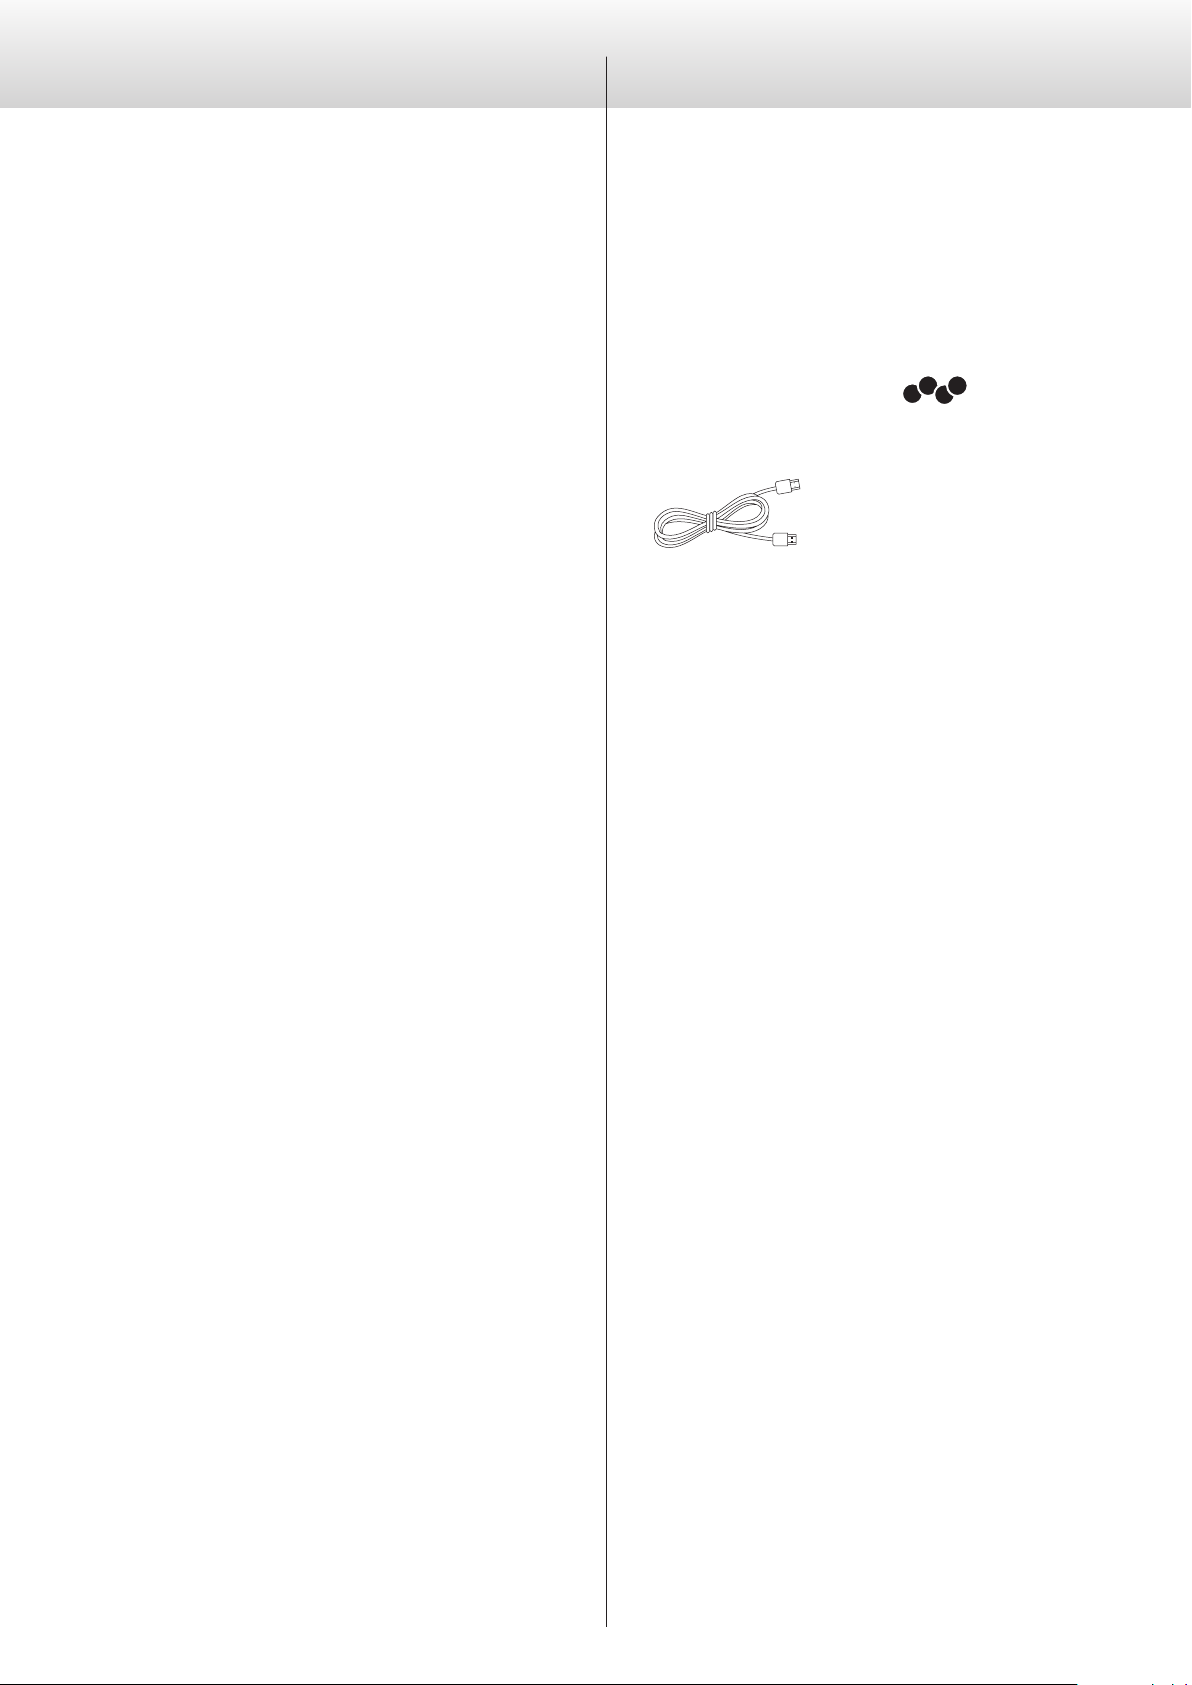
What's in the box
Check to be sure the box includes all the supplied accessories shown
below. Please contact the store where you purchased this unit if
any of these accessories are missing or have been damaged during
transportation.
Power cord × 1 Felt pads × 4
HDMI cable × 1 Warranty card × 1
Owner’s manual
(this document) × 1
o After reading this man-
ual, keep it in a safe place
with the warranty card
for future reference.
Connecting with a computer and playing back audio files ........17
Installing the driver ............................................ 17
Troubleshooting ..................................................19
Messages ......................................................... 20
Restoring factory settings. . . . . . . . . . . . . . . . . . . . . . . . . . . . . . . . . . . . . . 20
Specifications .....................................................21
i.LINK (IEEE1394) ..................................................22
Rear panel ........................................................ 24
66
Precautions for use
Note about pinpoint feet
o This unit is very heavy, so take care to avoid injury during installation.
o Do not install this unit in a location that could become hot. This
includes places that are exposed to direct sunlight or near a radiator, heater, stove or other heating equipment. Moreover, do not
place it on top of an amplifier or other equipment that generates
heat. Doing so could cause discoloration or deformation.
o Avoid locations that are extremely cold or exposed to excessive
humidity or dust.
o In order to enable good heat dissipation, leave at least 20 cm (8")
between this unit and walls and other equipment when installing it.
If you put it in a rack, take precautions to prevent overheating by
leaving at least 5 cm (2") open above the top of the unit and at
least 10 cm (4") open behind the unit.
o Place the unit in a stable location near the audio system that you
will use with it.
o DO NOT place anything, not even CDs, CD-Rs, LP records or cas-
sette tapes, on top of the unit. Doing so could cause damage.
o Do not put cloth on top of the unit or place the unit on top of
bedding or thick carpet. Doing so could cause the unit to overheat or damage it.
o Supply voltage to the unit that matches the voltage indicated on
the rear panel. If you are in any doubt regarding this matter, con-
sult an electrician.
o Do not move the unit during use.
o Do not open the body of the unit as this might result in damage
to the circuitry or cause electric shock. If a foreign object should
get into the unit, contact your dealer.
o When removing the power plug from an outlet, always pull
directly on the plug. Never pull on the cord itself.
o If a TV is turned on while the unit is on, static might appear on the
TV screen depending on the characteristics of the TV broadcast
signal. This is not a malfunction of the unit nor of the TV. If this
occurs, turn the unit off.
o Since ES-LINK is a format that is unique to ESOTERIC, do not con-
nect the HDMI cable used for it to ordinary HDMI connectors on
equipment made by other companies. They are not compatible.
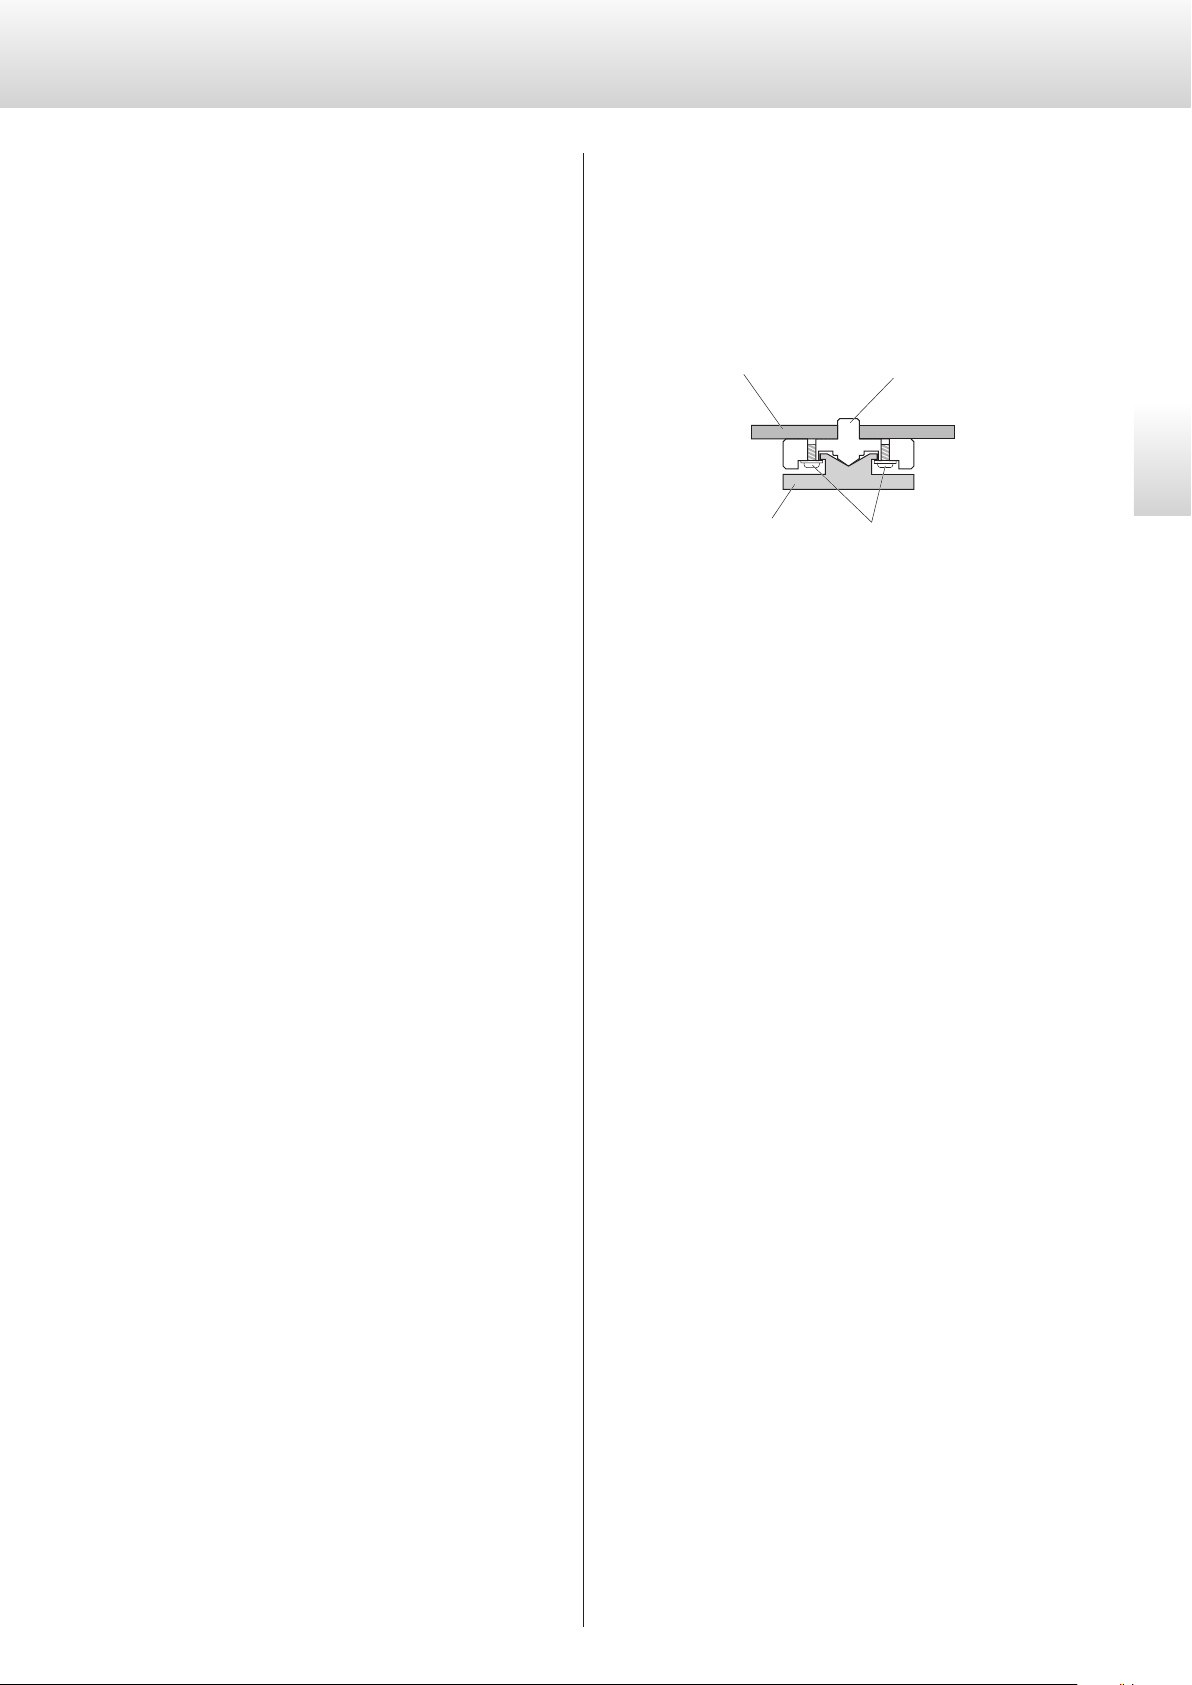
High-precision metal pinpoint feet are attached firmly to the bottom
plate of this unit.
The stands for these feet are loose, but when the unit is placed in
position, it is supported by these pinpoint feet, which will effectively
disperse vibrations.
Chassis Pinpoint foot (metal)
Foot-stand (metal)
o Apply the included felt pads to the bottoms of the foot-stands to
avoid scratching the surface where the unit is placed.
Screws that attach
foot-stand
Maintenance
Use a soft dry cloth to wipe the surface of the unit clean.
For stubborn smudges, use a damp cloth that has been thoroughly
wrung out to remove excess moisture.
V
For safety, disconnect the power plug from the outlet
before wiping the unit.
o Never spray liquid directly on this unit.
o Do not use chemically-treated wipes, thinner or similar substances
because they could damage the surface of the unit.
o Avoid allowing rubber or plastic materials to touch the unit for
long periods of time, because they could damage the cabinet.
English
77
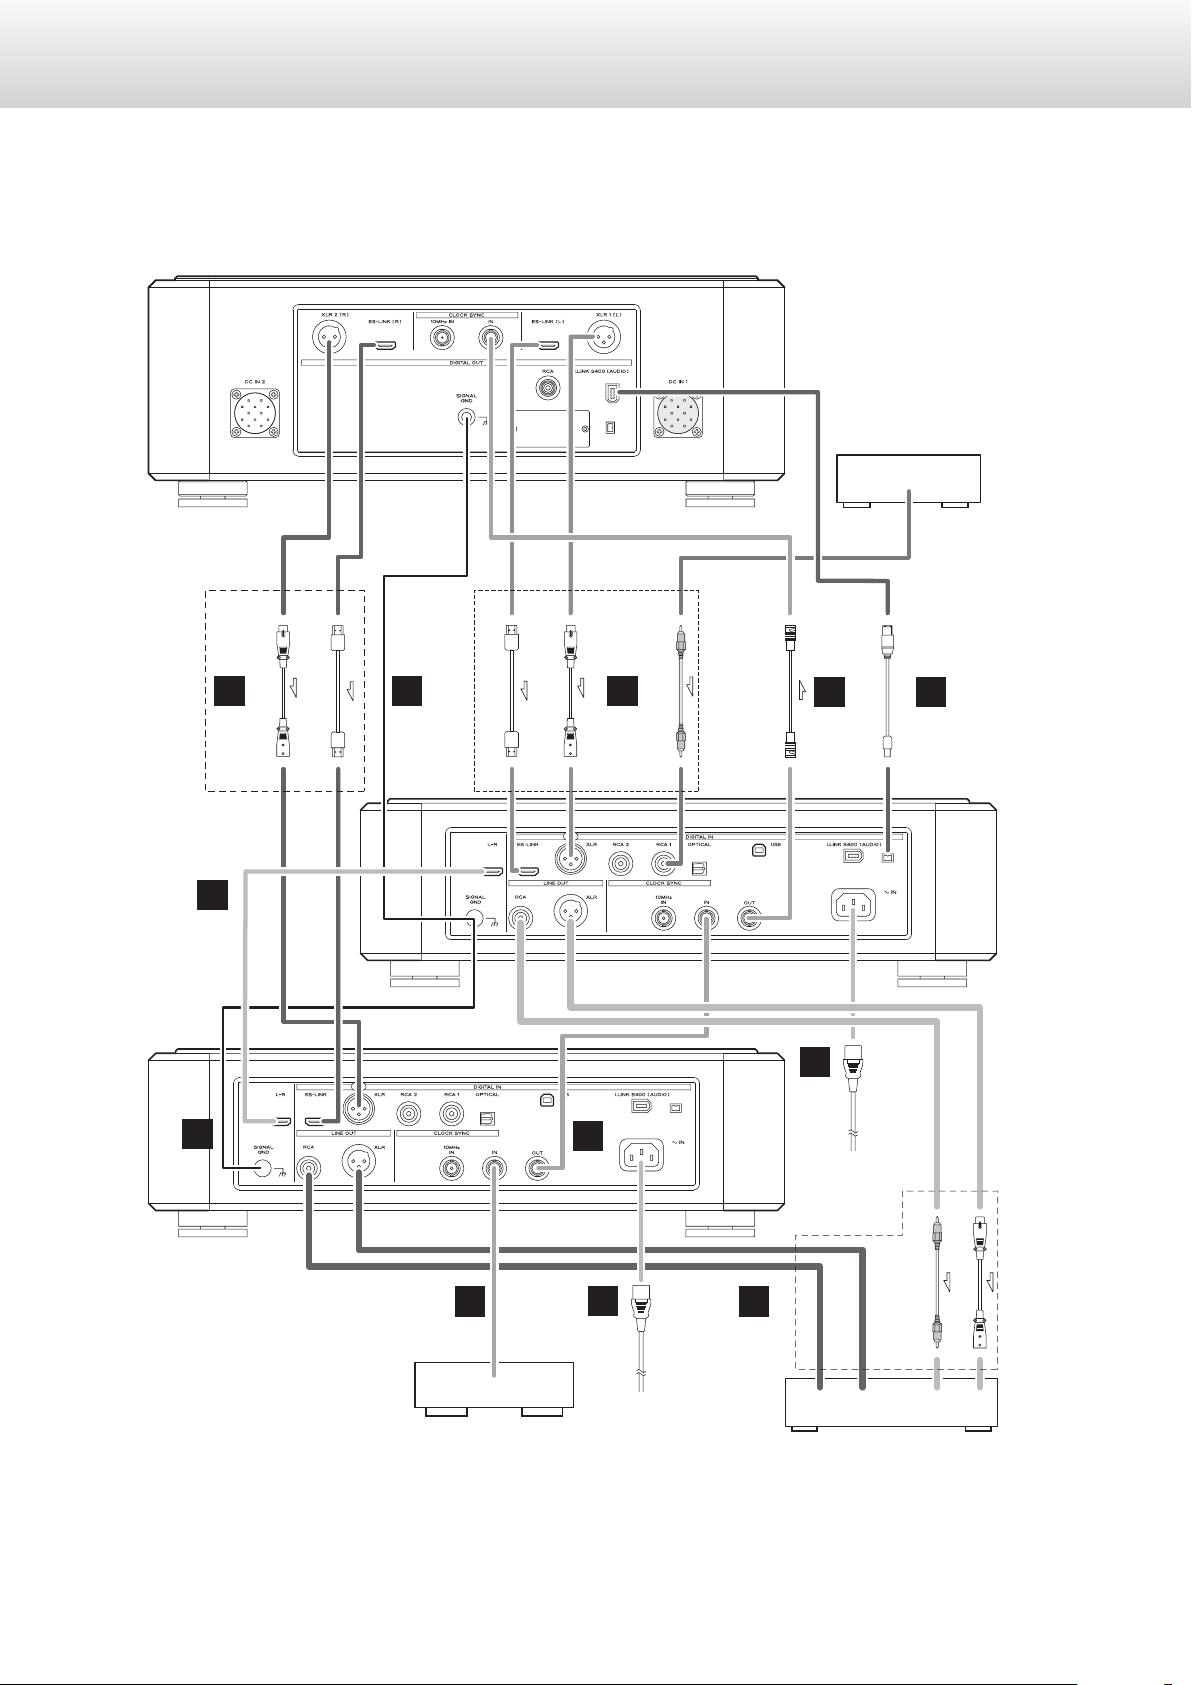
Connections
Super Audio CD/CD transport (Grandioso P1)
A B A
XLR digital cable
HDMI cable
XLR digital cable
HDMI cable
RCA coaxial digital cable
BNC coaxial digital cable
CD player, etc.
Digital audio
output connectors
i.LINK cable
C
Use either i.Link
connector. Choose
according to the
connecting cable.
A
D
B
Grandioso D1
(for right channel)
C
C F
E
E
Wall socket
Grandioso D1
(for left channel)
XLR audio cable
RCA audio cable
CLOCK SYNC OUT
Device that outputs
(G-01, G-02, etc.)
V
Precautions when making connections
o Complete all other connections before connecting power plugs to power outlets.
o Read the owner’s manuals of all devices that will be connected, and follow their instructions.
clock signal
Wall socket
88
AUDIO IN (L)AUDIO IN (R)
Amplifier

A
Digital audio input connectors
Use these to input digital audio.
Connect these to the digital output connectors of digital devices
(including the P1, P-01, P-02, P-03 and P-05).
ES-LINK: HDMI cable
Use commercially-available cables for the following
connections.
XLR: XLR digital cable
RCA: RCA coaxial digital cable
Optical: optical digital cable
i.LINK (AUDIO): 6-conductor or 4-conductor i.LINK cable (IEEE
1394 cable or FireWire cable) that supports S400.
o We recommend using ES-LINK when connecting to a P1.
o An i.LINK (AUDIO) connector is an interface that allows bidi-
rectional communication between connected devices. There
is no distinction between input and output connectors.
o Both 6-conductor and 4-conductor i.LINK connectors are
built-in. Use the one appropriate for the connection cable.
When connecting multiple devices using i.LINK cables, use
both connectors. (For information about i.LINK cable connections, see page 22.)
o The XLR connector supports Dual AES. If the digital source
device that you are using supports Dual AES, use two cables
to connect the left channel unit XLR connector to the left
digital output on the audio source device and the right channel unit XLR connector to the right digital output on the
audio source device.
B
Grounding terminal (GND)
Connecting this grounding terminal to the grounding terminal of another D/A converter, amplifier or other device might
improve the audio quality.
V
This is not an electrical safety ground.
D
Left-right channel link connector (L-R)
When using two separate units for the left and right channels,
connect this connector with an HDMI cable.
The D1 set to Lch using the CH setting will send settings and
right channel audio data to the D1 set to Rch.
o When using multiple D1 units for multichannel audio play-
back, connect to the i.LINK (AUDIO) connector of each unit
(page 22).
E
Power inlet
Connect the included AC power cord to this socket. After completing all other connections, plug the power plug into a power
outlet.
o This unit's power cord connection socket uses three pins, but
the grounding pin does not connect to its chassis.
V
Use only a genuine Esoteric power cord. Use of other
power cords could result in fire or electric shock.
Disconnect the power plug from the outlet if you will not
use the unit for a long time.
F
Analog audio output connectors (LINE OUT)
These output analog audio.
If the amplifier has XLR audio input connectors, use commercially-available XLR audio cables to connect to them.
If the amplifier has RCA audio input connectors, use commercially-available RCA audio cables to connect to them.
English
C
Clock sync input and output connectors (CLOCK
SYNC IN, OUT, 10MHz IN)
Use these to input and output clock synchronization signals.
When using a master clock generator, connect its clock sync output (CLOCK SYNC OUT or similar) connector to this unit's CLOCK
SYNC IN connector.
When inputting a 10 MHz oscillator signal, connect the output of
the oscillator to this unit's 10MHz IN connector.
Use the clock settings to select the active clock sync input (page
14).
Connect this unit's CLOCK SYNC OUT to the clock sync input of
the digital source device.
Use commercially-available BNC coaxial digital cables for these
connections (CLOCK SYNC IN/OUT: 75 Ω, 10MHz IN: 50 Ω).
At Esoteric, we use Esoteric MEXCEL stressfree cables for
reference.
For detailed information, access the following website.
http://www.esoteric.jp/products/esoteric/accessory/indexe.html
99

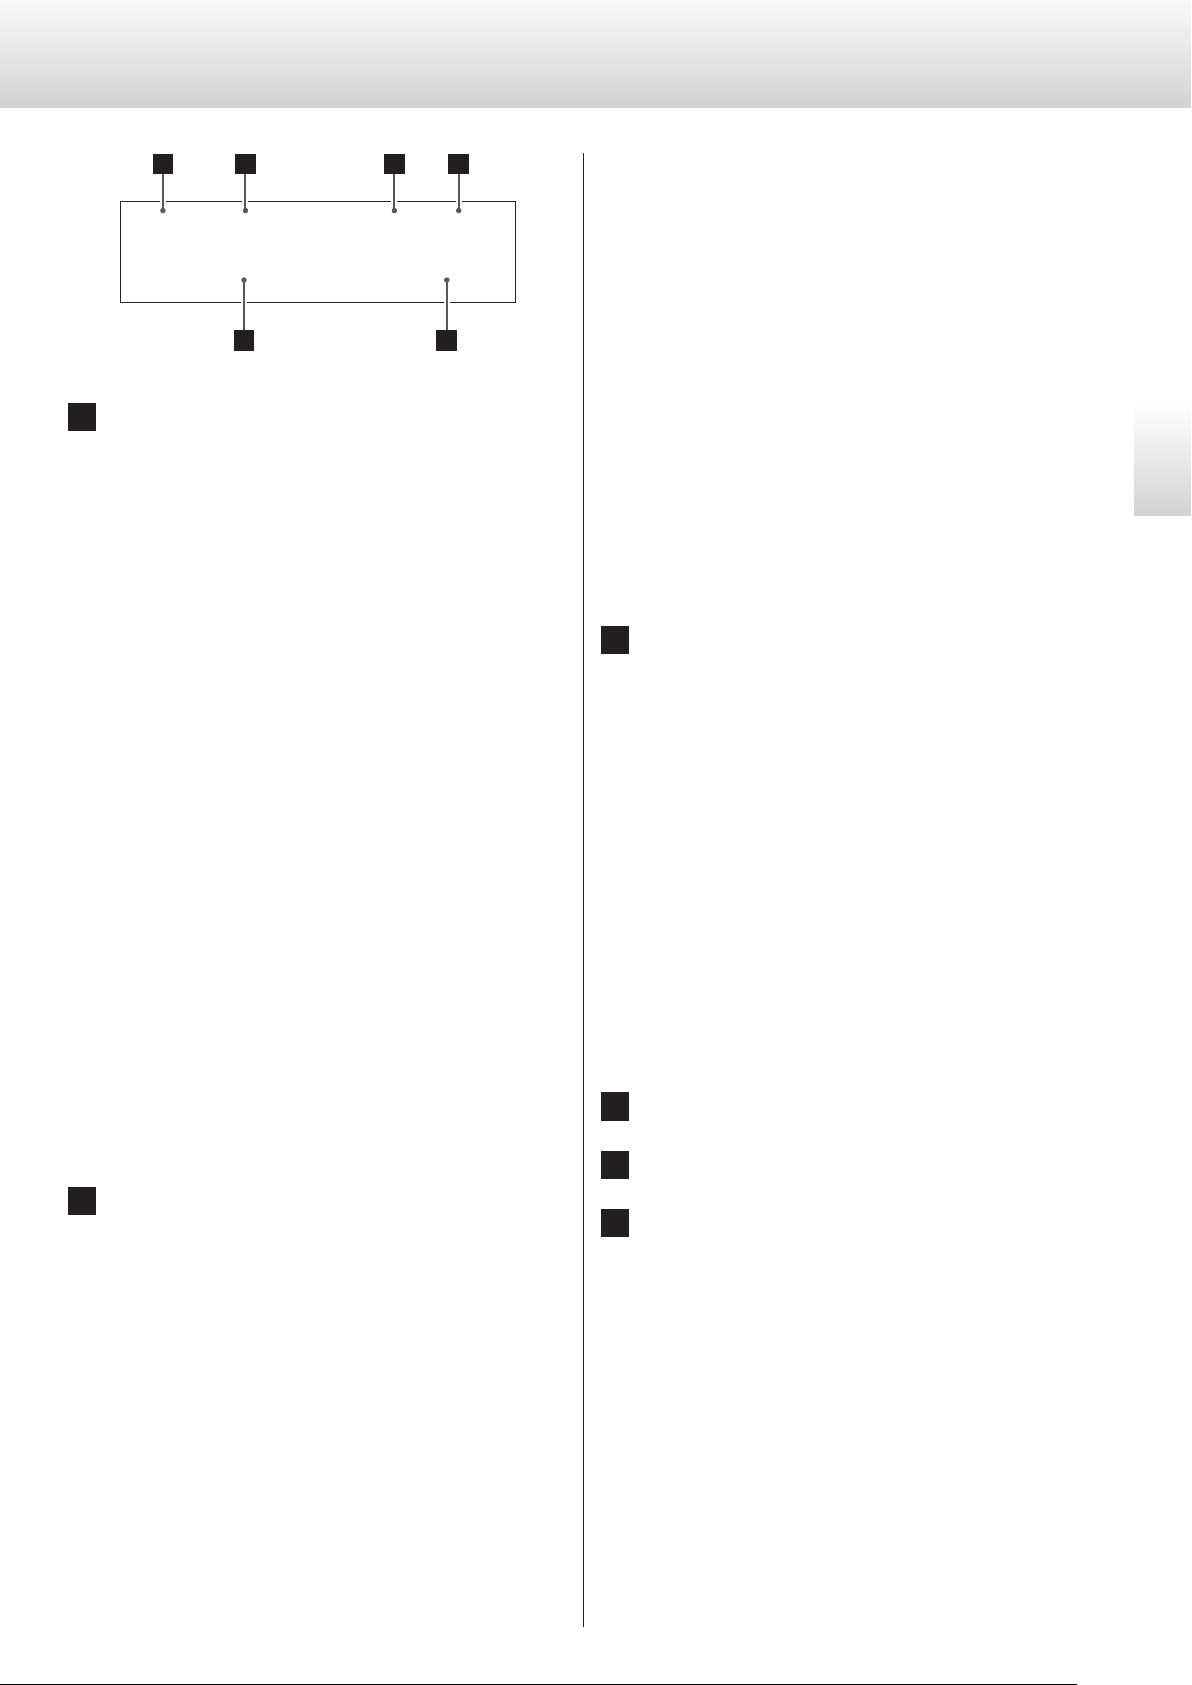
Names and functions of parts (main unit)
A B C D E F G
A
POWER button
Use to turn the unit on and off.
When the unit is on, the ring around this button lights blue.
When the unit is off, it is unlit.
Turn the unit off when not using it.
B
CLOCK indicator
This shows the clock synchronization status.
Lit blue
When the clock setting uses any synchronization other than
PLL (CLK>OFF), the indicator blinks blue while the clock signal is
being detected. The indicator stops blinking but stays lit when
the signal is confirmed and synchronization starts.
Lit green
This lights green when operating with USB or i.Link internal
clock.
C
MENU button
Use to enter setting mode (page 12).
E
Display
This shows information about the selected input connector, for
example.
F
INPUT selection button
Use to change the digital input. Select a connector that has
a digital source device connected. If no digital signal is being
input, no sampling frequency will be shown to the right of the
word “INPUT” on the display.
G
Parameter adjustment buttons (−/+)
Use to change parameters when in setting mode.
o You cannot change the volume with this unit.
D
Remote control signal receiver
This receives signals from the remote control. When using a
remote control, point it toward this receiver when operating it.
o This unit does not include a remote control.
o The dimmer of this unit can be adjusted using a remote con-
trol included with a P1 or other Esoteric product (page 16).
1010
Names and functions of parts (display)
a b c d
e f
DSD DIRECT MCK IN 10 MHzLch
ESLINK
a
Channel
This shows the channel played back by this unit (page 15).
No indicator:
No channel has been set for this unit. Use this setting only with
mono output from a source device.
Lch:
This unit is set to the front left channel. By connecting the L-R
connectors of this unit and the D1 set to Rch, they can share various settings and during stereo output the right channel audio
signal from the audio source device can be sent to the Rch D1.
Rch:
This unit is set to the front right channel. By connecting the L-R
connectors of this unit and the D1 set to Lch, they can share various settings and during stereo output the right channel audio
signal from the audio source device can be sent to this unit for
playback.
Cch:
This unit is set to the center channel. Use this setting when playing back multichannel audio from an SACD connected by i.LINK.
SWch:
This unit is set to the subwoofer channel. Use this setting when
playing back multichannel audio from an SACD connected by
i.LINK.
LSch:
This unit is set to the surround left channel. Use this setting when playing back multichannel audio from an SACD
connected by i.LINK.
RSch:
This unit is set to the surround right channel. Use this setting when playing back multichannel audio from an SACD
connected by i.LINK.
352
UPCONV 4Fs:
The upconverter circuit will upconvert the signal to 128, 176.4 or
192 kHz before digital to analog conversion.
UPCONV 8Fs:
The upconverter circuit will upconvert the signal to 256, 352.8 or
384 kHz before digital to analog conversion.
UPCONV DSD:
The upconverter circuit will convert the PCM signal to a DSD signal before digital to analog conversion.
DSD DIRECT:
If DSD_F (DSD filter) is set to OFF, this appears when a DSD signal
is input.
o Even if the upconverter is set, the upconverter might not be
usable depending on the input source sampling frequency
conditions.
o You can make settings as you like for each input.
o When ES-LINK input is selected, this can only be set to OFF or
DSD.
c
Clock mode
No indicator:
CLK is set to OFF.
CLK OUT:
Shown when CLK is set to OUT.
The frequency display area shows the output clock frequency.
CLK IN:
Shown when CLK is set to IN.
The frequency display area shows the input clock frequency.
MCK IN:
Shown when CLK is set to MCK IN or MCK10M.
The frequency display area shows the input clock frequency.
INTERNAL:
This is shown when unsynchronized signals are received during USB input and during playback with flow rate control when
using i.LINK input.
The frequency display area shows the master clock frequency
being used.
d
Clock frequency
e
Input
English
b
Upconversion setting
No indicator:
The upconversion function is not in use.
UPCONV 2Fs:
The upconverter circuit will upconvert the signal to 64, 88.2 or
96 kHz before digital to analog conversion.
f
Sampling frequency
1111
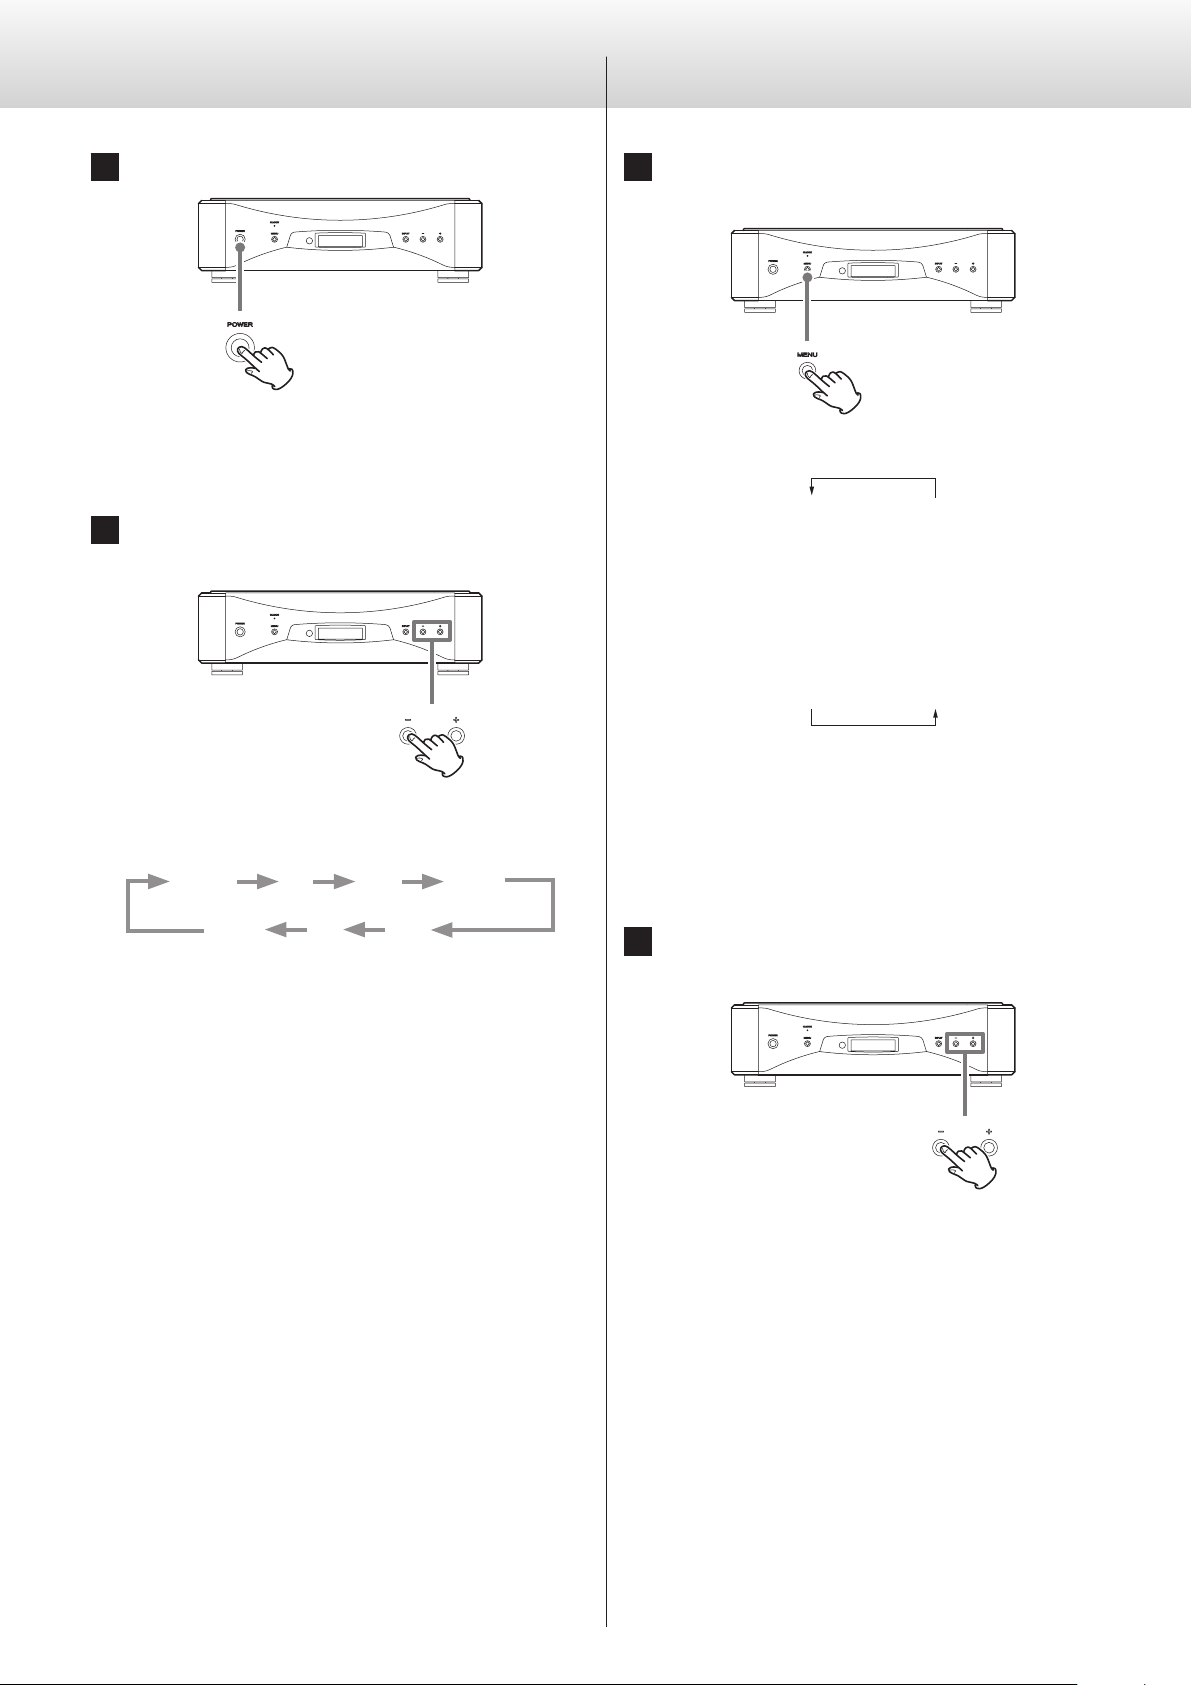
Basic operation
UPC
DIMMER>
Setting mode
1 Press the POWER button to turn the unit on.
Press the POWER button in completely until it stops.
When on, the POWER button lights blue.
2 Press the INPUT selection button to select the
source.
Each time you press the INPUT selection button, the active input
changes in the following order and is shown on the display.
ESLINK XLR RCA1 RCA2
1 Press the MENU button repeatedly to select the
desired setting item.
Each time you press the MENU button, the item shown on the
display changes.
ONV>
x
DSD_F>
x
CLK>
x
CLKin>
x
CLK_TH>
If you press the INPUT selection button or do nothing for 10 or
more seconds, setting mode will end and ordinary mode will
resume.
If the CH setting is set to Rch and L-R LINK connections have
been made with a unit set to Lch, the only settings that can be
changed in setting mode are CLK, CLKin and CH. The other set-
tings will reflect changes made using the Lch D1.
APS>
2
DPaOFF>
2
AOUT>
2
2
CH>
i.LINK
Select the input and start playback from the audio source device.
If no digital signal is detected, no sampling frequency will be
shown to the right of the word “INPUT” on the display. Confirm
the connections before turning connected devices on.
o When you are done using this unit, press the POWER button
to turn it off.
o If the CH setting is set to Rch and an L-R LINK connection has
been made with an Lch unit, the input cannot be changed
from the Rch unit. Change the input using the D1 set to Lch.
USB OPT
2 Use the parameter adjustment (−/+) buttons to
change the settings.
For information about settings, see pages 13–16.
If you press the INPUT selection button once or do nothing for
10 or more seconds, setting mode will end and ordinary mode
will resume.
o Settings are retained even if the power plug is disconnected.
1212

Meanings of items shown in setting mode
Upconversion setting
UPCONV>***
This is the upconversion setting.
This changes the sampling frequency used for upconversion (page
13).
DSD_F>***
This turns the DSD filter on and off (page 13).
CLK>***
This is the clock setting.
Use this to set synchronization with an external clock or clock output
to an audio source device that is being synchronized (page 14).
CLKin>***
This selects the clock input connector (page 15).
CLK TH>***
This sets the clock output during clock input mode (page 15).
CH>***
This sets the playback channel (page 15).
DIMMER>***
This sets the dimmer.
You can set the brightness of this unit's display and indicators to one
of four levels (page 16).
UPCONV>***
When a PCM signal from a CD, for example, is input, you can use this
setting to upconvert that signal or convert it to a DSD signal.
Each input connector can have a different setting.
By default, the setting is OFF.
o During ES-LINK input, only OFF or DSD can be selected.
OFF
Upconversion will not occur.
The original input signal will be sent as is directly to the D/A converter.
2Fs
The sampling frequency of the input source signal will be upconverted by a factor of 2 from 32, 44.1 or 48 kHz to 64, 88.2 or 96 kHz.
4Fs
The sampling frequency of the input source signal will be upconverted by a factor of 4 from 32, 44.1 or 48 kHz (or 2 from 88.2 or
96 kHz) to 128, 176.4 or 192 kHz.
8FS
The sampling frequency of the input source signal will be upconverted by a factor of 8 from 32, 44.1 or 48 kHz (or 4 from 88.2 or
96 kHz or 2 from 176.4 or 192 kHz) to 256, 352.8 or 384 kHz.
DSD
The digital format of the signal will be converted to DSD.
English
AOUT>***
This sets the analog output. Use this to select the analog output connector to be used (page 16).
DPaOFF>***
This sets automatic display darkening (page 16).
APS>***
This sets automatic power saving (page 16).
o The DSD signal of a Super Audio CD cannot be upconverted.
DSD digital filter setting
DSD_F>***
This setting turns the digital filter for DSD input signals sent to the
D/A converter on or off.
OFF
The digital filter is not used.
o “DSD DIRECT” appears on the display.
ON
The digital filter is used.
1313

Setting mode (continued)
Clock setting
CLK>***
You can set the synchronization with an external clock or clock output to a Super Audio CD transport or other audio source device that
is being synchronized.
By default, the setting is OFF.
o Set this to OFF when connected to a source device that does not
support clock synchronization.
OFF
Clock synchronization is not used and the master clock used to follow
the input digital signal is generated by the PLL circuit.
Operation following clock over a wide range is possible.
OUT44
44.1 kHz is output from the CLOCK SYNC OUT connector.
OUT88
88.2 kHz is output from the CLOCK SYNC OUT connector.
OUT176
176.4 kHz is output from the CLOCK SYNC OUT connector.
OUT48
48 kHz is output from the CLOCK SYNC OUT connector.
OUT96
96 kHz is output from the CLOCK SYNC OUT connector.
OUT192
192 kHz is output from the CLOCK SYNC OUT connector.
OUT22M
22.5792 MHz is output from the CLOCK SYNC OUT connector.
OUT24M
24.576 MHz is output from the CLOCK SYNC OUT connector.
o To synchronize the audio source device with this unit's high-
precision crystal oscillator as the master clock, connect this unit's
CLOCK SYNC OUT to the device's clock sync input connector.
IN
In this mode, this unit can receive a clock signal through its CLOCK
SYNC IN connector and operate with clock synchronization.
o The audio source device must also be connected to the clock
generator or be connected to this unit's CLOCK SYNC OUT connector and set to receive clock synchronization.
o The clock frequencies that can be input are 44.1, 48, 88.2, 96, 176.4
and 192 kHz as well as 10 MHz. The input audio signal and the
input clock signal must be synchronized.
MCK IN
In this mode, this unit can receive a master clock signal through its
CLOCK SYNC IN connector from a clock generator and operate with
clock synchronization. The master clock input can be 22.5792 MHz
(512 × 44.1 kHz) or 24.576 MHz (512 × 48 kHz).
When 22.5792 MHz is input, the sampling frequencies of the input
audio signals can be 44.1, 88.2, 176.4 or 352.8 kHz.
When 24.576 MHz is input, the sampling frequencies of the input
audio signals can be 48, 96, 192 or 384 kHz.
o The audio source device must also be connected to the clock
generator or be connected to this unit's CLOCK SYNC OUT connector and set to receive clock synchronization.
V
Be aware that during music playback, if the clock gen-
erator is turned off or the clock sync connection is broken,
causing the clock signal to stop, a loud noise could be
emitted from the speakers.
MCK10M
In this mode, the unit can receive a 10MHz clock signal through its
10MHz IN connector from a clock generator and operate with clock
synchronization using that signal. This mode can only be selected
when using ES-LINK input.
You must also set the P1 to MCK10M and connect it using ES-LINK.
During CD playback, the input 10MHz signal will be used directly
without using the PLL circuit as the master clock for this unit. During
SACD playback, the internal 22.5792 MHz signal will be synchronized
to the input 10MHz signal and used for operation.
o The audio source device must be connected to this unit's CLOCK
SYNC OUT connector and set to receive clock synchronization.
1414

Clock input connector selection
Playback channel setting
CLKin>***
Use this to select the clock input connector.
CLK
In this mode, this unit can receive a clock signal through its CLOCK
SYNC IN connector from a clock generator and operate with clock
synchronization.
o The input impedance of the CLOCK SYNC IN connector is 75 Ω, so
TTL-level square wave signals can be input.
10M
In this mode, this unit can receive a 10MHz clock signal from a clock
generator connected to its 10MHz IN connector and operate with
clock synchronization.
o The audio source device must also be connected to the clock
generator or be connected to this unit's CLOCK SYNC OUT connector and set to receive clock synchronization.
o The input impedance of the 10MHz IN connector is 50 Ω, so sine
wave signals can be input.
Clock output settings
CLK_TH>***
This sets the clock output during clock input mode.
OFF
No clocks signal is output from the CLOCK SYNC OUT connector.
ON
The input clock signal is output from the CLOCK SYNC OUT connector as clock with the same frequency.
CH>***
This shows the channel played back by this unit.
By default, this is set to “CH> – – –”. Use this setting when only connected to a P1 as a dedicated system.
(Use with ES-LINK or XLR_DUAL connections.)
When connecting to digital input connectors in modes other than
ES-LINK and XLR_DUAL and using the left and right channel transmission (L-R) connectors or i.LINK connectors, use one of the following
settings.
- - -
The channel used is not set. Only use this when connecting a P1 or
other source device that can output left and right signals as mono.
Using L-R LINK is not necessary.
Lch
Use to play back the left (front left) channel. The right channel data
will be output from the L-R connector.
Rch
Use to play back the right (front right) channel. The right channel
data will be input through the L-R connector.
Cch
Use to play back the center channel. Select this when using i.LINK for
multichannel playback.
SWch
Use to play back the subwoofer channel. Select this when using i.LINK
for multichannel playback.
LSch
Use to play back the left surround channel. Select this when using
i.LINK for multichannel playback.
RSch
Use to play back the right surround channel. Select this when using
i.LINK for multichannel playback.
English
o When using input other than ES-LINK, DUAL or i.LINK, connect this
unit to the D1 set as the left channel. The various settings made
for the left channel will be reflected by the right channel settings.
o If the audio source device is playing back a two-channel source,
no sound will be output from this unit if this setting is anything
other than Rch or Lch.
1515
Setting mode (continued)
DIMMER
DIMMER>***
You can adjust the brightness of this unit's display and indicators.
By default, the setting is 3.
3 (ordinary brightness)
2
1
0
o The dimmer of this unit can be adjusted using the DIMMER button
of a remote control included with a P1 or other Esoteric product.
o Even when set to any value other than 3 (ordinary brightness),
ordinary brightness will be used when displaying error messages
and setting menus.
Automatic display darkening setting
DPaOFF>***
You can set the display to darken automatically after a set amount of
time has elapsed.
By default, the setting is ON.
ON
The display will automatically darken after 30 minutes elapse without
any operation or change in the information shown.
OFF
The display will not automatically darken.
o We recommend setting this to “ON” because brightness irregulari-
ties might occur if the same information is shown without change
on the display for a long time.
Automatic power saving setting
APS>***
Analog output setting
AOUT>***
Use this to select the analog output connector to be used.
By default, the setting is XLR2.
RCA
An analog audio signal is output from the RCA connector.
XLR2
An analog audio signal is output from the XLR connector with pin 2
HOT.
XLR3
An analog audio signal is output from the XLR connector with pin 3
HOT.
The unit can be set to turn off automatically if the set amount of time
elapses without being able to lock to a digital signal from an input
source.
30m
The unit will automatically turn off if 30 minutes elapse without playback or other operation.
60m
The unit will automatically turn off if 60 minutes elapse without playback or other operation.
90m
The unit will automatically turn off if 90 minutes elapse without playback or other operation.
120m
The unit will automatically turn off if 120 minutes elapse without
playback or other operation.
OFF
The automatic power saving function is disabled.
1616
Note about the automatic power saving (APS) function
This product is compliant with the European ErP directive for
standby power.
In order to comply with the above directive, the automatic
power saving (APS) function is set to 30 minutes when shipped
from the factory, so the unit will automatically turn off if 30
minutes elapse without being able to lock to a digital signal
from an input source.

Connecting with a computer and playing back audio files
Installing the driver
When using Mac OS X
This unit works with the following operating systems (as of October
2013).
Mac OS X 10.6 (Snow Leopard)
(OS X 10.6.4 or later)
Mac OS X 10.7 (Lion)
Mac OS X 10.8 (Mountain Lion)
This unit will work with the standard operating system driver, so there
is no need to install a special driver.
When using Windows
Installing a driver on the computer
To play back audio files from a computer through this unit, you must
first download the driver from our download page and install it on
your computer.
Driver download page
http://www.esoteric.jp/products/esoteric/usb/usb_driver_e.html
Install the driver after downloading it from the above page.
Note about transmission modes
This unit connects using asynchronous HIGH SPEED mode.
The sampling frequencies that can be used for transmission are 44.1,
48, 88.2, 96, 176.4 and 192 kHz.
When connected correctly, you will be able to select “ESOTERIC USB
AUDIO DEVICE” as the audio output for the operating system.
In asynchronous mode, the audio data transmitted from the computer will be processed using this unit's clock, enabling it to reduce
jitter caused during data transmission.
English
This unit can be connected by USB to computers running the following operating systems. Operation with other operating systems
cannot be assured.
Windows XP (32-bit edition)
Windows Vista (32-bit and 64-bit editions)
Windows 7 (32-bit and 64-bit editions)
Windows 8 (32-bit and 64-bit editions)
CAUTION
Install the driver before connecting the unit to the computer by USB.
If you connect the unit to the computer by USB before installing the
driver, it will not function properly. Moreover, if using Windows XP, the
operation of the computer might become noticeably slower and it
might become necessary to restart it.
For detailed instructions about installing the driver, please see our
download page.
Depending on the composition of the computer hardware and
software, operation might not be possible even with the above operating systems.
1717
Connecting with a computer and playing back audio files (continued)
4
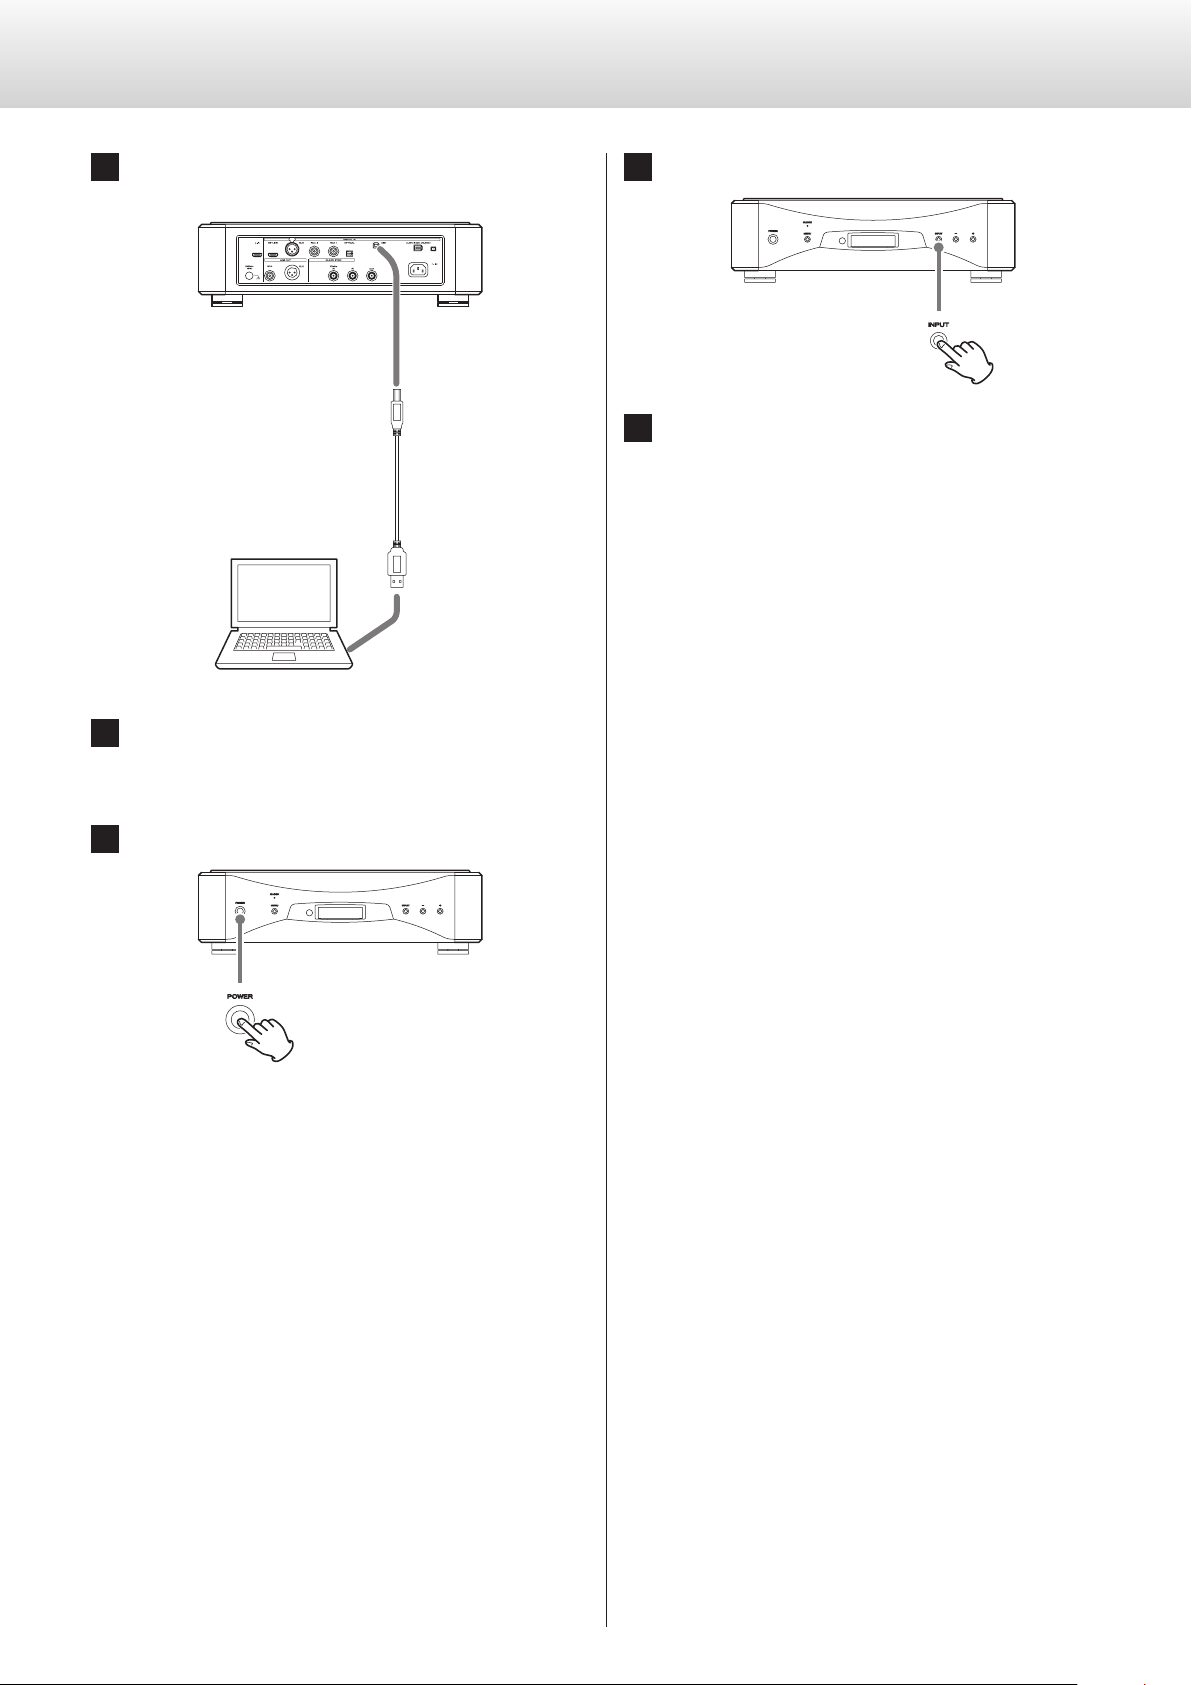
1 Connect this unit to the computer using a USB cable.
Use a cable that matches the USB port on this unit.
Press the INPUT selection button to select USB.
5 Start playback of an audio le on the computer.
For better audio quality, set the computer volume to its maxi-
mum and adjust the volume of the amplifier connected to this
unit. Minimize the amp volume before starting playback and
gradually increase it.
o The computer cannot be used to control this unit, nor can
this unit be used to control the computer.
2 Turn the computer on.
Confirm that the operating system has started properly.
3 Press the POWER button to turn the unit on.
o This unit cannot transmit audio files to the computer by USB.
o Do not do any of the following when playing back audio
files over the USB connection. Doing so could cause the
computer to malfunction. Always quit the audio playback
software before conducting any of these operations.
• Disconnect the USB cable
• Turn this unit off
• Change the input
o Computer operation sounds will also be transmitted when
playing back audio files over the USB connection. To avoid
outputting these sounds, make the necessary settings on
your computer.
o If you start the audio playback software before connecting
this unit with the computer or before setting the input to
USB, audio files might not play back properly. If this occurs,
restart the audio playback software or the computer itself.
1818

Troubleshooting
If you experience a problem with this unit, please take a moment to
review the following information before requesting service. The problem could also be something other than this unit. Please also check
the operation of the connected units.
If this unit still does not operate correctly, contact the retailer where
you purchased the unit.
The unit does not turn on.
e Confirm that the power cord is securely connected to both the
inlet on the back of this unit and a power outlet.
e Confirm that power is being supplied to the outlet to which the
power cord is connected by, for example, connecting another
device to it.
e Check if the power source is a switched outlet. If it is, make sure
it is turned on.
No sound is output from the speaker. The sound is distorted.
e In this case, turn the power off and check the connections with
the digital audio source device, the amp and the speaker (page
8).
e Change the input setting to the connector that is being used for
input (page 12).
e Set AOUT (analog output) according to the amp connection.
e Adjust the volume of the amp, for example.
This unit uses a microprocessor, so noise and other external interference could cause it to stop functioning properly.
In such a case, turn the unit off and wait about one minute
before restarting operation from the beginning.
English
No sampling frequency is shown to the right of “INPUT” on the
display.
e Turn the device that is connected to the selected input connec-
tor on.
e Confirm that the device is properly connected to the selected
input connector.
A beeping noise is output at a regular interval.
e If a beeping noise is output at a regular interval when the unit is
in clock sync mode, the connected device might not also be in
clock sync mode. Check the connections of the clock sync con-
nectors and the clock sync setting of the connected device.
The CLOCK indicator does not stop blinking.
e Set CLK> to OFF when not using clock sync (
e A clock signal with which the unit cannot be synchronized
might be being input. Check the connections of the clock sync
connectors and the settings of the connected device.
page 14).
1919

Troubleshooting (continued)
Messages
Restoring factory settings
Settings are retained even if the power plug is disconnected.
Follow these procedures to restore all settings to their factory
defaults and clear the unit's memory.
1 Turn the unit o.
If the power is on, press the POWER button and wait at least 30
seconds before proceeding.
2 Press the POWER button while pressing and holding
the MENU button.
When “Setup CLR” (clear settings) appears on the display, release
the MENU button.
– – –
There is a problem with the input signal.
Do not input signals other than PCM or DSD.
Check the connection with the digital device.
This unit cannot decode signals in formats such as Dolby Digital, DTS
and AAC. Have the playback device convert the signal to PCM before
output.
No sampling frequency is shown to the right of “INPUT” on the
display.
The digital signal cannot be locked. Press the INPUT selection button
and select the connector to which the digital device is connected.
Turn the connected device on. Check the settings of the connected
device.
LOOP ERR!
The i.LINK connections have created a loop. Connect devices in a
branching tree format (page 22).
CLOCK!
appears in the sampling frequency display area.
Check settings related to the clock.
If there is no input clock, “– – –” will appear in the clock frequency
display area.
If the set mode and the input clock are incorrect, the clock frequency
display area will blink.
2020

Specifications
Analog audio outputs
Connectors
XLR jack (mono) ....................................................1
RCA jack (mono) ....................................................1
Output impedance
XLR ............................................................100 Ω
RCA ............................................................47 Ω
Maximum output level
(when 1 kHz, full-scale signal input, 10 kΩ load)
XLR (when set to 0 dB) ...................................... 5.0 Vrms
RCA ........................................................2.5 Vrms
Frequency response (when 192 kHz PCM signal input)
5 Hz – 55 kHz (−3 dB)
S/N ratio ......................................................113 dB
Distortion ...........................................0.0007% (1 kHz)
Digital audio inputs
HDMI cable connector (ES-LINK/L-R) signal transmission
Low-voltage differential signaling (LVDS)
XLR jack ............................................................1
Clock output
Connector ...................................................BNC ×1
Output level ........................ TTL level equivalent (into 75 Ω)
Output frequencies .................44.1, 88.2, 176.4, 48, 96, 192 kHz
22.5792, 24.576 MHz
Same as input frequency (when set to through output)
Output frequency precision ..±0.5 ppm (when shipped from factory)
Clock input
Connectors ..................................................BNC ×2
Input impedance
IN ..............................................................75 Ω
10MHz IN .......................................................50 Ω
Frequencies that can be input
IN ...................................44.1, 88.2, 176.4, 48, 96, 192 kHz
22.5792, 24.576 MHz (±10 ppm)
10MHz IN ......................................... 10MHz (±10 ppm)
Input level
IN ...............................................TTL level equivalent
10MHz IN ................................... sine wave, 0.5 – 1.0 Vrms
English
Input level ..................................................5.0 Vp-p
Input impedance .............................................110 Ω
Input sampling frequency ..............................32 – 384 kHz
16-bit – 48-bit
PCM (AES/EBU format)
DSD (ES-LINK1, ES-LINK2 format)
RCA jack ........................................................... 1
Input level ..................................................0.5 Vp-p
Input impedance ..............................................75 Ω
Sampling frequencies that can be input ................32 – 192 kHz
16-bit – 24-bit
Linear PCM (IEC 60958 format)
Optical digital connector ...........................................1
Input level ................................. −24.0 – −14.5 dBm peak
Sampling frequencies that can be input ................32 – 192 kHz
16-bit – 24-bit
Linear PCM (IEC 60958 format)
i.LINK (AUDIO) connectors ........2 (6-conductor, 4-conductor) S400
Sampling frequencies that can be input ................32 – 192 kHz
16-bit – 24-bit
Linear PCM
DSD
USB port ...................................................1 (Type B)
Sampling frequencies that can be input ................32 – 192 kHz
16-bit – 32-bit
Linear PCM
General
Power supply
Model for Europe/Hong Kong .......................AC 230 V, 50 Hz
Model for USA/Canada ..............................AC 120 V, 60 Hz
Model for Korea .....................................AC 220 V, 60 Hz
Power consumption ............................................20 W
External dimensions (W × H × D, including protrusions)
445 × 132 × 449 (mm) (17 5/8" × 5 1/4" × 17 3/4")
Weight ................................................. 24 kg (53 lb)
Operating temperature ............................... +5°C to +35°C
Operating humidity ....................5% – 85% (no condensation)
Storage temperature ................................−20°C to +55°C
Included accessories
Power cord × 1
HDMI cable × 1
Felt pads × 4
Owner’s manual (this document) × 1
Warranty card × 1
o Specifications and appearance are subject to change without
notice.
o Weight and dimensions are approximate.
o Illustrations in this Owner’s Manual might differ slightly from pro-
duction models.
2121
 Loading...