

Page 1
ENGLISH VERSION
Page 2

Page 3

Table of Contents
Introduction .................................................... page 4
Quick Start .......................................................page 6
Using Two VoiceTone Pedals ....................... page 12
Front & Back Panel Descriptions ...............page 13
Setup Configurations ....................................page 16
Phantom Power ..............................................................page 16
Standard Setup ................................................................page 17
Main/Monitor ...................................................................page 18
Sound Engineer Setup .................................................page 19
Advanced Setup .............................................................page 2
TC Helicon Vocal Technologies Ltd.
info@tc-helicon.com
Using & Understanding the Effect ..............page 22
Using the Effects ............................................page 23
Adaptive Shape EQ ......................................................page 23
Adaptive Compression ...............................................page 24
De-ess ..................................................................................page 25
Pitch Correction .............................................................page 26
Understanding Live Engineer Effects .........page 27
Understanding Pitch Correction ................page 31
FAQ & Troubleshooting ...............................page 33
Specifications ..................................................page 35
Manual revision 1.0 – SW – V 1.0 | Prod. No: E60507211
English Version
3
Page 4

Introduction
Welcome to VoiceTone Correct
We at TC-Helicon believe that VoiceTone Correct will
finally make you truly satisfied with your live vocal sound.
More than any other musicians, vocalists are
understandably not happy with their live sound. The
reason is typically obvious - the singer has no control of
the sound system and most often there is no sound
engineer to help. Correct to the rescue! Correct listens
to your voice and adjusts your tone and dynamics
automatically to produce studio quality vocal tone that
you and your audience will appreciate. In addition, the
pitch correction effect is like a metronome for pitch. It
lets you know when you're out of tune and you naturally
decide to correct yourself, or not.
An incredible amount of live sound research was
undertaken for VoiceTone Correct and that means you
can trust it as a capable and reliable sound engineer. In
terms of audio quality (noise floor, harmonic distor tion,
and frequency response), Correct surpasses anything
that has come before it, and unarguably exceeds even
4
the most stringent "audiophile" requirements.
Many audience members, band members and sound
engineers may be surprised to see a singer taking
control over their sound. We think it's about time!
Features:
Pitch Correction:
o Auto-chromatic pitch correction acts as a guide for
you to improve your pitch
o Accurate input pitch and correction display
o Correction can go to monitors, mains or both
Live Engineer effects (LE effects)
o Adjustable Adaptive Compression
o Multiband Adaptive Shape EQ dynamically sweetens
raw mic sound
o Sibilance-smoothing de-ess algorithm
o Add rich lows on deep voices with the Warmth
button
o XLR mic level I/O
o Clean, studio quality mic preamp with phantom power
Page 5

Introduction
About TC-Helicon
At TC-Helicon we truly believe that the voice is the
world's most beautiful instrument. We don't mean to
degrade other beautiful instruments, but the singing
voice is the anthropological source for all things melodic.
In the words of the founders of TC-Helicon,
"Everything we do is dedicated to this instrument (the
singing voice). We envision a world where those who
work with the voice in live and recording situations can
bring out the very best from any performance, and
where the possibilities of vocal craft are endless."
Our mission was galvanized by a simple question:
"Isn't it time that someone finally provided dedicated
tools and solutions for voice?"
So what does this all mean to singers? It means that you
should know there is a dedicated group of engineers,
researchers and product specialist based in Victoria, BC,
Canada that spend every waking moment of their
working lives listening, talking, singing, and interacting
with singers and those who have passion for the singing
voice. All this knowledge and experience is used to
design products respecting and empowering the
modern vocalist. Our products focus on removing
barriers and inspiring creativity in performance. That's
why our products range from near-field personal vocal
monitors to floor-based vocal multi-effects pedals.
Enjoy.
The TC-Helicon Team
a TC Group company
5
Page 6

Quick Start
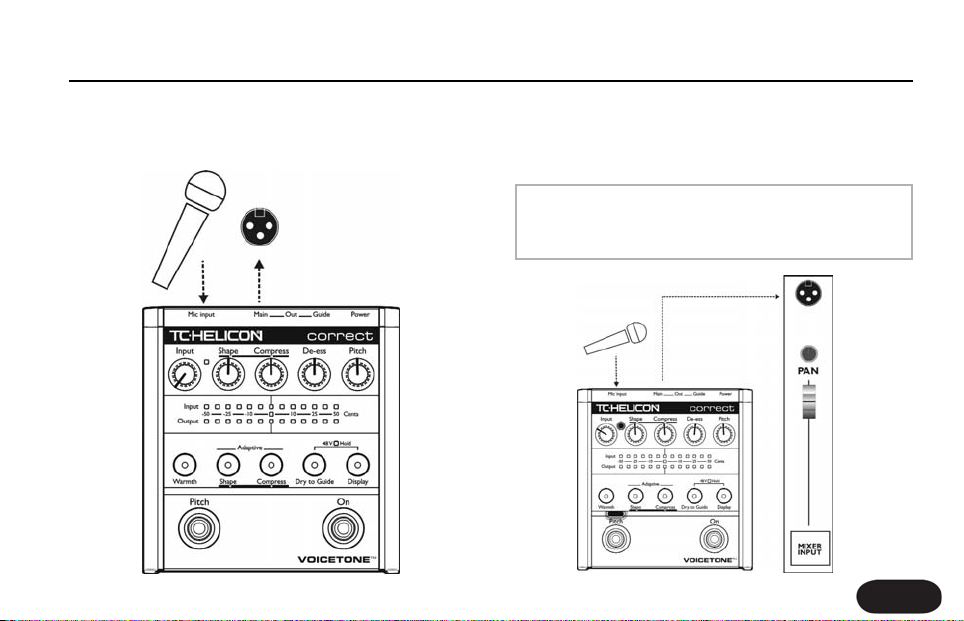
Step 1:
Connect your microphone to a mic cable
NOTE:
Make sure Correct is not powered.
6
Step 2:
Connect the mic cable to the Mic Input on Correct.
Page 7
Quick Start
Step 3:
Connect a mic cable to the Main Output of Correct.
Step 4:
Connect the mic cable from Correct to a mic input on
your sound system.
NOTE:
At this point it would be best to turn the gain and/or
volume on your sound system's mic input to off.
7
Page 8
Quick Start
Step 5:
Set all EQ and/or compression on your sound system
mic channel to off, or unity (middle position - no boost
or cut).
NOTE:
Correct is going to supply the EQ and compression
for your voice automatically. After it has been turned
on for your voice, a live sound engineer can decide if
they want to do any further processing. But know
that for the vast majority of the time, there is no
need for extra EQ or compression.
8
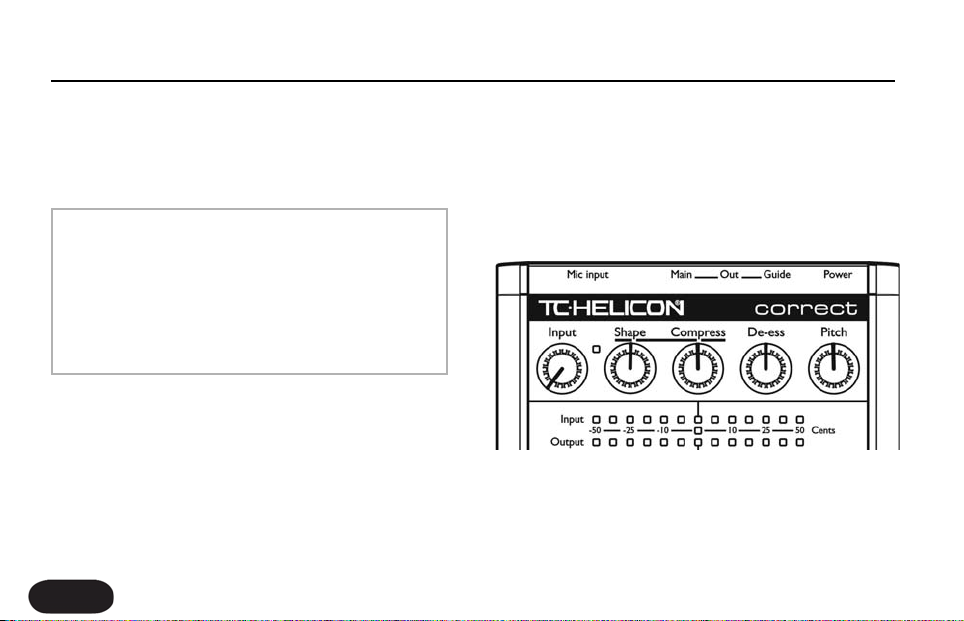
Step 6:
Turn the Input Knob fully left and set the last four knobs
on Correct to their default position as indicated.
Page 9
Quick Start
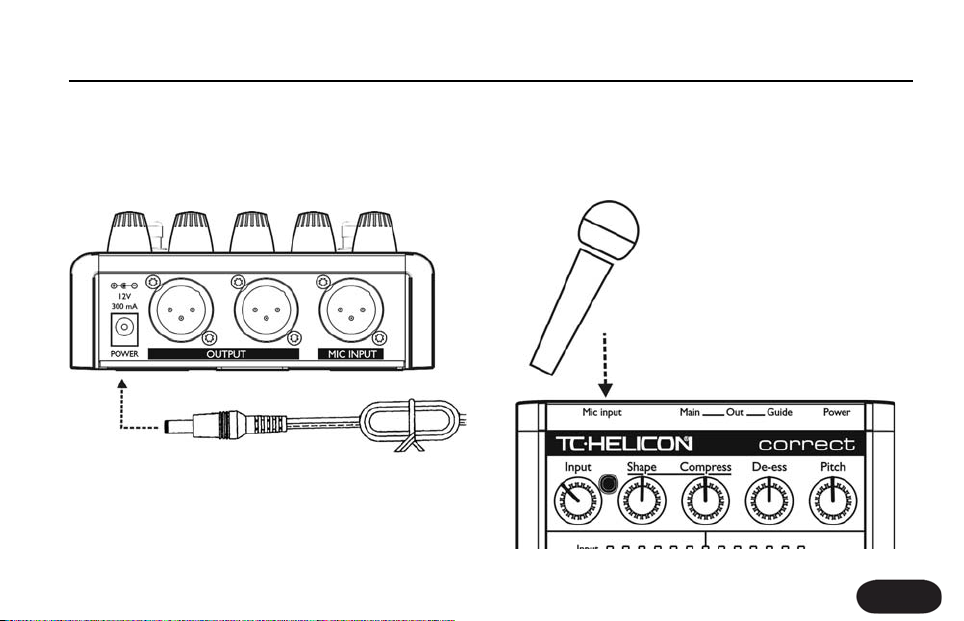
Step 7:
Connect Correct’s power adapter to main power and
to the Power Input on Correct.
Step 8:
While singing through your microphone, turn the Input
Knob to the right until the Input Light turns green,
sometimes orange on louder parts, but never red.
9
Page 10
Quick Start
Step 9:
Raise the gain and/or volume on your sound system mic
input channel and master volume until you hear a good
level from your vocals.
10
Step 10:
You're ready to hear Correct on your voice.
a. Turn the Live Engineer effects on or off with the
Right Footswitch
b. Turn the pitch correction effect on or off with the
Left Footswitch
Page 11

Step 11:
Here are some quick tips on understanding what
Correct will do for your live vocal sound.
Live Engineer (LE effects): On
Regardless of your microphone, mic technique or
whether you are a Bass or Soprano, the LE effects will
optimize the balance of low and high frequencies and
smooth the loud and soft parts of your singing to make
you sound your best. Your sound will be clear and
defined and will fit well into your mix.
Pitch Correction effect: On
Singing with the pitch correction effect can ensure that
your vocal is on pitch. You'll hear the pitch corrected
version of your voice that will act as a reference so you
can self adjust your pitch to be right on key.
Quick Start
11
Page 12

Using Two VoiceTone Pedals
You can use two VoiceTone pedals in series. For
example, a great combination is to have VoiceTone
Correct feeding a VoiceTone Create pedal. Generally,
Correct should be the first device in the chain.
Step 1:
Follow the Quick Start guide for both VoiceTone Pedals.
Step 2:
Instead of connecting your first VoiceTone pedal to the
PA, connect its mono output to the mic input on Create.
12
Step 3:
Connect the second VoiceTone pedal, in this case Create
to the PA.
Step 4:
Set VoiceTone Create’s Input Knob fully left.
Step 5:
Use the first pedal’s Input Knob to set the microphone
gain.
Page 13

Front & Back Panel Descriptions
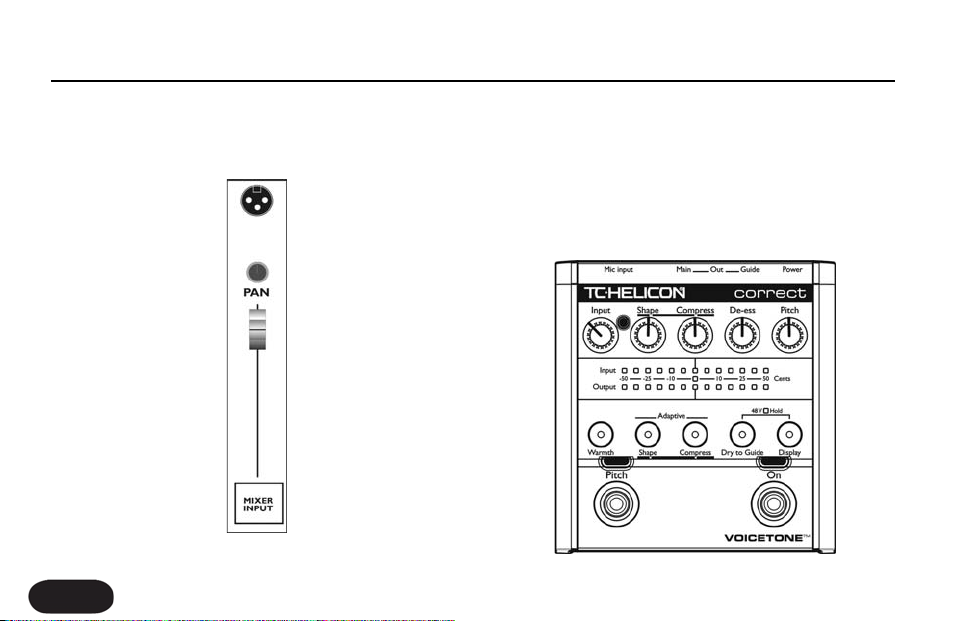
1. Guide Output
Alternate output with full time pitch correction when it’s
only desired in stage monitors. Diagram below shows
possible routings
2. Main Output
Typical output for use with sound system. Diagram
below shows possible routings.
POWER
3. Mic Input
Microphone connection
PPIITTCCHH EENNAABBLLEEDD LLEE EEFFFFEECCTTSS
No No Dry Pitch
Ye s No Dry Pitch
Ye s Ye s LE Effects + Pitch LE Effects + Pitch
No Ye s LE Effects LE Effects + Pitch
EENNAABBLLEEDD
1
MMAAIINN OOUUTTPPUUTT GGUUIIDDEE OOUUTTPPUUTT
2
3
13
Page 14
Front & Back Panel Descriptions
1 2 3 4 5
6
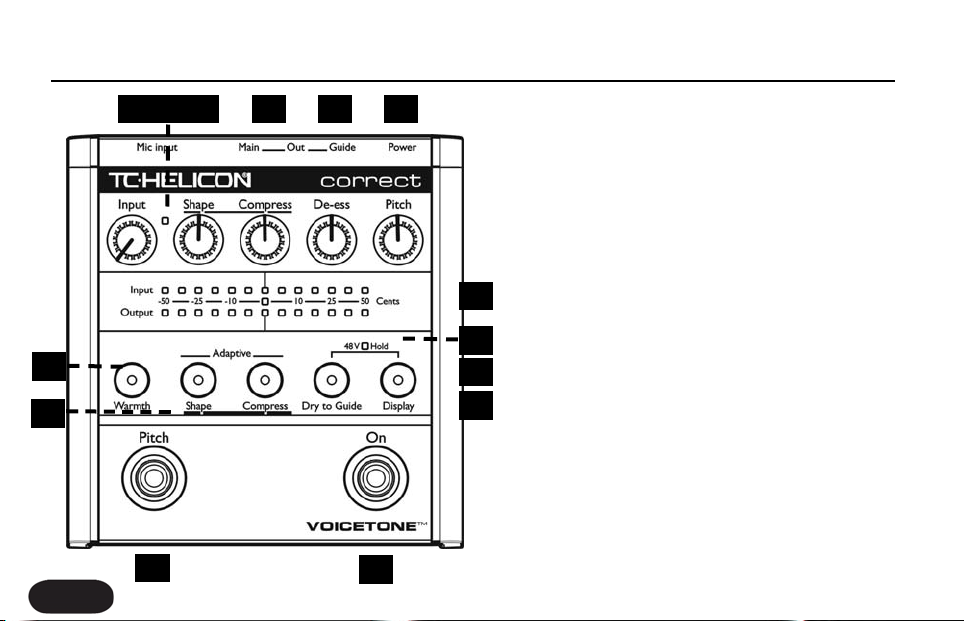
1. Input Knob
Controls the microphone pre-amplifier gain. Correct can
accept dynamic or condenser microphones.
2. Input Light
Indicates the input level of the microphone. Flashing
green, sometimes orange is good. Flashing red is clipping,
which is not good.
9
3. Shape Knob
Controls the amount of Shape EQ on the voice. 12
10
7
8
o’clock is the default position, full left is off.
11
4. Compress Knob
12
Controls the amount of compression on the voice. 12
o’clock is the default position, full left is off.
5. De-ess Knob
Controls the amount of de-essing on the voice. 12
o’clock is the default position, full left is off.
13
14
14
Page 15

Front & Back Panel Descriptions
6. Pitch Knob
Controls the amount of pitch correction effect on the
voice. 12 o’clock is default position, full left is off.
7.Warmth Button
Enables the Warmth EQ.
8.Adaptive Shape & Compress Buttons
Switch the Shape and Compress effects between
adaptive and manual.
9. Pitch Display
Displays your relative intonation.The top bar shows your
input pitch, the bottom bar shows your corrected pitch.
10. Phantom Power Light
Indicates status of +48V phantom power.
11. Dry to Guide Button
When enabled, the Guide Output will feature your pitch
corrected voice in parallel with your natural voice. This
can make it easier to hear the pitch correction effect in
high level situations.
12. Display Button
Turns the Pitch Display on/off
13. Left Footswitch
Turns the pitch correction effect on/off.
14. Right Footswitch
Turns all effects off in the Main Output of Correct (LE
Effects and pitch correction).
15
Page 16

Setup Configurations
Phantom Power
Before using any setup configuration, determine the type
of microphone you are using:
Dynamic microphone: phantom power off.
Condenser microphone: phantom power on.
Enabling Phantom Power:
1. Confirm that your sound system master level is off.
2. Connect Correct's power adapter to main power
and to the Power Input on Correct.
3. Press and hold Dr y to Guide Button and Display
Button simultaneously until the Phantom Power Light
comes on.To turn phantom power off, repeat this step.
16
NOTE:
Set your sound system level to off when you are
turning phantom power on/off as it can create a
“pop” sound in your speakers.
Page 17

Standard Setup
The standard setup for VoiceTone Correct couldn't be
easier - put Correct between your microphone and
your mic input on your sound system. In this
configuration only Main Output is used.
Connecting and Enabling for Standard Setup:
1. Connect your microphone to Correct’s Mic Input.
2. Connect to your sound system as in diagram on this
page. Main Output to mic input channel on your sound
system.
3. Connect Correct's power adapter to main power
and to the Power Input on Correct.
Setup Configurations
17
Page 18

Setup Configurations
Main / Monitor Setup
While Correct’s pitch correction is so transparent that
your audience may never know you're using it, we
suspect there'll always be purists who'd rather the
audience hear only their raw and naked voice. Using the
Guide Output, you can route your pitch corrected voice
to your monitor mix, while your audience hears no
correction effect from the Main Output.
Connecting and Enabling for Main/Monitor
Setup:
1. Connect your microphone to Correct's Mic Input.
2. Connect to your sound system as in diagram: Main
Output to your front-of-house sound system’s mic input,
and the Guide Output to your personal voice monitor,
or monitor mix channel.
3. Connect Correct's power adapter to main power
and to the Power Input on Correct.
18
Page 19

Setup Configurations
Sound Engineer Setup
If you are in a situation where a live sound engineer
mixes your vocal sound, there are some details you
should provide to them when working with VoiceTone
Correct:
1. Correct can supply phantom power if needed.
2. Sending external phantom power to Correct will
not harm the pedal, but will produce a pop sound when
power is turned on/off.
3. The Main Output is for front-of-house, the Guide
Output is for monitors only if the singer wants to hear
the pitch correction effect separately in the monitors.
4. Set your sound console’s EQ, and any outboard
dynamic processing gear to unity or bypass. Correct’s
Adaptive Shape EQ and compress features adapt to
vocals over a short time. Correct is designed with the
assumption that the overall sound system has a flat
response with no dynamics processing.
In the vast majority of cases, it won’t be necessary to
add any more EQ or compression. If extra processing is
desired, only add addtional EQ or compression after
Correct has been running for thir ty seconds, giving it
enough time to dynamically adjust to the singer's voice.
19
Page 20

Setup Configurations
Advanced Settings: Tuning Reference
If you know that the instruments you are singing with are
not tuned to A440, or you hear that your corrected
voice doesn’t sound in tune, then you need to change
Correct’s tuning reference.
1. Press and hold the Warmth, Shape, and Compress
Buttons simultaneoulsy as you plug the power adapter
into Correct. The Pitch On Light flashes to indicate you
are ready to change the tuning reference.
2. Plug your mic into the Mic Input and set the level as
in Step 8 of the Quick Start section.
3. Place the microphone near an instrument you know
to be in tune (piano, guitar, bass, etc.), and play any
monophonic pitch.
4. On the pitch display you’ll see how far the instrument
is out of tune from A440 on the top bar. As the note is
held, the bottom bar will show the tuning reference
20
change to correct it. When the two bars match, press
the Left Footswitch. Correct will enter regular mode
with the new tuning reference.
NOTE:
The tuning reference is reset to A440 the next time
power is removed from Correct.
Page 21

Setup Configurations
Advanced Settings: Manual Shape
The Shape EQ can either run in adaptive or manual
mode. Adaptive mode will function the vast majority of
the time to provide just the right amount of EQ for your
voice. Manual mode can be useful for applying
specialized EQ curves.
When the Shape Knob is turned fully left, there will be
no boost or cut. When it's turned fully right, there will
be a fixed amount of High Boost and Low Cut. The
maximum amount of High Boost and Low Cut can be
changed by following the steps below.
1. Press the Adaptive Shape Button to exit adaptive
mode (the Shape Button's light should be off).
2. Set the Shape Knob to 12 o'clock.
3. Press and Hold the Warmth and Adaptive Shape
buttons simultaneously for 2 seconds.
For the next 10 seconds, the pitch display meter will
change to indicate manual EQ settings. Only the leftmost four dots of the input and output display lines are
used. The Input line indicates High Boost while the
Output line indicates Low Cut.
High
Low
0dB
0dB
+4dB +8dB
-4dB -8dB
+12dB
-12dB
4.To change the High Boost or Low Cut, first make sure
you are viewing the manual settings using step 3. Press
the Warmth Button to cycle through High Boost settings
and the Shape Button to cycle through Low Cut settings.
You'll see the High Boost dot or Low Cut dot moving
from left to right as you press the respective button.
5. You can return to pitch view immediately by pressing
and holding the Warmth and Adapative Shape Buttons
for 2 seconds. Alternatively, if you make no changes for
10 seconds, Correct will return to manual shape mode.
21
Page 22

Using & Understanding the Effects
With all knobs set to 12 o'clock, Correct sounds great
in almost every situation. We've gone through a lot of
effort to see that it does.
The following sections in the manual will allow you to
get the best from Correct, as well as learn more about
what it takes to get a good vocal sound.
Using the Effects:
Use these sections to try out each effect in Correct to
hear the different qualities they give to your live vocal
performance. Connect Correct to your mic and the
mixer and set the input level as described in the Quick
Start section of the manual.
Understanding the Effects:
These sections discuss the major issues that can
compromise live vocal sound, what traditional steps are
taken to try to resolve the issues, and how Correct
solves the issues with its researched algorithms.
22
Page 23

Using the Effects: Adaptive EQ
Adaptive Shape EQ
Set up the product as follows:
Shape Control: 12 o’clock
Compress Control: off
De-Ess: off
Pitch: off
Warmth Button: off
Adaptive Shape Button: on
Adaptive Compress Button: on
Now try singing a song into Correct. The Adaptive
Shape EQ takes approximately 30 seconds to
completely adapt to your voice. While you’re singing
press the Right Footswitch to turn the LE effects on and
off.
What you’ll hear
In most cases, depending on the microphone used and
the timbre of your voice, the effect will make your voice
slightly brighter and less boomy. If you are using a good
mic, have really good mic technique, and have an
extremely well balanced timbre in your voice, you'll
barely perceive any change to the sound at all. For the
rest of us, you should hear a significant improvement in
both intelligibility and quality.
In Adaptive mode, turning the control down from center
will reduce the amount of Adaptive Shape EQ applied.
Turning past centre will intelligently add high frequencies
to make your voice sizzle with added presence, without
making it sound tinny.
Warmth Button
While you’re singing into Correct, tr y pressing the
Warmth Button. Since PA systems can vary in the
amount of low end they produce, this control adds
some additional low end when you need it.
Manual Shape
Press the Adaptive Shape Button to disable the adaptive
nature of the EQ. See Advance Settings: Manual Shape
section for using this mode.
23
Page 24

Using the Effects: Adaptive Compression
Adaptive Compression
Set up the product as follows:
Shape Control: 12 o’clock
Compress Control: 12 o’clock
De-Ess: off
Pitch: off
Warmth Button: off
Adaptive Shape Button: on
Adaptive Compress Button: on
Sing while turning the LE effects on and off.
What you’ll hear
Adaptive Compression is a tricky effect to perceive, but
will significantly help your voice stay balanced in a mix. It
smoothes your dynamics by increasing low levels and
decreasing the high levels of your voice. The more
compression you apply by turning the knob right of
centre, the smoother your voice will become. Without
compression it’s like singing directly into someone’s ear.
24
If you're having trouble hearing the effect, try singing
with an extreme dynamic range (very loud than
suddenly very soft) with the compress knob set at full.
Try toggling between LE effects on and off with the Right
Footswitch.
You should be able to hear what it’s doing now. Leaving
the Compress control at 12 o’clock should give optimal
results in most applications.Turning the Compress Knob
down from center will reduce the effect.
Manual Compress
Press the Adaptive Compress Button to turn the
adaptive nature of the compressor off. While set to
manual, the compressor works like a soft knee
compressor. To get the right sound you may need to
adjust your input level and the Compress Knob.
Page 25

Using the Effects: De-ess
De-ess
Set up the product as follows:
Shape Control: 12 o’clock
Compress Control: 12 o’clock
De-Ess: 12 o’clock
Pitch: off
Warmth Button: off
Adaptive Shape Button: on
Adaptive Compress Button: on
Sing or say words with lots of S's like "necessary" or
"sustenance" while turning the LE effects on and off.
What you’ll hear
At the center position you may or may not notice the
esses being reduced in level. With the LE effects on, sing
an ESSSSSS sound and try turning the De-ess control to
maximum. Now you'll hear the effect. The center
position results in a good balance of sibilance. With the
control at the center position you can turn up the Shape
Knob to add more sizzle to your voice with out making
the ess sounds excessively loud.
25
Page 26

Using the Effects: Pitch Correction
Pitch Correction
Set up the product as follows:
Pitch: 12 o’clock
Display Button: on
LE effect: on
Sing and toggle the Right Footswitch to turn pitch
correction on and off.
What you’ll hear
At this setting, Correct is optimized to produce
transparent sounding pitch correction as well as create
a comfortable pitch guide for you to sing with. The top
bar of the Pitch Display shows how far your input pitch
strays from its closest chromatic reference, while the
lower bar shows how much Correct is pulling your pitch
back in-tune. Try exaggerating the effect by turning the
Pitch Knob fully right. This position is only useful as a
special effect and to demonstrate what pitch correction
can do. For natural pitch correction that's comfortable
26
to sing with, keep the control between 10 and 2 o'clock.
When singing along with your corrected pitch, try to
sing the pitch that you hear. This will result in you selfcorrecting your pitch.
Dry to Guide
Press the Dry to Guide Button to hear your
uncorrected voice mixed with your pitch corrected
voice in the Guide Output. This can make it easier to
hear the pitch correction effect, especially in louder
situations.
Display
Press the Display Button to enable and disable the Pitch
Display. In rehearsal, coaching, or teaching, watching the
Pitch Display can provide valuable feedback.The top bar
shows your intonation. If the centre bar is lit, you are
singing exactly in tune. If the meter goes right or left of
centre, you are singing up to 50 cents sharp or flat of the
the closest chromatic pitch.The bottom bar shows how
much your voice is being corrected. If the display is
distracting in live performance you can disable it.
Page 27

Understanding Live Engineer Effects
What's the problem?
1. Dynamics
Vocals in music define the melody and the message in a
song. In professional studio recordings, vocals are always
clearly heard in the mix. In live situations, especially with
full bands, the vocals often get lost.
The human voice is very dynamic, meaning there can be
a very significant difference in volume between the
loudest and softest a person can sing. It's typical for a
singer's volume to vary by about 10dB. In terms of
sound energy, this means a person's loud singing can be
ten times louder than their soft signing. To get a good
mix where the vocal never gets lost during low levels, it
would be necessary to mix it such that the quietest
parts of the vocal are heard. If this was done, the loud
parts of the vocals would be excessively loud. As a
result, without dynamics processing, vocals in live sound
often "bounce" in and out of the mix.
2. EQ
If not treated properly, live vocals often sound:
- Muddy or woofy
- Tinny
- Lacking sizzle, presence or air.
These conditions have many contributing factors,
including the singer's voice. Some singers have lots of
bass in their voices (adds to muddiness) and some have
lots of energy in the upper-mids (adds to tinniness).
Muddiness also occurs as a result of the proximity effect
of cardioid pattern microphones. This occurs when the
microphone is positioned close to the sound source.
The proximity effect can add as much as 12dB to the
low end of a vocal sound.Another reason for muddiness
is the fact that frequencies are less directional as they get
lower. Low frequencies go everywhere while high
frequencies just go where the speakers are pointed. This
leads to far too much bass bouncing around the room.
27
Page 28

Understanding Live Engineer Effects
The best we can do to optimize clarity and intelligibility
while reducing muddiness is to intelligently limit low
frequencies without making them sound thin.
A vocal running into a PA without EQ usually sounds
quite dull. A sound engineer will often add high end to
give sizzle to the vocal using a two or three band EQ.
When you add a bit of high end with this type of EQ,
instead of adding sizzle it actually adds “tin”. With these
types of EQs you need to really crank the high end
before sizzle boost kicks in. Unfortunately this makes
the overall vocal sound much too bright.
To get more sizzle on a voice, people often turn the high
EQ past 3 o'clock, and then to compensate for the
excessive brightness, they then turn up the bass. This will
make the vocal sound somewhat spectrally balanced, but
unnatural and lacking detail. As well, turning up the bass
like this increases the low frequency energy of the vocals
and makes them sound extremely muddy everywhere
except directly in line with the PA speakers.
28
3. Excessive Sibilance
This is only a problem with some singers. It is when
"ess", "ch", "sh" and "t" sounds are too loud compared
with the overall vocal sound. With some singers this
sibilance can seem to almost rip your head off. This
natural sound of the singer coupled with the super
bright breathy EQ of a lot of today's pop music makes
the problem even more pronounced.
Page 29

Understanding Live Engineer Effects
Current ways of solving the problems
1. Dynamics
Fixing the problem of a vocal bouncing in and out of a
mix is usually done with something called compression.
Compression reduces the dynamic range of the audio
being processed. To make a compressor work optimally,
you need to match its operating range to the dynamic
range of the signal it's processing. In a musical
performance you usually have varying dynamics. You'll
have loud parts and quiet parts in the performance. If
the compressor is set up to work with the loud part of
a vocal performance, it won't do anything to the quiet
parts. If it’s set to work on the quiet parts, it will do way
too much on the loud parts, usually making the vocals
too quiet. For this reason, the only way to make
compression work well is if you have an experienced live
sound engineer monitoring the vocals at all times and
constantly adjusting the settings.
2. EQ
Previously, the only real way to fix EQ problems on
vocals is to have either out-board graphic or parametric
EQs, or a high end mixing console with multi-band
parametric EQ, and a good engineer who really knows
how to use it. It's simply not possible to do an optimal
job of EQ with just a standard mixing console, regardless
of how good the sound engineer is.
3. Sibilance
The best way to reduce unwanted sibilance is to buy an
adaptive de-esser. If you just get a regular De-esser, you'll
need a sound engineer to go along with it to make sure
it doesn't make you sound unnatural on loud passages.
29
Page 30

Understanding Live Engineer Effects
How Correct Solves the problems
1. Dynamics
Correct features a new kind of compression; Adaptive
Compression (Dynamic Smoothing™). This processing
does exactly what the name implies. It has been
designed to work optimally with a single voice input.
Over the course of a phrase, Adaptive Compression
will reduce your voice’s variance in levels. Whether your
performance is loud or soft, Correct will work to make
your vocals sit well in the mix and not bounce in and
out. On Correct all you need to do is set the Compress
Knob at its center position and make sure the Adaptive
Compress light is lit.
2. EQ
To solve this problem, Correct employs an Adaptive
Shape EQ that analyzes the input vocal and applies an
optimal digital EQ. To develop this technology, countless
pristine studio vocal recordings were analyzed. From
these analyses an algorithm was developed to
30
characterize the input vocal and apply the appropriate
EQ to approximately match the studio recordings. With
Correct, a male vocalist with a deep voice and a very
close mic technique will get the EQ needed, while a
female vocalist with a high voice, and farther mic
technique would get very different EQ, but again, exactly
as needed. The beauty of this is that you can plug in your
mic, tell the sound engineer to set your EQ to flat, and
just perform. The resulting EQ will probably be better
than anything you've ever had. Simply set the Shape
Knob to 12 o'clock, and make sure the Adaptive Shape
light is lit.
3. Sibilance
We've put an adaptive De-sser in Correct that
separately looks at the level of the overall voice and
makes sure the level of sibilance isn't too high. If it is, our
adaptive de-esser will reduce the sibilance level. Setting
the De-ess Knob to 12 o’clock will ensure that your
sibilance is in check.
Page 31

Understanding Pitch Correction
Getting comfortable with correction
No one likes the idea of needing pitch correction.
Everyone would much rather just sing in-tune. Correct
helps you do this. The reality is that no one ever sings
perfectly on pitch. This is not really a problem since it
isn't necessary to be perfectly in pitch to have a good
sounding vocal. In fact, natural pitch variances help make
singers who they are. Sounding like a robot is not the
goal.The goal is to sing in-tune at the end of a long set,
when you're tired, or just having a bad day. The goal is
to constantly improve your singing.
VoiceTone Correct can help.
The reasons for singing out of pitch are both a function
of physiology and psychology. A person's ability to hit a
desired pitch is affected by the way they hear the music
around them, coupled with their physical ability to
reproduce the pitch they want to sing. Pitch correction
most often occurs in the recording studio where the
pitch is corrected after a vocal is recorded.
When pitch correction is used live, the sound engineer
usually applies the correction to the mains and not the
monitors. In both cases, the ar tist doesn't hear the
corrected signal while they are singing. We've designed
Correct to be used differently. With Correct the singer
hears the corrected signal while they are singing. It
becomes a guide track. It's like being in a vocal duo and
singing unison with someone who sings in perfect pitch.
What happens is that the singer automatically selfcorrects their own voice to match Correct's pitch
corrected output. Sometimes, when pitch correction is
only applied at the mains, and a singer is singing flat, he
or she will keep singing flat. When using the Guide
Output on Correct, the singer immediately hears as they
stray out of tune, and can immediately compensate.
Even great singers, if they are not feeling well, or have
over-worked their voices, sometimes sing out of pitch.A
common tendency when this happens is for the singer
to tense up, which creates even more vocal strain. Using
Correct tends to relax people in these situations. Good
31
Page 32

Understand Pitch Correction
singers will often use Correct when they are having
trouble.
When pitch correction is only applied in the mains, what
often happens is that if the singer goes really off pitch,
the pitch corrector corrects to the wrong pitch. This
means that the pitch is actually more out than if it hadn't
been corrected in the first place.This is what has given
pitch correction a deservedly bad name for use in live
performance. By monitoring the Guide Output with
Correct, these problems completely disappear.
After using our pitch correction live for a while, some
users who admittedly had pitch problems reported that
their pitch had improved, even without using pitch
correction.
32
Page 33

FAQ & Troubleshooting
FAQ & Troubleshooting:
1. I'm not getting any sound out of Correct
a. Confirm the power adapter is properly connected
by pressing the Right Footswitch on/off, and confirming
the Correct On Light goes on/off.
b. Confirm your microphone is connected properly by
talking through the microphone and looking for the
Input Light to light green or orange. If the Input Light is
going on, check your connections and settings on your
sound system. If you have a condenser microphone,
ensure phantom power is enabled.
2. I'm not hearing any effect from Correct, just
my dry voice
a. If you’re using the Main Output, press the Right
Footswitch until the On Light activates. If there is still no
effect, ensure the Shape, Compress, and De-ess knobs
are at 12 o’clock. If you still hear no effect, try applying
more of each effect by turning the Shape, Compress
and De-ess Knobs further to the right.
b. If you’re using the the Guide Output check to make
sure the Pitch Knob is at 12 o’clock. If you still hear no
effect, your voice may be close enough in-tune that pitch
correction at the 12 o'clock setting has little effect. Try
turning the Pitch Knob further to the right to hear more
aggressive pitch correction.
3. I can’t turn pitch correction off.
a. Check if you are using the Guide Output. If so, the
only way to turn the pitch correction off is by turning
the Pitch Knob fully left.
b. If you are using the Main Output turn pitch
correction off by toggling the Left Footswitch.
Alternatively, you can also turn the Pitch Knob fully left.
However, this will also turn the pitch correction off in
the Guide Output.
33
Page 34

FAQ & Troubleshooting
4. My corrected voice sounds out of tune
a. It’s possible that the tuning reference of the
instruments you are singing with are not tuned to the
default setting of A440. Please see the Setup
Configuration, Advance Settings: Tuning Reference
section to change the tuning reference.
34
Page 35

Specifications
Analog Inputs
Connectors Balanced XLR, Input Impedance 1kOhm
Mic Input Sensitivity @ 0dBFS -44dBu to +2dBu
Mic Input Sensitivity @ 12dB headroom -56dBu to -10dBu
EIN -128dBu @ max. mic amp gain, Rg = 150 Ohm
Analog Outputs
Connectors Balanced XLR
Output Impedance 40 Ohm
Output Level @ 0dBFS +2dBu
Input to Output Analog Audio Performance
Dynamic Range, Mic. @ Min gain >108dB, 20 Hz - 20kHz *A-weighted
Dynamic Range, Mic. @ -18dBu sensitivity > 104dB, 20hz - 20kHz*
THD+ Noise, Mic. @ Min gain <-90dB
Frequency Response, max gain -1.5dB @ 40 Hz, +0/-0.3 dB (200Hz
to 20 kHz)
Conversion Characteristics
Sample Rate 48 kHz, Converter AKM AK4620B
AD / DA Conversion 24 bit, 128x oversampling bitstream
EMC & Safety
Complies with EN 55103-1 and EN
55103-2 FCC part 15, Class B, CISPR 22,
Class B
Certified to IEC 65, EN 60065, UL6500
and CSA E60065 CSA FILE #LR108093
Environment
Operating Temperature 32° F to 122° F
(0° C to 50° C)
Storage Temperature -22° F to 167° F (30° C to 70° C)
Humidity Max. 90 % non-condensing
Supplementary
Dimensions 130mm x 132mm x 41mm
(5" x 5.25" x 1.5")
Weight 1.5 lb. (0.72 kg)
Warranty Parts and labor 1 year
35
 Loading...