

TC electronic Konnekt 24D, Konnekt 8 Owner's Manual
User’s Manual
English Version
Konnekt 24D
Konnekt 8

1 Read these instructions.
2 Keep these instructions.
3 Heed all warnings.
4 Follow all instructions.
5 Do not use this apparatus near water.
6 Clean only with dry cloth.
7 Do not block any ventilation openings. Install in accordance
with the manufacturer's instructions.
8 Do not install near any heat sources such as radiators, heat
registers, stoves, or other apparatus (including amplifiers)
that produce heat.
9 Do not defeat the safety purpose of the polarized or
grounding-type plug. A polarized plug has two blades with
one wider than the other. A grounding type plug has two
blades and a third grounding prong. The wide blade or the
third prong are provided for your safety. If the provided plug
does not fit into your outlet, consult an electrician for
replacement of the obsolete outlet.
10 Protect the power cord from being walked on or pinched
particularly at plugs, convenience receptacles, and the point
where they exit from the apparatus.
11 Only use attachments/accessories specified by the
manufacturer.
12 Use only with the cart, stand, tripod, bracket, or
table specified by the manufacturer, or sold with the
apparatus. When a cart is used, use caution when
moving the cart/apparatus combination to avoid
injury from tip-over.
13 Unplug this apparatus during lightning storms or when
unused for long periods of time.
14 Refer all servicing to qualified service personnel. Servicing
is required when the apparatus has been damaged in any
way, such as cord or plug is damaged, liquid has been
spilled or objects have fallen into the apparatus, the
apparatus has been exposed to rain or moisture, does not
operate normally, or has been dropped.
• This equipment should be installed near the socket
outlet and disconnection of the device should be easily
accessible.
• To completely disconnect from AC mains, disconnect the
power supply cord from the AC receptacle.
• The mains plug of the power supply shall remain readily
operable.
• Do not install in a confined space.
• Do not open the unit – risk of electric shock inside.
Caution:
You are cautioned that any change or modifications not
expressly approved in this manual could void your authority to
operate this equipment.
Service
• There are no user-serviceable parts inside.
• All service must be performed by qualified personnel.
Warning!
• To reduce the risk of fire or electrical shock, do not expose
this equipment to dripping or splashing and ensure that no
objects filled with liquids, such as vases, are placed on the
equipment.
• This apparatus must be earthed.
• Use a three wire grounding type line cord like the one
supplied with the product.
• Be advised that different operating voltages require the use
of different types of line cord and attachment plugs.
• Check the voltage in your area and use the correct type.
See table below:
Voltage Line plug according to standard
110-125V UL817 and CSA C22.2 no 42.
220-230V CEE 7 page VII, SR section
107-2-D1/IEC 83 page C4.
240V BS 1363 of 1984.
Specification for 13A fused
plugs and switched and
unswitched socket outlets.
The lightning flash with an arrowhead symbol within
an equilateral triangle is intended to alert the user to
the presence of uninsulated “dangerous voltage”
within the product's enclosure that may be of sufficient
magnitude to constitute a risk of electric shock to persons.
The exclamation point within an equilateral triangle is
intended to alert the user to the presence of important
operating and maintenance (servicing) instructions in
the literature accompanying the product.
IMPORTANT SAFETY INSTRUCTIONS
a

EMC/EMI
This equipment has been tested and found to comply
with the limits for a Class B Digital device, pursuant to
part 15 of the FCC rules.
These limits are designed to provide reasonable
protection against harmful interference in residential
installations. This equipment generates, uses and can
radiate radio frequency energy and, if not installed and
used in accordance with the instructions, may cause
harmful interference to radio communications. However,
there is no guarantee that interference will not occur in a
particular installation. If this equipment does cause
harmful interference to radio or television reception,
which can be determined by turning the equipment off
and on. The user is encouraged to try to correct the
interference by one or more of the following measures:
• Reorient or relocate the receiving antenna.
• Increase the separation between the equipment and
receiver.
• Connect the equipment into an outlet on a circuit
different from that to which the receiver is connected.
• Consult the dealer or an experienced radio/TV
technician for help.
For Customers in Canada:
This Class B digital apparatus complies with Canadian
ICES-003.
Cet appareil numérique de la classe B est conforme à la
norme NMB-003 du Canada.
Certificate of Conformity
TC Electronic A/S, Sindalsvej 34, 8240
Risskov, Denmark, hereby declares on own
responsibility that the following product:
Konnekt 24D & Konnekt 8
that is covered by this certificate and
marked with CE-label conforms with
following standards:
EN 60065 Safety requirements for mains
(IEC 60065) operated electronic and
related apparatus for household
and similar general use
EN 55103-1 Product family standard for
audio,video, audio-visual and
entertainment lighting control
apparatus for professional
use. Part 1: Emission.
EN 55103-2 Product family standard for
audio, video, audio-visual and
entertainment lighting control
apparatus for professional
use. Part 2: Immunity.
With reference to regulations in following
directives:
73/23/EEC, 89/336/EEC
Issued in Risskov, August 2006
Mads Peter Lübeck
Chief Executive Officer
EMC / EMI & CERTIFICATE OF CONFORMITY
b

TC Electronic, Sindalsvej 34, DK-8240 Risskov – tcdk@tcelectronic.com Manual revision 1.7 – SW – V 1.20English Version
INTRODUCTION
Safety Instructions . . . . . . . . . . . . . . . . . . . . . . .a
EMC/EMI & Certificate of Conformity . . . . . . . . .b
Table of contents . . . . . . . . . . . . . . . . . . . . . . . . .3
Introduction . . . . . . . . . . . . . . . . . . . . . . . . . . . . .4
Konnekt 24D / Konnekt 8 compare chart . . . . . .5
Quick Setup guide . . . . . . . . . . . . . . . . . . . . . . .6
Konnekt and Cubase . . . . . . . . . . . . . . . . . . . . .7
Fabrik R & Fabrik C as VST plug-ins . . . . . . . . .8
OVERVIEW
Front panel - Konnekt 24D . . . . . . . . . . . . . . . .10
Bus-power notes . . . . . . . . . . . . . . . . . . . . . . . .13
Rear panel - Konnekt 24D . . . . . . . . . . . . . . . .14
Front panel - Konnekt 8 . . . . . . . . . . . . . . . . . .15
Rear panel - Konnekt 8 . . . . . . . . . . . . . . . . . . .15
SETUP EXAMPLES
Studio . . . . . . . . . . . . . . . . . . . . . . . . . . . . . . . .16
Mobile . . . . . . . . . . . . . . . . . . . . . . . . . . . . . . . .18
Live . . . . . . . . . . . . . . . . . . . . . . . . . . . . . . . . . .19
Stand Alone . . . . . . . . . . . . . . . . . . . . . . . . . . . .20
Multiple Konnekts . . . . . . . . . . . . . . . . . . . . . . .21
CONTROL P
ANEL
Mixer Page . . . . . . . . . . . . . . . . . . . . . . . . . . . .22
Setup Page . . . . . . . . . . . . . . . . . . . . . . . . . . . .26
DSP Effects settings . . . . . . . . . . . . . . . . . . . . .30
Routing modes . . . . . . . . . . . . . . . . . . . . . . . . .31
- examples Cubase LE . . . . . . . . . . . . . . . . . . .31
- examples Cubase SX . . . . . . . . . . . . . . . . . . .34
Konnekt WDM driver . . . . . . . . . . . . . . . . . . . . .33
System Settings . . . . . . . . . . . . . . . . . . . . . . . .34
Update Firmware . . . . . . . . . . . . . . . . . . . . . . .37
Reset to Default . . . . . . . . . . . . . . . . . . . . . . . .39
Fabrik C . . . . . . . . . . . . . . . . . . . . . . . . . . . . . .38
Fabrik R . . . . . . . . . . . . . . . . . . . . . . . . . . . . . .50
The Konnekt Tuner . . . . . . . . . . . . . . . . . . . . . .56
APPENDIX
Signal Flow Konnekt 24D . . . . . . . . . . . . . . . . .58
Signal Flow Konnekt 8 . . . . . . . . . . . . . . . . . . .59
Appendix ASIO channel names Konnekt 8 . . .60
Appendix ASIO channel names Konnekt 24D .61
FAQ . . . . . . . . . . . . . . . . . . . . . . . . . . . . . . . . . .62
Shortcut keys . . . . . . . . . . . . . . . . . . . . . . . . . .62
DICE background . . . . . . . . . . . . . . . . . . . . . . .62
Technical Specifications . . . . . . . . . . . . . . . . . .63
TABLE OF CONTENTS
3

4
INTRODUCTION
Congratulations on your purchase of the Konnekt 24D / Konnekt 8
Konnekt 24D is a groundbreaking audio interface that integrates TC's world famous effects in a state-of-the-art design. It is
designed for recording and performing musicians who want the highest possible sound quality from input, through built-in
real-time effects, to the recording application.
Two combo inputs on the front panel combine outstanding mic pre-amp quality with true Hi-Z guitar optimized inputs. The
light ring gives you easy access, instant control and visual feedback on important parameters directly from the front panel.
You can stack up to four Konnekts together using TC NEAR™ – Network Expandable Audio Recording – to obtain a
massive amount of I/O and effects channels. If you are working with active monitors, you'll be delighted with the analog
volume control that ensures a wide dynamic range. Dual headphone outputs are convenient when you’re two in studio and
one of the headphone outputs comes with an auto speaker muting function. If you don't need all the I/O or the DSP
effects, choose Konnekt 8, which is a non-DSP version of Konnekt 24D with less I/O.
The Fabrik C channel strip and Fabrik R reverb known from TC's PowerCore platform are built into the Konnekt 24D and
they work even when the unit is used in stand-alone mode.
Konnekt 24D also includes Assimilator Konnekt which is an extremely powerful equalization tool that “learns” the
frequency curve of one piece of audio so it can be applied to another audio file - Ideal for analyzing and copying EQ
curves of individual instruments, voices or reference mixes. It truly shines when applied to align the frequency response of
different tracks recorded at different times compiled to appear on the same album.
One manual for both Konnekt 24D and Konnekt 8
This manual covers both Konnekt 24D and Konnekt 8. Konnekt 8 has the exact same high quality as Konnekt 24D but
with less I/O options and no effects processing (Fabrik C, Fabrik R and Assimilator). Features that are omitted in Konnekt
8 are generally marked with “Konnekt 24D only”. We urge you to look at the product compare chart on page 5.
The screenshots in the manual derive from Konnekt 24D.
Should this manual leave any of your questions unanswered, please use the TC Support service, which you can access
via our website www.tcelectronic.com.
Over a period of time, we will collect the most frequently asked questions and
update the manual accordingly. Manual updates are available for download
from our website in PDF format.
Support for Cubase LE
Please search answers via http://www.steinberg.net/knowledgebase
or http://www.cubase.net
Upgrades are available from: http://www.steinberg.net/cubaseLEupgrade

5
KONNEKT 24D & KONNEKT 8 - FEATURE COMPARE CHART
Konnekt 24D
• Outstanding IMPACT™ mic pre-amps
• True Hi-Z guitar inputs – dedicated circuits for guitar
and bass
• Front panel control of internal mixer parameters
• Analog volume control for perfect integration with
powered speakers
• Network up to 4 units via the TC NEAR™ 1394
FireWire based network to get more inputs, outputs
and effects channels
• Full feature direct monitoring – With effects and also
between networked units
• Intuitive control panel with automatic input detection
• 3 DSP programs for total recall of internal routing,
mixer and effects settings
• FireWire bus powered
• DICEII digital interface chip with JETtm Jitter
Elimination Technology
• Low latency drivers: WDM, ASIO and CoreAudio
(including Intel Macs)
• Dual headphone outputs, one with auto speaker
muting
• 24-bit/192kHz sampling rate
• Sample accurate MIDI
• 14/14 I/O: 2 mic/inst/line, 2 line inputs and 4 line
outputs, 8 ADAT and 2 S/PDIF (optical and
coaxial) inputs and outputs
• Cubase LE included
• Built-in Tuner displayed both via TC Near Control
panel and front panel lightring
• Built-in real-time DSP effects; Fabrik R reverb and
Fabrik C channel strip based on MINT™
Fabrik Plug-ins also integrate as VST plug-ins
• Assimilator Konnekt Native Fingerprint EQ
Konnekt 8
• Outstanding IMPACT™ mic pre-amps
• True Hi-Z guitar inputs – dedicated circuits for guitar
and bass
• Front panel control of internal mixer parameters
• Analog volume control for perfect integration with
powered speakers
• Network up to 4 units via the TC NEAR™ 1394
FireWire based network to get more inputs and
outputs.
• Direct monitoring
• Intuitive control panel with automatic input detection
• FireWire bus powered
• DICEII digital interface chip with JETtm Jitter
Elimination Technology
• Low latency drivers: WDM, ASIO and CoreAudio
(including Intel Macs)
• Dual headphone outputs, one with auto speaker
muting
• 24-bit/192kHz sampling rate
• Sample accurate MIDI
• 4/4 I/O: 2 mic/inst/line, 2 line inputs (AUX) and 2 line
outputs, 2 S/PDIF (coaxial) inputs and outputs
• Cubase LE included

66
Up and running in 10 minutes
This quick-guide will help you set up the Konnekt in
a typical application. For further details please refer
to later sections of this manual.
Unpacking
• Open the box from the top and remove cabling.
• Lift out styrofoam insert, then using both hands lift out
Konnekt.
• Remove plastic bag from Konnekt.
• Inspect your Konnekt for signs of transit damage.
• In the unlikely event of this having occurred, inform
the carrier and the supplier.
• Keep all the packaging if damage has occurred, as
this will show evidence of excessive handling force.
• It is also a good idea to keep the packaging if
possible for future transportation.
Check contents
The package should contain the following items:
• Konnekt audio interface
• Power supply
• FireWire cable
• CD with software etc.
• Safety Instructions
Computer Requirements
Mac OS
• PowerPC (1 GHz or higher) or Intel CPU
• 256 MB RAM
• FireWire (IEEE 1394) port
• OS X 10.3.9
Windows
• Pentium 4, 1.6 GHz or faster
• 256 MB RAM
• FireWire (IEEE 1394) port
• Windows XP
* We recommend running Konnekts on a dedicated FireWire bus.
If your computer has one or more FireWire connections on the
chassis they will typically run on the same FireWire bus. You may
connect the Konnekt to one of these. If you intend to run more
FireWire devices simultaneously, such as e.g. an external hard drive,
we recommend running this device on a separate bus.
This would typically be on an installed FireWire PCI card. Note that
such a FireWire PCI card typically has 3 ports but these also operate
on a single bus.
Software installation
• We recommend installing the software before
connecting the Konnekt.
• Refer to the Konnekt Installation Guide supplied in
the package and on the Konnekt CD.
• If you are familiar with software installation
procedures in general you may simply insert the
accompanying CD-ROM in your computer’s CD drive
and follow the instructions.
TC Near control panel
If Konnekt drivers are installed correctly you are able to
open the TCNear control panel.
On W
indows computers:
Press: Start/Programs/TC Electronic/TC Near
The TC Near can also be accessed via the Windows
Control panel.
On Mac computers:
/Applications/TC Near
You may also start the application from System
Preferences.
QUICK SETUP GUIDE
Konnekt and Cubase
Cubase LE is delivered with Konnekt. If you choose to
use Cubase as your host application you can follow this
short guide to setup Konnekt with Cubase.
TC ELECTRONIC does not
support Cubase.
Please refer to the Cubase manual for general
and detailed information.
77
QUICK SETUP GUIDE
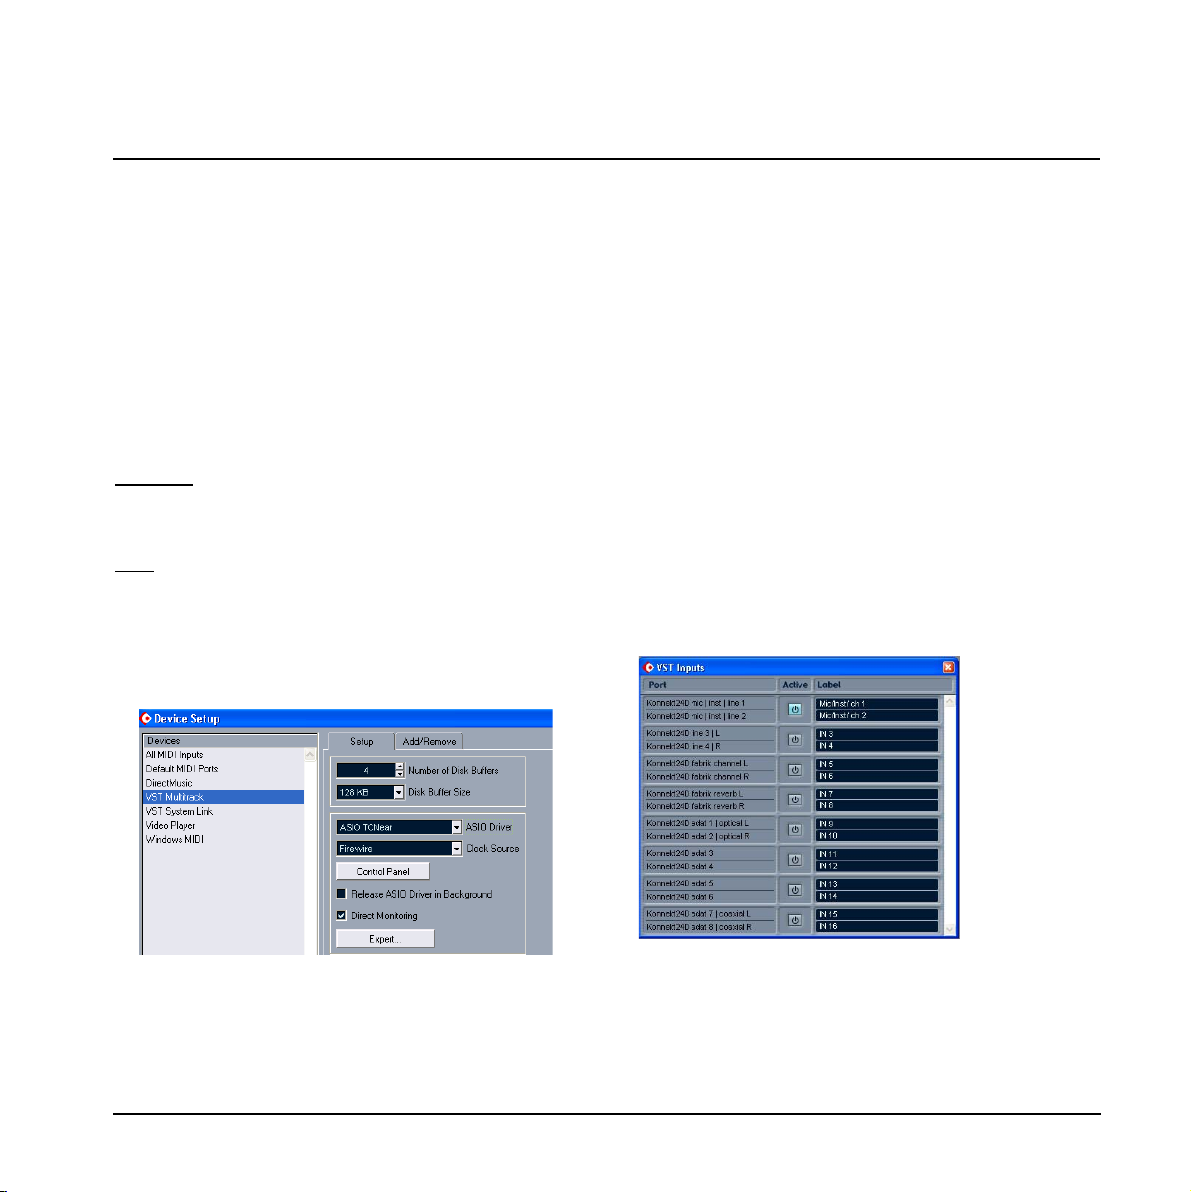
• Select “VST Multitrack” in the left column
• Select “ASIO TCNear” as Master ASIO Driver via the
drop-down menu in the right side of the display.
• Click OK
Cubase Project examples
• Create a new empty project.
• Go to Devices - VST Inputs
In this menu you can activate/deactivate the Konnekt
inputs and also label these for your own convenience.
ASIO channel names / Port
The left column describes the physical input ports on
Konnekt. The center column holds on/off buttons for the
inputs. In the right column you are able to assign a name
of your choice to each input. Depending on the selected
sample rate there are limitations on available digital
channels. Please refer to the appendix section to see the
ASIO channel names and distribution.
In Cubase LE for Macintosh the VST inputs are not
named automatically. However, you may enter channel
names of you choice. For Konnekt 24D we suggest using
the names as they appear in the screenshot above.
Cubase Installation
In the following we assume that you have already
followed the Konnekt Installation Guide.
• Close all running applications.
• Insert the Konnekt CD ROM in your CD rom drive.
• The Konnekt Installer most likely opens automatically.
• Close the application as we assume you have
previously followed the Installer once.
• Browse the CD and click on the Cubase_LE_setup.exe file
located in the Cubase LE folder.
• Follow the installation procedure to install Cubase.
W
indows: - During the installation procedure you will be
asked to enter a serial number. This number is found on the
CD label.
Mac:
- Unlike the Windows installation procedure, it is not
required to enter any serial number.
Selecting Konnekt as your audio interface in Cubase
• Open Cubase.
• Go to Devices - Device Setup
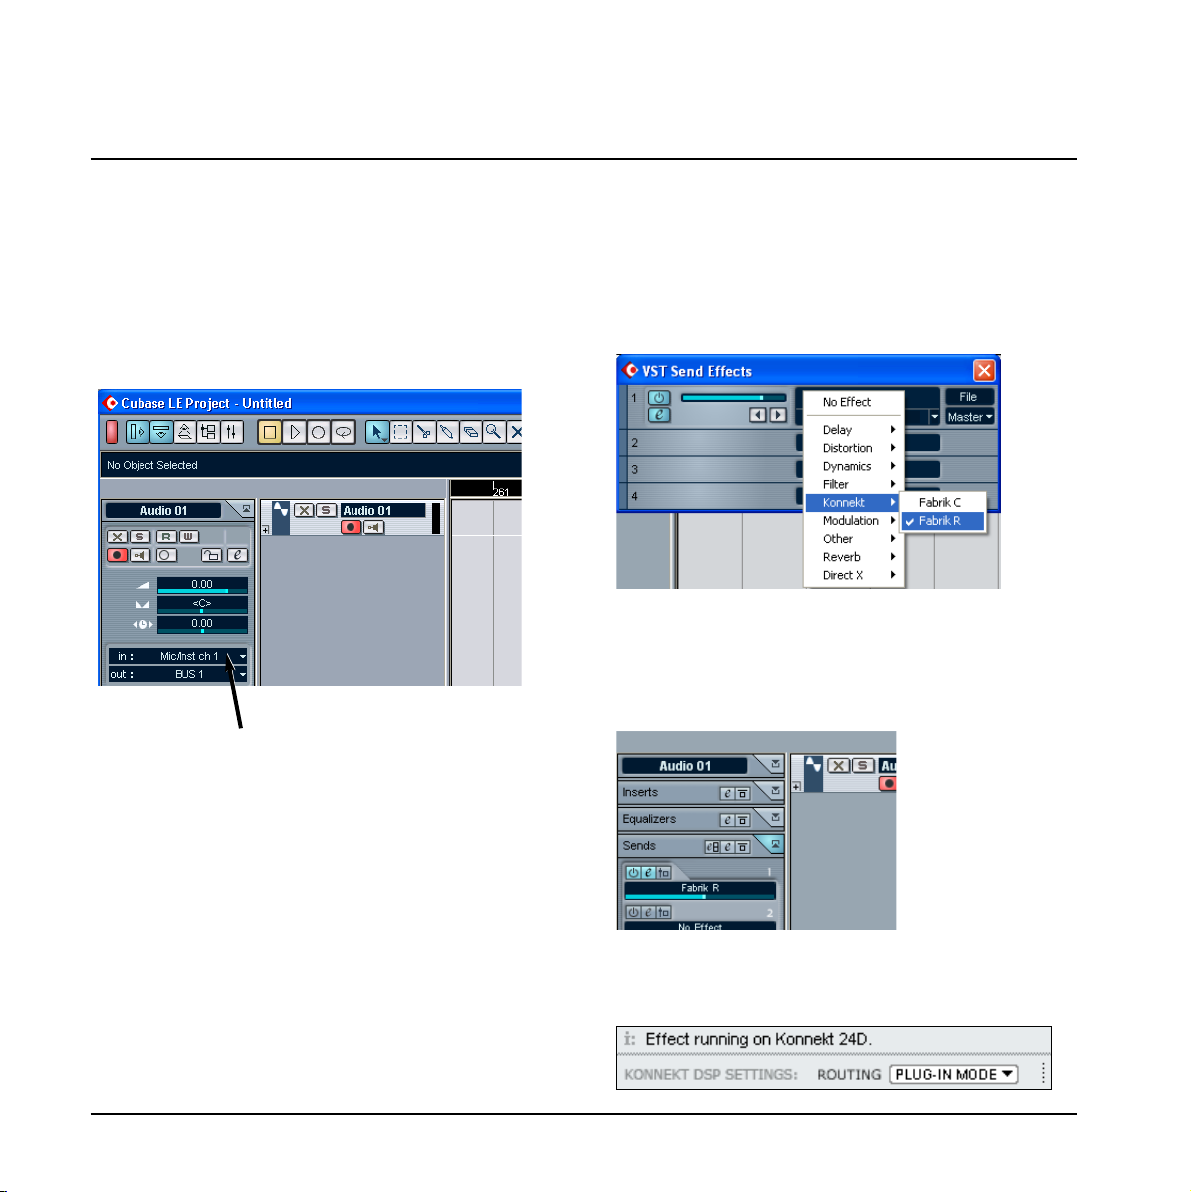
In the example on the previous page we have labeled the
two front panel inputs: “Mic/Inst ch 1” and “Mic/Inst ch 2”.
We have also activated those inputs by pressing the
“power-button”.
• Exit the VST Inputs menu.
• Create an audio track via:
“Project - Add track - audio”
Now you need to select the input and output for that
track.
• Click on the “in field” as illustrated above. Now select
one of the inputs that we earlier setup in the VST
Inputs menu. E.g. “Mic/Inst ch 1”.
• Unless you have changed the default settings for the
output busses the “out” is set to “BUS 1”. Leave it.
You can now record via the Konnekt front panel inputs
and playback via the Main outs.
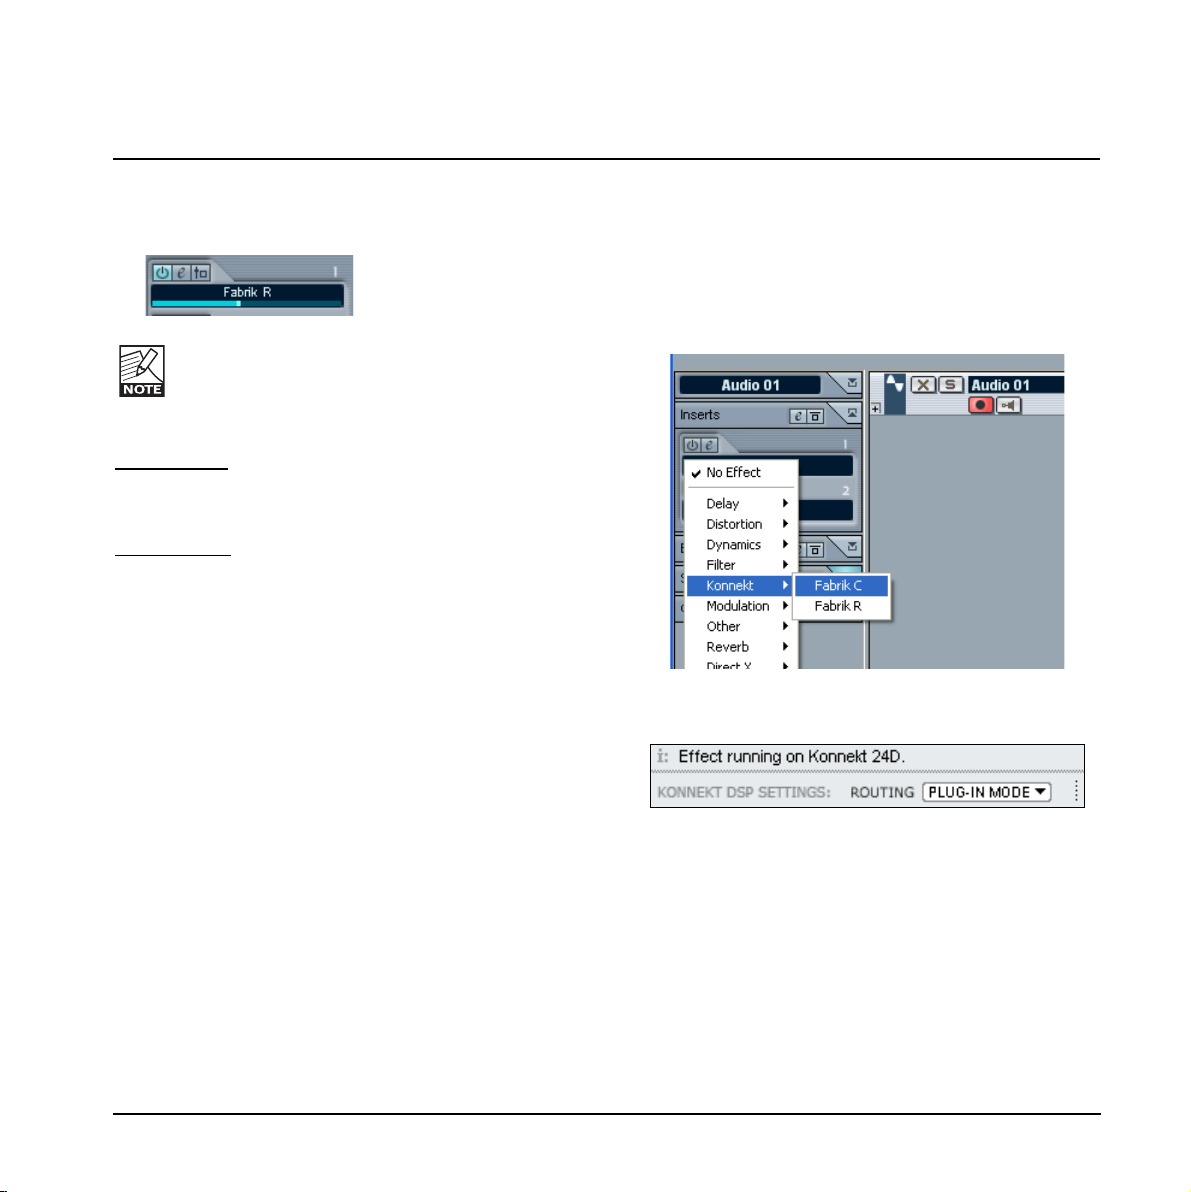
Fabrik R as VST send effect
The following example illustrates how Fabrik R is set up
as a send effect using Cubase LE. This procedure varies
slightly compared to higher versions of Cubase.
• Go to: Devices/VST Send effects.
• Select Fabrik R from the Konnekt folder.
• Now go to send effects, select and activate Fabrik R
if it isn’t already and use the slider to send to Fabrik R.
Go to the Fabrik R plug-in by pressing the “e”.
Select Plug-In routing mode for Fabrik R via the dropdown menu in the bottom of the Plug-In display. *)
QUICK SETUP GUIDE
8
QUICK SETUP GUIDE
9
• Now use the slider to send signal from the channel to
Fabrik R.
Activate the Fabrik R killdry function via the Fabrik
R page in the TC Near control panel.
*) Plug-In mode or Internal mode.
Plug-In mode
- is the mode to use when you are using
Fabrik R as a send or return effect from your host
application. In this example - Cubase.
Internal mode
- is the mode to use if you are using
Fabrik plug-ins from the TC Near Control panel.
Fabrik C as VST insert effect
The following example illustrates how Fabrik C is set up
as an insert effect using Cubase LE.
• Select the track on which you wish to insert Fabrik C.
• Select Fabrik C as insert effect.
• Select Plug-In mode for the Fabrik C plug-in.
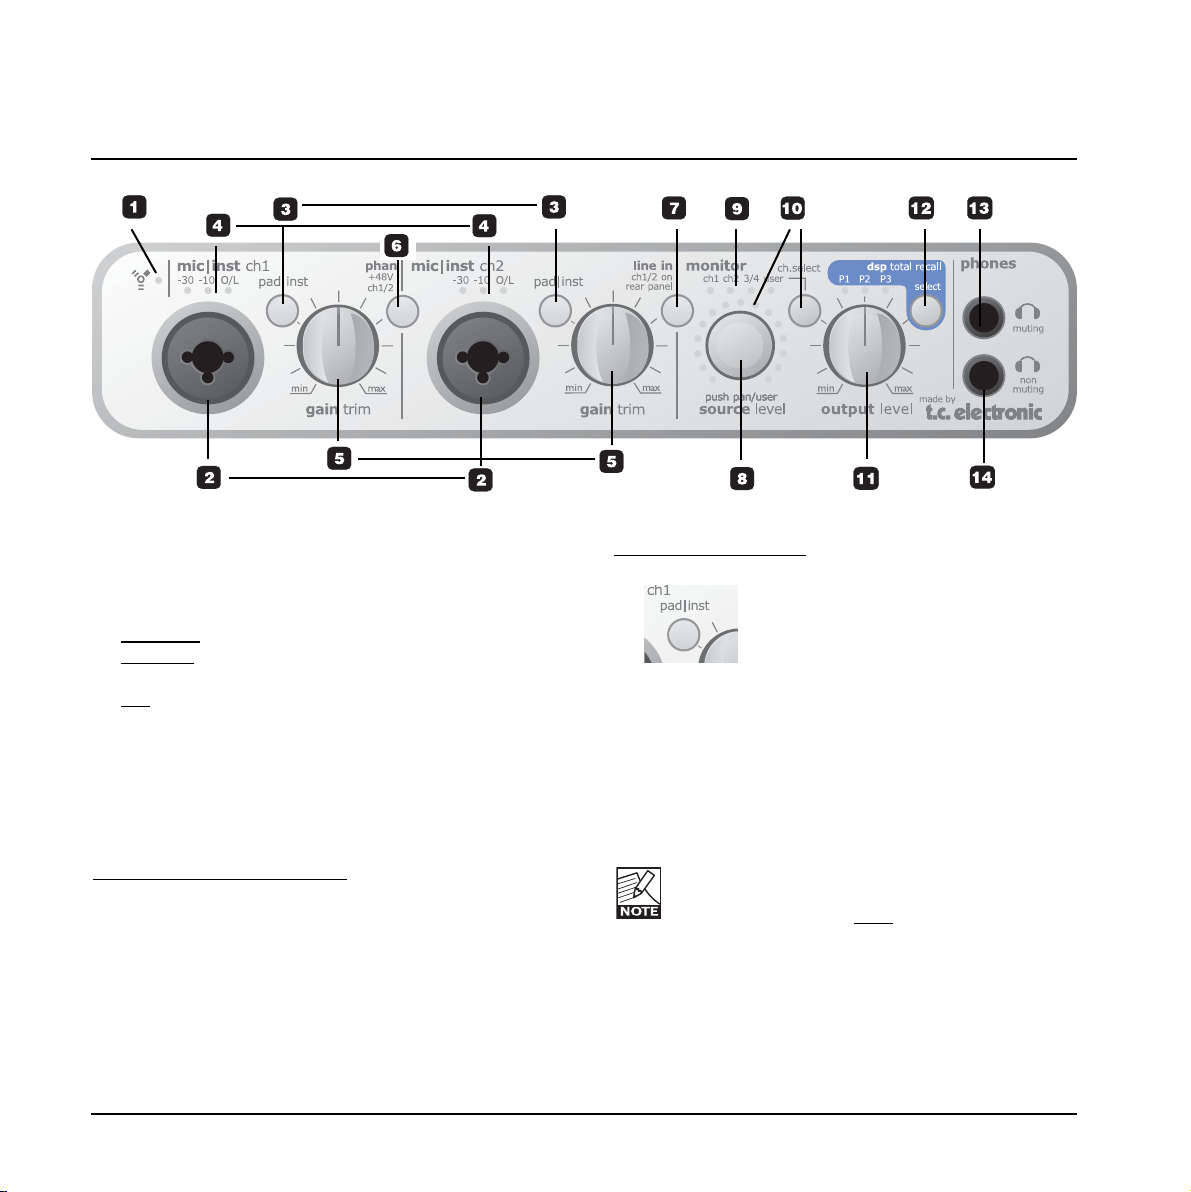
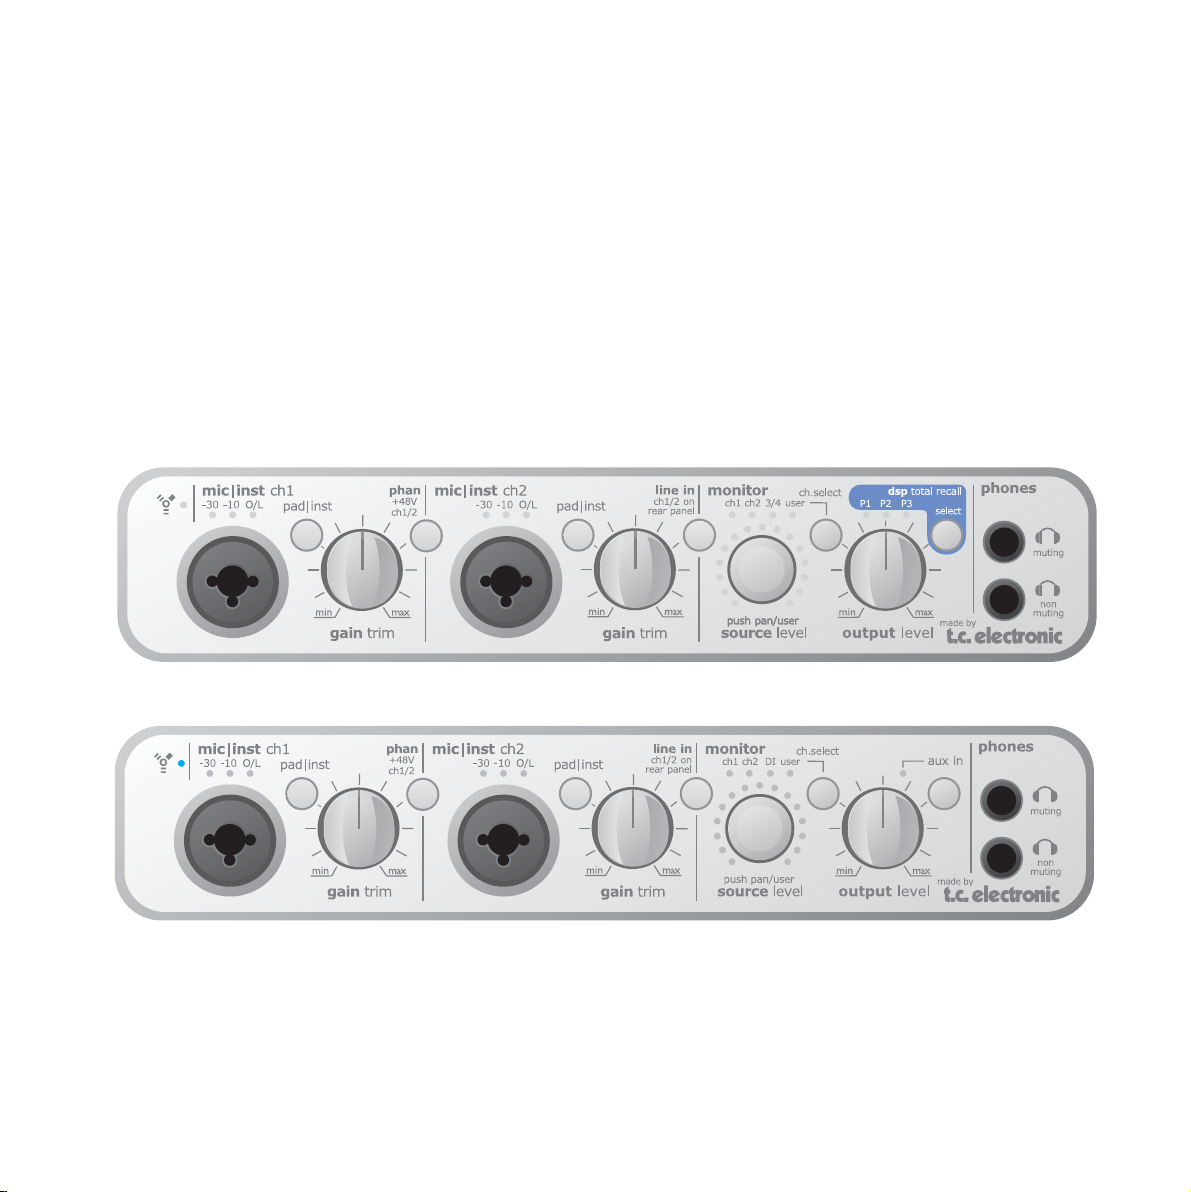
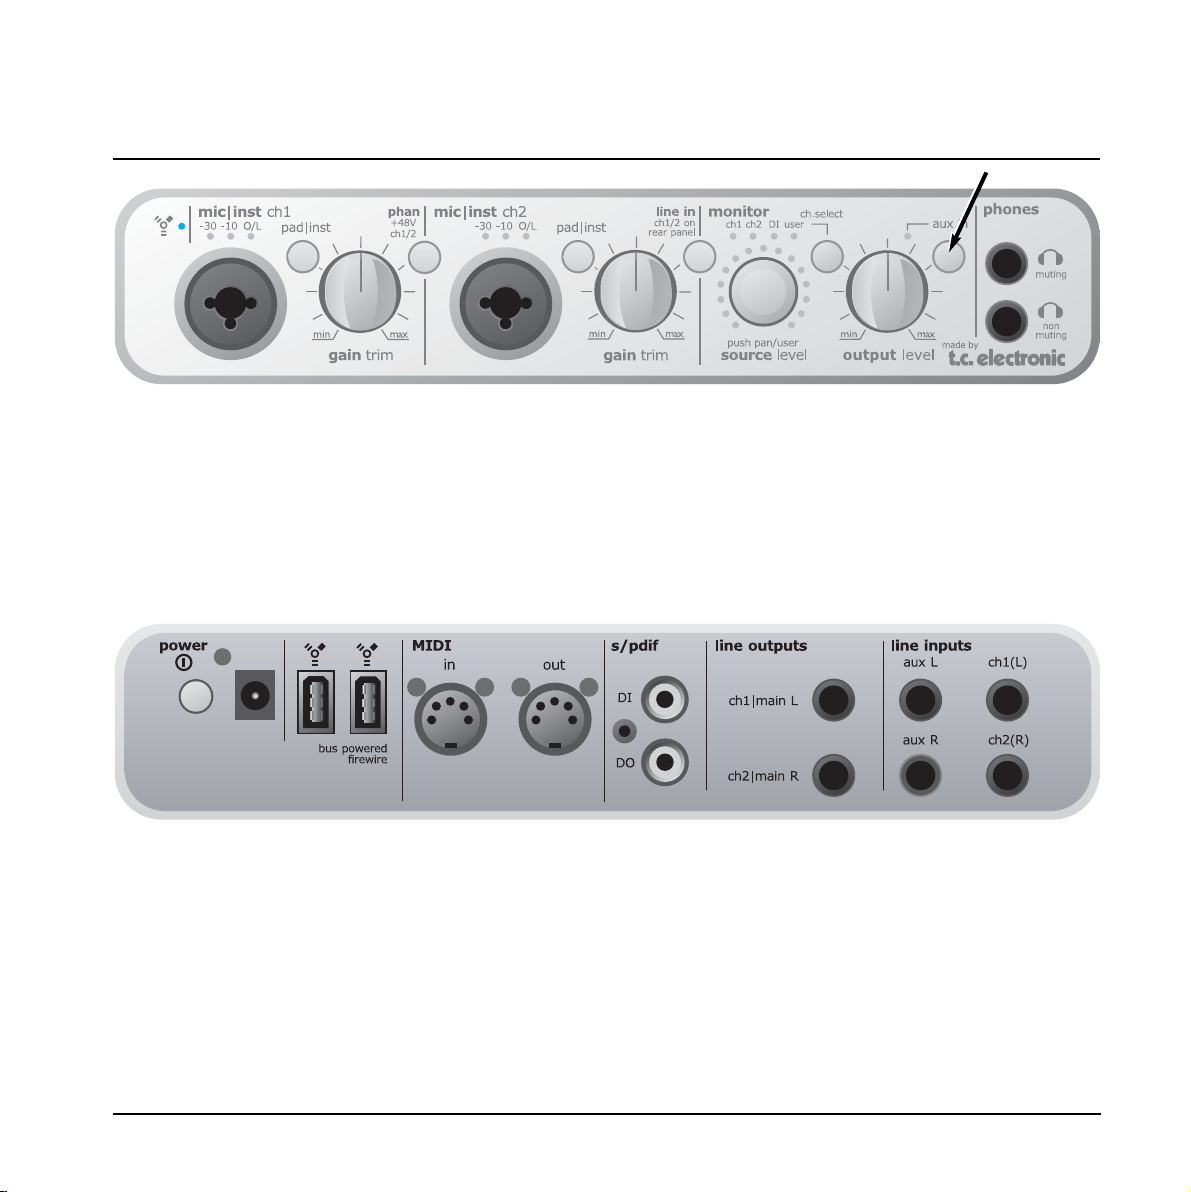
1 FireWire/Power LED indicator
When Konnekt is hooked up via FireWire the blue
LED can indicate the following:
S
teady lit: Sufficient power
Flashing:
Uploading firmware, hardware error or
FireWire communication error.
Off: The Konnekt has no connection to the
driver, maybe because the driver is not
installed.
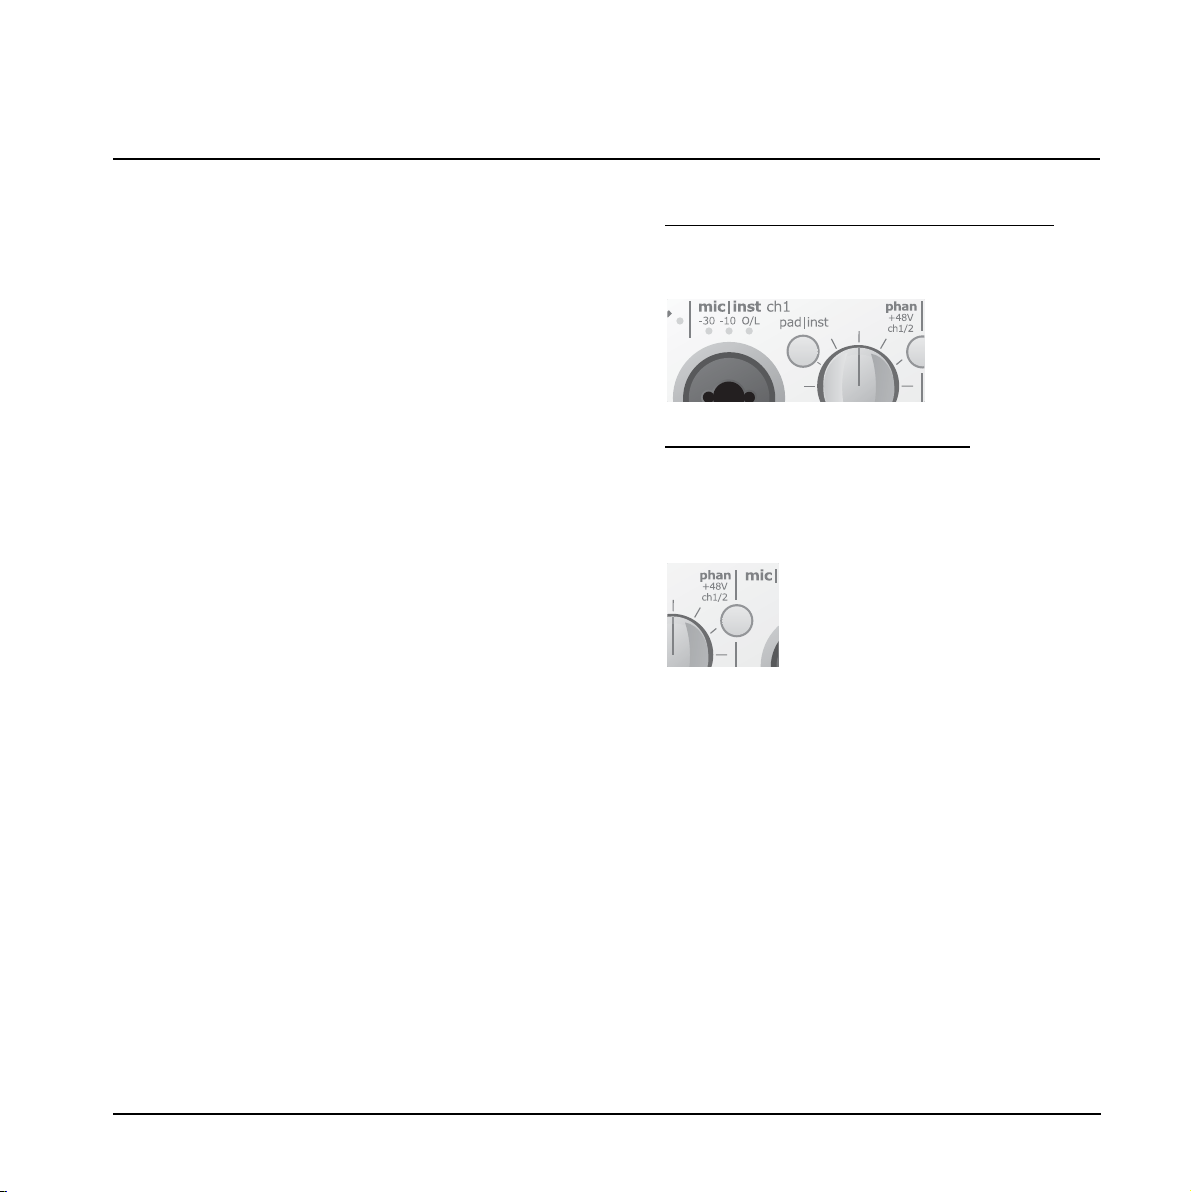
2 Mic/Inst ch1/ch2 on Combo XLR/Jack
Combo XLR/Jack inputs. Both XLR and 1/4 inch jack
can be used with this connector.
The XLR connection (balanced)
Connect a microphone and your signal is processed via
the IMPACT™ mic pre-amps.
- For condenser microphones activate phantom power.
See also (6) on the following page.
- The Input LEDs (4) indicate the level of the input
signal. If the red O/L LED is lit your signal is too “hot”
and you should press “PAD/INST” to attenuate the
signal by 20dB.
The 1/4 jack connection
- Press PAD/INST to activate this circuit.
The 1/4 “jack part” of the connector is a high quality Hi-Z
circuit that is designed especially for connecting a
passive guitar pick-up system (e.g. Strat-type) directly.
The jack inputs on the front panel are unbalanced. If you
wish to connect balanced equipment using TRS jacks
you should connect via the line inputs on the rear panel.
Important!
If you use the 1/4 jack part of the Combo jack/xlr
connection PAD/INST must
be set to “in” position.
3 Pad/Inst selectors
The PAD/INSTRUMENT selector can attenuate the
input sensitivity by 20dB on the XLR section of the
connector. If you cannot attenuate the signal
sufficiently using the GAIN/TRIM knob you should
use the -20 position. This is typical when connecting
line-level instruments.
FRONT PANEL OVERVIEW - KONNEKT 24D
10

FRONT PANEL OVERVIEW - KONNEKT 24D
11
4 Input LEDs
Three input level indicators. -30dB, -10dB and 0dB.
First adjust the Gain Trim so the 0dB LED is only lit at
absolute peaks. Then reduce the Gain Trim slightly
so the 0dB LED is never lit.
5 Gain/Trim
Use this control to set the appropriate input level.
(see previous paragraph)
6 Phantom Power +48v
The XLR part of the Combo XLR/Jack connections
features +48 phantom power when this switch is
pressed. Phantom power is used to power linedrivers and condenser microphones.
There are three main types of microphones.
Condenser microphones - phantom power required
except for some models that use proprietary power
supplies or built-in batteries. Please check the
microphone's manufacturer specifications for details.
Electrodynamic microphones
- phantom power is not
required but does no harm to the microphone.
Ribbon microphones
- phantom power could
damage the microphone. Search advice from the
manufacturer of the microphone!
Only the condenser type requires phantom power.
It is however no problem combining a condenser
microphone in e.g. ch. 1, with a standard
electrodynamic microphones (such as e.g. a Shure
SM57) in ch. 2. Nor is it any problem to activate
phantom power and use a condenser microphone to
one of the inputs and connect a guitar using a 1/4
jack to the other input, as phantom power only
concerns the XLR connections.
7 Line In - ch 1/2 on rear panel
This switch alternates between using the front panel
inputs or rear panel inputs for channels 1/2.
Rear panel inputs are balanced line inputs.
Connect a TV, a radio tuner or any secondary
device that you don’t use in music production to
Line inputs 1/2 on the rear panel. Use the “Line
In” switch to alternate between front and rear
panel inputs.
8 Source Level (push to control Pan)
Controls the level or pan-position of the selected
channel. The light ring shows the level or pan position
of the selected channel.
By default the Source Level knob controls the source
level of the selected channel. Press once and turn
the knob to pan the signal. Leave the knob
untouched for 1 second and it will automatically
return to volume control function.
9 Monitor LEDs
Indicate which channel is monitored. Select channels
using the Ch. Select button.
10 Ch. Select
The LED light-ring around the SOURCE level knob
indicates the source level of channel you have
selected or the pan position if the Source Level knob
(8) has been pushed.
Select between monitoring the following channels:
Ch 1 - Front or rear panel input channel 1*
Ch 2 - Front or rear panel input channel 2*
* Select between channel 1/2 front and
rear panel using the Line in switch on the
front panel.
Ch 3/4 (Konnekt 24D) -
- Channels 3/4 (note that channel 3/4 are
always linked.
DI (Konnekt 8)
- Monitor the signal present on S/PDIF Digital
In.
User - The Setup page allows you to setup which
channel/channels are monitored when
“User” is selected. The options will vary
depending on the connected devices.
It is also possible to assign a level control of a channel to
the LED light-ring via the Mixer page on the TC Near
computer user-interface by pressing the light-ring icon on
the channel of your choice:
11 Output level
Sets the output level of analog outputs 1-2 and of the
head-phone outputs.
12 DSP Total Recall (Konnekt 24D only)
Three program settings can be stored in locations P1,
P2 and P3. These programs are total recall presets
recalling settings from both mixer page, setup page
and plug-in pages. Total recall of Fabrik plug-in
settings does not apply when routing is set to plug-in
mode.
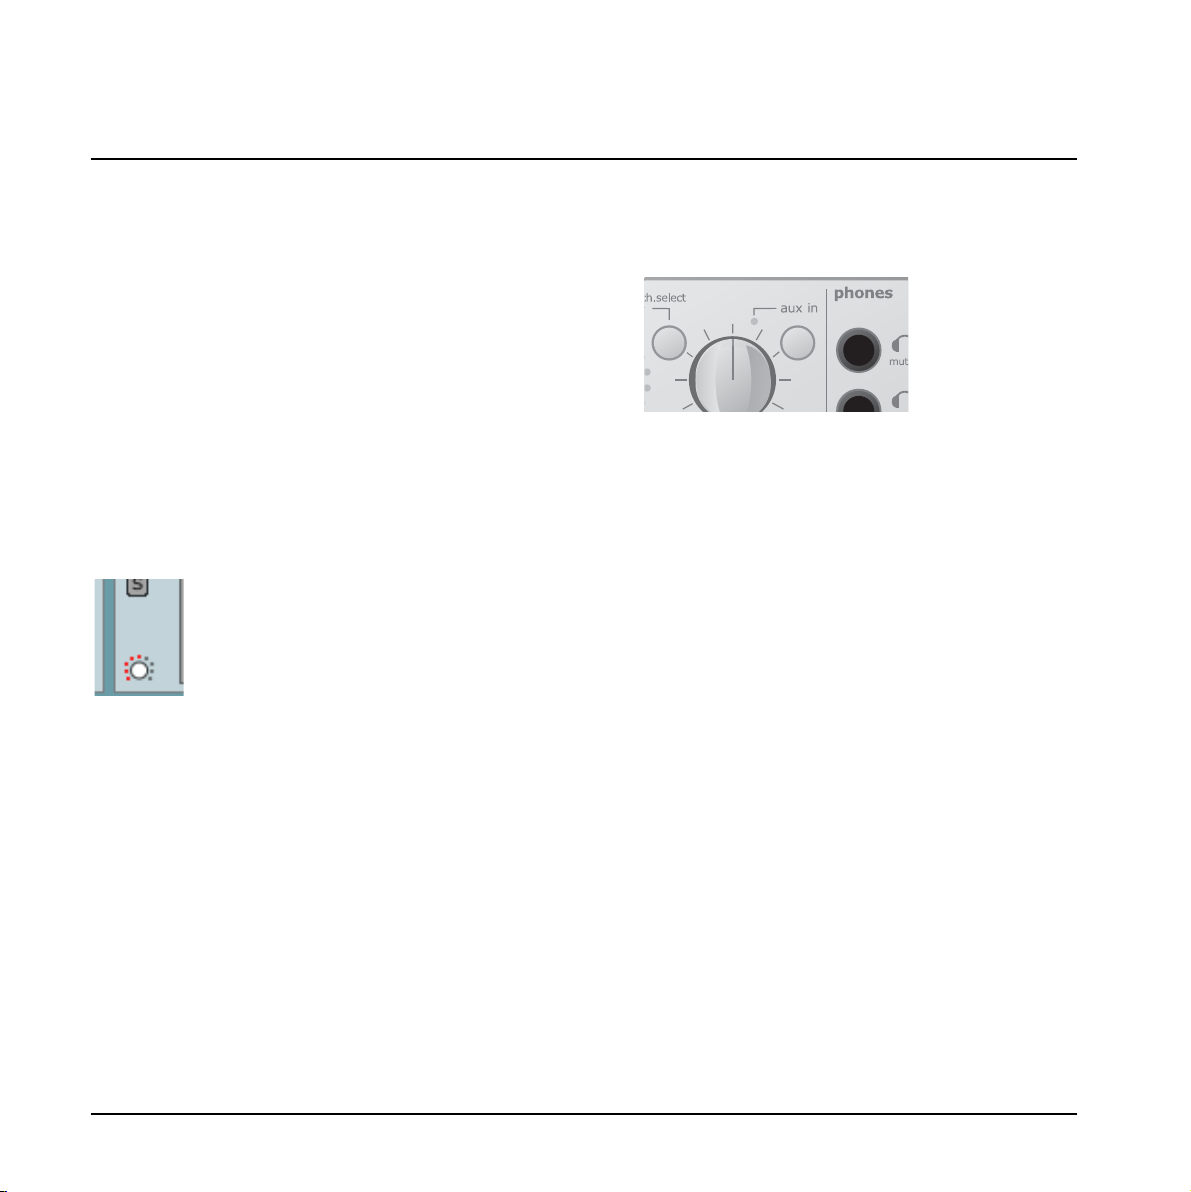
AUX (Konnekt 8 only)
On Konnekt 8 this section is replaced by a AUX
switch.
The AUX switch allows you to monitor the signal
present on the AUX inputs (rear panel)
An ideal function if you want to monitor e.g. a
keyboard thru the AUX inputs.
13 Phones muting
Connect a set of headphones here. Main outputs will
be muted.
14 Phones non muting
Connect a set of headphones here. Signal is still
passed to Main outputs.
FRONT PANEL OVERVIEW - KONNEKT 24D
12

Bus Power
Konnekt 24D and Konnekt 8 are able to work with
FireWire bus-power. With FireWire bus-power the device
is powered directly from the FireWire connection and you
do therefore not need to use the external power supply
(included with Konnekt).
There are a few things to be aware of regarding bus
power:
4-pin FireWire connectors
Please beware that not all FireWire ports are able to
provide bus power at all. Some laptop computers carry 4
pin connectors. These do not provide bus power.
Several Konnekts on a single FireWire bus
If you run more than one Konnekt device on a FireWire
bus, only one of them can be bus-powered; the others
require power from the supplied external power supply.
Insufficient bus-power
Some laptop computers, even those with 6-pin
connectors, do not provide enough bus-power for a
single Konnekt unit to run properly. If you experience any
problems, please use the provided external power supply
as the first effort to solve the problems.
BUS POWER NOTES
13
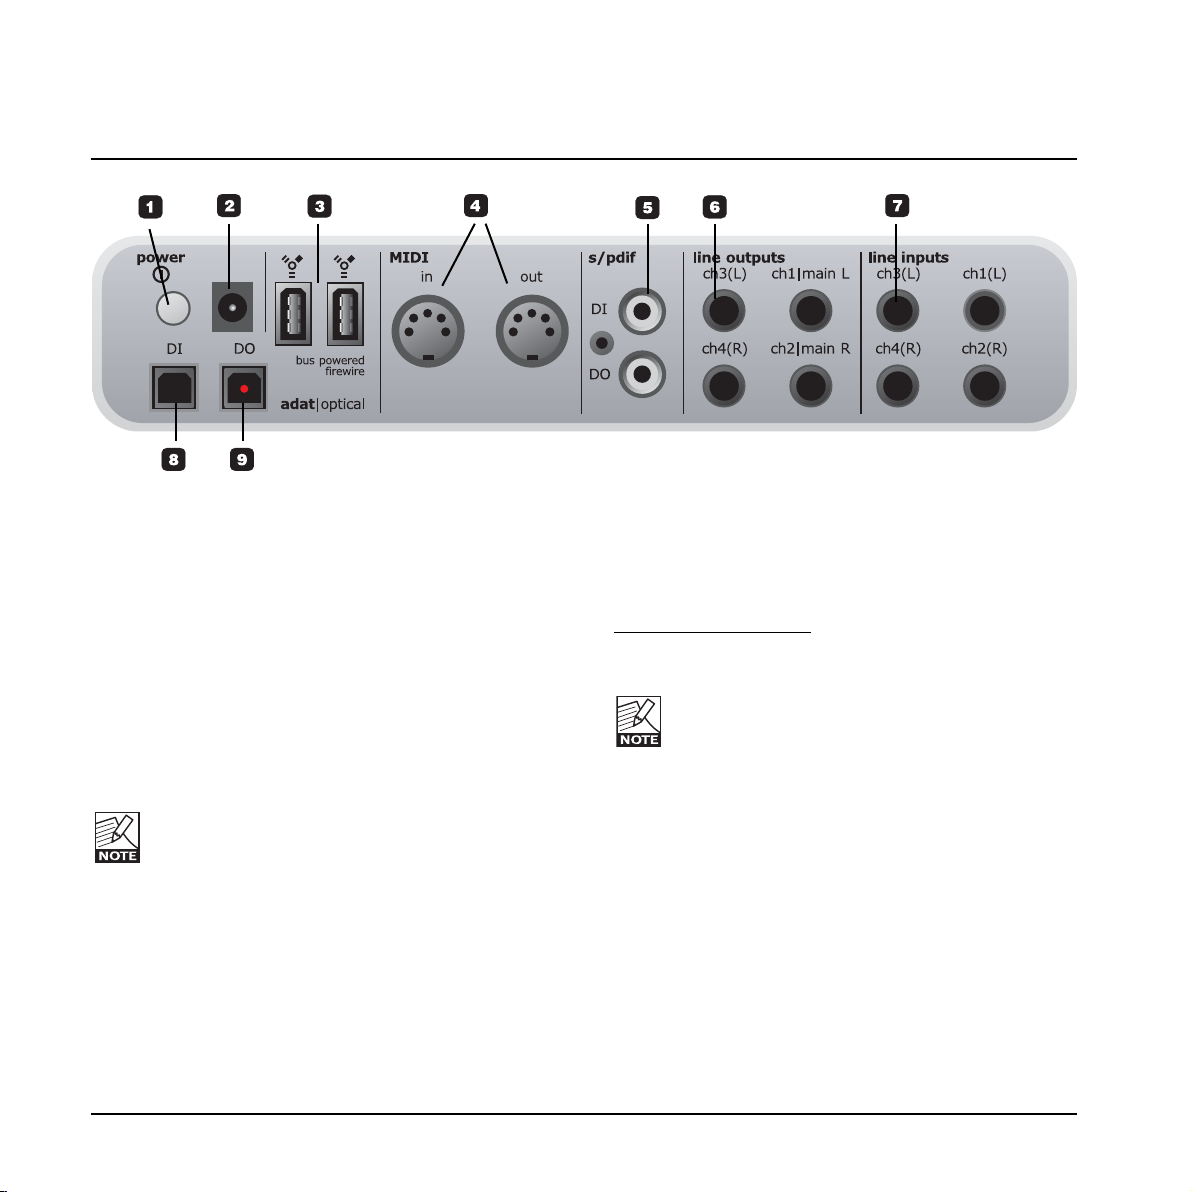
REAR PANEL OVERVIEW - KONNEKT 24D
14
1 Power Switch
On/off switch for the unit.
2 Power In
Konnekt can be bus-powered from the computer’s
FireWire port. Check your computer’s specifications.
If more than one Konnekt is used or your computer
delivers insufficient power on the FireWire port - use
the supplied 12VDC power supply.
3 FireWire connectors
IEEE 1394 connectors for connecting to a computer
and/or linking multiple Konnekt units. Konnekt can be
bus-powered* from the computer’s FireWire port.
Check your computer’s specifications.
Before plugging the FireWire connectors, make
sure that plugs are positioned correctly.
* Please read the section regarding bus-power on page
13.
4 MIDI In/Out
Standard MIDI in/out. MIDI out is automatically set to
MIDI thru in stand alone mode.
When Konnekt is used in stand-alone mode, MIDI out
always acts as MIDI thru.
5 Digital in/out - Coaxial S/PDIF
24bit digital in/out on S/PDIF. In addition to standard
I/O it is possible to insert e.g. an external digital
effects unit and use this as a send effect.
6 Line Outputs (balanced)
1/4 inch jack output
s for:
- Main Left (ch 1) and Main Right (ch 2).
- Left (ch 3) and Right (ch 4)
When connecting Main outs to a device (e.g.
active speakers) with balanced inputs: “ground”
and “cold” must be connected.
- On XLR type plugs this is pins 1 and 3.
- On Jack type plugs it is “sleeve” and “ring”.
7 Line Inputs (balanced)
- Ch 1 (L)
- Ch 2 (R)
- Ch 3 (L)
- Ch 4 (R)
8 DI - Digital In
Optical S/PDIF or ADAT Toslink for up to 8 channels of
digital in, depending on format and sample rate.
9 DO - Digital Out
Optical S/PDIF or ADAT for up to 8 channels of digital
out.
FRONT & REAR PANEL OVERVIEW - KONNEKT 8
15
Please refer to the description of the Konnekt 24D
back panel on the previous pages. The next few lines
describe the variations on Konnekt 8.
The following features have been omitted from the
Konnekt 8:
• Optical inputs/outputs.
• Line outputs 3/4
• Line inputs 3/4
Aux L and Aux R
External line instruments can be connected to the aux
inputs for monitoring purposes. To monitor the aux inputs
press the AUX IN button on the front panel.
Signals present on these inputs cannot be recorded.
Please refer to the description of the Konnekt 24D
front panel on the previous pages. The next few lines
describe the variations on Konnekt 8.
AUX In
The AUX IN LED and button replace the DSP recall
functions on the Konnekt 24D.
Press the AUX IN button to monitor the signal present on
the AUX inputs on the rear panel. The LED indicates
when AUX monitoring is enabled.
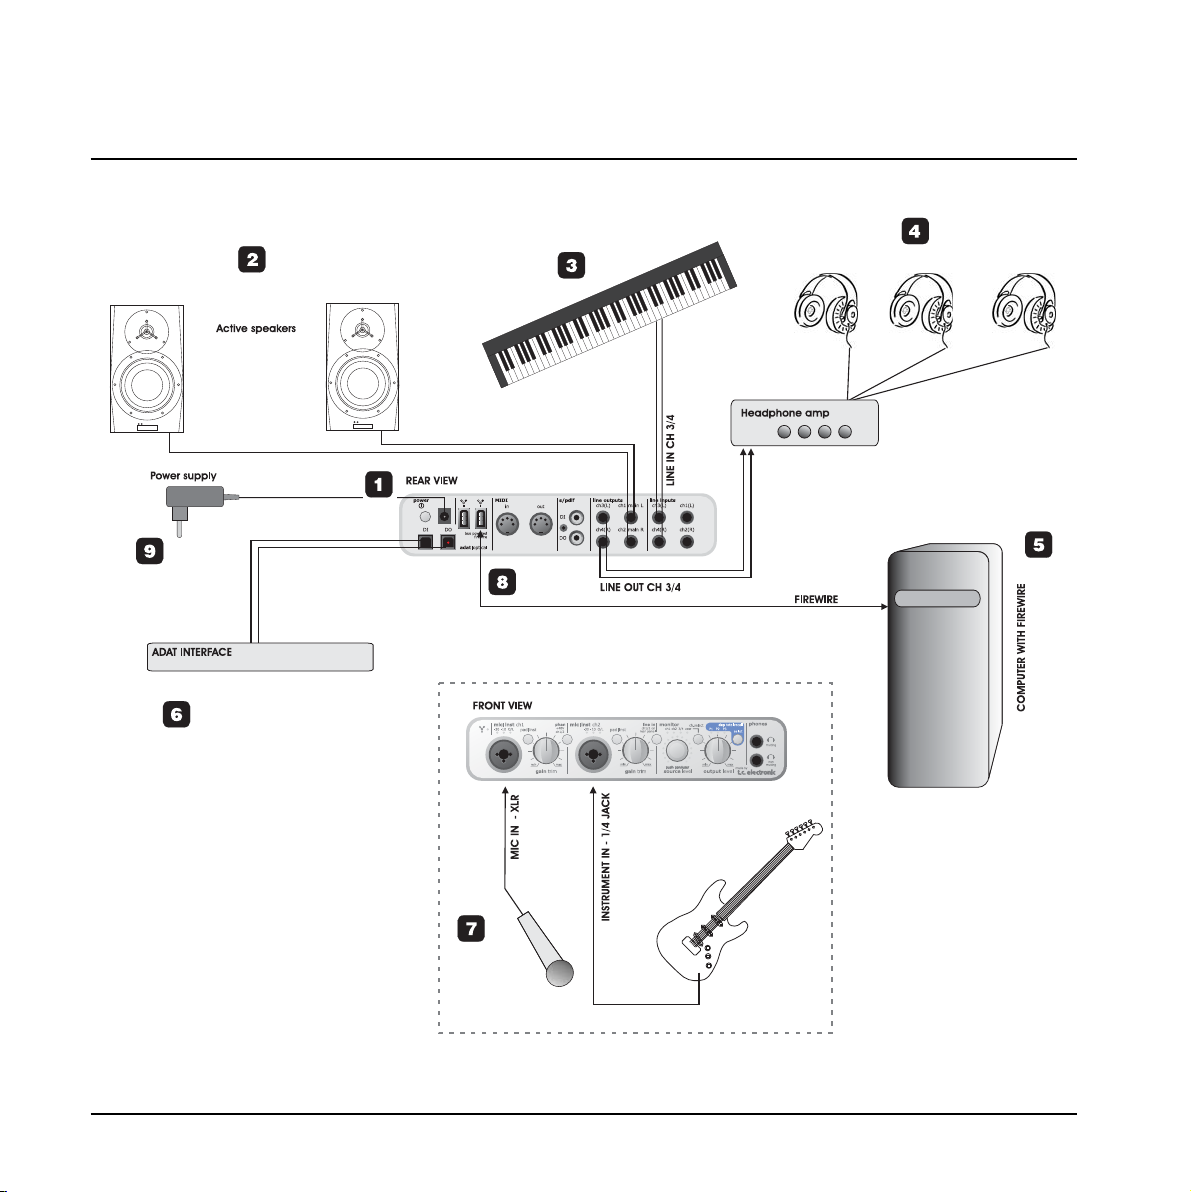
SETUP EXAMPLES - “STUDIO”
16
1 Konnekt 24D Rear View
The Konnekt rear panel. For better view please refer
to the section “Rear Panel Overview”.
2 Active Speakers
In this particular setup we illustrate the Konnekt in
use with a set of active monitors. You may of course
use a standard amplifier and passive speakers as
you prefer.
3 Keyboard
A keyboard is connected to Line In 3/4 for monitoring/
recording purposes. On Konnekt 8 you may use the
aux inputs for monitoring only (no recording).
4 Headphones
In this illustration multiple headphones are connected
via a separate headphones amp. Line outputs 3/4 on
the Konnekt are used to feed the headphone amp.
On the frontpanel an additional set of headphones
can be connected to the non-muting headphones
connection on the frontpanel.
5 Computer
Computer with FireWire interface. Please see the
system requirements section for information on
minimum system requirements.
6 ADAT interface
Digital I/O options can be extended with the use of an
ADAT interface. When used in combination with the 2
channels on coaxial S/PDIF, digital channels 7/8 can
be set to either ADAT or optical S/PDIF.
See also page 26.
7 Konnekt 24D front + instruments
Front panel view of the Konnekt illustrated with a
microphone and an electric guitar setup.
Connecting an electric guitar directly to Konnekt.
Connect a guitar using an standard 1/4 jack and
press the PAD/INST button to “in” position.
Connecting a Condenser microphone.
Konnekt delivers +48v phantom power on the XLR
part of the Combo connection for use with condenser
microphones. Press “phan” to activate phantom
power:
8 FireWire connection to computer
Use as standard FireWire (IEEE 1394) cable between
the computer and Konnekt. Any of the two
connections can be used.
9 Power supply
Konnekt can be bus-powered directly from your
computer’s FireWire connection. Please refer to the
computer’s manual to see if this is an option.
If bus-power is insufficient or if more than one
Konnekt units is connected to one FireWire bus, you
should use the external power supply delivered with
the Konnekt.
SETUP EXAMPLES - “STUDIO”
17
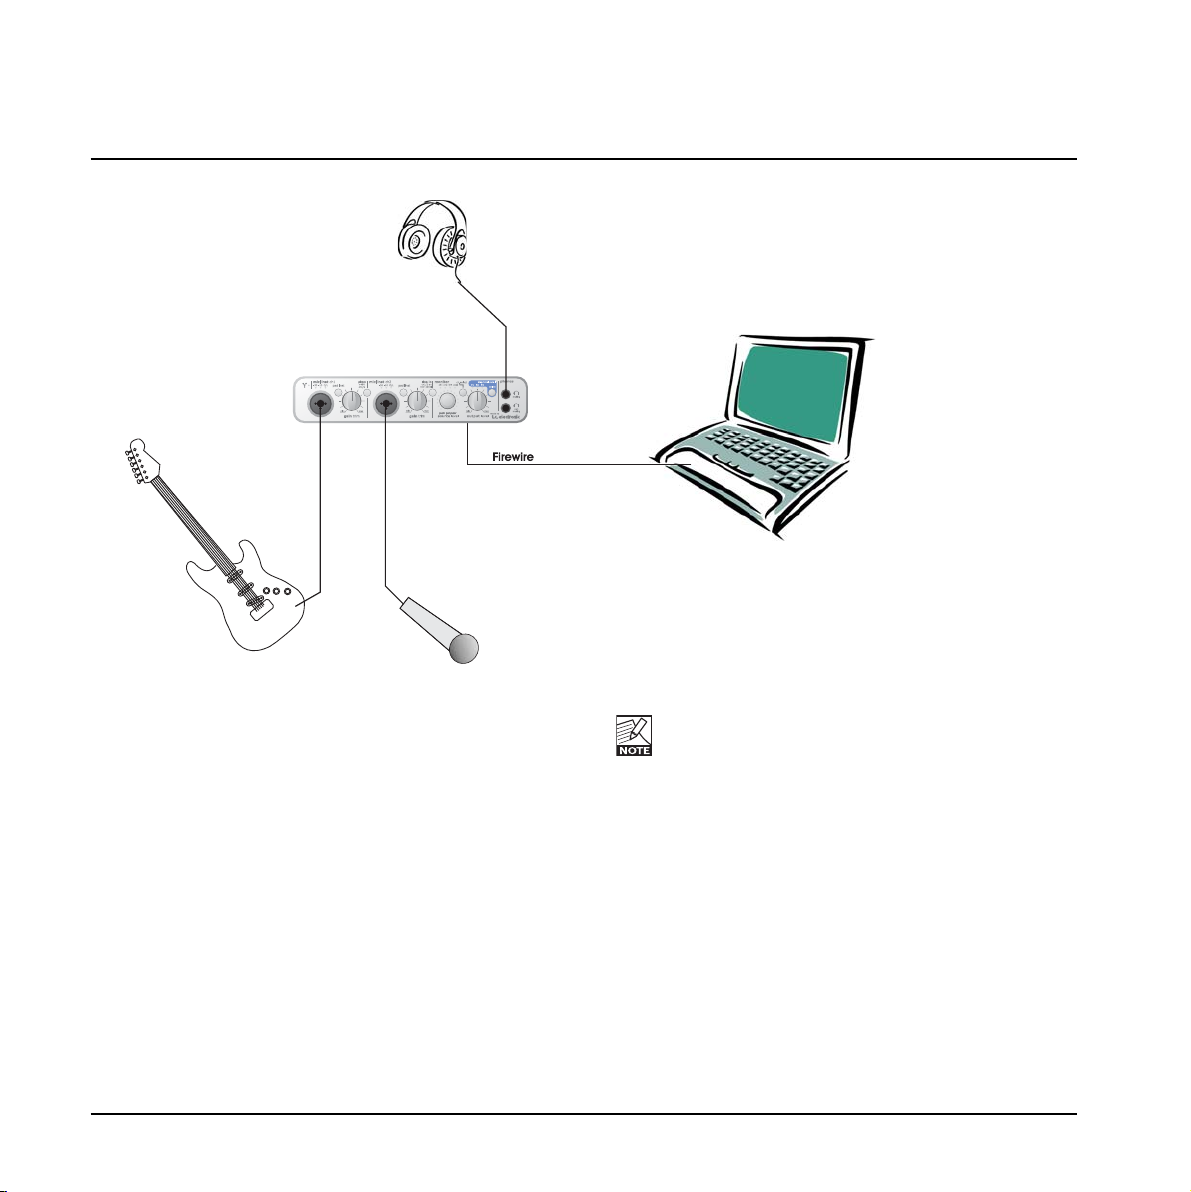
SETUP EXAMPLES - “MOBILE STUDIO”
18
This is a typical small mobile setup with just a guitar,
a microphone and a laptop computer.
• Connect the guitar to ch 1, using a standard 1/4 inch
jack mono-mono, and set the PAD/inst to “in”
position. Set input level using the GAIN TRIM knob.
• Connect a microphone to ch 2 and use the PAD/inst
selector to correct input sensitivity.
If you have connected a condenser microphone the
+48 phantom power switch must be pressed.
• Connect your laptop computer using a standard
FireWire cable.
• Connect headphones to one of the two headphone
outputs. The upper connection will mute the main
outputs on the rear panes, but as nothing is
connected to the main outputs it is indifferent which
output you use.
If only one Konnekt is used and no other FireWire
devices are connected to the computer’s FireWire
ports, Konnekt can be bus-powered directly from
the computer’s FireWire port*. This is ideal when
recording in the field.
However, Konnekt does use power and will drain the
computers battery faster (especially if phantom power is
used), and we therefore recommend using a power
supply for either the computer and/or Konnekt when
possible.
* Please read the section regarding bus-power.
 Loading...