


 Loading...
FLASHBACK X4 DELAY & LOOPER
User Manual

Table of contents
Introduction |
1 |
Important safety instructions |
2 |
Warning |
2 |
Service |
2 |
EMC / EMI |
3 |
For customers in Canada |
3 |
Unpacking and setting up |
4 |
Ready… |
4 |
Set… |
4 |
Play! |
4 |
Setup example: regular mono signal path |
5 |
Setup example: amplifier effect loop |
6 |
Delay types |
7 |
Tape |
7 |
Tube |
7 |
Space |
7 |
Analog |
7 |
Analog w/mod |
7 |
Reverse |
7 |
Dynamic |
8 |
2290 |
8 |
2290 w/mod |
8 |
Slap |
8 |
Lofi |
8 |
Ping Pong |
8 |
1 – Audio inputs and outputs |
9 |
Audio inputs |
9 |
Audio outputs |
9 |
2 – Expression pedal input |
10 |
Choosing an expression pedal |
10 |
Assigning delay parameters and parameter ranges to an expres-
sion pedal |
10 |
|
Resetting parameters and parameter ranges |
11 |
|
3 |
– Power input |
12 |
4 |
– USB jack |
12 |
5 |
– MIDI IN / MIDI THRU jacks |
12 |
MIDI IN jack |
12 |
|
MIDI THRU jack |
12 |
|
6 |
– Delay type selector |
13 |
a

The TonePrint concept |
14 |
Transferring TonePrints to the pedal |
15 |
Transferring TonePrints to the pedal via USB |
15 |
Transferring TonePrints to the pedal by beaming |
15 |
7 – DELAY TIME knob |
16 |
8 – Subdivision selector switch |
16 |
9 – FEEDBACK knob |
17 |
10 – DELAY LEVEL knob |
17 |
11 – LOOPER/DELAY switch |
18 |
12 – LOOPER LEVEL knob |
19 |
13 – Preset footswitches (A / B / C) |
20 |
Recalling a preset |
20 |
Factory presets |
20 |
Preset off / Bypass mode |
20 |
Storing presets |
21 |
Delay spill-over |
21 |
TonePrints and presets |
22 |
14 – TAP footswitch |
23 |
Using the Looper module |
24 |
Using the delay in Looper mode |
24 |
Recording a loop |
25 |
Playing a loop continuously |
25 |
Stopping loop playback immediately |
25 |
Playing a loop once |
25 |
Stopping loop playback at the end of the loop |
25 |
Undoing a loop recording |
26 |
Deleting a loop completely |
26 |
Loops cannot be stored |
26 |
Bypass modes |
27 |
True Bypass mode |
27 |
Buffered Bypass mode |
27 |
Kill-Dry feature |
28 |
b

Introduction
Introduction
Congratulations on the purchase of your new Flashback X4 Delay & Looper.
Flashback X4 Delay & Looper builds on the success of TC’s popular Flashback pedal. It provides 12 delay types in pristine TC Electronic quality, tap tempo and three preset slots for an instant classic.
Flashback X4 Delay & Looper is TonePrint-enabled, allowing you to load up to four signature Flashback delay settings as created and used by the biggest names in rock – from Steve Morse and Doug Aldrich to Joe Perry, Steve Stevens and many, many more.
We believe that Flashback X4 Delay & Looper offers the best sounding delay as well as enormous flexibility within a compact delay pedal – and we are certain that you will feel the same.
About this manual
This manual will provide you with a quick overview of how to get rocking fast as well as an in-depth look at the pedal’s more advanced features. Happy reading!
Please note: TC Electronic reserves the rights to change the contents of this manual at any time.
The latest revision of this manual can be downloaded from http://www.tcelectronic.com/manuals.asp
This is version 1.0 of the Flashback X4 Delay & Looper manual.
If you still have questions after reading this manual, please use
TC Electronic Support: http://support.tcelectronic.com/
1

Important safety instructions
Important safety instructions
––Read these instructions.
––Keep these instructions.
––Heed all warnings.
––Follow all instructions.
––Do not use this apparatus near water.
––Clean only with dry cloth.
––Do not block any ventilation openings. Install in accordance with the manufacturer’s instructions.
––Do not install near heat sources such as radiators, heat registers, stoves, or other apparatus (including amplifiers) that produce heat.
––Only use attachments/accessories specified by the manufacturer.
––Refer all servicing to qualified service personnel. Servicing is required when the apparatus has been damaged in any way, such as power supply cord or plug is damaged, liquid has been spilled or objects have fallen into the apparatus, the apparatus has been exposed to rain or moisture, does not operate normally, or has been dropped.
Warning
To reduce the risk of fire or electrical shock, do not expose this equipment to dripping or splashing and ensure that no objects filled with liquids, such as vases, are placed on or near the equipment.
Do not install this product in a confined space.
Service
All service must be performed by qualified personnel.
Caution
You are cautioned that any change or modifications not expressly approved in this manual could void your authority to operate this equipment.
When replacing the battery follow the instructions on battery handling in this manual carefully.
2

EMC / EMI
EMC / EMI
This equipment has been tested and found to comply with the limits for a Class B Digital device, pursuant to part 15 of the FCC rules.
These limits are designed to provide reasonable protection against harmful interference in residential installations. This equipment generates, uses and can radiate radio frequency energy and, if not installed and used in accordance with the instructions, may cause harmful interference to radio communications. However, there is no guarantee that interference will not occur in a particular installation. If this equipment does cause harmful interference to radio or television reception, which can be determined by turning the equipment off and on, the user is encouraged to try to correct the interference by one or more of the following measures:
––Reorient or relocate the receiving antenna.
––Increase the separation between the equipment and receiver.
––Connect the equipment into an outlet on a circuit different from that to which the receiver is connected.
––Consultthedealeroranexperiencedradio/TVtechnicianforhelp.
For customers in Canada
This Class B digital apparatus complies with Canadian ICES-003.
Cet appareil numérique de la classe B est conforme à la norme NMB-003 du Canada.
3

Unpacking and setting up
Unpacking and setting up
Ready…
The Flashback X4 Delay & Looper box should contain the following items:
––1 Flashback X4 Delay & Looper pedal
––1 TC 9V DC power supply with interchangeable plugs
––2 rubber feet for “non-velcro” pedal board mounting
––1 USB cable for transferring TonePrints from the computer to the pedal and updating the pedal firmware
––1 TC Electronic sticker
––1 leaflet about TC’s guitar FX product range.
Inspect all items for signs of transit damage. In the unlikely event of transit damage, inform the carrier and supplier.
If damage has occurred, keep all packaging as it can be used as evidence of excessive handling force.
Set…
––Attach the plug applicable to your region to the power supply. Connect the power supply to the 9V jack on the back of the Flashback X4 Delay & Looper and plug the power supply into a power outlet.
––Make sure the LOOPER/DELAY switch is set to “Delay”.
––Connect your instrument to the INPUT MONO jack on the back of the pedal (see page 5).
––Connect the OUTPUT MONO jack on the back of the pedal to your amplifier.
Play!
4
Setup examples
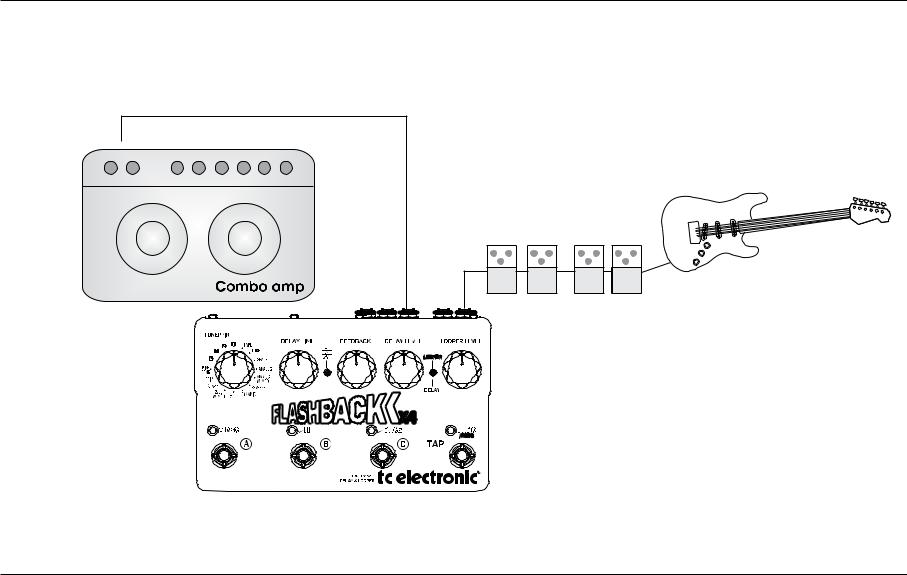
Setup example: regular mono signal path
Input
Modulation Drive
Pedals Pedals
5

Setup examples continued
Setup example: amplifier effect loop
Input |
FX Loop Send |
|
|
FX Loop Return |
|
|
|
|
|
|
Drive |
|
|
Pedals |
|
|
Modulation |
|
|
Pedals |
6

Delay types
Delay types
“OK… So what does this thing do?”
“Glad you asked. First and foremost, the Flashback X4 Delay & Looper is a top-notch delay unit – so let’s talk delays!”
TAPE
Who doesn’t love the smooth sound of an old tape echo machine? The “Tape” setting makes for an overall great starting point with its mellow and “warbling” sound.
TUBE
This delay type has been tweaked to sound like an old tube tape echo – much like the “Tape” setting, but with a bit more warmth.
Use this setting if you want your fans to check the stage for hidden vintage gear…
SPACE
It’s hard not to like the luscious tape sound of the original Roland® Space Echo*. The “Space” setting instantly gives you rich echo sounds with a bit of Space Echo* mojo.
ANALOG
This is as close as you can get to the charming nature of an old analog transistor bucket-brigade delay without buying the real thing! With every repeat you get more of that old-school “fade to grey” vibe.
ANALOG W/MOD
Take a trip down Memory Lane with this rich and larger-than-life sounding delay. “Analog w/mod” will definitely spice up your sound.
REVERSE
If you’ve been around for some time, you know the drill: Record a guitar part on tape. Flip the tape over. Play it back. This is a classic effect made famous by guitar legends such as Jimi Hendrix – and although it’s kind of “old school”, the reverse effect still seems to inspire people to try out new things.
Try this:
Turn the FEEDBACK knob all the way down to hear only the reversed signal.
7
Loading...