

Page 1
USER’S MANUAL
Manual v1.0
Page 2

Harmony4 User’s Manual
Table of Contents
Chapter 1: Introduction
Introduction . . . . . . . . . . . . . . . . . . . . . . . . . . . . . . . . . . . . . . . . . . . . . . . .3
Support Information . . . . . . . . . . . . . . . . . . . . . . . . . . . . . . . . . . . . . . . . . .5
Chapter 2: Descriptions
The Main Interface . . . . . . . . . . . . . . . . . . . . . . . . . . . . . . . . . . . . . . . . . .6
The Voices Tab . . . . . . . . . . . . . . . . . . . . . . . . . . . . . . . . . . . . . . . . . . . . .9
The Humanize Tab . . . . . . . . . . . . . . . . . . . . . . . . . . . . . . . . . . . . . . . . .10
The Control Tab . . . . . . . . . . . . . . . . . . . . . . . . . . . . . . . . . . . . . . . . . . . .11
The Setup Tab . . . . . . . . . . . . . . . . . . . . . . . . . . . . . . . . . . . . . . . . . . . . .13
Chapter 3: Producing Harmony
Harmony Modes Background . . . . . . . . . . . . . . . . . . . . . . . . . . . . . . . . . .15
A Comparison of the Harmony Modes . . . . . . . . . . . . . . . . . . . . . . . . . . .16
Getting Set Up . . . . . . . . . . . . . . . . . . . . . . . . . . . . . . . . . . . . . . . . . . . . .16
Checking Out the Harmony Presets . . . . . . . . . . . . . . . . . . . . . . . . . . . . .17
Chapter 4: Appendix
Troubleshooting . . . . . . . . . . . . . . . . . . . . . . . . . . . . . . . . . . . . . . . . . . . .20
Scale Types and Voicings Chart . . . . . . . . . . . . . . . . . . . . . . . . . . . . . . . .21
Chord Types and Voicings Chart . . . . . . . . . . . . . . . . . . . . . . . . . . . . . . .22
© BY TC HELICON 2007. ALL PRODUCT AND COMPANY NAMES ARE TRADEMARKS OF THEIR
RESPECTIVE OWNERS. PRO TOOLS
SPECIFICATIONS SUBJECT TO CHANGE WITHOUT NOTICE. ALL RIGHTS RESERVED. TC
HELICON IS A TC GROUP COMPANY.
®
IS A TRADEMARK OF AVID TECHNOLOGY INC. ALL
February 2007 Manual version 1.0
2
Page 3

Chapter 1: Introduction
Thank you for purchasing the Harmony4 Pro Tools®TDM plug-in from TCHelicon. This product is a landmark in that it is the first time our harmony
technology has been made available as a Pro Tools plug-in. You can now add
vocal sparkle and depth to your songs, advertising jingles, spoken word content,
video games and more from within the Pro Tools environment. All you need is a
nicely recorded vocal track to send to Harmony4. The four Hybrid Shifting
algorithms can be thought of as well trained singers that you can manipulate in
order to create vocal magic.
We hope you become as excited by the possibilities of Harmony4 as we are to
bring it to you.
The TC-Helicon Team
February 2007
TM
Main Features
² Runs in realtime on Pro Tools HD systems
² Up to 4 harmony voices can be derived from a single vocal track
² Choice of harmony intervals up to 2 octaves above or below
² Humanization styles offer maximum realism and special FX
² Tabbed interface simplifies and speeds editing
² Range of musical inputs possible: “Notes” or “Chords” MIDI input modes,
“Key and Scale” or “Shift”
² All settings are easily automated for precise results
² Compatible with 96 KHz recordings
3
Page 4

System Requirements
WINDOWS and MAC
• Digidesign Pro Tools|HD®running Pro Tools®version 7.0 or newer
• Available TDM DSP resources in project
Parameter Inputs
Mouse Click/Drag
Single-clicking and dragging the mouse vertically is supported in any text edit
field or on the harmony “heads”.
Direct Input
Double clicking in any edit field allows you to type in an exact number. In a text
field, you need only type in the first few characters and press enter.
Installation
Installing the Harmony4 plug-in is handled automatically when you double click
on the file you received when it was purchased. An iLok key with a valid
authorization for Harmony4 must be inserted into your computer before the
installation or the procedure will abort. All should go smoothly but if an error
occurs, you can contact TC Support from the contact information shown on the
next page.
Terminology: “Presets”
Throughout this manual we refer to the loading, saving and use of presets. Of
course, this is the way to describe pre-configured sets of parameter values that
simplify use of a product. In the Pro Tools world, the term is settings. the
functions of “presets” and “settings” are mostly interchangeable except that:
1. Selection of settings and presets is done in different areas of the plug-in;
settings are found on the Pro Tools host banner at the top of the plug-in and
presets towards the bottom left of the “face” of the plug-in.
2. Saving an edited setting will not be reflected in the presets drop down menu.
Because of this, it’s best to choose one way of retrieving and storing parameter
sets and stick with it.
4
Page 5
Support Information
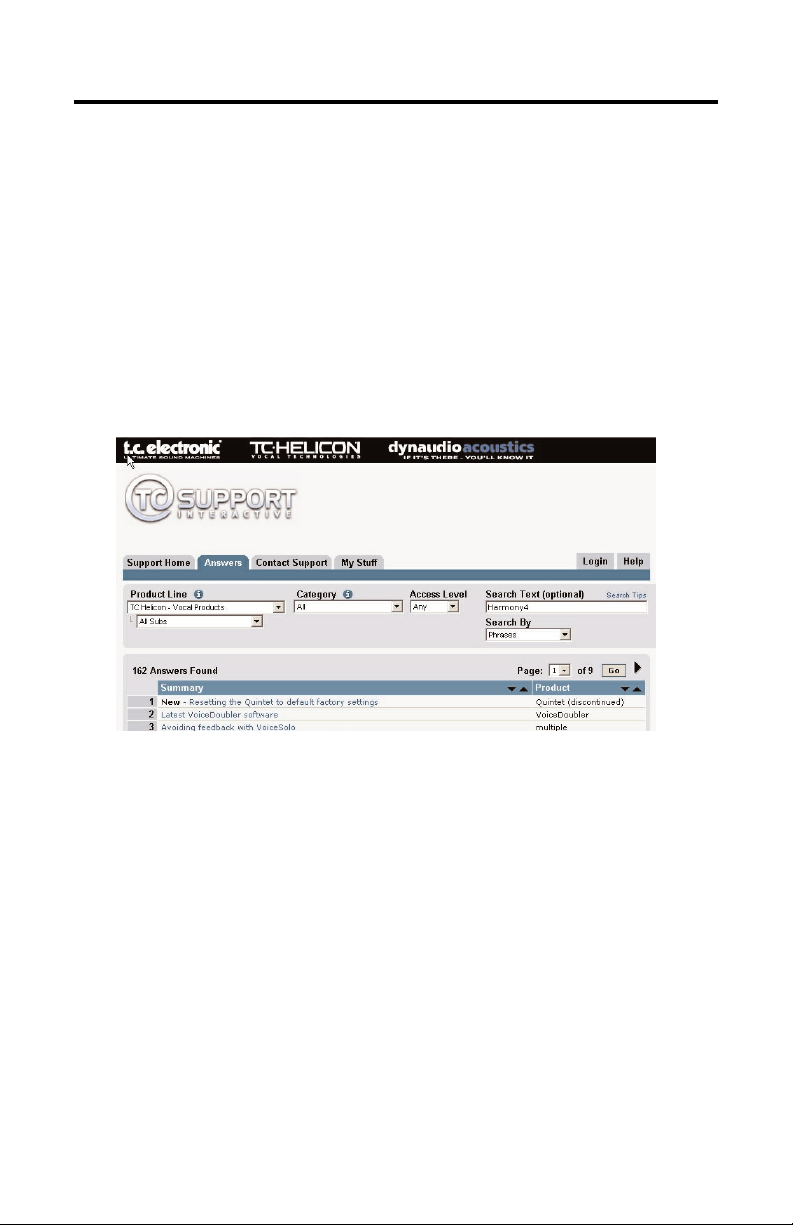
The TC Support Interactive website www.tcsupport.tc is designed as an online
support and information center. At the site you can find answers to specific
questions regarding TC-Helicon software and hardware. All known issues are
stored in a database searchable by product, category, keywords or phrases.
Under the section "My Stuff" you can login to check the status of your questions,
download materials such as product manuals, software updates and new
presets. This site has been specifically designed to meet the needs of our
users. We constantly update the database and you will find the site to be a
huge resource of information. Browse through Q&A's and discover new aspects
of your TC-Helicon product. If you can't find an answer online, you have the
option of submitting a question to our technical support staff who will then reply
to you by e-mail. The TC Support Team is on constant alert to help you in any
way they can.
Contact Details
Alternatively, you may contact the TC Electronic distributor in your area or write
to:
TC ELECTRONIC A/S
Customer Support
Sindalsvej 34
Risskov DK-8240
Denmark:
.
TC Electronic, Inc.
5706 Corsa Avenue, Suite 107
Westlake Village, CA 91362
USA
www.tc-helicon.com
5
Page 6

Chapter 2: Descriptions
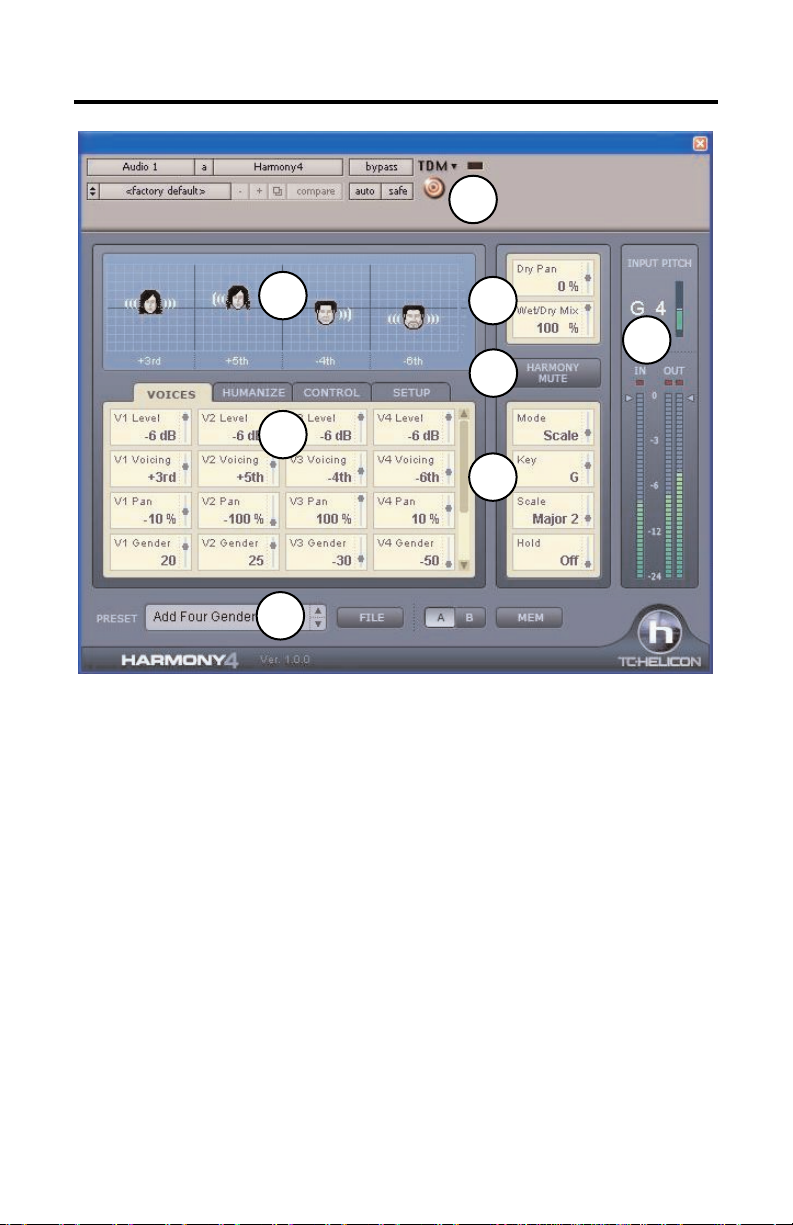
The Main Interface
Here we discuss getting around the GUI. More detail on parameters follows
later in the manual.
1
2
5
8
6
3
7
4
1. Host Area - Here you will find, among other features, the Settings drop down
menu with a selection of pre-configured parameter values grouped by harmony
mode. Consult your Pro Tools manual for more information on this area.
2. Visualization Area - Here you can see at a glance information about the current
preset. Each head represents an enabled harmony voice. Click on a head and you
can drag the mouse to change the harmony interval of each voice (although not in
Notes and Notes 4CH presets because harmony intervals in these presets are
determined by incoming MIDI note messages). Gender is represented by the
apparent male or female characteristic of each voice. The soundwaves emanating
from the heads show both level and pan position. The lower part of the window
shows text representing the harmony intervals or a MIDI note number depending on
the current harmony mode.
6
Page 7
The Main Interface (cont.)
1
2
5
8
6
3
7
4
3. Tab Editing Area - This is composed of 4 tabs containing parameters that
are grouped by function. Generally, each voice has its own vertical column of
parameters. The slider on the right side of this window can be used to reveal
more parameters if they exist in the harmony mode the preset is based upon.
4. Preset Area - Clicking the File button presents a drop down list of the factory
presets grouped by harmony mode, any new or edited presets and the Load
and Save features. Clicking in the preset name area will allow renaming of the
current preset. The A, B and Mem buttons offer an edit comparison feature.
Press the Mem button first to clear the comparison memory. Any edits you make
then become the A setting and the A button will light. Pressing the B button will
allow you to compare your edits (A) with the existing preset (B). To return to the
unedited version of the preset, press the Mem button or reselect the preset
using the File button.
5. Wet/Dry Mix and Pan - There is an optional dry path through the plug-in for
times when you use Harmony4 as a channel insert. Note that when used as a
stereo input insert, only the left channel of the audio track will be used as input
to Harmony4.
7
Page 8

The Main Interface (cont.)
1
2
5
8
6
3
7
4
6. Harmony Mute - Pressing this button will quickly turn the harmony voices off.
7. Musical Info/Various - Each preset in Harmony4 is based on one of the 4
harmony control modes. Each harmony mode has different requirements in
order to make the voices produce musical sounding harmonies. It’s important to
read the “Harmony Modes Background” section later in this manual to fully
understand each harmony mode’s control requirements. The parameters in this
area of the GUI will differ depending on which mode is selected. You can see at
a glance the harmony mode of the loaded preset.
8. Meters and In/Out Levels - The Input Pitch area shows the recognized sung
input note and octave as well as whether the input note is sharp or flat by +/- 50
cents. The lower meters display input and output audio levels. You can reduce
the input level or both output levels by clicking and dragging the arrows.
8
Page 9

The Voices Tab
The Voices Tab allows editing of settings you need most for each harmony
voice. The number of parameters differs depending on the harmony mode in the
current preset.
Level
Here you can mix the relative levels of each of the four voices. There is also an
"Off" value which will disable any voice. Setting all four voices to 0dB (full) will
most likely cause output clipping with hot inputs. If this occurs, you can either
reduce the input level with the IN slider or reduce the level of each voice. Note
that any voice whose level is set to Off will ignore MIDI. If you want to use
automation to fade-up a voice in a MIDI controlled harmony mode, you should
start at -60dB and not Off.
Voicing (Scale mode), Offset (Shift mode), Position (Chord mode)
These parameters allow you to arrange the intervals of your four singers above
and below the lead singer. They are available in all modes except Notes and
Notes 4CH and they work slightly differently in each harmony mode:
In Shift Mode, the Offset values range from -24 semitones to +24
semitones in a fixed, non-diatonic interval relative to the input melody.
In Scale Mode, the Voicing parameter specifies a diatonic interval relative
to the input. The range is -2 octaves to +2 octaves. For example, a setting
of +3rd will result in a harmony voice a third above the input voice, which
could be major or minor depending on the current Key and Scale settings.
Values of for example, ++3 or --5 are over an octave away from the input
note.
In Chord Mode, the Position parameter determines a more general
relationship between the harmony note and the input note. The harmony
intervals relate to the chords played on your MIDI keyboard. A setting of
"Up1" generally places the harmony voice a third above the input voice.
In Notes and Notes 4CH modes, the Voicing parameter is not shown or
editable because intervals are determined by the incoming MIDI notes.
Pan
Each harmony voice can have its own stereo pan position. Spreading the
harmony voices within the stereo field can help de-couple the harmony voices
from the input voice, resulting in more natural sounding harmonies. Left = “-”,
Right = “+”
Gender
This parameter shifts the formants (often called the gender) of the harmony
voices. Use it to alter the character of the voice ranging from -50 (a big person
with a deep, resonant voice) to 0 (no change) to +50 (mice/alien sound).
9
Page 10

Note Source and Input Note (Only available in Scale Mode)
These parameters help you to create custom scales for times when the lead
voice melody, the harmony voice(s) and the musical accompaniment don’t
sound correct on certain notes. You can edit the individual harmony notes of all
four voices (if they are all enabled) for each input note.
When Note Source is set to "Manual", you can select the Input Note with your
mouse and then edit the resulting note or notes produced by the harmony
voices. When Note Source is set to "Sung", the Input Note is determined by the
pitch of the singer.
Output Note
Each of the 4 harmony voices can produce a different harmony note for every
given input (sung note). Use these parameters to set the desired output note for
each enabled voice.
The Humanize Tab
TC-Helicon’s Humanize settings make the harmony voices sound more natural
or even wildly effected if you prefer. You can select a pre-programmed
Humanize style or start with the “Off” style and experiment with each parameter.
Style
This parameter contains preset values for all the parameters in the Humanize
block. It provides quick access to different qualities of performance.
Portamento
Portamento sets the time in milliseconds to reach a target note when a harmony
voice changes pitch.
Smoothing
This setting determines how in-tune the harmony pitches are in relation to your
sung pitch. It is most effective in Scale mode but it can also be useful in Notes
and Chords modes to “naturalize” the fixed pitches coming from a MIDI
keyboard. At Smoothing settings near zero, the harmony voices will be pitchcorrected which may make them sound too stepped without a little portamento.
Settings near 100 allow the lead singer to float between pitches with the
harmony voices following closely. This high value of Smoothing sounds the
most real in Scale mode if the input voice is in tune but a value of 50 to 70 is
best for the MIDI modes.
Detune
With the Detune Parameter, a tiny, fixed amount of pitch shift is applied uniquely
to each of the harmony voices. This creates a thicker, chorus-like effect when
applied to harmony voices set to similar pitches.
10
Page 11

Pitch Randomize
Small amounts of this parameter apply a unique, moving pitch shift to each
voice that is derived from the study of human singing. It is used to remove the
sometimes mechanical sound of perfectly in-tune harmonies.
Time Randomize
No group of singers is able to start their harmony notes at the exact same time.
Lower values of this parameter create slight timing differences to the onset and
sustained portions of each harmony note. This feature greatly increases realism
when the harmony voices are panned in stereo.
Vibrato Style & Amount
A unique modeled vibrato based on the analysis of human singers can be
added to each harmony voice using a combination of these two parameters.
When Style and Amount are chosen, vibrato occurs when the pitch of the lead
voice has settled momentarily. This more closely simulates human singing.
Vibrato may not occur if the lead voice melody is changing quickly.
The styles are randomized so that they sound slightly different on each voice
even when the same style is chosen for all. Mixing different styles can create a
very realistic sounding vocal group.
Scoop Style & Amount
The Scoop parameter adds a brief pitch envelope to the onsets of the harmony
notes, further disconnecting the harmonies from the lead. Select a style, then
use the Amount control to determine the shift range of the scoop.
The Control Tab
The Control Tab is used to configure parameters that relate to the different
harmony modes. Depending on the mode, different parameters are available. A
brief description of each harmony mode follows here with more detailed
discussion following in Chapter 3.
Mode: Shift
Shift Mode is best used for doubling and special FX. Shift is the most basic
mode of operation for the Harmony Block. The harmony voices can be shifted
above or below the input note in semi-tones.
Mode: Scale
In Scale Mode, harmonies use key and scale information to create musically
correct, diatonic harmonies. Scale Mode harmonies are more parallel than
Chord Mode harmonies. To overcome situations where the harmony interval is
incorrect for one or two sung notes, the custom scale editing parameters may
be used. Refer to Appendix: Scale Types and Voicings Table
11
Page 12

Mode: Chord
In Chord Mode, musically correct harmonies are produced by chords
recognized from the incoming MIDI notes.
Mode: Notes & Notes 4CH
In this Mode, incoming MIDI notes determine the pitches of up to four harmony
voices. When "Notes" is selected, a single MIDI channel controls the 4 harmony
voices. When Notes 4CH or “Notes Four Channel” is selected, each harmony
voice is assigned a unique MIDI channel in the Setup tab which has many
benefits including:
1. the ability to use unique pitch bends on each channel
2. full stability of panning and gender assignments for each voice.
To take full advantage of this mode, you will need to have 4 tracks of MIDI data
on separate channels driving Harmony4.
Key & Scale (available only in Scale Mode)
Use these parameters to set the key and scale type. The scale defines the map
for how the harmony voices will react to the input pitch. Available scales are
Major/Minor 1,2 and 3. Custom scales can be created for situations where the
predefined scales don’t produce the desire results. Refer to Appendix: Scale
Types and Voicings Table
Attack and Release
Available only in Chord and Notes Modes, these parameteres set the envelope
attack and release times for harmony voices. Using these parameters can make
entrances and exits of the harmony notes softer or harder. This function works
when Latch is "Off" and MIDI notes are being received.
Latch (available only in Chord and Notes Modes)
When enabled, the last chord remains active after the notes have been
released. When disabled, harmony output stops when MIDI notes are released.
In notes mode, the number of notes played must equal the number of harmony
voices enabled for any voices to be triggered.
Bend Range
You can define how far the harmony pitches are shifted when you move the
pitch wheel on your MIDI keyboard. The values go from 0 to +\- 24 semitones.
Tuning
There are three micro tuning options for all harmony modes except Notes,
Notes 4CH and Shift.
Equal tuning uses approximations for the tuning of each note, allowing you
to easily alter the key of your music without re-tuning your instruments. This
is the same way synthesizers are tuned. Most non-digital instruments are
tuned this way.
12
Page 13

Just tuning maintains the exact relative ratios between pitches,creating
perfect harmonies. Just Tuning will sound natural the majority of the time.
Barbershop tuning differs from Just tuning only in Chord Mode and is best
used for a cappella applications.
Hold
This control engages the Harmony Hold feature. When set to "On", Harmony
Hold will wait until the pitch of a sung note has remained stable enough to allow
“freezing” or looping of the harmony voices while allowing the lead voice to ad
lib over top. When a preset is stored, the parameter will always be saved as
"Off".
Hold Release (“H.Release”)
Sets a fade-out time for the hold feature when returned to the "Off" value.
Root and Chord (available only in Chord Mode)
Use these parameters to set the chord root (e.g. C) and chord type (e.g. major
7). The chord defines the allowable notes for the harmony voices.
The Setup Tab
When using the two modes that require MIDI input, Notes and Chords, it is
essential to match the MIDI settings of Harmony4 to those of your Pro Tools
MIDI track for controlling harmony.
Important note: All parameters in the Setup tab are saved with the current
preset or Pro Tools setting. This is especially important when considering MIDI
channels. Changing the MIDI channel to a non-default channel in one preset
and then changing to another factory preset will require setting the MIDI
channel again. If you plan on using a different channel it’s best to save your
favorite MIDI presets as user presets with your chosen channel assigned.
Harmony V1(All) Channel
The MIDI channel for notes and sustain pedal information must match the channel of the
transmitting keyboard controller or sequencer MIDI track. Chord and Notes modes (but
not Notes 4CH) require only the Harmony V1(All) Channel be set to match your controller.
The other three channel assignments only apply when using Notes 4CH mode
where each voice has its own channel assignment. The “Vn” nomenclature
denotes each edit field as the channel setting for Voice 1 through 4.
Harmony V2/ V2 / V3 / V4 Channel
In Notes 4CH mode only, these settings determine which channel controls each
single voice.
13
Page 14

Notes Transpose
In Notes mode only, this setting works in tandem with the Split Zone and Split
Note settings to allow you to play high harmony notes on the lower section of
your keyboard and vice versa.
Split Zone & Split Note
You can use these settings to isolate which section of your MIDI keyboard will
control Harmony4. This is mostly used when playing live with keyboard sounds
triggered from one side of the keyboard and harmonies triggered from the other.
Tuning Reference
If the vocal track that drives Harmony4 was recorded with a non-440Hz
instrument reference, you can use this setting to bring the harmonies into tune.
Bend Range
See the Control Tab description.
14
Page 15

Chapter 3 - Producing Harmony
Harmony Modes Background
A quick description of why the harmony modes are required is that they help
Harmony4 “sing the right notes”. Each harmony mode requires different input
from you and is capable of producing different harmony sounds. We will use a
little allegory to explain.
When you and a fellow musician get together to play and sing, typically some
musical information is passed from one to the other before commencing the
song. You do this in order to make sure the music sounds pleasant and not
discordant. The information can be as simple as the name of a song you both
know, a musical key or even pointing out the chords on your instrument. In this
respect, Harmony4 is similar. You will need to share some musical information
in order for it to do its job properly. The ways in which you communicate this
information to Harmony4 are through the “harmony modes”.
Like your friend in our analogy, Harmony4 has intelligence that can contribute to
making good music. You can choose to use this intelligence or not depending
on the chord structure of your song and the harmony lines you have in mind.
You make this choice when choosing presets to produce harmony in your song.
The factory presets are organized on the basis of the four harmony modes:
² Scale
² Chords
² Notes
² Shift
The “intelligent” harmony modes, Scale and Chords, calculate a harmony map
with the following inputs from you:
1. The note the lead vocal is singing at any given moment;
2. Either the key and scale you’ve set at the beginning of your song (Scale
mode);
3. or the chord root and type interpreted by Harmony4 from incoming MIDI
track (Chords mode).
The map has an output note associated with every input note. This creates a
harmony melody that moves with your lead melody while generally sounding
harmonically correct with your accompaniment.
The non-intelligent modes, Notes and Shift, each have unique requirements so
we will deal with them individually:
15
Page 16

The Notes harmony mode requires a MIDI keyboard and other MIDI source to
dictate to Harmony4 what harmony notes you’d like to hear. Once a harmony
note or notes are held down on your MIDI keyboard or MIDI track, this is where
they will stay regardless of your changing vocal melody.
Shift mode shifts the pitch of the lead melody by a fixed interval. This is most
useful for doubling, special effects or Gothic-sounding 5ths.
A Comparison of the Harmony Modes
The following table gives an overview of the plusses and minuses of each
harmony mode.
Getting Set Up
1. After you’ve successfully installed Harmony4, open a new Pro Tools session
or an existing one with a dry vocal track in it.
Notes concerning vocal input files:
² The vocal track driving Harmony4 can be mono or stereo. In the case
of it being stereo, only the left channel send is sent to Harmony4.
² There should be as little as possible pitched instrument or other vocal
leakage onto the main vocal track. Increasing leakage compromises the
harmony quality.
² Any equalization of the send to Harmony4 should be minimized. You
can add EQ after the plug-in if required.
16
Page 17

² While Harmony4 has excellent pitch detection, it may have trouble
finding a pitch in growled or extremely raspy voices.
2. Connect a MIDI keyboard to your computer and create a MIDI track to pass
the live MIDI notes through to Harmony4. You can also use a pre-existing track
or record a new one to control Harmony4.
3. Follow the procedure for creating an auxilliary send and return buss for your
version of Pro Tools. In the return buss/channel, load Harmony4 as a TDM plugin from the Pitch Shift menu. Once it is correctly loaded, press play and confirm
that audio is reaching Harmony4 by checking that the IN meter is showing
audio. Set Harmony4’s wet/dry to 100% wet.
Insert or Auxillary Send?
² While you can run Harmony4 as either an insert or auxiliary send plugin, typically it’s best to run it as a pre-fader auxilliary send effect. This
allows you to process and mix the lead and the harmony voices separately.
Also, the auxilliary input channels in Pro Tools feature delay compensation.
Ensure that no other tracks are inadvertently sending to Harmony4 on its
assigned send bus.
² You can use Harmony4 as an insert if you don’t mind controlling
wet/dry mix within the plug-in as opposed to the track fader controls in the
Pro Tools mixer.
4. You can confirm that Harmony4 is receiving MIDI note information by loading
a Notes mode preset e.g. “Notes In Stereo” and observing note names in the
visualization area as you play your keyboard or play back a MIDI track.
Checking Out The Harmony Presets
Now that you’re setup, you can start producing harmony! If you are familiar with
TC-Helicon harmony products you can proceed directly to the presets dedicated
to the harmony mode of your choice and experience the results.
1. If this is your first time creating virtual harmonies, start by loading the first
preset in the factory preset list. The first group of presets are based on the
Chords harmony mode so get ready to play chords on your MIDI keyboard or
play back an existing MIDI track with the song’s chord changes. Chords presets
will recognize the MIDI chords and produce harmonies relevant to the song.
2. Press Play and confirm all of your audio paths are correctly set. You should
hear a mix of the lead voice and the harmony voices and see metering
indications in your track meters. Until you play the keyboard or MIDI track, the
harmonies won’t follow the song but this is OK while you’re making sure the
audio paths are correct.
17
Page 18

You may want to record a scratch MIDI chord track in Pro Tools during the
song sections where harmony is required so you can try the different
Chords presets without having to play at the same time.
3. You can now listen to how the different Chord presets sound as the song
plays. At this point you can also start learning about editing. A good place to
start is with parameters in the Voices Tab. Here you can move the Voicing up
and down and hear the effect of different Gender settings on each voice.
4. Once you’ve experimented with the Chords mode presets, you can check out
the presets built on Notes mode. You’ll need your MIDI keyboard or MIDI track
again but this time, instead of simply playing chords, you also have the option of
playing melody lines or holding static notes.
Again, it will help if you create a scratch MIDI track with some harmony
lines so you can sample the different Notes presets.
One of the Notes mode presets is called MIDI 4 Channel. To hear this preset
correctly, you will need to record up to four MIDI tracks on different MIDI
channels each with a mono melody line. The four MIDI channel assignments of
the tracks must match the assignments set in the Setup tab of Harmony4. It
sounds like a lot of work but this is arguably the most flexible and powerful
harmony mode so it is worth the extra effort to hear it. Be sure to try a pitch
bend on at least one MIDI channel.
5. Auditioning the Scale mode presets with your lead vocal track is much easier.
All you have to do is determine which Key and Scale matches your song or
song section and enter it when you load each preset. If the song chord structure
is fairly simple, one setting of Key and Scale will sound wonderful. What may
happen though is that the harmony part will sound great for most of the song or
section but when the accompaniment goes to a particular chord and the singer
sings a particular note, the harmony at that moment doesn’t sound musically
correct.
When Scale harmony needs help, the beauty of Pro Tools automation comes to
the rescue! Take note of where the harmony needs to be adjusted. Then loop
this section and find a Key or Scale combination that works for that moment.
Now automate a Key or Scale edit just before that note or phrase. Return to the
original Key and Scale settings for the rest. You may have to do this at a couple
of places in your song but the often breathtaking reality of Scale mode
harmonies will make it worth the effort.
A table outlining the differences between the three Major and three Minor scales
is in the Appendix. These scale modifications have been developed by
performing musicians to make Scale harmonies work for more songs.
6. Shift is the last harmony mode group in the factory presets. These are least
likely to produce what we expect as harmony but they can be useful for
doubling and special FX. No input on these presets is required beyond loading
18
Page 19

the preset. Editing the voicing parameters will give you a good idea of what is
possible with this harmony mode.
If you’ve stayed with this text up to this point, you’ve received a good overview
of what Harmony4 has to offer. From this point onwards you can work with
presets in the harmony modes that suit your workflow best.
19
Page 20

Chapter 4: Appendix
Troubleshooting
For the more extensive and up to date troubleshooting information please visit
www.tcsupport.tc
I don’t hear any harmony voices, but the input meter to Harmony4 shows
input level - nothing on the output?
There are several common reasons harmonies are not being produced when
the plug-in shows input level:
1. Harmony Mute is enabled: disable it to hear harmonies
2. A Notes or Chord preset is selected: make sure there is MIDI being sent
through the correct path in Pro Tools.
3. If MIDI is being sent, but there are still no harmonies: confirm that:
a) the MIDI channel for Harmony4 is matched to your track with MIDI
information. or;
b) the split point settings are allowing MIDI notes through
Why do my meters only show activity on the left channel?
If Harmony4 is inserted on a mono channel only the left side of Harmony4 is
used. For both meters to function, use Harmony4 on a stereo channel.
Can I reduce excessive sibilance when using Harmony4?
The harmony voices are pitch shifted and humanized versions of the input
voice. If there is sibilance on the original recording, that effect becomes more
noticeable with each harmony voice added. Try using Time Randomize = 10.
Additionally, consider using a de-esser plug-in.
I hear a slight delay between the lead voice and the harmonies, can that
be fixed?
Pro Tools doesn’t default to having plug-in delay compensation turned on. You
will need to turn this on and set the buffer size to at least 1792 samples at 44.1
or 48 KHz or 3588 samples at 88/96 KHz.
I hear the harmony voices clipping but the Harmony4 input meters don’t
show it.
In this case, drag the IN fader in Harmony4 down to reduce the input level. If
your vocal track is very dynamic, you could also place a compressor plug-in
before the Harmony4 send or insert.
20
Page 21

Scale Types and Voicings Table
The table at left illustrates the how the six scale types
differ. It shows the third and fifth intervals for input
notes in the key of C.
The bold line of notes at the top represent the sung or
input note.
The symbol “nc” means no change, in that the harmony voice will simply stay on the previous note until the
lead voice changes to a non “nc” note.
The following table shows the range of harmony
voicings available in Scale mode.
+2 Octaves
++7
++6
++5
++4
++3
++2
+1
+7
+6
+5
+4
+3
+2
Lead Voice C C# D Eb E F F# G G# A Bb B
3rd Above E nc F nc G A nc B nc C D D
5th Above G nc A nc B C nc D nc E F F
MAJ1
Unison
-2
-3
-4
-5
-6
-7
-1 Octaves
- -2
- -3
5th above G nc A nc C C nc E nc E F F
5th above G nc A nc Bb C nc D nc E F F
5th above G nc Bb Bb nc C nc D Eb nc F nc
5th above G nc A Bb nc C nc D Eb nc F nc
5th above G nc A Bb nc C nc D Eb nc F nc
- -4
- -5
- -6
MAJ2 3rd above E nc F nc G A nc C nc C D D
MAJ3 3rd above E nc F nc G A nc Bb nc C D D
MIN1 3rd above Eb nc F G nc Ab nc Bb C nc D nc
MIN2 3rd above Eb nc F G nc A nc Bb C nc D nc
MIN3 3rd above Eb nc F G nc Ab nc B C nc D nc
- -7
-2 Octaves
21
Page 22

Chord Types and Voicings Table
The following gives additional detail on Chords mode. It shows the range of
chords recognized by Harmony4 based on a chord root of C in the left column.
To the right in the table is the combination of notes that are required to be
played in order for Harmony4 to recognize each chord type.
Recognized Chord Types with Root of C
Type Required Notes
Maj C E G
Maj6 C E G A
Maj7 C E G B
Maj7sus4 C F G B
Min C Eb G
Min6 C Eb G A
Min7 C Eb G Bb
Min7b5 C Eb Gb Bb
Dim C Eb Gb
Dim7 C Eb Gb Bbb
(equiv. to A)
Dom7 C E G Bb
Dom7b5 C E Gb Bb
Aug C E G#
Aug7 C E G# Bb
Sus C F G
Sus2 C D G
Sus7 C F G Bb
Voicing intervals in
Chord Mode Presets
+2 Octaves
+1 Octave
Up 6
Up 5
Up 4
Up 3
Up 2
Up 1
Unison
Down 1
Down 2
Down 3
Down 4
Down 5
-1 Octave
-2 Octaves
Bass 2
Bass 1
Root 2
Root 1
22
 Loading...