

Page 1

lASCAM
TEAC Professional Division
DA-38
Digital Multitrack Recorder
DA-38
□
0 0 0 0
«1 »
0»»i. O«««« euM Ci*H»
□ □ □ □
□ E] □ □
uei iMi O
unu t WM4I ECm
□ □ □
□—i
OWNER’S MANUAL
1 2 S 4 • T 8
□□□□□□□□
D00224500B
Page 2

SECTION 1 : INTRODUCTION
Thank you for choosing the TASCAM DA-38 Digital
Multitrack Recorder, The DA-38 is a product in the direct
line of the worldwide successful DA-88 and was designed
to meet the needs of video/film production, broadcast
production, recording studios, project studios, and the
musician.
Among the important features of DA-38 are the
following:
• Menu-selectable machine ID, pre-/postroll time, and
others
• Syncing up to 16 units for 128 tracks
• Syncing with the DA-88
• Can be slaved to external word clock
• Shuttling for reel rocking to identify specific points
on tape
• 2-point autolocator with or without preroll
• Trial punch in and out
• Crossfade action to ensure seamless punch in and out
• Track delay function to correct the timing discrepan
cies between tracks
• Digital copy between tracks within one DA-38 or
from tracks of one DA-38 to tracks of another
• Can be controlled from the TASCAM RC-848 or
RC-808 remote
1 . 1
Page 3

SECTION 1: INTRODUCTION
Table of Contents
Important Safety Precautions
Safety Instructions
....................................................................
..................................................
Section 1 : Introduction.................................................1
l-I. Unpacking................................................
1-2, Precautions and recommendations.
1-3. Compatible cassette tapes...................
1-4. Available recording/play time........
1-5. Backup facility.......................................
Hookup example
...........................................
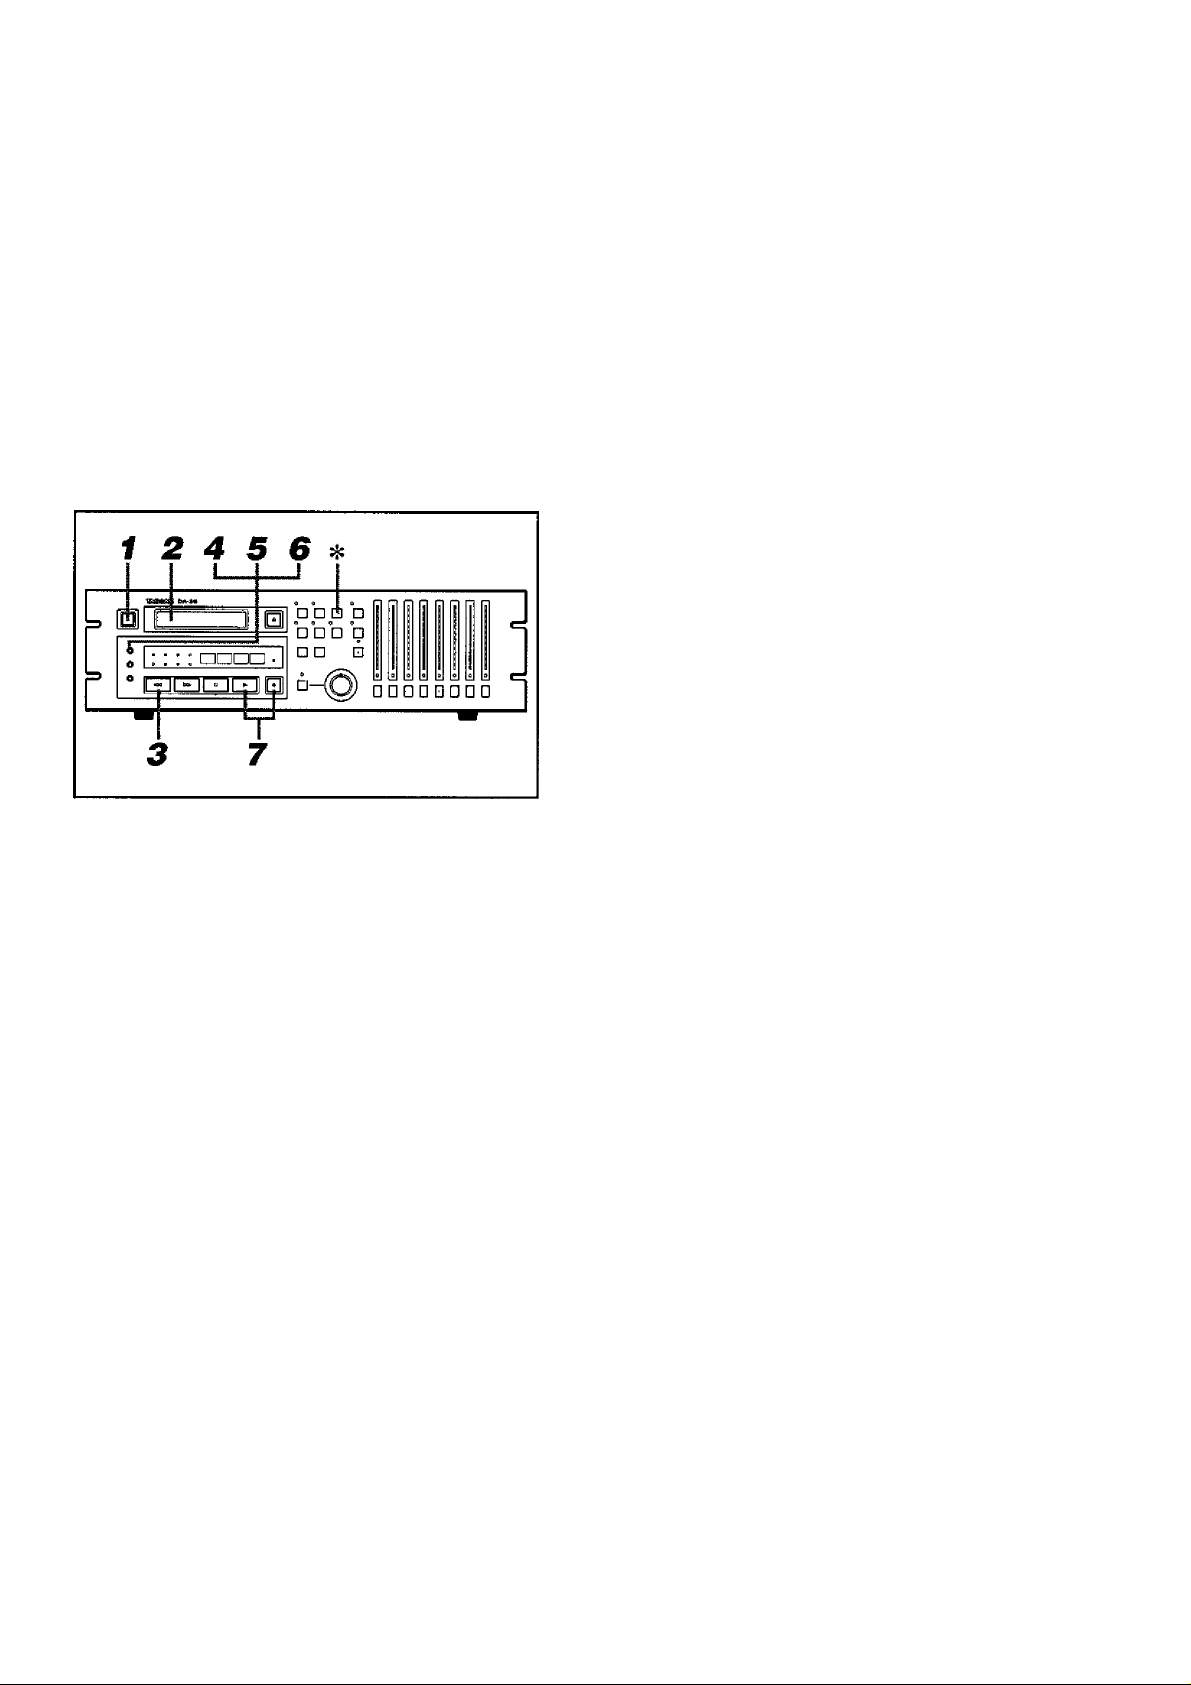
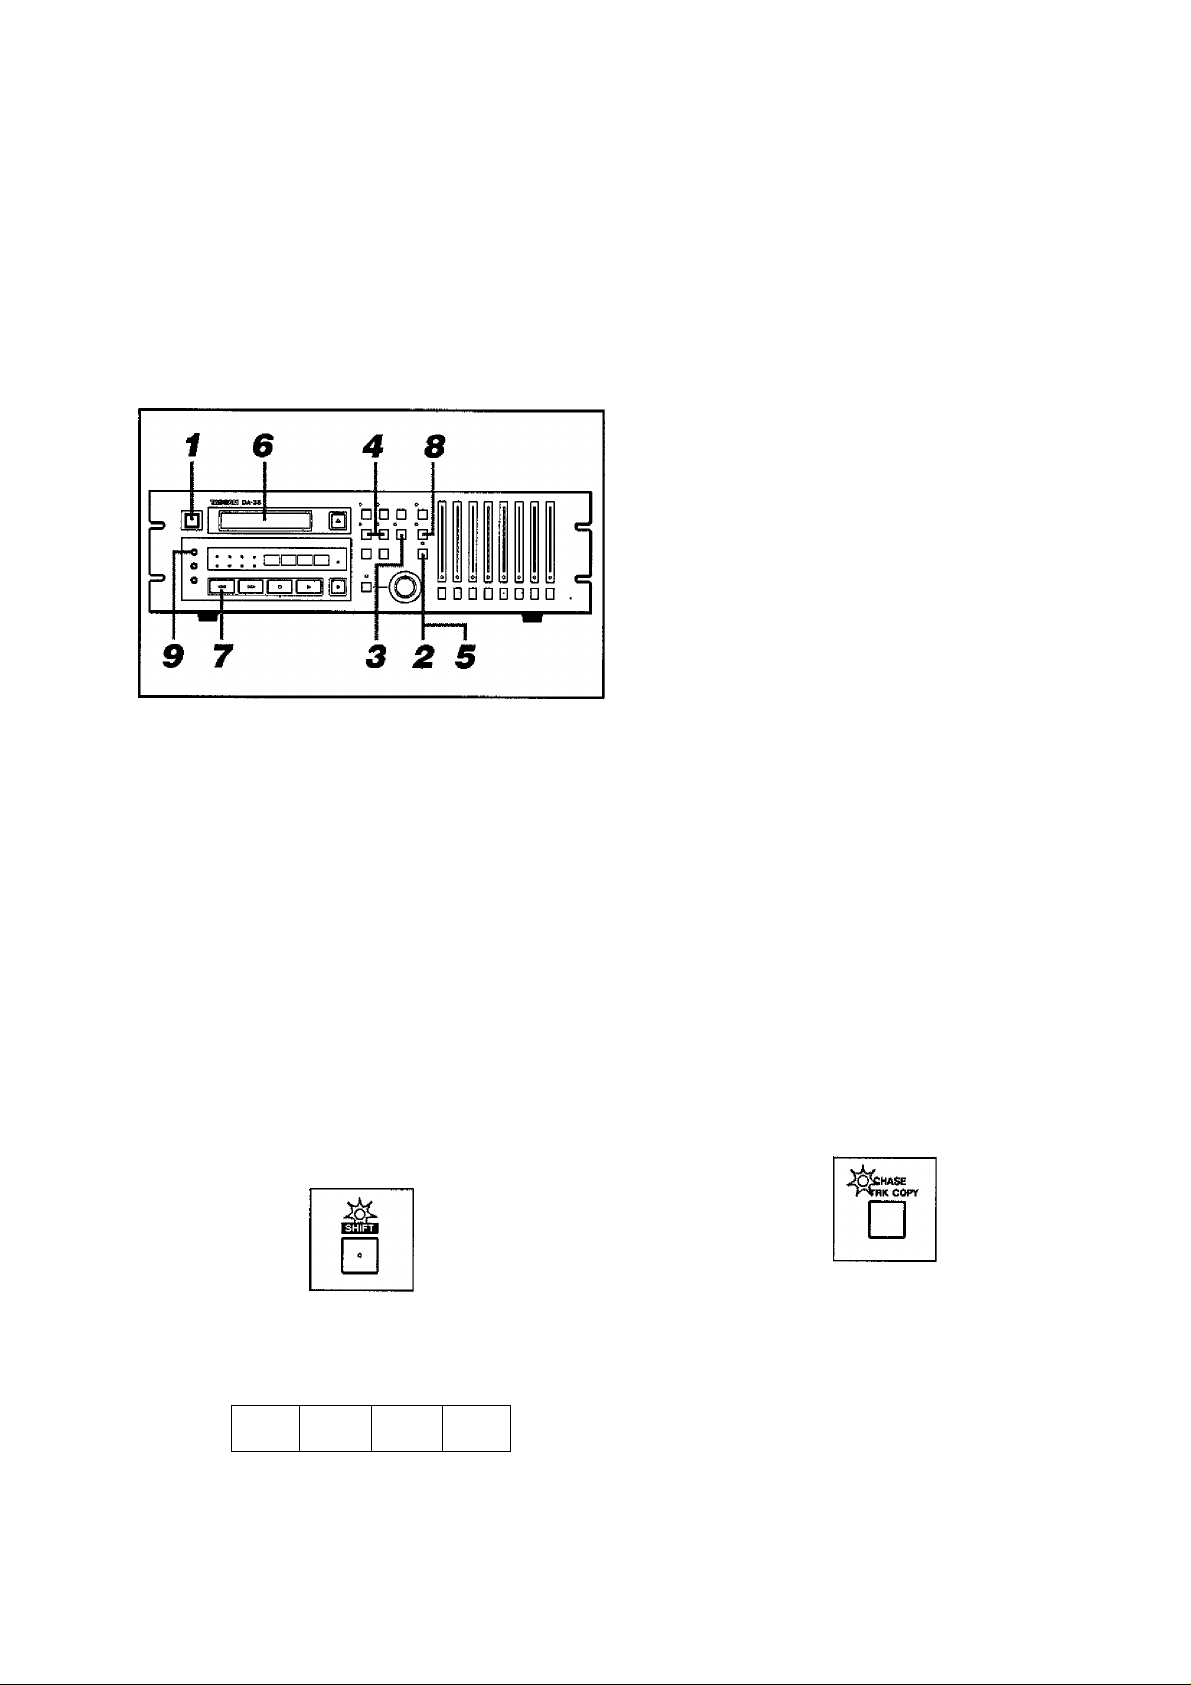
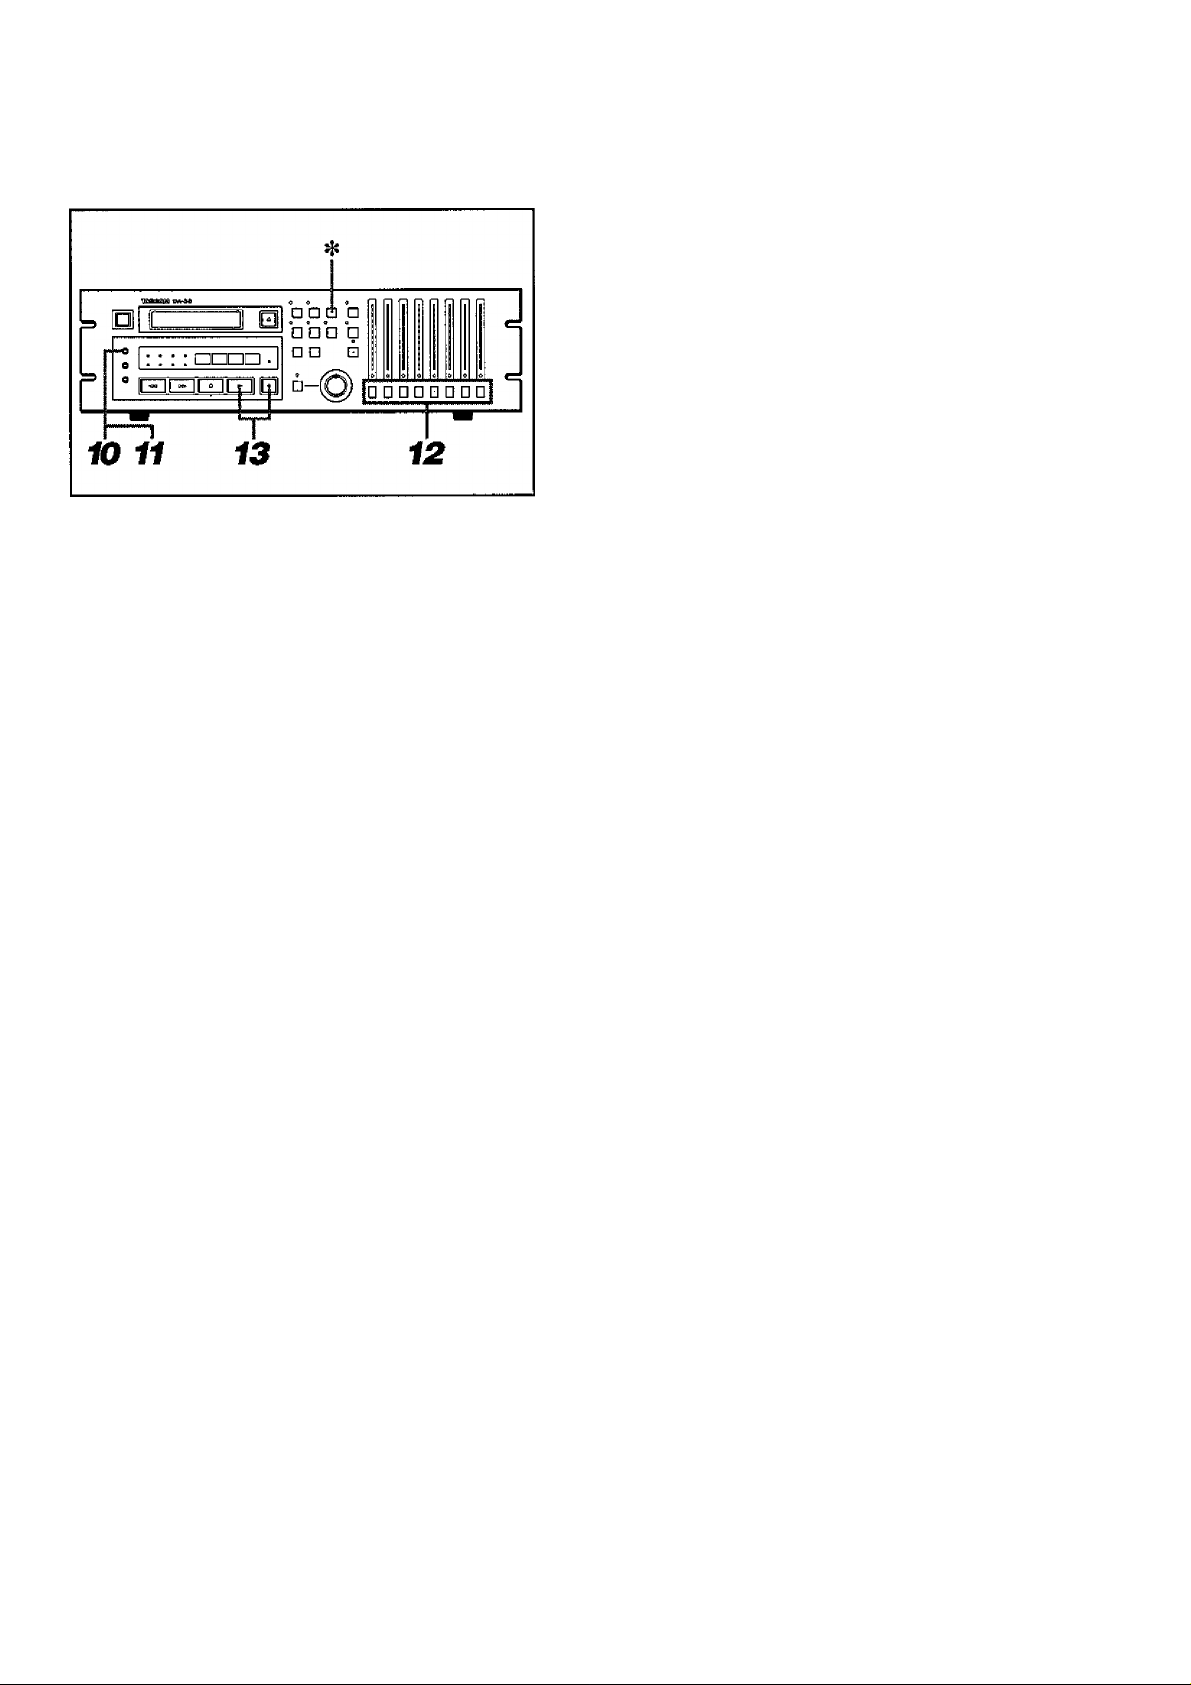
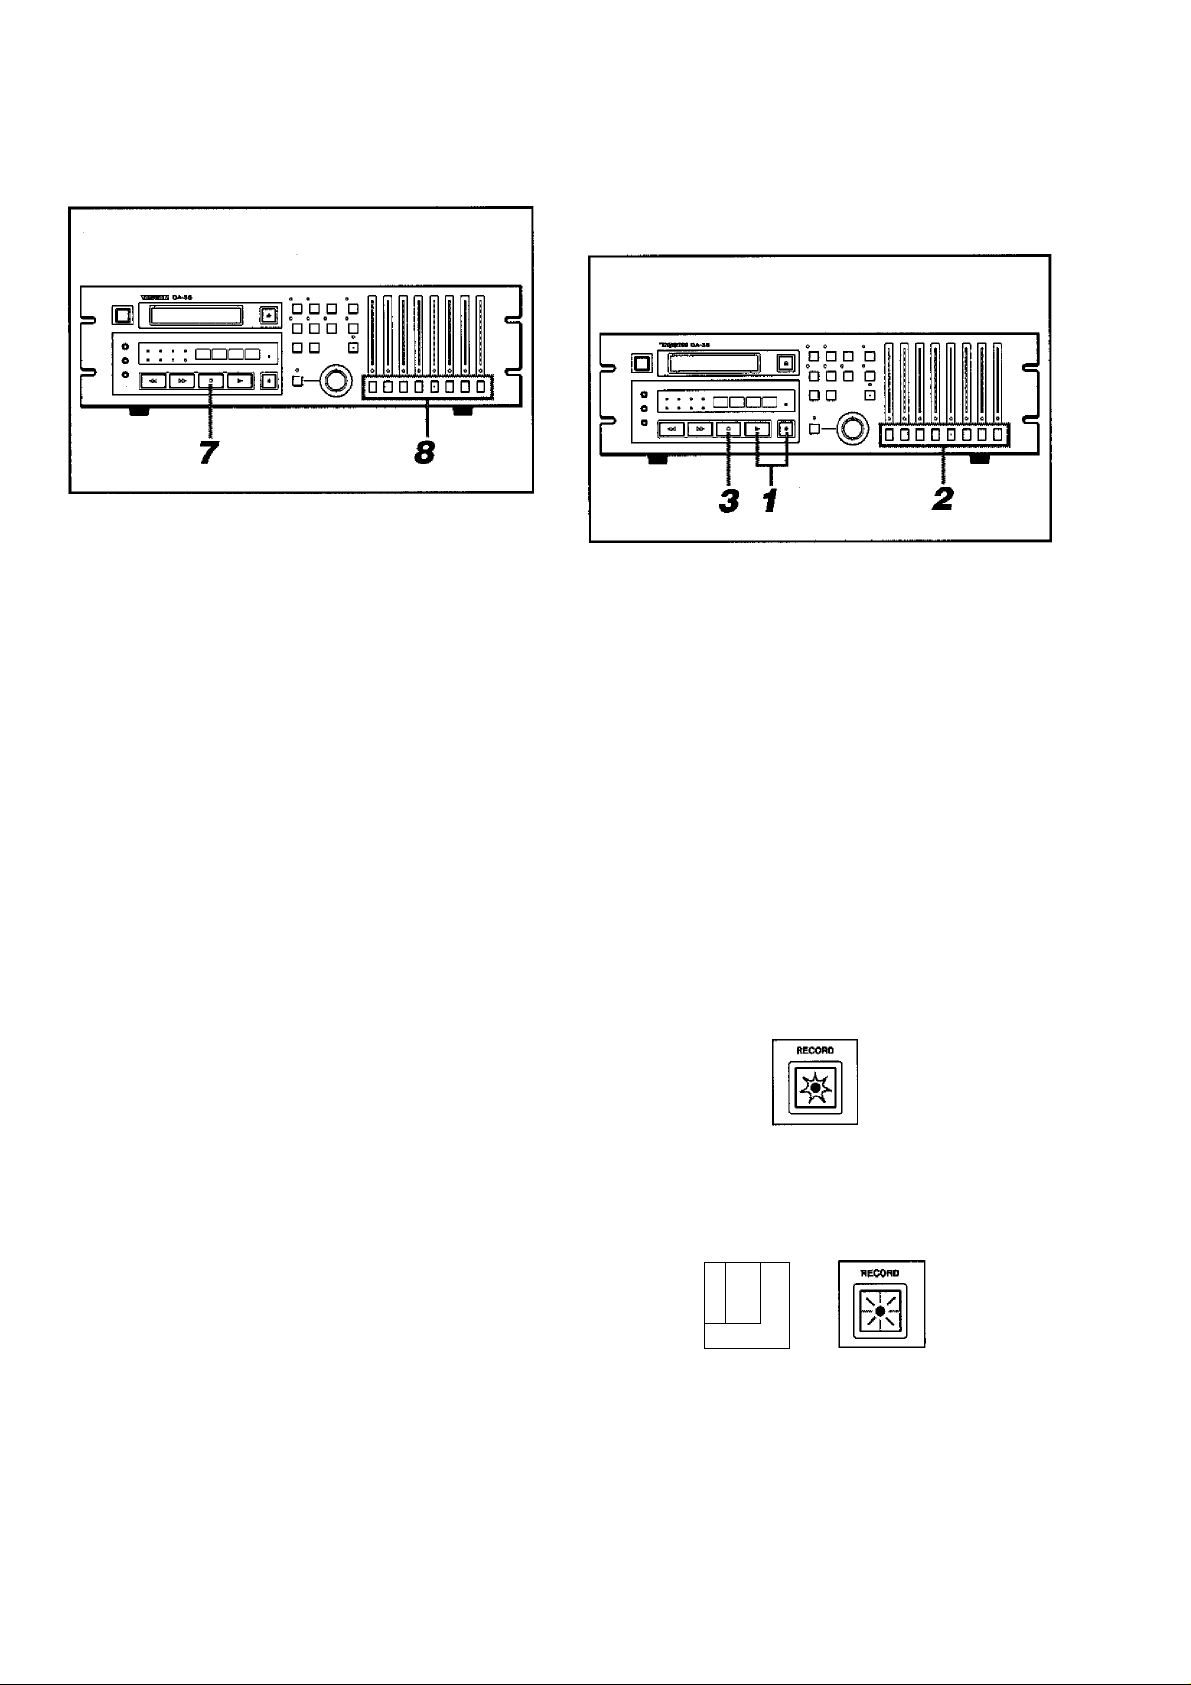
Section 2 : General Guide.................................................2
Section 3 : Formatting a Tape
3-1. How to format a tape (basic operation)
3- 2, Real-time, simultaneous tape format
.........................................
..................
.................
Section 4 : Recording........................................................4
4- 1. Recording analog input (basic operation)
4-2. Recording digital input
4-3. Punch in/out editing.................................................4
4-4. Crossfade time setting.............................................4
4-5. Preroll time setting...................................................4
4-6. Postroll time setting.................................................4
4-7. Copying tracks..........................................................4
4-8, Dithering the re-quantization noise
............................................
......................
........
4*14
2
3
3
3
3
4
4
Section 8 : Controlling the DA-38 from Menus
8-1. General...................................................................8
8-2. Using the built-in oscillator
8-3, Initializing the backup memory
8- 4. Selecting a TDIF input bit length...................8
Section 9: Monitor and Other Capabilities
9- 1. Monitor functions..
9-2. Capabilities to assist in saving your time...........9
9- 3, To see the system version
Section 10: Maintenance
10- 1. Error rate display.............................................10
10-2. Cleaning the heads..............................................10
10- 3. Head drum utilized time display
Section 11 : Appendices....................................................II
11- 1. Specifications
11 -2. Optional accessories...........................................II
11-3. Error messages explained
..................................................
.................................................
.................................
..........................................
.................................
.................
...........................
........................
.............................
....................
S
8
8
9
9
9
10
10
11
11
Section 5 : Playback......................................................5
5-1. Basic playback procedure.......................................5
5-2, Shuttling the tape.....................................................5
5-3. Variable speed play..................................................5
5-4. Setting locations
5-5, Repeat play
5- 6, Delaying tracks....................................................5
Section 6 : Autolocation
6- 1. Autolocating to either of two location points.. 6
6-2. Setting autolocation preroll time
6- 3. The auto play function.........................................6
......................................................
...............................................................
..............................................
............................
6
Section 7 : Syncing Multiple DA-38s..............................7
7- 1. Hooking up multiple DA-38s
7-2. Selecting a machine ID number..............................7
7-3. How to sync the slave units to the master
7-4. Offsetting slave units...............................................7
7-5. Digital dubbing between DA-38s
...............................
.............
............................
5
5
6
7
7
7
1 *2
Page 4
SECTION 3 : FORMAHING A TAPE
Audio can be recorded while formatting a tape (discussed
later). But it's wise of you to format the tape from the
beginning all the way to the end before recording audio.
The tape formatting process writes sub-code data such as
ABS time and setup data such as ATF (Automatic Track
Finding) signal onto a non-audio section of the tape.
^ While the FORMAT indicator is blinking, press the
3-1. How to Format a Tape (basic operation)
Q The FORMAT/Fs switch now acts as a sampling rate
Y Switch power ON,
You'll notice that a machine ID number (" id n a '"
for example) and other indications appear on the
display.
See Section 7 for an explanation of the machine ID
number.
2 Insert a new Hi8 tape into the DA-38.
7 To start formatting the tape, hold RECORD and press
• Unless you perform the next step (5) within five
seconds, the formatting mode is disabled and the
FORMAT indicator turns off. Should this occur,
press the FORMAT/Fs switch again.
FORMAT/Fs switch once more.
The FORMAT indicator will glow solid to show that
the unit is ready to format the tape.
* If you want to cancel the format ready mode at this
stage, press CLEAR and the FORMAT LED turns off.
selection switch, so press the switch until the required
rate shows on the display.
NOTE
If a digital signal is fed into the DA-38 (as indicated by
the DIGITAL IN indicator tit on the display), the unit is
automatically switched to operate at an incoming
sampling rate, and the Fs switch does not operate.
PLAY,
The RECORD button will light up. When the tape is
formatted all the way to the end, it will automatically
rewind, stopping at "u u 0 0 D D D u".
- L u Rd - - " will appear on the display to show
that the tape is being loaded.
IMPORTANT
• The DA-38 is designed to operate only with Hi8
video tapes. You cannot use any other tapes.
• The DA-38 automaticaliy ejects tapes thinner than
8.5 pm: 150-minute or longer tapes.
^ Press REW to rewind the tape all the way to the
beginning.
When the beginning is reached, "fa of' (beginning of
tape) will appear on the display,
4 Press the FORMAT/Fs switch.
The FORMAT indicator will start blinking on the
display.
3*1
Suggestion: You can record audio on a track selected
by the REC FUNCTION switch while at the same
time the tape is formatted.
IMPORTANT
• Be sure to format the tape from beginning to end in
one continuous stroke. Do not interrupt the format
process.
• When a tape is being formatted, any transport
contols do not operate except for STOP.
• When a tape is being formatted, you cannot
change the sampiing rate. (This is also true when
audio recording is in progress.)
• When the dispiay shows a negative ABS time,
audio cannot be recorded, as confirmed by a blink
ing RECORD LED.
Page 5
SECTION 3 : FORMATTING A TAPE
3-2. Real-time, Simultaneous Tape Format
In some cases, when recording a live concert using multi
ple DA-3 8s for instance, you may want to format tapes
while at the same time you record audio on them, for later
master/slave sync play.
Follow these steps to perform the real-time, simultaneous
tape format;
• Hook up a mutiple DA-38 sync system a basic example
of which is shown in Section 7.
•f Switch power ON,
^ Enter the desired machine ID number by pressing the
▲ and T keys.
• Enter " on the DA-38 you intend to use as the
master machine.
• Enter other numbers ("(?" to " IS") on each of the
slave DA-38s.
IMPORTANT
Assign a different number to each of the DA-38s.
^ Press SHIFT and the display will be switched back to
show the ABS time.
0 Insert a new Hi8 tape into each of the DA-38s.
The display will show - L DRd - - " while the tape
is being loaded.
Speaking of Remembering:
• The DA-38 is designed to operate only with Hi8
video tapes. You cannot use any other tapes.
• The DA-38 automatically ejects tapes thinner than
8.5 pm : 150-minute or longer tapes.
A machine ID number ("id no. t" for example)
and other indications will appear on the display.
Assigning a machine ID number to each of the DA-38s
(steps 2 through 5)
2 Press SHIFT and the associated LED will start blink
ing to show that all the double function keys are
switched to offer their lower blue-labelled functions.
3 By repeatedly pressing MENU, access an ID selection
menu, which looks like this:
1 d
SE
1
L
1
1
7 Press REW to rewind the tape all the way to the
beginning.
When the beginning is reached, "bob " will appear
on the display.
Q Press CHASE on each of the slave DA-38s to put
them into sync mode and the associated LED starts
blinking.
0 Press the FORMAT/Fs switch on all of the DA-38s.
The FORMAT indicator will start blinking on the
display of every DA-38.
¥
• If you don't perform the next step within 5 seconds,
the tape format mode will be disabled and the
FORMAT indicator will turn off. Should this occur,
press the FORMAT key again.
3*2
Page 6
SECTION 3 ; FORMAHING A TAPE
12 Put the tracks to record on into Record Ready mode
by pressing the tracks' associated REC FUNCTION
switches. Their LEDs will start blinking.
^3 master DA-38, hold RECORD and press
PLAY, and both the audio recording process and the
tape formatting process will start on all the DA-38s
(RECORD LED lit).
When the end of the tapes is reached, they will auto
matically rewind, stopping at "£7 £?£?£?£?£? tj £?".
10 Press the FORMAT switch once more on every DA-
38.
The FORMAT indicator will glow solid to show that
the unit is ready to format the tape.
^ If you want to cancel the tape format ready mode at
this stage, press CLEAR, and the FORMAT indicator
will turn off.
11 The FORMAT/Fs switch now acts as a sampling rate
selection switch, so press the switch until the
required rate shows on the display.
IMPORTANT
It is imperative that all the stave machines are refer
enced to the same sampling rate as the master.
Check to see one and the same sampling rate indica
tor is lit on ali the units' displays.
• If you select a different rate from the one selected
on the master unit, "E. E iUE'' will appear on
that slave's display.
IMPORTANT
• Let the tape run until the end is reached even if
audio recording is complete at an intermediate
point of the tape. Interrupting the tape format
process results in ABS time discontinuities, making
proper operation impossible.
• The tapes you intend to use for synchronization
also must be formatted from the beginning all the
way to the end in one continuous stroke. Tapes
which were formatted in multiple strokes or were
recorded in Assemble mode and in consequence
formatted in multiple strokes could lead to unstable
synchronization when they transit from one format
ted section to the next formatted section. Such
tapes must be re-formatted from beginning to end if
you want to use.
• During the tape formatting process, any transport
controls do not operate except for STOP.
• You cannot change the sampling rate during the
formatting/recording process.
• When the display shows a negative ABS time,
audio cannot be recorded, as indicated by a blink
ing RECORD button.
NOTE
When recording from the digital input, the DA-38 is
automatically switched to operate at an incoming
sampling rate. Your selection is overridden and the Fs
switch does not operate.
3-3
Page 7

SECTION 4: RECORDING
This section of the manual provides information on basic
recording procedures, punch-in/out procedure and others.
4-1. Recording Analog Input (basic operation)
There are three ways to start recording. Use whichever
one is most suitable to you.
• Hold RECORD and press PLAY.
• Press REC FUNCTION.
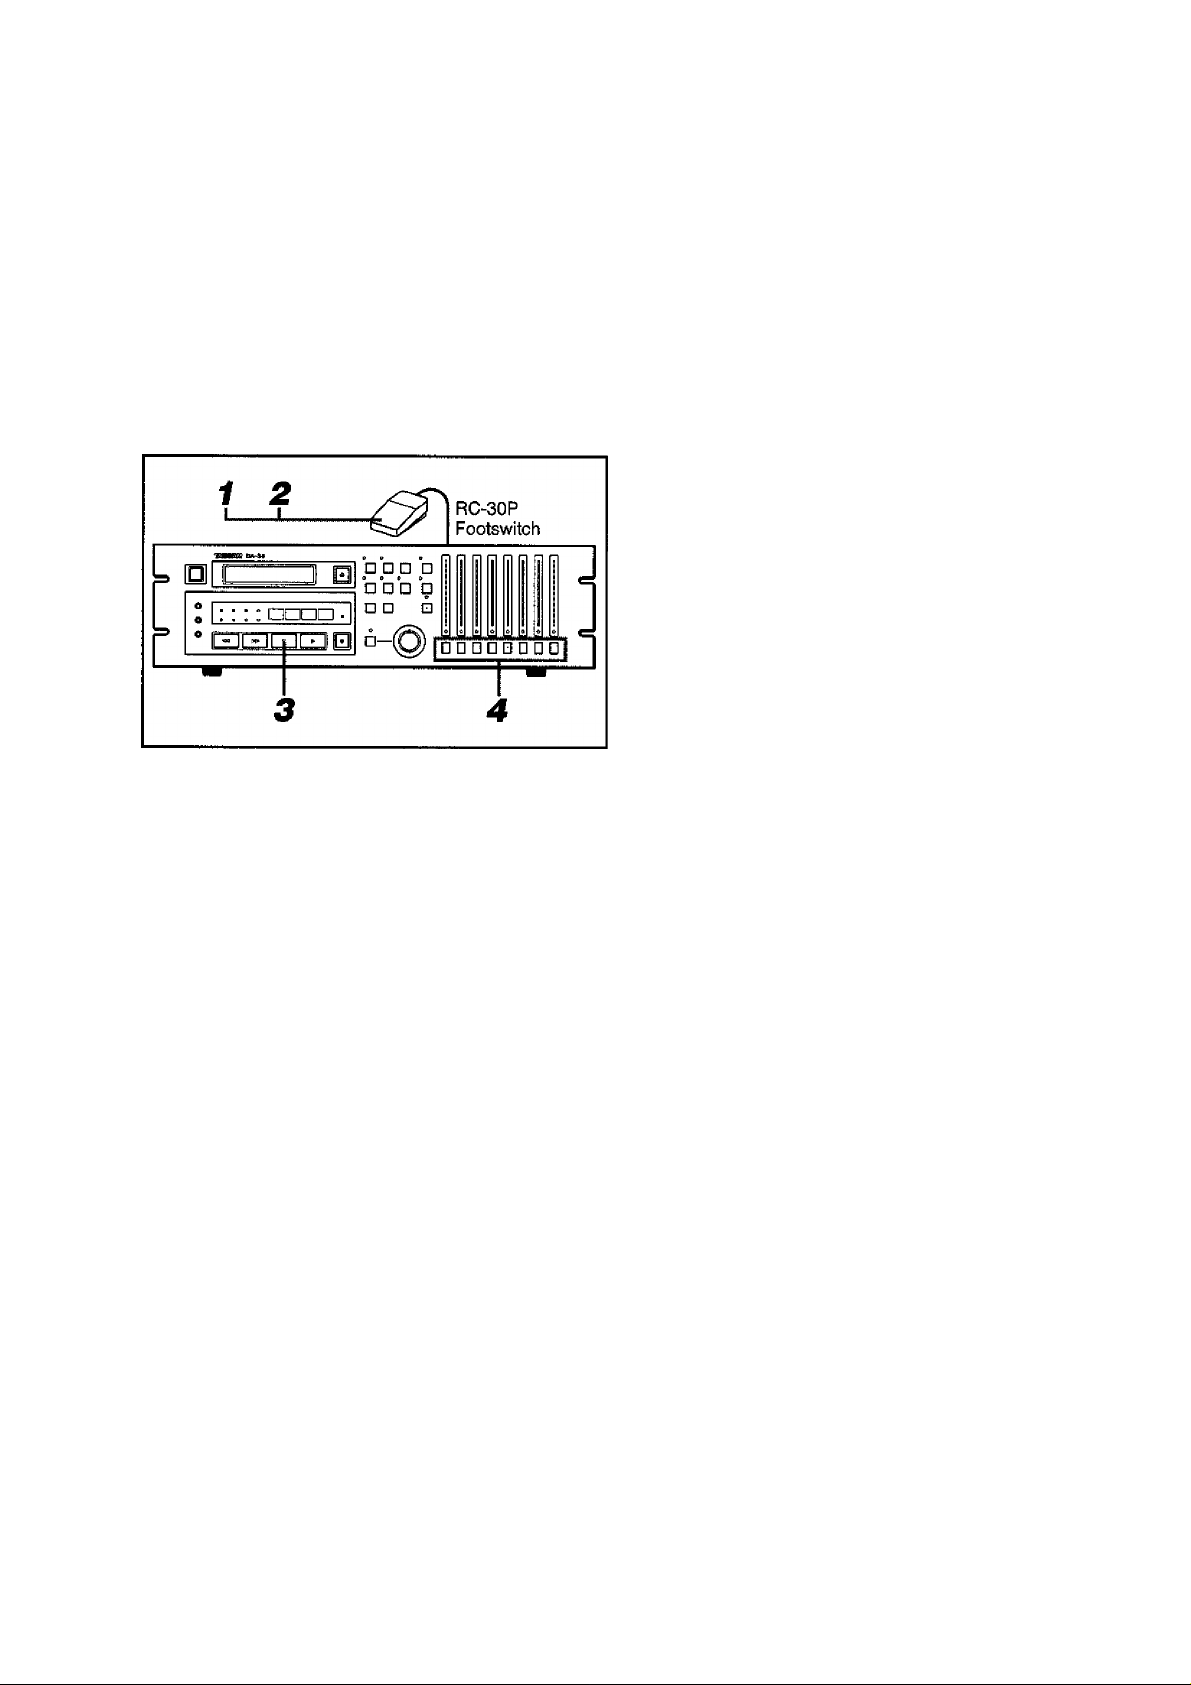
• Press an optional RC-30P footswitch.
They are explained in that order in the following.
• When recording on a newly formatted tape, rewind it all
the way to the beginning and allow a blank leader of 30
seconds or more of ABS time before the beginning of
recording. Recordings close to the beginning or the end
could cause drop outs. Also, create a recorded blank
trailer at the end of recording; and before continuing
recording, rewind the tape to the recorded blank trailer.
• When recording live concerts or others you have no
chance of retaking, it is wise of you to clean the heads
in advance.
• The DA-38 is designed to operate only with Hi8
• We recommend that you use pre-formatted new
• Do not use a tape once used in any different
• If the tape in use is write-protected, a "rEc mh >"
• The DA-38 automatically ejects tapes thinner than
2 Insert a pre-formatted new Hi8 tape into each DA-38.
While the tape is being loaded the display will show
-LO Rd-
IMPORTANT NOTICES
video cassette tapes. You cannot use any other
tapes.
(blank) Hi8 tapes for new recordings.
machines from the DA-38 or DA-88 : a tape used
for video recording for example.
message will appear on the display (in step 6
below). If you want to use this tape, open the write-
protect tab. If you try to record on a write-protected
tape, the DA-38 goes into Play mode.
8.5 pm : 150-minute or longer tapes.
(1) Using RECORD and PLAY
Hook up the DA-38(s) and other devices by referencing to
a hook-up example shown in Section 1 if necessary.
WARNING
Make all connections with power OFF.
•fl When your system is all hooked up, turn on each DA-
38.
0 Check to see that VARI SPEED is not enabled on any
DA-38, as indicated by the associated LED turned off.
Recording at variable speeds is referred to in Section
5, paragraph 5-3.
^ Put the tracks to record on into Record Ready mode
by pressing the corresponding REC FUNCTION
switches. The associated LEDs will start blinking.
^ Adjust the output level of the source unit or of the
mixer in use as high as possible, without causing
overscale reading on any DA-3 8's meter.
Q To start recording, hold RECORD and press PLAY.
A machine ID number (" id. no. /" for example)
and other indications will appear on each DA-38's
display.
4*1
Page 8
SECTION 4: RECORDING
Suggestion : Each time you start recording, that
point is automatically stored into memory, erasing the
previous one. You can program the DA-38 to punch in
at that point, as discussed later, page 4 • 7, paragraph
(4).
7 To terminate recording, press STOP.
Suggestion : Each time recording is stopped, that
point is automatically stored into memory, erasing the
previous one. You can program the DA-38 to punch
out at that point, as discussed later, page 4 • 7, para
graph (4).
(2) REC FUNCTION-triggered Recording
• For the hookup, refer to a diagram shown in Section 1 if
necessary.
• Understand the Important Notices on the previous page.
• Adjust the mixer's level controls or the output level of
the source unit so high as possible without causing
overscale reading on the DA-38's meter.
• Perform steps 1 through 3 under the paragraph, Using
RECORD and PLAY.
When you have the DA-38 drop out of record to
rewind or fast-forward too, that point is saved.
Q To prevent the tracks from accidentally erasing, press
the tracks' associated REC FUNCTION switches off.
NOTES
• You cannot change the sampling rate when record
ing is in progress.
• if you start a new recording at the same time as the
tape format from the end of the existing recording
("assemble"), the tape is recorded and formatted at
the previous sampling rate. When preparing to
record from the end of the previous take and to
continue to format the tape, first rewind the tape to
a formatted silence section. Avoid starting record
ing and formatting from a non-recorded and
unformatted blank section.
Then, follow these steps.
Y Making sure that all the REC FUNCTION switches
are released, hold RECORD and press PLAY. The
tape will start playing and the RECORD button will
start blinking.
2 Press the REC FUNCTION switch for the track(s)
you want to record on. The pressed REC FUNCTION
switches' associated LEDs will light solidly, and the
RECORD button the same.
"3ns-
u
-dB
-)?i
1
• If the tape is write-protected, the deck goes into
Play mode.
^ To stop recording, press STOP.
4*2
Page 9
SECTION 4: RECORDING
(3) Footswitch-controlled Recording
If you are recording alone and are too busy playing an
instrument to push the switches, the use of the optional
remote footswitch (RC-30P) is really handy.
This method of recording is recommended especially for
punching in and out of record. The punch-in/out proce
dure is explained later, under the corresponding heading.
• Plug the RC-30P footswitch into the REMOTE
PUNCH-IN/OUT jack on the rear of the DA-38. For
other connections, refer to a hookup example shown in
Section 1.
• Perform steps 1 through 5 under the paragraph, Using
RECORD and PLAY.
Then, proceed as follows :
Y Press the footswitch and the tape will start playing.
4-2. Recording Digital Input
The procedure is similar to that for Recording Analog
Input, with these exceptions:
• Press the DIGITAL IN switch. The indicator DIGITAL
IN will light on the display.
• In the most cases, the DA-38 is referenced to the same
clock as the source digital unit, so:
o Plug the clock from the source unit into the WORD
SYNC IN jack on the rear of the DA-38.
o Press the WORD IN switch. The indicator WORD
IN will light on the display to show that the DA-38 is
slaved to the external elock.
• When recording from the digital input, there is no need
of adjusting the recording level.
IMPORTANT
• If either of two sampling rate indicators blinks on
the display, it indicates that a different sampling
rate than the one present on the tape is coming in.
Then, re-format the tape with the correct sampling
rate, or use another tape.
• An 'f. J to ” warning appears on the display if your
digital source (DA-38/DA-88) or digital interface
unit (IF-88AE/IF-88SD) is not connected to the DA38 by using the optional PW-88D cable.
2 To start recording, press the footswitch once more.
• If the tape is write-protected, the DA-38 does not
go into Record mode, and remains in Play mode.
3 To stop recording, press STOP.
^ To insure against accidental erasure, press the REC
FUNCTION switches off.
Suggestion : The DA-38 remembers both the record
start point and the end point; and you can program the
unit to drop into and out of record at those points. For
details, see page 4-7, paragraph (4).
4.3
Page 10

SECTION 4: RECORDING
4-3. Punch In/Out Editing
This section of the manual provides information on
rehearsal or trial punch in/out and actual punch in/out
procedures.
Quite often, it becomes apparent that the recorded mater
ial contains a mistake or could be improved. One obvious
way to correct this problem is to re-record the entire track,
but, if the mistake is minor, this is not practical or neces
sary. You can use the technique known as Punch-in or
Insert recording. This provides a way to re-record only a
small part of a track, thus covering the mistake, or to
record additional material on a blank section of a track,
augmenting the original material.
For smooth punch-ins (dropping into record) and punch-
outs (dropping out of record) we recommend you the use
of the optional RC-30P footswitch. This streamlines the
process and you can control the timing of punching in and
out with ease. Especially if you are recording alone and
are busy playing an instrument, it is really handy.
The DA-38 has a Rehearsal function, allowing you to
make a trial punch in without actually recording on to
tape. And, when you are ready, you can use an Auto
Punch-in/out function to have the deck actually drop into
record and drop out to play exactly at pre-selected points.
The DA-38 ensures seamless punch-ins and outs with a
built-in crossfade action. The crossfade time defaults to
10 milliseconds. If you want to change this time, refer to
paragraph 4-4.
(1) Rehearsal
4 6 7 5 2
• Plug the mic or instrument as required into channel 2.
Y Press the track 2's REC FUNCTION switch.
The associated LED will start blinking to show that
track 2 is record-enabled.
T5
—dE
2
2 Press the INSERT switch.
The associated LED will light to show that an Insert
Monitor mode is enabled.
~-0**SEHT
Let's say we’ve discovered a small error on track 2, here's
how to fix it.
Out Point
Postroll
Prerol!
Time
In Point
Part to be retaken
4.4
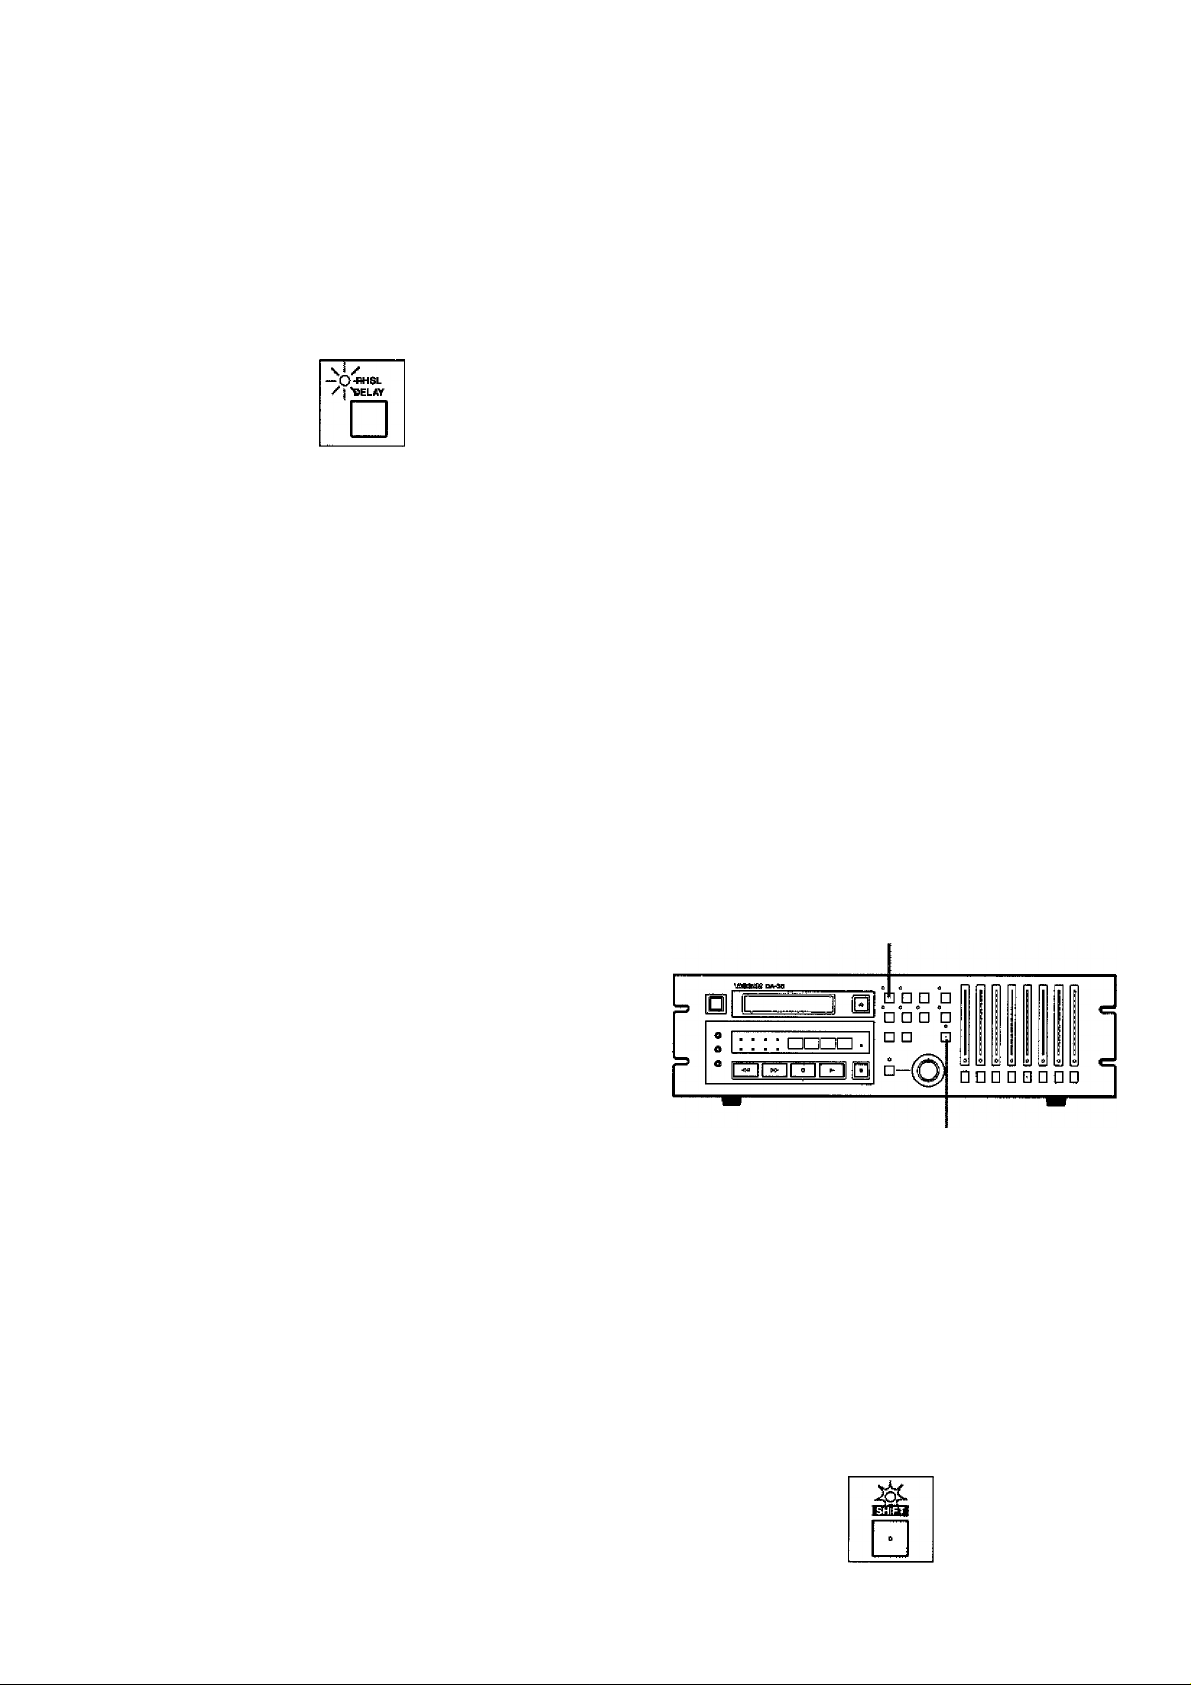
2 Press the RHSL switch.
The associated LED will start blinking to show that
the unit is in Rehearsal Ready mode.
oaHSL
"^EUY
□
^ Press PLAY to start playing the tape,
Q When the point you want to punch in the retake is
reached, press RECORD.
That point is saved to memory ; the monitor is
switched from tape to input; and the RECORD button
is blinking.
Page 11
SECTION 4: RECORDING
0 When the point where you want to punch out of
record is reached, press PLAY.
That point is saved to memory ; and the RHSL LED
that was blinking glows solid to show that the unit is
now in Rehearsal mode.
After about 3 seconds of play (this post-roll time is
adjustable, as discussed later), the tape will rewind,
automatically stopping at a point about 5 seconds
lower than the punch-in point (this pre-roll time also
is adjustable, as discussed later).
7 To cycle over a sequence punching in and out, press
PLAY.
During Rehearsal mode, the monitor is automatically
switched from tape to input at the punch-in point and,
at the punch-out point, reverts to tape.
^ If you decide to exit the Rehearsal mode, press
CLEAR. The RHSL LED will then turn off.
0 Repeat the rehearsal as many times as necessary. If
you are not satisfied with the current punch-in and out
point settings, first exit the rehearsal mode by press
ing RHSL, then go back to step 3, Consider also the
possibilities explained under the next paragraph, (2)
Setting Punch In and Out Points.
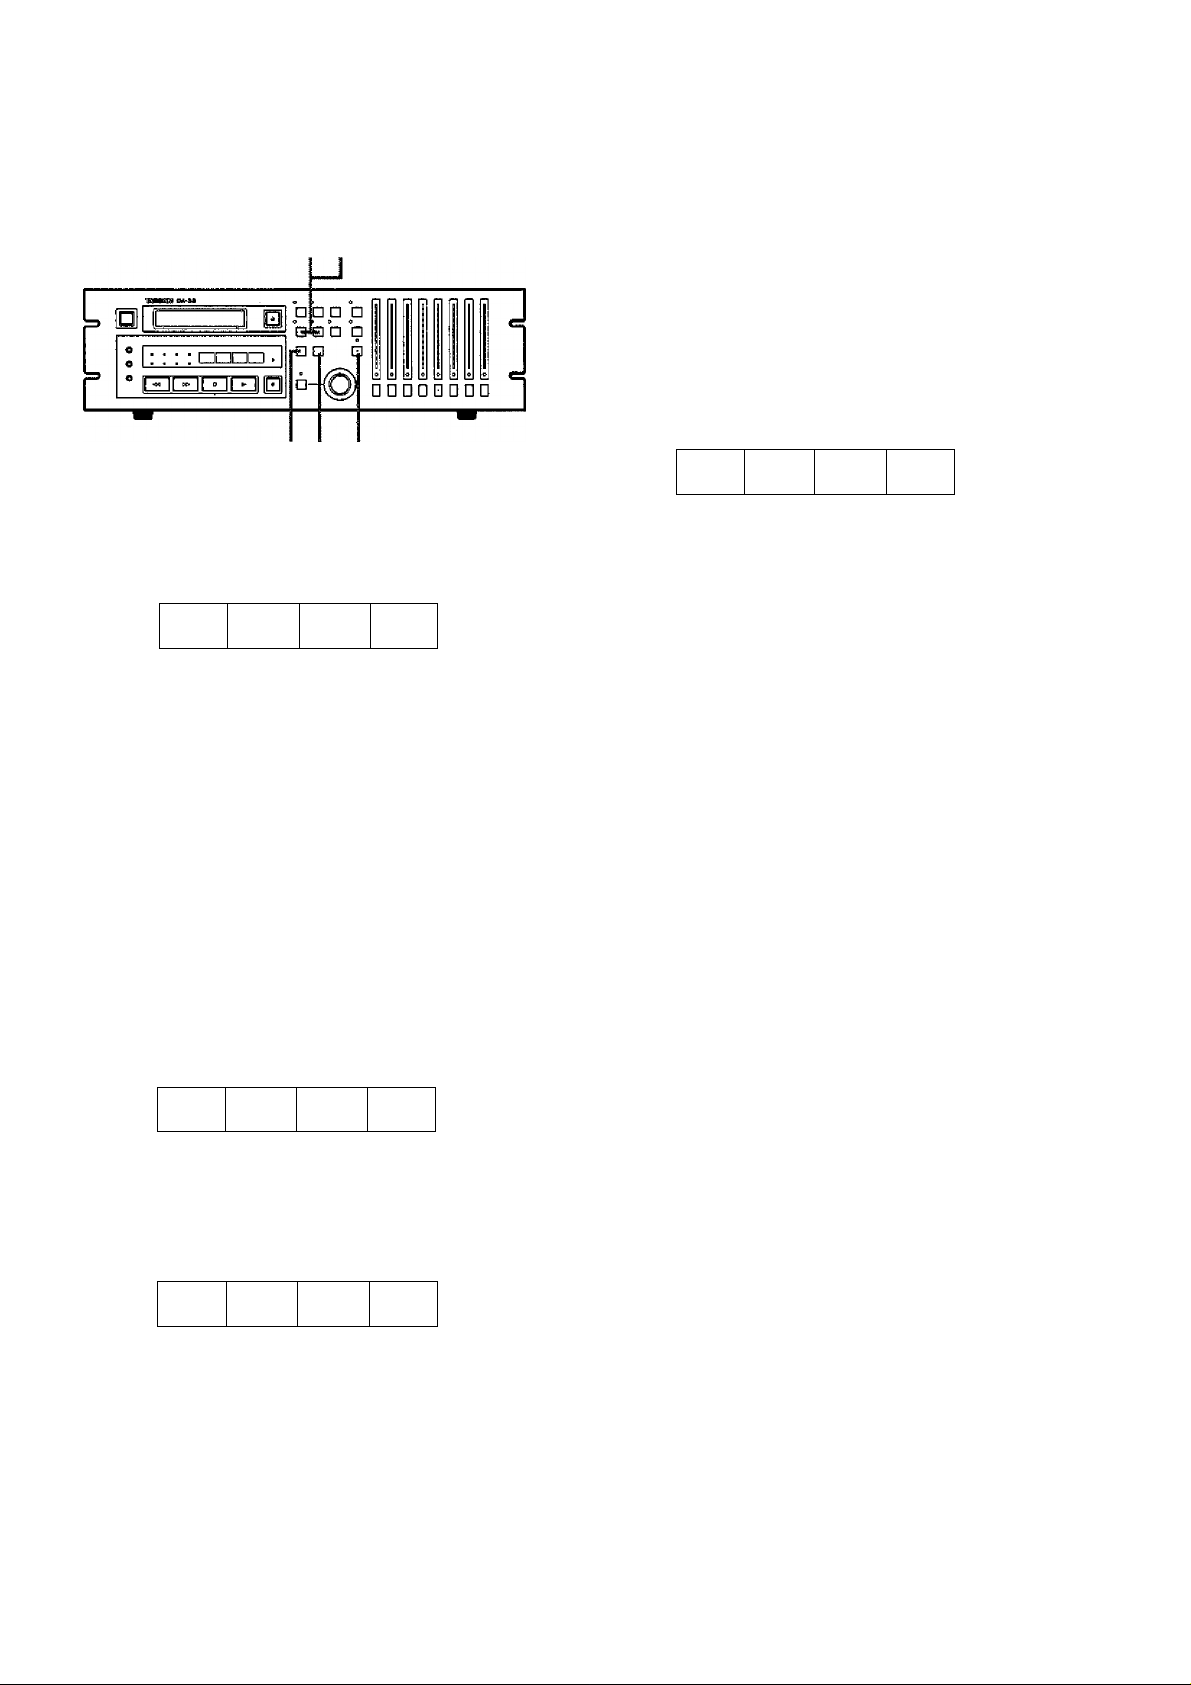
(2) Setting Punch In and Out Points
You can set the punch in and out points in any of three
ways:
A. Perform a trial punch-in recording in Rehearsal mode,
as explained above.
B. Key in the desired points at menus in Rehearsal
mode.
C. Perform a normal recording (as explained earlier, the
point you start recording from and the point you stop
recording are automatically stored into memory as
punch in and out points).
Punch in and out points you select by Method A or C can
be recalled from memory onto the display, and you can
trim them to frame accuracy (Method B). Also, if the
necessary punch in and out points are known to you in
advance, you can directly enter them at menus.
Follow these steps to control the punch in and out points
from menus:
NOTE
Each time you enter a punch in or out point, it over
writes the previous one.
• Auto Play Function : If you press PLAY during the
autolocate process after postroll, the PLAY button will
start brinking to show that the DA-38 will automatically
start playing when completing autolocation.
If you are using the optional RC-848 remote control
unit and press its AUTO PLAY key, the trial punch-in
will automatically repeat over and over,
• If you are using the optional RC-30P footswitch, press
the footswitch in step 7, instead of PLAY.
•
Y Check to see that the RHSL LED is lit. If it isn't, press
the RHSL key two times and the LED will light.
\i /
—0“RHSi-
/| '®BLAV
□
Press SHIFT and the associated LED will start blink
ing to show that all the double function keys are
switched to offer their lower blue-labelled functions.
4.5
Page 12
SECTION 4: RECORDING
35 7
46
• When no period in any column is blinking, the
hours, minutes, seconds and frame number change
all at once as you press the A or the ▼ key,
• To clear the display to "uuDuuD uu", hold the T
or the A key and press the other.
• You can enter any time from zero up to 23 hours,
59 minutes, 59 seconds, 33 frames.
8
B8
88
B 8
^ Press MEMO 1 and the display will momentarily read
like this before indicating the current punch in point.
H M S F
1 n
^ You'll notice that a period is blinking in the hours
column to show that you can key in the desired
number of hours using the A and T keys.
• Each time you press MEMO 1, the blinking period
moves to the next column (H, M, S, then F).
• When no period in any column is blinking, the
hours, minutes, seconds and frame number change
all at once as you press the A or the T key.
• To clear the display to"uuuuuDu u'', hold the T
or the A key and press the other.
• You can enter any time from zero up to 23 hours,
59 minutes, 59 seconds, and 33 frames.
8 8i<
^ Make sure that the entered punch in point is correct,
then press MEMO 2 and the display will momentarily
read like this before indicating the current punch out
point.
p
O 1
n h
88 88 88
7 To exit the punch in/out point setting mode, press
SHIFT The display will be switched back to show the
ABS time.
To audition the entered points:
• Pressing the LOG 1 key autolocates the tape to a
point 5 seconds (or user selected time) lower than
the entered punch in point, then press PLAY,
♦ Pressing the LOG 2 key autolocates the tape to a
point 5 seconds (or user selected time) lower than
the entered punch out point, then press PLAY.
Pre Point In Point
Log f Preroll
Time
Speaking of remembering :
The double function keys in the center of the unit
offer the upper black-labelled functions when the
SHIFT LED is turned off.
When the SHIFT LED is blinking, they offer the
lower blue-labelled functions.
Log 2 Preroll
Out Point
Time
n
u u
^ You'll notice that a period is blinking in the hours
column, so enter the desired hours using the A and T
•
keys.
• Each time you press MEMO 2, the blinking period
moves to the next column (H, M, S, then F),
t.p
O 1
n t
4 • 6
Page 13

SECTION 4: RECORDING
(3) Auto Punch In and Out
When you perform the following steps, the original take is
permanently lost. Repeat the rehearsal until you are sure
your performance and the in/out points are correct.
The DA-38 has an Auto punch in/out function and it drops
into and out of record exactly at the same points as during
rehearsal. Also, an Auto check function offers a prompt
audition of your retake.
2 3
Y Press the AUTO IN/OUT key and the associated LED
will start blinking to show that the unit is in Auto
punch-in/out ready mode.
Autolocation
• Pressing the LOG I key autolocates the tape to a point 5
seconds (or user selected time) lower than the punch in
point.
• Pressing the LOG 2 key autolocates the tape to a point 5
seconds (or user selected time) lower than the punch out
point.
(4) Punch In and Out at Points Captured on the
Fly
As mentioned earlier, when you start recording (with
REGORD + PLAY or with the optional footswitch), and
terminate recording, the start and the end points are auto
matically saved to memory, so you can have retakes be
punched in and out at those memory points (without pass
ing through rehearsal).
* To exit the auto punch in/out mode, press GLEAR
and the AUTO IN/OUT LED will turn off.
2 Press PLAY to start the programed punch-in/out
sequence.
After 3 seconds (or user selected time) of postroll, the
AUTO IN/OUT LED will glow solid and the tape will
rewind, stopping at a point 5 seconds (or user selected
time) lower than the punch-in point.
X! .«JTO
— O-w/ovr
i'l &FFSËT
^ Press PLAY to audition the result ("auto check").
Preroll
In
Point
Auto Punch In / Out
Auto Check
Out
Point
Postroll
Pre
Point
^ If you are not satisfied with your performance and
want to try again, re-do from step 1.
3 2
y Press AUTO IN/OUT and the associated LED will
start blinking to show that the unit is in Auto punchin/out mode.
2 Press LOG 1 and the tape will rewind, stopping at a
point 5 seconds (or user selected time) lower than the
point the original take started from.
* To exit the auto punch-in/out mode, press GLEAR
and the AUTO IN/OUT LED will turn off,
^ Press PLAY and, after preroll, the selected tracks will
automatically drop into and out of record at the same
points as the previous take. After postroll, the AUTO
1
^
IN/OUT LED will glow solid and the tape will
rewind, stopping at a point 5 seconds (or user selected
time) lower than the point where the unit dropped into
record.
4.7
Page 14

SECTION 4: RECORDING
4-4. Crossfade Time Setting
Seamless punch in and out of record is ensured by a
crossfade action which is factory preset to 10 millisec
onds. You can change this time up to 90 ms at a menu, in
10 ms steps.
3 2
Y Press SHIFT and the associated LED will start blink
ing to show that all the double function keys are
switched to offer their lower blue-labelled functions.
4-5. Preroll Time Setting
The DA-38 is factory preset to offer 5 seconds of preroll
up to punch in points. You can change the time up to 59
minutes 59 seconds, in 1 second steps, if you want to, as
follows:
Pre Point In Point
Preroll Time
15
2 Press MENU to access a crossfade menu, which looks
like this:
CF Rd E
^ Enter the desired time using the A and T keys,
^ To exit the menu mode, press SHIFT. The display will
be switched back to show the ABS time.
I n
I U
"f Press SHIFT and the associated LED will start blink
ing to show that all the double function keys are
switched to offer their lower blue-labelled functions.
2 Press PRE ROLL, The time now appearing on the
display is an autolocation preroll time and not for
punch-in. (Autolocation preroll time is explained in
Section 6)
^ Press PRE ROLL once more and the display will now
show the current punch-in preroll time, like this :
Pr.
^ Enter the desired preroll time using the A and T
keys.
If you hold the T key and press the A
key, the display is cleared to the factory preset
CPr.asns.rh'').
n n
u u
|u D,
r h
4*8
^ Press SHIFT to exit the preroll time setting mode and
switch the display back to show the ABS time,
Page 15

SECTION 4: RECORDING
4-6. Postroll Time Setting
The DA-38 is factory preset to play for 3 seconds after
dropping out of record. You can change the time up to 59
minutes 59 seconds at a menu, in 1 second steps.
Out Point
Postroll Time
3 2
14
Y Press SHIFT and the associated LED will start blink
ing to show that all the double function keys are
switched to offer their lower blue-labelled functions.
4-7. Copying Tracks
The DA-38 has a track matrix and you can assign any
sources (tracks or inputs as discussed below) to any loca
tions, that is, to any tracks. So, for instance, you can
record input I on track 2 and copy track 8 to track 5,
simultaneously.
Here is an outline of the track copy procedure :
TRK COPY
4-
Target track selection (REC FUNCTION)
4
Source selection {▲ / t)
4
RECORD + PLAY
PRECAUTIONS
• When the track copy function is disabled
('t r.c P. oFF " as the dispay reads), you cannot
proceed to specify tracks or inputs.
• Even if a source and a target track are specified,
the track is not recorded unless the track's REC
FUNCTION switch is pressed on.
2 Press MENU to access a postroll menu, which looks
like this :
H M
n n
u u
Po.
2 Enter the desired postroll time using the A and T
keys.
^ Press SHIFT to exit the menu mode and switch the
display back to show the ABS time.
in D
\U D
s
F
• Similarly, even if a source and a target track are
specified, the source is not fed to the track when
the track copy function is disabled ("t r.c P. oFF ").
4*9
Page 16

SECTION 4: RECORDING
(1) Copying in Stereo Pairs
As an example, let's copy tracks 3 and 4 to tracks 5 and 6
in stereo.
9 18 46
Y Press SHIFT and the associated LED will start blink
ing to show that all the double function keys are
switched to offer their lower blue-labelled functions.
Q Now, let's proceed with source track selection.
Each time you press the A key, the rightmost display
will change in sequence, like this (" i" for input, and
"t" for track):
,5—-S-
The T key generates them in reverse order.
Since track 3 is one of the source tracks in our exam
ple, have the display show "t 3", like this :
hr. cP. S
• If you hold the A or the T key and press the
other, the display is switched back to show the
default source selection (" < 5 " in our example).
0 In a similar way, let's specify another target/source
pair.
2 Press the TRK COPY key and the display will read
"irr.cP. off" .
2 Press the A or T and the "t r.c P. o ff" will change
to "t r.c P . on" to show that the track copy function is
activated, the TRK COPY LED being lit.
t r. cP.
^ You have to specify target tracks before source tracks.
So press the REC FUNCTION switch of track 5 (one
of the target tracks in our example). The track's LED
will start blinking and the display will change to look
like this:
Lr.
cP.
s
Target Track
o
n
.5
To specify track 6 as a target track, press the track's
REC FUNCTION switch, and the associated LED
will start blinking while the display will change to
look like this:
t r. cP.
7 Specify track 4 as a source track by means of the
and T keys.
r.
0 To exit the track copy setting mode, press SHIFT. The
display will be switched back to show the ABS time.
The TRK COPY LED remains lit.
0 To start copying, hold RECORD and press PLAY.
Track 3 is copied to track 5, and track 4 to track 6.
5 .5
Target Track
P. 5
Source
4*10
• If you are using two DA-3 8 s, you can copy tracks
of one unit to tracks of another (discussed below)
while at the same time you can copy tracks within
one unit (as discussed above).
Page 17

(2) Copying Tracks of One DA-38 to Tracks of Another
As an example, let's copy track 2 of first unit to track 1 of second unit.
SECTION 4: RECORDING
• Hook up a two DA-38 sync system. If necessary, refer
to Section 7.
• Be sure to connect the units by using the optional PW-
88D dubbing cable.
WARNING
Make all connections with power OFF.
Y Press the DIGITAL IN switch on the second unit. The
indicator DIGITAL IN will light on the display.
Dll^rityN
2 Press SHIFT on the second unit. The associated LED
will start blinking to show that all the double function
keys are switched to offer their lower blue-labelled
functions.
^ Press the TRK COPY key on the second unit. The
display will read "t r.c P. oPP".
0 Select input 2 by means of the A and ▼ keys.
(Remember, tracks of the first unit are 'inputs' to the
second unit.)
Each time you press the A key, the rightmost display
will change in sequence, like this (" i" for input, and
"fc " for track):
I ^ (p—^ (...) “* ('7—(S—t I —t P—(...) —t S
The T key generates them in reverse order.
• If you hold the A or the ▼ key and press the other,
the display is switched back to show the default
source selection (" ( /" in our example).
H
t r.
M 8 F
t
cP.
1
.P
%
Source
7 Press SHIFT on the second unit to exit the track copy
setting mode. The SHIFT LED will turn off and the
display will be switched back to show the ABS time.
Q Hold RECORD and press PLAY on the second unit.
^ Press the A or the ▼ key on the second unit to change
the "o P P " display to "o n ".
t r.
^ Press the REC FUNCTION switch for track 1 on the
second unit. The associated LED will start blinking
and the display will change to look like this :
t r.
cP.i o
I f
cP.
I !
Target Track
n
I 1
^ Press PLAY on the first unit.
Track 2 of the first unit is copied to track 1 of the
second unit.
• You can also copy tracks of a DA-38 to other tracks
of the same unit (discussed in the previous para
graph) while at the same time making a digital copy
between two DA-38s.
4*11
Page 18

SECTION 4: RECORDING
(3) Using the Track Copy Capability as a Patch
Bay
The track copy capability allows you to select sources and
tracks to record on, so you can record a specific input to
any tracks without going to the trouble of repatching the
input.
As an example, let's record analog input 2 to track 1, and
analog input 1 to track 2.
35 7 2
1846
• Check to see that the DIGITAL IN indicator is not lit on
the display. If it is, press the DIGITAL IN switch to turn
off the indicator.
Y Press SHIFT and the associated LED will start blink
ing to show that all the double function keys are
switched to offer their lower blue-labelled functions.
^ Select input 2 (the source to record on track 1 in our
example) by means of the A and T keys.
Each time you press the A key, the rightmost display
will change in sequence like this (" (" for input, and
"t " for track):
, (...)-1s'
The T key generates those options in reverse oder.
• If you hold either the A or the T key and press the
other, the dispslay will be switched back to show the
default selection (" > /" in our example).
r.
^ Press the REC FUNCTION switch for track 2. The
associated LED will start blinking and "2" will show
in the seconds column, like this ;
t r.
7 Select input 1 (the source to record on track 2 in our
example) by means of the A and T keys.
Go on to the next step when the display looks like
this;
P.
c P,
\p
%
2 Press the TRK COPY key and the display will reads
"tr.cP. off".
^ Press either the A or the T key to activate the track
copy function ; the "off" display will change to
"on", like this:
n
1
1
o
F
/
f f
%
t r.
/If Press the REC FUNCTION switch for track 1 and
" /" will show in the seconds column, like this :
cP.
H M s
t r. cP.
1
t r.
Press SHIFT and the associated LED will turn off, the
display being switched back to show the ABS time.
0 Hold RECORD and press PLAY to start recording.
Input 1 is recorded on track 2 and input 2 on track 1.
• If, for example, you select input 2 in step 7, analog
input 2 is recorded on tracks 1 and 2.
cP.
p
I I
4-12
Page 19

SECTION 4: RECORDING
(4) To Switch Off the Track Copy Mode (5) Track Copy Settings Backed Up
Your settings for track copy are automatically saved to a
backup memory and are not erased when turning off
power: they become the default.
Also, if you press and hold the TRK COPY key (for 1
second or more), the display will show the current track
copy settings as follows :
4 1
•f Press SHIFT and the associated LED will start blink
ing to show that all the double function keys are
switched to offer their lower blue-labelled functions.
2 Press the TRK COPY key and the display will show
the last track copy setting ("t r.c P.S > I" for exam
ple).
Depending on the last setting, the display will read
"t r.c P. on" at this stage. If this is the case, skip to
step 4.
^ Press the TRK COPY key once more and the display
will read "t r.c P on".
^ Press either the A or the T key to change the "on'
display to "of F".
Display
• The tens of hours column Track 1
• The units of hours column Track 2
• The tens of minutes column Track 3
• The units of minutes column Track 4
• The tens of seconds column Track 5
• The units of seconds column Track 6
• The tens of frames column Track 7
• The units of frames column
A solidly lit period in any columns indicates a track of the
DA-38, and an extinguished period indicates an input.
For example:
/ I
3H BE HB
I I,
In this case, track 1 is selected by the user as the source of
track 2, and input 6 as the source of track 5, the remaining
tracks being left alone.
Setting for
Track 8
t r.
c P. o
FF
4-13
Page 20

SECTION 4: RECORDING
4-8. Dithering the Re-quantization Noise
The DA-38 has a 18 bit A/D converter, a quantizer for
changing analog data into its digital equivalent.
The DA-38 can also receive digital data of up to 24 bits,
but it records and plays using 16 bit patterns, which means
that it is necessary to further convert the 18 or 24 bit data
into 16 bit data, a process called re-quantization.
The simplest solution may be rounding of the data, which
neglects data past the 16th bit.
This rounding may produce noise correlated to the origi
nal input signal, because of the difference in resolution
between 18/24 bit data and 16 bit data.
The dithering process overcomes re-quantization noise by
masking it with a low-level random signal (a kind of
noise).
The DA-38 is designed to allow you to monitor the input
with as high a definition as possible, so the dithering
process takes place only when the input signal is actually
recorded onto tape. The effect of dithering is thus percep
tible only on playback.
2 Access the dither menu by pressing MENU as many
times as necessary, which looks like "d it h. off".
^ Press either the A or the T key and the "off" will
change to "o n ".
d I t h. n
Press SHIFT and the associated LED will turn off, the
display being switched back to show the ABS time.
• To switch off the dither, change the "o n " display
to "o f f " by means of either A or T,
The dithering function is enabled or disabled in a menu, as
follows :
3 2
14
Press SHIFT and the associated LED will start blink
ing to show that all the double function keys are
switched to offer their lower blue-labelled functions.
4*14
Page 21

SECTIONS: PLAYBACK
This section of the manual is divided into six major
subheadings : basic playback procedure, shuttling the
tape, variable speed playback, setting locating points,
repeat playback, and delaying tracks.
5-1. Basic Playback Procedure
43
• Hook up your system by referring to a hook-up example
shown in Section 1 if necessary.
5-2. Shuttling the Tape
The SHUTTLE function allows you to rock the reels to
identify specific points on a tape.
Y Press the SHUTTLE switch and the associated LED
will light.
WARNING
Make all connections with power OFF.
Y Switch power ON.
A machine ID number (" < d n o. i" for example) and
other indications will show on the display. (The
machine ID number is explained in Section 4.)
2 insert the Hi8 tape into the DA-38.
“ L uFId - - " shows to indicate the tape is being
loaded.
^ To begin playback, press PLAY. The button will light
solidly.
^ To stop playback, press STOP.
IMPORTANT
The DA-38 is designed to operate with Hid tapes
only. Do not use any other tapes.
Do not use tapes once used in other machines than
the DA-38 or DA-88, tapes used for video recording
for example.
• As you rotate the knob to the right, the tape runs
forward, and as you rotate the knob to the left the
tape runs in reverse.
• Play speed varies depending on the amount of knob
rotation, from 1/4 up to 8 times the normal play
speed,
• Bringing the knob back to the center position puts
the transport into pause mode and no sound is
heard,
* Press the SHUTTLE switch to disable the function
and stop the tape. The associated LED will turn off.
NOTES
While shuttling the tape, the monitor output level is
automatically attenuated by about 12 dB from the
level during normal play.
If you leave the shuttle function in pause mode for
about 10 seconds with the knob at the center posi
tion, the function is automatically disabled and the
associated LED turns off.
Use 120-minute or shorter tapes. The DA-38
detects the thickness of tapes and automatically
ejects tapes thinner than 8.5 pm (tapes used in
150-minute or longer cassettes).
5-1
Page 22

SECTION 5: PLAYBACK
5-3. Variable Speed Play
The DA-38 provides a plus or minus 6.0% variation (in
0,1% steps) to the tape speed both in record and play
modes.
Y Press the VARI SPEED key.
Its associated LED will light solidly while at the same
time the SHIFT LED will start blinking and the
current pitch change will show on the display, like
this:
To Change the Current Pitch
1 4
Y Press the SHIFT key and the associated LED will
start blinking to show that all the double function
keys are switched to offer their lower blue-labelled
functions.
2 Press the PITCH key. The current pitch change will
show on the display, like this :
n
n 1
u.
u \
2 Enter the desired pitch change by means of the A and
T keys.
• If you hold either the A or the T key and press the
other, the display is cleared to " u£7".
^ After having entered the desired pitch change, press
SHIFT and its LED will turn off and the display will
be switched back to show the ABS time. But, the
VARI SPEED LED remains lit solidly.
^ Press PLAY to begin playback at the entered pitch.
* To disable the variable speed mode, press the VARI
SPEED key if the SHIFT LED is turned off. If the
SHIFT LED is lit solidly, press SHIFT then press
VARI SPEED.
*
n n
Lf
u
^ Enter the required pitch change by means of the A
and T keys.
• The display is cleared to " u.u’' if you hold either
the A or the T key and press the other.
4 Press SHIFT.
The associated LED will turn off and the display will
be switched back to show the ABS time.
NOTES
• Even if you entered a pitch change, the tape plays
at normal speed if the VARI SPEED LED Is not lit.
• Even If the VARI SPEED LED is lit, the tape plays
at normal speed if the pitch display was cleared to
• The DA-38 does not play at variable pitohes if it is
slaved to another unit or is referenced, although
used as the master, to external clock because Its
WORD IN switch is pressed on.
5-2
Page 23

SECTION 5 : PLAYBACK
5-4. Setting Locations
You can specify two points (MEMO 1 and 2) on the tape
to which you want the DA-38 to autolocate. You can also
have the DA-38 continually play a segment between two
MEMO points.
You can specify points on the tape in either of two ways :
• Hold SHIFT and hit MEMO 1/2 on the fly during
the recording or playback process, or
• Key in the desired time points.
The first method allows you to specify locations while
monitoring the recording or playback process. The second
method may be used when the necessary time addresses
are known to you in advance or when you want to trim
MEMO points captured on the fly.
(1) Setting Locations On The Fly
(2) Keying in Locations
Y Press SHIFT and the associated LED will start blink
ing to show that all the double function keys are
switched to offer their lower blue-labelled functions.
2 Press MEMO 1 or 2, as required, and the display will
show the corresponding current memory points, then
a period will start blinking in the hours column.
y Press PLAY to begin playback.
2 Hold SHIFT and, at the desired moment, hit MEMO
(1 or 2).
The ABS time reading at that moment is stored into
memory, the display momentarily reading like this :
p
r E
' Whether or not the LOC/MEMO keys are switched
to act as the MEMO keys, you can hold SHIFT and
hit either MEMO.
5E It
n n n 1
2 Key in the desired time by means of the ▲ and T
keys.
• Each time you press MEMO 1 or 2, the blinking
period moves to the next column (M, S, then F).
• When no period is blinking in any column, all the
hours, minutes, seconds and frame number will
change all at once as you press the A or T key.
• If you hold either the ▲ or the ▼ key and
press the other, the display will be cleared to
nn nnnnnnnw
uuuuuuuu .
• You can enter any time points from zero up to 23
hours, 59 minutes, 59 seconds, 33 frames.
4 Press SHIFT.
The associated LED will turn off and the display will
be switched back to show the ABS time.
U 1
P5
n n
u u
5*3
Page 24

SECTION 5: PLAYBACK
5-5. Repeat Play
You can have the DA-38 play between two MEMO points
over and over again.
If you haven't done yet, create a play loop (as discussed
above) before proceeding with the following steps.
Y Press REPEAT. (You don't need to press PLAY.)
• As you press REPEAT, the DA-38 will start playing
upon locating the start point of loop. When played
up to the end of loop, the tape will automatically
rewind and start playing from the start point again.
NOTES
• There must be at least 5 seconds between two
MEMO points.
• If only one MEMO point is set, play will repeat
between 00 00 00 00 and that MEMO point.
• The DA-38 understands the lower MEMO point as
the start point of loop, and the higher point as the
end.
• If you press a transport control key during the
repeat play process, the function pressed is acti
vated, but the repeat play mode is not disabled. To
resume repeat play:
o Press either LOG key and then, white the tape is
being autolocated or after completing autoloca
tion, press PLAY, or
0 Press PLAY when you are somewhere in the
repeat loop or before the start point of loop.
MEM01
DtUSQI 15
Outside the
V
s
• Pressing STOP interrupts repeat play. To resume
repeat play, press PLAY.
• You can change the current MEMO points during
the repeat play process. The repeat play will be
disabled if you happen to change the MEMO points
to create a loop shorter than 5 seconds.
i!« To exit the repeat play mode, press REPEAT. The
associated LED will then turn off and the transport
will go into
Normal play mode — if REPEAT was pressed
when the tape was playing,
OR
Stop — if REPEAT was pressed when the tape was
being located to the start point of loop.
Play Loop ^
—O^peat
/|\
MEMO 2
D IDS D8 ID
/
✓
Outside the
.Repeat
5 • 4
Page 25

SECTION 5: PLAYBACK
5-6. Delaying Tracks
The track delay function corrects the time discrepancies
between each track or may be used for other effects.
Adjustable range is from -200 samples (*) to 7200
samples, in 1 sample steps, or from -4 ms to 150 ms, in 1
ms steps, as selected.
(*) 1 sample corresponds to 22,7 ps at a 44.1 kHz
sampling rate or 20.8 ps at a 48 kHz sampling rate.
^ Enter the desired delay value by means of the ▲ and
T keys.
The display is cleared if you hold either the A or
the T key and press the other.
• Each time you press DELAY, the unit changes
between "sample" and "ms".
You can enter a 4-digit sample number or a 3-digit
ms number,
• If you press and hold DELAY, the display will
change to look like this and you can enter one and
the same delay time for all the tracks at once.
Q'
n L
The DELAY indicator will light solidly on the display
to remind you that a track or tracks are already
programed to delay.
5 Press SHIFT.
t n n n n
L u u
u u
Y Press SHIFT and the associated LED will start blink
ing to show that all the double function keys are
switched to offer their lower blue-labelled functions.
2 Press DELAY and the display will show the track
whose timing you have corrected after any other
tracks and the delay value you have entered for that
track, like this.
/
t r.
0 Select the track you want to delay by pressing its
REC FUNCTION switch.
1
n n 1
u u \
n n
u u
The associated LED will turn off and the display will
be switched back to show the ABS time.
5*5
Page 26

SECTION 6: AUTOLOCATION
This section of the manual provides information on
autolocation procedure, along with autolocation preroll
setting and auto play procedures.
The DA-38 is factory preset to autolocate directly to
MEMO points. But you can have the unit offer preroll
(up to 59 minutes, 59 seconds) to those points.
6-1. Autolocating to Either of Two Location
Points
You can have the DA-38 autolocate to either MEMO 1 or
MEMO 2 points.
We suppose you have already set one or two MEMO
points. Setting locations is explained in Section 5.
6-2. Setting Autolocation Preroll Time
MEM01
-Autolocation Preroll-
' The autolocation preroll is independent of the punch-in
preroll explained in Section 4,
MEMO 2
Y Simply press LOG 1 to have the DA-38 autolocate to
the location currently stored into the MEMO 1 regis
ter, or press LOG 2 to have the unit autolocate to the
current MEMO 2 location.
Upon pressing either LOG, the corresponding MEMO
point will show on the display before autolocation
•
starts,
• You can have the DA-38 autolocate to a lower point
than predetermined location points, as discussed
below.
1 4
Y Press SHIFT and the associated LED will start blink
ing to show that all the double function keys are
switched to offer their lower blue-labelled functions.
2 Press PRE ROLL and the current preroll time shows
on the display, like this :
H
Pr.
^ Enter the desired preroll time by means of the A and
T keys.
• If you hold either the A or the T key and press the
other, the display is cleared to "Ou DD ".
M
n n n n
u u
u u
s
L c
6-1
4 When the display shows the correct preroll time, press
SHIFT, and its associated LED will turn off, the
display being switched back to show the ABS time.
Page 27

6-3. The Auto Play Function
You can have the DA-38 automatically start playing after
completing autolocation.
SECTION 6 : AUTOLOCATION
Autolocation
Y Press PLAY after a LOC key and the PLAY button
will start blinking, and when the MEMO 1 or 2 point
(or user selected starting point of a preroll) is reached,
the DA-38 automatically enters play mode.
Play
MEMO 1 (MEMO 2)
Preroll
• If you press PLAY once more while it is blinking,
that is, if you press PLAY two times during the
autolocation process, the unit starts playing at that
moment.
• If you are using the optional RC-848 remote control
unit and have the AUTO PLAY LED turn on
solidly, the DA-38 automatically enters play mode
each time autolocation is complete.
6*2
Page 28

SECTION 8 ; CONTROLLING THE DA-38 FROM MENUS
8-1. General
The DA-38 allows you to control various functions from
menus. The following 10 menus are provided :
1 t
id 5FL /
i_ t
БЬи.п oFF
i t
Po.UUU3
1 t
й 5 L, о F F
i t
FLE oFF
i t
in lb,
i t
EFFdE ID
i t
bd ,F IB
i t
d I b h, о F F
I t
b,E.r, о F F
I t
2 Press MENU as many times as necessary to access
the desired menu.
• Each time you press MENU, you go down through
the menus in the order shown in the left column of
this page.
• To go up through the menus, hold MENU and press
the T key.
• After having exited a menu setting mode, when you
press MENU once, the menu you were last at shows
on the display. But, when switching on power to the
unit and pressing MENU once, the display shows
the ID selection menu <d 5EL ").
Menus Explained
5FL /"
For selecting a machine ID number. Select ” /" on the
master unit, and assign other numbers ("E " to " / 6 ")
to slaves. Factory preset is " /
(D'-Sti..^ oFF "
At this menu you can switch on or off the shuttle
monitor. Factory preset is "o FF ". Shuttling the tape
is explained in Section 9,
CD
"Po .DD03"
This is a postroll time menu for setting the length of
postroll after punching out of record. Adjustable
range is from 3 up to 59 minutes, 59 seconds, in 1
second steps. Factory preset is "иииЗ". See also
Section 4.
How to Access Menus
^ Press SHIFT and the associated LED will start blink
ing to show that all the double functions keys are
switched to offer their lower blue-labelled functions.
8*1
(D"i?5r. oFF "
At this menu you can switch the built-in oscillator on
or off. Factory preset is "oFF". For the details, see
below.
(D
"FiE oFF"
This is a head cleaning menu. The cleaning function is
factory preset to " aFF". Cleaning the heads is
explained in Section 10.
® "in ,t "
The menu is used to initialize the backup memory, as
discussed later in this section of the manual.
Ф "EFH dE ¡0"
This is a crossfade time menu, allowing you to enter
from 10 ms up to 90 ms, in 10 ms steps. Factory preset
is " lu". Entering a crossfade time is explained in
Section 4.
Page 29

SECTION 8 : CONTROLLING THE DA-38 FROM MENUS
CD
'tcf.F IB"
At this menu you can select a TDIF input bit length
among three options : 16, 20, and 24, as discussed
later in this section of the manual, Factory preset is
"IS".
@ "d 11 h. off
This is for switching the dithering function on or off,
as discussed in Section 4. Factory preset is "o f F ",
®''b.£r. off"
At this menu you can see the rate at which an error
occurs in the digital data. The function is factory
preset to "o F F See Section 10 for an explanation.
8-2. Using the Built-in Oscillator
The DA-38 has a digital tone oscillator that produces a
440 Hz, sine wave tone,
(1) Accessing the Oscillator Menu
^ Press SHIFT and the associated LED will turn off, the
display being switched back to show the ABS time.
• Obviously, to switch the oscillator off, change the
"o n " display back to "oFF " in step 3 above by
pressing either the A or the T key.
NOTES
• The built-in oscillator cannot be switched on if the
track copy function is turned on at the "tr.cP ."
menu.
• When the built-in osciilator is switched on, the DA-
38 overrides whatever signal is plugged into the
input.
(2) To Monitor the Sine Wave Tone
CAUTION
Reduce the monitor level to prevent damaging your
ears.
ing to show that all the double function keys are
switched to offer their lower blue-labelled functions.
2 Press MENU as many times as necessary to access
the oscillator menu which looks like "DSC. oFF ",
0 Press either the A or the T key to change the "o F F "
to "on".
n r
U J
r
o
I
n i
• The built-in oscillator must be switched on at the
"uB l " menu.
Y Press the REC FUNCTION switches that correspond
to the channels you want to monitor. The associated
LED will start blinking and the sine wave tone from
the oscillator is sent out of the outputs.
• When the ALL INPUT key is pressed on, the sine
wave tone from the oscillator is sent out of all the
eight outputs.
• To switch the oscillator off, press either the A or
the ▼ key to change the "on " display to "aFF "
when you are at the "£? 5 L " menu.
8*2
Page 30

SECTION 8 : CONTROLLING THE OA-38 FROM MENUS
(3) How to Record the Sine Wave Tone on Tape
• The built-in oscillator must be switched on at the
Y Press the REC FUNCTION switch of the track you
want to record on. The associated LED will start
blinking.
2 To begin recording the sine wave tone from the oscil
lator, hold RECORD and press PLAY. The RECORD
button will light solidly, and also the REC FUNC
TION LED that was blinking.
8‘3. Initializing the Backup Memory
Follow these steps to initialize or reset the backup
memory.
Y Press SHIFT and the associated LED will start blink
ing to show that all the double function keys are
switched to offer their lower blue-labelled functions.
□
^ To stop recording, press STOP.
* To switch the built-in oscillator off, press either the A
or the ▼ key to change the "on" display to "of F" at
the "uSr" menu.
2 Press MENU as many times as necessary to change
the display to look like this:
I n
^ Press either the A or the T key and the display will
change to look like this:
r E
4 Press either the A or the T key once more. The
initialization process will start, and when it is
complete, the display will change to look like this:
t.
Rd y
d o \ nE
^ Press SHIFT and the associated LED will turn off, the
display being switched back to show the ABS time.
8*3
Page 31

SECTION 8 : CONTROLLING THE DA-38 FROM MENUS
8-4. Selecting a TDIF Input Bit Length
To send and receive digital data through the TDIF-1 TO
port on the rear panel of the unit, you have to select a bit
length in accordance to the one of an incoming digital
data.
The DA-38 offers three options : 16, 20, and 24. Factory
preset is 16.
Follow these steps to select a bit length.
Y Press SHIFT and the associated LED will start blink
ing to show that all the double function keys are
switched to offer their lower blue-labelled functions.
2 Press MENU as many times as necessary to access a
TDIF menu, which looks like this:
t d\ iF
^ By using the ▲ and T keys, have the display show
the necessary bit length.
• Select ”i? H " when the unit is connected to another
DA- 38, or
• Select" 15 ” when connected to the DA-88.
^ Press SHIFT and the associated LED will turn off, the
display being switched back to show the ABS time.
15
8*4
Page 32

SECTION 9 : MONITOR AND OTHER CAPABILITIES
This section explains the DA-38’s capabilities that assist
in streamlining the recording, playback, and synchroniza
tion operations.
9-1. Monitor Functions
This paragraph explains the following monitor functions :
• All Input
• Insert
• Auto Input
• Shuttle
Relationship between those functions and the transport
modes is shown in table below.
(1) All Input Monitor
(2) Insert Monitor
This function causes the outputs to be switched between
tape and input depending on transport modes, as shown in
the table below.
To switch the function on :
Y Press INSERT and the associated LED will light
solidly to indicate that the unit is in Insert monitor
mode.
NOTES
If the DA-38 is not remote controlled, the INSERT
key switches on or off not only the insert monitor
function but also the next auto input monitor function.
ALL INPUT is used to switch the eight outputs to be fed
directly by the corresponding inputs.
To switch on the function :
Y Press ALL INPUT and the associated LED will light
solidly to show the unit is in Auto Input mode.
MONITOR SWITCHING
ALL INPUT ON
INSERT OFF
ALL
INPUT
OFF
INSERT
ON
AUTO INPUT
OFF
AUTO INPUT
ON
REG
FUNCTION
ON INPUT
OFF
ON
OFF
ON TAPE
OFF TAPE TAPE
ON
OFF TAPE
PLAY
INPUT INPUT
INPUT INPUT
TAPE TAPE
TAPE INPUT
* When the INSERT LED is lit:
Both the insert and the auto input monitor modes
are activated.
. • When the INSERT LED is turned off:
Both the insert and the auto input monitor func
tions are disabled.
If you are using the optional RC-848 remote contol
unit, you can switch the insert and the auto input
monitor functions on/off separately.
RECORD
INPUT INPUT
INPUT MUTE
TAPE MUTE
STOP
F FWD, REW
INPUT
INPUT INPUT
MUTE
MUTE
INPUT
SHTL. M OFF TAPE
SHTL, M ON
SHTL. M OFF TAPE
SHTL. M ON MUTE
SHUTTLE
INPUT
INPUT
TAPE
TAPE
TAPE
INPUT
9-1
Page 33

SECTION 9 : MONITOR AND OTHER CAPABILITIES
(3) Auto Input monitor
This causes the inputs whose corresponding tracks are
record enabled to be sent directly to the same numbered
outputs whenever the transport goes into any other modes
than play.
To activate this function :
^ Press INSERT and the associated LED will light
solidly to show that the auto input mode is entered.
(4) Shuttle Monitor
32 14
When you rotate the SHUTTLE knob for reel rocking to
locate specific points on the tape, what you hear depends
on whether the shuttle monitor mode is activated or not, as
shown in the table below.
To activate or disable the shuttle monitor function :
Y Press SHIFT and the associated LED will start blink
ing to show that all the double function keys are
switched to offer their lower blue-labelled functions.
NOTES
As discussed above, if the DA-38 is not remote
controlled, the INSERT key switches on or off not
only the auto input monitor function but also the
Insert monitor function.
• When the INSERT LED is lit:
Both the insert and the auto input monitor modes
are activated.
• When the INSERT LED Is turned off :
Both the insert and the auto input monitor func
tions are disabled.
If you are using the optional RC-848 remote control
unit, you can switch the insert and the auto input
monitor functions on/off separately.
2 Press MENU as many times as necessary to access a
shuttle monitor menu which looks like "S t L.n of F ".
^ Press either the A or the ▼ key to change the ''off"
to " on ".
H M S F
St
Shuttle Monitor
Mode
51L. n oFF
(factory preset)
5b L. n on
L.n
REC FUNCTION
Off
Tape
Mute
n
REC FUNCTION
On
Tape
Source
(Input)
NOTE
The shuttle monitor is not available unless both the
insert and the auto input monitor modes are acti
vated.
^ Press SHIFT and the associated LED will turn off, the
display being switched back to show the ABS time,
• To disable the shuttle monitor mode, press either
the A or the T key at the shuttle monitor menu
to change the "o n " display to "of F
9*2
Page 34

SECTION 9 : MONITOR AND OTHER CAPABILITIES
9-2. Capabilities to Assist In Saving Your Time
When entering the following numbers by using the A
and the ▼ keys, you can promptly clear the currently
displayed number or speed up the scrolling of numbers.
• Punch in and out points (p.4 • 6)
• Punch in preroll time (p.4 • 8)
• Pitch change (p.5 • 2)
• Locating points (p.5 • 3)
• Track delay time (p.5 • 5)
• Autolocation preroll time (p.6 • 1)
• Offset (p.7 • 3)
(1) To Clear the Currently Displayed Number
Hold either the A or the ▼ key and press the other. The
numeric display will be cleared to zero or to a factory
preset.
(2) To Speed Up the Keying In of Numbers
Hold either the A or the ▼ key and press SHIFT. The
numbers will scroll faster. Releasing the SHIFT key slows
the scrolling down to normal speed.
9-3. To See the System Version
You can have the display show the system version number
of your DA-38.
■f Hold STOP, PLAY, and RECORD and press POWER
on.
(1) To Display the SYSCON ROM Version
The SYSCON ROM version will show on the display.
- c
u t
r.
/ n n
u u
(2) To Display the SERVO Microcomputer
Y Hold REW, F FWD, and STOP and press POWER
on.
The SERVO microcomputer version will show on the
display.
C ”
J,U
r _
t r.
n n
/
u u
9*3
Page 35

SECTION 11 : APPENDICES
11-3. Error Messages Explained
Display
r r r n r
C. L L U L
When referenced
to external word
clock
When slaved to an
another DA-38
Problem
No clock is coming into the WORD IN,
or the incoming clock's frequency is
incorrect.
The unit is not connected to the
master with the PW-88S sync cable.
The master unit is turned off.
A different sampling rate from the
one used on the master unit is
selected on the slave.
Plug in the correct clock.
Connect the units by using the
PW-88S cable.
Turn on the master unit.
Use tapes formatted at the same
sampling rate.
Remedy
E t. c ut. The tape Is broken. Replace the tape.
E. d lo
You attempted to record from the digital Input to which the
PW-88D (dubbing) cable from the source unit Is not connected.
E. dEu Condensation occurred on the head drum.
E. H B.t. You inserted a different tape from the HI8 tape.
E. t h lat.
5. Err. 1 1
5. Err. 3 1 Because of excessive irregular stress, the tape slackened
S. Err. d 1
5. Err. 4 /
5. Err. Bd
5. Err. üd The capstan motor could not work correctly in time.
£ Err. OB
You inserted a thinner tape than 8.5 pm.
The transition from one transport mode to another didn't
take place in time.
beyond the limit and winding problems occurred.
The reel tables could not work correctly, causing winding
problems.
The drum motor could not work correctly in time.
The reel motor could not work correctly in time.
5. Err. 5 9
5. Err. BB
Connect the PW-88D cable to the
digital I/O port.
Wait for 1 or 2 hours with the unit
powered on before attempting
to use the unit again.
Use only HI8 tapes in this unit.
Use 120-minute or shorter tapes
in this unit.
Turn off the unit, then turn on it
again.
The tape is fatigued by excessive
use. Turn off the unit, and turn on it
again, then replace the tape.
Turn off the unit, and turn on it again
before continuing to use the unit.
Or replace the tape after turning on
the unit again.
Turn off the unit, and turn on it again
before continuing to use the unit.
Or replace the tape after turning on
the unit again.
Turn off the unit, and turn on it again.
Turn off the unit, and turn on it again
before continuing to use the unit.
Or replace the tape after turning on
the unit again.
If a "5. E r r.
11 *3
" message persists, contact your authorized TASCAM representatives.
Page 36

Other Messages
SECTION 11: APPENDICES
Display
--LORd--.
-UnLRRdboh
E o L
no b RPE
no R b5 • t
r Ec mb 1
Meaning
The unit is loading the tape.
The unit is ejecting the tape.
The tape is at the beginning.
The tape is at the end.
No tape is inserted into the unit.
The tape is not formatted.
The tape is write-protected.
11.4
Page 37

TASCAM
TEAC Professional Division
DA-38
TEAC CORPORATION
TEAC AMERICA, INC.
TEAC CANADA LTD.
TEAC UK LIMITED
TEAC DEUTSCHLAND GmbH
TEAC FRANCE S.A.
TEAC NEDERLAND BV
TEAC AUSTRALIA PTY., LTD.
A.C.N. 005 408 462
TEAC ITALIANA S.p.A.
3-7-3, Nakacho, Musastiino-shi, Tokyo 180, Japan Phone: (0422) 52-5081
7733 Telegraph Road, Montebello, California 90640 Phone: (213) 726-0303
340 Brunei Road, Mississauga, Ontario L4Z 2C2, Canada Phone: 905-890-8008
5 Marlin House, Marlins Meadow, The Croxley Centre, Watford, Herts. WD1 8YA, U.K. Phone: 01923-819699
Bahnstrasse 12, 65205 Wiesbaden-Erbenhelm, Germany Phone: 0611-71580
17, Rue AtexIs-de-Tocquevllle, CE 005 92182 Antony Cedex, France Phone: (1) 42.37.01.02
Perkinsbaan 11,3439 ND Nieuwegein, Nederland Phone: 03-402-30229
106 Bay Street, Port Melbourne, Victoria 3207, Australia Phone: (03) 9644-2442
Via C. Cantu 5, 20092 Cinisello Balsamo, Milano, Italy Phone: 02-66010500
PRINTED IN JAPAN 0796US M-1220A
 Loading...