

Page 1
- QUICK START GUIDE -
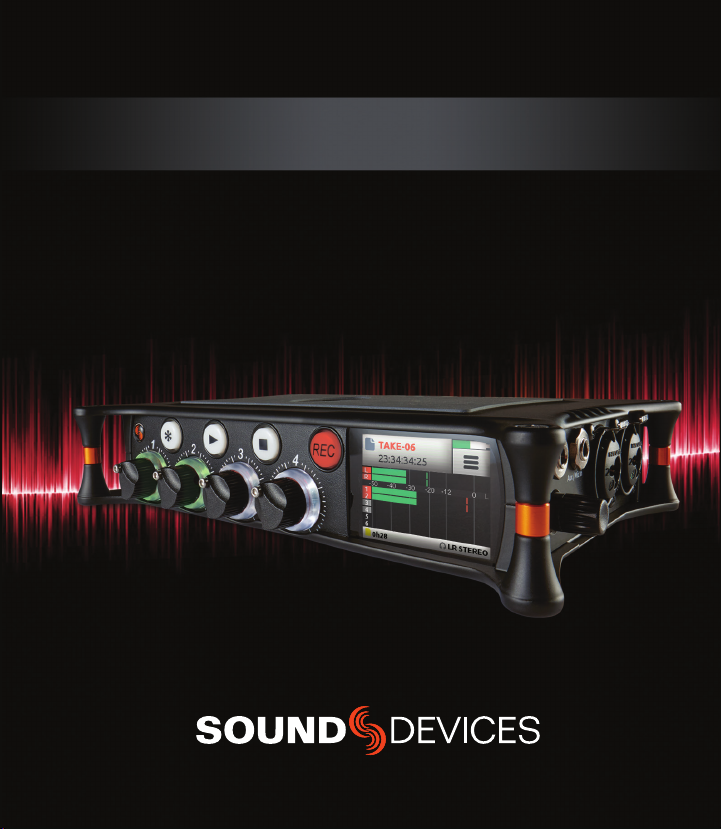
MixPre-6
Audio Recorder | USB Interface
Page 2
Welcome
Thank you for purchasing the MixPre-6. This Quick Start Guide provides the initial steps
necessary to set up and begin using the MixPre-6. The following table shows what is included
in the box.
QUANTITY ITEM
1 MixPre-6
1 Battery sled for 4 AA batteries (not included)
1 Y-cable USB-C to two USB-A
1 Anti-rotation pin
1 Allen wrench
1 Quick Start Guide
After receiving your purchase, remove all contents from the box to ensure there are no missing
parts and that all parts were received without damage.
Read and Register...
Sound Devices strongly encourages you to register your product. Registration extends your
warranty and ensures you will receive timely updates.
For a full description of all product features, user-based procedures, specications, and safety
information, please refer to the product’s User Guide located on the Sound Devices website.
Use the QR code or respective link to access and download the guide.
Full User Guide
Register Your Product
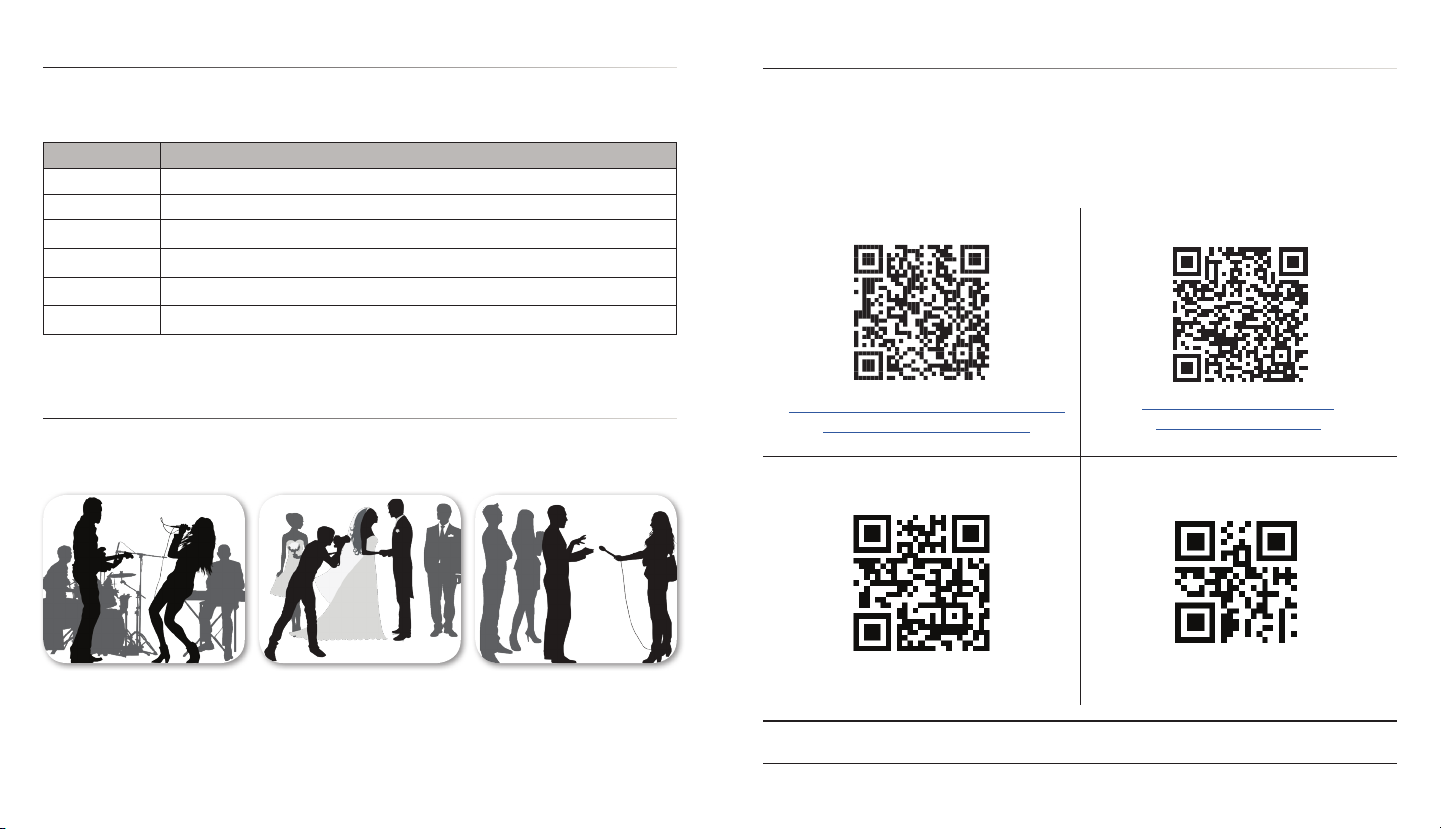
Featured Usage
The MixPre-6 is an incredibly versatile audio recorder that is ideal for the following scenarios,
and more.
www.sounddevices.com/download/
guides/MixPre6-UG_en.pdf
Email Support
Musicians
• Singer/Song Writer
• Live Performance
• Music Recitals
MIXPRE-6
2 3
Videographers
• Audio for DSLRs
Field Recording
• Interviews / Podcasts
• Corporate Meetings
• Nature Recording
support@sounddevices.com
Use of this product is subject to acceptance of the end-user license agreement (EULA) provided in the
online User Guide.
www.sounddevices.com/
support/registration/
Call Support
1-608-524-0625
1-800-505-0625
QUICK START GUIDE
Page 3
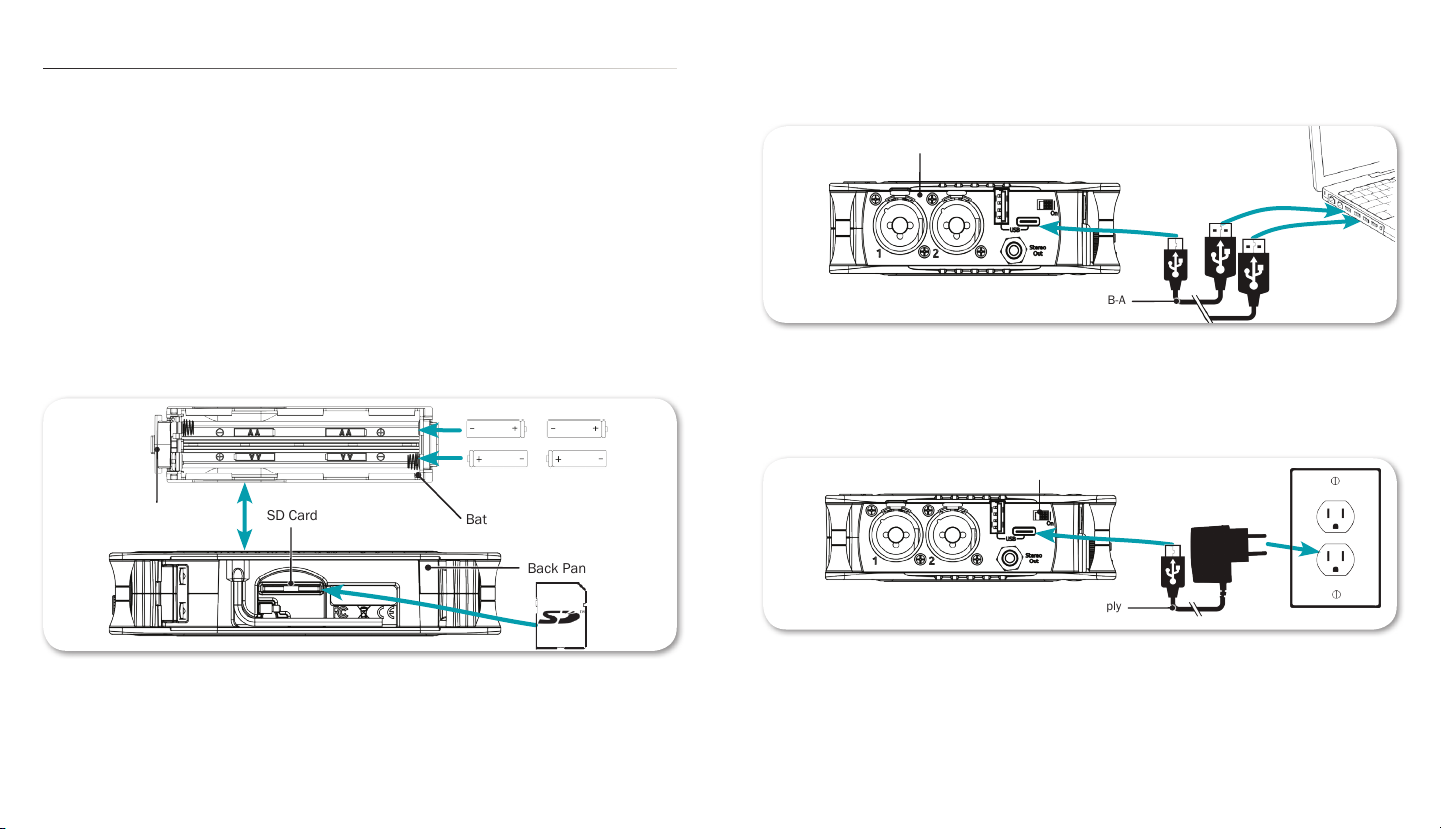
1. Choose a Power Source & 2. Insert SD Card
Back Panel
Release Tab
Battery Sled
SD Card Slot
MixPre-6 Left Panel
Y-cable USB-C to USB-A
Power Switch
USB-C Power Supply
The MixPre-6 may be powered via:
• AA Batteries - The MX-4AA battery sled holds four AA batteries. An optional MX-8AA
sled accessory holds eight AA batteries. Sound Devices recommends using NiMH
rechargeable AA cells.
• L-Mount Batteries - The optional MX-LMount sled holds two Lithium-Ion batteries.
• Computer - Use the USB-C to USB-A Y-Cable or a USB-C to USB-C cable.
• AC Wall Outlet - The optional MX-Charge comes with a USB-C plug and several universal
wall adapters.
To insert batteries and an SD card:
1. Press the release tab at one end of the battery sled to remove it and access the back panel.
2. Insert batteries into the sled
3. Insert approved SD card into the slot provided.
4. Reattach battery sled.
To power the MixPre-6 from a computer:
▶ Connect the USB Y-cable to the MixPre-6’s USB-C port and two USB-A ports on a computer.
▶ Connect a USB-C to USB-C cable to the MixPre-6 and a USB-C power source.
To power the MixPre-6 from an AC wall outlet:
▶ Connect the MX-Charge external USB-C Wall Adapter accessory to the USB-C port on the
MixPre-6 and an electrical outlet.
MIXPRE-6
4 5
To power on your MixPre-6:
▶ Slide the Power switch—located on the left panel—to the right.
QUICK START GUIDE
Page 4
Page 1
Page 2
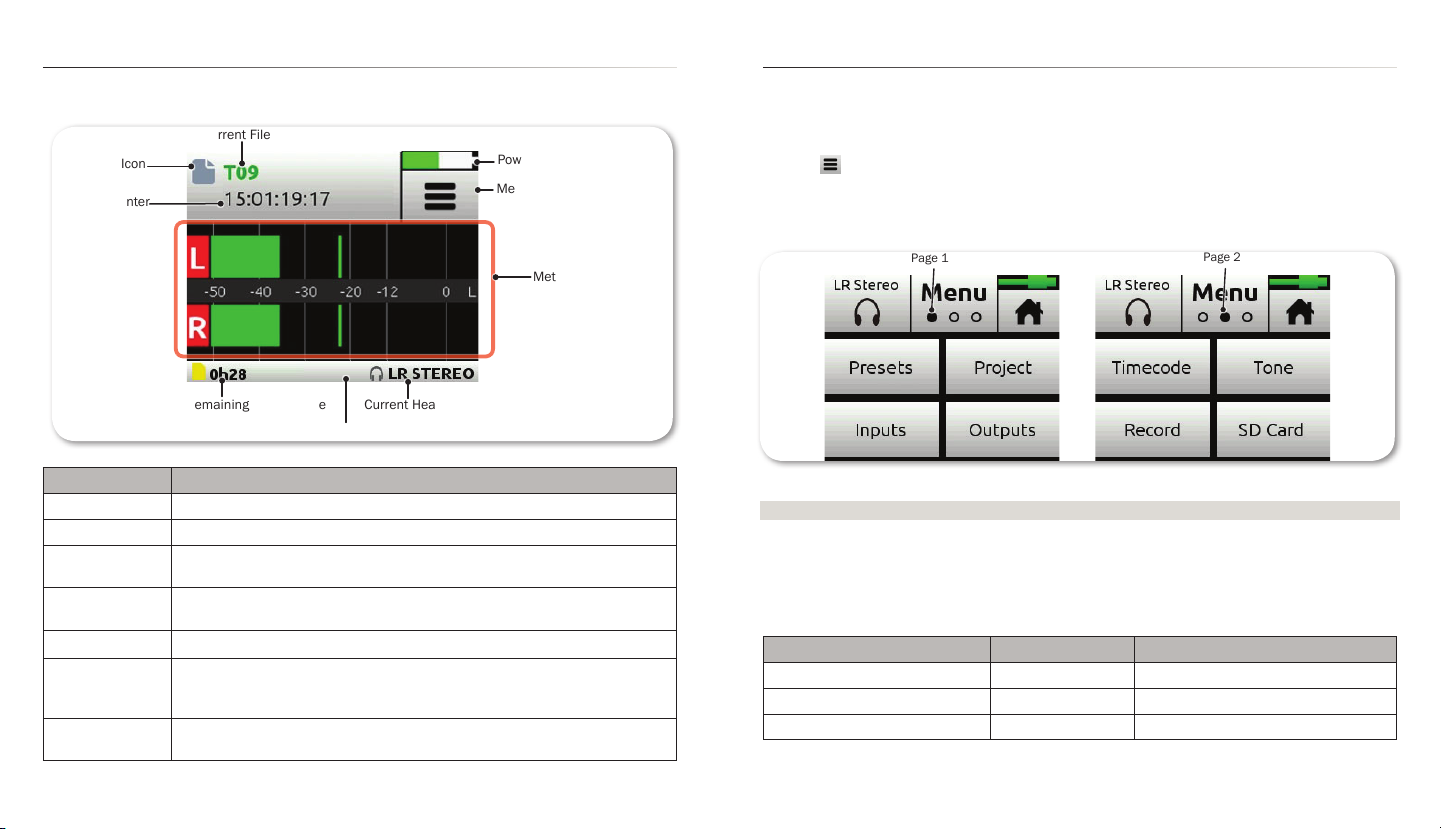
Home Screen
Current File Name
Power Status Icon
Menu Icon
SD Card Remaining Record Time
Current Headphone Preset
Time Counter
File List Icon
Meter View
Status Bar
The MixPre-6’s touch screen displays important metering and record information at a glance
on the Home screen.
3. Format SD Card
SD cards used with the MixPre-6 must be formatted by the MixPre-6.
To format the SD Card:
1. Power on the MixPre-6.
2. Tap .
[There are three pages of Menu settings, as indicated by dots. The solid black dot denotes
which page is displayed.]
3. Tap Menu (dots) to view the 2nd page of settings.
FEATUrE dEscrIpTIoN
File List icon Tap this icon to view the list of recorded les.
Current le name The name of the current le appears red when recording and green when playing.
Power status icon Displays an icon representing type of power source (USB or battery); the battery
Menu icon Tap this icon to access the main Menu screen. When displaying menus, this icon
Meter view The stereo meter view shows the left and right mix channels
Status bar Tap the status bar to toggle through three views of information that includes date
Time counter Displays elapsed time or the timecode, which is stamped on each recorded le and
6 7
MIXPRE-6
icon also indicates the current batteries’ remaining power level.
changes to the Home icon.
and time, current headphone presets, remaining record times, sample rate and bit
depth.
can help simplify audio-to-video synchronization during post-production editing.
4. Tap Card > Edit > Format.
⚠ This will erase all contents of the SD Card!
5. When asked to conrm the command to format the card, tap OK.
The status bar displays the SD card’s remaining record time, which will vary based on the
storage capacity of the card being used. Other variables that affect digital recording times
include concurrent audio track count, sample rate, and bit depth. Here are some record time
estimates for a 16 GB SD card.
ForMAT & rATE TrAcks rEcordINg TIME
WAV - 48 kHz / 24 bits 8 4 hours 2 ¾ minutes
WAV - 96 kHz / 24 bits 2 8 hours 5 ½ minutes
WAV - 192 kHz / 24 bits 2 4 hours 2 ¾ minutes
QUICK START GUIDE
Page 5

HP Encoder
HP Output
LCD
Channel
Knobs
4. Connect an Audio Source
Aux/Mic In
on Right Panel
XLR/TRS Inputs
#1 & #2
Left Panel
6. Set up Channels
The MixPre-6 provides versatile connectivity options for a wide variety
of recording applications. Channels 1-4 are sourced from the XLR/TRS
combo inputs—two on each side panel—or from Aux/Mic or USB 1-4
inputs. Channels 5-6 may be sourced from the Aux/Mic input, or USB
1-2 inputs.
To connect an audio source:
▶ Using a standard XLR or TRS audio cable, connect an audio source
to any of four XLR/TRS combo inputs on the MixPre-6.
▶ Plug an USB audio source into the USB-C port on the MixPre-6.
▶ Plug an audio source into the Aux/Mic In 3.5 mm TRS connection.
5. Connect Headphones
To connect headphones:
▶ Plug in the headphones cable to the headphone output located on
the right panel.
⚠ The MixPre-6 can drive headphones to very loud levels. Take care
when attaching headphones and setting the headphone level.
To adjust headphone volume:
▶ Turn the HP encoder, located on the right panel of the MixPre-6.
To set up channels:
1. Press the rotary knobs for the chosen channel. The Channel Settings
screen appears on the touch-screen LCD.
The Channel Settings screen appears differently depending on SYSTEM >
Mode configuration, so Input might be on the second page of settings.
2. Tap Input and select from the following input types:
INpUT TYpEs dEscrIpTIoN
Mic Use for microphones. For condenser mics requiring 48v phantom power, set Phantom to On.
Line Use this type for balanced analog line level sources.
Aux In 1-2 Use for unbalanced stereo input.
USB 1-4 Use for external audio from iOS device.
Off Turn the input off.
3. Tap Low Cut to set low-cut filter levels—ideal for reducing wind or mic handling noise.
4. Tap Pan to adjust the input’s pan.
8
MIXPRE-6
QUICK START GUIDE
9
Page 6

7. Adjust Mix Levels
Right Panel
Transport Controls
Star
Button
LED Rings
9. Record and Playback
To adjust the mix levels of each channel:
▶ Turn the channel knobs.
To assist in setting levels, LED rings around each of the three channel
knobs illuminate in various colors:
• Solid Green - the louder the signal, the brighter the LED
• Red - when peaking
• Orange - when limiting
• Blinking Orange - when soloed
8. Connect Timecode Input (Optional)
The MixPre-6 has an internal Time-of-Day clock that can be used for timecode, but an external
source for timecode may also be used via HDMI or the Aux/Mic In 3.5 mm connection on the
MixPre-6’s right side panel. The Aux/Mic In port provides two unbalanced channels through
which to receive timecode.
To connect timecode:
1. Connect a timecode source to appropriate port. For instance, connect an external timecode
generator to the Aux/Mic In port. For DSLR cameras that supports HDMI timecode, connect
the HDMI out from the camera to the HDMI TC In port on the MixPre-6.
2. Tap .
3. Select Inputs > Aux In Mode, and then select Timecode.
4. Select Timecode > Mode. Options include: Off, Aux In 1, Aux In 2, and HDMI TC In.
MIXPRE-6
10
There are three illuminated transport controls on the front panel of the MixPre-6 for recording
and playback operations.
To use transport controls:
▶ Press the REC button to record.
▶ Press the Stop ( ■ ) button to stop recording or playback.
▶ Press the Play ( ► ) button to play a recorded file.
Recording may also be triggered from rolling timecode or from compatible
DSLR cameras with HDMI output.
To set up Record Triggering:
1. Tap .
2. Select Record > Rec Trigger. Options include: Off, HDMI ag, and Timecode.
10. The Star Button
The MixPre-6 has a user-programmable button, called the Star (*) button, for exible
customization. You may congure it to gain quick-access to certain menus or features.
To set the Star button functionality:
1. Tap
2. Tap * Button
3. Choose a function from the available options, which include quick
access to the following: toggling between Channel 5 & 6 screens,
the Project sub-menu, the Solo/Mute screen, the SD Card screen,
or the Undo function.
QUICK START GUIDE
11
Page 7

Typical Applications: Audio Recording
The following illustration shows one example of how the MixPre-6 may be connected to different
external microphones for recording audio, such as dialog, sound effects, nature recording, and
other similar in-the-eld audio applications.
Typical Applications: Music Recording
The following illustration of a sample musical recording setup shows one example of how the
MixPre-6 may be connected to external devices—such as musical instruments, microphones,
computers, and speakers and headphones for monitoring.
12
MIXPRE-6
QUICK START GUIDE
13
Page 8

Allen Wrench & Anti-rotation Pin
MixPre-6 Back Panel
Retractable
Screw
Threaded hole for
Anti-rotation Pin
Typical Applications: Videography
The following illustration shows an example of how the MixPre-6 may be used with a DSLR
camera in sound-for-video applications.
To monitor return from the camera, connect the camera’s analog audio output to the 3.5 mm Aux/Mic
In on the MixPre-6, and set Inputs > Aux In Mode to Return.
Using with a Camera and/or Tripod
The MixPre-6 has ¼-inch, 20-threaded screw mounting options on the top and bottom panels,
so it may be mounted to gear in a variety of ways. For instance, when mounting between a
tripod and camera, attach it to the bottom of the camera rst before screwing it into place
atop the tripod.
To attach the MixPre-6:
1. Remove the battery sled to gain access to the back panel.
2. Retrieve the anti-rotation pin and Allen wrench. Both are magnetically
held in place on the back panel.
3. (Optional) If your camera has a slot for the anti-rotation pin, screw the pin into place on top
of the MixPre-6, and then position the MixPre-6 against the bottom of the camera so that
the pin ts into the camera’s slot.
The anti-rotation pin may also be screwed into a tripod and slotted into the
bottom of the MixPre-6.
4. From the MixPre-6’s bottom panel, insert the Allen wrench into the
mounting screw hole and push up on the retractable screw. Rotate to
screw the MixPre-6 into place underneath camera.
5. Align the mounting screw hole on the bottom panel with the mounting screw on the tripod, and screw into place.
14 15
MIXPRE-6
QUICK START GUIDE
Page 9

Enabling Bluetooth on MixPre-6 for Wingman
The MixPre-6 has built-in Bluetooth Smart® functionality that allows for control from the
Wingman
Sound Devices Wingman, which is a free download from Apple’s App
Store, is a wireless interface that gives users touch-screen access to
monitor meters, start and stop recordings, and edit lenames and
metadata on the MixPre-6 directly from any mobile device running iOS
8.0 or later.
To turn on Bluetooth on the MixPre-6:
1. Tap .
2. Tap System > Bluetooth. Options include Off and On.
™
iOS app.
Warranty and Service
Sound Devices, LLC strongly encourages you to register your product. Registering can extend your warranty
and ensure you will receive timely updates.
Register online here: www.sounddevices.com/support/registration
Read your warranty here: www.sounddevices.com/support warranty
For all service, including warranty repair, please contact Sound Devices for an RMA (return merchandise
authorization) before sending your unit in for repair. Product returned without an RMA number may
experience delays in repair. When sending a unit for repair, please do not include accessories, including
SD cards, batteries, power supplies, carry cases, cables, or adapters unless instructed by Sound Devices.
Sound Devices repairs and replacements may be completed using refurbished, returned or used parts that
have been factory certied as functionally equivalent to new parts.
Sound Devices, LLC
Service Repair RMA #XXXXX
E7556 State Road 23 and 33
Reedsburg, WI 53959 USA
Telephone: (608) 524-0625
Technical Support
For technical support and bug reporting on all Sound Devices products contact Sound Devices,
LLC at:
E-mail: support@sounddevices.com To report technical errors in this guide,
Website: www.sounddevices.com/support/ email: techpubs@sounddevices.com
Phone: +1 (608) 524-0625
Toll-free: +1 (800) 505-0625 — in USA only
Fax: +1 (608) 524-0655
Fill In and Keep for Your Records
PRODUCT: _____________________________________________
SERIAL NUMBER: _____________________________________________
PURCHASE DATE: _____________________________________________
STORE/RETAILER: _____________________________________________
MIXPRE-6
16 17
QUICK START GUIDE
Page 10

Legal Notes
Product specications and features are subject to change without prior notication.
Copyright © 2017
Sound Devices, LLC.
All rights reserved.
This document is protected under copyright law. An authorized licensee of this product may reproduce this publication for the
licensee’s own personal use. This document may not be reproduced or distributed, in whole or in part, for commercial purposes,
such as selling copies or providing educational services or support. This document is supplied as a technical guide. Special
care has been taken in preparing the information for publication; however, since product specications are subject to change,
this document might contain omissions and technical or typographical inaccuracies. Sound Devices, LLC does not accept
responsibility for any losses due to the use of this guide.
Limitation of Liability
LIMITATION ON SOUND DEVICES’ LIABILITY. SOUND DEVICES, LLC SHALL NOT BE LIABLE TO THE PURCHASER OF THIS
PRODUCT OR THIRD PARTIES FOR DAMAGES, LOSSES, COSTS, OR EXPENSES INCURRED BY PURCHASER OR THIRD
PARTIES AS A RESULT OF: ACCIDENT, MISUSE, OR ABUSE OF THIS PRODUCT OR UNAUTHORIZED MODIFICATIONS, REPAIRS,
OR ALTERATIONS TO THIS PRODUCT, OR FAILURE TO STRICTLY COMPLY WITH SOUND DEVICES, LLC’S OPERATING AND
INSTALLATION INSTRUCTIONS. TO THE FULLEST EXTENT PERMITTED BY LAW, SOUND DEVICES SHALL HAVE NO LIABILITY
TO THE END USER OR ANY OTHER PERSON FOR COSTS, EXPENSES, DIRECT DAMAGES, INCIDENTAL DAMAGES, PUNITIVE
DAMAGES, SPECIAL DAMAGES, CONSEQUENTIAL DAMAGES OR OTHER DAMAGES OF ANY KIND OR NATURE WHATSOEVER
ARISING OUT OF OR RELATING TO THE PRODUCTS, THESE TERM/S AND CONDITIONS OR THE PARTIES’ RELATIONSHIP,
INCLUDING, WITHOUT LIMITATION, DAMAGES RESULTING FROM OR RELATED TO THE DELETION OR OTHER LOSS OF AUDIO
OR VIDEO RECORDINGS OR DATA, REDUCED OR DIMINISHED AUDIO OR VIDEO QUALITY OR OTHER SIMILAR AUDIO OR
VIDEO DEFECTS ARISING FROM, RELATED TO OR OTHERWISE ATTRIBUTABLE TO THE PRODUCTS OR THE END USER’S
USE OR OPERATION THEREOF, REGARDLESS OF WHETHER SUCH DAMAGES ARE CLAIMED UNDER CONTRACT, TORT OR
ANY OTHER THEORY. “CONSEQUENTIAL DAMAGES” FOR WHICH SOUND DEVICES SHALL NOT BE LIABLE SHALL INCLUDE,
WITHOUT LIMITATION, LOST PROFITS, PENALTIES, DELAY DAMAGES, LIQUIDATED DAMAGES AND OTHER DAMAGES AND
LIABILITIES WHICH END USER SHALL BE OBLIGATED TO PAY OR WHICH END USER OR ANY OTHER PARTY MAY INCUR
RELATED TO OR ARISING OUT OF ITS CONTRACTS WITH ITS CUSTOMERS OR OTHER THIRD PARTIES. NOTWITHSTANDING
AND WITHOUT LIMITING THE FOREGOING, IN NO EVENT SHALL SOUND DEVICES BE LIABLE FOR ANY AMOUNT OF DAMAGES
IN EXCESS OF AMOUNTS PAID BY THE END USER FOR THE PRODUCTS AS TO WHICH ANY LIABILITY HAS BEEN DETERMINED
TO EXIST. SOUND DEVICES AND END USER EXPRESSLY AGREE THAT THE PRICE FOR THE PRODUCTS WAS DETERMINED
IN CONSIDERATION OF THE LIMITATION ON LIABILITY AND DAMAGES SET FORTH HEREIN AND SUCH LIMITATION HAS
BEEN SPECIFICALLY BARGAINED FOR AND CONSTITUTES AN AGREED ALLOCATION OF RISK WHICH SHALL SURVIVE THE
DETERMINATION OF ANY COURT OF COMPETENT JURISDICTION THAT ANY REMEDY HEREIN FAILS OF ITS ESSENTIAL
PURPOSE.
Trademarks
The “wave” logo and USBPre are registered trademarks of Sound Devices, LLC.
Mac and OS X are trademarks of Apple Inc., registered in the U.S. and other countries. Windows is a registered trademark of
Microsoft Corporation in the United States and other countries.
This device complies with part 15 of the FCC Rules. Operation is subject to the following two conditions: (1) This
device may not cause harmful interference, and (2) this device must accept any interference received, including
interference that may cause undesired operation.
FCC Part 15.19 (a) (3)
Full FCC compliance information may be found in the product’s User Guide found at www.sounddevices.com.
⚠ Caution: Incorrect use of batteries poses a danger of explosion. Replace only with
the same or equivalent type. Properly recycle batteries. Do not crush, disassemble,
incinerate, dispose in a re or expose batteries to high temperatures.
Declaration of Conformity
Manufacturer’s Name: Sound Devices, LLC
Manufacturer’s Address: E7556 State Road 23 and 33
Reedsburg, WI 53959
USA
Declares under sole responsibility that the product as delivered
Product Name: MixPre-6 Audio Recorder & USB Audio Interface
Model Number: MixPre-6
Description: 8-Track audio recorder with mixing & Bluetooth capabilities
Product Options: This declaration covers all options of the above product.
complies with the essential requirements of the following applicable European
Directives, and carries the CE marking accordingly:
EMC Directive (2014/30/EU)
EN 55032:2013
CISPR 32:2012
EN 55032:2012/AC:2013
EN 55103-2:2009
R&TTE Directive (1999/5/EC)
EN 300 328 v1.9.1
EN 301 489-17 v2.2.1
This Declaration of Conformity applies to the above-listed product(s) placed on the EU market
after:
April 19, 2017
Date Matt Anderson - Sound Devices, LLC President
18
MIXPRE-6
QUICK START GUIDE
19
Page 11

www.sounddevices.com
Part # 7376.001
 Loading...