

Page 1
®
MixPre-3
Audio Recorder | Mixer | USB Audio Interface
User Guide
Page 2
Legal Notices
Product specications and features are subject to
change without prior notication.
Revision History
This table provides the revision history for this guide.
Copyright © 2017 Sound Devices, LLC.
All rights reserved.
This product is subject to the terms and conditions of
a end-user license agreement provided in this guide,
and may be used in accordance with the license
agreement.
This document is protected under copyright law. An
authorized licensee of this product may reproduce
this publication for the licensee’s own personal use.
This document may not be reproduced or distributed, in whole or in part, for commercial purposes,
such as selling copies or providing educational services or support.
This document is supplied as a technical guide. Special care has been taken in preparing the information
for publication; however, since product specications
are subject to change, this document might contain
omissions and technical or typographical inaccuracies. Sound Devices, LLC does not accept responsibility for any losses due to the user of this guide.
Trademarks
The “wave” logo is a registered trademark and
Kashmir is a trademark of Sound Devices, LLC. iPad,
iPhone, Mac and OS X are trademarks of Apple Inc.,
registered in the U.S. and other countries. Windows
is a registered trademark of Microsoft Corporation in
the U.S. and other countries. Bluetooth Smart is a
registered trademark of Bluetooth SIG, Inc. All other
trademarks herein are the property of their respective owners.
Rev# Date Firmware
Version
1-A April 2017 v1.00 Initial release
1-B April 2017 v1.00 Fixed some doc
1-C April 2017 v1.00 Specs updated
1-D May 2017 v1.00 Fixed some doc errors
1-E May 2017 v1.00 Made edits to Inputs
Description
errors & added File
Transfer information
& USB chapters,
Specs and Appendix
WEEE Statement
If you wish to discard a Sound Devices
product in Europe, contact Sound Devices
(Germany) for further information.
MixPre-3 User Guide • May 30, 2017
This document is distributed by Sound Devices, LLC
in online electronic (PDF) format only. E-published
in the USA.
www.sounddevices.com
support@sounddevices.com
Sound Devices, LLC
E7556 Road 23 and 33
Reedsburg, Wisconsin 53959 USA
Direct: +1 (608) 524-0625
Toll Free: (800) 505-0625
Fax: +1 (608) 524-0655
Page 3
Table of Contents
Intro
Powering
Flexible Powering Options ..............7
Panels
Front Panel ........................9
Left Side Panel ......................9
Touch Screen
Home Screen ......................11
Main Menu Screen ..................12
Modes and Presets
Setting the Mode ...................15
Basic Mode .......................15
Advanced Mode ....................16
Right Side Panel .....................9
Back Panel ........................10
Channel Screen ....................13
Custom Mode ......................16
User Presets .......................17
Inputs
Channel Inputs .....................19 Inputs Menu ......................20
Outputs
Stereo Outs .......................23 Headphone Out ....................23
Metering
LEDs and Meter Views ................25
Recording and Playback
Formatting SD Cards ................27
Transport Controls ..................28
Record Menu ......................29
USB
USB Audio Interface .................31
Low-latency Monitoring ...............32
USB File Transfer ...................32
USB Keyboard .....................33
USB-C Mode ......................33
Timecode
Timecode Modes ...................35
HDMI TC In ......................36
Aux In 1, Aux In 2 .................36
Time of Day (TOD) ................36
Timecode Frame Rate Auto-Detection ....36
Timecode Stamp ...................37
3
Page 4

User Guide
Files, Projects
File Name Format ...................39
Naming a Recording .................39
Track Names and Notes ..............40
Undo, Trash File ....................40
Projects ..........................40
Remote Control
Wingman Application ................43
Connecting to a MixPre Recorder ......44
HDMI Record Trigger .................45
Linear Timecode (LTC) Record Trigger ....45
Keyboard .........................46
USB Keyboard Shortcuts ............46
Appendix A
Basic/Advanced Mode Dierences .......47 System Settings ....................48
Specifications
Audio Inputs ......................49
Audio Outputs .....................50
Recorder .........................50
USB ............................50
Touch Screen ......................50
Timecode .........................51
Remote Control ....................51
Power ...........................51
Environmental .....................51
Dimensions and Weight ..............52
Glossary of Terms
Notes ...........................54
Software License
FCC Compliance Statement
4
Page 5

Intro
Hello and thank you for buying the MixPre-3! At Sound Devices, we are freaks
about audio. We’ve unleashed our design and engineering team (most of
whom are musicians) and let them create a device that we want to own ourselves. We think that you’ll nd the unique mix of performance, ease-of-use,
design and build quality to be an invaluable part of your life and creative passion for many years to come.
The MixPre-3 has been meticulously-engineered to oer extreme exibility and
sound quality, operating in three basic ways:
• 3 mic/line input, 2 channel output mixer with our exclusive Kashmir™ discrete mic preampliers with user-selectable analog limiters and low-cut
lters.
• SD card recording and playback of individual channels and the main mix
simultaneously at 44.1, 48, 96 kHz, 16, 24-bit les.
• 5-in, 2-out USB computer audio interface
The possible uses for the MixPre-3 are virtually unlimited, but a few common
ones might be:
• Paired with a DSLR camera recording high-quality audio for video, complete
with timecode and HDMI record triggering.
• Podcast or music recording using up to three high-quality voice-over microphones (or other sources) interfacing via USB to a computer.
• Stand-alone audio recorder for House-of-Worship, mixing a direct feed from
the PA system with a stereo feed of ambient congregational response, singing and music from a stereo microphone.
The MixPre-3’s application exibility is augmented by the various powering
options. Whether you wish to power the MixPre-3 from a USB connection, AA
batteries, L-mount batteries or an optional AC wall plug adapter, it’s ready, willing and able to go anywhere, anytime - always handling your audio needs with
grace.
We’ve designed the MixPre-3 to be easy to use for the novice without taking
away truly professional-level features for the seasoned pro user. With that in
mind, the MixPre-3 ships from the factory in Basic mode - this is ideal for less
experienced users and will satisfy the majority of audio applications. If you
want to dive straight into the full array of professional features, we recommend
setting to Advanced mode. See Modes and Presets for more information.
We sincerely hope that you enjoy working with the MixPre-3 as much as we’ve
enjoyed creating it! Please drop us an email at support@sounddevices.com and
share your experiences as we’d love to see how the MixPre-3 is furthering your
passion!
5
Page 6

User Guide
6
Page 7
Powering
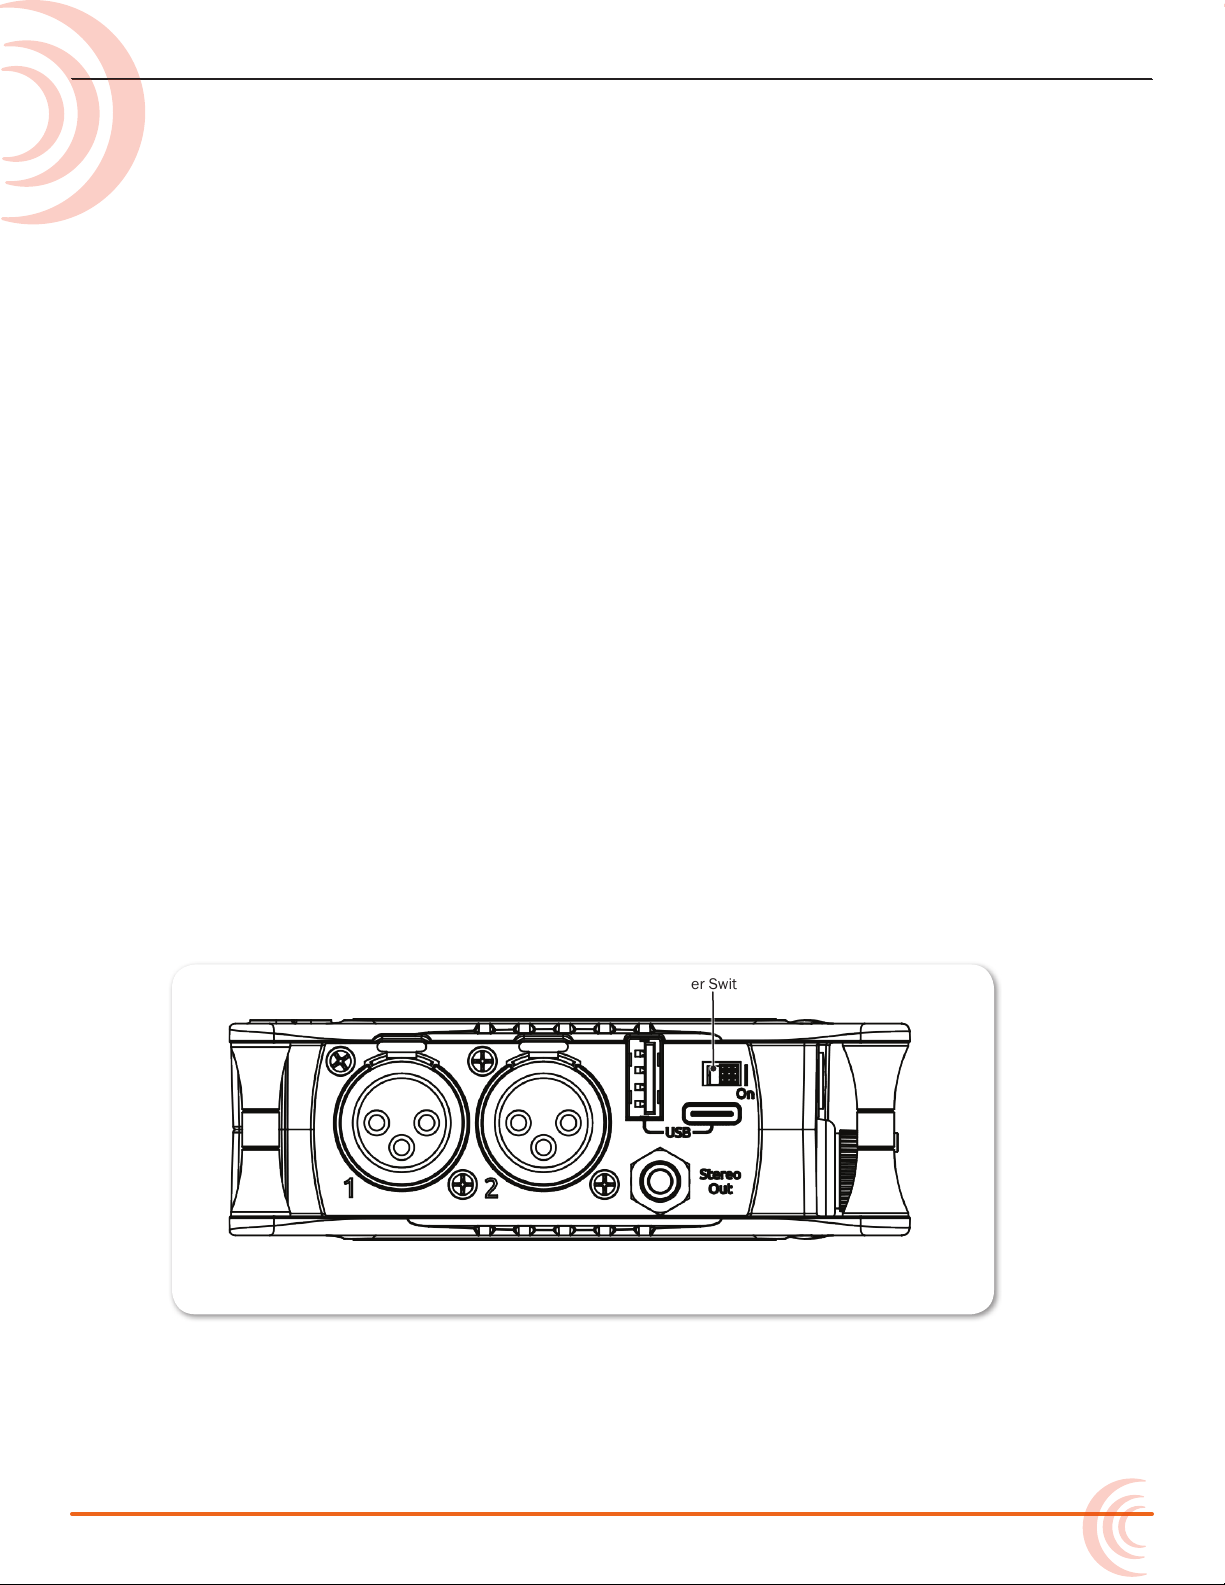
Power Switch
Flexible Powering Options
In designing the MixPre-3, we felt that it was important for it to be able to
operate in a wide array of applications and environments. To support that goal,
power can be supplied from several possible sources. Some possible powering
scenarios are:
• Four AA alkaline or NiMH rechargeable batteries installed in the provided
4-AA battery sled.
• Eight AA alkaline or NiMH rechargeable batteries installed in the optional
8-AA battery sled accessory.
• One or two Sony-type L-mount batteries installed in the optional L-mount
battery sled accessory.
• USB-C to USB-C cable connected to a USB-C host computer or AC wall
adapter.
• USB-A to USB-C cable connected to a USB-A host computer or AC wall
adapter.
• Dual USB-A to USB-C cable (included) connected to a USB-A host computer.
Use this cable option if your computer is unable to provide adequate power
for the MixPre-3 with only one USB-A port.
• Optional MX-CHARGE AC wall adapter to USB-C power supply.
The master power switch for the MixPre-3 is located in the upper right corner of
the left side panel.
To preserve battery power, USB-C power sources take priority over batteries if
both are connected with one exception - if the USB-C power source does not
meet the full power requirements of the MixPre-3, you can choose to power
from battery or continue to power from USB-C. We have designed the MixPre-3
so that even with an under powered USB-C source, you will still be able to use
7
Page 8

User Guide
two of the three channels with 48V phantom mics. The third channel can still
be used with dynamic mics and line, aux, or USB sources. To achieve this we
automatically do the following:
• Dim LCD and LED Brightness
• Disable USB-A port
• Disable HDMI TC port
For protection against accidental loss of power (not something you particularly
want to happen during recording), the MixPre-3 incorporates circuitry to
automatically switch over from USB-C to batteries if the USB-C power source
accidentally gets pulled.
8
Page 9
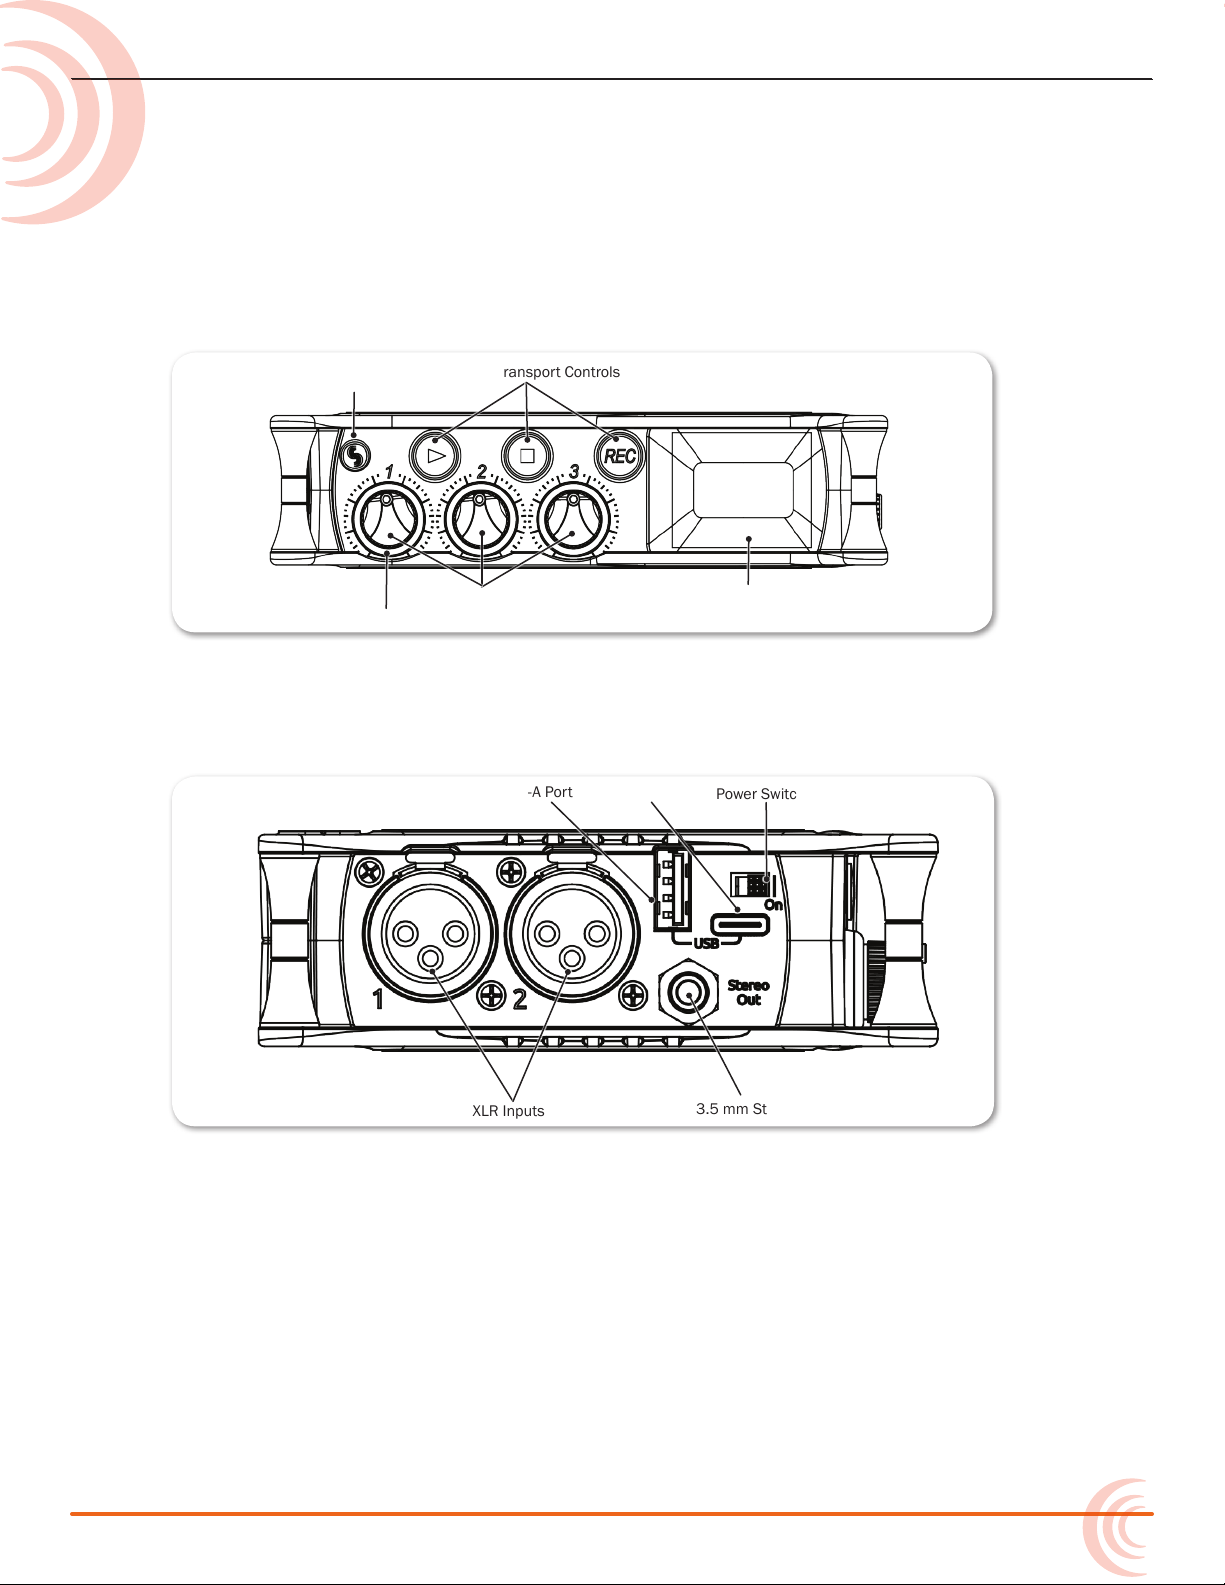
Panels
Recorder Transport Controls
Channel Knobs
Channel Knob Ring LEDs
Power Light
LCD
Power Switch
USB-A Port
XLR Inputs
3.5 mm Stereo Output
USB-C Port
Front Panel
Power light, Recorder transport controls, Channel knobs, Channel knob ring
LEDs, Touch screen
Left Side Panel
USB connections, XLR inputs 1-2, 3.5mm stereo output, Power switch
Right Side Panel
3.5mm headphone output, 3.5mm Mic/Aux input, XLR input 3,
Headphone volume encoder, micro HDMI TC input
9
Page 10

User Guide
HP Encoder
XLR Input
3.5 mm Headphone Output
3.5 mm Aux/Mic Input
SD Memory Card Slot
Battery Mounts
Allen wrench
Back Panel
Battery mounts, SD memory card slot, Allen wrench (for ¼-inch-20-thread
captive screw), anti-rotational pin
micro HDMI TC Input
10
Page 11
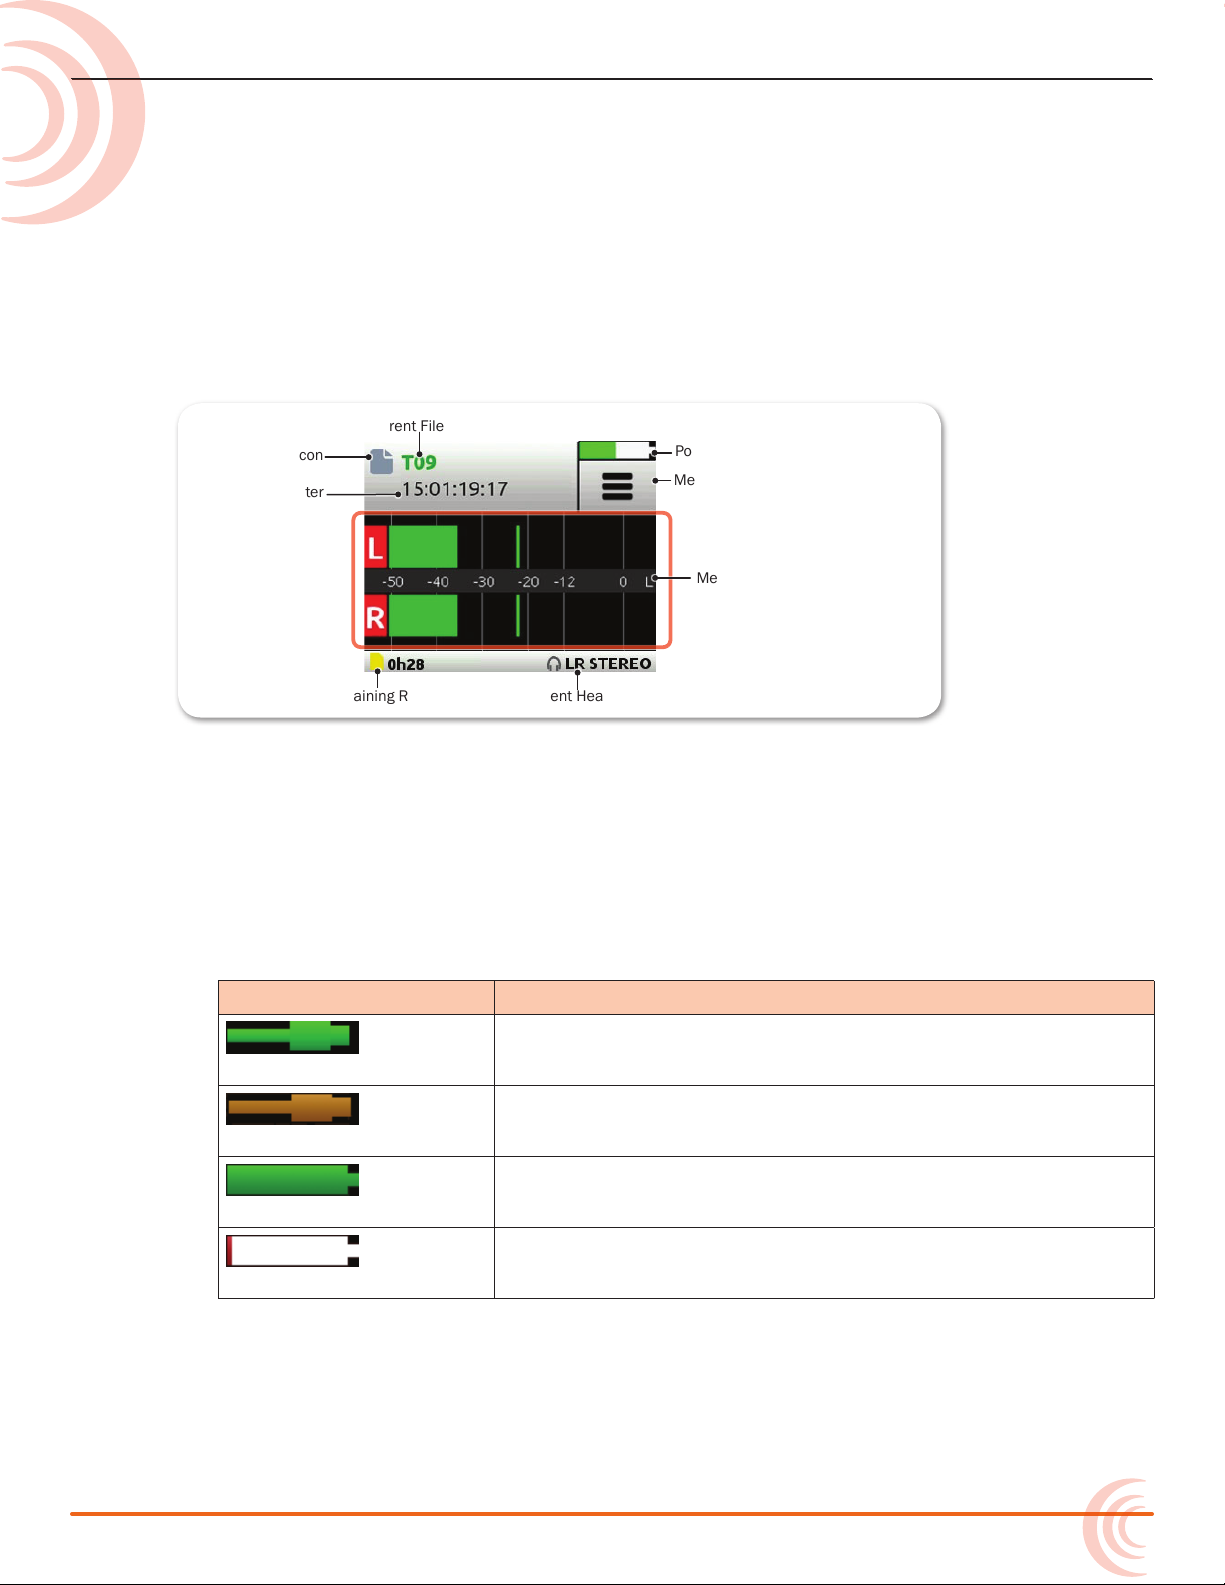
Touch Screen
Current File Name
Power Status Icon
Menu Icon
SD Card Remaining Record Time
Current Headphone Preset
Time Counter
File List Icon
Meter View
The MixPre-3 has a sunlight-viewable, high-resolution, touch-screen-based user
interface, which consists of the Home screen, Main Menu screen, and Channel
screen views. As you will notice, there are several touch zones on the touch
screen for controls. As you become familiar with the user interface, changing
settings for inputs, outputs, recording and metering will become fast and
intuitive.
Home Screen
The Home screen view is the default view that appears on the touch screen
when the device is powered up. On it, you will nd items such as:
• File list icon and current le name
• File elapsed time counter (timecode if LTC or HDMI timecode is enabled)
• Power status icon
• Menu icon
• Meter view (cycle views by touching)
Power Status Icon Description
(Green USB)
(Orange USB)
(Green Battery)
(Flashing Red Battery)
USB power source is ideal.
USB power source low. Brightness dimmed, HDMI & USB-A
ports disabled, 48v phantom on 2 channels only.
Healthy battery. Plan to change batteries when green level
drops to about ¼ full.
Battery power is critically low. Change batteries.
◦ Two channel mix track meters
◦ Two channel mix track meters, three individual track view
◦ Two channel mix track meters, two USB input meters, two aux input
meters
11
Page 12
User Guide
• Status bar
◦ SD card available recording time
◦ Headphone preset
◦ Sample rate and bit depth
◦ Date and time
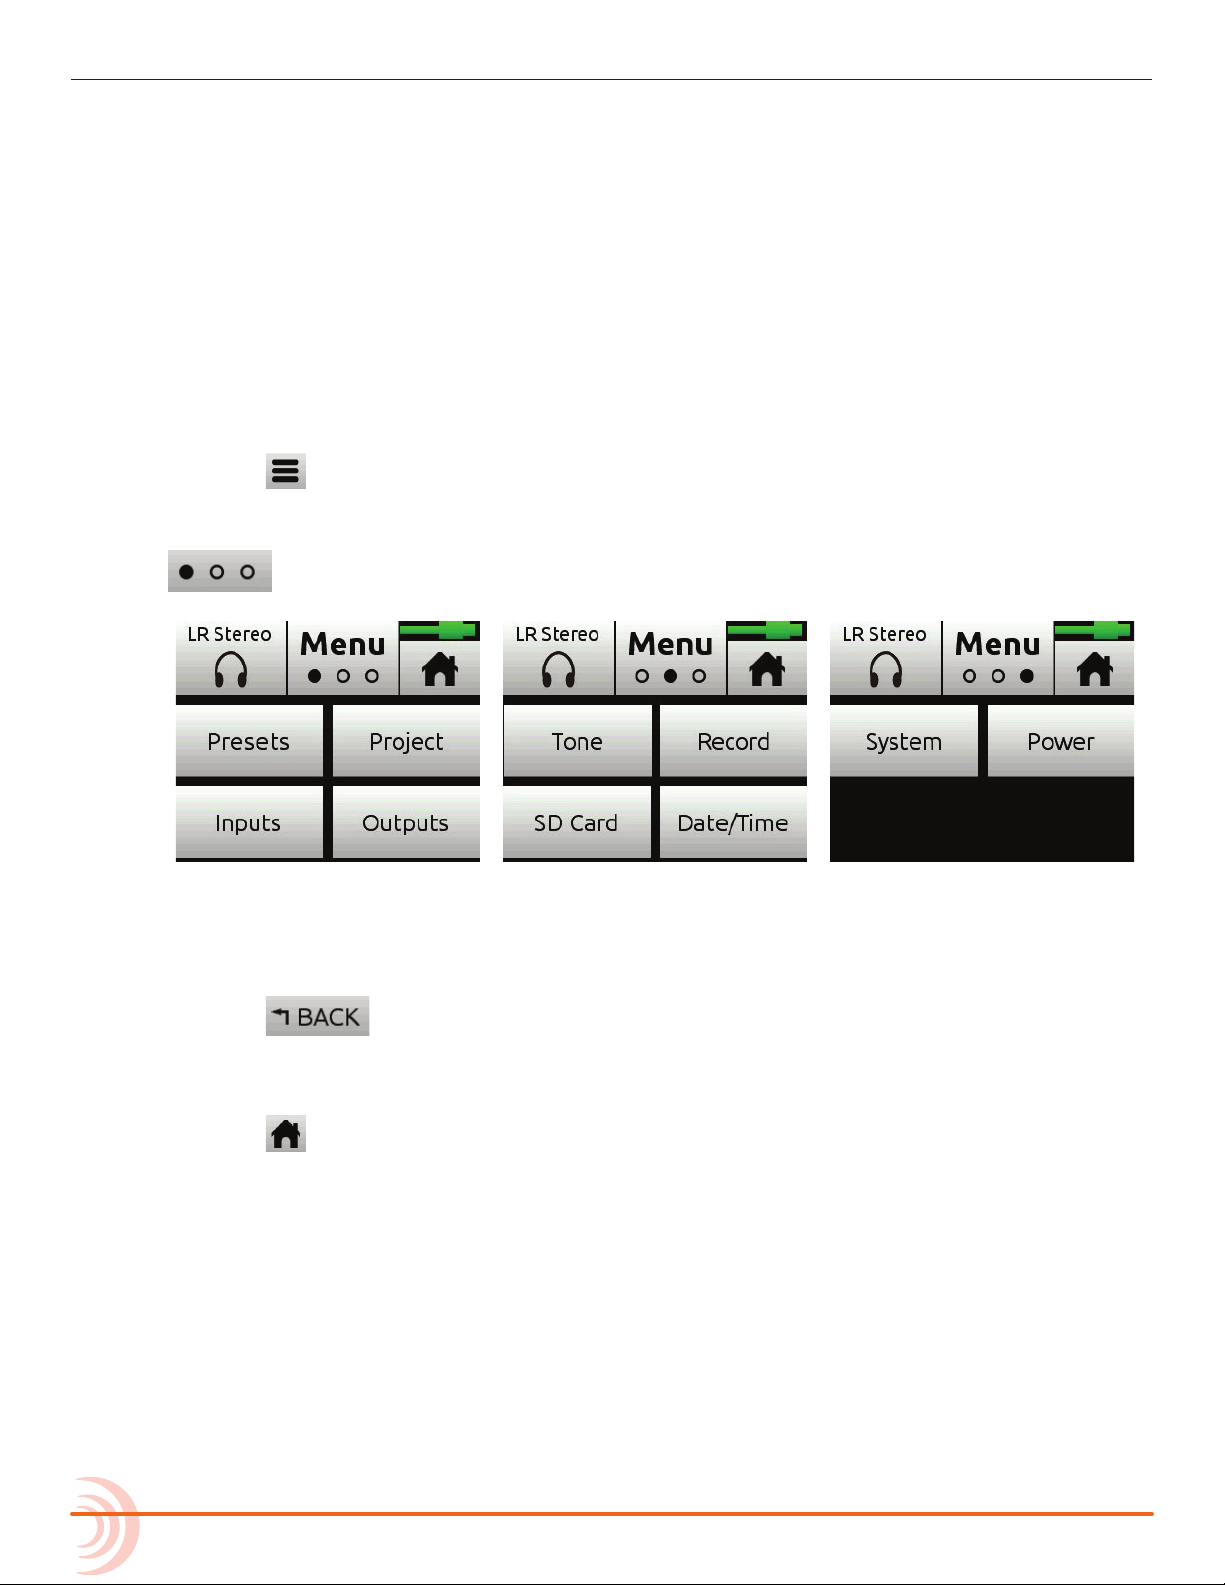
Main Menu Screen
The Menu screen is where most of the features and functions are selected and
set up.
To enter the Menu screen:
X Tap on the Home screen.
There are three Menu screen views. These views are indicated by the Dots icon
. Tapping it will toggle between the three Menu views.
The Menu has its own submenus that may be displayed by tapping them.
To return to the main Menu from a submenu at any time:
X Tap .
To return directly to the Home screen from the main Menu:
X Tap .
12
Page 13
TOUCH SCREEN
Page Sub-menu Description
1 Presets Lets you save and recall preset user settings to and from SD cards
and internal memory. Also allows resetting all settings to factory
default.
1 Project Provides the ability to create new, open and trash existing projects.
1 Inputs Provides settings for the Aux/Plug-in-power Mic/Timecode input/
Camera.
1 Outputs
2 Timecode
2 Tone Provides test tone settings.
2 Record
2 SD Card Displays current SD card information and allows for format and
3 Date/Time Sets current date/time and format.
3 System Provides settings for Basic/Advanced/Custom mode, Custom mode
3 Power Select the type of batteries being used (Alkaline, NiMH, L-Mount) to
*
**
Provides routing and gain settings for the stereo output.
*
Lets you select timecode mode.
Provides record settings for LR mix gain, sample rate, bit depth, LR
linking, and HDMI record trigger.
empty trash card functions.
setup, limiters, USB-C, File Transfer, Bluetooth®, Wingman App
password, adjusting LCD/LED brightness, updating rmware, and
viewing version and regulatory information.
ensure that the Power Status icon on the Home screen accurately
displays remaining battery level.
** Some Record sub-menu options are only available in Advanced mode
*Sub-menu/setting appears in Advanced mode only
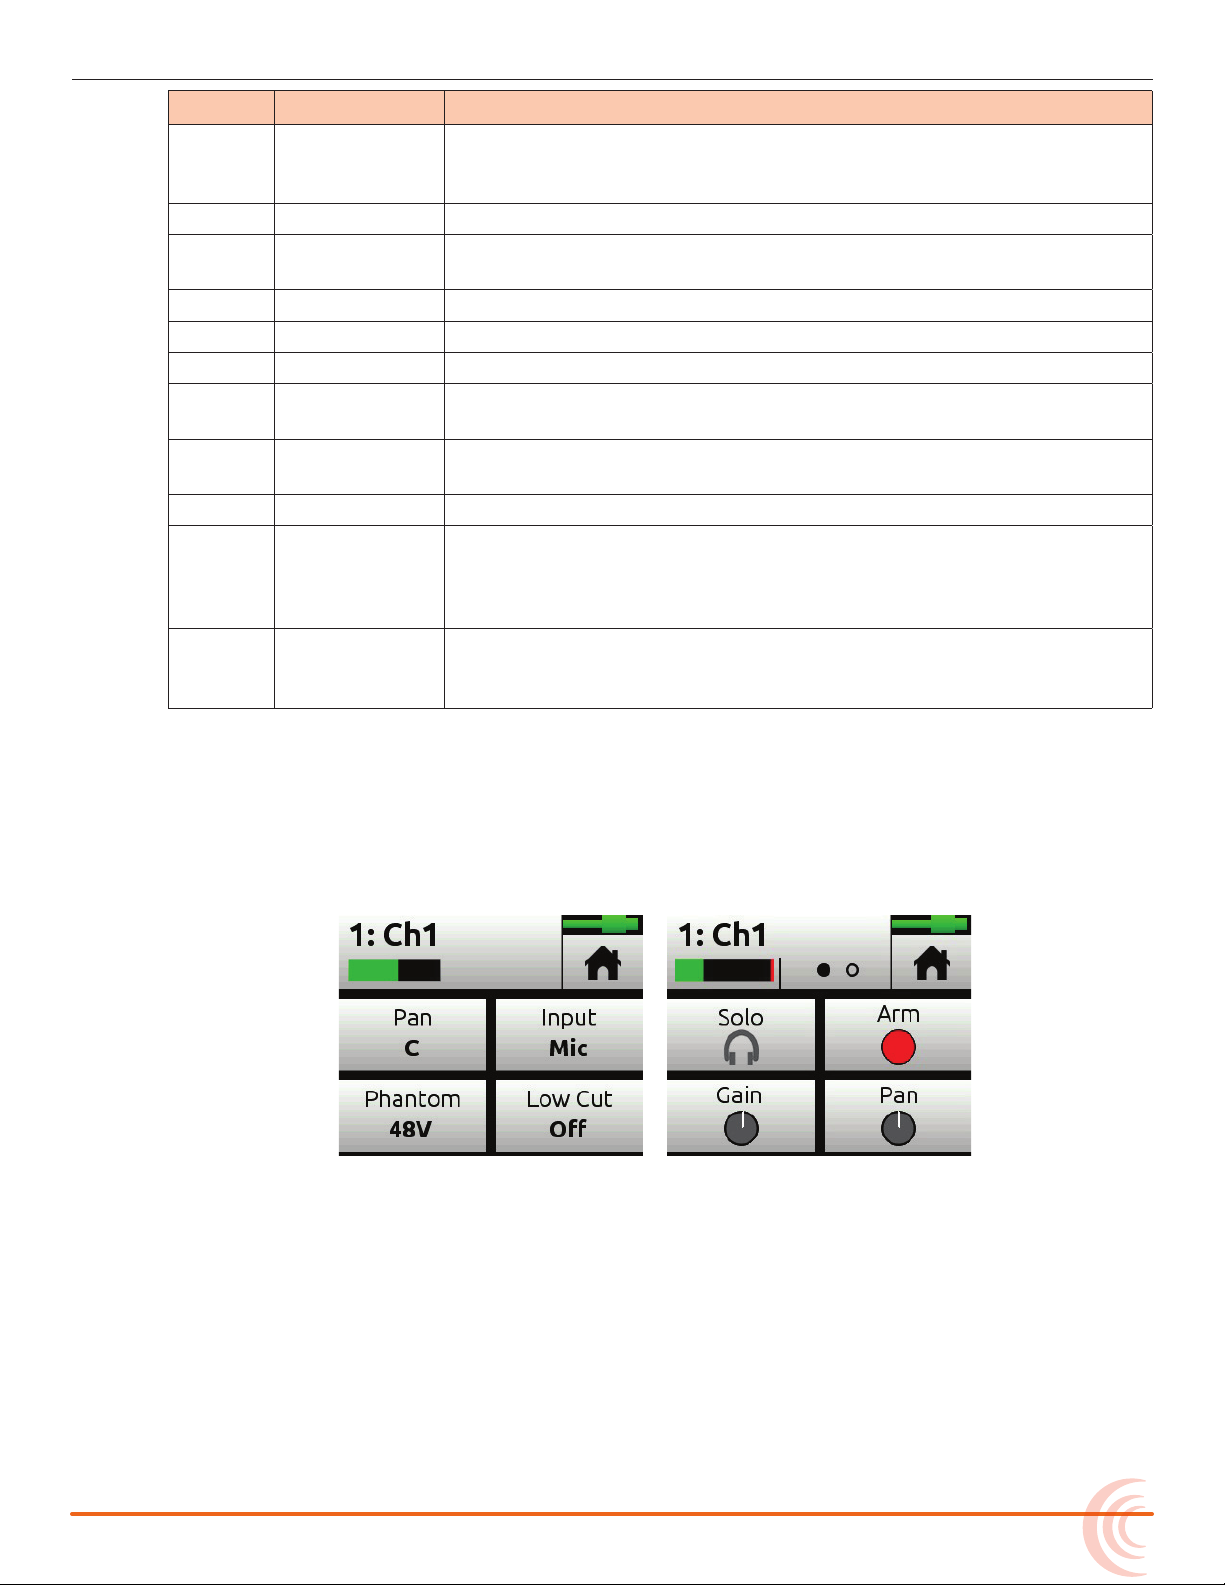
Channel Screen
The Channel screen is where you will nd channel-specic settings, such as
Channel name, Input selection, Pan, 48v phantom power and Low Cut ltering.
In Advanced mode, additional settings are available via a second channel page
accessed by tapping the Dots icon.
L The top left corner of the Channel screen displays an editable Channel name.
Touch this region to give the channel an easy to identify name, like Vocals or Bob.
Below the Channel name is a Channel meter to aid in setting audio levels.
13
Page 14

User Guide
Page Sub-menu Description
1 Solo
1 Arm
1 Gain
1 Pan Lets you position the channel’s audio in the stereo image of the LR
2 Input Lets you select one of the available Mic, Line, or USB inputs to route
2 Phantom Lets you apply full 48v phantom power to the channel’s mic or line
2 Low Cut Sometimes referred to as a high pass lter (HPF), the Low Cut lter
2 Linking
*
Lets you solo the selected channel in the headphone output. Soloing
by default is Individual (exclusive) in that only one input at a time
will be soloed. When a channel is soloed, its light ring will ash
orange. Soloing can be set to Multiple (non-exclusive) in the HP
Preset submenu.
*
Allows pre-fade recording of the channel to its own isolated (ISO)
track on the SD card.
*
Sets the sensitivity of the input. Generally, the gain should be set
so that the loudest parts of the audio signal just touch the red
segments of the meters.
mix and stereo out.
to the chosen channel.
input.
can be set up to roll o bass frequencies or reduce mic handling
noise, wind noise, and other undesirable low frequencies. The lter
has a carefully crafted 18 dB/octave slope.
*
Lets you link channels 1 and 2, either as a stereo pair or mid-side
pair.
* Sub-menu/setting appears in Advanced mode only
To enter the Channel screen:
X Press the associated Channel knob.
14
Page 15
Modes and Presets
Setting the Mode
We’ve designed the MixPre-3 to be easy to use for the novice without taking
away truly professional-level features for the seasoned pro user. We want both
the newcomer and the career professional to enjoy a quick, easy setup and
foolproof results. To accommodate this, we’ve incorporated three modes of
operation into the MixPre-3: Basic, Advanced and Custom.
To set the mode:
1. Turn all channel knobs to O (at full counter-clockwise position).
2. Tap .
3. Tap System > Mode. Options include: Basic, Advanced, and Custom.
Basic Mode
Basic mode is intended for hassle-free, plug-and-play use. This mode is ideal
for the new user and amateur needing only the basic functionality of the
MixPre-3.
Screen Sub-menu Description
Menu Presets Save and load user presets to and from SD card and internal
memory. Also allows resetting all settings to factory default.
Menu Project Create new projects, or open and trash existing projects.
Menu Inputs Provides settings for the 3.5 mm Aux/Mic In.
Menu Timecode Select Time of Day or HDMI TC from a DSLR as timecode
source. O is also an option.
Menu Tone Turn the test tone on or o. By default, the test tone is a 1kHz
sine wave at -20dBFS.
Menu Record Choose to auto start/stop recording via HDMI from a DSLR.
Menu SD Card Displays SD card info and allows for formatting SD cards and
and emptying their trash folder.
Menu Date/Time Sets current date/time and format.
Menu System Provides settings for Basic/Advanced/Custom mode, Custom
mode setup, limiters, USB-C, File Transfer, Bluetooth®,
Wingman App password, adjusting LCD/LED brightness,
updating rmware, and viewing version and regulatory
information.
Menu Power Select the type of batteries being used (Alkaline, NiMH,
L-Mount) to ensure that the Power Status icon on the Home
screen accurately displays remaining battery level.
Menu HP Preset Select LR Stereo or USB 1,2 as headphone sources.
15
Page 16
User Guide
Screen Sub-menu Description
Channel Pan Pan the channel’s signal Left, Center or Right in the stereo LR
Channel Input Select one of the available Mic, Line, Aux (only available if Aux
Channel Phantom Turn on 48V phantom power when using a condenser
Channel Low Cut Select the frequency at which a low cut lter will be placed.
Advanced Mode
Advanced mode is intended for use by professionals and users who wish to have
every available setting and option at their disposal. All settings available to
Basic Mode apply to Advanced Mode in addition to:
Screen Sub-menu Description
Menu Outputs Provides routing and gain settings for the Stereo Out.
Menu Tone Provides additional Tone mode (Continuous and Left Identify)
Menu Record Provides additional record settings for gain, sample rate, bit
Menu HP Preset Provides additional HP presets for LR Mono, User Presets 1-4,
Menu System >
Channel Solo Lets you “solo” the selected channel in the headphone output.
Channel Arm Allows pre-fade recording of the channel to an individual track
Channel Gain Sets the sensitivity of the input. Generally, the Gain should be
Channel Pan Lets you position the audio of the channel anywhere between
Channel Linking Lets you link channels 1 and 2 either as a stereo pair, mid side
mix and Stereo Out.
In Mode is Mic or Line) or USB inputs to route to the selected
channel.
microphone in the selected channel.
The lter has a carefully-crafted 18db/octave slope. Low
options are only On/O in Basic mode.
and Tone Level settings.
depth and LR linking.
Edit HP Preset utility and HP Solo mode selection. Camera
Stereo and Camera Mono are also available when Aux In Mode
is set to Camera.
Lets you turn limiters on or o.
Limiters
Solo mode can be set to “Individual” or “Multiple” in the HP
Preset menu. When a channel is soloed, its light ring will ash
orange.
on the SD card.
set so that the loudest parts of the audio signal just touch the
red segments of the meters.
Left and Right in the stereo image of the LR mix and Stereo
Out.
pair, or turn linking o.
Custom Mode
Custom mode is intended for users who want to customize the features and
functionality available to them. This mode grants access to dierent sections of
Advanced Mode features, turning them on or o in the user interface as desired.
16
Page 17
1. Tap .
2. Tap System > Custom Setup.
Custom Setup options are:
Page Sub-menu Description
1 Channel Lets you access Solo, Track Arm, extended Pan, Input Select,
Phantom and Low Cut, which is selectable by frequency.
1 Gain Lets you access to Channel Gain controls.
1 Headphone Lets you access extended headphone source select options
including factory and user headphone presets, preset editing
and Solo setup for Individual/Multiple channels.
1 Record Provides additional record settings for gain, sample rate, bit
depth and LR linking.
2 Metadata Adds ability to change track name, rename les, add notes and
undo recordings.
2 Outputs Provides routing and gain settings for the Stereo Out.
MODES AND PRESETS
User Presets
Flexibility is the MixPre-3’s M.O. To make it easy for you to use the MixPre-3 in
a wide variety of situations, we created a slick feature where you can store and
recall snapshots of all of the MixPre-3’s settings. There are four internal Preset
slots available. Also, the SD card can store virtually unlimited Presets.
Here are three common examples:
• You might want to use the MixPre-3 as recorder, mixer, and USB audio
interface in a podcasting rig with specic microphones.
• The next day, you need to have the MixPre-3 handle audio duties for you
while you’re shooting video on your DSLR camera.
• On Sunday, you might need to use your trusty MixPre-3 to record worship
services, mixing a direct line from the PA with a stereo microphone feed.
Using Presets, you can optimize settings for each of these scenarios and then
simply save each setup to one of four internal preset locations or to the SD
card. Once saved, simply load the appropriate preset and BOOM! You’re ready
to go in a jiy! We think that you’ll really appreciate this functionality.
To save a Preset:
1. Tap .
2. Tap Presets > Save to Internal 1-4 or SD Card
3. Enter a Preset Name and tap OK.
17
Page 18
User Guide
To recall a Preset
1. Tap .
2. Tap Presets > Load Preset.
3. Select preset with encoder.
4. Tap OK.
18
Page 19

Inputs
The MixPre-3’s exibility is enhanced by its ability to select various input types
to its mixer channels. Each of the MixPre-3’s channels can be sourced from an
XLR mic/line input, 3.5mm Aux or PiP (Plug in Power) Mic input or from either
of the two USB audio paths from a computer.
Channel Inputs
BASIC MODE -
For quick and easy applications, access the channel’s input settings by
pushing the desired channel’s channel knob. You will see the Channel
screen displayed.
There, you’ll be able to select the channel input source, whether you’d like
to send the audio to the Left, Center or Right in the mix bus and Stereo
out, select Phantom power (for condenser microphones and active DIs),
and select a Low Cut lter. The MixPre-3’s Kashmir mic preampliers have
extreme dynamic range and noise specs as well as analog limiters so it’s
not necessary for you to set any levels other than that of the Channel knob,
which sends the audio to the LR mix record channels and the Stereo Out.
The limiters are present on each channel and the LR mix bus. This means
that peaks that would normally clip other mic preampliers and ruin a mix,
will be handled in just the right way to make sure that your audio is safe
from accidental clipping both on the Stereo Outs and the recorder.
ADVANCED MODE -
For more complex situations requiring individual channel-to-track recording,
soloing, channel linking and extended gain functionality and limiter bypass.
19
Page 20

User Guide
To link channels 1-2:
1. Push the channel knob 1 to access that Channel screen.
2. Tap Linking.
Are you working with a stereo source—a keyboard or stereo mic perhaps?
To make it easy to adjust these types of sources, the MixPre-3 oers linking
of channel pairs 1-2.
Do one of the following:
X Select 1-2 for a stereo source.
X Select 1-2ms for MS (Mid-Side) source.
You’ll now be able to control the level of both channels 1 and 2 with the
channel 1 knob. The channel 2 knob will now function as a balance control
if stereo linked or as a width control if MS linked.
Inputs Menu
The Inputs menu, which is accessed through the Main Menu, allows you to
congure how the Aux/Mic In 3.5mm connector is to be used.
Tap Aux In Mode to select one of the following options:
• Mic: Select this option when the Aux/Mic In is to be used with a plug-inpower mic.
• Line: Select this option when the Aux/Mic In is to be used with an
unbalanced 2ch line source e.g. smartphone headphone output, stereo line
source etc.
When either the Mic or Line options above are selected as the Aux In Mode,
they are available as input sources to any channel by selecting Aux In 1 or
Aux In 2.
20
• Camera: Select this option when the Aux/Mic In is to be used for
monitoring a video camera’s audio output via the MixPre-3’s headphones
and C1/C2 meters located on meter view 3.
This is particularly useful when you want to use the MixPre-3 to drastically
improve the sound quality recorded on the DSLR camera. It is common
knowledge that DSLR mic inputs are of poor quality so by connecting your
mics to the MixPre-3 instead, then connecting the MixPre-3’s stereo output
Page 21

INPUTS
to your camera audio input, you will achieve far superior sound quality.
Then by connecting the camera’s audio output to the MixPre-3’s Aux/Mic In,
it allows you to check that the camera audio is noise and distortion-free.
When this option is selected an additional setting appears in the Input Menu
called Camera Gain. This allows you to adjust the gain of the incoming
camera audio level.
You also gain camera monitoring options in the HP Presets menu.
• Timecode (only available in Advanced Mode): Select this option when the
Aux/Mic In is to be used as a LTC (linear timecode) input. When selected as
a timecode input, Aux In 1 and Aux In 2 become available as options for TC
Mode (located in Timecode Menu)
L When Aux In Mode is set to Camera or Timecode, you cannot route Aux In to a
channel and thus you cannot record it.
• : Select this option to turn o the Aux/Mic Input.
21
Page 22

User Guide
22
Page 23

Outputs
While we were carefully thinking about how to maximize exibility with the
inputs, we were doing the same with the outputs!
Stereo Outs
The Outputs menu is available in Advanced mode and accessed through the
Main Menu. In the Outputs menu, you may send any channel, aux input, USB
input or LR mix to either or both of the Stereo Outs. In addition, if you choose
to send the channels to outputs, you can select either pre-fade (channel knob
has no eect) or post-fade (channel knob controls level). In addition to routing
options, the Outputs sub-menu also provides gain adjustment of the Stereo
Outs.
Headphone Out
The MixPre-3’s audiophile-grade headphone amplier provides high power and
very low noise performance so that you can accurately hear the audio being
handled, regardless of headphones or environment. Connect headphones
via 3.5mm jack to the headphone jack (located on the right side panel). The
volume of the headphones can be set with the encoder directly adjacent to the
headphone jack.
From the main Menu screen, the headphone presets (HP Presets)
may be accessed by pressing this icon in the upper left corner of the
screen. Above this icon, the currently selected HP preset is displayed.
Entering the HP Presets menu, you may select from LR Stereo, LR Mono,
USB 1, 2, and User Presets 1-4.
L Options listed here are those available in Advanced mode. Only LR Stereo and
USB 1,2 are available in Basic mode.
There’s an Edit HP Preset utility where User HP presets may be edited and
given custom names and nally a HP Solo button where the HP solo mode can
be switched between Individual and Multiple for single or multi-channel solo
23
Page 24

User Guide
monitoring.
Since the headphone amplier is capable of very high output levels, please
use caution when wearing headphones as hearing damage could result with
inappropriate volume levels.
Combining the input/output exibility and the User Presets feature, you’ll nd
endless uses for the MixPre-3!
24
Page 25

Metering
Channel Knob Ring LEDs
LCD
LEDs and Meter Views
There are ve basic methods for observing input and output meters on the
MixPre-3.
• Channel knob ring LEDs - Each LED ring is capable of displaying green,
orange and red colors. The brightness of the light ring tracks the level of
the input. Green = signal present, red = signal peaking, orange = signal
limiting. In addition, a channel’s ring LED will ash orange when in solo.
• Channel screen meter
• Main LR stereo meter view
25
Page 26

User Guide
• LR, 1-3 multi-track meter view
• LR, Returns (via Aux In) and USB 1,2 meter view
Switching between the three main meter views is easy—just touch the meters
and cycle through the dierent views. The meters will show not only signal
levels, but also the current arm status of each track for the recorder and
limiting activity for L,R and each channel.
26
Page 27

Recording and Playback
The MixPre-3 can record up to ve audio tracks at 96kHz, 24-bit to SD cards
(SD, SDHC, or SDXC) using the industry standard .WAV le format. The
recorded .WAV les written to SD card can be imported or played back using
any MAC, Windows, or Linux computer installed with a compatible audio
application, such as Pro Tools, Reaper, Cubase, Garageband, Audacity, and
many, many more.
You can mix and record to the SD card even when using the MixPre-3 as a USB
audio interface. This opens up cool opportunities for recording the computer’s
USB audio output and mixing it with other mic and line sources plugged into
the MixPre, making it ideal for podcasting and recording interviews via Skype or
any other VoIP application.
This simultaneous recording/USB audio streaming capability also makes the
MixPre ideal as a backup to a computer—highly desirable in mission critical
applications where relying only on a computer might be a risk.
The recording functionality is dependant on the current operating mode, Basic
or Advanced.
In Basic mode, the MixPre-3 functions as a two-track 48 kHz recorder. The two
record tracks are fed by the LR mix which is driven directly by the channel knob
gains.
In Advanced Mode, the MixPre-3 is congured as a ve-channel recorder with
user-selectable 44.1, 48, and 96kHz sample rate and 16 and 24bit depth.
The LR mix tracks may be recorded as well as each of the three channels as
individual isolated (ISO) tracks. Audio for the ISO tracks is recorded “prefade”
meaning before the channel knob gain, so any changes that are made there
will only aect the LR mix and have no aect on the recorded ISO track levels.
This is particularly useful for post-production audio processing where it may be
desirable to remix of the tracks at a later stage.
Formatting SD Cards
SD cards must be formatted by the MixPre-3 to ensure reliable recording and
playback. Be sure to backup any wanted audio recordings or data on the SD
card before formatting since the formatting process erases all data on the SD
card.
We highly recommend using Sound Devices branded SD cards as these have
been optimized to provide the best performance. If these are not available,
most reputable manufacturers’ cards (such as SanDisk or Delkin) that meet or
exceed class 10 speeds are acceptable.
27
Page 28

User Guide
To format an SD card:
1. Insert an SD card in the slot located on the rear panel.
2. Tap .
3. Tap SD Card > Edit > Format.
4. When asked to conrm the command to format the card, tap OK.
Cards with a capacity of 32 GB or less will be formatted with the FAT32 le
system. Cards with a capacity greater than 32 GB will be formatted with the
exFAT le system.
L The exFAT le system is not compatible with Windows XP or Mac OS X 10.6.4 and
lower.
Transport Controls
The three Transport controls (illuminated buttons) on the front panel are used
to perform recording and playback functions.
Function Control Action
Press to begin recording a new le. The button illuminates red
Record
Stop
Play / Pause
Scrub
while recording is in underway.
While recording, press once to stop recording. While in
playback, press once to stop playback. While in standby,
press and hold to display next name.
Press to begin playback of the last le recorded or le
currently loaded. The button illuminates green during
playback. While in playback, press once to pause, and press
again to resume playback. Whenever playback is paused, the
button and the current le name will ash green.
While playing or paused, press and hold the headphone
encoder to enter Scrub mode. Then rotate clockwise for fast
forward or counter-clockwise for rewind at speeds of 0x,
1/8x, 1/4x, 1/2x, 1x, 2x, 4x, 8x and 16x. The audio is heard
in Scrub mode up to 2x speed.
In Basic mode, only the L/R mix bus is recorded. Recording is as easy as
pressing the REC button. Push the Play button to play les and the Stop button
to stop recording or playback. Pushing the Play button while in Play mode,
initiates Pause mode. The Play button as well as the current le in the display
will ash to indicate that Pause is active.
28
In Advanced Mode, all channels as well as the L/R mix bus may be recorded
individually. To record an individual channel, ensure that it is armed.
Page 29

To arm a channel:
1. Press the channel knob.
2. Tap Arm.
Armed channels are indicated in the meters view with red meter labels
surrounding the channel number. If neighboring channels are stereo linked,
their labels are merged to indicate that they are linked. See Channel Inputs
for more information regarding stereo linking.
Record Menu
In Basic mode, the Rec Trigger function is used to automatically start and stop
recording from a compatible HDMI source, such as a DSLR. This cool feature
lets you simultaneously start recording on a DSLR and the MixPre-3 just by
pressing the Record button on the camera, thus eliminating the possibility of
forgetting to record audio on the MixPre-3—not something that a producer will
take kindly to!
RECORDING AND PLAYBACK
In Advanced mode, there are many more settings available, as shown in the
following table:
Sub-menu Description Options
Rec L,R Mix Arms L and/or R mix buses. • O
• L
• R
• L&R
• LR Linked
Left Gain Sets the gain for the L mix. • -60 - 0 dB (1 dB increment)
Right Gain Sets the gain for the R mix.
This setting is disabled when Rec L,R Mix is
set to LR Linked.
Sample Rate The internal sample rate and sample rate
of recorded WAV les.
The default is 48kHz.
Bit Depth The bit depth of recorded WAV les.
The default is 24.
Rec Trigger Sets record triggering from either timecode
or HDMI ags. The default is O.
• -60 - 0 dB (1 dB increment)
• 44.1kHz
• 48kHz
• 96kHz
• 24
• 16
• O
• HDMI ag
• Timecode
29
Page 30

User Guide
30
Page 31

USB
USB Audio Interface
The MixPre-3 has an integrated 5-in, 2-out core audio-compatible interface for
use with a Mac or PC computer. For PC users, the MixPre-3 will appear as a 2x2
audio interface unless a specic ASIO driver is installed. The latest ASIO driver
can be downloaded at www.sounddevices.com/support/downloads. See the
MixPre Series Downloads page.
When working with the USB audio from a host computer, it is necessary to
route the USB 1 and USB 2 sources appropriately. Should you want to mix the
USB audio from the host computer with live audio from the MixPre-3’s inputs
to the LR bus, use the channel screen and select input source (Advanced mode
only). To hear the USB host computer audio in the headphones only, switch the
HP preset to USB 1,2.
The MixPre-3 is capable of recording and streaming audio to a USB host
simultaneously. The MixPre-3 is also capable of recording the USB audio
stream out of a computer directly to its SD recorder. This is an amazinglyuseful feature for recording any computer-based audio. See the table below
detailing the MixPre-3’s channel to output assignments.
Channel USB Output Assignment
Channel 1 USB stream 1
Channel 2 USB stream 2
Channel 3 USB stream 3
Unused USB stream 4
Mix bus L USB stream 5
Mix bus R USB stream 6
31
Page 32

User Guide
Low-latency Monitoring
We’ve worked really hard with our hardware, logic and software design teams to
minimize latency. We’ve found that in many scenarios, latency when monitoring
through a DAW (digital audio workstation) is perfectly acceptable, depending
upon DAW software, computer hardware and plug-ins.
In situations where the throughput latency is higher than desired, the input to
the MixPre-3 can be directly monitored in the headphone output.
To monitor with zero-latency through the MixPre-3:
1. Connect MixPre-3 to computer.
2. Conrm that the LR Stereo HP Preset is selected.
3. Select USB1 for Channel 1 source and Pan L.
4. Select USB2 for Channel 2 source and Pan R.
5. Connect microphone or other input to Channels 3.
6. Select Mic for Channel 3 source. This input will appear to your computer as
USB stream 3.
7. Setup your DAW software for a new track with its source being Channel 3
and be sure that record monitoring is disabled for this track. (Optionally,
you may mute the channel’s output in the DAW).
8. You should now be able to hear and adjust the output of your DAW audio
through Channels 1 and 2 while adjusting your low-latency feed in your
headphones and to the DAW with Channel 3. Use the channel 3 knob to
adjust the send level to the DAW. Use channel 1 and 2 knobs to adjust the
mix of the DAW audio with channel 3 to taste.
USB File Transfer
The MixPre-3 can support USB le transfer between its SD and a USBconnected host computer. In order to use this feature, it’s necessary to put the
MixPre-3 into File Transfer mode. (USB audio will be suspended.)
To enter File Transfer mode:
1. Tap .
2. Tap System > File Transfer.
32
3. When le transfer is complete, tap Exit on the USB-C File Transfer Mode
screen to return to the previous operating state.
Page 33

USB Keyboard
The use of standard USB computer keyboards is supported. When using the
MixPre-3 in situations requiring extensive metadata entry, titling and wired
remote control capability, a USB keyboard may be desirable.
L Keyboards with an embedded USB hub and Apple brand keyboards are not
compatible. Additionally, some keyboards must be connected only after the
recorder is turned on.
USB-C Mode
When connected to a computer via USB-C, the MixPre-3 may be setup to be
powered from the host without the computer identifying it as an audio interface.
To toggle between the USB-C audio/power modes:
1. Tap .
USB
2. Tap System > USB-C. Options include: Audio and Power Only.
33
Page 34

User Guide
34
Page 35

Timecode
Timecode Modes
The MixPre-3 is not only a fantastic tool for audio enthusiasts. It was also
conceived for all you video acionados out there, whether you are a lm or
documentary maker or a YouTuber who wants no-compromise audio quality to
go along with their video content.
With that in mind, we have designed-in timecode capability to make it easy
to lip-sync DSLR and other camera video with the MixPre-3’s audio. This is
particularly useful in what is known as ‘double system sound’ applications
where audio is recorded separately from the video camera. In simple video/
audio productions, it is often sucient to simply use the MixPre-3 as a high
quality mic-preamp/mixer and record the audio on the DSLR into the same
le as the video content. This is known as single system and in this case, the
video and audio are already lip-synced. However, there are often times where
it is very benecial to record each audio source as a separate isolated (ISO)
track. Access to these ISO tracks allows the ability to clean up and remix audio
sources after the event in post production. To record ISO tracks and sync
them with video from a DSLR, you need a multichannel recorder with built in
timecode support like the MixPre-3.
In the audio for video category, no one does timecode better than Sound
Devices. It’s no surprise that many Oscar winning movies have had their sound
recorded using Sound Devices gear.
For some reason, timecode gets a bad rep as being dicult to understand,
but really it is quite simple. It is basically a time label that runs from 0 to 24
hours and is counted in hours (HH), minutes (MM), seconds (SS), and frames
(FF). A timecode value will look like this - HH:MM:SS:FF. Timecode ranges from
00:00:00:00 to 23:59:59:29, then starts over.
All you have to do to synchronize separate video and audio content is to ensure
that the camera and MixPre-3 are both labeling each moment in time with the
same timecode value. Then in your video editing software, whether it be Final
Cut, Adobe Premiere, or Avid Media Composer, you simply import your separate
audio and video content and match up the timecode numbers (computers are
good at matching up numbers) and “Hey Presto,” you have lip-synced video and
audio.
The MixPre-3 has three timecode modes, HDMI TC In, Aux In 1 or 2, and Time
of Day.
35
Page 36

User Guide
HDMI TC In
Use a DSLR camera that outputs timecode over its HDMI output connection.
A few examples of cameras that do this are the Sony a7s and Panasonic GH4.
Connect their HDMI output to the HDMI TC In port on the MixPre-3’s right hand
panel and set Menu>Timecode>TC Mode to HDMI TC In. Refer to the camera’s
user guide to determine how to output HDMI timecode from the camera since
all cameras do it in a slightly dierent way.
When the MixPre-3 receives HDMI timecode, it is displayed on the Home
screen beneath the current lename. Each time you press record, the incoming
timecode value is stored inside the MixPre-3’s WAV le. Most popular video
editing applications will be able to read this timecode value and sync the audio
with the camera video.
Aux In 1, Aux In 2
LTC, otherwise known as SMPTE Linear Timecode is the most common timecode
standard. Many professional cameras and other devices output this format.
This can be received by the MixPre-3 via its Aux/Mic In 3.5mm connector.
To enable Aux In Timecode:
1. Set the Aux In Mode to Timecode (Menu>Inputs>Aux In Mode) - this is only
available in Advanced mode.
2. Set Menu> Timecode>TC Mode> to Aux In 1 or Aux In 2.
When the MixPre-3 receives Aux In timecode, it is displayed on the home
screen beneath the current lename.
Time of Day (TOD)
Use TOD mode, when you want the recorded WAV les to be timecode stamped
with the time of day. The time of day is derived from the MixPre-3’s built-in
date/time clock. This mode is not used for frame accurate synchronization
with external devices. Rather, it is used as simple way of logging what time a
recording took place.
Timecode Frame Rate Auto-Detection
With both the HDMI TC In and Aux In Timecode modes, the MixPre-3 autodetects the incoming timecode frame rate and stamps the recorded les
accordingly.
36
Page 37

Timecode Stamp
Regardless of which timecode mode you use, each time you press record, the
timecode value at that moment is embedded within the MixPre-3’s WAV le.
Most popular video editing applications will be able to read this timecode value
and sync the audio with the camera video.
For those of you who are curious, WAV les that contain embedded timecode
are called Broadcast WAV les. They are identical to standard WAV les but
contain extra non-audio metadata such as timecode and other descriptive data
about the recording.
TIMECODE
37
Page 38

User Guide
38
Page 39

Files, Projects
Each time you press record, the MixPre-3 creates a WAV audio le which can
subsequently be played back on the MixPre or almost any computer audio
application. The MixPre-3 is able to record up to 5 tracks (the stereo mix LR
tracks plus three isolated tracks) into a single polyphonic WAV le. Polyphonic
simply refers to the fact that the le contains multiple tracks.
File Name Format
The MixPre-3 makes it easy to identify and organize your recordings (WAV les)
by providing the ability to name them before, during, or after recording.
Each recording’s le name is comprised of a Name (maximum 9 characters),
followed by a dash (-), and then followed by a Number (3 digits). For example:
MIXPRE-001.WAV
Name = MIXPRE
Number = 001
Each time you press record, the Number is incremented.
The Number is reset to 1 whenever you create a new Name.
Naming a Recording
To name a recording:
1. Go to the File List by tapping the top left region of the Home screen.
2. Select a le from the list by using the headphone encoder on the right
panel. Rotate to highlight a le then press the encoder (or touch Edit) to
select it for naming or press the Play button to play it.
L The File List is in chronological order with most recent recordings at the top of
the list. The row at the very top of the list represents the next le to be recorded.
Selecting this allows you to give a name to the next recording prior to recording
it.
3. Select Name to edit the Name.
4. Select Number to edit the Number.
The Name and Number not only determine the lename of the recording—
they are also embedded inside the WAV le. This is particularly useful
in lm and TV production where the data is used to help log and locate
content faster.
39
Page 40

User Guide
In Advanced mode you can also rename a recording.
X In the File List, select a le by pressing the encoder, and tap Rename.
Track Names and Notes
In Advanced mode, you also have the option to store track names and notes
inside the WAV le. This is ideal for multitrack recording where you want to
identify what or who is recorded on a particular track and for adding descriptive
notes about the recording that might be useful to an editor at a later stage.
To edit track names and notes:
1. In the File List, select a le and press the encoder
2. Do any of the following:
X Select Track Names to change track names.
X Select Name, Num Notes to edit notes.
Undo, Trash File
In Advanced mode, you can undo the last le recorded. Undo moves the last
recorded le to the SD card’s UNDO folder. Files in this folder are accessible
using a computer.
To undo your last recording:
X In the File List, select a le, press the encoder, and tap Undo.
1. In the File List, highlight a le, and tap Edit.
2. Select Trash Take.
Trash File moves the le to the SD card’s TRASH folder. Files in this folder are
accessible using a computer. You can permanently delete les in the SD card’s
TRASH folder from the MixPre’s SD Card menu.
Projects
40
It is easy to end up with many hundreds of WAV les on a single SD card,
especially as cards can hold many gigabytes of audio data. To help organize
this large number of les, they may be stored in separate folders which, in the
MixPre-3, are known as Projects. For instance, you may want to organize your
recordings based on their type, such as PODCASTS, SONGS, INTERVIEWS,
SOUND FX, NATURE RECORDINGS, etc. Each of these projects would be
Page 41

represented by a folder located at the root of the SD card.
To create a new Project:
1. Tap .
FILES, PROJECTS
2. Tap Project > New and choose to create a custom project name or project
name based on the current date.
1. Tap .
2. Tap Project > Open.
3. Select the required project. This will load the File List with the selected
Project’s les.
To trash a Project:
1. Tap .
2. Tap Project > Trash.
3. Select which project to trash. This moves the selected project and all its
les to the TRASH folder. Projects in this folder are accessible using a
computer.
L You can permanently delete projects in the SD card’s TRASH folder from the
MixPre’s SD Card sub-menu.
41
Page 42

User Guide
42
Page 43

Remote Control
Status Bar
Viewing Area
Tab Bar
Connection Icon
Wingman Application
Sound Devices Wingman is a free app that allows wireless remote control of the
Bluetooth Smart-enabled MixPre Series from iOS devices.
To enable Bluetooth on the MixPre recorder:
1. Tap .
2. Tap System > Bluetooth. This toggles Bluetooth On and O.
L If a remote password is congured on the recorder itself, Wingman will prompt for
that password to be entered prior to making the connection.
Wingman’s touch-screen user interface oers easy navigation and monitoring
43
Page 44

User Guide
Transport View
Track View
with three main areas of interest:
• Status - Shows device-specic status information.
• Viewing area - Displays dierent screen views, such as the Transport view
with its transport control buttons, metadata elds, and meters.
Swiping vertically in this area can toggle to other meters.
Swiping horizontally, toggles between Transport and Track views, handy
when using Wingman app on devices with smaller screens.
• Tab bar - Remaining on screen all the time, the bar has four icons enabling
access to other views, such as the File list.
L Not all buttons or tabs are enabled or used for MixPre functionality.
Connecting to a MixPre Recorder
If multiple Wingman-enabled devices are on set, Wingman will display all
available devices within range. You may tap the Connection icon to eciently
switch connection from one device to another from within the app.
L For productions with multiple recorders of the same model, tapping the Circled-I
icon helps identify the correct device, by displaying an “Identifying from Wingman”
message on the chosen recorder’s screen.
44
Page 45

REMOTE CONTROL
When running Wingman, the Connection icon, which bears the Sound Devices
logo, displays dierent colors. The color of the icon is signicant:
Color Icon Status
Gray Disconnected - either no activity or scanning for devices
Orange Bluetooth connection in progress
Yellow Connected - authentication underway
Green Connected and authenticated
HDMI Record Trigger
The MixPre-3 may be congured to begin recording when it is triggered to do so
from an HDMI record ag from compatible DSLR cameras with HDMI output. By
default, record triggering is turned o. Setting the Record Trigger to HDMI ag
will initiate record when a compatible device issues the record ag via the HDMI
input.
To access the Record Trigger settings:
1. Tap .
2. Tap Record > Rec Trigger.
Linear Timecode (LTC) Record Trigger
The MixPre-3 may be congured to begin recording when it detects running LTC
timecode via the Aux input when set to Timecode. Set Rec Trigger to Timecode
to activate this feature.
45
Page 46

User Guide
Keyboard
A connected USB keyboard may be used as a wired remote control for certain
functions of the MixPre-3. See the table below for available USB keyboard
shortcuts.
USB Keyboard Shortcuts
When a USB keyboard is attached, the following key-combinations or shortcuts
are available.
Keystrokes Action
Escape Back. Also cancels out of editing mode when virtual keyboard is on
F1 or Menu key Accesses the Main menu
F12 Home
F2 File list
F3 Cycles between available Meters views and the Main screen
Ctrl + R Record
Ctrl + S Stop
Spacebar Play
Left Arrow Main screen: Rewind
screen
Menu and Input Settings screens: Toggles through pages
Right Arrow Main screen: Fast forward
Menu and Input Settings screens: Toggles through pages
Up / Down Arrows Main screen: Adjusts headphone volume
In menus: Duplicates encoder rotation, such as moves highlight,
scrolls list
While editing parameters: Changes the value
Enter In menus: Activates current selection. (Same as encoder press.) Also,
same as choosing OK when virtual keyboard is on screen
Q In menus: select top left option in quad button view
W In menus: select top right option in quad button view
A In menus: select bottom left option in quad button view
S In menus: select bottom right option in quad button view
1-3 Channel Settings screen for 1-3
46
Page 47

Appendix A
Basic/Advanced Mode Differences
Screen Sub-Menu Basic Mode Advanced Mode
Channel Solo -
Channel Arm -
Channel Gain -
Channel Pan L, C, R Continuously Variable
Channel Input -
Channel Phantom
Channel Low Cut Fixed 80 Hz
Channel Linking - Stereo, MidSide
Menu Presets
Menu Project
Menu Inputs (Aux In) Mic, Line, O Mic, Line, Camera,
Menu Outputs - Stereo out L/R source select,
Menu Timecode
Menu Tone On/O On/O, Continuous/Left
Menu Record Rec Trigger LR Linking, L/R Gain, Sample
Menu SD Card
Menu Date/Time
Menu System
Menu System > Limiters Always On On/O
Menu Power
40, 80, 120, 160 Hz
Timecode, O
Stereo out gain
Identify/Tone Level
Rate, Bit Depth, Rec Trigger
47
Page 48

User Guide
System Settings
Page Sub-Menu Description
1 Mode
Lets you switch the operating mode between Basic, Advanced and
Custom.
1 USB-C
1 File Transfer
1 Limiters
2 Bluetooth
2 Wingman Password
2 Brightness
2 Version
3 Regulatory
3 Update Firmware
Switches between Audio and Power Only USB modes.
Lets you transfer les between the MixPre and a host computer.
Lets you turn limiters on/o (available only in Advanced or Custom
modes).
Switches Bluetooth Smart on/o.
Lets you set a password that would be required when connecting
to the MixPre-3 with the Wingman app.
Lets you independently adjust the brightness of the touch screen
and the ring LEDs.
Provides the current rmware version and serial number.
Provides full Federal Communications Commission (FCC)
compliance information specic to MixPre-3.
Lets you update the MixPre rmware from a le on the SD card.
The latest MixPre rmware can be downloaded from the Sound
Devices website: www.sounddevices.com/support/downloads.
48
Page 49

Specifications
Specications are subject to change without prior notice.
For the latest information available on all Sound Devices products, visit our
website at: www.sounddevices.com.
Audio Inputs
Name Description
Frequency Response
10Hz to 40kHz +/- 0.5dB re 1kHz @ 96kHz sample rate
Total Harmonic Distortion
(THD)
Equivalent Input Noise
(EIN)
Inputs
Gain
ADC
Maximum Input Level
Limiters
0.005% max (@1kHz, 22-22kHz BW, gain=20dB, -10dBu in)
-130dBV (-128dBu) max (A-weighting, gain=76dB, 150 ohm source impedance)
• Mic: XLR active-balanced; 4k input Z
• Line: XLR active-balanced; 4k input Z
• Aux/Mic in: 3.5mm TRS, 2-channel unbalanced; 100k input Z
• USB audio: 2 channel
• All inputs fully RF-filtered and overload protected
• Mic input: +6dB to +76dB
• Line input: -20dB to +30dB
• Fader: -inf to +20dB
• Headphone: -inf to +20dB
• Total, Mic-to-recording (max): +96dB
• Aux In (Mic): +10dB to +40dB
• Aux In (Line): -10dB to +20dB
• Total Aux Gain including Fader, Mic-to-recording: +60dB
32 bit precision; 120dB dynamic range min (A-weighted, gain=10dB, fader=0dB)
• Mic XLR: +14dBu (limiters on or off)
• Line XLR: +40dBu (limiters on or off)
• Aux In (Mic): -10dBu
• Aux In (Line): +10dBu
• Limiter at all gain stages, range > 40dB. First stage analog, subsequent stages digital
Low Cut Filters
Microphone Powering
40Hz to 160Hz (adjustable), 18 dB/oct. First stage analog, subsequent stages digital
• Mic XLRs: 48V via 6.8k resistors, 10mA each
• Mic 3.5mm: 3V @ 3k source Z
49
Page 50

User Guide
Audio Outputs
Name Description
Stereo Out
3.5mm TRS stereo unbalanced, 500 ohm output Z, +7.8dBu max output level
DAC feeding Stereo Out,
Headphone Out
Headphone Out
Output Limiters
32 bit precision; 115dB dynamic range (A-weighted)
3.5mm TRS stereo unbalanced, for use with any impedance headphones
Digital
Recorder
Name Description
Maximum Record Tracks
Sampling Frequency
Bit Depth
Media Type
Maximum Storage Size
Card Format
File Type
5 tracks (stereo mix + 3 ISOs)
• 44.1 kHz
• 48 kHz
16, 24
• Secure Digital Extended Capacity (SDXC)
• Secure Digital High Capacity (SDHC)
• Secure Digital (SD)
512 GB (SDXC)
• FAT32 formatted (32GB or less), exFAT for (>32GB), on-board memory card formatting
• WAV (Broadcast Wave File format), with embedded timecode stamp and metadata
• 96 kHz
USB
Name Description
Audio Interface (USB-C)
Mass Storage (USB-C)
Keyboard (USB-A)
5-in/2-out; 44.1 to 96 kHz; 16/24-bit; Class compliant USB 2.0 high speed or ASIO (supplied)
USB 2.0 high speed
Text entry and control
Touch Screen
Name Description
Display
Resolution
1.6-inch, color, sunlight-viewable IPS LCD
320x240
50
Page 51

Timecode
Name Description
Modes
• Time of Day (file stamped w/current ToD)
• LTC Input (file stamped w/incoming LTC on Aux 3.5mm)
• HDMI TC (file stamped w/incoming TC from HDMI & sample clock slaved from HDMI sample clock. Only works on specific cameras that support HDMI TC
SPECIFICATIONS
Frame Rates
HDMI TC In
Auto detects (fps):
• 23.98 (same as 23.976)
• 24
• 25
From cameras that output timecode over HDMI
Remote Control
Name Description
Bluetooth Smart
HDMI
Timecode
Wireless control using Wingman app
Auto-record start/stop trigger from cameras that output record flag over HDMI
Auto-record start/stop trigger via Aux In timecode
Power
Name Description
AA Batteries
• 4x AA sled
• 8x AA sled
• NiMH recommended
• 29.97DF
• 29.97
• 30
L-Mount Batteries
From Computer
AC Adapter
2x L-mount sled for hot-swappable Li-Ion batteries
Bus-powered via USB-C port. Use either:
• USB-C to USB-C cable (optional)
• MX-USBY: USB-C to dual USB-A Y-cable (included)
• MX-Charge: 15W PSU w/USB-C connector; includes wall adapter plugs for US, UK, Australia,
and Europe
Environmental
Name Description
Operation and Storage
• Operating: -20° C to 60° C
• Storage: -40° C to 85° C
• 0 to 90% relative humidity (non-condensing)
51
Page 52

User Guide
Dimensions and Weight
Name Description
Size (H x W x D)
• 1.4 in x 5.68 in x 4.35 in
• 36 mm x 144 mm x 110 mm
Weight
• 16.8 oz (unpackaged, without batteries)
• 0.48 kg (unpackaged, without batteries)
52
Page 53

Glossary of Terms
Enables a track for recording
The ratio of output to input level. Gain is relevant at any point in the audio
signal path where there is a stage of amplication, such as preamplier, mixer,
output, headphones.
The pan controls the spread of a monaural signal in a stereo or multi-channel
sound eld - it is critical to the makeup of the stereo image. Panning adds space
in a mix through panning the sounds center, left and right.
Phantom power is DC electric power transmitted through a microphone cable
to operate microphones that contain active electronic circuitry. Most often
used as a power source for condenser microphones, though many active direct
boxes also use it. The MixPre incorporates P48 +48VDC phantom powering,
switchable on each microphone input.
An active lter that removes frequencies below a specic point. The MixPre
incorporates 80, 120, 160, 200 and 240Hz options with a rollo of 18dB per
octave, switchable on each microphone input.
53
Page 54

User Guide
Notes
_______________________________________________________________
_______________________________________________________________
_______________________________________________________________
_______________________________________________________________
_______________________________________________________________
_______________________________________________________________
_______________________________________________________________
_______________________________________________________________
_______________________________________________________________
_______________________________________________________________
_______________________________________________________________
_______________________________________________________________
_______________________________________________________________
_______________________________________________________________
_______________________________________________________________
_______________________________________________________________
_______________________________________________________________
_______________________________________________________________
_______________________________________________________________
_______________________________________________________________
_______________________________________________________________
_______________________________________________________________
_______________________________________________________________
54
Page 55

Software License
End-user license agreement for Sound Devices MixPre Series Software / Embedded Firmware
Important Read carefully:
This Sound Devices, LLC end-user license agreement (“EULA”) is a legal agreement between you (either an
individual or a single entity) and Sound Devices, LLC for the Sound Devices, LLC software product identied
above, which includes computer software, embedded rmware, and may include associated media, printed
materials, and “online” or electronic documentation (“SOFTWARE PRODUCT”). By using, installing, or copying the SOFTWARE PRODUCT, you agree to be bound by the terms of this EULA. If you do not agree to the
terms of this EULA, do not use or install the SOFTWARE PRODUCT.
Software Product License
The SOFTWARE PRODUCT is protected by copyright laws and international copyright treaties, as well as
other intellectual property laws and treaties. The SOFTWARE PRODUCT is licensed, not sold.
Grant of license. This EULA grants you the following limited, non-exclusive rights: In consideration of
payment of the licensee fee, Sound Devices, LLC, as licensor, grants to you, the licensee, a non-exclusive
right to use this copy of a Sound Devices, LLC software program (hereinafter the “SOFTWARE”) on a single
product and/or computer. All rights not expressly granted to licensee are reserved to Sound Devices, LLC.
Software ownership. As the licensee, you own the hardware on which the SOFTWARE is recorded or xed.
Sound Devices, LLC shall retain full and complete title to the SOFTWARE and all subsequent copies of the
SOFTWARE, regardless of the media or form on or in which the original copies may exist. The license is not
a sale of the original SOFTWARE.
Copyright
All rights, title, and copyrights in and to the SOFTWARE PRODUCT (including, but not limited to, any images, photographs, animations, video, audio, music, text, and “applets” incorporated into the SOFTWARE
PRODUCT) and any copies of the SOFTWARE PRODUCT are owned by Sound Devices, LLC or its suppliers.
The SOFTWARE PRODUCT is protected by copyright laws and international treaty provisions. Therefore, you
must treat the SOFTWARE PRODUCT like any other copyrighted material, except that you may make copies
as only provided below. You may not copy the printed materials accompanying the SOFTWARE PRODUCT.
Restrictions on use. Licensee may not distribute copies of the SOFTWARE or accompanying materials to
others. Licensee may not modify, adapt, translate, reverse engineer, decompile, disassemble, or create derivative works based on the SOFTWARE or its accompanying printed or written materials.
Transfer restrictions. Licensee shall not assign, rent, lease, sell, sublicense, or otherwise transfer the SOFTWARE to another party without prior written consent of Sound Devices, LLC. Any party authorized by Sound
Devices, LLC to receive the SOFTWARE must agree to be bound by the terms and conditions of this agreement.
Termination
Without prejudice to any other rights, Sound Devices, LLC may terminate this EULA if you fail to comply
with the terms and conditions of this EULA. In such event, you must destroy all copies of the SOFTWARE
PRODUCT and all of its component parts.
Limited Warranty
No warranties. Sound Devices, LLC expressly disclaims any warranty for the SOFTWARE PRODUCT. The
SOFTWARE PRODUCT and any related documentation is provided “as is” without warranty or condition of
any kind, either express or implied, including, without limitation, the implied warranties and conditions of
merchantability, tness for a particular purpose, or non-infringement. The entire risk arising out of use or
performance of the SOFTWARE PRODUCT remains with you.
No liability for damages. In no event shall Sound Devices, LLC or its suppliers be liable for any damages
whatsoever (including, without limitation, damages for loss of business prots, business interruption, loss
of business information, or any other pecuniary loss) arising out of the use of or inability to use this Sound
55
Page 56

User Guide
Devices, LLC product, even if Sound Devices, LLC has been advised of the possibility of such damages. In
any case, Sound Devices, LLC’s entire liability under any provision of this evaluation license shall be limited
to the greater of the amount actually paid by you for the SOFTWARE PRODUCT or U.S. $5.00. Because some
states/jurisdictions do not allow the exclusion or limitation of liability for consequential or incidental damages, the above limitation may not apply to you.
Governing Law
This agreement and limited warranty are governed by the laws of the state of Wisconsin.
FCC Compliance Statement
This device complies with part 15 of the FCC Rules. Operation is subject to the following two conditions: (1)
This device may not cause harmful interference, and (2) this device must accept any interference received,
including interference that may cause undesired operation. FCC Part 15.19 (a) (3)
Changes or modications not expressly approved by the party responsible for compliance could void the
user’s authority to operate the equipment.
FCC Interference Statement
This equipment has been tested and found to comply with the limits for a Class B digital device, pursuant to
part 15 of the FCC Rules. These limits are designed to provide reasonable protection against harmful interference in a residential installation. This equipment generates, uses and can radiate radio frequency energy
and, if not installed and used in accordance with the instructions, may cause harmful interference to radio
communications. However, there is no guarantee that interference will not occur in a particular installation.
If this equipment does cause harmful interference to radio or television reception, which can be determined
by turning the equipment o and on, the user is encouraged to try to correct the interference by one or
more of the following measures:
—Reorient or relocate the receiving antenna.
—Increase the separation between the equipment and receiver.
—Connect the equipment into an outlet on a circuit dierent from that to which the receiver is connected.
—Consult the dealer or an experienced radio/TV technician for help.
This device complies with FCC and ISED RF Exposure SAR limits exposure limits for general population /
uncontrolled exposure.
Cet appareil est conforme à la norme FCC et USED RF Exposure SAR limite les limites d’exposition pour la
population générale / l’exposition incontrôlée.
This Device complies with Industry Canada License-exempt RSS standard(s). Operation is subject to the
following two conditions: 1) this device may not cause interference, and 2) this device must accept any interference, including interference that may cause undesired operation of the device.
Cet appareil est conforme avec Industrie Canada, exempts de licence standard RSS (s). Son fonctionnement est soumis aux deux conditions suivantes: 1) ce dispositif ne peut pas causer d’interférences, et 2)
ce dispositif doit accepter toute interférence, y compris les interférences qui peuvent causer un mauvais
fonctionnement de l’appareil.
56
Page 57

®
Sound Devices, LLC
E7556 Road 23 and 33
Reedsburg, Wisconsin 53959
USA
Phone: +1 (608) 524-0625
Fax: +1 (608) 524-0655
Customer Support
Toll Free: (800) 505-0625
Email: support@sounddevices.com
http://www.sounddevices.com/support
http://forum.sounddevices.com
Product Information
For more information about products
and accessories, visit us on the web at
www.sounddevices.com.
Report Documentation Error
Email: techpubs@sounddevices.com
 Loading...