

Page 1
®
MixPre-10M
Multitrack Recorder | Mixer | USB Audio Interface
User Guide
Page 2
Legal Notices
Revision History
Product specications and features are subject to
change without prior notication.
Copyright © 2018 Sound Devices, LLC.
All rights reserved.
This product is subject to the terms and conditions of
a end-user license agreement provided in this guide,
and may be used in accordance with the license
agreement.
This document is protected under copyright law. An
authorized licensee of this product may reproduce
this publication for the licensee’s own personal use.
This document may not be reproduced or distributed, in whole or in part, for commercial purposes,
such as selling copies or providing educational services or support.
This document is supplied as a technical guide. Special care has been taken in preparing the information
for publication; however, since product specications
are subject to change, this document might contain
omissions and technical or typographical inaccuracies. Sound Devices, LLC does not accept responsibility for any losses due to the use of this guide.
Trademarks
The “wave” logo is a registered trademark and
Kashmir is a trademark of Sound Devices, LLC. iPad,
iPhone, Mac and OS X are trademarks of Apple Inc.,
registered in the U.S. and other countries. Windows
is a registered trademark of Microsoft Corporation in
the U.S. and other countries. Bluetooth Smart is a
registered trademark of Bluetooth SIG, Inc. All other
trademarks herein are the property of their respective owners.
This table provides the revision history for this guide.
Rev# Date Firmware
Version
2-A Mar 2018 2.0 Initial release
2-B Apr 2018
2.0
Description
Minor edits
WEEE Statement
If you wish to discard a Sound Devices
product in Europe, contact Sound Devices
(Germany) for further information.
MixPre-10M User Guide • April 2018
This document is distributed by Sound Devices, LLC
in online electronic (PDF) format only. E-published
in the USA.
www.sounddevices.com
support@sounddevices.com
Sound Devices, LLC
E7556 Road 23 and 33
Reedsburg, Wisconsin 53959 USA
Direct: +1 (608) 524-0625
Toll Free: (800) 505-0625
Fax: +1 (608) 524-0655
Page 3

Table of Contents
Quick Start
Multitrack Recording Step-by-Step ........5
Intro
Powering
Flexible Powering Options .............11
Panels
Front Panel .......................13
Left Side Panel .....................13
Screens & Navigation
Home Screen ......................15
Main Menu Screen ..................17
Right Side Panel ....................14
Back Panel ........................14
Music Control Menu .................18
Using Star Shortcuts (*/**) ...........19
Input Channels
Accessing Channel Screen Settings ......21
Track Names .....................22
Setting Input Source ...............22
Enabling Monitoring ................23
Setting the Gain ..................23
Using Solo/Mute ..................24
Arming a Track ...................24
Understanding Pan ................25
Using Reverb ....................25
Rendering a Vocal Air Eect ..........25
Setting the Low Cut Filter ............26
Toggling Phase Inversion ............26
Stereo Track Linking .................26
Conguring Aux In Mode ..............26
Track Bank Selector .................27
Outputs
Adjusting Output Level ...............29 Headphone Output and Presets .........30
Metering
LEDs and Metering ..................31
Channel Knob Ring LEDs ............31
Channel Screen Meter ..............31
Meter View ......................32
Projects
Creating Projects ...................34
Opening Projects ...................34
Copying Projects ...................35
Trashing Projects ...................35
Project History .....................36
Project Folder Structure ..............37
Sharing Projects ....................37
3
Page 4
User Guide
Recording and Playback
Formatting SD Cards & USB Thumbdrives. . 39
Transport Controls ..................40
Record Arming ...................41
Working with Q-Points ................42
Moving Q-Points ..................44
Previewing Q-Point Positions ..........44
Clearing & Deleting Q-Points ..........45
Locating to Q-Points ...............45
Punching In/Out ....................45
Bouncing ........................46
Metronome .......................48
Record Settings ....................49
USB
USB Audio Interface .................51
Low-latency Monitoring ...............52
USB File Transfer ...................52
USB Keyboard .....................53
USB Keyboard Shortcuts ............53
Copying to a USB Drive ...............54
User Presets and System Settings
Saving and Recalling Presets ...........55 System Settings ....................56
Specifications
Audio Inputs ......................57
Audio Outputs .....................58
Recorder .........................58
USB ............................58
Touch Screen ......................59
Remote Control ....................59
Power ...........................59
Environmental .....................59
Dimensions and Weight ..............59
Software License
FCC Compliance Statement
4
Page 5
Quick Start
Multitrack Recording Step-by-Step
This Quick Start chapter is meant as a “step-by-step, how-to” reference for
setting up the recorder and making music with the MixPre-10M right out of the
box.
For more information on features and steps mentioned in this procedure, refer
to later chapters in this User Guide.
To begin multitrack recording:
1. Connect power.
X Provide at least one power source, either batteries (via included sled)
or AC adaptor (included).
2. Power up the MixPre 10M.
X Slide the power switch (left side panel) to On. The MixPre will boot and
light up.
3. Connect an audio source.
X Connect an audio source, either a microphone, line or instrument line-
level signal to one of the input jacks on the side panels.
4. Connect headphones.
X Connect your preferred headphones to the headphone jack on the right
side panel.
5. Insert & Format Media — Insert a Class 10 SD card into the slot on the
rear of the MixPre-10.
(A) Tap . The Main menu appears with multiple pages of settings.
(B) Tap (the Dots icon) to “page” through the sub-menu.
L The number of dots indicate the number of pages; the solid dot shows what page
is displayed.
(C) Tap SD Card > Edit > Format.
5
Page 6
User Guide
6. Create a project.
(D) Tap OK to conrm formatting of the card.
⚠ Warning - all data on the SD card will be erased!
(E) Tap to return to the Home screen.
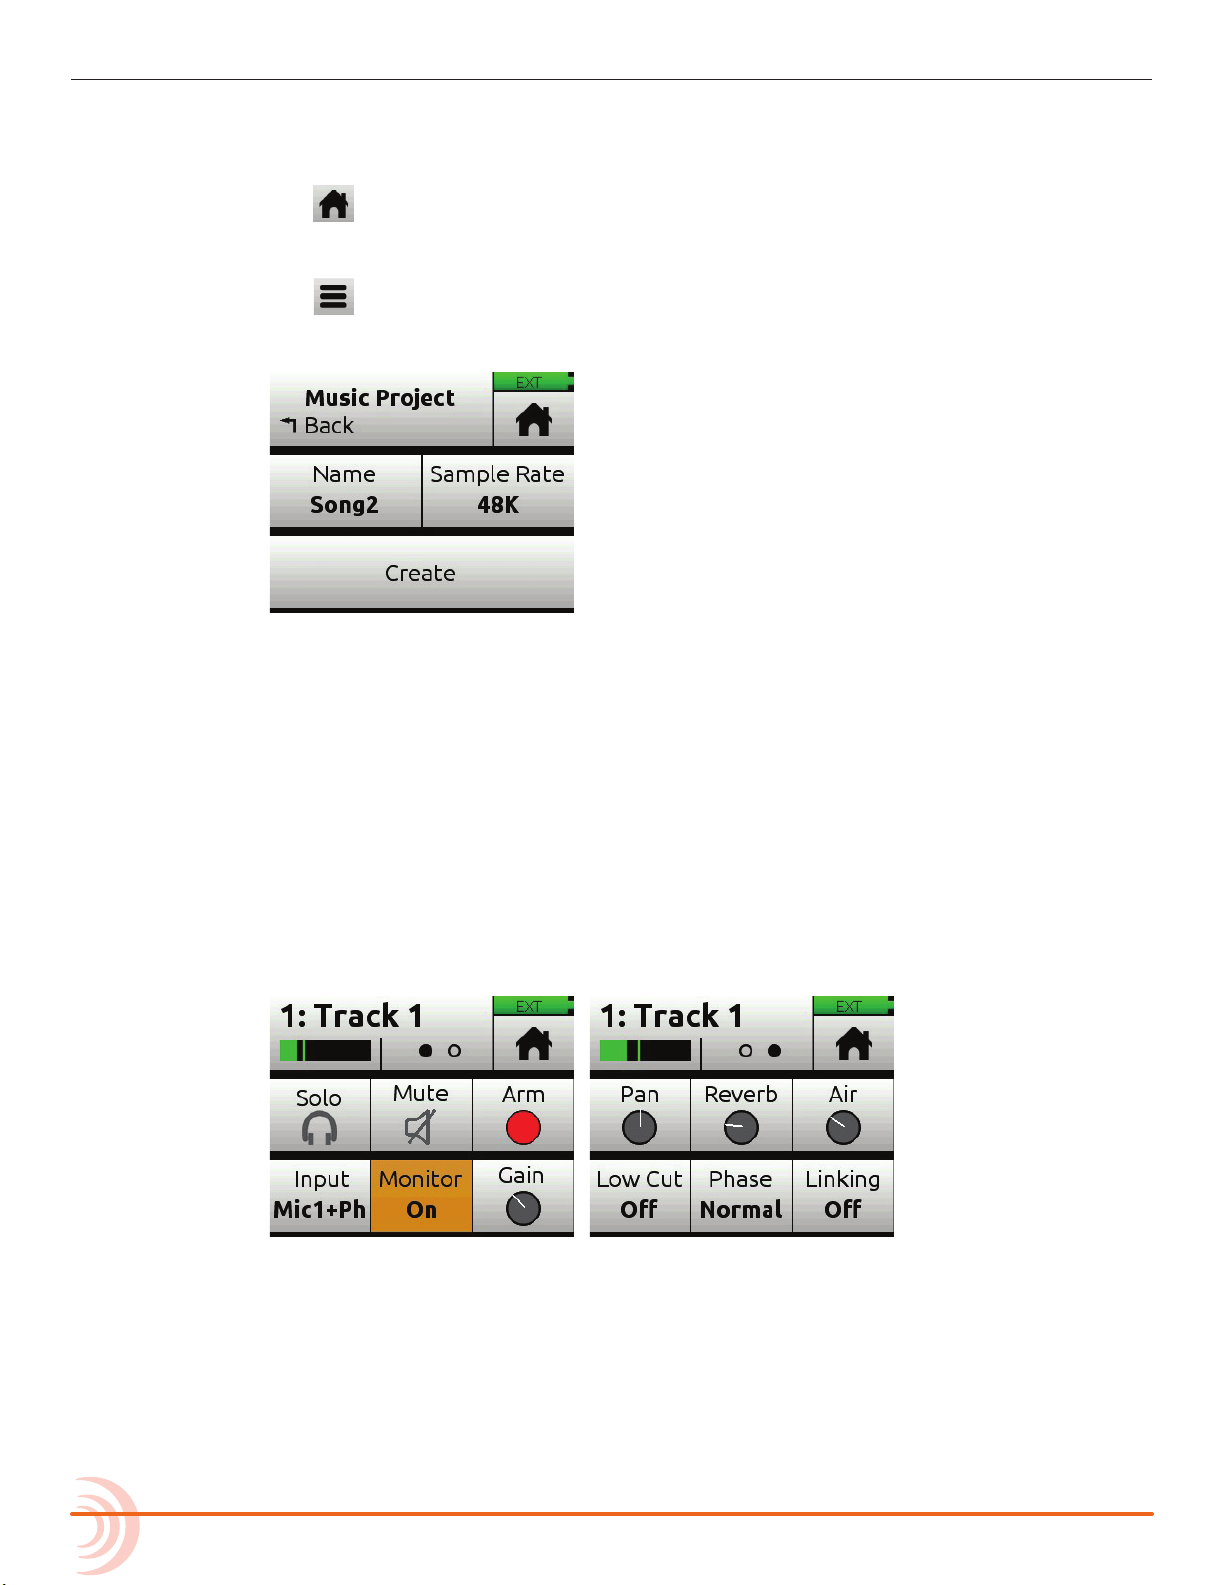
(A) Tap .
(B) Tap Project > New.
(C) Tap Name to customize the name of the new project.
L If no custom name is provided, the MixPre-10M creates new projects with unique
names, such as Song 1, Song 2, etc. by default.
(D) Tap Sample Rate to select from available rates.
(E) Tap Create.
7. Congure an input.
(A) Press the Channel knob associated with the track onto which you want
to record. For example, press knob 1 to record on track 1.
The Channel screen appears.
(B) Tap Input and use the HP encoder to select a source for the track.
Options include: Mic, Line, Aux In, and USB In.
(C) Select Phantom if your microphone, DI or other device requires +48v
phantom power to operate.
(D) Tap Back to return to Channel screen.
(E) Tap Arm to arm the track for recording. The circle on the button appears
red when track is armed.
6
Page 7
QUICK START
(F) To hear the input as you adjust gain, rst turn the Channel knob until
fader setting is 0dB. Then, tap Gain (on Channel screen) and turn the
HP encoder to adjust input sensitivity for the source.
If possible, adjust with signal coming in at the intended level and
observe the LED ring around the Channel knob. Aim for the LED ring
to remain green for the majority of the time. If unsure where to start,
set the gain to 35dB for mic sources, 10dB for line sources, and make
adjustments as needed.
L The Gain adjustment will time out after ve seconds.
(G) Tap the Dots icon to access “page” 2 of settings, such as Pan, Reverb,
Air, etc. Set any/all of them as desired.
(H) Enable Linking if your source is a stereo instrument such as a keyboard,
drum machine, or computer output.
(I) Tap to return to the Home screen.
8. Set up metronome.
(A) Tap .
(B) Page through submenu and tap Metronome. You will hear a preview of
the metronome in headphones while in this sub-menu.
(C) Make adjustments to the volume and to t your intended time signature
and tempo.
(D) Tap Count-in to select how many measures the metronome will count at
the beginning before recording begins.
(E) On page 2 of the Metronome sub-menu, tap On During... to determine
when you’ll hear the metronome. Options include: Count-in, Record, or
Play.
(F) Tap . The metronome preview will stop.
(G) Tap to access the Music Control menu. Then tap to activate the
metronome. The Metronome icon will illuminate orange when active.
L The metronome will only start when the MixPre enters record and/or play
according to the On During... settings previously congured.
9. From the Home screen, ensure the track number you intend to record is
red, indicating it is armed and ready to record. You should also see input
levels on the meter view.
10. Push the Transport control (joystick) up toward the REC position to record
and play music!
11. Press in the joystick once to stop recording. Press it again (twice) to return
to the beginning of the recording.
12. Push the joystick down toward the PLAY symbol to playback the recording.
7
Page 8
User Guide
13. (Optional) Should you want to scrap the recording and try again, tap
14. To lay another track over the just-recorded track, congure an input and
15. After laying down all of your tracks, play your song and adjust track mix
16. When you have a mix that you like, you can easily share your le by using
During playback, you can change the track Level, Reverb, Air, Pan, Solo,
and Mute settings.
L You can only use Air on one track at a time.
and then tap History. Using the HP encoder, rotate to highlight and select
Restart Song.
proceed from there. See step 7. Congure an input..
levels, pans, reverb, air, etc.
the Render feature.
(A) Tap and then tap Render.
(B) Select the format you want to use to render (export) the le. Options
include: Wav stereo, AAC stereo, or Wav All Isos.
This will perform a real-time render of your project. Feel free to
dynamically adjust mix levels, pans, reverbs etc during the render
process.
17. Most importantly, have fun creating music! No saving of the project need
be done, since the MixPre automatically takes care of that for you.
8
Page 9

Intro
Hi and a big thanks for buying the MixPre-10M! At Sound Devices, we are
passionate about great sounding audio. We’ve unleashed our design and engineering team, many of whom are musicians, and asked them to create a
groundbreaking device that sets new standards for what’s possible from a super
compact and aordable, multitrack audio recorder.
From the ground up, we’ve designed the MixPre-10M to be a versatile tool for
musicians and singer/songwriters who want to record sound with unrivalled
quality. Whether you are gigging, multitracking a new song or capturing a live
performance, the MixPre-10M is your best friend on stage, in the studio, and
out on the road.
We’ve harnessed our storied heritage in portable recording to create an incredible piece of kit! We think that you’ll nd the unique mix of functionality, performance, size, ease-of-use, design and build quality to be an invaluable part of
your life and creative passion for many years to come.
The MixPre-10M has been meticulously engineered to oer extreme exibility
and sound quality, operating in a variety of fundamental ways:
• 12-channel multitrack recorder/mixer, up to 96kHz/24-bit
• Ultra low noise, 8-channel mic preampliers
• 12-in, 4-out USB computer audio interface
The MixPre-10M includes many indispensable features for musicians including:
• Track Laying
• Overdubbing
• Punch In/Out
• Q-Points
• Track Bouncing
• Reverb and Vocal Air Eects
• Metronome
• Export
The MixPre-10M works in a similar fashion to a DAW such as Protools, Logic,
Cubase, Reaper etc, however, with its dedicated hardware it allows musicians
to focus on their art rather than getting bogged down in all the technical stuff
that a typical computer-based system brings. Musicians and songwriters now
have an easy to use, portable tool for creating high quality, multi-layered
songs anywhere and anytime that inspiration grabs them.
The MixPre-10M lets you record up to eight tracks at once from any of the 8
XLR inputs, Aux 3.5mm, or USB inputs. The built-in metronome helps you to
keep your performance in time, while the reverb and vocal air effects add
character to your recording and can aid in inspiring a great performance. The
vocal air effect is an easily dialed-in combination of EQ and compression that
results in an airy sheen and intimacy to vocals, popular today with singer/
songwriters.
9
Page 10

User Guide
Of course, the possible uses for the MixPre-10M are virtually unlimited, but a
few common ones are:
• Creating a multi-layered song using the track laying and overdubbing fea-
• Mixing and recording small ensemble live performance
• Playback of multichannel backing tracks
• Recording live events, concerts, jam sessions, and so forth.
• Premium-quality 12x4 USB audio interface for any DAW application
The MixPre-10M’s versatility is augmented by the various powering options.
Whether you want to power the MixPre-10M from AA batteries, L-mount batteries, external battery, or AC wall plug adapter, it’s ready, willing and able to go
anywhere, anytime—always handling your audio needs with grace.
We sincerely hope that you enjoy working with the MixPre-10M as much as
we’ve enjoyed creating it! Please drop us an email at support@sounddevices.
com and share your experiences as we’d love to see how the MixPre-10M is fur-
thering your passion.
tures
10
Page 11

Powering
Power Switch
Flexible Powering Options
In designing the MixPre-10M, we felt that it was important for it to be able to
operate in a wide array of applications and environments. To support that goal,
power can be supplied from several possible sources:
• 12 VDC from an AC-to-DC power supply (called XL-WPH3) or external
battery via the provided 4-pin locking power connector (Hirose).
• Eight AA NiMH rechargeable or Lithium primary batteries installed in the
provided 8-AA battery sled, called MX-8AA.
• One or two Sony-type L-mount batteries installed in the optional L-mount
battery sled accessory, called MX-LMount.
L Batteries not included.
The power switch for the MixPre-10M is located in the upper right corner of the
left side panel.
For preservation of battery power, 4-pin Hirose power sources take priority over
batteries if both are connected.
To ensure Battery Status indicator displays accurate levels/status:
1. Tap .
2. Page through submenu and tap Power.
11
Page 12
User Guide
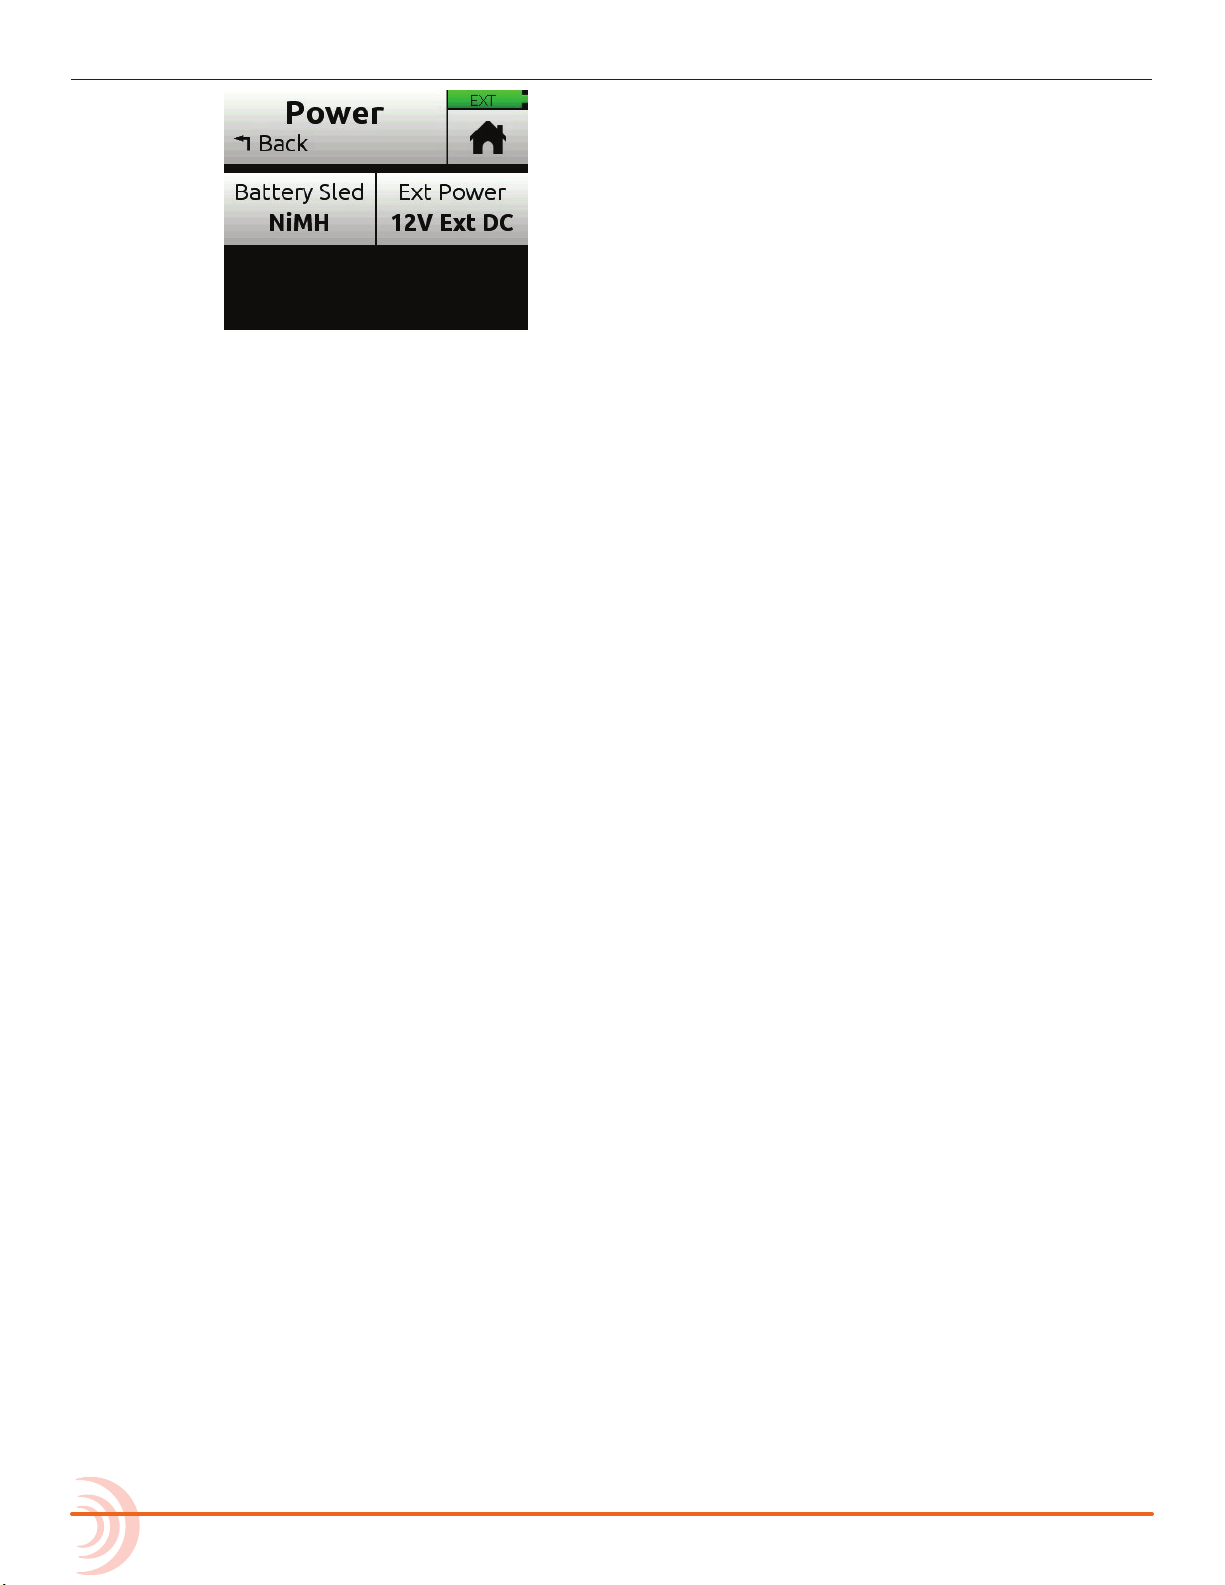
3. Do either or both of the following:
X Tap Battery Sled and select the type of batteries being used in the sled.
Options include: NiMH, Alkaline, L-Mount
X Tap Ext Power and select the type of external power being used.
Options include: 12V Ext DC, NiMH, Exp. NiMH, 12V PbAcid, 14V Li-ion,
or Full Range (10-17V).
12
Page 13

Panels
Channel Knobs 1-4
Channel Knobs 5-8
Channel Knob Ring LEDs
Power Light
Touch Screen
Star Shortcuts
Transport Joystick
Internal Mic
Power SwitchUSB-A Port
XLR/ ¼-inch TRS Inputs
3.5 mm X1/X2 Output
USB-C Port
Front Panel
Power light, transport joystick, toggle switch for Star (*/**) shortcuts, Channel
knobs, Channel knob ring LEDs, internal microphone and touch screen
The Channel knobs on the front panel have two purposes:
• Rotate to adjust the level of the selected track in the LR mix.
• Press to access the selected track’s Channel Screen.
Left Side Panel
USB connections, XLR/¼-inch TRS inputs 1-4, X1/X2 unbalanced, 2-channel
3.5 mm output, and power switch
13
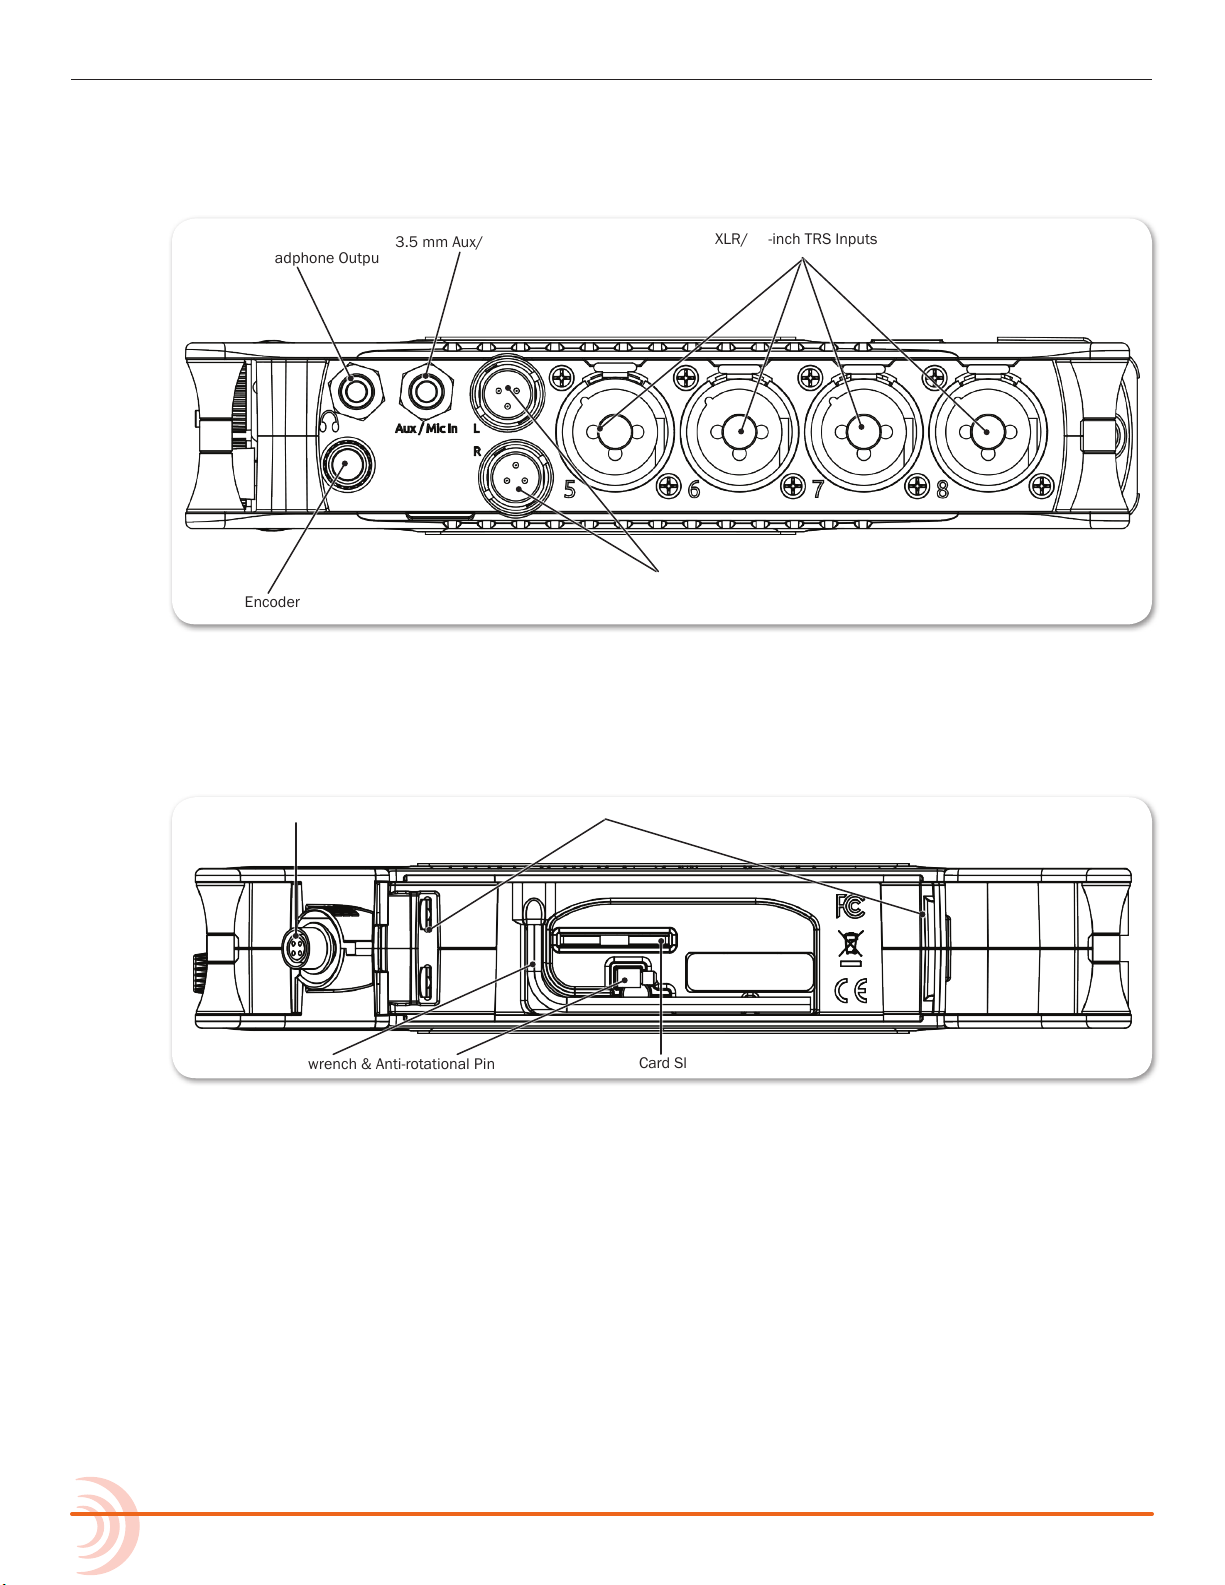
Page 14
User Guide
HP Encoder
XLR/ ¼-inch TRS Inputs
3.5 mm Headphone Output
3.5 mm Aux/Mic Input
L/R TA3 Outputs
3.5 mm Headphone Output
SD Card Slot
Battery Mounts
Allen wrench & Anti-rotational Pin
4-Pin power Connection
Right Side Panel
3.5mm headphone output, 3.5mm Aux/Mic input, main L/R balanced TA3
outputs, XLR/¼-inch TRS inputs 5-8, headphone encoder
Back Panel
Battery mounts, 4-pin locking power connection, SD memory card slot, Allen
wrench (for ¼-inch-20-thread captive screw), anti-rotational pin
14
Page 15
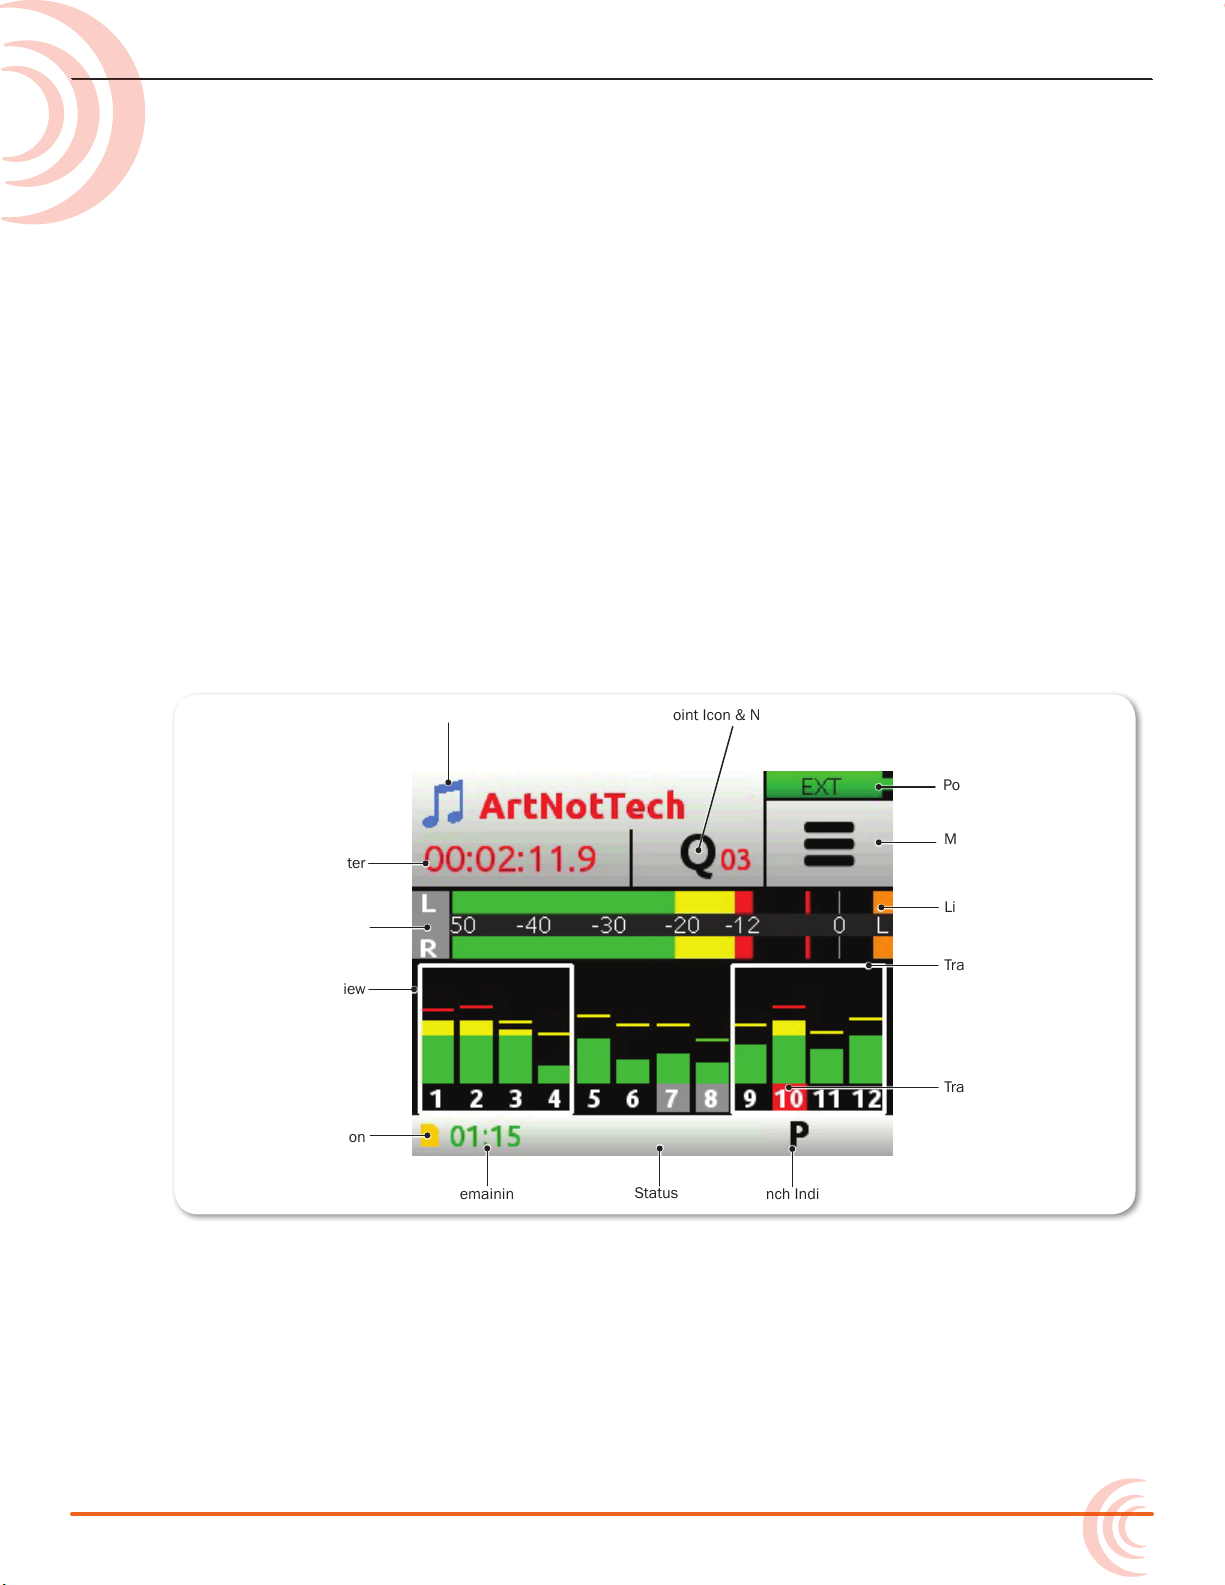
Screens & Navigation
Status Bar
Q-Point Icon & NumberMusic Icon
Time Counter
Punch IndicatorRemaining Time
SD Card Icon
Track Bank Selector
Meter View
Limiter Indicator
Track Labels
L/R Mix Meters
Power Status Icon
Menu Icon
The MixPre-10M has a sunlight-viewable, high-resolution, touch-screen-based
user interface. The touch screen interface displays the Home screen, Main Menu
screen, Channel screens and various other views.
For information on Channel screens, see Accessing Channel Screen Settings in
the Input Channels chapter.
There are several tap zones on the touch screen allowing you to easily interact
with the 10M, and the */** switch may be set to provide quick navigation to
key screens or functionality. As you become familiar with the user interface,
changing settings for inputs, outputs, recording and metering will become fast
and intuitive.
Home Screen
The Home screen view is the default view that appears on the touch screen
when the device is powered up. The Home screen looks like this:
15
Page 16
User Guide
You will nd on the Home screen numerous items, such as:
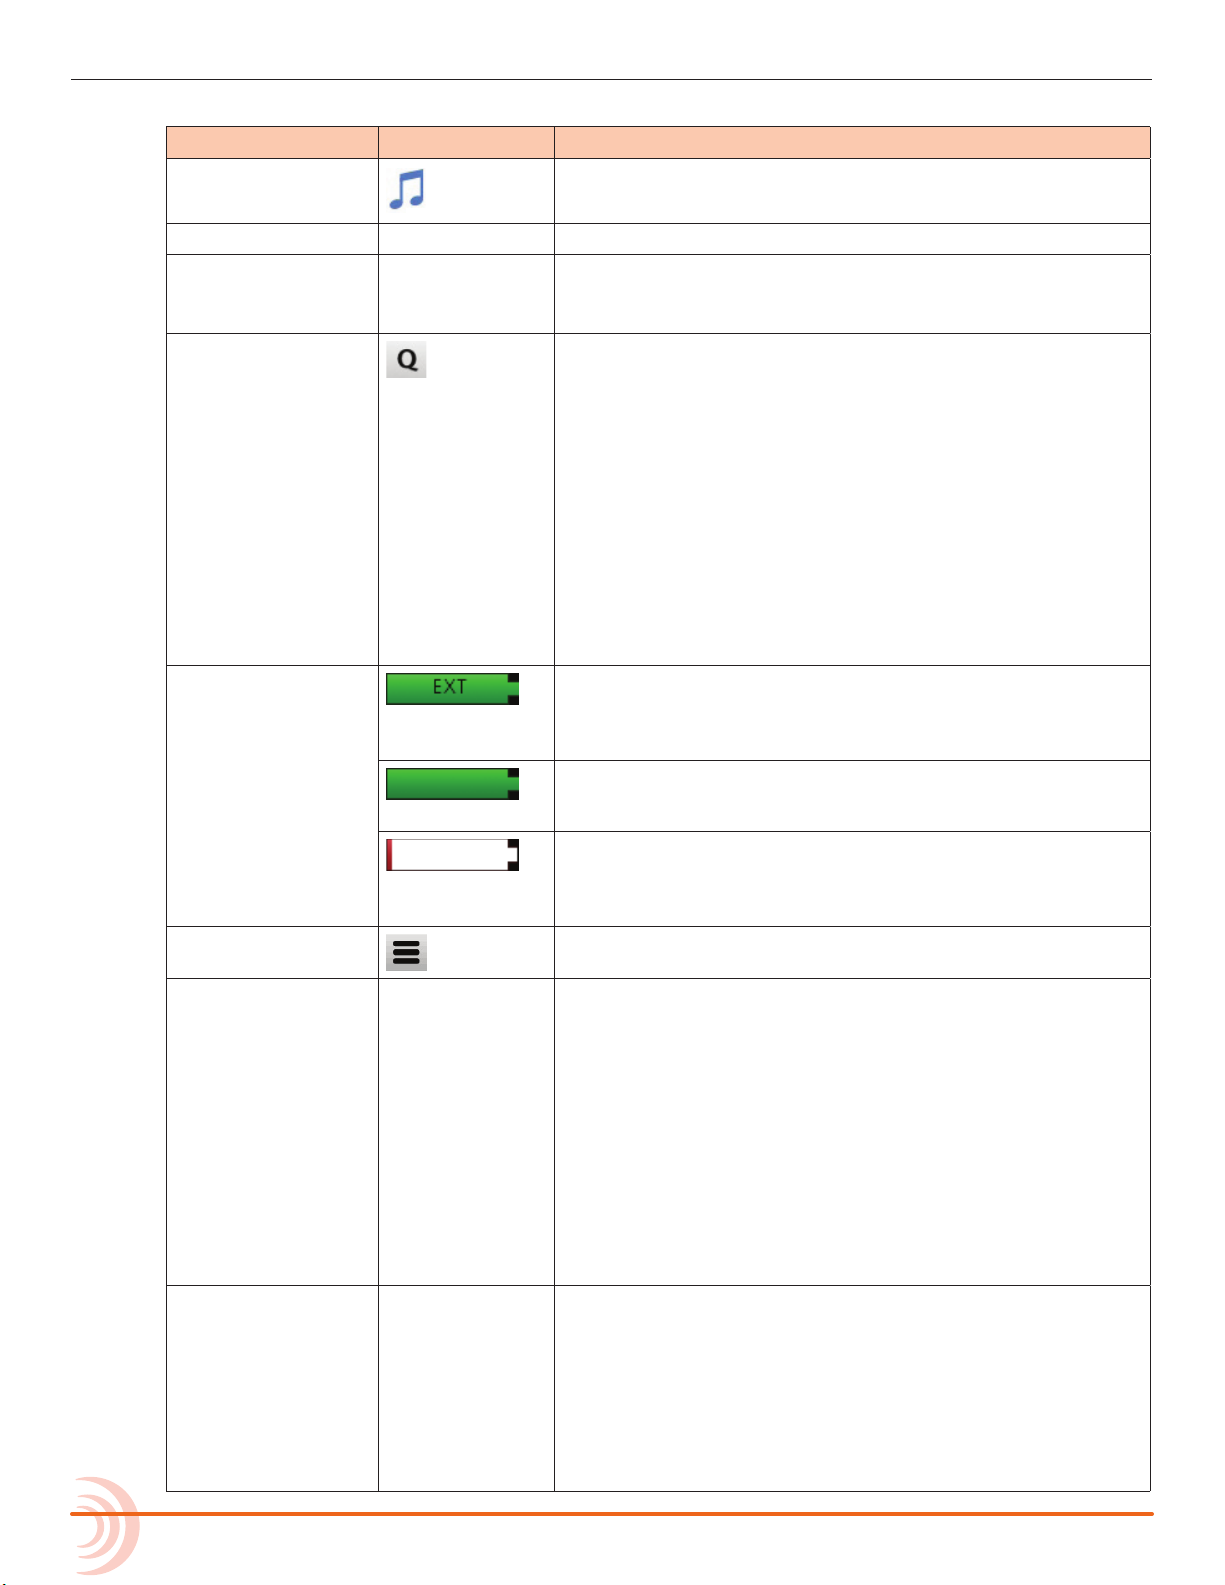
Music (notes) icon Access the Music Control menu by touching this region of
Current name Displays name of current Music project.
Time counter Indicates the current song position in hh:mm:ss:tenths.
Q icon Indicates current cue number: Q01, Q02, etc. A cue
Name Icon Description
the Home screen.
All songs start at 00:00:00:0. Access the Music Control
menu by touching this region of the Home screen.
(Q-point) stores a song position so that you can easily
locate to that point—ideal for quickly jumping to the
start of a verse, chorus, or bridge.
When stopped, tap the Q icon to open the Q-Points
menu, which provides access to the Q-List other Q-Point
options.
While recording or during playback, tap the Q icon to
create a cue (Q-point) at the current location in the
song. Cues may be set as Play In, Record In, Record
Out, or Stop Q-points via the Q-Points menu.
For more information, see Working with Q-Points.
Power Status Icons
(Green EXT
Battery)
(Green Battery)
(Flashing Red
Battery)
Menu icon Provides access to Menu screen.
Meter View Displays the metering for the 12 tracks and stereo mix,
Status bar Cycle status information by touching:
Healthy connection via Hirose to external power.
Healthy battery. Plan to change batteries when level
drops to about ¼ full.
Battery power is critically low. Change batteries.
LR. White-outlined boxes surround meters to indicate
which tracks are being controlled by the Channel knobs.
Tap the L (left) horizontal meter to open Record
submenu and quickly adjust L&R Gain.
Switch track banks by touching:
• the center of the vertical meters to enable Channel
knobs 5-8 to control tracks 5-8
• the right of the vertical meters to enable Channel
knobs 5-8 to control tracks 9-12
Channel knobs 1-4 always control tracks 1-4.
• Song status: current bar position as well as Punch
and Metronome,rendering status, and remaining
time: In idle or record, the remaining time eld
displays remaining time on the SD card. In play, the
eld displays remaining time to the end of the song.
• USB drive remaining (if present) & copy status
• Date & Time
16
Page 17
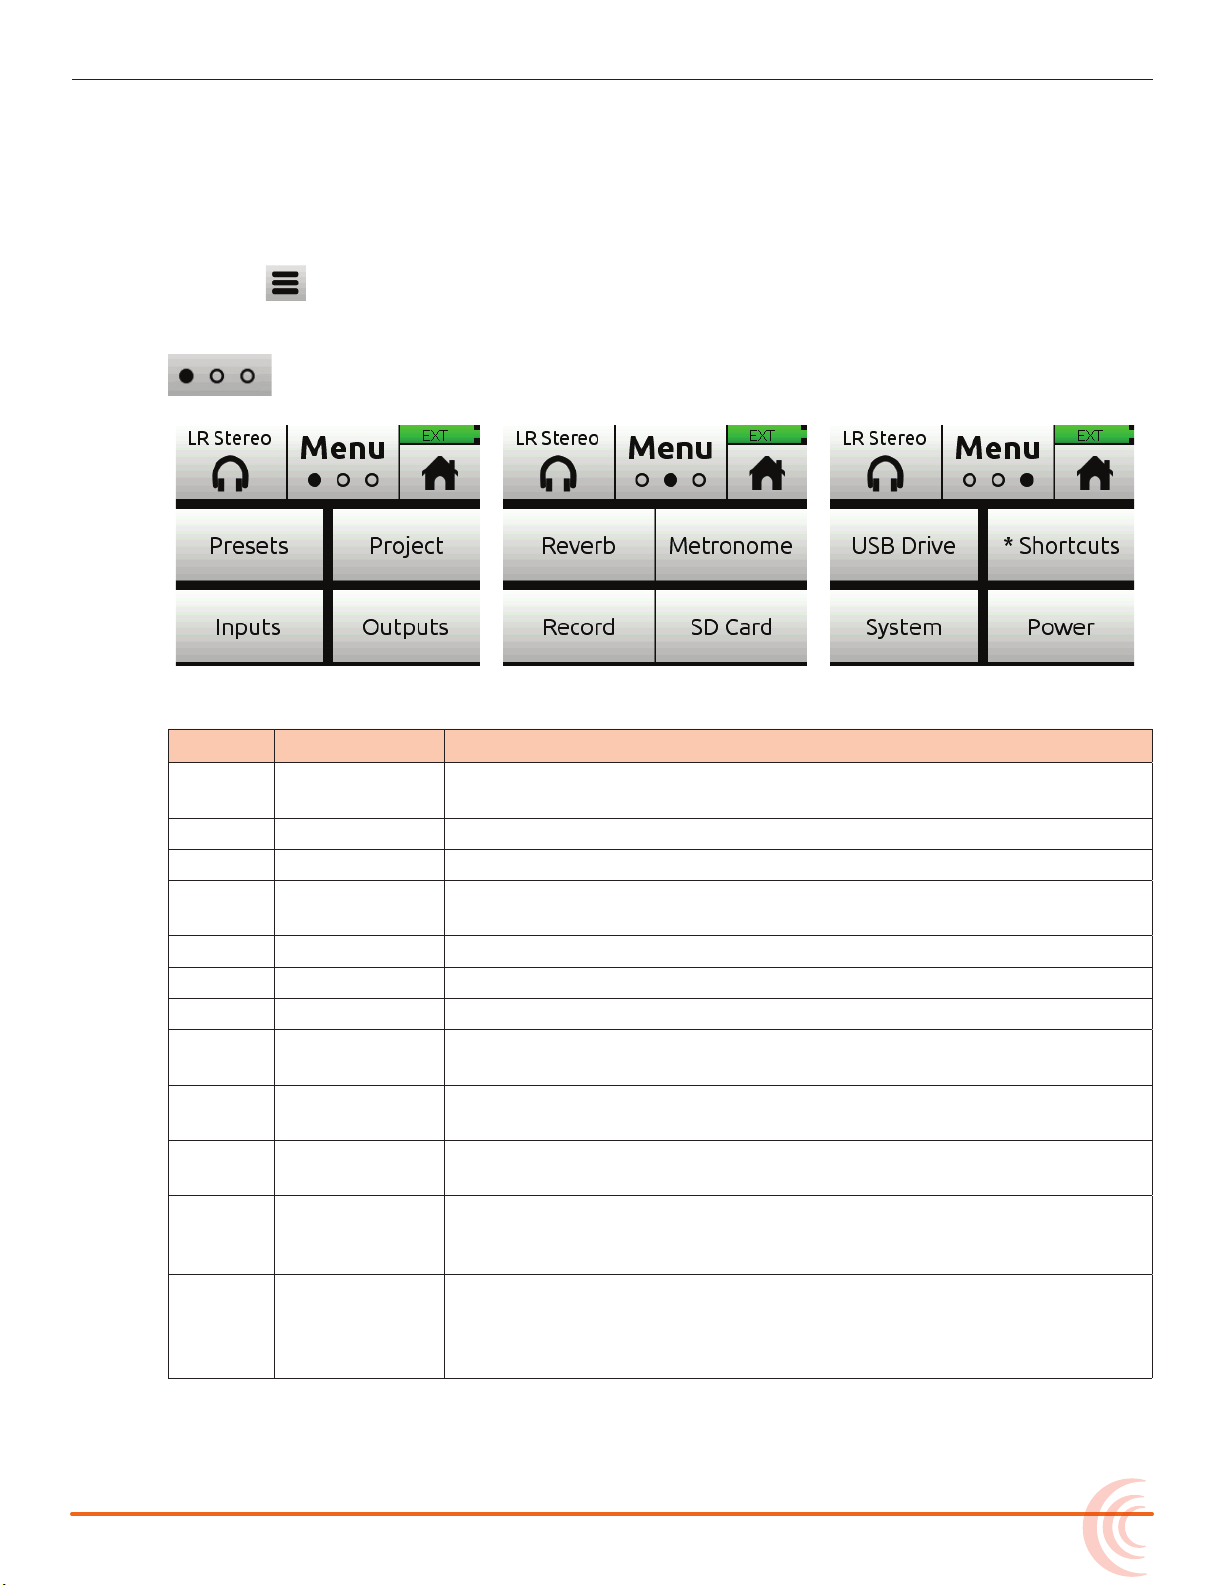
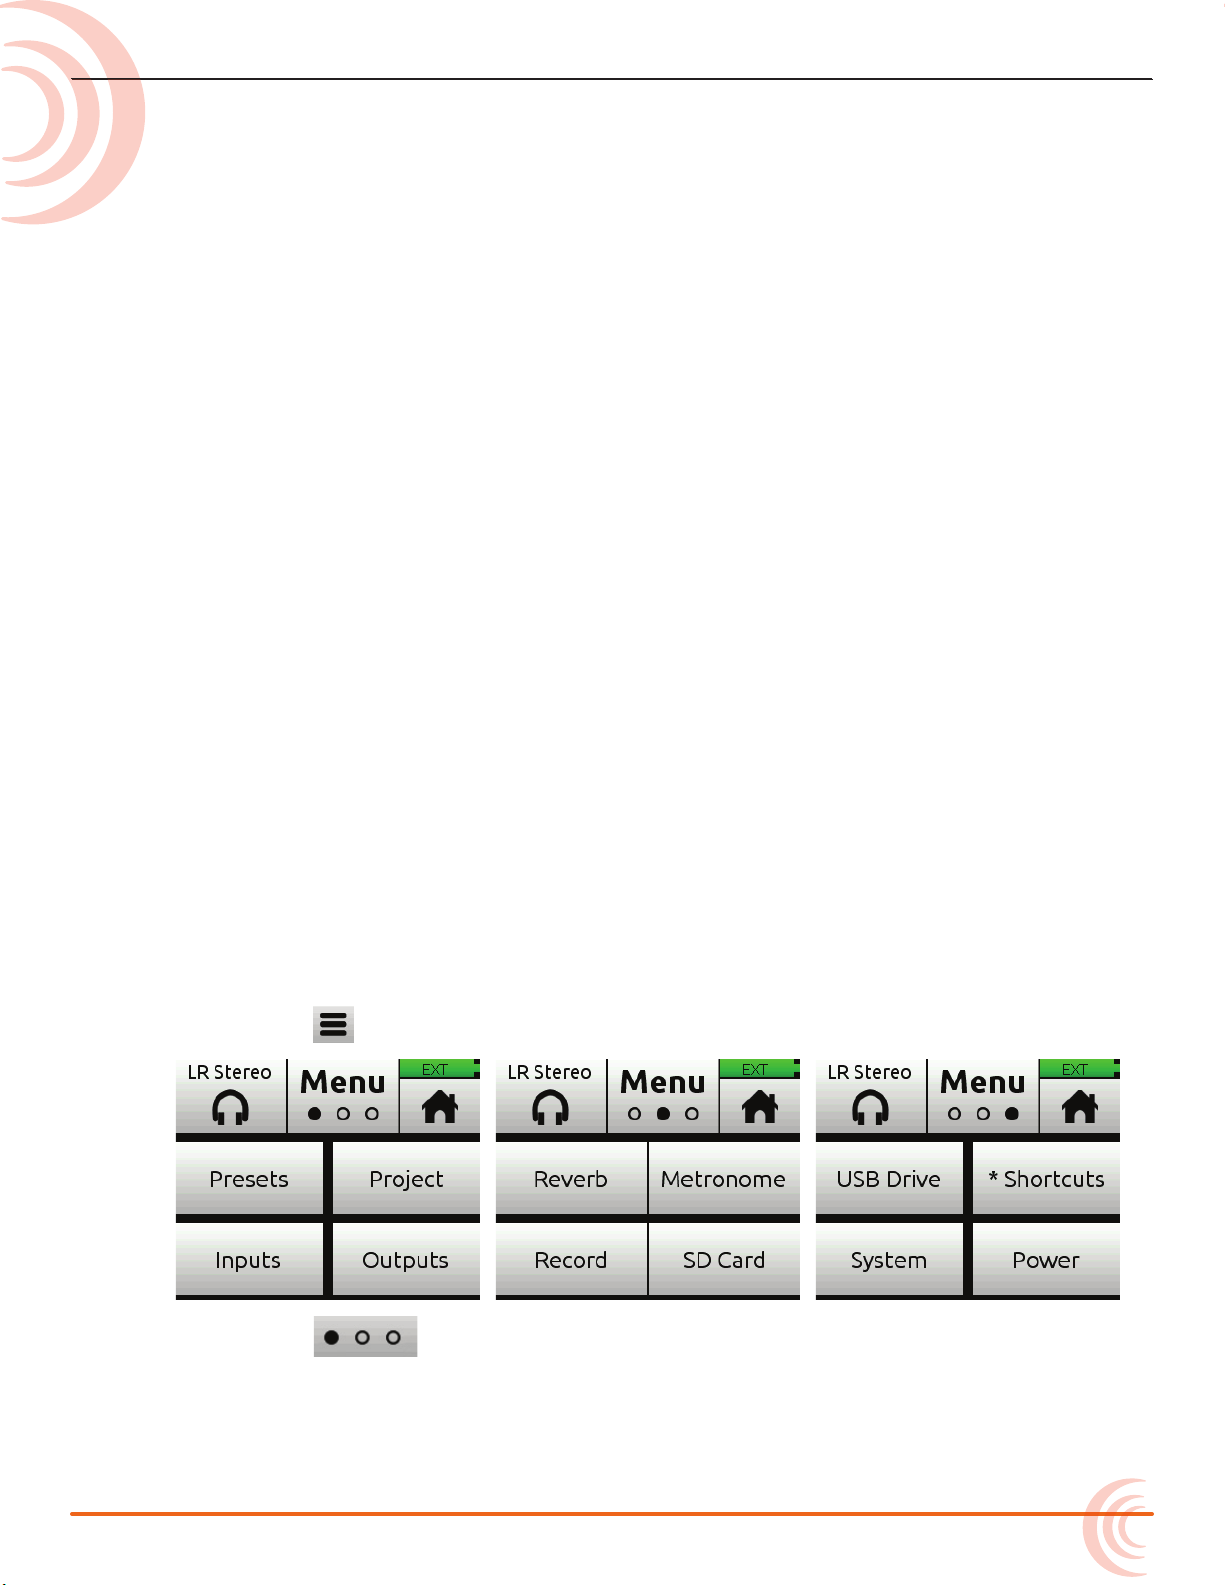
Main Menu Screen
The Menu screen is where most of the features and functions are selected and
set up.
To enter the Menu screen:
X Tap on the Home screen.
There are three Menu pages. These pages are indicated by the Dots icon
. Tapping it will toggle between the three Menu pages.
SCREENS & NAVIGATION
The Menu has its own submenus, which may be displayed by tapping them.
Page Submenu Description
1 Presets Lets you save and load user presets to and from SD card and
internal memory. Also allows resetting all settings to factory default.
1 Project Lets you create new projects, open or trash existing projects.
1 Inputs Provides settings for the 3.5 mm Aux/Mic input.
1 Outputs Provides routing and gain settings for the main L/R and X1/X2
outputs.
2 Reverb Provides access to Reverb settings.
2 Metronome Provides access to Metronome settings.
2 Record Provides access to L&R Gain and AAC export quality.
2 SD Card Displays SD card and allows for format and empty trash card
functions.
3 USB Drive Displays USB thumbdrive information and allows for formatting the
drive.
3 * Shortcuts Assigns various functions as shortcuts to the * / ** toggle switch on
the front panel.
3 System Provides settings for le transfers, setting and sending a tone
signal, limiters, Date/Time settings, adjusting LCD/LED brightness,
updating rmware, and viewing version and regulatory information.
3 Power Select the type of batteries (Alkaline, NiMH, L-Mount) and/or
external power source (12V DC, NiMH, 14V Li-Ion, etc.) being used
to ensure that the Power Status icon on the Home screen accurately
displays remaining battery level or power status.
17
Page 18
User Guide
To return to the main Menu from a submenu at any time:
X Tap .
To return directly to the Home screen from the main Menu:
X Tap .
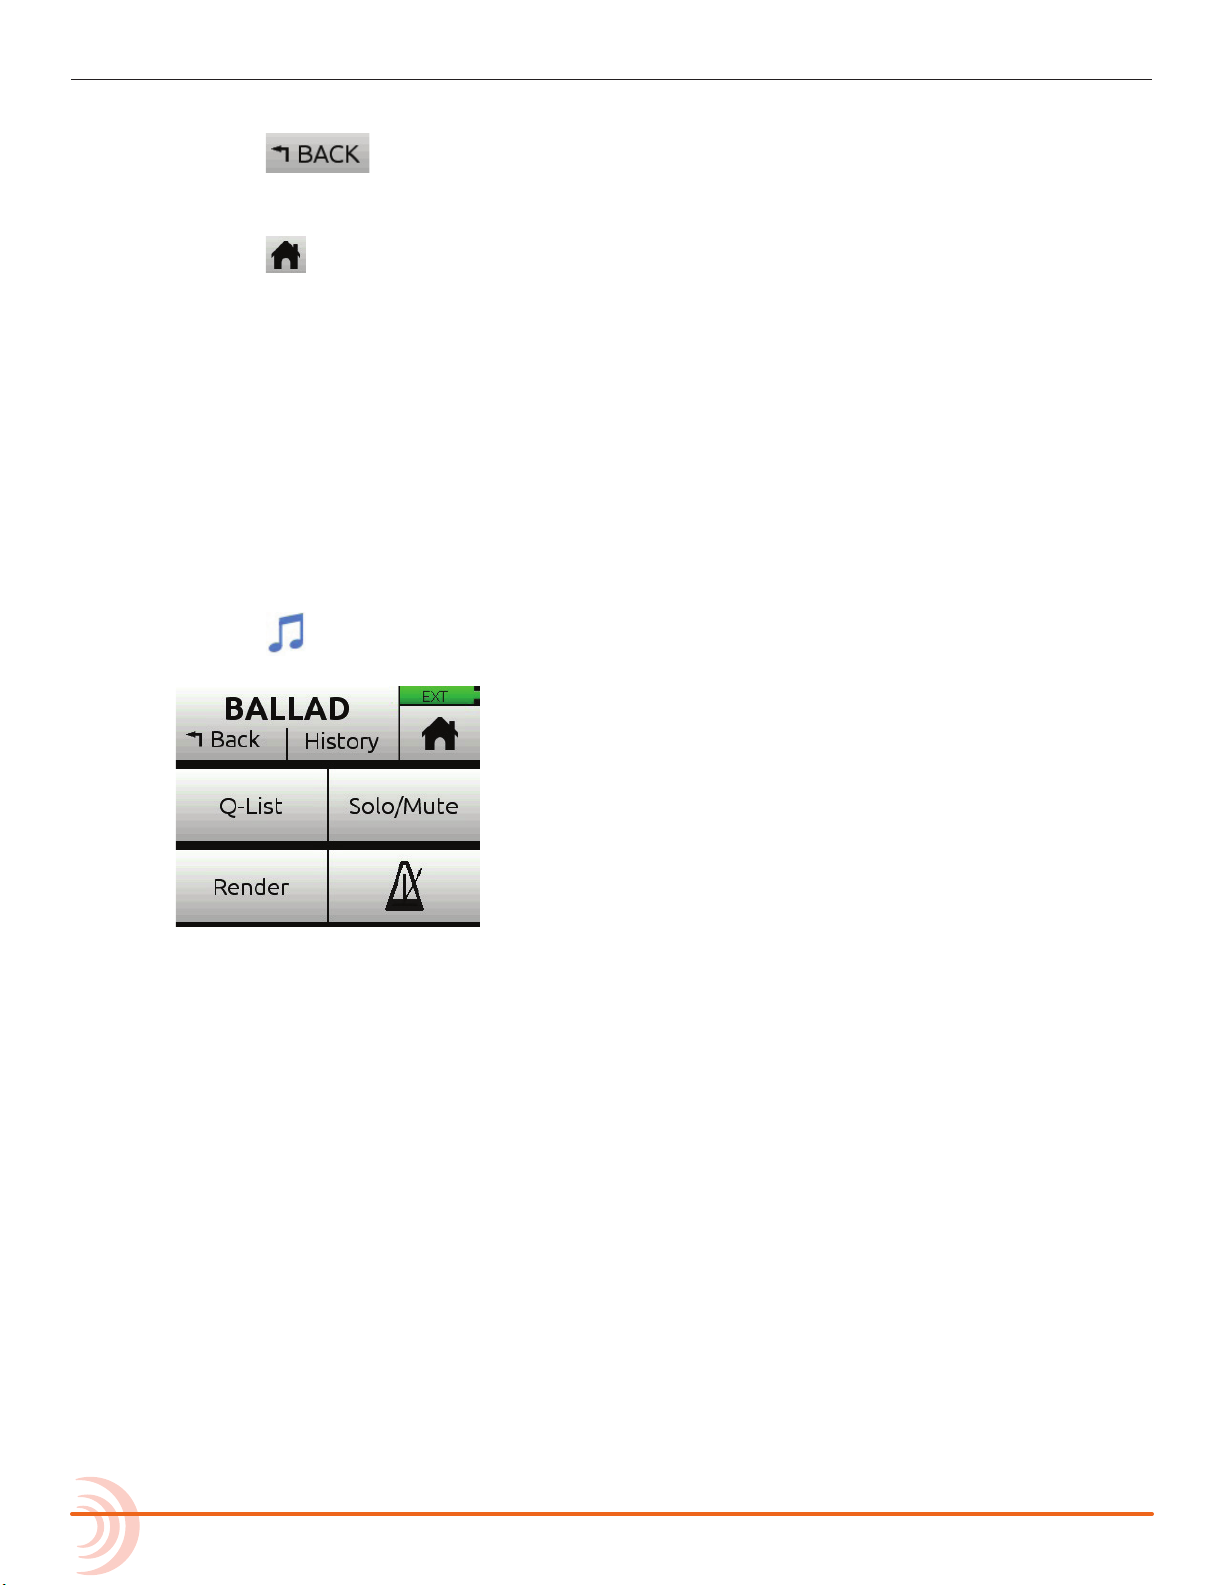
Music Control Menu
The Music Control Menu provides fast access to the the Q-List, the Solo/Mute
screen, metronome on/o, project render, and access to project history.
For more information, see Working with Q-Points, Using Solo/Mute, Metronome,
Project History and Sharing Projects.
To access the Music Control menu:
X Tap in the top left corner of the Home screen.
18
Page 19
Using Star Shortcuts (*/**)
For your convenience, we have included a front panel user-programmable
toggle switch with two positions, * and **. This lets you dedicate a hardware
shortcut to frequently used functions without having to navigate the menus.
To program functions to the Star toggle switch:
1. Tap .
2. Select * Shortcuts > * Shortcut (or ** Shortcut).
3. When the * Menu screen appears, select your preferred function.
Shortcut Description
Solo/Mute screen Opens Solo/Mute submenu screen.
Project Opens Project submenu screen.
SD Card Opens SD Card submenu screen.
Tone Toggles tone on/o.
Metronome Toggles metronome on/o.
Q Sets a Q-point.
SCREENS & NAVIGATION
To activate the * or ** shortcut(s):
X Slide the switch to the * or ** position.
19
Page 20

User Guide
20
Page 21

Input Channels
An input channel is the path an audio source travels before it can be mixed
and recorded along with other channels. In the MixPre-10M, think of an input
channel as the same as a ‘track’ in a DAW. An input channel can be fed by any
of the eight XLR or TRS mic/line sources, a 3.5mm Aux line/mic source (with or
without plug-in-power), or from USB channels 1-4 from a computer.
You can also select the MixPre-10M’s mixer outputs, internal mic, or a
metronome click. With its overdub capability, the MixPre-10M allows recording
of up to 12 tracks, a maximum of 8 at a time.
An input channel’s settings are adjusted in its Channel screen.
Accessing Channel Screen Settings
To access the Channel screen:
X Push in a Channel knob.
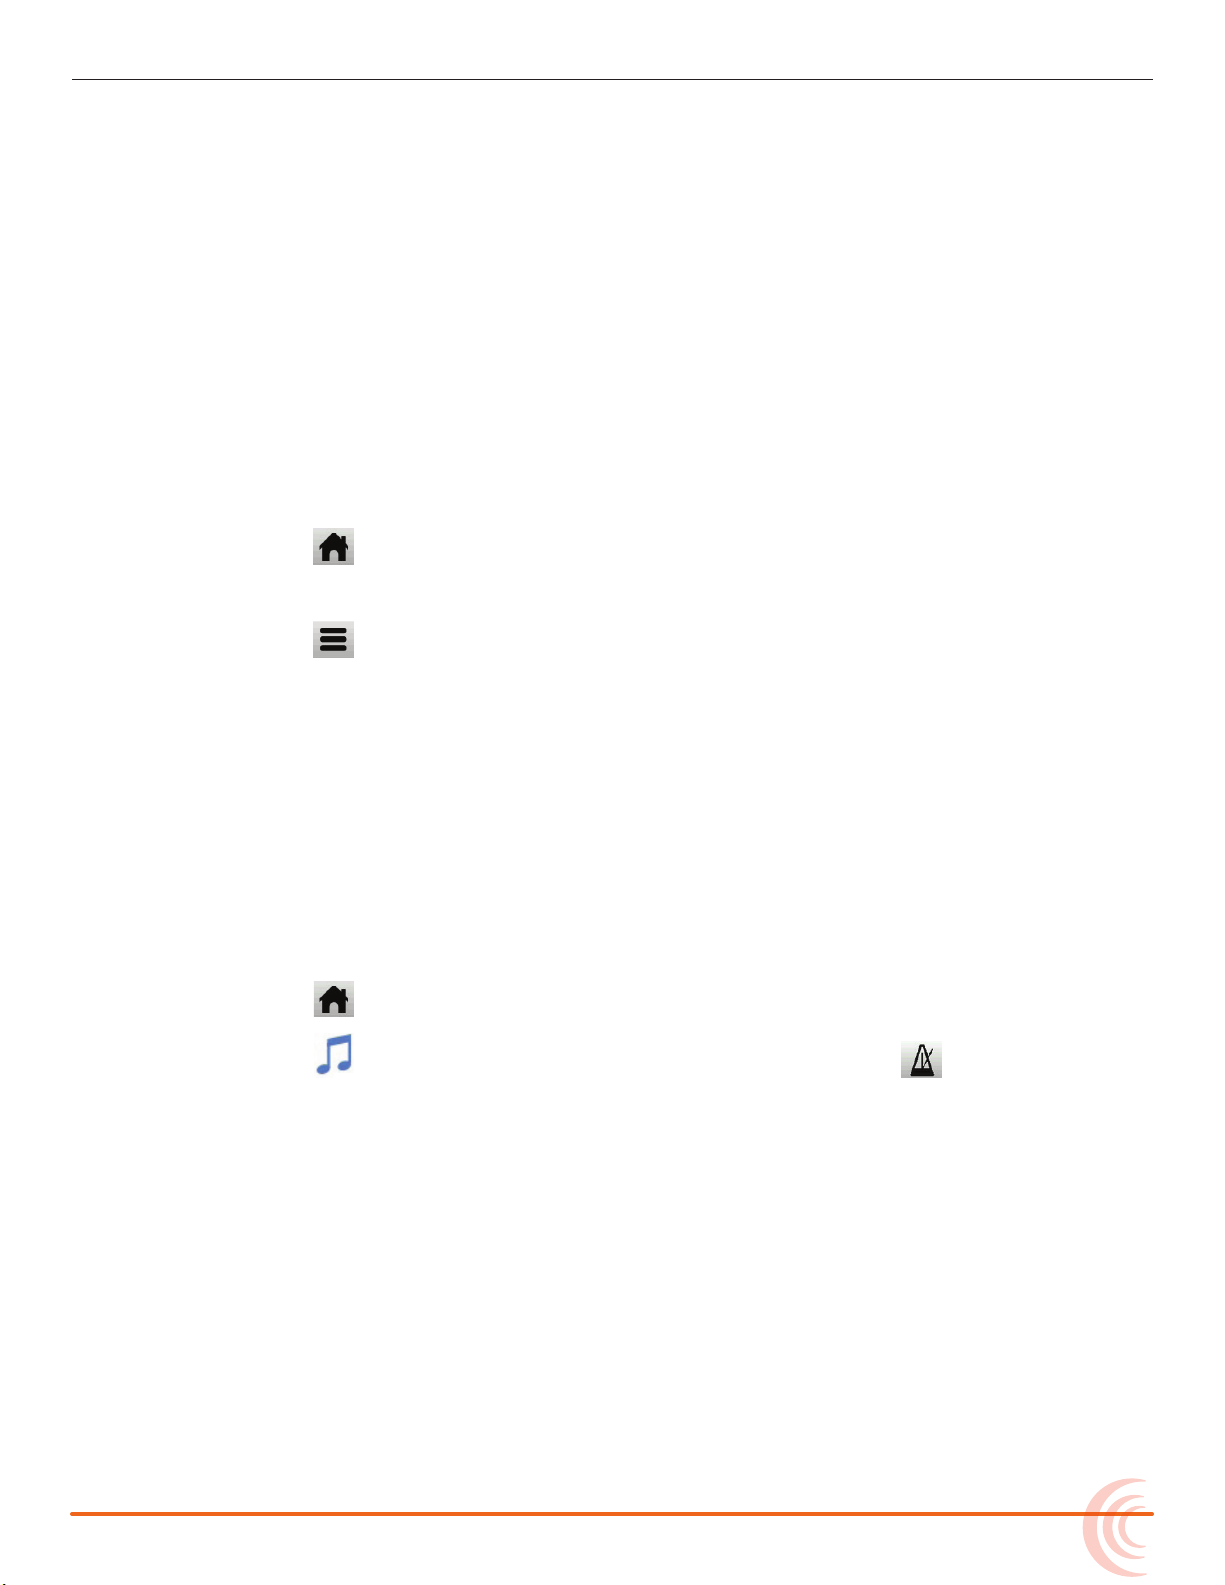
Each Channel screen provides two pages of settings—indicated by Dots icon. Tap
the Dots icon to switch pages.
Settings For More Information
Solo & Mute Using Solo/Mute
Arm Arming a Track
Input Setting Input Source
Monitor Enabling Monitoring
Gain Setting the Gain
Pan Understanding Pan
Reverb & (Vocal) Air Using Reverb & Rendering a Vocal Air Eect
Low Cut Setting the Low Cut Filter
Phase Toggling Phase Inversion
Linking Stereo Track Linking
Since the MixPre-10M has more tracks (up to twelve) than its eight physical
Channel knobs, settings for tracks 9 and higher are accessed using the Track
Bank selector. For more information, see Track Bank Selector.
21
Page 22

User Guide
Track Names
You can edit a song’s individual track names from its associated Channel
screen. For example, changing the default names Track 1 to Drums, Track 2 to
Keyboard, Track 3 to Lead Vocals, etc.:
To edit Track 1’s name:
1. Press Channel 1 knob.
2. Tap top left corner of the Channel screen.
3. Enter a new name for Track 1 and tap OK.
The edited name will appear at the top of the track’s Channel screen and
will also be embedded in the metadata of the rendered ISO files when
using Render > Wav All Isos. See Sharing Projects for more information.
Setting Input Source
Input lets you select the input source for a track.
Any input can be routed to any channel. This reduces the need to re-plug
inputs when you want to record an input to a dierent track. You can also
select the MixPre-10M’s mixer outputs (see Bouncing), a metronome click (see
Metronome) or turn on Phantom power.
To route inputs:
1. Enter the Channel screen, tap Input. The Routing screen appears, as shown
in the two following examples.
2. Select an input for the track. A track can only have one live input source.
22
3. Select Phantom if you want to turn on Phantom power for a Mic source.
Phantom toggles 48V Phantom on and o. Turn Phantom on if a condenser
microphone is being used.
L Notice in the previous screenshots how Phantom is only an option when a Mic
source is selected.
4. Select Click as an input for your track if you want to record the metronome
click into your song. This is useful should you want to later import the song
Page 23

INPUT CHANNELS
into a DAW to develop the song further. The recorded metronome will allow
you to set the DAW’s tempo and internal metronome so that it is perfectly
aligned with the MixPre recording. For more information, see Metronome.
L Tip: If you do not have a mic handy and want to quickly record a rough scratch
track of a song idea and are not too concerned about the audio quality, you can
use the built-in mic. To do this, set Inputs>Aux In Mode to Internal Mic, then via
the Routing screen, select Aux In - Internal Mic as the input’s source, as shown in
the previous example for Track 4. Notice in the other previous screenshots how
Internal Mic is not an option for Aux In; that is because, in those examples, it is
not selected as the Aux In Mode.
Enabling Monitoring
The Monitoring feature lets you hear the live input signal during playback. This
is particularly useful when practicing along with already recorded tracks or
performing live to a backing track.
To enable monitoring:
X Enter the Channel screen, tap Monitor. The button appears orange when on,
except if input is o.
Setting the Gain
Gain sets the trim gain (pre-fader gain) for the channel. This gain determines
the signal level on the channel’s individual track—i.e. the ISO track level.
The gain range is dependant on the input type selected.
• Mic: 6dB - 76dB
• Line: -20dB - 30dB
• Aux Mic : 10dB - 40dB
• Aux Line: -10dB - 20dB
• Aux IntMic: 10dB - 50dB
• USB: -20dB - 30dB
23
Page 24

User Guide
Using Solo/Mute
The MixPre-10M oers a few dierent ways to mute or solo tracks.
• From each track’s Channel screen, tap Mute to mute the selected track. This
removes the signal from recorded tracks, mix and all outputs. When muted,
its LED ring will glow red. Multiple tracks may be muted at the same time.
• From each track’s Channel screen, tap Solo to hear only the selected track
(pre-fade/pre-eects) in both ears of the headphone output. When a track
is soloed, its LED ring will ash orange.
Like Mute, soloing is non-exclusive, meaning any number of inputs may be
soloed at the same time.
You can quickly solo/mute several tracks from the Solo/Mute screen. All 12
tracks’ Solos and Mutes may be viewed and set from this screen.
L Access to it may also be set as a shortcut for the */** switch.
To solo or mute tracks from the Solo/Mute screen:
1. Tap . The Music Control screen appears.
2. Tap Solo/Mute. The Solo/Mute screen appears.
3. Do either of the following:
X Tap either Solo or Mute and then tap track(s) to select them. Soloed
channels appear orange; muted tracks appear red.
X Use the HP encoder to highlight (green outline) a track and then tap
either Solo or Mute.
4. Tap to exit the screen.
Arming a Track
Armed tracks appear with red numbered boxes on the Home screen’s Meter
view.
To arm/disarm a track:
X From the Channel screen, tap Arm to enable or disable a track for
24
recording.
Page 25

INPUT CHANNELS
Understanding Pan
Pan sets the position of the track in the LR stereo mix.
Pan range has 33 positions from L16 (fully left) to C (Center) to R16 (fully
right).
Using Reverb
Reverb sets how much reverb is added to a track in the LR mix. Only the mix is
aected, not the individual recorded tracks.
To render the reverb eect into the individual recorded tracks, you must use the
Bounce feature.
To adjust reverb:
X From the Channel screen, tap Reverb and turn encoder. Range is O, -50dB
to 0 dB in 1 dB increments.
You can also select dierent reverb characteristics—such as type, decay,
predelay, etc.
To congure Reverb:
1. Tap .
2. Page through submenu and tap Reverb.
3. Tap any of the following settings and adjust values accordingly:
Setting Options
Reverb Type O, Plate, Hall, Room
Reverb Decay 0.1 - 5.0 seconds
Reverb Pre-Delay 0 - 40 ms
Reverb HF Damp O, 0-20
Rendering a Vocal Air Effect
Applying Air to a lead vocal can help it stand out in a mix. It adds a desirable
‘airy’ sheen to vocals.
Vocal Air sets how much “Air” is added to a track in the LR mix. The range is
O, 1%-100%. Only the mix is aected, not the individual recorded tracks.
To render the Air eect into the individual recorded tracks, you must use the
Bounce feature.
L Air can only be applied to one track at a time. If you want to apply Air to a
track, but it appears grayed out on that track’s Channel screen, and is therefore
unavailable, you must rst turn Air o on the track to which it is currently applied.
If you want to add Air to multiple vocals, you can use the Bounce feature.
25
Page 26

User Guide
Setting the Low Cut Filter
Use Low Cut to attenuate undesirable low frequencies such as mic handling
noise and wind noise.
The Low Cut setting activates and sets the Low Cut lter. Range is O, 40-160
Hz in 40 Hz steps.
Toggling Phase Inversion
Phase inversion, also known as polarity reversal, can be used to prevent
signal cancellation when a source is dual-mic’d from opposite directions (e.g.
overheads on a drum kit) or to compensate for incorrectly wired, balanced
cables.
The Phase setting toggles Phase Inversion on and o.
To toggle a track’s phase inversion:
X From the Channel screen, tap Phase.
Stereo Track Linking
Used to link a pair of tracks when the input is a stereo source. Linking enables
control of the overall level of the pair using a single channel knob. If using a
stereo source, such as keyboard or drum machine, plug that instrument into a
neighboring pair of inputs such as 1-2, 3-4, etc. Link the tracks by setting the
pair’s rst Channel Screen>Linking menu to 1-2, 3-4, etc. Linking allows you to
control the level of both channels with just the odd-numbered knob.
For example, the following procedure links tracks 1 and 2.
To link tracks 1-2:
1. Push Channel 1 knob to access that Channel screen.
2. Tap Linking.
3. Select 1-2 for a stereo source.
You’ll now be able to control the level of both tracks 1 and 2 with the
Channel 1 knob.
Configuring Aux In Mode
26
To congure the Aux/Mic In connector:
1. Tap .
2. Tap Inputs > Aux In Mode.
Page 27

INPUT CHANNELS
3. Select one of the following options:
◦ Mic: Select this option when the Aux/Mic In is to be used with a mic. The
MixPre-10M provides bias voltage for PiP (plug-in-power) mics.
◦ Line: Select this option when the Aux/Mic In is to be used with an
unbalanced 2ch line source, such as smartphone headphone output,
stereo line source, etc.
◦ Internal Mic: Select this option to use the built in internal mic as input
source. For example, if you want to quickly record a rough scratch track of
a song idea, are not too concerned about audio quality, and do not have a
mic handy, you can use the built-in mic located on the front panel (next to
Channel knob 8).
L Tip: To select Internal Mic as an input, rst set Inputs>Aux In Mode to Internal
Mic, then select Aux In - Internal Mic in the Channel>Input’s Routing screen.
When any of the options above are selected as the Aux In Mode, they are
available as input sources to any track by selecting an Aux.
◦ O: Select this option to turn o the Aux/Mic input.
Track Bank Selector
Since there are more tracks (twelve) than physical Channel knobs (eight), a
Track Bank selector—shown as white boxes in the meter view—is used to select
which group of tracks you want to control.
In the following example, tracks 1-4 and 9-12 are controlled by Channel knobs
on the recorder’s front-panel.
L Channel knobs 1-4 always control tracks 1-4.
To switch track banks, do one of the following:
X Tap meters 5-8 to control tracks 5-8 with the bottom row of knobs (5-8).
X Tap meters 9-12 to switch Channel knobs 5-8 to control tracks 9-12.
When a track bank is switched, rotating a Channel knob in the newly selected
bank will not have an eect on level until it reaches its previously stored fader
value. As soon as it reaches that value, the gain will adjust normally in relation
to the knob’s rotational position.
27
Page 28

User Guide
When adjusting the Channel knob, its fader value along with the previously
stored value is shown in orange text at the top of the Home screen and Channel
screens until it reaches its previously stored value, at which point it changes to
black text.
For example:
In this example, the Channel knob track 9 must be rotated clockwise, as
indicated by the arrow, from its current fader value of -18dB. Once it reaches
the track’s previously stored value of -15dB, the mix level will start to be
aected.
L Upon switching track banks, if the knob’s rotational position is not aligned with its
fader value, the LEDs for that knob will illuminate with a pulsing orange light. This
will stop once position and value are re-aligned.
L Adjust the Channel knob a small fraction to display the stored value and arrow in
orange text. The displayed arrow and stored value will inform you which way to
rotate the knob.
28
Page 29

Outputs
The MixPre-10M includes two pairs of outputs, L/R and X1/X2. The L/R TA3
outputs are balanced (ideal for long cable runs), while the X1/X2 3.5mm are
unbalanced.
To route the L/R and X1/X2 stereo outputs:
1. Tap .
2. Tap Outputs.
3. Do either or both of the following:
X Tap L/R Out to route L/R outputs on the right side panel.
X Tap X1/X2 Out to route the X1/X2 output on left side panel.
The L/R outputs and X1/X2 outputs can be fed from the LR mix (stereo or
mono) or can be set to follow whatever is being output in the headphones
(stereo or mono). This is useful for providing a secondary headphone output
feed.
Adjusting Output Level
Adjust output gains to optimize the level feeding downstream devices, such as
active speakers, external mixers, PA gear, etc.
To adjust output gain:
1. Tap .
2. Tap Outputs.
3. Select either of the following:
◦ LR Gain.
◦ X1X2 Gain.
You can adjust L/R and X1/X2 output gains from 0 to -40dB.
29
Page 30

User Guide
Headphone Output and Presets
The MixPre-10M’s audiophile-grade headphone amplier provides high power
and very low noise performance so that you can accurately hear the audio
being handled, regardless of headphones or environment. Connect headphones
via 3.5mm jack to the headphone jack (located on the right side panel). The
volume of the headphones can be set with the encoder directly adjacent to the
headphone jack.
⚠ Since the headphone amplier is capable of very high output levels, please
use caution when wearing headphones as hearing damage could result
with inappropriate volume levels.
From the main Menu screen, the headphone presets (HP Presets)
may be accessed by pressing this icon in the upper left corner of the
screen. Above this icon, the currently selected HP preset is displayed.
From the HP Presets menu, you may select various HP presets.
Options include: LR Stereo, LR Mono, Preset 1-4 and Edit HP Preset.
To create a custom HP Preset:
X In the HP Preset submenu, select Edit HP Preset to edit and name any of
the four User HP Presets.
30
Page 31

Metering
Channel Knob Ring LEDs
Touch Screen
LEDs and Metering
There are several basic methods for observing input and output levels on
the MixPre-10M: Channel knob ring LEDs, Channel screen meter, and Home
screen’s meter view.
Channel Knob Ring LEDs
Channel knob ring LEDs - Each LED ring is capable of displaying green, orange
and red colors. The brightness of the light ring indicates the level of the input:
green = signal present, red = signal peaking, orange = signal limiting. In
addition, a channel’s ring LED will ash orange when soloed or illuminate solid
red when muted.
The LEDs around any of the bottom four knobs will also pulse orange if, upon
changing track banks, the knob’s rotational position is not aligned with its
fader value; this pulsing stops once position and value are realigned. For more
information, see Track Bank Selector.
Channel Screen Meter
The Channel screen provides a meter beneath the Track name.
For more information, see Accessing Channel Screen Settings.
31
Page 32

User Guide
Meter View
The Home screen’s meter view displays vertical metering for the 12 tracks and
horizontal stereo L/R mix. The meter view also provides the Track Bank selector,
which is a white-outlined box (or boxes) surrounding a group of neighboring
meters in the meter view. For instance, the Track Bank selector in the following
example shows tracks 1-4 and 9-12 selected. For more information, see Track
Bank Selector.
Track labels, each bearing the track number, appear along the bottom of the
meter view and will change color based on routing and transport status.
32
The following table shows the various options you may see during the music
creation process:
Track Label Description
Solid red Track is armed for recording and is monitoring live input.
Red with green outline Track is armed for recording, but is currently monitoring track
playback. (Input monitor is o.)
Solid green Track is currently playing back and is not armed for recording.
Gray (Stop only) Track has an input source routed to it but is not armed for
recording.
Black Track has no input source routed to it.
Page 33

Projects
Each song or composition in the MixPre-10M is known as a Project. A Project
is essentially a folder on the SD card that stores all your song’s audio les
and settings. This makes it easy to organize, share, and copy your musical
creations. The project folder also includes a special ‘session’ le that enables
the MixPre-10M to control precisely where on the timeline and on which track
the project’s recorded audio les should be played back.
Conceptually, a Music project operates like a typical DAW and as such you can
visualize it in much the same way. A play cursor moves across a horizontal
timeline and audio tracks (referred to as ‘channels’ in the MixPre) are laid out
as rows. A song always starts at 00:00:00:0 (hh:mm:ss:tenths), bar 1.
You can store many projects on an SD card, which is great if you are working
on multiple songs or an album, because you can quickly switch between them.
Only one project is active at any one time.
All project audio les and settings (e.g. mix parameters, track names, project
history, etc.) are saved automatically so don’t worry about having to manually
save.
If power is lost in the middle of recording, the 10M returns to the project state
prior to the loss of power, and no previously recorded audio is lost or corrupted.
On power up, the MixPre-10M automatically loads the last open project.
33
Page 34

User Guide
Creating Projects
MixPre-10M will automatically create a project if record is pressed without rst
creating a new project.
To create a new Music project:
1. Tap .
2. Tap Project > New.
3. When the new Music Project screen appears, you can do any of the
following:
X Name the project.
X Set the sample rate. Options include: 44.1kHz, 48kHz, or 96kHz.
L Be sure to choose the correct sample rate when you create a new project; you
cannot change it once created.
When using the 10M as a USB audio interface, ensure that you set the computer
OS, DAW application, and the 10M project to the same sample rate. This prevents
clocking and/or o-speed playback issues.
4. Tap Create when you’re ready to create the new Music project.
L The new project’s name is shown at the top of the Home screen.
For more information, see Project History and Project Folder Structure.
Opening Projects
When switching from the current project to another project, you do not need to
worry about saving the current one; the MixPre automatically saves the current
project’s state.
34
To open an existing project:
1. Tap .
2. Tap Project > Open. A list of all projects, identied by a music notes
icon, on the SD card is displayed.
Page 35

3. Rotate the HP encoder to highlight the chosen project; push in encoder to
open the project.
Once selected, the project is opened and the Home screen is displayed. You
are ready to start recording.
Copying Projects
You can manually copy any existing project or automatically copy the active
project to a USB Thumbdrive. This is ideal for backing up or sharing your
projects.
To auto-copy the active project:
1. Insert a USB thumbdrive into the USB-A port.
2. If the USB thumbdrive has not been previously formatted in the MixPre10M, format it rst. See Formatting SD Cards & USB Thumbdrives for more
information.
⚠ The formatting process erases all data.
PROJECTS
3. No need to do anything else. The MixPre-10M will automatically replicate
the active project from SD card to USB thumbdrive. See Copying to a USB
Drive for more information.
To manually copy a project to a USB thumbdrive:
1. Insert a USB thumbdrive into the USB-A port.
2. If the USB thumbdrive has not been previously formatted in the MixPre10M, format it rst. See Formatting SD Cards & USB Thumbdrives for more
information.
⚠ The formatting process erases all data.
3. Tap .
4. Tap Project > Copy. (Copy is disabled when no thumbdrive is present.)
5. Use the encoder to select a project.
6. Tap OK to conrm copy.
⚠ Do not remove the USB thumbdrive from the recorder when copying is in
progress.
Trashing Projects
Since SD cards are capable of holding many gigabytes of data, the list of
projects can become quite long. You can trash any project apart from the one
that is currently active.
35
Page 36

User Guide
To trash a project:
1. Tap .
2. Tap Project > Trash Project.
3. Select a project to trash.
4. Tap OK to conrm deletion of selected project. This actually moves the
selected project and all its les to the TRASH folder on the SD card. Projects
in this folder are still accessible using a computer.
L To free up space on the SD card, you can permanently delete projects in the SD
card’s TRASH folder from the MixPre-10M’s SD Card > Empty Trash sub-menu.
Project History
Each recording is logged as an item (revision) in the History list. This makes it
easy to “undo” to an earlier recording or “redo” to a later recording—ideal for
quickly redoing a bad take or comparing dierent takes. The History list is in
chronological order with the most recent recording at the top.
To access the History list and switch to an earlier or later recording:
1. Tap at the top left corner of the Home screen.
2. Tap History. The History list appears.
3. Use the HP encoder to select a le in the list. The current recording is
indicated by an asterisk (*) after its revision’s le name.
L The revision’s le name is derived from the date and time the recording was
nished. For example, a recording nished at 2:22 PM (14:22) on the 12th of
March 2018 would have a name like this: 001-031218-142200
36
To restart the current project from scratch:
X From the History list, scroll to the bottom, and select Restart Song.
⚠ This will clear all audio from the project and cannot be undone. However,
the audio les themselves are not actually deleted; they remain in the
project folder, which can be accessed using a computer.
Page 37

Project Folder Structure
A Project folder contains the following les:
• The project’s recorded audio WAV files. Each recording or overdub on
a track is represented by a single monophonic WAV file.
L The le name is derived from the date and time the recording was nished. For
example, a recording nished at 1:33 PM (13:33) on the 23rd of March 2018
would have a name like this: 001-032318-133300
• A render folder containing all rendered audio les and a SESSION.XML le
which manages how audio les are played back as well as storing settings
for the project.
You can view the contents of a Project folder on computer.
Sharing Projects
Sharing projects is as easy as transferring to a computer (see USB File
Transfer) and uploading to colleagues via the internet or simply handing them
an SD card or USB thumbdrive.
PROJECTS
There are multiple ways to share a project:
• Copy Project Folder - ideal for collaborating with other MixPre-10M users.
They can load the whole project from an SD card and continue working
from where you left o.
• Render a Wav or AAC Stereo File - ideal for sharing your latest mix with
friends and band members
L An AAC le is like an .mp3 audio le, except it has better quality for similar bit
rates.
• Render all individual tracks (also known as ISOs) as monophonic les - ideal
for importing into a DAW for further production.
To render a project:
1. Tap .
2. Tap Render.
3. Select a format. Options include:
◦ Wav Stereo - performs a real-time render of the LR mix to an
37
Page 38

User Guide
uncompressed 2ch stereo wav le. All track level, pan, mute, reverb and
air adjustments made during rendering are reected in the resulting
stereo wav le.
◦ AAC Stereo - performs a real-time render of the LR mix to a compressed
2ch stereo AAC le. AAC les are much smaller in size than a WAV le and
so are faster to share over the internet. All track level, pan, mute, reverb
and air adjustments made during rendering are reected in the resulting
AAC le.
L The bit rate for AAC rendering is set via Main Menu > Record > AAC Quality.
Options for AAC bit rates are: 32, 64, 128, 192, or 256 kbps. The higher the
number, the better the quality. See Record Settings for more information.
◦ Wav All Isos - performs a real-time render of all isolated (individual)
tracks each to their own monophonic wav le. This is the ideal option for
importing all tracks into a DAW. Just drag them all to zero on your DAW’s
timeline to sync all of them up perfectly.
38
Page 39

Recording and Playback
The MixPre-10M can simultaneously record and playback up to twelve audio
tracks at 96 kHz, 24-bit to an SD card (SD, SDHC,or SDXC). For peace of mind,
the MixPre-10M can automatically copy what is being recorded on the SD card
to a USB thumbdrive connected to the USB-A port. This is ideal for backup
purposes or as a quickly available handover copy for sharing with others.
You can record to the SD card even when using the MixPre-10M as a USB audio
interface. This opens up cool opportunities for recording the computer’s USB
audio output and mixing it with other mic and line sources plugged into the
MixPre.
This simultaneous recording/USB audio streaming capability also makes the
MixPre ideal as a backup to a computer - highly desirable in mission critical
applications where relying on a computer might be a risk.
Formatting SD Cards & USB Thumbdrives
SD cards must be formatted by the MixPre-10M for reliable recording and
playback.
If a USB thumbdrive is inserted into the USB A port, the MixPre-10M
automatically copies the current project’s recorded les to it. The thumbdrive
must also be formatted before use. For more information about this Auto Copy
feature, see Copying to a USB Drive.
⚠ Be sure to backup any wanted audio recordings or data before formatting
since the formatting process erases all data.
We highly recommend using Sound Devices branded SD cards as these have
been optimized to provide the best performance. If these are not available,
most reputable manufacturers’ cards (such as SanDisk or Delkin) that meet or
exceed class 10 speeds are acceptable. Similarly, we highly recommend only
using Sound Devices’ approved USB thumbdrives to ensure reliable operation.
To format an SD card:
1. Insert an SD card in the slot located on the rear panel.
2. Tap .
3. Tap SD Card > Edit > Format.
4. When asked to conrm the command to format the card, tap OK.
Cards with a capacity of 32 GB or less will be formatted with the FAT32 le
system. Cards with a capacity greater than 32 GB will be formatted with
the exFAT le system.
39
Page 40

User Guide
To format a USB Thumbdrive:
1. Connect a USB ThumbDrive to the USB-A port located on the left panel.
2. Tap .
3. Tap USB Drive > Edit > Format.
4. When asked to format the card, tap OK.
All USB drive sizes are formatted as exFAT.
L The exFAT le system is not compatible with Windows XP or Mac OS X 10.6.4 and
earlier.
Transport Controls
On the MixPre-10M, the joystick transport control works in a similar fashion
to how transport controls work in a typical DAW, i.e. they control a playback
cursor (typically indicated by a moving vertical line in most DAWs) that moves
horizontally across a timeline indicating the current position in the song. The
current position is indicated by the time counter at the top of the Home screen.
All projects start at 00:00:00.0.
Function Control Action
The LED ring illuminates red while recording is underway.
Record
Stop
Play
Rewind / Jump
to previous
cue mark
Fast forward /
Jump to next
cue mark
Push up (REC) to manually start recording from the current
position on the timeline. You can manually start recording
during playback or when stopped. Only armed channels are
recorded.
Press in to stop recording or playback at the current position.
Pressing Stop when already stopped returns the playback
cursor to the start of the song.
Push down to start playback from the current position. Press
down again during playback to pause at the current position.
If at the end of the song, pressing play does nothing.
Push left to jump to previous cue mark. See Locating to
Q-Points.
While in playback, push and hold left to rewind.
When the MixPre is playing back or paused, moving the
joystick to the left (<<) rewinds at 2x speed, then after
holding for 5 seconds, it increases to 16x speed.
Push right to jump to next cue mark. See Locating to
Q-Points.
While in playback, push and hold right to fast forward.
When the MixPre is playing back or paused, moving the
joystick to the right (>>) fast-forwards at 2x speed, then
after holding for 5 seconds, it increases to 16x speed.
40
Page 41

RECORDING AND PLAYBACK
Function Control Action
While playing or paused, press the headphone encoder to
enter Scrub mode. Then rotate clockwise for fast forward or
Scrub
counter-clockwise for rewind at speeds of 0x, 1/8x, 1/4x,
1/2x, 1x, 2x, 4x, 8x and 16x. The audio may be heard in
Scrub mode up to 2x speed. TO exit scrub mode, press the
headphone encoder again.
Record Arming
Armed tracks are recorded when REC is activated. THey play back when Play is
activated.
Disarmed tracks play back during recording and playback unless their input
monitor is on, in which case they monitor the live input.
To arm a channel:
1. Press the Channel knob.
2. Tap Arm.
Armed tracks are indicated in the Home screen’s meter view by red
track labels surrounding the channel number. See Meter View for more
information on possible colors of track labels and what they mean.
If neighboring channels are linked, their labels are merged to indicate that
they are linked. See Stereo Track Linking for more information regarding
linking.
41
Page 42

User Guide
Working with Q-Points
The MixPre-10M uses Q-Points to make it easy to locate quickly to points of
interest and set up automatic punch in/out regions.
There are dierent types of Q-Point.
Icon Type Description
Play In Denes when playback begins. Typically used as pre-roll before
Record In Denes when automatic recording begins (the start of the Punch
Record Out Denes when automatic recording ends (the end of the Punch In/
Stop Denes when playback stops. Typically used as post-roll after a
punch in (Record In).
In/Out region).
Out region).
punch out (Record Out).
Cue mark
(Q01, Q02, etc)
Cue marks are Q-points that dene a specic position of interest
within a song, which may be used to “cue” or relocate to that
point quickly and easily. For example, set a Q-point at the start of
a verse or chorus. You can name cues for easy identication.
To add Play In and Record In/Out and Stop Q-points:
1. While stopped, tap the Q icon , located at the top of the Home screen.
The Q-Points menu appears.
2. Tap each button (according to icons shown in previous table) to add that
Q-point at current song position. This may be done while stopped, paused,
or during playback.
42
Page 43

RECORDING AND PLAYBACK
L It is not possible to place an In point after an Out point. It is also not possible to
have more than one In or Out point of each type (Play or Record).
Alternatively, you can create cue marks and set them as Play In, Record In/Out,
or Stop points from the Q-List.
To add cues marks:
X During recording, playback, or pause, tap , the Q icon at the top of the
Home screen to add a Cue Mark exactly at that point in the song. A cue
mark number (starting from Q01 and incrementing each time a new cue
mark is added) is displayed next to the Q icon.
X Alternatively, when stopped, tap , the Q icon at the top of the Home
screen to access the Q-Points menu. Then, tap , the Q button to add a
cue at current song position.
The MixPre automatically renumbers cue marks if one is inserted between
existing cue marks to maintain their ascending numerical order from the start
of the song—Q01, Q02, Q03, etc.
Cues appear in numerical order in the Q-List, such as 01 shown in following
image of the Q-Points screen, below the Play In, Record In/Out and Stop points.
You may have up to 20 such Q-points per song. Cues may be named, moved,
deleted or set as Play In, Record In/Out, or Stop points from the Q-List.
L You cannot rename Playback or Record In/Out points.
To access the Q-List:
X From the Music Control menu.
X From the Q-Points menu.
To custom name a cue mark :
1. Access the Q-List. The Q-Points screen appears.
2. Select a cue mark, using the HP encoder.
3. Tap Name and enter a new name, such as Chorus or Bridge.
43
Page 44

User Guide
To set a cue as a Play In, Record In/Out, or Stop point:
1. From the Q-List, select a cue.
2. Tap Set As.
3. Tap Play In, Record In, Record Out, or Stop to set the selected cue as an
In/Out point for recording or playback.
Moving Q-Points
You can nely tune the position of In and Out points in 0.1 second increments.
To move Q-points:
1. Tap Q-List.
2. Use the HP encoder to select a Q-point.
3. Tap Move and rotate the HP encoder to adjust the selected Q-point in 0.1
second increments.
Previewing Q-Point Positions
44
To aid in ne tuning the position of a Q-point, you can preview it. Preview plays
a few seconds from the Q-point. If the Q-point is slightly late or early, use the
move function to ne tune its position.
To preview Q-Points:
1. Select the Q-point in the Q-List and press Play.
Page 45

RECORDING AND PLAYBACK
Clearing & Deleting Q-Points
You can delete cue marks and clear Play In, Record In/Out, or Stop points via
the Q-Points menu or Q-List screen.
To clear all In and Out stored values:
X Tap Clr In/Out.
To clear an individual Play In, Record In/Out, or Stop point:
X Select one from the Q-List and tap Disable.
To delete a cue mark:
1. From the Q-List, select a cue mark.
2. Tap Delete.
Locating to Q-Points
You can “cue” the song to a certain point—that is, quickly jump to specic cue
marks within a song using the joystick’s (<<, >>) positions.
To jump between cue marks, do any of the following:
X Push the joystick to the right (>>) to jump to the next cue mark or to the
left (<<) to jump to the previous cue mark.
Punching In/Out
Punching allows you to drop in and out of record on armed tracks while
playing back existing unarmed tracks. Automatic punching is a commonly
used technique that allows you to play along with existing audio and have
the recorder automatically and seamlessly drop into and out of record at
predetermined points—a cool tool for getting just the right performance. You
can punch in/out on a new track or over existing tracks.
Punching in/out over existing material (known as overdubbing) replaces the
existing track audio between the Record In and Out points with new audio.
To manually punch in/out:
1. Arm the tracks on which you want to punch in/out.
2. While playing back, at the desired point, press REC to punch in; the MixPre
will start recording on the armed tracks. The REC control illuminates solid
red.
3. Press REC again to punch out; the MixPre will stop recording but continue
playing back.
45
Page 46

User Guide
To automatically punch in/out:
1. Set Record In and Record Out points to where you want the MixPre to
2. Use Play In and Stop Q-Points to set pre-roll and/or post-roll as necessary.
3. Press REC. The transport joystick LED will illuminate green and the MixPre
automatically punch in and out. If a Record In or Out point is set, a ‘P’ is
displayed in the status bar to indicate that automatic punching is enabled.
See Working with Q-Points.
Setting a few bars of pre-roll allows you to play along with existing audio to
help you get up to speed and ‘into the groove’ before the Record In point.
Use the Track ‘Monitor’ button to monitor either track playback or your live
input during pre-roll and post-roll, depending on your preference.
will start playing from the Play In point if set, or from the current playback
cursor position if not set. ONce the Record In point is reached, the MixPre
will automatically start recording on the armed tracks and the joystick LED
will illuminate red. Recording will continue until the Record Out point is
reached (if set) at which point the MixPre will return to playback and the
joystick LED will illuminate green. Playback will stop when the Stop point (if
set) is reached.
See Working with Q-Points for more information on clearing and disabling Play
In, Record In/Out, and Stop points.
Bouncing
The MixPre-10M oers up to 12 tracks which is enough for many situations. For
example, four for drums, one for bass, two for vocals, two for guitars, two for
keyboards plus a spare!
However, sometimes you may want to add more layers. Bouncing, sometimes
known as Ping-Ponging, is a technique dating back to the days of the Beatles
and Beach Boys that allows you to combine multiple tracks into just one or two
thereby freeing up tracks for further overdubbing. It is also used to simplify
mixdowns by grouping multiple tracks, or burning in reverb or air eects into an
ISO track.
In the MixPre, the bounce mix is derived from the LR mix.
To bounce:
1. Decide which track(s) you want to bounce. Let’s call these the destination
tracks.
46
2. In the destination tracks’ channel screens, set Input to MixL, MixR, or both.
Your choice will depend on whether you want to do a mono, stereo, or dual
mono bounce. For instance, if you are doing a stereo bounce to tracks 1 and
2, set track 1 to MixL and track 2 to MixR. If you are doing a mono bounce
to track 3, set track 3 to both MixL and MixR.
L Any track that is set to MixL or MixR is removed from the LR mix to prevent
Page 47

RECORDING AND PLAYBACK
feedback. You can adjust the level of the recorded bounce using the LR gain
control - tap the L(left) mix meter in the home screen to quickly access LR gain.
3. Decide which track or tracks you want to bounce from. Let’s call these the
source tracks.
4. Mute all tracks except the source and destination tracks.
5. Disarm all tracks except for the destination tracks.
6. Set the source track levels, pans, reverb and air eects as required. Eects
are burned in to the destination track(s).
7. You are now ready to bounce.
8. Manually start recording or use auto-punch to begin bouncing from the
required location. As with normal recording, bouncing is a real-time process
where you can dynamically adjust the source track levels, pans, and eects.
9. Press stop to nish the bounce at any time.
10. Disarm and unroute MixL and MixR from the destination tracks.
11. To hear your bounce, start playback from roughly where the bounce started.
Adjust mix level, pan, reverb and air accordingly.
You may want to mute or clear the original source tracks so that you can hear
your bounce in isolation.
To clear a track:
1. Access its Channel screen.
2. Tap Input, and then tap Clear.
Clear is only displayed if the track contains audio.
⚠ Clearing tracks removes them from the project entirely. The les still
exist, but they can only be accessed from a computer.
3. Tap Yes to conrm removal of track audio from the project.
47
Page 48

User Guide
Metronome
The metronome is an audible click that may be used to help you perform in
time while recording and also provide a count-in so that you know when to start
playing. The rst beat of the bar is represented by a higher pitched click than
the other beats of the bar. The metronome click is summed with the LR mix and
as such can be heard when the headphones or outputs are set to LR.
The metronome may also be recorded to a track. Select Click in a track’s Input
screen.
To set up the metronome:
1. Tap .
2. Tap Metronome, then do any or all of the following:
L You will hear a preview of the metronome while in this screen.
X Tap Signature and set the beat (time signature) for the song. Options
include: 1/4, 2/4, 3/4, 4/4, 5/4, 6/4, 7/4, 8/4, 6/8, 7/8, 9/8.
X Tap Tempo and set the song tempo (metronome click rate) by tapping
the arrows or using the HP encoder to adjust the tempo bpm (beats per
minute) value. Range is 40 to 240 bpm.
X Tap Volume to set the volume of the metronome click.
X Tap Count-in to set the number of count-in bars you want before
recording starts. Range is 0 to 8 bars.
X Tap On During... to set when the metronome is active. Options include:
Record, Play, or Count-in.
To enable the metronome, do either of the following:
X From the Music Control menu, tap the Metronome button. The
Metronome icon will illuminate orange when active.
48
Page 49

L The Metronome button will be disabled (appearing grayed out but with an orange
icon) whenever Click is assigned as a track’s input source.
Record Settings
The Record submenu provides access to the settings detailed in the following
table:
Sub-menu Description Options
L&R Gain Sets the gain for the LR mix. • -30 - 0 dB (1 dB increment)
AAC Quality Sets the quality value for AAC rendering.
RECORDING AND PLAYBACK
L Tip: You can quickly access L&R Gain by tapping the L (left) horizontal meter
on the Home screen.
• 32 kbps
For more information, see Sharing
Projects.
• 64 kbps
• 128 kbps
• 192 kbps
• 256 kbps
To access the Record submenu:
X Tap , then Record.
49
Page 50

User Guide
50
Page 51

USB
USB Audio Interface
The MixPre-10M has an integrated 12-in, 4-out core audio-compatible interface
for use with a Mac or PC computer.
For PC users, the MixPre-10M will appear as a 2x2 audio interface unless
a specic ASIO driver is installed. The latest ASIO driver, along with install
instructions, is available for free at www.sounddevices.com/support/downloads.
See the MixPre-10M’s Downloads page.
To work with the USB audio from a host computer, it is necessary to route the
USB 1 - 4 sources appropriately. Should you want to mix the USB audio from
the host computer with live audio from the MixPre-10M’s inputs to the LR bus,
use the channel screen and select input source.
The MixPre-10M is capable of recording and streaming audio to a USB host
simultaneously. The MixPre-10M is also capable of recording the USB audio
stream out of a computer directly to its SD recorder. This is an amazingly useful
feature for recording any computer-based audio. See the table below detailing
the MixPre-10M’s channel to output assignments.
Tracks USB Output Assignment
Track 1 USB stream 1
Track 2 USB stream 2
Track 3 USB stream 3
Track 4 USB stream 4
Track 5 USB stream 5
Track 6 USB stream 6
Track 7 USB stream 7
Track 8 USB stream 8
Track 9 USB stream 9
Track 10 USB stream 10
Track 11 USB stream 11
Track 12 USB stream 12
51
Page 52

User Guide
Low-latency Monitoring
We’ve worked really hard with our hardware and software design teams to
minimize latency. We’ve found that in many scenarios, latency when monitoring
through a DAW (digital audio workstation) is perfectly acceptable, depending
upon DAW software, computer hardware and plug-ins.
In situations where the throughput latency is higher than desired, the input to
the MixPre-10M can be directly monitored in the headphone output.
For example...
To monitor with zero-latency through the MixPre-10M:
1. Connect MixPre-10M to computer.
2. Conrm that the LR Stereo HP Preset is selected.
3. Select USB1 for track 11 source and Pan L.
4. Select USB2 for track 12 source and Pan R.
5. Connect microphone or instrument to track 1.This will appear to your
computer as USB stream 1.
6. Set up your DAW software for a new track with its source being USB stream
1 and be sure that record monitoring is disabled for this track. (Optionally,
you may mute the track’s output in the DAW).
7. You should now be able to hear and adjust the output of your DAW audio
through channels 11 and 12 while adjusting your low-latency feed in your
headphones (and send levels to DAW) using the Channel 1 knob. Use
Channel 11 and 12 knobs to adjust the mix of the DAW audio with channel
1 to taste.
USB File Transfer
The MixPre-10M supports USB le transfer between its SD card and a computer
by connecting the MixPre-s USB-C port to a host computer’s USB port. To use
this feature, connect the recorder to a computer and then put the MixPre-10M
into File Transfer mode. (USB audio will be suspended.)
To enter File Transfer mode:
1. Tap .
52
2. Tap System > File Transfer.
3. When le transfer is complete, disconnect the recorder from the computer,
then tap Exit on the USB-C File Transfer Mode screen to return to the
previous operating state.
Page 53

USB Keyboard
The use of standard USB computer keyboards is supported with the USB-A port
on the recorder’s left panel for situations such as text entry.
L Keyboards with an embedded USB hub and Apple brand keyboards are not
compatible. Additionally, some keyboards must be connected only after the
recorder is turned on.
A connected USB keyboard may also be used as a wired remote control for
certain functions of the MixPre-10M. See the table below for available USB
keyboard shortcuts.
USB Keyboard Shortcuts
When a USB keyboard is attached, the following key-combinations or shortcuts
are available.
Keystrokes Action
F1 or Menu key Accesses the Main menu
F12 Home
Ctrl + R Record
Ctrl + S Stop
Spacebar Play
Left Arrow Main screen: Rewind, skip back to Q-point
USB
Menu and Channel screens: Toggles through pages
Right Arrow Main screen: Fast forward, skip forward to Q-point
Menu and Channel screens: Toggles through pages
Up / Down Arrows Main screen: Adjusts headphone volume
In menus: Duplicates encoder rotation, such as moves highlight,
scrolls list
While editing parameters: Changes the value
Enter In menus: Activates current selection. (Same as encoder press.) Also,
same as choosing OK when virtual keyboard is on screen
Q In menus: select top left option in quad button view
W In menus: select top right option in quad button view
A In menus: select bottom left option in quad button view
S In menus: select bottom right option in quad button view
1-9,0 Channel screen for 1-10
53
Page 54

User Guide
Copying to a USB Drive
The MixPre-10M supports automatic copying of active projects from its SD card
to a formatted USB thumbdrive inserted into its USB-A port. This handy feature
is great for fast hand-o copies to a music producer as well as for backup
purposes.
You can also manually copy previous projects.
For more information, see Copying Projects and Formatting SD Cards & USB
Thumbdrives.
L Sound Devices highly recommends only using approved USB thumbdrives for
reliable operation. For more information, see the MixPre Series list at:
www.sounddevices.com/support/approved-media
To conrm auto-copying is in progress:
X Tap the Status bar until you see the USB drive status. After recording is
stopped, Copying... will appear while auto-copying is in progress.
⚠ Do not remove the USB thumbdrive from the recorder when copying is in
progress.
During auto-copying, if power is lost or the USB thumbdrive is inadvertently
removed, you can repair the copied le. Simply re-insert the drive and
press Record.
54
Page 55

User Presets and System Settings
Saving and Recalling Presets
Flexibility is the MixPre-10M’s M.O. To make it easy for you to use the recorder
in a wide variety of situations, we created a slick feature where you can store
and recall snapshots of all of the MixPre-10M’s settings. There are four internal
Preset slots available. Also, the SD card can store virtually unlimited Presets.
To save a Preset:
1. Tap .
2. Tap Presets > Save to Internal 1-4 or SD Card
3. Enter a Preset Name and tap OK.
To recall a Preset
1. Tap .
2. Tap Presets > Load Preset.
3. Select preset with encoder.
4. Tap OK.
55
Page 56

User Guide
System Settings
To access system settings:
1. Tap .
2. Tap System.
Page Sub-Menu Description
1 File Transfer
Lets you transfer les between the MixPre and a host
computer.
1 Tone
1 Limiters
1 Brightness
2 Date/Time
2 Regulatory
2 Version
2 Update Firmware
Lets you turn tone on/o, set the tone’s level (from -20dBFS
to 0dBFS in 1 dBFS increments) and mode (to either
Continuous or L-Ident).
Lets you turn limiters on/o.
Lets you independently adjust the brightness of the touch
screen and the ring LEDs.
Provides access to set the date, time, and formats for both.
Provides, specic to MixPre-10M, full Federal
Communications Commission (FCC) compliance information
and ISED regulatory information. (FCC ID: 2AKLX-739M10T
and IC: 22225-739M10T)
Provides the current rmware version and serial number.
Lets you update the MixPre rmware from a le on the
SD card. The latest MixPre rmware can be downloaded
from the Sound Devices website: www.sounddevices.com/
support/downloads
56
Page 57

Specifications
Specications are subject to change without prior notice.
For the latest information available on all Sound Devices products, visit our
website at: www.sounddevices.com.
Audio Inputs
Name Description
Frequency Response
10 Hz to 40 kHz +/- 0.5dB re 1 kHz @ 96 kHz sample rate
Total Harmonic Distortion
(THD)
Equivalent Input Noise
(EIN)
Inputs
Gain
ADC Dynamic Range
Maximum Input Level
0.005% max (@1 kHz, 22-22 kHz BW, gain=20 dB, -10 dBu in)
-130 dBV (-128 dBu) max (A-weighting, gain=76 dB, 150 ohm source impedance)
• Mic: XLR active-balanced; 4k input Z
• Line: XLR active-balanced; 4k input Z
• Line: ¼-inch TRS active-balanced; 4k input Z
• Aux/Mic in: 3.5mm TRS, 2-channel unbalanced; 100k input Z
• USB Audio: 4 channels
• All inputs fully RF-filtered and overload protected.
• Mic input: +6 dB to +76 dB
• Line input: -20 dB to +30 dB
• Fader: -inf to +20 dB
• Total, Mic-to-recording (max): +96 dB
• Aux In (Mic): +10 dB to +40 dB
• Aux In (Line): -10 dB to +20 dB
• Total Aux Gain including Fader, Mic-to-recording: +60 dB
32 bit precision; 120 dB dynamic range min (A-weighted, gain=10 dB,
fader=0 dB)
• Mic XLR: +14 dBu (limiters on or off)
• Line XLR / ¼-inch: +28 dBu (limiters on or off)
• Aux In (Mic): -10 dBu
• Aux In (Line): +10 dBu
Limiters
Low Cut Filters
Microphone Powering
• Limiter at all gain stages, range > 40 dB.
• First stage analog, subsequent stages digital
40 Hz to 160 Hz (adjustable), 18 dB/oct. First stage analog, subsequent stages digital
• Mic XLRs: 48 V via 6.8k resistors, 10 mA each
• Mic 3.5 mm: 3 V @ 3k source Z
57
Page 58

User Guide
Audio Outputs
Name Description
L/R Out
TA3 2-channel balanced, 1.1 K max output impedance, +10.8 dBu max output level
X1/X2 Out
DAC feeding Stereo Out,
Headphone Out
Headphone Out
Output Limiters
3.5 mm TRS stereo unbalanced, 500 ohm output impedance, +7.8 dBu max output level
32 bit precision; 115 dB dynamic range (A-weighted)
3.5 mm TRS stereo unbalanced, for use with any impedance headphones
Digital
Recorder
Name Description
Maximum Record Tracks
Sampling Frequency
Bit Depth
Media Type
Maximum Storage Size
Card Format
12 tracks
• 44.1 kHz
• 48 kHz
24
• Secure Digital Extended Capacity (SDXC)
• Secure Digital High Capacity (SDHC)
• Secure Digital (SD)
• Auto-copy to USB thumbdrive
512 GB (SDXC)
• FAT32 formatted (32GB or less), exFAT for (>32GB)
• 96 kHz
File Type
Max WAV File Size
Eects
• Monophonic WAV
• AAC (render)
• Stereo WAV (render)
• 4GB; Files seamlessly auto-split at 4GB
• Reverb types: Plate, Room, Hall
• Vocal Air
USB
Name Description
Audio Interface (USB-C)
Mass Storage (USB-C)
Keyboard (USB-A)
Auto-copy (USB-A)
12-in/4-out; 44.1 to 96 kHz; 16/24 bit; Class compliant USB 2.0 high speed or
ASIO driver (supplied via download from Sound Devices’ website)
USB 2.0 high speed
Text entry and control
Auto-copy recordings to USB thumbdrive
58
Page 59

Touch Screen
Name Description
Display
1.6-inch, color, sunlight-viewable IPS LCD
SPECIFICATIONS
Resolution
320 x 256
Remote Control
Name Description
Keyboard (USB-A)
Text entry and control
Power
Name Description
AA Batteries
L-Mount Batteries
AC Adapter
8x AA sled (NiMH or Lithium recommended)
MX-LMount: 2x L-mount sled for hot-swappable Li-Ion batteries
XL-WPH3: Universal, 45 W in-line AC-to-DC power supply Hirose 4-pin DC plug, with
detachable IEC power cord. 100-240, 50/60 Hz.
Environmental
Name Description
Operation and Storage
• Operating: -20° C to 60° C
• Storage: -40° C to 85° C
• 0 to 90% relative humidity (non-condensing)
Dimensions and Weight
Name Description
Size (H x W x D)
Weight
L All specications at 48 kHz sample rate unless otherwise noted.
• 1.40 x 8.15 x 6.88 inches
• 3.5 cm x 20.6 cm x 17.5 cm
• 2 lbs (unpackaged, without batteries or sled)
• 910 g (unpackaged, without batteries or sled)
59
Page 60

User Guide
60
Page 61

Software License
End-user license agreement for Sound Devices MixPre Series Software / Embedded Firmware
Important Read carefully:
This Sound Devices, LLC end-user license agreement (“EULA”) is a legal agreement between you (either an
individual or a single entity) and Sound Devices, LLC for the Sound Devices, LLC software product identied
above, which includes computer software, embedded rmware, and may include associated media, printed
materials, and “online” or electronic documentation (“SOFTWARE PRODUCT”). By using, installing, or copying the SOFTWARE PRODUCT, you agree to be bound by the terms of this EULA. If you do not agree to the
terms of this EULA, do not use or install the SOFTWARE PRODUCT.
Software Product License
The SOFTWARE PRODUCT is protected by copyright laws and international copyright treaties, as well as
other intellectual property laws and treaties. The SOFTWARE PRODUCT is licensed, not sold.
Grant of license. This EULA grants you the following limited, non-exclusive rights: In consideration of
payment of the licensee fee, Sound Devices, LLC, as licensor, grants to you, the licensee, a non-exclusive
right to use this copy of a Sound Devices, LLC software program (hereinafter the “SOFTWARE”) on a single
product and/or computer. All rights not expressly granted to licensee are reserved to Sound Devices, LLC.
Software ownership. As the licensee, you own the hardware on which the SOFTWARE is recorded or xed.
Sound Devices, LLC shall retain full and complete title to the SOFTWARE and all subsequent copies of the
SOFTWARE, regardless of the media or form on or in which the original copies may exist. The license is not
a sale of the original SOFTWARE.
Copyright
All rights, title, and copyrights in and to the SOFTWARE PRODUCT (including, but not limited to, any images, photographs, animations, video, audio, music, text, and “applets” incorporated into the SOFTWARE
PRODUCT) and any copies of the SOFTWARE PRODUCT are owned by Sound Devices, LLC or its suppliers.
The SOFTWARE PRODUCT is protected by copyright laws and international treaty provisions. Therefore, you
must treat the SOFTWARE PRODUCT like any other copyrighted material, except that you may make copies
as only provided below. You may not copy the printed materials accompanying the SOFTWARE PRODUCT.
Restrictions on use. Licensee may not distribute copies of the SOFTWARE or accompanying materials to
others. Licensee may not modify, adapt, translate, reverse engineer, decompile, disassemble, or create derivative works based on the SOFTWARE or its accompanying printed or written materials.
Transfer restrictions. Licensee shall not assign, rent, lease, sell, sublicense, or otherwise transfer the SOFTWARE to another party without prior written consent of Sound Devices, LLC. Any party authorized by Sound
Devices, LLC to receive the SOFTWARE must agree to be bound by the terms and conditions of this agreement.
Termination
Without prejudice to any other rights, Sound Devices, LLC may terminate this EULA if you fail to comply
with the terms and conditions of this EULA. In such event, you must destroy all copies of the SOFTWARE
PRODUCT and all of its component parts.
Limited Warranty
No warranties. Sound Devices, LLC expressly disclaims any warranty for the SOFTWARE PRODUCT. The
SOFTWARE PRODUCT and any related documentation is provided “as is” without warranty or condition of
any kind, either express or implied, including, without limitation, the implied warranties and conditions of
merchantability, tness for a particular purpose, or non-infringement. The entire risk arising out of use or
performance of the SOFTWARE PRODUCT remains with you.
No liability for damages. In no event shall Sound Devices, LLC or its suppliers be liable for any damages
whatsoever (including, without limitation, damages for loss of business prots, business interruption, loss
of business information, or any other pecuniary loss) arising out of the use of or inability to use this Sound
61
Page 62

User Guide
Devices, LLC product, even if Sound Devices, LLC has been advised of the possibility of such damages. In
any case, Sound Devices, LLC’s entire liability under any provision of this evaluation license shall be limited
to the greater of the amount actually paid by you for the SOFTWARE PRODUCT or U.S. $5.00. Because some
states/jurisdictions do not allow the exclusion or limitation of liability for consequential or incidental damages, the above limitation may not apply to you.
Governing Law
This agreement and limited warranty are governed by the laws of the state of Wisconsin.
FCC Compliance Statement
This device complies with part 15 of the FCC Rules. Operation is subject to the following two conditions: (1)
This device may not cause harmful interference, and (2) this device must accept any interference received,
including interference that may cause undesired operation. FCC Part 15.19 (a) (3)
Changes or modications not expressly approved by the party responsible for compliance could void the
user’s authority to operate the equipment.
FCC Interference Statement
This equipment has been tested and found to comply with the limits for a Class B digital device, pursuant to
part 15 of the FCC Rules. These limits are designed to provide reasonable protection against harmful interference in a residential installation. This equipment generates, uses and can radiate radio frequency energy
and, if not installed and used in accordance with the instructions, may cause harmful interference to radio
communications. However, there is no guarantee that interference will not occur in a particular installation.
If this equipment does cause harmful interference to radio or television reception, which can be determined
by turning the equipment o and on, the user is encouraged to try to correct the interference by one or
more of the following measures:
—Reorient or relocate the receiving antenna.
—Increase the separation between the equipment and receiver.
—Connect the equipment into an outlet on a circuit dierent from that to which the receiver is connected.
—Consult the dealer or an experienced radio/TV technician for help.
This device complies with FCC and ISED RF Exposure SAR limits exposure limits for general population /
uncontrolled exposure.
Cet appareil est conforme à la norme FCC et USED RF Exposure SAR limite les limites d’exposition pour la
population générale / l’exposition incontrôlée.
This Device complies with Industry Canada License-exempt RSS standard(s). Operation is subject to the
following two conditions: 1) this device may not cause interference, and 2) this device must accept any interference, including interference that may cause undesired operation of the device.
Cet appareil est conforme avec Industrie Canada, exempts de licence standard RSS (s). Son fonctionnement est soumis aux deux conditions suivantes: 1) ce dispositif ne peut pas causer d’interférences, et 2)
ce dispositif doit accepter toute interférence, y compris les interférences qui peuvent causer un mauvais
fonctionnement de l’appareil.
62
Page 63

®
Sound Devices, LLC
E7556 Road 23 and 33
Reedsburg, Wisconsin 53959
USA
Phone: +1 (608) 524-0625
Fax: +1 (608) 524-0655
Customer Support
Toll Free: (800) 505-0625
Email: support@sounddevices.com
http://www.sounddevices.com/support
http://forum.sounddevices.com
Product Information
For more information about products
and accessories, visit us on the web at
www.sounddevices.com.
Report Documentation Error
Email: techpubs@sounddevices.com
 Loading...