

Page 1
DVD Remote Control
(for PlayStation®2) with IR Receiver Unit
Télécommande DVD
(pour PlayStation®2) avec Unité de
Récepteur Infrarouge
Control Remoto de DVD
(para PlayStation®2) con Unidad de
Receptor Infrarrojo
Instruction manual
Thank you for purchasing the DVD remote control (for PlayStation®2) with IR
receiver unit. Before using this product, carefully read this manual and retain it
for future reference.
This remote control is exclusively for use with the PlayStation
entertainment system.
Mode d’emploi
Nous vous remercions d’avoir fait l’acquisition de cette télécommande DVD
(pour PlayStation
produit, lisez attentivement ce mode d’emploi et conservez-le pour pouvoir vous
y reporter ultérieurement.
Cette télécommande DVD est conçue pour une utilisation exclusive avec le
système de loisir interactif PlayStation
®2) avec unité de récepteur infrarouge. Avant d’utiliser ce
®2.
Manual de instrucciones
Gracias por adquirir el control remoto de DVD (para PlayStation®2) con unidad
de receptor infrarrojo. Antes de utilizar este producto, lea detenidamente este
manual y consérvelo para consultarlo en el futuro.
Este producto ha sido diseñado para utilizarse exclusivamente con el sistema
de entretenimiento computarizado PlayStation
®2.
®2 computer
SCPH-10171/ 97042
3-069-287-12(1)
Page 2

WARNING
This product has been designed with the highest concern for safety. However, any
electrical device, if used improperly, has the potential for causing fire, electrical
shock or personal injury. To ensure accident-free operation, be sure to follow these
guidelines:
• Observe all warnings, precautions and instructions.
• Do not use the device if it functions in an abnormal manner.
• If the device does not function properly, contact our technical
support line at 1-800-345-7669 for assistance.
Warning marks and their meanings
The following marks are used throughout this instruction manual. Please take a
moment to familiarize yourself with the meaning of these marks before continuing
to read this manual.
Warning
If the warnings following this mark are not adhered to, serious injury or death from
fire may result, or accidents causing personal injuries may occur.
Caution
If the cautions following this mark are not adhered to, accidents causing injury or
damage to surrounding property may occur.
Information
For customers in the USA
This equipment has been tested and found to comply with the limits for a Class B
digital device, pursuant to Part 15 of the FCC Rules. These limits are designed to
provide reasonable protection against harmful interference in a residential
installation. This equipment generates, uses, and can radiate radio frequency energy
and, if not installed and used in accordance with the instructions, may cause harmful
interference to radio communications. However, there is no guarantee that
interference will not occur in a particular installation. If this equipment does cause
harmful interference to radio or television reception, which can be determined by
turning the equipment off and on, the user is encouraged to try to correct the
interference by one or more of the following measures:
• Reorient or relocate the receiving antenna.
• Increase the separation between the equipment and receiver.
• Connect the equipment into an outlet on a circuit different from that to which the
receiver is connected.
• Consult the dealer or an experienced radio/TV technician for help.
You are cautioned that any changes or modifications not expressly approved in this
manual could void your authority to operate this equipment.
2
Page 3

Table of contents
WARNING .................................... 2
Precautions .................................... 4
Discs that can be played with the
PlayStation®2 console .............. 7
Notes on use ................................... 8
Disc handling ................................. 9
Static image caution .................... 10
Setup .................... 11
Before use ........................................ 11
Inserting batteries into the DVD
remote control
(for PlayStation
Attaching the IR receiver unit
(for PlayStation
®2) ..................... 12
®2) ...................... 13
Startup with the supplied
DVD Player disc ...........
Installing the DVD Player on a
memory card (8MB)
(for PlayStation
®2) ..................... 14
Viewing a DVD video ...
Playing a DVD video ....................... 16
When the DVD video is finished ..... 17
Operating the DVD Player ............... 17
Operating with the Control Panel .... 18
Operating with the DVD remote
control (for PlayStation
Operating with the analog controller
(DUALSHOCK
Playback from the last stopping point
(Resume Play) ............................ 26
Playback in desired order
(Program Play) ........................... 27
®2) ..................... 24
14
16
®2) ......... 22
Playback in random order (Shuffle Play) ...
Repeated playback (Repeat Play) .... 30
Repeated playback of a selected
section (AyB Repeat) ............. 31
29
Using the Control
Panel .................... 32
Using the DVD menu....................... 32
Displaying the Title menu................ 33
Changing the audio language........... 34
Changing the viewing angle ............ 35
Displaying subtitles ......................... 36
Selecting a specific scene for
playback ...................................... 37
Displaying title and chapter
numbers ...................................... 38
Displaying the list of direct button
functions (Help) .......................... 39
Finding a particular point on a disc
(Search) ...................................... 40
Using the Setup display ................... 41
Setup display item list ...................... 42
Setting language options
(Language Setup) ....................... 43
Setting TV display options
(Screen Setup) ............................ 45
Setting viewer options
(Custom Setup) ........................... 47
Setting sound options (Audio Setup) ......
51
Troubleshooting ... 54
Specifications ...... 56
LIMITED WARRANTY ...
57
US
3
Page 4

Precautions on the DVD remote control
Caution
If the cautions below are not adhered to, accidents
causing injury or damage to surrounding property may
occur.
• Keep the IR receiver unit (for PlayStation®2) in a place out of the reach of
small children. If swallowed, the IR receiver unit can cause choking. If
the IR receiver unit is swallowed, immediately contact your physician.
• Do not disassemble or modify the DVD remote control or IR receiver
unit.
• Keep the DVD remote control and IR receiver unit away from heat and
dust, and from smoky, greasy or humid locations.
• Do not leave the DVD remote control or IR receiver unit on the floor.
• Do not place the DVD remote control or IR receiver unit on unstable
surfaces.
• Do not allow water or other foreign substances to get into the DVD
remote control or IR receiver unit.
• Dispose of all packaging materials and worn-out products properly.
4
Page 5

Precautions on safe battery use
To avoid the danger of overheating, fire, explosion or
battery content leakage, observe the following
instructions.
Warning
Do not touch material from a leaking battery.
Contact of the material with the eyes or body can result in injury or burns to the
eyes or skin. Even if foreign substances are not immediately visible, chemical
changes in the material can result in injuries occurring at a later time.
If you do come into contact with material from a leaking
battery, be sure to take the following actions:
, If the material gets into the eyes, do not rub. Flush the eyes with clean water
and immediately seek medical attention.
, If the material comes into contact with the skin or clothes, rinse the affected
area thoroughly with water. Consult your doctor if inflammation or soreness
develops.
Keep batteries in a place out of the reach of children.
If batteries are swallowed, this can result in choking or injury to the stomach.
, Seek the care of a physician immediately if batteries are swallowed.
US
Never throw batteries into a fire. Do not heat, break open
or modify batteries, and do not get batteries wet. Never
attempt to recharge non-rechargeable type batteries.
Any of these activities can cause explosion or battery content leakage and result in
injury.
5
Page 6

Precautions on safe battery use (continued)
To avoid the danger of overheating, fire, explosion or
battery content leakage, observe the following
instructions.
Caution
Do not use batteries other than those specified (size
AAA), and always replace with the same type of battery.
Do not mix old and new batteries.
The use of different batteries can result in explosion or content leakage, causing
injury.
Insert batteries with the plus and minus ends in the
correct direction.
Inserting batteries with the poles reversed can result in a short circuit and cause the
battery to release heat, explode or leak its contents, with the potential for injury.
, Always insert batteries in the correct direction as indicated in the battery
compartment.
Remove batteries when they have reached the end of their
useful life, or if the DVD remote control is to be stored for
a long period of time.
Leaving the batteries in place can cause content leakage and the potential for injury.
6
Page 7
Discs that can be played with the PlayStation
The following discs can be played on the PlayStation®2 console:
®
2 console
Disc type
Disc logo
Contents
Disc size
Play time
z
DVD video systems and regional restrictions
• This console conforms to the NTSC broadcast standard. You cannot play
discs recorded for other broadcast standards (such as PAL or SECAM) on
this console.
• Most DVD videos are marked with region numbers such as 1. The
number contained within the symbol represents the region number of
DVD players on which the disc can be played. DVD videos that do not
bear this symbol, or that do not display the number 1, cannot be played on
your console.
DVDs with the
to play any other DVDs, a message stating, “This disc cannot be played
due to regional restrictions.” will appear on the screen. Some DVDs that
have no region code markings may still be subject to area restrictions and
may not be playable on the console.
About 4 hrs (single-sided) About 80 min (single-sided)
About 8 hrs (double-sided) About 160 min (double-sided)
ALL
label can also be played on this console. If you attempt
12 cm 8 cm
DVD video
The “DVD VIDEO” logo is a trademark.
Audio and video
US
Note on the playback of DVD video
This console plays DVD video as originally designed by the software
producers. Some of the playback features of this console may not have
been incorporated into the DVD video design. As a result, some
playback features may not be available with certain software. Please
refer to the instructions supplied with your DVD video for details.
7
Page 8

Notes on use
• Some PlayStation®2 or PlayStation® format software may not function
properly when operated using the DVD remote control (for
PlayStation®2).
• The DVD remote control will not work if you push more than one button
at a time.
• Two or more DVD remote controls or IR receiver units should not be
used simultaneously.
• Do not expose the DVD remote control or IR receiver unit to high
temperatures, high humidity or direct sunlight (use in an environment
where temperatures range 5°C - 35°C/41°F - 95°F).
• Do not allow liquid or small particles to get into the DVD remote control
or IR receiver unit.
• Do not put heavy objects on the DVD remote control or IR receiver unit.
• Never disassemble or modify the DVD remote control or IR receiver unit.
• Do not throw or drop the DVD remote control or IR receiver unit, or
subject either item to strong physical shock.
• Do not touch the metal parts or insert foreign objects into the IR receiver
unit.
• When cleaning the DVD remote control or IR receiver unit, use a soft, dry
cloth. Do not use paint thinner, solvents or other chemicals.
8
Page 9

Disc handling
• Never use the supplied DVD Player disc in other machines. This can
cause damage to the machine, or injure the eyes or ears.
• The supplied DVD Player disc marked with is for use with
North American specification PlayStation®2 consoles only.
• When inserting a disc into the PlayStation®2 console, always set it into
the disc tray with the label side facing up (data side down).
• Do not leave discs near a heat source, in direct sunlight or in areas of high
humidity.
• Store discs in their cases when they are not in use. Stacking discs or
standing them at an angle without putting them in their cases can cause
the discs to warp.
• Do not touch the disc surface when handling; hold the disc by the edges.
• Do not stick paper or tape onto the disc.
• Do not write on the disc with a marker, etc.
• Fingerprints or dust on the disc can distort the picture or reduce sound
quality. Make sure discs are clean before use.
• Clean discs using a soft cloth, lightly wiping from the center outwards.
• Do not use solvents, record cleaners or anti-static sprays as these can
damage your discs.
• Do not use cracked or malformed discs or those that have been repaired
with adhesives as this can cause the PlayStation®2 console to malfunction.
• Do not insert fingers, etc. into the center hole of the disc on purpose. This
can result in injury.
• Never throw the disc, as this can damage the disc or cause injury.
• Sony Computer Entertainment America will not be held liable for injury
resulting from the mishandling of discs.
US
9
Page 10

Static image caution
Static, non-moving images, such as DVD menus, configuration displays, or
images “paused” may leave a faint image permanently on the TV screen if
left on for extended periods of time. Projection TVs are more susceptible to
this than other types of displays. Do not operate the PlayStation®2 console
in such a manner that this could occur.
10
Page 11

Setup
z
Before use
Please confirm that you have the following items:
• DVD remote control (for PlayStation®2) (1)
• IR receiver unit (for PlayStation
• DVD Player (for PlayStation
• Size AAA batteries (2)
• Instruction manual (1)
If any items are missing, please contact our technical support line at
1-800-345-7669.
®2) (1)
®2) disc (1)
US
11
Page 12
Setup (continued)
z
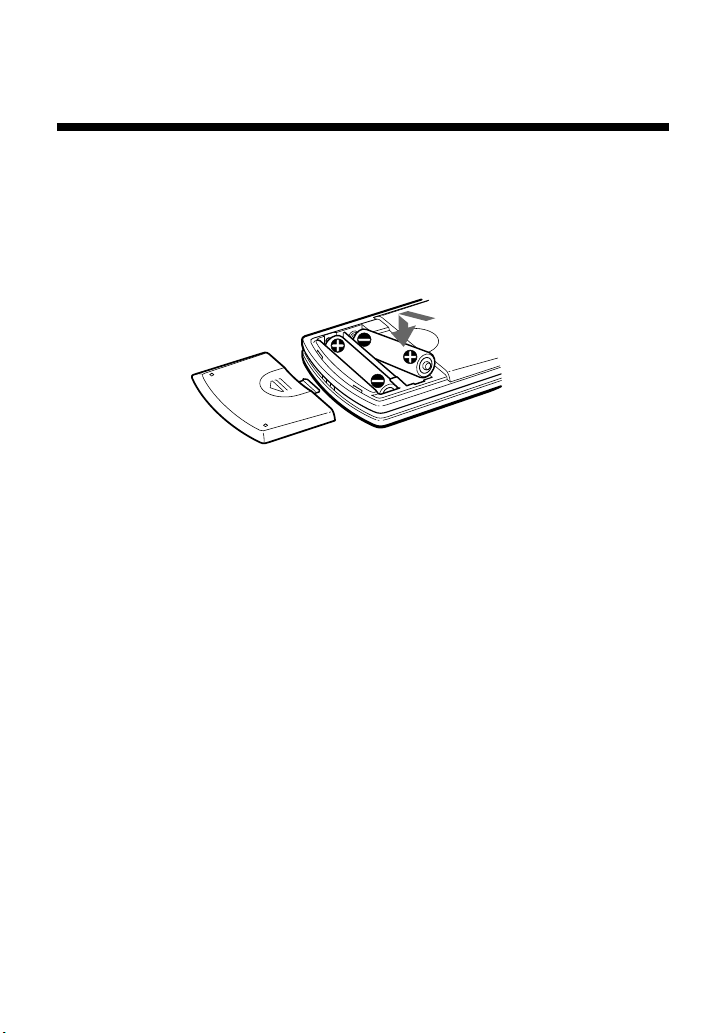
Inserting batteries into the DVD
remote control (for PlayStation®2)
Insert the two, size AAA batteries (supplied) into the DVD remote control
paying attention to the plus and minus ends (polarity) as indicated in the
battery compartment.
Notes
• Incorrect use of batteries can result in battery content leakage or explosion.
When using batteries, be sure to abide by the following instructions:
– Make sure that the plus and minus ends of the batteries are inserted in the
correct directions.
– Do not mix old and new or different types of batteries.
– Do not attempt to recharge non-rechargeable type batteries.
– Remove the batteries when the DVD remote control will not be used for an
extended period of time.
– If battery contents have leaked, be sure to carefully remove all residue before
inserting new batteries.
• When using the DVD remote control, be sure that the IR receiver of the IR
receiver unit is not in direct sunlight or exposed to other strong light. The DVD
remote control may not function properly under such conditions.
12
Page 13
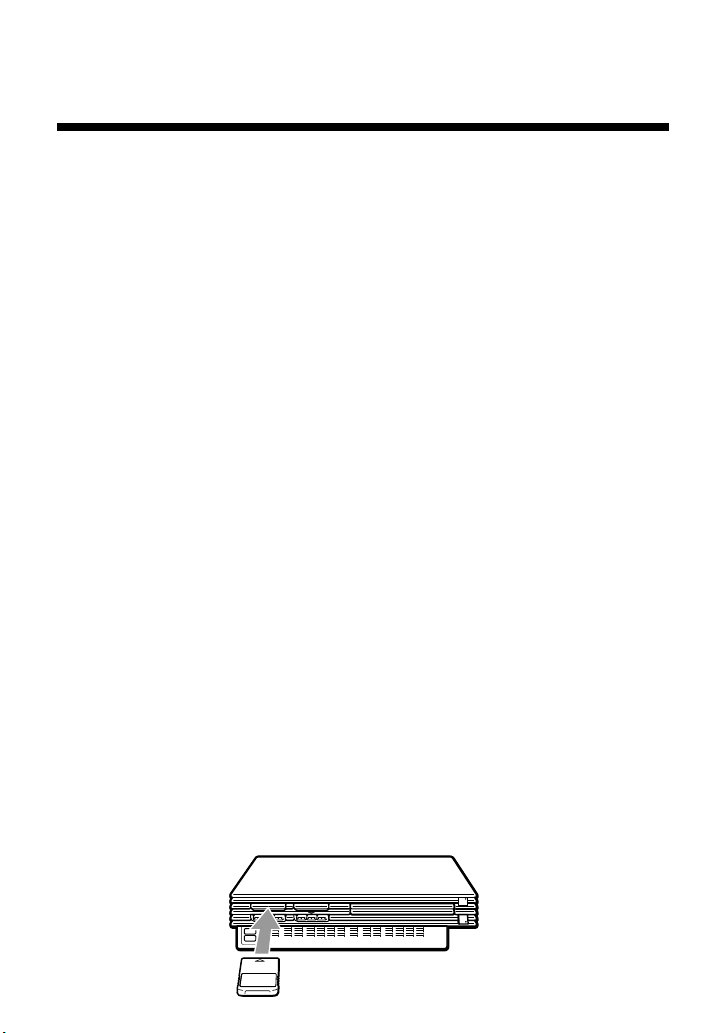
z
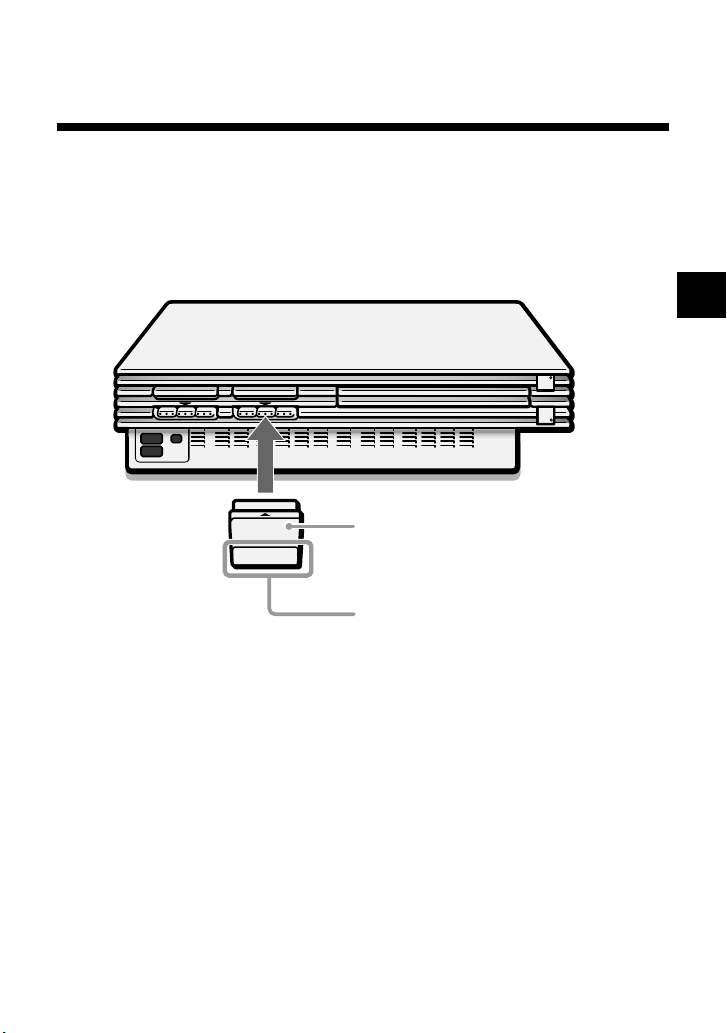
Attaching the IR receiver unit
(for PlayStation®2)
Holding the IR receiver unit with the arrow mark facing up, securely insert
the connector into a controller port of the PlayStation®2 console.
IR receiver unit
(for PlayStation®2)
IR receiver
Note
When using the IR receiver unit for the first time, be sure to remove the protective
scratch resistant film before inserting the unit into the PlayStation
®2 console.
US
13
Page 14
Startup with the supplied DVD Player disc
To use all DVD remote control functions, you may need to install the DVD
Player (for PlayStation®2) on a memory card (8MB) (for PlayStation®2)
(sold separately). For details, refer to the “Notes” section on page 15.
1 Press the MAIN POWER switch on the PlayStation®2 console rear
to turn the console on.
The 1 (standby) indicator turns red, and the console is in standby mode.
2 Press the 1/RESET button.
The 1 indicator turns green and the console startup screen is displayed.
3 Press the A (open) button.
The disc tray opens.
4 Place the disc into the disc tray with the label side facing up
(data side down).
5 Press the A button.
The disc tray closes. Once the disc has started, the disc startup screen is
displayed.
Note
The DVD Player (for PlayStation®2) is software that allows playback of DVD
videos on the PlayStation
z
Installing the DVD Player on a memory
®2 console.
card (8MB) (for PlayStation®2)
The DVD Player can be installed on a memory card (8MB) (for
PlayStation®2) (sold separately). If you delete the DVD Player, you can
install it from the supplied disc again at any time.
1 Insert the memory card (8MB) (for PlayStation®2) into MEMORY
CARD slot 1 of the PlayStation®2 console.
14
Page 15

2 Start the supplied DVD Player disc (see page 14 for instructions).
3 On the startup screen, press the ✕ (enter) button.
The Basic Operations screen is displayed.
4 With the Basic Operations screen displayed, press the ✕ button.
The Menu screen is displayed.
5 Select the “Installing DVD Player” option from the Menu screen
and press the ✕ button.
Complete the installation following the on-screen instructions.
Notes
• To view DVD video using the DVD Player installed on a memory card (8MB)
(for PlayStation
PlayStation
• Some DVD remote control functions will not work if you use DVD Player
software earlier than version 2.00. Refer to the PlayStation®2 console
instruction manual for details on how to check the version of your DVD Player
software.
For PlayStation®2 consoles of model numbers SCPH-30001 and SCPH-35001 GT,
you must install DVD Player (ver 2.00), or later, on a memory card (8MB) (for
PlayStation
• Before installing the DVD Player on the memory card (8MB) (for
PlayStation®2), be sure that at least 2,200KB (2.2MB) of free space is available
on the memory card.
• Insert the memory card (8MB) (for PlayStation®2) into MEMORY CARD
slot 1 of the PlayStation
card in MEMORY CARD slot 2.
• Do not remove the memory card (8MB) (for PlayStation®2) while the
installation is in progress. The installation will be incomplete if the memory
card is removed or the PlayStation
installing.
®2), you must insert the memory card (8MB) (for
®2) into a MEMORY CARD slot of the PlayStation®2 console.
®2) to activate all DVD remote control functions.
®2 console. Installation is not possible with the memory
®2 console is turned off or reset while
US
15
Page 16

Viewing a DVD video
To view DVD video using the DVD Player installed on a memory card (8MB)
(for PlayStation
into a MEMORY CARD slot of the PlayStation
Some DVD remote control functions will not work if you use DVD Player
software earlier than version 2.00. Refer to the PlayStation®2 console instruction
manual for details on how to check the version of your DVD Player software.
For PlayStation®2 consoles of model numbers SCPH-30001 and SCPH-35001 GT,
you must install DVD Player (ver 2.00), or later, on a memory card (8MB) (for
PlayStation
For detailed installation instructions, see “Installing the DVD Player on a
memory card (8MB) (for PlayStation®2)” on pages 14-15.
z
Playing a DVD video
1 Insert the memory card (8MB) (for PlayStation®2) containing the
installed DVD Player into any MEMORY CARD slot of the
PlayStation®2 console.
2 Press the MAIN POWER switch on the PlayStation®2 console rear
to turn the console on.
3 Press the 1 (standby)/RESET button.
4 Press the A (open) button.
5 Insert the DVD video you would like to play into the disc tray
with the label side facing up (data side down).
6 Press the A button.
The disc tray will close and playback will begin.
®2), you must insert the memory card (8MB) (for PlayStation®2)
®2 console.
®2) to activate all DVD remote control functions.
Notes
• Do not remove the memory card (8MB) (for PlayStation®2) containing the DVD
Player before playback of the DVD video begins.
• With some discs, playback will not begin immediately, but a Title menu or DVD
menu will be displayed.
• After the DVD video has finished playing, press the A button on the console to
eject the disc and display the browser screen.
• If the power is turned off during playback, any optional settings you have made
will be lost.
16
Page 17

Notes on the playback of DTS audio from a DVD video
DTS audio signal can only be output through an optical digital cable (sold
separately). Please note that it cannot be output through a regular audio cable.
• Do not set the “DTS” option of “Audio Digital Out” under “Audio Setup”
to “On” when using an audio component that does not have a built-in
DTS decoder. In such cases, if you play a DTS audio track, a loud noise
(or no sound) will come from the speakers, possibly hurting your ears or
damaging the speakers.
• When the “DTS” option of “Audio Digital Out” under “Audio Setup” is
set to “Off,” the DVD’s DTS audio output will not be played back, even if
you connect with an optical digital cable.
z
When the DVD video is finished
1 Press the A (open) button on the PlayStation®2 console.
2 Remove the disc.
3 Press the A button.
4 Press and hold the 1 (standby)/RESET button for about two
seconds.
Note
To save your changes, be sure to eject the DVD before pressing the 1/RESET
button or turning off the console with the MAIN POWER switch. Please note that
changes will not be saved if you reset or turn off the console without first ejecting
the DVD.
US
z
Operating the DVD Player
The DVD Player can be operated in the following three ways:
• through the on-screen Control Panel
• directly with the DVD remote control
• directly with the analog controller (DUALSHOCK®2).
Notes
• Depending on the disc used, some operations may vary or may not be possible.
• The method of operation for certain functions may vary depending on whether the
IR receiver unit is inserted into the PlayStation®2 console or not.
17
Page 18
Viewing a DVD video (continued)
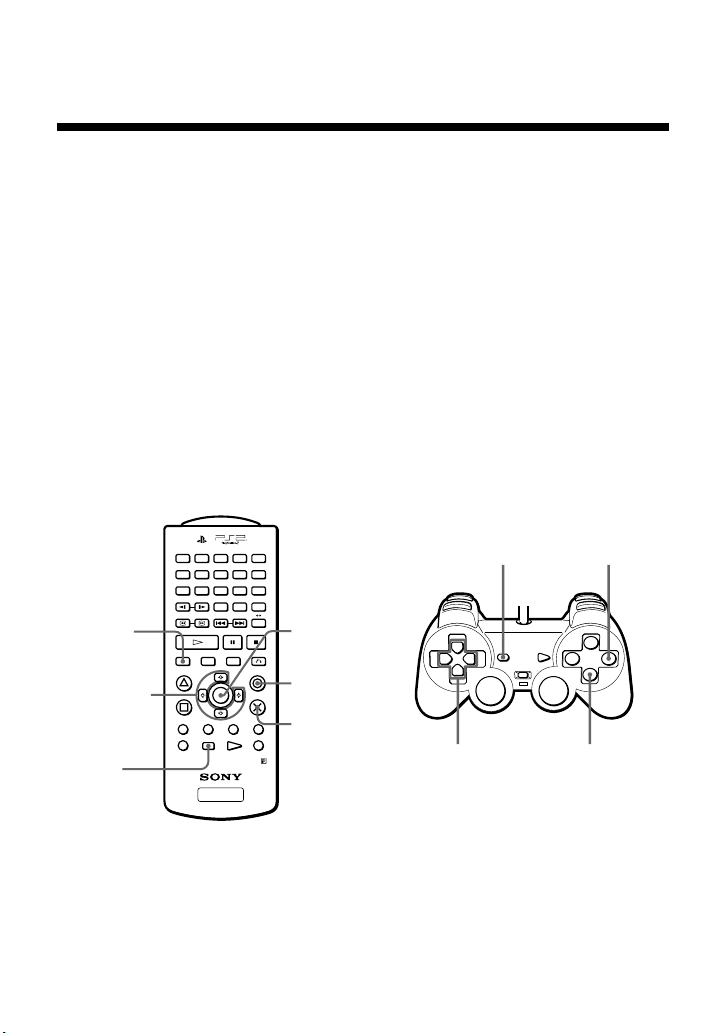
z
Operating with the Control Panel
The Control Panel can be used to search for a specific scene, to playback
scenes in a different order, to change viewing angle, and so on.
The actual functions available may vary from disc to disc.
For more information on the Control Panel, see the detailed explanations on
pages 32 through 53.
Direct item selection is also available.
A number of items can be directly selected using the buttons of the DVD
remote control or analog controller (DUALSHOCK®2). In this case, only
the selected items will be displayed. For more details, see “Operating with
the DVD remote control (for PlayStation®2)” on page 22, or “Operating
with the analog controller (DUALSHOCK®2)” on page 24.
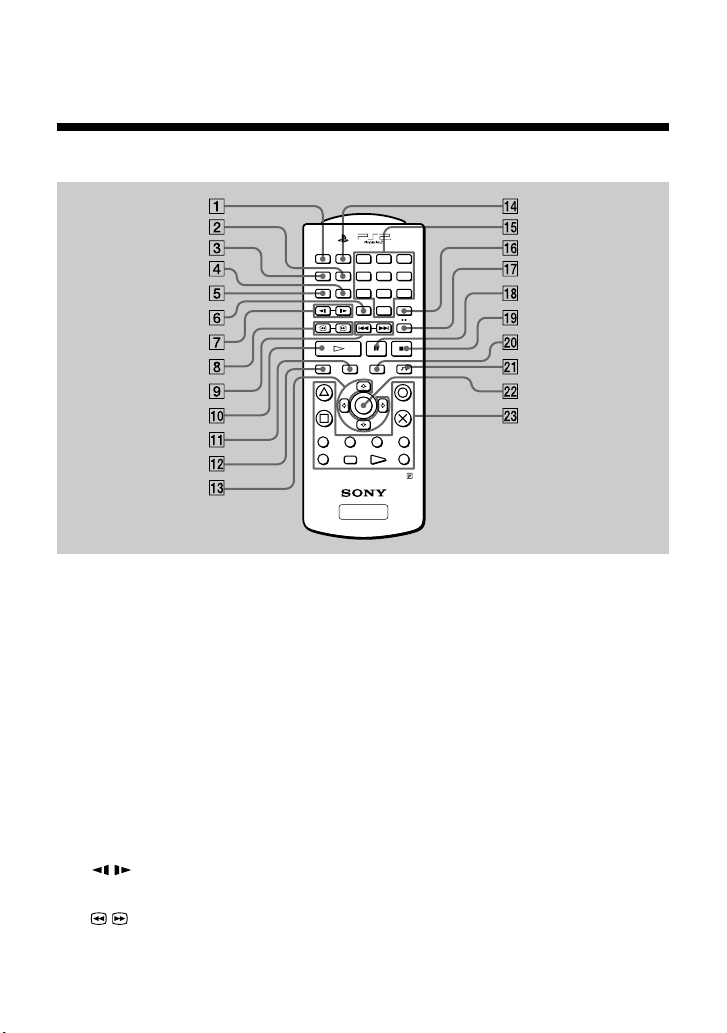
DISPLAY
button
Up, down,
right and left
directional
buttons
SELECT
button
18
AUDIO
ANGLE
SUBTITLE
SLOW
SCAN
PLAY STOPPAUSE
L
1
L
2
SHUFFLE
PROGRAM
REPEAT
CLEAR TIME
PREV A BNEXT
TITLE
ENTER
L
3
SELECT START
DVD/
PLAYSTATION
123
456
7809
DVD MENU
RETURNDISPLAY
R
3
R
1
R
2
ENTER
button
a button
(cancel)
✕ button
(enter)
SELECT
button
2
Up, down,
right and left
directional
buttons
a button
(cancel)
DUALSHOCK
✕ button
(enter)
Page 19

1 Press the DISPLAY or SELECT button of the DVD remote control.
The Control Panel is displayed on the screen.
2 Use the directional buttons to move to the desired item.
3 Press the ✕ (enter) button.
Note
The ✕ button and the ENTER button of the DVD remote control, and the ✕ button
of the analog controller (DUALSHOCK
For convenience, this manual will explain using the ✕ button only.
®2) can all be used as the ENTER button.
US
19
Page 20
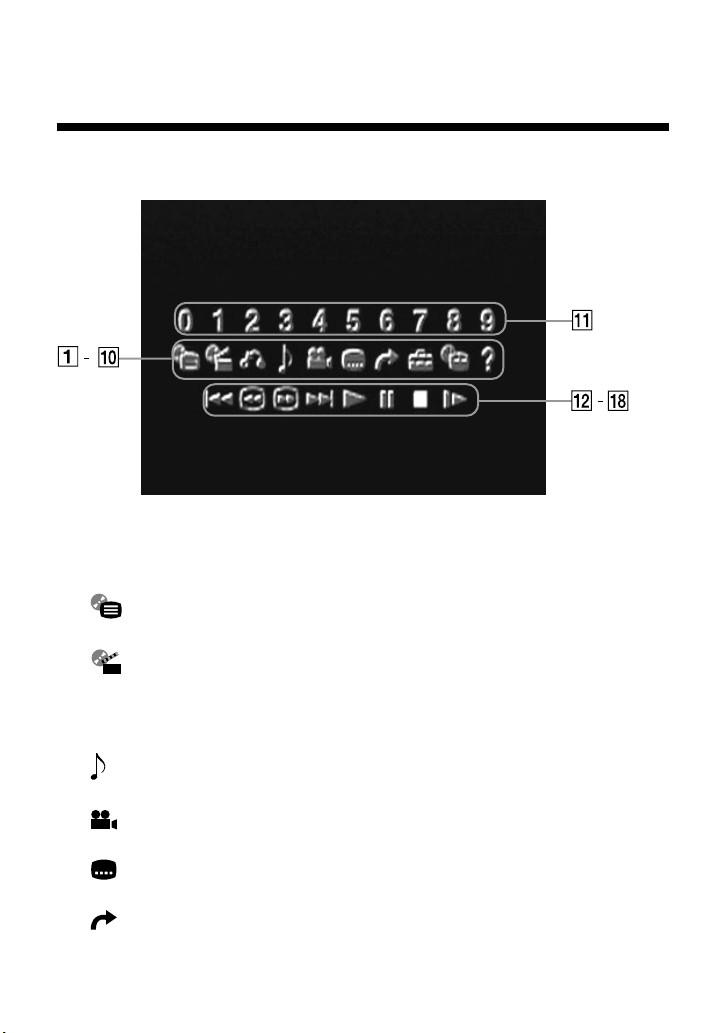
Viewing a DVD video (continued)
1 DVD Menu
Displays the DVD menu.
2 Title Menu
Displays the Title menu.
3 O Return
Returns to the previously selected screen.
4 Audio Options
Displays and changes audio options.
5 Angle Options
Displays and changes viewing angle options.
6 Subtitle Options
Displays and changes subtitle options.
7 Go to Title
You can skip to a different title or chapter by specifying the elapsed
time or selecting the title or chapter number with the number buttons.
20
Page 21
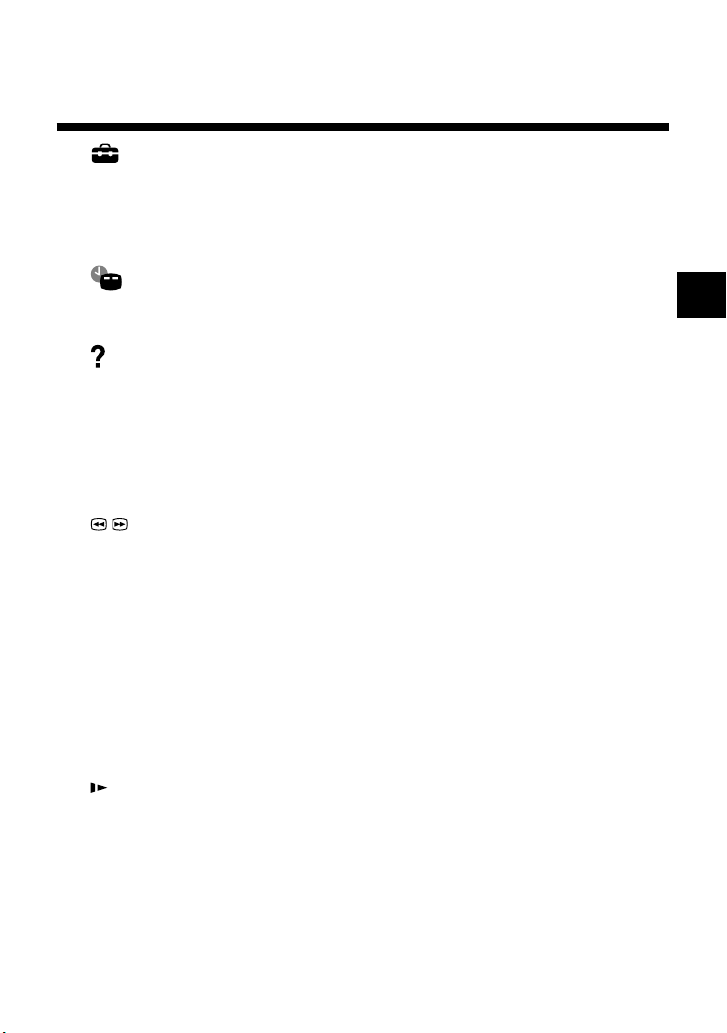
8 Setup
Using the Setup display, you can change the initial settings, adjust the
picture and sound, and set various other output options. For DVD
viewing, you can also choose a language for subtitles, restrict playback
by children, and so on.
9 Chapter Display
While playing a disc, the current title and chapter numbers can be
displayed.
0 Help
Displays the direct button functions of the analog controller
(DUALSHOCK®2).
qa Go to Chapter/Number Buttons
The desired chapter number or numerical value can be selected.
qs . Previous
Skips back to the beginning of the current or previous chapter.
qd / Search
You can locate a particular point on the DVD quickly by monitoring the
picture.
qf > Next
Skips to the beginning of the next chapter.
qg N Play
Selects playback.
qh X Pause
Momentarily stops playback.
qj x Stop
Stops playback of the DVD.
qk Slow
Selects slow playback of the on-screen image.
US
21
Page 22
Viewing a DVD video (continued)
z
Operating with the DVD remote control (for PlayStation®2)
AUDIO
SHUFFLE
123
ANGLE
PROGRAM
456
SUBTITLE
REPEAT
7809
CLEAR TIME
SLOW
SCAN
PREV A BNEXT
PLAY STOPPAUSE
DVD MENU
ENTER
L
3
SELECT START
DVD/
PLAYSTATION
RETURN
R
3
R
1
R
2
DISPLAY TITLE
L
1
L
2
1 AUDIO button
Displays and changes audio options.
2 PROGRAM button
Selects programmed playback.
3 ANGLE button
Displays and changes viewing angle options.
4 REPEAT button
Selects repeated playback.
5 SUBTITLE button
Displays and changes subtitle options.
6 CLEAR button
Clears selected numbers or playback modes.
7 / SLOW buttons
Select slow playback of the on-screen image.
8 / SCAN buttons
You can locate a particular point on the DVD quickly by monitoring the
picture.
22
Page 23

9 ./> PREV/NEXT buttons
Skip to the beginning of either the previous or next chapter.
0 H PLAY button
Selects playback.
qa TITLE button
Displays the Title menu.
qs DISPLAY button
Displays the Control Panel.
qd Up, down, right and left directional buttons
Used to select items from the on-screen display.
qf SHUFFLE button
Selects playback in a random order.
qg Number buttons
Allow for numerical selection of items in the on-screen display.
qh TIME button
Displays the playing time.
qj AyB button
Selects repeated playback of a specific section.
qk X PAUSE button
Momentarily stops playback.
ql x STOP button
Stops playback of the DVD.
w; DVD MENU button
Displays the DVD menu.
wa O RETURN button
Returns to the previously selected screen.
ws ENTER button
Enters the item selected on the screen.
wd Buttons identical to those on the analog controller
(DUALSHOCK®2) are also identical in function.
US
23
Page 24

Viewing a DVD video (continued)
z
Operating with the analog controller (DUALSHOCK®2)
DUALSHOCK
2
1 L2 button (SEARCH)
You can locate a particular point on the DVD quickly by monitoring the
picture (backward search).
2 L1 button (PREVIOUS CHAPTER)
Skips back to the beginning of the current or previous chapter.
3 Up, down, right and left directional buttons
Used to select items from the on-screen display.
4 L3 button (SUBTITLE) *
Displays and changes subtitle options.
5 SELECT button
Displays the Control Panel.
6 R2 button (SEARCH)
You can locate a particular point on the DVD quickly by monitoring the
picture (forward search).
7 R1 button (NEXT CHAPTER)
Skips to the beginning of the next chapter.
24
Page 25

8 f button (DVD MENU)
Displays the DVD menu.
9 a button (STOP)
Stops playback of the DVD.
0 ✕ button (ENTER)
Enters the item selected on the screen.
qa s button (TITLE)
Displays the Title menu.
qs R3 button (AUDIO OPTIONS) *
Displays and changes audio options.
qd START button (PLAY/PAUSE)
Selects playback or a momentary stop in play.
* When using a controller without the L3 or R3 buttons, use the on-screen Control Panel or
the DVD remote control to select among available subtitle and audio options.
US
25
Page 26
Viewing a DVD video (continued)
z
Playback from the last stopping point
(Resume Play)
1 During playback, press the x STOP or a button on the DVD
remote control to stop play.
The message, “Press [Play] to resume viewing. To start from the
beginning, press [Stop] and then [Play].” will appear on the screen.
2 Press the H PLAY button on the DVD remote control.
Playback begins from the point in step 1 where it was stopped.
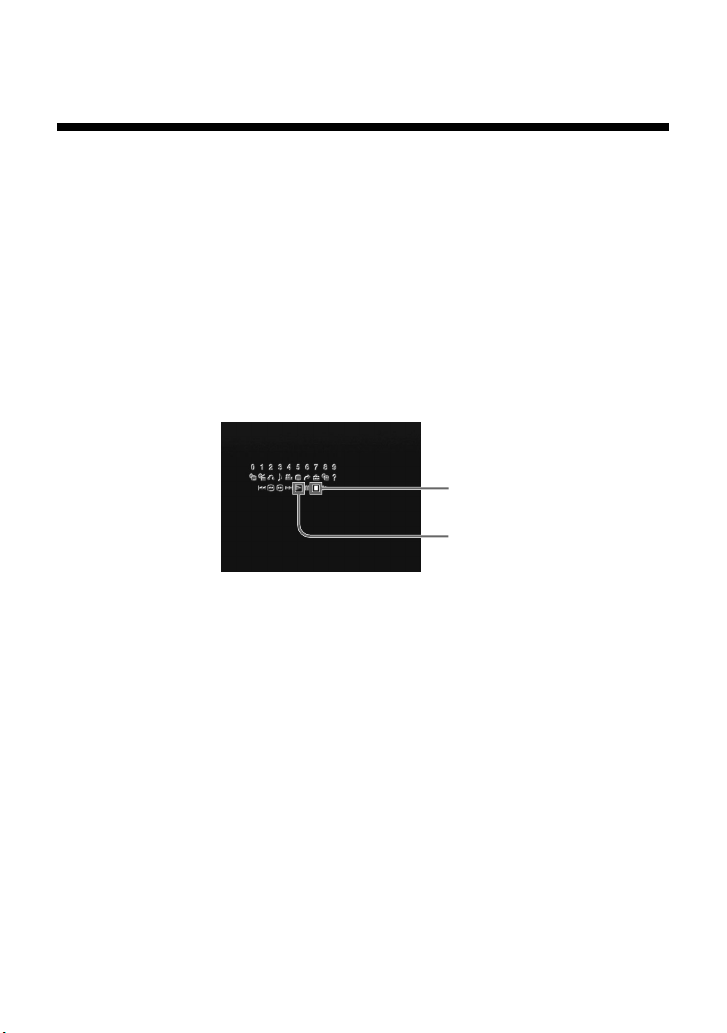
Using the Control Panel
x
N
1 During playback, use the directional buttons to move to the
x (Stop) icon of the Control Panel and press the ✕ button to
stop playback.
2 Select the N (Play) icon and press the ✕ button.
Playback begins from the point in step 1 where it was stopped.
Notes
• To play the disc from the beginning, press x one more time after stopping
playback, then press H.
• Resume Play may not be available on some DVD discs.
• Depending on where you stopped the disc, the console may resume play from a
slightly different point.
• The recording of the point where playback was stopped is cleared when:
– you open the disc tray
– you shift to standby mode by pressing and holding down the 1 (standby)/
RESET button
you turn the power off using the MAIN POWER switch on the console rear
–
– you start playback after selecting a title or chapter.
26
Page 27

z
Playback in desired order (Program Play)
You can set the DVD to play scenes in any order you like by arranging the
order of titles or chapters on this screen. This function can be accessed only
with the DVD remote control.
1 Press the PROGRAM button.
2 Select the item number and press the ✕ button.
3
Use the directional buttons to select the number of the title that
includes the desired chapter and press the ✕ button.
4 Use the directional buttons to select the number of the desired
chapter and press the ✕ button.
5 Repeat steps 3 and 4 to continue arranging the desired order of
titles.
6 Press the H PLAY button.
Program Play begins.
To end Program Play
Press the CLEAR button.
To change Program Play settings
1 In step 2, select the number of the item to be changed and press
the ✕ button.
Settings can be changed while Program Play is in use. Please note,
however, that the item currently in play cannot be changed.
2
Repeat steps 3 and 4 above to enter new settings.
US
To clear Program Play settings
To cancel all settings, select “Clear all” in step 2 at the top of this page.
To cancel settings one-by-one, stop play and use the directional buttons in
step 3 to select the item to be cleared. Press the ✕ button, select “Clear” and
press the ✕ button again to remove the item.
Using Program Play again after playback has finished
The same programmed sequence can be viewed again by pressing the
H
PLAY button.
27
Page 28

Viewing a DVD video (continued)
Repeat Play and Shuffle Play can be selected during
Program Play.
During Program Play, press the REPEAT or SHUFFLE button. For more
details, see “Playback in random order (Shuffle Play)” on page 29, or
“Repeated playback (Repeat Play)” on page 30.
Notes
• Program Play is not available on some DVD discs.
• Only the numbers of titles and chapters recorded on the disc are displayed.
• Program Play settings are cleared when:
– you open the disc tray
– you reset the console by pressing the 1 (standby)/RESET button
– you shift to standby mode by pressing and holding down the 1/RESET button
– you turn the power off using the MAIN POWER switch on the console rear.
• By setting Program Play, AyB Repeat is cancelled.
28
Page 29

z
Playback in random order (Shuffle Play)
Playback of the DVD is done in a random order with no relation to the
original title and chapter numbers. This function can be accessed only with
the DVD remote control.
Press the SHUFFLE button.
With each press of the button, the display cycles among “Title Shuffle,”
“Chapter Shuffle,” and “Shuffle Off.”
To end Shuffle Play
Select “Shuffle Off” or press the CLEAR button.
Shuffle Play can be set even when the disc is not playing.
Press the SHUFFLE button and choose the desired setting. Then press the
H PLAY button to begin playback in Shuffle Play mode.
Program Play or Repeat Play can be selected during
Shuffle Play.
During Shuffle Play, press the PROGRAM or REPEAT button. For more
details, see “Playback in desired order (Program Play)” on page 27, or
“Repeated playback (Repeat Play)” on page 30.
Notes
• Shuffle Play may not be available on some DVD discs.
• Shuffle Play is cleared when:
– you display the DVD menu or Title menu
– you open the disc tray
– you turn the power off using the MAIN POWER switch on the console rear.
• By setting Shuffle Play, AyB Repeat is cancelled.
• When “Chapter Shuffle” is selected, up to 200 chapters on the disc are played
back in random order.
US
29
Page 30

Viewing a DVD video (continued)
z
Repeated playback (Repeat Play)
All of the titles on the DVD, or one title or chapter can be repeatedly played
back with Repeat Play. When used in combination with Shuffle or Program
Play, this function will repeat the Program or Shuffle Play order. This
function can be accessed only with the DVD remote control.
Press the REPEAT button.
With each press of the button, the display cycles among “Disc Repeat,”
“Title Repeat,” “Chapter Repeat,” and “Repeat Off.”
To end Repeat Play
Select "Repeat Off" or press the CLEAR button.
Repeat Play can be set even when the disc is not playing.
Press the REPEAT button and choose the desired setting. Then press the
H PLAY button to begin playback in Repeat Play mode.
Program Play or Shuffle Play can be selected during Repeat
Play.
During Repeat Play, press the PROGRAM or SHUFFLE button. For more
details, see “Playback in desired order (Program Play)” on page 27, or
“Playback in random order (Shuffle Play)” on page 29.
Notes
• Repeat Play may not be available on some DVD discs.
• Repeat Play is cleared when:
– you open the disc tray
– you turn the power off using the MAIN POWER switch on the console rear.
• By setting Repeat Play, AyB Repeat is cancelled.
30
Page 31

z
Repeated playback of a selected
section (A
During playback, you can set a specific section of the disc for repeated
playback. This is convenient for language studies, learning a new song, and
many other applications. This function can be accessed only with the DVD
remote control.
y
B Repeat)
1 Press the AyB button at the starting point (point A) of the
section for repeated playback.
The starting point is set.
2 Press the AyB button again at the ending point (point B) of
the section for repeated playback.
The selected section begins repeated playback.
To cancel AyB Repeat
Press the CLEAR button.
Notes
•AyB Repeat may not be available on some sections of some DVD discs.
• Only one section can be selected for AyB Repeat at a time.
•AyB Repeat is cleared when:
– you press the x STOP button twice
– you display the DVD menu or Title menu
– you open the disc tray
– you turn the power off using the MAIN POWER switch on the console rear.
• Setting AyB Repeat cancels Shuffle Play, Repeat Play and Program Play.
US
31
Page 32

Using the Control Panel
This section describes various functions that can be performed using the
Control Panel.
This manual describes Control Panel operations using the DVD remote
control. When using an analog controller (DUALSHOCK®2), refer to
“Operating with the Control Panel” on page 18.
z
Using the DVD menu
Some DVDs allow you to select disc contents from a menu. When you play
such DVDs, you can select the item to be played, the language for subtitles,
the language for audio, etc., using the DVD menu.
1 Select the (DVD Menu) icon using the directional buttons
and press the ✕ button.
The DVD menu is displayed. The DVD menu content varies from disc to disc.
2 Select the item to be changed using the directional buttons and
press the ✕ button.
3 Change the setting and press the ✕ button.
4 To change other items, display the DVD menu again and repeat
from step 2.
You can select the DVD menu directly
Press the DVD MENU button on the DVD remote control.
To set the language for the DVD menu
Bring up the Setup display and select the (Language Setup) icon. For
details, refer to “Setting language options (Language Setup)” on page 43.
To return to the previous screen
Select the O (Return) icon and press the ✕ button. You cannot perform
this operation with some DVDs.
Notes
• Some DVDs do not have a DVD menu.
• Some DVDs refer to “DVD menu” simply as “Menu.”
32
Page 33

z
Displaying the Title menu
Some DVDs are recorded with multiple titles. A title is a major separation
of video recorded in the DVD. When playing such a DVD, you can use the
Title menu to select a desired title.
Select the (Title) icon using the directional buttons and
press the ✕ button.
The Title menu is displayed. The Title menu content may vary from disc to
disc.
You can select the Title menu directly
Press the TITLE button on the DVD remote control.
To return to the previous display
Select the O (Return) icon and press the ✕ button. You cannot perform
this operation with some DVDs.
Notes
• Some DVDs do not have a Title menu.
• Some DVDs refer to “Title menu” simply as “Title.”
US
33
Page 34

Using the Control Panel (continued)
z
Changing the audio language
Some DVDs are recorded with multiple languages (multilingual tracks).
You can change the language even during playback.
Select the (Audio Options) icon using the directional buttons
and press the ✕ button.
The audio language changes each time you press the ✕ button.
You can select Audio Options directly
Press the AUDIO button on the DVD remote control. The language changes
each time you press this button.
Notes
• Due to the programming on some DVDs, you may not be able to change
languages even if multiple languages are recorded on the disc.
• If you change titles, the audio language may change as well.
• When you set the “DTS” option of “Audio Digital Out” to “Off” under “Audio
Setup” in the Setup display, you cannot set the sound recording system to DTS
even when playing a DVD with DTS sound recorded.
34
Page 35

z
Changing the viewing angle
With DVDs on which multiple angles are recorded, you can change the
viewing angle on scenes for which multiple angles are available.
For example, while playing a scene of a train in motion, you can change the
view from either the front of the train, the left window, or the right window,
without having the train's movement interrupted.
Select the (Angle Options) icon using the directional
buttons and press the ✕ button.
The angle switching operation may vary from disc to disc. For details, refer
to the on-screen instructions.
You can select Angle Options directly
Press the ANGLE button on the DVD remote control. The angle changes
each time you press this button.
Notes
• The number of angles varies from disc to disc and from scene to scene. You can
choose from among the angles recorded for each individual scene.
• Due to the programming on some DVDs, you may not be able to change angles
even if multiple angles are recorded on the disc.
US
35
Page 36

Using the Control Panel (continued)
z
Displaying subtitles
With DVDs on which subtitles are recorded, you can turn the subtitles on or
off whenever you want while playing the DVD. With DVDs on which
multilingual subtitles are recorded, you can also change the subtitle
language while playing the DVD. For example, you can turn the subtitles on
as an aid for practicing a foreign language.
Select the (Subtitle Options) icon using the directional
buttons and press the ✕ button.
The language changes each time you press the ✕ button. The languages you
can select vary from disc to disc.
You can select Subtitle Options directly
Press the SUBTITLE button on the DVD remote control. The language
changes each time you press this button.
To turn the subtitles off
Press the SUBTITLE button on the DVD remote control until “Subtitles
Off” is displayed.
Notes
• When playing a DVD on which no subtitles are recorded, no subtitles can be
displayed.
• Due to the programming on some DVDs, you may not be able to display subtitles
or switch among subtitle languages even if subtitles are recorded on the disc.
• Depending on the DVD, you may not be able to turn the subtitles off.
• The type and number of languages for subtitles varies from disc to disc.
• While playing a DVD, the subtitle settings may change when you change titles.
36
Page 37

z
Selecting a specific scene for playback
When the IR receiver unit is connected to the console, you can search for a
scene to be played back by specifying the title number, chapter number and
elapsed time.
1 While playing a disc, select the (Go to Title) icon using the
directional buttons and press the ✕ button.
2 Select the appropriate item using the directional buttons and
press the ✕ button.
• Title = Specify the title number.
• Chapter = Specify the chapter number.
•C -:-:- (or T -:-:-) = Specify the elapsed time for chapter
(or title).
3 Input numbers for the fields listed above using the number
buttons of the DVD remote control.
Playback of the selected scene is started.
Note
When the IR receiver unit is connected, you cannot use the number buttons
of the Control Panel; use the number buttons on the DVD remote control.
When the IR receiver unit is not connected to the console
You can specify only the title number.
1 While playing a disc, select the (Go to Title) icon using the
directional buttons and press the ✕ button.
2 Select the number of the title to be played back using the
directional buttons.
In some cases, you can specify the chapter number using the number buttons of
the Control Panel.
US
Note
You cannot select a scene by specifying the remaining time of the chapter
or title (only elapsed time can be used).
37
Page 38

Using the Control Panel (continued)
z
Displaying title and chapter numbers
While playing or pausing a disc, select the (Chapter Display)
icon using the directional buttons and press the ✕ button.
The display is turned on or off each time you press the ✕ button.
To display the elapsed time and remaining time
Press the TIME button on the DVD remote control several times. Each time
you press this button, the display beside the title number and chapter
number changes as follows:
Elapsed time of the current chapter t Remaining time of the current
chapter t Elapsed time of the current title t Remaining time of the
current title t Display off t Title and chapter numbers t Elapsed time
of the current chapter t ...
C -:-:- = Elapsed time of the current chapter.
C – -:-:- = Remaining time of the current chapter.
T -:-:- = Elapsed time of the current title.
T – -:-:- = Remaining time of the current title.
When the IR receiver unit is not connected
You can display only the current title and chapter numbers.
38
Page 39

z
Displaying the list of direct button
functions (Help)
The functions of the direct buttons of the analog controller
(DUALSHOCK®2) are displayed in list form.
Select the (Help) icon using the directional buttons and
press the ✕ button.
To turn off the Help screen
Press the ✕ button.
US
39
Page 40

Using the Control Panel (continued)
z
Finding a particular point on a disc (Search)
While playing a disc, you can locate a particular point on the disc quickly
by using Search forward or Search backward.
Note
The Search function is not available on some DVDs.
To search for a point using Search forward or Search
backward
1 While playing a disc, select the (Search forward) or the
(Search backward) icon using the directional buttons and press
and hold down the ✕ button.
2 When you find the desired point, release the ✕ button.
You can search for a point directly
Press the or SCAN button on the DVD remote control and watch until
you find the point you are looking for. When you find the desired point,
press the H PLAY button.
Each time you press the
speeds).
or
SCAN button, the search speed changes (three
To search by slow-motion play
1 While playing a disc, select the (Slow) icon using the
directional buttons and press the ✕ button.
Slow-motion play is started.
2 When you find the desired point, select the N (Play) icon and
press the ✕ button.
Normal speed play is resumed.
You can choose slow-motion play directly
Press the or SLOW button on the DVD remote control and watch until
you find the point you are looking for. When you find the desired point,
press the H PLAY button.
40
Page 41

z
Using the Setup display
Using the Setup display, you can change the initial settings, adjust the
picture and sound and set various other output options. You can also choose
a language for subtitles, restrict playback by children, and so on. For details
on the Setup display, refer to pages 42 to 53.
1 Select the (Setup) icon using the directional buttons and
press the ✕ button.
The Setup display appears.
2 Select the category you want using the directional buttons and
press the ✕ button.
The category is selected and the menu becomes active.
3 Select the item you want to change using the directional
buttons and press the ✕ button.
The item is selected and the sub-menu becomes active.
4 Select or input changes to the sub-menu(s) as appropriate.
To save your changes, be sure to eject the DVD before pressing the
1 (standby)/RESET button or turning off the console with the MAIN
POWER switch. Please note that changes will not be saved if you reset or
turn off the console without first ejecting the DVD.
US
41
Page 42

Using the Control Panel (continued)
z
Setup display item list
The default settings for each item are underlined.
Language Setup (page 43)
OSD
DVD Menu
Audio
Subtitles
English
French
German
Italian
Spanish
Dutch
Por tuguese
English
French
German
Italian
Spanish
Dutch
Danish
Swedish
Finnish
Norwegian
Por tuguese
Russian
Chinese
Japanese
Language Options ,
(same as DVD Menu)
Audio Follow
(same as DVD Menu)
Screen Setup (page 45)
On
Off
16:9
4:3 Letter Box
4:3 PAN SCAN
Frame
Dolby Digital
DTS
TV Type
DNR
Outline Sharpening
Display
Custom Setup (page 47)
Pause Mode Auto
Parental Control ,
Audio Setup (page 51)
Audio Digital Out
DIGITAL OUT (OPTICAL)
Audio Track Auto Select Mode
DVD Volume
Off
DNR1
DNR2
+2
+1
0
–1
–2
On
Off
On
Off
On
Off
On
Off
+2
+1
Standard
42
Page 43

z
Setting language options (Language Setup)
“Language Setup” allows you to choose languages for the on-screen display
(OSD), the DVD audio and other items.
The default settings are underlined.
Select the (Language Setup) icon in the Setup display.
To save your changes, be sure to eject the DVD before pressing the
1 (standby)/RESET button or turning off the console with the MAIN
POWER switch. Please note that changes will not be saved if you reset or
turn off the console without first ejecting the DVD.
Notes
• When you select a language that is not recorded on the DVD, one of the recorded
languages is automatically selected for the “DVD Menu,” “Audio,” and
“Subtitles” settings.
• Depending on the DVD, the language you have selected for the “DVD Menu,”
“Audio,” or “Subtitles” settings may not be used.
x OSD
Selects the language for the on-screen display.
• English
• French
• German
• Italian
• Spanish
• Dutch
• Portuguese
x DVD Menu
Selects the language for the "DVD Menu" which is recorded in the DVD.
• English
• French
• German
• Italian
• Spanish
• Dutch
• Danish
•Swedish
US
43
Page 44

Using the Control Panel (continued)
• Finnish
• Norwegian
• Portuguese
• Russian
• Chinese
• Japanese
• Language Options
By choosing “Language Options,” you can select from an extensive list of
languages.
x Audio
Selects the language for the DVD audio.
• English
• French
• German
• Italian
• Spanish
• Dutch
• Danish
•Swedish
• Finnish
• Norwegian
• Portuguese
• Russian
• Chinese
• Japanese
• Language Options
By choosing “Language Options,” you can select from an extensive list of
languages.
x Subtitles
Selects the language for subtitles recorded on the DVD.
• Audio Follow *
• (same options as for “Audio” above)
* When you select “Audio Follow,” the language for subtitles automatically changes to match
the language you have selected as the audio language.
44
Page 45

z
Setting TV display options (Screen Setup)
“Screen Setup” allows you to set the aspect ratio of the connected TV, and
set other display options. The default settings are underlined.
Select the (Screen Setup) icon in the Setup display.
To save your changes, be sure to eject the DVD before pressing the
1 (standby)/RESET button or turning off the console with the MAIN
POWER switch. Please note that changes will not be saved if you reset or
turn off the console without first ejecting the DVD.
x TV Type
Sets the aspect ratio of the TV.
You can change this setting only when the DVD is stopped.
• 16:9 : Select this option when using a wide-screen TV, or a standard TV
that displays in wide mode.
• 4:3 Letter Box :
displays a wide picture with margins on the upper and lower portions of the screen.
• 4:3 PAN SCAN : Select this option when using a standard TV. Displays a
wide picture adjusted to match the height of the screen, automatically
cutting off the portions at left and right that do not fit.
16:9
4:3 Letter Box
Select this option when using a standard TV. This setting
US
4:3 PAN SCAN
45
Page 46

Using the Control Panel (continued)
Note
With some DVDs, the picture is automatically output in a predetermined aspect
ratio.
x DNR*
This feature allows for the reduction of roughness of the image to provide a
clearer picture.
• Off
• DNR1
• DNR2
* DNR is an abbreviation for Digital Video Noise Reduction.
Notes
• Although DNR2 is more effective for reducing image roughness than DNR1, in
some cases an afterimage may appear. If an afterimage appears, select “Off.”
• Depending on the DVD, the DNR function may produce limited results.
x Outline Sharpening
This function allows for the sharpening or softening of the outline of
on-screen images. The higher the value, the sharper the outline.
•+2
•+1
• 0 : Normally select this position.
•-1
•-2
x Display
This function displays or turns off the playing status information in the
upper right corner of the TV screen.
• On : When using the DVD Player, status information is displayed for
several seconds.
• Off : The status information is turned off.
46
Page 47

z
Setting viewer options (Custom Setup)
“Custom Setup” allows you to set Parental Control levels, etc.
The default settings are underlined.
Select the (Custom Setup) icon in the Setup display.
To save your changes, be sure to eject the DVD before pressing the
1 (standby)/RESET button or turning off the console with the MAIN
POWER switch. Please note that changes will not be saved if you reset or
turn off the console without first ejecting the DVD.
x Parental Control
Playback of certain DVD content can be restricted depending on the age of
the viewers.
The “Parental Control” function allows you to set this playback restriction
level.
Setting the Parental Control level
Select the (Custom Setup) icon in the Setup display.
1 Select “Parental Control” using the directional buttons and
press the ✕ button.
If a password has not been registered
The screen for registering a password is displayed.
US
47
Page 48

Using the Control Panel (continued)
If a password has already been registered
The password confirmation screen appears. Proceed with step 3.
2 Enter a four-digit password using the number buttons.
The password confirmation screen appears.
3 For confirmation, enter the password once again.
The screen for choosing a geographic region, setting Parental Control level, and
changing your password is displayed.
4 Select “Region” using the directional buttons and press the ✕
button.
48
Page 49

5 Select a geographic region using the directional buttons to set
the standard Parental Control level for that region and press
the ✕ button.
6 Select “Level” using the directional buttons and press the
✕ button.
7 Select the desired level using the directional buttons and press
the ✕ button.
The lower the value, the more strict the restriction.
US
To turn off Parental Control and play the DVD after
entering your password
Set “Level” to “Off” in step 7 and press the H PLAY button on the DVD
remote control.
49
Page 50

Using the Control Panel (continued)
To change your password
1 In step 3 of “Setting the Parental Control level,” select “Change
Password” using the directional buttons and press the ✕ button.
The screen for changing your password appears.
2 Perform steps 2 and 3 once again to register a new password.
To play a disc that is protected by Parental Control
1 Insert the disc.
Playback is started automatically. When you come to a section of the DVD that
is protected by Parental Control, the screen for entering your password appears.
2 Enter your four-digit password using the number buttons and
press the ✕ button.
Playback is resumed.
When you stop playing the DVD, the Parental Control level returns to the
original setting.
If you forget your password
Press the SELECT button and enter the four-digit number “7444” when the
“Parental Control” display asks you for your password. The old password is deleted.
Notes
• When you play DVDs that do not have the Parental Control function, playback
will not be restricted even if you set a playback restriction level on the
PlayStation
• If you do not set a password, you cannot change the Parental Control settings.
• Depending on the DVD, you may be asked to change the Parental Control level
while playing the disc. In this case, enter your password and change the level.
When you stop playing the DVD, the Parental Control level returns to the original
setting.
®2 console.
x Pause mode
Sets the picture status in pause mode.
• Auto : A picture including subjects that move dynamically can be seen without
jitter. Normally select this option.
• Frame : A picture including subjects that do not move dynamically can be seen
with high resolution.
50
Page 51

z
Setting sound options (Audio Setup)
“Audio Setup” allows you to adjust your audio settings according to the
playback conditions. The default settings are underlined.
Select the (Audio Setup) icon in the Setup display.
To save your changes, be sure to eject the DVD before pressing the
1 (standby)/RESET button or turning off the console with the MAIN
POWER switch. Please note that changes will not be saved if you reset or
turn off the console without first ejecting the DVD.
x Audio Digital Out
Switches the method of outputting audio signals when you connect the
following equipment to the DIGITAL OUT (OPTICAL) connector using an
optical digital cable (sold separately):
•a receiver (amplifier) with a digital connector
• an audio component with a built-in Dolby Digital or DTS decoder
• an MD (MiniDisc) or DAT (Digital Audio Tape) deck
For details on connection, refer to the PlayStation®2 console instruction
manual.
• DIGITAL OUT (OPTICAL)
Selects whether to output signal via the DIGITAL OUT (OPTICAL) connector.
– On : Select this when you connect with an optical digital cable (sold
separately). Normally select this option. If you select “On,” select the
appropriate settings for “Dolby Digital” and “DTS.”
– Off : Select this when you do not want sound (audio) signal to be output via the
DIGITAL OUT (OPTICAL) connector.
Note
When “Off” is selected, neither “Dolby Digital” nor “DTS” can be set.
US
51
Page 52

Using the Control Panel (continued)
• Dolby Digital
Selects the Dolby Digital signal that is output when you connect to the console
with an optical digital cable (sold separately).
– On : Select this option when you have an audio component with a built-in
Dolby Digital decoder connected to the console.
If the console is connected to an audio component without a built-in
Dolby Digital decoder, do not turn this option on. If you select this
option by mistake, when you play a Dolby Digital audio track, a loud
noise (or no sound) will come out from the speakers, possibly hurting your
ears or damaging the speakers.
Off : Select this option when you have an audio component without a built-in
–
Dolby Digital decoder connected to the console.
• DTS
Selects the DTS signal that is output when you connect to the console with an
optical digital cable.
– On : Select this option when you have an audio component with a built-in
DTS decoder connected to the console.
If the console is connected to an audio component without a built-in
DTS decoder, do not turn this option on. If you select this option by
mistake, when you play a DTS audio track, a loud noise (or no sound) will
come out from the speakers, possibly hurting your ears or damaging the
speakers.
– Off : Select this option when you have an audio component without a built-in
DTS decoder connected to the console.
x Audio Track Auto Select Mode
Gives priority to the audio track with the highest number of channels when
you play a DVD on which multiple audio formats (PCM, Dolby Digital, or
DTS) are recorded.
• On : Priority given.
•
Off : No priority given.
52
Page 53

Notes
• If you set this option to “On,” the language may change because the “Audio Track
Auto Select Mode” setting has higher priority than the “Audio” setting of
“Language Setup” (page 43).
• If the “DTS” option of “Audio Digital Out” is set to “Off” under “Audio Setup,”
the DTS audio track will not be played even if you set “Audio Track Auto Select
Mode” to “On” and the DTS audio track has the highest number of channels.
• If PCM, Dolby Digital, and DTS have the same number of channels, the console
selects PCM, Dolby Digital, and DTS in this order.
• Depending on the DVD, the audio track with priority may be predetermined. In
this case, you cannot give priority to the DTS or Dolby Digital format by selecting
“On.”
x DVD Volume
If the audio output level of the DVD is low, you can turn up the volume of
the DVD. The “DIGITAL OUT (OPTICAL)” option of “Audio Digital
Out” must be set to “Off,” to change the volume.
• +2 : Turns up the volume (maximum).
• +1 : Turns up the volume.
Standard : Original audio volume. Normally select this position.
•
Notes
• Sound clipping may occur in places where loud sound is present. If sound clipping
occurs, select “Standard.”
• If you turn up the volume too high, your ears may be injured or the speakers
damaged.
US
53
Page 54

Troubleshooting
Please go through this section if you experience
difficulty in operating the DVD remote control.
If you experience any of the following difficulties, use this
troubleshooting guide to help remedy the problem before requesting
repair. Use the troubleshooting guide in the PlayStation®2 console
instruction manual together with this troubleshooting guide.
Should any problem persist, contact our technical support line at
1-800-345-7669 for assistance.
Operation
DVD remote control doesn’t work.
, There is an obstacle between the DVD remote control and the
PlayStation®2 console.
, The distance between the DVD remote control and the console is too
long.
, You are not pointing the DVD remote control toward the IR receiver on
the IR receiver unit connected to the PlayStation®2 console.
, The batteries in the DVD remote control have run out.
, You are using the DVD remote control for another appliance.
, The IR receiver unit is not connected properly to the controller port of
the console.
, The IR receiver on the IR receiver unit is exposed to strong light such
as direct sunlight or the light from a lamp.
, You are playing PlayStation®2 or PlayStation® format software.
Some PlayStation®2 and PlayStation® format software will not function
properly when operated using the buttons on the DVD remote control.
Also, the DVD remote control will not work if you push more than one
button at a time.
, You are trying to play a DVD video without first inserting a memory
card (8MB) (for PlayStation®2) containing the DVD Player into a
MEMORY CARD slot of the PlayStation®2 console.
Another Sony DVD player responded to the DVD remote
control (for PlayStation
, The DVD remote control (for PlayStation®2) may operate other Sony
DVD players, due to its design.
54
®2).
Page 55

Picture quality
When you play a DVD video, picture noise appears.
, The settings are not correct.
When using the component AV cable (for PlayStation®2), you must set
the “Component Video Out” option of the console System
Configuration menu to “Y Cb/Pb Cr/Pr.” For details, refer to the
PlayStation®2 console instruction manual.
DVD video operation
Disc playback does not start from the beginning of the
DVD.
, Program Play, Shuffle Play, Repeat Play or AyB Repeat is set.
Refer to the instructions on pages 27-31 of this manual for the method
of clearing each of these special playback modes.
US
55
Page 56

Specifications
• Power supply : 3V DC (size AAA battery × 2)
• Dimensions : Approx. 59 × 159 × 17mm (2 1/4 × 6 1/4 × 1/2 in)
(w × h × d)
•Weight : Approx. 72g (2 1/2 oz) (not including batteries)
• Accessories : Refer to page 11.
• Battery life : About 6 months under normal operating conditions.
When the batteries run down, the DVD remote control
will not operate normally or the operating distance will
become shorter than usual. When this happens, replace
both batteries with new ones.
Design and specifications are subject to change without notice.
56
Page 57

LIMITED WARRANTY
Sony Computer Entertainment America (SCEA) warrants to the
original purchaser that this product is free from defects in material and
workmanship for a period of ninety (90) days from the date of purchase.
Upon a showing of proof of purchase, SCEA agrees for a period of
ninety (90) days to either repair or replace, at its option, the SCEA
product. You must call 1-800-345-7669 to receive instructions to
obtain repair/replacement services.
This warranty shall not be applicable and shall be void if the defect in
the SCEA product has arisen through abuse, unreasonable use,
mistreatment, neglect, or means other than from a defect in materials or
workmanship. THIS WARRANTY IS IN LIEU OF ALL OTHER
WARRANTIES AND NO OTHER REPRESENTATIONS OR
CLAIMS OF ANY NATURE SHALL BE BINDING ON OR
OBLIGATE SCEA. ANY IMPLIED WARRANTIES APPLICABLE
TO THIS PRODUCT, INCLUDING WARRANTIES OF
MERCHANTABILITY AND FITNESS FOR A PARTICULAR
PURPOSE, ARE LIMITED TO THE NINETY (90) DAY PERIOD
DESCRIBED ABOVE. IN NO EVENT WILL SCEA BE LIABLE
FOR INCIDENTAL OR CONSEQUENTIAL DAMAGES
RESULTING FROM POSSESSION, USE OR MALFUNCTION OF
THE SCEA PRODUCT.
US
SOME STATES OR PROVINCES DO NOT ALLOW LIMITATION
ON HOW LONG AN IMPLIED WARRANTY LASTS AND SOME
STATES DO NOT ALLOW THE EXCLUSION OR LIMITATIONS
OF CONSEQUENTIAL OR INCIDENTAL DAMAGES, SO THE
ABOVE LIMITATIONS OR EXCLUSION MAY NOT APPLY TO
YOU.
This warranty gives you specific legal rights, and you may also have
other rights which vary from state to state or province to province. This
warranty is valid only in the United States and Canada.
57
Page 58

Avertissement
Ce produit a été conçu dans le souci d’offrir les meilleures garanties de sécurité
possibles. Cependant, tout dispositif électrique utilisé de façon incorrecte risque de
provoquer incendie, électrocution ou blessures. Pour un fonctionnement en toute
sécurité, veillez à respecter les points suivants :
• Observez tous les avertissements, précautions et instructions.
• N’utilisez pas l’appareil s’il fonctionne de manière anormale.
• Si l’appareil ne fonctionne pas correctement, contactez notre ligne
d’assistance technique au 1-800-345-7669 pour recevoir l’assistance
nécessaire.
Symboles et leur signification
Les marques et symboles suivants sont utilisés dans plusieurs sections de ce mode
d’emploi. Veuillez prendre le temps de vous familiariser avec leur signification
avant de poursuivre la lecture de ce mode d’emploi.
Avertissement
Si les présentes directives ne sont pas respectées, des blessures graves ou la mort
résultant d’un incendie ou d’une électrocution, ou d’autres types de blessures
peuvent survenir.
Attention
Si le texte d’avertissement qui accompagne ce symbole n’est pas respecté, des
accidents pouvant entraîner des blessures ou des dommages matériels peuvent
survenir.
Notice réservée aux utilisateurs résidant aux États-Unis
Cette unité a été testée et il a été déterminé qu’elle se conforme aux normes stipulées par
l’article 15 des règlements de la FCC pour un appareil numérique de catégorie B. Ces
normes sont établies afin d’offrir une protection raisonnable contre toute possibilité de
brouillage préjudiciable dans une installation résidentielle. Cette unité produit, utilise et
peut émettre une énergie radiofréquence, et si elle n’est pas installée et utilisée
conformément aux instructions, pourrait causer un brouillage préjudiciable à la
radiocommunication. Il est toutefois impossible de garantir qu’il n’y aura pas de
brouillage préjudiciable dans une installation donnée. Si cette unité cause un brouillage
préjudiciable à la réception radio ou télévisuelle, ce qui peut être déterminé en activant
ou désactivant l’appareil, l’utilisateur est encouragé à tenter de corriger le brouillage en
prenant l’une ou plusieurs des mesures proposées suivantes :
•
Réorienter ou déplacer l’antenne de réception.
•
Éloigner l’unité du récepteur.
•
Connecter l’appareil à une prise sur un autre circuit que celui auquel le récepteur est
connecté.
•
Demander de l’aide au détaillant ou à un technicien radio/télévision spécialisé.
Tout changement ou modification apporté à l’appareil non approuvé expressément dans
ce manuel pourrait annuler le droit à opérer cet équipement.
2
Page 59

Table des matières
Av ertissement ................................ 2
Précautions .................................... 4
Disques pouvant être lus avec la
console PlayStation®2 .............. 7
Remarques sur l’utilisation .......... 8
Manipulation des disques ............. 9
Remarque sur l’effet d’image
rémanente .............................. 10
Configuration ....... 11
Avant utilisation ............................... 11
Insertion des piles dans la
télécommande DVD
(pour PlayStation
Raccordement de l’unité de récepteur
infrarouge (pour PlayStation
.................................................... 13
®2) ................... 12
®2)
Démarrage avec le
Lecteur DVD fourni ......
Installation du Lecteur DVD sur une
memory card (carte mémoire)
(8 MB) (pour PlayStation®2) ...... 14
Lecture d’un DVD vidéo ......
Reproduction d’un DVD vidéo ........ 16
Lorsque la lecture du DVD vidéo est
terminée, procédez comme suit :
.................................................... 17
Utilisation du Lecteur DVD ............. 17
Quelques mots sur le Panneau de
commandes ................................. 18
Utilisation de la télécommande DVD
(pour PlayStation
Utilisation de la manette analogique
(DUALSHOCK
Reprise de la lecture depuis le point
où vous avez arrêté le disque
(Reprise de lecture) .................... 26
Lecture dans l’ordre souhaité
(Lecture programmée) ................ 27
®2) ................... 22
®2) ..................... 24
14
16
Lecture au hasard
(Lecture aléatoire) ...................... 29
Relecture d’un passage
(Lecture répétée) ......................... 30
Lecture répétée d’un passage
sélectionné
(Lecture répétée AyB) ............ 31
Utilisation du Panneau de
commandes .................
Utilisation du menu DVD ................ 32
Affichage du menu des titres ........... 33
Changement de langue pour la
bande son .................................... 34
Modification des angles de
visionnement .............................. 35
Affichage de sous-titres ................... 36
Sélection d’une scène à reproduire .....
Affichage des numéros de titre et de
chapitre ....................................... 38
Affichage de la liste des touches
d’accès direct (Aide) .................. 39
Recherche d’un point spécifique
sur le disque (Recherche) ........... 40
Utilisation de l’écran réglages ......... 41
Options de l’écran réglages ............. 42
Sélection des options de langue
(Sélection de la langue) .............. 43
Réglage du mode d’affichage du
téléviseur (Réglage de l’écran) ... 45
Réglage personnalisé des options
(Réglage personnalisé) ............... 47
Réglage du son (Réglage audio) ...... 51
Guide de dépannage ....
32
37
54
FR
Spécifications ...... 56
GARANTIE LIMITÉE .....
57
3
Page 60

Remarques sur la télécommande DVD
Attention
Négliger les avertissements de cette notice peut entraîner
un accident avec des risques de blessures ou de
dommages matériels.
• Placez toujours l’unité de récepteur infrarouge (pour PlayStation®2) hors
de portée des enfants en bas âge. L’ingestion de l’unité de récepteur
infrarouge peut entraîner l’asphyxie ; en cas d’ingestion, contactez
immédiatement un médecin.
• Ne démontez pas et ne modifiez pas la télécommande DVD ou l’unité de
récepteur infrarouge.
• Protégez la télécommande DVD et l’unité de récepteur infrarouge contre
les sources de chaleur et de poussière, les endroits humides, la graisse, la
fumée, etc.
• Ne laissez pas la télécommande DVD ou l’unité de récepteur infrarouge
traîner sur le sol.
• Ne posez pas la télécommande DVD ou l’unité de récepteur infrarouge
sur une surface instable.
• Ne laissez pas de liquide ou de corps étrangers pénétrer dans la
télécommande DVD ou dans l’unité de récepteur infrarouge.
• La mise au rebut des matériaux d’emballages doit être effectuée de
manière appropriée.
4
Page 61

Précautions à prendre pour une utilisation sans danger des piles
Pour éviter les dangers de surchauffe, d’incendie,
d’explosion ou de fuite de l’électrolyte des piles, veuillez
observer les instructions qui suivent.
Avertissement
Ne touchez pas l’électrolyte d’une pile qui fuit.
Le contact de l’électrolyte avec les yeux ou le corps risque d’entraîner des
brûlures des yeux ou de la peau. Même si les substances étrangères ne sont pas
immédiatement visibles, la transformation chimique du produit peut entraîner des
brûlures après un certain temps.
Si vous entrez en contact avec l’électrolyte d’une pile,
prenez les mesures suivantes :
, Si l’électrolyte entre dans un œil, ne frottez pas celui-ci ; rincez-le à l’eau
courante et consultez un médecin immédiatement.
, Si l’électrolyte entre en contact avec la peau ou les vêtements, rincez
abondamment à l’eau courante. Consultez un médecin si la peau est irritée
ou douloureuse.
Placez toujours les piles hors de portée des enfants.
L’ingestion de piles peut entraîner l’asphyxie ou des blessures stomacales.
, En cas d’ingestion de pile, consultez un médecin immédiatement.
Ne jetez pas les piles dans le feu ; ne chauffez pas,
n’ouvrez pas et n’essayez pas de modifier les piles ; ne
trempez pas les piles dans l’eau ; n’essayez pas de
recharger des piles jetables.
Ces manipulations peuvent entraîner l’explosion des piles ou la fuite de leur
électrolyte, avec risque de brûlures.
FR
5
Page 62

Précautions à prendre pour une utilisation sans danger des piles (suite)
Pour éviter les dangers de surchauffe, d’incendie,
d’explosion ou de fuite de l’électrolyte des piles, veuillez
observer les instructions ci-dessous.
Attention
N’utilisez pas de piles autres que celles spécifiées (type
AAA), et remplacez toujours les piles usées par des piles
du même type. N’installez pas des piles neuves avec des
piles usées.
L’utilisation de piles de type différent peut entraîner une explosion ou une fuite et
provoquer des blessures ou des brûlures.
Insérez les piles avec les bornes “+” et “–” dans le bon
sens.
L’insertion d’une pile dont les bornes sont inversées peut entraîner un court-circuit
et un dégagement de chaleur par la pile, une explosion ou une fuite d’électrolyte,
avec risque de blessures ou de brûlures.
, Insérez toujours les piles dans le bon sens, selon schéma visible dans leur
logement.
Enlevez les piles lorsque elles ont atteint la fin de leur vie
utile, ou si la télécommande DVD doit être inutilisée
pendant longtemps.
Laisser les piles en place dans la télécommande DVD peut entraîner une fuite
d’électrolyte, avec risque de brûlures.
6
Page 63

Disques pouvant être lus avec la console PlayStation
Les disques suivants peuvent être lus sur la console PlayStation®2 :
®
2
Type de disque
Logo du disque
Contenu
Taille du disque
Durée de lecture
z
Systèmes DVD vidéo et restrictions régionales
• Cette console supporte uniquement la norme NTSC. Les DVD vidéo
enregistrés avec d’autres normes (par exemple, PAL ou SECAM) ne
peuvent pas être utilisés.
• La plupart des DVD vidéo portent des numéros de région tels que 1. Ce
numéro représente la région des lecteurs DVD sur lesquels il est possible
de lire le disque. La console ne peut pas lire les DVD vidéo qui ne portent
pas le numéro de votre région ou le chiffre 1.
Les DVD portant l’étiquette
console. Si vous essayez de lire un DVD qui ne correspond pas à votre
région, le message “Ce disque ne peut être lu en raison de restrictions
territoriales.” s’affiche. Certains DVD dépourvus de symbole de code
région risquent tout de même d’être l’objet de restrictions de zone et par
conséquent, de ne pas pouvoir être lus sur cette console.
Environ 4 heures (simple face) Environ 80 min (simple face)
Environ 8 heures (double face) Environ 160 min (double face)
12 cm 8 cm
ALL
peuvent également être utilisés sur cette
DVD vidéo
Le logo “DVD VIDEO” est une marque commerciale.
Audio et vidéo
FR
Remarque sur la lecture des DVD vidéo
Cette console lit les DVD tels qu’ils sont conçus par leurs fabricants.
Certaines fonctionnalités de lecture de la console peuvent ne pas avoir
été incorporées dans un DVD et par conséquent ne pas être disponibles
avec certains logiciels. Pour tous renseignements, veuillez vous reporter
aux instructions fournies avec le DVD.
7
Page 64

Remarques sur l’utilisation
• Certains logiciels au format PlayStation®2 ou PlayStation® peuvent ne pas
fonctionner correctement lorsqu’ils sont reproduits avec la télécommande
DVD (pour PlayStation®2).
• La télécommande DVD ne fonctionne pas si vous appuyez simultanément
sur deux touches.
• N’utilisez pas simultanément plusieurs télécommandes DVD ou unités de
récepteur infrarouge.
• Ne laissez pas la télécommande DVD ou l’unité de récepteur infrarouge
dans des endroits trop humides ou trop chauds ou exposés à la lumière
directe du soleil (températures conseillées : 5° C à 35° C/41°F à 95°F).
• Ne laissez pas de liquide ou de corps étrangers pénétrer dans la
télécommande DVD ou dans l’unité de récepteur infrarouge.
• Ne posez pas d’objets lourds sur la télécommande DVD ou l’unité de
récepteur infrarouge.
• Ne démontez pas et ne modifiez pas la télécommande DVD ou l’unité de
récepteur infrarouge.
• Ne jetez pas la télécommande DVD ou l’unité de récepteur infrarouge, ne
les laissez pas tomber et ne les soumettez pas à des chocs violents.
• Ne touchez pas les parties en métal et n’insérez pas d’objets étrangers
dans l’unité de récepteur infrarouge.
• Pour nettoyer la télécommande DVD ou l’unité de récepteur infrarouge,
utilisez un chiffon doux et sec. N’utilisez pas de diluant pour peinture, de
dissolvant ou aucun autre produit chimique.
8
Page 65

Manipulation des disques
• N’utilisez pas le Lecteur DVD avec d’autres appareils ; les appareils
pourraient être endommagés ainsi que votre vue ou votre ouïe.
• Le Lecteur DVD portant l’indication est destiné à être utilisé
uniquement avec les consoles PlayStation®2 destinées au marché
Amérique du Nord.
• Lorsque vous insérez un disque dans la console PlayStation®2, mettez-le
toujours dans le compartiment à disque avec l’étiquette vers le haut
(données vers le bas).
• Ne laissez pas les disques près d’une source de chaleur et ne les exposez
pas au rayonnement direct du soleil ou à une humidité excessive.
• Rangez les disques dans leur boîtier. Si vous les empilez ou que vous les
laissez traîner, ils risquent de se déformer.
• Ne touchez pas les faces du disque que vous manipulez (tenez-le par le
bord).
• Ne collez pas de papier ou d’autocollant sur le disque.
• N’écrivez pas sur le disque à l’aide d’un stylo, d’un feutre, etc.
• Les traces de doigts ou la poussière peuvent déformer l’image ou réduire
la qualité du son : vérifiez que le disque est propre avant de l’utiliser.
• Nettoyez les disques à l’aide d’un chiffon doux, en les essuyant
délicatement du centre vers l’extérieur.
• N’utilisez aucun solvant, produit de nettoyage pour disque ou
vaporisateur antistatique car ils peuvent endommager les disques.
• N’utilisez pas un disque craquelé, déformé ou réparé avec du ruban
adhésif. Un dysfonctionnement de la console PlayStation®2 pourrait en
résulter.
• N’insérez pas vos doigts dans le trou aménagé au centre du disque : vous
pourriez vous blesser.
• Ne jetez jamais le disque : vous pourriez l’endommager ou blesser une
personne.
• Sony Computer Entertainment America ne saurait être tenu responsable
des blessures résultant d’une manipulation incorrecte des disques.
FR
9
Page 66

Remarque sur l’effet d’image rémanente
Si vous laissez une image fixe affichée pendant trop longtemps (par
exemple, un menu DVD ou une image en pause), un effet d’image
rémanente risque de se produire sur l’écran. Cet effet se produit tout
particulièrement avec les téléviseurs de projection.
10
Page 67

Configuration
z
Avant utilisation
Vérifiez que vous êtes en possession des accessoires suivants :
• Télécommande DVD (pour PlayStation®2) (1)
• Unité de récepteur infrarouge (pour PlayStation
• Disque Lecteur DVD (1)
• Piles de type AAA (2)
• Mode d’emploi (1)
®2) (1)
Si l’un de ces éléments est manquant, veuillez contacter notre ligne
d’assistance technique au 1-800-345-7669.
FR
11
Page 68

Configuration (suite)
z
Insertion des piles dans la
télécommande DVD (pour
PlayStation®2)
Après avoir confirmé le bon sens des bornes “+” et “–” (cf. schéma visible
dans leur logement), insérez les deux piles de type AAA (incluses) dans la
télécommande DVD.
Remarques
• L’utilisation incorrecte des piles peut entraîner une fuite d’électrolyte ou une
explosion. Lors des manipulations de piles, respectez toujours les instructions
suivantes :
– Assurez-vous que les bornes “+” et “–” sont installées dans le bon sens.
– Ne mélangez pas des piles usées et neuves ou des piles de type différent.
– N’essayez pas de recharger des piles jetables.
– Retirez les piles si la télécommande DVD ne doit pas être utilisée pendant
longtemps.
– En cas de fuite de l’électrolyte des piles, éliminez soigneusement toute trace
d’électrolyte avant d’insérer des piles neuves.
• Lorsque vous utilisez la télécommande DVD, assurez-vous que le récepteur
infrarouge de l’unité de récepteur infrarouge n’est pas exposé à la lumière
directe du soleil ou à toute autre lumière forte, ce qui risque de gêner son
fonctionnement.
12
Page 69

z
Raccordement de l’unité de récepteur
infrarouge (pour PlayStation®2)
En tenant l’unité de récepteur infrarouge avec la flèche dirigée vers le haut,
insérez son connecteur dans l’un des ports de manette de la console
PlayStation®2.
Unité de récepteur
infrarouge (pour
PlayStation®2)
Récepteur infrarouge
Remarque
Avant de connecter l’unité de récepteur infrarouge pour la première fois à la console
PlayStation
®2, veillez à enlever la feuille de protection.
FR
13
Page 70

Démarrage avec le Lecteur DVD fourni
Pour utiliser toutes les fonctions de la télécommande DVD, vous devez installer
le Lecteur DVD (pour PlayStation
MB) (vendue séparément). Pour plus de détails, reportez-vous à la section des
“Remarques” à la page 15.
1
Mettez la console sous tension à l’aide de l’interrupteur
d’alimentation principal (MAIN POWER) situé à l’arrière de la console.
L’indicateur 1 (veille) s’allume en rouge et la console passe en mode de veille.
2 Appuyez sur le bouton 1 (veille)/RESET.
L’indicateur 1 devient vert, et l’écran de démarrage de la console s’affiche.
3 Appuyez sur le bouton A (ouvrir).
Le compartiment à disque s’ouvre.
4 Placez le disque sur le compartiment, étiquette vers le haut.
5 Appuyez sur le bouton A.
Le compartiment à disque se referme. Dès que le disque démarre,
l’écran de démarrage s’affiche.
Remarque
Le Lecteur DVD (pour PlayStation®2) est un logiciel qui permet la lecture de DVD
vidéos sur la console PlayStation
z
Installation du Lecteur DVD sur une
memory card (carte mémoire) (8 MB)
(pour PlayStation®2)
Le Lecteur DVD (pour PlayStation®2) doit être installé sur une memory card
(carte mémoire) (8 MB) (pour PlayStation
effacez ce Lecteur DVD, vous pouvez l’installer à nouveau en tout temps à
partir du disque fourni.
1 Introduisez une memory card (carte mémoire) (8 MB) (pour
PlayStation®2) dans la fente pour MEMORY CARD (carte
mémoire) Nº1 de la console PlayStation®2.
®2) sur une memory card (carte mémoire) (8
®2.
®2) (vendue séparément). Si vous
14
Page 71

2 Démarrez le Lecteur DVD (voir page 14).
3 Sur l’écran de démarrage, appuyez sur la touche ✕ (entrée).
L’écran Fonctions Élémentaires s’affiche.
4 Appuyez sur la touche ✕.
L’écran Menu s’affiche.
5 Sélectionnez l’option “Installer le Lecteur DVD” de l’écran Menu
et appuyez à nouveau sur la touche ✕.
Terminez l’installation en suivant les instructions affichées à l’écran.
Remarques
• Pour regarder un DVD vidéo avec le Lecteur DVD installé sur une memory
card (carte mémoire) (8 MB) (pour PlayStation
memory card (carte mémoire) (8 MB) (pour PlayStation
fentes pour MEMORY CARD (carte mémoire) de la console PlayStation
• Certaines fonctions de la télécommande DVD ne fonctionneront pas si vous
utilisez un logiciel de lecteur DVD d’une version antérieure à la version 2.00.
Reportez-vous au mode d’emploi de la console PlayStation
permettant de vérifier la version de votre logiciel de lecteur DVD.
Pour les consoles PlayStation®2 portant les numéros de modèle SCPH-30001 et
SCPH-35001
GT, vous devez installer le Lecteur DVD (version 2.00) ou une
version subséquente sur une memory card (carte mémoire) (8 MB) (pour
PlayStation®2) pour activer toutes les fonctions de la télécommande DVD.
• Avant d’installer le Lecteur DVD (pour PlayStation
(carte mémoire) (8 MB) (pour PlayStation
moins 2 200 Ko (2,2 Mo) d’espace libre.
• Insérez la memory card (carte mémoire) (8 MB) (pour PlayStation
fente pour MEMORY CARD (carte mémoire) Nº1 de la console PlayStation
L’installation n’est pas possible si la carte mémoire se trouve dans la fente pour
MEMORY CARD (carte mémoire) Nº2.
• Ne retirez pas la memory card (carte mémoire) (8 MB) (pour PlayStation
tandis que l’installation est en marche.
L’installation ne sera pas complète si la memory card (carte mémoire) est
retirée ou si la console PlayStation
®2 est mise hors tension ou réinitialisée
pendant l’installation.
®2), vous devez insérer la
®2) dans l’une des
®2.
®2 pour les détails
®2) sur une memory card
®2), vérifiez que celle-ci dispose d’au
®2) dans la
®2.
®2)
FR
15
Page 72

Lecture d’un DVD vidéo
Pour regarder un DVD vidéo avec le Lecteur DVD installé sur une memory card (carte
mémoire) (8 MB) (pour PlayStation®2), vous devez insérer la memory card (carte mémoire)
(8 MB) (pour PlayStation®2) dans l’une des fentes pour MEMORY CARD (carte mémoire)
de la console PlayStation®2.
Certaines fonctions de la télécommande DVD ne fonctionneront pas si vous utilisez un
logiciel de lecteur DVD d’une version antérieure à la version 2.00. Reportez-vous au mode
d’emploi de la console PlayStation®2 pour les détails permettant de vérifier la version de
votre logiciel de lecteur DVD.
Pour les consoles PlayStation®2 portant les numéros de modèle SCPH-30001 et SCPH35001 GT, vous devez installer le Lecteur DVD (version 2.00) ou une version subséquente
sur une memory card (carte mémoire) (8 MB) (pour PlayStation®2) pour activer toutes les
fonctions de la télécommande DVD.
Pour les instructions d’installation détaillées, consultez “Installation du Lecteur DVD sur
une memory card (carte mémoire) (8 MB) (pour PlayStation®2)” aux pages 14 et 15.
z
Reproduction d’un DVD vidéo
1
Introduisez la memory card (carte mémoire) (8 MB) (pour
PlayStation®2) (vendue séparément) – dans laquelle le Lecteur
DVD (pour PlayStation®2) a été installé – dans l’une des fentes
pour MEMORY CARD (carte mémoire) de la console PlayStation®2.
2
Mettez la console sous tension à l’aide de l’interrupteur
d’alimentation principal (MAIN POWER) situé à l’arrière de la console.
3 Appuyez sur le bouton 1 (veille)/RESET.
4 Appuyez sur le bouton A (ouvrir).
5 Placez le DVD à reproduire sur le compartiment à disque avec
l’étiquette vers le haut (données vers le bas).
6 Appuyez sur le bouton A.
Le compartiment à disque se referme et la lecture commence.
Remarques
• Ne retirez pas la memory card (carte mémoire) (8 MB) (pour PlayStation®2)
contenant le Lecteur DVD avant le début de la lecture.
• Avec certains disques, la lecture ne commence pas aussitôt mais le menu des titres
ou le menu DVD apparaît.
• Si vous appuyez sur le bouton A de la console PlayStation
DVD vidéo est terminée, l’écran de navigateur apparaît.
• Si l’alimentation est coupée pendant la lecture, les réglages effectués ne sont pas
enregistrés.
16
®2 lorsque la lecture du
Page 73

Remarques sur la reproduction du signal audio DTS d’un DVD vidéo
Le signal audio DTS peut être transmis uniquement par câble optique
numérique (vendu séparément), et non par câble audio standard.
• Lorsque vous utilisez un appareil audio non équipé d’un décodeur DTS intégré, ne
réglez pas l’option DTS de la section Sortie audio numérique sur “Activé(e)”.
Sinon, en utilisant la piste audio DTS, les haut-parleurs produiront un bruit très fort
(ou pas de son du tout), ce qui peut endommager les haut-parleurs ou votre ouïe.
• Lorsque l’option DTS de la section Sortie audio numérique du menu Réglage
audio est réglé sur “Désactivé(e)”, la sortie audio DTS du DVD ne sera pas
reproduite même si vous branchez un câble optique numérique.
z
Lorsque la lecture du DVD vidéo est
FR
terminée, procédez comme suit :
1 Appuyez sur le bouton A (ouvrir) de la console PlayStation®2.
2 Enlevez le disque.
3 Appuyez à nouveau sur le bouton A.
4 Appuyez sur le bouton 1 (veille)/RESET pendant deux secondes.
Remarque
Pour enregistrer les changements effectués, éjectez le DVD avant d’appuyer sur le
bouton 1/RESET ou de mettre la console hors tension à l’aide de l’interrupteur
d’alimentation principal (MAIN POWER). Si l’alimentation est interrompue ou que
vous réinitialisez la console avant d’éjecter le DVD, vos changements ne seront pas
enregistrés.
z
Utilisation du Lecteur DVD
Le Lecteur DVD (pour PlayStation®2) peut être piloté de trois manières suivantes :
• au moyen du Panneau de commandes (à l’écran) ;
• directement au moyen de la télécommande DVD ;
• directement au moyen de la manette analogique (DUALSHOCK®2).
Remarques
•
En fonction du disque employé, certaines opérations peuvent varier ou ne pas être possibles.
• La procédure à suivre pour certaines fonctions varie selon que l’unité de récepteur
infrarouge est insérée ou non dans la console PlayStation
®2.
17
Page 74

DUALSHOCK
2
Lecture d’un DVD vidéo (suite)
z
Quelques mots sur le Panneau de
commandes
Le Panneau de commandes peut être utilisé pour chercher une scène
particulière, reproduire des scènes dans un ordre différent, changer les
angles de visionnement, etc.
Les fonctions disponibles peuvent varier d’un disque à un autre.
Pour plus de détails sur le Panneau de commandes, voir pages 32 à 53.
La sélection directe de certaines options est également
possible.
Un certain nombre d’options peuvent être sélectionnées directement à l’aide
des touches de la télécommande DVD ou de la manette analogique
(DUALSHOCK®2). Dans ce cas, seules les options sélectionnées seront
affichées. Pour plus de détails, reportez-vous à “Utilisation de la
télécommande DVD (pour PlayStation®2)” à la page 22 ou à “Utilisation de
la manette analogique (DUALSHOCK®2)” à la page 24.
Touche
DISPLAY
Touches
directionnelles
haut, bas,
droite et gauche
Touche
SELECT
18
AUDIO
ANGLE
SUBTITLE
L
1
L
2
SLOW
SCAN
SHUFFLE
123
PROGRAM
456
REPEAT
7809
CLEAR TIME
PREV A BNEXT
PLAY STOPPAUSE
DVD MENU
TITLE
ENTER
L
3
SELECT START
DVD/
PLAYSTATION
Touche
SELECT
Touche
ENTER
RETURNDISPLAY
Touche a
(annuler)
Touche a
(annuler)
R
3
R
1
Touche ✕
(entrée)
R
2
Touches
directionnelles
haut, bas, droite
et gauche
Touche ✕
(entrée)
Page 75

1
Appuyez sur la touche DISPLAY ou SELECT de la télécommande DVD.
Le Panneau de commandes est affiché à l’écran.
2 Utilisez les touches directionnelles pour sélectionner l’option
souhaitée.
3 Appuyez sur la touche ✕.
Remarque
Les touches ✕ et ENTER de la télécommande DVD, et la touche ✕ de la manette
analogique (DUALSHOCK
manuel décrit uniquement l’utilisation de la touche
®2) peuvent être utilisées comme touche ENTER. Ce
✕.
FR
19
Page 76

Lecture d’un DVD vidéo (suite)
1 Menu DVD
Affiche le menu DVD.
2 Menu des titres
Affiche le menu des titres.
3 O Retour
Réaffiche l’écran précédent.
4 Choix audio
Affiche et change les options audio disponibles.
5 Choix d’angle de caméra
Affiche et change les angles de visionnement disponibles.
6 Choix des sous-titres
Affiche et change les options de sous-titres disponibles.
7 Aller au titre
Vous permet de passer à un titre ou à un chapitre différent en spécifiant
le temps écoulé ou en choisissant le titre ou un numéro de chapitre avec
les boutons numérotées.
20
Page 77

8 Réglages
L’écran réglages permet de modifier la configuration initiale, de régler
l’image et le son et de paramétrer les différentes options de sortie. Pour
la lecture d’un DVD, vous pouvez également choisir la langue des soustitres, les restrictions de lecture pour les enfants, etc.
9 Affichage du chapitre
Pendant la lecture du disque, les numéros du titre et du chapitre actuels
peuvent être affichés.
0 Aide
Affiche la liste des fonctions associées aux touches d’accès direct de la
manette analogique (DUALSHOCK®2).
qa Aller au chapitre/touches numérotées
Permet de sélectionner un numéro de chapitre ou une valeur numérique.
qs . Précédent
Permet de revenir au début du chapitre actuel ou précédent.
qd / Recherche (arrière/avant)
Vous permet de localiser rapidement un point spécifique sur le DVD en
contrôlant l’image.
qf > Suivant
Permet de passer au début du chapitre suivant.
qg N Lecture
Démarre la lecture.
qh X Pause
Interrompt momentanément la lecture.
qj x Arrêt
Arrête la lecture du DVD.
qk Ralenti
Effectue la lecture au ralenti des images affichées à l’écran.
FR
21
Page 78

Lecture d’un DVD vidéo (suite)
z
Utilisation de la télécommande DVD (pour PlayStation®2)
AUDIO
SHUFFLE
123
ANGLE
PROGRAM
456
SUBTITLE
REPEAT
7809
CLEAR TIME
SLOW
SCAN
PREV A BNEXT
PLAY STOPPAUSE
DVD MENU
ENTER
L
3
SELECT START
DVD/
PLAYSTATION
RETURN
R
3
R
1
R
2
DISPLAY TITLE
L
1
L
2
1 Touche AUDIO
Affiche et change les options audio disponibles.
2 Touche PROGRAM
Sélectionne la lecture programmée.
3 Touche ANGLE
Affiche et change les angles de visionnement disponibles.
4 Touche REPEAT
Sélectionne la lecture répétée.
5 Touche SUBTITLE
Affiche et change les options de sous-titres disponibles.
6 Touche CLEAR
Efface les numéros ou les modes de lecture sélectionnés.
7 Touches / SLOW
Effectue la lecture au ralenti des images affichées à l’écran.
8 Touches / SCAN
Permet la recherche sur le DVD en regardant l’écran.
22
Page 79

9 Touches ./> PREV/NEXT
Permet de revenir au début du chapitre précédent ou de passer au début
du chapitre suivant.
0 Touche H PLAY
Déclenche la lecture.
qa Touche TITLE
Affiche le menu des titres.
qs Touche DISPLAY
Affiche le Panneau de commandes.
qd Touches directionnelles haut, bas, droite et gauche
Utilisées pour sélectionner les options affichées à l’écran.
qf Touche SHUFFLE
Sélectionne la lecture aléatoire.
qg Touches numérotées
Permet de sélectionner les options affichées à l’écran par leur numéro.
qh Touche TIME
Affiche le temps de lecture.
qj Touche AyB
Sélectionne la lecture répétée du passage souhaité.
qk Touche X PAUSE
Interrompt momentanément la lecture.
ql Touche x STOP
Arrête la lecture du DVD.
w; Touche DVD MENU
Affiche le menu DVD.
wa Touche O RETURN
Réaffiche l’écran précédant.
ws Touche ENTER
Valide la sélection d’options effectuée à l’écran.
wd Les touches identiques à celles de la manette analogique
(DUALSHOCK®2) assurent également la même fonction.
FR
23
Page 80

Lecture d’un DVD vidéo (suite)
z
Utilisation de la manette analogique
(DUALSHOCK®2)
DUALSHOCK
2
1 Touche L2 (RECHERCHE ARRIÈRE)
Le passage souhaité du DVD peut être recherché en contrôlant l’écran
(recherche arrière).
2 Touche L1 (PRÉCÉDENT)
Revient au début du chapitre actuel ou précédent.
3 Touches directionnelles haut, bas, droite et gauche
Utilisées pour sélectionner les options affichées à l’écran.
4 Touche L3 (CHOIX DES SOUS-TITRES)*
Affiche et change les langues disponibles pour les sous-titres.
5 Touche SELECT
Affiche le Panneau de commandes
6 Touche R2 (RECHERCHE AVANT)
Le passage souhaité du DVD peut être recherché en contrôlant l’écran
(recherche avant)
7 Touche R1 (SUIVANT)
Passe au chapitre suivant.
24
Page 81

8 Touche f (MENU DVD)
Affiche le menu DVD.
9 Touche a (ANNULER/ARRÊT)
Arrête la lecture.
0 Touche ✕ (ENTRÉE)
Valide la sélection d’options effectuée à l’écran.
qa Touche s (TITRE)
Affiche le menu des titres.
qs Touche R3 (CHOIX AUDIO)*
Affiche et change les options audio disponibles sur le DVD.
qd Touche START (LECTURE/PAUSE)
Sélectionner la lecture ou l’interruption momentanée de la lecture.
* Si vous disposez d’une manette sans touches L3 ou R3, utilisez le Panneau de commandes
affiché à l’écran ou la télécommande DVD pour sélectionner les options requises de soustitres et de bande son.
FR
25
Page 82

Lecture d’un DVD vidéo (suite)
z
Reprise de la lecture depuis le point où vous
avez arrêté le disque (Reprise de lecture)
1 Pendant la lecture, appuyez sur la touche x STOP ou a de la
télécommande DVD pour arrêter la lecture ; le message suivant
apparaît :
“Appuyez sur [Lecture] pour reprendre la lecture. Pour recommencer au
début, appuyez sur [Arrêt], puis sur [Lecture].”
2 Appuyez sur la touche H PLAY de la télécommande DVD.
La lecture reprend à partir du point où vous l’avez arrêtée à l’étape 1.
Utilisation du Panneau de commandes
x
N
1 Pendant la lecture, utilisez les touches directionnelles pour
sélectionner l’icône x (Arrêt) du Panneau de commandes et
appuyez sur la touche ✕ pour arrêter la lecture.
2 Sélectionnez l’icône N (Lecture) et appuyez sur la touche ✕.
La lecture commence à partir du point où la lecture avait été arrêtée à l’étape 1.
Remarques
• Lorsque vous lisez le disque depuis le début, appuyez à nouveau sur x après avoir
arrêté la lecture et puis appuyez sur H.
• Certains DVD ne disposent pas de la fonction Reprise de lecture.
• Suivant le point d’arrêt du DVD, il est possible que la reprise de la lecture soit
légèrement décalée.
• Dans les cas suivants, l’enregistrement du point d’arrêt de la lecture sera effacé :
– Vous ouvrez le compartiment à disque.
– Vous passez en mode de veille en maintenant enfoncé le bouton 1 (veille)/
RESET.
– Vous mettez la console hors tension à l’aide de l’interrupteur d’alimentation
principal (MAIN POWER).
– Vous lancez la lecture après avoir sélectionné un titre ou un chapitre.
26
Page 83

z
Lecture dans l’ordre souhaité
(Lecture programmée)
Vous pouvez effectuer la lecture des scènes dans l’ordre de votre choix en
modifiant la séquence des titres ou des chapitres affichés sur cet écran.
Notez que cette fonction peut être exécutée uniquement à partir de la
télécommande DVD.
1 Appuyez sur la touche PROGRAM.
2 Sélectionnez le numéro du passage et appuyez sur la touche ✕.
3
Utilisez les touches directionnelles pour sélectionner le numéro du
titre qui contient le chapitre souhaité et appuyez sur la touche ✕.
4 Utilisez les touches directionnelles pour sélectionner le numéro
de chapitre souhaité et appuyez sur la touche ✕.
5 Répétez les opérations 3 et 4 pour continuer à modifier l’ordre
des titres.
6 Appuyez sur la touche H PLAY.
La lecture programmée commence.
Pour arrêter le programme
Appuyez sur la touche CLEAR.
Pour modifier les réglages de lecture programmée
1 A l’étape 2, sélectionnez le numéro de l’élément à modifier et
appuyez sur la touche ✕.
(Les réglages peuvent être changés au cours de la lecture programmée ;
toutefois, l’élément en cours de lecture ne peut pas être modifié.)
2
Pour entrer les nouveaux réglages, répétez les étapes 3 et 4
cidessus.
FR
Pour annuler les réglages de lecture programmée
Pour annuler tous les réglages, sélectionnez “Effacer tout” à l’étape 2 au
haut de cette page. Pour annuler un réglage, arrêtez la lecture et utilisez les
touches directionnelles à l’étape 3 pour sélectionner l’élément à annuler,
appuyez sur la touche ✕, sélectionnez “Suppression” et appuyez à nouveau
sur la touche ✕.
Pour reprendre la lecture programmée lorsque la lecture
est terminée
Pour revoir le même programme, il suffit d’appuyer sur la touche H PLAY.
27
Page 84

Lecture d’un DVD vidéo (suite)
La lecture répétée et la lecture aléatoire peuvent être
sélectionnées pendant la lecture programmée.
Pendant la lecture programmée, appuyez sur la touche REPEAT ou
SHUFFLE. Pour plus de détails, reportez-vous à “Lecture au hasard
(Lecture aléatoire)” à la page 29, ou à “Relecture d’un passage (Lecture
répétée)” à la page 30.
Remarques
• La lecture programmée n’est pas disponible sur certains disques DVD.
• Seulement les numéros des titres et des chapitres enregistrés sur le disque seront
affichés.
• Les réglages de lecture programmée sont effacés dans les cas suivants :
– Vous ouvrez le compartiment à disque.
– Vous appuyez sur le bouton 1 (veille)/RESET et la console est réinitialisée.
– Vous maintenez enfoncé le bouton 1/RESET et la console est mise en mode de
veille.
– Vous mettez la console hors tension à l’aide de l’interrupteur d’alimentation
principal (MAIN POWER).
• Lorsque vous sélectionnez la lecture programmée, la lecture répétée AyB est
annulée.
28
Page 85

z
Lecture au hasard (Lecture aléatoire)
La lecture du DVD se fait par sélection aléatoire, sans référence aux
numéros originaux des chapitres et des titres. Notez que cette fonction peut
être lancée uniquement à partir de la télécommande DVD.
Appuyez sur la touche SHUFFLE.
A chaque pression sur la touche, l’affichage change cycliquement entre
“Sélection aléatoire des titres” “Sélection aléatoire des chapitres” et
“Sélection aléatoire désactivée”.
FR
Pour arrêter la lecture aléatoire
Sélectionnez “
sélection aléatoire désactivée
” ou appuyez sur la touche CLEAR.
La sélection aléatoire peut être réglée même lorsque le
disque n’est pas en service.
Appuyez sur la touche SHUFFLE, choisissez la sélection souhaitée et appuyez sur la
touche H PLAY : la lecture aléatoire commence.
Durant la lecture aléatoire vous pouvez choisir lecture
programmée ou lecture répétée.
Pendant la lecture aléatoire, appuyez sur les touches PROGRAM ou
REPEAT. Pour plus de détails, reportez-vous à “Lecture dans l’ordre
souhaité (Lecture programmée)” à la page 27 ou à “Relecture d’un passage
(Lecture répétée)” à la page 30.
Remarques
• La lecture aléatoire n’est pas possible sur certains disques DVD.
• La lecture aléatoire sera annulée dans les cas suivants :
– Vous affichez le menu DVD ou le menu des titres.
– Vous ouvrez le compartiment à disque.
– Vous mettez la console hors tension à l’aide de l’interrupteur d’alimentation
principal (MAIN POWER).
• Lorsque la lecture aléatoire est sélectionnée, la lecture répétée AyB est annulée.
• Lorsque “Lecture aléatoire des chapitres” est sélectionné, jusqu’à 200 chapitres du
disque seront lus au hasard.
29
Page 86

Lecture d’un DVD vidéo (suite)
z
Relecture d’un passage (Lecture répétée)
Tous les titres sur le DVD, ou un titre ou chapitre peut être repris plusieurs
fois en utilisant la lecture répétée. Utilisée en combinaison avec la lecture
aléatoire ou la lecture programmée, la lecture répétée permet de répéter les
passages dans l’ordre de lecture programmée ou aléatoire. Notez que cette
fonction peut être lancée uniquement à partir de la télécommande DVD.
Appuyez sur la touche REPEAT.
A chaque pression sur la touche, l’affichage change cycliquement entre
“Répétition du disque”, “Répétition d’un titre”, “Répétition d’un chapitre”
et “Répétition désactivée”.
Pour arrêter la lecture répétée
Sélectionnez “Répétition désactivée” ou appuyez sur la touche CLEAR.
La lecture répétée peut être réglée même lorsque le
disque n’est pas en service.
Appuyez sur la touche REPEAT, choisissez la sélection souhaitée et
appuyez sur la touche H PLAY : la lecture répétée commence.
La lecture programmée et la lecture aléatoire sont possibles
pendant la lecture répétée.
Pendant la lecture répétée, appuyez sur les touches PROGRAM ou
SHUFFLE. Pour plus de détails, reportez-vous à “Lecture dans l’ordre
souhaité (Lecture programmée)” à la page 27 ou à “Lecture au hasard
(Lecture aléatoire)” à la page 29.
Remarques
• La lecture répétée n’est pas possible sur certains disques DVD.
• La lecture répétée sera annulée dans les cas suivants :
– Vous ouvrez le compartiment à disque.
– Vous mettez la console hors tension à l’aide de l’interrupteur d’alimentation
principal (MAIN POWER).
• Lorsque la lecture répétée est sélectionnée, la lecture répétée AyB est annulée.
30
Page 87

z
Lecture répétée d’un passage
sélectionné (Lecture répétée A
Pendant la lecture, un passage donné peut être répété, ce qui est très
pratique pour l’étude des langues, pour apprendre les paroles d’une chanson
et pour de nombreuses autres applications. Notez que cette fonction peut
être lancée uniquement à partir de la télécommande DVD.
y
B)
1 Appuyez sur la touche AyB au point de début (point A) du
passage à lire de façon répétée
Ce point est enregistré.
2 Appuyez à nouveau sur la touche AyB au point de fin (point B)
du passage à lire de façon répétée
La lecture répétée du passage commence.
Pour arrêter la lecture répétée AyB
Appuyez sur la touche CLEAR.
Remarques
• La lecture répétée AyB n’est pas possible pour certains passages de certains
disques DVD.
• Un seul passage peut être sélectionné pour la lecture répétée AyB.
• La lecture répétée AyB sera annulée dans les cas suivants :
– Appuyez deux fois sur la touche x STOP.
– Vous affichez le menu DVD ou le menu des titres.
– Vous ouvrez le compartiment à disque.
– Vous mettez la console hors tension à l’aide de l’interrupteur d’alimentation
principal (MAIN POWER).
• Lorsque la lecture répétée AyB est sélectionnée, la lecture aléatoire, la lecture
répétée et la lecture programmée sont annulées.
FR
31
Page 88

Utilisation du Panneau de commandes
Cette section décrit les fonctions accessibles à partir du Panneau de commandes.
Ce mode d’emploi décrit les opérations du Panneau de commandes possibles avec
la télécommande DVD. Si vous utilisez la manette analogique (DUALSHOCK®2
reportez-vous à “Quelques mots sur le Panneau de commandes” à la page 18.
z
Utilisation du menu DVD
Certains DVD permettent de sélectionner le contenu du disque à partir d’un menu.
Lorsque vous reproduisez ces DVD, vous pouvez sélectionner l’élément à reproduire,
la langue des sous-titres, la langue de la bande son, etc., à l’aide du menu DVD.
1 Sélectionnez l’icône (Menu DVD) à l’aide des touches
directionnelles et appuyez sur la touche ✕.
Le contenu du menu DVD qui s’affiche peut varier d’un disque à un autre.
2 Sélectionnez l’élément à modifier à l’aide des touches
directionnelles et appuyez sur la touche ✕.
3 Modifiez le réglage selon le besoin et appuyez sur la touche ✕.
4 Pour modifier d’autres éléments, réaffichez le menu DVD et
répétez la procédure à partir de l’étape 2.
Vous pouvez également afficher le menu DVD directement
Appuyez sur la touche DVD MENU de la télécommande.
),
Pour sélectionner la langue du menu DVD
Ouvrez l’écran des réglages et choisissez (Sélection de la langue). Pour
plus de détails, reportez-vous à “Sélection des options de langue (Sélection
de la langue)” à la page 43.
Pour réafficher l’écran précédent
Sélectionnez l’icône O (Retour) et appuyez sur la touche ✕. Notez que
certains DVD ne supportent pas cette opération.
Remarques
• Certains DVD ne comportent pas de menu DVD.
• Certains DVD désignent leur “menu DVD” sous la forme “Menu.”
32
Page 89

z
Affichage du menu des titres
Certains DVD contiennent plusieurs titres. Un titre correspond à une section
importante de la vidéo enregistrée sur le DVD. Lorsque vous reproduisez un
tel DVD, il est possible de sélectionner le titre que vous souhaitez lire à
l’aide du menu des titres.
Sélectionnez l’icône (Menu des titres) à l’aide des
touches directionnelles et appuyez sur la touche ✕.
Le contenu du menu des titres qui s’affiche peut varier d’un disque à un
autre.
Vous pouvez également afficher le menu des titres
directement
Appuyez sur la touche TITLE de la télécommande.
Pour réafficher l’écran précédent
Sélectionnez l’icône O (Retour) et appuyez sur la touche ✕. Notez que
certains DVD ne supportent pas cette opération.
Remarques
• Certains DVD n’offrent pas de menu des titres.
• Certains DVD désignent leur “menu des titres” sous la forme “Titres.”
FR
33
Page 90

Utilisation du Panneau de commandes (suite)
z
Changement de langue pour la bande son
Certains DVD sont enregistrés avec plusieurs langues (plages multilingues),
ce qui permet de changer de langue avant ou pendant la lecture.
Sélectionnez l’icône (Choix audio) à l’aide des touches
directionnelles et appuyez sur la touche ✕.
La langue de la bande son change à chaque pression sur la touche ✕.
Vous pouvez également sélectionner Choix audio
directement
Appuyez sur la touche AUDIO de la télécommande DVD. La langue
change à chaque pression sur cette touche.
Remarques
• Avec certains DVD, la sélection de la langue pour la bande son n’est pas possible,
même si plusieurs langues sont enregistrées.
• Lorsque vous changez de titre, il est possible que la langue de la bande son change
en conséquence.
• Lorsque vous réglez l’option “DTS” de “Sortie audio numérique” sur
“Désactivé(e)” (zone “Réglage audio” de l’affichage des réglages), vous ne
pouvez pas sélectionner le système d’enregistrement sonore DTS même si vous
reproduisez un DVD avec son DTS.
34
Page 91

z
Modification des angles de
visionnement
Avec les DVD où l’on a enregistré plusieurs angles de prises de vue, vous
pouvez changer l’angle de visionnement des scènes offrant cette option.
Par exemple, pendant la reproduction d’une scène présentant un train en
mouvement, il est possible de changer votre point de vue en passant
indifféremment de l’avant du train à la fenêtre gauche ou droite, sans avoir à
interrompre le mouvement du train.
Sélectionnez l’icône (Choix d’angle de caméra) à l’aide
des touches directionnelles et appuyez sur la touche ✕.
L’opération de changement d’angle varie d’un disque à un autre : suivez les
instructions affichées à l’écran.
Vous pouvez également sélectionner un angle de
visionnement directement
Appuyez sur la touche ANGLE de la télécommande DVD. L’angle change
à chaque pression sur cette touche.
Remarques
• Le nombre d’angles que vous pouvez sélectionner varie d’un disque à un autre et
d’une scène à une autre.
• Avec certains DVD, le changement d’angle n’est pas possible, même si plusieurs
angles sont enregistrés.
FR
35
Page 92

Utilisation du Panneau de commandes (suite)
z
Affichage de sous-titres
Avec les DVD sous-titrés, il est possible d’activer et de désactiver
l’affichage des sous-titres à tout moment pendant la lecture. Avec les DVD
sous-titrés en plusieurs langues, vous pouvez également modifier la langue
des sous-titres. Cette fonction permet par exemple d’apprendre plus
facilement une langue étrangère.
Sélectionnez l’icône (Choix des sous-titres) à l’aide des
touches directionnelles et appuyez sur la touche ✕.
La langue change à chaque pression sur la touche ✕. Les langues
disponibles varient d’un disque à un autre.
Vous pouvez également sélectionner Choix des soustitres directement
Appuyez sur la touche SUBTITLE de la télécommande DVD. La langue
change à chaque pression sur cette touche.
Pour désactiver les sous-titres
Appuyez plusieurs fois sur la touche SUBTITLE de la télécommande DVD,
jusqu’à ce que le message “Sous-titres désactivés” s’affiche.
Remarques
• Vous ne pouvez pas afficher de sous-titres pour un DVD sur lequel des sous-titres
n’ont pas été enregistrés.
• Avec certains DVD, l’affichage des sous-titres est inopérant, même si des soustitres ont été enregistrés.
• Avec certains DVD, vous ne pouvez pas désactiver les sous-titres.
• Le nombre et la sélection des langues de sous-titres varient d’un disque à un autre.
• Pendant la lecture d’un DVD, la sélection des sous-titres peut changer lorsque
vous changez de titre.
36
Page 93

z
Sélection d’une scène à reproduire
Lorsque l’unité de récepteur infrarouge est branchée à la console, vous
pouvez rechercher la scène à reproduire en précisant le numéro du titre, le
numéro du chapitre et le temps de lecture.
1 Pendant la lecture d’un disque, sélectionnez l’icône (Aller au
titre) à l’aide des touches directionnelles et appuyez sur la
touche ✕.
2 Sélectionnez l’élément requis à l’aide des touches
directionnelles et appuyez sur la touche ✕.
• Titre = Spécifie le numéro du titre.
• Chapitre = Spécifie le numéro du chapitre.
•
C -:-:- (ou T -:-:-) = Spécifie le temps écoulé du chapitre (ou du titre).
3 Sélectionnez un numéro à l’aide des touches numérotées de la
télécommande DVD : la lecture de la scène choisie commence.
Remarque
Lorsque l’unité de récepteur infrarouge est branchée, vous ne pouvez pas
utiliser les touches numérotées du Panneau de commandes ; utilisez les
touches numérotées de la télécommande DVD.
Lorsque l’unité de récepteur infrarouge n’est pas
branchée à la console
Vous pouvez spécifier seulement le numéro du titre.
FR
1 Pendant la lecture d’un disque, sélectionnez l’icône (Aller au
titre) à l’aide des touches directionnelles et appuyez sur la
touche ✕.
2 Sélectionnez le numéro du titre à reproduire à l’aide des
touches directionnelles.
Dans certains cas, vous pouvez spécifier le numéro du chapitre à l’aide des
touches numérotées du Panneau de commandes.
Remarque
Vous ne pouvez pas sélectionner une scène en utilisant le temps restant du
chapitre ou du titre (seul le temps écoulé peut être spécifié).
37
Page 94

Utilisation du Panneau de commandes (suite)
z
Affichage des numéros de titre et de chapitre
Pendant la lecture d’un disque ou pendant une pause,
sélectionnez l’icône (Affichage du chapitre) à l’aide des
touches directionnelles et appuyez sur la touche ✕.
L’affichage est activé ou désactivé à chaque pression sur la touche ✕.
Pour afficher le temps écoulé et le temps restant
Appuyez plusieurs fois sur la touche TIME de la télécommande DVD. A
chaque pression sur cette touche, l’affichage situé en face du numéro de
titre et du numéro de chapitre change comme suit :
Temps écoulé du chapitre actuel t Temps restant du chapitre actuel t
Temps écoulé du titre actuel t Temps restant du titre actuel t Affichage
désactivé t Numéros du titre et du chapitre t Temps écoulé du chapitre
actuel t ...
C -:-:- = Temps écoulé du chapitre actuel.
C – -:-:- = Temps restant du chapitre actuel.
T -:-:- = Temps écoulé du titre actuel.
T – -:-:- = Temps restant du titre actuel.
Lorsque l’unité de récepteur infrarouge n’est pas
branchée à la console
Vous pouvez afficher les numéros actuels de titre et de chapitre.
38
Page 95

z
Affichage de la liste des touches
d’accès direct (Aide)
Les fonctions des touches d’accès direct de la manette analogique
(DUALSHOCK®2) sont affichées sous forme de liste.
Sélectionnez l’icône (Aide) à l’aide des touches
directionnelles et appuyez sur la touche ✕.
Pour fermer cet écran d’aide
Appuyez à nouveau sur la touche ✕.
FR
39
Page 96

Utilisation du Panneau de commandes (suite)
z
Recherche d’un point spécifique sur le disque (Recherche)
Pendant la lecture d’un disque, vous pouvez rechercher rapidement un point
particulier à l’aide de la recherche avant ou de la recherche arrière.
Remarque
Avec certains DVD, ce type de recherche est impossible.
Recherche d’un point en avant ou en arrière
1 Pendant la lecture du disque, sélectionnez l’icône (Recherche
avant) ou l’icône (Recherche arrière) à l’aide des touches
directionnelles et maintenez enfoncée la touche ✕.
2 Lorsque vous trouvez le point souhaité, relâchez la touche ✕.
Vous pouvez également rechercher un point directement
Appuyez sur la touche SCAN ou la touche SCAN de la télécommande
DVD jusqu’à ce que vous trouviez ce point : appuyez alors sur la touche
H PLAY.
A chaque pression sur la touche SCAN ou la touche SCAN, la vitesse
de recherche change en trois étapes.
Recherche d’un point au ralenti
1 Pendant la lecture du disque, sélectionnez l’icône (Ralenti) à
l’aide des touches directionnelles et appuyez sur la touche ✕.
La lecture au ralenti commence.
2 Lorsque vous trouvez le point souhaité, sélectionnez l’icône N
(Lecture) et appuyez sur la touche ✕.
La vitesse de lecture normale est rétablie.
Vous pouvez également lancer la lecture au ralenti
directement
Appuyez sur la touche SLOW ou la touche SLOW de la
télécommande DVD jusqu’à ce que vous trouviez le point recherché :
appuyez alors sur la touche H PLAY.
40
Page 97

z
Utilisation de l’écran réglages
Avec l’écran réglages, vous pouvez changer les réglages initiaux, ajuster
l’image et le son et sélectionner d’autres options de sortie. Vous pouvez
également sélectionner une langue pour les sous-titres, restreindre la lecture
des disques par des enfants, etc. Pour plus de détails sur les options de
l’écran réglages, reportez-vous aux pages 42 à 53.
1 Sélectionnez l’icône (Réglages) à l’aide des touches
directionnelles et appuyez sur la touche ✕.
L’affichage des réglages apparaît à l’écran.
2 Sélectionnez la catégorie requise à l’aide des touches
directionnelles et appuyez sur la touche ✕.
La catégorie est sélectionnée et le menu devient actif.
3 Sélectionnez l’élément à modifier à l’aide des touches
directionnelles et appuyez sur la touche ✕.
Le réglage est sélectionné et le sous-menu devient actif.
4 Apportez les modifications requises dans les différents sous-
menus.
Pour enregistrer les changements effectués, éjectez le DVD avant d’appuyer
sur le bouton 1 (veille)/RESET ou de mettre la console hors tension à
l’aide de l’interrupteur d’alimentation principal (MAIN POWER). Attention
– Vos changements ne seront pas enregistrés si vous appuyez sur le bouton
1/RESET ou si vous mettez la console hors tension sans avoir éjecté le
DVD au préalable.
FR
41
Page 98

Utilisation du Panneau de commandes (suite)
z
Options de l’écran réglages
Pour chaque élément, la valeur par défaut est soulignée.
Sélection de la langue (page 43)
Ecrans
Menus DVD
Audio
Sous-titres
Anglais
Français
Allemand
Italien
Espagnol
Néerlandais
Por tugais
Anglais
Français
Allemand
Italien
Espagnol
Néerlandais
Danois
Suédois
Finnois
Norvégien
Por tugais
Russe
Chinois
Japonais
Choix de la langue ,
(idem que pour Menus DVD)
Idem audio
(idem que pour Menus DVD)
Réglage de l'écran (page 45)
Activé(e)
Désactivé(e)
16:9
4:3 Letter Box
4:3 PAN SCAN
Désactivé(e)
DNR1
DNR2
+2
+1
0
–1
–2
Activé(e)
Désactivé(e)
Image
Dolby Digital
DTS
+2
+1
Normal
Type TV
DNR
Précision des contours
Affichage
Réglage personnalisé (page 47)
Mode de pause Auto
Contrôle parental ,
Réglage audio (page 51)
Sortie audio numérique
DIGITAL OUT (OPTICAL)
Sélection automatique de plage audio
Volume du DVD
Activé(e)
Désactivé(e)
Activé(e)
Désactivé(e)
Activé(e)
Désactivé(e)
42
Page 99

z
Sélection des options de langue (Sélection de la langue)
A partir de l’écran “Sélection de la langue”, vous pouvez sélectionner
différentes langues pour l’affichage des menus (Ecrans), pour la bande son et
pour d’autres éléments. Les valeurs par défaut sont soulignées.
Sélectionnez l’icône (Sélection de la langue) dans l’écran réglages.
Pour enregistrer les changements effectués, éjectez le DVD avant d’appuyer sur
le bouton 1 (veille)/RESET ou de mettre la console hors tension à l’aide de
l’interrupteur d’alimentation principal (MAIN POWER). Attention – Vos
changements ne seront pas enregistrés si vous appuyez sur le bouton 1/RESET
FR
ou si vous mettez la console hors tension sans avoir éjecté le DVD au préalable.
Remarques
• Lorsque vous sélectionnez une langue qui n’est pas enregistrée sur le DVD, l’une
des langues disponibles est sélectionnée automatiquement pour les réglages “Menus
DVD”, “Audio” et “Sous-titres”.
• Selon les caractéristiques du DVD utilisé, il est possible que la langue sélectionnée
dans “Menus DVD”, “Audio” ou “Sous- titres” ne puisse pas être utilisée.
x Ecrans
Permet de sélectionner la langue d’affichage à l’écran.
• Anglais
• Français
• Allemand
• Italien
• Espagnol
• Néerlandais
• Portugais
x Menus DVD
Permet de sélectionner la langue d’affichage du Menu DVD (si celle-ci est
disponible sur le DVD).
• Anglais
• Français
• Allemand
• Italien
• Espagnol
• Néerlandais
• Danois
43
Page 100

Utilisation du Panneau de commandes (suite)
• Suédois
• Finnois
• Norvégien
• Portugais
• Russe
• Chinois
• Japonais
• Choix de la langue
Après avoir sélectionné “Choix de la langue”, vous pouvez sélectionner une
langue dans la liste affichée.
x Audio
Permet de sélectionner la langue de la bande son enregistrée sur le DVD.
• Anglais
• Français
• Allemand
• Italien
• Espagnol
• Néerlandais
• Danois
• Suédois
• Finnois
• Norvégien
• Portugais
• Russe
• Chinois
• Japonais
• Choix de la langue
Après avoir sélectionné “Choix de la langue”, vous pouvez sélectionner une
langue dans la liste affichée.
x Sous-titres
Permet de sélectionner la langue des sous-titres enregistrés dans le DVD.
• Idem audio*
• (idem “Audio” ci-dessus)
* Lorsque vous sélectionnez “Idem audio”, la langue des sous-titres change automatiquement
en fonction de la langue sélectionnée pour la bande son.
44
 Loading...