

Page 1

4-230-403-13(2)
MiniDisc De ck
Operating Instructions
Owner’s Record
The model and serial numbers are locatedon th e rear of the unit. Recordthe serial number
in the spaceprovided below. Referto them wheneveryou call upon your Sony dealer
regarding this product.
Model No.____________ Serial No.____________
MDS-S50
©2001Sony Corporation
Page 2

WARNING
To prevent fire or shock hazard, do not
expose the unit to rain or moisture.
The following caution label is located inside the unit.
IN NO EVENT SHALL SELLER BE LIABLE
FOR ANY DIRECT, INCIDENTAL OR
CONSEQUENTIAL DAMAGES OF ANY
NATURE, OR LOSSES OR EXPENSES
RESULTING FROM ANY DEFECTIVE
PRODUCT OR THE USE OF ANY PRODUCT.
To preventfire, do not Coverthe ventilationof the
apparatuswith news papers,table-cloths, curtains,etc.
And don’tplace lighted candles on the apparatus.To
preventfire or shock hazard, do not place vases on the
apparatus.
Don’t throw a battery, dispose it as the
injurious wastes.
For customers in the U.S.A.
This applianceis classified
as a CLASS 1 LASER
product.
The CLASS 1 LASER
PRODUCT MARKING is
located on the rear exterior.
CAUTION
You are cautioned that any changes or modification
not expresslyapproved inthis manualcould void your
authorityto operate this equipment.
INFORMATION
This equipment has been testedand found to comply
withthe limits fora Class B digital device, pursuantto
Part15of the FCC Rules. Theselimits are designed to
provide reasonable protection against harmful
interference in a residentialinstallation. This
equipment generates, uses,and can radiate radio
frequency energy and, if not installed and used in
accordance withth e instructions, may cause harmful
interferenceto radio communications. However, there
is no guarantee that interference willnot occur in a
particularinstallation. If this equipment does cause
harmful interference to radio or television reception,
whichcan be determinedby turningthe equipmentoff
and on, the user is encouraged to try to correct the
interference by one or more of the following
measures:
— R eorient or r elocate the receiving antenna.
— Increase theseparationbetween theequipment and
receiver.
— Connect the equipment into an outlet on a circuit
different fromthat to which the receiveris
connected.
— Consult the dealer or an experienced radio/TV
technician for help.
ENERGY STAR
registeredmark.
As an
ENERGY STAR
Sony Corporation has determined
thatthis product meets the
ENERGY STAR
energy efficiency.
®
is a U.S.
®
Partner,
®
guidelinesfor
For customers in Canada
This Class B digital apparatuscomplies With
Canadian ICES-003.
CAUTION
TO PREVENT ELECTRIC SHOCK, DO NOT USE
THIS POLARIZED AC PLUG WITH AN
EXTENSION CORD, RECEPTACLE OR OTHER
OUTLET UNLESS THE BLADES CAN B E FULLY
INSERTED TO PREVENT BLADE EXPOSURE.
About this manual
Controlsin these instructions are thoseon the deck;
This symbol is intendedto alert the user to
the presence of uninsulated “dangerous
voltage”within the product’senclosure that
may be of sufficientmagnitude to constitute
a risk of electric shock to persons.
This symbol is intendedto alert the user to
the presenceof important operating and
maintenance (servicing) instructions in the
literature accompanying the appliance.
2
these may, however, be substituted by controls on the
supplied remote that are similarly named, or, when
different, appear in the instructions within
parentheses.
Example: Turn AMS clockwise(or press >
repeatedly).
Page 3

Table of Contents
Parts Identif ication
Main unit.................................................4
Remote control........................................5
Getting Star ted
Hooking up the audio components .........6
Recording to MDs
Recording to an MD................................ 8
Notes on recording ..................................9
Recording tips
— Recording for l ong times/Marking
track numbers/Smart Space/Adjusting
the recording level/Checking the
remaining recordable time/
Input monitor....................................9
Startingrecording with six seconds of
prestoredaudiodata
— Time Machine Recording ..........13
Synchro-recording with the audio
component of your choice
— Music Synchro-recording ..........14
Synchro-recording with a Sony CD player
— CD Synchro-recording...............14
Playing MDs
Loading an MD.....................................16
PlayinganMD
— Normal Play/Shuffle Play/
Repeat Play.....................................16
Creatingyour own program
— Program Play .............................18
Editing Recorded MDs
Erasing recordings
— Erase Function........................... 19
Dividingrecordedtracks
— Dividing Function ..................... 21
Combining recorded tracks
— Combine Function..................... 22
Moving recordedtracks
— Move Function .......................... 23
Naming a track or MD
— Name Function .......................... 23
Changing the recorded level after
recording — S.F EDIT ................... 26
Undoing the last edit — UNDO ...........28
Other Functions
Fading in and fading out....................... 28
Fallingasleeptomusic
— Sleep Timer ............................... 29
Additional Information
Precautions............................................ 30
Note on MDs ........................................ 30
System limitations ................................ 30
Troubleshooting.................................... 32
Self-diagnosis function......................... 33
Display messages.................................. 33
Setup menu table .................................. 34
Specifications........................................ 34
Using the beeps (Except for North
American model)............................ 35
3
Page 4
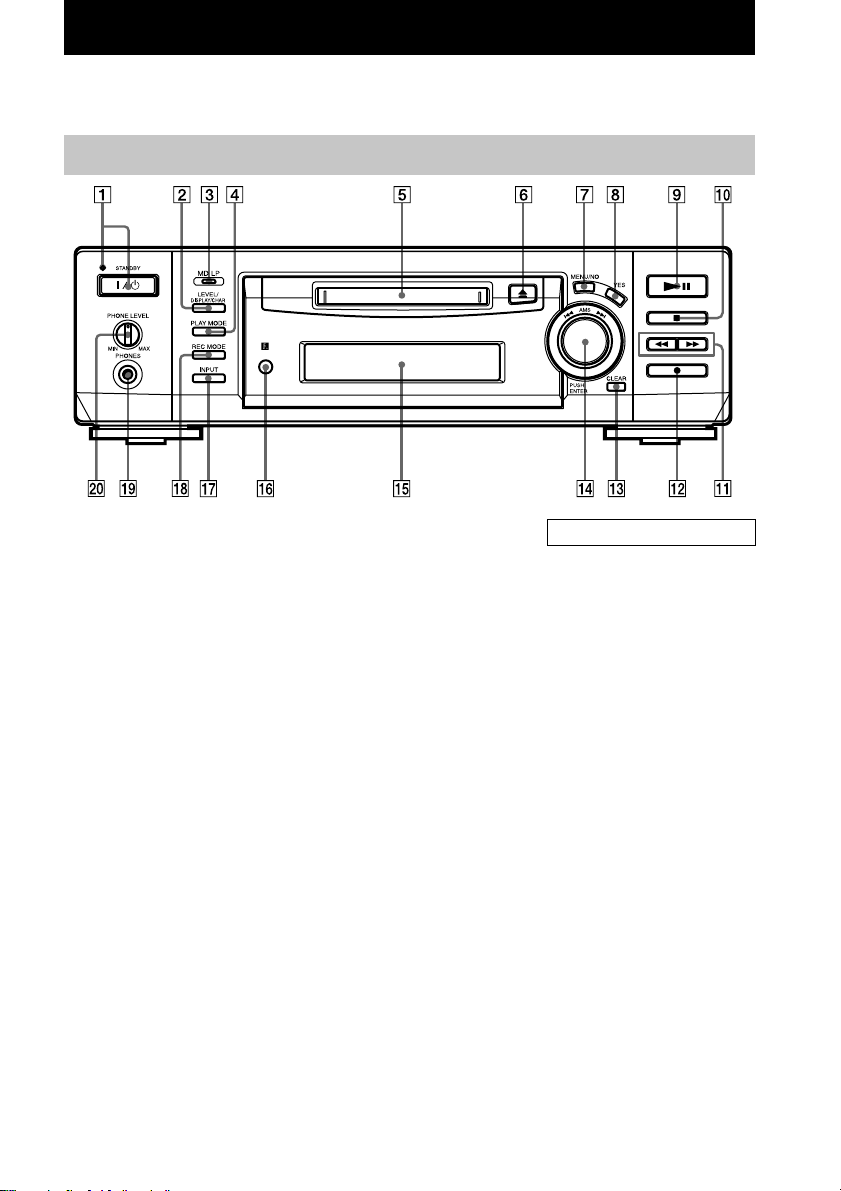
Parts Identification
The items are arranged in alphabeticalorder.
Refer to the pages indicated in parentheses( ) for details.
Main unit
AMS qf (8) (10) (12) (13) (24)
CLEAR qd (18) (24)
Display qg (8) (17)
INPUT qj (8)
LEVEL/DISPLAY/CHAR 2 (8)
(12) (24)
MD insertionslot 5 (16)
MD/LP indicator 3 (10) (17)
MENU/NO 7 (10) (18) (20)
PHONE LEVEL w; (17)
PHONES jack ql (17)
PLAY MODE4 (16)
REC MODE qk (9)
Remote sensor qh (7)
YES 8 (10) (18) (20)
BUTTON DESCRIPTIONS
?/1 (power)/STANDBYindicator
1 (8) (16)
Z (eject) 6 (8) (17)
NX (play/pause) 9 (8) (16)
x (stop) 0 (8) (16)
m (go back)/M (go forward)
qa (17) (18) (24)
z (recording) qs (8)
4
Page 5

Remo te co n trol
H
Parts Identification
AyB qs (16)
CD PLAYER . (go back)/> (go forward) ql
(15)
CD-SYNCHRO STANDBY/START/STOP 7 (14)
(15)
CLEAR 6 (18) (24)
DISPLAY ws (8) (12)
FADER 3 (28)
INPUT wf (8)
Letter/number buttons 5 (17)(25)
LEVEL +/– qa (12)
MENU/NO w; (10) (18) (20)
MUSIC SYNC 8 (14)
NAME EDIT/SELECT wa (24)
PLAY MODE 2 (16)
REC MODE wg (9)
REPEAT qd (16)
SCROLL wd (17)
T.REC qj (13)
YES 4 (10) (18) (20)
BUTTON DESCRIPTIONS
?/1 (power) 1 (8) (16)
X (pause) 9 (8) (16)
x (stop) 0 (8) (16)
m (fast reverse)/M (fastforward)qf (17) (18)
(24)
. (go back)/> (go forward) qg (8) (10) (16)
(25) (26)
z (recording)qh (8)
N (play) qk (16)
Z (eject) wh (8) (17)
5
Page 6
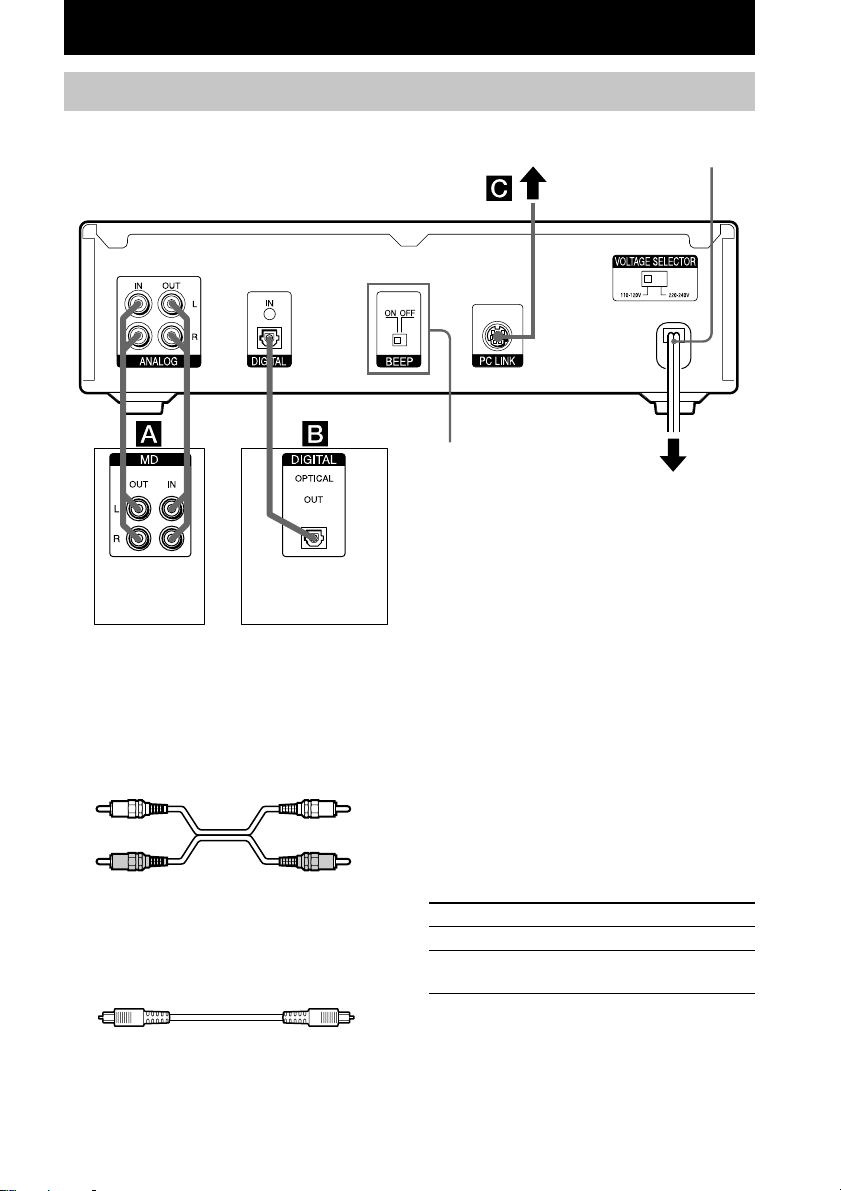
Getting Started
Hooking up the audio components
(Except for North
American model)
AC power cordPC LINK
to a wall outlet
Amplifier,
etc.
CD player, DBS
tuner, etc.
1)
Required cords
A Audio connecting cords (2) (supplied)
When connectingan audio connectingcord, be sure to
match the color-codedpins to the appropriate jacks:
white (left)to white and red (right) to red.
White (L) White (L)
Red (R) Red (R)
B Optical cables (supplied)
• When connectingan optical cable, take the caps off
the connectors and insertthe cable plugs straight in
until theyclick into place.
• Do not bend or tie the optical cables.
6
1) Digital equipmentwith a DIGITAL OUT
connector only
Hookup considerations
• Turn off the power of all components before
making any connections.
• Do not connect any AC power cord until all the
connections are completed.
• Be sure the connections are firm toprevent hum
and noise.
Jacks (connectors) for
connecting audio
components
Connect To the
Amplifiers ANALOG IN/OUT jacks
CD players or
DBS tuners
DIGITAL OPTICAL IN connector
Page 7

Setting the voltage selector
(only on models supplied wi th
a voltage selector)
Checkthatthe voltageselectoron the rear panel
of the deck is set to the local power line voltage.
If not, set the selector to the correct position
using a screwdriver before connecting the AC
power cord to a wall outlet.
Other connections
To connect a PC
C PC connecting kit (not supplied)
Use the PC connecting kit to connect aP C to the MD
deck.By connecting the MDdeck to aPC,you willbe
able to select and play MD tracks and do various
editingo perations on the PC. For details, refer to the
manual suppliedwith the PC connecting kit.
To connect the AC power cord
Connect the AC power cord of the deck to a
wall outlet.
Note
If you use a timer, connect the AC power cord to the
outlet of the timer.
Notes
• Do not leaveth e r emote in an extremely hot or
humid place.
• Do notdrop any foreign object into the remote
casing, particularlywhen replacing the batteries.
• Do not usea new battery with an old one.
• Do not expose the remote sensor to direct sunlight or
lightingapparatus. Doingso may cause a
malfunction.
• If you don’t use the remote for an extended period of
time, remove the batteries to avoid possible damage
from battery leakage and corrosion.
Demonstration mode
When you turn on the MD deck and there is no
MD in the deck, demonstration mode is
activated automatically after about ten minutes.
To deactivate demonstration mode, press any
buttonon the deck or on the remote.
Tip
To turn off demonstration mode, press x and CLEAR
simultaneouslyw hen there is no MD in the deck.
“DemoOff” appears in the display.
To turn on demonstration modeagain, perform the
same procedure described above.
“DemoOn” appears in the display.
Getting Started
Inserting batteries into the
remote
Insert two R6 (size-AA) batteries into the
battery compartment with the + and – properly
oriented to the markings. When using the
remote, point it at the remote sensor on the
deck.
Tip
When the remoteno longer operates thedeck, replace
both batteries with new ones.
7
Page 8

Recording to MDs
Recording to an MD
If the M D has bee n partially recorded,
recordingstarts after the recorded tracks.
1 Turn on the amplifierand program
source, and select the source on the
amplifier.
2 Press ?/1 to turn on the deck.
The STANDBY indicator turns off.
3 Load a recordable MD into the slot
(page 16).
4 Press INPUT repeatedly to select the
input jacks (connector) connected to
the program source.
When the source is
connected to the
DIGITAL OPTICAL IN
connector
ANALOG IN jacks A-IN
5 If necessary, locatethepointonthe MD
to start recording from.
If you want to record to a new MD or start
recording from the end of the recorded
portion, skip this step and go to step 6.
To record over from the beginning of an
existing MD track:
./> repeatedly) until the number of
the track to be recorded over appears.
Torecord over from the middle of an MD
Turn AMS (or press ./>
track:
repeatedly)until the number of the track to
be recorded over appears, then press NX
(or N)tostartplay.PressNX (or X)at
the point you want to start recordingfrom.
6 Press z.
The deck changes to recording pause.
7 If necessary , adjust the recording level.
For details, see “Adjusting the recording
level” on page 12.
8 Press NX (or press N or X).
Recording starts.
The MD deck is recording over existing
track(s). “Tr” flashes in the display during
recording. The indication stops flashing
when the deck reaches the end of the
recorded portion.
Set INPUT to
D-IN
Turn AMS (or press
9 Start playing the programsource.
Operations you may want to do
during recording
To Pre ss
Stop recording x
Pause recording NX (or X)
Resume recording after
1)
pausing
Eject the MD Z after stopping recording
1) The track number increases by one.
To change the display while
recording
PressLEVEL/DISPLAY/CHAR (or DISPLAY)
repeatedly to change the display.
Each press of the buttonchangesthe display
cyclically as follows:
Track number and recorded time of the
current track t Remaining recordable time
on the MD t Level of the input signal t
Track name
2) Time shownin the display differs depending on
3) “No Name” appears when the track has no name.
Note
You cannotrecord overexistingmaterialwhen Shuffle
Play (page16) or Program Play (page16) has been
selected. “Impossible” appears in the display at this
time.
3)
the setting of REC MODE.
NX (or press N or X)
2)
8
Page 9

Notes on recording
After recording
Press Z to remove the M D or press ?/1
(power) to turn off the unit.
“TOC” lights up, or either “TOC” or
“STANDBY” starts flashing. The TOC is
updated and recording is completed.
Before pulling out the power cord
MD recordingiscompleted when the MD Table
of Contents (TOC) is updated. The TOC is
updatedwhen you eject the MD or press ?/1 to
turn off the unit. Do not pull out the power cord
beforeupdatingthe TOC (while “TOC” is lit) or
while updating the TOC (while “TOC” or
“STANDBY” is flashing) to ensure a complete
recording.
Converting digital sampling rates
automatically
A built-insampling rate converterautomatically
converts the sampling frequency of various
digital sources to th e 44.1 kHz sampling rate of
the MD deck. This allows you to monitor and
record sources such as 32- or 48-kHz DAT tape
or satellite broadcasts, as well as the CDs and
MDs.
To prevent accidental erasure of the
recorded material
To protect an MD recording, slide the recordprotect tab in the direction of the a rrow (see
illustration below) to open the slot. To enable
re-recording, close the slot.
Record-protect tab
Slideinthedirection
of arrow
Recording tips
— Recording for long times/Marking
tracknumbers/Smart Space/Adjusting
the recording level/Checking the
remaining recordable time/Input
monitor
Recordi ng for long times
Inaddition to normalstereorecording,this deck
has two long time recording modes: LP2 and
LP4. When recording in LP2 Stereo mode, you
can record 2 times the normal recordable time,
andinLP4Stereomode, you can record 4 times
the normal recordable time. In a d dition, the
recordable time for monaural recording is
approximately double the stereo recording time.
LP4 Stereo mode (4
mode) achieves a long stereo recording time by
use of a special compression system. When
placing emphasis on sound quality, Stereo
recordingor LP2 Stereorecording (2
recordingmode)is recommended.
Note
MDs recorded in MD LP (LP2 or LP4 Stereo)mode
cannotbe played backon a deck thatdoes not support
MD LP mode. In addition, you cannot perform S.F
Edit for MDs recorded in MD LP mode.
1 Do steps 1 to 4 of “Recording to MDs”
on page 8.
2 Press REC MODE repeatedly to select
the recording mode you want to record
in.
To record in Set REC MODE to
Stereo Blank (No indicator)
LP2 Stereo LP2
LP4 Stereo LP4
Monaural MONO
3 Do steps 5 to 9 of “Recording to MDs”
on page 8.
× long time recording
× long time
continued
Recording to MDs
9
Page 10

Recording tips (continued)
Tips
• DuringrecordingtoanMDinLP2orLP4Stereo
mode,the MDLP indicatorlightsup whenyou press
z in step 3 above.
• The deck is set at the factory to add “LP:” at the
beginning of a track name automatically.This
indicationis displayed when the track is playedo n a
deckthatdoes not support long-time recording.
To turnoff this function,do the following procedure.
1 Whilethedeckis stoppedor playing,
press MENU/NO twice.
“Setup Menu” appears in the display.
2 Turn AMS (or press ./> repeatedly)
until“LPstamp On” (factory setting)
appears, then press AMS or YES.
3 Turn AMS (or press ./> repeatedly)
to select “LPstamp Off”, and then press
AMS or YES.
4 Press MENU/NO.
To add “LP:” automatically again, select “LPstamp
On” in step 3 above.
Notes
• The recorded "LP:"is a confirmation stampthat is
displayedt o indicatethat the track cannot be played
backon a deck thatdoes not support MD LP mode.
It is not displayed on decks that suppor t MD LP
mode.
• If "LPstamp:On" is set, "LP:" isrecorded as part of
the track name, so the number of characters thatcan
be inputin a singleMD is reduced. Furthermore,
"LP:" is automatically copied if the track name is
copied or if the track is divided by using the Divide
function.
• MDsrecordedinMDLP(LP2orLP4Stereo)mode
shouldbe played back on a deck that supports MD
LP mode. These MDs cannot be played back on
other decks.
• Even if you press REC MODE during recording or
recording pause, youcannot change the recording
mode.
• Even if you press REC MODE repeatedly to select
MONO, themonitor signal duringrecording does
not become monaural.
Marking track numbers while
recording
— Manual /Automatic Track Marking
You can m ark track numbers either manually or
automatically while recording. By marking
track numbers at specific points, you can
quickly locate the points later or edit the MD
easily.
Marking track numbers manually
(Manual Track Marking)
While recording, press z at the p oint
where you want to add a track number.
Marking track numbers
automatically (Automatic Track
Marking)
When recording from a C D player or MD deck
connectedto a DIGITAL IN connector, the deck
marks track numbers in the same sequence as
the source. When recording from other sources
connectedto the DIGITAL IN connector or a
source connectedto the ANALOG IN jacks, do
the procedure below to mark track numbers
automatically. However, you cannot mark track
numbersautomatically if thesoundsource to be
recordedis noisy (e.g., tapes or radio
programs).
1 While the deck is stopped, press MENU/
NO twi ce.
“Setup Menu” appears in the display.
2 Turn AMS (or press ./>
repeatedly) until“T.Mark Lsync”
appears, then press AMS or YES.
3 Turn AMS (or press ./>
repeatedly) to select the setting, then
press AMS or YES.
To Select
Turn on Automatic
Track Marking
Turnoff Automatic
Track Marking
T.Mark Lsync (factory
setting)
T.Mark Off
10
Page 11

4 Press MENU/NO.
When you set AutomaticTrackM arking to
on, “L.SYNC” lights up.
The deck marks a track number whenever
1)
the input signal level drops to –50 dB
(the
triggerlevel for Automatic Track Marking)
or below for at least 1.5 seconds.
1) Factory setting
To change the trigger level for
Automatic Track Marking
Do the procedure below to change the signal
level that triggers Automatic Track Marking.
1 While the deck is stopped, press MENU/
NO twice.
“Setup Menu” appears in the display.
2 TurnAMS (or press ./>
repeatedly) until “LS(T)” appears, then
press AMS or YES.
3 TurnAMS (or press ./>
repeatedly)to select the level,then
press AMS or YES.
You can set the level at any value between
–72 dB and 0 dB, in 2 dB increments.
4 Press MENU/NO.
Tips for automatic track marking
• When recording from a CD player or an MD deck
connected to the DIGITAL IN connector, the entire
material might be recorded as a single track in the
following cases:
— When you consecutively record the same track
two or more times usings ingle-track repeat play.
— When you consecutively recordtwo or more
trackswith the same track number butfrom
differentCDs or MDs.
— When you record tracks from certain CD or
multi-disc players.
• A track number might not be marked for tracks less
than 4 seconds long (in Stereo mode, Monaural
mode, and LP2 Stereo mode) or 8 secondslong (in
LP4 Stereo mode) during recording.
• When recordingfrom a component connected to the
ANALOG IN jackswith “T.Ma rk Off” selectedo r
when recording from a DAT deck or DBS tuner
connected to the DIGITAL IN connector, the entire
material may be recorded as a single track.
• When recording from a DAT deck or D BS tuner
connected to the DIGITAL IN connector, the deck
will mark a track number whenever the sampling
frequency of the input signalchanges, regardless of
the track marking parameter setting(“T.Mark
Lsync” or “T.Mark Off”).
Tip
You can mark track numbers even after recordinghas
finished.See “Dividing recorded tracks”on page 21.
Erasing blank portions
automatically (Smart Space/
Auto Cut)
The Smart Space function lets you make the
blank spaces between tracks 3 seconds long
automatically. Ifthe Sm art Space function is on
and there is no sound input for about 3 seconds
or more (but less than 30 seconds) while
recording, the MD deck replaces this silence
with a blank of about 3 seconds and continues
recording.
No sound input for less than 30 seconds
Off
On
Replaced with a blank of 3 seconds and
recording continues
Auto Cut: When th e Smart Space function is
on, if there is no sound input for 30 seconds or
more, the MD deck replaces this silence with a
blank of about 3 secondsand enters recording
pause.
No sound input for 30 seconds or more
Off
On
Replaced with a blank of 3 seconds
and recording pauses
continued
Recording to MDs
11
Page 12

Recording tips (continued)
1 While the deck is stopped, press MENU/
NO twi ce.
“Setup Menu” appears in the display.
2 Turn AMS (or press ./>
repeatedly) until “S.Space On” appears,
then press AMS or YES.
3 Turn AMS (or press ./>
repeatedly) to select the setting, then
press AMS or YES.
To Select
Turnon Smart Space
andAutoCut
Turn off Smart Space
andAutoCut
S.Space On (factory
setting)
S.Space Off
4 Press MENU/NO.
Notes
• Smart Space does not affect the order of the track
numbers being recorded, even if the blank space
occurs in the middleof a track.
• Auto Cut isautomatically turned on or offin tandem
with Smart Space.
• If the deck continuesrecording pause for about10
minutesafter the AutoCut activated, recordingstops
automatically.
Adjusting the recording level
You can adjust the recording level for both
analog and digital recordings.
1 Dosteps1to6of“Recording to MDs”
on page 8.
2 Play the portion of the program source
with the strongest output.
3 Press LEVEL/DISPLAY/CHAR (or
DISPLAY) repeatedly until the level of
the inputsignal appears.
4 While monitoring the sound, turn AMS
(or press LEVEL +/– repeatedly)to raise
the recording level to its highest level
without turning on “OVER” on the peak
levelmeters.
Tips
• To adjust the recording level,press LEVEL +/– on
the remote repeatedlyduring recording or recording
pause.
• Peak hold function freezesthe peak levelmeters at
the highest levelreached by the input signal.
1 While the deckis stopped,pressMENU/
NO twice.
“Setup Menu” appears in the display.
2 Turn AMS (or press./> repeatedly)
until “P.Hol d O ff” (factory setting) appears,
then press AMS or YES.
3 Turn AMS (or press./> repeatedly)
to select “P. H old On”,thenpressAMSor
YES.
4 Press MENU/NO.
Toturn off the Peak Hold Function,select “P. Hold
Off” in step 3 above.
Note
The volume can onlybe increased up to +12.0 dB (for
analog recording) or+1 8.0 dB (for digital recording).
Therefore,if the output levelof the connected
component is low, it may not be possible to set the
recording level to maximum.
Checking the remaining
recor d abl e tim e on the MD
Press DISPLAY on the remote repeatedly.
For the information in stop mode, see page 17.
For the information during recording, see
page 8.
Avoid turning on these indicators
5 Stop playing the program source.
6 To start recording, continue from step 8
of “RecordingtoMDs” on page 8.
12
Page 13

Monitori ng the input si gnal
(Input Monitor)
You can monitor the selected input signal even
when you are not recording it.
1 Press Z to eject the MD.
2 Press INPUT repeatedly to selectthe
jacks (connector)where the signal you
want to monitor is being input.
3 Press z.
When an analog input is selected
The analog signal input from the ANALOG
IN jacks is output to the ANALOG OUT
jacks and PHONES jack. “AD – DA”
appears in the display during this time.
When a digital input is selected
The digital signal input from the DIGITAL
IN connector is output to the ANALOG
OUT jacks and PHONES jack after D/A
conversion. “–DA” appears in the display
during this time.
To stop Input Monitor
Press x.
Starting recording with six
seconds of prestored
audio data
— Time Machine Recording
When recording from an FM or satellite
broadcast, the fist few seconds of material are
often lost due to the time it takes you to
ascertainthe contentsand press the record
button. To prevent the loss of th is material, the
TimeMachine Recording feature constantly
stores the most recent audio data in a buffer
memory. This lets you record the sound from 6
secondsbefore starting recording,as shown in
the illustration below:
When you press AMS
in step 3
6 seconds
End of the source
to be recorded
Time
Recorded
portion
Recording to MDs
Beginning of the sour e to
be recorded
1 Do steps 1 to 6 of “Re cording to MDs”
on page 8.
The deck changes to recordingpause.
2 Start playing the program source.
3 Press AMS (or T.REC) at the point
where you want to start recording.
Recording starts with the six seconds of
prestored data in the buffer memory, then
continues recording via the buffer memory
thereafter.
13
Page 14

Synchro-recording with
Synchro-recording with a
the audio component of
your choice
— Music Synchro-recording
The Music Synchro-recording allows you to
automatically synchronize recording to the MD
deck with the playing of the selected program
source. The Track Marking Function, however,
will differaccording to the program source. For
details, see “Marking track numbers while
recording”on page 10.
1 Dosteps1to5of“Recording to MDs”
on page 8.
2 Press MUSIC SYNC on the remote.
The deck changes to recording pause.
3 Start playingthe program source.
Recording starts automatically.
Note
DuringMusic Synchro-recording, SmartSpace and
Auto Cut will operate regardless of their setting
(“S.Space On” or “S.SpaceOff”).
Sony CD player
— CD Synchro-recording
When the deck is connected to a Sony CD
player or Hi-Fi component system, you can
easily copy the contents of CDs to the MD
using the deck’s remote. Because the MD
remote operates both the MD deck and the CD
player or CD player section of the component
system,make sure to place the MDdeckand the
CD player as close together as possible.
1 Turn on the amplifier and the CD player,
and select CD on the amplifier.
2 Dosteps2to5of“RecordingtoMDs”
on page 8.
3 Insert a CD into the CD player and
select the playing mode (Shuffle Play,
Program Play, etc.) on the CD player.
4 Press CD-SYNCHRO STANDBY on the
remote.
The CD player changes to play standby and
the MD deck changes to recording standby.
5 Press CD-SYNCHRO START on the
remote.
The deck starts recording a nd the CD player
starts to play.
The track number and elapsed recording
time of the track a ppear in the display.
If the CD player does not start
playing
Some CD players may not respond when you
press CD-SYNCHRO START
Press X on th e CD player’s remote instead to
start play on the CD player.
on the remote.
14
Page 15

Operations you may want to do
during CD Synchro-recording
To Press
Stoprecording CD-SYNCHROSTOP on
Pause recording CD-SYNCHROSTANDBY
Locatethe next track to
be recorded during
recording pause
Resume recording after
pausing
Check the remaining
recordabletime on the
MD
Tips
• You can use the remote of the CD player during CD
Synchro-recording.
Press
H Recording Play
x Recording pause Stop
X Recordingpause Pause
• During CD Synchro-recording, track numbers are
• By reprograming the MD’s remote,you can use the
To change the
deck to
marked in the following ways:
— When the CD player isconnected to the
DIGITAL IN connector,track numbers are
automatically marked as they appear on the CD.
— When the CD player isconnected to the
ANALOG IN jacks, track numbers are
automatically markedwhen “T.Mark Lsync” has
been selected (page 10).
— When you resume recording after recording
pause, a new track numberis automatically
marked,r egardless of the track marking
parametersetting (“T.Mark Lsync” or “T.Mark
Off”).
procedure above to performsynchro-recording with
a Sony video CD player.
Press numberbutton 2 on the remote while pressing
down?/1 on the remote.You cannow operate the
MD deck and the videoCD player with the remote.
Tocontrol the CD playeragain, press numberbutton
1 on the remote whilepressing down?/1 on the
remote.
the remote
on the remote
CD PLAYER ./> on
the remote
CD-SYNCHRO START on
the remote
DISPLAY
And change the
CD player to
Notes
• Whenperforming CDSynchro-recording witha CD
player with a mode selector, be sure to set the
selectorto CD1.
• When you record tracks from certain CD or multi-
disc players,the entirematerial may berecorded asa
single track.
Recording to MDs
15
Page 16

Playin g M Ds
Loading an MD
Load an MD as illustrated below.
With the labeled side up
With the arrow pointing
toward the deck
Playing an MD
— Normal Play/Shuffle Play/Repeat
Play
1 Turn on the amplifier and select MD on
the amplifier.
2 Press ?/1 to turn on the deck.
The STANDBY indicator turns off.
3 Load an MD.
4 PressPLAYMODErepeatedlyuntilthe
mode you want appears in the display.
Select To play
Blank (no PLAY MODE
indication)
SHUF The tracks in random
PGM The tracks in the
5 Press NX.
Thedeckstartstoplay.
6 Adjust the volume on the amplifier.
The MD in o riginal
order.
order.
order you want them
to be played.
Repeat Play Operations
To Do the following
Repeat only one track Press REPEAT repeatedly
Repeat all tracks Press REPEAT repeatedly
Cancel Repeat Play Press REPEAT repeatedly
Repeat a specific
portion withina track
(Repeat A – BPlay)
Cancel Repeat A – B
Play
until “Repeat 1” appears in
the display.
until “Repeat All”appears in
the display.
until “Repeat Off” appears
in the display.
1 While the deck is
playing,pressAyBon
the remote at the
starting point (point A)
of the portion to be
played repeatedly .
“REPA-” lights up and
“B” flashes in the display.
2 Continue playing the
track or press M on
the remote to locate the
ending point (point B),
thenpressAyBonthe
remote.
“REPA-B” lights up and
Repeat A-B Play starts.
Press REPEAT or CLEAR
on the remote.
Other Operations
To Press or turn
Stop play x
Pause play NX (or X)
Resume play after
pausing
Go to the next or a
succeeding trackd u ring
play
Go to a preceding track
duringplay
Go to the beginning of
the current track during
play
Go to a specific track
while the deck is
stopped
NX (or press N or X)
1)
clockwise (or press
AMS
> repeatedly).
AMS counterclockwise(or
press . repeatedly).
AMS counterclockwise(or
press . once).
AMS (or press ./>
repeatedly)until the track
number you want to go to
flashesin the display,then
press AMS or NX (or
N).
16
Page 17

To Press or turn
Find a pointin a track Press and hold M or m
during play
and release it at the desired
point.
Eject the MD Z after stopping play
1) AutomaticMusic Sensor
2) When you locate a point while monitoring the
sound.
3) When you locate by observing the time
indication.
Tips
• Whileplaying an MD recorded in LP2 or LP4
Stereo mode, the MD LP indicator lights up when
you press NX in step 5 above.
• To use headphones, connect them to the PHONES
jack. Turn PHONE LEVEL to adjust the
headphones level.
• When“– Over –” appears inthe display,the MD has
reachedtheendwhileyou’re pressing M.Turn
AMScounterclockwise(or press.)orpressm
to go back.
2)
or play pause
Playing a track by entering the track
number
Press the number button(s) on the remote
to ente r the track number of the track you
want to play.
To enter a track number over 10
1 Press>10.
2 Enter the corresponding digits.
To enter 0,press 10/0instead.
Examples:
• To playtrack number 30, press>10, then 3 and
10/0.
• To playtrack number 108, press>10 twice, then
1, 10/0, and8.
Using the MD display
To change the display during playing, press
3)
DISPLAY on the remote repeatedly.
Each press of the button changes the display
cyclically as follows:
Track number and elapsed time of the current
track t Track number and remaining time of
the current track t Remaining time of all
recorded tracks t The contents of a program
(only when “PGM” lights up) t Track name
Tip
To check the track namewhile playing (only whenthe
track name is recorded)
remote.
The trackname appears and scrolls. While thetrack
name is scrolling, pressthe button again to pause
scrolling, and again to continue scrolling.
To change the display in stop mode, press
DISPLAY repeatedly.
Each press of the button changes the display
cyclically as follows:
Total number of tracks and total recorded
time t Remaining recordabletime
MD (recordable MD s only) t The contents of
a program (only when “PGM” lights up) t
Total playing time of the program (only when
“PGM” lights up) t Disc name
1) “No Name” appears whenthe disc has no name.
2) Time shown in the display differs depending on
the setting ofREC MODE.
, press SCROLL on the
1)
Playing MDs
2)
on the
1)
17
Page 18

Creating your own
program
— Program Play
You can pick out the tracks that you like and
specify the playing order in a program
containingup to 25 tracks.
Program ing the tracks
1 While the deck is stopped, press MENU/
NO twi ce.
“Setup Menu” appears in the display.
2 Turn AMS (or press ./>
repeatedly) until “Program ?” appears,
then press AMS or YES.
3 Turn AMS (or press ./>
repeatedly) until the track number you
want to add to the program appears,
then press AMS or M (or use the
number button(s) on the remote to enter
the tra ck directly).
If you entered the wrong track number
Press m/M repeatedlyuntil the wrong
track number flashes, then do step 3 above
again or press CLEAR to erase the track
number. If “0” flashes, press m so that the
last track number flashes, then enter a
correct number.
To enter a track number over 10
Use >10. For details, see page 17.
4 Repeat step 3 to enter other tracks.
The entered track is added to the location
where the “0” flashes.
Each time you enter a track, th e total
program time appears in the display.
5 Press YES.
“Complete!!” appears and the program is
completed.
6 Press PLAY MODE repeatedly until
“PGM” lights up in the display.
7 Press NX (or N).
Program Play starts.
Notes
• If you eject the MD, the programwill be lost.
• The display shows “---.--” when the total playing
time of the program exceeds 999 minutes.
Checking the order of the program
Whilethedeckisstoppedand“PGM”
lights up, press DISPLAY repeatedly.
The first several tracks in the program appear in
the display. Tosee the rest of the program, turn
AMS (or press > repeatedly).
18
Page 19

Changing the contents of the
program
Whilethedeck is stopped and “PGM”lightsup,
do steps 1 and 2, followed by one of the
procedures below:
To Do the following:
Erase a track Press m/M repeatedly
Erase all tracks Pressdown CLEAR until all
Add a track at the
beginning of the
program
Add a track in the
middleof the program
Add a track to the end
of the program
Replace a track Press m/M repeatedly
until the number of the
unwantedtrack flashes, then
press CLEAR.
the track numbers disappear.
Press m repeatedlyuntil
“0” flashes before the first
tracknumber, thendo steps
3to5.
Press m/M repeatedly
until the track number which
will precede the new track
flashes. Press AMS to
displayflashing “0,” then do
steps 3 to 5.
Press M repeatedlyuntil
“0” flashes after the last
tracknumber, thendo steps
3to5.
until the number of the track
to be changed flashes, then
do steps 3 to 5.
Editing Recorded MDs
Before editing
You can edit an MD only when:
• The MD is recordable.
• TheMDplaymodeisnormalplay.
Check the following, before editing.
Canceling the la st edit
Use Undo Function to cancel the last edit and
restore the contents of the MD to the condition
before the edit.
To quit while editing
Press MENU/NO.
After editing
Press Z to remove the MD or press ?/1
(power) to turn off the unit.
“TOC” lights up, or either “TOC” or
“STANDBY” starts flashing.The TOC is
updatedand recording is completed.
Before pulling out the power cord
MD editingis completed when the MD Table of
Contents(TOC) is updated. The TOC is
updatedwhen you eject the MD or press ?/1 to
turn off the unit. Do not pull out the power cord
beforeupdatingthe TOC (while “TOC” islit)or
while updating the TOC (while “TOC” or
“STANDBY” is flashing) to ensure a complete
editing.
Editing Recorded MDs
Erasing recordings
— Erase Function
The MD deck lets you erase unwanted tracks
quickly and easily.
The three options for erasing recordings are:
• Erasing a single track (TrackEraseFunction)
• Erasing all tracks (All Erase Function)
• Erasing a portion of a track (A - B Erase
Function)
continued
19
Page 20

Erasing recordings (continued)
Erasing a single track
— Track Erase Function
You can erase a track simply by selecting its
track number. When you erase a track, the total
number of tracks on the MD decreases by one
and al the tracks following the erased one are
renumbered.
Example: Erasing track 2.
Track
number
Original
tracks
After
ERASE
Erase track 2
1 While the deck is stopped, playing, or
paused, pressMENU/NO.
“Edit Menu” appears in the display.
2 Turn AMS (or press ./>
repeatedly) until “Tr Erase ?” appears,
then press AMS or YES.
The deckstartsto play the track indicatedby
the number in the display.
3 Turn AMS (or press ./>
repeatedly) until the track number you
want to erase appears.
4 Press AMS or YES.
“Complete!!” appears. The track following
the erased track starts to play. If the erased
track is the last one on the MD, the track
preceding the erased track starts to play.
Tip
If “Erase ???” appears in step 4 above, the track has
beenrecord-protected onanotherMD deck.If you still
want to erase the track, press AMS or YES again
while the indication appears.
Erasing all the tracks on an
MD
— All Erase Function
Do the procedure below to erase all the tracks,
track names, and disc name at once.
1 While the deck is stopped, playing, or
paused, press MENU/NO.
“Edit Menu” appears in the display.
2 Turn AMS (or press ./>
repeatedly) until“All Erase ?” appears,
then press AMS or YES.
“All Erase ??” appears in the display.
3 Press AMS or YES.
“Complete!!” appears.
Erasing a portion of a track
— A-B Erase Function
You can specify a portion within a track and
erase the portion with ease. You can shift the
desired portion by frame
intervals.
1) 1 frame is 1/86 second.
Example: Erasing a portion of track 2.
rack
umber
Original
tracks
After A-B
ERASE
1)
, minute or second
Point A
Point B
1 While the deck is stopped, playing, or
paused, press MENU/NO.
“Edit Menu” appears in the display.
2 Turn AMS (or press ./>
repeatedly)until“A-BErase ?” appears,
then press AMS or YES.
20
Page 21

3 TurnAMS (or press ./>
repeatedly) until the number of the track
containing the portion to be erased
appears, then press AMS or YES.
“-Rehearsal-”and “Point A ok?” alternate in
the display and the deck repeatedlyplays
several seconds of the track before the point
AMS or YES was pressed.
4 While monitoring the sound, turn AMS
(or press ./> repeatedly) to locate
the starting point of the portion to be
erased (point A).
You can shift the starting point by 1-frame
intervals (1 frame = 1/86 second).
The time indication (minute, second, and
frame) of the current point is displayed and
thedeckplays severalseconds of thetrackto
that point repeatedly.
1) When recording in Stereo mode, you can shift
the startingpoint by 2-frame intervals (in
Monauralmode and LP2 Stereo mode)or by
4-frame intervals( in LP4 Stereo mode)
To find a point quickly
Specify a unit (minute, second, or frame) by
which the MD is advanced when you turn
AMS (or press ./> repeatedly).
To do this, press m/M in step 4
repeatedlyto select minute, second, or
frame. The selected unit flashes in the
display.
.
5 Repeat step 4 until you have located
point A.
6 Press AMS or YES to enter point A.
“Point B set” appears and the deck starts
playing from point A until the track ends.
7 Continue playing the track or press M
to locate the ending point of the portion
to be erased (point B), then press AMS
or YES.
“A-B Ers” and “Point B ok?” alternatein the
displayand a few secondsof the track before
point A and after point B play back
repeatedly.
8 Repeat step 4 until you have located
point B.
9 Press AMS or YES to enter point B.
“Complete!!” appears.
Note
If “Impossible” appears in the display, you cannot
erasea portionof a track. Thishappenswhen youhave
edited the same track manytimes.
This is due to a technical limitation of the MD system
and is not a mechanical error.
1)
Dividing recorded tracks
— Dividing Function
You can use this function to mark track numbers after
recording.The total number of tracks increasesby one
and all the tracks following the divided ones are
renumbered.
Example: Dividing track 2 into two tracks.
Track
number
Original
tracks
After
DIVIDE
Dividing a track after
selecting the track
1 While the deck is stopped, playing, or
paused, press MENU/NO.
“Edit Menu” appears in the display.
2 Turn AMS (or press ./>
repeatedly) until “Divide ?” appears,
then press AMS or YES.
3 Turn AMS (or press ./>
repeatedly) until the number of the track
youwanttodivideappears,thenpress
AMS or YES.
“-Rehearsal-”appearsand the deck
repeatedlyplays several secondsof the track
from the point AMS or YES was pressed.
Divide track2 into
track B and C
continued
Editing Recorded MDs
21
Page 22

Dividing recorded tracks (continued)
4 While monitoring the sound, turn AMS
(or press ./> repeatedly) to locate
the dividing point.
You can shift the starting point by 1-frame
intervals (1 frame = 1/86 second).
The time indication (minute, second, and
frame) of the current point is displayed and
the deckplaysseveralseconds of thetrackto
that point repeatedly.
1) When recordingin Stereo mode, you can shift
the starting point by 2-frame intervals (in
Monauralmode and LP2 Stereo mode) orby
4-frame intervals (inLP4 Stereo mode).
To find a point quickly
Specify a unit (minute, second, or frame) by
which the MD is advanced when you turn
AMS (or press ./> repeatedly).
To do this, press m/M in step 4
repeatedly to select minute, second, or
frame. The selected unit flashes in the
display.
5 Repeat step 4 until you have located the
dividing point.
6 Press AMS or YES.
“Complete!!” appears and the deck starts to
play the newly created track. Note that new
track has no name.
Tip
Yo u can dividetracks whilerecording. Fordetails, see
“Markingtrack nu mbers while recording” on page 10.
3 Press YES.
“Complete!!” appears for a few seconds and
the track is divided. The deck starts to play
the newly created track. Note that new track
1)
has no name.
Combining recorded
tracks
— Combine Function
You can use this function to combine 2 tracks
into a sin gle track. The total number of tracks
decreases by one and all tra cks following the
combined ones are renumbered.
You can also use this function to erase
unnecessary track numbers.
Example: Combining track 3 to track 1.
Track
number
Original
tracks
After
COMBINE
Example: Combining track 1 to track 4.
Original
tracks
Dividing a track after
selecting the dividing point
1 Whilethedeckisplaying,pressAMSat
the point you want to divide the track.
“-Divide-” and “-Rehearsal-” alternate in
the display and the deck starts to play from
the selected point repeatedly.
2 If necessary , do step 4 of “Dividing a
track after selecting the track” on
page 33 to finely adjust the dividing
point.
22
After
COMBINE
If both of the combined tracks have a track
name, the name of the second track is erased.
1 While the deck is stopped, playing, or
paused, press MENU/NO.
“Edit Menu” appears in the display.
Page 23

2 TurnAMS (or press ./>
repeatedly) until “Combine ? ” appears,
then press AMS or YES.
3 TurnAMS (or press ./>
repeatedly) untilthenumber of the first
track of the two to be combined
appears, then press AMS or YES.
The display for selecting a second track
appears and the deck plays the portion
where joining will occur (the end of the first
track and the beginning of the second track
following it) repeatedly.
4 TurnAMS (or press ./>
repeatedly) untilthenumber of the
second track of the two to be combined
appears, then press AMS or YES.
“Complete!!” appears and the deck starts to
play the combined track.
Notes
• Tracksrecorded in different modes (stereo, MONO,
LP2 or LP4) cannotbe combined.
• If both of the combined tracks have track titles,the
title of the second trackis erased.
• If “Impossible” appears in the display, the tracks
cannot be combined because repeated editing has
been done to the track(s). This is a technical
limitationof the MD system and is not a mechanical
error.
Moving recorded tracks
— Move Function
You can use this functionto changetheorderof
any track on the disc. When you move tracks,
the tracks are automatically renumbered.
Example:Movingtrack3 to position 2.
Track
number
Original
tracks
After
MOVE
1 While the deck is stopped, playing, or
paused, press MENU/NO.
“Edit Menu” appears in the display.
2 Turn AMS (or press ./>
repeatedly) until “Move ?” appears,
then press AMS or YES.
3 Turn AMS (or press ./>
repeatedly) until the number of the track
to be moved appears, then press AMS
or YES.
4 Turn AMS (or press ./>
repeatedly) until the new track position
appears, then press AMS or YES.
“Complete!!” appears and the deck starts to
play the moved track.
Naming a track or MD
— Name Function
You can enter a name for a recordedMD as well
as for individual tracks. Names can consist of
uppercase and lowercase letters, numbers, and
symbols.A total number of about 1,700
characters can be stored for all the names on the
MD.
Note
If you name a track while it is being recorded, be sure
to finish thenaming operation beforethe trackends. If
the track ends before you finish, the entered character
data will be discarded and the track will remain
unnamed. Also, you cannot name tracks while the
deck is recordingover existing material.
Naming a track or an MD
using the controls on the
deck
1 Press MENU/NO.
“Edit Menu” appears in the display.
Toenter a name while the deck is recording,
go to step 3.
2 Turn AMS until “Name ?” appears, then
press AMS or YES.
continued
Editing Recorded MDs
23
Page 24

Naming a track or MD (continued)
3 Turn AMS until “Nm In ?” appears, then
press AMS or YES.
While the deck is recording, a flashing
cursor appears in the display and you can
enter a name for the track being recorded. In
this case, go to step 5.
4 Turn AMS until the track number (when
naming a track) or “Disc” (when naming
the MD) flashes, then press A MS or
YES.
A flashing cursor appears.
The deck starts playing and you can name a
track while m onitoring the sound.
5 Press LEVEL/DISPLAY/CHAR
repeatedly to select the charactertype.
Each time you press the button, the display
changes cyclically as fo llows:
(Blank space) t A (Upper cases) t a
(Lowercases)t 0(Numbers)t ’
(Symbols)
To enter a space
Press M while the cursor is flashing. You
cannot enter a space as the first character.
6 Turn AMS to select the character.
The selected character flashes.
To enter a symbol
Yo u can use the following symbols in titles:
’–/,.():!?&+<>_=” ;#$%@*`
To change a selected character
Repeat steps 5 and 6.
7 Press AMS.
The selected character is entered and lights
continuously. The cursor shifts to the right,
flashes, and waits for the input of the next
character.
8 Repeatsteps5to7toentertherestof
the name.
To change a character
Pressm/M repeatedlyuntil the character
to be changed flashes,thenrepeat steps 5 to
7.
To erase a character
Pressm/M repeatedlyuntil the character
to be erased flashes, then press CLEAR.
9 Press YES.
The whole name appears in the display,
followed by “Complete!!”.
Naming a track or an MD
usin g the rem ote
1 Press NAME EDIT/SELECT while the
deck is in one of the operating modes
listed below, depending on what you
want to name:
To name Press while
A track The track number displayed
The MD The deck is stopped with total
A flashing cursor appears in the display.
number of tracks displayed
2 Press NAME EDIT/SELECTrepeatedly
to select the character type.
Each time you press the button, the display
changes cyclically as follows:
(Blank space) t “Selected ABC”
(Upper cases or symbols
abc” (Lower cases or symbols
“Selected 123” (N umbers)
1) Only ’–/,.():!?canbeselected.
1)
) t “Selected
1)
) t
24
Page 25

3 Enter a character using letter/number
buttons.
If you have selected uppercase or
lowercase letters
1 P ress the corresponding letter/number
button repeatedly until the character to
be entered flashes.
Or,pressthebuttononceandpress
./> repeatedly.
To select symbols, press .
repeatedly while “A” is flashing.
2 Press M.
The flashing characterisentered and
lightscontinuously and the cursor shifts
to the right.
If you have selected numbers
Press the corresponding number button.
The number is entered and the cursor shifts
to the rig h t.
4 Repeat steps2 and 3 to enter the restof
the name.
To change a character
Pressm/M repeatedlyuntil thecharacter
to bechanged flashes,press CLEAR to erase
the character, then repeat steps 2 and 3.
5 Press YES.
The whole n ame appears in the display,
followed by “Complete!!”.
Copying a track or disc name
You can copy an existingtrack or disc name and
useittonameanothertrackonthesamediscor
thediscitself.
1 While the deck is stopped, playing, or
paused, press MENU/NO.
“Edit Menu” appears in the display.
2 TurnAMS (or press ./>
repeatedly) until “Name ?” appears,
then press AMS or YES.
3 TurnAMS (or press ./>
repeatedly) until “Nm Copy ?” appears,
then press AMS or YES.
4 Turn AMS (or press ./>
repeatedly) until the track number
(when copying the track name) or
“Disc” (when copying the disc name)
flashes, then press AMS or YES to copy
the selected name.
When “No Name” appears in the display
The selected track or disc has no name.
5 Turn AMS (or press ./>
repeatedly) until the track number
(when naming a track) or “Disc” (when
naminga disc)flashes, then pressAMS
or YES to enter the copied name.
“Complete!!” appears.
Tip
When “Overwrite ??” appears in step 5 above, the
tracko r the disc selectedin step 5 already has a name.
If you wish to replace the name, press AMS or YES
againwhiletheindicationappearsinthedisplay.
If the track has been recorded in MD LP mode with
the “LPstamp On” setting (page 10),“Overwrite ??”
also appear s evenif a track name is not assigned. In
this case if you copy the track name, the “LP:”
indication disappears from thetrack name.
Renaming a track or MD
1 Press NAME EDIT/SELECT on the
remote while the deck is in one of the
operating modes listed below,
depending on what you want to rename:
To rename Press while
A track The track number is displayed
The MD The deck is stopped with total
numberof tracksdisplayed
A track or disc name appears in the display.
2 Press CLEAR until the selected name is
erasedcompletely.
3 Dosteps5to8of“Naming a track or an
MD using the controls on the deck” on
page 24 or steps 2 to 4 of “Naming a
track or an MD using the remote” on
page 24.
4 Press YES.
The whole name appears in the display,
followed by “Complete!!”.
continued
Editing Recorded MDs
25
Page 26

Naming a track or MD (continued)
Erasing a track or disc name
Use this functionto erase the name of a track or
disc.
1 While the deck is stopped, playing,
recording, or paused, press MENU/NO.
“Edit Menu” appears in the display.
2 Turn AMS (or press ./>
repeatedly) until “Name ?” appears,
then press AMS or YES.
3 Turn AMS (or press ./>
repeatedly) until “Nm Erase ?” appears,
then press AMS or YES.
4 Turn AMS (or press ./>
repeatedly) until the number of the track
(when erasing the track name) or “Disc”
(whenerasing the disc name)flashes,
then press AMS or YES.
“Complete!!” appears.
To erase all the names on the MD
Select “Nm All Ers?”,thenpressAMSorYES
twice in step 3 a b ove.
Changing the recorded
level after recording
— S.F EDIT
You can change the volume of recordedtracks
usingS.F(ScaleFactor) Edit.The original track
is recorded over at the new recording level.
When changing the recording level, you can
select Fade-in Recordingto gradually increase
the signal level at the start of recording, o r
Fade-out Recording to graduallydecreasethe
signal levelat the end of recording.
Changing the ov erall
recording level
1 Press MENU/NO.
“Edit Menu” appears in the display.
2 Turn AMS (or press ./>
repeatedly) until“S.F Edit?” appears,
then press AMS or YES.
3 Turn AMS (or press ./>
repeatedly) until“Tr Level ?” appears,
then press AMS or YES.
4 Turn AMS (or press ./>
repeatedly) until the track number you
wantto changetherecording level
appears, then press AMS or YES.
“Level 0dB” appears in the display.
5 While monitoring the sound, turn AMS
(or press ./> repeatedly) to
change the recorded level without
turning on “OVER” on the peak level
meters.
26
Avoid turning on these indicators
Page 27

6 Press AMS or YES.
“S.F Edit OK?” appears in the display.
7 Press AMS or YES.
The deck starts recording over the existing
track. “S.F Ed it(:) ** %” appears while the
track is being recorded. An amount of time
that is roughly equal to or longer than the
playback time of the track is required when
recordingoverthetrack. When therecording
finishes, “Com plete!!” appears.
Fade-in and Fade-out
Recording
1 Press MENU/NO.
“Edit Menu” appears in the display.
2 TurnAMS (or press ./>
repeatedly) until “S.F Edit?” appears,
then press AMS or YES.
3 TurnAMS (or press ./>
repeatedly) until “Fade In ?” or “Fade
Out ?” appears, then press AMS or
YES.
4 TurnAMS (or press ./>
repeatedly) until the track number you
wantto changetherecording level
appears, then press AMS or YES.
“Time 5.0s” appears in the display.
5 While monitoring the sound, turn AMS
(or press ./> repeatedly) to
change the Fade-in or Fade-out
Recording time.
The deck plays the p o rtion that will be
recorded overusing Fade-in or Fade-out
Recording.
You can set the time at any value between 1
second and 15 seconds, in 0.1 second
increments. You cannotset the time longer
than the track.
6 Press AMS or YES.
“S.F EditOK?” appears in the display.
7 Press AMS or YES.
The deck starts recording over the existing
track. “S.F Edit(:) ** %” appears while the
track is being recorded. When the recording
finishes, “Complete!!” appears.
To cancel the operation
Press MENU/NO or x in steps 1 to 6. If you
press AMS or YES in step 7 and recording
starts,you cannot interrupt the operation.
Notes
• Do not disconnect the ACpower cord or move the
deck while recording isin progress. This may
damage the recording data preventing recording
from being performedproperly.
• You cannot change the recorded level of a track
recorded in LP2 or LP4 Stereo mode.
• Do not use an MD that is damaged or dirty. This
may prevent recordingdata from being recorded
properly.
• Repeatedlychanging the recording level results in
poor sound quality.
• The recording level will not return to the exact
original level once the recording level has been
changedeven if it returnedto the original level.
• The recording level cannot be changed while the
timer is activated.
• You cannot undo any S.F edit operation with the
Undo Function.
Editing Recorded MDs
27
Page 28

Other Funct ions
Undoing the last edit
— UNDO
You can undo the last edit operation and restore
the contents o f the MD to the condition that
existed before the operation.Note, however,
that you cannot undo an edit operation if you
perform any of the following operations a fter
the edit:
• Start recording.
• Press MUSIC SYNC on the remote.
• Changet he recorded level after recording (S.F
Edit).
• Turn off the deck or eject the MD.
• Disconnect the AC power cord.
1 While the deck is stopped, press MENU/
NO.
“Edit Menu” appears in the display.
2 Turn AMS (or press ./>
repeatedly) until “Undo ? ” appears.
“Undo ?” does not appear if no editing has
been done.
3 Press AMS or YES.
One of the messages appears depending on
the last edit operation.
4 Press AMS or YES.
“Complete!!” appears.
Fading in and fading out
You can use Fade-in Play to gradually increase
the signal level to the ANALOG OUT jacks and
the PHONES jac k at the start of playing. Fadeout Play gradually decreases the signal level at
the end of playing.
Fade-inRecording gradually increases the
signal level at the start of recording. Fade-out
Recordinggradually decreases the signal level
at the end of recording.
Fade-in Play and Fade-in
Recording
During play pause (for Fade-in Play) or
recording pause (for Fade-in Recording),
press FADER on the remote.
b flashesin the display and the deck performs
Fade-inPlayorFade-inRecordingforfive
seconds (factorysetting) until the counter
reaches “0.0s.”
Fade-out Play and Fade-out
Recording
During play (forFade-out Play) or
recording (for Fade-out Recording), press
FADER on the remote.
B flashesin the display and the deck performs
Fade-out Play or Fade-out Recording for five
seconds (factorysetting) until the counter
reaches “0.0s,” then pauses.
28
Page 29

Tip
Do the following procedure to specify the fade-in or
fade-out durationfor playback or recording.
1 While thedeckis stopped,press MENU/NO
twice.
“Setup Menu” appears in the display.
2 Turn AMS (or press ./> repeatedly)
to select the setting, then press AMS or
YES.
Tochange the
duration of
Fade-in Play/Recording F.in
Fade-outPlay/Recording F.out
3 Turn AMS (or press ./> repeatedly)
to select the duration, then press AMS or
YES.
Both the Fade-in and Fade-out durationscan be
set in 0.1 second steps.
4 Press MENU/NO.
Select
Falling asleep to music
— Sleep Timer
Tip
You can check the remaining time.
Once you turn on Sleep Timer, the remaining time is
displayed when you select“Sleep” in Setup Menu.
You can set the deck so that it turns off
automatically after 60 minutes.
1 While the deck is stopped, press MENU/
NO twice.
“Setup Menu” appears in the display.
2 TurnAMS (or press ./>
repeatedly) until “Sleep Off” appears in
the display, then press AMS or YES.
3 TurnAMS (or press ./>
repeatedly)to select the setting, then
press AMS or YES.
To Select
Turn on Sleep Timer Sleep On
Turn offSleep Timer SleepOff (factory
setting)
4 Press MENU/NO.
Other Functions
29
Page 30

Additi onal Information
Precautions
On safety
• Should any solid object or liquid fall into the
cabinet, unplug the deck and haveitchecked by
qualified personnel before operating it any
further.
• Caution– The use of opticalinstruments with
this product will increase eye hazard.
On power sources
• Beforeoperating the deck, check that the
operating voltage of the deck is identical with
your local power supply. The operating voltage
is indicated on the nameplate at the rear of the
deck.
• The unitis not disconnectedfromthe AC power
source (mains) as long as it is connected to the
wall outlet, even if the unit itself has been turned
off.
• If you are not going to use the deck for a long
time,besuretodisconnectthedeckfromthe
wall outlet. To disconnect the AC power cord,
grasp the plug itself; never pullthe cord.
• AC powercord must be changed only at the
qualified service shop.
On condensation in the deck
If the deck is brought directly from a cold to a
warm location, or is placed in a very damp
room, moisture may condense on the lenses
insidethe deck. Should thisoccur, the deck may
not operate properly. In this case, remove the
MD and leave the deck turned on for several
hours until the moisture evaporates.
On cleaning
Cleanthecabinet, panel and controlswith a soft
cloth slightly moistened with a mild detergent
solution.Do not use any type of abrasive pad,
scouring powderor solvent such as alcohol or
benzine.
If you have any questions or problems
concerning your deck, please consult your
nearest Sony dealer.
Note on MDs
• Do not touch the internal disc directly. Forcing
the shutter open may damage the internal disc.
• Be sure to stick the labels supplied with the MD
to the appropriate positions. The shape of the
labels may vary dependingonthe MD brand.
Proper location
of the labels
Where to keep the MDs
Do not place the cartridgewhere it may be
exposed to direct sunlight or extremely high
heat and humidity.
Regular maintenance
Wipe dust and debris from the surface of the
cartridgewith a dry cloth.
Shutter
System limitations
The recording system in your deck is radically
different from those used in cassette and DAT
decks and is characterized by the limitations
describedbelow.Note, however, that these
limitations are due to the inherent nature of the
MD recording system itself and not to
mechanical causes.
“Disc Full” appears in the display
even before the M D has reached the
maximum recording time
When255 tracks havebeen recorded to theMD,
“Disc Full” appears regardless of the total
recordedtime. More than 255 tracks cannot be
recordedto the MD. Tocontinue recording,
erase unnecessarytracks or use another
recordable M D.
30
Page 31

“Disc Full” appears before the
maximum number of tracks is
reached
Fluctuations in emphasis within tracks are
sometimes interpreted as track intervals,
incrementing the track count and causing
“Disc Full” to appear.
The remaining recording time does
not increase even after erasing
numerous short tracks
Tracks under 12 seconds1)in length are not
countedand so erasing them may not lead to an
increase in the recording time.
Some tracks cannot be combined
with others
Tracks may not be combined if they have been
edited.
The total recorded time and the
remaining recordable time on the MD
may not total the maximum
recording time
Recordingis done in minimum units of two
1)
seconds
each,nomatter howshort the material
is. The contents recorded may thus be shorter
than the maximum recording capacity. Disc
space may also be further reduced by scratches.
1) During stereo recording.
In MONO or LP2 mode: about 4 seconds
In LP4 mode: about 8 seconds
Limitations when recording over an
existing track
• The correct remainingrecordable time may not
be displayed.
• You may find it impossible to record over a
track if thattrack has been recordedover several
times already. If this happens, erase the track
(see page 19).
• The remaining recordable time may be
shortened out of proportion to the total recorded
time.
• Recordingover a track to eliminatenoise is not
recommendedsince thismay shorten the
durationof the track.
• You may find it impossible to name a track
while recording over an existing track.
Tracks created through editing may
exhibit sound dropout as you are
searching for a point while
monitoring the sound.
Track numbers are not marked
correctly
Incorrect assignment or marking of track
numbersmay result when CD tracksare divided
into several smaller tracks during digital
recording. Also, when the Automatic Track
Marking is activated during recording,track
numbers may not be marked as in the original,
depending on the program source.
The correct recorded/playing time
may not be displayed during play of
MDs recorded in monaural mode.
Guide to the Serial Copy
Management System
Digitalaudiocomponents, such as CDs, MDs,
and DATs, make it easy to produce high-quality
copiesofmusic by processingmusicas a digital
signal.
To protect copyrighted music sources, this deck
uses the Serial Copy Management System,
which allows you to ma ke only a single co py of
a digitally recorded source through digital-todigitalconnections.
continued
Additional Information
31
Page 32

System limitations (continued)
You can make only a first-generation
2)
copy
through a digital-to-digital
connection.
Examples are as follows:
• You can make a copy of a commercially
available digital sound program (for example, a
CD or MD),but you cannotmakea secondcopy
from the first-generation copy.
• You can make a copy of a digital signal from a
digitallyrecorded analog sound program (for
example,an analog record or a music cassette
tape) or from a digital satellite broadcast
program, but you cannot make a second copy
from the first-generation copy.
2) A first-generationcopy means the first recording
of a digital audiosource throughthe deck’s
digitalinput connector. Forexample, if you
record from a CD player connected to the
DIGITAL IN connector, thatcopy is a firstgeneration copy.
Note
The restrictions of the Serial CopyMan agement
System do not apply when you make a recording
through the analog-to-analog connections.
Troubleshooting
If you experience any of the following
difficulties while using the deck, use this
troubleshooting guide to help you remedy the
problem. Should any problem persist,consult
your nearest Sony dealer.
The deck does not operate or operates poorly.
The MD may be dirty or damaged. Replace the
MD.
Only the following buttonsare operable while the
MD deck is being controlledby a personal
computer.
?/1, INPUT,LEVEL/DISPLAY/CHAR
(DISPLAY,SCROLL, LEVEL +/– on the remote).
The deck does not play.
• Moisture has formed inside the deck. Take the
MD out and leave the deck in a warmplace for
several hours untilthe moisture evaporates.
• The deckis not on. Press ?/1 to turn on the deck.
• The deck may not be connected to the amplifier
correctly. Check the connection (page6).
• The MD is inserted in the wrong direction. Slide
the MD into thedisc slot with the label sideup
and the arrow pointingtoward the slot (page 16).
• The MD may not be recorded. Replace the disc
with one that has been recorded.
The sound has a lot of static.
Strong magnetism from a television or a similar
device isinterfering with operations.Move the
deck awayfrom the source of strongm agnetism.
Thedeckdoesnotrecord.
• The deck is not connected properlyto the
program source. Check the connection (page 6).
• Selectthe correct program sourceusing INPUT.
• Therecording level is not adjustedproperly.
Adjust the recordinglevel (page 12).
• A premasteredMD is inserted.Replace it with a
recordableMD .
• Thereis not enoughtime lefton the MD.Replace
it with another recordableMD w ith fewer
recorded tracks, or erase unnecessarytracks
(page 19).
• Therehas been a power failureo r the AC power
cord has been disconnected duringrecording.
Data recorded to that point may be lost. Repeat
the recording procedure.
The deck does not perform Synchro-recording
with a CD player or video CD player.
The remotesupplied with the MD deck is not set
correctly. Reset the remote.
A message and a three- or five-digit
alphanumericcode alternate in the display.
The Self-diagnosis function is on (page 33).
Note
If the deck doesnot operate properlyeven after you
haveattempted the prescribed remedies, turn off the
deck,then re-insert the pluginto the power outlet.
32
Page 33

Self-diagnosis function Display messages
The deck’s self-diagnosis function
automatically checks the condition of the MD
deck when an error occurs, then issues a threeor five-digit code and an error message on the
display. If the code and message alternate, find
them in the following table and perform the
indicatedcountermeasure. Should the problem
persist, consult your nearest Sony dealer.
C11/Protected
, Takeout the MD and close the record-protect
slot (page 9).
C12/Cannot Copy
• Youtried to record a CD with a format that the
external device connected to the deck does not
support, such as CD-ROM or video CD.
, Remove the disc and inserta music CD.
C13/REC Error
, Set the deck in a stable surface, and repeat the
recording procedure.
• The inserted MD is dirty (with smudges,
fingerprints, etc.), scratched, or substandardin
quality.
, Replace the disc and repeat the recording
procedure.
C13/Read Error
, Take out the MD and insert itagain.
C14/TOC Error
, Insert another disc.
, If possible, erase all the tracks on the MD
(page 20).
C41/Cannot Copy
• The sound source isa copy of commercially
available music software, or you tried to record a
CD-R (Recordable CD).
, The Serial Copy Management System
preventsmaking adigital copy (page 31). You
cannot record a CD-R.
C71/Din Unlock
• The sporadic appearance of this message is
causedby the digital signalbeing recorded. This
will not affect the recording.
• While recordingfrom a digital component
connected throughthe D IGITAL IN connector,
the digitalconnecting cablewas unplugged or the
digitalcomponent turnedoff.
, Connect the cable or turnthe digital
component back on.
The following table explains the various
messagesthat appear in the display. Messages
are also displayed by the deck’s Self-diagnosis
function(see page 33).
Auto Cut
The Auto CutF unction is on (page 11).
Blank Disc
Anew(blank)orerasedMDhasbeeninserted.
Cannot Copy
An attempt was made to make a second copy from
a digitally dubbed MD (page 31).
Cannot Edit
An attempt was made to edit a premasteredMD, to
edit the MD duringProgram or Shuffle Play or to
change the recording level of an MD recorded in
LP2 or LP4 Stereo mode.
Disc Full
The MD is full (page31).
Impossible
The deck cannot do the specified operation (pages
8, 21 and 23).
Incomplete!!
The S.F Edit (changing the recording level after
recording, Fade-in, Fade-out) operationwas not
performed properlybecause the d eck was moved
while recording was in progress or the MD is
damagedor dirty.
Initialize (flashing)
The Setup Menu settings have been lost.
Or the contents recorded by the timer have
disappeared overtime andare not be availablefor
saving to disc, or Program Play could not be
activated since the program has disappeared over
time.
(The messageflashes for aboutfour seconds when
you turn on the deck by pressing?/ 1.)
Name Full
The naming capacity of the MD has reached its
limit (about 1,700 characters).
No Change
While attemptingto change the recordinglevel
after recording,you pressed YES withoutactually
changingthe recording level, so no changewas
made.
continued
Additional Information
33
Page 34

Display messages (continued)
No Disc
There is no MD in the deck.
No Name
The track or disc has no name.
ProgramFull!
The program contains the maximum number of
tracks. You cannot add any more tracks.
REMOTE
The MD is being controlled by an externaldevice
connected to the deck.
S.F Edit!
You attemptedto perform another operation while
in S.F Edit (changing the recording level after
recording, Fade-in,Fade-out) mode.
Yo u can not perform anyo ther operations while in
S.F Edit mode.
S.F Edit NOW
You pr es sed ?/1 while in S.F Edit (changing the
recording levelafter recording, Fade-in, Fade-out)
mode.
If youturn off thedeck whilein S.F Editm ode, any
changes thatyou have made willnot be made
properly. Finish the changesand leave S.F Edit
mode before turningoff the deck. If you
accidentallyturn off the deck while changes are
being made, press ?/1 while the message is
displayed.
Smart Space
The Smart Space Function is on (page 11).
TOC Reading
The deck is checking the TOC (Table Of Contents)
on the MD.
1) If “REMOTE”appears under other
circumstances,turn off the deck, then turn it on
again.
1)
Setup menu table
Menu item Reference page
Program? 18
T.Mark 10
LS(T) 11
S.Space 12
P.H old 12
F.in 29
F.out 29
Sleep 29
LPstamp 10
Specifications
System MiniDisc digital audio
Disc MiniDisc
Laser Semiconductorlaser (
Laser output MAX 44.6 µW
1) This output is the value measured at a distanceof
200 mm from the objectivelens s urface on the
Optical Pick-upBlock with 7 mm aperture.
Laser diode Material: GaAlAs
Revolutions (CLV) 400 rpm to 900 rpm
Error correction ACIRC(Advanced Cross
Samplingfrequency 44.1 kHz
Coding ATRAC (Adaptive
Modulation system EFM (Eight-to-Fourteen
Number of channels 2 stereochannels
Frequency response 5 to 20,000 Hz ±0.3 dB
Signal-to-noise ratio Over 94 dB during play
Wow and flutter Below measurable limit
Inputs
ANALOG IN Jack type: phono
DIGITAL IN Connector type: square
system
780 nm) Emission
duration: continuous
Interleave Reed Solomon
Code)
TRansform Acoustic
Coding)/ATRAC 3
Modulation)
Impedance: 47 kilohms
Rated input: 500 mVrms
Minimum input:
125 mVrms
optical
Impedance: 660 nm
(opticalwave length)
λ =
1)
34
Page 35

Outputs
PHONES Jack type: stereo phone
ANALOG OUT Jack type: phono
Rated output: 10 mW
Load impedance: 32 ohms
Rated output: 2 Vrms (at
50 kilohms)
Load impedance: over 10
kilohms
General
Power requirements
U.S.A. and Canadian models:
Europeanmodels: 230 V AC, 50/60Hz
Australian models: 240 V AC, 50/60Hz
Hong Kongmodels: 220-240V AC, 50/60Hz
Other models: 110-120/220-240 V AC,
Powerconsumption 15 W
Dimensions (approx.) 280
Mass (approx.) 2.4 kg
120 V AC, 60Hz
50/60Hz
Adjustablewith voltage
selector
0.5 W (in theSTANDBY
mode)
× 84.5 × 290 mm (w/
h/d) incl. projecting parts
and controls
Supplied accessories
Audio connectingcords (2)
Optical cable (1)
Remote commander (remote)(1)
R6 (size-AA) batteries(2)
US and foreign patents licensed from Dolby
Laboratories.
Design and specificatio n s are subject to change
withoutnotice.
Using the beeps
(Except for North American model)
The deck can output various beeps that allow
you to identify deck operations by sound. The
beeps are output from the LINE (ANALOG)
OUT jacks.
Set BEEP (located at the rear panel of
the deck) to ON.
Beepsareoutputaccording to the deck status as
follows:
One short beep (high)
The deck hasbeen turned on, startedplaying, started
recording,
Two short beep (high)
The deck has been turned off.
One short beep (low)
• The deck has stopped or the MD has been ejected.
• Menu operationh as finished or canceled,n o rmal
The peak level me ter is displayed.
Several beeps (low and high beeps
are output alternately)
The deck’sself diagnosis function has been activated
and a code and message alternate in the display.
Consecutive beeps (high)
• AnoperationbuttonwaspressedwithnoMD
• You cannot select an itemor setting valueby turning
• The remaining recordable time becomes less than 3
Consecutive beeps (low)
• The recordinglevel or trigger level for Automatic
• You cannot select an itemor setting valueby turning
One continuous beep (high)
z was pressed but the MD is full.
1)
etc.
play mode has been resumed, recording levelh as
been set to 0 dB (default value) (i.e., the deck has
resumedthe normal status).
inserted.
AMS (or pressing ./> repeatedly).
minutesduring recording.
TrackMarking has been set to maximum or
minimum.
AMS (or pressing ./> repeatedly).
1)
continued
Additional Information
35
Page 36

Using the beeps (continued)
One continuous beep (low)
• During recording or recording pause, the peak level
meters haveexceeded the recommendedlevel
(“OVER” lights up).
• You cannot changethe play mode.
Consecutive short beeps (low)2)
followed by single short beeps (low)
every few seconds
The deck has changed to recording pause.
1) The beep has no effect on recording results.
2) One low beep for each 10 minutes of remaining
recordable time (e.g., one beep for 11 to 20
minutes,two beeps for 21 to 30 minutes,and
three beepsfor 31 to 40 minutes). No beepis
output for a remaining time of 10 minutes or less.
To turn off the beeps
Set BEEP to OFF.
Note
If you press SCROLL while BEEP is set to ON and no
MD is inserted, a beep is emitted and the status of the
following items automaticallychanges as follows:
• Shuffle Playor Program Playis canceledan d normal
play is resumed.
• Repeat All Play or Repeat 1 Play is canceled.
• The recording mode is set to stereo mode.
• ANALOG IN is selected.
1)
Sony Corporation PrintedinMalaysia
 Loading...