

Sony MDS-S40 User Manual
MiniDisc Deck
3-865-729-12(1)
Operating Instructions
MDS-S40
1999 by Sony Corporation
WARNING
To prevent fire or shock
hazard, do not expose the
unit to rain or moisture.
To avoid electrical shock,
do not open the cabinet.
Refer servicing to qualified
personnel only.
This appliance is classified as a CLASS 1
LASER product.
The CLASS 1 LASER PRODUCT
MARKING is located on the rear exterior.
IN NO EVENT SHALL SELLER BE
LIABLE FOR ANY DIRECT,
INCIDENTAL OR CONSEQUENTIAL
DAMAGES OF ANY NATURE, OR
LOSSES OR EXPENSES RESULTING
FROM ANY DEFECTIVE PRODUCT OR
THE USE OF ANY PRODUCT.
For the customers in the U.S.A.
This symbol is intended to alert the user to
the presence of uninsulated “dangerous
voltage” within the product’s enclosure
that may be of sufficient magnitude to
constitute a risk of electric shock to
persons.
INFORMATION
This equipment has been tested and found
to comply with the limits for a Class B
digital device, pursuant to Part 15 of the
FCC Rules. These limits are designed to
provide reasonable protection against
harmful interference in a residential
installation. This equipment generates,
uses, and can radiate radio frequency
energy and, if not installed and used in
accordance with the instructions, may
cause harmful interference to radio
communications. However, there is no
guarantee that interference will not occur
in a particular installation. If this
equipment does cause harmful
interference to radio or television
reception, which can be determined by
turning the equipment off and on, the user
is encouraged to try to correct the
interference by one or more of the
following measures:
• Reorient or relocate the receiving
antenna.
• Increase the separation between the
equipment and receiver.
• Connect the equipment into an outlet on
a circuit different from that to which the
receiver is connected.
• Consult the dealer or an experienced
radio/TV technician for help.
CAUTION
You are cautioned that any changes or
modification not expressly approved in
this manual could void your authority to
operate this equipment.
Owner’s Record
The model and serial numbers are located
on the rear of the unit. Record the serial
number in the space provided below.
Refer to them whenever you call upon
your Sony dealer regarding this product.
Model No. MDS-S40
Serial No.
Welcome!
Thank you for purchasing the Sony
MiniDisc Deck. Before operating the
deck, please read this manual
thoroughly and retain it for future
reference.
About This
Manual
The instructions in this manual are for
the MDS-S40 MiniDisc Deck.
Conventions
• Controls in these instructions are
those on the deck; these may,
however, be substituted by controls
on the supplied remote that are
similarly named, or, when different,
appear in the instructions within
parentheses.
Example: Turn AMS clockwise (or
press > repeatedly).
• The following icons are used in this
manual:
ZIndicates a procedure that
requires use of the remote.
z Indicates hints and tips for
making the task easier.
This symbol is intended to alert the user to
the presence of important operating and
maintenance (servicing) instructions in the
literature accompanying the appliance.
2
For the customers in Canada
CAUTION
TO PREVENT ELECTRIC SHOCK, DO
NOT USE THIS POLARIZED AC PLUG
WITH AN EXTENSION CORD,
RECEPTACLE OR OTHER OUTLET
UNLESS THE BLADES CAN BE FULLY
INSERTED TO PREVENT BLADE
EXPOSURE.

TABLE OF CONTENTS
Getting Started 4
Before You Start the Hookup 4
Hooking Up the Audio Components 5
Location and Function of Parts 8
Front Panel Parts Description 8
Remote Parts Description 10
Using the Display 11
Recording on MDs 13
Notes on Recording 13
Recording on an MD 14
Adjusting the Recording Level 16
Recording Tips 16
Marking Track Numbers While Recording
(Track Marking) 17
Starting Recording With Six Seconds of Prestored
Audio Data (Time Machine Recording) 18
Synchro-recording With the Audio Component of
Your Choice (Music Synchro-recording) 19
Synchro-recording With a Sony CD Player
(CD Synchro-recording) 19
Playing MDs 21
Playing an MD 21
Playing a Specific Track 22
Locating a Particular Point in a Track 23
Playing Tracks Repeatedly 23
Playing Tracks in Random Order (Shuffle Play) 24
Creating Your Own Program (Program Play) 25
Tips for Recording From MDs to Tape 26
Editing Recorded MDs 28
Erasing Tracks 29
Dividing Tracks 31
Combining Tracks 32
Moving Tracks 32
Naming a Track or MD 33
Undoing the Last Edit 36
Other Functions 37
Fade In and Fade Out 37
Falling Asleep to Music (Sleep Timer) 38
Additional Information 39
Precautions 39
Handling MDs 40
System Limitations 40
Troubleshooting 41
Specifications 41
Display Messages 42
Edit Menu Table 43
Setup Menu Table 44
Self-Diagnosis Function 44
Using the Beeps 45
Index 46
3

Getting
Before You Start the Hookup
Started
This chapter provides information on
the supplied accessories, things you
should keep in mind while hooking
up the system, and how to connect
various audio components to the MD
deck. Be sure to read this chapter
thoroughly before you actually
connect anything to the deck.
Checking the supplied accessories
This MD deck comes with the following items:
• Audio connecting cords (2)
• Optical cable (1)
• Remote commander (remote) RM-D29M (1)
• R6 (size-AA) batteries (2)
Inserting batteries into the remote
Insert two R6 (size-AA) batteries with the + and –
properly oriented to the markings into the battery
compartment. When using the remote, point it at the
remote sensor
on the deck.
z
When to replace the batteries
Under normal conditions, the batteries should last for about six
months. When the remote no longer operates the deck, replace
both batteries with new ones.
Notes
• Do not leave the remote in an extremely hot or humid place.
• Do not drop any foreign object into the remote casing,
particularly when replacing the batteries.
• Do not use a new battery with an old one.
• Do not expose the remote sensor to direct sunlight or lighting
apparatus. Doing so may cause a malfunction.
• If you don’t use the remote for an extended period of time,
remove the batteries to avoid possible damage from battery
leakage and corrosion.
4
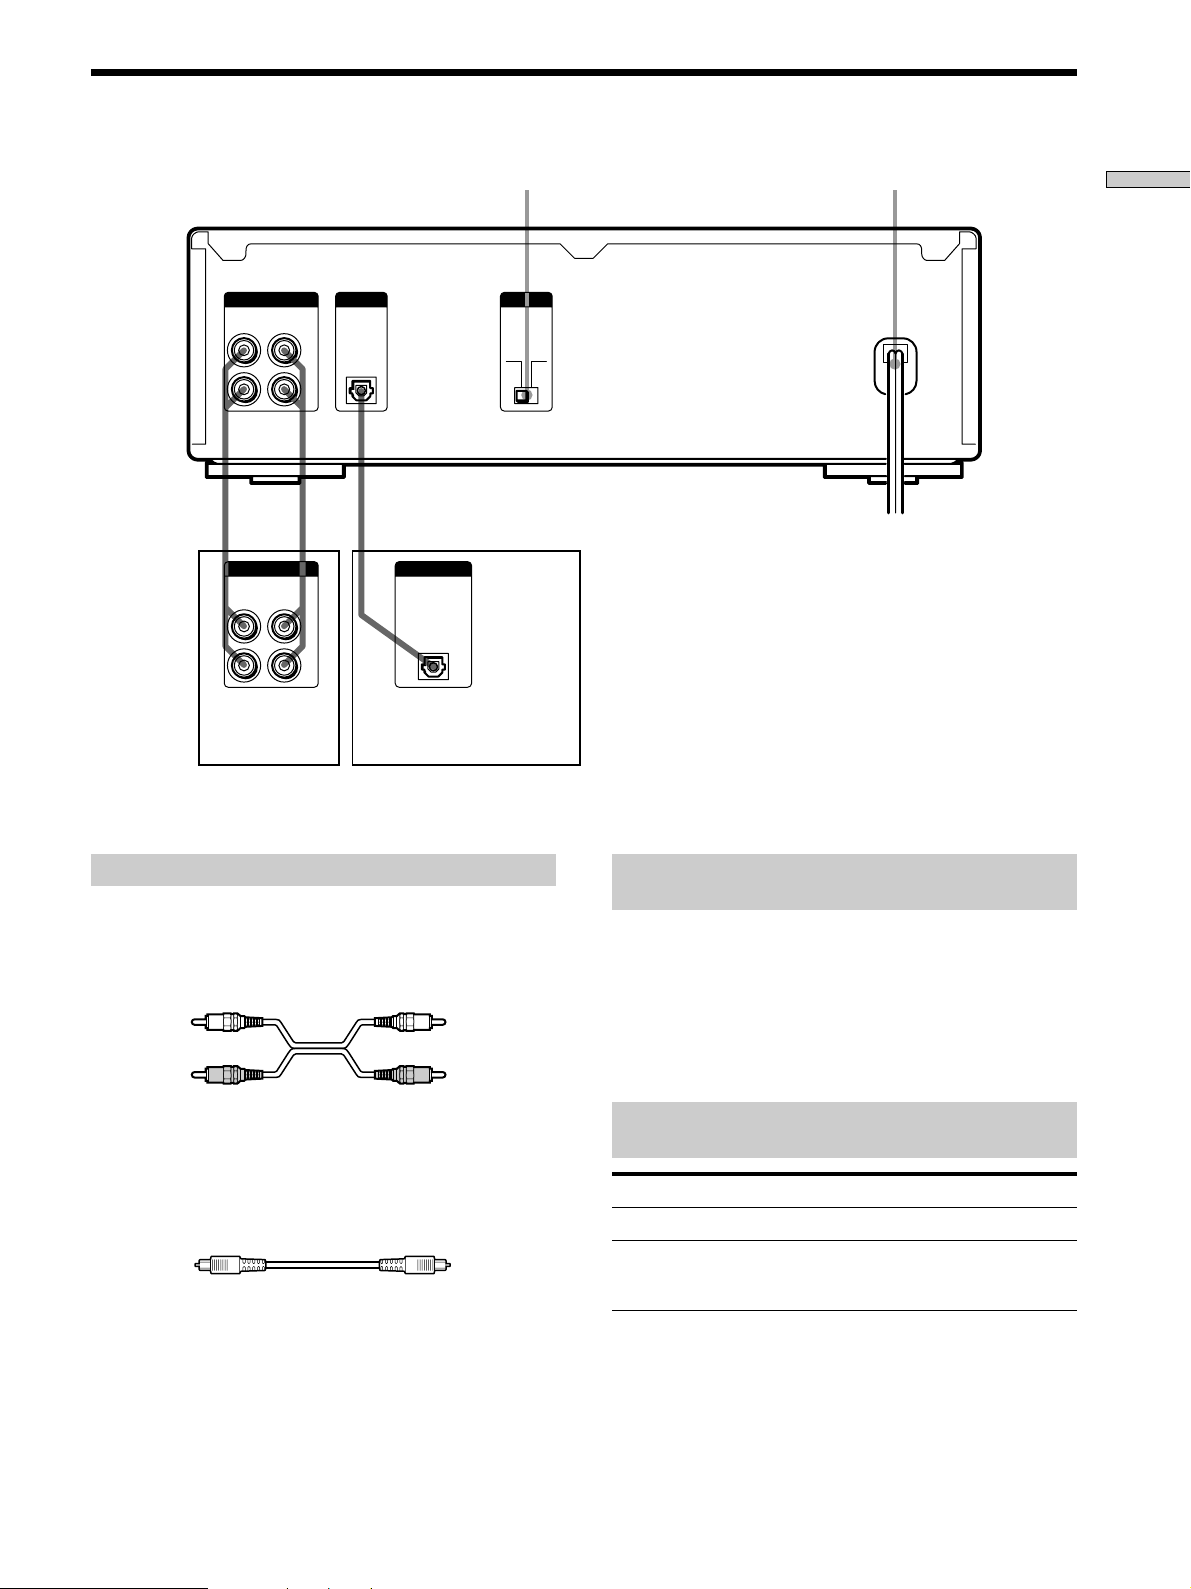
Hooking Up the Audio Components
LINE
(ANALOG)
OUT
IN
MD
IN
OUT
Amplifier, etc.
BEEP switch (page 45)
DIGITAL BEEP
IN
L
R
DIGITAL
L
R
OUT
Digital amplifier, DAT deck,
MD deck, CD player, DBS
tuner, etc.
AC power cord
Getting Started
ON OFF
Required cords
Audio connecting cords (2) (supplied)
When connecting an audio connecting cord, be sure to match the
color-coded pins to the appropriate jacks: white (left) to white
and red (right) to red.
White (L) White (L)
Red (R) Red (R)
Optical cable (1) (supplied)
• When connecting an optical cable, take the caps off the
connectors and insert the cable plugs straight in until they click
into place.
• Do not bend or tie the optical cable.
Things you should keep in mind while
hooking up the system
• Turn off the power to all components before making
any connections.
• Do not connect any AC power cord until all the
connections are completed.
• Be sure the connections are firm to prevent hum and
noise.
Jacks (connectors) for connecting audio
components
Connect To the
Amplifiers LINE (ANALOG) IN/OUT jacks
Digital amplifiers, DAT
decks, another MD deck, CD
players, or DBS tuners
DIGITAL IN connector
5
Hooking Up the Audio Components
Getting Started
Setting the voltage (only on models
supplied with a voltage selector)
Make sure the voltage selector on the rear panel of the
deck is set to the voltage of the local power supply. If not,
use a screwdriver to change it to the correct position
before connecting the AC power cord to a wall outlet.
Example
Connecting the AC power cord
Connect the AC power cord of the deck to a wall outlet.
Note
Do not connect the AC power cord to a switched outlet.
VOLTAGE SELECTOR
110–120V 220–240V
6

Getting Started
7

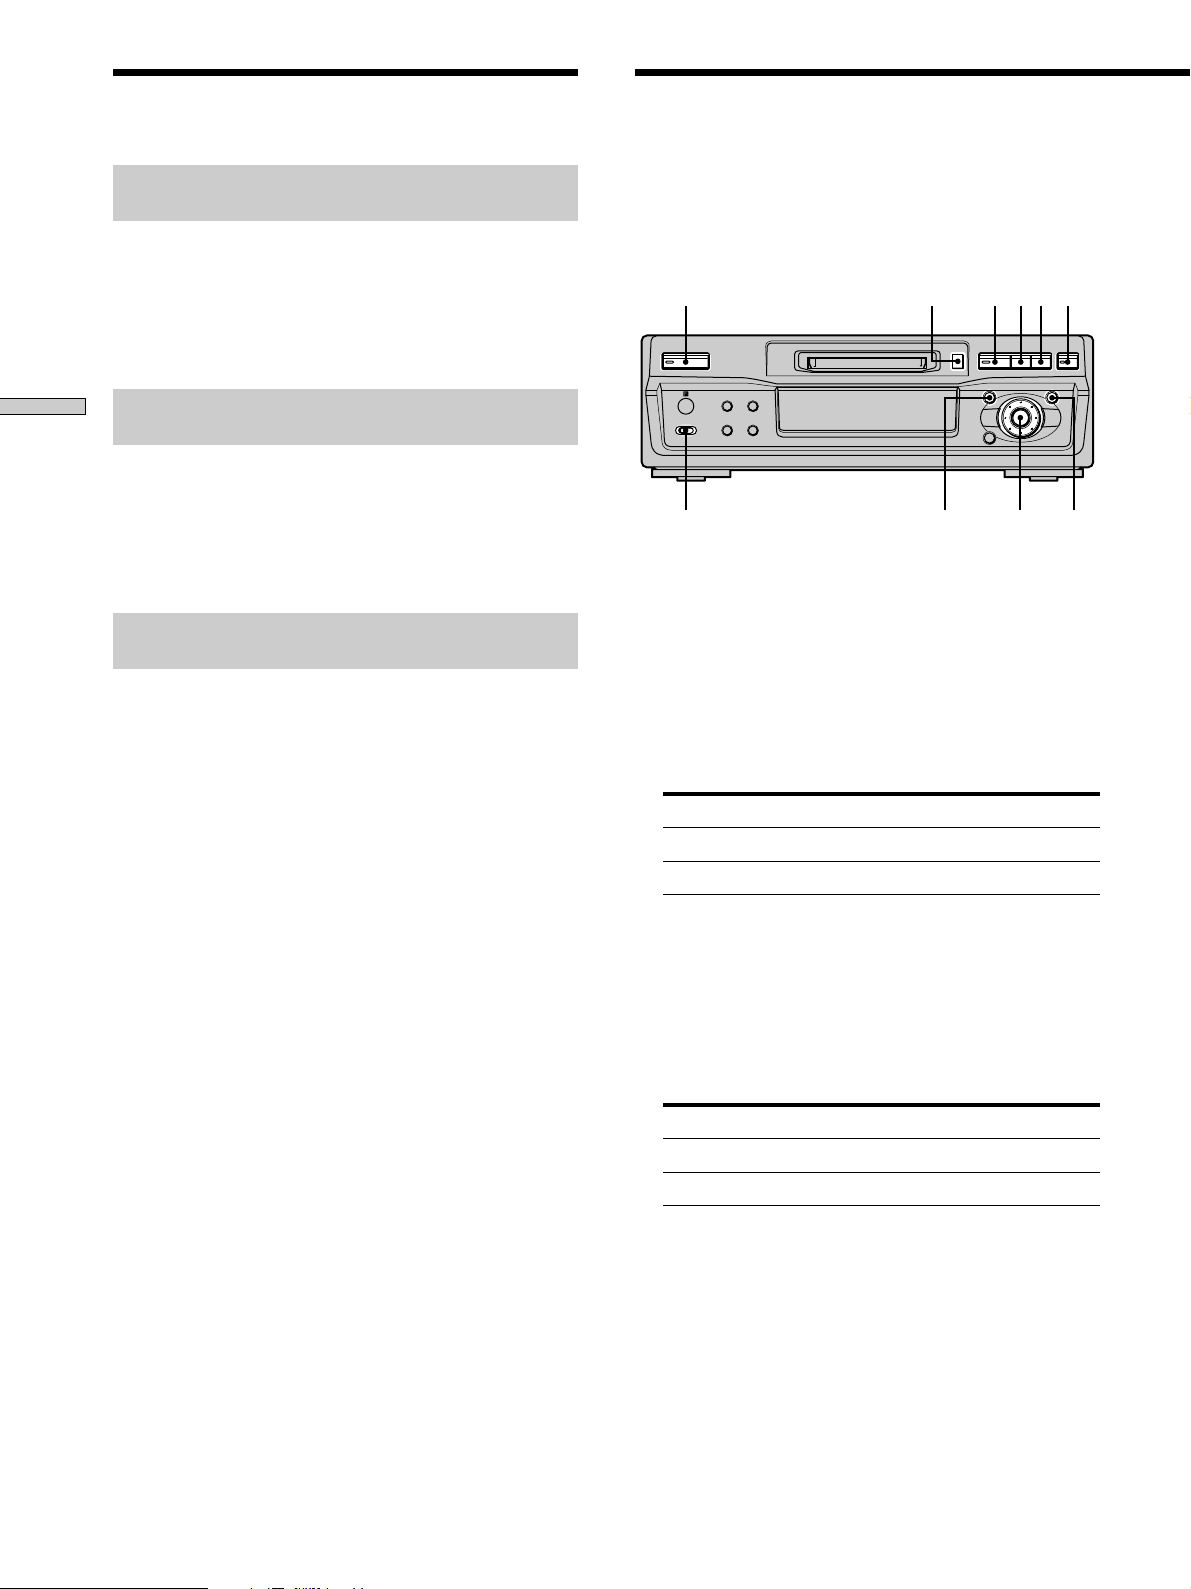
Location and Function of Parts
This chapter tells you about the
location and function of the various
buttons and controls on the front
panel and the supplied remote.
Further details are provided on the
pages indicated in the parentheses.
It also tells you about the information
that appears in the display window.
Front Panel Parts Description
1 ~/1 (power) switch (14, 21)
Press to turn the deck on. When you turn the deck on,
the switch indicator turns off. When you press the
switch again, the deck turns off and the indicator
lights up red.
2 SCROLL button (12)
Press to scroll the name of a track or MD.
3 LEVEL/DISPLAY/CHAR button (12, 16, 25, 33)
• Press during recording or recording pause to adjust
the recording level.
• Press when the deck is stopped to display disc
information or the contents of a program.
• Press during recording to display information on the
track being recorded.
• Press during play to display information on the
current track.
• Press while editing an MD to select the type of
characters to be input.
4 Display window (11, 12)
Shows various information.
5 MD insertion slot (14, 21)
Insert the MD as illustrated below.
With the labeled side up
8
With the arrow pointing towards the deck
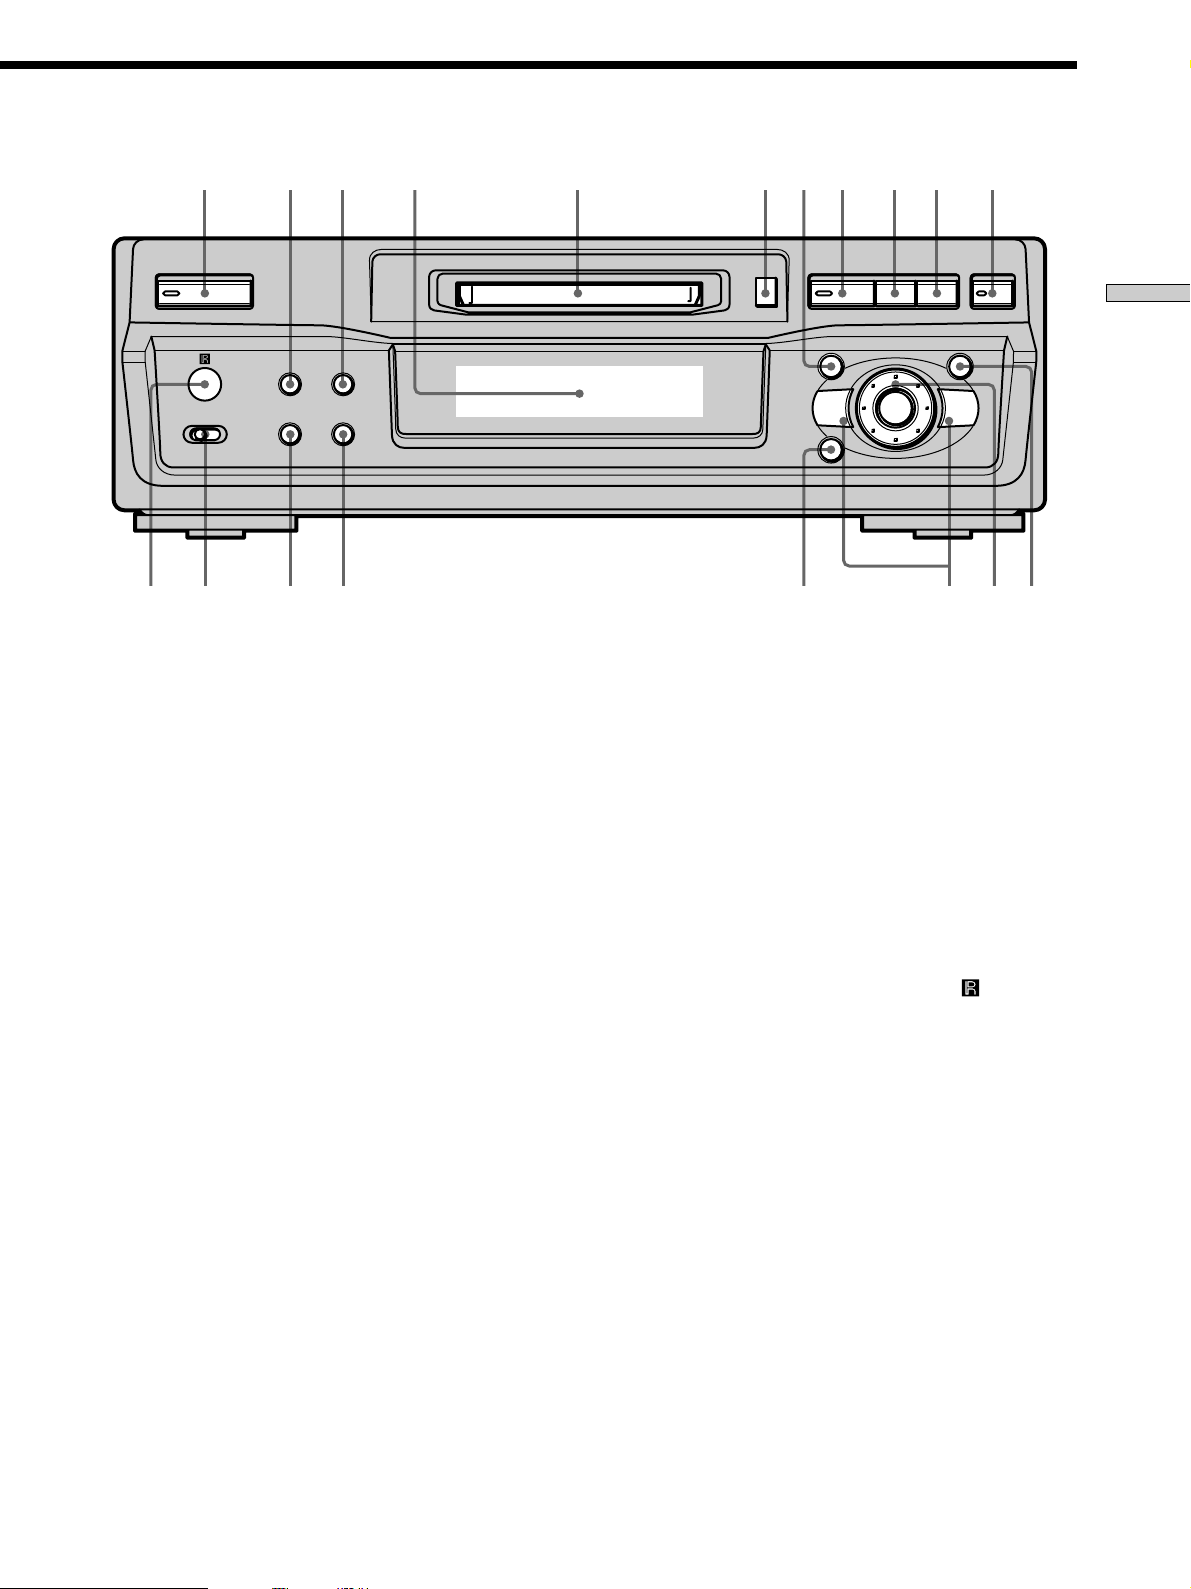
1 6 87 9 0 qa2 3 54
` / 1
LEVEL/
SCROLL
DISPLAY/CHAR
EJECT
Z
N
AMS
MENU/NO YES
>.
zxX
Location of Parts and Brief Explanations
REPEAT
INPUT
••
ANALOGDIGITAL
PLAY MODE
6 EJECT Z button (15, 21)
Press to eject the MD.
7 MENU/NO button (14, 29, 38)
Press to display “Edit Menu” or “Setup Menu.”
8 N button (15, 21)
Press to start play.
9 X button (15, 21)
Press to pause play or recording. Press again to
resume play or recording.
q; x button (15, 21, 29)
Press to stop play, stop recording, or cancel the
selected operation.
qa z button (15-17)
Press to record on the MD, monitor the input signal, or
mark track numbers.
mM
CLEAR PUSH ENTER
qg CLEAR button (26, 34)
Press to cancel the selection.
qh REPEAT button (23, 24)
Press to play tracks repeatedly.
qj PLAY MODE button (24)
Press to select Shuffle Play or Program Play.
qk INPUT switch (14)
Use to select the input jack (or connector) of the
program source to be recorded.
ql Remote sensor (4)
Point the remote towards this window (
remote operations.
qsqdqg qfqhqjqkql
) for
qs YES button (14, 25, 29, 38)
Press to carry out the selected operation.
qd AMS control (14-16, 21, 25, 29, 33, 38)
Turn to locate tracks, adjust the recording level, select
the input characters, or select a menu item.
qf m/M buttons (23, 25, 30, 33)
Press to locate a portion within a track, change the
contents of a program, or change the input character.
9
Remote Parts Description
` / 1
ws
Z
1
1 ~/1 (power) switch (14, 21)
Press to turn the deck on. When you turn the deck on,
the ~/1 switch indicator on the deck turns off. When
you press the switch again, the deck turns off and the
indicator lights up red.
Location of Parts and Basic Amplifier Operations
MENU/NO
CLEARYES
wa
DISPLAY
FADERSCROLL
w;
ql
qk
NAME IN
& ! ?
1
GHI
4
PRS
7
>
10
STOP
CD-SYNC
CD PLAYER
H
PLAY MODE
CHARNAME
ABC
2
JKL5MNO
TUV
8
QZ
MUSIC
SYNC
10/0
STANDBY
START
>.X
DEF
3
6
WXY
9
X
qj
T.REC
qh
qg
z x
. >
LEVEL
+
qf
qd
m M
REPEAT
A
y
B
–
2
3
4
5
6
7
8
9
0
qa
qs
2 CLEAR button (26, 34)
Press to cancel the selection.
3 FADER button (37)
Press to perform Fade-in Play/Recording or Fade-out
Play/Recording.
4 PLAY MODE button (24)
Press to select Shuffle Play or Program Play.
5 Letter/number buttons (22, 34)
Press to enter a track number directly or input letters
or numbers.
6 MUSIC SYNC button (19)
Press to start Music Synchro-recording.
7 CD-SYNC STOP button (20)
Press to stop CD Synchro-recording.
CD-SYNC START button (19)
Press to start CD Synchro-recording.
CD-SYNC STANDBY button (19)
Press to enter standby for CD Synchro-recording.
8 CD PLAYER X button (20)
Press to pause the CD play. Press again to resume CD
play.
CD PLAYER ./> buttons (20)
Press to locate tracks on the CD.
9 X button (15, 21)
Press to pause play or recording. Press again to
resume play or recording.
q; x button (15, 21, 29)
Press to stop play, stop recording, or cancel the
selected operation.
10
qa LEVEL +/– buttons (16)
Press to adjust the recording level.
qs AyB button (24)
Press to select Repeat A-B Play.
qd REPEAT button (23, 24)
Press to play tracks repeatedly.
qf m/M buttons (23, 25, 30, 34)
Press to locate a portion within a track, change the
contents of a program, or shift the cursor to the right.
Using the Display
SONGS
15 46m 08s
qg ./> buttons (14-16, 21, 25, 29, 34, 38)
Press to locate tracks, adjust the recording level, or
select a menu item.
qh z button (15-17)
Press to record on the MD, monitor the input signal, or
mark track numbers.
qj T.REC button (18)
Press during recording pause to start Time Machine
Recording.
qk H button (15, 21)
Press to start play.
ql NAME button (34)
Press to add the name or change the name of a track or
MD.
CHAR button (34)
Press to select the type of characters to be input when
naming a track or MD.
w; DISPLAY button (12, 16, 25)
Press to select the information to be displayed in the
window.
SCROLL button (12)
Press to scroll the name of a track or MD.
The display window shows information about the MD or
track. This section describes the information that appears
for each deck status.
LEVEL/DISPLAY/CHAR
` / 1
Note
The type of information (e.g., total number of tracks, recorded
time, remaining time, track or disc name) which was last
displayed will continue to appear until you change it by pressing
LEVEL/DISPLAY/CHAR (or DISPLAY), even if you change the
deck operation status. For example, if the remaining time was
displayed when you stop the deck, the remaining time will
continue to appear when you begin playing the same MD again
or a different one.
Z
N
>.
mM
zxX
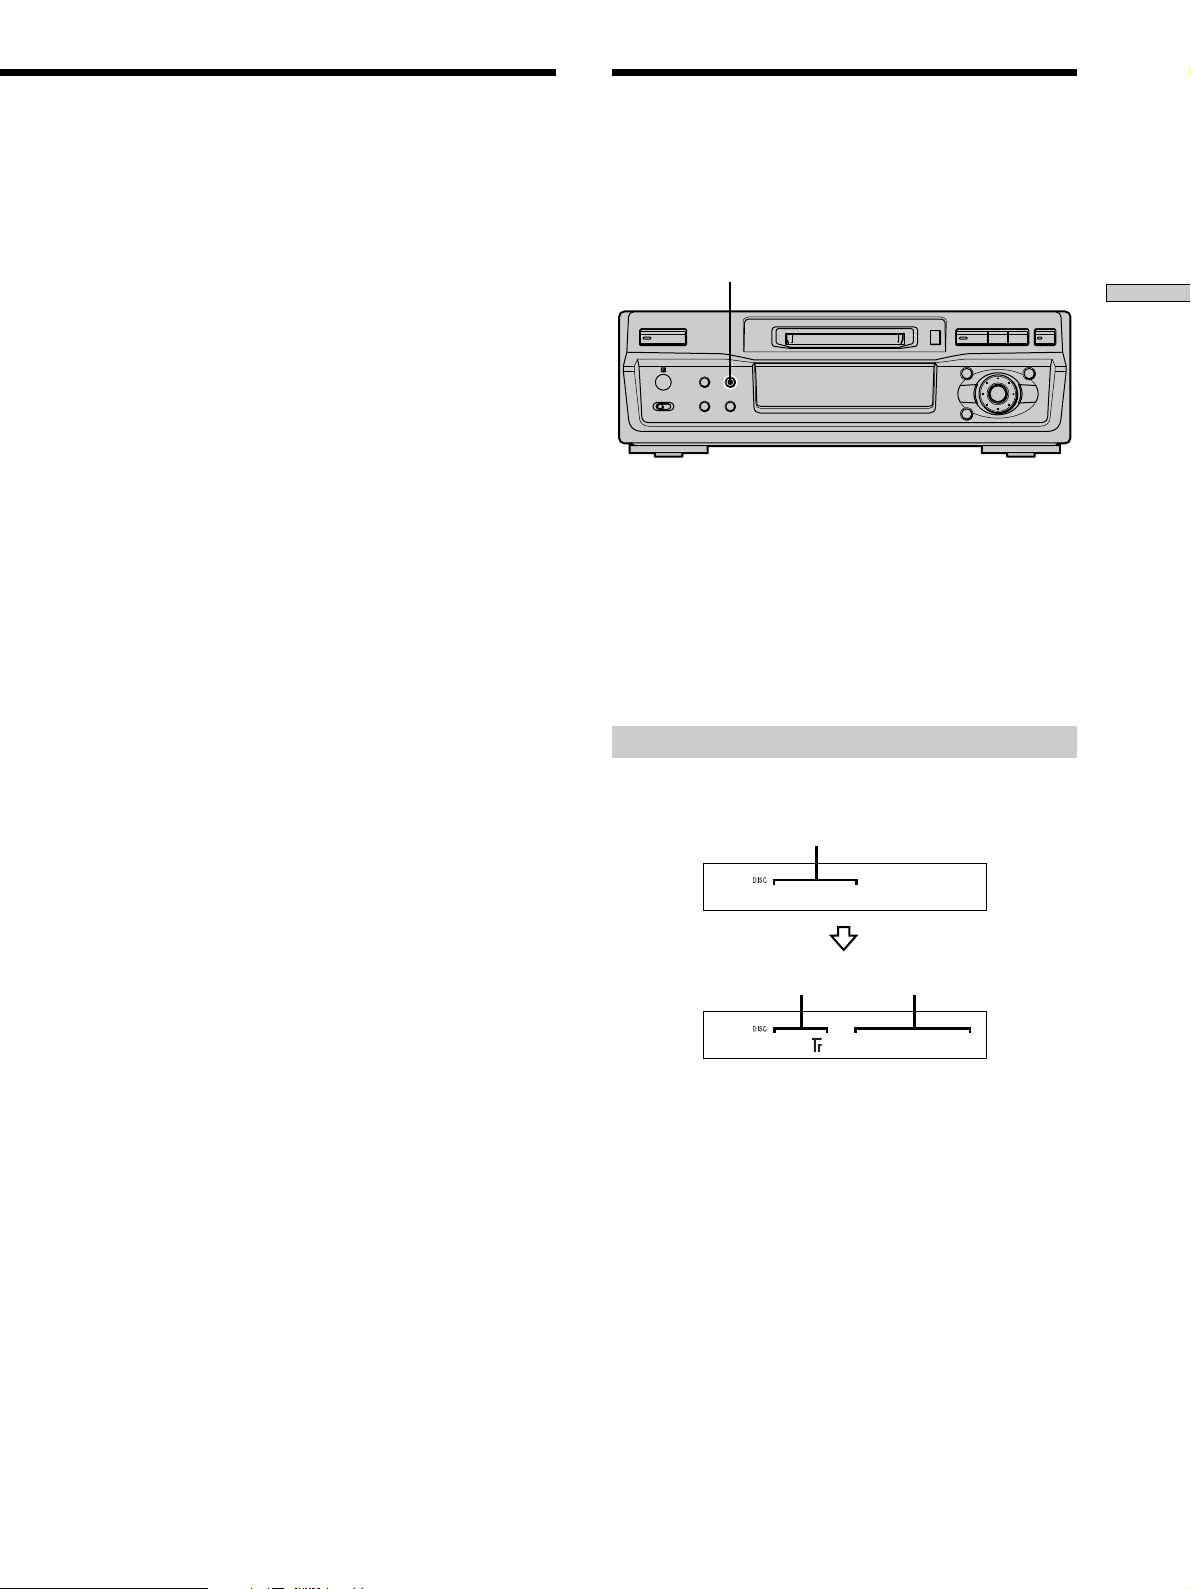
When you insert an MD
Location of Parts and Brief Explanations
wa MENU/NO button (14, 29, 38)
Press to display “Edit Menu” or “Setup Menu.”
YES button (14, 25, 29, 38)
Press to carry out the selected operation.
ws Z button (15, 21)
Press to eject the MD.
The display automatically changes as follows:
Disc name
Total number of tracks Total recorded time
11
Using the Display
2 3m 33s
DIARY
2 -1m 25s
While the deck is stopped
Press LEVEL/DISPLAY/CHAR (or DISPLAY) repeatedly to
change the display.
Each press of the button changes the display as follows:
Location of Parts and Basic Amplifier Operations
Total number of tracks and total
recorded time (default display)
15 46m 08s
Press
Remaining recordable time on the
MD (recordable MDs only)*
-27m 52s
Press
Disc name**
SONGS
Not shown for the premastered discs.
*
When the MD has no name, “No Name” appears, followed by the
**
default display.
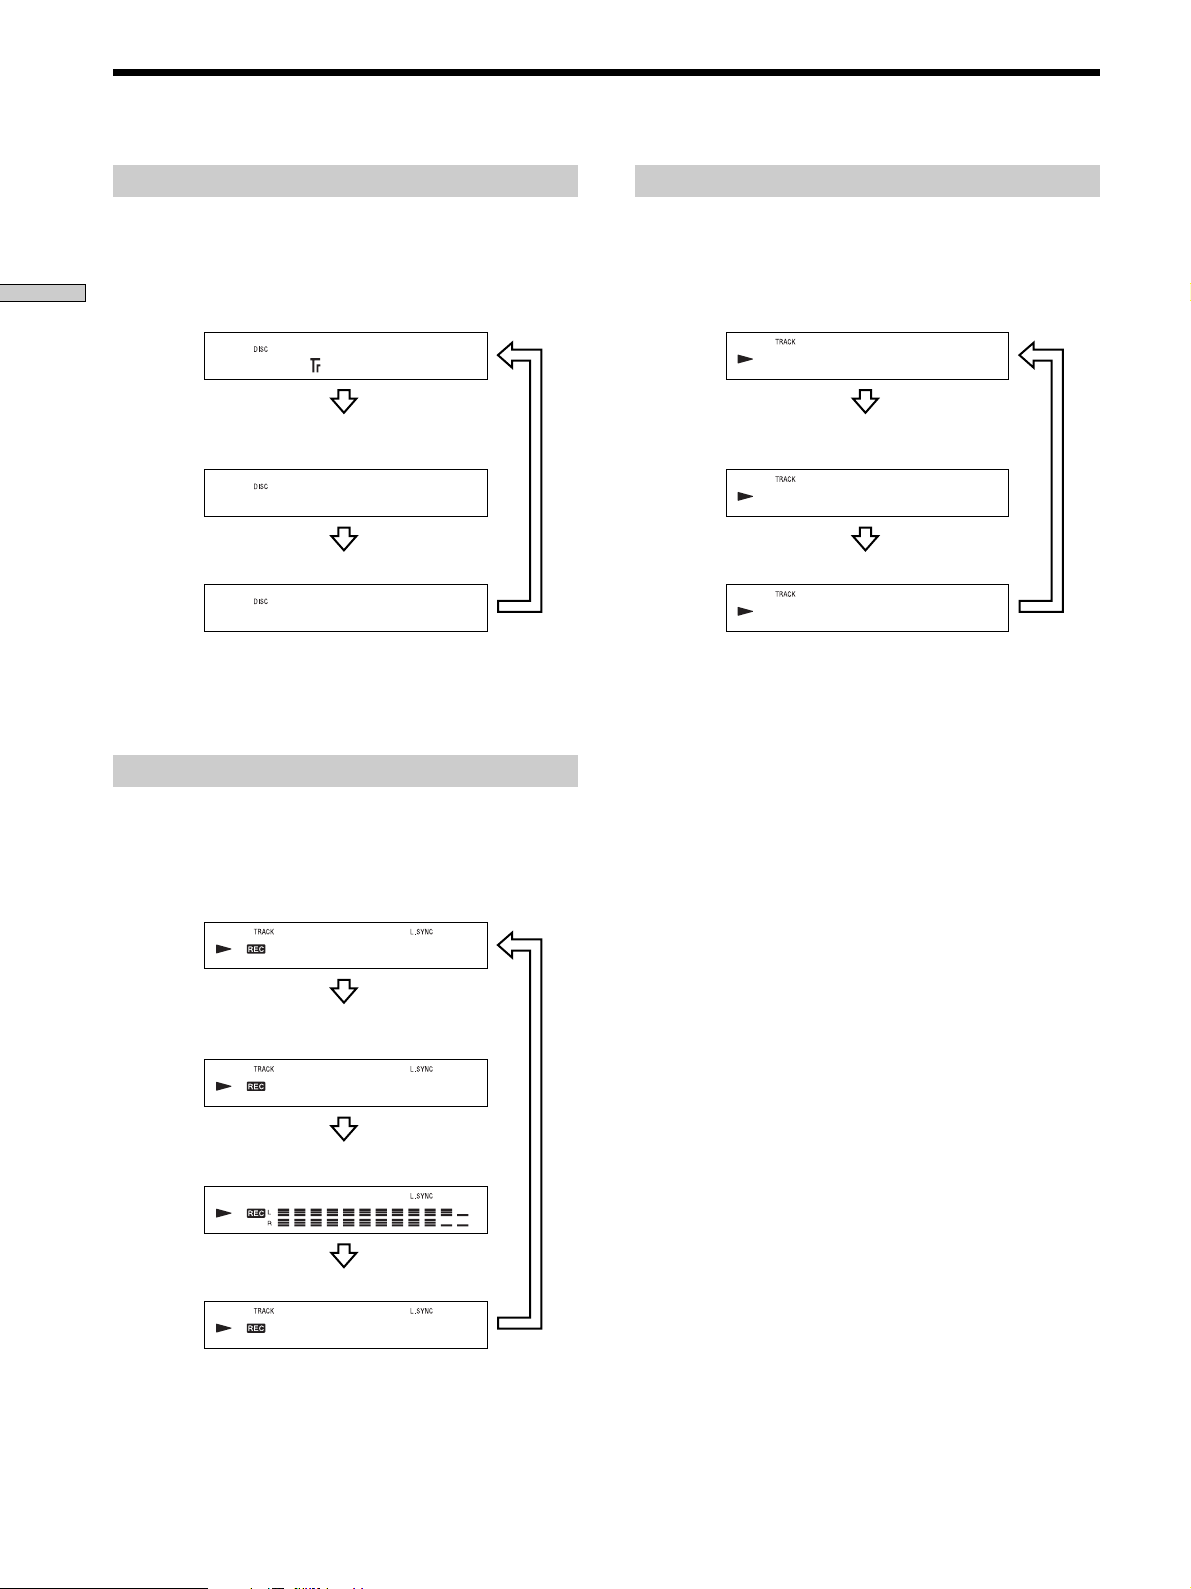
While the deck is recording
Press LEVEL/DISPLAY/CHAR (or DISPLAY) repeatedly to
change the display.
Each press of the button changes the display as follows:
Track number and recorded time of
the current track (default display)
Press
While the deck is playing
Press LEVEL/DISPLAY/CHAR (or DISPLAY) repeatedly to
change the display.
Each press of the button changes the display as follows:
Track number and elapsed time of
the current track (default display)
Press
Track number and remaining time of
the current track
Press
Track name*
Press
When the track has no name, “No Name” appears, followed by the
*
default display.
z
You can check the track name at any time while playing
Press SCROLL.
The track name appears and scrolls. While the track name is
scrolling, press the button again to pause scrolling, and again to
continue scrolling.
16 3m 05s
Press
Remaining recordable time on the
MD
-24m 47s
Press
Level of the input signal
Press
Track name*
When the track has no name, “No Name” appears, followed by the
*
default display.
BALLAD
Press
12

Recording on
Notes on Recording
MDs
This chapter explains the various
ways to record to an MD, as well as
how to mark track numbers and
perform synchro-recording with other
components.
About indications which appear while
recording
When “Protected” and “C11” alternate in the
display
The record-protect slot is open and the MD is recordprotected. To record on the MD, slide the tab to close the
slot. For details, see “To prevent accidental erasure of the
recorded material” on page 15.
When “Din Unlock” and “C71” alternate in the
display
• The digital component selected with the INPUT switch
is not connected correctly. Check the connection.
• The selected digital component is not turned on. Turn
on the component.
When “Cannot Copy” appears in the display
The MD deck uses the Serial Copy Management System.
MDs recorded through the digital input connector can’t be
copied to other MDs or DAT tapes through the digital
output connector. For details, see “Guide to the Serial
Copy Management System” on page 14.
When “TRACK” flashes in the display
The MD deck is recording over existing track(s)
(“Recording on an MD” on page 14). The indication stops
flashing when the deck reaches the end of the recorded
portion.
Recording on MDs
About indications which appear after
recording
When “TOC” lights up in the display
Recording has finished but the TOC (Table of Contents)
on the MD has not been updated to reflect the recording
results. The recording will be lost if you disconnect the
AC power cord while the indication is on. The TOC will
be updated only when you eject the MD or turn off the
MD deck.
When “TOC Writing” flashes in the display
The deck is updating the TOC. Do not disconnect the AC
power cord or move the deck while the indication flashes.
13
INPUT AMS YESMENU/NO
EJECT Zz
N?/1 X x
` / 1
N
zxX
Z
>.
mM
Notes on Recording
Recording on an MD
Automatic conversion of digital sampling
rates during recording
A built-in sampling rate converter automatically converts
the sampling frequency of various digital sources to the
44.1 kHz sampling rate of the MD deck. This allows you
to monitor and record sources such as 32- or 48-kHz DAT
tapes or satellite broadcasts, as well as the CDs and MDs.
Recording on MDs
Automatic de-emphasizing of input
signals for digital recording
When recording digital input signals that have been
emphasized in higher frequencies, the deck automatically
de-emphasizes the signals with attenuation proportional
to the degree of emphasis. The level of the deemphasized signal is indicated on the peak level meters.
Guide to the Serial Copy Management
System
Digital audio components, such as CDs, MDs, and DATs
make it easy to produce high-quality copies of music by
processing music as a digital signal.
To protect copyrighted music sources, this deck uses the
Serial Copy Management System which allows you to
make only a single copy of a digitally recorded source
through digital-to-digital connections.
You can make only a first-generation copy
through a digital-to-digital connection.
Examples are given as follows:
• You can make a copy of a commercially available digital
sound program (for example, a CD or MD), but you
can’t make a second copy from the first-generation
copy.
• You can make a copy of a digital signal from a digitally
recorded analog sound program (for example, an
analog record or a music cassette tape) or from a digital
satellite broadcast program, but you can’t make a
second copy from the first-generation copy.
A first-generation copy means the first recording of a digital audio
*
source through the deck’s digital input connector. For example, if you
record from a CD player connected to the DIGITAL IN connector,
that copy is a first-generation copy.
Note
The restrictions of the Serial Copy Management System don’t
apply when you make a recording through the analog-to-analog
connections.
*
The operations for normal recording are explained below.
If the MD has recorded material on it, the deck will
automatically start recording from the end of the recorded
portion.
1 Turn on the amplifier and program source, and
select the source on the amplifier.
2 Press ~/1 to turn on the deck.
The switch indicator turns off.
3 Insert a recordable MD.
4 Set INPUT to the position that corresponds to the
input jacks (connector) connected to the program
source.
If the source is connected to the Set INPUT to
DIGITAL IN connector DIGITAL
LINE (ANALOG) IN jacks ANALOG
5 Press MENU/NO twice.
“Setup Menu” appears in the display.
6 Turn AMS (or press ./> repeatedly) until
“Stereo Rec” or “Mono Rec” appears in the display,
then press AMS or YES.
7 Turn AMS (or press ./> repeatedly) to select
the recording mode, then press AMS or YES.
To record in Select
Stereo Stereo Rec (factory setting)
Monaural Mono Rec
Monaural mode allows you to record about twice as
much material as stereo.
8 Press MENU/NO.
14
9 If necessary, locate the point on the MD to start
recording from.
If you want to record on a new MD or start recording
from the end of the recorded portion, go to step 10.
To record over from the beginning of an existing MD
track
Turn AMS (or press ./> repeatedly) until the
number of the track to be recorded over appears.
To record over from the middle of an MD track
Turn AMS (or press ./> repeatedly) until the
number of the track to be recorded over appears, then
press N to start playback. Press X at the point you
want to start recording from.
10Press z.
The deck changes to recording pause.
11If you have set INPUT to ANALOG in step 4 above,
adjust the recording level.
For details, see “Adjusting the Recording Level” on
page 16.
12Press N or X.
Recording starts.
13Start playing the program source.
Operations you may want to do during recording
To Press
Stop recording x
Pause recording X
Resume recording after pausing N or X
Eject the MD EJECT Z after stopping
recording
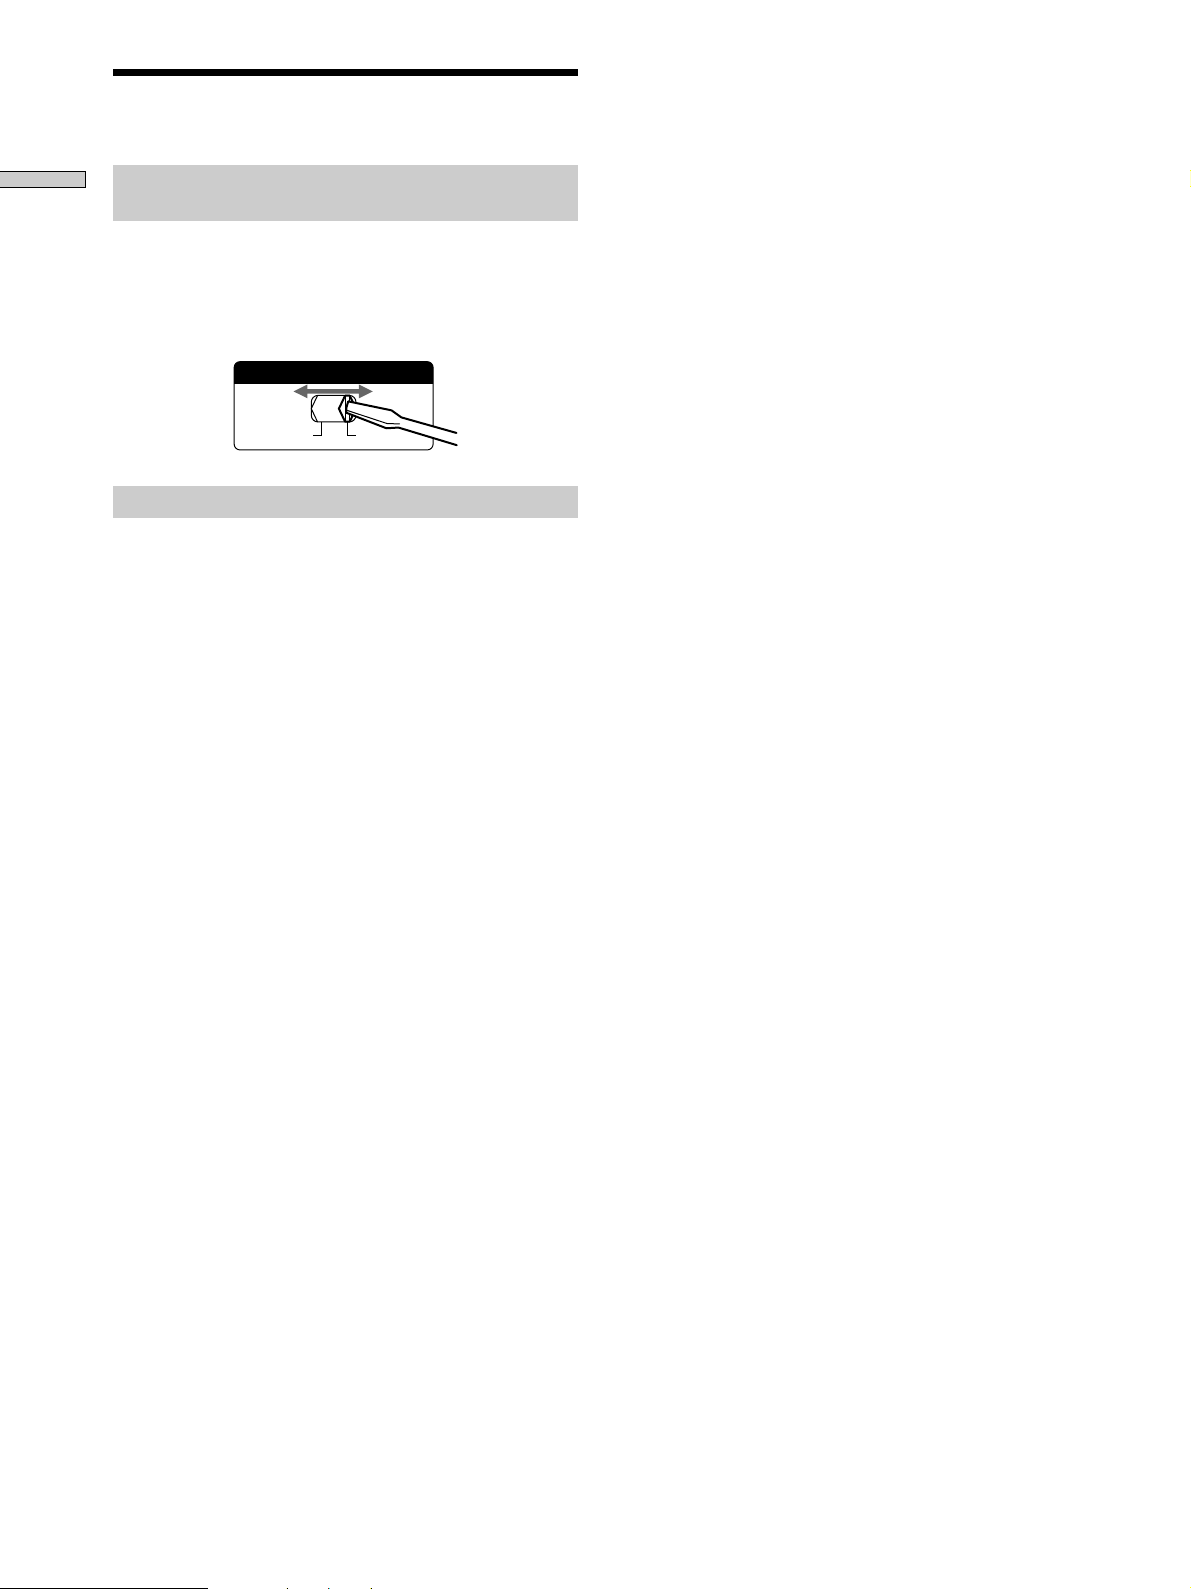
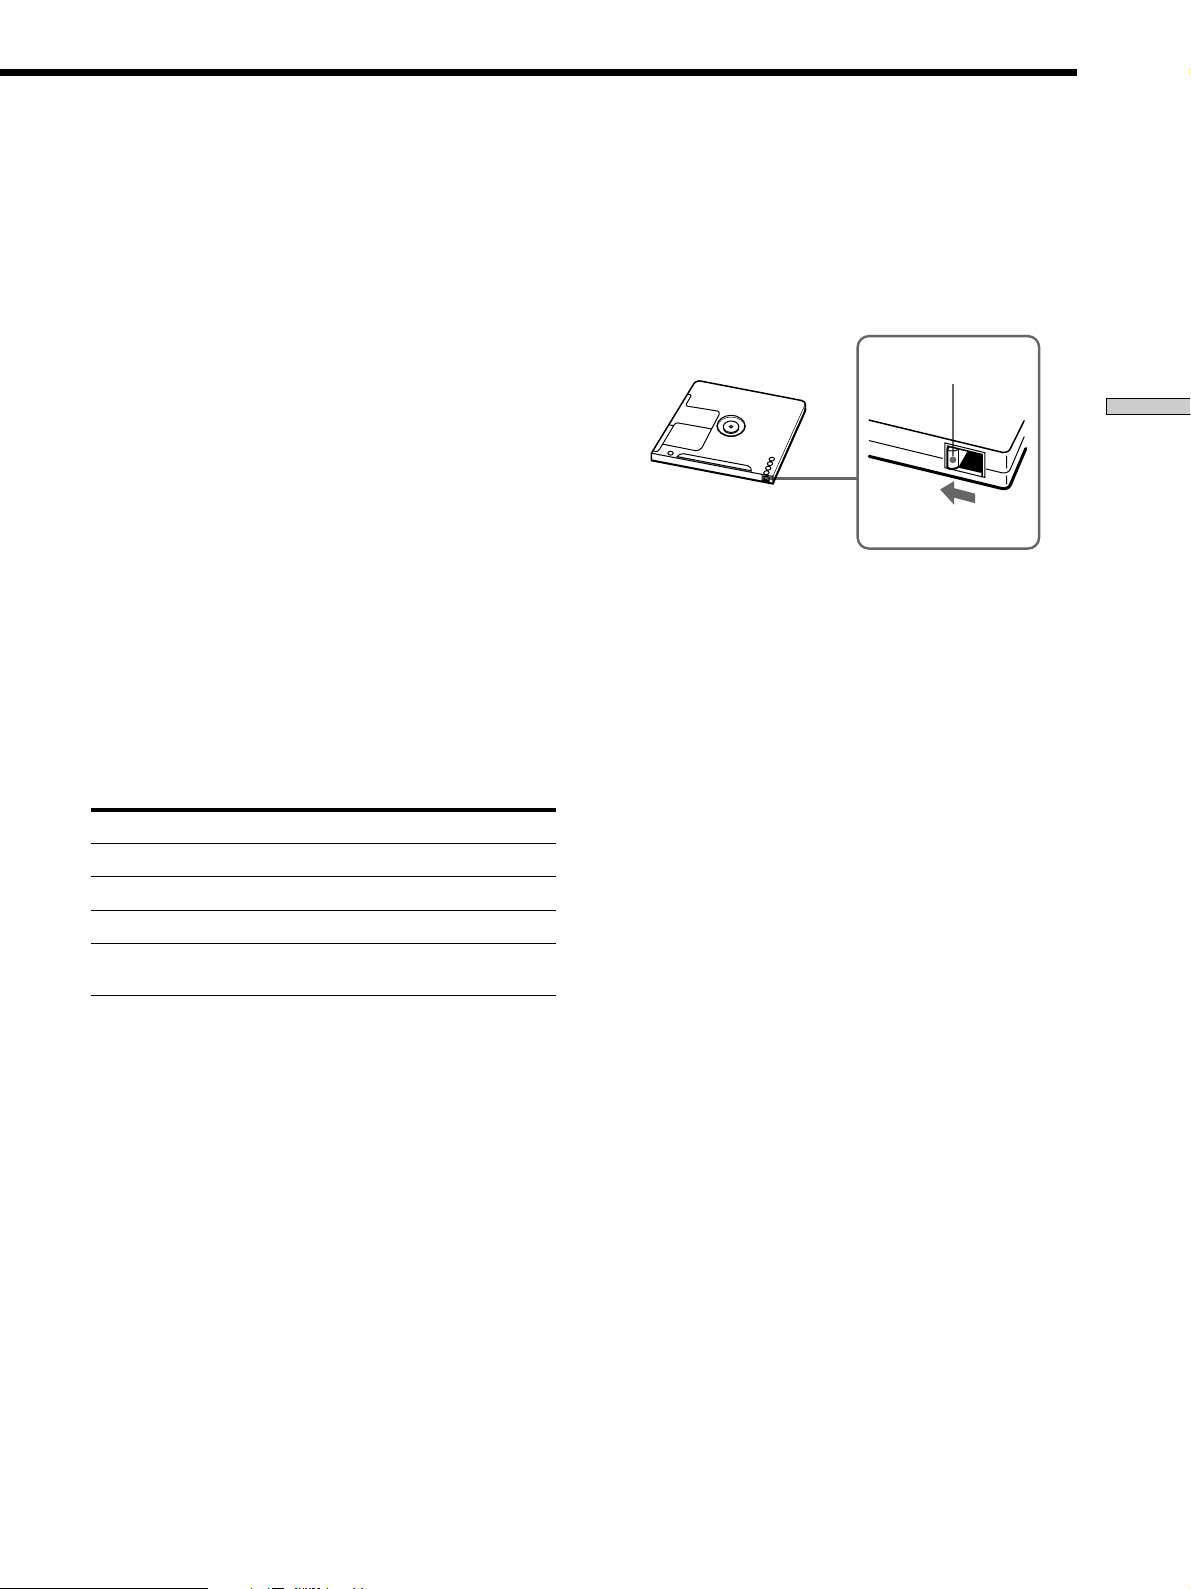
To prevent accidental erasure of the recorded
material
To make it impossible to record on an MD, slide the
record-protect tab in the direction of the arrow (see
illustration below) to open the slot. To enable recording,
close the slot.
Bottom side of the MD
z
To play the tracks you just recorded
Press N immediately after stopping recording.
The deck starts to play from the first track of the material just
recorded.
z
To play from the first track of the MD after recording
1 Press x again after stopping recording.
2 Press N.
The deck starts to play from the first track of the MD.
Note
You can’t record over existing material when Shuffle Play (page
24) or Program Play (page 25) has been selected. “Impossible”
appears in the display at this time.
Record-protect tab
Slide in the direction
of arrow
Recording on MDs
When you pause recording
The track number increases by one. For example, if you
paused recording while recording track 4, the track
number will be 5 when you resume recording.
15
 Loading...