

Page 1
MD Editor
3-861-428-11(1)
User’s Guide
Mode d’emploi
Manual de instrucciones
EN
F
ES
MDS-PC1
1998 by Sony Corporation
Page 2

Program © 1998 Sony Corporation
Documentation © 1998 Sony
Corporation
• Microsoft, MS-DOS and Windows are the
registered trademarks of Microsoft
Corporation.
• IBM and PC/AT are the registered
trademarks of International Business
Machines Corporation.
• Other companies and product names are
the trademarks or the registered
trademarks of each company.
2
Page 3

Table of contents
Getting started ............................... 4
Overview .............................................. 4
About this manual ............................... 4
System requirements .................. 5
Preparation ..................................... 6
Checking the supplied items.............. 6
Connections .......................................... 7
Connecting a computer .............. 7
Connecting a CD player ............. 8
Installing the software ........................ 9
Starting the software ......................... 10
Operation ...................................... 11
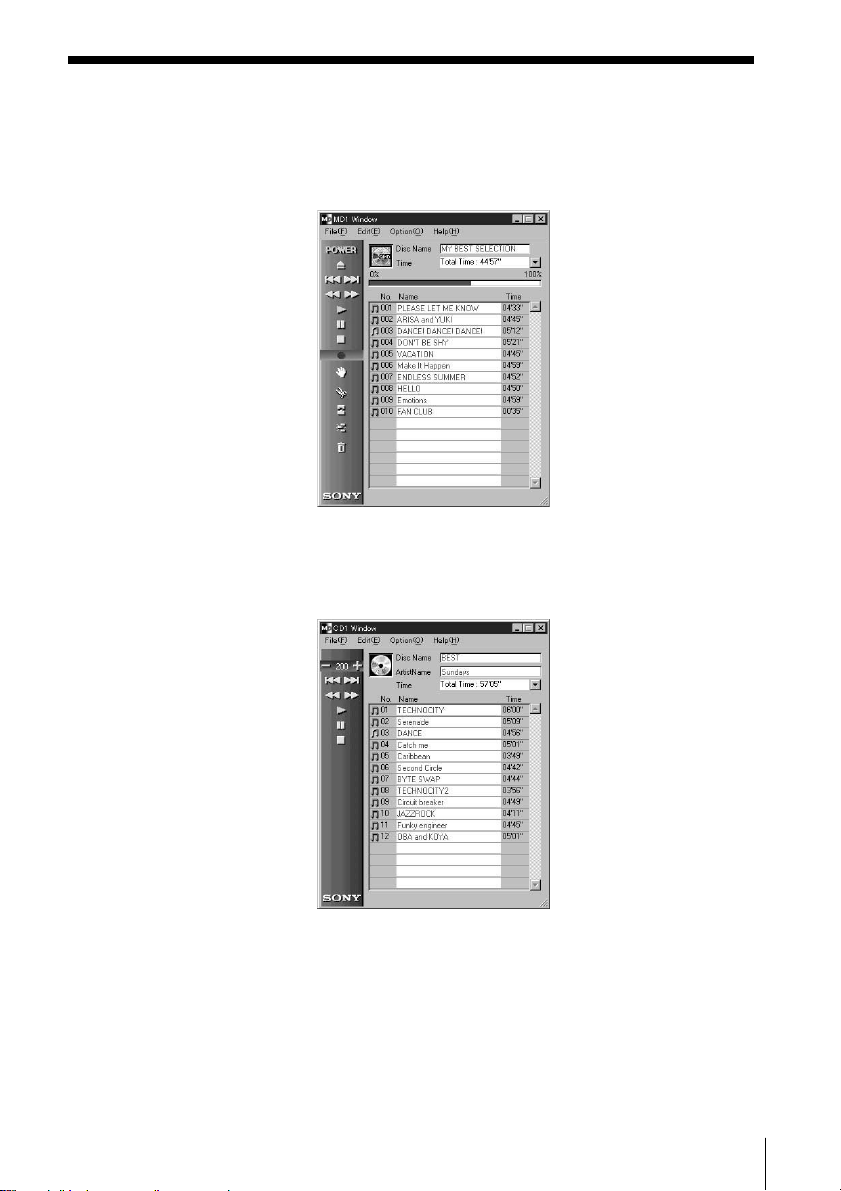
Names and functions of screen........ 11
MD operation screen................. 12
CD operation screen.................. 14
Playing an MD ................................... 16
Playing an MD ........................... 16
Selecting a track for playback .. 16
Locating a specific track ........... 16
Locating a particular point in a
track .................................... 16
Pausing playback ...................... 17
Stopping playback..................... 17
Editing recorded MDs....................... 18
Assigning track names and
disc names
(NAME function) .............. 18
Moving recorded tracks
(MOVE function)............... 20
Dividing recorded tracks
(DIVIDE function)............. 21
Combining recorded tracks
(COMBINE function)........ 22
Erasing a part of a track (A-B
ERASE function) ............... 23
Erasing recordings (ERASE
function) ............................. 24
Printing MD labels............................. 25
Assigning names to CDs (NAME
function)...................................... 26
Recording from a CD to an MD....... 27
Programming the CD tracks ............ 28
Changing the disc icons .................... 30
Quitting ............................................... 30
Additional Information ................ 31
Troubleshooting................................. 31
Index .................................................... 32
EN
3
Page 4

Getting started
Overview
When connected to your computer, the MDS-PC1 can
be operated using the computer’s display. Besides
easy operation of MD playback and editing as on a
regular MD deck using the computer’s mouse, other
features also possible with this unit include:
• Keyboard generated character input.
• Operation of Sony CD players*.
• Easy “drag and drop” recording* from a Sony CD
player to an MD deck.
* Only compatible with CD players that include a
CONTROL A1 jack (compatible models: CDP-CX220,
CDP-CX260, CDP-CX57, CDP-CA80ES and CDP-CE525).
The accessory (or sold separately) CONTROL A1 cable is
also necessary for this function.
About this manual
This manual explains preparations and operation
methods for operating the MDS-PC1 with a computer.
Before you get started
This section explains things that you should know
before actually operating this unit.
Preparation
This section explains connections, installation method,
etc..
Operation
This section explains MD playback, editing, easy CD
to MD recording methods, etc., using a computer.
Additional information
This section explains such things as how to deal with
problems when they occur, etc.. Please refer to this
section when necessary.
Viewing the latest information concerning
this software
The latest information about this software can be
found in the “Readme.txt” file installed on the hard
4
disk with the MD Editor software. Please be sure to
read this file.
Page 5

System requirements
The following hardware and software are necessary to
connect the MDS-PC1 to your computer and operate
it.
IBM PC/AT or compatibles
Memory: 16 MB or more (32 MB or more is
recommended.)
Video board and display driver:
VGA (640x480 pixels), 256 colors or more
displayable.
Hard disk space:
5MB or more.
CD-ROM drive
Serial port:
1 or more
OS: Microsoft Windows 95 (Microsoft Windows
3.1 and WindowsNT are invalid.)
Video monitor:
VGA (640x480 pixels), 256 colors or more
displayable.
Notes
• When using the timer to carry out recording and
playback, please quit the MD Editor.
• When turning off the MD deck’s power, please quit
the MD Editor.
5
Page 6
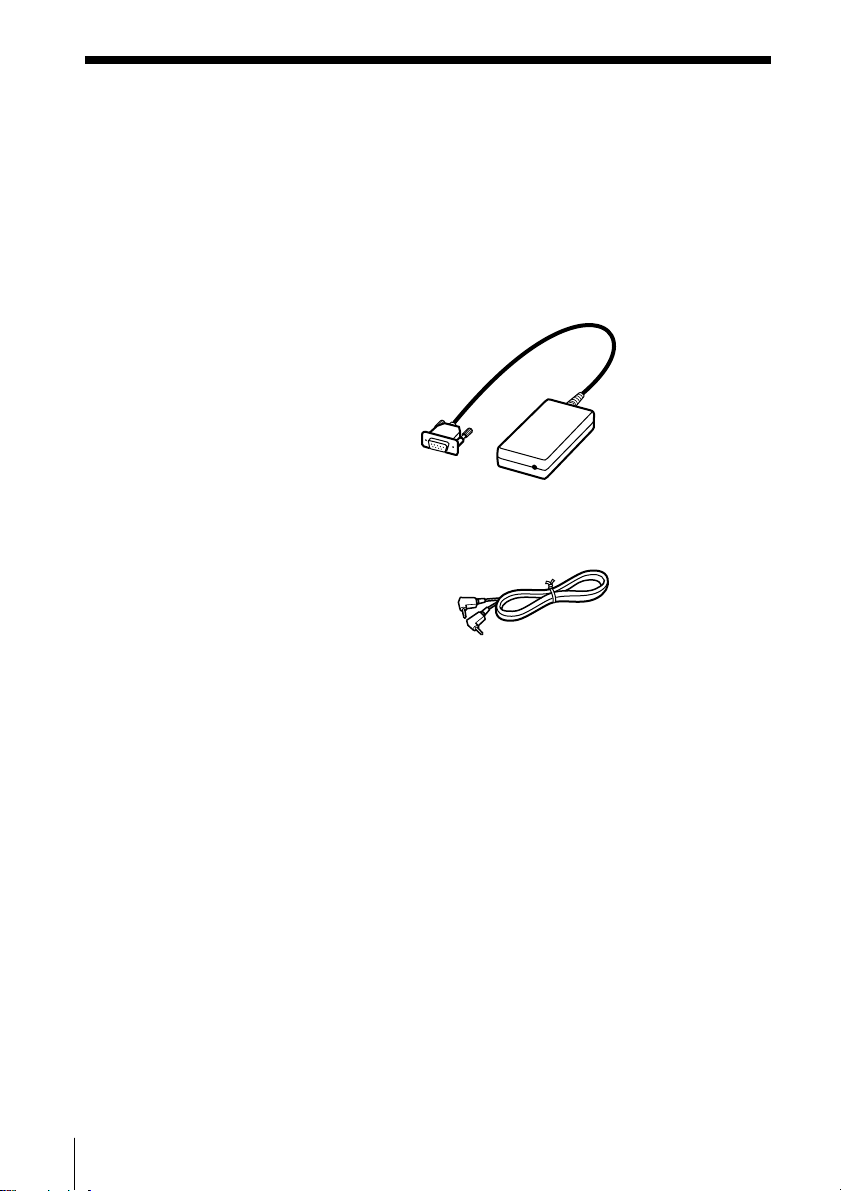
Preparation
Checking the supplied items
Check to make sure that you have received the
following supplied items with the MD Editor. If
anything is missing, please contact the shop where
you purchased this unit or your nearest Sony dealer.
• Connector (RS-232C˜monaural mini jack)
• CONTROL A1 connection cord (monaural mini plug cord)
• CD-ROM (1)
• Operating instructions (for the unit and software)
6
Page 7
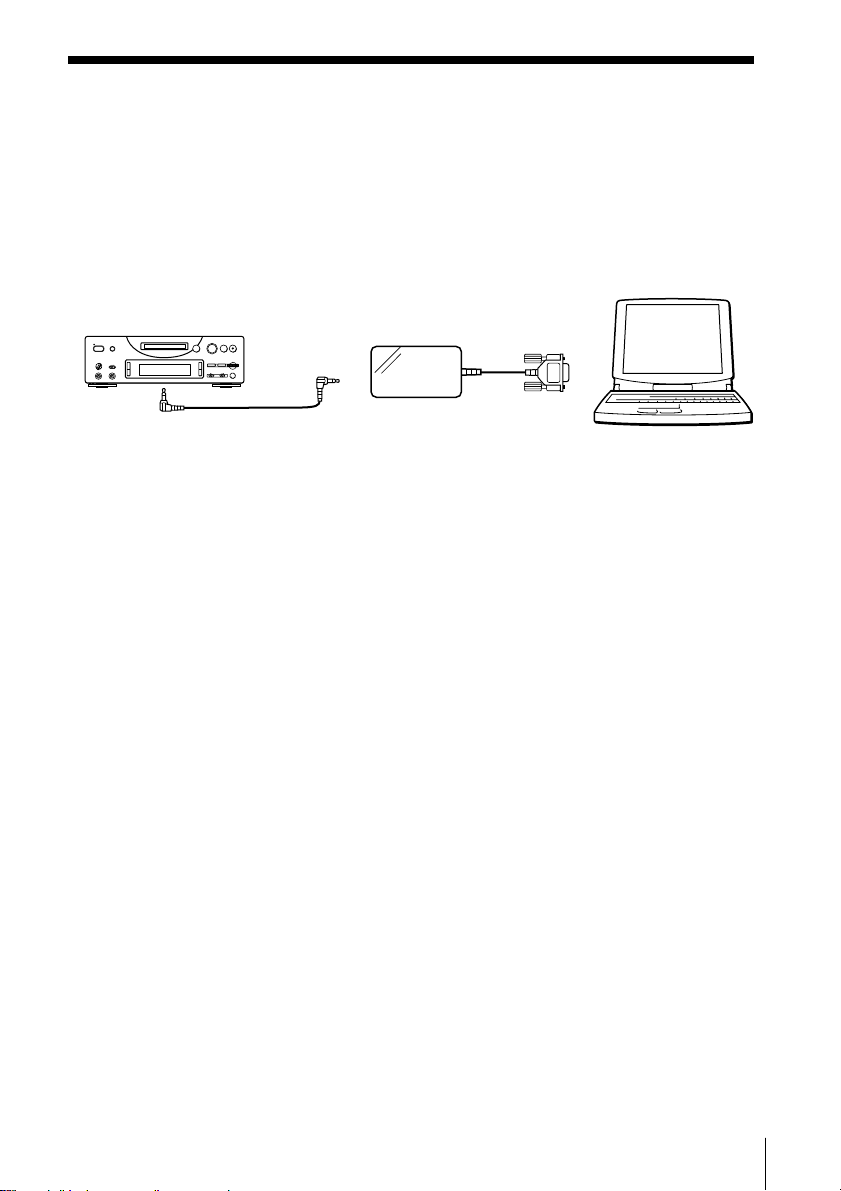
Connections
Connecting a computer
Connect this unit to your computer using the
provided connection cord and connector.
Computer
)
0
>
To CONTROL A1
jack on front panel
or rear panel
fl
pr
§
=+
CONTROL A1
connection
cord
Connector
?
?
To computer’s serial
(RS-232C) port
Connect the computer’s serial (RS-232C) port to this
unit’s CONTROL A1 jack.
7
Page 8

When your computer and this unit are
separated by distance
Please use a connection cord such as RK-G34
(optional).
Notes
• Please use the supplied connection cable. Using a
different cable may result in damage.
• Please plug the cable in straight when connecting.
Plugging the cable in at an angle may result in
damage.
• Do not insert any metal objects into the connection
jacks. Shorting may occur resulting in damage.
• Do not connect headphones to the CONTROL A1
jack. If connected, noise will be heard from the
headphones and all CONTROL A1 functions will be
inoperable.
Connecting a CD player
Use the CONTROL A1 cord supplied with a CD
player or optional one to connect this unit to a Sony
CD player (that includes a CONTROL A1 jack). When
operating this unit using a computer, connect only 1
CD player and set the CD player’s command mode to
1.
The CD player must also be connected to this unit
with an audio connection cable (digital or analog*).
For details, please refer to the CD player’s manual
(compatible models: CDP-CX220, CDP-CX260, CDPCX57, CDP-CA80ES and CDP-CE525).
* When carrying out drag and drop recording from a CD
referring to the procedure on page 27, please make
connection using an optical digital cable.
Note
When this unit is connected to a CD player, as well as
to a computer, be sure that the CD player’s play mode
is set to CONTINUE.
8
Page 9

Installing the software
Use this procedure to install the software onto your
computer’s hard disc. Set the computer to the
operation mode before proceeding.
1 Insert the supplied CD-ROM into the computer.
2 Double-click on the CD-ROM’s icon.
The Setup icon appears.
3 Double-click on the Setup icon to start installation.
4 Carry out installation operation according to the
messages that appear.
Eject the CD-ROM when installation is finished.
About the Database file
Installing the software creates a folder called the
“Database” folder. Because this software uses this
folder, please do not erase, move, or change the
contents of this folder.
Uninstalling the software
1 Select “Start”, “Settings”, “Control Panel” menu to
open the control panel, and double click on the
“Add/Remove Program”.
2 Select “Install/Uninstall” tag, select “MD Editor
Ver 1.1” and press “Add/Remove...” button.
The dialog box appears.
3 Press “Yes” to uninstall the software.
Uninstaller starts and the software deletes
automatically.
9
Page 10
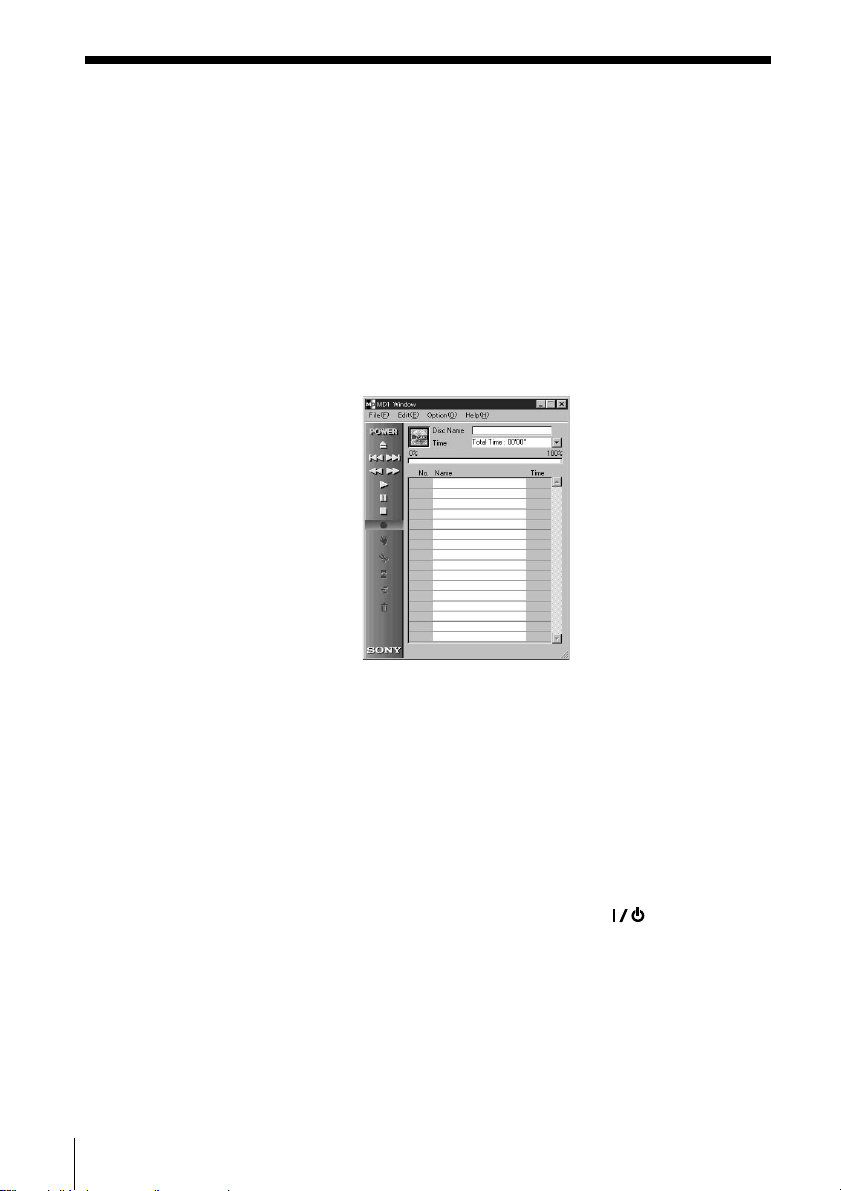
Starting the software
Use this procedure to start up this software.
Double click on the “MD Editor” icon.
This software is activated.
Registration of your name is only necessary the first
time.
The following screen appears immediately after start
up.
10
Setting up the serial port
Select “SerialSetup” from the option menu.
Select COM1, COM2, COM3, or COM4.
Notes
• When this software is started up, playback or
editing operations in progress on the main unit will
be stopped. Also, after start up, operation will not
be possible with the main unit’s controls or the
remote’s controls (excluding the
switch, REC MODE switch, INPUT switch and
TIMER switch).
When using this unit or the remote for operation,
please quit this software.
• When this software is started up, this unit’s PLAY
MODE will be automatically set to CONTINUE, and
the repeat mode will be canceled.
• When this software is started up, please do not turn
this unit’s power off.
(POWER)
Page 11
Operation
Names and functions of screen
Screen examples
MD operation screen
CD operation screen
11
Page 12
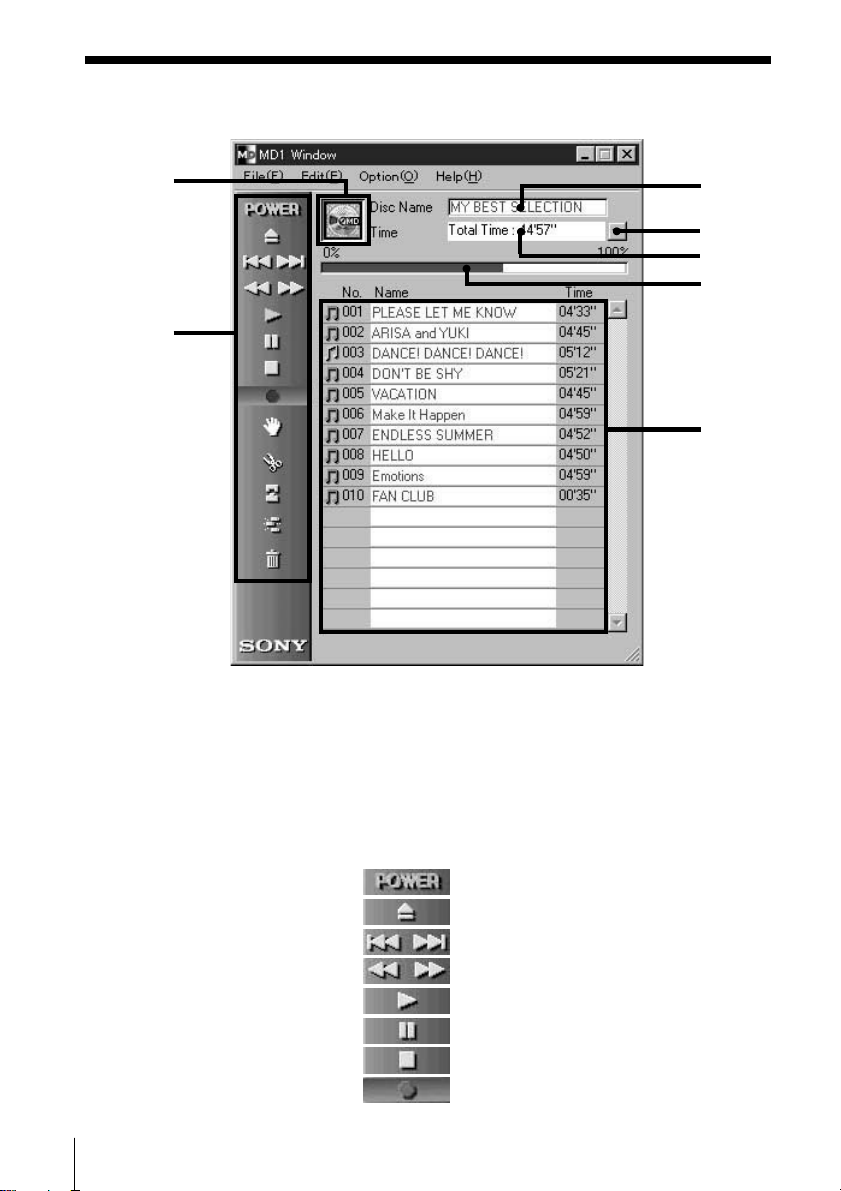
Names and functions of screen (continued)
MD operation screen
1
2
3
4
5
6
7
1 MD icon:
Clicking on this icon selects all tracks on the disc.
This function is convenient when you want to use
the ERASE mode to erase all tracks (page 24).
12
2 MD operation panel
The input monitor mode and manual track
marking mode can not be used.
: POWER switch
: MD eject button
: AMS *1 button
: Fast forward/Reverse button
: Play button
: Pause button
: Stop button
: Record button
*1
AMS = Automatic Music Sensor
This function searches for the beginning of tracks.
Page 13

: MOVE button
: DIVIDE button
: COMBINE button
: A-B ERASE button
: ERASE button
3 Disc Name display
4 Time display switching button
Used to switch between the Remain Time, Total
Time, Track Elapsed and Track Remain displays.
5 Time display
6 Disc capacity display
7 Track number, Track name, Time display
(continued)
13
Page 14
Names and functions of screen (continued)
CD operation screen
1
2
3
4
5
6
7
1 CD icon:
Clicking on this icon selects all tracks.
When recording onto an MD, dragging and
dropping this icon onto the MD operation screen
selects all tracks for recording.
14
2 CD operation buttons
The input monitor mode and manual track
marking mode cannot be used.
: DISC+/– buttons
(The number is the disc presently selected.)
: AMS *1 button
: Fast forward/Reverse button
: Play button
: Pause button
: Stop button
*1
AMS = Automatic Music Sensor
This function searches for the beginning of tracks.
Page 15

3 Disc Name display
4 Artist Name display
5 Time display switching button
Used to switch between the Remain Time, Total
Time, Track Elapsed and Track Remain displays.
6 Time display
7 Track number, Track name, Time display
Note
When this unit is connected to a CD player as well
as to a computer, be sure to set the CD player’s
play mode to CONTINUE.
15
Page 16
Playing an MD
Stating MD playback using the computer.
Playing an MD
1 Insert an MD into the MDS-PC1.
The disc’s content is displayed on the computer’s
display.
2 Click on .
Playback starts.
Selecting a track for playback
Double-clicking on the track number or time
display section.
The deck starts playing of that track.
Locating a specific track
Click on or during playback.
Playback begins from the beginning of the next
track (or the present track).
To start playback of the beginning of a track further
ahead, click on the number of tracks ahead you
want to skip. Click twice to return to the beginning
of the track before the current track.
16
Locating a particular point in a track
Click on or during playback.
Clicking on will engage fast rewind only
while the mouse button is held down, and clicking
and holding on
while the mouse button is held down. Playback
will resume from where the mouse button is
released.
will engage fast forward only
Page 17
Pausing playback
Click on during playback.
Playback pauses.
To resume playback after pause
Click on or .
Stopping playback
Click on during playback.
Playback stops.
17
Page 18

Editing recorded MDs
MD editing can easily be carried out using the
computer.
For a detailed explanation of functions, please refer to
the MD deck operating instructions.
Assigning track names and disc names
(NAME function)
Track names and disc names can easily be input using
the computer’s keyboard.
1 On the MD operation screen, move the cursor to
2 Input the desired track name.
Other operations
Input is also possible using functions such as copy and paste etc..
Notes
• You can only input the English alphabets, numbers
and some symbols. If an MD encoded with the
letters other than those above is played back, the
correct letters will not be displayed.
• If the disc’s write protect tab is set to protect,
character input, recording, editing etc., will not be
possible. Slide the erase prevention tab so that
recording is possible.
• Symbols that can be input are as follows.
! " # $ % & ' ( ) * + , – . / : ; < = > ? @ _ `
18
Symbols other than these will not be displayed.
Note
When this software is not used, and editing is
carried out using the MDS-PC1’s controls, be sure
to select and engage “Reload” on the option menu
once you have finished editing. If not engaged, the
actual content of the MD may differ from its
displayed content.
the track title display and click on it.
To input the other names continuously, press the
Enter key on the computer’s keyboard after you
once finish inputting the desired disc or track
name.
Next title display changes edit mode
automatically, and you can input the other names.
Page 19

To use the text data input by other
application (FLOW function)
Before you input disc or track names by using
memorandum or other text editing softwares, you can
assign all names with one copy and paste operation.
1 Input the disc or track names by using
memorandum or other text editing softwares.
Divide each name by pressing Enter key on the
computer´s keyboard.
(ex.)
disc name <enter>
track 1 name <enter>
track 2 name <enter>
:
track n name <enter>
2 Select all texts and copy it on the clipboard.
3 Click the disc name or 1st track name display to
enter edit mode.
4 Select “Paste” from the edit menu.
The text is assigned from the beginning display.
19
Page 20
Editing Recorded MDs (continued)
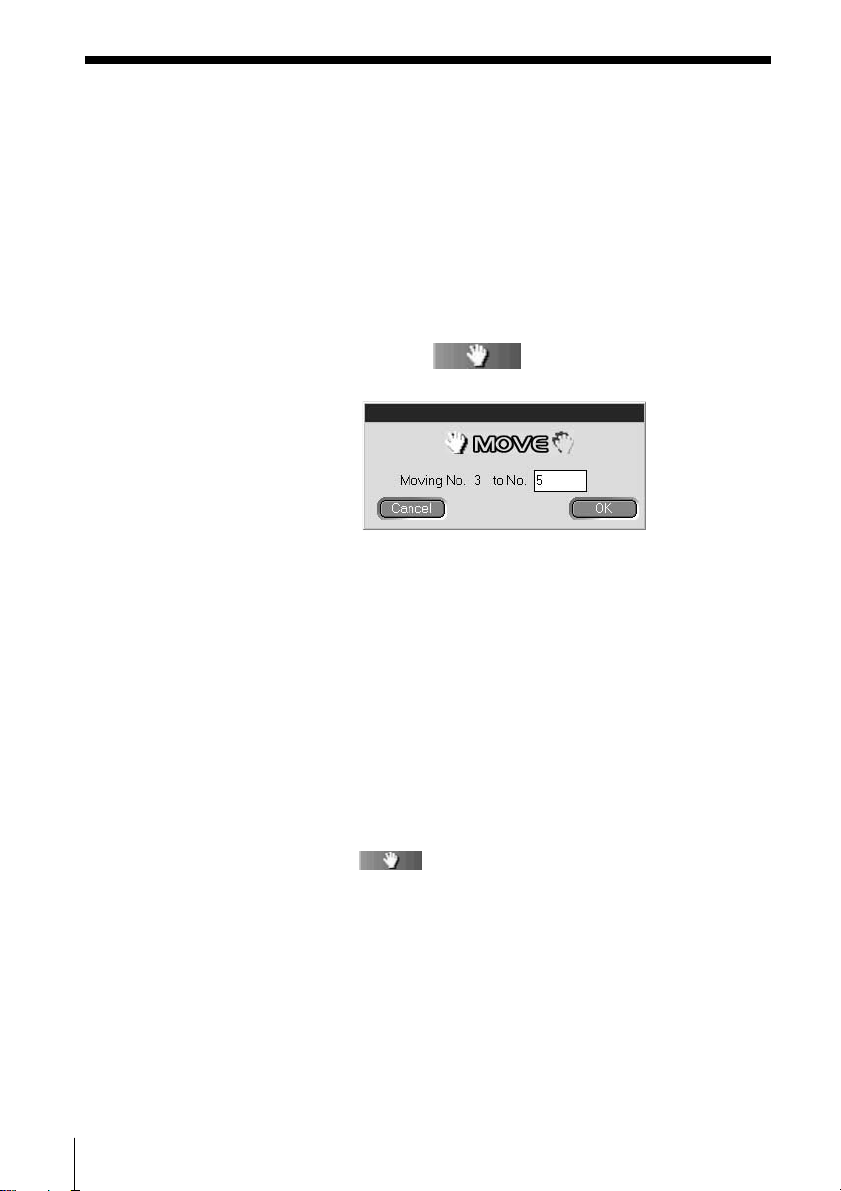
Moving recorded tracks (MOVE
function)
1 On the MD operation screen, click on the track
number of the track that you wish to move.
The track name’s color you clicked changes. More
than one track cannot be moved.
2 Click on on the operation panel.
The MOVE dialog box appears.
3 Input the track number of the location you are
moving the track to.
4 Click “OK”.
The selected track is moved to the designated
location.
20
To cancel the MOVE function
Click “Cancel”.
Moving a track during playback
During playback of the track you wish to move, click
on on the operation panel. Once the MOVE
dialog box appears, carry out the above steps 3 to 4. If
there is 1 other track selected during playback, that
track will be moved.
Tracks can also be moved by dragging
Tracks can be moved to the desired location by
dragging and dropping the track number of the track
you want to move.
Page 21
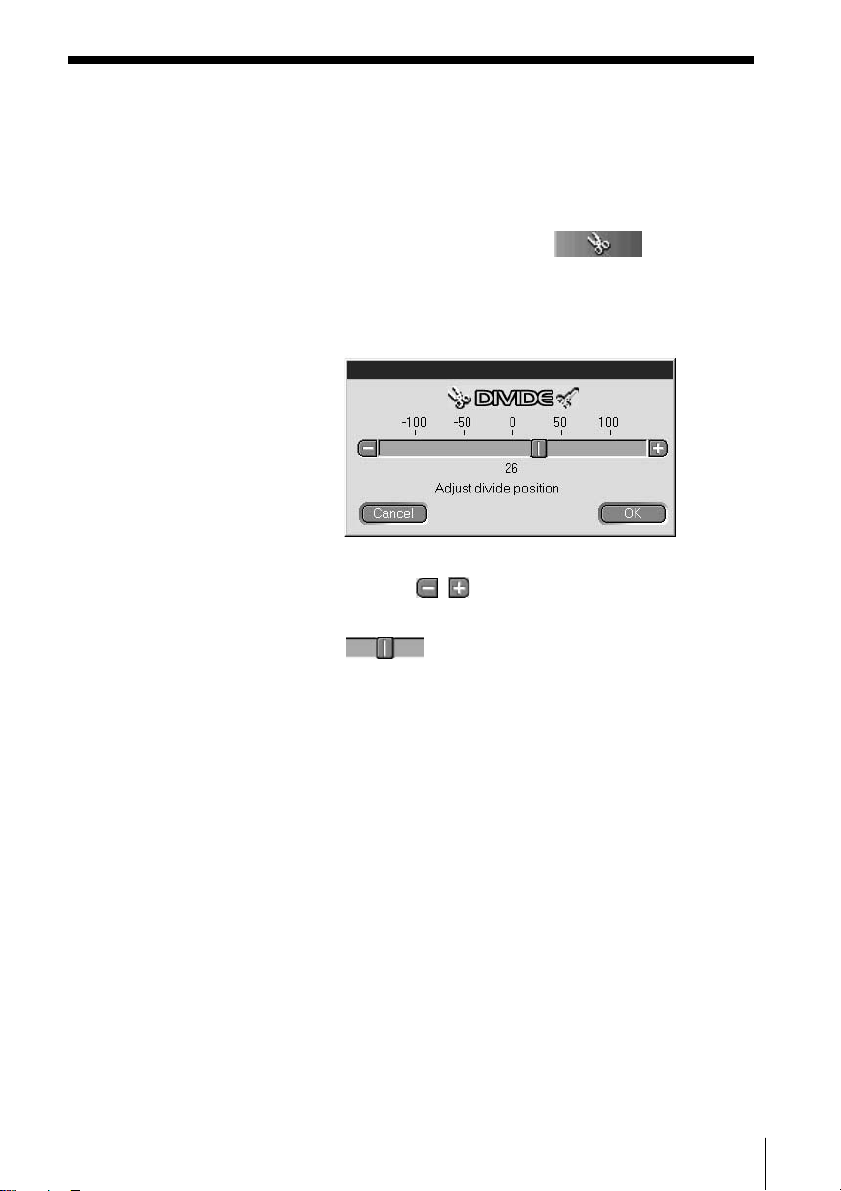
Dividing recorded tracks (DIVIDE
function)
1 During playback, click on on the
operation panel at the point that you wish to
divide the track.
Rehearsal playback starts from the point clicked on
and the DIVIDE dialog box appears.
2 Click on / and shift slowly*.
Rehearsal playback begins from the shift point.
can also be dragged left or right for
adjustment.
3 Click “OK” when the divide point plays back
correctly.
The track is divided.
To cancel the DIVIDE function at any time
Click “Cancel”.
* Shifting is possible in 1 step (approx. 0.06 second units).
21
Page 22
Editing Recorded MDs (continued)
Combining recorded tracks (COMBINE
function)
1 On the MD operation screen, click on the track
number of the tracks that you wish to combine.
When only one track is clicked on, that track and
the track immediately before it will be joined.
However, the lead track cannot be selected. When
tracks being joined are separated by distance, after
clicking on the first track, click on the track to be
joined while holding down the SHIFT key.
2 Click on on the operation panel.
The COMBINE dialog box appears, and rehearsal
playback of the section where the tracks are joined
begins.
Click on to reverse the order of the tracks
played back.
22
3 If the displayed tracks are correct, click “OK”.
The selected tracks are joined.
To cancel the COMBINE function at any time
Click “Cancel”.
Combining the track playing back with the
track immediately in front of it
During playback of the track you want to combine,
click on
COMBINE dialog box appears, carry out the above
step 3. This operation is not possible when the lead
track is being played back. If there are 1 or 2 other
tracks selected during playback, those selected tracks
will be combined.
on the operation panel. Once the
Page 23
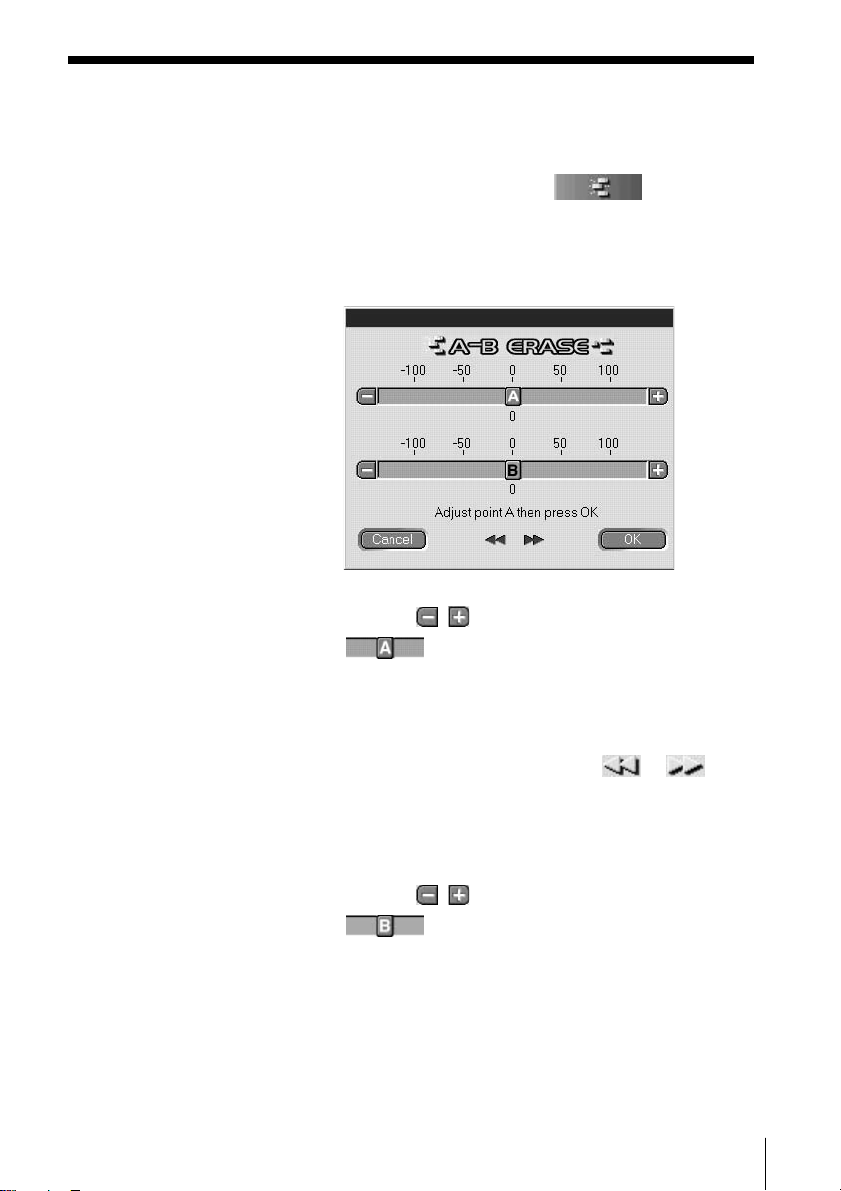
Erasing a part of a track (A-B ERASE
function)
1 During playback, click on on the
operation panel at the start point you wish to erase
(point A).
Rehearsal playback up to the selected point begins
and the A-B ERASE dialog box appears.
2 Click on / of A and slowly shift the A point*.
can also be dragged left or right for
adjustment.
3 Click “OK” when the point A is playing back
correctly.
4 Continue playback, or press the or
button to go to the erase point you want to stop
(point B), and click “OK”.
The point B is temporarily set. Rehearsal playback
of the section between the A and B points begins.
5 Click on / of B and slowly shift the B point*.
can also be dragged left or right for
adjustment.
6 Click “OK” when the point B is playing back
correctly.
The A-B section is erased.
To cancel the A-B ERASE function at any time:
Click “Cancel”.
* Shifting is possible in 1 step (approx. 0.06 second units).
23
Page 24
Editing Recorded MDs (continued)
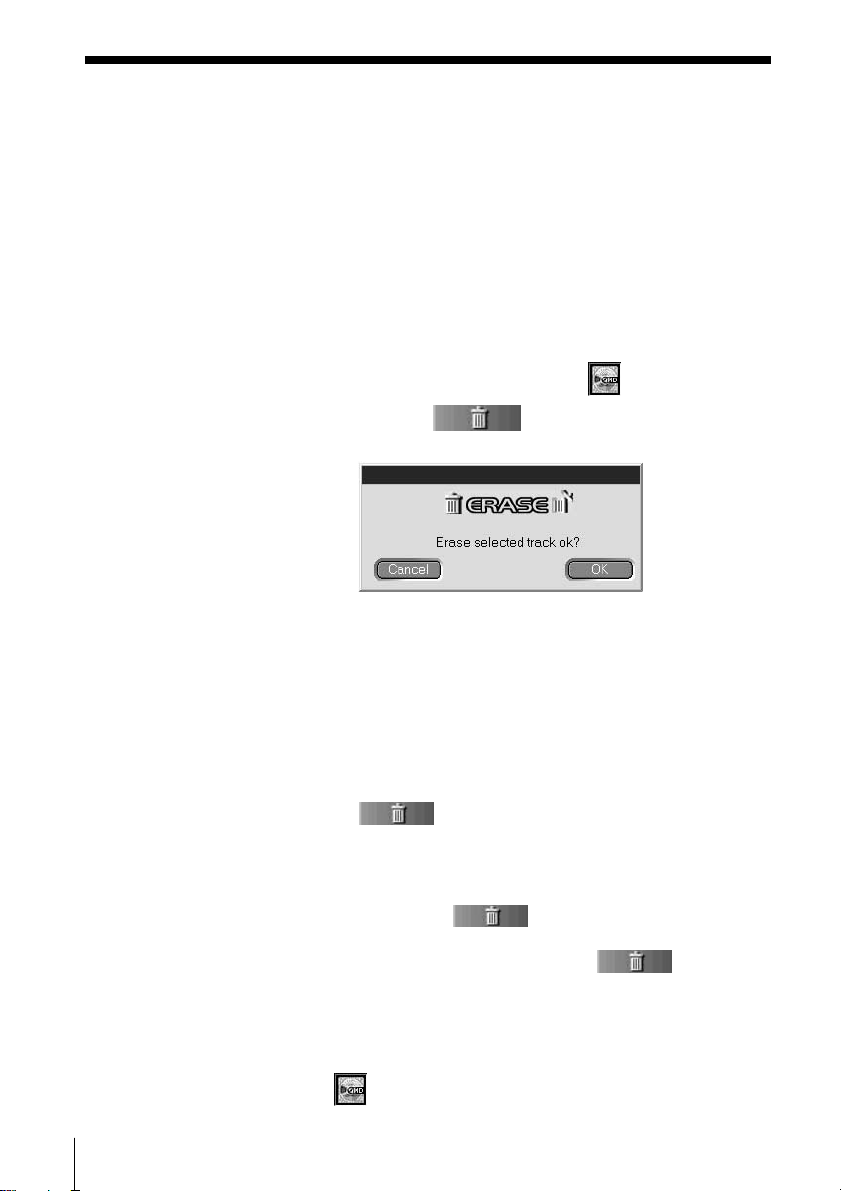
Erasing recordings (ERASE function)
1 On the MD operation screen, click on the track
number of the track that you wish to erase.
When selecting more than one track, click on the
numbers while holding down the SHIFT key.
When erasing all tracks do one of the
following:
• Click on all tracks after pressing SHIFT.
• Select “Select all” on the editing menu.
• Click on the MD disc icon
2 Click on on the operation panel.
The ERASE dialog box appears.
3 Click “OK” if it is ok to erase the track(s).
The selected track(s) is erased.
.
24
To cancel the ERASE function
Click “Cancel”.
Erasing a track that is playing back:
During playback of the track you want to erase, click
on on the operation panel. Once the ERASE
dialog box appears, carry out the above step 3. If there
are other tracks during playback, those selected tracks
will be erased.
Dragging to will also erase tracks
Erasing tracks can also be done by selecting the track
and dragging and dropping it in
operation panel.
Erasing of one track at a time, more than one track, or
all tracks is possible.
All tracks can be erased by selecting the MD disc icon
and then dragging and dropping.
on the
Note
Erased tracks can not be recalled.
Page 25
Printing MD labels
The disc and track name lists on the MD operation
screen can be printed out as MD labels.
The track list for a disc with 10 tracks or less will be
printed out as one column, and the list for a disc with
11 to 20 tracks will be printed out as 2 columns.
For printing, a printer must be connected to your
computer.
Label for cartridge
MY BEST SELECTION
Label for disc’s side
MY BEST SELECTION
1. PLEASE LET...
2. ARISA and YUKI
3. DANCE! DANC...
4. DON’T BE SHY
5. VACATION
6. Make It Happen
7. ENDLESS SUM...
8. HELLO
9. Emotions
10. FAN CLUB
11. Make
12. Lonely engineer
13. Good
MY BEST SELECTION
Label for disc
1 Load paper for label printing in the printer.
2 Select “Label Print” on the file menu.
The printing dialog box appears.
3 Follow the procedure for printing.
Please use the procedure for regular printing.
Note
Printing is not possible on labels included with discs.
25
Page 26

Assigning names to CDs (NAME function)
Disc names and track names can be assigned to CDs.
CD text data can also be displayed. Track and disc
names are input using the computer’s keyboard.
Assigned names are stored temporarily in the
“Database” folder on the computer’s hard disk until
you select “Reload” from the option menu. Names are
not input directly onto the CD itself.
1 On the CD operation screen, move the cursor to
the disc name or track name display column and
click on it.
2 Input the desired name.
To display the CD-TEXT information in the CD
including CD-TEXT
Select “Reload” from the option menu.
Note
If the CD is replaced, please be sure to engage
“Reload” on the option menu after replacement.
26
Page 27
Recording from a CD to an MD
Recording from a Sony CD player (connected with
the CONTROL A1 connection cord (optional)) to an
MD is easy on this unit. To record, simply drag the
track from the CD operation screen and drop it onto
the MD operation screen.
When using this recording method, please connect
this unit to the CD player using an optical
connection cable.
1 Select “Open CD window” on the file menu to
display the track that you wish to record.
When a CD changer is connected:
• Click on and select the desired CD.
• Up to 5 CD operation screens can be opened.
2
Drag the track number of the track that you wish to
record, and drop it onto the MD operation screen.
The selected track becomes the designated track
for recording, and the recording pause mode is
engaged.
Drag and drop
the track
number
Dragging the CD disc icon and dropping it
onto the MD operation screen will set all tracks on
that CD as designated recording tracks.
3 When there are more tracks that you wish to
record, repeat step 2.
A warning appears if the tracks don’t fit onto 1
MD.
4 Click on or .
appears, “Now Rec” flashes, and
recording begins.
27
Page 28
Recording from a CD to an MD (continued)
Removing tracks from the designated track
list:
During recording pause, click on the track that you
want to remove from the designated track list, and
then click
track is removed from the list.
Many tracks can be canceled at one time. When
selecting more than one track, click on the tracks while
holding down the SHIFT key.
Tracks already recorded onto the MD cannot be erased
at this time.
on the MD operation screen. The
To stop recording:
Click on .
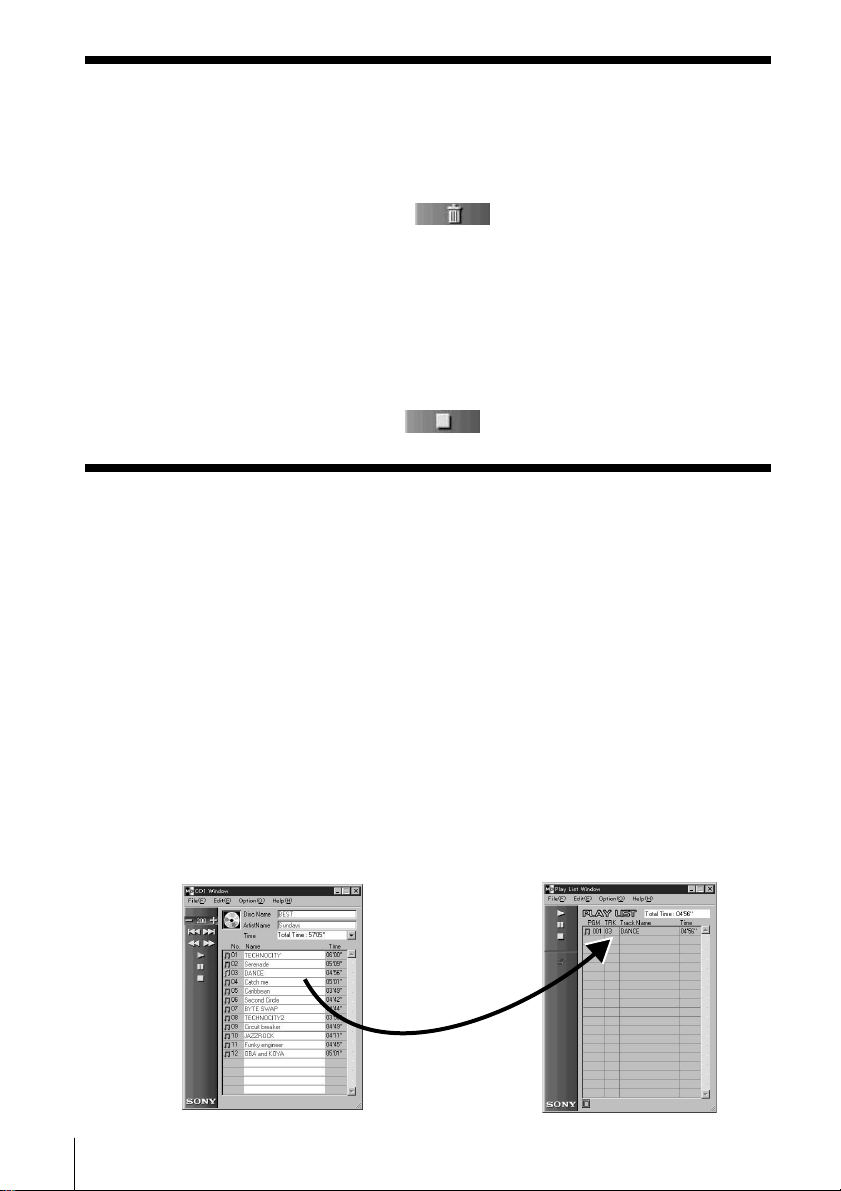
Programming the CD tracks
Tracks on a CD can be programmed to playback in the
order that you like. This is done by simply dragging
the track number from the CD operation menu and
dropping it onto the PLAY LIST screen.
28
1 Select “Program window” from the CD operation
screen’s file menu.
The PLAY LIST screen appears.
2 Drag the track numbers from the CD operation
screen and drop them onto the PLAY LIST screen
in the order that you want to hear them.
The tracks are added to the program in the
position that they are dropped.
Drag and drop
the track
number
Page 29
The track order can also be changed by dragging
and dropping within the PLAY LIST screen.
Dragging and dropping the CD disc icon
the PLAY LIST screen will program all tracks on
the CD.
onto
3 Click on .
Playback starts.
To stop program playback:
Click on .
Removing selected tracks from the program
In the stop mode, click on the track that you want to
remove, and then click on
panel. The selected track is removed from the
program.
Removing many tracks at one time is also possible.
When selecting more than one track, click on the
tracks while holding down the SHIFT key.
Viewing details of the programmed tracks
Click on on the bottom left side of the PLAY LIST
screen.
To return to the original screen, click again.
Note
During program playback, operation of MD operation
and CD operation screens is not possible.
on the operation
29
Page 30

Changing the disc icons
You can use the pictures (BMP format) made by other
applications as a MD/CD window's disc icon.
1 Copy the picture you want to paste to the
clipboard.
Only BMP format is available.
2 Click the disc icon on the MD/CD window to
select it.
3 Select “Paste Jacket” from the edit menu.
The picture on the clipboard is displayed on the
disc icon.
4 Click a place other than the disc icon to unselect it.
To turn back the original disc icon
1 Click the MD/CD window's disc icon to select it.
2 Select “Cut Jacket” from the edit menu.
The icon is deleted and the original icon appears
on the disc icon.
Quitting
30
3 Click a place other than the disc icon to unselect it.
Select “Quit” on the file menu.
Page 31

Additional Information
Troubleshooting
If you experience any of the following difficulties while using this unit, use this
troubleshooting guide to remedy the problem. Should any problem persist, consult
your nearest Sony dealer.
Please also refer to your computer’s manual, as well as the “Readme.txt” file on the
hard disk with the MD Editor software.
Problem Cause/countermeasure
“Communication port can not Another application may be using the serial port.
be opened” message appears. / Quit the other application.
No screen response or screen The computer may be damaged.
error. / Start up another application often used
and check if computer functions properly.
/ After uninstalling (page 9), try re-installing.
Character input, recording, The disc’s protect tab may be set for write protect.
editing etc., can not be done. / Slide the tab so that recording is possible.
/ Character input, recording, editing, etc., are
not possible on commercial playback MDs
(prerecorded MDs).
No MD deck response. /
Displayed name of MD or / Select “Reload” from
CD does not match the disc’s Option menu and engage this mode.
data.
Check that cables are connected properly
(page 7).
/ Check that “SerialSetup” has been done
properly (page 10).
/ Disconnect connection cables and then
reconnect them.
31
Page 32

Index
A, B
A-B ERASE ......................... 23
Accessory items ................... 6
AMS ............................... 12, 14
Assigning track and disc
names (NAME function)
(MD) ............................. 18
I, J, K, L
Installing software ...............9
M
Moving tracks (MOVE
function) ....................... 20
T
Troubleshooting................. 31
U, V, W, X, Y, Z
Uninstalling software.......... 9
C
Cables
For audio connection ... 8
For optical digital
connection................ 8, 27
CD operation screen .... 11, 14
CD-ROM ........................... 6, 9
COMBINE function ........... 22
Connections
Computer....................... 7
CD player....................... 8
Connector.......................... 6, 7
CONTROL A1 connection
cord .........................6, 7, 8
D
Database folder .............. 9, 26
DIVIDE function ................21
E
Erasing tracks (ERASE
function)
Erasing all tracks on an
MD ................................ 24
Erasing a section within
1 track (A-B ERASE
function) ....................... 23
Erasing one track at a
time ............................... 24
F, G, H
Fast forward .......................16
Fast rewind ......................... 16
N
NAME function
CD ................................. 26
MD ................................ 18
O
Operating environment ...... 5
P
Pausing playback ............... 17
Playback from the
beginning of a track.... 16
Playback (MD) ................... 16
Printing labels .................... 25
Program playback (CD) .... 28
Q
Quitting ...............................30
R
Recording (CD to MD)...... 27
S
Screens
Examples...................... 11
CD operation
screen...................... 11, 14
MD operation
screen...................... 11, 12
Serial port............................ 10
Serial (RS-232C) port ........... 7
Starting up software .......... 10
Stopping playback ............. 17
32
Page 33

33
Page 34

Programme © 1998 Sony Corporation
Documentation © 1998 Sony
Corporation
• Microsoft, MS-DOS et Windows sont des
marques de fabrique de Microsoft
Corporation.
• IBM et PC/AT sont des marques déposées
de International Business Machines
Corporation.
• Les autres noms de compagnies et de
produits sont des marques de fabrique ou
des marques déposées de chaque
compagnie.
2
Page 35

Table des matières
Informations préliminaires ............ 4
Présentation .......................................... 4
A propos de ce manuel ....................... 4
Configuration requise................. 5
Préparatifs....................................... 6
Vérification des articles fournis ......... 6
Raccordements ..................................... 7
Raccordement à un ordinateur.. 7
Raccordement à un
lecteur CD ............................ 8
Installation du logiciel ........................ 9
Mise en route du logiciel .................. 10
Exploitation................................... 11
Noms et fonctions d’écrans .............. 11
Ecran d’exploitation MD .......... 12
Ecran d’exploitation CD ........... 14
Lecture d’un minidisque .................. 16
Lecture d’un minidisque .......... 16
Sélection d’une plage pour la
lecture ................................. 16
Localisation d’une plage
précise ................................. 16
Localisation d’un point
particulier d’une plage ..... 16
Pause de la lecture..................... 17
Arrêt de la lecture...................... 17
Edition de minidisques
enregistrés ................................. 18
Titrage de plages et de disques
(fonction NAME) .............. 18
Déplacement de plages
enregistrées
(Fonction MOVE) ............. 20
Division de plages enregistrées
(Fonction DIVIDE) ............ 21
Réunion de plages enregistrées
(Fonction COMBINE) ....... 22
Effacement d’un passage d’une
plage
(Fonction A-B ERASE)...... 23
Effacement d’enregistrements
(Fonction ERASE) ............. 24
Impression d’étiquettes de
minidisque.................................. 25
Titrage de disques compacts
(Fonction NAME) ..................... 26
Enregistrement d’un disque
compact sur un minidisque ..... 27
Programmation des plages d’un
disque compact .......................... 28
Changement des icônes de
disque .......................................... 30
Fermeture du logiciel ........................ 30
Informations complémentaires ... 31
Guide de dépannage ......................... 31
Index .................................................... 32
F
3
Page 36

Informations préliminaires
Présentation
Relié à un ordinateur, le MDS-PC1 peut être piloté à
partir de l’écran de l’ordinateur. Avec la souris de
l’ordinateur, il permet non seulement les opérations
courantes de lecture et d’édition de minidisques
comme sur une platine MD classique, mais offre aussi
d’autres caractéristiques parmi lesquelles:
• Saisie de caractères au clavier.
• Commande des lecteurs CD Sony*.
• Enregistrement par “glisser-déposer”* simple d’un
lecteur CD Sony vers une platine MD.
* Compatible avec les lecteurs CD équipés d’une prise
CONTROL A1 (modèles compatibles: CDP-CX220, CDPCX260, CDP-CX57, CDP-CA80ES et CDP-CE525).
Le cordon CONTROL A1 fourni en accessoire (ou vendu
séparément) est indispensable dans ce cas.
A propos de ce manuel
Ce manuel explique les préparatifs nécessaires et
comment utiliser le MDS-PC1 avec un ordinateur.
Informations préliminaires
Donne toutes les informations nécessaires avant de
mettre l’appareil en service.
Préparatifs
Décrit les connexions, méthodes d’installation, etc.
Exploitation
Explique les méthodes de lecture et d’édition de
minidisques et d’enregistrement de disques compacts
sur un minidisque à l’aide d’un ordinateur.
Informations complémentaires
Explique comment résoudre certains problèmes
pouvant se présenter. Si nécessaire, veuillez vous
référer à cette partie.
Affichage des dernières informations
concernant ce logiciel
Les toutes dernières informations concernant ce
logiciel peuvent être trouvées dans le fichier
4
“Readme.txt” installé sur le disque dur avec le logiciel
d’édition MD. Veuillez lire attentivement ce fichier.
Page 37

Configuration requise
Les matériels et logiciels suivants sont nécessaires au
raccordement du MDS-PC1 à un ordinateur et à son
fonctionnement.
IBM PC/AT ou compatibles
Mémoire: 16 Mo ou plus (32 Mo ou plus
recommandé)
Carte vidéo et logiciel de visualisation:
VGA (640 x 480 pixels), affichage de 256
couleurs ou plus.
Espace disque:
5 Mo ou plus
Lecteur CD-ROM
Port série:
1 ou plus
Système d’exploitation:
Microsoft Windows 95 (Microsoft Windows
3.1 et Windows NT sont invalides.)
Ecran:
VGA (640 x 480 pixels), affichage de 256
couleurs ou plus.
Remarques
• Lors de l’enregistrement et de la lecture
programmés, sortez de l’éditeur MD.
• Lorsque vous arrêtez la platine MD, sortez
auparavant de l’éditeur MD.
5
Page 38

Préparatifs
Vérification des articles fournis
Vérifiez si vous avez bien reçu tous les articles
suivants avec l’éditeur MD. Si l’un d’eux manque,
veuillez contacter le magasin où vous avez acheté
l’appareil ou votre revendeur Sony.
• Connecteur (RS-232C ˜ minijack mono)
• Cordon de liaison CONTROL A1 (cordon à minifiches
mono)
• CD-ROM (1)
• Mode d’emploi (pour l’appareil et le logiciel)
6
Page 39

Raccordements
Raccordement à un ordinateur
Raccordez cet appareil à votre ordinateur à l’aide du
cordon de liaison fourni et du connecteur.
Ordinateur
>
à la prise
CONTROL A1 en
façade ou à
l’arrière
fl
pr
§
=+
)
0
Cordon de
liaison
CONTROL A1
Connecteur
?
?
au port série de
l’ordinateur (RS232C)
Raccordez le port série (RS-232C) de l’ordinateur à la
prise CONTROL A1 de cet appareil.
7
Page 40

Si votre ordinateur et cet appareil sont
éloignés l’un de l’autre
Utilisez un cordon de liaison de type RK-G34 (en option).
Remarques
• Veuillez utiliser le cordon de liaison fourni.
L’utilisation de tout autre cordon peut causer des
dommages.
• Veillez à ce que cordon reste bien droit au niveau de
la prise quand vous le raccordez. Le fait qu’il soit à
l’oblique peut causer des dommages.
• N’insérez pas d’objets métalliques dans les prises.
Un court-circuit peut provoquer des dommages.
• Ne raccordez pas de casque à la prise CONTROL
A1. Du bruit sera audible par le casque et aucune
fonction CONTROL A1 ne sera opérante.
Raccordement à un lecteur CD
Utilisez le cordon de liaison CONTROL A1 fourni
avec un lecteur CD, ou un cordon disponible en
option, pour relier cet appareil à un lecteur CD Sony
(équipé d’une prise CONTROL A1). Pour la
commande à partir d’un ordinateur, raccordez
seulement le lecteur CD 1 et réglez le mode de
commande du lecteur CD sur 1.
Le lecteur CD doit aussi être relié à cet appareil avec un
cordon de liaison audio (numérique ou analogique*).
Pour les détails, veuillez vous référer au mode
d’emploi du lecteur CD (modèles compatibles: CDPCX220, CDP-CX260, CDP-CX57, CDP-CA80ES et CDPCE525).
* Pour l’enregistrement d’un CD par glisser-déposer, comme
indiqué dans la procédure de la page 27, effectuez la
liaison à l’aide d’un cordon numérique optique.
Remarque
Lorsque cet appareil est raccordé à un lecteur CD ainsi
qu’à un ordinateur, veillez à régler le mode de lecture
8
du lecteur CD sur la lecture continue.
Page 41

Installation du logiciel
L’installation du logiciel sur le disque dur d’un
ordinateur s’effectue de la façon suivante. Avant de
commencer, mettez l’ordinateur en marche.
1 Insérez le CD-ROM fourni dans l’ordinateur.
2 Cliquez deux fois sur l’icône du CD-ROM.
L’icône d’installation apparaît.
3 Cliquez deux fois sur l’icône d’installation pour
lancer l’installation.
4 Effectuez l’installation en suivant les messages qui
apparaissent à l’écran.
Ejectez le CD-ROM quand l’installation est
terminée.
Fichier de base de données
L’installation du logiciel crée un dossier appelé
“Database” (base de données). Comme le logiciel
utilise ce dossier, veillez à ne pas effacer, déplacer ni
changer le contenu de ce dossier.
Désinstallation du logiciel
1 Sélectionnez les menus “Start”, “Settings” et
“Control Panel” pour ouvrir le panneau de
configuration et cliquez deux fois sur “Add/
Remove Program”.
2 Sélectionnez l’onglet “Install/Uninstall”, puis
“MD Editor Ver 1.1” et appuyez sur le bouton
“Add/Remove...”.
La boîte de dialogue apparaît.
3 Appuyez sur “Yes” pour désinstaller le logiciel.
La désinstallation commence et le logiciel est
automatiquement supprimé.
9
Page 42

Mise en route du logiciel
Procédez de la façon suivante pour mettre le logiciel en route.
Cliquez deux fois sur l’icône “MD Editor”.
Le logiciel est activé.
L’enregistrement de votre nom n’est nécessaire que la
première fois.
L’écran suivant apparaît immédiatement après la mise
en route.
Réglage du port série
Sélectionnez “SerialSetup” sur le menu d’options.
Sélectionnez COM1, COM2, COM3 ou COM4.
10
Remarques
• Lorsque le logiciel est mis en route, les opérations de
lecture ou d’édition en cours sur l’appareil sont
interrompues. Par ailleurs, après la mise en route,
l’exploitation par les commandes de l’appareil ou de
la télécommande (à l’exception de l’interrupteur
(POWER) et des commutateurs REC MODE,
INPUT et TIMER) n’est plus possible.
Si vous voulez utiliser les commandes de l’appareil
ou de la télécommande pour effectuer une
opération, fermez d’abord le logiciel.
• A la mise en route du logiciel, le mode de lecture sur
l’appareil est automatiquement réglé sur la lecture
CONTINUE et le mode de répétition est annulé.
• Une fois que le logiciel a été mis en route, n’éteignez
pas l’appareil.
Page 43

Exploitation
Noms et fonctions
d’écrans
Exemples d’écran
Ecran d’exploitation MD
Ecran d’exploitation CD
11
Page 44

Noms et fonctions d’écrans (voir page suivante)
Ecran d’exploitation MD
1
2
3
4
5
6
7
1 Icône MD:
Un clic sur cette te icône permet de sélectionner toutes
les plages du disque.
Cette fonction est pratique lorsqu’on veut utiliser le
mode ERASE pour effacer toutes les plages (page 24).
12
2 Panneau de commande MD
Le mode de contrôle d’entrée et le mode de marquage
manuel des plages ne peuvent pas être utilisés.
: Interrupteur d’alimentation (POWER)
: Touche d’éjection de minidisque
: Touche AMS
:
Touche de recherche rapide avant/arrière
: Touche de lecture
: Touche de pause
: Touche d’arrêt
: Touche d’enregistrement
*1
AMS = Automatic Music Sensor
Cette fonction permet la détection automatique du début des plages.
*1
Page 45

: Touche de déplacement (MOVE)
: Touche de division (DIVIDE)
: Touche de réunion (COMBINE)
: Touche d’effacement de passage (A-B
ERASE)
: Touche d’effacement (ERASE)
3 Affichage du nom de disque
4 Touche de changement d’affichage du
temps
Sert à indiquer le temps restant, le temps total, le
temps écoulé d’une plage et le temps restant d’une
plage.
5 Affichage du temps
6 Affichage de la capacité du disque
7 Affichage du numéro de plage, nom de
plage, temps
(voir page suivante)
13
Page 46

Noms et fonctions d’écrans (voir page suivante)
Ecran d’exploitation CD
1
2
3
4
5
6
7
1 Icône CD:
Un clic sur cette icône permet de sélectionner
toutes les plages.
Lors de l’enregistrement sur un minidisque, la sélection
de toutes les plages à enregistrer se fait par glisserdéposer de l’icône sur l’écran d’exploitation MD.
14
2 Touches d’exploitation CD
Le mode de contrôle d’entrée et le mode de marquage
manuel des plages ne peuvent pas être utilisés.
:
Touches de sélection de disque
(Le numéro indique le disque actuellement sélectionné.)
: Touche AMS
:
Touche de recherche rapide avant/arrière
: Touche de lecture
: Touche de pause
: Touche d’arrêt
*1
AMS = Automatic Music Sensor
Cette fonction permet la détection automatique du début
des plages.
*1
Page 47

3 Affichage du nom de disque
4 Affichage du nom de l’artiste
5 Touche de changement d’affichage du
temps
Sert à indiquer le temps restant, le temps total, le
temps écoulé d’une plage ou le temps restant
d’une plage.
6 Affichage du temps
7 Affichage du numéro de plage, nom de
plage, temps
Remarque
Lorsque l’appareil est raccordé à un lecteur CD et à
un ordinateur, veillez à choisir le mode de lecture
CONTINUE pour le lecteur CD.
15
Page 48

Lecture d’un minidisque
La lecture d’un minidisque peut être pilotée par
l’ordinateur.
Lecture d’un minidisque
1 Insérez un minidisque dans le MDS-PC1.
Le contenu du disque apparaît à l’écran de
l’ordinateur.
2 Cliquez sur .
La lecture commence.
Sélection d’une plage pour la lecture
Cliquez deux fois sur le numéro de plage ou sur la
section d’affichage du temps.
La lecture de la plage sélectionnée commence.
Localisation d’une plage précise
16
Cliquez sur ou pendant la lecture.
La lecture commence au début de la plage suivante
(ou de la plage actuelle).
Pour commencer la lecture au début d’une plage
ultérieure, cliquez sur le nombre de fois nécessaire
pour sauter à la plage souhaitée. Cliquez deux fois sur
pour revenir au début de la plage précédent la plage
actuelle.
Localisation d’un point particulier
d’une plage
Cliquez sur ou pendant la lecture.
Cliquez sur et maintenez la pression sur la
souris pour accélérer la recherche vers l’arrière, et
cliquez sur
souris pour accélérer la recherche vers l’avant. La
lecture reprend à l’endroit où la pression est
relâchée.
et maintenez la pression sur la
Page 49

Pause de la lecture
Cliquez sur pendant la lecture.
La lecture s’arrête.
Pour reprendre la lecture après la pause
Cliquez sur ou sur .
Arrêt de la lecture
Cliquez sur pendant la lecture.
La lecture s’arrête.
17
Page 50

Edition de minidisques enregistrés
L’édition de minidisques s’effectue facilement à partir
d’un ordinateur.
Pour tous les détails concernant les fonctions, veuillez
vous référer au mode d’emploi de la platine MD.
Remarque
Si vous n’utilisez pas le logiciel pour l’édition mais
les commandes du MDS-PC1, veillez à sélectionner
“Reload” sur le menu d’options à la fin de
l’édition. Si vous ne et à activer le faites pas, le
contenu actuel du minidisque risque d’être
différent du contenu de l’affichage.
Titrage de plages et de disques
(fonction NAME)
La saisie de noms de plage et de disque sur le clavier
de l’ordinateur est extrêmement simple.
1 Sur l’écran d’exploitation MD, amenez le curseur
sur l’afficheur du nom de plage et cliquez dessus.
2 Saisissez le nom de la plage souhaitée.
Pour saisir d’autres noms à la suite, appuyez sur la
touche de retour (validation) sur le clavier de
l’ordinateur lorsque vous avez terminé de saisir le
nom de disque ou de plage souhaité.
Ensuite, le mode d’édition apparaît automatiquement
et vous pouvez saisir d’autres noms.
Autres opérations
Vous pouvez aussi utiliser le copier-coller, etc. pour saisir un nom.
Remarques
•
Vous ne pouvez saisir que les lettres de l’alphabet anglais, les
nombres et quelques symboles. A la lecture d’un minidisque
codé avec des lettres autres que celles mentionnées ci-dessus,
les lettres correctes ne seront pas affichées.
•
Si l’onglet d’interdiction d’écriture est réglé sur la position
d’interdiction, la saisie de caractères, l’enregistrement,
l’édition, etc. ne seront pas possibles. Changez la position
de l’onglet pour que l’enregistrement soit possible.
•
Les symboles qui peuvent être saisis sont les suivants:
! " # $ % & ' ( ) * + , – . / : ; < = > ? @ _ `
18
Tout autre symbole n’apparaîtra pas.
Page 51

Pour utiliser les données alphanumériques
d’autres applications (Fonction FLOW)
Vous pouvez affecter par copie ou collage tous les
noms noms de disque ou de plage saisis dans un
éditeur de texte ou bloc-notes.
1 Saisissez les noms de disque ou de plage en
utilisant un éditeur de texte ou bloc-notes.
Divisez chaque nom en appuyant sur la touche de
retour à la ligne sur le clavier d’ordinateur.
(ex.)
nom de disque <retour>
nom de la plage 1 <retour>
nom de plage 2 <retour>
:
nom de plage n <retour>
2 Sélectionnez tout le texte et copiez-le dans le
presse-papiers.
3 Cliquez sur le nom de disque ou le premier
affichage de plages pour entrer dans le mode
d’édition.
4 Sélectionnez “Paste” sur le menu d’édition.
Le texte est affecté au premier affichage.
19
Page 52

Edition de minidisques enregistrés
(voir page suivante)
Déplacement de plages enregistrées
(Fonction MOVE)
1 Sur l’écran d’exploitation MD, cliquez sur le
numéro de la plage que vous voulez enregistrer.
La couleur du nom de la plage sur laquelle vous
cliquez change. Il n’est pas possible de déplacer
plus d’une plage à la fois.
2 Cliquez sur sur le panneau de
commande.
La boîte de dialogue MOVE apparaît.
3 Saisissez le numéro de plage de l’endroit où vous
voulez mettre la plage.
20
4 Cliquez sur “OK”.
La plage sélectionnée est déplacée vers l’endroit
désigné.
Pour annuler la fonction MOVE
Cliquez sur “Cancel”.
Déplacement d’une plage pendant la lecture
Pendant la lecture de la plage que vous voulez
déplacer, cliquez sur sur le panneau de
commande. Lorsque la boîte de dialogue MOVE
apparaît, effectuez les points 3 et 4 ci-dessus. Si vous
sélectionnez une autre plage pendant la lecture, elle
sera déplacée.
Déplacement de plages par glisser-déposer
Les plages peuvent aussi être déplacées à l’endroit
souhaité par un glisser-déposer du numéro de plage.
Page 53

Division de plages enregistrées
(Fonction DIVIDE)
1 Pendant la lecture, cliquez sur sur le
panneau de commande à l’endroit où la plage doit
être divisée.
La répétition de ce passage commence au point où
vous avez cliqué et la boîte de dialogue DIVIDE
apparaît.
2 Cliquez sur / et, au besoin, décalez
légèrement le point*.
La répétition du passage reprend au nouveau
point sélectionné.
Vous pouvez aussi tirer
ou la droite pour décaler le point de division.
vers la gauche
3 Cliquez sur “OK” quand le point de division est à
l’endroit souhaité.
La plage est divisée.
Pour annuler la fonction DIVIDE
Cliquez sur “Cancel”.
* Le décalage est possible à l’étape 1 (par unités de 0,06
secondes environ).
21
Page 54

Edition de minidisques enregistrés
(voir page suivante)
Réunion de plages enregistrées
(Fonction COMBINE)
1 Sur l’écran d’exploitation MD, cliquez sur le
numéro des plages que vous voulez réunir.
Si vous appuyez sur une seule plage, cette plage et
la plage précédente seront automatiquement
réunies.
Cependant, la toute première plage du minidisque
ne peut pas être sélectionnée. Si les plages qui
doivent être réunies sont séparées, cliquez sur la
première plage puis sur la seconde en tenant la
touche SHIFT enfoncée.
2 Cliquez sur du panneau de commande.
La boîte de dialogue COMBINE apparaît, et le
passage où les plages ont été réunies est répété.
22
Cliquez sur
plages lues.
pour inverser l’ordre des
3 Si les plages indiquées sont correctes, cliquez sur
“OK”.
Les plages sélectionnées sont réunis.
Pour annuler la fonction COMBINE
Cliquez sur “Cancel”.
Réunion de la plage en cours de lecture et de
la plage précédente
Pendant la lecture de la plage que vous voulez réunir
et de la plage précédente, cliquez sur
panneau de commande. Lorsque la boîte de dialogue
COMBINE apparaît, effectuez l’opération 2 ci-dessus.
Cette opération n’est pas possible pendant la lecture
de la toute première plage. Si une ou deux autres
plages sont sélectionnées pendant la lecture, elles
seront réunies.
sur le
Page 55

Effacement d’un passage d’une plage
(Fonction A-B ERASE)
1 Pendant la lecture, cliquez sur sur le
panneau de commande au point où l’effacement
doit commencer (point A).
Le passage jusqu’au point sélectionné est répété et
la boîte de dialogue A-B ERASE apparaît.
2 Cliquez sur / du point A et, au besoin,
décalez légèrement le point A*.
Le point
ou la droite.
peut être décalé vers la gauche
3 Cliquez sur “OK” lorsque le point A est correct.
4 Continuez la lecture, ou appuyez sur la touche
ou pour aller au point où l’effacement
doit s’arrêter (point B), et cliquez sur “OK”.
Le point B est fixé temporairement et le passage
entre les points A et B est répété.
5 Cliquez sur / du point B et, au besoin,
décalez légèrement le point B*.
Le point peut aussi être décalé vers la gauche ou la
droite avec
.
6 Cliquez sur “OK” lorsque le point B est correct.
Le passage A-B est effacé.
Pour annuler la fonction A-B
Cliquez sur “Cancel”.
* Le décalage est possible à l’étape 1 (par unités de 0,06
secondes environ).
23
Page 56

Edition de minidisques enregistrés
(voir page suivante)
Effacement d’enregistrements (Fonction ERASE)
1 Sur l’écran d’exploitation MD, cliquez sur le
numéro de la plage que vous voulez effacer.
Si vous sélectionnez plus d’une plage, cliquez sur les
numéros tout en tenant la touche SHIFT enfoncée.
Pour effacer toutes les plages effectuez
une des opérations suivantes:
•
Cliquez sur toutes les plages après avoir appuyé sur SHIFT.
• Sélectionnez “Select all” sur le menu d’édition.
• Cliquez sur l’icône de minidisque
2
Cliquez sur sur le panneau de configuration.
La boîte de dialogue ERASE apparaît.
3
Cliquez sur “OK” si vous voulez effacer la ou les plages.
La ou les plages sélectionnées sont effacées.
.
24
Pour annuler la fonction ERASE
Cliquez sur “Cancel”.
Effacement d’une plage en cours de lecture
Pendant la lecture de la plage que vous voulez effacer,
cliquez sur sur le panneau de commande.
Lorsque la boîte de dialogue ERASE apparaît,
effectuez l’étape 2 ci-dessus. Si vous sélectionnez
d’autres plages pendant la lecture, les plages
sélectionnées seront effacées.
Effacement des plages par glisser-déposer
dans
Vous pouvez effacer une plage en la sélectionnant et la déposant
dans la corbeille sur le panneau de commande.
De cette façon il est possible d’effacer une seule plage,
plusieurs plages ou toutes les plages à la fois.
Pour effacer toutes les plages, vous pouvez aussi sélectionner
l’icône du minidisque
et la déposer dans la corbeille.
Remarque
Les plages effacées ne peuvent pas être restituées.
Page 57

Impression
d’étiquettes de
minidisque
Les listes de noms de plage et de disque apparaissant
sur l’écran d’exploitation MD peuvent être imprimées
sur des étiquettes de minidisque.
Les listes de plages des disques comportant 10 plages
ou moins sont imprimées sur une seule colonne, et les
listes de plages des disques comportant 11 à 20 plages
sont imprimées sur deux colonnes.
Pour l’impression, une imprimante doit être raccordée
à l’ordinateur.
Etiquette pour l’étui de minidisque
MY BEST SELECTION
1. PLEASE LET...
2. ARISA and YUKI
3. DANCE! DANC...
4. DON’T BE SHY
5. VACATION
6. Make It Happen
7. ENDLESS SUM...
8. HELLO
9. Emotions
10. FAN CLUB
11. Make
12. Lonely engineer
13. Good
1 Insérez du papier pour l’impression d’étiquettes
dans l’imprimante.
2 Sélectionnez “Label Print” sur le menu fichier.
La boîte de dialogue d’impression apparaît.
3 Effectuez les opérations nécessaires pour
l’impression.
Procédez comme pour l’impression ordinaire.
Remarque
L’impression sur les étiquettes fournies avec les
disques n’est pas possible.
Etiquette pour l’arête de l’étui
MY BEST SELECTION
MY BEST SELECTION
Etiquette pour le disque
25
Page 58

Titrage de disques compacts (Fonction NAME)
Des noms de disque et de plage peuvent être attribués
aux disques compacts.
Les données alphanumériques d’un CD peuvent
également être affichées. Les noms de disque et de
plage sont saisis au clavier de l’ordinateur.
Les noms attribués sont temporairement stockés dans
le dossier “Database” sur le disque dur de l’ordinateur
jusqu’à ce que vous sélectionnez “Reload” sur le menu
d’options. Les noms ne sont pas enregistrés sur le
disque compact proprement dit.
1 Sur l’écran d’exploitation CD, amenez le curseur
sur la colonne d’affichage des noms de disque ou
de plage et cliquez dessus.
2 Saisissez le nom souhaité.
Pour afficher les informations
alphanumériques de disques compacts ainsi
que CD-TEXT
Sélectionnez “Reload” sur le menu d’options.
26
Remarque
Si vous changez de disque compact, veillez à réactiver
“Reload” sur le menu d’options après le changement
de disque.
Page 59

Enregistrement d’un disque compact sur un minidisque
Avec cet appareil, l’enregistrement d’un disque compact
sur un minidisque au moyen d’un lecteur CD Sony
(raccordé par un cordon de liaison CONTROL A1
optionnel) est extrêmement simple. Pour enregistrer, faites
simplement glisser la plage sur l’écran d’exploitation CD
et déposez-la sur l’écran d’exploitation MD.
Pour utiliser cette méthode d’enregistrement,
reliez l’appareil au lecteur CD à l’aide d’un cordon
de liaison optique.
1
Sélectionnez “Open CD window” sur le menu fichier
pour afficher la plage que vous voulez enregistrer.
Quand un changeur CD est raccordé:
•
Cliquez sur et sélectionnez le disque compact souhaité.
•
Vous pouvez ouvrir jusqu’à 5 écrans d’exploitation CD.
2 Faites glisser le numéro de la plage que vous
voulez enregistrer et déposez-le sur l’écran
d’exploitation MD.
La plage sélectionnée devient la plage désignée
pour l’enregistrement et le mode de pause
d’enregistrement est activé.
Faites glisser et
déposez le
numéro de
plage
Toutes les plages du disque compact sont
automatiquement désignées pour l’enregistrement
par un simple glisser-déposer de l’icône de disque
sur l’écran d’exploitation MD.
3 Si vous voulez enregistrer d’autres plages, répétez
le point 2.
Un avertissement apparaît si les plages ne
rentrent pas toutes sur le minidisque.
4 Cliquez sur ou .
apparaît, “Now Rec” clignote et
l’enregistrement commence.
27
Page 60

Programmation des plages d’un disque compact (voir page suivante)
Retrait de plages de la liste de plages
désignée
Pendant la pause de lecture, cliquez sur la plage que
vous voulez retirer de la liste de plages désignée, puis
cliquez sur
plage est retirée de la liste.
Plusieurs plages peuvent être annulées à la fois. Pour
sélectionner plusieurs plages à la fois, cliquez sur les
plages tout en tenant la touche SHIFT enfoncée.
Les plages déjà enregistrées sur le minidisque ne
peuvent pas être effacées à ce moment.
sur l’écran d’exploitation MD. La
Pour arrêter l’enregistrement:
Cliquez sur .
Programmation des plages
d’un disque compact
Les plages d’un disque compact peuvent être
programmées pour être lues dans un ordre précis. Il
suffit de faire glisser le numéro de plage sur le menu
d’exploitation CD et de le déposer sur l’écran PLAY
LIST.
28
1 Sélectionnez “Program window” sur le menu
fichier d’écran d’exploitation CD.
L’écran PLAY LIST apparaît.
2 Faites glisser les numéros de plage de l’écran
d’exploitation CD et déposez-les sur l’écran PLAY
LIST dans l’ordre dans lequel vous voulez les
entendre.
Les plages sont ajoutées au programme à l’endroit
où vous les déposer.
Faites glisser et
déposez le
numéro de
plage
Page 61

L’ordre des plages peut également être changé par
glisser-déposer sur l’écran PLAY LIST.
Vous pouvez programmer toutes les plages d’un
disque compact par simple glisser-déposer de
l’icône de disque
sur l’écran PLAY LIST.
3 Cliquez sur .
La lecture commence.
Pour arrêter la lecture du programme
Cliquez sur .
Retrait de plages d’un programme
Dans le mode d’arrêt, cliquez sur la plage que vous
voulez retirer, puis cliquez sur
panneau de commande. La plage sélectionnée est
retirée du programme.
Vous pouvez aussi supprimer plusieurs plages à la
fois. Pour sélectionner plusieurs plages, cliquez sur les
plages tout en tenant la touche SHIFT enfoncée.
Affichage des détails des plages programmées
Cliquez sur dans le coin inférieur gauche de
l’écran PLAY LIST.
Pour revenir à l’écran d’origine, cliquez une nouvelle
fois dessus.
sur le
Remarque
Pendant la lecture d’un programme, vous ne pouvez
effectuer aucune opération sur les écrans
d’exploitation CD et MD.
29
Page 62

Changement des icônes de disque
Vous pouvez utiliser des images (format BMP)
provenant d’autres applications à la place de l’icône
de disque sur l’écran MD/CD.
1 Copiez l’image que vous voulez coller dans le
presse-papiers.
Seules les images de format BMP sont valides.
2 Cliquez sur l’icône de disque sur l’écran MD/CD
pour la sélectionner.
3 Sélectionnez “Paste Jacket” sur le menu d’édition.
L’image copiée dans le presse-papiers est affichée
sur l’icône de disque.
4 Cliquez à un autre endroit que l’icône de disque
pour la désélectionner.
Pour revenir à l’icône de disque d’origine
1 Cliquez sur l’icône de disque sur l’écran MD/CD
pour la sélectionner.
2 Sélectionnez “Cut Jacket” sur le menu d’édition.
3 Cliquez à un autre endroit que l’icône de disque
Fermeture du logiciel
Sélectionnez “Quit” sur le menu fichier.
30
L’icône est supprimée et l’icône d’origine
réapparaît à la place de l’icône de disque.
pour la désélectionner.
Page 63

Informations complémentaires
Guide de dépannage
Si un problème quelconque se présente pendant l’utilisation de l’appareil, référezvous à ce guide de dépannage pour le résoudre. Si le problème persiste, adressezvous à votre revendeur Sony.
Veuillez aussi vous référer au mode d’emploi de l’ordinateur et lire le fichier
“Readme. txt” sur le disque dur avec le logiciel éditeur MD.
Problème Cause/Solution
Le message “Communication Une autre application utilise déjà le port série.
port can not be opened” / Fermez l’autre application.
apparaît.
Aucun écran n’apparaît ou L’ordinateur est éventuellement endommagé.
erreur d’affichage. / Lancez une autre application souvent utilisée
et vérifiez si l’ordinateur fonctionne
normalement.
/ Après avoir désinstallé l’application (page 9),
essayez de la réinstaller.
La saisie de caractères, L’onglet de protection est peut-être réglé sur la
l’enregistrement, l’édition, etc. position d’interdiction d’écriture.
ne peuvent pas être effectués. / Changez la position de l’onglet pour que
l’écriture soit possible.
/ La saisie de caractères, l’enregistrement,
l’édition, etc. ne sont pas possibles avec les
minidisques de lecture (préenregistrés)
vendus dans le commerce.
Pas de réponse de la platine / Vérifiez si les cordons sont branchés
MD. correctement (page 7).
/ Vérifiez si le réglage “SerialSetup” a été
effectué correctement (page 10).
/ Débranchez les cordons de liaison et
rebranchez-les.
Le nom de minidisque ou / Sélectionnez “Reload” sur le
disque compact affiché ne menu d’options et validez ce mode.
correspond pas aux données
du disque.
31
Page 64

Index
A, B
A-B ERASE (Effacement
A-B)............................... 23
Accessoires fournis .............. 6
AMS (détection automatique
de plage)...........................
12, 14
Arrêt de la lecture ..............17
C
CD-ROM ........................... 6, 9
COMBINE (fonction de
réunion)........................ 22
Configuration requise ......... 5
Connecteur ....................... 6, 7
Cordons
de liaison audio............. 8
de liaison numérique
optique ..................... 8, 27
de liaison CONTROL
A 1 ........................... 6, 7, 8
D
Désinstallation du
logiciel ............................ 9
DIVIDE (fonction de
division) ....................... 21
Dossier DATABASE ...... 9, 26
E
Ecrans
d’exploitation
CD ........................... 11, 14
d’exploitation
MD .......................... 11, 12
Exemples ...................... 11
Effacement de plages
(fonction ERASE)
d’un passage d’une plage
(A-B ERASE)................ 23
d’une plage à la fois ... 24
de toutes les plages d’un
minidisque ................... 24
Enregistrement (d’un disque
compact sur un
minidisque)..................27
F
Fermeture du logiciel ........ 30
Fonction COMBINE .......... 22
Fonction DIVIDE ............... 21
Fonction ERASE ................. 24
Fonction MOVE ................. 20
G, H
Guide de dépannage ......... 31
I, J, K
Impression d’étiquettes .... 25
Installation du logiciel ........ 9
L
Lecture à partir du début
d’une plage .................. 16
Lecture d’un minidisque .. 16
Lecture d’un programme
(CD) ..............................28
M
Mise en route du logiciel .. 10
MOVE (fonction de
déplacement) ............... 20
N, O
NAME (fonction
de titrage)..................... 18
P, Q
Pause de la lecture .............17
Port série ............................. 10
Port série (RS-232C)............. 7
R, S
Raccordements
d’un lecteur CD............. 8
d’un ordinateur ............. 7
Recherche rapide vers
l’arrière .........................16
Recherche rapide vers
l’avant ........................... 16
T, U, V, W, X, Y, Z
Titrage (fonction NAME)
de disque compact ...... 26
de minidisque..............18
32
Page 65

33
Page 66

Programa © 1998 Sony Corporation
Documentación © 1998 Sony
Corporation
• Microsoft, MS-DOS, y Windows son
marcas registradas de Microsoft
Corporation.
• IBM y PC/AT son marcas registradas de
International Business Machines
Corporation.
• Los demás nombres de compañías y
productos son marcas comerciales o
registradas de cada compañía.
2
Page 67

ÍNDICE
Preparativos .................................... 4
Descripción general ............................. 4
Descripción de este manual ............... 4
Requisitos del sistema ................ 5
Preparativos .................................... 6
Comprobación de los ítemes
suministrados............................... 6
Conexiones ........................................... 7
Conexión de un PC ..................... 7
Conexión de un reproductor de
discos compactos................. 8
Instalación del software ...................... 9
Inicio del software ............................. 10
Operación...................................... 11
Nombres y funciones de la
pantalla ....................................... 11
Pantalla de operación de
minidiscos .......................... 12
Pantalla de operación de
discos compactos............... 14
Reproducción de un minidisco........ 16
Selección de una canción para
reproducción...................... 16
Localización de una canción
específica ............................ 16
Localización de un punto
particular de una canción 16
Realización de una pausa en
la reproducción ................. 17
Parada de la reproducción ....... 17
Edición de minidiscos grabados...... 18
Asignación de nombres de
canciones y de discos
(Función NAME)............... 18
Movimiento de canciones
grabadas
(Función MOVE) .............. 20
División de canciones grabadas
(Función DIVIDE) ............. 21
Combinación de canciones
grabadas (Función
COMBINE)......................... 22
Borrado de una parte de una
canción (Función A-B
ERASE) ............................... 23
Borrado de grabaciones
(Función ERASE).............. 24
Impresión de etiquetas
de minidiscos ............................. 25
Asignación de nombres a discos
compactos (Función NAME) ... 26
Grabación de un disco compacto en
un minidisco............................... 27
Programación de canciones de un
disco compacto .......................... 28
Cambio de los iconos del disco........ 30
Salida ................................................... 30
Información adicional................... 31
Solución de problemas...................... 31
Índice alfabético ................................. 32
ES
3
Page 68

Preparativos
Descripción general
Cuando haya conectado el MDS-PC1 a su PC, podrá
controlarlo utilizando el monitor del mismo. Además
de la operación fácil de la reproducción de minidiscos
y la edición como un deck de minidiscos normal
utilizando el mouse (ratón) del PC, otras
características posibles con esta unidad incluyen:
• Introducción de caracteres generados con el teclado.
• Operación de reproductores de discos compactos*
Sony.
• Grabación fácil “arrastrando y colocando”* desde un
repropductor de discos compactos a un deck de
minidiscos.
*
Solamente compatible con reproductores de discos compactos
que incluyan toma CONTROL A1 (modelos compatibles:
CDP-CX220, CDP-CX260, CDP-CX57, CDP-CA80ES y CDPCE525). Para esta función también será necesario el cable
CONTROL A1 accesorio (u otro vendido aparte).
Descripción de este manual
En este manual se explican los preparativos y los
métodos de control del MDS-PC1 con un PC.
Antes de comenzar
En esta sección se explican las cosas que usted deberá
conocer antes de utilizar la unidad.
Preparativos
En esta sección se explican las conexiones, el método
de instalación, etc.
Operación
En esta sección se explican los métodos de
reproducción y edición de minidiscos, la grabación
fácil de un disco compacto a un minidisco, etc.
utilizando un PC.
Información adicional
En esta sección se explican cosas tales como cómo
resolver problemas, etc. Consulte esta sección cuando
sea necesario.
Información más reciente concerniente a este
software
La información más reciente sobre este software podrá
encontrara en el archivo “Readme.txt” instalado en el
4
disco duro con el software del editor de minidiscos.
Cerciórese de leer este archivo.
Page 69

Requisitos del sistema
Para conectar el MDS-PC1 a su PC y utilizarlo,
necesitará el hardware y el software siguientes.
IBM PC/AT o compatible
Memoria:
16 Mbytes o más (se recomiendan 32 Mbytes o
más),
Tarjeta de vídeo y controlador de visualización:
VGA (640 x 480 pixeles), 256 colores o más
visualizables.
Espacio del disco duro:
5 Mbytes o más.
Unidad de discos CD-ROM
Puertos en serie:
1 o más
Sistema operativo:
Microsoft Windows 95 (No podrá utilizarse
Windows 3.1 ni Windows NT).
Monitor:
VGA (640 x 480 pixreles), 256 colores o más
visualizables.
Notas
• Cuando utilice el temporizador para realizar la
grabación y la reproducción, salga del editor de
minidiscos.
• Cuando desconecte la alimentación del deck de
minidiscos, salga del editor de minidiscos.
5
Page 70

Preparativos
Comprobación de los ítemes suministrados
Compruebe si ha recibido los ítemes siguientes con el
editor de minidiscos. Si falta alguno, póngase en
contacto con el establecimiento en el que lo haya
adquirido o con su proveedor Sony.
• Conector (RS-232C ˜ minitoma monoaural)
• Cable conector CONTROL A1 (cable con miniclavijas
monoaurales)
• Disco CD-ROM (1)
• Manual de instrucciones (para la unidad y el software)
6
Page 71

Conexiones
Conexión de un PC
Conecte esta unidad a su PC utilizando el cable
conector y el conector suministrados.
PC
)
0
>
A la toma
CONTROL A1 del
panel frontal o del
posterior
fl
pr
§
=+
Cable
conector
CONTROL A1
Conector
?
?
Al puerto en serie
(RS-232C) de su PC
Conecte el puerto en serie (RS-232C) de su PC a la
toma CONTROL A1 de esta unidad.
7
Page 72

Cuando su PC y esta unidad estén separados
Utilice un cable conector, como el RK-G34 (opcional).
Notas
• Utilice el cable conector suministrado. Si utilizase
otro, podrían producirse daños.
• Cuando conecte el cable, póngalo recto. Si lo
doblase podría producir daños.
• No inserte ningún objeto metálico en las tomas de
conexión. Si lo hiciese podría producir un
cortocircuito y causar daños.
• No conecte auriculares a la toma CONTROL A1. Si
lo hiciese oiría ruido a través de los mismos y no
trabajaría ninguna de las funciones de CONTROL
A1.
Conexión de un reproductor de discos
compactos
Utilice el cable conector CONTROL A1 suministrado
con el reproductor de discos compactos u otro
opcional para conectar esta unidad a un reproductor
de discos compactos Sony (que posea toma
CONTROL A1). Para controlar esta unidad utilizando
un PC, conecte solamente 1 reproductor de discos
compactos y ajuste el modo de comando del mismo a
1.
El reproductor de discos compactos también deberá
conectarse a esta unidad con un cable conector de
audio (digital o analógico*).
Con respecto a los detalles, consulte el manual del
reproductor de discos compactos (modelos
compatibles: CDP-CX220, CDP-CX260, CDP-CX57,
CDP-CA80ES y CDP-CE525).
* Cuando realice la grabación “arrastrando y colocando” de
un disco compacto consultando el procedimiento de la
página 27, realice la conexión utilizando un cable digital
óptico.
Nota
Para conectar esta unidad a un reproductor de discos
compactos o a un PC, cerciórese de que el modo de
8
reproducción del reproductor de discos compactos
esté ajustado a CONTINUE.
Page 73

Instalación del software
Utilice este procedimiento para instalar el software en
el disco duro de su PC. Antes de seguir, ponga su PC
en el modo de operación.
1 Inserte el disco CD-ROM suministrado en su PC.
2 Haga doble clic en el icono del CD-ROM.
Aparecerá el icono de instalación.
3 Haga doble clic en el icono de instalación para
iniciar ésta.
4 Realice la operación de instalación de acuerdo con
los mensajes que aparezcan.
Cuando finalice la instalación, extraiga el disco
CD-ROM.
Acerca del archivo Database (de base de
datos)
La instalación del software creará una carpeta
denominada “Database”. Como este software utiliza
esta carpeta, no borre, mueva, ni cambie el contenido
de la misma.
Desinstalación del software
1 Seleccione el menú “Start”, “Settings”, “Control
Panel” para abrir el panel de control, y haga doble
clic en “Add/Remove Program”.
2 Seleccione la etiqueta “Install/Uninstall”,
seleccione “MD Editor Ver 1.1”, y presione el
botón “Add/Remove...”.
Aparecerá un cuadro de diálogo.
3 Presione “Yes” para desinstalar el softeware.
Se iniciará el desinstalador y el software se borrará
automáticamente.
9
Page 74

Inicio del software
Utilice este procedimiento para iniciar este software.
Haga doble clic en el icono “MD Editor”.
Este software se activará.
El registro de su nombre solamente será necesario la
primera vez.
Inmediatamente después de haber iniciado el
software, aparecerá la pantalla siguiente.
Configuración del puerto en serie
Seleccione “SerialSetup” del menú de opciones.
Seleccione COM1, COM2, COM3, o COM4.
10
Notas
• Cuando inicie este software, las operaciones de
reproducción o de edición en progreso en la unidad
principal se pararán. Además, después de haberlo
iniciado, no será posible la operación con los
controles de la unidad principal ni con los del
mando a distancia (excluyendo el interruptor
(POWER), el selector REC MODE, el interruptor
INPUT, y el interruptor TIMER).
Antes de utilizar esta unidad o el mando a distancia
para la operación, salga de este software.
• Cuando inicie este software, el modo de
reproducción (PLAY MODE) se ajustará
automáticamente a continua (CONTINUE), y el
modo de repetición se cancelará.
• Cuando haya iniciado este software, no desconecte
la alimentación de esta unidad.
Page 75

Operación
Nombres y funciones de la pantalla
Ejemplos de pantallas
Pantalla de operación de
minidiscos
Pantalla de operación de discos
compactos
11
Page 76

Nombres y funciones de la pantalla (continúa)
Pantalla de operación de minidiscos
12
1
2
3
4
5
6
7
1 Icono de minidisco:
Al hacer clic en este icono se seleccionarán todas
las canciones del disco.
Esta función será muy útil cuando desee utilizar el
modo de borrado (ERASE) para borrar todas las
canciones (página 24).
2 Panel de operación de minidiscos
No podrá utilizarse el modo de monitor de entrada
ni el de marcación manual de canciones.
: Interruptor de alimentación
: Tecla de expulsión del minidisco
: Tecla del AMS
: Tecla de avance/retroceso rápido
: Tecla de pausa
: Tecla de reproducción
: Tecla de parada
: Tecla de grabación
*1
AMS = Automatic Music Sensor: Sensor automático de
canciones
Esta función busca el comienzo de canciones.
*1
Page 77

: Tecla de movimiento
: Tecla de división
: Tecla de combinación
: Tecla de borrado de A a B
: Tecla de borrado
3 Visualización del nombre de disco
4 Tecla de cambio de visualización de tiempo
Se utiliza para cambiar entre las indicaciones del
tiempo restante, el tiempo total, el tiempo
transcurrido de la canción, y el tiempo restante de
la canción.
5 Visualización de tiempo
6 Visualización de capacidad del disco
7 Visualización de número de canción, nombre
de canción, y de tiempo
(continúa)
13
Page 78

Nombres y funciones de la pantalla (continúa)
Pantalla de operación de discos compactos
14
1
2
1 Icono de disco compacto:
Al hacer clic en este icono se seleccionarán todas
las canciones del disco.
Cuando grabe en in minidisco, arrastrando y
colocando este icono en la pantalla de operación de
minidiscos, podrán seleccionarse todas las
canciones para grabación.
2 Teclas de operación de discos compactos
No podrá utilizarse el modo de monitor de entrada
ni el de marcación manual de canciones.
: Teclas selectoras de disco
(El número corresponde al del disco actualmente
seleccionado.)
: Tecla del AMS
: Tecla de avance/retroceso rápido
: Tecla de reproducción
: Tecla de pausa
: Tecla de parada
*1
AMS = Automatic Music Sensor: Sensor automático de
canciones
Esta función busca el comienzo de canciones.
*1
3
4
5
6
7
Page 79

3 Visualización del nombre de disco
4 Visualización del nombre del artista
5 Tecla de cambio de visualización de tiempo
Se utiliza para cambiar entre las indicaciones del
tiempo restante, el tiempo total, el tiempo
transcurrido de la canción, y el tiempo restante de
la canción.
6 Visualización de tiempo
7 Visualización de número de canción, nombre
de canción, y de tiempo
Nota
Cuando haya conectado esta unidad a un
reproductor de discos compactos y a un PC,
cerciórese de ajustar el modos de reproducción del
reproductor de discos compactos a CONTINUE.
15
Page 80

Reproducción de un minidisco
Inicio de la reproducción de un minidisco utilizando
el PC
Reproducción de un minidisco
1 Inserte un minidisco en el MDS-PC1.
El contenido del disco se visualizará en el monitor
del PC.
2 Haga clic en .
Se iniciará la reproducción.
Selección de una canción para
reproducción
Haga doble clic en el número de la canción o en la
sección de visualización del tiempo.
El deck iniciará la reproducción de tal canción.
Localización de una canción específica
Haga clic en o durante la reproducción.
La reproducción volverá al comienzo de la canción
siguiente (o de la actual).
Para iniciar la reproducción desde el comienzo de una
canción posterior, haga clic en el número de
canciones que desee avanzar. Para volver al comienzo de
la canción anterior a la actual, haga doble clic en .
16
Localización de un punto particular de
una canción
Haga clic en o durante la reproducción.
Al hacer clic en
retroceso rápido mientras mantenga presionado el
botón del mouse, y si mantiene el clic en
activará solamente el avance rápido. La
reproducción se reanudará desde el punto en el
que suelte el botón del mouse.
solamente se activará el
, se
Page 81

Realización de una pausa en la
reproducción
Haga clic en durante la reproducción.
La reproducción entrará en el modo de pausa.
Para reanudar la reproducción después de
una pausa
Haga clic en o .
Parada de la reproducción
Haga clic en durante la reproducción.
La reproducción se parará.
17
Page 82

Edición de minidiscos grabados
La edición de minidiscos podrá realizarse fácilmente
utilizando su PC.
Con respecto a la información detallada sobre las funciones,
consulte el manual de instrucciones del deck de minidiscos.
Asignación de nombres de canciones y
de discos (Función NAME)
Los nombres de canciones y discos podrán
introducirse fácilmente utilizando el teclado de su PC.
1
2 Introduzca el nombre de canción deseado.
Otras operaciones
La introducción también será posible utilizando funciones
tales como copia, pegado, etc.
Notas
•
Este software no es compatible con juegos de caracteres
extranjeros. Si introduce un minidisco codificado con juegos de
caracteres extranjeros, no se visualizarán los caracteres correctos.
•
Si la lengüeta de protección contra escritura está deslizada
para protección, no podrá realizar operaciones de
introducción de caracteres, grabación, edición, etc. Para
poder realizar estas operaciones, deslícela.
•
Los símbolos que podrá introducir son los siguientes:
! " # $ % & ' ( ) * + , – . / : ; < = > ? @ _ `
18
Otros símbolos diferentes a éstos no se visualizarán.
Nota
Cuando no vaya a utilizar este software, y realice la
edición utilizando los controles del MDS-PC1, cerciórese
de seleccionar y activar “Reload” (volver a cargar) del
menú de opciones después de haber finalizado las
edición. Si no activase esta función, el contenido
visualizado del minidisco podría diferir del real.
En la pantalla de operación de minidiscos, mueva el cursor
hasta la indicación del título de la canción y haga clic en ella.
Para introducir continuamente otros nombres,
presione la tecla Enter del teclado de su PC
después de haber finalizado la introducción del
nombre del disco o de la canción que desee.
A continuación, la visualización del título
cambiará automáticamente al modo de edición, y
usted podrá introducir otros nombres.
Page 83

Para utilizar la introducción de datos de texto
(Función FLOW)
Antes de introducir nombres de disco o de canciones
utilizando software de memorando o de otro tipo de
texto, podrá asignar todos los nombres con una
operación de copia y pegado.
1 Introduzca el nombre del disco o de la canción
utilizando software de memorando o de otro tipo
de texto.
Divida cada nombre presionando la tecla Enter del
teclado de su PC.
(Ej.)
nombre del disco (Enter)
Nombre de la pista 1 (Enter)
Nombre de la pista 2 (Enter)
:
Nombre de la pista n (Enter)
2 Seleccione todos los textos y cópielos en el
portapapeles.
3 Haga clic en el nombre del disco o en el nombre de
la primera canción para entrar en el modo de
edición.
4 Seleccione “Paste” del menú de edición.
El texto se asignará desde el comienzo de la
visualización.
19
Page 84

Edición de minidiscos grabados (continúa)
Movimiento de canciones grabadas
(Función MOVE)
1 En la pantalla de operación de minidiscos, haga
clic en número de la canción que desee mover.
El color del nombre de la canción en el que haya
hecho clic cambiará. No es posible mover más de
una canción.
2 Haga clic en del panel de operación.
Aparecerá el cuadro de diálogo MOVE.
3 Introduzca el número de canción del lugar al que
desee mover la canción.
4 Haga clic en “OK”.
La canción seleccionada se moverá al lugar
designado.
20
Para cancelar la función MOVE
Haca clic en “Cancel” (cancelación).
Movimiento de una canción durante la
reproducción
Durante la reproducción de la canción que desee
mover, haga clic en
Cuando aparezca el cuadro de diálogo MOVE, realice
los pasos 3 y 4. Si había seleccionado otra canción
durante la reproducción, ésta se moverá.
Las canciones también podrán moverse
arrastrándolas.
Las canciones podrán moverse al lugar deseado
arrastrando y colocando el número de la canción que
desee mover.
del panel de operación.
Page 85

División de canciones grabadas
(Función DIVIDE)
1 Durante la reproducción, haga clic en
del panel de operación en el punto en el que desee
dividir la canción.
Se iniciará la reproducción de ensayo desde el
punto en el que haya hecho clic, y aparecerá el
cuadro de diálogo DIVIDE.
2 Haga clic en / y desplace lentamente*.
Se iniciará la reproducción de ensayo desde el
punto de desplazamiento.
Usted también podrá arrastrar
izquierda o la derecha para ajustar.
hacia la
3 Cuando el punto de división se reproduzca
correctamente, haga clic en “OK”.
La canción se dividirá.
Para cancelar la función DIVIDE en cualquier
momento
Haga clic en “Cancel”.
* El desplazamiento será posible en pasos (unidades de
aproximadamente 0,06 segundos).
21
Page 86

Edición de minidiscos grabados (continúa)
Combinación de canciones grabadas
(Función COMBINE)
1 En la pantalla de operación de minidiscos, haga
clic en el número de la canción que desee
combinar.
Si hace clic solamente en una canción, ésta y la
situada inmediatamente después se combinarán.
Sin embargo, la canción inicial no podrá
seleccionarse. Cuando las canciones que desee
combinar estén bastante separadas, después de
haber hecho clic en la primera, haga clic en la que
desee combinar manteniendo pulsada la tecla
SHIFT.
2 Haga clic en del panel de operación.
Aparecerá el cuadro de diálogo COMBINE, y se
iniciará la reproducción de ensayo de la sección de
combinación de las canciones.
22
Para invertir el orden de las canciones
reproducidas, haga clic en
.
3 Si las canciones visualizadas son correctas, haga
clic en “OK”.
Las canciones seleccionadas se combinarán.
Para cancelar la función COMBINE en
cualquier momento
Haga clic en “Cancel”.
Combinación de la canción en reproducción
con la situada inmediatamente frente a ella
Durante la reproducción de la canción que desee
combinar, haga clic en
Después de haber aparecido el cuadro de diálogo
COMBINE, realice el paso 3 anterior. Esta operación
no será posible cuando esté reproduciéndose la
canción inicial. Si ha seleccionado 1 o 2 canciones
durante la reproducción, tales canciones se
combinarán.
del panel de operación.
Page 87

Borrado de una parte de una canción
(Función A-B ERASE)
1 Durante la reproducción, haga clic en
del panel de operación en el punto a partir del que
desee borrar (punto A).
Se iniciará la reproducción de ensayo hasta el
punto seleccionado y aparecerá el cuadro de
diálogo A-B ERASE.
2
Haga clic en / de A y desplace lentamente el punto A*.
Usted también podrá arrastrar hacia la
izquierda o la derecha para ajustar.
3 Cuando el punto A se reproduzca correctamente,
haga clic en “OK”.
4 Continúe la reproducción, o presione la tecla
o para ir al punto en el que desee terminar el
borrado (punto B), y después haga clic en el “OK”.
El punto B se establecerá temporalmente. Se
iniciará la reproducción de ensayo de la sección
entre los puntos A y B.
5 Haga clic en / de B y desplace lentamente el
punto B*.
Usted también podrá arrastrar
izquierda o la derecha para ajustar.
hacia la
6 Cuando el punto B se reproduzca correctamente,
haga clic en “OK”.
La sección de A a B se borrará.
Para cancelar la función A-B ERASE en
cualquier momento:
Haga clic en “Cancel”.
* El desplazamiento será posible en pasos (unidades de
aproximadamente 0,06 segundos).
23
Page 88

Edición de minidiscos grabados (continúa)
Borrado de grabaciones (Función ERASE)
1 En la pantalla de operación de minidiscos, haga
clic en el número de la canción que desee borrar.
Para seleccionar más de una canción, haga clic en los números
correspondientes manteniendo pulsada la tecla SHIFT.
Para borrar todas las canciones realice algo
de lo siguiente:
• Haga clic en todas las canciones después de
haber presionado SHIFT.
• Seleccione “Select all” del menú de edición.
• Haga clic en el icono del minidisco .
2 Haga clic en del panel de operación.
Aparecerá el cuadro de diálogo ERASE.
3
Si desea borrar la canción (o las canciones), haga clic en “OK”.
La canción (o las canciones) seleccionada(s) se borrará(n).
24
Para cancelar la función ERASE
Haga clic en “Cancel”.
Borrado de la canción que esté
reproduciéndose:
Durante la reproducción de la canción que desee
borrar, haga clic en
Después de haber aparecido el cuadro de diálogo
ERASE, realice el paso 3 anterior. Si ha seleccionado
otras canciones para la reproducción, se borrarán tods.
del panel de operación.
El arrastre hasta también borrará
canciones
El borrado de canciones también podrá realizarse
seleccionándolas, y arrastrándolas y colocándolas en
del panel de operación.
Usted podrá borrar una canción cada vez, más de una, o todas.
Usted también podrá borrar todas las canciones
seleccionando el icono del minidisco y después
arrastrándolo y colocándolo en
.
Nota
Las canciones borradas no podrán recuperarse.
Page 89

Impresión de etiquetas de minidiscos
La lista de nombres de discos y de canciones de la
pantalla de operación de minidiscos podrá imprimirse
como etiquetas de minidiscos.
La lista de canciones para un disco con 10 canciones o
menos se imprimirá en una columna, y la lista para un
disco con 11 a 20 canciones se imprimirá en 2
columnas.
Para imprimir, tendrá que conectar una impresora a
su PC.
Etiueta para cartucho
MY BEST SELECTION
1. PLEASE LET...
2. ARISA and YUKI
3. DANCE! DANC...
4. DON’T BE SHY
5. VACATION
6. Make It Happen
7. ENDLESS SUM...
8. HELLO
9. Emotions
10. FAN CLUB
Etiqueta para cara del disco
MY BEST SELECTION
11. Make
12. Lonely engineer
13. Good
MY BEST SELECTION
Etiqueta para disco
1 Cargue el papel para impresión de etiquetas en la
impresora.
2 Seleccione “Label Print” del menú de archivos.
Aparecerá el cuadro de diálogo de impresión.
3 Siga el procedimiento para impresión.
Siga el procedimiento normal de impresión.
Nota
No será posible imprimir en las etiquetas incluidas
con los discos.
25
Page 90

Asignación de nombres a discos compactos (Función NAME)
Usted podrá asignar nombres de disco y de canciones
a los discos compactos. También será posible hacer
que se visualicen los datos de texto de discos
compactos CD-TEXT. Los nombres de las canciones y
los discos se introducen utilizando el teclado de su PC.
Los nombres asignados se almacenarán
temporalmente en la carpeta “Database” del disco
duro de su PC hasta que seleccione “Reload” (volver a
cargas) del menú de opciones. Los nombres no se
introducirán directamente en los propios discos
compactos.
1 En la pantalla de operación de discos compactos,
mueva el cursor hasta la columna de visualización
del nombre del disco o de la canción y haga clic
allí.
2 Introduzca el nombre deseado.
Para hacer que se visualice la información de
texto de discos compactos CD-TEXT
Seleccione “Reload” (volver a cargas) del menú de
opciones.
26
Nota
Después de haber reemplazado un disco compacto,
cerciórese de usar “Reload” (volver a cargas) del menú
de opciones.
Page 91

Grabación de un disco compacto en un minidisco
Con esta unidad será muy fácil grabar de un reproductor
de discos compactos Sony [conectado con un cable
conector CONTROL A1 (opcional)] a un minidisco. Para
grabar, simplemente arrastre la canción desde la pantalla
de operación de discos compactos y colóquela en la
pantalla de operación de minidiscos.
Para utilizar este método de grabación, conecte esta
unidad al reproductor de discos compactos utilizando
un cable conector óptico opcional.
1 Seleccione “Open CD window” (Abrir la ventana
CD) del menú de archivos para hacer que se
visualice la canción que desee grabar.
Cuando haya conectado un cambiador de discos
compactos:
• Haga clic en y seleccione el disco compacto
deseado.
• Usted podrá abrir hasta 5 pantallas de operación de 5
discos compactos.
2 Arrastre el número de la canción que desee grabar
y colóquela en la pantalla de operación de
minidiscos.
La canción seleccionada pasará a ser la designada
para la grabación, y se activará el modo de
grabación en pausa.
Arrastre y
coloque el
número de
canción.
Si arrastra el icono de disco compacto
coloca en la pantalla de operación de minidiscos,
todas las canciones de tal disco compacto se
designarán para grabación.
y lo
3 Si desea grabar más canciones, repita el paso 2.
Si las canciones no caben en el minidisco,
aparecerá un mensaje de aviso.
4 Haga clic en o .
Aparecerá
(grabando), y se iniciará la grabación.
, parpadeará “Now Rec”
27
Page 92

Programación de canciones de un disco compacto (continúa)
Eliminación de canciones de la lista de
canciones designada:
Durante la grabación en pausa, haga clic en la canción
que desee eliminar de la lista de canciones designada,
y después haga clic en
operación de minidiscos. La canción se eliminará de la
lista.
Usted podrá eliminar más de una canción a la vez.
Para seleccionar más de una canción, haga clic en las
que desee manteniendo pulsada la tecla SHIFT.
En este caso no podrá borrar las canciones ya grabadas
en el minidisco.
de la pantalla de
Para parar la grabación:
Haga clic en .
Programación de canciones de un disco compacto
Las canciones de un disco compacto podrán
programarse para reproducirlas en el orden deseado.
Esto se realiza simplemente arrasstrando el número
de la canción deseada desde el menú de operación de
discos compactos y colocándolo en la pantalla PLAY
LIST (lista de reproducción).
1 Seleccione “Program window” (ventana de
programación) del menú de archivos de la pantalla
de operación de discos compactos.
Aparecerá la pantalla PLAY LIST.
2 Arrastre los números de canciones desde la
pantalla de operación de discos compactos y
colóquelos en la pantalla PLAY LIST en el orden
en el que desee escucharlas.
Las canciones se añadirán al programa en la
posición en la que las haya colocado.
28
Arrastre y
coloque el
número de
canción.
Page 93

El orden de las canciones también podrá cambiarse
arrastrndo y colocándolas en la pantalla PLAY
LIST,
Si arrastra el icono de disco compacto
coloca en la pantalla PLAY LIST, se programarán
todas las canciones del mismo.
y lo
3 Haga clic en .
Se iniciará la reproducción
Para parar la reproducción programada
Haga clic en .
Eliminación de las canciones seleccionadas del
programa
En el modo de parada, haga clic en la canción que
desee eliminar, y después en del panel de
operación. La canción seleccionada se eliminará del
programa.
Usted podrá eliminar más de una canción a la vez.
Para seleccionar más de una canción, haga clic en las
que desee manteniendo pulsada la tecla SHIFT.
Vista de los detalles de las canciones
programadas
Haga clic en de la parte inferior izquierda de la
pantalla PLAY LIST.
Para volver a la pantalla original, vuelva a hacer clic.
Nota
Durante la reproducción programada, no podrá
utilizar las pantallas de operación de minidiscos ni de
discos compactos.
29
Page 94

Cambio de los iconos del disco
Usted podrá cambiar las imágenes (formato BMP)
realizadas con otras aplicaciones como icono de disco
de la ventana de un minidisco/disco compacto.
1 Copie la imagen que desee pegar en el
portapapeles.
Solamente estará disponible el formato BMP.
2 Haga clic en el icono de la ventana del minidisco/
disco compacto para seleccionarlo.
3 Seleccione “Paste Jacket” del menú de edición.
La imagen del portapapeles se visualizará en el
icono del disco.
4 Haga clic en un lugar que no sea el icono del disco
para cancelar su selección.
Para volver al icono del disco original
1 Haga clic en el icono de la ventana del minidisco/
disco compacto para seleccionarlo.
Salida
30
2 Seleccione “Cut Jacket” del menú de edición.
El icono se borrará y el icono original aparecerá en
el icono del disco.
3 Haga clic en un lugar que no sea el icono del disco
para abandonar su selección.
Seleccione “Quit” (salida) del menú de archivos.
Page 95

Información adicional
Solución de problemas
Si experimenta cualquiera de las dificultades siguientes cuando utilice esta unidad,
utilice la guía de solución de problemas siguiente para solucionarla. Si el problema
persiste, consulte a su proveedor Sony.
Consulte también el manual de instrucciones de su PC y el archivo “Readme.txt” del
disco duro con el software MD Editor.
Problema Solución
Aparece el mensaje
“Communication port can not
be opened” (no es posible abrir
el puerto de comunicación).
La pantalla no responde, o hay
un error de pantalla.
No es posible introducir,
grabar, editar, etc caracteres.
El deck de minidiscos no
responde.
El nombre visualizado del
minidisco o del disco
compacto no concuerda con los
datos del disco.
Es posible que esté utilizando otra aplicación en
el puerto en serie.
/ Abandone la aplicación.
El PC puede estar dañado.
/ Inicie otra aplicación que haya utilizado con
frecuencia para comprobar si el PC funciona
normalmente.
/ Desinstale (página 9) y vuelva a instalar el
software.
La lengüeta de protección contra escritura está en
la posición de protección.
/ Deslícela para habilitar la escritura.
/ La introducción, grabación, edición, etc. de
caracteres no es posible en minidiscos
comerciales para reproducción (pregrabados).
/ Compruebe si los cables están correctamente
conectados (página 7).
/ Compruebe si ha realizado correctamente
“SerialSetup” (página 10).
/ Desconecte los cables conectores y vuelva a
conectarlos.
/ Seleccione “Reload” del menú de opciones y
vuelva a activar este modo.
31
Page 96

Índice alfabético
A
A-B ERASE ........................ 23
AMS ............................... 12, 14
Asignación de nombres de
canciones y discos
(Función NAME)
(MD) ............................. 18
Avance rápido .................... 16
B
Borrado de canciones
(Función ERASE)
borrado de una sección
de una canción (Función
A-B ERASE) .................23
borrado de todas las
canciones de un
minidisco ..................... 24
Borrado de una canción
cada vez........................24
C
Cable conector CONTROL
A1 ............................ 6, 7, 8
Cables
para conexión de
audio............................... 8
para conexión digital
óptica ....................... 8, 27
Carpeta DATABASE .... 9, 26
Conector ........................... 6, 7
Conexiones
PC................................... 7
reproductor de discos
compactos ..................... 8
D
Desinstalación del
software.......................... 9
Disco CD-ROM ................ 6, 9
E
Entorno de operación ......... 5
F
Función COMBINE .......... 22
Función DIVIDE ................ 21
Función NAME
discos compactos ........ 26
minidiscos .................... 18
G, H
Grabación (discos compactos
o minidiscos) ...............27
I, J, K, L
Impresión de etiquetas......25
Inicio del software ............ 10
Instalación del software ..... 9
Itemes accesorios .................6
M, N, O
Movimiento de Pantalla de
operación de discos
compactos .............. 11, 14
P, Q
Pantallas
ejemplos ....................... 11
de operación de discos
compactos .............. 11, 14
de operación de
minidiscos ............. 11, 12
Parada de la reproducción
...................................... 17
Puerto en serie.................... 10
Puerto en serie (RS-232C) ... 7
R
Rebobinado rápido ............16
Reproducción
(minidiscos) ................. 16
Reproducción desde el
comienzo de
una canción.................. 16
Reproducción en pausa .... 17
Reproducción programada
(discos compactos) ..... 28
S, T, U, V, W, X, Y, Z
Salida .................................. 30
Solución de problemas..... 31
Sony Corporation Printed in Japan
32
 Loading...