

Page 1

4-237-878-12(1)
MiniDisc Deck
Operating Instructions
Mode d’emploi
Manual de instrucciones
Owner’s Record
The model and serial numbers are located on the bottom of the unit. Record the serial
number in the space provided below. Refer to them whenever you call upon your Sony
dealer regarding this product.
Model No. MDS-NT1
Serial No.
GB
FR
ES
CT
MDS-NT1
2002 Sony Corporation
Page 2
WARNING
To prevent fire or shock hazard, do not
expose the unit to rain or moisture.
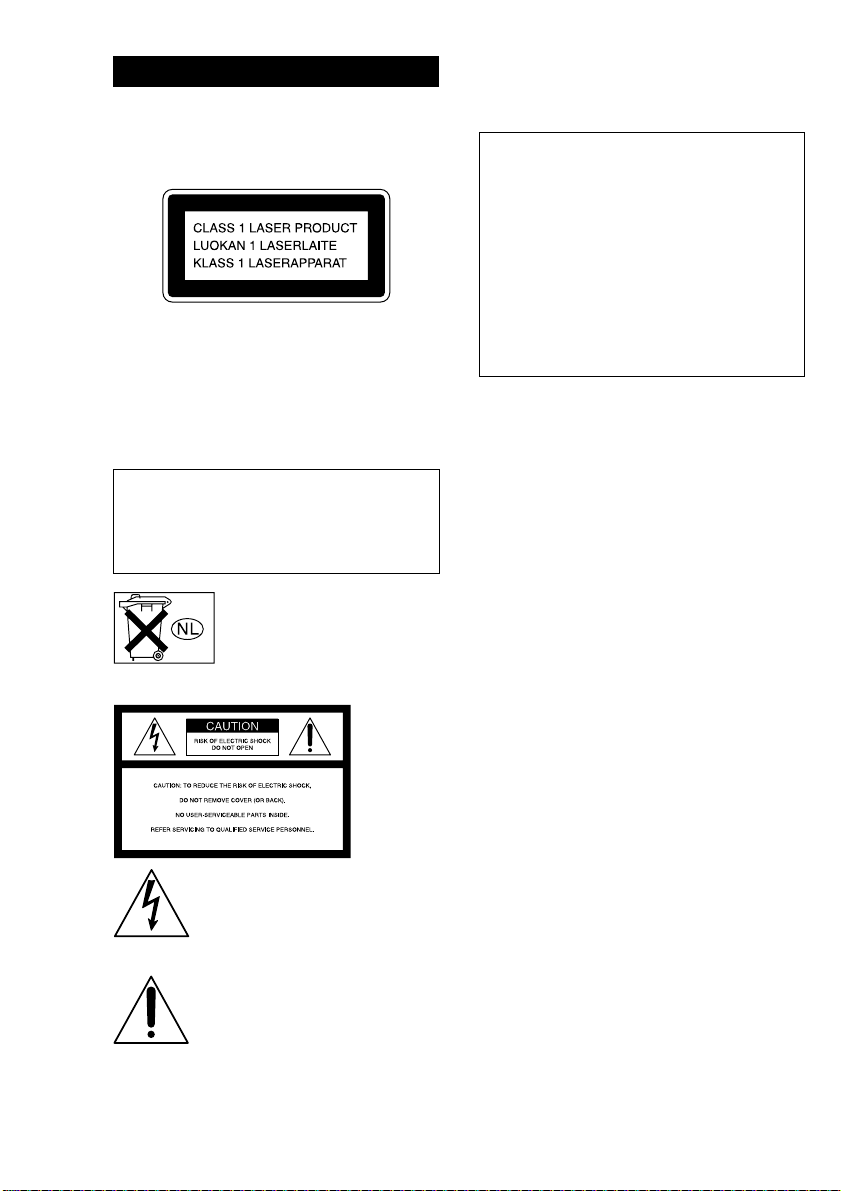
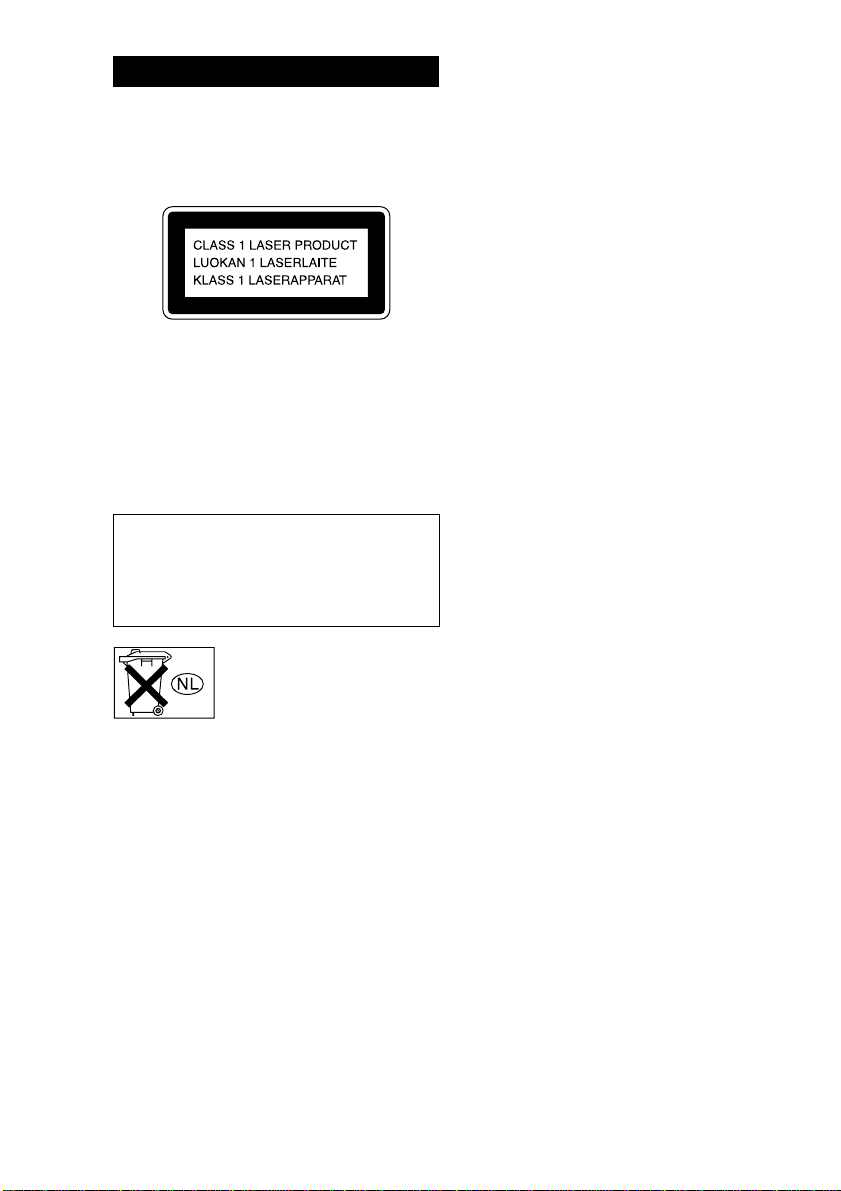
This appliance is classified as a CLASS 1 LASER
product.
This label is located on the bottom exterior.
To prevent fire, do not cover the ventilation of the
apparatus with newspapers, table-cloths, curtains, etc.
And don’t place lighted candles on the apparatus.
To prevent fire or shock hazard, do not place objects
filled with liquids, such as vases, on the apparatus.
CAUTION: INVISIBLE LASER RADIATION
WHEN OPEN AND INTERLOCKS DEFEATED.
AVOID EXPOSURE TO BEAM.
IN NO EVENT SHALL SELLER BE LIABLE
FOR ANY DIRECT, INCIDENTAL OR
CONSEQUENTIAL DAMAGES OF ANY
NATURE, OR LOSSES OR EXPENSES
RESULTING FROM ANY DEFECTIVE
PRODUCT OR THE USE OF ANY PRODUCT.
Don’t throw away the battery with
general house waste, dispose of it
correctly as chemical waste.
For the customers in the U.S.A.
If you have any questions about this product, you may call:
Sony customer Information Center 1-800-488-7669
The Number below is for the FCC related matters only.
Regulatory Information
Declaration of Conformity
Trade name: SONY
Model No.: MDS-NT1
Responsible Party: Sony Electronics Inc.
Address: 680 Kinderkamack Road,
Telephone No.: 201-930-6972
This device complies with Part 15 of the FCC
Rules. Operation is subject to the following two
conditions: (1) This device may not cause harmful
interference, and (2) this device must accept any
interference received, including interference that
may cause undesired operation.
Oradell, NJ.07649 USA
WARNING
This equipment has been tested and found to comply
with the limits for a Class B digital device, pursuant
to Part 15 of the FCC Rules. These limits are
designed to provide reasonable protection against
harmful interference in a residential installation. This
equipment generates, uses, and can radiate radio
frequency energy and, if not installed and used in
accordance with the instructions, may cause harmful
interference to radio communications. However, there
is no guarantee that interference will not occur in a
particular installation. If this equipment does cause
harmful interference to radio or television reception,
which can be determined by turning the equipment
off and on, the user is encouraged to try to correct the
interference by one or more of the following
measures:
• Reorient or relocate the receiving antenna.
• Increase the separation between the equipment and
receiver.
• Connect the equipment into an outlet on a circuit
different from that to which the receiver is
connected.
• Consult the dealer or an experienced radio/TV
technician for help.
CAUTION
You are cautioned that any changes or modification
not expressly approved in this manual could void
This symbol is intended to alert the
user to the presence of uninsulated
“dangerous voltage” within the
product’s enclosure that may be of
sufficient magnitude to constitute a
risk of electric shock to persons.
This symbol is intended to alert the
user to the presence of important
operating and maintenance (servicing)
instructions in the literature
accompanying the appliance.
your authority to operate this equipment.
The shielded interface cable recommended in this
manual must be used with this equipment in order to
comply with the limits for a digital device pursuant to
Subpart B of Part 15 of FCC Rules.
For the customers in Canada
CAUTION
TO PREVENT ELECTRIC SHOCK, DO NOT USE
THIS POLARIZED AC PLUG WITH AN
EXTENSION CORD, RECEPTACLE OR OTHER
OUTLET UNLESS THE BLADES CAN BE FULLY
INSERTED TO PREVENT BLADE EXPOSURE.
CAUTION
GB
2
This Class B digital apparatus complies with
Canadian ICES-003.
Page 3
Welcome!
Unpacking
Thank you for purchasing the Sony MiniDisc
Deck. Before operating the deck, please read this
manual thoroughly and retain it for future
reference.
For information on user support, visit the
following web site.
Net MD User support:
http://www.sony.co.jp/en/Products/homeaudio/
If you install another application software that
supports the Net MD after installing the supplied
OpenMG Jukebox, the links to the above web site
may be changed. In this case, enter the above
address manually in the address field of your
browser.
About This Manual
• This manual explains the location, function and
connection of parts on the MDS-NT1 and
provides notes on the operation of the
MDS-NT1.
• The MDS-NT1 is operated through connection
by USB cable to a computer installed with the
OpenMG Jukebox software. For details on the
installation and operation of OpenMG Jukebox,
refer to the instruction manual or the online
help for OpenMG Jukebox.
• The OS messages described in this manual
might be slightly different from the actual
massage that appears on your computer.
Check that you have the following items:
• AC power adaptor (1)
• USB cable (1)
• Audio connecting cord
(stereo mini-plug ×1 y stereo mini-plug ×1)
(1)
• OpenMG Jukebox CD-ROM (1)
• Operating instructions for OpenMG Jukebox
(1)
• If a problem should occur on this MD
deck as a result of defective
manufacturing, SONY shall replace unit.
However, SONY shall bear no other
responsibility.
• In no event shall SONY be liable for any
financial loss or loss of profits, including
claims made by third parties, arising out of
the use of the MD deck.
Table of Contents
Location and Function of Parts
Front Panel Parts Description ......................4
Rear Panel Parts Description .......................5
Hooking Up .................................................6
GB
Additional Information
Notes on Recording .....................................7
Precautions .................................................. 8
Handling MDs .............................................9
System Limitations ......................................9
Troubleshooting......................................... 10
Specifications ............................................ 11
Self-Diagnosis Function ............................12
GB
3
Page 4
Location and Function of Parts
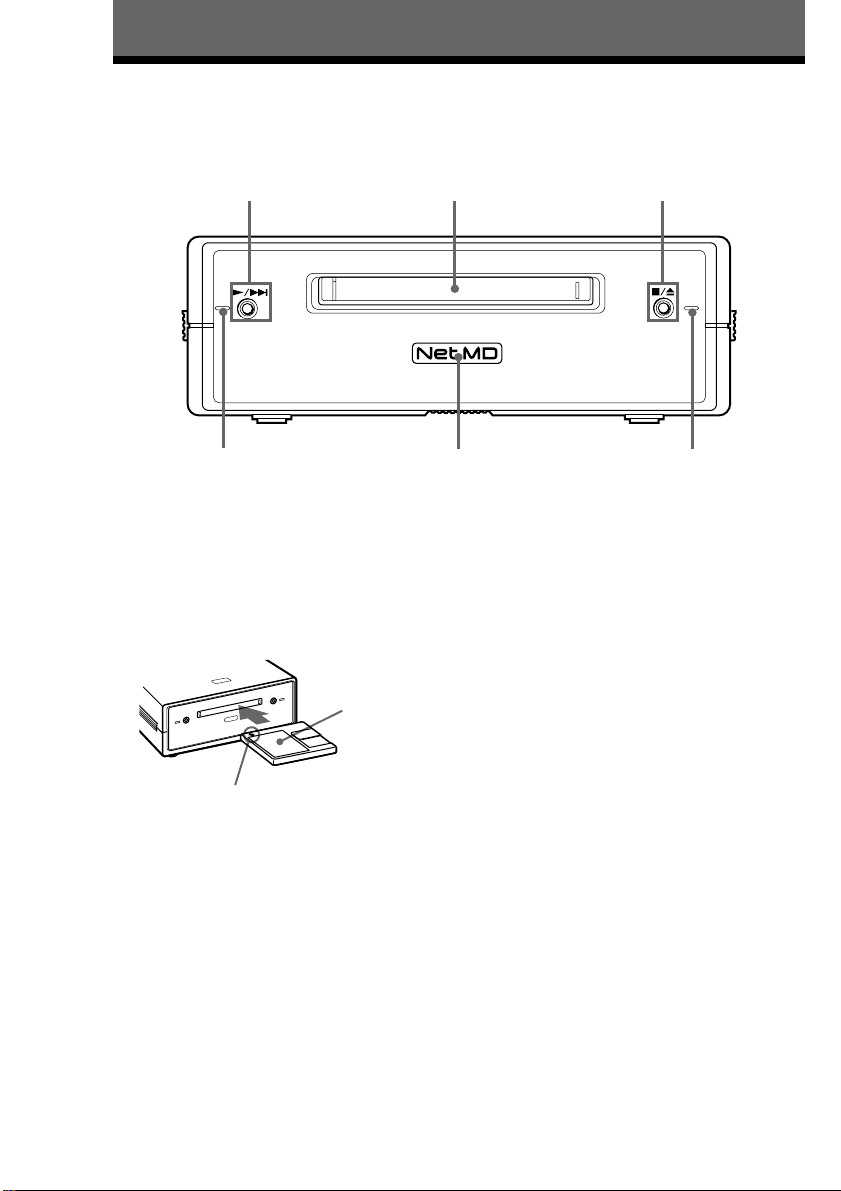
Front Panel Parts Description
This chapter tells you about the location and function of the various buttons, controls on the MD deck.
132
6
1 N/> button
Press while the unit is stopped to start playback.
Press while the unit is playing to locate the
beginning of the next track.
2 MD insertion slot
Insert the MD as illustrated below.
With the labeled
side up
With the arrow pointing
towards the deck
3 x/Z button
Press while the unit is playing to stop playback.
Press while the unit is stopped to eject the MD.
4 Recording indicator
Lights up in the following cases:
While an audio file is being transferred from the
connected computer to the MD deck (check-out).
While an audio file is being transferred from the
MD deck to the connected computer (check-in).
When TOC information (such as track
information) has not been recorded to the MD.
Flashes when overwriting of the MD’s TOC by
the MD deck is started by pressing x/Z .
GB
4
5
5 Net MD lamp
Indicates the USB connection status between the
unit and the computer.
Lights dimly when the unit is connected only to a
wall outlet with the supplied AC adaptor.
Lights brightly when the unit is connected to a
computer with its operating system running.
6 Playback indicator
Lights during playback.
Flashes while the MD's TOC is being loaded by
the MD deck.
Notes
• Except for operation of the x/Z button for ejecting
the MD, all other operations on the MD deck are
disabled while the Net MD is connected through the
supplied USB cable to a computer with its operating
system running.
Under these conditions, the Net MD lamp flashes
(the other indicators remain off) whenever you
attempt to do an operation that is disabled.
• The flashing of the Net MD lamp and flashing or
lighting up of the other indicators are indications
that the MD deck’s self-diagnosis function is active.
For details, see page 12.
4
Page 5
Rear Panel Parts Description
Location and Function of Parts
1
4
1 DC IN 9V jack
Connect this jack to a wall outlet via the supplied
AC power adaptor to power the MD deck.
2 USB port
Connect this port to a USB port on your
computer with the supplied USB cable.
3 Headphones jack and PHONE LEVEL
control
Connect a headphones plug to this jack.
Turn the PHONE LEVEL control to adjust the
volume of the connected headphones.
4 ANALOG OUT jack
Connect active speakers, etc. to this jack with the
supplied audio connecting cord (stereo mini-plug
×1 y stereo mini-plug ×1) or optional audio
connecting cord (stereo mini-plug ×1 y phono
plug ×2).
or
3
2
Notes
• Full performance of the MD deck is not guaranteed
when it is connected to the computer through a
USB hub or USB extension cord. Be sure to
connect the MD deck directly to the computer with
the supplied USB cable.
• Do not connect the supplied AC power adaptor to a
switched AC outlet (e.g., on an amplifier).
• Use only the supplied AC power adaptor. Do not
use any other AC power adaptor.
Polarity of the plug
The shielded interface cable recommended in this
manual must be used with this equipment in order to
comply with the limits for a digital device pursuant to
Subpart B of Part 15 of FCC Rules.
• Before outputting sound through the headphones, it
is recommended that you turn the volume down
completely, and then gradually turn up the volume
to the desired level while listening to the sound.
GB
5
Page 6
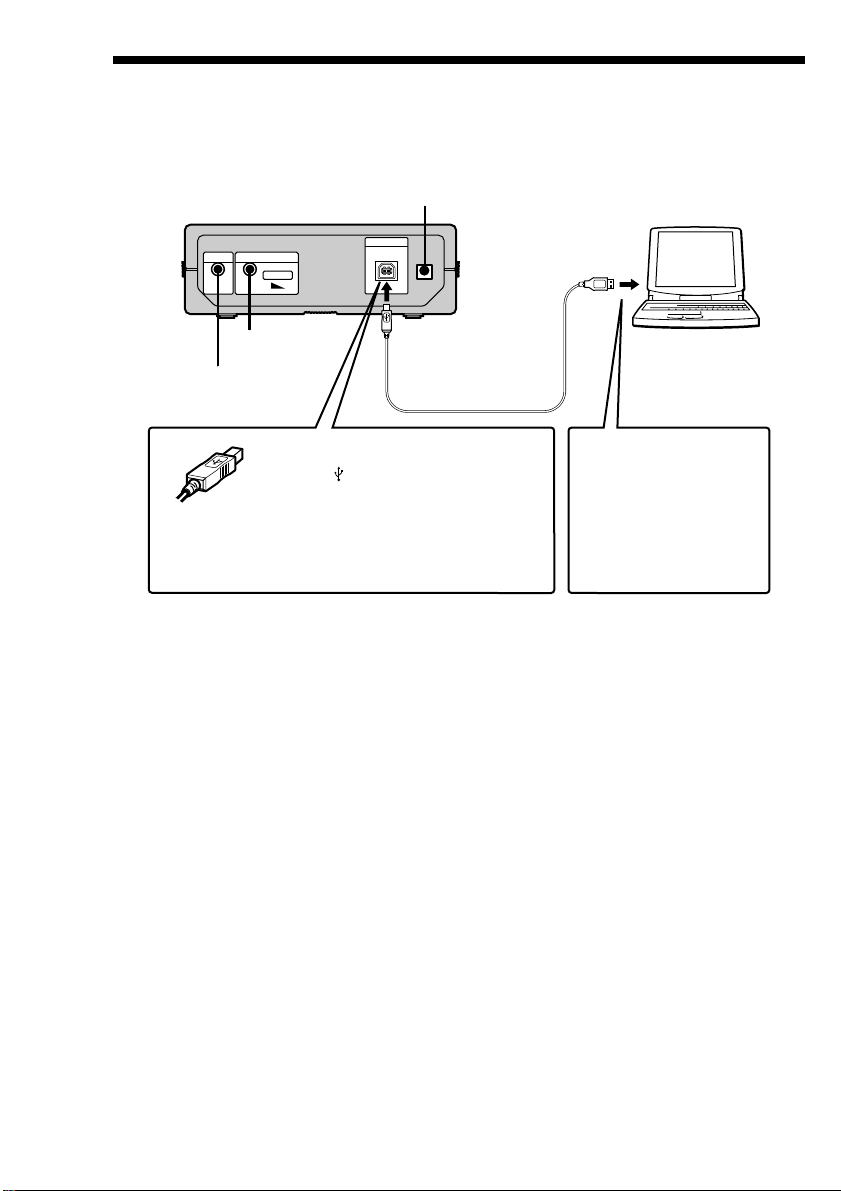
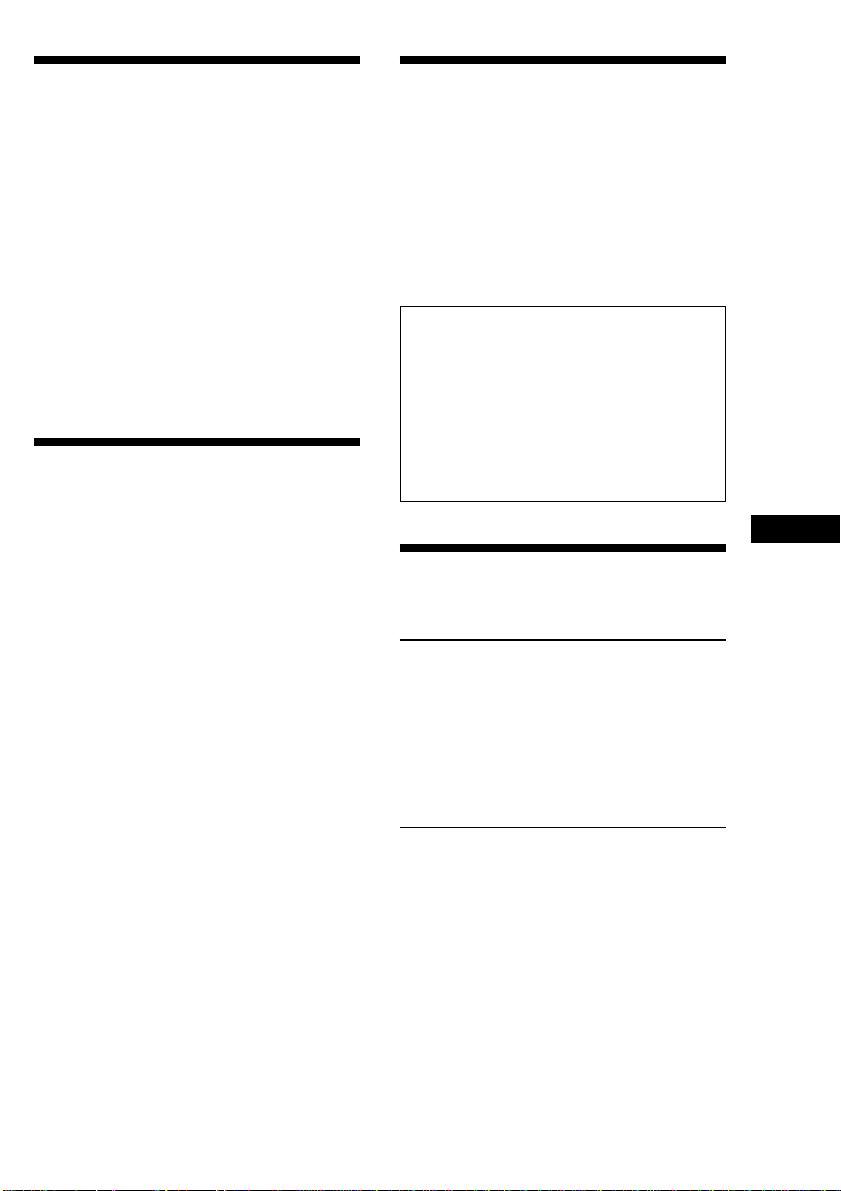
Hooking Up
MDS-NT1
To a wall outlet via the
supplied AC power adaptor
Computer
To the USB port
on your computer
To headphones
To active
speakers, etc.
USB cable
Insert the connector into the port fully
with the mark facing upward.
The shielded interface cable
recommended in this manual must be
used with this equipment in order to
comply with the limits for a digital
device pursuant to Subpart B of Part
15 of FCC Rules.
To a USB port
USB cable (supplied)
Do not use a USB hub
between the MD deck
and the computer. Be
sure to connect the MD
deck directly to the
computer with the
supplied USB cable.
Notes
• Make sure each plug is straight when you insert it.
Inserting it at an angle may damage the connector
parts.
• Be sure to install the OpenMG Jukebox software to
your computer before you connect the MD deck and
your computer. Otherwise, the computer may select
an inappropriate driver for the MD deck when you
connect them, and the MD deck may not work
correctly.
The [Add New hardware wizard] may appear when
you connect the MD deck to the computer. If this
happens, click [Cancel.]
• Sound output is not supported when you connect
the MD deck to the computer by the supplied USB
cable alone. Sound from the MD deck requires the
connection of headphones or active speakers, etc. to
the MD deck (see page 5).
• To output sound from the MD deck to the speakers
of the connected computer, use the supplied audio
connecting cord (a stereo mini-plug is provided on
both ends) or a resistance-free, equivalent
commercially available product to connect the
LINE OUT jack on the MD deck with the audio
input jack on the computer.
• Do not disconnect the USB cable while operating
the MD deck from the connected computer. Be sure
to stop the recording or playback operation before
disconnecting the USB cable.
GB
6
Page 7
Additional Information
Notes on Recording
About indications which light
up or flash after recording
When the recording indicator
lights up in the display
Recording has finished but the TOC (Table of
Contents) on the MD has not been updated to
reflect the recording results. The recording will be
lost if you disconnect the AC power adaptor while
the indicator is on. The TOC will be updated only
when you eject the MD from the MD deck.
Note
The restrictions of the Serial Copy Management
System don’t apply when you make a recording
through the analog-to-analog connections.
To prevent accidental erasure of
the recorded material
To make it impossible to record on an MD, slide
the record-protect tab in the direction of the arrow
(see illustration below) to open the slot. To enable
recording, close the slot.
Bottom side
of the MD
Record-protect tab
Additional Information
When the recording indicator
flashes in the display
The deck is updating the TOC. Do not disconnect
the AC power adaptor or move the deck while the
indicator flashes. The recording may not be
completed properly.
Guide to the Serial Copy
Management System
Digital audio components, such as CDs, MDs, and
DATs make it easy to produce high-quality copies
of music by processing music as a digital signal.
To protect copyrighted music sources, this deck
uses the Serial Copy Management System which
allows you to make only a single copy of a
digitally recorded source through digital-to-digital
connections.
You can make only a firstgeneration copy through a
digital-to-digital connection.
Examples are given as follows:
• You can make a copy of a commercially
available digital sound program (for example, a
CD or MD), but you can’t make a second copy
from the first-generation copy.
• You can make a copy of a digital signal from a
digitally recorded analog sound program (for
example, an analog record or a music cassette
tape) or from a digital satellite broadcast
program, but you can’t make a second copy
from the first-generation copy.
Slide in the direction
of arrow
GB
7
Page 8

Precautions
The nameplate is located on the bottom exterior.
On safety
• Should any solid object or liquid fall into the
cabinet, unplug the deck and have it checked by
qualified personnel before operating it any
further.
• Caution–The use of optical instruments with
this product will increase eye hazard.
On power sources
• Before operating the deck, check that the
operating voltage of the deck is identical with
your local power supply. The operating voltage
is indicated on the nameplate on the AC power
adaptor.
• The unit is not disconnected from the AC
power source (mains) as long as it is connected
to the wall outlet, even if the unit itself has been
turned off.
• If you are not going to use the deck for a long
time, be sure to disconnect the AC power
adaptor from the wall outlet. To disconnect the
AC power adaptor, grasp the plug itself; never
pull the cord.
• AC power adaptor must be changed only at the
qualified service shop.
On condensation in the deck
If the deck is brought directly from a cold to a
warm location, or is placed in a very damp room,
moisture may condense on the lenses inside the
deck. Should this occur, the deck may not operate
properly. In this case, remove the MD and leave
the deck turned on for several hours until the
moisture evaporates.
On cleaning
Clean the cabinet, panel and controls with a soft
cloth slightly moistened with a mild detergent
solution. Do not use any type of abrasive pad,
scouring powder or solvent such as alcohol or
benzine.
If you have any questions or problems concerning
your deck, please consult your nearest Sony
dealer.
On the MiniDisc cartridge
• Do not open the shutter to expose the MD.
• Do not place the cartridge where it will be
subject to extremes of sunlight, temperature,
moisture or dust.
GB
8
Page 9
Handling MDs
System Limitations
The MD is enclosed in a cartridge to protect the
disc from debris or fingerprints and to make it
easy to handle.
However, the presence of debris or a warped
cartridge may inhibit the disc from operating
properly. To assure that you can always listen to
the highest quality music, follow the precautions
below:
• Do not touch the internal disc directly. Forcing
the shutter open may damage the internal disc.
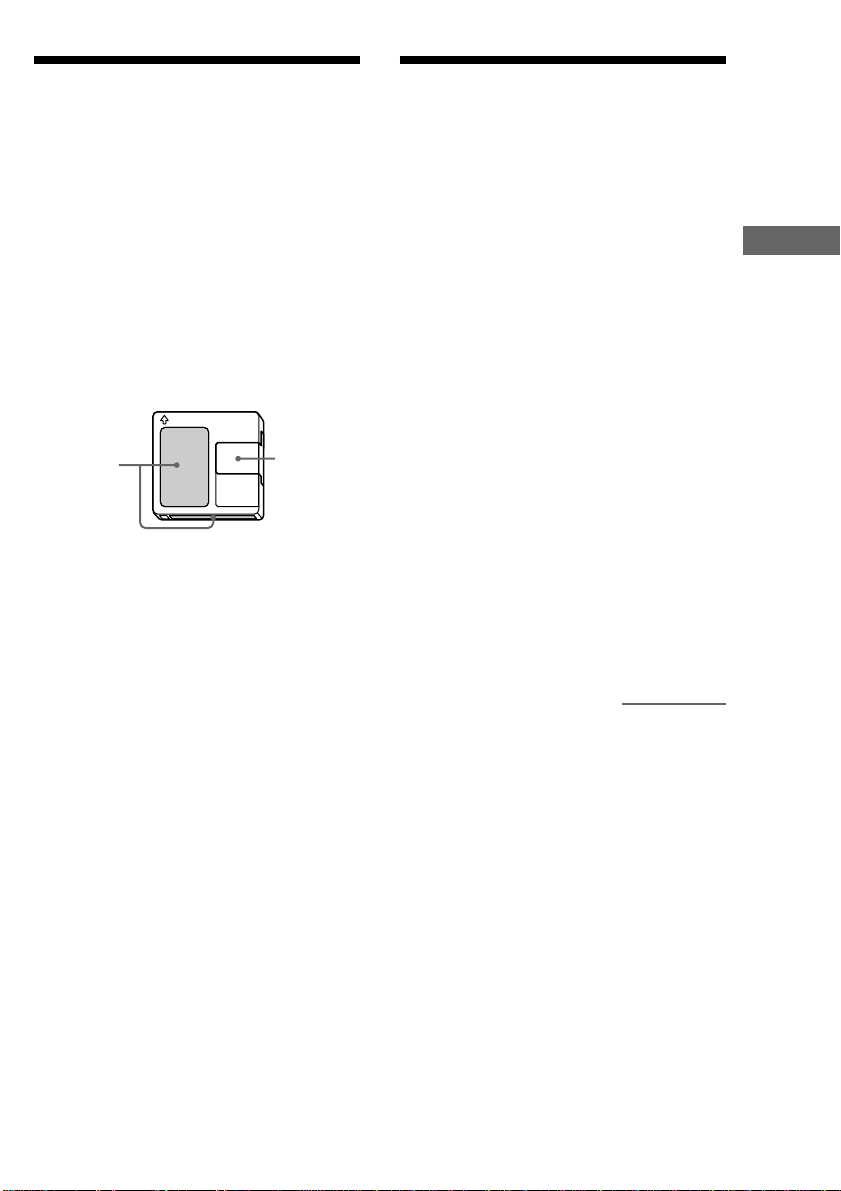
• Be sure to stick the labels supplied with the MD
to the appropriate positions. The shape of the
labels may vary depending on the MD brand.
Proper location
of the labels
Shutter
Where to keep the MDs
Do not place the cartridge where it may be
exposed to direct sunlight or extremely high heat
and humidity.
Regular maintenance
Wipe dust and debris from the surface of the
cartridge with a dry cloth.
The recording system in your deck is radically
different from those used in cassette and DAT
decks and is characterized by the limitations
described below. Note, however, that these
limitations are due to the inherent nature of the
MD recording system itself and not to mechanical
causes.
The remaining recordable time
becomes “0” even before the MD
has reached the maximum
recording time
When 255 tracks have been recorded on the MD,
the remaining recordable time becomes “0”
regardless of the total recorded time. More than
255 tracks can’t be recorded on the MD. To
continue recording, erase unnecessary tracks or
use another recordable MD.
The remaining recording time
does not increase even after
erasing numerous short tracks
Tracks under 12 seconds* in length are not
counted and so erasing them may not lead to an
increase in the recording time.
* When recording in stereo mode. (Approx. 24
seconds in mono or LP2 mode, and approx. 48
seconds in LP4 mode.)
continued
Additional Information
GB
9
Page 10

System Limitations (continued)
The total recorded time and the
remaining recordable time on
the MD may not total the
maximum recording time
Recording is done in minimum units of 2
seconds* each, no matter how short the material.
The contents recorded may thus be shorter than
the maximum recording capacity. Disc space may
also be further reduced by scratches.
* When recording in stereo mode. (Approx. 4 seconds
in mono or LP2 mode, and approx. 8 seconds in
LP4 mode.)
Tracks created through editing
may exhibit sound dropout as
you’re searching for a point
while monitoring the sound.
Some tracks can’t be combined
with others
Tracks may not be combined if they have been
edited.
The playback indicator flashes
for a long time
If the inserted recordable MD is brand new, the
playback indicator flashes longer than for MDs
that have already been used.
Troubleshooting
If you experience any of the following difficulties
while using the deck, use this troubleshooting
guide to help you remedy the problem. Should
any problem persist, consult your nearest Sony
dealer.
The deck does not operate or operates
poorly.
• The MD may be dirty or damaged. Replace
the MD.
• When the MD deck is connected to a
computer and the operating system is running,
you can only use the x/Z button (for ejecting
the MD while the deck is stopped).
The deck does not play.
• Moisture has formed inside the deck. Take
the MD out and leave the deck in a warm
place for several hours until the moisture
evaporates.
• The deck may not be connected to the
amplifier correctly. Check the connection.
• The MD is inserted in the wrong direction.
Slide the MD into the disc slot with the label
side up and the arrow pointing towards the
slot.
• The MD may not be recorded. Replace the
disc with one that has been recorded.
The sound has a lot of static.
• Strong magnetism from a television or a
similar device is interfering with operations.
Move the deck away from the source of
strong magnetism.
The deck does not record.
• The MD is record-protected. Slide the recordprotect tab and close the slot.
• The deck is not connected properly to the
computer. Check the connection.
• A premastered MD is inserted. Replace it
with a recordable MD.
• There is not enough time left on the MD.
Replace it with another recordable MD with
fewer recorded tracks, or erase unnecessary
tracks.
• There has been a power failure or the AC
power adaptor has been disconnected during
recording. Data recorded to that point may be
lost. Repeat the recording procedure.
10
GB
Page 11

The Net MD lamp flashes.
• If the other indicators are lighted up or
flashing, the MD deck’s self-diagnosis
function is active. See the table on page 12.
• When the other indicators are off, you have
pressed the inoperative N/> button while
OpenMG Jukebox is active. Only the x/Z
button for ejecting the MD can be operated at
this time.
Note
If the deck does not operate properly even after
you’ve attempted the prescribed remedies, eject the
MD, then reinsert the AC power adaptor into the AC
power outlet.
Specifications
System MiniDisc digital audio system
Disc MiniDisc
Laser Semiconductor laser (λ = 780 nm)
Revolutions (CLV) 800 rpm to 1800 rpm
Error correction Advanced Cross Interleave Reed
Sampling frequency 44.1 kHz
Coding Adaptive Transform Acoustic
Modulation system EFM (Eight-to-Fourteen
Number of channels 2 stereo channels
Frequency response 5 to 20,000 Hz ±0.8 dB
Signal-to-noise ratio Over 96 dB during playback
Wow and flutter Below measurable limit
Outputs
LINE (ANALOG) OUT Jack type: stereo-mini
PHONES Jack type: stereo-mini
General
USB port series B, self powerd, full speed
Where purchased
USA and Canada
Europe and Other
countries
*Using an AC power adaptor (supplied)
Power consumption 6 W
Dimensions (approx.) 152 × 52 × 249 mm (w/h/d) incl.
Mass (approx.) 1.0 kg
Emission duration: continuous
Solomon Code (ACIRC)
Coding (ATRAC)/ATRAC 3
Modulation)
Rated output: 1 Vrms (at
50 kilohms)
Load impedance: Over 10 kilohms
Rated output: 5 mW
Load impedance: 32 ohms
Power requirements*
120 V AC, 60 Hz
220 – 230 V AC, 50/60 Hz
projecting parts and controls
Additional Information
Supplied accessories
See page 3.
US and foreign patents licensed from Dolby
Laboratories Licensing Corporation.
Design and specifications are subject to change
without notice.
11
GB
Page 12

Self-Diagnosis Function
The deck’s self-diagnosis function automatically checks the condition of the MD deck when an error
occurs, then indicates the nature of the error through the two indicators. If the indicators light up or flash,
find them in the following table and perform the indicated countermeasure. Should the problem persist,
consult your nearest Sony dealer.
Playback
Indicator
(green)
Flashes The deck could not read the TOC on the MD properly. (C13/Read Error)
Lights up Lights up There is an error in the internal data that the deck needs in order to operate.
Flashes Flashes There is a problem with the optical pickup. (E0101/LASER NG)
Both indicators flash alternately An MD loading problem has occurred. (E0201/LOADING NG)
Recording
Indicator
(red)
Flashes The recording was not made properly. (C13/Rec Error)
Flashes The inserted MD is dirty (with smudges, fingerprints, etc.), scratched, or
Lights up The deck could not read the TOC on the MD properly. (C14/Toc Error)
Cause/Remedy
, Set the deck in a stable surface, and repeat the recording procedure.
substandard in quality. (C13/Rec Error)
, Replace the disc and repeat the recording procedure.
, Take out the MD and insert it again.
, Insert another disc.
, If possible, erase all the tracks on the MD.
(E0001/MEMORY NG)
, Consult your nearest Sony dealer.
, Consult your nearest Sony dealer.
, Consult your nearest Sony dealer.
12
GB
Page 13

Additional Information
13
GB
Page 14
AVERTISSEMENT
Pour éviter tout risque d’incendie ou
d’électrocution, n’exposez pas cet
appareil à la pluie ni à l’humidité.
Cet appareil fait partie des produits laser de la
CLASSE 1.
Cette étiquette est collée sous l’appareil.
Pour ne pas risquer un incendie, ne couvrez pas les
orifices d’aération de l’appareil avec des journaux,
nappes, rideaux, etc. Et ne placez pas de bougies
allumées sur l’appareil.
Pour éviter tout incendie ou électrocution, ne pas
placer d’objet rempli de liquide, tel que vase, sur la
chaîne.
ATTENTION: RADIATION LASER INVISIBLE
EN CAS D’OUVERTURE ET DE
VERROUILLAGE DEJOUE. EVITER
L’EXPOSITION AU RAYON.
LE REVENDEUR NE PEUT EN AUCUN CAS
ÊTRE TENU RESPONSABLE DE
DOMMAGES DIRECTS, INDIRECTS OU
ACCIDENTELS, QUELLE QU’EN SOIT LA
NATURE, OU DE PERTES OU DÉPENSES
RÉSULTANT D’UN PRODUIT DÉFECTUEUX
OU DE L’UTILISATION D’UN PRODUIT.
Ne pas jeter les piles avec les
ordures ménagères. Les déposer
aux endroits préconisés pour les
produits chimiques.
AVERTISSEMENT POUR LES
UTILISATEURS AU CANADA
ATTENTION
POUR PREVENIR LES CHOCS ELECTRIQUES,
NE PAS UTILISER CETTE FICHE POLARISEE
AVEC UN PROLONGATEUR, UNE PRISE DE
COURANT OU UNE AUTRE SORTIE DE
COURANT, SAUF SI LES LAMES PEUVENT
ETRE INSEREES A FOND SANS EN LAISSER
AUCUNE PARTIE A DECOUVERT.
FR
2
Page 15
Bienvenue!
Déballage
Merci d’avoir porté votre choix sur la platine
MiniDisc Sony. Avant de la faire fonctionner,
veuillez lire attentivement ce manuel et le
conserver pour toute référence ultérieure.
Consultez les sites web suivants pour les
informations sur le soutien aux utilisateurs.
Soutien aux utilisateurs Net MD:
http://www.sony.co.jp/en/Products/homeaudio/
Si vous installez un autre logiciel d’application qui
assiste Net MD après l’installation de OpenMG
Jukebox fourni, les liaisons avec le site web cidessus peuvent être modifiées. Dans ce cas, entrez
l’ adresse ci-dessus manuellement dans la zone
des adresses de votre navigateur.
A propos de ce manuel
• Ce manuel indique l’emplacement, la fonction
et les raccordements des composants du
MDS-NT1 et fait des remarques sur son
fonctionnement.
• Le MDS-NT1 fonctionne via raccordement par
câble USB à un ordinateur équipé du logiciel
OpenMG Jukebox. Consultez le mode d’emploi
ou l’aide en ligne pour OpenMG Jukebox pour
les détails sur son installation et son
fonctionnement.
• Les messages du système d’exploitation
indiqués dans ce mode d’emploi peuvent
légèrement différer de ceux apparaissant
réellement sur l’ordinateur.
Vérifiez la présence des articles suivants:
• Adaptateur secteur (1)
• Câble USB (1)
• Cordon de raccordement audio
(minifiche stéréo ×1 y minifiche stéréo ×1)
(1)
• CD-ROM OpenMG Jukebox (1)
• Mode d’emploi pour OpenMG Jukebox (1)
• En cas de problème sur la platine MD
suite à un vice de fabrication, SONY
remplacera l’appareil. Mais SONY
n’assumera aucune autre responsabilité.
• En aucun cas SONY ne sera responsable
d’une perte financière ou d’une perte de
profit, incluant des plaintes de tierces parties,
apparaissant suite à l’emploi de la platine
MD.
FR
Table des matières
Emplacement et fonctions des
composants
Description des composants du panneau
avant..........................................................4
Description des composants du panneau
arrière ........................................................ 5
Raccordements ............................................6
Informations additionnelles
Remarques sur l’enregistrement .................. 7
Précautions .................................................. 8
Manipulation des MD..................................9
Limitations du système................................9
Dépannage .................................................10
Spécifications ............................................ 11
Fonction d’auto-diagnostic ........................12
FR
3
Page 16

Emplacement et fonctions des composants
Description des composants du panneau avant
Cette section vous indique l’emplacement et la fonction des différentes touches et commandes de la platine
MD.
132
6
1 Touche N/>
Appuyez quand l’appareil est à l’arrêt pour
démarrer la lecture.
Appuyez quand l’appareil est en lecture pour
localiser le début de la plage suivante.
2 Fente d’insertion de MD
Insérez le MD comme l’indique l’illustration cidessous.
Face étiquetée
vers le haut
Flèche pointée vers la
platine
3 Touche x/Z
Appuyez quand l’appareil est en lecture pour
arrêter la lecture. Appuyez quand l’appareil est à
l’arrêt pour éjecter le MD.
4 Témoin d’enregistrement
S’allume dans les cas suivants:
Pendant le transfert d’un fichier audio d’un
ordinateur raccordé à la platine MD (check-out).
Pendant le transfert d’un fichier audio de la
platine MD à l’ordinateur raccordé (check-in).
Si des informations TOC (informations sur les
plages par exemple) sont enregistrées sur le MD.
FR
4
Clignote quand la réécriture du TOC du MD par
la platine MD est démarrée en appuyant sur x/Z.
5
5 Indicateur Net MD
Indique l’état de raccordement USB entre
l’appareil et l’ordinateur.
S’allume faiblement quand l’appareil est raccordé
seulement à une prise murale avec l’adaptateur
secteur fourni.
S’allume brillamment quand l’appareil est
raccordé à un ordinateur à système d’exploitation
activé.
6 Témoin de lecture
S’allume pendant la lecture.
Clignote pendant le chargement du TOC du MD
par la platine MD.
Remarques
• Sauf le fonctionnement de la touche x/Z pour
l’éjection du MD, toutes les autres opérations de la
platine MD sont invalidées pendant que Net MD est
raccordé via le câble USB fourni à un ordinateur à
système d’exploitation activé.
Dans ces conditions, l’indicateur Net MD clignote
(les autres indicateurs/témoins restent éteints)
chaque fois que vous essayez d’effectuer une
opération invalidée.
• Le clignotement de l’indicateur Net MD et le
clignotement ou l’illumination des autres témoins
indiquent que la fonction d’auto-diagnostic de la
platine MD est active. Voir la page 12 pour les
détails.
4
Page 17

Description des composants du panneau arrière
1
Emplacement et fonctions des composants
4
1 Prise DC IN 9V
Raccordez cette prise à une prise murale via
l’adaptateur secteur fourni pour alimenter la
platine MD.
2 Port USB
Raccordez ce port à un port USB de votre
ordinateur avec le câble USB fourni.
3 Prise de casque et commande PHONE
LEVEL
Raccordez une fiche de casque sur cette prise.
Tournez la commande PHONE LEVEL pour
ajuster le volume du casque raccordé.
4 Prise ANALOG OUT
Raccordez des enceintes actives etc. à cette prise
avec le cordon de raccordement audio fourni
(minifiche stéréo ×1 y minifiche stéréo ×1) ou
le cordon de raccordement audio en option
(minifiche stéréo ×1 y fiche phone ×2).
ou
3
2
Remarques
• La performance optimale de la platine MD n’est pas
garantie quand elle est raccordée à l’ordinateur via
un concentrateur USB ou une rallonge USB.
Raccordez bien la platine MD directement à
l’ordinateur avec le câble USB fourni.
• Ne raccordez pas l’adaptateur secteur fourni à une
sortie secteur commutée (par exemple sur un
amplificateur).
• Utilisez seulement l’adaptateur secteur fourni.
N’utilisez aucun autre adaptateur secteur.
Polarité de la fiche
Le câble d’interface blindé recommandé dans ce
mode d’emploi doit être utilisé avec cet appareil pour
assurer la conformité aux limites pour les dispositifs
stipulées dans la Section B de la Partie 15 des Règles
FCC.
• Avant de sortir le son via le casque, il est
recommandé d’abaisser complètement le volume,
puis de l’augmenter graduellement jusqu’au niveau
souhaité en écoutant le son.
FR
5
Page 18

Raccordements
A une prise murale via
MDS-NT1
l’adaptateur secteur fourni
Ordinateur
Au port USB de
votre ordinateur
Au casque
A des enceintes
actives etc.
Câble USB
Insérez le connecteur à fond dans le
port avec la marque vers le haut.
Le câble d’interface blindé
recommandé dans ce mode d’emploi
doit être utilisé avec cet appareil pour
assurer la conformité aux limites pour
les dispositifs stipulées dans la Section
B de la Partie 15 des Règles FCC.
A un port USB
Câble USB (fourni)
N’utilisez pas de nœud
USB entre la platine MD
et l’ordinateur.
Raccordez bien la
platine MD directement
à l’ordinateur avec le
câble USB fourni.
Remarques
• Vérifiez que chaque fiche est droite à l’insertion.
Une insertion de biais pourrait endommager des
parties du connecteur.
• Installez bien le logiciel OpenMG Jukebox dans
votre ordinateur avant de raccorder la platine MD et
l’ordinateur. Sinon, ce dernier peut sélectionner un
pilote erroné pour la platine MD quand vous les
raccordez, et la platine MD ne pas fonctionner
correctement.
[Assistant Ajout de nouveau matériel] peut
apparaître quand vous raccordez la platine MD à
l’ordinateur. Dans ce cas, cliquez sur [Annuler].
• Le son sorti n’est pas assisté quand vous raccordez
la platine MD à l’ordinateur seulement avec le câble
USB fourni. La sortie du son de la platine MD exige
le raccordement d’un casque ou d’enceintes actives
etc. à la platine MD (voir la page 5).
• Pour sortir le son de la platine MD aux enceintes de
l’ordinateur raccordé, raccordez la prise LINE OUT
sur la platine MD à la prise d’entrée audio de
l’ordinateur avec le cordon de raccordement audio
fourni (à minifiche stéréo aux deux extrémités) ou
un produit équivalent sans résistance disponible
dans le commerce.
• Ne déconnectez pas le câble USB en opérant la
platine MD depuis l’ordinateur raccordé. Arrêtez
bien l’opération d’enregistrement ou de lecture
avant de déconnecter le câble USB.
FR
6
Page 19

Informations
additionnelles
Remarques sur
l’enregistrement
A propos des indications
s’allumant ou clignotant après
l’enregistrement
Quand le témoin
d’enregistrement s’allume sur
l’afficheur
L’enregistrement est terminé mais le TOC (Table
des matières) du MD n’a pas été mis à jour pour
répercuter les résultats de l’enregistrement.
L’enregistrement sera perdu si vous déconnectez
l’adaptateur secteur alors que le témoin est allumé.
Le TOC sera mis à jour seulement à l’éjection du
MD de la platine MD.
Quand le témoin
d’enregistrement clignote sur
l’afficheur
La platine est en train de mettre à jour le TOC. Ne
déconnectez pas l’adaptateur secteur et ne
déplacez pas la platine quand le témoin clignote.
L’enregistrement pourrait ne pas s’achever
correctement.
Guide sur le système de
gestion de la copie série
Les composants audio numériques comme les CD,
MD et DAT, facilitent la production de copies
musicales de haute qualité en traitant la musique
en tant que signal numérique.
Pour protéger les sources musicales sous droits
d’auteur, cette platine utilise le système de gestion
de la copie série qui vous permet de faire une
seule copie d’une source enregistrée
numériquement par raccordement numérique-ànumérique.
Vous pouvez faire une seule
copie de première génération
par raccordement numérique-ànumérique.
Voici des exemples:
• Vous pouvez faire une copie d’un programme
audio numérique disponible dans le commerce
(par exemple un CD ou MD), mais vous ne
pouvez pas faire une seconde copie de la copie
de première génération.
• Vous pouvez faire une copie d’un signal
numérique d’un programme audio numérique
enregistré numériquement (par exemple, un
disque analogique ou une cassette musicale) ou
d’un programme numérique diffusé par
satellite, mais vous ne pouvez pas faire une
seconde copie de la copie de première
génération.
Remarque
Les restrictions du système de gestion de la copie
série ne s’appliquent pas quand vous faites un
enregistrement via des raccordements analogique-àanalogique.
Pour éviter l’effacement
accidentel de matériaux
enregistrés
Pour rendre l’enregistrement sur un MD
impossible, faites glisser le curseur de protection
contre l’enregistrement dans le sens de la flèche
(voir l’illustration ci-dessous) pour ouvrir la fente.
Fermez la fente pour permettre l’enregistrement.
Dessous du
MD
Curseur de protection
contre l’enregistrement
Faites glisser dans le
sens de la flèche
Informations additionnelles
FR
7
Page 20

Précautions
La plaque du fabricant est placée sous l’appareil.
Sécurité
• Si un objet solide ou un liquide tombe dans le
coffret, débranchez la platine et faites-la
contrôler par un personnel qualifié avant de la
remettre en fonctionnement.
• Attention–L’emploi d’instruments optiques
avec ce produit peut augmenter les risques pour
les yeux.
Sources d’alimentation
• Avant de faire fonctionner la platine, vérifiez
que sa tension de fonctionnement est identique
à celle du secteur local. La tension de
fonctionnement est indiquée sur la plaque du
fabricant de l’adaptateur secteur.
• La platine n’est pas déconnectée de la source
secteur tant qu’elle est raccordée à la prise
murale, même si la platine elle-même a étée de
ne pas mis hors tension.
• Si vous prévoyez de ne pas d’utiliser la platine
pendant une période prolongée, déconnectez
l’adaptateur secteur de la prise murale. Pour
cela, saisissez la fiche elle-même, ne tirez
jamais sur le cordon.
• L’adaptateur secteur doit être remplacé
seulement dans un centre de service compétent.
Condensation dans la platine
Si la platine est transportée directement d’un
endroit froid à un endroit chaud, ou placée dans
une salle très humide, de l’humidité peut se
condenser sur les lentilles à l’intérieur. Si cela
arrive, la platine peut ne pas fonctionner
correctement. Dans ce cas, retirez le MD et laissez
la platine sous tension pendant plusieurs heures
pour que l’humidité s’évapore.
Nettoyage
Nettoyez le coffret, le panneau et les commandes
avec un chiffon doux légèrement humidifié de
solution détergente douce. N’utilisez pas de
tampon abrasif, de poudre à récurer ou de solvant
tel que l’alcool ou la benzine.
En cas de question ou de problème concernant
votre platine, consultez le revendeur Sony le plus
proche.
Cartouche MiniDisc
• N’ouvrez pas le volet pour exposer le MD.
• Ne placez pas la cartouche à un endroit où elle
sera soumise à des rayons solaires, des
températures, une humidité ou une poussière
extrêmes.
FR
8
Page 21

Manipulation des MD
Limitations du système
Le MD est mis sous cartouche pour protéger le
disque contre les débris ou empreintes de doigts et
le rendre plus facile à manipuler.
Mais la présence de débris ou une cartouche
gondolée peuvent empêcher le bon
fonctionnement du disque. Observez les
précautions suivantes pour assurer que vous
pourrez toujours écouter de la musique de la
meilleure qualité.
• Ne touchez pas directement le disque interne.
Forcer l’ouverture du volet peut endommager le
disque à l’intérieur.
• Collez les étiquettes fournies avec le MD aux
emplacements prévus à cet effet. La forme des
étiquettes peut varier selon la marque du MD.
Emplacement
correct des
étiquettes
Volet
Où conserver les MD
Ne placez pas la cartouche à un endroit exposé en
plein soleil ou à une chaleur et humidité extrêmes.
Entretien régulier
Eliminez la poussière et les débris de la surface de
la cartouche avec un chiffon sec.
Le système d’enregistrement de votre platine,
radicalement différent de ceux utilisés dans les
platines cassette et DAT, se caractérise par les
limitations ci-dessous. Notez cependant que ces
limitations sont dues à la nature inhérente au
système d’enregistrement MD lui-même et non à
des causes mécaniques.
Le temps d’enregistrement
restant devient “0” même avant
que le MD atteigne le temps
d’enregistrement maximum
Quand 255 plages ont été enregistrées sur le MD,
le temps d’enregistrement restant devient “0”
indépendamment du temps d’enregistrement total.
Le temps d’enregistrement
restant n’augmente pas même
après l’effacement d’un grand
nombre de plages courtes
Les plages de moins de 12 secondes* de longueur
ne sont pas comptées et leur effacement peut donc
ne pas provoquer une augmentation du temps
d’enregistrement.
* A l’enregistrement en mode stéréo (env. 24
secondes en mode mono ou LP2, ou env. 48
secondes en mode LP4)
A suivre
Informations additionnelles
FR
9
Page 22

10
Limitations du système (suite)
Le total du temps
d’enregistrement total et du
temps d’enregistrement restant
du MD peut ne pas correspondre
au temps d’enregistrement
maximum
L’enregistrement est fait par unités minimales de 2
secondes*, même pour les matériaux très courts.
Les matériaux enregistrés peuvent ainsi être plus
courts que la capacité d’enregistrement maximale.
L’espace sur le disque peut aussi être
additionnellement réduit par des rayures.
* A l’enregistrement en mode stéréo. (env. 4 secondes
en mode mono ou LP2, ou env. 8 secondes en mode
LP4.)
Les plages créées par montage
peuvent présenter des pertes de
son quand vous recherchez un
point en surveillant le son.
Certaines plages ne peuvent pas
être combinées avec d’autres
Des plages peuvent ne pas être combinées si elles
ont été montées.
Le témoin de lecture clignote
longtemps
Si le MD enregistrable inséré est tout neuf, le
témoin de lecture clignote plus longtemps que
pour les MD ayant déjà été utilisés.
FR
Dépannage
Si vous rencontrez une des difficultés suivantes en
utilisant la platine, utilisez ce guide de dépannage
pour vous aider à résoudre le problème. Si le
problème persiste, consultez le revendeur Sony le
plus proche.
La platine ne fonctionne pas ou
fonctionne mal.
• Le MD est peut-être sale ou endommagé.
Remplacez-le.
• Quand la platine MD est raccordée à un
ordinateur et que le système d’exploitation
fonctionne, seule la touche x/Z est utilisable
(pour l’éjection du MD quand la platine est à
l’arrêt).
La platine ne lit pas.
• De l’humidité s’est condensée dans la platine.
Retirez le MD et laissez la platine à un endroit
chaud pendant plusieurs heures jusqu’à
évaporation de l’humidité.
• La platine n’est peut-être pas raccordée
correctement à l’amplificateur. Vérifiez le
raccordement.
• Le MD est inséré dans le mauvais sens.
Faites-le glisser dans la fente à disque, la face
étiquetée vers le haut et la flèche pointant vers
la fente.
• Le MD n’est peut-être pas enregistré.
Remplacez le disque par un disque enregistré.
Le son est très déformé.
• Le magnétisme puissant d’un téléviseur ou
d’un dispositif similaire interfère avec le
fonctionnement. Eloignez la platine de la
source de magnétisme puissant.
La platine n’enregistre pas.
• Le MD est protégé contre l’enregistrement.
Faites glisser le curseur de protection contre
l’enregistrement pour fermer la fente.
• La platine est mal raccordée à l’ordinateur.
Vérifiez le raccordement.
• Un MD préenregistré est inséré. Remplacez-le
par un MD enregistrable.
• Il ne reste pas suffisamment de temps sur le
MD. Remplacez-le par un autre MD
enregistrable avec moins de plages
enregistrées, ou effacez des plages inutiles.
• Il y a eu une panne d’électricité ou
l’adaptateur secteur a été déconnecté pendant
l’enregistrement. Les données enregistrées
jusqu’à ce point sont peut-être perdues.
Répétez la procédure d’enregistrement.
Page 23

L’indicateur Net MD clignote.
• Si les autres témoins sont allumés ou
clignotent, la fonction d’auto-diagnostic de la
platine MD est activée. Voir le tableau de la
page 12.
• Si les autres témoins sont éteints, vous avez
appuyé sur la touche inopérante N/>
alors que OpenMG Jukebox était actif. Seule
la touche x/Z d’éjection du MD est opérable
à ce moment-là.
Remarque
Si la platine ne fonctionne pas correctement même
après l’essai des solutions prescrites, mettez la platine
éjectez le MD, puis réinsérez l’adaptateur secteur
dans la prise secteur.
Spécifications
Système Système audio numérique
Disque MiniDisc
Laser Laser semi-conducteur (λ =
Vitesse de rotation (CLV) 800 à 1800 tpm
Correction d’erreur Advanced Cross Interleave Reed
Fréquence d’échantillonnage
Codage Adaptative Transform Acoustic
Système de modulation EFM (Eight-to-Fourteen
Nombre de canaux 2 canaux stéréo
Réponse en fréquence 5 à 20.000 Hz ±0,8 dB
Rapport signal/bruit Sup. à 96 dB pendant la lecture
Pleurage et scintillement Non mesurable
Sorties
LINE (ANALOG) OUT Type de prise: mini stéréo
PHONES Type de prise: mini stéréo
Généralités
Port USB Série B, auto-alimenté, pleine
Lieu d’achat Alimentation*
Etats-Unis et Canada Secteur 120 V, 60 Hz
Europe et autres pays Secteur 220 – 230 V, 50/60 Hz
*Avec l’adaptateur secteur (fourni)
Consommation 6 W
Dimensions (approx.) 152 × 52 × 249 mm (l/h/p) parties
Poids (approx.) 1,0 kg
MiniDisc
780 nm) Durée d’émission:
continue
Solomon Code (ACIRSC)
44,1 kHz
Coding (ATRAC)/ATRAC 3
Modulation)
Sortie nominale: 1 Vmrs (à
50 kohms)
Impédance de charge: Sup. à
10 kohms
Sortie nominale: 5 mW
Impédance de charge: 32 ohms
vitesse
et commandes en saillie incluses
Informations additionnelles
Accessoires fournis
Voir la page 3.
Brevets américains et étrangers sous licence de Dolby
Laboratories Licensing Corporation.
Conception et spécifications sont sujettes à
modification sans préavis.
11
FR
Page 24

Fonction d’auto-diagnostic
La fonction d’auto-diagnostic de la platine MD contrôle automatiquement son état en cas d’erreur, puis
indique la nature de l’erreur par le biais des deux témoins. Si les témoins s’allument ou clignotent, trouvezles dans le tableau ci-dessous et prenez la contre-mesure indiquée. Si le problème persiste, consultez le
revendeur Sony le plus proche.
Témoin de
lecture
(vert)
Clignote La platine n’a pas pu lire correctement le TOC du MD. (C13/Read Error)
S’allume S’allume Il y a une erreur dans les données internes que la platine exige pour bien
Clignote Clignote Il y a un problème avec le dispositif de lecture optique. (E0101/LASER NG)
Les deux témoins clignotent
alternativement
Témoin
d’enregistrement
(rouge)
Clignote L’enregistrement ne s’est pas fait correctement. (Cl3/Rec Error)
Clignote Le MD inséré est sale (avec des taches, empreintes de doigts etc.), rayé ou de
S’allume La platine n’a pas pu lire correctement le TOC du MD. (C14/Toc Error)
Cause/remède
, Placez la platine sur une surface stable et répétez la procédure
d’enregistrement.
qualité sous-standard. (Cl3/Rec Error)
, Remplacez le disque et répétez la procédure d’enregistrement.
, Retirez le MD, puis réinsérez-le.
, Insérez un autre disque.
, Si possible, effacez toutes les plages du MD.
fonctionner. (E0001/MEMORY NG)
, Consultez le revendeur Sony le plus proche.
, Consultez le revendeur Sony le plus proche.
Un problème de chargement de MD est survenu. (E0201/LOADING NG)
, Consultez le revendeur Sony le plus proche.
12
FR
Page 25

Informations additionnelles
13
FR
Page 26

ADVERTENCIA
Para evitar el riesgo de incendio o de
descargas eléctricas, no exponga la
unidad a la lluvia ni a la humedad.
Esta unidad está clasificada como producto lasérico
de clase 1.
Esta etiqueta está ubicada en la parte inferior exterior.
Para evitar un incendio, no cubra los orificios de
circulación de aire del aparato con diarios, manteles,
cortinas, etc. No coloque velas en el aparato.
Para evitar el peligro de un incendio o descarga
eléctrica, no coloque objetos llenos de líquido, por
ejemplo jarrones en el aparato.
PRECAUCION: RADIACION LASER INVISIBLE
CUANDO SE ABRE Y SE CANCELA EL
INTERBLOQUEO. EVITE EXPONERSE AL
RAYO.
EL VENDEDOR NO SE HARÁ
RESPONSABLE EN NINGÚN CASO DE LOS
DAÑOS DIRECTOS, FORTUITOS, NI
INDIRECTOS, SEA CUAL SEA SU
NATURALEZA, NI DE LAS PÉRDIDAS O
GASTOS RESULTANTES DE CUALQUIER
PRODUCTO DEFECTUOSO O DE LA
UTILIZACIÓN DE LOS PRODUCTOS.
No tire las pilas con la basura del
hogar, deshágase de ellas
correctamente como residuos
químicos.
ES
2
Page 27

¡Bienvenidos!
Desembalaje
Muchas gracias por su compra de la platina de
minidiscos de Sony. Antes de hacer funcionar la
platina, lea completamente este manual y guárdelo
para su referencia en el futuro.
Para información acerca del apoyo a los usuarios,
visite el siguiente sitio de Internet.
Apoyo a los usuarios del Net MD:
http://www.sony.co.jp/en/Products/homeaudio/
Si instala otro software de aplicación que acepte el
Net MD después de instalar el OpenMG Jukebox
suministrado, los enlaces al sitio de Internet de
arriba puede cambiar. En este caso, entre la
dirección manualmente en el campo de dirección
de su lector.
Acerca de este manual
• Este manual describe la posición, función y
conexión de piezas del MDS-NT1 y contiene
notas sobre el funcionamiento del MDS-NT1.
• El MDS-NT1 funciona mediante la conexión de
un cable USB a un ordenador que tenga
instalado el software OpenMG Jukebox. Para
más detalles sobre la instalación y
funcionamiento del OpenMG Jukebox, consulte
el manual de instrucciones o la ayuda en línea
del OpenMG Jukebox.
• Los mensajes OS que se describen en este
manual pueden ser ligeramente diferentes del
mensaje en la práctica que aparece en su
ordenador.
Verifique que la caja contiene los siguientes ítems:
• Adaptador de CA (1)
• Cable USB (1)
• Cable de conexión de audio (minitoma estéreo
×1 y minitoma estéreo ×1) (1)
• CD-ROM del OpenMG Jukebox (1)
• Manual de instrucciones del OpenMG Jukebox
(1)
• Si se produce un problema en esta platina
de minidiscos como resultado de un
defecto en la fabricación, SONY
cambiará la unidad. Sin embargo, SONY
no acepta ninguna otra responsabilidad.
• Bajo ningún concepto SONY aceptará
reclamaciones por pérdidas financieras o
pérdida de ganancias, incluyendo las
reclamaciones hechas por terceros
derivados del uso de la platina de
minidiscos.
ES
Índice
Ubicación y función de las
piezas
Descripción de las piezas del panel
delantero ...................................................4
Descripción de las partes del panel
delantero ...................................................5
Conexión .....................................................6
Información adicional
Notas acerca de la grabación .......................7
Precauciones ................................................ 8
Manipulación de minidiscos........................9
Limitaciones del sistema ............................. 9
Localización de averías ............................. 10
Especificaciones ........................................11
Función de autodiagnóstico .......................12
ES
3
Page 28

Ubicación y función de las piezas
Descripción de las piezas del panel delantero
Este capítulo de indica la ubicación y función de los distintos botones, controles de la platina de minidiscos.
132
6
1 Botón N/>
Presione con la unidad detenida para empezar a
reproducir. Presione durante la reproducción para
buscar el principio de la siguiente canción.
2 Ranura de inserción del minidisco
Inserte el minidisco tal como se indica a
continuación.
Con la etiqueta
hacia arriba
Con la flecha apuntando
hacia la platina
3 Botón x/Z
Presione cuando la unidad está reproduciendo
para detener la reproducción. Presione con la
unidad detenida para expulsar el minidisco.
4 Indicador de grabación
Se enciende en los siguientes casos:
Cuando se está transfiriendo un archivo de audio
del ordenador conectado a la platina de
minidiscos (salida).
Cuando se estás transfiriendo un archivo de audio
de la platina de minidiscos al ordenador
conectado (entrada).
Cuando la información TOC (índice) (tales como
ES
4
la información de canciones) no se grabó en el
minidisco.
5
Destella cuando la platina de minidiscos está
escribiendo en el índice del minidisco al
presionar x/Z .
5 Lámpara Net MD
Inicia el estado de conexión de USB entre la
unidad y el ordenador.
Se enciende un poco cuando la unidad sólo está
conectada a un tomacorriente de la pared con el
adaptador de CA suministrado.
Se enciende brillantemente cuando la unidad está
conectada a un ordenador con su sistema
operativo activado.
6 Indicador de reproducción
Se enciende durante la reproducción.
Destella cuando la platina de minidiscos está
cargando el TOC (índice) del minidisco.
Notas
• Las otras funciones que no sean las del botón x/Z
para expulsar el minidisco, las demás funciones de
la platina de minidisco se desactivan mientras el
Net MD esté conectado a través del cable de USB
suministrado a un ordenador que tenga su sistema
operativo activado.
En este estado, destella la lámpara Net MD (con los
otros indicadores apagados) siempre que trate de
utilizar una función desactivada.
• El destello de la lámpara Net MD y el destello o
encendido de los otros indicadores indican que se
ha activado la función de autodiagnóstico de la
platina de minidiscos. Para más detalles, vea la
página 12.
4
Page 29

Descripción de las partes del panel delantero
1
Ubicación y función de las piezas
4
1 Toma DC IN 9V
Conecte esta toma a un tomacorriente a través del
adaptador de CA para alimentar la platina de
minidiscos.
2 Puerto de USB
Conecte este puerto a un puerto de USB en su
ordenador con el cable USB suministrado.
3 Toma de auriculares y control PHONE
LEVEL
Conecte un enchufe de auriculares en estas toma.
Gire el control PHONE LEVEL para ajustar el
volumen de los auriculares conectados.
4 Toma ANALOG OUT
Conecte los auriculares activos, etc. a esta toma
con el cable de conexión de audio suministrado
(minienchufe estéreo ×1 y minienchufe estéreo
×1) o cable de conexión de audio opcional
(minienchufe estéreo ×1 y enchufe fonográfico
×2).
ó
3
2
Notas
• No pueden garantizarse las prestaciones totales de la
platina de minidiscos cuando estás conectados al
ordenador por el grupo de conectores USB o el
cable de extensión USB. Asegúrese de conectar
directamente la platina de minidiscos al ordenador
con el cable USB suministrado.
• No conecte el adaptador de CA suministrado a un
tomacorriente de CA con corriente (por ejemplo en
un amplificador).
• Utilice sólo el adaptador de CA suministrado. No
utilice ningún otro adaptador de CA.
Polaridad del enchufe
Debe utilizar el cable de interfase blindado
recomendado en este manual con este equipo para
cumplir con los límites para un equipo digital de
acuerdo con el aub-artículo B del artículo 15 de las
reglas de FCC.
• Antes de escuchar el sonido por los auriculares, se
recomienda bajar completamente el volumen y
subirlo gradualmente al nivel deseado mientras
escucha el sonido.
ES
5
Page 30

Conexión
MDS-NT1
A un tomacorriente de la
pared utilizando el adaptador
de CA suministrado
Ordenador
Al puerto de USB
en su ordenador
A los auriculares
A los altavoces
activos, etc.
Cable de USB
Inserte completamente el conector
en el puerto con la marca hacia
arriba.
Debe utilizar el cable de interfase
blindado recomendado en este
manual con este equipo para cumplir
con los límites para un equipo digital
de acuerdo con el aub-artículo B del
artículo 15 de las reglas de FCC.
A un puerto de
USB
Cable de USB
(suministrado)
Notas
• Asegúrese de insertar el enchufe derecho. Si lo
inserta en ángulo, puede dañar partes del conector.
• Asegúrese de instalar el software OpenMG Jukebox
a su ordenador antes de conectar la platina de
minidiscos y su ordenador. De lo contrario, el
ordenador puede seleccionar un controlador
inadecuado para la platina de minidiscos cuando los
conecte y puede no funcionar correctamente la
platina de minidiscos.
Puede aparecer el ayudante (Add New hardware
wizard) cuando conecte la platina de minidiscos al
ordenador. En este caso, haga clic en (Cancel).
• No puede escuchar los sonidos cuando se conecta la
platina de minidiscos al ordenador sólo con el cable
USB suministrado. El sonido de la platina de
minidiscos requiere la conexión de auriculares o
altavoces activos, etc. a la platina de minidiscos
(vea la página 5).
• Para escuchar el sonido de la platina de minidiscos
por los altavoces del ordenador, utilice el cable de
conexión de audio suministrado (una mini-toma
estéreo en ambas puntas) o un producto de venta
equivalente de venta en los comercios libre de
resistencia para conectar la toma LINE OUT en la
platina de minidiscos con la toma de entrada de
audio en el ordenador.
No utilice un grupo de
conectores USB entre la
platina de minidiscos y
el ordenador. Asegúrese
de conectar
directamente la platina
de minidiscos en el
ordenador con el cable
USB suministrado.
• No desconecte el cable USB mientras está
funcionando la platina de minidiscos con el
ordenador conectado. Asegúrese de detener la
grabación o reproducción antes de desconectar el
cable USB.
ES
6
Page 31

Información adicional
Notas acerca de la
grabación
Acerca de las indicaciones
que se encienden o destellan
después de la grabación
Cuando se enciende el indicador
de grabación en la pantalla
La grabación ha terminado pero no se ha
actualizado el TOC (índice) en el minidisco para
reflejar los resultados de la grabación. La
grabación se perderá si se desconecta el adaptador
de CA cuando está encendido el indicador. El
TOC sólo se actualizará cuando expulse el
minidisco de la platina de minidiscos.
Cuando destella el indicador de
grabación en la pantalla
La platina está actualizando el TOC. No
desconecte el adaptador de CA o mueva la platina
cuando está destellando el indicador. La grabación
puede no completarse correctamente.
Guía para el Sistema de
Administración de Copia en
Serie
Los componentes de audio digital tales como
discos compactos, minidiscos y cintas
audiodigitales pueden producir fácilmente copias
de alta calidad de la música, procesando la música
como una señal digital.
Para proteger los derechos de autor de las fuentes
de música, esta platina utiliza el Sistema de
Administración de Copia en Serie que permite
hacer sólo una sola copia de una fuente grabada
digitalmente a través de la conexión digital a
digital.
Sólo puede hacer una copia de
primera generación a través de
una conexión digital a digital.
Se dan los siguientes ejemplos:
• Puede hacer una copia de un programa de
sonido digital de venta comercial (por ejemplo
un disco compacto o minidisco) pero no puede
hacer una segunda copia de la copia de primera
generación.
• Puede hacer una copia de una señal digital de
un programa de sonido analógico grabado
digitalmente (por ejemplo, una grabación
analógica de un casete de cinta de música) o de
un programa digital transmitido por satélite
pero no puede hacer una segunda copia de la
copia de primera generación.
Nota
Las limitaciones del Sistema de Administración de
Copia de Serie no existen para las grabaciones por las
conexiones analógica a analógica.
Para evitar un borrado
accidental del material grabado
Para que sea imposible grabar en un minidisco,
deslice la lengüeta de protección contra
grabaciones en el sentido de la flecha (vea la
figura a continuación) para abrir la ranura. Para
poder grabar, cierre la ranura.
Lado inferior
del minidisco
Lengüeta de protección
contra grabaciones
Deslice en el sentido
de la flecha
Información adicional
Información adicional
ES
7
Page 32

Precauciones
La placa del modelo está ubicada en la parte
inferior exterior.
Acerca de la seguridad
• Si entra un objeto sólido o líquido en el mueble,
desenchufe la platina y solicite la inspección a
un técnico cualificado antes de seguir
utilizando.
• Precaución–El uso de instrumentos ópticos con
este producto aumenta el peligro a su visión.
Acerca de las fuentes eléctricas
• Antes de hacer funcionar la platina confirme
que el voltaje para el funcionamiento de la
platina es idéntica a la alimentación eléctrica
local. Se indica el voltaje de funcionamiento en
la placa del modelo del adaptador de CA.
• La unidad no queda desconectada de la fuente
de CA (principal) si está enchufada en el
tomacorriente de la pared, incluso cuando se ha
desconectado el interruptor principal.
• Si no se va a utilizar la platina durante mucho
tiempo, desconecte el adaptador de CA del
tomacorriente de la pared. Para desconectar el
adaptador de CA, tome del enchufe, nunca tire
del cable.
• El adaptador de CA debe cambiarse sólo en un
taller de servicio cualificado.
Acerca de la condensación en la
platina
Si se trae la platina directamente de un lugar frío a
otro caliente o si se deja en una habitación muy
húmeda, la humedad puede condensarse en las
lentes dentro de la platina. En este caso, puede
ocurrir que la platina no funcione correctamente.
Saque el minidisco y deje la platina conectada
varias horas hasta que se evapore la humedad.
Acerca de la limpieza
Limpie el mueble, panel y controles con un paño
suave ligeramente empapado con una solución
detergente suave. No utilice ningún tipo de
almohadilla abrasiva, polvo abrasivo o disolvente
tales como alcohol o bencina.
Si tiene preguntas o problemas con respecto a su
platina, consulte con su tienda de Sony más
cercana.
Acerca del cartucho del
minidisco
• No haga funcionar el cierre para exponer el
minidisco.
• No coloque el cartucho donde esté expuesto a
excesos de rayos solares, temperatura, humedad
o polvo.
ES
8
Page 33

Manipulación de
Limitaciones del
minidiscos
El minidisco está encerrado en un cartucho para
proteger el disco contra materias extrañas o
huellas dactilares y para facilitar su manipulación.
Sin embargo, la presencia de materias extrañas o
un cartucho doblado puede impedir que el disco
funcione correctamente. Para garantizar que
siempre escuche música de la más alta calidad,
respete las siguientes precauciones:
• No toque directamente el disco en el interior. Si
abre el cierre a la fuerza puede dañar el disco
interno.
• Asegúrese de pegar etiquetas suministradas con
el minidisco en las posiciones apropiadas. La
forma de las etiquetas son diferentes según la
marca del minidisco.
Lugar
correcto de
la etiqueta
Lugar para guardar los
minidiscos
No coloque el cartucho donde esté expuesto a la
luz directa del sol o gran calor y humedad.
Mantenimiento regular
Limpie el polvo y la suciedad de la superficie del
cartucho con un paño seco.
Cierre
sistema
El sistema de grabación de su platina es muy
diferente del utilizado en las platinas de casetes y
de cintas audiodigitales y se caracteriza por las
limitaciones descritas a continuación. Sin
embargo, tenga en cuenta que estas limitaciones se
deben a la naturaleza inherente del sistema de
grabación de minidiscos en sí y no a problemas
mecánicos.
El tiempo de grabación
remanente se vuelve “0” incluso
antes de que el minidisco haya
llegado al máximo tiempo de
grabación
Cuando se han grabado 255 canciones en el
minidisco, el tiempo de grabación remanente se
vuelve “0” sea cual sea el tiempo de grabación
total. No pueden grabarse más de 255 canciones
en el minidisco. Para continuar la grabación, borre
las canciones no necesarias o utilice otro
minidisco grabable.
El tiempo de grabación
remanente no aumenta incluso
después de borrar gran cantidad
de canciones cortas
Las canciones de menos de 12 segundos* no se
cuentan y su borrado puede no aumentar el tiempo
de grabación.
* Cuando se graba en estéreo. (Aprox. 24 segundos
en el modo monoaural o LP2 y aprox. 48 segundos
en el modo LP4).
Información adicional
continúa
ES
9
Page 34

10
Limitaciones del sistema
(continúa)
El tiempo de grabación total y el
tiempo de grabación remanente
en el minidisco pueden no sumar
el máximo tiempo de grabación
La grabación se hace en unidades mínimas de 2
segundos* cada una, aunque el material sea corto.
El contenido grabado puede ser más corto que la
máxima capacidad de grabación. El espacio en el
disco puede disminuir más debido a rayas.
* Cuando se graba en el modo estéreo. (Aprox. 4
segundos en el modo monoaural o LP2 y aprox. 8
segundos en el modo LP4.)
Las canciones creadas por
edición pueden tener caída en el
sonido mientras busca un punto
mientras escucha el sonido
Algunas canciones no pueden
combinarse con otras
Las canciones no se pueden combinar si se
editaron.
El indicador de reproducción
destella durante largo tiempo
Si el minidisco grabable insertado es nuevo, el
indicador de reproducción destella más tiempo
que para un minidisco que ya fue utilizado.
ES
Localización de averías
Si tiene los siguientes problemas cuando utilice la
platina, siga esta guía de localización de averías
para ayudarle a solucionar el problema. Si el
problema continúa, consulte con su tienda de Sony
más cercana.
La platina no funciona o funciona mal.
• El minidisco puede estar sucio o dañado.
Cambie el minidisco.
• Cuando la platina de minidiscos está
conectada a un ordenador y cuando está
activado el sistema operativo, sólo puede
utilizar el botón x/Z (para expulsar el
minidisco con la platina parada).
La platina no reproduce.
• Se condensó la humedad dentro de la platina.
Saque el minidisco y deje la platina en un
lugar caliente durante varias horas hasta que
se evapore la humedad.
• La platina puede no estar conectada
correctamente al amplificador. Verifique la
conexión.
• El minidisco está insertado en otro sentido.
Deslice el minidisco en la ranura de disco con
el lado de la etiqueta hacia arriba y la flecha
apuntando hacia adentro de la ranura.
• El minidisco puede no grabar. Cambie el
disco por uno que ha sido grabado.
El sonido tiene mucha estática.
• Un fuerte magnetismo de un televisor o
dispositivo similar interfiere con el
funcionamiento.
Aleje la platina de la fuente de magnetismo
fuerte.
La platina no graba.
• El minidisco está protegido contra grabación.
Deslice la lengüeta de protección contra
grabación y cierre la ranura.
• La platina no está bien conectada al
ordenador. Verifique la conexión.
• Se ha insertado un minidisco pregrabado.
Cambie por un minidisco grabable.
• No hay suficiente tiempo remanente en el
minidisco.
Cambie por otro minidisco grabable con
menos canciones grabadas o borre las
canciones no necesarias.
• Hubo un corte eléctrico o se desconectó el
adaptador de CA durante la grabación. Se
perderán los datos grabados hasta ese
momento. Repita el procedimiento de
grabación.
Page 35

Destella la lámpara Net MD.
• Si se encienden o destellan los otros
indicadores, se ha activado la función de
autodiagnóstico de la platina de minidiscos.
Vea el cuadro de la página 12.
• Se presionó el botón N /> inactivado,
cuando los otros indicadores están apagados y
el OpenMG Jukebox estaba activado. En este
momento, sólo puede hacer funcionar el x/Z
para expulsar el minidisco.
Nota
Si no funciona correctamente la platina, incluso si ha
tratado los remedios específicos, expulse el minidisco
y vuelva a enchufar el adaptador de CA en el
tomacorriente de CA.
Especificaciones
Sistema Sistema de audio digital en
Disco Minidisco
Láser Láser semiconductor (λ = 780 nm)
Revoluciones (CLV) 800 rpm a 1800 rpm
Corrección de error Código Advanced Cross Interleave
Frecuencia de muestreo 44,1 kHz
Código Código Adaptative Transform
Sistema de modulación EFM (Modulación ocho a catorce)
Número de canales 2 canales estéreo
Respuesta de frecuencia 5 a 20.000 Hz ± 0,8 dB
Relación de señal a ruido Más de 96 dB durante la
Variación de velocidad Por debajo del límite medible
Salidas
LINE (ANALOG) OUT Tipo de toma: mini-estéreo
PHONES Tipo de toma: mini-estéreo
General
Puerto USB serie B, autoencendido, a la
Lugar de compra Requisitos de alimentación*
EE.UU. y Canadá 120 V CA, 60 Hz
Europa y otros países 220 – 230 V CA, 50/60 Hz
*Utilizando un adaptador de CA (suministrado)
Consumo eléctrico 6 W
Dimensiones (aprox.) 152 × 52 × 249 mm (an/al/prof)
Peso (aprox.) 1,0 kg
minidisco
Duración de la emisión: continua
Reed Solomon (ACIRC)
Acoustic (ATRAC)/ATRAC 3
reproducción
Salida nominal: 1 Vrms (a
50 kiloohm)
Impedancia de carga: Más de
10 kiloohm
Salida nominal: 5 mW
Impedancia de carga: 32 ohm
velocidad normal
incluyendo salientes y controles
Información adicional
Accesorios suministrados
Vea la página 3.
Patentes para los EE.UU. y el extranjero de Dolby
Laboratories Licensing Corporation.
El diseño y especificaciones están sujetos a cambios
sin previo aviso.
11
ES
Page 36

Función de autodiagnóstico
La función de autodiagnóstico de la platina verifica automáticamente el estado de la platina de minidiscos
cuando se produce un error y se indica la naturaleza del error, indicando la naturaleza del error mediante
dos indicadores. Si se encienden o destellan los indicadores, encuéntrelos en el siguiente cuadro y realice la
contramedida indicada. Si el problema continúa, consulte con su tienda de Sony más cercana.
Indicador de
reproducción
(verde)
Destella La platina no pudo leer correctamente el TOC en el minidisco. (C13/Read
Se enciende Se enciende Hay un error en los datos internos que necesita la platina, para funcionar.
Destella Destella Hay un problema con el receptor óptico. (E0101/LASER NG)
Ambos indicadores destellan
alternadamente
Indicador de
grabación
(rojo)
Destella La grabación no se hizo correctamente. (C13/Rec Error)
Destella El minidisco colocado está sucio (con manchas, huellas dactilares, etc.)
Se enciende La platina no pudo leer correctamente el TOC en el minidisco (C14/Toc
Causa/Solución
, Coloque la platina en una superficie estable y repita el procedimiento de
grabación.
rayado o de mala calidad. (C13/Rec Error)
, Cambie el disco y repita el procedimiento de grabación.
Error)
, Saque el minidisco y vuelva a colocar.
Error)
, Coloque otro disco.
, Si fuera posible, borra todas las canciones en el minidisco.
(E0001/MEMORY NG)
, Consulte con su tienda de Sony más cercana.
, Consulte con su tienda de Sony más cercana.
Se produjo un problema en la colocación del minidisco. (E0201/LOADING
NG)
, Consulte con su tienda de Sony más cercana.
12
ES
Page 37

Información adicional
13
ES
Page 38

注意
為防止火災或觸電,請不要讓本機淋雨受
潮。
本裝置為一級鐳射產品。
本標籤位於裝置的底部外面。
為防止火災,請勿用報紙、桌布、窗帘等覆
蓋本裝置的通風口。請勿將點燃的蠟燭放在本裝置
上。
為防火災或觸電危險,請勿把花瓶等裝滿液
體的物體放在裝置上面。
注意:當打開及解除連鎖時,將發生肉眼看
不見的雷射線。注意避免暴露於射線射束。
對於任何性質的直接的、難於避免的或相因而
生的損害,或因缺陷產品或使用產品造成的損
失或費用,賣方概不負責。
別把電池當一般家庭垃圾丟
棄,必須把它當做化學廢棄物
正確地加以處理。
CT
2
Page 39

歡迎惠顧﹗
感謝您購買Sony MD(迷你光碟)座使用。
在操作光碟座之前,請全閱讀過本說明書,並
妥加保存以備將來參考。
有關用戶支持資訊,請訪問下列網站︰
Net MD用戶支持︰http://www.sony.co.jp/
en/Products/homeaudio/
如果在安裝附帶的OpenMG Jukebox 之後,
再安裝另一個支持Net MD 的應用軟體,則與上
述網站的鏈接可能改變。此時,請在瀏覽器地
址列手工輸入上述網址。
關於本說明書
• 本說明書說明 MDS-NT1 上部件的位置,功能
和連接,並提供 MDS-NT1 的操作上的須知事
項。
• MDS-NT1 是通過用 USB 電纜連接的安裝有
OpenMG Jukebox 軟體的電腦操作的。有關
OpenMG Jukebox 的安裝和操作的詳細內
容,請參考 OpenMG Jukebox 的說明書或聯
機輔助說明。
• 本說明書中描述的作業系統訊息可能和您電
腦上出現的實際訊息稍有不同。
目錄
部件的位置和功能
前面板部件說明 .................... 4
後面板的部件說明 .................. 5
連 接 .............................. 6
附加資訊
錄音須知 .......................... 7
使用前須注意 ...................... 8
MD 的管理 .......................... 9
系統限制 .......................... 9
故障排除 ......................... 10
規 格 ............................. 11
自我診斷功能 ................... 封底
CT
開箱
查點一下下列項目是否都有了:
• AC 電源配接器(1)
• USB 電纜(1)
• 聲頻連接導線
(立體聲迷你插頭× 1y 立體聲迷你插頭× 1)
(1)
• OpenMG Jukebox CD-ROM(1)
• OpenMG Jukebox 的使用說明書(1)
• 萬一 M D 座因品質有缺點而發生故障問
題時, SONY 將更換機器。但, SONY 不
負其他責任。
• 凡因使用 M D 座而造成的任何經濟上的
損失或利益上的損失,包含第三者的
索賠, SONY 概不負責。
CT
3
Page 40

部件的位置和功能
前面板部件說明
本章告訴您 MD 座上各種各樣按鈕的位置和功能。
132
6
1 N/> 按鈕
機器停止時,按此按鈕以開始播放。
機器在播放中,按此按鈕以找出下一首曲子的
開頭。
2 MD 裝碟口
請按照下列圖示裝插 MD 。
讓貼標籤面朝上
讓箭頭標誌指向光碟座
3 x/Z 按鈕
當機器正在播放中,按此按鈕以停止播放。
當機器停止中,按此按鈕以彈出 MD 。
4 錄音指示燈
在下列情形下點亮:
當從所連接的電腦把一音頻檔案傳輸到 MD 座
時(check-out)。
當從 MD 座把一音頻檔案傳輸到所連接電腦時
(check-in)。
當 MD 沒錄 TOC 資訊(例如曲子資訊)時。
當按了 x/Z 開始操作 MD 座以改寫 MD 的 TOC
時。
CT
4
5
5 Net MD 燈
指示機器和電腦之間的 USB 的連接狀態。
當用附帶的AC電源配接器只將機器連接到牆壁
電源插座時,點亮得較暗。
當把機器連接到電腦以操作系統運行時,點亮
得較亮。
6 播放指示燈
播放中點亮。
當用 MD 座寄存 MD 的 TOC 時,起閃爍。
註
• 當用附帶的 USB 電纜把 Net MD 連接到電腦以操
作系統運行時,除了用於彈出MD 的按鈕 x/Z 能
操作之外,其他所有MD座上的按鈕都不起作用。
在如此狀況下,每當您試圖操作不起作用的按鈕
時,Net MD燈即起閃爍(其他指示燈都熄滅)。
• Net MD 燈的閃爍,和其他指示燈的閃爍或點
亮,是表示 MD 座的自我診斷功能起作用。詳細
內容,請參看第 12 頁。
4
Page 41

後面板的部件說明
部件的位置和功能
1
4
1 DC IN 9V 插孔
用附帶的 AC 電源配接器將此插孔連接到牆壁
電源插座以供給 MD 座電源。
2 USB 插孔
用附帶的 USB 電纜將此插孔連接到您的電腦上
的 USB 插孔。
3 耳機插孔和 PHONE LEVEL(聲電平)控制
將耳機插頭連接到此插孔。
旋轉PHONE LEVEL 控制以調整所連接耳機的音
量。
4 ANALOG OUT(模擬輸出)插孔
用附帶的音頻連接導線(立體聲迷你插頭×
1y 立體聲迷你插頭× 1)或選購件的音頻連
接導線(立體聲迷你插頭×1y 聲插頭×2)將
有源揚聲器等連接到此插孔。
或
3
2
註
• 如果是通過 USB 中樞或 USB 分機線連接了電腦,
便不能保證MD座的完全性能了。一定請用附帶的
USB 電纜把 MD 座直接連接到電腦上。
• 不要把附帶的 AC 電源配接器連接到開關式的 AC
電源插座(例如放大器等上面的電源插座)。
• 限使用附帶的AC電源配接器。請勿使用任何其他
AC 電源配接器。
插頭的極性
為了遵守那依據 FCC(美聯邦電信委員會)
第 15 部 B 分部條例規定的數位裝置的限制,本
說明書中所介紹的屏蔽接口電纜,必須和設備
一起使用。
• 要通過耳機輸出聲音之前,最好請先完全關小音
量,然後一邊聽著聲音一邊逐漸轉大音量到自己
喜歡的電平。
CT
5
Page 42

連接
MDS-NT1
用附帶的 AC 電源配接器
接至牆壁電源插座
電腦
至您電腦上的
USB 插孔
至耳機
至有源揚聲器等
USB 電纜
讓 標誌朝上,並完全插入連接器。
為了遵守那依據 FCC(美聯邦電信委員
會)第15部B 分部條例規定的數位裝置
的限制,本說明書中所介紹的屏蔽接
口電纜,必須和設備一起使用。
至 USB 插孔
USB 電纜(附帶)
註
• 裝插插頭時,一定請垂直地插入。斜著角度插
入,可能會損壞連接器部件。
• 在連接 MD 座和電腦之前,一定請先把 OpenMG
Jukebox 軟體安裝到電腦上。否則,在連接時,
電腦可能會選擇不適當的 MD 座用激勵器,而且
MD 座還可能操作不正確。
當您把MD座連接到電腦時,可能會出現[Add New
hardware wizard](加新硬件師)。此時,請單
擊[Cancel]。
• 當您光用附帶的 USB 電纜將 MD 座連接到電腦
時,將不提供聲音輸出。要聽 MD 座的聲音,還
必須把耳機或有源揚聲器等連接到 MD 座(參看
第5頁)。
• 要從 MD 座輸出聲音到所連接電腦的揚聲器時,
請用附帶的音訊連接導線(兩端帶有立體聲小
型插頭)或無阻的同等市售品,將 MD 上的 LINE
OUT 插孔連接到電腦上的音訊輸入插孔。
• 從連接的電腦操作 MD 座當中,是不能拆下 USB
電纜的。要拆下 USB 電纜之前,一定請先聽掉
錄音或播放操作。
別在 MD 座和電腦之間使
用 USB 中樞。一定請用
附帶的 USB 電纜把 MD 座
直接連接到電腦。
CT
6
Page 43

附加資訊
錄音須知
有關錄音後指示燈的點亮或
閃爍
顯示器中點亮錄音指示燈時
表示已完成錄音,但未更新MD上的TOC(目
錄)以反映錄音結果。您如果在指示燈亮著時
拆下AC 電源配接器,錄音將受損失。只有在從
MD 座彈出 MD 時,您才能更新 TOC 。
註
如果是通過模擬對模擬連接進行錄音時,這個串行
拷貝管理系統的限制是不適用的。
為防意外刪除掉錄音內容
可令不能錄在MD上。請沿箭頭所指方向滑
動錄音保護小翼(參看下圖)以打開凹孔。要使
能錄音,則請關掉凹孔。
MD 的底面
錄音保護小翼
附加資訊
附加資訊
顯示器中閃爍著錄音指示燈時
表示 MD 座正在更新 TOC(目錄)。當閃爍
著指示燈時,請勿拆下AC電源配接器或移動MD
座。因為可能會錄不完全。
串行拷貝管理系統指南
數位音頻組件,例如CD , MD ,和DAT 因為
能處理音樂為數位信號,故能簡單地進行高品
質的音樂拷貝。
為保護具有版權的音樂源,本MD座採用有
串行拷貝管理系統,讓您利用數位對數位的連
接而只能作一次數位錄音拷貝。
只能用數位對數位連接作第一代拷貝。
例如:
• 您可作市售數位聲節目的拷貝(例如, CD 或
MD),但不能從此第一代拷貝進行第二次拷
貝。
• 您可以從用數位錄的模擬聲節目(例如, LP
唱片或音樂磁帶),或從數位衛星廣播節目
進行拷貝,但不能再從此第一代拷貝進行錄
音。
沿箭頭方向滑動
CT
7
Page 44

使用前須注意
名稱標籤位於機器底部外面。
安全須知
• 萬一有任何雜物或液體掉進機殼裡,即請拔
下MD座的電源線插頭並找持有資格的人檢查
過之後,才可再操作使用。
• 注意—本產品使用光學元件對眼睛有危險。
電源須知
• 操作MD座之前,請檢查MD座的操作電壓是否
符合當地電源電壓。操作電壓標示在AC電源
配接器上的名稱標籤。
• 機器只要是保持接插在牆壁電源插座,則即
使關掉了機器的電源開關,機器仍然沒有完
全斷開 AC 電源的。
• 如果長期不要用 MD座,一定請從牆壁電源插
座拔下AC電源線,必須抓住插頭拔下,切勿
拉著導線拔下。
• 要更換 AC 電源線時,限找持有資格的服務
店。
MD 座內的冷凝須知
您如果把MD座從寒冷處直接帶進溫暖的地
方,或放在極潮濕的房間裡,濕氣便可能冷凝
在MD座裡的透鏡上。發生如此情形時,MD座便
可能不能做適當的操作。此時,請取出MD 並打
開 MD 座電源放置數小時至水分蒸發乾。
清潔須知
請用軟布輕蘸溫和的洗滌劑溶液擦拭機
殼,面板和控制器。切勿使用任何類型的沙
紙,研磨粉或如酒精,汽油等溶劑清潔。
關於您的MD座如果仍有疑問或問題,即請
洽詢附近的 Sony 代銷店。
迷你光碟(MD)塑料匣須知
• 別打開塑料匣開閉器暴露 MD 。
• 別把塑料匣放置在強烈陽光下,或高溫,潮
濕或多塵的環境中。
CT
8
Page 45

MD 的管理
系統限制
MD 被密封在塑料匣內以防光碟沾染垃圾或
指痕而且便於手拿。
但如果垃圾侵入匣內或塑料匣翹曲,將可
能使光碟操作不正常。為保證能聽最高音質音
樂,務請注意下列幾點:
• 別直接接觸匣內的光碟。又如果強制打開塑
料匣的開閉器,也將可能損壞裡面的光碟。
• 一定請使用 MD附帶的標籤並黏貼在適當的位
置。標籤的形狀可能因 MD 製造廠牌而異。
適當的貼
標籤位置
開閉器
MD 應該保存在何處
別把MD塑料匣放置在會直接照射到陽光,
或太熱,太潮濕的地方。
基準保養
請用乾布擦拭清潔塑料匣表面的灰塵和垃
圾。
您的MD 座的錄音系統根本上是與磁帶座和
D A T 座所使用的不同,限制的特點敘述如下。
請注意,這些限制是出自MD錄音系統固有的限
制,並不是機器的機械上的問題。
即使MD還沒到達最大的錄音時間,光碟的
剩餘可錄時間變成“0”
當 MD 上已錄了 255 軌蹟(曲子)時,光
碟的剩餘可錄時間即將變“0”而不管總錄音
時間。亦即 MD 上是不能錄 255 軌蹟以上的。
如果要繼續錄音,只得刪除不必要的軌蹟或使
用別的可錄 MD 。
即使刪除了一些短軌蹟(曲子),剩餘錄
音時間並不增加
凡12秒* 長以下的軌蹟是不計算為軌蹟
的。因此,雖刪除了它們也可能不增加錄音時
間。
* 用立體聲模式錄音時。(單聲道或 LP2 模式時,
大約 24 秒;LP4 模式時大約 48 秒。)
接下頁
附加資訊
CT
9
Page 46

系統限制(續)
MD上的總錄音時間和剩餘可錄時間,可能
不等於最大總錄音時間
無論再短的內容,每軌蹟都以 2 秒為最小
錄音單位 * 。所錄的內容,便可能比最大錄音
容量短。光碟如有裂痕,空間便可能更減少。
* 用立體聲模式錄音時。(單聲道或 LP2 模式時,
大約 4 秒;LP4 模式時大約 8 秒。)
用編輯創作的軌蹟(曲子),在監聽著聲
音要找出某一點時,可能出現聲脫落。
有些軌蹟(曲子)是不能和別的相組合的
已被編輯的軌蹟(曲子)可能不能相組合。
播放指示燈長時間閃爍
如果裝入新MD,播放指示燈的閃爍,將比
用過的 MD 久些。
故障排除
使用MD座時,如果遭遇任何下列困難,即
請用此故障排除指南幫助解決問題。萬一仍然
不能解決問題,即請洽詢附近的Sony 代銷店。
MD 座不能操作或操作狀態太差。
• MD 可能髒了或損壞了。請更換 MD 。
• 當 MD 座連接於電腦而運轉著操作系統時,
此時您只能使用 x/Z 按鈕(在 MD 座停著
時,用於排出光碟的按鈕)。
MD 座不播放。
• MD座內有冷凝水分。取出MD光碟而把MD 座
放置在溫暖處幾個小時至機內水分蒸發乾
燥。
• MD 座可能沒有正確地連接到放大器。請檢
查一下連接狀態。
• MD 光碟裝插錯了方向。請讓 MD 貼標籤面朝
上並讓箭頭標誌指向裝碟口,把 MD 裝進裝
碟口。
• MD 可能是沒錄音的。請更換已錄音的光
碟。
聲音帶有太多靜電噪音。
• 被電視機或類似裝置發生的強磁場干擾操
作。請把 MD 座移離具強磁場的信號源裝
置。
MD 座不能錄音。
• MD 座成錄音保護狀態。請滑動錄音保護小
翼關掉裝碟口。
• MD 座與電腦沒有連接好。請檢查一下連接
狀態。
• 裝的是原版錄音的 MD 。請換裝能錄音的
MD 。
• MD 上剩餘可錄時間不夠。換裝一張已錄部
分較少的 MD ,或刪除不必要的軌蹟(曲
子)。
• 進行錄音中,發生停電或被拆下了 AC 電源
配接器。可能喪失了錄在該點上的數據。
請重複錄音程序,重新進行錄音。
10
CT
Page 47

MD Net 燈起閃爍。
• 如果其他指示燈也點亮或閃爍,即表示 MD
座的自我診斷功能起了作用。請參看第 12
頁的表。
• 當其他指示燈熄滅時,即在OpenMG Jukebox
起作用時,您按了不作用的 N / > 按
鈕。此時,只有用於彈出MD的x/Z按鈕能
操作。
註
雖用以上所述解決方法而 M D 座仍然不能操作適
當,即請彈出MD ,再插上 AC 電源配接器於AC電源
插座。
規格
系統 迷你數位音頻系統
光蝶 迷你光碟
雷射器 半導體雷射器(λ = 780nm)
轉速(CLV) 800rpm(每分鐘轉數)到1800rpm
錯誤校正 先進的交叉隔行振簧 X 射線碼
取樣頻率 44.1kHz
編碼 自適變量聲學編碼(ATRAC)/
調制系統 EFM(8 到 14 的調制)
頻道數 2 立體聲頻道
頻率響應 5 到 20,000Hz ± 0.8dB
信噪比 播放中超過 96dB
頻率顫動 可測限度以下
輸出端子
LINE(ANALOG)OUT 插孔型式:立體聲迷你型
(線路(模擬)輸出) 額定輸出:1Vrms(50KΩ 時)
PHONES(耳機) 插孔型:立體聲迷你型
一般規格
USB 插孔 系列 B ,自供電的,全速
購買地 電源 *
美國和加拿大 120V CA , 60Hz
歐洲和其他國家 220-230V CA , 50/60Hz
* 使用 AC 電源配接器(附帶)。
耗電量 6W
尺寸(大約) 寬 152 ×高 52 ×縱深 249mm
質量(大約) 1.0kg(公斤)
發射期間:連續
(ACIRC)
ATRAC 3
負載阻抗:超過 10KΩ
額定輸出:5mW
負載阻抗:32Ω
(含突出部分和控制器)
附加資訊
隨機附件
參看第 3 頁。
由杜比實驗證明公司授權的美國及外國專利。
設計和規格有所變更時,恕不另行奉告。
11
CT
Page 48

自我診斷功能
當發生錯誤時, MD 座的自我診斷功能將自動地檢查 MD 座的條件,然後通過兩指示燈指出錯誤
的性質類別。如果指示燈點亮或閃爍,即在下表找出它們並實施所指示措施。萬一仍不能解決問
題,即請洽詢附近的 Sony 代銷店。
播放指示燈
(綠色)
閃爍 MD 座不能適當地讀取 MD 上的 TOC(目錄)。(C13/Read Error(讀取
點亮 點亮 操作 MD 座所需內部數據中,有錯誤。(E0001/MEMORY NG(記憶裝置
閃爍 閃爍 光學拾音器有問題。(E0101/LASER NG(雷射器不好))
兩指示燈交替閃爍 發生 MD 裝載的問題。(E0201/LOADING NG(裝載不好))
錄音指示燈
(紅色)
閃爍 不能適當地進行錄音。(C13/Rec Error(錄音錯誤))
閃爍 所裝的 MD 光碟髒了(污泥,指痕,等),有裂痕,或品質不合標準。
點亮 MD 座不能適當地讀取 MD 上的 TOC(目錄)。(C14/Toc Error(目錄
原因解決方法
, 請把 MD 座安放在平穩台面上,然後重複錄音程序。
(C13/Rec Error(錄音錯誤))
, 更換光碟,然後重複錄音程序。
錯誤))
, 取出 MD ,再把它裝上。
錯誤))
, 換裝別的光碟。
, 可能的話,請刪除 MD 上的所有曲子。
不好))
, 請洽詢附近的 Sony 代銷店。
, 請洽詢附近的 Sony 代銷店。
, 請洽詢附近的 Sony 代銷店。
Sony Corporation Printed in Malaysia
 Loading...