

Sony LIB-D81 Operating Instructions
AIT Autoloader
4-673-839-19(1)
Operating Instructions
Before operating the unit, please read this manual
thoroughly and retain it for future reference.
LIB-D81
© 2003 Sony Corporation

WARNING
To reduce the risk of fire or electric shock, do not expose this apparatus to rain or moisture.
To avoid electrical shock, do not open the cabinet.
Refer servicing to qualified personnel only.
Caution
The mains plug on this equipment must be used to disconnect mains power.
Please ensure that the socket outlet is installed near the equipment and shall be easily accessible.
NOTICE
Use the power cord set approved by the appropriate testing organization for the specific countries where this unit is to be
used.
Achtung
Zur Trennung vom Netz ist der Netzstecker aus der Steckdose zu ziehen, welche sich in der Nähe des Gerätes befinden
muß und leicht zugänglich sein soll.
Hinweis
Maschinenlärminformations-Verordnung - 3. GPSGV, der höchste Schalldruckpegel beträgt 70 dB(A) oder weniger
gemäss EN ISO 7779.
Ratings Elektrische Daten
Voltage Spannung
AC 100 V - 240 V 100 V - 240 V Wechselstrom
Current Stromstärke
0.7 A - 0.35 A 0,7 A - 0,35 A
Frequency Frequenz
50 / 60 Hz 50 / 60 Hz
Max. Ambient Temperature Max. Umgebungstemperatur
40 °C 40 °C
A certified power supply cord has to be used with this equipment.
The relevant national installation and/or equipment regulations shall be considered.
A certified power supply cord not lighter than ordinary polyvinyl chloride flexible cord according to IEC 60227
(designation H05VV-F 3G 0.75 mm
synthetic rubber according to IEC 60245 (designation H05RR-F 3G 0.75 mm
Zum Netzanschluss dieses Gerätes ist eine geprüfte Leitung zu verwenden.
Es sind die zutreffenden nationalen Errichtungs- und/oder Gerätebestimmungen zu beachten.
Es ist eine geprüfte flexible PVC-ummantelte Leitung entsprechend IEC 60227 (H05VV-F 3G 0,75 mm
F 3G 0,75 mm
(Bauartkurzzeichen H05RR-F 3G 0,75 mm
2
) zu verwenden. Andernfalls ist eine flexible Leitung aus synthetischem Gummi entsprechend IEC 60245
2
or H05VVH2-F2 3G 0.75 mm2) shall be used. Alternative a flexible cord be of
2
) zu verwenden.
2
) shall be used.
2
oder H05VVH2-
ATTENTION
According to the EU Directives related to product safety, EMC and R&TTE the manufacturer of this product is Sony
Corporation, 1-7-1 Konan Minato-ku Tokyo, 108-0075 Japan. The Authorised Representative is Sony Deutschland
GmbH, Hedelfinger Strasse 61,70327 Stuttgart, Germany. For any service or guarantee matters please refer to the
addresses given in separate service or guarantee documents.
AUFMERKSAMKEIT
Im Sinne der EU Richtlinien bezüglich Produktsicherheit, EMV und R&TTE ist Sony Corporation, 1-7-1 Konan
Minato-ku Tokyo, 108-0075 Japan der Hersteller dieses Produktes. Bevollmächtigter ist Sony Deutschland GmbH,
Hedelfinger Strasse 61,D-70327 Stuttgart. Für Service oder Garantieangelegenheiten wenden Sie sich bitte an die in
separaten Service oder Garantiedokumenten angegebenen Adressen.
European Union Restriction of Hazardous Substances Directive compliant.
Entspricht der Richtlinie der Europäischen Union zur Beschränkung der Verwendung
gefährlicher Stoffe.
2
INFORMATION
For the customers in the U.S.A.
You are cautioned that any changes or modifications not expressly approved in this manual could void your authority to
operate this equipment.
Note: This equipment has been tested and found to comply with the limits for a Class B digital device, pursuant to Part 15
of the FCC Rules. These limits are designed to provide reasonable protection against harmful interference in a residential
installation.
This equipment generates, uses, and can radiate radio frequency energy and, if not installed and used in accordance with
the instructions, may cause harmful interference to radio communications. However, there is no guarantee that interference
will not occur in a particular installation. If this equipment does cause harmful interference to radio or television reception,
which can be determined by turning the equipment off and on, the user is encouraged to try to correct the interference by
one or more of the following measures:
• Reorient or relocate the receiving antenna.
• Increase the separation between the equipment and receiver.
• Connect the equipment into an outlet on a circuit different from that to which the receiver is connected.
• Consult the dealer or an experience radio/TV technician for help.
All interface cables used to connect peripherals must be shielded in order to comply with the limits for a digital device
pursuant to Subpart B of Part 15 of FCC Rules.
If you have any questions about this product, please contact Sony Support Center written in the warranty card.
Declaration of Conformity
Trade Name: SONY
Model No.: LIB-D81
Responsible Party: Sony Electronics Inc.
Address: 16530 Via Esprillo San Diego, CA. 92127 U.S.A.
Telephone No.: 858-942-2230
This device complies with Part 15 of the FCC Rules. Operation is subject to the following two conditions:
(1) This device may not cause harmful interference, and
(2) This device must accept any interference received, including interference that may cause undesired operation.
Für Kunden In Deutschland
Diese Ausrüstung erfüllt die Europäischen EMC-Bestimmungen für die Verwendung in folgender/folgenden Umgebung(en):
·Wohngegenden
·Gewerbegebiete
·Leichtindustriegebiete
(Diese Ausrüstung erfüllt die Bestimmungen der Norm EN55022, Klasse B.)
Ratings are indicated on the rear, while regulatory agency marks are separately affixed on the bottom.
3

Table of Contents
Chapter 1 Introduction
Chapter 2 Installation
Overview.......................................................................7
Product Features and Functions ...............................9
Front ................................................................................ 9
Rear ............................................................................... 10
Interior (Front) ..............................................................11
System Structure.......................................................12
Compatible Data Cartridges .....................................12
AIT Cartridges ..............................................................12
Cleaning Cartridge ........................................................ 13
Software .....................................................................14
Precautions ................................................................14
Overview.....................................................................15
Unpacking ..................................................................15
Package Contents .....................................................16
Preparing the Host Computer ..................................16
Installing the AIT Autoloader....................................17
Connecting the Power Cable....................................18
Connecting to the Host Computer ...........................18
Setting the DIP Switches ..........................................20
Setting the SCSI ID ....................................................22
Connecting SCSI Peripheral Devices ......................23
Turning the Power On/Off.........................................23
Setting Cartridges .....................................................25
Preparing Cartridges ..................................................... 25
Inserting Cartridges....................................................... 26
Setting Application Software....................................28
4

Chapter 3 Basic Usage
Overview.....................................................................29
Control Panel .............................................................29
Using the Control Panel ................................................ 29
Message Display ...........................................................30
Warnings ....................................................................30
Errors..........................................................................32
Disaster Recovery Function .....................................32
Assigned Element Addresses ..................................33
Handling the Cartridges............................................34
Handling........................................................................ 34
Storing........................................................................... 34
Maintenance...............................................................34
Chapter 4 Operating the AIT Autoloader
Overview.....................................................................36
Using Cartridges........................................................36
Removing/Changing Cartridges.................................... 36
Chapter 5 Cleaning the AIT Drive
Overview.....................................................................39
Cleaning the AIT Drive ..............................................39
Appendix
Cleaning the Air Filter ...............................................43
Troubleshooting ........................................................44
Transporting the AIT Autoloader .............................46
Hardware Specifications...........................................47
Hardware....................................................................... 47
Data Storage Capacity................................................... 48
SCSI Cable and Terminator Specifications.............48
SCSI Cable.................................................................... 48
SCSI Cable Length........................................................ 48
SCSI Specifications...................................................48
About the SCSI Components ........................................ 48
About the SCSI Bus ...................................................... 49
Error Code List ..........................................................49
Other Messages.........................................................54
Index ...........................................................................57
5

© 2003 Sony Corporation. All rights reserved.
Trademarks
• Sony, StorStation and Advanced Intelligent Tape are trademarks or registered trademarks of Sony Corporation in this
country, other countries, or both.
• Other product names are trademarks or registered trademarks of their respective owners in this country, other countries,
or both.
6

Overview
Introduction
The LIB-D81 AIT Autoloader is a desktop AIT (Advanced Intelligent Tape)
automatic loader (hereafter, “AIT autoloader”) with a built-in AIT drive. Up to
8 cartridges can be inserted in the AIT autoloader. The unit can also be
connected to and used with a workstation or server.
Up to 8 cartridges can be used
Up to 8 AIT cartridges can be used. Cartridges can be replaced from the front
panel. The following types of cartridges can be used in this AIT autoloader:
• AIT-5 cartridge: records up to 8.32 terabytes of data
(native: 3.2 terabytes)
• AIT-4 cartridge: records up to 4.16 terabytes of data
(native : 1.6 terabytes)
• AIT-3 Ex cartridge: records up to 3.12 terabytes of data
(native : 1.2 terabytes)
• AIT-3 cartridge: records up to 2.08 terabytes of data
(native : 0.8 terabytes)
• AIT-2 Turbo cartridge: records up to 1.66 terabytes of data
(native : 0.64 terabytes)
• AIT-2 cartridge: records up to 1.04 terabytes of data
(native : 0.4 terabytes)
• AIT-1 Turbo cartridge: records up to 0.83 terabytes of data
(native: 0.32 terabytes)
• AIT-1 cartridge: records up to 0.73 terabytes of data
(native : 0.28 terabytes)
• AIT-E Turbo cartridge:records up to 0.41 terabytes of data
(native: 0.16 terabytes)
Chapter
Notes
• Cartridges that can be used vary according to the type of built-in drive.
• The data storage capacity mentioned above assumes a data compression ratio
of 2.6:1.
• For combinations other than those mentioned above, refer to the attached
sheet.
Chapter 1 Introduction
7

Compact
Because of its compact size (170 × 350 × 224 mm) and light weight
(approx. 7 kg), the LIB-D81 is the perfect desktop AIT Autoloader.
Fast Wide SCSI compliant
The loader of the AIT autoloader is Fast Wide SCSI (LVD/SE) compliant.
When it is equipped with an AIT-5, AIT-4, AIT-3 Ex, AIT-3, or AIT-2 Turbo
drive, the drive is Ultra 160 SCSI (LVD/SE) compliant, while when the
autoloader is equipped with an AIT-2 or AIT-1 drive, the drive is Wide Ultra
SCSI (LVD/SE) compliant.
Chapter 1 Introduction
8
Product Features and Functions
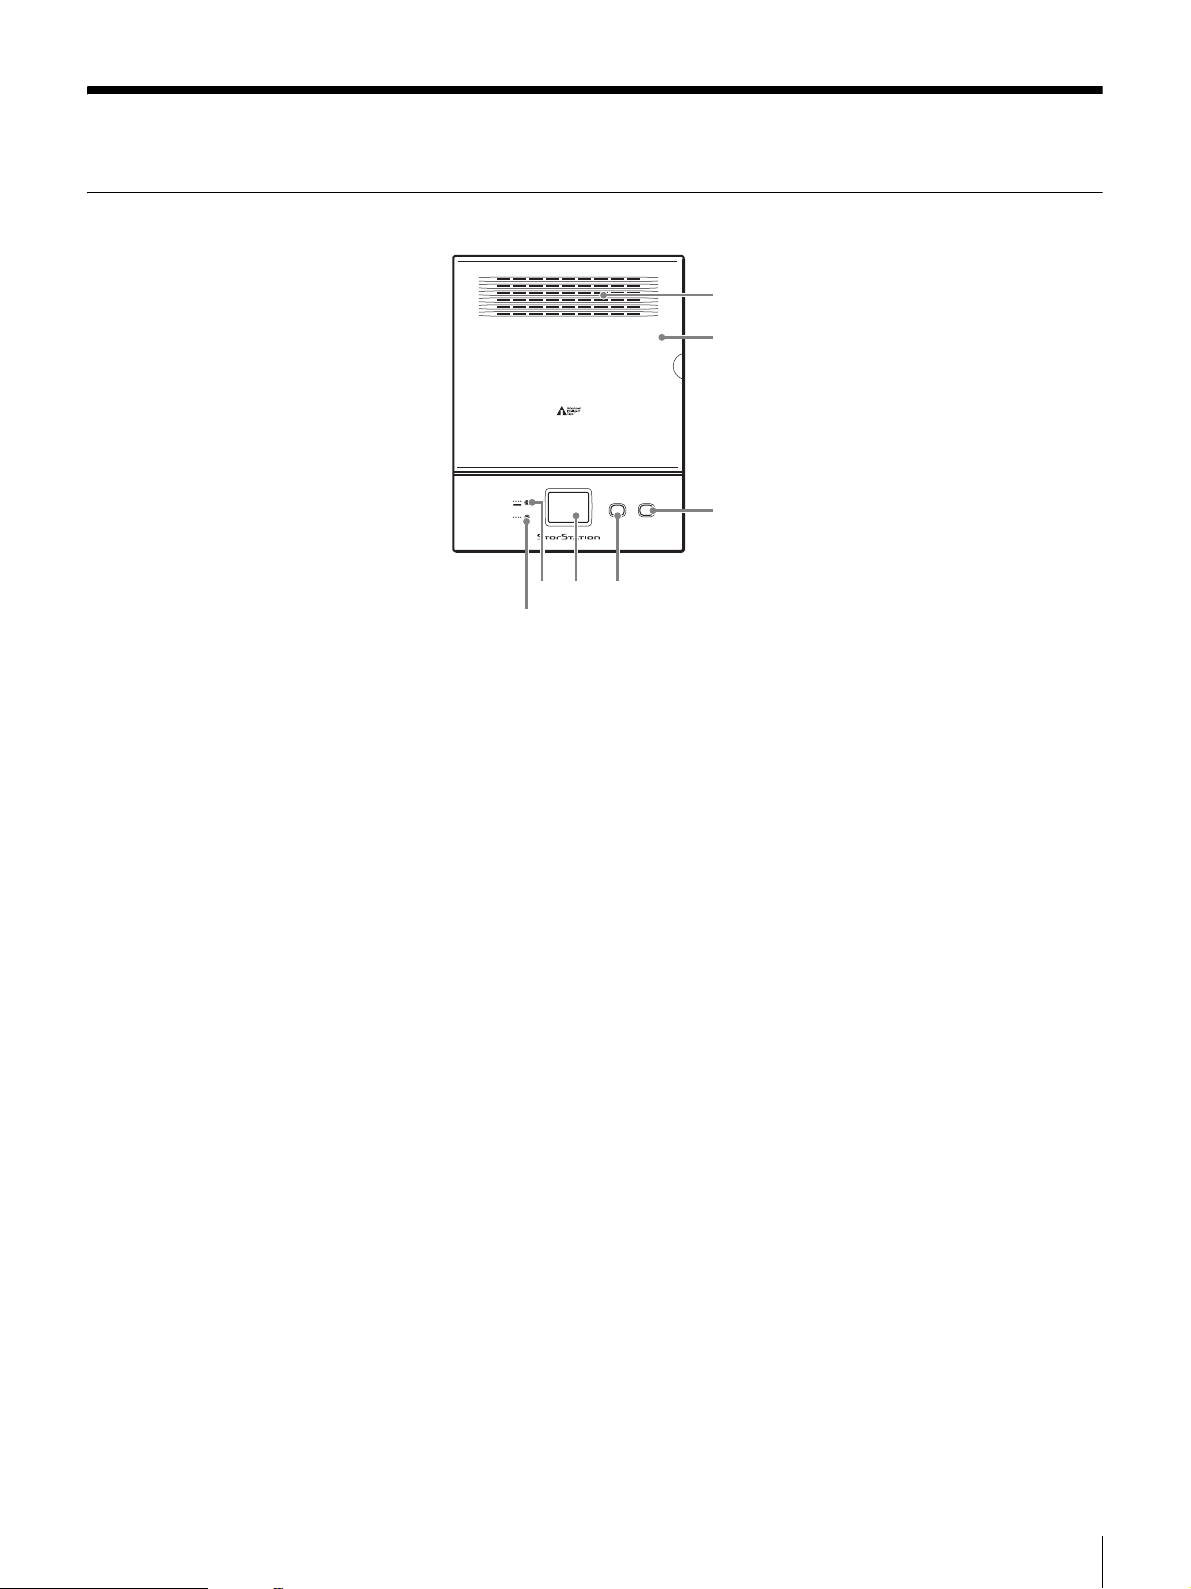
Front
AIT LIBRARY LIB-D81
5
CLEAN DOOR
4
ERROR
WARNING
CLEANING
6
7
A Ventilation Holes
Be careful not to block the ventilation holes. If the ventilation holes are blocked,
the AIT autoloader may overheat, resulting in damage.
1
2
3
B Front Door
Used in inserting and removing AIT cartridges. Press the DOOR button to
unlock and open the door. The AIT autoloader cannot operate when the door is
open, therefore when inserting or replacing a cartridge, make sure that the door
is securely closed. When the door is closed it locks automatically.
C DOOR Button
Press to open the front door. Do not press this button while the AIT autoloader
is operating.
D CLEAN Button
Insert the cleaning cartridge in slot CL/8 and press for at least three seconds to
clean the AIT drive.
E Message Display
The message display shows how many cartridges are in the AIT autoloader.
When in normal standby state, it displays the status of the AIT autoloader.
F ERROR/WARNING LED
Lights or flashes orange when a specific operation is necessary or an error
occurs. When it lights it indicates a warning, whereas when it flashes it indicates
an error. When this happens, a 2-character code appears on the message display.
For details about these codes, see “Error Code List” (page 49), “Other
Messages” (page 54), or the code reference table.
G CLEANING LED
Flashes green when the AIT drive is in need of cleaning. For details about
cleaning the AIT drive, see “Cleaning the AIT Drive” (page 39).
Chapter 1 Introduction
9
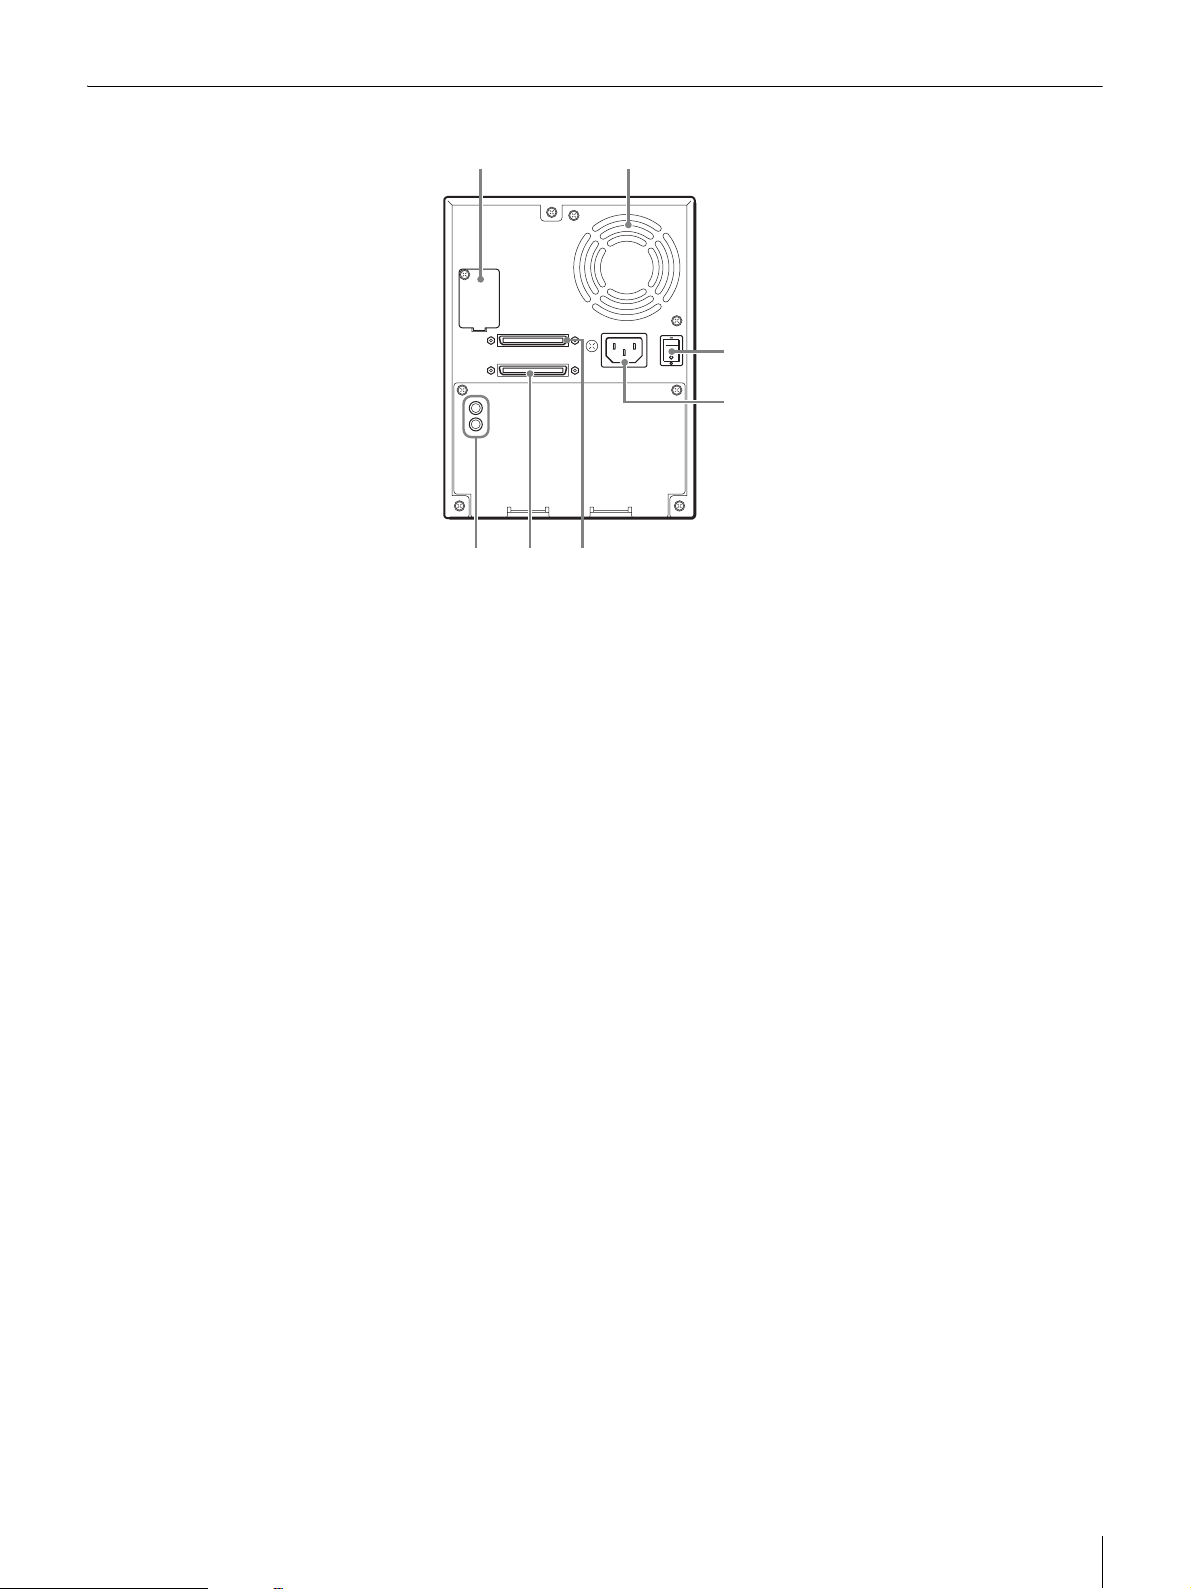
Rear
1 2
3
4
567
A Setup DIP Switches and DIP Switch Cover
Used to set up the AIT autoloader. Remove the screw and cover to access the
DIP switches. For details, see “Setting the DIP Switches” (page 20).
B Ventilation Holes
Please be careful not to block the ventilation holes. If the ventilation holes are
blocked, the AIT autoloader may overheat, resulting in damage.
C Power Switch
To turn the AIT autoloader on or off, press this power switch. When you restart
the AIT autoloader, be sure to wait at least 10 seconds before turning it on again.
D Power Supply Connector
Plug the supplied power cord into this connector.
E SCSI connector 1 6 SCSI connector 2
For information about connecting the SCSI connectors, see “Connecting to the
Host Computer” (page 18) and “Connecting SCSI Peripheral Devices” (page
23) in Chapter 2, “Installation.”
G SCSI ID Setup Switch
Used to set the SCSI ID of the AIT autoloader. For details, see “Setting the SCSI
ID” (page 22).
Chapter 1 Introduction
10
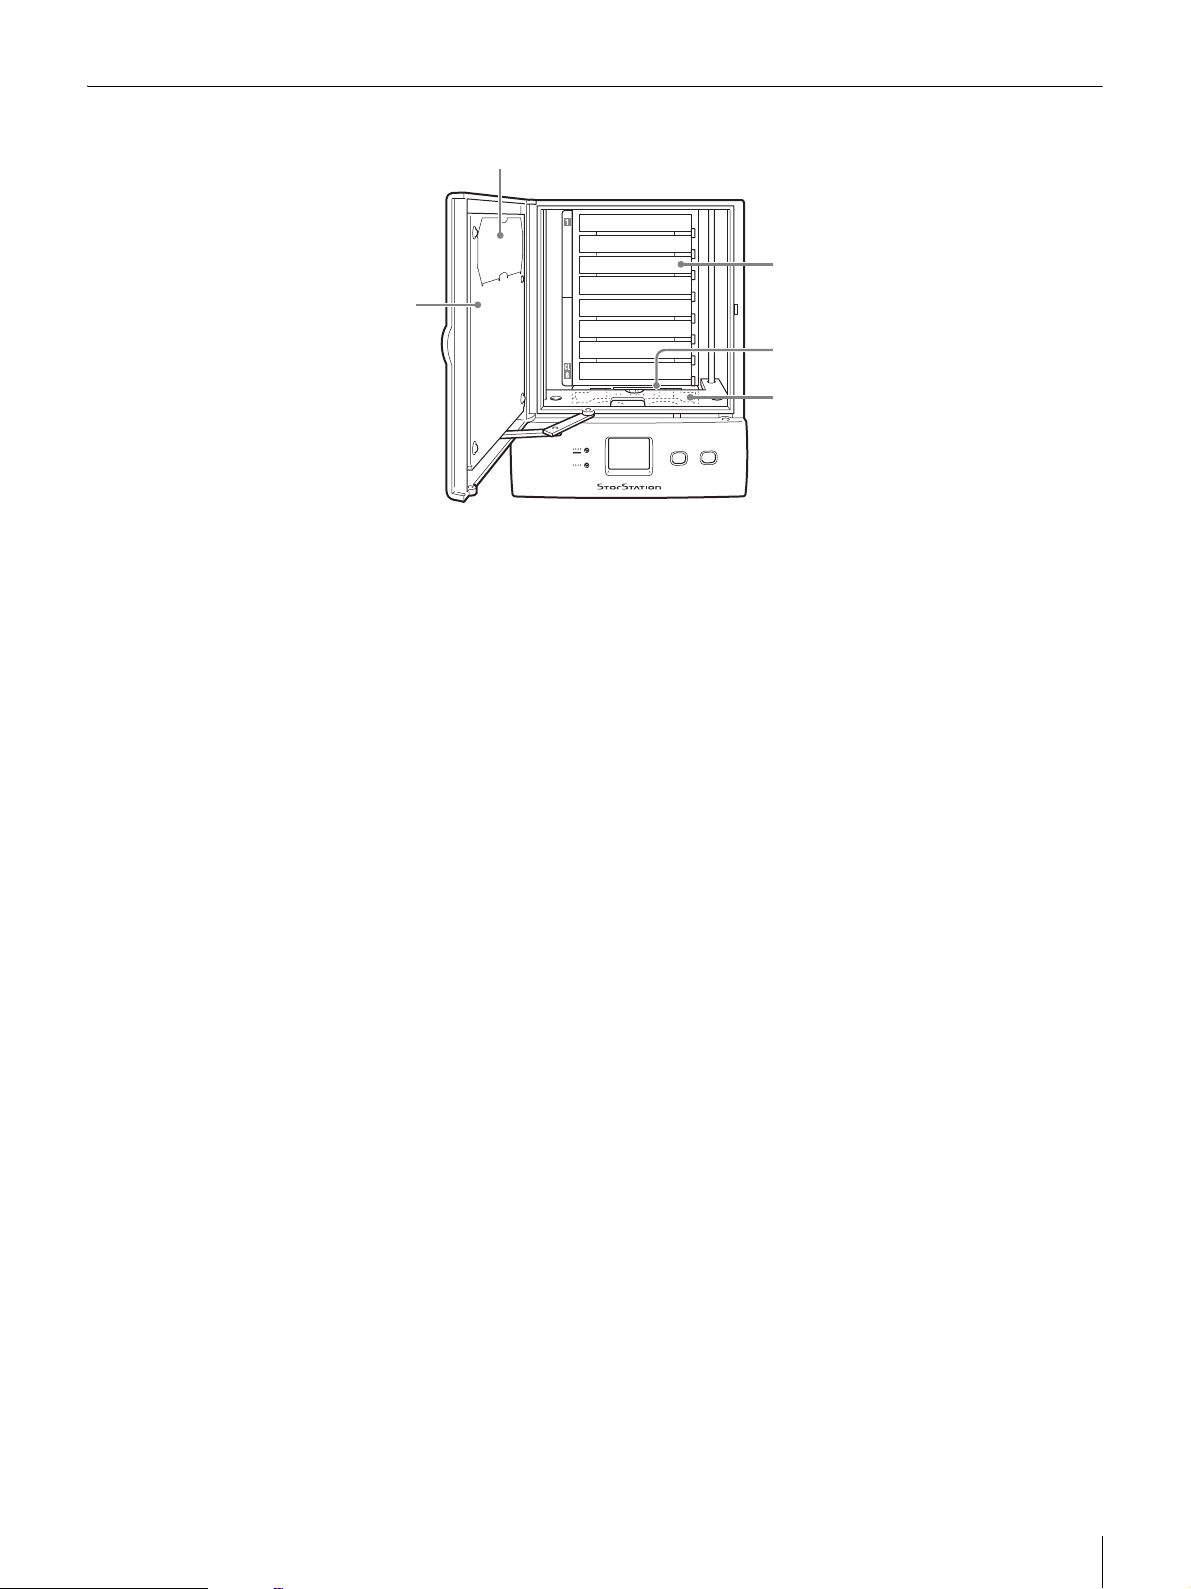
Interior (Front)
2
3
1
4
5
AIT LIBRARY LIB-D81
OR
DO
LEAN
WARNING
CLEANING
ERROR
C
A Front Door
B Air Filter
Periodically clean the air filter with a vacuum cleaner (we recommend monthly
cleaning). For details about how to replace the air filter, see “Cleaning the Air
Filter” (page 43).
C Cartridge Case
You can insert up to eight AIT cartridges in the case. Slots are numbered 1 to 8,
from the highest slot down. When using the cleaning cartridge, make sure that
you insert it in slot CL/8 (the lowest slot).
D AIT Drive
The AIT autoloader is equipped with one AIT drive.
E Elevator
Lowers cartridges to the AIT drive and returns them to their slots. When you
turn on the AIT autoloader, the elevator moves up and down counting the
cartridges, whose number appears on the message display.
Chapter 1 Introduction
11
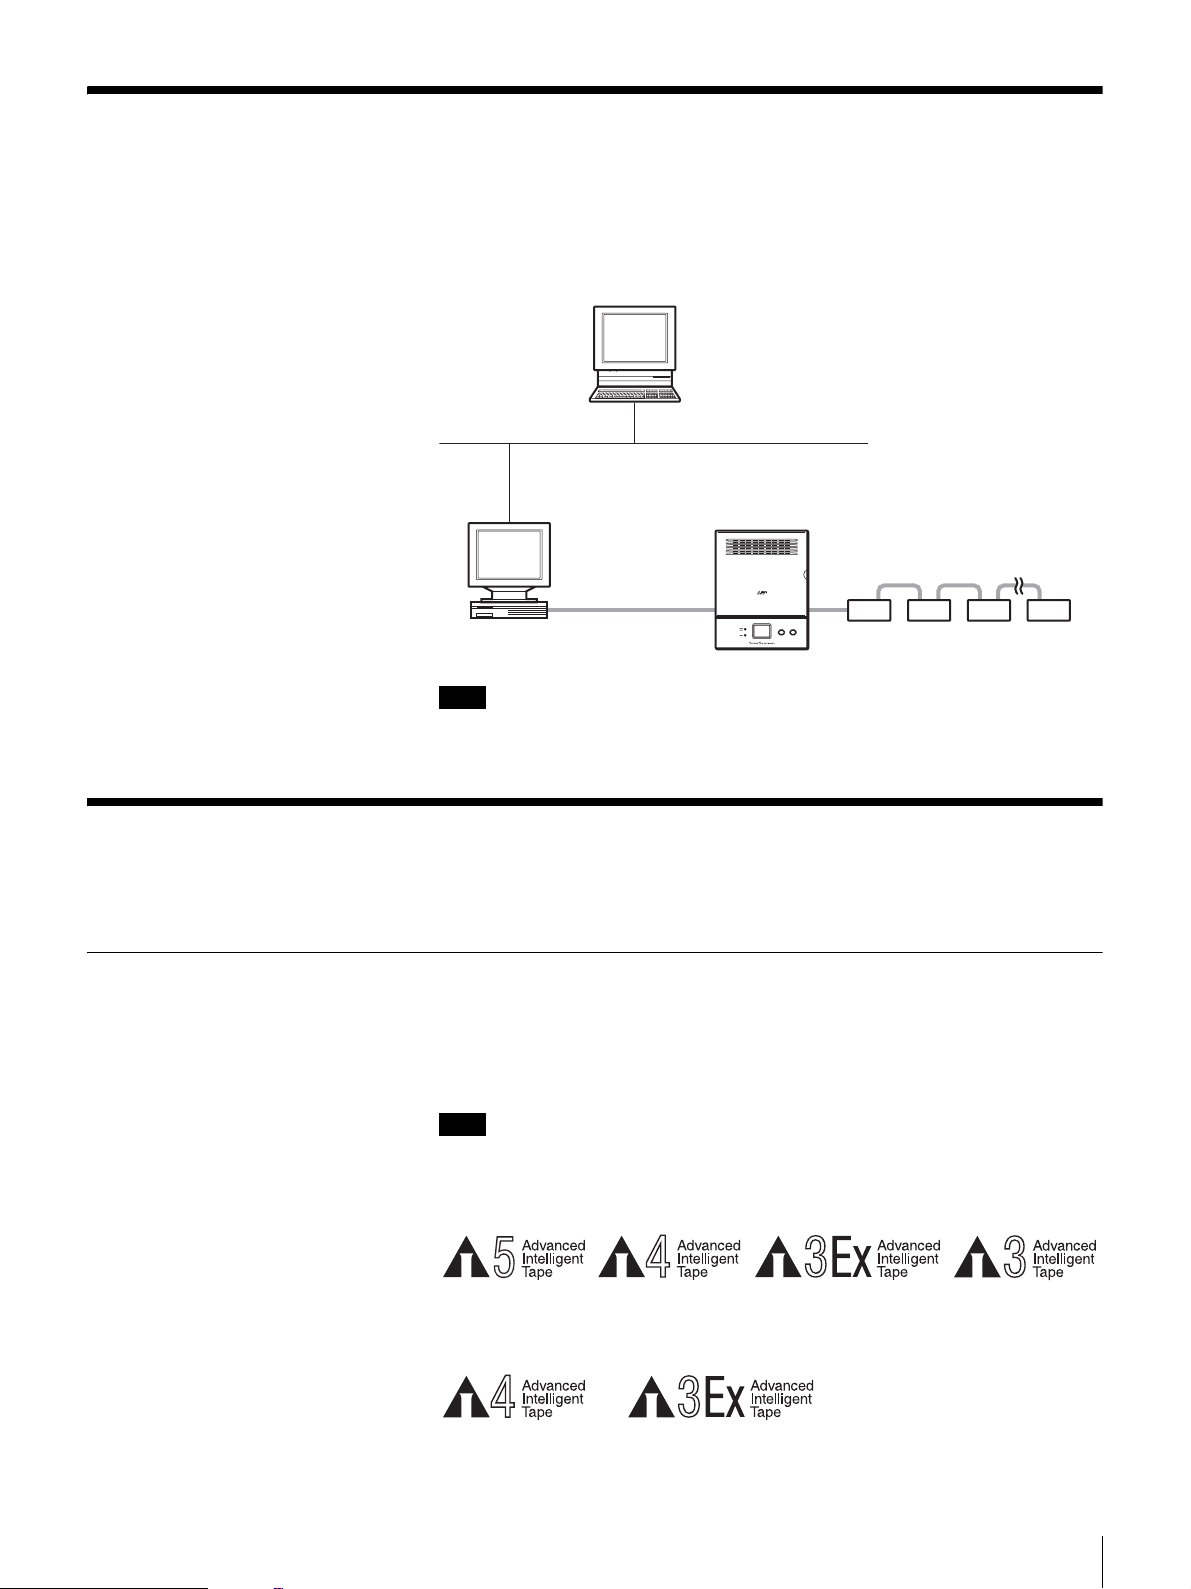
System Structure
To obtain the best performance out of your AIT drive, we recommend that you
connect the AIT autoloader to a host computer equipped with an Ultra 160 SCSI
(LVD/SE) interface. The AIT autoloader is controlled through the host
computer.
Computer
Ethernet (example)
LIB-D81
68-pin cable
AIT LIBRARY LIB-D81
CLEAN DOOR
ERROR
Host computer
SCSI
WARNING
CLEANING
SCSI peripheral devices
Note
A SCSI host bus adapter card must be installed in the host computer.
Compatible Data Cartridges
This section describes what AIT cartridges are used in the AIT autoloader.
AIT Cartridges
To achieve the maximum transfer rate and recording capacity, use the
appropriate type of AIT cartridge for your drive. For information on recording
capacities, see “Hardware Specifications” (page 47) in the “Appendix.”
Note
For combinations other than those mentioned below, refer to the attached sheet.
AIT-5 Drive
AIT-5 mark AIT-3 Ex mark
AIT-4 Drive
AIT-4 mark
AIT-3 mark
AIT-4 mark AIT-3 Ex mark
Chapter 1 Introduction
12
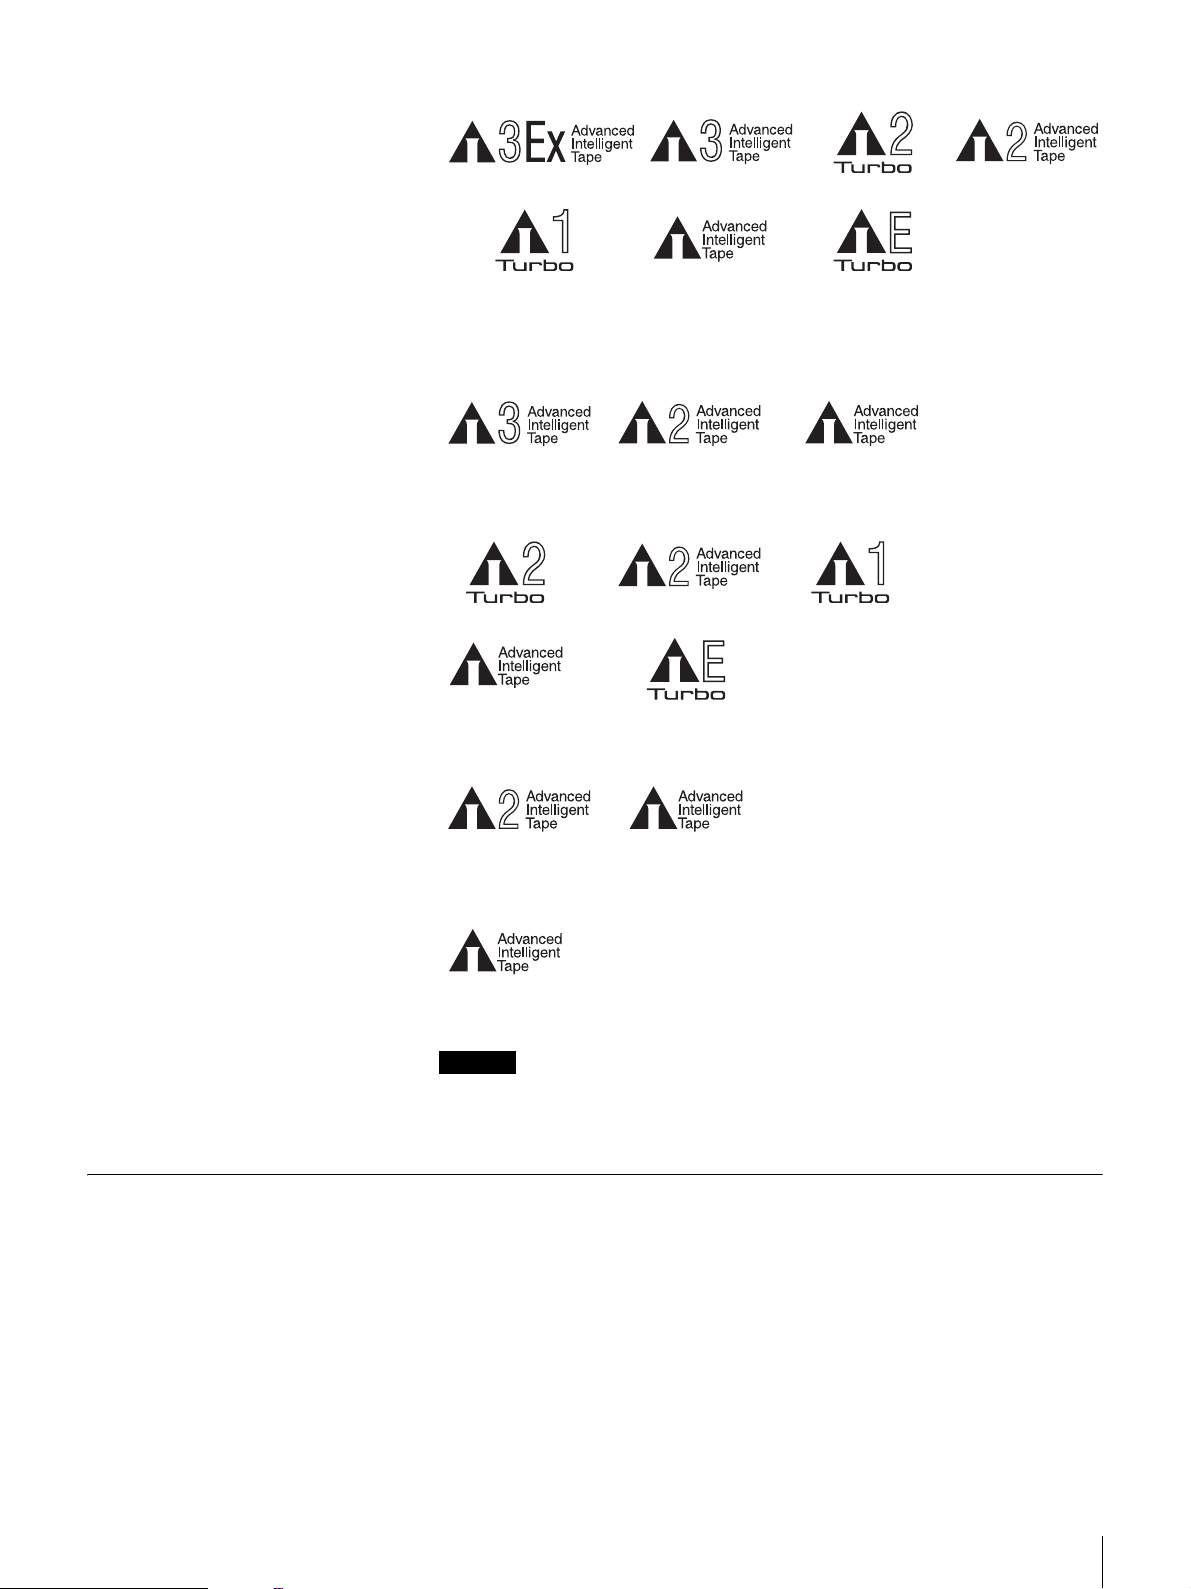
AIT-3 Ex Drive
AIT-2 Turbo mark
AIT-1 Turbo mark* AIT-E Turbo mark*
AIT-1 mark*
* Only supports read operations
AIT-3 Drive
AIT-3 mark
AIT-2 mark AIT-1 mark
AIT-2 Turbo Drive
AIT-1 mark
AIT-2 mark
AIT-E Turbo mark
AIT-1 Turbo markAIT-2 Turbo mark
AIT-2 mark*AIT-3 markAIT-3 Ex mark
Cleaning Cartridge
AIT-2 Drive
AIT-2 mark AIT-1 mark
AIT-1 Drive
AIT-1 mark
Caution
Do not use 8 mm video tapes. An 8 mm video tape looks a lot like an AIT
cartridge, but has different specifications. Do not use any cartridge other than
those listed above. Use only designated AIT data cartridges.
To clean the AIT drive, use an AIT Cleaning cartridge. There are four types of
cleaning cartridges: the SDX5-CL for use with AIT-5 drives; SDX4-CL or
SDX4-CLL for use with AIT-4 drives; SDX3X-CL for use with AIT-3 Ex
drives; and SDX1-CL for use with AIT-3, AIT-2, and AIT-1 drives. Make sure
that you use the cleaning cartridge appropriate for your drive. For information
on cleaning, see “Cleaning the AIT Drive” (page 39) in Chapter 5, “Cleaning
the AIT Drive.”
Chapter 1 Introduction
13

Software
Precautions
For guidance on application software that can be used with the AIT autoloader
and supported operating systems, contact your dealer.
• Use cartridges suited to the type of AIT drive installed. Using cartridges other
than AIT cartridges may cause improper operations. For information about
cartridges that can be used with the AIT autoloader, see “Compatible Data
Cartridges” (page 12).
• Do not insert anything except AIT cartridges in the slot of the cartridge case,
as doing so may result in damage.
• If the unit is suddenly taken from a cold to a warm location, or if ambient
temperature suddenly rises, moisture may form on the outer surface and/or
inside of the unit. This is known as condensation. If condensation occurs, put
the unit aside without turning it on and wait until the condensation clears. Do
not use the unit in such a state, as this may damage it.
Chapter 1 Introduction
14
Overview
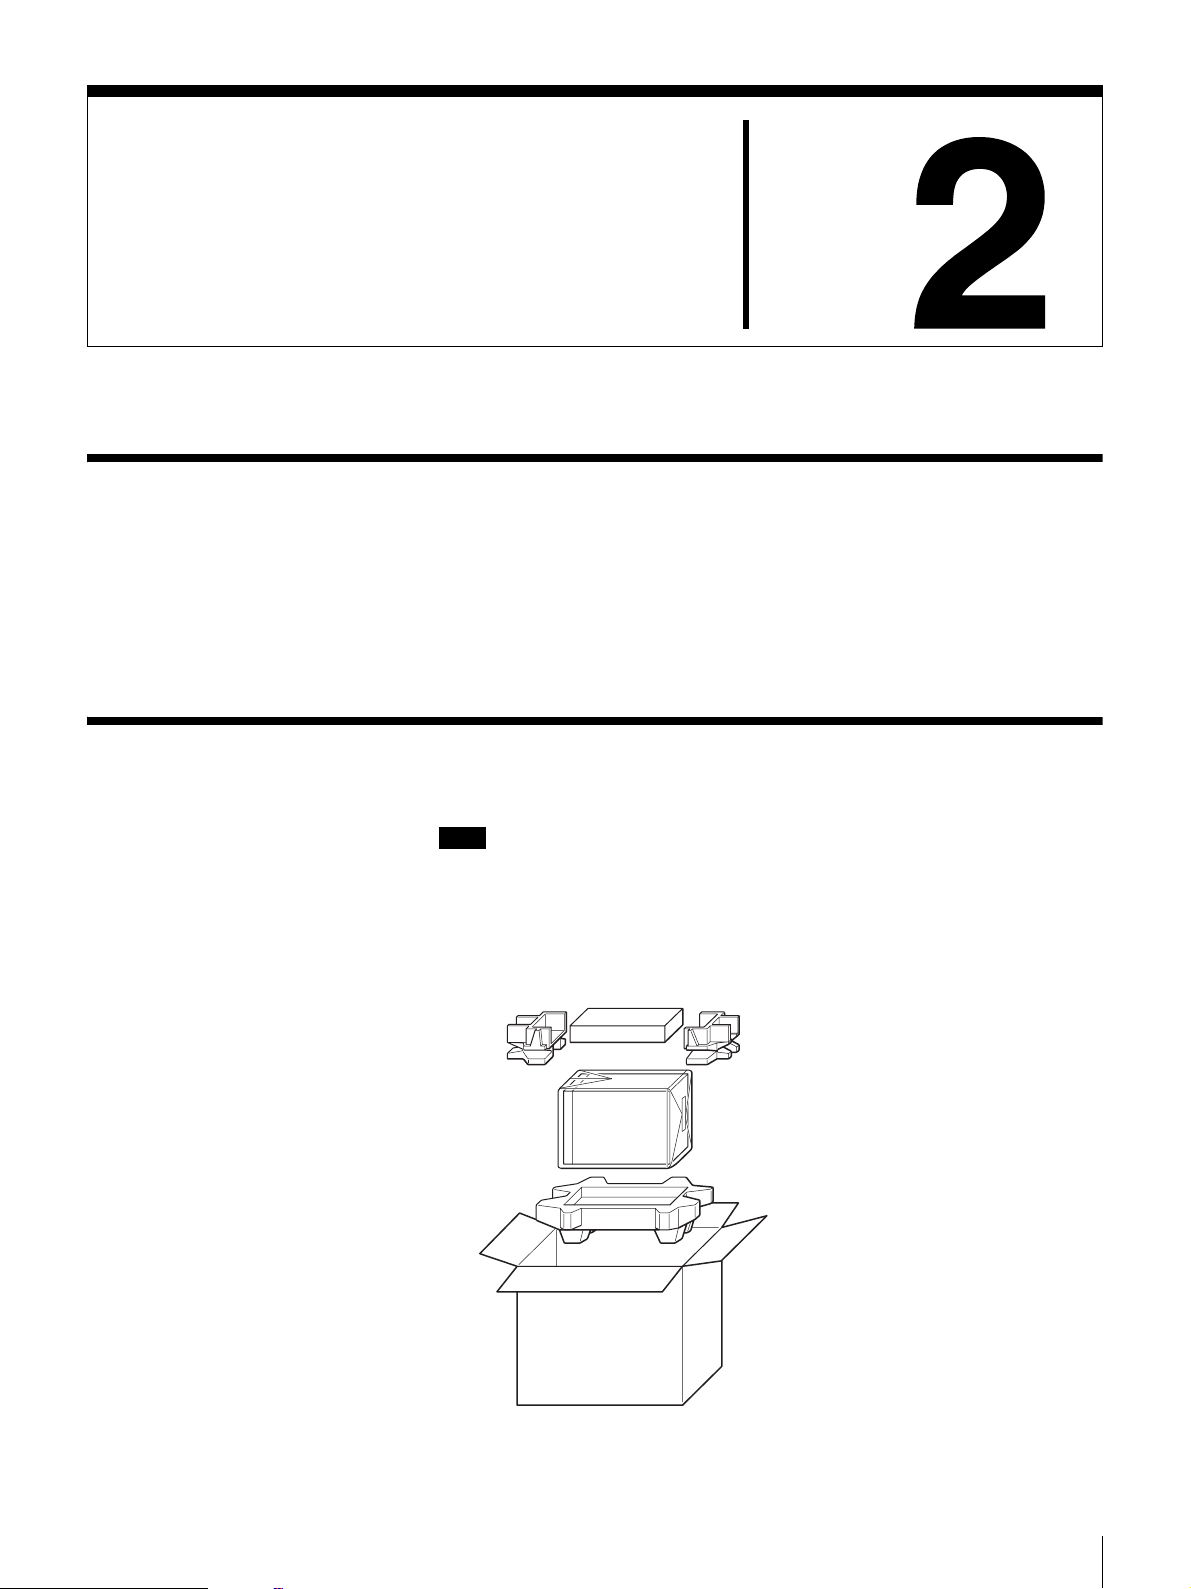
Unpacking
Installation
This chapter explains general procedures to install the AIT autoloader,
connecting it to the host computer and turning on the AIT autoloader. This
chapter also explains initial setup. Installation and setup procedures may vary
depending on your system.
Note
You will need the box and packing materials if you wish to move or transport
the AIT autoloader in the future. Retain them for future use.
Chapter
1
Remove the AIT autoloader from the box as indicated on the box.
Remove the packing materials, such as plastic covers and tapes.
Chapter 2 Installation
15

Package Contents
After opening the box, make sure all the following items are present. Contact
your dealer if anything is missing.
• LIB-D81 AIT Autoloader (1)
• Power cable (1)
• SCSI terminator (1)
• Cleaning cartridge (1)
• Quick Start Guide (1)
Note
In addition to the above, other documentation and/or documents may be
included in the package.
Preparing the Host Computer
Prepare the host computer before installing the AIT autoloader as follows.
1
Make sure that a SCSI host bus adapter card is installed in the host
computer.
2
Install the application software supporting the autoloader on the host
computer.
For guidance on application software that can be used with the AIT
autoloader and supported operating systems, contact your dealer.
Chapter 2 Installation
16
Installing the AIT Autoloader
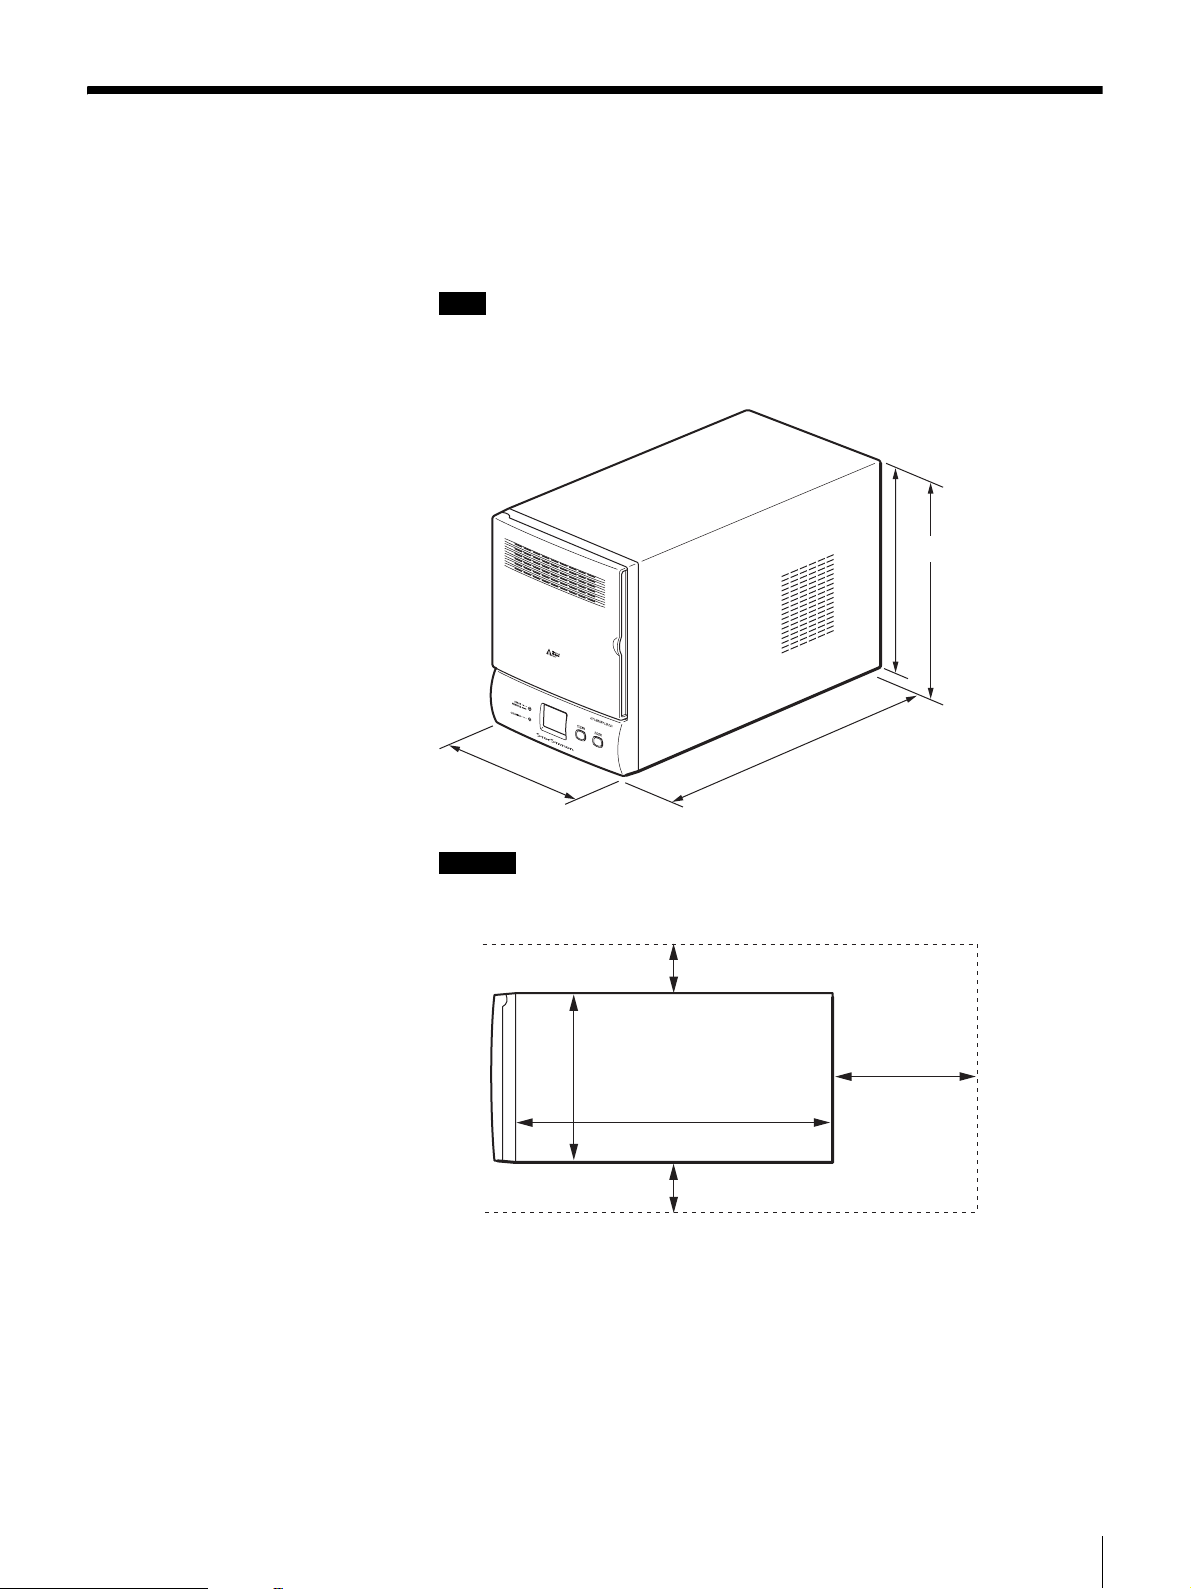
The AIT autoloader weighs about 7 kg (15.4 lb.) and has the following
dimensions. Before installing the AIT autoloader, make sure that the surface is
appropriate.
Note
Install the AIT autoloader on a horizontal surface near an AC power outlet. Also
leave a gap of about 150 mm (5.9 in.) behind the rear of the unit to allow air to
circulate.
220 mm (8.7 in.)
224 mm (8.8 in.)
(including rubber
feet)
170 mm
(6.7 in.)
Caution
350 mm (13.8 in.)
Make sure you position the AIT autoloader as indicated in the illustration.
Correct operation is not guaranteed if you place the AIT autoloader on its side.
50 mm (2.0 in.)
Rear
Front
170 mm (6.7 in.)
150 mm
(5.9 in.)
350 mm (13.8 in.)
50 mm (2.0 in.)
Chapter 2 Installation
17
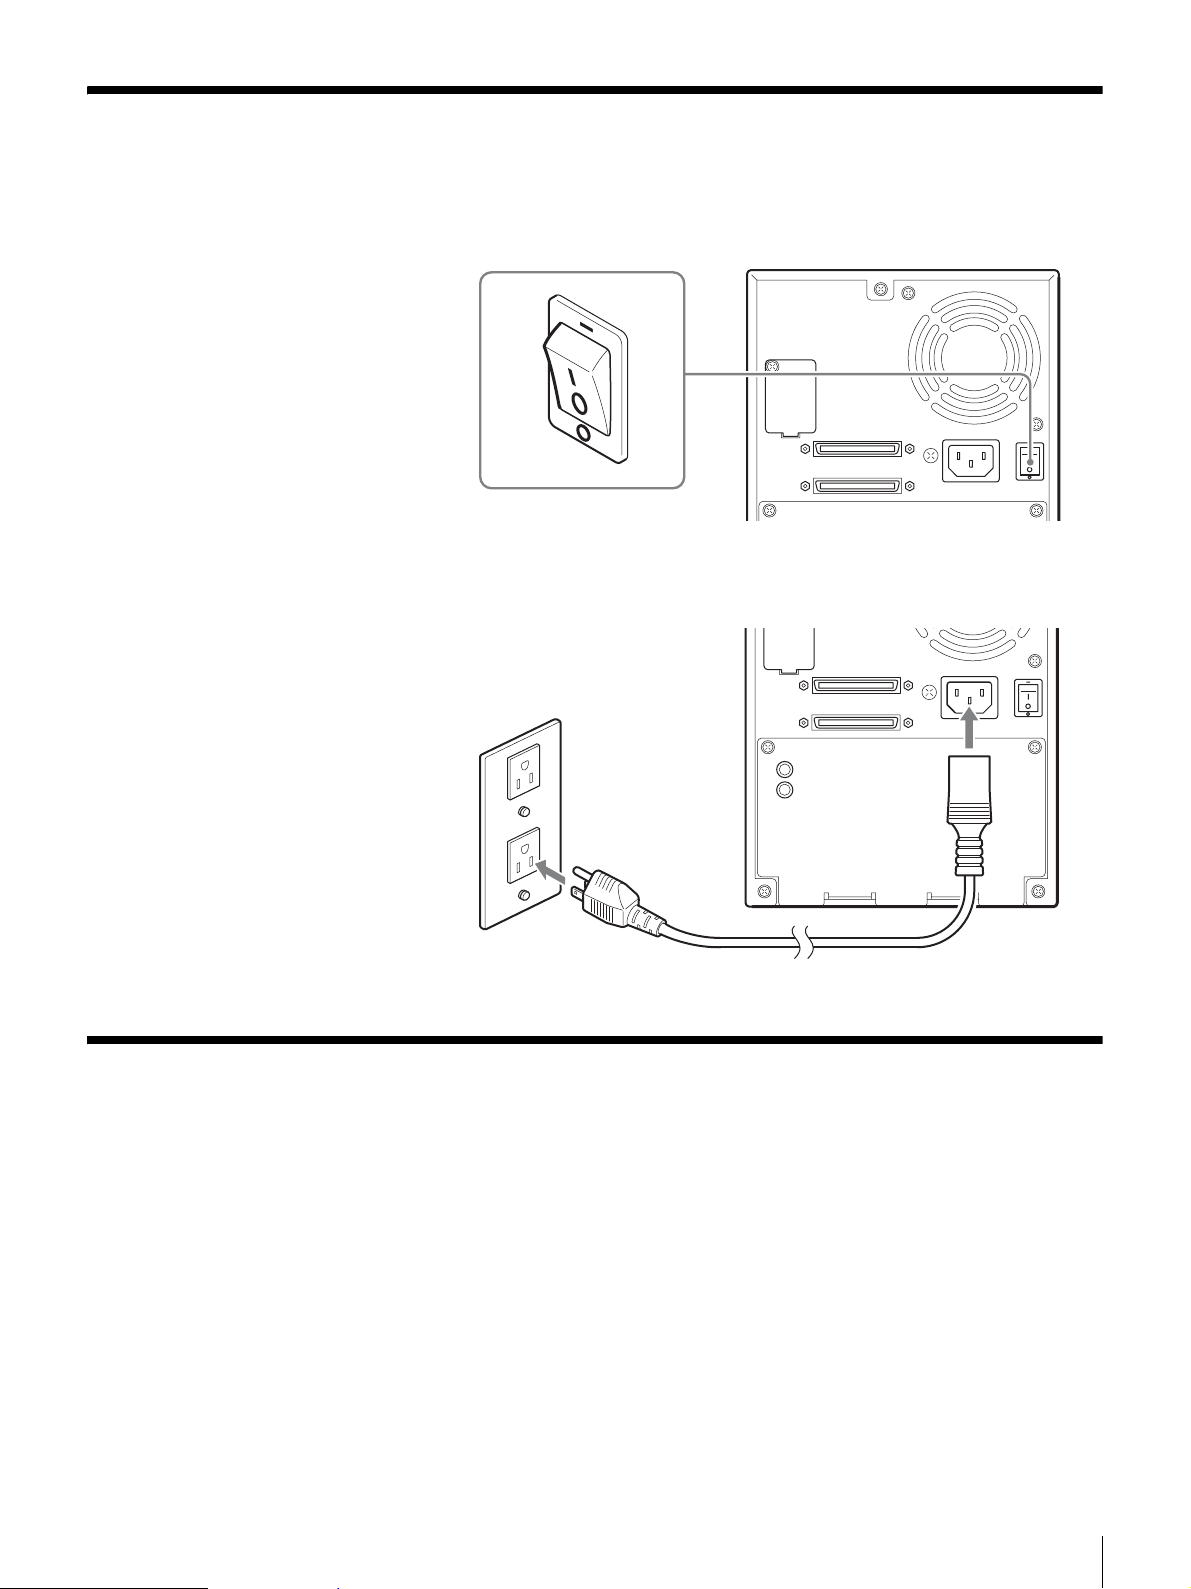
Connecting the Power Cable
1
Make sure the power switch on the rear of the AIT autoloader is in the off
position (a is depressed).
2
Connect one end of the power cable to the power supply connector and the
other end to the power outlet.
Connecting to the Host Computer
Connect the AIT autoloader and the host computer with a SCSI cable. This
section explains general connection steps. To connect, use an Wide Ultra2 SCSI
LVD cable commonly sold in stores. However, when using a model equipped
with the AIT-5, AIT-4, AIT-3 Ex, AIT-3, or AIT-2 Turbo drive, use an Ultra
160 SCSI LVD cable. The AIT autoloader side uses the 68-pin half pitch
connector.
When connecting other SCSI devices along with the AIT autoloader, see
“Connecting SCSI Peripheral Devices” (page 23).
Chapter 2 Installation
18
 Loading...