

Sony KP-51W520, KP-57WS520 Operating Instructions Manual
SON_.
2-02_-745-12(I)
ilili i!i¸II!!!!!
I ProjectionTV
Operating Instructions
0 2004 Sony Corporation

Owner's Record
The mode[ and serial numbers are [oc _ted at the rear of the
proiecLion TV, below the Sony logo, on the sticker, and also on the
TV box (white [abe[). Record these numbers [n the spaces provided
below. Refer to them whenever you ca[[ upon your Sony dealer
regarding this product.
Model No.
SerialN0,
WARNIN6
To reduce the risk of fire or e[ectrk: shock, do not expose this
"[ppar lh_s to Fain or [[lOiStLlrtt,
RISK el i L_ C'[RIC SHO(K
f)O got OP[-N
ATTENTION
/?ISOOf/iF C!OC FL_ C'FF:{ auff
NF P&S OUVRIR
PRECAUC_ON
R£SGO D CHOQU[ [:L C R(O
NO A bqqlR
This symbol is intemled to alert the user k_ the
pa_sence of uninsulated "dangerous voltage"
wi[hin the prod uct's enclosure that may be of
sufficient magnitude to con titute a risk of
electric shock to persons,
This symbol is intended to alert the user to d_e
presence ofimportan t opera tinS and maintenance
(servicing) instructions in [he literah_re
accompanying _he appliance.
Do not expose d_e TV to dripping or splashing. A_oM piacin S
liquid-filled objects, such as vases, on top of d_e TV:
CAUTION
To prevent electric shock, do not usu this polarized A( plug with
an extension cord, receptacle or other outlet unless the blades can
be fully inserted to prevent blade exposure
Now to Reduce the Risk of "Image Retention"
on the Screen
Pleasetake the following steps to reduce the risk of onus#N
image retention:
- When using video games, computers, an_ similar products
with your projection TV,or viewing a TV station whose
logo always stays on the screen, keep the Brightness and
Picture functions at low settings. [See page 62 fo_
instructions on adjusting Brightness and Picture settings.)
• View a variety of programming material. Changing the
program material viewed reduces the possibility that a
single image will become imprinted on the screens.
• This TVwas designed primarily for viewing TVbroa@asts
in wide screen mode (16:9 aspect ratio). Therefore when
viewing conuentionam (4:3} aspect ratio TV programs,
select Wide Mode settings that fill the image oe your
screen. This wilmreduce the possibility of the gray sidebars
becoming permanently imprinted.
Please see page 62 for instructions on adjusting piclure
settings. See pages 5344 for information about using Wide
Mode.
IMAGE RETENTIONISNOTCOVEREDBYYOURWARRANTY
As an ENERGY STAR c"Partner, Sony has
determined Lhat this product or prod uct models
meets the EN ERGY STAR guidelines for energy
eRicienc> ENERGY STAR is a U.S. registered mark.
If a fixed (hammering) pattern, such as a statiQn !ago, is :
left on the screen for !ong periods of time_ esPecia!!y at a
high br!ghtness or picture setting ! the image can be
permanent!y imprinted onto the screen These types of
imprints are known as "image retention,"
Note on Caption Vision
-fbis television receiver pro_ ides display of teh'vision c[osl'd
cap{iot_ing in accordance with _15.119 of the FC(' rules.
Note on Convergence Adjustment
Before you use _our proiectioa T% make ure to adjust
couvergen_ e, For details, see "Adjusking the ( onvergence
Automatically (Flash Focus)" on page 40,
Use of this television receiver for other than private viewing of
programs broadcaM oa UHF or VHF or transmitted by cable
companies for the use of the genera[ public may require
authorizatkm from _he broadcaster/cable company and/or
program owner.
NOTIFICATION
This equipmen_ has bees _ested and found to comply wi_b the
limits for a Class B digital device, pursuant to Part 15 of the FCC
Rules. These limits are designed to provide reasonable protection
agains_ harmful inter fereace in a residential installation. This
equipment generates, uses, and can radiate radio frequency energy
and, if not installed and used in accordance with _he instructions,
may cause harmful interference with radio communications.
However, there is no guarantee {bat interference will not occur in a
particular installation. [f _bis equipment does cause harmful
i_terfereuce to radio or television reception, which can be
determined by turning _be equipmenL off aml on, _he user is
encouraged to _ry _o correct the interference by one or more of the
following measures:
[] Reorien_ or relocate the receiving salem,s.
[] Increase the separation be_w,een the equipment and receiver.
[] Connect the equipment into an outlet on a circuit different
from _ha_ to which the receiver is connected.
[] Consuff the dealer or an experienced radio/TV technician for
help.
You are cautioned that any changes or modifications riot
ex press[y approved in this manual could void your authority to
operate this equipment.
Safety
[] (Jpera_e _he proiec_ion TV only on 120 V AC.
[] The plug is designed, for safety purposes, to fit into _hewall
outlet only one way. If you are unable to insert the plug fully
iuto _be outlet, coutact your dealer.
[] [f any liquid or solid object should fall inside the cabinet,
unplug the proiection TV immediaMy and have it checked
by qualified service personnel before operating it further.
[] [f you will rtot be using the projection TV for several days,
disconneck the power by pulling _he pl ug i_self. N ever p u[[ on
the cord.
[] For details concerning safety precautions, see "Important
Safety Inskruckions" on page 3.
Installing
[] To prevent internal beat build up, do not block the ventilation
openings.
[] Do not install the prc@ction TV in a hot or humid place, or in
a place subje< Lto excessive dust or mechanical \ ibration.
[] Avoid operating the proiection TV at temperatures below\ 5°C
(41°F).
[] [f _he pro}ection TV is _ransported directly from a cold to a
warm [ocakion, or if the room _emperature changes suddenly.
the picture may be blurred or show poor color due _o
moisture condensation. In this case, please wait a fe_\ hours
to let the moisture evaporate before turning on the projection
TV.
To obtain khe best picture, do nok expose the scre(m ko direct
ill umina _ion or direct sunlight. [t is recommended _ouse spot
lighking directed down from _he ceiling or ko cover the
windov\ s {ha_ face the screert v\itb opaque draper>; [t is
desirable to install the proiection TV ia a room where _he
floor and walg are sot of a wf[ec_ive material.
Trademark Information
TruSnr round, SRS and the (_)* symbol are trademarks of SRS
Labs, Inc. _mSurround _ecbno[og k is incorporated under license
from SRS Labs, Inc.
Licer_s(d by BBE Sound, Inc. under USP4638258, 4482866. "BBE"
and BBE symbol are trademarks of BBE Sound, Inc.
This TV incorpor _tes Higb-Defk_ition
tecbnolog>. HDM[, the HI)MI logo and
Highq)efiM_ioa Mukimedia _aterface are _rademarks or registered
trademarks of HI)M] Licensing LL(.
Steady Sound, Digital Reality Creation, CineMotion, and Twin
View are registered _rademark_ of Sony Corpor a_ion. C[earEdge
VM, and HD Detailer are trademarks of Sony Cocporatiom
For Safety
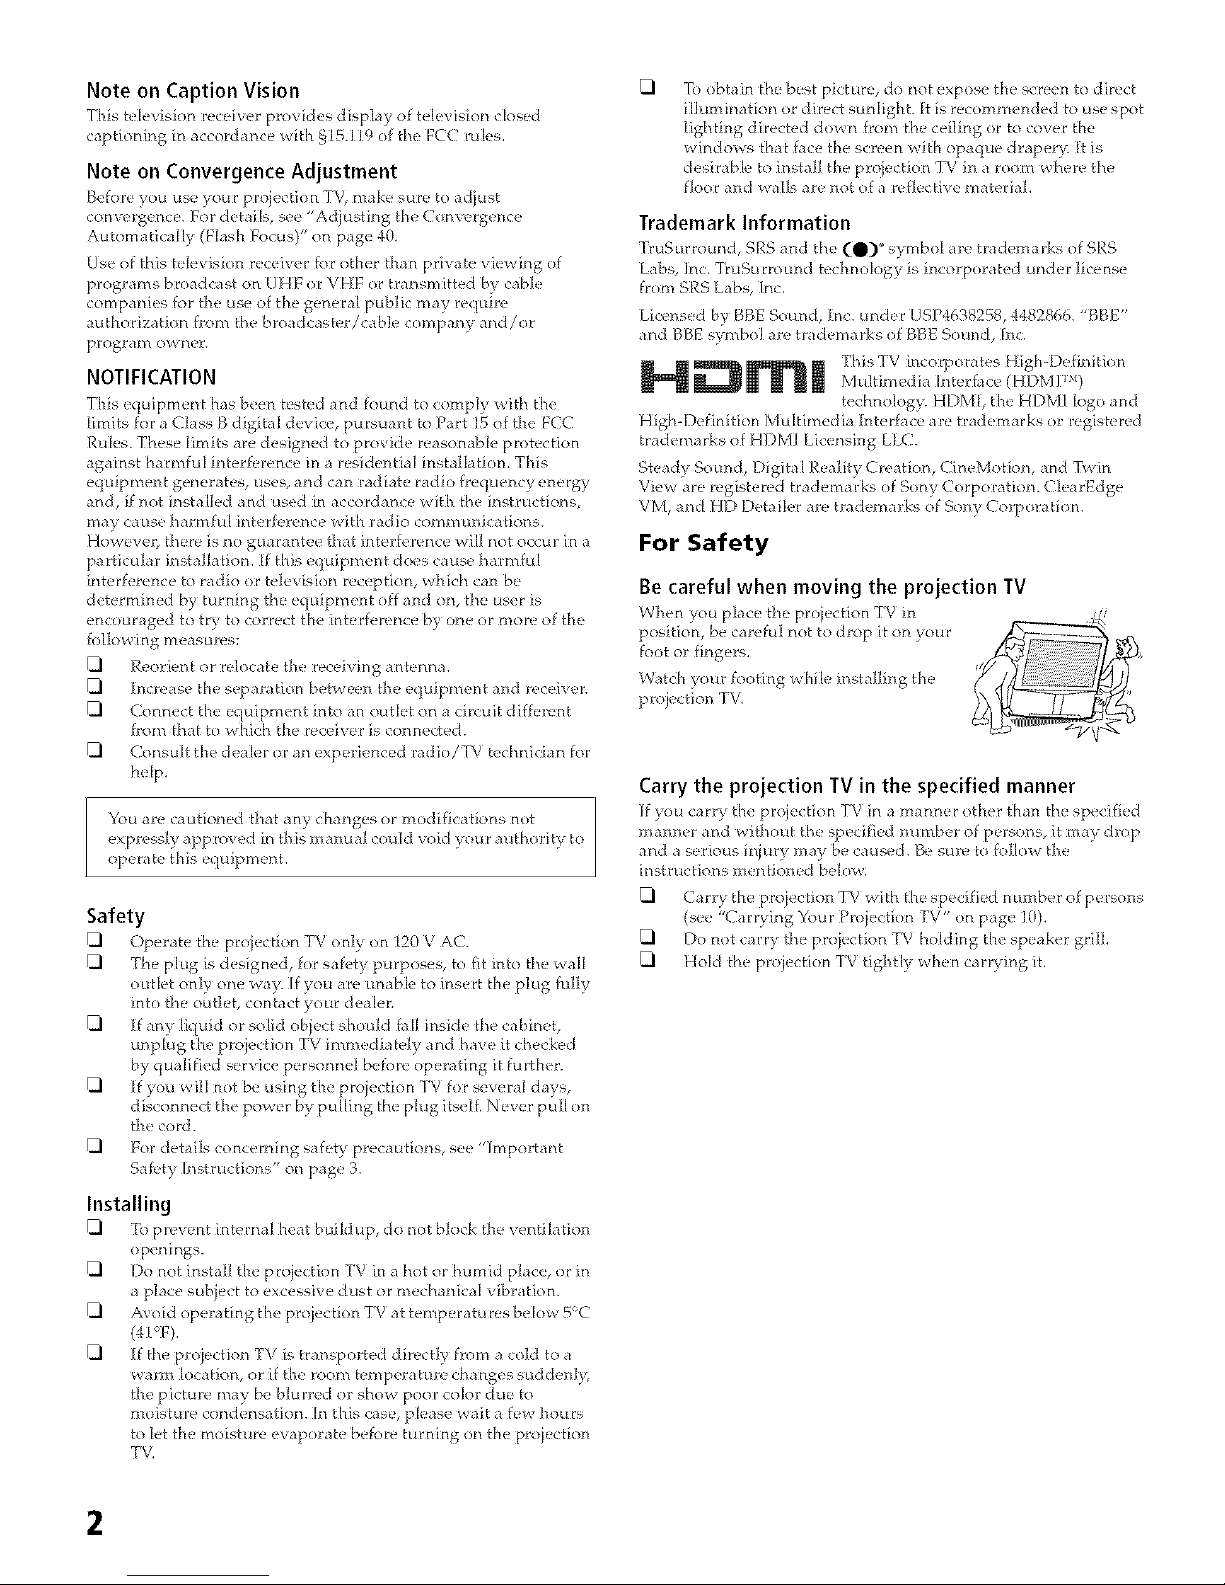
Be careful when moving the projection TV
When you place the proie< kion -fV ill
position, be careful not to drop it on your
foot or fingers.
Watch your footiug v\ hi[e installing the
projec kion TV_
Carry the projection TV in the specified manner
If you carry the projection -fV in a manner other [bau [he specified
mariner and wi_bou_ the _,pecified number of persons, it may drop
and a serious injury may be caused. B_,sure to fo[[ow the
instructions mentioned below;
[] Car ry the pro}eckiou TV wi_h kbe specified number of persons
(see "C arwing Your Projection TV" on page I0).
[] Do not carry _he projeckion TV homing the speaker grill
[] HoM _he projection TV tightly wb(m carl3.ing iL
Important Safety Instructions
1 R_,adthe,soinst_.ctions.
2 Keep thoso instructions.
3 Heed all warnings.
4 Follow a[[ instructions.
5 Do not use this apparatus near waten
6 Clean only with dry cloth.
7 Do not block any ventilation openings. Instal[ in
accordance with the mamffacturer's instructions.
8 Do not instal[ near any heat sources such as radiators,
heat registers, stoves, or other apparatus (induding
amplifiers) that produce heat.
9 Do not defeat the safety purpose of the pdarized or
grounding-type plug. A polarized plug has two
blades with one wider than the other. A grounding
type plug has two blades and a third grounding
prong. The wide blade or the third prong are
provided for your safety. If the provided plug does
not fit into your outlet, consult an electrician for
replacement of the obsolete outlet.
10 Protect the power cord from being walked on or
pinched particularly at plugs, convenience
roceptacles, and the point where they exit h:om the
apparatus.
1 1 Only use attachments/accessories specified by the
manufacturer.
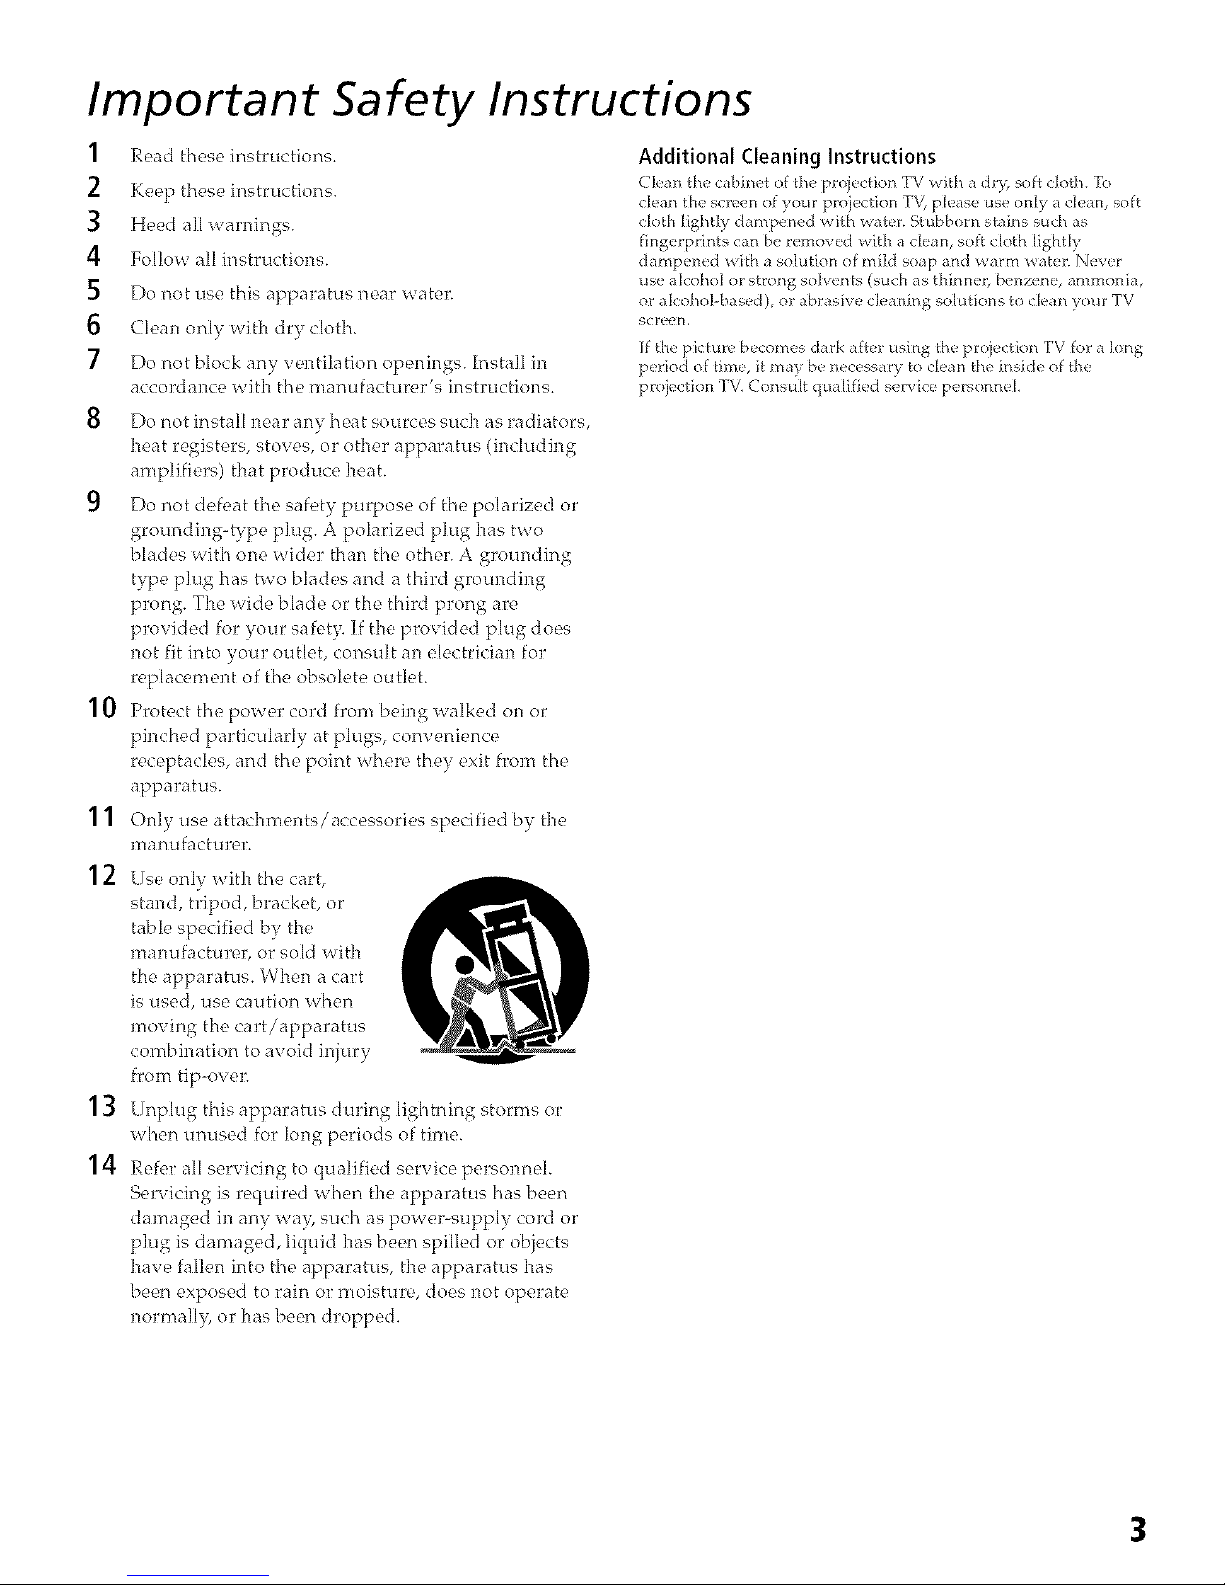
12 use only with the cart,
stand, tripod, bracket, or
table specified by the
manufacturer, or sold with
the apparatus. When a cart
is used, use caution when
moving the cart/apparatus
combination to avoid injury
from tip-over.
13 Unplug this apparatus during lightning stomps or
when unused for long periods of time.
14 Refer a[[ servicing to qualified service personnel
Servicing is required when fine apparatus has been
damaged in any wa> such as power-supply cord or
plug is damaged, liquid has been spilled or objects
have fallen into the apparatus, fine apparatus has
been exposed to rain or moisture, does not operate
normall> or has been dropped.
Additional Cleaning Instructions
(lean _he_abinet of _he projectkm TV with a dr,4 oft cloth. ]b
('[{KIll...... the screen of _°Ltr _roiect[o[/TV please rise o[t[V, a clean soft
cloth [ightl) d m_pened wffh wa[er. Stubborn stains such as
fingerprints can be removed _Gth a ciem, soft cloth [ight[_
dampend with a sotution of mild so_p and warm water. Never
use alcohol or strong soJvents (such as thinner, benzene, ammonia,
or ak:ohobbased , or abrasive cleaning soJutkms h_cJean tour TV
sctY_rl.
If the picture becomes dwk after using the projectk)n TV for a long
p_dod of time, it may be necessary k_clean the inside of the
projectkm TV.Consult qualified service personnel.
3

Introducing the Projection TV .................z
Welcome .............................................................................. 7
kade Contents
Pac " - ........ 7
Features
Up the Pr°jectie°neTVovrvi _ ...................'
Setting
r Pro'ection TV .................................................... 10
rr in You 1 .............. .., 10
Cay g .. ...............
he TV .......................................
Pos_ttonmg t ................ 11
TV Controls and Connectors ............................................................ ,. 11
Front V deo Inputs .............. ................................................. 12
Front Panel ! 2
£ear Panel 14
Basic Connections: Connecting a Cable or Antenna .................................
Only ..................................... 15
Cable or Antenna 16
Cable and Antenna Only ...................................... 18
Cab_e Box and Cable ....Ony 20
Cab e Box Only. ........ ..................................... 21
Connecting" Op tional Equipment ..................................................... 22
MakngVideo- Connect. ons ............................ ,23
About Using SVIDEO ...... ......................... 24
nd Cable ........................
VCR a 26
VCR and Cable Box ........ ............................ 28
Sate re_.Receiver, .... 30
Satellite Receiver and VCR , 32
VD P a er with Component Video Connectors
D Y _33
DVD Player with S VIDEO and Audio Connectors
Ca-ncorder ................................................ 334
o Receiver
Aud ........... 36
DVI-Equ pped Device...... ,37
HDM °Equipped__ Device 38
Using the cONTROL 5 Feature "...................................................... ,, ._39
5ettmg Up the Channel List ....................................................... ................... J9
Using Auto Program ........................................ 40
Adjusting the Convergence_ Automatically (Flash Focus) ......................... 40
es on Fla._h Focus .............................................................
Nc_. " "1 , 41
Ad'usting the Convergence Manuat y ............................................. 42
Notes on Adjusting the Convergence Manually ................................
5

Using the Remote Control
Overview ..................................................................................................... 43
inserting Batteries ....................................................................................... 43
Button Descriptions .................................................................................... 44
Programming the Remote Control ............................................................ 45
Using Other Equipment with Your TV Remote Control ........................... 48
All Equipment .................................................................................. 48
Operating a VCR 48
Operating a Satellite Receiver 48
Operating a Cable Box 49
Operating a DVD Player 49
Using the F1 and F2 Buttons 49
Using the Features
Overview ..................................................................................................... 51
Watching TV ................................................................................................ 52
Using Wide Mode ....................................................................................... 53
Using Wide Mode with Standard Definition (480i/480p) Sources 53
Using Wide Mode with High-Definition (720p/1080b Sources ...... 54
Using Twin View ......................................................................................... 55
Displaying Twin Pictures .................................................................. 55
Factors Affecting Twin View 55
Activating the Picture 56
Changing the Picture Size 57
Using Favorite Channels ............................................................................. 58
Creating a List of Favorite Channels ................................................. 58
Displaying a List of Favorite Channels .................................... 58
Using the Freeze Function .......................................................................... 59
Using the Menus
Overview ..................................................................................................... 61
Navigating Through Menus ....................................................................... 61
Using the Video Menu ................................................................................ 62
Using the Audio Menu ............................................................................... 64
Using the Screen Menu .............................................................................. 66
Using the Channel Menu ............................................................................ 67
Using the Parent Menu ............................................................................... 59
Using the Setup Menu ................................................................................ 72
Other Information
Overview ..................................................................................................... 75
Glossary ....................................................................................................... 76
Contacting Sony .......................................................................................... 77
Troubleshooting .......................................................................................... 77
Spedfications .............................................................................................. 81
Optional Accessories ................................................................................... 82
Index ............................................................................................................ 83
6
Welcome
This chapter describes the contents of the package in which the TV is
shipped and provides an overview of the features of your projection
TV.
Package Contents Along with your new projection TV, the package contains a remote
control and two AA batteries. No additional cables are fircluded.
These items are all you need to set up and operate the projection TV
in its basic configuration.
Most components (VCRs, DVD players, etc.) come with the necessary
cables to connect them. If you want to set up a complex system, you
may need to buy extra cables, connectors, etc. Be sure to have these
on hand before you start to connect your system.
Features Some of the features that you will e@oy with your new TV include:
[] Wide Screen Mode: Watch conventional 4:3 aspect ratio
broadcasts in wide screen (16:9) mode.
[] DRC @(Digital Reality Creation) Multiftmction: Ul_like
conventional line doublers, the DRC Multifunction feature
replaces the signal's NTSC waveform with the HD equivalent,
while doubling the number of vertical and horizontal lines. This
results in four times the density for quality sources, such as DVD,
satellite, and digital camcorders. The Video Menu allows you to
select interlaced, progressive, or CineMotion TM output.
[] Favorite C]hannels: Allows you to preview and select from 16 of
your favorite channels.
[] Twin View_: Using the Multi-Image Driver (MIDX), Twin View
allows you to watch two programs side by side, with the ability
to zoom in one picture. You can watch pictures from two
different sources (1080i, 720p, 480p, and 480i) simultaneously.
(Only the left Twin View window can display 1080i, 720p, and
480p sources.)
[] ClearEdge VM TM Velocity Modulation: Sharpens picture
definition by enhancing vertical lines.
[] Steady Sound@: Equalizes volume levels so there is consistent
output between programs and commercials.
[] ComponentVideoInputs:OffershighqualityvideoforDVD
(480p,480i),anddigitalset-topbox(HD1080i,720p)connections.
[] HD DetailerT_:Widebandvideoamplifierhasahighbandwidth
frequencyrating,whichallowsittosendmorevideoinformation
tothescreen,resultinginfinerpicturequalit_especiallyforHD
sources.
[] CineMotion'_: Reverse 3-2 pulldown processing provides
optimal picture quality for film-based sources (media originally
shot in 24 frames-per-second format).
[] Parental Control: V-Chip technology allows parents to block
unsuitable programming from younger viewers.
[] HDMI (High-Definition Multimedia Interface): Provides tan
uncompressed, al!-digital audio/video interface between this TV
and any HDMI-equipped audio/video component, such as a set-
top box, DVD player, and A/V receiver. HDMI supports
enhanced, or high-definition video, plus two-channel digital
audio.
Overview
This chapter includes illustrated instructions for setting up your TV.
10
TV Controls and Connector's 11-13
Basic Connections: Connecting a Cable or Antenna 14_20
Connecting Optional Equipment
VCR and Cable 24
V<R and Cable Box 26
Satellite Receiver 28
Satellite Receiver and VCR 30
DVD Player with Component Video Connectors 32
DVD Phyer with S VIDEO and Audio Connectors 33
Camcorder 34
Audio Receiver 35
DVI-Equipped Device 36
37
38
39
4O
Adiusting the Convergence Automatically (Flash Focus)
Ad usting the Convergence Manually (Manua! Convergence) 41
9
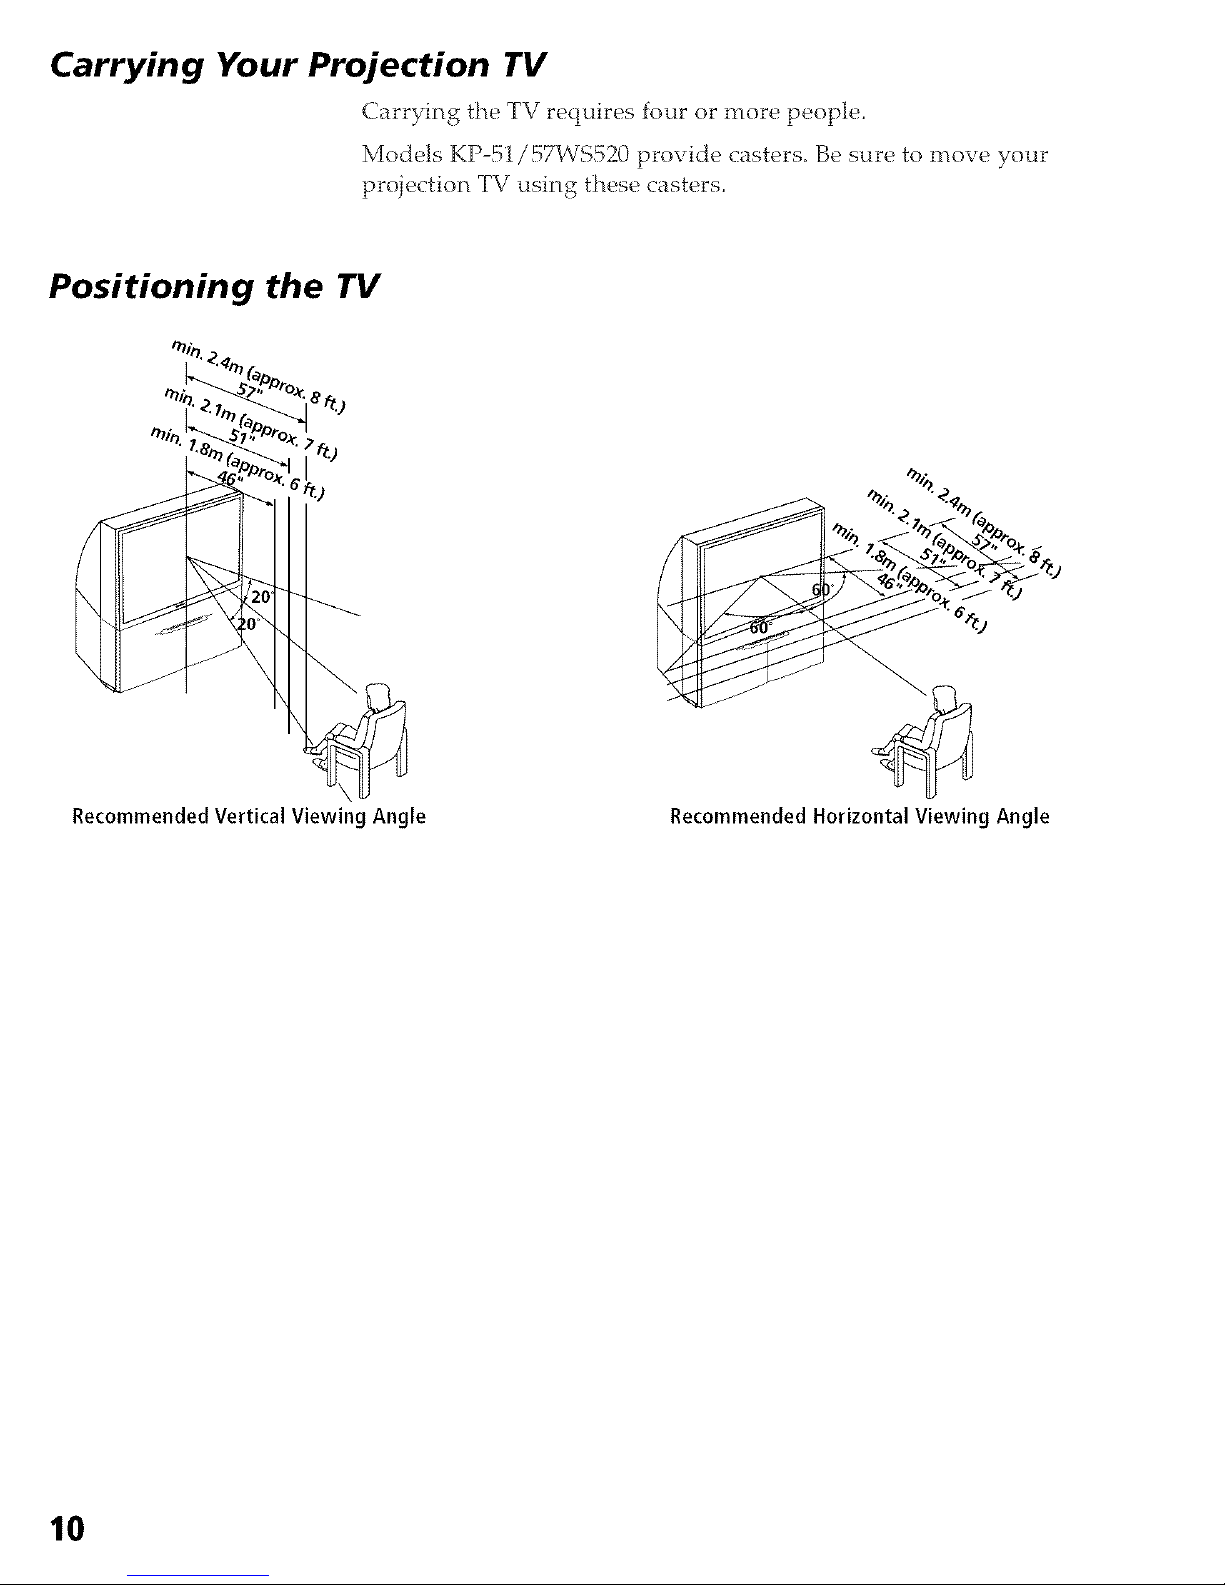
Carrying Your Projection TV
Carrying the TV requires four or more people.
Models KP-51/57WS520 provide casters. Be sure to move your
projection TV using these casters.
Positioning the TV
Recommended Vertical Viewing Angle Recommended Horizontal Viewing Angle
TV Controls and Connectors
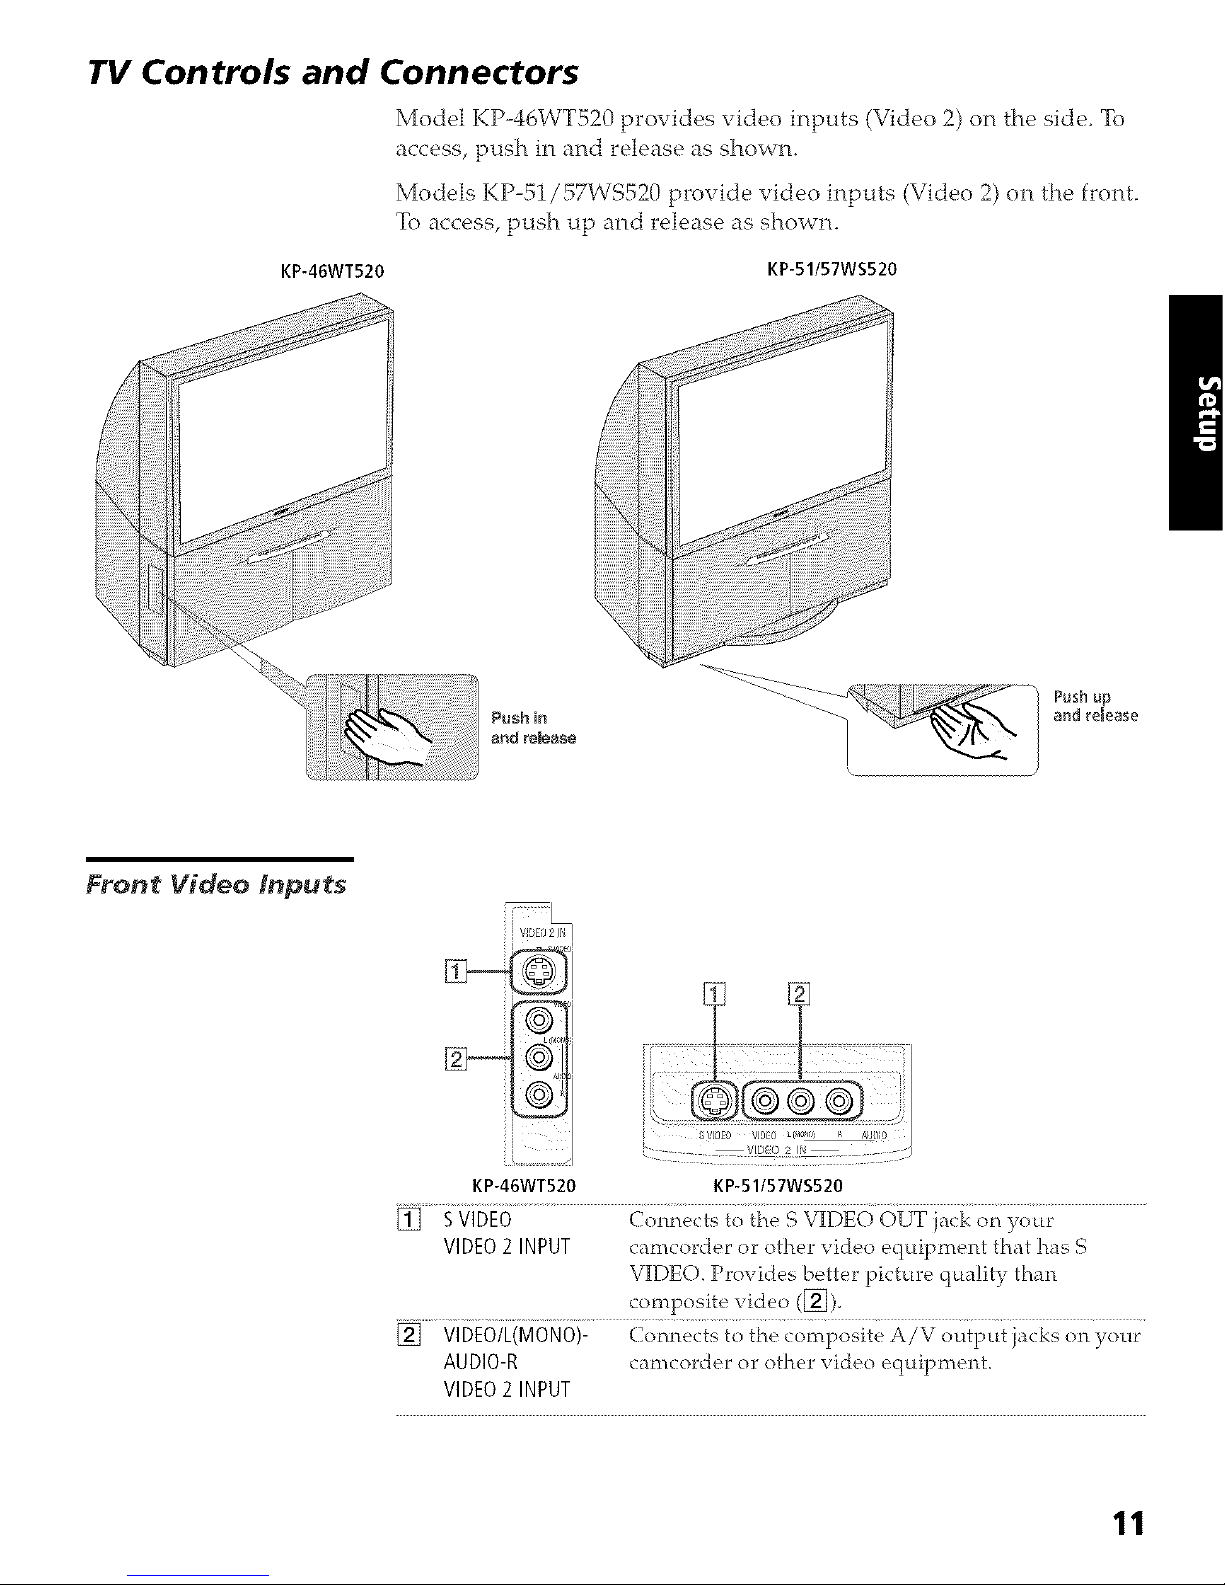
Model KP-46WT520 provides video inputs (Video 2) on the side. To
access, push in and release as shown.
Models KP-51/57WS520 provide video inputs (Video 2) on the front.
To access, push up and release as shown.
KP-46WT520
KP-51/57WS520
Push in
a_d _emease
Push up
and release
Front Video Inputs
KP-46WT520 KP-51/57WS520
[] SVIDEO Comwcts to the S VIDEO OUT jack oa your
VIDEO2 INPUT camcorder or other video equipment that has S
VIDEO. Provides better picture quality than
composite video ([_).
[] VIDEO/L(MONO)- (7onnects to the composite A/V output iacks on your
AUDIO-R camcorder or other video equipment.
VIDEO2 INPUT
11
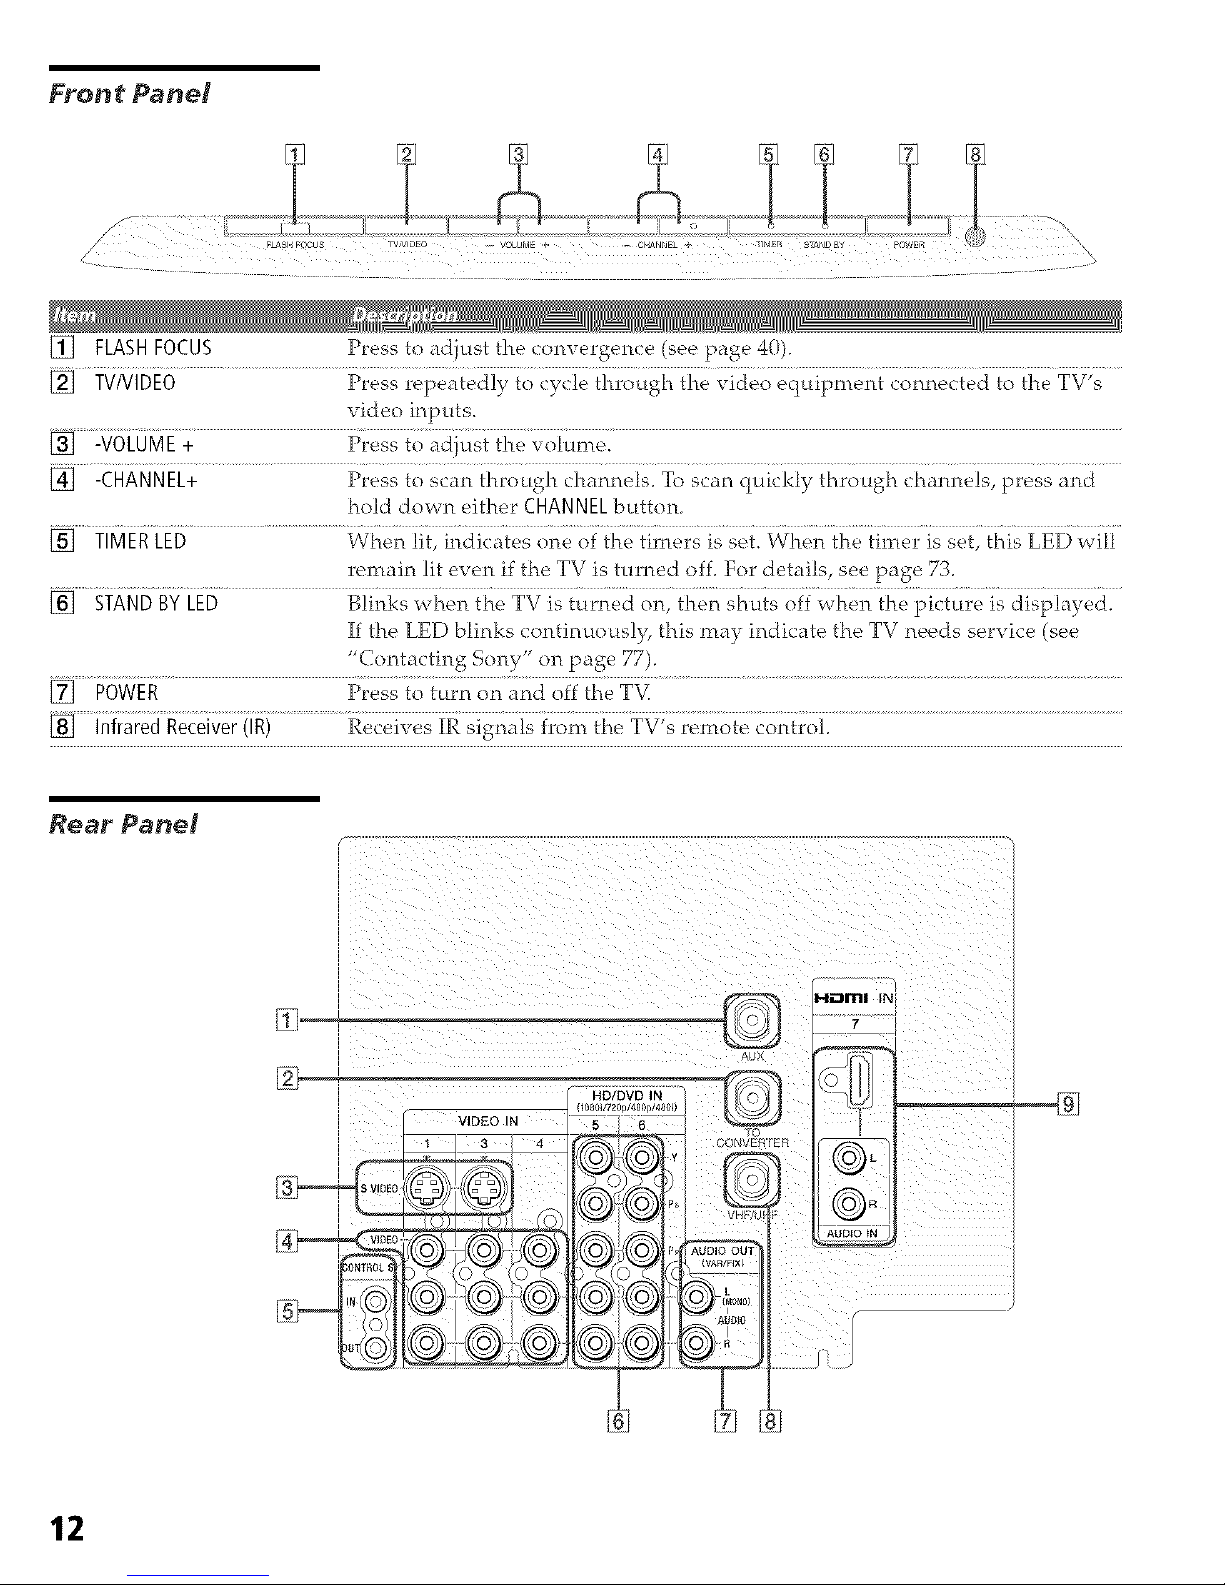
Front Pane#
[] FLASHFOCUS Press to adjust the convergence (see page 40).
[] TVNIDEO Press repeatedly to cycle through the video equipment connected to the TV's
videoinputs.
.................................Presstoadjustthevolume.
[] -CHANNEL+ Press to scan throctgh channels. To scan quickly through channels, press and
hold down either CHANNELbutton.
[] TIMERLED When lit, hrdicates one of the timers is set. When the timer is set, _his LED will
remain lit even if the TV is turned off. For details, see page 73.
[] STANDBYLED Blinks when the TV is turned on, then shuts off when the picture is displayed.
If tire LED blinks continuous]}€ this may indicate the TV needs service (see
"Contacting Sony on 1:age 77).
[] POWER Press to turn on and off the TM
[] Infrared Receiver (IR) Receives IR signals from the TV's _'emote control.
Rear Pane#
HDml INi
2, <
G
ONV :-R [EH
o _
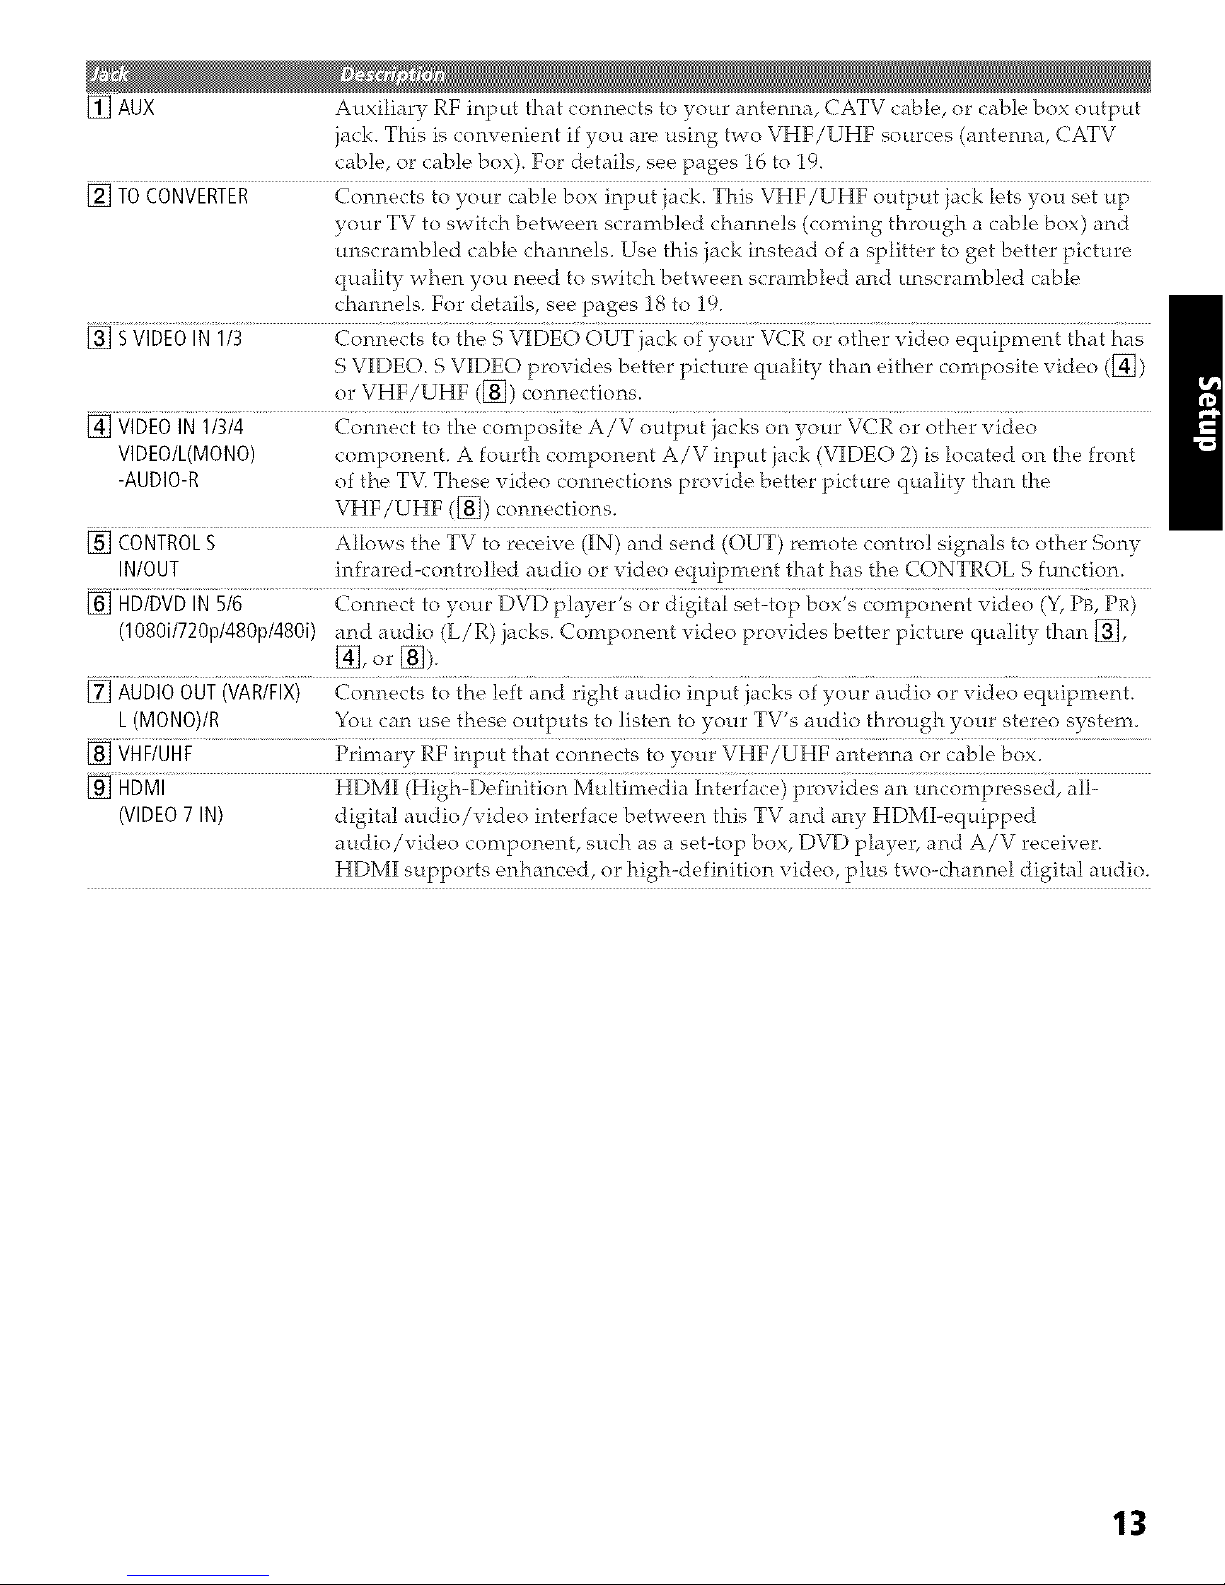
[] AUX Auxiliary RE input that connects to your antenna, CATV cable, or cable box output
jack. This is convenient if you are using two VHF/UHF sources (antenna, CATV
cable, or cable box). For details, see pages 16 to 19.
[] TOCONVERTER Connects to your cable box input iack. This VHF/UHF output iack lets you set up
your TV to switch between scrambled channels (coming through a cable box) and
unscrambled cable channels. Use tl-ds jack instead of a splitter to get better picture
quality when you need to switch between scrambled and unscrambled cable
channels. For details, see pages !8 to 19.
[] S VIDEOIN 1/3 Connects to the S VIDEO OUT jack of your VCR or other video equipment that has
S VIDEO. S VIDEO provides better picture quality than either composite video ([_)
or VHF/UHF ([]) connections.
[] VIDEOIN 1/3/4 Connect to the composite A/V output jacks on your VCR or other video
VIDEO/L(MONO) component. A fourth component A/V input }auk (VIDEO 2) is located on the front
-AUDIO-R of the TV. These video connections provide better picture quality than the
VHF/UHF ([]) connections.
[] CONTROLS Allows the TV to receive (IN) and send (OUT) remote contro! signals to other Sony
IN/OUT infrared-controlled audio or video equipment that has the CONTROL S function.
[] HD/DVDIN5/6 Connect to your DVD player's or digital set-top box's component video (Y)PB, PR)
(1080i!720p/480p/480i) and audio (L/R) jacks. Component video provides better picture quality than [],
[], or []).
[] AUDIOOUT(VAR/FIX) Connects to the left and right attdio input jacks of your audio or video equipment.
L(MONO)/R You can use these outputs to listen to your TV's audio through your stereo system.
[] VHF/UHF Primary RF input that connects to your VHF/UHF antenna or cable box.
[] HDMI HDMI (High-Defhrition Multimedia Interface) provides an uncompressed, all-
(VIDEO7 IN) digital audio/video interface between this TV and any HDMI-equipped
audio/video component, such as a set-top box, DVD player, and A/V receiver.
HDMI supports enhanced, or high-definition video, plus two-channel digital audio.
13
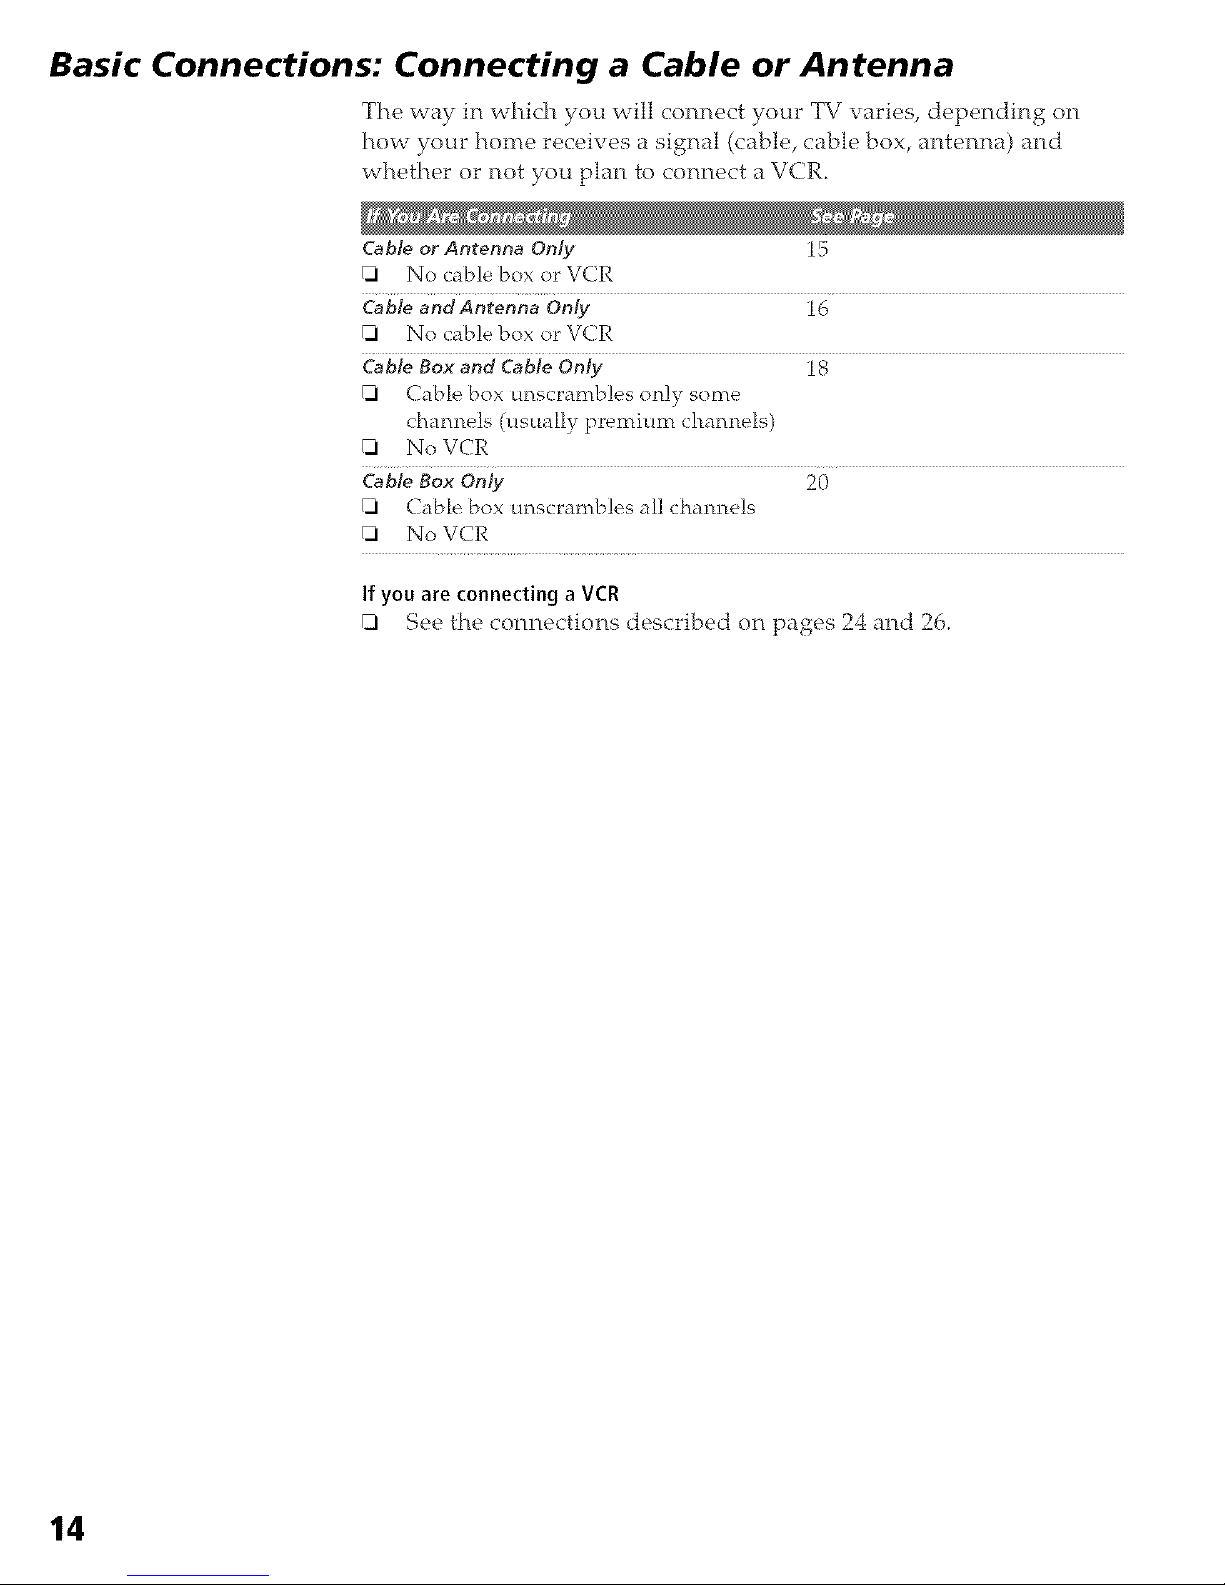
Basic Connections: Connecting a Cable or Antenna
The way it1 whkqa you will connect your TV varies, depending on
how your home receives a signal (cable, cable box, antenna) and
whether or not you planto connect a VCR.
Cable or Antenna Only 15
[] No cable box orVCR
Cable and Antenna Only 16
[] No cable box orVCR
Cable Box and Cable Only 18
[] Cable box Lmscrambles olJy some
chamaels (usually pre'mium chamaels)
[] No VCR
Cable Box Only 20
[_ Cable box unscrambles all channels
No VCR
If you are connecting a VCR
[] See the connections described on pages 24 and 26.
Cable or Antenna
Only
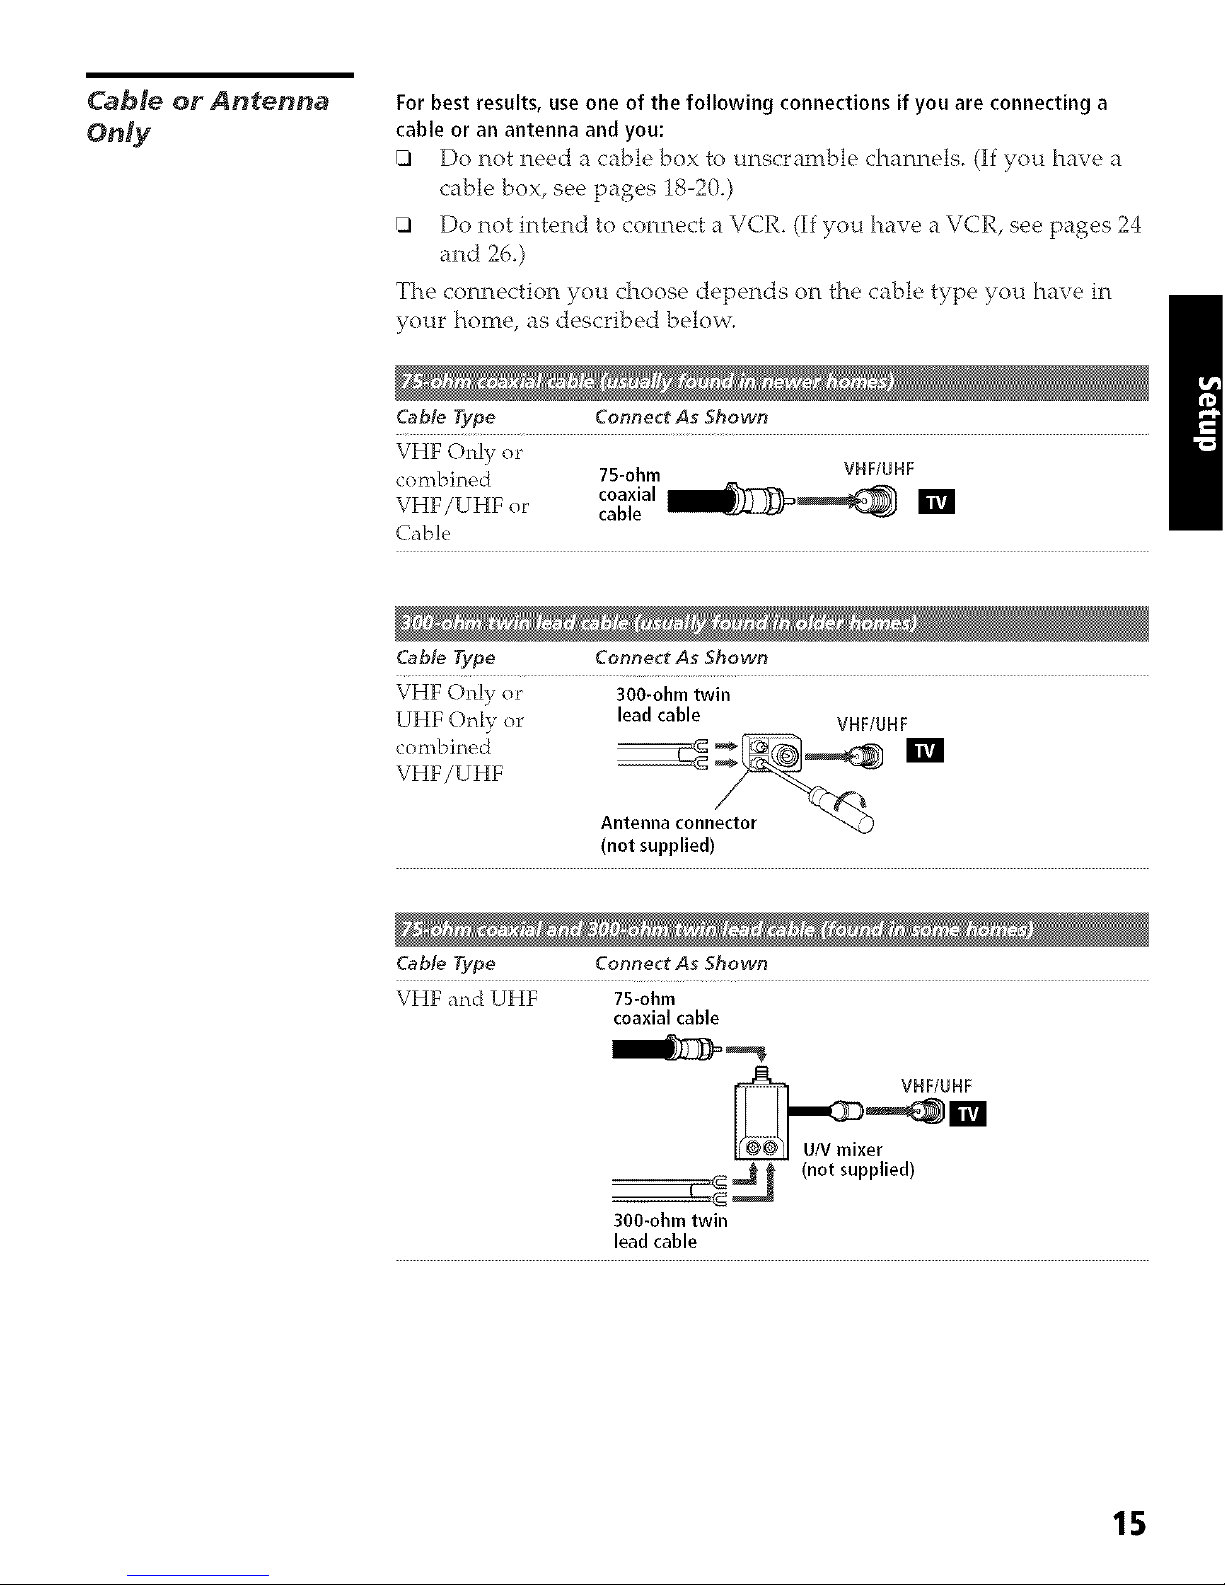
Forbest results, use one of the following connections if you are connecting a
cable or an antenna and you:
[] Do not need a cable box to unscramble chanrtels. (If you have a
cable box, see pages 18-20.)
[] Do not intend to connect a VCR. (If you have a VCR, see pages 24
and 26.)
The connection you choose depends on the cable type you have in
your [-tome, as described below.
Cable Type Connect As Shown
VHF Only or
combined 75-ohm VHF/UHF
coaxial __
VHF/UHF or cable
Cable
Cable Type Connect As Shown
VHF On]y or 300-ohm twin
UHF Only or lead cable VHFtUHF
combined __
VHF/UHF
Antennaconnector
(not supplied)
Cable Type Connect As Shown
VHF and UHF 75-ohm
coaxial cable
___ (notsupp{ied)
300-ohm twin
lead cable
15

Cable and Antenna
Only
For best results, use this connection if you:
[] Have a cable and an antenna.
(This is convertient if you are using a separate rooftop antertna to
receive additional channels, such as HDTV channels, that _re not
provided by your cable company.)
[] Do not have a cable box or VC-?R.(if you have a cable box, see
pages 18 to 20. If you have a VCR, see pages 24 t_nd 26.)
(:able TV (CATV) CATVcable
and Antenna OD_X
(No connection to t_g
TOCONVERTER)
CONVERTER
Antenna cable VNF/UHF
With this connection, you cannot view CATVchannels in the right dual picture wk_dow.
NotesonUsingThisConnection
Switch the TV's input Pt_ess ANTto switch back and fot_th between the TV's VHF/UHF and AUX
between the cable and inputs.
anttJnna
17
Cable Box and
Cable Only
jack is not compatib!e w!tb d!g!tal cabKe boxes.
Forbest results, usethis connection if:
[] Your cable comparly scrambles some cham_els, such as premium
channels (which requires you to use a cable box), but does not
scramble all channels.
[] You do not have a VCR. (If you have a VCR, see pages 24 and 26.)
With this connectionyou can:
[] Use the TV remote control to change channels coming through
the cable box to the TV's AUX input jack. (You must first program
the remote control for your specific cable box; see "Programming
the Remote Control" on page 46.)
[] Use the TV remote control to change channels coming directly
into the TV's VHF/UHF input. (The TV's tuner provides a better
signal than the cable box.)
With this connection, you can use a!l the dua! picture features for unscrambled channels
coming directly into the TV's VHF/UHF input iack_
However, you can use only some of the dual picture features for channels coming
through the cable box to the TV'sAUX input jack For example, when you switch the TV's
input to AUX -- to select the cable box input -- the picture displays only in the left
window_ For example, if you turn on Twin View, you can watch cable channels coming
into the VHF/UHF jack in the right window, but you cannot swap the pictures between
the left and right windows.
IfyouhaveadigitalcabJe
bo×,youcannotusethis
connectionbecausethe
TOCONVERTERjack is not
compat[b] e with dig!tal
cabMeboxes.
Notes on Using This Connection
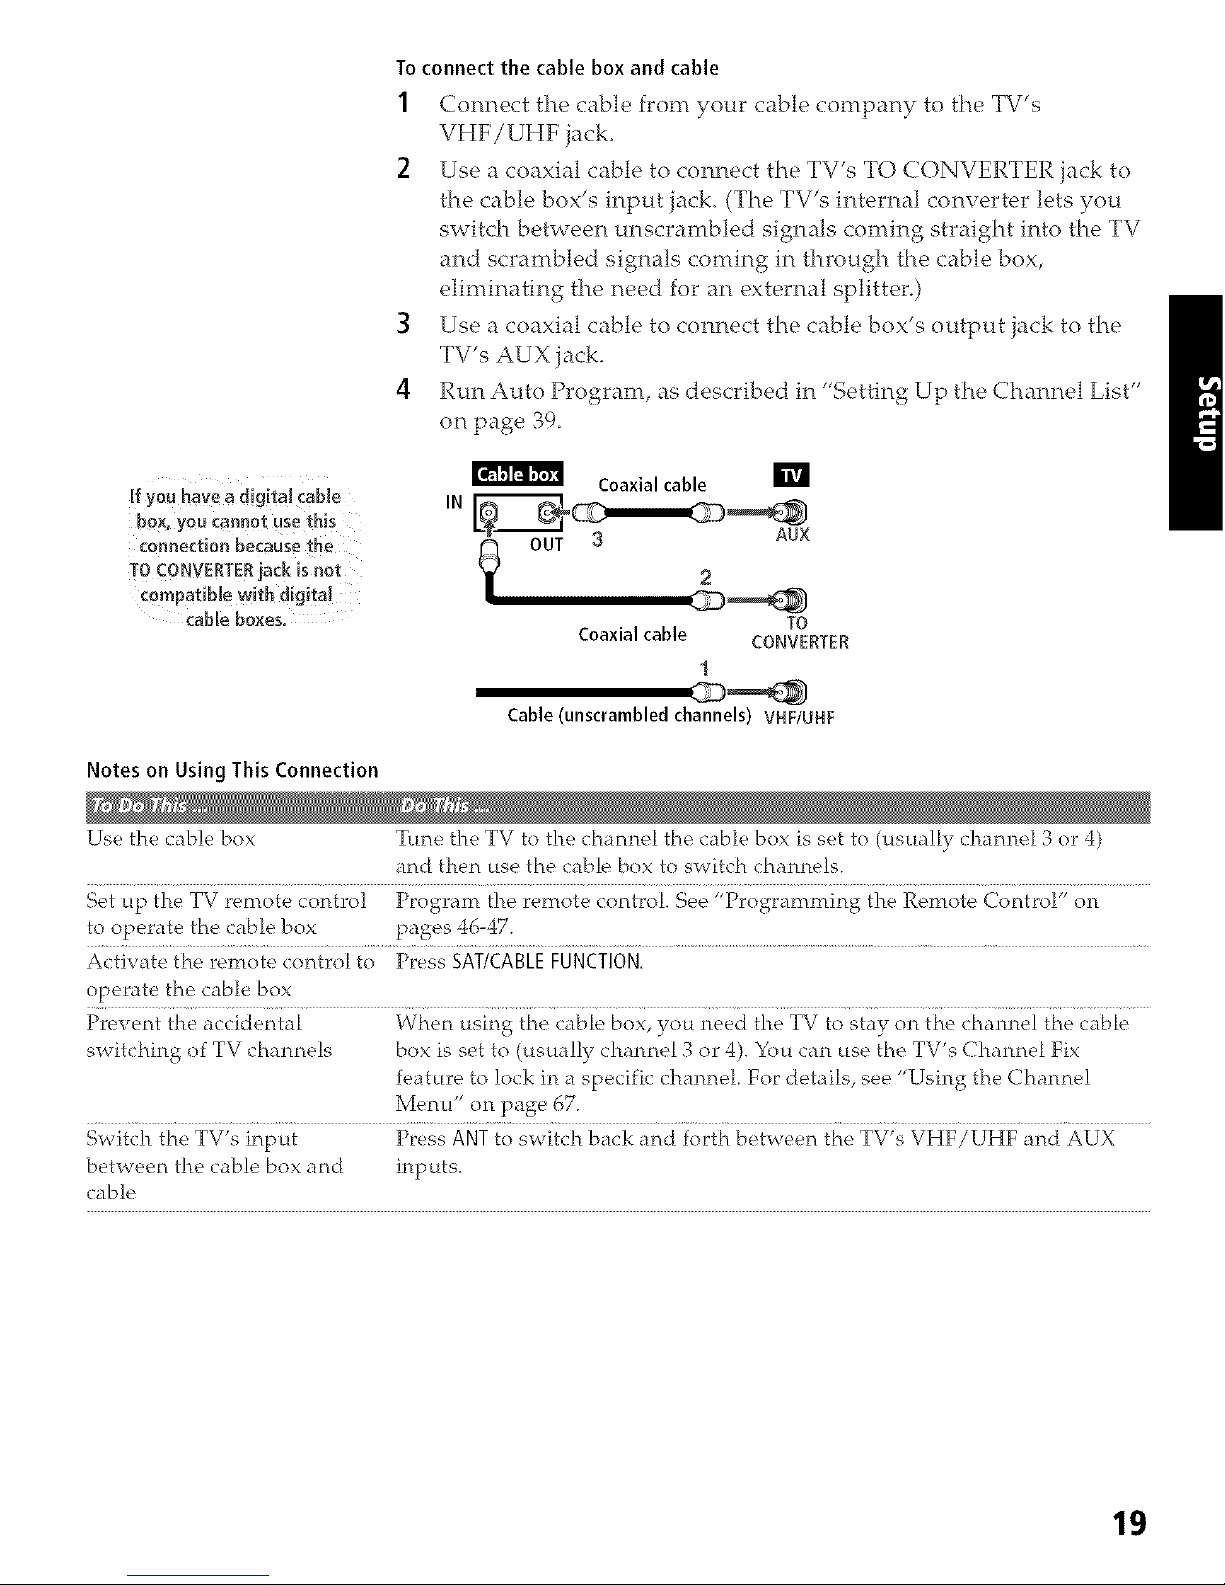
Toconnect the cable box and cable
1 Connect the cable from your cable company to the TV's
2 Use a coaxial cable to connect the TV's TO CONVERTER jack to
the cable box's input jack. (The TV's internal converter lets you
switch between unscrambled signals coming straight into the TV
and scrambled signals coming in through the cable box,
eliminating the need for an external splitter.)
3 Use a coaxial cable to connect the cable box's output jack to the
TV's AUX jack.
4 Run Auto Program, as described in "Setting Up the Channel List"
on page 39.
Coaxial cable
OUT 3 AUX
2
TO
Coaxial cable CONVERTER
"1
Cable (unscrambled channels) VHFIUNF
Use the cable box Tune the TV to the channel the cable box is set to (usually channel 3 or 4)
and then use the cable box to switch channels.
Set up the TV remote control Program the remote control. See "ProgramrrLing the Remote Control" on
to operate the cable box pages 46-47.
Activate the remote control to Press SAT/CABLE FUNCTION.
operate the cable box
Prevent the accidental When using the cable box, you need the TV 1o stay on the channe! the cable
switching of TV channels box is set 1o (usually channel 3 or 4). You can use the TV's Channel Fix
feature to lock in a specific channel For details, see "Using the Channe!
Menu" on page 67.
Switch the TV s lnt_ ut Press ANT to switc!-_ back and forth between the TV's VHF/UHF arid AUX
between the cable box and inputs.
cable
19
Cable Box Only Forbestresults, use this connectionif:
[] Your cable company scrambles all chamtels, which requires you
to use a cable box.
[] You do not have a VCR. (If you have a VCR, see pages 24 and 26.)
With this connection you can:
[] Use the TV remote control to change channels coming through
the cable box to the TV*s VHF/UHF jack, (You must first
program the remote control for your specific cable box,)
With this connection, all channels come into the TV through your cable box and only one
unscrambled signal is sent to the TV;so you cannot use the dua! picture features. If some
of your channels are scrambled, but others are not, consider using the "Cable Box and
Cable" connection on page !8 instead.
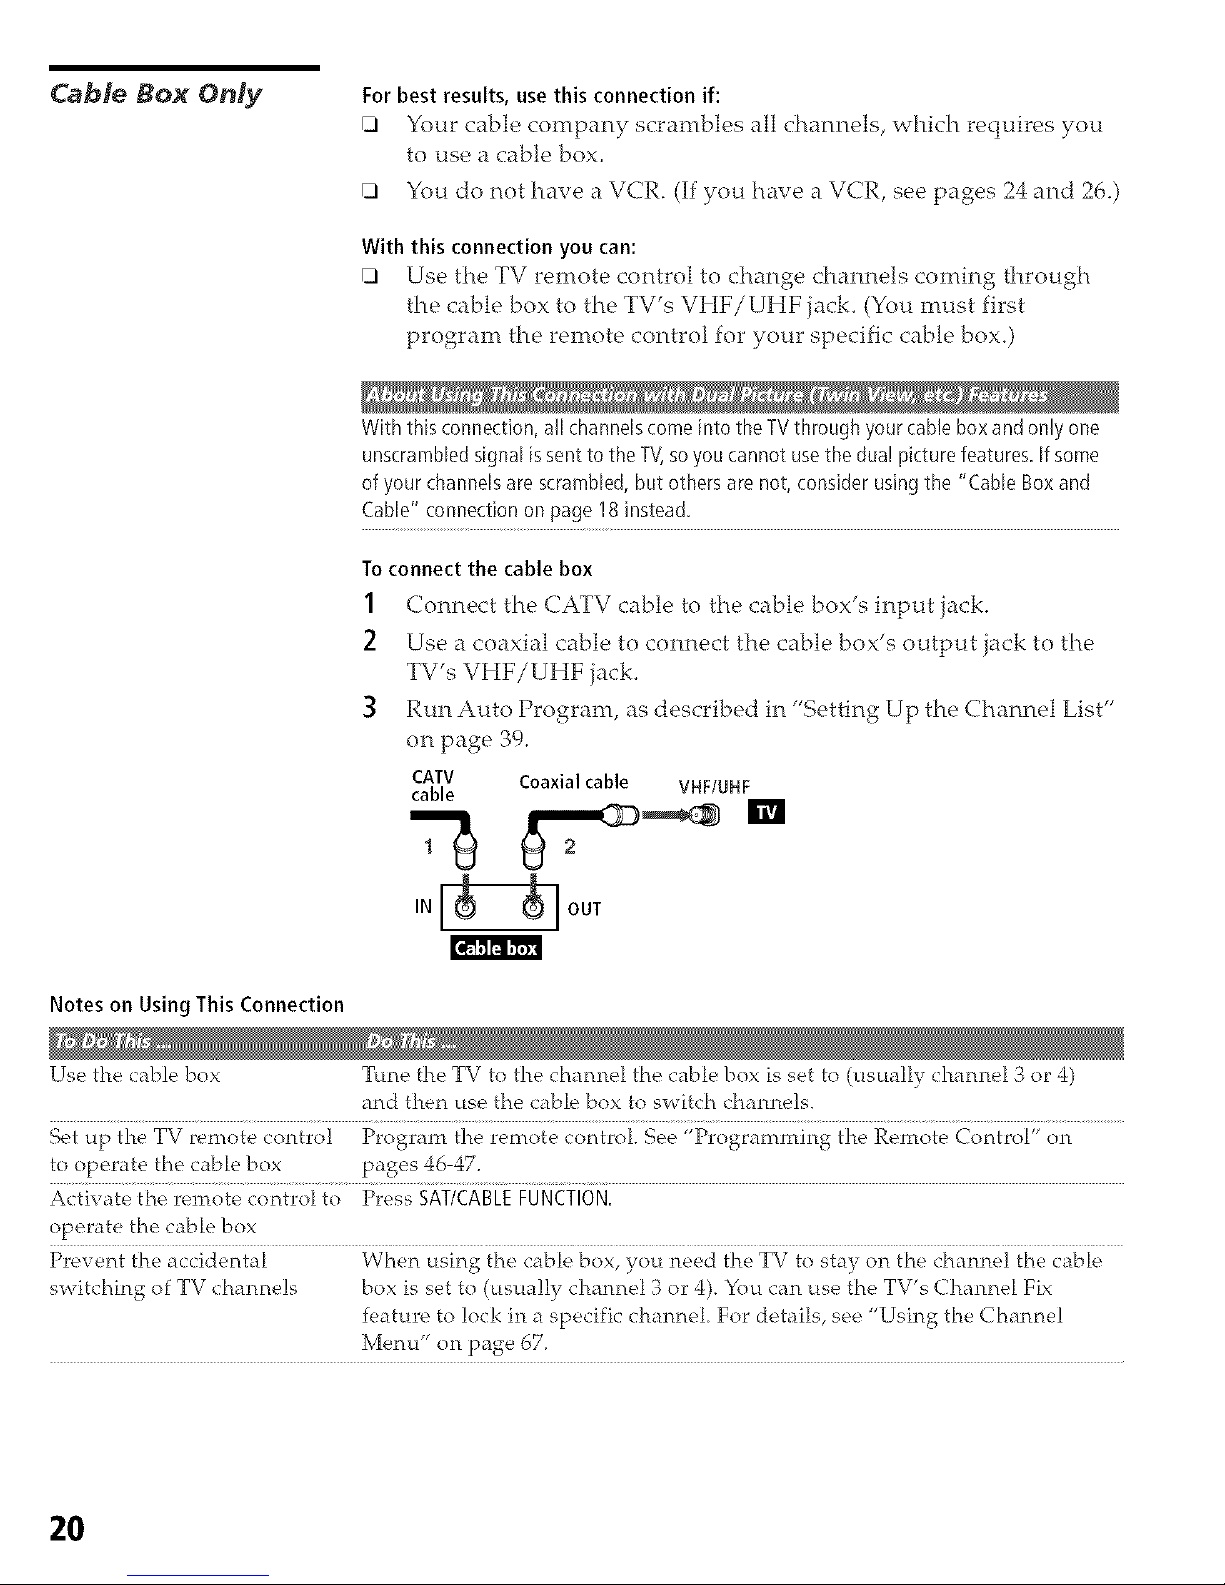
To connect the cable box
1 Connect the CATV cable to the cable box's input jack.
2 Use a coaxial cable to connect the cable box's output jack to the
TV's VHF/UHF jack.
3 Run Auto Program, as described in "Setting Up the Channel List"
on page 39.
CAW Coaxial cable VHFIUHF
cable
IN _ OUT
Notes on Using This Connection
Use the cable box Tune the TV to the channel the cable box is set to (usually channel 3 or 4)
and then use the cable box to switch channels.
Set up the TV remote control Program the remote control See "Programming the Remote Control" on
to operate the cable box pages 46-47.
Activate _he rernote control to Press SAT/CABLE FUNCTION,
operate the cable box
Prevent the accidental When using the cable box, you need the TV to stay on the channel the cable
switching of TV channels box is set to (usually channel 3 or 4). You can use the TV's Channel Fix
feature to ]ock in a specific channel. For details, see "Using the Channe]
Menu" on page 67.
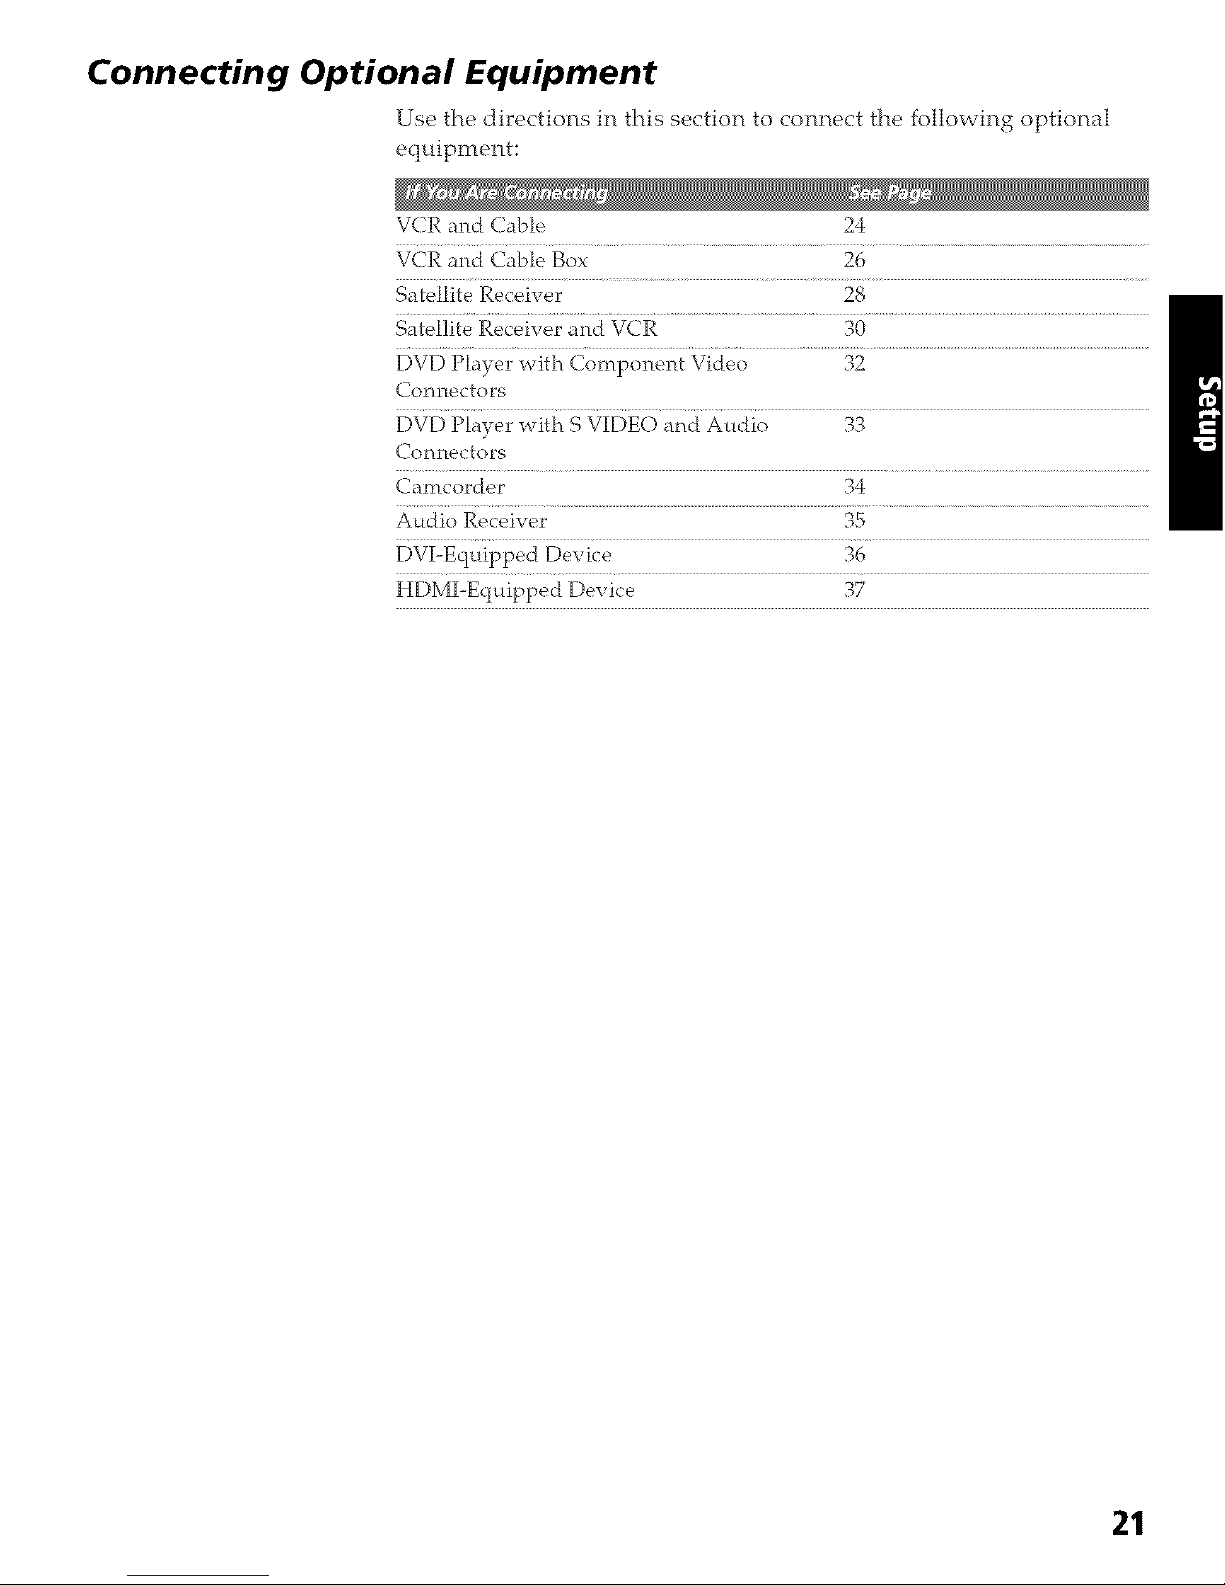
Connecting Optional Equipment
-Use the directions in this section to connect the following optional
equipment:
VCR and Cable 24
VCR and Cable Box 26
Satellite Receiver 28
Satellite Receiver and VCR o0
DVD Player with Component Video 32
Connectors
DVD Player with S VIDEO and Audio ,_3
Connectors
Camcorder 34
Audio Receix er _
DVI-Equipped Device 36
,37
21
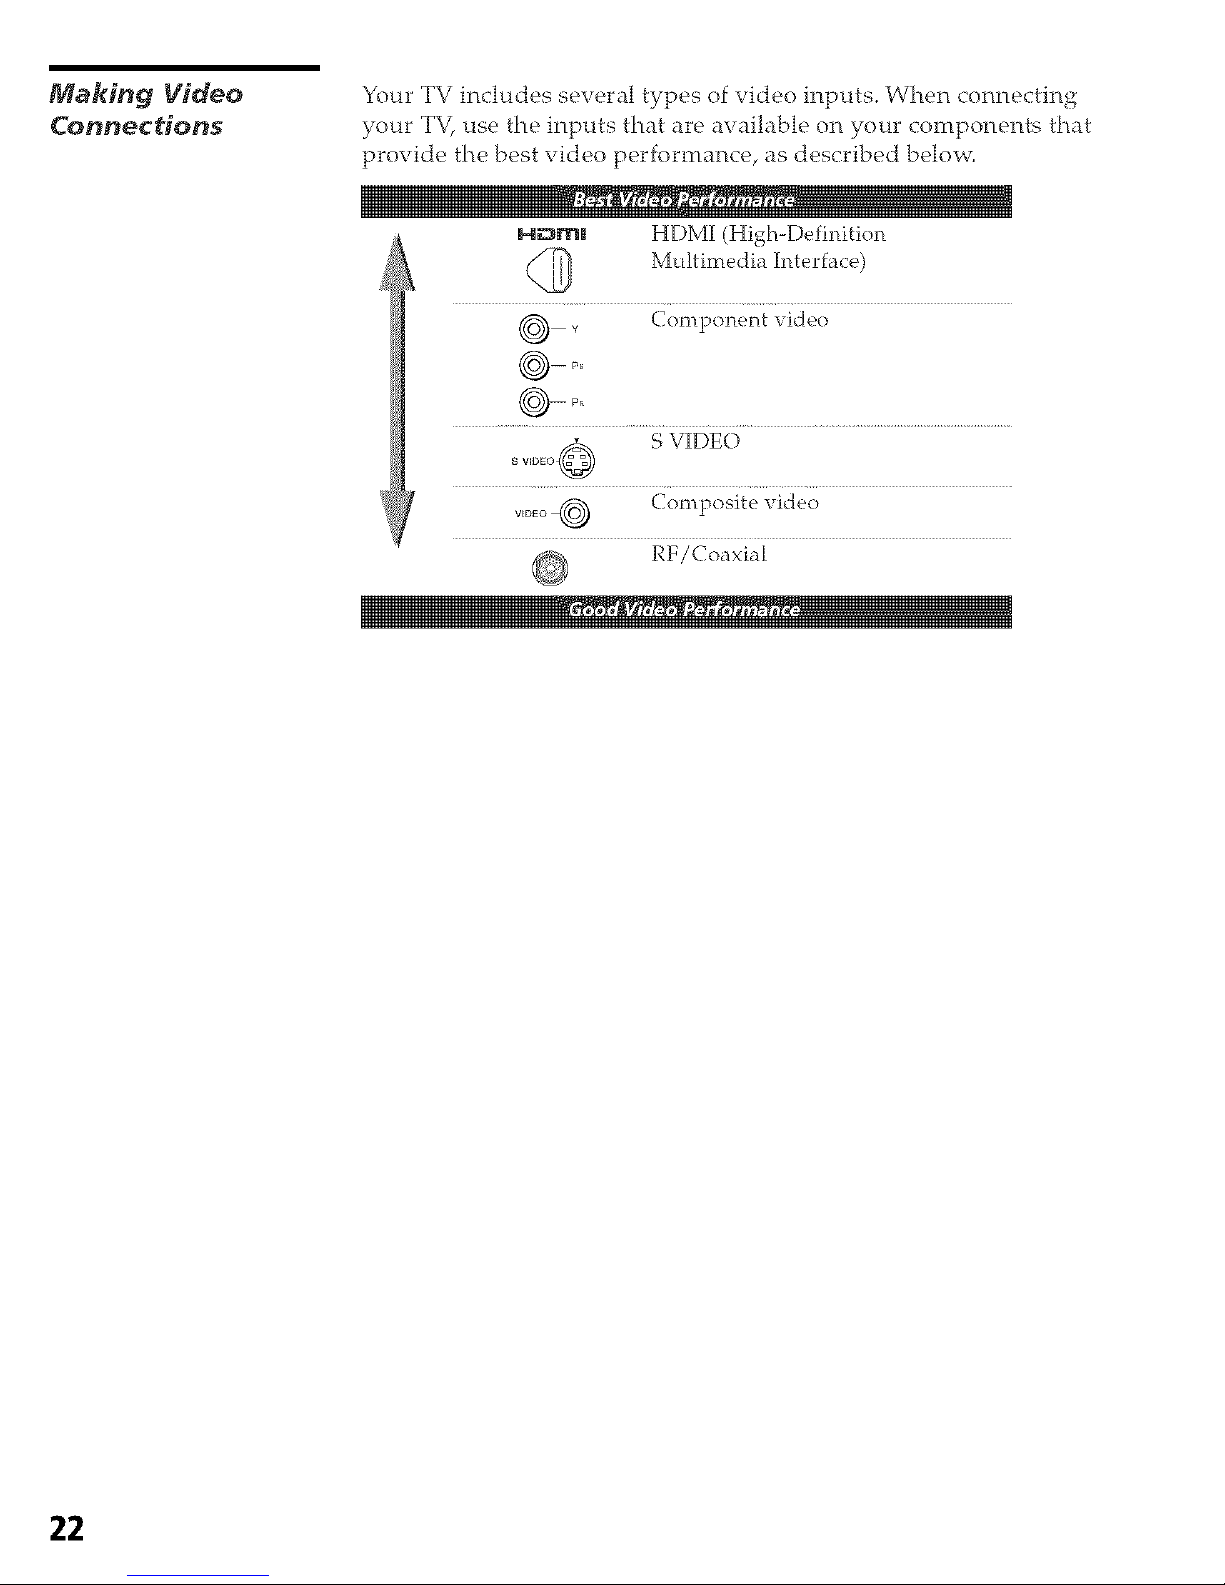
Making Video
Connections
Your TV includesseveraltypes of video inputs.When connecting
your TV, use the inputs that are available on your components that
provide the best video performance, as described below.
H_m_ HDMI (High-Definition
_ ....._i_i_i__,t
@ _ Component video
-- ps
_,D_Oq_ Composite video
RF/Coaxial
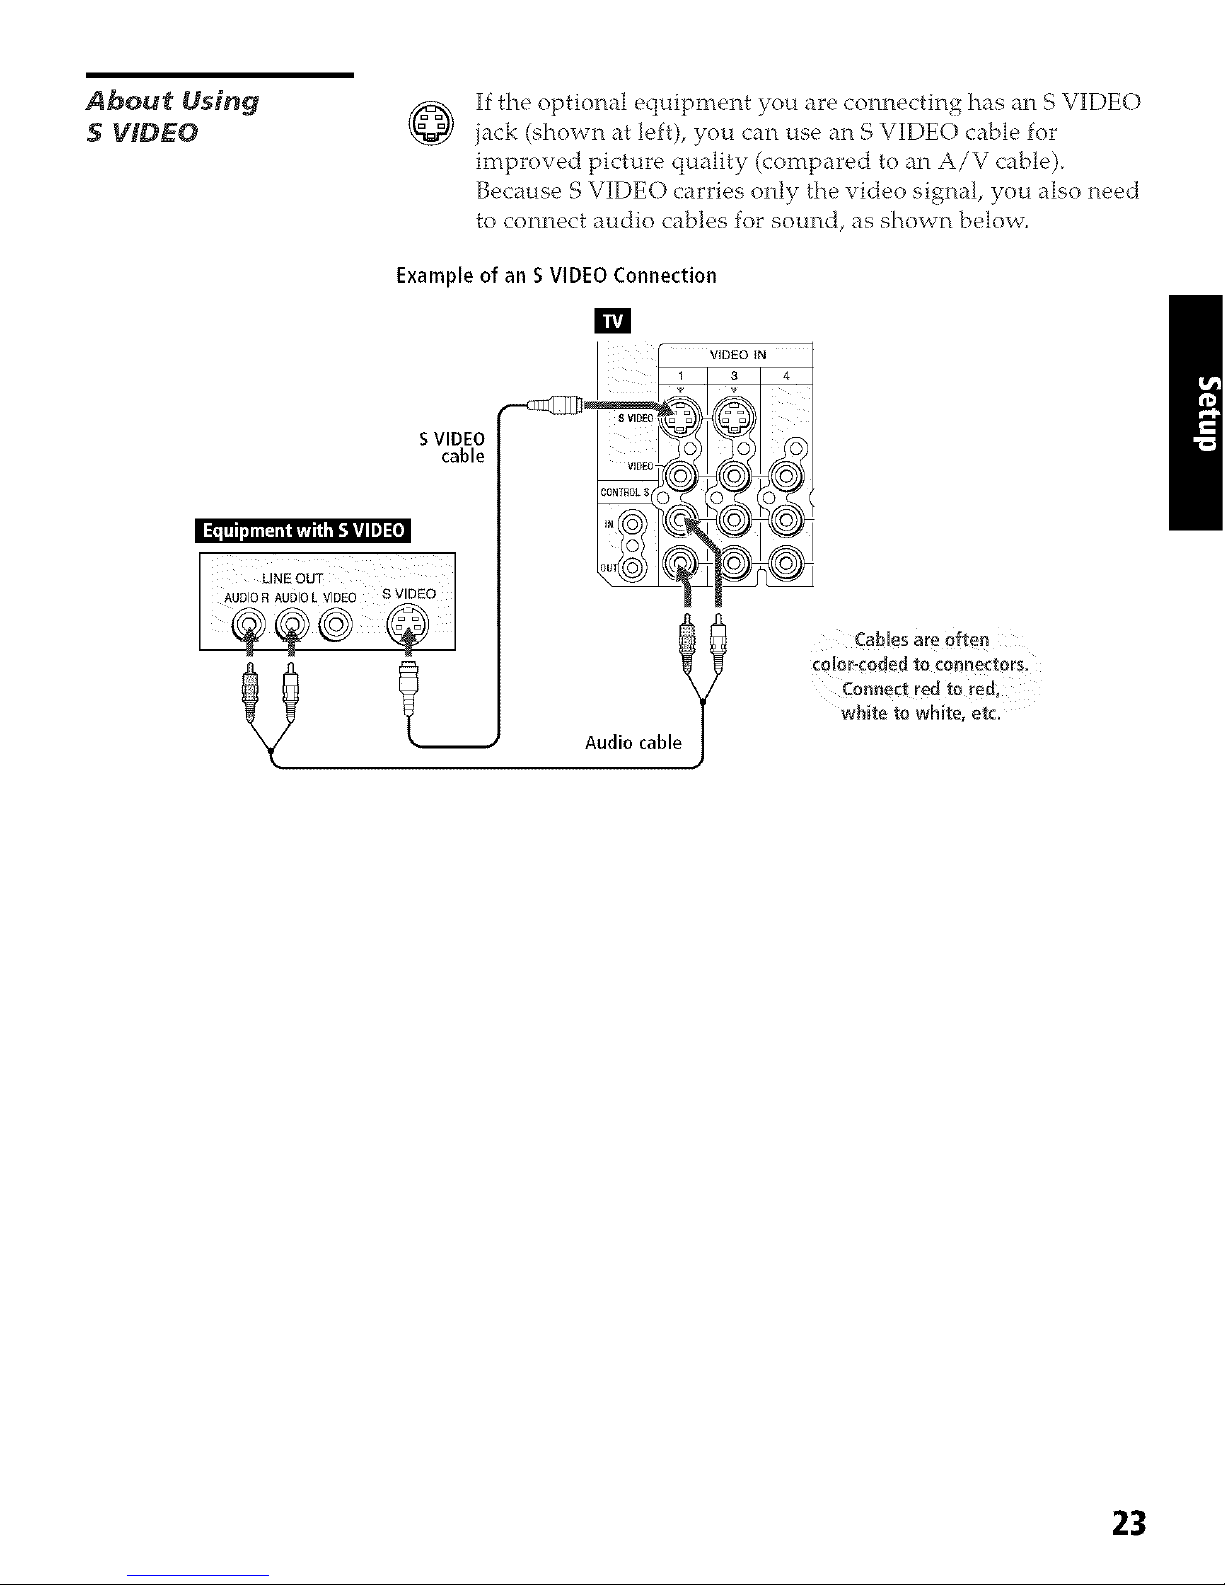
About Using
S VIDEO
If the optional equipment you are connecting has an S VIDEO
jack (si-town at left), you can use an S VIDEO cable for
improved picture quality (compared to an A/V cable).
Because S VIDEO carries only the video signal, you also need
to connec_ audio cables for sound, as shown below.
Example of an S VIDEO Connection
s VIDEO
cable
m
Audio cable?
Cables are Often
c010r,coded to connectors,
white to white, etc.
23
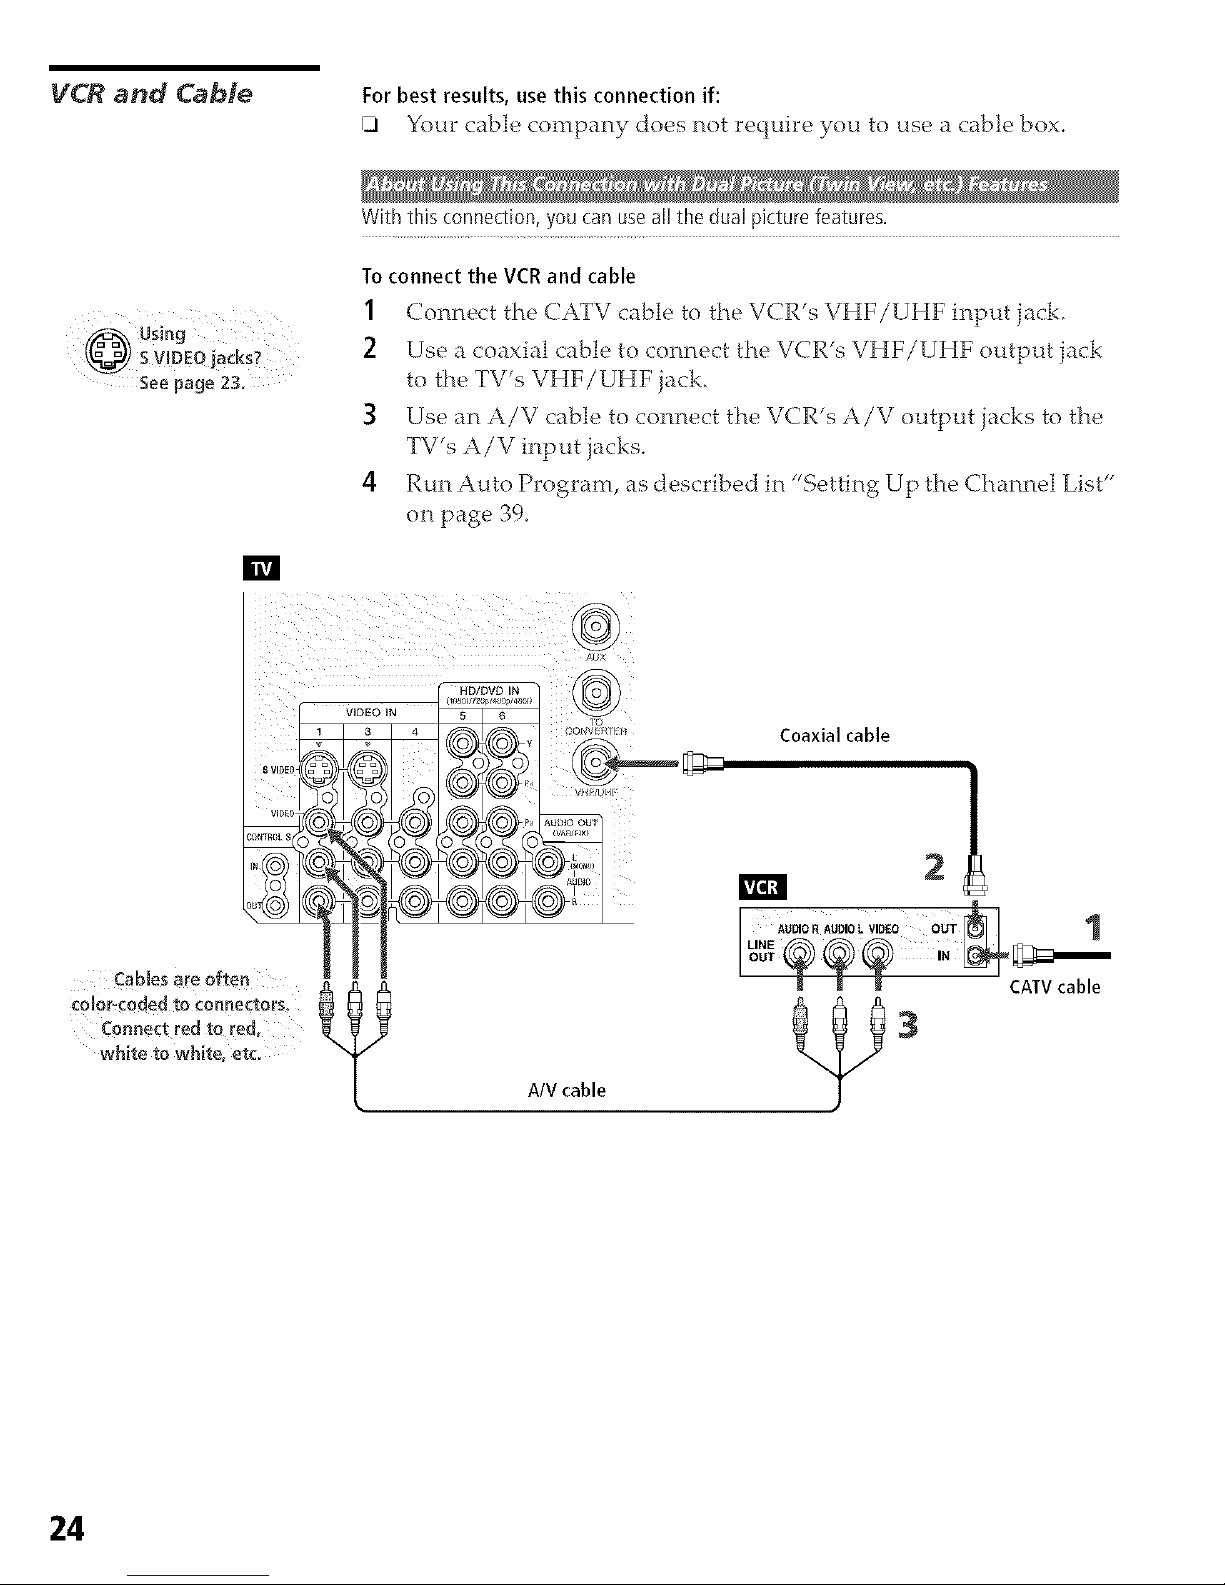
VCR and Cab_'e For best results, usethis connection if:
[] Your cable comparly does not require you to use a cable box.
With this connection, you can use all the dua! picture features.
Using
SV!DEO jacks?
See page 23,
Toconnect the VCRand cable
1 Connect the CATV cable to the VCR's VHF/UHF input jack.
2 Use a coaxial cable to connect the VCR's VHF/UHF output jack
to the TV's VHF/UHF jack.
3 Use an A/V cable to connect the VCR's A/V output jacks to the
TV's A/V input jacks.
4 Run Auto Program, as described in "Setting Up the Channel List"
on page 39
Eli
v,oEo,o iii@
_Y ':_ [_]Z Coaxial cable
CaMes are often ?a a _ _ CAWcable
color,codedtoconnectors.
conoeCtredtored, :3
white to white, etc.
AtV cable
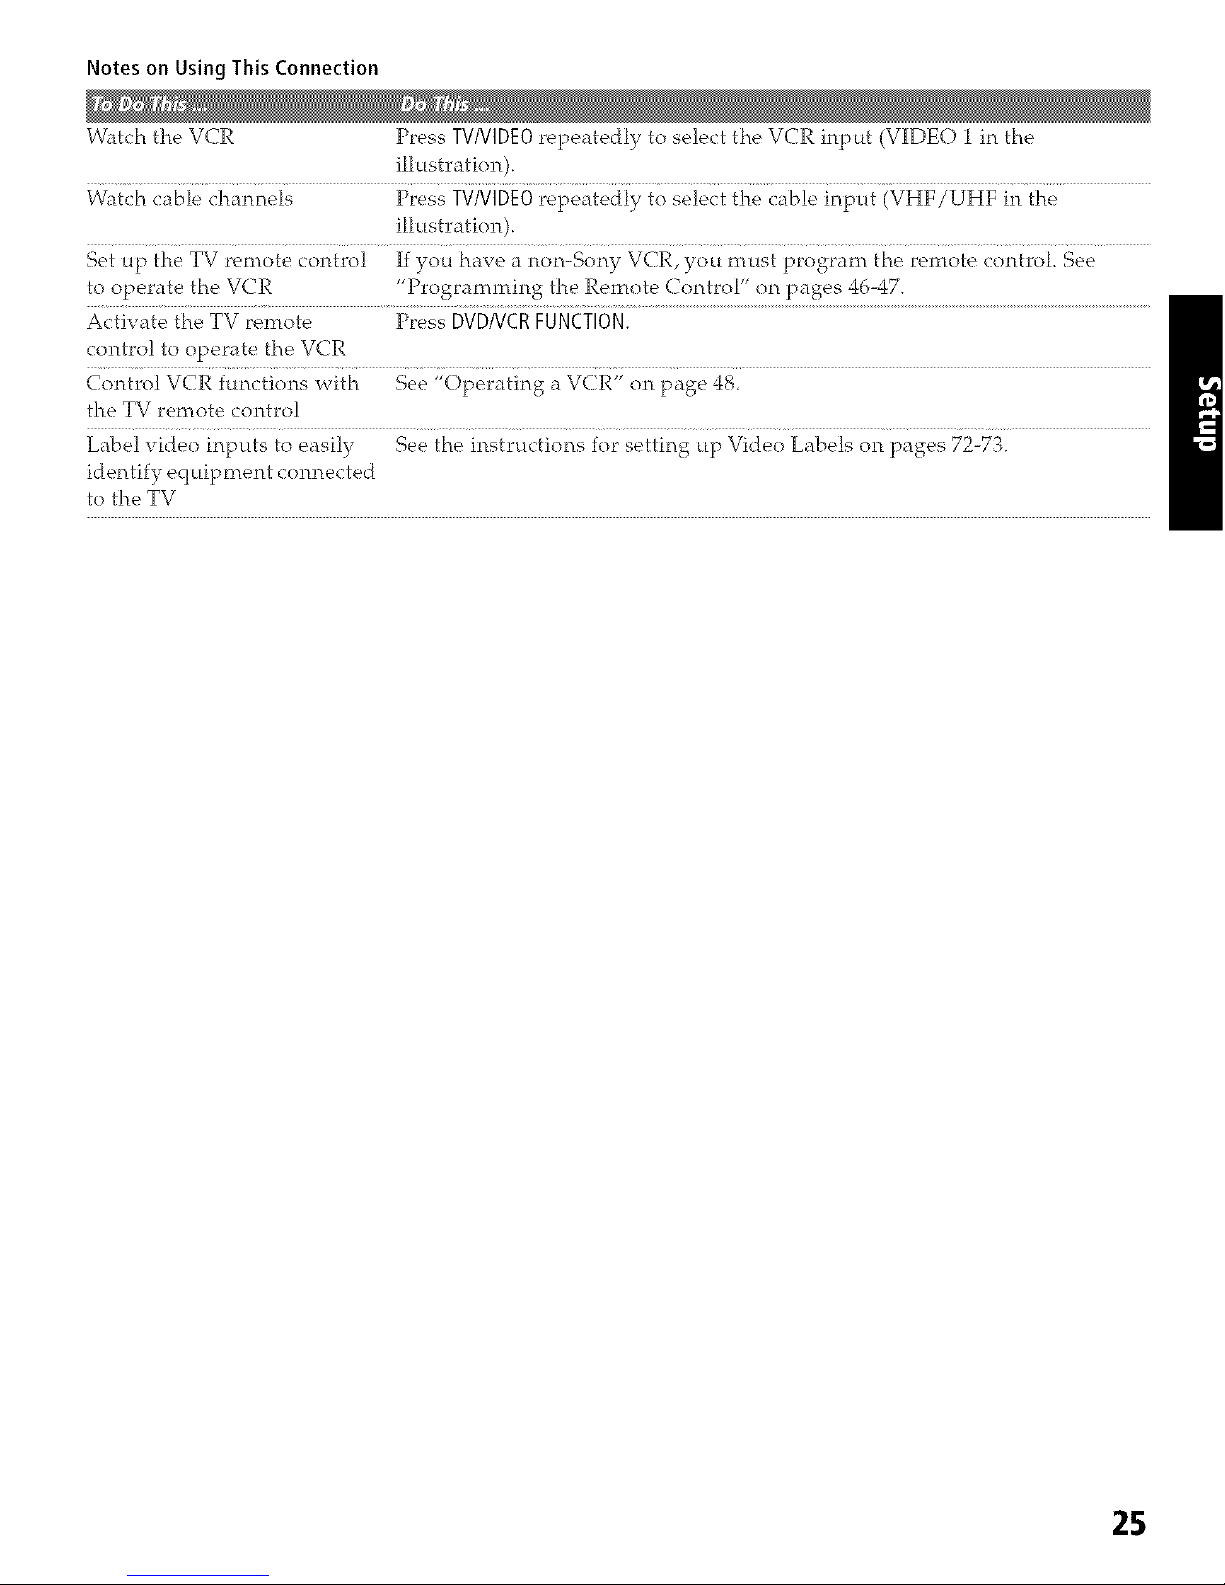
NotesonUsingThisConnection
Watch the VCR Press TVNIDEOrepeatedly to select the VCR input (VIDE() 1 in the
illustration).
Watch cable channels Press TVNIDE0repeatedly to select the cable input (VHF/UHF in the
illustration).
to operate the VCR "Programming the Remote C_ontrol" on pages 46-47.
Activate the TV relTtote Press DVDNCRFUNCTION.
contro! to operate the VCR
• _/ * y
Contro! VCR functions with See Operating a VCR" on page 48,
the TV remote contro!
Label video inputs to easily See the instructions for setting up Video Labels on pages 72-73.
identify equipment connected
to the TV
2S
 Loading...