

Sony KP-46S3K Operating Instructions Manual

1996 by Sony Corporation Printed in Spain
Operating Instructions
Getting Started
R
3-810-911-31 (1)
GB
GB
KP-46S3K
CZ
CZ
H
H
PL
PL
BG
BG
RF
RF
RF
RF
Projection TV (100 Hz)
Haszn·lati ÚtmutatÛ
A kÈsz¸lÈk
¸zembehelyezÈse
Instrukcja Obs ugi
Przygotowanie
иУ‰„УЪУ‚Н‡ Н
˝НТФОЫ‡Ъ‡ˆЛЛ
аМТЪ ЫНˆЛfl ФУ
˝НТФОЫ‡Ъ‡ˆЛЛ
аМТЪ ЫНˆЛЛ Б‡
ВНТФОУ‡Ъ‡ˆЛfl
燘‡ÎÌË ‰ÂÈÒÚ‚Ëfl
UvedenÌ do provozu
Funkce

2
WARNING
To prevent fire or shock hazard, do not expose the unit to
rain or moisture.
Dangerously high voltages are present inside the set. Do
not open the cabinet. Refer servicing to qualified
personnel only.
Safety Information
All TVs operate on extremely high voltages. To prevent
fire or electric shock, please follow the safety procedures
below. For your protection, refer all servicing to qualified
personnel only.
For general safety:
• Do not expose the TV to rain or moisture.
• Do not open the rear cover.
For safe operations:
• Do not operate the TV on any other voltages, but 220–
240 V AC.
• Do not operate the TV if any liquid or solid object falls in it
- have it checked immediately.
• Do not keep the set plugged in if you are not going to use
it for several days.
• Do not pull on the power cord to disconnect the TV. Pull it
out by the plug.
• Do not place anything on the surface of the front panel
cover when you open it.
Important Information
Please read the following information on using and
maintaining the TV, for optimum viewing quality.
Picture Quality
• Poor colour registration (the red, green and blue signals
do not overlap properly) may be caused by the influence
of the earth’s magnetism. Correct this with the
convergence adjustment (p. 7).
• Avoid touching the screen, and take care not to scratch
the surface with hard objects.
• Displaying a still picture for long periods of time, for
instance, when operating a video game or personal
computer, may damage the picture tube. To avoid this,
keep the picture contrast level low (PICTURE
ADJUSTMENT, p. 15).
Illumination
To obtain a clear picture, do not expose the screen to
direct illumination or direct sunlight. If possible, use spot
lighting directed down from the ceiling.
Installation
• To prevent over heating of the set, do not block the
ventilation openings.
• Do not install the TV in a hot or humid place, or in a place
subject to direct sunlight, excessive dust or mechanical
vibration.
• After transporting the TV directly from a cold to a warm
location, or if the room temperature has changed
suddenly, pictures may be blurred or show poor colour
over portions of the picture. This is because moisture has
condensed on the mirrors or lenses inside the TV. Let the
moisture evaporate before using the TV.
Maintenance
• Save the original shipping carton and packing material to
use if you ever have to ship your TV. For maximum
protection, repack your TV as it was originally packed at
the factory.
• To keep the cabinet looking brand-new, periodically clean
it with a soft cloth. Stubborn stains may be removed with a
cloth slightly dampened with a mild detergent solution.
Never use strong solvents such as thinner or benzene, or
abrasive cleaners since these will damage the cabinet. As
a safety precaution, unplug the TV before cleaning it.
• To remove dust from the front of the screen, unplug the
TV and wipe gently with a soft cloth lightly dampened with
water or a mild detergent solution, using vertical strokes
only. Then wipe it with a dry, soft cloth. Never use
solvents or thinners for cleaning purposes.
• If the picture turns dark after the TV has been in use for a
long period of time, it may be necessary to clean the
inside of the TV. Consult qualified service personnel for this.

GB
GB
3
Contents
Overview ................................................................................... 4
Getting Started ...............................................................
6
Step 1 Preparation ..................................................................... 6
Check the supplied accessories ...................................... 6
Insert the battery into the Remote Commander................ 6
Connect the aerial........................................................... 6
Step 2 Adjusting Colour Registration (Convergence) .................. 7
Choose a language......................................................... 7
Display the menu ............................................................ 7
Converge the red, green, blue lines ................................. 7
Step 3 Tuning in to TV Stations................................................... 8
Preset Channels Automatically ....................................... 8
Preset Channels Manually .............................................. 9
Additional Presetting Functions ................................................ 10
Exchanging Programme Positions ................................ 10
Tuning in to a Channel Temporarily ............................... 10
Skipping Programme Positions ..................................... 11
Captioning a Station Name ........................................... 11
Manual Fine-Tuning...................................................... 12
Operating Instructions .................................................
13
Watching the TV ...................................................................... 13
Switching the TV on and off........................................... 13
Selecting TV Programmes ............................................ 13
Adjusting the Volume .................................................... 13
Operating the TV Using the Buttons on the TV............... 14
Watching Teletext or Video Input................................... 14
More Convenient Functions .......................................... 14
Adjusting and Setting the TV Using the Menu ........................... 15
Adjusting the Picture and Sound ................................... 15
Using the Sleep Timer................................................... 16
Parental Lock................................................................ 16
PIP(Picture In Picture) .............................................................. 17
Displaying Frame-by-frame Pictures (Photo) ................. 18
Checking All the Preset Programmes (Index) ................ 18
Teletext.................................................................................... 19
Direct Access Functions................................................ 19
Using the Teletext Menu ............................................... 20
Connecting and Operating Optional Equipment ........................ 22
Connecting Optional Equipment.................................... 22
Selecting lnput and Output ............................................ 23
Remote Control of Other Sony Equipment..................... 24
For Your Information ................................................................ 25
Optimum Viewing Area ................................................. 25
Troubleshooting............................................................ 26
Specifications ............................................................... 26
Receivable Channels and Channel Display ................... 26
Operating Instructions
Getting Started
4
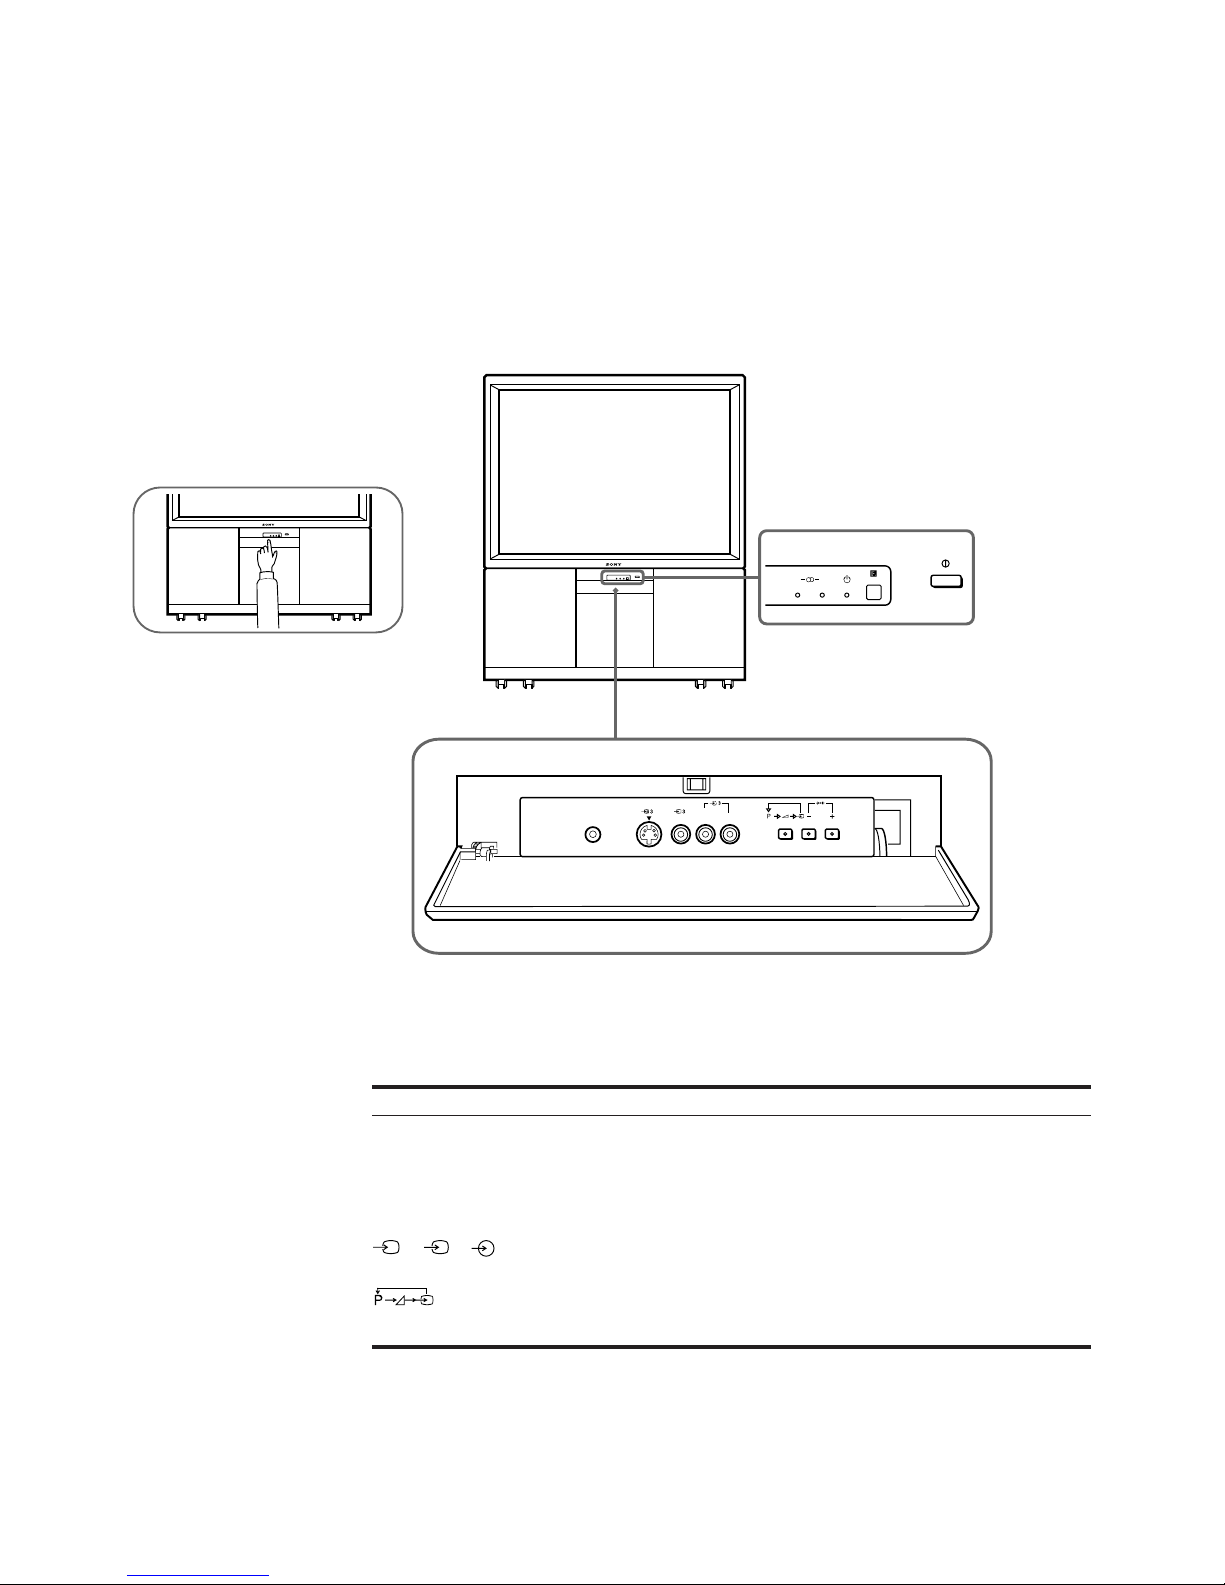
Overview
This section briefly describes the buttons and controls on the TV
set and on the Remote Commander. For more information, refer to
the pages given next to each description.
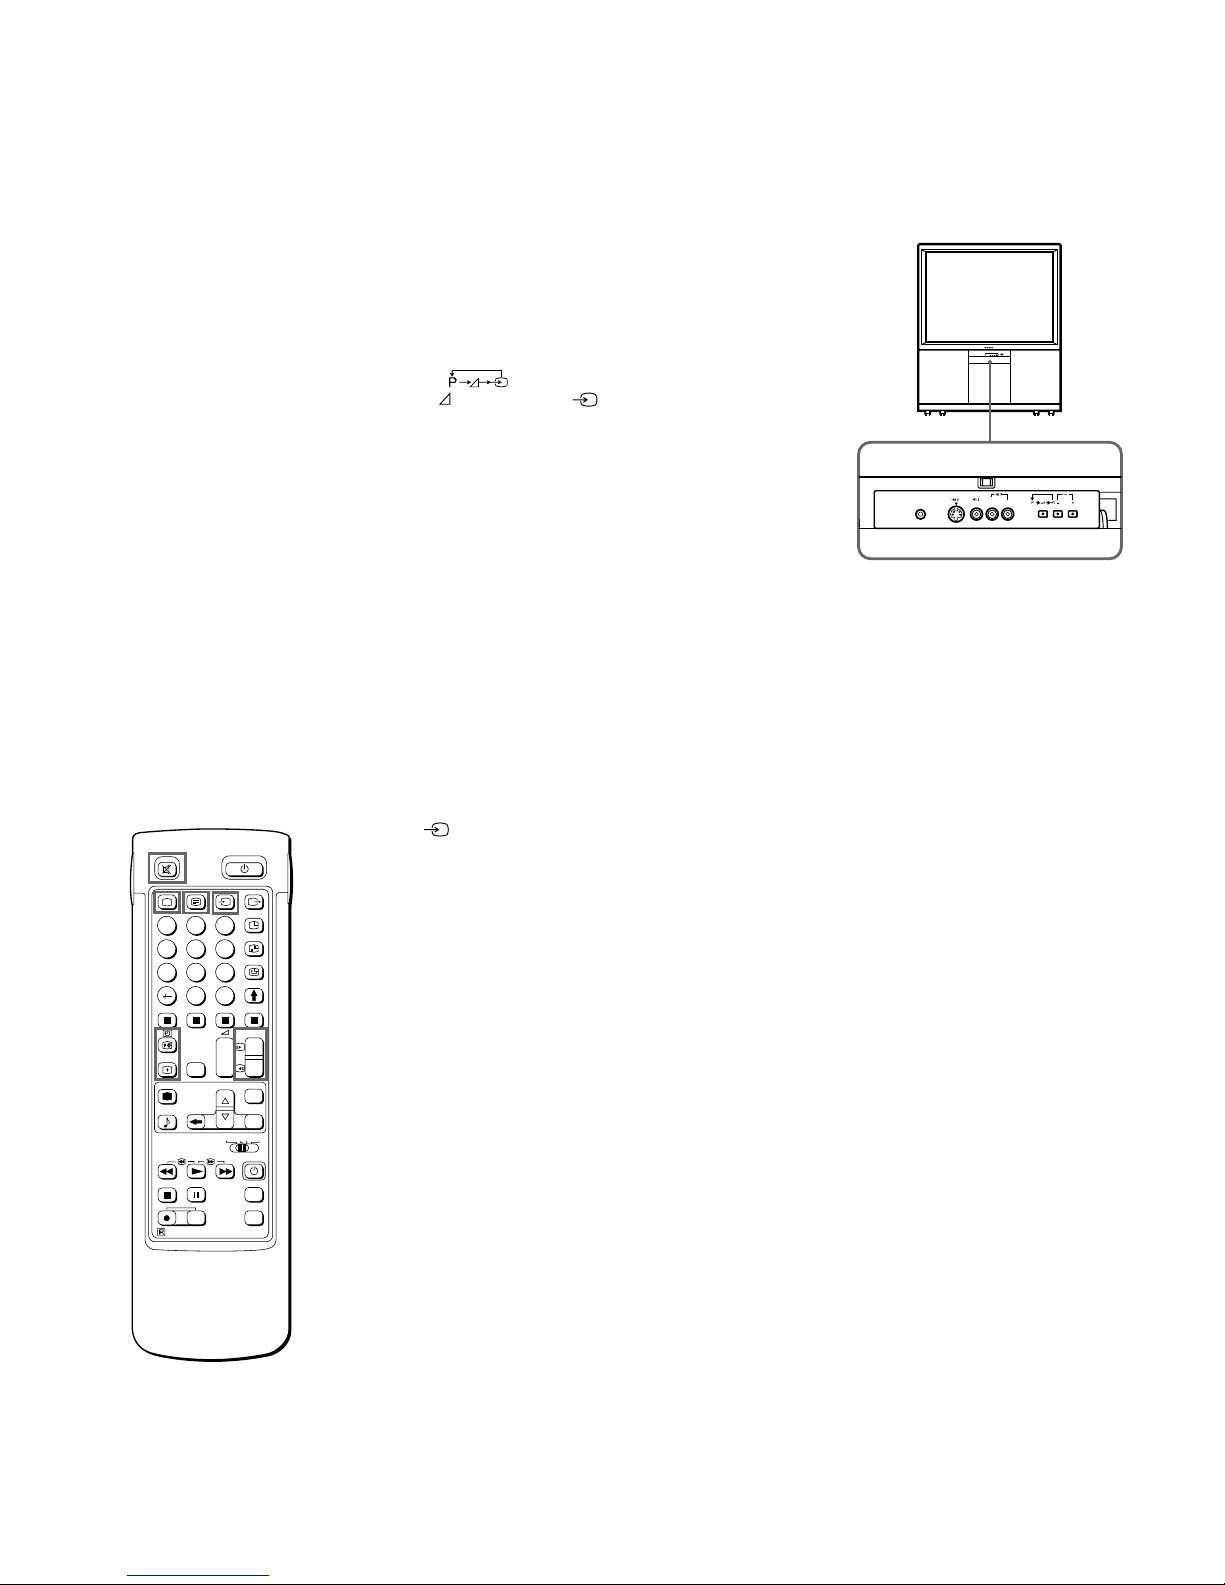
TV set-front
A B
2
MONO
L / G / S / I R / D / D / D
θ
φ
A-µ-B
λ
3, 3, 3
–/+
S
Symbol Name
Main power switch
Standby indicator
Stereo A/B indicators
Headphones jack
Input jacks (S video/video/audio)
Function selector
(Programme/volume/input)
Adjustment buttons for function selector
Refer to page
13
13
15
22
22
14
14
5
ο
φ
Ο
_
1,2,3,4,5,6,
7,8,9,and 0
-/-C
+/–
PROGR +/–
[
#
ΛΛΛΛ
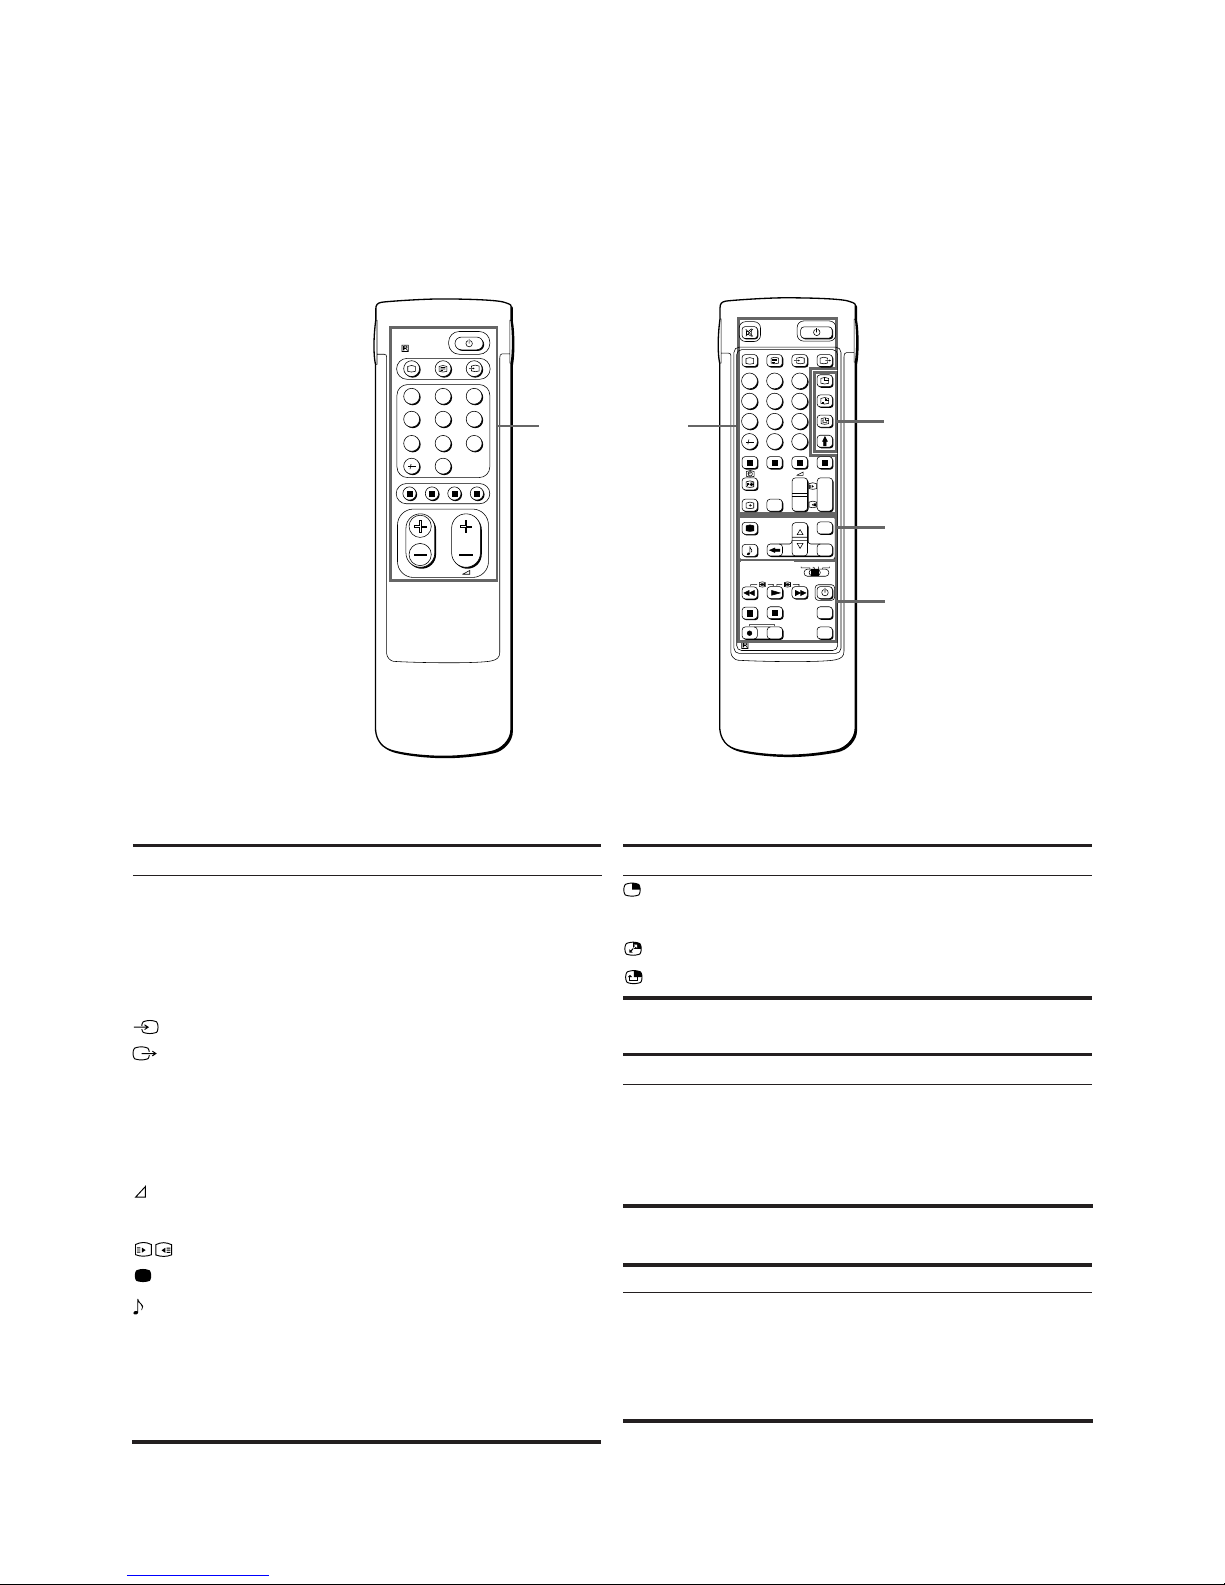
Remote commander
TV/Teletext
operation
Full-Function sideSimple side
Note
The SAT button does not
operate with this TV.
1
1
∃
Χ
Symbol Name
Mute on/off button
Standby button
TV power on/TV mode selector
button
Teletext button
Input mode selector
Output mode selector
Number buttons
Double-digit entering button
Direct channel entering button
Volume control button
Programme selectors
Teletext page access buttons
Picture adjustment button
Sound adjustment button
On-screen display button
Teletext hold button
Time display button
Fastext buttons
Refer to page
14
13
13
14
14
23
13
13
10
13
13
19
15
15
14
19
14
19
PIP (Picture-in-picture) operationTV/Teletext operation
Symbol Name
PIP on/off button
PIP source selector
Swap button
PIP position changing button
Refer to page
17
17
17
17
Menu operation
Name
Menu on/off button
Select buttons
OK(confirming)button
Back button
Refer to page
7
7
7
7
Symbol
MENU
>+/ ?–
OK
≅
VTR1/2/3,
MDP
;; − :: Λ
ϑ α φ
PROGR +/–
Symbol Name
Video equipment selector
Video equipment operation
buttons
Refer to page
24
24
Video operation
PROGR
RM-831
1
2
45
3
6
9
8
7
0
PROGR
PROGR
1
1
VTR 1-2-3
MDP
1
2
45
3
6
9
8
7
0
C
SAT
+
+
_
_
MENU
+
_
OK
+
_
RM-831
USE
MEM
RESET
PIP operation
Menu operation
Video operation
6
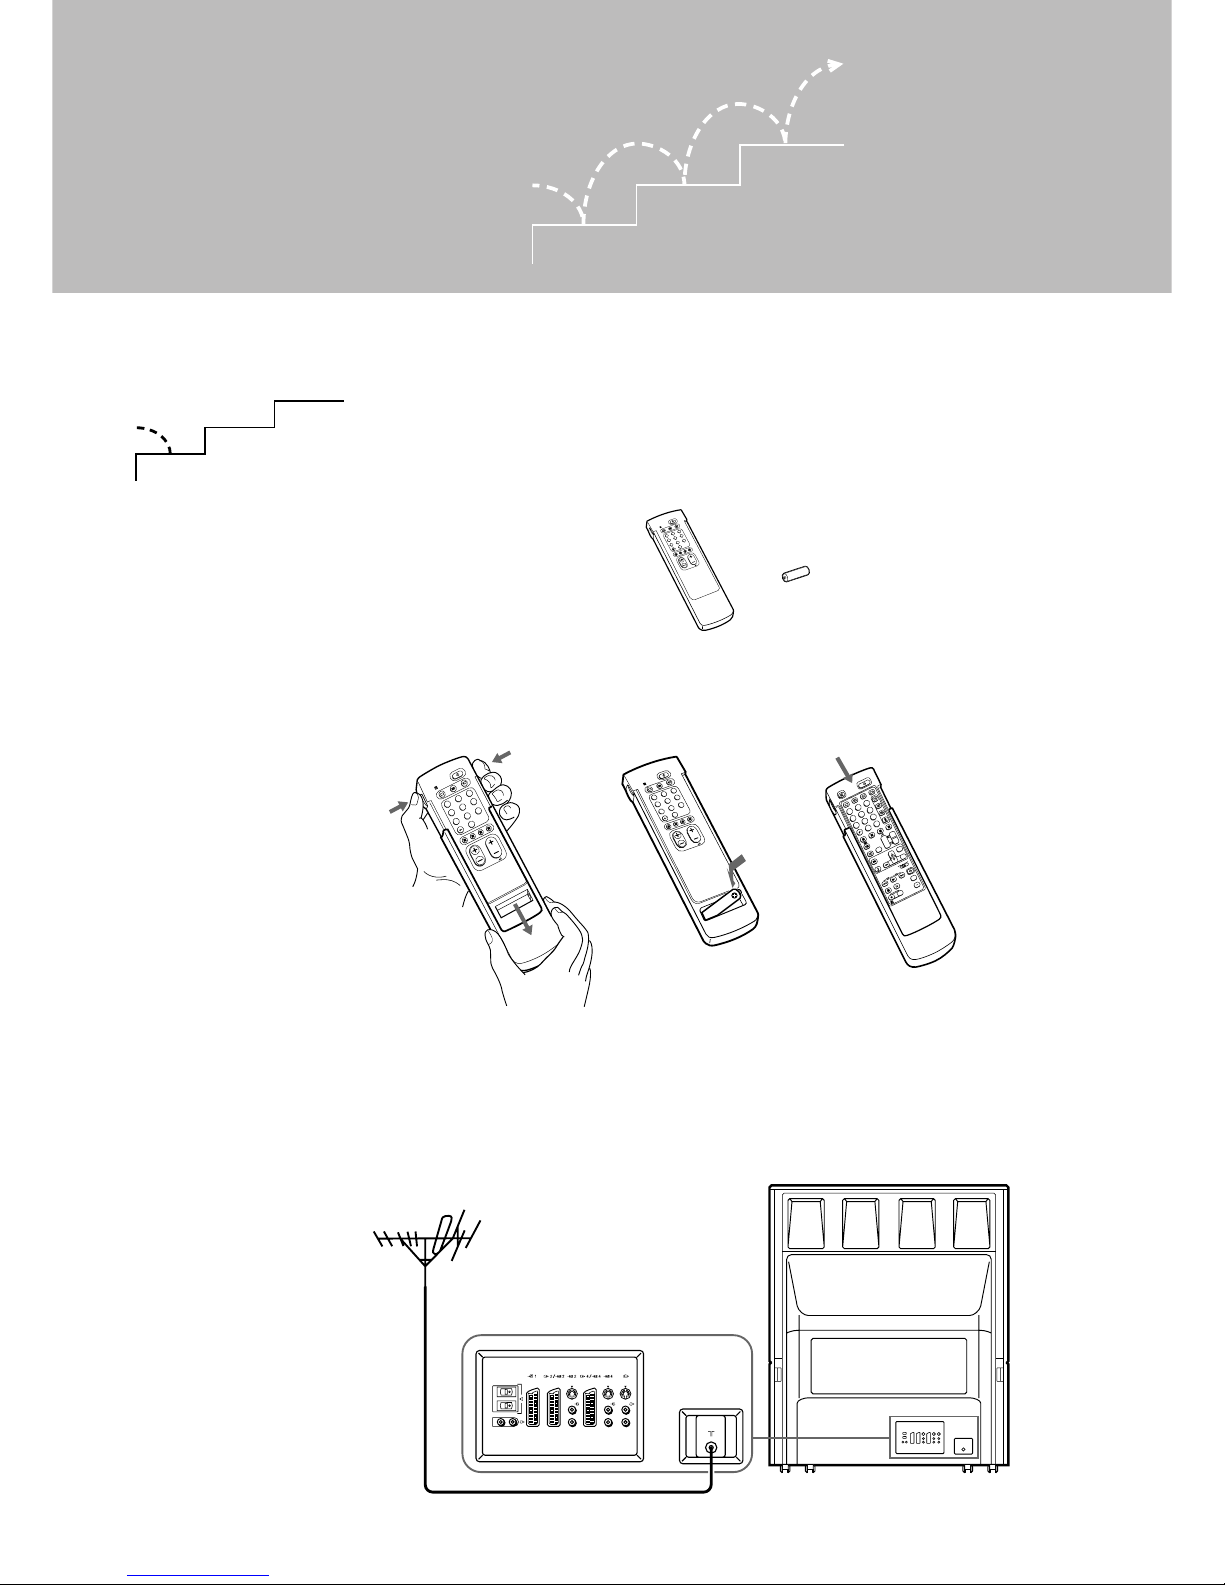
Step 1 Preparation
Check the supplied accessories
When you’ve taken everything
out of the carton, check that you
have these items:
• RM-831 Remote Commander
• One IEC designation R6 battery
Insert the battery into the Remote
Commander
Remove the cover. Check the correct
polarities.
Refit the outside cover
making sure that the FullFunction side is visible to use
the menu in step 2.
Connect the aerial
Fit an IEC aerial connector attached to 75-ohm coaxial cable (not
supplied) to the ) socket at the rear of the TV.
Getting Started
PROGR
8
7
0
9
RM-831
5
3
2
4
6
1
1
1
2
PROGR
RM-831
8
7
0
5
3
2
4
6
9
1
3
PROGR
8
7
0
9
RM-831
5
3
2
4
6
1
RM-831
PROGR
VTR 1-2-3
MDP
1
2
4
5
3
6
9
8
7
0
C
SAT
MENU
+
_
OK
+
4
PROGR
1
1
+
_
+
_
3
1
2
3
1
2
3
1
2
3
L/G/S/I
R/D/D/D
R/D/D/D-L/G/S/I
R/D/D/D
L/G/S/I
R/D/D/D
L/G/S/I
R/D/D/D
L/G/S/I
Note: Always remember
to dispose of used
batteries in an
environmental friendly
way.
GB
7
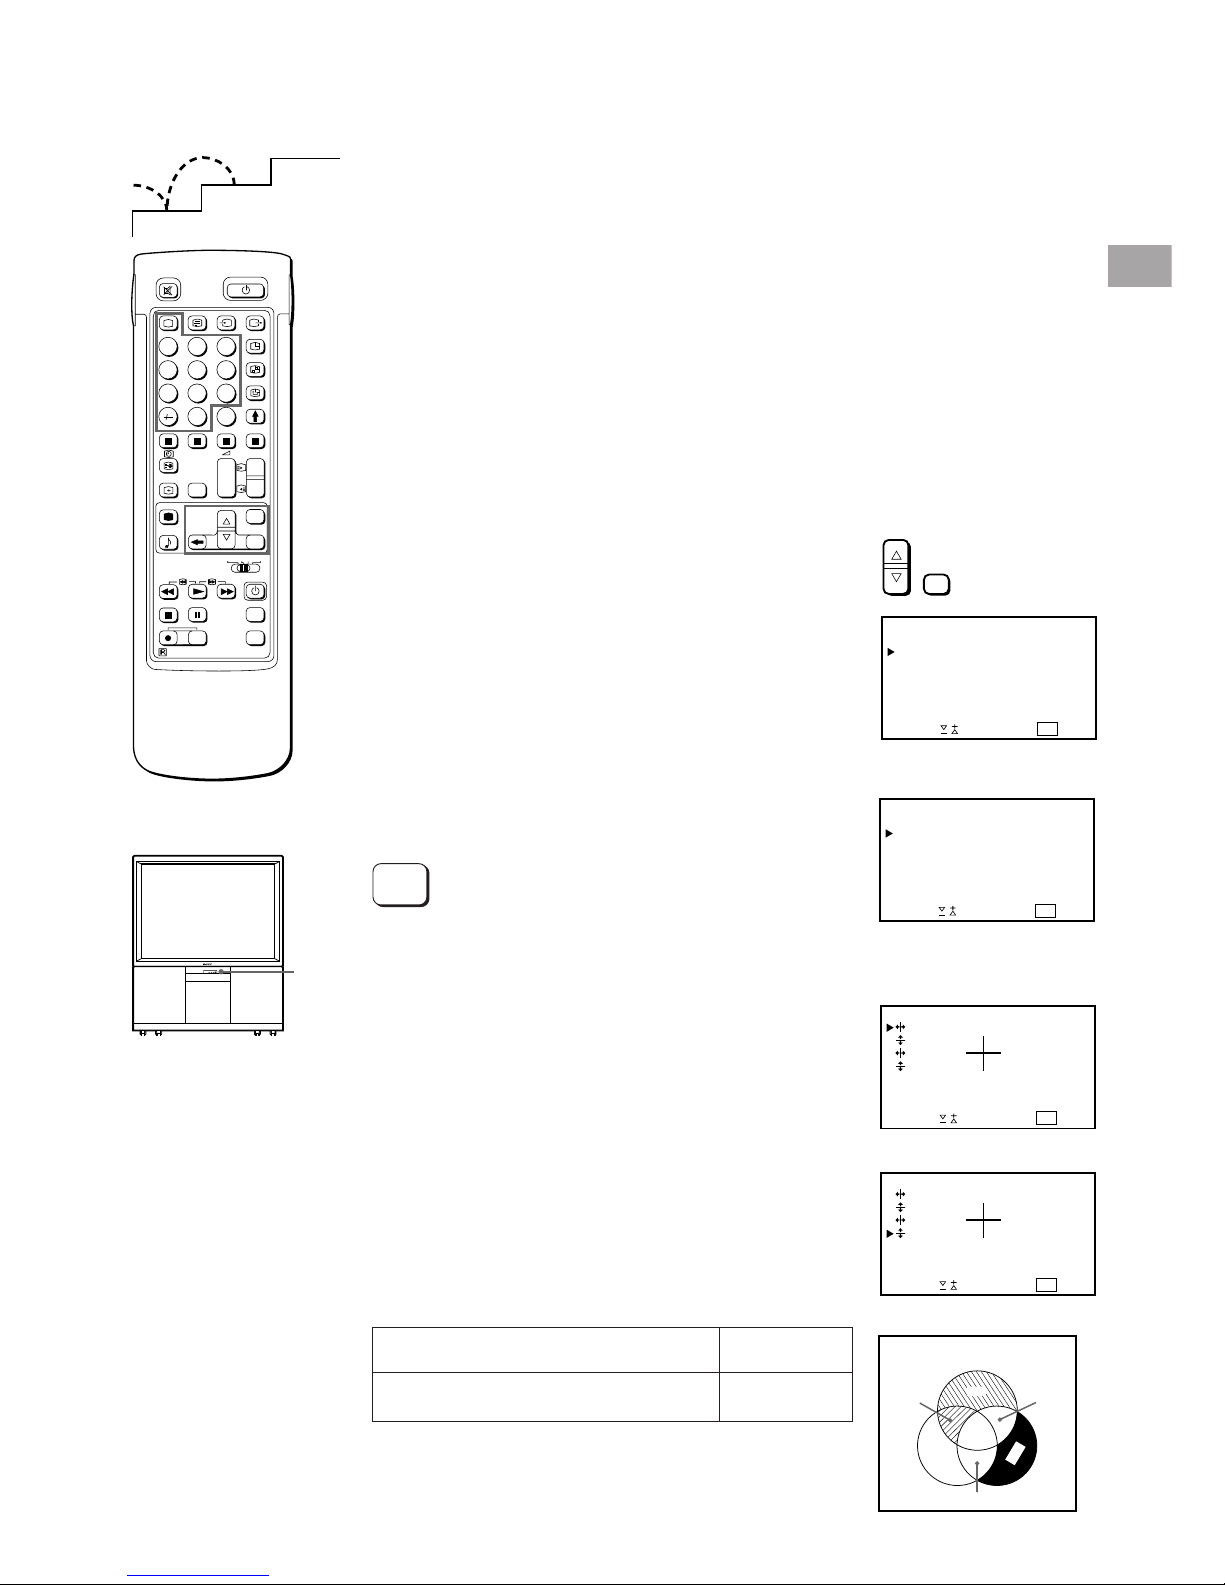
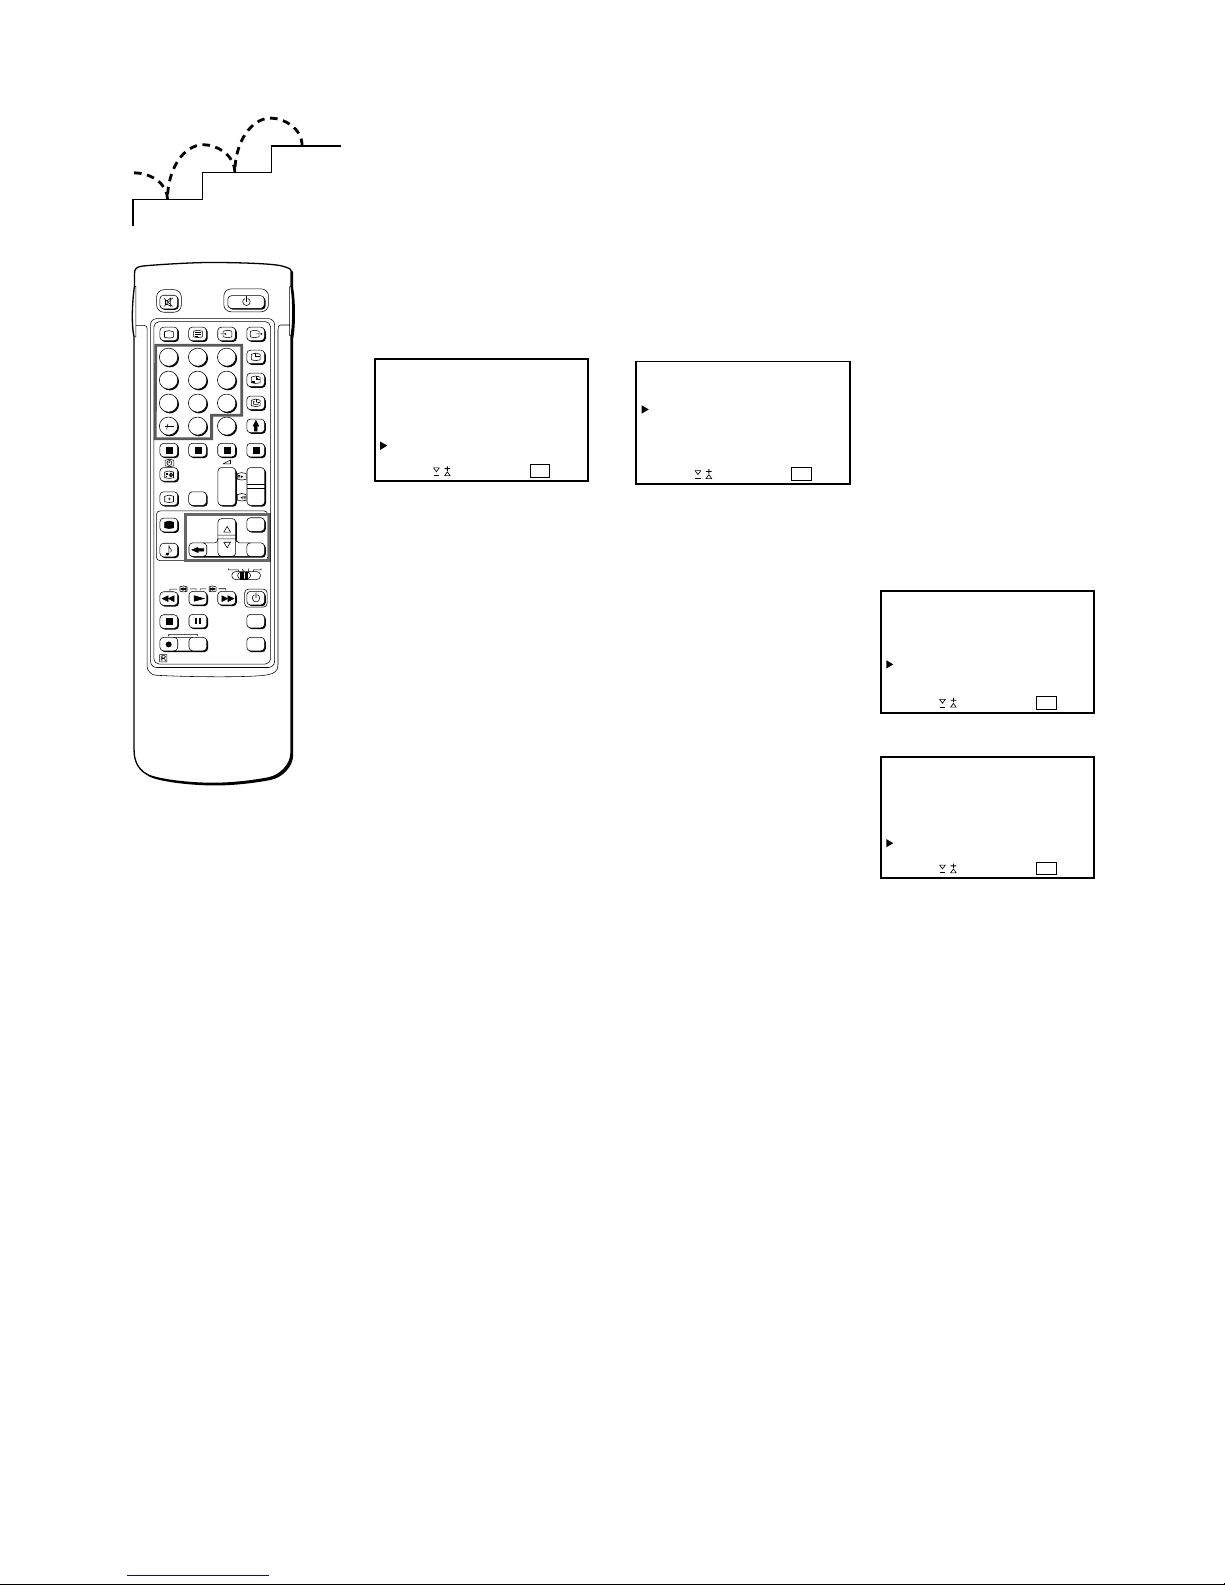
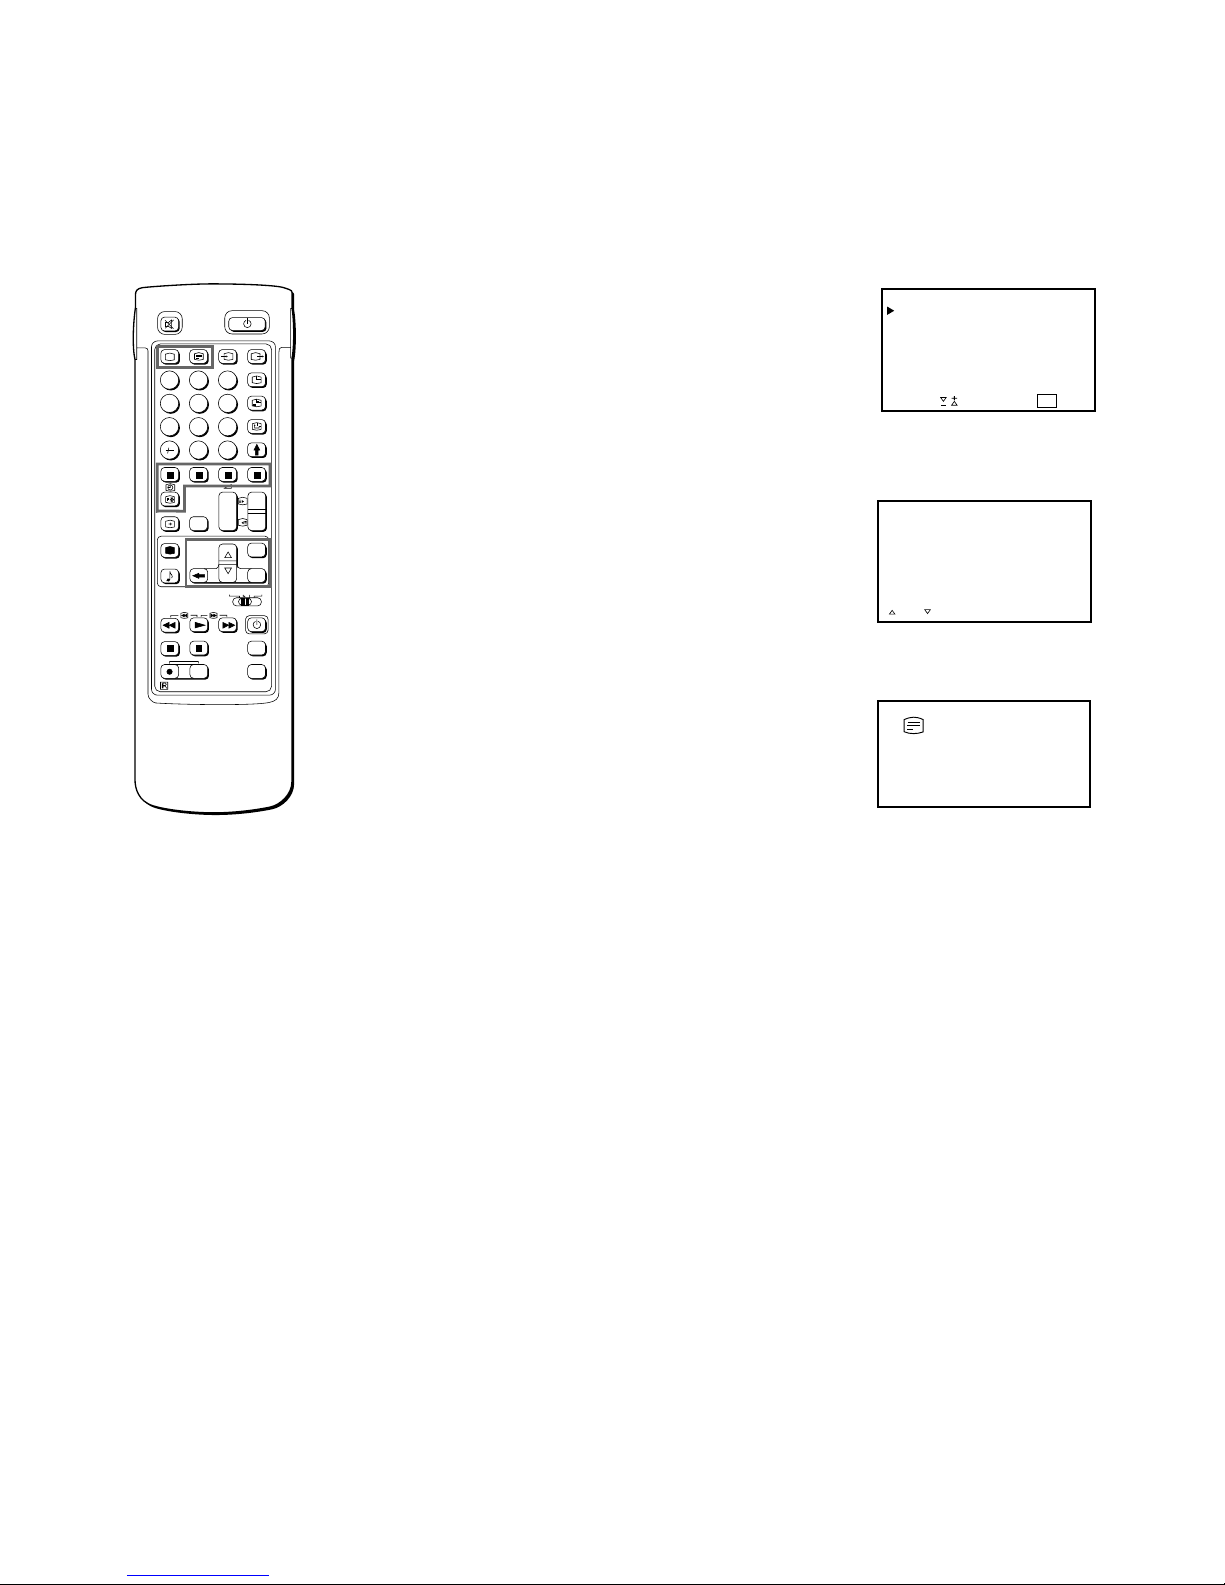
Step 2 Adjusting Colour Registration
(Convergence)
1
Fig. 3
Fig. 4
SELECT AND PRESS
OK
CONVERGENCE
SELECT AND PRESS
OK
CONVERGENCE
1
2
3
1
Once you have set up the TV, you can choose the language of the
menu. Then you should converge the three colour layers (red,
green, and blue).
Before you begin
• Check that the Full-Function side of the Remote Commander is
visible.
• Locate Menu operation buttons on the Remote Commander. They
are shaded in the illustration at the left.
Choose a language
1 Press 1 on the TV.
The TV will switch on. If the standby indicator on the TV is lit, press
Ο or a number button on the Remote Commander.
2 Press MENU.
The LANGUAGE menu appears. (See Fig. 1).
3 Select the language you want with > + or ? – and press OK.
4 Press ≅ to return to the main menu.
Display the menu
Press MENU.
The main menu appears. (See Fig.2)
Converge the red, green and blue
lines
1 Select “CONVERGENCE” with > + or ?– and press OK.
The CONVERGENCE menu appears. (See Fig. 3.)
2 Select “the line” you want to adjust with >+ or ?– .
Key to line adjustment symbols:
I (red vertical – left/right adjustment)
– (red horizontal – up/down adjustment)
I (blue vertical – left/right adjustment)
– (blue horizontal – up/down adjustment)
3 Press OK.
The line to adjust is selected.
4 Press>+ or ?– to converge the selected line with the centre green
line and press OK.
Fig. 2
MENU
PICTURE
SOUND
FEATURES
CONVERGENCE
PRESET
LANGUAGE
SELECT AND PRESS
OK
+
_
OK
Fig. 1
SELECT LANGUAGE
ENGLISH
DEUTSCH
FRANÇAIS
ITALIANO
NEDERLANDS
ESPAÑOL
SELECT AND PRESS
OK
Mixture of Primary
Colours
yellow
magenta
white
cyan
red
green
blue
RM-831
PROGR
+
_
PROGR
1
1
+
_
VTR 1-2-3
MDP
1
2
45
3
6
9
8
7
0
C
SAT
MENU
+
_
OK
+
_
2
MENU
3
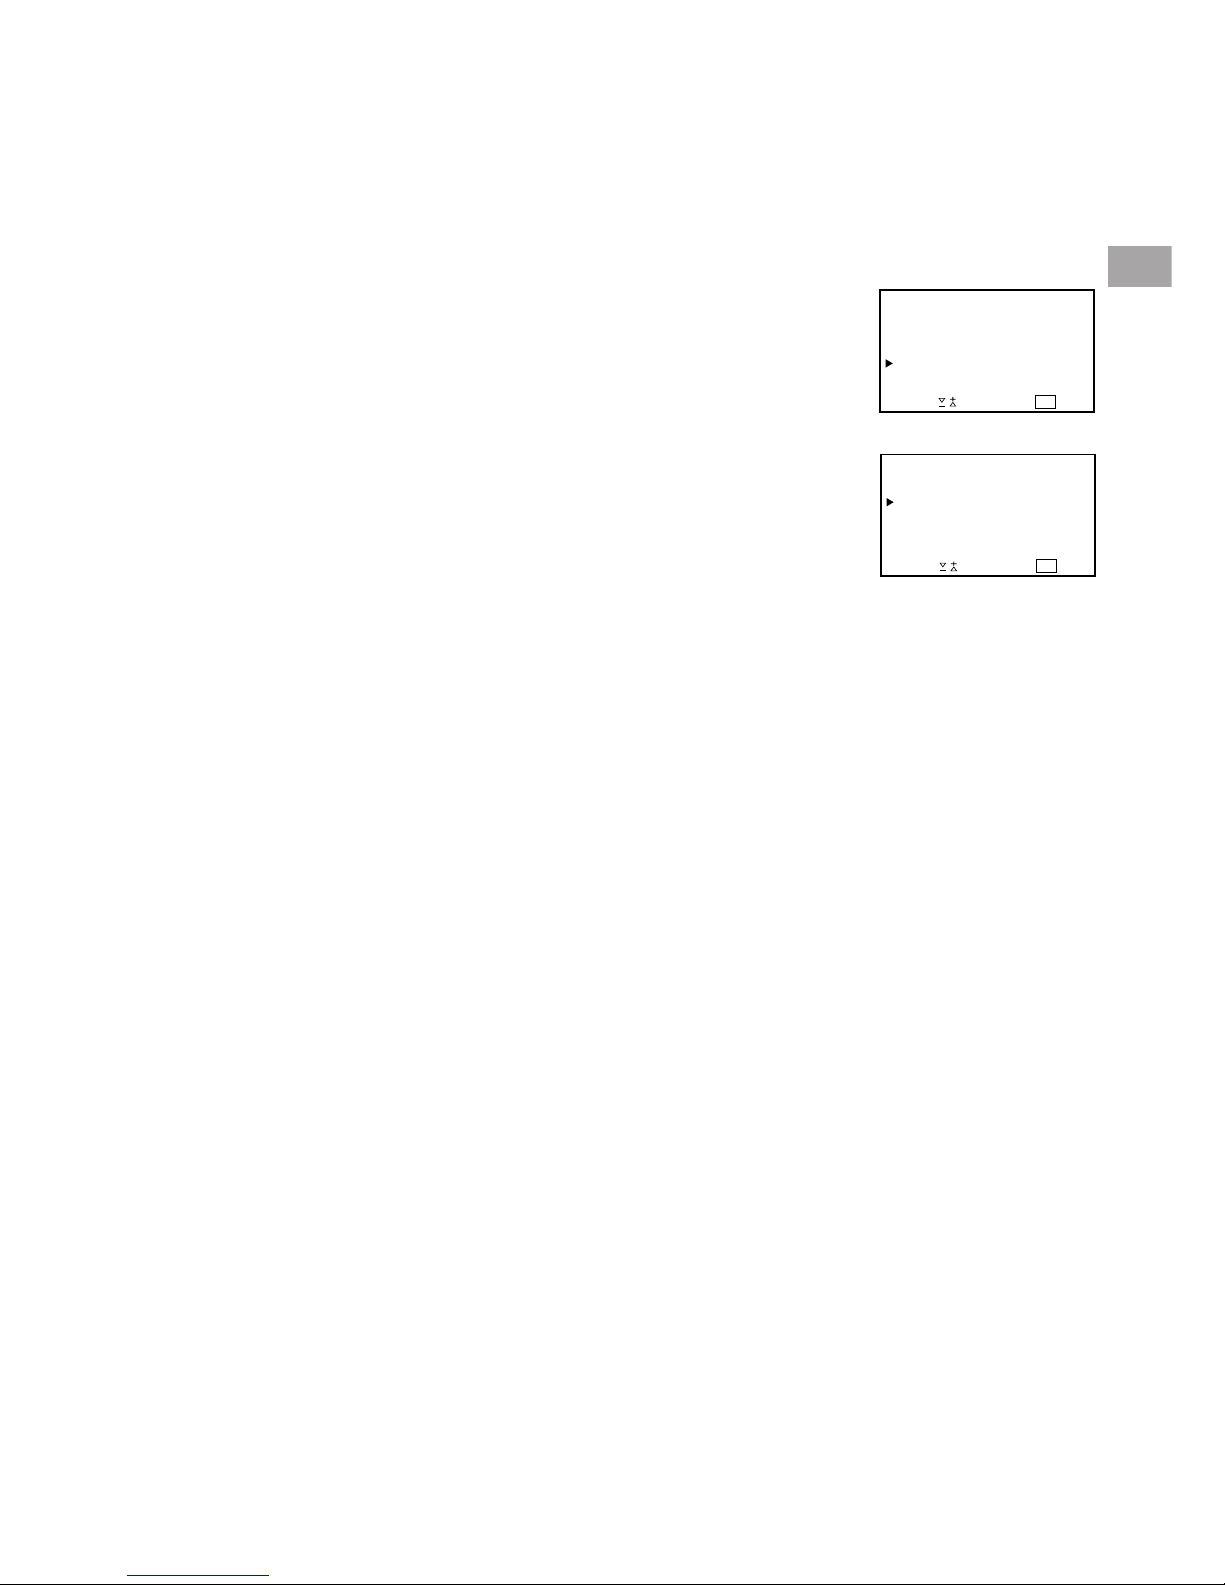
5 Repeat steps 2 to 4 to adjust the other lines, until all the lines have
overlapped to form a white cross. (See Fig. 4.)
6 Press MENU to return to TV picture.
To move up (horizontal line)
To move right (vertical line)
To move down (horizontal line)
To move left (vertical line)
Press >+
Press ?–
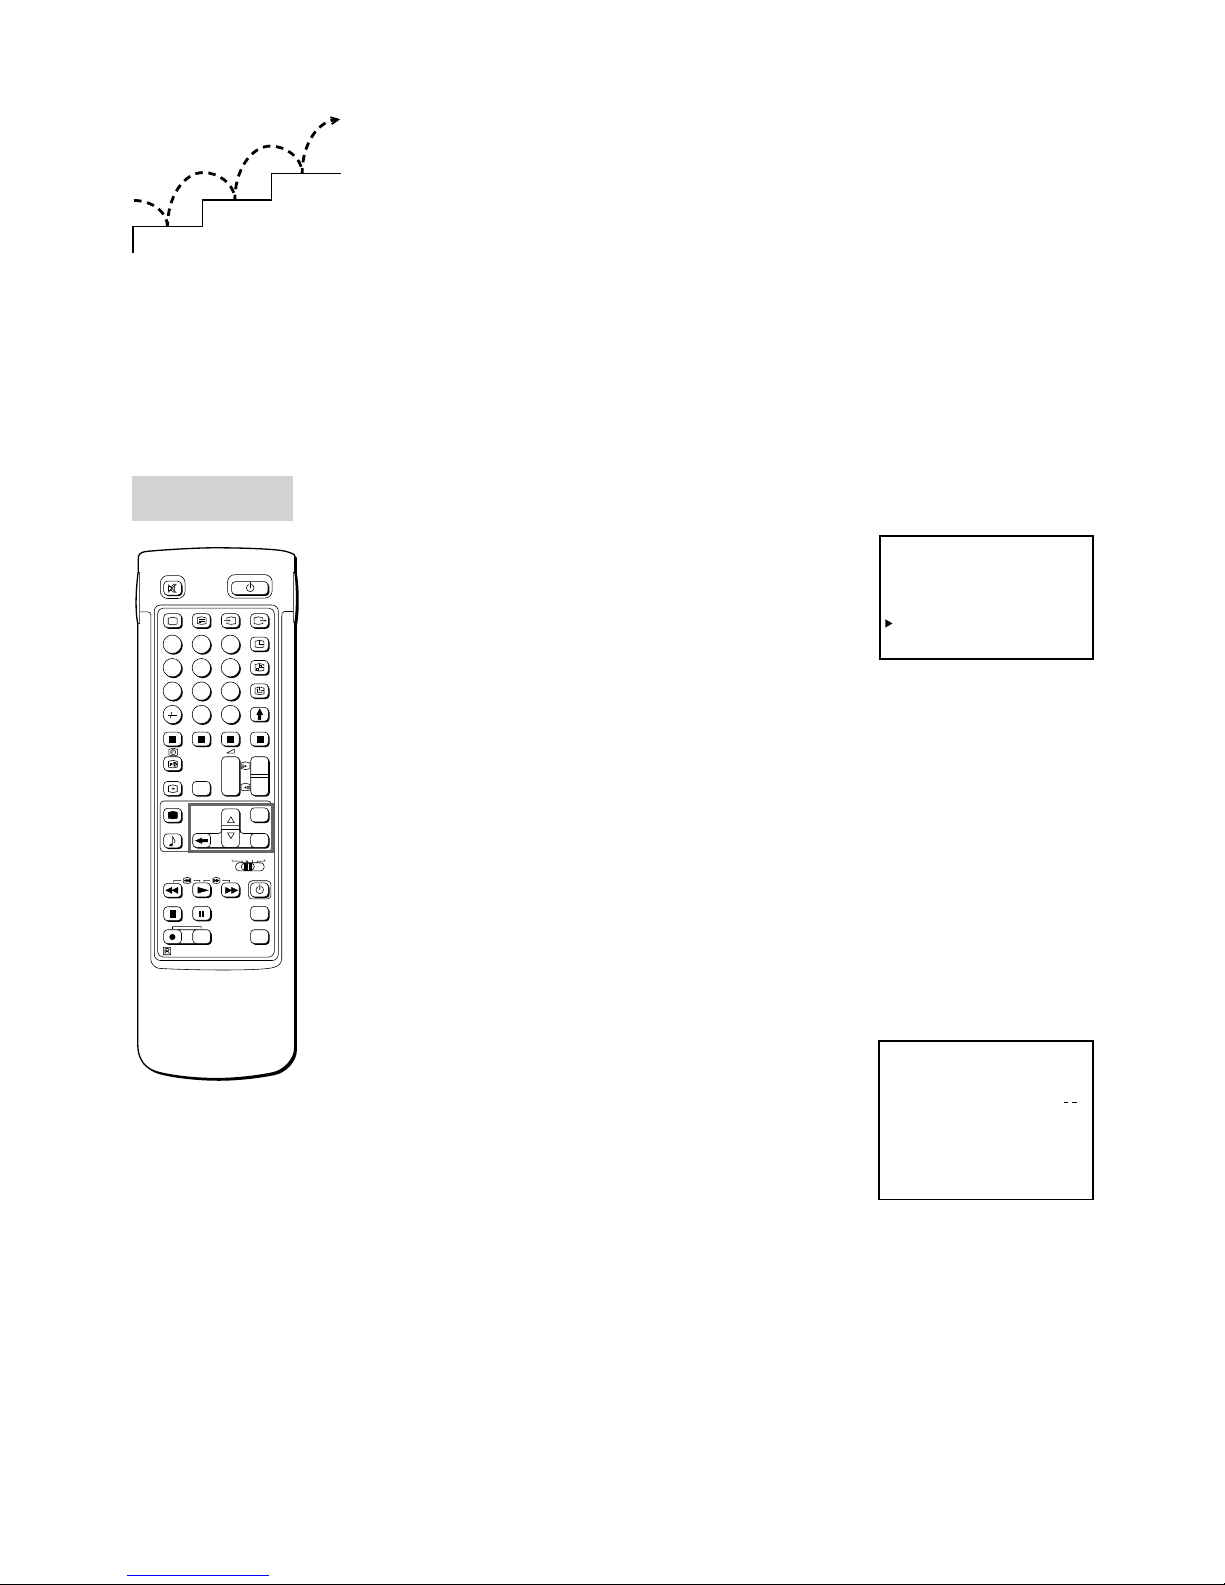
8
You can preset the channels (up to 100 channels) by choosing
either the automatic or manual method.
The automatic method is easier if you want to preset all receivable
channels at once. Use the manual method if you only have a few
channels and want to preset channels one by one.
Preset Channels Automatically
1 Press MENU to display the main menu.
2 Select “PRESET” with >+ or ?– and press OK.
The PRESET menu appears. (See Fig. 5.)
3 Select “AUTO TUNING” with >+ or ?– and press OK.
The AUTO TUNING menu appears. (See Fig. 6.)
4 Select the programme with -/- - and enter the digit numbers from
which you want to start presetting.
5 Press OK. Select if necessary the TV broadcast system with >+ or
?– and press OK. (B/G for western European countries, D/K for
eastern European countries, L for France and I for the United
Kingdom.)
6 Using >+ or ?–, select C (to start presetting from the C channels)
or S ( to start presetting from the S channels) and press OK.
The automatic channel presetting starts.
When presetting is finished, the preset menu reappears. All
available channels are now stored on successive number buttons.
If you want to change to another broadcasting system, repeat
steps 3 to 5.
7 Press MENU to return to TV picture.
Step 3 Tuning in to TV Stations
To go back to the main
menu
Keep pressing ≅ .
To stop automatic
channel presetting
Press ≅ on the Remote
Commander.
Notes
• After presetting the
channels
automatically, you can
check which channels
are stored on which
programme positions.
• You can exchange the
programme positions
to have them appear
on screen in the order
you like. For details,
see “Exchanging the
Programme Positions”
on page 10.
RM-831
PROGR
VTR 1-2-3
MDP
1
2
45
3
6
9
8
7
0
C
SAT
MENU
+
_
OK
+
_
+
_
PROGR
1
1
+
_
PR : 01
SYS :
LABEL :
SELECT AND PRESS
OK
MANUAL TUNING
B / G
CH : C
–––––
AFT : ON
03
1
2
3
AUTO TUNING
01 B / G C02
SELECT AND PRESS
OK
AUTO TUNING
SELECT AND PRESS
OK
PRESET
MANUAL TUNING
PROGR EXCHANGE
Fig. 5
AUTO TUNING
01 B / G C02
SELECT AND PRESS
OK
Fig. 6
9
GB
Preset Channels Manually
1 Press MENU to display the main menu.
2 Select “PRESET” with >+ or ?– and press OK. (See Fig. 7.)
3 Select “MANUAL TUNING” with >+ or ?– and press OK.
The MANUAL TUNING menu appears. (See Fig. 8.)
4 Using >+ or ?–, select the programme position to which you want
to preset a channel, and press OK.
You can also select the programme position with the number
buttons (e.g, for programme 24, press –/––, 2 and 4).
5 Select, if necessary, the TV broadcast system (B/G for western
European countries, D/K for eastern European countries, L for
France and I for the United Kingdom) with >+ or ?–. Then press
OK.
6 Using >+ or ?–, select C (to preset a regular channel), S (to
preset a cable channel) and press OK.
7 Press >+ or ?– until the channel you want appears on the screen.
You can also select the channel directly using the number buttons.
Press C (once for VHF/UHF channels, twice for cable TV
channels), then the number buttons (e.g., for channel 5, press 0
and 5).
Then press OK.
To preset other channels
Repeat steps 4 to 7.
To return to TV picture
Press MENU.
Use this method if there
are only a few channels
in your area to preset or
if you want to preset
channels one by one.
You may also allocate
programme numbers to
various video input
sources.
If you have made a
mistake
Press ≅ to go back to
the previous position.
To return to the main
menu
Keep pressing ≅.
Fig. 7
AUTO TUNING
SELECT AND PRESS
OK
PRESET
MANUAL TUNING
PROGR EXCHANGE
PR : 01
SYS :
LABEL :
SELECT AND PRESS
OK
MANUAL TUNING
B / G
CH : C
–––––
AFT : ON
03
Fig. 8
10
Additional Presetting Functions
Fig. 9
This section shows you additional presetting functions such as
exchanging or skipping programme positions, captioning a station
name, and manual fine-tuning.
You can skip this section, if not needed.
Before you begin
• Check that the Full Function side of the Remote
Commander is visible.
• Locate the Menu operation buttons.
Exchanging Programme Positions
With this function, you can exchange the programme positions to a
preferable order.
1 Press MENU to display the main menu.
2 Select “PRESET” with >+ or ?– and press OK.
The PRESET menu appears.
3 Select “PROGRAMME EXCHANGE” with >+ or ?– and press
OK.
The PROGRAMME EXCHANGE menu appears. (See Fig. 9.)
4 Using >+ or ?–, select the programme position you want to
exchange with another and press OK.
5 Using >+ or ?–, select the programme position to be exchanged
and press OK. Now the two programme positions have been
exchanged.
6 Repeat steps 4 and 5 to exchange other programme positions.
7 Press MENU to return to TV picture.
Tuning in to a Channel Temporarily
You can tune in to a channel temporarily, even when it has not
been preset. Use the buttons on the Full-Function side of the
Remote Commander.
1 Press C on the Remote Commander. For cable channels, press C
twice.
The indication “C” ( “S” for cable channels) appears on the screen.
(See Fig. 10.)
2 Enter the double-digit channel number using the number buttons
(e.g. for channel 4, first press 0, then 4).
The channel appears.
However, the channel will not be stored.
C
Fig. 10
If you have made a
mistake
Press ≅ to go back to
the previous position
To go back to main
menu
Keep pressing ≅.
PROGRAMME
EXCHANGE
RM-831
PROGR
PROGR
1
1
VTR 1-2-3
MDP
1
2
45
3
6
9
8
7
0
C
SAT
+
_
MENU
+
_
OK
+
_
+
_
1
2
3
PROGRAMME EXCHANGE
0
–– ––– ––– –––––
––
1 B / G C 30 –––––
MOVE PR 0 1 TO PR

11
GB
Skipping Programme Positions
You can skip unused programme positions when selecting
programmes with the PROGR +/– buttons. However, the skipped
programmes may still be called up when you use the number
buttons.
1 Press MENU to display the main menu.
2 Select “PRESET” with >+ or ?– and press OK.
The PRESET menu appears.
3 Select “MANUAL TUNING” with >+ or ?– and press OK.
The MANUAL TUNING menu appears. (See Fig.11.)
4 Using >+ or ?–, select the programme position which you want to
skip and press OK.
5 Press >+ or ?– until “---” appears in the SYS position. (See Fig.
12.)
6 Press OK.
When you select programmes using the PROGR +/– buttons, the
programme position will be skipped.
7 Repeat steps 4 to 6 to skip other programme positions.
8 Press MENU to return to TV picture.
Captioning a Station Name
You can “name” a channel using up to five characters (letters or
numbers) to be displayed on the TV screen (e.g. BBC1). Using this
function, you can easily identify which channel you are watching.
1 Press MENU to display the main menu.
2 Select “PRESET” with >+ or ?– and press OK.
The PRESET menu appears.
3 Select “MANUAL TUNING” with >+ or ?– and press OK.
The MANUAL TUNING menu appears.
4 Select “PR” with >+ or ?– and press OK.
5 Select programme position you want to caption with >+ or ?– and
press OK.
6 Select “LABEL” with >+ or ?– and press OK.
7 Select a letter or number with >+ or ?– and press OK.
Select other characters in the same way. If you want to leave an
element blank, select - and press OK. (See Fig. 13.)
8 Repeat steps 4 to 7 to caption names for other channels.
9 Press MENU to return to TV picture.
If you have made a
mistake
Press ≅ to go back to
the previous position.
To go back to main
menu
Keep pressing ≅.
Fig.13
MANUAL TUNING
MANUAL TUNING
PROGR
+
_
Fig. 11
PR : 01
SYS :
LABEL :
SELECT AND PRESS
OK
MANUAL TUNING
B / G
CH : C
–––––
AFT : ON
03
PR : 01
SYS :
LABEL :
SELECT AND PRESS
OK
MANUAL TUNING
–
CH : C
–––––
AFT : ON
––
03
Fig. 12
PR : 01
SYS :
LABEL :
SELECT AND PRESS
OK
MANUAL TUNING
B / G
CH : C
SONY
AFT : ON
03

12
Manual Fine-Tuning
Normally, the AFT (automatic fine-tuning) is already operating.
However, if the picture is distorted, you can use the manual fine
tuning function to obtain better picture reception.
1 Press MENU to display the main menu.
2 Select “PRESET” with >+ or ?– and press OK.
The PRESET menu appears.
3 Select “MANUAL TUNING” with >+ or ?– and press OK.
The MANUAL TUNING menu appears.
4 Select “PR” with >+ or ?– and press OK.
5 Select programme position you want to manually fine-tune
with >+ or ?– and press OK.
6 Select “AFT” with >+ or ?– and press OK.
7 Select “OFF” with >+ or ?– and press OK. (See Fig. 14.)
8 Fine-tune the channel with >+ or ?– so that you get the best
TV reception. As you press the cursor buttons, the frequency
changes from – 128 to + 127.
9 After fine tuning, press OK.
Now the fine-tuned level is stored.
10 Repeat steps 4 to 9 to fine-tune other channels.
11 Press MENU to return to TV picture.
To reactivate AFT
(automatic fine tuning)
Repeat from the
beginning and select
“ON” in step 7.
MANUAL TUNING
PR : 01
SYS :
LABEL :
SELECT AND PRESS
OK
MANUAL TUNING
B / G
CH : C
–––––
AFT : OFF
03
Fig. 14
13
GB
Operating Instructions
W atching the TV
If no picture appears
when you depress θ
on the TV and if the
standby indicator on
the TV is lit, the TV is in
standby mode.
Press Ο or one of the
number buttons to
switch it on.
This section explains the basic functions you use while watching
TV. Most of the operations can be done using the simple side of
the Remote Commander.
Switching the TV on and off
Switching on
Depress θ on the TV.
Switching off temporarily
Press φ on the Remote Commander.
The TV enters standby mode and the standby indicator on the front
of the TV lights up.
To switch on again
Press Ο, PROGR +/–, or one of the number buttons on the
Remote Commander.
Switching off completely
Depress θ on the TV.
Selecting TV Programmes
Press PROGR +/– or press the number buttons.
To select a double-digit number
Press -/--, then the numbers.
For example, If you want to choose 23, press -/--, 2 and 3.
Adjusting the V olume
Press +/–.
PROGR
RM-831
1
2
45
3
6
9
8
7
0
AB
14
For details of the video
input picture, refer to
page 23.
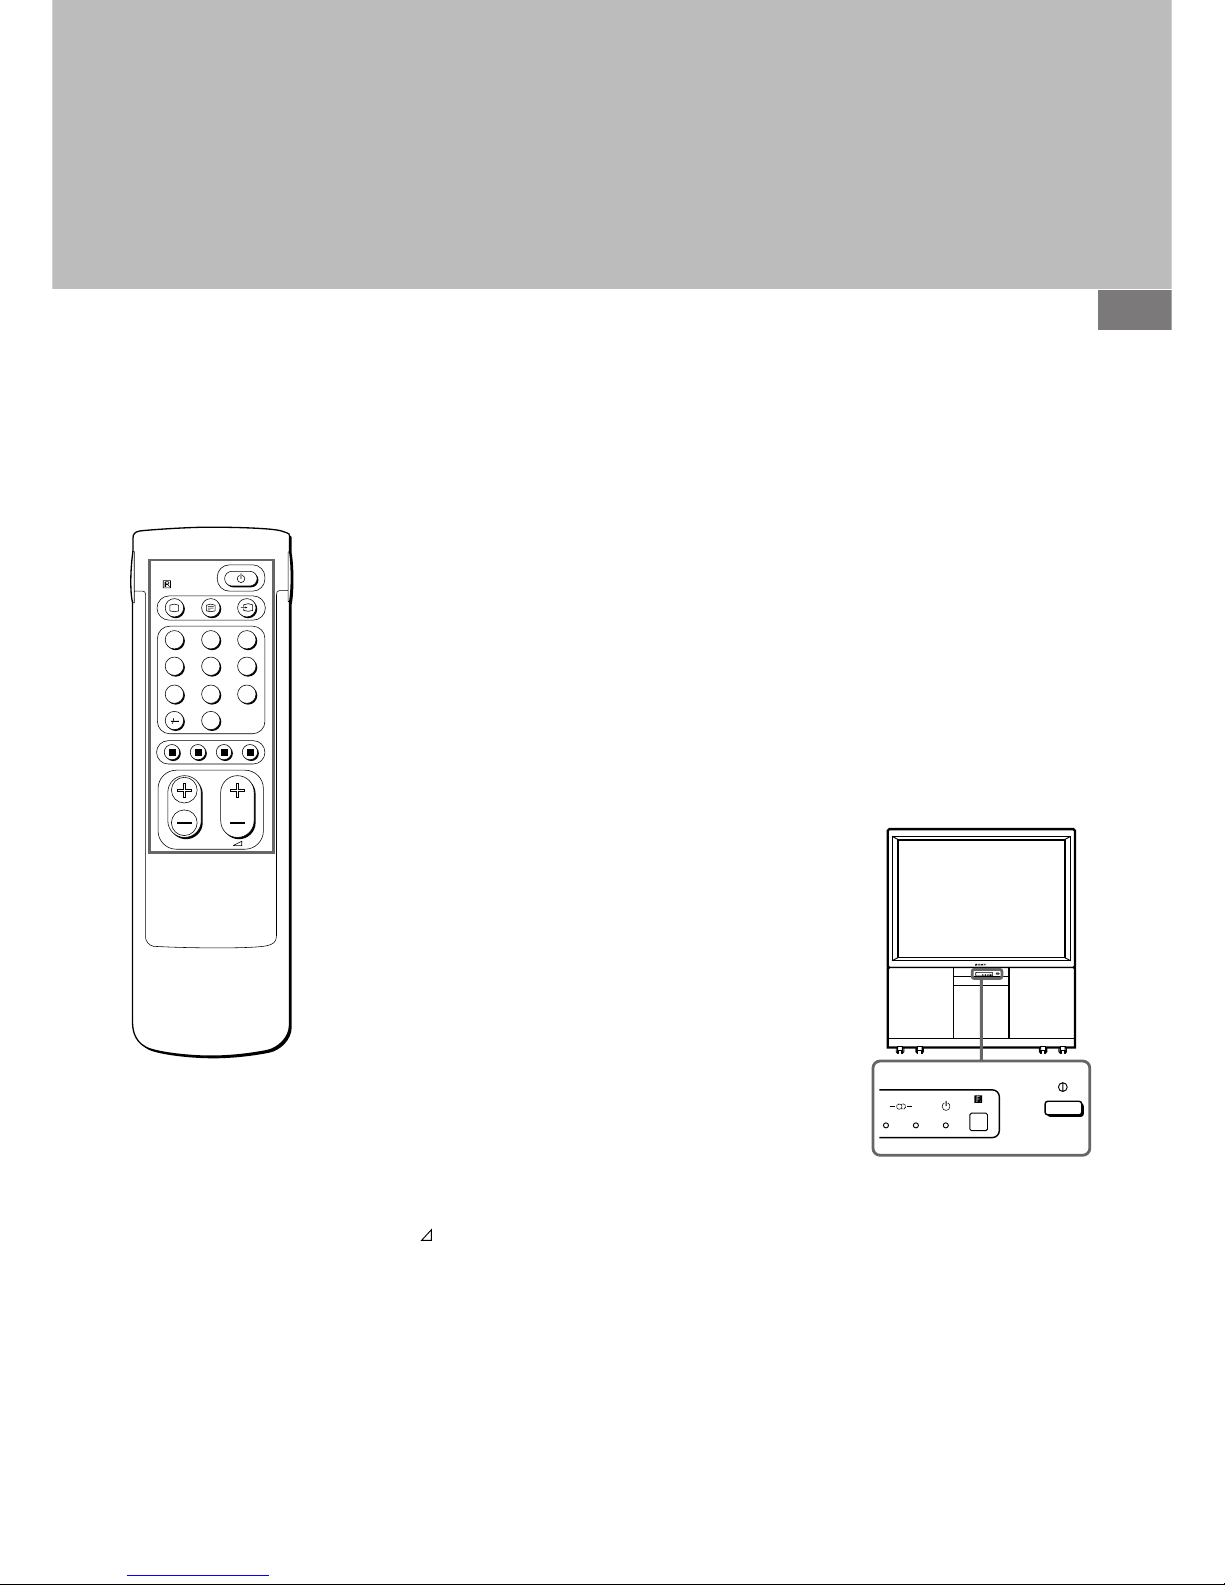
Operating the TV Using the
Buttons on the TV
With the –/+ buttons on the TV, you can select programmes, adjust
the volume, and select video input sources.
1 Press the button repeatedly until the programme
number,
(for volume), or (for video input picture) appears.
Then adjust with the –/+ buttons.
2 Press the –/+ buttons to switch on the TV from the standby mode.
3 Press –/+ buttons simultaneously to reset picture and sound
controls to the factory preset level (RESET function).
Watching Teletext or Video Input
Watching teletext
1 Press _ to view the teletext.
2 For teletext operation, enter a 3-digit page number with the number
buttons to select a page.
For fastext operation, press one of the coloured buttons.
For both operations, press ς (PAGE + ) for the next page or
Υ (PAGE – ) for the preceding page.
3 To go back to the normal TV picture, press Ο .
Watching a video input picture
1 Press repeatedly until the desired video input appears.
2 To go back to the normal TV picture, press Ο.
More Convenient Functions
Use the Full-Function side of the Remote Commander.
Displaying the on screen indications
• Press ∃ once to display all the indications.
• Press ∃ again to make the indications disappear.
Muting the sound
Press ο.
To resume normal sound, press ο again.
Displaying the time
Press #. This function is available only when teletext is
broadcast.
To make the time display disappear, press # again.
For details of the teletext
operation, refer to
page 19.
2
MONO
L / G / S / I R / D / D / D
RM-831
PROGR
PROGR
1
1
VTR 1-2-3
MDP
1
2
45
3
6
9
8
7
0
C
SAT
+
_
MENU
+
_
OK
+
_
+
_
15
GB
RESET
SELECT AND PRESS
OK
SOUND ADJUSTMENT
DUAL SOUND :
SELECT AND PRESS
OK
STEREO
SOUND ADJUSTMENT
LOUDNESS :
SPACE SOUND : ON
OFF
NICAM
PICTURE
SOUND
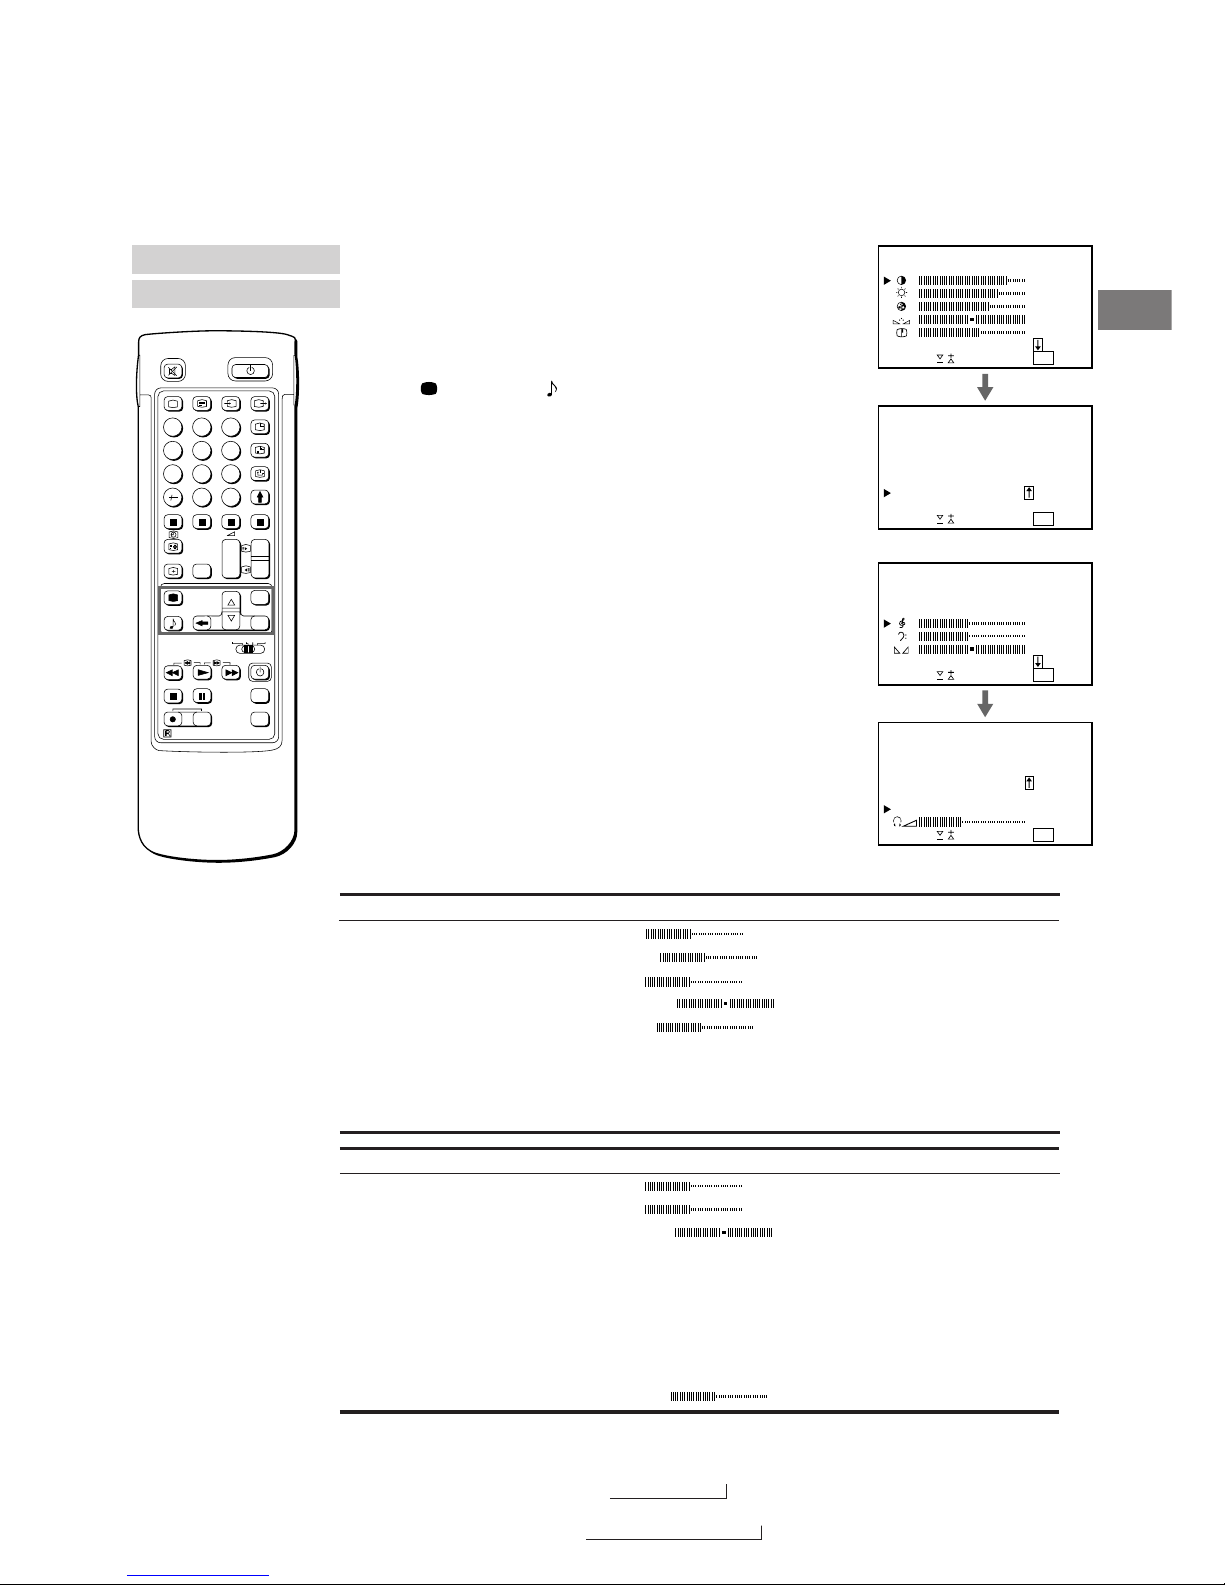
Adjusting the Picture and Sound
Although the picture and sound are adjusted at the factory, you
can adjust them to suit your own taste. You can also select dual
sound (bilingual) programmes when available or adjust the sound
for listening with the headphones.
1 Press
(for picture) or (for sound) on the remote Commander.
or
Press MENU and select “PICTURE” or “SOUND,” then press OK.
The PICTURE ADJUSTMENT or SOUND ADJUSTMENT menu
appears.
(See Fig. 15 or Fig. 16.)
2 Using >+ or ?–, select the item you want to adjust and press OK.
To move up/down:
From
.
position, press ?– to move down.
From
>
position, press >+ to move up.
.
means next page.
>
means previous page.
3 Adjust the setting with >+ or ?– and press OK.
For the effect of each control, see the table below.
4 Repeat steps 2 and 3 to adjust other items.
5 Press MENU to return to TV picture.
Adjusting and Setting the TV Using
the Menu
Fig. 15
Fig. 16
If you have made a
mistake
Press ≅ to go back to
the previous position.
To go back to the main
menu
Keep pressing ≅.
Note
HUE is only available for
NTSC colour systems.
Note on LINE OUT
The audio level and the
dual sound mode output
from the > jack on the
rear correspond to the
Headphone VOLUME
and DUAL SOUND
settings.
When watching a
video input picture
You can select DUAL
SOUND to change the
sound.
PICTURE ADJUSTMENT
> (contrast)
¨ (brightness)
¯ (colour)
(hue)
Π(sharpness)
RESET
NOISE REDUCE
DIGITAL MODE
Effect
Less More
Darker Brighter
Less More
Greenish Reddish
Softer Sharper
Resets picture to the factory preset levels.
OFF: Normal ON: When reducing the picture noise
1: Line Flicker reduction on.
2: Line Flicker reduction off.
SOUND ADJUSTMENT
( (Treble)
,(Bass)
Β (Balance)
RESET
SPACE SOUND
LOUDNESS
DUAL SOUND*
2 (Headphones)
Effect
Less More
Less More
More left More right
Resets sound to the factory preset levels.
OFF: Normal ON: Obtain acoustic sound effect.
OFF: Normal ON: When listening to low volume sound.
A: left channel B: right channel Stereo mono
STEREO ˜ MONO
The selected mode of the A-µ-B Indicator on the TV lights up.
LessÁ
*When receiving a NICAM programme
NICAM stereo/monaural STEREO NICAM ➝ MONO
NICAM bilingual NICAM A ➝ NICAM B ➝ MONO
➝
➝
RM-831
PROGR
VTR 1-2-3
MDP
1
2
45
3
6
9
8
7
0
C
SAT
+
_
MENU
+
_
OK
+
_
PROGR
1
1
+
_
Effect of each control
RESET
SELECT AND PRESS
OK
PICTURE ADJUSTMENT
NOISE REDUCE :
DIGITAL MODE
SELECT AND PRESS
OK
OFF
:1
PICTURE ADJUSTMENT
16
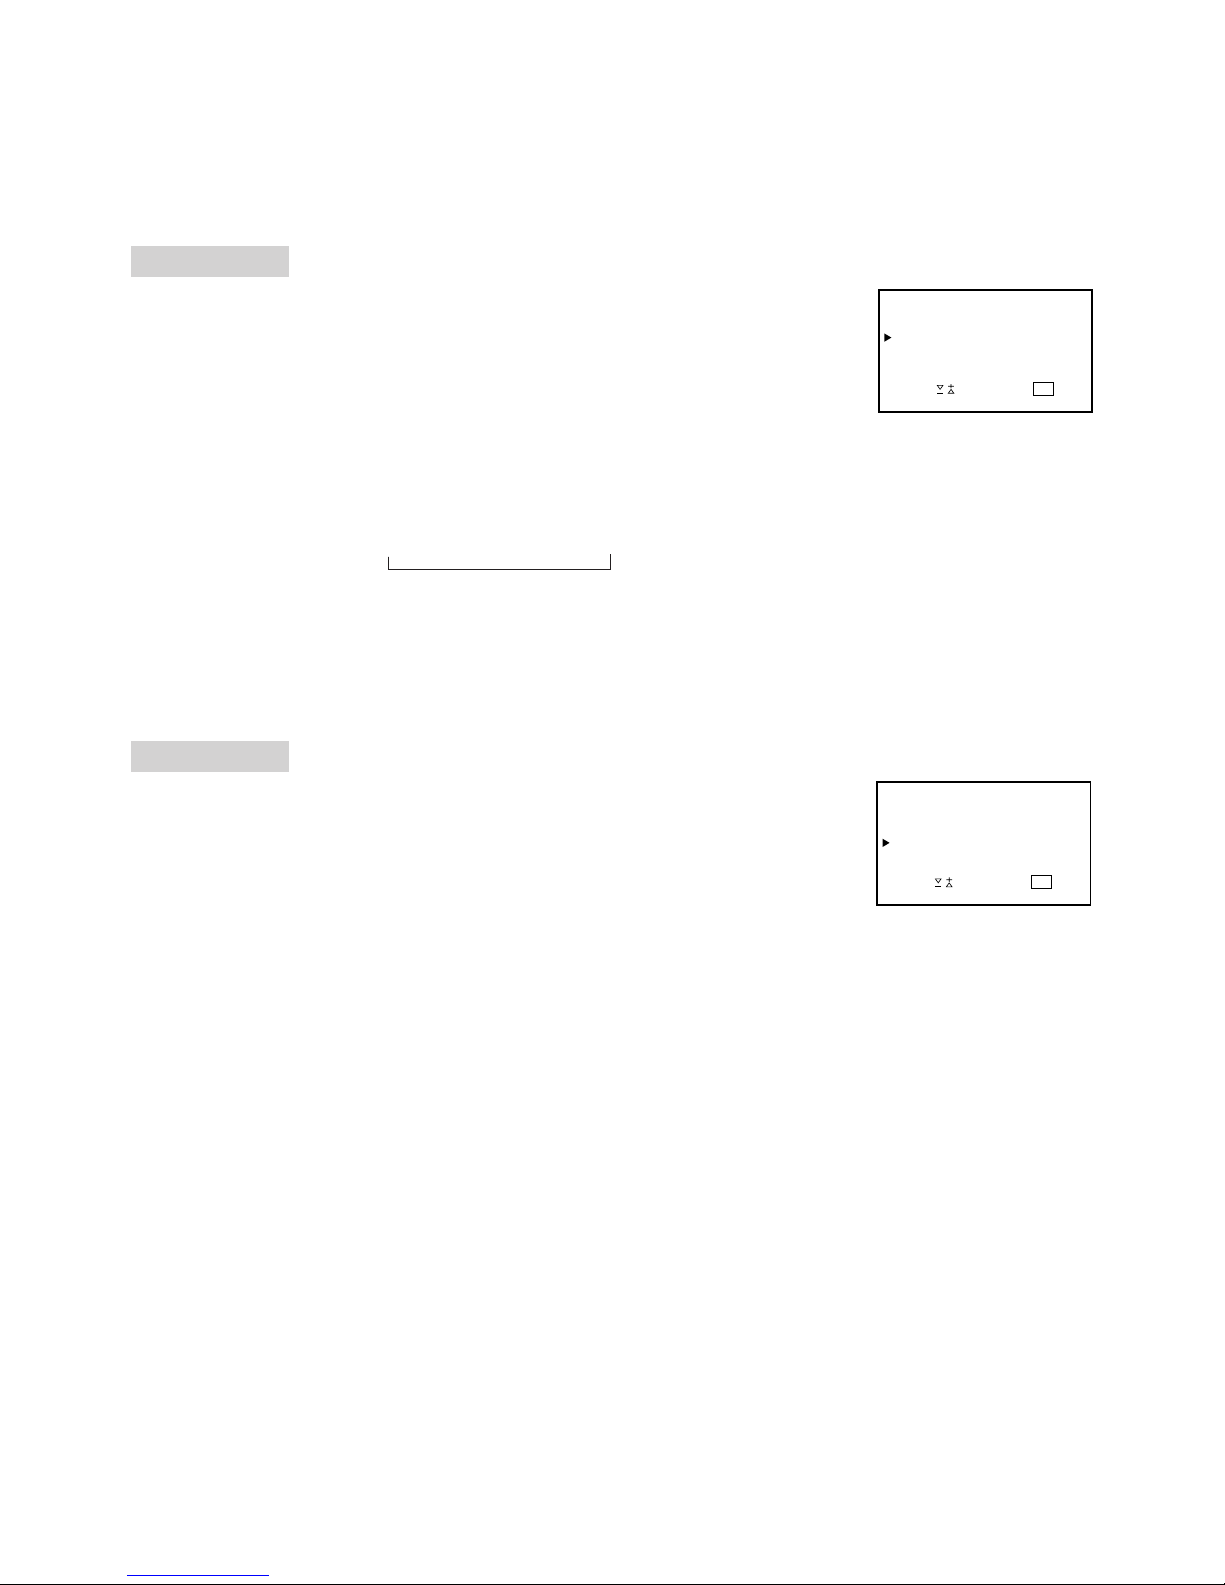
Using the Sleep Timer
You can select a time period after which the TV automatically
switches into standby mode.
1 Press MENU to display the main menu.
2 Select “FEATURES” with >+ or ?– and press OK.
The FEATURES menu appears.
3 Select “SLEEP TIMER” with >+ or ?– and press OK. (See Fig.
17.)
The time period option changes colour.
4 Select the time period with >+ or ?–.
The time period changes as follows:
OFF ➝ 0:30 ➝ 1:00 ➝ 1:30 ➝ 2:00
5 After selecting the time period, press OK.
The cursor moves back to the left margin and the timer starts
counting.
One minute before the TV switches into standby mode, a message
is displayed on the screen.
6 Press MENU to return to TV picture.
To switch off the timer
Select “OFF” in step 3.
To check the
remaining time
Press ∃.
↑
Parental Lock
You can prevent undesirable broadcasts from appearing on the
screen. We suggest you use this function to prevent children from
watching programmes which you consider unsuitable.
1 Select the TV programme which you want to block.
2 Press MENU to display the main menu.
3 Select “FEATURES” with >+ or ?– and press OK.
The FEATURES menu appears.
4 Select “PARENTAL LOCK” with >+ or ?– and press OK.
5 Select “ON” with >+ or ?– and press OK. (See Fig. 18.)
6 Press MENU to return to TV picture.
Cancelling Parental Lock
1 On the PARENTAL LOCK menu, select “OFF” with >+ or ?–.
2 Press OK.
If you try to select a
programme that has
been blocked
The message
“LOCKED” appears on
the blank TV screen.
FEATURES
FEATURES
Fig. 17
Fig. 18
FEATURES
SLEEP TIMER :
PARENTAL LOOK :
PHOTO
INDEX
SELECT AND PRESS
OK
OFF
OFF
FEATURES
SLEEP TIMER :
PARENTAL LOCK :
PHOTO
INDEX
SELECT AND PRESS
OK
OFF
ON

17
GB
PIP (Picture In Picture)
With this function you can display a “PIP screen” (small picture)
within the main TV picture. In this way you can watch or monitor
the video output from any connected equipment (for example from
a VTR) while watching TV or vice versa. For information about
connection of other equipment, refer to page 22.
Switching PIP on and off
Press .
The PIP screen will be displayed. The PIP picture will come from
the source chosen when the TV was last used.
To Switch PIP off
Press
again.
Selecting a PIP source
1 Press Χ.
The symbol Χ will be displayed at the bottom, left-hand corner of
the screen.
2 Press
repeatedly until the desired PIP source is indicated (e.g.
TV, AV1, AV2, YC2, AV3, YC3, AV4, YC4).
Note
If no video source has been connected, the PIP picture will be
noisy.
Swapping screens
Press a.
The main screen will switch the picture with the PIP screen.
Note
RGB input source
cannot be displayed in
PIP.
PIP
Main TV
picture
B
A
A
B
Notes
• If a TV programme is on the PIP screen and a video source
on the main picture, and you want to change channels, first
press Χ and then the programme number buttons or
PROGR +/–.
• Swapping screens takes about 2 seconds after pressing
a.
• After swapping screens if the colour systems of the main
and PIP pictures are different, the PIP picture first appears
in black and white and then in colour.
Changing the position of the PIP
Press A repeatedly to change the position of the PIP screen
within the main screen. There are four different positions available.
RM-831
PROGR
PROGR
1
1
VTR 1-2-3
MDP
1
2
45
3
6
9
8
7
0
C
SAT
+
_
MENU
+
_
OK
+
_
+
_
18
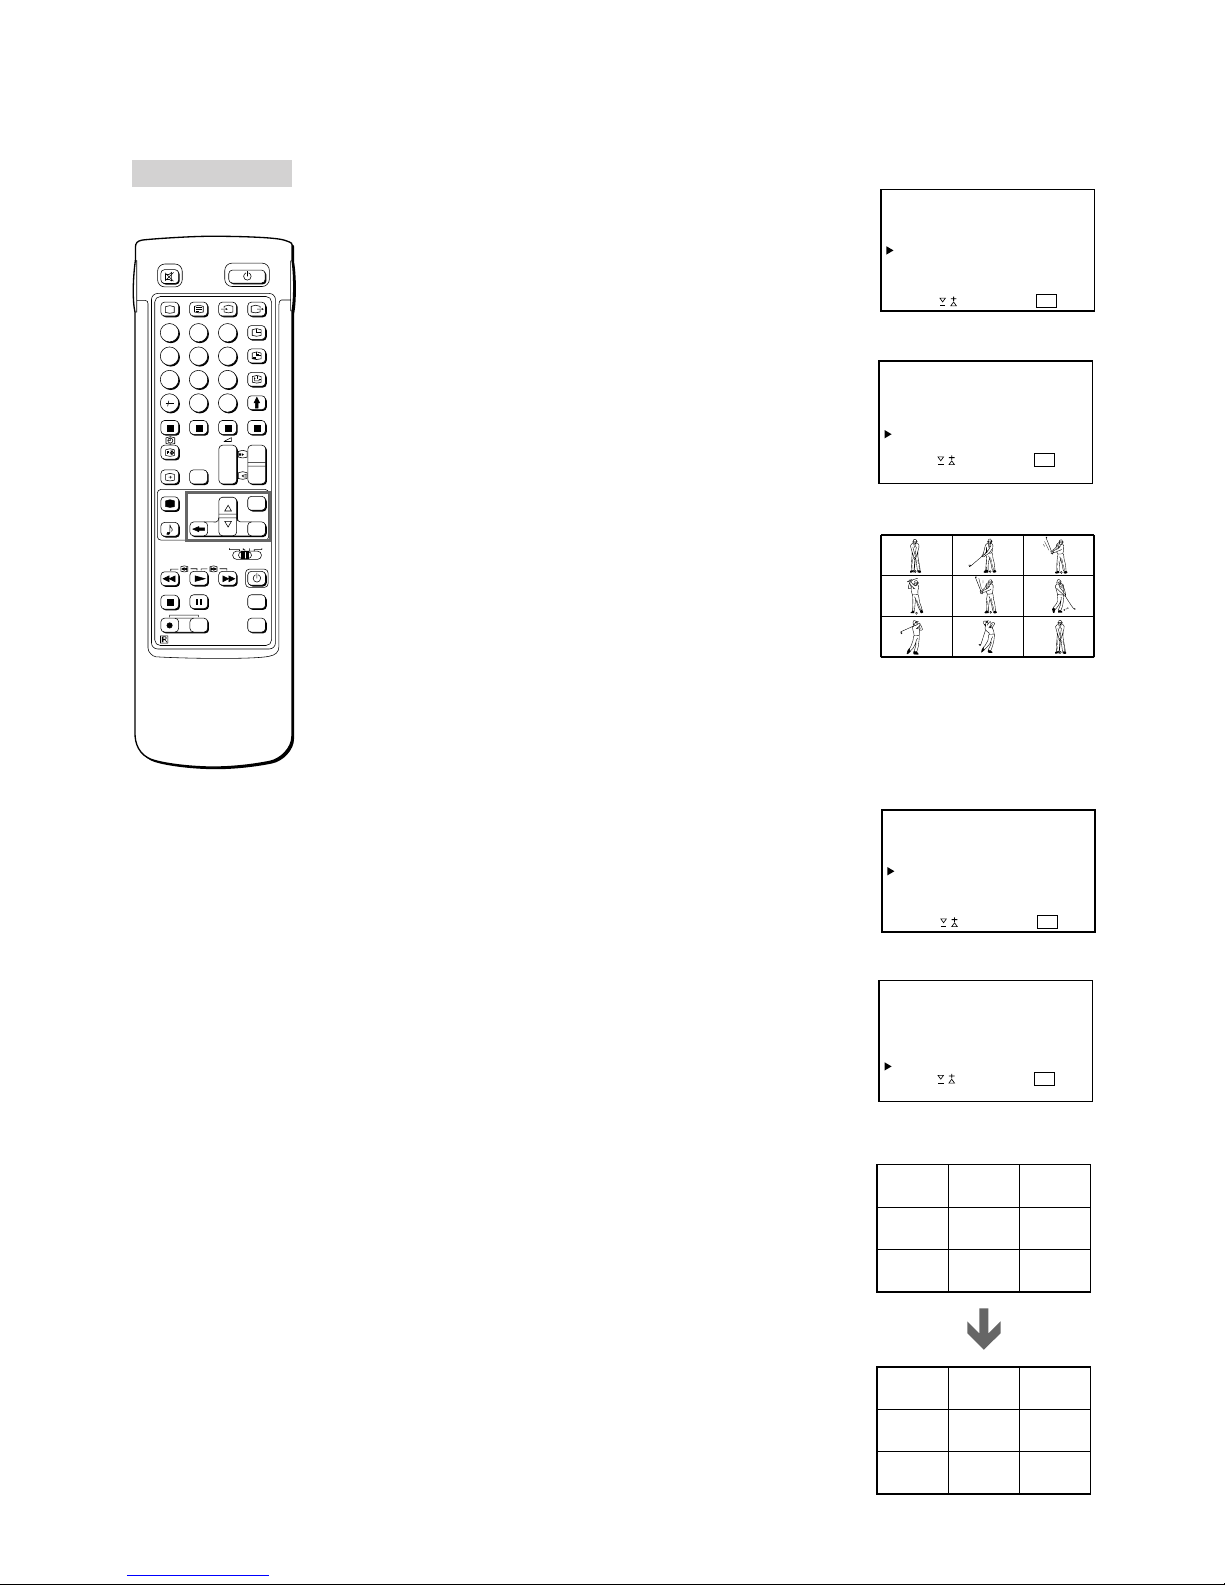
Displaying Frame-by-frame
Pictures (Photo)
1 Press MENU to display the main menu.
2 Select “FEATURES” with >+ or ?– and press OK.
The FEATURES menu appears. (See Fig. 19.)
3 Select “PHOTO” with >+ or ?– and press OK. (See Fig. 20.)
The preset programme is displayed in nine separated screen in
sequence. (See Fig. 21.)
To restore the normal picture
Press OK and MENU.
Checking All the Preset
Programmes (Index)
1 Press MENU to display the main menu.
2 Select “FEATURES” with >+ or ?– and press OK.
The FEATURES menu appears. (See Fig. 22.)
3 Select “INDEX” with >+ or ?– and press OK. (See Fig. 23.)
The nine preset programmes appear in the separated screen in
sequence, switching the picture for each seconds. After all the
nine programmes are displayed, each sequence switch the picture
with the sound for each five seconds. Press >+ also switches to
the next nine programmes. (See Fig. 24.)
To restore the normal picture
Press OK and MENU.
FEATURES
Fig. 24
MENU
PICTURE
SOUND
FEATURES
CONVERGENCE
PRESET
LANGUAGE
SELECT AND PRESS
OK
Fig. 22
Fig. 23
MENU
PICTURE
SOUND
FEATURES
CONVERGENCE
PRESET
LANGUAGE
SELECT AND PRESS
OK
Fig. 19
Fig. 20
RM-831
PROGR
+
_
PROGR
1
1
+
_
VTR 1-2-3
MDP
1
2
45
3
6
9
8
7
0
C
SAT
MENU
+
_
OK
+
_
Fig. 21
1 23
456
789
10
11 12
13 14 15
123
FEATURES
SLEEP TIMER :
PARENTAL LOOK :
PHOTO
INDEX
SELECT AND PRESS
OK
OFF
OFF
FEATURES
SLEEP TIMER :
PARENTAL LOOK :
PHOTO
INDEX
SELECT AND PRESS
OK
OFF
OFF

GB
19
Note
Teletext errors may
occur if the broadcasting
signals are weak.
With the simple side of
the Remote
Commander
You can switch teletext
on and off, operate
Fastext, and directly
select page numbers.
Note
Fastext operation is only
possible, if the TV station
broadcasts
Fastext signals.
Teletext
TV stations broadcast an information service called Teletext via
the TV channels.Teletext service allows you to receive various
information pages such as weather reports or news at any time
you want. For advanced teletext operation, use the buttons on the
Full-Function side of the Remote Commander.
Direct Access Functions
Switching Teletext on and off
1 Select the TV channel which carries the teletext broadcast you
want to watch.
2 Press _ to switch on teletext.
A teletext page will be displayed (usually the index page).
If there is no teletext broadcast, “No text available” is displayed on
the information line at the top of the screen.
To switch teletext off
Press Ο.
Selecting a teletext page
With direct page selection
Use the number buttons to input the three digits of the chosen
page number.
If you have made a mistake, type in any three digits. Then re-enter
the correct page number.
If the requested page is not available at that moment, a message
will be displayed.
Accessing next or preceding page
Press G (PAGE+) or g (PAGE-).
The next or preceding page appears.
Superimposing the teletext display on the TV programme
• Press _ once in teletext mode or twice in TV mode.
• Press _ again to resume normal teletext reception.
Preventing a teletext page from being updated
• Press [ (HOLD). The HOLD symbol “[” is displayed on the
information line.
• Press _ to resume normal teletext reception.
Using Fastext
With Fastext you can access pages with one key stroke.
When a Fastext page is broadcast, a colour-coded menu will
appear at the bottom of the screen. The colours of this menu
correspond to the red, green, yellow and blue buttons on the
Remote Commander.
Press the corresponding coloured button on the Remote
Commander which corresponds to the colour-coded menu. The
page will be displayed after a few seconds.
RM-831
PROGR
PROGR
1
1
VTR 1-2-3
MDP
1
2
45
3
6
9
8
7
0
C
SAT
+
_
MENU
+
_
OK
+
_
+
_
20
BOTTOM
OK
TOP
FULL
Note
Some of the features
may not be available
depending on the
teletext service.
Using the Teletext Menu
This TV is provided with a menu-guided teletext system. When
teletext is switched on, you can use the menu buttons to operate
the teletext menu. Select the teletext menu functions in the
following way:
1 Press MENU. The menu will be superimposed on the teletext
display. (See Fig. 25.)
2 Using >+ or ?–, select the teletext function you want and press
OK.
INDEX
The index will give you an overview of the contents of the teletext
and the page numbers.
ENLARGING
For convenient reading of a teletext page, you can enlarge the
teletext display with the ability to scroll up and down. After having
selected the function, an information line TOP/BOTTOM/FULL will
be displayed. (See Fig. 26.)
To enlarge the upper half with “TOP”, select “TOP” and hold down
the ?. To enlarge the lower half with “BOTTOM,” select
“BOTTOM” and hold down the >. The picture can be scrolled up to
12 steps in each direction. The enlarging display disappears soon
after the > or ? button is pressed. Press OK for “FULL” to resume
the normal size.
Press _ to resume normal teletext reception.
TEXT CLEAR
After selecting the function, you can watch a TV programme while
waiting for a teletext page to be displayed. (See Fig. 27.)
Press _ to resume normal teletext reception.
SUBTITLES
Your teletext service will inform you if a TV programme is subtitles.
After having selected the function the subtitles will be displayed.
REVEAL
Sometimes pages contain concealed information, such as
answers to a quiz. The reveal option lets you disclose the
information. After having selected the function, concealed
information will be displayed.
By choosing REVEAL again on the menu, the concealed
information will be canceled.
Press _ to resume normal teletext reception.
RM-831
PROGR
PROGR
1
1
VTR 1-2-3
MDP
1
2
45
3
6
9
8
7
0
C
SAT
+
_
MENU
+
_
OK
+
_
+
_
Fig. 26
ENLARGING
TEXT CLEAR
SUB TITLES
REVEAL
TIME PAGE
SUB PAGE
SELECT AND PRESS
OK
TELETEXT MENU
INDEX
Fig. 25
Fig. 27

GB
21
TIME PAGE
Your teletext service will inform you, if a time coded page is
available. You may have a page (e.g. an alarm page) displayed at
a certain time.
1 Using >+ or ?–, select “ON.” Press OK.
The TV programme you were watching before you selected TIME
PAGE is restored.
An information window will be displayed at the bottom of the page.
2 To select the desired page, enter three digits for the page number
(e.g.452) using the number buttons and press OK.
3 To select the desired time, enter four digits for the desired time
(e.g. 1800) using the number buttons and press OK.
The selected time is displayed at the top in the left-hand corner.
At the requested time, the page will be displayed.
Press _ to resume normal teletext mode.
SUBPAGE
You may want to select a particular teletext page from several
subpages which are rotated automatically. After having selected
the function, an information line will be displayed.
To select the desired subpage, enter four digits using PROGR +/–
or the number buttons (e.g. enter 0002 for the second page of a
sequence).
Press OK to select
“OFF” for the TIME
PAGE setting to cancel
the request.
To cancel the request
Select SUBPAGE and
press OK.
Note:
"Time Page" and
"Subpage" features may
not be available
depending on the
teletext service.
22
2
MONO
L / G / S / IR / D / D / D
L/G/S/I
R/D/D/D
R/D/D/D-L/G/S/I
R/D/D/D
L/G/S/I
R/D/D/D
L/G/S/I
R/D/D/D
L/G/S/I
Connecting and Operating Optional
Equipment
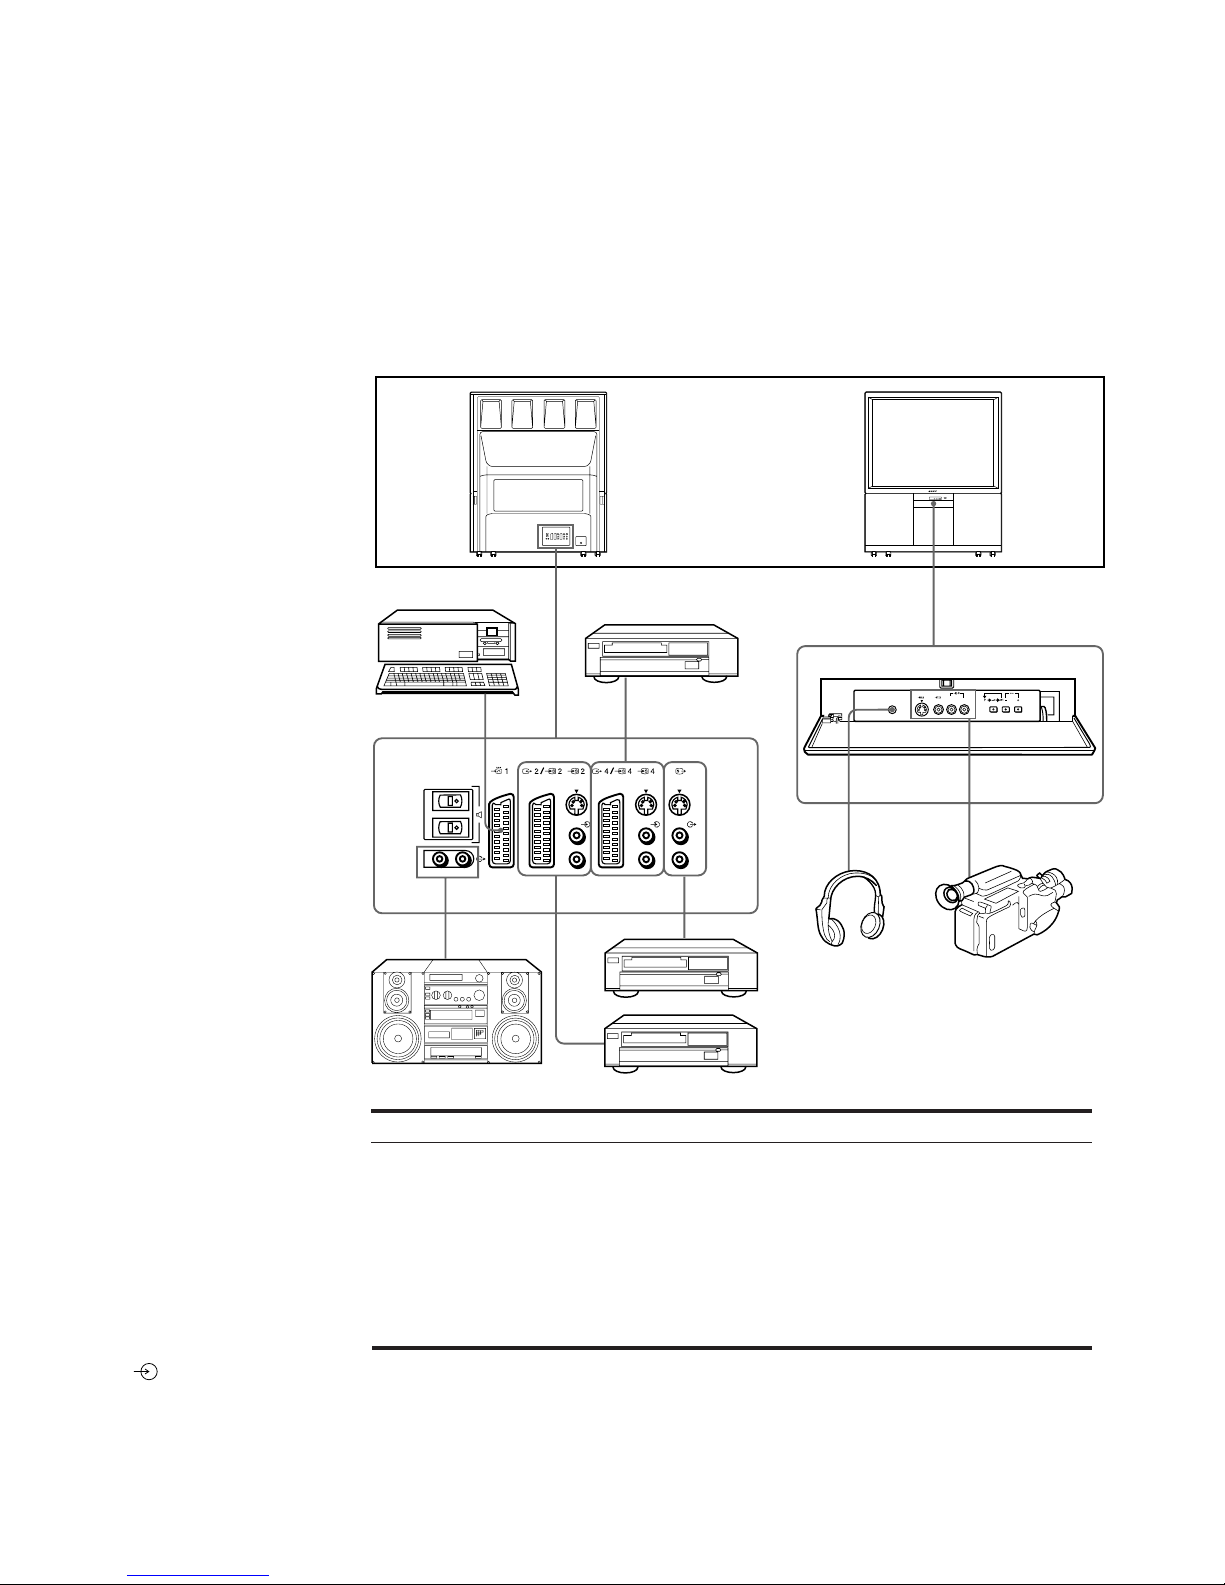
To connect a VCR
using the ) terminal
Connect the aerial
output of the VCR to the
aerial terminal ) of the
TV.
We recommend that you
tune in the video signal
to programme number
“0.” For details see
“Preset channels
manually” on page 9.
If the picture or the
sound is distorted
Move the VCR away
from the TV.
S/video Input
(Y/C input)
Video signals may be
separated into Y
(luminance or
brightness) and C
(chrominance) signals.
Separating the Y and C
signals prevents them
from interfering with one
another, and therefore
improves picture quality
(especially luminance).
This TV is equipped with
3 S Video input jacks
through which these
separated signals can be
input directly.
When connecting a
monaural VCR
Connect only the white
jack to both the TV
and VCR.
14
3
Connecting Optional Equipment
You can connect optional audio-video equipment to this TV such
as a VCR, video disc player, and stereo system.
Acceptable input signal
1 Normal audio/video and RGB signal
2 Normal audio/video and S video signal
3 Normal audio/video and S video signal
4 Normal audio/video and S video signal
5 No inputs
6 No inputs
Available output signal
Video/audio from TV tuner
Video/audio from selected source
No outputs
Video/audio displayed on TV screen (monitor out)
S/video/audio signal displayed on TV screen
(monitor out)
Audio signal (variable)
5
2
6
GB
23
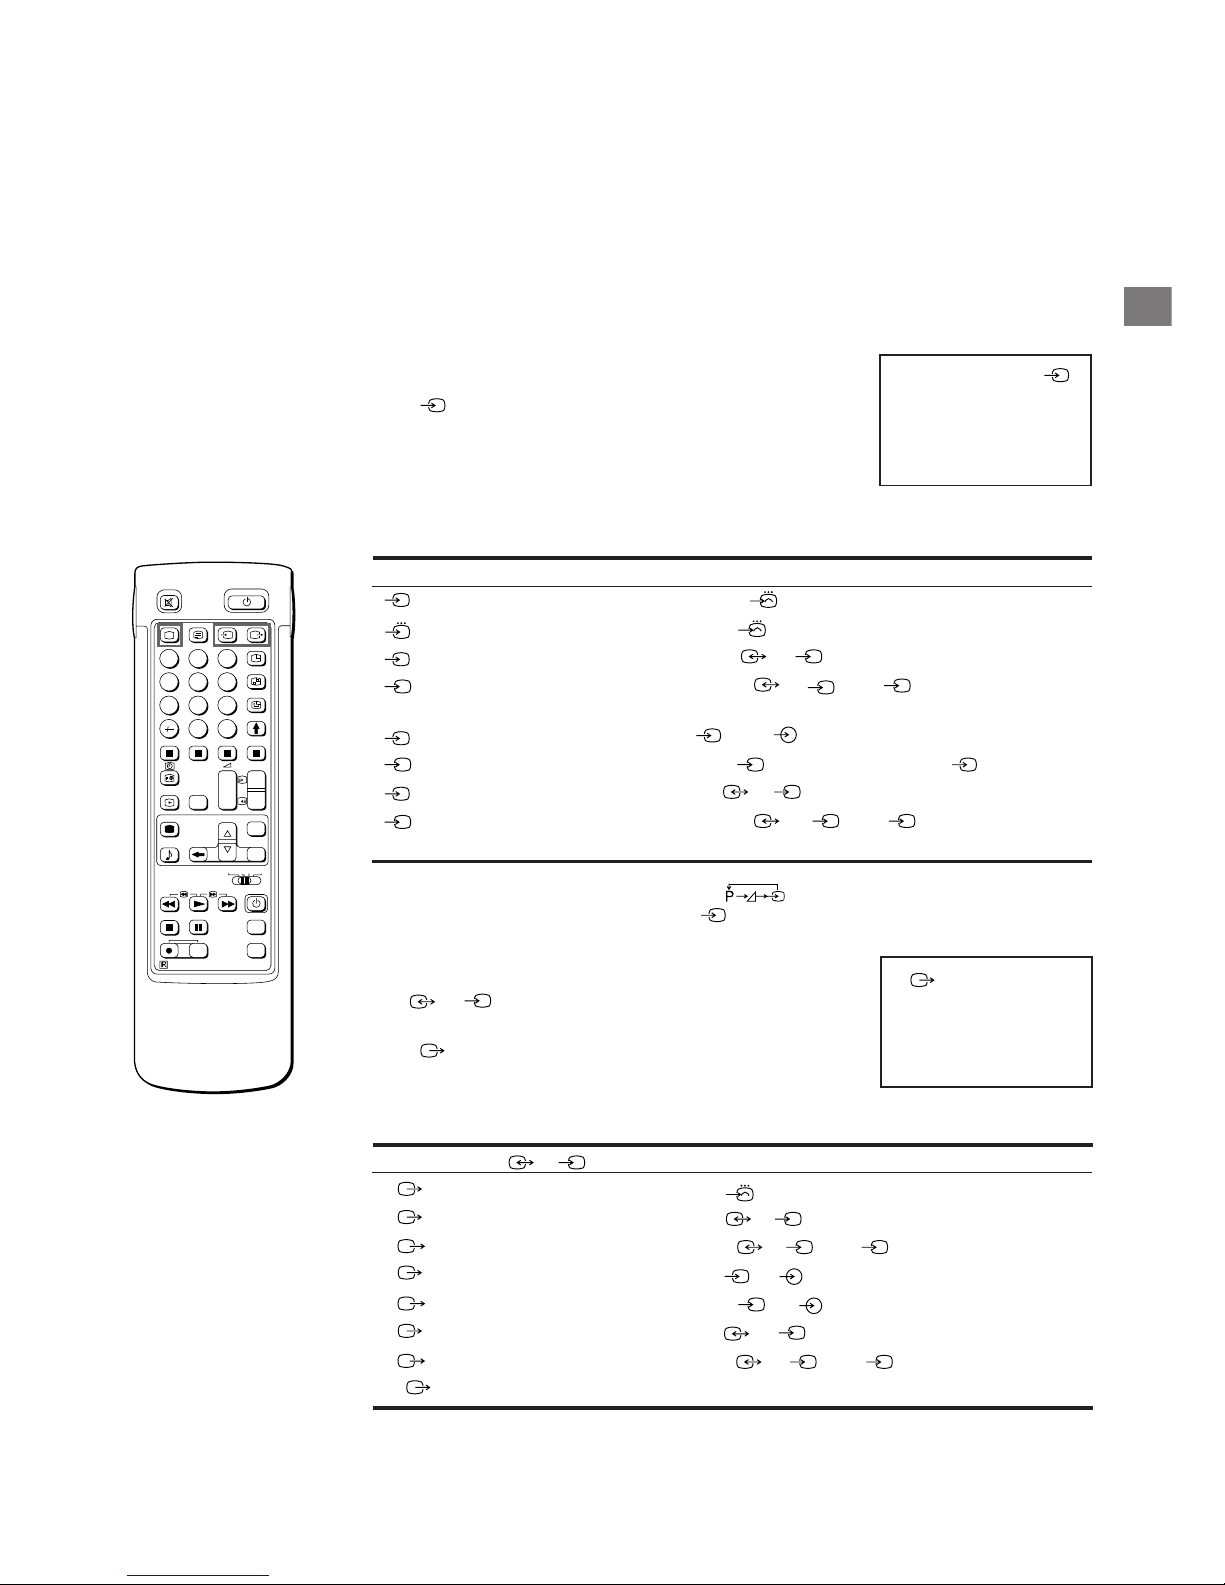
Symbol
1
2
S
2
3
S
3
4
S
4
Input signal
Audio/video input through the
1 connector
Audio/RGB input through the
1 connector
Audio/video input through the
2/ S 2 connector
Audio/S video input through the
2/ S 2 or S 2 connector (4-pin
connector)
Audio/video input through
3 and 3 on the front
Audio/S video input through the
S
3 (4-pin connector) and 3 connectors
Audio/video input through the
4/ S 4 connector
Audio/S video input through the
4 / S 4 or S 4 connector(4-pin
connector)
Selecting input with
PROGR +/– or number
buttons
You can preset video
input sources to the
programme positions so
that you can select them
with PROGR +/– or
number buttons. For
details, see “Preset
channels manually” on
page 9.
Symbol
1
2
2
S
3
3
S
4
4
S
TV
2/ S 2 connector outputs
Audio/video signal from the
1 connector
Audio/video signal from the
2/ S connector
Audio/S video signal from the
2/ S 2 or S2 connector (4 pin)
Audio/video signal from the
3, 3 connectors
Audio/S video signal from the
S
3, 3 connectors
Audio/video signal from the
4/ S4 connector
Audio/S video signal from the
4/ S 4 or S4 connector (4 pin)
Audio/video signal from the ) aerial terminal
Selecting Input and Output
This section explains how to view the video input picture (of the
video source connected to your TV), and how to select the output
signal using direct access buttons or the menu system.
Selecting input
Press repeatedly to select the input source.
The symbol of the selected input source will appear. (See Fig. 28.)
To go back to the normal TV picture
Press Ο.
Input modes
Fig. 28
Fig. 29
1
1
You can also select the input mode using the and –/+
buttons on the TV. In this case, first select
, and then
press –/+ buttons to select the input.
Selecting the output
The 2 /S 2 connector outputs the source input from the
other connectors.
Press
repeatedly to select the output.
The symbol of the selected output source appears. (See Fig. 29.)
Output modes
RM-831
PROGR
PROGR
1
1
VTR 1-2-3
MDP
1
2
45
3
6
9
8
7
0
C
SAT
+
_
MENU
+
_
OK
+
_
+
_
24
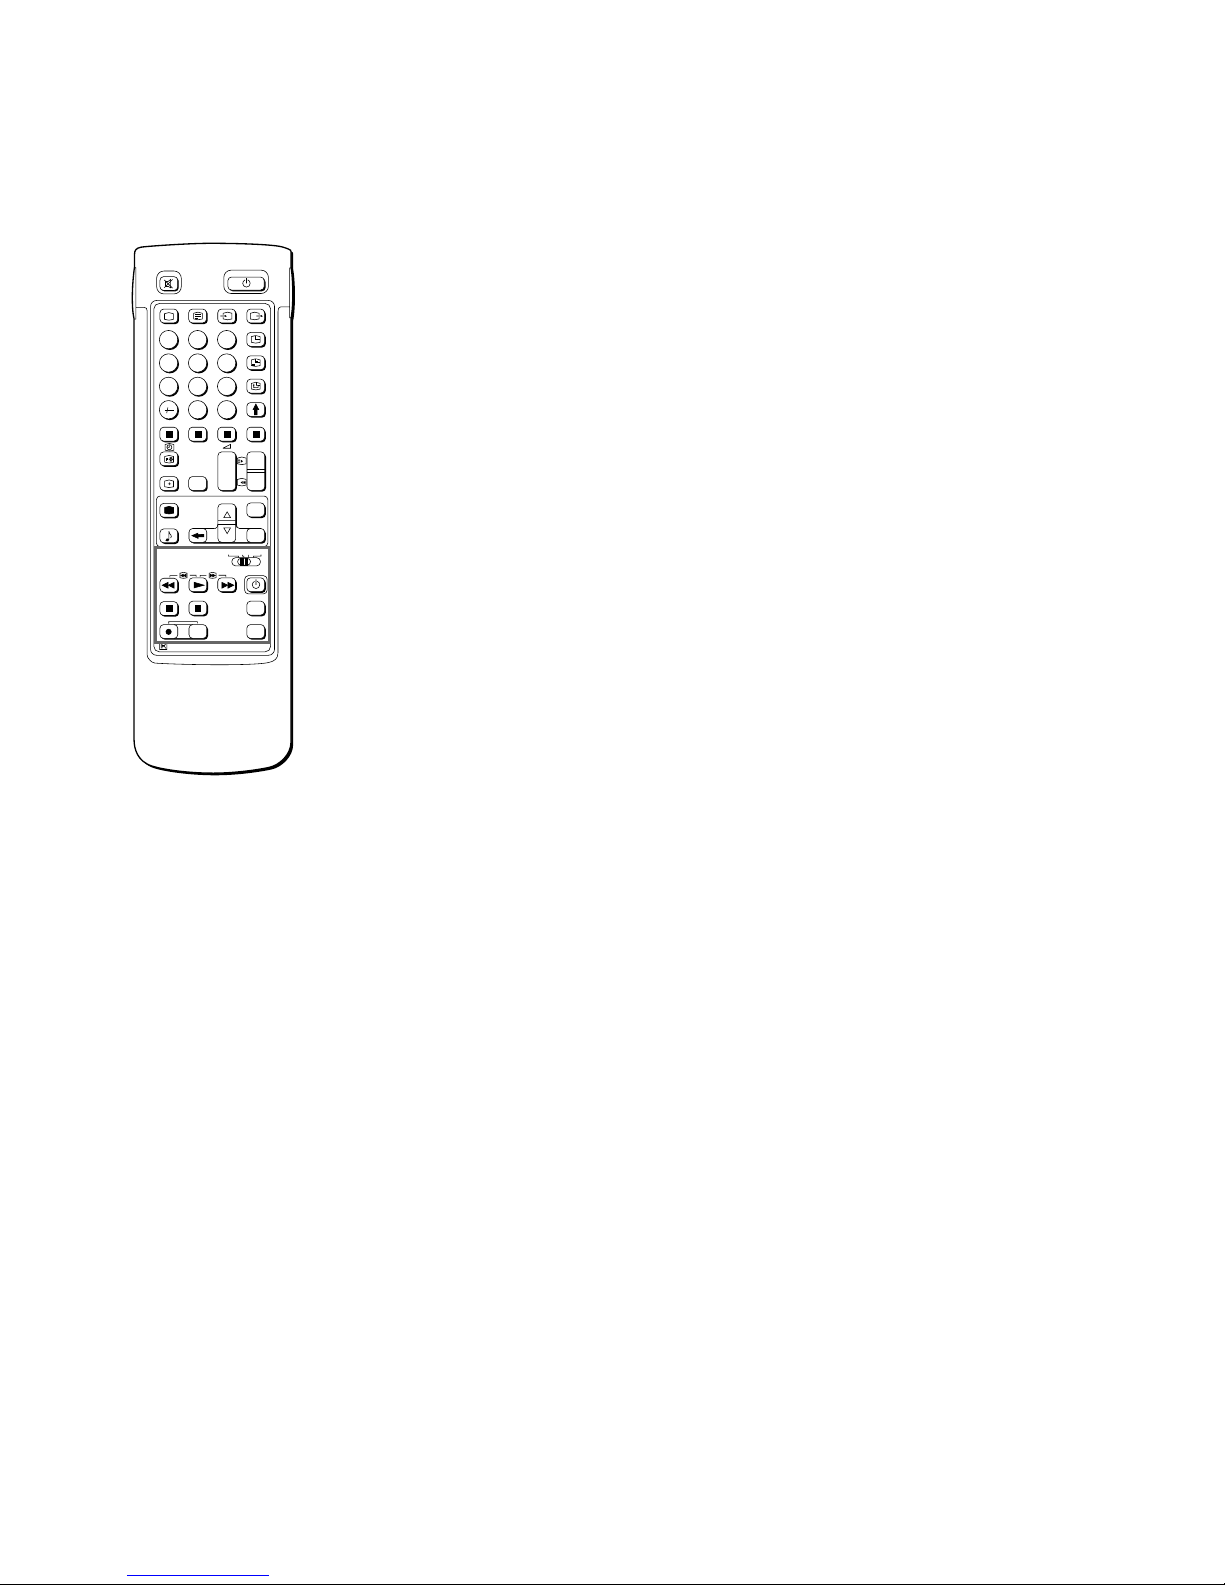
Remote Control of Other Sony
Equipment
You can use the TV Remote Commander to control most of Sony
remote-controlled video equipment such as: beta, 8 mm and VHS
VCRs and video disc players.
Tuning the Remote Commander to the equipment
1 Set the VTR 1/2/3 MDP selector according to the equipment you
want to control:
VTR1: Beta VCR
VTR2: 8 mm VCR
VTR3: VHS VCR
MDP: Video disc player
2 Use the buttons indicated in the Illustration to operate the
additional equipment.
If your video equipment is furnished with a COMMAND MODE
selector, set this selector to the same position as the VTR 1/2/3
MDP selector on the TV Remote Commander.
If the equipment does not have a certain function, the
corresponding button on the Remote Commander will not operate.
RM-831
PROGR
PROGR
1
1
VTR 1-2-3
MDP
1
2
45
3
6
9
8
7
0
C
SAT
+
_
MENU
+
_
OK
+
_
+
_
When recording
when you use the α
(record) button, make
sure to press this button
and the one to the right
of it simultaneously.
GB
25
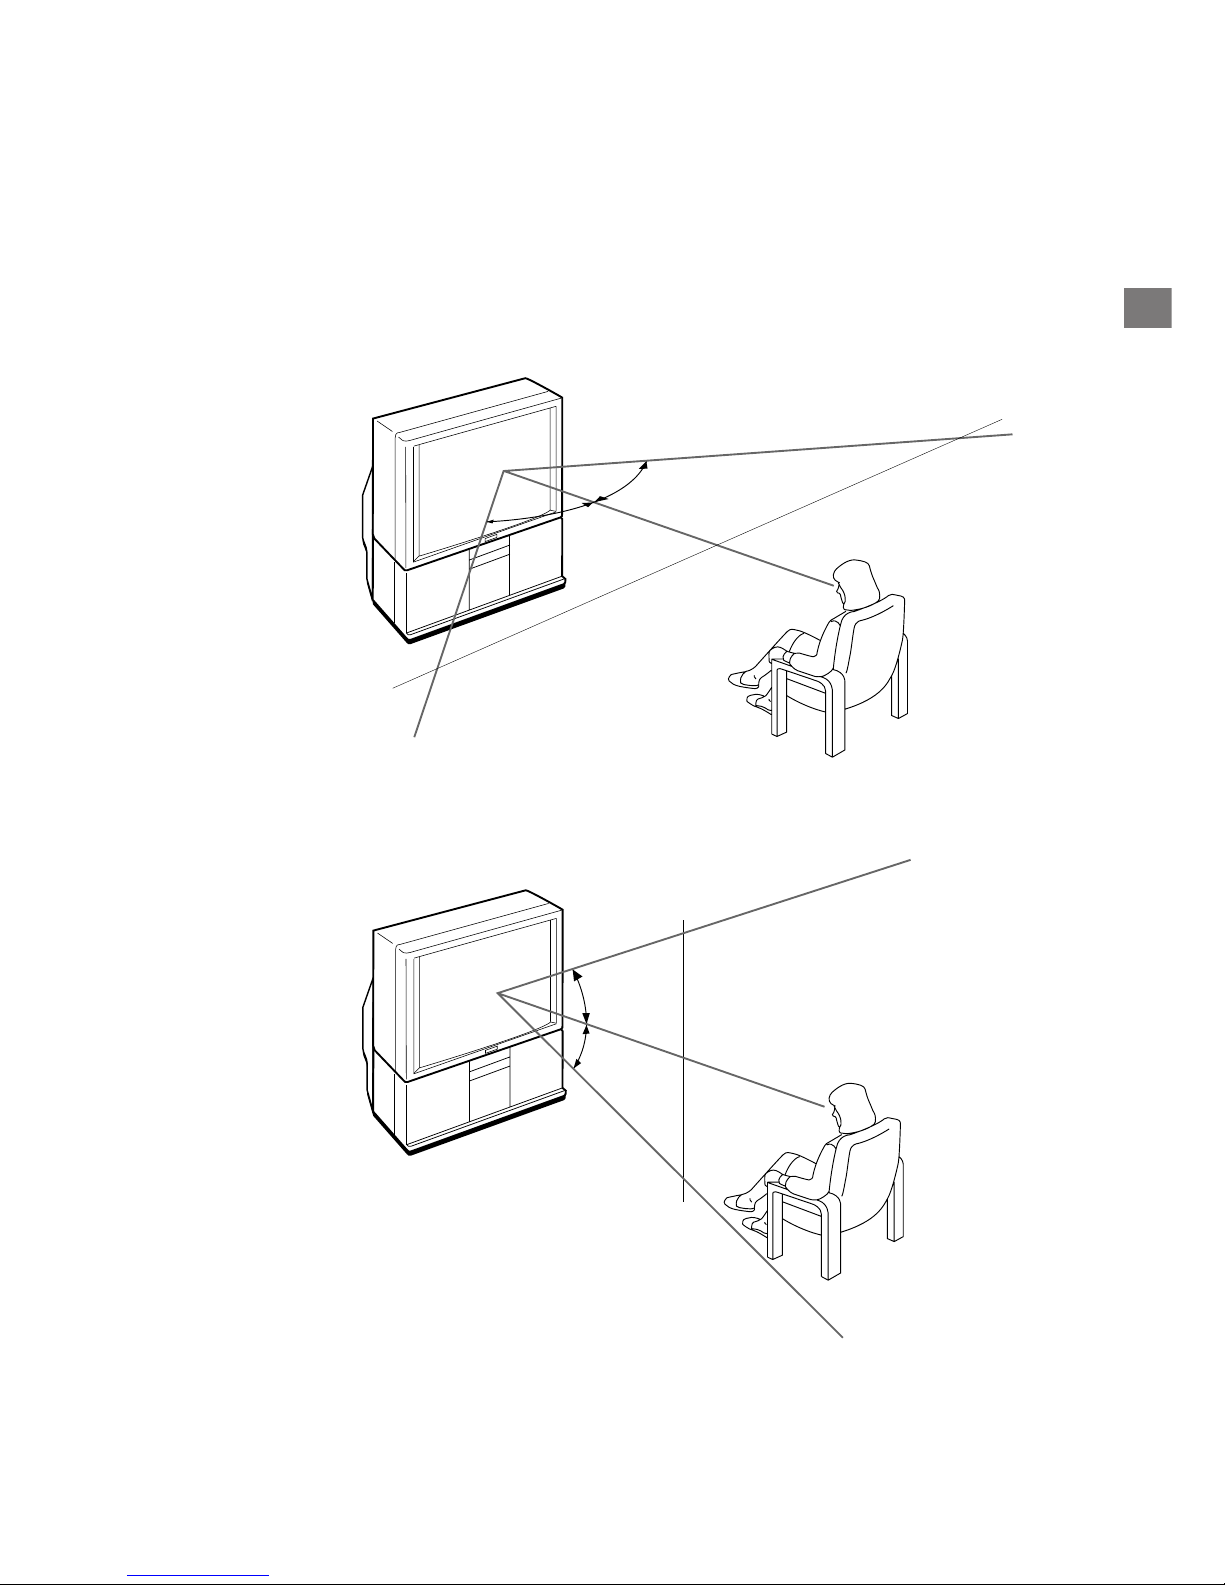
Optimum Viewing Area
For the best picture quality, try to position the projection TV so that
you can view the screen from within the areas shown below.
Horizontal viewing area
For Y our Information
2.1 m
Optimum viewing position
Optimum viewing position
75°
75°
(Minimum optimum
distance)
2.1 m
27.5°
27.5°
(Minimum optimum
distance)
Vertical viewing area

26
Problem
No picture (screen is dark), no sound
Poor or no picture (screen is dark), but sound is OK
The menu and picture disappear
(if contrast and brightness are minimum)
Good picture but no sound
No colour for colour programmes
Remote Commander does not function
Troubleshooting
Here are some simple solutions to some problems which may affect the picture and sound.
Solution
• Plug in the TV.
• Press θ on the TV (if φ indicator is on, press Ο or a programme number
on the Remote Commander).
• Check the aerial connection.
• Check if the selected video source is on.
•
Turn the TV off for three or four seconds and then turn it on again using θ.
• Press to enter the PICTURE ADJUSTMENT menu and adjust the
brightness, contrast and colour.
• Press τ both + and - on the front panel of the TV set.
• Press
+.
• If ο is displayed on the screen, press ο.
• Press
to enter the PICTURE ADJUSTMENT menu, select RESET, then
press OK.
• The batteries are weak.
Television system B/G/H, D/K, I, L
Colour system PAL/SECAM and NTSC 3.58/NTSC
4.43 (VIDEO IN)
Channel coverage See “Receivable channels and channel
displays” at the bottom.
Projected picture size 116 cm (46 inches)
Terminals
Rear
1 21-pin Euro connector
(CENELEC standard) inputs for audio
and video signals
- inputs for RGB
- outputs of TV video and audio signals
2/ S 2 21-pin Euro connector
- inputs for audio and video signals
- inputs for S video
- outputs for audio and video signals
(selectable)
4/ S 4 21-pin Euro connector
- inputs for audio and video signals
- inputs for S video
- outputs for audio and video signals
(monitor out)
Indication on the screen
C02 C03 C04..C12 C21..C69
S01 S02..S41
S42..S46 S01..S10 S11..S20
C11..C69
C02..C12 C21..C60
C01..C12 C21..C69
C21..C68
Receivable channels
E2..12 21..69
S1..41
S01..S05 M1..M10 U1..U10
A B C D E F G H H1 H2 21..69
R01..R12 R21..R60
F2..F10 F21..F69
B21..B68
PAL B/G/H
CABLE TV (1)
CABLE TV (2)
ITALIA
SECAM D/K
SECAM L
PAL I
S
2, S 4 S video inputs
- 4 pin DIN
Audio inputs (L, R) - phono jacks
S
S video output 4-pin DIN
Audio outputs - phono jacks
Audio outputs (variable)-phono jacks
External speaker terminals: 2-pin DIN
Front
3 video input - phono jack
Audio inputs - phono jacks
S
3 S video input - 4-pin DIN
λHeadphone jack: stereo minijack
Sound output 2 × 30 W (music power)
2 × 15 W (RMS)
Power consumption 225 W
Dimensions 1104 × 1289 × 512 mm
(W × H × D)
Weight 79 kg
Supplied accessories See page 6.
Other features Digital comb filter (High resolution)
PIP (Picture-in-picture)
FASTEXT
NICAM (B/G, L, I)
B/G STEREO
D/K/STEREO
Design and specifications are subject to change without notice.
Receivable Channels and Channel Displays
If you continue to have problems, have your TV serviced by qualified personnel. Never open the casing yourself.
Specifications

GB
27

28
D˘leæitÈ informace
P¯eËtÏte si prosÌm n·sledujÌcÌ informace t˝kajÌcÌ se
uæÌv·nÌ a ˙dræby Va eho televizoru, abyste se mohli tÏ it
z co nejvy Ì kvality p¯Ìjmu.
Kvalita obrazu
• ©patn˝ p¯enos barev (Ëerven˝, zelen˝ a modr˝ barevn˝
sign·l se p¯esnÏ nep¯ekr˝vajÌ) m˘æe b˝t zp˘soben
zemsk˝m magnetizmem. VylaÔte obraz podle postupu v
kapitole konvergenËnÌ nastavenÌ (str. 33).
• Nedot˝kejte se obrazovky a dbejte na to, abyste
nepo kr·bali jejÌ povrch tvrd˝mi p¯edmÏty.
• P¯en· enÌ zmrazenÈho obrazu po del Ì dobu, nap¯. p¯i
pouæitÌ televizoru pro videohry nebo ve spojenÌ s
poËÌtaËem m˘æe vÈst k po kozenÌ obrazovky. Abyste
tomu zabr·nili, nastavte kontrast obrazu na Ülowá (nÌzk˝)
(NASTAVENÕ OBRAZU, s. 41)
OsvÏtlenÌ
Abyste zÌskali jasn˝ obraz, nevystavujte obrazovku
p¯ÌmÈmu svÏtlu nebo sluneËnÌmu z·¯enÌ. Je-li to moænÈ,
pouæÌvejte bodovÈ svÏtlo svÌtÌcÌ od stropu smÏrem dol˘.
Instalace
• Nezakr˝vejte vÏtracÌ otvory, abyste zabr·nili vnit¯nÌmu
p¯eh¯·tÌ p¯Ìstroje.
• Neinstalujte televizor na p¯Ìli hork˝ch nebo vlhk˝ch
mÌstech, na mÌstech vystaven˝ch p¯ÌmÈmu sluneËnÌmu
z·¯enÌ, nadmÏrnÈ pra nosti, mechanick˝m vibracÌm
nebo ot¯es˘m.
• Jestliæe p¯enesete televizor p¯Ìmo z chladna do tepla
nebo zmÏnila-li se n·hle teplota v mÌstnosti, m˘æe dojÌt k
zvÏt enÌ obrazu nebo ke zkreslenÌ barev na Ë·sti
obrazovky. To je zp˘sobeno kondenzacÌ vlhkosti na
zrcadlech nebo ËoËk·ch uvnit¯ televizoru. P¯ed pouæitÌm
televizoru nechte vlhkost vyschnout.
⁄dræba
• Uschovejte si origin·lnÌ kartÛn i dal Ì materi·l, ve kterÈm
byl televizor zabalen, abyste ho mÏli k dispozici pro
p¯Ìpadnou dal Ì dopravu televizoru. Pro optim·lnÌ
ochranu zabalte televizor p¯esnÏ tak, jak byl origin·lnÏ
zabalen z tov·rny.
• Aby V· p¯Ìstroj vypadal jako nov˝, otÌrejte ho pravidelnÏ
mÏkkou utÏrkou. Skvrny m˘æete odstranit utÏrkou
namoËenou v slabÈm roztoku ËistÌcÌho prost¯edku. Nikdy
nepouæÌvejte siln· rozpou tÏdla jako je ¯edidlo nebo
benzÌn, ani agresivnÌ ËistÌcÌ prost¯edky (nap¯. pÌsek na
n·dobÌ), abyste nepo kodili povrch p¯Ìstroje. Pro Va i
bezpeËnost odpojte p¯ed Ëi tÏnÌm televizor od sÌtÏ.
• Chcete-li odstranit prach z obrazovky, odpojte televizor a
stÌrejte prach mÏkkou utÏrkou namoËenou ve vodÏ nebo
ve slabÈm roztoku ËistÌcÌho prost¯edku pouze svisl˝mi
pohyby. Potom ji p¯et¯ete suchou mÏkkou utÏrkou. Nikdy
za tÌmto ˙Ëelem nepouæÌvejte rozpou tÏdla nebo ¯edidla.
• Ztmavne-li obrazovka po del Ì dobÏ pouæÌv·nÌ televizoru,
je t¯eba vyËistit vnit¯nÌ prostor televizoru. V tomto p¯ÌpadÏ
se obraªte na odbornÌky.
UPOZORNÃNÕ
Nevystavujte p¯Ìstroj de ti ani vlhkosti, abyste zabr·nili
vzniku poæ·ru nebo zkratu.
Uvnit¯ p¯Ìstroje vznik· nebezpeËnÈ vysokÈ napÏtÌ.
NeotvÌrejte p¯Ìstroj. Ve kerÈ opravy p¯enechte pouze
odbornÌk˘m.
BezpeËnostnÌ opat¯enÌ
Aby nedo lo k poæ·ru nebo ˙razu elektrick˝m proudem,
dodræujte nÌæe uvedenÈ bezpeËnostnÌ pokyny. Pro Va i
bezpeËnost p¯enechte opravy pouze kvalifikovan˝m
odbornÌk˘m.
V eobecn· bezpeËnost:
• Nevystavujte televizor de ti ani nadmÏrnÈ vlhkosti.
• NeotvÌrejte zadnÌ kryt p¯Ìstroje.
BezpeËn˝ provoz:
• Nenapojujte p¯Ìstroj na jinÈ napÏtÌ neæ 220 â 240 V
st¯ÌdavÈho proudu.
• Nezapojujte p¯Ìstroj, vnikne-li do nÏho nÏjak˝ p¯edmÏt
nebo kapalina - nechte ho okamæitÏ zkontrolovat
kvalifikovan˝m odbornÌkem.
• Nenech·vejte p¯Ìstroj zapojen˝ v z·suvce, nebudete-li
ho nÏkolik dnÌ pouæÌvat.
• P¯i vytahov·nÌ z·strËky ze sÌtÏ tahejte vædy za z·strËku,
nikdy ne za Ú˘ru.
• Nepokl·dejte æ·dnÈ p¯edmÏty na plochu p¯ednÌho
panelu, kdyæ je vyklopen˝.

CZ
CZ
29
Obsah
Popis ..................................................................................... 30
UvedenÌ do provozu ..................................................... 32
1. krok: P¯Ìprava ....................................................................... 32
Kontrola dodanÈho p¯Ìslu enstvÌ ................................... 32
VloæenÌ bateriÌ do d·lkovÈho ovladaËe .......................... 32
ZapojenÌ antÈny ............................................................ 32
2. krok: NastavenÌ barevnÈho kontrastu (konvergence)............. 33
Volba jazyka ................................................................. 33
ZobrazenÌ menu............................................................ 33
Konvergence Ëerven˝ch, zelen˝ch a modr˝ch
obrys˘.......................................................................... 33
3. krok: NaladÏnÌ televiznÌch program˘ ..................................... 34
AutomatickÈ ladÏnÌ kan·l˘............................................ 34
Manu·lnÌ ladÏnÌ kan·l˘ ................................................. 35
Dal Ì funkce p¯edvolby ............................................................. 36
V˝mÏna programov˝ch pozic ...................................... 36
P¯echodnÈ naladÏnÌ kan·lu........................................... 36
P¯eskakov·nÌ programov˝ch pozic ............................... 37
Z·znam n·zvu stanice .................................................. 37
Manu·lnÌ jemnÈ dolaÔov·nÌ .......................................... 38
Pokyny k obsluze ......................................................... 39
Sledov·nÌ televiznÌho programu ............................................... 39
ZapnutÌ a vypnutÌ televizoru .......................................... 39
Volba televiznÌch program˘........................................... 39
NastavenÌ hlasitosti....................................................... 39
Ovl·d·nÌ televizoru ovl·dacÌmi prvky na p¯Ìstroji ........... 40
Sledov·nÌ teletextu nebo videoprogramu...................... 40
Dal Ì uæiteËnÈ funkce .................................................... 40
NastavenÌ a naladÏnÌ televizoru pomocÌ menu .......................... 41
NastavenÌ obrazu a zvuku ............................................. 41
PouæÌv·nÌ programovatelnÈho vypnutÌ (pro usÌn·nÌ)....... 42
DÏtsk· pojistka ............................................................. 42
Funkce PIP (Picture in Picture - obraz v obraze)........................ 43
Zobrazov·nÌ obrazu krok po kroku (foto) ....................... 44
Kontrola v ech nastaven˝ch program˘ (index) ............. 44
Teletext.................................................................................... 45
Funkce s p¯Ìm˝m p¯Ìstupem ......................................... 45
PouæitÌ menu teletextu .................................................. 46
P¯ipojenÌ a ovl·d·nÌ dal Ìho za¯ÌzenÌ ......................................... 48
P¯ipojenÌ dal Ìho za¯ÌzenÌ ............................................... 48
Volba vstupu a v˝stupu ................................................ 49
D·lkovÈ ovl·d·nÌ jin˝ch p¯Ìstroj˘ Sony .......................... 50
Pro Va i informaci .................................................................... 51
Oblast optim·lnÌho poslechu ........................................ 51
Poruchy a jejich odstranÏnÌ ........................................... 52
TechnickÈ ˙daje........................................................... 52
P¯ijÌmatelnÈ kan·ly a jejich indikace na obrazovce......... 52
Funkce
UvedenÌ do provozu
30
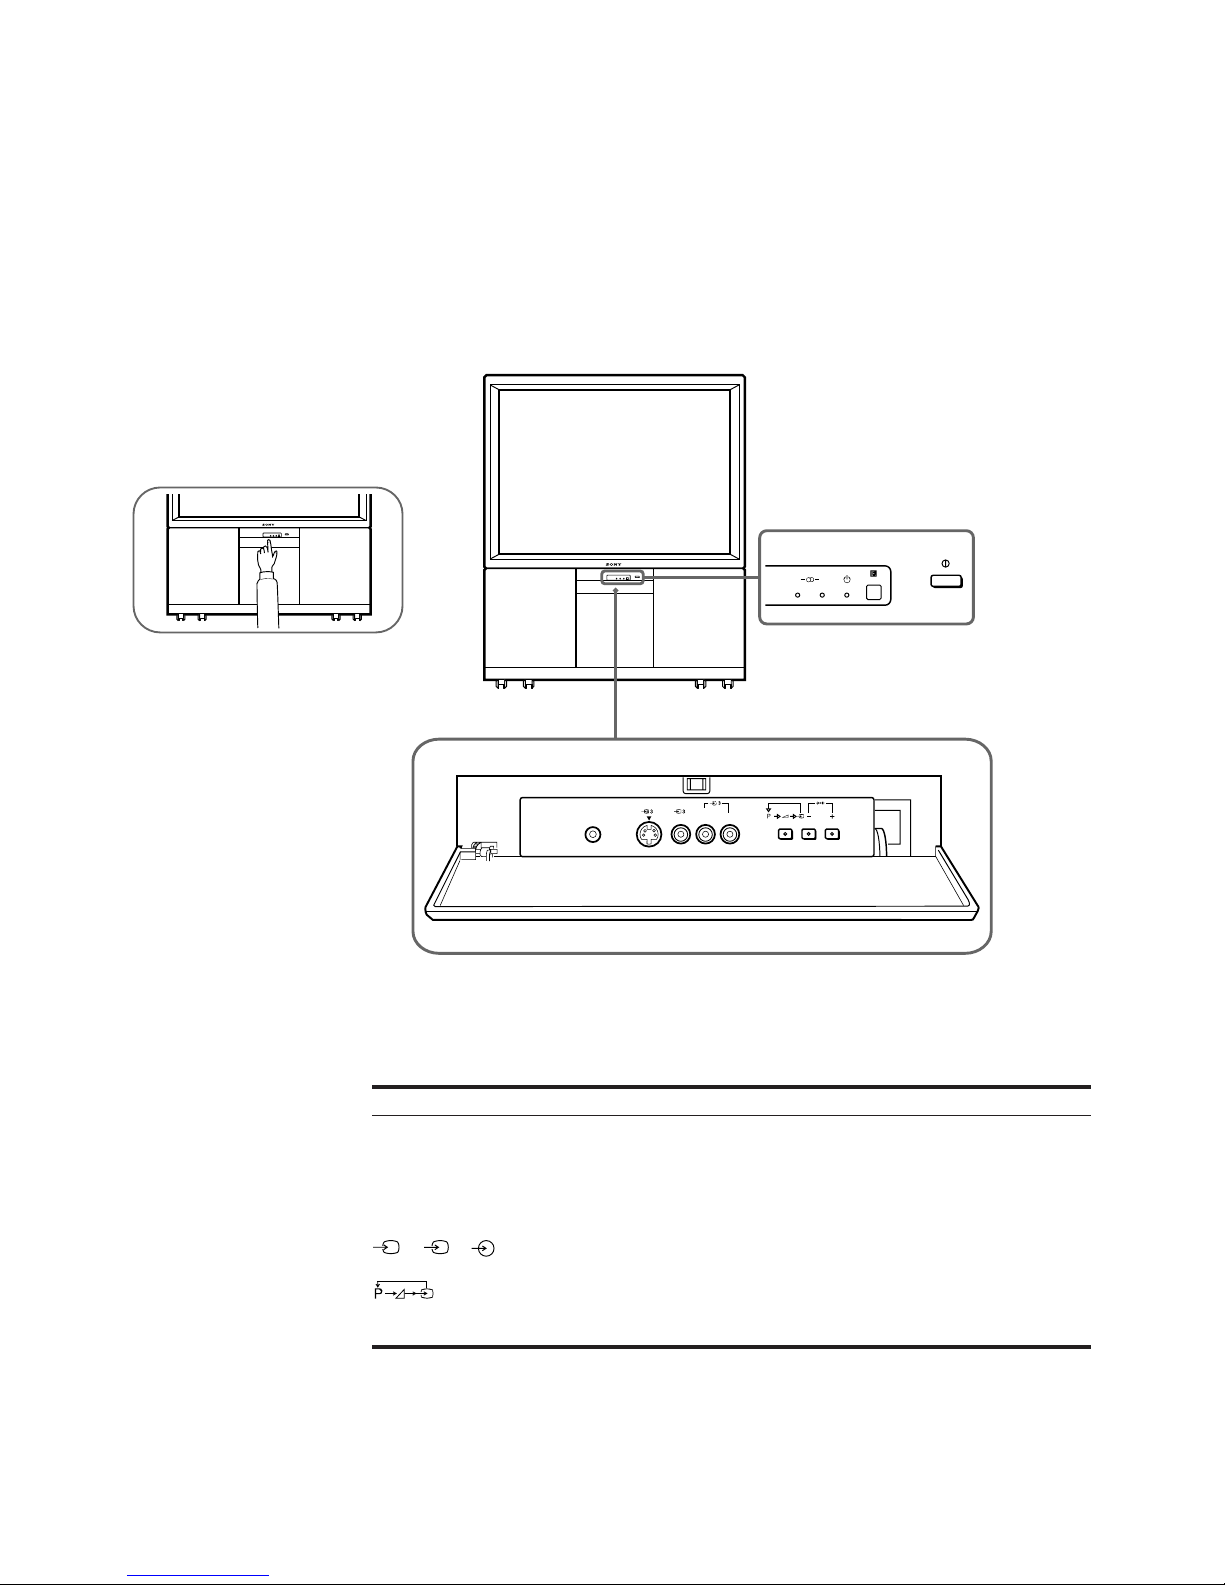
Popis
Tato Ë·st struËnÏ popisuje tlaËÌtka a ovl·dacÌ prvky na televizoru a
na d·lkovÈm ovl·daËi. Dal Ì informace naleznete na str·nk·ch
uveden˝ch vedle kaædÈho prvku.
P¯ednÌ strana televizoru
A B
2
MONO
L / G / S / I R / D / D / D
θ
φ
A-µ-B
λ
3, 3, 3
–/+
S
Symbol N·zev
HlavnÌ s̪ov˝ spÌnaË
Indik·tor pohotovostnÌ polohy
Indik·tory stereo A/B
Zd̯ka pro sluch·tka
Zd̯ky pro vstup (S video/video/audio)
SpÌnaË pro volbu funkce
(program, hlasitost, vstup)
TlaËÌtka pro nastavenÌ funkce
Viz strana
39
39
41
48
48
40
40
 Loading...