

Sony ICD-SX712 User Manual [en, es]

GB
Let’s try out your new IC recorder
What to do next
IC Recorder
Quick Start Guide
ICD-SX712
Welcome to your new Sony IC recorder!
This is the Quick Start Guide, which provides
you with instructions on the basic operations
of the IC recorder.
Please read it carefully. We hope you enjoy
using your new Sony IC recorder.
Check the supplied items.
IC Recorder (1)
Stereo headphones (1)
USB connecting cable (1)
Stand (1)
Application software, Sound Organizer
(CD-ROM) (1)
ES
4-196-714-61(1)
© 2011 Sony Corporation
Capacity (User available capacity)
2 GB (approx. 1.80 GB = 1,932,735,283 Byte)
A part of the memory capacity is used as a
management area.
Carrying pouch (1)
LR03 (size AAA) alkaline batteries (2)
Operating Instructions (Stored in the
built-in memory)
Printed in China
1. Power on.
1
1
POWER/
HOLD
1 Insert two batteries with the correct
polarity.
The IC recorder is turned on.
To turn the power off
for more than 2 seconds
To turn the power on again, slide the POWER/HOLD
switch in the direction of “POWER” for more than 1
second.
To prevent unintentional operations (HOLD)
To release the IC recorder from the HOLD status, slide the
POWER/HOLD switch towards the center.
2. Set the date and time.
2
1
1
1 Press or to set the year, month, day,
hour, and minute in sequence, and then
press /ENT.
2 Press STOP.
3. Select the menu language.
1
5
2, 3, 4
2, 3, 4
2
1 Press MENU.
2 Press , press or to select ,
and then press /ENT.
3 Press or to select “Language,” and
then press /ENT.
4 Press or to select the language that
you want to use in the display window,
and then press /ENT.
5 Press STOP.
4. Record.
5. Listen.
6. Erase.
Operation
indicator
1
2
Operation
indicator
3
2
1
2
2
1
Before you start using the IC recorder, make sure that
you slide the POWER/HOLD switch towards the center to
release the HOLD status.
1 Press REC/PAUSE.
Recording starts and the operation indicator lights
in red.
You can pause recording by pressing REC/PAUSE.
REC/PAUSE again to restart recording.
Press
2 Press STOP to stop recording.
Recording stops and the operation indicator
flashes in orange.
1 Press /ENT.
Playback starts and the operation indicator lights
in green.
2 Adjust the volume by pressing VOLUME
–/+.
3 Press STOP to stop playback.
Once a file is erased, you cannot restore it.
1 Press ERASE.
“Erase?” is displayed and the file to be erased is
played back for confirmation.
2 Select “Execute” using or , and then
press /ENT.
“Erasing…” is displayed while the selected file is
being erased.
Congratulations! You have set up your IC recorder and enjoyed your first recording. Let’s step
up to the next stage. There are some more useful functions and information that you can use to
fully utilize your IC recorder.
Selecting a memory/tab/folder/file
You can select a tab and a folder in which you
are going to record a file. You can also specify
the file to be played back or erased in the
selected folder.
1 Select a tab.
Press
Press
(Voice): Recordable area to be used
to manage files recorded with the IC
recorder.
(Music): Playback-only area to be used
to manage music files transferred from
your computer.
to display the folder selection
window.
and press or to select a
tab.
(Podcast): Playback-only area to be
used to manage podcast files transferred
from your computer.
(Built-in memory) or (External
memory): Memory to be used. You can
switch between the built-in memory and
external memory (memory card).
2 Select a folder.
Press to move to the tab you have
selected, and then press or to select
a folder.
3 Select a file.
Press to move to the folder you have
selected, and then press or to select
a file.
Copying the operating instructions to your
computer
3 Drag and drop the files of the
operating instructions from the
“Instructions” folder to the local
disk on your computer.
USB connecting cable
The operating instructions explaining all the
features and functions of the IC recorder are
stored as PDF files in the built-in memory of
the IC recorder.
You can also download the operating
instructions from the Sony support home page:
http://www.sony-latin.com/index.crp
1 Connect the IC recorder to your
computer.
2 Open the “Instructions” folder on
your computer.
On Windows: Click [My Computer]
or [Computer] - [IC RECORDER]
- [Instructions].
On Macintosh: Click [IC RECORDER] on the
desktop - [Instructions].
The file names of the operating
instructions are as follows:
Product name_language name_version.
pdf (e.g. ICD-SX712_English_51.pdf)
4 Disconnect the IC recorder from
your computer.
To read the operating instructions, double-click
the PDF file you want to read.
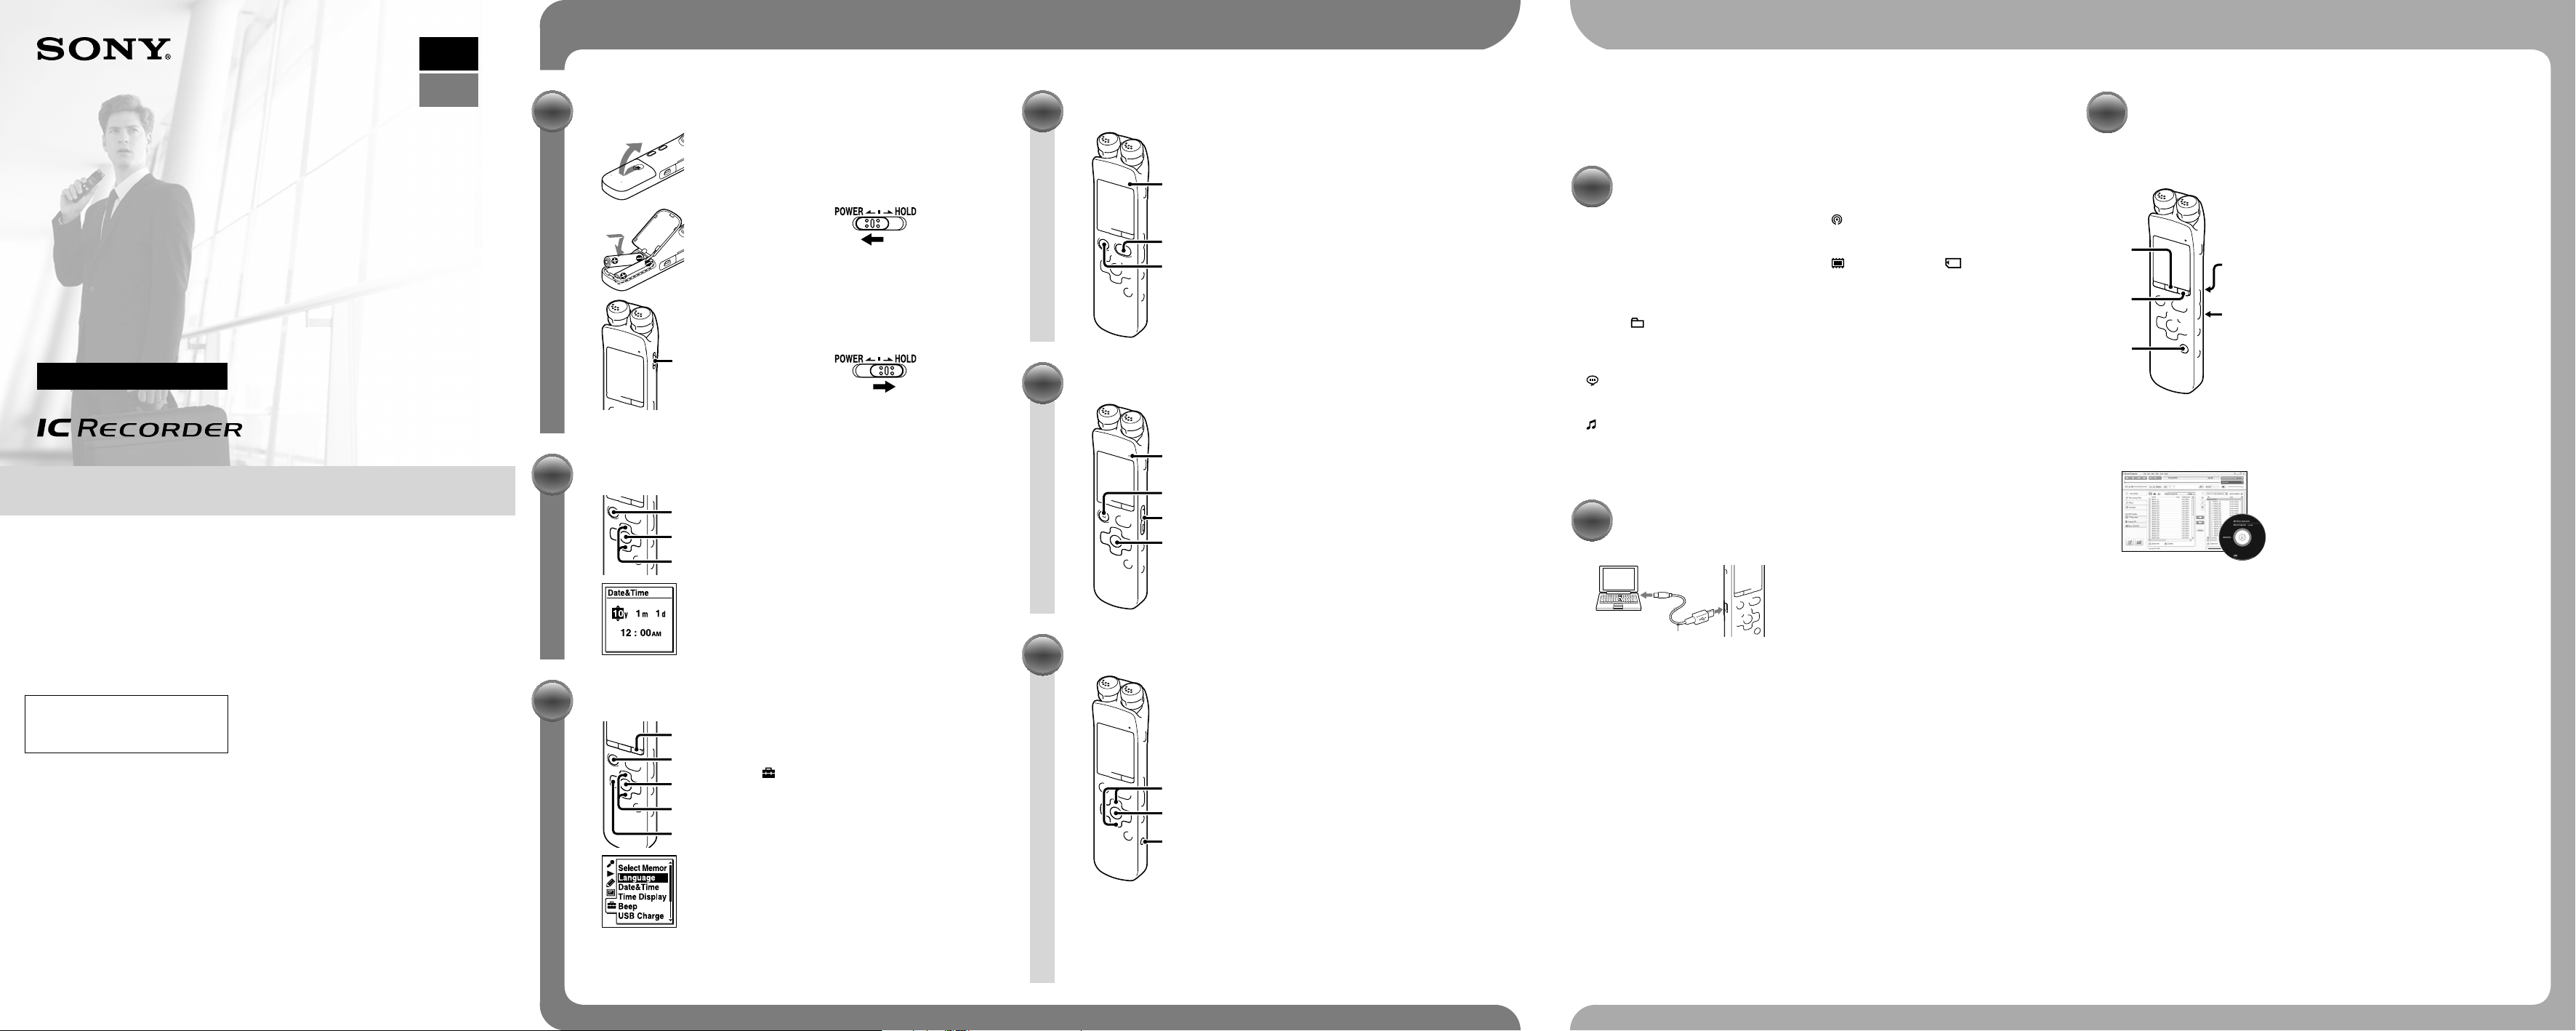
More advanced features
For details on each operation, refer to the
PDF operating instructions copied to your
computer.
SCENE
NOISE CUT
(on the rear)
MENU
DPC(SPEED)/
KEY CTRL
T-MARK
(on the rear)
Precautions
On power
Operate the unit only on 3.0 V or 2.4 V DC.
Use two LR03 (size AAA) alkaline batteries or
two NH-AAA rechargeable batteries.
On safety
Do not operate the unit while driving,
cycling or operating any motorized vehicle.
On handling
Do not leave the unit in a location near
heat sources, or in a place subject to direct
sunlight, excessive dust or mechanical
shock.
SCENE
Sets the menu items for recording to the
most appropriate settings according to
various recording scenes.
NOISE CUT
Reduces ambient noise to make the
playback sound clearer.
T-MARK
Adds a track mark to set the starting point
when recording or playing back a file.
DPC (SPEED)/KEY CTRL
Adjusts the playback speed and/or playback
tone.
MENU
Sets various menu items , such as REC Mode,
REC Level, etc.
Sound Organizer (PC application
software*)
Various operations can be performed using
Sound Organizer on your computer. You can
import files recorded with the IC recorder
into Sound Organizer to edit. You can import
music files of a music CD or podcast files to
transfer to the IC recorder. You can also burn
CDs of the music you like.
* For Windows only
Should any solid object or liquid fall into
the unit, remove the batteries and have
the unit checked by qualified personnel
before operating it any further.
If you have any questions or problems
concerning your unit, please consult your
nearest Sony dealer.
ES
Vamos a probar la nueva grabadora IC
Qué hacer a continuación
IC Recorder
Guía de inicio rápido
ICD-SX712
Le damos la bienvenida a su nueva
Grabadora IC de Sony
Esta es la Guía de inicio rápido en la cual se
ofrecen instrucciones sobre las operaciones
básicas de la grabadora IC.
Le rogamos leerla detenidamente. Esperamos
que disfrute utilizando su nueva grabadora
IC de Sony.
Grabadora IC
POR FAVOR LEA DETALLADAMENTE ESTE MANUAL
DE INSTRUCCIONES ANTES DE CONECTAR Y
OPERAR ESTE EQUIPO.
RECUERDE QUE UN MAL USO DE SU APARATO
PODRÍA ANULAR LA GARANTÍA.
Compruebe los componentes incluidos.
Grabadora IC (1)
Auriculares estéreo (1)
Cable de conexión USB (1)
Soporte (1)
Software de la aplicación Sound Organizer
(CD-ROM) (1)
Capacidad (capacidad disponible para el
usuario)
2 GB (aprox. 1,80 GB = 1 932 735 283 byte)
Una parte de la capacidad de la memoria es
usada como área de control.
Bolsa de transporte (1)
Pilas alcalinas LR03 (tamaño AAA) (2)
Manual de instrucciones (almacenado en la
memoria interna)
GB
1. Encender.
1
1
POWER/
HOLD
1 Inserte dos pilas con la con la polaridad
correcta.
La grabadora IC se enciende.
Para apagarla
durante más de 2 segundo
Para volverla a encender, deslice el interruptor POWER/
HOLD en el sentido de “POWER” durante más de 1
segundo.
Para evitar el funcionamiento no intencionado
(HOLD)
Para desactivar el estado HOLD de la grabadora IC, deslice
el interruptor POWER/HOLD hacia el centro.
2. Ajustar la fecha y la hora.
2
1
1
1 Pulse o para ajustar el año, el mes,
el día, la hora y los minutos en ese
orden y, a continuación, pulse /ENT.
2 Pulse STOP.
3. Seleccionar el idioma del menú.
1
5
2, 3, 4
2, 3, 4
2
1 Pulse MENU.
2 Pulse , pulse o para seleccionar
y, a continuación, pulse /ENT.
3 Pulse o para seleccionar “Language”
y, a continuación, pulse /ENT.
4 Pulse o para seleccionar el idioma
que desea utilizar en el visor y, a
continuación, pulse /ENT.
5 Pulse STOP.
4. Grabar.
Indicador de
funcionamiento
1
2
5. Escuchar.
Indicador de
funcionamiento
3
2
1
6. Borrar.
2
2
1
Antes de empezar a utilizar la grabadora IC, asegúrese de
deslizar el interruptor POWER/HOLD hacia el centro para
desactivar el estado HOLD.
1 Pulse REC/PAUSE.
La grabación comienza y el indicador de
funcionamiento se ilumina en rojo.
Puede pausar la grabación pulsando REC/PAUSE.
REC/PAUSE de nuevo para volver a iniciar la
Pulse
grabación.
2 Pulse STOP para detener la grabación.
La grabación se detiene y el indicador de
funcionamiento parpadea en naranja.
1 Pulse /ENT.
La reproducción comienza y el indicador de
funcionamiento se ilumina en verde.
2 Ajuste el volumen pulsando VOLUME
–/+.
3 Pulse STOP para detener la
reproducción.
Una vez borrado un archivo, no es posible recuperarlo.
1 Pulse ERASE.
Aparece “Erase?” y el archivo que se va a borrar se
reproduce para su confirmación.
2 Seleccione “Execute” usado o y, a
continuación, pulse /ENT.
Aparece “Erasing…” mientras que el archivo
seleccionado se está borrando.
¡Enhorabuena! Ya ha configurado su grabadora IC y disfrutado de su primera grabación. Demos
el siguiente paso. Hay más funciones prácticas e información que puede utilizar para aprovechar
al máximo su grabadora IC.
Seleccionar una memoria/pestaña/carpeta/archivo
Puede seleccionar una pestaña y una
carpeta en la que vaya a grabar un archivo.
Puede también especificar el archivo que
se vaya a reproducir o borrar en la carpeta
seleccionada.
1 Seleccionar una pestaña.
Pulse
Pulse
(voz): Área grabable utilizada para
administrar los archivos grabados con la
grabadora IC.
(música): Área sólo de reproducción
utilizada para administrar los archivos de
música transferidos desde el ordenador.
para mostrar la ventana de
selección de carpeta.
y pulse o para
seleccionar una pestaña.
(podcast): Área sólo de reproducción
utilizada para administrar los archivos de
podcast transferidos desde el ordenador.
(memoria interna) o (memoria
externa): La memoria que se va a utilizar.
Puede intercambiar entre la memoria
interna o la memoria externa (tarjeta de
memoria).
2 Seleccionar una carpeta.
Pulse para desplazarse a la pestaña
que haya seleccionado y, a continuación,
pulse o para seleccionar una carpeta.
3 Seleccionar un archivo.
Pulse para desplazarse a la carpeta
que haya seleccionado y, a continuación,
pulse o para seleccionar un archivo.
Copiar el manual de instrucciones al
ordenador
3 Arrastre y coloque los archivos
del manual de instrucciones
desde la carpeta “Instructions” al
disco local del ordenador.
Cable de conexión USB
El manual de instrucciones en el que se
explican todas las características y funciones
de la grabadora IC se encuentra almacenado
como archivos PDF dentro de la memoria
interna de la grabadora IC.
Puede también descargar el manual de
instrucciones a través de la página principal de
soporte técnico de Sony:
http://www.sony-latin.com/index.crp
1 Conecte la grabadora IC al
ordenador.
2 Abra la carpeta “Instructions” en
el ordenador.
En Windows: Haga clic en [Mi PC] o
[Equipo] - [IC RECORDER] - [Instructions].
En Macintosh: Haga clic en [IC RECORDER]
en el escritorio - [Instructions].
Los nombres de los archivos del manual
de instrucciones son los siguientes:
Nombre del producto_nombre del
idioma_versión.pdf
(p.ej. ICD-SX712_English_51.pdf)
4 Desconecte la grabadora IC del
ordenador.
Para leer el manual de instrucciones, haga doble
clic en el archivo pfd que desee leer.
Más funciones avanzadas
Para más información sobre cada operación
consulte el manual de instrucciones del PDF
que ha copiado al ordenador.
SCENE
NOISE CUT
(en la parte
MENU
T-MARK
trasera)
DPC(SPEED)/
KEY CTRL
(en la parte
trasera)
Precauciones
Alimentación
Utilice la unidad sólo con cc de 3,0 V o 2,4 V
Utilice dos pilas alcalinas LR03 (tamaño AAA)
o dos pilas recargables NH-AAA.
Seguridad
No utilice la unidad mientras conduce, va
en bicicleta o utiliza cualquier vehículo
motorizado.
Manejo
No deje la unidad cerca de fuentes de
calor, ni en lugares expuestos a la luz
solar directa, polvo excesivo o golpes
mecánicos.
SCENE
Ajusta los elementos de menú para efectuar
la grabación con los ajustes más apropiados
en función a las diferentes escenas de
grabación.
NOISE CUT
Reduce el ruido ambiente para aportar
claridad al sonido de reproducción.
T-MARK
Añade una marca de pista para definir
el punto inicial al grabar o reproducir un
archivo.
DPC (SPEED)/KEY CTRL
Ajusta la velocidad de reproducción y/o el
tono de reproducción.
MENU
Ajusta los diferentes elementos del menú,
tales como REC Mode, REC Level, etc.
Sound Organizer (Software de
aplicación del PC*)
Se pueden llevar a cabo diversas
operaciones mediante Sound Organizer
en el ordenador. Puede importar archivos
grabados con la grabadora IC en Sound
Organizer para editarlos. Puede importar
archivos de música de un CD de música o
archivos de podcast para transferirlos a la
grabadora IC. Puede también grabar CD de
la música que le guste.
* Sólo para Windows
Si se introduce algún objeto sólido o
líquido en la unidad, extraiga las pilas y
hágala revisar por personal cualificado
antes de seguir utilizándola.
Si tiene problemas o preguntas acerca de
esta unidad, consulte al distribuidor Sony
más cercano.
 Loading...