

Page 1

SON'K
Digital
Video Camera
Recorder
Operating Instructions
Before operatmg the unit, please read this manual thoroughly,
and retain it for future reference.
Owner's Record
The model and serial numbers are located on the bottom. Record the
serial number in die space provided below. Refer to these numbers
whenever you call upon your Sony dealer regarding diis product.
Model No. DCR-TR.
Serial No. ______________
Mode) No. AC*.
Serial No.
________
3-865-969-11 (1)
Digital 8
DCR-TR7000
©1999 by Sony Corporation
Handycam
(j) InfoUTHIUM
Page 2

Congratulations on your purchase of this Sony Digital Handycam camcorder. With your
Welcome!
EHgital Piandycani/ you can capture life's precious moments with superior picture and sound
qu^ty. Your E)igital Handycam is loaded with advanced features, but at the same time it is
very easy to use. You will soon be producing home video that you can enjoy for years to
Eoi^ustomers in the U.S.A.
WARNING
To prevent fire or shock hazard, do not expose the unit to rain or moisture.
A
CAtmON: TO REDUCE THE nSK Of ELECTRIC SHOCK.
DO NOT REMOVE COVER (OR BACK).
NO UeCWSOWICCAaLC PARTS INSIDE.
This symbol is intended to alert
the user to the preseiu« of
uninsulated "dangefous voltage"
within the product's enclosure
A
Never expose the battery pack to temperatures
above 140®F (60®C) such as in a car parked in
the sim or under direct sunlight.
DISPOSAL OF LITHIUM ION BATTERY.
UTHiUM ION BATTERY.
DISPOSE OF PROPERLY.
You can return your unwanted lithium ion batteries
to your nearest Sony Service Center or Factory
Service Center.
Note: In some areas the disposal of lithium ion
batteries in household or business trash may
be prohibited.
For the S(my Service Center nearest you call
1-800-222-SONY (United States only)
For the Sony Factory Service Center nearest you call
416-499-SONY (Canada only)
Caution: Do not handle damaged or leaking lithium
that n^y be of sufhcient
magnitude to constitute a risk of
electric shock to persons.
This symbol is intended to alert
dte user to the presence of
important operating and
maintenarKe (servicing)
instructions in the literature
accompanying the appliance.
ion battery.
A
-.i'A ■■rtf.
CAUTION
You are cautioned that any changes or modifications
not expressly approved in this manual could void
your authority to operate this equipment.
Declaration of Conformity
Trade Name: SONY
Model No.: DCR-TR7000
Responsible Party: Sony Electronics inc.
Address: 1 Sony Drive. Park Ridge, NJ,
Telephone No.: 201 -930-6970
This device complies with PartlS of the FCC Rules.
Operation is subject to the following two
conditions.: (1) This device may not cause hannful
interference, and (2) this device must accept any
interference received, including interference that
may cause undesired operation.
Note:
This equipment has been tested and found to comply
with the limits for a Class B digital device, pursuant
to Part 15 of the FCC Rules. These limits are designed
to provide reasonable protection agaiirst harmful
interference in a residential installation. This
equipment generates, uses, and can radiate radio
frequency energy and, if not installed and used in
accordance with the instructions, may_cause harmful
interference to radio communications. However,
there is no guarantee that interference will not occur
in a particular installation. If this equipment does
cause harmful interference to radio or television
reception, which can be determined by turning the
equipment off and on, the user is encouraged to try to
correct the interference by one or more of the
following measures;
— Reorient or relocate the receiving antenna.
— Increase the separation between the equipment
and receiver.
— Connect the equipment into an outlet on a circuit
different from that to which the receiver is
corrected.
— Consult the dealer or an experienced radio/TV
technician for help.
07656 USA
¡(§li;^stomers in CANADA
CAUTION
TO PREVENT ELECTRIC SHOCK, MATCH
WIDE BLADE OF PLUG TO WIDE SLOT,
FULLY INSERT.
Page 3

Table of contents
Quick Start Guide......
..................
Getting started
Using this manual.............................................6
Checking supplied accessories........................7
Step 1 Preparing the power supply
Installing the battery pack........................8
Charging the battery pack
Connecting to a wall outlet
Step 2 Inserting a cassette
.................
........................
....................
............................
Recording - Basics
Recording a picture
Shooting backlit subjects
(BACKLIGHT)
Shooting in the dark
(Ni^tShot).........................................17
Checking the recording
- EDITSEARCH / Rec Review
........................................
...............................
............
Playback - Basics
Cotmections for playback
Playing back a tape
.............................
.....................................
Advanced Recording Operations
Photo recording
Using the wide mode
Using the fader function................................28
Using special effects
- Picture effect........................................31
Using special effects
- Digital effect
Using the PRCXjRAM AE function .... 35
Adjusting the exposure manually
Focusing manually
Inserting a scene.............................................39
..............................................
.....................................
........................................
.................
.........................................
Advanced Playback Operations
4
Playing back a tape with picture effects
..................................................
Playing back a tape with digital effects
......................................,...........
Quickly locating a scene using the zero
8
set memory function
Searching a recording by date
9
11
12
Searching for a photo
- Photo search/Photo scan
Editing on Other Equipment
Dubbing a tape
13
Recording video or TV programs..49
Inserting a scene from a VCR
17
Customizing Your Camcorder
Changing the MENU settings
19
Resetting the date and time............57
Additional Information
20
22
25
27
32
37
38
Digitals i> system, recording and
playback
.........
Changing the lithiiun battery in your
camcorder.................................60
Troubleshooting
Self-diagnosis display
Warning indicators and messages.67
Using your camcorder abroad
Maintenance information and
precautions
Specifications.................................73
Quick Reference
Identifying the parts and controls..74
Quick Function Guide
Index...............................................82
................
.......
........
42
43
45
....................................
.......
50
........
52
..........................
.........................
....................
...............................
...................
.......
58
r..... 62
66
68
69
81
40
41
47 ^
Page 4
Quick Start Guide
This chapter introduces you to the basic features of your
camcorder. See the page in parentheses "( )" for more
information.
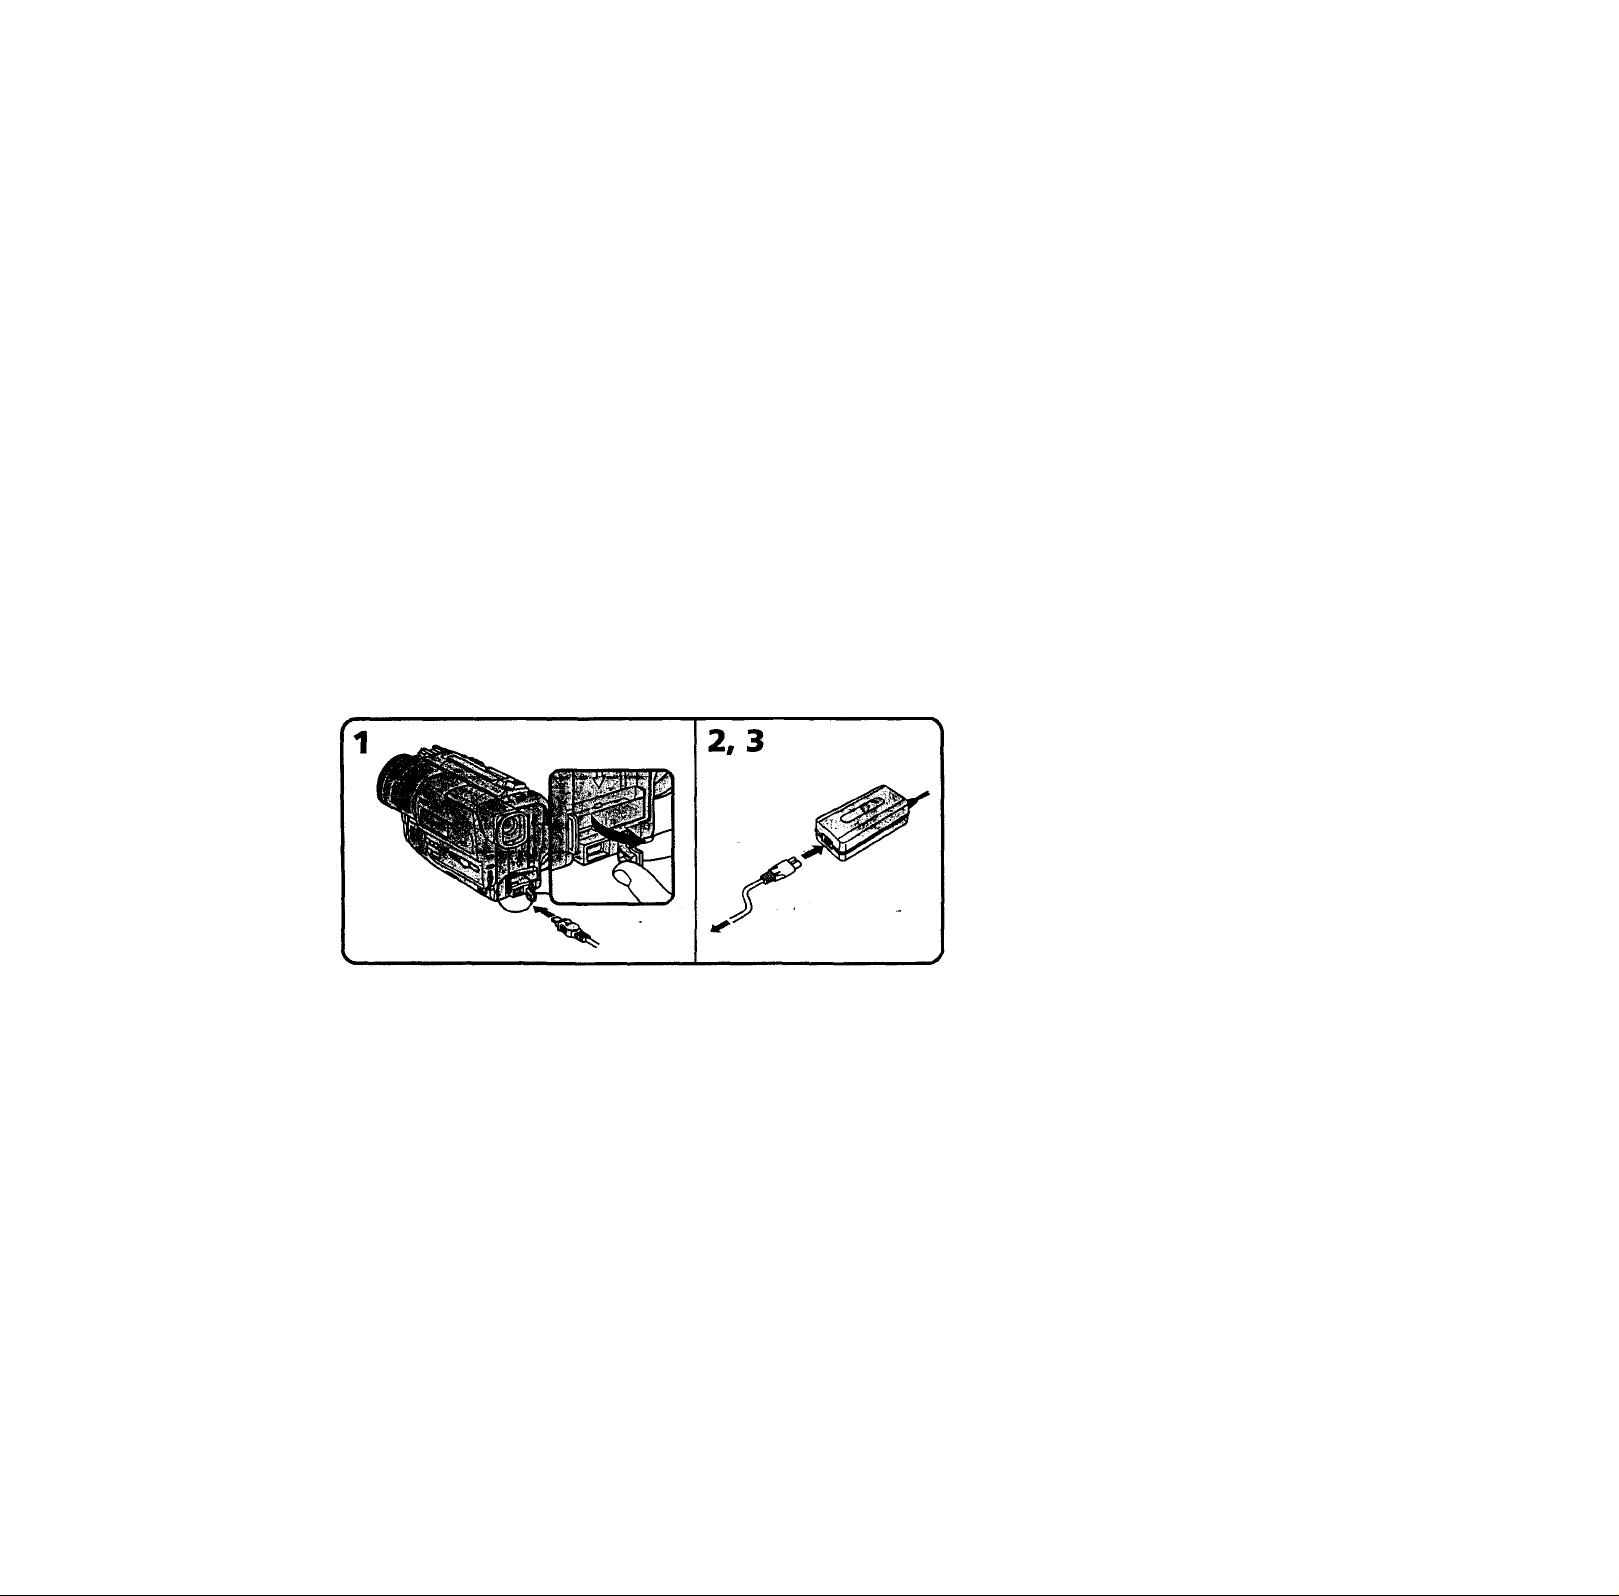
Connecting the power cord (p. ii)
Use die battery pack when using your camcorder outdoors (p. 8).
AC power adaptor (supplied)
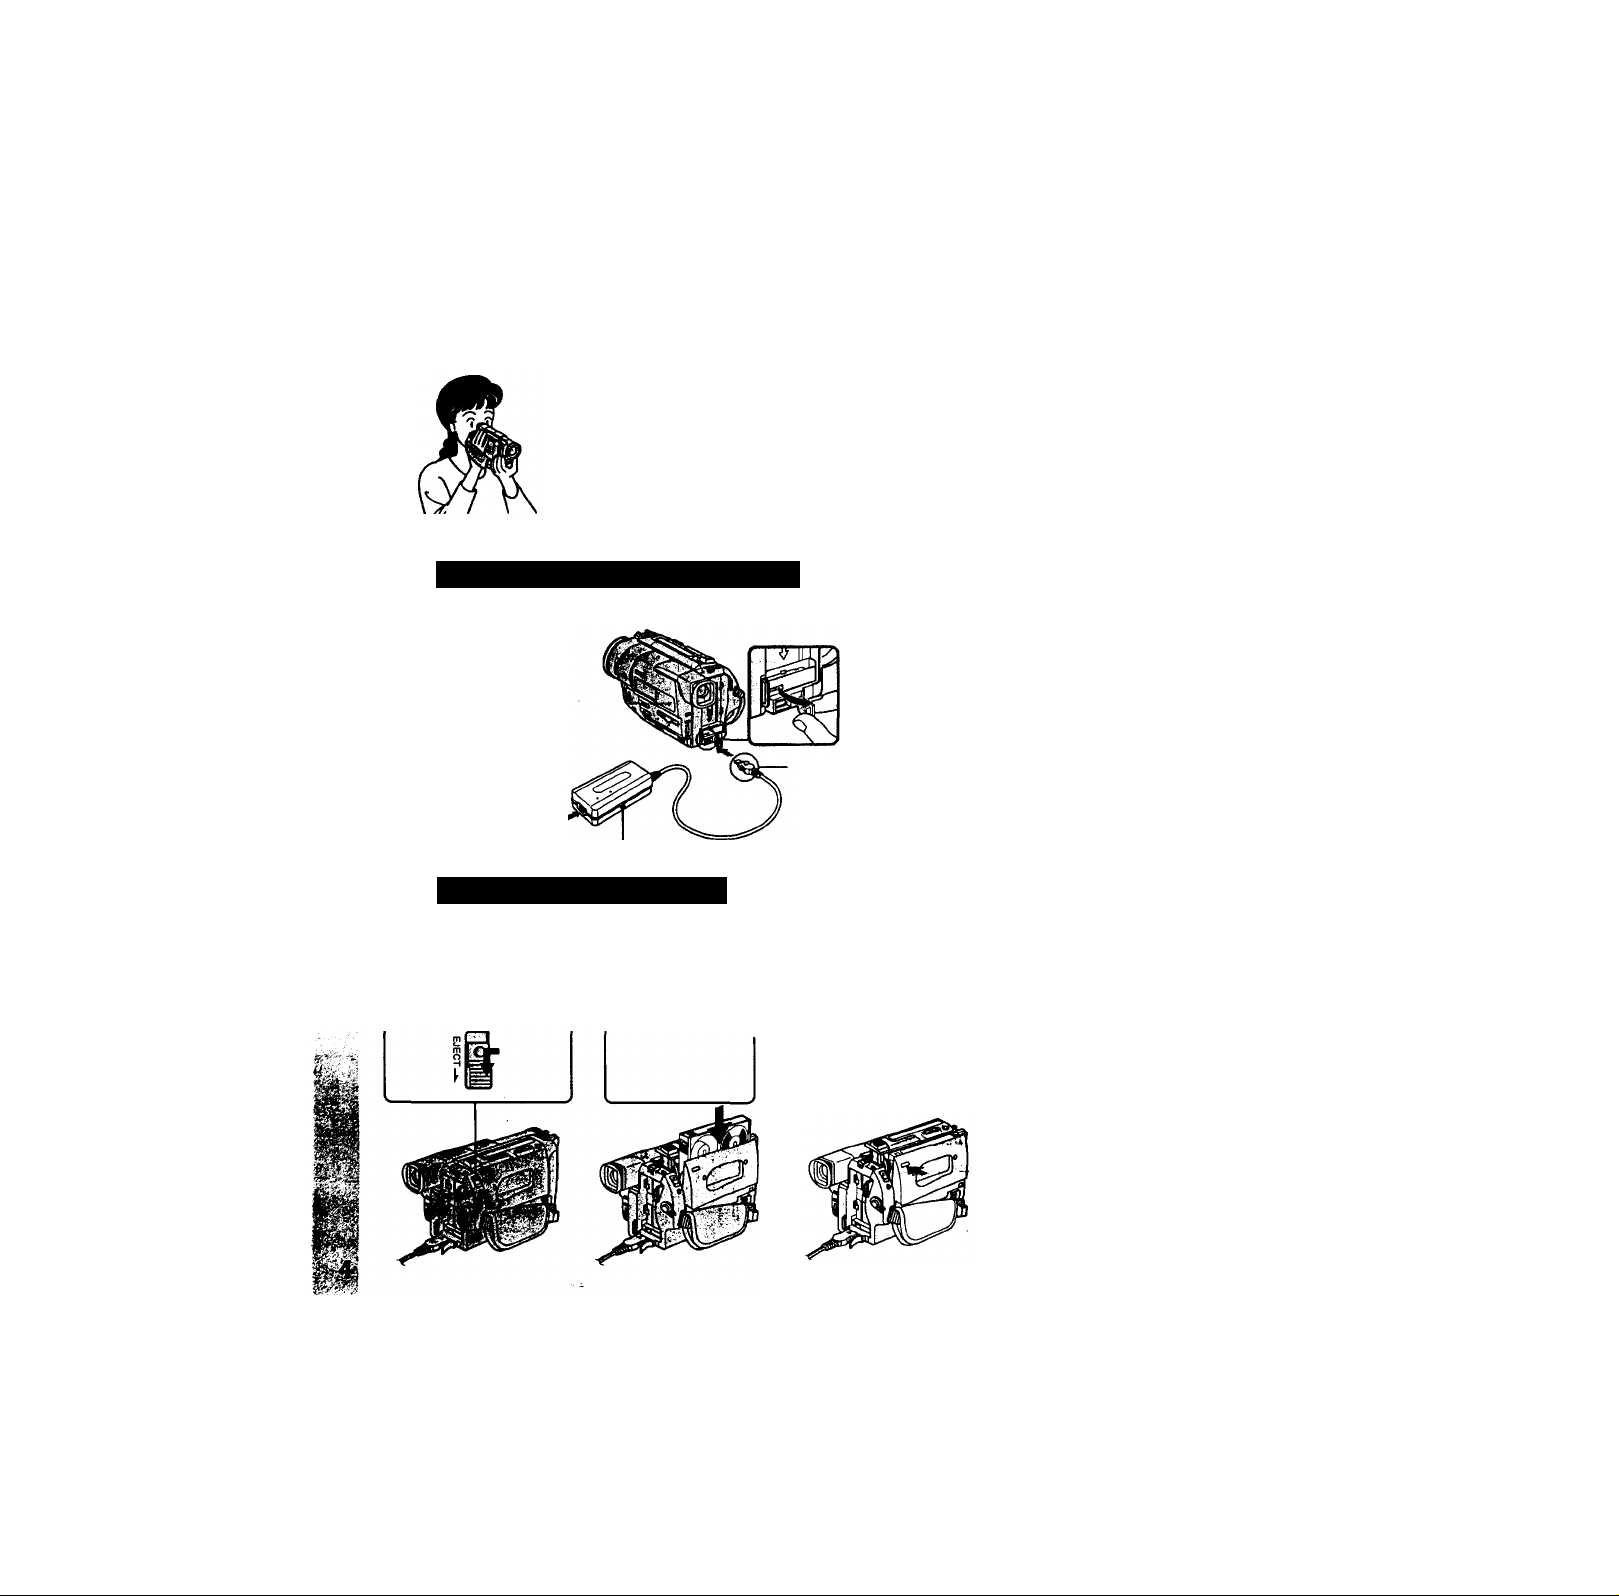
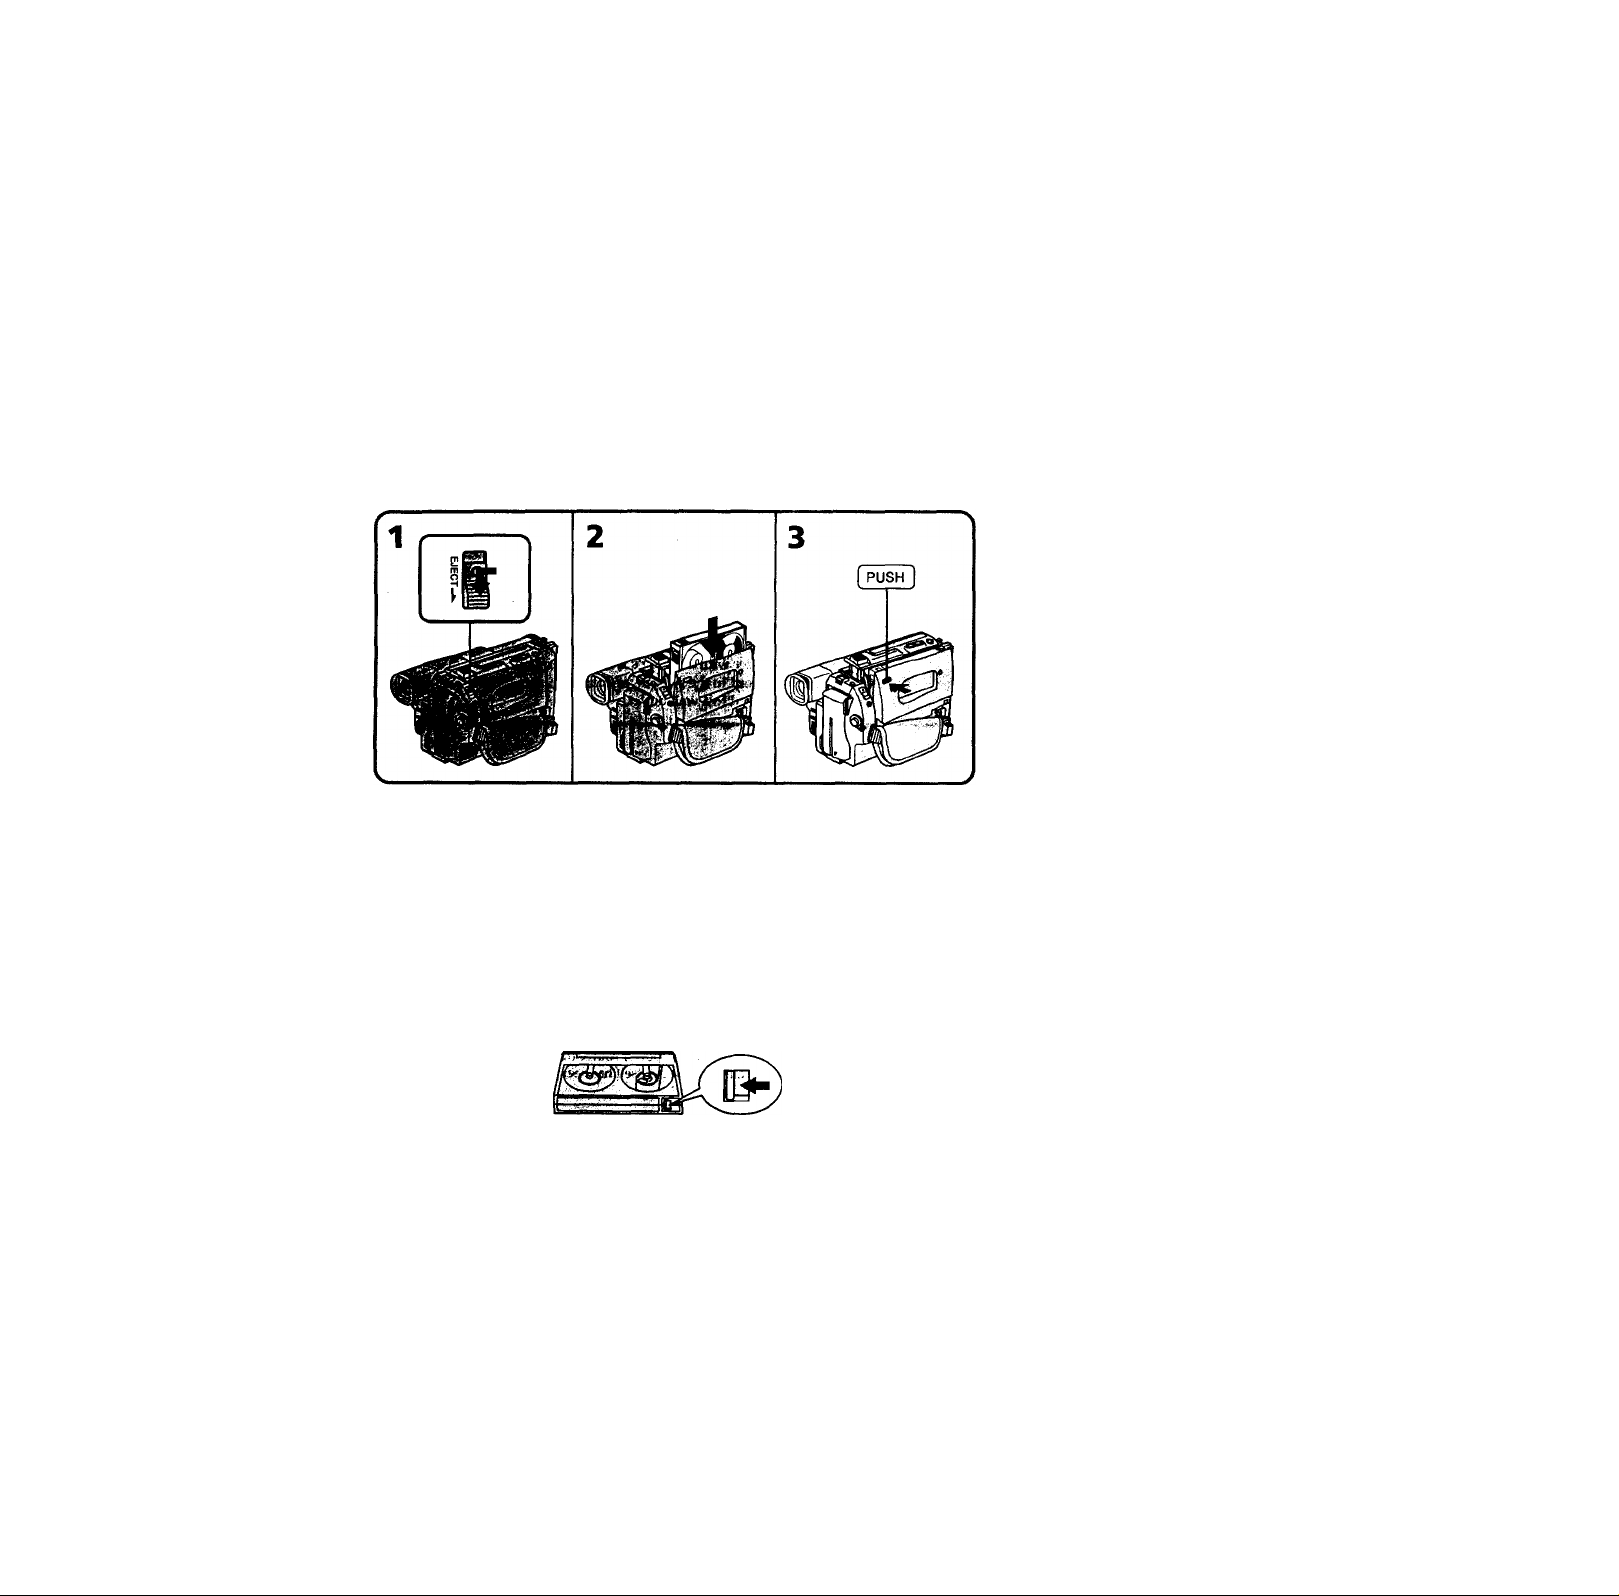
inserting a cassette (p. 12)
Open the DC IN
jack cover.
Connect the plug with
its À mark facing up.
O Slide EJECT in the
direction of the arrow
while pressing the
small blue button.
© Insert a cassette
into the cassette
compartment
with its
window facing
out.
© Close the cassette
compartment by
pressing the "PUSH"
mark on the cassette
compartment. The
cassette compartment
automatically goes
down.
Page 5
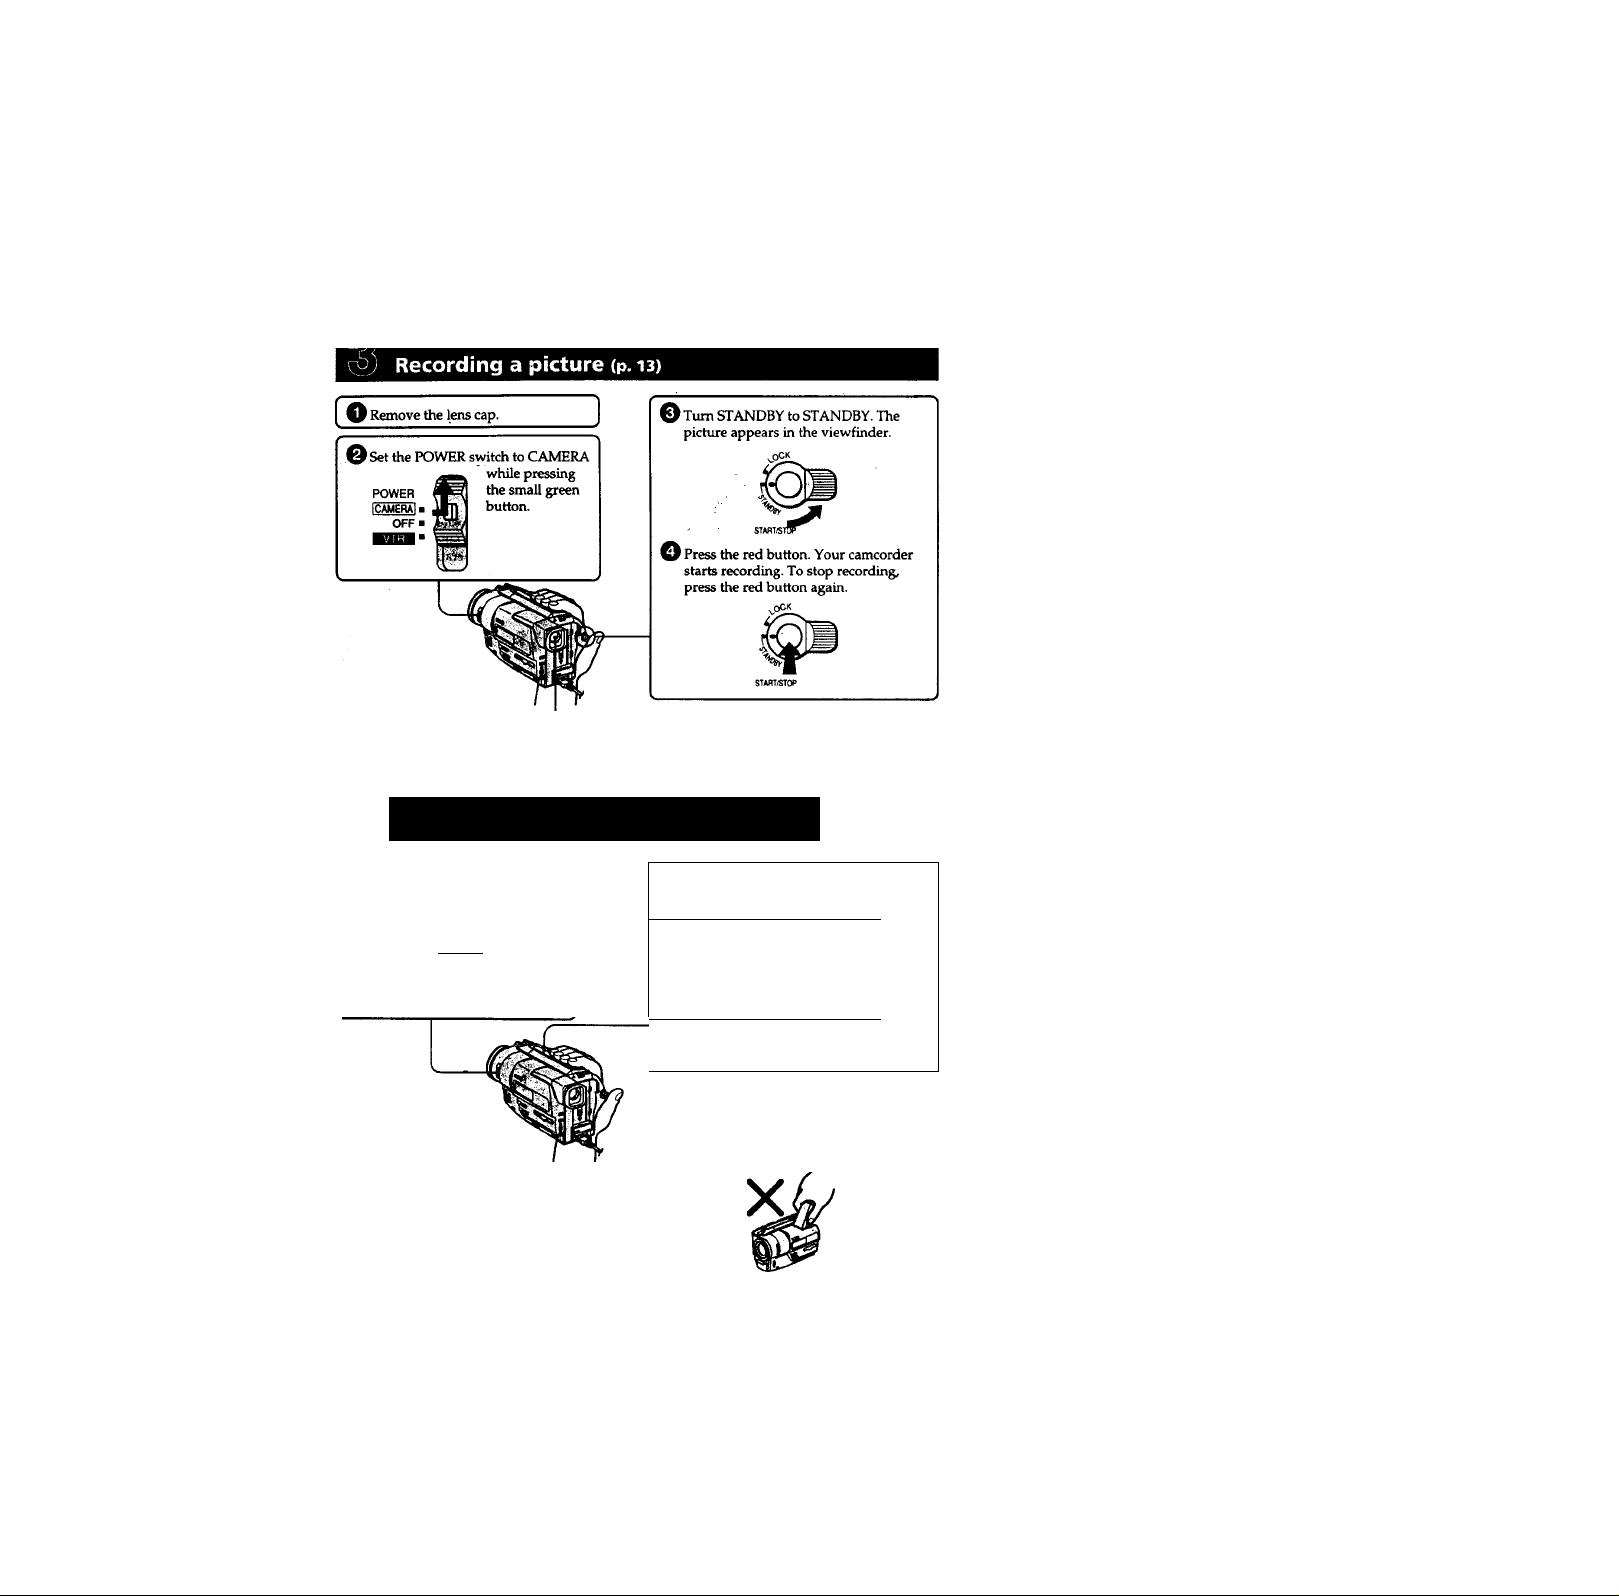
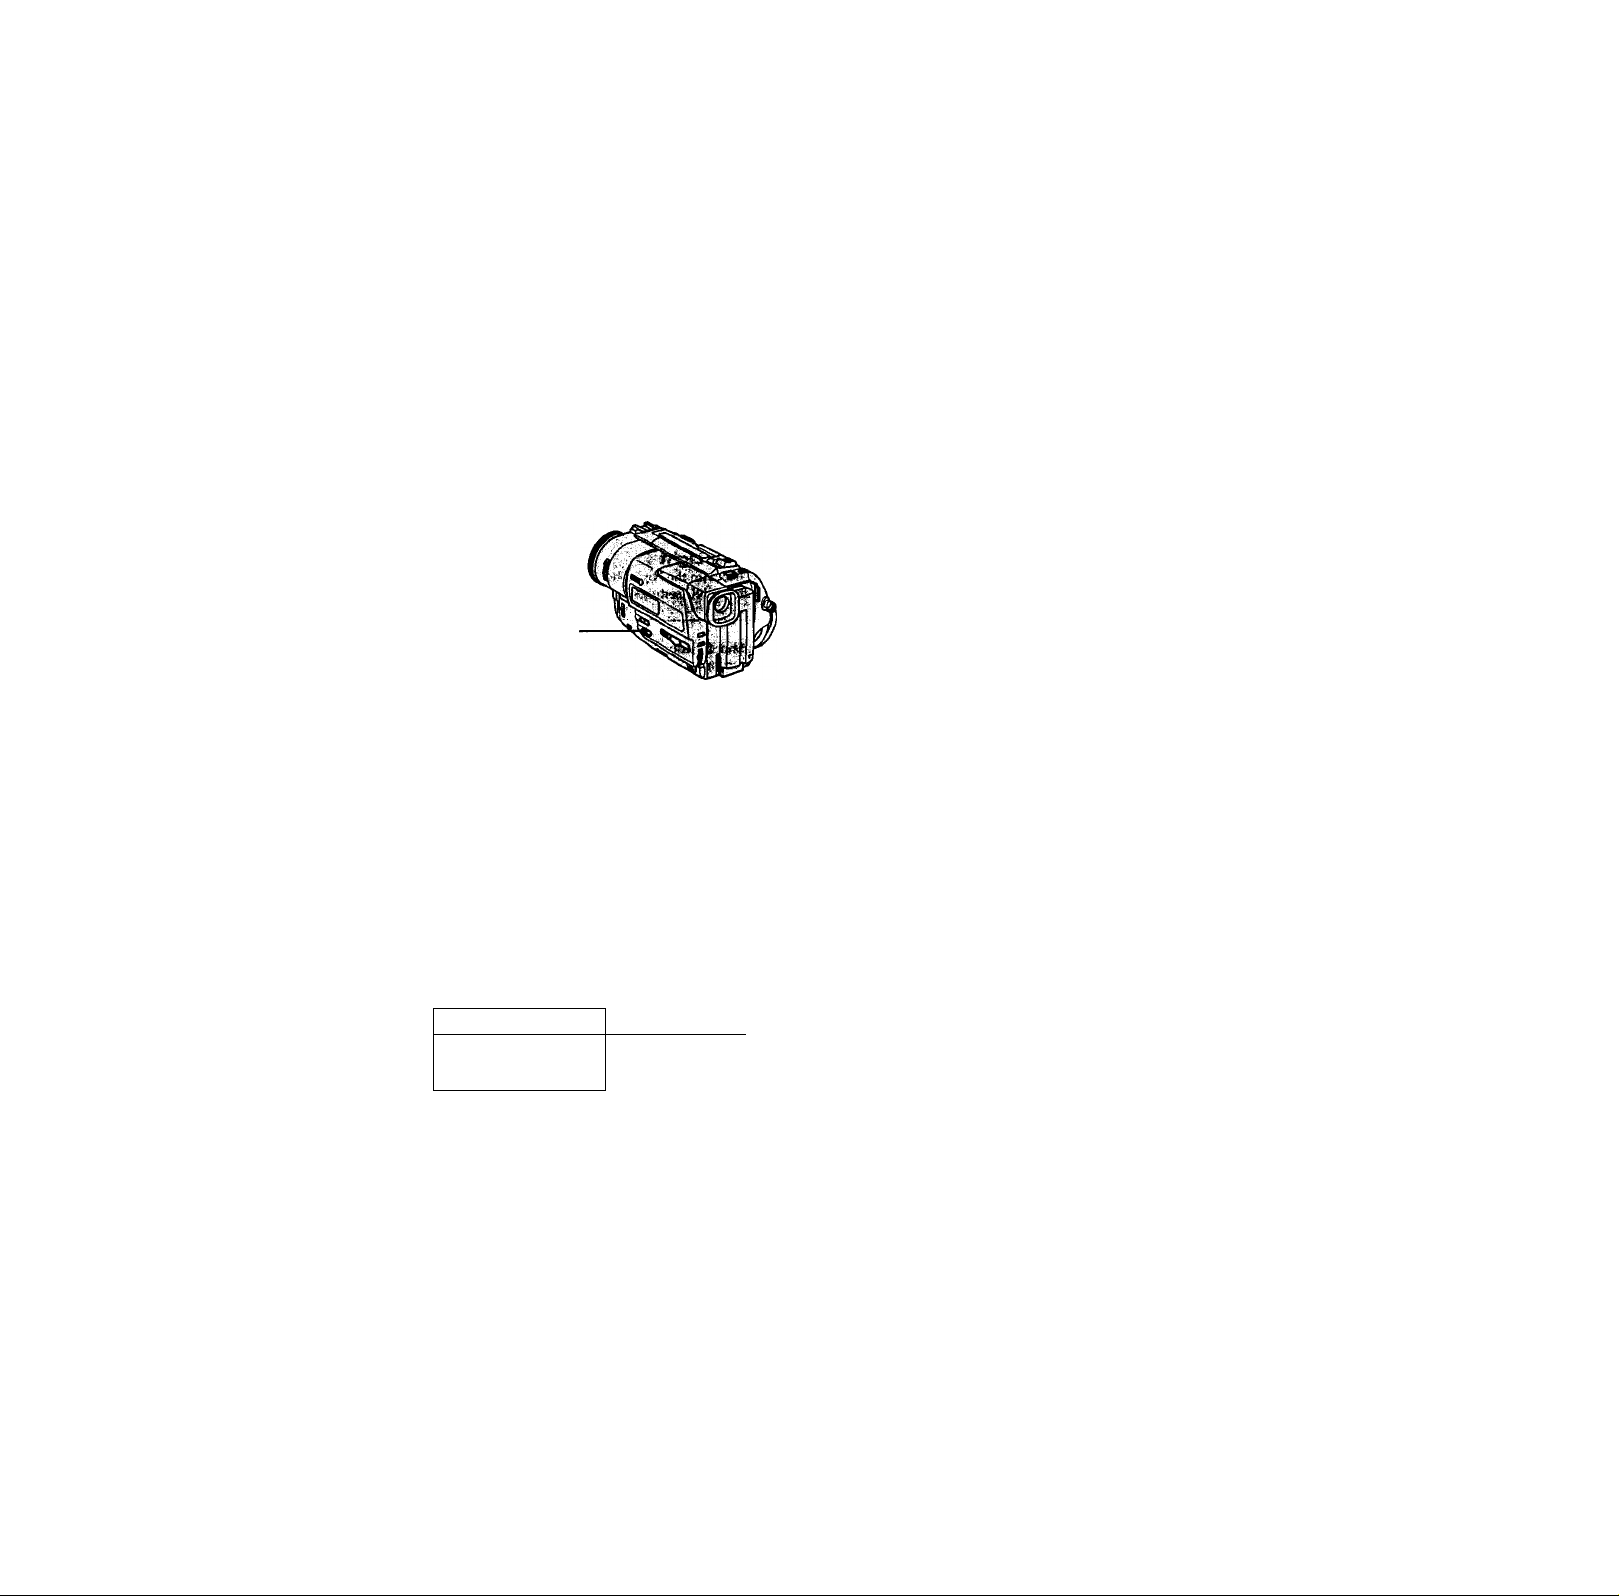
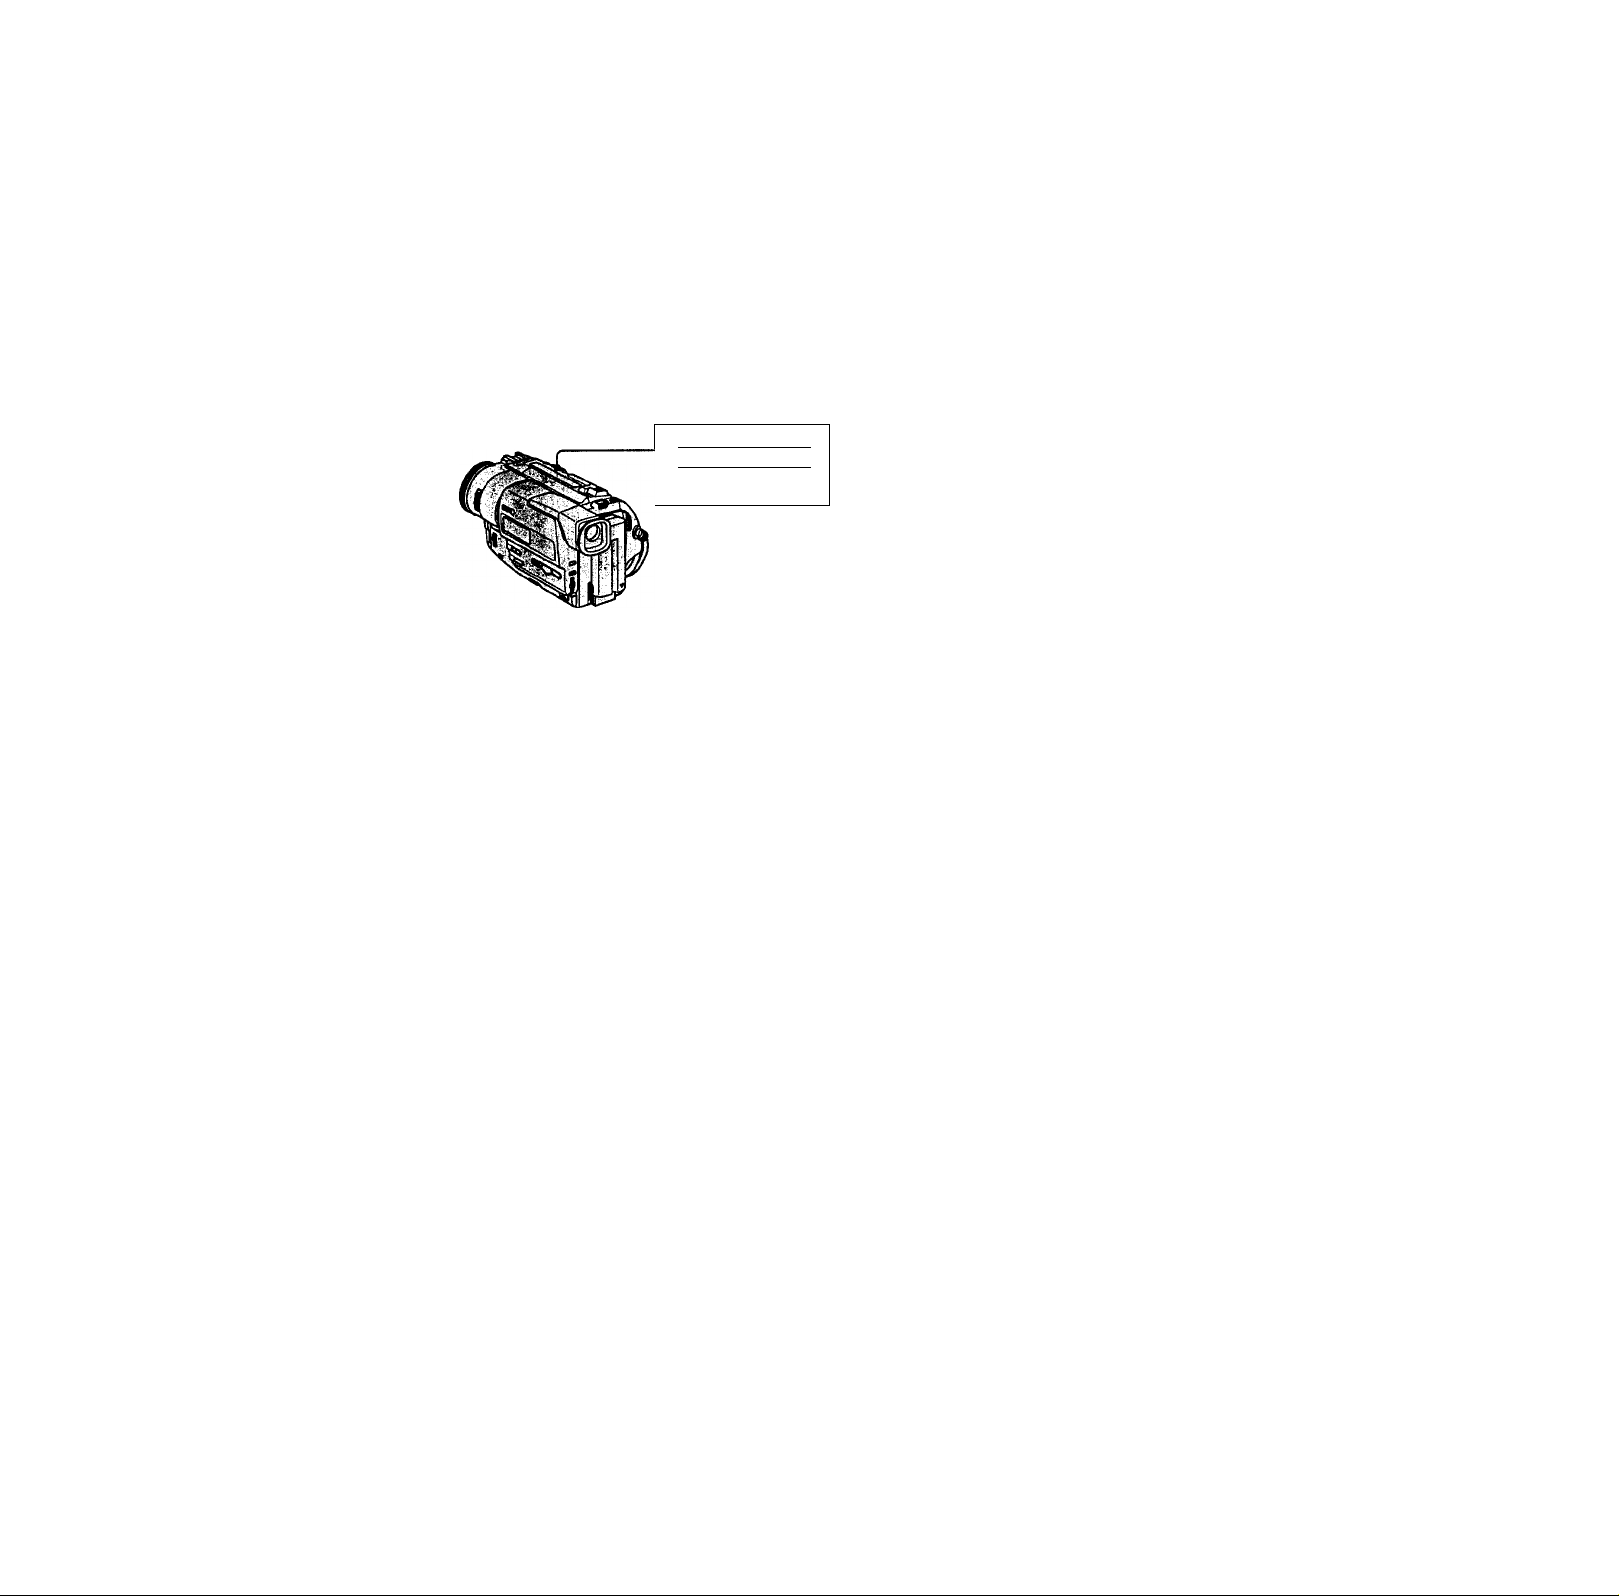
Viewfinder
Use the viewfinder placing your eye against its
eyecup.
Monitoring the playback picture in the viewfinder (p. 22)
w$
9
f Set the POWER switch to VTR
while pressing the small green
button.
NOTE
Do not pick up your camcorder by holding
the viewfinder.
POWER
ICAMERAI ■
OFFa
Press to rewind the tape.
REW0
Press ► to start playback.
PLAY
|!>)
-
Page 6

— Getting started —
Using this manual
As you read through this manual, buttons and settings on your camcorder are shown in
capital letters.
e.g. Set the POWER switch to CAMERA.
'When you carry out an operation, you can hear a beep sound to indicate that the
operation is being carried out.
With your digital camcorder, you can use Hi8 video cassettes HI0.
Your camcorder records and plays back pictures in the DigitalS I) system. Also your
camcorder plays back tapes recorded in the Hi8 HI0/standard 8 @ (analog) system.
You, however, caimot use the functiotts in "Advanced Playback Operations" on page 40
to 46 for playback in the HiS HIQ/standard 8 B system. To enable smooth transition,
we recommend that you do not mix pictures recorded in the Hi8 HIB/standard 8 Q
with the Digital81) system on a tape.
TV color systems differ from country to country. To view your recordings on a TV, you
need an NTSC system-based TV.
Television programs, films, video tapes, and other materials may be copyrighted.
Unaudiorized recording of such materials may be contrary to the provision of the
daylight laws.
• The cotorViewfinder is manufactured using high-precision technoiogy. However,
there may be some tiny biack spots and/or bright spots (red, biue or green in
coior) that constantly appear in the viewfinder. These spots occur normally in
the manufacturing process and do not affect the recorded picture in any way.
Effective number of pixels'is 99.99% or more.
• Do not let your camcorder get wet. Keep your camcorder away from rain and sea
water. Letting your camcorder get wet may cause your camcorder to malfunction.
Sometimes this malfunction caimot be repaired [a].
• Never leave your camcorder exposed to temperatures above 140°F (60°C ), such as in a
car parked in the sun or under direct sunlight [b].
• Do not place your camcorder so as to point the viewfinder toward the sun. The inside
of the viewfinder may be damaged [cj.
„id
-■'8s
Page 7

Checking supplied accessories
Make sure that the following accessories are supplied with your camcorder.
a
[T] Wireless Remote Commander (1)
(P-79)
] AC-L10A/L10B/L10C AC power adaptor [U A/V connecting cable (1) (p. 20)
(1), Power cord (1) (p. 9) '
[3] NP-F330 battery pack (1) (p. 8,9)
[3 CR2025 lithium battery (1) (p. 60)
The lithium battery is already installed
in your camcorder.
Contents of the recording cannot be compensated if recording or playback is not
made due to a malfunction of the camcorder, video tape, etc.
is] Size AA (R6) battery for Remote
Commander (2) (p. 79)
[7] Shoulder strap (1) (p. 76)
[8] Lens cap (1) (p. 13)
[9] Label sheet for cassette (1)
Stick this label on the recorded cassette.
a
Page 8
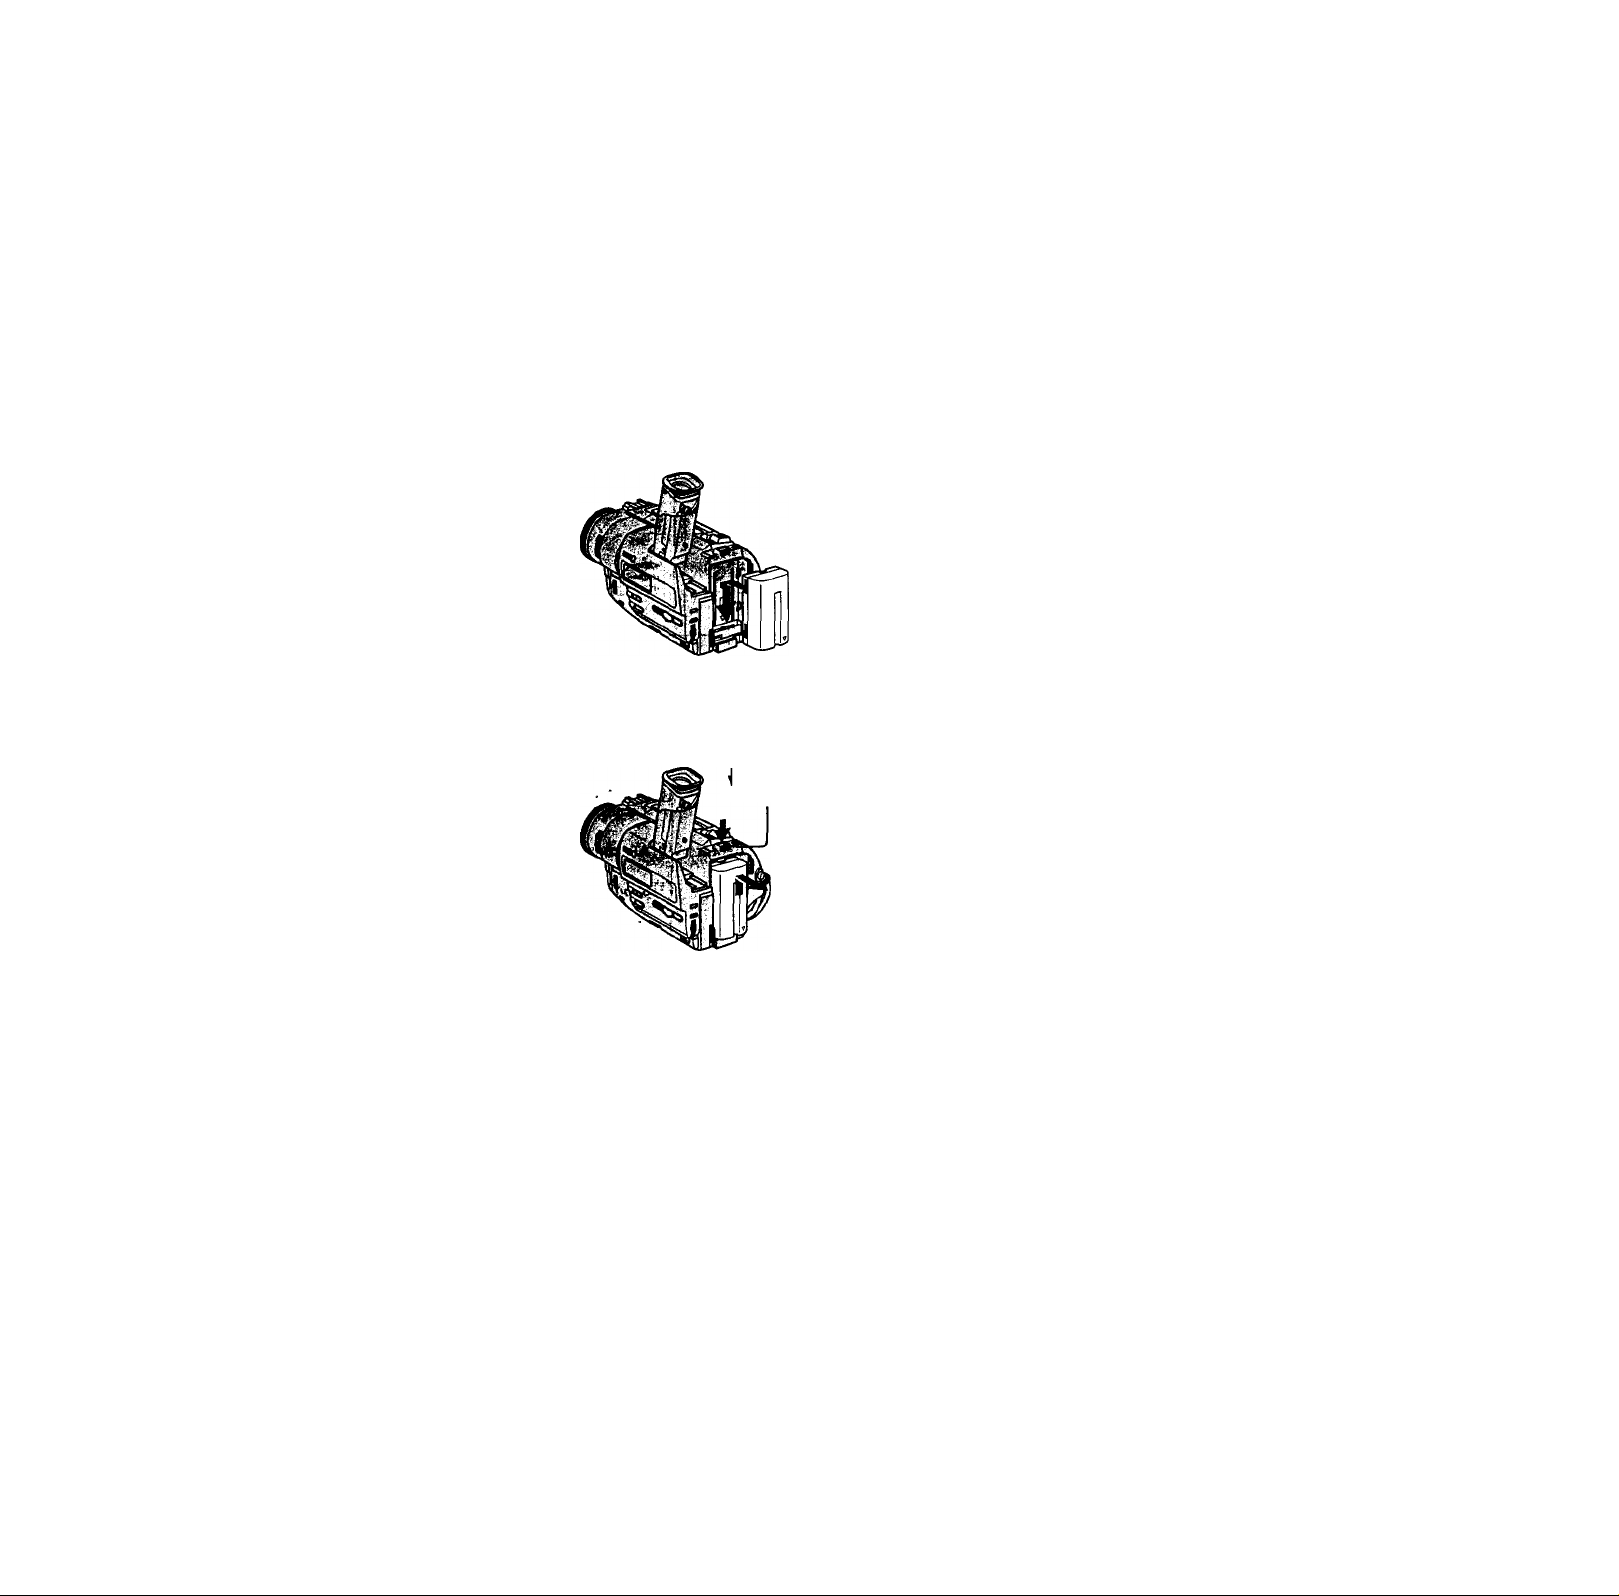
step 1 Preparing the power supply
Install the battery pack to use your camcorder outdoors.
Slide the battery pack down.
To remove the battery pack
Slide the battery pack out in die direction of the arrow while pressing i ВАТТ
RELEASE down.
ВАТТ RELEASE
After installing the battery pack
Do not carry your camcorder by holding the battery pack If you do so, the battery pack
may slide off your camcorder unintentionally, damaging your camcorder.
Page 9
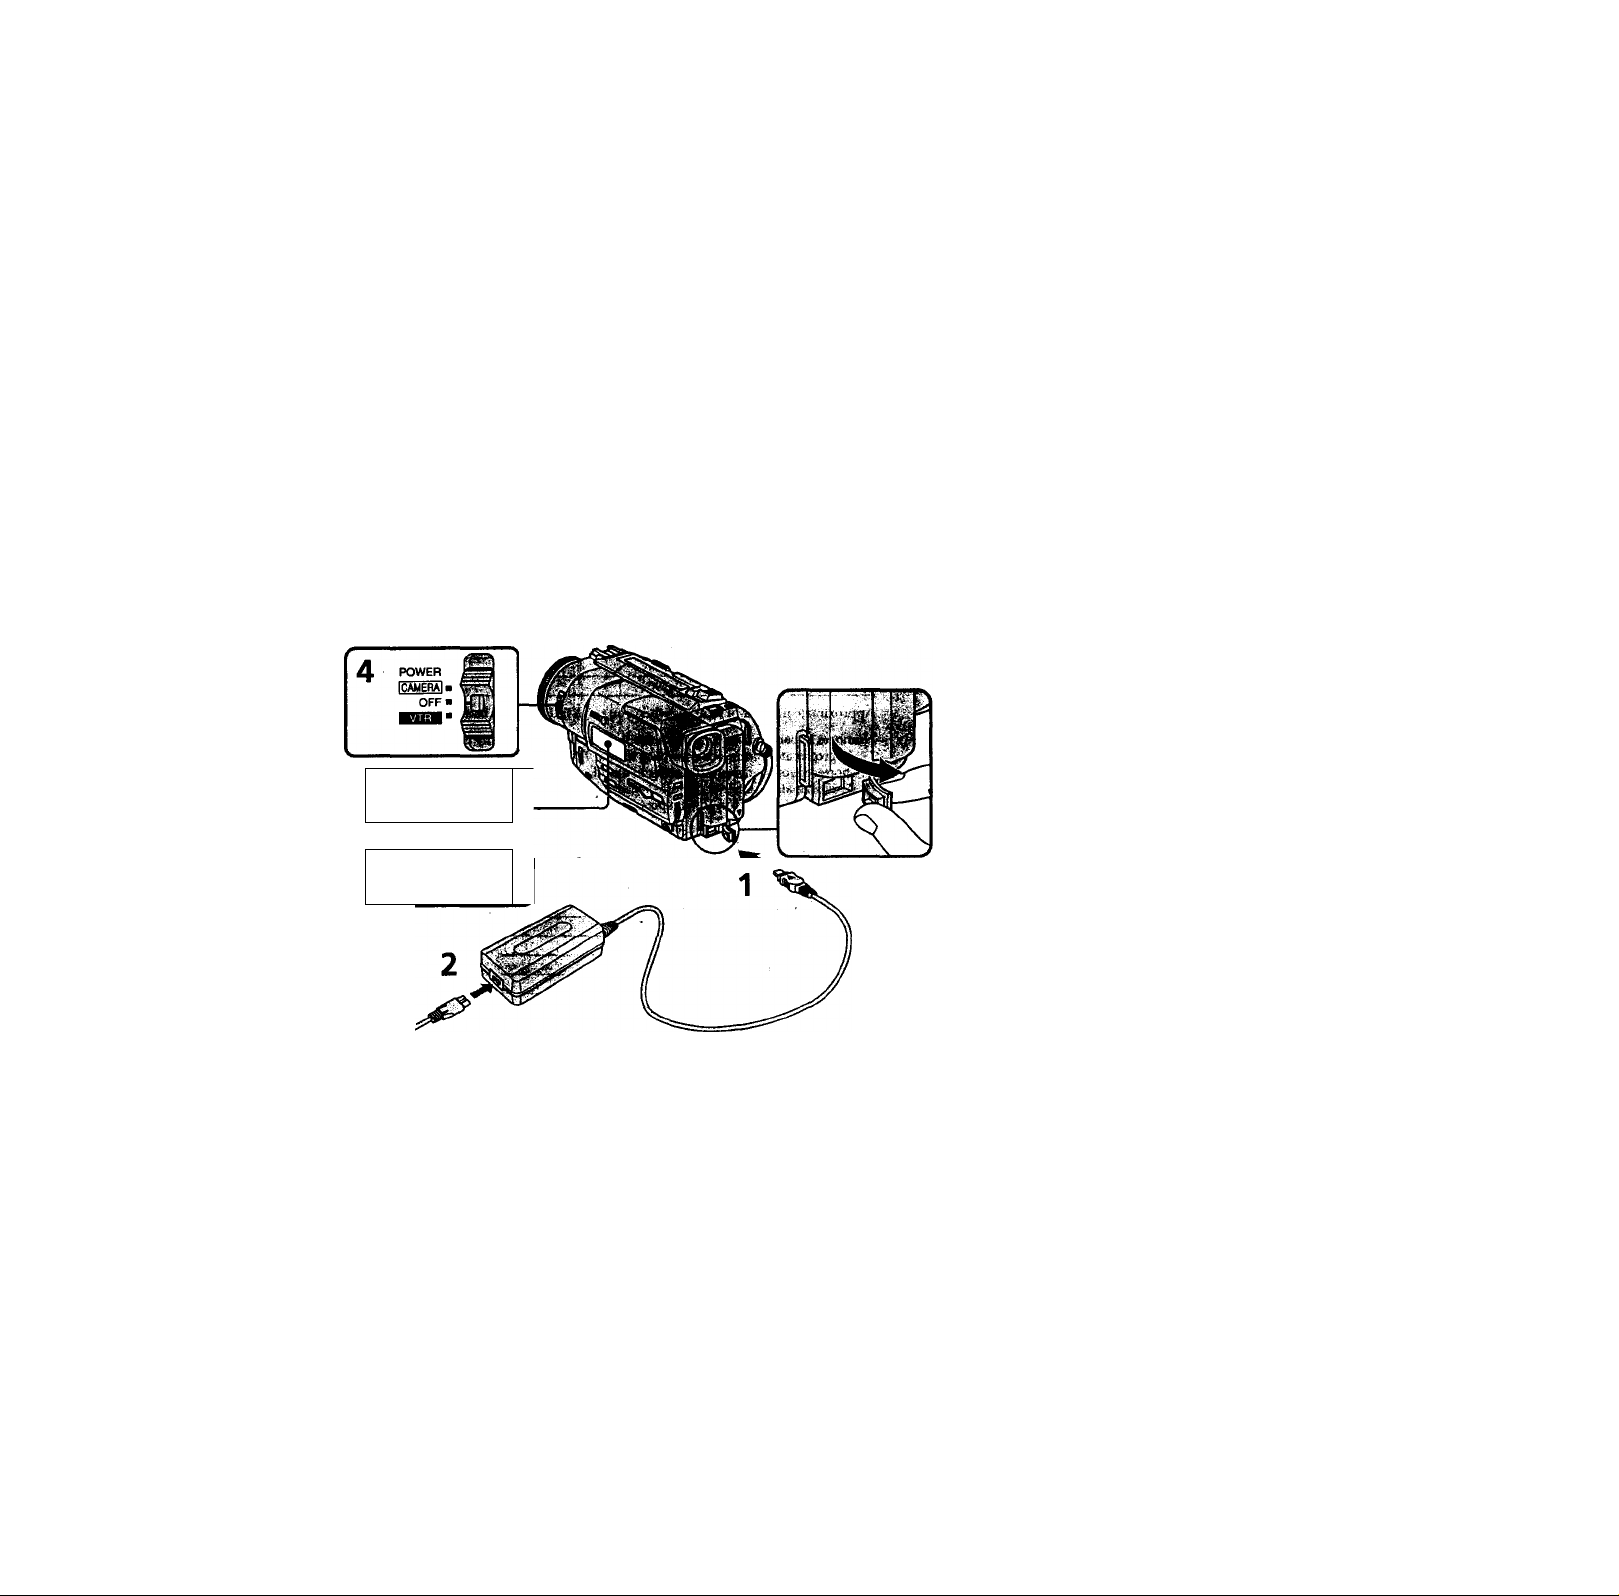
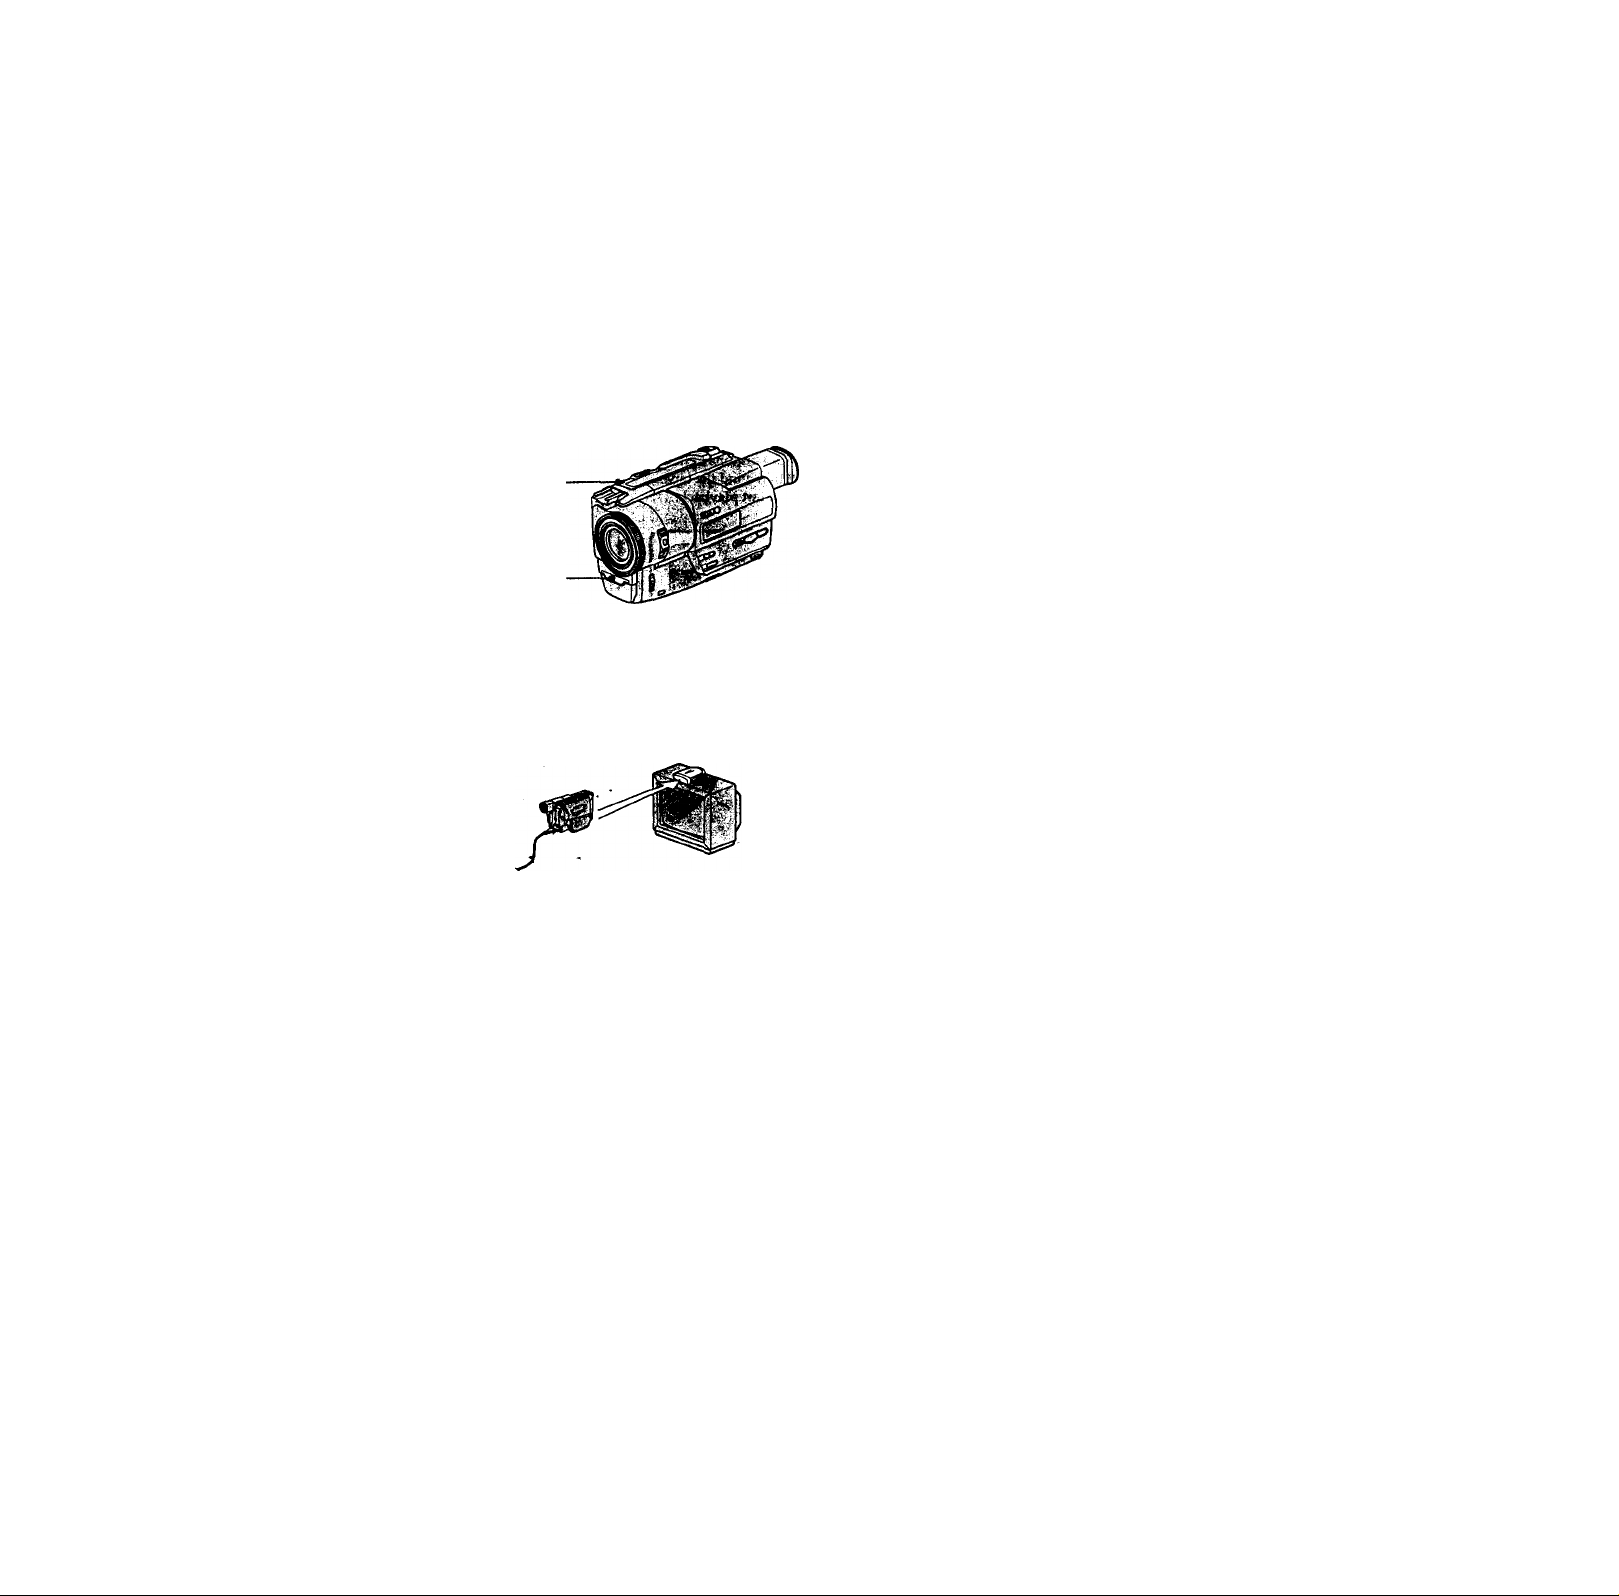
step 1 Preparing the power supply
Use the battery pack after charging it for your camcorder.
Your camcorder operates only with the "InfoLITHIUM" battery pack (L series).
"InfoUTHIUM" is a trademark of Sony Corporation.
(1) Open the DC IN jack cover and connect the AC power adaptor supplied with
your camcorder to the DC IN jack with the plug's A mark facing up.
(2) Coimect the power cord to the AC power adaptor.
(3) Connect the power cord to a wall outlet.
(4) Set the POWER switch to OFF. Charging begins. The remaining battery time is
indicated in minutes on the display window.
When the remaining battery indicator changes to normal charge is completed. To
fully charge the battery (full charge), leave the battery pack attached for about 1 hour
after normal charge is completed imtil FULL appears in the display window. Fully
charging the battery allows you to use the battery longer than usual.
-
,
SOmki
Mr
1 OOmbi
FULL
_
-1
0
3
3
ID
3
1
Note
Prevent metallic objects from coming into contact with the metal parts of the DC plug of
the AC power adaptor. This may cause a short-circuit, damaging the AC power
adaptor.
Remaining battery time indicator
The remaining battery time indicator in the display window roughly indicates the
recording time. .,
Battery pack
The battery pack is charged a little before it leaves the factory.
Until your camcorder calculates the actual remaining battery time
"
---------
min" appears in the display window.
Page 10

step 1 Preparing the power supply
Charging time
Battery pack
NP-F330 (supplied)
NP-F530/F550
NP-F730/F730H/F750
NP-F930/F950
Approximate number of minutes to charge an
Full charge (Normal charge)
Recording time
Battery pack
NP-F330 (supplied)
NP-F530
NP-F550 205 (185) 110(100)
NP-F730 350 (310) 195(170)
NP-F730H/F750
NP-F930 555(500) 305 (275)
NP-F950 650(590) 355 (325)
Approximate number of minutes when you use a fully charged battery
Numbers in parentheses "( )" indicate d\e time using a normally charged battery.
• Approximate continuous recording time at 77®F (25®C). The battery life will be
shorter if you use your camcorder in a cold environment.
** Approximate nunibej* of minutes when recording while you repeat recording start/
stop/ zooming and turning the power on/off. The actual battery life may be shorter.
Continuous* Typical**
100 (90) 55 (50)
170 (155) 95 (85)
425(380) 235 (210)
Playing time
i.i. II ^
Battery pack
NP-F330 (supplied)
NP-F530 165 (150)
NP-F550
NP-F730 335(300)
NP-F730H/F750
NP-F930 535 (480)
NP-F950
Approximate number of minutes when you use a fully charged battery
Numbers in parentheses "( )" indicate the time using a normally charged battery. The
battery life will be shorter if you use your camcorder in a cold environment.
.150(90)
210 (150)
300(240)
390 (330)
Playing time
100(90)
200 (180)
410 (365)
630 (570)
empty battery pack
V
10
Page 11
step 1 Preparing the power supply
After charging the battery pack
Disconnect the AC power adaptor from the DC IN jack on your camcorder.
Note on the remaining battery time indicator during recording
The indicator may not be correct, dependirtg on the conditions in which you are
recording.
What is “InfoLITHlUM* *?
The "tofoUTHIUM" is a iithium ion battery pack which can exchange data such as
battery consumption with compatible video equipment. This unit is compatible with the
"InfoUTHIUM" battery pack (L series). Your camcorder operates oidy with the
"InfoUTHIUM'' battery. "InfoUTHIUM" battery packs have the (j) mtournuu mark.
"InfoUTHIUM" is a trademark of Sony Corporation.
I a walijputlet
When you use your camcorder for a long time, we recommend that you power it from a
wall outlet using the AC power adaptor. *
(1) Open the DC IN jack cover, and connect the AC power adaptor to the DC IN
jack on your camcorder with the plug's A mark facing up.
1
(2) Connect the power cord to the AC power adaptor.
(3) Connect the power cord to a wall outlet.
WARNING
The power cord must only be changed at a qualified service shop.
PRECAUTION
The set is not disconnected from the AC power source (house current) as long as it is
cormected to the wall outlet, even if the set itself has been turned off.
Notes
• The AC power adaptor can supply power even if the battery pack is attached to your
camcorder.
• The DC IN jack has "source priority". This means that the battery pack carmot supply
any power if the power cord is cormected to the DC IN jack, even when the power
cord is not plugged into a wall outlet. ''
• Keep the AC power adaptor away from the camcorder if the picture is disturbed.
Using a car battery
Use Sony DC Adaptor/Charger (not supplied).
11
Page 12
step 2 Inserting a cassette
We recommend using Hi8 video cassettes HIQ.
If you use standard 8 B tape, be sure to play back the tape on this camcorder.
YoUr camcorder records in the Digitals [> system.
(1) Slide EJECT in the direction of the arrow while pressing the small blue button.
■ The cassette compartment automatically lifts up and opens.
(2) Insert a cassette with its window facing out and the tab on the cassette up.
(3) Close the cassette compartment by pressing the "PUSH" mark on the cassette
compartment. The cassette compartment automatically goes down.
To eject a cassette
Slide EJECT in the direction of the arrow while pressing the small blue button.
Notes '
• The recording time when you use your Digital81> system camcorder on Hi8/standard
8 tape is half the recording time when using the conventional Hi8/standard 8 system
camcorder.
• If you use standard 8 tape, be sure to play back the tape on this camcorder. Mosaic
pattern noise may appear when you play back standard 8 tape on other VCRs.
• Do not press the cassette compartment down. Doing so may cause malfunction.
12
To prevent accidental erasure
Slide the write-protect tab on the cassette to expose the red mark.
Page 13
— Recording - Basics —
Recording a picture
Your camcorder automatically focuses for you.
(1) Remove the lens cap by pressing both knobs on its sides and attatch the lens
cap to the grip strap.
(2) Install the power source and insert a. cassette. See "Step 1" and "Step 2" for
more information (p. 8 to 12).
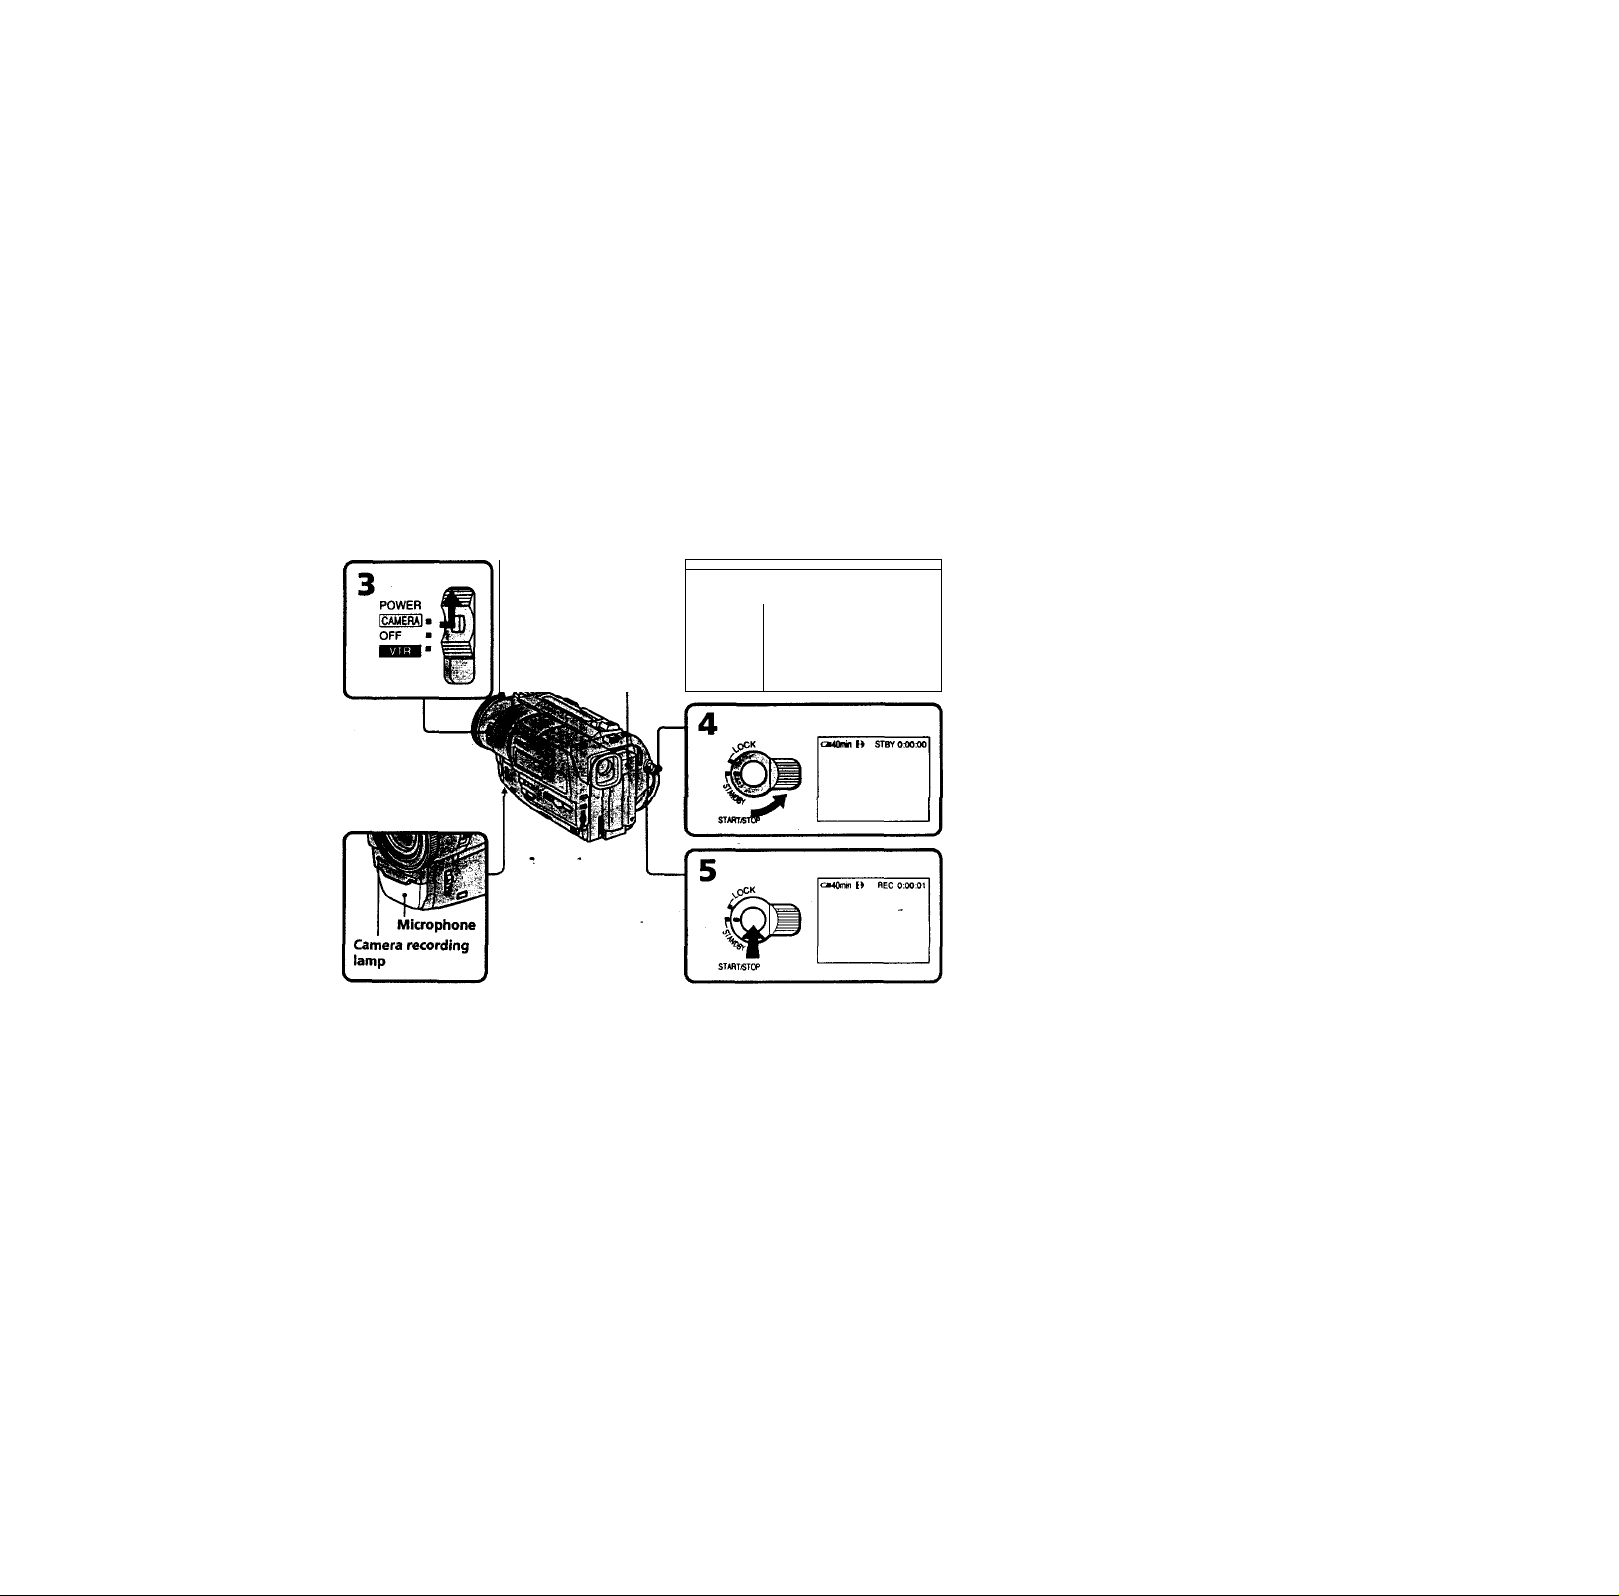
(3) Set the POWER switch to CAMERA while pressing the small green button.
(4) Turn STANDBY to STANDBY.
(5) Press START/STOP. Your camcorder starts recording. The "REC" indicator
appears. The camera recording lamp located on the front of your camcorder
lights up. To stop recording, press START/STOP again.
.... ^
1
I
2
Note
Fasten the grip strap firmly. Do not touch the built-in microphone during recording.
To enable smooth transition
You can make the transition between the last scene you recorded and the next scene
smooth as long as you do not eject the cassette. When you exchange the battery pack in
the recording mode, set STANDBY to LOCK.
If you leave your camcorder in the standby mode for 3 minutes while the cassette
is inserted
Your camcorder automatically turns off. This is to save battery power and to prevent
battery and tape wear. To resume the standby mode, turn STANDBY down and up
again. To start recording, press START/STOP.
13
Page 14

Recording a picture
'•f {fTT
(1) Turn STANDBY down to LOCK.
(Z) Eject the cassette.
(3) Set tire POWER switch to OFF.
Adjust the viewfinder lens to your eyesight so d\at the indicators in the viewfinder
come into ^larp focus.
Lift up die viewfinder and move the viewfinder lens adjustment lever.
^^te^in^^^adjusting the
14
Page 15
Recording a picture
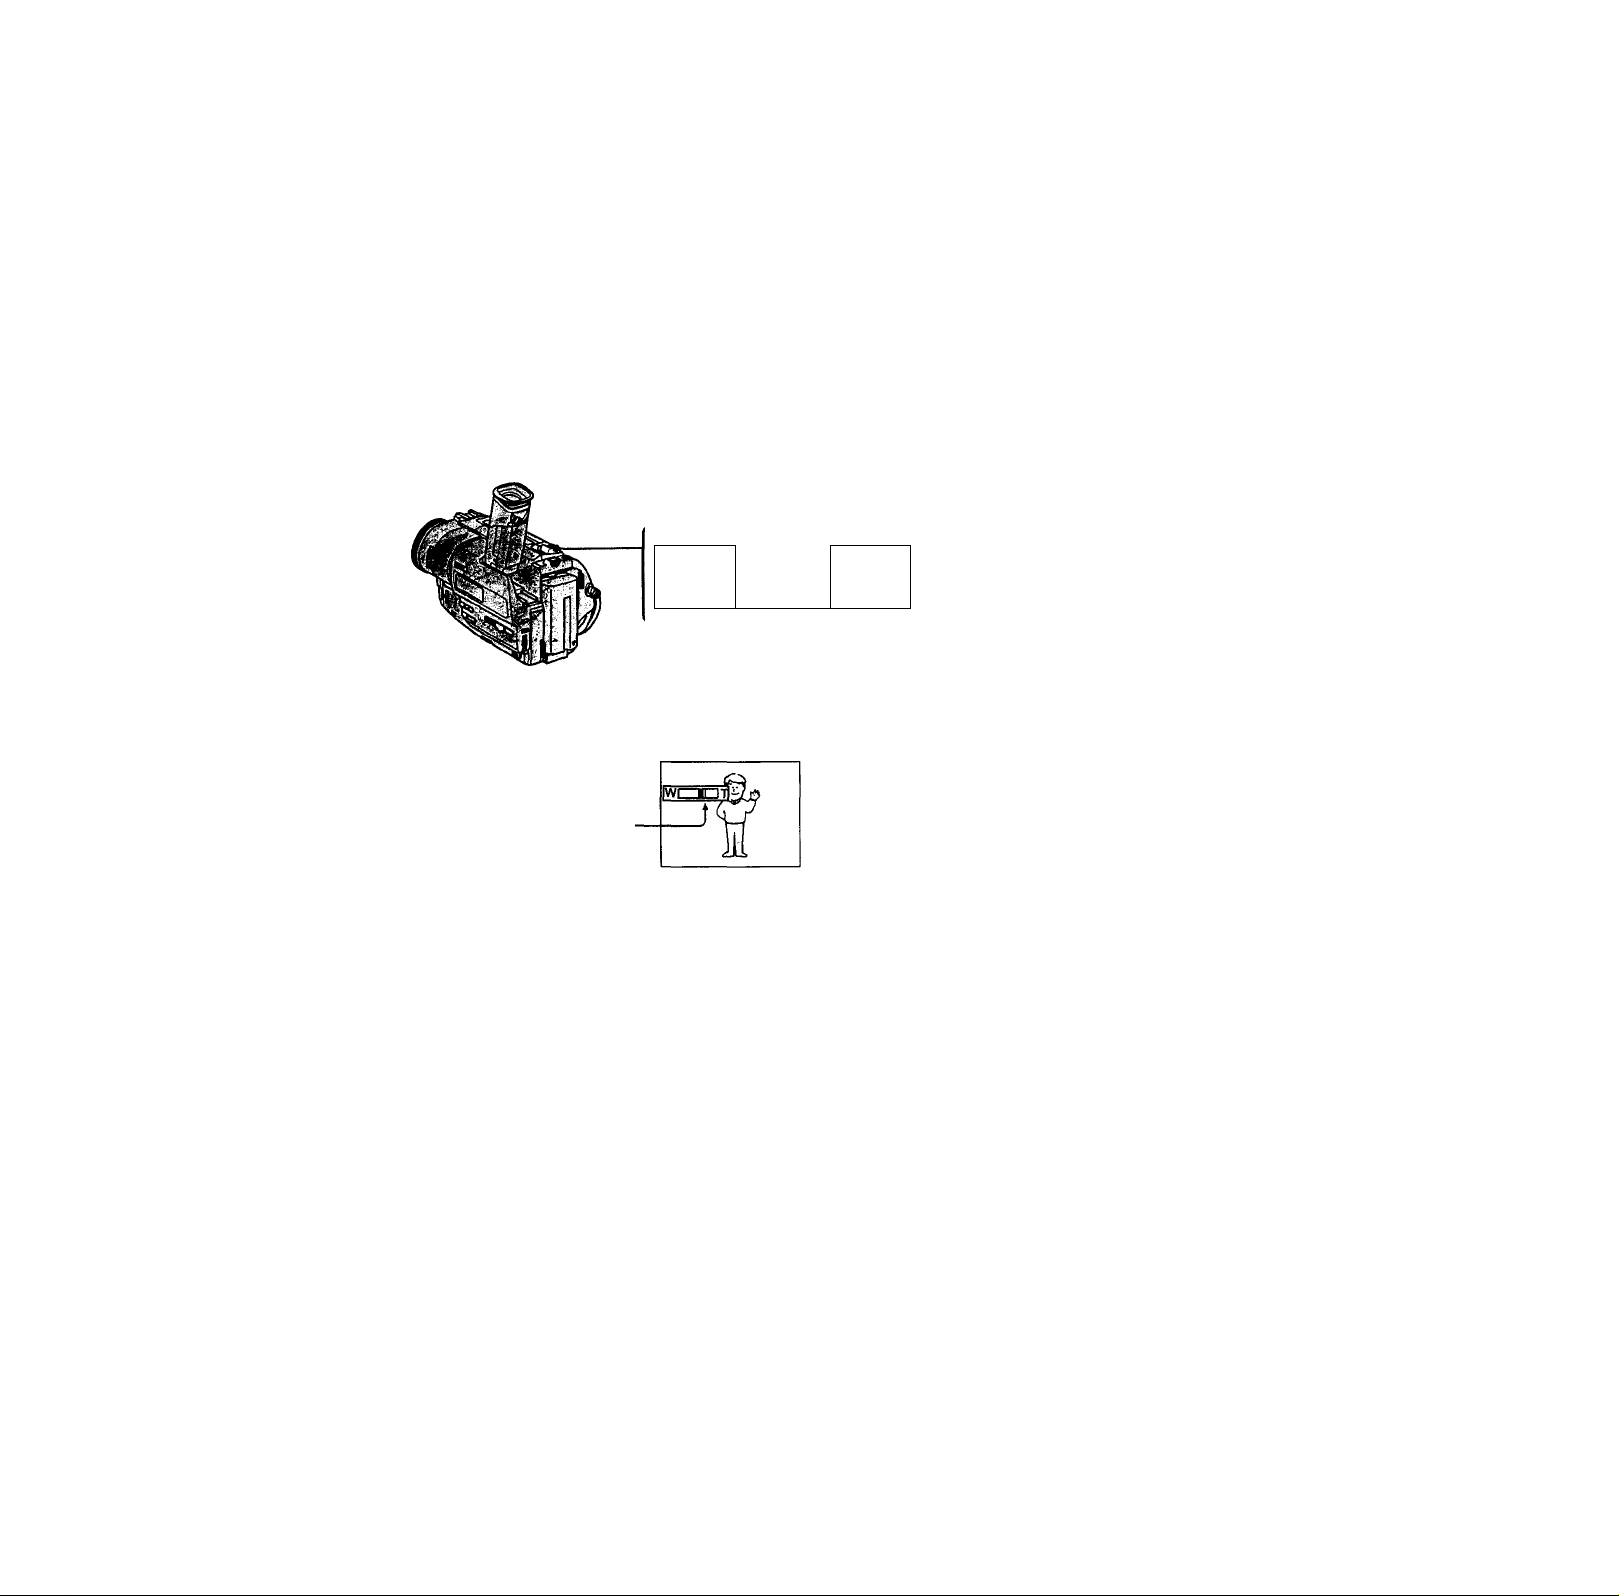
Move the power zoom lever a little for a slower zoom. Move it further for a faster zoom.
Using the zoom function sparingly results-in better-looking recordings.
"T" side: for telephoto (subject appears closer)
"W" side; for wide-angle (subject appears farther away)
Zoom greater than 20x is performed digitaliy, if you set D ZOOM to ON in the MENU
settings. The digital zoom function is set OFF at die factory, (p. 52)
The right side of the bar shows
the digital zooming zone.
The digital zooming zone appears
when you set D ZOOM to ON.
.mm
Wll 1 IT
w T
Wr-pCT
S
V* *
Q
When you shoot close to a subject '
If you cannot get a sharp focus, move the power zoom lever to the "W" side until the
focus is sharp. You can shoot a subject that is at least about 2 feet 5/8 inch (about 80 cm)
away from the lens surface in the telephoto position, or about 1/2 inch (about 1 cm)
away in the wide-angle position.
Notes on digital zoom
• Digital zoom starts to function when zoom exceeds 20x.
♦ The picture quality deteriorates as you go toward the "T" side. Set D ZCXDM to OFF in
the MENU settings. Otherwise the digital zoom activates without notice (p. 52).
15
Page 16

Recording a picture
Recording starts when you press START/STOP, and stops when you press it again
, (factory setting).
ANTI GROUND SHOOTING i: The camcorder records only while you press START/
5SEC: When you press use this mode to START/STOP, your camcorder records for 5
seconck and then stops automatically.
STOP. Use this mode to avoid recording unnecessary
scenes.
16
START/STOPMODE J :C \ ANTI GROUND
Notes
• You cannot use ttte fader function in the 5SEC or mode.
• The time code docs not appear in the 5SEC mode.
To extend the recording time in the 5SEC mode
Five dots (♦»#<) appear, and then disappear at a rate of one per second. To extend
the recording time, press START/STOP again before all the dots disappear. Recording
continues for about 5 seconds from the moment you press START/STOP.
The indicators are not recorded on tape.
- Format indicator
STANDBY/REC indicator
SHOOTING
BlmiDlli>l IRECI— Time code/Tape counter
Remaining tape indicator
This appears after you insert a cassette for a while.
Remaining battery time indicator
Time code (for tapes recorded in the Digitals I) system only)
The time code indicates the recording or playback time, "0:00:00" (hours:minutes:
seamds) in CAMERA mode and "0:00:00:00" (hours:minutes:seconds:frames) in VTR
mode. You cannot rewrite only the time code. Your camcorder uses the drop frame
mode.
When you play back tapes recorded in the Hi8/standard 8 system, the tape counter
appears.,
Page 17
Recording a picture
When you shoot a subject with the light source behind the subject or a subject with a
light background, use die backlight functi6n.
Press BACK LIGHT in the recording or standby mode.
The 3 indicator appears in the viewfinder.
To cancel, press BACK LIGHT again.
If you press EXPOSURE when shooting backlit subjects
The backlight function will be canceled.
The NightShot function enables you to shoot a subject in a dark place. For example, you
can satisfactorily record the.enviroranent of nocturnal animals for observation when
you use this function.
s.
BACK UGHT
(1) While your camcorder is in the standby mode, slide NIGHTSHOT to ON.
(2) Press START/STOP to start recording.
@ and "NIGHTSHOT" indicators flash in the viewfinder. To cancel the
NightShot function, slide NIGHTSHOT to OFF.
NIGHTSHOT
0MMi_O
.OFF 1 ONH +SLOW SHUTTER
NightShot Light ■
emitter
17
Page 18

Recording a picture
Using the +SLOW SHUTTER
The Night^ot +SI0W shutter mode makes subjects more than four times brighter dian
those recorded in the NightShot mode.
(1) Slide NIGHTSHOT to ON in the standby mode. IS indicator appears.
(2) Press +SLOW SHUTTER until the desired NIGHTSHOT indicator flashes.
The indicator changes as follows:
@ (NIGHTSHOT) Si (NIGHTSHOT 1) -► S2 (NIGHTSHOT 2) -♦
@ (NIGHTSHOT)
To cancel the NightShot +SI0W shutter mode, slide NIGHTSHOT to OFF.
Using the NightShot Light
The picture will be clearer with the NightShot Light on. To enable NightShot Light, set
N.S.UGHT to ON in the MENU settings (p. 52).
Notes
• Do not use the NigJitShot function in bright places (ex. outdoors in the daytime). This
may cause your camcorder to malfunction.
• When you keep NIGHTSHOT set to ON in normal recording, the picture may be
recorded in incorrect or unnatural colors.
• If focusing is difficult with the autofocus mode when using the NightShot function,
focus manually.
While using the NightShot function, you can not use the following functions:
-Exposure
-PROGRAMAE
-Fader*
-Digital effect*
• You cannot use thes$ functions only in the NightShot +Slow shutter mode.
Shutter speed in the NightShot +Slow shutter mode
Indicator
@1 (NIGHTSHOT 1)
®2 (NIGHTSHOT 2)
Shutter speed
1/15
1/4
-
18
The +SLOW SHUTTER button does not work;
- while the fader function is set or in use
- while the digital effect hmction is in use
- when NIGHTSHOT is set to OFF
NightShot Light
NightShot Light rays are infrared and so are invisible. The maximum shooting distance
using the Ni^tSiot Light is about 10 feet (3 m). The shooting distance will be twice or
more in the NightSiot +Slow shutter mode.
Page 19
Checking the recording^
- EDITSEARCH / Rec Review
You can use diese buttons to check the recorded picture or shoot so that the transition
between the last recorded scene and the next scene you record is smooth.
You can search for the next recording start point.
Hold down the +/- (@) side of EDITSEARCH in the standby mode. The recorded
section is played back.
+ : to go forward
to go backward
Release EDITSEARCH to stop playback. If you press START/STOP, re-recording begins
from the point you released EDITSEARCH. You cannot monitor the sound.
You can check die last recorded section.
Press the - (@) side of EDITSEARCH momentarily in the standby mode.
The last few seconds of the recorded section are played back. You can monitor the
sound from headphones.
+ EDITSEARCH - @
, I”
Note
EDITSEARCH and Rec Review work only for tapes recorded in the Digitals ft system.
19
Page 20
— Playback - Basics —
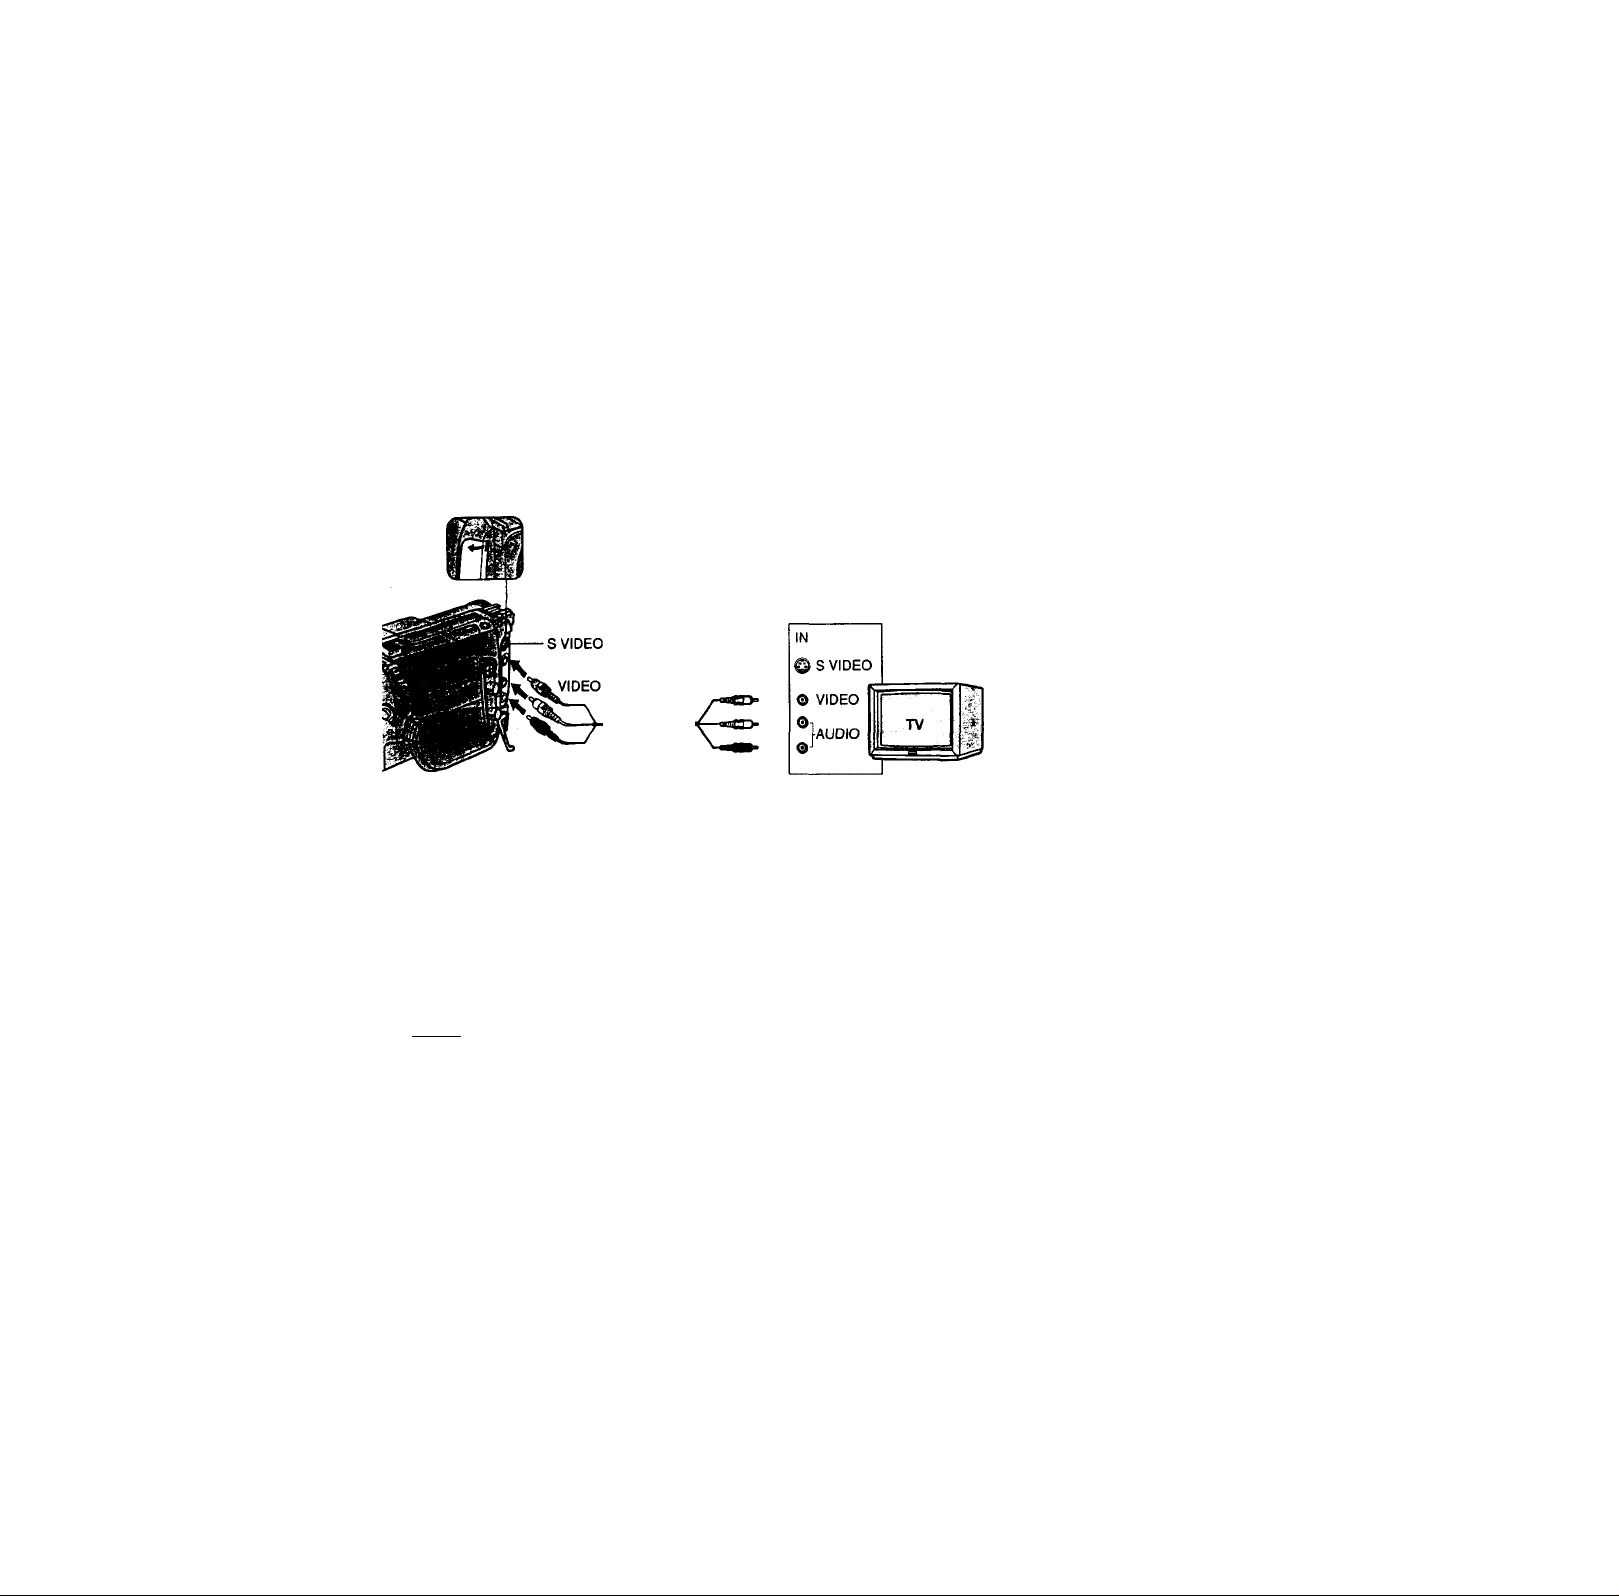
Connections for playback
Connect your camcorder to your TV or VCR witìì the A/V connecting cable supplied
witfi your camcorder to watch the playback picture on the TV screen. When monitoring
the playback picture on the TV screen, we recommend that you power your camcorder
from a wall outlet using the AC power adaptor (p. 11). Refer to àie operating
instructions of your TV or VCR.
Open-the jack cover. Connect your camcorder to the TV using the A/V connecting
cable. Then, set the TV/ VCR selector on the TV to VCR.
AUDIO
: Signal flow
Connect your camcorder to tt\e LINE IN input on the VCR by using the A/V connecting
cable supplied with your camcorder. Set the input selector on the VCR to LINE.
Connect the yellow plug for video and the white plug for audio on both your
camcorder and the TV or the VCR (you do not connect the red plug).
With this connecti<m, the sound is monaural even on stereo models.
T^olwnect to a TV or VCR without Video/Audio input jacks
Use an NTSC system RFU adaptor (not supplied).
Refer to the operating instructions of your TV or VCR and the RFU adaptor. With an
RFU adaptor, the sound is monaural.
If your TV or VCR has an S video jack
Connect using an S video cable (not supplied) to obtain high-quality pictures. With this
connection, you do not need to cormect the yellow (video) plug of the A/V connectirig
cable.
Cormect the S video cable (not supplied) to the S video jacks on both your camcorder
and the TV or the VCR.
20
Page 21
Connections for playback
Once you connect the AV cordless IR receiver (not supplied) to your TV or VCR, you
can easily view the picture on your TV. For details, refer to the operating instructions of
the AV cordless IR receiver.
LASER UNK
LASER UNK emitter
(1) After connecting your TV and AV cordless IR receiver, set the POWER switch
on the AV cordless IR receiver to ON.
(2) Turn the TV on and set the TV/VCR selector on the TV to VCR.
(3) Press LASER LINK. The lamp of LASER LINK Ughts up.
(4) Press ► on your camcorder to start playback.
(5) Point the LASER LINK emitter at the AV cordless IR receiver. Adjust the
position of your camcorder and the AV cordless IR receiver to obtain clear
playback pictures.
t
To cancel the laser link function
Press LASER LINK. The lamp on the LASER LINK button goes out.
If you turn the power off
Laser link turns off automatically.
If you use a Sony TV
• You can turn on the TV automatically when you press LASER LINK or ►. To do so,
set AUTO TV ON to ON in the MENU settings and turn the TV's main switch on, then
do either of the following:
-Point ttie LASER LINK emitter at the TV's remote sensor and press LASER LINK.
- Turn on LASER LINK and press ►.
• You can switch the video input of the TV automatically to the one which the AV
cordless IR receiver is connected. To do so, set AUTO TV ON to ON and TV INPUT to
the same video input (1,2,3) in the MENU settings. With some models, however, the
picture and sound may be disconnected momentarily when the video input is
switched.
• The above feature may not work on some TV models.
Note
When laser link is activated (the LASER LINK button is lit), your camcorder consumes
power. Press LASER LINK to turn off the laser link function when if is not needed.
* •
21
Page 22

Playing back a tape
You canjnonitor the playback picture on a TV screen after connecting your camcorder
to a TV or VCR. You can also monitor the picture in the viewfinder.
You can control playback using the Remote Commander supplied with your
r^mcorder.
(1) Install the power source and insert the recorded tape,
(2) Set the POWER switch to VTR while pressing the small green button. The
video control buttons light up.
(3) Press to rewind the tape.
(4) Press ► to start playback.
22
To stop playback
Press ■.
To monitor the sound from headphones
Cormect headphones (not supplied) to the D jack.
Page 23

Playing back a tape
Press DISPLAY on the Remote Commander supplied with your camcorder.
The indicators appear on the TV screen. '
To make the indicators disappear, press DISPLAY again.
Using the data code function
Your camcorder automatically records not only images on the tape but also the
recording data (date/time or various settings when recorded) (Data code function).
Press DATA CODE on your camcorder or the Remote Commander in the playback
mode.
The display changes as follows:
date/time —» various settings (SteadyShot, exposure AUTO/MANUAL, white balance,
gain, shutter speed, aperture value) —> no indicator
'-Dlsplay^^
Not to display recording data
Set DATA CODE to DATE in the MENU settings (p. 52).
The display changes as follows:
date/time —» no indicator
Note on the data code function
The data code fimction works only for tapes recorded in the DigitalS E) system.
Recording data
Recording is your camcorder's information when you have recorded. In the recording
mode, the recording data will not be displayed.
When you use data code function, bars (
• A blank section of the tape is being played back. ^ , .
• The tape is unreadable due to tape damage or noise.
• The tape was recorded by a camcorder without the date and time set.
* •
------
) appear if;
23
Page 24

Playing back a tape
To operate control buttons, set the POWER switch to VTR.
To view a still picture (playback pause)
Press il during playback. To resume playback, press II or I
To advance the tape
Press ►► in the stop mode. To resume normal playback, press I
To rewind the tape
Press in the stop mode. To resume normal playback, press I
To change the playback direction
Press < on the Remote Commander during playback to reverse the playback direction.
To resume normal playback, press ►.
To locate a scene monitoring the picture (picture search)
Keep pressing or ►► during playback. To resume normal playback, release the
button.
To monitor the high-speed picture while advancing or
rewinding the tape (skip scan)
Keep pressing while rewinding or ►► while advancing the tape. To resume
rewinding or advancing, release the button.
To view the picture at slow speed (slow playback)
Press !► on the Remote Commander during pla^ack. For slow playback in the reverse
direction, press <, then press !► on the Remote Commander. To resume normal
playback, press ►.
To view the picture at double speed
Press x2 on the Remote Commander during playback. For double speed playback in the
reverse direction, press <, then press x2 on the Remote Commander. To resume
normal playback, press ►.
To view the picture frame-by-frame
Press !!► on the Remote Commander in the playback pause mode. For frame-by-frame
playback in the reverse direction, press -^11. To resume normal playback, press ►.
I
*
•
24
In the various playback modes
• Noise may appear when your camcorder plays back tapes recorded in the Hi8/
standard 8 system.
• Sound is muted.
• The previous recording may appear as a mosaic image when playing back in the
Digitals H system.
When the playback pause mode lasts for 3 minutes
• Your camcorder automatically enters the stop mode. To resume playback, press I
• The previous recording may appear.
Slow playback for tapes recorded in the DigitaiS i) system
The slow playback can be performed smoothly on your camcorder; however, this
function does not work for an output sigrtal from the g DV IN/OUT jack.
Page 25

— Advanced Recording Operations -
Photo recording
You can record a still picture like a photograph. This mode is useful when you want to
record a picture such as a photograph or when you print a picture using a video printer
(not supplied).
(1) Set the POWER switch to CAMERA.
(2) In the standby mode, keep pressing PHOTO lightly until a still picture
appears. The CAPTURE indicator appears. Recording does not start yet.
To chalige the still picture, release PHOTO, select a still picture again, and then
press and hold PHOTO lightly.
(3) Press PHOTO deeper.
The still picture in the viewfinder is recorded for about seven seconds. The
sound during those seven seconds is also recorded.
During recording, the image you are shooting appears in the viewfinder.
Notes
• During photo recording, you cannot change the mode or setting.
• During photo recording, you cannot turn your camcorder off or press the PHOTO
button.
• The PHOTO button does not work:
- while the digital effect fimction is set or in use.
- while the fader function is in use.
• When recording a still picture, do not shake your camcorder. The picture may
fluctuate.
To use the photo recording function using the Remote Commander
Press PHOTO in the Remote Conunander. Your camcorder record a picture in the
viewfinder inunediately.
To use the photo recording function during normal CAMERA recording
Press PHOTO deeper. The still picture is then recorded for about seven seconds and
your camcorder returns to the standby mode. You carmot select another still picture.
•
25
Page 26
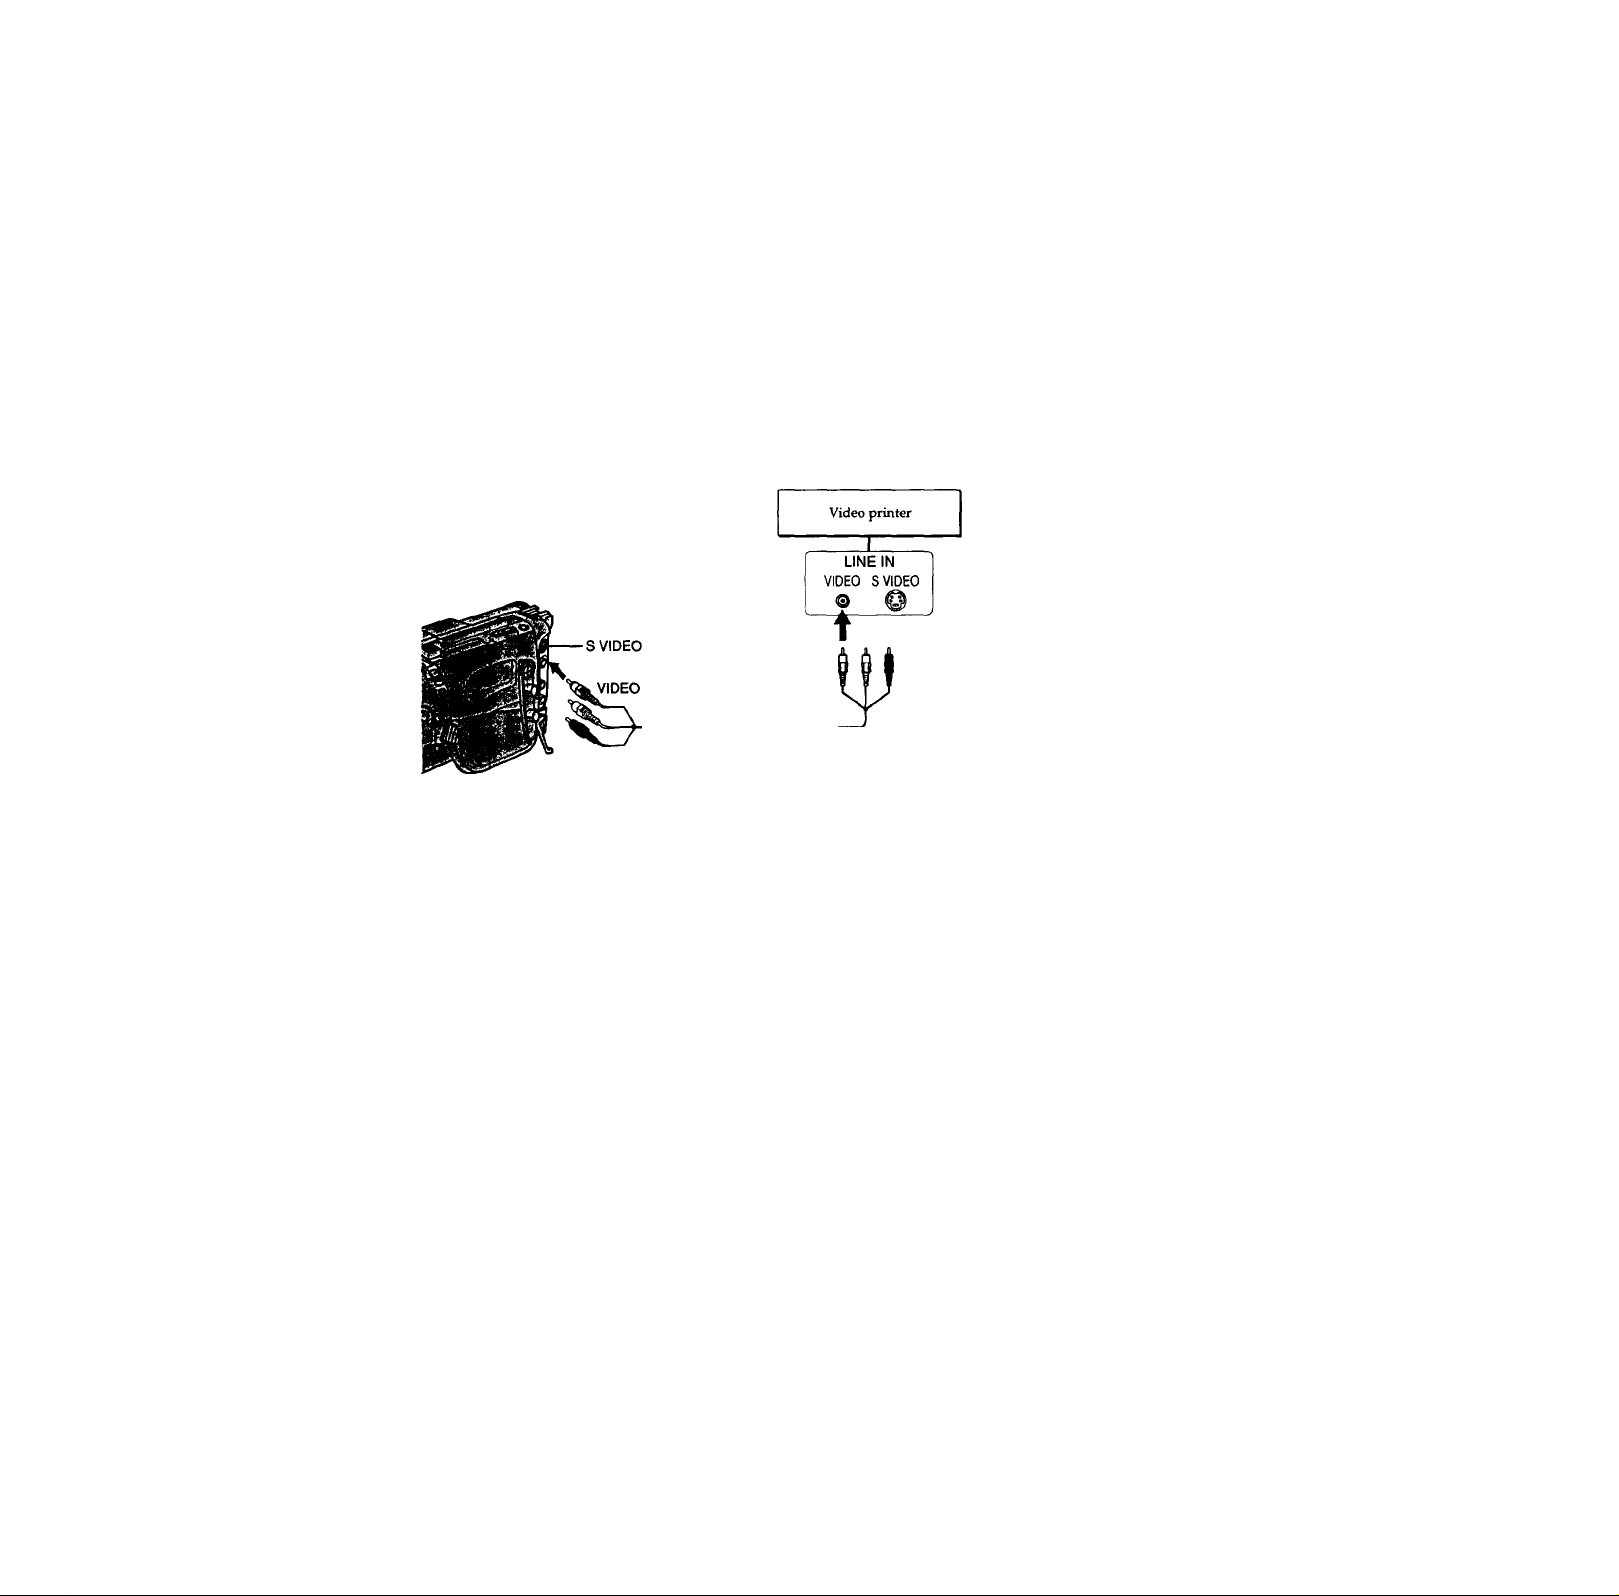
Photo recording
You can print a still picture by using the video printer (not supplied). Cormect the video
printer using the A/V connecting cable supplied with your camcorder.
Connect the yellow plug of the cable to the VIDEO jack and connect to the video input
of the video printer. Refer to the operating instructions of the video printer as well.
: Signal flow
If the video printer is.equipped with S video input
Use the S video connecting cable (not supplied). Connect it to the S VIDEO jack and the
S video input of the video printer.
26
Page 27

Using the wide mode
You can record a 16:9,wide picture to watch on the 16:9 wide-screen TV (16:9 WIDE).
The picture with black bands at the top and the bottom in the viewfinder [a] is normal.
The picture on a normal TV [b] is horizontally compressed. You can watch the picture
of normal images on a wide-screen TV [ej.,
[a]
[b]
^ “’[HI
In the standby mode, set 16:9WIDE to ON in the MENU settings (p. 52).
MENU
To cancel the wide mode
Set 16:9WIDE to OFfi in the MENU settings.
If the wide mode is set to ON
The SteadyShot function docs not work. If you set 16:9WIDE to ON in the MENU
settings when the SteadyShot function is working, "CT flashes and the SteadyShot
function does not function.
In the wide mode
You cannot select the old movie function with DIGITAL EFFECT and the bounce
function with FADER.
During recording
You cannot select or cancel the wide mode.
Connection for a TV
Pictures recorded in the 16:9W1DE mode automatically appear on the TV screen at full
size when:
• you connect your camcorder into a TV that is compatible with the video ID (ID-1 /ID-
2) system.
• you coimect your camcorder to the S video jack on the TV.
ID-2 system
The ID-2 systems is a system which converts the copyright signal to the analog system
with ID-1 signals inserted between video signals.
* •
>
4
3
(O
0
?
1
27
Page 28

Using the fader function
You can fade in or out to give yoiu recording a professional appearance.
[a]
FADER
M.FADER
(mosaic)
BOUNCE*
(Fade in oniy)
OVERLAP
(Fade in only)
[b]
MONOTONE
When fading in, the picture gradually changes from black-and-white to color.
When fading out the picture gradually changes from color to black-and-white.
* You cannot use this function when D ZOOM is set to ON in the MENU settings.
*
28
Page 29

Using the fader function
(1) When fading in [a]
In the standby mode, press FADER until the desired fader indicator flashes.
When fading out [b]
In the recording mode, press FADER until the desired fader indicator flashes.
The indicator changes as follows:
FADER -► M.FADER -► BOUNCE -► MONOTONE -► OVERLAP -►
no indicator
The last selected fader mode is indicated first of all.
(2) Press START/STOP. The fader indicator stops flashing.
To cancei the fader function
After the fade in/out is carried out: Your camcorder automatically returns to the
normal mode.
Before the fade in/oiit is carried out: Before pressing START/STOP, press FADER until
the indicator disappears.
o
■8
S
29
Page 30

Using the Fader function
Notes
•The overlap function works only for tapes recorded in the DigitalS I) system.
• You cannot use the following functions while using the fader function. Also, you
cannot use the fader function while using the following functions.
- EHgital effect
- Low lux mode of PROGRAM AE (Overlap function only)
- NightShot +SI0W shutter
- Photo recording
When the OVERLAP indicator appears
The camcorder automatically memorizes the image recorded on a tape. As the image is
being memorized, the OVERLAP indicator flashes fast, and the playback pictiue is
displayed. At this stage, the picture may not be recorded clearly, depending on the tape
condition.
When START/STOP MODE is set to 1 or 55EC
You cannot use the fader function.
While using the bounce function, you cannot use the following functions:
-Exposure
-Focus
-Zoom
-Picture effect
Note on the bounce function
The BOUNCE indicator does not appear in the following mode or functions:
- D ZOOM is set to ON in-tKe MENU settings
- Wide mode
-Picture effect
- PROGRAM AE
30
Page 31

Using special effects - Picture effect
You can digitally process images to obtain special effects like those in films or on the
TV.
NEG. ART [a]: The color and brightness of the picture is reversed.
SEPIA: The picture is sepia.
B&W: The picture is monochrome (biack-and-white).
SOLARIZE [bl: The light intensity is clearer, and the picture looks like an illustration.
SUM [cj: The picture expands vertically.
STRETCH [d]: The picture expands horizontally.
PASTEL [a]: The contrast of the picture is emphasized, and the picture looks like an
animated cartoon.
MOSAIC [f]: The picture is mosaic.
>
s-
[a]
w
[b] [c]
[d]
[el
#1
(1) Press PICTURE EFFECT in the standby or recording mode.
The picture effect indicator appears.
(2) Turn the SEL/PUSH EXEC to select the desired picture effect mode.
The indicator changes as follows;
NEG.ART <-► SEPIA B&W SOLARIZE SLIM STRETCH ♦
PASTEL «-»MOSAIC
PICTURE EFFECT
To turn the picture effect function off
Press PICTURE EFFECT.
While using the picture effect function
You carmot select the old movie mode with DIGITAL EFFECT.
[f]
Ea3
Q.
o
■J
When you turn the power off
Your camcorder automatically retunrs to the normal mode.
31
Page 32

Using special effects - Digital effect
You can add s{>ecial effects to recorded pictures using tt\e various digital functions. The
sound is recorded normally.
STILL
You can record a still picture so that it is superimposed on a moving picture.
FLASH (FLASH MOTION)
You can record still pictures successively at constant intervals.
LUMI. (LUMINANCEKEY)
You can swap a brighter area in a still picture with a moving picture.
TRAIL
You can record d\e picture so that an incidental image like a trail is left.
SLOW SHTR (SLOW SHUTTER)
You can slow down die shutter speed. The slow shutter mode is good for recording
dark pictures more brightly. However, the picture may be less clear.
OLD MOVIE
You can add an old movie type atmosphere to pictures. Your camcorder automatically
sets die wide mode to ON, picture effect to SEPIA, and the appropriate shutter speed.
32
STILL
LUMI.
Still picture
Still picture
?
Moving picture
Page 33

Using special effects - Digitai effect
(1) While your camcorder is in the standby or recording mode, press DIGITAL
EFFECT. The digital effect indicator appears.
(2) Turn the SEL/PUSH EXEC dial to select the desired digital effect mode.
The indicator changes as follows:
STILL <-► FLASH LUMI. <-► TRAIL SLOW SHTR OLD MOVIE
(3) Press the SEL/PUSH EXEC dial. The indicator lights up and the bars appear.
In the STILL and LUMI. modes, the still picture is stored in memory.
(4) Turn the SEL/PUSH EXEC dial to adjust the effect.
Items to adjust
STILL
FLASH The interval of flash motion
LUMI.
TRAIL
SLOW SHTR
OLD MOVIE No adjustment necessary
The more bars there are on screen, the stronger the digital effect. The bars appear in tire
following modes: STILL, FLASH, LUMI. and TRAIL.
The rate of the still picture you want to superimpose on the moving
picture
The color scheme of the area in the still picture which is to be
swapped with a moving picture
The vanishing time of the incidental image
Shutter speed. The larger the shutter speed number, the slower the
shutter speed.
o
H
To cancel the digital effect
Press DIGITAL EFFECT. The digital effect indicator disappears.
33
Page 34

Using special effects - Digital Effect
Notes
• The following functions do not work during digital effect:
-Fader
- Low lux mode of PROGRAM АЁ
- Photo recording
- Nigjht^iot +SI0W shutter
• The following functions do not work in the slow shutter mode:
-Exposure
- PROGRAM AE
• The following functions do not work in the old movie mode:
-Exposure
-Wide mode
- Picture effect
- PROGRAM AE
When you turn the power off
The digital effect will be automatically canceled.
When recording in the slow shutter mode
Auto focus may not be effective. Focus manually using a tripod.
Shutter speed
Stutter speed number
SLOWSHTRl 1/30
SLOWSHTR2 1/15
SЮWSHTRЗ
SЮWSHTR4
Shutter speed
1/8
1/4
34
Page 35

Using the PROGRAM AE function
You can select PROGRAM AE (Auto Exposure) mode to suit your specific shooting
requirements.
O Spotlight mode
This mode prevents people's faces, for example, from appearing excessively white
when shooting subjects lit by strong light at weddings or in the theater.
■ & Soft portrait mode
This mode brings out the subject while creating a soft background for subjects such as
people or flowers, and faithfully reproduces skin color.
Sports lesson mode
This mode minimizes shake on fast-moving subjects such as in tennis or golf.
T' Beach & ski mode
This mode prevents people's faces from appearing dark in strong light or reflected light,
such as at a beach in midsummer or on a sld slope.
Sunset & moon mode
This mode allows you to maintain atmosphere when you are recording sunsets, general
night views, fireworks displays and neon signs.
HI Landscape mode
This mode is for when you are recording distant subjects such as mountains and
prevents your camcorder from focusing on glass or metal mesh in windows when you
are recording a subject behind glass or a screen.
2 Low lux mode
This mode makes subjects brighter in insufficient light.
_____________
‘.a.
<a
3
O
35
Page 36

Using the PROGRAM AE function
(1) Press PROGRAM AE in the standby mode. The PROGRAM AE indicator
appears.
(2) Turn the SEL/PUSH EXEC dial to select the desired PROGRAM AE mode.
The indicator changes as follows:
©<— »is * *-» K ■•—►T'«—►OB'«—>4
To turn the PROGRAM AE function off
Press PROGRAM AE.
Notes
• In spotlight sports lesson and beach & ski inodes, you cannot take close-ups. This
is because your camcorder is set to focus only on subjects in the middle to far distance.
• In the sunse^& moon and landscape modes, your camcorder is set to focus only on
distant subjects.
• The following functions do not work in the PROGRAM AE mode:
-Slow shutter
-Old movie
-Bounce
• The following functions do not work in the low lux mode:
- Digital effect
- Overlap
-Exposure
• If you press PROGRAM AE when using the NightShot function, the PROGRAM AE
indicator flashes and the PROGRAM AE function does not work.
tf you are recording under a discharge tube such as a fluorescent lamp, sodium
lamp or mercury iamp
Flickering or dianges in color may occur in the following modes. If this happens, turn
the PROGRAM AE function off.
- Soft portrait mode
- Sports lesson mode
«1
1 PROGRAM
i
36
Page 37

Adjusting the exposure manually
You can manually adjust and set the exposure. When you turn your camcorder on, it
will automatically be in the automatic exposiure mode. This mode works to record
subjects so that they are recorded slightly brighter than they actually are.
Adjust the exposure manually in the following cases:
• The subject is backlit
• Bright subject and dark background
• To record dark pictures (e.g. night scenes) faithfully
(1) Press EXPOSURE in the standby or recording mode.
The exposure indicator appears.
(2) Turn the SEL/PUSH EXEC dial to adjust the brightness.
" EXPOSURE
____________
S.
JO
s
¿1.1
To return to the automatic exposure mode
Press EXPOSURE again.
Note
When you adjust the exposure manually, the following function and modes do not
work:
- Backlight
- Slow shutter
- Old movie
If you change the PROGRAM AE mode or slide NIGHTSHOT to ON
Your camcorder automatically returns to the automatic exposure mode.
0
Ti
1
o
37
Page 38

Focusing manually
You can gain better results by manually adjusting the focus in the following cases:
•The autofocus mode is not effective when shooting
- subjects through glass coated with water droplets
- horizontal stripes
- subjects with little contrast with backgrounds such as walls and sky
•When you want to change the focus from a subject in the foreground to a subject in the
background
• Shooting a stationary subject when using a tripod
(1) Set FCXniS to MAN in the standby or recording mode. The ® indicator
appears.
(2) Turn the focus ring to sharpen focus.
To return tp the jiutofocus mode
SetroCUStoAUTO.
To record distant subjects
when you press FOCUS down to.INFINITY. The lens focuses on and li indicator
appears. When you release FOCUS, your camcorder returns to the manual focus mode.
Use this mode when your camcorder focuses on near objects even though you are
trying to shoot a distant object.
To shoot with auto focusing momentarily
Press PUSH AUTO.
The auto focus functions while you are pressing PUSH AUTO.
Use this button to focus on one subject and then another w ith smooth focusing.
When you release PUSH AUTO, manual focusing resumes.
Shooting in relatively dark places or shooting fast-moving subjects in relatively
bright places
Shoot at the "W" (wide-angle) position after focusing at the "T" (telephoto) position.
When you shoot close to the subject
Focus at the end of the "W" (wide-angle) position. '' ^
The following indicators may appear
when recording a distant subject.
38
2 when the subject is too close to focus on.
Page 39

Inserting a scene
You can insert a scene in the middle of a recorded tape by setting the start and end
points. The previously recorded frames between these start and end points will be
erased. Use the Remote Commander for this operation.
(1) While your camcorder is in the standby mode, keep pressing EDITSEARCH,
and release the button at the insert end point [b].
(2) Press ZERO SET MEMORY. The ZERO SET MEMORY indicator flashes and
the tape counter resets to zero.
(3) Keep pressing the - @ side of EDITSEARCH and release the button at the
insert start point [a].
(4) Press START/STOP to start recording. The scene is inserted. Recording stops
automatically at the tape counter zero point. Your camcorder returns to the
standby mode.
^ (al 4^ [b]
EDITSEARCH
■*
>
Î
3
i
»
«
o
Notes
• The zero set memory function works only for tapes recorded in the DigitalS H system.
• The picture and the sound may be distorted at the end of the inserted section when it
is played back.
If you re-record on the section which contains a non-recorded section
The zero set memory function may not work correctly.
When START/STOP MODE is set to 1. or 5SEC
You cannot use the zero set memory function.
39
Page 40

— Advanced Playback Operations — ^
Playing back a tape with picture effects
During playback^ you can process a scene using the picture effect functions: NEG.ART,
SEPIA, B&W and SOLARIZE.
During playback, press PICTURE EFFECT and turn the SEL/PUSH EXEC dial until the
desired picture effect indicator (NEG.ART, SEPIA, B&W or SOLARIZE) flashes.
For details of each picture effect function, see page 31.
PICTURE EFFECT
NEG. ART
40
To cancel the picture effect function
Press PICTURE EFFECT.
Notes
•The picture effect function works only for tapes recorded in the DigitalS H system.
• You cannot process exttmally input scenes using the picture effect function.
•To record pictures that you have processed using the picture effect function, record
the pictures on the VCfl.
Pictures processed by the picture effect function
Pictures processed by the picture effect hmction are not output through the g DV IN/
OUT jack.
When you set the POWER switch to OFF or stop playing back
The picture effect function is automatically canceled.
•
Page 41

Playing back a tape with digital effects
During playback, you can process a scene using the digital effect functions: STILL,
FLASH, LUMl. and TRAIL.
(1) During playback, press DIGITAL EFFECT and turn the SEL/PUSH EXEC dial
until the desired digital effect indicator (STILL, FLASH, LUML or TRAIL)
flashes.
(2) Press the SEL/PUSH EXEC dial.
The digital effect indicator lights up and the bars appear. In the STILL or
LUMl. mode, the picture where you press the SEL/PUSH EXEC dial is stored
in memory as a still picture.
(3) Turn the SEL/PUSH EXEC dial to adjust the effect.
For details of each digital effect function, see page 32.
I
To cancel the digital effect function
Press DIGITAL EFFECT.
Notes
• The digital effect function works oitly for tapes recorded in the DigitalS H system.
• You cannot process scenes externally input scenes using the digital effect function.
• To record picture you apply digital effect, record the pictures on the VCR.
Piaures processed by the digital effect function
Pictures processed by the digital effect function are not output through the g DV IN/
OUT jack.
When you set the POWER switch to OFF or stop playing back
The digital effect function is automaticaEy canceled.
•
o
H
41
Page 42

QuicKiy locating a scene using me zero set memory function
Your camcorder goes forward or backward to automatically stop at a desired scene
having a tape counter value of "0:00:00". Use the Remote Commander for this operatiott.
Use tWs function, for example, to view a desired scene later on during playback.
(1) In tiie playback mode, press DISPLAY.
(2) Press ZERO SET MEMORY at' the point you want to locate later. The tape
counter shows "0:00:00" and the ZERO SET MEMORY indicator flashes.
(3) Press ■ when-you want to stop playback.
(4) Press to rewind the tape to ti\e tape coimter's zero point. The tape stops
automatically when the tape coimter reaches approximately zero. The ZERO
SET MEMORY indicator disappears and the time code appears.
(5) Press ►. Playback starts from the tape counter's zero point.
ZERO SET MEMORY
Notes
• The zero set memory function works only for tapes recorded in the Digitals B system.
• When you press 2SRO SET MEMORY before rewinding the tape, the zero set memory
furtction wUt be caiMeled.
•There may be a discrepancy of several seconds from the time code.
• The zero set memory function may not work when there is a blank portion between
pictures on a tape.
____________________________
DISPLAY
42
Page 43

Searching a recording by date
You can automatically search for the point where the recording date changes and start
playback from that point (Date search). Use the Remote Commander for this operation.
Use this function to check where recording dates change or to edit the tape at each
recording date.
We recommend connecting your camcorder to your TV or VCR to view the picture on
the TV screen. If the viewfinder indicators do not appear on the TV screen during
operation, press DISPLAY on the Remote Commander.
(1) Set the POWER switch to VTR.
(2) Press SEARCH MODE on the Remote Commander repeatedly, imtil the date
search indicator appears.
The indicator changes as follows:
DATE SEARCH -♦ PHOTO SEARCH -► PHOTO SCAN -► no indicator
(3) When the current position is [b], press to search towards [a] or press ►►
to search towards [cj. Your camcorder automatically starts playback at the
point where the date changes.
Eadt time you press or ►►!, the camcorder searches for the previous or
next date.
DEC 31 1999
44
•a
fli
t
o
H
Ô
SEARCH
2
To stop searching
Press ■.
DATE 00
SEARCH
43
Page 44

Searching a recording by date
Notes on the date seach mode
• The date search works only for tapes recorded in the DigitalS H system.
• If one day's recording is less tiian one minute, your camcorder may not accurately
hnd the point where the recording date changes.
If a tape has a blank portion in the recorded portions
The date search function will not work correctly.
44
Page 45

bearcnmg тог a pnoto^ Photo search/
Photo scab
You can search for the recorded still picture (photo search).
You can also search for still pictures one after anotiier and display each picture for tive
seconds automatically (photo scan). Use ti\e Remote Commander for these operations.
We recommend connecting your camcorder to your TV or VCR to view the picture on
the TV screen. If the viewfinder indicators do not appear on the TV screen during
operation, press DISPLAY on the Remote Commander.
,^.%ajrfyp9^for'aph^ ^ •
(1) Set the ЮWER switch to VTR.
(2) Press SEARCH MODE on the Remote Commander repeatedly, until the photo
search indicator appears.
The indicator changes as follows:
DATE SEARCH PHOTO SEARCH PHOTO SCAN — no indicator
(3) Press or to select the photo for playback. Each time you press or ►►!,
the camcorder searches for the previous or next photo. Your camcorder
automatically starts playback from the photo.
О
To stop searching
Press ■.
If a tape has a blank portion in the recorded portions
The photo search function may not work correctly.
45
Page 46

Searching for a photo - Photo search/Photo scan
(1) Sct the POWER switch to VTR.
(2) Press SEARCH MODE on the Remote Commander repeatedly, until the photo scan
indicator appears.
The indicator changes as foilows:
DATE SEARCH -► PHOTO SEARCH — PHOTO SCAN — no indicator
(3) Press h« or
Each photo is played back for about 5 seconds automatically.
2
SEAflCH
MODE
PHOTO 00
SCAN
To stop scanning
Press ■.
Note
The photo search and photo scan work only for tapes recorded in the DigitalS O system.
46
Page 47

— Editing on Other Equipment —
Dubbing a tape
Using the AIM connecting cabie or S video connecting cabie
(not suppiied)
Connect your camcorder to the VCR using tt\e A/V connecting cable supplied with
your camcorder.
Set the input selector on the VCR to LINE, if available.
(1) Insert a blank tape (or a tape you want to record over) into the VCR, and insert
the recorded tape into your camcorder.
(2) Set the POWER switch to VTR.
(3) Play back the recorded tape on your camcorder.
(4) Start recording on the VCR.
S VIDEO
AUDIO
. : Signal flow
When you have finished dubbing a tape
Press ■ on both your camcorder and the VCR.
s
If you have displayed the viewfinder indicators on the TV
Make the indicators disappear by pressing SEARCH MODE or DISPLAY on the Remote
Commander, or DATA CODE so that they will not be superimposed on the edited tape.
You can edit on VCRs that support the following systems
0 8 mm. Him Hi8, Bffi VHS, S№ S-VHS, WKW VHSC, SSBSa S-VHSC, ID Betamax,
B3Sa»l ED Betamax, “"IX’ nuni DV, DT DV or I) DigitalS
If your VCR is a monaural type
Cotmect the yellow plug for video and the white plug for audio on both your
camcorder and the VCR. You do not need to connect the red plug. With this connection,
the sound will be monaural.
Connect using an S video cable (not supplied) to obtain high-quality pictures
With this connection, you do not need to coimect the yellow (video) plug of the A/V
connecting cable.
Connect an S video cable (not supplied) to the S video jacks of both your camcorder and
the VCR.
To perform a more precise editing
Connect a LANC cable (not supplied) to your camcorder and other video equipment
having fine synchro-editing function, using this camcorder as a player.
47
Page 48

Dubbing a tape
Using the i.LINK cable
Simply connect the VMC-IL4415/IL4435/2DV/4DV i.LINK cable (not supplied) to
IIDV IN/Otrr and to DVIN/OUT of the DV products. With digital-to-digital
connection, video and audio signals are transmitted in digital form for high-quality
editing. You can not dub the viewfinder indicators.
(1) Insert a blank tape (or a tape you want to record over) into the VCR, and insert
the recorded tape into your camcorder.
(2) Set the POWER switch to VTR.
(3) Play back the recorded tape on your camcorder.
(4) Start recording on the VCR.
I DV IN/OUT
(not supplied)
. : Signal flow
48
When you have finished dubbing a tape
Press ■ on both your camcorder and the VCR.
Note on tapes that are not recorded in the Digitals H system
The picture may fluctuate. This is not a malfunction.
During piayback of tapes reco'rded in the HiS/standard 8 system
Digital signals are output as the image signals from the g DV IN/OUT jack.
You can connect one VCR only using the i.LINK cable.
During digital editing
You cannot use DIGITAL EFFECT button functions.
You can also use your camcorder as a recorder
• You can use your camcorder as a player or recorder without changing the connection.
In this case, ttte DV IN indicator appears in the viewfinder. The DV IN indicator may
appear on both equipment.
• When using your camcorder as a recorder, the color balance mey be incorrect on the
monitor screen. This, however, is not recorded on the tape.
If you record playback pause picture via the DV jack
The recorded picture becomes rough. Also, when you play back the recorded pictures
on other video equipment, the picture may jitter.
* •
Page 49

Recording video or TV programs
You can record a tape from another VCR or a TV program from a TV that has video/
audio outputs. Use your camcorder as a recorder. Turn down the volume of your
camcorder. Otherwise, the picture may be distorted.
(1) Insert a blank tape (or a tape you want to record over) into your camcorder. If
you are recording a tape from the VCR, insert a recorded tape into the VCR.
(2) Set the POWER switch to VTR.
(3) Press # REC and the button on its right simultaneously on your camcorder,
then immediately press II on your camcorder.
(4) Press ► on the VCR to start playback if you are recording a tape from VCR.
Select a TV program if you are recording from TV.
(5) Press II on your camcorder at the scene where you want to start recording
from.
S VIDEO
- ■•'V
© S VIDEO
0 VIDEO
OUT
IVCR
01
UUDIO
0J
: Signal flow
Notes
•To enable smooth transition, we recommend that you do not mix pictures recorded in
the Hi8/standard 8 with the DigitalS I) system on a tape.
• If you fast-forward or slow playback on U\e other equipment, the image being
recorded may turn black and white. When recording from other equipment, be sure to
play back the original tape at normal speed.
If your VCR is a monaural type
Cormect die yellow plug for video and the white plug for audio on both your
camcorder and the VCR (you do not need to connect the red plug). With this
connection, the sound will be monaural.
Connect using an S video cable (not supplied) to obtain high-quality pictures
With this connection, you do not need to connect the yellow (video) plug of the A/V
connecting cable. -.
Connect an S video cable (not supplied) to the S video jacks of both your camcorder and
VCR.
If your VCR or TV does not have an S video out jack, do not connect an S video cable
(not supplied) to your camcorder. If you connect an S video cable, die picture may not
appear on screen.
49
Page 50

Inserting a scene from a VCR
/;TrîTT' ^Ц[ttcrтíXí
You can insert a new scene from a VCR onto your originally recorded tape by
specifying the insert start and end points. Use d\e Remote Commander for this
operation. Connections are the same as in "Recording video or TV programs" on
page 49.
Insert-a cassette containing the desired scene to insert into the VCR.
ii№
vгp
50
Page 51

Inserting a scene from a VCR
(1) Set the POWER switch to VTR.
(2) On the VCR, locate just before the insert start point [a], then press 11 to set the VCR
to the playback pause mode.
(3) On'your camcorder, locate the insert end point [c] by pressing or Then
press II to set it to the playback pause mode.
(4) Press ZERO SET MEMORY on the Remote Commander. The ZERO SET MEMORY
indicator flashes and the end point of the insert is stored in memory.
(5) On your camcorder, locate the insert start point [b] by pressing then press two
# IŒC buttons at same time to set your camcorder to Ù\e recording pause mode.
(6) First press 11 on the VCR, and after a few seconds press 11 on your camcorder to
start inserting the new s<^ne.
Inserting automatically stops near the zero point on the tape counter. Your
camcorder automatically returns to the recording pause mode.
4
ZERO SET
MEMORY
B •
0:00:00
y^EROsÉV'
y- MEMORY,
/'billin''
1
To change the insert end point
Press ZERO SET MEMORY again after step 5 to erase the ZERO SET MEMORY
indicator and begin from step 3.
Notes
• The zero set memory function works only for tapes recorded in the DigitalS H system.
•The picture <md sound recorded on the section between the insert start and end points
will be erased when you insert the new scene.
When the inserted picture is played back
The picture may be distorted at the end of the inserted section. This is not a
malfunction.
To insert a scene without setting the insert end point
Skip step 3 and 4. Press ■ when you want to stop inserting.
* •
51
Page 52

— Customizing Your Camcorder —
Changing the MENU settings
To d^ge the mode settings in the MENU settings, select the menu items with the
SEL/PUSH EXEC dial. The factory settings can be partially changed. First, select the
icon, then the menu item and then the mode.
(1) In the standby or VTR mode, press MENU.
(2) Turn the SEL/PUSH EXEC dial to select the desired icon, then press the dial to
set.
(3) Turn the SEL/PUSH EXEC dial to select the desired item, then press the dial to
set.
(4) Turn the SEL/PUSH EXEC dial to select the desired mode, and press the dial
to set.
(5) If you want to change other items, select io RETURN and press the dial, then
repeat steps from 2 to 4.
________________
CAMERA SET
91 D ZOOM
« 16 :9WI0E
B COMMANDER
S
OTHERS
V WORLD TIME
9 BEEP
B COMMANDER
a, DISPLAY
S REC LAMP
INDICATOR
DISPLAY
REC LAMP
P INDICATOR
01XERS
t WORLD TIME
».BEEP
i REC LAMP
INDICATOR
PRETURN
n
52
To make the MENU display disappear
Press MENU.
BICOMMANDERIION I
a bTsplay off
OTHERS
W WORLD TIME
« BEEP
B ICOMMANOE^T)
® DiSPLAY (n
S REC LAMP
P INDICATOR
PRETUHN
OTHERS
W WORLD TIME
- EEP_
OrSPLA'
S
REC LAMP
P INDICATOR
PRETURN
Page 53

Changing the MENU settings
Menu items are displayed as the following six icons:
CAMERA SET
® VTRSET
B VF SET
^ TAPE SET
Is) SETUP MENU
^ OTHERS
Sele^lpg Ithe mofie setting of each item • is the factory setting. • .>
Menu itenas differ according to whether the POWER switch is set to VTR or CAMERA.
POWER
Icon/item
B D ZOOM
16:9WIDE
STEADYSHOT
N.S. UGHT • ON
Notes on the SteadyShot-function
• The SteadyShot function will not correct excessive camera-shake.
• Attachment of a conversion lens (not supplied) may influence the SteadyShot
function.
• SteadyShot does not operate in the-16:9WlDE mode. If you set STEADYSHOT to ON
in the MENU settings, the '<7 indicator flashes.
Mode
ON To activate digital zoom. More than 20x to 360x
• OFF
• OFF
ON To record a 16:9 wide picture (p. 27)
• ON To compensate for camera>shake
OFF To cancel the SteadyShot function. Natural
OFF To cancel the NightShot Light hincHon
Meaning
zoom is performed digitally (p. 15)
To prevent the deterioration of the picture quality
— CAMERA
pictures are produced when shooting a stationary
object with a tripod.
To use the NightShot light function (p. 18)
switch
CAMERA
CAMERA
CAMERA
53
Page 54

Changing the MENU settings
Icon/item
HiH SOUND
AUDIO MIX
PB MODE
B VF B.L
Mode
• STEREO
1
2
• auto
HiB/a
• BRT NORMAL To set the brightness in the viewfinder normal
BRIGHT To brighten the viewfinder
Notes on AUDIO MIX
• You can adjust the balance only tor tapes recorded in the Digitals E) system.
• When playing back a tape recorded in the 16-bit mode, you cannot adjust the balance.
Note on PB MODE .
The mode will return to the factory setting when:
• you remove the battery pack or power source.
• you turn the POWER switch.
Notes on VF B.L
•When you select "BRIGHT", battery life is reduced by about 10 percent during
recording.
• When you use power sources other than the battery pack, "BRIGHT" is automatically
selected.
Meaning
To play .hack a stereo tape or dual sound track
tape with main and sub sound
To play back dual sound track tape with main
sound
To play back a dual sound track tape with sub
sound
To adjust the balance between the stereo 1 and
stereo 2
II n
STl A. ST2
To automatically select the system (Hi8/
standard 8 or DigitalS) that was used to record
on the tape, and play back the tape
To play back a tape Uiat was recorded in the
Hi8/standard 8 system when your camcorder
does not automatically distinguish the
recording system
POWER
switch
VTR
VTR
VTR
VTR
■ CAMERA
54
Page 55

Changing the MENU settings
Icon/item
^ AUDIO MODE
es3 REMAIN
DATA CODE
@1 CLOCK SET
AUTO TV ON
TV INPUT
LTR SIZE
DEMO MODE
Note on AUDIO MODE
When
AUDK
Notes on DEMO MODE
• You cannot select DEMO MODE when a cassette is inserted in your camcorder.
• DEMO MODE is set to STBY (Standby) at the factory and the demonstration starts
• When NIGHTSHOT is set to ON, the NIGHTSHOT indicator appears in the
*To dub a tape to anothe VCR
Mode Meaning
• 12BIT To record or play back in the 12-bit mode (two
16BIT
# AUTO To display the remaining tap>e bar;
ON
• DATE/CAM To display date, time and recording data
DATE To display date and time during playback
• OFF
ON To automatically turn on the Sony TV when
• VIDEQl
VIDE02
VIDEOS
OFF
• NORMAL
2x
• ON
OFF
i^l^^g back a tape recorded in the 16-bit mode, you cannot adjust the balance in
about 10 minutes after you have set me POWER switch to CAMERA without a
cassette inserted.
Note that you cannot select STBY of DEMO MODE in the MENU settings.
viewfinder and you cannot select DEMO MODE in the MENU settings.
You cannot select AUDIO MODE for tapes recorded in the DigitalS H system. You,
however, can select AUDIO MODE when you dub tapes recorded in the Hi8/
standard 8 system to ano^er VCR using the i.LD^ cable.
POWER
switch
stereo sounds)
To record or play back in the 16-bit mode (the
one stereo sound with high quality)
• for about 8 seconds after your camcorder is
turned on and calculates the remaining
amoimt of tape
• for about 8 seconds after a cassette is inserted
and your camcorder calculates the remaining
amount of tape
• for about 8 seconds after ► is pressed in
VTR mode
• for about 8 seconds after DISPLAY on the
Remote Commander is pressed to display the
viewfinder indicators
• for the period of tape rewinding, forwarding
or picture search in the VTR mode
To always display tfte remaining tape indicator
during playback
To reset the date or time (p. 57)
‘
using the laser link function
To switch the video input on a Sony TV when
using the laser link function (p. 21)
— . . To display selected menu items in normal size
To display selected menu items at twice the
normal size
To make the demonstration appear
To cancel the demonstration mode
VTR*
CAMERA
VTR
CAMERA
VTR
CAMERA
VTR
CAMERA
VTR
CAMERA
VTR
CAMERA
CAMERA
55
Page 56

Changing the MENU settings
kon/item Mode
@ WORLD TIME
BEEP
COMMANDER • ON To activate the Remote Commander supplied
REC LAMP
INDICATOR
In more than S minutes after removing the power source
The "COMMANDER" and "HiFi SOUND" items are returned to their factory settings.
The odier menu items are held in memory even when the battery is removed, as long as
the lidiium battery is installed.
Notes on INDICATOR
• When you select "BL ON", battery life is reduced by about 10 percent during
• When you use power sources other than the battery pack, "BL ON" is automatically
• MELODY To output the melody when you start/stop
NORMAL To output the beep instead of the melody
OFF To cancel the melody and beep sound
OFF
• ON
OFF
• BLOFF
BLON To turn on the backlight
recording.
selected.
Meaning
To set the clock to the local time. Turn the SEL/
PUSH EXEC dial to set a time difference. The
clock changes by the time difference you set
here. If you set the time difference to 0, the
clock returns to the originally set time.
recording or when an unusual condition occurs
on your camcorder
with your camcorder
To deactivate the Remote Commander to avoid
remote control misoperation caused by other
VCR's remote control
To light up the camera recording lamp at the
hunt of your camcorder
To turn the camera recording lamp off so that
the subject is not aware of the recording
To turn off die backlight on display window VTR
POWER
switch
CAMERA
VTR
CAMERA
VTR
CAMERA
CAMERA
CAMERA
56
Page 57

Resetting the date and time
The clock is set to East Coast Standard Time at the factory.
The date and time are held in memory by the lithium battery. If you replace the lithium
battery wid\ the battery pack or od\er power source connected, you need not reset tt\e
date and time.
You must reset the date and time when tKe lithium battery becomes dead with no
power source installed.
First, set die year, then.tiie month, the day, the hour and then the minute.
(1) While the camcorder is in the standby mode, press MENU to display the
MENU settings.
(2) Turn the SEL/PUSH EXEC dial to select e, then press the dial.
(3) Turn the SEL/PUSH EXEC dial to select CLCXIK SET, then press the dial.
(4) Turn the SEL/PUSH EXEC dial to adjust the desired year, then press the dial.
(5) Set the month, day and hour by turning the SEL/PUSH EXEC dial and
pressing the dial.
(6) Set the minute by turning the SEL/PUSH EXEC dial and pressing the dial by
the time signal. The clock starts to move.
(7) Press MENU to make the MENU settings disappear. The time indicator
appears.
SETUP MENU
t CLOCK SET
r AUTO TV ON
I TV INPUT
J LTH SIZE
■n DEMO MODE
______________________
SPTllP MENU
* GS2SS3EO
rv INPUT
LTA SIZE
S
DEMO MODE
P PAETURN
m TV INPUT iTwllJAN 1
S LTR SIZE * * » »
ne DEMO MOOE
P pRETUflN
(MENU) :ENO
2 00 AH
-<
o
c
“»
c
3
8
TV INPUT
B tTR SIZE
IN DEMO MODE
P PNETUNN
The year changes as follows:
1998
1999
2029
L_
Note on the time indicator
The internal clock of your camcorder operates on a 12-hour cycle.
• 12:00 AM stands for midnight.
• 12:00 PM stands for noon.
TV INPUT
la tTR SIZE
m DEMO MOOE
P PWTtWN
57
Page 58

— AiMitional Information —
Digitals system, recording and playback
what is the “Digitals E) system“ ?
lius video system has been developed to oiable digital recording to Hi8 video cassette
Him.
liable cassette tapes
We recommend using Hi8 video cassettes Hi@. The recording time when you use your
EiigitalS If system camcorder on Hi8 HiS/standard 8 □ tape is half the recording time
when using the conventional Hi8 HI0/standard 8 0 system camcorder. (120 minutes
of recording time becomes 60 minutes.)
If you use standard 8 0 tape, be sure to play back the tape on this camcorder. Mosaic
pattern noise may appear when you play back standard 8 0 tape on other VCRs.
Note
Tapes recorded in the Digital8 B system cannot be played back on Hi8 H10/standard 8
0
(analog) system machine.
The Digitals E) system or Hi8 HI 0/standard 8 0 system is automatically detected
before the tape is played back*.
* During playback of tapes recorded in the Hi8 HI0/standard 8 0 system, digital
signals are output as the image signals from the i DVIN/OUT jack.
Display during automatic detection of system
The Digitals if system or Hi& HI 0/standard 8 0 system is automatically detected, and
the playback system is automatically switched to. During switching of systems, the
screen turns blue, and the following displays appear. A hissing noise also sometimes
can be heard.
If —> HI0/0; Dtuing switching from DigitalS i) to №8 HI0/standard 8 0
HI0/0 —» ik During switching from Hi8 HI0/standard 8 0 to Digital8 If
•le
58
m
Playing back a PAL-recorded tape
You can play back tapes recorded in the PAL video system, if the tape is recorded in the
Digital8 Ef system.
EMlEf--i = ' ■ .--"l
When you record
You cannot record software on your camcorder that contains copyright control
signals for copyright protection of software.
"COPY INHIBIT" appears in the viewfinder or on the TV screen if you try to record
such software.
Your camcorder does not record copyright control signals on the tape when it records.
Page 59

Digitals E) system, recording and playliack
When you use tapes recorded in the Digitals E) system
When you play back DigitalS H system tape which is dubbed from a dual sound track
tape recorded in the DV system, set "HiFi SOUND" to the desired mode in the MENU
settings (p. 52).
Sound from speaker
HiFi Sound Playing back
Mode
STEREO Stereo
1 Lch Main sound
2 Rch
a stereo tape
When you use tapes recorded in the HiS/standard 8 system
When you play back a dual sound track tape recorded in an AFM HlFi stereo system,
set "HlFi SOUND" to the desired mode in the MENU settings (p. 52).
Sound from speaker
HiFi Sound
Mode a stereo tape sound track tape
STEREO
1 Monaural
2 Unnatural
You cannot record dual sound programs on your camcorder.
Playing back
Stereo Main sound and sub sound
Playing back a dual
sound track tape
Main sound and sub sound
Sub sound
Main sound
Sub sound
Playing back a dual
0
1
59
Page 60

Changing the lithium battery in your
camcorder_____________________________________
When repladiig d\e lithium battery^ keep the battery pack or other power source
attached. Otherwise, you will need to reset d\e date, time and other items in die MENU
settings hold in memory by the lithium battery.
Insert the battery with the positive (+) side facing out. When the battery becomes weak
or dead, the indicator flashes in die viewfinder for about 5 seconds when you set die
POWER switch to CAMERA. In this case,
Duraceli DL-2025 lithium battery. Use of any other battery may present a risk of
fire or explosion. Discard used batteries according to the manufacturer's instructions.
WARNING
The battery may explode if mistreated. Do not recharge, disassemble, nor dispose of it
in fire.
Lithium battery
• Keep the lithium battery out of the reach of children.
• Should die battery be swallowed, immediately consult a doctor.
• Wipe the battery widi a dry clodi to ensure good contact.
Lithium battery installed at the factory
This battery njay not last 1 year.
replace the battery with a Sony CR2025 or
* •
60
Page 61

Changing the lithium battery in your camcorder
(1) Open the lid of the lithium battery compartment.
(2) Push the lithium battery down once and pull it out from the holder.
(3) Install a Sony CR2025 or Duracell DL-2025 lithium battery with the positive (+)
side facing out.
(4) Close the lid.
o
1
3
2
4
61
Page 62

Troubleshooting
li you nin into any problem using your camcorder, use the following table to
troubleshoot the problem. If the problem persists, disconnect the power source and
contact your Sony dealer or local authorized Sony service facility. If "C:CD:DQ"
appears in tite viewfinder, the self-diagnosis display function has worked. See page 66.
Symptom Cause and/or Corrective Actions
START/STOP does not operate.
Recording stops in a few seconds.
The power goes off.
Your camcorder turns on/off when
using the aocessoty that is attached
to d№ intelligent accessory shoe.
The image on the viewfinder screen * The viewfinder lens is not adjusted.
isnotclrar.
The SteadyShot function does not
work.
The autofbcusing fimction does not
work.
The fader function does not work.
The O indicator fla^ies in the
viewfinder.
• The POWER switch is set to VTR.
■» Set it to CAMERA, (p. 13)
• STANDBY is set to LOCK.
Turn STANDBY to STANDBY, (p. 13)
• The tape has run out.
^ Rewind tire tape or insert a new one. (p. 12,22)
• The write-protect tab is set to expose the red mark.
Use a new tape or slide the tab. (p. 12)
• The tape is stuck to the drum (moisture condensation).
■> Remove the cassette and leave your camcorder for at
least 1 hour to acclimatize, (p. 69)
• START/STOP MODE is set to 5SEC or ±.
4 Set it to A- (p. 16)
• While being operated in the CAMERA mode, your
camcorder has been in the standby mode for more than 3
minutes.
^ Turn STANDBY down once and tt\en up again, (p. 13)
• Your camcorder is working with the AC power adaptor.
Use the battery pack.
■* Adjust the viewfinder lens. (p. 14)
• STEADYSHOT is set to OFF in the MENU settings.
4 Set it to ON. (p. 52)
• The SteadyShot function does not work when the wide
mode is set to ON.
• FOCUS is set to MAN.
■> Set it to AUTO. (p. 38)
• Shooting conditions are not suitable for autofocus.
■> Set FOCUS to MAN to focus manually, (p. 38)
• START/STOP MODE is set to 5SEC or 1.
Set it to . (p. 16)
• The digital effect function is working.
Cancel it. (p. 32)
• The video heads may be dirty.
Clean the heads using the Sony V8-25CLD cleaning
cassette (not supplied), (p. 70)
62
Page 63

Troubleshooting
Symptom
A vertical band appears when you
shoot a subject such as lights or a
candle flame against a dark
background.
A vertical band appears when you
shoot a very bright subject.
Some tiny white spots appear in the
viewfinder.
An unknown picture is displayed in
the viewfinder.
The picture is recorded in incorrect
or unnatural colors.
Picture appears too bright, and the
subject does not appear in the
viewfinder.
Symptom
The tape does not move when a
video control button is pressed.
The playback picture is not clear or
does not appear.
There are four horizontal lines on the
picture or the playback picture is not
clear or does not appear.
No sound or only a low sound is
heard when playing back a tape.
The date search does not work
correctly.
The picturer which is recorded in the
Digitals H system is not played back.
The tape which is recorded in the
HiS/standard 8 system is not played
back correctly.
Causé and/or Corrective Actions
• The contrast between the subject and background is too
high. Your camcorder is not a malfunction.
• Your camcorder is not a malfunction.
• Slow shutter, low lux or NightShot +Slow shutter mode is
activated. This is not a malfunction.
• If 10 minutes elapse after you set the POWER switch to
CAMERA or DEMO MODE is set to ON in the MENU
settings without a cassette inserted, your camcorder
automatically starts the demonstration.
Ir\sert a cassette and the demonstration stops.
You can also cancel DEMO MODE. (p. 55)
• NIGHTSHOT is set to ON.
Set it to OFF. (p. 17)
• NIGHTSHOT is set to ON in a bright place.
•> Set it to OFF, or use fl\e NightShot function in a dark
place, (p. 17)
^ .... 7 i ■
Cause and/or Corrective Actions
• The POWER switch is set to CAMERA or OFF.
•¥ Set it to VTR. (p. 22)
• The tape has run out.
_ Rewind the tape. (p. 22)
• The television's video channel is not adjusted correctly.
■> Adjust it. (p. 20)
• The video head may be dirty.
Clean the heads using the Sony V8-25CLD cleaning
cassette (not supplied), (p. 70)
• The stereo tape is played back with HiFi SOUND set to 2
in the MENU settings.
■» Set it to STEREO, (p. 52)
• AUDIO MIX is set to ST2 side in the MENU settings.
-» Adjust AUDIO MIX. (p. 52)
• The tape has a blank portion in the recorded portion
(p.43)
• PB MODE is set to HiB/S in the MENU settings.
•»Set it to AUTO. (p. 52)
• Set PB MODE to HIS/Q in the MENU settings, (p. 52)
(Continued on the following page)
63
Page 64

Troubleshooting
Symptom
The power does not turn on
The battery pack is quickly
discharged.
The battery remaining indicator does
not indicate the correct time.
The cassette cannot be removed from
the holder.
The S) and A indicators flash and no
functicms except for cassette ejection
work.
-
Cause and/.or Corrective Actions
• The battery pack is not installed, or is dead or nearly dead.
•> Install a charged battery pack. (p. 8,9)
• The AC power adaptor is not connected to a wall outlet.
Connect the AC power adaptor to a wall outlet, (p. 11)
• The operating temperature is too low.
• The battery pack is not fully charged.
^ Charge ¿te battery pack again, (p. 9)
• The battery pack is completely dead, and cannot be
recharged.
Replace with a new battery pack. (p. 8)
• You have used tiie battery pack in an extremely hot or
cold environment for a long time.
• The battery pack is completely dead, and cannot be
recharged.
4 Replace with a new battery pack. (p. 8)
• The battery is dead.
Use a charged battery pack. (p. 8,9)
• The power source is disconnected.
4 Coimect it firmly, (p. 8.11)
• The battery is dead.
■> Use a charged battery pack or the AC power adaptor.
. (P-8,9)
• Moisture condensation has occurred.
^ Remove the cassette and leave your camcorder for at
least 1 hour to acclimatize, (p. 69)
'
64
... ^
Page 65

Troubleshooting
Symptom
The Remote Commander supplied
with your camcorder does not work.
The melody or beep sounds for 5
seconds.
While charging the battery pack^ no
indicator appears or the indicator
flashes in the display window.
Cause and/or Corrective Actions
• COMMANDER is set to OFF in the MENU settings.
Set it to ON. (p. 52)
• Something is blocking ttie infrared rays.
Remove the obstacle.
• The batteries are inserted in the battery holder with the + polarities incorrectly matching the + - marks.
4 Insert dre batteries with the correct polarity, (p. 79)
• The batteries are dead.
•> Insert new ones. (p. 79)
• Moisture condensation has occurred.
■> Remove the cassette and leave your camcorder for at
least 1 hour to acclimatize, (p. 69)
• Some troubles has occurred in your camcorder.
•> Remove the cassette and insert it again, then operate
your camcorder.
• The AC power adaptor is disconnected.
4 Connect it firmly, (p. 9)
• Something is wrong with the battery pack.
Contact your Sony dealer or local authorized Sony
service facility.
65
Page 66

Self-diagnosis display
Your camcorder has a self-diagnosis display
function.
This function displays the current condition of
your camcorder as a 5-digjt code (a combination of
a letter and figures) in the viewfinder and display
window. If a 5-digit code is displayed, check the
following code diart. The last two digits (indicated
by □□) will differ depending on the state of your
camcorder.
Viewfinder
Self-diagnosis display
•C:OD:DD
You can service your camcorder
yourself.
Contact your Sony dealer or local
authorized Sony facility.
Five-digit display
C:04:DD
C:21:DQ
C:22:DD
C-31:DD
C:32:DD
E61;DD
E:62:DD
66
Cause and/or Corrective Actions
• You are using a battery pack that is not an
"InfoUTHIUM" battery pack.
•» Use an "InfoUTHIUM" battery pack. (p. 11)
• Moisture condensation has occurred.
^ Remove the cassette and leave your camcorder for at
' least 1 hour to acclimatize, (p. 69)
• The video heads are dirty.
Qean the heads using the Sony V8-25CLD cleaning
cassette (not supplied), (p. 70)
• A malfunction other than the above that you can service
has occurred.
4 Remove the cassette and insert it again, then operate
your camcorder.
Disconnect the power cord of the AC power adaptor or
remove the battery pack. After reconnecting the power
source, operate your camcorder.
• A malfunction that you cannot service has occurred.
^ Contact your Sony dealer or local authorized Sony
service facility and inform them of the 5-digit code.
(example: E:61:10)
If you are unable to rectify the problem even if you try corrective actions a few times,
contact your Sony dealer or local authorized Sony service facility.
Page 67

Warning indicators and messages
If indicators and messages appear in the viewfinder and display window, check the
following:
See the page in parentheses "( )" for more information.
• The indicators and messages are displayed in yellow.
Warning, indicators
The video heads are dirty
Fast flashing:
• You need to clean the heads using the Sony V8-25CLD
cleaning cassette (not supplied) (p. 70).
The battery is dead or
nearly dead
Slow flashing:
• The battery is nearly dead.
Fast flashing:
• The battery is dead (p. 9).
Warning indicator as to
tape
Slow flashing:
• The tape is near the end.
• No tape is inserted (p. 12).* *
• The write-protect tab on the
cassette is out (red) (p. 12)*
Fast flashing:
• The tape has run out (p. 12,22).*
The lithium battery is weak
or is not installed (p. 60)
-----
Warning messages
CASSETTE ’
COPY
INHIBIT
The video heads are dirty.
You tried to record a picture that has a copyright control signal (p. 58).
Self-diagnosis display (p. 66)
Moisture condensation has
occurred*
Fast flashing:
• Eject the cassette, turn off your
camcorder, and leave it for
about 1 hour with the cassette
compartment open (p. 69).
-----
You need to eject the cassette
Slow flashing:
• The write-protect tab on the
cassette is out (red) (p. 12).*
Fast flashing:
• Moisture conderrsation has
occurred (p. 69).
• The tape has run out (p. 12,
22).*
• The self-diagnosis display
function is activated (p. 66).
’ You hear the melody or beep sound.
67
Page 68

Using your camcorder abroad
You can use your camcorder in any country or area with the AC power adaptor
Supplied with your camcorder widun 100 V to 240 V AC, 50/60 Hz.
When charging the battery pack, use a commercially available AC plug adaptor [a], if
necessary, depending on the design of the wall outlet Ib].
AC-L10A/L10B/L10C
Et—0
[a] [b]
Your camcorder is an NTSC system based camcorder. If you want to view the playback
picture on a TV, it must be an NTSC system based TV with VIDEO/AUDIO input jack.
The following shows TV color systems used overseas.
NTSC system
Bahama Islands, Bolivia, Canada, Central America, Chile, Colombia, Ecuador, Jamaica,
Japan, Korea, Mexico, Peru, Surinam, Taiwan, the Philippines, the U.S.A., Venezuela,
etc.
PAL system
Australia, Austria, Belgium, China, Czech Republic, Denmark, Finland, Germany, Great
Britain, Holland, Hong Kong, Italy, Kuwait, Malaysia, New Zealand, Norway, Portugal,
Singapore, Slovak Republic, Spain, Sweden, Switzerland, Thailand, etc.
PAL-M system
Brazil .
PAL-N system
Argentina, Paraguay, Uruguay
SECAM system
Bulgaria, France, Guyana, Himgary, Iran, Iraq, Monaco, Poland, Russia, Ukraine, etc.
by time difference
You can easily set the clock to the local time by setting a time difference. Select WORLD
TIME in the MENU settings. See page 52 for more information.
68
Page 69

Maintenance information and precautions
If your camcorder is brought directly from a cold place to a warm place, moisture may
condense inside your camcorder, on the surface of the tape, or on tf\e lens. In this
condition, the tape may stick to the head drum and be damaged or your camcorder may
not operate correctly. If there is moisture inside your camcorder, the beep sounds and
die GD indicator flashes. When the — indicator flashes at the same time, the cassette is
inserted in your camcorder. If moisture condenses on the lens, die indicator will not
appear.
If moisture condensation occurred
None of the functions except cassette Section will work. Eject the cassette, turn off your
camcorder, and leave it for about 1 hour with the cassette compartment open. Your
camcorder can be used again if die IS indicator does not appear when the power is
turned on again.
Note on moisture condensation
Moisture may condense when you bring your camcorder from a cold place into a warm
place (or vice versa) or when you use your camcorder in a hot place as follows:
• You bring your camcorder from a ski slope into a place warmed up by a heating
device
• You bring your camcorder from an air-conditioned car or room into a hot place
outside
• You use your camcorder after a squall or a shower
• You use your camcorder in a high temperature and humidity place
How to prevent moisture condensation
When you bring your camcorder from a cold place into a warm place, put your
camcorder in a plastic bag and tightly seal it. Remove the bag when the air temperature
inside the plastic bag has reSched the surrotmding temperature (after about 1 hour).
* •
«
69
Page 70

Maintenance information and precautions
Cleaning the video head
To ensure normal recording and clear pictures, clean the video heads. The video head
may be dirty when:
• mosmc-pattem noise appears on the playback picture.
• playbadc pictures do not move.
• playback pictures are hardly visible.
• playback pictures do not appear.
• the O indicator and "A CLEANING CASSETTE" message appear one after another
or the O indicator flashes in the viewfinder.
If the above problem, [a] or [b] occurs, dean the video heads with the Sony V8-25CLD
deaning cassette (not supplied). Check the picture and if the above problem persists,
repeat dearung.
70
Page 71

Maintenance information and precautions
Camcorder operation
• Operiite your camcorder on 7.2 V (battery pack) or 8.4 V (AC power adaptor).
• For DC or AC operation, use the accessories recommended in this operating
instructions.
• If any solid object or liquid get inside the casing, unplug your camcorder and have it
checked by a Sony dealer before operating it any further.
• Avoid rough handling or mechanical shock. Be particularly careful of the lens.
• Keep the POWER switch set to OFF when you are not using your camcorder.
• Do not wrap your camcorder with a towel, for example, and operate it. Doing so
might cause heat to build up inside.
• Keep your camcorder away from strong magnetic fields or mechanical vibration.
On handling tapes
Do not insert anything into the small holes on the rear of the cassette. These holes are
used to sense the type and thickness of the tape and if the recording tab is in or out.
Camcorder care
• Remove the tape, and periodically turn on the power, operate the CAMERA and VTR
sections and play back a tape for about 3 minutes when your camcorder is not to be
used for a long time.
• Clean the lens with a soft brush to remove dust. If there are fingerprints on the lens,
remove them with a soft cloth.
• Clean the camcorder body with a dry soft cloth, or a soft cloth lightly moistened with
a mild detergent solution. Do not use any type of solvent which may damage the
finish.
• Do not let sand get into your camcorder. When you use your camcorder on a sandy
beach or in a dusty place, protect it from die sand or dust. Sand or dust may cause
your camcorder to malfunction, and sometimes ttiis malfunction cannot be repaired.
71
Page 72

Maintenance information and precautions
AC power adaptor
• Unplug tt>e unit from the wall outlet when you are not using the unit for a long time.
To discoimect the power cord, pull it out by the plug. Never pull the power cord itself.
• Do not operate the unit with a damaged cord or if the unit has been dropped or
damaged.
• Do not bend the power cord forcibly, or place a heavy object on it. This will damage
the card and may cause fire or electrical shock.
• Prevent metallic objects from coming into contact with the metal parts of the
connecting section. If this happens, a short may occur and the unit may be damaged.
• Always keep metal contacts clean.
• Do not disassemble the unit.
• Do not apply mechattical shock or drop the uiüt.
• While the unit is in use, particularly during charging, keep it away from AM receivers
and video equipment. AM receivers and video equipment disturb AM reception and
video operation.
• The unit becomes warm during use. This is not a malfunction.
• Do not place the unit in locations that are:
- Extremely hot or cold
- Dusty or dirty
- Very humid
- Vibrating
Notes on dry batteries
To avoid possible damage from battery leakage or corrosion, observe the following:
• Be sure to insert the batteries with the + - polarities matched to the + - marks.
• Dry batteries are not rechargeable.
• Do not use a coinbinati<m of new and old batteries.
• Do not use different types of batteries.
• Current flows from batteries when you are not using them for a long time.
• Do not use leaking batteries.
if batteries are leaking
• Wipe off the liquid in the battery compartment carefully before replacing the batteries.
• If you touch the liquid, wash it off wiffx water.
• If the liquid get into your eyes, wash your eyes with a lot of water and then consult a
doctor.
If any problem occurs, unplug your camcorder and contact your nearest Sony dealer.
72
Page 73

Specifications
Video recording system
2 rotary heads
Helical scanning systenr
Audio recording system
Rotary heads, PCM system
Quantization: 12 bits (Fs 32 kHz,
stereo 1, stereo 2), 16 bits
(Fs 48 kHz, stereo)
\^deo signal
NTSC color, EIA standards
Recommended cassette
Hi8 video cassette
Recording/playback time (using
120 min. cassette)
1 hours
Fastforwardyrewind time (using
120 min. cassette)
Approx. 8 min.
Image device
1/4 inch CCD (Charge Coupled
Device)
Approx. 460,000 pixels
(Effective: Approx. 290,000 pixels)
Lens
Combined power zoom lens
Filter diameter 17/16 in. (37 mm)
20x (Optical), 360x (Cogitai)
Focal length
5/32 - 2 7/8 in. (3.6 - 72 mm)
When corwerted to a 35 mm still *
camera
1 5/8 - 32 3/8 in. (41.820 mm)
Color temperature
Auto
Minimum illumination
1 lux (F 1.4)
0 lux (in the NightShot mode)*
* Objects unable to be seen due to
the dark can be shot with
infrared lighting.
::«onnectors’
S video mput/output
4-pin mini DIN
Luminance signal: 1 Vp-p,
75 ohms, unbalanced
Chrominance signal: 0.286 Vp-p,
75 ohms, unbalanced
Video input/output
Phono jack, 1 Vp-p, 75 ohms,
unbalanced
Audio input/output
Phono jacks (2: stereo L and R)
327 mV, (at output impedance
47 kilohms) impedance less than
2.2 kilohms
RFU DC OUT
Special minilack, DC 5V
IDV input/output
4-pin cormector
HeMiphcme )ack
Stereo minijack (e 3.5 mm)
LANC control jack
Stereo mini-minijack {0 2.5 mm)
MIC Jack
Minijack, 0.388 mV low
imp«lance with 2.5 to 3.0 V DC,
output impedance 6.8 kilohms
(0 3.5 nun)
Stereo
etillBK#;
Power requirements
7.2 V (battery pack)
8,4 V (AC power adaptor)
Average power consumption
(when using the battery pack)
During camera recording
3.1 W
Operating temperature
32 °F to 104 “F(0 ®Cto40“C)
Storage temperature
-4 “F to +140 '’F (-20 ■’C to +60 ®C)
Dimensions (Approx.)
4x4 1/4 X 7 3/4 in.
(101 X 106 X 195 mm) (w/h/d)
Mass (approx.)
llblloz (790 g)
excluding the battery pack,
lithium battery, cassette and
shoulder strap
2 lb (930 g)
Including the battery pack
NP-F330, lithium battery CR2025,
120 min. cassette and shoulder
strap
Supplied accessories
See page 7.
ACpowe
Power requirements
100 - 240 V AC 50/60 Hz
Power consumption
23W
Output voltage
DC OUT; 8-4 V, 1.5 A in operating
mode
Operating temperature
32 '•F to 104 “^F (0 “C to 40 ®C)
Storage temperature
-4 “F to +140 “F (-20 ^C to +60 X)
Dimensions (approx.)
5x19/16x21/2 in.
(125x39x62 mm) (w/h/d)
excluding projecting parts
Mass (approx.) *
9.8 oz (280 g)
excluding power cord
Cord length (approx.)
AC power cord: 6.6 feet (2 m)
Connecting cord; 5.2 feet (1.6 m)
Design and specificatior« are
subject to change without notice.
73
Page 74

— Quick Reference —
Identifying the parts and controls
¿•viir;
H POWER switch (p. 13)
d] FOCUS switch (p. 38)
d] PUSH AUTO button (p. 38)
(4] Eyecup '
d] Viewfinder lens adjustment lever
(p. 14)
[6] Power zoom lever (p, 15)
74
Ш PHOTO button (p. 25)
О ВАТТ RELEASE lever (p. 8)
[Ш STANDBY switch (p. 13)
И START/STOP button (p. 13)
О Hook for shoulder strap (p. 76)
m DC IN jack (p. 9)
This mark indicates that this product is a genuine accessory for Sony
video products.
When purchasing Sony video products, Sony recommends that you
purchase accessories with this "GENUINE VIDEO ACCESSORIES"
mark.
Page 75

Identifying the parts and controls
Ql Video control buttons
(p. 22,24,44,49,51)
■ STOP (stop)
◄◄ REW (rewind)
► PLAY (pUyback) .
►► FF (fastforward)
II PAUSE (pause)
0 REC (recording)
The control buttons light up when you
set the POWER switch to VTR,
H EDITSEARCH buttons (p. 19)
O LASER UNK button (p. 21)
H Focus ring (p. 38)
Q3 Camera recording lamp (p. 13)
What is LASER UNK7
The LASER LINK system sends and receives pictures and sound between video
equipment having ¿re ^ mark by using infrared rays.
Infrared rays emitter (p. 17,21)
Microphone
+SLOW SHUTTER button (p. 18)
NIGHTSHOT switch (p. 17)
Display window (p. 80)
Remote sensor (p. 79)
Lithium battery compartment (p. 61)
Tripod receptacle (base)
Make sure that the length of the tripod
screw is less than 9/32 inch (6.5 mm).
Otherwise, you cannot attach the tripod
securely and the screw may damage
your camcorder.
75
Page 76

Identifying the parts and controls
76
FADER button (p. 28)
BACK UGHT button (p. 17)
START/STOP MODE switch (p. 16)
Attaching the shoulder strap
A№ch the shoylder strap supplied with your camcorder to the hooks for the shoulder
strap.
EXPOSURE button (p. 37)
MENU button (p. 27,52)
SEiyPUSH EXEC dial (p. 31)
Page 77

Identifying the parts and controls
InteHigent accessory shoe
DIGITAL EFFECT button (p. 32,41)
PROGRAM AE button (p. 36)
t A Imelllgent
UIa
------------
I AccessofyShoe
Notes on the intelligent accessory shoe
• The intelligent accessory shoe supplies power to optional accessories such as a video
light or microphone.
• The intelligent accessory shoe is linked to STANDBY, allowing you to turn tKe power
supplied by the shoe on and off. Refer to the operating instructions of the accessory
for further information.
• The intelligent accessory shoe has a safety device for fixing the installed accessory
securely. To connect an accessory, press down and push it to the end, and then tighten
the screw.
• To remove an accessory, loosen the screw, and then press down and pull out the
accessory.
PICTURE EFFECT button (p, 31,40)
DATA CODE button (p. 23)
77
Page 78

Identifying the parts and controls
^ Viewfinder (p. 14)
^ EJECT switch (p. 12)
^ LANC C controi jack
LANC stands for Local Application
Control Bus System. The C control jack
is tised for controlling the tape'transport
of video equipment and other
peripherals connected to the video
equipment. This jack has the same
functioin as the jack indicated as
CONTROL L or REMOTE.
@ Cassette compartment (p. 12)
H] Grip strap
M s vìdeo jack (p. 20,26,47,49)
@ 0 (headphones) jack
Fastening the grip strap
Fasten the grip strap firmly.
78
S RFU DC OUT (RFU adaptor DC output)
jack (p. 20)
@ MIC jack (PLUG IN POWER)
Connect an external microphone
(not supplied). This jack also accepts
a "plug-in-power" microphone.
If you connect a 2-pin microphone,
supply power from DC OUT jack.
@ kDV IN/OUT jack (p. 48)
This "i.LINK" mark is a trademark of
Sony Corporation and indicates that this
product is in agreement with IEEE 13941995 specifications and their'revisions.
The К DV IN/OUT jack is i.LINK
compatible.
VIDEO/AUDIO jacks (p. 20, 26,47,49)
Page 79

Identifying the parts and controls
The buttons that have the same name on the Remote Commander as on your camcorder
function identically to the buttons on yOür camcorder.
SI /► ► ! buttons (p. 43,45,46)
d] Tape transport buttons (p. 24)
[U DATA CODE button (p. 23) .
To prepare the Remote Commander
Insert 2 size AA (R6) batteries by matching the + and - polarities on the batteries to
the + - marks inside the battery compartment.
Notes on the Remote Commander
• Point the remote sensor away from strong light sources such as direct sunlight or
overhead lighting. Otherwise, the Remote Commander may not function properly^
• Your camcorder works in the commander mode VTR 2. Commander modes
1,2 and 3 are used to distinguish your camcorder from other Sony VCRs to avoid
remote contr<^ misoperation. If you use another Sony VCR in the Commander mode
VTR 2, we recommend changing the commander mode or covering the sensor of the
VCR with black paper.
control the camcorder after turning on
the camcorder.
S] STARt/STOP button (p. 13)
B3 Power zoom button (p. 15)
79
Page 80

Identifying the parts and controls
Viewfinder
[I] Tape speed mode indicator
This indicator appears while playing
back in the Hi8/standard 8 system.
[2 Format indicator (p. 58)
I), HiB or B appears.
[2 Remaining battery time indicator
(p. 16)
Q] Exposure indicator (p. 37)/Zoom
indicator (p. 15)
d] Fader indicator (p. 29)/Digital effect
indicator (p. 33,41)
[6] Wide mode indicator (p. 27)
[7] Picture effect indicator (p. 31,40)
[2 Data code indicator (p. 23)
[2 PROGRAM AE indicator (p. 36)
S3 Backlight indicator (p. 17)
Qi] SteadyShot off indicator (p. 53)
m Manual focusing indicator (p. 38)
in Standby/Recording indicator (p. 13)/
Video control mode (p. 24)
80
Display window
Handycam
mmW8W88.M7m
01 Tape counter (p. 16,39,42,51)Time
code indicator (p. 16)/Self-diagnosis
display function indicator (p. 66)/5SEC
mode indicator (p. 16)/Photo
recording indicator (p. 25)
01 Remaining tape indicator (p. 16)
01 ZERO SET MEMORY indicator
(p. 39,42,51)
02 Search mode indicator (p. 43,45,46)
01 NIGHTSHOT indicator (p. 17,18)
01 DV IN indicator (p. 48)
^ Audio mode indicator (p. 55)
ij] Warning indicators (p. 67)
@ Video flash ready indicator
This indicator appears when you use the
video flash light (not supplied).
^ HiS indicator
This indicator appears while playing
back in the Hi8 system.
S Tape counter (p. 16,39,42,51) /
Time code indicator (p. 16)/ -. _
Self-diagnosis display function
indicator (p. 66)/Remaining battery
time indicator (p. 9)
H FULL charge indicator (p. 9)
-m
Page 81

Quick Function Guide
Functions to adjust exposure (in the recording mode)
• In a dark place
• In insufficient light
• In dark environments such as sunset, fireworks,
or general night views
• Shooting backlit subjects
• In spotlight, such as at the theater or a formal
event
• In strong light or reflected light, such as
at a beach in midsiunmer or on a ski slope
NIGHTSHOT (p, 17)
Low lux mode (p. 35)
Sunset & moon mode (p. 35)
BACK LIGHT (p.lT)
Spotlight mode (p. 35)
Beach & ski mode (p. 35)
Functions to give images more impact (in the recording mode)
• Smooth transition between scenes
• Taking a still picture
• Digital processing of images
• Processing a scene using digital effects
• Creating a soft background for subjects
FADER (p. 28)
PHOTO (p. 25)
PICTURE EFFECT (p. 31)
DIGITAL EFFECT (p. 32)
Soft portrait mode (p. 35)
Functions to give a naturai appearance to your recordings (in the recording mode)
• Preventing deterioration of picture quality
in digital zoom
• Focusing manually
• Shooting distant subjects
•Recording fast-moving subjects.
DZOOMfMENUJ(p.52)
Manual focus (p. 38)
Landscape mode (p. 35)
Sports lesson mode (p. 35)
Functions to use in editing (in the recording mode)
• Watching the picture on a wide-screen TV Wide mode (p. 27)
Functions to use after recording (in the playback mode)
• Digital processing of recorded images
• Processing a recorded scene using digital effects
• Displaying the date/time or recording data
when you recorded
• Quickly locating a desired scene
• Searching for scenes recorded in the photo mode
• Scanning scenes recorded in the photo mcxle
• Playing back on monaural sound or sub sound
• Playing back the picture on a TV without
connecting a cord
PICTURE EFFECT (p.40)
DIGITALEFFECT(p.41) .
Data code (p. 23)
Zero set memory (p. 39,42,51)
Photo search (p. 45)
Photo scan (p. 46)
HiFi SOUND [MENU] {p. 52)
LASER LINK (p.21)
81
Page 82

Index
A,B
Adjusting viewfinder
AC power adaptor
AFM HiFi Sound
ANTI GROUND SHOOTING
...............................................
A/V connecting cable
....................................
BACK UGHT..........................17
Battery pack
Beep..........................................56
BOUNCE
.................................
cTd
Charging battery........................9
Clock set...................................57
Connection
(viewing (HI TV)
(dubbing a tape)
Data code..................................23
Date search...............................43
DEMO
......................................
DIGITAL EFFECT.................32
Digitals system
DISPLAY
Dual sound track tape
Dubbing a tape
DV connecting cable
..............
.....................
....................
20,26,47, 49
...............................
.................
..................
........................
................................
.............
.............
...........
..............
47
i
EDITSEARCH...................... 19
Exposure
..................................
External microphone (not
supplied)................................78
F,G, H
BADER
....................................
Fadein/out
................................
FLASH MOTION
FOCUS
.....................................
Full charge
Grip strap..................................78
Heads
........................................
Headphone jack
HiFi SOUND
..................
.................................
.......................
............ .............
I, J, X, L
¡.LINK.................................47,78
14
"InfoLITHIUM" battery
9
Infrared rays emitter
59
LANC
16
8
28
20
55
58
23
59
47
48
37
29
29
32
38
9
70
78
54
.......................................
LASER LINK..........................21
LUMINANCEKEY
mTn
Main sound
Manual focus
Menu settings...........................52
Moisture condensation
MONOTONE
Monaural
Mosaic fader
NIGHTSHOT
Normal charge
NTSC system
..............................
...........................
..................................
............................
..........................
...........................
O, P,Q
OLD MOVIE
Operation indicators................80
OVERLAP
Photo scan
n»oto search
Photo recording
PICTURE EFFECT
Picture search
* Playback pause
Power sources
(house current)
(car battery)
(battery pack)
Power zoom
PROGRAMAE
...........................
...............................
................................
.............................
........................
..........................
.............................
R
Rec review
Recording time
Remaining tape indicator
Remaining battery time
Remote control jack (LANC)
Remote commander
Remote sensor
...............................
indicator.................................16
...............................................
.........
..........
17,21
................
............
..........................
...........................
.......................
................
.......................
.....................
..........................
......................
........................
.......
................
.........................
5
S video jack
11
Self-diagnosis display
SEL/PUSH EXEC dial
Shoulder strap
78
Skip scan
32
Slow playback
SLOW SHUTTER
+SLOW SHUTTER............................18
START/STOP MODE........................16
STEADYSHOT
54
Stereo tape
38
STILL......................................................32
Sub sound
69
28
59
T, u. V
28
17
Time code.......................................... 16
Tape counter............... 16,39,42,51
9
Telephote............................................15
68
TRAIL
Transition............................................13
TV color systems
32
w, X, Y, z
28
46
Warning indicators
Wide-angle....................................... 15
45
25
Wide mode
31
WORLD TIME.....................................56
24
Write-protect tab
24
Zoom....................................................15
Zero set memory
11
11
8
15
36
19
10
16
78
79
75
.................
.............................................
........................................
..........................................
....................................................
........................................
20,26,47,49
....................
.......................
..................................
...................................
...............................
....................................
..............................
.........................
............................
..............
39,42,51
66
76
76
24
24
32
53
59
54
32
68
67
27
12
82
Page 83

Page 84

Sony^raline http://www.worid.sony.com/
Sony Corporation Printed in Japan
Printed on recycled paper
 Loading...