

Page 1
Compact Disc
Player
Operating Instructions
Thank you for purchasing the Sony Compact Disc Player.
Before operating the player, please read this manual thoroughly
and retain it for future reference.
2-347-023-12(1)
CDP-D11
1999 by Sony Sound Tec Corporation
Page 2
WARNING
Notice for the Customers in the
United Kingdom
IMPORTANT
The wires in this mains lead are
coloured in accordance with the
following code:
Blue: Neutral
Brown: Live
As the colours of the wires in the
mains lead of this apparatus may not
correspond with the coloured markings
identifying the terminals in your plug,
proceed as follows:
The wire which is coloured blue must
be connected to the terminal which is
marked with the letter N or coloured
black.
The wire which is coloured brown
must be connected to the terminal
which is marked with the letter L or
coloured red. Do not connect either
wire to the earth terminal in the plug
which is marked by the letter E or by
the safety earth symbol Y or coloured
green or green-and-yellow.
To prevent fire or shock hazard,
do not expose the unit to rain or
moisture.
To avoid electrical shock, do not
open the cabinet. Refer servicing
to qualified personnel only.
INFORMATION
This equipment has been tested and
found to comply with the limits for a
Class B digital device, pursuant to Part
15 of the FCC Rules. These limits are
designed to provide reasonable
protection against harmful interference
in a residential installation. This
equipment generates, uses, and can
radiate radio frequency energy and, if
not installed and used in accordance
with the instructions, may cause
harmful interference to radio
communications.
However, there is not guarantee that
interference will not occur in a
particular installation. If this equipment
does cause harmful interference to radio
or television reception, which can be
determined by turning the equipment
off and on, the user is encouraged to try
to correct the interference by one or
more of the following measures:
– Reorient or relocate the receiving
antenna.
– Increase the separation between the
equipment and receiver.
– Connect the equipment into an outlet
on a circuit different from that to
which the receiver is connected.
– Consult the dealer or an experienced
radio/TV technician for help.
The laser component in this product
is capable of emitting radiation
exceeding the limit for Class 1.
Precautions
On safety (Refer to the supplied
“WARNING”.)
Should any solid object or liquid fall
into the cabinet, unplug the recorder and
have it checked by qualified personnel
before operating it any further.
On power sources
• Before operating the player, check that
the operating voltage of the player is
identical with your local power supply.
The operating voltage is indicated on
the nameplate at the rear of the player.
• If you are not going to use the player
for a long time, be sure to disconnect
the player from the wall outlet. To
disconnect the AC power cord, grasp
the plug itself: never pull the cord.
• AC power cord must be changed
only at the qualified service shop.
On condensation
If the player is brought directly from a
cold to a warm location, or is placed in a
very damp room, moisture may condense
on the lenses inside the player. Should
this occur, the player may not operate
properly. In this case, remove the CD
and leave the player turned on for about
an hour until the moisture evaporates.
On cleaning
Clean the cabinet, panel and controls with
a soft cloth slightly moistened with a
mild detergent solution. Do not use any
type of abrasive pad, scouring powder or
solvent such as alcohol or benzine.
If you have any questions or problems
concerning your player, please consult
your nearest Sony dealer.
About This Manual
Conventions
• Controls in the instructions are those on
the player, these may, however, be substituted by controls on the remote that are
similarly named or, when different, appear in the instructions within brackets.
• The following icons are used in this
manual:
Indicates a procedure that
Z
z
requires use of the remote.
Indicates tips for making
the task easier and hints.
This symbol is intended to alert the
user to the presence of uninsulated
"dangerous voltage" within the
product's enclosure that may be of
sufficient magnitude to constitute a
risk of electric shock to persons.
This symbol is intended to alert the
user to the presence of important
operating and maintenance (servicing)
instructions in the literature
accompanying the appliance.
This appliance is classified as a CLASS 1 LASER
product.
The CLASS 1 LASER PRODUCT MARKING is
located on the rear exterior.
2
Page 3

TABLE OF CONTENTS
PREPARATIONS
In the beginning ................................................................................................... 4
Connection ............................................................................................................4
PLAYBACK ........................................................................................6
VARIOUS OPERATIONS
On display window ...............................................................................................7
Searching for a track (AMS/Direct play/Music scan) ........................................... 7
Searching for a particular point (Search) ............................................................ 8
Repeat play ........................................................................................................... 9
Playback in random order (Shuffle play)...........................................................10
Playback in programmed order (Programmed play) ........................................10
To return to the specified point (Locate) .......................................................... 12
To pause after playback of each track (Auto pause) ........................................13
To start the sound immediately (Auto cue) ...................................................... 14
To change playback speed (Variable speed play) ............................................. 15
Timer playback .................................................................................................... 16
Last mode memory ............................................................................................. 16
OTHERS
Functions of control terminals ...........................................................................18
Functions of REMOTE terminal ..........................................................................18
Precautions .......................................................................................................... 20
Treatment of compact discs ............................................................................... 21
Troubleshooting guide .......................................................................................21
Parts names ......................................................................................................... 22
Specifications ...................................................................................................... 23
3
Page 4
Preparations
èÄîıPreparations
In the beginning
Check that the following accessories are packed.
• Remote control RM-DS11 (1)
• Batteries size AA (R6) (2)
• Connection cord for control S (1)
If any accessory is missing, contact the shop where
you purchased.
Inserting batteries into the remote
control
Insert two R6 (size AA) batteries (supplied) with ‘
and ’ directions correctly.
z These batteries hold out for about 6 months.
The operational distance from the remote control
decreases when the batteries are consumed. In this
case replace the batteries with new ones.
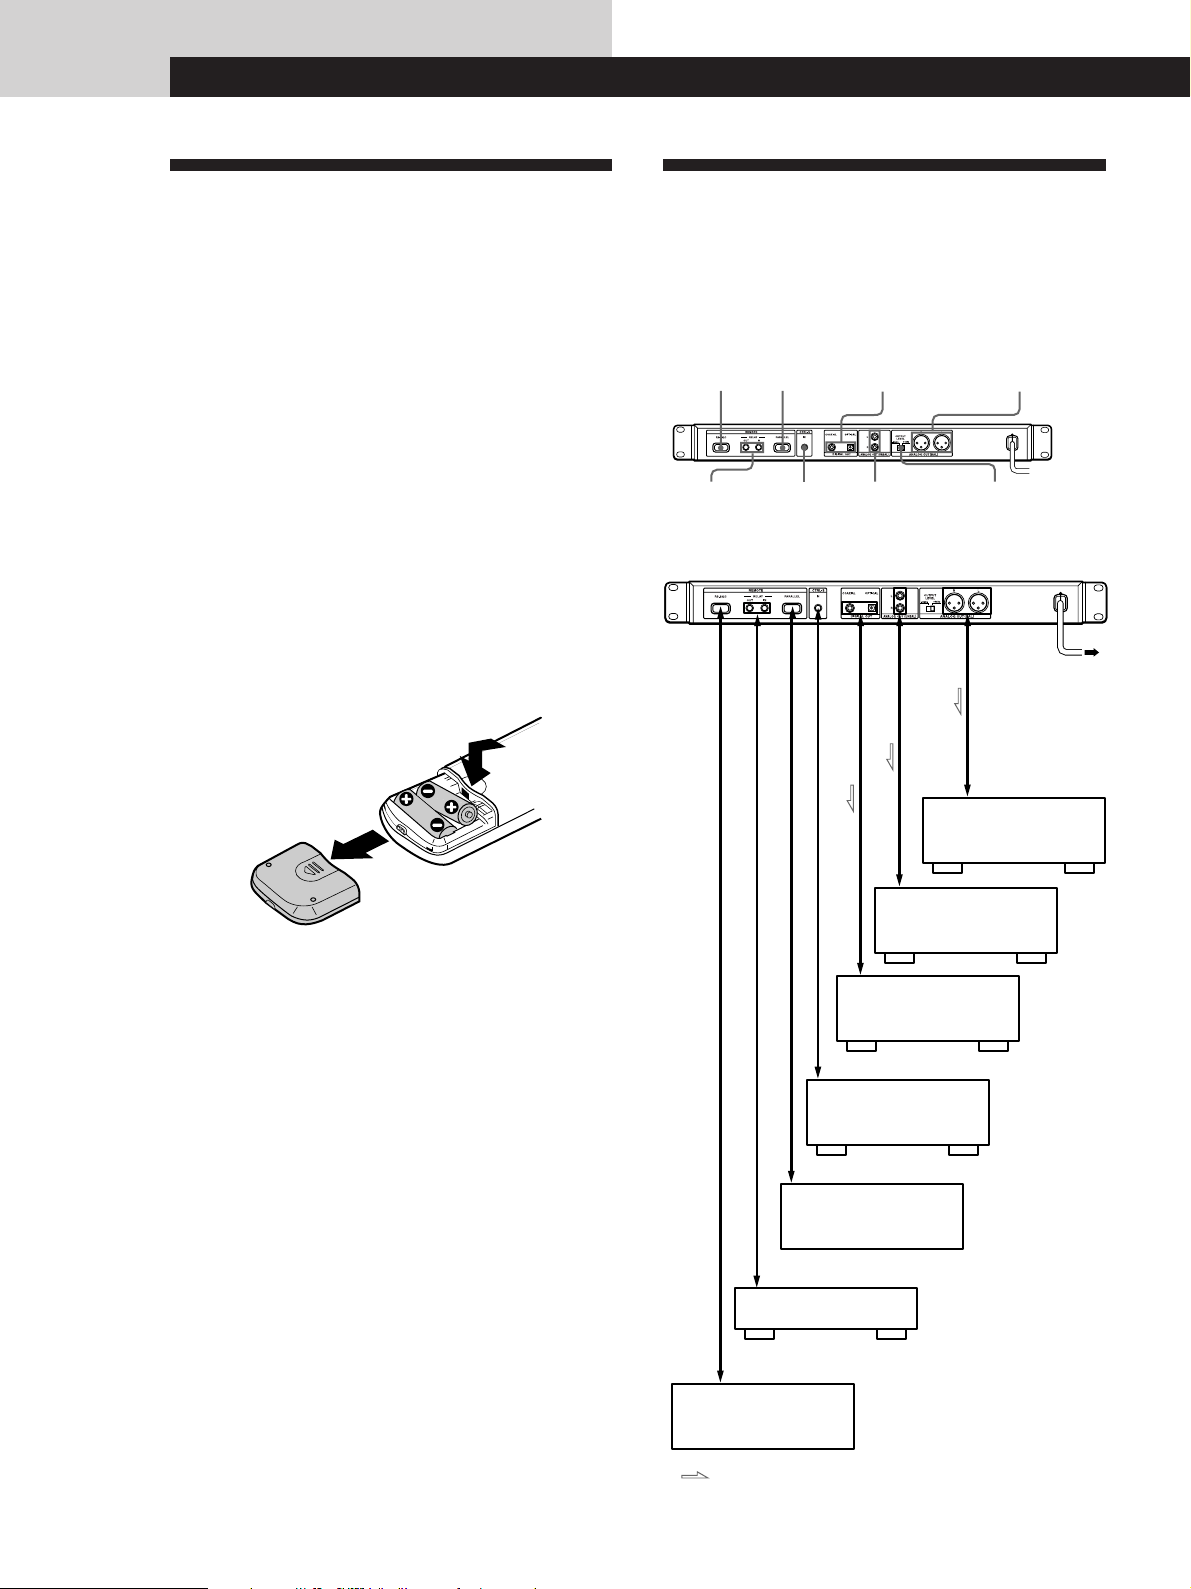
CONNECTION
The CD player can be connected with a mixer, an MD
recorder or a DAT recorder, etc. Before connection,
make sure to turn off each equipment.
REMOTE
RS-232C
OUT/IN
REMOTE
PARALLEL DIGITAL OUT
CTRL-SRELAY
(UNBAL)
ANALOG OUT
(BAL)
OUTPUT LEVELANALOG OUT
To a wall outlet
Notes
• Incorrect use of the batteries may causes an electrolyte
leakage or a explosion. Keep the following.
– Insert the batteries with ‘ and ’ directions correctly.
– Do not mix new batteries with old ones or not mix
different type of batteries.
– Do not charge the batteries.
– When the remote control is not going to be used for an
extended period of time, remove the batteries.
– In the event of electrolyte leakage, wipe out inside the
compartment and insert new batteries.
• Keep the remote sensor from direct sunlight or strong
illumination. If it is exposed to them, the remote control
may not work.
Mixer
Mixer
Digital audio
equipment (MD, DAT)
Supplied remote control
or control equipment
Control equipment
CDP-D11
Control equipment
: Flow of the signals
4
Page 5
Preparations
z To use the supplied remote control as the
wired remote control
Connect the terminal on the front side of the remote
control and the CONTROL terminal of the main unit
with the CONTROL S cord (supplied).
When the remote control and the main unit is
connected with the CONTROL S cord, the infrared ray
is not set out from the remote control and is not
received at the main unit.
To use as the wireless remote control, disconnect the
plugs from both the main unit and the remote control.
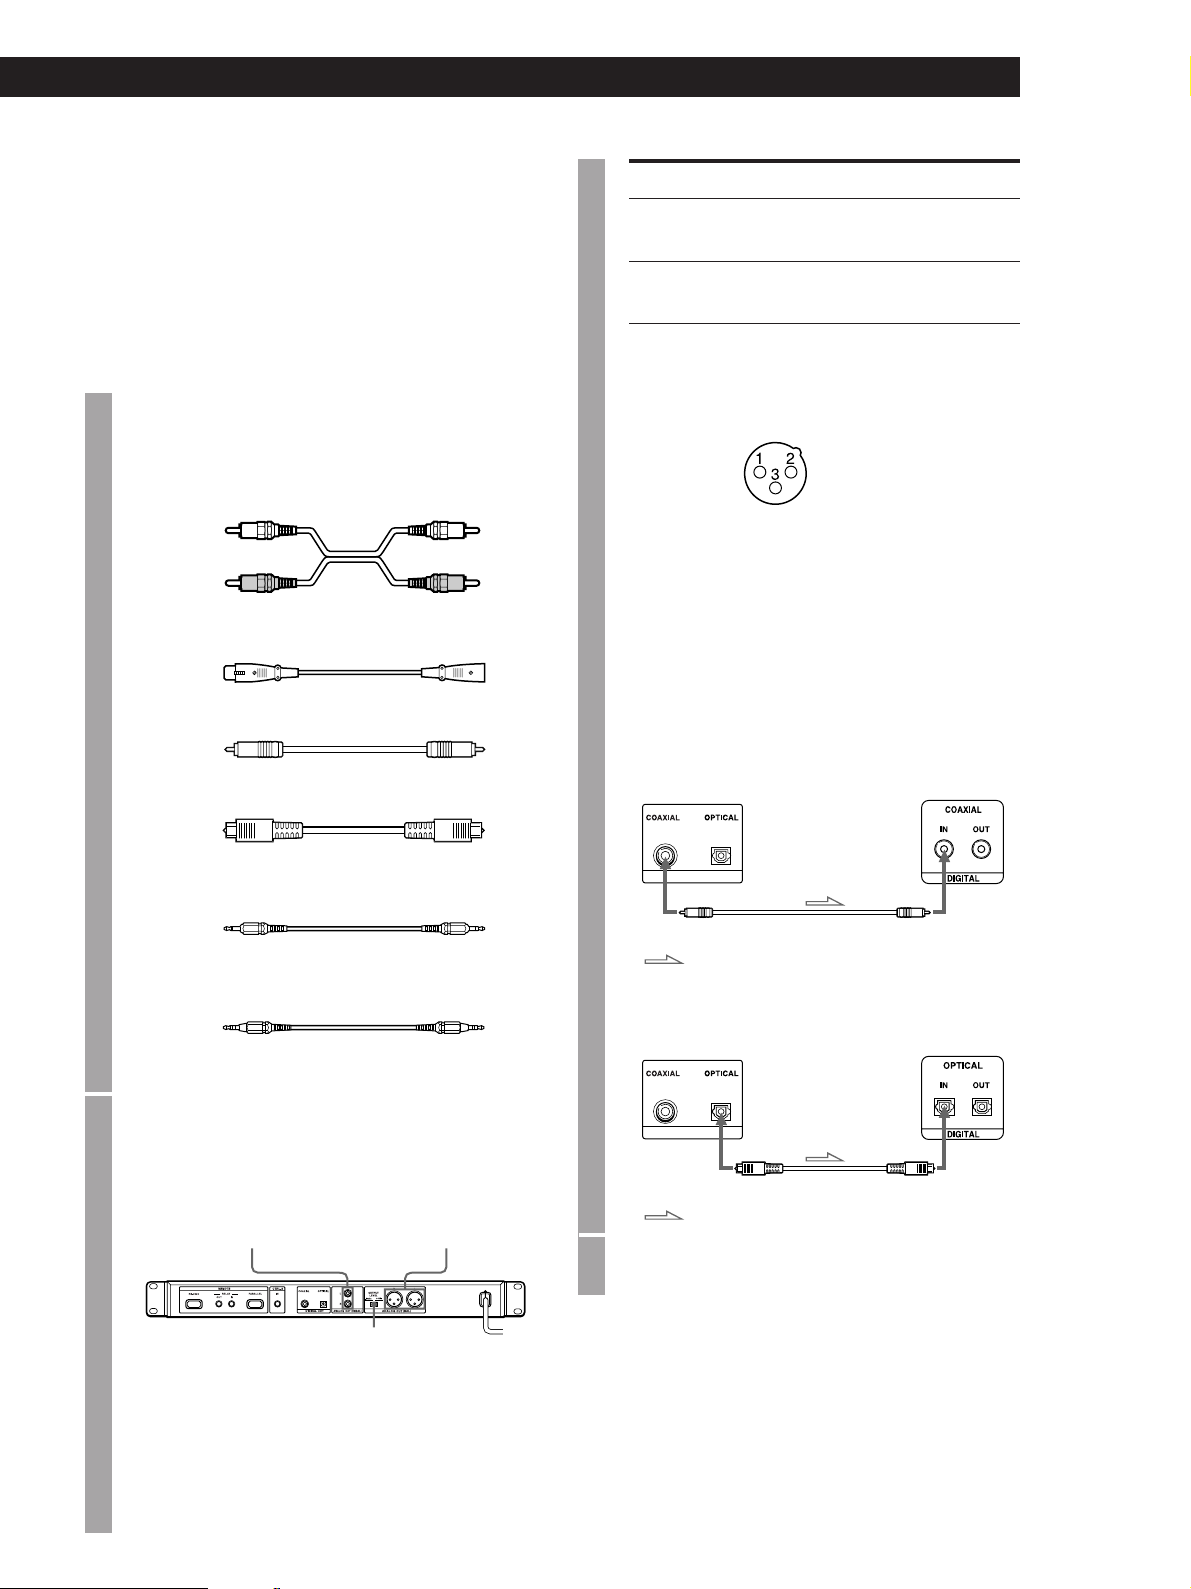
1 Prepare the necessary connecting
cord.
• Audio connecting cord (pin type)
Left (L)
Right (R)
• Audio connecting cord XLR type
• Coaxial digital connecting cable VMC-10, etc.
White White
Red
Red
Left (L)
Right (R)
Position
+4dBu
-10dBu
Output level
The signal of -20dB in digital is
output in +4dBu level.
The signal of -20dB in digital is
output in -10dBu level.
Specification of the BALANCE output
connector.
Equivalent to XLR-3-32
output terminal
1: GND
2: HOT
3: COLD
To connect to a digital equipment
p
(MD recorder, DAT recorder, mixer with
digital input terminal, etc.)
Digital recording can be carried out by
connecting to MD or DAT recorder. Use
coaxial digital connecting cable VMC-10
(optional) or optical digital connecting cable
POC-15A (optional), etc.
• Optical digital connecting cable POC-15A, etc.
• Control S cord (supplied)
(Mini jack)(Mini jack)
• Relay playback cord (RK-G136, etc.)
(Stereo mini jack) (Stereo mini jack)
2 Connect the cord.
To connect to an analog equipment
p
Use the terminals and switch as below.
Analog output terminal
UNBAL (pin type)
Analog output terminal
BAL (XLR type)
• When using coaxial digital cable
CD player
DIGITAL OUT
: Flow of the signals
• When using optical digital connecting cable
CD player Digital equipment
DIGITAL OUT
: Flow of the signals
Digital equipment
3 Connect the AC power cord to the wall
outlet.
OUTPUT LEVEL
switch
z When BALANCE output (XLR type)
terminal is used, output level can be changed
by OUTPUT LEVEL switch.
5
Page 6
Basic playback operation
Playback
23 4
z To use the headphones
Connect headphones to PHONE
jack in the front panel.
Adjust the volume by PHONE
LEVEL control.
z Playback can be started in
step 4 by selecting a track
number.
1 Turn the AMS control until
the desired track number is
displayed.
(To use the remote control,
press the = or + button.)
2 Press the AMS control or the
fl button.
MENU/EXIT DISPLAY
PUSH MARK/ENTER
A CUE
LOCATE
SPEED
VARI
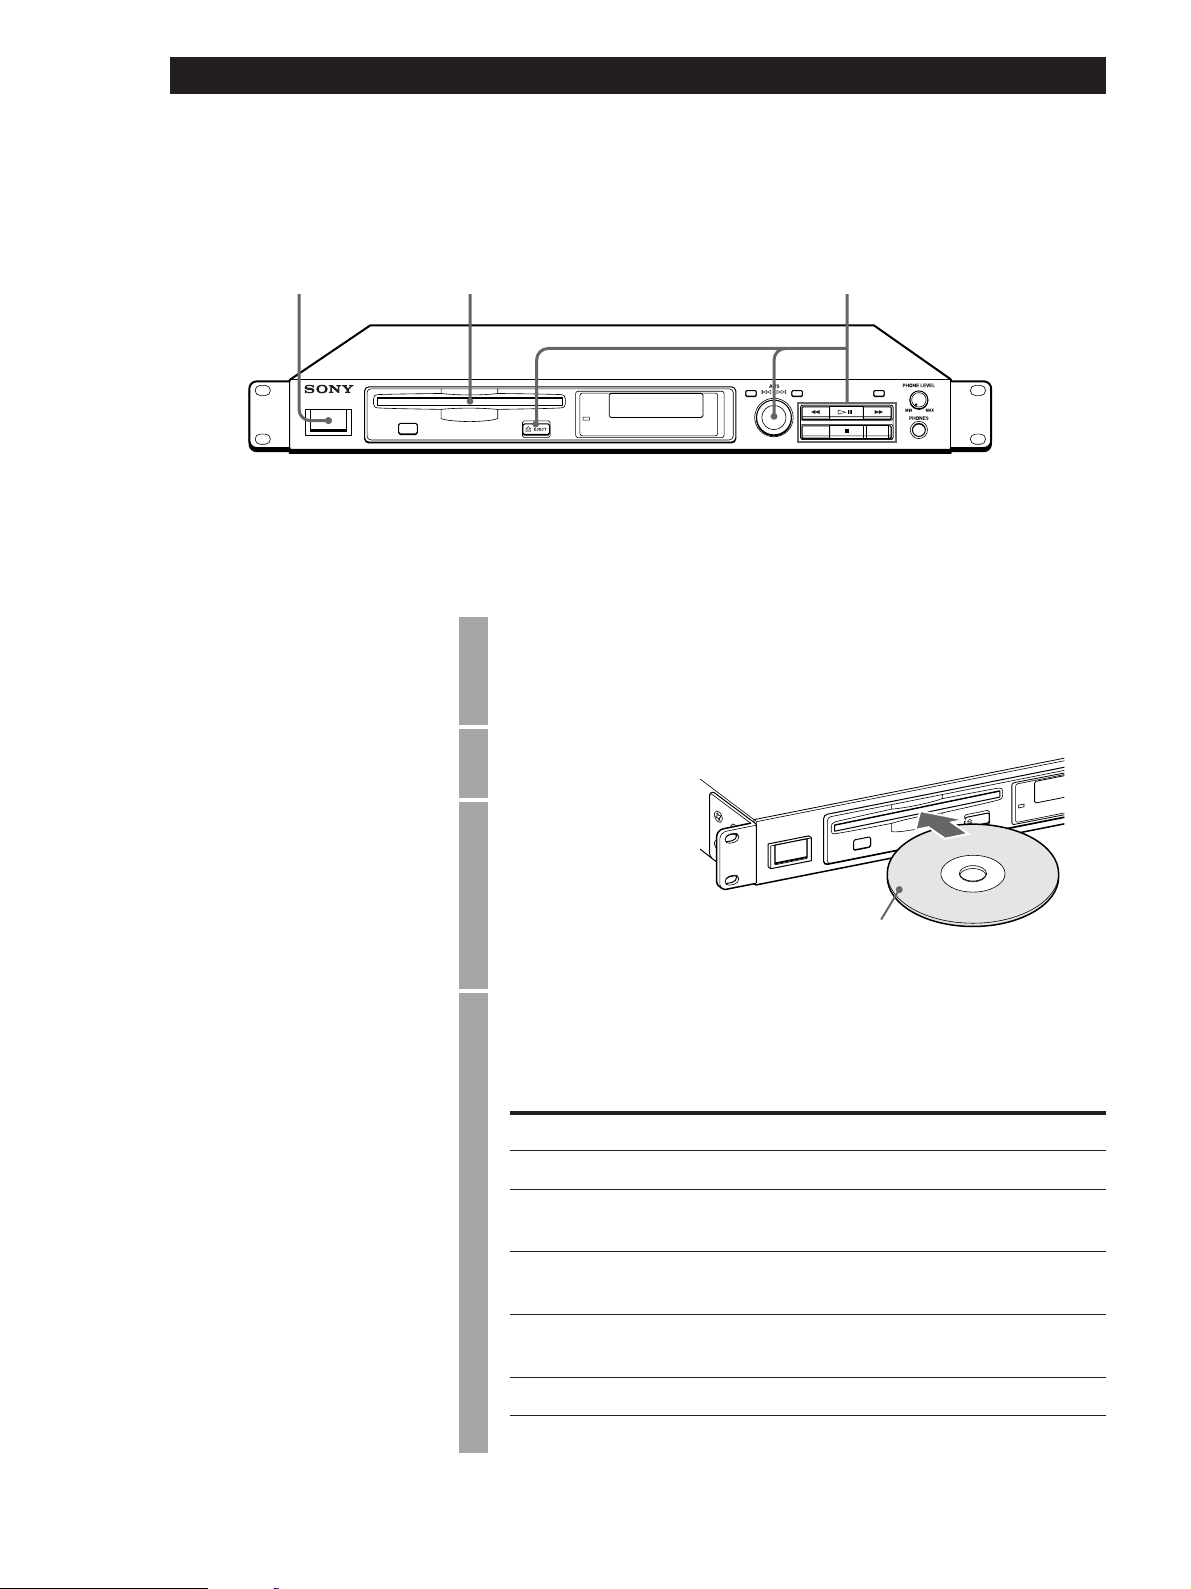
1 Turn on the mixer and adjust fader or level of the
connected channel.
2 Turn on this unit.
3 Insert the disc.
8cm disc can be
played without
adapter.
Label side up
4 Press the fl button.
Playback starts.
z Ejecting function can be
turned not to work to avoid
ejecting the disc by mistake
during playback or pause
mode.
1 Press the MENU/EXIT button
in stop mode to display
“MENU Mode”.
2 Turn the AMS control until
“PLAY/PAUSE” is displayed,
then press the AMS control.
3 Turn the AMS control until
“EJECT Disable” is displayed,
then press the AMS control.
4 Press the MENU/EXIT button.
To change so that ejecting
function is always workable,
select “EJECT Enable” in step 3.
What to be
To stop playback
To pause playback
To skip to the next track
To return to the previous
track
To eject the disc
Operation
Press p.
Press fl.
(Playback starts by pressing it again.)
Turn AMS to right.
(Press + in the remote control.)
Turn AMS to left.
(Press = in the remote control.)
Press § EJECT.
6
Page 7
VARIOUS OPERATION
Ç¢ÇÎÇ¢ÇÎÇ»çƒê∂ ÇÃǵǩÇΩ
VARIOUS OPERATION
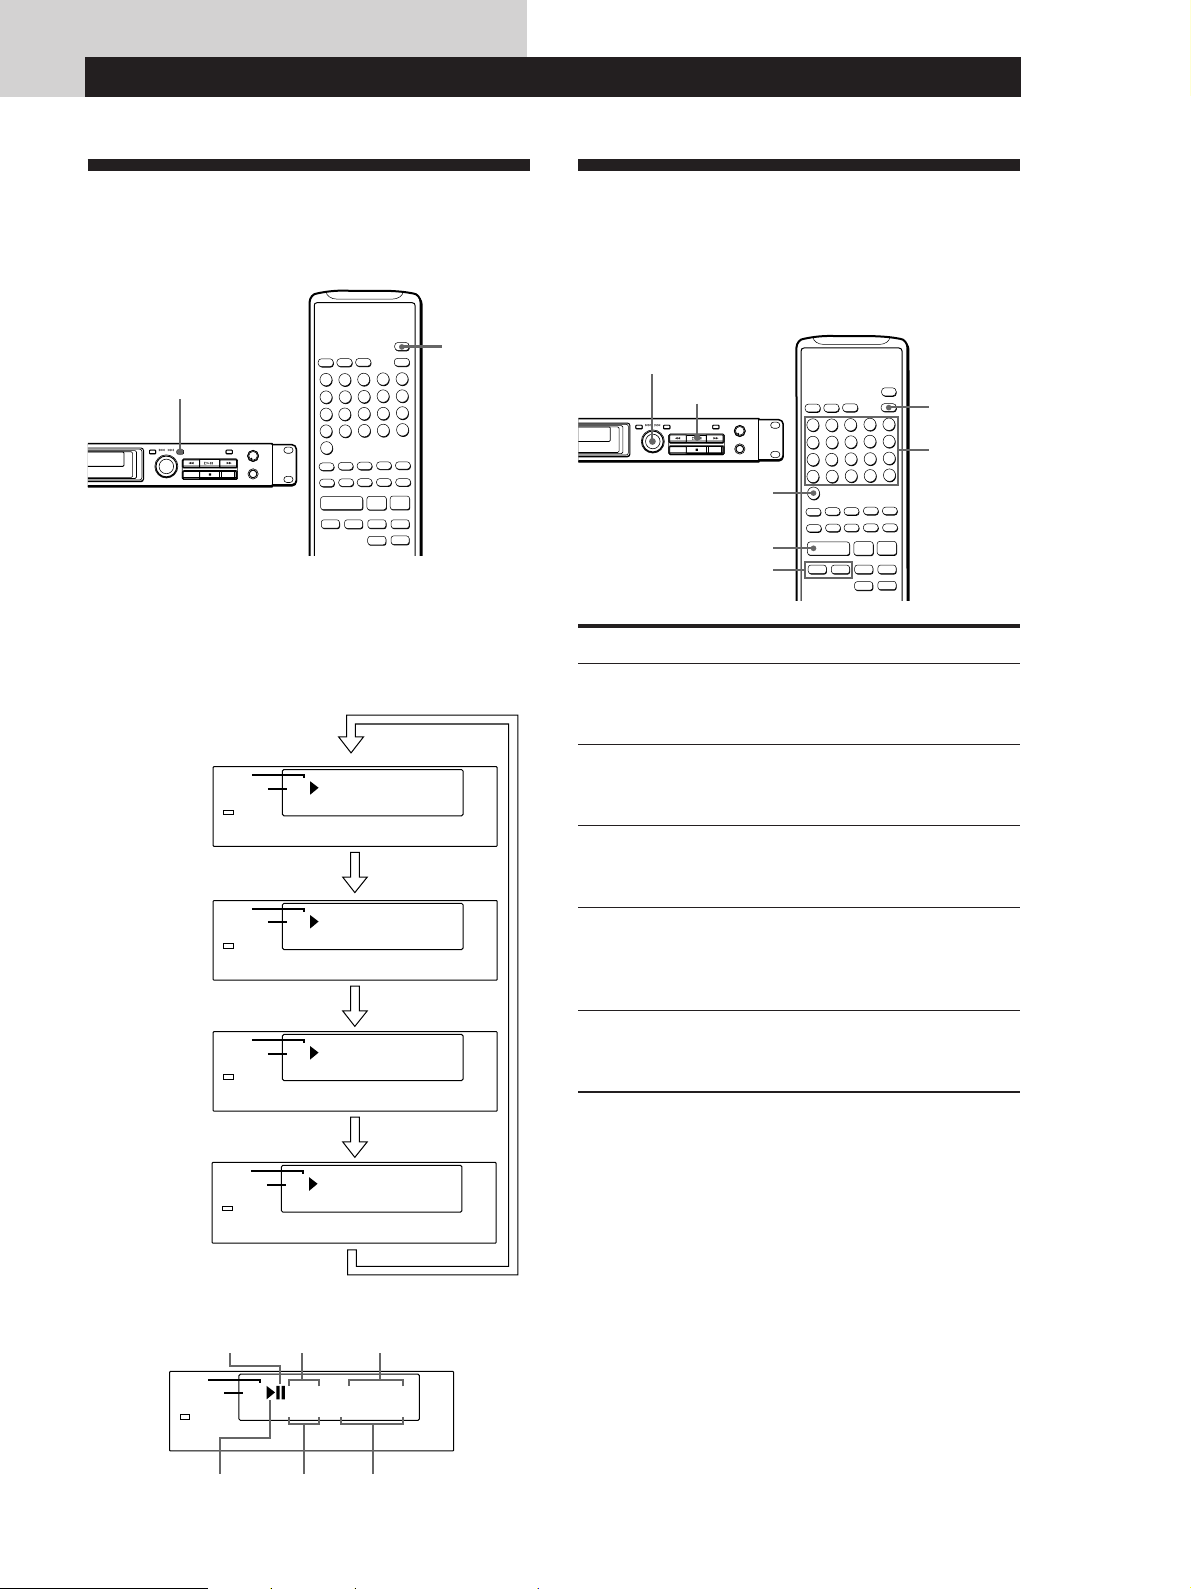
On display window
Total playing time of the disc, remaining playing time,
etc. can be checked in the display window.
DISPLAY
DISPLAY
pP·
0 )
+=
0)
To check the remaining time of
current playing track or of whole disc
Press DISPLAY during playback or in pause mode.
Each time it is pressed, display changes as below.
Current track number and elapsed
playing time (normal display)
REPEAT
PLAY MODE
VARI SPEED
Ct1
3
T16 14
54
A-PAUSE
A-CUE
s
m
54
MARK
s
m
Searching for a track
(AMS/Direct play/Music scan)
There are 5 ways for search as follows. AMS is a
shortened form of Automatic Music Sensor.
≠AMS±
fl
=/+
How to search
To skip to the
beginning of the next
track (AMS)
To skip to the
beginning of the current
or the previous track
>20
·
+=
0 )
0)
Operation
Turn the AMS control to right
during playback. (Press + in the
remote control.)
Turn the AMS control to left during
playback. (Press = in the remote
control.)
MUSIC SCAN
Number buttons
pP·
Remaining time of the current track
REPEAT
PLAY MODE
Remaining time of the whole disc
REPEAT
PLAY MODE
Index number in the current track
REPEAT
PLAY MODE
Ct1
VARI SPEED
C
VARI SPEED
Ct1
VARI SPEED
Basic display
Playback
pause mark
REPEAT
PLAY MODE
VARI SPEED
Playback mark Total
Current track
number
Ct12
T16 14
number
of tracks
Press
s
m
20
-1
T16 14
54
s
m
Press
s
m
28
-49
T16 14
54
s
m
Press
Index
T16 1454
Elapsed playing time
of the current track
m
40
3
54
m
Total playing time of
whole disc
1
sm
A-PAUSE
A-CUE
s
MARK
s
A-PAUSE
A-CUE
MARK
A-PAUSE
A-CUE
MARK
A-PAUSE
A-CUE
MARK
To select the track
number directly
(Direct play)
Z
To search by track
number (AMS)
Press the number button of desired
track number.
1 Turn the AMS control in stop
mode to select a track number.
2 Press the AMS control or the fl
button.
To search by listening to
the beginning of each
track (Music scan)
1 Press the MUSIC.SCAN button.
2 Press the · button when
Z
desired track is played.
z To select the 21st track or after by the direct play Z
Press the >20 button, then press the second digit number
and the first digit number by the number buttons.
Example: To select the 30th track
Press the number buttons in the order of >20 n3 n10.
z Playing time of each track during Music scan can
be changed.
1 Press the MENU/EXIT button in stop mode to
display “MENU Mode”.
2 Turn the AMS control to display “MUSIC SCAN”,
then press the AMS control.
3 Turn the AMS control to set the playing time
between 6 seconds to 20 seconds (1 second interval),
then press the AMS control.
4 Press the MENU/EXIT button.
z Play can be paused at the beginning of a track.
Turn the AMS control in pause mode.
(Press = or + in the remote control.)
7
Page 8
VARIOUS OPERATION
Searching for a
particular point (Search)
0/)
0/)
pP·
0 )
+=
0)
There are 3 speed to search as follows.
• Searching a point listening to a sound in twice the
speed as normal playback. (Low speed search)
• Searching a point listening to a sound in 20 times the
speed as normal playback. (Standard search)
• Searching a point checking the playing time display
in 80 times the speed as normal playback. (High
speed search)
-SLOW-
0/)
“SOUND ON” or “SOUND OFF” can be set as
follows.
1 Press the MENU/EXIT button in stop mode to
display “MENU Mode”.
2 Turn the AMS control to display
“PAUSE
0/)
”.
3 Turn the AMS control to display “SOUND ON” or
“SOUND OFF”, then press the AMS control.
4 Press the MENU/EXIT button.
When “OVER” is displayed while pressing
button in pause mode
It shows that playback goes to the end of the last track.
Turn the AMS control to left or press 0 button.
(Press = or 0 button in the remote control.)
Note
Playback stops when playback goes to the end of the last track
while pressing ) button during playback.
Searching way will be different due to MENU Mode
setting (SOUND ON or SOUND OFF) or playback
mode (playback or pause 0/)).
1.When “SOUND OFF” is selected
Button
During
In pause mode
playback
0/) in the main unit
0/) in the remote
control
-SLOW-
0/) in the remote
control
Standard
search
Standard
search
Low speed
search
High speed
search
High speed
search
Low speed
search
2.When “SOUND ON” is selected
Button
During
In pause mode
playback
0/) in the main unit
Standard
search
Low speed
search
0/) in the remote
control
-SLOW-
0/) in the remote
control
Standard
search
Low speed
search
Standard
search
Low speed
search
8
Page 9

Repeat play
Z
All tracks are played repeatedly.
Shuffle play and programmed play can also be
repeated.
Ç¢ÇÎÇ¢ÇÎÇ»çƒê∂ ÇÃǵǩÇΩ
VARIOUS OPERATION
z Repeat play can be set with the MENU Mode in the
main unit.
1 Press the MENU/EXIT button to display “MENU
Mode”.
2 Turn the AMS control to display “REPEAT Mode”,
then press the AMS control.
3 Turn the AMS control to display either of “REPEAT
OFF”, “ALL REPEAT” or “1 Track REPEAT”,
then press the AMS control.
4 Press the MENU/EXIT button.
To repeat a particular section
(A-B repeat) Z
REPEAT
A˜B
+=
pP·
0 )
0)
)
Press REPEAT button.
“R” is displayed at the REPEAT position in the
display window, and playback is repeated as
follows.
REPEAT
PLAY MODE
VARI SPEED
CR t1
T16 14
Playback mode
Normal play (page 6)
Shuffle play (page 10)
programmed play
(page 10)
3
54
How to repeat tracks
All tracks in numerical order
In different order in each
time all tracks are repeated
In programmed order
A-PAUSE
A-CUE
s
m
54
MARK
s
m
To cancel repeat play
Press REPEAT button repeatedly until “R“ in the “REPEAT”
position in the display disappears.
To repeat one track only (1 track repeat)
Only one track can be repeated during normal play.
Press REPEAT button repeatedly until “1” is
displayed in the “REPEAT” position while the
track to be repeated is being played.
REPEAT
PLAY MODE
VARI SPEED
C1 t1
3
T16 14
54
A-PAUSE
A-CUE
s
m
54
MARK
s
m
Specified section can be played repeatedly. The
function is effective for language study or memorizing
words of songs.
1 During playback, press A˜B button at the
starting point of the section to be repeated.
“Repeat A–” is displayed in the window and “–” is
displayed in the “REPEAT” position.
REPEAT
PLAY MODE
VARI SPEED
C- t1
REPEAT A-
A-PAUSE
A-CUE
sm
543
MARK
2 When the ending point of the section comes by
playback or pressing ) button, press A˜B
button again.
The specified section is repeated.
To cancel A-B repeat
Press REPEAT or p button.
To change the section
Set the beginning and ending points in the same operation.
z A-B REPEAT can be set with the MENU Mode in
the main unit.
1 Press the MENU/EXIT button during play to display
“MENU Mode”.
2 Turn the AMS control to display “REPEAT Mode”,
then press the AMS control.
3 Turn the AMS control to display “A-B REPEAT”,
then press the AMS control.
4 Press the AMS control at the beginning point of the
section to be repeated.
5 When the ending point of the section comes by
playback or pressing ) button, press the AMS
control again.
Notes
• After turning off the power or after disconnecting the
AC cord, the last setting of the repeat play is retained
when the power is turned on. However, A-B REPEAT
is canceled.
• When auto pause or auto cue is set, playback enters
pause mode at the beginning point of the repeated
section.
9
Page 10

VARIOUS OPERATION
0 )
0)
+=
pP·
10
Playback in random
order
All tracks are played in random order.
1 In stop mode, press the SHUFFLE
button on the remote control.
“S” is displayed in the PLAY MODE position in
the display window.
2 Press fl button.
Shuffle play starts.
To return to the normal play from the shuffle play
In stop mode, press CONTINUE in the remote control.
The indicator of the PLAYMODE position in the display window turns to “C”.
z A track can be skipped during shuffle play
Turn the the AMS control.
(Press the = or + button on the remote control.)
• By turning to right (pressing + ), the next track is
selected randomly and playback starts.
• By turning to left (pressing =), playback of the
current track starts from the beginning.
z Shuffle play can be set with the MENU Mode in the
main unit.
1 Press the MENU/EXIT button to display “MENU
Mode”.
2 Turn the AMS control to display “PLAY Mode”,
then press the AMS control.
3 Turn the AMS control to display “SHUFFLE”, then
press the AMS control.
4 Press the MENU/EXIT button.
(Shuffle play)
CONTINUE
SHUFFLE
·
REPEAT
PLAY MODE
St11
VARI SPEED
pP·
0 )
+=
0)
m
28
1
T16 14
54
m
Z
s
s
A-PAUSE
A-CUE
MARK
Playback in programmed
order (Programmed play)
Up to 99 tracks can be programmed.
CONTINUE
>20
CHECK
·
=/+
1 In stop mode, press the PROGRAM
button on the remote control.
“P” is displayed in the PLAY MODE position in
the display window.
REPEAT
PLAY MODE
2 Press the number buttons of the
desired track number in the order to
be programmed.
The selected track is programmed.
REPEAT
PLAY MODE
To select the 21st track or after
Use the >20 button. (See page 7.)
If an incorrect number is pressed
Press the CLEAR button, then press the correct number
button.
3 Repeat step 2 to program other tracks.
Each time the selected track is programmed,
total playing time of the programmed tracks are
displayed. Up to 99 tracks can be programmed.
If you attempt to program more, “PROGRAM
Full” is displayed.
4 Press the fl button.
Playback starts in the programmed order.
VARI SPEED
VARI SPEED
P
00Step
Pt3
02Step
224
408
Z
PROGRAM
Number buttons
CLEAR
A-PAUSE
A-CUE
MARK
A-PAUSE
A-CUE
sm
MARK
sm
Page 11

Ç¢ÇÎÇ¢ÇÎÇ»çƒê∂ ÇÃǵǩÇΩ
VARIOUS OPERATION
To return to the normal play from the
programmed play
In stop mode, press CONTINUE in the remote control.
The indicator of the PLAYMODE position in the display window turns to “C” from “P”.
z The same track can be programmed repeatedly.
Press the track number as much as times you want
to repeat.
z The program is retained after all programmed
tracks are played.
By pressing the fl button, the same program is
played again.
Notes
• The program is canceled when the disc is ejected by
pressing the § EJECT button.
• After turning off the power or after disconnecting the AC
cord, tracks after the 25th in the program are canceled.
• Up to 888 minutes can be programmed. If you attempt
to program more, “Time Full” is displayed.
• The program is canceled when the PLAY MODE is
changed.
z During program operation, you can check the total
playing time of the program. (Program edit)
In step 2, press the = or + button repeatedly
until the track you want to program is displayed. The
selected track number and the total playing time of
when the track is added are displayed. By pressing the
PROGRAM button, the track is programmed.
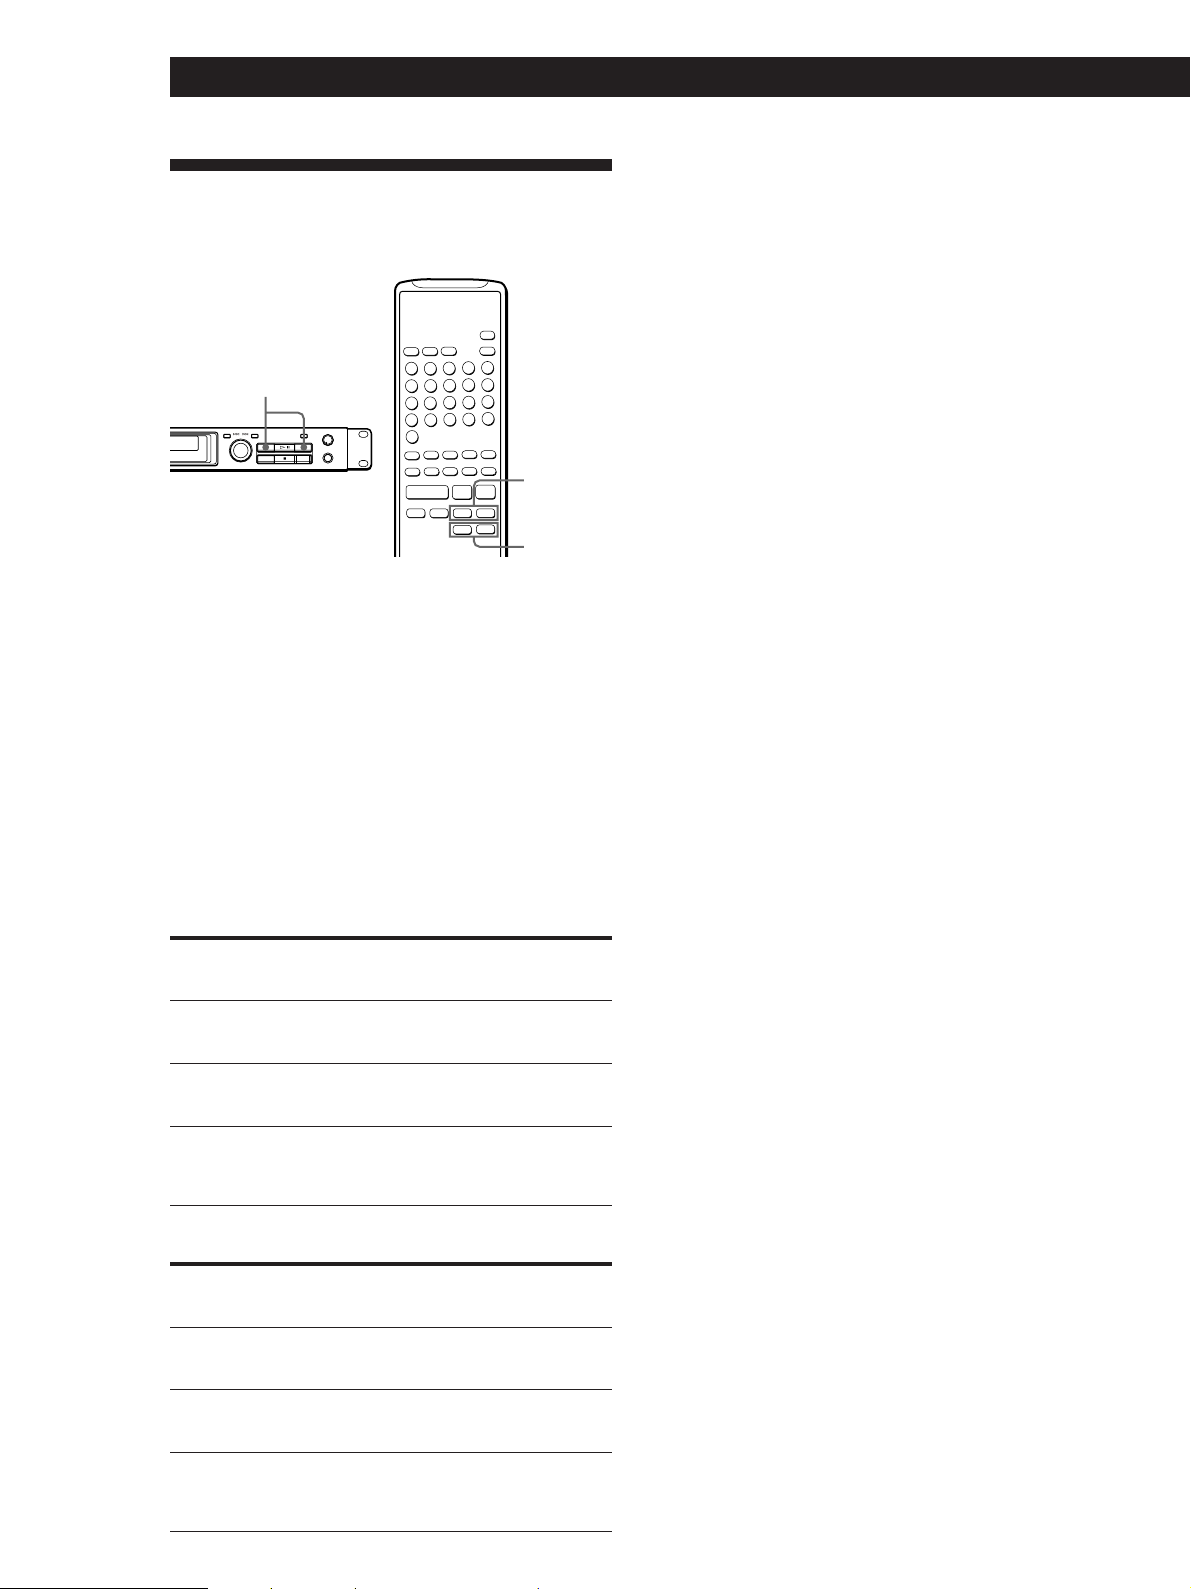
To check the programmed contents
To change the programmed tracks
Before playback starts, the program can be changed.
Contents
Cancel a track in the
middle
Cancel the last track
Add a track to the end
Cancel the whole
program
z Programmed play can be set with the MENU Mode
in the main unit.
1 Press the MENU/EXIT button to display “MENU
Mode”.
2 Turn the AMS control to display “PLAY Mode”,
then press the AMS control.
3 Turn the AMS control to display “PROGRAM”,
then press the AMS control.
4 Press the MENU/EXIT button.
5 Turn the AMS control to display the track number to
be programmed, then press the AMS control. Repeat
this step in the order you want to program.
Operation
1 Press CHECK repeatedly until the
track to be canceled is displayed.
2 Press CLEAR.
Press CLEAR in stop mode.
Each time it is pressed, the last track
is canceled.
Press the number button of the track
to be added.
Press CONTINUE.
Before playback starts or during playback, press
the CHECK button.
Each time it is pressed before playback starts, the
track number and its playing time are displayed in the
programmed order.
Track number of the
checking track
REPEAT
PLAY MODE
Program number
Pt12
02/05Step
VARI SPEED
Total number of
programmed tracks
Playing time of the
checking track
A-PAUSE
A-CUE
sm
213
MARK
sm
3215
Total playing time of the
programmed tracks
During playback, information about the track during
play and the later tracks are displayed.
Track number of the current
playing track
REPEAT
PLAY MODE
Program number
Total number of
programmed tracks
VARI SPEED
Pt3
04/05S
Track number of the
checking track
Elapsed playing time
of the current track
A-PAUSE
A-CUE
sm
281
MARK
sm
545t03
Playing time of the
checking track
To check the programmed contents in the main unit
By turning the AMS control in pause mode, track
numbers can be checked in the programmed order.
11
Page 12

VARIOUS OPERATION
To return to the specified
point (Locate)
By marking the desired point, you can locate to the
point repeatedly.
≠AMS±
MENU/EXIT
MARK
Note on marking
The displayed track number and playing time will be incorrect
when the marked point is located in the following cases.
• If a point is marked while the minus time is being
displayed before play.
• If a point is marked in the last several seconds of a track
by the direct mark.
This is caused by restrictions in the mechanism, and there is
no problem for operation. But we recommend not to use in the
ways above.
To adjust the marked point (Rehearsal)
The marked point is adjusted to forward or backward
with listening to the playback sound.
pP·
0 )
+=
0)
To mark the point (Mark)
There are 2 ways of marking.
1 Press the AMS (MARK) button. (Press
the MARK button on the remote control.)
This point is located.
REPEAT
PLAY MODE
VARI SPEED
Ct12
MARK
2 The point can be marked using the
elapsed playing time with the MENU
Mode in the main unit.
1 Press the MENU/EXIT button to display
“MENU Mode”.
2 Turn the AMS control to display “Direct
MARK”, then press the AMS control.
3 Turn the AMS control to display the track
number you want to mark in, then press the
AMS control.
REPEAT
PLAY MODE
4 Turn the AMS control to display minutes and
5 Press the MENU/EXIT button.
C
Direct MARK
VARI SPEED
t10
seconds of the point you want to mark, then
press the AMS control.
Lights.
A-PAUSE
A-CUE
sm
453
MARK
sm
211
t12
Time at the marked point
A-PAUSE
A-CUE
MARK
sm
----
1 Press the MENU/EXIT button to display “MENU
Mode”.
2 Turn the AMS control to display “Reharsal”, then
press the AMS control.
The portion for several seconds from the marked point
is played repeatedly.
REPEAT
PLAY MODE
VARI SPEED
Ct10
10t01m31s13Fr
Marked point
A-PAUSE
A-CUE
sm
3401
MARK
3 Turn the AMS control to move the mark point.
The new point and “Position OK?” is displayed in turn.
REPEAT
PLAY MODE
VARI SPEED
Ct10
Position 03
01
2
Moved time
A-PAUSE
A-CUE
s
m
34
MARK
Fr
s
The point can be moved up to 8 seconds forward or
backward in 5 frames interval (5 frames =
approximately 0.0667 seconds).
4 When the point is settled, press the AMS button.
“Complete” is displayed for several seconds.
5 Press the MENU/EXIT button.
Notes
• If no point is marked, “Reharsal” is not displayed and
this operation cannot be carried out.
• The point cannot be moved to the other track.
12
Page 13

To locate the marked point (Locate)
Press the LOCATE button. Play is paused at the
marked point, and play can be starts from there.
LOCATE
LOCATE
Ç¢ÇÎÇ¢ÇÎÇ»çƒê∂ ÇÃǵǩÇΩ
VARIOUS OPERATION
To pause after playback
of each track (Auto pause)
Playback of each track is paused automatically at the
beginning of the next track. The function is effective
for recording only a track or recording several tracks
which are not continual.
fl
pP·
0 )
+=
0)
Notes
• When a marked point is located, play may be paused at
the point several frames after the marked one due to
recording condition of the disc. In this case, the time of
the located point may be 1 second after the marked one,
if the time of the marked point is very near to the next
second.
• During the programmed play, if the LOCATE button is
pressed though the track in which the point is marked is
not included to the playing program, “Not PROGRAM” is displayed.
A•CUE
A•CUE
·
P
+=
0 )
0)
A•PAUSE
pP·
Press the A•CUE button repeatedly
until “Auto PAUSE ON” is displayed.
(Press the A•CUE/A•PAUSE button on the
remote control.)
“P” is displayed.
REPEAT
PLAY MODE
VARI SPEED
C
Auto PAUSE ON
To cancel Auto pause
Press the A•CUE button repeatedly until “A•CUE/PAUSE
OFF” is displayed.
(Press the A•CUE/A•PAUSE button on the remote control.)
A-PAUSE
A-CUE
P
MARK
13
Page 14

VARIOUS OPERATION
To start the sound
immediately (Auto cue)
Play can starts from the point of sounds by skipping
the portion with no sounds. This function is effective
when you add the sounds to video editing.
MENU/EXIT
≠AMS±
A•CUE
1 Press the A•CUE button repeatedly
until “Auto CUE ON” is displayed.
(Press the A•CUE/A•PAUSE button on the
remote control.)
REPEAT
PLAY MODE
VARI SPEED
2 Turn the AMS control to display the
track number to be selected.
(Press the = or + button on the remote
control.)
fl
·
P
=/+
C
Auto CUE ON
pP·
0 )
+=
0)
“C” is displayed.
A-PAUSE
A-CUE
C
MARK
Number
buttons
A•CUE
A•PAUSE
Auto pause and Auto cue
Track
Portion with sounds
Auto pause
Auto cue
1st track
PP P
PP P
2nd track 3rd track
z When the track is selected by the number button on
the remote control
When the track is selected by the number button on the
remote control at “Auto CUE ON”, play is paused after
the point from which the sound starts is searched out
without pressing the · button.
z The sound level (threshold level) at the point to be
auto cued can be selected.
This unit is designed so as to search for a point with
sounds more than –60dB and to pause.
The level of the point where play is paused is selected
from among 5 levels (–72dB, –66dB, –60dB, –54dB,
–48dB) by setting the MENU Mode.
1 In stop mode, press the MENU/EXIT button to
display “MENU Mode”.
2 Turn the AMS control to display “Auto CUE”, then
press the AMS control.
3 Turn the AMS control to display the desired level,
then press the AMS control.
4 Press the MENU/EXIT button.
14
3 By pressing the fl button, the point
from which the sound starts is
searched and play is paused at it.
(Press the · button on the remote control.)
4 By pressing the fl button, playback
starts immediately.
(Press the ∏ button on the remote control.)
To cancel Auto cue
Press the A•CUE button repeatedly until “A•CUE/PAUSE
OFF” is displayed.
(Press the A•CUE/A•PAUSE button on the remote control.)
Page 15

To change playback
0 )
0)
+=
pP·
speed (Variable speed play)
Ç¢ÇÎÇ¢ÇÎÇ»çƒê∂ ÇÃǵǩÇΩ
VARIOUS OPERATION
Note
The variable speed play will be off when the VARI SPEED
button is pressed while the VARI SPEED indicator is lighting
and the button is released without turning the AMS control.
Playing time is adjusted by changing playback speed.
Playback speed can be adjusted up to ±12.5% of normal
speed. Playback speed can be decreased up to 12.5% of
normal play (the pitch will be felled down), and can be
increased up to 12.5% (the pitch will be raised).
Note
When the variable speed play is carried out, the connected
equipment may not be able to receive digital signals from this
unit. In this case, connect analog signals.
Change speed in the main unit
MENU/EXIT
≠AMS±
VARI SPEED
1 During playback or in pause mode,
press the VARI SPEED button.
“VARI SPEED” indicator lights up.
REPEAT
PLAY MODE
VARI SPEED
Lights.
Ct1
+10.0%07T 33m07s
A-PAUSE
A-CUE
sm
531
MARK
z Playback speed can be set in the MENU mode.
1 Press the VARI SPEED button so that the VARI
SPEED indicator lights up.
2 In stop mode, press the MENU/EXIT button to
display “MENU Mode”.
3 Turn the AMS control to display “Variable”, then
press the AMS control.
4 Turn the AMS control to display the desired speed,
then press the AMS control.
•In stop mode
REPEAT
PLAY MODE
Ct7
VARI SPEED
•During playback or in pause mode
REPEAT
PLAY MODE
5 Press the MENU/EXIT button.
Ct1
VARI SPEED
Total playing time of all tracks
in the selected speed
sm
5734
+5.0% [ 36m48s]
Total playing time of all tracks
in the standard speed (0%)
Playing time of the current track
in the selected speed
sm
015
+10.0% [ 5m35s]
Playing time of the current track
in the standard speed (0%)
A-PAUSE
A-CUE
MARK
A-PAUSE
A-CUE
MARK
2 Turn the AMS control while pressing
the VARI SPEED button to select the
desired speed.
The speed is varied in 0.5% interval.
Two kinds of display are shown in the window
as follows.
•In stop mode
REPEAT
PLAY MODE
•During playback or in pause mode
REPEAT
PLAY MODE
C
VARI SPEED
+5.0%07T 34m57s
Total playing time of all tracks in
the selected speed
Time information at the current
point in the selected speed
Ct1
+5.0%07T 34m57s
VARI SPEED
sm
381
3 When the desired speed is displayed,
release the VARI SPEED button.
A-PAUSE
A-CUE
MARK
A-PAUSE
A-CUE
MARK
To change playback speed in the
remote control
VARI SPEED
1 Press the VARI SPEED button so that the VARI
SPEED indicator lights up.
2 Press the VARI SPEED + or – button to select the
desired speed.
The speed is varied in 0.5% interval.
To cancel Variable speed play
Press the VARI SPEED button so that “VARI SPEED ” disappears.
To play in the selected speed again, press the VARI SPEED
button. The selected speed is memorized.
15
Page 16

VARIOUS OPERATION
Timer playback
By connecting with the external timer, playback can be
started or stopped at the desired time. Refer also to the
operation manual of the timer.
1 Turn on the power of the timer.
2 Carry out steps 1 to 3 of Playback
in page 6.
3 Select PLAY of “Timer” in the
MENU Mode.
1 In stop mode, Press the MENU/EXIT button
to display “MENU Mode”.
2 Turn the AMS control to display “Timer”,
then press the AMS control.
3 Turn the AMS control to display “PLAY”,
then press the AMS control.
4 Press the MENU/EXIT button.
4 Set the external timer to your
preference.
Last mode memory
After turning off the power, this unit retains the last
setting contents. When the power is turned on, this
unit can be used in the same settings.
The setting contents this unit retains are as follows.
• Playback mode (CONTINUE, PROGRAM
SHUFFLE)
• Repeat play mode (ALL REPEAT, 1 track REPEAT,
OFF)
• Auto cue/pause mode (AUTO CUE, AUTO PAUSE,
OFF)
• Playback speed
• VARI SPEED ON/OFF
• Music scan time (6 seconds to 20 seconds)
• Auto cue level (–72dB, –66dB, –60dB, –54dB,
–48dB)
• Sound during search in pause mode ON/OFF
• Timer play PLAY/OFF
• Parallel setting (PRESET/USER)
• User parallel I/O setting (PI 1 to 5, PO 1to 3)
• Program (up to 24 tracks)
After the timer playback
If “PLAY” of “Timer” is selected, play will start automatically
whenever the power is turned on. When the timer is not used,
select “OFF” of “Timer”.
Notes
• In playing of the programmed play by the timer, the
program is played up to the 24th track after the power
is turned off once.
• When Auto cue or Auto pause is set, play is paused at
the beginning of the 1st track. To play by timer, set
Auto cue or Auto pause to OFF.
16
Page 17

OTHERS
Sizes
430
ǪÇÃëº
OTHERS
ǪÇÃëº
482 44
To rackmount
The unit can be mounted on EIA 19-inch rack. Move
the four feet away and mount it on the rack.
To move them away, pull out the plastic pins piercing
them, then feet will be removed.
MENU/EXIT DISPLAY
PUSH MARK/ENTER
350
LOCATE
VARI
A CUE
SPEED
370
Unit: mm
17
Page 18

OTHERS
Functions of control
terminals
Control terminal (CTRL-S)
– mini jack
The control terminal of this unit allows external
control by connecting system controler equipped with
CTRL-S terminal to the unit or with the attached
remote control.
Controllable functions
Same as those of attached remote control.
When a plug is connected to control S terminal,
receiving infrared ray function stops.
Functions of REMOTE
terminal
RELAY PLAY
– stereo mini jack terminal
When you connect the unit to the other CDP-D11, they
play back automatically in succession after playing
back at the unit finishes by receiving control signal via
RELAY terminal.
To the
mixer
1 Playbacks at the first player.
2 After the first player finishes playback, the second
player starts playback.
3 If the other player’s cables are connected via
RELAY IN terminal, they play back in turn after the
previous player’s playback finishes.
Notes
All of following conditions are required to make the
connected players start playback by receiving relay control
signal.
• Discs which can playback are set.
• Players are set in STOP mode.
• Not to be set in MENU mode.
When REPEAT is set, the Relay play is not carried out
as control signals are not output.
18
Relay play
This function enables players to play back
continuously by connecting the unit to the other
CDP-D11.
When you connect them in loop, continuous repeat
play is possible.
Connection for relay play
Connect “RELAY OUT” of the unit to “RELAY IN”
of the connected player with stereo mini plug cable
(RK-G136, etc.).
When you connect more than two players, connect
“RELAY OUT” and “RELAY IN” as well.
Note
To operate relay play properly, you need two systems of
control signal.
Be sure to use a stereo type plug cable.
RS-232C
– D-sub 9 pin (male)
External control is possible.
On control protocols, please consult dealers.
Page 19

ǪÇÃëº
OTHERS
ǪÇÃëº
Parallel input/output
D-sub 9 pin (female)
When a simple circuit is connected to the parallel in/
out terminals, remote control is available.
By connecting input terminal and GND, each function
assigned to each terminal can work.
These output terminals are open collector output. The
LEDs can be lit on to show the status of the unit.
Circuit examples for input/output terminals
<Example of output circuit>
CDP-D11
Output
terminals
(7th to 9th)
GND
(6th)
By the parallel select of the MENU Mode, either the
standard setting (Preset) or the user setting (User) can
be selected.
The following chart shows inputs/outputs of the
terminals and functions of the standard settings.
Pin number Input/output Function Names in MENU Mode
1 Input PLAY PIN1
2 Input PAUSE PIN2
3 Input STOP PIN3
4 Input AMS+ PIN4
5 Input AMS– PIN5
6 GND --7 Output PLAY POUT1
8 Output PAUSE POUT2
9 Output NO DISC POUT3
In the user setting, the following functions can be
assigned to PIN1 to PIN5, to POUT1 to POUT3 in the
MENU Mode.
Input/output of each pin is fixed.
<Example of input circuit>
CDP-D11
Pin number
Input
terminals
(1st to 5th)
GND
(6th)
The user setting of the function of each pin is set as
follows.
1 In stop mode, press MENU/EXIT button to display
“MENU Mode”.
2 Turn the AMS control to display “Parallel”, then
press the AMS control.
3 Turn the AMS control to display “User”, then press
the AMS control.
4 Turn the AMS control to display the pin name
(“P.Input1” “P.Output1” for example), then press
the AMS control.
5 Turn the AMS control to display the desired
function, then press the AMS control.
6 Press the MENU/EXIT button.
Repeat steps 4 and 5 for each pin.
When the user setting of parallel select has already
been selected, carry out from step 4.
PIN1 to PIN5 (input terminals)
PLAY/PAUSE The same function as PLAY/PAUSE in the main unit
PLAY The same function as PLAY in the remote control
PAUSE The same function as PAUSE in the remote control
STOP The same function as STOP in the main unit
AMS+ The same function as AMS+ in the remote control
AMS– The same function as AMS- in the remote control
FF The same function as FF in the main unit
REW The same function as REW in the main unit
MARK The same function as MARK in the remote control
LOCATE The same function as LOCATE in the remote control
EJECT The same function as EJECT in the main unit
Fader PLAY Carry out the fader play
1 Track PLAY– The same function as Number buttons (1–20) in the
20 Track PLAY remote control
OFF No operation
How to use Fader PLAY
By connecting the fader of the mixer to the terminal on
the CDP-D11 which is set as the Fader PLAY of the
parallel input, starting play and pause at the beginning
of the next track are synchronized to the fader.
This can be used in the mixer equipped with fader
remote function in which – ∞ position (lowest
position) is OFF and the other positions are ON.
In the CDP-D11, “AMS+” and “PAUSE” are carried
out when the fader is OFF, and “PLAY” is carried out
when the fader is ON.
19
Page 20

OTHERS
Notes on the Fader PLAY
• Operation in the largest numbered track
To continue the Fader PLAY in the next track, select the
track to be played manually.
In the largest numbered track, it is designed mechanically
that the next track is not selected automatically by
“AMS+”. So, in the largest numbered track, play is
paused when the Fader is turned OFF.
• To carry out 1 track repeat
When you want to repeat only one track with the Fader
PLAY, select the track number by the PROGRAM Mode,
and then set the REPEAT Mode to “ALL REPEAT”.
In the normal operation, it is designed mechanically that
by “AMS+” operation in the setting of 1 track repeat play
skips to the next track. So, 1 track repeat play is not
carried out on the track set at first.
Precautions
Installation
Do not place the unit on such as following.
• On a rickety stand, uneven surface
• On a carpet, bedclothes
• Where the humidity is high, is poorly ventilated.
• Where is dusty
• Under the direct sunlight, where the temperature is high
• Where the temperature is very low
• Near the tuner, TV set, or video deck
(When this unit is used with such equipments, if played
on nearby, noises may be generated or pictures may be
distorted. Especially these troubles apt to happen when
using antennas for inside, we recommend to use outdoor
antennas.)
POUT1 to POUT 3 (output terminals)
PLAY Grounding during PLAY operation of the main unit
PAUSE Grounding during PAUSE operation of the main unit
NO DISC Grounding during NO DISC operation of the main unit
OFF Always floating
Electrical specifications
Input terminal
Input system Make contact
Input ON voltage Less than 0.5V
Input OFF voltage More than 3V
Opening terminal voltage 5V
Input pulse width More than 100msec
Input standing voltage -0.5 to +10V
Output terminal
Output system Open collector of NPN transister
Remaining voltage at ON Less than 0.5V
Maximum pouring current at ON 100mA
Standing voltage 20V
When adjusting the volume
Compact discs contains fewer noises than records.
If you listen to noises without sounds while adjusting the
volume as in records, unexpected high volume may be output
and speakers may be damaged.
Turn down the volume before play.
Etiquette toward listening
Listen to the sounds not to disturb a neighbor. Especially,
sounds are easily out in the night.
Shut the window, or use headphones to keep comfort.This is
the symbol mark of listening etiquette.
20
Note
If the User is not selected in “PARALLEL Select” of MENU
Mode, MENU for assignment of each pin is not displayed.
When Preset is selected, the standard setting functions of the
pins are displayed.
Page 21

ǪÇÃëº
OTHERS
ǪÇÃëº
Treatment of compact
discs
How to treat
• Not to touch the side without label (playing side).
• Do not stick any paper or seal.
• Do not use a disc sticked with seals or pastes such as a
secondhand disc or a rental disc.
Such a disc may not be ejected by sticking to inside, or
may be a cause of trouble of the unit.
Preservation
• Do not leave discs in the places such as of high
temperature or high humidity, especially under the direct
sunlight.
• Store a disc in its case. If the discs are piled up or
standed without cases, they may become deformed.
Cleaning
• Fingerprints or dusts make the sound quality worse.
Keep the disc clean.
• To clean the disc, wipe it from the center out with a soft
cloth.
Troubleshooting guide
If you experience any of the following difficulties
while using the player, use this troubleshooting guide
to help you remedy the problem. Should any problem
persist, consult your nearest Sony dealer.
If “Disc Error” is displayed
/ It shows an unusual status in installing the disc or
the disc itself.
Remove the disc and check it.
There is no sound.
/ The connection cord is not connected firmly.
/ The amplifier is not operated correctly.
/ The PHONE LEVEL control is turned toward 0.
Turn it to right to increase the volume.
/ The AC cord is not connected firmly.
The unit does not play.
/ No disc is inside.
/ The disc is inserted upside down.
/ The disc is inserted inclined.
/ The disc is dirty.
/ The unit has condensation inside. Remove the
disc, and leave the unit for about an hour, then
turn on and try to operate again.
The remote control does not work.
/ There is an object between the unit and it.
/ It is not directed to the sensor on the main unit.
/ Replace the batteries with new ones.
/ Only the cable is connected to CTRL-S.
• If the disc is extremely dirty, use a soft cloth lightly
moistened with water, then wipe it with a dry cloth.
• Do not use benzine, record cleaner or medicine for
preventing static electricity as these could damage the
disc.
The unit does not function correctly.
/ The operation mechanism is not working correctly.
Turn off the power, then turn on again.
If the unit does not work correctly by any of the operations
above, disconnect the AC cord, then connect it again.
21
Page 22

OTHERS
Parts names
1 POWER switch
2 Disc installing slot
3 Display window
4 MENU/EXIT button
5 DISPLAY button
6 0/) (searching back and forth)
buttons
7 LOCATE button
8 PHONE LEVEL control
MENU/EXIT DISPLAY
0 §
A CUE
PUSH MARK/ENTER
EJECT button
LOCATE
SPEED
VARI
!¡ VARI SPEED indicator
!™ AMS control (button)
!£ A•CUE button
!¢ p (stop) button
!∞ fl (play/pause) button
!§ VARI SPEED button
!¶ PHONES jack
22
9 Remote control sensor
Page 23

Specifications
System Compact disc player
Frequency response 20Hz - 20kHz (±0.5dB)
Signal-to-noise ratio More than 93dB (IHF-A weight)
Dynamic range More than 98dB
Harmonic distortion Less than 0.008% (1kHz, 20kHz LPF)
Channel separation More than 90dB (1kHz, 20kHz LPF)
Analog output
ǪÇÃëº
OTHERS
ǪÇÃëº
Terminal
ANALOG
OUT
(BALANCE)
ANALOG
OUT
(UNBALANCE)
PHONES
Terminal type
XLR-3
Phono jack
Stereo phone
jack
Maximum output level
+10/+24dBu
(switchable)
+ 8dBu
0 - 10mW
(adjustable)
Digital output
Terminal
DIGITAL OUT
(OPTICAL)
DIGITAL OUT
(IEC-958)
Terminal type
Optical connector
Phono jack
0dBu=0.775Vrms
General
Power requirements
European models : 230V AC 50/60Hz
USA models : 120V AC 60Hz
Power consumption
European models : 16W
USA models : 16W
Dimensions (approx.) (w/h/d):
482 × 44 × 370mm (19 × 1
Mass (approx.): 5.2kg (11lbs 8oz)
Load impedance
More than 600Ω
More than 10kΩ
32Ω
Load impedance
75Ω
3
/4 × 145/8 in.)
Accessories
See page 4.
The 8cm compact disc can be played back without the adapter as
well as the 12cm compact disc.
Specifications are subject to change without notice.
23
Page 24

OTHERS
24
Printed in Japan
 Loading...