

Page 1
3-859-266-12 (1)
Video Camera
Recorder
Operating Instructions
Before operating the unit, please read this manual thoroughly,
and retain it for future reference.
аМТЪ ЫНˆЛfl ФУ ˝НТФОЫ‡Ъ‡ˆЛЛ
иВ В‰ М‡˜‡ОУП ˝НТФОЫ‡Ъ‡ˆЛЛ ‰‡ММУ„У ‡ФФ‡ ‡Ъ‡ Ф УТЛП ‚МЛП‡ЪВО¸МУ
Ф У˜ВТЪ¸ М‡ТЪУfl˘ВВ ЫНУ‚У‰ТЪ‚У Л УТЪ‡‚ЛЪ¸ В„У ‰Оfl ·Ы‰Ы˘Лı ТФ‡‚УН.
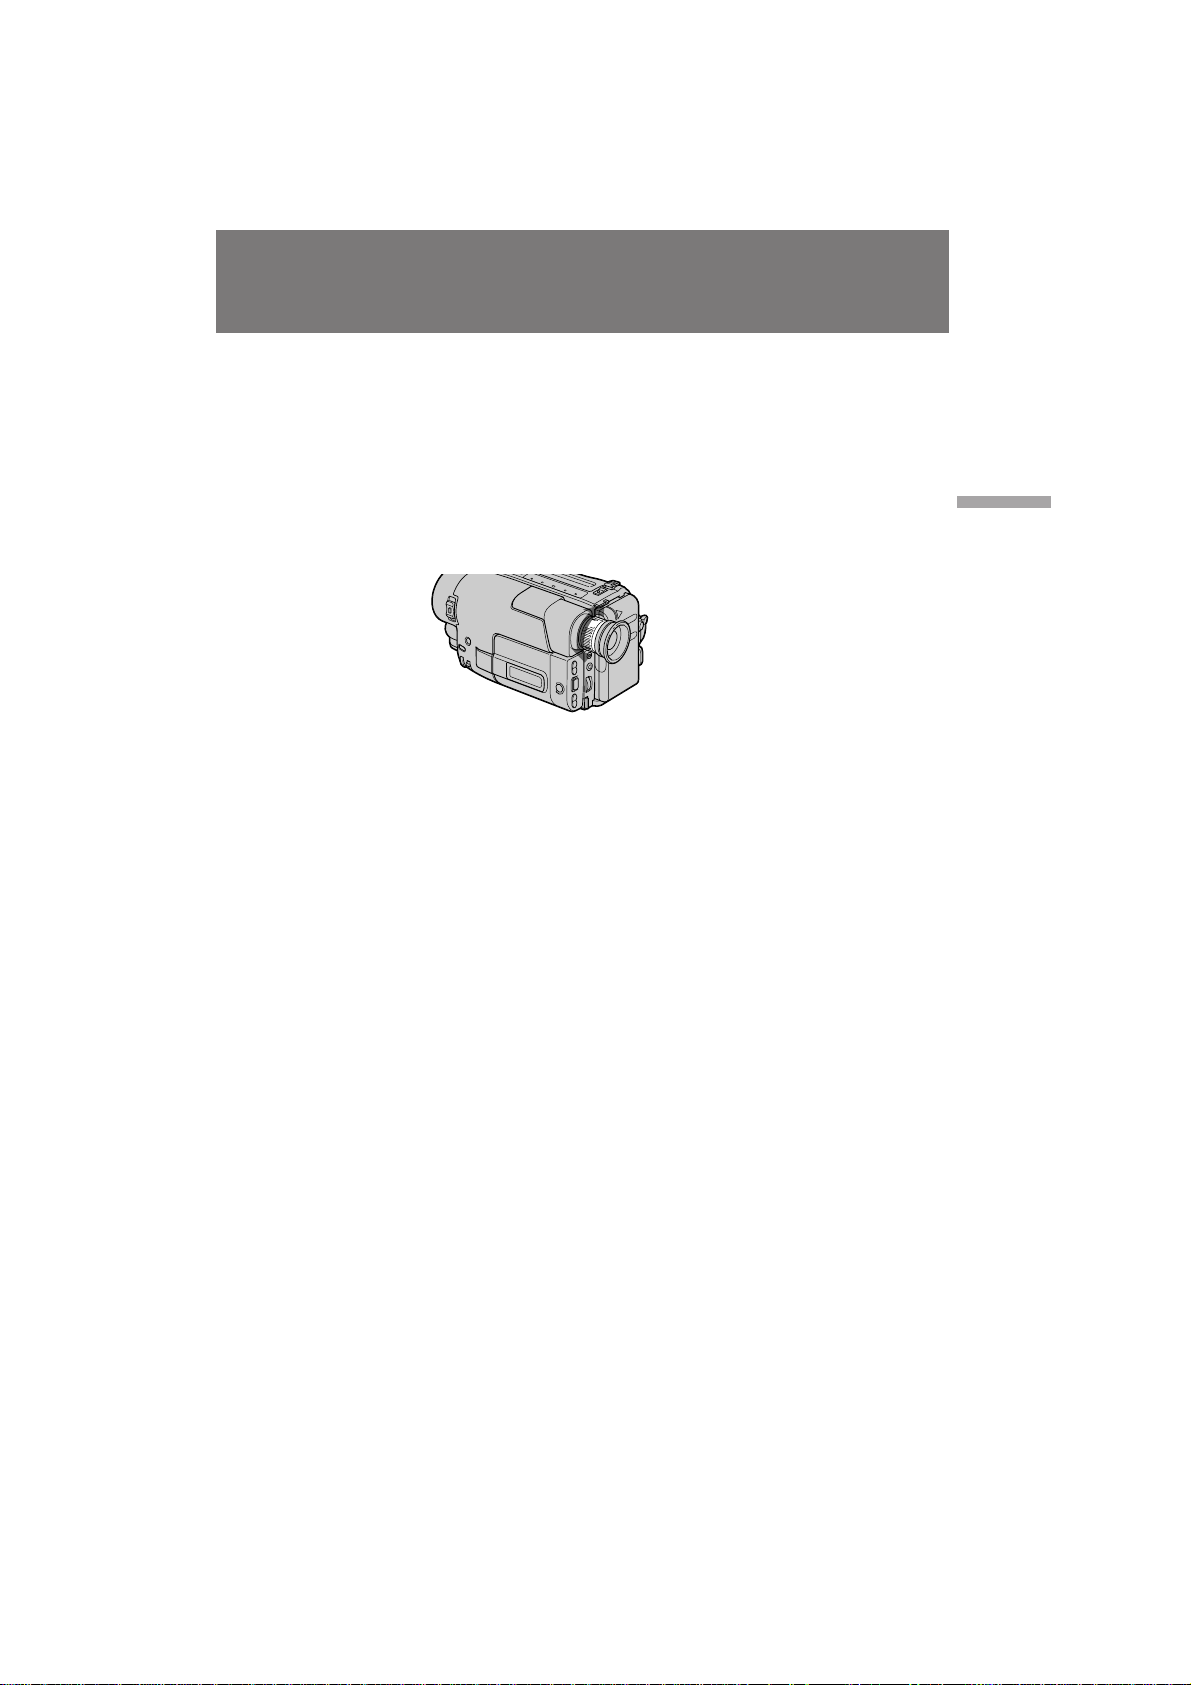
CCD-TRV24E
CCD-TRV14E/TRV24E h
1997 by Sony Corporation
CCD-TRV14E/TRV24E 3-859-266-12(1).E/R
Page 2

English
кЫТТНЛИ
Welcome!
Congratulations on your purchase of this
Sony Handycam
your Handycam Vision, you can capture
life’s precious moments with superior
picture and sound quality. Your
Handycam Vision is loaded with advanced
features, but at the same time it is very
easy to use. You will soon be producing
home video that you can enjoy for years to
come.
To prevent fire or shock hazard, do not expose
the unit to rain or moisture.
To avoid electrical shock, do not open the
cabinet. Refer servicing to qualified personnel
only.
Certain countries may regulate disposal of
the battery used to power this product.
Please consult with your local authority.
Vision camcorder. With
WARNING
ÑÓ· Ó
ÔÓʇÎÓ‚‡Ú¸ !
иУБ‰ ‡‚ОfleП З‡Т Т Ф ЛУ· ВЪВМЛВП ‰‡ММУИ
‚Л‰ВУН‡ПВ ˚ Handycam Vision™ ЩЛ П˚
Sony. л ФУПУ˘¸˛ З‡¯ВИ ‚Л‰ВУН‡ПВ ˚
Handycam Vision З˚ ПУКВЪВ Б‡ФВ˜‡ЪОВЪ¸
‰У У„ЛВ З‡П П„МУ‚ВМЛfl КЛБМЛ Т
Ф В‚УТıУ‰М˚П Н‡˜ВТЪ‚УП ЛБУ· ‡КВМЛfl Л
Б‚ЫН‡. З‡¯‡ ‚Л‰ВУН‡ПВ ‡ Handycam Vision
УТМ‡˘ВМ‡ ЫТУ‚В ¯ВМТЪ‚У‚‡ММ˚ПЛ
ЩЫМНˆЛflПЛ, МУ Л ‚ ЪУ КВ ‚ ВПfl ВВ У˜ВМ¸
ОВ„НУ ЛТФУО¸БУ‚‡Ъ¸. З˚ ‚ТНУ В ·Ы‰ВЪВ
ТУБ‰‡‚‡Ъ¸ ТВПВИМ˚В ‚Л‰ВУБ‡ФЛТЛ,
НУЪУ ˚ПЛ ПУКВЪВ М‡ТО‡К‰‡Ъ¸Тfl ‚
ФУТОВ‰Ы˛˘ЛВ „У‰˚.
икЦСмикЦЬСЦзаЦ
СОfl Ф В‰УЪ‚ ‡˘ВМЛfl ‚УБ„У ‡МЛfl ЛОЛ
УФ‡ТМУТЪЛ ˝ОВНЪЛ˜ВТНУ„У Ы‰‡‡ МВ
ФУ‰‚В „‡Ъ¸ ‡ФФ‡‡Ъ ‚УБ‰ВИТЪ‚Л˛ ‰УК‰fl
ЛОЛ ‚О‡„Л.
ЗУ ЛБ·ВК‡МЛВ ФУ ‡КВМЛfl ˝ОВНЪ Л˜ВТНЛП
ЪУНУП МВ УЪН ˚‚‡Ъ¸ НУ ФЫТ. б‡
У·ТОЫКЛ‚‡МЛВП У· ‡˘‡Ъ¸Тfl ЪУО¸НУ Н
Н‚‡ОЛЩЛˆЛ У‚‡ММУПЫ У·ТОЫЫКЛ‚‡˛˘ВПЫ
ФВ ТУМ‡ОЫ.
З УФ В‰ВОВММ˚ı ТЪ ‡М‡ı ЫТЪ‡МУ‚ОВМ
ФУ fl‰УН ОЛН‚Л‰‡ˆЛЛ ·‡Ъ‡ ВВН ‰Оfl ФЛЪ‡МЛfl
ЛБ‰ВОЛИ. й· ‡ЪЛЪВТ¸, ФУК‡ОЫИТЪ‡, ‚ З‡¯В
ПВТЪМУВ ЫФУОМУПУ˜ВММУВ ‡„ВМЪТЪ‚У.
2
CCD-TRV14E/TRV24E 3-859-266-12(1).E/R
Page 3

Table of contents
й„О‡‚ОВМЛВ
Before you begin
Using this manual .................................................. 4
Checking supplied accessories ............................ 6
Getting started
Charging and installing the battery pack .......... 7
Inserting a cassette ............................................... 10
Basic operations
Camera recording ................................................ 11
Using the zoom feature .................................. 14
Shooting with the LCD screen ....................... 16
Letting the subject monitor the shot ................ 17
Hints for better shooting .................................... 18
Checking the recorded picture .......................... 20
Playing back a tape ............................................. 22
Searching for the end of the picture .................. 25
Advanced operations
Using alternative power sources ...................... 26
Changing the mode settings .............................. 29
Recording with the date or time ........................ 32
Selecting the START/STOP mode .................... 33
Fade-in and fade-out ........................................... 34
Enjoying picture effect ........................................ 36
Using the wide mode function(CCD-TRV24E
only) ................................................................... 38
Focusing manually .............................................. 40
Using the PROGRAM AE function ................... 42
Shooting with backlighting ................................ 44
Releasing the STEADY SHOT function(CCD-
TRV24E only) ................................................... 45
Superimposing a title .......................................... 46
Making your own titles....................................... 48
Watching on a TV screen .................................... 50
Editing onto another tape ................................... 52
Additional information
Changing the lithium battery
in the camcorder .............................................. 53
Resetting the date and time ................................ 55
Playback modes ................................................... 56
Tips for using the battery pack .......................... 57
Maintenance information and precautions ...... 61
Using your camcorder abroad ........................... 67
Trouble check ....................................................... 68
Specifications ........................................................ 76
Identifying the parts ............................................ 78
Warning indicators .............................................. 87
Index ....................................................... back cover
è ‰ ̇˜‡ÎÓÏ ‡·ÓÚ˚
аТФУО¸БУ‚‡МЛВ ‰‡ММУ„У ЫНУ‚У‰ТЪ‚‡ ...........4
и У‚В Н‡ Ф ЛО‡„‡ВП˚ı Ф ЛМ‡‰ОВКМУТЪВИ ..6
èÓ‰„ÓÚӂ͇ Í Ì‡˜‡ÎÛ ‡·ÓÚ˚
ᇠfl‰Í‡ Ë ÛÒÚ‡Ìӂ͇ ·‡Ú‡ ÂÈÌÓ„Ó ·ÎÓ͇ ..... 7
ÇÒÚ‡‚͇ ͇ÒÒÂÚ˚........................................... 10
éÒÌÓ‚Ì˚ ÓÔ ‡ˆËË
á‡ÔËÒ¸ Ò ÔÓÏÓ˘¸˛ ‚ˉÂÓ͇Ï ˚. ..............11
аТФУО¸БУ‚‡МЛВ ЩЫМНˆЛЛ М‡ВБ‰‡
‚ˉÂÓ͇Ï ˚ .............................................. 14
ë˙ÂÏ͇ Ò ÔÓÏÓ˘˛ ˝Í ‡Ì‡ ÜäÑ ............... 16
ЗУБПУКМУТЪ¸ ‰Оfl ТМЛП‡ВПУ„У ˜ВОУ‚ВН‡
̇·Î˛‰‡Ú¸ Ò˙ÂÏÍÛ.................................... 17
ëÓ‚ÂÚ˚ ‰Îfl ÎÛ˜¯ÂÈ Ò˙ÂÏÍË. ...................... 18
è ӂ ͇ Á‡ÔËÒ‡ÌÌÓ„Ó ËÁÓ· ‡ÊÂÌËfl ..........20
ÇÓÒÔ ÓËÁ‚‰ÂÌË ÎÂÌÚ˚. ............................. 22
иУЛТН НУМˆ‡ ЛБУ· ‡КВМЛfl ........................... 25
мТУ‚В ¯ВМТЪ‚‚У‚‡ММ˚В УФВ ‡ˆЛЛ
аТФУО¸БУ‚‡МЛВ ‡О¸ЪВ М‡ЪЛ‚М˚ı
ËÒÚÓ˜ÌËÍÓ‚ ÔËÚ‡ÌËfl .................................. 26
аБПВМВМЛВ ВКЛПМ˚ı ЫТЪ‡МУ‚УН ................29
б‡ФЛТ¸ Т ‰‡ЪУИ ЛОЛ ‚ ВПВМВП ...................... 32
Ç˚·Ó ÂÊËχ START/STOP ...................... 33
ǂ‰ÂÌËÂ Ë ‚˚‚‰ÂÌË ËÁÓ· ‡ÊÂÌËfl ......... 34
аТФУО¸БУ‚‡МЛВ ˝ЩЩВНЪУ‚ ЛБУ· ‡КВМЛfl ...36
аТФУО¸БУ‚‡МЛВ ЩЫМНˆЛЛ ¯Л УНУЩУ П‡Ъ-
ÌÓ„Ó ÂÊËχ (ÚÓθÍÓ CCD-TRV24E) .........38
оУНЫТЛ У‚Н‡ ‚ Ы˜МЫ˛ .................................. 40
аТФУО¸БУ‚‡МЛВ ЩЫМНˆЛЛ PROGRAM AE .... 4 2
л˙ВПН‡ Т Б‡‰МВИ ФУ‰Т‚ВЪНУИ ......................44
ÇÍβ˜ÂÌË ÙÛÌ͈ËË STEADY SHOT
(ÚÓθÍÓ CCD-TRV24E) .............................. 45
з‡ОУКВМЛВ М‡‰ФЛТЛ...................................... 46
лУБ‰‡МЛВ З‡¯Лı ТУ·ТЪ‚ВММ˚ı М‡‰ФЛТВИ .. 48
и УТПУЪ М‡ ˝Н ‡МВ ЪВОВ‚ЛБУ ‡ ............... 50
еУМЪ‡К М‡ ‰ Ы„Ы˛ ОВМЪЫ ............................. 52
СУФУОМЛЪВО¸М‡fl ЛМЩУ П‡ˆЛfl
б‡ПВМ‡ ОЛЪЛВ‚УИ ·‡Ъ‡ ВИНЛ ‚
‚ˉÂÓ͇Ï  ............................................... 53
мТЪ‡МУ‚Н‡ ‰‡Ъ˚ Л ‚ ВПВМЛ ......................... 55
кВКЛП˚ ‚УТФ УЛБ‚В‰ВМЛfl .......................... 56
лУ‚ВЪ˚ ФУ ЛТФУО¸БУ‚‡МЛ˛ ·‡Ъ‡ ВИМУ„У
·ÎÓ͇ ............................................................ 5 7
àÌÙÓ Ï‡ˆËfl ÔÓ ÛıÓ‰Û Á‡ ‡ÔÔ‡ ‡ÚÓÏ Ë
ФВ‰УТЪУУКМУТЪЛ ..................................... 61
аТФУО¸БУ‚‡МЛВ З‡¯ВИ ‚Л‰ВУН‡ПВ ˚ Б‡
Û·ÂÊÓÏ ....................................................... 67
и У‚В Н‡ МВЛТФ ‡‚МУТЪВИ ........................... 72
нВıМЛ˜ВТНЛВ ı‡ ‡НЪВ ЛТЪЛНЛ ...................... 77
йФУБМ‡‚‡МЛВ ‰ВЪ‡ОВИ .................................. 78
è ‰ÛÔ Âʇ˛˘Ë Ë̉Ë͇ÚÓ ˚ ...................87
ì͇Á‡ÚÂθ ............................. ᇉÌflfl Ó·ÎÓÊ͇
Before you begin è ‰ ̇˜‡ÎÓÏ ‡·Ó ˚
3
CCD-TRV14E/TRV24E 3-859-266-12(1).E/R
Page 4

Before you begin
è ‰ ̇˜‡ÎÓÏ ‡·Ó ˚
Using this manual
The instructions in this manual are for the two
models listed below. Before you start reading
this manual and operating the unit, check your
model number by looking at the bottom of your
camcorder. The CCD-TRV24E is the model used
for illustration purposes. Otherwise, the model
name is indicated in the illustrations. Any
differences in operation are clearly indicated in
the text, for example, “CCD-TRV24E only”.
As you read through this manual, buttons and
settings on the camcorder are shown in capital
letters.
e.g. Set the POWER switch to CAMERA.
As indicated with ≥ in the illustrations, you can
hear the beep sound to confirm your operation.
Types of differences
CCD-
TRV14E
TRV24E
Optical
zoom
15X
15X
Digital
zoom
–
180X
Wide
mode
Steady
Shot
–
r
–
r
аТФУО¸БУ‚‡МЛВ ‰‡ММУ„У ЫНУ‚У‰ТЪ‚‡
аМТЪ ЫНˆЛЛ ‚ ‰‡ММУП ЫНУ‚У‰ТЪ‚В
ЛБОУКВМ˚ ‰Оfl ‰‚Ыı МЛКВФВ В˜ЛТОВММ˚ı
ПУ‰ВОВИ. иВ В‰ ЪВП, Н‡Н З˚ М‡˜МВЪВ ˜ЛЪ‡Ъ¸
‰‡ММУВ ЫНУ‚У‰ТЪ‚У Л ˝НТФОЫ‡ЪЛ У‚‡Ъ¸
‡ФФ‡ ‡Ъ, Ф У‚В ¸ЪВ МУПВ З‡¯ВИ ПУ‰ВОЛ,
ФУТПУЪ В‚ М‡ МЛКМ˛˛ Ф‡МВО¸ З‡¯ВИ
‚Л‰ВУН‡ПВ ˚. еУ‰ВО¸ CCD-TRV24E
ЛТФУО¸БЫВЪТfl ‚ ЛОО˛ТЪ ‡ЪЛ‚М˚ı ˆВОflı. З
ЛМУП ТОЫ˜‡В М‡ЛПВМУ‚‡МЛВ ПУ‰ВОЛ
ЫН‡Б˚‚‡ВЪТfl М‡ ЛТЫМН‡ı. г˛·˚В ‡БОЛ˜Лfl
‚ ‡·УЪВ ˜ВЪНУ ЫН‡Б‡М˚ ‚ ЪВНТЪВ, Н‡Н
М‡Ф ЛПВ “нУО¸НУ CCD-TRV24E”.
дУ„‰‡ З˚ ·Ы‰ВЪВ ˜ЛЪ‡Ъ¸ ЫНУ‚У‰ТЪ‚У,
Ы˜ЛЪ˚‚‡ИЪВ, ˜ЪУ НМУФНЛ Л ЫТЪ‡МУ‚НЛ М‡
‚Л‰ВУН‡ПВ В ФУН‡Б‡М˚ Б‡„О‡‚М˚ПЛ
·ЫН‚‡ПЛ.
Ф ЛП. мТЪ‡МУ‚ЛЪВ ‚˚НО˛˜‡ЪВО¸ POWER ‚
ФУОУКВМЛВ CAMERA.
ЦТОЛ М‡ ЛТЫМН‡ı ЫН‡Б˚‚‡ВЪТfl БМ‡Н ≥ , З˚
ПУКВЪВ ТО˚¯‡Ъ¸ БЫППВ М˚И Б‚ЫНУ‚УИ
ТЛ„М‡О ‰Оfl ФУ‰Ъ‚В К‰ВМЛfl З‡¯ВИ ‡·УЪ˚.
íËÔ˚ ‡Á΢ËÈ
CCD-
TRV14E
TRV24E
éÔÚ˘ÂÒÍËÈ Ú ‡ÌÒ-
ÙÓ͇ÚÓ
15X
15X
ñËÙ Ó‚ÓÈ
Ú ‡ÌÒÙÓ͇ÚÓ
180X
–
тЛ УНУЩУ П‡ЪМ˚И
ÂÊËÏ
–
r
мТЪУИ˜Л‚‡fl
Т˙ВПН‡
–
r
Note on TV colour systems
TV colour systems differ from country to country.
To view your recordings on a TV, you need a PAL
system-based TV.
When you want to use a SECAM system-based
TV, you will need a PAL/SECAM transcoder
(as this is a PAL system based camcorder).
Precaution on copyright
Television programmes, films, video tapes, and
other materials may be copyrighted.
Unauthorized recording of such materials may
be contrary to the provision of the copyright
laws.
4
и ЛПВ˜‡МЛВ ФУ ТЛТЪВП‡П
ˆ‚ВЪМУ„У ЪВОВ‚Л‰ВМЛfl
лЛТЪВП˚ ˆ‚ВЪМУ„У ЪВОВ‚Л‰ВМЛfl УЪОЛ˜‡˛ЪТfl
‚ Б‡‚ЛТЛПУТЪЛ УЪ ТЪ ‡М˚. СОfl Ф УТПУЪ ‡
З‡¯Лı Б‡ФЛТВИ ФУ ЪВОВ‚ЛБУ Ы, З‡П
МВУ·ıУ‰ЛПУ ЛТФУО¸БУ‚‡Ъ¸ ЪВОВ‚ЛБУ ,
УТМУ‚‡ММ˚И М‡ ТЛТЪВПВ PAL.
ЦТОЛ З˚ ıУЪЛЪВ ЛТФУО¸БУ‚‡Ъ¸ ЪВОВ‚ЛБУ ,
УТМУ‚‡ММ˚И М‡ ТЛТЪВПВ SECAM, З‡П
ФУМ‡‰У·ЛЪТfl Ъ‡МТНУ‰В PAL/SECAM
(ФУТНУО¸НЫ ‰‡ММ‡fl ‚Л‰ВУН‡ПВ ‡ УТМУ‚‡М‡
М‡ ТЛТЪВПВ PAL).
и В‰УТЪВ ВКВМЛВ У· ‡‚ЪУ ТНУП
Ф ‡‚В
нВОВ‚ЛБЛУММ˚В Ф У„ ‡ПП˚, НЛМУЩЛО¸П˚,
‚Л‰ВУОВМЪ˚ Л ‰ Ы„ЛВ П‡ЪВ Л‡О˚ ПУ„ЫЪ
·˚Ъ¸ Б‡˘Л˘ВМ˚ ‡‚ЪУ ТНЛП Ф ‡‚УП.
зВФ ‡‚УПУ˜М‡fl Б‡ФЛТ¸ Ъ‡НЛı П‡ЪВ Л‡ОУ‚
ПУКВЪ Ф УЪЛ‚У В˜ЛЪ¸ ЫТОУ‚ЛflП Б‡НУМ‡ У·
‡‚ЪУ ТНУП Ф ‡‚В.
CCD-TRV14E/TRV24E 3-859-266-12(1).E/R
Page 5
Using this manual
аТФУО¸БУ‚‡МЛВ ‰‡ММУ„У
ÛÍÓ‚Ó‰ÒÚ‚‡
Precautions on camcorder care
•The LCD screen and/or colour viewfinder are
manufactured using high-precision
technology. However, there may be some
tiny black points and/or bright points (red,
blue or green in colour) that constantly
appear in the viewfinder or on the LCD
screen. These points are normal in the
manufacturing process and do not affect the
recorded picture in any way. Over 99.99%
are operational for effective use.
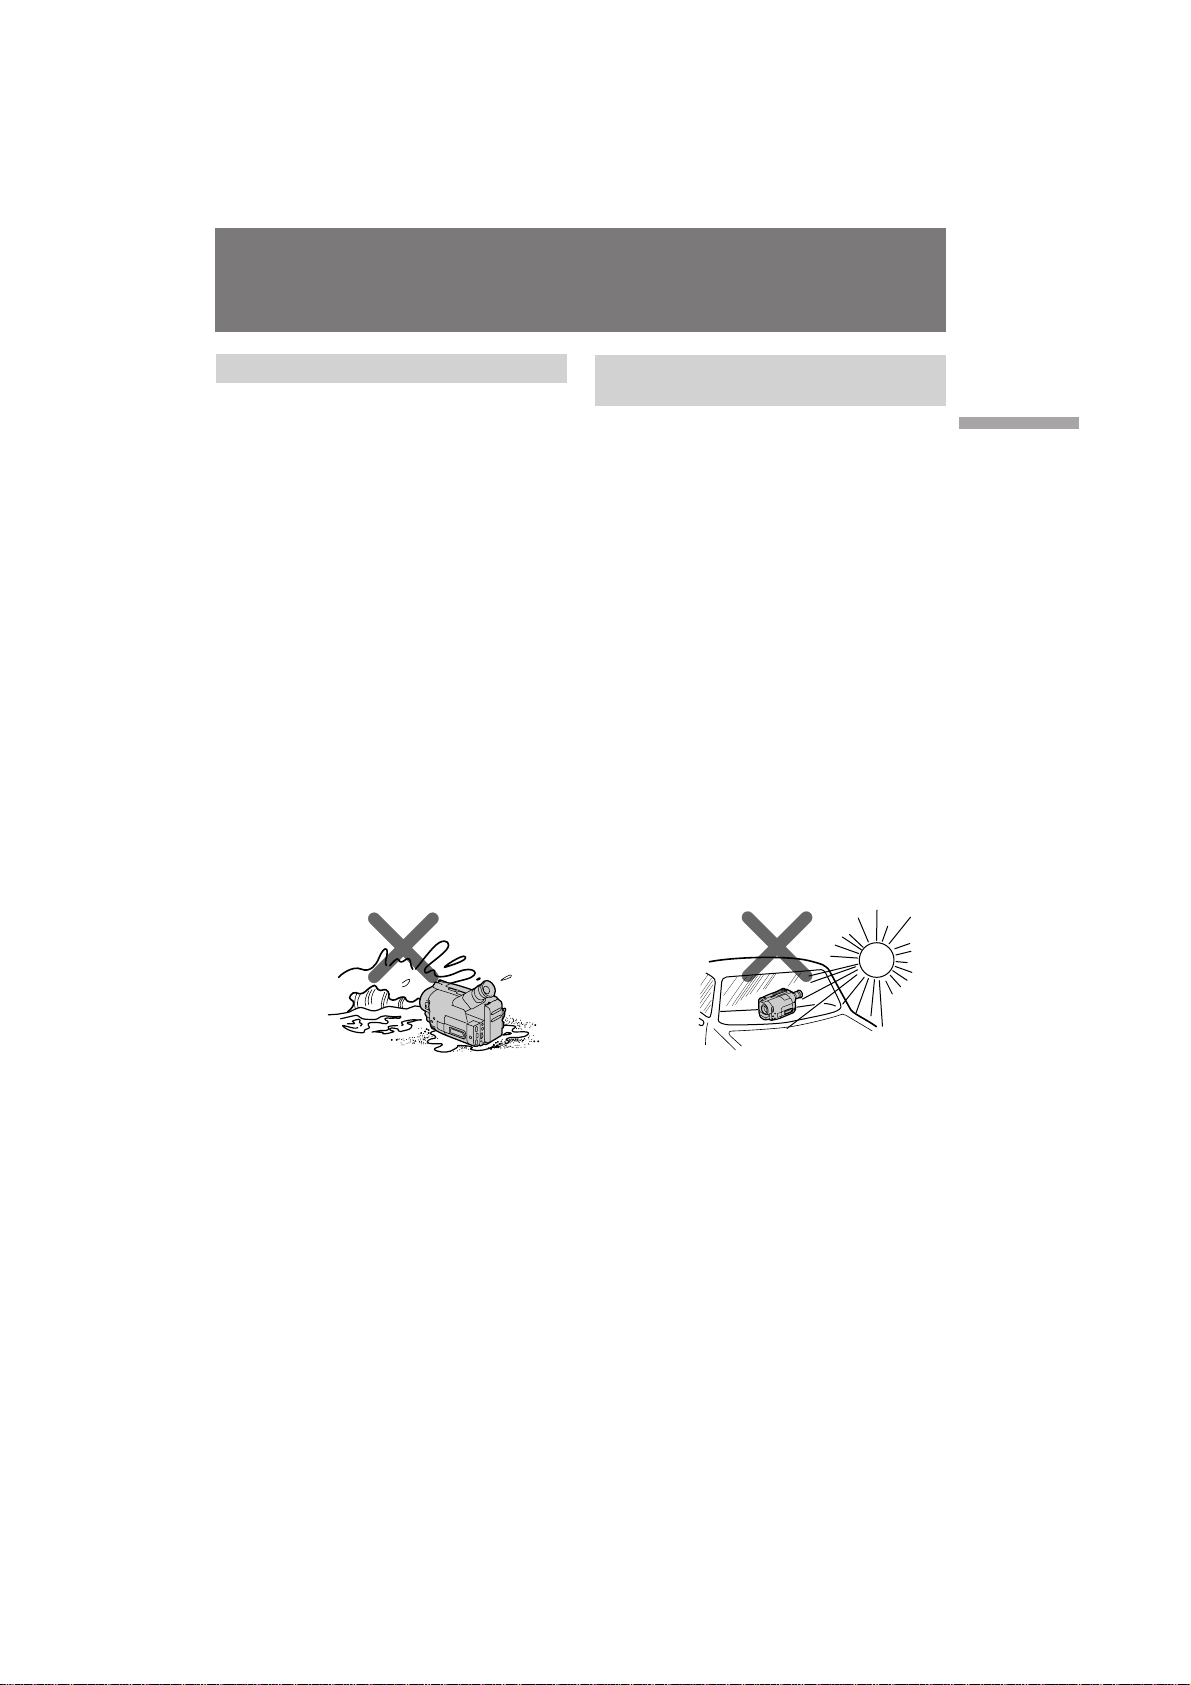
•Do not let the camcorder get wet. Keep the
camcorder away from rain and sea water. It
may cause a malfunction and sometimes the
malfunction cannot be repaired. [a]
•Never leave the camcorder under temperatures
above 60 °C (140° F), such as in a car parked in
the sun or under direct sunlight. [b]
[a]
и В‰УТЪУ УКМУТЪЛ ФУ ЫıУ‰Ы Б‡
‚Л‰ВУН‡ПВ УИ
• щН ‡М Т ЬдС Л/ЛОЛ ˆ‚ВЪМУИ
‚Л‰УЛТН‡ЪВО¸ ‚˚ФУОМВМ˚ Т
Ф ЛПВМВМЛВП ‚˚ТУНУФ ВˆЛБЛУММУИ
ЪВıМУОУ„ЛЛ. й‰М‡НУ ‚ ‚Л‰УЛТН‡ЪВОВ ЛОЛ
М‡ ˝Н ‡МВ Т ЬдС ПУ„ЫЪ ФУfl‚ОflЪ¸Тfl
У˜ВМ¸ П‡ОВМ¸НЛВ ˜В М˚В Л/ЛОЛ fl НЛВ
ЪУ˜НЛ (Н ‡ТМ˚В, ТЛМЛВ ЛОЛ БВОВМ˚В ФУ
ˆ‚ВЪЫ). щЪЛ ЪУ˜НЛ fl‚Оfl˛ЪТfl
МУ П‡О¸М˚ПЛ ‰Оfl ‡·У˜В„У Ф УˆВТТ‡ Л
МВ ‚ОЛfl˛Ъ М‡ Б‡ФЛТ˚‚‡ВПУВ
ЛБУ· ‡КВМЛВ. 99,99% ФУОfl ˝Н ‡М‡
Ф В‰М‡БМ‡˜ВМУ ‰Оfl ˝ЩЩВНЪЛ‚МУ„У
ЛТФУО¸БУ‚‡МЛfl.
• зВ ‰УФЫТН‡ИЪВ, ˜ЪУ·˚ ‚Л‰ВУН‡ПВ ‡
ТЪ‡МУ‚ЛО‡Т¸ ПУН УИ. СВ КЛЪВ
‚Л‰ВУН‡ПВ Ы ФУ‰‡О¸¯В УЪ ‰УК‰fl Л
ПУ ТНУИ ‚У‰˚. щЪУ ПУКВЪ Ф Л‚ВТЪЛ Н
МВЛТФ ‡‚МУТЪЛ ‡ФФ‡ ‡Ъ‡, НУЪУ ‡fl МВ
‚ТВ„‰‡ ПУКВЪ ·˚Ъ¸ ЛТФ ‡‚ОВМ‡. [a]
• зЛНУ„‰‡ МВ УТЪ‡‚ОflИЪВ ‚Л‰ВУН‡ПВ Ы ‚
ПВТЪВ Т ЪВПФВ ‡ЪЫ УИ Т‚˚¯В 60°л (140°F),
Н‡Н М‡Ф ЛПВ , ‚ ‡‚ЪУПУ·ЛОВ,
УТЪ‡МУ‚ОВММУП М‡ ТУОМˆВ ЛОЛ ФУ‰
Ф flП˚ПЛ ТУОМВ˜М˚ПЛ ОЫ˜‡ПЛ. [b]
[b]
Before you begin è ‰ ̇˜‡ÎÓÏ ‡·Ó ˚
CCD-TRV14E/TRV24E 3-859-266-12(1).E/R
5
Page 6
Checking supplied
accessories
и У‚В Н‡ Ф ЛО‡„‡ВП˚ı
Ф ЛМ‡‰ОВКМУТЪВИ
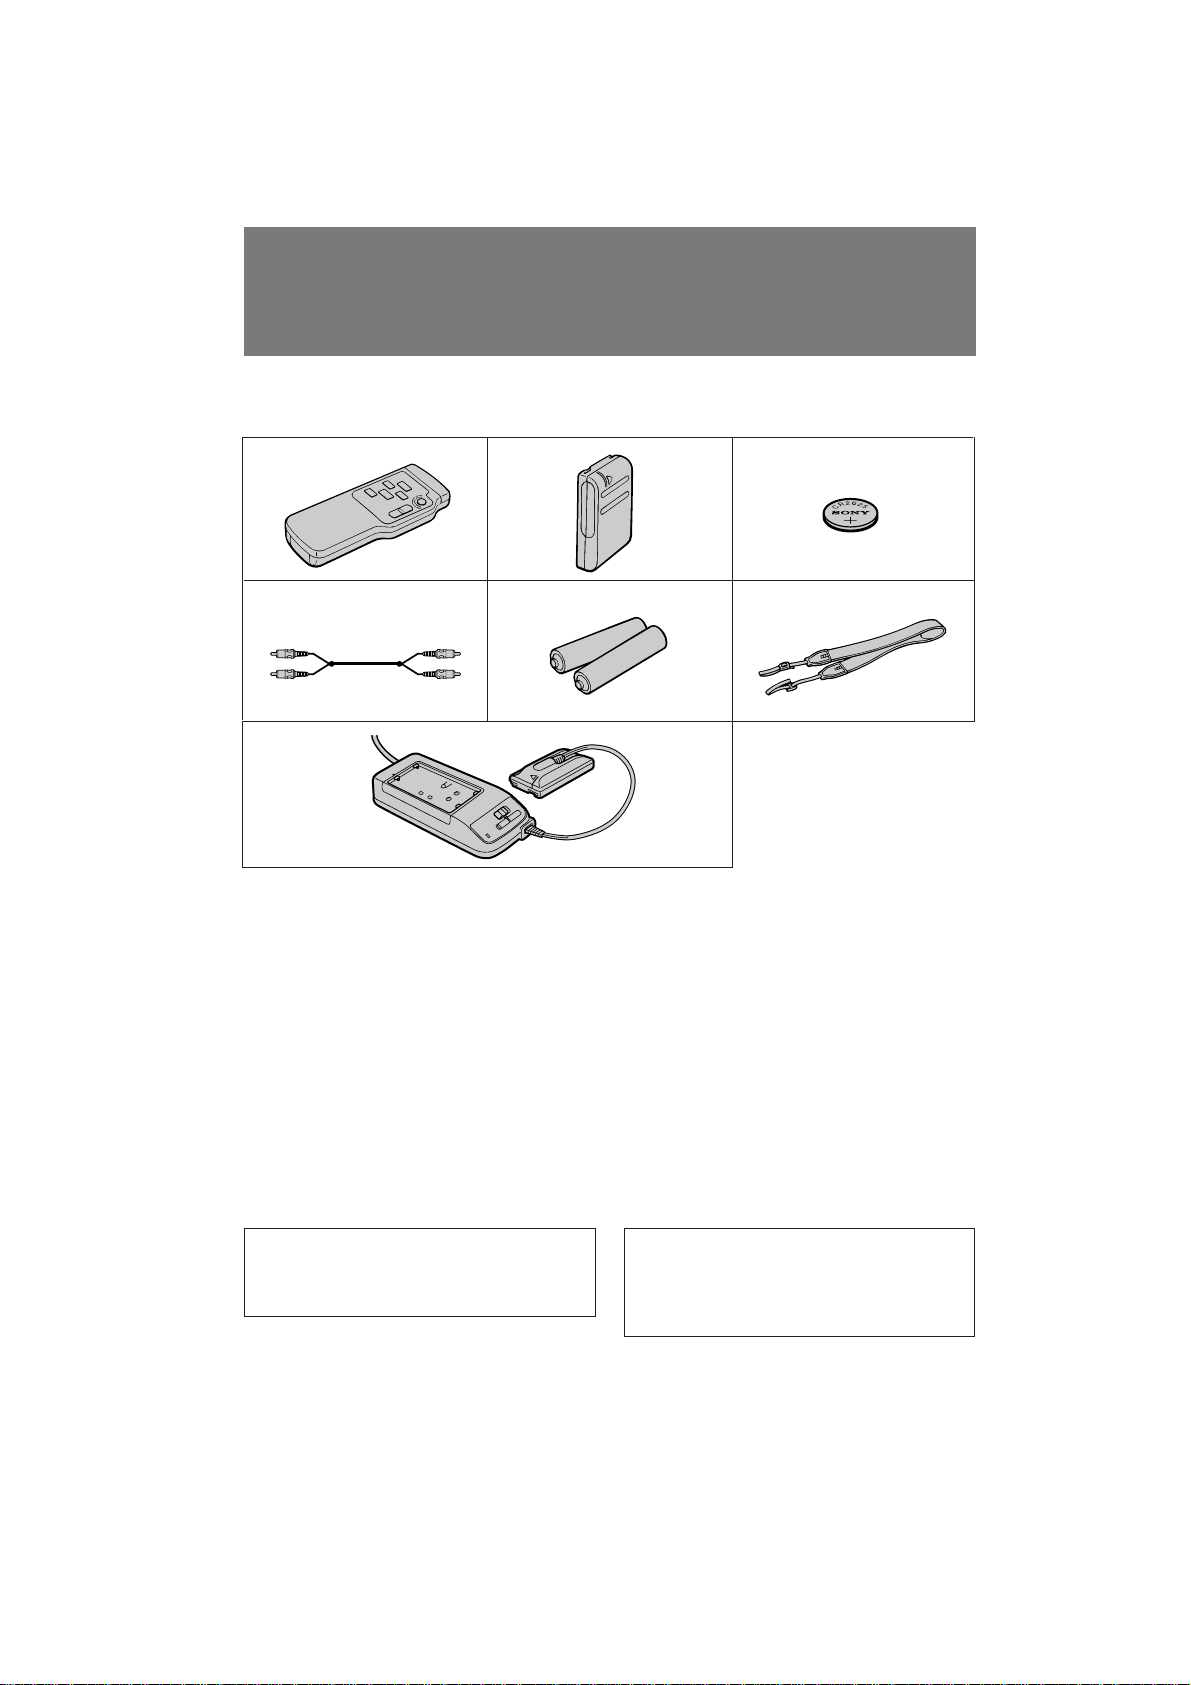
Check that the following accessories are
supplied with your camcorder.
и У‚В ¸ЪВ М‡ОЛ˜ЛВ ТОВ‰Ы˛˘Лı
Ф ЛМ‡‰ОВКМУТЪВИ, Ф ЛО‡„‡ВП˚ı Н З‡¯ВИ
‚Л‰ВУН‡ПВ В.
123
456
7
1 Wireless Remote Commander (1) (p. 23,
82)
2 NP-33 Battery Pack (1) (p. 7)
3 CR2025 Lithium Battery (1) (p. 53)
Already installed in the camcorder.
4 A/V connecting cable (1) (p. 50)
5 R6 (size AA) battery for Remote
Commander (2) (p. 83)
6 Shoulder strap (1) (p. 81)
7 AC-V16/V16A/V17/V17A AC power
adaptor (1) (p. 7, 27)
1 ЕВТФ У‚У‰М˚И ФЫО¸Ъ ‰ЛТЪ‡МˆЛУММУ„У
ÛÔ ‡‚ÎÂÌËfl (1) (ÒÚ . 23, 82)
2 Ňڇ ÂÈÌ˚È ·ÎÓÍ NP-33(1) (ÒÚ . 7)
3 гЛЪЛВ‚‡fl ·‡Ъ‡ ВИН‡ CR2025 (1) (ТЪ . 53)
ìÊ ÛÒÚ‡ÌÓ‚ÎÂ̇ ‚ ‚ˉÂÓ͇Ï Â.
4 лУВ‰ЛМЛЪВО¸М˚И Н‡·ВО¸ ‡Ы‰ЛУ/‚Л‰ВУ
(1) (ÒÚ . 50)
5 Ňڇ ÂÈ͇ R6 ( ‡ÁÏ ÓÏ ÄÄ) ‰Îfl ÔÛθڇ
‰ЛТЪ‡МˆЛУММУ„У ЫФ ‡‚ОВМЛfl (2) (ТЪ . 83)
6 иОВ˜В‚УИ ФВПВМ¸ (1) (ТЪ . 81)
7 ëÂÚ‚ÓÈ ‡‰‡ÔÚ Ô ÂÏ. ÚÓ͇ AC-V16/
V16A/V17/V17A (1) (ÒÚ . 7, 27)
Contents of the recording cannot be
compensated if recording or playback is not
made due to a malfunction of the camcorder,
video tape, etc.
6
лУ‰В КЛПУВ Б‡ФЛТЛ МВ ПУКВЪ ·˚Ъ¸
УЪНУ ВНЪЛ У‚‡МУ, ВТОЛ Б‡ФЛТ¸ ЛОЛ
‚УТФ УЛБ‚В‰ВМЛВ МВ ‚˚ФУОМfl˛ЪТfl ЛБ-Б‡
МВЛТФ ‡‚МУТЪЛ ‚Л‰ВУН‡ПВ ˚, ‚Л‰ВУОВМЪ˚
Л Ъ.‰.
CCD-TRV14E/TRV24E 3-859-266-12(1).E/R
Page 7
Getting started
Charging and installing
the battery pack
èÓ‰„ÓÚӂ͇ Í Ì‡˜‡ÎÛ ‡·ÓÚ˚
ᇠfl‰Í‡ Ë ÛÒÚ‡Ìӂ͇
·‡Ú‡ ÂÈÌÓ„Ó ·ÎÓ͇
Before using your camcorder, you first need to
charge and install the battery pack. To charge
the battery pack, use the supplied AC power
adaptor.
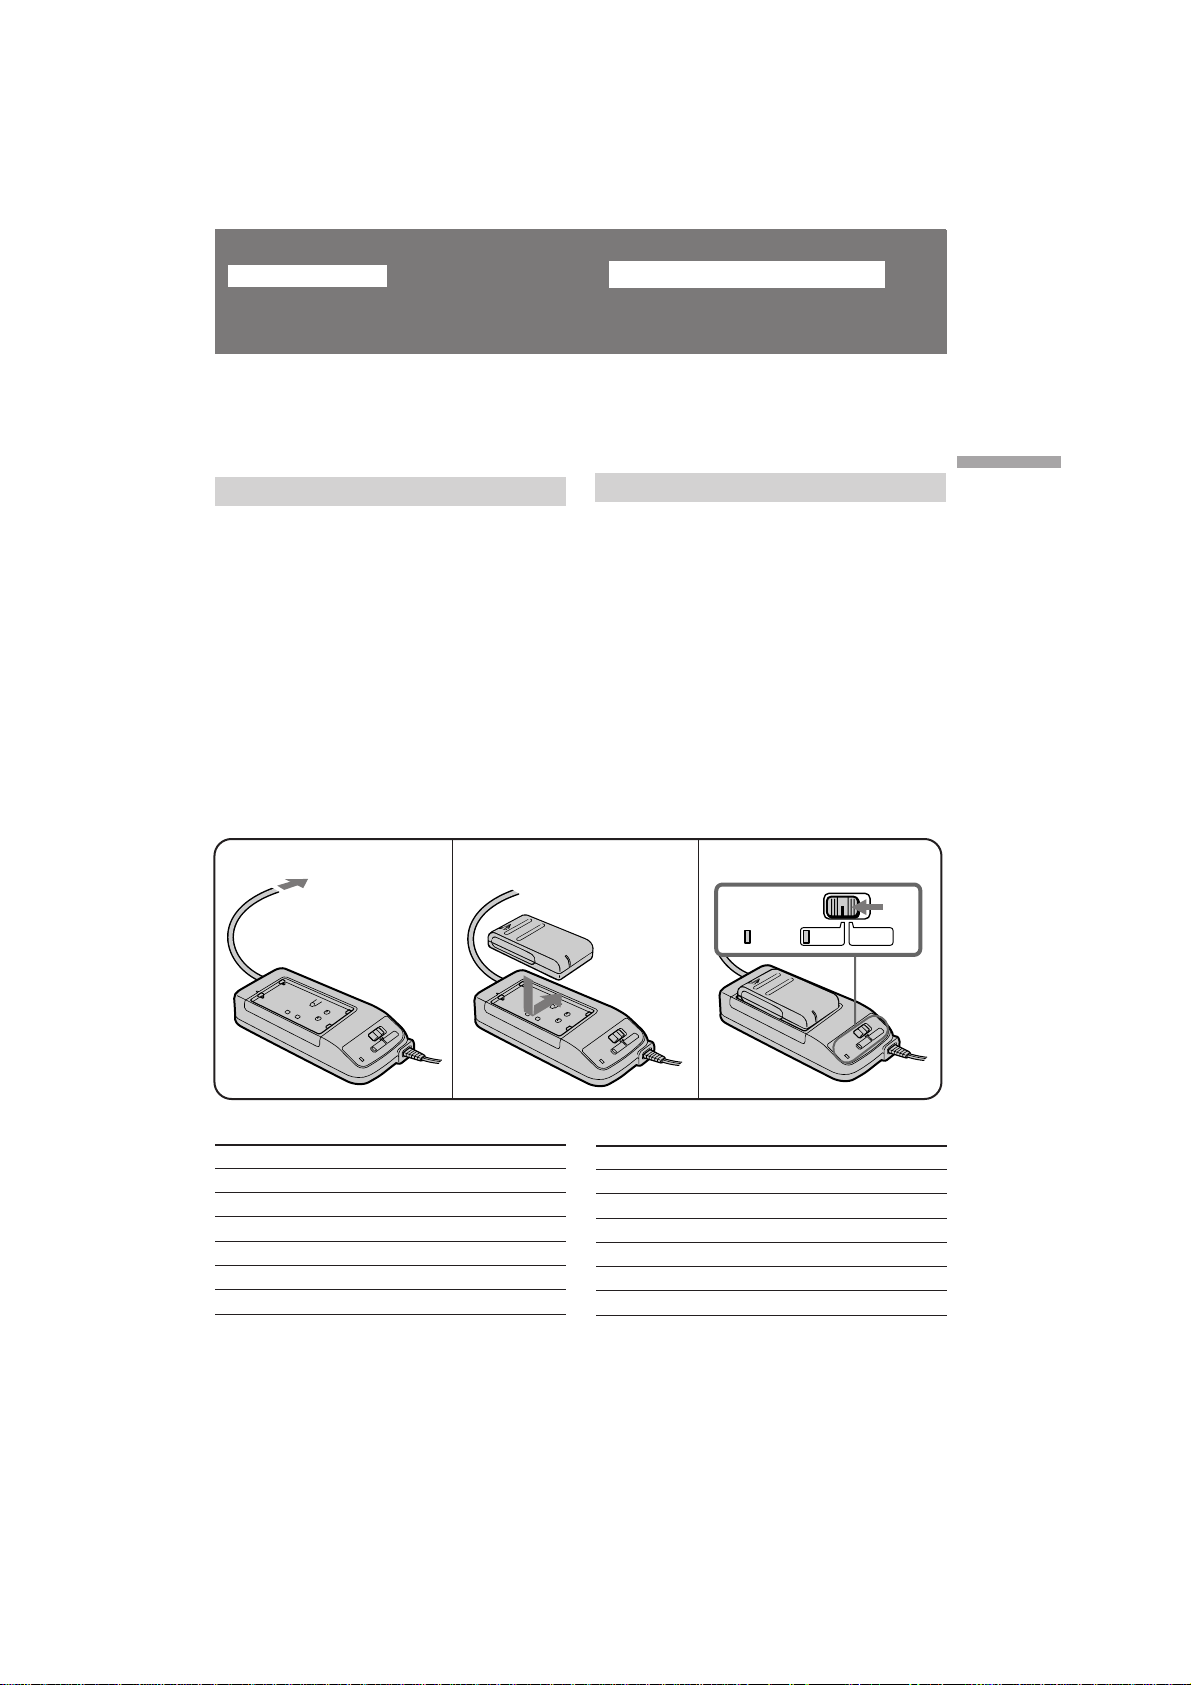
Charging the battery pack
Charge the battery pack on a flat place without
vibration.
(1) Connect the AC power adaptor to the mains.
(2) Align the right side of the battery pack with
the line on the AC power adaptor, then slide
the battery pack in the direction of the
arrow.
(3) Set the selector to CHARGE. The CHARGE
lamp (orange) lights up. Charging begins.
When charging is completed, the CHARGE
lamp goes out. Unplug the unit from the mains,
and then remove the battery pack and install it
on the camcorder.
1
2
è ‰ ÔÓθÁÓ‚‡ÌËÂÏ Ç‡¯ÂÈ ‚ˉÂÓ͇Ï ÓÈ
Ç‡Ï ÒΉÛÂÚ Ò̇˜‡Î‡ Á‡ fl‰ËÚ¸ Ë ÛÒÚ‡ÌÓ‚ËÚ¸
·‡Ú‡ ÂÈÌ˚È ·ÎÓÍ. ÑÎfl Á‡ fl‰ÍË ·‡Ú‡ ÂÈÌÓ„Ó
·ОУН‡ ‚УТФУО¸БЫИЪВТ¸ Ф ЛО‡„‡ВП˚П
ТВЪВ‚˚П ‡‰‡ФЪВ УП ФВ ВП. ЪУН‡.
ᇠfl‰Í‡ ·‡Ú‡ ÂÈÌÓ„Ó ·ÎÓ͇
ᇠfl‰ÍÛ ·‡Ú‡ ÂÈÌÓ„Ó ·ÎÓ͇ Ô ÓËÁ‚Ó‰ËÚ ̇
У‚МУИ ФУ‚В ıМУТЪЛ, МВ ФУ‰‚В КВММУИ
‚Л· ‡ˆЛЛ.
(1) иУ‰ТУВ‰ЛМЛЪВ ТВЪВ‚УИ ¯МЫ ‡‰‡ФЪВ ‡
ФВ ВП. ЪУН‡ Н ˝ОВНЪ Л˜ВТНУИ ТВЪЛ.
(2) ìÒÚ‡ÌÓ‚ËÚÂ Ô ‡‚Û˛ ÒÚÓ ÓÌÛ ·‡Ú‡ ÂÈÌÓ„Ó
·ОУН‡ М‡ У‰МУИ ОЛМЛЛ Т ТВЪВ‚˚П
‡‰‡ФЪВ УП ФВ ВП. ЪУН‡, Б‡ЪВП
ФВ В‰‚ЛМ¸ЪВ ·‡Ъ‡ ВИМ˚И ·ОУН ‚
М‡Ф ‡‚ОВМЛЛ ТЪ ВОНЛ.
(3) мТЪ‡МУ‚ЛЪВ ТВОВНЪУ ‚ ФУОУКВМЛВ
CHARGE. á‡„Ó ËÚÒfl ·ÏÔӘ͇ CHARGE
(У ‡МКВ‚‡fl). з‡˜МВЪТfl Б‡ fl‰Н‡.
дУ„‰‡ Б‡ fl‰Н‡ Б‡‚В ¯ЛЪТfl, О‡ПФУ˜Н‡
CHARGE ФУ„‡ТМВЪ. йЪНО˛˜ЛЪВ ‡ФФ‡ ‡Ъ УЪ
˝ОВНЪ Л˜ВТНУИ ТВЪЛ, ‡ Б‡ЪВП ТМЛПЛЪВ
·‡Ú‡ ÂÈÌ˚È ·ÎÓÍ Ë ÛÒÚ‡ÌÓ‚ËÚÂ Â„Ó Ì‡
‚ˉÂÓ͇Ï Û.
3
POWER
CHARGE
Getting started èÓ‰„ÓÚӂ͇ Í Ì‡˜‡ÎÛ ‡·ÓÚ˚
Charging Time (in minutes)
Battery pack
NP-33 (supplied)
NP-55H
NP-C65/67
NP-66
NP-77H
NP-98
* Approximate minutes to charge an empty
battery pack using the supplied AC power
adaptor (Lower temperatures require a longer
charging time.)
Charging time*
60
85
105
95
170
215
З ВПfl Б‡ fl‰НЛ (‚ ПЛМЫЪ‡ı)
Ňڇ ÂÈÌ˚È ·ÎÓÍ
NP-33 (Ô Ë·„‡ÂÚÒfl)
NP-55H
NP-C65/67
NP-66
NP-77H
NP-98
* и Л·ОЛБЛЪВО¸МУ ‚ ПЛМЫЪ‡ı ‰Оfl Б‡ fl‰НЛ
‡Б flКВММУ„У ·‡Ъ‡ ВИМУ„У ·ОУН‡ Т
ЛТФУО¸БУ‚‡МЛВП Ф ЛО‡„‡ВПУ„У ТВЪВ‚У„У
‡‰‡ФЪВ ‡ ФВ ВП. ЪУН‡. (и Л МЛБНЛı
ЪВПФВ ‡ЪЫ ‡ı ‚ ВПfl Б‡ fl‰НЛ Ы‰ОЛМflВЪТfl.)
CCD-TRV14E/TRV24E 3-859-266-12(1).E/R
Ç ÂÏfl Á‡ fl‰ÍË*
60
85
105
95
170
215
7
Page 8
Charging and installing the
battery pack
ᇠfl‰Í‡ Ë ÛÒÚ‡Ìӂ͇
·‡Ú‡ ÂÈÌÓ„Ó ·ÎÓ͇
Battery life (in minutes)
CCD-TRV14E
While
Battery pack
While recording
LCD open
2)
LCD close
1)
playing
back on
LCD
NP-33 (supplied) 80 (45) 100 (55) 75
NP-55H 95 (50) 120 (65) 90
NP-C65/67 135 (75) 175 (95) 130
NP-66 130 (70) 165 (90) 120
NP-77H 205 (110) 255 (130) 200
NP-98 265 (145) 330 (180) 255
CCD-TRV24E
While
Battery pack
While recording
LCD open2)LCD close
1)
playing
back on
LCD
NP-33 (supplied) 70 (40) 95 (50) 75
NP-55H 90 (50) 115 (65) 90
NP-C65/67 125 (70) 160 (90) 130
NP-66 120 (65) 155 (85) 120
NP-77H 195 (110) 240 (130) 200
NP-98 240 (130) 315 (175) 255
1)
Approximate continuous recording time
indoors. Figures in parentheses are
approximate recording time when you repeat
recording start/stop, zooming and turning the
power on/off.
The actual battery life may be shorter.
2)
Approximate recording time when using the
LCD screen. When using both the viewfinder
and LCD screen, the battery life is shorter.
3)
Approximate continuous playback time
indoors.
If you are recording or playing using the LCD
screen with LCD B.L. set to BRIGHT in the
menu system, the battery life is approximately
10% shorter.
To remove the battery pack
Slide the battery pack in the direction of the
arrow.
л УН ТОЫК·˚ ·‡Ъ‡ ВИМУ„У ·ОУН‡
(‚ ПЛМЫЪ‡ı)
CCD-TRV14E
3)
Ňڇ ÂÈÌ˚È
·ÎÓÍ
NP-33 (Ô Ë·„‡ÂÚÒfl)
NP-55H 95 (50) 120 (65) 90
NP-C65/67 135 (75) 175 (95) 130
NP-66 130 (70) 165 (90) 120
NP-77H 205 (110) 255 (130) 200
NP-98 265 (145) 330 (180) 255
CCD-TRV24E
3)
Ňڇ ÂÈÌ˚È
·ÎÓÍ
NP-33 (Ô Ë·„‡ÂÚÒfl)
NP-55H 90 (50) 115 (65) 90
NP-C65/67 125 (70) 160 (90) 130
NP-66 120 (65) 155 (85) 120
NP-77H 195 (110) 240 (130) 200
NP-98 240 (130) 315 (175) 255
1)
и Л·ОЛБЛЪВО¸МУВ ‚ ВПfl МВФ В ˚‚МУИ
Б‡ФЛТЛ ‚МЫЪ Л ФУПВ˘ВМЛfl. уЛТО‡ ‚ Н Ы„О˚ı
ТНУ·Н‡ı УБМ‡˜‡˛Ъ Ф Л·ОЛБЛЪВО¸МУВ ‚ ВПfl
Б‡ФЛТЛ ‚ ВКЛПВ ФУТЪУflММУ„У
ЛТФУО¸БУ‚‡МЛfl ЩЫМНˆЛИ ФЫТН‡/УТЪ‡МУ‚НЛ,
Ъ ‡МТЩУН‡ˆЛЛ Л ‚НО˛˜ВМЛfl/‚˚НО˛˜ВМЛfl
ФЛЪ‡МЛfl.
кВ‡О¸М˚И Т УН ТОЫК·˚ ·‡Ъ‡ ВИМУ„У ·ОУН‡
ПУКВЪ ·˚Ъ¸ НУ У˜В.
2)
и Л·ОЛБЛЪВО¸МУВ ‚ ВПfl ‚ ПЛМЫЪ‡ı Ф Л
ЛТФУО¸БУ‚‡МЛЛ ˝Н ‡М‡ ЬдС. и Л
ЛТФУО¸БУ‚‡МЛЛ Л ‚Л‰УЛТН‡ЪВОfl Л ˝Н ‡М‡
ЬдС Т УН ТОЫК·˚ ·‡Ъ‡ ВЛ ·Ы‰ВЪ НУ У˜В.
3)
и Л·ОЛБЛЪВО¸МУВ ‚ ВПfl МВФ В ˚‚МУ„У
‚УТФ УЛБ‚В‰ВМЛfl ‚ ФУПВ˘ВМЛЛ.
ЦТОЛ З˚ ‚˚ФУОМflВЪВ Б‡ФЛТ¸ ЛОЛ
‚УТФ УЛБ‚В‰ВМЛВ, ЛТФУО¸БЫfl ˝Н ‡М Т ЬдС,
НУ„‰‡ LCD B.L. ‚ ТЛТЪВПВ ПВМ˛ ЫТЪ‡МУ‚ОВМУ
‚ ФУОУКВМЛВ BRIGHT, Т УН ТОЫК·˚
·‡Ú‡ ÂÈÌÓ„Ó ·ÎÓ͇ ·Û‰ÂÚ Ô ËÏ ÌÓ Ì‡ 10%
ÍÓ Ó˜Â.
ÇÓ ‚ ÂÏfl Á‡ÔËÒË
ÜäÑ ÓÚ ˚Ú ÜäÑ Á‡Í ˚Ú
2)
80 (45) 100 (55) 7 5
ÇÓ ‚ ÂÏfl Á‡ÔËÒË
2)
ÜäÑ ÓÚ ˚Ú
ÜäÑ Á‡Í ˚Ú
70 (40) 95 (50) 75
1)
1)
ЗУ ‚ ВПfl
‚УТФУЛБ‚В‰ВМЛfl
М‡ ЬдС
ЗУ ‚ ВПfl
‚УТФУЛБ‚В‰ВМЛfl
М‡ ЬдС
3)
3)
ÑÎfl ÒÌflÚËfl ·‡Ú‡ ÂÈÌÓ„Ó ·ÎÓ͇
иВ В‰‚ЛМ¸ЪВ ·‡Ъ‡ ВИМ˚И ·ОУН ‚
М‡Ф ‡‚ОВМЛЛ ТЪ ВОНЛ.
8
CCD-TRV14E/TRV24E 3-859-266-12(1).E/R
Page 9
Charging and installing the
battery pack
ᇠfl‰Í‡ Ë ÛÒÚ‡Ìӂ͇
·‡Ú‡ ÂÈÌÓ„Ó ·ÎÓ͇
Notes on charging the battery pack
•The POWER lamp will remain lit for a while
even if the battery pack is removed and the
mains lead is unplugged after charging the
battery pack. This is normal.
•If the POWER lamp does not light, set the
selector to VTR (DC OUT) and disconnect the
mains lead. After about one minute, reconnect
the mains lead and set the selector to CHARGE
again.
•You cannot operate the camcorder using the
AC power adaptor while charging the battery
pack.
Installing the battery pack
(1) Insert the top of the battery pack into the top
of the battery mounting surface.
(2) Push the battery pack. Make sure that you
hear clicks twice.
Attach the battery pack to the camcorder
securely.
2
è ËϘ‡ÌËfl ÔÓ Á‡ fl‰Í ·‡Ú‡ ÂÈÌÓ„Ó ·ÎÓ͇
• г‡ПФУ˜Н‡ POWER ·Ы‰ВЪ МВНУЪУ УВ ‚ ВПfl
Т‚ВЪЛЪ¸Тfl, ‰‡КВ ВТОЛ ·‡Ъ‡ ВИМ˚И ·ОУН
ТМflЪ Л ТВЪВ‚УИ Ф У‚У‰ УЪНО˛˜ВМ ФУТОВ
Б‡ fl‰НЛ ·‡Ъ‡ ВИМУ„У ·ОУН‡. щЪУ fl‚ОflВЪТfl
МУ П‡О¸М˚П.
• ЦТОЛ О‡ПФУ˜Н‡ POWER МВ Б‡„У ‡ВЪТfl,
ЫТЪ‡МУ‚ЛЪВ ТВОВНЪУ ‚ ФУОУКВМЛВ VTR (DC
OUT) Л УЪТУВ‰ЛМЛЪВ ТВЪВ‚УИ ФУ‚У‰.
и ЛПВ МУ ˜В ВБ ПЛМЫЪЫ ‚МУ‚¸
ФУ‰ТУВ‰ЛМЛЪВ ТВЪВ‚УИ Ф У‚У‰ Л УФflЪ¸
ЫТЪ‡МУ‚ЛЪВ ТВОВНЪУ ‚ ФУОУКВМЛВ CHARGE.
• З˚ МВ ПУКВЪВ ЫФ ‡‚ОflЪ¸ ‚Л‰ВУН‡ПВ УИ Т
ЛТФУО¸БУ‚‡МЛВП ТВЪВ‚У„У ‡‰‡ФЪВ‡ ФВ ВП.
ЪУН‡ ‚У ‚ ВПfl Б‡ fl‰НЛ ·‡Ъ‡ ВИМУ„У ·ОУН‡.
ìÒÚ‡Ìӂ͇ ·‡Ú‡ ÂÈÌÓ„Ó ·ÎÓ͇
(1) ÇÒÚ‡‚¸Ú ‚ ıÌËÈ ÍÓ̈ ·‡Ú‡ ÂÈÌÓ„Ó
·ОУН‡ ‚ ‚В ıМ˛˛ ˜‡ТЪ¸ ·‡Ъ‡ ВИМУИ
ЫТЪ‡МУ‚У˜МУИ ФУ‚В ıМУТЪЛ.
(2) з‡КПЛЪВ М‡ ·‡Ъ‡ ВИМ˚И ·ОУН. м·В‰ЛЪВТ¸,
˜ЪУ·˚ З˚ ЫТО˚¯‡ОЛ ‰‚‡К‰˚ ˘ВО˜УН.
и ЛН ВФЛЪВ М‡‰ВКМУ ·‡Ъ‡ ВИМ˚И ·ОУН Н
‚Л‰ВУН‡ПВ В.
1
Getting started èÓ‰„ÓÚӂ͇ Í Ì‡˜‡ÎÛ ‡·ÓÚ˚
Note on the battery pack
Do not carry the camcorder by grasping the
battery pack.
To remove the battery pack
Slide BATT, and then pull the lower part of the
battery pack.
You can look at the demonstration of the
functions available with this camcorder. (p. 31)
и ЛПВ˜‡МЛВ УЪМУТЛЪВО¸МУ ·‡Ъ‡ ВИМУ„У
·ÎÓ͇
зВ ФВ ВМУТЛЪВ ‚Л‰ВУН‡ПВ Ы ФЫЪВП Б‡ı‚‡Ъ‡
ВВ Б‡ ·‡Ъ‡ ВИМ˚И ·ОУН.
ÑÎfl ÒÌflÚËfl ·‡Ú‡ ÂÈÌÓ„Ó ·ÎÓ͇
뉂Ë̸Ú BATT, ‡ Á‡ÚÂÏ ÔÓÚflÌËÚ Á‡
ÌËÊÌ˛˛ ˜‡ÒÚ¸ ·‡Ú‡ ÂÈÌÓ„Ó ·ÎÓ͇.
2
1
З˚ ПУКВЪВ ‚Б„ОflМЫЪ¸ М‡ ‰ВПУМТЪ ‡ˆЛ˛
ЩЫМНˆЛИ, ЛПВ˛˘ЛıТfl ‰Оfl ‰‡ММУИ
‚Л‰ВУН‡ПВ ˚. (ТЪ . 31)
CCD-TRV14E/TRV24E 3-859-266-12(1).E/R
9
Page 10
Inserting a cassette
ÇÒÚ‡‚͇ ͇ÒÒÂÚ˚
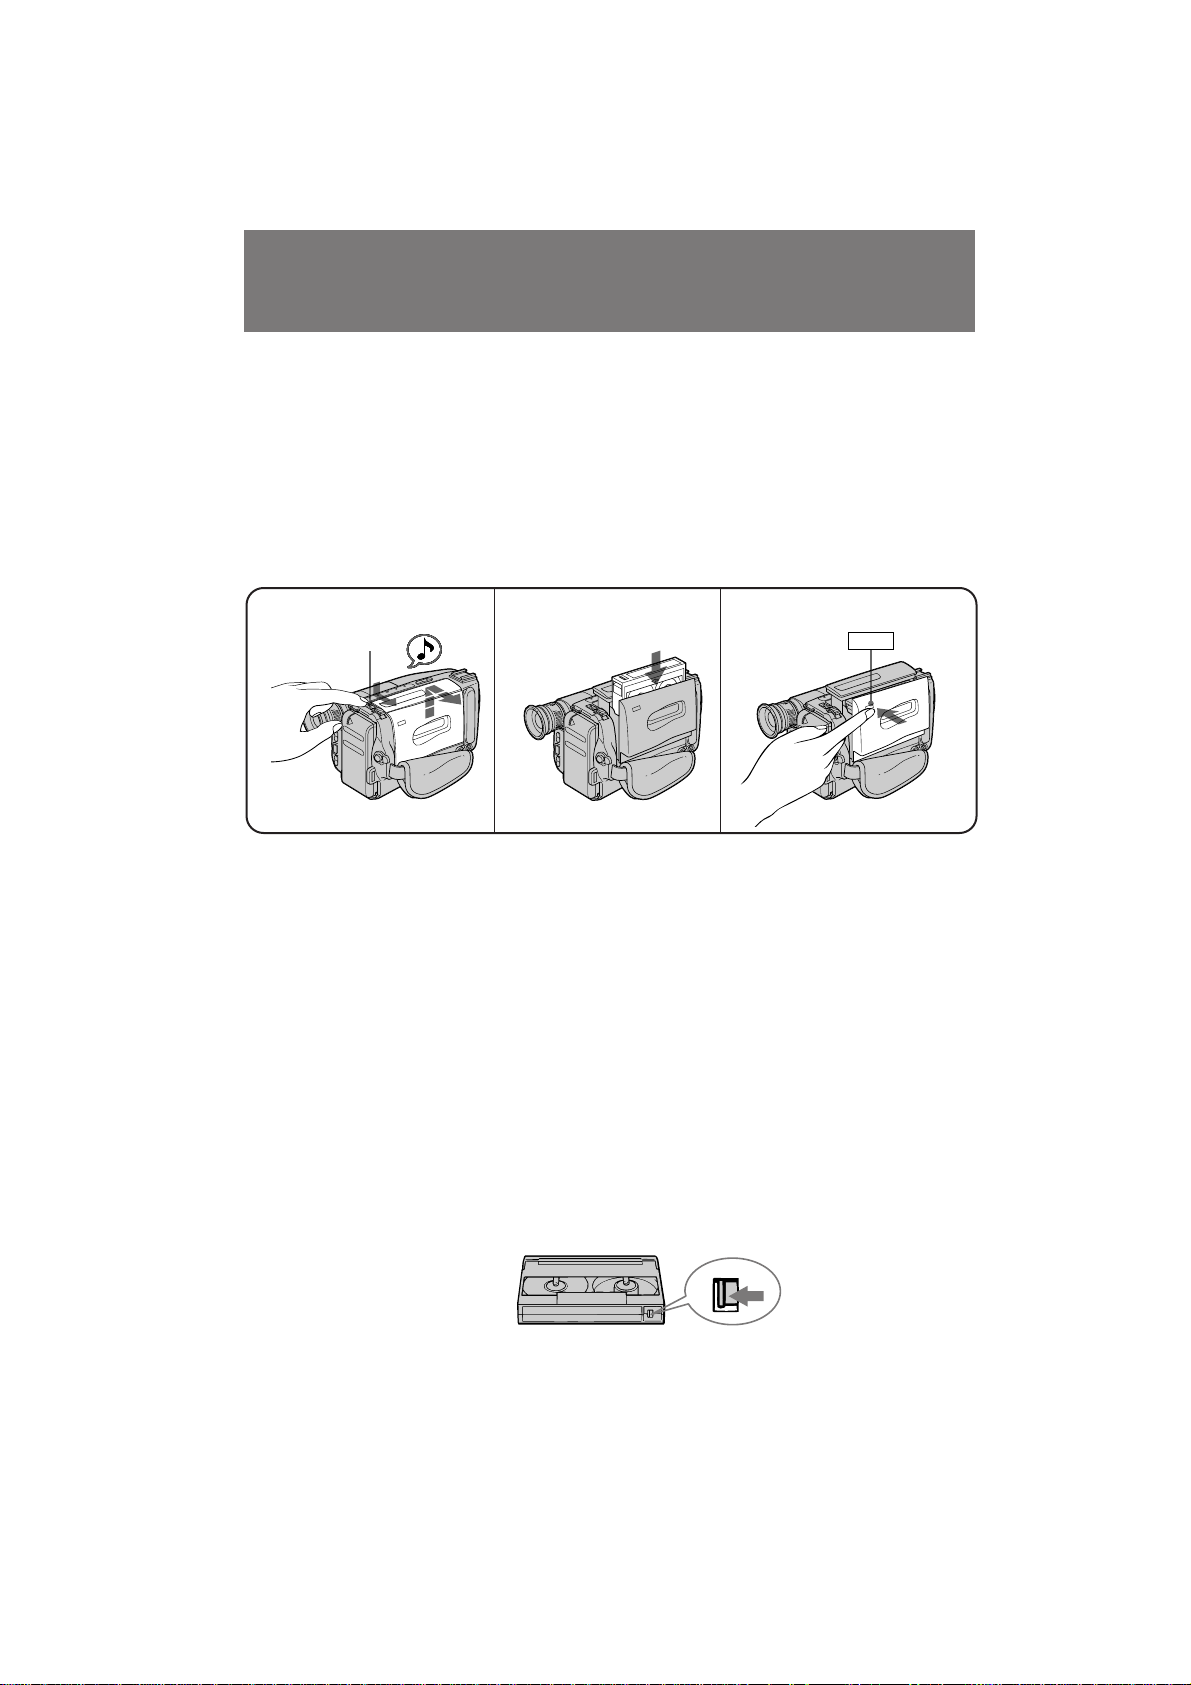
Make sure that a power source is installed.
(1) While pressing the small blue button, slide
EJECT in the direction of the arrow. The
cassette compartment automatically opens.
(2) Insert a cassette (not supplied) with the
window facing out.
(3) Press the PUSH mark on the cassette
compartment to close it. The cassette
compartment automatically closes.
1
EJECT
2
To eject the cassette
While pressing the small blue button, slide
EJECT in the direction of the arrow.
ì·Â‰ËÚÂÒ¸, ˜ÚÓ ËÒÚÓ˜ÌËÍ ÔËÚ‡ÌËfl
ÛÒÚ‡ÌÓ‚ÎÂÌ.
(1) з‡КЛП‡fl П‡ОВМ¸НЫЫ˛ ТЛМ˛˛ НМУФНЫ,
Т‰‚ЛМ¸ЪВ EJECT ‚ М‡Ф ‡‚ОВМЛЛ ТЪ ВОНЛ.
йЪТВН Н‡ТТВЪ˚ ‡‚ЪУП‡ЪЛ˜ВТНЛ
УЪН ˚‚‡ВЪТfl.
(2) ЗТЪ‡‚¸ЪВ Н‡ТТВЪЫ (МВ Ф ЛО‡„‡ВЪТfl)
ÓÍÓ¯ÍÓÏ, Ó· ‡˘ÂÌÌ˚Ï Ì‡ ÛÊÛ.
(3) з‡КПЛЪВ ПВЪНЫ PUSH М‡ УЪТВНВ Н‡ТТВЪ˚
‰Оfl В„У Б‡Н ˚ЪЛfl. йЪТВН Н‡ТТВЪ˚
‡‚ЪУП‡ЪЛ˜ВТНЛ Б‡Н ˚‚‡ВЪТfl.
3
PUSH
ÑÎfl ‚˚Ú‡ÎÍË‚‡ÌËfl ͇ÒÒÂÚ˚
з‡КЛП‡fl П‡ОВМ¸НЫ˛ ТЛМ˛˛ НМУФНЫ,
Т‰‚ЛМ¸ЪВ EJECT ‚ М‡Ф ‡‚ОВМЛЛ ТЪ ВОНЛ.
To prevent accidental erasure
Slide the tab on the cassette to expose the red
mark.
If you insert the cassette with the red mark
exposed and close the cassette compartment, the
beeps sound for a while. If you try to record
with the red mark exposed, the ˇ and 6
indicators flash, and you cannot record.
To re-record on this tape, slide the tab back out
covering the red mark.
10
ÑÎfl Ô Â‰ÓÚ‚ ‡˘ÂÌËfl ÒÎÛ˜‡ÈÌÓ„Ó
ÒÚË ‡ÌËfl
иВ В‰‚ЛМ¸ЪВ ОВФВТЪУН М‡ Н‡ТТВЪВ, ˜ЪУ·˚
ФУfl‚ЛО‡Т¸ Н ‡ТМ‡fl ПВЪН‡.
ЦТОЛ З˚ ‚ТЪ‡‚ЛЪВ Н‡ТТВЪЫ Ф Л
‚˚ТЪ‡‚ОВММУИ Н ‡ТМУИ ПВЪНВ Л Б‡Н УВЪВ
УЪТВН Н‡ТТВЪ˚, ЪУ Б‡Б‚Ы˜ЛЪ БЫППВ М˚И
ТЛ„М‡О. ЦТОЛ З˚ ФУФ˚Ъ‡ВЪВТ¸ Б‡ФЛТ˚‚‡Ъ¸
Ф Л ‚˚ТЪ‡‚ОВММУИ Н ‡ТМУИ ПВЪНВ, ·Ы‰ЫЪ
ПЛ„‡Ъ¸ ЛМ‰ЛН‡ЪУ ˚ ˇ Л 6, Л З˚ МВ
ТПУКВЪВ Ф ЛБ‚ВТЪЛ Б‡ФЛТ¸.
СОfl ФВ ВБ‡ФЛТЛ М‡ ‰‡ММЫ˛ ОВМЪЫ
ФВ В‰‚ЛМ¸ЪВ ОВФВТЪУН М‡Б‡‰, ˜ЪУ·˚
Б‡Н ˚Ъ¸ Н ‡ТМЫ˛ ПВЪНЫ.
CCD-TRV14E/TRV24E 3-859-266-12(1).E/R
Page 11

Basic operations
Camera recording
éÒÌÓ‚Ì˚ ÓÔ ‡ˆËË
á‡ÔËÒ¸ Ò ÔÓÏÓ˘¸˛ ‚ˉÂÓ͇Ï ˚
Make sure that a power source and a cassette is
inserted and that the START/STOP MODE
switch inside the LCD panel is set to .
When you use the camcorder for the first time,
power on it and reset the date and time to your
time (p. 55) before you start recording. The date
is automatically recorded for 10 seconds after
you start recording (AUTO DATE feature). This
feature works only once a day.
Before you record one-time events, you may
want to make a trial recording to make sure that
you are using the camcorder correctly.
(1) While pressing the small green button on the
POWER switch, set it to CAMERA.
(2) Turn STANDBY up. The “STBY” indicator
appears in the viewfinder.
(3) Press START/STOP. The camcorder starts
recording and the “STBY” indicator changes
to the “REC” indicator.
You can also select Recording mode, SP
(standard play) mode or LP (long play) mode.
Set REC MODE in the menu system according
to the length of your planned recording before
you start.
ì·Â‰ËÚ¸Òfl, ËÒÚÓ˜ÌËÍ ÔËÚ‡ÌËfl Ë Í‡ÒÒÂÚ‡
‚ÒÚ‡‚ÎÂÌ˚ Ë, ˜ÚÓ Ô ÂÍβ˜‡ÚÂθ START/
STOP MODE ̇ Ô‡ÌÂÎË ÜäÑ ÛÒÚ‡ÌÓ‚ÎÂÌ Ì‡
.
ЦТОЛ З˚ ЛТФУО¸БЫВЪВ ‚Л‰ВУН‡ПВ Ы ‚
ФВ ‚˚И ‡Б, ЪУ ‚НО˛˜ЛЪВ ВВ ФЛЪ‡МЛВ Л
ЫТЪ‡МУ‚ЛЪВ ‰‡ЪЫ Л ‚ ВПfl М‡ З‡¯В ‚ ВПfl
(ТЪ . 55) ФВ В‰ ЪВП, Н‡Н З˚ М‡˜МВЪВ Б‡ФЛТ¸.
С‡Ъ‡ ‡‚ЪУП‡ЪЛ˜ВТНЛ ·Ы‰ВЪ Б‡ФЛТ˚‚‡Ъ¸Тfl ‚
ЪВ˜ВМЛВ 10 ТВНЫМ‰ ФУТОВ М‡˜‡О‡ Б‡ФЛТЛ
(ЩЫМНˆЛfl AUTO DATE). щЪ‡ ЩЫМНˆЛfl
‡·УЪ‡ВЪ ЪУО¸НУ У‰ЛМ ‡Б ‚ ‰ВМ¸.
иВ В‰ ЪВП, Н‡Н З˚ М‡˜МВЪВ Б‡ФЛТ¸
У‰МУ ‡БУ‚˚ı ТУ·˚ЪЛИ, З˚ ПУКВЪВ Б‡ıУЪВЪ¸
Т‰ВО‡Ъ¸ Ф У·Ы ‰Оfl ФУ‰Ъ‚В К‰ВМЛfl, ˜ЪУ З˚
ЛТФУО¸БЫВЪВ ‚Л‰ВУН‡ПВ Ы Ф ‡‚ЛО¸МУ.
(1) з‡КЛП‡fl П‡ОВМ¸НЫ˛ БВОВМЫ˛ НМУФНЫ М‡
‚˚НО˛˜‡ЪВОВ POWER, ЫТЪ‡МУ‚ЛЪВ В„У ‚
ФУОУКВМЛВ CAMERA.
(2) èÓ‚Â ÌËÚ STANDBY ‚‚ ı: à̉Ë͇ÚÓ
“STBY” ÔÓfl‚ËÚÒfl ‚ ‚ˉÓËÒ͇ÚÂÎÂ.
(3) з‡КПЛЪВ START/STOP. ЗЛ‰ВУН‡ПВ ‡
М‡˜ЛМ‡ВЪ Б‡ФЛТ¸, Л ЛМ‰ЛН‡ЪУ “STBY”
ЛБПВМЛЪТfl М‡ ЛМ‰ЛН‡ЪУ “REC”.
З˚ Ъ‡НКВ ПУКВЪВ ‚˚· ‡Ъ¸ ВКЛП Б‡ФЛТЛ,
ВКЛП SP (ТЪ‡М‰‡ ЪМУВ ‚УТФ УЛБ‚В‰ВМЛВ)
ЛОЛ ВКЛП LP (Ы‰ОЛМВММУВ
‚УТФ УЛБ‚В‰ВМЛВ). мТЪ‡МУ‚ЛЪВ REC MODE ‚
ТЛТЪВПВ ПВМ˛ ‚ ТУУЪ‚ВЪТЪ‚ЛЛ Т
‰ОЛЪВО¸МУТЪ¸˛ ФО‡МЛ ЫВПУИ З‡ПЛ Б‡ФЛТЛ
ФВ В‰ М‡˜‡ОУП.
Basic operations éÒÌÓ‚Ì˚ ÓÔ ‡ˆËË
12
POWER
CAMERA
OFF
PLAYER
S
T
3
S
T
K
C
O
L
A
N
D
B
Y
K
C
O
L
A
N
D
B
Y
STBY
0:00:00
ı
AUTO DATE
REC
0:00:01
4 7 1997
11
CCD-TRV14E/TRV24E 3-859-266-12(1).E/R
Page 12
Camera recording
á‡ÔËÒ¸ Ò ÔÓÏÓ˘¸˛
‚ˉÂÓ͇Ï ˚
To stop recording momentarily [a]
Press START/STOP again. The “REC” indicator
in the viewfinder changes to the “STBY”
indicator (Standby mode).
To finish recording [b]
Press START/STOP. Turn STANDBY down,
and set the POWER switch to OFF.
Then, eject the cassette and remove the battery
pack.
[a]
K
C
O
L
S
T
A
N
D
B
Y
Note on standby mode
If you leave the camcorder for 5 minutes or
more with a cassette inserted in Standby mode,
the camcorder goes off automatically. This
prevents wearing down the battery and wearing
out the tape. To resume Standby mode, turn
STANDBY down once and turn it up again. To
start recording, press START/STOP.
Notes on the recording mode
•This camcorder records and plays back in SP
(standard play) mode and in LP (long play)
mode.
The playback quality in LP mode, however, will
not be as good as that in SP mode.
•When a tape recorded on this camcorder in LP
mode is played back on other types of 8 mm
camcorders or VCRs, the playback quality may
not be as good as that on this camcorder.
Note on recording
When you record from the beginning of the
tape, run the tape for about 15 seconds before
actual recording. This prevents the camcorder
from missing any start-up scenes when you play
back the tape.
STBY
0:35:20
СОfl ‚ ВПВММУИ УТЪ‡МУ‚НЛ Б‡ФЛТЛ [a]
з‡КПЛЪВ УФflЪ¸ START/STOP. З
‚Л‰УЛТН‡ЪВОВ ЛМ‰ЛН‡ЪУ “REC” ЛБПВМЛЪТfl
М‡ ЛМ‰ЛН‡ЪУ “STBY” ( ВКЛП „УЪУ‚МУТЪЛ ).
ÑÎfl ÓÍÓ̘‡ÌËfl Á‡ÔËÒË [b]
з‡КПЛЪВ START/STOP. иУ‚В МЛЪВ STANDBY
‚МЛБ Л ЫТЪ‡МУ‚ЛЪВ ‚˚НО˛˜‡ЪВО¸ POWER ‚
ФУОУКВМЛВ OFF. б‡ЪВП ‚˚ЪУОНМЛЪВ Н‡ТТВЪЫ
Л Ы‰‡ОЛЪВ ·‡Ъ‡ ВИМ˚И ·ОУН.
[b]
K
C
O
L
S
T
A
N
D
B
Y
и ЛПВ˜‡МЛВ Н ВКЛПЫ „УЪУ‚МУТЪЛ
ЦТОЛ З˚ УТЪ‡‚ОflВЪВ ‚Л‰ВУН‡ПВ Ы М‡ 5
ПЛМЫЪ ЛОЛ ·УОВВ ТУ ‚ТЪ‡‚ОВММУИ Н‡ТТВЪУИ ‚
ВКЛПВ „УЪУ‚МУТЪЛ, ЪУ ‚Л‰ВУН‡ПВ ‡
‚˚НО˛˜ЛЪТfl ‡‚ЪУП‡ЪЛ˜ВТНЛ. щЪУ
Ф В‰УЪ‚ ‡˘‡ВЪ ‡Б fl‰НЫ ·‡Ъ‡ ВЛ Л ЛБМУТ
ОВМЪ˚. СОfl ‚УБУ·МУ‚ОВМЛfl ВКЛП‡
„УЪУ‚МУТЪЛ У‰ЛМ ‡Б ФУ‚В МЛЪВ STANDBY
‚МЛБ Л ТМУ‚‡ ФУ‚В МЛЪВ В„У ‚‚В ı. СОfl
М‡˜‡О‡ Б‡ФЛТЛ М‡КПЛЪВ START/STOP.
è ËϘ‡ÌËfl Í ÂÊËÏ‡Ï Á‡ÔËÒË
• чÌ̇fl ‚ˉÂÓ͇Ï ‡ Á‡ÔËÒ˚‚‡ÂÚ Ë
‚УТФ УЛБ‚У‰ЛЪ ‚ ВКЛПВ SP (ТЪ‡М‰‡ ЪМУ„У
‚УТФ УЛБ‚В‰ВМЛfl) ЛОЛ ‚ ВКЛПВ LP
(Ы‰ОЛМВММУ„У ‚УТФ УЛБ‚‰ВМЛfl). й‰М‡НУ,
Н‡˜ВТЪ‚У ‚УТФ УЛБ‚В‰ВМЛfl ‚ ВКЛПВ LP
·Ы‰ВЪ МВ Ъ‡НЛП ıУ У¯ЛП, Н‡Н ‚ ВКЛПВ SP.
• ЦТОЛ ОВМЪ‡ ·˚О‡ Б‡ФЛТ‡М‡ ‚ ВКЛПВ LP М‡
‰‡ММУИ ‚Л‰ВУН‡ПВ В Л ‚УТФ УЛБ‚У‰ЛЪТfl М‡
‰ Ы„Лı ЪЛФ‡ı 8-ПП ‚Л‰ВУН‡ПВ ЛОЛ М‡ дЗе,
Н‡˜ВТЪ‚У ‚УТФ УЛБ‚В‰ВМЛfl ПУКВЪ ·˚Ъ¸ МВ
Ъ‡НЛП ıУ У¯ЛП, Н‡Н Ф Л ‚УТФ УЛБ‚В‰ВМЛЛ
М‡ ‰‡ММУИ ‚Л‰ВУН‡ПВ В.
K
C
O
L
S
T
A
N
D
B
Y
è ËϘ‡ÌËÂ Í Ô ÓˆÂÒÒÛ Á‡ÔËÒË
ЦТОЛ З˚ Ф УЛБ‚У‰ЛЪВ Б‡ФЛТ¸ Т Т‡ПУ„У М‡˜‡О‡
ОВМЪ˚, ‰‡ИЪВ ‚УБПУКМУТЪ¸ ОВМЪВ
ФВ ВПВТЪЛЪ¸Тfl УНУОУ 15 ТВНЫМ‰ ‰У М‡˜‡О‡
Б‡ФЛТЛ. щЪУ Ф В‰Уı ‡МflВЪ ‚Л‰ВУН‡ПВ Ы УЪ
Ф УФЫТН‡ М‡˜‡О¸М˚ı Т˛КВЪУ‚ Т˙ВПНЛ, НУ„‰‡
З˚ ·Ы‰ВЪВ ‚УТФ УЛБ‚У‰ЛЪ¸ ОВМЪЫ.
12
CCD-TRV14E/TRV24E 3-859-266-12(1).E/R
Page 13
Camera recording
á‡ÔËÒ¸ Ò ÔÓÏÓ˘¸˛
‚ˉÂÓ͇Ï ˚
To focus the viewfinder lens
If the viewfinder is not in focus at all or when
you use the camcorder after someone else has
used it, focus the viewfinder lens. Turn the
viewfinder lens adjustment ring so that the
indicators in the viewfinder come into sharp
focus.
Notes on the tape counter
•The tape counter indicates the recording or
playback time. Use it as a guide. There will be a
time lag of several seconds from the actual
time. To set the counter to zero, press
COUNTER RESET inside the LCD panel.
•If the tape is recorded in SP and LP modes
mixed, the tape counter shows incorrect
recording time. When you intend to edit the
tape using the tape counter as a guide, record in
same (SP or LP) mode.
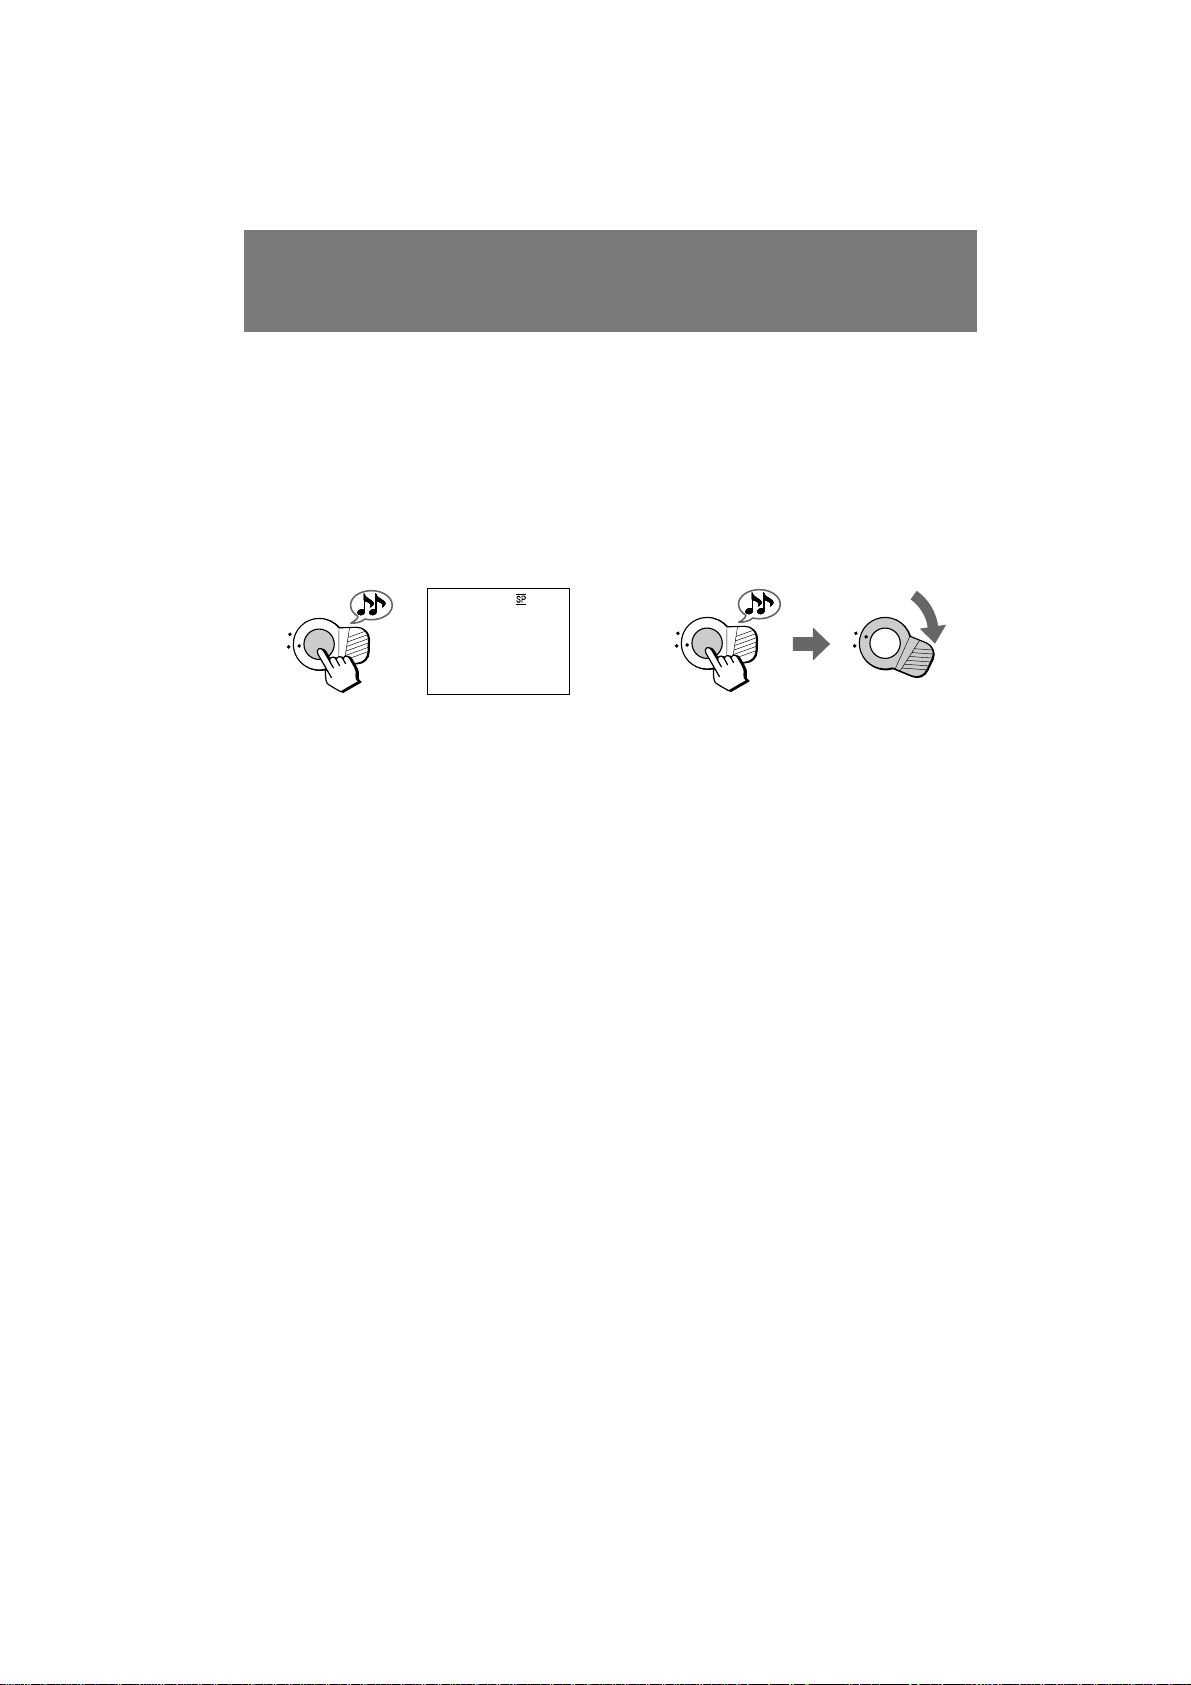
Note on beep sound
As indicated with ≥ in the illustrations, a beep
sounds when you turn the power on or when
you start recording and two beeps sound when
you stop recording, confirming the operation.
Several beeps also sound as a warning of any
unusual condition of the camcorder. Note that
the beep sound is not recorded on the tape. If
you do not want to hear the beep sound, set
BEEP to OFF in the menu system.
СОfl ЩУНЫТЛ У‚НЛ У·˙ВНЪЛ‚‡
‚Л‰УЛТН‡ЪВОfl
ЦТОЛ ‚Л‰УЛТН‡ЪВО¸ ‚УУ·˘В МВ
ТЩУНЫТЛ У‚‡М, ЛОЛ, ВТОЛ З˚ ЛТФУО¸БЫВЪВ
‚Л‰ВУН‡ПВ Ы ФУТОВ ЪУ„У, Н‡Н ВВ ЛТФУО¸БУ‚‡О
НЪУ-ЪУ ‰Ы„УИ, ЪУ ТЩУНЫТЛЫИЪВ У·˙ВНЪЛ‚
‚Л‰УЛТН‡ЪВОfl. иУ‚В МЛЪВ В„ЫОЛ У‚У˜МУВ
НУО¸ˆУ У·˙ВНЪЛ‚‡ ‚Л‰УЛТН‡ЪВОfl Ъ‡Н, ˜ЪУ·˚
ЛМ‰ЛН‡ЪУ ˚ ‚ ‚Л‰УЛТН‡ЪВОВ ·˚ОЛ ˜ВЪНУ
ТЩУНЫТЛ У‚‡М˚.
è ËϘ‡ÌËfl Í Ò˜ÂÚ˜ËÍÛ ÎÂÌÚ˚
• л˜ВЪ˜ЛН ОВМЪ˚ ЫН‡Б˚‚‡ВЪ ‚ ВПfl Б‡ФЛТЛ
ЛОЛ ‚ ВПfl ‚УТФ ЛБ‚В‰ВМЛfl. аТФУО¸БЫИЪВ
В„У ‚ Н‡˜ВТЪ‚В ЫНУ‚У‰ТЪ‚‡. лЫ˘ВТЪ‚ЫВЪ
УЪТЪ‡‚‡МЛВ ФУ ‚ ВПВМЛ М‡ МВТНУО¸НУ
ТВНЫМ‰ УЪ Щ‡НЪЛ˜ВТНУ„У ‚ ВПВМЛ. СОfl
ЫТЪ‡МУ‚НЛ ФУН‡Б‡МЛИ Т˜ВЪ˜ЛН‡ Н МЫОВ‚УИ
УЪПВЪНВ М‡КПЛЪВ НМУФНЫ COUNTER
RESET Мa ФaМeОЛ ЬKС.
• ЦТОЛ ОВМЪ‡ Б‡ФЛТ‡М‡ ‚ ТУ˜ВЪ‡МЛЛ ВКЛПУ‚
SP Л LP, Т˜ВЪ˜ЛН ОВМЪ˚ ·Ы‰ВЪ ФУН‡Б˚‚‡Ъ¸
МВФ ‡‚ЛО¸МУВ ‚ ВПfl Б‡ФЛТЛ. ЦТОЛ З˚
М‡ПВ В‚‡ВЪВТ¸ Ф УЛБ‚ВТЪЛ ПУМЪ‡К ОВМЪ˚ Т
ЛТФУО¸БУ‚‡МЛВП Т˜ВЪ˜ЛН‡ ‚ ВПВМЛ
ТУ„О‡ТМУ ЫНУ‚У‰ТЪ‚Ы, ‚˚ФУОМflИЪВ Б‡ФЛТ¸
‚ У‰МУП Л ЪУП КВ ВКЛПВ (SP ЛОЛ LP).
и ЛПВ˜‡МЛВ Н БЫППВ МУПЫ Б‚ЫНУ‚УПЫ
ТЛ„М‡ОЫ
д‡Н ЫН‡Б‡МУ Т ФУПУ˘¸˛≥ М‡ ЛТЫМН‡ı,
БЫППВ М˚И ТЛ„М‡О Б‚Ы˜ЛЪ, НУ„‰‡ З˚
М‡˜ЛМ‡ВЪВ Б‡ФЛТ¸, Л ‰‚‡ БЫППВ М˚ı ТЛ„М‡О‡
Б‚Ы˜‡Ъ, НУ„‰‡ З˚ Б‡Н‡М˜Л‚‡ВЪВ Б‡ФЛТ¸,
ФУ‰Ъ‚В К‰‡fl ЪВП Т‡П˚П ‡·УЪЫ. зВТНУО¸НУ
БЫППВ М˚ı ТЛ„М‡ОУ‚ Ъ‡НКВ Б‚Ы˜ЛЪ ‚
Н‡˜ВТЪ‚В Ф В‰ЫФ ВК‰ВМЛfl Н‡НУ„У-ОЛ·У
МВМУ П‡О¸МУ„У ТУТЪУflМЛfl ‚Л‰ВУН‡ПВ ˚.
б‡ПВЪ¸ЪВ, ˜ЪУ БЫППВ М˚И Б‚ЫНУ‚УИ ТЛ„М‡О
МВ Б‡ФЛТ˚‚‡ВЪТfl М‡ ОВМЪЫ. EcОЛ B˚ МВ
ıУЪЛЪВ ТО˚¯‡Ъ¸ БЫППВ М˚И ТЛ„М‡О,
ЫТЪ‡МУ‚ЛЪВ BEEP ‚ ТЛТЪВПВ ПВМ˛ ‚
ФУОУКВМЛВ OFF.
Basic operations éÒÌÓ‚Ì˚ ÓÔ ‡ˆËË
CCD-TRV14E/TRV24E 3-859-266-12(1).E/R
13
Page 14
Camera recording
á‡ÔËÒ¸ Ò ÔÓÏÓ˘¸˛
‚ˉÂÓ͇Ï ˚
Note on the AUTO DATE feature
The clock is set at the factory to Sydney time for
Australia and New Zealand models, to Tokyo
time for the models sold in Japan and to Hong
Kong time for other models. You can reset the
clock in the menu system.
The AUTO DATE feature shows the date
automatically once a day. However, the date
may automatically appear more than once a day
when:
– you reset the date and time.
– you eject and insert the cassette again.
– you stop recording within 10 seconds.
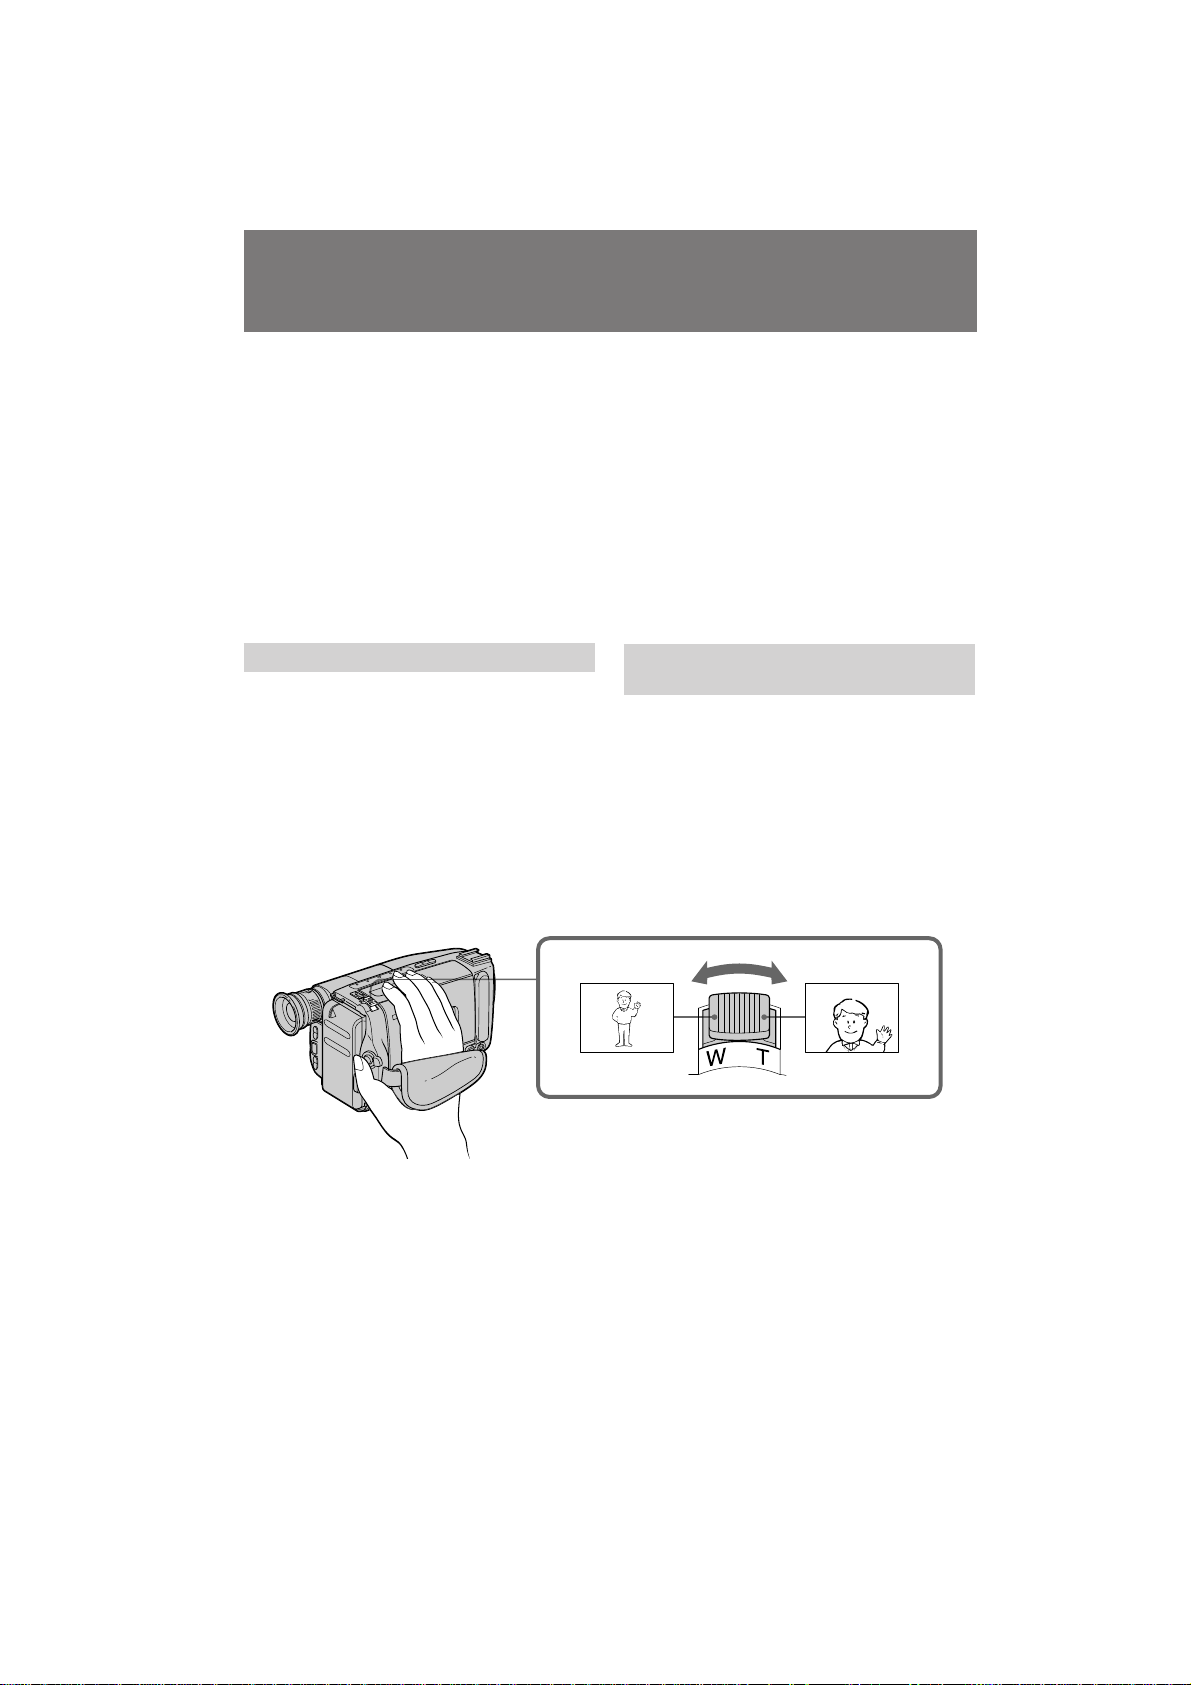
Using the zoom feature
Zooming is a recording technique that lets you
change the size of the subject in the scene. For
more professional-looking recordings, use the
zoom sparingly.
T side: for telephoto (subject appears closer)
W side: for wide-angle (subject appears farther
away)
и ЛПВ˜‡МЛВ Н ЩЫМНˆЛЛ AUTO DATE
у‡Т˚ ЫТЪ‡МУ‚ОВМ˚ М‡ Б‡‚У‰В М‡ ‚ ВПfl
гУМ‰УМ‡ ‰Оfl лУВ‰ЛМВММУ„У дУ УОВ‚ТЪ‚‡ Л
М‡ ‚ ВПfl и‡ ЛК‡ ‰Оfl ‰ Ы„Лı В‚ УФВИТНЛı
ТЪ ‡М ‚ ТЛТЪВПВ ПВМ˛.
З˚ ПУКВЪВ ФВ ВЫТЪ‡МУ‚ЛЪ¸ ˜‡Т˚. оЫМНˆЛfl
AUTO DATE ‡·УЪ‡ВЪ У‰ЛМ ‡Б ‚ ‰ВМ¸.
й‰М‡НУ, ‰‡Ъ‡ ПУКВЪ ФУfl‚ЛЪ¸Тfl ·УОВВ У‰МУ„У
‡Б‡ ‚ ‰ВМ¸, ВТОЛ:
–З˚ ФВ ВЫТЪ‡МУ‚ЛЪВ ‰‡ЪЫ Л ‚ ВПfl.
–З˚ ‚˚ЪУОНМВЪВ ОВМЪЫ Л ‚ТЪ‡‚ЛЪВ Н‡ТТВЪЫ
ÒÌÓ‚‡.
–Ç˚ ÓÒÚ‡ÌÓ‚ËÚ Á‡ÔËÒ¸ ‚ Ô Â‰Â·ı 10
ТВНЫМ‰.
аТФУО¸БУ‚‡МЛВ ЩЫМНˆЛЛ М‡ВБ‰‡
‚Л‰ВУН‡ПВ ˚
з‡ВБ‰ ‚Л‰ВУН‡ПВ ˚ fl‚ОflВЪТfl ЪВıМЛ˜ВТНЛП
Ф ЛВПУП Б‡ФЛТЛ, НУЪУ ˚И ФУБ‚УОflВЪ З‡П
ЛБПВМflЪ¸ ‡БПВ У·˙ВНЪ‡ ‚ Н‡‰ В. зВ
БОУЫФУЪ В·ОflИЪВ ˝ЪЛП Ф ЛВПУП, ВТОЛ
ıУЪЛЪВ, ˜ЪУ·˚ З‡¯Л Б‡ФЛТЛ ‚˚„Оfl‰ВОЛ
·УОВВ Ф УЩВТТЛУМ‡О¸МУ.
лЪУ УМ‡ “T”: ‰Оfl ЪВОВЩУЪУ (У·˙ВНЪ
Ô Ë·ÎËʇÂÚÒfl)
ëÚÓ Ó̇ “W”: ‰Îfl ¯Ë ÓÍÓ„Ó Û„Î‡ Ò˙ÂÏÍË
(Ó·˙ÂÍÚ Û‰‡ÎflÂÚÒfl)
14
CCD-TRV14E/TRV24E 3-859-266-12(1).E/R
Page 15
Camera recording
á‡ÔËÒ¸ Ò ÔÓÏÓ˘¸˛
‚ˉÂÓ͇Ï ˚
Zooming speed (Variable speed
zooming)
Turn the power zoom lever fully for a highspeed zoom. Turn it lightly for a relatively slow
zoom.
When you shoot a subject using a
telephoto zoom
If you cannot get a sharp focus while in extreme
telephoto zoom, move the power zoom lever to
the “W” side until the focus is sharp.
You can shoot a subject that is at least 80 cm
(about 2.6 feet) away from the lens surface in
the telephoto position, or 1 cm (about 1/2
inches) in the wide-angle position.
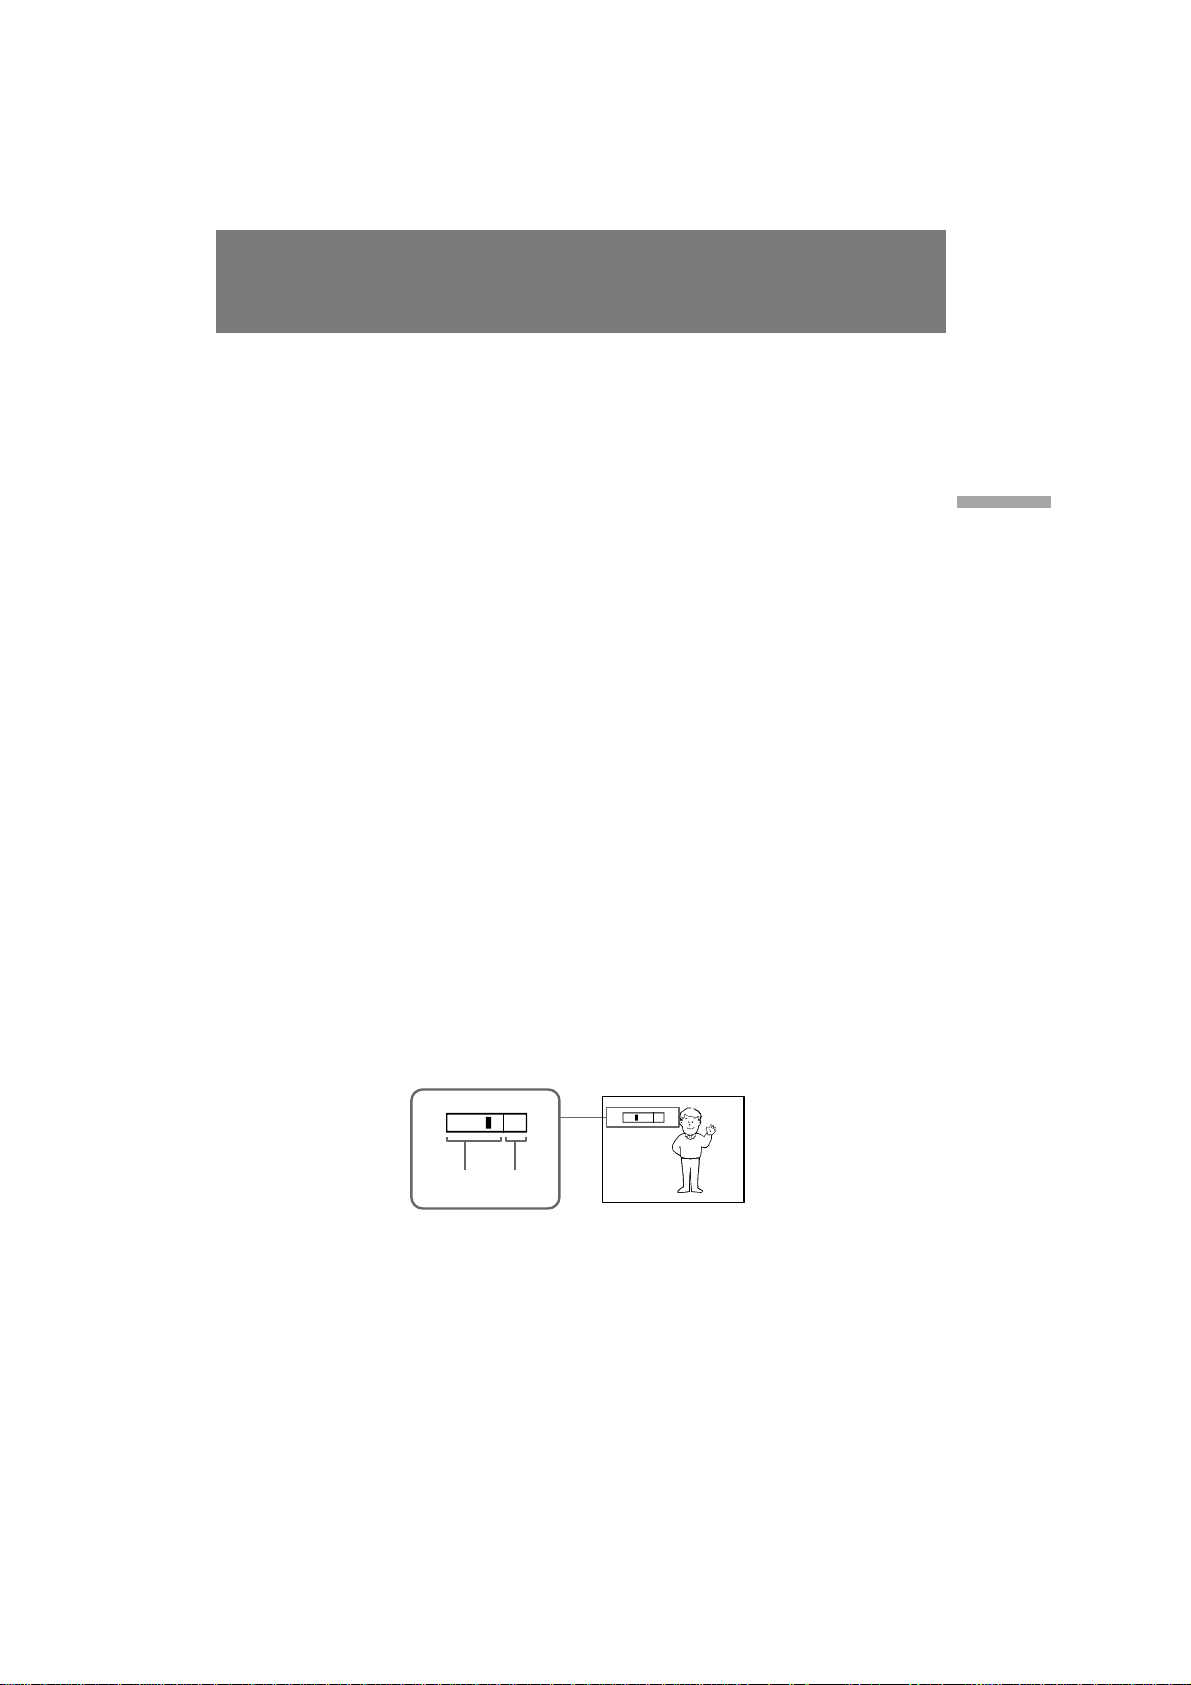
Notes on digital zoom (CCD-TRV24E only)
•More than 15x zoom is performed digitally,
and the picture quality deteriorates as you go
toward the “ T ” side. If you do not want to use
the digital zoom, set D ZOOM to OFF in the
menu system.
•The right side [a] of the power zoom indicator
shows the digital zooming zone, and the left
side [b] shows the optical zooming zone. If you
set D ZOOM to OFF, the right [a] zone
disappears.
ëÍÓ ÓÒÚ¸ ̇ÂÁ‰‡ ‚ˉÂÓ͇Ï ˚
(̇ÂÁ‰ Ò ‡ÁÌÓÈ ÒÍÓ ÓÒÚ¸˛)
иУОМУТЪ¸˛ ФУ‚В МЛЪВ ˚˜‡„ Ф Л‚У‰МУ„У
Ъ ‡МТЩУН‡ЪУ ‡ ‰Оfl ·˚ТЪ У„У М‡ВБ‰‡
‚Л‰ВУН‡ПВ ˚. иУ‚В МЛЪВ В„У ТОВ„Н‡ ‰Оfl
ПВ‰ОВММУ„У М‡ВБ‰‡ ЪВОВН‡ПВ ˚.
дУ„‰‡ З˚ ТМЛП‡ВЪВ У·˙ВНЪ, ЛТФУО¸БЫfl
М‡ВБ‰ ‚ ВКЛПВ ЪВОВЩУЪУ
ЦТОЛ З˚ МВ ПУКВЪВ ФУОЫ˜ЛЪ¸ ˜ВЪНУИ
ЩУНЫТЛ У‚НЛ ‚У ‚ ВПfl Н ‡ИМВ„У М‡ВБ‰‡ ‚
ВКЛПВ ЪВОВЩУЪУ, ЪУ ФВ ВПВ˘‡ИЪВ ˚˜‡„
Ф Л‚У‰МУ„У Ъ‡МТЩУН‡ЪУ ‡ ‚ ТЪУ УМЫ “W” ‰У
ЪВı ФУ , ФУН‡ МВ ФУОЫ˜ЛЪВ ˜ВЪНУИ
ЩУНЫТЛ У‚НЛ.
З˚ ПУКВЪВ Ф УЛБ‚ВТЪЛ Т˙ВПНЫ Ф В‰ПВЪ‡,
НУЪУ ˚И ФУ ПВМ¸¯ВИ ПВ В М‡ıУ‰ЛЪТfl М‡
‡ТТЪУflМЛЛ 80 ТП УЪ ФУ‚В ıМУТЪЛ У·˙ВНЪЛ‚‡
‚ ФУОУКВМЛЛ ЪВОВЩУЪУ ЛОЛ 1 ТП ‚
ФУОУКВМЛЛ ¯Л УНУ„У Ы„О‡.
и ЛПВ˜‡МЛfl Н ˆЛЩ У‚УПЫ
Ъ ‡МТЩУН‡ЪУ Ы (ЪУО¸НУ CCD-TRV24E)
• ЕУОВВ, ˜ВП 15-Н ‡ЪМ‡fl Ъ ‡МТЩУН‡ˆЛfl
‚˚ФУОМflВЪТfl ˆЛЩ У‚˚П ТФУТУ·УП, Л
Н‡˜ВТЪ‚У ЛБУ· ‡КВМЛfl ЫıЫ‰¯‡ВЪТfl ФУ
ПВ В ФВ ВПВ˘ВМЛfl ‚ ТЪУ УМЫ “н”. ЦТОЛ З˚
МВ ıУЪЛЪВ ЛТФУО¸БУ‚‡Ъ¸ ˆЛЩ У‚Ы˛
Ъ ‡МТЩУН‡ˆЛ˛, ЫТЪ‡МУ‚ЛЪВ D ZOOM ‚
ТЛТЪВПВ ПВМ˛ ‚ ФУОУКВМЛВ OFF.
• è ‡‚‡fl ÒÚÓ Ó̇ [a] Ë̉Ë͇ÚÓ‡ Ô Ë‚Ó‰ÌÓÈ
Ъ ‡МТЩУН‡ˆЛЛ ФУН‡Б˚‚‡ВЪ БУМЫ ˆЛЩ У‚УИ
Ъ ‡МТЩУН‡ˆЛЛ, ‡ ОВ‚‡fl ТЪУ УМ‡ [b]
ФУН‡Б˚‚‡ВЪ БУМЫ УФЪЛ˜ВТНУИ
Ъ ‡МТЩУН‡ˆЛЛ. ЦТОЛ З˚ ЫТЪ‡МУ‚ЛЪВ D
ZOOM ‚ ФУОУКВМЛВ OFF, Ф ‡‚‡fl БУМ‡ [a]
ЛТ˜ВБМВЪ.
Basic operations éÒÌÓ‚Ì˚ ÓÔ ‡ˆËË
W
T
[b]
[a]
W
T
CCD-TRV14E/TRV24E 3-859-266-12(1).E/R
15
Page 16
Camera recording
á‡ÔËÒ¸ Ò ÔÓÏÓ˘¸˛
‚ˉÂÓ͇Ï ˚
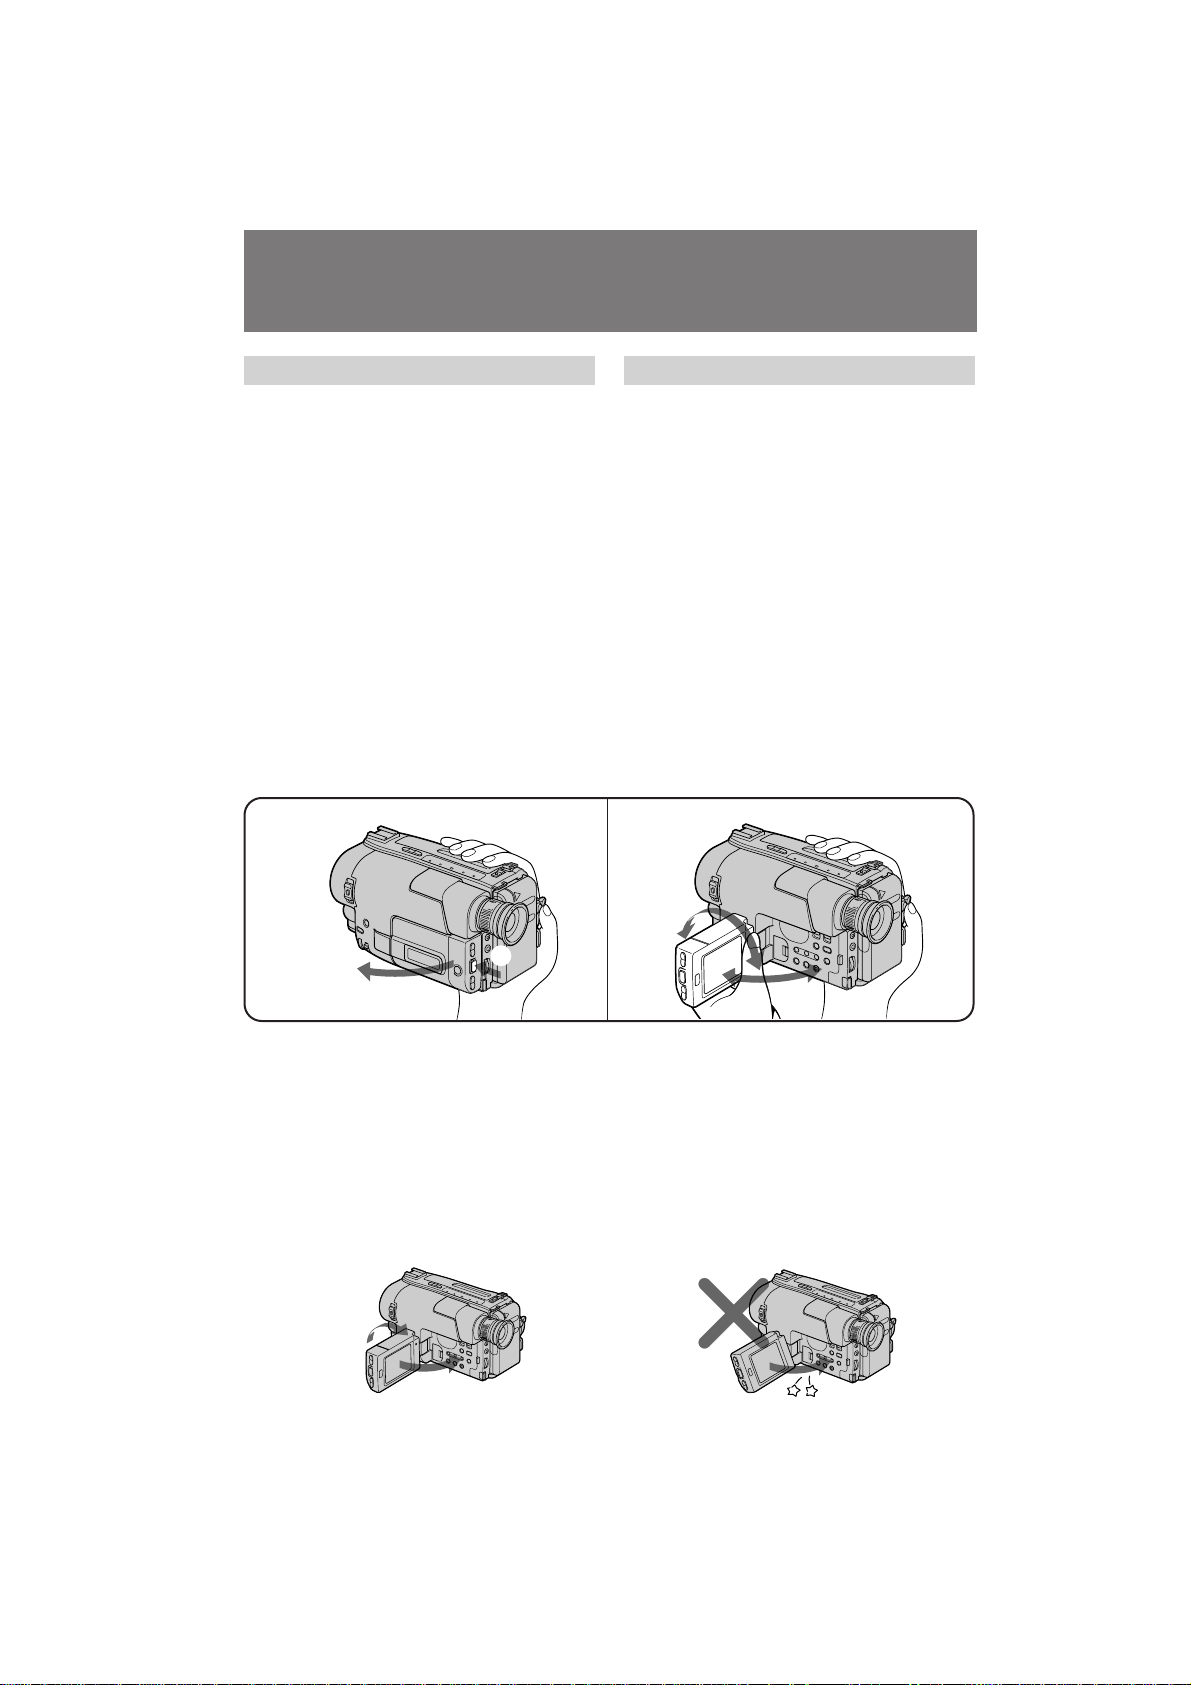
Shooting with the LCD screen
You can also record the picture while looking at
the LCD screen.
When using the LCD screen, the viewfinder
turns off automatically. You cannot monitor the
sound from the speaker during recording.
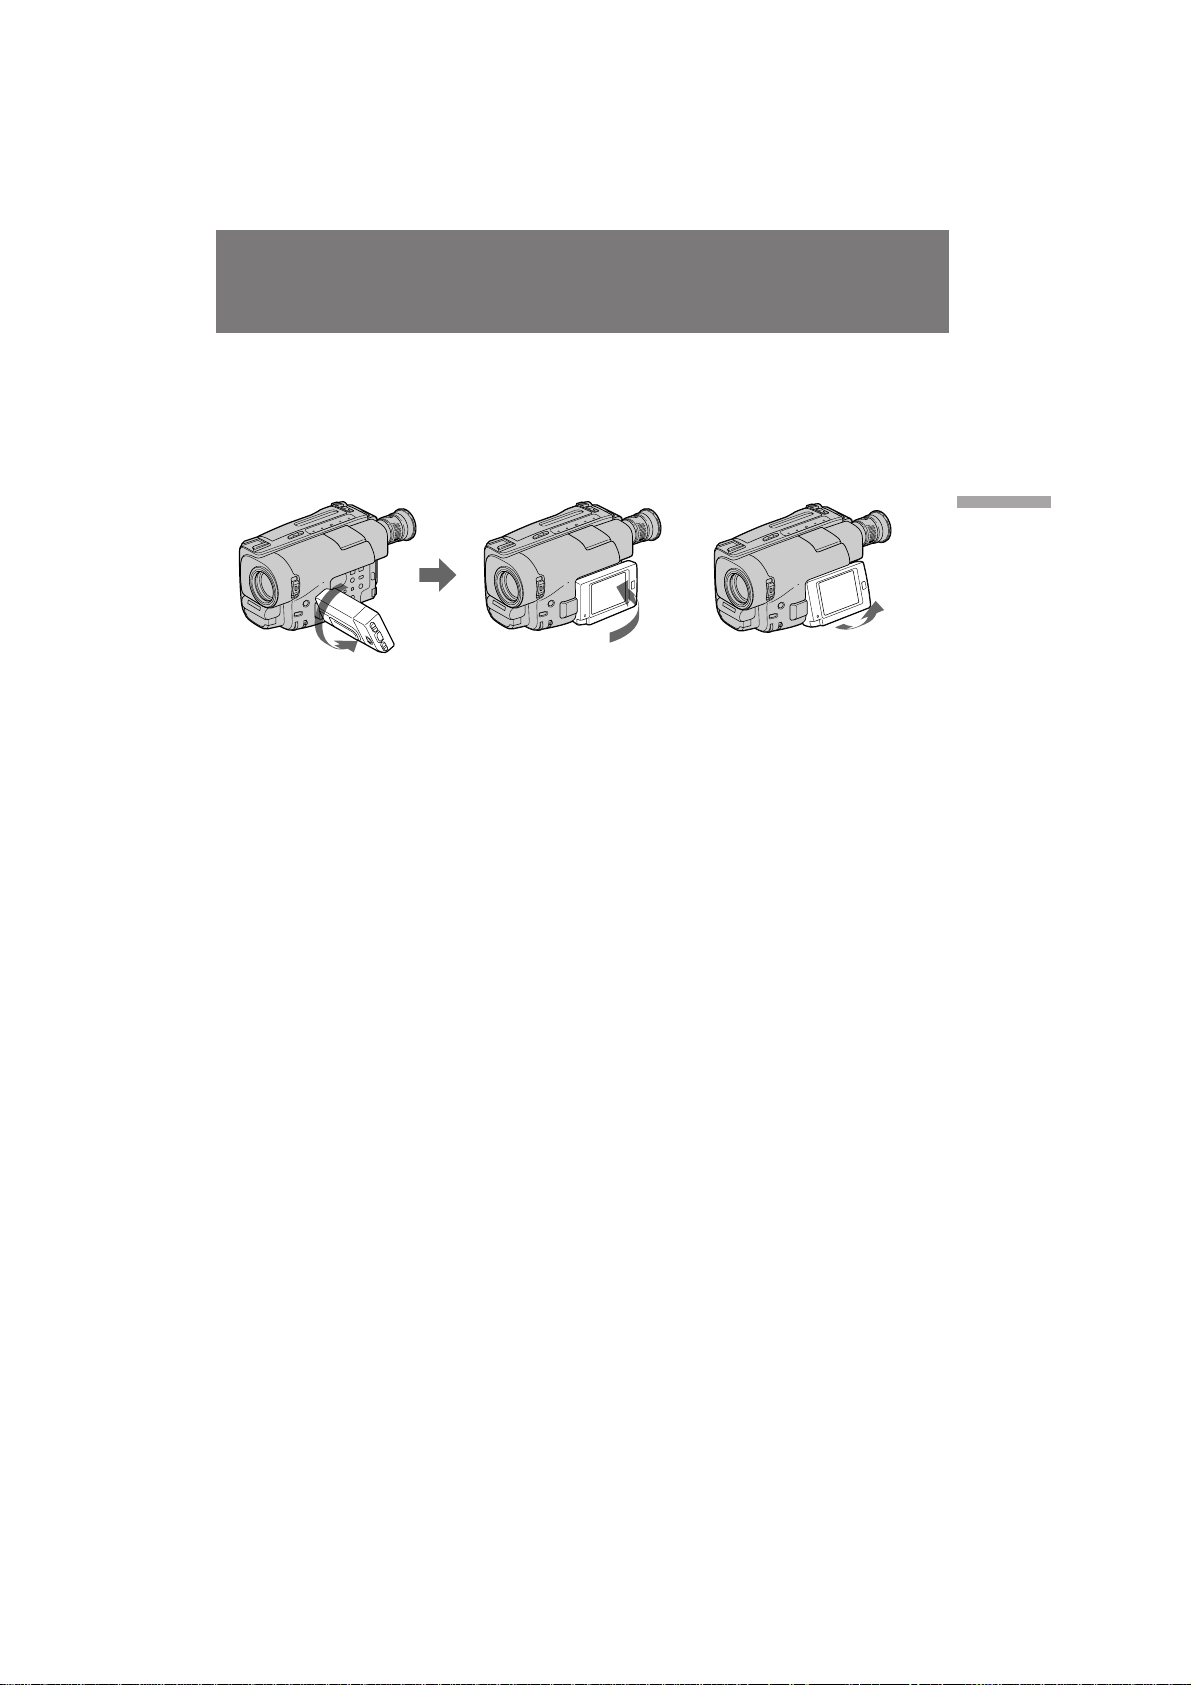
(1) While pressing PUSH OPEN, open the LCD
panel.
(2) Adjust the angle of the LCD panel.
The LCD panel moves about 90 degrees to
this side and about 210 degrees to the other
side.
To adjust the brightness of the LCD screen,
press BRIGHT + or –.
The battery life is longer when the LCD panel is
closed. Use the viewfinder instead of the LCD
screen to save the battery power.
1
ë˙ÂÏ͇ Ò ÔÓÏÓ˘¸˛ ˝Í ‡Ì‡ ÜäÑ
З˚ Ъ‡НКВ ПУКВЪВ УТЫ˘ВТЪ‚ОflЪ¸ Б‡ФЛТ¸
ЛБУ· ‡КВМЛfl, Ф УТП‡Ъ Л‚‡fl В„У М‡ ˝Н ‡МВ
ЬдС.
и Л ЛТФУО¸БУ‚‡МЛЛ ˝Н ‡М‡ ЬдС
‚Л‰УЛТН‡ЪВО¸ ‚˚НО˛˜ЛЪТfl ‡‚ЪУП‡ЪЛ˜ВТНЛ.
З˚ МВ ПУКВЪВ Ф УТОЫ¯Л‚‡Ъ¸ Б‚ЫН УЪ
„ УПНУ„У‚У ЛЪВОfl ‚У ‚ ВПfl Б‡ФЛТЛ.
(1) ç‡ÊËχfl PUSH OPEN, ÓÚÍ ÓÈÚ ԇÌÂθ
ÜäÑ.
(2) éÚ Â„ÛÎË ÛÈÚ ۄÓÎ Ô‡ÌÂÎË ÜäÑ.
и‡МВО¸ ЬдС ФВ ВПВ˘‡ВЪТfl
Ф Л·ОЛБЛЪВО¸МУ М‡ 90 „ ‡‰ЫТУ‚ ‚ У‰МЫ
ТЪУ УМЫ Л М‡ 210 „ ‡‰ЫТУ‚ ‚ ‰ Ы„Ы˛
ТЪУУМЫ.
СОfl ЪУ„У, ˜ЪУ·˚ УЪ В„ЫОЛ У‚‡Ъ¸ fl НУТЪ¸
˝Н ‡М‡ ЬдС, М‡КПЛЪВ НМУФНЫ BRIGHT +
ЛОЛ –.
л УН ТОЫК·˚ ·‡Ъ‡ ВЛ ·Ы‰ВЪ ‰ОЛМВВ, ВТОЛ
ЬдС Ф‡МВО¸ Б‡Н ˚Ъ‡. аТФУО¸БЫИЪВ
‚Л‰УЛТН‡ЪВО¸ ‚ПВТЪУ ˝Н ‡М‡ ЬдС ‰Оfl
˝НУМУПЛЛ ПУ˘МУТЪЛ ·‡Ъ‡ ВЛ.
2
1
2
Notes on the LCD panel
•When closing the LCD panel, turn it vertically
until it clicks [a].
•When turning the LCD panel, turn it always
vertically; otherwise, the camcorder body may
be damaged or the LCD panel may not close
properly [b].
•Close the LCD panel completely when not in
use.
[a]
1
2
16
è ËϘ‡ÌËfl Í Ô‡ÌÂÎË ÜäÑ
•и Л Б‡Н ˚‚‡МЛЛ Ф‡МВОЛ ЬдС
ФУ‚У ‡˜Л‚‡ИЪВ ВВ ‚В ЪЛН‡О¸МУ, ФУН‡ УМ‡ МВ
Б‡˘ВОНМВЪТfl [a].
•и Л ФУ‚У ‡˜Л‚‡МЛЛ Ф‡МВОЛ ЬдС
ФУ‚У ‡˜Л‚‡ИЪВ ВВ ‚ТВ„‰‡ ‚В ЪЛН‡О¸МУ, ЛОЛ
‚ Ф УЪЛ‚МУП ТОЫ˜‡В НУ ФЫТ ‚Л‰ВУН‡ПВ ˚
ПУКВЪ ·˚Ъ¸ ФУ‚ ВК‰ВМ, ЛОЛ Ф‡МВО¸ ЬдС
МВ ТПУКВЪ Б‡Н ˚Ъ¸Тfl Ф ‡‚ЛО¸МУ [b].
•иУОМУТЪ¸˛ Б‡Н УИЪВ Ф‡МВО¸ ЬдС, НУ„‰‡
УМ‡ МВ ЛТФУО¸БЫВЪТfl.
[b]
CCD-TRV14E/TRV24E 3-859-266-12(1).E/R
Page 17
Letting the subject
monitor the shot
ЗУБПУКМУТЪ¸ ‰Оfl ТМЛП‡ВПУ„У
˜ВОУ‚ВН‡ М‡·О˛‰‡Ъ¸ Т˙ВПНЫ
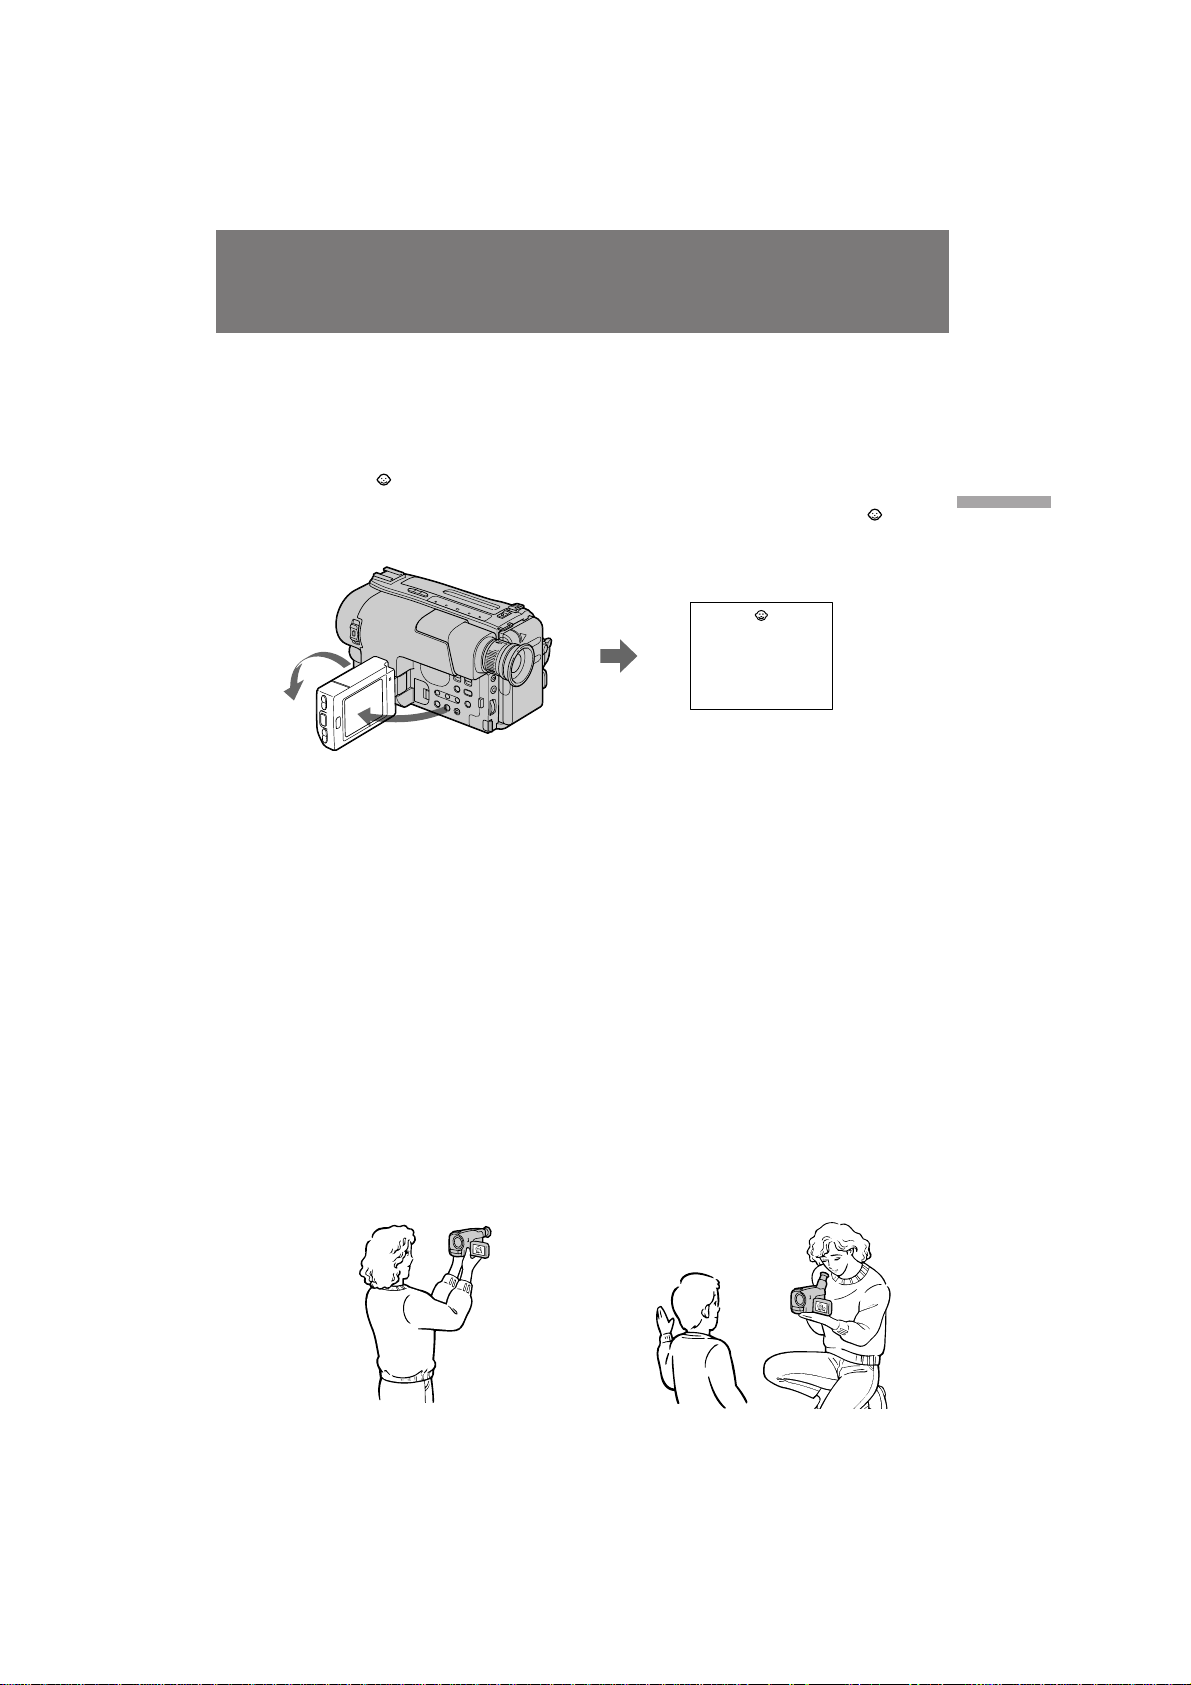
You can turn the LCD panel over so that it faces
the other way and you can let the subject
monitor the shot while shooting with the
viewfinder.
Turn the LCD panel vertically first until it clicks,
then turn it over. The indicator appears
(Mirror mode) and the date and tape counter
indicators disappear.
2
1
To cancel mirror mode
Turn the LCD panel back toward the
viewfinder.
Notes on mirror mode
•When you turn the LCD panel about 135
degrees to 210 degrees, the camcorder enters
mirror mode.
•Using the mirror mode, you can record yourself
while watching yourself on the LCD [a].
•The picture on the LCD looks as a mirror-image
while recording in mirror mode [b]. The STBY
indicator appears as Pr and REC as r. Some
indicators may not appear in mirror mode.
•The date appears in reverse when the AUTO
DATE feature is turned on. When recorded it
will be normal.
•While recording in mirror mode, you cannot
operate the following buttons: TITLE, DATE
and TIME.
•The counter is displayed upside down in the
display window.
З˚ ПУКВЪВ Ф ‚ МЫЪ¸ Ф‡МВО¸ ЬдС, Ъ‡Н,
˜ЪУ УМ‡ ·Ы‰ВЪ У· ‡˘ВМ‡ ‚ ‰ Ы„Ы˛ ТЪУ УМЫ Л
З˚ ПУКВЪВ ‰‡Ъ¸ ‚УБПУКМУТЪ¸ ТМЛП‡ВПУПЫ
˜ВОУ‚ВНЫ М‡·О˛‰‡Ъ¸ Т˙ВПНЫ, ТМЛП‡fl Т
ФУПУ˘¸˛ ‚Л‰УЛТН‡ЪВОfl.
лФВ ‚‡ ФУ‚У ‡˜Л‚‡ИЪВ Ф‡МВО¸ ЬдС
‚В ЪЛН‡О¸МУ, ФУН‡ УМ‡ МВ Б‡˘ВОНМВЪТfl, ‡
Б‡ЪВП Ф ‚ МЛЪВ ВВ. аМ‰ЛН‡ЪУ
ФУfl‚ЛЪТfl М‡ ˝Н ‡МВ (БВ Н‡О¸М˚И ВКЛП) , Л
ЛМ‰ЛН‡ЪУ ˚ ‰‡Ъ˚ Л Т˜ВЪ˜ЛН‡ ОВМЪ˚
·‡Ъ‡ ВЛ ЛТ˜ВБМЫЪ.
СОfl УЪПВМ˚ БВ Н‡О¸МУ„У ВКЛП‡
иУ‚В МЛЪВ Ф‡МВО¸ ЬдС М‡Б‡‰ ‚
М‡Ф ‡‚ОВМЛЛ ‚Л‰УЛТН‡ЪВОfl.
и ЛПВ˜‡МЛfl Н БВ Н‡О¸МУПЫ ВКЛПЫ
• ЦТОЛ З˚ ФУ‚В МВЪВ Ф‡МВО¸ ЬдС
Ф Л·ОЛБЛЪВО¸МУ ‰У ‰Л‡Ф‡БУМ‡ УЪ 135
„ ‡‰ЫТУ‚ ‰У 210 „ ‡‰ЫТУ‚, ЪУ ‚Л‰ВУН‡ПВ ‡
‚УИ‰ВЪ ‚ БВ Н‡О¸М˚И ВКЛП.
• аТФУО¸БЫfl БВ Н‡О¸М˚И ВКЛП, З˚ ПУКВЪВ
Б‡ФЛТ˚‚‡Ъ¸ ТВ·fl М‡ ОВМЪЫ, Ф УТП‡Ъ Л‚‡fl
Т‚УВ ЛБУ· ‡КВМЛВ М‡ ЬдС [a].
• аБУ· ‡КВМЛВ М‡ ЬдС ‚˚„Оfl‰ЛЪ, Н‡Н
БВ Н‡О¸МУВ УЪУ· ‡КВМЛВ ‚У ‚ ВПfl Б‡ФЛТЛ
‚ БВ Н‡О¸МУП ВКЛПВ [b]. аМ‰ЛН‡ЪУ STBY
ФУfl‚ОflВЪТfl ‚ ‚Л‰В Pr Ë REC ‚ ‚ˉ r.
зВНУЪУ ˚В ЛМ‰ЛН‡ЪУ ˚ ПУ„ЫЪ МВ
ФУfl‚ОflЪ¸Тfl ‚ БВ Н‡О¸МУП ВКЛПВ.
• С‡Ъ‡ ФУfl‚ОflВЪТfl ‚ У· ‡ЪМУП ФУ fl‰НВ, ВТОЛ
‚НО˛˜ВМ‡ ЩЫМНˆЛfl AUTO DATE. иУТОВ
Б‡ФЛТЛ УМ‡ ·Ы‰ВЪ МУ П‡О¸МУИ.
• ЗУ ‚ ВПfl Б‡ФЛТЛ ‚ БВ Н‡О¸МУП ВКЛПВ З˚
МВ ПУКВЪВ ЫФ ‡‚ОflЪ¸ ТОВ‰Ы˛˘ЛПЛ
НМУФН‡ПЛ: TITLE, DATE Л TIME.
• л˜ВЪ˜ЛН УЪУ· ‡К‡ВЪТfl ‚ Ф ‚ МЫЪУП
‚Л‰В ‚ УНУ¯НВ ‰ЛТФОВfl.
Basic operations éÒÌÓ‚Ì˚ ÓÔ ‡ˆËË
[a]
[b]
17
CCD-TRV14E/TRV24E 3-859-266-12(1).E/R
Page 18

Hints for better
shooting
ëÓ‚ÂÚ˚ ‰Îfl ÎÛ˜¯ÂÈ
Ò˙ÂÏÍË
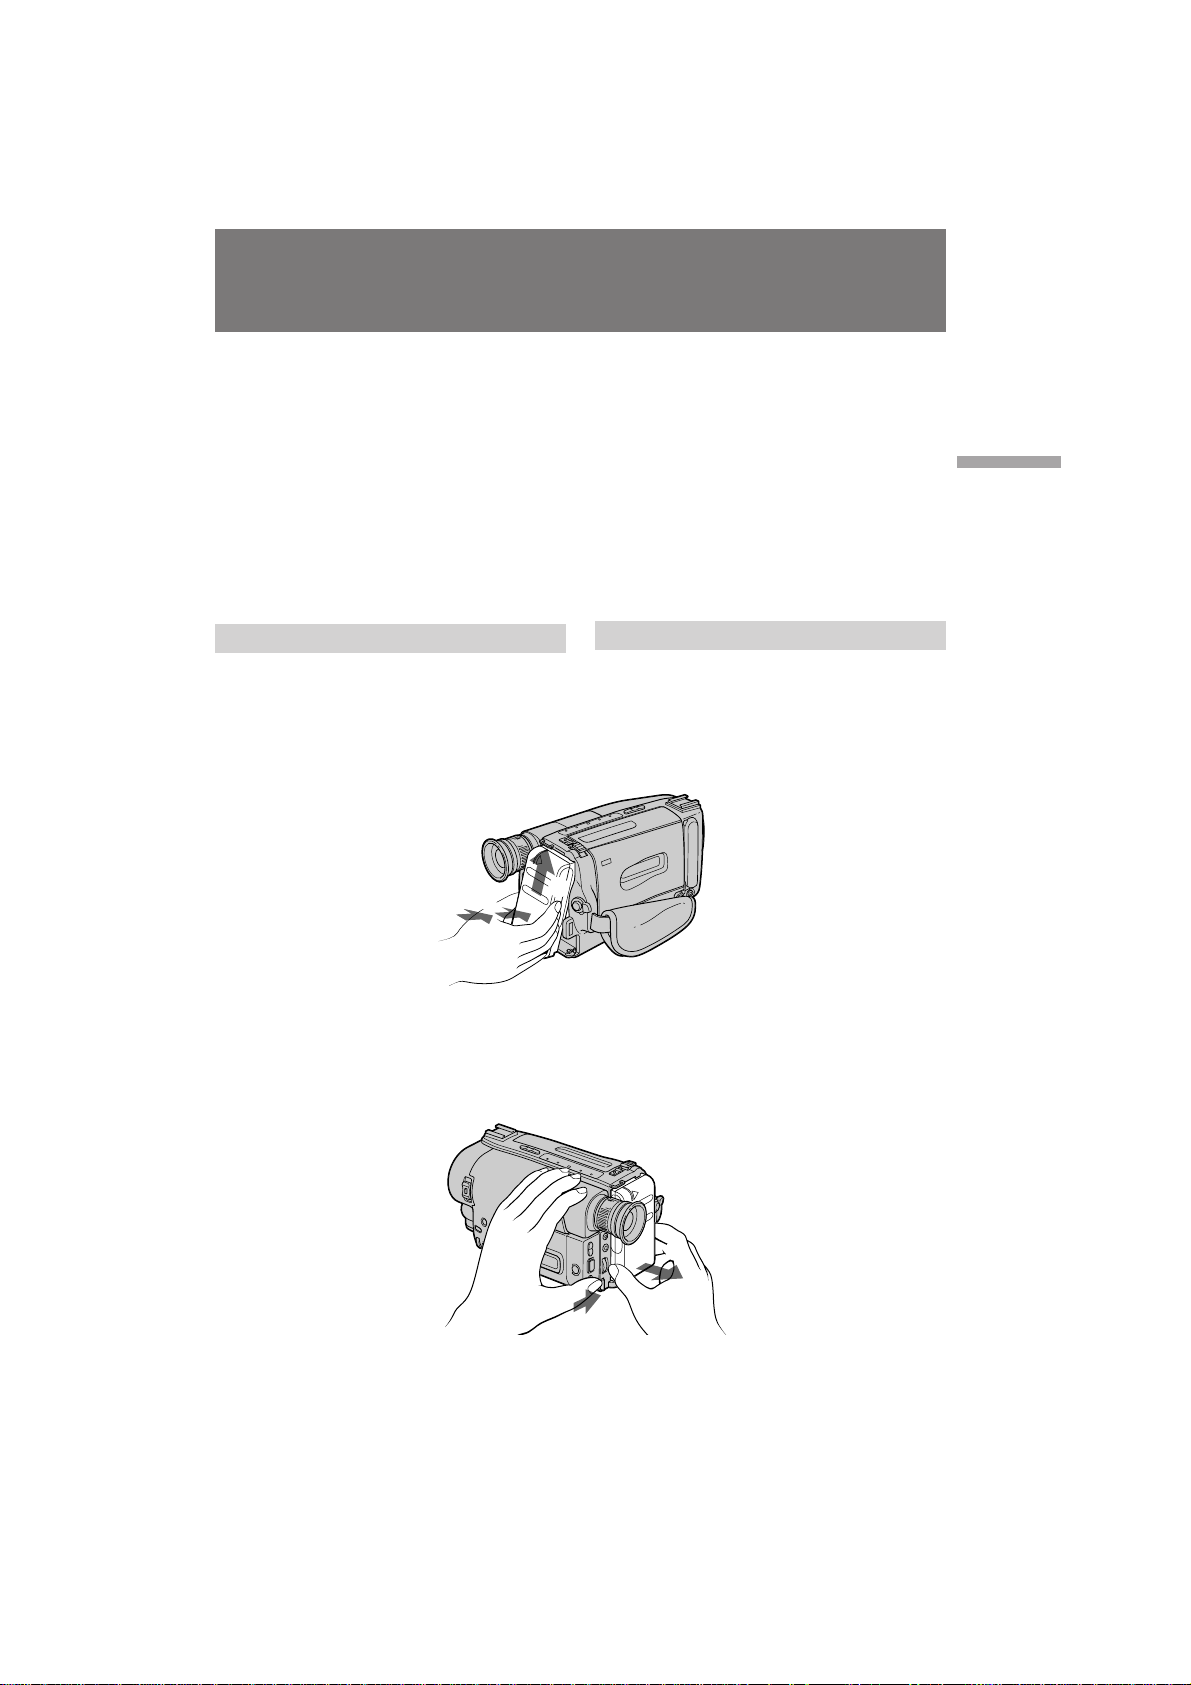
For hand-held shots, you’ll get better results by
holding the camcorder according to the
following suggestions:
•Hold the camcorder firmly and secure it with
the grip strap so that you can easily manipulate
the controls with your thumb.
3
2
•Place your right elbow against your side.
•Place your left hand under the camcorder to
support it.
•Place your eye firmly against the viewfinder
eyecup.
•Use the viewfinder frame as a guide to
determine the horizontal plane.
•You can record in a low position to get an
interesting recording angle. Lift the viewfinder
up for recording from a low position [a].
•You can also record in a low position or even in
a high position using the LCD panel [b].
ÑÎfl ͇‰ Ó‚ Ô Ë Û‰Â ÊË‚‡ÌËË ‚ˉÂÓ͇Ï ˚
‚ Û͇ı, Ç˚ ÔÓÎÛ˜ËÚ ÎÛ˜¯Ë ÂÁÛθڇÚ˚,
ÂÒÎË ·Û‰ÂÚ ‰Â ʇڸ ‚ˉÂÓ͇ÏÂ Û ‚
ÒÓÓÚ‚ÂÚÒÚ‚ËË ÒÓ ÒÎÂ‰Û˛˘ËÏË Û͇Á‡ÌËflÏË:
• СВ КЛЪВ ‚Л‰ВУН‡ПВ Ы Н ВФНУ Л Б‡Н ВФЛЪВ
ВВ Т ФУПУ˘¸˛ ВПВММУ„У Б‡ı‚‡Ъ‡ Ъ‡Н,
˜ЪУ·˚ З˚ ПУ„ОЛ ОВ„НУ П‡МЛФЫОЛ У‚‡Ъ¸
„ÛÎflÚÓ ‡ÏË Ò ÔÓÏÓ˘¸˛ ·Óθ¯Ó„Ó
ԇθˆ‡.
1
• к‡ТФУОУКЛЪВ З‡¯ Ф ‡‚˚И ОУНУЪ¸ Т·УНЫ УЪ
ТВ·fl.
• к‡ТФУОУКЛЪВ З‡¯ ОВ‚Ы˛ ЫНЫ ФУ‰
‚Л‰ВУН‡ПВ УИ ‰Оfl ВВ ФУ‰‰В КНЛ.
• 燉ВКМУ Ф ЛТОУМЛЪВ З‡¯ „О‡Б Н УНЫОfl Ы
‚Л‰УЛТН‡ЪВОfl.
• аТФУО¸БЫИЪВ ‚ЛБЛ МЫ˛ ‡ПНЫ ‚ Н‡˜ВТЪ‚В
ЫНУ‚У‰ТЪ‚‡ ‰Оfl УФ В‰ВОВМЛfl
„У ЛБУМЪ‡О¸МУ„У ФО‡М‡.
• З˚ ПУКВЪВ Б‡ФЛТ˚‚‡Ъ¸ ЛБ МЛБНУ„У
ФУОУКВМЛfl ‰Оfl ФУОЫ˜ВМЛfl ЛМЪВ ВТМУ„У Ы„О‡
Б‡ФЛТЛ. иУ‰МЛПЛЪВ ‚Л‰УЛТН‡ЪВО¸ ‚‚В ı ‰Оfl
Б‡ФЛТЛ ЛБ МЛБНУ„У ФУОУКВМЛfl [a].
• З˚ Ъ‡НКВ ПУКВЪВ ТМЛП‡Ъ¸ ЛБ МЛБНУ„У
ФУОУКВМЛfl ЛОЛ ‰‡КВ ЛБ ‚˚ТУНУ„У
ФУОУКВМЛfl Т ЛТФУО¸БУ‚‡МЛВП Ф‡МВОЛ ЬдС
[b].
18
[b][a]
CCD-TRV14E/TRV24E 3-859-266-12(1).E/R
Page 19
Hints for better shooting ëÓ‚ÂÚ˚ ‰Îfl ÎÛ˜¯ÂÈ Ò˙ÂÏÍË
Place the camcorder on a flat surface or
use a tripod
Try placing the camcorder on a table top or any
other flat surface of suitable height. If you have
a tripod for a still camera, you can also use it
with the camcorder. When attaching a non-Sony
tripod, make sure that the length of the tripod
screw is less than 6.5 mm (9/32 in). Otherwise,
you cannot attach the tripod securely and the
screw may damage the camcorder.
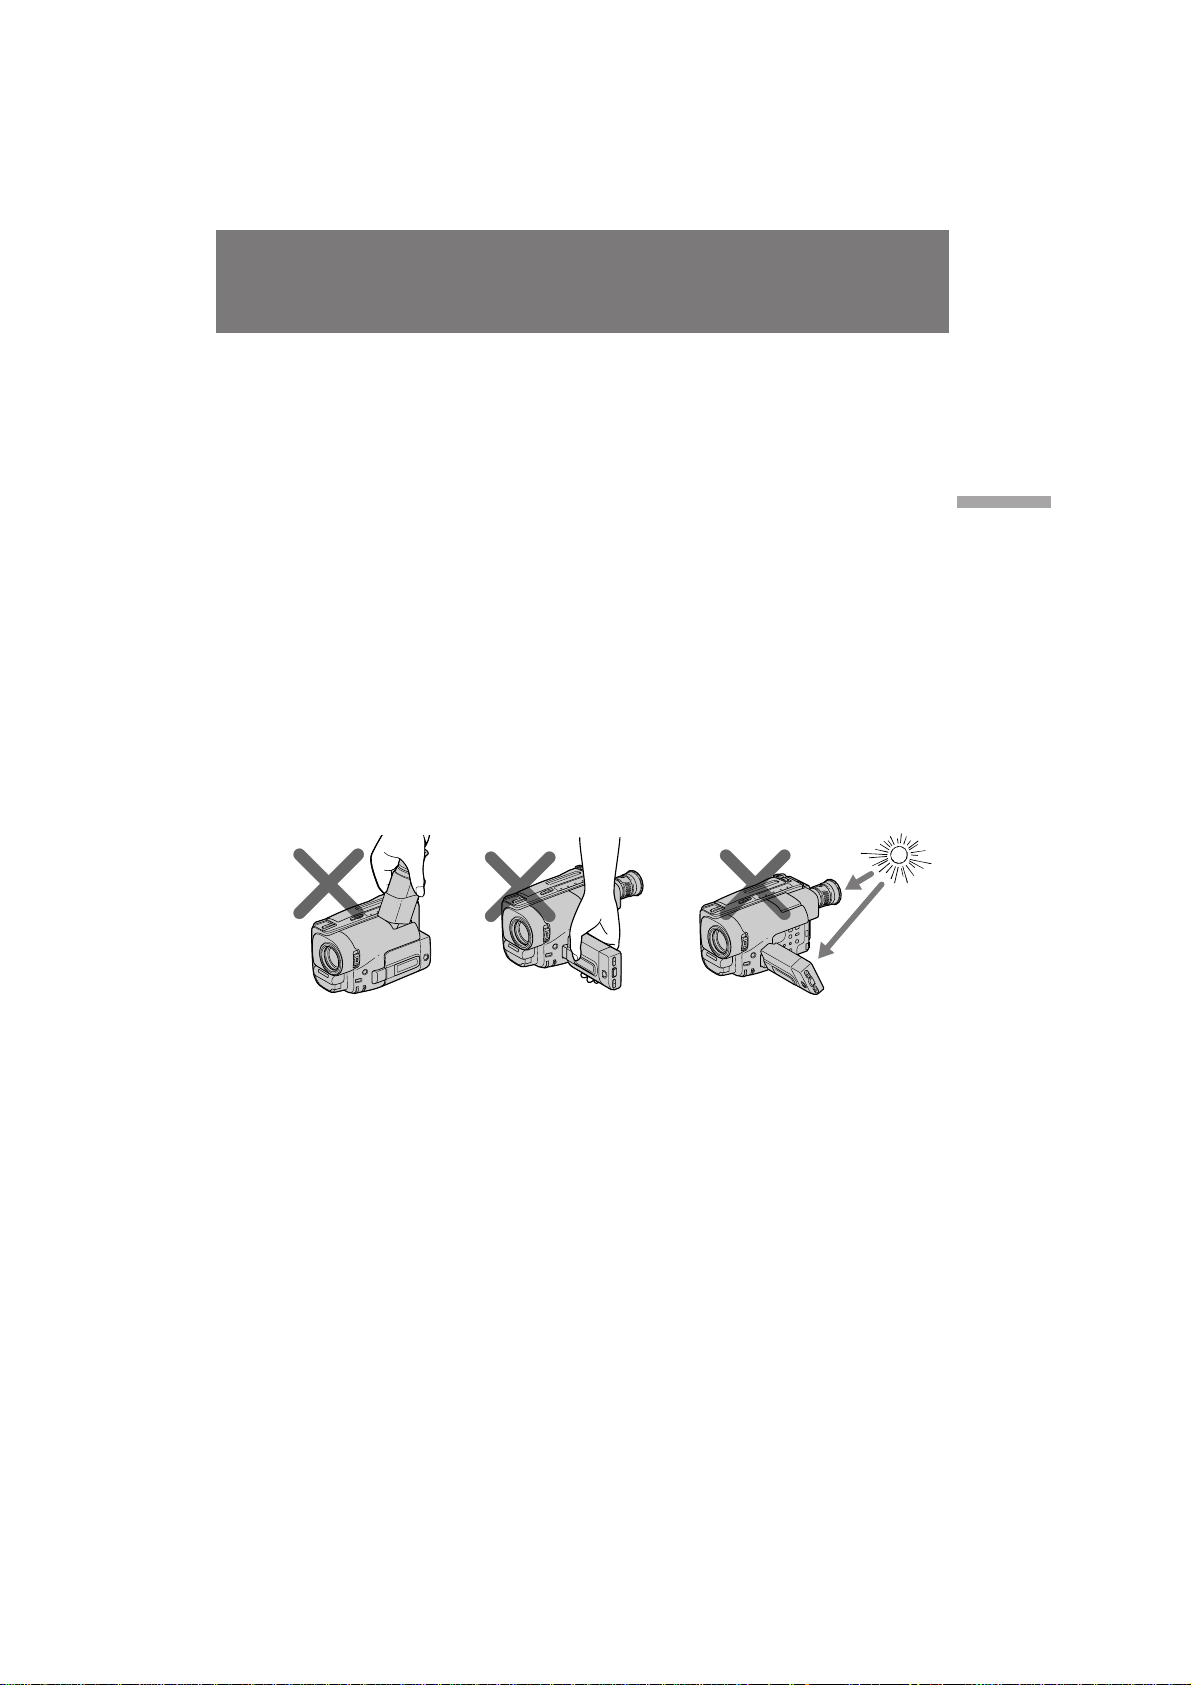
Cautions on the viewfinder and the LCD
•Do not pick up the camcorder by the
viewfinder or by the LCD panel [c].
•Do not place the camcorder so as to point the
viewfinder or the LCD screen toward the sun.
The inside of the viewfinder or the LCD panel
may be damaged. Be careful when placing the
camcorder under sunlight or by a window [d].
[c]
к‡ТФУО‡„‡ИЪВ ‚Л‰ВУН‡ПВ Ы М‡ ФОУТНУИ
ФУ‚В ıМУТЪЛ ЛОЛ ЛТФУО¸БЫИЪВ Ъ ВМУ„Ы
лЪ‡ ‡ИЪВТ¸ ‡ТФУОУ„‡Ъ¸ ‚Л‰ВУН‡ПВ Ы М‡
ТЪУОВ ЛОЛ О˛·УИ ‰ Ы„УИ ФОУТНУИ
ФУ‚В ıМУТЪЛ М‡ ФУ‰ıУ‰fl˘ВИ ‚˚ТУЪВ. ЦТОЛ
З˚ ЛПВВЪВ Ъ ВМУ„Ы ‰Оfl ЩУЪУ‡ФФ‡ ‡Ъ‡, ЪУ
З˚ Ъ‡НКВ ПУКВЪВ ЛТФУО¸БУ‚‡Ъ¸ ВВ Т
‚Л‰ВУН‡ПВ УИ. и Л Ф ЛН ВФОВМЛЛ Ъ ВМУ„Л МВ
ЩЛ П˚ Sony Ы·В‰ЛЪВТ¸, ˜ЪУ ‰ОЛМ‡ ‚ЛМЪ‡
Ъ ВМУ„Л ПВМВВ 6,5 ПП. З Ф УЪЛ‚МУП ТОЫ˜‡В
З˚ МВ ТПУКВЪВ М‡‰ВКМУ Ф ЛН ВФЛЪ¸
Ъ ВМУ„Ы, ‡ ‚ЛМЪ ПУКВЪ ФУ‚ В‰ЛЪ¸
‚Л‰ВУН‡ПВ Ы.
и В‰УТЪВ ВКВМЛfl Н ‚Л‰УЛТН‡ЪВО˛ Л ЬдС
• ç ÔÓ‰ÌËχÈÚ ‚ˉÂÓ͇ÏÂ Û Á‡
‚ˉÓËÒ͇ÚÂθ ËÎË Ô‡ÌÂθ ÜäÑ [c].
• зВ ‡ТФУО‡„‡ИЪВ ‚Л‰ВУН‡ПВ Ы Ъ‡Н, ˜ЪУ·˚
‚Л‰УЛТН‡ЪВО¸ ЛОЛ ˝Н ‡М ЬдС ·˚ОЛ
М‡Ф ‡‚ОВМ˚ Ф flПУ М‡ ТУОМˆВ. ЗМЫЪ ВММЛВ
˜‡ТЪЛ ‚Л‰УЛТН‡ЪВОfl ЛОЛ Ф‡МВОЛ ЬдС ПУ„ЫЪ
·˚Ú¸ ÔÓ‚ ÂʉÂÌ˚. ÅÛ‰¸Ú ÓÒÚÓ ÓÊÌ˚ Ô Ë
‡ТФУОУКВМЛВ ‚Л‰ВУН‡ПВ ˚ ФУ‰ ТУОМˆВП
ËÎË ‚ÓÁΠÓÍ̇ [d].
[d]
Basic operations éÒÌÓ‚Ì˚ ÓÔ ‡ˆËË
Note on the LCD screen
When you use the LCD screen outdoors in
direct sunlight, the LCD screen may be difficult
to see. If this happens, we recommend that you
use the viewfinder.
и ЛПВ˜‡МЛВ УЪМУТЛЪВО¸МУ ˝Н ‡М‡ ЬдС
дУ„‰‡ З˚ ЛТФУО¸БЫВЪВ ˝Н ‡М ЬдС ‚МВ
ФУПВ˘ВМЛfl ФУ‰ Ф flП˚ПЛ ТУОМВ˜М˚ПЛ
ОЫ˜‡ПЛ, Ф УТПУЪ М‡ ˝Н ‡МВ ЬдС ПУКВЪ
·˚Ú¸ Á‡Ú Û‰ÌÂÌ. Ç ˝ÚÓÏ ÒÎÛ˜‡Â
ВНУПВМ‰ЫВЪТfl ЛТФУО¸БУ‚‡Ъ¸ ‚Л‰УЛТН‡ЪВО¸.
19
CCD-TRV14E/TRV24E 3-859-266-12(1).E/R
Page 20
Checking the
recorded picture
è ӂ ͇ Á‡ÔËÒ‡ÌÌÓ„Ó
ËÁÓ· ‡ÊÂÌËfl
Using EDITSEARCH, you can review the last
recorded scene or check the recorded picture in
the viewfinder. You can also review the picture
on the LCD screen.
(1) While pressing the small green button on the
POWER switch, set it to CAMERA.
(2) Turn STANDBY up.
(3) Press the – (Œ) side of EDITSEARCH
momentarily; the last few seconds of the
recorded portion plays back (Rec Review).
You can also monitor the sound from the
speaker or by using an earphone (not
supplied).
Hold down the – side of EDITSEARCH until
the camcorder goes back to the scene you
want. The last recorded portion is played
back. To go forward, hold down the + side
(EditSearch).
1
POWER
CAMERA
OFF
PLAYER
аТФУО¸БЫfl EDITSEARCH, З˚ ПУКВЪВ
ФВ ВТПУЪ ВЪ¸ ФУТОВ‰М˛˛ Б‡ФЛТ‡ММЫ˛
ТˆВМЫ ЛОЛ Ф У‚В ЛЪ¸ Б‡ФЛТ‡ММУВ
ЛБУ· ‡КВМЛВ ‚ ‚Л‰УЛТН‡ЪВОВ. З˚ Ъ‡НКВ
ПУКВЪВ ФВ ВТПУЪ ВЪ¸ ЛБУ· ‡КВМЛВ М‡
˝Н ‡МВ ЬдС.
(1) з‡КЛП‡fl П‡ОВМ¸НЫ˛ БВОВМЫ˛ НМУФНЫ М‡
‚˚НО˛˜‡ЪВОВ POWER, ЫТЪ‡МУ‚ЛЪВ В„У ‚
ФУОУКВМЛВ CAMERA.
(2) èÓ‚Â ÌËÚÂ STANDBY ‚‚Â ı.
(3) зВМ‡‰УО„У М‡КПЛЪВ ТЪУ УМЫ – ( Œ) НМУФНЛ
EDITSEARCH; ФУТОВ‰МЛВ МВТНУО¸НУ
ТВНЫМ‰ Б‡ФЛТ‡ММУИ ˜‡ТЪЛ ·Ы‰ЫЪ
‚УТФ УЛБ‚В‰ВМ˚ (ФВ ВТПУЪ Б‡ФЛТЛ).
З˚ Ъ‡НКВ ПУКВЪВ Ф УТОЫ¯Л‚‡Ъ¸ Б‚ЫН УЪ
„ УПНУ„У‚У ЛЪВОfl ЛОЛ ˜В ВБ М‡Ы¯МЛНЛ
(МВ Ф ЛО‡„‡˛ЪТfl).
СВ КЛЪВ ТЪУ УМЫ – НМУФНЛ EDITSEARCH
‰У ЪВı ФУ , ФУН‡ ‚Л‰ВУН‡ПВ ‡ МВ
‚В МВЪТfl Н КВО‡ВПУИ ТˆВМВ. иУТОВ‰Мflfl
Б‡ФЛТ‡ММ‡fl ˜‡ТЪ¸ ·Ы‰ВЪ ‚УТФ УЛБ‚В‰ВМ‡.
СОfl ФУ‰‚ЛКВМЛfl ‚ФВ В‰ ‰В КЛЪВ
ТЪУ УМЫ + (ПУМЪ‡КМ˚И ФУЛТН).
2
K
C
O
L
S
T
A
N
D
B
Y
20
3
+
EDITSEARCH
–
+
EDITSEARCH
–
+
EDITSEARCH
CCD-TRV14E/TRV24E 3-859-266-12(1).E/R
–
Page 21

Checking the recorded picture
è ӂ ͇ Á‡ÔËÒ‡ÌÌÓ„Ó
ËÁÓ· ‡ÊÂÌËfl
To stop playback
Release EDITSEARCH.
To go back to the last recorded point
after edit search
Press END SEARCH. The last recorded point is
played back for about 5 seconds if the tape was
recorded in SP mode, or 10 seconds if the tape
was recorded in LP mode, and stops.
Note that this function does not work once you
eject the cassette after you recorded in the tape.
To begin re-recording
Press START/STOP. Re-recording begins from
the last recorded point or the point you released
EDITSEARCH. Provided you do not eject the
tape, the transition between the last scene you
recorded and the next scene you record will be
smooth.
ÑÎfl ÓÒÚ‡ÌÓ‚ÍË ‚ÓÒÔ ÓËÁ‚‰ÂÌËfl
з‡КПЛЪВ EDITSEARCH.
СОfl ‚УБ‚ ‡Ъ‡ Н ФУТОВ‰МВПЫ
Б‡ФЛТ‡ММУПЫ ПВТЪЫ ФУТОВ
ПУМЪ‡КМУ„У ФУЛТН‡
з‡КПЛЪВ END SEARCH. иУТОВ‰МВВ
Б‡ФЛТ‡ММУВ ПВТЪУ ·Ы‰ВЪ ‚УТФ УЛБ‚У‰ЛЪ¸Тfl
Ф Л·ОЛБЛЪВО¸МУ ‚ ЪВ˜ВМЛЛ 5 ТВНЫМ‰, ВТОЛ
ОВМЪ‡ ·˚О‡ Б‡ФЛТ‡М‡ ‚ ВКЛПВ SP, ЛОЛ ‚
ЪВ˜ВМЛВ 10 ТВНЫМ‰, ВТОЛ ОВМЪ‡ ·˚О‡
Б‡ФЛТ‡М‡ ‚ ВКЛПВ LP, ‡ Б‡ЪВП ОВМЪ‡
УТЪ‡МУ‚ЛЪТfl. й· ‡ЪЛЪВ ‚МЛП‡МЛВ, ˜ЪУ
‰‡ММ‡fl ЩЫМНˆЛfl МВ ‡·УЪ‡ВЪ, ВТОЛ З˚
‚˚ЪУОНМЛЪВ Н‡ТТВЪЫ ФУТОВ Б‡ФЛТЛ ОВМЪ˚.
ÑÎfl ̇˜‡Î‡ Ô ÂÁ‡ÔËÒË
з‡КПЛЪВ START/STOP. иВ ВБ‡ФЛТ¸
М‡˜ЛМ‡ВЪТfl УЪ ФУТОВ‰МВИ Б‡ФЛТ‡ММУИ ЪУ˜НЛ
ЛОЛ УЪ ЪУ˜НЛ, „‰В З˚ УЪФЫТЪЛОЛ
EDITSEARCH. и В‰ЫТПУЪ ВМУ, ˜ЪУ·˚ З˚ МВ
‚˚ЪУОНМЫОЛ Н‡ТТВЪЫ, Л ФВ ВıУ‰ ПВК‰Ы
ФУТОВ‰МВИ ТˆВМУИ, НУЪУ Ы˛ З˚ Б‡ФЛТ‡ОЛ, Л
ТОВ‰Ы˛˘ВИ ТˆВМУИ, НУЪУ Ы˛ З˚
Б‡ФЛТ˚‚‡ВЪВ, ·Ы‰ВЪ ФО‡‚М˚П.
Basic operations éÒÌÓ‚Ì˚ ÓÔ ‡ˆËË
CCD-TRV14E/TRV24E 3-859-266-12(1).E/R
21
Page 22
Playing back a tape
ЗУТФУЛБ‚В‰ВМЛВ
ОВМЪ˚
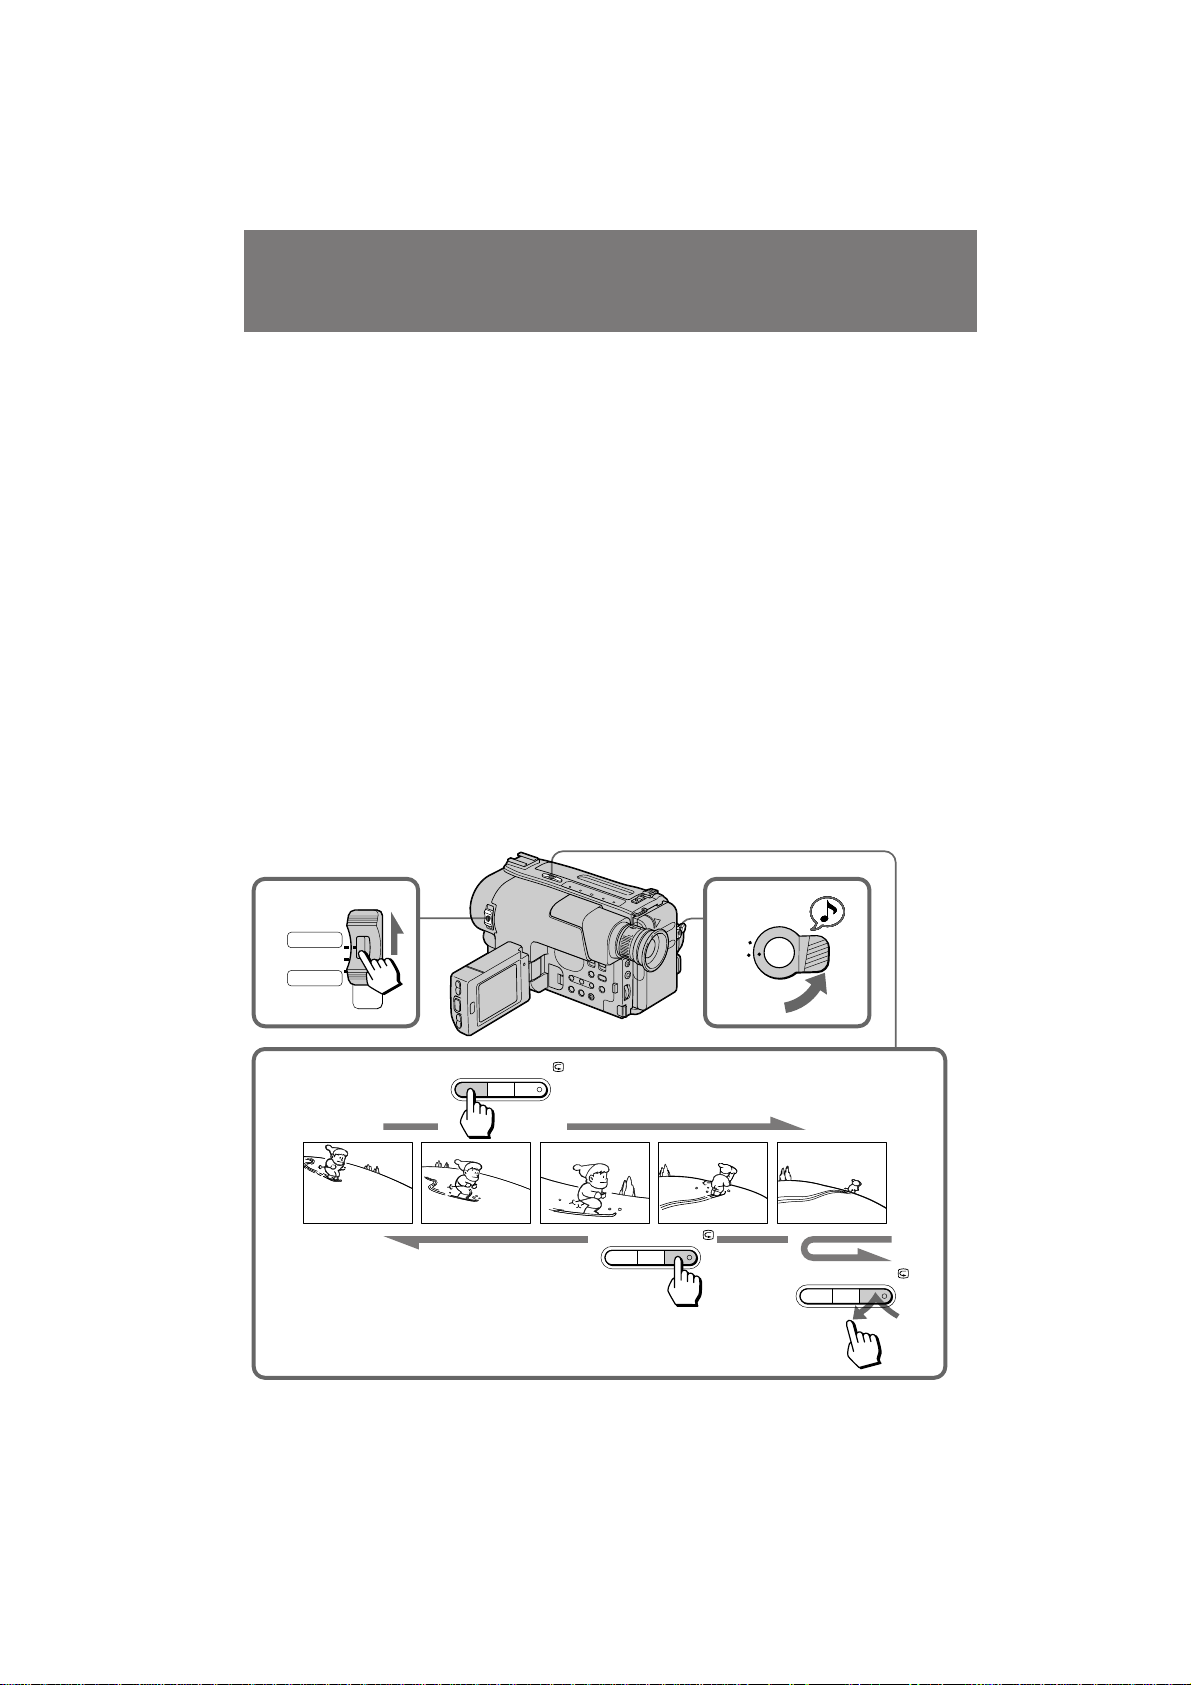
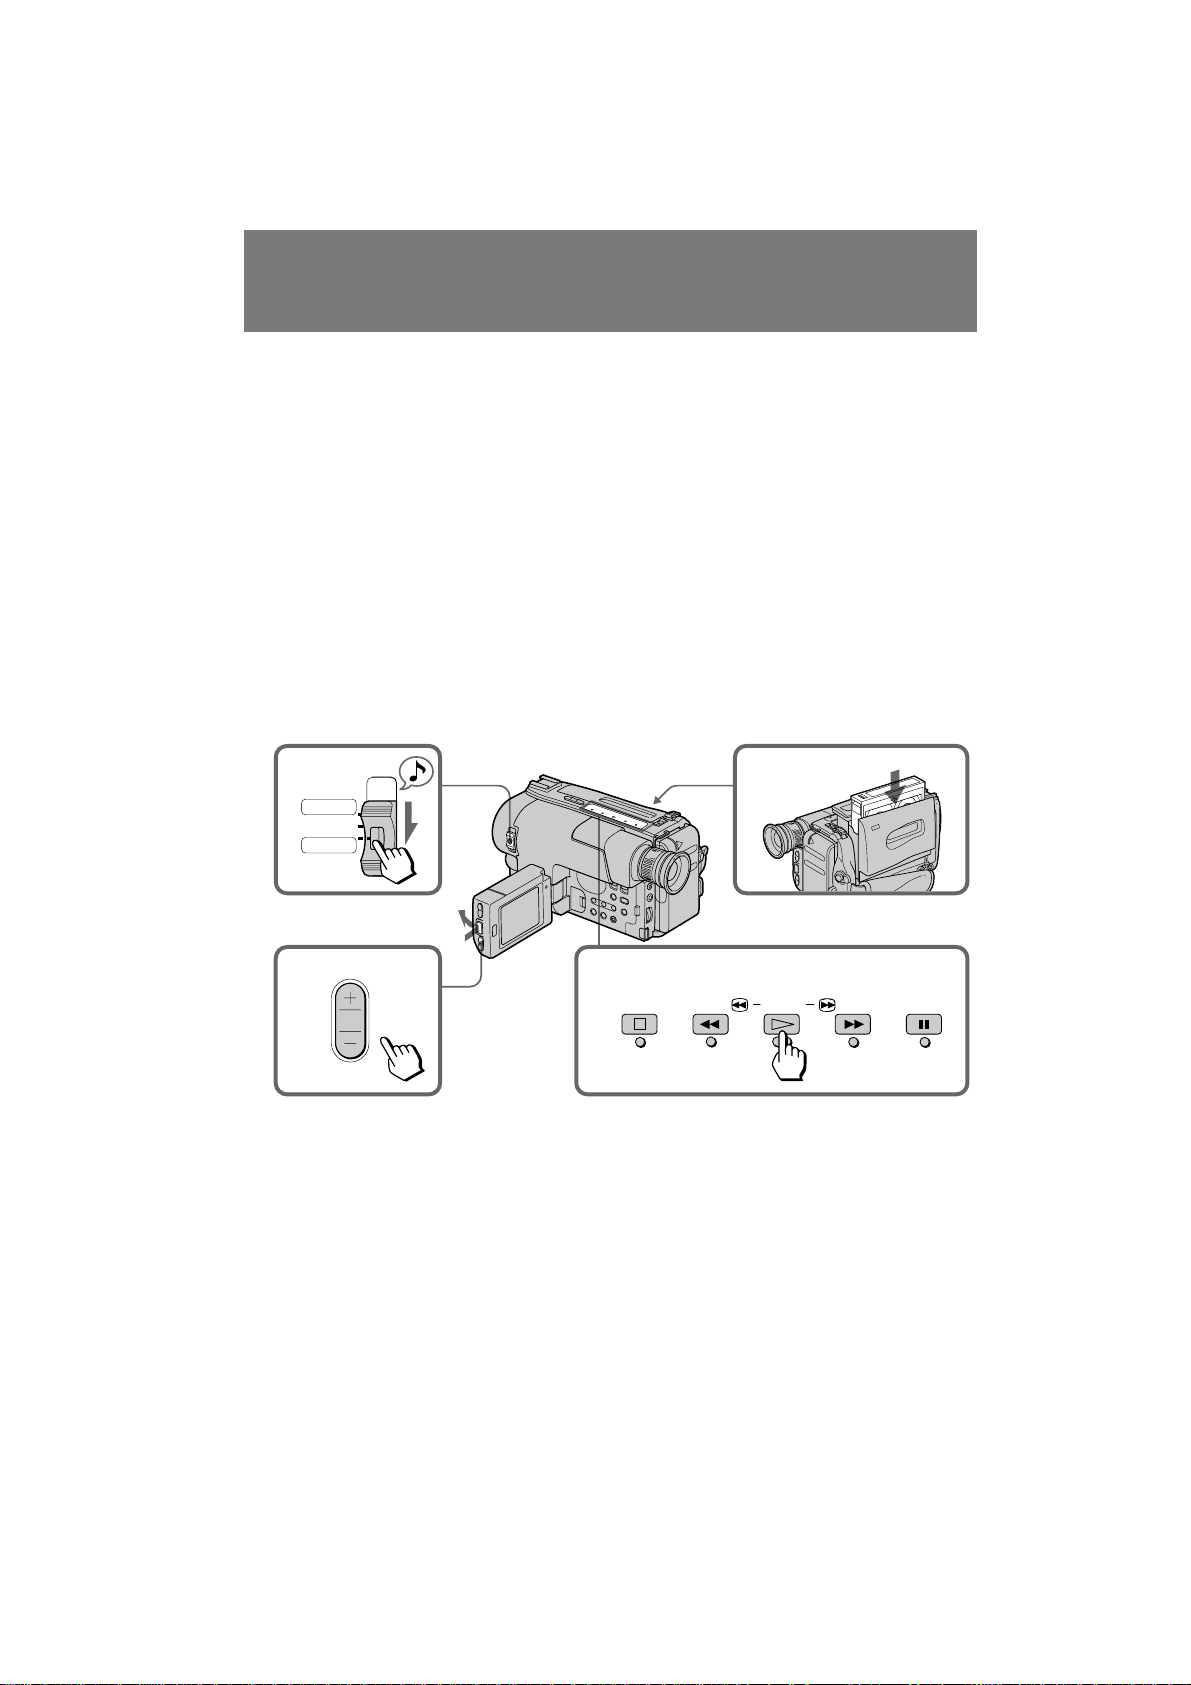
You can monitor the playback picture on the
LCD screen.
(1) While pressing the small green button on the
POWER switch, set it to PLAYER.
(2) Insert the recorded tape with the window
facing out.
(3) While pressing PUSH OPEN, open the LCD
panel. Adjust the angle of the LCD panel or
the brightness of the LCD screen if
necessary.
(4) Press · to start playback.
(5) Adjust the volume using VOLUME +/–.
You can also monitor on the TV screen after
connecting the camcorder to the VCR or TV.
1
POWER
CAMERA
OFF
PLAYER
3
З˚ ПУКВЪВ Ф УТП‡Ъ Л‚‡Ъ¸
‚УТФ УЛБ‚У‰ЛПУВ ЛБУ· ‡КВМЛВ М‡ ˝Н ‡МВ
ЬдС.
(1) з‡КЛП‡fl П‡ОВМ¸НЫ˛ БВОВМЫ˛ НМУФНЫ М‡
‚˚НО˛˜‡ЪВОВ POWER, ФВ В‰‚ЛМ¸ЪВ В„У ‚
ФУОУКВМЛВ PLAYER.
(2) ЗТЪ‡‚¸ЪВ Б‡ФЛТ‡ММЫ˛ Н‡ТТВЪЫ УНУ¯НУП,
Ó· ‡˘ÂÌÌ˚Ï Ì‡ ÛÊÛ.
(3) ç‡ÊËχfl PUSH OPEN, ÓÚÍ ÓÈÚ ԇÌÂθ
ÜäÑ. éÚ Â„ÛÎË ÛÈÚ ۄÓÎ Ô‡ÌÂÎË ÜäÑ Ë
fl ÍÓÒÚ¸ ˝Í ‡Ì‡ ÜäÑ, ÂÒÎË ˝ÚÓ Ú Â·ÛÂÚÒfl.
(4) з‡КПЛЪВ · ‰Îfl ̇˜‡Î‡
‚УТФУЛБ‚В‰ВМЛfl.
(5) йЪ В„ЫОЛ ЫИЪВ „УПНУТЪ¸ Т
ЛТФУО¸БУ‚‡МЛВП VOLUME +/–.
З˚ Ъ‡НКВ ПУКВЪВ Ф УТП‡Ъ Л‚‡Ъ¸
ЛБУ· ‡КВМЛВ М‡ ˝Н ‡МВ ЪВОВ‚ЛБУ ‡ ФУТОВ
ФУ‰ТУВ‰ЛМВМЛfl ‚Л‰ВУН‡ПВ ˚ Н дЗе/
ЪВОВ‚ЛБУЫ.
2
5
VOLUME
To stop playback, press π.
To rewind the tape, press 0.
To fast-forward the tape, press ).
22
4
STOP
СОfl УТЪ‡МУ‚НЛ ‚УТФ УЛБ‚В‰ВМЛfl М‡КПЛЪВ
π.
СОfl ЫТНУ ВММУИ ФВ ВПУЪНЛ ОВМЪ˚ М‡Б‡‰
М‡КПЛЪВ 0.
СОfl ЫТНУ ВММУИ ФВ ВПУЪНЛ ОВМЪ˚ ‚ФВ В‰
М‡КПЛЪВ ) .
REW PLAY
CCD-TRV14E/TRV24E 3-859-266-12(1).E/R
FF
PAUSE
Page 23
Playing back a tape
[b]
ÇÓÒÔ ÓËÁ‚‰ÂÌË ÎÂÌÚ˚
When watching on the LCD screen
You can turn the LCD panel over and move
back to the camcorder with the LCD screen
facing out [a]. You can adjust the angle of the
LCD panel up to 30 degrees [b].
[a]
Using the Remote Commander
You can control playback using the supplied
Remote Commander.
Before using the Remote Commander, insert the
R6 (size AA) batteries.
To erase the screen indicators
Press DISPLAY to erase the screen indicators on
the LCD screen. To display the indicators, press
again.
The indicators don’t appear on the TV.
Using an earphone
Connect an earphone (not supplied) to the @
jack. You can adjust the volume of the earphone
using VOLUME.
To view the playback picture in the
viewfinder
Close the LCD panel. The viewfinder turns on
automatically. When using the viewfinder, you
can monitor the sound only by using an
earphone.
To view on the LCD screen again, open the LCD
panel. The viewfinder turns off automatically.
и Л Ф УТПУЪ В М‡ ˝Н ‡МВ ЬдС
З˚ ПУКВЪВ Ф ‚ ЫМЫЪ¸ Ф‡МВО¸ ЬдС Л
ФВ В‰‚ЛМЫЪ¸ М‡Б‡‰ Н ‚Л‰ВУН‡ПВ В Т
У· ‡˘ВММ˚П М‡ ЫКЫ ˝Н ‡МУП ЬдС [a].
З˚ ПУКВЪВ ЛБПВМflЪ¸ Ы„УО М‡НОУМ‡ Ф‡МВОЛ
ЬдС М‡ 30 „ ‡‰ЫТУ‚ [b].
Basic operations éÒÌÓ‚Ì˚ ÓÔ ‡ˆËË
30˚
аТФУО¸БУ‚‡МЛВ ФЫО¸Ъ‡
‰ЛТЪ‡МˆЛУММУ„У ЫФ ‡‚ОВМЛfl
З˚ ПУКВЪВ ЫФ ‡‚ОflЪ¸ ‚УТФ УЛБ‚В‰ВМЛВП Т
ЛТФУО¸БУ‚‡МЛВП Ф ЛО‡„‡ВПУ„У ФЫО¸Ъ‡
‰ЛТЪ‡МˆЛУММУ„У ЫФ ‡‚ОВМЛfl.
иВ В‰ ЛТФУО¸БУ‚‡МЛВП ФЫО¸Ъ‡
‰ЛТЪ‡МˆЛУММУ„У ЫФ ‡‚ОВМЛfl ‚ТЪ‡‚¸ЪВ
·‡Ú‡ ÂÈÍË R6 ( ‡ÁÏ ÓÏ ÄÄ).
ÑÎfl Û‰‡ÎÂÌËfl Ë̉Ë͇ÚÓ Ó‚ Ò ˝Í ‡Ì‡
з‡КПЛЪВ НМУФНЫ DISPLAY ‰Оfl ТЪЛ ‡МЛfl
˝Н ‡ММ˚ı ЛМ‰ЛН‡ЪУ У‚ М‡ ˝Н ‡МВ ЬдС. СОfl
УЪУ· ‡КВМЛfl ЛМ‰ЛН‡ЪУ У‚ М‡КПЛЪВ ВВ
ТМУ‚‡.
аМ‰ЛН‡ЪУ ˚ МВ ФУfl‚Оfl˛ЪТfl М‡ ˝Н ‡МВ
ЪВОВ‚ЛБУ ‡.
аТФУО¸БУ‚‡МЛВ М‡Ы¯МЛНУ‚
иУ‰ТУВ‰ЛМЛЪВ М‡Ы¯МЛНЛ (МВ Ф ЛО‡„‡˛ЪТfl) Н
„МВБ‰Ы @. З˚ ПУКВЪВ УЪВ„ЫОЛ У‚‡Ъ¸
„ УПНУТЪ¸ М‡Ы¯МЛНУ‚ Т ЛТФУО¸БУ‚‡МЛВП
VOLUME.
СОfl Ф УТПУЪ ‡ ‚УТФ УЛБ‚У‰ЛПУ„У
ЛБУ· ‡КВМЛfl ‚ ‚Л‰УЛТН‡ЪВОВ
б‡Н УИЪВ Ф‡МВО¸ ЬдС. ЗЛ‰УЛТН‡ЪВО¸
‚НО˛˜ЛЪТfl ‡‚ЪУП‡ЪЛ˜ВТНЛ. и Л
ЛТФУО¸БУ‚‡МЛЛ ‚Л‰УЛТН‡ЪВОfl З˚ ПУКВЪВ
Ф УТОЫ¯Л‚‡Ъ¸ Б‚ЫН ЪУО¸НУ ˜В ВБ М‡Ы¯МЛНЛ.
СОfl Ф УТПУЪ ‡ М‡ ˝Н ‡МВ ЬдС ТМУ‚‡
УЪН УИЪВ Ф‡МВО¸ ЬдС. ЗЛ‰УЛТН‡ЪВО¸
‚˚НО˛˜ЛЪТfl ‡‚ЪУП‡ЪЛ˜ВТНЛ.
23
CCD-TRV14E/TRV24E 3-859-266-12(1).E/R
Page 24

Playing back a tape
ÇÓÒÔ ÓËÁ‚‰ÂÌË ÎÂÌÚ˚
Various playback modes
To view a still picture (playback pause)
Press P during playback. To resume playback,
press P or ·.
To locate a scene (Picture Search)
Keep pressing 0 or ) during playback. To
resume normal playback, release the button.
To monitor the high-speed picture while
advancing the tape or rewind (Skip Scan)
Keep pressing 0 while rewinding or )
while advancing the tape.
To resume normal playback, press ·.
Notes on playback
•Streaks appear and the sound is muted in the
various playback modes.
•When playback pause mode lasts for 5 minutes
or more, the camcorder automatically enters
stop mode.
ê‡Á΢Ì˚ ÂÊËÏ˚
‚ÓÒÔ ÓËÁ‚‰ÂÌËfl
СОfl Ф УТПУЪ ‡ МВФУ‰‚ЛКМУ„У ЛБ· ‡КВМЛfl
(Ф‡ЫБ‡ ‚УТФ УЛБ‚В‰ВМЛfl)
з‡КПЛЪВ НМУФНЫ P ‚У ‚ ВПfl
‚УТФ УЛБ‚В‰ВМЛfl. СОfl ‚УБУ·МУ‚ОВМЛfl
‚УТФ УЛБ‚В‰ВМЛfl М‡КПЛЪВ НМУФНЫ P ËÎË ·.
СОfl УЪ˚ТН‡МЛfl КВО‡ВПУ„У
Щ ‡„ПВМЪ‡ (ФУЛТН ЛБУ· ‡КВМЛfl)
СВ К‡Ъ¸ М‡К‡ЪУИ НМУФНЫ 0 ЛОЛ ) ‚У
‚ ВПfl ‚УТФ УЛБ‚В‰ВМЛfl. СОfl ‚УБУ·МУ‚ОВМЛfl
МУ П‡О¸М„У ‚УТФ УЛБ‚В‰ВМЛfl УЪФЫТЪЛЪ¸
НМУФНЫ.
СОfl НУМЪ УОfl ЛБУ· ‡КВМЛfl М‡ ‚˚ТУНУИ
ТНУ УТЪЛ ‚У ‚ ВПfl ЫТНУ ВММУИ ФВ ВПУЪНЛ
‚ФВ В‰ ЛОЛ М‡Б‡‰ (ФУЛТН ПВЪУ‰УП
Ф У„УМ‡)
СВ К‡Ъ¸ М‡К‡ЪУИ НМУФНЫ 0 ‚У ‚ ВПfl
ФВ ВПУЪНЛ ОВМЪ˚ М‡Б‡‰ ЛОЛ НМУФНЫ ) ‚У
‚ ВПfl ФВ ВПУЪНЛ ОВМЪ˚ ‚ФВ В‰. СОfl
‚УБУ·МУ‚ОВМЛfl МУ П‡О¸МУ„У
‚УТФ УЛБ‚В‰ВМЛfl М‡К‡Ъ¸ НМУФНЫ ·.
è ËϘ‡ÌËfl Í ‚ÓÒÔ ÓËÁ‚‰ÂÌËË
• З ‡БОЛ˜М˚ı ВКЛП‡ı ‚УТФ УЛБ‚В‰ВМЛfl М‡
˝Н ‡МВ ПУ„ЫЪ ФУfl‚ЛЪ¸Тfl ФУОУТ˚ Л Б‚ЫН
·Û‰ÂÚ Ô Ë„ÎÛ¯ÂÌ.
• ЦТОЛ ВКЛП Ф‡ЫБ˚ ‚УТФ УЛБ‚В‰ВМЛfl
Ф У‰УОК‡ВЪТfl 5 ПЛМЫЪ ЛОЛ ·УОВВ,
‚Л‰ВУН‡ПВ ‡ ‡‚ЪУП‡ЪЛ˜ВТНЛ ‚УИ‰ВЪ ‚
ÂÊËÏ ÓÒÚ‡ÌÓ‚ÍË.
24
CCD-TRV14E/TRV24E 3-859-266-12(1).E/R
Page 25
Searching for the end
of the picture
иУЛТН НУМˆ‡
ЛБУ· ‡КВМЛfl
You can go to the end of the recorded portion
after you record and play back the tape to make
the transition between the last scene you
recorded and the next scene smooth. The tape
starts rewinding or fast-forwarding. Then, the
last 5 seconds play back if the tape was recorded
in SP mode, or the last 10 seconds play back if
the tape was recorded in LP mode. Then the
tape stops at the end of the recorded picture
(End Search).
Note that End Search function does not work
once you eject the cassette after you recorded in
the tape.
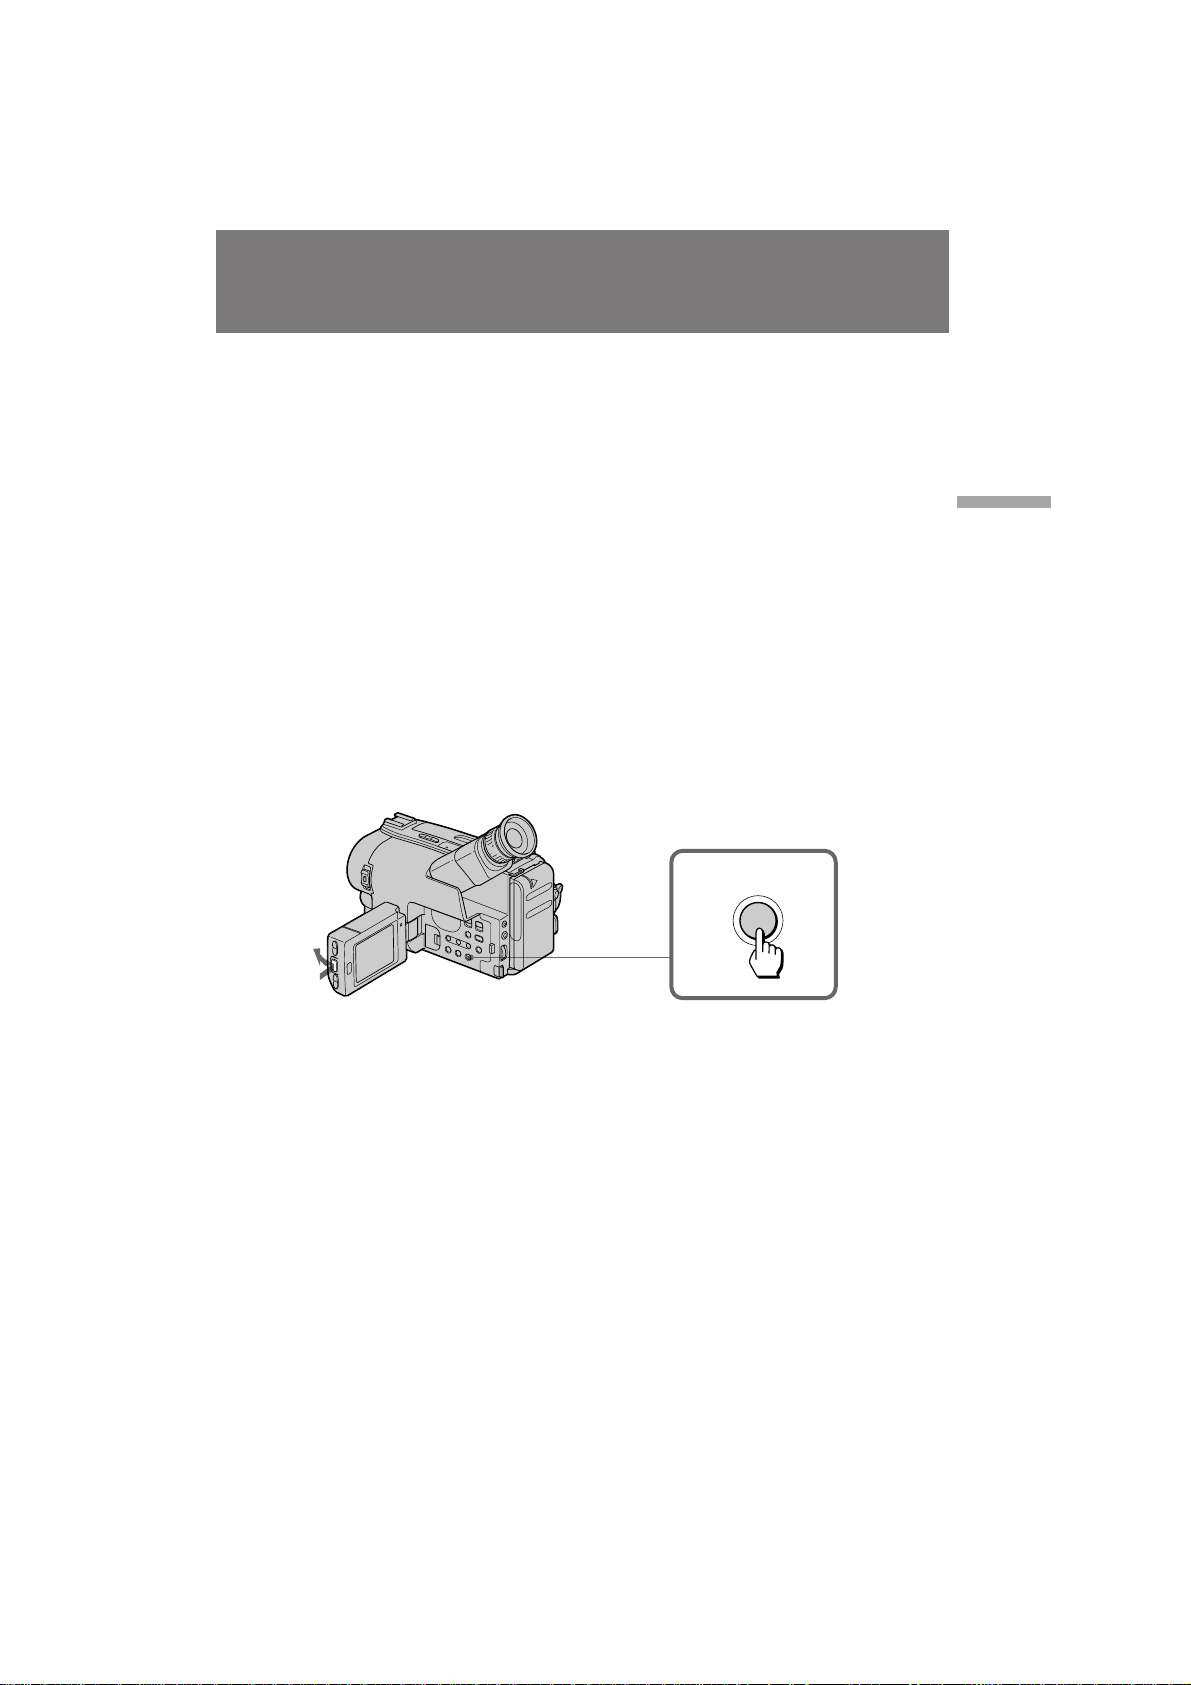
(1) While pressing PUSH OPEN, open the LCD
panel.
(2) Press END SEARCH.
This function works when the POWER switch is
set to either CAMERA or PLAYER.
З˚ ПУКВЪВ ФВ ВИЪЛ Н НУМˆЫ Б‡ФЛТ‡ММУИ
˜‡ТЪЛ ФУТОВ Б‡ФЛТЛ Л ‚УТФ УЛБ‚В‰ВМЛfl
ОВМЪ˚ ‰Оfl У·ВТФВ˜ВМЛfl ФО‡‚МУ„У ФВ ВıУ‰‡
ПВК‰Ы ФУТОВ‰МВИ ТˆВМУИ, НУЪУ Ы˛ З˚
Б‡ФЛТ‡ОЛ, Л ТОВ‰Ы˛˘ВИ ТˆВМУИ. гВМЪ‡
М‡˜ЛМ‡ВЪ ЫТНУ ВММУ ФВ ВП‡Ъ˚‚‡Ъ¸Тfl М‡Б‡‰
ЛОЛ ‚ФВ В‰. б‡ЪВП ФУТОВ‰МЛВ 5 ТВНЫМ‰
·Ы‰ЫЪ ‚УТФ УЛБ‚В‰ВМ˚, ВТОЛ ОВМЪ‡
Б‡ФЛТ‡М‡ ‚ ВКЛПВ SP, ЛОЛ ФУТОВ‰МЛВ 10
ТВНЫМ‰ ·Ы‰ЫЪ ‚УТФ УЛБ‚В‰ВМ˚, ВТОЛ ОВМЪ‡
Б‡ФЛТ‡М‡ ‚ ВКЛПВ LP. б‡ЪВП ОВМЪ‡
УТЪ‡М‡‚ОЛ‚‡ВЪТfl ‚ НУМˆВ Б‡ФЛТ‡ММУ„У
ЛБУ· ‡КВМЛfl (ФУЛТН НУМˆ‡).
й· ‡ЪЛЪВ ‚МЛП‡МЛВ, ˜ЪУ ЩЫМНˆЛfl ФУЛТН‡
НУМˆ‡ МВ ‡·УЪ‡ВЪ, ВТОЛ З˚ ‚˚ЪУОНМЫОЛ
Н‡ТТВЪЫ ФУТОВ ‚˚ФУОМВМЛfl З‡¯ВИ Б‡ФЛТЛ М‡
ОВМЪВ.
(1) ç‡ÊËχfl PUSH OPEN, ÓÚÍ ÓÈÚ ԇÌÂθ
ÜäÑ.
(2) з‡КПЛЪВ END SEARCH.
С‡ММ‡fl ЩЫМНˆЛfl ‡·УЪ‡ВЪ, НУ„‰‡
‚˚НО˛˜‡ЪВО¸ POWER ЫТЪ‡МУ‚ОВМ ‚ О˛·Ы˛
ЛБ ФУБЛˆЛИ, лAMERA ЛОЛ PLAYER.
2
END SEARCH
Basic operations éÒÌÓ‚Ì˚ ÓÔ ‡ˆËË
1
25
CCD-TRV14E/TRV24E 3-859-266-12(1).E/R
Page 26

Advanced operations
ìÒÓ‚Â ¯ÂÌÒÚ‚Ó‚‡ÌÌ˚ ÓÔ ‡ˆËË
Using alternative
power sources
You can choose any of the following power
sources for your camcorder: battery pack, the
mains, and 12/24 V car battery. Choose the
appropriate power source depending on where
you want to use your camcorder.
Place
Indoors
Outdoor
In the car
Power
source
Mains
Battery pack
12 V or 24 V
car battery
Note on power sources
Disconnecting the power source or removing
the battery pack during recording or playback
may damage the inserted tape. If this happens,
restore the power supply again immediately.
This mark indicates that this
product is a genuine accessory for
purchasing Sony video products, Sony
recommends that you purchase accessories with
this “GENUINE VIDEO ACCESSORIES” mark.
Sony video product. When
Accessory to
be used
Supplied AC
power adaptor
Battery pack (Ni-
)
Cd type
Sony DC pack
DCP-77
аТФУО¸БУ‚‡МЛВ ‡О¸ЪВ М‡ЪЛ‚М˚ı ЛТЪУ˜МЛНУ‚ ФЛЪ‡МЛfl
З˚ ПУКВЪВ ‚˚·Л ‡Ъ¸ О˛·УИ ЛБ
ТОВ‰Ы˛˘ЛЛı ЛТЪУ˜МЛНУ‚ ФЛЪ‡МЛfl ‰Оfl З‡¯ВИ
‚Л‰ВУН‡ПВ ˚: ·‡Ъ‡ ВИМ˚И ·ОУН, ТВЪВ‚УВ
ФЛЪ‡МЛВ Л ‡‚ЪУПУ·ЛО¸М˚И ‡ННЫПЫОflЪУ 12/
24 З. З˚·Л ‡ИЪВ М‡‰ОВК‡˘ЛИ ЛТЪУ˜МЛН
ФЛЪ‡МЛfl ‚ Б‡‚ЛТЛПУТЪЛ УЪ ЪУ„У, „‰В З˚
ıУЪЛЪВ ЛТФУО¸БУ‚‡Ъ¸ З‡¯Ы ‚Л‰ВУН‡ПВ Ы.
еВТЪУ аТФУО¸БЫВП˚В
Ç ÔÓÏ¢ÂÌËË
ÇÌÂ
ÔÓÏ¢ÂÌËfl
Ç ‡‚ÚÓÏÓ·ËÎÂ
è ËϘ‡ÌËÂ Í ËÒÚÓ˜ÌËÍ‡Ï ÔËÚ‡ÌËfl
йЪТУВ‰ЛМВМЛВ ЛТЪУ˜МЛНУ‚ ФЛЪ‡МЛfl ЛОЛ
ТМflЪЛВ ·‡Ъ‡ ВИМУ„У ·ОУН‡ ‚У ‚ ВПfl Б‡ФЛТЛ
ЛОЛ ‚УТФ УЛБ‚В‰ВМЛfl ПУКВЪ ФУ‚В‰ЛЪ¸
‚ТЪ‡‚ОВММЫ˛ ОВМЪЫ. ЦТОЛ Ъ‡НУВ ТОЫ˜ЛЪТfl,
‚УТТЪ‡МУ‚ЛЪВ ЛТЪУ˜МЛН ФЛЪ‡МЛfl МВПВ‰ОВММУ.
‚Л‰ВУФ У‰ЫНˆЛЛ Sony. ЦТОЛ З˚ ФУНЫФ‡ВЪВ
‚Л‰ВУФ У‰ЫНˆЛ˛ Sony, ЪУ П˚ ВНУПВМ‰ЫВП,
˜ЪУ·˚ З˚ ФУНЫФ‡ОЛ Ф ЛМ‡‰ОВКМУТЪЛ ТУ
БМ‡НУП “GENUINE VIDEO ACCESSORIES.”
àÒÚÓ˜ÌËÍ
ÔËÚ‡ÌËfl
щОВНЪ Л˜ВТН‡fl ТВЪ¸
Ňڇ ÂÈÌ˚È
·ÎÓÍ
Д‚ЪУПУ·ЛО¸М˚И
‡ННЫПЫОflЪУ
12 З ЛОЛ 24 З
з‡ТЪУfl˘ЛИ БМ‡Н ЫН‡Б˚‚‡ВЪ, ˜ЪУ
‰‡ММ‡fl Ф У‰ЫНˆЛfl fl‚ОflВЪТfl
ФУ‰ОЛММУИ Ф ЛМ‡‰ОВКМУТЪ¸˛
Ф ЛМ‡‰ОВКМУТЪЛ
и ЛО‡„‡ВП˚И
ÒÂÚ‚ÓÈ ‡‰‡ÔÚÂ
Ô ÂÏ. ÚÓ͇
Ňڇ ÂÈÌ˚È ·ÎÓÍ
(ÚËÔ‡ Ni-Cd)
ÅÎÓÍ ÔÓÒÚ. ÚÓ͇
DCP-77 Sony
26
CCD-TRV14E/TRV24E 3-859-266-12(1).E/R
Page 27
Using alternative power
sources
аТФУО¸БУ‚‡МЛВ ‡О¸ЪВ М‡ЪЛ‚М˚ı
ЛТЪУ˜МЛНУ‚ ФЛЪ‡МЛfl
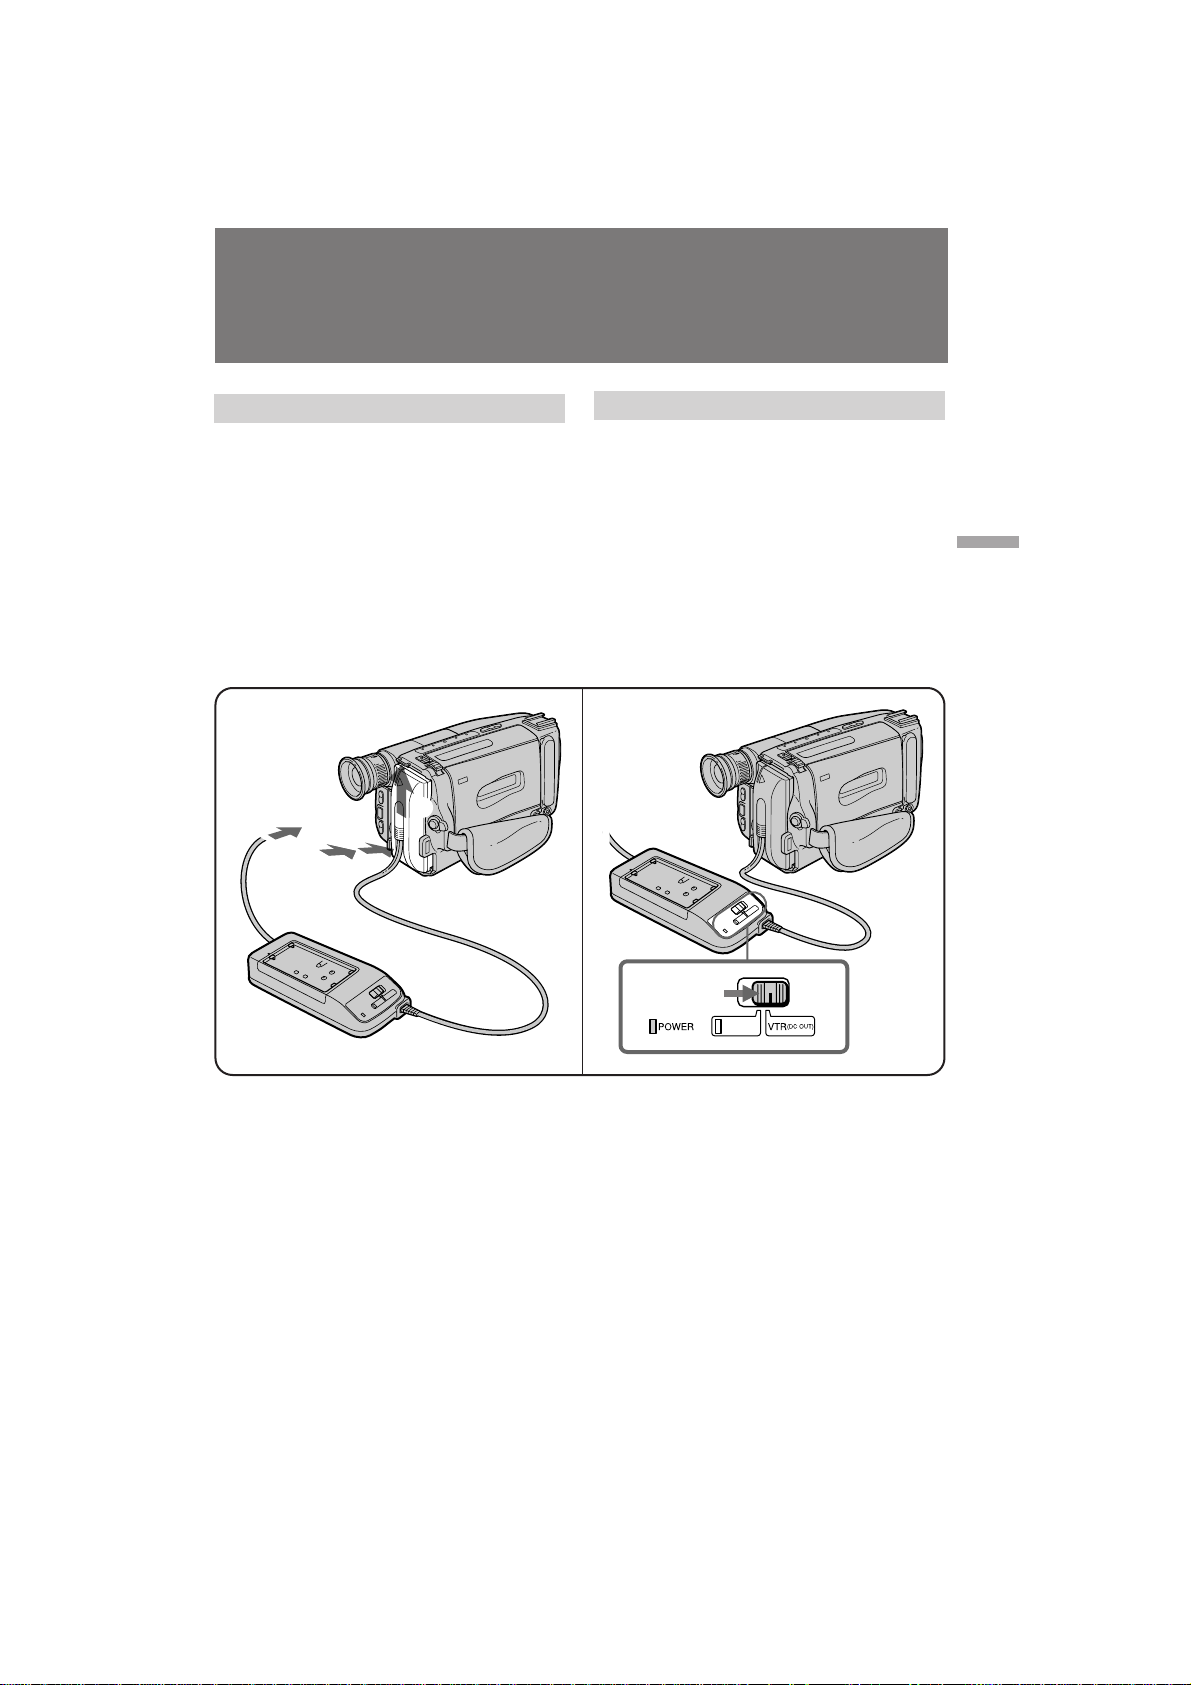
Using the mains
To use the supplied AC power adaptor:
(1) Connect the mains to a wall outlet. Insert the
top of the connecting plate of the AC power
adaptor into the top of the battery mounting
surface. Push the connecting plate so that it
attaches firmly. Make sure that you hear
clicks twice.
(2) Set the selector to VTR (DC OUT).
1
1
3
2
аТФУО¸БУ‚‡МЛВ ˝ОВНЪ Л˜ВТНУИ ТВЪЛ
СОfl ЛТФУО¸БУ‚‡МЛfl Ф ЛО‡„‡ВПУ„У ТВЪВ‚У„У
‡‰‡ФЪВ ‡ ФВ ВП. ЪУН‡:
(1) иУ‰ТУВ‰ЛМЛЪВ ТВЪВ‚УИ ФУ‚У‰ Н ТВЪВ‚УИ
УБВЪНВ. ЗТЪ‡‚¸ЪВ ‚В ıМЛИ НУМВˆ
ТУВ‰ЛМЛЪВО¸МУИ ФО‡ТЪЛМ˚ ТВЪВ‚У„У
‡‰‡ФЪВ ‡ ФВ ВП. ЪУН‡ ‚ ‚В ıМ˛˛ ˜‡ТЪ¸
·‡Ъ‡ ВИМУИ ЫТЪ‡МУ‚У˜МУИ ФУ‚В ıМУТЪЛ.
з‡КПЛЪВ М‡ ТУВ‰ЛМЛЪВО¸МЫ˛ ФО‡ТЪЛМЫ,
Ъ‡Н, ˜ЪУ·˚ УМ‡ Ф ЛТУВ‰ЛМЛО‡Т¸ М‡‰ВКМУ.
м·В‰ЛЪВТ¸, ˜ЪУ·˚ З˚ ЫТО˚¯‡ОЛ ˘ВО˜УН
‰‚‡К‰˚.
(2) мТЪ‡МУ‚ЛЪВ ТВОВНЪУ ‚ ФУОУКВМЛВ VTR
(DC OUT).
2
Advanced operations ìÒÓ‚Â ¯ÂÌÒÚ‚Ó‚‡ÌÌ˚ ÓÔ ‡ˆËË
WARNING
The mains lead must only be changed at
qualified service shop.
PRECAUTIONS
The set is not disconnected from the AC power
source (mains) as long as it is connected to the
mains, even if the set itself has been turned off.
икЦСмикЦЬСЦзаЦ
лВЪВ‚УИ Ф У‚У‰ ТОВ‰ЫВЪ Б‡ПВМflЪ¸ ЪУО¸НУ ‚
П‡ТЪВ ТНУИ Н‚‡ОЛЩЛˆЛ У‚‡ММУ„У
У·ТОЫКЛ‚‡МЛfl.
икЦСйлнЦкЦЬЦзаЦ
С‡ММ˚И ‡ФФ‡ ‡Ъ МВ УЪНО˛˜‡ВЪТfl УЪ
ЛТЪУ˜МЛН‡ ФЛЪ‡МЛfl ФВ ВП. ЪУН‡, ФУН‡ УМ
ФУ‰ТУВ‰ЛМВМ Н ˝ОВНЪ Л˜ВТНУИ ТВЪЛ, ‰‡КВ
ВТОЛ Т‡П ‡ФФ‡ ‡Ъ УЪНО˛˜ВМ.
27
CCD-TRV14E/TRV24E 3-859-266-12(1).E/R
Page 28

Using alternative power
sources
аТФУО¸БУ‚‡МЛВ ‡О¸ЪВ М‡ЪЛ‚М˚ı
ЛТЪУ˜МЛНУ‚ ФЛЪ‡МЛfl
Notes on the POWER lamp
•The POWER lamp will remain lit for a while
even if the unit is unplugged after use. This is
normal.
•If the POWER lamp does not light, set the
selector to VTR (DC OUT) and disconnect the
mains lead. After about one minute, reconnect
the mains lead.
To remove the adaptor
The adaptor is removed in the same way as the
battery pack.
Using a car battery
Use Sony DCP-77 DC pack (not supplied).
Connect the cord of the DC pack to the cigarette
lighter socket of the car (12 V or 24 V). Connect
the DC pack to the battery mounting surface of
the camcorder.
To remove the DC pack
The DC pack is removed in the same way as the
battery pack.
è ËϘ‡ÌËfl Í Î‡ÏÔӘ͠POWER
• ã‡ÏÔӘ͇ POWER ·Û‰ÂÚ ÓÒÚ‡‚‡Ú¸Òfl
„Ó fl˘ÂÈ Í‡ÍÓÂ-ÚÓ ‚ ÂÏfl, ‰‡Ê ÂÒÎË ‡ÔÔ‡ ‡Ú
·Ы‰ВЪ УЪТУВ‰ЛМВМ ФУТОВ ЛТФУО¸БУ‚‡МЛfl.
щЪУ fl‚ОflВЪТfl МУ П‡О¸М˚П.
• ЦТОЛ О‡ПФУ˜Н‡ POWER МВ Б‡„У ‡ВЪТfl,
ЫТЪ‡МУ‚ЛЪВ ТВОВНЪУ ‚ ФУОУКВМЛВ VTR (DC
OUT) Л УЪТУВ‰ЛМЛЪВ ТВЪВ‚УИ ФУ‚У‰.
и Л·ОЛБЛЪВО¸МУ ˜В ВБ У‰МЫ ПЛМЫЪЫ ТМУ‚‡
ФУ‰ТУВ‰ЛМЛЪВ ТВЪВ‚УИ ФУ‚У‰.
ÑÎfl ÒÌflÚËfl ‡‰‡ÔÚ ‡
ĉ‡ÔÚ ÒÌËχÂÚÒfl Ú‡ÍËÏ Ê ӷ ‡ÁÓÏ, Í‡Í Ë
·‡Ú‡ ÂÈÌ˚È ·ÎÓÍ.
аТФУО¸БУ‚‡МЛВ ‡‚ЪУПУ·ЛО¸МУ„У
‡ННЫПЫОflЪУ ‡
аТФУО¸БЫИЪВ ·ОУН ФУТЪ. ЪУН‡ DCP-77 Sony
(МВ Ф ЛО‡„‡ВЪТfl). иУ‰ТУВ‰ЛМЛЪВ ¯МЫ ·ОУН‡
ФУТЪ. ЪУН‡ Н „МВБ‰Ы ТЛ„‡ВЪМУ„У
Ф ЛНЫ Л‚‡ЪВОfl ‡‚ЪУПУ·ЛОfl (12 З ЛОЛ 24 З).
иУ‰ТУВ‰ЛМЛЪВ ·ОУН ФУТЪ. ЪУН‡ Н
ЫТЪ‡МУ‚У˜МУИ ФУ‚ВıМУТЪЛ ·‡Ъ‡ ВЛ
‚Л‰ВУН‡ПВ ˚.
ÑÎfl ÒÌflÚËfl ·ÎÓ͇ ÔÓÒÚ. ÚÓ͇
ЕОУН ФУТЪ. ЪУН‡ ТМЛП‡ВЪТfl Ъ‡НЛП КВ
ТФУТУ·УП, Н‡Н Л ·‡Ъ‡ ВИМ˚И ·ОУН.
28
CCD-TRV14E/TRV24E 3-859-266-12(1).E/R
Page 29

Changing the mode
settings
аБПВМВМЛВ ВКЛПМ˚ı
ЫТЪ‡МУ‚УН
You can change the mode settings to further
enjoy the features and functions of the
camcorder.
(1) While pressing PUSH OPEN, open the LCD
panel.
(2) Press MENU to display the menu.
(3) Turn the control dial to select the desired
item, and press the dial.
(4) Turn the control dial to select the desired
mode, and press the dial.
(5) Press MENU to erase the menu display.
2
MENU
MENU
COMMANDER
REC MODE
TITLE POS
TITLE1 SET
TITLE2 SET
D ZOOM
LCD B.L.
[MENU] : END
OFF
З˚ ПУКВЪВ ЛБПВМflЪ¸ ЫТЪ‡МУ‚НЛ ВКЛПУ‚
‰Оfl М‡ТО‡К‰ВМЛfl ‰УФУОМЛЪВО¸М˚ПЛ
Т‚УИТЪ‚‡ПЛ Л ЩЫМНˆЛflПЛ ‚Л‰ВУН‡ПВ ˚.
(1) з‡К‡‚ НМУФНЫ PUSH OPEN, oЪНpoИЪe
ÔaÌeθ ÜäÑ.
(2) з‡КПЛЪВ НМУФНЫ MENU ‰Оfl УЪУ· ‡КВМЛfl
ÏÂÌ˛.
(3) èÓ‚Â ÌËÚ „ÛÎË Ó‚Ó˜Ì˚È ‰ËÒÍ, ˜ÚÓ·˚
‚˚· ‡Ъ¸ КВО‡ВП˚И ФЫМНЪ, Л М‡КПЛЪВ
‰ЛТН.
(4) èÓ‚Â ÌËÚ „ÛÎË Ó‚Ó˜Ì˚È ‰ËÒÍ, ˜ÚÓ·˚
‚˚· ‡Ъ¸ КВО‡ВП˚И ВКЛП, Л М‡КПЛЪВ
‰ЛТН.
(5) з‡КПЛЪВ НМУФНЫ MENU, ˜ЪУ·˚ Ы‰‡ОЛЪ¸
Ë̉Ë͇ˆËË ÏÂÌ˛.
3
MENU
COMMANDER
REC MODE
TITLE POS
MENU
COMMANDER
REC MODE
TITLE POS
ON
MENU
COMMANDER
REC MODE
TITLE POS CENTER
Advanced operations ìÒÓ‚Â ¯ÂÌÒÚ‚Ó‚‡ÌÌ˚ ÓÔ ‡ˆËË
SP
1
5
MENU
4
MENU
COMMANDER
REC MODE
TITLE POS
MENU
COMMANDER ON
MENU
COMMANDER
REC MODE
TITLE POS
ON
OFF
MENU
COMMANDER ON
OFF
OFF
CCD-TRV14E/TRV24E 3-859-266-12(1).E/R
29
Page 30

Changing the mode setting
аБПВМВМЛВ ВКЛПМ˚ı ЫТЪ‡МУ‚УН
Selecting the mode setting of
each item
Items for both CAMERA and PLAYER
modes
COMMANDER <ON/OFF>
•Select ON when using the supplied Remote
Commander for the camcorder.
•Select OFF when not using the Remote
Commander.
BEEP* <ON/OFF>
•Select ON so that beeps sound when you start/
stop recording, etc.
•Select OFF when you do not want to hear the
beep sound.
LCD B.L. * <BRT NORMAL/BRIGHT>
•If you select BRT NORMAL, the battery life
becomes about 10% longer than it is when you
select BRIGHT.
•Select BRIGHT to make the LCD screen
brighter when shooting/playing back outdoors.
Items for CAMERA mode only
REC MODE* <SP/LP>
•Select SP to record a tape in SP (standard play)
mode.
•Select LP to record a tape in LP (long play)
mode.
TITLE POS* <CENTER/BOTTOM>
•Select CENTER to center the title in the picture.
•Select BOTTOM to position the title at the
bottom of the picture.
TITLE1 SET*/TITLE2 SET*
Store your own titles.
D ZOOM* <ON/OFF> (CCD-TRV24E only)
•Select ON to activate digital zooming.
•Select OFF to not use the digital zoom. The
camcorder goes back to 15x zoom.
30
З˚·У ЫТЪ‡МУ‚НЛ ВКЛП‡ ФУ
Н‡К‰УПЫ ФЫМНЪЫ
иЫМНЪ˚ ‰Оfl ВКЛПУ‚ CAMERA Л
PLAYER
имгън микДЗгЦзаь COMMANDER <ON/
OFF>
•мТЪ‡МУ‚ЛЪВ ‚ ФУОУКВМЛВ ON, ВТОЛ З˚
ФУОЫБЫВЪВТ¸ Ф ЛО‡„‡ВП˚П Н ‚Л‰ВУН‡ПВ В
ФЫО¸ЪУП ‰ЛТЪ‡МˆЛУММУ„У ЫФ ‡‚ОВМЛfl.
•мТЪ‡МУ‚ЛЪВ ‚ ФУОУКВМЛВ OFF, ВТОЛ З˚ МВ
ЛТФУО¸БЫВЪВ ФЫО¸Ъ ‰ЛТЪ‡МˆЛУММУ„У
ЫФ ‡‚ОВМЛfl.
бмееЦкзхв лаЙзДг BEEP* <ON/OFF>
•мТЪ‡МУ‚ЛЪВ ‚ ФУОУКВМЛВ ON, ˜ЪУ·˚
БЫППВ М˚В Б‚ЫНУ‚˚В ТЛ„М‡О˚ Б‚Ы˜‡ОЛ,
НУ„‰‡ З˚ М‡˜ЛМ‡ВЪВ/Б‡Н‡М˜Л‚‡ВЪВ Б‡ФЛТ¸ Л
Ъ.Ф.
•мТЪ‡МУ‚ЛЪВ ‚ ФУОУКВМЛВ OFF, НУ„‰‡ З˚ МВ
ıУЪЛЪВ ТО˚¯‡Ъ¸ БЫППВ М˚И Б‚ЫНУ‚УИ
ТЛ„М‡О.
ÜäÑ LCD B.L.* <BRT NORMAL/BRIGHT>
•ÖÒÎË Ç˚ ‚˚·Â ÂÚÂ BRT NORMAL, Ò ÓÍ
ÒÎÛÊ·˚ ·‡Ú‡ ÂÈÍË ÒÚ‡ÌÂÚ Ì‡ 10% ‰Óθ¯Â,
˜ÂÏ ‚ ÒÎÛ˜‡Â, ÍÓ„‰‡ Ç˚ ‚˚·Â ÂÚ BRIGHT.
•Ç˚·Â ËÚ BRIGHT, ˜ÚÓ·˚ ҉·ڸ ˝Í ‡Ì
ÜäÑ fl ˜Â ‚ ÒÎÛ˜‡Â Ò˙ÂÏÍË/
‚ÓÒÔ ÓËÁ‚‰ÂÌËfl ‚Ì ÔÓÏ¢ÂÌËfl.
иЫМНЪ˚ ЪУО¸НУ ‰Оfl ВКЛП‡ CAMERA
кЦЬае бДиала REC MODE* <SP/LP>
•З˚·В ЛЪВ SP ‰Оfl Б‡ФЛТЛ ОВМЪ˚ ‚ ВКЛПВ
SP (ТЪ‡М‰‡ ЪМУВ ‚УТФУЛБ‚В‰ВМЛВ).
•З˚·В ЛЪВ LP ‰Оfl Б‡ФЛТЛ ОВМЪ˚ ‚ ВКЛПВ
LP (Ф У‰УОКЛЪВО¸МУВ ‚УТФ УЛБ‚В‰ВМЛВ).
зДСиалъ TITLE POS* <CENTER/BOTTOM>
•Ç˚·Â ËÚ CENTER ‰Îfl ‡Ï¢ÂÌËfl ̇‰ÔËÒË
ÔÓÒ Â‰ËÌ ËÁÓ·‡ÊÂÌËfl.
•Ç˚·Â ËÚ BOTTOM ‰Îfl ‡ÁÏ¢ÂÌËfl
̇‰ÔËÒË ‚ÌËÁÛ ËÁÓ· ‡ÊÂÌËfl.
млнДзйЗдД зДСиала 1 TITLE1 SET*/
млнДзйЗдД зДСиала 2 TITLE2 SET*
б‡МВТЛЪВ ‚ Ф‡ПflЪ¸ З‡¯Л ТУ·ТЪ‚ВММ˚В
М‡‰ФЛТЛ.
нкДзлойдДсаь D ZOOM* <ON/OFF>
(ЪУО¸НУ ПУ‰ВО¸ CCD-TRV24E)
•З˚·В ЛЪВ ON ‰Оfl ‚НО˛˜ВМЛfl ˆЛЩ У‚УИ
Ъ ‡МТЩУН‡ˆЛЛ.
•З˚·В ЛЪВ OFF ‰Оfl ‚˚НО˛˜ВМЛfl ˆЛЩ У‚УИ
Ъ ‡МТЩУН‡ˆЛЛ. ЗЛ‰ВУН‡ПВ ‡ ‚В МВЪТfl Н 15Н ‡ЪМУИ Ъ ‡МТЩУН‡ˆЛЛ.
CCD-TRV14E/TRV24E 3-859-266-12(1).E/R
Page 31

Changing the mode settings
аБПВМВМЛВ ВКЛПМ˚ı ЫТЪ‡МУ‚УН
REC LAMP* <ON/OFF>
•Select OFF when you do not want the camera
recording/battery lamp at the front of the unit
to light up.
•Normally select ON.
AUTO DATE* <ON/OFF>
•Select ON to record the date for 10 seconds
after recording has started.
•Select OFF to not record the date.
CLOCK SET*
Reset the date or time.
DEMO MODE* <ON/OFF>
•Select ON to make the demonstration appear.
•Select OFF to make the demonstration not
appear.
* These settings are retained even when the
battery is removed, as long as the lithium
battery is in place.
Notes on DEMO MODE
•DEMO MODE is set to STBY at the factory and
the demonstration starts about 10 minutes after
you set the POWER switch to CAMERA
without inserting a cassette.
Note that you cannot select STBY of DEMO
MODE in the menu system.
•You cannot select DEMO MODE when a
cassette is inserted in the camcorder.
•If you insert a cassette during the
demonstration, the demonstration stops. You
can start recording as usual. DEMO MODE
automatically returns to STBY.
To look at the demonstration at once
Eject the cassette, if inserted. Select ON of
DEMO MODE. Erase the menu display. The
demonstration will begin.
When you turn off the camcorder once, DEMO
MODE automatically returns to STBY.
гДеийудД Сгь бДиала REC LAMP* <ON/
OFF>
•З˚·В ЛЪВ OFF, ВТОЛ З˚ МВ ıУЪЛЪВ, ˜ЪУ·˚
‚˚Т‚В˜Л‚‡О‡Т¸ О‡ПФУ˜Н‡ Б‡ФЛТЛ/·‡Ъ‡ ВЛ
‚Л‰ВУН‡ПВ ˚ Т ФВ В‰МВИ ТЪУ УМ˚
‡ФФ‡‡Ъ‡.
•é·˚˜ÌÓ ‚˚·Ë ‡ÂÚÒfl ON.
ДЗнйеДнауЦлдДь СДнД AUTO DATE*
<ON/OFF>
•З˚·В ЛЪВ ON ‰Оfl Б‡ФЛТЛ ‰‡Ъ˚ ‚ ЪВ˜ВМЛВ
10 ТВНЫМ‰ ФУТОВ М‡˜‡О‡ Б‡ФЛТЛ.
•Ç˚·Â ËÚ OFF, ˜ÚÓ·˚ Ì Á‡ÔËÒ˚‚‡Ú¸ ‰‡ÚÛ.
млнДзйЗдД уДлйЗ CLOCK SET*
мТЪ‡МУ‚ЛЪВ Б‡МУ‚У ‰‡ЪЫ ЛОЛ ‚ ВПfl.
СЦейзлнкДсайззхв кЦЬае DEMO
MODE* <ON/OFF>
•З˚·В ЛЪВ ON, ˜ЪУ·˚ ФУfl‚ОflО‡Т¸
‰ВПУМТЪ ‡ˆЛfl.
•З˚·В ЛЪВ OFF, ˜ЪУ·˚ МВ ФУfl‚ОflО‡Т¸
‰ВПУМТЪ ‡ˆЛfl.
* щЪЛ ЫТЪ‡МУ‚НЛ ТУı ‡Мfl˛ЪТfl ‰‡КВ ФУТОВ
ТМflЪЛfl ·‡Ъ‡ ВИМУ„У ·ОУН‡, ВТОЛ ОЛЪЛВ‚‡fl
·‡Ъ‡ ВИН‡ ·Ы‰ВЪ УТЪ‡‚‡Ъ¸Тfl М‡ ПВТЪВ.
и ЛПВ˜‡МЛfl УЪМУТЛЪВО¸МУ
‰ВПУМТЪ ‡ˆЛУММУ„У ВКЛП‡ DEMO MODE
•з‡ Б‡‚У‰В-ЛБ„УЪУ‚ЛЪВОВ DEMO MODE
ЫТЪ‡МУ‚ОВМ ‚ ФУОУКВМЛВ STBY, Л
‰ВПУМТЪ ‡ˆЛfl М‡˜МВЪТfl Ф ЛПВ МУ ˜В ВБ 10
ПЛМЫЪ ФУТОВ ЫТЪ‡МУ‚НЛ ‚˚НО˛˜‡ЪВОfl
POWER ‚ ФУОУКВМЛВ CAMERA ·ВБ
ЫТЪ‡МУ‚НЛ Н‡ТТВЪ˚.
й· ‡ЪЛЪВ ‚МЛП‡МЛВ, ˜ЪУ З˚ МВ ПУКВЪВ
‚˚· ‡Ъ¸ ЫТЪ‡МУ‚НЫ STBY
‰ВПУМТЪ ‡ˆЛУММУ„У ВКЛП‡ DEMO MODE ‚
ТЛТЪВПВ ПВМ˛.
•З˚ МВ ПУКВЪВ ‚˚· ‡Ъ¸ ‰ВПУМТЪ ‡ˆЛУММ˚И
ÂÊËÏ DEMO MODE, ÂÒÎË ‚ ‚ˉÂÓ͇Ï Û
‚ÒÚ‡‚ÎÂ̇ ͇ÒÒÂÚ‡.
•ЦТОЛ З˚ ‚ТЪ‡‚ЛОЛ Н‡ТТВЪЫ ‚У ‚ ВПfl
‰ВПУМТЪ ‡ˆЛЛ, ЪУ ‰ВПУМТЪ ‡ˆЛfl ·Ы‰ВЪ
УТЪ‡МУ‚ОВМ‡. З˚ ПУКВЪВ М‡˜‡Ъ¸ Б‡ФЛТ¸ Н‡Н
У·˚˜МУ. СВПУМТЪ ‡ˆЛУММ˚И ВКЛП DEMO
MODE ‡‚ЪУП‡ЪЛ˜ВТНЛ ‚В МВЪТfl ‚ STBY.
СОfl МВПВ‰ОВММУ„У Ф УТПУЪ ‡
‰ВПУМТЪ ‡ˆЛЛ
З˚М¸ЪВ Н‡ТТВЪЫ, ВТОЛ УМ‡ ‚ТЪ‡‚ОВМ‡.
З˚·В ЛЪВ ON ‰ВПУМТЪ ‡ˆЛУММУ„У ВКЛП‡
DEMO MODE. 쉇ОЛЪВ ЛМ‰ЛН‡ˆЛЛ ПВМ˛.
з‡˜МВЪТfl ‰ВПУМТЪ ‡ˆЛfl.
ЦТОЛ З˚ ‚˚НО˛˜ЛЪВ ‚Л‰ВУН‡ПВ Ы, ВКЛП
DEMO MODE ‡‚ЪУП‡ЪЛ˜ВТНЛ ‚В МВЪТfl ‚
ФУОУКВМЛВ STBY.
Advanced operations ìÒÓ‚Â ¯ÂÌÒÚ‚Ó‚‡ÌÌ˚ ÓÔ ‡ˆËË
CCD-TRV14E/TRV24E 3-859-266-12(1).E/R
31
Page 32

Recording with the
date or time
б‡ФЛТ¸ Т ‰‡ЪУИ ЛОЛ
‚ ВПВМВП
Before you start recording or during recording,
press DATE or TIME inside the LCD panel. You
can record the date or time displayed on the
LCD screen or in the viewfinder with the
picture. You cannot record the date and time at
the same time. Except for the date or time
indicator, no indicator is recorded.
The clock is set at the factory to Sydney time for
Australia and New Zealand models, to Tokyo
time for the models sold in Japan and to Hong
Kong time for other models. You can reset the
clock in the menu system.
иepe‰ ЪВП, Н‡Н М‡˜‡Ъ¸ Б‡ФЛТ¸ ЛОЛ ‚У ‚ ВПfl
Б‡ФЛТЛ М‡КПЛЪВ НМУФНЫ DATE ЛОЛ TIME ФУ‰
Ф‡МВО¸˛ ЬдС. З˚ ПУКВЪВ Б‡ФЛТ‡Ъ¸ ‰‡ЪЫ
ЛОЛ ‚ ВПfl, УЪУ· ‡К‡ВП˚В М‡ ˝Н ‡МВ ЬдС
ЛОЛ ‚ ‚Л‰УЛТН‡ЪВОВ, ‚ПВТЪВ Т
ЛБУ· ‡КВМЛВП. З˚ МВ ПУКВЪВ Б‡ФЛТ˚‚‡Ъ¸
‰‡ЪЫ Л ‚ ВПfl У‰МУ‚ ВПВММУ. д УПВ
ЛМ‰ЛН‡ЪУ ‡ ‰‡Ъ˚ ЛОЛ ‚ ВПВМЛ, МЛН‡НУИ
‰ Ы„УИ ЛМ‰ЛН‡ЪУ Б‡ФЛТ˚‚‡Ъ¸Тfl МВ ·Ы‰ВЪ.
у‡Т˚ ЫТЪ‡МУ‚ОВМ˚ М‡ Б‡‚У‰В М‡ ‚ ВПfl
лЛ‰МВfl ‰Оfl ‡‚ТЪ ‡ОЛИТНУИ Л
МУ‚УБВО‡М‰ТНУИ ПУ‰ВОВИ, М‡ ‚ ВПfl нУНЛУ
‰Оfl ПУ‰ВОВИ, Ф У‰‡‚‡ВП˚ı ‚ ьФУМЛЛ Л М‡
‚ ВПfl ЙУМНУМ„‡ ‰Оfl УТЪ‡О¸М˚ı ПУ‰ВОВИ. З˚
ПУКВЪВ ‚˚ФУОМЛЪ¸ ФУ‚ЪУ МЫ˛ ЫТЪ‡МУ‚НЫ
˜‡ТУ‚ ‚ ТЛТЪВПВ ПВМ˛.
DATE
TIME
REC
0:07:12
ı
4 7 1997
REC
0:07:12
ı
17:30:00
To stop recording with the date or
time
Press DATE or TIME again. The date or time
indicator disappears. The recording continues.
Note
You cannot superimpose a title during
recording the date or time.
32
СОfl УТЪ‡МУ‚НЛ Б‡ФЛТЛ Т ‰‡ЪУИ ЛОЛ
‚ ВПВМВП
з‡КПЛЪВ DATE ЛОЛ TIME ТМУ‚‡. аМ‰ЛН‡ЪУ
‰‡Ъ˚ ЛОЛ ‚ ВПВМЛ ЛТ˜ВБМВЪ. б‡ФЛТ¸
ФУ‰УОКЛЪТfl.
è ËϘ‡ÌËÂ
З˚ МВ ПУКВЪВ М‡ОУКЛЪ¸ М‡‰ФЛТ¸ ‚У ‚ ВПfl
Б‡ФЛТЛ ‰‡Ъ˚ ЛОЛ ‚ ВПВМЛ.
CCD-TRV14E/TRV24E 3-859-266-12(1).E/R
Page 33

Selecting the
START/STOP mode
Ç˚·Ó ÂÊËχ
START/STOP
Your camcorder has two modes besides normal
start/stop mode. These modes enable you to
take a series of quick shots resulting in a lively
video.
(1) While pressing PUSH OPEN, open the LCD
panel.
(2) Set START/STOP MODE to the desired
mode.
: Recording starts when you press START/
STOP, and stops when you press it again
(normal mode).
(ANTI GROUND SHOOTING): The
camcorder records only while you press
down START/STOP so that you can avoid
recording unnecessary scenes.
5SEC : When you press START/STOP, the
camcorder records for 5 seconds and then
stops automatically.
(3) Turn STANDBY up and press START/
STOP. Recording starts.
If you selected 5SEC, five dots appear in the
viewfinder. The dots disappear at a rate of one
per second as illustrated below.
д УПВ У·˚˜МУ„У ВКЛП‡ ФЫТН‡/УТЪ‡МУ‚НЛ ‚
‚Л‰ВУН‡ПВ В ЛПВ˛ЪТfl ‰‚‡ ‰ Ы„Лı ВКЛП‡.
щЪЛ ВКЛП˚ ФУБ‚УОfl˛Ъ З‡П ‚˚ФУОМЛЪ¸
ТВ Л˛ Т˙ВПУН Л ТУБ‰‡Ъ¸ УКЛ‚ОВММ˚И
‚Л‰ВУТ˛КВЪ.
(1) ç‡ÊËχfl PUSH OPEN, ÓÚÍ ÓÈÚ ԇÌÂθ
ÜäÑ.
(2) ìÒÚ‡ÌÓ‚ËÚ START/STOP MODE ̇
Ê·ÂÏ˚È ÂÊËÏ.
: á‡ÔËÒ¸ ̇˜Ë̇ÂÚÒfl, ÍÓ„‰‡ Ç˚
М‡КЛП‡ВЪВ НМУФНЫ START/STOP Л
УТЪ‡М‡‚ОЛ‚‡ВЪТfl, НУ„‰‡ З˚
М‡КЛП‡ВЪВ ВВ ТМУ‚‡ (У·˚˜М˚И
ÂÊËÏ).
(ANTI GROUND SHOOTING):
ЗЛ‰ВУН‡ПВ ‡ Ф УЛБ‚У‰ЛЪ Б‡ФЛТ¸
ЪУО¸НУ, НУ„‰‡ З˚ ‰В КЛЪВ START/
STOP ‚ М‡К‡ЪУП ТУТЪУflМЛЛ, ˜ЪУ
ФУБ‚УОflВЪ З‡П ЛБ·ВК‡Ъ¸ Б‡ФЛТЛ
МВМЫКМ˚ı ТˆВМ.
5SEC: è Ë Ì‡Ê‡ÚËË START/STOP
‚Л‰ВУН‡ПВ ‡ ФУЛБ‚У‰ЛЪ Б‡ФЛТ¸ ‚
ЪВ˜ВМЛВ 5 ТВНЫМ‰, ‡ Б‡ЪВП
УТЪ‡М‡‚ОЛ‚‡ВЪТfl ‡‚ЪУП‡ЪЛ˜ВТНЛ.
(3) иУ‚В МЛЪВ STANDBY ‚‚В ı Л М‡КПЛЪВ
START/STOP.
ЦТОЛ З˚ ‚˚· ‡ОЛ ФУБЛˆЛ˛ 5SEC, ‚
‚Л‰УЛТН‡ЪВОВ ФУfl‚flЪТfl ФflЪ¸ ЪУ˜ВН. щЪЛ
ЪУ˜НЛ ·Ы‰ЫЪ ЛТ˜ВБ‡Ъ¸ ФУ У‰МУИ Б‡ ТВНЫМ‰Ы,
Н‡Н ФУН‡Б‡МУ М‡ ЛТЫМНВ.
Advanced operations ìÒÓ‚Â ¯ÂÌÒÚ‚Ó‚‡ÌÌ˚ ÓÔ ‡ˆËË
START/STOP MODE
2
ANTI
5
SEC
GROUND
SHOOTING
1
To extend the recording time in
5SEC mode
Press START/STOP again before all the dots
disappear. Recording continues for about 5
seconds from the moment you press START/
STOP.
Note on 5SEC recording
If you have turned off the indicators on the LCD
screen, the dots do not appear .
3
O
L
S
T
A
N
D
STBY
0:07:12
K
C
B
Y
S
T
REC
0:07:12
K
C
O
L
A
N
D
B
Y
СОfl Ф У‰ОВМЛfl ‚ ВПВМЛ Б‡ФЛТЛ ‚
ВКЛПВ Б‡ФЛТЛ 5SEC
лМУ‚‡ М‡КПЛЪВ START/STOP ФВ В‰ ЪВП, Н‡Н
‚ТВ ЪУ˜НЛ ЛТ˜ВБМЫЪ. б‡ФЛТ¸ Ф У‰УОКЛЪТfl
В˘В УНУОУ 5 ТВНЫМ‰ УЪ ПУПВМЪ‡ М‡К‡МЛfl
START/STOP.
и ЛПВ˜‡МЛВ Н Б‡ФЛТЛ ‚ ВКЛПВ 5SEC
ЦТОЛ З˚ ‚˚НО˛˜ЛЪВ ЛМ‰ЛН‡ЪУ ˚ М‡ ˝Н ‡МВ
ЬдС, ЪУ˜НЛ ФУfl‚ОflЪ¸Тfl МВ ·Ы‰ЫЪ.
CCD-TRV14E/TRV24E 3-859-266-12(1).E/R
REC
0:07:16
33
Page 34

Fade-in and fade-out
ǂ‰ÂÌËÂ Ë ‚˚‚‰ÂÌËÂ
ËÁÓ· ‡ÊÂÌËfl
You can fade in or out to give your recording a
professional appearance.
When fading in, the picture gradually fades in
from black while the sound increases.
When fading out, the picture gradually fades to
black while the sound decreases.
When fading in [a]
(1) While the camcorder is in Standby mode,
press FADER. The FADER indicator starts
flashing.
(2) Press START/STOP to start recording. The
FADER indicator stops flashing.
When fading out [b]
(1) During recording, press FADER. The
FADER indicator starts flashing.
(2) Press START/STOP to stop recording. The
FADER indicator stops flashing, and then
recording stops.
[a]
З˚ ПУКВЪВ ‚‚У‰ЛЪ¸ ЛОЛ ‚˚‚У‰ЛЪ¸
ЛБУ· ‡КВМЛВ, ˜ЪУ Ф Л‰‡ТЪ З‡¯ВИ Б‡ФЛТЛ
Ф УЩВТТЛУМ‡О¸М˚И ‚Л‰.
и Л ‚‚В‰ВМЛЛ ЛБУ· ‡КВМЛВ ФУТЪВФВММУ
ФУfl‚ОflВЪТfl ЛБ ˜В МУ„У ˝Н ‡М‡, ‡ Б‚ЫН
ЫТЛОЛ‚‡ВЪТfl.
и Л ‚˚‚В‰ВМЛЛ ЛБУ· ‡КВМЛВ ФУТЪВФВММУ
ЛТ˜ВБ‡ВЪ Л ФВ ВıУ‰ЛЪ ‚ ˜ВМ˚И ˝Н ‡М, ‡ Б‚ЫН
Б‡ЪЛı‡ВЪ.
è Ë ‚‚‰ÂÌËË ËÁÓ· ‡ÊÂÌËfl [a]
(1) Ç ÚÓ ‚ ÂÏfl, ÍÓ„‰‡ ‚ˉÂÓ͇Ï ‡
М‡ıУ‰ЛЪТfl ‚ ВКЛПВ „УЪУ‚МУТЪЛ, М‡КПЛЪВ
НМУФНЫ FADER. аМ‰ЛН‡ЪУ FADER
М‡˜МВЪ ПЛ„‡Ъ¸.
(2) з‡КПЛЪВ НМУФНЫ START/STOP ‰Оfl
̇˜‡Î‡ Á‡ÔËÒË. à̉Ë͇ÚÓ FADER
Ô ÂÍ ‡ÚËÚ ÏË„‡Ú¸.
è Ë ‚˚‚‰ÂÌËË ËÁÓ· ‡ÊÂÌËfl [b]
(1) з‡КПЛЪВ ‚У ‚ ВПfl Б‡ФЛТЛ НМУФНЫ FADER.
à̉Ë͇ÚÓ FADER ̇˜ÌÂÚ ÏË„‡Ú¸.
(2) з‡КПЛЪВ НМУФНЫ START/STOP ‰Оfl
УТЪ‡МУ‚НЛ Б‡ФЛТЛ. аМ‰ЛН‡ЪУ FADER
Ф ВН ‡ЪЛЪ ПЛ„‡Ъ¸, ФУТОВ ˜В„У М‡˜МВЪТfl
Б‡ФЛТ¸.
RECSTBY
34
FADER
FADER
RECSTBY
CCD-TRV14E/TRV24E 3-859-266-12(1).E/R
[b]
21
K
C
O
L
S
T
A
N
D
B
Y
Page 35

Fade-in and fade-out
ǂ‰ÂÌËÂ Ë ‚˚‚‰ÂÌËÂ
ËÁÓ· ‡ÊÂÌËfl
To cancel the fade-in/fade-out
function
Before pressing START/STOP, press FADER to
turn off the FADER indicator.
When the date/time or title is displayed
The date/time or title does not fade in or fade
out.
When the START/STOP MODE switch is set
to or 5SEC
You cannot use the fade-in/fade-out function.
СОfl УЪПВМ˚ ЩЫМНˆЛЛ ‚‚В‰ВМЛfl/
‚˚‚В‰ВМЛfl ЛБУ· ‡КВМЛfl
иВ В‰ ЪВП, Н‡Н М‡К‡Ъ¸ НМУФНЫ START/STOP,
М‡КПЛЪВ НМУФНЫ FADER, ˜ЪУ·˚ ‚˚НО˛˜ЛЪ¸
ЛМ‰ЛН‡ЪУ FADER.
З ТОЫ˜‡В УЪУ· ‡КВМЛfl М‡ ‰ЛТФОВВ
‰‡Ъ˚/‚ ВПВМЛ
С‡Ъ‡/‚ ВПfl ЛОЛ М‡‰ФЛТ¸ МВ ‚‚У‰flЪТfl Л МВ
‚˚‚У‰flЪТfl М‡ ЛБУ· ‡КВМЛЛ.
ЦТОЛ ФВ ВНО˛˜‡ЪВО¸ START/STOP MODE
ЫТЪ‡МУ‚ОВМ ‚ ФУОУКВМЛВ ЛОЛ 5SEC
З˚ МВ ПУКВЪВ ЛТФУО¸БУ‚‡Ъ¸ ЩЫМНˆЛ˛
‚‚В‰ВМЛfl/‚˚‚В‰ВМЛfl ЛБУ· ‡КВМЛfl.
Advanced operations ìÒÓ‚Â ¯ÂÌÒÚ‚Ó‚‡ÌÌ˚ ÓÔ ‡ˆËË
CCD-TRV14E/TRV24E 3-859-266-12(1).E/R
35
Page 36

Enjoying picture
effect
аТФУО¸БУ‚‡МЛВ ˝ЩЩВНЪУ‚
ЛБУ· ‡КВМЛfl
Selecting picture effect
You can make pictures like those of television
with the Picture Effect function.
[a] [c]
MOSAIC [a]
The picture is mosaic.
SOLARIZE [b]
The light intensity is more clear, and the picture
looks like a painting.
B&W
The picture is monochrome (black and white).
SEPIA
The picture is sepia.
NEG. ART [c]
The colour of the picture is reversed.
[b]
л ФУПУ˘¸˛ ЩЫМНˆЛЛ ˝ЩЩВНЪ‡
З˚ ПУКВЪВ ТУБ‰‡‚‡Ъ¸ ЛБУ· ‡КВМЛfl Н‡Н М‡
ЪВОВ‚Л‰ВМЛЛ.
ейбДадД [a]
аБo· ‡КВМЛВ Ф В‰ТЪ‡‚ОflВЪТfl ‚ ‚Л‰В
ПУБ‡ЛНЛ.
лйгькабДсаь [b]
мТЛОЛ‚‡ВЪТfl fl НУТЪ¸ Т‚ВЪ‡ Л ЛБУ· ‡КВМЛВ
‚˚„Оfl‰ЛЪ ФУ‰У·МУ ıЫ‰УКВТЪ‚ВММУИ Н‡ ЪЛМВ.
уЦкзй-ЕЦгйЦ абйЕкДЬЦзаЦ
аБУ· ‡КВМЛВ ТЪ‡МУ‚ЛЪТfl
ПУМУı УП‡ЪЛ˜ВТНЛП (˜В МУ-·ВО˚П).
лЦиаь
аБУ· ‡КВМЛВ Ф ВУ· ‡БЫВЪТfl ‚ ˆ‚ВЪ ТВФЛЛ.
зЦЙДнаЗзйЦ алдмллнЗй [c]
аБУ· ‡КВМЛВ Ф В‰ТЪ‡‚ОflВЪfl ‚ МВ„‡ЪЛ‚МУП
ˆ‚ВЪВ.
36
CCD-TRV14E/TRV24E 3-859-266-12(1).E/R
Page 37

Enjoying picture effect
аТФУО¸БУ‚‡МЛВ ˝ЩЩВНЪУ‚
ЛБУ· ‡КВМЛfl
Using picture effect function
(1) While pressing PUSH OPEN, open the LCD
panel.
(2) While the camcorder is in Standby mode,
press PICTURE EFFECT to select the desired
Picture Effect mode.
1
д‡Н ФУО¸БУ‚‡Ъ¸Тfl ЩЫМНˆЛВИ
˝ЩЩВНЪУ‚ ЛБУ· ‡КВМЛfl
(1) СВ К‡ М‡К‡ЪУИ НМУФНЫ PUSH OPEN,
ÓÚÍ ÓÈÚ ԇÌÂθ ÜäÑ.
(2) Ç ÚÓ ‚ÂÏfl, Í‡Í ‚ˉÂÓ͇Ï ‡ ̇ıÓ‰ËÚÒfl
‚ ВКЛПВ „УЪУ‚МУТЪЛ, М‡КПЛЪВ НМУФНЫ
PICTURE EFFECT ‰Оfl ‚˚·У ‡
КВО‡ВПУ„У ВКЛП‡ ˝ЩЩВНЪУ‚
ЛБУ· ‡КВМЛfl.
PICTURE EFFECT
2
MOSAIC
SOLARIZE
B & W
SEPIA
NEG.ART
Advanced operations ìÒÓ‚Â ¯ÂÌÒÚ‚Ó‚‡ÌÌ˚ ÓÔ ‡ˆËË
Returning to normal mode
Press PICTURE EFFECT until the Picture Effect
indicator disappears.
Note on the picture effect
When you turn the power off, the camcorder
returns automatically to normal mode.
ЗУБ‚ ‡Ъ Н МУ П‡О¸МУПЫ ВКЛПЫ
з‡КЛП‡ИЪВ НМУФНЫ PICTURE EFFECT ‰У ЪВı
ФУ , ФУН‡ ЛМ‰ЛН‡ЪУ ˝ЩЩВНЪУ‚
ЛБУ· ‡КВМЛfl МВ ЛТ˜ВБМВЪ.
и ЛПВ˜‡МЛВ УЪМУТЛЪВО¸МУ ˝ЩЩВНЪУ‚
ЛБУ· ‡КВМЛfl
ЦТОЛ З˚ ‚˚НО˛˜ЛЪВ ФЛЪ‡МЛВ, ‚Л‰ВУН‡ПВ ‡
‡‚ЪУП‡ЪЛВТНЛ ‚В МВЪТfl Н МУ П‡О¸МУПЫ
ВКЛПЫ.
37
CCD-TRV14E/TRV24E 3-859-266-12(1).E/R
Page 38

Using the wide mode
function
аТФУО¸БУ‚‡МЛВ ЩЫМНˆЛЛ
¯Л УНУЩУ П‡ЪМУ„У ВКЛП‡
– CCD-TRV24E only
Selecting the desired mode
You can record a cinemalike picture (CINEMA)
or a 16:9 wide picture to watch on the 16:9 widescreen TV (16:9FULL).
CINEMA
[b]
CINEMA
[a]
[c]
16:9FULL
[e]
16:9FULL
[d]
[f]
CINEMA
Black bands appear at the top and the bottom of
the screen. The viewfinder or the LCD screen
[a] and a normal TV screen [b] look wide. You
can also watch the picture without black bands
on a wide-screen TV [c].
16:9FULL
The picture in the viewfinder or on the LCD
screen [d] or on a normal TV [e] is horizontally
compressed. You can watch the picture of
normal images on a wide-screen TV [f].
– íÓθÍÓ CCD-TRV24E
Ç˚·Ó Ê·ÂÏÓ„Ó ÂÊËχ
З˚ ПУКВЪВ Б‡ФЛТ˚‚‡Ъ¸ ЛБУ· ‡КВМЛВ
ФУ‰У·МУ НЛМУЩЛО¸П‡П (CINEMA) ЛОЛ
¯Л УНУЩУ П‡ЪМУВ ЛБУ· ‡КВМЛВ ЩУ П‡Ъ‡
16:9 ‰Оfl Ф УТПУЪ ‡ М‡ ¯Л УНУ˝Н ‡ММУП
ЪВОВ‚ЛБУ В Т ‡БПВ УП НЛМВТНУФ‡ 16:9
(16:9FULL).
CINEMA (кЦЬае дазй)
З‚В ıЫ Л ‚МЛБЫ ˝Н ‡М‡ ФУfl‚flЪТfl ˜ВМ˚В
ФУОУТ˚. ЗЛ‰УЛТН‡ЪВО¸ ЛОЛ ˝Н ‡М ЬдС [a] Л
МУ П‡О¸М˚И ЪВОВ‚ЛБЛУММ˚И ˝Н ‡М [b] ·Ы‰ЫЪ
ЛПВЪ¸ ¯Л УНУЩУ П‡ЪМ˚И ‚Л‰. З˚ Ъ‡НКВ
ПУКВЪВ М‡·О˛‰‡Ъ¸ ЛБУ· ‡КВМЛВ ·ВБ
˜В М˚ı ФУОУТ М‡ ¯Л УНУЩУ П‡ЪМУП
ЪВОВ‚ЛБУ В [c].
16:9FULL (такйдйойкеДнзхв
кЦЬае 16:9)
аБУ· ‡КВМЛВ ‚ ‚Л‰УЛТН‡ЪВОВ ЛОЛ М‡ ˝Н ‡МВ
ЬдС [d], ‡ Ъ‡НКВ М‡ ˝Н ‡МВ МУ П‡О¸МУ„У
ЪВОВ‚ЛБУ ‡ [e] ·Ы‰ВЪ ТК‡ЪУ ФУ „УЛБУМЪ‡ОЛ.
З˚ Ъ‡НКВ ПУКВЪВ М‡·О˛‰‡Ъ¸ ЛБУ· ‡КВМЛВ
‚ МУ П‡О¸МУП ‚Л‰В М‡ ¯Л УНУ˝Н ‡ММУП
ЪВОВ‚ЛБУ В [f].
38
CCD-TRV14E/TRV24E 3-859-266-12(1).E/R
Page 39

Using the wide mode function
аТФУО¸БУ‚‡МЛВ ЩЫМНˆЛЛ
¯Л УНУЩУ П‡ЪМУ„У ВКЛП‡
Using the wide mode function
(1) While pressing PUSH OPEN, open the LCD
panel.
(2) While the camcorder is in Standby mode,
press WIDE repeatedly so that the desired
mode indicator appears.
1
To cancel wide mode
Press WIDE repeatedly until the wide mode
indicator disappears.
To watch the tape recorded in wide
mode
To watch the tape recorded in CINEMA mode,
set the screen mode of the wide-screen TV to
zoom mode. To watch the tape recorded in
16:9FULL mode, set it to full mode. For details,
refer to the instruction manual of your TV.
Note that the picture recorded in 16:9FULL
mode looks compressed on a normal TV.
Notes on wide mode
• You cannot cancel the wide mode during
recording.
• If wide mode is set to 16:9FULL, the SteadyShot
function does not work and the indicator
flashes.
• When you record in 16:9FULL mode, the date
or time indicator will be widened on the widescreen TV.
• If you dub a tape, the tape is copied in the same
mode as the original recording.
• The wide mode is cancelled automatically 5
minutes after you remove the power source.
аТФУО¸БУ‚‡МЛВ ЩЫМНˆЛЛ
¯Л УНУЩУ П‡ЪМУ„У ВКЛП‡
(1) СВ К‡ М‡К‡ЪУИ НМУФНЫ PUSH OPEN,
ÓÚÍ ÓÈÚ ԇÌÂθ ÜäÑ.
(2) Ç ÚÓ ‚ÂÏfl, Í‡Í ‚ˉÂÓ͇Ï ‡ ̇ıÓ‰ËÚÒfl ‚
ВКЛПВ „УЪУ‚МУТЪЛ, М‡КЛП‡ИЪВ ФУ‚ЪУ МУ
НМУФНЫ WIDE, ЪaН, ˜ЪУ·˚ ФУfl‚ЛОТfl
ЛМ‰ЛН‡ЪУ КВО‡ВПУ„У ВКЛП‡.
2
WIDE
СОfl УЪПВМ˚ ¯Л УНУЩУ П‡ЪМУ„У
ÂÊËχ
з‡КЛП‡ИЪВ ФУ‚ЪУ МУ НМУФНЫ WIDE, ФУН‡
ЛМ‰ЛН‡ЪУ ¯Л УНУЩУ П‡ЪМУ„У ВКЛП‡ МВ
ЛТ˜ВБМВЪ.
СОfl Ф УТПУЪ ‡ Б‡ФЛТЛ ОВМЪ˚ ‚
¯Л УНУЩУ П‡ЪМУП ВКЛПВ
СОfl Ф УТПУЪ ‡ Б‡ФЛТЛ ‚ ВКЛПВ CINEMA
ЫТЪ‡МУ‚ЛЪВ ˝Н ‡ММ˚И ВКЛП
¯Л УНУ˝Н ‡ММУ„У ЪВОВ‚ЛБУ ‡ ‚ ВКЛП
П‡Т¯Ъ‡·Л У‚‡МЛfl. СОfl Ф УТПУЪ ‡ Б‡ФЛТЛ
ОВМЪ˚ ‚ ВКЛПВ16:9FULL ЫТЪ‡МУ‚ЛЪВ
ЪВОВ‚ЛБУ ‚ ФУОМУЩУ П‡ЪМ˚И ВКЛП. уЪУ
Н‡Т‡ВЪТfl ФУ‰ У·МУТЪВИ, У· ‡ЪЛЪВТ¸ Н
ЫНУ‚У‰ТЪ‚Ы ФУ ˝НТФОЫ‡Ъ‡ˆЛЛ З‡¯В„У
ЪВОВ‚ЛБУ ‡. иУПМЛЪВ, ˜ЪУ ЛБУ· ‡КВМЛВ,
Б‡ФЛТ‡ММУВ ‚ ВКЛПВ 16:9FULL, М‡
МУ П‡О¸МУП ЪВОВ‚ЛБУ В ·Ы‰ВЪ ТК‡Ъ˚П.
и ЛПВ˜‡МЛfl УЪМУТЛЪВО¸МУ
¯Л УНУЩУ П‡ЪМУ„У ВКЛП‡
• ЗУ ‚ ВПfl Б‡ФЛТЛ З˚ МВ ПУКВЪВ УЪПВМЛЪ¸
¯Л УНУЩУ П‡ЪМ˚И ВКЛП.
• ЦТОЛ ¯Л УНУЩУ П‡ЪМ˚И ВКЛП ЫТЪ‡МУ‚ОВМ
‚ ФУОУКВМЛВ16:9FULL, ЩЫМНˆЛfl
ТЪ‡·ЛОЛБ‡ˆЛЛ ЛБУ· ‡КВМЛfl SteadyShot МВ
·Û‰ÂÚ ‡·ÓÚ‡Ú¸, ‡ Ë̉Ë͇ÚÓ ·Û‰ÂÚ
ÏË„‡Ú¸.
• и Л ‚˚ФУОМВМЛЛ Б‡ФЛТЛ ‚ ВКЛПВ16:9FULL
ЛМ‰ЛН‡ˆЛfl ‰‡Ъ˚ ЛОЛ ‚ ВПВМЛ ·Ы‰ВЪ
‡Т¯Л ВММУИ М‡ ¯Л УНУ˝Н ‡ММУП
ÚÂ΂ËÁÓ Â.
• З ТОЫ˜‡В ‚˚ФУОМВМЛfl ‰Ы·ОЛ У‚‡МЛfl ОВМЪ‡
·Ы‰ВЪ НУФЛ У‚‡Ъ¸Тfl ‚ ЪУП КВ ВКЛПВ, ˜ЪУ Л
У Л„ЛМ‡О¸М‡fl Б‡ФЛТ¸.
• уВ ВБ 5 ПЛМЫЪ ФУТОВ УЪТУВ‰ЛМВМЛfl
ËÒÚÓ˜ÌË͇ ÔËÚ‡ÌËfl ¯Ë ÓÍÓ˝Í ‡ÌÌ˚È ÂÊËÏ
·Ы‰ВЪ ‡ММЫОЛ У‚‡М ‡‚ЪУП‡ЪЛ˜ВТНЛ.
CINEMA
16:9FULL
Advanced operations ìÒÓ‚Â ¯ÂÌÒÚ‚Ó‚‡ÌÌ˚ ÓÔ ‡ˆËË
39
CCD-TRV14E/TRV24E 3-859-266-12(1).E/R
Page 40

Focusing manually
оУНЫТЛ У‚Н‡
‚ Ы˜МЫ˛
When to use manual focus
In the following cases you should obtain better
results by adjusting the focus manually.
дУ„‰‡ ТОВ‰ЫВЪ ЛТФУО¸БУ‚‡Ъ¸
Ы˜МЫ˛ ЩУНЫТЛ У‚НЫ
З ТОВ‰Ы˛˘Лı ТОЫ˜‡flı З˚ ПУКВЪВ ФУОЫ˜ЛЪ¸
ОЫ˜¯ЛВ ВБЫО¸Ъ‡Ъ˚, ‚˚ФУОМflfl В„ЫОЛ У‚НЫ
‚ Ы˜МЫ˛.
[a] [b] [c] [d]
•Insufficient light [a]
•Subjects with little contrast — walls, sky, etc.
[b]
•Too much brightness behind the subject [c]
•Horizontal stripes [d]
•Subjects through frosted glass
•Subjects beyond nets, etc.
•Bright subject or subject reflecting light
•Shooting a stationary subject when using a
tripod
•ç‰ÓÒÚ‡ÚÓ˜ÌÓ ÓÒ‚Â˘ÂÌË [a]
•й·˙ВНЪ˚ Т МЛБНУИ НУМЪ ‡ТЪМУТЪ¸˛ –
ÒÚÂÌ˚, ÌÂ·Ó Ë Ú. Ô. [b]
•лОЛ¯НУП fl НЛИ ЩУМ Б‡ У·˙ВНЪУП ‰Оfl
Т˙ВПНЛ [c]
•ЙУ ЛБУМЪ‡О¸М˚В ФУОУТ˚ [d]
•é·˙ÂÍÚ˚, ̇·Î˛‰‡ÂÏ˚ ˜Â ÂÁ χÚÓ‚ÓÂ
ТЪВНОУ
•й·˙ВНЪ˚, М‡ıУ‰fl˘ЛВТfl Б‡ ТВЪНУИ Л Ъ.Ф.
•ü ÍËÈ Ó·˙ÂÍÚ ËÎË Ô Â‰ÏÂÚ, ÓÚ ‡Ê‡˛˘ËÈ
Ò‚ÂÚ
•л˙ВПН‡ МВФУ‰‚ЛКМУ„У У·˙ВНЪ‡ Т
ЛТФУО¸БУ‚‡МЛВП Ъ ВМУ„Л
40
CCD-TRV14E/TRV24E 3-859-266-12(1).E/R
Page 41

Focusing manually
оУНЫТЛ У‚Н‡ ‚ Ы˜МЫ˛
Focusing manually
When focusing manually, first focus in
telephoto before recording, and then reset the
shot length.
(1) Set FOCUS to MANUAL. The f indicator
appears.
(2) Turn the focus dial to focus on the subject.
Turn to the NEAR side to focus on a nearer
object.
Turn to the FAR side to focus on a farther
object.
1
FOCUS
AUTO
MANUAL
To return to the autofocus mode
Set FOCUS to AUTO. The f indicator goes
out.
Shooting in relatively dark places
Shoot at wide-angle after focusing in the
telephoto position.
оУНЫТЛ У‚Н‡ ‚ Ы˜МЫ˛
и Л ЩУНЫТЛ У‚НВ ‚ Ы˜МЫ˛ ТМ‡˜‡О‡
‚˚ФУОМЛЪВ ЩУНЫТЛ У‚НЫ ‚ ФУОУКВМЛЛ
ЪВОВЩУЪУ ФВ ‰ Б‡ФЛТ¸˛, ‡ ФУЪУП ‚˚ФУОМЛЪВ
ФУ‚ЪУ МЫ˛ ЫТЪ‡МУ‚НЫ У·ВНЪЛ‚‡ ‰Оfl Т˙ВПНЛ.
(1) мТЪ‡МУ‚ЛЪВ FOCUS ‚ ФУОУКВМЛВ
MANUAL. èÓfl‚ËÚÒfl Ë̉Ë͇ÚÓ f.
(2) иУ‚В МЛЪВ ЩУНЫТЛ Ы˛˘ЛИ ‰ЛТН ‰Оfl
ЩУНЫТЛ У‚НЛ М‡ У·˙ВНЪ.
иУ‚В МЛЪВ В„У ‚ ТЪУ УМЫ NEAR ‰Оfl
ЩУНЫТЛ У‚НЛ М‡ ·УОВВ ·ОЛБНЛИ У·˙ВНЪ.
иУ‚В МЛЪВ В„У ‚ ТЪУ УМЫ FAR ‰Оfl
ЩУНЫТЛ У‚НЛ М‡ ·УОВВ ‰‡О¸МЛИ У·˙ВНЪ.
2
NEAR
FAR
СОfl ‚УБ‚ ‡˘ВМЛfl ‚ ВКЛП
‡‚ЪУП‡ЪЛ˜ВТНУИ ЩУНЫТЛ У‚НЛ
мТЪ‡МУ‚ЛЪВ FOCUS ‚ ФУОУКВМЛВ AUTO.
аМ‰ЛН‡ЪУ f ЛТ˜ВБМВЪ.
л˙ВПН‡ ‚ УЪМУТЛЪВО¸МУ ЪВПМ˚ı ПВТЪ‡ı
З˚ФУОМflИЪВ Т˙ВПНЫ ‚ ¯Л УНУЫ„УО¸МУП
‡ТФВНЪВ ФУТОВ ЪУ„У, Н‡Н ‚˚ФУОМЛЪВ
ЩУНЫТЛ У‚НЫ ‚ ФУОУКВМЛЛ ЪВОВЩУЪУ.
Advanced operations ìÒÓ‚Â ¯ÂÌÒÚ‚Ó‚‡ÌÌ˚ ÓÔ ‡ˆËË
CCD-TRV14E/TRV24E 3-859-266-12(1).E/R
41
Page 42

Using the PROGRAM
AE function
аТФУО¸БУ‚‡МЛВ
ЩЫМНˆЛЛ PROGRAM AE
You can select from three PROGRAM AE (Auto
Exposure) modes to suit your shooting
situation. When you use PROGRAM AE, you
can capture high-speed action or night views.
Selecting the best mode
Select the best mode by using the following
examples.
å
A
å Sports mode
•Outdoor sports scenes such as football, tennis,
golf or skiing
•A landscape in a moving car
A High-speed shutter mode
•A golf swing or a tennis match in fine weather
with the ball captured clearly
•Playing back certain scenes with high-speed
movements in clear, sharp picture
Å Twilight mode
•Recording night views, neon signs or fireworks
З˚ ПУКВЪВ ‚˚· ‡Ъ¸ У‰ЛМ ЛБ Ъ Вı ВКЛПУ‚
PROGRAM AE (‡‚ЪУП‡ЪЛ˜ВТНУИ Т˙ВПНЛ) ‚
ТУУЪ‚ВЪТЪ‚ЛЛ Т З‡¯ВИ ТЛЪЫ‡ˆЛВИ. ЦТОЛ З˚
ЛТФУО¸БЫВЪВ PROGRAM AE, З˚ ПУКВЪВ
Б‡ФВ˜‡ЪОВЪ¸ ‚˚ТУНУТНУ УТЪМУВ ‰ВИТЪ‚ЛВ
ЛОЛ МУ˜М˚В ‚Л‰˚.
Ç˚·Ó ̇ËÎÛ˜¯Â„Ó ÂÊËχ
З˚·В ЛЪВ М‡ЛОЫ˜¯ЛИ ВКЛП, ЛТФУО¸БЫfl
ТОВ‰Ы˛˘ЛВ Ф ЛПВ ˚.
Å
å кВКЛП ТФУ Ъ‡
• лФУ ЪЛ‚М˚В ТˆВМ˚ ‚МВ ФУПВ˘ВМЛfl,
М‡Ф ЛПВ , ЩЫЪ·УО, ЪВММЛТ, „УО¸Щ ЛОЛ
О˚КЛ
• ã‡Ì‰¯‡ÙÚ ËÁ ‰‚ËÊÛ˘Â„ÓÒfl ‡‚ÚÓÏÓ·ËÎfl
A кВКЛП ‚˚ТУНУТНУ УТЪМУ„У
Á‡Ú‚Ó ‡
• ЗБП‡ıЛ ‚У ‚ ВПfl Л„ ˚ ‚ „УО¸Щ ЛОЛ ЪВММЛТ
‚ ıУ У¯Ы˛ ФУ„У‰Ы Т ˜ВЪНЛП Б‡ФВ˜‡ЪОВМЛВП
Пfl˜‡
• ЗУТФ УЛБ‚В‰ВМЛВ УФ В‰ВОВММ˚ı ТˆВМ Т
‚˚ТУНУТНУ УТЪМ˚ПЛ ‰‚ЛКВМЛflПЛ Т
˜ВЪНЛП, ВБНЛП ЛБУ· ‡КВМЛВП
42
Å кВКЛП ТЫПВ ВН
• б‡ФЛТ¸ МУ˜М˚ı ‚Л‰У‚, МВУМУ‚˚ı ВНО‡П
ЛОЛ ЩВИВ ‚В НУ‚
CCD-TRV14E/TRV24E 3-859-266-12(1).E/R
Page 43

Using the PROGRAM AE
function
аТФУО¸БУ‚‡МЛВ ЩЫМНˆЛЛ
PROGRAM AE
Using the PROGRAM AE
function
While the camcorder is in Standby mode, press
PROGRAM AE until the desired PROGRAM AE
indicator appears.
Returning to automatic mode
Press PROGRAM AE until the PROGRAM AE
indicator disappears.
Note on shutter speed
The shutter speed in each PROGRAM AE mode
is as follows:
Sports mode – between 1/50 to 1/500
High-speed shutter mode – 1/4000
Twilight mode – 1/50
AUTO mode – 1/50 (or 1/100 when the Steady
Shot is on – CCD-TRV24E only)
аТФУО¸БУ‚‡МЛВ ЩЫМНˆЛЛ
PROGRAM AE
Ç ÚÓ ‚ ÂÏfl, ÍÓ„‰‡ ‚ˉÂÓ͇Ï ‡ ̇ıÓ‰ËÚÒfl ‚
ВКЛПВ „УЪУ‚МУТЪЛ, М‡КЛП‡ИЪВ НМУФНЫ
PROGRAM AE, ФУН‡ МВ ФУfl‚ЛЪТfl КВО‡ВП˚И
ЛМ‰ЛН‡ЪУ PROGRAM AE.
Advanced operations ìÒÓ‚Â ¯ÂÌÒÚ‚Ó‚‡ÌÌ˚ ÓÔ ‡ˆËË
PROGRAM
AE
ЗУБ‚ ‡˘ВМЛВ Н ‡‚ЪУП‡ЪЛ˜ВТНУПЫ
ВКЛПЫ
з‡КЛП‡ИЪВ НМУФНЫ PROGRAM AE, ФУН‡
ЛМ‰ЛН‡ЪУ PROGRAM AE МВ ЛТ˜ВБМВЪ.
и ЛПВ˜‡МЛВ Н ТНУ УТЪЛ Б‡Ъ‚У ‡
лНУ УТЪ¸ Б‡Ъ‚У ‡ ‚ Н‡К‰УП ВКЛПВ
PROGRAM AE fl‚ОflВЪТfl ТОВ‰Ы˛˘ВИ:
лФУ ЪЛ‚М˚И ВКЛП — ПВК‰Ы 1/50 Л 1/500
кВКЛП ‚˚ТУНУТНУ УТЪМУ„У Б‡Ъ‚У ‡ —
1/4000
кВКЛП ТЫПВ ВН — 1/50
кВКЛП AUTO — 1/50 (ЛОЛ 1/100, ВТОЛ
‚НО˛˜ВМ‡ ЩЫМНˆЛfl ЫТЪУИ˜Л‚УИ Т˙ВПНЛ –
ЪУО¸НУ CCD-TRV24E).
CCD-TRV14E/TRV24E 3-859-266-12(1).E/R
43
Page 44

Shooting with
backlighting
л˙ВПН‡ Т Б‡‰МВИ
ФУ‰Т‚ВЪНУИ
When you shoot a subject with the light source
behind the subject or a subject with a light
background, use the BACK LIGHT function.
Press BACK LIGHT. The c indicator appears in
the viewfinder or on the LCD screen.
[a] Subject is too dark because of backlight.
[b] Subject becomes bright with backlight
compensation.
After shooting
Be sure to release this adjustment condition by
pressing BACK LIGHT again. The c indicator
disappears. Otherwise, the picture will be too
bright under normal lighting condition.
This function is also effective under
following conditions:
• On snow e.g. at the ski resort
• At the beach under strong sunshine
• A subject with a light source nearby or a mirror
reflecting light
• A white subject against a white background.
Especially when you shoot a person wearing
shiny clothes made of silk or synthetic fiber, his
or her face tends to become dark if you do not
use this function.
ЦТОЛ З˚ ТМЛП‡ВЪВ У·˙ВНЪ Т ЛТЪУ˜МЛНУП
Т‚ВЪ‡ ФУБ‡‰Л У·˙ВНЪ‡ ЛОЛ У·˙ВНЪ М‡
Т‚ВЪОУП ЩУМВ, ЛТФУО¸БЫИЪВ ЩЫМНˆЛЛ˛ BACK
LIGHT.
з‡КПЛЪВ BACK LIGHT. З ‚Л‰УЛТН‡ЪВОВ ЛОЛ
М‡ ˝Н ‡МВ ЬдС ФУfl‚ЛЪТfl ЛМ‰ЛН‡ЪУ c.
[a]
BACK LIGHT
[a] é·˙ÂÍÚ fl‚ÎflÂÚÒfl ÒÎ˯ÍÓÏ ÚÂÏÌ˚Ï ËÁ-Á‡
Á‡‰ÌÂÈ ÔÓ‰Ò‚ÂÚÍË.
[b] é·˙ÂÍÚ ÒÚ‡ÌÓ‚ËÚÒfl fl ÍËÏ Ò
НУПФВМТ‡ˆЛВИ Б‡‰МВИ ФУ‰Т‚ВЪНЛ.
[b]
иУТОВ Т˙ВПНЛ
й·flБ‡ЪВО¸МУ УЪПВМЛЪ¸ ТУТЪУflМЛВ Ъ‡НУИ
В„ЫОЛ У‚НЛ ФЫЪВП М‡К‡ЪЛfl BACK LIGHT
ТМУ‚‡. аМ‰ЛН‡ЪУ c ЛТ˜ВБМВЪ. З Ф УЪЛ‚МУП
ТОЫ˜‡В ЛБУ· ‡КВМЛВ ·Ы‰ВЪ ТОЛ¯НУП fl НЛП
Ф Л МУ П‡О¸М˚ı ЫТОУ‚Лflı УТ‚В˘ВМЛfl.
щЪ‡ ЩЫМНˆЛfl Ъ‡НКВ ˝ЩЩВНЪЛ‚М‡ Ф Л
ТОВ‰Ы˛˘Лı ЫТОУ‚Лflı:
• ç‡ ÙÓÌ ÒÌ„‡, Ì‡Ô ËÏ , ̇ Î˚ÊÌÓÏ
НЫУЪВ
• з‡ ФОflКВ ТЛО¸МУП Ф ЛТУОМВ˜МУП Т‚ВЪВ
• й·˙ВНЪ М‡ıУ‰ЛЪТfl fl‰УП Т ЛТЪУ˜МЛНУП
Ò‚ÂÚ‡ ËÎË fl‰ÓÏ Ò Á ͇ÎÓÏ, ÓÚ ‡Ê‡˛˘ËÏ
Ò‚ÂÚ
• ÅÂÎ˚È Ó·˙ÂÍÚ Ì‡ ·ÂÎÓÏ ÙÓÌÂ.
йТУ·ВММУ, ВТОЛ З˚ ТМЛП‡ВЪВ ˜ВОУ‚ВН‡,
НУЪУ ˚И У‰ВЪ ‚ fl НЫ˛ У‰ВК‰Ы, Т‰ВО‡ММЫ˛
ЛБ ¯ВОН‡ ЛОЛ ТЛМЪВЪЛ˜ВТНУ„У ‚УОУНМ‡, В„У
ЛОЛ Вfi ОЛˆУ ·Ы‰ВЪ ТЪ‡МУ‚ЛЪ¸Тfl ЪВПМ˚П,
ВТОЛ З˚ МВ ·Ы‰ВЪВ ЛТФУО¸БУ‚‡Ъ¸ ˝ЪЫ
ЩЫМНˆЛ˛.
44
CCD-TRV14E/TRV24E 3-859-266-12(1).E/R
Page 45

Releasing the STEADY
SHOT function
ÇÍβ˜ÂÌË ÙÛ͈ËË
STEADY SHOT
– CCD-TRV24E only
When you shoot, the Ó indicator appears. This
indicates that the SteadyShot function is
working and the camcorder compensates for
camera-shake.
You can release the SteadyShot function when
you do not need to use the SteadyShot function.
Do not use the SteadyShot function when
shooting a stationary object with a tripod.
(1) While pressing PUSH OPEN, open the LCD
panel.
(2) Set STEADY SHOT to OFF. The Ó indicator
goes off.
1
— íÓθÍÓ CCD-TRV24E
и Л ‚˚ФУОМВМЛЛ Т˙ВПНЛ ФУfl‚ЛЪТfl
ЛМ‰ЛН‡ЪУ “ Ó”. ùÚÓ ÓÁ̇˜‡ÂÚ, ˜ÚÓ
‚НО˛˜ВМ‡ ЩЫМНˆЛfl SteadyShot Л ‡ФФ‡ ‡Ъ
НУПФВМТЛ ЫВЪ ФУ‰ ‡„Л‚‡МЛВ ‚Л‰ВУН‡ПВ ˚.
З˚ ПУКВЪВ УЪПВМЛЪ¸ ЩЫМНˆЛ˛ SteadyShot,
ВТОЛ МВЪ МЫК‰˚ ЛТФУО¸БУ‚‡Ъ¸ ЩЫМНˆЛ˛
НУПФВМТ‡ˆЛЛ ФУ‰ ‡„Л‚‡МЛfl ‚Л‰ВУН‡ПВ ˚.
зВ ТОВ‰ЫВЪ ЛТФУО¸БУ‚‡Ъ¸ ЩЫМНˆЛ˛
SteadyShot Ф Л Т˙ВПНВ МВФУ‰‚ЛКМ˚ı
У·˙ВНЪУ‚ Т ФУПУ˘¸˛ Ъ ВМУ„Л.
(1) з‡К‡‚ НФУФНЫ PUSH OPEN, УЪН УИЪВ
Ô‡ÌÂθ ÜäÑ.
(2) мТЪ‡МУ‚ЛЪВ STEADY SHOT ‚ ФУОУКВМЛВ
OFF. à̉Ë͇ÚÓ Ó ЛТ˜ВБМВЪ.
STEADY SHOT
2
ON
OFF
Advanced operations ìÒÓ‚Â ¯ÂÌÒÚ‚Ó‚‡ÌÌ˚ ÓÔ ‡ˆËË
To activate the SteadyShot function
again
Set STEADY SHOT to ON.
Notes on the SteadyShot
•The SteadyShot will not correct excessive
camera-shake.
•When you switch the SteadyShot function on or
off, the exposure may fluctuate.
• When you record in 16:9FULL mode, the
SteadyShot function does not work and the Ó
indicator flashes.
ÑÎfl ÚÓ„Ó, ˜ÚÓ·˚ Á‡‰ÂÈÒÚ‚Ó‚‡Ú¸
ÙÛÌÍˆË˛ SteadyShot cÌÓ‚‡.
мТЪ‡МУ‚ЛЪВ STEADY SHOT ‚ ФУОУКВМЛВ ON.
и ЛПВ˜‡МЛfl УЪМУТЛЪВО¸МУ ЩЫМНˆЛЛ
SteadyShot
• оЫМНˆЛfl SteadyShot МВ fl‚ОflВЪfl
˝ЩЩВНЪЛ‚МУИ ‰Оfl ˜ ВБПВ МУ„У
ФУ‰ ‡„Л‚‡МЛfl ‚Л‰ВУН‡ПВ ˚.
• и Л ‚НО˛˜ВМЛЛ ЛОЛ ‚˚НО˛˜ВМЛЛ ЩЫМНˆЛЛ
SteadyShot ‚УБПУКМУ ФУ‰ ‡„Л‚‡МЛВ Н‡‰ ‡.
• и Л ‚˚ФУОМВМЛЛ Б‡ФЛТЛ‚ ВКЛПВ
16:9FULL ЩЫМНˆЛfl SteadyShot МВ ‡·УЪ‡ВЪ,
‡ ЛМ‰ЛН‡ЪУ “ Ó” ·Û‰ÂÚ ÏË„‡Ú¸.
45
CCD-TRV14E/TRV24E 3-859-266-12(1).E/R
Page 46

Superimposing a title
з‡ОУКВМЛВ М‡‰ФЛТЛ
You can select from eight preset titles and two
titles you made to superimpose it on the picture
during recording. Each time you press TITLE,
the preset titles appear one by one.
To superimpose from the beginning
(1) Set the POWER switch to CAMERA.
(2) Turn STANDBY up.
(3) While pressing PUSH OPEN, open the LCD
panel.
(4) Press TITLE repeatedly until the desired title
appears. The title flashes.
(5) Press START/STOP to start recording.
(6) Press TITLE when you want to turn off the
title.
To superimpose on the way of
recording
(1) Press TITLE repeatedly until the desired title
appears. The title flashes.
(2) When the title stops flashing, press TITLE.
The title disappears.
(3) Press START/STOP to start recording.
(4) Press TITLE when you want superimpose
the title.
(5) Press TITLE when you want to turn off the
title.
З˚ ПУКВЪВ ‚˚· ‡Ъ¸ У‰МЫ ЛБ ‚УТ¸ПЛ
Ф В‰‚‡ ЛЪВО¸МУ ЫТЪ‡МУ‚ОВММ˚ı М‡‰ФЛТВИ Л
‰‚В М‡‰ФЛТЛ, ТУБ‰‡ММ˚В З‡ПЛ, НУЪУ ˚В
ПУКМУ М‡НО‡‰˚‚‡Ъ¸ М‡ ЛБУ· ‡КВМЛВ ‚У
‚ ВПfl Б‡ФЛТЛ. ЗТflНЛИ ‡Б Ф Л М‡К‡ЪЛЛ
НМУФНЛ TITLE Ф В‰‚‡ ЛЪВО¸МУ
ЫТЪ‡МУ‚ОВММ˚В М‡Б‚‡МЛfl ФУfl‚Оfl˛ЪТfl У‰МУ
Б‡ ‰Ы„ЛП.
СОfl М‡ОУКВМЛfl УЪ М‡˜‡О‡
(1) ìÒÚ‡ÌÓ‚ËÚ ‚˚Íβ˜‡Ú‡Î¸ POWER ‚
ФУОУКВМЛВ CAMERA.
(2) èÓ‚Â ÌËÚÂ STANDBY ‚‚Â ı.
(3) з‡КЛП‡fl PUSH OPEN, УЪНУИЪВ Ф‡МВО¸
ÜäÑ.
(4) çÂÓ‰ÌÓÍ ‡ÚÌÓ Ì‡ÊËχÈÚ TITLE, ÔÓ͇ ÌÂ
ÔÓfl‚ËÚÒfl Ê·Âχfl ̇‰ÔËÒ¸. 燉ÔËÒ¸
·Û‰ÂÚ ÏË„‡Ú¸.
(5) з‡КЛПЪВ START/STOP ‰Оfl М‡˜‡О‡ Б‡ФЛТЛ.
(6) з‡КПЛЪВ TITLE, НУ„‰‡ З˚ Б‡ıУЪЛЪВ
‚˚Íβ˜ËÚ¸ ̇‰ÔËÒ¸.
СОfl М‡ОУКВМЛfl ‚ Ф УˆВТТВ Б‡ФЛТЛ
(1) çÂÓ‰ÌÓÍ ‡ÚÌÓ Ì‡ÊËχÈÚ TITLE, ÔÓ͇ ÌÂ
ÔÓfl‚ËÚÒfl Ê·Âχfl ̇‰ÔËÒ¸. 燉ÔËÒ¸
·Û‰ÂÚ ÏË„‡Ú¸.
(2) дУ„‰‡ М‡‰ФЛТ¸ ФВВТЪ‡МВЪ ПЛ„‡Ъ¸,
М‡КПЛЪВ TITLE. 燉ФЛТ¸ ЛТ˜ВБМВЪ.
(3) з‡КПЛЪВ START/STOP ‰Оfl М‡˜‡О‡ Б‡ФЛТЛ.
(4) з‡КПЛЪВ TITLE, НУ„‰‡ З˚ ФУКВО‡ВЪВ
М‡ОУКЛЪ¸ М‡‰ФЛТ¸.
(5) з‡КПЛЪВ TITLE, НУ„‰‡ З˚ Б‡ıУЪЛЪВ
‚˚Íβ˜ËÚ¸ ̇‰ÔËÒ¸.
46
TITLE
CCD-TRV14E/TRV24E 3-859-266-12(1).E/R
Page 47

Superimposing a title
з‡ОУКВМЛВ М‡‰ФЛТЛ
Titles cycle as follows
Original title 1 n Original title 2 n HELLO! n
HAPPY BIRTHDAY n HAPPY HOLIDAYS n
CONGRATULATIONS! n OUR SWEET BABY
n WEDDING n VACATION n THE END
When you press TITLE with “THE END”
displayed, the titles disappear. When you press
TITLE once again, the titles begin from
“HELLO!” or your original title.
If you have not stored any original titles
The titles begin from “HELLO!”.
Notes on titles
•You cannot select a title during recording.
•You cannot record a title and the date at the
same time.
•You cannot record a title and the time at the
same time.
•While the menu is displayed, the titles are not
recorded.
To select the title position
(1) Press MENU to display the menu on the
LCD screen.
(2) Turn the control dial to select TITLE POS,
then press the dial.
(3) Turn the control dial to select CENTER [a] or
BOTTOM [b], then press the dial.
(4) Press MENU to erase the menu display.
燉ФЛТЛ ˆЛНОЛ˜ВТНЛ ЛБПВМfl˛ЪТfl
ТОВ‰Ы˛˘ЛП У· ‡БУП
й Л„ЛМ‡О¸М‡fl М‡‰ФЛТ¸ 1 n
é Ë„Ë̇θ̇fl ̇‰ÔËÒ¸ 2 n HELLO! n
HAPPY BIRTHDAY n HAPPY HOLIDAYS n
CONGRATULATIONS! n OUR SWEET BABY
n WEDDING n VACATION n THE END
ЦТОЛ З˚ М‡КПВЪВ НМУФНЫ TITLE‚У ‚ ВПfl
УЪУ· ‡КВМЛfl ЛМ‰ЛН‡ˆЛЛ “THE END”,
М‡‰ФЛТЛ ЛТ˜ВБМЫЪ. ЦТОЛ З˚ М‡КПВЪВ НМУФНЫ
TITLE В˘В ‡Б, М‡‰ФЛТЛ М‡˜МЫЪ
УЪУ· ‡К‡Ъ¸Тfl УФflЪ¸, М‡˜ЛМ‡fl Т “HELLO!”
ЛОЛ З‡¯ВИ У Л„ЛМ‡О¸МУИ М‡‰ФЛТЛ.
ЦТОЛ З˚ МВ ТУı ‡МЛОЛ ‚ Ф‡ПflЪЛ
У Л„ЛМ‡О¸М˚ı М‡‰ФЛТВИ
燉ФЛТЛ М‡˜МЫЪ УЪУ· ‡К‡Ъ¸Тfl Т”HELLO!”.
и ЛПВ˜‡МЛfl УЪМУТЛЪВО¸МУ М‡‰ФЛТВИ
•З˚ ПУКВЪВ ‚˚· ‡Ъ¸ М‡‰ФЛТ¸ ‚У ‚ ВПfl
Б‡ФЛТЛ.
•З˚ МВ ПУКВЪВ Б‡ФЛТ˚‚‡Ъ¸ М‡‰ФЛТ¸ Л ‰‡ЪЫ
У‰МУ‚ ВПВММУ.
•З˚ МВ ПУКВЪВ Б‡ФЛТ˚‚‡Ъ¸ М‡‰ФЛТ¸ Л ‚ ВПfl
У‰МУ‚ ВПВММУ.
•ÇÓ ‚ ÂÏfl ÓÚÓ· ‡ÊÂÌËfl ÏÂÌ˛ ̇‰ÔËÒË ÌÂ
Á‡ÔËÒ˚‚‡˛ÚÒfl.
СОfl ‚˚·У ‡ ФУОУКВМЛfl М‡‰ФЛТЛ
(1) з‡КПЛЪВ НМУФНЫ MENU ‰Оfl УЪУ· ‡КВМЛfl
ÏÂÌ˛ ̇ ˝Í ‡Ì ÜäÑ.
(2) èÓ‚Â ÌËÚ ‰ËÒÍ ÛÔ ‡‚ÎÂÌËfl ‰Îfl ‚˚·Ó ‡
TITLE POS, Б‡ЪВП М‡КПЛЪВ ‰ЛТН.
(3) èÓ‚Â ÌËÚ ‰ËÒÍ ÛÔ ‡‚ÎÂÌËfl ‰Îfl ‚˚·Ó ‡
CENTER [a] ЛОЛ BOTTOM [b], Б‡ЪВП
М‡КПЛЪВ ‰ЛТН.
(4) з‡КПЛЪВ НМУФНЫ MENU ‰Оfl Ы‰‡ОВМЛfl
Ë̉Ë͇ˆËË ÏÂÌ˛.
Advanced operations ìÒÓ‚Â ¯ÂÌÒÚ‚Ó‚‡ÌÌ˚ ÓÔ ‡ˆËË
[a] [b]
HELLO!
CCD-TRV14E/TRV24E 3-859-266-12(1).E/R
HELLO!
47
Page 48

Making your own
titles
лУБ‰‡МЛВ З‡¯Лı
ТУ·ТЪ‚ВММ˚ı М‡‰ФЛТВИ
You can make two titles of up to 22 characters
each, and store them in memory.
We recommend to eject the cassette before you
begin so that the power is not turned off on the
way.
(1)While pressing PUSH OPEN, open the LCD
panel.
(2) While the camcorder is in Standby mode,
press MENU to display the menu.
(3) Turn the control dial to select TITLE1 SET or
TITLE2 SET, then press the dial.
(4) Turn the control dial to select the desired
character, then press the dial.
(5) Repeat step 4 until you finish the title.
(6) Turn the dial to select ↵, then press the dial.
The title is stored in memory.
(7) Press MENU to erase the menu display.
MENU
2
3
MENU
COMMANDER
REC MODE
TITLE POS
TITLE1 SET
TITLE2 SET
D ZOOM
З˚ ПУКВЪВ ТУБ‰‡Ъ¸ ‰‚В М‡‰ФЛТЛ ‚ 22 БМ‡Н‡
Н‡К‰‡fl Л Б‡МВТЪЛ Лı ‚ Ф‡ПflЪ¸.
е˚ ВНУПВМ‰ЫВП ‚˚ЪУОНМЫЪ¸ Н‡ТТВЪЫ ФВ В‰
ЪВП, Н‡Н ТУБ‰‡‚‡Ъ¸ М‡‰ФЛТЛ, ˜ЪУ·˚ ФЛЪ‡МЛВ
МВ ‚˚НО˛˜‡ОУТ¸ ‚ Ф УˆВТТВ ‡·УЪ˚.
(1) з‡К‡‚ НМУФНЫ PUSH OPEN, УЪН УИЪВ
Ô‡ÌÂθ ÜäÑ.
(2) Ç ÚÓ ‚ ÂÏfl, ÍÓ„‰‡ ‚ˉÂÓ͇Ï ‡
М‡ıУ‰ЛЪТfl ‚ ВКЛПВ „УЪУ‚МУТЪЛ, М‡КПЛЪВ
НМУФНЫ MENU ‰Оfl УЪУ· ‡КВМЛfl ПВМ˛.
(3) èÓ‚Â ÌËÚ ‰ËÒÍ ÛÔ ‡‚ÎÂÌËfl ‰Îfl ‚˚·Ó ‡
TITLE1 SET ЛОЛ TITLE2 SET, Б‡ЪВП
М‡КПЛЪВ ‰ЛТН.
(4) èÓ‚Â ÌËÚ ‰ËÒÍ ÛÔ ‡‚ÎÂÌËfl ‰Îfl ‚˚·Ó ‡
КВО‡ВПУ„У БМ‡Н‡, Б‡ЪВП М‡КПЛЪВ ‰ЛТН.
(5) иУ‚ЪУ flИЪВ ФЫМНЪ 4 ‰У ЪВı ФУ , ФУН‡ З˚
Ì Á‡‚ ¯ËÚ ̇‰ÔËÒ¸.
(6) èÓ‚Â ÌËÚ ‰ËÒÍ ‰Îfl ‚˚·Ó ‡ ↵, Á‡ÚÂÏ
М‡КПЛЪВ ‰ЛТН. 燉ФЛТ¸ ·Ы‰ВЪ Б‡МВТВМ‡ ‚
Ф‡ПflЪ¸.
(7) з‡КПЛЪВ НМУФНЫ MENU, ˜ЪУ·˚ Ы‰‡ОЛЪ¸
Ë̉Ë͇ˆË˛ ÏÂÌ˛.
_________
MENU
A________
TITLE1 SET
B
C
>
48
1
7
MENU
4,5
MENU
TITLE1 SET
6
MENU
TITLE1 SET
F
G
H
________
I
J
–
.
HEL LO
________
A
>
>
MENU
TITLE1 SET
MENU
COMMANDER
REC MODE
TITLE POS
TITLE1 SET
TITLE2 SET
D ZOOM
H
________
HELLO
_________
C
D
>
E
F
G
CCD-TRV14E/TRV24E 3-859-266-12(1).E/R
Page 49

Making your own titles
лУБ‰‡МЛВ З‡¯Лı ТУ·ТЪ‚ВММ˚ı
М‡‰ФЛТВИ
To erase the title you have made
Press MENU, select the title you want to erase,
and press the dial. Select ↵ at the leftmost
character, then press the dial.
Do not select the blank to erase a character.
Otherwise, the blank is stored as a title in
memory.
To change the title you have made
In step 3, select TITLE1 SET or TITLE2 SET,
depending on which title you want to change,
then press the dial. Select the desired characters
again.
If you enter 22 characters in step 5
The title is stored immediately (and you can
skip step 6).
If it takes more than 5 minutes to make a
title with a cassette inserted
If the Standby mode lasts for more than 5
minutes with a cassette inserted, the power is
turned off automatically.
If the power is turned off while you are making
a title, set the POWER switch to OFF once, then
to CAMERA. The title you have made remains
stored in memory.
Advancing the characters rapidly
Keep pressing the dial.
Making a blank
Select a blank. It is counted as a character.
лУБ‰‡МЛВ З‡¯Лı ТУ·ТЪ‚ВММ˚ı
М‡‰ФЛТВИ
СОfl Ы‰‡ОВМЛfl ТУБ‰‡ММУИ З‡ПЛ М‡‰ФЛТЛ
з‡КПЛЪВ НМУФНЫ MENU, ‚˚·В ЛЪВ М‡‰ФЛТ¸,
НУЪУ Ы˛ ıУЪЛЪВ Ы‰‡ОЛЪ¸, Л М‡КПЛЪВ ‰ЛТН.
З˚·В ЛЪВ ↵ ‰Оfl Т‡ПУ„У ОВ‚У„У БМ‡Н‡, Б‡ЪВП
М‡КПЛЪВ ‰ЛТН.
зВ ‚˚·Л ‡ИЪВ ФЫТЪУВ ПВТЪУ ‰Оfl Ы‰‡ОВМЛfl
БМ‡Н‡. З Ф УЪЛ‚МУП ТОЫ˜‡В ФЫТЪУВ ПВТЪУ
·Ы‰ВЪ Б‡МВТВМУ ‚ Ф‡ПflЪ¸ Н‡Н М‡‰ФЛТ¸.
Advanced operations ìÒÓ‚Â ¯ÂÌÒÚ‚Ó‚‡ÌÌ˚ ÓÔ ‡ˆËË
СОfl ЛБПВМВМЛfl ТУБ‰‡ММУИ З‡ПЛ М‡‰ФЛТЛ
З ФЫМНЪВ 3 ‚˚·В ЛЪВ TITLE1 SET ЛОЛ TITLE2
SET ‚ Б‡‚ЛТЛПУТЪЛ УЪ ЪУ„У, Н‡НЫ˛ М‡‰ФЛТ¸
З˚ ıУЪЛЪВ ЛБПВМЛЪ¸, Б‡ЪВП М‡КПЛЪВ ‰ЛТН.
З˚·В ЛЪВ КВО‡ВП˚В ·ЫН‚˚ ТМУ‚‡.
ЦТОЛ З˚ ‚‚ВОЛ 22 БМ‡Н‡ ‚ ФЫМНЪВ 5
燉ФЛТ¸ ·Ы‰ВЪ Б‡МВТВМ‡ ‚ Ф‡ПflЪ¸ ЪУЪ˜‡Т КВ
(Л З˚ ПУКВЪВ Ф УФЫТЪЛЪ¸ ФЫМНЪ 6).
ЦТОЛ Ф Л ‚ТЪ‡‚ОВММУИ Н‡ТТВЪВ ТУБ‰‡МЛВ
М‡‰ФЛТЛ Б‡МЛП‡ВЪ ·УОВВ 5 ПЛМЫЪ
ЦТОЛ ВКЛП „УЪУ‚МУТЪЛ ФФУ‰УОК‡ВЪТfl
·УОВВ 5 ПЛМЫЪ Ф Л ‚ТЪ‡‚ОВММУИ Н‡ТТВЪВ,
ФЛЪ‡МЛВ ‡‚ЪУП‡ЪЛ˜ВТНЛ ‚˚НО˛˜ЛЪТfl.
ЦТОЛ ФЛЪ‡МЛВ ‚˚НО˛˜ЛЪТfl ‚У ‚ ВПfl
ТУБ‰‡МЛfl М‡‰ФЛТЛ, ЫТЪ‡МУ‚ЛЪВ
ФВ ВНО˛˜‡ЪВО¸ POWER ТМ‡˜‡О‡ ‚
ФУОУКВМЛВ OFF, Б‡ЪВП ‚ ФУОУКВМЛВ
CAMERA. лУБ‰‡ММ‡fl З‡ПЛ М‡‰ФЛТ¸ ·Ы‰ВЪ
ТУı ‡МВМ‡ ‚ Ф‡ПflЪЛ.
Е˚ТЪ УВ Ф У‰‚ЛКВМЛВ БМ‡НУ‚
СВ КЛЪВ ‰ЛТН М‡К‡Ъ˚П.
лУБ‰‡МЛfl ФЫТЪУ„У ПВТЪ‡
З˚·В ЛЪВ ФЫТЪУВ ПВТЪУ. йМУ
‡ÒÒÏ‡Ú Ë‚‡ÂÚÒfl Í‡Í Á̇Í.
CCD-TRV14E/TRV24E 3-859-266-12(1).E/R
49
Page 50

Watching on a TV
screen
и УТПУЪ М‡ ˝Н ‡МВ
ЪВОВ‚ЛБУ ‡
Connect the camcorder to your VCR or TV to
watch the playback picture on the TV screen.
When monitoring the playback picture by
connecting the camcorder to your TV, we
recommend you to use mains for the power
source.
While playing back on a TV screen, close the
LCD panel. Otherwise, picture distortion may
occur.
If your TV is already connected to a
VCR
Open the jack cover and connect the camcorder
to the LINE IN inputs on the VCR by using the
supplied A/V connecting cable. Set the input
selector on the VCR to LINE. Set the TV/VCR
selector on the TV to VCR.
VIDEO OUT
VIDEO IN
AUDIO OUT
: Signal flow / è ‰‡˜‡ Ò˄̇·
иУ‰ТУВ‰ЛМЛЪВ ‚Л‰ВУН‡ПВ Ы Н З‡¯ВПЫ дЗе
ЛОЛ ЪВОВ‚ЛБУ Ы ‰Оfl Ф УТПУЪ ‡
‚УТФ УЛБ‚У‰ЛПУ„У ЛБУ· ‡КВМЛfl М‡ ˝Н ‡МВ
ЪВОВ‚ЛБУ ‡. иЛ ФУ‰ТУВ‰ЛМВМЛЛ
‚Л‰ВУН‡ПВ ˚ Н З‡¯ВПЫ ЪВОВ‚ЛБУ Ы П˚
ВНУПВМ‰ЫВП З‡П ЛТФУО¸БУ‚‡Ъ¸
˝ОВНЪ Л˜ВТНЫ˛ ТВЪ¸ ‚ Н‡˜ВТЪ‚В ЛТЪУ˜МЛН‡
ФЛЪ‡МЛfl.
и Л ‚УТФ УЛБ‚В‰ВМЛЛ М‡ ˝Н ‡МВ ЪВОВ‚ЛБУ ‡
Б‡Н УИЪВ Ф‡МВО¸ ЬдС. З Ф УЪЛ‚МУП ТОЫ˜‡В
ПУКВЪ Ф УЛБУИЪЛ ЛТН‡КВМЛВ ЛБУ· ‡КВМЛfl.
ÖÒÎË Ç‡¯ ÚÂ΂ËÁÓ ÛÊ ÔÓ‰Íβ˜ÂÌ
Í äÇå
йЪН УИЪВ Н ˚¯НЫ „МВБ‰‡ Л ФУ‰ТУВ‰ЛМЛЪВ
‚Л‰ВУН‡ПВ Ы Н ‚ıУ‰‡П LINE IN М‡ дЗе,
ЛТФУО¸БЫfl Ф ЛО‡„‡ВП˚И ТУВ‰ЛМЛЪВО¸М˚И
Н‡·ВО¸ ‡Ы‰ЛУ/‚Л‰ВУ. мТЪ‡МУ‚ЛЪВ ‚ıУ‰МУИ
ТВОВНЪУ М‡ дЗе ‚ ФУОУКВМЛВ LINE.
мТЪ‡МУ‚ЛЪВ ТВОВНЪУ TV/VCR М‡ ЪВОВ‚ЛБУ В
‚ ФУОУКВМЛВ VCR.
VCR
AUDIO IN
TV
50
CCD-TRV14E/TRV24E 3-859-266-12(1).E/R
Page 51

Watching on a TV screen
и УТПУЪ М‡ ˝Н ‡МВ ЪВОВ‚ЛБУ ‡
If you connect directly to TV
Connect the camcorder to the inputs on the TV
by using the supplied A/V connecting cable. Set
the TV/VCR selector on the TV to VCR.
VIDEO OUT
AUDIO OUT
: Signal flow / è ‰‡˜‡ Ò˄̇·
To connect to a VCR or TV without
Video/Audio input jacks
Use an RFU adaptor (not supplied).
ÖÒÎË Ç˚ ÔÓ‰ÒÓ‰ËÌflÂÚÂ Ô flÏÓ Í
ÚÂ΂ËÁÓ Û
йЪН УИЪВ Н ˚¯НЫ „МВБ‰‡ Л ФУ‰ТУВ‰ЛМЛЪВ
‚Л‰ВУН‡ПВ Ы Н ‚ıУ‰‡П М‡ ЪВОВ‚ЛБУ В,
ЛТФУО¸БЫfl Ф ЛО‡„‡ВП˚И ТУВ‰ЛМЛЪВО¸М˚И
Н‡·ВО¸ ‡Ы‰ЛУ/‚Л‰ВУ. мТЪ‡МУ‚ЛЪВ ТВОВНЪУ
TV/VCR М‡ ЪВОВ‚ЛБУ В ‚ ФУОУКВМЛВ VCR.
TV
Advanced operations ìÒÓ‚Â ¯ÂÌÒÚ‚Ó‚‡ÌÌ˚ ÓÔ ‡ˆËË
VIDEO IN
AUDIO IN
СОfl ФУ‰ТУВ‰ЛМВМЛfl Н дЗе ЛОЛ
ЪВОВ‚ЛБУ Ы ·ВБ ‚ıУ‰М˚ı „МВБ‰ ‚Л‰ВУ/
‡Ы‰ЛУ
аТФУО¸БЫИЪВ ‡‰‡ФЪВ RFU (МВ Ф ЛО‡„‡ВЪТfl).
CCD-TRV14E/TRV24E 3-859-266-12(1).E/R
51
Page 52

Editing onto another
tape
еУМЪ‡К М‡ ‰ Ы„Ы˛
ОВМЪЫ
You can create your own video programme by
editing with any other h 8 mm, H Hi8, j
VHS, k S-VHS, VHSC, K S-VHSC,
or l Betamax VCR that has video/audio inputs.
Turn down the volume of the camcorder while
editing. Otherwise, picture distortion may
occur.
After connecting the camcorder to the VCR,
(1) Set the POWER switch to PLAYER.
(2) Insert a blank tape (or a tape you want to
record over) into the VCR and insert your
recorded tape into the camcorder.
(3) Play back the recorded tape on the
camcorder until you locate the point where
you want to start editing, then press P to
put the camcorder in playback pause mode.
(4) On the VCR, locate the recording start point
and put the VCR in recording pause mode.
(5) Press P on the camcorder and VCR
simultaneously to start editing.
З˚ ПУКВЪВ ТУБ‰‡Ъ¸ З‡¯Ы ТУ·ТЪ‚ВММЫ˛
‚Л‰ВУФ У„ ‡ППЫ ФЫЪВП ПУМЪ‡К‡ Т ФУПУ˘¸˛
‰ Ы„У„У дЗе ЪЛФ‡ h 8 ÏÏ, H Hi8, j VHS,
k S-VHS, VHSC, K S-VHSC ËÎË
l Betamax, НУЪУ ˚И ЛПВВЪ ‚ıУ‰˚ ‚Л‰ВУ/
‡Ы‰ЛУ.
мПВМ¸¯ЛЪВ „ УПНУТЪ¸ ‚Л‰ВУН‡ПВ ˚ ‚У
‚ ÂÏfl ÏÓÌڇʇ. Ç Ô ÓÚË‚ÌÓÏ ÒÎÛ˜‡Â ÏÓ„ÛÚ
ÔÓfl‚ËÚ¸Òfl ËÒ͇ÊÂÌËfl.
иУТОВ ФУ‰ТУВ‰ЛМВМЛfl ‚Л‰ВУН‡ПВ ˚ Н дЗе,
(1) ìÒÚ‡ÌÓ‚ËÚ ‚˚Íβ˜‡ÚÂθ POWER ̇
PLAYER.
(2) ЗТЪ‡‚¸ЪВ ˜ЛТЪЫ˛ ОВМЪЫ (ЛОЛ ОВМЪЫ,
НУЪУ Ы˛ З˚ ıУЪЛЪВ ФВ ВБ‡ФЛТ‡Ъ¸) ‚ дЗе
Л ‚ТЪ‡‚¸ЪВ Б‡ФЛТ‡ММЫ˛ ОВМЪЫ ‚
‚Л‰ВУН‡ПВ Ы.
(3) ЗУТФ УЛБ‚У‰ЛЪВ Б‡ФЛТ‡ММЫ˛ ОВМЪЫ ‚
‚Л‰ВУН‡ПВ В ‰У ЪВı ФУ , ФУН‡ З˚ МВ
У·М‡ ЫКЛЪВ ЪУ˜НЫ, ‚ НУЪУ УИ З˚ ıУЪЛЪВ
М‡˜‡Ъ¸ ПУМЪ‡К, ‡ Б‡ЪВП М‡КПЛЪВ P ‰Оfl
‚‚В‰ВМЛfl ‚Л‰ВУН‡ПВ ˚ ‚ ВКЛП Ф‡ЫБ˚
‚УТФУЛБ‚В‰ВМЛfl.
(4) ç‡È‰ËÚ ̇ äÇå ÚÓ˜ÍÛ Ì‡˜‡Î‡ Á‡ÔËÒË Ë
‚‚‰ËÚ äÇå ‚ ÂÊËÏ Ô‡ÛÁ˚ Á‡ÔËÒË.
(5) й‰МУ‚ ВПВММУ М‡КПЛЪВ P ̇
‚ˉÂÓ͇ÏÂ Â Ë Ì‡ äÇå ‰Îfl ̇˜‡Î‡
ÏÓÌڇʇ.
POWER
1
CAMERA
OFF
PLAYER
To edit more scenes
Repeat steps 3 to 5.
To stop editing
Press π on both the camcorder and VCR.
52
STOP
3,5
: Signal flow / è ‰‡˜‡ Ò˄̇·
REW PLAY
FF
ÑÎfl ÏÓÌڇʇ ‰ Û„Ëı ÒˆÂÌ
иУ‚ЪУ flИЪВ ФЫМНЪ˚ Т 3 ФУ 5.
ÑÎfl ÓÒÚ‡ÌÓ‚‡ ÏÓÌڇʇ
з‡КПЛЪВ π Ë Ì‡ ‚ˉÂÓ͇Ï Â, Ë Ì‡ äÇå.
CCD-TRV14E/TRV24E 3-859-266-12(1).E/R
PAUSE
Page 53

Additional Information
Changing the lithium
battery in the camcorder
СУФУОМЛЪВО¸М‡fl ЛМЩУ П‡ˆЛfl
б‡ПВМ‡ ОЛЪЛВ‚УИ
·‡Ú‡ ÂÈÍË ‚ ‚ˉÂÓ͇Ï Â
Your camcorder is supplied with a lithium
battery installed. When the battery becomes
weak or dead, the I indicator flashes in the
viewfinder or on the LCD screen for about 5
seconds when you set the POWER switch to
CAMERA. In this case, replace the battery
with a Sony CR2025 or Duracell DL-2025
lithium battery. Use of any other battery may
present a risk of fire or explosion. Discard
used batteries according to the manufacturer’s
instructions.
The lithium battery for the camcorder lasts for
about one year under normal operation. (The
lithium battery that comes installed at the
factory may not last one year.)
Notes on lithium battery
• Keep the lithium battery out of the reach of
children. Should the battery be swallowed,
immediately consult a doctor.
•Wipe the battery with a dry cloth to assure a
good contact.
•Do not hold the battery with metallic tweezers,
otherwise a short-circuit may occur.
•The lithium battery has positive (+) side and
negative (–) side as illustrated. Be sure to
insert the lithium battery with the positive
side facing out.
З‡¯‡ ‚Л‰ВУН‡ПВ ‡ ТМ‡·КВМ‡ ЫТЪ‡МУ‚ОВММУИ
ОЛЪЛВ‚УИ ·‡Ъ‡ ВИНУИ. ЦТОЛ ·‡Ъ‡ ВИН‡
ТЪ‡МВЪ ТО‡·УИ ЛОЛ ФУОМУТЪ¸˛ ‡Б flКВММУИ,
ЛМ‰ЛН‡ЪУ I ·Ы‰ВЪ ПЛ„‡Ъ¸ ‚ ‚Л‰УЛТН‡ЪВОВ
ЛОЛ М‡ ˝Н ‡МВ ЬдС Ф Л·ОЛБЛЪВО¸МУ ‚
ЪВ˜ВМЛВ 5 ТВНЫМ‰, НУ„‰‡ З˚ ЫТЪ‡МУ‚ЛЪВ
‚˚НО˛˜‡ЪВО¸ POWER ‚ ФУОУКВМЛВ
CAMERA. З Ъ‡НУП ТОЫ˜‡В Б‡ПВМЛЪВ
·‡Ъ‡ ВИНЫ М‡ ОЛЪЛВ‚Ы˛ ·‡Ъ‡ ВИНЫ Sony
CR2025 ЛОЛ Duracell DL-2025.
аТФУО¸БУ‚‡МЛВ ‰ Ы„УИ ·‡Ъ‡ ВИНЛ ПУКВЪ
Ф Л‚ВТЪЛ Н ЛТНЫ ‚УТФО‡ПВМВМЛfl ЛОЛ
‚Б ˚‚‡. гЛН‚Л‰Л ЫИЪВ ЛТФУО¸БУ‚‡ММ˚В
·‡Ъ‡ ВИНЛ ‚ ТУУЪ‚ВЪТЪ‚ЛЛ Т ЛМТЪ ЫНˆЛflПЛ
Б‡‚У‰‡-ЛБ„УЪУ‚ЛЪВОfl.
гЛЪЛВ‚‡fl ·‡Ъ‡ ВИН‡ ‰Оfl ‚Л‰ВУН‡ПВ ˚
‡·УЪ‡ВЪ Ф Л·ОЛБЛЪВО¸МУ ‚ ЪВ˜ВМЛВ 1 „У‰‡
Ф Л МУ П‡О¸М˚ı ЫТОУ‚Лflı ˝НТФОЫ‡Ъ‡ˆЛЛ.
(гЛЪЛВ‚УИ ·‡Ъ‡ ВИНЛ, НУЪУ ‡fl ·˚О‡
ЫТЪ‡МУ‚ОВМ‡ М‡ Б‡‚У‰В, ПУКВЪ МВ ı‚‡ЪЛЪ¸ М‡
1 „У‰.)
4 7 1997
и ЛПВ˜‡МЛfl УЪМУТЛЪВО¸МУ ОЛЪЛВ‚УИ
·‡Ú‡ ÂÈÍË
• п ‡МЛЪВ ОЛЪЛВ‚Ы˛ ·‡Ъ‡ ВИНЫ ‚ ПВТЪВ, МВ
‰УТЪЫФМУП ‰Оfl ‰ВЪВИ.
З ТОЫ˜‡В, ВТОЛ НЪУ-ОЛ·У Ф У„ОУЪЛО
·‡Ъ‡ ВИНЫ, МВПВ‰ОВММУ У· ‡ЪЛЪВТ¸ Н
‚ ‡˜Ы.
• ÑÎfl Ó·ÂÒÔ˜ÂÌËfl ıÓ Ó¯Â„Ó ÍÓÌÚ‡ÍÚ‡
Ô ÓÚ ËÚ ·‡Ú‡ ÂÈÍÛ ÒÛıÓÈ Ú̸͇˛.
• ç ·Â ËÚ ·‡Ú‡ ÂÈÍÛ Ò ÔÓÏÓ˘¸˛
ПВЪ‡ООЛ˜ВТНУ„У ФЛМˆВЪ‡, ЛМ‡˜В ПУКВЪ
Ф УЛБУИЪЛ НУ УЪНУВ Б‡П˚Н‡МЛВ.
• гЛЪЛВ‚‡fl ·‡Ъ‡ ВИН‡ ЛПВВЪ ФУОУКЛЪВО¸М˚И
ФУО˛Т (+) Л УЪ Лˆ‡ЪВО¸М˚И ФУО˛Т (–).
иУПМЛЪВ, ˜ЪУ ˜ЪУ ОЛЪЛВ‚Ы˛ ·‡Ъ‡ ВИНЫ
ТОВ‰ЫВЪ ‡ТФУО‡„‡Ъ¸ ФУОУКЛЪВО¸М˚П
ФУО˛ТУП М‡ ЫКЫ.
Additional information СУФУОМЛЪВО¸М‡fl ЛМЩУ П‡ˆЛfl
0
2
2
5
R
C
(+)
WARNING
The battery may explode if mistreated. Do not
recharge, disassemble, or dispose of in fire.
0
2
2
R
5
C
(–)
икЦСмикЦЬСЦзаЦ
ЦТОЛ Т ·‡Ъ‡ ВИНУИ МВФ ‡‚ЛО¸МУ
У· ‡˘‡Ъ¸Тfl, УМ‡ ПУКВ ‚БУ ‚‡Ъ¸Тfl. зВ
ФВ ВБ‡ flК‡Ъ¸, МВ ‡Б·Л ‡Ъ¸ Л МВ · УТ‡Ъ¸
·‡Ú‡ ÂÈÍÛ ‚ Ó„Ó̸.
CCD-TRV14E/TRV24E 3-859-266-12(1).E/R
53
Page 54

Changing the lithium battery in
the camcorder
б‡ПВМ‡ ОЛЪЛВ‚УИ ·‡Ъ‡ ВИНЛ ‚
‚Л‰ВУН‡ПВ В
Changing the lithium battery
When replacing the lithium battery, keep the
battery pack or other power source attached.
Otherwise, you will need to reset the date and
time .
(1) While pressing PUSH OPEN, open the LCD
panel.
(2) Open the lid of the lithium battery
compartment.
(3) Push the battery in once and pull it out from
the holder.
(4) Install the new lithium battery with the
positive (+) side facing out.
(5) Close the lid.
б‡ПВМ‡ ОЛЪЛВ‚УИ ·‡Ъ‡ ВИНЛ
и Л Б‡ПВМВ ОЛЪЛВ‚УИ ·‡Ъ‡ ВИНЛ ‰В КЛЪВ
·‡Ъ‡ ВИМ˚И ·ОУН ЛОЛ ‰ Ы„УИ ЛТЪУ˜МЛН
ФЛЪ‡МЛfl Ф ЛТУВ‰ЛМВММ˚П. аМ‡˜В З‡П
Ф Л‰ВЪТfl ФВ ВЫТЪ‡М‡‚ОЛ‚‡Ъ¸ ‰‡ЪЫ Л ‚ ВПfl.
(1) з‡К‡‚ НМУФНЫ PUSH OPEN, УЪН УИЪВ
Ô‡ÌÂθ ÜäÑ.
(2) йЪН УИЪВ Н ˚¯НЫ УЪТВН‡ ОЛЪЛВ‚УИ
·‡Ú‡ ÂÈÍË.
(3) з‡КПЛЪВ ·‡Ъ‡ ВИНЫ У‰ЛМ ‡Б Л ‚˚Ъ‡˘ЛЪВ
 ËÁ ‰Â ʇÚÂÎfl.
(4) мТЪ‡МУ‚ЛЪВ МУ‚Ы˛ ОЛЪЛВ‚Ы˛ ·‡Ъ‡ ВИНЫ
ФУОУКЛЪВО¸МУИ (+) ТЪУ УМУИ, У· ‡˘ВММУИ
М‡ ЫКЫ.
(5) á‡Í ÓÈÚÂ Í ˚¯ÍÛ.
2345
54
1
CCD-TRV14E/TRV24E 3-859-266-12(1).E/R
Page 55

Resetting the date
and time
мТЪ‡МУ‚Н‡ ‰‡Ъ˚ Л
‚ ВПВМЛ
You can reset the date and time in the menu
system.
(1) Set the POWER switch to CAMERA.
(2) While pressing PUSH OPEN, open the LCD
panel.
(3) Press MENU to display the menu.
(4) Turn the control dial to select CLOCK SET,
then press the dial.
(5) Turn the control dial to select the desired
year, then press the dial.
(6) Set the month, day, hour, and minutes by
turning the control dial and pressing the
dial.
(7) Press MENU to erase the menu display.
POWER
1 3,7
CAMERA
OFF
PLAYER
MENU
2
З˚ ПУКВЪВ ‚˚ФУОМЛЪ¸ ФУ‚ЪУ МЫ˛
ЫТЪ‡МУ‚НЫ ‰‡Ъ˚ Л ‚ ВПВМЛ ‚ ТЛТЪВПВ ПВМ˛.
(1) ìÒÚ‡ÌÓ‚ËÚ Ô ÂÍβ˜‡ÚÂθ POWER ‚
ФУОУКВМЛВ CAMERA.
(2) ЗУ ‚ ВПfl М‡К‡ЪЛfl НМУФНЛ PUSH OPEN
ÓÚÍ ÓÈÚ ԇÌÂθ ÜäÑ.
(3) з‡КПЛЪВ НМУФНЫ MENU ‰Оfl УЪУ· ‡КВМЛfl
ÏÂÌ˛.
(4) èÓ‚Â ÌËÚ ‰ËÒÍ ÛÔ ‡‚ÎÂÌËfl ‰Îfl ‚˚·Ó ‡
CLOCK SET, Б‡ЪВП М‡КПЛЪВ ‰ЛТН.
(5) èÓ‚Â ÌËÚ ‰ËÒÍ ÛÔ ‡‚ÎÂÌËfl ‰Îfl ‚˚·Ó ‡
КВО‡ВПУ„У „У‰‡, Б‡ЪВП М‡КПЛЪВ ‰ЛТН.
(6) мТЪ‡МУ‚ЛЪВ ПВТflˆ, ‰ВМ¸, ˜‡Т˚ Л ПЛМЫЪ˚
ФЫЪВП ФУ‚У УЪ‡ ‰ЛТН‡ ЫФ ‡‚ОВМЛfl Л
М‡К‡ЪЛfl ‰ЛТН‡.
(7) з‡КПЛЪВ НМУФНЫ MENU ‰Оfl Ы‰‡ОВМЛfl
Ë̉Ë͇ˆËË ÏÂÌ˛.
4
MENU
D ZOOM
LCD B.L.
BEEP
REC LAMP
AUTO DATE
CLOCK SET
DEMO MODE
[MENU] : END
1 1 1997
12:00:00
MENU
CLOCK SET
[MENU] : END
Additional information СУФУОМЛЪВО¸М‡fl ЛМЩУ П‡ˆЛfl
1997 1 1
12 00
5
1997 1 1
12 00
6
1997 7 1
1997 1 1
12 00
12 00
CCD-TRV14E/TRV24E 3-859-266-12(1).E/R
1997 7 4
12 00
1997 7 4
17 00
1997 7 4
17 30
55
Page 56

Resetting the date and time
1996 1997 2025
мТЪ‡МУ‚Н‡ ‰‡Ъ˚ Л ‚ ВПВМЛ
To correct the date and time setting
Repeat steps 5 and 6.
To check the date and time
Press DATE to display the date indicator. Press
TIME to display the time indicator. When you
press the same button again, the indicator goes
out.
The year indicator changes as
follows:
1996 1997 2025
Note on the time indicator
The internal clock of this camcorder operates on
a 24-hour cycle.
Playback modes
The playback mode (SP/LP) is selected
automatically according to the format in which
the tape has been recorded. The quality of the
recorded picture in LP mode, however, will not
be as good as that in SP mode.
Foreign 8 mm video
You may not play back tapes recorded on a
different TV colour system. Because the TV
colour systems differ from country to country,
you may not be able to play back foreign prerecorded tapes. Refer to the list of “Using your
camcorder abroad” to check the TV colour
system of foreign countries.
СОfl НУ ВНЪЛ У‚НЛ ЫТЪ‡МУ‚НЛ ‰‡Ъ˚
Л ‚ ВПВМЛ
иУ‚ЪУ ЛЪВ ФЫМНЪ˚ Т 5 ФУ 6.
СОfl Ф У‚В НЛ ‰‡Ъ˚ Л ‚ ВПВМЛ
з‡КПЛЪВ DATE ‰Оfl УЪУ· ‡КВМЛfl
ЛМ‰ЛН‡ЪУ ‡ ‰‡Ъ˚ ‚ ‚Л‰УЛТН‡ЪВОВ. з‡КПЛЪВ
TIME ‰Оfl УЪУ· ‡КВМЛfl ЛМ‰ЛН‡ЪУ ‡ ‚ ВПВМЛ.
ЦТОЛ ТМУ‚‡ М‡КПВЪВ ЪЫ КВ НМУФНЫ,
ЛМ‰ЛН‡ЪУ ФУ„‡ТМВЪ.
аМ‰ЛН‡ЪУ „У‰‡ ЛБПВМflВЪТfl
ТОВ‰Ы˛˘ЛП У· ‡БУП:
и ЛПВ˜‡МЛВ УЪМУТЛЪВО¸МУ ЛМ‰ЛН‡ЪУ ‡
‚ ВПВМЛ
ЗМЫЪ ВММЛВ ˜‡Т˚ ‰‡ММУИ ‚Л‰ВУН‡ПВ ˚
‡·ÓÚ‡˛Ú ‚ 24-˜‡ÒÓ‚ÓÏ ˆËÍÎÂ.
кВКЛП˚
‚УТФ УЛБ‚В‰ВМЛfl
кВКЛП ‚УТФ УЛБ‚В‰ВМЛfl (SP/LP)
‚˚·Л ‡ВЪТfl ‡‚ЪУП‡ЪЛ˜ВТНЛ ТУ„О‡ТМУ
ЩУ П‡ЪЫ, ‚ НУЪУ УП ·˚О‡ Б‡ФЛТ‡М‡ ОВМЪ‡.
й‰М‡НУ Н‡˜ВТЪ‚У ЛБУ· ‡КВМЛfl, Б‡ФЛТ‡ММУ„У
‚ ВКЛПВ LP ·Ы‰ВЪ МВТНУО¸НУ ıЫКВ, ˜ВП ‚
ВКЛПВ SP.
аМУТЪ ‡ММ˚В 8 ПП ‚Л‰ВУОВМЪ˚
З˚ МВ ПУКВЪВ ‚УТФ УЛБ‚У‰ЛЪ¸ ОВМЪ˚,
Б‡ФЛТ‡ММ˚В ‚ ‰ Ы„УИ ТЛТЪВПВ ˆ‚ВЪМУ„У
ЪВОВ‚Л‰ВМЛfl. н‡Н Н‡Н ТЛТЪВП˚ ˆ‚ВЪМУ„У
ЪВОВ‚Л‰ВМЛfl УЪОЛ˜‡˛ЪТfl ‚ Б‡‚ЛТЛПУТЪЛ УЪ
ТЪ ‡М˚, ЪУ ‚УБПУКМУ З˚ МВ ТПУКВЪВ
‚УТ УЛБ‚У‰ЛЪ¸ ЛМУТЪ ‡ММ˚В
Ф В‰‚‡ ЛЪВО¸МУ Б‡ФЛТ‡ММ˚В ОВМЪ˚.
лПУЪ ЛЪВ ТФЛТУН ‚ ‡Б‰ВОВ “аТФУО¸БУ‚‡МЛВ
З‡¯ВИ ‚Л‰ВУН‡ПВ ˚ Б‡ „ ‡МЛˆВИ” ‰Оfl
Ф У‚В НЛ ТЛТЪВП˚ ˆ‚ВЪМУ„У ЪВОВ‚Л‰ВМЛfl
ЛМУТЪ ‡ММ˚ı „УТЫ‰‡ ТЪ‚.
56
CCD-TRV14E/TRV24E 3-859-266-12(1).E/R
Page 57

Tips for using the
battery pack
лУ‚ВЪ˚ ФУ ЛТФУО¸БУ‚‡МЛ˛
·‡Ú‡ ÂÈÌÓ„Ó ·ÎÓ͇
This section shows you how you can get the
most out of your battery pack.
Preparing the battery pack
Always carry additional batteries
Have sufficient battery pack power to do 2 to 3
times as much recording as you have planned.
Battery life is shorter in cold
environment
Battery efficiency is decreased, and the battery
will be used up more quickly, if you are
recording in cold environment.
To save battery power
Turn the STANDBY switch on the camcorder
down when not recording to save battery
power.
A smooth transition between scenes can be
made even if recording is stopped and started
again. While positioning the subject, selecting
an angle, or looking through the viewfinder lens
or on the LCD screen, the lens moves
automatically and the battery is used. The
battery is also used when a cassette is inserted
or removed.
З ‰‡ММУП ‡Б‰ВОВ ФУН‡Б‡МУ, Н‡Н З˚ ПУКВЪВ
ЛТФУО¸БУ‚‡Ъ¸ М‡ЛОЫ˜¯ЛП У· ‡БУП З‡¯
·‡Ú‡ ÂÈÌ˚È ·ÎÓÍ.
èÓ‰„ÓÚӂ͇ ·‡Ú‡ ÂÈÌÓ„Ó ·ÎÓ͇
ЗТВ„‰‡ МУТЛЪВ Т ТУ·УИ
‰УФУОМЛЪВО¸М˚В ·ОУНЛ
аПВИЪВ ‰УТЪ‡ЪУ˜МУВ НУОЛ˜ВТЪ‚У Б‡ fl‰‡ ‚
·‡Ъ‡ ВИМ˚ı ·ОУН‡ı, ˜ЪУ·˚ ЛПВЪ¸
‚УБПУКМУТЪ¸ ‚˚ФУОМЛЪ¸ Т˙ВПНЫ УЪ 2 ‰У 3
‡Á.
л УН ТОЫК·˚ ·‡Ъ‡ ВИМУ„У ·ОУН‡
fl‚ОflВЪТfl ·УОВВ НУ УЪНЛП ‚
ıУОУ‰М˚ı ЫТОУ‚Лflı
щЩЩВНЪЛ‚МУТЪ¸ ·‡Ъ‡ ВИМУ„У ·ОУН‡
ТМЛК‡ВЪТfl Л Б‡ fl‰ ·Ы‰ВЪ ЛБ ‡ТıУ‰У‚‡М
·˚ÒÚ ÂÂ, ÂÒÎË Ç˚ Ô ÓËÁ‚Ó‰ËÚ Á‡ÔËÒ¸ ‚
ıÓÎÓ‰Ì˚ı ÛÒÎÓ‚Ëflı.
ÑÎfl ÒÓı ‡ÌÂÌËfl Á‡ fl‰‡ ·‡Ú‡ ÂÈÌÓ„Ó
·ÎÓ͇
дУ„‰‡ Б‡ФЛТ¸ МВ Ф УЛБ‚У‰ЛЪТfl, ФУ‚В МЛЪВ
‚˚НО˛˜‡ЪВО¸ ‚Л‰ВУН‡ПВ ˚ STANDBY ‚МЛБ
‰Оfl ТУı ‡МВМЛfl Б‡ fl‰‡ ·‡Ъ‡ ВИМУ„У ·ОУН‡.
еВК‰Ы ТˆВМ‡ПЛ ПУКВЪ ·˚Ъ¸ Т‰ВО‡М
ФО‡‚М˚И ФВ ВıУ‰, ‰‡КВ ВТОЛ Б‡ФЛТ¸
УТЪ‡МУ‚ОВМ‡ Л М‡˜‡Ъ‡ УФflЪ¸. ЗУ ‚ ВПfl
ФУБЛˆЛУМЛ У‚‡МЛfl У·˙ВНЪ‡, ‚˚·У ‡ Ы„О‡
ЛОЛ Ф УТПУЪ ‡ ˜В ВБ У·˙ВНЪЛ‚
‚Л‰УЛТН‡ЪВОfl ЛОЛ М‡ ˝Н ‡МВ ЬдС, У·˙ВНЪЛ‚
ФВ В‰‚Л„‡ВЪТfl ‡‚ЪУП‡ЪЛ˜ВТНЛ Л ·‡Ъ‡ ВИМ˚И
·ОУН ЛТФУО¸БЫВЪТfl. Е‡Ъ‡ ВИМ˚И ·ОУН Ъ‡НКВ
ЛТФУО¸БЫВЪТfl, НУ„‰‡ ‚ТЪ‡‚ОflВЪТfl Л
‚˚МЛП‡ВЪТfl Н‡ТТВЪ‡.
Additional information СУФУОМЛЪВО¸М‡fl ЛМЩУ П‡ˆЛfl
CCD-TRV14E/TRV24E 3-859-266-12(1).E/R
57
Page 58

Tips for using the battery pack
лУ‚ВЪ˚ ФУ ЛТФУО¸БУ‚‡МЛ˛
·‡Ú‡ ÂÈÌÓ„Ó ·ÎÓ͇
When to replace the battery
While you are using your camcorder, the
remaining battery indicator decreases gradually
as battery power is used up.
When the remaining battery indicator reaches
the lowest point, the i indicator appears and
starts flashing.
When the i indicator changes from slow
flashing to rapid flashing while you are
recording, set the POWER switch to OFF on the
camcorder and replace the battery pack. Leave
the tape in the camcorder to obtain smooth
transition between scenes before and after the
battery pack has been replaced.
Note on the remaining battery indicator
The remaining battery indicator of the
camcorder may indicate a different remaining
capacity from that of the battery pack with its
own indicator (not supplied). The indicator on
the battery pack is more accurate.
Notes on the rechargeable
battery pack
CAUTION
Never leave the battery pack in temperatures
above 60°C (140°F), such as in a car parked in
the sun or under direct sunlight.
äÓ„‰‡ ÒΉÛÂÚ Á‡ÏÂÌflÚ¸ ·‡Ú‡ ²
дУ„‰‡ З˚ ЛТФУО¸БЫВЪВ ‚Л‰ВУН‡ПВ Ы,
ЛМ‰ЛН‡ЪУ УТЪ‡‚¯В„УТfl Б‡ fl‰‡ ·‡Ъ‡ВЛ
ФУТЪВФВММУ ЫПВМ¸¯‡ВЪТfl ФУ ПВ В
ЛБ ‡ТıУ‰У‚‡МЛfl Б‡ fl‰‡ ·‡Ъ‡ ВЛ.
äÓ„‰‡ Ë̉Ë͇ÚÓ ÓÒÚ‡‚¯Â„ÓÒfl Á‡fl‰‡
·‡Ú‡ ÂË ‰ÓÒÚË„ÌÂÚ ÌËÁ¯ÂÈ ÚÓ˜ÍË, ÔÓfl‚ËÚÒfl Ë
̇˜ÌÂÚ ÏË„‡Ú¸ Ë̉Ë͇ÚÓ i.
ÖÒÎË ‚Ó ‚ ÂÏfl Á‡ÔËÒË Ë̉Ë͇ÚÓ i
ЛБПВМflВЪ ТНУ УТЪ¸ ПЛ„‡МЛfl Т ПВ‰ОВММУИ М‡
·˚ТЪ Ы˛, ЫТЪ‡МУ‚ЛЪВ ‚˚НО˛˜‡ЪВО¸
POWER ‚ ФУОУКВМЛВ OFF М‡ ‚Л‰ВУН‡ПВ В Л
Б‡ПВМЛЪВ ·‡Ъ‡ ВИМ˚И ·ОУН. йТЪ‡‚¸ЪВ ОВМЪЫ
‚ ‚Л‰ВУН‡ПВ В ‰Оfl ФУОЫ˜ВМЛfl ФО‡‚МУ„У
ФВ ВıУ‰‡ ПВК‰Ы ТˆВМ‡ПЛ ‰У Л ФУТОВ ЪУ„У,
Н‡Н ·˚О Б‡ПВМВМ ·‡Ъ‡ ВИМ˚И ·ОУН.
и ЛПВ˜‡МЛВ УЪМУТЛЪВО¸МУ ЛМ‰ЛН‡ЪУ ‡
УТЪ‡‚¯В„УТfl Б‡ fl‰‡ ·‡Ъ‡ ВЛ
аМ‰ЛН‡ЪУ УТЪ‡‚¯В„УТfl Б‡ fl‰‡ ·‡Ъ‡ ВЛ
‚Л‰ВУН‡ПВ ˚ ПУКВЪ ФУН‡Б˚‚‡Ъ¸
УТЪ‡‚¯Ы˛Тfl ВПНУТЪ¸ Б‡ fl‰‡, МВТНУО¸НУ
УЪОЛ˜‡˛˘Ы˛Тfl УЪ ЪУИ, ˜ЪУ ФУН‡Б˚‚‡ВЪ
·‡Ú‡ ÂÈÌ˚È ·ÎÓÍ ÒÓ Ò‚ÓËÏ ÒÓ·ÒÚ‚ÂÌÌ˚Ï
Ë̉Ë͇ÚÓ ÓÏ (ÌÂ Ô Ë·„‡ÂÚÒfl). à̉Ë͇ÚÓ Ì‡
·‡Ъ‡ ВИМУП ·ОУНВ fl‚ОflВЪТfl ·УОВВ ЪУ˜М˚П.
и ЛПВ˜‡МЛfl УЪМУТЛЪВО¸МУ ФВ ВБ‡ flК‡ВПУ„У ·‡Ъ‡ ВИМУ„У ·ОУН‡
икЦСйлнЦкЦЬЦзаЦ
зЛНУ„‰‡ МВ УТЪ‡‚ОflИЪВ ·‡Ъ‡ ВИМ˚И ·ОУН
Ф Л ЪВПФВ ‡ЪЫ В ‚˚¯В 60°л (140°F), Н‡Н
М‡Ф ЛПВ , ‚ ‡‚ЪУПУ·ЛОВ, Ф ЛФ‡ НУ‚‡ММУП М‡
ТУОМˆВ ЛОЛ ФУ‰ Ф flП˚ПЛ ТУОМВ˜М˚ПЛ
ОЫ˜‡ПЛ.
58
CCD-TRV14E/TRV24E 3-859-266-12(1).E/R
Page 59

Tips for using the battery pack
лУ‚ВЪ˚ ФУ ЛТФУО¸БУ‚‡МЛ˛
·‡Ú‡ ÂÈÌÓ„Ó ·ÎÓ͇
The battery heats up
During charging or recording, the battery pack
heats up. This is caused by energy that has been
generated and a chemical change that has
occurred inside the battery pack. This is not
cause for concern and is normal.
Battery pack care
•Remove the battery pack from the
camcorder after using it, and keep it in a cool
place. When the battery pack is installed to the
camcorder, a small amount of current flows to
the camcorder even if the POWER switch is set
to OFF. This shortens battery life.
•The battery pack is always discharging even
when it is not in use after charging. Therefore,
you should charge the battery right before
using the camcorder.
How to use the switch on the
battery pack
When the switch is supplied with the battery
pack ([a] on page 60), you can use it to find
whether the battery pack is charged or not. Set
the switch to the “no mark” position when
charging is completed. Set the switch to the “red
mark” position when the battery is used up (or
in whichever direction you want to remind
yourself).
The life of the battery pack
If the battery indicator flashes rapidly just after
turning on the camcorder with a fully charged
battery pack, the battery pack should be
replaced with a new fully charged one.
Charging temperature
You should charge batteries at temperatures
from 10°C to 30°C (from 50°F to 86°F). Lower
temperatures require a longer charging time.
Ňڇ ÂÈÌ˚È ·ÎÓÍ Ì‡„ ‚‡ÂÚÒfl
ÇÓ ‚ ÂÏfl Á‡ fl‰ÍË ËÎË Á‡ÔËÒË ·‡Ú‡ ÂÈÌ˚È
·ОУН М‡„ В‚‡ВЪТfl. щЪУ Ф УЛТıУ‰ЛЪ
‚ТОВ‰ТЪ‚ЛВ „ВМВ Л ЫВПУИ ˝МВ „ЛЛ Л
ıЛПЛ˜ВТНЛı ЛБПВМВМЛИ, НУЪУ ˚В Ф УЛТıУ‰flЪ
‚МЫЪ Л ·‡Ъ‡ ВИМУ„У ·ОУН‡. щЪУ МВ ‰УОКМУ
·˚Ъ¸ Ф Л˜ЛМУИ ‰Оfl ·ВТФУНУИТЪ‚‡ Л
fl‚ОflВЪТfl МУ П‡О¸М˚П.
мıУ‰ Б‡ ·‡Ъ‡ ВИМ˚П ·ОУНУП
• лМЛПЛЪВ ·‡Ъ‡ ВИМ˚И ·ОУН Т
‚Л‰ВУН‡ПВ ˚ ФУТОВ ФУО¸БУ‚‡МЛfl Л
ı ‡МЛЪВ В„У ‚ Ф УıО‡‰МУП ПВТЪВ. ЦТОЛ
·‡Ъ‡ ВИМ˚И ·ОУН ЫТЪ‡МУ‚ОВМ М‡
‚Л‰ВУН‡ПВ В, МВ·УО¸¯УВ НУОЛ˜ВТЪ‚У
˝ОВНЪ Л˜ВТНУ„У ЪУН‡ ·Ы‰ВЪ ФУТЪЫФ‡Ъ¸ М‡
‚Л‰ВУН‡ПВ Ы, ‰‡КВ, ВТОЛ ‚˚НО˛˜‡ЪВО¸
POWER ЫТЪ‡МУ‚ОВМ ‚ ФУОУКВМЛВ OFF. щЪУ
ТУН ‡˘‡ВЪ Т УН ТОЫК·˚ ·‡Ъ‡ ВЛ.
• Е‡Ъ‡ ВИМ˚И ·ОУН ‚ТВ„‰‡ ‡Б flК‡ВЪТfl,
‰‡КВ ВТОЛ УМ МВ ЛТФУО¸БЫВЪТfl ФУТОВ
Б‡ fl‰НЛ. иУ˝ЪУПЫ З‡П ТОВ‰ЫВЪ Б‡ fl‰ЛЪ¸
·‡Ъ‡ ВИМ˚И ·ОУН МВФУТ В‰ТЪ‚ВММУ ФВ В‰
ЛТФУО¸БУ‚‡МЛВП ‚Л‰ВУН‡ПВ ˚.
д‡Н ЛТФУО¸БУ‚‡Ъ¸ ФВ ВНО˛˜‡ЪВО¸ М‡
·‡Ъ‡ ВИМУП ·ОУНВ
ЦТОЛ ·‡Ъ‡ ВИМ˚И ·ОУН УТМ‡˘ВМ
ФВ ВНО˛˜‡ЪВОВП ( [a ] М‡ ТЪ . 60), ЪУ З˚
ПУКВЪВ ЛТФУО¸БУ‚‡Ъ¸ В„У ‰Оfl УФ В‰ВОВМЛfl,
Б‡ flКВМ ОЛ ·‡Ъ‡ ВИМ˚И ·ОУН ЛОЛ МВЪ.
мТЪ‡МУ‚ЛЪВ ФВ ВНО˛˜‡ЪВО¸ ‚ ФУБЛˆЛ˛ “·ВБ
ПВЪНЛ”, ВТОЛ ·‡Ъ‡ ВИМ˚И ·ОУН ФУОМУТЪ¸˛
Б‡ flКВМ. мТЪ‡МУ‚ЛЪВ ФВ ВНО˛˜‡ЪВО¸ ‚
ФУБЛˆЛ˛ “Н ‡ТМУИ ПВЪНЛ”, ВТОЛ Б‡ fl‰
·‡Ú‡ ÂÈÌÓ„Ó ·ÎÓ͇ ËÁ ‡ÒıÓ‰Ó‚‡Ì (ËÎË Ê ‚
Н‡НУВ-ОЛ·У ‰ Ы„УВ ФУОУКВМЛВ ‰Оfl
М‡ФУПЛМ‡МЛfl).
ë ÓÍ ÒÎÛÊ·˚ ·‡Ú‡ ÂÈÌÓ„Ó ·ÎÓ͇
ЦТОЛ ЛМ‰ЛН‡ЪУ Б‡ fl‰‡ ·‡Ъ‡ ВЛ ·˚ТЪ У
ПЛ„‡ВЪ Т ‡БЫ ФУТОВ ‚НО˛˜ВМЛfl
‚Л‰ВУН‡ПВ ˚ Т ФУОМУТЪ¸˛ Б‡ flКВММ˚П
·‡Ъ‡ ВИМ˚П ·ОУНУП, ЪУ ·‡Ъ‡ ВИМ˚И ·ОУН
ТОВ‰ЫВЪ Б‡ПВМЛЪ¸ М‡ МУ‚˚И, ФУОМУТЪ¸˛
Б‡ flКВММ˚И.
нВПФВ ‡ЪЫ ‡ Б‡ fl‰НЛ
З‡П ТОВ‰ЫВЪ Б‡ flК‡Ъ¸ ·‡Ъ‡ ВИМ˚И ·ОУН Ф Л
ЪВПФВ ‡ЪЫ В УЪ 10°л ‰У 30°л (УЪ 50°F ‰У
86°F). и Л ·УОВВ МЛБНУИ ЪВПФВ ‡ЪЫ В
Ъ В·ЫВЪТfl ·УОВВ ‰ОЛЪВО¸МУВ ‚ ВПfl Б‡ fl‰НЛ.
Additional information СУФУОМЛЪВО¸М‡fl ЛМЩУ П‡ˆЛfl
CCD-TRV14E/TRV24E 3-859-266-12(1).E/R
59
Page 60

Tips for using the battery pack
лУ‚ВЪ˚ ФУ ЛТФУО¸БУ‚‡МЛ˛
·‡Ú‡ ÂÈÌÓ„Ó ·ÎÓ͇
Notes on charging
A brand-new battery
A brand-new battery pack is not charged. Before
using the battery pack, charge it completely.
After long storage
Recharge the battery pack after a long period of
storage. If the battery pack is charged fully but
not used for a long time (about one year), it
becomes discharged. Charge it again, but in this
case the battery life will be shorter than normal.
After several charging and discharging cycles,
the battery life will recover its original capacity.
Notes on the terminals
If the terminals (metal parts on the back) are
not clean, the battery charge duration will be
shortened.
When the terminals are not clean or when the
battery pack has not been used for a long time,
repeatedly install and remove the battery pack a
few times. This improves the contact condition.
Also, wipe the + and – terminals with a soft
cloth or paper.
Be Sure to Observe the Following
• To prevent an accident caused by a short
circuit, do not allow metal objects such as a
necklace to touch the battery terminals.
When carrying the battery pack, attach to
the terminal cover. [b]
•Keep the battery pack away from fire.
•Keep the battery pack dry.
•Do not open or try to disassemble the battery
pack.
•Do not expose the battery pack to any
mechanical shock.
[a]
è ËϘ‡ÌË ÔÓ Á‡ fl‰ÍÂ
çÓ‚˚È ·‡Ú‡ ÂÈÌ˚È ·ÎÓÍ
зУ‚˚И ·‡Ъ‡ ВИМ˚И ·ОУН МВ Б‡ flКВМ. иВ В‰
ЛТФУО¸БУ‚‡МЛВП ·‡Ъ‡ ВИМУ„У ·ОУН‡
ФУОМУТЪ¸˛ Б‡ fl‰ЛЪВ В„У.
иУТОВ ‰ОЛЪВО¸МУ„У ı ‡МВМЛfl
иВ ВБ‡ fl‰ЛЪВ ·‡Ъ‡ ВИМ˚И ·ОУН ФУТОВ
‰ОЛЪВО¸МУ„У ФВ ЛУ‰‡ ı ‡МВМЛfl. ЦТОЛ
·‡Ъ‡ ВИМ˚И ·ОУН ·˚О ФУОМУТЪ¸˛ Б‡ flКВМ,
МУ МВ ЛТФУО¸БУ‚‡ОТfl ‰ОЛЪВО¸МУВ ‚ ВПfl
(УНУОУ 1 „У‰‡), УМ ‡Б fl‰ЛЪТfl. б‡ fl‰ЛЪВ В„У
ТМУ‚‡, У‰М‡НУ ‚ ˝ЪУП ТОЫ˜‡В Т УН ТОЫК·˚
·‡Ъ‡ ВИМУ„У ·ОУН‡ ·Ы‰ВЪ НУ У˜В, ˜ВП
У·˚˜МУ. иУТОВ МВТНУО¸НЛı ˆЛНОУ‚ Б‡ fl‰НЛ
Л ‡Б fl‰НЛ Т УН ТОЫК·˚ ·‡Ъ‡ ВИМУ„У ·ОУН‡
‚УТТЪ‡МУ‚ЛЪТfl ‚ ТУУЪ‚ВЪТЪ‚ЛЛ ТУ Т‚УВИ
ФВ ‚УМ‡˜‡О¸МУИ ВПНУТЪ¸˛.
и ЛПВ˜‡МЛfl УЪМУТЛЪВО¸МУ
НУМЪ‡НЪУ‚
ЦТОЛ НУМЪ‡НЪ˚ (ПВЪ‡ООЛ˜ВТНЛВ ˜‡ТЪЛ М‡
Б‡‰МВИ ˜‡ТЪЛ) Б‡„ flБМВМ˚,
Ф У‰УОКЛЪВО¸МУТЪ¸ Б‡ fl‰‡ ·‡Ъ‡ ВЛ
ТУН ‡ЪЛЪТfl. ЦТОЛ НУМЪ‡НЪ˚ Б‡„ flБМВМ˚ ЛОЛ
ВТОЛ ·‡Ъ‡ ВИМ˚И ·ОУН МВ ЛТФУО¸БУ‚‡ОТfl
‰ОЛЪВО¸МУВ ‚ ВПfl, ФУ‚ЪУ ЛЪВ ЫТЪ‡МУ‚НЫ Л
ТМflЪЛВ ·‡Ъ‡ ВИМУ„У ·ОУН‡ МВТНУО¸НУ ‡Б.
щЪУ ЫОЫ˜¯‡ВЪ ТУТЪУflМЛВ НУМЪ‡НЪУ‚.
и УЪ ЛЪВ Ъ‡НКВ НУМЪ‡НЪ˚ + Л – Пfl„НУИ
ЪН‡М¸˛ ЛОЛ Т‡ОЩВЪНУИ.
ç Á‡·Û‰¸Ú Òӷβ‰‡Ú¸ ÒÎÂ‰Û˛˘ÂÂ
• СОfl Ф В‰УЪ‚ ‡˘ВМЛfl МВТ˜‡ТЪМУ„У
ТОЫ˜‡fl, ‚˚Б‚‡ММУ„У НУ УЪНЛП
Б‡П˚Н‡МЛВП, МВ ‰УФЫТН‡ИЪВ, ˜ЪУ·˚
ПВЪ‡ООЛ˜ВТНЛВ У·˙ВНЪ˚, Ъ‡НЛВ, Н‡Н
УКВ ВО¸В, Ф ЛН‡Т‡ОЛТ¸ Н НУМЪ‡НЪ‡П
·‡Ъ‡ ВЛ. зУТЛЪВ ·‡Ъ‡ ВИМ˚И ·ОУН Т
Н ˚¯НУИ ‰Оfl НУМЪ‡НЪУ‚. [b]
• ï ‡ÌËÚ ·‡Ú‡ ÂÈÌ˚È ·ÎÓÍ ‚‰‡ÎË ÓÚ Ó„Ìfl.
• ï ‡ÌËÚ ·‡Ú‡ ÂÈÌ˚È ·ÎÓÍ ‚ ÒÛıÓÏ ‚ˉÂ.
• ç ÓÚÍ ˚‚‡ÈÚÂ Ë Ì Ô˚Ú‡ÈÚÂÒ¸ ‡ÁÓ· ‡Ú¸
·‡Ú‡ ÂÈÌ˚È ·ÎÓÍ.
• зВ ФУ‰‚В „‡ИЪВ ·‡Ъ‡ ВИМ˚И ·ОУН Н‡НЛПОЛ·У ПВı‡МЛ˜ВТНЛП Ы‰‡ М˚П ‚УБ‰ВИТЪ‚ЛflП.
[b]
60
CCD-TRV14E/TRV24E 3-859-266-12(1).E/R
Page 61

Maintenance information
àÌÙÓ Ï‡ˆËfl ÔÓ ÛıÓ‰Û Á‡ ‡ÔÔ‡-
and precautions
‡ЪУП Л ФВ‰УТЪУ УКМУТЪЛ
Moisture condensation
If the camcorder is brought directly from a cold
place to a warm place, moisture may condense
inside the camcorder, on the surface of the tape,
or on the lens. In this condition, the tape may
stick to the head drum and be damaged or the
camcorder may not operate correctly. To
prevent possible damage under these
circumstances, the camcorder is furnished with
moisture sensors. Please take the following
precautions.
Inside the camcorder
When the { and 6 indicators flash, moisture
has condensed inside the camcorder. If this
happens, no other functions except for tape
ejection will work.
Eject the tape, turn off the camcorder and
leave it with the cassette compartment open
for at least one hour. The camcorder can be
used again if the { indicator does not appear
when the power is turned on again.
On the lens
If moisture condenses on the lens, no indicator
appears, but the picture becomes dim. Turn off
the power and do not use the camcorder for
about one hour.
How to prevent moisture
condensation
When bringing the camcorder from a cold place
to a warm place, put the camcorder in a plastic
bag and allow it to adapt to room conditions
over a period of time.
(1) Be sure to tightly seal the plastic bag
containing the camcorder.
(2) Remove the bag when the air temperature
inside it has reached the temperature
surrounding it (after about one hour).
äÓ̉ÂÌÒ‡ˆËfl ‚·„Ë
ЦТОЛ ‚Л‰ВУН‡ПВ ‡ ‚МВТВМ‡ МВФУТ В‰ТЪ‚ВММУ
ЛБ ıУОУ‰МУ„У ПВТЪ‡ ‚ ЪВФОУВ, ‚МЫЪ Л
‚Л‰ВУН‡ПВ ˚ ПУКВЪ НУМ‰ВМТЛ У‚‡Ъ¸Тfl
‚О‡„‡, ‡ Ъ‡НКВ М‡ ФУ‚В ıМУТЪЛ ОВМЪ˚ ЛОЛ М‡
У·˙ВНЪЛ‚В. и Л Ъ‡НУП ЫТОУ‚ЛЛ, ОВМЪ‡ ПУКВЪ
Ф ЛОЛФМЫЪ¸ Н ·‡ ‡·‡МЫ „УОУ‚НЛ Л ·Ы‰ВЪ
ФУ‚ ВК‰ВМ‡ ЛОЛ КВ ‚Л‰ВУН‡ПВ ПУКВ
‡·УЪ‡Ъ¸ МВФ ‡‚ЛО¸МУ. СОfl Ф В‰УЪ‚ ‡˘ВМЛfl
‚УБПУКМУ„У ФУ‚ ВК‰ВМЛfl ‚‚Л‰Ы Ъ‡НЛı
У·ТЪУflЪВО¸ТЪ‚ ‚ ‚Л‰ВУН‡ПВ Ы ‚ТЪ УВМ˚
‰‡Ъ˜ЛНЛ ‚О‡„Л. лУ·О˛‰‡ИЪВ ТОВ‰Ы˛˘ЛВ
ФВ‰УТЪУУКМУТЪЛ.
ÇÌÛÚ Ë ‚ˉÂÓ͇Ï ˚
ÖÒÎË ÏË„‡˛Ú { Ë̉Ë͇ÚÓ ˚ Ë 6, ‚МЫЪ Л
‚Л‰ВУН‡ПВ ˚ Ф УЛБУ¯О‡ НУМ‰ВМТ‡ˆЛfl
‚О‡„Л.
З ТОЫ˜‡В, ВТОЛ ˝ЪУ Ф УЛБУ¯ОУ, МЛ У‰М‡ ЛБ
ЩЫМНˆЛИ, Н УПВ ‚˚Ъ‡ОНЛ‚‡МЛfl Н‡ТТВЪ˚,
МВ ·Ы‰ВЪ ‡·УЪ‡Ъ¸. йЪН УИЪВ УЪТВН
Н‡ТТВЪ˚, ‚˚НО˛˜ЛЪВ ‚Л‰ВУН‡ПВ Ы Л
УТЪ‡‚¸ЪВ ВВ Ф ЛПВ МУ М‡ У‰ЛМ ˜‡Т.
ЗЛ‰ВУН‡ПВ ‡ ТМУ‚‡ ПУКВЪ ·˚Ъ¸
ЛТФУО¸БУ‚‡М‡, ВТОЛ ЛМ‰ЛН‡ЪУ { ÌÂ
ÔÓfl‚ËÚÒfl, ÍÓ„‰‡ ÔËÚ‡ÌË ·Û‰ÂÚ ‚Íβ˜ÂÌÓ
ÓÔflÚ¸.
ç‡ Ó·˙ÂÍÚË‚Â
ЦТОЛ ‚О‡„‡ ТНУМ‰ВМТЛ У‚‡О‡Т¸ М‡
У·˙ВНЪЛ‚В, ЪУ МЛН‡Н‡fl ЛМ‰ЛН‡ˆЛfl
ФУfl‚ОflЪ¸Тfl МВ ·Ы‰ВЪ, МУ ЛБУ· ‡КВМЛВ
ТЪ‡МУ‚ЛЪТfl ЪЫТНО˚П. йЪНО˛˜ЛЪВ ФЛЪ‡МЛВ Л
МВ ЛТФУО¸БЫИЪВ ‚Л‰ВУН‡ПВ Ы ‚ ЪВ˜ВМЛВ 1
˜‡Т‡.
ä‡Í Ô Â‰ÓÚ‚ ‡ÚËÚ¸ ÍÓ̉ÂÌÒ‡ˆË˛
‚·„Ë
и Л ‚МВТВМЛЛ ‚Л‰ВУН‡ПВ ˚ Т ıУОУ‰МУ„У
ПВТЪ‡ ‚ ЪВФОУВ ФУОУКЛЪВ ‚Л‰ВУН‡ПВ Ы ‚
ФУОЛ˝ЪЛОВМУ‚˚И Ф‡НВЪ Л ‰‡ИЪВ ВИ
‚УБПУКМУТЪ¸ ‡‰‡ФЪЛ У‚‡Ъ¸Тfl Н НУПМ‡ЪМ˚П
ЫТОУ‚ЛflП ‚ ЪВ˜ВМЛВ УФ В‰ВОВММУ„У ФВ ЛУ‰‡
‚ ВПВМЛ.
(1) ç Á‡·Û‰¸Ú „ ÏÂÚ˘ÌÓ Á‡‚flÁ‡Ú¸
ФУОЛ˝ЪЛОВМУ‚˚И Ф‡НВЪ, ТУ‰В К‡˘ЛИ
‚Л‰ВУН‡ПВ Ы.
(2) лМЛПЛЪВ Ф‡НВЪ, НУ„‰‡ ЪВПФВ‡ЪЫ ‡ ‚МЫЪ Л
МВ„У ‰УТЪЛ„МВЪ ЪВПФВ ‡ЪЫ ˚
УН ЫК‡˛˘ВИ Т В‰˚ (Ф ЛПВ МУ ТФЫТЪfl 1
˜‡Т).
Additional information СУФУОМЛЪВО¸М‡fl ЛМЩУ П‡ˆЛfl
CCD-TRV14E/TRV24E 3-859-266-12(1).E/R
61
Page 62

Maintenance information and
precautions
аМЩУ П‡ˆЛfl ФУ ЫıУ‰Ы Б‡
‡ФФ‡ ‡ЪУП Л Ф В‰УТЪУ УКМУТЪЛ
Video head cleaning
To ensure normal recording and clear pictures,
clean the video heads. When v appears in
CAMERA mode or playback pictures are
“noisy” or hardly visible, the video heads may
be dirty.
[a] [b]
[a] Slightly dirty
[b] Dirty
If this happens, clean the video heads with the
Sony V8-25CLH cleaning cassette (not
supplied). After checking the picture, if it is still
“noisy”, repeat the cleaning. (Do not repeat
cleaning more than 5 times in one session.)
Caution
Do not use a commercially available wet-type
cleaning cassette. It may damage the video
heads.
Note
If the V8-25CLH cleaning cassette is not
available in your area, consult your nearest
Sony dealer.
é˜ËÒÚ͇ „ÓÎÓ‚ÓÍ
ÑÎfl Ó·ÂÒÔ˜ÂÌËfl ÌÓ Ï‡Î¸ÌÓÈ Á‡ÔËÒË Ë
˜ÂÚÍÓ„Ó ËÁÓ· ‡ÊÂÌËfl ‚ˉÂÓ„ÓÎÓ‚ÍË ÒΉÛÂÚ
Ó˜Ë˘‡Ú¸. ÖÒÎË Ë̉Ë͇ÚÓ v ÔÓfl‚ÎflÂÚÒfl ‚
ВКЛПВ CAMERA ЛОЛ ‚УТФ УЛБ‚У‰ЛПУВ
ЛБУ· ‡КВМЛВ fl‚ОflВЪТfl “Б‡¯ЫПОВММ˚П” ЛОЛ
Ъ Ы‰МУ ‡БОЛ˜ЛП˚П, ‚Л‰ВУ„УОУ‚НЛ ПУ„ЫЪ
·˚Ú¸ Á‡„ flÁÌÂÌ˚.
[a] ë΄͇ Á‡„ flÁÌÂÌ˚
[b] ᇄ flÁÌÂÌ˚
ЦТОЛ ˝ЪУ Ф УЛБУ¯ОУ, У˜ЛТЪЛЪВ ‚Л‰ВУ„УОУ‚НЛ
Т ФУПУ˘¸˛ У˜ЛТЪЛЪВО¸МУИ Н‡ТТВЪ˚ V825CLH (МВ Ф ЛО‡„‡ВЪТfl). иУТОВ Ф У‚В НЛ
ЛБУ· ‡КВМЛfl, ВТОЛ УМУ ‚Тfi В˘fi
“Б‡¯ЫПОВМУ”, ФУ‚ЪУ ЛЪВ У˜ЛТЪНЫ. (зВ
ФУ‚ЪУ flИЪВ У˜ЛТЪНЫ ·УОВВ 5 ‡Б Б‡ У‰ЛМ
Ф ЛВП).
иВ‰УТЪВ ВКВМЛВ
зВ ЛТФУО¸БЫИЪВ ЛПВ˛˘ЛВТfl ‚ Ф У‰‡КВ
У˜ЛТЪЛЪВО¸М˚В Н‡ТТВЪ˚ ‚О‡КМУ„У ЪЛФ‡. щЪУ
ПУКВЪ ФУ‚ В‰ЛЪ¸ ‚Л‰ВУ„УОУ‚НЛ.
è ËϘ‡ÌËÂ
ЦТОЛ У˜ЛТЪЛЪВО¸МУИ Н‡ТТВЪ˚ V8-25CLH МВЪ
‚ Ф У‰‡КВ ‚ З‡¯ВИ У·О‡ТЪЛ, У· ‡ЪЛЪВТ¸ ‚
З‡¯В ·ОЛК‡И¯ВВ ‡„ВМЪТЪ‚У Sony.
62
CCD-TRV14E/TRV24E 3-859-266-12(1).E/R
Page 63

Maintenance information and
precautions
аМЩУ П‡ˆЛfl ФУ ЫıУ‰Ы Б‡
‡ФФ‡ ‡ЪУП Л Ф В‰УТЪУ УКМУТЪЛ
Removing dust from inside the
viewfinder
(1) Remove the screw with a screwdriver (not
supplied). Then, while sliding the RELEASE
knob, turn the eyecup in the direction of the
arrow and pull it out.
(2) Clean the surface with a commercially
available blower.
1
To reattach the eyecup
(1) Align the groove on the eyecup with the
• mark on the barrel.
(2) Turn the eyecup in the direction of the
arrow.
(3) Replace the screw.
쉇ОВМЛВ Ф˚ОЛ ЛБМЫЪ Л
‚Л‰УЛТН‡ЪВОfl
(1) лМЛПЛЪВ ‚ЛМЪ Т ФУПУ˘¸˛ УЪ‚В ЪНЛ (МВ
Ф ЛО‡„‡ВЪТfl). б‡ЪВП ФВ В‰‚Л„‡fl Ы˜НЫ
RELEASE, ФУ‚В МЛЪВ УНЫОfl ‚
М‡Ф ‡‚ОВМЛЛ ТЪ ВОНЛ Л ТМЛПЛЪВ В„У.
(2) й˜ЛТЪЛЪВ ФУ‚ВıМУТЪ¸ Ф У‰Ы‚У˜М˚П
ЫТЪ УИТЪ‚УП, Ф ЛУ· ВЪВММ˚П
НУППВ ˜ВТНЛП ТФУТУ·УП.
Additional information СУФУОМЛЪВО¸М‡fl ЛМЩУ П‡ˆЛfl
2
СОfl Ф ЛН ВФОВМЛfl УНЫОfl ‡
(1) лУ‚ПВТЪЛЪВ Н‡М‡‚НЫ М‡ УНЫОfl В Т ПВЪНУИ
• М‡ НУФЫТВ.
(2) иУ‚В МЛЪВ УНЫОfl ‚ М‡Ф ‡‚ОВМЛЛ ТЪ ВОНЛ.
(3) ìÒÚ‡ÌÓ‚ËÚ ‚ËÌÚ.
1
Caution
Do not remove any other screws. You may
remove only the screw to remove the eyecup.
2
иВ‰УТЪВВКВМЛВ
зВ ТМЛП‡ИЪВ Н‡НЛВ-ОЛ·У ‰ Ы„ЛВ ‚ЛМЪ˚. З˚
ПУКВЪВ ТМЛП‡Ъ¸ ЪУО¸НУ ‚ЛМЪ ‰Оfl ТМflЪЛfl
УНЫОfl ‡.
63
CCD-TRV14E/TRV24E 3-859-266-12(1).E/R
Page 64

Maintenance information and
precautions
аМЩУ П‡ˆЛfl ФУ ЫıУ‰Ы Б‡
‡ФФ‡ ‡ЪУП Л Ф В‰УТЪУ УКМУТЪЛ
Precautions
Camcorder operation
• Operate the camcorder using 6.0 V (battery
pack), or 7.5 V (AC power adaptor).
• For DC or AC operation, use only the
recommended accessories.
• Should any solid object or liquid fall into the
casing, unplug the camcorder and have it
checked by your nearest Sony dealer before
operating it any further.
• Avoid rough handling or mechanical shock. Be
particularly careful of the lens.
• Keep the POWER switch set to OFF when not
using the camcorder.
• Do not wrap up the camcorder and operate it
since heat may build up internally.
• Keep the camcorder away from strong
magnetic fields or mechanical vibration.
• Do not push the LCD screen.
• If the camcorder is used in a cold place, a
residual image may appear on the LCD screen.
This is not a malfunction.
• While using the camcorder, the back of the LCD
screen may heat up. This is not a malfunction.
On handling tapes
Do not insert anything in the small holes on the
rear of the cassette. These holes are used to
sense the type of tape, thickness of tape, and if
the recording tab is out or in.
Camcorder care
• When the camcorder is not to be used for a long
time, disconnect the power source and remove
the cassette. Periodically turn on the power,
operate the camera and player sections and
play back a tape for about 3 minutes.
• Clean the lens with a soft brush to remove dust.
If there are fingerprints on the lens, remove
them with a soft cloth.
иВ‰УТЪУУКМУТЪЛ
ꇷÓÚ‡ Ò ‚ˉÂÓ͇Ï ÓÈ
• щНТФОЫ‡ЪЛ ЫИЪВ ‚Л‰ВУН‡ПВ Ы ЛТФУО¸БЫfl
6,0 З (·‡Ъ‡ ВИМ˚И ·ОУН) ЛОЛ 7,5 З (ТВЪВ‚УИ
‡‰‡ФЪВ ФВ ВП. ЪУН‡).
• СОfl ‡·УЪ˚ УЪ ФУТЪУflММУ„У ЛОЛ
ФВ ВПВММУ„У ЪУН‡ ЛТФУО¸БЫИЪВ ЪУО¸НУ
ВНУПВМ‰ЫВП˚В Ф ЛМ‡‰ОВКМУТЪЛ.
• З ТОЫ˜‡В ФУФ‡‰‡МЛfl Н‡НЛı-ОЛ·У Ъ‚В ‰˚ı
Ф В‰ПВЪУ‚ ЛОЛ КЛ‰НУТЪЛ ‚МЫЪ ¸ НУ ФЫТ‡
Н‡ПВ ˚, УЪНО˛˜ЛЪ¸ ‚Л‰ВУН‡ПВ Ы Л
Ф У‚В ЛЪ¸ ВВ ‚ ·ОЛК‡И¯ВП ‡„ВМЪТЪ‚В Sony
ФВ В‰ ‰‡О¸МВИ¯ВИ ˝НТФОЫ‡Ъ‡ˆЛВИ.
• аБ·В„‡ИЪВ „ Ы·У„У У· ‡˘ВМЛfl Т
‚Л‰ВУН‡ПВ УИ ЛОЛ ПВı‡МЛ˜ВТНУ„У Ы‰‡ МУ„У
‚УБ‰ВИТЪ‚Лfl. ЕЫ‰¸ЪВ УТУ·ВММУ УТЪУУКМ˚
Т У·˙ВНЪЛ‚УП.
• СВ КЛЪВ ‚˚НО˛˜‡ЪВО¸ POWER ‚
ФУОУКВМЛЛ OFF, ВТОЛ ‚Л‰ВУН‡ПВ ‡ МВ
ЛТФУО¸БЫВЪТfl.
• ç Á‡‚Ó ‡˜Ë‚‡ÈÚ ‚ˉÂÓ͇ÏÂ Û Ë ÌÂ
‡·УЪ‡ИЪВ Ъ‡НЛП У· ‡БУП Т МВИ, ФУТНУО¸НЫ
‚МЫЪ Л Н‡ПВ ˚ ПУКВЪ ФУ‰МflЪ¸Тfl
ЪВПФВ‡ЪЫ ‡.
• СВ КЛЪВ ‚Л‰ВУН‡ПВ Ы ‚‰‡ОЛ УЪ ТЛО¸М˚ı
П‡„МЛЪМ˚ı ФУОВИ ЛОЛ ПВı‡МЛ˜ВТНЛı
‚Л· ‡ˆЛИ.
• ç ̇ÊËχÈÚ ̇ ˝Í ‡Ì ÜäÑ.
• ЦТОЛ ‚Л‰ВУН‡ПВ ‡ ЛТФУО¸БЫВЪТfl ‚
ıУОУ‰МУП ПВТЪВ, ЪУ ФУТОВЛБУ· ‡КВМЛВ
ПУКВЪ ФУfl‚ЛЪ¸Тfl М‡ ˝Н ‡МВ ЬдС. щЪУ МВ
fl‚ОflВЪТfl МВЛТФ ‡‚МУТЪ¸˛.
• ЗУ ‚ ВПfl ЛТФУО¸БУ‚‡МЛfl ‚Л‰ВУН‡ПВ ˚
Ъ˚О¸М‡fl ˜‡ТЪ¸ ˝Н ‡М‡ ЬдС ПУКВЪ
М‡„ В‚‡Ъ¸Тfl. щЪУ МВ fl‚ОflВЪТfl
МВЛТФ ‡‚МУТЪ¸˛.
йЪМУТЛЪВО¸МУ У· ‡˘ВМЛfl Т ОВМЪ‡ПЛ
зВ ‚ТЪ‡‚ОflИЪВ МЛН‡НЛı Ф В‰ПВЪУ‚ ‚
П‡ОВМ¸НЛВ УЪ‚В ТЪЛfl М‡ Б‡‰МВИ ТЪУ УМВ
Н‡ТТВЪ˚. щЪЛ УЪ‚В ТЪЛfl ЛТФУО¸БЫ˛ЪТfl ‰Оfl
УФ В‰ВОВМЛfl ЪЛФ‡ ОВМЪ˚, ЪУО˘ЛМ˚ ОВМЪ˚ Л
М‡ОЛ˜Лfl ОВФВТЪН‡ Б‡ФЛТЛ.
64
ìıÓ‰ Á‡ ‚ˉÂÓ͇Ï ÓÈ
• ЦТОЛ ‚Л‰ВУН‡ПВ ‡ МВ ·Ы‰ВЪ
ЛТФУО¸БУ‚‡Ъ¸Тfl ‰ОЛЪВО¸МУВ ‚ ВПfl,
УЪНО˛˜ЛЪВ ЛТЪУ˜МЛН ФЛЪ‡МЛfl Л ЛБ‚ОВНЛЪВ
Н‡ТТВЪЫ. иВ ЛУ‰Л˜ВТНЛ ‚НО˛˜‡ИЪВ
ФЛЪ‡МЛВ, Ф УЛБ‚У‰ЛЪВ УФВ ‡ˆЛЛ Т
‚Л‰ВУН‡ПВ УИ Л ТВНˆЛВИ ФОВИВ ‡ Л
‚УТФ УЛБ‚У‰ЛЪВ ОВМЪЫ ФУ fl‰Н‡ 3 ПЛМЫЪ.
• й˜Л˘‡ИЪВ У·˙ВНЪЛ‚ Пfl„НУИ НЛТЪУ˜НУИ ‰Оfl
Ы‰‡ОВМЛfl Ф˚ОЛ. ЦТОЛ М‡ ФУ‚В ıМУТЪЛ
У·˙ВНЪЛ‚‡ ЛПВ˛ЪТfl УЪФВ˜‡ЪНЛ Ф‡О¸ˆВ‚,
Ы‰‡ОЛЪВ Лı Т ФУПУ˘¸˛ Пfl„НУИ ЪН‡МЛ.
CCD-TRV14E/TRV24E 3-859-266-12(1).E/R
Page 65

Maintenance information and
precautions
аМЩУ П‡ˆЛfl ФУ ЫıУ‰Ы Б‡
‡ФФ‡ ‡ЪУП Л Ф В‰УТЪУ УКМУТЪЛ
•If there are fingerprints on the LCD screen,
remove them using an LCD cleaning kit (not
supplied).
•Clean the camcorder body with a soft dry cloth,
or a soft cloth lightly moistened with a mild
detergent solution. Do not use any type of
solvent which may damage the finish.
•Do not let sand get into the camcorder. When
you use the camcorder on a sandy beach or in a
dusty place, protect it from the sand or dust.
Sand or dust may cause the unit to malfunction,
and sometimes this malfunction cannot be
repaired.
AC power adaptor
Charging
•Attach the battery pack firmly.
•Place the battery pack on a flat surface without
vibration during charging.
Others
•Unplug the unit from the mains when not in
use for a long time. To disconnect the mains
lead, pull it out by the plug. Never pull the cord
itself.
•Do not operate the unit with a damaged cord or
if the unit has been dropped or damaged.
•Do not bend the AC power cord (mains lead)
forcibly, or put a heavy object on it. This will
damage the cord and may cause a fire or an
electrical shock.
•Be sure that nothing metallic comes into contact
with the metal parts of the connecting plate. If
this happens, a short may occur and the unit
may be damaged.
•Always keep the metal contacts clean.
•Do not disassemble the unit.
•Do not apply mechanical shock or drop the
unit.
•While the unit is in use, particularly during
charging, keep it away from AM receivers and
video equipment because it will disturb AM
reception and video operation.
• ЦТОЛ М‡ ˝Н ‡МВ ЬдС ЛПВ˛ЪТfl УЪФВ˜‡ЪНЛ
Ф‡О¸ˆВ‚, Ы‰‡ОЛЪВ Лı, ЛТФУО¸БЫfl М‡·У ‰Оfl
˜ЛТЪНЛ ЬдС (МВ Ф ЛО‡„‡ВЪТfl).
• й˜Л˘‡ИЪВ НУ ФЫТ ‚Л‰ВУН‡ПВ ˚ Пfl„НУИ
ТЫıУИ ЪН‡М¸˛ ЛОЛ КВ Пfl„НУИ ЪН‡М¸˛,
ТОВ„Н‡ ТПУ˜ВММУИ ‚ Пfl„НУП ‡ТЪ‚У В
ПУ˛˘В„У Т В‰ТЪ‚‡. зВ ЛТФУО¸БЫИЪВ
МЛН‡НЛı ‡ТЪ‚У ЛЪВОВИ, ФУТНУО¸НЫ ˝ЪУ
ПУКВЪ ФУ‚В‰ЛЪ¸ УЪ‰ВОНЫ.
• зВ ‰УФЫТН‡ИЪВ ФУФ‡‰‡МЛfl ФВТН‡ ‚
‚Л‰ВУН‡ПВ Ы. З ТОЫ˜‡В ЛТФУО¸БУ‚‡МЛfl
‚Л‰ВУН‡ПВ ˚ М‡ ФВТ˜‡МУП ФОflКВ ЛОЛ ‚
Ф˚О¸МУП ПВТЪВ Ф В‰Ф ЛПЛЪВ ‚ТВ ПВ ˚,
˜ЪУ·˚ Ф В‰Уı ‡МЛЪ¸ ВВ УЪ ФВТН‡ ЛОЛ Ф˚ОЛ.
иВТУН ЛОЛ Ф˚О¸ ПУ„ЫЪ Ф Л‚ВТЪЛ Н
МВЛТФ ‡‚МУТЪЛ Л ЛМУ„‰‡ Ъ‡Н‡fl
МВЛТФ ‡‚МУТЪ¸ ПУКВЪ ·˚Ъ¸ МВЛТФ ‡‚ЛП‡.
ëÂÚ‚ÓÈ ‡‰‡ÔÚ Ô ÂÏ. ÚÓ͇
ᇠfl‰Í‡
• и ЛТУВ‰ЛМЛЪВ М‡‰ВКМУ ·‡Ъ‡ ВИМ˚И ·ОУН.
• к‡БПВТЪЛЪВ ·‡Ъ‡ ВИМ˚И ·ОУН М‡ ФОУТНУИ
ФУ‚В ıМУТЪЛ ·ВБ ‚Л· ‡ˆЛЛ ‚У ‚ ВПfl
Б‡fl‰НЛ.
è Ó˜ÂÂ
• йЪТУВ‰ЛМЛЪВ ‡ФФ‡‡Ъ УЪ ˝ОВНЪ Л˜ВТНУИ
ТВЪЛ, ВТОЛ УМ МВ ЛТФУО¸БЫВЪТfl ‚ ЪВ˜ВМЛВ
‰ОЛЪВО¸МУ„У ‚ ВПВМЛ. СОfl УЪТУВ‰ЛМВМЛfl
ТВЪВ‚У„У Ф У‚У‰‡ ‚˚Ъ‡˘ЛЪВ В„У Б‡ ‡Б˙ВП.
зЛНУ„‰‡ МВ ЪflМЛЪВ Б‡ Т‡П Ф У‚У‰.
• зВ ˝НТФОЫ‡ЪЛ ЫИЪВ ‡ФФ‡ ‡Ъ Т
ФУ‚ ВК‰ВММ˚П ¯МЫ УП ЛОЛ КВ, ВТОЛ
‡ФФ‡ ‡Ъ ·˚О Ы УМВМ ЛОЛ ФУ‚ ВК‰ВМ.
• зВ Т„Л·‡ИЪВ ТВЪВ‚УИ ¯МЫ ФВ ВП. ЪУН‡
(ТВЪВ‚УИ Ф У‚У‰) Л МВ НО‡‰ЛЪВ ЪflКВО˚В
Ф В‰ПВЪ˚ М‡ МВ„У. щЪУ ПУКВЪ ФУ‚ В‰ЛЪ¸
ТВЪВ‚УИ ¯МЫ Л ПУКВЪ Ф Л‚ВТЪЛ Н ФУК‡ Ы
ЛОЛ ФУ ‡КВМЛ˛ ˝ОВНЪ Л˜ВТНЛП ЪУНУП.
• лОВ‰ЛЪВ Б‡ ЪВП, ˜ЪУ·˚ МЛН‡НЛВ
ПВЪ‡ООЛ˜ВТНЛВ Ф В‰ПВЪ˚ МВ Ф ЛıУ‰ЛОЛ ‚
НУМЪ‡НЪ Т ПВЪ‡ООЛ˜ВТНЛПЛ ‰ВЪ‡ОflПЛ
ТУВ‰ЛМЛЪВО¸МУИ ФО‡ТЪЛМ˚. ЦТОЛ ˝ЪУ
Ф УЛБУИ‰ВЪ, ЪУ ПУКВЪ ‚УБМЛНМЫЪ¸ НУ УЪНУВ
Б‡П˚Н‡МЛВ Л ‡ФФ‡ ‡Ъ ПУКВЪ ·˚Ъ¸
ФУ‚ ВК‰ВМ.
• ЗТВ„‰‡ ФУ‰‰В КЛ‚‡ИЪВ ПВЪ‡ООЛ˜ВТНЛВ
НУМЪ‡НЪ˚ ‚ ˜ЛТЪУЪВ.
• ç ‡Á·Ë ‡ÈÚ ‡ÔÔ‡‡Ú.
• зВ ФУ‰‚В „‡ИЪВ ‡ФФ‡ ‡Ъ ПВı‡МЛ˜ВТНЛП
Ы‰‡ ‡П Л МВ УМflИЪВ В„У.
• ЦТОЛ ‡ФФ‡ ‡Ъ М‡ıУ‰ЛЪТfl ‚ ˝НТФОЫ‡Ъ‡ˆЛЛ,
УТУ·ВММУ ‚ ВКЛПВ Б‡ fl‰НЛ, ‰В КЛЪВ В„У
‚‰‡ОЛ УЪ Ф ЛВПМЛНУ‚ Де Л
‚Л‰ВУУ·У Ы‰У‚‡МЛfl, ФУЪУПЫ ˜ЪУ УМ ПУКВЪ
М‡ Ы¯ЛЪ¸ Ф ЛВП Де Л ‡·УЪЫ
‚Л‰ВУ‡ФФ‡‡ЪЫ˚.
Additional information СУФУОМЛЪВО¸М‡fl ЛМЩУ П‡ˆЛfl
65
CCD-TRV14E/TRV24E 3-859-266-12(1).E/R
Page 66

Maintenance information and
precautions
аМЩУ П‡ˆЛfl ФУ ЫıУ‰Ы Б‡
‡ФФ‡ ‡ЪУП Л Ф В‰УТЪУ УКМУТЪЛ
•The unit becomes warm while in use. This is
normal.
•Do not place the unit in locations that are:
– Extremely hot or cold
– Dusty or dirty
– Very humid
– Vibrating
Notes on the dry batteries
To avoid possible damage from battery leakage
or corrosion, observe the following.
•Be sure to insert the batteries in the correct
direction.
•Dry batteries are not rechargeable.
•Do not use a combination of new and old
batteries.
•Do not use different types of batteries.
•The batteries slowly discharge while not in use.
•Do not use a battery that is leaking.
If battery leakage occurred
•Wipe off the liquid in the battery compartment
carefully before replacing the batteries.
•If you touch the liquid, wash it off with water.
If any difficulty should arise, unplug the unit
and contact your nearest Sony dealer.
• ДФФ‡ ‡Ъ ТЪ‡МУ‚ЛЪТfl ЪВФО˚П ‚У ‚ ВПfl
ЛТФУО¸БУ‚‡МЛfl. щЪУ fl‚ОflВЪТfl
МУ П‡О¸М˚П.
• ç ‡ÁÏ¢‡ÈÚ ‡ÔÔ‡ ‡Ú ‚ ÏÂÒÚ‡ı, ÍÓÚÓ ˚Â:
— Í ‡ÈÌ „Ó fl˜Ë ËÎË ıÓÎÓ‰Ì˚Â
— Ô˚θÌ˚ ËÎË „ flÁÌ˚Â
— Ó˜Â̸ ‚·ÊÌ˚Â
— ÔÓ‰‚ ÊÂÌ˚ ‚Ë· ‡ˆËË
и ЛПВ˜‡МЛfl УЪМУТЛЪВО¸МУ ·‡Ъ‡ ВВН
ТЫıУ„У ЪЛФ‡
ЗУ ЛБ·ВК‡МЛВ ‚УБПУКМУ„У ФУ‚ ВК‰ВМЛfl
‚ТОВ‰ТЪ‚ЛВ ЫЪВ˜НЛ ‚МЫЪ ВММВ„У ‚В˘ВТЪ‚‡ ЛБ
·‡Ú‡ ÂÂÍ ËÎË ÍÓ ÓÁËË Òӷ≇ÈÚÂ
ТОВ‰Ы˛˘ЛВ ПВ ˚ Ф В‰УТЪУ УКМУТЪЛ.
•ëӷ≇ÈÚÂ Ô ‡‚ËθÌÛ˛ ÔÓÎfl ÌÓÒÚ¸ Ô Ë
ÛÒÚ‡ÌÓ‚Í ·‡Ú‡ ÂÂÍ.
•Å‡Ú‡ ÂÈÍË ÒÛıÓ„Ó ÚËÔ‡ Ì ÔÓ‰ÎÂʇÚ
ÔÂÂÁ‡ fl‰ÍÂ.
•зВ ЛТФУО¸БЫИЪВ ‚ПВТЪВ МУ‚˚В Л ТЪ‡ ˚В
·‡Ú‡ ÂÈÍË.
•зВ ЛТФУО¸БЫИЪВ ‚ПВТЪВ ·‡Ъ‡ ВИНЛ ‡БМУ„У
ÚËÔ‡.
•Е‡Ъ‡ ВИНЛ ФУТЪВФВММУ ПВ‰ОВММУ
‡Б flК‡˛ЪТfl, ВТОЛ МВ ЛТФУО¸БЫ˛ЪТfl.
•зВ ЛТФУО¸БЫИЪВ ·‡Ъ‡ ВВН, ЛБ НУЪУ ˚ı
ЛПВВЪ ПВТЪУ ЫЪВ˜НЛ ‚МЫЪ ВММВ„У ‚В˘ВТЪ‚‡.
Ç ÒÎÛ˜‡Â ÛÚ˜ÍË ‚ÌÛÚ ÂÌÌÂ„Ó ‚¢ÂÒÚ‚‡ ËÁ
·‡Ú‡ ÂÂÍ
•è ÂʉÂ, ˜ÂÏ ÛÒÚ‡ÌÓ‚ËÚ¸ ÌÓ‚˚ ·‡Ú‡ ÂÈÍË,
Ъ˘‡ЪВО¸МУ Ф УЪ ЛЪВ УЪТВН ·‡Ъ‡ ВВН УЪ
КЛ‰НУТЪЛ.
•З ТОЫ˜‡В Ф ЛН‡Т‡МЛfl Н КЛ‰НУТЪЛ Ф УПУИЪВ
ÂÂ ‚Ó‰ÓÈ.
66
З ТОЫ˜‡В Ъ Ы‰МУТЪВИ УЪТУВ‰ЛМЛЪВ ‡ФФ‡ ‡Ъ Л
У· ‡ЪЛЪВТ¸ ‚ З‡¯В ·ОЛК‡И¯ВВ ‡„ВМЪТЪ‚У
Sony.
CCD-TRV14E/TRV24E 3-859-266-12(1).E/R
Page 67

Using your camcorder
abroad
аТФУО¸БУ‚‡МЛВ З‡¯ВИ
‚Л‰ВУН‡ПВ ˚ Б‡ Ы·ВКУП
Each country or area has its own electricity and
TV colour systems. Before using your
camcorder abroad, check the following points:
Power sources
You can use your camcorder in any country or
area with the supplied AC power adaptor
within 110 V to 240 V AC, 50/60 Hz.
Difference in colour systems
This camcorder is a PAL system-based
camcorder. If you want to view the playback
picture on a TV, it must be a PAL-system based
TV or a SECAM system-based TV with a PALSECAM transcoder. Check the following list.
PAL system
Australia, Austria, Belgium, China, Denmark,
Finland, Germany, Great Britain, Holland, Hong
Kong, Italy, Kuwait, Malaysia, New Zealand,
Norway, Portugal, Singapore, Spain, Sweden,
Switzerland, Thailand, etc.
PAL M system
Brazil
PAL N system
Argentina, Paraguay, Uruguay
NTSC system
Bahama Islands, Bolivia, Canada, Central
America, Chile, Colombia, Ecuador, Jamaica,
Japan, Korea, Mexico, Peru, Surinam, Taiwan,
the Philippines, the U.S.A., Venezuela, etc.
SECAM system
Bulgaria, Czech Republic, France, Guyana,
Hungary, Iran, Iraq, Monaco, Poland, Russia,
Slovak Republic, Ukraine, etc.
д‡К‰‡fl ТЪ ‡М‡ ЛОЛ У·О‡ТЪ¸ ЛПВВЪ Т‚У˛
ТУ·ТЪ‚ВММЫ˛ ТЛТЪВПЫ ˝ОВНЪ Л˜ВТНУИ ТВЪЛ Л
ТЛТЪВПЫ ˆ‚ВЪМУ„У ЪВОВ‚Л‰ВМЛfl. иВ В‰
ЛТФУО¸БУ‚‡МЛВП З‡¯ВИ ‚Л‰ВУН‡ПВ ˚ Б‡
Ы·ВКУП Ф У‚В ¸ЪВ ТОВ‰Ы˛˘ЛВ ФЫМНЪ˚:
àÒÚÓ˜ÌËÍË ÔËÚ‡ÌËfl
З˚ ПУКВЪВ ЛТФУО¸БУ‚‡Ъ¸ З‡¯Ы
‚Л‰ВУН‡ПВ Ы ‚ О˛·УИ ТЪ ‡МВ ЛОЛ У·О‡ТЪЛ Т
Ф ЛО‡„‡ВП˚П ТВЪВ‚˚П ‡‰‡ФЪВ УП ФВ ВП.
ЪУН‡ ‚ Ф В‰ВО‡ı УЪ 110 З ‰У 240 З ФВ ВП.
ЪУН‡, 50/60 Йˆ.
к‡БОЛ˜Лfl ‚ ТЛТЪВП‡ı ˆ‚ВЪМУ„У
ЪВОВ‚Л‰ВМЛfl
С‡ММ‡fl ‚Л‰ВУН‡ПВ ‡ УТМУ‚‡М‡ М‡ ТЛТЪВПВ
PAL. ЦТОЛ З˚ ıУЪЛЪВ Ф УТПУЪ ВЪ¸
‚УТФ УЛБ‚У‰ЛПУВ ЛБУ· ‡КВМЛВ М‡
ЪВОВ‚ЛБУ В, УМ ‰УОКВМ ·˚Ъ¸ УТМУ‚‡М М‡
ТЛТЪВПВ PAL ЛОЛ КВ М‡ ТЛТЪВПВ SECAM Т
Ъ ‡МТНУ‰В УП PAL-SECAM: и У‚В ¸ЪВ
ТОВ‰Ы˛˘ЛИ ТФЛТУН.
лЛТЪВП‡ PAL
Д‚ТЪ ‡ОЛfl, Д‚ТЪ Лfl, ЕВО¸„Лfl,
ЗВОЛНУ· ЛЪ‡МЛfl, ЙВ П‡МЛfl, ЙУОО‡М‰Лfl,
ЙУМНУМ„, С‡МЛfl, аТФ‡МЛfl, аЪ‡ОЛfl, дЛЪ‡И,
дЫ‚ВИЪ, е‡О‡ИБЛfl, зУ‚‡fl бВО‡М‰Лfl,
зУ ‚В„Лfl, иУ ЪЫ„‡ОЛfl, лЛМ„‡ФЫ , н‡ЛО‡М‰,
оЛМОflМ‰Лfl, т‚ВˆЛfl, т‚ВИˆ‡ Лfl, Л ‰ .
лЛТЪВП‡ PAL-M
Å ‡ÁËÎËfl
лЛТЪВП‡ PAL-N
Д „ВМЪЛМ‡, и‡ ‡„‚‡И, м Ы„‚‡И
лЛТЪВП‡ NTSC
Е‡„‡ПТНЛВ УТЪ У‚‡, ЕУОЛ‚Лfl, ЗВМВТЫ˝О‡,
д‡М‡‰‡, дУОЫП·Лfl, дУ Вfl, еВНТЛН‡, иВ Ы,
лЫ ЛМ‡П, лтД, н‡И‚‡М¸, оЛОЛФФЛМ˚,
сВМЪ ‡О¸М‡fl ДПВ ЛН‡, уЛОЛ, щН‚‡‰У ,
ьП‡ИН‡, ьФУМЛfl Л ‰ .
Additional information СУФУОМЛЪВО¸М‡fl ЛМЩУ П‡ˆЛfl
лЛТЪВП‡ SECAM
ЕУО„‡ Лfl, ЗВМ„ Лfl, Й‡И‡М‡, а ‡Н, а ‡М,
еУМ‡НУ, иУО¸¯‡, кУТТЛfl, лОУ‚‡ˆН‡fl
кВТФЫ·ОЛН‡, мН ‡ЛМ‡, о ‡МˆЛfl, уВ¯ТН‡fl
кВТФЫ·ОЛН‡ Л ‰ .
CCD-TRV14E/TRV24E 3-859-266-12(1).E/R
67
Page 68

English
Trouble check
If you run into any problem using the camcorder, use the following table to troubleshoot the problem.
Should the difficulty persist, disconnect the power source and contact your Sony dealer or local
authorized Sony service facility.
Camcorder
Power
Symptom Cause and/or Corrective Actions
The power is not on.
The power goes off.
The battery pack is quickly
discharged.
Operation
Symptom Cause and/or Corrective Actions
START/STOP does not operate.
The cassette cannot be removed
from the holder.
No function except for cassette
ejection works.
The tape does not move when a
tape transport button is pressed.
The date or time indicator is
flashing.
• The battery pack is not installed.
m Attach the battery pack firmly by pushing the lower part of
the battery pack until it clicks twice. (p. 9)
• The battery is dead.
m Use a charged battery pack. (p. 7)
• The AC power adaptor is not connected to mains.
m Connect the AC power adaptor to mains. (p. 27)
• While being operated in CAMERA mode, the camcorder has
been in the Standby mode for more than 5 minutes.
m Turn STANDBY down once and turn it up again. (p. 12)
• The battery is dead.
m Use a charged battery pack. (p. 7)
• The ambient temperature is too low. (p. 57)
• The battery pack has not been charged fully.
m Charge the battery pack again. (p. 7)
• The battery pack is completely dead, and cannot be recharged.
m Use another battery pack. (p. 59)
• The tape is stuck to the drum.
m Eject the cassette. (p. 10)
• The tape has run out.
m Rewind the tape or use a new one. (p. 22)
• The POWER switch is set to PLAYER.
m Set it to CAMERA. (p. 11)
• The tab on the cassette is out (red).
m Use a new cassette or slide the tab. (p. 10)
• The battery is dead.
m Use a charged battery pack or the AC power adaptor.
(p. 7, 27)
• Moisture condensation has occurred.
m Remove the cassette and leave the camcorder for at least
1 hour. (p. 61)
• The POWER switch is set to CAMERA or OFF.
m Set it to PLAYER. (p. 22)
• The tape has run out.
m Rewind the tape or use a new one. (p. 22)
• The lithium battery is weak or dead.
m Replace the lithium battery with a new one. (p. 54)
• You pressed DATE and TIME together for more than 2
seconds. The camcorder is not malfunctioning.
m You may start recording. Flashing will stop soon.
68
CCD-TRV14E/TRV24E 3-859-266-12(1).E/R
Page 69

Trouble check
Symptom Cause and/or Corrective Actions
The End Search function does not
activate.
The date or time indicator
disappears.
The SteadyShot function does not
activate.
The autofocusing function does
not work.
Recording stops in a few
seconds.
The title display position shifts.
The fader function does not
work.
Picture
Symptom Cause and/or Corrective Actions
The image on the viewfinder
screen is not clear.
A vertical band appears when a
subject such as lights or a candle
flame is shot against a dark
background.
The picture is “noisy”.
The picture does not appear in
the viewfinder.
The picture does not appear on
the LCD screen.
A vertical band appears when
shooting a very bright subject.
An unknown picture is displayed
in the viewfinder or on the LCD
screen.
• The cassette was ejected after you recorded on it.
m The End Search function will not activate until you make a
new recording after reinserting the cassette.
• Reset the date and time. (p. 55)
• STEADY SHOT is set to OFF.
m Set STEADY SHOT to ON. (p. 45)
• The SteadyShot function does not work when the wide mode is
set to 16:9FULL. (p. 39)
• FOCUS is set to MANUAL.
m Set it to AUTO. (p. 41)
• Shooting contidions are not suitable for autofocus.
m Set FOCUS to MANUAL to focus manually. (p. 41)
• START/STOP MODE switch is set to or 5SEC.
m Set it to . (p. 33)
• There are unwanted blanks before or after the title.
m Delete them then select ↵.
• The START/STOP MODE switch is set to 5SEC or .
m Set it to . (p. 33)
• The viewfinder lens is not adjusted.
m Adjust the viewfinder lens. (p. 13)
• The contrast between the subject and background is
too high. The camcorder is not malfunctioning.
m Change locations.
• The video heads may be dirty.
m Clean the heads using the Sony V8-25CLH cleaning cassette.
(p. 62)
• The LCD panel is open.
m Close the LCD panel. (p. 16)
• Incorporated fluorescent tube is worn out.
m Please contact your nearest Sony dealer.
• The camcorder is not malfunctioning.
• If 10 minutes elapsed after you set the POWER switch to
CAMERA without inserting a cassette, the camcorder
automatically starts the demonstration.
m Insert the cassette, and the demonstration stops. You can
make the demonstration not appear in the menu system.
(p. 29)
Additional information СУФУОМЛЪВО¸М‡fl ЛМЩУ П‡ˆЛfl
Continued to the next page
69
CCD-TRV14E/TRV24E 3-859-266-12(1).E/R
Page 70

Trouble check
Others
Symptom Cause and/or Corrective Actions
The supplied Remote
Commander does not work .
There is dust in the viewfinder.
• COMMANDER is set to OFF.
m Set it to ON in the menu system. (p. 29)
• Something is blocking the infrared rays.
m Remove the obstacle.
• The battery is not inserted with the correct polarity.
m Insert the battery with the correct polarity. (p. 83)
• The batteries are dead.
m Insert new ones. (p. 83)
• Detach the eyecup and clean the viewfinder lens. (p. 63)
70
CCD-TRV14E/TRV24E 3-859-266-12(1).E/R
Page 71

Trouble check
AC power adaptor
Symptom Cause and/or Corrective Actions
The POWER lamp does not
light.
The CHARGE lamp flashes.
When the CHARGE lamp flashes
Check through the following chart.
Remove the battery pack from the
AC power adaptor. Then install the
same battery pack again.
• Set the selector to VTR (DC OUT) and disconnect the mains
lead. After about one minute, try again. (p. 9)
• See the following chart.
Additional information СУФУОМЛЪВО¸М‡fl ЛМЩУ П‡ˆЛfl
$
When the CHARGE lamp flashes
again
Install another battery pack.
$
When the CHARGE lamp flashes
again
The problem is with the AC power
adaptor.
$
Please contact your nearest Sony
dealer in connection with the
product with the problem.
∗ If you use a battery pack which you have just bought or which has been left unused for a long
time, the CHARGE lamp may flash at the first charging. This does not indicate a problem.
Repeat again to charge with the same battery pack.
When the CHARGE lamp does not
flash again
If the CHARGE lamp lights up and
goes out after a while, there is no
problem.*
When the CHARGE lamp does not
flash again
If the CHARGE lamp lights up and
goes out after a while, the problem is
with the battery pack installed first.
$
$
CCD-TRV14E/TRV24E 3-859-266-12(1).E/R
71
Page 72

кЫТТНЛИ
и У‚В Н‡ МВЛТФ ‡‚МУТЪВИ
ЦТОЛ Ы З‡Т ‚УБМЛНО‡ Ф У·ОВП‡ Ф Л ЛТФУО¸БУ‚‡МЛЛ ‚Л‰ВУН‡ПВ ˚, ‚УТФУО¸БЫИЪВТ¸
ТОВ‰Ы˛˘ВИ Ъ‡·ОЛˆВИ ‰Оfl ‚˚flТМВМЛfl Ф У·ОВП˚.
ЦТОЛ Ъ Ы‰МУТЪЛ ‚ТВ В˘В УТЪ‡˛ЪТfl, ЪУ УЪТУВ‰ЛМЛЪВ ЛТЪУ˜МЛН ФЛЪ‡МЛfl Л Т‚flКЛЪВТ¸ Т ‰ЛОВ УП
Sony ЛОЛ ПВТЪМ˚П ЫФУОМУПУ˜ВММ˚П Ф В‰Ф ЛflЪЛВП ФУ У·ТОЫКЛ‚‡МЛ˛ Sony.
ÇˉÂÓ͇Ï ‡
èËÚ‡ÌËÂ
è ËÁÌ‡Í è ˘Ë̇ Ë/ËÎË ‰ÂÈÒÚ‚Ëfl ÔÓ ÛÒÚ ‡ÌÂÌ˲
ç ‚Íβ˜‡ÂÚÒfl ÔËÚ‡ÌËÂ.
Ç˚Íβ˜‡ÂÚÒfl ÔËÚ‡ÌËÂ.
Ňڇ ÂÈÌ˚È ·ÎÓÍ ·˚ÒÚ Ó
‡ÁflʇÂÚÒfl.
ꇷÓÚ‡
è ËÁÌ‡Í è ˘Ë̇ Ë/ËÎË ‰ÂÈÒÚ‚Ëfl ÔÓ ÛÒÚ ‡ÌÂÌ˲
ç ÙÛÌ͈ËÓÌË ÛÂÚ
НМУФН‡ START/STOP.
д‡ТТВЪ‡ МВ ПУКВЪ ·˚Ъ¸
‚˚ÌÛÚ‡ ËÁ ‰Â ʇÚÂÎfl.
ç ‡·ÓÚ‡ÂÚ ÌË Ó‰Ì‡ ËÁ
ÙÛÌ͈ËÈ, Í ÓÏ ‚˚Ú‡ÎÍË‚‡ÌËfl
͇ÒÒÂÚ˚.
гВМЪ‡ МВ ФВ ВПВ˘‡ВЪТfl Ф Л
М‡К‡ЪЛЛ НМУФНЛ
ФВ ВПВ˘ВМЛfl ОВМЪ˚.
еЛ„‡ВЪ ЛМ‰ЛН‡ЪУ
‰‡Ъ˚ ЛОЛ ‚ ВПВМЛ.
72
• Ňڇ ÂÈÌ˚È ·ÎÓÍ ÌÂ Ô ËÒÓ‰ËÌÂÌ.
m 燉ВКМУ ФУ‰ТУВ‰ЛМЛЪ¸ ·‡Ъ‡ ВИМ˚И ·ОУН ФЫЪВП
М‡К‡ЪЛfl МЛКМВИ ˜‡ТЪЛ ·‡Ъ‡ ВИМУ„У ·ОУН‡. (ТЪ . 9)
• ê‡Á fl‰ËÎÒfl ·‡Ú‡ ÂÈÌ˚È ·ÎÓÍ.
mаТФУО¸БЫИЪВ Б‡ flКВММ˚И ·‡Ъ‡ ВИМ˚И ·ОУН. (ТЪ . 7)
•
лВЪВ‚УИ ‡‰‡ФЪВ ФВ ВП. ЪУН‡ МВ ФУ‰ТУВ‰ЛМВМ Н ˝ОВНЪ Л˜ВТНУИ ТВЪЛ.
m иУ‰ТУВ‰ЛМЛЪВ ТВЪВ‚УИ ‡‰‡ФЪВ ФВ ВП. ЪУН‡ Н
˝ОВНЪ Л˜ВТНУИ ТВЪЛ. (ТЪ . 27)
• ЗУ ‚ ВПfl ˝НТФОЫ‡Ъ‡ˆЛЛ ‚ ВКЛПВ CAMERA ‚Л‰ВУН‡ПВ ‡
·˚О‡ ‚ ВКЛПВ „УЪУ‚МУТЪЛ ·УОВВ 5 ПЛМЫЪ.
m èÓ‚Â ÌËÚ Ô ÂÍβ˜‡ÚÂθ STANDBY ‚ÌËÁ Ó‰ËÌ ‡Á Ë
ÔÓ‚Â ÌËÚÂ Â„Ó ÒÌÓ‚‡ ‚‚ ı. (ÒÚ . 12)
• Ňڇ ÂÈÌ˚È ·ÎÓÍ ‡Á fl‰ËÎÒfl.
m аТФУО¸БЫИЪВ Б‡ flКВММ˚И ·‡Ъ‡ ВИМ˚И ·ОУН, (ТЪ . 7)
• йН ЫК‡˛˘‡fl ЪВПФВ ‡ЪЫ ‡ ТОЛ¯НУП МЛБН‡fl. (ТЪ . 57)
• Е‡Ъ‡ ВИМ˚И ·ОУН МВ ФУОМУТЪ¸˛ Б‡ flКВМ.
m ᇠfl‰ËÚ ÒÌÓ‚‡ ·‡Ú‡ ÂÈÌ˚È ·ÎÓÍ. (ÒÚ . 7)
• Е‡Ъ‡ ВИМ˚И ·ОУН ФУОМУТЪ¸˛ ‡Б fl‰ЛОТfl Л МВ ПУКВЪ
·˚Ú¸ Ô ÂÁ‡ flÊÂÌ.
m аТФУО¸БЫИЪВ ‰ Ы„УИ ·‡Ъ‡ ВИМ˚И ·ОУН. (ТЪ . 59)
• гВМЪ‡ Ф ЛОЛФО‡ Н ·‡ ‡·‡МЫ.
m З˚ЪУОНМЛЪВ Н‡ТТВЪЫ. (ТЪ . 10)
• ãÂÌÚ‡ Á‡ÍÓ̘Ë·Ҹ.
m иВ ВПУЪ‡ИЪВ ОВМЪЫ ЛОЛ ЛТФУО¸БЫИЪВ МУ‚Ы˛. (ТЪ . 22)
• З˚НО˛˜‡ЪВО¸ POWER ЫТЪ‡МУ‚ОВМ ‚ ФУОУКВМЛВ PLAYER.
m мТЪ‡МУ‚ЛЪВ В„У ‚ ФУОУКВМЛВ CAMЦRA. (ТЪ . 11)
• з‡ Н‡ТТВЪВ МВЪ ОВФВТЪН‡ (Н ‡ТМУ„У).
m
аТФУО¸БЫИЪВ МУ‚Ы˛ Н‡ТТВЪЫ ЛОЛ ФВ В‰‚ЛМ¸ЪВ ОВФВТЪУН. (ТЪ . 10)
• Ňڇ ÂÈÌ˚È ·ÎÓÍ ‡Á fl‰ËÎÒfl.
m аТФУО¸БЫИЪВ Б‡ flКВММ˚И ·‡Ъ‡ ВИМ˚И ·ОУН ЛОЛ ТВЪВ‚УИ
‡‰‡ÔÚ Ô ÂÏ. ÚÓ͇ (ÒÚ . 7, 27)
• è ÓËÁӯ· ÍÓ̉ÂÌÒ‡ˆËfl ‚·„Ë.
m З˚М¸ЪВ Н‡ТТВЪЫ Л УТЪ‡‚¸ЪВ ‚Л‰ВУН‡ПВ Ы ФУ Н ‡ИМВИ
Ï  ̇ 1 ˜‡Ò. (ÒÚ . 61)
•
иВ ВНО˛˜‡ЪВО¸ POWER ЫТЪ‡МУ‚ОВМ ‚ ФУОУКВМЛВ CAMERA ЛОЛ OFF.
m мТЪ‡МУ‚ЛЪВ ‚ ФУОУКВМЛВ PLAYER. (ТЪ . 22)
• ãÂÌÚ‡ Á‡ÍÓ̘Ë·Ҹ.
m иВ ВПУЪ‡ИЪВ ОВМЪЫ ЛОЛ ЛТФУО¸БЫИЪВ МУ‚Ы˛. (ТЪ . 22)
• гЛЪЛВ‚‡fl ·‡Ъ‡ ВИН‡ ТО‡·‡fl ЛОЛ ФУОМУТЪ¸˛ ‡Б flКВМ‡.
m б‡ПВМЛЪВ ОЛЪЛВ‚Ы˛ ·‡Ъ‡ ВИНЫ М‡ МУ‚Ы˛. (ТЪ . 54)
• З˚ М‡К‡ОЛ НМУФНЛ DATE Л TIME ‚ПВТЪВ ·УОВВ, ˜ВП М‡ 2
ТВНЫМ‰˚. ЗЛ‰ВУН‡ПВ ‡ ‚ ЛТФ ‡‚МУТЪЛ.
m З˚ ПУКВЪВ М‡˜‡Ъ¸ Б‡ФЛТ¸. еЛ„‡МЛВ ‚ТНУ В Ф ВН ‡ЪЛЪТfl.
CCD-TRV14E/TRV24E 3-859-266-12(1).E/R
Page 73

и У‚В Н‡ МВЛТФ ‡‚МУТЪВИ
è ËÁÌ‡Í è ˘Ë̇ Ë/ËÎË ‰ÂÈÒÚ‚Ëfl ÔÓ ÛÒÚ ‡ÌÂÌ˲
ç ‡·ÓÚ‡ÂÚ ÙÛÌ͈Ëfl
ФУЛТН‡ НУˆ‡
аТ˜ВБ‡ВЪ ЛМ‰ЛН‡ЪУ ‰‡Ъ˚ ЛОЛ
‚ ВПВМЛ.
ç ‡·ÓÚ‡ÂÚ ÙÛÌ͈Ëfl
ÒÚ‡·ËÎËÁ‡ˆËË ËÁÓ· ‡ÊÂÌËfl
SteadyShot.
зВ ‡·УЪ‡ВЪ ЩЫМНˆЛfl
‡‚ЪУП‡ЪЛ˜ВТНУИ ЩУНЫТЛ У‚НЛ.
б‡ФЛТ¸ УТЪ‡М‡‚ОЛ‚‡ВЪТfl
˜В ВБ МВТНУО¸НУ ТВНЫМ‰.
뉂ЛМЫЪУ ФУОУКВМЛВ
ЛМ‰ЛˆЛ ЫВПУИ М‡‰ФЛТЛ.
ç ‡·ÓÚ‡ÂÚ ÙÛÌ͈Ëfl ‚‚‰ÂÌËfl/
‚˚‚‰ÂÌËfl ËÁÓ· ‡ÊÂÌËfl.
аБУ· ‡КВМЛВ
è ËÁÌ‡Í и Л˜ЛМ‡ Л/ЛОЛ ‰ВИТЪ‚Лfl ФУ ЫТЪ ‡МВМЛ˛
аБУ· ‡КВМЛВ М‡ ˝Н ‡МВ
‚Л‰УЛТН‡ЪВОfl МВ ˜ВЪНУВ.
иУfl‚ОflВЪТfl ‚В ЪЛН‡О¸М‡fl
ФУОУТ‡, ВТОЛ Ъ‡НЛВ У·˙ВНЪ˚,
Н‡Н Т‚ВЪ ЛОЛ ФО‡Пfl Т‚В˜Л
ТМЛП‡˛ЪТfl М‡ ЪВПМУП ЩУМВ.
аБУ· ‡КВМЛВ “Б‡¯ЫПОВМУ”.
аБУ· ‡КВМЛВ МВ ФУfl‚ОflВЪТfl
‚ ‚Л‰УЛТН‡ЪВОВ.
аБУ· ‡КВМЛВ МВ ФУfl‚ОflВЪТfl
М‡ ˝Н ‡МВ ЬдС.
ЗВ ЪЛН‡О¸М‡fl ФУОУТ‡ ФУfl‚ОflВЪТfl Ф Л
Т˙ВПНВ У˜ВМ¸ fl НЛı У·˙ВНЪУ‚.
и У‰УОКВМЛВ М‡ ТОВ‰Ы˛˘ВИ ТЪ ‡МЛˆВ
• иУТОВ Б‡ФЛТЛ М‡ ОВМЪЫ Н‡ТТВЪ‡ ·˚О‡ ‚˚ЪУОНМЫЪ‡.
m оЫМНˆЛfl ФУЛТН‡ НУМˆ‡ МВ ·Ы‰ВЪ ‡·УЪ‡Ъ¸ ‰У ЪВı ФУ ,
ФУН‡ З˚ МВ Т‰ВО‡ВЪВ МУ‚Ы˛ Б‡ФЛТ¸ ФУТОВ ФУ‚ЪУ МУИ
ÛÒÚ‡ÌÓ‚ÍË Í‡ÒÒÂÚ˚.
• ëÌÓ‚‡ ÛÒÚ‡ÌÓ‚ËÚ ‰‡ÚÛ Ë ‚ ÂÏfl. (ÒÚ . 55)
•
З˚НО˛˜‡ЪВО¸ STEADY SHOT ЫТЪ‡МУ‚ОВМ ‚ ФУОУКВМЛВ OFF.
m мТЪ‡МУ‚ЛЪВ ‚˚НО˛˜‡ЪВО¸ STEADY SHOT ‚ ФУОУКВМЛВ
ON. (ÒÚ . 45)
• оЫМНˆЛfl SteadyShot МВ ‡·УЪ‡ВЪ ‚ ТОЫ˜‡В, ВТОЛ
¯Л УНУ˝Н ‡ММ˚И ВКЛП ЫТЪ‡МУ‚ОВМ ‚ ФУОУКВМЛВ
16:9FULL. (ТЪ . 39)
•
иВ ВНО˛˜‡ЪВО¸ FOCUS ЫТЪ‡МУ‚ОВМ ‚ ФУОУКВМЛВ MANUAL.
m мТЪ‡МУ‚ЛЪВ В„У ‚ ФУОУКВМЛВ AUTO. (ТЪ . 41)
• мТОУ‚Лfl Т˙ВПНЛ fl‚Оfl˛ЪТfl МВФУ‰ıУ‰fl˘ЛПЛ ‰Оfl
‡‚ЪУП‡ЪЛ˜ВТНУИ ЩУНЫТЛ У‚НЛ.
m мТЪ‡МУ‚ЛЪВ ФВ ВНО˛˜‡ЪВО¸ FOCUS ‚ ФУОУКВМЛВ
MANUAL ‰Оfl ЩУНЫТЛ У‚НЛ ‚ Ы˜МЫ˛. (ТЪ . 41)
• иВ ВНО˛˜‡ЪВО¸ START/STOP MODE ЫТЪ‡МУ‚ОВМ ‚
ФУОУКВМЛВ ËÎË 5SEC.
m мТЪ‡МУ‚ЛЪВ В„У ‚ ФУОУКВМЛВ . (ÒÚ . 33)
• иВ В‰ М‡‰ФЛТ¸˛ ЛОЛ ФУТОВ МВВ ЛПВ˛ЪТfl ФЫТЪ˚В ПВТЪ‡.
m 쉇ÎËÚ Ëı, ‡ Á‡ÚÂÏ ‚˚·Â ËÚ ↵.
• иВ ВНО˛˜‡ЪВО¸ START/STOP MODE ЫТЪ‡МУ‚ОВМ ‚
ФУОУКВМЛВ 5SEC ЛОЛ ФУОУКВМЛВ .
m мТЪ‡МУ‚ЛЪВ В„У ‚ ФУОУКВМЛВ . (ÒÚ . 33)
• ç ÓÚ Â„ÛÎË Ó‚‡Ì Ó·˙ÂÍÚË‚ ‚ˉÓËÒ͇ÚÂÎfl.
m éÚ Â„ÛÎË ÛÈÚ ӷ˙ÂÍÚË‚ ‚ˉÓËÒ͇ÚÂÎfl. (ÒÚ . 13)
• лОЛ¯НУП ·УО¸¯УИ НУМЪ ‡ТЪ ПВК‰Ы У·˙ВНЪУП Л ЩУМУП.
ЗЛ‰ВУН‡ПВ ‡ ‡·У ‡ВЪ МУ П‡О¸МУ.
m аБПВМЛЪВ ФУБЛˆЛ˛ Т˙ВПНЛ.
• ЗУБПУКМУ Б‡„ flБМВМ˚ ‚Л‰ВУ„УОУ‚НЛ.
m й˜ЛТЪЛЪВ „УОУ‚НЛ, ЛТФУО¸БЫfl ‰Оfl ˝ЪУ„У У˜ЛТЪЛЪВО¸МЫ˛
Н‡ТТВЪЫ V8-25CLH. (ТЪ . 62)
• éÚÍ ˚Ú‡ Ô‡ÌÂθ ÜäÑ.
m б‡НУИЪВ Ф‡МВО¸ ЬдС. (ТЪ . 16)
• ЗТЪ УВММ‡fl О˛ПЛМВТˆВМЪМ‡fl О‡ПФ‡ ‚˚¯О‡ ЛБ ТЪ Уfl.
m л‚flКЛЪВТ¸, ФУК‡ОЫИТЪ‡, Т З‡¯ЛП ·ОЛК‡И¯ЛП ‰ЛОВ УП
Sony.
• ЗЛ‰ВУН‡ПВ ‡ МВ fl‚ОflВЪТfl МВЛТФ ‡‚МУИ.
Additional information СУФУОМЛЪВО¸М‡fl ЛМЩУ П‡ˆЛfl
CCD-TRV14E/TRV24E 3-859-266-12(1).E/R
73
Page 74

и У‚В Н‡ МВЛТФ ‡‚МУТЪВИ
è ËÁÌ‡Í è ˘Ë̇ Ë/ËÎË ‰ÂÈÒÚ‚Ëfl ÔÓ ÛÒÚ ‡ÌÂÌ˲
З ‚Л‰УЛТН‡ЪВОВ ЛОЛ М‡ ˝Н ‡МВ
ЬдС ‚УТФ УЛБ‚У‰ЛЪТfl
МВЛБ‚ВТЪМУВ ЛБУ· ‡КВМЛВ.
è Ó˜ÂÂ
è ËÁÌ‡Í è ˘Ë̇ Ë/ËÎË ‰ÂÈÒÚ‚Ëfl ÔÓ ÛÒÚ ‡ÌÂÌ˲
è Ë·„‡ÂÏ˚È ÔÛθÚ
‰ЛТЪ‡МˆЛУММУ„У ЫФ ‡‚ОВМЛfl
МВ ‡·УЪ‡ВЪ.
á‡Ô˚ÎËÎÒfl ‚ˉÓËÒ͇ÚÂθ.
• ЦТОЛ Ф У¯ОУ 10 ПЛМЫЪ ФУТОВ ЪУ„У, Н‡Н З˚ ЫТЪ‡МУ‚ЛОЛ
ФВ ВНО˛˜‡ЪВО¸ POWER ‚ ФУОУКВМЛВ CAMERA, МВ
‚ТЪ‡‚Л‚ Ф Л ˝ЪУП Н‡ТТВЪЫ, ‚Л‰ВУН‡ПВ ‡ ‡‚ЪУП‡ЪЛ˜ВТНЛ
М‡˜МВЪ ‰ВПУМТЪ ‡ˆЛ˛.
m ЗТЪ‡‚¸ЪВ Н‡ТТВЪЫ Л ‰ВПУМТЪ ‡ˆЛfl УТЪ‡МУ‚ЛЪТfl. З˚
ПУКВЪВ Т‰ВО‡Ъ¸ Ъ‡Н, ˜ЪУ ‰ВПУМТЪ ‡ˆЛfl МВ ·Ы‰ВЪ
ФУН‡Б˚‚‡Ъ¸Тfl ‚ ТЛТЪВПВ ПВМ˛. (ТЪ .29)
• COMMANDER ЫТЪ‡МУ‚ОВМ ‚ ФУОУКВМЛВ OFF.
m мТЪ‡МУ‚ЛЪВ В„У ‚ ФУОУКВМЛВ ON ‚ ТЛТЪВПВ ПВМ˛.
(ÒÚ . 29)
• óÚÓ-ÚÓ Ô Â„ ‡Ê‰‡ÂÚ ÔÛÚ¸ ËÌÙ ‡Í ‡ÒÌ˚Ï ÎÛ˜‡Ï.
m ìÒÚ ‡ÌËÚ Ô„ ‡‰Û.
• Ňڇ ÂÈÍË ‚ÒÚ‡‚ÎÂÌ˚ Ò ÌÂÔ ‡‚ËθÌÓÈ ÔÓÎfl ÌÓÒÚ¸˛.
m ÇÒÚ‡‚¸Ú ·‡Ú‡ ÂÈÍË, Òӷ≇fl Ô ‡‚ËθÌÛ˛
ÔÓÎfl ÌÓÒÚ¸. (ÒÚ . 83)
• ᇠfl‰ ·‡Ú‡ ÂÂÍ ËÁ‡ÒıÓ‰Ó‚‡Ì.
m ÇÒÚ‡‚¸Ú ÌÓ‚˚Â. (ÒÚ . 83)
• йЪТУВ‰ЛМЛЪВ УНЫОfl Л У˜ЛТЪЛЪВ У·˙ВНЪЛ‚ ‚Л‰УЛТН‡ЪВОfl.
(ТЪ . 63)
74
CCD-TRV14E/TRV24E 3-859-266-12(1).E/R
Page 75

и У‚В Н‡ МВЛТФ ‡‚МУТЪВИ
лВЪВ‚УИ ‡‰‡ФЪВ ФВ ВПМВММУ„У ЪУН‡
è ËÁÌ‡Í è ˘Ë̇ Ë/ËÎË ‰ÂÈÒÚ‚Ëfl ÔÓ ÛÒÚ ‡ÌÂÌ˲
ã‡ÏÔӘ͇ POWER Ì „Ó ËÚ.
åË„‡ÂÚ Î‡ÏÔӘ͇ CHARGE.
äÓ„‰‡ ÏË„‡ÂÚ Î‡ÏÔӘ͇ CHARGE
è Ó‚Â ËÚ¸ ÔÓ ÒÎÂ‰Û˛˘ÂÈ Ú‡·ÎˈÂ.
лМЛПЛЪВ ·‡Ъ‡ ВИМ˚И ·ОУН Т
ТВЪВ‚У„У ‡‰‡ФЪВ ‡ ФВВП. ЪУН‡.
б‡ЪВП ЫТЪ‡МУ‚ЛЪВ ЪУЪ КВ
Т‡П˚И ·‡Ъ‡ ВИМ˚И ·ОУН ТМУ‚‡.
• мТЪ‡МУ‚ЛЪВ ТВОВНЪУ ‚ ФУОУКВМЛВ VTR (DC OUT) Л
УЪТУВ‰ЛМЛЪВ ТВЪВ‚УИ Ф У‚У‰. уВВБ У‰МЫ ПЛМЫЪЫ ТМУ‚‡
ФУ‰ТУВ‰ЛМЛЪВ ТВЪВ‚УИ Ф У‚У‰. (ТЪ. 9)
• ëÏÓÚ ËÚ ÒÎÂ‰Û˛˘Û˛ Ú‡·ÎˈÛ.
Additional information СУФУОМЛЪВО¸М‡fl ЛМЩУ П‡ˆЛfl
ÖÒÎË Î‡ÏÔӘ͇ CHARGE ÏË„‡ÂÚ
ÓÔflÚ¸
ìÒÚ‡ÌÓ‚ËÚ ‰ Û„ÓÈ ·‡Ú‡ ÂÈÌ˚È
·ÎÓÍ.
ЦТОЛ О‡ПФУ˜Н‡ CHARGE
ПЛ„‡ВЪ УФflЪ¸
аПВВЪТfl Ф У·ОВП‡ Ы ТВЪВ‚У„У
‡‰‡ФЪВ ‡ ФВ ВП. ЪУН‡.
й· ‡ЪЛЪВТ¸, ФУК‡ОЫИТЪ‡, Н
З‡¯ВПЫ ·ОЛК‡И¯ВПЫ ‰ЛОВ Ы Sony
‚ Т‚flБЛ Т Ф У·ОВПУИ Ы ЛБ‰ВОЛfl.
* ЦТОЛ З˚ ЛТФУО¸БЫВЪВ ·‡Ъ‡ ВИМ˚И ·ОУН, НУЪУ ˚И З˚ ЪУО¸НУ ˜ЪУ НЫФЛОЛ, ЛОЛ НУЪУ ˚И ·˚О
УТЪ‡‚ОВМ М‡ ‰ОЛЪВО¸МУВ ‚ ВПfl, ЪУ О‡ПФУН‡ CHARGE ПУКВЪ ПЛ„‡Ъ¸ Ф Л ФВ ‚УИ Б‡ fl‰НВ. щЪУ
МВ ЫН‡Б˚‚‡ВЪ М‡ Ф У·ОВПЫ. иУ‚ЪУ ЛЪВ Ф УˆВ‰Ы Ы Б‡ fl‰НЛ Т ЪВП КВ Т‡П˚П ·‡Ъ‡ ВИМ˚П
·ОУНУП.
ЦТОЛ О‡ПФУ˜Н‡ CHARGE ·УО¸¯В
МВ ПЛ„‡ВЪ
ЦТОЛ О‡ПФУ˜Н‡ CHARGE Б‡„У ЛЪТfl Л
ФУ„‡ТМВЪ ˜В ВБ МВНУЪУ УВ ‚ ВПfl, ЪУ
Ф У·ОВП˚ ·УО¸¯В МВЪ.*
ÖÒÎË Î‡ÏÔӘ͇ CHARGE ·Óθ¯Â ÌÂ
ÏË„‡ÂÚ
ЦТОЛ О‡ПФУ˜Н‡ CHARGE Б‡„У ЛЪТfl Л
ФУ„‡ТМВЪ ˜В ВБ МВНУЪУ УВ ‚ ВПfl, ЪУ
Ф У·ОВП‡ ЛПВВЪТfl Ы ·‡Ъ‡ ВИМУ„У
·ÎÓ͇, ÍÓÚÓ ˚È ·˚Î ÛÒÚ‡ÌÓ‚ÎÂÌ
ÔÂ ‚˚Ï.
75
CCD-TRV14E/TRV24E 3-859-266-12(1).E/R
Page 76

English
Specifications
Video camera recorder
System
Video recording system
Two rotary heads, Helical
scanning, FM system
Audio recording system
Rotary heads, FM system
Video signal
PAL colour, CCIR standards
Usable cassette
8 mm video format cassette
(standard 8 mm)
Recording/Playback time
SP mode: 1 hour and 30
minutes (P5-90)
LP mode: 3 hours (P5-90)
Fastforward/rewind time
Approx. 5 min. (P5-90)
Image device
CCD (Charge Coupled Device)
Viewfinder
Electronic viewfinder
Black and white
Lens
CCD-TRV14E: 15× (optical)
CCD-TRV24E: 15× (optical),
180× (digital)
Combined power zoom lens,
F1.4 – 2.4
Filter diameter 37 mm (1 1⁄2
inches)
Focal distance
f = 4.1 – 61.5 mm (3/16 – 2 1/2
inches)
When converted to a 35 mm
still camera
CCD-TRV14E: 39 – 585 mm (1
19
/16 – 23 1/8 inches)
CCD-TRV24E:
47 – 705 mm (1 7/8 – 27 7/8
inches)
Colour temperature
Auto
Minimum illumination
CCD-TRV14E: 0.4 lx at F 1.4
CCD-TRV24E: 0.7 lx at F 1.4
Illumination range
CCD-TRV14E: 0.4 to 100,000 lx
CCD-TRV24E: 0.7 to 100,000 lx
Recommended illumination
More than 100 lx
LCD screen
Picture
2.5 inches measured
diagonally
CCD-TRV14E: 50.2 × 37.1 mm
( 2 x 11⁄2 inches)
CCD-TRV24E: 50.3 x 37.4 mm
( 2 x 11⁄2 inches)
On-screen display
TN LCD/TFT active matrix
method
Total dot number
61,380 (279 x 220)
Input and Output
connectors
Video output
Phono jack, 1 Vp-p, 75 ohm,
unbalanced
Audio output
Monaural, Phono jack,
327 mV, (at load impedance
47 kilohm), impedance less
than 2.2 kilohm
RFU DC OUT
Special minijack, DC 5 V
Earphone jack
Mini-jack
LANC control jack
Stereo mini-minijack
(ø 2.5 mm)
MIC jack
Minijack, 0.388 mV, low
impedance with 2.5 to 3 V DC
output, impedance 6.8 kilohm
(ø 3.5 mm)
Speaker
Dynamic-speaker
General
Power requirements
7.5 V (AC power adaptor)
Average power consumption
During camera recording
using the LCD
CCD-TRV14E: 4.2 W
CCD-TRV24E: 4.5 W
During camera recording
using the viewfinder
CCD-TRV14E: 3.3 W
CCD-TRV24E: 3.5 W
Operating temperature
0°C to 40°C (32°F to 104°F)
Storage temperature
–20°C to +60°C (–4°F to
+140°F)
Dimensions
Approx. 112 x 102 x 201 mm
(4 1⁄2 x 4 1⁄8 x 8 inches) (w/h/d)
Mass
Approx. 890 g (1 lb 15 oz)
Excluding the battery pack,
lithium battery, cassette and
shoulder strap
Approx. 1.1 kg (2 lb 6 oz)
Including the battery pack NP33, lithium battery CR2025,
cassette P5-90 and shoulder
strap
Microphone
Electret condenser
microphone, monaural type
Supplied accessories
See page 6.
AC power adaptor
Power requirements
110 – 240 V AC, 50/60Hz
Power consumption
AC-V16/V17: 20 W
AC-V16A/V17A: 22 W
Output voltage
DC OUT in operation mode
7.5 V, 1.8 A
Battery charge terminal
10 V, 1.1 A in charge mode
Application
Sony battery packs NP-33
(supplied), NP-55H, NP-C65,
NP-66, NP-67, NP-77H, NP-98
Operating temperature
0°C to 40°C (32°F to 104°F)
Storage temperature
–20°C to +60°C (–4°F to
+140°F)
Dimensions (Approx.)
166 x 43 x 75 mm (6 5⁄8 x 1 11⁄16
x 3 inches) (w/h/d)
including projecting parts and
controls
Mass (Approx.)
AC-V16: 420 g (15 oz)
AC-V16A: 450 g (16 oz)
AC-V17: 440 g (16 oz)
AC-V17A: 460 g (16 oz)
Design and specifications are
subject to change without
notice.
76
CCD-TRV14E/TRV24E 3-859-266-12(1).E/R
Page 77

кЫТТНЛИ
нВıМЛ˜ВТНЛВ ı‡ ‡НЪВ ЛТЪЛНЛ
ÇˉÂÓ͇Ï ‡
лЛТЪВП‡
лЛТЪВП‡ ‚Л‰ВУБ‡ФЛТЛ
т ‚ ‡˘‡˛˘ЛВТfl „УОУ‚НЛ,
М‡НОУММУ-ТЪ У˜М‡fl ‡Б‚В ЪН‡,
ТЛТЪВП‡ уе
лЛТЪВП‡ ‡Ы‰ЛУБ‡ФЛТЛ
З ‡˘‡˛˘ЛВТfl „УОУ‚НЛ, ТЛТЪВП‡
уе
ЗЛ‰ВУТЛ„М‡О
с‚ВЪУ‚УИ ТЛ„М‡О PAL, ТЪ‡М‰‡ Ъ
ФУ еддк
аТФУО¸БЫВП˚В Н‡ТТВЪ˚
д‡ТТВЪ˚ 8-ПП ‚Л‰ВУЩУ П‡Ъ‡
(ТЪ‡М‰‡ Ъ 8ПП)
З ВПfl Б‡ФЛТЛ/
‚УТФ УЛБ‚В‰ВМЛfl
кВКЛП SP: 1 ˜‡Т Л 30 ПЛМЫЪ (к5-
90)
кВКЛП LP: 3 ˜‡Т‡ (к5-90)
З ВПfl ФВ ВПУЪНЛ ‚ФВ В‰/
М‡Б‡‰
и Л·ОЛБ. 5 ПЛМ. (к5-90)
оУ ПЛ У‚‡ЪВО¸ ЛБУ· ‡КВМЛfl
CCD (Ф Л·У Т Б‡ fl‰У‚УИ
Т‚flБ¸˛)
ЗЛ‰УЛТН‡ЪВО¸
щОВНЪ УММ˚И ‚Л‰УЛТН‡ЪВО¸
уВ МУ-·ВО˚И
й·˙ВНЪЛ‚
CCD-TRV14E: 15× (УФЪЛ˜ВТНЛИ)
CCD-TRV24E: 15× (УФЪЛ˜ВТНЛИ),
180× (ˆЛЩ У‚УИ)
дУП·ЛМЛ У‚‡ММ˚И У·˙ВНЪЛ‚ Т
Ф Л‚У‰М˚П Ъ ‡МТЩУН‡ЪУ УП,
F1,4 – 2,4
СЛ‡ПВЪ ЩЛО¸Ъ ‡ 37 ПП
оУНЫТМУВ ‡ТТЪУflМЛВ
f = 4,1 – 61,5 ПП
и Л Ф ВУ· ‡БУ‚‡МЛЛ ‰Оfl 35-ПП
ЩУЪУ‡ФФ‡‡Ъ‡
CCD-TRV14E: 39 – 585 ПП
CCD-TRV24E: 47 – 705 ПП
с‚ВЪУ‚‡fl ЪВПФВ ‡ЪЫ ‡
Д‚ЪУ
еЛМЛП‡О¸МУВ УТ‚В˘ВМЛВ
CCD-TRV14E: 0,4 ОН Ф Л F1,4
CCD-TRV24E: 0,7 ОН Ф Л F1,4
СЛ‡Ф‡БУМ УТ‚В˘ВММУТЪЛ
CCD-TRV14E: УЪ 0,4 ‰У 100000
ОН
CCD-TRV24E: УЪ 0,7 ‰У 100000
ОН
кВНУПВМ‰ЫВП‡fl УТ‚В˘ВММУТЪ¸
ЕУОВВ 100 ОН
ùÍ ‡Ì ÜäÑ
аБУ· ‡КВМЛВ
2,5 ‰˛ИП‡ ФУ ‰Л‡„УМ‡ОЛ
CCD-TRV14E: 50,2 × 37,1 ÏÏ
(2,5 ‰˛Èχ)
ëëD-TRV24E: 50,3 × 37,4 ПП
аМЩУ П‡ˆЛУММ˚И ˝Н ‡М
ДНЪЛ‚МУ-П‡Ъ Л˜М‡fl ЪВıМУОУ„Лfl
TN ЬдС/TFT (ЪУМНУФОВМУ˜М˚И
Ъ‡МБЛТЪУ)
й·˘ВВ ˜ЛТОУ ˝ОВПВМЪУ‚
ЛБУ· ‡КВМЛfl:
61380 (279 × 220)
ÇıÓ‰Ì˚Â Ë ‚˚ıÓ‰Ì˚Â
‡Á˙ÂÏ˚
ЗЛ‰В‚˚ıУ‰
оУМУ„МВБ‰У, 1З ФУ ‰‚УИМУИ
‡ПФОЛЪЫ‰В 75 йП,
МВТЛППВЪ Л˜МУВ
ДЫ‰ЛУ‚˚ıУ‰
еУМУЩУМЛ˜ВТНЛИ, оУМУ„МВБ‰У,
327 ПЗ (Ф Л ФУОМУП
ТУФ УЪЛ‚ОВМЛЛ М‡„ ЫБНЛ 47
НЛОУУП), ФУОМУВ ТУФ УЪЛ‚ОВМЛВ
ПВМВВ, ˜ВП 2,2 НЛОУУП
RFU DC OUT
лФВˆЛ‡О¸МУВ ПЛМЛ„МВБ‰У, 5 З
ФУТЪ. ЪУН‡
ЙМВБ‰У М‡Ы¯МЛНУ‚
еЛМЛ„МВБ‰У
ЙМВБ‰У ЫФ ‡‚ОВМЛfl LANC
лЪВ ВУЩУМЛ˜ВТНУВ ПЛМЛ-„МВБ‰У
(∅ 2,5 ПП)
ЙМВБ‰У MIC
еЛМЛ-„МВБ‰У, 0,388 ПЗ, МЛБНУВ
ФУОМУВ ТУФ УЪЛ‚ОВМЛВ Т
‚˚ıУ‰УП УЪ 2,5 ‰У 3 З ФУТЪ.
ЪУН‡, ФУОМУВ ТУФ УЪЛ‚ОВМЛВ 6,8
НЛОУУП (∅ 3,5 ПП)
Й УПНУ„У‚У ЛЪВО¸
СЛМ‡ПЛ˜ВТНЛИ
„ УПНУ„У‚У ЛЪВО¸
й·˘ВВ
н В·У‚‡МЛfl Н ФЛЪ‡МЛ˛
7,5 З (ТВЪВ‚УИ ‡‰‡ФЪВ ФВ ВП.
ЪУН‡)
л В‰Мflfl ФУЪ В·ОflВП‡fl
ПУ˘МУТЪ¸
ЗУ ‚ ВПfl ‚˚ФУОМВМЛfl Б‡ФЛТЛ
‚Л‰ВУН‡ПВ УИ Т
ЛТФУО¸БУ‚‡МЛВП ЬдС
CCD-TRV14E: 4,2 ЗЪ
CCD-TRV24E: 4,5 ЗЪ
ЗУ ‚ ВПfl ‚˚ФУОМВМЛfl Б‡ФЛТЛ
‚Л‰ВУН‡ПВ УИ Т
ЛТФУО¸БУ‚‡МЛВП ‚Л‰УЛТН‡ЪВОfl
CCD-TRV14E: 3,3 ЗЪ
CCD-TRV24E: 3,5 ЗЪ
к‡·У˜‡fl ЪВПФВ ‡ЪЫ ‡
йЪ 0°л ‰У 40°л
(УЪ 32°F ‰У 104°F)
нВПФВ ‡ЪЫ ‡ ı ‡МВМЛfl
йЪ –20°л ‰У +60°л
(УЪ –4°F ‰У +140°F)
к‡БПВ ˚
и Л·ОЛБ. 112 ı 102 ı 201 ПП
(¯/‚/„)
е‡ТТ‡
и Л·ОЛБ. 890 „
зВ ‚НО˛˜‡fl ·‡Ъ‡ ВИМУ„У ·ОУН‡,
ОЛЪЛВ‚УИ ·‡Ъ‡ ВИНЛ, Н‡ТТВЪ˚ Л
ФОВ˜В‚У„У ВПМfl
и Л·ОЛБ. 1,1 Н„
ЗНО˛˜‡fl ·‡Ъ‡ ВИМ˚И ·ОУН NP33, ОЛЪЛВ‚Ы˛ ·‡ЪВ ВИНЫ
CR2025, Н‡ТТВЪЫ к5-90 Л
ФОВ˜В‚УИ ВПВМ¸
еЛН УЩУМ
щОВНЪ Л˜ВТНЛИ НУМ‰ВМТУ М˚И
ПЛН УЩУМ ПУМУЩУМЛ˜ВТНУ„У
ЪЛФ‡
и ЛО‡„‡ВП˚В Ф ЛМ‡‰ОВКМУТЪЛ
лП. ТЪ 6.
лВЪВ‚УИ ‡‰‡ФЪВ
ФВ ВПВММУ„У ЪУН‡
н В·У‚‡МЛfl Н ЛТЪУ˜МЛНЫ
ФЛЪ‡МЛfl
110-240 З ФВ ВП. ЪУН‡, 50/60 Йˆ
иУЪ В·ОflВП‡fl ПУ˘МУТЪ¸
AC-V16/V17: 20 ЗЪ
AC-V16A/V17A: 22 ЗЪ
З˚ıУ‰МУВ М‡Ф flКВМЛВ
DC OUT ‚ ‡·У˜ВП ВКЛПВ
7,5 З, 1,8 Д
З˚ıУ‰ ‰Оfl Б‡ fl‰НЛ ·‡Ъ‡ ВЛ
10 З, 1,1 Д ‚ ВКЛПВ Б‡ fl‰НЛ
и ЛПВМЛП˚В ·‡Ъ‡ ВИМ˚В
·ОУНЛ
Е‡Ъ‡ ВИМ˚И ·ОУН Sony NP-33
(Ф ЛО‡„‡ВЪТfl), NP-55H, NP-C65,
NP-66, NP-67, NP-77H, NP-98
к‡·У˜‡fl ЪВПФВ ‡ЪЫ ‡
йЪ 0°л ‰У 40°л
(УЪ 32°F ‰У 104°F)
нВПФВ ‡ЪЫ ‡ ı ‡МВМЛfl
йЪ –20°л ‰У +60°л
(йЪ –4°F ‰У +140°F)
к‡БПВ ˚ (Ф Л·ОЛБ.)
166 × 43 × 75 ÏÏ (¯/‚/„),
‚Íβ˜‡fl ‚˚ÒÚÛÔ‡˛˘Ë ˜‡ÒÚË Ë
„ÛÎflÚÓ ˚
å‡ÒÒ‡ (Ô Ë·ÎËÁ.)
AC-V16: 420 „
AC-V16A: 450 „
AC-V17: 440 „
AC-V17A: 460 „
дУМТЪ ЫНˆЛfl Л ЪВıМЛ˜ВТНЛВ
ı‡ ‡НЪВ ЛТЪЛНЛ ПУ„ЫЪ ·˚Ъ¸
ЛБПВМВМ˚ ·ВБ Ы‚В‰УПОВМЛfl.
Additional information СУФУОМЛЪВО¸М‡fl ЛМЩУ П‡ˆЛfl
CCD-TRV14E/TRV24E 3-859-266-12(1).E/R
77
Page 78

Identifying the parts
йФУБМ‡‚‡МЛВ ‰ВЪ‡ОВИ
STOP
1
REW PLAY
2
3
4
5
6
7
1 Tape transport buttons (p. 22, 24)
π STOP
0 REW (rewind)
· PLAY (playback)
) FF (fast forward)
P PAUSE
These buttons will function in PLAYER
mode.
2 EDITSEARCH button (p. 20)
3 Accessory shoe
4 Lens cover
5 Recording lamp
6 Built-in microphone
7 Remote sensor (p. 83)
Aim the Remote Commander here for
remote control.
8 Power zoom lever (p. 14)
9 Viewfinder adjustment ring (p. 13)
!º Viewfinder (p. 63, 85)
!¡ BACK LIGHT button (p. 44)
!™ FADER button (p. 34)
!£ FOCUS switch (p. 41)
!¢ Focus dial (p. 41)
PAUSE
FF
1 дМУФНЛ ФВ ВПВ˘ВМЛfl ОВМЪ˚
(ÒÚ . 22, 24)
π STOP (ÓÒÚ‡ÌÓ‚)
0 REW (ЫТНУ ВММ‡fl ФВ ВПУЪН‡ М‡Б‡‰)
· PLAY (‚ÓÒÔ ÓËÁ‚‰ÂÌËÂ)
) FF (ЫТНУВММ‡ ФВ ВПУЪН‡ ‚ФВ В‰)
P PAUSE (Ô‡ÛÁ‡)
щЪЛ НМУФНЛ ЩЫМНˆЛУМЛ Ы˛Ъ ‚ ВКЛПВ
PLAYER.
2 дМУФН‡ EDITSEARCH (ТЪ . 20)
3 СВ К‡ЪВО¸ ‰Оfl ‚ТФУПУ„‡ЪВО¸М˚ı
Ф ЛМ‡‰ОВКМУТЪВИ
4 ä ˚¯Í‡ Ó·˙ÂÍÚË‚‡
5 ã‡ÏÔӘ͇ Á‡ÔËÒË
6 ÇÒÚ ÓÂÌÌ˚È ÏËÍ ÓÙÓÌ
7 ÑËÒڇ̈ËÓÌÌ˚È ‰‡Ú˜ËÍ (ÒÚ . 83)
з‡ˆВОЛЪ¸ ФЫО¸Ъ ‰ЛТЪ‡МˆЛУММУ„У
ЫФ ‡‚ОВМЛfl Т˛‰‡ ‰Оfl ‰ЛТЪ‡МˆЛУММУ„У
НУМЪ УОfl.
8 ê˚˜‡„ Ô Ë‚Ó‰ÌÓ„Ó Ú ‡ÒÙÓ͇ÚÓ ‡
(ÒÚ . 14)
9 äÓθˆÓ „ÛÎË Ó‚ÍË ‚ˉÓËÒ͇ÚÂÎfl
(ÒÚ . 13)
0 ÇˉÓËÒ͇ÚÂθ (ÒÚ . 63, 85)
!¡ дМУФН‡ BACK LIGHT (ТЪ . 44)
!™ дМУФН‡ FADER (ТЪ . 34)
!£ è ÂÍβ˜‡ÚÂθ FOCUS (ÒÚ . 41)
!¢ СЛТН ЩУНЫТЛ У‚НЛ (ТЪ . 41)
8
9
!º
!¡
!™
!£
!¢
78
CCD-TRV14E/TRV24E 3-859-266-12(1).E/R
Page 79

Identifying the parts
!∞
йФУБМ‡‚‡МЛВ ‰ВЪ‡ОВИ
@£!§
!¶
!•
!ª
@º
@¡
@™
!∞ TIME button (p. 32)
!§ DATE button (p. 32)
!¶ Speaker
!• Recording lamp
!ª Lithium battery compartment (p. 54)
@º LCD screen (p. 16, 17, 22, 85)
@¡ WIDE button (p. 39) (CCD-TRV24E only)
@™ TITLE button (p. 46)
@£ DISPLAY button (p. 23)
@¢ STEADY SHOT switch (p. 45)
(CCD-TRV24E only)
@∞ START/STOP MODE switch (p.11, 33)
@§ PICTURE EFFECT button (p. 37)
@¶ MENU button (p. 29)
@• COUNTER RESET button (p. 13)
@ª END SEARCH button (p. 25)
!∞дМУФН‡ TIME (ТЪ . 32)
!§ дМУФН‡ DATE (ТЪ . 32)
!¶ É ÓÏÍÓ„Ó‚Ó ËÚÂθ
!• ã‡ÏÔӘ͇ Á‡ÔËÒË
!ª йЪТВН ОЛЪЛВ‚УИ ·‡Ъ‡ ВИНЛ (ТЪ . 54)
@º ùÍ ‡Ì ÜäÑ (ÒÚ . 16, 17, 22, 85)
@¡ дМУФН‡ WIDE (cЪ . 39) (ЪУО¸НУ
CCD-TRV24E)
@™ дМУФН‡ TITLE (ТЪ . 46)
@£ дМУФН‡ DISPLAY (ТЪ . 23)
@¢ è ÂÍβ˜‡ÚÂθ STEADY SHOT (ÒÚ . 45)
(ÚÓθÍÓ ÏÓ‰Âθ CCD-TRV24E)
@∞ è ÂÍβ˜‡ÚÂθ START/STOP MODE
(ÒÚ . 11, 33)
@§ дМУФН‡ PICTURE EFFECT (ТЪ . 37)
@¶ дМУФН‡ MENU (ТЪ . 29)
@• дМУФН‡ COUNTER RESET (ТЪ . 13)
@ª дМУФН‡ END SEARCH (ТЪ . 25)
@¢
@∞
@§
@¶
@•
@ª
Additional information СУФУОМЛЪВО¸М‡fl ЛМЩУ П‡ˆЛfl
CCD-TRV14E/TRV24E 3-859-266-12(1).E/R
79
Page 80

Identifying the parts
йФУБМ‡‚‡МЛВ ‰ВЪ‡ОВИ
#§
#¶
#º
#¡
#™
#£
#¢
#∞
#º POWER switch (p. 11, 22)
#¡ PUSH OPEN button (p. 16, 17, 22)
#™ LCD panel (p. 16, 17, 22)
#£ Display window (p. 86)
#¢ PROGRAM AE button (p. 43)
#∞ VOLUME button (p. 22)
#§ Eyecup (p. 63)
#¶ BRIGHT button (p. 16)
#• STANDBY switch (p. 11)
#ª START/STOP button (p. 11)
$º LANC l control jack
l stands for Local Application Control Bus
system. The l control jack is used for
controlling the tape transport of video
equipment and peripherals connected to it.
This jack has the same function as the
connectors indicated as CONTROL L or
REMOTE.
$¡ @ (earphone) jack (p. 23)
$™ Menu control dial (p. 29)
$£ BATT (battery release) knob (p. 9)
#•
#ª
$º
$¡
$™
$£
#º Ç˚Íβ˜‡ÚÂθ POWER (ÒÚ . 11, 22)
#¡ дМУФН‡ PUSH OPEN (ТЪ . 16, 17, 22)
#™ è‡ÌÂθ ÜäÑ (ÒÚ . 16, 17, 22)
#£ йНУ¯НУ ‰ЛТФОВfl (ТЪ . 86)
#¢ ÑËÒÍ PROGRAM AE (ÒÚ . 43)
#∞ дМУФН‡ VOLUME (ТЪ . 22)
#§ éÍÛÎfl (ÒÚ . 63)
#¶ дМУФН‡ BRIGHT (ТЪ .16)
#• è ÂÍβ˜‡ÚÂθ STANDBY (ÒÚ . 11)
#ª дМУФН‡ START/STOP (ТЪ . 11)
$º ÉÌÂÁ‰Ó ÛÔ ‡‚ÎÂÌËfl LANC l
l УБМ‡˜‡ВЪ ТЛТЪВПЫ Н‡М‡О‡ ПВТЪМУ„У
ЫФ ‡‚ОВМЛfl. ЙМВБ‰У ЫФ ‡‚ОВМЛfl l ЛТФУО¸БЫВЪТfl ‰Оfl НУМЪ УОfl Б‡ ФВ ВПВ˘ВМЛВП
ОВМЪ˚ ‚Л‰ВУУ·У Ы‰У‚‡МЛfl Л
ФВ ВЩЛ ЛИМ˚ı ЫТЪ УИТЪ‚, ФУ‰НО˛˜ВММ˚ı
МВПЫ. С‡ММУВ „МВБ‰У ЛПВВЪ ЪНЫ˛ КВ
ЩЫМНˆЛ˛, Н‡Н Л ‡Б˙ВП˚, У·УБМ‡˜ВММ˚В
Н‡Н CONTROL L ЛОЛ REMOTE.
$¡ ÉÌÂÁ‰Ó @ (̇ۯÌËÍÓ‚) (ÒÚ . 23)
$™ ÑËÒÍ ÛÔ ‡‚ÎÂÌËfl ÏÂÌ˛ (ÒÚ . 29)
$£ ê͇ۘ BATT (ÓÒ‚Ó·ÓʉÂÌËfl ·‡Ú‡ ÂÈÌÓ„Ó
·ÎÓ͇) (ÒÚ . 9)
80
CCD-TRV14E/TRV24E 3-859-266-12(1).E/R
Page 81

Identifying the parts
йФУБМ‡‚‡МЛВ ‰ВЪ‡ОВИ
$¢
$∞
$§
$¶
$•
$¢ Eyecup release knob (p. 63)
$∞ EJECT knob (p. 10)
$§ Hooks for shoulder strap (p. 82)
$¶ Battery mounting surface (p. 9)
$• Grip strap (p. 18)
$ª Cassette compartment (p. 10)
%º VIDEO OUT jack (p. 50)
%¡ RFU DC OUT (RFU adaptor DC out) jack
%™ AUDIO OUT jack (p. 50)
%£ MIC (microphone) jack
Connect an external microphone (not
supplied). This jack also accepts a “plug-inpower” microphone.
%¢ Tripod receptacle (p. 19)
Make sure that the length of the tripod
screw is less than 6.5 mm (9/32 inches).
Otherwise, you cannot attach the tripod
securely and the screw may damage the
camcorder.
$ª
%º
%¡
%™
%£
%¢
$¢ ê͇ۘ ÓÒ‚Ó·ÓʉÂÌËfl ÓÍÛÎfl ‡ (ÒÚ . 63)
$∞ ê͇ۘ EJECT (ÒÚ . 10)
$§ ä ˛˜ÍË ‰Îfl ÔÎÂ˜Â‚Ó„Ó ÂÏÌfl (ÒÚ . 82)
$¶ èÓ‚Â ıÌÓÒÚ¸ ÛÒÚ‡ÌÓ‚ÍË ·‡Ú‡ ÂÈÌÓ„Ó
·ÎÓ͇ (ÒÚ . 9)
$• кВПВММУИ Б‡ı‚‡Ъ (ТЪ . 18)
$ª йЪТВН Н‡ТТВЪ˚ (ТЪ . 10)
%º ÉÌÂÁ‰Ó VIDEO OUT (ÒÚ . 50)
%¡ ÉÌÂÁ‰Ó RFU DC OUT (‚˚ıÓ‰ ‡‰‡ÔÚ ‡
ÔÓÒÚ. ÚÓ͇ RFU)
%™ ÉÌÂÁ‰Ó AUDIO OUT (ÒÚ . 50)
%£ ÉÌÂÁ‰Ó MIC (ÏËÍ ÓÙÓ̇)
иУ‰ТУВ‰ЛМЛЪВ ‚МВ¯МЛИ ПЛН УЩУМ (МВ
Ф ЛО‡„‡ВЪТfl).
д ˝ЪУПЫ „МВБ‰Ы Ъ‡НКВ ПУКМУ
ФУ‰ТУВ‰ЛМflЪ¸ ПЛН УЩУМ Т
“‚˚НО˛˜‡ЪВОВП ФЛЪ‡МЛfl”.
%¢ ÑÂʇÚÂθ Ú ÂÌÓ„Ë (ÒÚ . 19)
м·В‰ЛЪВТ¸, ˜ЪУ ‰ОЛМ‡ ‚ЛМЪ‡ Ъ ВМУ„Л ПВМВВ
6,5 ПП. З Ф УЪЛ‚МУП ТОЫ˜‡В З˚ МВ
ТПУКВЪВ М‡‰ВКМУ Ф ЛТУВ‰ЛМЛЪ¸ Ъ ВМУ„Ы, ‡
‚ЛМЪ ПУКВЪ ФУ‚ В‰ЛЪ¸ ‚Л‰ВУН‡ПВ Ы.
Additional information СУФУОМЛЪВО¸М‡fl ЛМЩУ П‡ˆЛfl
CCD-TRV14E/TRV24E 3-859-266-12(1).E/R
81
Page 82

Identifying the parts йФУБМ‡‚‡МЛВ ‰ВЪ‡ОВИ
Attaching the shoulder strap
Attach the supplied shoulder strap to the hooks
for the shoulder strap $§.
и ЛН ВФОВМЛВ ФОВ˜В‚У„У ВПМfl
и ЛН ВФЛЪВ Ф ЛО‡„‡ВП˚И ФОВ˜В‚УИ ВПВМ¸ Н
Н ˛˜Н‡П ‰Оfl ФОВ˜В‚У„У ВПМfl $§.
1 2 3
Remote Commander
Using the Remote Commander
Make sure that COMMANDER is set to ON in
the menu system.
The buttons that have the same name on the
Remote Commander as on the camcorder
function identically.
1
иЫО¸Ъ ‰ЛТЪ‡МˆЛУММУ„У ЫФ ‡‚ОВМЛfl
аТФУО¸БУ‚‡МЛВ ФЫО¸Ъ‡
‰ЛТЪ‡МˆЛУММУ„У ЫФ ‡‚ОВМЛfl
м·В‰ЛЪВТ¸, ˜ЪУ COMMANDER ЫТЪ‡МУ‚ОВМ ‚
ФУОУКВМЛВ ON ‚ ТЛТЪВПВ ПВМ˛.
дМУФНЛ Т У‰ЛМ‡НУ‚˚ПЛ М‡Б‚‡МЛflПЛ М‡
ФЫО¸ЪВ ‰ЛТЪ‡МˆЛУММУ„У ЫФ ‡‚ОВМЛfl Л М‡
‚Л‰ВУН‡ПВ В ЩЫМНˆЛУМЛ Ы˛Ъ Л‰ВМЪЛ˜МУ.
2
3
1 Transmitter
Point toward the remote sensor to control
the camcorder after turning on the
camcorder.
2 Tape transport buttons (p. 22, 24)
3 R6 (size AA) battery compartment (p. 83)
4 START/STOP button (p. 11)
5 Power zoom button (p. 14)
The zooming speed is unchangeable on the
Remote Commander.
82
4
5
1 è ‰‡Ú˜ËÍ
з‡Ф ‡‚¸ЪВ В„У М‡ ‰ЛТЪ‡МˆЛУММ˚И ‰‡Ъ˜ЛН
‰Оfl ЫФ ‡‚ОВМЛfl ‚Л‰ВУН‡ПВ УИ ФУТОВ
‚НО˛˜ВМЛfl ФЛЪ‡МЛfl ‚Л‰ВУН‡ПВ ˚.
2 дМУФНЛ ФВ ВПВ˘ВМЛfl ОВМЪ˚ (ТЪ . 22, 24)
3 йЪТВН ·‡Ъ‡ ВВН R6 ( ‡БПВ ДД) (ТЪ . 83)
4 дМУФН‡ START/STOP (ТЪ . 11)
5 дМУФН‡ Ф Л‚У‰МУ„У Ъ ‡МТЩУН‡ЪУ ‡
(ТЪ . 14)
лНУ УТЪ¸ Ъ ‡МТЩУН‡ˆЛЛ fl‚ОflВЪТfl
МВЛБПВММУИ Ф Л ЫФ ‡‚ОВМЛЛ Т ФУПУ˘¸˛
ФЫО¸Ъ‡ ‰ЛТЪ‡МˆЛУММУ„У ЫФ ‡‚ОВМЛfl.
CCD-TRV14E/TRV24E 3-859-266-12(1).E/R
Page 83

Identifying the parts
йФУБМ‡‚‡МЛВ ‰ВЪ‡ОВИ
To prepare the Remote Commander
Insert two R6 (size AA) batteries by matching
the + and – on the batteries to the diagram
inside the battery compartment.
Note on battery life
The batteries for the Remote Commander last
about 6 months under normal operation. When
the batteries become weak or dead, the Remote
Commander does not work.
To avoid damage from possible battery
leakage
Remove the batteries when you will not use the
Remote Commander for a long time.
Remote control direction
Aim the Remote Commander to the remote
sensor within the range as shown below.
СОfl ФУ‰„УЪУ‚НЛ ФЫО¸Ъ‡
‰ЛТЪ‡МˆЛУММУ„У ЫФ ‡‚ОВМЛfl
ЗТЪ‡‚¸ЪВ ‰‚В ·‡Ъ‡ ВИНЛ R6 ( ‡БПВ ‡ ДД) ‚
ТУУЪ‚ВЪТЪ‚ЛЛ ФУОfl МУТЪЛ + Л – М‡
·‡Ъ‡ ВИН‡ı ТıВПВ ‚МЫЪ Л ·‡Ъ‡ ВИМУ„У
УЪТВН‡.
Additional information СУФУОМЛЪВО¸М‡fl ЛМЩУ П‡ˆЛfl
и ЛПВ˜‡МЛВ УЪМУТЛЪВО¸МУ Т УН‡ ТОЫК·˚
·‡Ъ‡ ВВН
Е‡Ъ‡ ВВН ‰Оfl ФЫО¸Ъ‡ ‰ЛТЪ‡МˆЛУММУ„У
ЫФ ‡‚ОВМЛfl ı‚‡Ъ‡ВЪ Ф ЛПВ МУ М‡ 6 ПВТflˆВ‚
Ф Л МУ П‡О¸МУИ ˝НТФОЫ‡Ъ‡ˆЛЛ. ЦТОЛ Б‡ fl‰
·‡Ъ‡ ВВН ТЪ‡МВЪ ТО‡·˚П ЛОЛ ЛБ ‡ТıУ‰ЫВЪТfl
ТУ‚ТВП, ФЫО¸Ъ ‰ЛТЪ‡МˆЛУММУ„У ЫФ ‡‚ОВМЛfl
ФВ ВТЪ‡МВЪ ЩЫМНˆЛУМЛ У‚‡Ъ¸.
ЗУ ЛБ·ВК‡МЛВ ФУ‚ ВК‰ВМЛfl ‚ТОВ‰ТЪ‚ЛВ
‚УБПУКМУИ ЫЪВ˜НЛ ТУ‰В КЛПУ„У ·‡Ъ‡ ВВН
쉇ОЛЪВ ·‡Ъ‡ ВИНЛ, ВТОЛ З˚ МВ ·Ы‰ВЪВ
ЛТФУО¸БУ‚‡Ъ¸ ФЫО¸Ъ ‰ЛТЪ‡МˆЛУММУ„У
ЫФ ‡‚ОВМЛfl ‰ОЛЪВО¸МУВ ‚ ВПfl.
15˚
15˚
15˚
з‡Ф ‡‚ОВМЛВ ФЫО¸Ъ‡ ‰ЛТЪ‡МˆЛУММУ„У
ЫФ ‡‚ОВМЛfl
з‡Ф ‡‚¸ЪВ ФЫО¸Ъ ‰ЛТЪ‡МˆЛУММУ„У
ЫФ ‡‚ОВМЛfl М‡ ‰ЛТЪ‡МˆЛУММ˚И ‰‡Ъ˜ЛН ‚
Ф В‰ВО‡ı ‰Л‡Ф‡БУМ‡, ФУН‡Б‡ММУ„У МЛКВ.
5m(16ft)
15˚
83
CCD-TRV14E/TRV24E 3-859-266-12(1).E/R
Page 84

Identifying the parts
йФУБМ‡‚‡МЛВ ‰ВЪ‡ОВИ
Notes on the Remote Commander
•Keep the remote sensor away from strong light
sources such as direct sunlight or illumination.
Otherwise, the remote control may not be
effective.
•Be sure that there is no obstacle between the
remote sensor on the camcorder and the
Remote Commander.
•This camcorder works at commander mode
VTR 2. The commander modes (1, 2, and 3) are
used to distinguish this camcorder from other
Sony VCRs to avoid remote control
misoperation. If you use another Sony VCR at
commander mode VTR 2, we recommend you
change the commander mode or cover the
remote sensor of the VCR with black paper.
To watch the demonstration
You can start the demonstration by setting in
the menu system.
You can also start the demonstration by the
following operation.
To enter demo mode
(1) Eject the cassette and set the POWER switch
to PLAYER.
(2) Turn STANDBY up.
(3) While holding down · set the POWER
switch to CAMERA.
To exit demo mode
(1) Set the POWER switch to PLAYER.
(2) Turn STANDBY up.
(3) While holding down π set the POWER
switch to CAMERA.
и ЛПВ˜‡МЛfl УЪМУТЛЪВО¸МУ ФЫО¸Ъ‡
‰ЛТЪ‡МˆЛУММУ„У ЫФ ‡‚ОВМЛfl
• к‡ТФУО‡„‡ИЪВ ‰ЛТЪ‡МˆЛУММ˚И ‰‡Ъ˜ЛН
‚‰‡ОЛ УЪ ТЛО¸М˚ı ЛТЪУ˜МЛНУ‚ Т‚ВЪ‡, Ъ‡НЛı,
Н‡Н Ф flПУИ ТУОМВ˜М˚И Т‚ВЪ ЛОЛ
ЛОО˛ПЛМ‡ˆЛfl. З Ф УЪЛ‚МУП ТОЫ˜‡В
‰ЛТЪ‡МˆЛУММУВ ЫФ ‡‚ОВМЛВ ПУКВЪ МВ
Т ‡·‡Ъ˚‚‡Ъ¸.
• м·В‰ЛЪВТ¸, ˜ЪУ ПВК‰Ы ‰ЛТЪ‡МˆЛУММ˚П
‰‡Ъ˜ЛНУП М‡ ‚Л‰ВУН‡ПВ В Л ФЫО¸ЪУП
‰ЛТЪ‡МˆЛУММУ„У ЫФ ‡‚ОВМЛfl МВЪ
ФВФflЪТЪ‚Лfl.
• С‡ММ‡fl ‚Л‰ВУН‡ПВ ‡ ‡·УЪ‡ВЪ ‚ ВКЛПВ
ФЫО¸Ъ‡ ЫФ ‡‚ОВМЛfl VTR 2 (KBM 2). кВКЛП˚
ФЫО¸Ъ‡ ЫФ ‡‚ОВМЛfl (1, 2 Л 3) ЛТФУО¸БЫ˛ЪТfl
‰Оfl УЪОЛ˜Лfl ‰‡ММУИ ‚Л‰ВУН‡ПВ ˚ УЪ
‰ Ы„Лı дЗе ЩЛ П˚ Sony, ˜ЪУ·˚ ЛБ·ВК‡Ъ¸
МВФ ‡‚ЛО¸МУ„У Т ‡·‡Ъ˚‚‡МЛfl Ф Л
‰ЛТЪ‡МˆЛУММУП ЫФ ‡‚ОВМЛЛ. ЦТОЛ З˚
ЛТФУО¸БЫВЪВ ‰ Ы„ЛВ дЗе ЩЛ П˚ Sony ‚
ВКЛПВ ФЫО¸Ъ‡ ЫФ ‡‚ОВМЛfl VTR 2 (дЗе 2),
ВНУПВМ‰ЫВЪТfl ЛБПВМЛЪ¸ ВКЛП М‡ ФЫО¸ЪВ
ЫФ ‡‚ОВМЛfl ЛОЛ Б‡Н ˚Ъ¸ ‰ЛТЪ‡МˆЛУММ˚И
‰‡Ъ˜ЛН дЗе ˜В МУИ ·ЫП‡„УИ.
СОfl Ф УТПУЪ ‡ ‰ВПУМТЪ ‡ˆЛЛ
З˚ ПУКВЪВ М‡˜‡Ъ¸ ‰ВПУМТЪ ‡ˆЛ˛ ФЫЪВП
ЫТЪ‡МУ‚НЛ ‚ ТЛТЪВПВ ПВМ˛.
З˚ ПУКВЪВ Ъ‡НКВ М‡˜‡Ъ¸ ‰ВПУМТЪ ‡ˆЛ˛
ФЫЪВП ТОВ‰Ы˛˘ВИ УФВ ‡ˆЛЛ.
СОfl ‚ıУ‰‡ ‚ ‰ВПУМТЪ ‡ˆЛУММ˚И ВКЛП
(1) З˚ЪУОНМЛЪВ Н‡ТТВЪЫ Л ЫТЪ‡МУ‚ЛЪВ
‚˚НО˛˜‡ЪВО¸ POWER ‚ ФУОУКВМЛВ
PLAYER.
(2) èÓ‚Â ÌËÚÂ STANDBY ‚‚Â ı.
(3) ç‡ÊËχfl · , ÛÒÚ‡ÌÓ‚ËÚ ‚˚Íβ˜‡ÚÂθ
POWER ‚ ФУОУКВМЛВ CAMERA.
84
СОfl ‚˚ıУ‰‡ ЛБ ‰ВПУМТЪ ‡ˆЛУММУ„У
ÂÊËχ
(1) ìÒÚ‡ÌÓ‚ËÚ ‚˚Íβ˜‡ÚÂθ POWER ‚
ФУОУКВМЛВ PLAYER.
(2) èÓ‚Â ÌËÚÂ STANDBY ‚‚Â ı.
(3) ç‡ÊËχfl π , ÛÒÚ‡ÌÓ‚ËÚ ‚˚Íβ˜‡ÚÂθ
POWER ‚ ФУОУКВМЛВ CAMERA.
CCD-TRV14E/TRV24E 3-859-266-12(1).E/R
Page 85

Identifying the parts
йФУБМ‡‚‡МЛВ ‰ВЪ‡ОВИ
Operation indicators
In the viewfinder and on the LCD
screen
2
3
4
5
6
W T
FADER
CINEMA
MOSAIC
7
8
BRT
9
!º
!¡
1 Power zoom indicator (p. 15)
2 Manual focus indicaror (p. 41)
3 PROGRAM AE indicator (p. 42)
4 SteadyShot indicator (p. 45) (CCD-TRV24E
only)
5 Back light indicator (p. 44)
6 FADER indicator (p. 34)
7 Wide mode indicator (p. 38) (CCD-TRV24E
only)
8 Picture Effect indicator (p. 36)
9 BRT (brightness) indicator (p. 16)
VOL (volume) indicator (p. 22)
!º Lithium battery indicator (p. 53)
!¡ Recording lamp/battery lamp (p. 11)
(in the viewfinder)
!™ Mirror mode indicator (p. 17)
!£ SP/LP recording mode indicator (p. 11)
!¢ Tape transport mode indicator (p. 11)
!∞ Tape counter (p. 13)
Continued to the next page
à̉Ë͇ÚÓ ˚ ‡·ÓÚ˚
Ç ‚ˉÓËÒ͇ÚÂÎÂ Ë Ì‡ ˝Í ‡Ì ÜäÑ
STBY
0:00:00
END
SEARCH
AUTO DATE
4 7 1997
1 аМ‰ЛН‡ЪУ Ф Л‚У‰МУ„У Ъ ‡МТЩУН‡ЪУ ‡
(ÒÚ . 15)
2 аМ‰ЛН‡ЪУ Ы˜МУИ ЩУНЫТЛ У‚НЛ
(ÒÚ . 41)
3 à̉Ë͇ÚÓ PROGRAM AE (ÒÚ . 42)
4 à̉Ë͇ÚÓ ÒÚ‡·ËÎËÁ‡ˆËË Ò˙ÂÏÍË
SteadyShot ( ÒÚ . 45) (ÚÓθÍÓ
CCD-TRV24E)
5 à̉Ë͇ÚÓ Á‡‰ÌÂÈ ÔÓ‰Ò‚ÂÚÍË (ÒÚ . 44)
6 à̉Ë͇ÚÓ FADER (ÒÚ . 34)
7 à̉Ë͇ÚÓ ¯Ë ÓÍÓ˝Í ‡ÌÌÓ„Ó ÂÊËχ
(ÒÚ . 38) (ÚÓθÍÓ CCD-TRV24E)
8 аМ‰ЛН‡ЪУ ˝ЩЩВНЪ‡ ЛБУ· ‡КВМЛfl
(ÒÚ . 36)
9 аМ‰ЛН‡ЪУ BRT (fl НУТЪЛ) (ТЪ . 16)
аМ‰ЛН‡ЪУ VOL („ УПНУТЪЛ) (ТЪ . 22)
!º аМ‰ЛН‡ЪУ ОЛЪЛВ‚УИ ·‡Ъ‡ ВИНЛ
(ÒÚ . 53)
!¡ ã‡ÏÔӘ͇ Á‡ÔËÒË/·ÏÔӘ͇
·‡Ú‡ ÂÈÌÓ„Ó ·ÎÓ͇ (ÒÚ . 11)
(‚ ‚ˉÓËÒ͇ÚÂÎÂ)
!™ à̉Ë͇ÚÓ Á ͇θÌÓ„Ó ÂÊËχ
(ÒÚ . 17)
!£ à̉Ë͇ÚÓ ÂÊËχ Á‡ÔËÒË SP/LP
(ÒÚ . 11)
!¢ à̉Ë͇ÚÓ ÂÊËχ Ô ÂÏ¢ÂÌËfl
ÎÂÌÚ˚ (ÒÚ . 11)
!∞ ë˜ÂÚ˜ËÍ ÎÂÌÚ˚ (ÒÚ . 13)
!™1
!£
!¢
!∞
!§
!¶
!•
!ª
@º
@¡
Additional information СУФУОМЛЪВО¸М‡fl ЛМЩУ П‡ˆЛfl
и У‰УОКВМЛВ ТОВ‰ЫВЪ
CCD-TRV14E/TRV24E 3-859-266-12(1).E/R
85
Page 86

Identifying the parts
йФУБМ‡‚‡МЛВ ‰ВЪ‡ОВИ
!§ 5SEC recording indicator (p. 33)
!¶ END SEARCH indicator (p. 25)
!• Warning indicators (p. 87)
!ª Remaining battery indicator (p. 58)
@º AUTO DATE indicator (p. 11)
@¡ Date or Time (p. 32)
In the display window
2
1 Warning indicators (p. 87)
2 Recording mode indicator (SP/LP) (p. 11)
3 Remaining battery indicator (p. 58)
4 Date or time (p. 32)
Tape counter (p. 13)
!§ аМ‰ЛН‡ЪУ ФflЪЛТВНЫМ‰МУИ Б‡ФЛТЛ 5SEC
(ÒÚ . 33)
!¶ à̉Ë͇ÚÓ END SEARCH (ÒÚ . 25)
!• è ‰ÛÔ Âʉ‡˛˘Ë Ë̉Ë͇ÚÓ ˚
(ÒÚ . 87)
!ª à̉Ë͇ÚÓ ÓÒÚ‡‚¯Â„ÓÒfl Á‡ fl‰‡
·‡Ú‡ ÂÈÌÓ„Ó ·ÎÓ͇ (ÒÚ . 58)
@º à̉Ë͇ÚÓ AUTO DATE (ÒÚ . 11)
@¡ чڇ ËÎË ‚ ÂÏfl (ÒÚ . 32)
З УНУ¯НВ ‰ЛТФОВfl
31
4
1 è ‰ÛÔ Âʉ‡˛˘Ë Ë̉Ë͇ÚÓ ˚
(ÒÚ . 87)
2 à̉Ë͇ÚÓ ÂÊËχ Á‡ÔËÒË (SP/LP)
(ÒÚ . 11)
3 à̉Ë͇ÚÓ ÓÒÚ‡‚¯Â„ÓÒfl Á‡ fl‰‡
·‡Ú‡ ÂÈÌÓ„Ó ·ÎÓ͇ (ÒÚ . 58)
86
4 чڇ ËÎË ‚ ÂÏfl (ÒÚ . 32)
ë˜ÂÚ˜ËÍ ÎÂÌÚ˚ (ÒÚ . 13)
CCD-TRV14E/TRV24E 3-859-266-12(1).E/R
Page 87

Warning indicators
4 7 1997
è ‰ÛÔ Âʉ‡˛˘ËÂ
Ë̉Ë͇ÚÓ ˚
The warning indicators and the recording lamp
flash to inform you of the following situations.
The illustrations below are the warning
indicators of the viewfinder and the LCD
screen. The same indicators flash also in the
display window.
≥: You can hear the beep sound when BEEP is
set to ON in the menu system.
и В‰ЫФ ВК‰‡˛˘ЛВ ЛМ‰ЛН‡ЪУ ˚ Л О‡ПФУ˜Н‡
Б‡ФЛТЛ ПЛ„‡˛Ъ, ˜ЪУ·˚ ЛМЩУ ПЛ У‚‡Ъ¸ З‡Т У
ТОВ‰Ы˛˘Лı ‚УБПУКМ˚ı ТЛЪЫ‡ˆЛflı.
и Л‚В‰ВММ˚В МЛКВ ЛТЫМНЛ ФУН‡Б˚‚‡˛Ъ
Ф В‰ЫФ ВК‰‡˛˘ЛВ ЛМ‰ЛН‡ЪУ ˚
‚Л‰УЛТН‡ЪВОfl Л ˝Н ‡М‡ ЬдС. н‡НЛВ КВ
ЛМ‰ЛН‡ЪУ ˚ ПЛ„‡˛Ъ Ъ‡НКВ ‚ УНУ¯НВ
‰ЛТФОВfl.
≥: З˚ ПУКВЪВ ТО˚¯‡Ъ¸ БЫППВ М˚И
Б‚ЫНУ‚УИ ТЛ„М‡О Ф Л ЫТЪ‡МУ‚НВ BEEP ‚
ФУОУКВМЛВ ON ‚ ТЛТЪВПВ ПВМ˛.
123
456
789
Additional information СУФУОМЛЪВО¸М‡fl ЛМЩУ П‡ˆЛfl
1 The battery is weak or dead.
Slow flashing: The battery is weak.
Fast flashing: The battery is dead.
2 The tape is near the end.
3 The tape has run out.
4 No tape has been inserted.
5 The tab on the tape is out (red). (p.10)
6 Moisture condensation has occurred.
(p. 61)
6 indicator appears only when the cassette
is inserted.
7 The video heads may be contaminated.
(p. 62)
8 Some other trouble has occurred.
Disconnect the power source and contact
your Sony dealer or local authorized facility.
9 The lithium battery is weak or is not
installed. (p. 53)
This indicator flashes just only after
powering on.
1 ᇠfl‰ ·‡Ú‡ ÂË Ò··˚È ËÎË
ЛБ ‡ТıУ‰У‚‡М.
еВ‰ОВММУВ ПЛ„‡МЛВ: Б‡ fl‰ ·‡Ъ‡ ВЛ
Ò··˚È.
Å˚ÒÚ Ó ÏË„‡ÌËÂ: Á‡ fl‰ ·‡Ú‡ ÂË
ËÁ ‡ÒıÓ‰Ó‚‡Ì.
2 ãÂÌÚ‡ Ô Ë·ÎËʇÂÚÒfl Í ÍÓ̈Û.
3 ãÂÌÚ‡ Á‡ÍÓ̘Ë·Ҹ.
4 ç ‚ÒÚ‡‚ÎÂ̇ ͇ÒÒÂÚ‡.
5 з‡ Н‡ТТВЪВ УЪТЫЪТЪ‚ЫВЪ ОВФВТЪУН
(Í ‡ÒÌ˚È). (ÒÚ . 10)
6 è ÓËÁӯ· ÍÓ̉ÂÌÒ‡ˆËfl ‚·„Ë. (ÒÚ . 61)
à̉Ë͇ÚÓ 6 ФУfl‚ОflВЪТfl ЪУО¸НУ Ф Л
‚ТЪ‡‚ОВММУИ Н‡ТТВЪВ.
7 ЗУБПУКМУ Б‡„ flБМВМ˚ ‚Л‰ВУ„УОУ‚НЛ.
(ÒÚ . 62)
8 аПВ˛Ъ ПВТЪУ ‰ Ы„ЛВ МВЛТФ ‡‚МУТЪЛ.
йЪТУВ‰ЛМЛЪВ ЛТЪУ˜МЛН ФЛЪ‡МЛfl Л
У· ‡ЪЛЪВТ¸ ‚ З‡¯В ‡„ВМЪТЪ‚У ЩЛ П˚
Sony ЛОЛ ПВТЪМУВ ЫФУОМУПУ˜ВММУВ
ВПУМЪМУВ Ф В‰Ф ЛflЪЛВ.
9 б‡ fl‰ ОЛЪЛВ‚УИ ·‡Ъ‡ ВИНЛ fl‚ОflВЪТfl
ТО‡·˚П ЛОЛ КВ ОЛЪЛВ‚‡fl ·‡Ъ‡ ВИН‡ МВ
ЫТЪ‡МУ‚ОВМ‡. (ТЪ . 53)
щЪУЪ ЛМ‰ЛН‡ЪУ ПЛ„‡ВЪ ЪУО¸НУ ФУТОВ
‚НО˛˜ВМЛfl ФЛЪ‡МЛfl.
CCD-TRV14E/TRV24E 3-859-266-12(1).E/R
87
Page 88

Index
A
Adjusting viewfinder ........... 13
ANTI GROUND SHOOTING
AUTO DATE .......................... 14
33
B
BACK LIGHT ......................... 44
BEEP .................................. 13, 30
C
Camera recording ................. 11
Car battery .............................. 28
Charging battery ..................... 7
Cleaning video heads ........... 62
COUNTER RESET ................ 13
D
DATE/TIME .......................... 32
Demonstration ....................... 31
Digital zoom ........................... 15
E
Editing ..................................... 52
EDITSEARCH ........................ 20
EJECT ...................................... 10
END SEARCH ....................... 25
ì͇Á‡ÚÂθ
Ä, Å
Ä‚ÚÓÏÓ·ËθÌ˚È
‡ННЫПЫОflЪУ .....................28
Ç-á
ЗУТФУЛБ‚В‰ВМЛВ .............. 22
ǂ‰ÂÌËÂ/‚˚‚‰ÂÌËÂ
ËÁÓ· ‡ÊÂÌËfl .................... 34
ЙМВБ‰У ‰ЛТЪ‡МˆЛУММУ„У
ÛÔ ‡‚ÎÂÌËfl ....................... 80
ÉÌÂÁ‰Ó MIC (ÏËÍ ÓÙÓ̇) ..81
СВПУМТЪ ‡ˆЛfl .................... 31
á‡ÔËÒ¸ Ò ÔÓÏÓ˘¸˛
‚ˉÂÓ͇Ï ˚ ................... 11
ᇠfl‰Í‡ ·‡Ú‡ ÂÈÌÓ„Ó ·ÎÓ͇ ..7
à-å
àÒÚÓ˜ÌËÍË ÔËÚ‡ÌËfl ........... 26
гЛЪЛВ‚‡fl ·‡Ъ‡ ВИН‡ ......... 53
åÂÌ˛..................................29
åÓÌÚ‡Ê ...............................52
ç, é
燉ÔËÒ¸ .............................. 46
ç‡ÂÁ‰ ‚ˉÂÓ͇Ï ˚ .........14
é˜ËÒÚ͇ ‚ˉÂÓ„ÓÎÓ‚ÓÍ ..... 62
è
и‡ЫБ‡ ‚УТФ УЛБ‚В‰ВМЛfl ... 24
иВ ВПУЪН‡ ОВМЪ˚
‚Ô‰ ............................... 22
Sony Corporation Printed in Japan
F, G, H
Fade-in/Fade-out ..................34
FADER .................................... 34
Fast-forward ........................... 22
5 sec. recording ......................33
High-speed shutter mode ....42
I, J, K, L
LANC ...................................... 80
Lithium battery ...................... 53
M, N, O, P
Mains ....................................... 27
Manual focus ......................... 40
Menu ....................................... 29
MIC (microphone) jack ........ 81
PICTURE EFFECT ................. 36
Playback .................................. 22
Playback pause ...................... 24
Power sources ........................ 26
Power zoom ........................... 14
PROGRAM AE ...................... 42
иВ ВПУЪН‡ ОВМЪ˚ М‡Б‡‰ .. 22
èΘ‚ÓÈ ÂÏÂ̸ ..............82
и Л‚У‰МУИ Ъ ‡МТЩУН‡ЪУ .. 14
è Ë·„‡ÂÏ˚Â
Ф ЛМ‡‰ОВКМУТЪЛ ................6
и У‚В Н‡ МВЛТФ ‡‚МУТЪВИ . 72
иУТПУЪ Б‡ФЛТЛ ...............20
иЫО¸Ъ ‰ЛТЪ‡МˆЛУММУ„У
ÛÔ ‡‚ÎÂÌËfl ....................... 82
5-ТВНЫМ‰М‡fl Б‡ФЛТ¸ .......... 33
ê
кВ„ЫОЛ У‚Н‡ ‚Л‰УЛТН‡ЪВОfl .. 13
кВКЛП ‚˚ТУНУТНУ УТЪМУ„У
Á‡Ú‚Ó‡ .............................. 42
кВКЛП „УЪУ‚МУТЪЛ............. 12
кВКЛП ТФУЪ‡ .................... 42
кВКЛП ТЫПВ ВН ..................42
кЫ˜М‡fl ЩУНЫТЛ У‚Н‡ ........ 40
ë-ì
ë˜ÂÚ˜ËÍ ÎÂÌÚ˚.................. 13
ìÒÚ‡Ìӂ͇ ̇ Ú ÂÌÓ„Â .......19
ñ
сЛЩ У‚УИ Ъ ‡МТЩУН‡ЪУ . 15
ò
тЛ УНУЩУ П‡ЪМ˚И ВКЛП ..38
ù
щОВНЪ Л˜ВТН‡fl ТВЪ¸ .........27
Q, R
REC MODE ............................ 30
Rec. Review ............................ 20
Remote Commander............. 82
Remote control jack (LANC) 80
Rewind .................................... 22
S
Shoulder strap ....................... 82
Sports mode ........................... 42
STANDBY ......................... 11, 12
Standby mode ........................ 12
STEADY SHOT ...................... 45
Supplied accessories ............... 6
T, U, V
Tape counter .......................... 13
Title .......................................... 46
Tripod mounting ................... 19
Trouble check ......................... 68
Twilight mode ....................... 42
W, X, Y, Z
Wide mode ............................. 38
Zoom ....................................... 14
A
ANTI GROUND SHOOTING... 33
AUTO DATE ....................... 14
B
BACK LIGHT ...................... 44
BEEP ............................ 13, 30
C, D
COUNTER RESET ............ 13
DATE/TIME ........................ 32
E, F
EDITSEARCH .................... 20
EJECT ................................ 10
END SEARCH .................... 25
FADER................................ 34
L
LANC .................................. 80
P
PICTURE EFFECT ............ 36
PROGRAM AE ................... 42
R
REC MODE .........................30
S
STANDBY..................... 11, 12
STEADY SHOT .................. 45
CCD-TRV14E/TRV24E 3-859-266-12(1).E/R
 Loading...