


USER
GUIDE
SONIM XP5520
BOLT
English
Copyright © 2012 Sonim Technologies, Inc.
SONIM and the Sonim logo are trademarks of Sonim Technologies, Inc. Other company and product names may be trademarks or registered trade-marks of the respective owners with whom they are associated.
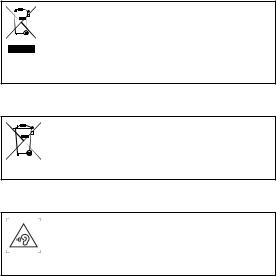
Disposal of Old Electrical and Electronic Equipment
The symbol of the crossed-out wheeled bin indicates that within the countries in the European Union, this product, and any enhancements marked with this symbol, can not be disposed as unsorted waste but must be taken to separate collection at their end- of-life.
Disposal of Battery
2
Please check local regulations for disposal of batteries. The battery should never be placed in municipal waste. Use a battery disposal facility if available.
Guideline for Headphone and Earphone
To prevent possible hearing damage, please do not listen at high volume levels for long periods.

Contents
General InformationСССССССС 7
Phone Models Covered Network Services
Sonim Support Information
Use the Guide Effectively
Your Safety GuidelinesСССССССС 9
Battery Performance
Battery Replacement
Avoid Short Circuit Avoid High Temperatures Battery Disposal
Personal Medical Devices Child Safety
Emergency Calls
SAR Information
Getting Started with XP5520 BOLTСССССССС 14
Battery Usage Inserting the Battery Removing the Battery Charging the Battery Set Battery Alert Your SIM Card
Inserting the SIM Card
Removing the SIM Card Switching On
Home Screen
Key Shortcuts in Home Screen Basic Settings
Keypad Functions
Your Sonim XP5520 BOLTСССССССС 26
Main Menu Main Menu Icons
Home Screen Indicators
Key Operations without Your SIM Card
Managing CallsСССССССС 30
Dial a Number
Dial an International Number Dial a Number via Contacts
Dial a Number via the Call History Managing Call History
Call Timers
Call Settings
Auto Answer Any key Answer Call Waiting Caller ID
Call Forwarding
Receive a Call
Record a Call
Managing Phone SettingsСССССССС 33
Time and Date Settings Schedule Power On/Off Settings Language Settings
Display Settings 3 Customizing Dedicated Keys
Managing Speed Dial Numbers Power Saving Settings
Auto Keypad Lock Connecting to Hearing Aid
Managing Network SettingsСССССССС 35
Network Selection
Data Connection Data Account Service Selection A-GPS Settings
Managing Security SettingsСССССССС 38
Restore Factory Settings
Managing ConnectivityСССССССС 39
Sending Data via Bluetooth Receiving Data via Bluetooth

Contents
USB Function
Managing Your FilesСССССССС 42
Managing ContactsСССССССС 44
Add a New Contact View the Contact Details
Sending a Message from Contacts Dialing a Number from Contacts Edit the Contact Details
Delete Contact
Copy Numbers between Phone and SIM Move Numbers between Phone and SIM Sending Contact
Selecting Multiple Contacts Caller Groups
Phonebook Settings
Searching Contacts
Managing MessagesСССССССС 49
Write Message Manage Your Messages Drafts
Outbox
Sent Messages Archive
Con!guring Email Accounts Write Email
Email Inbox
Email Outbox Email Sent Email Draft
Broadcast Messages Templates
Message Settings MMS Settings
Managing Pro!lesСССССССС 58
Sound Settings
ToolsСССССССС 60
Calendar Alarm Calculator Unit Converter World Clock
Sound Recorder Notes Stopwatch
Text Reader
SIM Services
ApplicationsСССССССС 63
Network Pro!le Settings GPS Navigator
Self Serve
Installing Java Application from WAP Installing Java Application from Memory Card
WAP BrowserСССССССС 64 |
4 |
|
Managing Push-to-talk ServicesСССССССС 65 |
||
|
||
Activating the PTT service |
|
|
Login and Logout of the PTT Service |
|
|
PTT Home Screen |
|
|
A corporate only subscriber will be able to: |
|
|
PTT Related Key Functions |
|
|
PTT Display Icons |
|
|
Manage PTT Settings |
|
|
Managing PTT Calls |
|
|
Direct PTT Calls |
|
|
Calls from PTT History Tab |
|
|
Calls from PTT Contacts Tab |
|
|
Calls from PTT Group Tab |
|
|
Sending Alerts |
|
|
Block Incoming PTT Calls |
|
|
Manage PTT Contact List |
|
|
Manage PTT Groups |
|

Contents
Manage PTT Favourite Contacts
Manage PTT Favourite Groups
Managing Multimedia FilesСССССССС 75
Camera Camera Options Media Player FM Radio
Hardcoded ShortcutsСССССССС 78
Using Memory CardСССССССС 79
Inserting Memory card into the Phone
Using PCTOOLSСССССССС 80
Installation of PC-Tools
Using PC-Tools with XP5520 Phone
Upgrading Sonim XP5520 FirmwareСССССССС 81
System Requirements
Installing Sonim Software Upgrade Tool Upgrading Sonim XP5520 Firmware
End User License AgreementСССССССС 83
Our Warranty
Comprehensive 3 Year Warranty Our Warranty
What We Will Do Phone Care Conditions
FCC StatementСССССССС 86
FCC Statement
IndexСССССССС 87
5

6
¥Please register your phone within 30 days at www.sonimtech.com/register, to receive product information and updates. For more information related to the warranty, please refer to ÒOur WarrantyÓ on page 84.

General Information
Congratulations on the purchase of a Sonim XP5520 BOLT mobile phone. This phone is a GSM/GPRS/EDGE/ UMTS enabled handset with quad-band capabilities and has an intuitive, feature-rich user interface, which allows you to make the best use of the offered functions.
Phone Models Covered
This user guide covers Sonim XP5520 BOLT phone model XP5520-A-R1. The model name can be read on the phone label under the battery.
This device utilizes the following 2G RF bands: GSM 850, GSM 900, DCS 1800, PCS 1900 MHz bands and supports the UMTS 850 MHz, 1900 MHz and 2100 MHz bands.
Network Services
These are additional services that you can avail through your network service provider. To make the best of these services, you must subscribe to them through your service provider and obtain instructions for their use from your service provider.
Sonim Support Information
If your phone needs product support, please contact Bell support center (1-800-677-0123). For online support information, refer http://www.bell.ca.
Use the Guide Effectively
Familiarize yourself with the terminology and symbols used in the guide to help you use your phone effectively.
HOME |
This is the screen displayed when the |
|
SCREEN |
phone is in idle condition. |
|
PRESS |
Means to press and release a key |
|
|
immediately. For example, Press 2 |
|
|
means that you press the key on |
|
|
the keypad that is labelled with the |
|
|
numeral 2 and the alphabets ÒABCÓ. |
|
SELECT |
Means to either press the Left or Right |
|
|
Selection Key to apply the command |
|
|
indicated at the bottom of the screen. |
|
|
The Center navigation key can also be |
|
|
used to select options. For example, |
|
|
if this guide says Select Menu > |
|
|
Messages > Write message, you |
|
|
must press the Left Selection Key to |
|
|
select Menu, scroll to Messages and |
|
|
press the Left Selection Key, scroll |
7 |
|
to Write message and press the Left |
|
|
Selection Key. To return to the previous |
|
|
screen, press the Right Selection Key. |
|
PRESS & |
Means to press and hold a key for 2 |
|
HOLD |
seconds before releasing the key. This |
|
|
action is typically used when trying |
|
|
to switch on/off the phone or when |
|
|
using shortcut keys to access speci!c |
|
|
functions. For example: press and hold |
|
|
1 to access voicemail. |
|
|
|
|
MENU |
Press Options to display menu options |
|
OPTIONS |
on the screen. The selection keys |
|
|
are used to accomplish the indicated |
|
|
option. |
|

General Information
SELECT |
Means to press the Left Selection Key |
||||
MENU |
to select the Menu option or press the |
||||
|
|
|
|
|
Menu key (centre) for the same result. |
A MENU |
Means more options are available but |
||||
ITEM |
only one has been mentioned in the |
||||
SUFFIXED |
guide. |
||||
WITH THREE |
|
||||
DOTS (É) |
|
||||
|
|
|
|
|
Signi!es a Note. |
|
|
|
|
|
|
|
|
|
|
|
|
|
|
|
|
|
|
|
|
|
|
|
|
|
|
|
|
|
|
|
|
|
|
|
|
Options Commonly Used across Menu Items
The following are common actions used across various menu items:
BACK |
Displays the previous screen. Use |
|
the Right Selection Key to perform |
|
this function. |
|
|
CLEAR |
Deletes data character by |
|
character. Use the Right Selection |
|
Key to perform this function. |
|
|
OK |
Con!rms an action. Use the Left |
|
Selection Key or the Menu key to |
|
perform this function. |
|
|
CLEAR KEY |
Use this key to delete while editing |
|
a message or delete a selected |
|
item in a list. |
|
|
BACK KEY |
Use this key to display the |
|
previous screen. |
|
|
8
Your Safety Guidelines
Please read and understand the following safety guidelines before you use the phone. These guidelines provide details to enable you to operate your phone safely and conform to any legal requirements regarding the use of cellular phones.
Do not to use the phone at a refuelling point. Observe restrictions when using radio equipment at fuel depots, chemical plants or where blasting operations are in progress.
Electrical interference may obstruct the use of your phone. Observe restrictions in hospitals and near medical equipment.
Switch off your cellular phone when in an aircraft. Wireless phones can cause interference or danger to an aircraft. In an aircraft, the phone can be used in flight mode.
Do not expose the battery to high temperatures (in excess of 60¡C).
9
Adhere to road safety laws. Do not hold/use a phone while you are driving; find a safe place to stop first. Use hands-free microphone while you are driving.
Avoid using the phone in close proximity to personal medical devices, such as pacemakers and hearing aids.
Use only Sonim XP5520 approved charging equipment to charge your phone and avoid damage to your phone.
The symbol of the crossed-out wheeled bin indicates that this product, and any enhancements marked with this symbol, can not be disposed as unsorted waste but must be taken to separate collection at their end-of-life.
Your Safety Guidelines
Ensure that only quali!ed personnel install or repair your phone.
The Sonim XP5520 is water-proof and can be submerged to 2 metres for 30 minutes.
¥Ensure to properly close the rubber cover of the charging connector and audio connector, to avoid deposits of water drops on these connectors, when the phone is immersed in water.
¥Water droplets may condense under the display cover if the phone is immersed in water with signi!cant drop in temperature. This does not indicate water leakage. The droplets will disappear at room temperature.
The Sonim XP5520 is dust-resistant, rugged and shock-resistant. However, it is not dust-proof or unbreakable if subjected to overwhelming impact. For best results and long product life, one should protect the Sonim XP5520 from salt water, dust and strong impacts.
Make back-up copies of important information stored in your phone or maintain a written record, using Sonim PC-tools application.
10
Your Safety Guidelines
Battery Performance
A rechargeable battery powers your device. Use the battery only for its intended purpose. Never use any charger or battery that is damaged. If the battery is completely discharged, it may take a few minutes before the charging indicator appears on the display or before any calls can be made. The full performance of a new battery is achieved only after three to four complete charge and discharge cycles. The battery can be charged and discharged hundreds of times but it will eventually wear out. Unplug the charger from the electrical plug and the device when not in use. Ensure that you do not leave the fully charged battery connected to the charger for longer time. If left unused, a fully charged battery will lose its charge over time.
There is a risk of explosion while charging if the battery has been replaced by an incorrect type.
Battery Replacement
When the talk and standby times are noticeably shorter than normal, replace the battery with an original Sonim battery. If a replacement battery is being used for the !rst time or if the battery has not been used for a prolonged period, it may be necessary to connect the charger and then disconnect and reconnect it to begin charging the battery.
Avoid Short Circuit
Do not short-circuit the battery. An accidental shortcircuit can occur when a metallic object such as a coin, clip, or pen causes direct connection of the positive (+) and negative (-) terminals of the battery. (These look like metal strips on the battery.) This might happen, for
example, when you carry a spare battery in your pocket or purse. A short-circuit at the terminals may damage the battery or the connecting object.
Avoid High Temperatures
Leaving the battery in hot or cold places, such as in a closed car in summer or winter conditions, will reduce the capacity and lifetime of the battery. For the best results, try to keep the battery between -20¡C and +55¡C (-4¡F and 131¡F). A device with a hot or cold battery
may not work temporarily, even when the battery is fully charged. Battery performance is particularly limited in temperatures well below freezing.
Battery Disposal
Do not dispose off batteries in a !re as they may explode. Batteries may also explode if damaged. Dispose of 11 batteries according to local regulations and recycle when possible. Do not dispose as household waste. Do not dismantle, open or shred cells or batteries. In the event of
a battery leak, do not allow the liquid to come in contact with the skin or eyes. In the event of leak or a hazard seek medical help immediately.
Personal Medical Devices
Mobile phones may affect the operation of cardiac pacemakers and other implanted equipment. Please avoid placing the mobile phone over the pacemaker, for example in your breast pocket. When using the mobile phone, place it at the ear opposite the pacemaker. If a minimum distance of 15 cm (6 inches) is kept between the mobile phone and the pacemaker, the risk of interference is limited. If you suspect that interference is taking place, immediately turn off your mobile phone.

Your Safety Guidelines
Contact your cardiologist for more information. For other medical devices, consult your physician and the manufacturer of the device. Comply with instructions to switch off the device or deactivate the RF transmitter when required, especially when posted in hospitals and aeroplanes. Equipment used in these places may be sensitive to radio waves emitted from the device and
adversely affect their operation. Also, observe restrictions at gas stations or other areas with "ammable atmosphere or when close to electro-explosive devices.
Child Safety
Do not allow children to play with your mobile phone or its accessories. Keep it out of their reach. They could hurt themselves or others, or could accidentally damage the mobile phone or accessories. Your mobile phone and its accessories may contain small parts, which could be detached and create a choking hazard.
Emergency Calls
Mobile phones operate using radio signals, which cannot guarantee connection under all conditions. Therefore you should never rely solely upon any mobile phone for essential communications (e.g. medical emergencies). Emergency calls may not be possible in all areas, on all cellular networks, or when certain network services and/ or mobile phone features are in use. Check with your local service provider.
SAR Information
The Sonim XP5520 BOLT has been certified in compliance with the GovernmentÕs requirements for exposure to Radio Waves.
When communicating over the wireless network, the
mobile phone emits via the radio frequency waves low levels of radio energy. The Speci!c Absorption Rate, or SAR, is the amount of RF energy absorbed by the body while using the phone and is expressed in watts/kilogram (W/kg).
Governments around the world have adopted comprehensive international safety guidelines, developed by scienti!c organizations, for example, ICNIRP (International Commission on Non-Ionizing Radiation Protection) and IEEE (The Institute of Electrical and Electronics Engineers Inc.). These guidelines establish permitted levels of radio wave exposure for the general population.
Tests for SAR are conducted using standardized methods with the phone transmitting at its highest certi!ed power level in all used frequency bands.
SAR Data Information for residents in the United |
12 |
States and Canada. |
In the United States and Canada, the SAR limit for mobile phones used by the public is 1.6 watts/kilogram averaged over one gram of tissue. The standard incorporates a margin of safety to give additional protection for the public and to account for any variations in measurements.
Before a phone model is available for sale to the public in the US, it must be tested and certi!ed by the Federal Communications Commission (FCC) that it does not exceed the limit established by the government-adopted requirement for safe exposure. The tests are performed in positions and locations (that is, by the ear and worn on the body) as required by the FCC for each model.
The highest SAR value for the Sonim XP5520-A-R1 phone when tested by Sonim for use:

¥By the ear is 1.350 W/kg (1 g).
¥Worn on the body is 1.280 W/kg (1 g).
For body-worn operation, this phone meets FCC RF exposure guidelines provided that it is used with a nonmetallic accessory with the handset at least 1.9 cm from the body, or with the original Sonim accessory intended for this phone and worn on the body. Use of other accessories may not ensure compliance with FCC RF exposure guidelines.
Your Safety Guidelines
13
Getting Started with XP5520 BOLT
This section provides information on using your Sonim XP5520 phone.
The list of items in the Sonim XP5520 phone box are:
¥Sonim XP5520 BOLT phone
¥Tip sheet
¥Quick Start Guide
¥Welcome Letter
¥Battery
¥Screw driver
¥Wired headset
¥USB Adaptor
¥Data Cable
¥Wall Charger
Battery Usage
¥Use only a Sonim XP5520 certi!ed battery that is designed for this phone model.
¥The use of other batteries may void the warranty terms of your phone and cause damage.
¥It is recommended to protect the battery from extreme temperature environments and moisture.
¥Please keep the battery out of the reach of children.
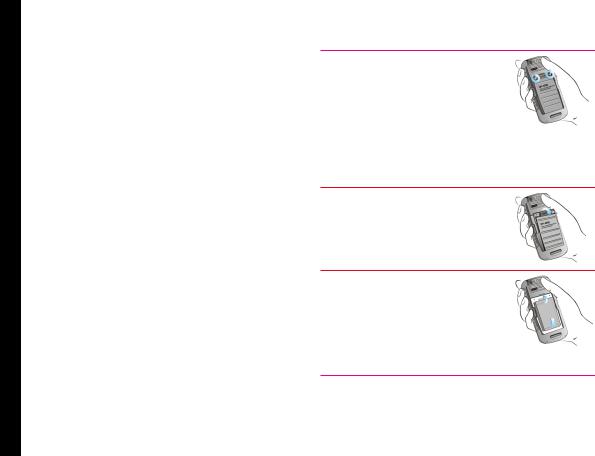
Inserting the Battery
1 Unscrew Cover
To open the battery cover, rotate both the battery cover screws in an counter clockwise direction (as shown in the !gure). Sometimes, the battery cover may be tight and some extra effort is required to open it. You
can use the screwdriver provided to open the screws.
2 Lift Cover
Lift the back cover to reveal the |
14 |
battery slot. |
|
3 Insert Battery
Insert the battery and "ush into the battery slot such that the three metallic contacts at the top of the battery are aligned with the metallic contacts within the battery compartment.
Getting Started with XP5520 BOLT
4 Close Cover
Close the battery cover. Rotate the battery cover screws in clockwise direction. You can use the screwdriver provided to tighten the screws. Ensure not to overtighten the screws.
Removing the Battery
Follow steps 1 and 2 of ÒInserting the BatteryÓ on page 14.
To remove the battery, lift the cover behind the phone and raise the upper end of the battery from the slot. Follow step 4 of ÒInserting the BatteryÓ on page 14 to close the cover.
Charging the Battery
The battery delivered with your mobile phone is not fully charged. We recommend that you charge your mobile for 5 hours before you use your mobile phone for the !rst time.
There is a risk of explosion while charging if the battery has been replaced by an incorrect type.
If the battery is completely out of charge, it can take several minutes for the charging icon to appear when the charger is connected.
1 Insert Charger
Insert the charger plug into a power outlet
2 Connect to Phone
The charger port is located on the left side of the phone. To access the charger port, lift the cover with the USB sign. Insert the 3.5 mm jack/connector of the charger to the port. You can also use the standard USB cable and adaptor to charge the phone battery. Insert the adaptor to the charger port of the phone. Connect one end of the standard USB cable to the
adaptor and the other end of the USB 15 cable to the PC.
3 Charging Animation/Icon
If the battery is being charged when the phone is switched off,only the battery icon is displayed. If the battery is being charged while the phone is switched on, the bars in the battery charge icon on the home screen shows animation indicating that the battery is being charged. After the phone is fully charged the battery bars on the display stop scrolling. You can disconnect the charger from the phone.

Getting Started with XP5520 BOLT
Set Battery Alert
When you set the battery alert, every time the battery charge is low you hear an alarm. To set the battery alert select Menu > Settings > Profiles > any profile >
Options > Customize > Extra tone > Warning. Select to activate the alert.
Your SIM Card
Purchase a SIM card from a mobile operator. The SIM card associates your network services (for example, phone number, data services, and so on) with your phone.
Inserting the SIM Card
1 Switch Off Phone
Ensure that the phone is switched off.
2 Lift Cover
Lift the battery cover and remove the battery. For instructions refer ÒInserting the BatteryÓ on page 14.
3 Place SIM Card
Place the SIM card by pushing it upward in the designated slot located under the battery.
4 Lock Cover
Reinsert the battery and the cover. Turn the battery cover screws clockwise to lock the battery cover.
Removing the SIM Card
1 |
Switch Off Phone |
|
|
Ensure the phone is switched off. |
|
2 |
Lift Cover |
16 |
|
Lift the battery cover and remove |
|
|
the battery. For instructions refer |
|
|
ÒInserting the BatteryÓ on page 14. |
|
|
|
|
3 |
Remove SIM Card |
|
|
Remove the SIM card by pushing |
|
|
it downward from the slot. |
|
4 |
Lock Cover |
|
Reinsert the battery and the cover.
Getting Started with XP5520 BOLT
Parts of the Sonim XP5520 BOLT Phone
The Sonim XP5520 keypad has 11 function keys and 12 alphanumeric keys. The left side of
the phone has one key and the right side of the phone has three keys.
Speaker
Headset port
Charger/USB port
Display screen
Function keys
Alphanumeric keys
Microphone
17

Getting Started with XP5520 BOLT
Parts of the Sonim XP5520 BOLT Phone
|
|
|
|
|
|
|
|
Torch |
|
Volume keys |
|
Headset port |
||||||
Camera |
|
|
|
|
|
|
|
|
|
|
|
|
|
|
|
|
|
|
|
|
|
|
|
|
|
|
|
|
|
|
|||||||
|
|
|
|
|
|
|
|
|
|
|
||||||||
Loud speaker |
|
|
|
|
|
|
|
|
|
|
|
|
|
|
|
|||
|
|
|
|
|
|
|
|
|
|
Charger/ |
||||||||
|
|
|
|
|
|
|
|
|
||||||||||
Battery cover |
|
|
Camera |
USB port |
|
|
|
Push-to-talk/ |
||||||||||
|
||||||||||||||||||
|
|
|
|
|||||||||||||||
(short press) |
|
|
|
|
||||||||||||||
screws |
|
|
|
|
GPS Navigator |
|||||||||||||
|
|
|
|
|
|
|
|
|||||||||||
|
|
|
|
|
|
|
|
|
|
Torch |
|
|
|
|
||||
|
|
|
|
|
|
|
|
|
|
18 |
||||||||
|
|
|
|
|
|
|
|
|
|
(long press) |
||||||||
Battery cover |
|
|
|
|
|
|
|
|
|
|
|
|
|
|||||
|
|
|
|
|
|
|
|
|
|
|
||||||||

Getting Started with XP5520 BOLT
Sonim XP5520 BOLT Keypad
The following !gure represents different keys in the phone key pad.
Left Selection Key (LSK) 
Clear Key 
Call/Accept/Send 
Press and hold to lock the keypad 
Press and hold to display + (before dialing an international number)
Menu key
Navigation arrow keys (Up/Down/Left/Right)
19
Right Selection Key (RSK)
Back Key
Power On/Off/End call
Press and hold to turn on/off meeting mode
Some features are enabled only if the SIM card is present.
Getting Started with XP5520 BOLT
Switching On
Press and Hold the Power ON/OFF key for 2 seconds to Power ON the phone.
When the phone is switched on, it tries to register with the network. After successful registration, the name of the service provider is displayed.
Home Screen
Details such as the name of the service provider, date and time, battery charge status, and data service connectivity are displayed when the phone is in standby mode. Other optional indicators alarm and call forward will be displayed, if the feature is activated.
1
8 |
|
|
|
|
|
|
|
|
|
|
2 |
1. |
Display icons |
|
|
|
|
|
|
|
|
|
|
2. |
Battery charge |
||
|
|
|
|
|
|
|
|
||||||
7 |
|
|
|
|
|
|
|
|
|
|
3 |
||
|
|
|
|
|
|
|
|
|
|
|
indicator |
||
|
|
|
|
|
|
|
|
|
|
|
|
|
|
|
|
|
|
|
|
|
|
|
|
|
|
3. |
Service provider |
|
|
|
|
|
|
|
|
|
|
|
|
||
|
|
|
|
|
|
|
|
|
|
|
|
||
|
|
|
|
|
|
|
|
|
|
|
|
4. |
RSK command |
|
|
|
|
|
|
|
|
|
|
|
|
5. |
LSK command |
6 |
|
|
|
|
|
|
|
|
|
|
|
6. |
Date and day |
|
|
|
|
|
|
|
|
|
|
|
7. |
Time |
|
|
|
|
|
|
|
|
|
|
|
|
|
||
|
|
|
|
|
|
|
|
|
|
|
|
8. |
Signal strength |
|
|
|
|
|
|
|
|
|
|
|
|
||
|
|
|
|
|
|
|
|
|
|
|
|
|
indicator |
5 |
|
4 |
|
|
|
|
|||||||
|
|
|
|
|
|
||||||||
Key Shortcuts in Home Screen
The following can be accessed from the home screen.
Press |
To Access |
|
Menu Key |
Main menu |
|
|
|
|
Left Selection Key |
Main menu |
|
|
|
|
Right Selection Key |
Contacts |
|
|
|
|
Call/Accept/Send Key |
All calls list |
|
|
|
|
Up Arrow |
Calendar |
|
|
|
|
Down Arrow |
Pro!les |
|
|
|
|
Left Arrow |
Messages |
|
|
|
|
Right Arrow |
Browser |
20 |
|
|
|
The four functions that are performed using the arrow keys are set as factory defaults, To change these functions, select Menu >
Settings > Phone settings > Dedicated key. Select the required arrow key and select OK.
You cannot use the arrow keys when a noti!cation for example: 1 missed call, is displayed on the home screen.
Getting Started with XP5520 BOLT
Basic Settings
Security Settings
To prevent unauthorized use of your phone, you can set a PIN code. The PIN is operator dependent.
1.Select Menu > Settings > Security settings > PIN protection > On. Input PIN message pops up. Enter the PIN. Select OK. After this is set, every time you power on the phone, you will be requested to enter the PIN. If the PIN code is wrong you cannot access the phone.
2.To change the PIN code select Menu > Settings > Security settings > Change PIN. You can change codes for PIN and PIN2. Contact your service provider for details.
Phonelock Mode
In the phonelock mode, the phone can be unlocked only by entering a password.
To enter the phonelock password, select Menu > Settings > Security settings > Phone lock. Enter the default phone lock password, to lock the phone. Enter the password again to unlock the phone.
The default password for phonelock is 1234.
If the phone lock is enabled, you will be requested to enter the password, when ever you power on the phone.
Auto Keypad Lock
To lock the keypad, select Menu > Settings > Phone settings > Auto keypad lock. You can choose to switch
it off by selecting None or enable the feature by setting time.
You can also press and hold the Ô*Õ to lock the keypad. To unlock the keypad, press ÔLSKÕ and then Ô*Õ key.
Date and Time
To set the Date and Time, select Menu > Settings > Phone settings > Time and date > Set time/date.
Silent Mode
In the silent mode, the alerts for Calls, Organizer, SMS, and battery status are disabled. Select Menu > Settings > Profiles > Silent.
SIM Lock: Based on your service contract, your phone may be locked to a speci!c Operator.
21

Keypad Functions
The following table displays the various keys and the corresponding functions they perform:
|
Keypad key |
Operations |
|
|
|
|
|
|
|
|
|
¥ |
Press to end a call. |
|
|
|
¥ |
Press and hold to switch on or switch off the mobile phone. |
|
|
POWER ON/OFF/END CALL |
¥ |
Press when in Menu or Edit modes to return to Standby mode. |
|
|
¥ |
Press to reject an incoming call. |
|
|
BOLT |
|
|
|
|
|
¥ |
Press to answer an incoming call. |
|
|
|
¥ |
After entering a phone number, press to make a call. |
|
|
XP5520 |
CALL/ACCEPT/SEND |
¥ |
Press while in Standby mode to access All calls list. |
|
These keys are present immediately below the display screen. |
|
|||
|
|
|
|
|
with |
|
¥ |
Press the Left Selection Key (LSK) or Right Selection Key (RSK) to select the |
|
|
|
function indicated at the bottom of the screen. The indicated functions can |
22 |
|
Started |
LSK/RSK |
|
vary according to different program de!nitions. |
|
¥ |
Press LSK to access the Menu in standby mode. |
|
||
|
|
¥ |
Press RSK to access the Contacts in standby mode. |
|
Getting |
|
|
|
|
|
¥ |
Long press this key to delete the complete message. |
|
|
|
|
This key is present below the LSK key. |
|
|
|
|
¥ |
Press this key to delete the text, while editing a message |
|
|
CLEAR (C) |
¥ |
Press this key to delete a selected item in a list. |
|
|
|
This key is present below the RSK key. Press this key to display the previous |
|
|
|
BACK |
screen. |
|
|
|
|
|
|
|
|
|
|
|
|
Getting Started with XP5520 BOLT
Keypad key |
Operations |
|
|
|
|
|
Present at the centre of the navigation keys. |
|
|
¥ |
Press while in standby mode to enter the main menu. |
|
¥ |
Press when required to be used as a toggle key to select or clear a checkbox. |
|
¥ |
Press to perform similar tasks as the Left Selection Key. |
MENU KEY (CENTRE) |
¥ |
Press to select the OK command. |
¥ |
Press to view missed call and new message noti!cations. |
|
The Left and Right Selection Keys and Power On/Off keys surround this key group. There are arrows on the key that denote the direction to scroll for information displayed on the screen.
UP/DOWN
|
¥ |
Press to move the cursor up or down in the text editor. |
|
|
|
¥ |
Press to view the pages in the text editor. |
|
|
|
¥ |
Press to browse menus/lists at the same level. |
|
|
|
¥ |
Press to browse the main menu. |
|
|
|
¥ |
Press to access features assigned as shortcuts. |
23 |
|
|
|
|
||
NAVIGATION KEYS |
LEFT/RIGHT |
|
|
|
|
¥ |
Press to navigate between tabs. |
|
|
|
¥ |
Press to move the cursor left or right in the text editor. |
|
|
|
¥ |
Press to browse the main menu. |
|
|
|
¥ |
Press to view the previous or next picture when previewing pictures. |
|
|
|
¥ |
Press to access features assigned as shortcuts. |
|
|
ALPHA-NUMERIC |
¥ |
Press the required keys to enter the desired phone number and press |
to make a call. |
|
|
Alternatively, enter the number and select Options > Call to dial the number. |
|||
KEYS |
¥ |
Press and hold any numeric key to access the shortcut /speed dial number assigned, |
||
|
while in standby mode. |
|
|
|
|
¥ |
Enter text while in the text editor. |
|
|

Getting Started with XP5520 BOLT
¥Press and hold in standby mode to access your Voice mail.
¥When entering text, press to enter space.
Press and hold to set access Tone settings.
Press and hold to access the Pro!les.
Press and hold to set the alarm.
Press and hold to access the calendar.
Press and hold to access the Bluetooth.
Press and hold to access the Browser.
Press and hold to access shortcuts.
Press and hold to access language list.
24

Getting Started with XP5520 BOLT
The above preset functions of number keys (from 2 to 9) can also be changed to the speed dial functionality. For more information refer, ÒManaging Speed Dial NumbersÓ on page 35 .
¥Press and hold to display Ô+Õ used for dialing an international number, while in standby mode.
¥On editor screen, press 0 to get Ò.Ó in T9 or normal mode.
¥Press and hold to lock the keypad.
¥With backlight on, press LSK followed by this key to unlock the keypad.
¥When entering text, press to display special characters, for example, period, comma, and so on. Press and hold to display the text input languages.
¥Press and hold in standby mode to switch between Meeting on/off modes.
¥When entering text, press to switch between lower case, upper case or numeric.
¥Press and hold to enable/disable T9 mode.
25

Your Sonim XP5520 BOLT
This model is a bar type phone with a single LCD screen. The graphic !eld of the screen is 240 (w) and 320 (h) pixels. The TFT technology used displays 262K colours.
Main Menu
To access the phone menu, press the Menu key. The main menu which comprises the following 12 items appears.
Main Menu Icons
|
|
|
|
|
|
|
|
|
|
|
|
|
|
1. |
Calls |
1 2 |
3 |
|
|
4 |
|
|
2. |
Browser |
|||||||
|
|
|
|
|
|
|
|
|
|
|
|
|
|
3. |
Messages |
|
|
|
|
|
|
|
|
|
|
|
|
|
|
4. |
Push-to-talk |
|
|
|
|
|
|
|
|
|
|
|
|
|
|
5. |
Multimedia |
|
|
|
|
|
|
|
|
|
|
|
|
|
|
||
12 |
|
|
|
|
|
|
|
|
|
|
|
|
5 |
6. |
My Files |
|
|
|
|
|
|
|
|
|
|
|
|
7. |
Settings |
||
|
|
|
|
|
|
|
|
|
|
||||||
11 |
|
|
|
|
|
|
|
|
|
6 |
8. |
GPS Navigator |
|||
|
|
|
|
|
|
|
|
|
|
|
|
|
|
9. |
Self Serve |
|
|
|
|
|
|
|
|
|
|
|
|
|
|
10. |
Applications |
|
|
|
|
|
|
|
|
|
|
|
|
|
|
11. |
Tools |
|
|
|
|
|
|
|
|
|
|
|
|
|
|
12. |
Phonebook |
10 |
|
9 |
8 |
7 |
|
|
|||||||||
|
|
|
|
|
|||||||||||
Home Screen Indicators
The home screen indicators are visible when the phone is in standby mode. Some icons indicate the status of certain functions of the phone, for example, the battery charge indicator, the network status indicator, the date and time etc. Some icons are displayed only if the speci!c service is activated.
26
Your Sonim XP5520 BOLT
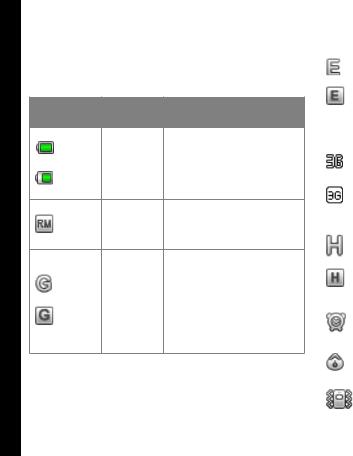
The following table describes the display indicators on the top bar of the home screen in the Sonim XP5520 phone. These icons depend on the selected theme.
For information related to PTT icons, refer ÒPTT Display IconsÓ on page 68.
Display Name Description
Indicators
Full green indicator represents maximum
Battery battery charge.
Green indicator with empty space indicates decline in battery charge.
This icon is only displayed Roaming when your phone is
registered with a non home network.
G icon indicates that the phone is attached to 2G network and GPRS feature is available in the phone.
GPRS Boxed G icon indicates that the phone is in active data connection and GPRS feature is available in the phone.
|
|
E icon indicates that the |
|
|
|
phone is attached to 2G |
|
|
|
network and EDGE feature |
|
|
EDGE |
is available in the phone. |
|
|
Boxed E icon indicates |
|
|
|
|
that the phone is in active |
|
|
|
data connection and EDGE |
|
|
|
feature is available in the |
|
|
|
phone. |
|
|
|
|
|
|
|
3G icon indicates that the |
|
|
|
phone is attached to 3G |
|
|
3G |
packet network |
|
|
Boxed 3G icon indicates |
|
|
|
|
that the phone is in active |
|
|
|
data connection in 3G |
|
|
|
packet network. |
|
|
|
|
|
|
|
H icon indicates that the |
27 |
|
|
phone is attached to HSPA |
|
|
HSPA |
packet network |
|
|
Boxed H icon indicates |
|
|
|
|
that the phone is in active |
|
|
|
data connection in HSPA |
|
|
|
packet network. |
|
|
|
|
|
|
Alarm |
Indicates that the alarm |
|
|
Clock |
clock has been set. |
|
|
|
|
|
|
Stop |
Indicates that the |
|
|
watch |
Stopwatch is running. |
|
|
|
|
|
|
Meeting |
Indicates that the phone is |
|
|
on meeting mode. |
|
|
|
|
|
|
|
|
|
|
Your Sonim XP5520 BOLT
|
Call |
Indicates that the |
|
call forward function is |
|
|
Forward |
|
|
enabled. |
|
|
|
|
|
|
|
Display |
Name |
Description |
Indicators |
|
|
|
Unread |
Indicates that there are |
|
unread messages in the |
|
|
Message |
|
|
inbox. |
|
|
|
|
|
|
|
|
Voice |
Indicates a new voice |
|
Message |
message. |
|
|
|
|
Unread |
Indicates a new e-mail |
|
||
|
message. |
|
|
Message |
|
|
|
|
|
|
|
|
Keypad Lock |
Indicates that the |
|
|
keypad is locked. |
|
|
|
|
Bluetooth |
Indicates that bluetooth |
|
Connec- |
|
|
is active. |
|
|
tivity |
|
|
|
|
|
|
|
|
Bluetooth |
Indicates that your |
|
CarKit/ |
device is paired and |
|
Headset |
connected to a carkit or |
|
Connec- |
headset with bluetooth |
|
tivity |
connectivity. |
|
Wired |
Indicates that a wired |
|
Headset |
headset is connected. |
|
|
|
|
Both |
|
Indicates that the phone |
|
|
|
Vibration |
|
performs both vibration |
|
|
|
and Ringing |
|
and ringing. |
|
|
|
|
|
|
|
|
|
|
|
|
|
|
Display |
Name |
Description |
|
||
Indicators |
|
|
|
|
|
|
2G |
Indicates the signal |
|
||
|
strength when registered |
|
|||
|
|
to 2G network. |
|
||
|
|
|
|
|
|
|
HSPA |
Indicates the signal |
|
||
|
strength when registered |
|
|||
|
|
to HSPA network. |
|
||
|
|
|
|
|
|
|
3G |
Indicates the signal |
|
||
|
strength when registered |
28 |
|||
|
|
to 3G network. |
|
||
Indicates that the Java JAVA application is active
and is available in the background.
The following table describes the display indicators on the call screen in the Sonim XP5520 phone:
Display |
Name |
Description |
Indicators |
|
|
|
Active Call |
Indicates an active |
|
call. |
|
|
|
|
|
|
|

Your Sonim XP5520 BOLT
|
Call on Hold |
Indicates a call on |
|
hold. |
|
|
|
|
|
|
|
|
Call on Mute |
Indicates a call on |
|
mute. |
|
|
|
|
|
|
|
|
Handsfree |
Indicates a handsfree |
|
Call |
call. |
|
|
|
The following table describes the display indicators on the home screen in the Sonim XP5520 phone:
Display |
Name |
Description |
Indicators |
|
|
|
Incoming |
Indicates an incoming |
|
Call |
call. |
|
|
|
|
Outgoing |
Indicates an outgoing |
|
Call |
call. |
|
|
|
|
Missed Call |
Indicates a missed call. |
|
|
|
Key Operations without Your SIM Card
Menus Accessible
The following menus can be accessed on the phone without the SIM card:
¥Settings
¥Phone settings
¥A-GPS settings
¥Security settings
¥Connectivity - Bluetooth
¥Phonebook
¥My !les
¥Tools
¥ |
Applications |
29 |
|
¥Multimedia

Managing Calls
This section provides information on managing calls.
Dial a Number
1.Use the numeric keys to enter the number and press
 .
.
2.Alternatively you can enter the desired phone number and select Options > Call.
Dial an International Number
Press and hold the numeric key 0 till the + symbol is displayed. Enter the Country code, Area code (without
preceding 0) and the phone number and press |
or |
select Options> Call. |
|
Dial a Number via Contacts
1.On the home screen, select Contacts. Scroll to the phone number.
2.Press to dial the number OR select Options >
Call OR press the call key. Press |
or select End |
to disconnect.
Dial a Number via the Call History
The Call History comprises separate lists for All calls, Missed calls, Dialled calls and Received calls.
1.To access the Call history, press  or select Menu > Calls > Call history. All the available call history is
displayed.
2. Select a list, scroll to the number and press |
to |
dial the number. |
|
Managing Call History
Contacts within the call history have the following options:
¥View: You can view the details of the call such as the type of call, name, number, call time, call duration and times of call.
¥Call: You can call the selected contact.
¥Send message: You can send an SMS/MMS to the number. Enter the SMS/MMS and select Options to view the send options and send it accordingly.
¥Save to Phonebook: You can save the number in Contacts. This option is displayed only if the number is not saved.
¥Edit before call: You can edit the number before dialing.
¥ |
Delete: You can delete the number from the Call |
30 |
|
history.
¥Delete all: You can delete all the numbers from the Call history.
Call Timers
¥To view the total time spent on the last call, select
Menu > Calls > Call history > Options > Advanced
>Call timers > Last call.
¥To view the total time spent on outgoing calls, select
Menu > Calls > Call history > Options > Advanced
>Call timers > Dialled calls.
¥To view the total time spent on incoming calls, select
Menu > Calls > Call history > Options > Advanced
>Call timers > Received calls.
 Loading...