

Page 1
molinillo Eléctrico dE sal o PimiEnta
Instrucciones de utilización y de seguridad
macinaPEPE E salE ElEttrico
Indicazioni per l’uso e per la sicurezza
salEiro ou PimEntEiro Eléctrico
Instruções de utilização e de segurança
ElEctric salt/PEPPEr mill
Operation and Safety Notes
ElEktrischE salz- odEr PfEffErmühlE
Bedienungs- und Sicherheitshinweise
Z30342
5
Page 2

ES Instrucciones de utilización y de seguridad Página 4
IT / MT Indicazioni per l’uso e per la sicurezza Pagina 8
PT Instruções de utilização e de segurança Página 12
GB / MT Operation and Safety Notes Page 16
DE / AT / CH Bedienungs- und Sicherheitshinweise Seite 20
Page 3
A
B C
1
10
9
8
11
2
12
3
4
5
6
7
3
Page 4
Introducción / Indicaciones de seguridad
Molinillo eléctrico de sal o
pimienta
Q
Introducción
Familiarícese con el artefacto antes de la
primera puesta en funcionamiento. Lea de-
tenidamente para esto el siguiente manual
de instrucciones y las indicaciones de seguridad.
Utilice el artefacto únicamente como esta descrito y
para las aplicaciones indicadas. Conserve adecuadamente estas instrucciones. Adjunte igualmente toda
la documentación en caso de entregar el artefacto
a un tercero.
Q
Uso adecuado
Este aparato está diseñado como un molinillo de
sal o de pimienta eléctrico. Cualquier modificación
en el aparato no entra dentro del uso adecuado y
pueden provocar accidentes graves. El fabricante
declina toda responsabilidad en caso de daños
debidos al uso inadecuado. El producto no está
diseñado para un uso industrial. El producto no
está concebido para el uso comercial.
Q
Datos técnicos
Pilas: 6 x 1,5 V NiMH Mignon
Pilas AAA (recargables), in-
cluidas en el contenido
Tensión nominal: 9 V
Potencia nominal: 3,5 W
Clase de protección: III
Adaptador de alimentación:
Tensión de entrada: 230 V ∼ 50 Hz
Tensión de salida: 9 V
, 300 mA
Núm. de modelo.: YH-G350900300D
Q
Contenido
1 molinillo para sal /pimienta
1 estación de carga
6 pilas AAA
1 adaptador de alimentación
1 manual de instrucciones
Indicaciones de seguridad
¡GUARDAR TODAS LAS ADVERTENCIAS E INDICACIONES DE SEGURIDAD PARA EL FUTURO!
Q
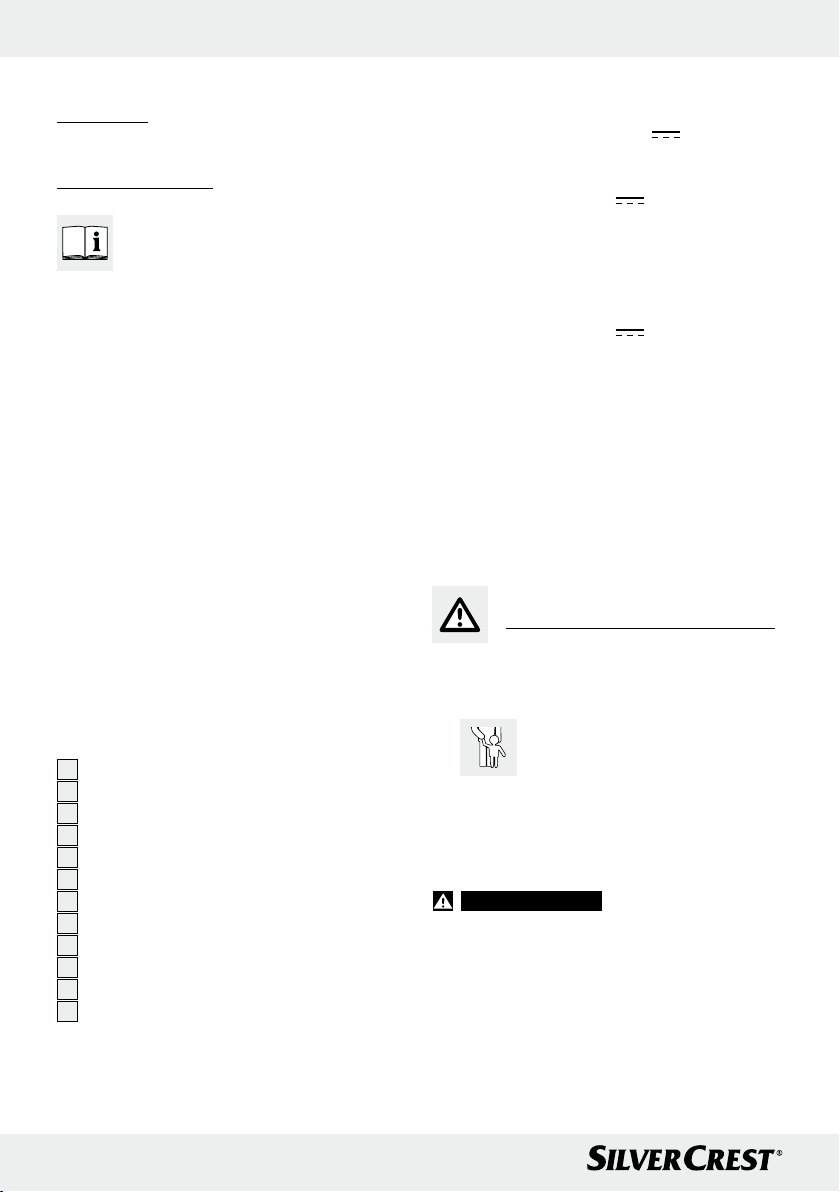
Descripción de las piezas
1
Parte superior
2
Botón
3
Motor
4
Parte inferior que contiene el recipiente
5
Tapadera
6
Estación de carga
7
Tornillo de ajuste
8
Bombilla
9
Contacto 1
10
Contacto 2
11
Anillo de batería
12
Adaptador de alimentación
4 ES
J
¡PELIGRO DE ACCIDENTE Y DE
MUERTE PARA NIÑOS Y NI ÑOS PEQUEÑOS! No deje nunca
a los niños sin vigilancia cerca del material de
embalaje. Existe peligro de asfixia a causa del
material de embalaje. A menudo, los niños no
son conscientes del peligro. Manténgalos alejados del producto.
¡ADVERTENCIA!
Las pilas podrían ingerirse, lo que supondría
¡PELIGRO DE MUERTE!
un peligro de muerte. En caso de ingestión de
una piIa busque ayuda médica de inmediato.
J Los niños o las personas que carezcan de los
conocimientos o la experiencia necesarios
para manipular el aparato, o aquellas cuyas
capacidades físicas, sensoriales o psicológicas
estén limitadas, no deben utilizar el aparato
sin la supervisión o la dirección de una perso-
Page 5
Indicaciones de seguridad / Uso
na responsable por su seguridad. Vigile a los
niños para que no jueguen con el aparato.
J No ponga el aparato en funcionamiento si
está dañado. Los aparatos dañados constituyen peligro de muerte por descarga eléctrica.
J No exponga el aparato
– a temperaturas extremas,
– a vibraciones fuertes,
– a grandes esfuerzos mecánicos,
– a la luz del sol directa,
– a la humedad.
En caso contrario el aparato puede dañarse.
J Tenga en cuenta que los daños producidos
por manejo incorrecto, no seguimiento del manual de instrucciones o manipulación por parte
de personas no autorizadas, están excluidos
de la garantía.
J No desmonte nunca el aparato. Las reparacio-
nes inadecuadas pueden suponer un riesgo
considerable para el usuario. Únicamente el
personal especializado debe realizar las reparaciones.
J Mantenga el producto siempre limpio.
J Llene el molinillo únicamente con granos de pi-
mienta o con sal gorda.
J Utilice para cargar el aparato exclusivamente la
estación de carga suministrada
J ¡
APTO PARA ALIMENTOS! Las
6
.
propiedades gustativas y olfativas no
se ven disminuidas por este producto.
Indicaciones de seguridad
para las pilas
J Extraiga la pila del aparato cuando éste no se
haya utilizado durante mucho tiempo.
J
J Cuando coloque las baterías observe la polari-
J En caso necesario, limpie el contacto del apa-
J Extraiga del aparato inmediatamente la pila
¡CUIDADO! ¡PELIGRO DE EX-
PLOSIÓN! ¡Nunca cargue las
baterías nuevamente!
dad correcta. Éste se indica en el compartimento
de las baterías.
rato y la pila antes de colocar éstas.
agotada. Existe un elevado riesgo de sulfatación.
J Las pilas no deben eliminarse junto con la ba-
sura doméstica.
J Todo usuario está obligado por ley a reciclar
las pilas correctamente.
J Mantenga las pilas lejos del alcance de los
niños. No las arroje al fuego, no las ponga en
cortocircuito ni las desmonte.
J Evite el contacto con la piel, ojos y mucosas. Si
se entra en contacto con el ácido de las baterías,
lave la parte afectada con abundante agua
y / o procure atención médica.
J Utilice siempre pilas recargables.
Q
Uso
Q
Colocar las pilas / llenar
el molinillo de sal y pimienta
Advertencia: El molinillo de sal y pimienta está
diseñado para granos de pimienta o sal gorda.
Proceda como se especifica a continuación (véase
fig. A / B):
1. Sostenga firmemente la parte inferior que con-
.
4
y gire la parte superior
3
de la parte
4
11
del motor 3.
3
sobre la parte
4
.
de
1
4
. Retire el
11
sobre
4
9
y
tiene el recipiente
1
en sentido contrario a las agujas del reloj.
2. A continuación separe la parte superior
la parte inferior que contiene el recipiente
3. Extráiga con cuidado el motor
inferior que contiene el recipiente
anillo de batería
4. Introduzca las 6 pilas suministradas (AAA
1,5 V
.).
Advertencia: Compruebe que la polaridad
es correcta. La polaridad se indica en el compartimento de las pilas.
5. Vuelva a colocar el anillo de batería
el motor
3
6. Llene la parte inferior que contiene el recipien-
4
te
con granos de pimienta o sal gorda.
Para obtener excelentes resultados llene la
parte inferior que contiene el recipiente
hasta aprox. el 75 %.
7. Coloque nuevamente el motor
inferior con el recipiente
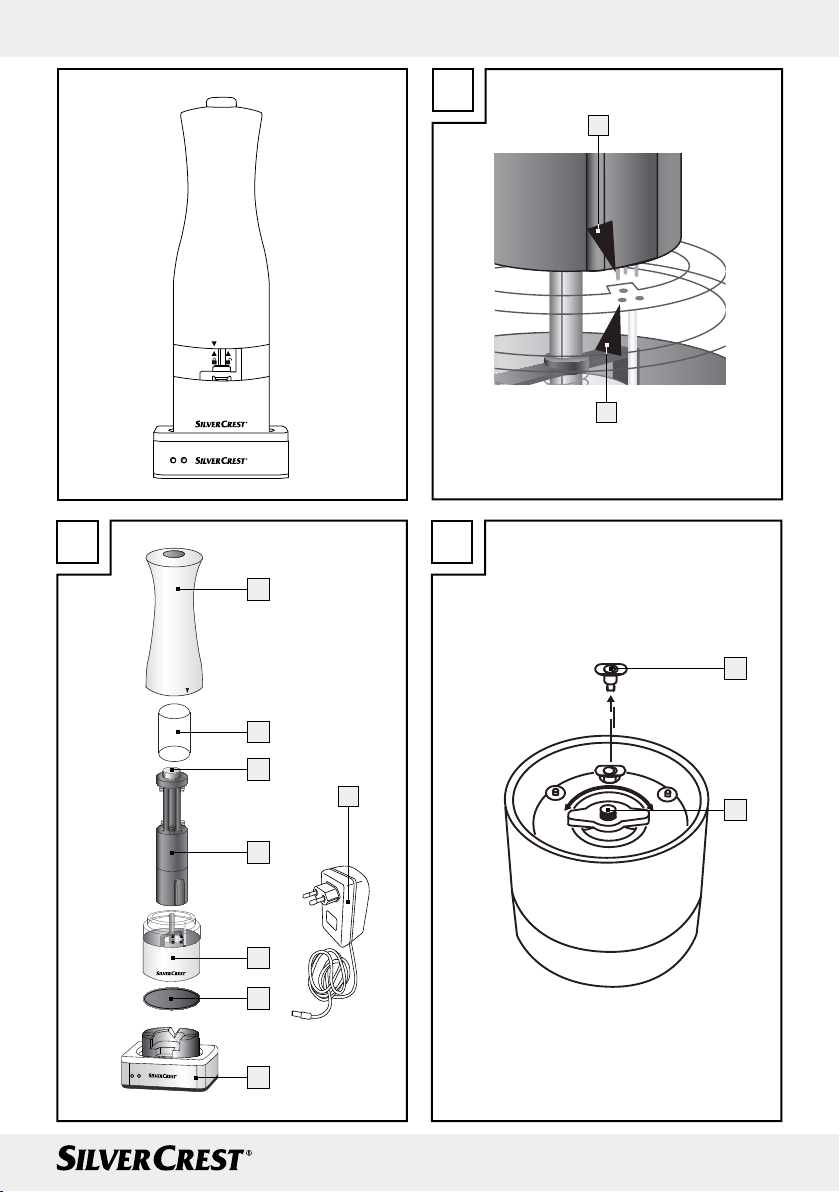
Indicación: fíjese en que los contactos
10
están colocados exactamente uno sobre otro.
.
5 ES
Page 6
Uso / Limpieza y conservación / Eliminación
8. Coloque de nuevo la parte superior 1 sobre
la parte inferior que contiene el recipiente
4
9. Sostenga firmemente la parte inferior que contiene el recipiente
superior
en el sentido de las agujas del re-
1
y enrosque bien la parte
4
loj (tenga en cuenta las marcas del aparato).
Q
Utilizar el molinillo
de sal y pimienta
j Retire la tapadera 5.
j Mantenga el interruptor
cender el molinillo de sal y pimienta. Al mismo
tiempo se activará la bombilla
inferior del molinillo de sal y pimienta.
Indicación: Utilice el molinillo únicamente
con el recipiente lleno
conectado sin interrupción durante más de 1
minuto, podría sobrecalentarse. Deje que el
molinillo se enfríe durante al menos 3 minutos
después de un minuto de haberlo utilizado, antes de volverlo a conectar.
Q
Ajustar el grado de moledura
pulsado para en-
2
en la parte
8
4
y no lo deje nunca
tador de alimentación 12 en la estación de
6
.
carga
y conéctelo a un enchufe.
j Introduzca el molinillo para sal/pimienta con
el logotipo de Silvercrest hacia delante en la
estación de carga
6
para comenzar el proceso de carga. El tiempo de carga es de aprox.
3 horas.
Indicación: la luz verde del LED del molinillo
estará iluminada durante el proceso de carga.
Ésta se apagará cuando las pilas no estén cargadas completamente.
Q
Sustituir la luz
Indicación: retire las pilas antes de sustituir la
luz, para evitar que el molinillo de sal /pimienta se
conecte por error. Utilice únicamente bombillas del
mismo tipo y con la misma potencia en vatios, ya
que sino el molinillo podría estropearse.
j Dele la vuelta al molinillo de sal / pimienta
para que el molido y la luz
8
estén arriba.
j Retire con cuidado la bombilla del portalám-
paras.
j Introduzca la bombilla nueva en el portalám-
paras.
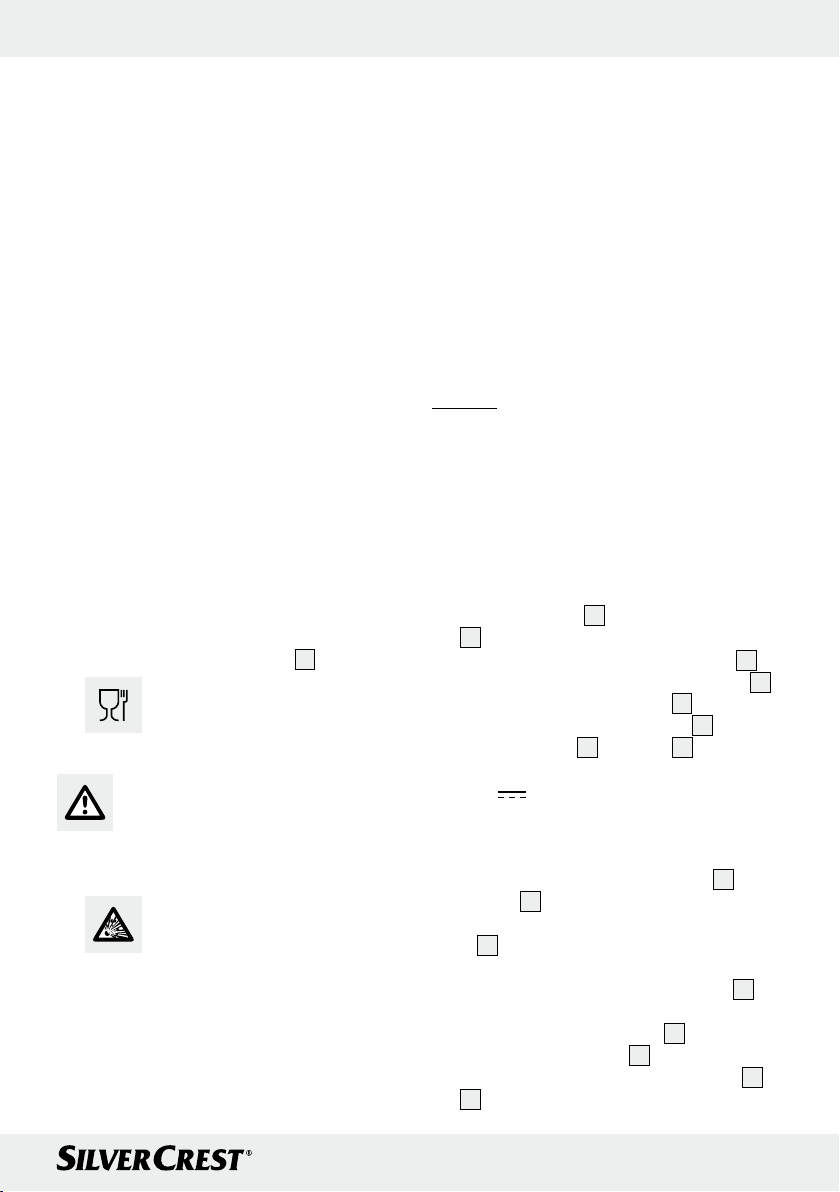
j Gire el tornillo de ajuste 7 en el sentido de
las agujas del reloj para ajustar un grado de
moledura más fino.
j Gire el tornillo de ajuste
en sentido contra-
7
rio a las agujas del reloj para ajustar un grado
de moledura más grueso (véase fig. C).
Indicación: Si el molinillo ya no gira con un
ajuste muy fino, debe seleccionar un ajuste
más grueso. Si aún así el molinollo no girase,
está eventualmente obstruido. Suelte el tornillo
de ajuste
y extraiga el molinillo. Límpielo,
7
vuelva a colocarlo y apriete de nuevo bien el
tornillo de ajuste
Q
Recargar sal /pimienta
.
7
j Retire la tapadera 5.
j Coloque la estación de carga
6
sobre una
superficie estable y plana. Introduzca el adap-
6 ES
Q
Limpieza y conservación
j Limpie el producto únicamente por el exterior
con un paño suave y seco.
j No utilice en ningún caso líquidos o productos
de limpieza, ya que estos podrían dañar el
producto.
Q
Eliminación
El embalaje está compuesto por mate-
riales no contaminantes que pueden ser
eliminados en el centro de reciclaje local.
Puede averiguar las posibilidades de eliminación
del producto estropeado en la administración de
su comunidad o ciudad.
Page 7
No elimine el producto estropeado con
los desechos domésticos, sino hágalo de
manera correcta. Proteja así el medio
ambiente. Se puede informar en la oficina
competente de su administración sobre
los puestos de recogida y sus horarios
de atención al público.
Las pilas defectuosas o usadas deben ser recicladas
según lo indicado en la directiva 2006 / 66 / EC.
Para ello devuelva las pilas y / o el aparato en los
puntos de recogida indicados.
Daño medioambiental debido a
un reciclaje incorrecto de las pilas
Las pilas no deben eliminarse junto a los residuos
domésticos. Las pilas pueden contener metales pesados tóxicos que debe tratarse conforme a la normativa aplicable a los residuos especiales. Los símbolo
químicos de los metales pesados son: Cd = Cadmio,
Hg = Mercurio, Pb = Plomo. Las pilas deben reciclarse en el punto de recolección específico para ello.
Eliminación
Denominación del producto:
Molinillo eléctrico de sal o pimienta
Modelo Nº: Z30342
Versión: 08 / 2010
EMC
7 ES
Page 8
Introduzione / Versione delle informazioni
Macinapepe e sale elettrico
Q
Introduzione
Familiarizzate con il prodotto prima del-
la messa in funzione. Leggete attenta-
mente quindi le seguenti istruzioni d‘uso
e le misure di sicurezza. Utilizzate l‘apparecchio
solo come descritto e per gli ambiti di funzione indicati. Conservate per bene queste istruzioni. Consegnate anche tutti i documenti di questo prodotto
quando lo date a terzi.
Q
Utilizzo previsto
Questo prodotto è stato previsto come macinapepe
o macinasale. Altre modifiche del prodotto non sono
conformi alle norme e possono aumentare notevolmente i rischi di incidenti. Il produttore non si assume
la responsabilità di eventuali danni causati un utilizzo
non corretto del prodotto.
Q
Descrizione dei componenti
1
Parte superiore
2
Pulsante
3
Motore
4
Parte inferiore con contenitore
5
Coperchio
6
Stazione di carico
7
Vite di taratura
8
Lampadina
9
Contatto 1
10
Contatto 2
11
Anello della batteria
12
Adattatore di rete
Q
Dati tecnici
Accumulatori: 6 x 1,5 V accumulatori
NiMH Mignon AAA (ricaricabili), forniti in dotazione
Tensione nominale: 9 V
Potenza nominale: 3,5 W
Classe di protezione: III
Adattatore di rete:
Tensione di ingresso: 230 V ∼ 50 Hz
Tensione di uscita: 9 V
, 300 mA
N. modello: YH-G350900300D
Q
Fornitura
1 macinino per sale e pepe
1 stazione di carico
6 accumulatori AAA
1 adattatore di rete
1 istruzioni d’uso
Versione delle informazioni
CONSERVARE LE INDICAZIONI DI SICUREZZA
E LE ISTRUZIONI PER EVENTUALI NECESSITÀ
FUTURE!
J
se non sotto sorveglianza di un adulto. Sussiste
batterie possono essere ingoiate con conseguen-
J Senza la sorveglianza o la guida di una perso-
J Non metta in funzione l’apparecchiatura se è
PERICOLO PER L’INCOLUMITÀ
DEI BAMBINI! Vietare l’accesso al
materiale d’imballaggio ai bambini,
il pericolo di soffocamento dei bambini con il
materiale d’imballaggio. I bambini non sono in
grado di valutare l’entità dei pericoli. Tenere i
bambini lontani dall’apparecchio.
ATTENZIONE!
PERICOLO DI VITA! Le
te pericolo di vita. Se è stata ingoiata la batteria,
rivolgersi immediatamente alle cure di un medico.
na responsabile, questo apparecchio non deve
essere utilizzato da bambini né da persone
non in possesso della conoscenza e dell’esperienza necessarie per maneggiarlo, o le cui capacità corporali, sensoriali o intellettuali fossero limitate. I bambini devono essere sorvegliati
affinché non giochino con l’apparecchio.
danneggiata. Apparecchiature danneggiate
8 IT/MT
Page 9

Versione delle informazioni / Messa in funzione
possono mettere a repentaglio la Sua vita a
causa di una scossa elettrica!
J Non esponga l’apparecchiatura
– a temperature estreme,
– a forti vibrazioni,
– a forti sollecitazioni meccaniche,
– all’insolazione diretta,
– all’umidità.
Altrimenti rischia di danneggiare l’apparec-
chiatura.
J Prenda in considerazione il fatto che i danneg-
giamenti ad opera di maneggio scorretto,
violazione delle istruzioni d’uso e causati da
interventi di personale non autorizzato sono
esclusi dalla garanzia.
J Non smonti assolutamente l’apparecchiatura. A
causa di riparazioni scorrette l’utente può essere
esposto a gravi pericoli. Faccia eseguire le riparazioni da personale qualificato.
J Mantenete il prodotto sempre pulito.
J Riempire il macinino per sale e pepe solamente
con pepe in grani oppure sale grosso.
J Per ricaricare l’apparecchio utilizzare esclusi-
vamente la stazione di carico
6
fornita in do-
tazione.
J
IDONEO PER ALIMENTI! Le ca-
ratteristiche del sapore e dell‘odore non
ven
gono pregiudicate dal prodotto.
Indicazioni di sicurezza
per gli accumulatori
J Rimuovere l’accumulatore dall’apparecchio se
non è stato utilizzato per lungo tempo.
ATTENZIONE! PERICOLO DI
ESPLOSIONE! Non ricaricare mai
batterie non ricaricabili!
Inserendo le batterie fare attenzione a che ne
sia rispettata la polarità! Essa viene mostrata
nei vani portabatterie.
J Se necessario, prima di inserire l’accumulatore,
pulire i contatti dell’accumulatore e dell’apparecchio.
J Rimuovere subito un accumulatore scarico
dall’apparecchio. In caso contrario vi è un notevole pericolo di perdite!
J Gli accumulatori non devono essere gettati nei
rifiuti domestici!
J Ogni consumatore è tenuto per legge a smaltire
gli accumulatori secondo le disposizioni!
J Tenere gli accumulatori fuori dalla portata dei
bambini, non gettarli nel fuoco, non cortocircuitarli e non smontarli.
Evitare il contatto con pelle, occhi e mucose. In
caso di contatto con gli acidi contenuti nelle
batterie, risciacquare abbondantemente l’area
in questione con acqua e / o chiedere l’intervento di un medico!
J Non utilizzare in nessun caso batterie non rica-
ricabili.
Q
Messa in funzione
Q
Introdurre le batterie /
riempire il macinapepe
Nota: Il macinino per sale e pepe è adatto per
pepe in grani o sale grosso.
Procedere nel modo seguente (vedi fig. A / B):
1. Tenere ferma la parte inferiore con contenitore
4
e ruotare la parte superiore 1 in senso
antiorario.
2. Estrarre la parte superiore
riore con contenitore
3. Rimuovere con cautela il motore
inferiore con contenitore
della batteria
11
dal motore 3.
4. Inserire i 6 accumulatori (AAA 1,5 V
niti in dotazione.
Nota: prestare attenzione alla polarità esatta.
Questa viene indicata negli scomparti di
batterie.
5. Ricollocare l’anello della batteria
3
re
.
6. Riempire la parte inferiore con contenitore
con pepe in grani o sale grosso. Per ottenere
un risultato ottimale riempire la parte inferiore
con contenitore
4
fino al 75 % circa.
7. Inserire nuovamente il motore
inferiore con contenitore
Nota: Assicurarsi che i contatti
vino esattamente l’uno sopra l’altro.
dalla parte infe-
1
.
4
3
4
. Rimuovere l’anello
11
3
nella parte
4
.
9
dalla parte
) for-
sul moto-
4
e 10 si tro-
9 IT/MT
Page 10

Messa in funzione / Pulizia e cura / Smaltimento
8. Posizionae la parte superiore 1 sulla parte
inferiore del contenitore
4
.
9. Tenere ferma la parte inferiore comprensiva di
contenitore
4
e ruotare la parte superiore 1
in senso orario (tenere presente i contrassegni
posti sull’apparecchio).
Q
Uso del macinapepe
j Rimuovere il coperchio 5.
2
j Tenere premuto il pulsante
per avviare il
macinapepe. Nello stesso tempo si accenderà
8
la spia
sulla parte inferiore del macinapepe.
Nota: Utilizzare il macinino solo con conteni-
4
tore
riempito e non lasciarlo acceso per più
di 1 minuto ininterrottamente, per non farlo surriscaldare. Dopo avere utilizzato il macinino
per un minuto, farlo raffreddare per almeno 3
minuti, prima di riaccenderlo.
Q
Regolare il grado di macinatura
j Girare la vite di aggiustaggio 7 in senso orario,
per poter regolare un grado di macinazione
più fine.
j Girare la vite di aggiustaggio
7
in senso
antiorario, per poter regolare un grado di
macinazione più grosso (vedi Ill. C).
Nota: Qualora il macinino, in caso di regola-
zione molto fine, non girasse più, deve essere
scelta una regolazione più grossa. Qualora il
macinino continuasse a non girare, esso è
eventualmente intasato. Allentare la vite di ta-
7
ratura
ed estrarre il macinino. Pulirlo, inserirlo di nuovo e stringere nuovamente la vite di
taratura
7
.
lo a una presa.
j Per avviare la procedura, inserire il macinino
per sale / pepe con il logo Silvercrest in avanti
nella stazione di carico
6
. Il tempo di ricarica
è di circa 3 ore.
Nota: Il LED rosso sul macinino è acceso du-
rante la procedura di ricarica. La luce si spegne quando gli accumulatori sono completamente carichi.
Q
Sostituzione dell’illuminazione
Nota: Prima di sostituire l’illuminazione rimuovere gli
accumulatori allo scopo di evitare un’accensione
involontaria del macinino per sale e pepe. Utilizzare
solo lampadine ad incandescenza dello stesso tipo
e con lo stesso numero di watt, per evitare danni al
macinino.
j Girare il macinino per sale e pepe in modo tale
che la macina e l’illuminazione
8
si trovino in
alto.
j Rimuovere con cautela la lampadina ad incan-
descenza dal portalampadina.
j Inserire la nuova lampadina ad incandescenza
nel portalampadina.
Q
Pulizia e cura
j Pulisca l’apparecchiatura solo sulla sua superficie
esterna servendosi di una pezza morbida e
asciutta.
j Non faccia mai uso di liquidi e di detergenti che
potrebbero danneggiare l’apparecchiatura.
Q
Smaltimento
Q
Ricarica del macinino
per sale e pepe
j Rimuovere il coperchio 5.
j Collocare la stazione di carico
perficie piana e stabile. Inserire l’adattatore di
12
rete
nella stazione di carico 6 e collegar-
10 IT/MT
6
su una su-
La confezione è prodotta in materiale rici-
clabile e biodegradabile, smaltibile nei
luoghi di raccolta differenziati.
Potete informarvi sulle possibilità di smaltimento del
prodotto consumato dall‘amministrazione comunale e cittadina.
Page 11

Per la salvaguardia della tutela ambien-
tale, quando il vostro prodotto non funziona più, non gettatelo nei rifiuti domestici bensì nei luoghi adatti di raccolta.
Potete informarvi sui luoghi di raccolta e i
loro orari di apertura dall‘amministrazione competente.
Accumulatori difettosi o consumati vanno riciclati
secondo le normative 2006 / 66 / EC. Portate il
prodotto e/o gli accumulatori nei luoghi di raccolta.
Vi possono essere conseguenze
negative
di uno smaltimento non corretto
delle batterie!
Le batterie non devono essere smaltite nella spazzatura domestica. Esse possono contenere metalli
pesanti velenosi e devono essere trattate quali
rifiuti speciali. I simboli chimici dei metalli pesanti
sono i seguenti: Cd = Cadmio, Hg = mercurio,
Pb = piombo. Consegnare quindi le batterie usate
ad un punto di raccolta comunale.
per l’ambiente a seguito
Smaltimento
Definizione del prodotto:
Macinapepe e sale elettrico
N°. modello: Z30342
Versione: 08 / 2010
EMC
11 IT/MT
Page 12

Introdução / Indicações de segurança
Saleiro ou pimenteiro eléctrico
Q
Introdução
Familiarize-se com o aparelho antes da
primeira colocação em funcionamento.
Para tal, leia atentamente o seguinte
manual de instruções e as indicações de segurança.
Utilize o aparelho apenas da forma descrita e para
a finalidade indicada. Guarde cuidadosamente este
manual de instruções. Se entregar este aparelho a
terceiros, entregue também todos os respectivos
documentos.
Q
Utilização correcta
Este acessório foi concebido para ser utilizado
como moinho eléctrico de sal ou pimenta. Qualquer
alteração ao mesmo é considerada incorrecta, podendo dar origem a acidentes. O fabricante não
se responsabiliza por danos provocados por uma
utilização incorrecta. Este produto não se destina a
uma utilização industrial. Este artigo não é indicado
para uma utilização comercial.
Q
Dados técnicos
Pilhas: 6 x 1,5 V NiMH Mig-
non Pilhas AAA (recarregáveis), disponíveis no
volume de fornecimento
Tensão nominal: 9 V
Potência nominal: 3,5 W
Classe de protecção: III
Adaptador de rede:
Tensão de entrada: 230 V - 50 Hz
Tensão de saída: 9 V
, 300 mA
N.º de modelo.: YH-G350900300D
Q
Volume de fornecimento
1 Moinho de sal / pimenta
1 Estação de carregamento
6 Pilhas AAA
1 Adaptador de rede
1 Manual de instruções
Indicações de segurança
Q
Descrição das peças
1
Parte superior
2
Botão
3
Motor
4
Parte inferior com recipiente
5
Tampa
6
Estação de carregamento
7
Parafuso de ajuste
8
Lâmpada
9
Contacto 1
10
Contacto 2
11
Anel para pilhas
12
Adaptador de rede
12 PT
GUARDE TODAS AS INDICAÇÕES DE SEGURANÇA E INSTRUÇÕES PARA FUTURA CONSULTA!
J
PERIGO DE MORTE E DE
ACIDENTE PARA CRIANÇAS E
BEBÉS!
Nunca deixe as crianças
sem vigilância com o material da embalagem.
Perigo de asfixia através do material da embalagem. As crianças subestimam frequentemente
os perigos. Mantenha o produto sempre fora
do alcance das crianças.
AVISO!
PERIGO DE MORTE! As pilhas
podem ser engolidas, o que constitui perigo de
morte. Em caso de uma pilha ser engolida, é
necessário procurar imediatamente ajuda médica.
J Este aparelho não deve ser utilizado por crian-
ças ou pessoas sem conhecimentos e / ou experiência no manuseamento do aparelho, ou
cujas capacidades físicas, sensoriais ou mentais
Page 13

Indicações de segurança / Uso
são limitadas, sem a vigilância ou instruções por
parte de uma pessoa responsável pela sua segurança. As crianças devem ser vigiadas para
assegurar que não brincam com o aparelho.
J Não coloque o aparelho em funcionamento se
este estiver danificado. Os aparelhos danificados representam perigo de morte por choque
eléctrico!
J Não exponha o produto a
– temperaturas extremas,
– vibrações fortes,
– esforços mecânicos fortes,
– radiação solar directa,
– humidade.
Caso contrário, o produto pode ficar danificado.
J Os danos causados por uma utilização inade-
quada, pela inobservância do manual de instruções ou uma intervenção de pessoal não
autorizado estão excluídos da garantia.
J Nunca desmonte o produto. Reparações inde-
vidas podem representar perigos significativos
para o utilizador. Estas só devem ser efectuadas por pessoal especializado.
J Mantenha o produto sempre limpo.
J Encha o moinho de sal / pimenta somente com
pimenta em grão ou sal grosso.
J Para carregar utilize apenas a estação de car-
regamento fornecida
J
SEGURO PARA ALIMENTOS!
6
.
A utilização deste produ- to não influencia o aroma nem o sabor dos
alimentos.
Indicações de segurança
relativamente às pilhas
J Retire as pilhas do aparelho se este não for uti-
lizado durante um longo período de tempo.
J
J Ao colocar as pilhas, tenha em atenção a
J Se necessário, limpe os contactos do aparelho
CUIDADO! PERIGO DE EXPLO-
SÃO! Nunca recarregue as pilhas!
polaridade correcta! Esta é indicada nos
compartimentos das pilhas.
e das pilhas antes da sua colocação.
J Retire imediatamente as pilhas usadas do apa-
relho. Existe um elevado risco de derrame!
J As pilhas não devem ser depositadas no lixo
doméstico!
J Cada consumidor é obrigado legalmente a eli-
minar as pilhas devidamente!
J Mantenha as pilhas afastadas de crianças,
não as atire para o fogo, proteja-as contra curto-circuitos e não as desmonte.
J Evite o contacto com a pele, olhos e mucosas. No
caso de contacto com o ácido das pilhas, lave o
local afectado com bastante água e / ou consulte
um médico!
J Nunca utilize pilhas não recarregáveis.
Q
Uso
Q
Inserir as pilhas / encher o
moinho com sal / pimenta
Nota: o moinho de sal / pimenta é adequado
para pimenta em grão e / ou sal grosso.
Proceda da seguinte forma (ver fig. A / B):
11
4
no
4
9
e
1. Segure bem a parte inferior com recipiente
e rode a parte superior
1
no sentido contrá-
rio ao dos ponteiros do relógio.
2. Agora retire a peça superior
rior com o recipiente
4
3. Retire cuidadosamente o motor
ferior com o recipiente
11
pilhas
do motor 3.
da peça infe-
1
.
3
da parte in-
4
. Retire o anel para
4. Coloque as 6 filhas fornecidas (AAA 1,5 V
Nota: certifique-se de que a polaridade é a
correcta. Esta é indicada nos compartimentos
das pilhas.
5. Coloque novamente o anel para pilhas
3
motor
.
6. Encha a parte inferior com o recipiente
com grãos de pimenta ou sal grosso. Pode obter um resultado perfeito se encher a parte inferior com o recipiente
7. Coloque novamente o motor
rior com recipiente
4
até aprox. 75 %.
4
.
3
na parte infe-
Nota: certifique-se de que os contactos
10
ficam sobrepostos com precisão.
).
13 PT
Page 14

Uso / Limpeza e conservação
8. Coloque a peça superior 1 novamente sobre
a peça inferior com o recipiente
9. Segure bem a parte inferior com recipiente
e rode a parte superior
1
.
4
no sentido dos
4
ponteiros do relógio (tenha em atenção as
marcações no aparelho).
Q
Utilizar o moinho de
sal /pimenta
j Retire a tampa 5.
j Mantenha o botão
o moinho de sal / pimenta. Simultaneamente,
acende-se a lâmpada
moinho de sal / pimenta.
Nota: Utilize o moinho apenas com recipien-
te cheio
4
e nunca deixe o moinho mais do
que 1 minuto ligado sem interrupção, para
que não sobreaqueça. Antes de voltar a ligar o
moinho, deixe-o arrefecer durante pelo menos
3 minutos, após uma utilização de um minuto.
Q
Ajustar o grau de moagem
j Rode o parafuso de ajuste 7 no sentido dos
ponteiros do relógio para ajustar um grau de
moagem superior.
j Rode o parafuso de ajuste
trário ao dos ponteiros do relógio para ajustar
um grau de moagem inferior (ver fig. C).
Nota: Quando o mecanismo de moagem
não rodar mais no ajuste de moagem fina,
deve seleccionar uma moagem mais grossa.
Caso o mecanismo de moagem continue sem
rodar, este pode estar obstruído. Desaperte os
parafusos de ajuste
de moagem. Limpe-o, volte a colocá-lo e em
seguida aperte bem o parafuso de ajuste
pressionado para ligar
2
do lado inferior do
8
no sentido con-
7
e retire o mecanismo
7
7
Q
Recarregar o moinho de sal/
pimenta
j Retire a tampa 5.
j Coloque a estação de carregamento
uma superfície estável e plana. Ligue o adaptador de rede
6
e ligue-o à tomada.
j Coloque o moinho de sal / pimenta com o lo-
gótipo Silvercrest virado para a frente na estação de carga
carga. O tempo de carga tem uma duração
de cerca de 3 horas.
Nota: O LED vermelho acende-se durante o
processo de carregamento. Este desliga-se
quando as pilhas estiverem completamente
carregadas.
Q
Substituição da iluminação
Nota: Antes da substituição da iluminação retire
as pilhas para evitar que liguem acidentalmente o
moinho de sal / pimenta. Utilize apenas lâmpadas
incandescentes do mesmo tipo e o mesmo número
de Watts, caso contrário pode danificar o moinho.
j Rode o moinho de sal / pimenta, de modo a
que o mecanismo de moagem e a iluminação
8
se encontrem em cima.
j Retire cuidadosamente a lâmpada incandes-
cente do suporte.
j Coloque a nova lâmpada incandescente no
suporte.
Q
Limpeza e conservação
j Limpe apenas o exterior do produto com um
pano seco e macio.
j Nunca utilize líquidos nem detergentes, pois
.
estes danificam o aparelho.
12
na estação de carregamento
6
para iniciar o processo de
6
sobre
14 PT
Page 15

Q
Eliminação
A embalagem é feita de materiais não
poluentes que podem ser eliminados
nos contentores de reciclagem locais.
As possibilidades de reciclagem dos artigos utilizados poderão ser averiguadas no seu Município ou
Câmara Municipal.
No interesse da protecção do ambiente,
não deite fora este produto juntamente
com o lixo doméstico; entregue-o num
ponto de recolha adequado. Pode informar-se no seu município sobre os locais
de recolha adequados e o seu período
de funcionamento.
As pilhas avariadas ou gastas têm de ser recicladas
de acordo com a directiva 2006 / 66 / EC. Entregue
as pilhas e/ou o aparelho nos locais específicos
destinados à sua recolha.
Danos ambientais devido à
eliminação incorrecta das pilhas!
Eliminação
As pilhas não podem ser eliminadas no lixo doméstico. Podem conter metais pesados tóxicos e são
consideradas resíduos perigosos. Os símbolos
químicos dos metais pesados são os seguintes:
Cd = cádmio, Hg = mercúrio, Pb = chumbo. Como
tal, deposite as pilhas utilizadas num ponto de
recolha adequado do seu município.
Designação do produto:
Saleiro ou pimenteiro eléctrico
Modelo n.°: Z30342
Versão: 08 / 2010
EMC
15 PT
Page 16

Introduction / Safety Information
Electric Salt / Pepper Mill
Q
Introduction
Familiarise yourself with the product be-
fore using it for the first time. In addition
please refer carefully to the operating
instructions below and the safety advice. Use the
product only as described and for the indicated
purpose. Keep these instructions in a safe place. If
you pass the product on to anyone else, please ensure that you also pass on all the documentation.
Q
Intended use
This appliance is intended for use as electrical salt
or pepper mill. All modifications to this appliance
are not intended and may cause considerable risk
of accident. The manufacturer assumes no liability
for damages caused because of non-intended usage.
The product is not intended for commercial use.
Q
Description of parts
Top part
1
Button
2
Motor compartment
3
Lower part with container
4
Cover
5
Charging station
6
Adjusting screw
7
Light bulb
8
Contact 1
9
Contact 2
10
Battery ring
11
Adaptor
12
Q
Technical data
Rechargeable batteries: 6 x 1.5 V NiMH
rechargeable batteries
AAA (rechargeable),
included in delivery
Nominal voltage: 9 V
Nominal output: 3.5 W
Protection class: III
Adaptor:
Input voltage: 230 V ∼ 50 Hz
Output voltage: 9 V
, 300 mA
Model No.: YH-G350900300D
Q
Scope of delivery
1 Salt / pepper mill
1 Charging station
6 AAA rechargeable batteries
1 Adaptor
1 Set of directions for use
Safety Information
PLEASE KEEP ALL SAFETY INFORMATION AND
INSTRUCTIONS IN A SAFE PLACE FOR FUTURE
CONSULTATION!
J
allow children to play unsupervised with the
can be swallowed, which may represent a dan-
J Children or persons who lack the knowledge or
J Do not use the device if it is damaged. Damaged
DANGER TO LIFE AND ACCI-
DENT HAZARD FOR TODDLERS
AND SMALL CHILDREN! Never
packaging material. There is a danger of suffocation from the packaging material. Children
frequently underestimate the dangers. Children
should be kept away from the product at all times.
WARNING!
DANGER TO LIFE! Batteries
ger to life. If a battery has been swallowed,
medical help is required immediately.
experience to use the device or whose physical,
sensory or intellectual capacities are limited must
never be allowed to use the device without supervision or instruction by a person responsible
for their safety. Children must never be allowed
to play with the device.
devices represent a danger of death from electric shock!
16 GB/MT
Page 17

Safety Information / Use
J Do not subject the appliance to
– any extreme temperatures.
– any strong vibrations.
– any severe mechanical stress.
– any direct solar radiation,
– any moisture or humidity.
Otherwise damage to the product may result.
J Please note that the guarantee does not cover
damage caused by incorrect handling, non-compliance with the operating instructions or interference with the device by unauthorised individuals.
J Under no circumstances should you take the
device apart. Improper repairs may place the
user in considerable danger. Repairs should
only be carried out by specialist personnel.
J Please keep the product clean.
J Please fill the salt and pepper mill only with
peppercorns or coarse salt.
J To recharge the appliance, use only the charging
6
station
supplied.
J FOOD SAFE! This product does not
affect the taste and aroma properties
of foodstuffs.
Safety instructions for
rechargeable batteries
J If the rechargeable battery has not been used for
any length of time, remove it from the appliance.
Make sure you fit rechargeable batteries the right
J Clean the rechargeable battery and appliance
J Immediately remove any exhausted rechargeable
J Rechargeable batteries should not be disposed
J Every consumer is legally obliged to dispose of
CAUTION! DANGER OF EX-
PLOSION! Never attempt to re-
charge non-rechargeable batteries!
way round (polarity). The correct orientation is
shown in the battery compartment.
contact before insertion if necessary.
battery from the appliance. There is an increased
risk of leakage otherwise!
of with domestic waste.
rechargeable batteries according to the statutory
regulations!
J Keep rechargeable batteries away from children;
do not throw rechargeable batteries into a fire;
do not short-circuit the batteries and do not take
them apart.
Do not let the fluid from a leaking rechargeable
battery come into contact with your skin, eyes
or mucous membranes. In the event of contact
with fluid leaking from a rechargeable battery,
thoroughly flush the affected area with water
and / or seek the advice of a doctor!
J On no account should you use non-rechargeable
batteries.
Q
Use
Q
Insert Batteries / Filling of the
salt and pepper mill
Indication: The salt and pepper mill is intended
for peppercorns or coarse salt.
Proceed as follows (see Figs. A / B):
1. Hold the lower part with the container
and turn the top part
2. Now please pull the top part
with container
3. Pull the motor compartment
base with container
off the motor compartment
4. Insert the 6 AAA 1,5 V
anti-clockwise.
1
1
4
.
3
4
. Pull the battery ring 11
3
.
rechargeable batter-
carefully off the
ies supplied.
Indication: Pay attention to the right polarity.
This is shown in the battery compartment.
5. Place the battery ring
compartment
6. Fill up the base with container
11
back to the motor
3
.
4
corns or coarse salt. The best result will be
achieved when filling the base with container
up to approx. 75 %.
3
7. Put the motor compartment
with container
4
.
back on the base
Note: Make sure that the contacts
lie precisely on top of each other.
8. Put the top part
4
tainer
1
back on the base with con-
.
9. Hold the lower section with the container
tightly and turn the upper section
tightly
4
off the base
with pepper-
and 10
9
4
1
in a clock-
4
17 GB/MT
Page 18

Use / Cleaning and Maintenance / Disposal
wise direction until it is tight (note the markings
on the device).
Q
Using of the salt
and pepper mill
j Remove the cover 5.
j Please keep the button
the salt and pepper mill. The bulb
base of the salt and pepper mill will then be
simultaneously activated.
Note: Use the mill only when the container
is full and do not leave the mill switched on
4
uninterrupted for longer than 1 minute so that it
does not overheat. After using the mill for one
minute, let it cool down for at least 3 minutes
before switching it on again.
Q
Adjusting the grinding level
j Turn the adjustable screw 7 clockwise to re-
ceive a finer grinding level.
j Turn the adjustable screw
receive a coarser grinding level (see fig. C).
Note: If you can no longer turn the grinder
when it is adjusted to very fine, you have to select a coarser setting. If the grinder still does
not turn, it may be clogged up. Release the adjustment screw
Clean it, place it back in position and then
retighten the adjustment screw
2
pushed to activate
8
on the
7
anticlockwise to
7
and take out the grinder.
7
.
Note: The red LED light on the mill will shine
during the charging process. It will go out when
the rechargeable batteries have been completely
recharged.
Q
Replacing the light
Note: Remove the rechargeable batteries before
replacing the light bulb in order to avoid switching
the salt / pepper mill on by accident. Only use light
bulbs of the same type and the same wattage as
you could otherwise damage the mill.
j Turn the salt / pepper mill around so that the
grinder and the lighting
are at the top.
8
j Carefully remove the light bulb from the bulb
socket.
j Insert the new light bulb into the bulb socket.
Q
Cleaning and Maintenance
j The device should only be cleaned on the out-
side with a soft dry cloth.
j Under no circumstances should you use liquids
or detergents, as these will damage the device.
Q
Disposal
The packaging is made entirely of recy-
clable materials, which you may dispose
of at local recycling facilities.
Q
Recharging the salt / pepper
mill again
j Remove the cover 5.
j Place the charging station
level surface. Insert the adaptor
ing station
and then connect it to a socket.
6
j Place the salt / peppermill with the Silvercrest
logo facing towards the front on the charging
station
in order to start the charging pro-
6
cess. The charging time is approximately 3
hours.
18 GB/MT
onto a stable and
6
into the charg-
12
Contact your local refuse disposal authority for more
details of how to dispose of your worn-out product.
To help protect the environment, please
dispose of the product properly when it
has reached the end of its useful life and
not in the household waste. Information
on collection points and their opening
hours can be obtained from your local
authority.
Page 19

Faulty or used batteries must be recycled in accordance with Directive 2006 / 66 / EC. Please return
the batteries and / or the device to the available
collection points.
Environmental damage through
incorrect disposal of the batteries!
Batteries may not be disposed of with the usual domestic waste. They may contain toxic heavy metals
and are subject to hazardous waste treatment rules
and regulations. The chemical symbols for heavy
metals are as follows: Cd = cadmium, Hg = mercury,
Pb = lead. That is why you should dispose of used
batteries at a local collection point.
Product Description:
Electric Salt / Pepper Mill
Model-No.: Z30342
Version: 08 / 2010
EMC
Disposal
19 GB/MT
Page 20

Einleitung / Sicherheitshinweise
Elektrische Salz- oder Pfeffermühle
Q
Einleitung
Machen Sie sich vor der ersten Inbetrieb-
nahme mit dem Produkt vertraut. Lesen Sie
hierzu aufmerksam die nachfolgende
Bedienungsanleitung und die Sicherheitshinweise.
Benutzen Sie das Produkt nur wie beschrieben und
für die angegebenen Einsatzbereiche. Bewahren Sie
diese Anleitung gut auf. Händigen Sie alle Unterlagen bei Weitergabe des Produkts an Dritte ebenfalls
mit aus.
Q
Bestimmungsgemäße
Verwendung
Dieses Gerät ist als elektrische Salz- oder Pfeffermühle
vorgesehen. Alle Veränderungen des Geräts sind
nicht bestimmungsgemäß und können erhebliche
Unfallgefahren bedeuten. Der Hersteller übernimmt
für aus bestimmungswidriger Verwendung entstandene Schäden keine Haftung. Das Produkt ist nicht
für den gewerblichen Einsatz bestimmt.
Q
Technische Daten
Akkus: 6 x 1,5 V NiMH
Mignon Akkus AAA
(wiederaufladbar), im
Lieferumfang enthalten
Nennspannung: 9 V
Nennleistung: 3,5 W
Schutzklasse: III
Netzadapter:
Eingangsspannung: 230 V ∼ 50 Hz
Ausgangsspannung: 9 V
, 300 mA
Model-Nr.: YH-G350900300D
Q
Lieferumfang
1 Salz- / Pfeffermühle
1 Ladestation
6 Akkus AAA
1 Netzadapter
1 Bedienungsanleitung
Sicherheitshinweise
Q
Teilebeschreibung
1
Oberteil
2
Knopf
3
Motor
4
Unterteil mit Behälter
5
Deckel
6
Ladestation
7
Justierschraube
8
Leuchtmittel
9
Kontakt 1
10
Kontakt 2
11
Batterie-Ring
12
Netzadapter
20 DE/AT/CH
BEWAHREN SIE ALLE SICHERHEITSHINWEISE
UND ANWEISUNGEN FÜR DIE ZUKUNFT AUF!
J
LEBENS- UND UNFALLGEFAHR
FÜR KLEINKINDER UND KINDER! Lassen Sie Kinder niemals un-
beaufsichtigt mit dem Verpackungsmaterial. Es
besteht Erstickungsgefahr durch Verpackungsmaterial. Kinder unterschätzen häufig die Gefahren. Halten Sie Kinder stets vom Produkt fern.
WARNUNG!
LEBENSGEFAHR! Batterien
können verschluckt werden, was lebensgefährlich
sein kann. Ist eine Batterie verschluckt worden,
muss sofort medizinische Hilfe in Anspruch genommen werden.
J Kinder oder Personen, denen es an Wissen oder
Erfahrung im Umgang mit dem Gerät mangelt,
oder die in ihren körperlichen, sensorischen oder
geistigen Fähigkeiten eingeschränkt sind, dürfen
das Gerät nicht ohne Aufsicht oder Anleitung
Page 21

Sicherheitshinweise / Inbetriebnahme
durch eine für ihre Sicherheit verantwortliche
Person benutzen. Kinder müssen beaufsichtigt
werden, damit sie nicht mit dem Gerät spielen.
J Nehmen Sie das Gerät nicht in Betrieb, wenn es
beschädigt ist. Beschädigte Geräte bedeuten
Lebensgefahr durch elektrischen Schlag!
J Setzen Sie das Gerät
– keinen extremen Temperaturen,
– keinen starken Vibrationen,
– keinen starken mechanischen Beanspruchungen,
– keiner direkten Sonneneinstrahlung,
– keiner Feuchtigkeit aus.
Andernfalls droht eine Beschädigung des Gerätes.
J Beachten Sie, dass Beschädigungen durch un-
sachgemäße Handhabung, Nichtbeachtung der
Bedienungsanleitung oder Eingriff durch nicht
autorisierte Personen von der Garantie ausgeschlossen sind.
J Nehmen Sie das Gerät keinesfalls auseinander.
Durch unsachgemäße Reparaturen können erhebliche Gefahren für den Benutzer entstehen.
Lassen Sie Reparaturen nur von Fachkräften
durchführen.
J Halten Sie das Produkt stets sauber.
J Befüllen Sie die Salz- / Pfeffermühle nur mit
Pfefferkörnern oder grobkörnigem Salz.
J Verwenden Sie zum Aufladen des Geräts aus-
schließlich die mitgelieferte Ladestation
J LEBENSMITTELECHT!
6
.
Geschmacksund Geruchseigenschaften werden
durch dieses Produkt nicht beein-
trächtigt.
Sicherheitshinweise
zu Akkus
J Entfernen Sie den Akku, wenn er längere Zeit
nicht verwendet worden ist, aus dem Gerät.
J
VORSICHT! EXPLOSIONSGE-
FAHR! Laden Sie nicht aufladbare
Batterien niemals wieder auf!
J Achten Sie beim Einlegen auf die richtige Polarität!
Diese wird in den Batteriefächern angezeigt.
J Reinigen Sie Akku- und Gerätekontakt vor dem
Einlegen falls erforderlich.
J Entfernen Sie einen erschöpften Akku umgehend
aus dem Gerät. Es besteht erhöhte Auslaufgefahr!
J Akkus gehören nicht in den Hausmüll!
J Jeder Verbraucher ist gesetzlich verpflichtet,
Akkus ordnungsgemäß zu entsorgen!
J Halten Sie Akkus von Kindern fern, werfen Sie
sie nicht ins Feuer, schließen Sie sie nicht kurz
und nehmen Sie sie nicht auseinander.
J Vermeiden Sie den Kontakt mit Haut, Augen und
Schleimhäuten. Bei Kontakt mit Batteriesäure
spülen Sie die betroffene Stelle mit reichlich
Wasser ab und / oder suchen Sie einen Arzt auf!
J Verwenden Sie keinesfalls nicht aufladbare
Batterien.
Q
Inbetriebnahme
Q
Batterien einsetzen /
Salz- / Pfeffermühle auffüllen
Hinweis: Die Salz- / Pfeffermühle eignet sich für
Pfefferkörner oder grobkörniges Salz.
Gehen Sie wie folgt vor (siehe Abb. A / B):
1. Halten Sie das Unterteil mit Behälter
drehen Sie das Oberteil
1
gegen den Uhrzei-
gersinn.
2. Ziehen Sie nun das Oberteil
mit Behälter
3. Ziehen Sie den Motor
teil mit Behälter
terie-Ring
4
ab.
4
ab. Entfernen Sie den Bat-
11
vom Motor 3.
3
vorsichtig vom Unter-
4. Legen Sie die 6 mitgelieferten Akkus (AAA
1,5 V
) ein.
Hinweis: Achten Sie dabei auf die richtige
Polarität. Diese wird in den Batteriefächern angezeigt.
5. Stülpen Sie den Batterie-Ring
den Motor
3
.
6. Befüllen Sie das Unterteil mit Behälter
Pfefferkörnern oder grobkörnigem Salz. Ein optimales Ergebnis erzielen Sie, wenn Sie das Unterteil mit Behälter
7. Setzen Sie den Motor
teil mit Behälter
4
bis zu ca. 75 % befüllen.
3
wieder auf das Unter-
4
.
Hinweis: Achten Sie darauf, dass die Kontakte
9
und 10 genau übereinander liegen.
4
1
vom Unterteil
11
wieder über
fest und
4
mit
21 DE/AT/CH
Page 22

Inbetriebnahme / Reinigung und Pflege / Entsorgung
8. Setzen Sie das Oberteil 1 wieder auf das Unterteil mit Behälter
9. Halten Sie das Unterteil mit Behälter
drehen Sie das Oberteil
4
.
1
im Uhrzeigersinn fest
4
fest und
(achten Sie auf die Markierungen am Gerät).
Q
Salz- / Pfeffermühle benutzen
j Entfernen Sie den Deckel 5.
j Halten Sie den Knopf
2
gedrückt, um die
Salz- / Pfeffermühle einzuschalten. Gleichzeitig
wird das Leuchtmittel
8
an der Unterseite der
Salz- / Pfeffermühle aktiviert.
Hinweis: Benutzen Sie die Mühle nur mit ge-
fülltem Behälter
4
und lassen Sie die Mühle nie
länger als 1 Minute ununterbrochen eingeschaltet,
damit sie nicht überhitzt. Lassen Sie die Mühle
nach einminütigem Gebrauch mindestens 3 Minuten abkühlen, bevor Sie sie erneut einschalten.
Q
Mahlgrad einstellen
j Drehen Sie die Justierschraube 7 im Uhrzeiger-
sinn, um einen feineren Mahlgrad einzustellen.
j Drehen Sie die Justierschraube
7
gegen den
Uhrzeigersinn, um einen gröberen Mahlgrad
einzustellen (siehe Abb. C).
Hinweis: Wenn sich das Mahlwerk bei sehr
feiner Einstellung nicht mehr dreht, müssen Sie
eine gröbere Einstellung wählen. Sollte sich das
Mahlwerk noch immer nicht drehen, ist es eventuell verstopft. Lösen Sie die Justierschraube
7
und nehmen Sie das Mahlwerk heraus. Säubern
Sie es, setzen Sie es wieder ein und schrauben
Sie dann die Justierschraube
Q
Salz- / Pfeffermühle wieder
7
wieder fest.
aufladen
j Stecken Sie die Salz- / Pfeffermühle mit dem Silver-
crest-Logo nach vorne auf die Ladestation
6
, um
den Ladevorgang zu starten. Die Ladezeit beträgt ca. 3 Stunden.
Hinweis: Das rote LED-Licht auf der Mühle
leuchtet während des Ladevorgangs. Es erlischt,
wenn die Akkus vollständig aufgeladen sind.
Q
Austauschen der Beleuchtung
Hinweis: Entfernen Sie die Akkus vor dem Aus-
tauschen der Beleuchtung, um zu vermeiden, dass
Sie die Salz- / Pfeffermühle versehentlich einschalten.
Verwenden Sie nur Glühlampen des gleichen Typs
und derselben Wattzahl, da Sie sonst die Mühle
beschädigen könnten.
j Drehen Sie die Salz- / Pfeffermühle um, so dass
sich das Mahlwerk und die Beleuchtung
8
oben
befinden.
j Entfernen Sie vorsichtig die Glühlampe aus der
Fassung.
j Setzen Sie die neue Glühlampe in die Fassung
ein.
Q
Reinigung und Pflege
j Reinigen Sie das Gerät nur äußerlich mit einem
weichen trockenen Tuch.
j Verwenden Sie in keinem Fall Flüssigkeiten und
Reinigungsmittel, da diese das Gerät beschädigen.
Q
Entsorgung
Die Verpackung besteht aus umwelt-
freundlichen Materialien, die Sie über
die örtlichen Recyclingstellen entsorgen
können.
j Entfernen Sie den Deckel 5.
j Stellen Sie die Ladestation
6
auf eine stabile
und ebene Fläche. Stecken Sie den Netzadap-
12
ter
in die Ladestation
6
und schließen Sie
ihn an eine Steckdose an.
22 DE/AT/CH
Möglichkeiten zur Entsorgung des ausgedienten
Produktes erfahren Sie bei Ihrer Gemeinde- oder
Stadtverwaltung.
Page 23

Werfen Sie Ihr Produkt, wenn es ausge-
dient hat, im Interesse des Umweltschutzes
nicht in den Hausmüll, sondern führen
Sie es einer fachgerechten Entsorgung
zu. Über Sammelstellen und deren Öffnungszeiten können Sie sich bei Ihrer
zuständigen Verwaltung informieren.
Defekte oder verbrauchte Akkus müssen gemäß
Richtlinie 2006 / 66 / EC recycelt werden. Geben
Sie Akku und / oder das Gerät über die angebotenen
Sammeleinrichtungen zurück.
Umweltschäden durch falsche
Entsorgung der Batterien!
Batterien dürfen nicht über den Hausmüll entsorgt
werden. Sie können giftige Schwermetalle enthalten
und unterliegen der Sondermüllbehandlung. Die
chemischen Symbole der Schwermetalle sind wie
folgt: Cd = Cadmium, Hg= Quecksilber, Pb = Blei.
Geben Sie deshalb verbrauchte Batterien bei einer
kommunalen Sammelstelle ab.
Entsorgung
Produktbezeichnung:
Elektrische Salz- oder Pfeffermühle
Modell-Nr.: Z30342
Version: 08 / 2010
EMC
23 DE/AT/CH
Page 24

IAN 53906
Milomex Ltd.
c/o Milomex Services
Hilltop Cottage
Barton Road
Pulloxhill
Bedfordshire
MK45 5HP
UK
© by ORFGEN Marketing
Estado de las informaciones · Versione delle informazioni
Estado das informações · Last Information Update · Stand der
Informationen: 07 / 2010 · Ident.-No.: Z30342072010-5
5
 Loading...