

Page 1
ROLL OUT PIANO
Operation and Safety Notes
Z30258-BS
6
Page 2
GB / IE Operation and Safety Notes Page 5
Page 3
A
28
29
1
2
3
4
5
6
7
8
9
10
11
12
13
14
15
16
17
18
19
20
27
21
22
2426
2325
3
Page 4
B
OUT
AUDIO
DC 4.5V
34
33
30 31
4
32
Page 5
Table of Contents
Introduction
Proper use ...........................................................................................................................................Page 6
Description of parts ............................................................................................................................Page 6
Technical Data ...................................................................................................................................Page 6
Functions .............................................................................................................................................Page 7
Includes ...............................................................................................................................................Page 7
Safety Information
Battery Safety Instructions ..................................................................................................................Page 8
Before Initial Use
Operating the roll piano by means of the mains adapter ...............................................................Page 9
Inserting / Replacing the Batteries .....................................................................................................Page 9
Operation
Turning the Roll Piano on / off ...........................................................................................................Page 9
Making Adjustments ..........................................................................................................................Page 9
Sound effects ......................................................................................................................................Page 10
Special functions (FUNCTION) ........................................................................................................Page 11
Learning function (LEARNING) .........................................................................................................Page 11
Volume / Tempo .................................................................................................................................Page 12
Cleaning and care ...................................................................................................................Page 12
Disposal ...........................................................................................................................................Page 13
5 GB/IE
Page 6

Introduction
Roll Out Piano
Introduction
The instructions for use are to be consid-
ered as part of the product. They contain
important information concerning safety,
use and disposal. Before using the product, please
familiarise yourself with all of the safety information
and instructions for use. The product must only be
used as described and for the stated fields of application. Keep all the safety advice and instruction in
a safe place for future reference. If you pass the
product on to third parties, please give them all of
the documentation as well.
Proper use
This product is only suitable for playing music in
dry indoor rooms. The roll piano can be operated
either by battery or mains adapter. Any use other
than the aforementioned or any product modification
is prohibited and can lead to injuries and / or product
damage. The manufacturer is not liable for any
damages caused by any use other than its intended
purpose. This product is not intended for commercial
use. This roll-up piano is not intended for professional
use.
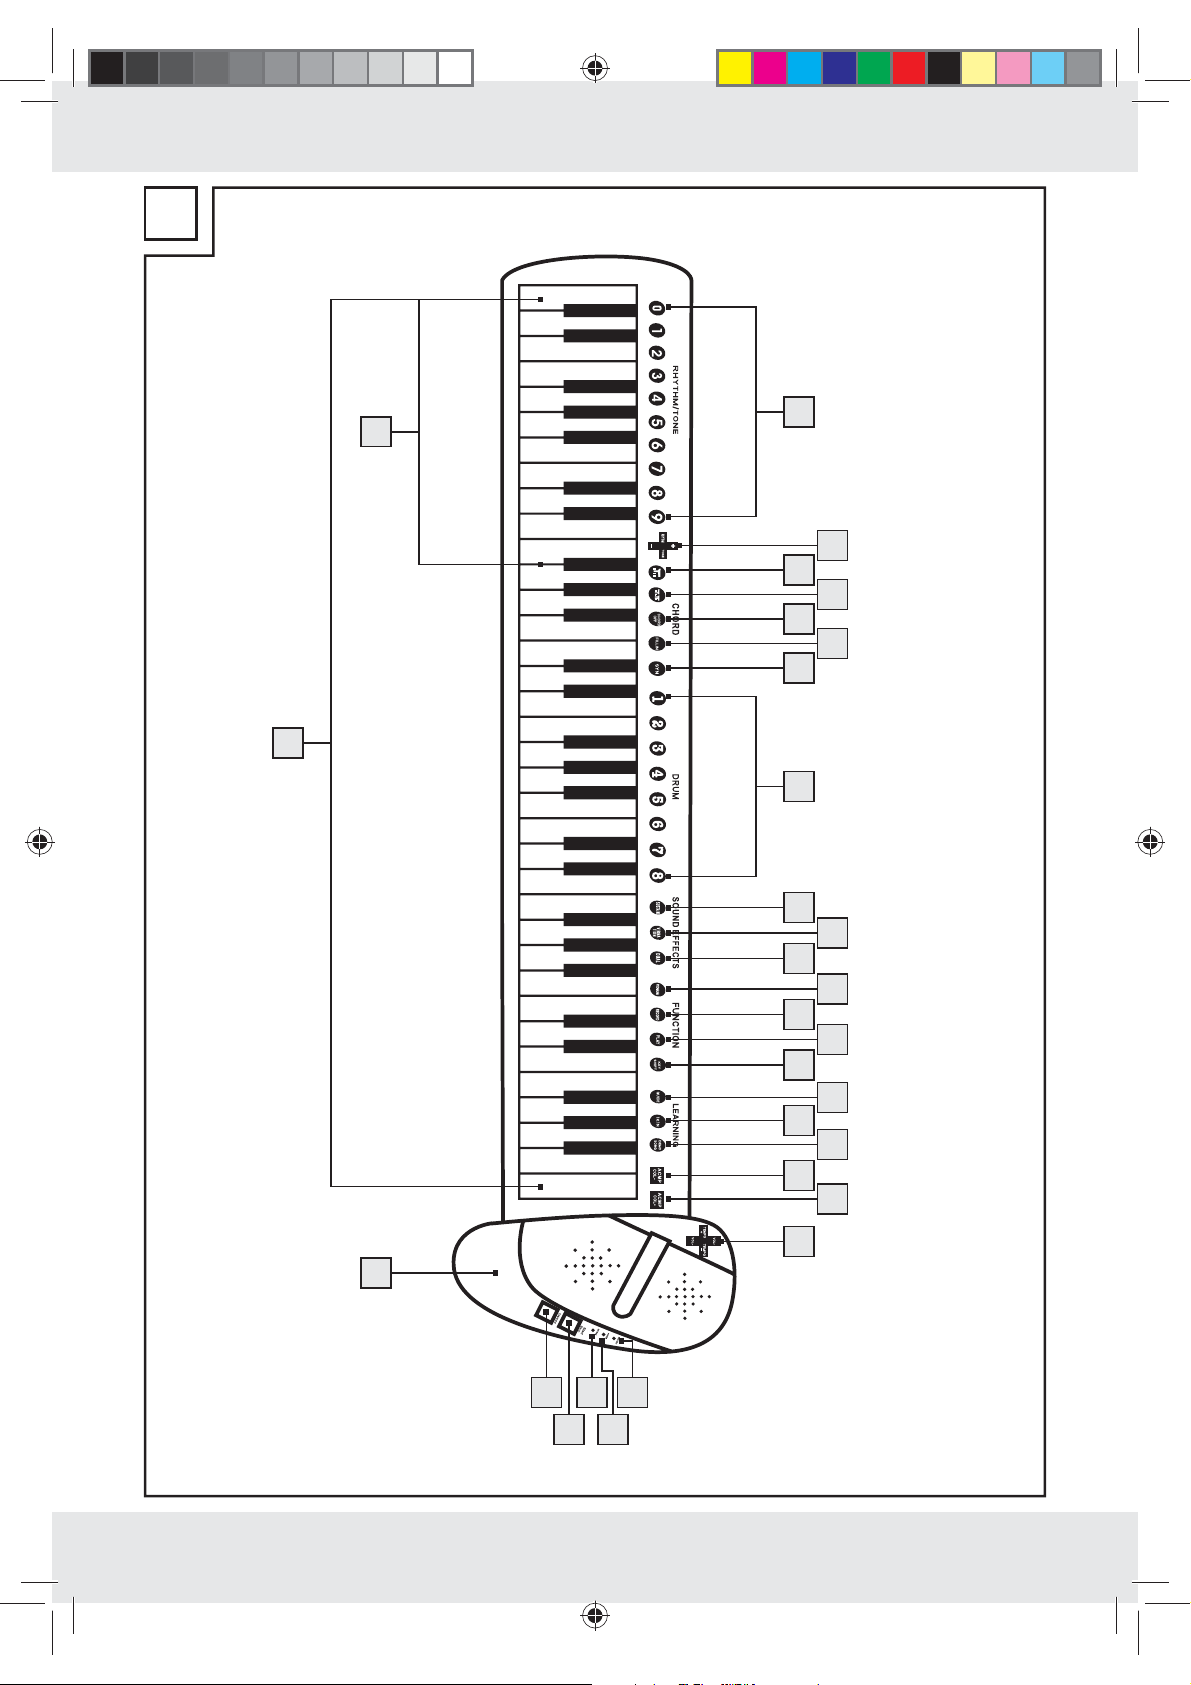
13
RECORD button
14
PLAY button
15
KEY SHIFT button
16
GUIDE button (learning mode 1)
17
1K1N button (learning mode 2)
18
DEMO SONG button (play demo song)
19
ACMP COL – - button
(reduce volume of accompanying music)
20
ACMP COL + - button
(increase volume of accompanying music)
Control Unit
21
VOL + / TEMPO – / VOL – / TEMPO + - button
27
:
(volume control / tempo control)
22
RECORD LED
23
POWER LED
24
RHYTHM-LED
25
START / STOP button
26
ON / OFF button
27
Control unit
28
Keys
29
Chord keys
30
Battery compartment
31
Battery compartment cover
32
Mains adapter
33
Headphone outlet (headphones not included)
34
Mains adapter socket
Technical Data
Description of parts
Roll Piano:
1
Number buttons RHYTHM / TONE
2
Selection button RHYTHM / TONE
3
Single finger button (simplified chord)
4
Finger button (chord)
5
CHORD OFF button (switch off chord)
6
FILL IN button (drum sequence)
7
SYN button (synchronization)
8
Number buttons DRUM
9
SUSTAIN button (sustain note)
10
VIBRATION button
11
DUAL button (second tone)
12
PROGRAM button
6 GB/IE
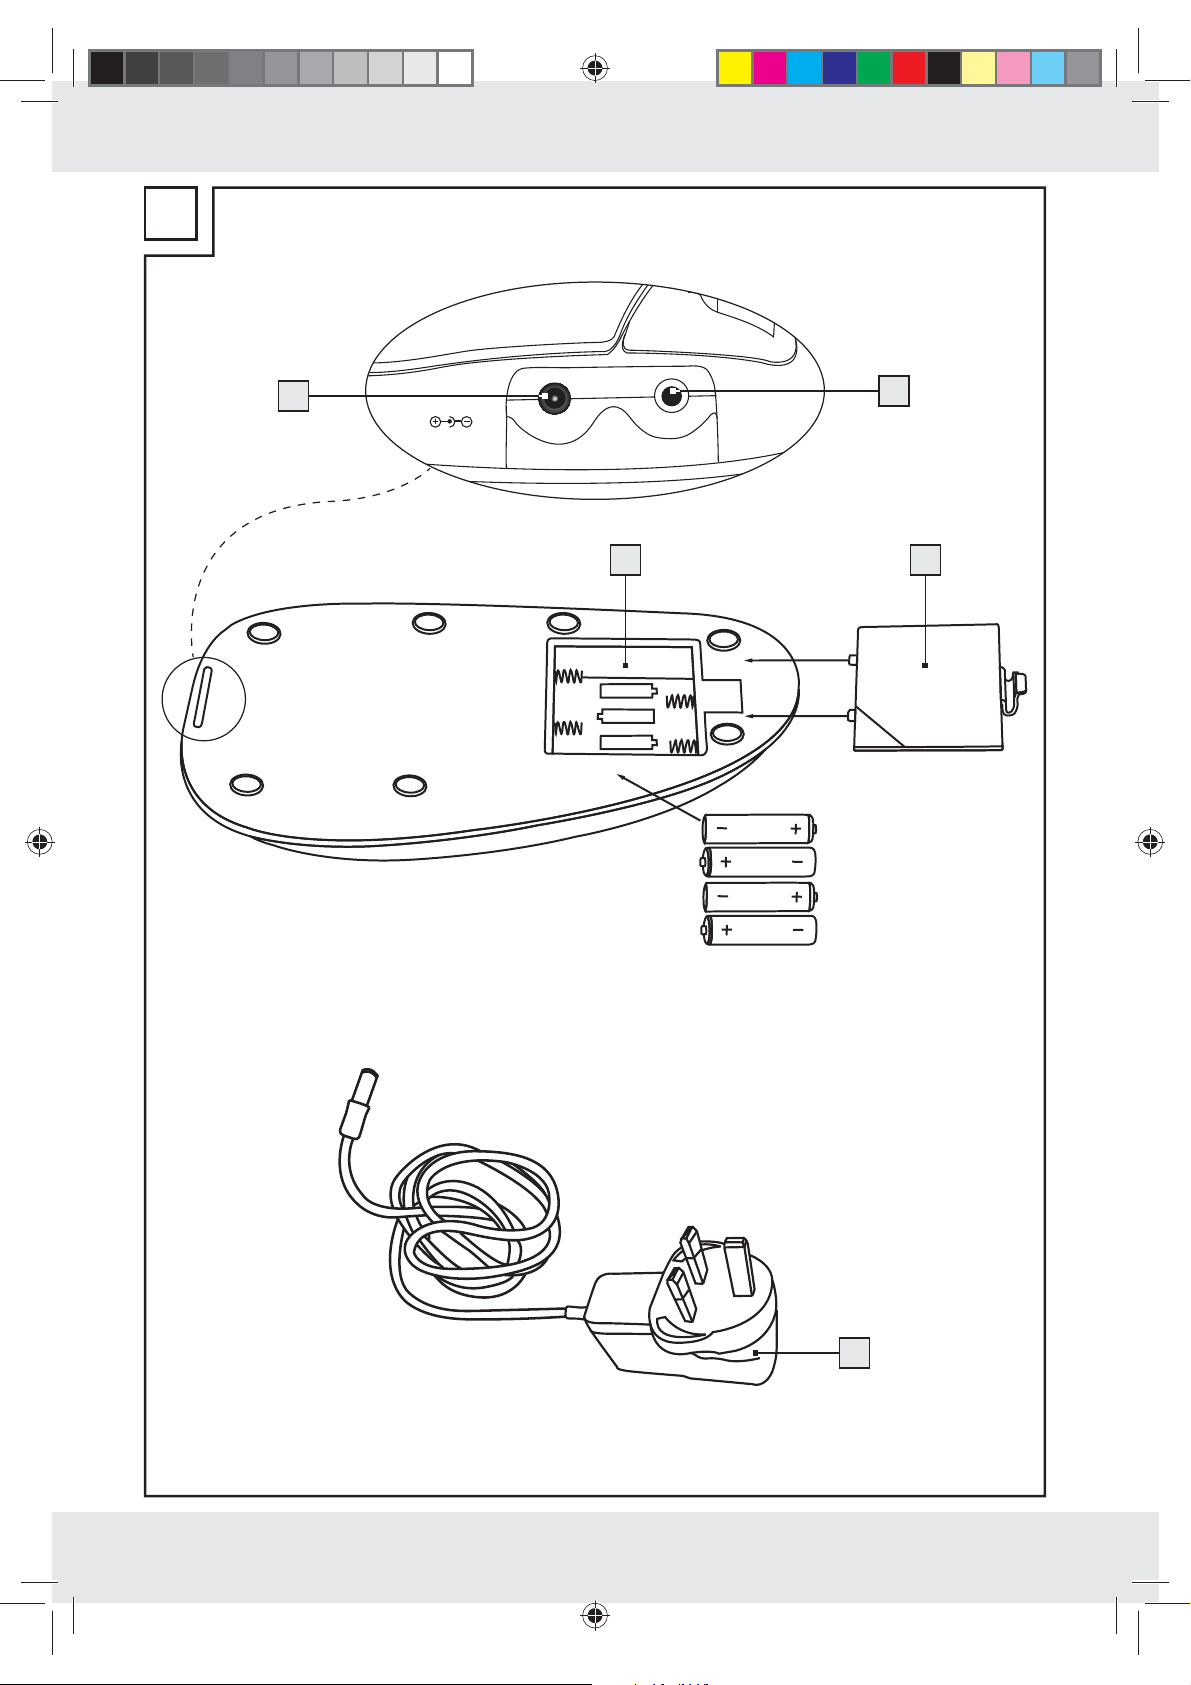
Battery operation:
Operating voltage: 4 x 1.5 V
Output power: 2.1 W
Batteries: 4 x 1.5 V
, AA
Mains adapter operation:
Output voltage: 4.5 V
, 1000 mA
Output power: 1.58 W
Input voltage: 100 – 240 V ~, 0.4 A,
50 / 60 Hz
Protection class:
Page 7

Introduction
Roll-up piano:
Dimensions: 103 x 23.5 x 3.5 cm
(L x W x H)
Protection class:
Functions
Demo Songs:
0. Merry widow waltz
1. Have yourself a merry little christmas
2. Twinkle twinkle little star
3. Rudolph the red nosed reindeer
4. Air on the G string
5. If you are happy
6. Oh, Susannah
7. Wish you a Merry Christmas
8. Rondo Alla Turca
9. Menuett
Tones:
0. Concert grand
1. Clavinet
2. Vibraphone
3. Accordion
4. Harmonica
5. Guitar
6. Electric guitar (muted)
7. Overmodulated guitar
8. Acoustic bass
9. Electric bass (finger)
10. Slap bass
11. Orchestral harp
12. Strings
13. String orchestra
14. Synthesized strings
15. Trumpet
16. Horn
17. Lyre
18. Banjo
5. March
6. Folk dance
7. Bossa nova
8. Waltz
9. Cha-cha
10. POP
11. POP 16 time
12. Smooth rock
13. Samba
14. Swing
15. Polka
16. Jock rock
17. Nursery rhyme
18. 70’s POP
19. Disco fox
20. Heartbeat
21. Express POP
22. Folk song
23. Fast waltz
24. Baiao
25. Dance
26. Punk
27. Bruce
28. Rock
29. Swing 8 time
30. 8 time fast
31. Country
Drums:
Drum 1 Bass drum 1
Drum 2 Electric snare
Drum 3 Cymbal (foot)
Drum 4 Cymbal (hand 1)
Drum 5 High Tom
Drum 6 Splash cymbal
Drum 7 High bongo
Drum 8 Claves
Includes
Rhythms:
0. Disco
1. POP 8 time
2. Fast rock
3. Rumba
4. Tango
Immediately after unpacking please check the
package contents for completeness and if all parts
and the product are in good condition. Do not
under any circumstances use the product if the
delivery is incomplete.
7 GB/IE
Page 8

Introduction / Safety Information
1 Roll Out Piano
1 Mains adapter
4 Batteries 1.5 V
1 Operating instructions
AA
Safety Information
In the case of damage resulting from non-compliance
with these operating instructions the guarantee claim
becomes invalid! No liability is accepted for consequential damage! In the case of material damage
or personal injury caused by incorrect handling
or non-compliance with the safety instructions, no
liability is accepted!
Never leave children unsupervised with the
packaging material. The packaging material
represents a danger of suffocation. Children
frequently underestimate the dangers. Please
keep children away from the device at all times.
Children or other individuals who do not know
or have no experience of handling this device,
or whose physical, sensory or mental abilities
are restricted, must not use the device without
supervision or instruction by an individual
responsible for their safety. Children must be
supervised in order to ensure that they do not
play with the device.
Make sure that the product is only installed by
skilled individuals.
CAUTION! DANGER OF OVERHEATING!
Do not operate the product in its packaging.
CAUTION! DANGER OF OVERHEATING!
Always ensure that there is adequate ventilation.
Ensure that the product does not become covered
by towels, curtains, newspapers or similar objects.
Do not pull on the cable of the product and
make sure that it is laid in such a way that
no-one can walk or stumble over it.
WARNING! DANGER OF DEATH! Check
the product for damage beforehand every time
you use it. Do not use the product if you find
any damage.
WARNING! DANGER OF
DEATH AND ACCIDENTS FOR
TODDLERS AND CHILDREN!
Never open any of the electrical equipment
or insert any objects into it.
Keep the product away from moisture. The
product is only suitable for use in dry, enclosed
indoor locations.
Keep the product away from liquid droplets or
sprays. Do not allow vessels containing liquids
(e.g. vases) to be placed near the product.
Never expose the product to high temperatures
or humidity, as otherwise the product may be
damaged.
Use only the mains adapter supplied
(type: JYI5-045-100).
Never overstretch or twist the roll-up piano.
Otherwise damage to the product may occur.
Ensure that the keys and buttons cannot be
pressed while the product is in the rolled-up
condition.
Keep the product away from sharp or pointed
objects. Otherwise damage to the product
may occur.
Never connect the product directly to the
230 V ~, 50 Hz mains electricity supply.
Always place the mains adapter so that you
can easily reach it.
CAUTION! DANGER OF FIRE!
Do not allow open flames (candles
etc.) near the product.
Battery Safety Instructions
WARNING! DANGER TO LIFE! Keep
batteries out of the reach of children. Do not
leave batteries lying around. There is a risk of
children or animals swallowing them. Consult
a doctor immediately if a battery is swallowed.
This can cause them to overheat, burn or burst.
Never throw batteries into fire or water. The
batteries may explode.
EXPLOSION HAZARD! Never
recharge nonrechargeable batteries,
short-circuit and / or open batteries.
8 GB/IE
Page 9

Safety Information / Before Initial Use / Operation
Remove spent batteries from the product
immediately. Otherwise there is an increased
risk of leakage.
Always replace all batteries at the same time
and only use batteries of the same type.
Do not use different types of batteries or mix
used and new batteries together.
Check regularly that the batteries are not leaking.
Leaked or damaged batteries can cause chemical
burns if they come into contact with the skin; in
such cases you must wear suitable protective
gloves.
Remove the batteries from the product if it is
not in use for any length of time.
Ensure the correct polarity when inserting the
batteries! Otherwise the batteries may explode.
The direction in which the batteries should face
is indicated in the battery compartment.
Never attempt to recharge batteries which are
not rechargeable.
Before Initial Use
Note: You can operate the roll piano by means of
the mains adapter or with batteries.
Close the battery compartment by means of
the battery compartment cover.
Operation
Turning the Roll Piano on / off
Press the ON / OFF button to turn the roll piano
on or off.
Note: When the product is switched on, the
POWER LED lamp lights up in red.
Press the buttons to use the roll piano.
Making Adjustments
Adjusting the Tone:
Note: The RHYTHM LED does not light up during
the adjustment process.
1. Press TONE on the Select button RHYTHM / TONE.
2. Press one of the Number buttons
RHYTHM / TONE to select the desired tone
(see “Functions” > “Tones”).
3. Press TONE again on the Select button RHYTHM /
TONE to confirm your input. A sample tone
sounds as a confirmation of the selected tone.
Operating the roll piano by
means of the mains adapter
Insert the plug of the mains adapter into the
socket on the back of the control unit.
Insert the plug of the mains adapter into a cor-
rectly installed power socket.
Inserting / Replacing
the Batteries
Open the battery compartment on the back of
the control unit.
Remove any used batteries.
Insert 4 batteries (1.5 V
compartment.
Note: Ensure the correct polarity. This is shown
in the battery compartment.
, AA) into the battery
OR
1. Press TONE on the Select button RHYTHM / TONE.
2. Then press + or – on the Selection button
RHYTHM / TONE to call up the next tone from
the list in turn (see “Functions” > “Tones”).
3. Press TONE again on the Selection button
RHYTHM / TONE to confirm your input. A sample
tone sounds as a confirmation of the selected tone.
Setting the Rhythm:
Note: The RHYTHM-LED lights up in green during
the adjustment process.
1. Press RHYTHM on the Select button
RHYTHM / TONE.
2. Press one of the Number buttons
RHYTHM / TONE to select the desired rhythm
(see “Functions” > “Rhythms”).
9 GB/IE
Page 10

Operation
3. Press RHYTHM again on the Select button
RHYTHM / TONE to confirm your input.
The selected rhythm sounds immediately.
OR
1. Press RHYTHM on the Select button
RHYTHM / TONE.
2. Then press + or – on the Selection button
RHYTHM / TONE to increase or decrease the
currently selected rhythm from the list by one
number (see “Functions” > “Rhythms”).
3. Press RHYTHM again on the Selection button
RHYTHM / TONE to confirm your input. The
selected rhythm sounds immediately.
Starting / stopping a rhythm:
Press the START / STOP button to stop or restart
the selected rhythm.
Simplified chord mode (see Fig. C):
In the simplified chord mode you can play a complete chord by pressing a maximum of 3 so-called
chord keys (see Fig. C).
The keys in the lowest one and a half octaves of
the keyboard are assigned as chord keys (i.e. the
notes from bottom C to second F (see Fig. A)).
If the simplified tone mode is selected while a
rhythm is playing, then the key combinations only
need to be pressed briefly. A rhythmic accompaniment sounds – matching the selected rhythm – with
the selected chord.
Press the
mode.
Press the CHORD OFF button to quit the simpli-
fied chord mode.
Chord mode (see Fig. D):
In the chord mode, you play a chord by pressing a
chord in the area of the chord keys (see Fig. D).
The keys in the lowest one and a half octaves of
the keyboard are assigned as chord keys (i.e. the
notes from bottom C to second F (see Fig. A)).
button to start the simplified chord
If the chord mode is selected while a rhythm is
playing, then the key combinations only need to be
pressed briefly and a rhythmic accompaniment
sounds – matching the selected rhythm – with the
selected chord.
Press the
Press the CHORD OFF button to quit the chord
mode.
Adding a drum solo:
Note: Ensure that the rhythm is activated (see
“Setting the rhythm”).
Press the FILL IN button. The roll-up piano inte-
grates a drum solo 2 bars long into the current
rhythm. The rhythm continues normally as soon
as the drum solo has ended.
Synchronisation:
Note: This function starts the rhythm in time with
your playing.
Press the SYN button to enter the synchronisa-
tion mode.
Press one or more chord keys to start the selected
rhythm.
Note: If the chord mode or the simplified
chord mode was selected before pressing the
SYN button, then the rhythm starts with accompaniment.
Drum:
Press any number button DRUM to play the
selected percussion instrument. You can see the
assignment of the buttons in the list “Functions”
> “Drum”.
Sound effects
Sustain:
Press the SUSTAIN button to make the note
sustain a little after the key is released.
Note: Chord assignment and drum are not
assigned to work with this effect.
button to start the chord mode.
10 GB/IE
Page 11

Operation
Press the SUSTAIN key again to switch off the
sustain function.
Vibration:
Press the VIBRATION button to assign the
played notes with a pitch vibrato.
Note: Drum and auto-accompaniment are not
assigned to work with this effect.
Press the VIBRATION key again to switch off
the vibrato function.
Dual mode:
In dual mode you can add a second sound to the
already selected one.
Press the DUAL button and then select a sec-
ond sound using the RHYTHM / TONE button.
The roll-up piano now plays two sounds at the
same time.
Press the DUAL key again to switch off the dual
mode.
Press the PROGRAM button to quit the pro-
gramming mode.
Note: The programmed sequence remains
stored until you restart the programming mode,
switch off the instrument or load the recording
memory with a keyboard track in accordance
with the following section.
Recording mode (Keyboard):
Note: The roll piano can store up to 50 notes.
Press the RECORD button. The recording mode
is active. The RECORD LED lights up in green.
Play the desired sequence.
Press the PLAY button. The stored recording is
played back.
Press the PLAY button again to exit the play-
back mode.
Press the RECORD button again to stop
recording. The RECORD LED goes off.
Note: Once you exit the record mode, the
recording is deleted.
Special functions (FUNCTION)
Programming mode (percussion):
Note: The roll-up piano can store up to 50 percus-
sion notes one after the other.
Press the PROGRAM button. The programming
mode is active. The RECORD LED illuminates
green.
Press the keys of the keyboard to play the de-
sired percussion sequence.
Note: In this mode, the keyboard has 19
different percussion sounds assigned, which
repeat themselves in a regular pattern along
the keyboard.
Refer to Fig. E for more information.
Press the PLAY button to start or stop the
programmed sequence.
Note: While the percussion sequence is being
played, you can also play the keys on the keyboard to add percussion sounds. When the
sequence has stopped, the keys on the keyboard are once again assigned with the normal
tones.
Tuning - changing the pitch (KEY-SHIFT):
Press the KEY-SHIFT button to change the pitch
of the roll-up piano.
Then press the + or – on the selection button
RHYTHM / TONE to set the sound a semi-tone
higher or lower with each button press.
Press the + and – on the selection button
RHYTHM / TONE simultaneously to bring the
sound back to the normal tuning setting.
Learning function (LEARNING)
Selecting a demo song:
Note: In this mode the settings for tone and
rhythm cannot be changed.
Press the DEMO SONG button. Now song
number 0 is played.
Press the DEMO SONG button to stop the
song playing.
Press the DEMO SONG button again to play
the song with the next number.
11 GB/IE
Page 12

Operation / Cleaning and care
Note: After pressing the DEMO SONG button
you can also select the desired song directly.
Press the + or – on the selection button
RHYTHM / TONE or the number button
RHYTHM / TONE to select the desired demo
song directly (see “Functions” > “Demo songs”).
Press the DEMO SONG button again to stop
the demo song playing.
Learning mode 1 (Tempo):
Note: Ensure that you have first selected the
desired demo song as the accompanying piece
(see “Settings” > “Selecting a demo song”).
The playing / song notes can be downloaded from
the Internet-Page www.lidl-service.com (IAN 54438).
Press the 1K1N button.
Press any key to start the accompanying piece.
The roll-up piano now plays the accompaniment
automatically.
Try to play the melody in time with the accom-
paniment.
Note: In this learning mode the idea is to
press the keys at the right time. If you press the
wrong key, the error is automatically corrected.
Press the 1K1N button to quit learning mode 1.
Learning mode 2 (Melody):
Note: Ensure that you have first selected the
desired demo song as the accompanying piece
(see “Settings” > “Selecting a demo song”).
The playing / song notes can be downloaded from
the Internet-Page www.lidl-service.com (IAN 54438).
Volume / Tempo
Adjusting the Volume of the Accompanying
Music:
Press the ACMP VOL + or ACMP VOL – buttons
in order to increase or decrease the volume of
the rhythm.
Press the ACMP VOL + or ACMP VOL – buttons
simultaneously in order to reset the volume to
its original level.
Adjusting the Volume:
Press VOL + or VOL – on the VOL + / TEMPO – /
VOL – / TEMPO + - button to increase or decrease
the volume. As soon as the maximum or minimum volume is reached, a warning sound is
heard.
Note: The product has 17 volumes.
Setting the Tempo:
Press TEMPO + or TEMPO – on the VOL + /
TEMPO – / VOL – / TEMPO + button in order to
increase or decrease the tempo. As soon as
the maximum or minimum tempo is reached, a
warning sound is heard.
Note: The product has 33 tempi.
Press TEMPO + or TEMPO – on the VOL + /
TEMPO – / VOL – / TEMPO + button simultaneously in order to return the tempo to its original
level.
Cleaning and care
Press the GUIDE button.
Press any key to start the song you are intend-
ing to learn. The roll-up piano now plays the
accompaniment automatically.
Now play the melody along with the accom-
paniment.
Press the GUIDE button to quit learning mode 2.
12 GB/IE
Under no circumstances should you use
aggressive detergents or abrasives in order
to avoid damaging the material.
Use a dry lint-free cloth for cleaning and caring
for the piano.
Use a damp cloth to clean the product if it is
very dirty.
Page 13

Disposal
The packaging is made entirely of
recyclable materials, which you may
dispose of at local recycling facilities.
Contact your local refuse disposal authority for more
details of how to dispose of your worn-out product.
To help protect the environment, please
dispose of the product properly when it
has reached the end of its useful life and
not in the household waste. Information
on collection points and their opening
hours can be obtained from your local
authority.
Faulty or used batteries must be recycled in accordance with Directive 2006 / 66 / EC. Please return
the batteries and / or the device to the available
collection points.
Disposal
Batteries should not be disposed
Pb
Batteries may not be disposed of with the usual
domestic waste. They may contain toxic heavy
metals and are subject to hazardous waste treatment
rules and regulations. The chemical symbols for
heavy metals are as follows: Cd = cadmium,
Hg = mercury, Pb = lead. That is why you should
dispose of used batteries at a local collection point.
Product Information:
Roll Out Piano
Model no.: Z30258-BS
Version: 08 / 2010
of in normal domestic waste!
EMC
13 GB/IE
Page 14

C
Major Minor Major seventh chord Minor seventh chord
14
= H
Page 15

D
Major Minor Major seventh chord Minor seventh chord
= H
15
Page 16

E
16
Page 17

Page 18

IAN 54438
Milomex Ltd.
c / o Milomex Services
Hilltop Cottage
Barton Road
Pulloxhill
Bedfordshire
MK45 5HP
UK
© by ORFGEN Marketing
Last Information Update: 05 / 2011
Ident.-No.: Z30258-BS052011-6
6
 Loading...