

Page 1

ROTARY SHAVER, RECHARGEABLE/MAINS-OPERATED
SRR 3.7 C4
ROTARY SHAVER, RECHARGEABLE/MAINS-OPERATED
Operating instructions
KÖRKÉSES BOROTVA,
AKKU/HÁLÓZAT
Használati utasítás
HOLICÍ STROJEK
Návod k obsluze
ROTATIONSRASIERER,
AKKU/NETZ
Bedienungsanleitung
IAN 115785
GOLARKA ROTACYJNA
ZASILANA Z SIECI LUB
AKUMULATOREM
Instrukcja obsługi
ROTACIJSKI BRIVNIK, POLNILNA BATERIJA/OMREŽJE
Navodila za uporabo
ROTAČNÝ HOLIACI STROJČEK,
BATÉRIA/SIEŤ
Návod na obsluhu
Page 2

Before reading, unfold both pages containing illustrations and familiarise
yourself with all functions of the device.
Przed przeczytaniem proszę rozłożyć obie strony z ilustracjami, a następnie
proszę zapoznać się z wszystkimi funkcjami urządzenia.
Olvasás előtt kattintson az ábrákat tartalmazó mindkét oldalra és végezetül
ismerje meg a készülék mindegyik funkcióját.
Pred branjem obe strani s slikami odprite navzven in se nato seznanite z
vsemi funkcijami naprave.
Před čtením si odklopte obě dvě strany s obrázky a potom se seznamte se
všemi funkcemi přístroje.
Pred čítaním si odklopte obidve strany s obrázkami a potom sa oboznámte
so všetkými funkciami prístroja.
Klappen Sie vor dem Lesen die beiden Seiten mit den Abbildungen aus und
machen Sie sich anschließend mit allen Funktionen des Gerätes vertraut.
GB Operating instructions Page 1
PL Instrukcja obsługi Strona 23
HU Használati utasítás Oldal 45
SI Navodila za uporabo Stran 67
CZ Návod k obsluze Strana 89
SK Návod na obsluhu Strana 111
DE / AT / CH Bedienungsanleitung Seite 133
Page 3

A
Page 4

B
Page 5

Contents
Introduction ...................................2
Intended use ..................................2
Package contents ..............................2
Description of the appliance ......................3
Technical data .................................4
Safety instructions ..............................5
Charging the rechargeable battery with the charger . . 10
Charging the rechargeable battery without the charger 11
Cordless shaving ..............................12
Shaving using the mains adapter ................13
Trimmer/long hair trimmer .....................13
Travel lock ...................................14
Cleaning and care .............................15
Cleaning with the brush .................................15
Cleaning under running water ............................16
Thorough cleaning .....................................17
Storage .....................................18
Warranty ....................................19
Service ......................................20
Disposal .....................................20
Importer .....................................22
GB
SRR 3.7 C4
1
Page 6

Introduction
GB
Congratulations on the purchase of your new device.
You have selected a high-quality product. The operating instructions are
part of this product. They contain important information on safety,
usage and disposal. Before using the product, familiarise yourself
with all handling and safety guidelines. Use the product only as
described and for the range of applications specified. Please also
pass these operating instructions on to any future owner.
Intended use
This appliance is intended exclusively for shaving and trimming
human hair.
This appliance is intended solely for use in private households.
Do not use it for commercial applications.
All other uses are deemed to be improper and may result in property
damage or even in personal injury.
Package contents
▯ Shaver with cutting unit
▯ Mains adapter
▯ Trimmer unit
▯ Protective cap
▯ Brush
▯ Charger
▯ Order card
▯ Operating instructions
2
SRR 3.7 C4
Page 7

NOTE
Check contents for completeness and damage immediately
after unpacking. Contact Customer Services if necessary.
Description of the appliance
Figure A (front fold-out page):
Drive shaft
Cutting unit
Unlocking button
Protective collar
On/Off switch
Trimmer unit
Long hair trimmer
GB
Symbol
Symbol
Symbol
- Charging socket
Figure B (rear fold-out page):
3 Connector
! Mains adapter
. Brush
0 Protective cap
6 Charger
1 Connector (charger)
% Charging socket (charger)
SRR 3.7 C4
(battery charge indicator)
(charging)
(locked)
3
Page 8

Technical data
GB
Appliance
Input voltage: 5 V
Input current: 1000 mA
Battery: 3.7 V/800 mAh Li-ion battery
Environmental temperature: 5°C up to 35°C
Charging time: approx. 60 minutes
Operating time with fully
charged battery: approx. 60 minutes
Protection rating: IPX 4
Mains adapter (type PTB-050100EU)
Input voltage: 100 - 240 V ∼ 50/60 Hz
Output voltage: 5 V
Input current: 0,2 A
Output current: 1000 mA
Protection rating: IP 20
Protection class: II /
4
SRR 3.7 C4
Page 9

Safety instructions
DANGER – RISK OF ELECTRIC
SHOCK!
► Prior to use, check the appliance for visible
external damage. Never operate an appliance
that is damaged. There is a risk of electrocution.
► The appliance may no longer be used if there is
any damage to the cable, to the mains adapter,
the housing or any other components.
► Pull the mains adapter from the mains power
socket
— if a defect occurs,
— before cleaning the appliance,
— if you do not intend using the appliance
for long periods,
— after every use.
When doing so, pull the mains adapter itself
and not the cable.
► Never submerge the appliance or the cable
with mains adapter in water or other liquids.
GB
SRR 3.7 C4
5
Page 10

GB
DANGER – RISK OF ELECTRIC
SHOCK!
► If the appliance drops into water, pull the mains
adapter out of the power socket before you
reach into the water.
► Never touch the mains adapter with wet hands,
especially when plugging it in or unplugging it.
Risk of electrical shock!
► Check the mains adapter and appliance regu-
larly for possible mechanical defects.
► Ensure that the cable does not get jammed in
cupboard doors or pulled over hot surfaces.
If this occurs, the cable insulation may be
damaged.
► The installation of a residual current circuit
breaker with a rated tripping current of no
more than 30 mA offers further protection from
electric shocks. Have the installation carried
out only by a qualified electrician.
6
SRR 3.7 C4
Page 11

DANGER – RISK OF ELECTRIC
SHOCK!
► WARNING! Disconnect the main adapter from
handset when you clean it with water..
WARNING – RISK OF INJURY!
► This appliance may be used by children aged
8 years and above and by persons with limited
physical, sensory or mental capabilities or lack
of experience and knowledge, provided that
they are under supervision or have been told
how to use the appliance safely and are aware
of the potential risks.
► Children must not play with the device.
► Cleaning and user maintenance tasks may
not be carried out by children unless they are
supervised.
GB
SRR 3.7 C4
7
Page 12

GB
WARNING – RISK OF INJURY!
► All repairs must be carried out by authorised
specialist companies or by the Customer Service
department. Improper repairs can pose significant risks to the user. It will also invalidate any
warranty claims.
► Do not use the appliance with a defective cutter
attachment or cutting length attachment, since
these may have sharp edges. There is a risk of
injury!
► Defective components must always be replaced
with original replacement parts. Compliance with
safety requirements can only be guaranteed if
original replacement parts are used.
► Only plug the mains adapter into an easily
accessible power socket so that you can pull
it out of the power socket quickly in an emergency.
8
SRR 3.7 C4
Page 13

CAUTION – PROPERTY DAMAGE!
► Never operate the appliance unsupervised,
and only in accordance with the information
on the nameplate.
► For mains operation, use only the supplied
mains adapter (type PTB-050100EU).
► To avoid improper warming, do not cover the
mains adapter.
► The mains adapter is for indoor use
only.
GB
SRR 3.7 C4
9
Page 14
Charging the rechargeable battery with the
GB
charger
The battery should be charged for at least 60 minutes before first
use.
NOTE
► Ensure that the appliance is switched off before charging the
battery.
1) Plug the connector 3 into the charging socket % of the charger.
Pay heed to the correct polarity: The guide pillar in the charging
socket % must grip the guide rail on the connector plug 3.
If it does not, the connector plug 3 cannot be inserted.
2) Flip open the charger 6 as far as it will go until the bracket is
in an upright position (see figure).
3) Plug the mains adapter ! into a mains socket that complies with
the appliance specifications.
4) Place the appliance in the charger 6. The bracket holds the
appliance in place in the charger 6.
The charging of the battery is indicated by the red flashing
symbol
9.
10
SRR 3.7 C4
Page 15

As soon as the battery is fully charged, the red flashing symbol
■
disappears and the blue symbol
indicator appears.
■ Once the battery is fully charged, you can use the appliance for
around 60 minutes without connecting it to the power supply.
■ If the battery is nearly empty, the red symbol
of the battery charge
flashes.
Charging the rechargeable battery without
the charger
NOTE
► Ensure that the appliance is switched off before charging the
battery.
1) Plug the connector 3 into the charging socket - on the shaver.
Pay heed to the correct polarity: The guide pillar in the charging
socket - must grip the guide rail on the connector plug 3. If it
does not, the connector plug 3 cannot be inserted.
2) Plug the mains adapter ! into a mains socket that complies with
the appliance specifications.
The charging of the battery is indicated by the red flashing
symbol
■ As soon as the battery is fully charged, the red flashing symbol
indicator appears.
■ Once the battery is fully charged, you can use the appliance for
around 60 minutes without connecting it to the power supply.
■ If the battery is nearly empty, the red symbol
.
disappears and the blue symbol
of the battery charge
flashes.
GB
SRR 3.7 C4
11
Page 16

Cordless shaving
GB
CAUTION! MATERIAL DAMAGE!
►
This appliance is not suitable for wet shaving!
This shaver can be used without the power cable. In this case, you
must charge the appliance before initial use (see section “Charging
the rechargeable battery with/without the charger”).
1) If not already attached, attach the protective collar from the
bottom onto the cutting unit (see fold-out page).
2) Fit the cutting unit with the attached protective collar onto
the drive shaft . Make sure that the protective collar is fitted
correctly onto the hand element.
3) Remove the protective cap 0.
4) Press the ON/OFF button . The symbol
charge indicator and the
as soon as the shaver starts up.
NOTE
► The best results are achieved if used on dry skin.
► It can take 2 to 3 weeks until the skin is accustomed to the
dry shaving system.
5) Move the shaving heads with straight and circular motions over
the skin.
6) After you have covered all the areas you want to shave, press
the ON/OFF button . The appliance stops. The display disappears at once.
7) Clean the shaver after every use with the supplied brush ..
For a more thorough cleaning, read the section “Cleaning and
care”.
12
of the battery
logo are displayed
SRR 3.7 C4
Page 17

Shaving using the mains adapter
CAUTION! MATERIAL DAMAGE!
► This appliance is not suitable for wet shaving!
Should you wish to use the shaver without first charging the battery,
you can do so by using energy directly from the mains adapter !:
1) Plug the connector 3 into the charging socket - on the shaver.
Pay heed to the correct polarity: The guide pillar in the charging
socket - must grip the guide rail on the connector plug 3. If it
does not, the connector plug 3 cannot be inserted.
2) Insert the plug into a mains power socket.
The shaver can then be used.
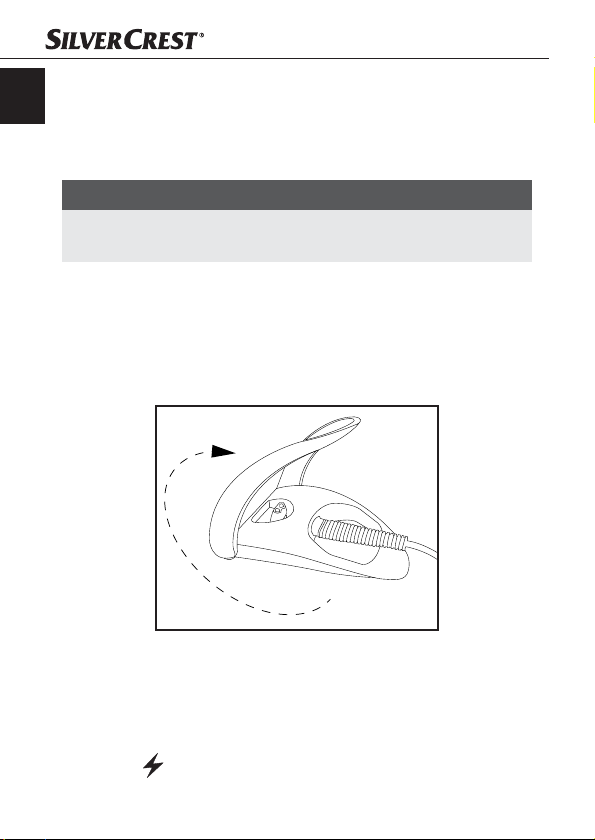
Trimmer/long hair trimmer
To shape your beard, form sideburns or shave eyebrows, use the
trimmer unit .
1) Pull the cutting unit , if attached, off the handset.
2) Fit the trimmer unit onto the drive shaft (see figure).
GB
3) Attach the trimmer unit in such a way that both guide pillars
on the trimmer unit grip the guide rails on the drive shaft .
SRR 3.7 C4
13
Page 18

4) Press the ON/OFF button . The symbol
GB
charge indicator and the
as soon as the shaver starts up.
5) When you have finished trimming, press the ON/OFF switch
again.
6) Clean the trimmer unit with the supplied brush ..
For a more thorough cleaning, read the section “Cleaning and
care”.
of the battery
logo are displayed
Travel lock
To prevent the appliance from switching on unintentionally, you can
lock the ON/OFF button .
♦ Press and hold down the ON/OFF button until the symbol
appears on the display.
If the ON/OFF button is pressed now, the symbol
appears briefly. The appliance however does not switch on.
♦ If you want to unlock your appliance again, press and hold
down the ON/OFF button :
– the symbol
5 seconds. The display then disappears and the appliance
can now be switched on again.
appears and starts to flash for approx.
14
SRR 3.7 C4
Page 19

Cleaning and care
DANGER – ELECTRIC SHOCK!
► Before cleaning the appliance, disconnect the power plug
from the mains power socket! There is a risk of electric
shock!
CAUTION! MATERIAL DAMAGE!
► Do not use abrasive, chemical or caustic cleaning agents
to clean this appliance. This will irreparably damage the
appliance.
Cleaning with the brush
Cutting unit
Clean the 3 shaving heads of the cutting unit after every shave
using the brush ..
1) Press the release button so that the cutting unit pops open.
2) Tap the cutting unit on a flat surface or blow off the hair
cuttings.
3) Use the brush . to remove any remaining hair cuttings.
Trimmer unit
■ Clean the trimmer unit after every shave using the supplied brush ..
■ Oil the long hair trimmer around every 6 months with a drop
of sewing machine oil.
GB
SRR 3.7 C4
15
Page 20

Cleaning under running water
GB
The cutting unit is suitable for cleaning under running
water.
1) Pull the cutting unit off the handset.
2) Press the release button so that the cutting unit pops open.
3) Hold the cutting unit under the running water so that the
water flows through the shaving heads from the inside to the
outside.
CAUTION! MATERIAL DAMAGE!
► Ensure that only the shaver unit is under the stream of
water! The shaver handset is only protected against water
splashes and can be irreparably damaged if it is held under
running water.
4) Allow the cutting unit to dry out completely before using the
shaver again.
16
SRR 3.7 C4
Page 21

Thorough cleaning
For a more thorough cleaning, remove the shaving heads:
1) Press the release button . The cutting unit pops up.
2) Overstretch the cutting unit a little so it can be pulled upwards
and off.
3) Carefully turn the lock marked with arrows in the direction of the
arrows until the mounting of the cutters allows itself to be lifted
off (see figure).
GB
4) Clean all parts under running water and then allow them to dry
fully.
5) Replace the cutting unit .
SRR 3.7 C4
17
Page 22

6) To reattach, simply turn the lock marked with arrows in the opposite
GB
direction of the arrows so that the mounting of the cutters cannot
be lifted off.
7) Remove loose hairs from the shaver with the brush ..
8) Replace the cutting unit on the shaver. Ensure that it snaps
into place and is seated firmly.
■ Clean the housing and the mains adapter ! with a moist cloth.
NOTE
If...
– ... the shaving result is noticeably poorer, ...
– ... you have to the shave the same spot repeatedly to
achieve a good result, ...
– ... the shave takes much longer than usual, ...
– ... there is visible damage to the shaving heads, ...
... you must change the cutters.
Please contact Customer Services if you want to order cutters.
Storage
■ Always replace the protective cap 0 onto the cutting unit
when you are not using the appliance.
■ Store the everything in a clean, dust-free and dry place.
18
SRR 3.7 C4
Page 23

Warranty
This device is provided with a 3-year warranty valid from the date
of purchase. This appliance has been manufactured with care and
inspected meticulously prior to delivery. Please retain your receipt
as proof of purchase. In the event of a warranty claim, please
contact your Customer Service unit by telephone. This is the only
way to guarantee free return of your goods.
The warranty only covers claims for material and manufacturing defects, not for damage sustained during carriage, components subject
to wear and tear or damage to fragile components such as switches
or batteries. This appliance is intended solely for private use and not
for commercial purposes.
The warranty shall be deemed void in cases of misuse or improper
handling, use of force and modifications/repairs which have not
been carried out by one of our authorised Service centres.
Your statutory rights are not restricted by this warranty.
The warranty period is not prolonged by repairs effected under the
warranty. This also applies to replaced and repaired components.
Any damage and defects present at the time of purchase must be reported immediately after unpacking, but no later than two days after
the date of purchase. Repairs carried out after expiry of the warranty
period shall be subject to charge.
GB
SRR 3.7 C4
19
Page 24

Service
GB
Service Great Britain
Tel.: 0871 5000 720 (£ 0.10/Min.)
E-Mail: kompernass@lidl.co.uk
IAN 115785
Hotline availability:
Monday to Friday from 8:00 a.m. to 8:00 p.m. (CET)
Disposal
Never dispose of the appliance in the
normal domestic waste. This product is
subject to the provisions of European
Directive 2012/19/EU.
Dispose of the appliance via an approved waste disposal company
or your municipal waste disposal facility. Please observe applicable
regulations. Please contact your waste disposal facility if you are in
any doubt.
20
SRR 3.7 C4
Page 25

Disposal of (rechargeable) batteries
To dispose of the appliance in an environmentally friendly way, you
must remove the battery from the appliance:
CAUTION – PROPERTY DAMAGE!
► Remove the battery from the appliance only if you want to
scrap/dispose of the appliance! The appliance is permanently defective after you have removed the battery!
1) To remove the rechargeable battery from the handset, remove
the small screw from the back of the handset with a Phillips
screwdriver.
2) Pull the back cover off the handset.
3) Lever out the internal housing, for instance with a screwdriver.
Before the internal housing can be levered out, you may need
to remove additional screws, snap off the side and bottom
mountings or bend them outwards. Preferably use a flat-head
screwdriver to do this.
4) After you have removed the internal housing:
Snap the mountings of the clear plastic cover off on the sides.
5) Now remove everything until you can access the battery.
6) Lever out the rechargeable battery.
7) Dispose of the battery in an environmentally friendly manner.
GB
SRR 3.7 C4
21
Page 26

Used batteries may not be disposed of in household waste.
GB
Consumers are legally obliged to dispose of (rechargeable)
batteries at a collection point in their community/city district
or at a retail store. The purpose of this requirement is to
ensure that batteries are disposed of in an environmentally
friendly manner. Only dispose of batteries when they are
fully discharged.
The packaging is made of environmentally friendly materials
which you can dispose of at your local recycling centre.
Importer
KOMPERNASS HANDELS GMBH
BURGSTRASSE 21
44867 BOCHUM
GERMANY
www.kompernass.com
22
SRR 3.7 C4
Page 27

Spis treści
Wstęp .......................................24
Użytkowanie zgodne z przeznaczeniem ..........24
Zakres dostawy ..............................24
Opis urządzenia ..............................25
Dane techniczne ..............................26
Wskazówki dotyczące bezpieczeństwa ...........27
Ładowanie akumulatora ze stacją ładowania .....32
Ładowanie akumulatora bez stacji ładowania .....33
Golenie bezprzewodowe .......................34
Golenie golarką podłączoną do zasilacza sieciowego . 35
Trymer / końcówka do przycinania długich włosów 35
Zabezpieczenie na czas podróży ................36
Czyszczenie i pielęgnacja .......................37
Czyszczenie za pomocą pędzelka ........................37
Czyszczenie pod bieżącą wodą ..........................38
Dokładne czyszczenie ..................................39
Przechowywanie .............................40
Gwarancja ...................................41
Serwis ......................................42
Utylizacja ....................................42
Importer .....................................44
PL
SRR 3.7 C4
23
Page 28

Wstęp
Serdecznie gratulujemy zakupu nowego urządzenia.
Wybrany produkt charakteryzuje się wysoką jakością. Instrukcja obsłu-
PL
gi jest częścią składową produktu. Zawiera ona ważne informacje na
temat bezpieczeństwa, użytkowania i utylizacji. Przed rozpoczęciem
użytkowania produktu należy zapoznać się ze wszystkimi informacjami dotyczącymi obsługi i bezpieczeństwa. Produkt należy użytkować
wyłącznie zgodnie z zamieszczonym tu opisem oraz w podanym
zakresie zastosowań. W przypadku przekazania urządzenia osobie
trzeciej należy dołączyć również całą dokumentację.
Użytkowanie zgodne z przeznaczeniem
To urządzenie jest przeznaczone wyłącznie do golenia i przycinania włosów ludzkich.
Urządzenie przeznaczone jest wyłącznie do stosowania w gospodarstwie domowym. Nie należy używać go w celach komercyjnych.
Każde inne użycie jest uważane za niezgodne z przeznaczeniem i
może spowodować szkody rzeczowe lub nawet uszkodzenia ciała.
Zakres dostawy
▯ Golarka z zespołem tnącym
▯ Zasilacz sieciowy
▯ Trymer
▯ Pokrywka ochronna
▯ Pędzelek
▯ Stacja ładowania
▯ Formularz zamówieniowy
▯ Instrukcja obsługi
24
SRR 3.7 C4
Page 29

WSKAZÓWKA
Bezpośrednio po rozpakowaniu należy sprawdzić, czy dostarczony produkt jest kompletny oraz nie posiada żadnych uszkodzeń. W razie potrzeby, prosimy zwrócić się do serwisu.
Opis urządzenia
Rysunek A (przednia rozkładana strona okładki):
Wałek napędowy
Zespół tnący
Przycisk odblokowania
Kołnierz ochronny
Włącznik
Trymer
Końcówka do przycinania długich włosów
PL
Symbol
Symbol
Symbol
- Gniazdo ładowania
Rysunek B (tylna rozkładana strona okładki):
3 Wtyczka
! Zasilacz sieciowy
. Pędzelek
0 Pokrywka ochronna
6 Stacja ładowania
1 Wtyczka (w stacji ładowania)
% Gniazdo ładowania (w stacji ładowania)
SRR 3.7 C4
(wskaźnik stanu naładowania akumulatora)
(wskaźnik ładowania)
(blokada)
25
Page 30

Dane techniczne
Urządzenie
Napięcie wejściowe: 5 V
PL
Prąd wejściowy: 1000 mA
Akumulator: Akumulator litowo-jonowy 3,7 V
800 mAh
Temperatura otoczenia: 5°C do 35°C
Czas ładowania: ok. 60 minut
Czas pracy przy
w pełni naładowanym
akumulatorze: ok. 60 minut
Zasilacz sieciowy (typ PTB-050100EU)
Napięcie wejściowe: 100 - 240 V ∼ 50/60 Hz
Napięcie wyjściowe: 5 V
Prąd wejściowy: 0,2 A
Prąd wyjściowy: 1000 mA
Stopień ochrony: IP 20
Klasa ochrony: II /
26
SRR 3.7 C4
Page 31

Wskazówki dotyczące bezpieczeństwa
NIEBEZPIECZEŃSTWO PORAŻENIA
PRĄDEM ELEKTRYCZNYM!
► Przed przystąpieniem do użytkowania należy
sprawdzić, czy urządzenie nie ma widocznych,
zewnętrznych uszkodzeń. Nie wolno uruchamiać uszkodzonego urządzenia. Istnieje niebezpieczeństwo porażenia prądem elektrycznym.
► W przypadku stwierdzenia uszkodzeń kabla,
zasilacza sieciowego, obudowy lub innych
elementów, dalsze korzystanie z urządzenia
jest zabronione.
► Zasilacz sieciowy należy odłączyć od
gniazdka zasilania:
— gdy wystąpi usterka,
— przed rozpoczęciem czyszczenia urzą-
dzenia,
— gdy urządzenie przez dłuższy czas nie
jest używane,
— po każdym użyciu.
Należy przy tym chwytać bezpośrednio za
zasilacz sieciowy, a nie za kabel.
► Nie wolno zanurzać urządzenia ani kabla
wraz zasilaczem sieciowym w wodzie ani
w żadnej innej cieczy.
SRR 3.7 C4
PL
27
Page 32

NIEBEZPIECZEŃSTWO PORAŻENIA
PRĄDEM ELEKTRYCZNYM!
PL
► Gdy urządzenie wpadnie do wody, najpierw
należy bezwzględnie odłączyć zasilacz sieciowy z gniazda zasilania, a następnie można
wyjąć urządzenie z wody.
► Nie wolno dotykać zasilacza sieciowego mo-
krymi rękoma, w szczególności podczas podłączania go do gniazda zasilania lub odłączania
z niego. Niebezpieczeństwo porażenia prądem
elektrycznym!
► Regularnie należy sprawdzać zasilacz siecio-
wy i urządzenie pod kątem występowania
ewentualnych uszkodzeń mechanicznych.
► Należy uważać, aby nie zatrzasnąć kabla
pomiędzy drzwiczkami szafek ani aby nie
dotykał on gorących powierzchni. Mogłoby to
doprowadzić do uszkodzenia izolacji kabla.
► Zamontowanie wyłącznika różnicowo-prądo-
wego o znamionowym prądzie wyłączającym
o wartości nie większej niż 30 mA zapewnia
dodatkową ochronę przed porażeniem prądem elektrycznym. Montaż należy zlecić wyłącznie wykwalifikowanemu elektrykowi.
28
SRR 3.7 C4
Page 33

NIEBEZPIECZEŃSTWO PORAŻENIA
PRĄDEM ELEKTRYCZNYM!
► UWAGA! Urządzenie należy przechowywać
w suchym miejscu!
OSTRZEŻENIE – NIEBEZPIECZEŃSTWO
ODNIESIENIA OBRAŻEŃ!
► To urządzenie może być używane przez dzieci
od 8roku życia oraz przez osoby o zmniejszonych zdolnościach fizycznych, sensorycznych
lub umysłowych lub też osoby nieposiadające
odpowiedniego doświadczenia i/lub wiedzy,
wyłącznie pod nadzorem lub po przeszkoleniu
w zakresie bezpiecznego użytkowania urządzenia oraz potencjalnych zagrożeń.
► Dzieciom nie wolno bawić się urządzeniem.
► Dzieciom nie wolno czyścić ani konserwować
urządzenia bez opieki osób dorosłych.
PL
SRR 3.7 C4
29
Page 34

OSTRZEŻENIE – NIEBEZPIECZEŃ-
STWO ODNIESIENIA OBRAŻEŃ!
PL
► Naprawy urządzenia należy zlecać wyłącznie
w autoryzowanych punktach serwisowych lub
w serwisie producenta. Nieprawidłowo wykonane naprawy mogą być źródłem poważnych
zagrożeń dla użytkownika. Powodują one też
utratę gwarancji.
► Nie wolno używać urządzenia z uszkodzoną
nasadką tnącą ani uszkodzoną nasadką do
regulacji długości strzyżenia, ponieważ mogą
one mieć ostre krawędzie. Niebezpieczeństwo
odniesienia obrażeń!
► Uszkodzone elementy należy zawsze wymie-
niać na oryginalne części zamienne. Tylko te
części gwarantują odpowiednie bezpieczeństwo użytkowania urządzenia.
► Zasilacz sieciowy wolno podłączać wyłącznie
do łatwo dostępnego gniazda zasilania, aby
w razie usterki można było go szybko wyjąć
z gniazda.
30
SRR 3.7 C4
Page 35

UWAGA– ZAGROŻENIE POWSTANIEM
SZKÓD MATERIALNYCH!
► Nie wolno pozostawiać działającego urzą-
dzenia bez nadzoru. Urządzenie należy użytkować zgodnie z informacjami podanymi na
tabliczce znamionowej.
► Urządzenie wolno podłączać do gniazda
zasilania wyłącznie za pomocą załączonego
zasilacza sieciowego (typ PTB-050100EU).
► Nie wolno zakrywać zasilacza sieciowego,
gdyż może to doprowadzić do jego przegrzania.
► Zasilacz sieciowy można stosować
tylko wewnątrz pomieszczeń.
PL
SRR 3.7 C4
31
Page 36

Ładowanie akumulatora ze stacją ładowania
Przed pierwszym użyciem akumulator powinien być ładowany przez
co najmniej 60 minut.
PL
WSKAZÓWKA
Przed rozpoczęciem ładowania akumulatora upewnij się, że
►
urządzenie jest wyłączone.
1) Podłącz wtyczkę 3 do gniazda ładowania - w stacji ładowania.
Zwróć uwagę na prawidłowe podłączenie biegunów: Palec
prowadzący w gnieździe ładowania - musi wejść do prowadnicy we wtyczce 3. W przeciwnym razie nie można podłączyć
wtyczki 3.
2) Rozłóż na tyle stację ładowania 6, aby uchwyt znalazł się
w położeniu pionowym (patrz ilustracja).
3) Podłącz zasilacz sieciowy ! do gniazda zasilania zgodnego
ze specyfikacją urządzenia.
4) Ustaw urządzenie na stacji ładowania 6. Urządzenie jest
podtrzymywane przez uchwyt w stacji ładowania 6. Proces
ładowania akumulatora jest sygnalizowany poprzez miganie
czerwonego symbolu
.
32
SRR 3.7 C4
Page 37

Po całkowitym naładowaniu akumulatora migający czerwony
■
symbol
niku naładowania akumulatora .
■ Przy całkowicie naładowanym akumulatorze można korzystać z
urządzenia w czasie do 60 minut bez konieczności podłączania
go do sieci.
■ Gdy akumulator jest rozładowany, miga czerwony symbol
gaśnie i zapala się niebieski symbol
na wskaź-
.
Ładowanie akumulatora bez stacji ładowania
WSKAZÓWKA
► Przed rozpoczęciem ładowania akumulatora upewnij się, że
urządzenie jest wyłączone.
1) Podłącz wtyczkę 3 do gniazda ładowania - w golarce.
Zwróć uwagę na prawidłowe podłączenie biegunów: Palec
prowadzący w gnieździe ładowania - musi wejść do prowadnicy we wtyczce 3. W przeciwnym razie nie można podłączyć
wtyczki 3.
2) Podłącz zasilacz sieciowy ! do gniazda zasilania zgodnego
ze specyfikacją urządzenia.
Proces ładowania akumulatora jest sygnalizowany poprzez
miganie czerwonego symbolu
■ Po całkowitym naładowaniu akumulatora migający czerwony
symbol
niku naładowania akumulatora .
■ Przy całkowicie naładowanym akumulatorze można korzystać z
urządzenia w czasie do 60 minut bez konieczności podłączania
go do sieci.
■ Gdy akumulator jest rozładowany, miga czerwony symbol
gaśnie i zapala się niebieski symbol na wskaź-
.
.
PL
SRR 3.7 C4
33
Page 38

Golenie bezprzewodowe
UWAGA! SZKODY MATERIALNE!
►
PL
Urządzenie nie jest przeznaczone do golenia na mokro!
Golarkę można używać bezprzewodowo. W tym przypadku przed
pierwszym użyciem urządzenie należy naładować (patrz rozdział
„Ładowanie akumulatora ze stacją ładowania / bez stacji ładowania”).
1) Załóż kołnierz ochronny od dołu na zespół tnący (jeśli
jeszcze nie jest założony, patrz rozkładana strona okładki).
2) Załóż zespół tnący z zamontowanym kołnierzem ochronnym
na wałek napędowy . Pamiętaj, aby kołnierz ochronny był
prawidłowo założony na korpusie urządzenia.
3) Zdejmij pokrywkę ochronną 0.
4) Naciśnij włącznik . Po włączeniu golarki zapala się symbol
wskaźnika ładowania oraz pojawia się logo
WSKAZÓWKA
► Najlepsze wyniki uzyskuje się na suchej skórze.
► Może potrwać od 2 do 3 tygodni, aż skóra przyzwyczai się
do tego sposobu golenia.
5) Prowadź głowice tnące prostymi i kolistymi ruchami po skórze.
6) Po ogoleniu wszystkich miejsc naciśnij włącznik . Urządzenie
zatrzymuje się. Wyświetlacz wyłącza się.
7) Po każdym goleniu czyść golarkę znajdującym się w zestawie
pędzelkiem ..
W celu przeprowadzenia dokładnego czyszczenia zapoznaj
się z rozdziałem „Czyszczenie i konserwacja”.
34
SRR 3.7 C4
.
Page 39

Golenie golarką podłączoną do zasilacza
sieciowego
UWAGA! SZKODY MATERIALNE!
► Urządzenie nie jest przeznaczone do golenia na mokro!
Aby używać golarki bez jej uprzedniego naładowania, można ją
również używać wraz z zasilaczem sieciowym !:
1) Podłącz wtyczkę 3 do gniazda ładowania - w golarce.
Zwróć uwagę na prawidłowe podłączenie biegunów: Palec
prowadzący w gnieździe ładowania - musi wejść do prowadnicy we wtyczce 3. W przeciwnym razie nie można podłączyć
wtyczki 3.
2) Podłącz wtyczkę sieciową do gniazda zasilania.
Teraz możesz już używać golarkę.
Trymer / końcówka do przycinania długich
włosów
W celu przystrzyżenia brody, bokobrodów lub brwi należy użyć
trymera .
1) Zdejmij zespół tnący z korpusu urządzenia (jeśli jest na nim
zamontowany).
2) Załóż trymer na wałek napędowy (patrz ilustracja).
PL
SRR 3.7 C4
35
Page 40

PL
3) Załóż trymer w taki sposób, aby oba palce prowadzące
w trymerze weszły na prowadnice w wałku napędowym .
4) Naciśnij włącznik . Po włączeniu golarki zapala się symbol
wskaźnika ładowania oraz pojawia się logo
5) Po przystrzyżeniu naciśnij przycisk .
6) Wyczyść trymer dostarczonym w zestawie pędzelkiem ..
W celu przeprowadzenia dokładnego czyszczenia zapoznaj
się z rozdziałem „Czyszczenie i konserwacja”.
Zabezpieczenie na czas podróży
Aby uniknąć przypadkowego włączenia urządzenia, można zablokować włącznik .
♦ Naciśnij i przytrzymaj włącznik , aż na wyświetlaczu pojawi
się symbol
Samo naciśnięcie włącznika powoduje chwilowe pojawienie
się symbolu
♦ Aby usunąć blokadę, naciśnij i przytrzymaj włącznik :
– Pojawia się symbo
Następnie wyświetlacz gaśnie i urządzenie można włączyć.
36
.
. Urządzenie jednak nie włącza się.
i miga przez ok. 5 sekundy.
l
SRR 3.7 C4
.
Page 41

Czyszczenie i pielęgnacja
NIEBEZPIECZEŃSTWO PORAŻENIA PRĄDEM
ELEKTRYCZNYM!
Przed każdym czyszczeniem należy wyciągnąć wtyczkę z
►
gniazda zasilania! Istnieje zagrożenie porażeniem prądem
elektrycznym!
UWAGA! SZKODY MATERIALNE!
► Do czyszczenia urządzenia nie wolno używać szorujących,
chemicznych ani żrących środków czyszczących. Następstwem jest nieodwracalne uszkodzenie urządzenia.
Czyszczenie za pomocą pędzelka
Zespół tnący
Po każdym goleniu czyść 3 głowice tnące w zespole tnącym za
pomocą pędzelka ..
1) Naciśnij przycisk odblokowania , aby zwolnić zespół tnący .
2) Ostukaj delikatnie zespół tnący na płaskiej powierzchni lub
zdmuchnij resztki włosów.
3) Użyj pędzelka ., aby usunąć resztki włosów.
Trymer
■ Po każdym goleniu należy wyczyścić trymer znajdującym się
w zestawie pędzelkiem ..
■ Końcówkę do przycinania długich włosów należy oliwić co
ok. 6 miesięcy jedną kroplą oliwy do maszyn do szycia.
PL
SRR 3.7 C4
37
Page 42

Czyszczenie pod bieżącą wodą
Zespół tnący nadaje się do czyszczenia pod bieżącą
wodą.
PL
1) Zdejmij zespół tnący z korpusu urządzenia.
2) Naciśnij przycisk odblokowania , aby zwolnić zespół tnący .
3) Trzymaj zespół tnący pod strumieniem wody tak, aby woda
spływała przez głowice tnące od środka na zewnątrz.
4) Przed ponownym użyciem wysusz zespół tnący .
38
SRR 3.7 C4
Page 43

Dokładne czyszczenie
W celu przeprowadzenia dokładnego czyszczenia należy zdemontować głowice tnące:
1) Naciśnij przycisk odblokowania . Zespół tnący wyskakuje.
2) Pociągnij lekko zespół tnący w taki sposób, aby można go
było zdjąć.
3) Ostrożnie obróć oznakowaną strzałkami blokadę w kierunku
wskazywanym przez strzałki, aż będzie można zdjąć uchwyt
głowic tnących (patrz ilustracja).
PL
4) Oczyść wszystkie elementy pod bieżącą wodą i pozostaw je do
całkowitego wyschnięcia.
5) Zamontuj ponownie zespół tnący .
SRR 3.7 C4
39
Page 44

6) Aby zamontować głowice tnące, obracaj oznakowaną strzałkami blokadę w kierunku przeciwnym do wskazywanym przez
strzałki, aż do zupełnego przykręcania głowic tnących.
7) Usuń z golarki resztki włosów pędzelkiem !.
PL
8) Załóż zespół tnący ponownie na golarkę. Uważaj, aby się
on zatrzasnął i był dobrze zamontowany.
■ Wyczyść obudowę i zasilacz sieciowy ! wilgotną szmatką.
WSKAZÓWKA
Jeżeli...
– ... jakość golenia staje się zauważalnie gorsza, ...
– ... musisz kilkakrotnie przesuwać golarkę po tym samym
miejscu, w celu osiągnięcia dobrego wyniku, ...
– ...golenie trwa znacznie dłużej ...
– ... widoczne są uszkodzenia na głowicach tnących, ...
... głowice tnące należy wymienić .
Aby zamówić nowe głowice tnące, prosimy skontaktować się
z serwisem.
Przechowywanie
■ Gdy urządzenie nie jest używane, należy zawsze zakładać
pokrywkę ochronną 0 na zespół tnący .
■ Wszystko należy przechowywać w czystym, wolnym od pyłów
i suchym miejscu.
40
SRR 3.7 C4
Page 45

Gwarancja
Urządzenie objęte jest 3-letnią gwarancją, licząc od daty zakupu.
Urządzenie zostało starannie wykonane i przed wysyłką z zakładu
poddane skrupulatnej kontroli. Paragon należy zachować jako
dowód zakupu. W przypadku konieczności przeprowadzenia
naprawy gwarancyjnej należy skontaktować się telefonicznie z
najbliższym punktem serwisowym. Tylko w ten sposób można
zagwarantować bezpłatną wysyłkę zakupionego produktu.
Gwarancja obejmuje wyłącznie wady materiałowe i fabryczne,
nie obejmuje natomiast szkód transportowych, części ulegających
zużyciu ani uszkodzeń części łatwo łamliwych, np. wyłącznika lub
akumulatorów. Produkt przeznaczony jest wyłącznie do użytku
domowego, a nie do zastosowań komercyjnych.
Niewłaściwe użytkowanie urządzenia, używanie go w sposób
niezgodny z jego przeznaczeniem, użycie siły lub ingerencja w
urządzenie dokonywana poza naszymi autoryzowanymi punktami
serwisowymi powodują utratę gwarancji.
Niniejsza gwarancja nie ogranicza ustawowych praw nabywcy
urządzenia.
Wykonanie usługi gwarancyjnej nie przedłuża okresu gwarancji.
Dotyczy to również wymienionych i naprawionych części. Wszelkie
szkody i wady wykryte w chwili zakupu należy zgłosić bezpośrednio po rozpakowaniu urządzenia, nie później niż po upływie dwóch
dni od daty zakupu. Po upływie okresu gwarancji wszelkie naprawy
są wykonywane odpłatnie.
PL
SRR 3.7 C4
41
Page 46

Serwis
Serwis Polska
PL
Tel.: 22 397 4996
E-Mail: kompernass@lidl.pl
IAN 115785
Czas pracy infolinii:
od poniedziałku do piątku, w godzinach 08:00 - 20:00 czasu
środkowoeuropejskiego
Utylizacja
W żadnym przypadku nie wolno wyrzucać
urządzenia wraz z normalnymi odpadami
domowymi. Ten produkt podlega dyrektywie europejskiej 2012/19/EU.
Zużyte urządzenie należy oddać do certyfikowanej firmy prowadzącej utylizację odpadów lub do komunalnego zakładu utylizacji odpadów. Należy przestrzegać aktualnie obowiązujących przepisów.
W razie pytań i wątpliwości odnośnie do zasad utylizacji należy
zwrócić się do miejscowego zakładu utylizacji odpadów.
42
SRR 3.7 C4
Page 47

Utylizacja baterii / akumulatorów
W celu zgodnej z przepisami utylizacji urządzenia należy wyjąć
z niego akumulator.
UWAGA – SZKODY MATERIALNE!
► Akumulator należy wyjąć z urządzenia tylko przy utylizacji
lub złomowaniu urządzenia! Po wymontowaniu akumulatora
urządzenie nie będzie nadawać się do dalszego użytku!
1) Aby wyjąć akumulator z urządzenia, za pomocą wkrętaka
krzyżakowego wykręć małą śrubkę w tylnej części korpusu
urządzenia.
2) Zdejmij tylną osłonę z korpusu urządzenia.
3) Podważ wnętrze obudowy, np. za pomocą wkrętaka. Przed
wyjęciem wnętrza obudowy może być konieczne wykręcenie
dodatkowych śrubek, wyłamanie bocznych i dolnych uchwytów
lub wychylenie ich na zewnątrz. Idealnym narzędziem do tego
celu jest wkrętak krzyżowy.
4) Po wyjęciu wnętrza obudowy:
Odłam boczne uchwyty w przezroczystej osłonie z tworzywa
sztucznego.
5) Usuń wszystkie elementy, aby uzyskać dostęp do akumulatora.
6) Podważ akumulator.
7) Usuń akumulator zgodnie z przepisami.
PL
SRR 3.7 C4
43
Page 48

Baterii i akumulatorów nie wolno wyrzucać razem z odpada-
mi domowymi. Każdy użytkownik jest ustawowo zobowiązany do oddania zużytych baterii / akumulatorów w punkcie
PL
zbiorczym swojej gminy lub dzielnicy, ewentualnie do ich
oddania sprzedawcy. Obowiązek ten został wprowadzony,
aby zapewnić utylizację baterii / akumulatorów w sposób
nieszkodliwy dla środowiska naturalnego. Baterie / akumulatory należy oddawać tylko w stanie rozładowanym.
Opakowanie jest wykonane z materiałów przyjaznych
dla środowiska naturalnego, które można utylizować
za pośrednictwem lokalnych punktów selektywnej
zbiórki odpadów.
Importer
KOMPERNASS HANDELS GMBH
BURGSTRASSE 21
44867 BOCHUM
GERMANY
www.kompernass.com
44
SRR 3.7 C4
Page 49

Tartalomjegyzék
Bevezető ....................................46
Rendeltetésszerű használat .....................46
A csomag tartalma ............................46
A készülék leírása .............................47
Műszaki adatok ..............................48
Biztonsági utasítások ..........................49
Az akkumulátor feltöltése töltőállomással .........54
Az akkumulátor feltöltése töltőállomás nélkül .....55
Vezeték nélküli borotválkozás ..................56
Hálózati adapterrel történő borotválkozás ........57
Trimmer/hosszúhaj-vágó .......................57
Utazási biztosítóelem ..........................58
Tisztítás és ápolás .............................59
Tisztítás ecsettel .......................................59
Tisztítás csapvíz alatt ...................................60
Alapos tisztítás ........................................61
Tárolás ......................................62
Garancia ....................................63
Szerviz ......................................64
Ártalmatlanítás ...............................64
Gyártja ......................................66
HU
SRR 3.7 C4
45
Page 50

Bevezető
Gratulálunk új készüléke megvásárlásához!
Vásárlásával kiváló minőségű termék mellett döntött. A használati
utasítás a termék része. Fontos tudnivalókat tartalmaz a biztonságra,
használatra és ártalmatlanításra vonatkozóan. A termék használata
előtt ismerkedjen meg valamennyi használati útmutatóval és bizton-
HU
sági figyelmeztetéssel. Csak a leírtak szerint és a megadott célokra
használja a készüléket. A készülék harmadik személynek történő
továbbadása esetén adja át a készülékhez tartozó valamennyi
leírást is.
Rendeltetésszerű használat
A készülék kizárólag emberi szőrzet borotválására és vágására
használható.
A készülék kizárólag magánháztartásokban használható.
Ne használja kereskedelmi célra.
Minden egyéb felhasználás rendeltetésellenesnek minősül és anyagi
károkat vagy személyi sérülést idézhet elő.
A csomag tartalma
▯ borotva, nyíróegységgel
▯ hálózati adapter
▯ trimmer egység
▯ védőkupak
▯ ecset
▯ töltőállomás
▯ megrendelőlap
▯ használati útmutató
46
SRR 3.7 C4
Page 51

TUDNIVALÓ
Közvetlenül kicsomagolás után ellenőrizze a csomag tartalmának teljességét és sértetlenségét. Szükség esetén forduljon a
szervizhez.
A készülék leírása
A ábra (elülső kihajtható oldal):
hajtótengely
nyíróegység
kireteszelő gomb
védőperem
be/ki gomb
trimmer egység
hosszúhaj-vágó
HU
- töltőaljzat
B. ábra (hátsó kihajtható oldal):
3 csatlakozódugó
! hálózati adapter
. ecset
0 védőkupak
6 töltőállomás
1 csatlakozódugó (töltőállomás)
% töltőaljzat (töltőállomás)
SRR 3.7 C4
szimbólum (akku töltéskijelző)
szimbólum (töltés)
szimbólum (reteszelés)
47
Page 52

Műszaki adatok
Készülék
Bemeneti feszültség: 5 V
Bemeneti áram: 1000 mA
Akkumulátor: Li-Ion akkumulátor, 3,7 V, 800 mAh
HU
Környezeti hőmérséklet: 5°C és 35°C között
Töltési idő: kb. 60 perc
Működési idő teljesen
feltöltött akkumulátornál: kb. 60 perc
Hálózati adapter (PTB-050100EU)
Bemeneti feszültség: 100 - 240 V ∼ 50/60 Hz
Kimeneti feszültség: 5 V
Bemeneti áram: 0,2 A
Kimeneti áramerősség: 1000 mA
Védettség: IP 20
Védelmi osztály: II /
48
SRR 3.7 C4
Page 53

Biztonsági utasítások
VESZÉLY – ÁRAMÜTÉS!
► Használat előtt ellenőrizze a készülék külső,
látható sérüléseit. Ne működtessen hibás
készüléket. Áramütés veszélye áll fenn!
► Amennyiben a kábel, a hálózati adapter, a
készülékház vagy egyéb alkatrész hibája állapítható meg, a készüléket nem szabad tovább
használni.
► Húzza ki a hálózati adaptert a csatlakozóalj-
zatból
— hiba fellépése esetén,
— a készülék tisztítása előtt,
— ha hosszabb ideig nem használja a
készüléket,
— minden egyes használatot követően.
A hálózati adaptert ne a kábelnél fogva, hanem
közvetlenül a csatlakozónál fogva húzza ki.
► Soha ne merítse a készüléket vagy a kábelt a
hálózati adapterrel vízbe vagy más folyadékba.
HU
SRR 3.7 C4
49
Page 54

HU
VESZÉLY – ÁRAMÜTÉS!
► A készülék vízbe esése esetén először minden-
képpen a hálózati adaptert húzza ki a csatlakozóaljzatból és csak ezt követően nyúljon a
vízbe.
► Soha ne fogja meg vizes kézzel a hálózati
adaptert, különösen akkor ne, amikor bedugja
a hálózati csatlakozóaljzatba vagy kihúzza.
Áramütés veszélye áll fenn!
► Rendszeresen ellenőrizze a hálózati adapter
és a készülék esetleges fizikai sérüléseit.
► Ügyeljen arra, hogy a kábel ne szoruljon be
szekrényajtókba vagy ne legyen forró felületen.
Ellenkező esetben megsérülhet a kábel szigetelése.
► Egy legfeljebb 30 mA-es kioldási áramú áram-
védőkapcsoló beszerelése további védelmet
biztosít az áramütéssel szemben. A beszerelést
kizárólag villanyszerelő szakemberrel végeztesse.
50
SRR 3.7 C4
Page 55

VESZÉLY – ÁRAMÜTÉS!
► FIGYELEM! Tartsa szárazon a készüléket!
FIGYELMEZTETÉS – SÉRÜLÉSVESZÉLY!
► A készüléket 8 éves kor feletti gyermekek és
csökkent fizikai, érzékszervi vagy mentális
képességű vagy tapasztalattal, illetve tudással
nem rendelkező személyek csak felügyelet
mellett használhatják, vagy ha felvilágosították
őket a készülék biztonságos használatáról és
megértették az ebből eredő veszélyeket.
► Gyermekek nem játszhatnak a készülékkel.
► Tisztítást és a felhasználó által végzendő kar-
bantartást felügyelet nélküli gyermekek nem
végezhetnek.
HU
SRR 3.7 C4
51
Page 56

HU
FIGYELMEZTETÉS – SÉRÜLÉSVESZÉLY!
► Csak megfelelő jogosultsággal rendelkező szak-
emberrel vagy az ügyfélszolgálattal javíttassa
a készüléket. A szakszerűtlen javítás jelentős
veszélyt jelenthet a felhasználó számára.
Ezenkívül a garancia is érvényét veszti.
► Ne használja a készüléket hibás vágófejjel vagy
hibás vágáshossz-beállító fejjel, mert azok éles
szélűek lehetnek. Sérülésveszély áll fenn!
► A hibás alkatrészeket csak eredeti alkatrészekre
szabad cserélni. Csak ilyen alkatrészekkel garantálható, hogy azok megfelelnek a biztonsági
követelményeknek.
► A hálózati adaptert kizárólag jól elérhető csat-
lakozóaljzathoz csatlakoztassa, így üzemzavar
esetén a hálózati adaptert gyorsan ki tudja
húzni a csatlakozóaljzatból.
52
SRR 3.7 C4
Page 57

FIGYELEM –– ANYAGI KÁR VESZÉLYE!
► Soha ne működtesse a készüléket felügyelet
nélkül, és csak a típustábla adatai szerint
használja.
► A hálózati működtetéshez csak a csomagban
található PTB-050100EU típusú hálózati
adaptert használja.
► A túlzott felmelegedés elkerülése érdekében,
ne takarja le a hálózati adaptert.
► A hálózati adaptert csak belső térben
használja.
HU
SRR 3.7 C4
53
Page 58

Az akkumulátor feltöltése töltőállomással
Az első használat előtt az akkumulátort legalább 60 percen keresztül
tölteni kell.
TUDNIVALÓ
Mielőtt tölteni kezdi az akkumulátort, bizonyosodjon meg
HU
►
róla, hogy a készülék ki van kapcsolva.
1) Csatlakoztassa a csatlakozódugót 3 a töltőállomás töltőaljzatába %.
Ügyeljen a helyes polaritásra: A töltőaljzatban % lévő vezetőpálcának a csatlakozódugón 3 lévő vezetősínbe kell nyúlnia.
Ellenkező esetben a csatlakozódugót 3 nem lehet behelyezni.
2) Hajtsa szét a töltőállomást 6 annyira, hogy a tartókengyel
függőleges helyzetben legyen (lásd az ábrát).
3) Csatlakoztassa a hálózati adaptert ! a készüléknek megfelelő
csatlakozóaljzatba.
4) Állítsa a készüléket a töltőállomásba 6. A készüléket a töltőállomás z tartókengyele tartja.
Az akku töltését a pirosan villogó szimbólum
jelzi.
54
SRR 3.7 C4
Page 59

Ha az akkumulátor teljesen feltöltődött, kialszik a pirosan villogó
■
szimbólum
világít.
■ Teljesen feltöltött akkumulátorral a készüléket mintegy 60 percig
üzemeltetheti elektromos hálózatra csatlakoztatás nélkül.
■ Ha az akkumulátor már szinte teljesen üres, akkor villog a piros
szimbólum
és az akku töltéskijelzőjének kék szimbóluma
.
Az akkumulátor feltöltése töltőállomás nélkül
TUDNIVALÓ
► Mielőtt tölteni kezdi az akkumulátort, bizonyosodjon meg
róla, hogy a készülék ki van kapcsolva.
1) Csatlakoztassa a csatlakozódugót 3 a borotván lévő töltőaljzatba -.
Ügyeljen a helyes polaritásra: A töltőaljzatban - lévő vezetőpálcának a csatlakozódugón 3 lévő vezetősínbe kell nyúlnia.
Ellenkező esetben a csatlakozódugót 3 nem lehet behelyezni.
2) Csatlakoztassa a hálózati adaptert ! a készüléknek megfelelő
csatlakozóaljzatba.
Az akku töltését a pirosan villogó szimbólum
■ Ha az akkumulátor teljesen feltöltődött, kialszik a pirosan villogó
szimbólum
világít.
■ Teljesen feltöltött akkumulátorral a készüléket mintegy 60 percig
üzemeltetheti elektromos hálózatra csatlakoztatás nélkül.
■ Ha az akkumulátor már szinte teljesen üres, akkor villog a piros
szimbólum
és az akku töltéskijelzőjének kék szimbóluma
.
jelzi.
HU
SRR 3.7 C4
55
Page 60

Vezeték nélküli borotválkozás
FIGYELEM! ANYAGI KÁR VESZÉLYE!
►
Ez a készülék nem használható nedves borotválkozásra!
A villanyborotvát vezeték nélkül is használhatja. Ebben az esetben
az első használat előtt fel kell tölteni a készüléket (lásd az „Az akku-
HU
mulátor feltöltése töltőállomással/ töltőállomás nélkül“ fejezetet).
1) Szükség esetén csatolja fel alulról a védőperemet a nyíróegy-
ségre (lásd a kihajtható oldalt).
2) A nyíróegységet a felhelyezett védőperemmel helyezze
fel a hajtótengelyre . Ügyeljen arra, hogy a védőperem
megfelelően felfeküdjön a kéziegységre.
3) Vegye le a védőkupakot 0.
4) Nyomja meg a be/ki gombot . Amint működni kezd a bo-
rotva, megjelenik az akku töltéskijelző szimbóluma
a
TUDNIVALÓ
► A legjobb eredményt száraz bőrön érheti el.
► Akár 2 - 3 hétre is szükség lehet ahhoz, hogy bőre hozzá-
szokjon a nyírórendszerhez.
5) A nyírófejeket egyenes és körkörös mozgással vezesse a bőrfelületen.
6) Ha minden borotválni kívánt bőrfelületet megborotvált, nyomja
meg a be/ki gombot . A készülék megáll. Elteltével a kijelző
kialszik.
7) Tisztítsa meg a borotvát minden borotválkozás után a kapott
ecsettel ..
Az alapos tisztítással kapcsolatos tudnivalók a „Tisztítás és
ápolás“ fejezetben találhatók.
logó.
és
56
SRR 3.7 C4
Page 61

Hálózati adapterrel történő borotválkozás
FIGYELEM! ANYAGI KÁR VESZÉLYE!
► Ez a készülék nem használható nedves borotválkozásra!
Ha úgy szeretné használni a borotvát, hogy előtte nem töltötte fel,
akkor közvetlenül a hálózati adapterről ! is üzemeltetheti:
1) Csatlakoztassa a csatlakozódugót 3 a borotván lévő töltőaljzatba -. Ügyeljen a helyes polaritásra: A töltőaljzatban lévő vezetőpálcának a csatlakozódugón 3 lévő vezetősínbe
kell nyúlnia. Ellenkező esetben a csatlakozódugót 3 nem lehet
behelyezni.
2) Csatlakoztassa a hálózati csatlakozódugót a hálózati csatlakozóaljzathoz.
A borotva használatra kész.
Trimmer/hosszúhaj-vágó
Szakáll és bajusz formázásához vagy a szemöldök borotválásához
használja a trimmer egységet .
1) Ha fel van helyezve, vegye le a nyíróegységet a kézi készü-
lékről.
2) Helyezze a trimmer egységet a hajtótengelyre (lásd az
ábrát).
HU
SRR 3.7 C4
57
Page 62

3) Helyezze fel a trimmer egységet úgy, hogy a trimmer egység
két vezetőpálcája a hajtótengely vezetősínjeibe érjen.
4) Nyomja meg a be/ki gombot . Amint működni kezd a bo-
rotva, megjelenik az akku töltéskijelző szimbóluma
a
5) Ha be akarja fejezni a trimmelést, akkor nyomja meg még
HU
egyszer a be/ki gombot .
6) Tisztítsa meg a trimmer egységet a kapott ecsettel ..
Az alapos tisztítással kapcsolatos tudnivalók a „Tisztítás és
ápolás“ fejezetben találhatók.
logó.
Utazási biztosítóelem
A készülék véletlen bekapcsolódásával szembeni védelem érdekében
a be/ki gomb lezárható.
♦ Nyomja le és tartsa lenyomva a be/ki gombot mindaddig,
amíg a kijelzőn a
A be/ki gomb megnyomását követően rövid ideig a
szimbólum látható. A készülék azonban nem kapcsol be.
♦ A lezárás feloldásához nyomja le és tartsa lenyomva a be/ki
gombot :
– megjelenik a
kezd. Ezt követően kialszik a kijelző és a készüléket ismét
bekapcsolhatja.
szimbólum nem látható.
szimbólum és kb. 5 másodpercig villogni
és
58
SRR 3.7 C4
Page 63

Tisztítás és ápolás
VESZÉLY - ELEKTROMOS ÁRAMÜTÉS!
► Tisztítás előtt mindig húzza ki az aljzatból a hálózati csatla-
kozót. Elektromos áramütés veszélye áll fenn!
FIGYELEM! ANYAGI KÁR VESZÉLYE!
► A készülék tisztításához ne használjon súroló hatású, vegyi
vagy maró hatású tisztítószert. Ez a készülékben helyrehozhatatlan kárt okoz.
Tisztítás ecsettel
Nyíróegység
Minden borotválkozás után tisztítsa meg a nyíróegység 3 nyírófejét
a kapott ecsettel ..
1) Nyomja meg a nyíróegység kireteszelő gombját , hogy a
nyíróegység felugorjon.
2) Ütögesse ki óvatosan a nyíróegységet egy sima felületen,
illetve fújja ki a szőrmaradványokat.
3) Használja az ecsetet . a szőrmaradványok eltávolításához.
Trimmer egység
■ Tisztítsa meg a trimmer egységet minden borotválkozás után a
kapott ecsettel ..
■ Olajozza meg a hosszúhaj-vágót kb. 6 havonta egy csepp
varrógépolajjal.
HU
SRR 3.7 C4
59
Page 64

Tisztítás csapvíz alatt
A nyíróegység csapvíz alatt tisztítható.
1) Vegye le a nyíróegységet a kézi készülékről.
2) Nyomja meg a nyíróegység kireteszelő gombját , hogy a
HU
nyíróegység felugorjon.
3) Tartsa a nyíróegységet a vízsugár alá olyan módon, hogy a
víz belülről kifelé folyjon át a nyírófejeken.
4) A borotva ismételt használata előtt hagyja megszáradni a
nyíróegységet .
60
SRR 3.7 C4
Page 65

Alapos tisztítás
Az alapos tisztításhoz vegye le a nyírófejeket:
1) Nyomja meg a kireteszelő gombot . A nyíróegység
felugrik.
2) Hajlítsa vissza egy kicsit a nyíróegységet , hogy felfelé ki
lehessen húzni.
3) Forgassa el a nyíl irányába a nyilakkal jelzett reteszt, hogy a
nyírófejek tartóját le lehessen emelni (lásd az ábrát).
HU
4) Tisztítson meg minden alkatrészt folyó víz alatt és hagyja teljesen
megszáradni.
5) Szerelje össze a nyíróegységet .
SRR 3.7 C4
61
Page 66

6) A rögzítéshez forgassa el a nyilakkal jelzett reteszt a nyíllal
ellentétes irányba, hogy a nyírófejek tartóegysége ne legyen
leemelhető.
7) A különálló szőrmaradványokat ecsettel . távolítsa el a borotvából.
8) Helyezze vissza a nyíróegységet a borotvára. Ügyeljen arra,
HU
hogy megfelelően bekattanjon és rögzüljön.
■ Tisztítsa meg a burkolatot és a hálózati adaptert ! egy nedves
törlőkendővel.
TUDNIVALÓ
Ha...
– ... a borotválkozás minősége érezhetően rosszabb
lesz,...
– ... a megfelelő borotválkozási eredmény eléréséhez
a borotvát többször át kell húznia ugyanazon a
felületen,...
– ... a borotválkozás lényegesen hosszabb ideig tart,...
– ... sérülés látható a nyírófejen,...
... ki kell cserélni a nyírófejeket .
A nyírófejeket szervizünktől rendelheti meg.
Tárolás
■ Ha a készüléket nem használja, mindig helyezze fel a védőkupa-
kot 0 a nyíróegységre .
■ Tartsa mindezt száraz, pormentes és száraz helyen.
62
SRR 3.7 C4
Page 67

Garancia
Erre a készülékre a vásárlás napjától számított 3 év garanciát
vállalunk. A készüléket gondosan gyártottuk, és szállítás előtt
lelkiismeretesen ellenőriztük. Kérjük, hogy a vásárlás igazolására
őrizze meg a pénztári blokkot. Kérjük, hogy garanciaigény esetén
telefonon forduljon ügyfélszolgálatához. Csak ebben az esetben
garantálhatjuk, hogy díjmentesen tudja beküldeni az árut.
A garancia csak anyag- és gyártási hibára vonatkozik, nem pedig
szállítási kárra, kopásra vagy törékeny részek (pl. kapcsoló vagy
elem) sérülésére. A termék kizárólag magánhasználatra, nem ipari
felhasználásra készült.
A garancia érvényét veszti visszaélésszerű vagy szakszerűtlen
kezelés, erőszak alkalmazása vagy olyan beavatkozások esetén,
amelyeket általunk nem engedélyezett szervizben végeztek el.
Az Ön törvényben előírt jogait ez a garancia nem korlátozza.
A garancia ideje nem hosszabbodik meg a jótállással. Ez a cserélt
és javított alkatrészekre is vonatkozik. Az esetlegesen már a vételkor
meglévő károkat és hiányokat a kicsomagolás után azonnal, de legkésőbb 2 nappal a vásárlás napja után jelezni kell. A garanciaidő
lejárta után esedékes javítások díjkötelesek.
HU
SRR 3.7 C4
63
Page 68

Szerviz
Szerviz Magyarország
Tel.: 0640 102785
E-Mail: kompernass@lidl.hu
IAN 115785
HU
Forródrót elérhetősége:
Hétfő - péntek, 8:00 óra – 20:00 óra(KEI)
Ártalmatlanítás
Semmi esetre se dobja a készüléket a
háztartási hulladékba. A termékre a
2012/19/EU uniós irányelv vonatkozik.
A készüléket kizárólag engedélyezett hulladékkezelő üzemben vagy
a kommunális hulladékkezelő létesítményben ártalmatlanítsa. Vegye
figyelembe a hatályos előírásokat. Ha bizonytalan, vegye fel a
kapcsolatot a hulladékkezelővel.
64
SRR 3.7 C4
Page 69

Az elemek/akkumulátorok ártalmatlanítása
A készülék környezetbarát ártalmatlanítása érdekében vegye ki az
akkumulátort a készülékből:
FIGYELEM - ANYAGI KÁR!
► Csak akkor vegye ki az akkumulátort a készülékből, ha
ártalmatlanítani szeretné/ki szeretné selejtezni a készüléket!
A készülék elromlik, ha kiveszi belőle az akkumulátort!
1) A kézi készülék akkumulátorának eltávolításához csillagcsavarhúzóval csavarozza ki a kézi készülék hátoldalán lévő kis
csavart.
2) Húzza le a kéziegység hátsó fedelét.
3) Emelje ki a belső készülékházat például egy csavarhúzó segítségével. A belső készülékház kivételéhez adott esetben további
csavarokat is el kell távolítani, az oldalsó és az alsó tartóelemeket le kell törni vagy ki kell hajtani. Használjon erre a célra
csillagcsavarhúzót.
4) Ha kivette a belső készülékházat:
Törje le az átlátszó műanyag-burkolat oldalain lévő tartóelemeket.
5) Távolítson el mindent úgy, hogy hozzáférjen az akkumulátorhoz.
6) Emelje ki az akkumulátort.
7) Ártalmatlanítsa az akkumulátort környezetbarát módon.
HU
SRR 3.7 C4
65
Page 70

Az elemeket/akkumulátorokat soha nem szabad a háztartási
szemétbe dobni. Valamennyi felhasználó törvényes kötelessége az elemeket és akkumulátorokat települése, illetve
városrésze gyűjtőhelyén vagy a üzletben leadni. Ez a
kötelezettség azt a célt szolgálja, hogy az elemek/akkumulátorok környezetkímélő ártalmatlanításra kerülhessenek. Az
HU
elemeket és akkumulátorokat csak lemerült állapotban adja le.
A csomagolás környezetbarát anyagokból áll, melyet
a helyi hulladékhasznosítónál adhat le.
Gyártja
KOMPERNASS HANDELS GMBH
BURGSTRASSE 21
44867 BOCHUM
GERMANY
www.kompernass.com
66
SRR 3.7 C4
Page 71

Kazalo
Uvod ........................................68
Predvidena uporaba ..........................68
Vsebina kompleta .............................68
Opis naprave .................................69
Tehnični podatki ..............................70
Varnostna obvestila ...........................71
Polnjenje akumulatorske baterije s polnilno postajo . . 76
Polnjenje akumulatorske baterije brez polnilne postaje . .77
Brezžično britje ...............................78
Britje z omrežnim adapterjem ...................79
Oblikovalni brivnik/brivnik za dolge dlake ........79
Potovalno varovalo ...........................80
Čiščenje in vzdrževanje ........................81
Čiščenje s čopičem .....................................81
Čiščenje pod tekočo vodo ...............................82
Temeljito čiščenje ......................................83
Shranjevanje .................................84
Garancijski list ................................85
Servis .......................................86
Odlaganje med odpadke .......................86
Proizvajalec ..................................88
SI
SRR 3.7 C4
67
Page 72

Uvod
Iskrene čestitke ob nakupu vaše nove naprave.
Odločili ste se za kakovosten izdelek. Navodila za uporabo so
sestavni del izdelka. Vsebujejo pomembna obvestila za varnost,
uporabo in odlaganje naprave med odpadke. Preden začnete
izdelek uporabljati, se seznanite z vsemi obvestili o njegovi uporabi
in varnosti. Izdelek uporabljajte le tako, kot je opisano v navodilih,
in samo za navedena področja uporabe. Ob predaji izdelka tretji
SI
osebi zraven priložite vso dokumentacijo.
Predvidena uporaba
Ta naprava je predvidena izključno za britje in striženje človeških las
ter dlak.
Naprava je namenjena izključno za uporabo v zasebnih gospodinjstvih. Ne uporabljajte je v poslovne namene.
Vsaka druga vrsta uporabe velja za nepredvideno in lahko privede
do materialne škode ali celo do telesnih poškodb.
Vsebina kompleta
▯ brivnik s strižno enoto
▯ omrežni adapter
▯ enota oblikovalnega brivnika
▯ zaščitni pokrov
▯ čopič
▯ polnilna postaja
▯ naročilnica
▯ navodila za uporabo
68
SRR 3.7 C4
Page 73

NAPOTEK
Takoj ko izdelek in vse sestavne dele vzamete iz embalaže,
preverite, ali komplet vsebuje vse dele in ali ti niso poškodovani.
Po potrebi se obrnite na servisno službo.
Opis naprave
Slika A (sprednja razklopna stran):
pogonska gred
strižna enota
tipka za sprostitev
zaščitni rob
tipka za vklop/izklop
enota oblikovalnega brivnika
brivnik za dolge dlake
SI
simbol
simbol
simbol
- vtičnica za polnjenje
Slika B (zadnja razklopna stran):
3 povezovalni vtič
! omrežni adapter
. čopič
0 zaščitni pokrov
6 polnilna postaja
1 povezovalni vtič (polnilna postaja)
% vtičnica za polnjenje (polnilna postaja)
SRR 3.7 C4
(prikaz polnosti akum. baterije)
(polnjenje)
(zapora)
69
Page 74

Tehnični podatki
Naprava
Vhodna napetost: 5 V
Vhodni tok: 1000 mA
Akum. baterija: litij-ionska akum. baterija 3,7V 800mAh
Temperatura okolice: 5°C do 35°C
Čas polnjenja: pribl. 60minut
SI
Časa delovanja pri
polni akum. bateriji: pribl. 60 minut
Omrežni adapter (tipa PTB-050100EU)
Vhodna napetost: 100–240V∼ 50/60Hz
Izhodna napetost: 5 V
Vhodni tok: 0,2 A
Izhodni tok: 1000 mA
Vrsta zaščite: IP 20
Razred zaščite: II/
70
SRR 3.7 C4
Page 75

Varnostna obvestila
NEVARNOST – ELEKTRIČNI UDAR!
► Pred uporabo napravo preverite, da ta nima
vidnih zunanjih poškodb. Poškodovane naprave
ne uporabljajte več. Obstaja nevarnost električnega udara.
► Če ugotovite poškodbe na kablu, omrežnem
adapterju, ohišju ali na drugih delih, z uporabo
naprave ne smete nadaljevati.
► Povlecite omrežni adapter iz vtičnice,
— če pride do motnje,
— preden začnete napravo čistiti,
— če naprave dlje časa ne uporabljate,
— po vsaki uporabi.
Pri tem vlecite neposredno za omrežni adapter
in ne za kabel.
► Naprave in kabla z omrežnim adapterjem nikoli
ne potopite v vodo ali kakšno drugo tekočino.
SI
SRR 3.7 C4
71
Page 76

NEVARNOST – ELEKTRIČNI UDAR!
► Če vam naprava pade v vodo, obvezno
najprej povlecite omrežni adapter iz vtičnice,
preden sežete v vodo.
► Omrežnega adapterja se nikoli ne dotikajte
z mokrimi rokami, še posebej, ko ga vtikate v
SI
vtičnico oz. vlečete iz nje. Obstaja nevarnost
električnega udara!
► Omrežni adapter in napravo redno preverjajte,
da je brez morebitnih mehanskih okvar.
► Pazite na to, da se kabel ne zatakne za vrata
omare ali spelje čez vroče površine. Izolacija
kabla se lahko tako poškoduje.
► Vgradnja zaščitne naprave za okvarne tokove
z nazivnim diferenčnim tokom do ne več kot
30mA nudi še dodatno zaščito pred električnim udarom. Napravo naj vam vgradi izključno
električar.
72
SRR 3.7 C4
Page 77

NEVARNOST – ELEKTRIČNI UDAR!
► POZOR! Napravo ohranjajte suho!
OPOZORILO – NEVARNOST TELESNIH
POŠKODB!
► Otroci od 8. leta starosti naprej in osebe z
zmanjšanimi telesnimi, zaznavnimi ali duševnimi sposobnostmi ali s pomanjkljivimi izkušnjami
in znanjem napravo lahko uporabljajo le pod
nadzorom ali če so bili poučeni o varni uporabi
naprave in so razumeli nevarnosti, ki izhajajo
iz njene uporabe.
► Otroci se z napravo ne smejo igrati.
► Otroci brez nadzora ne smejo čistiti ali oprav-
ljati uporabniškega vzdrževanja naprave.
SI
SRR 3.7 C4
73
Page 78

OPOZORILO – NEVARNOST TELESNIH
POŠKODB!
► Popravilo naprave prepustite samo pooblašče-
nim strokovnim delavnicam ali servisni službi.
Zaradi nestrokovnih popravil lahko pride do
velikih nevarnosti za uporabnika. Poleg tega
SI
preneha veljati garancija.
► Naprave ne uporabljajte z okvarjenim rezalnim
nastavkom ali okvarjenim nastavkom za dolžino reza, saj lahko imata ostre robove. Obstaja
nevarnost telesnih poškodb!
► Okvarjene dele naprave lahko zamenjate le za
originalne nadomestne dele. Samo pri teh delih
je zagotovljeno, da bodo izpolnjene zahteve
glede varnosti naprave.
► Priključite omrežni adapter samo na lahko
dosegljivo vtičnico, da lahko v primeru motnje
omrežni adapter hitro povlečete iz vtičnice.
74
SRR 3.7 C4
Page 79

POZOR – MATERIALNA ŠKODA!
► Naprave nikoli ne uporabljajte brez nadzora
in samo v skladu s podatki na tipski tablici.
► Za delovanje ob priključitvi na električno omrežje
uporabljajte samo priloženi omrežni adapter
(tip PTB-050100EU).
► Omrežnega napajalnika ne prekrivajte, da
preprečite nedovoljeno segrevanje.
► Omrežni adapter uporabljajte samo
v notranjih prostorih.
SI
SRR 3.7 C4
75
Page 80

Polnjenje akumulatorske baterije s polnilno
postajo
Pred prvo uporabo je treba akumulatorsko baterijo polniti najmanj
60minut.
NAPOTEK
► Pred začetkom polnjenja akumulatorske baterije zagotovite,
SI
da je naprava izklopljena.
1) Vtaknite povezovalni vtič 3 v vtičnico za polnjenje % polnilne
postaje.
Pazite na pravilno polarnost: vodilni nastavek v vtičnici za
polnjenje % mora segati v vodilno tirnico na povezovalnem
vtiču 3. Drugače povezovalnega vtiča 3 ne morete vtakniti
v vtičnico.
2) Razklopite polnilno postajo 6 tako daleč, da je držalni lok
v pokončnem položaju (glejte sliko).
3) Vtaknite omrežni adapter ! v vtičnico v skladu s podatki naprave.
4) Napravo postavite v polnilno postajo 6. Držalni lok polnilne
postaje 6 napravo drži. Polnjenje akumulatorske baterije
prikazuje rdeče utripajoč simbol
76
.
SRR 3.7 C4
Page 81

Ko je akumulatorska baterija napolnjena, rdeče utripajoč simbol
■
ugasne in modri simbol
zasveti.
■ Z napolnjeno akumulatorsko baterijo lahko napravo uporabljate
do približno 60minut brez priključitve na električno omrežje.
■ Ko je akumulatorska baterija skoraj prazna, utripa rdeči simbol
.
prikaza polnosti akum. baterije
Polnjenje akumulatorske baterije brez polnilne
postaje
NAPOTEK
► Pred začetkom polnjenja akumulatorske baterije zagotovite,
da je naprava izklopljena.
1) Vtaknite povezovalni vtič 3 v vtičnico za polnjenje - na
brivskem aparatu.
Pazite na pravilno polarnost: vodilni nastavek v vtičnici za
polnjenje - mora segati v vodilno tirnico na povezovalnem
vtiču 3. Drugače povezovalnega vtiča 3 ne morete vtakniti
v vtičnico.
2) Vtaknite omrežni adapter e v vtičnico v skladu s podatki naprave.
Polnjenje akumulatorske baterije prikazuje rdeče utripajoč simbol
.
■ Kakor hitro je akumulatorska baterija napolnjena, rdeče utripajoč
simbol
baterije zasveti.
■ Z napolnjeno akumulatorsko baterijo lahko napravo uporabljate
do približno 60minut brez priključitve na električno omrežje.
■ Ko je akumulatorska baterija skoraj prazna, utripa rdeči simbol
.
ugasne in modri simbol prikaza polnosti akum.
SI
SRR 3.7 C4
77
Page 82

Brezžično britje
POZOR! MATERIALNA ŠKODA!
►
Ta naprava ni primerna za mokro britje!
Brivnik lahko uporabite za brezžično britje. V tem primeru morate
napravo pred prvo uporabo napolniti (glejte poglavje »Polnjenje
akumulatorske baterije z/brez polnilne postaje«).
1) Če ni nataknjen, nataknite zaščitni rob od spodaj na strižno
SI
enoto (glejte razklopno stran).
2) Nataknite strižno enoto z nameščenim zaščitnim robom na
pogonsko gred . Pazite na to, da se zaščitni rob brivniku
pravilno prilega.
3) Snemite zaščitni pokrov 0.
4) Pritisnite tipko za vklop/izklop . Simbol
akum. baterije in logo
brivnika.
NAPOTEK
► Najboljše rezultate dosežete na suhi koži.
► Traja lahko od 2 do 3tedne, preden se koža navadi na
sistem striženja.
5) Strižne glave z ravnimi in krožečimi gibi pomikajte po koži.
6) Ko ste obdelali vsa mesta za britje, pritisnite tipko za vklop/
izklop . Naprava se zaustavi. Zaslon ugasne.
7) Po vsakem britju brivnik očistite s priloženim čopičem ..
Za temeljito čiščenje preberite poglavje »Čiščenje in vzdrževanje«.
78
prikaza polnosti
se prikažeta ob vklopu
SRR 3.7 C4
Page 83

Britje z omrežnim adapterjem
POZOR! MATERIALNA ŠKODA!
► Ta naprava ni primerna za mokro britje!
Če brivnik želite uporabljati, ne da bi ga prej napolnili, ga lahko
uporabite tudi neposredno z omrežnim adapterjem !:
1) Vtaknite povezovalni vtič 3 v vtičnico za polnjenje - na brivskem aparatu. Pazite na pravilno polarnost: vodilni nastavek
v vtičnici za polnjenje - mora segati v vodilno tirnico na pove-
zovalnem vtiču 3. Drugače povezovalnega vtiča 3 ne morete
vtakniti v vtičnico.
2) Električni vtič priključite v električno vtičnico.
Potem lahko brivnik uporabite.
Oblikovalni brivnik/brivnik za dolge dlake
Za oblikovanje brade in zalizkov ali za britje obrvi uporabljajte
enoto oblikovalnega brivnika .
1) Če je nameščena, strižno enoto povlecite z brivnika.
2) Nataknite enoto oblikovalnega brivnika na pogonsko gred
(glejte sliko).
SI
SRR 3.7 C4
79
Page 84

3) Nataknite enoto oblikovalnega brivnika tako, da oba vodilna
nastavka na enoti oblikovalnega brivnika segata v vodilne
tirnice na pogonski gredi .
4) Pritisnite tipko za vklop/izklop . Simbol
akum. baterije in logo
brivnika.
5) Ko ste oblikovanje končali, še enkrat pritisnite tipko za vklop/
SI
izklop .
6) Očistite enoto oblikovalnega brivnika s priloženim čopičem ..
Za temeljito čiščenje preberite poglavje »Čiščenje in vzdrževanje«.
prikaza polnosti
se prikažeta ob vklopu
Potovalno varovalo
Za zaščito naprave pred nenamernim vklopom lahko tipko za vklop/
izklop blokirate.
♦ Pridržite tipko za vklop/izklop za toliko časa, da se na zaslonu
pojavi simbol
Če sedaj pritisnete tipko za vklop/izklop , se za kratek čas
pojavi simbol
♦ Ko želite zaporo odpraviti, pridržite tipko za vklop/izklop :
– pojavi se simbol
zaslon ugasne in napravo je sedaj mogoče znova vklopiti.
.
. Naprava se ne vklopi.
in utripa približno 5 sekunde. Potem
80
SRR 3.7 C4
Page 85

Čiščenje in vzdrževanje
NEVARNOST ‒ ELEKTRIČNI UDAR!
► Pred vsakim čiščenjem električni vtič izvlecite iz električne
vtičnice! Obstaja nevarnost električnega udara!
POZOR! MATERIALNA ŠKODA!
► Za čiščenje naprave ne uporabljajte ostrih, kemičnih ali
jedkih čistilnih sredstev. To lahko privede do nepopravljivih
poškodb na napravi.
Čiščenje s čopičem
Strižna enota
Po vsakem britju 3 strižne glave na strižni enoti očistite s čopičem ..
1) Pritisnite tipko za sprostitev , tako da se strižna enota
odpne.
2) Previdno potrkajte s strižno enoto po ravni površini oz.
izpihajte dlačice.
3) Uporabite čopič ., da odstranite preostale dlačice.
Enota oblikovalnega brivnika
■ Enoto oblikovalnega brivnika po vsakem britju očistite s čopičem ..
■ Naoljite brivnik za dolge dlake približno vsakih 6 mesecev
s kapljico olja za šivalne stroje.
SI
SRR 3.7 C4
81
Page 86

Čiščenje pod tekočo vodo
Strižna enota je primerna za čiščenje pod tekočo vodo.
1) Povlecite strižno enoto z brivnika.
2) Pritisnite tipko za sprostitev , tako da se strižna enota
odpne.
3) Držite strižno enoto pod curkom vode, tako da teče voda
SI
od znotraj navzven skozi strižne glave.
4) Strižno enoto pustite, da se pred ponovno uporabo brivnika
posuši.
82
SRR 3.7 C4
Page 87

Temeljito čiščenje
Za temeljito čiščenje odstranite strižne glave:
1) Pritisnite tipko za sprostitev . Strižna enota se odpne.
2) Strižno enoto malce razpotegnite, tako da jo je mogoče
povleči navzgor in ven.
3) S puščico označeno zaporo previdno obrnite v smeri puščice
tako daleč, da lahko dvignete držalo strižnih glav (glejte sliko).
SI
4) Očistite vse dele pod tekočo vodo in jih pustite, da se popolnoma
posušijo.
5) Strižno enoto znova sestavite.
SRR 3.7 C4
83
Page 88

6) Za pritrditev s puščicami označeno zaporo obrnite v nasprotni
strani puščice, da držala strižnih glav ni več mogoče dvigniti.
7) Odstranite preostale dlake s čopičem . iz brivnika.
8) Strižno enoto znova namestite na brivnik. Pazite na to, da
se enota zaskoči in je trdno pritrjena.
■ Očistite ohišje in omrežni adapter ! z vlažno krpo.
NAPOTEK
SI
Ko ...
– ... so rezultati britja vidno slabši ...
– ... morate brivnik večkrat pomakniti čez isto mesto,
da dosežete dober rezultat ...
– ... traja britje bistveno dlje ...
– ... so na strižnih glavah vidne poškodbe ...
... je treba strižne glave zamenjati.
Če želite strižne glave naročiti, se obrnite na servisno službo.
Shranjevanje
■ Ko naprave ne uporabljate, vedno nataknite zaščitni pokrov 0
na strižno enoto .
■ Vse skupaj shranite na čistem in suhem mestu brez prahu.
84
SRR 3.7 C4
Page 89

Garancijski list
1. S tem garancijskim listom jamčimo Kompernass Handels GmbH,
da bo izdelek v garancijskem roku ob normalni in pravilni uporabi
brezhibno deloval in se zavezujemo, da bomo ob izpolnjenih
spodaj navedenih pogojih odpravili morebitne pomanjkljivosti in
okvare zaradi napak v materialu ali izdelavi oz. po svoji presoji
izdelek zamenjali ali vrnili kupnino.
2. Garancija je veljavna na ozemlju Republike Slovenije.
3. Garancijski rok za proizvod je 3 leta od dneva nabave.
4. Kupec je dolžan okvaro javiti pooblaščenemu servisu oz. se
informirati o nadaljnjih postopkih na zgoraj navedeni telefonski
številki. Svetujemo vam, da pred tem natančno preberete navodila
o sestavi in uporabi izdelka.
5. Kupec je dolžan pooblaščenemu servisu predložiti garancijski list
in račun, kot potrdilo in dokazilo o nakupu.
6. V primeru, da proizvod popravlja nepooblaščeni servis ali oseba,
kupec ne more uveljavljati zahtevkov iz te garancije.
7. Vzroki za okvaro oz. nedelovanje izdelka morajo biti lastnosti stvari
same, in ne vzroki, ki so zunaj proizvajalčeve oz. prodajalčeve
sfere. Kupec ne more uveljavljati zahtevkov iz te garancije, če se
ni držal priloženih navodil za sestavo in uporabo izdelka ali, če je
izdelek kakorkoli spremenjen ali nepravilno vzdrževan.
8. Jamčimo servisiranje in rezervne dele za minimalno dobo, ki je
zahtevana s strani zakonodaje.
9. Obrabni deli oz. potrošni material so izvzeti iz garancije.
10. Vsi potrebni podatki za uveljavljanje garancije se nahajajo na
dveh ločenih dokumentih (garancijski list, račun).
11. Ta garancija proizvajalca ne izključuje pravic potrošnika, ki
izhajajo iz odgovornosti prodajalca za napake na blagu.
Prodajalec:
Lidl d.o.o.k.d., Pod lipami 1, SI-1218 Komenda
SI
SRR 3.7 C4
85
Page 90

Servis
Servis Slovenija
Tel.: 080080917
E-Mail: kompernass@lidl.si
IAN 115785
Dosegljivost telefonske službe za stranke:
Od ponedeljka do petka od 8:00 do 20:00 (po srednjeevropskem času)
SI
Odlaganje med odpadke
Naprave nikakor ne odvrzite med običajne
gospodinjske odpadke. Za izdelek velja
evropska direktiva 2012/19/EU.
Odpadno napravo oddajte pri podjetju, registriranem za odstranjevanje odpadkov, ali pri svojem komunalnem podjetju za odstranjevanje odpadkov. Upoštevajte trenutno veljavne predpise. V primeru
dvoma se obrnite na najbližje podjetje za odstranjevanje odpadkov.
86
SRR 3.7 C4
Page 91

Odstranitev baterij/akumulatorjev
Da napravo odstranite na okoljsko primeren način, morate akumulatorsko baterijo vzeti iz naprave:
POZOR – MATERIALNA ŠKODA!
► Akumulatorsko baterijo vzemite iz naprave le, če želite
napravo odstraniti/oddati na odpadu! Ko akumulatorsko
baterijo odstranite, je naprava pokvarjena!
1) Za odstranjevanje akumulatorske baterije iz brivnika najprej s
križnim izvijačem odstranite mali vijak na zadnji strani brivnika.
2) Odstranite zadnji pokrov brivnika.
3) Postopoma odstranite notranje ohišje iz naprave, pri tem si po-
magajte z izvijačem kot vzvodom. Preden notranje ohišje lahko
vzamete ven, morebiti morate odstraniti še druge vijake, odlomiti
stranska ali spodnja držala ali jih upogniti navzven. Najbolje
bo, da v ta namen uporabite izvijač za vijake z zarezo.
4) Ko ste notranje ohišje odstranili:
odlomite držala prozornega plastičnega pokrova ob strani.
5) Sedaj odstranite vse potrebne dele, da dosežete baterijo.
6) Akumulatorsko baterijo s pomočjo učinka vzvoda odstranite.
7) Akumulatorsko baterijo odstranite na okolju prijazen način.
SI
SRR 3.7 C4
87
Page 92

Baterij/akumulatorjev ni dovoljeno odvreči med gospodinj-
ske odpadke. Vsak potrošnik je po zakonu dolžan baterije/
akumulatorje oddati na zbirališču svoje občine/svoje četrti
ali v trgovini. Ta obveza služi temu, da se baterije/akumulatorji lahko oddajo za okolju prijazno odstranjevanje.
Baterije/akumulatorje oddajajte samo prazne.
SI
Embalaža je iz okolju prijaznih materialov, ki jih lahko
oddate na krajevnih zbirališčih odpadkov za recikliranje.
Proizvajalec
KOMPERNASS HANDELS GMBH
BURGSTRASSE 21
44867 BOCHUM
GERMANY
www.kompernass.com
88
SRR 3.7 C4
Page 93

Obsah
Úvod ........................................90
Použití vsouladu surčením .....................90
Rozsah dodávky ..............................90
Popis přístroje ................................91
Technické údaje ...............................92
Bezpečnostní pokyny ..........................93
Nabíjení akumulátoru pomocí nabíjecí stanice .....98
Nabíjení akumulátoru bez nabíjecí stanice ........99
Holení bez kabelu ............................100
Holení se síťovým adaptérem ..................101
Zastřihovač/hlava pro stříhání dlouhých vousů . . .101
Zajištění při cestování .........................102
Čištění a údržba ..............................103
Čištění pomocí štětečku ............................... 103
Čištění pod tekoucí vodou ............................. 104
Důkladné vyčištění ................................... 105
Uložení přístroje .............................106
Záruka .....................................107
Servis ......................................108
Likvidace ...................................108
Dovozce ....................................110
CZ
SRR 3.7 C4
89
Page 94

Úvod
Gratulujeme vám kzakoupení nového přístroje.
Rozhodli jste se pro vysoce kvalitní výrobek. Návod kobsluze je sou-
částí tohoto výrobku. Obsahuje důležité informace obezpečnosti,
použití a likvidaci. Před použitím výrobku se prosím dobře seznamte
se všemi provozními a bezpečnostními pokyny. Výrobek používejte
pouze předepsaným způsobem apro uvedené oblasti použití.
Při předávání výrobku třetím osobám předejte spolu sním i tyto
podklady.
Použití vsouladu surčením
CZ
Tento přístroj je určen výhradně k holení a stříhání lidských vousů.
Tento přístroj je určen výhradně kpoužití vdomácnostech pro sou-
kromé účely. Není určen kprofesionálnímu použití.
Jakékoli jiné použití neodpovídá určenému účelu a může vést ke
vzniku hmotných škod, nebo dokonce ke škodám na zdraví osob.
Rozsah dodávky
▯ holicí strojek s holicí jednotkou
▯ síťový adaptér
▯ zastřihovací jednotka
▯ ochranný kryt
▯ štěteček
▯ nabíjecí stanice
▯ objednací list
▯ návod kobsluze
90
SRR 3.7 C4
Page 95

UPOZORNĚNÍ
Po vybalení ihned zkontrolujte rozsah dodávky, zda je úplná
a není poškozená. Vpřípadě potřeby se obraťte na servis.
Popis přístroje
Obrázek A (přední výklopná strana):
hnací hřídel
holicí jednotka
uvolňovací tlačítko
ochranný límec
vypínač
zastřihovací jednotka
hlava pro stříhání dlouhých vousů
CZ
symbol
symbol
symbol
- nabíjecí zdířka
Obrázek B (zadní výklopná strana):
3 spojovací konektor
! síťový adaptér
. štěteček
0 ochranný kryt
6 nabíjecí stanice
1 spojovací konektor (nabíjecí stanice)
% nabíjecí zdířka (nabíjecí stanice)
SRR 3.7 C4
(indikace stavu nabití akumulátoru)
(nabíjení)
(zablokování)
91
Page 96

Technické údaje
Přístroj
Vstupní napětí: 5 V
Vstupní proud: 1000 mA
Akumulátor: Li-Ion akumulátor 3,7 V 800 mAh
Teplota okolí: 5°C až 35°C
Doba nabíjení: cca 60 minut
Doba použití s plně
nabitým akumulátorem: cca 60 minut
CZ
Síťový adaptér (Typ PTB-050100EU)
Vstupní napětí: 100 - 240 V ∼ 50/60 Hz
Výstupní napětí: 5 V
Vstupní proud: 0,2 A
Výstupní proud: 1000 mA
Typ ochrany: IP 20
Třída ochrany: II /
92
SRR 3.7 C4
Page 97

Bezpečnostní pokyny
NEBEZPEČÍ ÚRAZU ELEKTRICKÝM
PROUDEM!
► Před použitím zkontrolujte, jestli není přístroj na
povrchu viditelně poškozen. Poškozený přístroj
neuvádějte do provozu. Hrozí nebezpečí úrazu
elektrickým proudem.
► Pokud se zjistí poškození kabelu, síťového
adaptéru, krytu nebo jiných dílů, nesmí se
přístroj dál používat.
► Vytáhněte síťový adaptér ze zásuvky vždy:
— pokud se vyskytne porucha,
— před čištěním přístroje,
— když přístroj delší dobu nepoužíváte,
— po každém použití.
Tahejte při tom přímo za síťový adaptér a ne
za kabel.
► Přístroj ani kabel se síťovým adaptérem nikdy
neponořujte do vody nebo jiných tekutin.
SRR 3.7 C4
CZ
93
Page 98

CZ
NEBEZPEČÍ ÚRAZU ELEKTRICKÝM
PROUDEM!
► Pokud přístroj spadne do vody, než sáhnete do
vody, bezpodmínečně nejdříve vytáhněte síťový
adaptér ze zásuvky.
► Síťového adaptéru se nikdy nedotýkejte mokrý-
ma rukama, zvláště při zastrkování do zásuvky
nebo při vytahování. Hrozí nebezpečí úrazu
elektrickým proudem!
► U síťového adaptéru a přístroje pravidelně kon-
trolujte, jestli se nevyskytly mechanické závady.
► Dbejte na to, aby nedošlo k uskřípnutí kabelu
např. ve dveřích skříně nebo nebyl tažen přes
horké plochy. Mohla by se totiž poškodit izolace kabelu.
► Instalace proudového chrániče proti svodovému
proudu sdimenzovaným vypínacím proudem
nejvýše 30mA poskytuje další ochranu před
úrazem elektrickým proudem. Nechte tuto
instalaci provést pouze odborným elektrikářem.
94
SRR 3.7 C4
Page 99

NEBEZPEČÍ ÚRAZU ELEKTRICKÝM
PROUDEM!
► POZOR! Přístroj udržujte v suchu!
VÝSTRAHA – NEBEZPEČÍ ZRANĚNÍ!
► Děti starší 8let a osoby somezenými fyzický-
mi, smyslovými nebo mentálními schopnostmi či
nedostatkem zkušeností a znalostí mohou používat tento přístroj, avšak pouze tehdy, pokud
jsou pod dohledem nebo pokud byly poučeny
obezpečném používání přístroje, a pokud porozuměly ztoho vyplývajícímu nebezpečí.
► Děti si nesmí spřístrojem hrát.
► Čištění a uživatelskou údržbu nesmí provádět
děti bez dozoru.
CZ
SRR 3.7 C4
95
Page 100

CZ
VÝSTRAHA – NEBEZPEČÍ ZRANĚNÍ!
► Opravy na přístroji nechte provádět pouze auto-
rizovanými odbornými firmami nebo zákaznickým servisem. Neodborné opravy mohou vést
ke vzniku závažných nebezpečí pro uživatele.
Navíc by zanikly i veškeré záruční nároky.
► Nepoužívejte přístroj svadnou stříhací hlavi-
cí nebo vadným nástavcem pro různé délky
stříhání, protože mohou mít ostré hrany. Hrozí
nebezpečí zranění!
► Vadné součástky se smějí nahradit pouze origi-
nálními náhradními díly. Pouze utěchto součástí je zaručeno, že budou splněny bezpečnostní
požadavky.
► Síťový adaptér zapojujte pouze do dobře do-
stupné zásuvky, abyste síťový adaptér v případě poruchy mohli rychle vytáhnout ze zásuvky.
96
SRR 3.7 C4
 Loading...