

Page 1

Before reading, unfold the page containing the illustrations and familiarise yourself with all functions of
the device.
Vik ut bildsidan och ha den till hands när du läser igenom anvisningarna och gör dig bekant med
apparatens / maskinens funktioner.
Klappen Sie vor dem Lesen die Seite mit den Abbildungen aus und machen Sie sich anschließend mit allen
Funktionen des Gerätes vertraut.
RICE COOKER SRK 700 A1
KOMPERNASS GMBH
Burgstraße 21
D-44867 Bochum
www.kompernass.com
RICE COOKER
Operation and Safety Notes
REISKOCHER
Bedienungs- und Sicherheitshinweise
Last Information Update · Informationsstatus
Stand der Informationen:
02/2012 · Ident.-No.: SRK700A1112011-2
IAN 73271 IAN 73271
RISKOKARE
Bruksanvisning och säkerhetsanvisningar
GB / IE Operation and Safety Notes Page 1
SE Bruksanvisning och säkerhetsanvisningar Sidan 9
DE / AT / CH Bedienungs- und Sicherheitshinweise Seite 17
Page 2

1
2
3
8
5
4
6
7
Page 3

CONTENT PAGE
Safety information 2
Intended use 3
Technical Data 3
Items supplied 3
Appliance Overview 3
Before the First Use 3
Using the Rice Cooker 3
Cooking Rice.....................................................................................................................................3
Steaming............................................................................................................................................5
Troubleshooting 6
Cleaning and care 7
Disposal 7
Warranty and Service 7
Importer 8
Read the operating instructions carefully before using the device for the first time and preserve this booklet
for later reference. Pass this manual on to whoever might acquire the device at a future date.
- 1 -
Page 4

Rice Cooker
Safety information
Danger! Electric shock!
• Connect the rice cooker only to correctly installed
and earthed mains sockets supplying a voltage
that tallies with the details given on the appliance
identification plate.
• Always remove the plug from the mains power sokket when you move or fill the device, in the event
of problems, before cleaning the appliance and
when the cooker is not in use!
• Never disconnect the appliance by pulling on
the power cable. Always pull on the plug itself.
• Never touch the appliance plug with wet or moist
hands.
Never submerse the device in water or other
liquids.
• Should the appliance ever fall into a liquid,
IMMEDIATELY remove the plug from the mains
power socket. Then, do not operate the appliance
again until it has been inspected by an approved
service company.
• Never subject the appliance to moisture and do
not use it outdoors.
• Do not use the rice cooker while standing on a
wet floor or when your hands or the appliance
are wet.
• Position the power cable so that it does not come
into contact with hot or sharp-edged objects.
• Do not kink or crush the power cable and do not
wind it around the appliance.
• Arrange for defective power plugs and/or cables
to be replaced at once by qualified technicians
or our Customer Service Department.
Risk of personal injury!
• Never leave the appliance unattended during
operation.
WARNING! Hot steam escapes from the
steam hole and upon opening the cover! Risk
of scalding!
This symbol on the appliance warns you on
the risk of burns caused by hot surfaces.
• This appliance is not intended for use by individuals
(including children) with restricted physical, physiological or intellectual abilities or deficiences in
experience and/or knowledge unless they are
supervised by a person responsible for their safety
or receive from this person instruction in how the
appliance is to be used.
• Children should be supervised to ensure that
they do not play with the appliance.
• Allow the appliance and accessories to cool
completely before cleaning and storing them.
• Do not use an external timing switch or a separate
remote control system to operate the appliance.
Important! Appliance damage!
• When cooking, never cover the appliance lid
with handtowels or anything similar.
• Never place the appliance adjacent to sources
of heat.
• Never open the housing. If you do, the safety
concept of the appliance can no longer be assured
and the warranty becomes void.
• Only use the accessory parts provided with the
appliance and never use the appliance without
first inserting the cooking bowl.
- 2 -
Page 5

Intended use
Appliance Overview
Only use the rice cooker for cooking rice and
steaming foods, such as vegetables or fish.
This rice cooker is not intended for commercial use; it
is intended exclusively for use in private households!
Technical Data
Rated voltage: 220 - 240 V ~ / 50 Hz
Power consumption: 700 W
Items supplied
1 Rice cooker,
incl. cooking bowl and steaming attachment
1 power cable fitted with a plug
1 measuring cup
1 plastic spoon
1 operating manual
The total capacity of the measuring cup is approximately 180 ml. The measuring cup has 2 different
sets of measurement markings to make filling easier:
1/4 = approx. 45 ml
1/2 = approx. 90 ml
3/4 = approx. 135 ml
40 = approx. 40 ml
80 = approx. 80 ml
120 = approx. 120 ml
160 = approx. 160 ml
1 Steam exit opening
2 Lid
3 Steamer attachment
4 Cooking bowl
5 Yellow control lamp (Keep-warm)
6 Red control lamp (Cooking)
7 Function selector switch for "Cooking" and
"Keep-warm"
8 Connection socket for the power cable
Before the First Use
Carefully remove the rice cooker from the packaging.
Remove all possibly remaining protective foils and
clean any packaging-dust remnants from all components that will come into contact with foodstuffs.
Clean the appliance as described in the chapter
"Cleaning and Care".
Using the Rice Cooker
With this appliance, it is possible to cook rice as
well as to steam other foods at the same time. Experiment with finding the right quantity of water and
the right cooking time for the various combinations.
Cooking Rice
Note:
Coat the inside of the cooking bowl 4 evenly with
a little grease or vegetable oil to achieve a better
cooking result.
1. Remove the lid 2.
2. Take the cooking bowl 4 out.
- 3 -
Page 6

Note:
If the cooking bowl 4 is damaged, discontinue all
further use! Due to the damage it may be that the
safety shut-off of the appliance has triggered and
the appliance does not allow itself to be switched on.
Note:
If you use warm water the cooking time can be
shortened. In this case, use somewhat less water
than is given on the cup marking in the cooking
bowl 4.
3. Measure the desired quantity of rice using the
supplied measuring cup.
As a general rule: A level measuring cup - filled
with rice - yeilds a portion for one person. Determine the right quantity of rice and water for you
in a few cooking attempts.
4. Thoroughly wash and sieve the loose rice. Nu-
trients will be lost with this, however, if you do
not wash the rice this could lead to poor cooking
results and elevated foam and steam formation
in the cooking bowl 4. Also, always pay heed
to the preparation instructions of the rice producer.
5. After washing it, pour the rice into the cooking
bowl 4 and smooth it out.
Note:
Place at least 2 measuring beakers of rice into the
rice cooker! A lesser volume of rice could cause
inferior cooking results!
6. Then add water in the cooking bowl 4 as per
the following cup markings:
• 2 Measuring beakers of rice =
Water up to cup marking "2"
• 4 Measuring beakers of rice =
Water up to cup marking "4"
• 6 Measuring beakers of rice =
Water up to cup marking "6"
• 8 Measuring beakers of rice =
Water up to cup marking "8"
• 10 Measuring beakers of rice =
Water up to cup marking "10"
Subject to taste preferences, salt can also be
added to the rice.
Note:
Subject to the type/sort of rice being prepared, it
could be that you may have to insert a little more or
less water to achieve an optimal cooking result.
Vary the amount of water in accordance with your
individual experiences and personal preference.
7. When the cooking bowl 4 is full, place it back
in the rice cooker housing.
Ensure that...
- ... to avoid dirtying the cooking area, check to
make sure there is no moisture or rice located on
the outside of the cooking bowl 4. If necessary,
wipe the outside with a clean cloth.
- ... the cooking bowl 4 is not skewed or tilted
when being placed in the rice cooker housing. Always insert the cooking bowl 4 correctly and pre-
cisely into the rice cooker housing. If you do not, it
may be that the safety shut-off of the
appliance will trigger and the appliance does not
allow itself to be switched on.
Note:
This appliance is fitted with a safety switch:
the cooking process cannot be started with an empty
cooking vessel 4 without a lid 2. However, with the
lid 2 in place the cooking process can also be started
with an empty cooking vessel.
8. Close the appliance lid 2.
9. Insert the power cable into the socket 8 on
the side of the appliance.
10. Insert the power plug into a properly installed
power socket. The yellow control lamp 5
glows.
- 4 -
Page 7

Important!
During the cooking process steam is emitted from
the steam exit opening 1. NEVER hold your hands
or other parts of the body over the steam exit opening 1 during the cooking process. There is a risk
of receiving severe scalds!
11. Press the function selector switch 7 down. The
yellow control lamp 5 extinguishes and
the red control lamp 6 starts to glow.
The cooking process begins.
Note:
If the cooking bowl 4 is not correctly positioned,
the function selector switch 7 cannot be moved to
the setting "Cooking".
As soon as the rice is cooked, the rice cooker switches
itself automatically back to the keep-warm setting.
The red control lamp 6 extinguishes and the
yellow control lamp 5 starts to glow.
12. Open the lid 2. The rice is now ready for
consumption.
Attention!
For removal of the rice use exclusively the supplied
plastic spoon. If you do not, the non-stick coating
could be damaged.
Steaming
Important!
Do not lift the steaming attachment 3 up during the
steaming process - the escaping steam brings with it
the real risk of scalding. The steaming attachment 3
becomes hot during the steaming process. When
taking hold of the steaming attachment 3, use oven
cloths or something similar to lift it from the cooking
bowl 4.
Note:
Ensure that the cooking bowl 4 is also inserted
correctly when it is used for steaming. The cooking
bowl 4 must not be damaged. If it is, it may be that
the safety shut-off of the appliance will trigger and
the appliance does not allow itself to be switched
on.
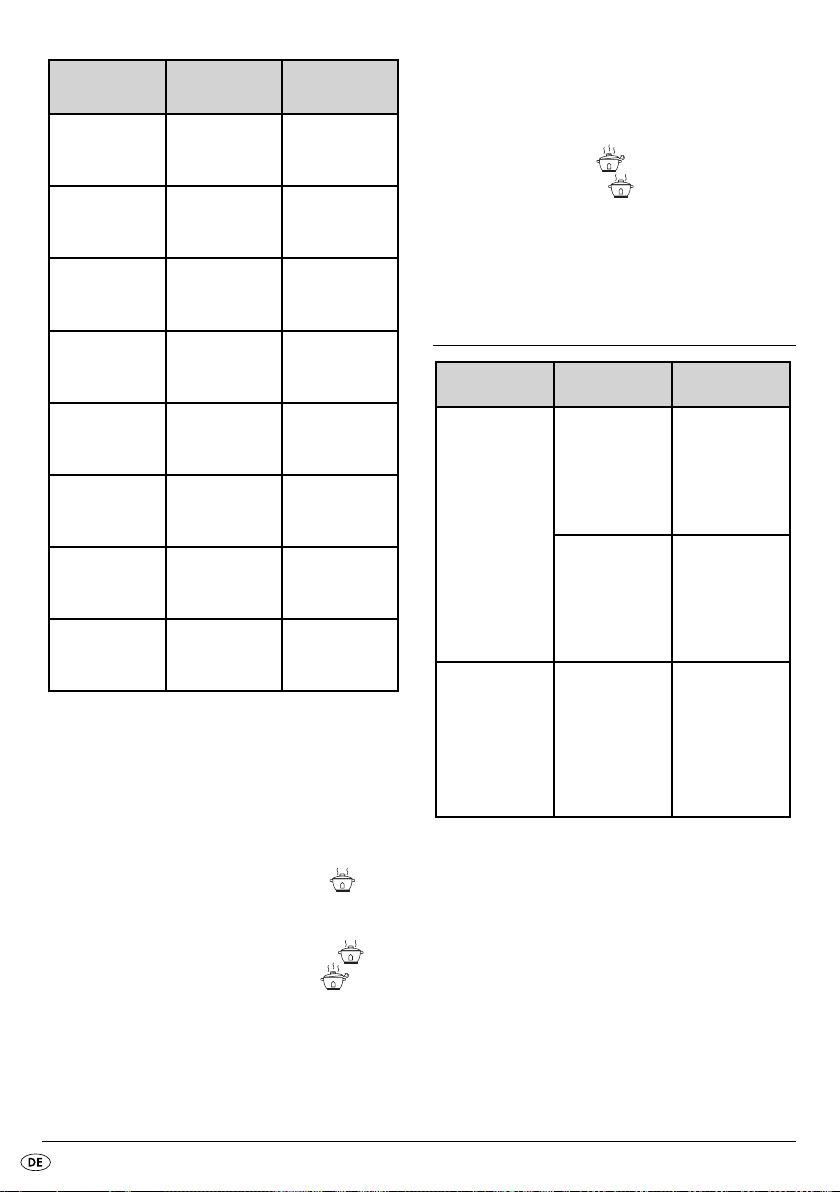
1. Pour the required amount of water into the cooking
bowl 4. The cooking time is dependant on the
inserted volume of water. Take note of the examples
given in the following table.
• 1 filled measuring cup is sufficient for about
15 minutes of steaming.
• 2 filled measuring cups are sufficient for about
30 minutes of steaming, etc.
If you do not consume the rice immediately
• During the keep-warm period, do not open the
lid 2.
• Do not leave the rice for longer than 2 hours in
the keep.warm state.
Important!
Always remove the plug from the mains power sokket when the rice cooker is not in use. Otherwise,
there is a permanent risk of receiving an electric
shock!
- 5 -
Page 8

Fish / seafood
Mussels
(cook until they
are opened)
Prawns
(cook until a
pink colour)
Fish (Fillet)
Steak
Oysters
(in the shell)
Vegetables
Mushrooms
(whole)
Peas
(with pods)
Asparagus
Carrots
(peeled)
Green beans
(cut)
Green beans:
(whole)
Brussels sprouts
Corncobs
Water in
milliliter
approx.
120 ml
approx.
140 ml
approx.
180 ml
approx.
240 ml
approx.
300 ml
Water in
milliliter
approx.
120 ml
approx.
200 ml
approx.
200 ml.
approx.
240 ml
approx.
240 ml
approx.
300 ml
approx.
300 ml
approx.
360 ml
Weight /
quantity
approx. 450 g
approx. 350 g
approx. 350 g
approx. 450 g
approx. 700 g
Weight /
quantity
approx. 450 g
approx. 350 g
approx. 450 g
approx. 450 g
approx. 450 g
approx. 450 g
approx. 350 g
2 cobs
2. Place the food to be steamed in the steaming
attachment 3.
3. Place the container on the cooking bowl 4.
4. Close the appliance lid 2.
5. Place the power plug in a wall socket. The
yellow control lamp 5 glows.
6. Press the function selector switch 7 down. The
yellow control lamp 5 extinguishes and
the red control lamp 6 starts to glow.
The steaming process begins.
As soon as the added water has left the cooking
bowl 4 by being completely turned to steam, the
rice cooker automatically switches back to the
"keeping warm" mode.
The red control lamp 6 extinguishes and the
yellow control lamp 5 starts to glow again.
The food is now completely steamed and is ready
to eat.
Troubleshooting
Defect Cause Solution
The device
does not func-
tion.
The yellow indi-
cator light 5
switches on, but
the cooking
process cannot
be started.
The rice cooker
is not plugged
in.
The power
socket is
defective.
The cooking
bowl 4 is empty
and, as such,
the safety
switch cannot
be pressed
down.
Push the power
plug into the
wall socket.
Use a
different wall
power socket.
Fill the cooking
bowl 4 with
the foodstuffs to
be cooked.
- 6 -
Page 9

Cleaning and care
Warranty and Service
Danger! Electric shock!
• ALWAYS remove the plug from the wall socket
before cleaning, and allow the appliance to
cool completely before cleaning and storing it!
• Make certain that no liquid comes into contact
with the heating plate and the insides of the rice
cooker.
• Use a dry cloth to clean the rice cooker housing
incl. the heating plate. Do not use harsh cleaners
and abrasive materials. These could damage the
upper surfaces.
• Clean the steaming attachment 3, the lid 2,
the cooking bowl 4, the plastic spoon and the
measuring cup in water containing a mild detergent.
• Dry all parts before using the appliance again.
Disposal
Do not dispose of the appliance in your
normal domestic waste. This product is
subject to the provisions of European
Directive 2002/96/EC.
Dispose of the appliance through an approved disposal centre or at your community waste facility.
Observe the currently applicable regulations.
In case of doubt, please contact your waste disposal centre.
The warranty for this appliance is for 3 years from
the date of purchase. The appliance has been manufactured with care and meticulously examined before delivery. Please retain your receipt as proof of
purchase. In the event of a warranty claim, please
make contact by telephone with our Service Department. Only in this way can a post-free despatch for
your goods be assured.
The warranty covers only claims for material and
manufacturing defects, but not for transport damage, for wearing parts or for damage to fragile components, e.g. buttons or batteries. This product is for
private use only and is not intended for commercial
use. The warranty is void in the case of abusive and
improper handling, use of force and internal tampering not carried out by our authorized service
branch. Your statutory rights are not restricted in any
way by this warranty.
The warranty period will not be extended by repairs
made under warranty. This applies also to replaced
and repaired parts. Any damage and defects extant
on purchase must be reported immediately after unpacking the appliance, at the latest, two days after
the purchase date. Repairs made after the expiration of the warranty period are subject to payment.
Service Great Britain
Tel.: 0871 5000 720 (£ 0.10/Min.)
E-Mail: kompernass@lidl.co.uk
IAN 73271
Dispose of all packaging materials in an
environmentally friendly manner.
Service Ireland
Tel.: 1890 930 034
(0,08 EUR/Min., (peak))
(0,06 EUR/Min., (off peak))
E-Mail: kompernass@lidl.ie
IAN 73271
- 7 -
Page 10

Importer
KOMPERNASS GMBH
BURGSTRASSE 21
44867 BOCHUM, GERMANY
www.kompernass.com
- 8 -
Page 11

Innehållsförteckning Sidan
Säkerhetsanvisningar 10
Föreskriven användning 11
Tekniska data 11
Leveransens innehåll 11
Översikt över apparaten 11
Förberedelser 11
Använda riskokaren 11
Koka ris ...........................................................................................................................................11
Ångkokning.....................................................................................................................................13
Åtgärda fel 14
Rengöring och skötsel 15
Kassering 15
Garanti och service 15
Importör 16
Läs igenom bruksanvisningen noga innan du börjar använda apparaten och spara den för senare bruk.
Lämna över bruksanvisningen tillsammans med apparaten om du överlåter den till någon annan person.
- 9 -
Page 12
Riskokare
Säkerhetsanvisningar
Fara! Risk för elchock!
• Anslut endast apparaten till ett godkänt och jordat
eluttag med den spänning som anges på typskylten.
• Dra alltid ut kontakten ur uttaget när du flyttar
eller fyller på apparaten, vid störningar, innan
den rengörs och när den inte används!
• Dra aldrig i kabeln när du ska dra ut den ur uttaget.
Fatta tag om själva kontakten när du drar ut den.
• Ta aldrig i kontakten med våta händer.
Apparaten får absolut inte doppas ner i vatten
eller andra vätskor.
• Skulle det ändå hända att apparaten faller ner
i vätska ska du genast dra ut kontakten. Sedan
måste du lämna in den till ett godkänt serviceställe för kontroll innan du använder den igen.
• Utsätt inte apparaten för fukt och använd den
inte utomhus.
• Använd inte riskokaren när du står på ett fuktigt
golv, om riskokaren själv är våt eller om du är
blöt om händerna.
• Lägg kabeln så att den inte kan komma i kontakt
med heta eller vassa föremål.
• Bocka eller kläm inte kabeln och linda den inte
runt apparaten.
• Låt omedelbart en auktoriserad yrkesman eller
vår kundtjänst byta ut skadade kontakter och
strömkablar för att undvika risken för skador.
Risk för Personenskador!
• Lämna aldrig apparaten utan uppsikt när den
används.
OBSERVERA! Det tränger ut het ånga ur
ångut-släppet när locket öppnas! Risk för
brännskador!
Den här symbolen som sitter på apparaten
ska varna för heta ytor.
• Den här apparaten ska inte användas av personer
(inklusive barn) med begränsad fysisk, sensorisk
eller mental förmåga eller bristande erfarenhet
och kunskap om de inte först övervakats eller
instruerats av någon ansvarig person.
• Se noga till så att barnen inte leker med apparaten.
• Låt apparaten och alla delarna bli helt kalla
innan du rengör och sätter undan dem.
• Använd ingen extern timer eller separat fjärrkontroll för att styra ugnen.
Akta! Skador på apparaten!
• Täck aldrig över locket med handdukar eller
liknande när du använder riskokaren.
• Ställ aldrig apparaten i närheten av värmekällor.
• Öppna aldrig höljet. Då kan säkerheten inte garanteras och garantin upphör att gälla.
• Använd endast de tillbehör som medföljer i leveransen och sätt aldrig på riskokaren utan att först
sätta i kokkärlet.
- 10 -
Page 13
Föreskriven användning
Översikt över apparaten
Använd bara riskokaren till att koka ris samt ångkoka
t ex grönsaker och fisk.
Den här riskokaren är inte avsedd för yrkesmässigt
bruk utan får bara användas i privata hushåll!
Tekniska data
Nominell spänning: 220 - 240 V ~ / 50 Hz
Effektförbrukning: 700 W
Leveransens innehåll
1 riskokare,
inkl. kokkärl och ångkokningstillsats
1 anslutningskabel med skärmad kontakt
1 måttbägare
1 plastsked
1 bruksanvisning
Måttbägaren rymmer totalt ca 180 ml. För att göra
det lättare att fylla riskokaren har måttbägaren två
mätskalor:
1/4 = ca 45 ml
1/2 = ca 90 ml
3/4 = ca 135 ml
40 = ca 40 ml
80 = ca 80 ml
120 = ca 120 ml
160 = ca 160 ml
1 Ångutsläpp
2 Lock
3 Ångkokningstillsats
4 Kokkärl
5 Gul kontrolllampa (varmhållning)
6 Röd kontrolllampa (kokning)
7 Funktionsväljare "Kokning" och
"Varmhållning"
8 Uttag för elkabel
Förberedelser
Ta först försiktigt ut riskokaren ur förpackningen.
Ta bort ev. skyddsfolie och rengör de delar som
kommer i kontakt med livsmedel från damm och
rester av förpackningen. Rengör apparaten så som
beskrivs i kapitel "Rengöring och skötsel".
Använda riskokaren
Med den här riskokaren kan du både koka ris och
samtidigt ångkoka andra livsmedel. Experimentera
lite för att hitta rätt mängd vatten och rätt koktid för
olika kombinationer.
Koka ris
Observera:
Stryk ut ett jämnt, tunt lager olja eller annat matfett
över kokkärlets 4 insida så blir resultatet bättre.
1. Ta av locket 2.
2. Ta ut kokkärlet 4.
- 11 -
Page 14

Observera:
Om kokkärlet 4 är skadat får du inte använda det
längre! Det kan hända att skadan utlöser säkerhetsfrånkopplingen och det inte går att sätta på produkten igen.
3. Mät upp önskad mängd ris med medföljande
måttbägare.
Som riktvärde gäller: Ett struket mått med ris = en
portion. Ta fram rätt proportioner mellan vatten
och ris genom att provkoka några gånger.
4. Tvätta det lösa riset noga och låt det rinna av.
Då försvinner visserligen lite näringsämnen, men
annars kan resultatet bli sämre och det bildas
mycket skum och ånga i kokkärlet 4. Följ alltid
kokanvisningarna från tillverkaren.
5. Häll sedan riset i kokkärlet 4 och jämna till det
på ytan.
Observera:
Du måste hälla minst 2 mått ris i riskokaren! Om du
försöker koka mindre ris kan resultatet bli sämre!
6. Häll sedan vatten upp till motsvarande CUP-
markering i kokkärlet 4:
• 2 mått ris = vatten upp till CUP-markering "2"
• 4 mått ris = vatten upp till CUP-markering "4"
• 6 mått ris = vatten upp till CUP-markering "6"
• 8 mått ris = vatten upp till CUP-markering "8"
• 10 mått ris = vatten upp till CUP-markering "10"
Den som vill kan också tillsätta lite salt i riset.
Observera:
Om man använder varmt vatten kan koktiden minskas. Ta i så fall lite mindre vatten än vad som anges
på kokkärlets 4 CUP-markering.
Observera:
Beroende på typen av ris kan det hända att man måste
tillsätta mer eller mindre vatten för att resultatet ska bli
så bra som möjligt. Variera mängden vatten efter
din egen smak och erfarenhet.
7. När du fyllt på kokkärlet 4 sätter du in det
igen.
Kontrollera då att...
- ... det inte finns någon fukt eller något ris på utsi-
dan av kärlet 4 för att undvika att smutsa ner ko-
kytan. Torka av kärlets utsida då och då med en
torr trasa.
- ... kärlet 4 inte satts in snett eller på kant i riskoka-
rens hölje. Sätt alltid in kokkärlet 4 korrekt och
rakt i riskokarens hölje. Annars kan säkerhetsfrånkopplingen utlösas och det går inte att sätta på
produkten igen.
Observera:
Den här produkten är utrustad med en säkerhetsbrytare: Det går inte att starta kokningsprocessen med
tomt kokkärl 4 utan lock 2. Om locket 2 är på
går det däremot att starta processen, även om kokkärlet är tomt.
8. Stäng locket 2.
9. Sätt anslutningskabeln i uttaget 8 på sidan av
apparaten.
10. Sätt kontakten i ett godkänt eluttag. Den gula
kontrollampan 5 tänds.
- 12 -
Page 15

Obs!
När det kokar kommer det ut ånga ur ångutsläppet 1.
Håll aldrig händerna eller andra kroppsdelar ovanför
ångutsläppet 1 när det kokar. Då finns risk för brännskador!
11. Tryck ner funktionsväljaren 7. Den gula kontrol-
lampan 5 och den röda kontrollampan
6 tänds. Kokningsprocessen har börjat.
Observera:
Om kokkärlet 4 inte fyllts och satts in går det inte
att sätta funktionsväljaren 7 på "Kokning".
Så snart riset är färdigkokt kopplar riskokaren över
till varmhållning. Den röda kontrollampan 6
slocknar och den gula kontrollampan 5 tänds
igen.
Ångkokning
Obs!
Lyft inte upp ångkokningstillsatsen 3 när det kokar,
du kan bränna dig på den heta ånga som då tränger
ut. Ångkokningstillsatsen 3 blir varm när den an-
vänds. Använd grytlappar eller liknande när du
lyfter av ångkokningstillsatsen 3 från kokkärlet 4.
Observera:
Kontrollera att kokkärlet 4 satts in rätt även när du
ångkokar. Kokkärlet 4 får inte vara skadat. Annars
kan säkerhetsfrånkopplingen utlösas och det går
inte att sätta på produkten igen.
1. Häll önskad mängd vatten i kokkärlet 4. Koktiden
beror på hur mycket vatten som fylls på. Titta på
exemplen i följande tabell.
12. Öppna locket 2. Riset är nu klart att ätas.
Akta!
Använd endast medföljande plastslev för att ta upp
riset. Annars kan nonstickbeläggningen skadas.
Om du inte ska äta riset direkt:
• Öppna inte locket 2 under varmhållningsfasen.
• Låt inte riset varmhållas längre än 2 timmar.
Obs!
Dra alltid ut kontakten ur uttaget när du inte använder
riskokaren. Annars finns risk för elchocker!
• 1 fullt mått räcker till ca 15 minuters ångkokning.
• 2 fulla mått räcker till ca 30 minuters ångkokning, osv.
- 13 -
Page 16

Fisk/Skaldjur
Musslor
(kokas tills de
öppnas)
Räkor
(kokas tills de
blir rosa)
Fisk (filé) ca 180 ml ca 350 g
Vattenmängd
i milliliter
ca 120 ml ca 450 g
ca 140 ml ca 350 g
Vikt/mängd
2. Lägg de livsmedel som ska ångkokas i ångkokningstillsatsen 3.
3. Sätt tillsatsen på kokkärlet 4.
4. Stäng locket 2.
5. Sätt kontakten i ett eluttag. Den gula kontrollampan 5 tänds.
6. Tryck ner funktionsväljaren 7. Den gula kontrollampan 5 slocknar och den röda kontrollampan 6 tänds. Ångkokningsprocessen
har börjat.
Biff ca 240 ml ca 450 g
Ostron
(i skal)
Grönsaker
Svamp (hel) ca 120 ml ca 450 g
Ärtor
(med skida)
Sparris ca 200 ml ca 450 g
Morötter
(skalade)
Gröna bönor
(skurna)
Gröna bönor
(hela)
Brysselkål ca 300 ml ca 350 g
ca 300 ml ca 700 g
Vattenmängd
i milliliter
ca 200 ml ca 350 g
ca 240 ml ca 450 g
ca 240 ml ca 450 g
ca 300 ml ca 450 g
Vikt/mängd
Så snart allt vatten i kokkärlet 4 förångats kopplar
riskokaren automatiskt över till varmhållning.
Den röda kontrollampan 6 slocknar och den
gula kontrollampan 5 tänds igen.
Den ångkokta maten är färdig och klar att ätas.
Åtgärda fel
Fel Orsak Åtgärd
Riskokaren
fungerar inte
över huvud
taget.
Den gula kontrollampan 5
lyser med
apparaten kan
ändå inte koka.
Den är inte
kopplad till elut-
taget.
Eluttaget är
defekt.
Kokkärlet 4 är
tomt och då
trycks inte sä-
kerhetsbrytaren
ner.
Sätt kontakten
i ett eluttag.
Prova men ett
annat eluttag
Lägg de livs-
medel som ska
tillagas
i kokkärlet 4.
Majskolvar ca 360 ml 2 kolvar
- 14 -
Page 17

Rengöring och skötsel
Garanti och service
Fara! Risk för elchocker!
• Dra alltid ut kontakten och låt apparaten bli helt
kall innan du rengör och ställer undan den!
• Se till att det inte kommer vätska på kokplattan
eller innanför höljet.
• Använd en torr trasa för att torka av höljet och
kokplattan. Använd inga starka rengörings- eller
lösningsmedel. Då kan ytan skadas.
• Rengör ångkokningstillsatsen 3, locket 2, kok-
kärlet 4, plastskeden och måttbägaren i vatten
och vanligt handdiskmedel.
• Torka alla delarna ordentligt innan du använder
apparaten igen.
Kassering
Apparaten får absolut inte kastas bland
hushållssoporna. Produkten faller under
EU-direktiv 2002/96/EC.
Lämna in den till ett företag som har tillstånd att ta
hand om kasserade apparater av den här typen
eller till rätt återvinningsstation på din kommuns
avfallsanläggning.
Följ gällande föreskrifter.
Om du är tveksam ska du fråga den lokala avfallshanteringsmyndigheten.
Lämna in allt förpackningsmaterial till
miljövänlig återvinning.
För den här apparaten lämnar vi tre års garanti från
och med inköpsdatum. Den här apparaten har tillverkats med omsorg och genomgått en noggrann
kontroll innan leveransen. Var god bevara kassakvittot som köpbevis. Vi ber dig att kontakta ditt serviceställe per telefon vid garantifall. Endast då kan produkten skickas in fraktfritt.
Garantin gäller bara för bara för material- eller fabrikationsfel, den täcker inte transportskador, förslitningsdelar eller skador på ömtåliga delar som t ex
brytare och batterier. Produkten är endast avsedd
för privat bruk och får inte användas yrkesmässigt.
Vid missbruk och felaktig behandling, användande
av våld och vid ingrepp som inte gjorts av vår auktoriserade servicefilial upphör garantin att gälla.
Den lagstadgade garantin begränsas inte av denna
garanti.
Garantitiden förlängs inte för att man utnyttjar garantiförmånerna. Det gäller även för utbytta eller reparerade delar. Eventuella skador och brister som
upptäcks redan vid köpet måste anmälas omedelbart efter uppackningen, dock senast två dagar efter inköpsdatum. När garantitiden är slut måste man
betala för eventuella reparationer.
Service Sverige
Tel.: 0770 930739
E-Mail: kompernass@lidl.se
IAN 73271
Service Suomi
Tel.: 010309 3582
E-Mail: kompernass@lidl.fi
IAN 73271
- 15 -
Page 18

Importör
KOMPERNASS GMBH
BURGSTRASSE 21
44867 BOCHUM, GERMANY
www.kompernass.com
- 16 -
Page 19

INHALTSVERZEICHNIS SEITE
Sicherheitshinweise 18
Verwendungszweck 19
Technische Daten 19
Lieferumfang 19
Geräteübersicht 19
Vor dem ersten Gebrauch 19
Benutzung des Reiskochers 19
Reis kochen.....................................................................................................................................19
Dampfgaren....................................................................................................................................21
Fehlerbehebung 22
Reinigen und Pflegen 23
Entsorgen 23
Garantie und Service 23
Importeur 24
Lesen Sie die Bedienungsanleitung vor der ersten Verwendung aufmerksam durch und heben Sie diese für
den späteren Gebrauch auf. Händigen Sie bei Weitergabe des Gerätes an Dritte auch die Anleitung aus.
- 17 -
Page 20

Reiskocher
Sicherheitshinweise
Gefahr! Elektrischer Schlag!
• Schließen Sie den Reiskocher nur an eine vorschriftsmäßig installierte und geerdete Steckdose
mit der auf dem Typenschild des Gerätes angegebenen Netzspannung an.
• Ziehen Sie, wenn Sie das Gerät bewegen, befüllen, bei Störungen, bevor Sie das Gerät reinigen
oder wenn Sie es nicht gebrauchen, immer den
Netzstecker aus der Netzsteckdose!
• Ziehen Sie niemals am Netzkabel, um den Netzstecker aus der Netzsteckdose zu ziehen. Ziehen
Sie am Netzstecker selbst.
• Berühren Sie den Gerätestecker nicht mit nassen
oder feuchten Händen.
Sie dürfen das Gerät keinesfalls in Wasser
oder andere Flüssigkeiten tauchen.
• Sollte das Gerät doch einmal in Flüssigkeit gefallen sein, ziehen Sie sofort den Netzstecker aus
der Netzsteckdose. Danach das Gerät nicht
mehr in Betrieb nehmen, sondern erst von einer
zugelassenen Servicestelle überprüfen lassen.
• Setzen Sie das Gerät keiner Feuchtigkeit aus und
benutzen Sie es nicht im Freien.
• Benutzen Sie den Reiskocher nicht, wenn Sie sich
auf feuchtem Boden befinden oder wenn Ihre
Hände oder das Gerät nass sind.
• Verlegen Sie das Netzkabel so, dass es nicht mit
heißen oder scharfkantigen Gegenständen in
Berührung kommt.
• Knicken oder quetschen Sie das Netzkabel
nicht, und wickeln Sie es nicht um das Gerät.
• Lassen Sie beschädigte Netzstecker oder Netzkabel sofort von autorisiertem Fachpersonal
oder dem Kundenservice austauschen, um
Gefährdungen zu vermeiden.
Verletzungsgefahr!
• Lassen Sie das Gerät während des Betriebes
nicht ohne Aufsicht.
VORSICHT! Aus der Dampfaustrittsöffnung und
beim Öffnen des Deckels tritt heißer Dampf
aus! Verbrühungsgefahr!
Dieses Symbol auf dem Gerät warnt Sie vor
Verbrennungsgefahr durch heiße Oberflächen.
• Dieses Gerät ist nicht dafür bestimmt, durch
Personen (einschließlich Kinder) mit eingeschränkten physischen, sensorischen oder
geistigen Fähigkeiten oder mangels Erfahrung
und/oder mangels Wissen benutzt zu werden,
es sei denn, sie werden durch eine für ihre
Sicherheit zuständige Person beaufsichtigt oder
erhielten von ihr Anweisungen, wie das Gerät
zu benutzen ist.
• Kinder sollten beaufsichtigt werden, um sicherzustellen, dass sie nicht mit dem Gerät spielen.
• Lassen Sie das Gerät und die Zubehörteile vollständig abkühlen, bevor Sie sie reinigen und verstauen.
• Benutzen Sie keine externe Zeitschaltuhr oder
ein separates Fernwirksystem um das Gerät zu
betreiben.
Achtung! Geräteschäden!
• Decken Sie während des Kochens niemals den
Deckel mit Handtüchern oder ähnlichem ab.
• Stellen Sie das Gerät niemals in der Nähe von
Wärmequellen auf.
• Öffnen Sie niemals das Gehäuse. In diesem Fall
ist die Sicherheit nicht gegeben und die Gewährleistung erlischt.
• Verwenden Sie nur die im Lieferumfang enthaltenen Zubehörteile und benutzen Sie das Gerät
nie ohne den eingesetzten Kochbehälter.
- 18 -
Page 21

Verwendungszweck
Geräteübersicht
Benutzen Sie den Reiskocher ausschließlich zum
Kochen von Reis und zum Dampfgaren von Lebensmitteln, wie z. B. Gemüse oder Fisch.
Dieser Reiskocher ist nicht für den gewerblichen
Gebrauch bestimmt, sondern ausschließlich für die
Benutzung im privaten Haushalt!
Technische Daten
Nennspannung: 220 - 240 V ~ / 50 Hz
Leistungsaufnahme: 700 W
Lieferumfang
1 Reiskocher,
inkl. Kochbehälter und Dampfgareinsatz
1 Anschlussleitung mit Schutzkontaktstecker
1 Messbecher
1 Kunststofflöffel
1 Bedienungsanleitung
Die Gesamtkapazität des Messbechers beträgt ca.
180 ml. Zur Erleichterung der Befüllung besitzt der
Messbecher 2 unterschiedliche Skalierungen:
1/4 = ca. 45 ml
1/2 = ca. 90 ml
3/4 = ca. 135 ml
40 = ca. 40 ml
80 = ca. 80 ml
120 = ca. 120 ml
160 = ca. 160 ml
1 Dampfaustrittsöffnung
2 Deckel
3 Dampfgareinsatz
4 Kochbehälter
5 gelbe Kontrolllampe (Warmhalten)
6 rote Kontrolllampe (Kochen)
7 Funktionswahlschalter für „Kochen“ und
„Warmhalten“
8 Anschlussbuchse für Netzleitung
Vor dem ersten Gebrauch
Entnehmen Sie den Reiskocher vorsichtig aus der
Verpackung. Entfernen Sie eventuell vorhandene
Schutzfolien und reinigen Sie die mit Lebensmitteln
in Berührung kommenden Teile von Verpackungsstaubresten. Reinigen Sie das Gerät wie im Kapitel
„Reinigen und Pflegen” beschrieben.
Benutzung des Reiskochers
Mit diesem Gerät ist es möglich, sowohl Reis zu kochen als auch gleichzeitig andere Lebensmittel
dampfzugaren. Experimentieren Sie ein wenig, um
die hierfür richtige Menge Wasser und die richtige
Kochzeit für die verschiedenen Kombinationsmöglichkeiten herauszufinden.
Reis kochen
Hinweis:
Bestreichen Sie die Innenseite des Kochbehälters 4
gleichmäßig mit ein wenig Fett oder Pflanzenöl, um
ein besseres Kochergebnis zu erzielen.
1. Nehmen Sie den Deckel 2 ab.
2. Entnehmen Sie den Kochbehälter 4.
- 19 -
Page 22

Hinweis:
Wenn der Kochbehälter 4 beschädigt ist, benutzen
Sie diesen nicht weiter! Durch die Beschädigungen
kann es sein, dass die Sicherheitsabschaltung des
Gerätes auslöst und das Gerät sich nicht mehr einschalten lässt.
3. Messen Sie die gewünschte Menge Reis mit
Hilfe des mitgelieferten Messbechers ab.
Als Richtwert gilt: Ein gestrichener Messbecher
- gefüllt mit Reis - ergibt eine Portion für eine
Person. Ermitteln Sie, die für Sie richtige Menge Reis / Wasser, durch einige Kochversuche.
4. Waschen Sie den losen Reis gründlich und sie-
ben Sie ihn ab. Dabei gehen zwar Nährstoffe
verloren, jedoch kann es ohne Waschen zu
schlechteren Kochergebnissen und zu erhöhter
Schaum- und Dampfbildung im Kochbehälter
4 kommen. Beachten Sie auch immer die Zubereitungshinweise des Reisherstellers.
5. Geben Sie den Reis nach dem Waschen in
den Kochbehälter 4 und streichen Sie den
Reis glatt.
Hinweis:
Geben Sie mindestens 2 Messbecher Reis in den
Reiskocher! Bei weniger Reis kann es zu schlechten
Kochergebnissen kommen!
6. Anschließend gießen Sie bis zur entsprechen-
den CUP-Markierung im Kochbehälter 4 Wasser ein:
• 2 Messbecher Reis = Wasser bis zur CUPMarkierung „2”
• 4 Messbecher Reis = Wasser bis zur CUPMarkierung „4”
• 6 Messbecher Reis = Wasser bis zur CUPMarkierung „6”
• 8 Messbecher Reis = Wasser bis zur CUPMarkierung „8”
• 10 Messbecher Reis = Wasser bis zur CUPMarkierung „10”
Je nach Geschmacksrichtung, kann dem Reis
auch Salz hinzugefügt werden.
Hinweis:
Wenn Sie warmes Wasser verwenden, kann die
Kochzeit verkürzt werden. Verwenden Sie dann
allerdings etwas weniger Wasser, als die CUP-Markierung im Kochbehälter 4 vorsieht.
Hinweis:
Je nach Reissorte kann es vorkommen, dass Sie etwas mehr oder etwas weniger Wasser einfüllen
müssen, um ein optimales Kochergebnis zu erzielen.
Variieren Sie die Wassermenge nach Ihren eigenen
Erfahrungen und Geschmack.
7. Setzen Sie nach dem Befüllen des Kochbehälters 4, diesen in das Reiskochergehäuse ein.
Achten Sie dabei darauf, dass...
- ... sich keine Feuchtigkeit und kein Reis an der
Außenseite des Kochbehälters 4 befinden, um
eine Verschmutzung des Kochbereiches zu vermeiden. Gegebenenfalls ist die Außenseite mit einem
sauberen Tuch trocken zu wischen.
- ... der Kochbehälter 4 nicht schief oder verkantet
in das Reiskochergehäuse eingesetzt wird. Setzen
Sie den Kochbehälter 4 immer korrekt und gera-
de in das Reiskochergehäuse ein. Ansonsten kann
es sein, dass die Sicherheitsabschaltung des Gerätes auslöst und das Gerät sich nicht mehr einschalten lässt.
Hinweis:
Dieses Gerät ist mit einem Sicherheitsschalter ausgestattet: der Kochvorgang lässt sich mit leerem Kochbehälter 4 ohne Deckel 2 nicht starten. Mit aufgesetztem Deckel 2 kann der Kochvorgang jedoch
auch mit leerem Kochbehälter gestartet werden.
8. Schließen Sie den Deckel 2.
9. Stecken Sie die Anschlussleitung in die Anschlussbuchse 8 an der Geräteseite.
10. Stecken Sie den Netzstecker in eine vorschriftsmäßig installierte Netzsteckdose. Die gelbe
Kontrolllampe 5 leuchtet auf.
- 20 -
Page 23

Achtung!
Während des Garvorgangs tritt Dampf aus der
Dampfaustrittsöffnung 1 aus. Halten Sie niemals
Hände oder andere Körperteile über die Dampfaustrittsöffnung 1 während des Garvorganges. Es besteht die Gefahr von Verbrühungen!
11. Drücken Sie den Funktionswahlschalter 7
nach unten. Die gelbe Kontrolllampe 5
erlischt und die rote Kontrolllampe 6
leuchtet auf. Der Kochvorgang beginnt.
Hinweis:
Ist der Kochbehälter 4 nicht eingesetzt und gefüllt,
lässt sich der Funktionswahlschalter 7 nicht auf
„Kochen” stellen.
Sobald der Reis gekocht ist, schaltet der Reiskocher
automatisch auf die Warmhaltefunktion zurück. Die
rote Kontrolllampe 6 erlischt, während die
gelbe Kontrolllampe 5 wieder aufleuchtet.
12. Öffnen Sie den Deckel 2. Der Reis ist nun fertig
zum Verzehr.
Achtung!
Verwenden Sie zur Entnahme des Reises ausschließlich den mitgelieferten Kunststofflöffel. Ansonsten
kann die Antihaftbeschichtung beschädigt werden.
Wenn Sie den Reis nicht sofort verzehren:
• Öffnen Sie während der Warmhaltezeit nicht den
Deckel 2.
• Lassen Sie den Reis nicht länger als 2 Stunden in
der Warmhaltung.
Dampfgaren
Achtung!
Während des Garvorgangs den Dampfgareinsatz
3 nicht abheben, da durch den austretenden
Dampf Verbrühungsgefahr besteht. Der Dampfgareinsatz 3 erhitzt sich während des Garvorgangs.
Nehmen Sie den Dampfgareinsatz 3 mittels Topflappen oder ähnlichem vom Kochbehälter 4 ab.
Hinweis:
Achten Sie darauf, dass der Kochbehälter 4 auch
beim Dampfgaren korrekt eingesetzt ist. Der Kochbehälter 4 darf nicht beschädigt sein. Ansonsten
kann es sein, dass die Sicherheitsabschaltung des
Gerätes auslöst und das Gerät sich nicht mehr einschalten lässt.
1. Gießen Sie die gewünschte Wassermenge in
den Kochbehälter 4. Die Garzeit ist abhängig
von der eingefüllten Wassermenge. Beachten
Sie die Beispiele in der nachfolgenden Tabelle.
• 1 gefüllter Messbecher ist ausreichend für ca.
15 Minuten Dampfgaren.
• 2 gefüllte Messbecher sind ausreichend für ca.
30 Minuten Dampfgaren usw.
Fisch / Mee-
resfrüchte
Muscheln
(bis zum
Öffnen garen)
Garnelen
(bis rosa Fär-
bung garen)
Wasser in
Milliliter
ca. 120 ml ca. 450 g
ca. 140 ml ca. 350 g
Gewicht /
Menge
Achtung!
Ziehen Sie stets den Netzstecker aus der Netzsteckdose, wenn Sie den Reiskocher nicht mehr verwenden. Es besteht die Gefahr eines elektrischen
Schlages!
Fisch (Filet) ca. 180 ml ca. 350 g
Steak ca. 240 ml ca. 450 g
Austern
(in der Schale)
- 21 -
ca. 300 ml ca. 700 g
Page 24
Gemüse
Pilze (ganz) ca. 120 ml ca. 450 g
Erbsen
(mit Schale)
Spargel ca. 200 ml ca. 450 g
Karotten
(geschält)
Wasser in
Milliliter
ca. 200 ml ca. 350 g
ca. 240 ml ca. 450 g
Gewicht /
Menge
Sobald das eingefüllte Wasser vollständig aus dem
Kochbehälter 4 verdampft ist, schaltet der Reiskocher automatisch auf die Warmhaltefunktion zurück.
Die rote Kontrolllampe 6 erlischt, während
die gelbe Kontrolllampe 5 wiederum aufleuchtet.
Die eingefüllten Lebensmittel sind fertig gegart und
können verzehrt werden.
Fehlerbehebung
Fehler Ursache Behebung
grüne Bohnen
(geschnitten)
grüne Bohnen
(ganz)
Rosenkohl ca. 300 ml ca. 350 g
Maiskolben ca. 360 ml 2 Kolben
2. Geben Sie die zu garenden Lebensmittel in
den Dampfgareinsatz 3.
3. Setzen Sie das Behältnis auf den Kochbehälter
4.
4. Schließen Sie den Deckel 2.
5. Stecken Sie den Netzstecker in eine Netzsteckdose. Die gelbe Kontrolllampe 5
leuchtet auf.
6. Drücken Sie den Funktionswahlschalter 7
nach unten. Die gelbe Kontrolllampe 5
erlischt und die rote Kontrolllampe 6
leuchtet auf. Das Dampfgaren beginnt.
ca. 240 ml ca. 450 g
ca. 300 ml ca. 450 g
Das Gerät zeigt
keine Funktion.
Die gelbe Kon-
trolllampe 5
leuchtet, der
Kochvorgang
kann jedoch
nicht gestartet
werden.
Der Reiskocher
ist nicht mit der
Steckdose ver-
bunden.
Die Netz-
steckdose ist
defekt.
Der Kochbehäl-
ter 4 ist leer
und der Sicher-
heitsschalter
wird so nicht
herunter-
gedrückt.
Stecken Sie den
Netzstecker in
eine Netzsteckdose.
Benutzen Sie
eine andere
Netzsteckdose.
Füllen Sie die
zu garenden
Lebensmittel in
den Kochbehäl-
ter 4.
- 22 -
Page 25

Reinigen und Pflegen
Garantie und Service
Gefahr! Elektrischer Schlag!
• Ziehen Sie vor dem Reinigen immer den Netz-
stecker und lassen Sie das Gerät vollständig abkühlen, bevor Sie es reinigen und verstauen!
• Achten Sie darauf, dass keine Flüssigkeit auf die
Heizplatte und in das Innere des Reiskochers gelangt.
• Zur Reinigung des Reiskochergehäuses inkl. der
Heizplatte benutzen Sie ein trockenes Tuch. Verwenden Sie keine scharfen Reinigungs- und
Scheuermittel. Diese können die Oberfläche angreifen.
• Reinigen Sie den Dampfgareinsatz 3, den
Deckel 2, den Kochbehälter 4, den Kunststofflöffel und den Messbecher in spülmittelhaltigem
Wasser.
• Trocknen Sie alle Teile, bevor Sie das Gerät wie-
der in Betrieb nehmen.
Entsorgen
Werfen Sie das Gerät keinesfalls in den
normalen Hausmüll. Dieses Produkt
unterliegt der europäischen Richtlinie
2002/96/EC.
Entsorgen Sie das Gerät über einen zugelassenen
Entsorgungsbetrieb oder über Ihre kommunale
Entsorgungseinrichtung.
Beachten Sie die aktuell geltenden Vorschriften.
Setzen Sie sich im Zweifelsfall mit Ihrer Entsorgungseinrichtung in Verbindung.
Sie erhalten auf dieses Gerät 3 Jahre Garantie ab
Kaufdatum. Das Gerät wurde sorgfältig produziert
und vor Anlieferung gewissenhaft geprüft.
Bitte bewahren Sie den Kassenbon als Nachweis
für den Kauf auf. Bitte setzen Sie sich im Garantiefall mit Ihrer Servicestelle telefonisch in Verbindung.
Nur so kann eine kostenlose Einsendung Ihrer Ware
gewährleistet werden.
Die Garantieleistung gilt nur für Material- oder
Fabrikationsfehler, nicht aber für Transportschäden,
Verschleißteile oder für Beschädigungen an zerbrechlichen Teilen, z. B. Schalter oder Akkus. Das
Produkt ist lediglich für den privaten und nicht für
den gewerblichen Gebrauch bestimmt.
Bei missbräuchlicher und unsachgemäßer Behandlung, Gewaltanwendung und bei Eingriffen, die
nicht von unserer autorisierten Service-Niederlassung vorgenommen wurden, erlischt die Garantie.
Ihre gesetzlichen Rechte werden durch diese
Garantie nicht eingeschränkt.
Die Garantiezeit wird durch die Gewährleistung
nicht verlängert. Dies gilt auch für ersetzte und reparierte Teile. Eventuell schon beim Kauf vorhandene
Schäden und Mängel müssen sofort nach dem
Auspacken gemeldet werden, spätestens aber zwei
Tage nach Kaufdatum. Nach Ablauf der Garantiezeit anfallende Reparaturen sind kostenpflichtig.
Führen Sie alle Verpackungsmaterialien
einer umweltgerechten Entsorgung zu.
- 23 -
Page 26
Service Deutschland
Tel.: 01805 772 033 (0,14 EUR/Min. aus dem dt.
Festnetz, Mobilfunk max. 0,42 EUR/Min.)
E-Mail: kompernass@lidl.de
IAN 73271
Service Österreich
Tel.: 0820 201 222 (0,15 EUR/Min.)
E-Mail: kompernass@lidl.at
IAN 73271
Service Schweiz
Tel.: 0842 665566 (0,08 CHF/Min.,
Mobilfunk max. 0,40 CHF/Min.)
E-Mail: kompernass@lidl.ch
IAN 73271
Importeur
KOMPERNASS GMBH
BURGSTRASSE 21
44867 BOCHUM, GERMANY
www.kompernass.com
- 24 -
 Loading...