

PHOTO SLIDE SCANNER SND 3600 A2
PHOTO SLIDE SCANNER
Operating instructions
DIA-SCANNER
Bedienungsanleitung
SCANNER PENTRU DIAPOZITIVE
Instrucţiuni de utilizare
IAN 73761
Before reading, unfold both pages containing illustrations and familiarise
yourself with all functions of the device.
Înainte de a citi instrucţiunile, priviţi ambele pagini cu imagini şi familiarizaţi-vă
cu toate funcţiile aparatului.
Klappen Sie vor dem Lesen die beiden Seiten mit den Abbildungen aus und
machen Sie sich anschließend mit allen Funktionen des Gerätes vertraut.
GB / CY Operating instructions Page 1
RO Instrucţiuni de utilizare Pagina 27
DE / AT / CH Bedienungsanleitung Seite 53
2 x

Index
Introduction . . . . . . . . .2
Information for these
operating instructions . . . . . 2
Copyright . . . . . . . . . . . . . . 2
Limited liability . . . . . . . . . . 2
Warnings . . . . . . . . . . . . . . 3
Proper use . . . . . . . . . . . . . 3
Safety . . . . . . . . . . . . . .4
Basic Safety Instructions . . . 4
Setting up and
connecting . . . . . . . . . .6
Safety instructions . . . . . . . . 6
Package contents and
transport inspection . . . . . . 6
Disposal of the packaging . 7
Requirements for the set-up
location . . . . . . . . . . . . . . . 7
Connecting to a computer . 8
Operating components 14
Handling and
operation . . . . . . . . . .14
Insert the negative strip . . . 14
Inserting slides . . . . . . . . . 14
Starting the ArcSoft
MediaImpression 2
programme . . . . . . . . . . . 16
ArcSoft MediaImpression 2
programme . . . . . . . . . . . . 16
Scanning with the ArcSoft
MediaImpression 2
programme . . . . . . . . . . . 17
After Use . . . . . . . . . . . . . 20
Cleaning . . . . . . . . . .21
Safety instructions . . . . . . . 21
Cleaning . . . . . . . . . . . . . . 21
Troubleshooting . . . .22
Safety instructions . . . . . . . 22
Malfunction causes and
remedies . . . . . . . . . . . . . . 22
Storage/Disposal . . .23
Storage . . . . . . . . . . . . . . . 23
Disposal of the device . . . 23
Appendix . . . . . . . . . .24
Technical data . . . . . . . . . 24
Note regarding the
conformity declaration . . 25
Warranty . . . . . . . . . . . . . 25
Service . . . . . . . . . . . . . . . 26
Importer . . . . . . . . . . . . . . 26
GB
CY
SND 3600 A2
1

Introduction
GB
CY
Information for these operating instructions
Congratulations on the purchase of your new appliance.
You have clearly decided in favor of a quality product.
These operating instructions are a component of the Slide & Negative
Scanner SND 3600 A2 (henceforth designated as the device) and
supplies you with important information for intended use, safety and
connection as well as operation of the device. The operating instructions must be constantly kept available close to the device. They
are to be read and used by anyone assigned to the operation and
repairing of the device. Keep these operating instructions and hand
them over with the device to any future owners.
Copyright
This documentation is copyright protected.
Any copying and/or printing, including partial copying/printing,
as well as reproductions of the diagrams, even in an altered state is
only allowed with written permission from the manufacturer.
Limited liability
All technical information, data and information for connection and
operation, contained in these operating instructions correspond to
the latest at the time of printing and, to the best of our knowledge,
take into account our previous experience and know-how.
No claims can be derived from the details, illustrations and descriptions
in these instructions.
The manufacturer assumes no responsibility for damage caused
by failure to observe the instructions, improper use, inappropriate
repairs, making unauthorized changes or for using unapproved
replacement parts.
Introduction
2
SND 3600 A2

Introduction
Warnings
In the current operation instructions the following warnings are used:
WARNING
A warning of this danger level signifi es a possible
dangerous situation.
If the dangerous situation is not avoided it can lead to injuries.
► The directives in this warning are there to avoid personal
injuries.
IMPORTANT
A warning of this danger level signifi es possible
property damage.
If the situation is not avoided it can lead to property damage.
► The directives in this warning are there to avoid property
damage.
NOTICE
A notice signifi es additional information that assists in the
►
handling of the device.
Proper use
This device is intended exclusively for the non-commercial use of
scanning and digitizing fi lm negatives and slides.
This device is not intended for any other use or for uses beyond those
mentioned.
GB
CY
SND 3600 A2
3

GB
WARNING
CY
Danger from unintended use!
Danger can come from the device if used for unintended purposes
and/or other types of use.
► Use the device exclusively for intended purposes.
► Observe the procedures described in these operating instructions.
Claims of any kind for damage resulting from unintended use will not
be excepted.
The operator alone bears liability.
Safety
In this chapter you receive important safety information regarding
handling of the device.
This device complies with the statutory safety regulations. Improper
use can lead to personal injury and property damage.
Basic Safety Instructions
For safe handling of the device observe the following safety information:
■ Before use check the device for visible external damage. Do not
put into operation a device that is damaged or has been dropped.
■ Damaged cables or connections should be replaced by authorized
qualifi ed persons or by the customer service department.
Safety
4
SND 3600 A2

Safety
■
This appliance is not intended for use by individuals (including
children) with restricted physical, physiological or intellectual abilities or defi ciences in experience and/or knowledge unless they
are supervised by a person responsible for their safety or receive
from this person instruction in how the appliance is to be used.
■ Children should be supervised to ensure that they do not play
with the appliance.
■ Repairs should only be carried out by authorized specialist com-
panies or by the customer service department. Incorrect repairs
can result in signifi cant dangers for the user. In addition warranty
claims become void.
■ A repair to the device during the warranty period may only be
carried out by a customer service department authorized by the
manufacturer otherwise no additional warranty claims can be
considered for subsequent damages.
■ Defective components may only be replaced with original
replacement parts. Only by using original replacement parts can
you guarantee that the safety requirements are complied with.
■ Do not carry out any unauthorised reconstructions or alterations
to the device.
■ Protect the device from moisture and liquid penetration. Do not
place any liquid-fi lled vessels (such as fl ower vases) next to the
appliance.
■ Do not operate the device in the vicinity of open fl ames.
GB
CY
SND 3600 A2
5
Setting up and connecting
Setting up and connecting
GB
CY
Safety instructions
WARNING
Personal injury and property damage can occur
during initial operation of the device!
Observe the following safety information to avoid danger:
► Packaging material should not be used as a play thing.
There is a risk of suff ocation!
Package contents and transport inspection
The device is delivered with the following components as standard:
▯ Scanner
▯ 1 x Slide magazine
▯ 2 x Negative holder
▯ Programme CD
▯ Cleaning brush
▯ Operating instructions
NOTICE
Check the contents to make sure everything is there and for
►
visible damage.
► If the contents are not complete or are damaged due to
defective packaging or through transportation contact the
service hotline (see the section “Service”).
6
SND 3600 A2
Setting up and connecting
Disposal of the packaging
The packaging protects the device from transport damage. The packaging materials are selected from the point of view of their environmental
friendliness and disposal technology and are therefore recyclable.
The recirculation of packaging into the material circuit
saves on raw material and reduces generated waste.
Dispose of packaging material that is no longer needed
according to the regionally established regulations.
NOTICE
If possible preserve the device's original packaging during
►
the warranty period so that in the case of a warranty claim
you can package the device properly for return.
Requirements for the set-up location
For safe and faultless operation of the device the set-up location must
fulfi ll the following provisions:
■ The device must be placed on a fi rm, fl at and level surface.
■ Do not place the device in a hot, wet or very damp environment
or in the vicinity of fl ammable materials.
■ Place the device so that it is not subjected to direct sunlight.
GB
CY
SND 3600 A2
7
Setting up and connecting
Connecting to a computer
GB
CY
System prerequisites
♦ You will need a computer with a vacant USB port and with the
operating system Windows
from the Microsoft® corporation.
Installation of the ArcSoft MediaImpression 2 programme
NOTICE
In these operating instructions only the programme sections
►
are described that you will need for scanning your slides
and/or fi lm negatives. You can fi nd further information in the
programme's on-line help.
► The illustrations and descriptions refer to the operating
system Microsoft® Windows® 7. The illustration depictions
can diff er, depending on the display settings, with other
operating systems.
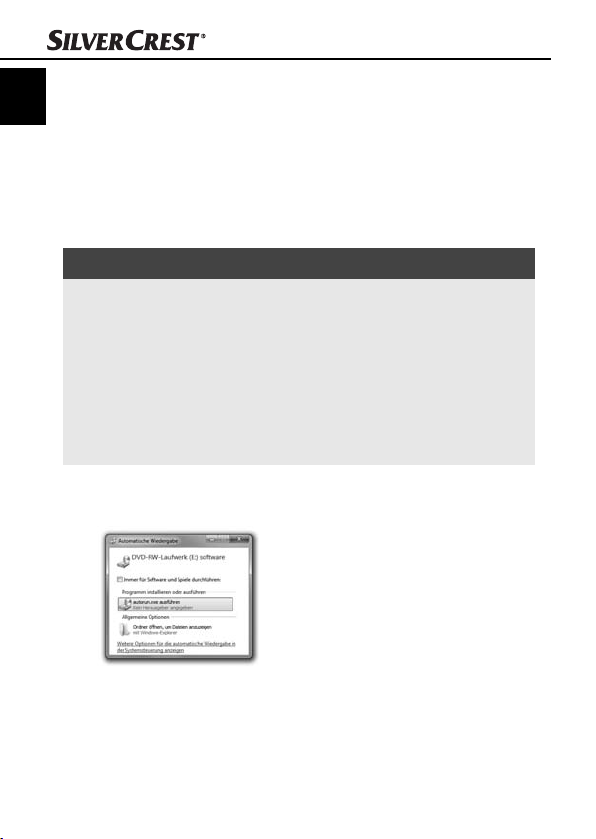
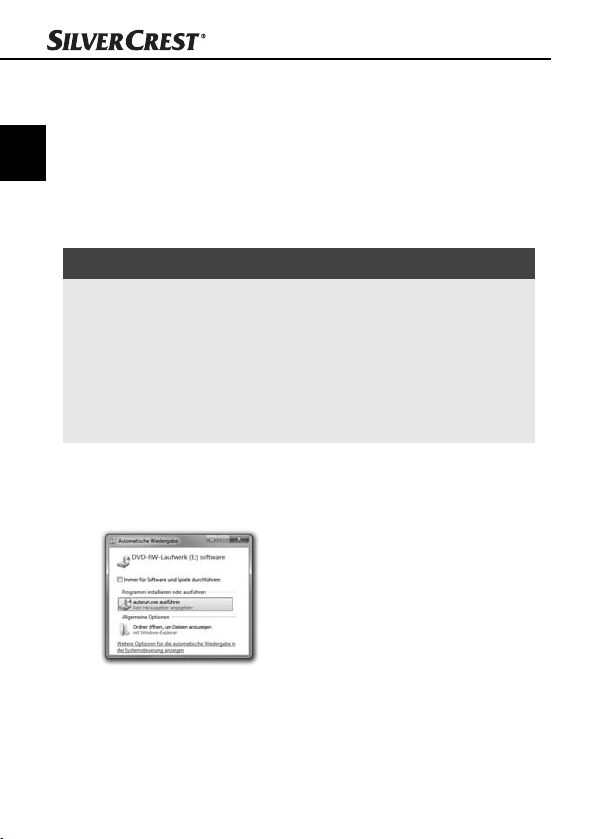
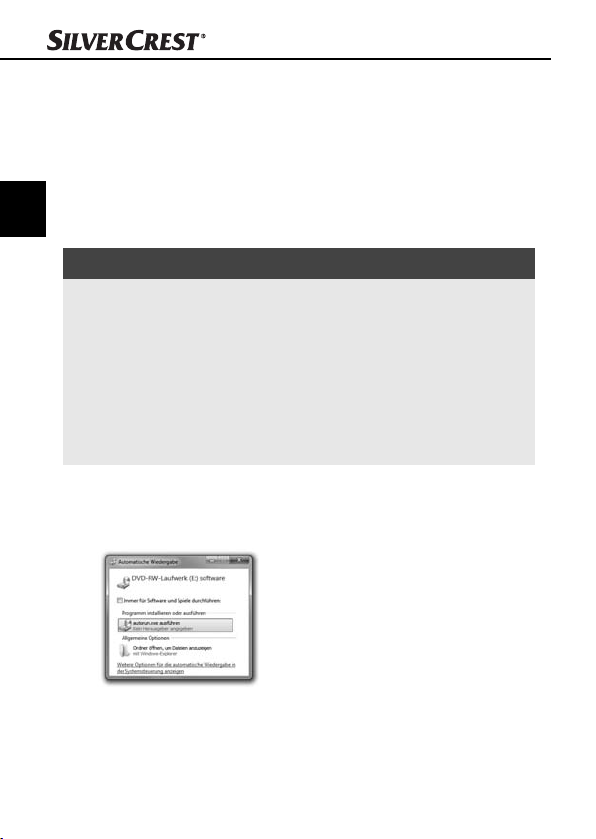
♦ Insert the supplied programme CD into your computer’s CD drive.
The window “Automatic playback” will be displayed.
®
XP, Windows® Vista or Windows® 7
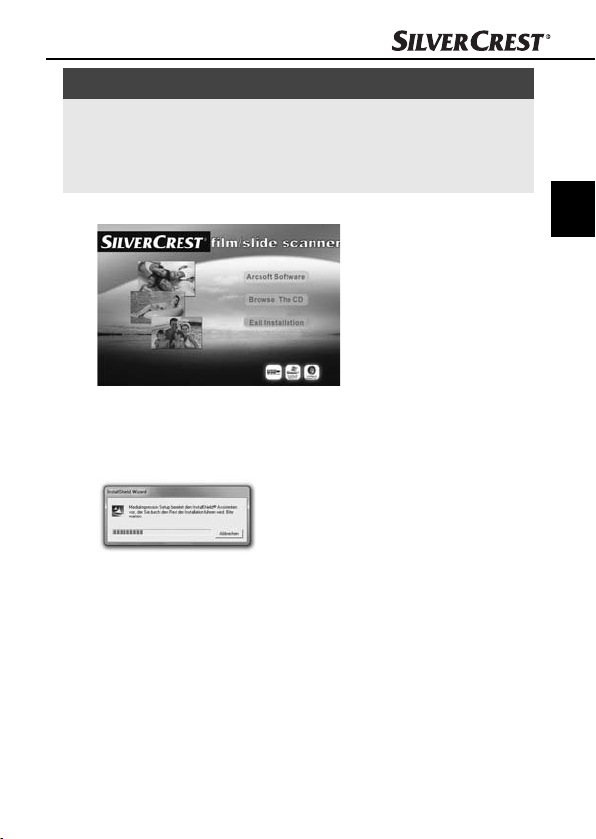
♦ Click on the button “run autorun.exe”.
The installation begins and the start window is displayed.
8
SND 3600 A2
Setting up and connecting
NOTICE
If you have switched off the autostart function and the installa-
►
tion process does not begin automatically you can start the
installation process by double clicking on the fi le "autorun.exe"
in the CD's main directory.
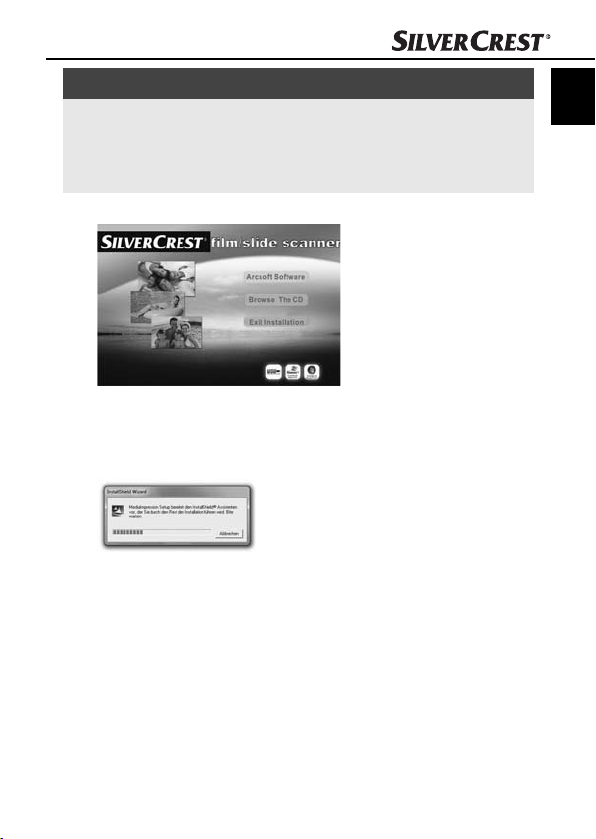
♦ Click on the button “Arcsoft Software” to install the “ArcSoft
MediaImpression 2“ programme.
The installation wizard will be confi gured.
GB
CY
SND 3600 A2
9
GB
CY
Setting up and connecting
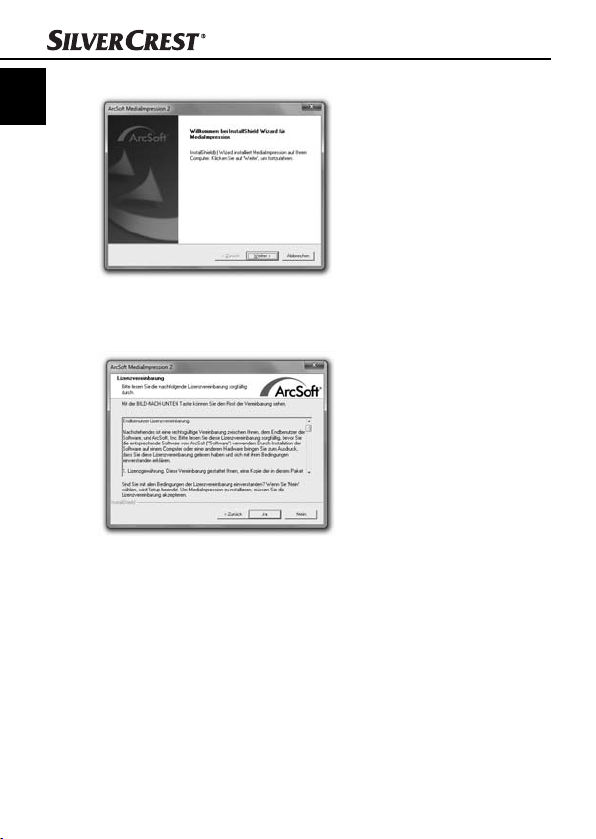
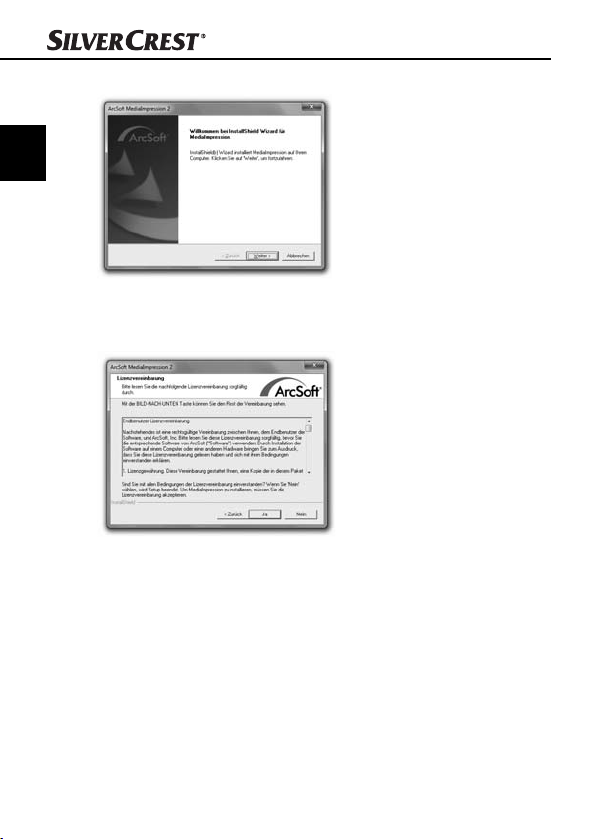
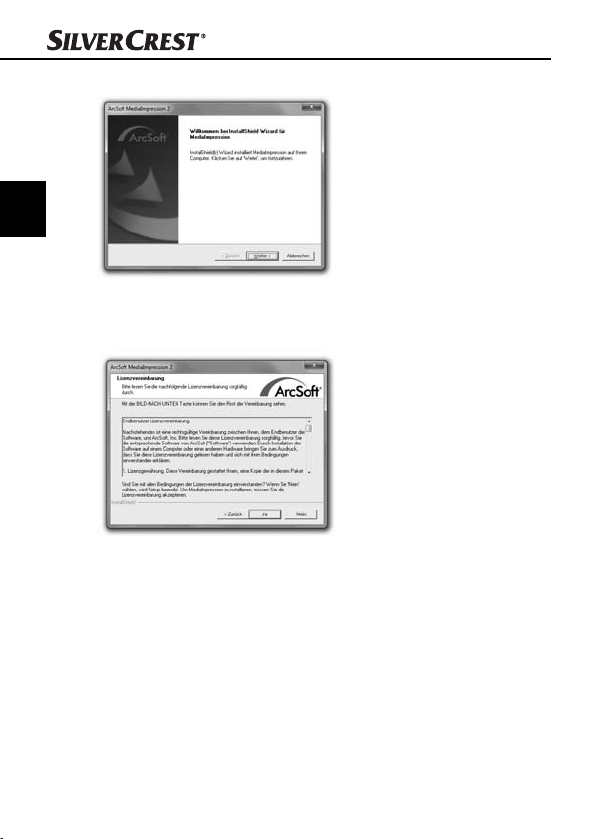
The start window of the installation wizard will be displayed.
♦ Click on the button “Continue>”.
The window “License agreement” will be displayed.
♦ Click on the button “Yes”.
10
SND 3600 A2
Setting up and connecting
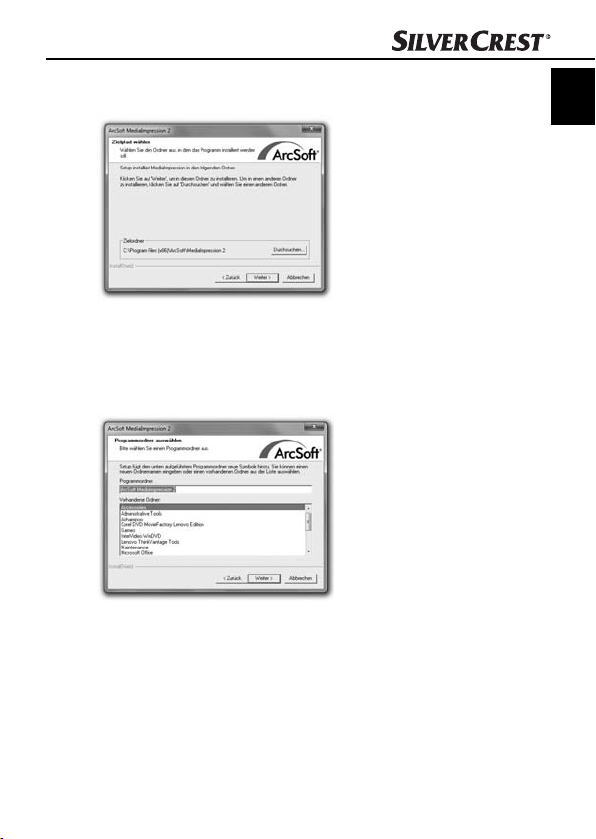
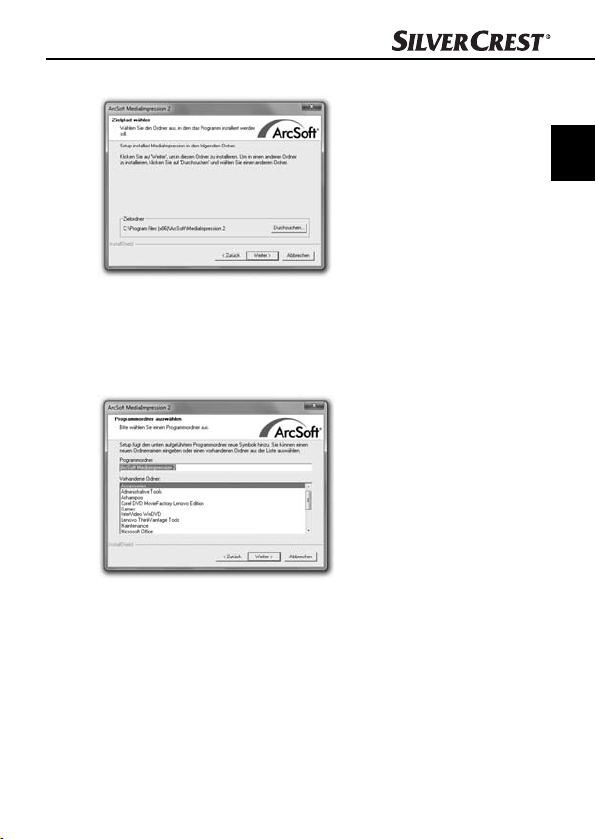
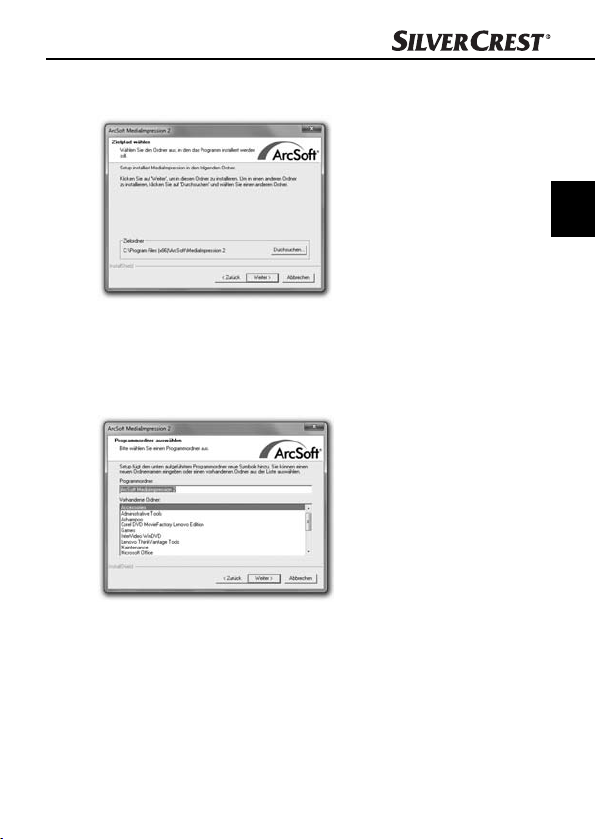
The window for the selection of the installation directory will be
displayed.
♦ Select the desired installation directory and click on the button
“Continue>”.
The window for the selection of the programme folders (Entry in
the Windows start menu) will be displayed.
GB
CY
♦ Select the desired programme folder and click on the button
“Continue>”.
SND 3600 A2
11
GB
CY
Setting up and connecting
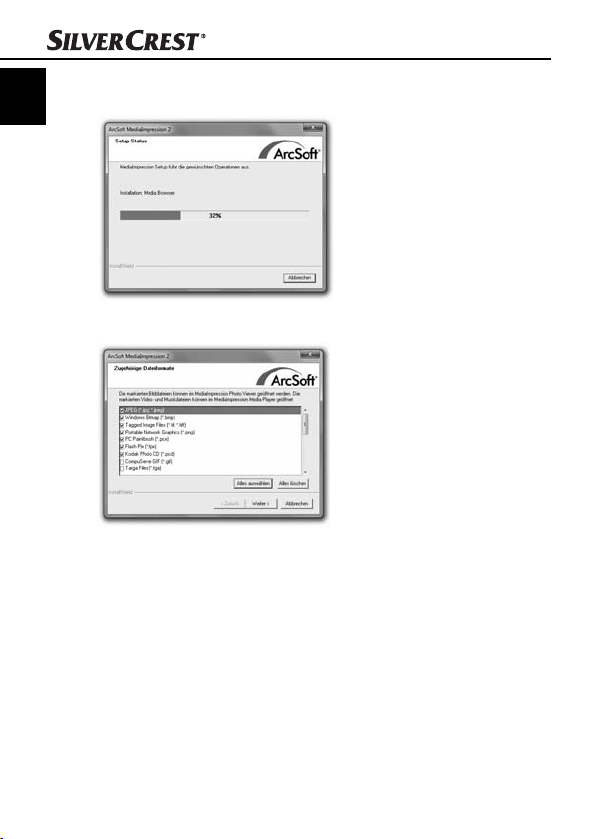
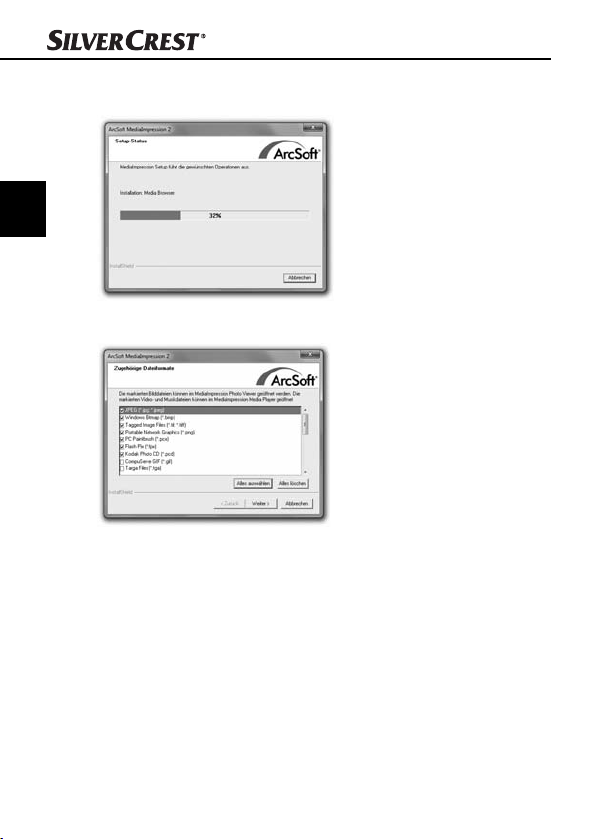
The programme will be installed and the installation progress
will be displayed.
The window “Associated fi le formats” will be displayed.
♦ Select the fi le format that is to be associated with the programme
and click on the button “Continue >”.
12
SND 3600 A2
Setting up and connecting
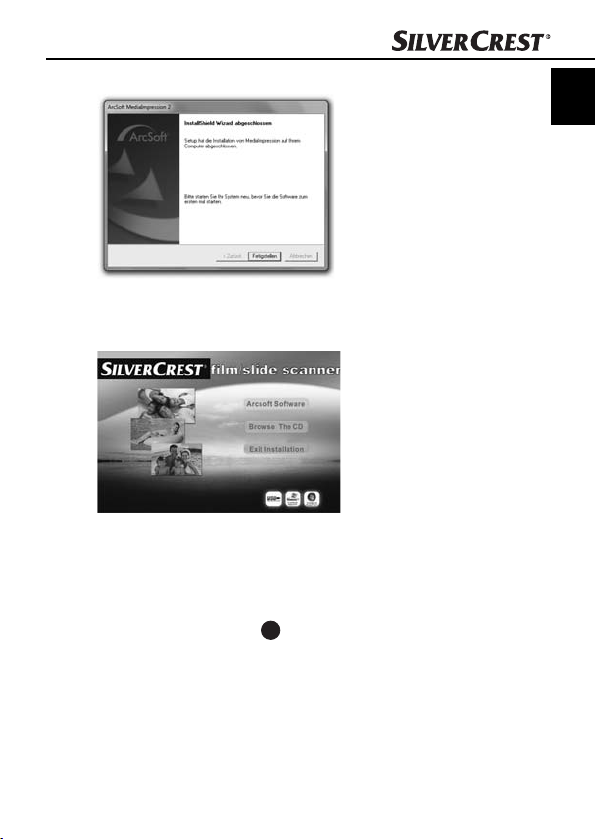
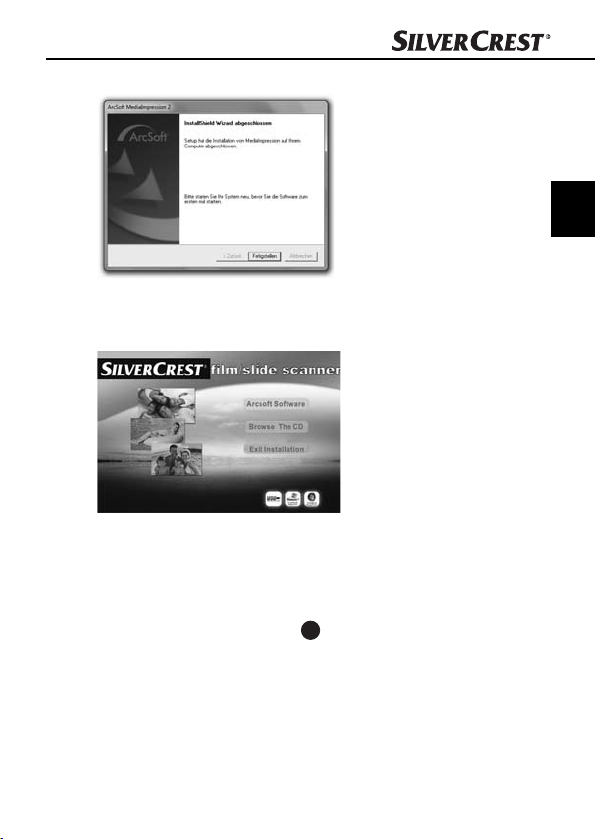
The display will show that the installation has been completed.
♦ Click on the button “Finish”.
The start window will be displayed again.
♦ Click on the button “Exit Installation” to exit the installation
programme.
Connection
♦ Connect the USB cable 4 to a USB port on your computer.
The computer recognizes the new hardware and starts the
automatic driver installation.
GB
CY
SND 3600 A2
13
Operating components/Handling …
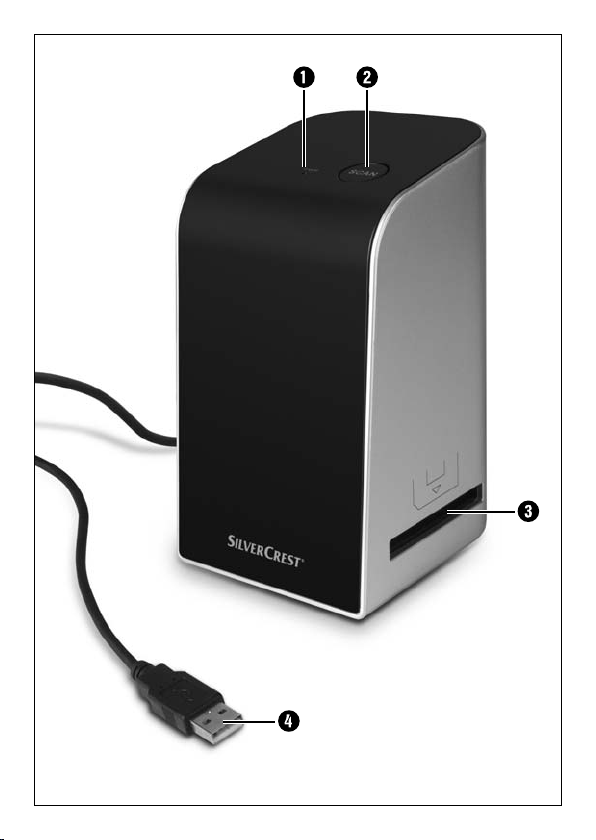
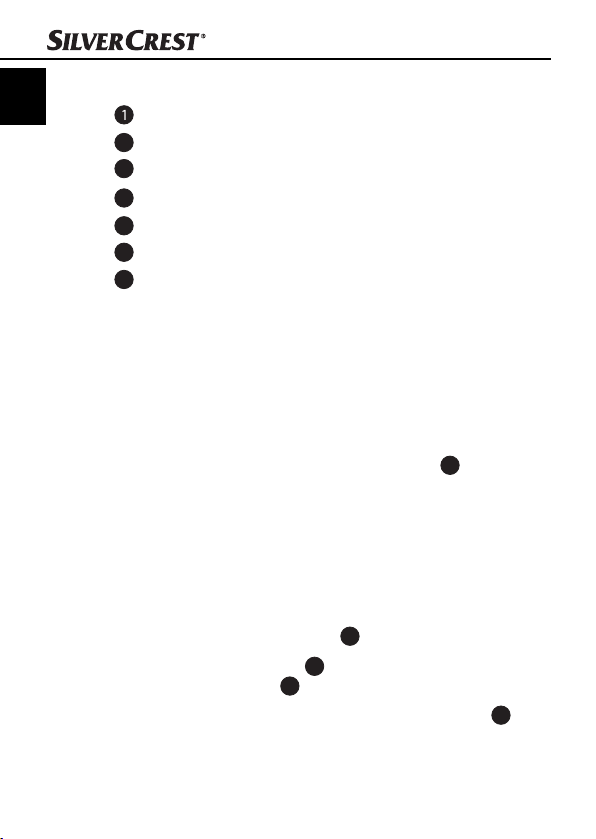
Operating components
GB
CY
LED PWR
2
SCAN button
3
Insert slot for the negative or slide magazine
4
USB connection cable
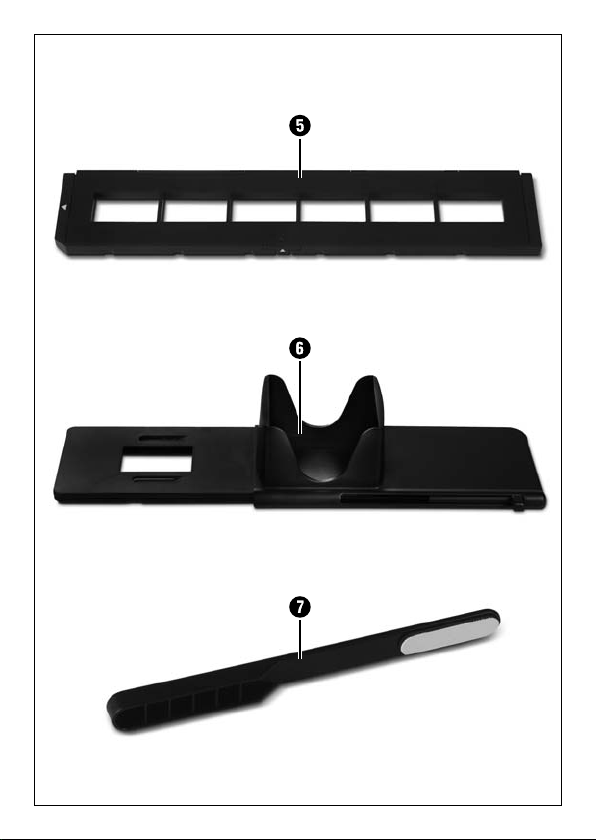
5
Film holder
6
Slide magazine
7
Cleaning brush
Handling and operation
In this chapter you receive important information for the handling
and operation of the device.
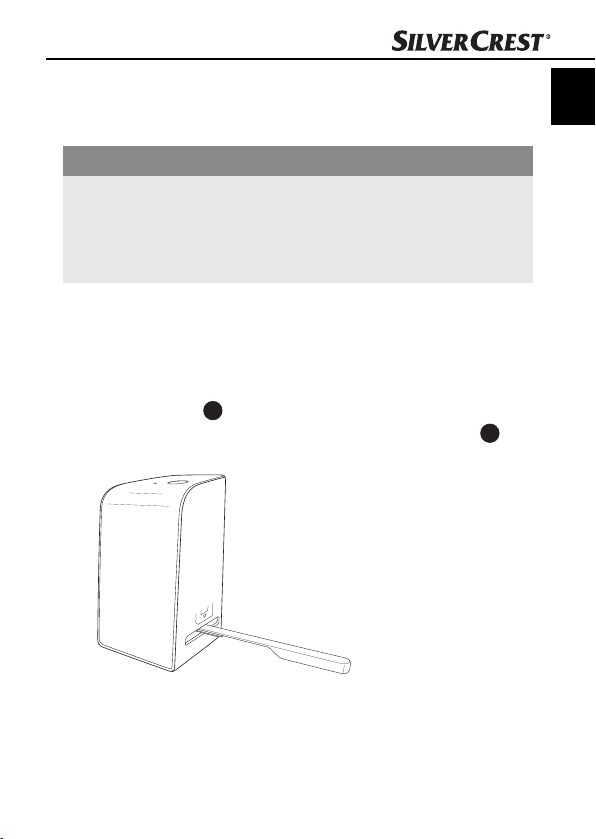
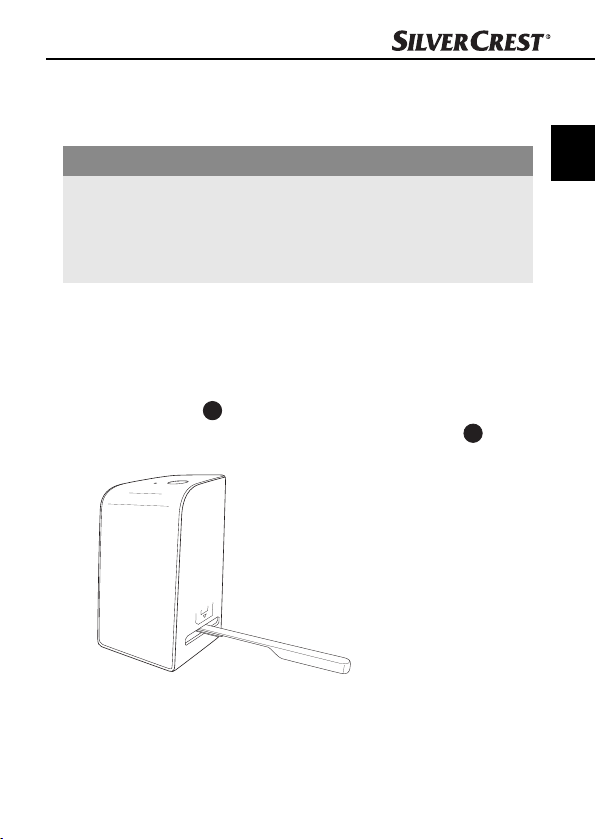
Insert the negative strip
♦ Release the fastener on the front of the fi lm holder 5 and open
the holder.
♦ Insert the fi lm strip, correctly orientated, into the holder.
♦ Close the holder making sure that the cover locks into place.
Inserting slides
♦ Place the slides, with the sides the right way round, into the
intended slot of the slide magazine 6.
♦ First guide the slide magazine 6, with the viewing window
leading, into the insert slot 3.
By means of the slider, located laterally on the slide magazine
the slides contained in the slots are pushed individually into the
scanner.
6
,
14
SND 3600 A2

Handling and operation
♦
For this, fi rst slide the slider away from the scanner to the dead
stop. Then carefully move the slider back towards the scanner.
NOTICE
A slide located in the scanner is thereby removed from the
►
appliance and a new slide is pushed into the visual range of
the scanner.
► Be sure to insert a new slide into the scanner slowly. If this
happens too quickly, then the slide could glide outside the
visual range of the scanner. In this case, you will need to
raise the appliance slightly to the side, so that the slide can
glide back to an optimal position.
♦ When you have decided to fi nish scanning the slides, remove
the slide magazine 6 from the insert slot 3. Remove the
last slide from the bottom of the viewing window of the slide
magazine 6.
GB
CY
SND 3600 A2
15
Handling and operation
Starting the ArcSoft MediaImpression 2 programme
GB
CY
♦ Start the ArcSoft MediaImpression 2 programme by double
clicking on the programme icon on the desktop or select the
corresponding input from the start menu.
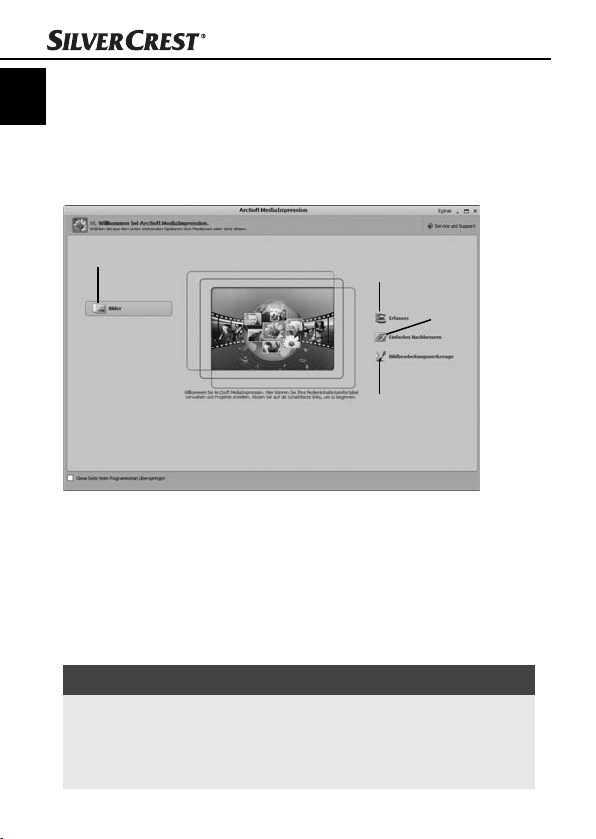
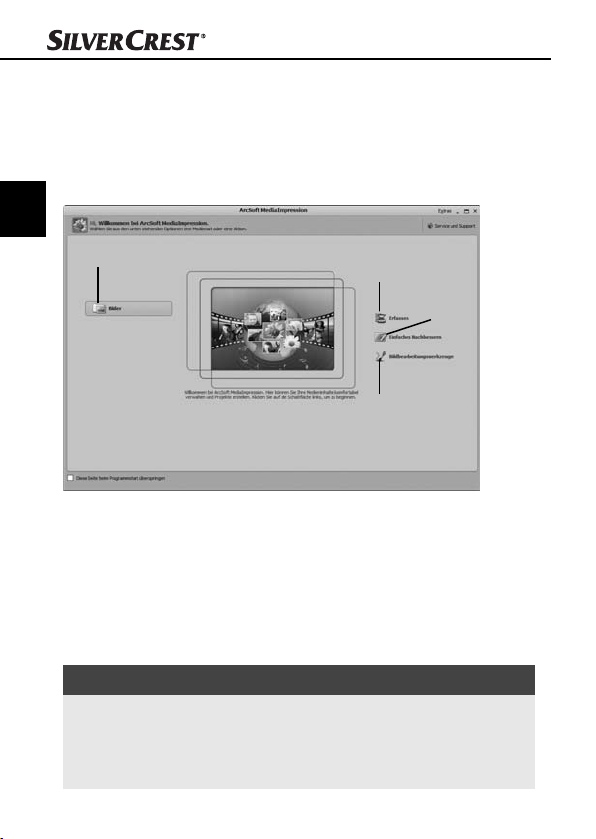
ArcSoft MediaImpression 2 programme
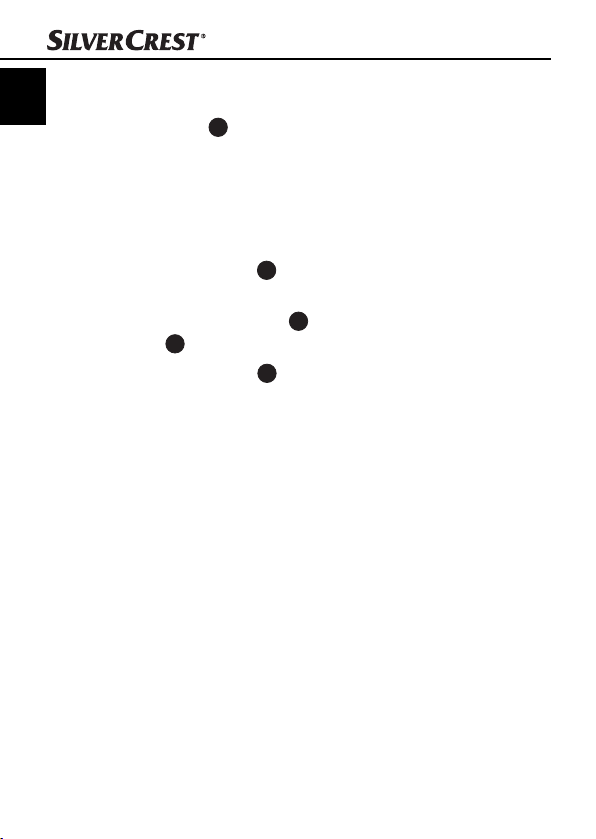
1
There are four options available:
1. Image: Open an available image on the computer or memory
medium.
2. Capture: For the scanning of new images
3. Simple reproduction: Fast image editing
4. Image editing tools: Detailed image editing
NOTICE
In these operating instructions only the programme sections
►
are described that you will need for scanning your slides
and/or fi lm negatives. You can fi nd further information in
the programme's online help.
16
2
3
4
SND 3600 A2
Handling and operation
Scanning with the ArcSoft MediaImpression 2 programme
♦ Connect the device. The LED PWR lights up.
♦ Start the ArcSoft MediaImpression 2 programme.
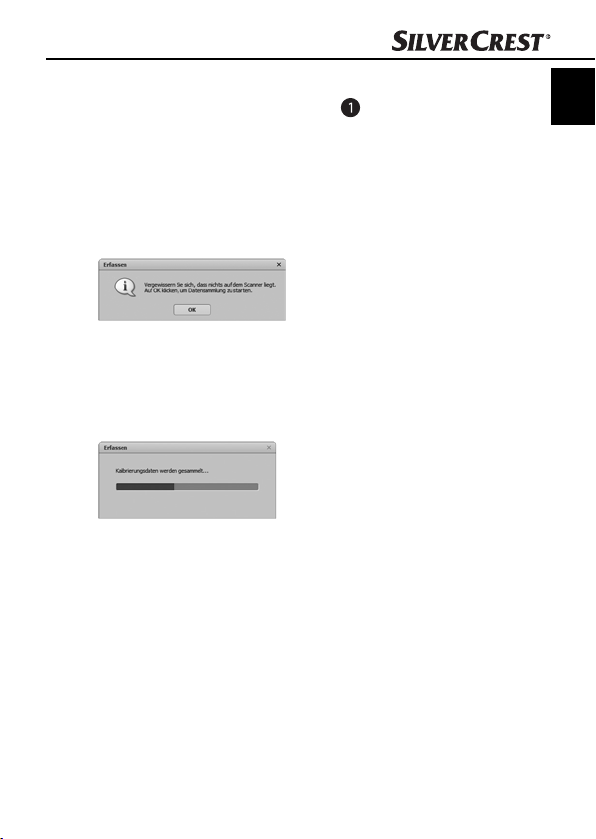
♦ Click on the button “Capture”.
When the programme is fi rst started after the installation a calibration and data collection process takes place. Make sure that
no slide or negative holders are inserted into the device.
♦ In the displayed information window click on the button “OK”
to start calibration and data collection. The fi rst calibration and
data collection process can take several minutes.
The calibration progress will be displayed.
After completion of the calibration the programme window will
be displayed.
GB
CY
SND 3600 A2
17
GB
CY
Handling and operation
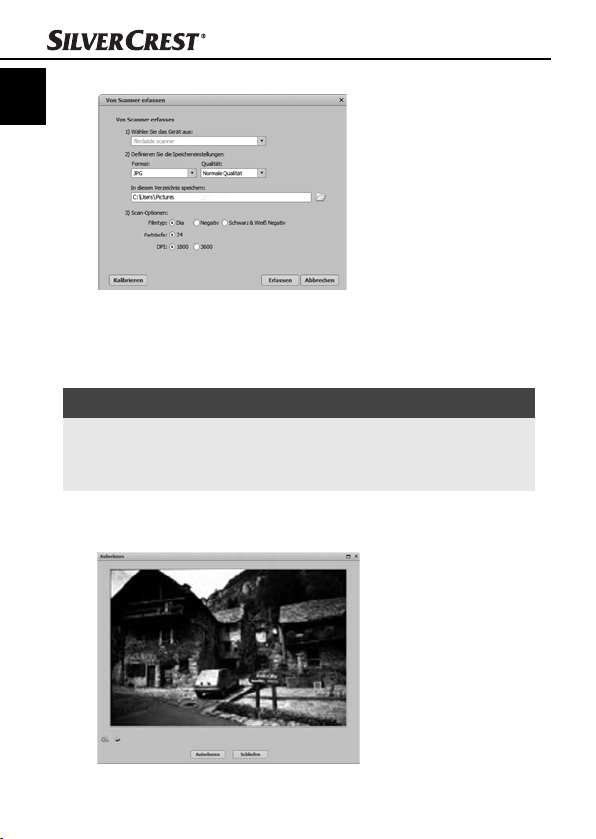
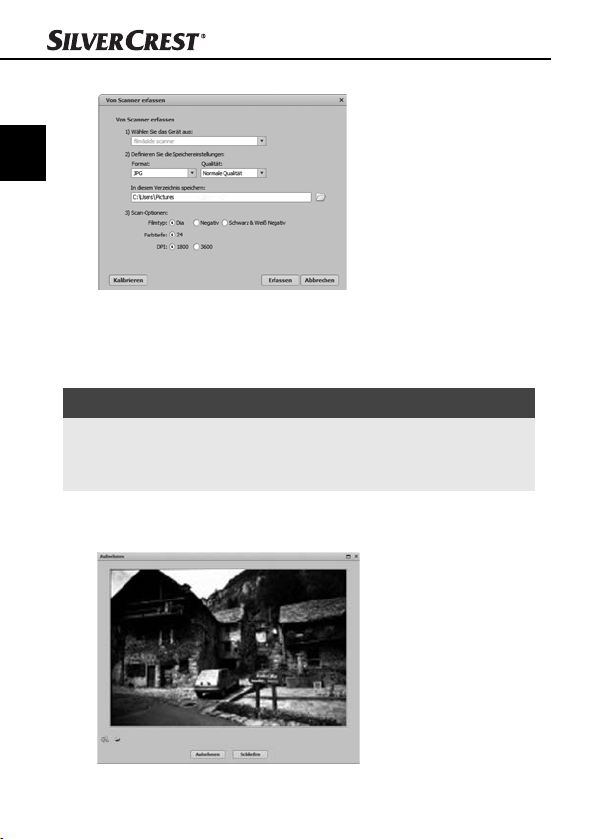
The window “Capture from scanner” will be displayed.
♦ Carry out the necessary settings:
File format, quality (only with JPG fi les), memory location, fi lm
type, colour depth, scan resolution
NOTICE
The colour depth is defi ned as 24 Bit. A scan with 1800 DPI
►
has a resolution of 2520 x 1680 Pixel and a scan with
3600 DPI has a resolution of 5040 x 3360 Pixel.
♦ Click on the button “Capture”.
The “Capture” window is displayed.
18
SND 3600 A2
Handling and operation
♦
Slide the holder with the negatives and/or slides to be scanned
into the slot 3 on the device until it locks into place.
The scan motif will be displayed in the preview fi eld .
NOTICE
A holder that has been inserted into the device cannot be pulled
►
out again, it has to be pushed completely through the device.
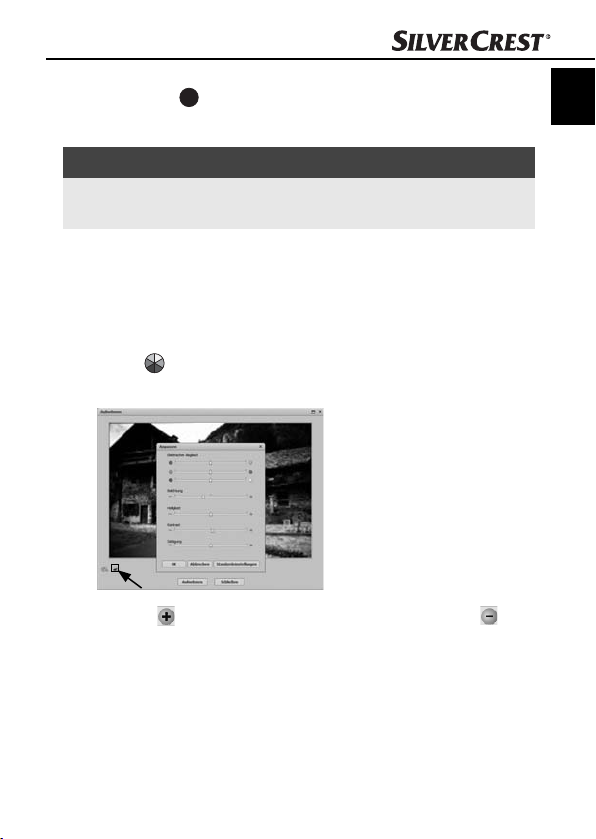
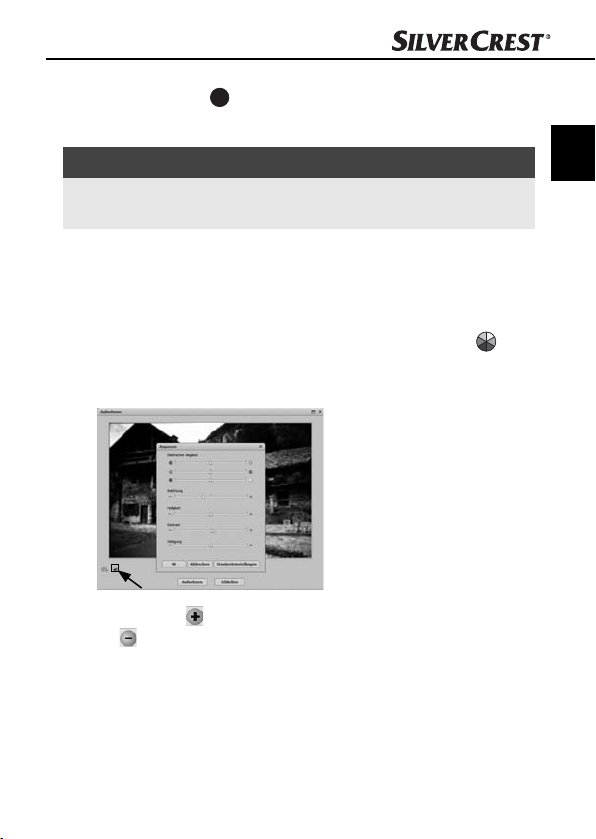
♦ Adjust the holder, if required, until the scan motif is displayed
optimally in the preview window.
♦ If necessary, you can set the electrical balance (Balance), the
exposure (Exposure), the brightness (Brightness), the contrast
(Contrast) and the saturation (Saturation) by pressing on the
button
A settings window will be opened.
♦ Click on to increase the corresponding value and on to
decrease the corresponding value.
Use the slide controller to adjust the electrical balance (Colour
balance).
Example: If the image has a too high proportion of blue, this can be
reduced by increasing the yellow component.
“Adjust”.
GB
CY
SND 3600 A2
19
GB
CY
Handling and operation
♦ Click on the “OK” button to accept the setting and return to the
“Capture” window.
♦ Press the SCAN 2 button on the device or click on the “Capture”
button. The image will be scanned and be displayed in the
scan fi eld.
♦ Repeat this procedure to scan additional images.
After Use
♦ Remove the fi lm holder 5 by pushing it completely through the
appliance.
♦ Remove the slide magazine 6 by pulling it back out of the
3
insert slot
♦ Remove the USB cable 4 from the USB port of your computer.
.
20
SND 3600 A2
Cleaning
Cleaning
Safety instructions
IMPORTANT
Possible damage to the device
Penetrating moisture can lead to damaging of the device.
► Make sure when you are cleaning the device that no moisture
gets inside in order to avoid irreparable damage to it.
Cleaning
■ Clean the housing exclusively with a soft damp cloth and a mild
dishwashing liquid.
■ Clean the surface of the scanner lens inside of the device with
a cleaning brush 7. For this, push the cleaning brush with the
cleaning surface facing downwards only into the right slot 3.
GB
CY
SND 3600 A2
21

Troubleshooting
Troubleshooting
GB
CY
In this chapter you will receive important information for malfunction
localization and remedies. Observe the instructions in order to avoid
danger and damage.
Safety instructions
WARNING
Observe the following safety information to avoid danger
and property damage:
► Repairs to electronic devices may only be carried out by
specialists who have been trained by the manufacturer. Considerable danger to the consumer and damage to the device
can occur as a result of incorrect repairs.
Malfunction causes and remedies
The following table will help with localizing and remedying minor
malfunctions:
Malfunction Possible cause Solution
LED PWR
light up
Poor image quality
does not
The device is not connected correctly.
Dust on the scanner
lens.
Dust on the fi lm and/or
the slide
Connect the device.
Clean the scanner lens.
Clean the fi lm and/or
the slide.
NOTICE
If you cannot solve the problem with the aforementioned methods
►
please contact customer service.
22
SND 3600 A2

Storage/Disposal
Storage/Disposal
Storage
Store the device in a dry environment.
Disposal of the device
Do not dispose of the device in your normal
domestic waste. This product is subject to
the European directive 2002/96/EC-WEEE
(Waste Electrical and Electronic Equipment).
Dispose of the device through an approved disposal
centre or at your community waste facility. Observe
the currently applicable regulations. In case of doubt,
please contact your waste disposal centre.
GB
CY
SND 3600 A2
23

Appendix
GB
CY
Technical data
Interface USB 2.0
Operating temperature +5 - +40 °C
Humidity (no condensation) 5 - 90 %
Measurements (W x H x D) 9.6 x 16.9 x 10.5 cm
Weight (without accessories) approx. 540 g
Appendix
Image sensor
Lens
Image repeat rate 2 fps
Focusing range Fixed focus
Brightness control automatic
Colour adjustment automatic
Resolution (interpolated) 3600 dpi
Data converting 10 bit per colour channel
Scan method Single pass
Light source Backlighting (3 white LEDs)
24
1/2.5 " CMOS-Sensor
(5 038 848 Pixel)
F=6.0, 4 Glass components,
half fi eld angle 15°
SND 3600 A2

Appendix
Note regarding the conformity declaration
This device complies regarding conformity with the
basic requirements and other relevent provisions
of the directive for electromagnetic compatibility
2004/108/EC.
The complete original declaration of conformity
can be obtained from the importer.
Warranty
You receive a 3-year warranty for this device as of the purchase date.
This device has been manufactured with care and meticulously examined before delivery.
Please retain your receipt as proof of purchase. In the case of a warranty claim, please get in touch, by telephone, with our service
department. Only in this way can a post-free despatch for your
goods be assured.
NOTICE
The warranty is valid only for material or manufacturing defects
►
and not for transportation damage, wear and tear or for damages to breakable parts such as switches or power packs.
This product is for private use only and is not intended for commercial applications. In the event of misuse and improper handling, use
of force and interference not carried out by our authorized service
branch, the warranty will become void.
Your statutory rights are not restricted in any way by this warranty.
The guarantee period will not be extended by the warranty. This also
applies to replacement and repaired parts.
GB
CY
SND 3600 A2
25

Damages and defects possibly present at time of purchase must be
GB
reported immediately after unpacking or at the latest two days after
CY
the purchase date. After expiration of the guarantee period incidental repairs are liable to costs.
Service
Service Great Britain
Tel.: 0871 5000 720 (£ 0.10/Min.)
E-Mail: kompernass@lidl.co.uk
IAN 73761
CY
Service Cyprus
Tel.: 8009 4409
E-Mail: kompernass@lidl.com.cy
IAN 73761
Importer
KOMPERNASS GMBH
BURGSTRASSE 21
44867 BOCHUM, GERMANY
www.kompernass.com
Appendix
26
SND 3600 A2

Cuprins
Introducere . . . . . . . .28
Informaţii despre acest
manual de utilizare . . . . . . 28
Drepturile de autor . . . . . . 28
Limitarea responsabilităţii . 28
Avertizări . . . . . . . . . . . . . 29
Utilizarea conform destinaţiei 29
Siguranţa . . . . . . . . . .30
Informaţii de siguranţă
fundamentale . . . . . . . . . . 30
Amplasarea şi
conectarea . . . . . . . . .32
Indicaţii de siguranţă . . . . 32
Furnitura şi inspecţia la
livrare . . . . . . . . . . . . . . . . 32
Eliminarea ambalajelor . . 33
Cerinţele pentru locul de
amplasare . . . . . . . . . . . . 33
Conectarea la un computer 34
Elemente de operare 40
Operarea şi
funcţionarea . . . . . . .40
Inserarea benzilor negative 40
Inserarea diapozitivelor . . 40
Porniţi programul ArcSoft
MediaImpression 2 . . . . . 42
Programul ArcSoft
MediaImpression 2 . . . . . 42
Scanare cu programul
ArcSoft MediaImpression 2 43
După utilizare . . . . . . . . . . 46
Curăţarea . . . . . . . . . .47
Indicaţii de siguranţă . . . . 47
Curăţarea . . . . . . . . . . . . . 47
Remedierea
defecţiunilor . . . . . . . .48
Indicaţii de siguranţă . . . . 48
Cauzele defecţiunilor şi
remedierea acestora . . . . 48
Depozitarea /
Eliminare . . . . . . . . . .49
Depozitarea . . . . . . . . . . . 49
Eliminarea aparatului . . . . 49
Anexă . . . . . . . . . . . . .50
Date tehnice . . . . . . . . . . . 50
Indicaţii privind declaraţia
de conformitate . . . . . . . . 51
Garanţia . . . . . . . . . . . . . . 51
Service-ul . . . . . . . . . . . . . 52
Importator . . . . . . . . . . . . . 52
RO
SND 3600 A2
27

Introducere
Informaţii despre acest manual de utilizare
Felicitări pentru cumpărarea noului dumneavoastră aparat!
RO
Acum deţineţi un produs de calitate excepţională.
Acest manual de utilizare este parte componentă pentru aparatul
digital Negativ SND 3600 A2 (numit în continuare aparat) şi vă
oferă indicaţii importante despre utilizarea conform destinaţiei, despre siguranţă, precum şi despre conectarea şi operarea aparatului.
Instrucţiunile de utilizare a aparatului trebuie să fi e în permanenţă
disponibile în apropierea acestuia. Acestea trebuie citite şi aplicate
de către fi ecare persoană care operează aparatul sau care remediază defecţiunile. Păstraţi aceste instrucţiuni de utilizare şi daţi-le mai
departe împreună cu aparatul la înstrăinarea acestuia.
Drepturile de autor
Această documentaţie este protejată de legea privind drepturile de
autor. Multiplicarea, respectiv retipărirea ulterioară, chiar şi în extras,
precum şi redarea imaginilor, fi e acestea şi modifi cate, sunt permise
numai cu acordul scris al producătorului.
Limitarea responsabilităţii
Toate informaţiile tehnice, datele şi indicaţiile pentru conectare şi
operare din aceste instrucţiuni de utilizare corespund stadiului tehnic
din momentul tipăririi şi refl ectă experienţa şi cunoştinţele noastre de
până acum. Din specifi caţiile, imaginile şi descrierile din acest manual
nu pot fi derivate niciun fel de pretenţii. Producătorul nu răspunde
pentru pagubele rezultate în urma nerespectării instrucţiunilor, a utilizării neconforme, a reparaţiilor necorespunzătoare, a modifi cărilor
operate neautorizate sau a utilizării pieselor de schimb neaprobate.
Introducere
28
SND 3600 A2
Introducere
Avertizări
În prezentul manual de utilizare sunt folosite următoarele avertizări:
AVERTIZARE
Avertizările pentru acest grad de pericol marchează
o situaţie potenţial periculoasă.
Dacă situaţia periculoasă nu este evitată, aceasta poate
provoca răniri.
► Respectaţi indicaţiile din această avertizare pentru a evita
rănirea persoanelor.
ATENŢIE
Avertizările pentru acest grad de pericol marchează
posibile daune materiale.
Dacă situaţia periculoasă nu este evitată, aceasta poate
provoca pagube materiale.
► Respectaţi indicaţiile din această avertizare pentru a evita
pagubele materiale.
INDICAŢIE
Indicaţiile marchează informaţii suplimentare care uşurează
►
lucrul cu aparatul.
Utilizarea conform destinaţiei
Acest aparat este conceput exclusiv pentru utilizarea non-comercială,
pentru scanarea şi digitalizarea negativelor şi diapozitivelor.
Un alt mod de utilizare este considerat în neconformitate cu destinaţia
de utilizare pentru care a fost conceput.
RO
SND 3600 A2
29

AVERTIZARE
Pericol din cauza utilizării neconforme!
RO
Aparatul prezintă pericol în cazul în care este utilizat contra-
venţional.
► Utilizaţi aparatul în conformitate cu destinaţia de utilizare.
► Respectaţi procedurile descrise în acest manual de utilizare.
Sunt excluse orice fel de pretenţii pentru pagubele rezultate în urma
utilizării neconforme cu destinaţia.
Riscul este suportat în exclusivitate de către benefi ciar.
Siguranţa
În acest capitol sunt cuprinse indicaţii de siguranţă importante pentru
manipularea aparatului.
Acest aparat corespunde dispoziţiilor de siguranţă prescrise. Utilizarea
necorespunzătoare poate provoca totuşi vătămări şi pagube materiale.
Informaţii de siguranţă fundamentale
Pentru utilizarea în siguranţă a aparatului, respectaţi următoarele
indicaţii de siguranţă:
■ Înainte de utilizare verifi caţi dacă aparatul prezintă defecţiuni
exterioare vizibile. Nu puneţi în funcţiune aparatul, dacă este
defect sau dacă a căzut.
■ În cazul deteriorării cablului sau conexiunilor acestea trebuie
înlocuite de către un specialist sau de către atelierul de service
pentru clienţi.
Siguranţa
30
SND 3600 A2

Siguranţa
■
Acest aparat nu este destinat utilizării de către persoane (inclusiv
copii) cu abilităţi fi zice, senzoriale sau intelectuale limitate sau cu
experienţă şi/sau cunoştinţe limitate, cu excepţia cazului în care
sunt supravegheate de către o persoană responsabilă de siguranţa lor sau au primit instrucţiuni de la aceasta privind modul de
utilizare a aparatului.
■ Copiii trebuie supravegheaţi pentru a împiedica utilizarea apara-
tului ca jucărie.
■ Reparaţia aparatului trebuie realizată numai de către un specialist
sau de către serviciul pentru clienţi. În urma reparaţiilor necorespunzătoare pot apărea pericole considerabile pentru benefi ciarul
aparatului. În plus, se pierde garanţia.
■ În timpul perioadei de garanţie, repararea aparatului trebuie
realizată numai de către serviciul clienţi autorizat de către producător. Dacă nu se respectă această prevedere, nu se mai acordă
garanţie pentru defecţiunile ulterioare.
■ Componentele defecte trebuie înlocuite numai cu piese de schimb
originale. Numai prin utilizarea acestor piese este garantată
îndeplinirea cerinţelor de siguranţă.
■ Nu efectuaţi schimbări neautorizate sau modifi cări la acest aparat.
■ Protejaţi aparatul împotriva umezelii şi infi ltrării lichidelor. Nu
aşezaţi vase umplute cu lichide (de ex. vaze) lângă aparat.
■ Nu operaţi aparatul în apropierea fl ăcărilor deschise.
RO
SND 3600 A2
31

Amplasarea şi conectarea
Amplasarea şi conectarea
Indicaţii de siguranţă
RO
AVERTIZARE
La punerea în funcţiune a aparatului pot apărea
vătămări şi pagube materiale!
Pentru evitarea pericolelor, respectaţi următoarele indicaţii de
siguranţă:
► Ambalajele nu trebuie utilizate ca obiecte de joacă. Pericol
de asfi xiere.
Furnitura şi inspecţia la livrare
Standard, aparatul este livrat împreună cu următoarele componente:
▯ Scaner
▯ 1 x cartuş diapozitive
▯ 2 x suport pentru negative
▯ CD cu program
▯ Perie de curăţare
▯ Instrucţiuni de utilizare
INDICAŢIE
Verifi caţi dacă au fost livrate toate componentele şi dacă
►
există defecţiuni vizibile.
► În cazul în care furnitura nu este completă sau în cazul
pagubelor provocate în urma transportului sau ambalajului
neadecvat, apelaţi linia de service directă (a se vedea
capitolul Service-ul).
32
SND 3600 A2
Amplasarea şi conectarea
Eliminarea ambalajelor
Ambalajul protejează aparatul împotriva daunelor din timpul transportului. Materialele de ambalare au fost selectate ţinând seama de
compatibilitatea cu mediul înconjurător şi de aspectele tehnice de
eliminare, putând fi astfel reciclate.
Reintroducerea ambalajelor în circuitul de materiale
contribuie la economia de materie primă şi reduce
cantitatea de deşeuri. Eliminaţi ambalajele de care nu
mai aveţi nevoie conform prevederilor locale în vigoare.
INDICAŢIE
Păstraţi, dacă este posibil, ambalajul original pe perioada
►
garanţiei aparatului, pentru a putea ambala aparatul conform destinaţiei, în caz de garanţie.
Cerinţele pentru locul de amplasare
Pentru operarea sigură şi fără defecţiuni a aparatului, locul de montaj
trebuie să îndeplinească următoarele cerinţe:
■ Aparatul trebuie amplasat pe un cartuş stabil, neted şi orizontal.
■ Nu amplasaţi aparatul într-un mediu foarte cald sau umed şi nici
în apropierea materialelor infl amabile.
■ Amplasaţi aparatul, astfel încât să nu fi e expus direct la razele
soarelui.
RO
SND 3600 A2
33
Amplasarea şi conectarea
Conectarea la un computer
Cerinţele sistemului
RO
♦ Aveţi nevoie de un computer cu slot USB liber şi ca sistem de
operare Windows
®
Windows XP® Vista sau Windows® 7
al fi rmei Microsoft®.
Instalarea programului ArcSoft MediaImpression 2
INDICAŢIE
În acest manual de utilizare sunt descrise doar părţile din
►
program, de care aveţi nevoie pentru scanarea diapozitivelor
resp. negativelor dumneavoastră. Informaţii suplimentare
găsiţi pe adresa de asistenţă online a programului.
► Imaginile şi descrierile se referă la sistemul de operare
Microsoft® Windows® 7. Imaginea ecranului poate fi diferită
în funcţie de setările de afi şare pentru alte sisteme de operare.
♦ Inseraţi CD-ul livrat pentru program în dispozitivul de rulare al
computerului dumneavoastră.
Se deschide fereastra „Redare automată“.
♦ Daţi click pe „aplicaţia autorun.exe“.
Începe instalarea şi se deschide fereastra de start.
34
SND 3600 A2

Amplasarea şi conectarea
INDICAŢIE
Dacă aţi oprit funcţia de auto-start iar procesul de instalare nu
►
începe automat, porniţi procesul de instalare prin dublu-click
pe fi şierul „autorun.exe“ din cuprinsul principal al CD-ului.
♦ Daţi click pe tasta „Arcsoft Software“, pentru a instala programul
„ArcSoft MediaImpression 2“.
Asistentul de instalare este confi gurat.
RO
SND 3600 A2
35
RO
Amplasarea şi conectarea
Se deschide fereastra de start pentru asistentul de instalare.
♦ Daţi click pe tasta „Continuare >“.
Se deschide fereastra „Acord de licenţă“.
♦ Daţi click pe tasta „Da“.
36
SND 3600 A2
Amplasarea şi conectarea
Se deschide fereastra pentru selectarea directorului de instalare.
♦ Alegeţi directorul de instalare dorit şi daţi click pe tasta
„Continuare >“.
Se deschide fereastra pentru alegerea fi şierului pentru program
(introducere în meniul de start din Windows).
♦ Alegeţi fi şierul dorit pentru program şi daţi click pe tasta
„Continuare >“.
RO
SND 3600 A2
37

RO
Amplasarea şi conectarea
Programul este instalat şi se afi şează procesul de instalare.
Se deschide fereastra „Formatele fi şierelor corespunzătoare“.
♦ Alegeţi formatele fi şierelor care să corespundă programului şi
daţi click pe tasta „Continuare>“
38
SND 3600 A2

Amplasarea şi conectarea
Se afi şează informaţia că procesul de instalare este complet.
♦ Daţi click pe tasta „Încheiere“.
Fereastra de start este din nou afi şată.
♦ Daţi click pe tasta „Ieşire instalare“, pentru a încheia programul
de instalare.
Conectare
♦ Conectaţi cablul USB 4 la un slot USB al computerului dum-
neavoastră. Computerul recunoaşte noul hardware şi porneşte
instalarea automată a driverului.
RO
SND 3600 A2
39

Elemente de operare/Operarea …
Elemente de operare
RO
LED PWR
2
Tastă SCAN
3
Cadru glisant pentru suportul de negative
resp. cartuşul de diapozitive
4
Cablu de conectare USB
5
Suport pentru negative
6
Cartuş diapozitive
7
Perie de curăţare
Operarea şi funcţionarea
Acest capitol cuprinde indicaţii importante cu privire la operarea şi
funcţionarea aparatului.
Inserarea benzilor negative
♦ Deschideţi dispozitivul de pe partea frontală a suportului
pentru negative 5 şi desfaceţi apoi suportul.
♦ Inseraţi benzile negative pe partea corectă în suport.
♦ Închideţi suportul până ce capacul este blocat.
Inserarea diapozitivelor
♦ Inseraţi diapozitivele pe partea corectă în cadrul prevăzut
pentru acestea în cartuşul cu diapozitive 6.
♦ Inseraţi mai întâi cartuşul de diapozitive 6 cu vizorul în
cadrul 3 glisant.
Cu ajutorul cursorului, care se afl ă pe lateralul cartuşului, 6 diapozitivele care se afl ă în cadru, sunt împinse pe rând spre scaner.
40
SND 3600 A2

Operarea şi funcţionarea
♦
De aceea, trageţi mai întâi cursorul până ajunge la scaner.
Apoi mutaţi cursorul din nou, cu grijă în direcţia scanerului.
INDICAŢIE
Un diapozitiv care se afl ă în scaner este îndepărtat cu acesta din
►
aparat şi un alt diapozitiv este împins spre ecranul scanerului.
► Aveţi grijă, să împingeţi încet noul diapozitiv spre scaner.
Dacă se întâmplă prea repede, diapozitivul poate aluneca
în afara ecranului de la scaner. În acest caz trebuie să
ridicaţi aparatul puţin într-o parte, pentru ca diapozitivul să
ajungă din nou în poziţia optimă.
♦ Când nu mai doriţi să scanaţi alte diapozitive, îndepărtaţi cartuşul
de diapozitive 6 din cadrul glisant 3. Îndepărtaţi ultimul
diapozitiv de jos, din vizorul cartuşului de diapozitive 6.
RO
SND 3600 A2
41

Operarea şi funcţionarea
Porniţi programul ArcSoft MediaImpression 2
♦ Porniţi programul ArcSoft MediaImpression 2 prin dublu-click
pe simbolul de pe desktop pentru program sau selectaţi input-ul
RO
corespunzător în meniul Start.
Programul ArcSoft MediaImpression 2
1
Aveţi la dispoziţie patru opţiuni:
1. Imagini: Să deschideţi o imagine disponibilă pe computer sau pe
cardul de memorie.
2. Înregistrare: Pentru scanarea unor noi fotografi i
3. Corectare simplă: Prelucrare rapidă a imaginii
4. Dispozitive de prelucrare a imaginii: Prelucrare detaliată a imaginii
INDICAŢIE
În acest manual de utilizare sunt descrise doar părţile din
►
program, de care aveţi nevoie pentru scanarea diapozitivelor
resp. negativelor dumneavoastră. Informaţii suplimentare
găsiţi pe adresa de asistenţă online a programului.
42
2
3
4
SND 3600 A2

Operarea şi funcţionarea
Scanare cu programul ArcSoft MediaImpression 2
♦ Conectaţi aparatul. LED-ul PWR luminează.
♦ Porniţi programul ArcSoft MediaImpression 2.
♦ Daţi click pe tasta „Înregistrare“.
La prima pornire a programului, după instalare, are loc un
proces de calibrare şi colectare a datelor. Asiguraţi-vă că nu
există nici un suport pentru diapozitive sau negative, în aparat.
♦ Daţi click în fereastra de informare afi şată, pe tasta „OK“
pentru a porni calibrarea şi colectarea datelor. Prima etapă
de calibrare şi colectare a datelor poate dura câteva minute.
Etapele de calibrare sunt afi şate.
După încheierea procesului de calibrare este afi şată fereastra
programului.
RO
SND 3600 A2
43
RO
Operarea şi funcţionarea
Se deschide fereastra „Înregistrat de scaner“.
♦ Realizaţi setările necesare:
Formatul fi şierului, Calitatea (doar la fi şiere JPG), Locaţia de
stocare, Tipul de fi lm, Intensitatea culorii, Rezoluţia de scanare
INDICAŢIE
Intensitatea culorii este setată prin 24 biţi. Un scaner cu
►
1800 DPI are o rezoluţie de 2520 x 1680 pixeli iar cu
3600 DPI, un scaner are o rezoluţie de 5040 x 3360 pixeli.
♦ Daţi click pe tasta „Înregistrare“.
Se deschide fereastra „Fotografi ere“.
44
SND 3600 A2
Operarea şi funcţionarea
♦
Împingeţi suportul cu negativele resp. diapozitivele pentru scanat
în cadrul glisant 3 al aparatului, până rămâne blocat.
Modelul pentru scanare este afi şat în fereastra de previzualizare.
INDICAŢIE
Un suport împins în aparat nu poate fi tras din nou afară,
►
acesta trebuie să fi e împins complet prin aparat.
♦ Reglaţi suportul în caz de necesitate, până ce modelul de
scanare este afi şat în mod optim în fereastra de previzualizare.
♦ Setaţi dacă este necesar, egalizarea electronică (Balance),
expunerea (Exposure), luminozitatea (Brightness), contrastul
(Contrast) şi saturaţia (Saturation), prin apăsarea tastei
„Ajustare“.
Se deschide o fereastră de setări.
♦ Daţi click pe pentru a creşte valoarea corespunzătoare şi
pe
pentru a reduce valoarea corespunzătoare.
Utilizaţi cursorul, pentru a seta egalizarea electronică (Egalizarea
culorilor).
Exemplu: dacă o imagine are un procent prea mare de albastru,
acesta poate fi redus prin creşterea procentului de galben.
RO
SND 3600 A2
45
RO
După utilizare
Operarea şi funcţionarea
♦ Daţi click pe tasta „OK“ pentru a prelua setările şi pentru a vă
întoarce la fereastra „Fotografi ere“.
♦ Apăsaţi tasta SCAN 2 de la aparat sau daţi click pe tasta
„Fotografi ere“. Imaginea va fi scanată şi afi şată în fereastra de
scanare.
♦ Repetaţi etapele de lucru pentru a scana şi alte imagini.
♦ Îndepărtaţi suportul negativelor 5 prin împingerea completă
a acestuia prin aparat.
♦ Îndepărtaţi cartuşul de diapozitive 6 prin scoaterea acestuia
3
din cadrul
♦ Îndepărtaţi cablul USB 4 din slotul USB al computerului
dumneavoastră.
glisant.
46
SND 3600 A2
Curăţarea
Curăţarea
Indicaţii de siguranţă
ATENŢIE
Posibilă defectare a aparatului.
Infi ltrarea umezelii poate provoca deteriorarea aparatului.
► Pentru evitarea defectării ireparabile a aparatului, asiguraţi-vă
că în timpul curăţării în acesta nu se infi ltrează umezeală.
Curăţarea
■ Curăţaţi carcasa numai cu un prosop uşor umezit şi un detergent
uşor.
■ Curăţaţi suprafaţa lentilei scanerului în interiorul aparatului cu
peria de curăţat. 7. Pentru aceasta împingeţi peria de curăţat, cu
suprafaţa de curăţare în jos, doar în cadrul din dreapta.3.
RO
SND 3600 A2
47
Remedierea defecţiunilor
Remedierea defecţiunilor
Acest capitol cuprinde indicaţii importante cu privire la localizarea
şi remedierea defecţiunilor. Respectaţi indicaţiile pentru a evita
RO
pericolele şi deteriorările.
Indicaţii de siguranţă
AVERTIZARE
Respectaţi următoarele indicaţii de siguranţă pentru a evita
pericolele şi pagubele materiale:
► Reparaţiile aparatelor electrice trebuie realizate numai de
către specialişti care au fost instruiţi de către producător.
Reparaţiile incompetente reprezintă un pericol pentru utilizatorul aparatului şi defectarea acestuia din urmă.
Cauzele defecţiunilor şi remedierea acestora
Tabelul următor ajută la localizarea şi remedierea defecţiunilor
minore:
Defecţiunea Cauza posibilă Remedierea
LED-ul PWR
nu luminează
calitatea imaginii
nu este bună
Aparatul nu este
corect conectat.
Praf pe lentila
scanerului.
Praf pe fi lm resp.
pe diapozitiv
INDICAŢIE
Dacă nu reuşiţi să rezolvaţi problema cu niciunul dintre paşii
►
indicaţi anterior, adresaţi-vă serviciului pentru clienţi.
48
Conectaţi aparatul.
Curăţaţi lentila
scanerului.
Curăţaţi fi lmul
resp. diapozitivul
SND 3600 A2

Depozitarea / Eliminare
Depozitarea / Eliminare
Depozitarea
Depozitaţi aparatul într-o încăpere uscată.
Eliminarea aparatului
Nu aruncaţi aparatul sub nicio formă în
gunoiul menajer obişnuit. Acest produs
se afl ă sub incidenţa Directivei Europene
2002/96/EC (Echipamente electrice şi
electronice uzate).
Eliminaţi aparatul prin intermediul unei fi rmei speciali-
zate şi autorizate sau prin intermediul serviciului local
de eliminare a deşeurilor. Respectaţi reglementările
actuale în vigoare. Dacă aveţi nelămuriri, contactaţi
serviciul dumneavoastră local de eliminare a deşeurilor.
RO
SND 3600 A2
49
Anexă
Date tehnice
RO
Interfaţa USB 2.0
Temperatura de operare +5 - +40 °C
Umiditatea (fără condens) 5 - 90 %
Dimensiuni (l x Î x A) 9,6 x 16,9 x 10,5 cm
Greutatea (fără accesorii) cca 540 g
Anexă
Senzor de imagine
Lentilă
Rata de repetare a imaginilor 2 fps
Domeniul de focalizare Focalizare clară
Reglarea luminozităţii Automat
Optimizarea culorilor Automat
Rezoluţie (interpolată) 3600 dpi
Convertor de date 10 biţi per canal de culoare
Metoda de scanare Single pass
Sursa de lumină Contralumina (3 LED-uri albe)
50
1/2,5 " Senzor-CMOS
(5 038 848 pixeli)
F=6.0, 4 Elemente din sticlă,
unghi de refl exie 15°
SND 3600 A2

Anexă
Indicaţii privind declaraţia de conformitate
Acest aparat corespunde cerinţelor fundamentale
şi altor prescripţii relevante ale Directivei privind
compatibilitatea electromagnetică 2004/108/EC.
Declaraţia de conformitate în original se găseşte la
sediul importatorului.
Garanţia
Pentru acest aparat se acordă o garanţie de 3 ani începând cu data
cumpărării. Aparatul a fost produs cu grijă şi verifi cat cu scrupulozitate
înaintea livrării.
Păstraţi bonul de casă pentru a dovedi cumpărarea. În cazul reparaţiilor din perioada de garanţie, contactaţi telefonic centrul dumneavoastră de service. Numai astfel poate fi asigurată o expediere
gratuită a produsului dumneavoastră.
INDICAŢIE
Garanţia acoperă numai defectele de material sau de
►
fabricaţie, nu şi deteriorările rezultate în urma transportului,
piesele de uzură sau deteriorările apărute la componentele
fragile, de ex. comutatoare sau acumulatoare.
Aparatul este destinat numai pentru uz privat şi nu pentru o utilizare
profesională. În cazul manevrării abuzive sau necorespunzătoare,
al uzului de forţă şi al intervenţiilor care nu au fost realizate de către
fi liala noastră autorizată de service, garanţia îşi pierde valabilitatea.
Drepturile dumneavoastră legale nu sunt restrânse prin această
garanţie. Perioada de garanţie nu este prelungită după realizarea
reparaţiilor realizate în perioada de garanţie. Acest lucru este valabil
şi pentru piesele înlocuite şi reparate.
RO
SND 3600 A2
51
Deteriorările şi defi cienţele prezente deja la cumpărare trebuie
semnalate imediat după dezambalare sau cel târziu în două zile
de la data cumpărării.
Reparaţiile necesare după expirarea perioadei de garanţie se
RO
efectuează contra cost.
Service-ul
R
Service România
Tel.: 0800896637
E-Mail: kompernass@lidl.ro
IAN 73761
Importator
KOMPERNASS GMBH
BURGSTRASSE 21
44867 BOCHUM, GERMANY
www.kompernass.com
Anexă
52
SND 3600 A2

Inhaltsverzeichnis
Einführung . . . . . . . . .54
Informationen zu dieser
Bedienungsanleitung . . . . 54
Urheberrecht . . . . . . . . . . 54
Haftungsbeschränkung . . . 54
Warnhinweise . . . . . . . . . . 55
Bestimmungsgemäße
Verwendung . . . . . . . . . . . 55
Sicherheit . . . . . . . . . .56
Grundlegende
Sicherheitshinweise . . . . . . 56
Aufstellen und
Anschließen . . . . . . . .58
Sicherheitshinweise . . . . . . 58
Lieferumfang und
Transportinspektion . . . . . . 58
Entsorgung der Verpackung 59
Anforderungen an den
Aufstellort . . . . . . . . . . . . . 59
Anschluss an einen
Computer . . . . . . . . . . . . . 60
Bedienelemente. . . . .66
Bedienung und
Betrieb . . . . . . . . . . . .66
Negativstreifen einlegen . . 66
Dias einlegen . . . . . . . . . . 66
Programm ArcSoft Media-
Impression 2 starten . . . . . 68
Programm ArcSoft Media-
Impression 2 . . . . . . . . . . . 68
Scannen mit dem Programm
ArcSoft MediaImpression 2 69
Nach dem Gebrauch . . . . 72
Reinigung . . . . . . . . . .73
Sicherheitshinweise . . . . . . 73
Reinigung . . . . . . . . . . . . . 73
Fehlerbehebung . . . .74
Sicherheitshinweise . . . . . . 74
Fehlerursachen und
-behebung . . . . . . . . . . . . 74
Lagerung/Entsorgung 75
Lagerung . . . . . . . . . . . . . 75
Gerät entsorgen . . . . . . . . 75
Anhang . . . . . . . . . . . .76
Technische Daten . . . . . . . 76
Hinweise zur
Konformitätserklärung . . . 77
Garantie . . . . . . . . . . . . . . 77
Service . . . . . . . . . . . . . . . 78
Importeur . . . . . . . . . . . . . 78
DE
AT
CH
SND 3600 A2
53

Einführung
Informationen zu dieser Bedienungsanleitung
Herzlichen Glückwunsch zum Kauf Ihres neuen Gerätes.
Sie haben sich damit für ein hochwertiges Produkt entschieden.
Diese Bedienungsanleitung ist Bestandteil des Negativ-Digitalisierers
DE
SND 3600 A2 (nachfolgend als Gerät bezeichnet) und gibt Ihnen
AT
wichtige Hinweise für den bestimmungsgemäßen Gebrauch, die
CH
Sicherheit, den Anschluss sowie die Bedienung des Gerätes. Die
Bedienungsanleitung muss ständig in der Nähe des Gerätes verfügbar sein. Sie ist von jeder Person zu lesen und anzuwenden, die mit
der Bedienung und Störungsbehebung des Gerätes beschäftigt ist.
Bewahren Sie diese Bedienungsanleitung auf und geben Sie diese
mit dem Gerät an den Nachbesitzer weiter.
Urheberrecht
Diese Dokumentation ist urheberrechtlich geschützt.
Jede Vervielfältigung, bzw. jeder Nachdruck, auch auszugsweise,
sowie die Wiedergabe der Abbildungen, auch im veränderten Zustand
ist nur mit schriftlicher Zustimmung des Herstellers gestattet.
Haftungsbeschränkung
Alle in dieser Bedienungsanleitung enthaltenen technischen Informationen, Daten und Hinweise für den Anschluss und die Bedienung, entsprechen dem letzten Stand bei Drucklegung und erfolgen unter Berücksichtigung unserer bisherigen Erfahrungen und Erkenntnisse nach
bestem Wissen. Aus den Angaben, Abbildungen und Beschreibungen in dieser Anleitung können keine Ansprüche hergeleitet werden.
Der Hersteller übernimmt keine Haftung für Schäden aufgrund von
Nichtbeachtung der Anleitung, nicht bestimmungsgemäßer Verwendung, unsachgemäßen Reparaturen, unerlaubt vorgenommenen
Veränderungen oder Verwendung nicht zugelassener Ersatzteile.
Einführung
54
SND 3600 A2

Einführung
Warnhinweise
In der vorliegenden Bedienungsanleitung werden folgende Warnhinweise verwendet:
WARNUNG
Ein Warnhinweis dieser Gefahrenstufe kennzeichnet
eine mögliche gefährliche Situation.
Falls die gefährliche Situation nicht vermieden wird, kann dies
zu Verletzungen führen.
► Die Anweisungen in diesem Warnhinweis befolgen, um
Verletzungen von Personen zu vermeiden.
ACHTUNG
Ein Warnhinweis dieser Gefahrenstufe kennzeichnet
einen möglichen Sachschaden.
Falls die Situation nicht vermieden wird, kann dies zu Sachschäden führen.
► Die Anweisungen in diesem Warnhinweis befolgen, um
Sachschäden zu vermeiden.
HINWEIS
Ein Hinweis kennzeichnet zusätzliche Informationen, die den
►
Umgang mit dem Gerät erleichtern.
DE
AT
CH
Bestimmungsgemäße Verwendung
Dieses Gerät ist ausschließlich für den nicht gewerblichen Gebrauch
zum Scannen und Digitalisieren von Filmnegativen und Dias bestimmt.
Eine andere oder darüber hinausgehende Benutzung gilt als nicht
bestimmungsgemäß.
SND 3600 A2
55

WARNUNG
Gefahr durch nicht bestimmungsgemäße
Verwendung!
Von dem Gerät können bei nicht bestimmungsgemäßer
DE
AT
CH
Verwendung und/oder andersartiger Nutzung Gefahren
ausgehen.
► Das Gerät ausschließlich bestimmungsgemäß verwenden.
► Die in dieser Bedienungsanleitung beschriebenen Vorgehens-
weisen einhalten.
Ansprüche jeglicher Art wegen Schäden aus nicht bestimmungsgemäßer Verwendung sind ausgeschlossen.
Das Risiko trägt allein der Betreiber.
Sicherheit
In diesem Kapitel erhalten Sie wichtige Sicherheitshinweise im Umgang
mit dem Gerät.
Dieses Gerät entspricht den vorgeschriebenen Sicherheitsbestimmungen.
Ein unsachgemäßer Gebrauch kann zu Personen- und Sachschäden
führen.
Grundlegende Sicherheitshinweise
Beachten Sie für einen sicheren Umgang mit dem Gerät die folgenden
Sicherheitshinweise:
■ Kontrollieren Sie das Gerät vor der Verwendung auf äußere
sichtbare Schäden. Nehmen Sie ein beschädigtes oder heruntergefallenes Gerät nicht in Betrieb.
■ Bei Beschädigung der Kabel oder Anschlüsse lassen Sie diese
von autorisiertem Fachpersonal oder dem Kundenservice
austauschen.
Sicherheit
56
SND 3600 A2

Sicherheit
Dieses Gerät ist nicht dafür bestimmt, durch Personen (einschließ-
■
lich Kinder) mit eingeschränkten physischen, sensorischen oder
geistigen Fähigkeiten oder mangels Erfahrung und/oder mangels
Wissen benutzt zu werden, es sei denn, sie werden durch eine für
ihre Sicherheit zuständige Person beaufsichtigt oder erhielten von
ihr Anweisungen, wie das Gerät zu benutzen ist.
■ Kinder sollten beaufsichtigt werden, um sicherzustellen, dass sie
nicht mit dem Gerät spielen.
■ Lassen Sie Reparaturen am Gerät nur von autorisierten Fachbetrieben
oder dem Kundenservice durchführen. Durch unsachgemäße
Reparaturen können erhebliche Gefahren für den Benutzer
entstehen. Zudem erlischt der Garantieanspruch.
■ Eine Reparatur des Gerätes während der Garantiezeit darf nur
von einem vom Hersteller autorisierten Kundendienst vorgenommen
werden, sonst besteht bei nachfolgenden Schäden kein Garantieanspruch mehr.
■ Defekte Bauteile dürfen nur gegen Original-Ersatzteile ausgetauscht
werden. Nur bei diesen Teilen ist gewährleistet, dass sie die
Sicherheitsanforderungen erfüllen werden.
■ Nehmen Sie keine eigenmächtigen Umbauten oder Veränderungen
an dem Gerät vor.
■ Schützen Sie das Gerät vor Feuchtigkeit und dem Eindringen von
Flüssigkeiten. Stellen Sie keine mit Flüssigkeit gefüllten Gegenstände (z.B. Vasen) neben das Gerät.
■ Das Gerät nicht in der Nähe von off enen Flammen betreiben.
DE
AT
CH
SND 3600 A2
57

Aufstellen und Anschließen
Aufstellen und Anschließen
Sicherheitshinweise
WARNUNG
DE
AT
CH
Bei der Inbetriebnahme des Gerätes können
Personen- und Sachschäden auftreten!
Beachten Sie die folgenden Sicherheitshinweise, um die
Gefahren zu vermeiden:
► Verpackungsmaterialien dürfen nicht zum Spielen verwendet
werden. Es besteht Erstickungsgefahr.
Lieferumfang und Transportinspektion
Das Gerät wird standardmäßig mit folgenden Komponenten geliefert:
▯ Scanner
▯ 1 x Dia Magazin
▯ 2 x Halterung für Negative
▯ Programm-CD
▯ Reinigungsbürste
▯ Bedienungsanleitung
HINWEIS
Prüfen Sie die Lieferung auf Vollständigkeit und auf sichtbare
►
Schäden.
► Bei einer unvollständigen Lieferung oder Schäden infolge
mangelhafter Verpackung oder durch Transport wenden Sie
sich an die Service-Hotline (siehe Kapitel Service).
58
SND 3600 A2

Aufstellen und Anschließen
Entsorgung der Verpackung
Die Verpackung schützt das Gerät vor Transportschäden.
Die Verpackungsmaterialien sind nach umweltverträglichen und
entsorgungstechnischen Gesichtspunkten ausgewählt und deshalb
recyclebar.
Die Rückführung der Verpackung in den Materialkreislauf
spart Rohstoff e und verringert das Abfallaufkommen.
Entsorgen Sie nicht mehr benötigte Verpackungsmaterialien
gemäß den örtlich geltenden Vorschriften.
HINWEIS
Heben Sie, wenn möglich, die Originalverpackung während
►
der Garantiezeit des Gerätes auf, um das Gerät im
Garantiefall ordnungsgemäß verpacken zu können.
Anforderungen an den Aufstellort
Für einen sicheren und fehlerfreien Betrieb des Gerätes muss der
Aufstellort folgende Voraussetzungen erfüllen:
■ Das Gerät muss auf einer festen, fl achen und waagerechten
Unterlage aufgestellt werden.
■ Stellen Sie das Gerät nicht in einer heißen, nassen oder sehr feuchten
Umgebung oder in der Nähe von brennbarem Material auf.
■ Stellen Sie das Gerät so auf, dass es nicht direkter Sonnenein-
strahlung ausgesetzt wird.
DE
AT
CH
SND 3600 A2
59
Aufstellen und Anschließen
Anschluss an einen Computer
Systemvoraussetzungen
♦ Sie benötigen einen Computer mit einem freien USB-Anschluss
und als Betriebssystem Windows
DE
Windows® 7 der Firma Microsoft®.
AT
CH
Installation des Programms ArcSoft MediaImpression 2
HINWEIS
In dieser Bedienungsanleitung sind nur die Programmteile
►
beschrieben, die Sie zum Scannen Ihrer Dias bzw. Filmnegative
benötigen. Weiterführende Informationen fi nden Sie in der
Onlinehilfe des Programmes.
► Die Abbildungen und die Beschreibungen beziehen sich auf
das Betriebssystem Microsoft® Windows® 7. Die Bildschirmdarstellung kann in Abhängigkeit der Anzeigeeinstellungen
bei anderen Betriebssystemen abweichen.
♦ Legen Sie die mitgelieferte Programm-CD in das CD-Laufwerk
Ihres Computers ein.
Das Fenster „Automatische Wiedergabe“ wird angezeigt.
®
XP, Windows® Vista oder
♦ Klicken Sie auf die Schaltfl äche „autorun.exe ausführen“.
Die Installation startet und das Startfenster wird angezeigt.
60
SND 3600 A2
Aufstellen und Anschließen
HINWEIS
Wenn Sie die Autostartfunktion ausgeschaltet haben und der
►
Installationsvorgang nicht automatisch beginnt, starten Sie
den Installationsvorgang durch einen Doppelklick auf die
Datei „autorun.exe“ im Hauptverzeichnis der CD.
♦ Klicken Sie auf die Schaltfl äche „Arcsoft Software“, um das
Programm „ArcSoft MediaImpression 2“ zu installieren.
Der Installationsassistent wird konfi guriert.
DE
AT
CH
SND 3600 A2
61
DE
AT
CH
Aufstellen und Anschließen
Das Startfenster des Installationsassistenten wird angezeigt.
♦ Klicken Sie auf die Schaltfl äche „Weiter >“.
Das Fenster „Lizenzvereinbarung“ wird angezeigt.
♦ Klicken Sie auf die Schaltfl äche „Ja“.
62
SND 3600 A2
Aufstellen und Anschließen
Das Fenster zur Auswahl des Installationsverzeichnisses wird
angezeigt.
♦ Wählen Sie das gewünschte Installationsverzeichnis und klicken
Sie auf die Schaltfl äche „Weiter >“.
Das Fenster zur Auswahl des Programmordners (Eintrag im
Windows-Startmenü) wird angezeigt.
DE
AT
CH
♦ Wählen Sie den gewünschten Programmordner und klicken Sie
auf die Schaltfl äche „Weiter >“.
SND 3600 A2
63
DE
AT
CH
Aufstellen und Anschließen
Das Programm wird installiert und der Installationsfortschritt
wird angezeigt.
Das Fenster „Zugehörige Dateiformate“ wird angezeigt.
♦ Wählen Sie die Dateiformate aus, die mit dem Programm
verknüpft werden sollen und klicken Sie auf die Schaltfl äche
„Weiter>“
64
SND 3600 A2
Aufstellen und Anschließen
Es wird angezeigt, dass die Installation vollständig erfolgt ist.
♦ Klicken Sie auf die Schaltfl äche „Fertigstellen“.
Das Startfenster wird wieder angezeigt.
♦ Klicken Sie auf die Schaltfl äche „Exit Installation“, um das
Installationsprogramm zu beenden.
Anschluss
♦ Schließen Sie das USB-Kabel 4 an einem USB-Anschluss Ihres
Computers an. Der Computer erkennt die neue Hardware und
startet die automatische Treiberinstallation.
DE
AT
CH
SND 3600 A2
65
Bedienelemente/Bedienung …
Bedienelemente
LED PWR
2
Taste SCAN
3
Einschub für Negativhalterung bzw. Dia-Magazin
4
USB-Anschlusskabel
5
Negativhalterung
6
Dia-Magazin
7
Reinigungsbürste
DE
AT
CH
Bedienung und Betrieb
In diesem Kapitel erhalten Sie wichtige Hinweise zur Bedienung und
Betrieb des Gerätes.
Negativstreifen einlegen
♦ Entriegeln Sie den Verschluss an der Vorderseite der Negativ-
halterung
♦ Legen Sie den Negativstreifen seitenrichtig in die Halterung ein.
♦ Schließen Sie die Halterung, bis der Deckel einrastet.
Dias einlegen
♦ Legen Sie die Dias seitenrichtig in den dafür vorgesehenen
Schacht des Dia-Magazins 6.
♦ Führen Sie das Dia-Magazin 6 mit dem Sichtfenster zuerst in
den Einschub 3 ein.
Mit dem Schieber, der sich seitlich am Dia-Magazin 6 befi ndet,
werden die im Schacht befi ndlichen Dias einzeln in den Scanner
geschoben.
5
und öff nen Sie die Halterung.
66
SND 3600 A2
Bedienung und Betrieb
Schieben Sie dazu den Schieber zunächst bis zum Anschlag
♦
vom Scanner weg. Anschließend den Schieber wieder vorsich-
tig in Richtung des Scanners bewegen.
HINWEIS
Ein im Scanner befi ndliches Dia wird dadurch aus dem
►
Gerät entfernt und ein neues Dia in den Sichtbereich des
Scanner geschoben.
► Achten Sie darauf, ein neues Dia langsam in den Scanner zu
schieben. Geschieht dies zu schnell, so kann das Dia über
den Sichtbereich des Scanners hinaus gleiten. In diesem Fall
müssen Sie das Gerät seitlich etwas anheben, damit das Dia
wieder in eine optimale Lage gelangt.
♦ Sobald Sie keine weiteren Dias mehr scannen möchten,
entfernen Sie das Dia-Magazin 6 aus dem Einschub 3.
Entnehmen Sie das letzte Dia von unten aus dem Sichtfenster
des Dia-Magazins 6.
DE
AT
CH
SND 3600 A2
67
Bedienung und Betrieb
Programm ArcSoft MediaImpression 2 starten
♦ Starten Sie das Programm ArcSoft MediaImpression 2 durch
einen Doppelklick auf das Programmsymbol auf dem Desktop
oder wählen Sie den entsprechenden Eintrag im Startmenü aus.
Programm ArcSoft MediaImpression 2
DE
AT
CH
1
Es stehen vier Optionen zur Verfügung:
1. Bilder: Ein auf dem Computer oder einer Speicherkarte
vorhandenes Bild öff nen.
2. Erfassen: Zum Scannen von neuen Aufnahmen
3. Einfaches Nachbessern: Schnelle Bildbearbeitung
4. Bildbearbeitungswerkzeuge: Ausführliche Bildbearbeitung
2
4
3
HINWEIS
In dieser Bedienungsanleitung sind nur die Programmteile
►
beschrieben, die Sie zum Scannen Ihrer Dias bzw. Filmnegative benötigen. Weiterführende Informationen fi nden Sie in
der Onlinehilfe des Programmes.
68
SND 3600 A2
Bedienung und Betrieb
Scannen mit dem Programm ArcSoft MediaImpression 2
♦ Schließen Sie das Gerät an. Die LED PWR leuchtet.
♦ Starten Sie das Programm ArcSoft MediaImpression 2.
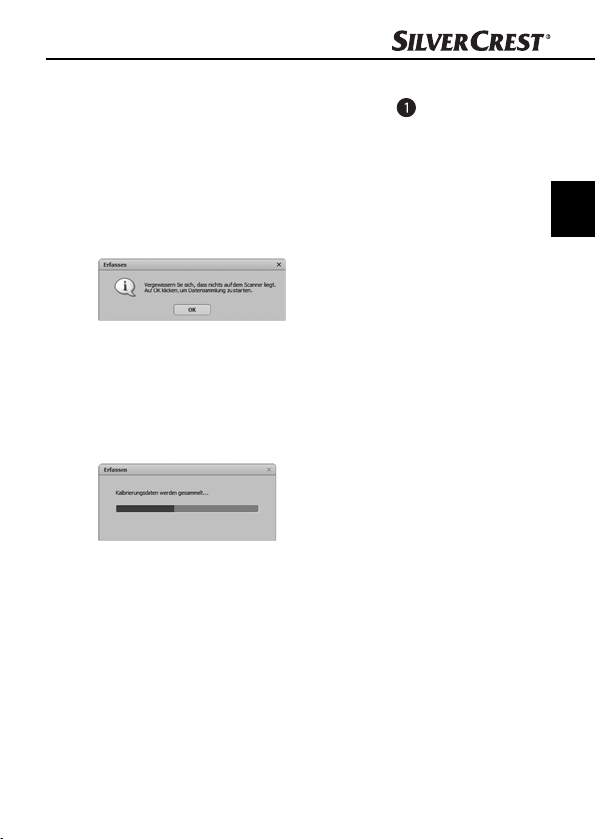
♦ Klicken Sie auf die Schaltfl äche „Erfassen“.
Beim ersten Programmstart nach der Installation erfolgt ein
Kalibrier- und Datensammlungsprozess. Stellen Sie sicher, dass
keine Dia- oder Negativhalterung im Gerät eingelegt ist.
♦ Klicken Sie im angezeigten Informationsfenster auf die Schaltfl ä-
che „OK“, um die Kalibrierung und Datensammlung zu starten.
Der erste Kalibrierungs- und Datensammlungsvorgang kann
einige Minuten dauern.
Der Kalibrierungsfortschritt wird angezeigt.
Nach Abschluss der Kalibrierung wird das Programmfenster
angezeigt.
DE
AT
CH
SND 3600 A2
69

DE
AT
CH
Bedienung und Betrieb
Das Fenster „Vom Scanner erfassen“ wird angezeigt.
♦ Nehmen Sie die notwendigen Einstellungen vor:
Dateiformat, Qualität (nur bei JPG-Dateien), Speicherort, Filmtyp,
Farbtiefe, Scanaufl ösung
HINWEIS
Die Farbtiefe ist mit 24 Bit festgelegt. Ein Scan mit 1800 DPI
►
hat eine Aufl ösung von 2520 x 1680 Pixel, mit 3600 DPI
hat ein Scan eine Aufl ösung von 5040 x 3360 Pixel.
♦ Klicken Sie auf die Schaltfl äche „Erfassen“.
Das Fenster „Aufnehmen“ wird angezeigt.
70
SND 3600 A2

Bedienung und Betrieb
Schieben Sie die Halterung mit den zu scannenden
♦
Negativen bzw. mit den zu scannenden Dias in den Einschub 3
am Gerät, bis sie einrastet.
Das Scanmotiv wird im Vorschaubereich angezeigt.
HINWEIS
Eine in das Gerät eingeschobene Halterung kann nicht
►
wieder herausgezogen werden, sondern muss komplett
durch das Gerät hindurchgeschoben werden.
♦ Justieren Sie bei Bedarf die Halterung, bis das Scanmotiv
optimal im Vorschaufenster angezeigt wird.
♦ Stellen Sie bei Bedarf den elektrischen Abgleich (Balance), die
Belichtung (Exposure), die Helligkeit (Brightness), den Kontrast
(Contrast) und die Sättigung (Saturation) ein, indem Sie auf die
Schaltfl äche
Ein Einstellungsfenster wird geöff net.
♦ Klicken Sie auf um den entsprechenden Wert zu erhöhen
und auf
Verwenden Sie die Schieberegler, um den elektrischen Abgleich
(Farbabgleich) vorzunehmen.
Beispiel: Hat das Bild einen zu hohen Blauanteil, kann dies durch
Erhöhen des Gelbanteils verringert werden.
„Anpassen“ drücken.
um den entsprechenden Wert zu verringern.
DE
AT
CH
SND 3600 A2
71

♦ Klicken Sie auf die Schaltfl äche „OK“, um die Einstellung zu
übernehmen und zum Fenster „Aufnehmen“ zurückzukehren.
♦ Drücken Sie die Taste SCAN 2 am Gerät oder klicken Sie auf
die Schaltfl äche „Aufnehmen“. Das Bild wird gescannt und im
Scanbereich angezeigt.
DE
AT
CH
♦ Wiederholen Sie die Arbeitsschritte, um weitere Bilder zu
scannen.
Nach dem Gebrauch
♦ Entnehmen Sie die Negativhalterung 5, indem Sie sie komplett
durch das Gerät hindurchschieben.
♦ Entnehmen Sie das Dia-Magazin 6, indem Sie es wieder aus
dem Einschub
♦ Entfernen Sie das USB-Kabel 4 von dem USB-Anschluss Ihres
Computers.
3
herausziehen.
Bedienung und Betrieb
72
SND 3600 A2

Reinigung
Reinigung
Sicherheitshinweise
ACHTUNG
Mögliche Beschädigung des Gerätes.
Eindringende Feuchtigkeit kann zu einer Beschädigung des
Gerätes führen.
► Stellen Sie sicher, dass bei der Reinigung keine Feuchtigkeit
in das Gerät eindringt, um eine irreparable Beschädigung
des Gerätes zu vermeiden.
Reinigung
■ Reinigen Sie das Gehäuse ausschließlich mit einem leicht
feuchten Tuch und einem milden Spülmittel.
■ Reinigen Sie die Oberfl äche der Scannerlinse im Inneren des
Gerätes mit der Reinigungsbürste 7. Schieben Sie dazu die
Reinigungsbürste mit der Reinigungsfl äche nach unten nur in den
rechten Einschub3.
DE
AT
CH
SND 3600 A2
73

Fehlerbehebung
Fehlerbehebung
In diesem Kapitel erhalten Sie wichtige Hinweise zur Störungslokalisierung und Störungsbehebung. Beachten Sie die Hinweise, um
Gefahren und Beschädigungen zu vermeiden.
DE
Sicherheitshinweise
AT
CH
WARNUNG
Beachten Sie die folgenden Sicherheitshinweise, um Gefahren
und Sachschäden zu vermeiden:
► Reparaturen an Elektrogeräten dürfen nur von Fachleuten
durchgeführt werden, die vom Hersteller geschult sind. Durch
unsachgemäße Reparaturen können erhebliche Gefahren für
den Benutzer und Schäden am Gerät entstehen.
Fehlerursachen und -behebung
Die nachfolgende Tabelle hilft bei der Lokalisierung und Behebung
kleinerer Störungen:
Fehler Mögliche Ursache Behebung
LED PWR
nicht
schlechte Bildqualität
leuchtet
Das Gerät ist nicht
korrekt angeschlossen.
Staub auf der Scannerlinse.
Staub auf dem Film
bzw. dem Dia
Schließen Sie das
Gerät an.
Reinigen Sie die Scannerlinse.
Reinigen Sie den Film
bzw. das Dia.
HINWEIS
Wenn Sie mit den vorstehend genannten Schritten das Problem
►
nicht lösen können, wenden Sie sich bitte an den Kundendienst.
74
SND 3600 A2

Lagerung/Entsorgung
Lagerung/Entsorgung
Lagerung
Lagern Sie das Gerät in einer trockenen Umgebung.
Gerät entsorgen
Werfen Sie das Gerät keinesfalls in den
normalen Hausmüll. Dieses Produkt unterliegt der europäischen Richtlinie 2002/96/EC
WEEE (Waste Electrical and Electronic
Equipment).
Entsorgen Sie das Gerät über einen zugelassenen
Entsorgungsbetrieb oder über Ihre kommunale Entsorgungseinrichtung. Beachten Sie die aktuell geltenden
Vorschriften. Setzen Sie sich im Zweifelsfall mit Ihrer
Entsorgungseinrichtung in Verbindung.
DE
AT
CH
SND 3600 A2
75
Anhang
Technische Daten
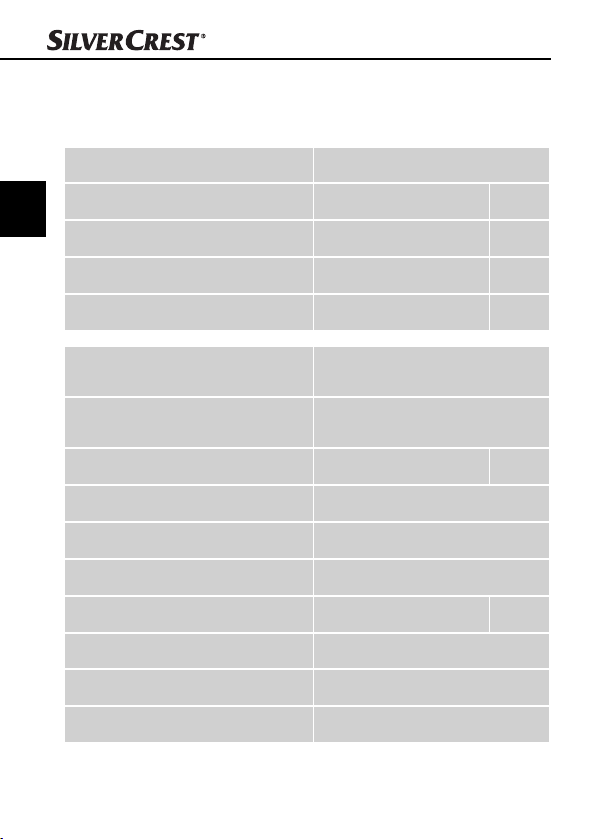
Schnittstelle USB 2.0
DE
Betriebstemperatur +5 - +40 °C
AT
CH
Feuchtigkeit (keine Kondensation) 5 - 90 %
Abmessungen (B x H x T) 9,6 x 16,9 x 10,5 cm
Gewicht (ohne Zubehör) ca. 540 g
Anhang
Bildsensor
Linse
Bildwiederholrate 2 fps
Fokussierungsbereich fester Fokus
Helligkeitssteuerung Automatisch
Farbabgleich Automatisch
Aufl ösung (interpoliert) 3600 dpi
Datenkonvertierung 10 bit pro Farbkanal
Scanmethode Single pass
Lichtquelle Gegenlicht (3 weiße LED)
76
1/2,5 " CMOS-Sensor
(5 038 848 Pixel)
F=6.0, 4 Glaselemente, Halb-
feldwinkel 15°
SND 3600 A2

Anhang
Hinweise zur Konformitätserklärung
Dieses Gerät entspricht hinsichtlich Übereinstimmung
mit den grundlegenden Anforderungen und den
anderen relevanten Vorschriften der Richtlinie zur
elektromagnetischen Verträglichkeit 2004/108/EC.
Die vollständige Original-Konformitätserklärung ist
beim Importeur erhältlich.
Garantie
Sie erhalten auf dieses Gerät 3 Jahre Garantie ab Kaufdatum. Das
Gerät wurde sorgfältig produziert und vor Anlieferung gewissenhaft
geprüft.
Bitte bewahren Sie den Kassenbon als Nachweis für den Kauf auf.
Bitte setzen Sie sich im Garantiefall mit Ihrer Servicestelle telefonisch
in Verbindung. Nur so kann eine kostenlose Einsendung Ihrer Ware
gewährleistet werden.
HINWEIS
Die Garantieleistung gilt nur für Material- oder Fabrikations-
►
fehler, nicht aber für Transportschäden, Verschleißteile oder
für Beschädigungen an zerbrechlichen Teilen, z. B. Schalter
oder Akkus.
Das Produkt ist lediglich für den privaten und nicht für den gewerblichen Gebrauch bestimmt. Bei missbräuchlicher und unsachgemäßer
Behandlung, Gewaltanwendung und bei Eingriff en, die nicht von
unserer autorisierten Service-Niederlassung vorgenommen wurden,
erlischt die Garantie.
Ihre gesetzlichen Rechte werden durch diese Garantie nicht eingeschränkt. Die Garantiezeit wird durch die Gewährleistung nicht
verlängert. Dies gilt auch für ersetzte und reparierte Teile.
DE
AT
CH
SND 3600 A2
77
Eventuell schon beim Kauf vorhandene Schäden und Mängel müssen sofort nach dem Auspacken gemeldet werden, spätestens aber
zwei Tage nach Kaufdatum.
Nach Ablauf der Garantiezeit anfallende Reparaturen sind kostenpfl ichtig.
DE
AT
Service
CH
Service Deutschland
Tel.: 0180 5772033 (0,14 EUR/Min. aus dem dt. Festnetz,
Mobilfunk max. 0,42 EUR/Min.)
E-Mail: kompernass@lidl.de
IAN 73761
Service Österreich
Tel.: 0820 201 222 (0,15 EUR/Min.)
E-Mail: kompernass@lidl.at
IAN 73761
Service Schweiz
Tel.: 0842 665566 (0,08 CHF/Min.,
Mobilfunk max. 0,40 CHF/Min.)
E-Mail: kompernass@lidl.ch
IAN 73761
Anhang
Importeur
KOMPERNASS GMBH
BURGSTRASSE 21
44867 BOCHUM, GERMANY
www.kompernass.com
78
SND 3600 A2

KOMPERNASS GMBH
Burgstraße 21
D-44867 Bochum
www.kompernass.com
Last Information Update · Versiunea informaţiilor
Stand der Informationen: 03 / 2012
Ident.-No.: SND3600A2012012-2
IAN 73761
7
 Loading...