

Page 1
Microwave SMW 800 A2
Φούρνος μικροκυμάτων
KOMPERNASS GMBH
BURGSTRASSE 21 · D-44867 BOCHUM
www.kompernass.com
ID-Nr.: SMW 800 A2-09/11-V3
IAN: 71492/71493
Microwave
Operating instructions
Mikrovalna peçnica
Upute za upotrebu
R
Coptor cu microunde
Instrucţiunile
Микровълнова фурна
Ръководство за експлоатация
Οδηγίες χρήσης
Mikrowelle
Bedienungsanleitung
Page 2
SMW 800 A2
5
4
1
2
3
r
e
w
0
q
7
9
t
6
8
Page 3

CONTENT PAGE
Safety instructions 2
Intended Usage 5
Items supplied 5
Technical Data 5
Before you begin 6
Basic principles of microwave cookery..........................................................................................6
Use suitable cookware.....................................................................................................................6
Description of the appliance 7
Commissioning 7
Installation of the appliance............................................................................................................7
Preparing the appliance ..................................................................................................................7
Inserting accessories ........................................................................................................................8
Operation 8
Setting the Clock...............................................................................................................................8
Setting the kitchen timer...................................................................................................................8
Child protection system....................................................................................................................9
Query functions ................................................................................................................................9
Heating and cooking 9
Microwave operation.......................................................................................................................9
Grill operation................................................................................................................................11
Combination cooking processes ..................................................................................................11
Auto menu 11
Starting the Auto-menu ..................................................................................................................12
Programmes in detail.....................................................................................................................13
Defrosting 15
Preset 15
Cleaning and Care 16
Troubleshooting 17
Disposal 17
Warranty and Service 17
Importer 18
Read the operating instructions carefully before using the device for the first time and preserve this booklet
for later reference. Pass this manual on to whoever might acquire the device at a future date.
- 1 -
Page 4
MICROWAVE
Safety instructions
Important!
Warnings regarding damage to the appliance.
Danger! / Risk of injury!
Warning about physical injuries and electric shock!
Risk of fire!
Warning about risks of fire.
Notice!
Note – Hints and tips for using the microwave.
Safety precautions for the avoidance of excessive
contact with microwave energy
• Do not try to operate the appliance while the
door is open, as this can lead to you coming
into contact with a potentially harmful dose of
microwave radiation. It is also important not
to break open or manipulate the safety locks .
• Do not jam anything between the front of the
appliance and the door, and make sure that
there is no residual food or cleaning agent
on the seals.
Risk of injury!
• If the door or the door seal is damaged, under
no circumstances may you continue to use the
appliance. Arrange for it to be repaired as soon
as possible by qualified specialists.
• Never attempt to repair the appliance yourself.
Removal of the appliance housing could cause
the release of microwave energy. Arrange for
the repair to be carried out only by qualified
specialists.
• This appliance is not intended for use by individuals
(including children) with restricted physical, physiological or intellectual abilities or deficiences in
experience and/or knowledge unless they are
supervised by a person responsible for their safety
or receive from this person instruction in how the
appliance is to be used. Children should be
supervised to ensure that they do not play with
the appliance.
• Children may only be allowed to use the appliance without supervision if appropriate instructions have been given that have provided
the child with the knowledge to use the cooker
in a safe manner and to understand the risks
of improper use.
• Only use this appliance for its intended purpose
as described in this manual. Do not use any caustic
chemicals or vapours in this appliance. This microwave oven is especially designed for heating,
cooking, grilling, or drying foodstuffs.
It is not intended for use in industrial applications
or laboratories.
• Do not operate the microwave oven if the power
cable or plug are damaged. To avoid injury,
arrange for damaged power cables or plugs to
be exchanged by qualified specialists before
re-using the appliance.
• Keep children well away from the microwave
oven when it is in use. Risk of Burns!
• Under no circumstances should you remove the
microwave oven housing.
• Should the lamp in the interior of the microwave
oven need replacing, arrange for this to be done
by a qualified specialist.
• Never touch the microwave oven door, housing,
ventilation openings, accessories or the dinnerware
directly after the grill, combi or automatic menu
process. The parts will be very hot. Allow them
to cool down before cleaning them.
• Ensure that the plug is at all times easily accessible,
so that it can be quickly removed in the event of
an emergency.
- 2 -
Page 5

• People fitted with a heart pacemaker should consult
their doctor about the possible risks of using a microwave oven before taking one into use.
• Do not allow the power cable to hang from a table
or work surface. Children could pull on it.
• After they have been warmed up, always open
containers, popcorn-bags etc. with the opening
pointing away from your body. Escaping steam
could lead to scalds.
• Never stand directly against the microwave oven
when opening the door. Escaping steam could
lead to scalds.
• Do not fry in the microwave. Hot oil can damage
parts of the appliance and utensils and even
cause skin burns.
• Always shake-up or stir warmed up baby glasses
or bottles! The contents could have heated up
unevenly and the baby could be burned/scalded
by them. At all events, check their temperature
before feeding them to the baby!
• Do not modify the microwave oven.
• Microwave radiation is dangerous! Maintenance and repairs requiring the removal of access
covers, which are intended for protection
against contact with microwave radiation, are to
be carried out by trained specialists only.
• Before consumption, check the temperature, so
as to avoid a potentially life-threatening scalding
for babies.
Cooking utensils may become hot from the heat
emitted by the food, so that you may require oven
gloves to touch them. In this case, a check should
also be made to ensure that the cooking utensils
are suitable for use with the microwave oven.
Attention! Hot surfaces!
Risk of fire
• Never leave the microwave oven unattended if
you are heating foodstuffs packed in plastics or
paper.
• Never place flammable materials close to the
microwave oven or the ventilation openings.
• Remove ALL metallic closures from the packaging
of the foodstuff that you intend to warm up.
Risk of fire!
• When making popcorn, use only popcorn-bags
suitable for microwave ovens.
• Do not use the microwave oven to warm up cushions
filled with kernels, cherry stones or gels.
Risk of fire!
• Do not use the microwave oven for storing foodstuffs
or other objects.
• Do not exceed the cooking times detailed by the
manufacturer.
• Do not place any objects on the microwave oven
when it is in use. The ventilation openings would
be blocked!
• Do not place the microwave oven adjacent to
other appliances discharging heat, for example,
an oven.
• Clean the microwave oven thoroughly after warming
up greasy foods, especially if they were not covered.
Allow the appliance to cool down completely
before cleaning it. Residues such as fat or grease
cannot be allowed to collect on the heating
elements of the grill. They could possibly ignite.
• Do not thaw frozen fat or oil in the microwave oven.
The fat or oil could ignite.
• Do not use an external timing switch or a separate
remote control system to operate the appliance.
- 3 -
Page 6
Important! Appliance Damage!
• Do not use the microwave oven when it is empty.
The only exception is for the initial commissioning
(see chapter "Commissioning").
• Never insert foreign objects into the ventilation
openings or the door safety locks.
• Do not use metallic utensils which reflect micro-
waves and lead to sparking. Do not place tins
in the microwave oven.
• Do not place plastic containers in the microwave
oven immediately after a grill, combi or automatic
menu process. The plastic could melt.
• This microwave oven may not be located in areas
with high humidity or where moisture could collect.
• Liquids and other foods must not be heated in airtight containers, as these may explode and
damage the appliance.
• Do not lean on the microwave oven door.
• Insufficient cleanliness of the appliance could lead
to the destruction of the upper surfaces, which
themselves influence its useful lifespan and could
possibly also lead to dangerous situations.
Danger
• Never submerse the appliance, the power cable
or the plug in water or other fluids.
• Keep the power cable away from hot surfaces.
Do not lead it in front of the microwave oven door.
The heat could damage the cable.
• Never pour fluids into the ventilation openings
or the safety locks. Should fluids ever enter them,
immediately switch the microwave oven off and
remove the plug from the mains power socket.
Arrange for the appliance to be checked by
qualified specialists.
Safety tips
• To minimize the risk of fire in the microwave:
When heating food in plastic or paper containers,
always keep an eye on the microwave when it
is in operation, as these materials can catch fire.
• When heating drinks in the microwave, bubbling
may be delayed when the drink boils. Therefore,
be careful when handling the container.
To avoid sudden simmering:
- If possible, place a glass rod in the fluid for as
long as it is being heated.
- To avoid an unexpected reboiling, leave the
fluid to stand in the microwave oven for
ca. 20 seconds after being warmed up.
• Puncture the skins of potatoes, sausages or similar.
Otherwise, they could explode.
• Proceed with caution when warming up fluids.
Use only open containers, so that any air bubbles
produced can escape.
• Should you notice smoke, switch the appliance
off or remove the plug from the socket and
keep the door closed to suffocate any possible
flames.
• Eggs in their shells and hard-boiled eggs should
not be heated in the microwave oven as they
could explode, even on completion of the heating
process. Food with thick skins, such as potatoes,
whole pumpkins, apples and chestnuts must be
pricked before cooking.
• Do not transport the microwave oven when it is
in use.
- 4 -
Page 7

Earthing information/correct installation
This appliance must be earthed. This appliance is
to be connected only to a correctly earthed power
socket. An individual circuit, solely for the connection
of the microwave oven, is recommended.
Danger: Improper use of the earthing connector
could increase the risk of an electric shock.
Note: Should you have any questions about earthing or about the instructions on the use of
this electrical appliance given here, please
consult an electrician or
a maintenance technician.
Neither the manufacturer nor the dealer can accept
liability for damage to the microwave oven or injury
to persons resulting from failure to comply with the
instructions for electrical connection.
Interference with other appliances
The operation of the microwave may cause interference
on your radio, television or similar appliances.
If such interference should occur, they may be reduced
or corrected by the following remedial measures:
• Clean the door and the seal of the microwave.
• Re-align the receiver antenna of your radio or
television.
• Position the microwave in a different place to
the receiver.
• Move the microwave away from the receiver.
• Plug the microwave into another wall socket.
The microwave and the receiver should be
connected to different circuits.
Intended Usage
This appliance is intended for the heating up and
preparation of foodstuffs according to the described
procedures.
Any modifications to the appliance shall be deemed
to be improper use and implies substantial risk of
accidents. The manufacturer declines to accept
responsibility for damage(s) arising out of usage
contrary to the instructions specified below.
This appliance is intended exclusively for use in
domestic households!
Do not use it in/for commercial, industrial or laboratory areas/applications!
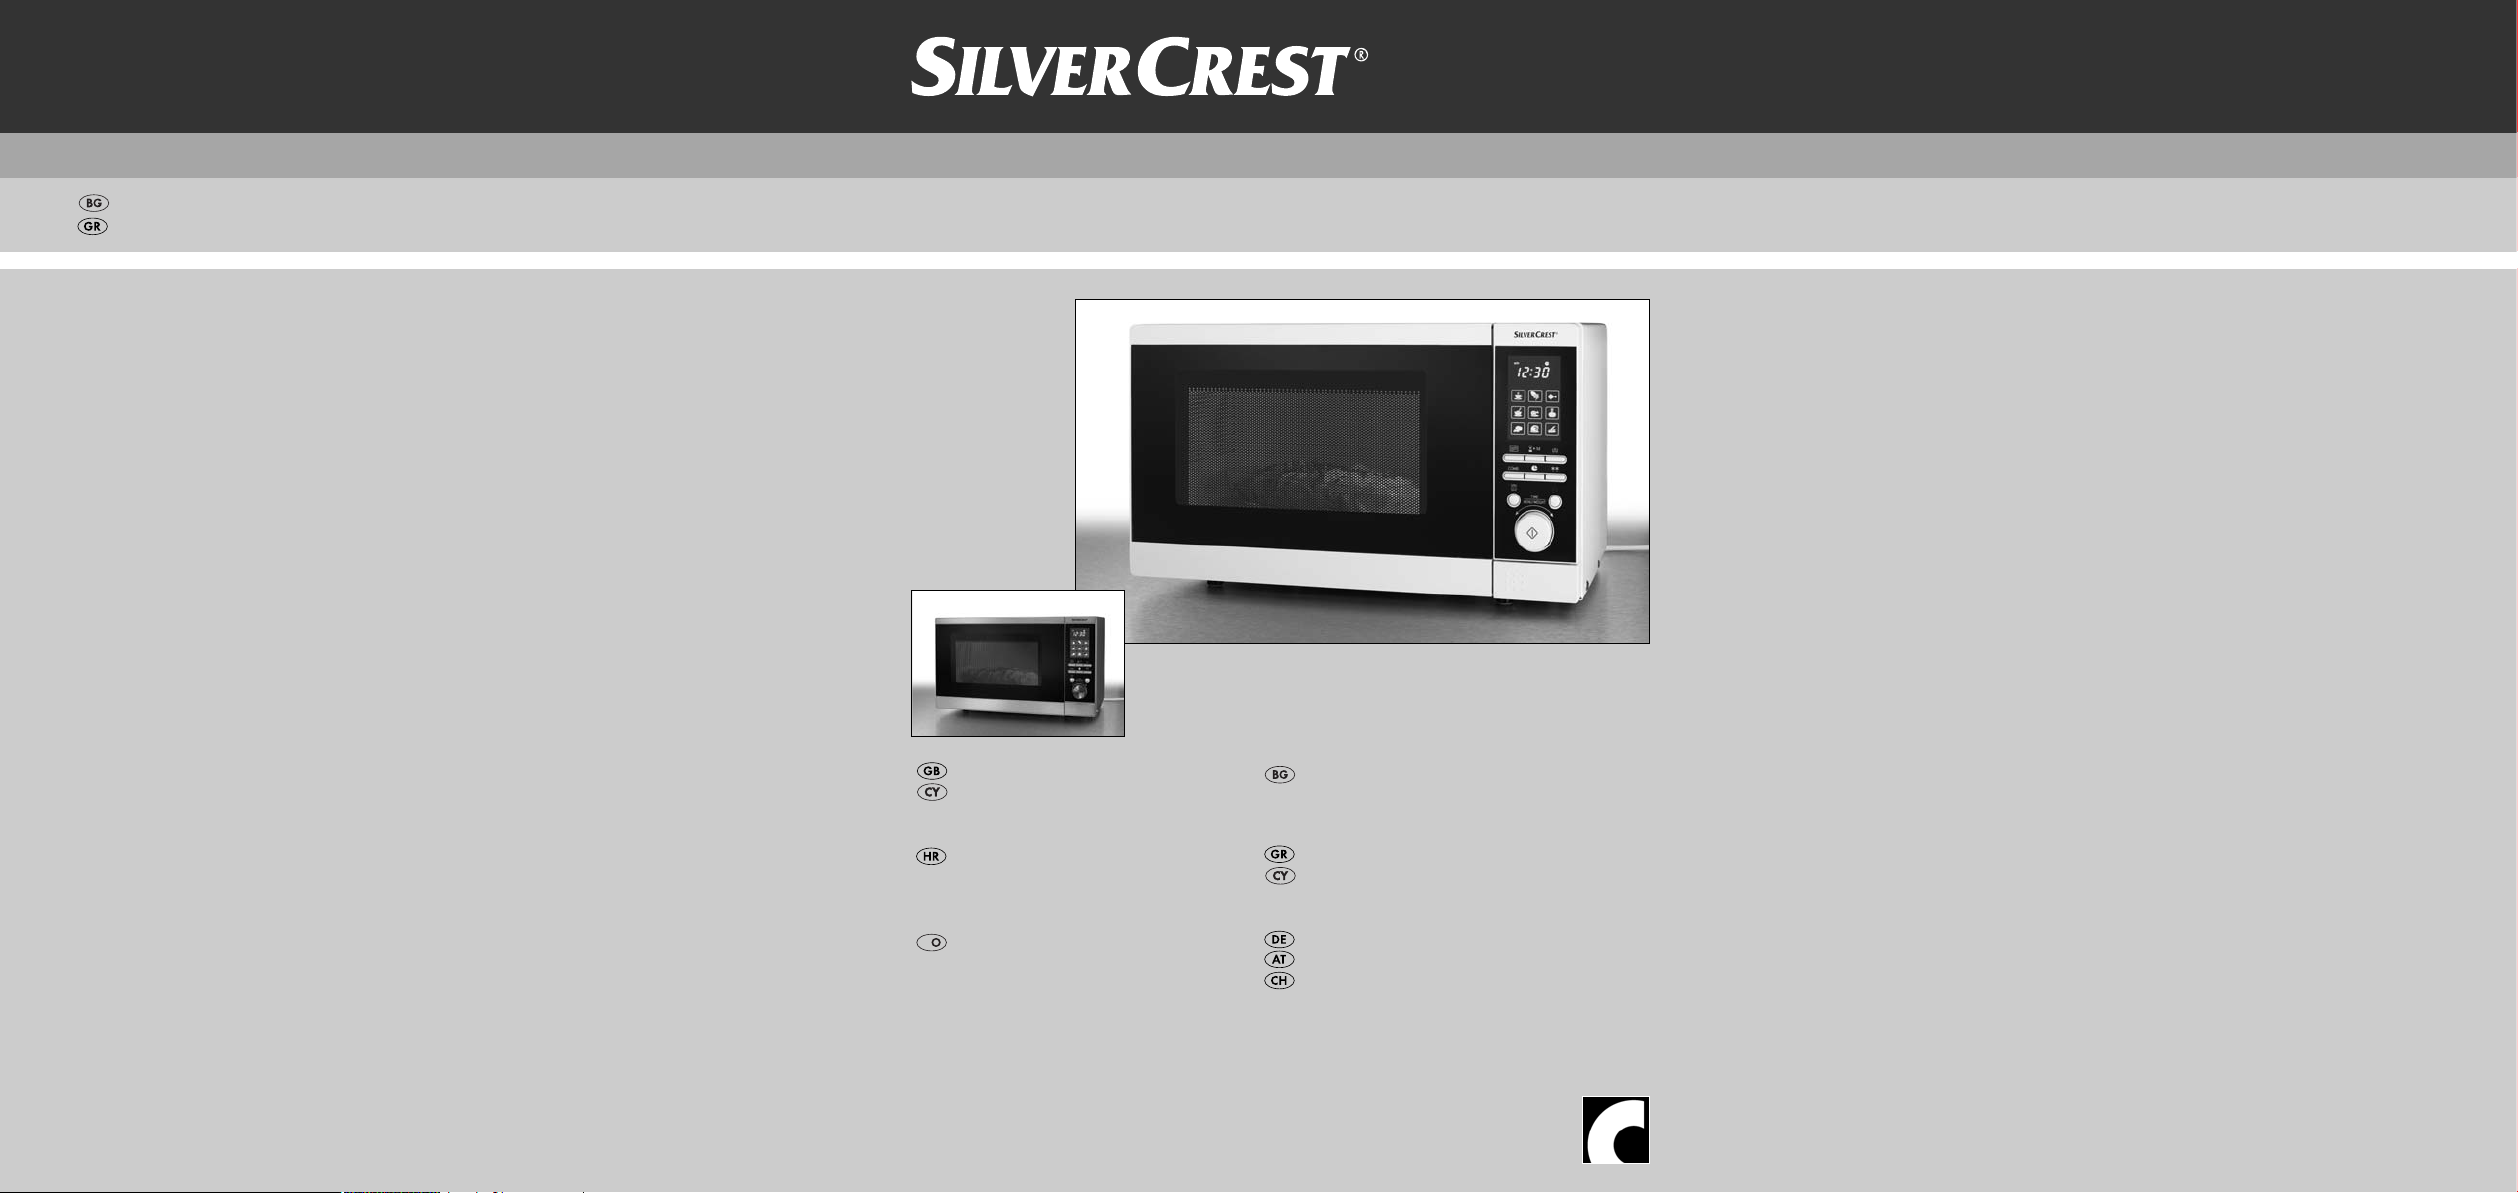
Items supplied
Microwave
Glass plate
Grill stand
Star rotator
Operating instructions
Concise instruction sheet
Technical Data
Power rating: 230 - 240 V
50 Hz
Maximum power consumption: 1200 W
Maximum power output
Microwave: 800 W
Maximum power consumption
Grill: 1000 W
Microwave frequency: 2450 MHz
~
- 5 -
Page 8
Before you begin
Basic principles of microwave cookery
• Arrange the food with consideration.
• The thickest parts near the edges.
• Pay attention to the cooking time. Select the
shortest possible stated cooking time and increase
as required. Food that is cooked too long can
begin to smoke or catch fire.
• Cover the food during cooking with a lid suitable
for microwave cookery. The lid prevents splashing
and helps in the even cooking of the food.
• While cooking, turn the food in the microwave
once so that items such as chicken or hamburgers
are cooked more quickly.
• Large pieces of food, such as joints of meat,
must be turned at least once.
• Completely re-arrange foods such as meatballs
after half the cooking time. Turn them and move
the meatballs from the middle of the cookware
to the edge.
• We recommend the use of round/oval cookware
instead of square or oblong containers, as food
in corner areas tends to overcook.
The following list provides general hints to assist
you in selecting the correct cookware.
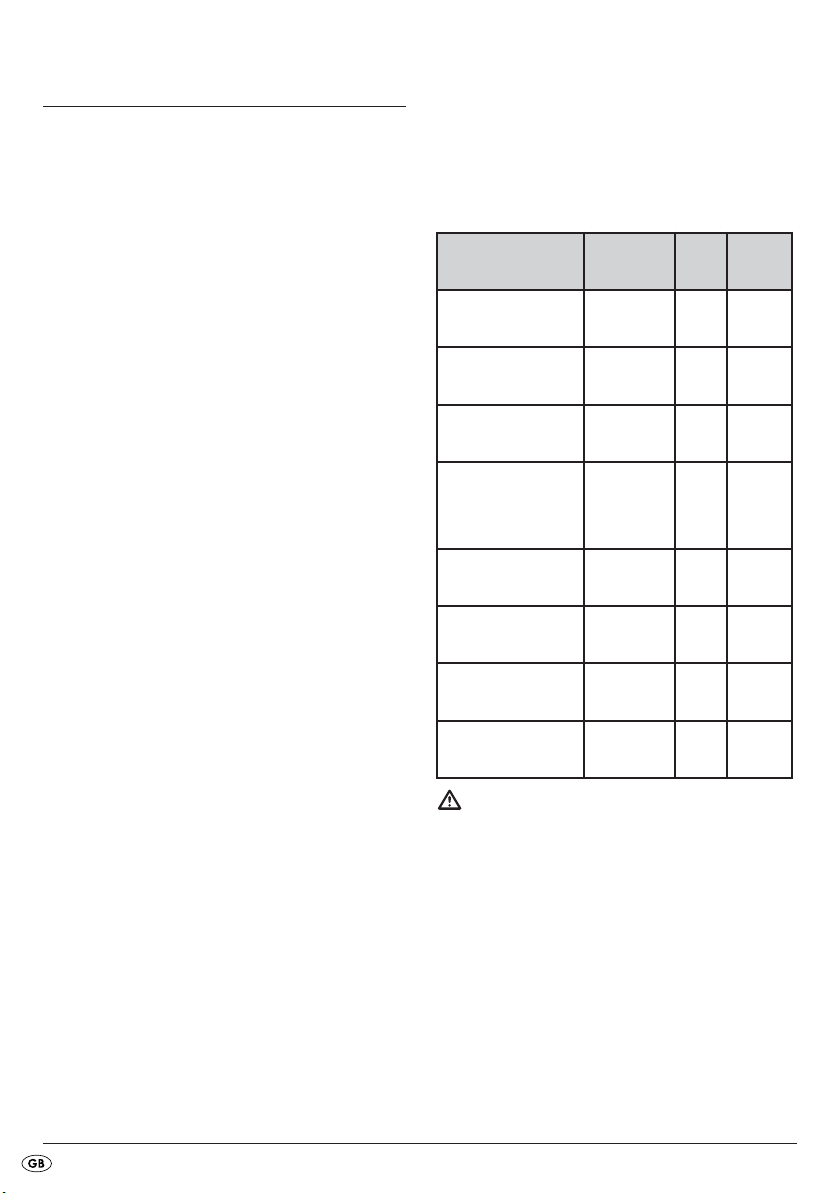
Cookware
Heat-resistant glass Ye s Yes Yes
Non-heat-resistant
glass
Heat-resistant
ceramics
Plastic crockery
suitable for microwave
Kitchen roll Yes No No
Microwave oven
No No No
Yes Yes Yes
Yes No No
Grill
Combination
Use suitable cookware
• The ideal material for a microwave oven is
microwave-permeable, allowing the energy to
penetrate the container to heat the food.
Microwaves cannot permeate metal. Therefore,
metal containers and cookware should not be
used.
Microwaves cannot permeate metal. For this
reason metal containers and cookware should
not be used.
• When using the microwave for heating do not
use products made of recycled paper. These
can contain minute fragments of metal, which
can generate sparks and/or fires.
Metal tray/plate No Yes No
Grill stand No Yes No
Alufoil & Foil
containers
No Yes No
Risk of fire!
Never use the grill stand or other metallic objects
when you are using the appliance in the microwave
mode or in the combination cooking process.
Metals reflect the microwave radiation and it leads
to the generation of sparks. This could cause a fire
and irreparably damage the appliance!
- 6 -
Page 9
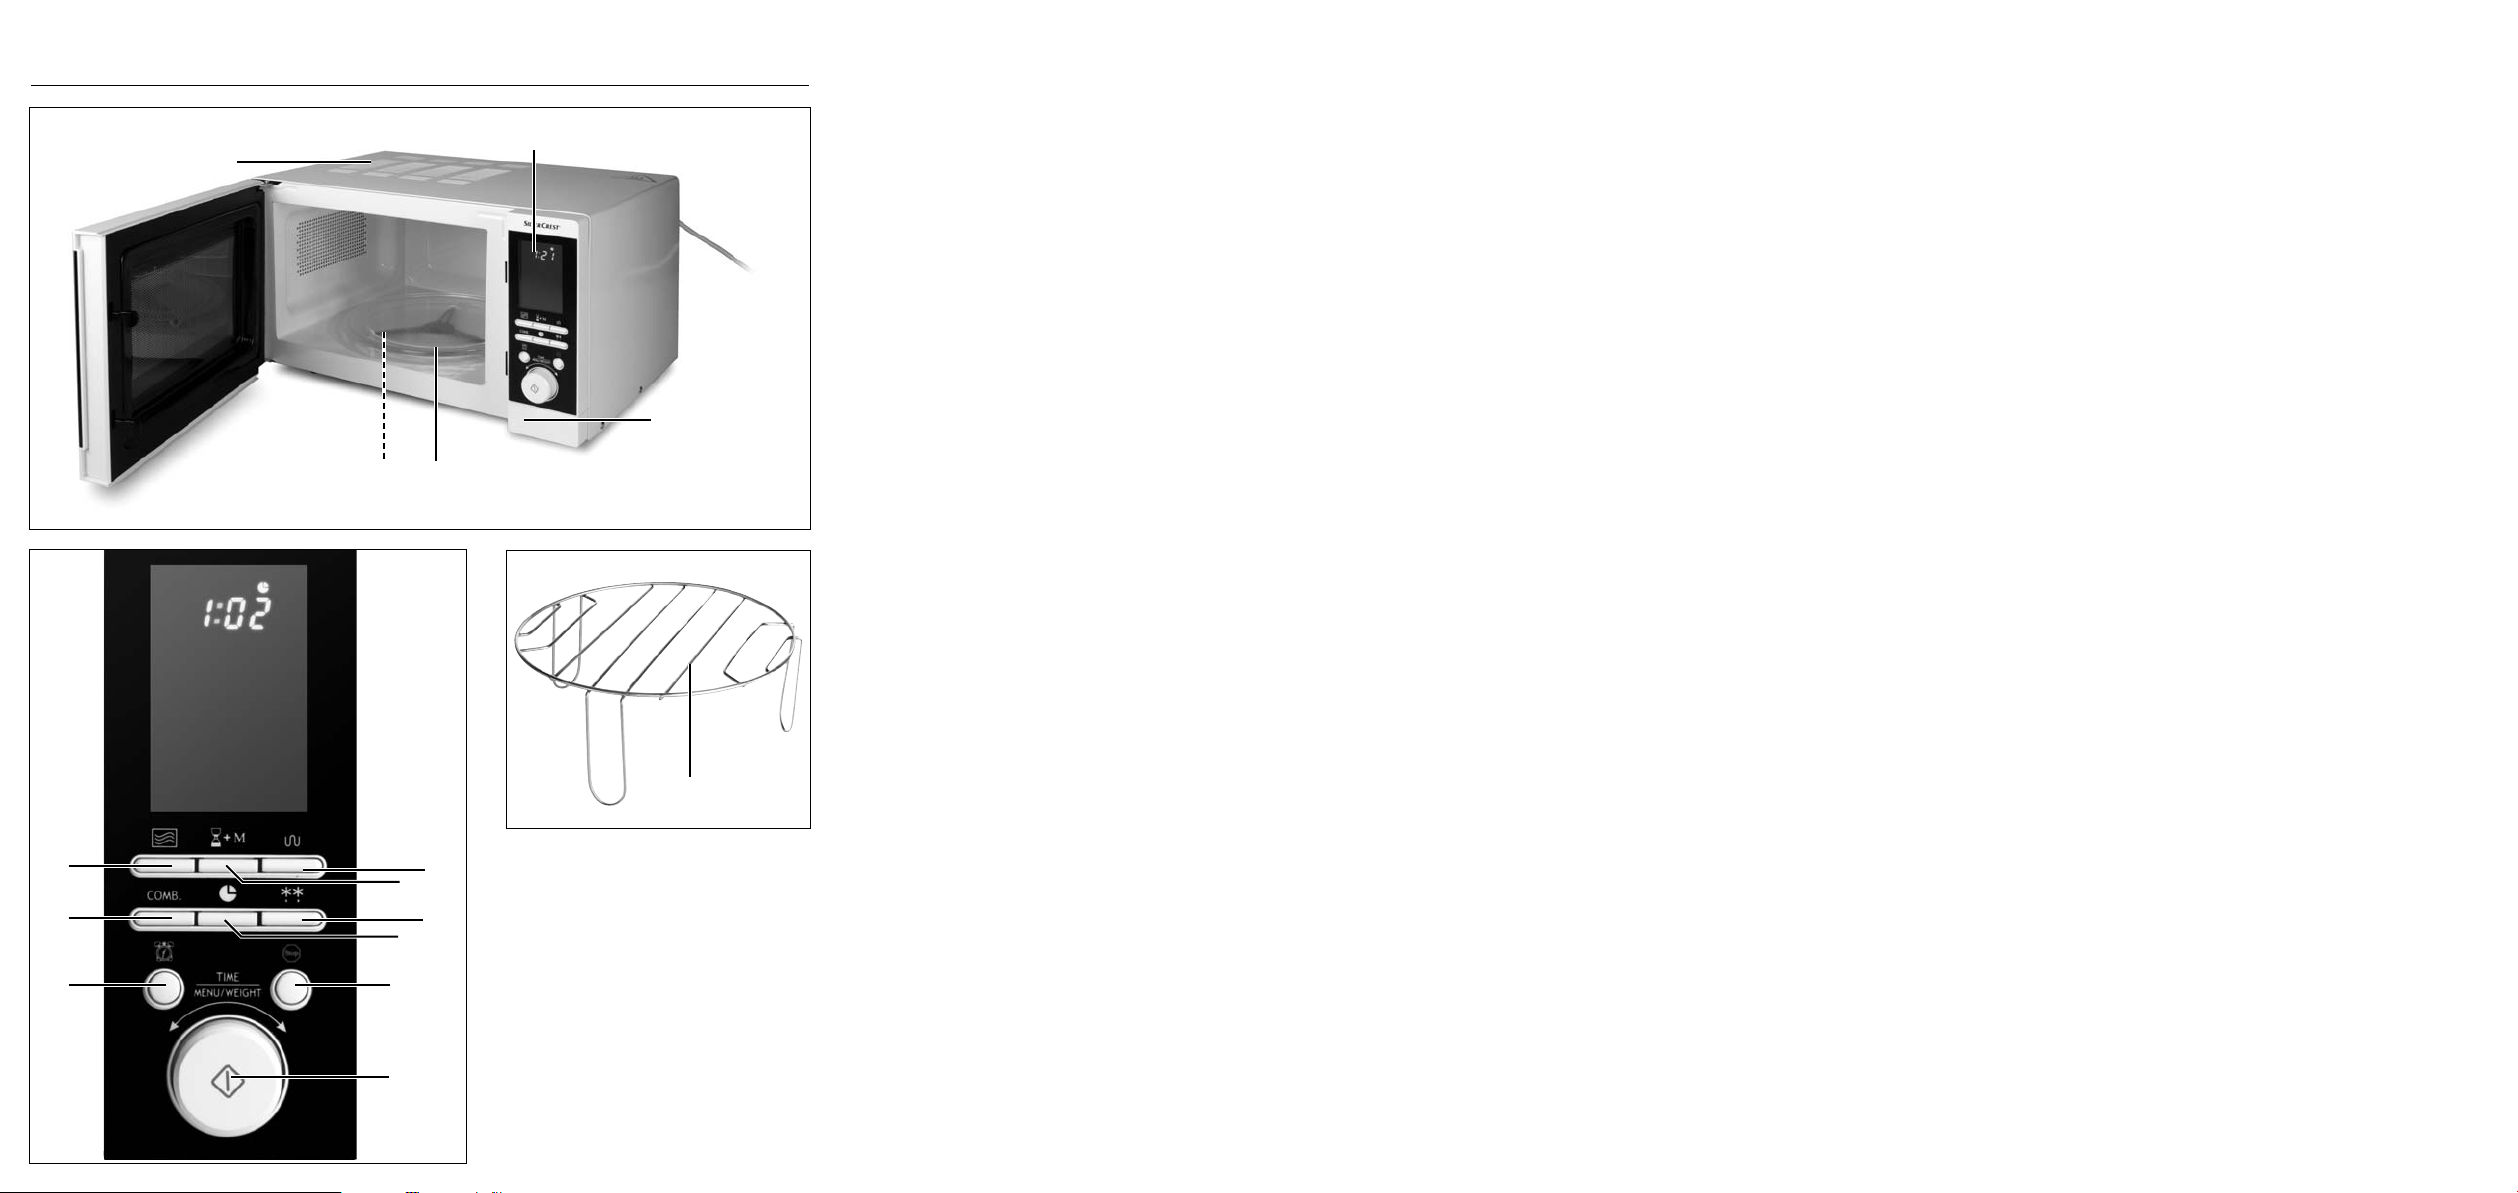
Description of the appliance
DO NOT
1 Display
2 Door opener button
3 Glass plate
4 Star rotator
5 Cold air intake
6 Grill Button
7 Preset Button
8 Defrosting button
9 Time Button
0 Stop button
q Control dial/Start/Quickstart
w Kitchen timer button
e Combination Button
r Operation button
t Grill stand
• Ensure that the electrical plug is accessible
without problem, so that in case of danger it
can be easily reached and removed.
• Do not remove the pads underneath the microwave oven.
• Do not block the ventilation slots 5. If you do,
it could damage the appliance.
• Install the appliance as far away as possible
from radios and televisions. The operation of
the microwave oven can cause malfunctions to
radio and televsision reception.
Warning:
Do not install the microwave above a cooker or any
other appliance generating heat. Installation in such
a location could cause damage to the appliance and
lead to a subsequent cancellation of the warranty
provisions.
Commissioning
Installation of the appliance
Risk of fire!
This microwave oven is not suitable for installation in
a kitchen cabinet. In closed cabinets sufficient ventilation
for the appliance cannot be assured. The appliance
could be damaged and there would be the additional
risk of a fire!
• Select an even surface offering sufficient space
for the adequate ventilation of the appliance:
Ensure that you maintain a minimum distance
of 10 cm from neighbouring walls/surfaces.
Ensure that the door of the microwave oven
can be opened easily.
Maintain a gap of at least 20 cm above the
microwave oven.
Preparing the appliance
• Remove all packaging materials and any
protective film on the surface of the housing.
D
mer cover plate, which is mounted
in the cooking area to protect the
magnetron.
• Insert the plug into a power socket.
Use a 230 - 240 V ~, 50 Hz, mains power
socket with a 16A fuse. It is recommended that
the microwave oven is powered from its own
ring main. If you are unsure about how to connect the microwave oven, consult a specialist.
remove the light grey flim-
- 7 -
Page 10
Before the first regular usage of the microwave oven
the appliance must be heated up to remove any
remaining production residues.
Without foodstuffs or accessories (glass plate 3, star
roller 4 and grill stand t), switch the appliance on
in the mode Grill:
• Press the button Grill once 6 .
With this you select the Grill operation.
In the display 1 appears the symbol and
the symbol blinks. This indicates readiness
to start.
• Adjust the control dial q to a cooking time of
10 minutes.
• Press the button Start/Quick start q to
start the grilling process.
Note:
On the first usage, the generation of light smoke and
a slight smell can occur, this is due to the production
residues. This is unharmful. Provide for sufficient
ventilation. For example, open a window.
Operation
Setting the Clock
When you take the microwave oven into use for the
first time, or there has been a power cut, the display 1
indicates "1 : 0 1 ".
1. Press the button Clock 9 . "Hr 12" appears
in the display 1.Press the button Clock 9
once again should you wish to switch to the 24hour mode.
2. By turning the control dial q programme in the
current hour. The clock symbol in the display 1 blinks.
3. Press button Start/Quick Start q . The
minute indicator appears.
4. By turning the control dial q, programme in the
current minute.
5. When the clock is correctly set, press the Start/
Quick Start button q . The clock symbol
in the display 1 glows continuously and
the colon indicates, by blinking, that the clock is
running.
• After 10 minutes, the appliance switches itself
off automatically. Signal tones sound. Open the
door. Wait until it has cooled down completely.
• Remove the plug from the mains power socket
then, after cleaning the appliance with a moist
cloth, dry it carefully.
Inserting accessories
• Place the star rotator 4 centrally on the drive
shaft in the cooking area. Ensure that it slides
completely onto the axle and is firmly seated.
• Place the glass plate 3 centrally on the star
rotator. The three rollers must be seated on the
leading edge on the glass plate 3.
To read off the current time when the microwave oven
is in operation, press the button Clock 9 ; the
time will then be indicated in the display 1 for
approx. 4 seconds.
Setting the kitchen timer
The microwave oven is provided with a kitchen timer
which you can use independently of the microwave
operation.
1. Press the button Kitchen timer w when the
appliance is in standby mode. In the display
appears 1 "00:10".
2. Now set the desired time using the control dial q.
You can select any time range from 10 seconds
to 95 minutes.
- 8 -
Page 11
3. Press button Start/Quick Start q . The
appliance emits an acoustic signal. The count
down begins. After approx. 3 seconds the current time is shown once again. The cooking timer progresses further in the background.
If you wish to check the progress of the kitchen timer, press the kitchentimer button w . It
appears for a brief period in the kitchen timer.
As soon as the set time has expired you will hear
3 signal tones.
Take note:
To stop the countdown of the kitchen timer, press
the button Kitchen timer w so that the remaining
time of the kitchen appears in the display. Press, during the period that the remaining time of the kitchen
timer is being shown in the display 1, the
Stop 0 button. The kitchen timer will then be cancelled and the current time appears in the display 1.
Child protection system
Engage this setting to prevent accidental activation
by children and other persons not familiar with the
operation of the appliance.
The symbol for Child safety appears in the display 1 and, for as long as this function is activated,
the appliance cannot be put into operation.
• Press and hold the button Stop0 until a
signal tone sounds and the symbol for Child
Safety appears in the display 1. The
buttons and the control dial now no longer have
a function.
• To deactivate Child Safety, press and hold the
Stop button 0 until an signal tone sounds
and the symbol for Child Safety extinguishes.
Query functions
Query the time during operation
During the cooking process press the button
Clock 9 .
The time appears in the display 1 for approx.
4 seconds.
Query the power level operation
During the cooking process press the button
Operation r .
In the display 1 the activated operational level
appears for approx. 3 seconds.
Heating and cooking
Microwave operation
Notice
During the cooking process, drops of water can form
on the oven door or on the housing. This is normal and
is not an indication of a malfunction.When the appliance has cooled down, wipe the moisture off with a
dry cloth.
Risk of fire!
Never use the grill stand t or other metallic objects
when you are using the appliance in the microwave
mode. Metals reflect the microwave radiation and it
leads to the generation of sparks. This could cause
a fire and irreparably damage the appliance!
- 9 -
Page 12
Selecting the operation level
• Press the button Operation r the appropriate number of times to set the required power
level.
• 1x for 800 Watts of power (P800).
• 2x for 700 Watts of power (P700).
• 3x for 600 Watts of power (P600).
• 4x for 500 Watts of power (P500).
• 5x for 400 Watts of power (P400).
• 6x for 300 Watts of power (P300).
• 7x for 200 Watts of power (P200).
• 8x for 100 Watts of power (P100).
The power setting level is indicated in the display 1
(e.g. P800 at 800 Watts of power).
Programming the cooking time
After you have selected the power level, programme
in the desired cooking time:
• Turn the control dial q, until the desired cooking
time has been programmed in.
The increments for setting the time with the control
dial q are as follows:
• from 10 sec. to 5 min: in 10 second increments
• from 5 to 10 min: in 30 second increments
• from 10 to 30 min: in 1 minute increments
• from 30 to 95 min: in 5 minute increments
Aborting/stopping an input process
Press the button Stop 0 once to cancel or end
input of data. The appliance reverts to standby mode.
Interrupting the cooking process
Press the button Stop 0 once to interrupt a cooking
process . The appliance interrupts the cooking process
and stops the remaining time. Press the button
Start/Quick start q to continue the cooking process.
Abort the cooking process
Press the button Stop 0 twice to stop the cooking
process. The appliance reverts to standby mode.
Cooking process is finished
When a cooking process is complete, "End" appears
in the display 1 and 4 signal tones sound. If the
door of the microwave is not opened, the signal
tones sound again after about 2 minutes.
Quick start
With this function you can immediately begin cooking
at 800W power for 30 seconds (or longer, up to
12 minutes).
• Press the button Start/Quick Start q once.
In the display 1 appear the symbols for microwave operation and cooking , as well
as ":30". The microwave starts the cooking process for 30 seconds. The count down begins.
Should you wish to cook for a longer period, repeatedly press the button Start/Quickstart q
until the desired time is reached.
Starting the cooking process
When you have programmed in the power level
and the cooking time, and the symbol blinks in
the display 1, you can start the cooking process:
To start the cooking process, press button Start/
Quickstart q .In the display 1 appear the
symbols for microwave operation and cooking
(Power P100 - P400) or (Power P500 P800).
The programmed time starts to count down.
- 10 -
Page 13
Grill operation
You can use the grill function for thin slices of meat,
steaks, hamburgers, sausage or chicken pieces. It is
also excellent for use in making topped sandwiches
and gratins. Always use the grill stand t for grilling.
To achieve an optimal grilling result.
Always place the Grill stand t on the Glass plate 3.
1. Press the button Grill 6 to activate the
grill function.
In the display 1 appears the symbol for the
grill function and „:10“.
2. Using the control knob q, set the required
cooking time. The maximum possible cooking
time setting is 95 minutes.
3. To start the grilling function press the button
Start/Quick start q .
4. Turn the meat after about half of the cooking
time.
Combination cooking processes
This function combines the grill function and the normal
microwave operation. In combined mode, the microwave automatically cooks for a certain amount of
time and grills for the remaining time. You may notice
a quiet clicking noise when the oven is switching
between modes.
Warning:
Never use the grill stand t, or other metallic objects,
when you are using the appliance in the combination
cooking process. Metals reflect the microwave radiation
and it leads to the generation of sparks. This could
cause a fire and irreparably damage the appliance!
Combination 1
In Combination 1 the microwave element amounts
to 30% and the grill element amounts to 70% of the
cooking time. This is suitable for, for example, fish,
potatoes or gratins.
1. Press the button Combination e once
to activate combination 1. In the display 1
appears as well as „:10“.
2. Using the control dial q set the required cooking
time. The maximum possible cooking time setting
is 95 minutes.
3. To start, press the button Start/Quick start q .
Combination 2
In Combination 2 the microwave element amounts
to 55% and the grill element amounts to 45% of the
cooking time. This is suitable for, for example,
puddings, omelettes, poultry dishes or lasagne.
1. Press the button Combination e twice
to activate combination 2. In the display 1
appears as well as „:10“.
2. Using the control dial q set the required cooking
time. The maximum possible cooking time setting
is 95 minutes.
3. To start, press the button Start/Quick start q .
Auto menu
For foods that are intended to be prepared in the
Auto Menu modus it is not necessary to programme
in the period of the cooking process and the power
level. It is quite sufficient to enter which type of food
is to be cooked/boiled, and its weight.
- 11 -
Page 14
Notice
The microwave calculates the time/operational level
for fresh foods. Frozen foods will not be cooked
with the times programmed into the microwave.
If needs be, defrost frozen foods with the defrost
programme beforehand (see section "Defrosting").
Starting the Auto-menu
Note
Always place the food item in a suitable container
or on a plate. Bear in mind that, during the cooking
or heating process, liquids such as grease, etc. can
drain from the food. The container/plate should
therefore be large enough to avoid the overflowing
of liquids.
1. Turn the Control dial q slowly to the left. In the
display 1 appears a number (e.g. "3" for
Auto Programme 3 (fish)), the Symbol "Fish"
and
for your foodstuff (1 to 9). You can, after you
are in automatic mode menu, also access the
desired automatic menu with a clockwise rotation. Confirm your selection by pressing the
Start/Quick Start button q .
Select the appropriate Auto-menu
.
Nr. Symbol Foodstuff
1 Beverages 1 - 3
2 Noodles 100 - 300g
3 Fish 100 - 1000g
4 Rice 100 - 1000g
5 Chicken 800 - 1400g
6 Warming 100 - 1000g
7 Potatoes 150 - 600g
8 Roasting 300 - 1300g
9 Kebabs 100 - 700g
2. Now set by, by rotating the control knob q
the desired weight resp. the desired number of
servings. The symbol blinks.
3. Press the button Start/Quick start q to
start the cooking process.
Weight
(Portions)
Note:
To achieve an even cooking or simmering, you
should turn the food after about 2/3 of the cooking
process (only programme 5, 8 and 9). The microwave reminds you of the need to turn: "turn" appears in
the display 1 and a signal tone sounds.
• Open the door and turn the food over. Proceed
cautiously with the possibly already hot food.
- 12 -
Page 15
• Press the button Start/Quickstart q to continue
the cooking process.
Take note:
If you wish to dispense with turning, simply wait for
the signal tones to finish. The microwave continues
your programme automatically after approx. 30
seconds.
Note
Should the meal not be properly cooked on completion
of the auto-menu, continue cooking for a couple of
minutes with the Quick start programme. For programmes that continue with utilisation of the grill
function (Programme numbers 5, 8 and 9), the food
can be cooked further with the grill function. Extended
cooking with the grill function also increases the
browning level of the food.
Programmes in detail
Programme 1: Beverages
This programme runs only with utilisation of microwave power. Subject to the number of portions, the
programme runs for between 1:30 and 3:50 minutes.
• Place the beverage that you wish to heat up on
the Glass plate 3 in the cooking area. If you
wish to place several glasses or cups in the
microwave oven, ensure that the receptacles do
not touch each other.
Notice
To avoid sudden simmering:
• If possible, place a glass rod in the fluid for as
long as it is being heated.
• To avoid an unexpected reboiling, leave the
fluid to stand in the microwave oven for ca.
20 seconds after being warmed up.
Risk of fire!
When using the programes with incorporated grill
function, under no circumstances should you use any
form of covering or cookware that is not heat resistant,
as these could melt or ignite themselves!
Risk of injury!
After a cooking process, the Glass plate 3 is very
hot! You should therefore always use an oven cloth
or heat resistant oven gloves when removing it from
the cooking area.
Note:
Take note that size, shape and the type of foodstuff
determines the result of the cooking process.
Programme 2: Noodles
This programme runs only with utilisation of microwave power.
Subject to the weight programmed in, this programme
runs for between 25 and 35 minutes.
• When cooking noodles use a tall container, as
there is a great risk of it boiling over.
• Use as much water as you would in conventional
cooking. The noodles should "swim" in the water.
• First bring the the water to the boil: Set the microwave to its highest performance level (P800)
and then start it. For a liter of water you need
about 10 minutes to bring the water to the boil.
• Then add the noodles. After this, you can start
the auto-menu for noodles.
• Finally, allow the noodles to stand for approx.
3 minutes.
- 13 -
Page 16

Programmme 3: Fish
This programme runs only with utilisation of microwave power.
Subject to the weight programmed in, this programme
runs for between approx 3:30 and 16 minutes.
• Lay the pieces of fish on a plate suitable for
microwave ovens, add a little butter or an other
fat, add flavouring to taste and then start the
auto-menu for fish.
Programmme 4: Rice
This programme runs only with utilisation of microwave power.
Subject to the weight programmed in, this programme
runs for between 16 and 36 minutes.
• When cooking rice use a tall container, as there
is a great risk of it boiling over. Use 400 ml water
for, for example, 200 gr of rice. Use the weight
adjustment "200g" despite the water. It is always
the weight of the rice that is to be set.
• Place the rice in the container, fill it with the required volume of liquids and then allow the rice
to swell for approx 3 minutes.
• Cover the container. Ensure that it is not sealed
airtight. After this, you can start the auto-menu
for rice.
Programmme 5: Chicken
This programme runs over several cooking stages,
using microwave power and the grill function.
Subject to the weight programmed in, this programme
runs for between 39 and 50 minutes.
• Place the chicken on a plate suitable for microwave ovens.
• Season to taste and then start the auto-menu for
chicken.
• A whole chicken must be turned, otherwise the
side facing upwards could dry out. For this reason
the microwave oven automatically interrupts the
programme after about 2/3 of the time has
elapsed and a signal tone sounds.
Turn the chicken and then press the button Start/
Quick start q once again to continue the
programme.
Programmme 6: Warming
This programme runs only with utilisation of microwave power.
Subject to the weight programmed in, this programme
runs for between approx 1:00 and 6:20 minutes.
• Place the receptacle with the foodstuff that you
wish to warm up on the glass plate 3 in the
cooking area and then start the auto-menu for
warming.
Programme 7: Potatoes
This programme runs only with utilisation of microwave power.
Subject to the weight programmed in, this programme
runs for between 3:50 and 11 minutes.
Tip!
Use unpeeled potatoes for the cooking process.
Prick the skins a couple of times.
• Place the unpeeled potatoes onto a plate suitable
for microwave ovens or into a receptacle. As far
as possible, use potatoes of the same size.
If possible, the potatoes should not touch each other.
- 14 -
Page 17

Programmme 8: Roasting
This programme runs over several cooking stages,
using microwave power and the grill function.
Subject to the weight programmed in, this programme
runs for between 16 and 60 minutes.
• Place the roast on a plate suitable for microwave
ovens. Season to taste and then start the auto-menu
for roasting.
• A whole roast must be used, otherwise the side
facing upwards could dry out. For this reason
the microwave oven automatically interrupts the
programme after about 2/3 of the time has
elapsed and a signal tone sounds.
Turn the roast and then press the button Start/
Quick start q once again to continue the
programme.
Defrosting
This function enables you to defrost meat, poultry and
fish with ease. The defrosting time and the power level
are calculated and set automatically once you have
entered the weight.
1. Press button Defrosting 8 .
In the display 1 appears and .
The symbol blinks.
2. Using the control dial q enter in the weight of
the foodstuff to be defrosted. You can enter in
a weight of between 100 g and 1800 g.
3. Press button Start/Quick Start q .
The appliance calculates the defrosting time automatically. It appears in the display 1 and starts to
countdown.
Programme 9: Kebabs
This programme runs over several cooking stages,
using microwave power and the grill function.
Subject to the weight programmed in, this programme
runs for between 9 and 27 minutes.
• Place the kebabs on a plate suitable for microwave ovens. Season to taste and then start the
auto-menu for kebabs.
• The kebabs must be turned to ensure even cooking.
For this reason the microwave oven automatically
interrupts the programme after about 2/3 of the
time has elapsed and a signal tone sounds.
Turn the kebabs and then press the button Start/
Quick start q once again to continue the
programme.
After about 1/2 the time you hear a signal tone
and "turn" appears in the display 1. Open the
door and turn the food over. Close the door and
press the Start/Quick Start q button to continue
the defrosting process.
Note:
If you wish to dispense with turning, simply wait for
the signal tones to finish. The defrosting programme
will continue despite the signal tone!
Preset
With this programme you can preset a specific start
time for the cooking or grilling of the foodstuff. If the
programming is carried out correctly, the appliance
starts automatically at the programmed time.
Take note:
The clock must be correctly set to be able to select
the function "Preset".
- 15 -
Page 18
1. Programme in the required microwave function
(cooking, grilling or automatic-menu (except
auto-programme 6):
For microwave operation: Press the button Operation
r the appropriate number of times to
set the required power level. Programme the
cooking time with the rotary switch q.
For grill operation: Press the button Grill 6
to activate the grill function.
Set the desired grilling time using the rotary
switch q.
For automatic-menu: Using the control dial q
select the appropriate programme for your foodstuff (excluding auto-programme 6).Confirm your
selection by pressing the Start/Quick Start button q . Now set by, by rotating the control
knob q, the desired weight resp. the desired number of servings.
2. Press the Preset Button 7 . In the
display 1 "01: “ blinks and the hour-glass symbol appears.
3. Turn the control knob q to programme the
hours.
4. Press the button Start/Quick Start q , now
the minute figures appear.
5. Turn the control knob q to programme the minutes.
6. Press the button Start/Quick start q . The
hour-glass symbol blinks. The
start time is shown. The microwave oven automatically starts the cooking process at the programmed time.
A signal tone sounds when it starts.
Take note:
To erase the saved start time and thus cancel the
saved procedure, press the Stop 0 button.
The hourglass symbol disappears and the time
is displayed.
Cleaning and Care
Risk of personal injury!
Before cleaning, switch the microwave oven off and
remove the plug from the mains power socket.
Under no circumstances should you immerse
the appliance in water or other liquids.
This could result in you receiving a fatal electric
shock and the appliance could be damaged.
• Always keep the interior of the microwave oven
clean.
• If splashes of food or spilt liquids stick to the
walls of the microwave, wipe them off with
a damp cloth.
• Use a mild detergent if the microwave is more
heavily soiled. Rinse detergent residues off with
clear water.
• Avoid using cleaning sprays and other aggressive
cleaning agents, as they can cause stains, stripes
or a blurring of the door surface.
• Clean the external walls with a damp cloth.
• To avoid damage to the functional components
in the interior of the microwave, do not let liquids
seep in through the ventilation slits 5.
• Regularly remove splashes or contaminants.
Clean the door, both sides of the viewing window, the door seals and adjacent components
with a damp cloth. Do not use abrasive cleaning
agents.
• If steam should collect on or around the outside
of the appliance door, wipe it off with a soft towel. This can happen if the microwave is
operated in extremely humid conditions.
- 16 -
Page 19

• Clean the Glass plate 3 regularly. Clean the
plate in warm soapy water or in the dishwasher.
• Clean the grill stand t in warm dishwater and
dry it well.
• Regularly eliminate odours. Put a deep microwave bowl with a cup of water, juice and peel
of a lemon into the microwave. Heat for 5 minutes.
Wipe off thoroughly and rub dry with a cloth.
• Should replacement of the bulb in the microwave
be necessary, arrange for it to be exchanged
by a dealer or consult our Service Department.
Disposal
Do not dispose of this appliance in your
normal domestic waste. This product is
subject to the provisions of European
Directive 2002/96/EC.
Dispose of the appliance through an approved disposal
centre or at your community waste facility.
Observe the currently applicable regulations.
In case of doubt, please contact your waste disposal
centre.
Troubleshooting
The display 1 indicates nothing.
• The plug is not inserted into a power socket.
Check the plug.
• The mains power socket is defective.
Try another mains power socket.
• The display 1 is defective.
Contact our Customer Services Department.
The appliance does not respond to pressing the
buttons.
• The Child safety facility is activated. Deactivate
the Child safety facility (see chapter "Operation“).
The appliance does not start the cooking/
warming process.
• The door is not properly closed.
Close the door correctly.
The Glass plate 3 generates loud noise when
revolving.
• The Glass plate 3 is not correctly positioned
on the star rotator 4. Insert the Glass plate 3
correctly into the cooking area.
• The star rotator 4 and/or the floor of the
cooking area are unclean. Clean the star
rotator 4 and the floor of the cooking area.
Dispose of all packaging materials in an
environmentally friendly manner.
Warranty and Service
The warranty for this appliance is for 3 years from
the date of purchase. The appliance has been manufactured with care and meticulously examined before delivery. Please retain your receipt as proof of
purchase. In the event of a warranty claim, please
make contact by telephone with our Service Department. Only in this way can a post-free despatch for
your goods be assured.
The warranty covers only claims for material and
maufacturing defects, but not for transport damage,
for wearing parts or for damage to fragile components, e.g. buttons or batteries. This product is for
private use only and is not intended for commercial
use. The warranty is void in the case of abusive and
improper handling, use of force and internal tampering not carried out by our authorized service
branch. Your statutory rights are not restricted in
any way by this warranty.
- 17 -
Page 20
The warranty period will not be extended by repairs
made under warranty. This applies also to replaced
and repaired parts. Any damage and defects extant
on purchase must be reported immediately after unpacking the appliance, at the latest, two days after
the purchase date. Repairs made after the expiration of the warranty period are subject to payment.
Service Great Britain
Tel.: 0871 5000 720 (£ 0.10/Min.)
E-Mail: kompernass@lidl.co.uk
IAN 71492/71493
Service Ireland
Tel.: 1890 930 034
(0,08 EUR/Min., (peak))
(0,06 EUR/Min., (off peak))
E-Mail: kompernass@lidl.ie
IAN 71492/71493
CY
Service Cyprus
Tel.: 8009 4409
E-Mail: kompernass@lidl.com.cy
IAN 71492/71493
Importer
KOMPERNASS GMBH
BURGSTRASSE 21
44867 BOCHUM, GERMANY
www.kompernass.com
- 18 -
Page 21

SADRŽAJ STRANA
Sigurnosne upute 20
Upotreba u skladu sa namjenom 23
Obim isporuke 23
Tehnički podaci 23
Prije nego što započnete 24
Temeljni principi prilikom kuhanja u mikrovalnoj pećnici . . . . . . . . . . . . . . . . . . . . . . . . . . . .24
Upotrebljavajte prikladni pribor za kuhanje . . . . . . . . . . . . . . . . . . . . . . . . . . . . . . . . . . . . .24
Opis uređaja 25
Prvo puštanje u pogon 25
Postavljanje uređaja . . . . . . . . . . . . . . . . . . . . . . . . . . . . . . . . . . . . . . . . . . . . . . . . . . . . . . . .25
Priprema uređaja . . . . . . . . . . . . . . . . . . . . . . . . . . . . . . . . . . . . . . . . . . . . . . . . . . . . . . . . . .25
Umetanje opreme . . . . . . . . . . . . . . . . . . . . . . . . . . . . . . . . . . . . . . . . . . . . . . . . . . . . . . . . . .26
Rukovanje 26
Podešavanje sata . . . . . . . . . . . . . . . . . . . . . . . . . . . . . . . . . . . . . . . . . . . . . . . . . . . . . . . . . .26
Podešavanje kuhinjskog timera . . . . . . . . . . . . . . . . . . . . . . . . . . . . . . . . . . . . . . . . . . . . . . . .26
Dječje osiguranje . . . . . . . . . . . . . . . . . . . . . . . . . . . . . . . . . . . . . . . . . . . . . . . . . . . . . . . . . .27
Funkcije upita . . . . . . . . . . . . . . . . . . . . . . . . . . . . . . . . . . . . . . . . . . . . . . . . . . . . . . . . . . . . .27
Kuhanje i pripravljanje 27
Mikrovalni pogon . . . . . . . . . . . . . . . . . . . . . . . . . . . . . . . . . . . . . . . . . . . . . . . . . . . . . . . . . .27
Grill-pogon . . . . . . . . . . . . . . . . . . . . . . . . . . . . . . . . . . . . . . . . . . . . . . . . . . . . . . . . . . . . . . .29
Kombinirani postupak pripravljanja . . . . . . . . . . . . . . . . . . . . . . . . . . . . . . . . . . . . . . . . . . . .29
Automatski-meni 30
Pokretanje automatik-menija . . . . . . . . . . . . . . . . . . . . . . . . . . . . . . . . . . . . . . . . . . . . . . . . . .30
Programi u detalju . . . . . . . . . . . . . . . . . . . . . . . . . . . . . . . . . . . . . . . . . . . . . . . . . . . . . . . . . .31
Otapanje 33
Predodređivanje startnog vremena (Preset) 33
Čišćenje i održavanje 34
Otklanjanje grešaka 34
Zbrinjavanje 35
Jamstvo i servis 35
Uvoznik 35
Upute za rukovanje prije prve upotrebe pažljivo pročitajte i sačuvajte ih za kasnije korištenje. Ukoliko uređaj
dajete trećim osobama, priložite i ove upute.
- 19 -
Page 22
Mikrovalna pećnica
Sigurnosne upute
Pažnja!
Upozorenje od oštećenja uređaja.
Opasnost! / Opasnost od ozljede!
Upozorenje od ozljede i strujnog udara!
Opasnost od požara!
Upozorenje na opasnost od požara.
Napomena!
Napomene i savjeti za rukovanje mikrovalnom
pećnicom.
Mjere sigurnosti za sprječavanje mogućeg prekomjernog kontakta sa mikrovalnom energijom
• Ne pokušajte uređaj pogoniti sa otvorenim
vratima, jer pogon sa otvorenim vratima može
dovesti do kontakta sa štetnom dozom mikrovalnog zračenja. Pritom je također važno ne
otvarati silom sigurnosne zatvarače ili iste
manipulirati.
Ništa ne umetajte između prednjeg dijela uređaja
i vratiju i osigurajte, da se na površinama za
brtvljenje ne skupe naslage onečišćenja ili
naslage od sredstava za čišćenje.
Opasnost od eksplozije!
• Ako su vrata ili brtvila vrata oštećeni, niukom
slučaju ne nastavite sa radom mikrovalne peći.
Uređaj neizostavno odnesite na popravak kvalificiranom stručnjaku.
• Nikada ne pokušajte uređaj popraviti na vlastitu
ruku. Skidanjem kućišta može doći do oslobađanja
mikrovalne energije. Popravke uređaja smiju vršiti isključivo kvalificirani stručnjaci.
• Ovaj uređaj nije namijenjen da bude korišten od
strane osoba (uključujući djecu) sa ograničenim
fizičkim, senzoričnim i mentalnim osobinama i
nedostatkom iskustva ili znanja, osim ako ove
osobe stoje pod nadzorom druge osobe zadužene za njihovu sigurnost, ili ako su od nje primili
upute za ispravno korištenje uređaja. Djeca bi
trebala biti pod nadzorom, čime treba biti osigurano da se ne mogu igrati ovim uređajem.
• Djeci korištenje pribora za kuhanje smije biti dopušteno samo onda, kada su na prikladan način instruirani, i to tako da budu u stanju pribor za
kuhanje koristiti na siguran način i shvatiti opasnosti uslijed neispravnog načina uporabe.
• Ovaj uređaj upotrebljavajte isključivo za namjensko korištenje u skladu sa opisom u ovom
priručniku. Ne koristite u ovom uređaju nikakve
agresivne kemikalije ili pare. Ova mikrovalna
pećnica posebno je konstruirana za zagrijavanje,
kuhanje, roštiljanje ili sušenje živežnih namirnica.
Nije koncipirana za korištenje u područjima
industrije i labora.
• Ne radite sa mikrovalnom pećnicom, kada su
mrežni kabel ili mrežni utikač oštećeni. Mrežni
kabel/mrežni utikač dajte zamijeniti od strane
kvalificiranog stručnog osoblja, kako biste izbjegli
nastanak opasnosti.
• Djecu držite podalje od vrata mikrovalne peći,
dok je ona u pogonu. Opasnost od opeklina!
• Nikako ne smijete odstraniti kućište mikrovalne
pećnice.
• Svjetiljku u unutrašnjosti mikrovalne pećnice dajte
zamijeniti isključivo od strane kvalificiranog
stručnog osoblja.
• Nikada ne dirajte vrata mikrovalne pećnice, kućište, otvore za ventilaciju, dijelove opreme
ili pribor za jelo neposredno nakon roštiljanja,
kombi-, ili automatik-meni-postupka. Ovi dijelovi
postaju vrlo vrući. Prije čišćenja ove dijelove
ostavite da se ohlade.
• Obratite pažnju na to, da mrežni utikač uvijek
bude lako dostupan, kako biste isti u slučaju
opasnosti brzo mogli odvojiti od strujne mreže.
- 20 -
Page 23

• Osobe, koje imaju aparat za reguliranje otkucaja
srca, trebaju se prije puštanja u pogon mikrovalne
pećnice kod svog kućnog liječnika informirati o
mogućim rizicima.
• Napojni kabel nikada ne pustite da visi sa stola ili
radne ploče. Djeca bi ovaj kabel mogla povlačiti.
• Limenke, vrećice sa kokicama i sl. nakon zagrijavanja uvijek otvorite tako, da otvor ne bude
okrenut prema vama. Izlazeća para mogla bi
vas ugroziti i stvoriti opekline.
• Nikada ne stanite neposredno ispred mikrovalne
pećnice, kada otvarate vrata uređaja. Izlazeća
para mogla bi vas ugroziti i stvoriti opekline.
• Ne fritirajte u mikrovalnoj pećnici. Vruće ulje
može oštetiti dijelove uređaja i opremu, te čak
izazvati opekline na koži.
• Obavezno protresite ili promiješajte zagrijane
staklenke za bebe ili bočice za bebe! Sadržaj
je eventualno neravnomjerno zagrijan, a beba se
može opeći vrućom hranom. U svakom slučaju
prekontrolirajte temperaturu prije nego što hranite
Vašu bebu!
• Ne pregrađujte mikrovalnu pećnicu.
• Mikrovalne zrake su opasne! Radove servisiranja
ili popravke, kod kojih moraju biti uklonjeni
pokrovi koji štite od kontakta sa mikrovalnim
zrakama, isključivo smiju izvoditi osposobljeni
stručnjaci.
• Prije konzumiranja prekontrolirajte temperaturu,
kako biste izbjegli opekline, koje za bebe eventualno mogu biti i opasne po život.
Oprema za kuhanje može postati vrlo vruća uslijed
temperature primljene od zagrijanih namirnica,
tako da je eventualno smijete dotaknuti samo sa
kuhinjskom krpom. Oprema za kuhanje treba
biti ispitana, da li je prikladna za mikrovalnu
pećnicu.
Pažnja! Vruća površina!
Opasnost od eksplozije!
• Nikada ne ostavite mikrovalnu pećnicu nenadziranu, kada zagrijavate živežne namirnice
u plastičnim ili papirnatim pakiranjima.
• Ne postavljajte zapaljive materijale u blizini
mikrovalne pećnice ili otvora za ventilaciju.
• Otklonite sve metalne zatvarače iz pakiranja
živežnih namirnica, koje želite zagrijati.
Opasnost od požara!
• Za proizvodnju kokica upotrebljavajte isključivo
vrećice sa kokicama, koje su prikladne za mikrovalnu pećnicu.
• Ne koristite mikrovalnu peć, da biste zagrijavali
jastučiće napunjene sa zrnima, košticama trešanja
ili gelom. Opasnost od požara!
• Mikrovalnu pećnicu ne koristite za skladištenje
namirnica ili drugih stvari.
• Nikada ne prekoračite vrijeme kuhanja navedeno
od strane proizvođača.
• Ne postavljajte predmete na mikrovalnu peć,
dok je ona u pogonu. Ventilacijski otvori će biti
prekriveni!
• Ne postavljajte mikrovalnu pećnicu u blizinu
drugih uređaja, koji absorbiraju toplinu, na
primjer u blizini štednjaka.
• Temeljito očistite mikrovalnu pećnicu nakon
zagrijavanja namirnica, koje sadrže masnoće,
pogotovo ako ove namirnice nisu bile pokrivene.
Prije čišćenja ostavite uređaj da se potpuno
ohladi. Na grijačim elementima gril-a ne smiju
se nalaziti naslage, na primjer naslage masnoće.
Masnoća bi se mogla pregrijati i zapaliti.
• Ne otapajte zamrznute masnoće ili zamrznuta
ulja u mikrovalnoj pećnici. Masnoće bi se mogle
zapaliti.
• Ne koristite eksterni rasklopni sat ili odvojeni
daljinski sustav za rad sa uređajem.
- 21 -
Page 24

Pažnja! Oštećenje uređaja!
• Mikrovalna pećnica ne treba raditi, kada je
prazna. Izuzeto je prvo puštanje u rad (vidi
poglavlje „Prvo puštanje u rad“).
• Ne stavljajte nikakve predmete u otvore za ventila-
ciju ili u sigurnosne zatvarače za vrata.
• Ne koristite metalne predmete, koji reflektiraju
mikrovalove i koji mogu dovesti do stvaranja
iskri. Ne stavljajte limenke u mikrovalnu peć.
• Ne stavljajte plastične spremnike neposredno
nakon postupka roštiljanja, kombi-, ili automatskog
meni-postupka u mikrovalnu pećnicu. Plastika
bi se pritom mogla istopiti.
• Mikrovalna pećnica ne smije biti postavljena
na mjestima sa velikom vlažnosti zraka, ili na
mjestima na kojima se skuplja vlaga.
• Tekućine i druge namirnice ne smiju biti zagrijane
u vakuumski zatvorenim spremnicima, jer oni
mogu eksplodirati i oštetiti uređaj.
• Ne naslanjajte se na vrata mikrovalne pećnice.
• Nedostatna čistoća pribora za kuhanje može
dovesti do uništenja površine, utjecati na vijek
trajanja uređaja i dovesti do opasnih situacija.
Opasnost
• Mrežni kabel i mrežni utikač nikada ne zaronite
u vodu ili u druge tekućine.
• Mrežni kabel držite podalje od izvora toplote.
Ne provodite ga pred vratima mikrovalne pećnice.
Visoke temperature mogle bi oštetiti kabel.
• Nikada ne sipajte tekućinu u otvore za ventilaciju ili
u sigurnosne zatvarače za vrata. Ukoliko ipak
tekućina dospije u unutrašnjost uređaja, mikrovalnu pećnicu neizostavno isključite i mrežni
utikač izvucite iz mrežne utičnice. Mikrovalnu
pećnicu dajte prekontrolirati od strane kvalificiranog stručnog osoblja.
Sigurnosni savjeti
• Da biste umanjili rizik od zapaljivanja u mikrovalnoj pećnici: Kada zagrijavate hranu u ambalaži od plastike ili papira, mikrovalnu pećnicu
uvijek držite na oku, jer eventualno može doći
do zapaljivanja ovih materijala.
• Prilikom zagrijavanja napitaka u mikrovalnoj
pećnici može doći do vremenski odloženog
stvaranja mjehurića, kada napitak prokuha.
Budite stoga oprezni prilikom rukovanja sa
posudama. Za izbjegavanje naglog ključanja:
- Po mogućnosti stavite stakleni prut u tekućinu,
dok se ona zagrijava.
- Tekućinu nakon zagrijavanja ostavite da stoji
20 sekundi u mikrovalnoj pećnici, kako biste
spriječili neočekivano naglo ključanje.
• Probodite kožu krumpira, hrenovki ili sličnih
namirnica. U protivnom one mogu eksplodirati.
• Budite oprezni prilikom zagrijavanja tekućina.
Upotrebljavajte isključivo otvorene posude,
kako bi mjehuri, koji se stvaraju, mogli izlaziti.
• Ukoliko primijetite dim, isključite uređaj ili ivucite
utikač i držite vrata zatvorena, kako bi eventualni
plamen bio zagušen.
• Jaja u ljusci i tvrdo kuhana jaja ne smiju biti
zagrijavana u mikrovalnoj pećnici, jer ona čak
i nakon završetka postupka grijanja mogu eksplodirati u uređaju. Živežne namirnice sa debelom
ljuskom, kao na primjer krumpire, cijele bundeve,
jabuke ili kestene prije kuhanja zarezati ili probosti.
• Ne pomičite mikrovalnu pećnicu, dok je ona u
pogonu.
- 22 -
Page 25

Napomene glede uzemljenja/namjenska
instalacija
Ovaj uređaj mora biti uzemljen. Ovaj uređaj smije biti
priključen isključivo na propisno uzemljenu utičnicu.
Preporučamo uporabu odvojenog strujnog kruga,
koji snabdijeva samo mikrovalnu pećnicu.
Opasnost: Nestručno rukovanje sa utikačem
za uzemljenje može prouzrokovati rizik od
strujnog udara.
Napomena: Ukoliko imate pitanja u pogledu
uzemljenja ili naputaka glede elektrike, upitajte
stručnjaka za elektriku ili servisiranje.
Upotreba u skladu sa namjenom
Ovaj uređaj predviđen je za zagrijavanje i pripremanje
živežnih namirnica u skladu sa opisanim načinom
postupanja.
Svaka promjena uređaja smatra se nenamjenskom
i uvjetuje znatne opasnosti nastanka nesreće. Za
štete nastale nenamjenskom uporabom proizvođač
ne preuzima nikakvu odgovornost.
Ovaj uređaj je predviđen isključivo za korištenje u
privatnim domaćinstvima!
Ne koristite ga u gospodarske svrhe, u industrijskim
ili laboratorijskim područjima!
Ni proizvođač niti trgovac ne mogu preuzeti odgovornost za oštećenje mikrovalne pećnice ili za ozljede
osoba izazvane nepridržavanjem uputa za postupanje
prilikom priključivanja struje.
Smetnje kod drugih uređaja izazvane iskrenjem
Rad mikrovalne pećnice može izazvati smetnje kod
Vašeg televizijskog prijemnika, radio-prijemnika ili kod
sličnih uređaja.
Ukoliko do toga dođe, ove smetnje možete umanjiti
ili otkloniti pomoću slijedećih mjera:
• Očistite vrata i površine za brtvljenje mikrovalne
pećnice.
• Ponovno podesite prijemni smijer antene radio-,
ili televizijskog prijemnika.
• Mikrovalnu pećnicu postavite na mjesto udaljeno
od prijemnika.
• Udaljite mikrovalnu pećnicu od prijemnika.
• Mikrovalnu pećnicu uključite u drugu utičnicu.
Mikrovalna pećnica i prijemnik bi trebali biti
snabdijevani električnom energijom preko
različitih grana strujnog kruga.
Obim isporuke
Mikrovalna pećnica
Stakleni tanjur
Grill-stalak
Zvjezdasti podmetač
Upute za rukovanje
Kratke upute za uporabu
Tehnički podaci
Nominalni napon: 230 - 240 V
50 Hz
Maksimalna snaga: 1200 W
Maksimalna snaga:
Mikrovalna pećnica 800 W
Maksimalna snaga
gril: 1000 W
Mikrovalna frekvencija: 2450 MHz
Izjava o sukladnosti za ovaj proizvod dostupna je
na internet stranici www.lidl.hr.
~
- 23 -
Page 26
Prije nego što započnete
Temeljni principi prilikom kuhanja
u mikrovalnoj pećnici
• Brižljivo poređajte namirnice.
• Najdeblja mjesta moraju biti u blizini ruba.
• Obratite pažnju na vrijeme kuhanja. Odaberite
najkraće navedeno vrijeme kuhanja, a po potrebi
ga produžite. Namirnice, koje su predugo kuhane,
mogu se početi dimiti ili se zapaliti.
• Za vrijeme kuhanja namirnica na iste postavite
poklopac prikladan za mikrovalnu pećnicu.
Poklopac sprječava prskanje i osim toga doprinosi
ravnomjernom kuhanju namirnica.
• Namirnice za vrijeme pripremanja u mikrovalnoj
pećnici jednom okrenite , kako bi jela poput
piletine ili hamburgera brže bila pripremljena
• Veliki komadi namirnica poput pečenja moraju
najmanje jednom biti okrenuti.
• Namirnice poput kosanih odrezaka nakon polovice vremena kuhanja kompletno presortirajte.
Tada ih okrenite, a odreske sa sredine tanjura
stavite na rub.
• Preporučljivo je koristiti okrugli/ovalni pribor
umjesto pravokutnog/duguljastog, jer se namirnice u ćoškovima lakše mogu prekuhati.
Slijedeći spisak predstavlja pomoć za odabir
prikladnog pribora.
Posuđe za
kuhanje
Staklo otporno na
visoke temperature
Staklo neotporno
na visoke
temperature
Keramika otporna
na visoke
temperature
Plastični pribor za
jelo, prikladan za
mikrovalnu pećnicu
Kuhinjski papir Da Ne Ne
Mikrovalna
pećnica
Da Da Da
Ne Ne Ne
Da Da Da
Da Ne Ne
Gril
Kombinacija
Upotrebljavajte prikladni pribor za
kuhanje
• Idealan materijal za mikrovalnu pećnicu propušta mikrovalove, dakle propušta energiju kroz
spremnik, kako bi se namirnice mogle
zagrijati.
Mikrovalovi nisu u stanju prodirati kroz metal.
Iz tog razloga ne smiju biti korištene metalne
posude, niti pribor za jelo od metala.
• Prilikom zagrijavanja u mikrovalnoj pećnici ne
koristite proizvode od recikliranog papira. Oni
mogu sadržati vrlo male metalne fragmente,
koji mogu stvarati iskre i požar.
Metalni poslužavnik/ -ploča
Grill-stalak Ne Da Ne
Alu-folija &
spremnik za foliju
Ne Da Ne
Ne Da Ne
Opasnost od eksplozije!
Nikada ne koristite grill-stalak ili druge metalne
predmete, ako mikrovalnu pećnicu koristite u mikrovalnom modusu ili modusu za kombinirano pripravljanje namirnica. Metal reflektira mikrovalne zrake
i time dolazi do iskrenja. To može dovesti do požara
i nepopravljivog oštećenja uređaja!
- 24 -
Page 27
Opis uređaja
1 Display
2 Tipka za otvaranje vrata
3 Stakleni tanjur
4 Zvjezdasti podmetač
5 Ventilacijski otvori
6 Tipka grill
7 Tipka Startno vrijeme (Preset)
8 Tipka za otapanje
9 Tipka za sat
0 Tipka Stop
q Okretni regulator / Start/brzi start
w Tipka za kuhinjski timer
e Taste za kombinaciju
r Tipka za snagu
t Stalak za grill
Prvo puštanje u pogon
• Pobrinite se, da utikač za struju bude bez problema dostupan, tako da ga u slučaju opasnosti
možete lako dohvatiti i izvući.
• Ne otklanjajte nogice ispod mikrovalne pećnice.
• Ne blokirajte ventilacijske otvore 6. U protivnom
može doći do oštećenja uređaja.
• Uređaj postavite u što većoj udaljenosti od radio-,
i televizijskih prijemnika. Rad mikrovalne pećnice
može izazvati smetnje u prijemu radio-, i televizijskih signala.
Pažnja:
Ne postavljajte mikrovalnu pećnicu iznad kuhinjskog
štednjaka ili nekog drugog uređaja, koji stvara toplinu.
Postavljanje na takvom mjestu moglo bi dovesti do
oštećenja uređaja, a time i do gašenja jamstva.
Priprema uređaja
• Odstranite materijal ambalaže i eventualno
na površini kućišta postavljenu zaštitnu foliju.
Postavljanje uređaja
Opasnost od eksplozije!
Ova mikrovalna pećnica nije prikladna za ugradnju
u kuhinjske ormare. U zatvorenim ormarima ventilacija uređaja nije u dovoljnoj mjeri osigurana. Uređaj
može biti oštećen i postoji opasnost požara!
• Odaberite ravnu površinu, koja ostavlja dovoljno
odstojanja prema otvorima za ventilaciju uređaja.
Između uređaja i susjednih zidova obavezno
ostavite minimalno odstojanje od 10 cm.
Osigurajte, da se vrata mikrovalne pećnice
daju bez problema otvarati.
Iznad mikrovalne pećnice držite odstojanje od
najmanje 20 cm.
Ne uklonite svijetlosivu ploču od
glimera, koja je postavljena za zaštitu
magnetnog polja u prostoru za
kuhanje
• Mrežni utikač utaknite u utičnicu. Koristite
230 - 240 V, 50 Hz, mrežnu utičnicu sa 16 A
osiguračem. Preporučamo, da odvojeni strujni
krug snabdijeva mikrovalnu pećnicu. Ako niste
sigurni, kako da priključite mikrovalnu pećnicu,
potražite savjet stručnjaka.
- 25 -
Page 28
Prije uporabe mikrovalne pećnice uređaj mora biti
prvo zagrijan u praznom stanju, kako bi mogle ispariti
naslage preostale nakon postupka izrade uređaja.
Uređaj uključite bez namirnica i pribora (stakleni
tanjur 3, valjkasta zvijezda 4 i stalak za roštilj t)
u pogonskom modusu za roštiljanje:
• Pritisnite jednom tipku Grill 6 . Time odabirate grill-modus. Na displayu 1 se pojavljuje
simbol i simbol trepti. Time je prikazana spremnost za start.
• Sa okretnim regulatorom q podesite vrijeme
pripravljanja od 10 minuta.
• Pritisnite tipku Start/brzi start q , da biste
pokrenuli grill-postupak.
Napomena:
Prilikom prvog puštanja u rad uslijed tvorničkih naslaga može doći do blagog razvijanja dima i mirisa.
To je neškodljivo. Uvijek osigurajte dostatnu ventilaciju. Primjerice otvorite jedan prozor.
• Nakon 10 minuta uređaj se automatski isključuje.
Oglašavaju se signalni zvukovi. Otvorite vrata.
Pričekajte, da se uređaj potpuno ohladi.
• Izvucite mrežni utikač iz utičnice i unutrašnjost
uređaja nakon toga očistite vlažnom krpom
i temeljito osušite.
Umetanje opreme
• Postavite zvjezdasti podmetač 4 na sredinu
osovine u prostoru za kuhanje. Obratite pažnju
na to, da podmetač kompletno bude postavljen
na osovini i da čvrsto stoji.
• Postavite stakleni tanjur 3 na sredinu zvjezdastog
podmetača. Tri valjka moraju biti smještena na
ivici vodilici staklenog tanjura 3.
Rukovanje
Podešavanje sata
Kada mikrovalnu pećnicu po prvi puta puštate u
pogon ili je došlo do nestanka struje, na displayu
se pojavljuje dojava 1 "1 : 0 1 ".
1. Pritisnite tipku sat 9 . Na displayu 1 se pojavljuje „Hr 12“. Pritisnite tipku sat 9 još
jednom, ako želite prelazak u 24-satni modus.
2. Okretanjem regulatora q podesite željeni sat.
Simbol sata na displayu 1 trepti.
3. Pritisnite tipku Start/brzi start q .
Oznaka za minute se pojavljuje.
4. Okretanjem okretnog regulatora q podesite
željenu oznaku minuta.
5. Ako je točno vrijeme korektno podešeno, pritisnite
tipku Start/brzi start q . Simbol sata na
displayu 1 trajno svijetli i dvotočka treptanjem
prikazuje da sat radi.
Za očitavanje aktualnog vremena za vrijeme pogona
mikrovalne pećnice pritisnite tipku za sat 9 ;
Točno vrijeme će onda za ca. 4 sekundi na displayu 1 biti prikazano.
Podešavanje kuhinjskog timera
Mikrovalna pećnica raspolaže kuhinjskim timerom,
kojeg možete koristiti neovisnog od rada mikrovalne
pećnice.
1. Pritisnite tipku kuhinjskog timera w kada
je uređaj u standby-modusu. Na displayu 1
se pojavljuje prikaz „00:10“.
2. Sada sa okretnim regulatorom q podesite
željeno vrijeme.
Možete unijeti vremenske postavke od 10 sekundi
do 95 minuta.
- 26 -
Page 29
3. Pritisnite tipku Start/brzi start q . Oglašava
se signalni zvuk. Započinje odbrojavanje vremena unatrag. Nakon ca. 3 sekunde ponovo
se pojavljuje normalno točno vrijeme. Kuhinjski
timer u pozadine i dalje radi.
Ako u međuvremenu želite kontrolirati vrijeme
kuhinjskog timera, pritisnite tipku za kuhinjski
timer w . Nakratko se pojavljuje kuhinjski
timer.
Čim je podešeno vrijeme isteklo, oglašavaju se 3
signalna zvuka.
Napomena:
Da biste prekinuli vremensko proticanje kuhinjskog
timera, pritisnite tipku za kuhinjski timer w , tako
da se pojavi aktualno vrijeme kuhinjskog timera.
Pritisnite, još dok se kuhinjski timer na displayu 1
prikazuje, tipku Stop 0 . Kuhinjski timer se
prekida i točno vrijeme se pojavljuje na displayu 1.
Dječje osiguranje
Aktivirajte ovo podešenje, kako biste spriječili neželjeno rukovanje i uključivanje mikrovalne pećnice od
strane male djece i osoba, koje nisu upoznate sa
rukovanjem ovim uređajem.
Simbol za dječje osiguranje se pojavljuje na
displayu 1, a uređaj ne može biti pušten u rad,
dok je ova funkcija aktivirana.
• Pritisnite tipku Stop 0 i držite je pritisnutu to-
liko dugo, dok se ne oglasi signalni zvuk i dok se
simbol za dječje osiguranje na displayu 1
ne pojavi. Tipke i regulator mikrovalne pećnice
sada više nemaju funkciju.
• Da biste dječje osiguranje deaktivirali, pritisnite
tipku Stop 0 i držite je toliko dugo pritisnutu,
dok se ne oglasi dugi signalni zvuk i dok se simbol
za dječje osiguranje ne ugasi.
Funkcije upita
Ispitivanje točnog vremena za vrijeme pogona
uređaja
Za vrijeme pripravljanja namirnica pritisnite tipku za
sat 9 . Na displayu 1 se na ca. 4 sekundi pojavljuje točno vrijeme.
Ispitivanje stupnja snage za vrijeme pogona
uređaja
Za vrijeme pripravljanja namirnica pritisnite tipku za
snagu r . Na displayu 1 se na ca. 3 sekundi
pojavljuje aktivirani stupanj snage.
Kuhanje i pripravljanje
Mikrovalni pogon
Napomena
Na vratima mikrovalne pećnice ili na kućištu se za
vrijeme pripravljanja namirnice mogu stvoriti kapljice vode. To je normalno i ne predstavlja znak pogrešnog funkcioniranja mikrovalne pećnice.
Nakon što se uređaj ohladio, suhom krpom obrišite
ove kapljice.
Opasnost od eksplozije!
Nikada ne koristite grill-stalak t ili druge metalne
predmete, kada mikrovalnu pećnicu koristite u mikrovalnom pogonu. Metal reflektira mikrovalne zrake
i time dolazi do iskrenja. To može dovesti do požara
i nepopravljivog oštećenja uređaja!
- 27 -
Page 30
Odabir stupnja snage
• Pritisnite tipku za snagu r u svrhu odabira
stupnja snage kako slijedi
• 1x za 800 W snage (P800).
• 2x za 700 W snage (P700).
• 3x za 600 W snage (P600).
• 4x za 500 W snage (P500).
• 5x za 400 W snage (P400).
• 6x za 300 W snage (P300).
• 7x za 200 W snage (P200).
• 8x za 100 W snage (P100).
Prekidanje postupka kuhanja
Pritisnite jednom tipku Stop 0 , da biste prekinuli
postupak pripravljanja. Uređaj će prekinuti postupak
kuhanja i zaustaviti preostalo vrijeme. Pritisnite tipku
Start/brzi start q , da biste postupak pripravljanja
nastavili.
Prekidanje postupka kuhanja
Pritisnite dvaput tipku Stop 0 , da biste prekiniuli
postupak pripravljanja. Uređaj se ponovo vraća
u modus "Standby".
Snaga je u displayu 1 prikazana (npr. P800 kod
800 W snage).
Podešavanje vremena pripravljanja
Nakon što ste odabrali snagu, podesite željeno
vrijeme pripravljanja:
• Okrenite okretni regulator q, sve dok željeno
vrijeme pripravljanja ne bude podešeno.
Stupnjevi za vremensko podešavanje okretnog
regulatora q su slijedeći:
od 10 sek. do 5 min:u koracima od po 10 sekundi
• od 5 do 10 min: u koracima od po 30 sekundi
• od 10 do 30 min: u koracima od po 1 minute
• od 30 do 95 min: u koracima od po 5 minuta
Prekidanje/završavanje postupka unosa
Pritisnite jednom tipku Stop 0 , da biste prekinuli
postupak unosa i isti okončali. Uređaju se ponovo
vraća u modus "Standby".
Pokretanje postupka pripravljanja
Nakon što ste stupanj snage i vrijeme pripravljanja
podesili, a na displayu 1 simbol trepti, možete
započeti postupak pripravljanja:
Za pokretanje postupka pripravljanja namirnica
pritisnite tipku Start/brzi start q . Na displayu 1
se pojavljuju simboli za mikrovalni pogon i kuhanje (snaga P100 - P400) ili (snaga P500 P800).
Postupak pripravljanja je završen
Kada je okončan postupak pripravljanja, na displayu 1 se pojavljuje „End“ i 4 signalna tona se
oglašavaju. Ako vrata mikrovalne pećnice ne otvorite,
signalni tonovi će se nakon približno 2 minute još
jednom oglasiti.
Brzi start
Sa ovom funkcijom možete odmah na 30 sekundi
(ili duže, do 12 minuta) sa snagom od 800 W
započeti sa pripravljanjem.
• Pritisnite jednom tipku Start/brzi start q .
Na displayu 1 se pojavljuju simboli za mikrovalni pogon i pripravljanje , kao i „:30“.
Mikrovalna pećnica pokreće postupak pripravljanja za 30 sekundi. Započinje odbrojavanje
vremena unatrag.
Ako želite postupak pripravljanja produžiti, pritisnite
toliko često tipku Start/brzi start q , dok ne postignete željeno vrijeme.
- 28 -
Page 31

Grill-pogon
Gril-funkciju možete koristiti za tanke šnite mesa,
odreske, kosane odreske, viršle ili dijelove piletine.
Ova funkcija je takođe vrlo prikladna za prepečene
sendviče i gratene.
Za grilanje uvijek koristite grill-stalak t.
Na taj način ćete postići optimalan rezultat grilanja.
Postavite grill-stalak t uvijek na stakleni tanjur 3.
1. Pritisnite tipku Grill 6 , da biste aktivirali
grill-funkciju.
Na displayu 1 se pojavljuje simbol za grillfunkciju
2. Pomoću okretnog regulatora q podesite željeno
vrijeme kuhanja. Maksimalno podesivo vrijeme
kuhanja iznosi 95 minuta.
3. Za pokretanje grill-funkcije pritisnite tipku Start/
brzi start q .
4. Kada protekne približno polovica vremena,
okrenite meso.
„:10“.
i
Kombinirani postupak pripravljanja
Ova funkcija ujedinjuje gril-funkciju sa normalnim
radom mikrovalne pećnice. Za vrijeme trajanja
postupka ove kombinacije automatski se jedno
određeno vrijeme vrši kuhanje, a ostalo vrijeme
pečenje u okviru jednog postupka. U trenutku, kada
uređaj prebaci sa jednog postupka na drugi, možete
čuti jedan tihi klik.
Kombinacija 1
Kod kombinacije 1 mikrovalna snaga iznosi 30 %,
a snaga grilanja (roštiljanja) 70 % vremena pripravljanja. To je primjerice prikladno za ribu, krumpir ili
graten.
1. Pritisnite tipku za kombinaciju e jednom,
da biste kombinaciju 1 aktivirali. Na displayu 1
se pojavljuju i „:10“.
2. Maksimalno podesivo vrijeme kuhanja iznosi
95 minuta.
3. Za start pritisnite tipku Start/brzi start q .
Kombinacija 2
Kod kombinacije 2 mikrovalna snaga iznosi 55 %,
a snaga grilanja 45 % vremena pripravljanja. To je
primjerice prikladno za pudinge, omlete, perad ili
lazanje.
1. Pritisnite tipku za kombinaciju e dva
puta, da biste kombinaciju 2 aktivirali. Na
displayu 1 se pojavljuju i „:10“.
2. Maksimalno podesivo vrijeme kuhanja iznosi
95 minuta.
3. Za start pritisnite tipku Start/brzi start q .
Opasnost od eksplozije!
Nikada ne koristite grill-stalak t ili druge metalne
predmete, kada mikrovalnu pećnicu koristite u kombiniranom postupku pripravljanja. Metal reflektira
mikrovalne zrake i time dolazi do iskrenja. To može
dovesti do požara i nepopravljivog oštećenja
uređaja!
- 29 -
Page 32

Automatski-meni
Br. Simbol
Živežne
namirnice
Težina
(porcije)
Za namirnice, koje se pripremaju u automatik-modusu,
nije potrebno trajanje postupka pripravljanja i stupnja
snage unijeti. Potpuno je dovoljno, ako unesete vrstu
namirnice, koja treba biti kuhana, kao i težinu dotične
namirnice.
Napomena
Mikrovalna pećnica izračunava vrijeme/stupanj snage
za svježe namirnice. Duboko smrznute namirnice
u okviru vremena navedenog vremena ne mogu biti
potpuno pripravljene.
Eventualno otopite zamrznute namirnice prethodno
pomoću programa za otapanje (vidi poglavlje
"Otapanje").
Pokretanje automatik-menija
Napomena
Namirnice uvijek postavite na prikladnu posudu ili na
tanjur. Pritom vodite računa o tome, da za vrijeme
postupka kuhanja ili podgrijavanja iz namirnica
mogu izlaziti tekućine kao što je tekuća mast i sl.
Posuda/tanjur stoga obavezno treba biti dovoljno
velika da može prihvatiti istupajuće tekućine.
1. Okrenite okretni regulator q polako u lijevu
stranu. Na displayu 1 se pojavljuje broj (npr.
„3“ za autoprogram 3 (riba)), simbol „riba“ i
. Odaberite odgovarajući automatik-meni
za Vašu namirnicu (1 do 9). Ako ste u modusu
automatskog menija, možete okretom u desnu
stranu dospjeti do željenog automatik-menija.
Izbor potvrdite pritiskom tipke Start/brzi start
q .
1 Pića 1 - 3
2 Rezanci 100 - 300g
3 Riba 100 - 1000g
4 Riža 100 - 1000g
5 Pile 800 - 1400g
6 Podgrijavanje 100 - 1000g
7 Krumpir 150 - 600g
8 Pečenje 300 - 1300g
9 Ražnjići 100 - 700g
2. Zatim okretanjem okretnog regulatora q podesite željenu težinu, odnosno željeni broj porcija.
Simbol trepti.
3. Pritisnite tipku Start/brzi start q , da biste
pokrenuli postupak pripravljanja.
Napomena
Da biste postigli ravnomjerno kuhanje ili pripravljanje,
namirnice kod programa 5, 8 i 9 nakon približno
2/3 vremena pripravljanja trebate okrenuti. Mikrovalna pećnica Vas podsjeća na okretanje: „turn“ se
pojavljuje na displayu 1 i oglašava se signalni
zvuk.
• Otvorite vrata i izvršite okretanje namirnica.
Oprezno postupite sa namirnicama, koje su eventualno već vruće.
- 30 -
Page 33

• Pritisnite tipku Start/brzi start q , da biste
postupak kuhanja ponovo nastavili.
Napomena:
Ako ne želite okretati namirnice, nakon signalnih
tonova jednostavno pričekajte. Mikrovalna pećnica
svoj program nakon ca. 30 sekundi automatski nastavlja.
Napomena
Ako namirnice nakon završetka automatik-menija
nisu sasvim pripravljene, izvršite naknadno pripravljanje pomoću programa brzog starta. Kod programa
izvedenih uz uporabu grill-funkcije (brojevi programa
5, 8 i 9), možete izvršiti naknadno pripravljanje uz
grill-funkciju. Kod naknadnog pripravljanja sa grillfunkcijom se povećava i stupanj rumenila namirnica.
Opasnost od eksplozije!
Kod programa sa dodatom grill-funkcijom niukom
slučaju ne koristite pokrove ili pribor neotporan na
visoke temperature, jer bi se ovi predmeti mogli
istopiti ili zapaliti!
Opasnost od eksplozije!
Stakleni tanjur 3 je nakon postupka pripravljanja
sa grill-funkcijom vrlo vruć! Stoga obavezno koristite
kuhinjske rukavice ili zaštitne rukavice, kada ovaj
tanjur vadite iz prostora za kuhanje.
Napomena:
Molimo uzmite u obzir, da veličina, oblik i vrste
namirnica utječu na rezultat kuhanja.
Programi u detalju
Program 1: Pića
Ovaj program može biti izvršen isključivo uz uporabu
mikrovalne snage. Ovisno o podešenom broju porcija
program traje između 1:30 i 3:50 minuta.
• Postavite napitak, koji želite zagrijati, na stakleni
tanjur 3 u prostoru za pripravljanje. Ako stavite
veći broj čaša, odnosno šalica u mikrovalnu pećnicu, obratite pažnju da se ove posude međusobno
ne dodiruju.
Napomena
Za izbjegavanje naglog ključanja:
• Umetnite, ako je to moguće, stakleni prut u
tekućinu, dok se ona zagrijava.
• Tekućinu nakon zagrijavanja ostavite da stoji
20 sekundi u mikrovalnoj pećnici, kako biste
spriječili neočekivano naglo ključanje.
Program 2: Rezanci
Ovaj program može biti izvršen isključivo uz uporabu
mikrovalne snage.
Ovisno o podešenoj težini program traje između
25 i 35 minuta.
• Za kuhanje tjestenine koristite visoku posudu, jer
voda može iskipiti.
• Upotrijebite količinu vode kao kod konvencionalnog kuhanja. Tjestenina bi trebala “plivati” u
vodi.
• Prvo prokuhajte vodu: Postavite mikrovalnu pećnicu na najviši stupanj snage (P800) i pokrenite
je. Za jednu litru vode treba Vam ca. 10 minuta,
da bi voda proključala.
• Zatim dodajte tjesteninu. Nakon toga možete
pokrenuti automatik-meni za rezance (tjesteninu).
• Nakon toga tjesteninu ostavite da stoji ca. 3 minute.
- 31 -
Page 34

Program 3: Riba
Ovaj program može biti izvršen isključivo uz uporabu
mikrovalne snage.
Ovisno o podešenoj težini program traje između
3:30 i 16 minuta.
• Komade ribe postavite na tanjur prikladan za
mikrovalnu pećnicu, dodajte nešto maslaca ili
drugu vrstu masnoće, začinite prema ukusu i
pokrenite automatik-meni za ribu.
Program 4: Riža
Ovaj program može biti izvršen isključivo uz uporabu
mikrovalne snage.
Ovisno o podešenoj težini program traje između
16 i 36 minuta.
• Za kuhanje riže koristite visoku posudu, jer voda
može iskipiti. Koristite npr. za 200 g riže po prilici 400 ml vode. Unatoč vodi koristite podešenje
za težinu „200 g“. Uvijek se podešava težina
riže.
• Umetnite rižu u posudu, dodajte tekućinu i ostavite
rižu da bubri ca. 3 minute.
• Prekrijte posudu. Obratite pažnju na to, da ne
bude hermetički zatvorena. Nakon toga možete
pokrenuti automatik-meni za rižu.
Program 5: Pile
Ovaj program teče u nekoliko stupnjeva pripravljanja
uz uporabu mikrovalne snage i grill-funkcije.
Ovisno o podešenoj težini program traje između
39 i 50 minuta.
• Postavite pile na tanjur prikladan za mikrovalnu
pećnicu.
• Začinite po ukusu i pokrenite automatik-meni za
pile.
• Cijelo pile mora biti okrenuto, jer bi se strana
okrenuta prema gore u protivnom mogla isušiti
Mikrovalna pećnica u tu svrhu prekida program
nakon ca 2/3 vremena automatski, te se oglašava signalni zvuk.
Okrenite pile i pritisnite tipku Start/brzi start q
, da biste nastavili program.
Program 6: Podgrijavanje
Ovaj program može biti izvršen isključivo uz uporabu
mikrovalne snage.
Ovisno o podešenoj težini program traje između
1:00 i 6:20 minuta.
• Stavite tanjur sa namirnicom, koju želite podgrijati,
na stakleni tanjur 3 u prostoru za kuhanje i
pokrenite automatik-meni za podgrijavanje.
Program 7: Krumpir
Ovaj program može biti izvršen isključivo uz uporabu
mikrovalne snage.
Ovisno o podešenoj težini program traje između
3:50 i 11:minuta.
Savjet
Koristite neoljušteni krumpir za postupak pripravljanja. Krumpire na nekoliko mjesta zabodite.
• Neoljuštene krumpire stavite na tanjur prikladan za
mikrovalnu pećnicu ili u posudu. Po mogućnosti
koristite krumpire jednake veličine. Ako je moguće,
krumpiri se ne bi trebali dodirivati.
Program 8: Pečenje
Ovaj program teče u nekoliko stupnjeva pripravljanja
uz uporabu mikrovalne snage i grill-funkcije.
Ovisno o podešenoj težini program traje između
16 i 60 minuta.
• Postavite pečenje na tanjur prikladan za mikrovalnu pećnicu. Meso začinite prema ukusu i
pokrenite automatik-meni za pečenje.
• Cijelo pečenje mora biti okrenuto, jer bi se u protivnom strana okrenuta prema gore mogla isušiti.
Mikrovalna pećnica u tu svrhu prekida program nakon ca 2/3 vremena automatski, te se oglašava
signalni zvuk. Okrenite pečenje i pritisnite tipku
Start/brzi start q , da biste program nastavili.
- 32 -
Page 35
Program 9: Ražnjići
Ovaj program teče u nekoliko stupnjeva pripravljanja
uz uporabu mikrovalne snage i grill-funkcije.
Ovisno o podešenoj težini program traje između
9 i 27 minuta.
• Postavite ražnjiće na tanjur prikladan za mikrovalnu pećnicu. Meso začinite prema ukusu i
pokrenite automatik-meni za ražnjiće.
• Ražnjići moraju biti okrenuti, kako bi postupak
pripravljanja bio ravnomjeran. Mikrovalna pećnica u tu svrhu prekida program nakon ca 2/3
vremena automatski, te se oglašava signalni
zvuk. Okrenite roštilje i pritisnite tipku Start/brzi
start q , da biste nastavili program.
Otapanje
Sa ovom funkcijom bez problema možete otapati
meso, perad i ribu. Vrijeme otapanja i stupanj snage
nakon unosa težine automatski se izračunavaju
i podešavaju.
1. Pritisnite tipku za otapanje 8 . Na dis-
playu 1 se pojavljuju i . Simbol
trepti.
2. Odaberite uz pomoć okretnog regulatora q
težinu namirnice, koja treba biti otopljena.
Možete podesiti težinu između 100 g i 1800g.
3. Pritisnite tipku Start/brzi start q .
Uređaj automatski određuje vrijeme otapanja.
Ono se pojavljuje na displayu 1 i protiče.
Nakon ca. 1/2 vremena oglašava se signalni zvuk
i oznaka “turn” se pojavljuje na displayu 1.
Otvorite vrata i izvršite okretanje namirnica. Ponovo
zatvorite vrata i pritisnite tipku Start/brzi start q,
da biste postupak otapanja nastavili .
Napomena:
Ako ne želite okretati namirnice, nakon signalnih
tonova jednostavno pričekajte. Program otapanja
unatoč signalnom zvuku i dalje teće!
Predodređivanje startnog
vremena (Preset)
Sa ovim programom možete unaprijed programirati
određeno startno vrijeme za kuhanje ili grilanje namirnica. Ako ste podešenja ispravno izvršili, uređaj
će automatski krenuti u određenom trenutku.
Napomena:
Sat mora biti podešen, da biste funkciju
"Predodređivanje startnog vremena" mogli odabrati.
1. Podesite željenu funkciju mikrovalne pećnice (kuhanje, grilanje ili automatik-meni - sa izuzetkom
autoprograma 6):
Za mikrovalni pogon: Pritisnite tipku za snagu r
za odabir stupnja snage toliko puta, koliko
je potrebno. Podesite vrijeme kuhanja sa okretnim
regulatorom q.
Za gril-pogon: . Pritisnite tipku Grill 6 , da
biste aktivirali grill-funkciju.
Pomoću okretnog regulatora q podesite željeno
vrijeme kuhanja.
Za automatik-meni: Odaberite sa okretnim regulatorom q odgovarajući program za Vašu namirnicu (sa izuzetkom autoprograma 6). Izbor
potvrdite pritiskanjem tipke Start/brzi start q .
Sada okretanjem okretnog regulatora q podesite željenu težinu, odnosno željeni broj porcija.
2. Pritisnite tipku Startno vrijeme 7 . Na
displayu 1 trepti „01: “ i simbol pješčanog
sata se pojavljuje.
3. Okrenite okretni regulator q, da biste podesili
sate.
4. Pritisnite tipku Start/brzi start q, nakon čega se
pojavljuju znamenke za minute .
5. Okrenite okretni regulator q, da biste podesili
minute.
6. Pritisnite tipku Start/brzi start q . Simbol pje-
ščanog sata trepti. Pojavljuje se prikaz startnog vremena. Mikrovalna pećnica automatski pokreće postupak u predodređenom trenutku. Na
startu se oglašava signalni zvuk.
- 33 -
Page 36

Napomena:
Da biste memorirano startno vrijeme izbrisali i time
pohranjeni postupak prekinuli, pritisnite tipku Stop 0
. Simbol pješčanog sata se gasi i ponovo
se pojavljuje točno vrijeme.
Čišćenje i održavanje
Opasnost od ozljeđivanja!
Prije čišćenja isključite mikrovalnu pećnicu i izvucite
mrežni utikač iz mrežne utičnice.
Niukom slučaju uređaj ne smijete uroniti u
vodu ili druge tekućine. Uslijed toga može
doći do opasnosti po život uslijed strujnog
udara, te do oštećenja uređaja.
• Ukoliko se na vanjskoj strani vrata ili oko nje stva-
ra talog nečistoće, isti prebrišite sa mekom
krpom. Do toga dolazi, kada mikrovalna pećnica radi u uvjetima visoke vlažnosti zraka.
• Očistite i stakleni tanjur 3 u redovnim vremenskim
razmacima. Isperite ga u toploj sapunici ili u
stroju za pranje suđa.
• Očistite stalak za gril t u toploj vodi za pranje
posuđa i dobro ga osušite.
• Redovno odstranite neugodne mirise. Postavite
duboku zdjelu za mikrovalnu pećnicu napunjenu
sa šalicom vode, soka i kože od limuna u mikrovalnu pećnicu. Zdjelu zagrijte oko 5 minuta.
Temeljito obrišite i osušite pomoću mekane krpe.
• Ukoliko je potrebna zamjena lampice u mikro-
valnoj pećnici, isto treba izvršiti trgovac ili se
obratite našem servisu.
• Unutrašnjost mikrovalne pećnice uvijek održavajte
čistu.
• Ukoliko se na zidovima mikrovalne pećnice nalaze onečišćenja od prskanja hrane ili prosutih
tekućina, ova onečišćenja obrišite vlažnom
krpom.
• Koristite blago sredstvo za čišćenje, ukoliko u
mikrovalnoj pećnici postoje jača onečišćenja.
Ostatke sredstva za pranje suđa isperite
bistrom vodom.
• Sprječavajte korištenje sprejeva za čišćenje
i drugih agresivnih sredstava za čišćenje, jer
ovakva sredstva mogu izazvati mrlje, pruge
ili zamućivanje površine vrata.
• Vanjsku stranu uređaja očistite pomoću vlažne
krpe.
• Kako biste izbjegli oštećenje funkcionalnih dijelova u unutrašnjosti mikrovalne pećnice, ne pustite da voda u ventilacijske otvore 5 prodire.
• Redovno otklonite onečišćenja i tragove
prskanja. Očistite vrata, obje strane vidnih prozora, brtvila na vratima i susjedne dijelove pomoću vlažne krpe. Ne koristite ribajuća
sredstva.
Otklanjanje grešaka
Display 1 ništa ne prikazuje.
• Mrežni utikač nije utaknut u mrežnu utičnicu.
Kontrolirajte mrežni utikač.
• Mrežna utičnica je defektna. Probajte koristiti
drugu mrežnu utičnicu.
• Display 1 je defektan. Kontaktirajte servis za
kupce.
Uređaj ne reagira na pritisak tipke.
• Dječje osiguranje je aktivirano. Deaktivirajte
dječje osiguranje (vidi poglavlje „Rukovanje“).
Uređaj ne pokreće postupak kuhanja/pripravljanja.
• Vrata nisu ispravno zatvorena. Zatvorite vrata
ispravno.
Stakleni tanjur 3 prilikom okretanja stvara
glasne zvukove.
• Stakleni tanjur 3 ne leži ispravno na podmetaču 4.
Umetnite stakleni tanjur 3 ispravno u prostor
za kuhanje.
- 34 -
Page 37
• Zvjezdasti podmetač 4 i/ili dno prostorije
za kuhanje su onečišćeni. Očistite zvjezdasti
podmetač 4 i dno.
Zbrinjavanje
Uređaj nikako ne bacajte u obično
kućno smeće. Ovaj proizvod podliježe
europskoj smjernici 2002/96/EC.
Uređaj otklonite preko ovlaštenog poduzeća za
otklanjanje otpada ili preko vašeg komunalnog
poduzeća za otklanjanje otpada.
Obratite pažnju na aktualno važeće propise.
U slučaju dvojbe se povežite sa svojim poduzećem
za uklanjanje otpada.
Sve materijale ambalaže zbrinite na način
neškodljiv za okoliš.
U slučaju nestručnog rukovanja, rukovanja protivnog namjeni uređaja, primjene sile i zahvata, koji
nisu izvršeni od strane našeg ovlaštenog servisnog
predstavništva, važenje jamstva prestaje. Vaša zakonska prava ovim jamstvom ostaju netaknuta.
Jamstveni rok se ne produžava uslijed ostvarivanja
prava na jamstvo. To vrijedi i za zamijenjene i popravljene dijelove. Eventualno već prilikom kupovine prisutna oštećenja i nedostaci moraju biti javljena neposredno nakon raspakiranja, ali najkasnije
dva dana nakon datuma kupovine. Popravke vršene
nakon isteka jamstvenog roka podliježu obavezi
plaćanja.
Servis Hrvatska
Tel.: 0800 777 999
E-Mail: kompernass@lidl.hr
IAN 71492/71493
Uvoznik
Jamstvo i servis
Na ovaj uređaj vrijedi jamstvo u trajanju od 3 godine od datuma kupovine. Uređaj je pažljivo proizveden i prije isporuke brižljivo kontroliran. Molimo sačuvajte blagajnički račun kao dokaz o kupnji.
Molimo da se u slučaju ostvarivanja prava na jamstvo telefonski povežete sa Vašom servisnom ispostavom. Samo na taj način vaša roba može biti besplatno uručena.
Jamstvo vrijedi samo za greške materijala i izrade,
a ne za transportne štete, potrošne dijelove ili oštećenja lomljivih dijelova, na primjer prekidača ili baterija.
Proizvod je namijenjen isključivo za privatnu, a ne
za gospodarstvenu uporabu.
Lidl Hrvatska d.o.o. k.d.,
p.p. 61
10020 Novi Zagreb
Proizvođač:
KOMPERNASS GMBH
BURGSTRASSE 21
D-44867 BOCHUM, Njemačka
www.kompernass.com
- 35 -
Page 38

- 36 -
Page 39

CUPRINS PAGINA
Indicaţii de siguranţă 38
Utilizarea conform destinaţiei 41
Furnitura 41
Date tehnice 41
Cuvânt înainte 42
Principii de bază pentru prepararea alimentelor în cuptorul cu microunde . . . . . . . . . . . . . .42
Utilizarea instrumentelor de gătit adecvate . . . . . . . . . . . . . . . . . . . . . . . . . . . . . . . . . . . . . . .42
Descrierea aparatului 43
Prima punere în funcţiune 43
Amplasarea aparatului . . . . . . . . . . . . . . . . . . . . . . . . . . . . . . . . . . . . . . . . . . . . . . . . . . . . . .43
Pregătirea aparatului . . . . . . . . . . . . . . . . . . . . . . . . . . . . . . . . . . . . . . . . . . . . . . . . . . . . . . . .43
Montarea accesoriilor . . . . . . . . . . . . . . . . . . . . . . . . . . . . . . . . . . . . . . . . . . . . . . . . . . . . . . .44
Operarea 44
Setarea ceasului . . . . . . . . . . . . . . . . . . . . . . . . . . . . . . . . . . . . . . . . . . . . . . . . . . . . . . . . . . .44
Setarea temporizatorului . . . . . . . . . . . . . . . . . . . . . . . . . . . . . . . . . . . . . . . . . . . . . . . . . . . . .44
Siguranţa pentru copii . . . . . . . . . . . . . . . . . . . . . . . . . . . . . . . . . . . . . . . . . . . . . . . . . . . . . . .45
Funcţii de apelare informaţii . . . . . . . . . . . . . . . . . . . . . . . . . . . . . . . . . . . . . . . . . . . . . . . . . .45
Prepararea alimentelor 45
Modul microunde . . . . . . . . . . . . . . . . . . . . . . . . . . . . . . . . . . . . . . . . . . . . . . . . . . . . . . . . . .45
Modul grill . . . . . . . . . . . . . . . . . . . . . . . . . . . . . . . . . . . . . . . . . . . . . . . . . . . . . . . . . . . . . . . .47
Funcţii combinate . . . . . . . . . . . . . . . . . . . . . . . . . . . . . . . . . . . . . . . . . . . . . . . . . . . . . . . . . .47
Meniul automat 48
Prezentarea detaliată a programelor . . . . . . . . . . . . . . . . . . . . . . . . . . . . . . . . . . . . . . . . . . .49
Decongelarea 51
Programarea orei de pornire (Preset) 51
Curăţarea şi îngrijirea 52
Remedierea defecţiunilor 52
Eliminarea aparatelor uzate 53
Garanţia şi service-ul 53
Importator 54
Citiţi cu atenţie instrucţiunile de utilizare înainte de prima utilizare şi păstraţi-le pentru o consultare ulterioară.
Dacă înmănaţ iaparatul unor terţi, ataşaţi şi instrucţiunile de utilizare.
- 37 -
R
Page 40

Coptor cu microunde
Indicaţii de siguranţă
Atenţie!
Avertizări contra defecţiunilor aparatului.
Pericol! / Pericol de rănire!
Avertizare contra vătămărilor şi electrocutării!
Pericol de incendiu!
Avertizare contra pericolului de incendiu.
Indicaţie!
Indicaţii şi sfaturi de manipulare a cuptorului cu
microunde.
Măsuri de precauţie pentru evitarea contactului
prelungit cu energia generată de microunde
• Nu încercaţi să utilizaţi aparatul cu uşa deschisă,
acest lucru însemnând expunerea la o doză periculoasă de radiaţie. În acest sens este important să nu dezactivaţi sau să manipulaţi blocajele
de siguranţă.
• Nu prindeţi obiecte între partea din faţă a aparatului şi uşă şi asiguraţi-vă că pe suprafeţele de
etanşare nu se acumulează depuneri sau resturi
de detergenţi de curăţare.
Pericol de rănire!
• Dacă uşa sau garniturile de etanşare ale acesteia
sunt defecte, este interzisă utilizare aparatului.
În acest caz, aparatul trebuie reparat de către
o persoană calificată.
• Nu încercaţi să reparaţi singuri aparatul. Prin
demontarea carcasei se poate degaja energie
generată de microunde. Reparaţiile trebuie
efectuate numai de către o persoană calificată.
• Acest aparat nu poate fi utilizat de către persoane (inclusiv copii) ale căror abilităţi motrice,
senzoriale sau mentale sunt limitate sau cărora le
lipseşte experienţa necesară, excepţie făcând
cazurile în care sunt supravegheate de către o
altă persoană, responsabilă de siguranţa lor
sau dacă au primit în prealabil indicaţii de utilizare a aparatului.
• Copiilor le este permisă utilizarea aparatului de
gătit numai dacă au primit indicaţiile necesare
de utilizare, care să le permită să utilizeze aparatul în mod sigur şi să înţeleagă pericolele la
care se expun în cazul unei utilizări greşite.
• Utilizaţi aparatul numai în conformitate cu destinaţia de utilizare descrisă în acest manual. Nu
introduceţi substanţe sau aburi chimici caustici
în acest aparat. Aparatul este produs special
pentru încălzirea, fierberea, prăjirea sau uscarea
alimentelor.
Aparatul nu a fost conceput pentru a fi utilizat
în industrie sau laboratoare.
• Nu utilizaţi aparatul dacă cablul de alimentare /
ştecărul este deteriorat. Pentru evitarea rănirilor,
cablul de alimentare / ştecărul trebuie înlocuit
de către o persoană calificată.
• Ţineţi copii departe de uşa aparatului în timpul
funcţionării acestuia. Pericol de arsuri!
• Nu demontaţi carcasa aparatului sub niciun
pretext.
• Becul din interiorul aparatului trebuie înlocuit
numai de către o persoană calificată.
• Nu atingeţi niciodată uşa aparatului, orificiile
de aerisire, accesoriile sau tacâmurile imediat
după utilizarea cuptorului în regim de grill, combinat sau automat. Componentele se încălzesc
foarte tare. Înainte de curăţare, aşteptaţi răcirea
părţilor componente.
• Asiguraţi-vă că ştecărul este în orice moment
imediat accesibil, pentru a-l putea scoate repede
din priză în caz de urgenţă.
R
- 38 -
Page 41

• Persoanele care poartă un stimulator cardiac
trebuie să ceară sfatul medicului înainte de utilizarea cuptorului cu microunde, pentru a afla
posibilele riscuri la care se expun.
• Evitaţi suspendarea cablului peste masă sau
blatul de lucru. Copiii ar putea trage de cablu.
• După preparare, deschideţi cutiile, pungile de
popcorn etc., astfel încât partea deschisă să
fie orientată în direcţia opusă corpului. Aburul
degajat poate provoca opăriri.
• Nu staţi direct în faţa cuptorului atunci când
deschideţi uşa. Aburul degajat poate provoca
opăriri.
• Nu prăjiţi alimentele cu ulei în cuptorul cu microunde. Uleiul încins poate deteriora componentele aparatului şi ustensilele şi poate provoca
arderea pielii.
• După încălzire, agitaţi sau amestecaţi biberonul
copiilor! Conţinutul se poate încălzi neuniform,
iar copilul s-ar putea arde. Verificaţi temperatura
biberonului, înainte de a hrăni copilul!
• Nu modificaţi construcţia cuptorului cu microunde.
• Radiaţiile generate de microunde sunt periculoase!
Reparaţiile sau lucrările de mentenanţă care
implică demontarea tablelor de protecţie trebuie
efectuate numai de către o persoană calificată.
• Înainte de a hrăni copiii, verificaţi temperatura
conţinutului , pentru a evita eventualele arderi
majore.
Instrumentele de gătit se pot încălzi de la căldura
degajată de alimente, de aceea trebuie prinse
numai cu o lavetă de bucătărie. Trebuie de asemenea verificat dacă instrumentele folosite sunt
adecvate pentru utilizarea în cuptorul cu microunde.
Atenţie! Suprafaţă fierbinte!
Pericol de ardere
• Nu lăsaţi aparatul să funcţioneze nesupravegheat dacă încălziţi alimente în ambalaje de
plastic sau de hârtie.
• Nu aşezaţi materiale inflamabile în apropierea
cuptorului sau pe orificiile de aerisire.
• Îndepărtaţi toate obiectele sau ambalajele de
metal ale alimentelor pe care doriţi să le încălziţi.
Pericol de incendiu!
• Pentru popcorn utilizaţi numai pungi de pop-
corn adecvate pentru utilizarea în cuptoarele
cu microunde.
• Nu utilizaţi cuptorul pentru încălzirea pernelor
umplute cu sâmburi, sâmburi de cireşe sau gel.
Pericol de incendiu!
• Nu utilizaţi cuptorul pentru a depozita alimente
sau alte lucruri.
• Nu depăşiţi durata de fierbere specificată de
producător.
• Nu aşezaţi obiecte pe cuptor în timpul funcţio-
nării acestuia. Astfel sunt astupate orificiile de
aerisire!
• Nu aşezaţi cuptorul în apropierea altor aparate
generatoare de căldură, de exemplu, cuptoare
de copt.
• Curăţaţi temeinic cuptorul după încălzirea ali-
mentelor ce conţin grăsimi, în special dacă le
încălziţi neacoperite. Înainte de a-l curăţa, aşteptaţi până cuptorul s-a răcit. Pe elemenţii de
încălzire ai grillului nu trebuie să existe resturi,
de exemplu, de grăsimi. Acestea s-ar putea supraîncălzi şi aprinde.
• Nu dezgheţaţi grăsimi sau ulei îngheţat în cup-
torul cu microunde. Grăsimea sau uleiul se pot
aprinde.
• Nu utilizaţi temporizatoare externe sau sisteme
separate de comandă de la distanţă pentru a
opera cuptorul.
- 39 -
R
Page 42
Atenţie! Defectarea aparatului!
• Nu porniţi cuptorul dacă este gol. Excepţie
face prima punere în funcţiune (vezi capitolul
„Prima punere în funcţiune“).
• Nu introduceţi obiecte în orificiile de aerisire
sau în blocajele de siguranţă ale uşii.
• Nu utilizaţi ustensile metalice care reflectă
microundele şi care generează scântei. Nu
introduceţi doze de tablă în cuptor.
• Nu introduceţi recipiente de plastic în cuptor
imediat după utilizarea acestuia în modul grill,
combinat sau automat. Plasticul se poate topi.
• Aparatul nu trebuie amplasat în locuri cu umiditate ridicată a aerului sau unde se acumulează
umiditate.
• Lichidele sau orice alte alimente nu trebuie încălzite în recipiente închise ermetic, deoarece acestea pot exploda şi defecta aparatul.
• Nu vă sprijiniţi de uşa cuptorului cu microunde.
• Starea insalubră a aparatului de gătit poate
distruge suprafaţa acestuia, ceea ce reduce
durata de funcţionare a aparatul şi poate
duce la apariţia unor situaţii periculoase.
Pericol
• Nu introduceţi niciodată în apă sau în alte lichide
cablul de alimentare sau ştecărul.
• Ţineţi cablul de alimentare departe de sursele
de căldură. Cablul nu trebuie să stea aşezat în
faţa uşii cuptorului. Căldura poate distruge
cablul.
• Nu aspersaţi lichide în orificiile de aerisire sau
în blocajele de siguranţă ale uşii. Dacă totuşi
lichidele penetrează cuptorul, opriţi imediat
aparatul şi scoateţi ştecărul din priză. Cuptorul
trebuie verificat de către un specialist.
Sfaturi de siguranţă
• Pentru a reduce la minimum riscul de combustie
în interiorul cuptorului: supravegheaţi în permanenţă cuptorul când încălziţi alimente în recipiente de plastic sau de hârtie , deoarece există
posibilitatea ca aceste materiale să se aprindă.
• La încălzirea băuturilor în cuptorul cu microunde
se pot forma bule efervescente de scurtă durată
în momentul în care lichidul începe să fiarbă.
De aceea, fiţi atenţi când puneţi mâna pe vas.
Pentru a evita fierberea instantanee:
– introduceţi un baston de sticlă în lichid în timpul
în care se încălzeşte;
– după încălzire, lăsaţi lichidul în cuptor pentru
cca 20 de secunde, pentru a evita fierberea
neaşteptată.
• Perforaţi membrana cartofilor, a cârnaţilor sau
a altor produse asemănătoare. Altfel, acestea
pot exploda.
• Atenţie la încălzirea lichidelor. Utilizaţi numai
recipiente deschise pentru a asigura degajarea
bulelor de aer.
• Dacă se formează fum, opriţi aparatul sau scoateţi ştecărul din priză şi ţineţi uşa închisă pentru
a înăbuşi flăcările eventual formate.
• Ouăle cu coajă sau ouăle fierte tare nu pot fi
încălzite în cuptor, deoarece pot exploda înainte
de a se fi încălzit. Alimentele cu coajă groasă,
de exemplu, cartofii, dovlecii întregi, merele
sau castanele trebuie perforate înainte de a le
încălzi.
• Nu mişcaţi aparatul în timp ce funcţionează.
R
- 40 -
Page 43

Indicaţii de pământare / instalarea reglementară
Acest aparat trebuie pământat. Cuptorul trebuie
conectat numai la o priză pământată reglementar.
Recomandăm utilizarea unui circuit de curent propriu,
care să alimenteze numai cuptorul cu microunde.
Pericol: manipularea necorespunzătoare a
ştecărului pământat poate genera riscul de
electrocutare.
Indicaţie: dacă aveţi întrebări privind pământarea sau dacă aveţi nevoie de instrucţiuni din
domeniul electric, întrebaţi un electrician sau o
altă persoană responsabilă de mentenanţă.
Nici producătorul, nici distribuitorul nu pot fi făcuţi
responsabili pentru defecţiunile aparatului sau pentru
daunele umane rezultate în urma nerespectării procedurii de realizare a conexiunii electrice.
Deranjamente în recepţia radio a altor aparate
Utilizarea cuptorului cu microunde poate provoca
deranjamente în funcţionarea aparatului de radio,
a televizorului sau a altor aparate similare.
În cazul în care apar astfel de interferenţe, luaţi următoarele măsuri pentru evitarea sau oprirea lor:
• curăţaţi uşa sau suprafaţa de etanşare a
cuptorului;
• modificaţia poziţia antenei aparatului radio
sau televizorului;
• aşezaţi cuptorul într-un loc separat de locul
receptorului radio;
• îndepărtaţi cuptorul de receptorul radio;
• introduceţi cuptorul într-o altă priză. Cuptorul
cu microunde şi receptorul trebuie să folosească
ramificaţii diferite ale circuitului de curent.
Utilizarea conform destinaţiei
Acest aparat este destinat încălzirii şi preparării de
alimente conform modului de utilizare descris.
Orice modificare a aparatului este considerată
contravenţională şi ascunde pericole considerabile de
accidentare. Producătorul nu-şi asumă răspunderea
pentru prejudiciile rezultate în urma unei utilizări care
contravine destinaţiei.
Acest aparat este destinat exclusiv folosirii în gospodării particulare!
A nu se utiliza în scopuri comerciale, în industrie sau
laboratoare!
Furnitura
Cuptor cu microunde
Suport de sticlă
Grătar pentru grill
Suport rotativ
Instrucţiuni de utilizare
Informaţii sumare
Date tehnice
Tensiune nominală: 230 - 240 V
50 Hz
Consum maxim: 1200 W
Putere maximă microunde: 800 W
Consum maxim
grill: 1000 W
Frecvenţă microunde: 2450 MHz
~
- 41 -
R
Page 44

Cuvânt înainte
Principii de bază pentru prepararea
alimentelor în cuptorul cu microunde
• Aranjaţi alimentele în mod logic.
• Locurile cele mai etanşe se aşează aproape de
margine.
• Atenţie la timpul de funcţionare setat. Selectaţi
cel mai scurt timp indicat, iar la nevoie prelungiţi-l.
Alimentele voluminoase preparate un timp îndelungat pot începe să fumege sau să se aprindă.
• În timpul preparării, acoperiţi alimentele cu un
capac adecvat pentru microunde. Capacul împiedică stropirea şi ajută la prepararea uniformă
a alimentelor în interiorul cuptorului.
• Întoarceţi o dată alimentele preparate în cuptor,
pentru ca produsele precum carnea de pui şi
hamburgerii să se prepare uniform şi în profunzime.
• Bucăţile mari de alimente ca fripturile trebuie
să fie întoarse cel puţin o dată.
• Alimentele precum chiftelele trebuie rearanjate
după scurgerea a jumătate din timpul de preparare. Întoarceţi-le şi mutaţi-le din mijloc pe marginea vasului.
Utilizarea instrumentelor de gătit
adecvate
• Materialul ideal pentru un cuptor cu microunde
permite trecerea microundelor prin recipient,
pentru încălzirea alimentelor.
Microundele nu pot trece prin metale. Din acest
motiv, nu trebuie utilizate recipiente metalice
sau tacâmuri de metal.
• Pentru încălzirea în cuptorul cu microunde nu
utilizaţi produse de hârtie reciclată. Acestea
pot conţine fragmente foarte mici de metal
care pot genera scântei şi/sau incendii.
• Se recomandă utilizarea vaselor rotunde / ovale în locul celor cu multe colţuri / lungi, deoarece bucăţile de alimente din colţuri se ard.
Următoarea listă vă este de ajutor la alegerea
vaselor adecvate.
Instrumente de
gătit
Sticlă rezistentă la
temperaturi înalte
Sticlă nerezistentă
la temperaturi înalte
Ceramică rezistentă
la temperaturi ridicate
Tacâmuri de plastic
adecvate pentru
microunde
Hârtie de bucătărie Da Nu Nu
Tavă metalică Nu Da Nu
Grătar pentru grill Nu Da Nu
Folie de aluminiu &
recipient de folie
Microunde
Da Da Da
Nu Nu Nu
Da Da Da
Da Nu Nu
Nu Da Nu
Grill
Funcţionare combinată
Pericol de incendiu!
Nu utilizaţi niciodată suportul pentru grill sau alte
obiecte metalice dacă aparatul funcţionează în modul
microunde sau combinat. Metalul reflectă radiaţia
generată de microunde şi duce la formarea de
scântei. Acest lucru poate duce la incendiu şi la
defectarea iremediabilă a cuptorului!
R
- 42 -
Page 45
Descrierea aparatului
Nu
1 Ecran
2 Buton deschidere uşă
3 Suport de sticlă
4 Suport rotativ
5 Gaură de aerisire
6 Buton grill
7 Tasta ceas (Preset)
8 Buton decongelare
9 Buton ceas
0 Buton oprire
q Buton rotativ / Pornire / Pornire rapidă
w Buton temporizator
e Buton funcţii combinate
r Buton putere
t Grătar pentru grill
Prima punere în funcţiune
Amplasarea aparatului
Pericol de incendiu!
Acest cuptor cu microunde nu poate fi montat într-un
dulap de bucătărie. În dulapurile închise nu este asigurată aerisirea suficientă a aparatului. Aparatul se
poate defecta şi există pericol de incendiu!
• Alegeţi o suprafaţă plană, cu spaţiu suficient
pentru aerisirea aparatului:
păstraţi neapărat o distanţă de cel puţin 10 cm
între aparat şi peretele din vecinătate. Asiguraţi-vă
că uşa cuptorului poate fi deschisă fără niciun
impediment.
Deasupra aparatului, asiguraţi un spaţiu de cel
puţin 20 cm.
• Asiguraţi că ştecărul este accesibil fără mari
greutăţi, pentru a putea fi scos din priză în cazul
apariţiei unui pericol.
• Nu îndepărtaţi picioruşele de sub cuptorul cu
microunde.
• Nu obturaţi gaura de aerisire 5. În caz contrar
aparatul se poate defecta.
• Amplasaţi aparatul la distanţă faţă de aparatele de radio şi de televizoare. Funcţionarea
cuptorului cu microunde poate provoca deranjamente ale receptorului radio sau receptorului
televizorului.
Atenţie
Nu amplasaţi cuptorul cu microunde deasupra aragazului sau deasupra altui aparat care produce căldură. Amplasarea într-un asemenea loc poate produce defectări ale aparatului şi poate duce astfel la
anularea garanţiei.
Pregătirea aparatului
• Îndepărtaţi ambalajele şi, eventual, folia de
protecţie de pe carcasa aparatului.
N
îndepărtaţi tabla de acoperire
gri deschis, cu rol de protecţie pentru
ţ evile câmpului magnetic din interiorul
aparatului.
• Introduceţi ştecărul în priză. Utilizaţi o priză de
230 - 240 V ~, 50 Hz cu o siguranţă de 16 A
. Se recomandă alimentarea cuptorului cu microunde de la un circuit de curent propriu. Dacă
nu sunteţi siguri că puteţi conecta aparatul,
cereţi sfatul unui specialist.
- 43 -
R
Page 46
Înainte de utilizarea cuptorului cu microunde, acesta
trebuie încălzit gol, pentru evaporarea resturilor rămase
din fabricaţie.
Porniţi aparatul fără alimente şi fără accesorii (suport
de sticlă 3, suport rotativ 4 şi grătar pentru grill t)
în modul grill:
• Apăsaţi o dată butonul grill 6 . Astfel se-
lectaţi modul grill. Pe ecran 1 apare simbolul
şi se aprinde simbolul . Astfel se indi-
,
că faptul că aparatul poate fi pornit.
• De la butonul rotativ q , selectaţi un timp de
funcţionare de 10 minute.
• Apăsaţi butonul pornire / pornire rapidă q
, pentru pornirea în modul grill.
Indicaţie
La prima punere în funcţiune se poate forma fum
sau se pot degaja mirosuri din cauza resturilor rămase
din fabricaţie. Acestea nu sunt nocive. Asiguraţi o
aerisire suficientă. Deschideţi de exemplu o fereastră.
Operarea
Setarea ceasului
La prima punere în funcţiune a cuptorului cu microunde
sau în caz de pană de curent, pe ecran apare 1
„1 : 0 1 ".
1. Apăsaţi butonul pentru ceas 9 . Pe ecran 1
apare „Hr 12“. Apăsaţi încă o dată butonul pentru
ceas 9 , dacă doriţi să modificaţi afişajul în
sistemul de 24 de ore.
2. Prin rotirea butonului rotativ q setaţi ora dorită.
Se aprinde simbolul ceas de pe ecran 1.
3. Apăsaţi tasta pornire / pornire rapidă q .
Apare câmpul de setare pentru minute.
4. Prin rotirea butonului rotativ q setaţi minutele
dorite.
5. Dacă ora este setată corect, apăsaţi tasta pornire/
pornire rapidă q . Simbolul ceas de
pe ecran 1 este permanent aprins, iar cele două
puncte indică, prin aprindere intermitentă,
funcţionarea ceasului.
• După 10 minute aparatul se opreşte automat.
Se aude un semnal sonor. Deschideţi uşa.
Aşteptaţi până s-a răcit complet.
• Scoateţi ştecărul din priză şi apoi curăţaţi aparatul în interior cu un prosop moale după care
ştergeţi-l bine.
Montarea accesoriilor
• Aşezaţi suportul rotativ 4 pe mijlocul arborelui
de antrenare din interior. Asiguraţi-vă că alunecă
complet pe arborele de antrenare şi că este
poziţionat fix.
• Aşezaţi suportul de sticlă 3 pe mijlocul suportului rotativ. Cele trei role trebuie să fie aşezate pe
marginea de ghidare a suportului de sticlă 3.
Pentru a vedea ora în timpul funcţionării cuptorului,
apăsaţi butonul pentru ceas 9 ; ora este afişată pe
ecran 1 pentru cca 4 secunde.
Setarea temporizatorului
Cuptorul cu microunde dispune de un temporizator
care poate fi utilizat independent de funcţionarea
aparatului.
1. Apăsaţi butonul temporizator w când
aparatul este în stand-by. Pe ecran 1 apare
„00:10“.
2. Reglaţi acum de la butonul rotativ q timpul
dorit. Puteţi seta un timp cuprins în intervalul
10 secunde şi 95 de minute.
- 44 -
Page 47
3. Apăsaţi butonul pornire / pornire rapidă q .
Se aude un semnal sonor. Timpul se scurge descendent. După cca 3 secunde este afişată din
nou ora. Temporizatorul funcţionează mai departe în fundal.
Dacă între timp doriţi să vedeţi timpul rămas,
apăsaţi butonul temporizator w . Va apărea
pentru scurt timp temporizatorul.
Imediat ce a expirat timpul setat sunt emise 3 semnale sonore.
Indicaţie
Pentru întreruperea timpului temporizatorului apăsaţi butonul temporizator w pentru afişarea
timpului actual al temporizatorului. În timp ce temporizatorul este afişat pe ecran 1 apăsaţi butonul
de oprire 0 .
Temporizatorul este întrerupt, iar pe ecran este
afişată ora 1.
Siguranţa pentru copii
Activaţi această setare pentru a evita punerea în
funcţiune a cuptorului de către copii şi de către alte
persoane nefamiliarizate cu utilizarea aparatului.
Simbolul de siguranţă pentru copii este afişat
pe ecran 1, iar aparatul nu mai poate fi pus în
funcţiune atât timp cât această funcţie este activată.
• Apăsaţi butonul de oprire 0 şi ţineţi-l apăsat
până la declanşarea semnalului sonor şi până la
apariţia pe ecran 1 a simbolului de siguranţă
pentru copii . Butoanele, inclusiv butonul rotativ
nu mai execută acum nicio funcţie.
• Pentru dezactivarea siguranţei pentru copii, apă-
saţi butonul de oprire 0 şi ţineţi-l apăsat
până când auziţi un semnal sonor şi până la stingerea simbolului de siguranţă pentru copii .
Funcţii de apelare informaţii
Apelarea ceasului în timpul funcţionării
Apăsaţi butonul pentru ceas 9 în timpul
procesului de preparare. Pe ecran 1 apare ceasul
pentru cca 4 secunde.
Apelarea treptei de putere în timpul funcţionării
Apăsaţi butonul de putere r în timpul proce-
sului de preparare. Pe ecran 1 apare treapta de
putere activată pentru cca 3 secunde.
Prepararea alimentelor
Modul microunde
Indicaţie
Pe uşa sau pe carcasa cuptorului se pot forma stropi
de apă în timpul procesului de fierbere. Acest lucru
este complet normal şi nu reprezintă un semn de
defectare a aparatului. După ce s-a răcit, ştergeţ i
umiditatea formată cu un prosop uscat.
Pericol de incendiu!
Nu utilizaţi niciodată grătarul pentru grill t sau
alte obiecte metalice când utilizaţi cuptorul în modul
microunde. Metalul reflectă radiaţia generată de
microunde şi duce la formarea de scântei. Acest lucru
poate duce la incendiu şi la defectarea iremediabilă
a cuptorului!
- 45 -
R
Page 48

Selectarea treptei de putere
• Apăsaţi repetat butonul de putere r
pentru selectarea treptei de putere dorite.
• 1x pentru 800 W (P800).
• 2x pentru 700 W (P700).
• 3x pentru 600 W (P600).
• 4x pentru 500 W (P500).
• 5x pentru 400 W (P400).
• 6x pentru 300 W (P300).
• 7x pentru 200 W (P200).
• 8x pentru 100 W (P100).
Întreruperea procesului de fierbere
Apăsaţi o dată butonul de oprire 0 , pentru
întreruperea procesului de fierbere. Aparatul întrerupe
procesul şi opreşte timpul rămas. Apăsaţi butonul
pornire /pornire rapidă q , pentru continuarea
procesului.
Terminarea procesului de fierbere
Apăsaţi de două ori butonul de oprire 0 , pentru a
termina procesul de fierbere. Aparatul revine în modul stand-by.
Puterea selectată este afişată pe ecran 1 (de ex.
P800 la 800 W).
Setarea timpului de fierbere
După selectarea treptei de putere, setaţi timpul de
fierbere dorit:
• rotiţi butonul rotativ q până la setarea timpului
dorit.
Treptele de setare a timpului de la butonul
rotativ q sunt următoarele:
• de la 10 sec. până la 5 min: în paşi de câte
10 sec.
• de la 5 până la 10 min.: în paşi de câte
30 sec.
• de la 10 până la 30 min.: în paşi de câte 1 min.
• de la 30 până la 95 min.: în paşi de câte 5 min.
Întreruperea / terminarea setărilor
Apăsaţi o dată butonul de oprire 0 , pentru
a întrerupe şi termina procesul de setare. Aparatul
revine în modul stand-by.
Pornirea procesului de fierbere
După setarea puterii şi a timpului de fierbere şi după
apariţia pe ecran 1 a simbolului , puteţi porni
procesul de fierbere.
Pentru pornire apăsaţi butonul pornire / pornire rapidă q . Pe ecranul 1 apar simbolurile pentru
operarea cuptorului ţi înc?lzire/fierbere
(putere P100 - P400) sau (putere P500 P800). Timpul setat curge invers.
Procesul de fierbere a fost terminat
Când terminaţi procesul de fierbere, pe ecran 1
apare „End“ şi se aud semnalele sonore. Dacă nu
deschideţi uşa cuptorului, semnalele sonore se repetă
după cca 2 minute.
Pornirea rapidă
Cu această funcţie puteţi începe procesul de fierbere
pentru 30 de secunde (sau mai mult, până la 12 minute) la o putere de 800 W.
• Apăsaţi o dată butonul pornire / pornire rapidă q .
Pe ecran 1 apar simbolurile pentru modul microunde şi fierbere , precum şi „:30“. Cuptorul
porneşte procesul pentru 30 de secunde. Timpul se
scurge descendent.
Dacă doriţi să prelungiţi procesul de fierbere, apăsaţi butonul pornire / pornire rapidă q până
ajungeţi la timpul dorit.
R
- 46 -
Page 49

Modul grill
Funcţia de grill poate fi folosită pentru felii subţiri de
carne, pentru fripturi, chiftele, cârnăciori sau părţi de
pui. De asemenea, pentru sandwichuri şi preparate
gratinate.
Pentru grill utilizaţi totdeauna grătarul pentru grill t.
Astfel veţi obţine un rezultat optim.
Aşezaţi grătarul pentru grill t pe suportul de sticlă 3.
1. Apăsaţi butonul grill 6 , pentru a activa
funcţia grill.
Pe ecran 1 apare simbolul pentru funcţia grill
şi „:10“.
2. De la butonul rotativ q reglaţi timpul de preparare dorit. Timpul maxim ce se poate seta este
de 95 de minute.
3. Pentru pornirea funcţiei de grill, apăsaţi butonul
pornire / pornire rapidă q .
4. Întoarceţi carnea la jumătatea timpului setat.
Funcţii combinate
Această funcţie combină funcţia grill cu modul micr
ounde normal. În timpul procesului combinat, o
anumită durată din timpul setat se foloseşte pentru
fierbere, iar restul timpului este alocat pentru grill.
Momentul de comutare al aparatului poate fi
perceput printr-un clicăit încet.
Pericol de incendiu!
Nu utilizaţi niciodată grătarul pentru grill t sau
alte obiecte metalice când utilizaţi cuptorul în modul
de funcţii combinate. Metalul reflectă radiaţia generată de microunde şi duce la formarea de scântei.
Acest lucru poate duce la incendiu şi la defectarea
iremediabilă a cuptorului!
Combinaţia 1
Pentru combinaţia 1 puterea microundelor este de
30 %, iar puterea pentru grill de 70 % din timpul total.
Această combinaţie este recomandată de exemplu
pentru peşte, cartofi sau preparate gratinate.
1. Apăsaţi o dată butonul pentru combinaţii e
pentru a activa combinaţia 1. Pe ecran 1
apare şi „:10“.
2. De la butonul rotativ q reglaţi timpul de prepa-
rare dorit. Timpul maxim ce se poate seta este
de 95 de minute.
3. Pentru pornire apăsaţi butonul pornire / pornire
rapidă q .
Combinaţia 2
Pentru combinaţia 2 puterea microundelor este de
55 % iar puterea pentru grill de 45 % din timpul total.
Această combinaţie este recomandată de exemplu
pentru budinci, omletă, preparate din pasăre sau
lasagna.
1. Apăsaţi de două ori butonul pentru combinaţii e
pentru a activa combinaţia 2. Pe ecran 1
apare şi „:10“.
2. De la butonul rotativ q reglaţi timpul de prepa-
rare dorit. Timpul maxim ce se poate seta este
de 95 de minute.
3. Pentru pornire apăsaţi butonul pornire / pornire
rapidă q .
- 47 -
R
Page 50

Meniul automat
Nr. Simbol Produs
Greutate
(porţii)
Pentru alimentele pe care doriţi să le preparaţi în
mod automat, nu este necesară setarea duratei de
preparare şi a treptei de putere. Este de ajuns să
setaţi tipul de alimente pe care urmează să le preparaţi, precum şi greutatea acestora.
Indicaţie
Cuptorul alege timpul / treapta de putere pentru
alimente proaspete. Alimentele congelate nu sunt
preparate bine cu timpul ales de cuptor.
De aceea, dezgheţaţi în prealabil alimentele congelate cu programul pentru decongelare (vezi capitolul „Decongelarea“).
Pornirea meniului automat
Indicaţie
Aşezaţi întotdeauna alimentele într-un recipient
adecvat sau pe o farfurie. Ţineţi cont de faptul că
în timpul încălzirii sau fierberii, se pot scurge lichide
din alimente, precum grăsime sau altele. Din acest
motiv, recipientul/farfuria trebuie să fie suficient de
mari pentru a evita scurgerea acestor lichide în aparat.
1. Rotiţi încet butonul rotativ q spre stânga. Pe
ecran 1 apare un număr (de. ex.. „3“ pentru
programul automat 3 (peşte)), simbolul „Peşte“
şi . Selectaţi meniul automat adecvat pentru
produsul preparat (1 - 9). Din meniul modului
automat puteţi intra în meniul automat dorit, şi
printr-o rotire spre dreapta. Confirmaţi alegerea
dvs. prin apăsarea tastei pornire/pornire rapidă
q .
1 Lichide 1 - 3
2 Paste 100 - 300g
3 Peşte 100 - 1000g
4 Orez 100 - 1000g
5 Pui 800 - 1400g
6 Încălzire 100 - 1000g
7 Cartofi 150 - 600g
8 Friptură 300 - 1300g
9 Carne 100 - 700g
2. Prin rotirea regulatorului q selectaţi acum
greutatea dorită, respectiv numărul de porţii
dorit.Simbolul se aprinde intermitent.
3. Apăsaţi butonul pornire / pornire rapidă q
pentru pornirea procesului de preparare.
Indicaţie
Pentru a obţine rezultate uniforme pe toată suprafaţ a
produsului, alimentele preparate cu programele 5,
8 şi 9 trebuie întoarse după trecerea a cca 2/3 din
timp. Cuptorul cu microunde vă aminteşte de întoarcere: pe display 1 este afişat „turn“ şi se emite un
semnal sonor.
• Deschideţi uşa şi întoarceţi preparatele.
Atenţie la preparatele fierbinţi.
R
- 48 -
Page 51

• Apăsaţi butonul pornire /pornire rapidă q
pentru continuarea procesului.
Indicaţie
Dacă nu doriţi să întoarceţi preparatele, aşteptaţi
pur şi simplu până când auziţi semnalele sonore.
Cuptorul continuă programul după cca 30 de
secunde.
Indicaţie
Dacă după terminarea meniului automat, preparatele nu sunt făcute bine, daţi-le din nou la cuptor
pentru câteva minute şi activaţi programul pornire
rapidă. Pentru programele care utilizează funcţia
grill (programul 5, 8 şi 9) preparatele pot fripte suplimentar cu funcţia grill. Prin folosirea suplimentară
a funcţiei grill preparatele devin mai rumene.
Pericol de incendiu!
Pentru programele la care este activată funcţia grill
nu folosiţi capace sau vase care nu rezistă la temperaturi ridicate pentru că se pot topi sau pot lua foc!
Pericol de rănire!
Suportul de sticlă 3 este foarte fierbinte după ce a
fost folosit în modul grill! De aceea, utilizaţi neapărat
lavete de bucătărie sau mănuşi rezistente la temperaturi înalte atunci când scoateţi suportul din cuptor.
Indicaţie
Nu uitaţi că dimensiunea, forma şi tipul alimentelor
influenţează rezultatul preparării.
Prezentarea detaliată a programelor
Programul 1: băuturi
Acest program funcţionează numai dacă se utilizează
microundele. În funcţie de numărul de porţii setat,
programul se derulează un timp cuprins între 1:30
şi 3:50 minute.
• Introduceţi băutura în aparat, pe suportul de
sticlă 3. Dacă introduceţi mai multe pahare resp.
ceşti asiguraţi-că că acestea nu se vor atinge.
Indicaţie
Pentru a evita fierberea instantanee:
• introduceţi un baston de sticlă în lichid în timpul
în care se încălzeşte;
• după încălzire, lăsaţi lichidul în cuptor pentru
cca 20 de secunde, pentru a evita fierberea
neaşteptată.
Programul 2: paste
Acest program funcţionează numai dacă se utilizează
microundele.
În funcţie de greutatea setată, programul se derulează
un timp cuprins între 25 - 35 de minute.
• Pentru fierberea pastelor, utilizaţi un vas înalt,
deoarece există riscul de revărsare.
• Utilizaţ i aceeaşi cantitate de apă precum la fier-
tul convenţ ional. Pastele trebuie să „înoate” în
apă.
• Fierbeţ i întâi apa: reglaţ i aparatul la puterea cea
mai mare (P800) şi porniţ i-l. Pentru un litru de
apă sunt necesare aprox.10 min. pentru a aduce
apa la fierbere.
• Adăugaţi apoi pastele. Apoi puteţi porni meniul
automat pentru paste.
• După fierbere lăsaţi pastele să se liniştească
pentru cca 3 minute.
Programul 3: peşte
Acest program funcţionează numai dacă se utilizează
microundele.
În funcţie de greutatea setată, programul se derulează un timp cuprins între 3:30 şi 16 minute.
• Aşezaţi bucăţile de peşte pe o farfurie, turnaţi
ulei sau alt tip de grăsime, condimentaţi după
gust şi apoi porniţi meniul automat pentru peşte.
Programul 4: orez
Acest program funcţionează numai dacă se utilizează
microundele.
În funcţie de greutatea setată, programul se derulează
un timp cuprins între 16 - 36 de minute.
- 49 -
R
Page 52

• Pentru fierberea orezului utilizaţi un vas înalt, deoarece există riscul de revărsare. Pentru o cantitate de
200 g de orez este nevoie de cca 400 ml de apă.
Chiar dacă e apă, folosiăi reglajul de greutate
„200 g“. Întotdeauna se setează greutatea orezului.
• Vărsaţi orezul în vas, acoperiţi cu apă şi aştepta ţi
cca 3 minute umflarea orezului.
• Acoperiţi vasul. Asiguraţi-vă că nu este închis
ermetic. Apoi puteţi porni meniul automat pentru
orez.
Programul 5: pui
Acest program se derulează în mai multe etape şi
foloseşte atât microundele, cât şi grillul. În funcţie de
greutatea setată, programul se derulează un timp
cuprins între39 - 50 de minute.
• Aşezaţi puiul pe o farfurie adecvată pentru
microunde.
• Condimentaţi după gust şi porniţi programul
automat pentru pui.
• Puiul întreg trebuie întors, deoarece, pe partea
orientată în sus, se poate usca. În acest scop, cuptorul întrerupe automat programul după aproximativ
2/3 din timpul setat şi se aud semnalele sonore.
Întoarceţi puiul şi apăsaţi butonul pornire / pornire
rapidă q , pentru a continua programul.
Programul 6: încălzire
Acest program funcţionează numai dacă se utilizează
microundele.
În funcţie de greutatea setată, programul se derulează
un timp cuprins între1:00 şi 6:20 minute.
• Aşezaţi farfuria cu mâncare pe suportul de sticlă 3
din cuptor şi porniţi meniul automat pentru încălzire.
Programul 7: cartofi
Acest program funcţionează numai dacă se utilizează
microundele.
În funcţie de greutatea setată, programul se derulează
un timp cuprins între 3:50 şi 11 minute.
Sfat
Utilizaţi cartofi cu coajâ. Înţepaţi coajâ de câteva ori.
• Puneţi cartofii curăţaţi pe o farfurie sau într-un vas.
Utilizaţi cartofi de aceeaşi dimensiune. Dacă este
posibil, cartofii ar fi bine să nu se atingă între ei.
Programul 8: friptură
Acest program se derulează în mai multe etape şi
foloseşte atât microundele, cât şi grillul. În funcţie de
greutatea setată, programul se derulează un timp
cuprins între16 şi 60 de minute.
• Aşezaţi carnea de friptură pe o farfurie. Condimentaţi carnea după gust şi porniţi meniul automat
pentru fripturi.
• O friptură întreagă trebuie întoarsă, deoarece
partea orientată în sus se poate usca. În acest
scop, cuptorul întrerupe automat programul după
aproximativ 2/3 din timpul setat şi se aud semnalele sonore. Întoarceţi friptura şi apăsaţi butonul
pornire / pornire rapidă q , pentru a continua programul.
Programul 9: carne
Acest program se derulează în mai multe etape şi
foloseşte atât microundele, cât şi grillul. În funcţie de
greutatea setată, programul se derulează un timp
cuprins între 9 şi 27 de minute.
• Aşezaţi carnea pe o farfurie. Condimentaţi carnea
după gust şi porniţi meniul automat pentru carne.
• Carnea trebuie întoarsă pentru a se frige uniform.
În acest scop, cuptorul întrerupe automat programul
după aproximativ 2/3 din timpul setat şi se aud
semnalele sonore. Întoarceţi şi apăsaţi butonul
pornire / pornire rapidă q , pentru a continua programul.
R
- 50 -
Page 53

Decongelarea
Cu această funcţie puteţi decongela fără probleme
carne, pui, legume şi peşte. Timpul de decongelare
este calculat şi setat automat în funcţie de greutate.
1. Apăsaţi butonul decongelare 8 .
Pe ecran 1 apare şi . Simbolul
se aprinde intermitent.
2. Cu ajutorul butonului rotativ q selectaţi greutatea
produsului pe care doriţi să-l dezgheţaţi.
Puteţi regla o cantitate cuprinsă între 100 g şi
1800 g.
3. Apăsaţi butonul pornire / pornire rapidă q .
Aparatul indică automat timpul de decongelare.
Timpul apare pe ecran 1 şi începe derularea.
După aprox. jumătate din timpul setat, se emite un
semnal sonor şi pe display 1 este afişat “turn”.
Deschideţi uşa şi întoarceţi preparatele. Închideţi
din nou uşa şi apăsaţi tasta pornire/pornire rapidă
q , pentru a continua procesul de decongelare.
Indicaţie
Dacă nu doriţi să întoarceţi preparatele, aşteptaţi
pur şi simplu până când semnalele sonore se opresc.
Programul de decongelare continuă însă!
Programarea orei de pornire
(Preset)
Cu acest program puteţi pre-programa un anumit
timp de pornire pentru preparare sau grill. Dacă aţi
realizat setările corect, aparatul porneşte automat la
timpul setat.
1. Reglaţi funcţia dorită a cuptorului (preparare, grill
sau meniu automat (cu excepţia programului 6)):
pentru funcţionarea cu microunde: pentru selectarea
puterii, apăsaţi butonul putere r până
apare valoarea dorită. De la butonul rotativ q
reglaţi timpul dorit. Pentru funcţionarea cu grill:
apăsaţi butonul grill 6 , pentru a activa
funcţia grill.
De la butonul rotativ q reglaţi timpul dorit.
Pentru meniul automat: de la butonul rotativ q
selectaţi programul adecvat pentru produsul dvs.
(cu excepţia programului 6). Confirmaţi alegerea
dvs. prin apăsarea tastei pornire/ pornire rapidă
q . Prin rotirea regulatorului q selectaţ i
acum greutatea dorită, respectiv numărul de
porţii dorit.
2. Apăsaţi tasta pentru ora de pornire 7.
Pe ecran 1 se aprinde intermitent „01: “ şi apare
eclipsa .
3. Rotiţi butonul rotativ q, pentru setarea orei.
4. Apăsaţi tasta pornire/pornire rapidă q ,
acum sunt afişate cifrele pentru minute.
5. Roţiţi butonul rotativ q, pentru setarea minutelor.
6. Apăsaţi butonul pornire / pornire rapidă q .
Eclipsa se aprinde intermitent. Timpul de pornire este afişat. Cuptorul porneşte automat
la timpul presetat. La pornire se aude un semnal
sonor.
Indicaţie
Pentru ştergerea timpului memorat şi pentru întreruperea funcţionării, apăsaţi butonul oprire 0 .
Eclipsa dispare şi este afişată ora.
Indicaţie
Ceasul trebuie să fie setat, pentru a putea selecta
funcţia „Presetarea timpului de pornire“.
- 51 -
R
Page 54

Curăţarea şi îngrijirea
Pericol de rănire!
Înainte de curăţare opriţi cuptorul şi scoateţi ştecărul
din priză.
Este interzisă introducerea aparatului în apă
sau în alte lichide. Pericol de moarte prin electrocutare şi deteriorarea aparatului.
• Păstraţi tot timpul interiorul aparatului curat.
• Dacă pe pereţii cuptorului există picuri de apă
sau alte lichide, acestea trebuie şterse cu un
prosop umed.
• Utilizaţi un detergent uşor dacă pe cuptor există
resturi mari de mâncare. Clătiţi resturile de detergent cu apă curată.
• Evitaţi utilizarea de spray de curăţare sau a
altor substanţe acide deoarece acestea pot
provoca pete, dungi sau opacizarea suprafeţei
uşii.
• Curăţaţi pereţii din exterior cu un prosop
umed.
• Pentru a evita defectarea componentelor
funcţionale luaţi măsurile necesare pentru a
evita pătrunderea apei în gaura de aerisire 5.
• Îndepărtaţi regulat stropii sau resturile de alimente. Curăţaţi uşa, geamul (pe ambele părţi),
garniturile uşii şi componentele învecinate cu un
prosop umed. Nu utilizaţi substanţe abrazive.
• Dacă în interior sau exterior se formează aburi,
ştergeţi-i cu un prosop moale. Aburii se formează
dacă cuptorul este utilizat în condiţii de umiditate
ridicată.
• Curăţaţi regulat şi suportul de sticlă 3.
Spălaţi-l în apă cu detergent sau în maşina de
spălat vase.
• Curăţaţi grătarul de grill t în apă de vase
caldă şi ştergeţi-l bine.
• Îndepărtaţi regulat mirosurile din cuptor. Puneţi
în cuptor un castron adânc cu o cană de apă
cu coajă şi suc de lămâie. Încălziţi-le preţ de
5 minute. Ştergeţi temeinic şi uscaţi cu o lavetă
moale.
• Dacă este necesară înlocuirea becului din interiorul cuptorului, acest lucru trebuie realizat de
către distribuitor sau serviciul nostru pentru
clienţi.
Remedierea defecţiunilor
Ecranul 1 nu afişează nimic.
• Ştecărul nu este în priză. Verificaţi ştecărul.
• Priza este defectă. Încercaţi cu altă priză.
• Ecranul 1 este defect. Luaţi legătura cu service-ul.
Aparatul nu răspunde la apăsarea butoanelor.
• Siguranţa pentru copii este activată. Dezactivaţi
siguranţa pentru copii (vezi capitolul „Operarea“).
Aparatul nu porneşte prepararea / fierberea.
• Uşa nu este închisă corect. Închideţi corect uşa.
Suportul de sticlă 3 produce zgomote la rotire.
•Suportul 3 nu este aşezat corect pe suportul
rotativ 4. Aşezaţi corect suportul de sticlă 3
în interiorul aparatului.
• Suportul rotativ 4 şi/sau baza din interior sunt
murdare. Curăţaţi suportul rotativ 4 şi baza.
R
- 52 -
Page 55

Eliminarea aparatelor uzate
Garanţia şi service-ul
Nu aruncaţi aparatul sub nicio formă
în gunoiul menajer obişnuit. Acest produs cade sub incidenţa directivei europene 2002/96/EC.
Eliminaţi aparatul prin intermediul unei firmei specializate şi autorizate sau prin intermediul serviciului local
de eliminare a deşeurilor.
Respectaţi reglementările actuale în vigoare.
Dacă aveţi nelămuriri, contactaţi serviciul dumneavoastră local de eliminare a deşeurilor.
Eliminaţi toate materialele de ambalare
într-un mod ecologic.
Pentru acest aparat, se acordă o garanţie de 3 ani
începând cu data cumpărării. Aparatul a fost produs
cu grijă şi verificat cu scrupulozitate înaintea livrării.
Păstraţi bonul de casă pentru a dovedi cumpărarea.
Dacă aveţi solicitări privind garanţia, contactaţi telefonic centrul dumneavoastră de service. Numai astfel
poate fi asigurată o expediere gratuită a produsului
dumneavoastră. Garanţia acoperă numai defectele
de material sau de fabricaţie, nu şi deteriorările rezultate în urma transportului, piesele de uzură sau
deteriorările apărute la componentele fragile, de ex.
comutatoare sau acumulatoare. Aparatul este destinat numai pentru uz privat şi nu pentru o utilizare
profesională. În cazul manevrării abuzive sau necorespunzătoare, uzului de forţă şi intervenţiilor care
nu au fost realizate de către filiala noastră autorizată de service, garanţia îşi pierde valabilitatea. Drepturile dumneavoastră legale nu sunt limitate prin această garanţie.
Perioada de garanţie nu este prelungită după realizarea reparaţiilor realizate în perioada garanţie.
Acest lucru este valabil şi pentru piesele înlocuite şi
reparate. Deteriorările şi deficienţele prezente deja
la cumpărare trebuie semnalate imediat după dezambalare sau cel târziu în două zile de la data
cumpărării. Reparaţiile necesare după expirarea
perioadei de garanţie se efectuează contra cost.
E-mail: support.ch@kompernass.com
R
Service România
Tel.: 0800896637
E-Mail: kompernass@lidl.ro
IAN 71492/71493
- 53 -
R
Page 56

Importator
KOMPERNASS GMBH
BURGSTRASSE 21
44867 BOCHUM, GERMANIA
www.kompernass.com
R
- 54 -
Page 57

Cъдържание Cтраница
Указания за безопасност 56
Употреба по предназначение 59
Обем на доставката 59
Технически характеристики 59
Преди да започнете 60
Основни принципи при готвене с микровълнова печка . . . . . . . . . . . . . . . . . . . . . . . . . .60
Използване на подходящи съдове . . . . . . . . . . . . . . . . . . . . . . . . . . . . . . . . . . . . . . . . . . . .60
Описание на уреда 61
Първо пускане 61
Поставяне на уреда . . . . . . . . . . . . . . . . . . . . . . . . . . . . . . . . . . . . . . . . . . . . . . . . . . . . . . . .61
Подготвяне на уреда . . . . . . . . . . . . . . . . . . . . . . . . . . . . . . . . . . . . . . . . . . . . . . . . . . . . . . .61
Използване на аксесоари . . . . . . . . . . . . . . . . . . . . . . . . . . . . . . . . . . . . . . . . . . . . . . . . . .62
Обслужване 62
Настройване на часа . . . . . . . . . . . . . . . . . . . . . . . . . . . . . . . . . . . . . . . . . . . . . . . . . . . . . .62
Настройване на таймера . . . . . . . . . . . . . . . . . . . . . . . . . . . . . . . . . . . . . . . . . . . . . . . . . . .62
Детска защита . . . . . . . . . . . . . . . . . . . . . . . . . . . . . . . . . . . . . . . . . . . . . . . . . . . . . . . . . . . .63
Функции за запитване . . . . . . . . . . . . . . . . . . . . . . . . . . . . . . . . . . . . . . . . . . . . . . . . . . . . .63
Готвене и приготвяне на продукти 63
Микровълнова печка . . . . . . . . . . . . . . . . . . . . . . . . . . . . . . . . . . . . . . . . . . . . . . . . . . . . . .63
Печене на грил . . . . . . . . . . . . . . . . . . . . . . . . . . . . . . . . . . . . . . . . . . . . . . . . . . . . . . . . . . .65
Комбинирано приготвяне на ястия . . . . . . . . . . . . . . . . . . . . . . . . . . . . . . . . . . . . . . . . . . .65
Автоматично меню 66
Стартиране на автоматичното меню . . . . . . . . . . . . . . . . . . . . . . . . . . . . . . . . . . . . . . . . . .66
Програмите в детайл . . . . . . . . . . . . . . . . . . . . . . . . . . . . . . . . . . . . . . . . . . . . . . . . . . . . . . .67
Размразяване 69
Предварителна настройка на времето за стартиране (Preset) 69
Почистване и поддържане 70
Отстраняване на повреди 71
Рециклиране 71
Гаранция и сервиз 71
Вносител 72
Прочетете внимателно ръководството за експлоатация преди да използвате уреда за първи път и го
запазете за по-нататъшна употреба. Когато предавате уреда на трети лица, предайте и това ръководство.
- 55 -
Page 58

Бикровълнова фурна
Указания за безопасност
Внимание!
Предупреждения за щети по уреда.
Опасност! Опасност от
нараняване!
Предупреждение за опасност от електрически
удар!
Опасност от пожар!
Предупреждение за опасност от пожар.
Указание
Указания и съвети за боравене с микровълновата
печка.
Мерки за безопасност за предотвратяване на
вероятен прекомерен контакт с микровълнова
енергия
• Не се опитвайте да използвате уреда с
отворена врата, тъй като този вид експлоатация може да доведе до контакт с вредна
за здравето доза от микровълново облъчване.
Важно тук е също да не се чупи или манипулира защитната блокировка.
• Не поставяйте нищо между предната част
на уреда и вратата и имайте грижата върху
уплътняващите повърхности да не попадат
замърсявания или остатъци от почистващ
препарат.
Опасност от нараняване!
• Когато се повредят вратата или уплътненията
на вратата, не използвайте в никакъв случай
повече микровълновата печка. Оставете тя да
бъде ремонтирана веднага от квалифициран
персонал.
!
• Не се опитвайте никога да ремонтирате сами
уреда. При сваляне на корпуса може да се
отдели микровълнова енергия. Оставете
ремонтът да се извърши само от квалифициран
персонал.
• Този уред не е предвиден да се използва от
лица (включително и деца) с ограничени
физически, органолептични или умствени
способности или от лица, които не притежават
необходимия опит и/или знания, освен ако те
го правят под надзора на лица, отговорни за
тяхната безопасност или са получили от тях
указания, как да използват уреда. Децата
трябва да останат под наблюдение, за да
се гарантира, че не играят с машината.
• Децата могат да използват готварския съд
без надзор само, когато са инструктирани
правилно, така че детето да бъде в състояние
да използва сигурно и безопасно готварския
уред и да разбира опасностите от неправилното
обслужване.
• Използвайте уреда само за експлоатацията
по предназначение според описаното в този
наръчник. Не използвайте агресивни химикали
или пари в този съд. Тази микровълнова печка
е разработена специално за нагряване,
готвене, печене на грил или изсушаване на
хранителни продукти.
Тя не е предназначена за използване в промишлената или лабораторната сфера.
• Не използвайте микровълновата печка, когато
кабелът/щепселът са повредени. Оставете
кабелът/щепселът да се заменят от квалифициран персонал, за да предотвратите
опасности.
• Дръжте настрана децата от микровълновата
печка, докато тя е включена. Опасност от
изгаряне!
• В никакъв случай не сваляйте корпуса на
микровълновата печка.
• Оставете лампичката във вътрешната част на
микровълновата печка да се сменя само от
квалифициран персонал.
- 56 -
Page 59

• Не докосвайте никога директно след печене
на грил, комбинирано или автоматично
включване вратата, корпуса на микровълновата
печка, вентилационните отвори, аксесоарни
части или кухненските съдове. Частите се
нагорещяват много. Оставете частите да се
охладят преди да бъдат почистени.
• Обърнете внимание на това щепселът да е
винаги добре достъпен, за да можете да го
изключите лесно от електрическата мрежа
в случай на авария.
• Лицата, носещи кардиостимулатор, трябва
да се информират за възможните рискове
при своя домашен лекар, когато използват
микровълновата печка.
• Не оставяйте никога мрежовият кабел да виси
над масата или работния плот. Децата би
могли да го дръпнат.
• След затопляне отваряйте консерви, торбички
с пуканки така, че отворът им да не сочи към
тялото. Парата, която се изпуска, може да
доведе до изгаряния.
• Не стойте никога директно пред микровълновата
печка, когато отваряте вратата. Парата, която
се изпуска, може да доведе до изгаряния.
• Не фритирайте хранителни продукти в
микровълновата печка. Горещото масло може
да повреди частите и принадлежностите на
уреда и да причини дори изгаряния на
кожата.
• Разтръсквайте или разбърквайте във всеки
случай шишенцата или бурканчета с бебешка
храна! Възможно е съдържанието да е неравномерно нагрято и бебето може да се изгори
при ядене. Контролирайте във всеки случай
температурата, преди да нахраните бебето!
• Не преустройвайте микровълновата печка.
• Микровълновите лъчи са опасни! Оставете
ремонтите или поддръжката, при които се
свалят капаци и които предпазват от контакт
с микровълновите лъчи, да се извършват само
от обучен персонал.
• Преди консумация контролирайте температурата, за да предпазите евентуално бебетата
от опасни изгаряния.
Готварските принадлежности могат да се
нагорещят от отделяната от ястията топлина,
така че те могат евентуално да се хващат
само с кухненски ръкавици. Поради това
кухненските принадлежности трябва да се
контролират за годността им за използване в
микровълнова печка.
Внимание! Гореща повърхност!
Опасност от пожар
• Не оставяйте микровълновата печка никога
без надзор, когато затопляте хранителните
продукти в пластмасови или хартиени
опаковки.
• Не поставяйте горими материали в близост до
микровълновата печка или вентилационните
отвори.
• Отстранете всички метални капачки от
опаковките на хранителните продукти, които
желаете да нагреете. Опасност от пожар!
• За изпичането на пуканки използвайте само
специални торбички, годни за микровълнова
печка.
• Не използвайте микровълновата печка, за да
нагрявате семена, черешови костилки или
пълни с гел възглавнички. Опасност от пожар!
• Не използвайте микровълновата печка за
съхранение на хранителни продукти или
други неща.
• Не превишавайте никога посочените от
производителя времена за приготвяне на
ястията.
• Не поставяйте предмети върху
микровълновата печка, докато тя е включена.
По този начин
се покриват вентилационните отвори!
• Не поставяйте микровълновата печка в близост
до уреди, които излъчват топлина, като
например фурни.
- 57 -
Page 60
• Почиствайте основно микровълновата печка
след затоплянето на мазни ястия, особено
когато те не са били покрити. Оставете уреда
да се охлади изцяло, преди да го приберете.
Върху нагревателните серпентини на грила не
трябва да се намират остатъци, като например
мазнина. Тя може да прегрее и да се
възпламени.
• Не разтапяйте в микровълновата печка
замразена мазнина или масло. Мазнината
или маслото могат да се запалят.
• Не използвайте външно реле за време или
отделна телемеханична система, за да използвате машината.
Внимание! Щета на уреда!
• Не използвайте микровълновата печка в празно
състояние. С изключение на първото пускане
в експлоатация (виж глава "Първо пускане в
експлоатация").
• Не пъхайте предмети във вентилационните
отвори или безопасното блокиране на
вратата.
• Не използвайте метални принадлежности,
които рефлектират микровълни и могат да
доведат до образуване на искри. Не поставяйте
консерви в микровълновата печка.
• Не поставяйте в микровълновата печка
пластмасови съдове веднага след печене на
грил, комбинирано или автоматично готвене.
Пластмасата може да се разтопи.
• Микровълновата печка не трябва да се поставя
на места с висока влажност на въздуха или
там, където се събира прекомерно много
влага.
• Течностите или другите хранителни продукти
не трябва да се нагряват във вакумно затворени
съдове, тъй като те могат да експлодират и да
повредят уреда.
• Не се облягайте на вратата на микровълновата
печка.
• Недостатъчна чистота на готварския уред
може да доведе до разрушаване на повърхността, което от своя страна оказва влияние
върху продължителността на експлоатация
на уреда и води вероятно до опасни
ситуации.
Опасност
• Не потапяйте никога кабела или щепсела
във вода или други течности.
• Дръжте кабела настрана от източници на
топлина. Не го поставяйте пред вратата на
микровълновата печка. Горещината може да
повреди кабела.
• Не разливайте никога течности във вентилац-
ионните отвори или безопасното блокиране
на вратата. Ако все пак в тях попадне течност,
изключете веднага микровълновата печка и
издърпайте щепсела от контакта. Оставете
микровълновата печка да се контролира от
квалифициран персонал.
Съвети за безопасност
• За да се намали минимално рискът от пожар
в микровълновата печка. Дръжте микровълновата печка винаги под око, когато нагрявате
в нея пластмасови или хартиени съдове, тъй
като материалите могат евентуално да се
възпламенят.
• При нагряване на напитки в микровълновата
печка може да се получи забавено бълбукане,
когато напитката започне да ври. Бъдете
внимателни, когато хващате съда. За да
предотвратите внезапното кипване:
– поставете по възможност стъклена пръчка
в течността, докато тя се нагрява.
– след като се нагрее, оставете течността
20 секунди в микровълновата печка, за да
предотвратите внезапното кипване.
• Надупчете кората на картофи, наденички или
подобни хранителни продукти. В противен
случай те могат да експлодират.
• Внимавайте при нагряване на течности.
Използвайте само открити съдове, за да
могат да се отделят въздушните мехурчета.
- 58 -
Page 61
• Ако Ви направи впечатление образуването
на дим, изключете веднага уреда, издърпайте
щепсела и оставете вратата затворена, за да
могат пламъците да се задушат.
• Яйцата в черупки или твърдо сварените яйца
не трябва да се нагряват в микровълновата
печка, тъй като след нагряването могат да
експлодират в микровълновата печка.
Хранителните продукти с дебела кора, като
напр. картофи, цели тикви, ябълки и кестени
трябва да се надупчат преди варенето им.
• Не движете микровълновата печка, когато тя е
пусната.
Указания за заземяване/правилно инсталиране
Този уред трябва да бъде заземен. Този уред
може да се включи само в правилно заземен
контакт. Препоръчва се използването на собствена
токова верига, който да захранва само
микровълновата печка.
Опасност: Неправилното боравене с щепсела
за заземяване може да предизвика риск от
електрически удар.
Указание Ако имате въпроси във връзка със
заземяването или относно инструкциите за
електрическите съоръжения, обърнете се
към електромонтьор.
Производителят или търговеца не могат да
поемат отговорност за щети на микровълновата
печка или на лица, които се позовават на
неспазване на указанията за използване на
електрическата връзка.
Радио смущения при други уреди
Използването на микровълновата печка може
да предизвика радио смущения при радиото,
телевизора или подобни уреди.
Ако настъпят подобни смущения, те могат да се
намалят и преустановят с помощта на следните
мерки:
• почистете вратата и уплътнителните
повърхности на микровълновата печка.
• насочете наново антената на радиото или
телевизора.
• поставете микровълновата печка на друго
място от това на приемника.
• отстранете микровълновата печка от приемника.
• включете микровълновата печка в друг контакт.
Микровълновата печка и приемника трябва
да използват различни електрически вериги.
Употреба по предназначение
Този уред е предназначен за претопляне и
приготвяне на хранителни продукти според
описания начин.
Всяка промяна на уреда не важи като употреба
по предназначение и крие значителни опасности
от злополука. При щети, възникнали от употреба,
която не отговаря на предназначението, производителят не поема отговорност.
Този уред е предназначен за ползване само в
домашни условия!
Не го използвайте професионално, за
индустриални или лабораторни цеwли!
Обем на доставката
Микровълнова печка
Стъклена чиния
Стойка за грил
Колелца
Ръководство за експлоатация
Кратка информация
Технически характеристики
Номинално напрежение 230 - 240 V
50 Hz
Максимална консумация
на ток: 1200 W
Максимално отдаване на
мощност на микровълновата
печка: 800 W
Максимална консумация
на ток:
Грил: 1000 W
Честота на микровълните: 2450 MHz
~
- 59 -
Page 62

Преди да започнете
Основни принципи при готвене с
микровълнова печка
• Наредете добре хранителните продукти.
• Най-дебелите места трябва да се намират
на ръба.
• Обърнете внимание на времето за приготвяне.
Изберете най-краткото посочено време за
приготвяне и го удължете при необходимост.
Прекалено дълго приготвяните ястия могат да
започнат да димят и да се възпламенят.
• Покрийте ястията с капак, който е годен за
използване в микровълнова печка. Капакът
предотвратява пръскането и освен това
допринася за равномерното приготвяне на
ястията.
• По време на приготвяне обърнете ястията
веднъж в микровълновата печка, за да могат
продуктите като пилета или хамбургери да
се изпекат по-бързо.
• По-големите хранителни продукти като напр.
печено, трябва да се обърнат най-малко
един път.
• Подредете отново хранителни продукти като
напр. кюфтенца след като измине половината
от времето за приготвяне. Обърнете ги и
поставете кюфтенцата, намиращи се в
средата, на ръба на съда.
• Препоръчва се използването на кръгли/овални
съдове вместо правоъгълни/продълговати
съдове, тъй като хранителните продукти
завират по-бързо в крайните части.
Посочения по-долу списък служи като
помощно средство при избора на правилните
съдове.
Кухненски
съдове
Стъкло, устойчиво
на висока
температура
Стъкло, което
не е устойчиво
на висока
температура
Керамични
съдове, устойчиви
на топлина
Пластмасови
съдове, годни за
микровълнова
печка
Кухненска хартия Да Не Не
Метална табличка Не Да Не
Микровъл
нова
печка
Да Да Да
Не Не Не
Да Да Да
Да Не Не
Грил Комбин
ация
Използване на подходящи съдове
• Идеалният материал за микровълновата
печка пропуска микровълните, тоест
пропуска енергията през съда, за да нагрее
ястията.
Микровълните не могат да минат през метал.
По тази причина не трябва да се използват
метални съдове.
• При нагряване в микровълновата печка не
използвайте изделия от хартия от вторична
обработка. Тя може да съдържа малки
метални частички, които могат да предизвикат
искри и/или пожар.
Стойка за грил Не Да Не
Фолио & Съд за
фолио
Не Да Не
Опасност от пожар!
Не използвайте никога стойката за грил или други
метални предмети, когато използвате микровълновата печка като микровълнова печка или в
комбиниран режим на приготвяне на ястията.
Металът рефлектира микровълновото облъчване
и води до образуване на искри. Това може да
доведе до образуване на пожар, което би
повредило непоправимо уреда.
- 60 -
Page 63

Описание на уреда
Не
1 Дисплей
2 Бутон за отваряне на вратата
3 Стъклена чиния
4 Колелца
5 Вентилационни отвори
6 Бутон "Грил"
7 Бутон "Време за стартиране" (Preset)
8 Бутон "Размразяване"
9 Бутон "Часовник"
0 Бутон "Стоп"
q Регулатор / Старт / Бърз старт
w Бутон "Таймер за кухня"
e Бутон "Комбинирано приготвяне"
r Бутон "Мощност"
t Стойка за грил
Първо пускане
• Погрижете се добра достъпност до щепсела,
за да може той да се достигне и да се
издърпа в случай на опасност.
• Не отстранявайте опорите под
микровълновия уред.
• Не блокирайте вентилационните отвори 5.
В противен случай това може да доведе до
повреда на уреда.
• Поставете по възможност уреда на
разстояние от радиоуреди и телевизори.
Работата на микровълновата печка може да
доведе до смущения в радио- и телевизионното приемане.
Внимание:
Не поставяйте микровълновата печка над
кухненска печка или друг уред, който излъчва топлина. Поставянето на такова място би могло да
повреди уреда и да доведе до заличаване
на гаранцията.
Поставяне на уреда
Опасност от пожар!
Тази микровълнова печка не е подходяща за
вграждане в кухненски шкаф. В затворени шкафове
не може да се гарантира достатъчното вентилиране
на уреда. Уредът може да се повреди и е налице
опасност от пожар!
• Изберете равна повърхност, която оставя
достатъчно разстояние за вентилиране и
проветряване на уреда.
Поддържайте непременно минимално
разстояниеот 10 см. между уреда и съседните
стени. Уверете се, че вратата на микровълновата печка може да се отваря без никакви
проблеми.
Поддържайте разстояние от най-малко
20 см. над микровълновата печка.
Подготвяне на уреда
• Отстранете опаковъчния материал и
евентуално защитното фолио, с което е
обвита повърхността на уреда.
Н
отстранявайте светлосивата
блестяща покривна плоча, която
е поставена за защита на тръбите
в магнитното поле на работната
камера.
• Включете щепсела в контакта. Използвайте
контакт с 230 - 240 V ~, 50 Hz с
предпазител от 16 A. Препоръчва се
микровълновата печка да се захранва от
собствена електри-ческа верига. Ако не сте
сигурни, как да включите микровълновата
печка, в такъв случай се обърнете към
специализирано лице.
- 61 -
Page 64
Преди да използвате микровълновата печка, тя
трябва първо да се нагрее в празно състояние, за
да могат да се изпарят остатъци от
производството.
Включете уреда без хранителни продукти и
аксесоари (стъклена чиния 3, колелца 4 и
стойка за грила t) в режим за изпичане на грил:
• Натиснете веднъж бутон "Грил" 6 . Така
ще изберете печене на грил. На дисплея 1
се появява символа и символът мига.
Той показва, че уредът е готов за включване.
• Настройте с регулатора q време за приготвяне
от 10 минути.
• Натиснете бутон "Старт/Бързо стартиране" q
, за да започнете печенето на грил.
Указание
При първото пускане в експлоатация може да се
образува лек дим или мирис поради наличието
на остатъци от производството. Те не са вредни
за здравето. Погрижете се за достатъчно добре
проветрение. Например отворете прозореца.
• След 10 минути уредът се изключва
автоматично. Прозвучава сигнален звук.
Отворете вратата. Изчакайте, докато уредът
се охлади изцяло.
• Изключете щепсела от контакта и след това
почистете отвътре уреда с влажна кърпа и го
подсушете.
Използване на аксесоари
• Поставете колелцата 4 в средата на
работната камера върху задвижващия вал.
Обърнете внимание те да са поставени
плътно и изцяло върху задвижващия вал.
• Поставете стъклената чиния 3 в средата
върху колелцата. Трите колелца трябва да
улегнат в направляващия ръб на стъклената
чиния 3.
Обслужване
Настройване на часа
Когато включвате за първи път микровълновата
печка или спре токът, дисплеят показва 1
"1 : 0 1 ".
1. Натиснете бутона "Часовник" 9 . На
дисплея 1 се появява „Hr 12“. Натиснете
още веднъж бутон "Часовник" 9 , ако
желаете да преминете в режим на индикация
24 часа.
2. Чрез завъртане на регулатора q можете
да настроите желания час. Символът на
часовника на дисплея 1 започва да мига.
3. Натиснете бутон "Старт/Бързо стартиране" q
. Появяват се минутите.
4. Чрез завъртане на регулатора q можете да
настроите желаните минути.
5. След като настроите правилно часовото
време, натиснете бутона "Старт/Бързо
стартиране" q . Символът за часовник
на дисплея 1 свети непрекъснато, а двете
точки показват чрез мигане, че часовникът
работи.
За да видите актуалното време и час, докато
микровълновата печка е включена, натиснете
бутон "Часовник" 9 ; часът се появява за
около 4 секунди на дисплея 1.
Настройване на таймера
Микровълновата печка разполага с таймер,
който може да се използва независимо от нея.
1. Натиснете бутон "Таймер" w , когато
уредът се намира в режим на готовност.
На дисплея 1 се появява „00:10“.
2. С помощта на регулатора q настройте сега
желаното време.
Възможно е да настроите време от 10
секунди до 95 минути.
- 62 -
Page 65

3. Натиснете бутон "Старт/Бърз старт" q .
Прозвучава сигнален звук. Времето започва
да тече обратно. След около 3 секунди
нормалният час се показва отново. Таймерът
продължава да работи на заден фон. Ако
междувременно желаете да контролирате
времето на таймера, натиснете бутон
"Таймер" w . Таймерът се появява за
кратко време.
Щом изтече настроеното време, се чуват 3
звукови сигнала.
Указание
За да прекъснете настроеното и течащо време на
таймера, натиснете бутон "Таймер" w , така
че да се появи актуалното време на таймера.
Още докато на дисплея 1 се появява таймера,
натиснете бутон "Стоп" 0 . Таймерът се
прекъсва и на дисплея 1 се появява часът.
Детска защита
Активирайте тази настройка, за да предотвратите
неволното пускане на микровълновата печка
от деца или други лица, които не са запознати
с нейното обслужване.
Символът за детска защита се появява на
дисплея 1, и уредът не може да се пусне, докато
е активирана тази функция.
• Натиснете бутон "Стоп" 0 и го дръжте
натиснат, докато прозвучи сигнален звук и
символът за детска защита се появи на
дисплея 1. Бутоните и регулатора на
микровълновата печка не функционират
повече.
• За да деактивирате детската защита, натиснете
бутон "Стоп" 0 и го задръжте натиснат,
докато прозвучи сигнален звук и символът за
детска защита изгасне.
Функции за запитване
Запитване на часа по време на експлоатация
По време на приготвяне на продукта натиснете
бутон "Часовник" 9 . Часът се появява за
около 4 секунди на дисплея 1.
Запитване за степента на мощност по време
на експлоатация
По време на приготвяне на продукта натиснете
бутон "Мощност" r . Активираната степен
на мощността се появява за около 3 секунди на
дисплея 1.
Готвене и приготвяне на
продукти
Микровълнова печка
Указани
На вратата на микровълновата печка и по време
на готвене могат да се образуват капчици вода.
Това е нормално и не е признак за неправилно
функциониране на микровълновата печка.
Избършете влагата със суха кърпа, след като се
охлади уредът.
Опасност от пожар!
Не използвайте никога стойката за грил или други
метални предмети, когато използвате уреда като
микровълнова печка или в комбиниран режим на
приготвяне на ястията. Металът рефлектира
микровълновото облъчване и води до образуване
на искри. Това може да доведе до образуване на
пожар, което би повредило непоправимо уреда.
е
- 63 -
Page 66

Избор на мощността
• Натиснете бутон "Мощност" r , за да
изберете съответната степен на мощността.
• 1x за мощност от 800 вата (P800).
• 2x за мощност от 700 вата (P700).
• 3x за мощност от 600 вата (P600).
• 4x за мощност от 500 вата (P500).
• 5x за мощност от 400 вата (P400).
• 6x за мощност от 300 вата (P300).
• 7x за мощност от 200 вата (P200).
• 8x за мощност от 100 вата (P100).
Мощността се изобразява на дисплея 1 (напр.
P800 при мощност от 800 вата).
Настройване на времето за приготвяне
След като изберете мощността, можете да
настроите и желаното време за приготвяне на
продуктите:
• Завъртете регулатора q, докато се настрои
желаното от Вас време за приготвяне на
продуктите.
Степените за времето, което може да се
настрои с регулатора q, са следните:
• от 10 сек. до 5 мин. :на стъпки от 10 секунди
• от 5 до 10 мин.: на стъпки от 30 секунди
• от 10 до 30 мин.: на стъпки от 1 минута
• от 30 до 95 мин.: на стъпки от 5 минути
Прекъсване/приключване въвеждането на
данни
Натиснете веднъж бутон "Стоп" 0 , за да
прекъснете или приключите въвеждането на
данни. Уредът се връща обратно в режим на
готовност.
Стартиране приготвянето на продуктите
След като настроите мощността и времето на
приготвяне и на дисплея 1 започне да мига
символът , Вие можете да започнете
приготвянето на продуктите.
За да стартирате, натиснете бутон "Cтарт/Бързo
стартиране" q . На дисплея 1 се появяват
символите за готвене с микровълни и
варене (мощност P100 - P400) или
(мощност P500 - P800).
Настроеното време започва да се отброява
обратно.
Прекъсване на готвенето респ. приготвянето на
продуктите
Натиснете веднъж бутон "Стоп" 0 , за да
прекъснете приготвянето на ястията. Уредът прекъсва
процеса на готвене и спира останалото време.
Натиснете бутон "Старт/ Бързо стартиране" q
, за да продължите приготвянето на продуктите.
Спиране на готвенето респ. приготвянето на
продуктите
Натиснете два пъти бутон "Стоп" 0 , за да
спрете приготвянето на ястията. Уредът се връща
обратно в режим на готовност.
Приготвянето на ястията е приключило
Когато приготвянето на ястията приключи, на
дисплея 1 се появява „End“ и прозвучават 4
сигнални звука. Ако вратата на микровълновата
печка не е отворена, сигналният звук прозвучава
отново след около 2 минути.
Бързо стартиране
С тази функция можете да започнете да работите
веднага с уреда за 30 секунди или за по-дълго
време до 12 минути при мощност от 800 вата.
• Натиснете веднъж бутон "Старт/Бързо
стартиране" q . На дисплея 1 се
появяват символите за микровълнова печка
и готвене , както и „:30“.
Микровълновата печка се включва за 30
секунди. Времето започва да тече обратно.
Ако желаете да удължите приготвянето на ястията,
натискайте бутона "Старт/Бързо стартиране" q
, докато се настрои желаното от Вас време.
- 64 -
Page 67
Печене на грил
Функцията за печене на грил можете да използвате за тънки парчета меса, пържоли, кюфтета,
наденички и пилешки части. Тази функция е
подходяща също така за препичане на сандвичи
и гратини.
Използвайте за печене на грил винаги стойката t.
Така ще получите оптималния резултат.
Поставяйте стойката за грил t винаги върху
стъклената чиния 3.
1. Натиснете бутон "Грил" 6 , за да
активирате функцията за печене на грил.
На дисплея 1 се появява символа за
печене на грил и „:10“.
2. С помощта на регулатора q настройте сега
желаното време за приготвяне. Максималното
време, което можете да настроите, е 95
минути.
3. За да включите функцията за печене на грил
натиснете бутон "Старт/Бързо стартиране" q
.
4. След като изтече около половината от
времето за приготвяне, обърнете месото.
Комбинирано приготвяне на ястия
Тази функция обединява печенето на грил и
нормалното приготвяне на ястията с микровълнова
печка. По време на комбинираното готвене има
опредено време за готвене, а останалото време
остава за печене на грил като това се извършва
напълно автоматично в една операция.
Превключването на уреда може да се долови
чрез кратко кликване.
Комбинация 1
При комбинация 1 мощността на микровълновата
печка е 30 % и мощността на грила 70 % от
времето за приготвяне. Това е подходящо напр.
за риба, картофи или гратини.
1. Натиснете веднъж бутон "Комбинирано
приготвяне" e , за да активирате
комбинация 1. На дисплея 1 се появява
също "10"
2. С помощта на регулатора q настройте сега
желаното време за приготвяне. Максималното
време, което можете да настроите, е 95
минути.
3. За да стартирате, натиснете бутон "Старт/
Бързо стартиране" q .
Комбинация 2
При комбинация 2 мощността на микровълновата
печка е 55 % и мощността на грила 45 % от
времето за приготвяне. Това е подходящо напр.
за пудинг, омлети, ястия птиче месо или лазаня.
1. Натиснете два пъти бутон "Комбинирано
приготвяне" e , за да активирате
комбинация 2. На дисплея 1 се
появява също "10"
2. С помощта на регулатора q настройте сега
желаното време за приготвяне. Максималното
време, което можете да настроите, е 95
минути.
3. За да стартирате, натиснете бутон "Старт/
Бързо стартиране" q .
Опасност от пожар!
Не използвайте никога стойката за грил t или
други метални предмети, когато използвате
микровъл-новата печка като микровълнова печка
или в комбиниран режим на приготвяне на
ястията. Металът рефлектира микровълновото
облъчване и води до образуване на искри. Това
може да доведе до образуване на пожар, което
би повредило непоправимо уреда.
- 65 -
Page 68
Автоматично меню
№ Символ
Хранителни
продукти
Тегло
(порции)
За ястия, които трябва да се приготвят в режим
"Автоматично меню", не е необходимо да се
въвежда продължителността на готвенето и
мощностната степен. Напълно е достатъчно,
когато посочите какъв вид хранителен продукт
трябва да се приготви, както и неговото тегло.
Указани
Микровълновата печка пресмята времето/
мощностната степен за пресни хранителни
продукти. Дълбоко замразените хранителни
продукти не могат да се приготвят в посоченото
от микровълновата печка време.
Евентуално е необходимо да размразите
предварително хранителния продукт с
програмата за размразяване (виж глава
"Размразяване").
е
Стартиране на автоматичното меню
Указани
Поставяйте ястията винаги в подходящ съд или
чиния. Имайте предвид, че по време на готвенето
или затоплянето от ястията могат да се изтекат
течности, като мазнина или др.п. Затова съдът/
чинията трябва да е достатъчно голям/а, за да
се избегне преливане на течности.
1. Завъртете бавно регулатора q в посока
наляво. На дисплея 1 се появява номер
(напр. „3“ за автоматичната програма 3
(риба)), символът „риба“ и . Изберете
подходящото автоматично меню за Вашето
ястие (1 до 9). Когато сте в режим
автоматично меню, с въртене надясно
можете да влезете в желаното автоматично
меню. Потвърдете избора си с натискане на
бутона "Старт/Бързо стартиране" q .
е
1 Напитки 1 - 3
2 Юфка 100 - 300 гр.
3 Риба
4 Ориз
5 Пиле
6 Претопляне
7 Картофи 150 - 600 гр.
8 Печено
9 Шишчета 100 - 700 гр.
2. Чрез въртене на въртящия се регулатор q
настройте желаното тегло респ. желания
брой порции. Символът мига.
3. Натиснете бутон "Старт/Бързо стартиране"
q , за да започнете приготвянето на
продуктите.
Указани
За да постигнете равномерно приготвяне на
продуктите, ястията от програмите 5, 8 и 9 трябва
да се обърнат, след като изтече 2/3 от времето
за приготвяне. Микровълновата фурна напомня
за обръщане: На дисплея 1 се появява „turn“ и
прозвучава звуков сигнал.
• Отворете вратата и обърнете ястията. Бъдете
внимателни с горещите ястия.
е
100 - 1000
гр.
100 - 1000
гр.
800 - 1400
гр.
100 - 1000
гр.
300 - 1300
гр.
- 66 -
Page 69

• Натиснете бутон "Старт/Бързо стартиране" q
, за да продължите приготвянето на
продуктите.
Указание
Ако не желаете да обърнете ястията, изчакайте
просто един момент, след като прозвучи сигналният
тон. Микровълновата печка продължава автоматично програмата след около 30 секунди.
Указани
Ако след приключване на режима "Автоматично
меню" ястието не е добре сготвено, допригответе
го още няколко минути с програмата за бързо
стартиране. При програми, при които се използва и функцията за печене на грил (програми
номер 5, 8 и 9), можете да доприготвите ястията
и с функцията за печене на грил. Когато ястията
се доприготвят с функцията за печене на грил, те
се изпичат още по-силно.
е
Програмите в детайл
Програма 1: Напитки
Тази програма протича само с микровълновата
печка. В зависимост от настроения брой на
порциите програмата тече между 1:30 и 3:50
минути.
• Поставете върху стъклената чиния 3 в
работната камера напитката, която ще се
нагрява. Ако поставите няколко чаши в микровълновата печка, обърнете внимание на това те
да не се докосват.
Указани
За да предотвратите внезапното кипване:
• поставете по възможност стъклена пръчка
в течността, докато тя се нагрява.
• след като се нагрее, оставете течността
20 секунди в микровълновата печка, за да
предотвратите внезапното кипване.
е
Опасност от пожар!
При програмите с допълнително включена функция
за печене на грил не трябва в никакъв случай да
използвате капаци или съдове, които не са
устойчиви на висока температура, тъй като те
могат да се разтопят и да предизвикат пожар!
Опасност от нараняване!
Стъклената чиния 3 се нагорещява много след
печенето на грил! За това използвайте непременно кухненски ръкавици или кърпа, когато ги
изваждате от работната камера.
Указание
Обърнете внимание на това, че размерът, формата,
сортът на хранителния продукт оказват влияние
върху резултата от готвенето.
Програма 2: Юфка
Тази програма протича само с микровълновата
печка.
В зависимост от настроеното тегло програмата
тече между 25 и 35 минути.
• Използвайте висок съд при приготвяне на
юфката, тъй като тук има опасност от изкипяване.
• Използвайте толкова вода, колкото при
обикновеното варене. Макароните трябва да
гплуват“ във водата.
• Най-напред оставете водата да заври:
Настройте най-високата степен на мощност
на микровълновата фурна (P800) и я
включете. За един литър вода са ви
необходими около 10 минути, за да заври
водата.
• След това прибавете юфката. След това
можете да стартирате автоматичното меню за
юфка.
• Оставете след това юфката за 3 минути.
- 67 -
Page 70

Програма 3: Риба
Тази програма протича само с микровълновата
печка.
В зависимост от настроеното тегло програмата
тече между 3:30 и 16 минути.
• Поставете парчетата риба върху чиния, годна
за използване в микровълнова печка, прибавете
малко масло или подобна мазнина, вкусете
на вкус и стартирайте автоматичното меню за
приготвяне на риба.
Програма 4: Ориз
Тази програма протича само с микровълновата
печка.
В зависимост от настроеното тегло програмата
тече между 16 и 36 минути.
• Използвайте висок съд при приготвяне на
ориза, тъй като тук има опасност от изкипяване.
Напр. при 200 гр. ориз прибавете около
400 мл. вода. Въпреки че използвате вода, използвайте настройката за тегло г200 g“.
Настройва се винаги теглото на ориза.
• Поставете ориза в съд, напълнете необходимата
течност и го оставете да набъбне около 3
минути.
• Покрийте съда. Обърнете внимание на това,
че той не е вакумно затворен. След това
можете да стартирате автоматичното меню
за приготвяне на ориз.
Програма 5: Пиле
Тази функция тече на няколко степени за приготвяне
като се използва микровълнова печка и функция
за печене на грил. В зависимост от настроеното
тегло програмата тече между 39 и 50 минути.
• Поставете пилето в чиния, годна за
използване в микровълнова печка.
• Овкусете по вкус и стартирайте автоматичното
меню за приготвяне на пилета.
• Когато се пече цяло пиле, то трябва да се
обърне, тъй като горната страна би могла да
изсъхне в противен случай. За тази цел микровълновата печка прекъсва автоматично програмата,
след като изтече 2/3 от времето като при това
прозвучава сигнален звук. Обърнете пилето и
натиснете бутон "Старт/Бързо стартиране" q
, за да продължите програмата.
Програма 6: Претопляне
Тази програма протича само с микровълновата
печка.
В зависимост от настроеното тегло програмата
тече между 1:00 и 6:20 минути.
• Поставете върху стъклената чиния 3 в работ-
ната камера чинията с ястието, което трябва
да се претопля.
Програма 7: Картофи
Тази програма протича само с микровълновата
печка.
В зависимост от настроеното тегло програмата
тече между 3:50 и 11 минути.
Съвет
Използвайте необелени картофи. Надупчете
първо коричката няколко пъти.
• Поставете необелените картофи в чиния или
съд, годни за използване в микровълнова
печка. Използвайте по възможност картофи с
еднаква големина. По възможност картофите
не трябва да се докосват.
- 68 -
Page 71

Програма 8: Печено
Тази функция тече на няколко степени за приготвяне
като за целта се използват микровълнова печка и
функция за печене на грил. В зависимост от
настроеното тегло програмата тече между 16 и
60 минути.
• Поставете печеното в чиния, годна за използване в микровълнова печка. Овкусете по
вкус месото и стартирайте автоматичното
меню за приготвяне на пилета.
• Когато се пече голямо парче печено месо, то
трябва да се обърне, тъй като горната страна
би могла да изсъхне в противен случай. За
тази цел микровълновата печка прекъсва
автоматично програмата, след като изтече
2/3 от времето като при това прозвучава
сигнален звук. Обърнете печеното и натиснете
бутон "Старт/Бързо стартиране" q , за
да продължите програмата.
Програма 9: Шишчета
Тази функция тече на няколко степени за приготвяне
като се използва микровълнова печка и функция
за печене на грил. В зависимост от настроеното
тегло програмата тече между 9 и 27 минути.
• Поставете шишчетата в чиния, годна за използване в микровълнова печка. Овкусете по
вкус месото и стартирайте автоматичното
меню за приготвяне на пилета.
• Шишчетата трябва да се обърнат, за да се
изпекат равномерно. За тази цел микровълновата печка прекъсва автоматично програмата,
след като изтече 2/3 от времето като при
това прозвучава сигнален звук. Обърнете
шишчетата и натиснете бутон "Старт/Бързо
стартиране" q , за да продължите
програмата.
Размразяване
С тази функция можете да размразявате без
проблеми месо, птиче месо, зеленчуци и риба.
Времето за размразяване и мощностната степен
се изчисляват и настройват автоматично, след
като се въведе теглото.
1. Натиснете бутон "Размразяване" 8 . На
дисплея 1 се появяват и . Символът
мига.
2. С помощта на регулатора q изберете теглото
на продуктите, които ще се размразяват. Вие
можете да настроите тегло между 100 гр. и
1800 гр.
3. Натиснете бутон "Старт/Бързо стартиране" q
.
Уредът определя автоматично времето за размразяване. То се появява на дисплея 1и започва да тече.
След като измине около 1/2 от времето прозвучава звуков сигнал и на дисплея 1 се появява
„turn“. Отворете вратата и обърнете ястията.
Затворете отново вратата и натиснете бутона
"Старт/Бързо стартиране" q , за да
продължите размра-зяването.
Указание:
Ако не желаете да обърнете ястията, просто
изчакайте един момент, след като прозвучи
звуковият сигнал. Програмата размразяване
продължава въпреки звуковия сигнал!
Предварителна настройка на
времето за стартиране (Preset)
С тази програма можете да програмирате
предварително определено време за стартиране
на готвенето или печенето на грил. Ако сте
направили настройките правилно, уредът
стартира автоматично в настроеното време.
Указание
Часовникът трябва да е настроен, за да се стартира
функцията „Настройване на времето за старти-ране“.
- 69 -
Page 72

1. Настройте желаната функция на микровълновата печка (готвене, печене на грил или
автоматично меню (с изключение на автоматична програма 6)):
за микровълнова печка: Натиснете бутон
"Мощност" r , за да изберете
съответната степен на мощността. С помощта
на регулатора q настройте времето за
приготвяне. за печене на грил: Натиснете
бутон "Грил" 6 , за да активирате
функцията за печене на грил.
С помощта на регулатора q настройте
желаното време за печене на грил.
за автоматично меню: Изберете с помощта на
регулатора q подходящата програма за
Вашето ястие (с изключение на автоматична
програма 6). Потвърдете избора си с
натискане на бутона "Старт/Бързо
стартиране" q . Чрез въртене на
въртящия се регулатор q настройте желаното
тегло респ. желания брой порции.
2. Натиснете бутона "Време за стартиране" 7
. На дисплея 1 започва да мига „01:
“ и се появява пясъчен часовник .
3. Завъртете регулатора q, за да настроите
часовете.
4. Натиснете бутона "Старт/Бързо стартиране" q
, появяват се цифрите за минутите.
5. Завъртете регулатора q, за да настроите
минутите.
6. Натиснете бутон "Старт/Бързo стартиране"
q . Пясъчният часовник започва да
мига. Времето за стартиране се показва.
Микровълновата печка стартира автоматично
в настроеното време. При стартиране
прозвучава сигнален звук.
Указание
За да изтриете запаметеното време за стартиране и
за да прекъснете започната операция, натиснете
бутон "Стоп" 0 . Пясъчният часовник
изгася и се показва часът.
Почистване и поддържане
Опасност от нараняване!
Изключете микровълновата печка, преди да я
почистете и издърпайте щепсела от контакта.
В никакъв случай уредът не трябва да се
потапя във вода или други течности. Това
би представлявало опасност за живота от
електрически удар, при което може да се
повреди и самият уред.
• Поддържайте работната камера на микровълновата печка винаги в чисто състояние.
• Ако по стените на микровълновата печка
или пръски от ястия или разлети течности,
избършете ги с влажна кърпа.
• Използвайте мек препарат за миене, ако
микровълновата печка е по-силно замърсена.
Измийте остатъците от миещия препарат с
чиста вода.
• Избягвайте използването на спрейове за
почистване и други агресивни препарати, тъй
като те могат да предизвикат образуването
на петна, ленти или потъмняване на повърхността на вратата.
• Изчистете външните стени с влажна кърпа.
• За да избегнете повреждането на части във
вътрешната част на микровълновата печка,
не допускайте проникването на вода във
вентилационните отвори 5.
• Отстранявайте редовно пръски и замърсявания.
Почистете вратата, прозореца от двете страни,
уплътненията на вратата и съседните части с
влажна кърпа. Не използвайте търкащи
препарати.
• Ако във вътрешната или около външната част
на вратата са се образували капчици,
избършете ги с мека кърпа. Това получава,
когато микровълновата печка се използва
при условия на висока влажност.
- 70 -
Page 73

• Почиствайте също така редовно стъклената
чиния 3. Изплакнете я в топла сапунена
вода или в миялната машина.
• Почистете стойката за грил t в топла
сапунена вода и я изсушете добре.
• Отстранявайте редовно миризмите. Поставете
в микровълновата печка дълбок съд с чаша
вода, сок и кората на един лимон в него.
Нагрейте го за 5 минути. Избършете го
основно и го подсушете с мека кърпа.
• Ако е необходимо да се смени лампичката
в микровълновата печка, оставете това да се
направи от сервиз или попитайте в нашия
сервиз.
Отстраняване на повреди
Рециклиране
Не изхвърляйте в никакъв случай уреда
с битовите отпадъци. Този уред подлежи
на европейската Директива 2002/96/
EC.
Рециклирайте уред при оторизирано предприятие
за рециклиране или в пункта за вторични
суровини на общината.
Съблюдавайте валидните актуални разпоредби.
В случай на съмнение се свържете с пункта за
вторични суровини.
Рециклирайте опаковъчния материал
без да замърсявате околната среда.
Дисплеят 1 не показва нищо.
• Щепселът не е включен в контакта.
Контролирайте щепсела.
• Контактът е дефектен. Изпробвайте друг
контакт.
• Дисплеят 1 е дефектен. Обърнете се към
сервиза.
Уредът не реагира при натискане на бутоните.
• Активирана е детската защита.
Деактивирайте детската защита (виж глава
„Обслужване").
Уредът не стартира процеса на готвене/
приготвяне.
• Вратата не е затворена правилно. Затворете
вратата правилно.
Стъклената чиния 3 прави силни шумове при
въртене.
• Стъклената чиния 3 не е улегнала правилно
върху колелцата 4. Поставете стъклената
чиния 3 правилно в работната камера.
• Колелцата 4 и/или подът на работната
камера са замърсени. Почистете колелцата 4
и пода.
Гаранция и сервиз
За този уред Вие получавате гаранция от 3 години
от датата на закупуване. Уредът е произведен
старателно и е контролиран преди да бъде
доставен.
Запазете касовата бележка, за да удостоверите
датата на закупуване. В случай на гаранция се
свържете по телефона с Вашия сервиз. Само по
този начин може да се гарантира безплатното
изпращане на Вашата стока.
Гаранционната претенция важи само за материални или фабрични дефекти, но не и за транспортни щети, износени части или при повреда на
лесно чупливи части, напр. прекъсвачи, акумулаторни батерии. Продуктът е предназначен само
за лична, но не и за стопанска употреба.
При злонамерена и неправилна употреба, при
употреба на сила или дейности, които не са
извършени от нашия оторизиран сервизен филиал,
гаранцията се заличава. Законните Ви права не
се ограничават с тази гаранция.
- 71 -
Page 74

Гаранционният срок не се удължава от гаранцията.
Това важи за заменени и ремонтирани части.
Евентуалните налични още при закупуването
щети и дефекти трябва да се съобщават още
при разопаковането, но най-късно два дена след
датата на закупуване. След като изтече гаранционният срок, ремонтите трябва да бъдат заплатени.
Сервизно обслужване България
Тел.:00800 111 4920
Е-мейл: kompernass@lidl.bg
IAN 71492/71493
Вносител
KOMPERNASS GMBH
BURGSTRASSE 21
44867 BOCHUM, GERMANY
www.kompernass.com
- 72 -
Page 75

Περιεχόμενα Σελίδα
Υποδείξεις ασφαλείας 74
Χρήση σύμφωνη με τους κανονισμούς 77
Σύνολο αποστολής 77
Τεχνικές πληροφορίες 77
Πριν ξεκινήσετε 77
Βασικές αρχές κατά το μαγείρεμα στα μικροκύματα...................................................................78
Χρήση ενδεικνυόμενων συσκευών μαγειρέματος ..........................................................................78
Περιγραφή συσκευής 78
Πρώτη θέση σε λειτουργία 79
Τοποθέτηση συσκευής....................................................................................................................79
Προετοιμασία συσκευής ................................................................................................................79
Τοποθέτηση αξεσουάρ...................................................................................................................80
Χειρισμός 80
Ρύθμιση ώρας .................................................................................................................................80
Ρύθμιση χρονοδιακόπτη ................................................................................................................80
Ασφάλεια για παιδιά ......................................................................................................................81
Λειτουργίες ερωτήσεων ...................................................................................................................81
Μαγείρεμα και σύντομο μαγείρεμα 81
Λειτουργία μικροκυμάτων...............................................................................................................81
Λειτουργία γκριλ.............................................................................................................................83
Διαδικασία σύντομου μαγειρέματος σε συνδυασμό ...................................................................83
Μενού αυτόματου 83
Έναρξη μενού αυτόματου..............................................................................................................84
Προγράμματα με λεπτομέρειες......................................................................................................85
Απόψυξη 87
Προρύθμιση του χρόνου έναρξης (Preset) 87
Καθαρισμός και συντήρηση 88
Διόρθωση σφαλμάτων 89
Απομάκρυνση 89
Εγγύηση και σέρβις πελατών 89
Εισαγωγέας 90
Διαβάστε το εγχειρίδιο χειρισμού πριν από την πρώτη χρήση προσεκτικά και φυλάξτε το για μια μελλοντική
χρήση. Παραδώστε το εγχειρίδιο σε όποιον παραδοθεί στη συνέχεια η συσκευή.
- 73 -
Page 76

Φούρνος μικροκυμάτων
Υποδείξεις ασφαλείας
Προσοχή!
Προειδοποιήσεις για πρόκληση ζημιών στη
συσκευή.
Κίνδυνος! / Κίνδυνος
τραυματισμού!
Προειδοποίηση για τραυματισμούς και ηλεκτροπληξία!
Κίνδυνος πυρκαγιάς!
Προειδοποίηση για κίνδυνο πυρκαγιάς.
Υπόδειξη!
Υποδείξεις και συμβουλές για τη μεταχείριση των
μικροκυμάτων.
Μέτρα ασφαλείας για την αποφυγή μιας πιθανής
υπερβολικής επαφής με την ενέργεια των
μικροκυμάτων
• Μη δοκιμάζετε να λειτουργείτε τη συσκευή με
ανοιχτή θύρα, διότι η λειτουργία σε ανοιχτή θύρα
μπορεί να οδηγήσει σε επαφή με μια βλαβερή δόση
ακτινοβολίας μικροκυμάτων. Εδώ είναι σημαντικό
επίσης να μην ανοίγετε με τη βία ή να μην
πειράζετε τις ασφαλίσεις προστασίας.
• Μην συμπιέζετε τίποτα μεταξύ του μπροστινού
μέρους της συσκευής και της θύρας και φροντίζετε
ώστε να μην συσσωρεύονται βρομιές ή υπολείμματα
καθαριστικών στις επιφάνειες στεγανοποίησης.
Κίνδυνος τραυματισμού!
• Εάν η θύρα ή οι στεγανοποιήσεις θύρας έχουν
φθαρεί, σε καμία περίπτωση μη συνεχίζετε τη
λειτουργία της συσκευής μικροκυμάτων.
Επιτρέψτε να επισκευαστεί η συσκευή αμέσως
από εξειδικευμένο προσωπικό.
• Ποτέ μη δοκιμάζετε να επιδιορθώνετε οι ίδιοι τη
συσκευή.Μέσω απομάκρυνσης του περιβλήματος,
μπορεί να απελευθερωθεί ενέργεια μικροκυμάτων.
Οι επισκευές επιτρέπεται να διεξάγονται μόνο
από εξουσιοδοτημένο ειδικό προσωπικό.
• Αυτή η συσκευή δεν προορίζεται για χρήση από
άτομα (συμπεριλαμβανομένων παιδιών) με
περιορισμένες φυσικές, αισθητηριακές ή
πνευματικές δυνατότητες ή με έλλειψη
εμπειρίας και/ ή με έλλειψη γνώσεων, εκτός
εάν επιτηρούνται μέσω ενός υπεύθυνου
ατόμου για την ασφάλειά τους ή εάν έχουν
λάβει υποδείξεις για το πως χρησιμοποιείται η
συσκευή.
Τα παιδιά πρέπει να επιτηρούνται ώστε να
εξασφαλίζεται ότι δεν παίζουν με τη συσκευή.
• Τα παιδιά επιτρέπεται να χρησιμοποιούν τη συσκευή
μαγειρέματος χωρίς επιτήρηση, εάν υπάρχει
αντίστοιχη υπόδειξη ότι είναι σε θέση να
χρησιμοποιούν τη συσκευή μαγειρέματος με
ασφαλή τρόπο και ότι μπορούν να κατανούν
τους κινδύνους από έναν εσφαλμένο χειρισμό.
• Χρησιμοποιείστε αυτή τη συσκευή μόνο για την
σύμφωνη με τους κανονισμούς χρήση σύμφωνα
με την περιγραφή σε αυτό το εγχειρίδιο.
Μην χρησιμοποιείτε σε αυτή τη συσκευή
ερεθιστικά χημικά ή ατμούς. Αυτή η συσκευή
μικροκυμάτων έχει κατασκευαστεί ειδικά για το
ζέσταμα, το μαγείρεμα, το ψήσιμο, ή την
ξήρανση τροφίμων.
Δεν έχει σχεδιαστεί για μια χρήση σε βιομηχανικούς
ή εργαστηριακούς τομείς.
• Μη λειτουργείτε τη συσκευή μικροκυμάτων εάν
το καλώδιο δικτύου/το βύσμα έχουν βλάβη. Το
καλώδιο/βύσμα δικτύου πρέπει να αντικαθίστανται
από εξειδικευμένο ειδικό προσωπικό ώστε να
αποφεύγονται κίνδυνοι.
• Κρατάτε τα παιδιά μακριά από τη θύρα
μικροκυμάτων, όσο η συσκευή είναι σε
λειτουργία. Κίνδυνος εγκαύματος!
• Σε καμία περίπτωση μην απομακρύνετε την
επικάλυψη μικροκυμάτων.
• Η λυχνία στο εσωτερικό των μικροκυμάτων
πρέπει να αντικαθίσταται μόνο από
εξειδικευμένο προσωπικό.
- 74 -
Page 77

• Μην αγγίζετε ποτέ τη θύρα μικροκυμάτων,
τη ν επικάλυψη τους, τα ανοίγματα αερισμού,
εξαρτήματα ή σκεύη αμέσως μετά τη
διαδικασία ψησίματος, του μενού συνδυασμού
ή του μενού αυτόματου. Τα τμήματα καίνε πάρα
πολύ. Αφήνετε τα τμήματα να κρυώνουν πριν
από τον καθαρισμό.
• Προσέχετε ώστε το βύσμα δικτύου να είναι
πάντα εύκολα προσβάσιμο ώστε να μπορείτε
να το αποσυνδέσετε γρήγορα από το ρεύμα σε
περίπτωση κινδύνου.
• Άτομα τα οποία έχουν βηματοδότη, πρέπει να
πληροφορηθούν από τον γιατρό τους για
πιθανούς κινδύνους, πριν από τη θέση σε
λειτουργία της συσκευής.
• Μην αφήνετε ποτέ το καλώδιο δικτύου να κρέμεται
πάνω από το τραπέζι ή τον πάγκο εργασίας.
Τα παιδιά μπορεί να το τραβήξουν.
• Ανοίγετε δοχεία, σακούλες ποπ-κόρν κλπ. μετά το
ζέσταμα πάντα έτσι ώστε το άνοιγμα να δείχνει
μακριά από το σώμα σας. Ο εξερχόμενος ατμός
μπορεί να οδηγήσει σε ζεμάτισμα.
• Ποτέ μην στέκεστε απευθείας μπροστά από τα
μικροκύματα, όταν ανοίγετε τη θύρα.
Ο εξερχόμενος ατμός μπορεί να οδηγήσει σε
ζεμάτισμα.
• Μην τηγανίζετε στα μικροκύματα. Το καυτό λάδι
μπορεί να προκαλέσει βλάβη σε τμήματα της
συσκευής και σε σκεύη και επίσης να
προκαλέσει εγκαύματα.
• Ανακινείτε ή ανακατεύετε πάντα τα ζεσταμένα
ποτηράκια ή φιάλες για μωρά! Το περιεχόμενο
μπορεί να έχει ζεσταθεί ανομοιόμορφα, και μπορεί
το μωρό να καεί από το περιεχόμενο. Ελέγχετε σε
κάθε περίπτωση τη θερμοκρασία, προτού ταϊσετε
το μωρό σας!
• Μην κάνετε μετατροπές στα μικροκύματα.
• Οι ακτίνες μικροκυμάτων είναι επικίνδυνες!
Οι εργασίες συντήρησης ή επισκευών σε συσκευές
στις οποίες πρέπει να απομακρύνονται οι
επικαλύψεις που προστατεύουν από επαφή
με ακτινοβολία μικροκυμάτων, πρέπει να
διεξάγονται μόνο από εκπαιδευμένο ειδικό
προσωπικό.
• Ελέγχετε πριν από την κατανάλωση τη
θερμοκρασία, ώστε να αποφεύγετε επικίνδυνα
εγκαύματα σε μωρά. Σκεύη κουζίνας μπορεί να
είναι καυτά από την θερμότητα που εκπέμπεται
από τις τροφές, έτσι ώστε να πρέπει ενδεχομένως
να τα πιάνετε μόνο με πανιά για σκεύη. Τα
σκεύη μαγειρέματος πρέπει για το λόγο αυτό
να ελέγχονται για το εάν είναι κατάλληλα για
μικροκύματα.
Προσοχή! Καυτή επιφάνεια!
Κίνδυνος πυρκαγιάς
• Ποτέ μην αφήνετε τα μικροκύματα χωρίς
επιτήρηση όταν ζεσταίνετε τρόφιμα σε
πλαστικές ή χάρτινες συσκευασίες.
• Μην τοποθετείτε εύφλεκτα υλικά κοντά στα
μικροκύματα ή στα ανοίγματα αερισμού.
• Απομακρύνετε όλες τις μεταλλικές ασφαλίσεις
των συσκευασιών των τροφίμων τα οποία θέλετε
να ζεστάνετε. Κίνδυνος πυρκαγιάς!
• Για τη δημιουργία ποπ-κόρν χρησιμοποιείτε
μόνο ειδικές σακούλες ποπ-κόρν για
μικροκύματα.
• Μη χρησιμοποιείτε τη συσκευή μικροκυμάτων
για να ζεσταίνετε μαξιλάρια γεμάτα με σπόρους,
κουκούτσια ή τζελ. Κίνδυνος πυρκαγιάς!
• Μην χρησιμοποιείτε τα μικροκύματα για την
αποθήκευση τροφίμων ή άλλων ειδών.
• Ποτέ μην υπερβαίνετε τους δοθέντες από τον
κατασκευαστή χρόνους μαγειρέματος.
• Μην τοποθετείτε αντικείμενα επάνω στη συσκευή
μικροκυμάτων, όσο αυτή είναι σε λειτουργία.
Τα ανοίγματα αερισμού καλύπτονται!
• Μην τοποθετείτε τα μικροκύματα κοντά σε άλλες
συσκευές που εκπέμπουν θερμότητα όπως π.χ.
κοντά σε ένα φούρνο.
• Καθαρίζετε τα μικροκύματα μετά το ζέσταμα
επιμελώς, από τρόφιμα με λίπη, κυρίως εάν αυτά
δεν είχαν σκεπαστεί. Αφήνετε τη συσκευή να
κρυώνει καλά πριν την καθαρίσετε. Στα θερμαντικά
στοιχεία του γκριλ, δεν επιτρέπεται να υπάρχουν
υπολείμματα όπως π.χ. λίπος. Αυτό θα μπορούσε
να υπερθερμανθεί και αναφλεγεί.
- 75 -
Page 78

• Μην κάνετε απόψυξη παγωμένου λίπους ή λαδιού
στα μικροκύματα. Το λίπος ή το λάδι μπορούν
να αναφλεγούν.
• Μη χρησιμοποιείτε εξωτερικό χρονοδιακόπτη
ή ξεχωριστό τηλεχειριστήριο για να λειτουργήσετε
τη συσκευή.
Προσοχή! Βλάβες στη συσκευή!
• Μην λειτουργείτε τα μικροκύματα όταν αυτά
είναι άδεια. Γίνεται εξαίρεση κατά την πρώτη
θέση σε λειτουργία (βλέπε Κεφάλαιο “Πρώτη
θέση σε λειτουργία“).
• Μην εισάγετε αντικείμενα στα ανοίγματα αερισμού
ή στις ασφαλίσεις θυρών ασφαλείας.
• Μην χρησιμοποιείτε μεταλλικά σκεύη, τα οποία
αντανακλούν μικροκύματα και οδηγούν σε
δημιουργία σπινθήρων.
Μην τοποθετείτε κονσέρβες μέσα στη συσκευή
μικροκυμάτων.
• Μην τοποθετείτε πλαστικά δοχεία αμέσως
μετά από μια διαδικασία ψησίματος, μενού
συνδυασμού ή αυτόματου μενού στη συσκευή
μικροκυμάτων. Το πλαστικό μπορεί να λιώσει.
• Τα μικροκύματα δεν επιτρέπεται να
τοποθετηθούν σε σημεία με υψηλή υγρασία
αέρα ή εκεί όπου συγκεντρώνεται υγρασία.
• Υγρά και άλλα τρόφιμα δεν επιτρέπεται να
ζεσταίνονται σε κλεισμένα σε κενό δοχείa, διότι
αυτά εκρήγνυνται και μπορεί να καταστρέψουν
τη συσκευή.
• Μην σκύβετε επάνω στη θύρα μικροκυμάτων.
• Ελλιπής καθαριότητα της συσκευής
μαγειρέματος μπορεί να οδηγήσει σε καταστροφή
της επιφάνειας, η οποία επηρεάζει συνεπώς τη
διάρκεια χρήσης και πιθανώς οδηγεί σε
επικίνδυνες καταστάσεις.
Κίνδυνος
• Ποτέ μην βυθίζετε το καλώδιο δικτύου ή το βύσμα
σε νερό ή άλλα υγρά.
• Κρατάτε το καλώδιο δικτύου μακριά από πηγές
θερμότητας. Μην το φέρνετε μπροστά από τη
θύρα μικροκυμάτων. Η θερμότητα μπορεί να
καταστρέψει το καλώδιο.
• Ποτέ μην ρίχνετε υγρά στα ανοίγματα
αερισμού
ή στις κλειδαριές θυρών ασφαλείας. Εάν
ωστόσο φτάσουν υγρά εκεί μέσα,
απενεργοποιήστε αμέσως τη συσκευή
μικροκυμάτων και τραβήξτε το βύσμα από την
πρίζα. Δώστε τα μικροκύματα για έλεγχο από
εξειδικευμένο προσωπικό.
Υποδείξεις ασφαλείας
• Για την ελαχιστοποίηση των κινδύνων πυρκαγιάς
στα μικροκύματα: Όταν ζεσταίνετε τρόφιμα τα
οποία βρίσκονται σε πλαστικά ή χάρτινα δοχεία,
θα κοιτάζετε συνεχώς τα μικροκύματα διότι αυτά
τα υλικά μπορεί ενδεχομένως να αναφλεγούν.
• Κατά το ζέσταμα ποτών στη συσκευή μικροκυμάτων
μπορεί να δημιουργηθεί παφλασμός με χρονική
καθυστέρηση, εάν το ποτό βράζει.Για το λόγο
αυτό να είστε προσεκτικοί όταν χειρίζεστε το δοχείο.
Για την αποφυγή ξαφνικής δημιουργίας φυσαλίδων
βρασμού:
- Τοποθετείτε εάν είναι δυνατό μια γυάλινη
ράβδο μέσα στο υγρό, όσο αυτό ζεσταίνεται.
- Αφήστε το υγρό μέσα στα μικροκύματα μετά
το ζέσταμα για 20 δευτερόλεπτα ώστε να
αποφύγετε μη αναμενόμενο ζεμάτισμα.
• Τρυπάτε τη φλούδα από πατάτες, λουκάνικα
ή παρόμοια. Σε άλλη περίπτωση ίσως εκραγούν.
• Να είστε προσεκτικοί κατά το ζέσταμα υγρών.
Χρησιμοποιείτε μόνο ανοιχτά δοχεία έτσι ώστε
να εκφεύγουν φυσαλίδες αέρα που ενδεχομένως
δημιουργούνται.
• Εάν καταλάβετε ότι υπάρχει καπνός, απενεργοποιείστε τη συσκευή ή τραβήξτε το βύσμα και
κρατήστε τη θύρα κλειστή, ώστε να καταπνίξετε
ενδεχόμενες φλόγες.
- 76 -
Page 79

• Αυγά σε μπολ και σφιχτά αυγά δεν επιτρέπεται
να ζεσταίνονται στα μικροκύματα, διότι αυτά
μπορούν να εκραγούν μετά τον τερματισμό του
ζεστάματος μέσα στα μικροκύματα. Τρυπήστε
πριν από το μαγείρεμα τα τρόφιμα με χονδρή
φλούδα όπως πατάτες, ολόκληρες κολοκύθες,
μήλα και κάστανα.
• Μην κινείτε τα μικροκύματα όσο αυτά είναι σε
λειτουργία.
Υποδείξεις γείωσης/ εγκατάσταση σύμφωνη με
τους κανονισμούς
Η παρούσα συσκευή πρέπει να έχει γειωθεί. Αυτή
η συσκευή πρέπει να συνδέεται μόνο σε μια σύμφωνα
με τις προδιαγραφές γειωμένη υποδοχή. Προτείνεται
να χρησιμοποιείτε ένα δικό σας κύκλωμα ρεύματος,
το οποίο θα τροφοδοτεί μόνο τη συσκευή μικροκυμάτων.
Κίνδυνος:
βύσματος γείωσης μπορεί να κρύβει τον
κίνδυνο μιας ηλεκτροπληξίας.
Υπόδειξη:
ή για τις υποδείξεις σχετικά με τα ηλεκτρικά,
ρωτήστε έναν ειδικό ηλεκτρολόγο ή συντηρητή.
Ούτε ο κατασκευαστής ούτε ο έμπορος μπορούν
να αναλάβουν την ευθύνη για μια βλάβη των
μικροκυμάτων ή για βλάβες ατόμων, οι οποίες
προέρχονται από μη τήρηση των υποδείξεων
διαδικασιών για την ηλεκτρική σύνδεση.
Βλάβες ραδιοπαρεμβολών σε άλλες συσκευές
Η λειτουργία των μικροκυμάτων μπορεί να προκαλέσει
βλάβες στο ραδιόφωνο, την τηλεόραση ή σε παρόμοιες
συσκευές.
Στην περίπτωση που εμφανιστούν τέτοιες
παρεμβολές, μπορείτε να τις μειώσετε ή να τις
εξαφανίσετε με τη βοήθεια των ακόλουθων μέτρων:
• Καθαρίστε τη θύρα ή την επιφάνεια
στεγανοποίησης των μικροκυμάτων.
• Ευθυγραμμίστε εκ νέου την κεραία λήψης του
ραδιοφώνου ή της τηλεόρασης.
• Τοποθετήστε τα μικροκύματα σε ένα άλλο σημείο
από αυτό που βρίσκεται ο δέκτης.
Η ακατάλληλη μεταχείριση του
Εάν έχετε ερωτήσεις για τη γείωση
• Απομακρύνετε τα μικροκύματα από την δέκτη.
• Βάλτε τα μικροκύματα σε μια άλλη υποδοχή.
Τα μικροκύματα και ο δέκτης πρέπει να
καταλαμβάνουν διαφορετική πορεία
κυκλώματος ρεύματος.
Χρήση σύμφωνη με τους
κανονισμούς
Αυτή η συσκευή προβλέπεται για το ζέσταμα και την
ετοιμασία τροφίμων σύμφωνα με τους περιγραφόμενους
τρόπους διαδικασίας. Κάθε αλλαγή της συσκευής
ισχύει ως μη σύμφωνη με τους κανονισμούς και κρύβει
σημαντικούς κινδύνους ατυχημάτων. Για βλάβες από
χρήση μη σύμφωνη με τους κανονισμούς ο
κατασκευαστής δεν αναλαμβάνει καμία ευθύνη.
Αυτή η συσκευή προορίζεται αποκλειστικά για τη
χρήση στο ιδιωτικό νοικοκυριό!
Μην τη χρησιμοποιείτε για επαγγελματικό σκοπό
σε τομείς της βιομηχανίας ή εργαστηρίων!
Σύνολο αποστολής
Μικροκύματα
Γυάλινο πιάτο
Βάση γκριλ
Αστέρι με ροδάκια
Οδηγία χειρισμού
Σύντομη οδηγία
Τεχνικές πληροφορίες
Ονομαστική τάση: 230 - 240 V
50 Hz
Μέγιστη κατανάλωση ρεύματος: 1200 W
Μέγιστη απόδοση ισχύος
Συσκευή μικροκυμάτων: 800 W
Μέγιστη κατανάλωση ρεύματος
Γκριλ: 1000 W
Συχνότητα συσκευής
μικροκυμάτων: 2450 MHz
~
- 77 -
Page 80

Πριν ξεκινήσετε
Βασικές αρχές κατά το μαγείρεμα στα
μικροκύματα
• Κατανέμετε τα φαγητά έξυπνα.
• Τα χονδρότερα σημεία πρέπει να είναι κοντά
στα άκρα.
• Προσέξτε τον χρόνο μαγειρέματος. Επιλέξτε τον
συντομότερο δοθέντα χρόνο μαγειρέματος και
μεγαλώστε τον εάν απαιτείται. Τρόφιμα που
μαγειρεύονται για μεγάλο χρονικό διάστημα
μπορεί να προκαλέσουν κάπνα ή να αναφλεγούν.
• Προβλέπετε τα τρόφιμα κατά το μαγείρεμα με ένα
κατάλληλο καπάκι για τη συσκευή μικροκυμάτων.
Το κάλυμμα εμποδίζει πιτσίλισμα και συνεισφέρει
επίσης στο να μαγειρεύονται τα τρόφιμα
ομοιόμορφα.
• Γυρίζετε τα τρόφιμα κατά την ετοιμασία στα
μικροκύματα μια φορά ώστε οι συνταγές
όπως κοτόπουλο ή χάμπουργκερ να γίνονται
γρηγορότερα.
• Τα μεγάλα κομμάτια τροφίμων όπως το ψητό
πρέπει να τα γυρίσετε μια φορά.
• Επανακατανέμετε τα τμήματα τροφίμων όπως
κεφτεδάκια μετά τον μισό χρόνο μαγειρέματος.
Γυρίστε τα και τοποθετήστε τα μπαλάκια από τη
μέση του σκεύους στις άκρες.
• Προτείνονται τα στρογγυλά/ οβάλ σκεύη αντί
των γωνιωδών/ μακριών διότι τα τρόφιμα
μαγειρεύονται εύκολα στις άκρες.
Η παρακείμενη λίστα εννοείται ως γενική βοήθεια
για την επιλογή του σωστού σκεύους.
Σκεύη
μαγειρέματος
Θερμανθεκτικό
γυαλί
Μη θερμανθεκτικό
γυαλί
Κεραμικά ανθεκτικά
στην υψηλή
θερμοκρασία
Κατάλληλα
πλαστικά σκεύη
για συσκευές
μικροκυμάτων
Χαρτί κουζίνας Ναι Όχι Όχι
Μεταλλική
ταμπλέτα/ πλάκα
Μικροκύματα
Ναι Ναι Ναι
Όχι Όχι Όχι
Ναι Ναι Ναι
Ναι Όχι Όχι
Όχι Ναι Όχι
Γκριλ
Συνδ
υασμός
Χρήση ενδεικνυόμενων συσκευών
μαγειρέματος
• Το ιδεώδες υλικό για μικροκύματα επιτρέπει την
ενέργεια να περνά μέσα από το δοχείο ώστε να
ζεσταίνονται τα τρόφιμα.
Τα μικροκύματα δεν είναι σε θέση να διεισδύουν
στο μέταλλο. Για το λόγο αυτό δεν επιτρέπεται
να χρησιμοποιούνται μεταλλικά δοχεία και
σκεύη.
• Κατά το ζέσταμα μη χρησιμοποιείτε στη συσκευή
μικροκυμάτων προϊόντα από χαρτί ανακύκλωσης.
Αυτά ίσως περιέχουν μικροσκοπικά μεταλλικά
θραύσματα τα οποία μπορούν να προκαλέσουν
σπινθήρες και/ ή πυρκαγιά.
Βάση γκριλ Όχι Ναι Όχι
Αλουμινόχαρτο &
δοχεία μεμβρανών
Όχι Ναι Όχι
Κίνδυνος πυρκαγιάς!
Ποτέ μη χρησιμοποιείτε τη βάση γκριλ ή άλλα μεταλλικά
αντικείμενα όταν χρησιμοποιείτε τη συσκευή
μικροκυμάτων σε αυτή τη λειτουργία ή στη
διαδικασία μαγειρέματος συνδυασμού.Το μέταλλο
αντανακλά την ακτινοβολία των μικροκυμάτων και
οδηγεί έτσι στη δημιουργία σπινθήρων. Αυτό
μπορεί να οδηγήσει σε πυρκαγιά και σε
ανεπανόρθωτη βλάβη της συσκευής!
- 78 -
Page 81

Περιγραφή συσκευής
Μην
1 Οθόνη
2 Πλήκτρο ανοίγματος θύρας
3 Γυάλινο πιάτο
4 Αστέρι με ροδάκια
5 Εγκοπή αερισμού
6 Πλήκτρο ψησίματος (γκριλ)
7 Πλήκτρο χρόνου έναρξης (Preset)
8 Πλήκτρο απόψυξης
9 Πλήκτρο ώρας
0 Πλήκτρο σταματήματος (Στοπ)
q Περιστρεφόμενος ρυθμιστής /
Εκκίνηση/Γρήγορη εκκίνηση
w Πλήκτρο χρονοδιακόπτη κουζίνας
e Πλήκτρο συνδυασμού
r Πλήκτρο απόδοσης
t Βάση γκριλ
Πρώτη θέση σε λειτουργία
Τοποθέτηση συσκευής
Κίνδυνος πυρκαγιάς!
Αυτή η συσκευή μικροκυμάτων δεν ενδείκνυται για
την τοποθέτηση σε ράφι ντουλαπιού. Σε κλειστά
ερμάρια δεν εξασφαλίζεται επαρκώς ο αερισμός της
συσκευής. Η συσκευή μπορεί να χαλάσει και
υπάρχει κίνδυνος πυρκαγιάς!
• Επιλέξτε μια επίπεδη επιφάνεια η οποία θα αφήνει
επαρκή απόσταση για τον αερισμό και εξαερισμό
της συσκευής:
Διατηρείτε απαραίτητα μεταξύ της συσκευής
και των παρακείμενων τοίχων μια ελάχιστη
απόσταση 10 cm. Βεβαιώνεστε ότι η θύρα
της συσκευής μικροκυμάτων μπορεί να ανοίγει
ελεύθερα.
Διατηρείτε πάνω από τη συσκευή μικροκυμάτων
μια απόσταση τουλάχιστο 20 cm.
• Φροντίστε ώστε το βύσμα να είναι άνετα
προσβάσιμο ώστε σε περίπτωση κινδύνων να
το φτάνετε και να το τραβάτε χωρίς ιδιαίτερο
κόπο.
• Μην απομακρύνετε τα πόδια κάτω από τη
συσκευή μικροκυμάτων.
• Μη μπλοκάρετε την εγκοπή αερισμού 5.
Αλλιώς μπορεί να χαλάσει η συσκευή.
• Τοποθετείτε τη συσκευή το δυνατό μακριά
από συσκευές ραδιοφώνου και τηλεόρασης.
Η λειτουργία των μικροκυμάτων μπορεί να
προκαλέσει παρεμβολές στην ραδιοφωνική
ή τηλεοπτική λήψη.
Προσοχή:
Μην τοποθετείτε τα μικροκύματα πάνω από ένα μάτι
κουζίνας ή άλλη συσκευή που εκπέμπει υψηλές
θερμοκρασίες. Μια τοποθέτηση σε ένα τέτοιο σημείο
μπορεί να οδηγήσει σε βλάβη της συσκευής και έτσι
σε ακύρωση της εγγύησης.
Προετοιμασία συσκευής
• Απομακρύνετε το υλικό συσκευασίας και μια
ενδεχομένως τοποθετημένη προστατευτική
μεμβράνη επάνω στην επιφάνεια επικάλυψης.
Μ
απομακρύνετε την ανοιχτή
γκρίζα πλάκα επικάλυψης, η οποία
έχει τοποθετηθεί για την προστασία
των σωλήνων μαγνητικού πεδίου στο
χώρο μαγειρέματος.
• Εισάγετε το βύσμα σε μια πρίζα δικτύου.
Χρησιμοποιήστε μια πρίζα 230 - 240 V ~,
50 Hz, με μια ασφάλεια 16 A . Προτείνεται η
συσκευή μικροκυμάτων να τροφοδοτείται από
ένα δικό της κύκλωμα ρεύματος. Εάν δεν είστε
σίγουροι για το πως πρέπει να συνδέσετε τη
συσκευή, συμβουλευτείτε έναν ειδικό.
- 79 -
Page 82

Πριν από τη χρήση της συσκευής μικροκυμάτων
πρέπει πρώτα η συσκευή να ζεσταθεί άδεια, ώστε
να μπορούν να εξατμιστούν υπολείμματα από την
κατασκευή.
Ενεργοποιήστε τη συσκευή χωρίς τρόφιμα και αξεσουάρ
(Γυάλινο πιάτο 3, αστέρι με ροδάκια 4 και βάση
γκριλ t) στο είδος λειτουργίας γκριλ:
• Πιέστε μια φορά το πλήκτρο Γκριλ 6 .
Έτσι επιλέγετε τη λειτουργία Γκριλ. Στην οθόνη 1
εμφανίζεται το σύμβολο και το σύμβολο
αναβοσβήνει. Έτσι δείχνει την ετοιμότητα
εκκίνησης.
• Ρυθμίστε με τον περιστρεφόμενο ρυθμιστή q
έναν χρόνο μαγειρέματος 10 λεπτών.
• Πιέστε το πλήκτρο Εκκίνησης/Γρήγορης
εκκίνησης q , ώστε να εκκινήσετε τη
διαδικασία ψησίματος.
Υπόδειξη:
Κατά την πρώτη θέση σε λειτουργία ίσως δημιουργηθεί,
λόγω κατασκευαστικών υπολειμμάτων, λίγος καπνός
και οσμή. Αυτό δεν είναι βλαβερό. Φροντίζετε για
έναν επαρκή αερισμό. Ανοίξτε για παράδειγμα ένα
παράθυρο.
• Μετά από 10 λεπτά η συσκευή απενεργοποιείται
αυτόματα. Ακούγονται ήχοι σήματος. Ανοίξτε
τη θύρα. Περιμένετε έως ότου κρυώσει πλήρως.
• Τραβήξτε το βύσμα από την πρίζα και καθαρίστε
τη συσκευή εν συνεχεία με ένα νωπό πανί από
μέσα και στεγνώστε τη προσεκτικά.
Τοποθέτηση αξεσουάρ
• Τοποθετήστε το αστέρι με ροδάκια 4 στο
κέντρο επάνω στον άξονα κίνησης στο χώρο
μαγειρέματος. Προσέξτε ότι γλιστράει πλήρως
επάνω στον άξονα και ότι εδράζεται σταθερά.
• Τοποθετήστε το γυάλινο πιάτο 3 στο κέντρο του
αστεριού με ρόδες. Οι τρεις κύλινδροι πρέπει να
εδράζονται στην ακμή οδήγησης στο γυάλινο
πιάτο 3.
Χειρισμός
Ρύθμιση ώρας
Όταν θέτετε τη συσκευή μικροκυμάτων για πρώτη
φορά σε λειτουργία ή εάν υπάρχει μια διακοπή
ρεύματος, η οθόνη δείχνει το 1 "1 : 0 1 ".
1. Πιέστε το πλήκτρο Ρολογιού 9 . Στην
ένδειξη 1 εμφανίζεται ψ“Hr 12“. Πιέστε το
πλήκτρο Ρολογιού 9 ακόμα μία φορά, όταν
θέλετε να γυρίσετε στη λειτουργία των 24 ωρών.
2. Ρυθμίστε μέσω περιστροφής στο στρεφόμενο
ρυθμιστή q την επιθυμούμενη ώρα. Το σύμβολο
Ρολογιού αναβοσβήνει στην ένδειξη 1.
3. Πιέστε το πλήκτρο Εκκίνηση/Γρήγορη εκκίνηση q
. Προβάλλεται η ένδειξη λεπτών.
4. Μέσω περιστροφής στον περιστρεφόμενο
ρυθμιστή q ρυθμίστε τα επιθυμητά λεπτά.
5. Εάν η ώρα έχει ρυθμιστεί σωστά, πιέστε το πλήκτρο
Εκκίνηση/Γρήγορη εκκίνηση q . Το σύμβολο
ώρας στην οθόνη 1 ανάβει συνεχώς και
η διπλή τελεία δείχνει μέσω αναβοσβήσματος ότι
η ώρα τρέχει.
Για να διαβάσετε την τρέχουσα ώρα της ημέρας, ενώ
η συσκευή μικροκυμάτων είναι σε λειτουργία, πιέστε
το πλήκτρο ώρας 9 ; η ώρα εμφανίζεται στη
συνέχεια για περ. 4 δευτερόλεπτα στην οθόνη 1.
Ρύθμιση χρονοδιακόπτη
Η συσκευή μικροκυμάτων διαθέτει έναν χρονοδιακόπτη,
τον οποίο μπορείτε να ρυθμίσετε ανεξάρτητα από τη
λειτουργία μικροκυμάτων.
1. Πιέστε το πλήκτρο χρονοδιακόπτη w εάν
η συσκευή βρίσκεται στη λειτουργία
ετοιμότητας. Στην οθόνη 1 εμφανίζεται το
“00:10“.
2. Ρυθμίστε τώρα με τον περιστρεφόμενο ρυθμιστή q
την επιθυμητή ώρα.
Μπορείτε να διεξάγετε χρονικές ρυθμίσεις από
10 δευτερόλεπτα έως 95 λεπτά.
- 80 -
Page 83

3. Πιέστε το πλήκτρο Εκκίνησης/Γρήγορης
εκκίνησης q .
Ακούγεται ένας ήχος σήματος. Ο χρόνος μετρά προς
τα πίσω. Μετά από περ. 3 δευτερόλεπτα προβάλλεται
η κανονική ώρα εκ νέου. Ο χρονοδιακόπτης συνεχίζει
να τρέχει στο φόντο.
Εάν ενδιάμεσα θέλετε να ελέγξετε το χρόνο του χρονοδιακόπτη, πιέστε το πλήκτρο Χρονοδιακόπτη w .
Εμφανίζεται για σύντομο χρόνο ο Χρονοδιακόπτης.
Μόλις ολοκληρωθεί ο ρυθμισμένος χρόνος,
ακούγονται 3 ήχοι σήματος.
Λειτουργίες ερωτήσεων
Ερώτηση ώρας κατά τη λειτουργία
Πιέστε κατά τη διαδικασία μαγειρέματος το πλήκτρο
ώρας 9 . Στην οθόνη 1 εμφανίζεται για περ.
4 δευτερόλεπτα η ώρα.
Ερώτηση βαθμίδας απόδοσης κατά τη λειτουργία
Πιέστε κατά τη διαδικασία μαγειρέματος το πλήκτρο
απόδοσης r . Στην οθόνη 1 εμφανίζεται για
περ. 3 δευτερόλεπτα η ενεργοποιημένη βαθμίδα
απόδοσης.
Υπόδειξη:
Για να διακόψετε τον εκτελούμενο χρόνο του χρονοδιακόπτη, πιέστε το πλήκτρο χρονοδιακόπτη w ,
έτσι ώστε να προβάλλεται ο τρέχων χρόνος του
χρονοδιακόπτη.Πιέστε, όσο ο χρονοδιακόπτης
εμφανίζεται στην οθόνη 1, το πλήκτρο σταματήματος 0 . Ο χρονοδιακόπτης διακόπτεται και
η ώρα εμφανίζεται στην οθόνη 1.
Ασφάλεια για παιδιά
Ενεργοποιήστε αυτή τη ρύθμιση, ώστε να εμποδίσετε
μια μη ηθελημένη θέση σε λειτουργία της συσκευής
μικροκυμάτων μέσω παιδιών και άλλων ατόμων μη
εξοικειωμένων με το χειρισμό.
Το σύμβολο για την ασφάλεια παιδιών εμφανίζεται
στην οθόνη 1, και η συσκευή δεν μπορεί να λειτουργήσει
όσο αυτή η λειτουργία είναι ενεργοποιημένη.
• Πιέστε το πλήκτρο Στοπ 0 και κρατήστε
το πατημένο τόσο έως ότου ακουστεί ένας ήχος
σήματος και εμφανίζεται το σύμβολο για την
ασφάλεια παιδιών στην οθόνη 1. Τα πλήκτρα
και ο ρυθμιστής της συσκευής μικροκυμάτων δεν
έχουν πλέον καμία λειτουργία.
• Για να απενεργοποιήσετε την ασφάλεια παιδιών,
πιέστε το πλήκτρο Στοπ 0 και κρατήστε
το τόσο πατημένο έως ότου ακουστεί ένας ήχος
σήματος και σβήσει το σύμβολο για την ασφάλεια
παιδιών .
Μαγείρεμα και σύντομο
μαγείρεμα
Λειτουργία μικροκυμάτων
Υπόδειξη
Στη θύρα της συσκευής μικροκυμάτων ή στο
περίβλημα μπορεί να δημιουργηθούν κατά τη
διαδικασία βρασίματος σταγόνες νερού. Αυτό είναι
φυσικό και όχι ένδειξη ελαττωματικής λειτουργίας των
μικροκυμάτων. Σκουπίστε την υγρασία αφότου
κρυώσει με ένα στεγνό πανί.
Κίνδυνος πυρκαγιάς!
Ποτέ μη χρησιμοποιείτε τη βάση γκριλ tή άλλα
μεταλλικά αντικείμενα, εάν χρησιμοποιείτε τη συσκευή
μικροκυμάτων στη λειτουργία μικροκυμάτων.
Το μέταλλο αντανακλά την ακτινοβολία
μικροκυμάτων και οδηγεί έτσι σε δημιουργία
σπινθήρων.Αυτό μπορεί να οδηγήσει σε πυρκαγιά
και μπορεί να προκληθεί ανεπανόρθωτη ζημιά στη
συσκευή!
- 81 -
Page 84

Επιλογή απόδοσης
• Πιέστε το πλήκτρο απόδοσης r τόσο
συχνά για να επιλέξετε τη βαθμίδα απόδοσης.
• 1x για απόδοση 800 Watt (P800).
• 2x για απόδοση 700 Watt (P700).
• 3x για απόδοση 600 Watt (P600).
• 4x για απόδοση 500 Watt (P500).
• 5x για απόδοση 400 Watt (P400).
• 6x για απόδοση 300 Watt (P300).
• 7x για απόδοση 200 Watt (P200).
• 8x για απόδοση 100 Watt (P100).
Η απόδοση προβάλλεται στην ένδειξη 1
(π.χ. P800 σε απόδοση 800 Watt).
Ρύθμιση χρόνου σύντομου μαγειρέματος
Αφότου έχετε επιλέξει την απόδοση, ρυθμίστε τον
επιθυμητό χρόνο σύντομου μαγειρέματος:
• Περιστρέψτε τον περιστρεφόμενο ρυθμιστή q,
έως ότου ρυθμιστεί ο επιθυμητός χρόνος
σύντομου μαγειρέματος.
Διακοπή διαδικασίας σύντομου μαγειρέματος
Πιέστε μια φορά το πλήκτρο Στοπ 0 , ώστε να
διακόψετε μια διαδικασία βρασίματος. Η συσκευή
διακόπτει την διαδικασία μαγειρέματος και σταματά
το χρόνο που απέμεινε. Πιέστε το πλήκτρο Εκκίνησης/
Γρήγορης εκκίνησης q , ώστε να συνεχίσετε πάλι τη
διαδικασία σύντομου μαγειρέματος.
Διακοπή διαδικασίας σύντομου μαγειρέματος
Πιέστε δύο φορές το πλήκτρο Στοπ 0 , ώστε
να διακόψετε μια σύντομη διαδικασία μαγειρέματος.
Η συσκευή γυρίζει πάλι πίσω στη λειτουργία Standby.
Η διαδικασία μαγειρέματος έχει ολοκληρωθεί
Όταν έχει ολοκληρωθεί μια διαδικασία μαγειρέματος,
εμφανίζεται στην οθόνη 1 το „End“ και ακούγονται
4 ήχοι σήματος.Όταν δεν ανοίγει η θύρα της συσκευής
μικροκυμάτων, ακούγονται οι ήχοι σήματος άλλη μια
φορά μετά από περ. 2 λεπτά.
Οι βαθμίδες για το χρόνο ρύθμισης του
περιστρεφόμενου ρυθμιστή q είναι ως
ακολούθως:
• από 10 δευτ. έως 5 λεπτά: σε βήματα των
10 δευτερολέπτων
• από 5 έως 10 λεπτά: σε βήματα των
30 δευτερολέπτων
• από 10 έως 30 λεπτά: σε βήματα του 1 λεπτού
• από 30 έως 95 λεπτά: σε βήματα των 5 λεπτών
Διακοπή/ τερματισμός διαδικασίας εισαγωγής
Πιέστε δύο φορές το πλήκτρο Στοπ 0 , ώστε να
διακόψετε μια διαδικασία. Η συσκευή γυρίζει πάλι πίσω
στη λειτουργία Standby (ετοιμότητας).
Έναρξη διαδικασίας σύντομου μαγειρέματος
Όταν έχετε ρυθμίσει την απόδοση και το χρόνο
σύντομου μαγειρέματος, και στην οθόνη 1 αναβοσβήνει το σύμβολο , μπορείτε να εκκινήσετε τη
διαδικασία σύντομου μαγειρέματος:
Πιέστε για την εκκίνηση της διαδικασίας σύντομου
μαγειρέματος το πλήκτρο Εκκίνησης/Γρήγορης
εκκίνησης q . Στην οθόνη 1 εμφανίζονται τα
σύμβολα για λειτουργία μικροκυμάτων και
μαγειρέματος (Απόδοση Ρ100 – Ρ400) ή
(Απόδοση Ρ500 – Ρ800). Ο ρυθμισμένος χρόνος
μετράει προς τα πίσω.
Γρήγορη εκκίνηση
Με αυτή τη λειτουργία μπορείτε άμεσα για 30 δευτερόλεπτα (ή περισσότερο, έως 12 λεπτά) σε απόδοση
800 W, να ξεκινήσετε με το σύντομο μαγείρεμα.
• Πιέστε μια φορά το πλήκτρο Εκκίνησης/Γρήγορης
εκκίνησης q . Στην οθόνη 1 εμφανίζονται
τα σύμβολα για λειτουργία μικροκυμάτων
και σύντομο μαγείρεμα ., καθώς και το „:30“.
Η συσκευή μικροκυμάτων εκκινεί τη διαδικασία
σύντομου μαγειρέματος για 30 δευτερόλεπτα.
Ο χρόνος μετρά προς τα πίσω.
Εάν θέλετε να επιμηκύνετε τη διαδικασία σύντομου
μαγειρέματος, πιέστε τόσες φορές το πλήκτρο
Εκκίνησης/Γρήγορης εκκίνησης q , έως ότου
επιτευχθεί ο επιθυμητός χρόνος.
- 82 -
Page 85

Λειτουργία γκριλ
Μπορείτε να χρησιμοποιήσετε τη Λειτουργία γκριλ
για λεπτές φέτες κρέας, στέϊκς, μπιφτέκια, λουκάνικα
ή κομμάτια κοτόπουλου. Ενδείκνυται εξαιρετικά και
για ψημένα από πάνω σάντουιτς και ογκρατέν.
Για το ψήσιμο χρησιμοποιείτε πάντα τη βάση γκριλ t.
Έτσι επιτυγχάνετε ένα ιδανικό αποτέλεσμα ψησίματος.
Τοποθετείτε τη βάση γκριλ t πάντα επάνω στο
γυάλινο πιάτο 3.
1. Πιέστε το πλήκτρο Γκριλ 6 , ώστε να
ενεργοποιήσετε τη λειτουργία ψησίματος.
Στην οθόνη 1 εμφανίζεται το σύμβολο για τη
λειτουργία ψησίματος και το „:10“.
2. Ρυθμίστε με τον περιστρεφόμενο ρυθμιστή q
τον επιθυμητό χρόνο ψησίματος. Ο μέγιστος
ρυθμισμένος χρόνος μαγειρέματος ανέρχεται
στα 95 λεπτά.
3. Πιέστε για την εκκίνηση της λειτουργίας γκριλ το
πλήκτρο Εκκίνηση / Γρήγορη εκκίνηση q .
4. Γυρίστε το κρέας μετά από περίπου το ήμισυ
του χρόνου.
Διαδικασία σύντομου μαγειρέματος σε
συνδυασμό
Αυτή η λειτουργία συνδυάζει τη λειτουργία γκριλ με
την φυσιολογική λειτουργία μικροκυμάτων. Κατά τη
διαδικασία συνδυασμού διεξάγεται ένας καθορισμένος
χρόνος για μαγείρεμα και ο υπόλοιπος χρόνος για
ψήσιμο αυτόματα και σε μια περίοδο. Μπορείτε να
ακούσετε τη στιγμή εναλλαγής της συσκευής μέσω
ενός σιγανού κλικ.
Συνδυασμός 1
Κατά το Συνδυασμό 1 ανέρχεται η απόδοση
μικροκυμάτων στο 30 % και η απόδοση γκριλ στο
70 % του χρόνου μαγειρέματος. Αυτό ενδείκνυται
π.χ. για ψάρι, πατάτες ή ογκρατέν.
1. Πιέστε το πλήκτρο συνδυασμού e μια
φορά, ώστε να ενεργοποιήσετε το Συνδυασμό
1. Στην οθόνη 1 εμφανίζονται καθώς και
το “:10“.
2. Ρυθμίστε με τον περιστρεφόμενο ρυθμιστή q
τον επιθυμητό χρόνο σύντομου μαγειρέματος.
Ο μέγιστος ρυθμισμένος χρόνος μαγειρέματος
ανέρχεται στα 95 λεπτά.
3. Πιέστε για την εκκίνηση το πλήκτρο Εκκίνησης/
Γρήγορης εκκίνησης q .
Συνδυασμός 2
Κατά το Συνδυασμό 2 ανέρχεται η απόδοση
μικροκυμάτων στο 55 % και η απόδοση γκριλ στο
45 % του χρόνου μαγειρέματος. Αυτό ενδείκνυται
για παράδειγμα για πουτίγκες, ομελέτες, συνταγές
πουλαρικών ή λαζάνια.
1. Πιέστε το πλήκτρο συνδυασμού e δύο
φορές, ώστε να ενεργοποιήσετε το Συνδυασμό
2. Στην οθόνη 1 εμφανίζονται καθώς και
το “:10“.
2. Ρυθμίστε με τον περιστρεφόμενο ρυθμιστή q
τον επιθυμητό σύντομο χρόνο μαγειρέματος.
Ο μέγιστος ρυθμισμένος χρόνος μαγειρέματος
ανέρχεται στα 95 λεπτά.
3. Πιέστε για την εκκίνηση το πλήκτρο Εκκίνησης/
Γρήγορης εκκίνησης q .
Κίνδυνος πυρκαγιάς!
Ποτέ μη χρησιμοποιείτε τη βάση γκριλ tή άλλα
μεταλλικά αντικείμενα, όταν χρησιμοποιείτε τη συσκευή
μικροκυμάτων στη διαδικασία σύντομου μαγειρέματος
συνδυασμού. Το μέταλλο αντανακλά την ακτινοβολία
μικροκυμάτων και οδηγεί έτσι σε δημιουργία σπινθήρων.
Αυτό μπορεί να οδηγήσει σε πυρκαγιά και σε
ανεπανόρθωτη βλάβη της συσκευής!
Μενού αυτόματου
Για τρόφιμα τα οποία πρέπει να προετοιμαστούν στην
λειτουργία μενού αυτόματου, δε χρειάζεται να εισάγετε
τη διάρκεια της διαδικασίας σύντομου μαγειρέματος
και τη βαθμίδα απόδοσης. Είναι αρκετό να εισάγετε
το είδος τροφίμου που πρέπει να μαγειρευτεί, καθώς
και το βάρος του.
- 83 -
Page 86

Υπόδειξη
Η συσκευή μικροκυμάτων υπολογίζει το χρόνο/τη
βαθμίδα απόδοσης για
φρέσκα
τρόφιμα.
Κατεψυγμένα τρόφιμα δεν μαγειρεύονται με τους
προρυθμισμένους χρόνους της συσκευής
μικροκυμάτων. Εάν απαιτείται αποψύξτε προηγουμένως
τα κατεψυγμένα τρόφιμα με το πρόγραμμα απόψυξης
(βλέπε Κεφάλαιο “Ξεπάγωμα“).
Έναρξη μενού αυτόματου
Αρ. Σύμβολο Τρόφιμα
1 Ποτά 1 - 3
2 Ζυμαρικά 100 - 300g
3 Ψάρι 100 - 1000g
Βάρος
(μερίδες)
Υπόδειξη
Τοποθετείτε πάντα τα φαγητά σε ένα κατάλληλο δοχείο
ή σε ένα πιάτο. Λαμβάνετε πάντα υπόψη ότι κατά τη
διάρκεια της διαδικασίας μαγειρέματος ή ζεστάματος
μπορεί να εξέρχονται υγρά όπως λίπος ή παρόμοια
από τα φαγητά. Για το λόγο αυτό το δοχείο/πιάτο
πρέπει να είναι επαρκώς μεγάλα ώστε να αποφεύγεται
υπερχείλιση υγρών.
1. Γυρίστε τον περιστρεφόμενο ρυθμιστή q αργά
προς τα αριστερά. Στην οθόνη 1 εμφανίζεται
ένας αριθμός (π.χ. „3“ για αυτόματο πρόγραμμα
3 (ψάρι)), το σύμβολο "Ψάρι" και το .
Επιλέξτε το αντίστοιχο μενού αυτόματου για τα
τρόφιμά σας (1 έως 9). Εάν βρίσκεστε στη
λειτουργία μενού Αυτόματου μπορείτε με μια
δεξιά περιστροφή να φτάσετε στο επιθυμητό
μενού Αυτόματου. Επιβεβαιώστε την επιλογή
σας μέσω πίεσης του πλήκτρου Εκκίνηση/
Γρήγορη εκκίνηση q .
4 Ρύζι 100 - 1000g
5 Κοτόπουλο 800 - 1400g
6 Ζέσταμα 100 - 1000g
7 Πατάτες 150 - 600g
8 Ψητό 300 - 1300g
9
2. Τώρα μέσω περιστροφής του περιστρεφόμενου
ρυθμιστή q ρυθμίστε το επιθυμητό βάρος ή
τον επιθυμητό αριθμό μερίδων. Το σύμβολο
αναβοσβήνει.
3. Πιέστε το πλήκτρο Εκκίνησης/Γρήγορης
εκκίνησης q , ώστε να εκκινήσετε τη
διαδικασία σύντομου μαγειρέματος.
Σουβλάκια
κρέατος
100 - 700g
Υπόδειξη
Για να επιτύχετε ένα ομοιόμορφο μαγείρεμα ή σύντομο
μαγείρεμα, πρέπει να γυρίζετε τα φαγητά στα προγράμματα 5, 8 και 9 μετά από περίπου τα 2/3 του
χρόνου μαγειρέματος. Η συσκευή μικροκυμάτων σας
θυμίζει το γύρισμα: το „turn“ προβάλλεται στην
οθόνη 1 και ακούγεται ένας ήχος σήματος.
• Ανοίξτε τη θύρα και γυρίστε τα φαγητά. Να είστε
προσεκτικοί με ενδεχόμενα ήδη καυτά τρόφιμα.
- 84 -
Page 87

• Πιέστε το πλήκτρο εκκίνησης/γρήγορης εκκίνησης q
, ώστε να συνεχίσετε πάλι το μαγείρεμα.
Υπόδειξη:
Εάν θέλετε να παραλείψετε το γύρισμα των φαγητών,
απλά περιμένετε να σταματήσουν οι ήχοι σήματος.
Η συσκευή μικροκυμάτων συνεχίζει το πρόγραμμα
σας αυτόματα μετά από περ. 30 δευτερόλεπτα.
Υπόδειξη
Εάν το είδος φαγητού μετά την ολοκλήρωση του αυτόματου μενού δεν έχει μαγειρευτεί σωστά, μαγειρέψτε το
άλλη μια φορά για λίγα λεπτά με το πρόγραμμα
γρήγορης εκκίνησης.Σε προγράμματα τα οποία
τελειώνουν με τη χρήση της λειτουργίας ψησίματος
(Αριθμός προγρ-άμματος 5, 8 και 9), μπορείτε να
σιγοβράσετε τα τρόφιμα με τη λειτουργία ψησίματος.
Κατά το σιγοβράσιμο με τη λειτουργία ψησίματος
αυξάνεται και ο βαθμός ροδίσματος των τροφίμων.
Κίνδυνος πυρκαγιάς!
Σε προγράμματα με συνδεδεμένη λειτουργία γκριλ
μη χρησιμοποιείτε σε καμία περίπτωση επικαλύψεις ή
μη θερμανθεκτικά σκεύη, διότι αυτά λιώνουν ή
μπορεί να αρπάξουν φωτιά!
Κίνδυνος τραυματισμού!
Το γυάλινο πιάτο 3είναι πολύ καυτό μετά από
μια διαδικασία σύντομου μαγειρέματος! Για το λόγο
αυτό χρησιμοποιείτε γάντια κουζίνας ή θερμανθεκτικά
γάντια, όταν απομακρύνετε τα σκεύη από το χώρο
μαγειρέματος.
Υπόδειξη:
Παρακαλούμε προσέξτε ότι στο αποτέλεσμα μαγειρέματος παίζουν ρόλο το μέγεθος, η μορφή και τα είδη
των τροφίμων.
Προγράμματα με λεπτομέρειες
Πρόγραμμα 1: Ποτά
Αυτό το πρόγραμμα εκτελείται μόνο με τη χρήση της
απόδοσης μικροκυμάτων. Ανάλογα με τον ρυθμισμένο
αριθμό μερίδων, το πρόγραμμα λειτουργεί μεταξύ 1 ώρας
και 30 λεπτών και 3 ωρών και 50 λεπτών.
• Τοποθετήστε το ρόφημα που θέλετε να ζεστάνετε,
επάνω στο γυάλινο πιάτο 3 στο χώρο μαγειρέματοςΌταν τοποθετείτε περισσότερα ποτήρια
ή φλιτζάνια στη συσκευή μικροκυμάτων, προσέχετε
ότι το ένα δοχείο δεν θα αγγίζει το άλλο.
Υπόδειξη
Για την αποφυγή ξαφνικής δημιουργίας φυσαλίδων
βρασμού:
• Τοποθετείστε εάν γίνεται μια γυάλινη ράβδο στο
υγρό, όσο αυτό ζεσταίνεται.
• Αφήστε το υγρό μέσα στα μικροκύματα μετά το
ζέσταμα για 20 δευτερόλεπτα ώστε να αποφύγετε
μη αναμενόμενο ζεμάτισμα.
Πρόγραμμα 2: Ζυμαρικά
Αυτό το πρόγραμμα εκτελείται μόνο με τη χρήση της
απόδοσης μικροκυμάτων.
Ανάλογα με το ρυθμισμένο βάρος, το πρόγραμμα
διαρκεί μεταξύ 25 και 35 λεπτών.
• Χρησιμοποιείτε για το μαγείρεμα ζυμαρικών ένα
ψηλό δοχείο, διότι υπάρχει κίνδυνος υπερχείλισης.
• Χρησιμοποιείτε τόσο νερό όσο κατά το σύνηθες
μαγείρεμα. Τα λαζάνια πρέπει να «κολυμπάνε»
στο νερό.
• Βράστε πρώτα το νερό: Ρυθμίστε την ανώτερη
βαθμίδα απόδοσης της συσκευής μικροκυμάτων
(Ρ800) και εκκινήστε την. Για ένα λίτρο νερό
χρειάζεστε περ. 10 λεπτά για να αρχίσει να
βράζει το νερό.
• Στη συνέχεια προσθέστε τα ζυμαρικά.
Μετά μπορείτε να εκκινήσετε το αυτόματο μενού
για ζυμαρικά.
• Αφήστε τέλος τα ζυμαρικά να καθίσουν για περ. 3
λεπτά.
- 85 -
Page 88

Πρόγραμμα 3: Ψάρι
Αυτό το πρόγραμμα εκτελείται μόνο με τη χρήση της
απόδοσης μικροκυμάτων.
Ανάλογα με το ρυθμισμένο βάρος, το πρόγραμμα
διαρκεί μεταξύ 3 ωρών και 30 λεπτών και 16 λεπτών.
• Τοποθετήστε τα κομμάτια ψαριού σε ένα πιάτο
κατάλληλο για συσκευή μικροκυμάτων, βάλτε
λίγο βούτυρο ή άλλο λίπος, καρυκεύστε κατόπιν
επιθυμίας και εκκινήστε το μενού αυτόματου για
ψάρι.
Πρόγραμμα 4: Ρύζι
Αυτό το πρόγραμμα εκτελείται μόνο με τη χρήση της
απόδοσης μικροκυμάτων.
Ανάλογα με το ρυθμισμένο βάρος, το πρόγραμμα
διαρκεί μεταξύ 16 και 36 λεπτών.
• Χρησιμοποιείτε για το μαγείρεμα ρυζιού ένα ψηλό
δοχείο, διότι υπάρχει κίνδυνος υπερχείλισης.
Π.χ. για 200 g ρύζι χρησιμοποιήστε περ. 400 ml
νερό. Παρά το νερό χρησιμοποιείτε τη ρύθμιση
βάρους «200 γρ.». Ρυθμίζεται πάντα το βάρος
του ρυζιού.
• Βάλτε το ρύζι στο δοχείο, γεμίστε με το απαραίτητο
υγρό και αφήστε το ρύζι να φουσκώσει για περ.
3 λεπτά.
• Καλύψτε το δοχείο. Προσέχετε ότι δεν θα έχει κλείσει
αεροστεγώς. Στη συνέχεια μπορείτε να εκκινήσετε
το αυτόματο μενού για το ρύζι.
Πρόγραμμα 5: Κοτόπουλο
Αυτό το πρόγραμμα λειτουργεί σε περισσότερες
βαθμίδες μαγειρέματος με τη χρήση της απόδοσης
μικροκυμάτων και της λειτουργίας ψησίματος.Ανάλογα
με το ρυθμισμένο βάρος, το πρόγραμμα διαρκεί
μεταξύ 39 και 50 λεπτών.
• Τοποθετήστε το κοτόπουλο σε ένα πιάτο κατάλληλο
για μικροκύματα.
• Καρυκεύστε κατόπιν επιθυμίας και εκκινήστε το
μενού αυτόματου για κοτόπουλο.
• Ένα ολόκληρο κοτόπουλο πρέπει να γυρίσει, διότι
αλλιώς η πλευρά με κατεύθυνση προς τα επάνω
μπορεί να στεγνώσει. Η συσκευή μικροκυμάτων
διακόπτει για αυτό το σκοπό το πρόγραμμα
μετά από περίπου 2/3 του χρόνου αυτόματα
και ακούγονται ήχοι σήματος. Περιστρέψτε το
κοτόπουλο και πιέστε το πλήκτρο Εκκίνησης/
Γρήγορης εκκίνησης q , ώστε να συνεχίσετε
το πρόγραμμα.
Πρόγραμμα 6: Ζέσταμα
Αυτό το πρόγραμμα εκτελείται μόνο με τη χρήση της
απόδοσης μικροκυμάτων.
Ανάλογα με το ρυθμισμένο βάρος, το πρόγραμμα
διαρκεί μεταξύ 1 ώρας και 6 ωρών και 20 λεπτών.
• Τοποθετήστε το πιάτο με το φαγητό το οποίο
θέλετε να ζεστάνετε, στο γυάλινο πιάτο 3 στο
χώρο μαγειρέματος και εκκινήστε το μενού
αυτόματου για το ζέσταμα.
Πρόγραμμα 7: Πατάτες
Αυτό το πρόγραμμα εκτελείται μόνο με τη χρήση της
απόδοσης μικροκυμάτων.
Ανάλογα με το ρυθμισμένο βάρος, το πρόγραμμα
διαρκεί μεταξύ 3 ωρών και 50 πενήντα λεπτών και
11 λεπτών.
Υπόδειξη!
Χρησιμοποιείτε μη ξεφλουδισμένες πατάτες για τη
διαδικασία μαγειρέματος.Τρυπήστε μερικές φορές
τη φλούδα.
• Τοποθετήστε τις ακαθάριστες πατάτες σε ένα πιάτο
ή δοχείο κατάλληλα για συσκευή μικροκυμάτων.
Χρησιμοποιείτε όσο γίνεται πατάτες του ίδιου
μεγέθους. Εάν είναι δυνατό, πρέπει οι πατάτες
να μην έρχονται σε επαφή μεταξύ τους.
- 86 -
Page 89

Πρόγραμμα 8: Ψητό
Αυτό το πρόγραμμα λειτουργεί σε περισσότερες
βαθμίδες μαγειρέματος με τη χρήση της απόδοσης
μικροκυμάτων και της λειτουργίας ψησίματος.
Ανάλογα με το ρυθμισμένο βάρος, το πρόγραμμα
διαρκεί μεταξύ 16 και 60 λεπτών.
• Τοποθετήστε το ψητό επάνω σε ένα πιάτο κατάλληλο
για μικροκύματα. Καρυκεύστε το κρέας κατόπιν
απαίτησης και εκκινήστε το μενού αυτόματου για
ψητά.
• Ένα ολόκληρο ψητό πρέπει να γυρίσει, διότι η
πλευρά που βλέπει προς τα επάνω μπορεί αλλιώς
να στεγνώσει. Η συσκευή μικροκυμάτων διακόπτει
για αυτό το σκοπό το πρόγραμμα μετά από περίπου
2/3 του χρόνου αυτόματα και ακούγονται ήχοι
σήματος.
Περιστρέψτε το ψητό και πιέστε το πλήκτρο
Εκκίνησης/Γρήγορης εκκίνησης q , ώστε
να συνεχίσετε το πρόγραμμα.
Πρόγραμμα 9: Μικρά σουβλάκια κρέατος
Αυτό το πρόγραμμα λειτουργεί σε περισσότερες
βαθμίδες μαγειρέματος με τη χρήση της απόδοσης
μικροκυμάτων και της λειτουργίας ψησίματος.
Ανάλογα με το ρυθμισμένο βάρος, το πρόγραμμα
διαρκεί μεταξύ 9 και 27 λεπτών.
• Τοποθετήστε τα σουβλάκια κρέατος σε ένα πιάτο
κατάλληλο για μικροκύματα. Καρυκεύστε το κρέας
κατόπιν επιθυμίας και εκκινήστε το μενού αυτόματου
για σουβλάκια κρέατος.
• Τα σουβλάκια πρέπει να γυρίζουν, ώστε να
μαγειρεύονται ομοιόμορφα. Η συσκευή
μικροκυμάτων διακόπτει για αυτό το σκοπό το
πρόγραμμα μετά από περίπου 2/3 του χρόνου
αυτόματα και ακούγονται ήχοι σήματος.
Περιστρέψτε τα σουβλάκια και πιέστε το πλήκτρο
Εκκίνησης/Γρήγορης εκκίνησης q , για να
συνεχίσετε το πρόγραμμα.
Υπόδειξη:
Εάν θέλετε να παραλείψετε το γύρισμα των φαγητών,
απλά περιμένετε να σταματήσουν οι ήχοι σήματος.
Η συσκευή μικροκυμάτων συνεχίζει το πρόγραμμα
σας αυτόματα μετά από περ. 30 δευτερόλεπτα.
Απόψυξη
Με αυτή τη λειτουργία μπορείτε χωρίς προβλήματα
να κάνετε απόψυξη κρέατος, πουλερικών και ψαριού.
Ο χρόνος απόψυξης και η βαθμίδα απόδοσης
υπολογίζονται αυτόματα και ρυθμίζονται κατόπιν
εισαγωγής του βάρους.
1. Πιέστε το πλήκτρο απόψυξης 8 .
Στην οθόνη 1 εμφανίζονται τα και .
Το σύμβολο αναβοσβήνει.
2. Επιλέξτε με τη βοήθεια του περιστρεφόμεvou
ρυθμιστή e τo βάpoς των τρoφίμων τρoς
aτόψυξη.Μπορείτε να ρυθμίσετε ένα βάρος
μεταξύ 100 γρ. και 1800 γρ.
3. Πιέστε το πλήκτρο Εκκίνησης/Γρήγορης
εκκίνησης q .
Η συσκευή δίνει αυτόματα το χρόνο απόψυξης.
Εμφανίζεται στην οθόνη 1 και τρέχει.
Μετά από περ. 1/2 του χρόνου ακούγεται ένας ήχος
σήματος και το „turn” προβάλλεται στην οθόνη 1.
Ανοίξτε τη θύρα και γυρίστε τα τρόφιμα. Κλείστε πάλι
τη θύρα και πιέστε το πλήκτρο Εκκίνηση/Γρήγορη
εκκίνηση q , ώστε να συνεχίσετε πάλι τη
διαδικασία απόψυξης.
Υπόδειξη:
Εάν θέλετε να παραλείψετε το γύρισμα των φαγητών,
απλά περιμένετε να σταματήσουν οι ήχοι σήματος.
Το πρόγραμμα απόψυξης συνεχίζει να λειτουργεί
ανεξάρτητα από τον ήχο σήματος!
Προρύθμιση του χρόνου
έναρξης (Preset)
Μπορείτε με αυτό το πρόγραμμα να προ - προγραμματίσετε μια καθορισμένη ώρα έναρξης για το μαγείρεμα
ή το ψήσιμο των φαγητών. Εάν έχετε διεξάγει τις
ρυθμίσεις σωστά, η συσκευή ξεκινά αυτόματα στη
ρυθμισμένη ώρα.
- 87 -
Page 90

Υπόδειξη:
Η ώρα πρέπει να είναι ρυθμισμένη, για να μπορείτε
να επιλέξετε τη λειτουργία „Προρύθμιση της ώρας
έναρξης“.
1. Ρυθμίστε την επιθυμούμενη λειτουργία μικροκυμάτων
(Μαγείρεμα, ψήσιμο ή Μενού Αυτόματου (εκτός
από το αυτόματο πρόγραμμα 6)):
Για τη λειτουργία μικροκυμάτων: Πιέστε το πλήκτρο
απόδοσης r τόσο συχνά για να επιλέξετε
τη βαθμίδα απόδοσης. Ρυθμίστε το χρόνο
μαγειρέματος με τον περιστρεφόμενο ρυθμιστή q.
Για τη λειτουργία ψησίματος: Πιέστε το πλήκτρο
Γκριλ 6 , ώστε να ενεργοποιήσετε τη λειτουργία
ψησίματος.
Ρυθμίστε με τον περιστρεφόμενο ρυθμιστή q
τον επιθυμητό χρόνο ψησίματος. Για το Μενού
Αυτόματου: Επιλέξτε με τον περιστρεφόμενο
ρυθμιστή q το πρόγραμμα που ταιριάζει για τα
φαγητά σας (εκτός από το Αυτόματο πρόγραμμα
6). Επιβεβαιώστε την επιλογή σας μέσω πίεσης
του πλήκτρου Εκκίνηση/Γρήγορη εκκίνηση q
. Τώρα μέσω περιστροφής του
περιστρεφόμενου ρυθμιστή q ρυθμίστε το
επιθυμητό βάρος ή τον επιθυμητό αριθμό
μερίδων.
2. Πιέστε το πλήκτρο χρόνου έναρξης 7 .
Στην οθόνη 1 αναβοσβήνει το „01: “ και
εμφανίζεται το σύμβολο της κλεψύδρας .
3. Γυρίστε τον περιστρεφόμενο ρυθμιστή q, ώστε
να ρυθμίσετε τις ώρες.
4. Πιέστε το πλήκτρο Εκκίνηση/Γρήγορη εκκίνηση q
, τώρα εμφανίζονται τα ψηφία των λεπτών.
5. Γυρίστε τον περιστρεφόμενο ρυθμιστή q, ώστε να
ρυθμίσετε τα λεπτά.
6. Πιέστε το πλήκτρο Εκκίνησης/Γρήγορης εκκίνησης
q . Το σύμβολο της κλεψύδρας
αναβοσβήνει. Εμφανίζεται ο χρόνος έναρξης.
Ο φούρνος μικροκυμάτων ξεκινά αυτόματα τη
διαδικασία στη ρυθμισμένη ώρα. Ένας ήχος
σήματος ακούγεται κατά την έναρξη.
Υπόδειξη:
Για να διαγράψετε τον αποθηκευμένο χρόνο έναρξης
και συνεπώς να διακόψετε την αποθηκευμένη διαδικασία,
πιέστε το πλήκτρο σταματήματος 0 . Το σύμβολο
κλεψύδρας σβήνει και προβάλλεται η ώρα.
Καθαρισμός και συντήρηση
Κίνδυνος τραυματισμού!
Απενεργοποιείτε τη συσκευή μικροκυμάτων πριν από
τον καθαρισμό και τραβάτε το βύσμα από την πρίζα.
Σε καμία περίπτωση δεν επιτρέπεται να βυθιστεί
η συσκευή σε νερό ή άλλα υγρά.Μπορεί έτσι
να προκύψει κίνδυνος ζωής από ηλεκτροπληξία
και η συσκευή να υποστεί φθορά.
• Διατηρείτε το εσωτερικό της συσκευής μικροκυμάτων
πάντα καθαρό.
• Εάν έχουν κολλήσει φαγητά ή πιτσιλιές από υγρά
στα τοιχώματα των μικροκυμάτων, καθαρίστε τα
με ένα νωπό πανί.
• Χρησιμοποιείστε ένα απαλό καθαριστικό μέσο,
εάν τα μικροκύματα παρουσιάζουν πιο μεγάλες
ακαθαρσίες.Σκουπίζετε τα υπολείμματα
καθαριστικού με καθαρό νερό.
• Αποφεύγετε τη χρήση καθαριστικών σπρέϊ και
άλλων επιθετικών καθαριστικών μέσων, διότι
αυτά μπορεί να προκαλέσουν λεκέδες, γραμμές
ή θολότητα στην επιφάνεια της θύρας.
• Καθαρίζετε τα εξωτερικά τοιχώματα με ένα νωπό
πανί.
- 88 -
Page 91

• Για να αποφύγετε φθορά των λειτουργικών
τμημάτων στο εσωτερικό της συσκευής μικροκυμάτων, μην αφήνετε να διεισδύει νερό στην
εγκοπή αερισμού 5.
• Απομακρύνετε τακτικά πιτσιλιές ή ακαθαρσίες.
Καθαρίζετε τη θύρα, το παράθυρο οπτικής
επαφής και από τις δύο πλευρές, τις στεγανοποιήσεις θυρών και τα παρακείμενα τμήματα με
ένα νωπό πανί. Μη χρησιμοποιείτε μέσα τριβής.
• Εάν στο εσωτερικό ή γύρω από την εξωτερική
πλευρά της θύρας εναποτεθεί υγρασία,
σκουπίστε την με ένα μαλακό πανί. Αυτό γίνεται
όταν τα μικροκύματα λειτουργούν σε συνθήκες
με υψηλό ποσοστό υγρασίας.
• Καθαρίζετε και το γυάλινο πιάτο 3 τακτικά.
Πλένετε το σε ζεστό διάλυμα νερού με σαπούνι
ή στο πλυντήριο πιάτων.
• Καθαρίζετε τη βάση γκριλ t σε ζεστό νερό
πλύσης και στεγνώνετέ την καλά.
• Απομακρύνετε τακτικά τις μυρωδιές. Τοποθετείτε
ένα βαθύ μπολ για μικροκύματα γεμισμένο με ένα
φλιτζάνι νερό, χυμό και φλούδα λεμονιού, μέσα
στα μικροκύματα . Ζεστάνετε το για 5 λεπτά.
Καθαρίστε λεπτομερώς και στεγνώστε με ένα απαλό
πανί.
• Εάν απαιτείται μια αντικατάσταση της λυχνίας
στη συσκευή μικροκυμάτων, επιτρέψτε την
αντικατάσταση από ένα κατάστημα ή ρωτήστε
στο σέρβις μας.
Διόρθωση σφαλμάτων
Η οθόνη 1 δεν προβάλει τίποτα.
• Το βύσμα δεν είναι στην πρίζα.
Ελέγξτε το βύσμα.
• Η πρίζα είναι ελαττωματική.
Δοκιμάστε σε μια άλλη πρίζα.
• Η οθόνη 1 είναι ελαττωματική.
Επικοινωνήστε με το σέρβις.
Η συσκευή δεν αντιδρά στο πάτημα των πλήκτρων.
• Έχει ενεργοποιηθεί η ασφάλεια παιδιών.
Απενεργοποιήστε την ασφάλεια παιδιών
(βλέπε Κεφάλαιο “Χειρισμός“).
Η συσκευή δεν εκκινεί τη διαδικασία σύντομου
μαγειρέματος/μαγειρέματος.
• Η θύρα δεν έχει ασφαλίσει σωστά. Κλείστε τη
θύρα σωστά.
Το γυάλινο πιάτο 3 δημιουργεί κατά την
περιστροφή δυνατούς θορύβους.
• Το γυάλινο πιάτο 3 δεν εδράζεται σωστά
επάνω στο αστέρι με ρόδες 4.
Τοποθετήστε το γυάλινο πιάτο 3 σωστά στο
χώρο μαγειρέματος.
• Το αστέρι με ρόδες 4 και/ ή το δάπεδο του
χώρου μαγειρέματος έχουν ακαθαρσίες.
Καθαρίστε το αστέρι με ρόδες 4 και το
δάπεδο.
Απομάκρυνση
Σε καμία περίπτωση μην πετάξετε τη
συσκευή στα οικιακά απορρίμματα.
Αυτό το προϊόν υπόκειται στην Ευρωπαϊκή
Οδηγία 2002/96/EC.
Απομακρύνετε τη συσκευή μέσω μιας εγκεκριμένης
επιχείρησης απομάκρυνσης ή μέσω της κοινοτικής
επιχείρησης απομάκρυνσης.
Να τηρείτε τους ισχύοντες κανονισμούς.
Σε περίπτωση αμφιβολιών ελάτε σε επαφή με την
επιχείρηση απόρριψης.
Απομακρύνετε όλα τα υλικά συσκευασιών
φιλικά προς το περιβάλλον.
- 89 -
Page 92
Εγγύηση και σέρβις πελατών
Έχετε για αυτή τη συσκευή 3 χρόνια εγγύηση από
την ημερομηνία αγοράς. Η συσκευή κατασκευάστηκε
και ελέγχθηκε προσεκτικά πριν από την αποστολή.
Παρακαλούμε φυλάξτε την απόδειξη ταμείου ως
απόδειξη για την αγορά. Παρακαλούμε
επικοινωνήστε τηλεφωνικά με την υπηρεσία σέρβις σε
περίπτωση εγγύησης. Μόνο έτσι μπορεί να
εξασφαλιστεί μια δωρεάν αποστολή του
εμπορεύματός σας.
Η απόδοση εγγύησης ισχύει μόνο για σφάλματα
υλικού ή κατασκευής, όχι όμως για ζημιές από τη
μεταφορά, για εξαρτήματα φθοράς ή για βλάβες σε
εύθραυστα εξαρτήματα, π.χ. διακόπτες ή
συσσωρευτές. Το προϊόν προορίζεται μόνο για την
ιδιωτική και όχι για την επαγγελματική χρήση.
Σε περίπτωση κακής μεταχείρισης και ακατάλληλης
χρήσης, σε χρήση βίας και σε παρεμβάσεις οι
οποίες δεν διεξήχθησαν από το εξουσιοδοτημένο
μας τμήμα σέρβις, η εγγύηση παύει να ισχύει. Τα νομικά σας δικαιώματα δεν περιορίζονται μέσω αυτής
της εγγύησης.
Ο χρόνος εγγύησης δεν επεκτείνεται μέσω της
απόδοσης εγγύησης. Αυτό ισχύει και για
εξαρτήματα τα οποία έχουν αντικατασταθεί ή
επισκευαστεί. Ενδεχόμενες ήδη υπάρχουσες κατά
την αγορά, ζημιές και ελλείψεις πρέπει να
αναφέρονται αμέσως μετά την αποσυσκευασία, το
αργότερο όμως δύο ημέρες μετά την ημερομηνία
αγοράς. Επισκευές που εμφανίζονται μετά τη λήξη
του χρόνου εγγύησης χρεώνονται.
Σέρβις Ελλάδα
Tel.: 801 5000 019
E-Mail: kompernass@lidl.gr
IAN 71492/71493
CY
Σέρβις Κύπρος
Tel.: 8009 4409
E-Mail: kompernass@lidl.cy
IAN 71492/71493
(0,03 EUR/Min.)
Εισαγωγέας
KOMPERNASS GMBH
BURGSTRASSE 21
44867 BOCHUM, ΓΕΡΜΑΝΙΑ
www.kompernass.com
- 90 -
Page 93

INHALTSVERZEICHNIS SEITE
Sicherheitshinweise 92
Bestimmungsgemäßer Gebrauch 95
Lieferumfang 95
Technische Daten 95
Bevor Sie beginnen 96
Grundprinzipien beim Kochen in der Mikrowelle......................................................................96
Geeignetes Kochgeschirr verwenden..........................................................................................96
Gerätebeschreibung 97
Erste Inbetriebnahme 97
Gerät aufstellen..............................................................................................................................97
Gerät vorbereiten...........................................................................................................................97
Zubehör einsetzen .........................................................................................................................98
Bedienen 98
Uhr einstellen..................................................................................................................................98
Küchentimer einstellen ...................................................................................................................98
Kindersicherung..............................................................................................................................99
Abfragefunktionen..........................................................................................................................99
Kochen und Garen 99
Mikrowellenbetrieb........................................................................................................................99
Grillbetrieb ...................................................................................................................................101
Kombinations-Garvorgang .........................................................................................................101
Automatik-Menü 101
Automatik-Menü starten ..............................................................................................................102
Programme im Detail...................................................................................................................103
Auftauen 105
Startzeit voreinstellen (Preset) 105
Reinigung und Pflege 106
Fehlerbehebung 107
Entsorgen 107
Garantie und Service 107
Importeur 108
Lesen Sie die Bedienungsanleitung vor der ersten Verwendung aufmerksam durch und heben Sie diese für
den späteren Gebrauch auf. Händigen Sie bei Weitergabe des Gerätes an Dritte auch die Anleitung aus.
- 91 -
Page 94

Mikrowelle
Sicherheitshinweise
Achtung!
Warnungen vor Beschädigungen am Gerät.
Gefahr! / Verletzungsgefahr!
Warnung vor Verletzungen und elektrischem Schlag!
Brandgefahr!
Warnung vor Brandgefahr.
Hinweis!
Hinweise und Tipps zur Handhabung der Mikrowelle.
Vorsichtsmaßnahmen zur Vermeidung eines
möglichen übermäßigen Kontaktes mit Mikrowellenenergie
• Versuchen Sie nicht, das Gerät bei geöffneter
Tür zu betreiben, da der Betrieb bei geöffneter
Tür zum Kontakt mit einer schädlichen Dosis
Mikrowellenstrahlung führen kann. Wichtig ist
hierbei auch, nicht die Sicherheitsverriegelungen
aufzubrechen oder zu manipulieren.
• Klemmen Sie nichts zwischen Gerätefront und
Tür und sorgen Sie dafür, dass sich keine Verschmutzungen oder Reinigungsmittelrückstände
auf den Dichtflächen ansammeln.
Verletzungsgefahr!
• Wenn die Tür oder die Türdichtungen beschä-
digt sind, betreiben Sie die Mikrowelle auf keinen Fall weiter. Lassen Sie sie sofort von qualifiziertem Fachpersonal reparieren.
• Versuchen Sie nie das Gerät selber zu reparie-
ren. Durch das Abnehmen des Gehäuses kann
Mikrowellenenergie freigesetzt werden. Lassen
Sie Reparaturen nur von qualifiziertem Fachpersonal durchführen.
• Dieses Gerät ist nicht dafür bestimmt, durch Personen (einschließlich Kinder) mit eingeschränkten physischen, sensorischen oder geistigen Fähigkeiten oder mangels Erfahrung und/oder
mangels Wissen benutzt zu werden, es sei denn,
sie werden durch eine für ihre Sicherheit zuständige Person beaufsichtigt oder erhielten von ihr
Anweisungen, wie das Gerät zu benutzen ist.
Kinder sollten beaufsichtigt werden, um sicherzustellen, dass sie nicht mit dem Gerät spielen.
• Kindern darf die Benutzung des Kochgerätes
ohne Aufsicht nur erlaubt werden, wenn eine angemessene Anweisung gegeben wurde, die das
Kind in die Lage versetzt, das Kochgerät in sicherer Weise zu benutzen und die Gefahren einer falschen Bedienung zu verstehen.
• Verwenden Sie dieses Gerät nur zum bestimmungsgemäßen Gebrauch gemäß Beschreibung
in diesem Handbuch. Verwenden Sie in diesem
Gerät keine ätzenden Chemikalien oder Dämpfe. Diese Mikrowelle ist speziell für Erhitzen, Kochen, Grillen, oder Trocknen von Nahrungsmitteln konstruiert.
Sie ist nicht für eine Nutzung im Industrieoder Laborbereich konzipiert.
• Betreiben Sie die Mikrowelle nicht, wenn
Netzkabel/Netzstecker beschädigt sind. Lassen
Sie Netzkabel/Netzstecker von qualifiziertem
Fachpersonal austauschen, um Gefährdungen
zu vermeiden.
• Halten Sie Kinder von der Mikrowellentür fern,
während diese in Betrieb ist. Verbrennungsgefahr!
• Entfernen Sie unter keinen Umständen das
Mikrowellengehäuse.
• Lassen Sie die Lampe im Inneren der Mikrowelle nur von qualifiziertem Fachpersonal austauschen.
• Berühren Sie nie die Mikrowellentür, das Mikrowellengehäuse, die Lüftungsöffnungen, Zubehörteile oder das Essgeschirr direkt nach dem
Grill-, Kombi- oder Automatikmenü-Vorgang.
Die Teile werden sehr heiß. Lassen Sie vor dem
Reinigen die Teile abkühlen.
- 92 -
Page 95

• Achten Sie darauf, dass der Netzstecker immer
gut zu erreichen ist, damit Sie diesen im Notfall
schnell vom Stromnetz trennen können.
• Personen, die einen Herzschrittmacher tragen,
sollten sich vor Inbetriebnahme der Mikrowelle
bei ihrem Hausarzt über mögliche Risiken informieren.
• Lassen Sie das Netzkabel nie über den Tisch
oder die Arbeitsplatte hängen. Kinder könnten
daran ziehen.
• Öffnen Sie Dosen, Popcorntüten etc. nach dem
Erhitzen immer so, dass die Öffnung von Ihrem
Körper weg zeigt. Austretender Dampf kann zu
Verbrühungen führen.
• Stellen Sie sich nie direkt vor die Mikrowelle,
wenn Sie die Tür öffnen. Austretender Dampf
kann zu Verbrühungen führen.
• Frittieren Sie nicht in der Mikrowelle. Heißes Öl
kann Geräteteile und Utensilien beschädigen
und sogar Hautverbrennungen hervorrufen.
• Schütteln oder rühren Sie aufgewärmte Babygläschen oder Babyfläschchen auf jeden Fall
um! Der Inhalt kann sich ungleichmäßig erhitzt
haben und das Baby kann sich am Inhalt verbrennen. Kontrollieren Sie auf jeden Fall die
Temperatur, bevor Sie Ihr Baby füttern!
• Bauen Sie die Mikrowelle nicht um.
• Mikrowellenstrahlen sind gefährlich! Lassen Sie
Wartungs- oder Reparaturarbeiten, bei denen
Abdeckungen zu entfernen sind, die vor einem
Kontakt mit Mikrowellenstrahlen schützen, nur
von geschultem Fachpersonal durchführen.
• Überprüfen Sie vor dem Verzehr die Temperatur, um für Babys u. U. lebensgefährliche Verbrennungen zu vermeiden.
Kochutensilien können durch die von den
erhitzten Speisen abgegebene Hitze heiß
werden, so dass sie sich eventuell nur mit Topflappen anfassen lassen. Die Kochutensilien müssen daraufhin geprüft werden, ob sie mikrowellengeeignet sind.
Brandgefahr
• Lassen Sie die Mikrowelle nie unbeaufsichtigt,
wenn Sie Lebensmittel in Plastik- oder Papierverpackungen erhitzen.
• Stellen Sie keine brennbaren Materialien in der
Nähe der Mikrowelle oder der Lüftungsöffnungen auf.
• Entfernen Sie alle metallischen Verschlüsse
der Verpackungen der Lebensmittel, die Sie
erhitzen wollen. Brandgefahr!
• Benutzen Sie zur Herstellung von Popcorn nur
mikrowellengeeignete Popcorn-Tüten.
• Benutzen Sie die Mikrowelle nicht, um mit
Körnern, Kirschkernen oder Gel gefüllte Kissen
zu erhitzen. Brandgefahr!
• Benutzen Sie die Mikrowelle nicht zur Lagerung
von Lebensmitteln oder anderen Dingen.
• Überschreiten Sie nie die vom Hersteller ange-
gebenen Garzeiten.
• Stellen Sie keine Gegenstände auf die Mikro-
welle, während diese in Betrieb ist. Die Lüftungsöffnungen werden verdeckt!
• Stellen Sie die Mikrowelle nicht in der Nähe von
anderen Hitze absondernden Geräten, wie zum
Beispiel einem Backofen, auf.
• Reinigen Sie die Mikrowelle nach dem Erhitzen
von fetthaltigen Speisen, insbesondere wenn diese nicht abgedeckt waren, gründlich. Lassen Sie
das Gerät vollständig abkühlen, bevor Sie es
reinigen. Auf den Heizelementen des Grills dürfen sich keine Rückstände, wie zum Beispiel Fett
befinden. Dieses könnte überhitzen und sich entzünden.
• Tauen Sie kein gefrorenes Fett oder Öl in der
Mikrowelle auf. Das Fett oder Öl kann sich
entzünden.
• Benutzen Sie keine externe Zeitschaltuhr oder
ein separates Fernwirksystem um das Gerät zu
betreiben.
Achtung! Heiße Oberfläche!
- 93 -
Page 96

Achtung! Geräteschäden!
• Betreiben Sie die Mikrowelle nicht im Leerzustand. Ausgenommen ist die erste Inbetriebnahme (siehe Kapitel „Erste Inbetriebnahme“).
• Stecken Sie keine Gegenstände in die Lüftungsöff-
nungen oder die Sicherheits-Türverriegelungen.
• Benutzen Sie keine metallischen Utensilien, die
Mikrowellen reflektieren und zu Funkenbildung
führen. Stellen Sie keine Blechdosen in die
Mikrowelle.
• Stellen Sie keine Plastikbehälter sofort nach
einem Grill-, Kombi- oder AutomatikmenüVorgang in die Mikrowelle. Das Plastik kann
schmelzen.
• Die Mikrowelle darf nicht an Orten mit hoher
Luftfeuchtigkeit, oder wo sich Feuchtigkeit
sammelt, aufgestellt werden.
• Flüssigkeiten und sonstige Nahrungsmittel dürfen nicht in luftdicht verschlossenen Behältern erhitzt werden, da diese explodieren und das Gerät beschädigen können.
• Lehnen Sie sich nicht auf die Mikrowellentür.
• Mangelhafte Sauberkeit des Kochgerätes kann
zu einer Zerstörung der Oberfläche führen, die
ihrerseits die Gebrauchsdauer beeinflusst und
möglicherweise zu gefährlichen Situationen führt.
Gefahr
• Tauchen Sie nie das Netzkabel oder den Netzstecker in Wasser oder andere Flüssigkeiten.
• Halten Sie das Netzkabel von Hitzequellen fern.
Führen Sie es nicht vor der Mikrowellentür her.
Die Hitze kann das Kabel beschädigen.
• Schütten Sie niemals Flüssigkeiten in die Lüftungsöffnungen oder die Sicherheits-Türverriegelungen. Sollte doch Flüssigkeit hineingelangen, stellen Sie die Mikrowelle sofort
aus und ziehen Sie den Netzstecker aus der
Netzsteckdose. Lassen Sie die Mikrowelle
von qualifiziertem Fachpersonal überprüfen.
Sicherheitstipps
• Um das Brandrisiko in der Mikrowelle zu
minimieren: Behalten Sie, wenn Sie Speisen
in Kunststoff- oder Papierbehältern erhitzen,
die Mikrowelle immer im Auge, da sich die Materialien eventuell entzünden können.
• Beim Erhitzen von Getränken in der Mikrowelle
kann es zu einem zeitlich verzögerten Sprudeln
kommen, wenn das Getränk kocht. Seien Sie
deshalb vorsichtig beim Hantieren mit dem
Gefäß. Um plötzliches Sieden zu vermeiden:
– Stellen Sie, wenn möglich, einen Glasstab in
die Flüssigkeit, solange es erhitzt wird.
– Lassen Sie die Flüssigkeit nach dem Erhitzen
20 Sekunden in der Mikrowelle stehen, um
unerwartetes Aufbrodeln zu vermeiden.
• Durchstechen Sie die Haut von Kartoffeln,
Würstchen, oder ähnlichem. Sie können sonst
explodieren.
• Seien Sie vorsichtig beim Erhitzen von Flüssigkeiten. Benutzen Sie nur offene Gefäße, damit entstehende Luftblasen entweichen können.
• Sollte Ihnen Rauch auffallen, schalten Sie das
Gerät aus oder ziehen Sie den Stecker und halten Sie die Tür geschlossen, um eventuelle Flammen zu ersticken.
• Eier in der Schale und hart gekochte Eier dür-
fen nicht in der Mikrowelle erhitzt werden, da
sie selbst noch nach der Beendigung des Erhitzens in der Mikrowelle explodieren können.
Nahrungsmittel mit dicker Schale, wie etwa
Kartoffeln, ganze Kürbisse, Äpfel und Kastanien vor dem Kochen einstechen.
• Bewegen Sie die Mikrowelle nicht, während sie
in Betrieb ist.
- 94 -
Page 97

Erdungshinweise/ordnungsgemäße
Installation
Das vorliegende Gerät muss geerdet sein. Dieses
Gerät ist nur an eine vorschriftsmäßig geerdete
Steckdose anzuschließen. Es wird empfohlen,
einen eigenen Stromkreis zu verwenden, der nur
die Mikrowelle versorgt.
Gefahr: Unsachgemäßer Umgang mit dem Erdungsstecker kann das Risiko eines elektrischen
Schlages nach sich ziehen.
Hinweis: Sollten Sie Fragen zum Erden oder
den Anweisungen in Sachen Elektrik haben, fragen Sie eine Elektro- oder Wartungsfachkraft.
Weder der Hersteller noch der Händler können die
Haftung für eine Beschädigung der Mikrowelle
oder für Personenschäden übernehmen, die auf
eine Nichtbeachtung der Verfahrenshinweise für
den Elektroanschluss zurückgehen.
Funkstörungen bei anderen Geräten
Der Betrieb der Mikrowelle kann Störungen bei Ihrem
Radio, Fernseher oder ähnlichen Geräten hervorrufen.
Falls solche Interferenzen auftreten sollten, lassen
sie sich mit Hilfe der folgenden Maßnahmen
vermindern oder ausschalten:
• Tür und Dichtfläche der Mikrowelle säubern.
• Empfangsantenne des Radios oder Fernsehers
neu ausrichten.
• Mikrowelle an einen anderen Ort stellen als
den, an dem der Empfänger steht.
• Entfernen Sie die Mikrowelle vom Empfänger.
• Stecken Sie die Mikrowelle in eine andere
Steckdose ein. Mikrowelle und Empfänger
sollten einen unterschiedlichen Zweig des
Stromkreises in Anspruch nehmen.
Bestimmungsgemäßer
Gebrauch
Dieses Gerät ist zum Erhitzen und Zubereiten von
Lebensmitteln gemäß den beschriebenen Vorgehensweisen vorgesehen.
Jede Veränderung des Gerätes gilt als nicht bestimmungsgemäß und birgt erhebliche Unfallgefahren.
Für aus bestimmungswidriger Verwendung entstandene Schäden übernimmt der Hersteller keine
Haftung.
Dieses Gerät ist ausschließlich für die Benutzung in
privaten Haushalten bestimmt!
Benutzen Sie es nicht gewerblich, in Industrie- oder
Laborbereichen!
Lieferumfang
Mikrowelle
Glasteller
Grillständer
Rollenstern
Bedienungsanleitung
Kurzinformation
Technische Daten
Nennspannung: 230 - 240 V
50 Hz
Maximale Leistungsaufnahme: 1200 W
Maximale Leistungsabgabe
Mikrowelle: 800 W
Maximale Leistungsaufnahme
Grill: 1000 W
Mikrowellen-Frequenz: 2450 MHz
~
- 95 -
Page 98

Bevor Sie beginnen
Grundprinzipien beim Kochen in der
Mikrowelle
• Ordnen Sie die Speisen wohlbedacht an.
• Die dicksten Stellen kommen in Randnähe.
• Achten Sie auf die Garzeit. Wählen Sie die
kürzeste angegebene Garzeit und verlängern
Sie diese bei Bedarf. Massiv zu lange gekochte Speisen können zu rauchen beginnen oder
sich entzünden.
• Versehen Sie die Speisen während des Garens
mit einem für die Mikrowelle geeigneten Deckel.
Der Deckel verhindert ein Spritzen und trägt
außerdem dazu bei, dass Speisen gleichmäßig
gar werden.
• Wenden Sie die Speisen während der Zubereitung in der Mikrowelle einmal, damit Gerichte
wie Hähnchen oder Hamburger schneller
„durch“ sind.
• Große Lebensmittelstücke wie etwa Braten
müssen mindestens einmal gewendet werden.
• Sortieren Sie Lebensmittelteile wie etwa Hackbällchen nach der halben Garzeit komplett um.
Wenden Sie sie, und platzieren Sie die Bällchen von der Mitte des Geschirrs an den Rand.
Geeignetes Kochgeschirr verwenden
• Das ideale Material für einen Mikrowellenherd
ist mikrowellendurchlässig, lässt also die Energie durch den Behälter hindurch, um die
Speise zu erwärmen.
Mikrowellen sind nicht in der Lage, Metall zu
durchdringen. Aus diesem Grund dürfen keine
Metallgefäße und kein Metallgeschirr verwendet werden.
• Verwenden Sie beim Erhitzen in der Mikrowelle keine Erzeugnisse aus Recyclingpapier.
Diese können winzige Metallfragmente enthalten, die Funken und/oder Brände erzeugen
können.
• Es empfiehlt sich eher rundes/ovales Geschirr
statt eckiges/längliches, da Speisen im Eckbereich leicht verkochen.
Die nachstehende Liste versteht sich als allgemeine Hilfe für die Wahl des korrekten Geschirrs.
Kochgeschirr
Hitzebeständiges
Glas
Nicht hitzebeständiges Glas
Hitzebeständige
Keramik
Mikrowellengeeignetes
Plastikgeschirr
Küchenpapier Ja Nein Nein
Metalltablett/
-platte
Grillständer Nein Ja Nein
Alufolie &
Folienbehälter
Mikrowelle
Ja Ja Ja
Nein Nein Nein
Ja Ja Ja
Ja Nein Nein
Nein Ja Nein
Nein Ja Nein
Grill
Kombination
Brandgefahr!
Benutzen Sie niemals den Grillständer oder andere
metallische Gegenstände, wenn Sie die Mikrowelle
im Mikrowellenbetrieb oder im KombinationsGarvorgang verwenden. Metall reflektiert die
Mikrowellenstrahlung und führt so zu Funkenbildung. Das kann zu einem Brand führen und das
Gerät irreparabel beschädigen!
- 96 -
Page 99

Gerätebeschreibung
nicht
1 Display
2 Taste Türöffner
3 Glasteller
4 Rollenstern
5 Lüftungsschlitze
6 Taste Grill
7 Taste Startzeit (Preset)
8 Taste Auftauen
9 Taste Uhr
0 Taste Stop
q Drehregler / Start/Schnellstart
w Taste Küchentimer
e Taste Kombination
r Taste Leistung
t Grillständer
Erste Inbetriebnahme
• Sorgen Sie dafür, dass der Netzstecker
problemlos zugänglich ist, damit er im Fall von
Gefahren mühelos erreicht und gezogen
werden kann.
• Entfernen Sie nicht die Füße unter dem Mikrowellengerät.
• Blockieren Sie nicht die Lüftungsschlitze 5. An-
dernfalls kann es zu Beschädigungen des Geräts kommen.
• Stellen Sie das Gerät möglichst weit entfernt
von Radio- und Fernsehgeräten auf. Der
Betrieb der Mikrowelle kann Störungen des
Radio- oder Fernsehempfangs hervorrufen.
Achtung:
Stellen Sie die Mikrowelle nicht über einem Küchenherd oder einem sonstigen Hitze erzeugenden Gerät auf. Eine Aufstellung an einem solchen Ort könnte zur Beschädigung des Gerätes und damit auch
zum Erlöschen der Garantie führen.
Gerät aufstellen
Brandgefahr!
Diese Mikrowelle ist nicht für den Einbau in einen
Küchenschrank geeignet. In geschlossenen
Schränken ist die Belüftung des Gerätes nicht ausreichend gewährleistet. Das Gerät kann beschädigt
werden und es besteht die Gefahr eines Brandes!
• Wählen Sie eine ebene Fläche, die genug
Abstand für die Be- und Entlüftung des Gerätes
lässt:
Halten Sie zwischen Gerät und den angrenzenden Wänden einen Mindestabstand von
10 cm unbedingt ein. Stellen Sie sicher,
dass sich die Tür der Mikrowelle einwandfrei
öffnen lässt.
Halten Sie über der Mikrowelle einen Abstand
von mindestens 20 cm.
Gerät vorbereiten
• Entfernen Sie das Verpackungsmaterial und
eine eventuell auf der Gehäuseoberfläche
angebrachte Schutzfolie.
n
Entfernen Sie
Glimmer-Abdeckplatte, die zum
Schutz der Magnetfeldröhre im Garraum angebracht ist.
• Stecken Sie den Netzstecker in eine Netzsteckdose. Benutzen Sie eine 230 - 240 V ~,
50 Hz Netzsteckdose mit einer 16 A Sicherung. Es wird empfohlen, dass ein eigener
Stromkreis die Mikrowelle versorgt. Wenn Sie
sich nicht sicher sind, wie Sie die Mikrowelle
anschließen sollen, ziehen Sie einen Fachmann
zu Rate.
- 97 -
die hellgraue
Page 100

Vor dem Verwenden der Mikrowelle muss das Gerät zunächst leer aufgeheizt werden, damit fertigungsbedingte Rückstände verdampfen können.
Schalten Sie das Gerät ohne Lebensmittel und ohne
Zubehör (Glasteller 3, Rollenstern 4 und Grillständer t) in der Betriebsart Grillen ein:
• Drücken Sie einmal die Taste Grill 6 . Sie
wählen damit den Grillbetrieb. Im Display 1
erscheint das Symbol und das Symbol
blinkt. Es zeigt damit die Startbereitschaft an.
• Stellen Sie mit dem Drehregler q eine Garzeit
von 10 Minuten ein.
• Drücken Sie die Taste Start/Schnellstart q ,
um den Grillvorgang zu starten.
Hinweis:
Bei der ersten Inbetriebnahme kann es durch fertigungsbedingte Rückstande zu leichter Rauch- und
Geruchsentwicklung kommen. Dieses ist unschädlich.
Sorgen Sie für eine ausreichende Belüftung. Öffnen
Sie zum Beispiel ein Fenster.
Bedienen
Uhr einstellen
Wenn Sie die Mikrowelle zum ersten Mal in Betrieb
nehmen oder ein Stromausfall vorlag, zeigt das
Display 1 "1 : 0 1 " an.
1. Drücken Sie die Taste Uhr 9 . Im Display 1
erscheint „Hr 12“. Drücken Sie die Taste Uhr 9
noch einmal, wenn Sie in den 24-Stunden-
Modus wechseln wollen.
2. Stellen Sie durch Drehen am Drehregler q die
gewünschte Stunde ein. Das Uhrsymbol im
Display 1 blinkt.
3. Drücken Sie die Taste Start/Schnellstart q .
Die Minutenangabe erscheint.
4. Stellen Sie durch Drehen am Drehregler q die
gewünschten Minuten ein.
5. Wenn die Uhrzeit korrekt eingestellt ist, drücken
Sie die Taste Start/Schnellstart q . Das
Uhrsymbol im Display 1 leuchtet dauerhaft
und der Doppelpunkt zeigt durch Blinken an,
dass die Uhr läuft.
• Nach 10 Minuten schaltet sich das Gerät automatisch aus. Signaltöne erklingen. Öffnen Sie
die Tür. Warten Sie, bis es vollständig abgekühlt ist.
• Ziehen Sie den Netzstecker aus der Steckdose
und reinigen Sie das Gerät anschließend mit
einem feuchten Tuch von innen und trocknen
Sie es sorgfältig ab.
Zubehör einsetzen
• Setzen Sie den Rollenstern 4 mittig auf die An-
triebswelle im Garraum. Achten Sie darauf,
dass er komplett auf die Antriebswelle rutscht
und fest sitzt.
• Setzen Sie den Glasteller 3 mittig auf den Rol-
lenstern. Die drei Rollen müssen an der Führungskante am Glasteller 3 sitzen.
Um die aktuelle Tageszeit abzulesen, während die
Mikrowelle in Betrieb ist, drücken Sie die Taste Uhr
9 ; die Uhrzeit wird dann für ca. 4 Sekunden
im Display 1 angezeigt.
Küchentimer einstellen
Die Mikrowelle verfügt über einen Küchentimer, den
Sie unabhängig vom Mikrowellenbetrieb einsetzen
können.
1. Drücken Sie die Taste Küchentimer w
wenn das Gerät im Standby-Betrieb ist. Im
Display 1 erscheint „00:10“.
2. Stellen Sie nun mit dem Drehregler q die ge-
wünschte Zeit ein.
Sie können Zeiteinstellungen von 10 Sekunden
bis 95 Minuten vornehmen.
- 98 -
 Loading...