

KITCHEN TOOLS
4
Microwave SMW 800 A1
Microwave
Operating instructions
Kuchenka mikrofalowa
Instrukcja obsługi
KOMPERNASS GMBH
BURGSTRASSE 21 · D-44867 BOCHUM
www.kompernass.com
ID-Nr.: SMW800 A1-05/10-V2
Mikrohullámú sütő
Használati utasítás
Mikrovlnná trouba
Návod k obsluze
Mikrowelle
Bedienungsanleitung
Mikrovalovna pečica
Navodila za uporabo
Mikrovlnná rúra
Návod na obsluhu
SMW 800 A1
5
4
1
2
3
r
e
w
0
q
7
9
t
6
8
INDEX PAGE
Intended Usage 2
Safety instructions 2
Items supplied 5
Technical Data 5
Before you begin 6
Basic principles of microwave cookery . . . . . . . . . . . . . . . . . . . . . . . . . . . . . . . . . . . . . . . . . .6
Use suitable cookware . . . . . . . . . . . . . . . . . . . . . . . . . . . . . . . . . . . . . . . . . . . . . . . . . . . . . . .6
Description of the appliance 7
Commissioning 7
Installation of the appliance . . . . . . . . . . . . . . . . . . . . . . . . . . . . . . . . . . . . . . . . . . . . . . . . . . .7
Preparing the appliance . . . . . . . . . . . . . . . . . . . . . . . . . . . . . . . . . . . . . . . . . . . . . . . . . . . . . .7
Inserting accessories . . . . . . . . . . . . . . . . . . . . . . . . . . . . . . . . . . . . . . . . . . . . . . . . . . . . . . . . .8
Operation 8
Setting the Clock . . . . . . . . . . . . . . . . . . . . . . . . . . . . . . . . . . . . . . . . . . . . . . . . . . . . . . . . . . . .8
Setting the kitchen timer . . . . . . . . . . . . . . . . . . . . . . . . . . . . . . . . . . . . . . . . . . . . . . . . . . . . . .8
Child protection system . . . . . . . . . . . . . . . . . . . . . . . . . . . . . . . . . . . . . . . . . . . . . . . . . . . . . . .9
Query functions . . . . . . . . . . . . . . . . . . . . . . . . . . . . . . . . . . . . . . . . . . . . . . . . . . . . . . . . . . . . .9
Heating and cooking 9
Microwave operation . . . . . . . . . . . . . . . . . . . . . . . . . . . . . . . . . . . . . . . . . . . . . . . . . . . . . . . .9
Grill operation . . . . . . . . . . . . . . . . . . . . . . . . . . . . . . . . . . . . . . . . . . . . . . . . . . . . . . . . . . . . .10
Combination cooking processes . . . . . . . . . . . . . . . . . . . . . . . . . . . . . . . . . . . . . . . . . . . . . . .10
Auto menu 11
Starting the Auto-menu . . . . . . . . . . . . . . . . . . . . . . . . . . . . . . . . . . . . . . . . . . . . . . . . . . . . . .11
Programmes in detail . . . . . . . . . . . . . . . . . . . . . . . . . . . . . . . . . . . . . . . . . . . . . . . . . . . . . . . .12
Defrosting 14
Presetting the start time 14
Cleaning and Care 15
Troubleshooting 15
Disposal 16
Warranty and Service 16
Importer 16
Read the operating instructions carefully before using the appliance for the first time and preserve this
booklet for later reference. Pass the manual on to whomsoever might acquire the appliance at a later date.
- 1 -
MICROWAVE
Intended Usage
• Do not jam anything between the front of the
appliance and the door, and make sure that
there is no residual food or cleaning agent
on the seals.
This appliance is intended for the heating up and
preparation of foodstuffs according to the described
procedures.
Any modifications to the appliance shall be deemed
to be improper use and implies substantial risk of
accidents. The manufacturer declines to accept
responsibility for damage(s) arising out of usage
contrary to the instructions specified below.
This appliance is not intended for commercial use.
Safety instructions
Important!
Warnings regarding damage to the appliance.
Danger! / Risk of injury!
Warning about physical injuries and electric shock!
Risk of fire!
Warning about risks of fire.
Notice!
Note – Hints and tips for using the microwave.
Safety precautions for the avoidance of excessive
contact with microwave energy
• Do not try to operate the appliance while the
door is open, as this can lead to you coming
into contact with a potentially harmful dose of
microwave radiation. It is also important not
to break open or manipulate the safety locks .
Risk of injury!
• If the door or the door seal is damaged, under
no circumstances may you continue to use the
appliance. Arrange for it to be repaired as soon
as possible by qualified specialists.
• Never attempt to repair the appliance yourself.
Removal of the appliance housing could cause
the release of microwave energy. Arrange for
the repair to be carried out only by qualified
specialists.
• This appliance is not intended for use by individuals
(including children) with restricted physical, physiological or intellectual abilities or deficiences in
experience and/or knowledge unless they are
supervised by a person responsible for their safety
or receive from this person instruction in how the
appliance is to be used. Children should be
supervised to ensure that they do not play with
the appliance.
• Children may only be allowed to use the appliance without supervision if appropriate instructions have been given that have provided
the child with the knowledge to use the cooker
in a safe manner and to understand the risks
of improper use.
• Only use this appliance for its intended purpose
as described in this manual. Do not use any caustic
chemicals or vapours in this appliance. This microwave oven is especially designed for heating,
cooking, grilling, or drying foodstuffs.
It is not intended for use in industrial applications
or laboratories.
• Do not operate the microwave oven if the power
cable or plug are damaged. To avoid injury,
arrange for damaged power cables or plugs to
be exchanged by qualified specialists before
re-using the appliance.
• Keep children well away from the microwave
oven when it is in use. Risk of Burns!
- 2 -

• Under no circumstances should you remove the
microwave oven housing.
• Should the lamp in the interior of the microwave
oven need replacing, arrange for this to be done
by a qualified specialist.
• Never touch the microwave oven door, housing,
ventilation openings, accessories or the dinnerware
directly after the grill, combi or automatic menu
process. The parts will be very hot. Allow them
to cool down before cleaning them.
• Ensure that the plug is at all times easily accessible,
so that it can be quickly removed in the event of
an emergency.
• People fitted with a heart pacemaker should consult
their doctor about the possible risks of using a microwave oven before taking one into use.
• Do not allow the power cable to hang from a table
or work surface. Children could pull on it.
• After they have been warmed up, always open
containers, popcorn-bags etc. with the opening
pointing away from your body. Escaping steam
could lead to scalds.
• Never stand directly against the microwave oven
when opening the door. Escaping steam could
lead to scalds.
• Do not fry in the microwave. Hot oil can damage
parts of the appliance and utensils and even
cause skin burns.
• Always shake-up or stir warmed up baby glasses
or bottles! The contents could have heated up
unevenly and the baby could be burned/scalded
by them. At all events, check their temperature
before feeding them to the baby!
• Do not modify the microwave oven.
• Microwave radiation is dangerous! Maintenance and repairs requiring the removal of access
covers, which are intended for protection
against contact with microwave radiation, are to
be carried out by trained specialists only.
• Before consumption, check the temperature, so
as to avoid a potentially life-threatening scalding
for babies.
Cooking utensils may become hot from the heat
emitted by the food, so that you may require oven
gloves to touch them. In this case, a check should
also be made to ensure that the cooking utensils
are suitable for use with the microwave oven.
Attention! Hot surfaces!
Risk of fire
• Never leave the microwave oven unattended if
you are heating foodstuffs packed in plastics or
paper.
• Never place flammable materials close to the
microwave oven or the ventilation openings.
• Remove ALL metallic closures from the packaging
of the foodstuff that you intend to warm up.
Risk of fire!
• When making popcorn, use only popcorn-bags
suitable for microwave ovens.
• Do not use the microwave oven to warm up cushions
filled with kernels, cherry stones or gels.
Risk of fire!
• Do not use the microwave oven for storing foodstuffs
or other objects.
• Do not exceed the cooking times detailed by the
manufacturer.
• Do not place any objects on the microwave oven
when it is in use. The ventilation openings would
be blocked!
• Do not place the microwave oven adjacent to
other appliances discharging heat, for example,
an oven.
- 3 -
• Clean the microwave oven thoroughly after warming
up greasy foods, especially if they were not covered.
Allow the appliance to cool down completely
before cleaning it. Residues such as fat or grease
cannot be allowed to collect on the heating
elements of the grill. They could possibly ignite.
• Do not thaw frozen fat or oil in the microwave oven.
The fat or oil could ignite.
• Do not use an external timing switch or a separate
remote control system to operate the appliance.
Important! Appliance Damage!
• Do not use the microwave oven when it is empty.
The only exception is for the initial commissioning
(see chapter "Commissioning").
• Never insert foreign objects into the ventilation
openings or the door safety locks.
• Do not use metallic utensils which reflect micro-
waves and lead to sparking. Do not place tins
in the microwave oven.
• Do not place plastic containers in the microwave
oven immediately after a grill, combi or automatic
menu process. The plastic could melt.
• This microwave oven may not be located in areas
with high humidity or where moisture could collect.
• Liquids and other foods must not be heated in airtight containers, as these may explode and
damage the appliance.
• Do not lean on the microwave oven door.
• Insufficient cleanliness of the appliance could lead
to the destruction of the upper surfaces, which
themselves influence its useful lifespan and could
possibly also lead to dangerous situations.
Danger
• Never submerse the appliance, the power cable
or the plug in water or other fluids.
• Keep the power cable away from hot surfaces.
Do not lead it in front of the microwave oven door.
The heat could damage the cable.
• Never pour fluids into the ventilation openings
or the safety locks. Should fluids ever enter them,
immediately switch the microwave oven off and
remove the plug from the mains power socket.
Arrange for the appliance to be checked by
qualified specialists.
Safety tips
• To minimize the risk of fire in the microwave:
When heating food in plastic or paper containers,
always keep an eye on the microwave when it
is in operation, as these materials can catch fire.
• When heating drinks in the microwave, bubbling
may be delayed when the drink boils. Therefore,
be careful when handling the container.
To avoid sudden simmering:
- If possible, place a glass rod in the fluid for as
long as it is being heated.
- To avoid an unexpected reboiling, leave the
fluid to stand in the microwave oven for
ca. 20 seconds after being warmed up.
• Puncture the skins of potatoes, sausages or similar.
Otherwise, they could explode.
• Proceed with caution when warming up fluids.
Use only open containers, so that any air bubbles
produced can escape.
• Should you notice smoke, switch the appliance
off or remove the plug from the socket and
keep the door closed to suffocate any possible
flames.
- 4 -
• Eggs in their shells and hard-boiled eggs should
not be heated in the microwave oven as they
could explode, even on completion of the heating
process. Food with thick skins, such as potatoes,
whole pumpkins, apples and chestnuts must be
pricked before cooking.
• Do not transport the microwave oven when it is
in use.
Earthing information/correct installation
This appliance must be earthed. This appliance is
to be connected only to a correctly earthed power
socket. An individual circuit, solely for the connection
of the microwave oven, is recommended.
• Plug the microwave into another wall socket.
The microwave and the receiver should be
connected to different circuits.
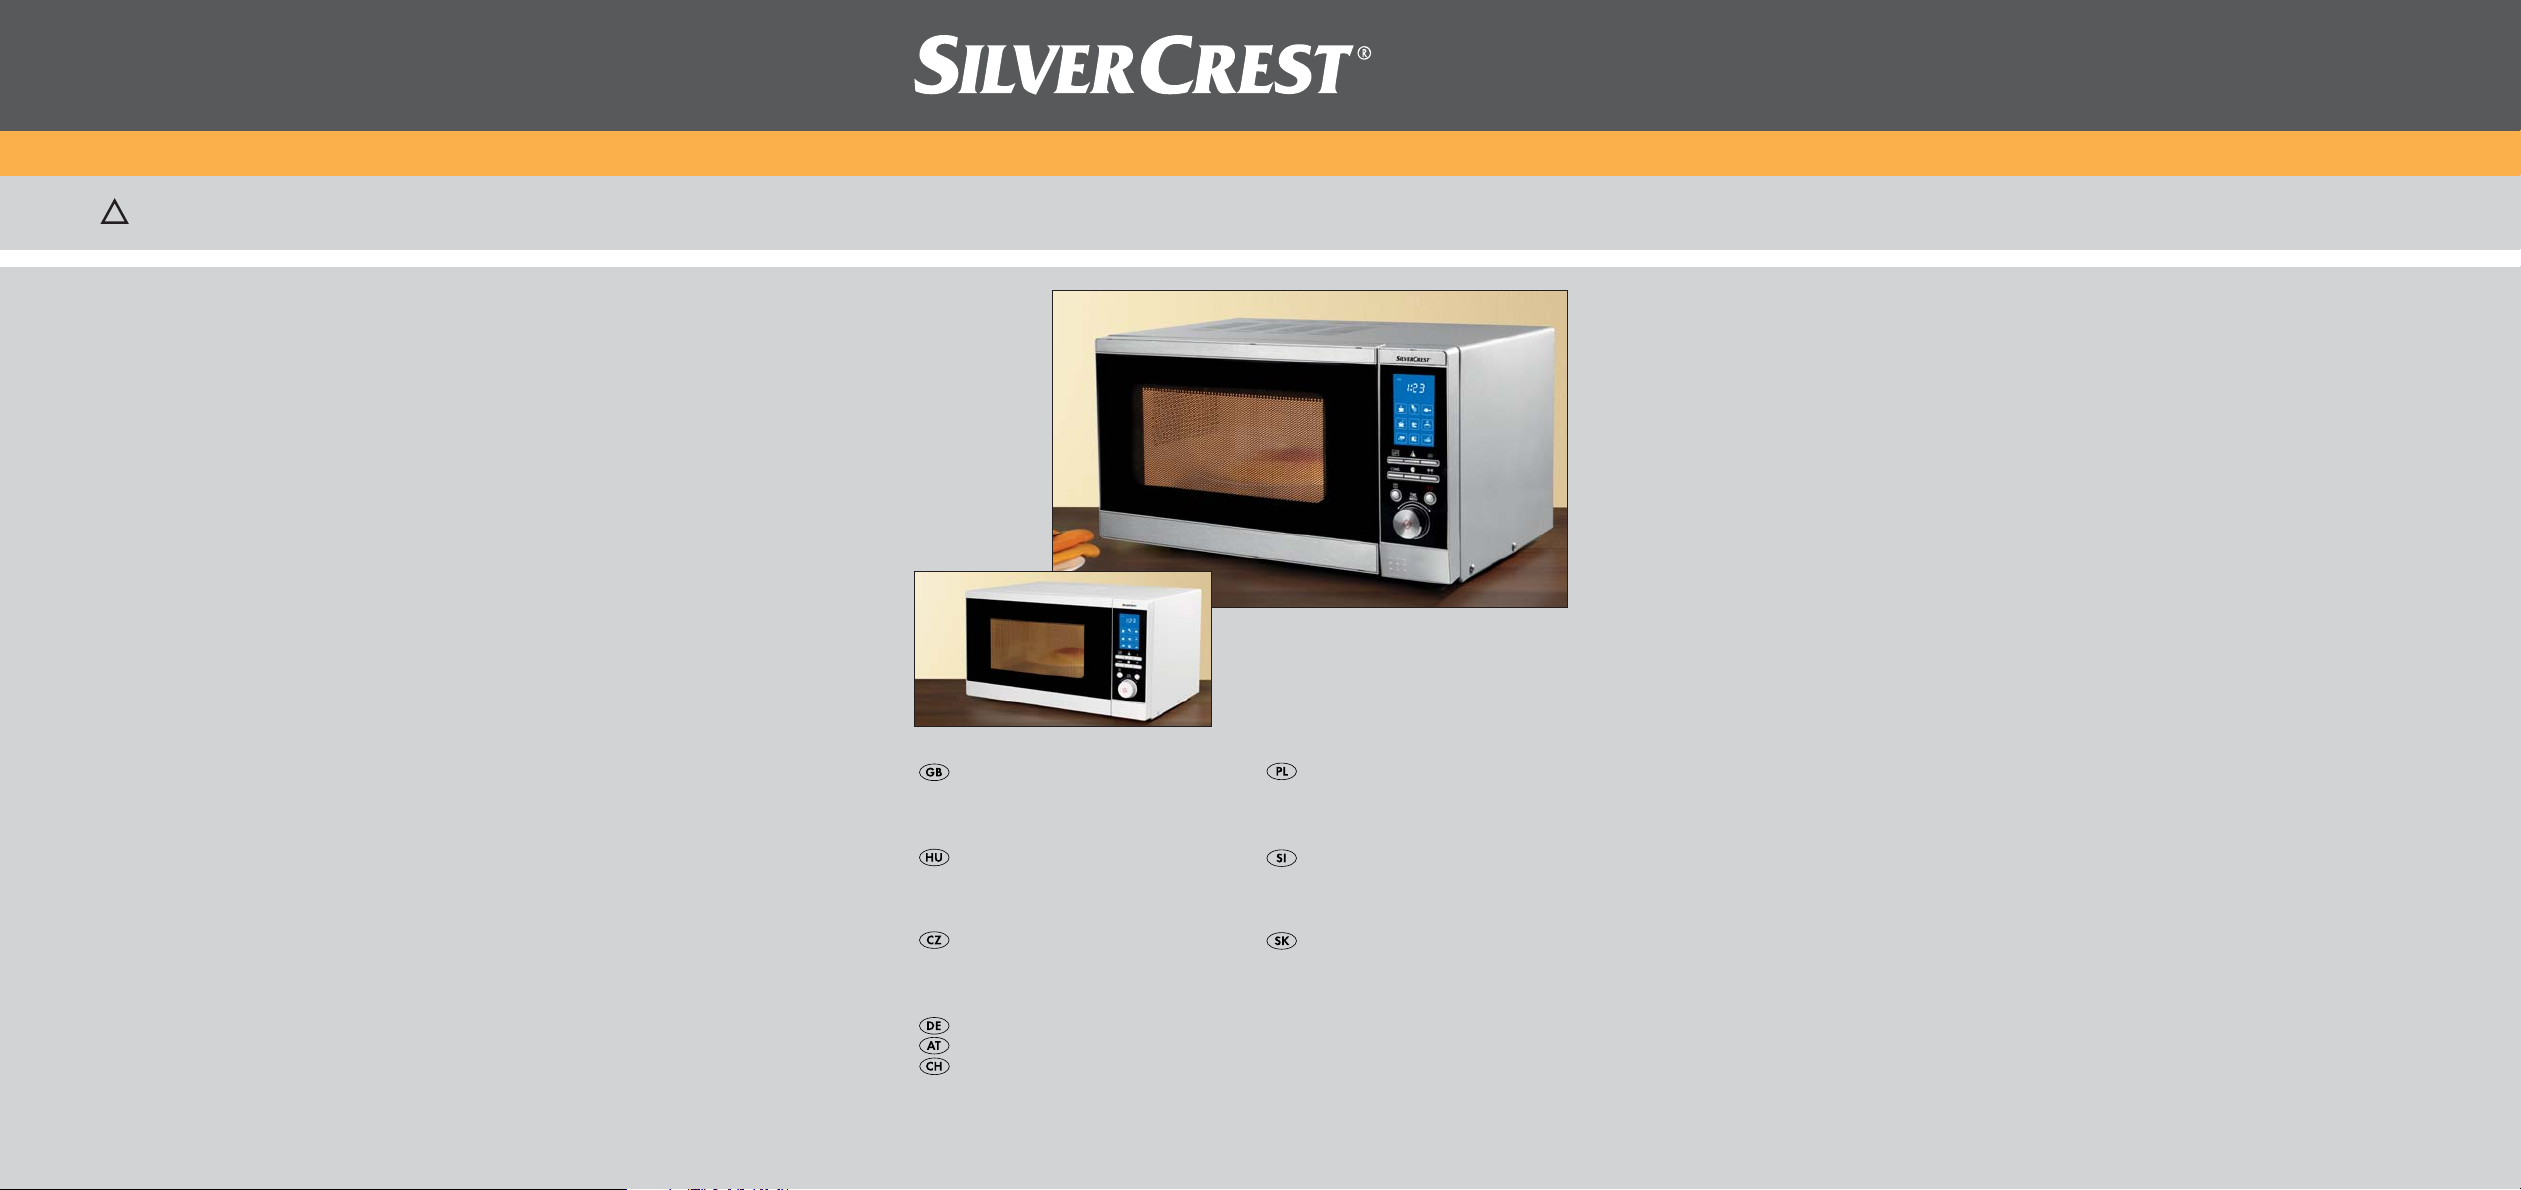
Items supplied
Microwave
Glass plate
Grill stand
Star rotator
Operating instructions
Concise instruction sheet
Danger: Improper use of the earthing connector
could increase the risk of an electric shock.
Note: Should you have any questions about earthing or about the instructions on the use of
this electrical appliance given here, please
consult an electrician or
a maintenance technician.
Neither the manufacturer nor the dealer can accept
liability for damage to the microwave oven or injury
to persons resulting from failure to comply with the
instructions for electrical connection.
Interference with other appliances
The operation of the microwave may cause interference
on your radio, television or similar appliances.
If such interference should occur, they may be reduced
or corrected by the following remedial measures:
• Clean the door and the seal of the microwave.
• Re-align the receiver antenna of your radio or
television.
• Position the microwave in a different place to
the receiver.
• Move the microwave away from the receiver.
Technical Data
Power rating: 230 - 240 V
50 Hz
Maximum power consumption: 1200 W
Maximum power output
Microwave: 800 W
Maximum power consumption
Grill: 1000 W
Microwave frequency: 2450 MHz
~
- 5 -

Before you begin
Basic principles of microwave cookery
• Arrange the food with consideration.
• The thickest parts near the edges.
• Pay attention to the cooking time. Select the
shortest possible stated cooking time and increase
as required. Food that is cooked too long can
begin to smoke or catch fire.
• Cover the food during cooking with a lid suitable
for microwave cookery. The lid prevents splashing
and helps in the even cooking of the food.
• While cooking, turn the food in the microwave
once so that items such as chicken or hamburgers
are cooked more quickly.
• Large pieces of food, such as joints of meat,
must be turned at least once.
• Completely re-arrange foods such as meatballs
after half the cooking time. Turn them and move
the meatballs from the middle of the cookware
to the edge.
• We recommend the use of round/oval cookware
instead of square or oblong containers, as food
in corner areas tends to overcook.
The following list provides general hints to assist
you in selecting the correct cookware.
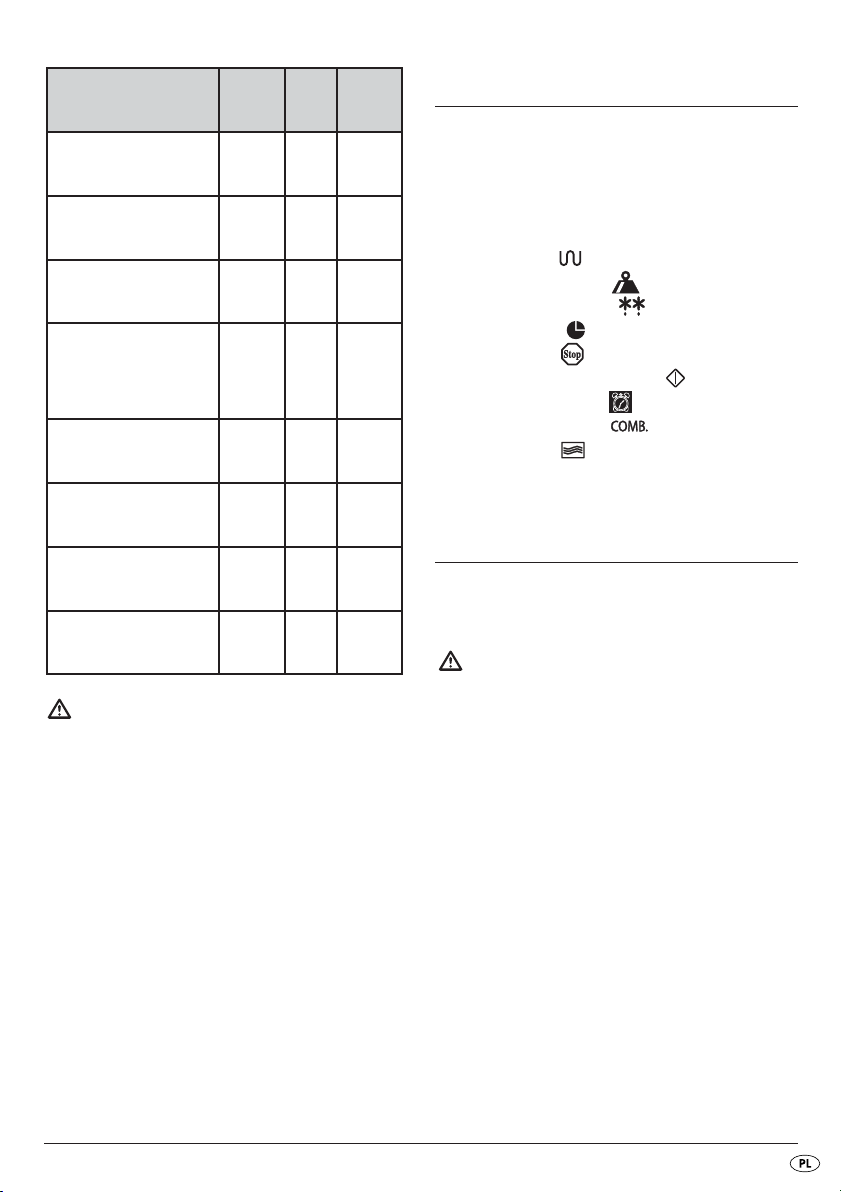
Cookware
Heat-resistant glass Yes Yes Yes
Non-heat-resistant
glass
Heat-resistant
ceramics
Plastic crockery
suitable for microwave
Kitchen roll Yes No No
Microwave oven
No No No
Yes Ye s Yes
Yes No No
Grill
Combination
Use suitable cookware
• The ideal material for a microwave oven is
microwave-permeable, allowing the energy to
penetrate the container to heat the food.
Microwaves cannot permeate metal. Therefore,
metal containers and cookware should not be
used.
Microwaves cannot permeate metal. For this
reason metal containers and cookware should
not be used.
• When using the microwave for heating do not
use products made of recycled paper. These
can contain minute fragments of metal, which
can generate sparks and/or fires.
Metal tray/plate No Yes No
Grill stand No Ye s No
Alufoil & Foil
containers
No Ye s No
Warning:
Never use the grill stand or other metallic objects
when you are using the appliance in the microwave
mode or in the combination cooking process.
Metals reflect the microwave radiation and it leads
to the generation of sparks. This could cause a fire
and irreparably damage the appliance!
- 6 -
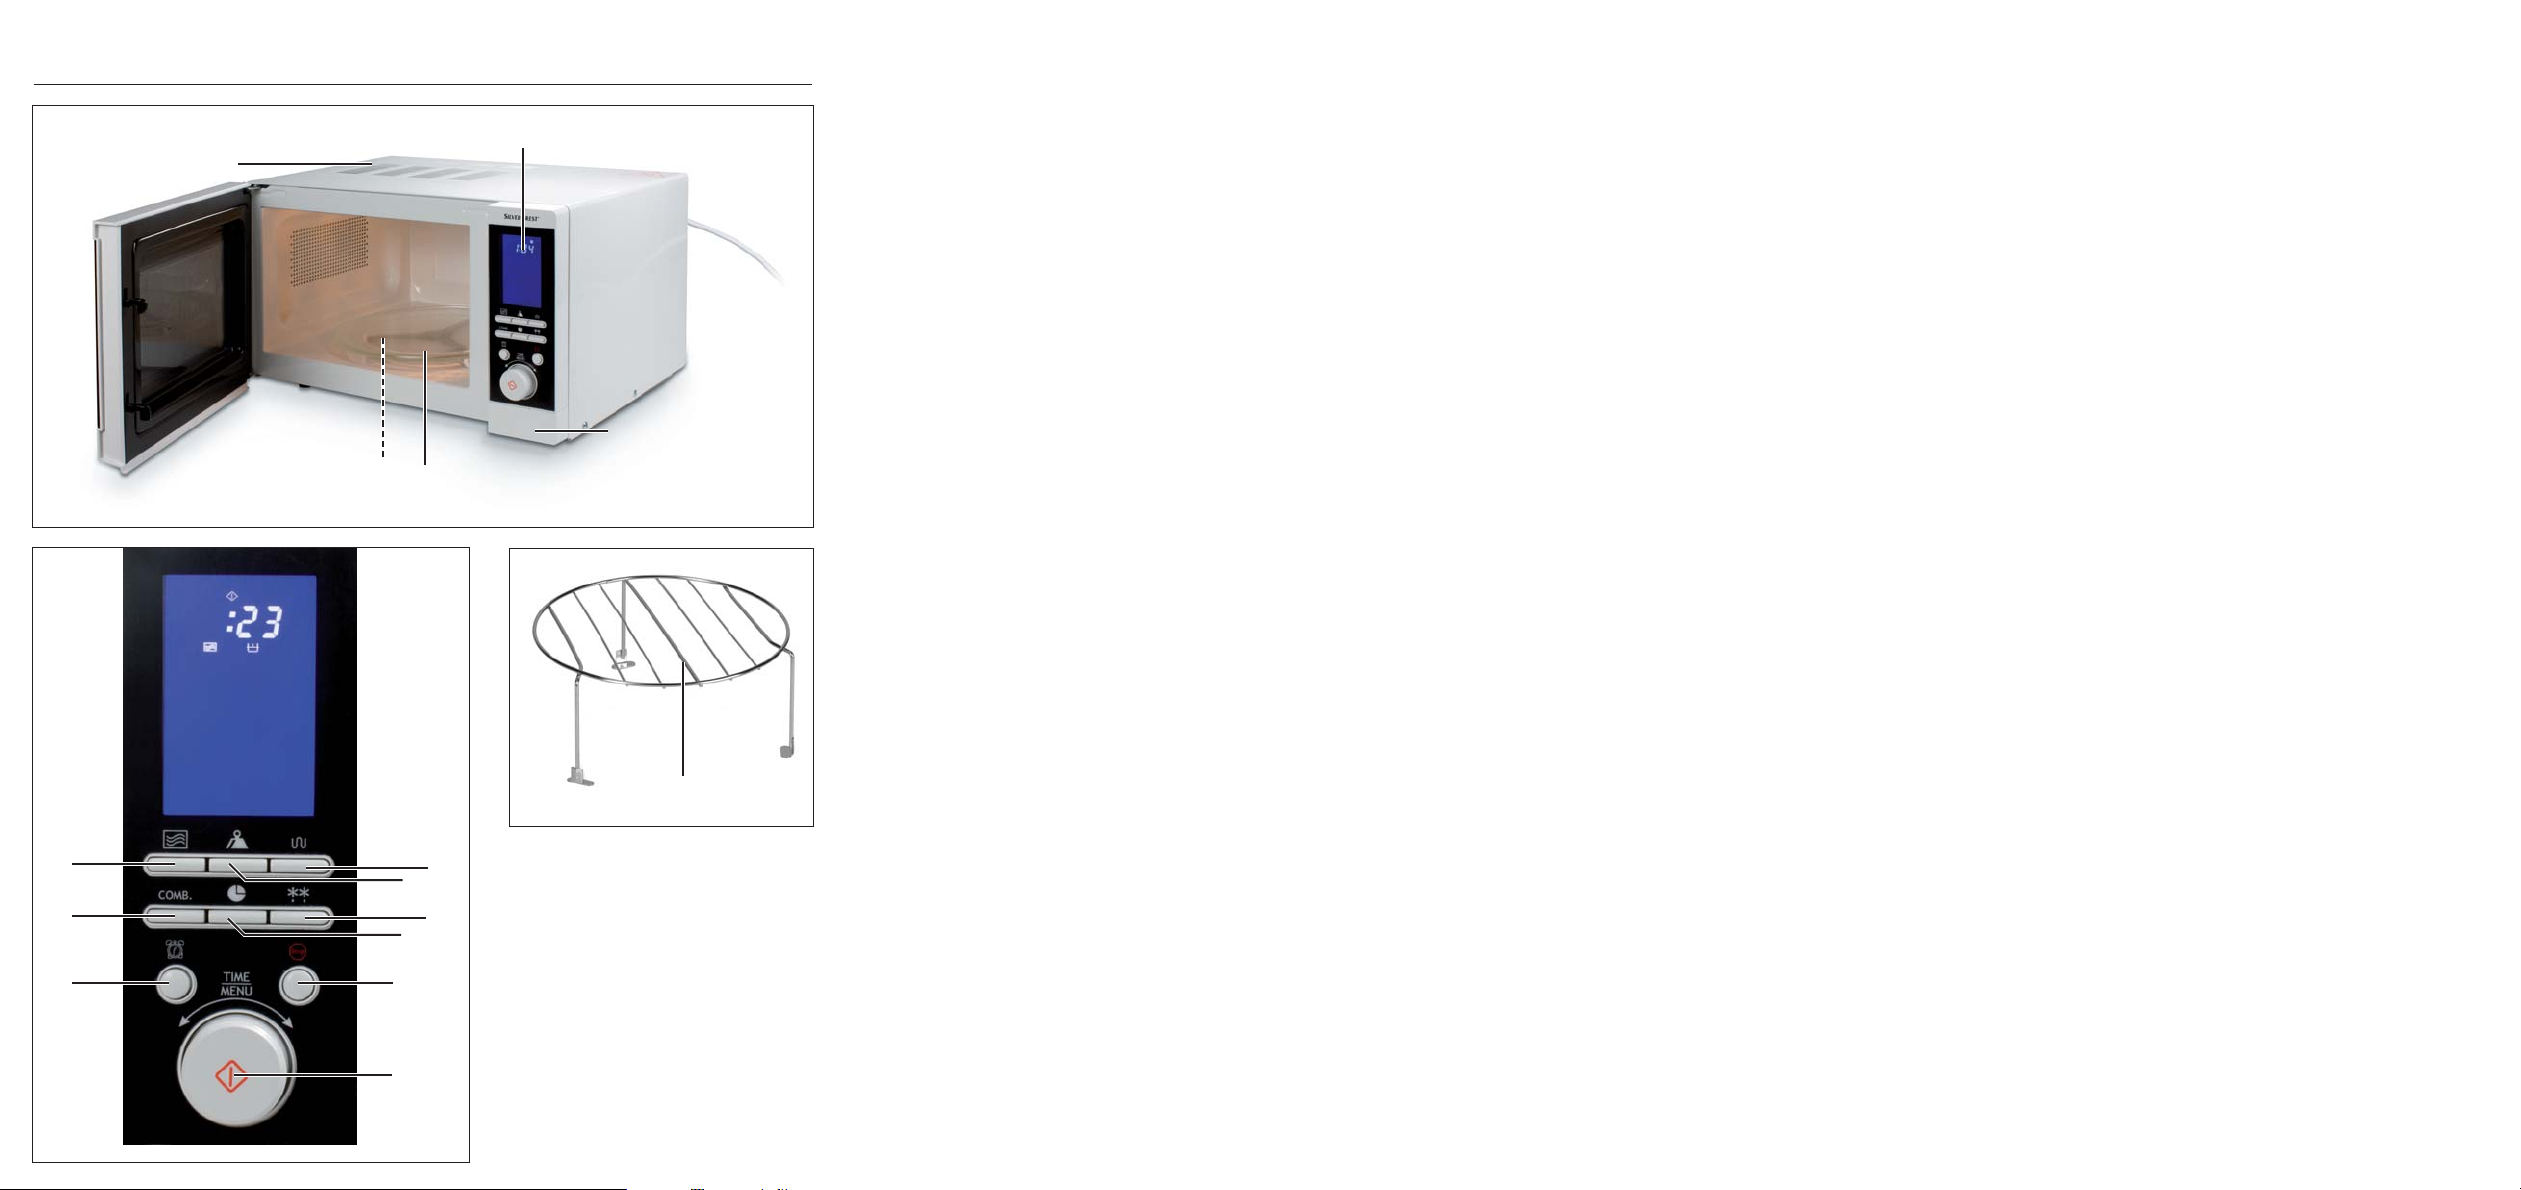
Description of the appliance
1 Display
2 Door opener button
3 Glass plate
4 Star rotator
5 Cold air intake
6 Grill Button
7 Weight/Amount Button
8 Defrosting button
9 Time Button
0 Stop button
q Control dial/Start/Quickstart
w Kitchen timer button
e Combination Button
r Operation button
t Grill stand
• Ensure that the electrical plug is accessible
without problem, so that in case of danger it
can be easily reached and removed.
• Do not remove the pads underneath the microwave oven.
• Do not block the ventilation slots 5. If you do,
it could damage the appliance.
• Install the appliance as far away as possible
from radios and televisions. The operation of
the microwave oven can cause malfunctions to
radio and televsision reception.
Warning:
Do not install the microwave above a cooker or any
other appliance generating heat. Installation in such
a location could cause damage to the appliance and
lead to a subsequent cancellation of the warranty
provisions.
Commissioning
Installation of the appliance
Warning:
This microwave oven is not suitable for installation in
a kitchen cabinet. In closed cabinets sufficient ventilation
for the appliance cannot be assured. The appliance
could be damaged and there would be the additional
risk of a fire!
• Select an even surface offering sufficient space
for the adequate ventilation of the appliance:
Ensure that you maintain a minimum distance
of 10 cm from neighbouring walls/surfaces.
Ensure that the door of the microwave oven
can be opened easily.
Maintain a gap of at least 20 cm above the
microwave oven.
Preparing the appliance
• Remove all packaging materials and any
protective film on the surface of the housing.
Note:
Do not remove the light grey flimmer cover plate,
which is mounted in the cooking area to protect
the magnetron.
• Insert the plug into a power socket.
Use a 230 - 240 V, 50Hz, mains power socket
with a 16A fuse. It is recommended that the
microwave oven is powered from its own ring
main. If you are unsure about how to connect
the microwave oven, consult a specialist.
Before the first regular usage of the microwave oven
the appliance must be heated up to remove any
remaining production residues.
- 7 -
Without foodstuffs or accessories (glass plate 3, star
roller 4 and grill stand t) ), switch the appliance on
in the mode Grill:
• Press the button Grill once 6 .
With this you select the Grill operation.
In the display 1 appears the symbol and
the symbol blinks. This indicates readiness
to start.
• Adjust the control dial q to a cooking time of
10 minutes.
• Press the button Start/Quick start q to
start the grilling process.
Note:
On the first usage, the generation of light smoke and
a slight smell can occur, this is due to the production
residues. This is unharmful. Provide for sufficient
ventilation. For example, open a window.
• After 10 minutes, the appliance switches itself
off automatically. Signal tones sound. Open the
door. Wait until it has cooled down completely.
• Remove the plug from the mains power socket
then, after cleaning the appliance with a moist
cloth, dry it carefully.
Inserting accessories
• Place the star rotator 4 centrally on the drive
shaft in the cooking area. Ensure that it slides
completely onto the axle and is firmly seated.
• Place the glass plate 3 centrally on the star
rotator. The three rollers must be seated on the
leading edge on the glass plate 3.
Operation
Setting the Clock
When you take the microwave oven into use for the
first time, or there has been a power cut, the display 1
indicates "1 : 0 1 ".
1. Press the button Clock 9 . "Hr 12" appears
in the display 1.Press the button Clock 9
once again should you wish to switch to the 24hour mode.
2. By turning the control dial q programme in the
current hour. The clock symbol in the display 1 blinks.
3. Press the button Clock 9 .
The minute indicator appears.
4. By turning the control dial q, programme in the
current minute.
5. When the correct time is programmed in, press
the button Clock 9 .
The clock symbol in the display 1 glows
continuously and the colon indicates, by blinking,
that the clock is running.
To read off the current time when the microwave oven
is in operation, press the button Clock 9 ; the
time will then be indicated in the display 1 for
approx. 4 seconds.
Setting the kitchen timer
The microwave oven is provided with a kitchen timer
which you can use independently of the microwave
operation.
1. Press the button Kitchen timer w when the
appliance is in standby mode. In the display
appears 1 "00:10".
2. Now set the desired time using the control dial q.
You can select any time range from 10 seconds
to 95 minutes.
3. Press button Start/Quick Start q . The
appliance emits an acoustic signal. The count
down begins. After approx. 3 seconds the current time is shown once again.
- 8 -
The cooking timer progresses further in the background.
If you wish to check the progress of the kitchen timer,
press the kitchentimer button w .
It appears for a brief period in the kitchen timer.
As soon as the programmed time has expired, an
acoustic signal sounds.
Take note:
To stop the countdown of the kitchen timer, press
the button Kitchen timer w so that the remaining
time of the kitchen appears in the display. Press, during the period that the remaining time of the kitchen
timer is being shown in the display 1,the Stop 0
button. The kitchen timer will then be cancelled
and the current time appears in the display 1.
Child protection system
Engage this setting to prevent accidental activation
by children and other persons not familiar with the
operation of the appliance.
The symbol for Child safety appears in the display 1 and, for as long as this function is activated,
the appliance cannot be put into operation.
• Press and hold the button Stop 0 until a
signal tone sounds and the symbol for Child
Safety appears in the display 1. The
buttons and the control dial now no longer have
a function.
• To deactivate Child Safety, press and hold the
Stop button 0 until an signal tone sounds
and the symbol for Child Safety extinguishes.
Heating and cooking
Microwave operation
Notice
During the cooking process, drops of water can form
on the oven door or on the housing. This is normal and
is not an indication of a malfunction.When the appliance has cooled down, wipe the moisture off with a
dry cloth.
Warning:
Never use the grill stand t or other metallic objects
when you are using the appliance in the microwave
mode. Metals reflect the microwave radiation and it
leads to the generation of sparks. This could cause
a fire and irreparably damage the appliance!
Selecting the operation level
• Press the button Operation r the appropriate number of times to set the required power
level.
• 1x for 800 Watts of power (P800).
• 2x for 700 Watts of power (P700).
• 3x for 600 Watts of power (P600).
• 4x for 500 Watts of power (P500).
• 5x for 400 Watts of power (P400).
• 6x for 300 Watts of power (P300).
• 7x for 200 Watts of power (P200).
• 8x for 100 Watts of power (P100).
Query functions
Query the time during operation
During the cooking process press the button
Clock 9 .
The time appears in the display 1 for approx.
4 seconds.
Query the power level operation
During the cooking process press the button
Operation r .
In the display 1 the activated operational level
appears for approx. 3 seconds.
The power setting level is indicated in the display 1
(e.g. P800 at 800 Watts of power).
Programming the cooking time
After you have selected the power level, programme
in the desired cooking time:
• Turn the control dial q, until the desired cooking
time has been programmed in.
- 9 -
The increments for setting the time with the control
dial q are as follows:
• from 10 sec. to 5 min: in 10 second increments
• from 5 to 10 min: in 30 second increments
• from 10 to 30 min: in 1 minute increments
• from 30 to 95 min: in 5 minute increments
Aborting/stopping an input process
Press the button Stop 0 once to cancel or end
input of data. The appliance reverts to standby mode.
Starting the cooking process
When you have programmed in the power level
and the cooking time, and the symbol blinks in
the display 1, you can start the cooking process:
To start the cooking process, press button Start/
Quickstart q . In the display 1 the symbols
for microwave operation and cooking or
appear. The programmed time counts back-
wards.
Interrupting the cooking process
Press the button Stop 0 once to interrupt a cooking process . The appliance interrupts the cooking
process and stops the remaining time. Press the button Start/Quick start q to continue the cooking
process.
Abort the cooking process
Press the button Stop 0 twice to stop the cooking
process. The appliance reverts to standby mode.
Quick start
With this function you can immediately begin cooking
at 800W power for 30 seconds (or longer, up to
12 minutes).
• Press the button Start/Quick Start q once.
In the display 1 appear the symbols for micro-
wave operation and cooking , as well
as ":30". The microwave starts the cooking process for 30 seconds. The count down begins.
Should you wish to cook for a longer period, repeatedly press the button Start/Quickstart q
until the desired time is reached.
Grill operation
You can use the grill function for thin slices of meat,
steaks, hamburgers, sausage or chicken pieces. It is
also excellent for use in making topped sandwiches
and gratins. Always use the grill stand t for grilling.
To achieve an optimal grilling result.
Always place the Grill stand t on the Glass plate 3.
1. Press the button Grill 6 to activate the
grill function.
In the display 1 appears the symbol for the
grill function and „:10“.
2. Using the control knob q, set the required
cooking time. The maximum possible cooking
time setting is 95 minutes.
3. To start the grilling function press the button
Start/Quick start q .
4. Turn the meat after about half of the cooking
time.
Cooking process is finished
When a cooking process is complete, "End" appears
in the display 1 and 4 signal tones sound. If the
door of the microwave is not opened, the signal
tones sound again after about 2 minutes.
Combination cooking processes
This function combines the grill function and the normal
microwave operation. In combined mode, the microwave automatically cooks for a certain amount of
time and grills for the remaining time. You may notice
a quiet clicking noise when the oven is switching
between modes.
- 10 -
Warning:
Never use the grill stand t, or other metallic objects,
when you are using the appliance in the combination
cooking process. Metals reflect the microwave radiation
and it leads to the generation of sparks. This could
cause a fire and irreparably damage the appliance!
Notice
The microwave calculates the time/operational level
for fresh foods. Frozen foods will not be cooked
with the times programmed into the microwave.
If needs be, defrost frozen foods with the defrost
programme beforehand (see section "Defrosting").
Combination 1
In Combination 1 the microwave element amounts
to 30% and the grill element amounts to 70% of the
cooking time. This is suitable for, for example, fish,
potatoes or gratins.
1. Press the button Combination e once
to activate combination 1. In the display 1
appears as well as „:10“.
2. Using the control dial q set the required cooking
time. The maximum possible cooking time setting
is 95 minutes.
3. To start, press the button Start/Quick start q .
Combination 2
In Combination 2 the microwave element amounts
to 55% and the grill element amounts to 45% of the
cooking time. This is suitable for, for example,
puddings, omelettes, poultry dishes or lasagne.
1. Press the button Combination e twice
to activate combination 2. In the display 1
appears as well as „:10“.
2. Using the control dial q set the required cooking
time. The maximum possible cooking time setting
is 95 minutes.
3. To start, press the button Start/Quick start q
.
Starting the Auto-menu
1. Turn the Control dial q slowly to the left. In the
display 1 appears a number (e.g. "3" for
Auto Programme 3 (fish)), the Symbol "Fish"
and . Select the appropriate Auto-menu
for your foodstuff (1 to 9).
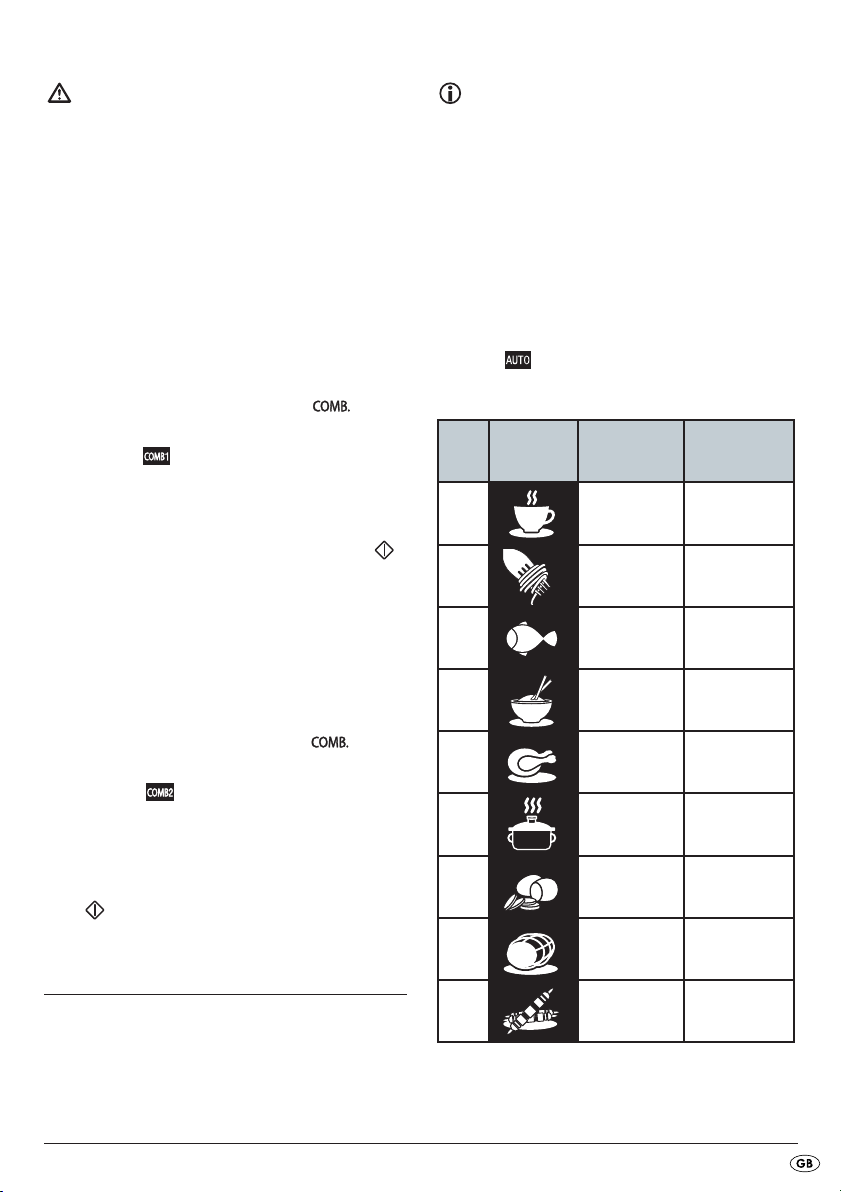
Nr. Symbol Foodstuff
1 Beverages 1 - 3
2 Noodles 100 - 300g
Select the appropriate Auto-menu for your food-
3 Fish 100 - 1000g
stuff (1 to 9). The respective programme numbers
are to be found on the appliance.
4 Rice 100 - 1000g
5 Chicken 800 - 1400g
6 Warming 100 - 1000g
7 Potatoes 150 - 600g
Weight
(Portions)
Auto menu
For foods that are intended to be prepared in the
Auto Menu modus it is not necessary to programme
in the period of the cooking process and the power
level. It is quite sufficient to enter which type of food
is to be cooked/boiled, and its weight.
8 Roasting 300 - 1300g
9 Kebabs 100 - 700g
- 11 -
2. Press, repeatedly if need be, the button Weight/
Amount 7 until the required weight resp.
required number of portions appears in the
display 1. The symbol blinks.
3. Press the button Start/Quick start q to
start the cooking process.
Note
In order to achieve an even cooking or warming,
in the programmes 5, 8 and 9 the food should be
turned over after about two thirds of the cooking
time.The microwave automatically interrupts the programme after this time: “turn" appears in the display 1 and signal tones sound to remind you of
the requirement for turning the food.
• Open the door and turn the food over. Proceed
cautiously with the possibly already hot food.
• Press the button Start/Quickstart q to continue
the cooking process.
Take note:
If you wish to dispense with turning, simply wait for
the signal tones to finish. The microwave continues
your programme automatically after approx. 30
seconds.
Notice
Should the meal not be properly cooked on completion
of the auto-menu, continue cooking for a couple of
minutes with the Quick start programme. For programmes that continue with utilisation of the grill
function (Programme numbers 5, 8 and 9), the food
can be cooked further with the grill function. Extended
cooking with the grill function also increases the
browning level of the food.
Important
When using the programes with incorporated grill
function, under no circumstances should you use any
form of covering or cookware that is not heat resistant,
as these could melt or ignite themselves!
Risk of injury!
After a cooking process, the Glass plate 3 is very
hot! You should therefore always use an oven cloth
or heat resistant oven gloves when removing it from
the cooking area.
Note:
Take note that size, shape and the type of foodstuff
determines the result of the cooking process.
Programmes in detail
Programme 1: Beverages
This programme runs only with utilisation of microwave power. Subject to the number of portions, the
programme runs for between 1:30 and 3:50 minutes.
• Place the beverage that you wish to heat up on
the Glass plate 3 in the cooking area. If you
wish to place several glasses or cups in the
microwave oven, ensure that the receptacles do
not touch each other.
Notice
To avoid sudden simmering:
• If possible, place a glass rod in the fluid for as
long as it is being heated.
• To avoid an unexpected reboiling, leave the
fluid to stand in the microwave oven for ca.
20 seconds after being warmed up.
Programme 2: Noodles
This programme runs only with utilisation of microwave power.
Subject to the weight programmed in, this programme
runs for between 25 and 35 minutes.
• When cooking noodles use a tall container, as
there is a great risk of it boiling over.
• Use as much water as when cooking them
conventionally.
• First of all, boil the water up in the covered container.
Then add the noodles. After this, you can start
the auto-menu for noodles.
• Finally, allow the noodles to stand for approx.
3 minutes.
- 12 -
Programmme 3: Fish
This programme runs only with utilisation of microwave power.
Subject to the weight programmed in, this programme
runs for between approx 3:30 and 16 minutes.
• Lay the pieces of fish on a plate suitable for
microwave ovens, add a little butter or an other
fat, add flavouring to taste and then start the
auto-menu for fish.
Programmme 4: Rice
This programme runs only with utilisation of microwave power.
Subject to the weight programmed in, this programme
runs for between 16 and 36 minutes.
• When cooking rice use a tall container, as there
is a great risk of it boiling over. Use 400 ml water
for, for example, 200 gr of rice.
• Place the rice in the container, fill it with the required volume of liquids and then allow the rice
to swell for approx 3 minutes.
• Cover the container. Ensure that it is not sealed
airtight. After this, you can start the auto-menu
for rice.
Programmme 5: Chicken
This programme runs over several cooking stages,
using microwave power and the grill function.
Subject to the weight programmed in, this programme
runs for between 39 and 50 minutes.
• Place the chicken on a plate suitable for microwave ovens.
• Season to taste and then start the auto-menu for
chicken.
• A whole chicken must be turned, otherwise the
side facing upwards could dry out. For this reason
the microwave oven automatically interrupts the
programme after about 2/3 of the time has
elapsed and a signal tone sounds.
Turn the chicken and then press the button Start/
Quick start q once again to continue the
programme.
Programmme 6: Warming
This programme runs only with utilisation of microwave power.
Subject to the weight programmed in, this programme
runs for between approx 1:00 and 6:20 minutes.
• Place the receptacle with the foodstuff that you
wish to warm up on the glass plate 3 in the
cooking area and then start the auto-menu for
warming.
Programme 7: Potatoes
This programme runs only with utilisation of microwave power.
Subject to the weight programmed in, this programme
runs for between 3:50 and 11 minutes.
Tip!
Use unpeeled potatoes for the cooking process.
Prick the skins a couple of times.
• Place the unpeeled potatoes onto a plate suitable
for microwave ovens or into a receptacle. As far
as possible, use potatoes of the same size.
If possible, the potatoes should not touch each other.
Programmme 8: Roasting
This programme runs over several cooking stages,
using microwave power and the grill function.
Subject to the weight programmed in, this programme
runs for between 16 and 60 minutes.
• Place the roast on a plate suitable for microwave
ovens. Season to taste and then start the auto-menu
for roasting.
• A whole roast must be used, otherwise the side
facing upwards could dry out. For this reason
the microwave oven automatically interrupts the
programme after about 2/3 of the time has
elapsed and a signal tone sounds.
Turn the roast and then press the button Start/
Quick start q once again to continue the
programme.
- 13 -
Programme 9: Kebabs
This programme runs over several cooking stages,
using microwave power and the grill function.
Subject to the weight programmed in, this programme
runs for between 9 and 27 minutes.
• Place the kebabs on a plate suitable for microwave ovens. Season to taste and then start the
auto-menu for kebabs.
• The kebabs must be turned to ensure even cooking.
For this reason the microwave oven automatically
interrupts the programme after about 2/3 of the
time has elapsed and a signal tone sounds.
Turn the kebabs and then press the button Start/
Quick start q once again to continue the
programme.
Defrosting
Note:
If you wish to dispense with turning, simply wait for
the signal tones to finish. The microwave continues
your programme automatically after approx. 30
seconds.
Presetting the start time
With this programme you can preset a specific start
time for the cooking or grilling of the foodstuff. If the
programming is carried out correctly, the appliance
starts automatically at the programmed time.
Take note:
The clock must be correctly set to be able to select
the function " Presetting the start time".
This function enables you to defrost meat, poultry and
fish with ease. The defrosting time and the power level
are calculated and set automatically once you have
entered the weight.
1. Press button Defrosting 8 .
In the display 1 appears and .
The symbol blinks.
2. Using the control dial q enter in the weight of
the foodstuff to be defrosted. You can enter in
a weight of between 100 g and 1800 g.
3. Press button Start/Quick Start q .
The appliance calculates the defrosting time automatically. It appears in the display 1 and starts to
countdown.
The microwave oven automatically interrupts the
defrosting after about 1/2 of the time and a signal
tone sounds. Turn the food that is being defrosted
and then press the button Start/Quick start q
once again to continue the programme.
1. Programme in the required microwave function
(cooking, grilling or automatic-menu (except
auto-programme 6):
For microwave operation: Press the button Operation r the appropriate number of times to
set the required power level. Programme the
cooking time with the rotary switch q.
For grill operation: Press the button Grill 6
to activate the grill function.
Set the desired grilling time using the rotary
switch q.
For automatic-menu: Using the control dial q
select the appropriate programme for your foodstuff (excluding auto-programme 6). Press the
button Weight/Amount 7 as required until
the desired measure appears in the display 1.
2. Press the button Clock 9 . In the display 1
„01: “ blinks and the hour-glass symbol
appears.
3. Turn the control knob q to programme the hours.
4. Press the clock button 9 , now the minute
figures appear.
5. Turn the control knob q to programme the minutes.
- 14 -
6. Press the button Start/Quick start q . The
hour-glass symbol blinks. The
start time is shown. The microwave oven automatically starts the cooking process at the programmed time.
A signal tone sounds when it starts.
Take note:
To erase the saved start time and thus cancel the
saved procedure, press the Stop 0 button.
The hourglass symbol disappears and the time
is displayed.
Cleaning and Care
Risk of personal injury!
Before cleaning, switch the microwave oven off and
remove the plug from the mains power socket.
Under no circumstances should you immerse
the appliance in water or other liquids.
This could result in you receiving a fatal electric
shock and the appliance could be damaged.
• Always keep the interior of the microwave oven
clean.
• If splashes of food or spilt liquids stick to the
walls of the microwave, wipe them off with
a damp cloth.
• Use a mild detergent if the microwave is more
heavily soiled.
• Avoid using cleaning sprays and other aggressive
cleaning agents, as they can cause stains, stripes
or a blurring of the door surface.
• Clean the external walls with a damp cloth.
• To avoid damage to the functional components
in the interior of the microwave, do not let liquids
seep in through the ventilation slits 5.
• Regularly remove splashes or contaminants.
Clean the door, both sides of the viewing window, the door seals and adjacent components
with a damp cloth. Do not use abrasive cleaning
agents.
• If steam should collect on or around the outside
of the appliance door, wipe it off with a soft towel. This can happen if the microwave is
operated in extremely humid conditions.
• Clean the Glass plate 3 regularly. Clean the
plate in warm soapy water or in the dishwasher.
• Clean the grill stand t in warm dishwater and
dry it well.
• Regularly eliminate odours. Put a deep microwave bowl with a cup of water, juice and peel
of a lemon into the microwave. Heat for 5 minutes.
Wipe off thoroughly and rub dry with a cloth.
• Should replacement of the bulb in the microwave
be necessary, arrange for it to be exchanged
by a dealer or consult our Service Department.
Troubleshooting
The display 1 indicates nothing.
• The plug is not inserted into a power socket.
Check the plug.
• The mains power socket is defective.
Try another mains power socket.
• The display 1 is defective.
Contact our Customer Services Department.
The appliance does not respond to pressing the
buttons.
• The Child safety facility is activated. Deactivate
the Child safety facility (see chapter "Operation“).
The appliance does not start the cooking/
warming process.
• The door is not properly closed.
Close the door correctly.
- 15 -
The Glass plate 3 generates loud noise when
revolving.
• The Glass plate 3 is not correctly positioned
on the star rotator 4. Insert the Glass plate 3
correctly into the cooking area.
• The star rotator 4 and/or the floor of the
cooking area are unclean. Clean the star
rotator 4 and the floor of the cooking area.
Disposal
Do not dispose of this appliance in your
normal domestic waste. This product is
subject to the provisions of European
Directive 2002/96/EC.
Dispose of the appliance through an approved disposal
centre or at your community waste facility.
Observe the currently applicable regulations.
In case of doubt, please contact your waste disposal
centre.
The warranty covers only claims for material and
maufacturing defects, but not for transport damage,
for wearing parts or for damage to fragile components, e.g. buttons or batteries. This product is for
private use only and is not intended for commercial
use. The warranty is void in the case of abusive and
improper handling, use of force and internal tampering not carried out by our authorized service
branch. Your statutory rights are not restricted in
any way by this warranty.
The warranty period will not be extended by repairs
made under warranty. This applies also to replaced
and repaired parts. Any damage and defects extant
on purchase must be reported immediately after unpacking the appliance, at the latest, two days after
the purchase date. Repairs made after the expiration of the warranty period are subject to payment.
DES UK LTD
Tel.: 0871 5000 700
e-mail: support.uk@kompernass.com
(£ 0.10 / minute)
Dispose of all packaging materials in an
environmentally friendly manner.
Warranty and Service
The warranty for this appliance is for 3 years from
the date of purchase. The appliance has been manufactured with care and meticulously examined before delivery. Please retain your receipt as proof of
purchase. In the event of a warranty claim, please
make contact by telephone with our Service Department. Only in this way can a post-free despatch for
your goods be assured.
Kompernass Service Ireland
Tel: 1850 930 412 (0,082 EUR/Min.)
Standard call rates apply. Mobile operators may vary.
e-mail: support.ie@kompernass.com
Importer
KOMPERNASS GMBH
BURGSTRASSE 21
44867 BOCHUM, GERMANY
www.kompernass.com
- 16 -

SPIS TREŚCI: STRONA
Zastosowanie zgodnie z przeznaczeniem 18
Wskazówki dotyczące bezpieczeństwa 18
Zakres dostawy 21
Dane techniczne 22
Czynności przygotowawcze przed pierwszym użyciem 22
Główne zasady obowiązujące podczas gotowania w kuchence mikrofalowej . . . . . . . . .22
Używanie odpowiednich naczyń do gotowania . . . . . . . . . . . . . . . . . . . . . . . . . . . . . . . . . .22
Opis urządzenia 23
Pierwsze uruchomienie 23
Ustawianie urządzenia . . . . . . . . . . . . . . . . . . . . . . . . . . . . . . . . . . . . . . . . . . . . . . . . . . . . . .23
Przygotowanie urządzenia . . . . . . . . . . . . . . . . . . . . . . . . . . . . . . . . . . . . . . . . . . . . . . . . . . .24
Korzystanie z oprzyrządowania . . . . . . . . . . . . . . . . . . . . . . . . . . . . . . . . . . . . . . . . . . . . . .24
Obsługa 25
Ustawianie czasu . . . . . . . . . . . . . . . . . . . . . . . . . . . . . . . . . . . . . . . . . . . . . . . . . . . . . . . . . .25
Ustawianie czasomierza kuchennego . . . . . . . . . . . . . . . . . . . . . . . . . . . . . . . . . . . . . . . . . .25
Blokada rodzicielska . . . . . . . . . . . . . . . . . . . . . . . . . . . . . . . . . . . . . . . . . . . . . . . . . . . . . . . .25
Funkcje odczytu . . . . . . . . . . . . . . . . . . . . . . . . . . . . . . . . . . . . . . . . . . . . . . . . . . . . . . . . . . . .25
Gotowanie 26
Kuchenka mikrofalowa . . . . . . . . . . . . . . . . . . . . . . . . . . . . . . . . . . . . . . . . . . . . . . . . . . . . . .26
Grill . . . . . . . . . . . . . . . . . . . . . . . . . . . . . . . . . . . . . . . . . . . . . . . . . . . . . . . . . . . . . . . . . . . . .27
Gotowanie łączone . . . . . . . . . . . . . . . . . . . . . . . . . . . . . . . . . . . . . . . . . . . . . . . . . . . . . . . .27
Menu trybu automatycznego 28
Uruchamianie menu Automatyka . . . . . . . . . . . . . . . . . . . . . . . . . . . . . . . . . . . . . . . . . . . . . .28
Opisy programów . . . . . . . . . . . . . . . . . . . . . . . . . . . . . . . . . . . . . . . . . . . . . . . . . . . . . . . . . .29
Rozmrażanie 31
Nastawianie czasu rozpoczęcia pracy 31
Czyszczenie i pielęgnacja 32
Usuwanie usterek 32
Utylizacja 33
Gwarancja i serwis 33
Importer 34
Niniejszą instrukcję należy zachować, aby móc także później z niej skorzystać, w przypadku
przekazywania urządzenia osobom trzecim należy przekazać także instrukcję!
- 17 -
KUCHENKA
MIKROFALOWA
Zastosowanie zgodnie
z przeznaczeniem
Urządzenie służy do podgrzewania i przyrządzania
artykułów spożywczych zgodnie z przedstawionym
opisem.
Każda zmiana w zakresie urządzenia jest uznawana
za użytkowanie niezgodne z przeznaczeniem i grozi
odniesieniem poważnych obrażeń. Producent nie
bierze na siebie żadnej odpowiedzialności w przypadku powstania szkody, wynikającej z użytkowania
urządzenia w sposób całkowicie niezgodny
z przeznaczeniem.
To urządzenie nie jest przeznaczone do użycia
komercyjnego.
Wskazówki dotyczące
bezpieczeństwa
Uwaga!
Ostrzeżenia przed uszkodzeniami urządzenia.
Niebezpieczeństwo! / Niebezpieczeństwo odniesienia obrażeń!
Ostrzeżenie przed odniesieniem obrażeń spowodowanych porażeniem prądem elektrycznym!
Niebezpieczeństwo pożaru!
Ostrzeżenie przed wybuchem pożaru.
Wskazówka!
Wskazówki i porady, które warto wykorzystać w pracy
z kuchenką mikrofalową.
Środki ostrożności mające na celu unikanie
częstego kontaktu z energią mikrofali
• Nie próbuj używać urządzenia przy otwartych
drzwiach, ponieważ praca przy otwartych
drzwiach może prowadzić do kontaktu ze
szkodliwą dawką promieniowania mikrofal.
Ważne jest również, aby nie wyważać ani nie
manipulować przy blokadach zabezpieczających.
• Między częścią frontową urządzenia a drzwiami
nie wolno niczego zakleszczać, a także należy
uważać, aby zanieczyszczenia lub pozostałości
po środkach czyszczących nie zbierały się na
powierzchni uszczelnień.
Zagrożenie odniesieniem obrażeń!
• Nigdy nie używaj kuchenki mikrofalowej z usz-
kodzonymi drzwiami lub uszczelkami drzwi.
Zleć naprawę wykwalifikowanemu personelowi
specjalistycznemu.
• Nie podejmuj prób naprawy urządzenia. Zdję-
cie obudowy może spowodować uwolnienie energii mikrofal. Naprawy urządzenia powierzaj wyłącznie wykwalifikowanym osobom.
• Urządzenie nie jest przeznaczone do użytkowania
przez osoby (w tym dzieci) z ograniczoną sprawnością fizyczną, sensoryczną bądź umysłową lub
nieposiadające doświadczenia i / lub wiedzy,
chyba że będą one przebywały pod opieką osoby
odpowiedzialnej za ich bezpieczeństwo lub
uzyskają od niej wskazówki dotyczące właściwego
używania urządzenia. Nie można pozwolić
dzieciom na zabawę urządzeniem.
• Dzieciom powinno się pozwalać korzystać ze
sprzętu kuchennego bez opieki osoby dorosłej
tylko wtedy, gdy przekazano odpowiednią instrukcję, dzięki której dziecko będzie potrafiło
bezpiecznie użytkować sprzęt kuchenny i zrozumie,
co może mu grozić w przypadku nieprawidłowej
obsługi urządzenia.
- 18 -
• Korzystaj z urządzenia wyłącznie w zakresie
zgodnym z przeznaczeniem oraz zgodnie z opisem
znajdującym się w instrukcji obsługi. Nie stosuj
żadnych żrących substancji chemicznych. Kuchenka
mikrofalowa jest przeznaczona specjalnie do
podgrzewania, gotowania, grillowania lub
suszenia produktów spożywczych.
Nie jest przeznaczona do wykorzystania w warunkach przemysłowych i laboratoryjnych.
• Nigdy nie używaj kuchenki mikrofalowej z uszkodzonym kablem lub wtyczką sieciową.
Dla własnego bezpieczeństwa urządzenie
z uszkodzonym kablem lub wtyczką przekaż
do naprawy wykwalifikowanemu serwisowi.
• Podczas pracy kuchenki mikrofalowej nie pozwól,
aby dzieci zbliżały się do drzwi urządzenia.
Niebezpieczeństwo poparzenia!
• Pod żadnym względem nie zdejmuj obudowy
kuchenki mikrofalowej.
• W celu wymiany oświetlenia we wnętrzu kuchenki
mikrofalowej, przekaż urządzenie do wykwalifikowanego punktu naprawczego.
• Bezpośrednio po zakończeniu funkcji grillowania,
kombi lub automatycznej nie dotykaj drzwi kuchenki
mikrofalowej, obudowy, otworów wentylacyjnych,
akcesoriów lub sztućców. Te części są bardzo
gorące. Przed przystąpieniem do czyszczenia
odczekaj do ostygnięcia elementów.
• Zwróć uwagę, aby wtyczka była zawsze łatwo
dostępna, aby w sytuacji awaryjnej można ją
było wyciągnąć z gniazdka.
• Osoby posiadające wszczepiony rozrusznik serca
powinny przed uruchomieniem kuchenki mikrofalowej skontaktować się z lekarzem, celu
uzyskania informacji o grożącym ryzyku.
• Zwracaj uwagę, aby kabel sieciowy nie zwisał
nad stołem ani nad powierzchnią roboczą.
Dzieci mogą pociągnąć za kabel.
• Puszki, torebki do popcornu itp. po nagrzaniu
otwieraj zawsze w taki sposób, aby otwór był
skierowany od ciała. Ulatniająca się para może
prowadzić do poparzeń.
• Otwierając drzwi kuchenki mikrofalowej nie stawaj
bezpośrednio przed urządzeniem. Ulatniająca
się para może prowadzić do poparzeń.
• W kuchence mikrofalowej nie wolno smażyć.
Gorący olej może uszkodzić elementy urządzenia
i naczynia oraz spowodować poparzenia skóry.
• Kubki lub butelki dla dzieci po podgrzaniu
zawartości zawsze wstrząśnij lub zamieszaj!
Zawartość może się nierównomiernie podgrzać
i dziecko mogłoby się poparzyć. Przed podaniem
dziecku podgrzanego posiłku, zawsze sprawdź
temperaturę!
• Nie dokonuj przebudowy kuchenki mikrofalowej.
• Promienie mikrofalowe są niebezpieczne!
Wykonanie czynności konserwacyjnych lub
naprawczych, które wiążą się ze zdjęciem pokryw
chroniących przed kontaktem z promieniowaniem
mikrofal, zleć wykwalifikowanemu zakładowi
naprawczemu.
• Aby uniknąć poważnym poparzeń niemowląt,
przed rozpoczęciem karmienia należy sprawdzić
temperaturę przygotowanego pokarmu.
Naczynia mogą się nagrzać od gorącej potrawy
do tego stopnia, że będzie konieczne chwytanie
przez rękawicę. Sprawdź, czy używane naczynia
nadają się do użycia w kuchence mikrofalowej.
Uwaga! Gorąca powierzchnia!
Niebezpieczeństwo pożaru
• Nie pozostawaj kuchenki mikrofalowej bez
nadzoru podczas podgrzewania opakowań
plastikowych lub papierowych.
• W pobliżu kuchenki mikrofalowej lub jej otworów
wentylacyjnych nie stawiaj żadnych łatwopalnych
materiałów.
• Z wszystkich podgrzewanych opakowań usuń
wszystkie metalowe zamknięcia.
Niebezpieczeństwo pożaru!
• Do przygotowania popcornu stosuj wyłącznie
torebki do popcornu przystosowane do przygotowania w kuchence mikrofalowej.
- 19 -

• Nie używaj kuchenki mikrofalowej do nagrzewania
poduszek wypełnionych, ziarnem, pestkami wiśni
lub żelem. Niebezpieczeństwo pożaru!
• Nie używaj kuchenki mikrofalowej do przechowywania produktów spożywczych i innych
przedmiotów.
• Nie przekraczaj czasów gotowania podanych
przez producenta.
• Nie stawiaj żadnych przedmiotów na pracującą
kuchenkę mikrofalową. Otwory wentylacyjne
zostaną wtedy zasłonięte!
• Nie stawiaj kuchenki mikrofalowej w pobliżu innych
urządzeń emitujących ciepło, jak np. piekarnik.
• Wyczyść kuchenkę mikrofalową po przyrządzeniu
potraw zawierających dużą ilość tłuszczu, szczególnie, jeśli potrawa była przyrządzana bez
przykrywki. Przed przystąpieniem do czyszczenia
kuchenki mikrofalowej odczekaj do jej całkowitego
ostygnięcia. Na elementach grzewczych grilla
nie mogą odkładać się żadne nieczystości, np.
tłuszcz. Tłuszcz może się rozgrzać do wysokiej
temperatury i spowodować zapalenie.
• W kuchence mikrofalowej nie rozmrażaj tłuszczu
ani oleju. Tłuszcz lub olej może się zapalić.
• Do sterowania pracą urządzenia nie próbuj
używać żadnych zewnętrznych zegarów sterujących
ani żadnego innego systemu zdalnego sterowania.
Uwaga! Ryzyko uszkodzenia
urządzenia!
• Nie włączaj nigdy pustego urządzenia. Wyjątkiem
od tej reguły jest pierwsze uruchamianie (patrz
rozdział „Pierwsze uruchamianie”).
• Nigdy nie wkładaj żadnych przedmiotów do
otworów wentylacyjnych ani do blokad zabezpieczających drzwi.
• Nie używaj naczyń z metalu, ponieważ odbijają
one mikrofale i powodują tworzenie się iskier.
Nie wkładaj do kuchenki mikrofalowej puszek
blaszanych.
• Bezpośrednio po zakończeniu funkcji grillowania,
kombi lub menu trybu automatycznego nie wkładaj
do kuchenki mikrofalowej plastikowych pojemników.
Plastik może się stopić.
• Nie stawiaj urządzenia w miejscach zwiększonej
wilgotności lub tam, gdzie gromadzi się wilgoć.
• Artykuły płynne lub podobne muszą być podgrzewane w szczelnie zamkniętych pojemnikach,
gdyż w przeciwnym wypadku mogą eksplodować
i uszkodzić urządzenie.
• Nie opieraj się o drzwi kuchenki mikrofalowej.
• Brudne naczynie do gotowania może spowodować
zniszczenie powierzchni, co z kolei ma wpływ na
skrócenie okresu użytkowania i w pewnych sytuacjach może powodować różne zagrożenia.
Niebezpieczeństwo
• Nie zanurzaj kabla sieciowego ani wtyczki pod
wodę ani żadną inną ciecz.
• Kabel sieciowy trzymaj z dala od źródeł ciepła.
Nie zbliżaj ich przed drzwiami kuchenki mikrofalowej. Wysoka temperatura może uszkodzić
kabel.
• Nigdy nie wlewaj żadnych cieczy do otworów
wentylacyjnych ani do blokad zabezpieczających drzwi. Jeśli jednak ciecz przedostanie się
w te miejsca, wyłącz natychmiast kuchenkę
mikrofalową i wyciągnij wtyczkę z gniazdka.
Przekaż kuchenkę mikrofalową do wykwalifikowanego punktu naprawczego.
Wskazówki bezpieczeństwa
• Aby ograniczyć ryzyko powstania pożaru w kuchence mikrofalowej: W wypadku podgrzewania
potraw w opakowaniach plastikowych lub torebkach zawsze obserwuj pracę urządzenia,
ponieważ opakowanie może się zapalić.
• W wypadku podgrzewania napojów w kuchence
mikrofalowej może dojść do opóźnionego wykipienia w czasie gotowania. Z tego względu
należy postępować ostrożnie z naczyniami.
Aby nie doprowadzić do gwałtownego wrzenia:
- Jeśli to możliwe, zawartość do momentu zago-
towania mieszaj szklanym przedmiotem.
- 20 -
- Aby nie dopuścić do niekontrolowanego wykipienia zawartości, po zagotowaniu odczekaj
około 20 sekund i dopiero wtedy wyjmij naczynie
z kuchenki mikrofalowej.
• Ponacinaj skórkę ziemniaków, kiełbasek lub podobnych produktów. Jeśli tego nie uczynisz, produkty
mogą wybuchnąć podczas przygotowania
w kuchence.
• Postępuj ostrożnie podczas podgrzewania cieczy.
Stosuj wyłącznie otwarte pojemniki, aby pęcherzyki
powietrza mogły się ulatniać.
• Jeśli zauważysz dym, wyłącz urządzenie lub
wyciągnij wtyczkę i pozostaw zamknięte drzwi,
aby zgasić ewentualne płomienie.
• W kuchence mikrofalowej nie można gotować
na miękko ani na twardo jajek, ponieważ jajka
po zakończeniu gotowania mogą wybuchnąć
w kuchence mikrofalowej. Artykuły spożywcze
w grubych skorupkach, takie jak ziemniaki, dynie
w całości, jabłka i kasztany jadalne należy przed
rozpoczęciem gotowania ponacinać.
• Nie dotykaj pracującej kuchenki mikrofalowej.
Wskazówki dotyczące uziemiania / prawidłowa instalacja
To urządzenie musi być prawidłowo uziemione.
Można je przyłączać wyłącznie do prawidłowo
uziemionego gniazdka zasilania. Zaleca się stosowanie
oddzielnego obwodu elektrycznego, przeznaczonego
wyłącznie do zasilania kuchenki mikrofalowej.
Zagrożenie: Niewłaściwe obchodzenie się
z wtyczką z uziemieniem może prowadzić do
powstania ryzyka porażenia prądem elektrycznym.
Ani producent, ani sprzedawca nie może ponosić
odpowiedzialności za uszkodzenie kuchenki mikrofalowej lub szkody osobowe, wynikające z nieprzestrzegania wskazówek postępowania z przyłączem
elektrycznym.
Zakłócenia radiowe innych urządzeń
Używanie kuchenki mikrofalowej może spowodować
zakłócenia w pracy odbiornika radiowego, telewizyjnego i podobnych urządzeń.
W wypadki wystąpienia tego typu zakłóceń, spróbuj
je ograniczyć lub całkowicie wyeliminować za
pomocą następujących środków:
• Wyczyść drzwi i powierzchnie uszczelniające
kuchenki mikrofalowej.
• Ustaw ponownie antenę odbiorczą radioodbiornika lub telewizora.
• Ustaw kuchenkę mikrofalową z dala od miejsca
ustawienia odbiornika.
• Oddal kuchenkę mikrofalową od odbiornika.
• Przyłącz kuchenkę mikrofalową do innego gniazdka. Kuchenka mikrofalowa i odbiornik powinny
korzystać z różnych odgałęzień obwodu elektrycznego.
Zakres dostawy
kuchenka mikrofalowa
szklany talerz
stojak do grilla
trójramienny element obrotowy
Instrukcja obsługi
Skrócona instrukcja obsługi
Wskazówka: W razie dodatkowych pytać na
temat uziemienia lub elektryki, należy zwrócić się
do elektryka.
- 21 -

Dane techniczne
Napięcie znamionowe: 230–240 V
50 Hz
Maksymalny pobór mocy: 1200 W
Moc maksymalna kuchenki
Mikrofala: 800 W
Maksymalny pobór mocy
Grill: 1000 W
Częstotl. mikrofal: 2450 MHz
~
Czynności przygotowawcze
przed pierwszym użyciem
Główne zasady obowiązujące podczas
gotowania w kuchence mikrofalowej
• Należy starannie i rozmieszczać potrawy.
• Najgrubsze miejsca powinny się znajdować
w pobliżu krawędzi.
• Uważaj na czas gotowania. Wybieraj zawsze
najkrótszy z podanych czasów gotowania
i wydłużaj go w razie potrzeby.
Potrawy o dużej objętości gotowane zbyt długo
mogą się spalić lub zapalić.
• Potrawy na czas gotowania należy przykrywać
odpowiednią pokrywką. Pokrywka chroni przed
pryskaniem potrawy na zewnątrz i powoduje, że
potrawy ugotują się równomiernie.
• W trakcie gotowania obracaj potrawę, aby
szybciej się ugotowała.
• Większe kawałki, takie jak pieczeń muszą być
odwrócone przynajmniej jeden raz.
• Potrawy takie jak np. kotlety mielone należy
przekręcić w całości w połowie gotowania.
Należy je nie tylko przekręcić, ale również
przełożyć ze środka na krawędzie naczynia.
Używanie odpowiednich naczyń do
gotowania
• Idealny materiał nadający się do używania
w kuchence mikrofalowej musi przepuszczać fale
mikrofalowe, a więc energię przez pojemnik, co
umożliwia podgrzewanie potrawy.
Mikrofale nie przechodzą przez metal. Z tego
powodu nie należy używać naczyń ani sztućców
metalowych.
• Podczas gotowania w kuchence mikrofalowej
nie wolno stosować opakowań z papieru po
recyklingu. Mogą one zawierać drobne fragmenty metalu, które mogą doprowadzić do
powstania iskier i spowodować pożar.
• Zaleca się stosowanie okrągłych / owalnych
naczyń zamiast kwadratowych / podłużnych,
ponieważ potrawy w rogach mogą się łatwo
spalić.
Poniższa lista ma na celu ułatwienie wybrania
odpowiedniego naczynia.
- 22 -
Naczynie
Szkło żaroodporne Tak Tak Tak
Szkło nie żaroodporne Nie Nie Nie
Naczynia ceramiczne
żaroodporne
Naczynia plastikowe
przystosowane do
używania w kuchence
mikrofalowej
Papier do pieczenia Tak Nie Nie
Płytka metalowa Nie Tak Nie
Stojak do grilla Nie Tak Nie
Mikrofala
Tak Tak Tak
Tak Nie Nie
Grill
Połączenie
Opis urządzenia
1 wyświetlacz
2 przycisk otwierania drzwi
3 talerz szklany
4 trójramienny element obrotowy
5 otwory wentylacyjne
6 przycisk Grill
7 przycisk Waga/Ilość
8 przycisk Rozmrażanie
9 przycisk Czas
0 przycisk Stop
q pokrętło / Start/Szybki start
w przycisk Czasomierz
e przycisk Kombinacja
r przycisk Moc
t stojak do grilla
Pierwsze uruchomienie
Folia aluminiowa tacki
z folii aluminiowej
Nie Tak Nie
Uwaga:
Nigdy nie używaj stojaka do grilla ani żadnych innych
metalowych przedmiotów do pracy w trybie mikrofali lub gotowania mieszanego. Promieniowanie mikrofalowe odbija się o metal i powoduje powstawanie
iskier. Może to doprowadzić do pożaru i nieodwracalnego uszkodzenia urządzenia!
Ustawianie urządzenia
Uwaga:
Kuchenka mikrofalowa nie nadaje się do montażu
w szafce kuchennej. W zamkniętych szafkach nie ma
odpowiedniej wentylacji urządzenia. Urządzenie
może ulec uszkodzeniu i podczas pracy mogłoby
się zapalić!
• Wybieraj płaską powierzchnię, która zapewni
dostateczny odstęp dla wentylacji i odprowadzania powietrza z urządzenia:
Między stojącym urządzeniem a ścianami musi
być zachowany minimalny odstęp około 10 cm.
Należy zapewnić, aby drzwi mogły się swobodnie otwierać.
Nad kuchenką mikrofalową należy zachować
odstęp przynajmniej 20 cm.
- 23 -
• Postaraj się, aby wtyczka była zawsze łatwo
dostępna i w sytuacji awaryjnej dała się szybko
wyciągnąć z gniazdka sieciowego.
• Nie wykręcaj nóżek pod urządzeniem.
• Nie zakrywaj otworów wentylacyjnych 5.
Praca przy niedostatecznej wentylacji może
doprowadzić do uszkodzenia urządzenia.
• Ustawiać urządzenie możliwie daleko od
odbiorników radiowych i telewizyjnych. Używanie kuchenki mikrofalowej może powodować zakłócenia w funkcjonowaniu odbiorników
radiowych i telewizyjnych.
Włącz urządzenie bez produktów spożywczych i
bez oprzyrządowania (talerz szklany 3, karuzela 4
i stojak do grilla t) w trybie pracy grill:
• Naciśnij jeden raz przycisk Grill 6 .
Urządzenie zostanie nastawione na tryb pracy
Grill. Na wyświetlaczu 1 pojawia się symbol
i miga symbol . W tym stanie urządzenie jest
gotowe do pracy.
• Pokrętłem q ustaw czas gotowania 10 minut.
• Naciśnij przycisk Start/Szybki start q ,
by rozpocząć grillowanie.
Uwaga:
Nie wolno stawiać kuchenki mikrofalowej nad piekarnikiem lub innym urządzeniem wytwarzającym
dużo ciepła. Ustawienie w takim miejscu mogłoby
prowadzić do uszkodzenia urządzenia i wygaśnięcia
gwarancji.
Przygotowanie urządzenia
• Zdejmij całe opakowanie i ewentualnie folię
ochronną z obudowy.
UWAGA:
Nie zdejmuj jasnoszarej płytki, przymocowanej
w komorze w celu ochrony magnetronu.
• Podłącz wtyczkę do gniazdka zasilania. Użyj
gniazdka 230 - 240 V, 50 Hz z bezpiecznikiem
16 A . Zaleca się wykonanie oddzielnego obwodu
prądu do zasilania kuchenki mikrofalowej. Jeśli
nie jesteś pewien, w jaki sposób należy podłączyć
kuchenkę mikrofalową, skorzystaj z porady fachowca.
Przed rozpoczęciem codziennego użytkowania
kuchenki mikrofalowej, należy ją najpierw nagrzać
bez produktów w środku, by umożliwić wyparowanie
środków pozostałych w urządzeniu po produkcji.
UWAGA:
Przy pierwszym uruchomieniu może być wyczuwalny
zapach spalenizny. Jest to spowodowane wypalaniem
się pozostałości środków zastosowanych przy produkcji urządzenia i nie stanowi zagrożenia dla
zdrowia. Zapewnij dostateczne przewietrzanie
pomieszczenia. Na przykład otwórz okno.
• Po upływie 10 minut urządzenie wyłączy się
automatycznie. Włączają się sygnały dźwiękowe.
Otwórz drzwi. Odczekaj, aż urządzenie całkowicie ostygnie.
• Wyciągnij wtyczkę z gniazdka, a następnie
wyczyść urządzenie wilgotną szmatką od
wewnątrz i starannie wytrzyj powierzchnię
do sucha.
Korzystanie z oprzyrządowania
• Umieść trójramienny element obrotowy 4
pośrodku na wałku napędowym w komorze
grzewczej. Zwróć uwagę, czy trójramienny
element obrotowy porusza się w całości na
osi i jest stabilnie osadzony.
• Połóż talerz szklany 3 centralnie na trójramien-
nym elemencie obrotowym. Trzy krążki muszą
przylegać do krawędzi prowadzącej na talerzu
szklanym 3.
- 24 -

Obsługa
Ustawianie czasu
Przy pierwszym uruchamianiu kuchenki mikrofalowej
lub po przerwie w zasilaniu elektrycznym, na
wyświetlaczu pojawia się 1 „1 : 0 1”.
1. Naciśnij przycisk Czas 9 . Na wyświetlaczu 1 pojawia się „Hr 12”. Naciśnij przycisk
Czas 9 ponownie, by przełączyć na tryb
wyświetlania 24-godzinnego.
2. Obracając pokrętłem e ustaw wybraną godzinę
q. Symbol zegarka na wyświetlaczu 1
miga.
3. Naciśnij przycisk Czas 9 .
Wyświetla się wskazanie minut.
4. Pokrętłem q ustaw minuty.
5. Po nastawieniu prawidłowego czasu, naciśnij
przycisk Czas 9 .
Symbol zegarka na wyświetlaczu 1 jest
widoczny na stałe a migający dwukropek oznacza,
że zegarek odlicza czas.
Przy pracującej kuchence mikrofalowej naciśnij
przycisk Czas 9 , by sprawdzić aktualny czas;
na wyświetlaczu 1 przez 4 sekund będzie się
wyświetlał aktualny czas.
Ustawianie czasomierza kuchennego
Kuchenka mikrofalowa posiada czasomierz, który
można używać niezależnie od uruchomienia
kuchenki mikrofalowej.
1. Przy urządzeniu w stanie gotowości naciśnij
przycisk Czasomierz kuchenny w .
Na wyświetlaczu 1 wyświetla się napis „00:10”.
2. Pokrętłem q ustaw żądany czas.
Możesz wybrać ustawienie czasu w zakresie
od 10 sekund do 95 minut.
3. Naciśnij przycisk Start/Szybki start q .
Słychać sygnał dźwiękowy. Rozpoczyna się odliczanie czasu wstecz. Po upływie około 3 sekund wyświetla się ponownie czas zegarka.
Czasomierz kuchenny odlicza czas w tle.
By w międzyczasie sprawdzić stan czasomierza kuchennego, naciśnij przycisk Czasomierz kuchenny w . Na chwilę wyświetla
się stan czasomierza kuchennego.
Po upływie ustawionego czasu przez włącza się sygnał
dźwiękowy.
Wskazówka:
Naciśnij przycisk licznika zegarowego w , by
przerwać odliczanie czasu. Zamiast czasu licznika
powinien się wyświetlić bieżący czas zegarowy.
Gdy na wyświetlaczu 1 cały czas będzie się wyświetlał czas licznika zegarowego, naciśnij przycisk
Stop 0 . Odliczanie czasu zostanie przerwane
i na wyświetlaczu 1 wyświetli się bieżący czas
zegarowy.
Blokada rodzicielska
Włącz to ustawienie, aby nie dopuścić do niezamierzonego uruchomienia kuchenki mikrofalowej przez
dzieci i inne osoby niepowołane.
Symbol blokady rodzicielskiej wyświetla się na
wyświetlaczu 1, i tak długo, jak funkcja pozostaje
włączona, urządzenia nie można uruchomić.
• Naciśnij przycisk Stop 0 i przytrzymaj
go dotąd, aż usłyszysz długi sygnał dźwiękowy
i wyświetli się symbol blokady rodzicielskiej
na wyświetlaczu 1. Przyciski i pokrętła w kuchence mikrofalowej nie działają.
• Naciśnij przycisk Stop 0 i przytrzymaj
go dotąd, aż usłyszysz długi sygnał dźwiękowy
i zgaśnie symbol blokady rodzicielskiej .
Funkcje odczytu
Odczytywanie czasu w trakcie pracy kuchenki
mikrofalowej
W trakcie gotowania naciśnij przycisk Czas 9 .
Na wyświetlaczu 1 przez 4 sekund wyświetla się
czas.
- 25 -

Odczytywanie zakresu mocy w trakcie pracy
kuchenki mikrofalowej
W trakcie gotowania naciśnij przycisk Moc r .
Na wyświetlaczu 1 przez 3 sekundy wyświetla się
nastawiony zakres mocy.
Gotowanie
Kuchenka mikrofalowa
Nastawianie czasu gotowania
Po wybraniu mocy nastaw żądany czas gotowania:
• Obracaj pokrętłem q, aż zostanie nastawiony
żądany czas gotowania.
Dostępne są następujące zakresy czasu
ustawienia pokrętła q:
• od10 sek. do 5 min.: w krokach 10 sek.
• od 5 do 10 min.: w krokach 30 sek.
• od 10 do 30 min.: w krokach 1 min.
• od 30 do 95 min.: w krokach 5 min.
Wskazówka
Na drzwiczkach kuchenki mikrofalowej lub
obudowie podczas gotowania mogą się tworzyć
krople wody. Jest to zjawisko normalne i nie jest
objawem wadliwego działania kuchenki mikrofalowej.
Po ostygnięciu kuchenki mikrofalowej wytrzyj wilgotną
powierzchnię do sucha szmatką.
Uwaga:
Nigdy nie używaj stojaka do grilla t ani żadnych
innych metalowych przedmiotów do pracy w trybie
mikrofali lub gotowania mieszanego. Promieniowanie
mikrofalowe odbija się o metal i powoduje powstawanie iskier. Może to doprowadzić do pożaru
i nieodwracalnego uszkodzenia urządzenia!
Wybór mocy
• Naciśnij odpowiednią ilość razy przycisk Moc r
, by wybrać odpowiedni zakres mocy.
• 1x na moc 800 W (P800).
• 2x na moc 700 W (P700).
• 3x na moc 600 W (P600).
• 4x na moc 500 W (P500).
• 5x na moc 400 W (P400).
• 6x na moc 300 W (P300).
• 7x na moc 200 W (P200).
• 8x na moc 100 W (P100).
Moc jest prezentowana na wyświetlaczu 1
(np. P800 przy mocy 800 W).
Anulowanie / zamykanie wprowadzania
Naciśnij jeden raz przycisk Stop 0 , by anulować
i zakończyć wprowadzanie ustawień. Urządzenie
przełącza się ponownie na tryb gotowości.
Rozpoczęcie gotowania
Po ustawieniu mocy i czasu gotowania i przy migającym symbolu 1 na wyświetlaczu 1, możesz
rozpocząć gotowanie:
Naciśnij przycisk Start/Szybki start q , by
rozpocząć gotowanie. Na wyświetlaczu 1 wyś-
wietlają się symbole mikrofal i gotowania
lub . Rusza odliczanie nastawionego czasu
wstecz.
Przerywanie gotowania
Naciśnij jeden raz przycisk Stop 0 , by przerwać
gotowanie. Urządzenie przerywa gotowanie i zatrzymuje pozostały czas do zakończenia. Naciśnij przycisk
Start/Szybki start q , by wznowić gotowanie.
Anulowanie gotowania
Naciśnij dwa razy przycisk Stop 0 , by przerwać
gotowanie. Urządzenie przełącza się ponownie na
tryb gotowości.
Gotowanie kończy się
Po zakończeniu gotowania, na wyświetlaczu 1
wyświetla się komunikat „Koniec” i słychać 4 sygnały
dźwiękowe. Po upływie około 2 minut jeszcze raz
włączą się sygnały dźwiękowe, gdy drzwi kuchenki
mikrofalowej nie zostaną otwarte.
- 26 -
Szybki start
Za pomocą tej funkcji możesz natychmiast gotowanie przez 30 sekund (lub dłużej, maks. 12 minut)
z mocą 800 W.
• Naciśnij jeden raz przycisk Start/Szybki start q
. Na wyświetlaczu 1 wyświetlają się sym-
bole mikrofal i gotowania , jak również
„:30”. Urządzenie rozpoczyna gotowanie
przez 30 sekund. Rozpoczyna się odliczanie
czasu wstecz.
By wydłużyć czas gotowania, naciskaj dotąd przycisk
Start/Szybki start q , aż wyświetli się żądany
czas.
Grill
Funkcję grillowania można używać do cienkich plastrów mięsa, steków, kotletów mielonych, kiełbasek i
elementów kurczaka. Nadaje się idealnie do grzanek i zapiekanek.
Do grillowania używaj zawsze stojaka t.
W ten sposób można uzyskać optymalny rezultat
grillowania.
Stojak do grilla t stawiaj zawsze na talerzu szklanym 3.
1. Naciśnij przycisk Grill 6 , by włączyć
funkcję Grill.
Na wyświetlaczu 1 pojawia się symbol funkcji
Grill i „:10”.
2. Pokrętłem q ustaw żądany czas gotowania.
Maksymalny czas gotowania jaki można usta-
wić wynosi 95 minut.
3. Naciśnij przycisk Start/Szybki start q .
4. Po upływie połowy czasu, obróć mięso.
Gotowanie łączone
Ta funkcja łączy funkcję grillowania z normalnym
trybem kuchenki mikrofalowej. W trakcie połączonego
trybu pracy w jednej operacji następuje najpierw
gotowanie, a następnie przez pozostały czas grillowanie. Moment przełączenia trybu pracy z gotowania
na grillowanie słychać poprzez ciche kliknięcie.
Uwaga:
Nigdy nie używaj stojaka do grilla t ani żadnych
innych metalowych przedmiotów do pracy w trybie
gotowania łączonego. Promieniowanie mikrofalowe
odbija się o metal i powoduje powstawanie iskier.
Może to doprowadzić do pożaru i nieodwracalnego
uszkodzenia urządzenia!
Połączenie 1
W połączeniu 1 moc kuchenki mikrofalowej wynosi
30 % a moc grilla 70 % czasu gotowania. W tym
ustawieniu możesz przyrządzać np. ryby, ziemniaki
lub zapiekanki.
1. Naciśnij przycisk Połączenie e , by
włączyć połączenie 1. Na wyświetlaczu 1
wyświetla się i „:10”.
2. Pokrętłem q ustaw żądany czas gotowania.
Maksymalny czas gotowania jaki można ustawić
wynosi 95 minut.
3. Naciśnij przycisk Start/Szybki start q .
Połączenie 2
W połączeniu 2 moc kuchenki mikrofalowej wynosi
55 % a moc grilla 45 % czasu gotowania. Nadaje
się przykładowo do budyniów, omletów, potraw z
drobiu lub lasagni.
1. Naciśnij dwa razy przycisk Połączenie e ,
by włączyć połączenie 2. Na wyświetlaczu 1
wyświetla się i „:10”.
2. Pokrętłem q ustaw żądany czas gotowania.
Maksymalny czas gotowania jaki można ustawić
wynosi 95 minut.
3. Naciśnij przycisk Start/Szybki start q .
- 27 -
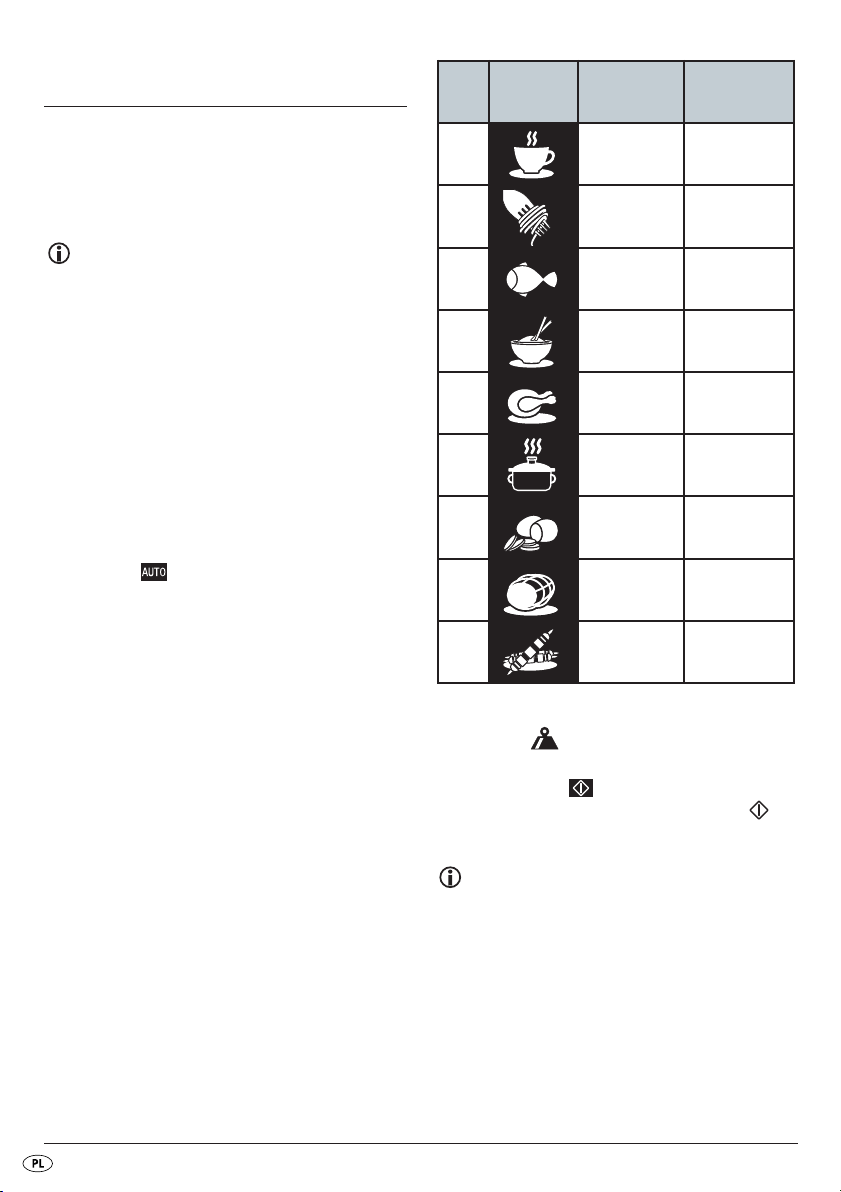
Menu trybu automatycznego
Nr Symbol
Artykuł spo-
żywczy
Waga
(porcje)
W przypadku potraw przyrządzanych w trybie menu
auto, nie ma konieczności wprowadzania czasu
gotowania i zakresu mocy. Wystarczy wprowadzić
rodzaj oraz ciężar artykułu spożywczego.
Wskazówka
Kuchenka mikrofalowa dobiera czas/zakres mocy do
świeżych produktów spożywczych. Przy zastosowaniu
czasów nastawionych przez kuchenkę mikrofalową
nie upieką się potrawy zamrożone.
Zamrożone produkty spożywcze przed przystąpieniem
do pieczenia możesz rozmrozić przy użyciu programu
Rozmrażanie (patrz rozdział „Rozmrażanie”).
Uruchamianie menu Automatyka
1. Obracaj pokrętłem q powoli w lewo. Na
wyświetlaczu 1 wyświetla się numer (np.
„3” oznacza program Auto 3 (Ryby)), symbol
„ryby” i . Dobierz odpowiednie menu
Automatyka do potrawy (1–9).
1 Napoje 1 - 3
2 Makaron 100–300 g
3 Ryba 100–1000 g
4 Ryż 100–1000 g
5 Kurczak 800–1400 g
6 Podgrzewanie 100–1000 g
7 Ziemniaki 150–600 g
8 Pieczeń 300–1300 g
9
2. Naciśnij ewentualnie ponownie przycisk Waga/
Ilość 7 , aż na wyświetlaczu 1 wyświetli
się wskazanie wagi wzgl. żądanej liczby porcji.
Miga symbol .
3. Naciśnij przycisk Start/Szybki start q ,
by rozpocząć gotowanie.
Potrawy z mi-
ęsa
100–700 g
Wskazówka
By uzyskać równomierne dogotowanie potraw,
w programach 5, 8 i 9 potrawy po upływie mniej
więcej 2/3 czasu gotowania należy obrócić. Urządzenie po upływie tego czasu automatycznie przerwie
na chwilę program: na wyświetlaczu 1 wyświetla
się komunikat „turn”, przypominający o konieczności
odwrócenia potrawy.
• Otwórz drzwi i przekręć potrawy na drugą stronę.
Uważaj, by się przy tym nie poparzyć.
- 28 -

• Naciśnij przycisk Start/Szybki start q ,
by wznowić gotowanie.
Wskazówka:
By zrezygnować z odwrócenia potrawy, po usłyszeniu
sygnałów dźwiękowych odczekaj jakiś czas.
Kuchenka mikrofalowa po upływie około 30 sekund
automatycznie wznowi program.
Wskazówka
Aby nie doprowadzić do gwałtownego wrzenia:
• Jeśli to możliwe, zawartość do momentu zagotowania mieszaj szklanym przedmiotem.
• Aby nie dopuścić do niekontrolowanego wykipienia zawartości, po zagotowaniu odczekaj
około 20 sekund i dopiero wtedy wyjmij naczynie
z kuchenki mikrofalowej.
Wskazówka
Gdy potrawa po zakończeni menu Automatyka nie
będzie dostatecznie upieczona, dopiecz ją jeszcze
przez kilka minut za pomocą programu Szybki start.
W programach pracujących z wykorzystaniem funkcji
Grill (numer 5, 8 i 9), potrawy możesz podgrzewać
z wykorzystaniem funkcji Grill. Podgrzewanie
z wykorzystaniem funkcji Grill umożliwia uzyskanie większego przypieczenia potrawy.
Uwaga
W programach z dołączaną funkcją Grill nie używaj
przykrywek ani żadnych innych nie żaroodpornych
naczyń, ponieważ mogą się one stopić i spowodować
pożar!
Zagrożenie odniesieniem obrażeń!
Talerz szklany 3 po zakończeniu pieczenia z funkcją
Grill jest bardzo gorący! Dlatego do wyjmowania
talerza z komory grzewczej używaj zawsze rękawicy.
Wskazówka:
Pamiętaj o tym, że wielkość, kształt i gatunki produktów spożywczych wpływają na wynik gotowania.
Program 2: Makaron
Ten program pracuje tylko z wykorzystaniem mocy
mikrofali.
W zależności od ustawionej wagi program trwa od
25 do 35 minut.
• Do gotowania makaronu używaj wysokiego
naczynia, ponieważ w przeciwnym wypadku
mogłoby dojść do wykipienia zawartości.
• Używaj tyle wody, ile się używa przy zwykłym
gotowaniu.
• Najpierw zagotuj wodę w przykrytym naczyniu.
Następnie dodaj makaron. Następnie możesz
rozpocząć menu Automatyka do makaronu.
• Następnie pozostaw makaron na około 3 minuty.
Program 3: Ryba
Ten program pracuje tylko z wykorzystaniem mocy
mikrofali.
W zależności od ustawionej wagi program trwa
około 3:30 do 16 minut.
• Połóż kawałki ryby na talerzu przystosowanym
do używania w kuchence mikrofalowej, dodaj
odrobinę masła lub innego tłuszczu, dopraw do
smaku i rozpocznij menu Automatyka do ryb.
Opisy programów
Program 1: Napoje
Ten program pracuje tylko z wykorzystaniem mocy
mikrofali. W zależności od ustawionej liczby porcji
program trwa od 1:30 do 3:50.
• Postaw na talerzu szklanym 3 napój, który chcesz
podgrzać. Przy podgrzewaniu większej liczby
napojów zwróć uwagę, by naczynia się nie
dotykały.
Program 4: Ryż
Ten program pracuje tylko z wykorzystaniem mocy
mikrofali.
W zależności od ustawionej wagi program trwa od
16 do 36.
• Do gotowania ryżu używaj wysokiego naczynia,
ponieważ w przeciwnym wypadku mogłoby
dojść do wykipienia zawartości. Do 200 g użyj
400 ml wody.
- 29 -

• Wsyp ryż do naczynia, dolej odpowiednią ilość
wody i namocz ryż przez około 3 minuty.
• Przykryj pojemnik. Zwróć uwagę, by zamknięcie
nie było całkowicie szczelne. Następnie możesz
rozpocząć menu Automatyka do ryżu.
• Ziemniaki z mundurakach połóż na talerzu lub
w misce przystosowanej do użytkowania w kuchence mikrofalowej. Wybierz ziemniaki o możliwie jednakowej wielkości. W miarę możliwości,
ziemniaki nie powinny się dotykać.
Program 5: Kurczak
Ten program jest wykonywany w kilku zakresach
przy użyciu mocy mikrofali i funkcji grilla.
W zależności od ustawionej wagi program trwa od
39 do 50 minut.
• Połóż kurczaka na talerzu przystosowanym do
użytkowania w kuchence mikrofalowej.
• Dopraw kurczaka do smaku i rozpocznij menu
Automatyka do kurczaka.
• Musisz obrócić kurczaka w całości, ponieważ
w przeciwnym razie góra mogłaby wyschnąć.
Kuchenka mikrofalowa przerwie na ten czas
pracę po upływie około 2/3 czasu i włączą
się sygnały dźwiękowe.
Obróć kurczaka i naciśnij przycisk Start/Szybki
start q , by wznowić program.
Program 6: Podgrzewanie
Ten program pracuje tylko z wykorzystaniem mocy
mikrofali.
W zależności od ustawionej wagi program trwa
około 1:00 do 6:20 minut.
• Na talerz szklany 3 połóż talerz z potrawą, którą
chcesz rozmrozić i uruchom menu Automatyka
do rozmrażania.
Program 7: Ziemniaki
Ten program pracuje tylko z wykorzystaniem mocy
mikrofali.
W zależności od ustawionej wagi program trwa
około 3:50 do 11 minut.
Program 8: Pieczeń
Ten program jest wykonywany w kilku zakresach przy
użyciu mocy mikrofali i funkcji grilla. W zależności
od ustawionej wagi program trwa od 16 do 60 minut.
• Połóż pieczeń na talerzu przystosowanym do
użytkowania w kuchence mikrofalowej. Dopraw
pieczeń do smaku i rozpocznij menu Automatyka
do pieczeni.
• Musisz obrócić pieczeń w całości, ponieważ
w przeciwnym razie góra mogłaby wyschnąć.
Kuchenka mikrofalowa przerwie na ten czas
pracę po upływie około 2/3 czasu i włączą się
sygnały dźwiękowe.
Obróć pieczeń i naciśnij przycisk Start/Szybki
start q , by wznowić program.
Program 9: Potrawy z mięsa
Ten program jest wykonywany w kilku zakresach
przy użyciu mocy mikrofali i funkcji grilla.
W zależności od ustawionej wagi program trwa od
9 do 27 minut.
• Połóż mięso na talerzu przystosowanym do
użytkowania w kuchence mikrofalowej. Dopraw
mięso do smaku i rozpocznij menu Automatyka
do mięsa.
• Musisz obrócić potrawę, by została równomiernie
upieczona. Kuchenka mikrofalowa przerwie na
ten czas pracę po upływie około 2/3 czasu i
włączą się sygnały dźwiękowe. Obróć potrawę
i naciśnij przycisk Start/Szybki start q , by
wznowić program.
Porada
Do gotowania używaj ziemniaków w mundurkach.
Wykonaj kilka nacięć na skórce.
- 30 -

Rozmrażanie
Za pomocą tej funkcji można bez problemu rozmrażać
mięso, drób i ryby. Czas rozmrażania i zakres mocy
są obliczane i ustawiane po wprowadzeniu ciężaru.
1. Naciśnij przycisk Rozmrażanie 8 .
Na wyświetlaczu 1 wyświetla się i .
Miga symbol .
2. Pokrętłem q wybierz wagę potrawy, którą
chcesz rozmrozić. Możesz ustawić ciężar od
100 g do 1800 g.
3. Naciśnij przycisk Start/Szybki start q .
Urządzenie automatycznie dobiera czas rozmrażania.
Czas wyświetla się na wyświetlaczu 1.
Kuchenka mikrofalowa przerwie pracę po upływie
około 1/2 czasu i włączą się sygnały dźwiękowe.
Obróć rozmrażane potrawy i naciśnij przycisk
Start/Szybki start q , by wznowić program.
Wskazówka:
By zrezygnować z odwrócenia potrawy, po usłyszeniu
sygnałów dźwiękowych odczekaj jakiś czas.
Kuchenka mikrofalowa po upływie około 30 sekund
automatycznie wznowi program.
Nastawianie czasu rozpoczęcia
pracy
Za pomocą tego programu możesz programować
określony czas rozpoczynania pieczenia lub grillowania potraw. Po dokonaniu prawidłowych ustawień, urządzenie rozpocznie pracę automatycznie
o ustawionym czasie.
Wskazówka:
Funkcja „Nastawianie czasu rozpoczęcia pracy”
działa tylko przy ustawionym czasie.
1. Ustaw wybraną funkcję kuchenki mikrofalowej
(dogotowanie, grillowanie lub menu trybu automatycznego (z wyjątkiem programu Auto 6)):
W trybie pracy kuchenki mikrofalowej: Naciśnij
przycisk Moc r w celu wybrania odpo-
wiedniego zakresu mocy. Ustaw czas gotowania za pomocą pokrętła q.
W trybie grillowania: Naciśnij przycisk Grill 6
, by włączyć funkcję Grill.
Za pomocą pokrętła q ustaw wybrany czas
grillowania.
W menu trybu automatycznego: Za pomocą pokrętła q wybierz program pasujący do przygotowywanej potrawy (w wyjątkiem programu
Auto 6). Naciskaj przycisk Waga/Ilość 7
dotąd, aż na wyświetlaczu 1 wyświetli się żądana ilość.
2. Naciśnij przycisk Czas 9 . Na wyświetlaczu 1 miga „01: ” i wyświetla się symbol
klepsydry .
3. Obróć pokrętło q, aby ustawić odpowiednią
godzinę.
4. Naciśnij przycisk Czas 9 , wyświetlają
się cyfry minut.
5. Obracaj pokrętłem q, aby ustawić minuty.
6. Naciśnij przycisk Start/Szybki start q .
Symbol klepsydry miga. Wyświetla się
czas startu. Kuchenka mikrofalowa rozpocznie
funkcję o ustawionym czasie. Przy uruchamianiu
włącza się sygnał dźwiękowy.
- 31 -

Wskazówka:
Naciśnij przycisk Stop 0 , by skasować zapamiętany czas włączenia i tym samym przerwać
zaprogramowaną operację. Symbol klepsydry
gaśnie i wyświetla się bieżący czas zegarowy.
Czyszczenie i pielęgnacja
Zagrożenie odniesieniem obrażeń!
Przed rozpoczęciem czyszczenia wyłącz kuchenkę
mikrofalową i wyciągaj wtyczkę z gniazdka.
Urządzenia nie można w żadnym wypadku
zanurzać w wodzie ani nie narażać w żaden
innych sposób na działanie wilgoci.
Mogłoby to spowodować niebezpieczeństwo
porażenia prądem elektrycznym i uszkodzenia
urządzenia.
• Wnętrze kuchenki mikrofalowej powinno być
zawsze utrzymywane w czystości.
• Ściany od wewnątrz poplamione odpryskującymi
potrawami należy wycierać wilgotną szmatką.
• Aby usunąć silne zabrudzenia można skorzystać
z delikatnego środka do mycia.
• Unikaj używania wszelkiego rodzaju żrących
środków czyszczących, ponieważ mogą one
powodować poplamienie, porysowanie
i zmatowienie powierzchni drzwi.
• Ściany zewnętrzne czyść wilgotną szmatką.
• Aby nie dopuścić do uszkodzenia elementów
wewnątrz kuchenki mikrofalowej, nie wlewaj
wody do środka urządzenia przez otwory
wentylacyjne 5.
• Usuwaj regularnie wszelkiego rodzaju odpryski
i zanieczyszczenia. Drzwiczki, szybkę z dwóch
stron, uszczelnienia drzwi i sąsiednie elementy
czyść zwilżoną szmatką. Nie wolno używać
żadnych środków szorujących powierzchnię.
• Jeśli wewnątrz lub wokół strony zewnętrznej
drzwiczek zgromadziła się para, należy ją
wytrzeć szmatką. Dochodzi do tego w wypadku
gdy kuchenka mikrofalowa jest użytkowana
pomieszczeniach o dużej wilgoci.
• Regularnie czyść też talerz szklany 3. Wymyj
go w ciepłej wodzie z dodatkiem płynu do mycia
naczyń lub myj w zmywarce do naczyń.
• Stojak do grilla t wymyj pod gorącą wodą
i dobrze wysusz.
• Należy regularnie eliminować zapachy.
Ustaw głęboką miskę z filiżanką wody, soku
i skórki z cytryny. Podgrzej zawartość przez
5 minut. Wytrzyj dokładnie, a następnie wysusz
szmatką.
• Jeśli wymagana jest wymiana lampki w kuchence
mikrofalowej, zwróć się z tym do sprzedawcy
lub punktu serwisowego.
Usuwanie usterek
Nie działa wyświetlacz 1.
• Wtyczka nie jest podłączona do gniazdka
sieciowego. Sprawdź wtyczkę.
• Gniazdko jest uszkodzone. Spróbuj podłączyć
do innego gniazdka.
• Wyświetlacz 1 jest uszkodzony. Zwróć się do
serwisu
Urządzenie nie reaguje na obsługę przyciskami.
• Włączona blokada rodzicielska. Wyłącz blokadę
rodzicielską (patrz rozdział „Obsługa”).
Urządzenie nie rozpoczyna pracy.
• Drzwiczki nie są zamknięte.
Zamknij poprawnie drzwiczki.
Talerz obrotowy 3 hałasuje przy obracaniu.
• Talerz szklany 3 nie leży prawidłowo na
trójramiennym elemencie obrotowym 4.
Połóż talerz szklany 3 prawidłowo w komorze
grzewczej.
- 32 -

• Trójramienny element obrotowy 4 i/lub dno
komory grzewczej są zabrudzone. Wyczyść
trójramienny element obrotowy 4 i dno komory
grzewczej.
Utylizacja
W żadnym przypadku nie należy
wyrzucać urządzenia jako normalnych
śmieci domowych. W odniesieniu do
produktu ma zastosowanie dyrektywa
europejska 2002/96/EC.
Urządzenie utylizować w specjalistycznych zakładach
utylizacji odpadów lub w lokalnych składowiskach
odpadów.
Przestrzegaj aktualnie obowiązujących przepisów.
W razie pytań i wątpliwości odnośnie zasad utylizacji
skontaktować z najbliższy zakładem utylizacji.
Wszystkie materiały wchodzące w skład
opakowania należy przekazać do odpowiednich punktów zbiórki odpadów.
Gwarancja i serwis
Urządzenie objęte jest dwuletnią gwarancją, licząc
od daty zakupu. Urządzenie zostało starannie wyprodukowane i poddane skrupulatnej kontroli przed
wysyłką. Paragon należy zachować jako dowód
dokonania zakupu. W przypadku roszczeń gwarancyjnych należy skontaktować się telefonicznie z
serwisem. Tylko w ten sposób można zagwarantować bezpłatną wysyłkę zakupionego produktu.
Gwarancja obejmuje wyłącznie wady materiałowe
i fabryczne, natomiast nie obejmuje szkód powstałych podczas transportu, części ulegających zużyciu ani uszkodzeń części łatwo łamliwych, np. wyłączników, akumulatorów. Produkt przeznaczony
jest wyłącznie do użytku domowego, a nie do zastosowań profesjonalnych.
Gwarancja traci ważność w przypadku niewłaściwego używania urządzenia, używania niezgodnego z przeznaczeniem, użycia siły lub ingerencji w
urządzenie dokonywanej poza naszymi autoryzowanymi punktami serwisowymi. Niniejsza gwarancja nie ogranicza ustawowych praw nabywcy urządzenia.
Okres gwarancji nie ulega wydłużeniu o czas trwania usługi gwarancyjnej. Dotyczy to również wymienionych i naprawionych części. Szkody i wady zauważone już w chwili zakupu należy zgłosić od razu
po rozpakowaniu, nie później niż po upływie
dwóch dni od daty zakupu. Po upływie okresu
gwarancyjnego wszystkie naprawy będą wykonywane płatnie.
Kompernass Service Polska
Tel.: 022 / 3972212
e-mail: support.pl@kompernass.com
- 33 -

Importer
KOMPERNASS GMBH
BURGSTRASSE 21
44867 BOCHUM, NIEMCY
www.kompernass.com
- 34 -

TARTALOMJEGYZÉK OLDAL
Rendeltetésszerű használat 36
Biztonsági utasítások 36
Tartozékok 39
Műszaki adatok 39
A használat előtt 40
A mikrohullámú sütőben való főzés alapelvei . . . . . . . . . . . . . . . . . . . . . . . . . . . . . . . . . . . .40
Alkalmas főzőedény használata . . . . . . . . . . . . . . . . . . . . . . . . . . . . . . . . . . . . . . . . . . . . . .40
A készülék leírása 41
Első használat 41
A készülék felállítása . . . . . . . . . . . . . . . . . . . . . . . . . . . . . . . . . . . . . . . . . . . . . . . . . . . . . . . .41
A készülék előkészítése . . . . . . . . . . . . . . . . . . . . . . . . . . . . . . . . . . . . . . . . . . . . . . . . . . . . . .41
A tartozékok behelyezése . . . . . . . . . . . . . . . . . . . . . . . . . . . . . . . . . . . . . . . . . . . . . . . . . . .42
Működtetés 42
Az óra beállítása . . . . . . . . . . . . . . . . . . . . . . . . . . . . . . . . . . . . . . . . . . . . . . . . . . . . . . . . . . .42
A sütőóra beállítása . . . . . . . . . . . . . . . . . . . . . . . . . . . . . . . . . . . . . . . . . . . . . . . . . . . . . . . .42
Gyermekzár . . . . . . . . . . . . . . . . . . . . . . . . . . . . . . . . . . . . . . . . . . . . . . . . . . . . . . . . . . . . . .43
Lekérdezési funkciók . . . . . . . . . . . . . . . . . . . . . . . . . . . . . . . . . . . . . . . . . . . . . . . . . . . . . . . .43
Főzés és párolás 43
Mikrohullámú üzemmód . . . . . . . . . . . . . . . . . . . . . . . . . . . . . . . . . . . . . . . . . . . . . . . . . . . . .43
Grillező üzemmód . . . . . . . . . . . . . . . . . . . . . . . . . . . . . . . . . . . . . . . . . . . . . . . . . . . . . . . . .45
Kombinált párolás . . . . . . . . . . . . . . . . . . . . . . . . . . . . . . . . . . . . . . . . . . . . . . . . . . . . . . . . . .45
Automatika-menü 45
Automatika-menü indítása . . . . . . . . . . . . . . . . . . . . . . . . . . . . . . . . . . . . . . . . . . . . . . . . . . . .46
A programok részletes bemutatása . . . . . . . . . . . . . . . . . . . . . . . . . . . . . . . . . . . . . . . . . . . .47
Kiolvasztás 48
A kezdési idő beállítása 49
Tisztítás és karbantartás 49
Hibaelhárítás 50
Ártalmatlanítás 50
Garancia és szervíz 51
Gyártja 51
Őrizze meg ezt a leírást arra az esetre, ha később kérdése merülne fel. A készülék harmadik személynek
történő továbbadásakor adja tovább a leírást is!
- 35 -

MIKROHULLÁMÚ SÜTŐ
Rendeltetésszerű használat
• Ne csípjen be semmit a készülék eleje és ajtaja
közé és ügyeljen arra, hogy semmilyen szennyeződés vagy visszamaradt tisztítószer ne
rakódjon le a tömítés felületén.
Ez a készülék élelmiszerek leírt módon történő
melegítésére és elkészítésére alkalmas.
A készülék bármilyen megváltoztatása nem rendeltetésszerűnek minősül és jelentős balesetveszélyt
okozhat. A nem rendeltetésszerű használatból eredő
károkért a gyártó nem vállal felelősséget.
Ez a készülék nem alalkalmas ipari használatra.
Biztonsági utasítások
Figyelem!
Figyelmeztetés a készülék esetleges sérülésére.
Veszély! Sérülésveszély!
Figyelmeztetés a sérülésveszélyre és elektromos
áramütés veszélyére!
Tűzveszély!
Figyelmeztetés a tűzveszélyre.
Tudnivalók!
Tudnivalók és tippek a mikrohullámú sütő használatához.
Óvintézkedések a mikrohullámú energiával
való túlzott érintkezés elkerülésére
• Ne próbálja meg a készüléket nyitott ajtóval
üzemeltetni, mivel a nyitott ajtóval történő üzemeltetés káros adagú mikrohullámú sugárzáshoz
vezethet.Szintén fontos, hogy ne törje fel a biztonsági zárakat vagy ne kísérelje meg átalakítani
őket.
Sérülésveszély!
• Semmiképpen ne üzemeltesse tovább a mikrohullámú sütőt, ha az ajtó vagy annak tömítése
meg van sérülve. Javíttassa a készüléket képzett
szakemberrel.
• Ne próbálkozzon egyedül a készülék javításával!
A burkolat levételével mikrohullámú energia
szabadulhat fel. Csak engedéllyel rendelkező
szakemberre bízza a javítást!
• A készülék nem alkalmas arra, hogy olyan személyek (ideértve a gyermekeket is) használják,
akiket testi, érzékszervi vagy elmebeli képességeik
vagy tapasztalatuk és ismeretük hiánya megakadályoznának abban, hogy biztonságosan
használják a készüléket, kivéve, ha a biztonságukról gondoskodó felügyelettel vannak, vagy
ha előtte felvilágosították őket a készülék használatáról. Vigyázni kell a gyermekekre, hogy
ne játsszanak a készülékkel.
• Gyerekeknek csak akkor szabad felügyelet nélkül
használjni a főzőedényt, ha megfelelőel elmagyaráztuk neki a főzőedény biztonságos használatát
és és a hibás kezelés okozta veszélyek megértését.
• A készüléket csak eme kézikönyv leírásainak
megfelelően, rendeltetésszerűen használja. Ne
használjon a készülékben maró vegyi anyagokat
vagy gőzt. Ezt a mikrosütőt kifejezetten élelmiszerek melegítésére, főzésére, grillezésére vagy
szárítására tervezték.
Nem alkalmas ipari vagy laborban való használatra.
• Ne üzemeltesse a a mikrohullámú sütőt, ha
a hálózati vezeték vagy a csatlakozó meg van
sérülve. A sérült hálózati kábelt szakemberrel
cseréltesse, hogy elkerülje a veszélyhelyzetet.
• A gyermekeket tartsa távol a mikrohullámú sütőtől,
amíg az üzemel. Megégetheti magát!
- 36 -

• Semmilyen körülmények között se szedje le
a mikrohullámú sütő burkolatát.
• A mikrohullámú sütő belsejében lévő lámpát
csak képzett szakemberrel cseréltesse.
• Soha ne érjen hozzá a mikrosütő ajtajához,
burkolatához, szellőzőnyílásához, alkatrészeihez
vagy az edényhez grillezés, kombi üzemmód
vagy automatikamenü használata után. Ezek
a részek nagyon felforrósodhatnak. Tisztítás
előtt várja meg, amíg lehűlnek a részek.
• Ügyeljen arra, hogy a csatlakozó mindig jól
elérhető helyen legyen, hogy vészhelyzetben
gyorsan le lehessen választani a hálózatról.
• Szívritmusszabályzót használó személyek tájékozódjanak a mikrohullámú sütő használata
előtt háziorvosuknál az esetleges kockázatokról.
• Ne hagyja lelógni a hálózati vezetéket az asztalról
vagy a konyhapultról. A gyerekek meghúzhatják.
• A dobozt, pattogatott kukoricás zacskót melegítés
után mindig úgy nyissa ki, hogy a nyílás ne Ön
felé helyezkedjen el. A kilépő gőzzel megégetheti
magát.
• Soha ne álljon közvetlenül a mikrohullámú sütő
elé, amikor kinyitja az ajtaját. A kilépő gőzzel
megégetheti magát.
• Ne süssön olajjal a mikrosütőben. A forró olaj
kárt okozhat a készülék részeiben és a kiegészítőkben, és még égési sebeket is okozhat.
• A felmelegített cumisüveget vagy bébiételt mindenképpen keverje meg! Előfordulhat, hogy
a benne lévő étel egyenetlenül melegszik dett fel
és a kisbaba megégetheti magát. Mindenképpen ellenőrizze a hőmérsékletet, mielőtt megetetné vele a babát!
• Ne szerelje át a mikrohullámú sütőt.
• Fogyasztás előtt ellenőrizze a hőmérsékletet,
nehogy a kisbaba esetleg életveszélyes égési
sérüléseket szenvedjen.
A konyhai eszközök a felmelegített ételtől felforrósodhatnak, lehet, hogy csak edényfogóval
lehet őket megfogni. A konyhai eszközöket
vizsgálja meg, hogy alkalmasak-e a mikrohullámokhoz.
Figyelem! Forró a felülete!
Tűzveszély!
• Soha ne hagyja a mikrohullámú sütőt felügyelet
nélkül, ha műanyagba vagy papírba csomagolt
élelmiszert melegít fel.
• Ne tegyen a mikrohullámú sütő vagy annak
szellőzőnyílása közelébe gyúlékony anyagot.
• Vegye le a melegíteni kívánt élelmiszer csomagolásáról a fémrészeket. Tűzveszély!
• Kukoricapattogtatáshoz csak mikrohullámú sütőbe
alkalmas pattogatottkukoricás zacskót hasznájon.
• Ne használja a mikrohullámú sütőt arra, hogy
cseresznyemaggal vagy zselével töltött párnát
melegítsen benne. Tűzveszély!
• Ne használja a mikrohullámú sütőt élelmiszerek
vagy más tárgyak tárolására.
• Soha ne lépje túl a gyártó által megszabott
főzési időt.
• Ne helyezzen a működésben lévő mikrohullámú
sütőre semmilyen tárgyat. Ilyenkor a szellőzőnyílások le vannak fedve!
• Ne helyezze a mikrohullámú sütőt más hőkibocsájtó készülék, mint például sütő mellé.
• A mikrohullámú sugarak veszélyesek!
Csak képzett szakemberrel végeztesse azokat
a karbantartási és szerelési munkákat, melyekhez
le kell venni a mikrohullámú sugárzástól védő
fedeleket.
- 37 -

• Zsíros ételek melegítése után alaposan tisztítsa
meg a mikrohullámú készüléket, különösen akkor,
ha nem voltak letakarva. Hagyja a készüléket
teljesen lehűlni, mielőtt megtisztítaná. A grill
fűtőrészén ne maradjon semmilyen ételmaradék
vagy zsír. Ezek felforrósodva meggyulladhatnak.
• Ne olvasszon ki zsírt vagy olajat a mikrohullámú
sütőben. A zsír vagy olaj meggyulladhat.
• Ne használjon a készülék üzemeltetésére külső
időkapcsoló órát vagy külön távirányítós rendszert.
Figyelem! Kár keletkezhet
a készülékben!
• Ne működtesse a mikrosütőt üres állapotban.
Ez alól csak az első alkalommal történő üzembe
helyezés kivétel (lásd az „Első üzembe helyezés“
című részt).
• Ne dugjon semmilyen tárgyat a szellőzőnyílásokba vagy a biztonsági ajtózárba.
• Ne használjon fémeszközöket, mert ezek visszaverik a mikrohullámokat és szikra képződik.
Ne helyezzen a mikrohullámú sütőre bádogdobozt.
• Ne tegyen műanyagzacskót a mikrohullámú sütőre
közvetlenül grillezés, kombi- vagy automatamenü
üzemmód után. A műanyag megolvadhat.
• A mikrohullámú sütőt nem szabad magas párat-
artalmú vagy nedves helyen felállítani.
• Folyadékot és egyéb élelmiszert nem szabad
légmentesen lezárt edényben melegíteni, mivel
ezek felrobbanhatnak és kárt okozhatnak
a készülékben.
• Ne támaszkodjon a mikrosütő ajtajához.
• A főzőkészülék hiányos tisztasága a felület
károsodásához vezethet, mely befolyással van
a használat időtartamára és esetleg veszélyes
helyzeteket is teremthet.
Veszély
• Soha ne merítse a hálózati vezetéket vagy
a csatlakozót vízbe vagy más folyadékba.
• A hálózati vezetéket tartsa távol a hőforrásoktól.
Ne vezesse a vezetéket a mikrohullámú sütő előtt.
A hő kárt tehet a vezetékben.
• Soha ne öntsön folyadékot a szellőzőnyílásokba
vagy a biztonsági ajtózárba. Amennyiben mégis
folyadék kerülne a mikrohullámú sütő belsejébe,
azonnal kapcsolja ki és húzza ki a csatlakozót
a konektorból. Vizsgáltassa meg szakemberrel
a mikrohullámú készüléket.
Biztonsági tippek
• Ahhoz, hogy a mikrosütőben csökkentsük a tűzveszély kialakulását: Ha az ételeket műanyag- vagy
papírtartóban melegíti fel, üzemelés közben
egyfolytában tartsa szemmel a mikrosütőt, mivel
ezek az anyagok esetleg meggyulladhatnak.
• Italok melegítésekor előfordulhat, hogyha az ital
forr, bugyogni kezd. Legyen emiatt óvatos, ha
az edényt kiveszi. A hirtelen forrás elkerülése
végett:
- Amennyiben lehetséges, melegítés alatt helyezzen
üvegpálcát a folyadékba.
- Melegítés után 20 másodpercig hagyja a fo-
lyadékot a mikrohullámú sütőben, hogy elkerülje
a folyadék hirtelen felbuggyanását.
• Szúrja át a burgonya héját és a virsli bőrét (hasonló
élelmiszereknél is hasonlóképpen járjon el).
Egyébként felrobbanhatnak.
• Legyen elővigyázatos a folyadékok melegítésekor. Csak nyitott edényeket használjon, hogy a keletkező légbuborékok el tudjanak távozni.
• Ha füstöt észlel, kapcsolja ki a készüléket vagy
húzza ki a csatlakozót és hagyja csukva az aktót,
nehogy megfulladjon az esetlegesen kilépő
lángtól.
- 38 -

• Egész tojást vagy keményre főtt tojást nem szabad
a mikrohullámú sütőben melegíteni, mivel még
a melegítés befejezése után is felrobbanhatnak.
Vastaghajú/-héjú élelmiszereket, mint pl. a burgonyát, egész tököt, almát és gesztenyét meg
kell szurkálni melegítés előtt.
• Ne mozdítsa el üzemelés közben a mikrohullámú
sütőt.
Földelési tudnivalók/előírásszerű beszerelés
A készüléket földelni kell. Ezt a készüléket csak előírásszerűen földelt konektorhoz szabad csatlakoztatni.
A mikrosütő ellátására ajánlatos külön áramkört
használni.
• Csatlakoztassa a mikrosütőt egy másik konektorba. A mikrosütőhöz és a vevőhöz különböző
áramköri ágat kell igénybe venni.
Tartozékok
mikrohullámú sütő
üvegtányér
grillező állvány
forgó csillag
használati útmutató
rövid leírás
Veszély: A földelt csatlakozóval való szakavatatlan bánásmód áramütés veszélyét is vonhatja
maga után.
Tudnivaló: Ha a földeléssel vagy az elektromossággal kapcsolatos utasításokhoz kapcsolódó
kérdése van, forduljon villamossági vagy
karbantartó szakemberhez.
Sem a gyártó, sem a kereskedő nem vállal felelősséget
a mikrosütőben keletkezett olyan károkért vagy személyi sérülésért, amelyek az elektromos csatlakozóra
vonatkozó utasítások be nem tartására vezethetők
vissza.
Más készülékek rádióvételi zavarása
A mikrosütő üzemeltetése zavarhatja a rádiót, televíziót
vagy más hasonló készüléket.
Ha ilyen interferencia lépne fel, a következő módon
csökkentheti vagy küszöbölheti ki őket:
• tisztítsa meg a mikrosütő ajtaját vagy szigetelését.
• újból be kell igazítani a rádió vagy televízió
vételi antennáját.
• a mikrosütőt ne tegyük a vevő közelébe.
• tegye a mikrosütőt egy egészen más helyre,
mint ahol a vevő van.
Műszaki adatok
Hálózati feszültség: 230 - 240 V
50 Hz
Maximális teljesítményfelvétel: 1200 W
Maximális leadott teljesítmény
Mikrohullám: 800 W
Maximális teljesítményfelvétel
Grill: 1000 W
Mikrohullámú frekvencia: 2450 MHz
~
- 39 -

A használat előtt
A mikrohullámú sütőben való főzés
alapelvei
• Az ételt átgondoltan helyezze el.
• A legvastagabb részek a szélre kerüljenek.
• Ügyeljen a főzési időre. Válassza ki a legrövidebb
megadott főzási időt és hosszabbítsa meg szükség
esetén. A végtelenségig főzött ételek füstölni
kezdhetnek vagy meggyulladhatnak.
• A főzés idejére tegyen az ételre mikrohullámú
sütőhöz alkalmas fedelet. A fedő megakadályozza, hogy az étel kispricceljen, valamint hozzájárul ahhoz, hogy egyenletesen főjjön meg.
• Készítés közben fordítsa meg egyszer a mikrosütőben az ételt, hogy az olyan ételek, mint
a csirkehús vagy hamburger hamarabb átsüljön.
• Az olyan nagy darab élelmiszereket, mint pl.
a sültet legalább egyszer meg kell fordítani.
• Az olyan élelmiszereket, mint pl. a fasírtot a sütési
félidőben rendezze át a tányéron.
Fordítsa meg őket és a tányér közepén lévő
fasírtokat helyezze a szélre.
• Szögletes/hosszúkás edény helyett ajánlatos
inkább kereket/oválisat használni, mivel az
ételek a sarkakban kissé elfőhetnek.
Az alábbi lista általános segítséget nyújt a helyes
edény kiválasztásában.
Főzőedény
Hőálló üveg igen igen igen
Nem hőálló üveg nem nem nem
Hőálló kerámia igen igen igen
Mikroullámú sütőhöz
való műanyag
étkészlet
Papírtörlő igen nem nem
Fémtálca- /lemez nem igen nem
Mikrohullám
igen nem nem
Grill
Kombináció
Alkalmas főzőedény használata
• A mikrohullámú sütőhöz azok az anyagok
a legalkalmasabbak, melyek átengedik a mikrohullámokat az edény falán, hogy az étel
megmelegedjen.
A mikrohullámok nem tudnak áthatolni a fémeken.
Ezért nem alkalmasak a fémedények és a fémevőeszközök.
• Ne használjon a mikrohullámú edényben való
melegítésre újrahasznosított papírt.Ezek apró
fémrészeket tartalmazhatnak, melyek szikrát
és/vagy tüzet okozhat.
Grillező állvány nem igen nem
Alufólia és fóliatál nem igen nem
Figyelem:
Ne használja a grillező állványt vagy más fémes
tárgyakat, ha a mikrohullámú sütőt mikrohullámú
üzemmódban vagy kombinált pároló üzemmódban
használja. A fém visszaveri a mikruhullámú sugárzást és
így szikra képződik. Ez égéshez vezethet és a készülék
helyrehozhatatlanul megsérülhet!
- 40 -
A készülék leírása
1 kijelző
2 ajtónyitó gomb
3 üvegtányér
4 forgó csillag
5 szellőzőnyílások
6 Grill gomb
7 Súly/mennyiség gomb
8 kiolvasztó gomb
9 óra gomb
0 Stop gomb
q forgatható gomb/Start/Gyorsindítás
w sütőóra gomb
e Kombi gomb
r Teljesítmény gomb
t grillező állvány
• Gondoskodjon róla, hogy a csatlakozó könnyen
hozzáférhető helyen legyen, hogy vészhelyzetben
gond nélkül ki lehessen húzni.
• Ne vegye le a mikrosütőről a lábakat.
• Ne zárja el a szellőzőnyílásokat 5.
Ellenkező esetben a készülék megsérülhet.
• A készüléket rádió- és tévékészülékektől a lehető
legmesszebb állítsa fel. A mikrosütő üzemelése
zavarhatja a rádió vagy televízió vételét.
Figyelem:
Ne állítsa a mikrosütőt tűzhely vagy más hőkibocsátó
készülék fölé. Ez kárt tehet a készülékben és
a garancia is érvényét vesztheti.
A készülék előkészítése
• Vegye le a csomagolást és esetleg a készülék
külső burkolatára ráégett védőfóliát.
Első használat
A készülék felállítása
Figyelem:
Ez a fajta mikrohullámú sütő nem alkalmas arra, hogy
konyhaszekrény alá szereljék be. Zárt szekrényekben
nincsen eléggé szavatolva a készülék szellőzése.
A készülék megsérülhet és tűzveszély áll fenn!
• Válasszon ki egy egyenes felületet, amelyen elég
szabad helye van a készülék szellőzőjének.
A készülék és a mellette levő falak között legalább
10 cm távolság legyen. Biztosítsa, hogy a mikrosütő ajtaját teljesen ki lehessen nyitni.
Hagyjon a mikrosütő előtt legalább 20 cm-t
szabadon.
Tudnivaló:
Ne vegye le a világosszürke csillámlemezt, amely
a főzőtér mágneses mező csövének védelmét szolgálja.
• Dugja be a csatlakozót a konnektorba. Használjon 230 - 240 V-os, 50 Hz-es hálózati dugaljat 16 A-es biztosítékkal. Ajánlatos saját áramkörrel ellátni a mikrohullámú készüléket. Ha
bizonytalan benne, hogy hogyan csatlakoztassa a mikrohullámú készüléket, kérje ki szakember
tanácsát.
A mikrohullámú sütő használata előtt a készüléket
először üresen kell felmelegíteni, hogy a gyártásból
visszamaradt anyagok el tudjanak gőzölögni.
- 41 -

A készüléket élelmiszer és tartozékok nélkül (üvegtányér 3, görgős csillag 4 és grillező állvány t)
nélkül) kapcsolja be grillező üzemmódban:
• Nyomja meg egyszer a Grill gombot 6
Ezzel a grillező üzemmódot választotta ki.
A kijelzőn 1 a jel jelenik meg és a
jel villog. Ez a készenlétet jelzi.
• Állítson be a forgatható szabályozóval q
10 perces párolási időt.
• Nyomja meg a Start/Gyorsindítás q
gombot, hogy elindítsa a grillezést.
Tudnivaló:
Ha először üzemeli be a készüléket, előfordulhat,
hogy a gyártásból visszamaradt anyagok miatt enyhén
kellemetlen szag képződik. Ez nem káros.
Gondoskodjon megfelelő szellőzésről. Például nyissa
ki az ablakot.
• 10 perc elteltével a készülék automatikusan
kikapcsol. Hangjelzés hallatszik. Nyissa ki az
ajtót. Várja meg, amíg teljesen le nem hűlt.
• Húzza ki a csatlakozót a dugaljból, majd tisztítsa
meg a készüléket belülről egy nedves ronggyal
és alaposan szárítsa meg.
A tartozékok behelyezése
• Helyezze a görgős csillagot 4 a főzőtérbe a
meghajtótengelyre. Ügyeljen arra, hogy teljesen
rácsússzon a tengelyre és fixen álljon rajta.
• Helyezze az üvegtányért 3 a forgó csillag
közepére. A három görgő az üvegtányéron 3
lévő vezető szélbe illeszkedjen.
Működtetés
Az óra beállítása
Ha először helyezi üzembe a mikrohullámú sütőt
.
vagy áramkimaradás volt, a kijelző 1 "1 : 0 1 "-t
jelez ki.
1. Nyomja meg az óra gombot 9 . A kijelzőn
1 „Hr 12“ jelenik meg. Nyomja meg még egyszer az óra gombot 9 , ha 24 órás üzemmódba szeretne átkapcsolni.
2. A forgókapcsoló e elfordításával állítsa be az
órák számát q. Az óra jel villog a kijelzőn
1.
3. Nyomja meg az Óra gombot 9 . A percek
kijelzése jelenik meg.
4. A forgókapcsoló q elfordításával állítsa be
a percek számát.
5. Ha pontosan van beállítva az idő, nyomja meg
az Óra gombot 9 . A kijelzőn 1 hosszan
világít az Óra jel és a kettőspont villogása
jelzi, hogy az óra jár.
A mikrohullámú sütő üzemelése közben úgy lehet
leolvasni a pontos időt, ha megnyomja az Óra
gombot 9 ; a pontos idő ilyenkor kb. 4 másodpercre jelenik meg a kijelzőn 1.
A sütőóra beállítása
A mikrosütőn van egy sütőóra, amelyet a mikrohullámú
sütő üzemeltetésétől függetlenül használhat.
1. Nyomja meg a Sütőóra gombot w , ha a
készülék készenléti üzemmódban van.
A kijelzőn 1 „00:10“ jelenik meg.
2. Állítsa be a forgatható kapcsolóval q e az időt.
Az időt 10 másodperctől 95 perc időtartamra
állíthatja be.
3. Nyomja meg az Indítás/Gyorsindítás
gombot q .
- 42 -

Tudnivaló:
Ha a sütőóra beállított idejét meg szeretené szakítani,
nyomja meg a sütőóra gombot w , hogy a sü-
tőóra aktuális ideje jelenjen meg. Miközben még a
kijelzőn 1 megjelenik a sütőóra kijelzése, nyomja
meg a Stop gombot 0 . A sütőóra megáll és
a pontos idő jelenik meg a kijelzőn 1.
Hangjelzés szólal meg. Visszafele számolja az időt.
Kb. 3 másodperc múlva ismét a pontos idő jelenik
meg. A háttérben tovább megy a sütőóra.
Ha közben ellenőrizni szeretné a sütőórán mért időt,
nyomja meg a Sütőóra gombot w . Rövid időre
a Sütőóra jelenik meg.
A beállított idő lejárta után hosszú jelzőhang szólal meg.
Gyermekzár
Kapcsolja be ezt a beállítást, ha el szeretné kerülni,
hogy kisgyermekek vagy más személyek, akik nem
ismerik a mikrosütő használatát, felügyelet nélkül
üzembe helyezzék a készüléket.
A Gyermekzár jel jelenik meg a kijelzőn 1
és a készüléket addig nem lehet üzemeltetni, amíg
ez a funkció be van kapcsolva.
• Nyomja meg a Stop gombot 0 és tartsa
addig lenyomva, amíg hosszú hangjelzést nem
hall és a Biztonsági gyermekzár jele meg
nem jelenik a kijelzőn 1.A gombok és a mikrohullámú sütő szabályzója ilyenkor nem működik.
• A gyermekzár kikapcsolásához nyomja meg a
Stop gombot 0 és tartsa addig lenyomva,
amíg hosszú hangjelzést nem hall és a Biztonsági
gyermekzár jele ki nem alszik a kijelzőn.
Lekérdezési funkciók
Működés közben a pontos idő lekérdezése
Működés közben nyomja meg az Óra gombot 9
A kijelzőn 1 kb. 4 másodpercre a pontos idő
jelenik meg.
Működés közben a teljesítményfokozat
lekérdezése
Működés közben nyomja meg a Teljesítmény
gombot r. A kijelzőn 1 kb. 3 másodpercre
a bekapcsolt teljesítményfokozat jelenik meg.
Főzés és párolás
Mikrohullámú üzemmód
Tudnivaló
A mikrohullámú sütő alján vagy a burkolaton mikrózás közben vízcseppek képződhetnek.
Ez természetes és nem jelenti azt, hogy a mikrohullámú
sütő elromlott volna. Miután lehűlt, törölje le a nedvességet egy száraz ronggyal.
Figyelem:
Soha ne használja a grillező állványt t vagy más
fémes tárgyakat, ha a mikrohullámú sütőt mikrohullámmal használja. A fém visszaveri a mikruhullámú
sugárzást és így szikra képződik. Ez égéshez vezethet
és a készülék helyrehozhatatlanul megsérülhet!
A teljesítményfokozat kiválasztása
• Nyomja meg annyiszor a Teljesítmény r
gombot, amíg ki nem választotta a kívánt
teljesítmény-fokozatot.
• 1x 800 W teljesítményhez (P800).
• 2x 700 W teljesítményhez (P700).
• 3x 600 W teljesítményhez (P600).
• 4x 500 W teljesítményhez (P500).
• 5x 400 W teljesítményhez (P400).
• 6x 300 W teljesítményhez (P300).
• 7x 200 W teljesítményhez (P200).
• 8x 100 W teljesítményhez (P100).
.
A teljesítmény a kijelzőn 1 jelenik meg.
(pl. P800 800 W teljesítménnyel).
A főzési idő beállítása
Miután kiválasztotta a teljesítményt, állítsa be a kívánt
főzési időt:
- 43 -

• Fordítsa el a forgókapcsolót q, amíg be nem
állította a kívánt főzési időt.
Az forgatható kapcsolóval q való időbeállítás
fokozatai a következők:
• 10 másodperctől 5 percig:
10 másodperces lépésekben
• 5 - 10 percig: 30 másodperces lépésekben
• 10 - 30 percig: 1 perces lépésekben
• 30 - 95 percig: 5 perces lépésekben
Az adatbeadás megszakítása/befejezése
Nyomja meg egyszer a Stop gombot 0 , ha
meg akarja szakítani és be szeretné fejezni az adatok
beadását. A készülék újra készenléti üzemmódba
kapcsol vissza.
A főzés indítása
Ha beállította a teljesítményt és a főzési időt, a kijelzőn 1 pedig a jel villog, elindíthatja a főzési
folyamatot:
Nyomja meg a főzés elindításához az Indítás/
Gyorsindításgombot q
A kijelzőn 1 megje-
.
lenik a mikrohullámú üzem , főzés vagy
jele. A beállított időt visszafele számolja.
A főzés indítása
Ha beállította a teljesítményt és a főzési időt,
a kijelzőn 1 pedig a jel villog, elindíthatja
a főzési folyamatot:
Nyomja meg a főzés elindításához az Indítás/
Gyorsindításgombot q . A kijelzőn 1 a mikrohullámú üzemmód és a főzés jele villog.
A beállított idő visszafele számolódik.
A főzési folyamat megszakítása
Nyomja meg egyszer a Stop 0 gombot, ha
meg akarja szakítani a főzési folyamatot. A készülék
megszakítja a főzést és megállítja a még hátramaradó
időt. Nyomja meg az „Indítás/Gyorsindításgombot q , ha folytatni akarja a főzési folyamatot.
A főzési folyamat leállítása
Nyomja meg kétszer a Stop gombot 0 , ha
meg szeretné szakítani a főzési folyamatot. A készülék
újra készenléti üzemmódba kapcsol vissza.
A főzés befejeződött
Ha befejeződött a főzés, a kijelzőn 1 „End“ és
4 hangjelzés hallatszik. Ha nem nyitja ki a mikrohullámú sütő ajtaját, kb. 2 percre még egyszer hangjelzés
hallható.
Gyors indítás
Ezzel a funkcióval azonnal 30 másodpercre (vagy
hosszabb időre, akár 12 percre) 800 W-os teljesítménnyel indul meg a melegítés/főzés.
• Nyomja meg egyszer az Indítás/Gyorsindítás
gombot q . A kijelzőn 1 megjelenik a
mikrohullámú üzem , főzés .jele, valamint
a „:30“. A mikrohullámú sütő 30 percre megkezdi a melegítést. Visszafele számolja az időt.
Ha meg szeretné hosszabbítani a melegítést/főzést,
annyiszor nyomja meg az Indítás/Gyorsindítás
gombot q , amíg el nem éri a kívánt időtartamot.
Gyors indítás
Ezzel a funkcióval azonnal 30 másodpercre (vagy
hosszabb időre, akár 12 percre) 800 W-os teljesítménnyel indul meg a melegítés/főzés.
• Nyomja meg egyszer az Indítás/Gyorsindítás
gombot q . A kijelzőn 1 megjelenik
a mikrohullámú üzem , főzés .jele,
valamint a „:30“. A jel villog.
Várjon kb. 3 másodpercet. A mikrohullám 30
másodpercre megkezdi a főzést és a jel
kialszik. Visszafele számolja az időt.
Ha 30 másodpercnél tovább akarja párolni az ételt,
annyiszor nyomja meg az Indítás/Gyorsindítás
gombot q , amíg el nem éri a kívánt időtartamot.
- 44 -

Grillező üzemmód
A grillfunkciót vékony szelet húsokhoz, marhaszelethez,
fasírthoz, virslihez vagy csirkesülthez használhatja.
Kiválóan alkalmas pirított szendvicsekhez és rakott
ételekhez. A grillezéshez mindig használja a grillező
állványt t.
Így optimális eredményt érhet el grillezés közben.
Mindig állítsa a grillező állványt t az üvegtányérra
3.
1. Nyomja meg a Grill gombot 6 , ha be
szeretné kapcsolni a grillező funkciót.
A kijelzőn 1 a grillező funkció jele és
„:10“ jelenik meg.
2. Állítsa be a forgatható kapcsolóval q a kívánt
főzési időt. A maximális beállítható idő 95 perc.
3. Nyomja meg a grillfunkció indításához a Start/
Gyorsindításq gombot.
4. Fordítsa meg a húst a beállított idő felénél.
Kombinált párolás
Ez a funkció egyesíti a grillfunkciót a normál mikrohullámú üzemmóddal. A kombiprogram közben egy
bizonyos ideig fő és a megmaradó időben pedig
automatikusan grilleződik az étel. Halk kattanás jelzi,
ha a készülék átkapcsol egyikről a másikra.
Figyelem:
Soha ne használja a grillező állványt t vagy más
fémes tárgyakat, ha a mikrohullámú sütőt kombinált
főzéshez használja. A fém visszaveri a mikruhullámú
sugárzást és így szikra képződik. Ez égéshez vezethet
és a készülék helyrehozhatatlanul megsérülhet!
1-es kombináció
Az 1-es kombinációnál a mikrohullámú teljesítmény
30 %-a és a grillező teljesítmény 70 %-a a főzési
időnek. Ez pl. hal, burgonya vagy rakott ételek
főzésére alkalmas.
1. Nyomja meg egyszer a Kombináció gombot
e , ha be szeretné kapcsolni az 1-es
kombinációt. A kijelzőn 1 valamint „:10“ jelenik meg.
2. Állítsa be a forgatható kapcsolóval q a kívánt
főzési időt. A maximális beállítható idő 95 perc.
3 Indításához nyomja meg az „Indítás/
Gyorsindítás" q gombot.
2-es kombináció
Az 2-es kombinációnál a mikrohullámú teljesítmény
55 %-a és a grillező teljesítmány 45 %-a a főzési
időnek. Ez például pudinghoz, omletthez, szárnyasételekhez és lasagnéhez alkalmas.
1. Nyomja meg kétszer a Kombináció gombot e
, ha be szeretné kapcsolni az 2-es kombinációt. A kijelzőn 1 valamint „:10“
jelenik meg.
2. Állítsa be a forgatható kapcsolóval q a kívánt
főzési időt. A maximális beállítható idő 95
perc.
3. Indításához nyomja meg az „Indítás/
Gyorsindítás" q gombot.
Automatika-menü
Automata üzemmódban elkészített ételekhez nem
szükséges megadni a főzés időtartamát és a teljesítményfokozatot. Elegendő, ha beadja a melegítendő/
főzendő élelmiszer fajtáját és súlyát.
Tudnivaló
A mikrohullámú kiszámítja a friss élelmiszerhez tartozó
időt/teljesítményfokozatot. A mélyhűtött élelmiszerek
nem főnek meg a mikrohullámú sütő által megadott
idő alatt.
Olvassza ki előtte a mélyhűtött élelmiszert a kiolvasztó
programmal (lásd a „Kiolvasztás“ részt).
- 45 -

Automatika-menü indítása
1. Lassan fordítsa el balra a forgókapcsolót q.
A kijelzőn 1 szám (pl. „3“ a 3-as automatika
programhoz (hal)) és jelenik meg. Válassza
ki az ételhez tartozó automatika menüt (1-9).
Sz. Jel Élelmiszer
1 italok 1 - 3
2 főtt tészta 100 - 300 g
Súly
(adagok)
Tudnivaló
Ha azt szeretné elérni, hogy az étel egyenletesen
főjjön át, az 5, 8 és 9 programoknál kb. a főzési
idő 2/3-ánál fordítsa meg az élelmiszert. A mikrohullámú sütő ennyi idő után magától megszakítja a
programot: “turnjelenik meg a kijelzőn 1és hang-
jelzés hallatszik, ami az étel megfordítására figyelmeztet.
• Nyissa ki az ajtót és fordítsa meg az ételt. Óvatosan
bánjon az esetleg már felforrósodott ételekkel.
• Nyomja meg az „Indítás/Gyorsindítás" gombot q
, ha folytatni akarja a főzési folyamatot.
3 hal 100 - 1000 g
4 rizs 100 - 1000 g
5 csirke 800 - 1400 g
6 felmelegítés 100 - 1000 g
7 burgonya 150 - 600 g
8 sült 300 - 1300 g
9 saslik 100 - 700 g
2. Nyomja meg többször a Súly/Mennyiség
gombot 7 , amíg a kijelzőn 1 meg
nem jelenik a kívánt súly ill. az adagok száma.
A jel villog.
3. Nyomja meg az Indítás/Gyorsindítás q
gombot, hogy elindítsa a melegítést.
Tudnivaló:
Ha nem akarja megfordítani az ételt, várja meg a
hangjelzés végét és ne tegyen semmit. A mikrohullámú
sütő a programot kb. 30 másodperc elteltével magától folytatja.
Tudnivaló
Ha az étel nincsen teljesen átfőve az automatika menü
befejezése után, még főzze pár percig a gyorsindító
programmal. Azoknál a programoknál, amelyek
a grillfunkció után lejárnak (az 5, 8 és 9 programszámok), a grillfunkcióval tovább puhíthatja őket.
A grillfunkcióval történő utánfőzés esetén jobban
megpirulnak az ételek.
Figyelem
Semmiképpen ne takarja le az ételeket vagy ne
használjon nem hőálló edényt azoknál a programoknál, amelyekhez be van kapcsolva a grillező
funkció is, mert megolvadhatnak vagy kigyulladhatnak.
Sérülésveszély!
Az üvegtányér 3 a grillező főzés után nagyon forró!
Használjon edényfogó kesztyűt vagy hőálló kesztyűt,
ha ki szeretné venni a főzőtérből.
- 46 -

Tudnivaló:
Kérjük, vegye figyelembe, hogy az élelmiszerek mérete,
alakja és fajtája meghatározza a végeredményt.
A programok részletes bemutatása
1-es program: Italok
Ez a program csak a mikrohullámú teljesítmény
használata mellett megy. A beállított adagszám
szerint 1:30 és 3:50 percig megy a program.
• Állítsa a melegítendő italt a főzőtérben lévő
üvegtányérra 3 . Ha több poharat vagy csészét
tesz a mikrohullámú sütőbe, ügyeljen arra, hogy
ne érjen hozzá az edényekhez.
Tudnivaló
A hirtelen forrás elkerülése végett:
• Amennyiben lehetséges, melegítés közben helyezzen
üvegpálcát a folyadékba.
• Tegye a halszeleteket egy mikrohullámú sütőbe
alkalmas tányérra, tegyen hozzá egy kis vajat
vagy más zsiradékot, fűszerezze ízlés szerint és
indítsa el a Halhoz tartozó Automatika menüt.
4-es program: Rizs
Ez a program csak a mikrohullámú teljesítmény
használata mellett megy.
A beállított súly szerint a program 16-36 percig megy.
• Rizs főzésére magas edényt használjon, mert
fennáll annak a veszélye, hogy kifut. Kb. 20 dkg
rizshez 4 dl vizet számoljon.
• Tegye a rizst az edénybe, tölte fel a szükséges
folyadékmennyiséggel és hagyja dagadni benne
a rizst kb. 3 percig.
• Takarja le az edényt. Ügyeljen arra, hogy ne
legyen légmentesen lezárva. Ezután elindíthatja
a rizshez tartozó Automatika menüt.
• Melegítés után 20 másodpercig hagyja a folyadékot
a mikrohullámú sütőben, hogy elkerülje a folyadék
hirtelen felbuggyanását.
2-as program: Főtt tészta
Ez a program csak a mikrohullámú teljesítmény
használata mellett megy.
A beállított súly szerint a program 25-35 percig megy.
• Tészta főzésére magas edényt használjon, mert
fennáll annak a veszélye, hogy kifut.
• Használjon annyi vizet, mint a hagyományos
főzésnél is.
• Először forralja fel a vizet a lefedett edényben.
Tegye bele a tésztát. Ezután elindíthatja az
Automatikus menüben a tészta programot.
• Ezután hagyja állni a tésztát kb. 3 percig.
3-as program: Hal
Ez a program csak a mikrohullámú teljesítmény
használata mellett megy.
A beállított súly szerint a program kb. 3:30 -16 percig
megy.
5-ös program: Csirke
Ez a program több párolási fokozatban a mikrohullámú
teljesítmény és a grillező funkció felhasználásával megy.
A beállított súly szerint a program 39-50 percig megy.
• Helyezze a csirkét egy mikrohullámú sütőhöz
alkalmas tányérra.
• Ízlés szerint fűszerezze meg és indítsa el a csirkéhez
tartozó Automatika menüt.
• Egész csirkét meg kell fordítani, mivel a felfele
álló oldala kiszáradhat. A mikrohullámú sütő erre
a célra automatikusan megszakítja a programot
az idő 2/3-ánál és hangjelzés hallatszik.
Fordítsa meg a csirkét és nyomja meg az Indítás/
Gyorsindítás gombot q , ha folytatni szeretné
a programot.
6-os program: Felmelegítés
Ez a program csak a mikrohullámú teljesítmény
használata mellett megy.
A beállított súly szerint a program kb. 1:00 - 6:20
percig megy.
- 47 -

• Helyezze a felmelegítendő ételt tartalmazó tányért
a főzőtérben lévő üvegtányérra 3 és indítsa el
a felmelegítéshez tartozó Automatika menüt.
7-as program: Burgonya
Ez a program csak a mikrohullámú teljesítmény
használata mellett megy.
A beállított súly szerint a program kb. 3:50 -11percig
megy.
Tipp
Hámozatlan burgonyát használjon a főzéshez.
Szúrjon bele egy párszor villával a burgonya héjába.
• Tegye a hámozatlan burgonyát egy mikrohullámú
sütőbe való tányérra vagy edénybe. Ha lehet,
egyforma méretű burgonyát használjon. Lehetőleg
ne érjenek egymáshoz a burgonyadarabok.
8-as program: Sült
Ez a program több párolási fokozatban a mikrohullámú teljesítmény és a grillező funkció felhasználásával
megy. A beállított súly szerint a program 16-60 percig
megy.
• Helyezze a sültet egy mikrohullámú sütőhöz
alkalmas tányérra. Ízlés szerint fűszerezze meg
hústés indítsa el a sülthöz tartozó Automatika
menüt.
• Egész sültet meg kell fordítani, mivel a felfele álló
oldala kiszáradhat. A mikrohullámú sütő erre
a célra automatikusan megszakítja a programot
az idő 2/3-ánál és hangjelzés hallatszik.
Fordítsa meg a sültet és nyomja meg az Indítás/
Gyorsindítás gombot q , ha folytatni szeretné
a programot.
9-es program: Saslik
Ez a program több párolási fokozatban a mikrohullámú teljesítmény és a grillező funkció felhasználásával
megy. A beállított súly szerint a program 9-27 percig
megy.
• Helyezze a nyársakat egy mikrohullámú sütőhöz
alkalmas tányérra. Ízlés szerint fűszerezze meg
húst és indítsa el a saslikhoz tartozó Automatika
menüt.
• Az egyenletes sütés érdekében meg kell fordítani
a nyársakat. A mikrohullámú sütő erre a célra
automatikusan megszakítja a programot az idő
2/3-ánál és hangjelzés hallatszik. Fordítsa meg
a nyársakat és nyomja meg az Indítás/Gyorsindítás gombot q , ha folytatni szeretné a
programot.
Kiolvasztás
Ezzel a funkcióval gond nélkül olvaszthat ki húst,
szárnyast és halat. A készülék a súly megadása
után a kiolvasztási időt és a teljesítményfokozatot
automatikusan kiszámolja és beállítja.
1. Nyomja meg a Kiolvasztás 8 gombot.
A kijelzőn 1 és jelenik meg.
A jel villog.
2. Válassza ki a forgókapcsoló q segítségével
a kiolvasztandó étel súlyát. 10 dkg és 1 kg 80 dkg
között állíthatja be a súlyt.
3. Nyomja meg az Indítás/Gyorsindítás
gombot q .
A készülék automatikusan megadja a kiolvasztási időt.
A kijelzőn 1 megjelenik ez az idő és visszafele
számolódik.
A mikrohullámú sütő automatikusan megszakítja
a kiolvasztástaz idő felénél és hangjelzés hallatszik.
Fordítsa meg a kiolvasztandó ételeket és nyomja
meg az Indítás/Gyorsindítás gombot q , ha
folytatni szeretné a kiolvasztást.
Tudnivaló:
Ha nem akarja megfordítani az ételt, várja meg a
hangjelzés végét és ne tegyen semmit. A mikrohullámú
sütő a programot kb. 30 másodperc elteltével magától folytatja.
- 48 -

A kezdési idő beállítása
Ezzel a programmal különböző kezdési időt állíthat
be a főzéshez vagy grillezéshez. Ha megfelelően
adta be a beállításokat, a készülék automatikusan
a beállított időben indít.
Tudnivaló:
Ha törölni szeretné a lementett indítási időt és ezzel
meg szeretné szakítani a lementett folyamatot, nyomja
meg a Stop gombot 0 . A homokóra jel
kialszik és a pontos idő jelenik meg.
Tudnivaló:
Az órát be kell állítani ahhoz, hogy a „Kezdési idő
beállítása“ funkciót ki lehessen választani.
1. Állítsa be a kívánt mikrohullámú funkciót (főzés,
grillezés vagy automatika menü (kivéve az automata programot 6)):
Mikrohullámú üzemeléshez: Nyomja meg
annyiszor a Teljesítmény r gombot, amíg ki
nem választotta a kívánt teljesítményfokozatot.
Állítsa be a forgatható kapcsolóval q a főzési
időt.
Grillező üzemmódhoz: nyomja meg a Grill gombot 6 , ha be szeretné kapcsolni
a grillező funkciót.
Állítsa be a forgatható kapcsolóval q a kívánt
grillezési időt.
Automatika menühöz: válassza ki a forgókapcsolóval q az ételhez illő programot (kivéve
automatika program 6). Nyomja meg annyiszor
a Súly/Mennyiség gombot 7 , míg meg
nem jelenik a kijelzőn 1 a kívánt mennyiség.
2. Nyomja meg az Óra gombot 9 .
A kijelzőn 1 „01: “ villog és a homokóra jel
jelenik meg.
3. Csavarja el a forgatható kapcsolót q az órák
beállításához.
4. Ha megnyomja az Óra gombot 9 , a percek
helye jelenik meg.
5. Csavarja el a forgatható kapcsolót q a percek
beállításához.
6. Nyomja meg a Start/Gyorsindítás q
gombot. A homokóra jel villog. Az indítási
idő jelenik meg. A mikrohullámú sütő a folyamatot a beállított időben magától indítja. Kezdéskor
hangjelzés hallatszik.
Tisztítás és karbantartás
Sérülésveszély!
Tisztítás előtt kapcsolja ki a mikrosütőt és húzza ki
a csatlakozót a konnektorból.
A készüléket soha ne merítsük vízbe vagy más
folyadékba! Az elektromos áramütés okozta
életveszély állhat fenn és a készülék megsérülhet.
• A mikrosütő belsejét mindig tartsa tisztán.
• Ha kispriccelt ételdarabka vagy kifolyadék
ragadna a mikrosütő falán, nedves kendővel
törölje le.
• Használjon enyhe mosogatószert, ha makacsabb
foltok vannak a mikrosütőn.
• Ne használjon tisztítósprayt vagy más erős
tisztítószert, mert ezek foltot, csíkot vagy maszatos
foltot hagyhatnak az ajtó felületén.
• A külső borítást egy nedves kendővel törölje meg.
• A mikrohullámú sütő belsejében található funkciós
részek sérülésének elkerülése érdekében ne
engedje, hogy víz szivárogjon be a szellőzőnyílásokba 5.
• Rendszeresen távolítsa el a kispriccelt foltokat
vagy szennyeződéseket. Az ajtó és a betekintőablak mindkét oldalát, az ajtó szigetelését és a
mellette levő részeket nedves kendővel tartsa
tisztán. Ne használjon súrolószert.
• Ha a készülék ajtaján vagy annak külső részén
pára csapódna le, puha ronggyal törölje le.
Ez akkor fordulhat elő, ha a mikrosütőt magas
páratartalmú levegőn használják.
• Rendszeresen tisztítsa meg az üvegtányért 3.
Meleg szappanos vízben vagy a mosogatógépben mossa el.
- 49 -

• A grillező állványt t meleg mosogatószeres
vízben tisztítsa és jól szárítsa meg.
• A kellemetlen szagokat rendszeresen távolítsa el.
Helyezzen a mikrohullámú sütőbe egy mély
mikrohullámú sütőbe alkalmas edényt, amibe
egy csésze vizet, egy citrom haját és levét tölt.
Melegítse fel ezt 5 percig. Alaposan törölje ki
a mikrosütőt és száraz ronggyal törölje szárazra.
• Ha lámpát kell cserélni a mikrosütőben, csak
kereskedővel cseréltesse vagy forduljon szervizünkhöz.
Hibaelhárítás
A kijelző 1 nem jelez ki semmit.
• A hálózati csatlakozó nincs benne a dugaljban.
Ellenőrizze a hálózati csatlakozót.
• A hálózati aljzat meghibásodott.
Próbálja meg másik csatlakozó aljzattal.
• A kijelző 1 elromlott.Vegye fel a kapcsolatot
az ügyfélszolgálattal.
Az üvegtányér 3 forgás közben zajt okoz.
• Az üvegtányér 3 nem fekszik ki a forgó
csillagon 4.
Megfelelően helyezze be az üvegtányért 3
a főzőtérbe.
• A görgős csillag 4 és/vagy a főzőtér alja
koszos. Tisztítsa meg a görgős csillagot 4 és
a sütő alját.
Ártalmatlanítás
Semmi esetre se dobja a készüléket
a háztartási hulladékba. Ez a termék
a 2002/96/EC európai irányelv hatálya
alá tartozik.
A készüléket engedélyeztetett hulladékgyűjtő helyen
vagy a helyi hulladékeltávolító üzemnél tudja kidobni.
Vegye figyelembe az érvényben lévő idevonatkozó
előírásokat.
Kétség esetén vegye fel a kapcsolatot a hulladékfeldolgozó vállalattal.
A készülék nem reagál, ha megnyomom
valamelyik gombot.
• Be van kapcsolva a biztonsági gyermekzár.
Kapcsolja ki a biztonsági gyermekzárat
(lásd a „Kezelés“ részt).
A készülék nem indítja el a főzést/párolást.
• Nincsen jól becsukva az ajtó.
Rendesen csukja be az ajtót.
Valamennyi csomagolóanyagot juttasson el
a környezetbarát hulladékhasznosítóhoz.
- 50 -

Garancia és szervíz
Gyártja
A készülékre 3 év garanciát adunk a vásárlás dátumától számítva. A készüléket gondosan gyártottuk,
és szállítás előtt lelkiismeretesen ellenőriztük. Kérjük,
a vásárlás igazolására őrizze meg a pénztári blokkot.
Kérjük, garanciaigény esetén vegye fel a kapcsolatot telefonon az Ön közelében lévő szervizzel.
Csak ebben az esetben garantálhatjuk, hogy ingyen tudja beküldeni az árut.
A garancia csak anyag- és gyártási hibára vonatkozik, nem pedig szállítási kárra, kopásra vagy törékeny részek (pl. kapcsoló vagy elem) sérülésére. A termék kizárólag magánhasználatra, nem üzleti
használatra készült.
A garancia érvényét veszti visszaélésszerű vagy
szakavatatlan kezelés, erőszak alkalmazása vagy
olyan beavatkozások esetén, amelyeket nem engedélyeztetett szervizelő üzleteink hajtottak végre. Az
ön törvényes jogait ez a garancia nem korlátozza.
A garanciaidő nem hosszabbodik a jótállással. Ez
a kicserélt vagy javított alkatrészekre is érvényes.
Az esetlegesen már a megvételkor meglévő károkat
és hiányosságokat azonnal kicsomagolás után, legkésőbb két nappal a vétel dátumától számítva jelezni kell. A garanciális idő lejárta után esedékes javítások térítéskötelesek.
KOMPERNASS GMBH
BURGSTRASSE 21
44867 BOCHUM, GERMANY
www.kompernass.com
Kompernass Service Hungary
Tel.: 06 40 104680
e-mail: support.hu@kompernass.com
- 51 -

- 52 -

KAZALO VSEBINE STRAN
Predvidena uporaba 54
Varnostni napotki 54
Vsebina kompleta 57
Tehnični podatki 57
Pred prvo uporabo 57
Osnovna načela kuhanja v mikrovalovni pečici . . . . . . . . . . . . . . . . . . . . . . . . . . . . . . . . . . .57
Uporaba primerne posode . . . . . . . . . . . . . . . . . . . . . . . . . . . . . . . . . . . . . . . . . . . . . . . . . . .57
Opis naprave 58
Pred prvo uporabo 58
Postavitev naprave . . . . . . . . . . . . . . . . . . . . . . . . . . . . . . . . . . . . . . . . . . . . . . . . . . . . . . . . .58
Priprava naprave . . . . . . . . . . . . . . . . . . . . . . . . . . . . . . . . . . . . . . . . . . . . . . . . . . . . . . . . . . .59
Uporaba pribora . . . . . . . . . . . . . . . . . . . . . . . . . . . . . . . . . . . . . . . . . . . . . . . . . . . . . . . . . . .59
Uporaba 60
Nastavitev ure . . . . . . . . . . . . . . . . . . . . . . . . . . . . . . . . . . . . . . . . . . . . . . . . . . . . . . . . . . . . .60
Nastavitev kuhinjske ure . . . . . . . . . . . . . . . . . . . . . . . . . . . . . . . . . . . . . . . . . . . . . . . . . . . . .60
Varnostna zaščita za otroke . . . . . . . . . . . . . . . . . . . . . . . . . . . . . . . . . . . . . . . . . . . . . . . . . .60
Funkcije prikaza informacij . . . . . . . . . . . . . . . . . . . . . . . . . . . . . . . . . . . . . . . . . . . . . . . . . . .60
Kuhanje in priprava jedi 61
Uporaba mikrovalovne pečice . . . . . . . . . . . . . . . . . . . . . . . . . . . . . . . . . . . . . . . . . . . . . . . .61
Uporaba žara . . . . . . . . . . . . . . . . . . . . . . . . . . . . . . . . . . . . . . . . . . . . . . . . . . . . . . . . . . . . .62
Kombinirana priprava jedi . . . . . . . . . . . . . . . . . . . . . . . . . . . . . . . . . . . . . . . . . . . . . . . . . . .62
Meni Avtomatika 62
Zagon menija Avtomatika . . . . . . . . . . . . . . . . . . . . . . . . . . . . . . . . . . . . . . . . . . . . . . . . . . . .63
Podrobnosti o programih . . . . . . . . . . . . . . . . . . . . . . . . . . . . . . . . . . . . . . . . . . . . . . . . . . . .64
Odtajanje 65
Predhodna nastavitev časa zagona 66
Čiščenje in nega 66
Odprava napak 67
Odstranitev 67
Garancija in servis 67
Proizvajalec 68
Ta navodila shranite za poznejša vprašanja – ob predaji naprave tretji osebi jih priložite zraven!
- 53 -

MIKROVALOVNA
PEČICA
Predvidena uporaba
Ta izdelek je predviden za segrevanje in pripravo
živil po opisanih postopkih.
Vsaka sprememba naprave velja za nepredvideno
in pomeni bistveno nevarnost nezgod. Proizvajalec
ne prevzema nobene garancije za škodo, nastalo
zaradi nepredvidene oz. nenamenske uporabe.
Ta naprava ni namenjena obrtni uporabi.
Varnostni napotki
Pozor!
Opozorila pred poškodbami naprave.
Nevarnost! / Nevarnost poškodb!
Nevarnost poškodb in električnega udara.
Nevarnost požara!
Nevarnost požara.
Opozorilo!
Navodila in nasveti za ravnanje z mikrovalovno pečico.
Preventivni ukrepi za preprečitev prekomernega
stika z energijo mikrovalov
• Naprave ne poskušajte uporabljati z odprtimi vrati,
ker pri delovanju mikrovalovne pečice z odprtimi
vrati lahko pride do stika s škodljivo količino
mikrovalovnega sevanja. Pri tem je pomembno,
da ne poskušate odstranjevati oz. spreminjati
varnostnih zapor.
• Med prednji del in vrata naprave ne vtikajte
nobenih predmetov. Poskrbite, da se na tesnilnih
površinah ne bodo nabirali umazanija ali ostanki
čistilnih sredstev.
Nevarnost poškodbe!
• Če so vrata ali tesnila na njih poškodovana,
mikrovalovne pečice v nobenem primeru več ne
uporabljajte. Takoj poskrbite za popravilo pri
usposobljenih strokovnjakih.
• Naprave nikoli ne poskušajte popravljati sami.
Če snamete ohišje, se lahko sprosti energija
mikrovalov. Poskrbite, da bodo popravila izvajali
le usposobljeni strokovnjaki.
• Ta izdelek ni namenjen temu, da bi ga uporabljale
osebe (tudi otroci ne) z omejenimi fizičnimi,
zaznavnimi ali duševnimi sposobnostmi ali
s pomanjkljivimi izkušnjami in/ali znanjem, razen
pod nadzorom osebe, ki je zanje odgovorna
ali jim je dala navodila v zvezi z uporabo izdelka.
Otroke je treba nadzorovati, da preprečite igro
z napravo.
• Otrokom se uporaba naprave za pripravo jedi
brez nadzora sme dovoliti le, če so dobili primerna
navodila, na podlagi katerih so napravo sposobni
uporabljati na varen način, in če je zagotovljeno, da razumejo nevarnosti, ki izhajajo iz napačne uporabe.
• Napravo uporabljajte le za predvidene namene
v skladu z opisom v teh navodilih. V napravi ne
uporabljajte nobenih jedkih kemikalij ali hlapov.
Mikrovalovna pečica je zasnovana posebej za
gretje, kuhanje, pripravo na žaru ali sušenje živil.
Ni pa izdelana za uporabo v industriji ali
laboratorijih.
• Mikrovalovne pečice ne uporabljajte, če sta omrežni
kabel oz. vtič poškodovana. Da preprečite
nevarnosti, naj omrežni kabel oz. vtič zamenjajo
usposobljeni strokovnjaki.
• Poskrbite, da med delovanjem pečice v njeni
bližini ne bo otrok. Nevarnost opeklin!
• V nobenem primeru ne odstranjujte ohišja
mikrovalovne pečice.
- 54 -

• Žarnico v notranjosti mikrovalovne pečice naj
zamenjajo le usposobljeni strokovnjaki.
• Takoj po pripravi jedi na žaru, v kombinaciji ali
z avtomatsko pripravo, se nikoli ne dotikajte vrat,
ohišja, prezračevalnih odprtin, delov pečice ali
jedilnega pribora. Navedeni deli so takrat zelo
segreti. Pred čiščenjem počakajte, da se deli
ohladijo.
• Poskrbite, da bo omrežni vtič vedno zlahka
dosegljiv, da ga boste v sili lahko hitro izklopili
iz omrežne vtičnice.
• Osebe s srčnim spodbujevalnikom naj se pred
začetkom uporabe mikrovalovne pečice pri svojem
osebnem zdravniku pozanimajo glede možnih
tveganj.
• Omrežni kabel naj nikoli ne leži na mizi ali
delovni površini. V nasprotnem primeru ga lahko
otroci potegnejo za sabo.
• Posode, vrečke za pokovko in drugo po segrevanju
vedno odpirajte tako, da bo odprtina obrnjena
stran od vašega telesa. Izhajajoča para lahko
povzroči opekline.
• Ko odpirate vrata mikrovalovne pečice, se nikoli
ne postavite neposredno pred samo pečico.
Izhajajoča para lahko povzroči opekline.
• V mikrovalovni pečici ne cvrite jedi. Vroče olje
lahko poškoduje dele naprave in pripomočke
ter celo povzroči opekline.
• Segrete otroške stekleničke nujno pomešajte ali
potresite! Možno je namreč, da se je vsebina
neenakomerno segrela in bi se vaš otrok lahko
opekel zaradi vroče hrane. Vsekakor preverite
temperaturo jedi, preden svojega dojenčka
začnete hraniti!
• Mikrovalovne pečice ne predelujte.
• Mikrovalovno sevanje je nevarno!
Izvedbo vzdrževanja in popravil, kjer je potrebno
odstraniti ohišje, ki varuje pred stikom z mikrovalovi, zaupajte le usposobljenim strokovnjakom.
• Preden začnete otroka hraniti, preverite temperaturo
živila, da ne bi otroka smrtno nevarno opekli.
Kuhinjski pripomočki se lahko segrejejo s toploto,
ki jo oddajajo živila, tako da jih je mogoče prijeti
le s krpo oz. prijemalko. Kuharske pripomočke
je treba preveriti, ali so primerni za mikrovalovno
pečico.
Pozor! Vroča površina!
Nevarnost požara!
• Mikrovalovne pečice nikoli ne puščajte brez
nadzora, če v njej pripravljate živila v plastični
ali papirnati embalaži.
• V bližino mikrovalovne pečice ali prezračevalnih
odprtin ne polagajte nobenih vnetljivih materialov.
• Z embalaže živil, ki jih želite segrevati, odstranite
vsa kovinska zapirala. Nevarnost požara!
• Za pripravo pokovke uporabljajte le vrečke za
pokovko, primerne za mikrovalovno pečico.
• Mikrovalovne pečice ne uporabljajte za segrevanje
blazin, napolnjenih z zrni, češnjevimi koščicami
ali želejem. Nevarnost požara!
• Mikrovalovno pečico ne uporabljajte za
shranjevanje živil ali drugih stvari.
• Jedi ne pripravljajte dlje, kot to navaja proizvajalec.
• Na mikrovalovno pečico med delovanjem ne
polagajte nobenih predmetov. Tako boste prekrili
odprtine za zračenje!
• Mikrovalovne pečice ne postavljajte v bližino
drugih naprav, ki oddajajo toploto, npr. peči.
• Mikrovalovno pečico temeljito očistite po pripravi
jedi, ki vsebujejo maščobe, še posebej, če jedi
med pripravo niso bile pokrite. Pred čiščenjem
počakajte, da se naprava popolnoma ohladi.
Na grelnih elementih žara ne sme biti nobenih
ostankov, npr. maščob. Ti se lahko pregrejejo
in vnamejo.
• V mikrovalovni pečici ne odtajajte zamrznjenih
maščob ali olj. Maščobe ali olje se lahko vnamejo.
• Za upravljanje naprave ne uporabljajte eksterne
stikalne ure ali ločenega daljinskega sistema.
- 55 -

Pozor! Možnost okvare naprave!
• Mikrovalovne pečice ne vklapljajte oz. naj ne
deluje, ko je prazna. Izjema je le prvi zagon
(glejte poglavje „Prvi zagon“).
• V prezračevalne odprtine ali varnostne zapore
vrat ne vtikajte nobenih predmetov.
• Ne uporabljajte kovinskega pribora, ki odbija
mikrovalove in povzroča iskrenje. V mikrovalovno
pečico ne dajajte pločevink.
• V mikrovalovno pečico takoj po pripravi jedi na
žaru, kombinaciji ali avtomatski pripravi ne
postavljajte nobenih plastičnih posod.
Plastični predmeti se lahko stopijo.
• Mikrovalovne pečice se ne sme nameščati na
mesta, kjer je izredno vlažen zrak ali kjer se
nabira vlaga.
• Tekočin in drugih živil ne smete segrevati v nepredušno zaprtih posodah, ker lahko eksplodirajo
in napravo poškodujejo.
• Ne naslanjajte se na vrata mikrovalovne pečice.
• Pomanjkljiva čistoča pribora lahko uniči površi-
no, kar spet skrajša življenjsko dobo in lahko
povzroči celo nevarnost.
Nevarnost
• Omrežnega kabla ali vtiča nikoli ne polagajte
v vodo ali druge tekočine.
• Omrežnega kabla ne imejte v bližini virov toplote.
Ne imejte ga speljanega pred vrati pečice.
Vročina lahko kabel poškoduje.
• V prezračevalne odprtine ali varnostne zapore
vrat nikoli ne vlivajte nobenih tekočin. Če vanje
kljub temu steče tekočina, mikrovalovno pečico
takoj izklopite in potegnite omrežni vtič iz vtičnice.
Mikrovalovno pečico naj pregledajo usposobljeni
strokovnjaki.
Varnostni napotki
• Kako zmanjšate tveganje požara v mikrovalovni
pečici: Če jedi segrevate v plastičnih ali papirnatih
posodah, mikrovalovno pečico stalno opazujte,
ker se materiali lahko vnamejo.
• Pri segrevanju pijač v mikrovalovni pečici lahko
pride do časovno zakasnjenega vrenja zaradi
kuhanja pijače. Posode zato prijemljite previdno.
Da preprečite nenadno vrenje:
- Po možnosti v tekočino med segrevanjem
postavite stekleno palico.
- Po končanem segrevanju pustite tekočino še
20 sekund v mikrovalovni pečici, da preprečite
nenadno kipenje.
• Lupino krompirja, klobas in podobnih živil predrite.
V nasprotnem primeru lahko eksplodirajo.
• Pri segrevanju tekočin ravnajte previdno.
Uporabljajte le odprte posode, da bodo nastajajoči
zračni mehurčki lahko uhajali v zrak.
• Če opazite dim, napravo izklopite ali izvlecite
omrežni vtič iz vtičnice ter pustite vrata pečice
zaprta, da morebiten plamen ugasne.
• Neolupljenih in trdo kuhanih jajc ne smete segrevati
v mikrovalovni pečici, ker lahko v mikrovalovni
pečici eksplodirajo tudi še po končanem segrevanju. Živila z debelo lupino, kot so npr. krompir,
cele buče, jabolka in kostanj pred kuhanjem
preluknjajte.
• Med delovanjem mikrovalovne pečice ne
premikajte.
Navodila za ozemljitev in pravilno namestitev
Ta naprava mora biti ozemljena. Ta naprava se sme
priklopiti le na omrežno vtičnico, ozemljeno po
predpisih. Priporočamo uporabo ločenega električnega
tokokroga le za napajanje mikrovalovne pečice.
Nevarnost: Nepravilno ravnanje z ozemljitvenim
vtičem lahko povzroči udar električnega toka.
Napotek: Če imate vprašanja o ozemljitvi ali
o navodilih glede električnega toka, se obrnite
na strokovnjaka električarja ali vzdrževalca.
Za škodo na mikrovalovni pečici ali za poškodbe ljudi,
ki bi bile posledice neupoštevanja navodil za električni
priklop, ne moreta prevzeti odgovornosti ne proizvajalec ne zastopnik oz. prodajalec.
- 56 -

Radijske motnje drugih naprav
Delovanje mikrovalovne pečice lahko povzroči motnje
delovanja radijskih, televizijskih in drugih podobnih
aparatov.
Če se pojavijo omenjene interference, jih zmanjšajte
oz. odpravite z naslednjimi ukrepi:
• Očistite vrata in tesnilne površine mikrovalovne
pečice.
• Anteno radijskega ali televizijskega sprejemnika
obrnite v drugo smer.
• Mikrovalovno pečico postavite na drugo mesto,
stran od sprejemnika.
• Mikrovalovno pečico odstranite od sprejemnika.
• Mikrovalovno pečico priklopite v drugo električno
vtičnico. Mikrovalovna pečica in sprejemnik naj
uporabljata različni električni tokokrog.
Vsebina kompleta
Mikrovalovna pečica
Stekleni krožnik
Stoječi žar
Zvezda s kolesci
Navodila za uporabo
Kratka navodila
Tehnični podatki
Nazivna napetost: 230–240 V
50 Hz
Največja poraba
električnega toka: 1200 W
Največja izhodna moč
Mikrovalovna pečica: 800 W
Največja poraba
električnega toka
Žar: 1000 W
Frekvenca mikrovalov: 2450 MHz
~
Pred prvo uporabo
Osnovna načela kuhanja v mikrovalovni
pečici
• Jedila razporedite premišljeno.
• Debelejš dele položite bližje robu posode.
• Upoštevajte čas priprave. Izberite najkrajši
navedeni čas priprave in ga po potrebi podaljšujte.
Predolgo kuhanje jedil lahko povzroči dim ali
vžig.
• Jedi med pripravo pokrijte s pokrovom, primernim
za uporabo v mikrovalovni pečici.
Pokrov preprečuje škropljenje in pripomore
k enakomernemu kuhanju živil.
• Živila med pripravo v mikrovalovni pečici enkrat
obrnite, da bodo jedi, kot sta piščanec ali
hamburger, hitreje pripravljene.
• Večje kose živil, npr. pečenko, je potrebno
obrniti najmanj enkrat.
• Po polovici časa za pripravo živila, kot so npr.
mesne kroglice, v celoti prerazporedite.
Kroglice obrnite in tiste s sredine posode
premestite na njen rob.
Uporaba primerne posode
• Idealen material za mikrovalovno pečico je
prepusten za mikrovalove, energijo torej prepušča
skozi posodo, da se jedi lahko segrejejo.
Mikrovalovi ne morejo prodreti skozi kovine.
Zaradi tega ne smete uporabljati nobenih
kovinskih posod in materialov.
• Za segrevanje živil v mikrovalovni pečici tudi
ne uporabljajte izdelkov iz recikliranega papirja.
Ti lahko vsebujejo drobne kovinske delce, ki
lahko povzročijo iskrenje ali celo požar.
- 57 -
• Priporočamo uporabo okroglih ali ovalnih posod
namesto oglatih ali podolgovatih, ker se hrana
v kotih hitro preveč skuha.
Naslednji seznam naj bo splošna pomoč pri
izbiri pravilne posode.
Posoda za kuho
Toplotno obstojno
steklo
Toplotno neobstojno
steklo
Keramika, odporna
na toploto
Plastična posoda
primerna za mikrovalovno pečico
Mikrovalovna
pečica
Da Da Da
Ne Ne Ne
Da Da Da
Da Ne Ne
Žar
Kombinacija
Opis naprave
1 Prikazovalnik
2 Tipka za odpiranje vrat
3 Stekleni krožnik
4 Zvezda s kolesci
5 Prezračevalne reže
6 Tipka za žar
7 Tipka za težo/količino
8 Tipka za odtajanje
9 Tipka za uro
0 Tipka Stop
q Vrtljiv gumb za nastavljanje/zagon/
hitri zagon
w Tipka za kuhinjsko uro
e Tipka za kombinacije
r Tipka za moč
t Stoječi žar
Papirnate brisače Da Ne Ne
Kovinski pladenj
oz. plošča
Stoječi žar Ne Da Ne
Aluminijeva folija
& posoda iz folije
Ne Da Ne
Ne Da Ne
Pozor:
Nikoli ne uporabljajte stoječega žara ali drugih
kovinskih predmetov, če napravo uporabljate za
pripravo jedi z mikrovalovi ali s kombiniranim postopkom. Kovina odseva mikrovalovno sevanje in tako
privede do nastanka isker. To lahko privede do požara
in napravo nepopravljivo poškoduje!
Pred prvo uporabo
Postavitev naprave
Pozor:
Mikrovalovna pečica ni primerna za vgradnjo v kuhinjsko omaro. V zaprtih omarah prezračevanje
naprave ni zagotovljeno v zadostni meri. Naprava
se lahko poškoduje in obstaja nevarnost požara!
• Za mesto, kjer bo stala mikrovalovna pečica,
izberite raven prostor z dovolj prostora za dovod
in odvod zraka v in iz naprave:
Med napravo in stenami naj bo obvezno najmanj
10 cm nezasedenega prostora. Prepričajte se,
da je mogoče vrata mikrovalovne pečice
brezhibno odpreti.
Od mikrovalovne pečice bodite oddaljeni
najmanj 20 cm.
- 58 -

• Poskrbite za to, da je omrežni vtič lahko dosegljiv,
da se ga da v primeru nevarnosti doseči in
potegniti ven hitro in brez težav.
• Ne odstranjujte podstavkov mikrovalovne pečice.
• Ne blokirajte prezračevalnih rež 5.
Drugače lahko pride do poškodbe naprave.
• Izdelek postavite čimbolj stran od radijskih in
televizijskih sprejemnikov. Delovanje mikrovalovne
pečice lahko povzroči motnje pri sprejemu
radijskih ali televizijskih programov.
Pozor:
Mikrovalovne pečice ne postavljajte nad kuhinjski
štedilnik ali drugo napravo, ki oddaja toploto.
Postavitev na takem kraju bi napravo poškodovala
in povzročila tudi izgubo garancije.
Priprava naprave
• Odstranite embalažo in s površine ohišja naprave
zaščitno folijo, če je nameščena na izdelku.
Napravo vklopite brez živil in brez pribora (steklenega krožnika 3, zvezde s kolesci 4 in stoječega
žara t) in nastavite peko na žaru kot način delovanja:
• Enkrat pritisnite tipko za žar 6 .
Na ta način izberete peko na žaru.
Na prikazovalniku 1 se pojavi simbol in
simbol utripa. Na ta način prikazuje
pripravljenost za zagon.
• Z vrtljivim gumbom za nastavljanje q nastavite
čas priprave 10 minut.
• Pritisnite tipko za zagon/hitri zagon q ,
da vklopite peko na žaru.
Napotek:
Pri prvem zagonu lahko pride do rahlega nastanka
smradu zaradi ostankov od izdelave. Ta je neškodljiv.
Poskrbite za zadostno zračenje. Na primer tako, da
odprete okno.
Opomba:
Ne odstranjujte svetlo sive ploščice iz sljude, nameščene
zaradi zaščite cevi magnetnega polja v notranjosti
pečice.
• Omrežni vtič vtaknite v omrežno vtičnico.
Uporabljajte 230 - 240 V, 50 Hz omrežno
vtičnico z varovalko s 16 A. Priporočamo, da
mikrovalovno pečico napaja ločen električni tokokrog. Če niste prepričani, kako naj priklopite
mikrovalovno pečico, za nasvet vprašajte strokovnjaka.
Pred uporabo mikrovalovne pečice je napravo najprej
treba segreti prazno, da ostanki od proizvodnje lahko
izparijo.
• Čez 10 minut se naprava samodejno izklopi.
Zadonijo signalni toni. Odprite vrata. Počakajte,
da se v celoti ohladi.
• Omrežni vtič potegnite iz vtičnice in napravo
znotraj očistite z vlažno krpo ter jo skrbno
obrišite.
Uporaba pribora
• Postavite zvezdo s kolesci 4 na sredino na
pogonsko os v prostoru za pripravo jedi. Pazite,
da zvezda v celoti zdrsne na os in je trdno
pritrjena.
• Stekleni krožnik 3 postavite na sredino zvezde
s kolesci. Tri kolesca se morajo prilegati vodilu
na steklenem krožniku 3.
- 59 -

Uporaba
Nastavitev ure
Ko mikrovalovno pečico zaženete prvič ali je prišlo
do izpada elektrike, se na prikazovalniku 1 pojavi
"1 : 0 1 ".
1. Pritisnite tipko za uro 9 . Na prikazovalniku
1 se pojavi „ Hr 12“. Pritisnite tipko za uro
9 še enkrat, če želite vklopiti 24-urni način
prikaza.
2. Z vrtljivim gumbom e nastavite q želeno uro.
Simbol za uro na prikazovalniku 1 utripa.
3. Pritisnite tipko za uro 9 .
Pojavi se številka za prikaz minut.
4. Z vrtenjem gumba za nastavljanje q nastavite
želene minute.
5. Ko je urni čas pravilno nastavljen, pritisnite tipko
za uro 9 . Simbol ure na prikazovalniku 1 trajno sveti in dvopičje z utripanjem prikazuje, da ura teče.
Za odčitavanje trenutnega dnevnega časa med
delovanjem mikrovalovne pečice pritisnite tipko za
uro 9 ; tako se bo urni čas za pribl. 4 sekund
pojavil na prikazovalniku 1.
Nastavitev kuhinjske ure
Mikrovalovna pečica ima kuhinjsko uro, ki jo lahko
uporabite samostojno, ne glede na delovanje mikrovalovne pečice.
1. Pritisnite tipko za kuhinjsko uro w , ko je
naprava v stanju pripravljenosti. Na prikazovalniku 1 se pojavi „00:10“.
2. Z vrtljivim gumbom za nastavljanje q nastavite
želeni čas.
Čas lahko nastavite od 10 sekund do 95 minut.
3. Pritisnite tipko za zagon/hitri zagon q .
Zadoni signalni ton. Čas se bo začel odštevati nazaj, proti nič. Čez pribl. 3 sekunde se ponovno
prikaže normalen urni čas. Kuhinjska ura v ozadju
teče naprej.
Če vmes želite kontrolirati čas kuhinjske ure, pritisnite tipko za kuhinjsko uro w .
Za kratek čas se pojavi kuhinjska ura.
Ko nastavljen čas poteče, zadoni daljši zvočni signal.
Napotek:
Za prekinitev potekanja časa kuhinjske ure pritisnite
tipko za kuhinjsko uro w , tako da se pojavi
aktualni čas kuhinjske ure. Pritisnite, medtem ko se
prikazuje kuhinjska ura na prikazovalniku 1, tipko
Stop 0 . Kuhinjska ura se prekine in na prikazovalniku 1 se pojavi urni čas.
Varnostna zaščita za otroke
To nastavitev aktivirajte, da mikrovalovne pečice ne
bi nenadzorovano uporabljali majhni otroci in druge
osebe, ki niso seznanjeni z njeno uporabo.
Simbol varnostne zaščite za otroke se pojavi
na prikazovalniku 1 in naprave ni možno zagnati,
dokler je ta funkcija aktivirana.
• Pritisnite tipko Stop 0 in jo držite pritisnjeno,
dokler ne zadoni zvočni signal in se pojavi simbol
varnostne zaščite za otroke na prikazovalniku 1. Tipke in gumbi mikrovalovne pečice sedaj ne delujejo več.
• Za deaktiviranje varnostne zaščite za otroke pritisnite tipko Stop 0 in jo držite pritisnjeno,
dokler ne zadoni daljši zvočni signal in simbol
varnostne zaščite za otroke ugasne.
Funkcije prikaza informacij
Prikaz časa med delovanjem
Med pripravo jedi pritisnite tipko za uro 9 .
Na prikazovalniku 1 se za pribl. 4 sekund pojavi
urni čas.
Prikaz moči med delovanjem
Med pripravo jedi pritisnite tipko za moč r .
Na prikazovalniku 1 se za pribl. 3 sekunde pojavi
aktivirana stopnja moči.
- 60 -

Kuhanje in priprava jedi
Uporaba mikrovalovne pečice
Stopnje vrtljivega gumba za nastavitev časa q so:
• od 10 sek. do 5 min: v razmikih po 10 sekund
• od 5 do 10 min: v razmikih po 30 sekund
• od 10 do 30 min: v razmikih po 1 minuto
• od 30 do 95 min: v razmikih po 5 minut
Opomba
Na vratih mikrovalovne pečice ali na ohišju lahko
med pripravo jedi pride do nastanka vodnih kapljic.
To je običajen pojav in ne pomeni okvare pečice.
Po ohladitvi vlago obrišite s suho krpo.
Pozor:
Nikoli ne uporabljajte stoječega žara t ali drugih
kovinskih predmetov, če napravo uporabljate za
pripravo jedi v mikrovalovni pečici ali s kombiniranim
postopkom. Kovina odseva mikrovalovno sevanje in
tako privede do nastanka isker. To lahko privede do
požara in napravo nepopravljivo poškoduje!
Izbira moči
• Pritisnite tipko za moč r tako pogosto,
da nastavite želeno moč.
• 1x za 800 W moči (P800).
• 2x za 700 W moči (P700).
• 3x za 600 W moči (P600).
• 4x za 500 W moči (P500).
• 5x za 400 W moči (P400).
• 6x za 300 W moči (P300).
• 7x za 200 W moči (P200).
• 8x za 100 W moči (P100).
Moč se prikaže na prikazovalniku 1
(npr. P800 pri 800 W moči).
Nastavitev časa priprave
Ko ste izbrali moč, nastavite želeni čas priprave:
• Obračajte vrtljivi gumb za nastavljanje q,
dokler ni nastavljen želeni čas priprave.
Prekinitev/zaključek vnosa podatkov
Če želite pripravo jedi izklopiti in končati, enkrat pritisnite
tipko Stop 0 . Naprava se bo preklopila v stanje
pripravljenosti.
Zagon postopka priprave jedi
Ko ste nastavili moč in čas priprave jedi in na prikazovalniku 1 utripa simbol , lahko zaženete
postopek priprave jedi:
Za začetek priprave jedi pritisnite tipko za zagon/
hitri zagon q . Na prikazovalniku 1 se pojavijo
simboli za mikrovalovno delovanje in pripravo
jedi ali . Nastavljeni čas se bo začel odštevati.
Prekinitev priprave jedi
Enkrat pritisnite tipko Stop 0 , da prekinete
postopek priprave jedi. Naprava pripravo jedi prekine
in zaustavi odštevanje preostalega časa. Pritisnite tipko
za zagon/hitri zagon q za nadaljevanje
postopka priprave jedi.
Ustavitev priprave jedi
Dvakrat pritisnite tipko Stop 0 , da prekinete
postopek priprave jedi. Naprava se bo preklopila
v stanje pripravljenosti.
Postopek priprave jedi je končan.
Ko je postopek priprave jedi končan, se na prikazovalniku 1 pojavi „End“ (konec) in zadonijo 4 signalni
toni. Če vrat mikrovalovne pečice takrat ne odprete,
signalni toni čez okrog 2 minuti zadonijo še enkrat.
Hiter začetek
S to funkcijo lahko takoj začnete s pripravo jedi za
30 sekund (ali dlje, do 12 minut) pri 800 W moči.
- 61 -
• Enkrat pritisnite tipko za zagon/hitri zagon q
. Na prikazovalniku 1 se pojavita simbola
za delovanje mikrovalovne pečice in pripravo jedi ter „:30“. Mikrovalovna pečica
zažene postopek priprave jedi za 30 sekund.
Čas se bo začel odštevati.
Če želite pripravo jedi podaljšati, tipko za zagon/
hitri zagon q pritisnite tako pogosto, da dobite
želeni čas.
Uporaba žara
Žar lahko uporabljate pri pripravi tankih rezin rib in
zrezkov ter mesnih cmokov, klobas ali kosov piščanca.
Zelo je primeren tudi za opečene kruhke in narastke.
Za peko na žaru zmeraj uporabljajte stoječi žar t.
Tako dosežete optimalne rezultate peke.
Stoječi žar t zmeraj postavite na stekleni krožnik 3.
1. Pritisnite tipko za žar 6 , da aktivirate
funkcijo žara.
Na prikazovalniku 1 se pojavi simbol za funk-
cijo žara in „:10“.
2. Z vrtljivim gumbom q nastavite želeni čas
priprave. Čas priprave je lahko dolg največ
95 minut.
3. Za vklop funkcije žara pritisnite tipko za zagon/
hitri zagon q .
4. Ko polovica časa preteče, meso obrnite.
Kombinirana priprava jedi
Ta funkcija združuje žar z običajnim delovanjem
mikrovalovne pečice. Med kombiniranim postopkom
se določen čas samodejno in z enim postopkom
porabi za kuhanje in preostali čas za delovanje žara.
Ob preklopu boste slišali tih klik.
Pozor:
Nikoli ne uporabljajte stoječega žara t ali drugih
kovinskih predmetov, če napravo uporabljate za
pripravo jedi s kombiniranim postopkom.
Kovina odseva mikrovalovno sevanje in tako privede
do nastanka isker. To lahko privede do požara in
napravo nepopravljivo poškoduje!
Kombinacija 1
Pri kombinaciji 1 mikrovalovna moč obsega 30 %
in moč žara 70 % časa priprave. To je npr. primerno
za ribe, krompir ali gratiniranje.
1. Pritisnite tipko za kombinacijo e enkrat,
da aktivirate kombinacijo 1. Na prikazovalniku 1
se pojavi ter „:10“.
2. Z vrtljivim gumbom q nastavite želeni čas
priprave. Čas priprave je lahko dolg največ
95 minut.
3. Za začetek priprave pritisnite tipko za zagon/
hitri zagon q .
Kombinacija 2
Pri kombinaciji 2 mikrovalovna moč obsega 55 %
in moč žara 45 % časa priprave. To je npr. primerno
za pudinge, omlete, jedi iz perutnine ali lazanjo.
1. Pritisnite tipko za kombinacijo e dvakrat,
da aktivirate kombinacijo 2. Na prikazovalniku 1
se pojavi ter „:10“.
2. Z vrtljivim gumbom q nastavite želeni čas
priprave. Čas priprave je lahko dolg največ
95 minut.
3. Za začetek priprave pritisnite tipko za zagon/
hitri zagon q .
Meni Avtomatika
Pri jedeh, ki bodo pripravljene avtomatsko oz.
samodejno, ni potrebno vnašati časa priprave in
moči. Dovolj je že navesti vrsto pripravljenega
živila ter njegovo težo.
- 62 -

Opomba
Mikrovalovna pečica izračuna čas/moč za sveža
živila. Zamrznjena živila se v času, ki ga določi
mikrovalovna pečica, ne skuhajo.
Po potrebi zamrznjena živila najprej odtalite s programom za odtajanje (glejte poglavje „Odtajanje“).
2. Pritisnite, po potrebi večkrat, tipko za težo/
količino 7 , dokler se na prikazovalniku 1
ne pojavi želena teža oz. želeno število porcij.
Simbol utripa.
3. Pritisnite tipko za zagon/hitri zagon q ,
da vklopite pripravo jedi.
Zagon menija Avtomatika
1. Vrtljiv gumb za nastavljanje q počasi obrnite
na levo. Na prikazovalniku 1 se pojavi številka
(npr. „3“ za avtom. program 3 (ribe)) simbol
„riba“ ter . Izberite ustrezni avtomatski
meni za svojo jed (1 do 9).
Št. Simbol Živilo
1 Pijače 1 - 3
2 Testenine 100–300 g
3 Ribe 100–1000 g
4 Riž 100–1000 g
5 Piščanec 800–1400 g
6 Segrevanje 100–1000 g
Teža
(porcije)
Opomba
Za doseganje enakomernih rezultatov kuhanja ali
priprave jedi je potrebno pri programih 5, 8 in 9
po poteku okrog 2/3 časa priprave jedi obrniti.
Po poteku tega časa mikrovalovna pečica program
samodejno prekine: na prikazovalniku 1 se pojavi
„turn“ (obrnite) in zadonijo signalni toni, ki vas
opomnijo na obračanje jedi.
• Odprite vrata in jedi obrnite. Bodite previdni pri
morebiti že vročih jedeh.
• Pritisnite tipko za zagon/hitri zagon q za
nadaljevanje postopka priprave jedi.
Napotek:
Če živil ne želite obrniti, po zvočnih signalih nekaj
časa počakajte. Mikrovalovna pečica bo čez okrog
30 sekund svoj program samodejno nadaljevala.
Opomba
Če jed po koncu avtomatskega postopka ni čisto
skuhana, pripravo še malce podaljšajte s programom
za hitri zagon. Pri programih, ki potekajo s pomočjo
funkcije peke na žaru (številke programa 5, 8 in 9),
jed lahko dokončate s pomočjo funkcije peke na žaru.
Pri dodatni peki na žaru se poveča popečenost jedi.
7 Krompir 150–600 g
8 Pečenka 300–1300 g
9
Mesna
nabodala
100–700 g
Pozor
Pri programih s priklopljeno funkcijo peke na žaru
nikakor ne uporabljajte pokrovov ali neobstojne
posode, ker se ta lahko stali ali vžge!
- 63 -

Nevarnost poškodbe!
Stekleni krožnik 3 je po koncu peke na žaru zelo vroč!
Zato nujno uporabljajte krpo za lonec ali vročinsko
odporne rokavice, ko krožnik jemljete iz prostora za
peko.
Opomba:
Prosimo, upoštevajte, da je rezultat priprave jedi
odvisen od velikosti, oblike in vrste živil.
Podrobnosti o programih
Program 1: Pijače
Ta program poteka le s pomočjo moči mikrovalov.
Odvisno od nastavljenega števila porcij program
potrebuje med 1:30 in 3:50 minut.
• Pijačo, ki jo želite segreti, položite na stekleni
krožnik 3 v posodi za pripravo. Če v mikrovalovno
pečico odložite več kozarcev oz. skodelic, pazite
na to, da se med sabo ne dotikajo.
Program 3: Ribe
Ta program poteka le s pomočjo moči mikrovalov.
Odvisno od nastavljene teže program teče med
3:30 in 16 minutami.
• Koščke ribe dajte na krožnik, primeren za mikrovalovno pečico, dodajte malce masla ali druge
maščobe, po želji začinite in zaženite meni
Avtomatika za ribe.
Program 4: Riž
Ta program poteka le s pomočjo moči mikrovalov.
Odvisno od nastavljene teže program teče med
16 in 36 minutami.
• Za kuhanje riža uporabljajte visoko posodo, ker
obstaja nevarnost, da prekipi. Za pribl. 200 g
riža vzemite pribl. 400 ml vode.
• Riž dajte v posodo, dodajte potrebno količino
vode in riž pustite 3 minute, da se skuha.
• Posodo pokrijte. Pazite, da ni nepredušno zaprta.
Potem lahko zaženete meni Avtomatika za riž..
Opomba
Da preprečite nenadno vrenje:
• Po možnosti v tekočino med segrevanjem postavite
stekleno palico.
• Po končanem segrevanju pustite tekočino še
20 sekund v mikrovalovni pečici, da preprečite
nenadno kipenje oz. izbruh.
Program 2: Testenine
Ta program poteka le s pomočjo moči mikrovalov.
Odvisno od nastavljene teže program teče med
25 in 35 minutami.
• Za kuhanje testenin uporabljajte visoko posodo,
ker obstaja nevarnost, da prekipijo.
• Uporabite toliko vode kot pri normalnem kuhanju.
• Najprej vodo zavrite v pokriti posodi. Potem dodajte
testenine. Potem lahko zaženete meni Avtomatika
za testenine.
• Testenine na koncu pustite mirovati pribl. 3 minute.
Program 5: Piščanec
Ta program teče v več stopnjah z uporabo mikrovalovnega sevanja in funkcije peke na žaru. Odvisno
od nastavljene teže program teče med 39 in
50 minutami.
• Piščanec odložite na krožnik, primeren za mikrovalovno pečico.
• Po želji ga začinite in zaženite meni Avtomatika
za piščanca.
• Celega piščanca morate obrniti, ker bi se zgornja
stran sicer lahko izsušila. V ta namen mikrovalovna
pečica program samodejno prekine čez približno
2/3 časa in zadonijo zvočni signali.
Piščanca obrnite in pritisnite tipko za zagon/hitri
zagon q za nadaljevanje programa.
- 64 -

Program 6: Segrevanje
Ta program poteka le s pomočjo moči mikrovalov.
Odvisno od nastavljene teže program teče med
1:00 in 6:20 minutami.
• Krožnik z jedjo, ki jo želite segreti, dajte na stekleni
krožnik 3 v prostoru za pripravo in zaženite
meni Avtomatika za segrevanje.
Program 7: Krompir
Ta program poteka le s pomočjo moči mikrovalov.
Odvisno od nastavljene teže program teče med
3:50 in 11minutami.
Nasvet
Uporabite neolupljen krompir. Nekajkrat zapičite
v lupino.
• Neolupljen krompir dajte na krožnik ali v posodo,
primerno za mikrovalovno pečico. Po možnosti
uporabite gomolje podobne velikosti. Če se da,
naj se gomolji ne dotikajo eden drugega.
Program 8: Pečenje
Ta program teče v več stopnjah z uporabo mikrovalovnega sevanja in funkcije peke na žaru. Odvisno
od nastavljene teže program teče med 16 in
60 minutami.
• Pečenko odložite na krožnik, primeren za mikrovalovno pečico. Meso po želji začinite in zaženite
meni Avtomatika za pečenko.
• Pečenko morate obrniti, ker bi se zgornja stran sicer lahko izsušila. V ta namen mikrovalovna
pečica program samodejno prekine čez približno
2/3 časa in zadonijo zvočni signali.
Pečenko obrnite in pritisnite tipko za zagon/hitri
zagon q za nadaljevanje programa.
Program 9: Mesna nabodala
Ta program teče v več stopnjah z uporabo mikrovalovnega sevanja in funkcije peke na žaru. Odvisno
od nastavljene teže program teče med 9 in 27
minutami.
• Mesna nabodala odložite na krožnik, primeren
za mikrovalovno pečico. Meso po želji začinite
in zaženite meni Avtomatika za mesna nabodala.
• Nabodala morate obračati, da se bodo enakomerno zapekla. V ta namen mikrovalovna pečica
program samodejno prekine čez približno 2/3
časa in zadonijo zvočni signali. Nabodala obrnite
in pritisnite tipko za zagon/hitri zagon q
za nadaljevanje programa.
Odtajanje
S to funkcijo lahko enostavno odtalite meso, perutnino
in ribe. Čas za odtajanje in moč se samodejno
izračunata in nastavita po vnosu teže živila.
1. Pritisnite tipko za odtajanje 8 .
Na prikazovalniku 1 se pojavi in .
Simbol utripa.
2. S pomočjo vrtljivega gumba za nastavljanje q
izberite težo živila za odtajanje. Nastavite lahko
težo med 100 g in 1800 g.
3. Pritisnite tipko za zagon/hitri zagon q .
Naprava čas odtajanja določi samodejno. Pojavi se
na prikazovalniku 1 in začne teči.
V ta namen mikrovalovna pečica odtajanje samodejno
prekine čez približno 1/2 časa in zadonijo zvočni
signali. Živila za odtajanje obrnite in pritisnite tipko
za zagon/hitri zagon q za nadaljevanje odtajanja.
Napotek:
Če živil ne želite obrniti, po zvočnih signalih nekaj
časa počakajte. Mikrovalovna pečica bo čez okrog
30 sekund svoj program samodejno nadaljevala.
- 65 -

Predhodna nastavitev časa
zagona
S tem programom lahko za pripravo jedi ali peko
na žaru vnaprej programirate želeni čas zagona.
Če ste nastavitve izvedli pravilno, se naprava ob
nastavljenem času samodejno zažene.
Napotek:
Ura mora biti nastavljena, da lahko izberete funkcijo
„Predhodna nastavitev časa zagona“.
1. Nastavite želeno funkcijo mikrovalovne pečice
(priprava jedi, peka na žaru ali meni Avtomatika
(z izjemo programa 6)):
Za uporabo mikrovalovne pečice: Pritisnite tipko
za moč r tolikokrat, kakršno moč želite
nastaviti. Čas priprave nastavite z vrtljivim gumbom q.
Za uporabo žara: Pritisnite tipko za žar 6 ,
da aktivirate funkcijo žara.
Z vrtljivim gumbom za nastavljanje q nastavite
želeni čas peke na žaru. Za meni Avtomatika:
Z vrtljivim gumbom za nastavljanje q izberite
primeren program za svojo jed (z izjemo programa
6). Pritisnite tipko za težo/količino 7 tako
pogosto, da se na prikazovalniku 1 pojavi želena
količina.
2. Pritisnite tipko za uro 9 . Na prikazovalniku 1 utripa „01: “ in pojavi se simbol peščene
ure .
3. Obrnite vrtljivi gumb q za nastavitev ur.
4. Pritisnite tipko za uro 9 , sedaj se pojavijo
številke minut.
5. Obrnite vrtljivi gumb q za nastavitev minut.
6. Pritisnite tipko zagon/hitri zagon q .
Simbol peščene ure utripa. Prikaže se čas
zagona. Mikrovalovna pečica ob nastavljenem
času samodejno zažene postopek priprave.
Pri zagonu zadoni zvočni signal.
Napotek:
Za brisanje shranjenega časa in s tem tudi shranjenega postopka pritisnite tipko Stop 0 . Simbol
peščene ure ugasne in prikaže se urni čas.
Čiščenje in nega
Nevarnost poškodb!
Pred čiščenjem mikrovalovno pečico izklopite in
omrežni vtič potegnite iz vtičnice.
Na noben način ne smete naprave pomočiti
v vodo ali v kakšno drugo tekočino. Tako
ravnanje lahko povzroči smrtno nevarnost zaradi
električnega udara ter poškoduje napravo.
• Notranjost mikrovalovne pečice naj bo vedno čista.
• Če na stene mikrovalovne pečice brizgajo delci
jedi ali se po njih polijejo tekočine, jih obrišite
z vlažno krpo.
• Če je mikrovalovna pečica bolj umazana,
uporabite blago čistilno sredstvo.
• Ne uporabljajte čistilnih pršil in drugih jedkih
sredstev za čiščenje, ker ta lahko pustijo madeže,
proge ali zaradi njih površina vrat postane motna.
• Zunanje stene čistite z vlažno krpo.
• Da preprečite poškodbe funkcijskih delov
v notranjosti mikrovalovne pečice, ne dovolite,
da bi v prezračevalne reže 5 vdrla voda.
• Redno odstranjujte brizgano maščobo in nečistoče.
Očistite vrata, obe strani okenca, tesnila na
vratih in okolico z vlažno krpo. Ne uporabljajte
grobih sredstev.
• Če se na oz. okrog zunanje strani vrat nabira sopara, jo obrišite z mehko krpo. Do tega pride,
če mikrovalovna pečica deluje v zelo vlažnih
pogojih.
• Redno čistite tudi stekleni krožnik 3.
Splahnite ga v topli milnici ali v pomivalnem
stroju.
- 66 -

• Očistite stoječi žar t v topli vodi za pomivan-
je in ga dobro osušite.
• Odpravljajte vonje, ki se pojavijo v mikrovalovni
pečici. V globoko skledo za mikrovalovno pečico
vlijte skodelico vode, sok in lupino ene limone
ter jo položite v mikrovalovno pečico. Vse skupaj
v mikrovalovni pečici grejte 5 minut. Nato pečico
temeljito obrišite in jo z mehko krpo zdrgnite
do suhega.
• Če je potrebno v mikrovalovni pečici zamenjati
žarnico, naj jo zamenja prodajalec ali se obrnite
na naš servis.
Odprava napak
Odstranitev
Naprave v nobenem primeru ne odvrzite
v običajne hišne smeti. Za ta izdelek
velja evropska direktiva 2002/96/EC.
Napravo oddajte pri podjetju, registriranem za
predelavo odpadkov, ali pri svojem komunalnem
podjetju za predelavo odpadkov.
Upoštevajte trenutno veljavne predpise.
V primeru dvoma se obrnite na svoje podjetje za
predelavo odpadkov.
Vse embalažne materiale oddajte v reciklažo.
Prikazovalnik 1 ne prikazuje ničesar.
• Omrežni vtič ni priklopljen v omrežno vtičnico.
Omrežni vtič preverite.
• Omrežna vtičnica je pokvarjena.
Poskusite z drugo omrežno vtičnico.
• Prikazovalnik 1 je pokvarjen.
Obrnite se na servisno službo.
Naprava se ne odziva na pritiskanje tipk.
• Varnostna zaščita za otroke je aktivirana.
Deaktivirajte varnostno zaščito za otroke
(glejte poglavje „Uporaba“).
Naprava ne zažene postopka priprave/kuhanja.
• Vrata niso pravilno zaprta. Vrata zaprite
pravilno.
Stekleni krožnik 3 pri vrtenju povzroča glasen
hrup.
• Stekleni krožnik 3 se zvezdi s kolesci 4 ne
prilega pravilno.
Stekleni krožnik 3 pravilno vstavite v prostor
za pripravo.
• Zvezda s kolesci 4 in/ali tla prostora za pripravo so umazana. Zvezdo s kolesci 4 in tla
očistite.
Garancija in servis
Ta naprava ima 3 leta garancije od datuma nakupa. Naprava je bila skrbno izdelana in pred dobavo natančno preverjena. Prosimo, da blagajniški račun shranite kot dokazilo o nakupu. V primeru
uveljavljanja garancije se po telefonu obrnite na
svojo servisno službo.
Samo tako je zagotovljeno brezplačno pošiljanje
vašega izdelka.
Garancija velja le za napake pri materialu ali izdelavi, ne pa tudi za poškodbe pri transportu, potrošne dele ali za poškodbe lomljivih delov, npr. stikal
ali akumulatorjev.
Izdelek je namenjen izključno za zasebno in ne za
poslovno uporabo.
V primeru zlorabe ali nepravilnega ravnanja, pri
uporabi sile ter pri posegih, ki jih ni izvedla naša
pooblaščena servisna poslovalnica, garancija preneha veljati. Vaših zakonskih pravic ta garancija ne
omejuje.
- 67 -

Jamstvo ne podaljša garancijske dobe. To velja tudi
za zamenjane in popravljene dele. Morebitne poškodbe in pomanjkljivosti, ki obstajajo že pri nakupu,
je treba javiti takoj po razpakiranju, najpozneje pa
dva dni po datumu nakupa.Popravila po preteku
garancijske dobe je treba plačati.
Birotehnika
Phone:+386 (0) 2 522 16 66
Fax: +386 (0) 2 531 17 40
e-mail: support.si@kompernass.com
Proizvajalec
KOMPERNASS GMBH
BURGSTRASSE 21
44867 BOCHUM, GERMANY
www.kompernass.com
- 68 -

OBSAH STRANA
Použití odpovídající určení 70
Bezpečnost 70
Rozsah dodávky 73
Technické údaje 73
Dříve než začnete 74
Základní zásady při vaření v mikrovlnné troubě . . . . . . . . . . . . . . . . . . . . . . . . . . . . . . . . . .74
Použití vhodného nádobí . . . . . . . . . . . . . . . . . . . . . . . . . . . . . . . . . . . . . . . . . . . . . . . . . . . .74
Popis přístroje 75
První uvedení do provozu 75
Umístění přístroje . . . . . . . . . . . . . . . . . . . . . . . . . . . . . . . . . . . . . . . . . . . . . . . . . . . . . . . . . . .75
Příprava přístroje . . . . . . . . . . . . . . . . . . . . . . . . . . . . . . . . . . . . . . . . . . . . . . . . . . . . . . . . . . .75
Vložení příslušenství . . . . . . . . . . . . . . . . . . . . . . . . . . . . . . . . . . . . . . . . . . . . . . . . . . . . . . . . .76
Obsluha 76
Nastavení hodin . . . . . . . . . . . . . . . . . . . . . . . . . . . . . . . . . . . . . . . . . . . . . . . . . . . . . . . . . . .76
Nastavení kuchyňského časovače . . . . . . . . . . . . . . . . . . . . . . . . . . . . . . . . . . . . . . . . . . . . .76
Dětská pojistka . . . . . . . . . . . . . . . . . . . . . . . . . . . . . . . . . . . . . . . . . . . . . . . . . . . . . . . . . . . .77
Funkce dotazování . . . . . . . . . . . . . . . . . . . . . . . . . . . . . . . . . . . . . . . . . . . . . . . . . . . . . . . . .77
Vaření a ohřívání 77
Provoz mikrovlnné trouby . . . . . . . . . . . . . . . . . . . . . . . . . . . . . . . . . . . . . . . . . . . . . . . . . . . .77
Grilování . . . . . . . . . . . . . . . . . . . . . . . . . . . . . . . . . . . . . . . . . . . . . . . . . . . . . . . . . . . . . . . . .78
Kombinovaný proces vaření . . . . . . . . . . . . . . . . . . . . . . . . . . . . . . . . . . . . . . . . . . . . . . . . . .78
Automatické menu 79
Spustit automatické menu . . . . . . . . . . . . . . . . . . . . . . . . . . . . . . . . . . . . . . . . . . . . . . . . . . . .79
Programy v detailu . . . . . . . . . . . . . . . . . . . . . . . . . . . . . . . . . . . . . . . . . . . . . . . . . . . . . . . . .80
Rozmrazování 82
Nastavit předem dobu spuštění 82
Čištění a údržba 83
Odstranění závad 83
Likvidace 84
Záruka a servis 84
Dovozce 84
Uschovejte tento návod pro případné pozdější dotazy a předejte jej v případě přenechání přístroje třetím
osobám zároveň s ním!
- 69 -

MIKROVLNNÁ TROUBA
Použití odpovídající určení
• Mezi čelní stranu a dveře nesevírejte žádné
předměty a pečujte o to, aby se na těsnících
plochách nenahromadilo znečištění nebo
zbytky čistícího prostředku.
Tento přístroj je určen k ohřívání a přípravě potravin
podle popsaných postupů. Každá změna přístroje
je pokládána za rozpor s urče-ným účelem a může
způsobit nebezpečí úrazu. Za škody, které vzniknou
při použití mimo vymezený účel, neposkytuje výrobce
záruku.
Tento přístroj není určen pro využití v podnikatelské
sféře.
Bezpečnost
Pozor!
Upozornění na poškození přístroje.
NEBEZPEČÍ! / PORANĚNÍ!
Výstraha před zraněním a úderem elektrickým
proudem!
Nebezpečí požáru!
Výstraha před nebezpečím požáru.
Poznámka!
Pokyny a tipy pro ovládání mikrovlnné trouby.
Bezpečnostní opatření pro eliminaci případného
nadměrného kontaktu s mikrovlnnou energií
• Nepokoušetje se přístroj používat při otevřených
dvířkách, neboť takový provoz může vést ke
kontaktu s nebezpečnou dávkou mikrovlnného
záření. Při tom je také důležité, nevylamovat
a ani nemanipulovat bezpečnostní zajištění.
NEBEZPEČÍ PORANĚNÍ!
• Pokud je poškozené těsnění dveří nebo jsou poškozené dveře, nepoužívejte v žádném pří-padě
dál mikrovlnnou troubu. Nechte ji opravit kvalifikovaným personálem.
• Nikdy se nepokoušejte přístroj opravit sami.
Odejmutím krytu by se mohla uvolnit mikrovlnná
energie. Opravy nechte provádět pouze kvalifikovaným a autorizovaným personálem.
• Tento přístroj není určen k tomu, aby jej používaly
osoby (včetně dětí), které mají omezené fyzické,
senzorické nebo duševní schopnosti či nedostatek
zkušeností a/nebo znalostí, ledaže by jej používaly pod bezpečnostním dohledem zodpovědné
osoby nebo by od ní obdržely pokyny, jak přístroj
používat. Dohlížejte na děti, aby si s přístrojem
nehrály.
• Děti smí používat varné zařízení bez dozoru
pouze tehdy, pokud byly řádně poučeni a jsou
schopny používat varné zařízení bezpečným
způsobem a pochopily nebezpečí při nesprávném
použití.
• Používejte tento přístroj pouze k účelům, k nimž
je určen, a to podle pokynů v této příručce.
V tomto přístroji nepoužívejte žádné leptavé
chemikálie nebo výpary. Tato mikrovlnná trouba
je určena speciálně pro ohřev, vaření, grilování
nebo sušení potravin.
Není vytvořena pro využití v průmyslové nebo
laboratorní sféře.
• Nepoužívejte mikrovlnnou troubu také i v tom
případě, pokud je poškozený síťový kabel nebo
je poškozená síťová zástrčka. K zabránění ohrožení nechte síťový kabel/síťovou zástrčku vyměnit
pouze kvalifikovaným personálem.
• Děti se nesmějí zdržovat v blízkosti dvířek
mikrovlnné trouby po dobu jejího provozu.
Nebezpečí popálení!
- 70 -

• Za žádných okolností neodstraňujte plášť
mikrovlnné trouby.
• Výměnu lampy uvnitř mikrovlnné trouby nechte
provádět pouze odborným personálem.
• Nikdy se nedotýkejte dvířek mikrovlnné trouby,
pláště mikrovlnné trouby, ventilačních otvorů,
příslušenství nebo jídelních souprav bezprostředně
po grilování, kombinovaném či automatickém
ohřevu. Tyto díly/předměty jsou velmi horké.
Před čištěním nechte tyto díly vychladnout.
• Dbejte na to, aby síťová zástrčka byla vždy dobře přístupná, aby se mohla v případě
nouze rychle vytáhnout ze zásuvky.
• Osoby, které používají kardiostimulátor, by
se měly před používáním mikrovlnné trouby
poradit se svým lékařem o možných rizicích.
• Síťový kabel nenechávejte nikdy viset přes stůl
nebo pracovní desku. Děti by za něj mohly
zatáhnout.
• Dózy, sáčky s popcornem atd. otevírejte po
ohřátí vždy tak, aby byl jejich otvor orientován
opačným směrem od vašeho těla. Vystupující
pára by mohla způsobit opaření.
• Při otevírání dvířek nikdy nestůjte přímo před
mikrovlnnou troubou. Vystupující pára by mohla
způsobit opaření.
• V mikrovlnné troubě nefritujte. Horký olej může
poškodit součásti přístroje i pomůcky k vaření
a existuje dokonce nebezpečí popálení kůže.
• V každém případě potřepte nebo obraťte ohřáté
kojenecké láhve nebo dětské výživy! Mohlo totiž
dojít k nerovnoměrnému ohřátí obsahu a Vaše
dítě by se mohlo tak popálit. V každém případě
vždy zkontrolujte teplotu, než začnete Vaše dítě
krmit!
• Na mikrovlnné troubě neprovádějte žádné změny.
• K zabránění dle okolností životu nebezpečného
popálení u kojenců třeba vždy zkontrolovat před
požíváním teplotu jídla.
Pomůcky pro vaření se mohou v důsledku horka
vycházejícího z pokrmů rozpálit, a proto je v některých případech odebírejte pouze pomocí
kuchyňské chňapky. Je třeba ověřit, zda jsou pomůcky k vaření vhodné pro použití v mikrovlnné
troubě.
Pozor! Horký povrch!
Nebezpečí požáru!
• Pokud ohříváte potraviny v plastových nebo
papírových obalech, nenechávejte mikrovlnnou
troubu nikdy bez dozoru.
• Do blízkosti mikrovlnné trouby a ventilačních
otvorů neumísťujte hořlavé materiály.
• Z obalů potravin, které chcete ohřívat, odstraňte
veškeré kovové uzávěry. Nebezpečí požáru!
• K výrobě popcornu používejte výhradně sáčky,
které jsou určeny do mikrovlnné trouby.
• Nepoužívejte mikrovlnnou troubu k ohřívání polštářů, plněných zrním, třešňovými peckami nebo
gelem. Nebezpečí požáru!
• Mikrovlnnou troubu nepoužívejte ke skladování
potravin či jiných předmětů.
• Nepřekračujte doby ohřevu předepsané výrobcem.
• Nestavte na mikrovlnnou troubu běheme jejího
provozu žádné předměty. Došlo by tak k zakrytí
větracích otvorů!
• Mikrovlnnou troubu neumísťujte do blízkosti jiných přístrojů, které vydávají teplo, jako je například pečicí trouba.
• Mikrovlnné záření je nebezpečné! Údržbu
a opravy, při nichž je zapotřebí odstranit kryty,
které chrání před kontaktem s mikrovlnným zářením, nechte provádět pouze vyškolený
odborný personál.
- 71 -
• Po ohřívání pokrmů s obsahem tuku mikrovlnnou
troubu důkladně vyčistěte, zejména pokud tyto
pokrmy nebyly přikryty. Před čištěním však přístroj
nechte zcela vychladnout. Na ohřívacích prvcích
grilu se nesmějí nacházet žádné zbytky, například
zbytky tuku. Ty by se mohly přehřát a vznítit.
• V mikrovlnné troubě nerozmrazujte zmražený
tuk nebo olej. Tuk nebo olej by se mohl vznítit.
• K provozu spotřebiče nepoužívejte externí
spínací hodiny ani zvláštní dálkové ovládání.
Pozor! Poškození přístroje!
• Mikrovlnnou troubu nepoužívejte, je-li prázdná.
Výjimku tvoří první uvedení do chodu (viz kapitolu
„První uvedení do chodu“).
• Do větracích otvorů nebo bezpečnostních dveřních uzávěrů nestrkejte žádné předměty.
• Nepoužívejte kovové pomůcky, které odrážejí
mikrovlny a vedou ke vzniku jisker. Nedávejte
do mikrovlnné trouby plechovky.
• Po grilování, kombinovaném nebo automatickém
ohřevu nevkládejte do mikrovlnné trouby žádné
nádoby z umělých hmot. Umělá hmota se může
roztavit.
• Mikrovlnnou troubu neinstalujte na místech
s vysokou vlhkostí vzduchu nebo tam, kde se
akumuluje vlhkost.
• Tekutiny a jiné potraviny se nesmí ohřívat ve
vzduchotěsných nádobách, protože by tyto
mohly explodovat a poškodit přístroj.
• Neopírejte se o dvířka mikrovlnné trouby.
• Nedostatečná čistota varného spotřebiče může
vést k zničení povrchu, které ovlivní životnost spotřebiče a dle možností může vést k nebezpeč-ným
situacím.
Nebezpečí!
• Síťový kabel ani síťovou zástrčku nevkládejte
do vody ani do jiných tekutin.
• Síťový kabel udržujte v dostatečné vzdálenosti od
zdrojů tepla. Neveďte jej před dvířky mikrovlnné
trouby. Horko by kabel mohlo poškodit.
• Nikdy nevylévejte tekutiny do ventilačních otvorů
nebo do bezpečnostních uzávěrů dvířek. Vnikne-li
tekutina do mikrovlnné trouby, ji okamžitě vypněte
a vytáhněte zástrčku ze zásuvky. Mikrovlnnou
troubu nechte zkontrolovat kvalifikovaným odborníkem.
Bezpečnostní tipy
• Pro omezení rizika požáru s původem v mikrovlnné
troubě: Pokud v mikrovlnné troubě ohříváte pokrmy
v nádobkách z umělé hmoty nebo papíru, mějte
přístroj neustále na očích, neboť existuje nebezpečí vznícení těchto materiálů.
• Při ohřívání nápojů v mikrovlnné troubě může
dojít k časově opožděnému bublání, jakmile se
začne nápoj vařit. Proto buďte při manipulaci
s nádobou vždy opatrní. K zabránění náhlého
vření:
- Pokud je to možné, vložte do tekutiny skleněnou
tyčinku po dobu jejího ohřívání.
- Tekutinu po ohřívání nechte 20 sekund odstát
v mikrovlnné troubě, čímž se vyhnete náhlému
vření.
• Propíchněte slupku brambor, střívka klobás
a podobně. V opačném případě mohou explodovat.
• Při ohřívání tekutin buďte zvlášť opatrní. Používejte
pouze otevřené nádoby, aby mohly unikat vznikající vzduchové bubliny.
• Pokud byste ucítili kouř, přístroj vypněte, vytáhněte
zástrčku ze sítě a dvířka ponechte uzavřená,
aby došlo k udušení případných plamenů.
- 72 -

• Vajíčka ve skořápce a vajíčka uvařená na tvrdo
se v mikrovlnné troubě nesmějí ohřívat, neboť
mohou i po ukončení ohřevu v mikrovlnné troubě
explodovat. Potraviny s tlustou slupkou, jako
např. brambory, celé dýně, jablka a kaštany,
je třeba před ohřevem naříznout.
• Nepohybujte mikrovlnnou troubou, je-li v provozu.
• Mikrovlnnou troubu zasuňte do jiné zásuvky.
Mikrovlnná trouba a přijímač by měly být připojeny na rozdílnou větev elektrického
obvodu.
Rozsah dodávky
Pokyny pro uzemnění/řádná instalace
Tento přístroj musí být uzemněn. Tento přístroj musí být
připojen pouze do zásuvky, která je řádně uzemněna.
Doporučuje se, používat vlastní proudový okruh, který
napájí proudem pouze mikrovlnnou troubu.
Nebezpečí: Neodborné zacházení s uzemňovací
zástrčkou může být spojeno s rizikem úrazu
elektrickým proudem.
Poznámka: V případě dotazů souvisejících
s uzemněním nebo pokyny k elektrickému
zapojení se obraťte na svého dodavatele elektřiny či odborníka na elektroinstalace.
Výrobce ani prodejce nenesou odpovědnost za poškození mikrovlnné trouby nebo za zranění osob,
která vznikla v důsledku nedodržování pokynů
k elektrickému zapojení.
Rádiové rušení u jiných přístrojů
Provoz mikrovlnné trouby může vyvolat rušení Vašeho
rádia, televizoru nebo podobných zařízení.
V případě výskytu těchto interferencí je možné
problémy snížit či omezit pomocí těchto opatření:
• Vyčistěte dvířka a těsnicí plochy mikrovlnné
trouby.
• Nově nasměrujte přijímací anténu rádia nebo
televizoru.
• Mikrovlnnou troubu umístěte na jiné místo
mimo dosah přijímače, který je rušen.
• Odstraňte mikrovlnnou troubu z dosahu
přijímače.
Mikrovlnná trouba
Skleněný talíř
Grilovací stojan
Otáčivá hvězdice
Návod k obsluze
Krátký návod
Technické údaje
Jmenovité napětí: 230 - 240 V ~50 Hz
Maximální příkon: 1200 W
Maximální dodávaný
výkon
Mikrovlnná trouba: 800 W
Maximální příkon
Gril: 1000 W
Mikrovlnný kmitočet: 2450 MHz
- 73 -
Dříve než začnete
Základní zásady při vaření
v mikrovlnné troubě
• Pokrmy uvážlivě uspořádejte.
• Nejtlustší místa by měla být umístěna do
okrajových částí.
• Dodržujte čas ohřevu. Zvolte nejkratší udávaný
čas ohřevu a v případě potřeby jej prodlužte.
Z intenzivně a dlouho ohřívaných pokrmů se
může začít kouřit nebo se mohou vznítit.
• Během dušení a vaření zakryjte jídla víčkem,
vhodnou pro mikrovlnné trouby. Víčko zabrání
výstřikům a přispívá k tomu, že se pokrmy ohřívají rovnoměrně.
• Během přípravy v mikrovlnné troubě potraviny
jednou obraťte, aby se pokrmy typu kuřete
nebo hamburgru rychleji prohřály.
• Velké kusy potravin, např. pečeně, je třeba
obrátit minimálně jednou.
• Kusy pokrmů, jako např. kuličky z mletého
masa, v polovině doby ohřevu zcela obraťte.
Po obrácení umístěte kuličky ze středu nádoby
na okraj.
• Doporučujeme spíše používání kulatého/oválného
nádobí místo hranatého/podélného, neboť
pokrmy se v rozích nádob snadno spékají.
Níže uvedený seznam je třeba chápat jako
obecní pomůcku pro volbu správného nádobí.
Mikro-
Nádobí
Žáruvzdorné sklo Ano Ano Ano
Ne žáruvzdorné
sklo
Žáruvzdorná
keramika
Pro mikrovlnnou
troubu vhodné
plastické nádobí
Kuchyňský papír Ano Ne Ne
Kovový podnos/
kovová deska
vlnná
trouba
Ne Ne Ne
Ano Ano Ano
Ano Ne Ne
Ne Ano Ne
Gril
Kombinace
Použití vhodného nádobí
• Ideální materiál pro mikrovlnnou troubu propouští mikrovlnné záření, nechává tedy prostupovat energii materiálem, čímž se pokrm zahřívá.
Mikrovlny nejsou schopny pronikat kovem.
Z tohoto důvodu se nesmějí používat kovové
nádoby ani kovové nádobí.
• Při ohřívání v mikrovlnné troubě nepoužívejte
výrobky z recyklovaného papíru. Ten může
obsahovat drobné kovové částečky, které
mohou vytvářet jiskry a/nebo způsobit požár.
Grilovací stojan Ne Ano Ne
Hliníková fólie &
fóliová nádoba
Ne Ano Ne
Pozor:
Nikdy nepoužívejte grilovací stojany nebo jiné kovové předměty, když používáte mikrovlnnou troubu
v mikrovlnném provozu nebo v kombinovaném procesu vaření. Kov reflektuje mikrovlnné záření a vede
tak k tvorbě jisker. To může vést k požáru a neopravitelnému poškození přístroje!
- 74 -

Popis přístroje
1 displej
2 tlačítko otevření dveří
3 skleněný talíř
4 otáčivá hvězdice
5 větrací otvory
6 tlačítko grilu
7 tlačítko hmotnosti/množství
8 tlačítko rozmrazování
9 tlačítko hodin
0 tlačítko zastavení
q otočný regulátor / start/rychlostart
w tlačítko kuchyňského časovače
e tlačítko kombinace
r tlačítko výkonu
t grilovací stojan
• Dbejte na to, aby byla síťová zástrčka bez problémů dosažitelná, aby byla v případě nebezpečí snadno uchopitelná a dala se vytáhnout
ze zásuvky.
• Neodstraňujte nožky, na nichž mikrovlnná
trouba stojí.
• Neblokujte větrací otvory 5. V opačném případě může dojít k poškození přístroje.
• Přístroj udržujte v co možná největší vzdálenosti
od rozhlasových a televizních přijímačů. Při
provozu mikrovlnné trouby může dojít k rušení
příjmu rozhlasu či televizoru.
Pozor:
Mikrovlnnou troubu neumísťujte na kuchyňský sporák
nebo jiný přístroj, který vytváří teplo. Umístění v této
poloze by mohlo způsobit poškození přístroje a tím
i zánik záručních nároků.
První uvedení do provozu
Umístění přístroje
Pozor:
tato mikrovlnná trouba není vhodná pro vestavění
do kuchyňské skříně. V uzavřených skříních není
dostatečně zaručena ventilace přístroje. Přístroj by
se mohl poškodit a hrozí nebezpečí požáru!
• Zvolte rovnou plochu, která zaručuje dostatečnou
vzdálenost pro ventilaci přístroje:
Bezpodmínečně dodržujte mezi přístrojem
a ohraňujícími stěnami minimální odstup
o 10 cm. Ubezpečte se, že se dají dveře
mikrovlnné trouby otevírat bez problémů.
Nad mikrovlnnou troubou dodržujte minimální
odstup o 20 cm.
Příprava přístroje
• Odstraňte obalový materiál a popřípadě také
ochrannou fólii umístěnou na povrchu pláště
přístroje.
Poznámka:
Neodstraňujte světle šedou slídovou krycí desku,
která je umístěna k ochraně magnetronů v prostoru
ohřevu.
• Síťovou zástrčku zasuňte do síťové zásuvky.
Používejte 230 - 240 V, 50 Hz, zásuvky s pojistkou 16 A . Doporučuje se, aby mikrovlnná
trouba byla napájená vlastním proudovým
okruhem. Pokud si nejste jistí, jak mikrovlnou
troubu zapojit do sítě, přivolejte si k tomu na
pomoc odborníka.
Před použitím mikrovlnné trouby se musí přístroj nejdříve vyhřát naprázdno, aby se mohly vypařít zbytky, vzniklé při výrobě.
- 75 -

Zapněte přístroj bez potravin a bez příslušenství
(skleněný talíř 3, otáčející se hvězdice 4 a grilovací
stojan t) v provozním režimu grilování:
• Stiskněte jednou tlačítko grilu 6 . Tím tak
navolíte režim grilování. Na displeji 1 se zjeví
symbol a symbol bliká. Toto signalizuje připravenosti spuštění chodu.
• Otočným regulátorem nastavte q dobu vaření
na 10 minut.
• Stiskněte tlačítko start/rychlý start q
pro spuštění grilování.
Poznámka:
Při prvním uvedení do chodu může dojít z důvodu
zbytků, vzniklých při výrobě, k lechkému vzniku
dýmu a zápachu. Toto není škodlivé. Postarejte
se o dostatečné větrání. Otevřte například okno.
• Po 10 minutách se přístroj automaticky vypne.
Zazní signální tóny. Otevřete dveře. Vyčkejte,
dokud přístroj celkem nevychladne.
• Vytáhněte síťovou zástrčku ze zásuvky a vyčistěte zevnitř přístroj vlhkým hadříkem a pečlivě
jej vysušte.
Vložení příslušenství
• Položte otáčivou hvězdici 4 do středu na hnací
hřídel v prostoru ohřevu. Dbejte na to, aby
hvězdice dosedala napevno kompletně na osu
a aby nemohla sklouznout dolů.
• Položte skleněný talíř 3 do středu na otáčivou
hvězdici. Ty tři kolečka musí dopadat na vodicí
okraj na skleněném talíři 3.
Obsluha
Nastavení hodin
Pokud jste uvedli mikrovlnnou troubu do chodu
poprvé nebo došlo k výpadku proudu, zobrazí
se na displeji 1 "1 : 0 1 ".
1. Stiskněte tlačítko hodin 9 . Na displeji 1
se objeví „Hr 12“. Stiskněte tlačítko hodin 9
ještě jednou, pokud chcete přejít do
24-hodinového režimu.
2. Nastavte otočením otočným regulátorem q po-
žadovanou hodinu. Symbol hodin bliká na
displeji 1.
3. Stiskněte tlačítko hodin 9 . Objeví se zadání
minut.
4. Otočením otočného regulátoru q nastavte
žádané minuty.
5. Jsou-li hodinky správně nastavené, stiskněte tlačítko
hodinek 9 . Symbol hodinek na displeji 1 svítí trvale a dvojitá tečka signalizuje
blikáním, že hodinky běží.
K odečtení aktuálního denního času stiskněte tlačítko
hodin během provozu mikrovlnné trouby 9 ;
na cca. 4 sekund se na displeji zobrazí hodinky
s aktuálním časem 1.
Nastavení kuchyňského časovače
Mikrovlnná trouba je vybavena kuchyňským časovačem, který můžete používat nezávisle na provozu
mikrovlnné trouby.
1. Stiskněte tlačítko kuchyňského časovače w
, když je přístroj v režimu standby. Na
displeji 1 se objeví „00:10“.
2. Otočným regulátorem q nastavte nyní požado-
vanou dobu.
Můžete nastavit čas od 10 sekund do 95 minut.
3. Stiskněte tlačítko startu/rychlého startu q
. Zazní signál.Čas se odečítá. Po cca.
3 sekundách se opět zobrazí normální čas.
Kuchyňský časovač běží v pozadí dál.
- 76 -

Pokud chcete mezitím zkontrolovat čas kuchyňského časovače, stiskněte tlačítko kuchyňského
časovače w . Na krátkou dobu se zobrazí
čas kuchyňského časovače.
Jakmile nastavený čas uplyne, zazní dlouhý signál.
Upozornění:
Chcete-li zastavit uplynulý čas časovače, stiskněte
tlačítko časovače w , takže aktuální čas se objeví
v časovači. Ještě po dobu, co je zobrazen časovač
na displeji 1 stiskněte tlačítko Stop 0 .
Časovače je přerušen a hodiny se zobrazí na displeji 1.
Dětská pojistka
K zabránění nezáměrného uvedení mikrovlnné trouby
do chodu malými dětmi a jinými neoprávněnými
osobami aktivujte toto nastavení.
Symbol pro zabezpečení před dětmi se objeví
na displeji 1 a přístroj nelze uvést do chodu tak
dlouho, dokud je aktivovaná tato funkce.
• Stiskněte tlačítko zastavení 0 a držte je tak
dlouho stisknuté, dokud nezazní dlouhý signál
a objeví se symbol pro zabezpečení před dětmi
na displeji 1. Tlačítka a regulátor mikrovlnné
trouby jsou nyní nefunkční.
• K deaktivaci zabezpečení před dětmi stiskněte
tlačítko zastavení 0 a držte jej tak dlouho
stisknuté, dokud nezazní dlouhý signál a symbol
zabezpečení před dětmi zhasne.
Funkce dotazování
Zjišťování času během provozu
Stiskněte během procesu vaření tlačítko hodin 9
. V displeji 1 se objeví na cca. 4 sekund čas.
Zjišťování stupně výkonu během provozu
Stiskněte během procesu vaření tlačítko výkonu r
. Na displeji 1 se na cca. 3 sekundy objeví
aktivovaný stupeň výkonu.
Vaření a ohřívání
Provoz mikrovlnné trouby
Upozornění
Na dveřích mikrovlnné trouby nebo krytu se může vytvořit během procesu dušení a vaření kondenzát. Je
to běžný jev a nejedná se o znak chybné funkce
mikrovlnné trouby. Otřete vlhkost po její vychlazení
suchým hadrem.
Pozor:
Nikdy nepoužívejte grilovací stojan t nebo jiné
kovové předměty, když používáte mikrovlnnou
troubu v kombinovaném postupu. Kov reflektuje
mikrovlnné záření a vede tak k tvorbě jisker. To
může vést k požáru a neopravitelnému poškození
přístroje!
Zvolit výkon
• Stiskněte přiměřeně často tlačítko výkonu r
pro volbu stupně výkonu.
• 1x pro výkon 800 Watt (P800).
• 2x pro výkon 700 Watt (P700).
• 3x pro výkon 600 Watt (P600).
• 4x pro výkon 500 Watt (P500).
• 5x pro výkon 400 Watt (P400).
• 6x pro výkon 300 Watt (P300).
• 7x pro výkon 200 Watt (P200).
• 8x pro výkon 100 Watt (P100).
Výkon se znázorní na displeji 1 (např. P800 při
výkonu 800 Watt).
Nastavit dobu vaření
Poté, co jste zvolili výkon, nastavte požadovanou
dobu vaření:
• Otáčejte otočným regulátorem q, dokud není
nastavená požadovaná doba vaření.
- 77 -

Stupně pro dobu nastavení otočného regulátoru q jsou následující:
• od 10 sek. do 5 min: v 10-ti sek.krocích
• od 5 do 10 min.: v 30 sek.krocích
• od 10 do 30 min.: v 1 min.krocích
• od 30 do 95 min.: v 5 min.krocích
Ukončení/zrušení zadávání
Stiskněte jednou tlačítko zastavení 0 pro přeru-
šení či ukončení zadávání. Přístroj se znovu
vrátí do režimu stand-by.
Spustit vaření
Když jste nastavili výkon a dobu vaření a na displeji
bliká 1 symbol , můžete spustit vaření:
Ke spuštění vaření stiskněte tlačítko startu/rychlého
startu q . Na displeji 1 se objeví symboly
provozu mikrovlnky a ohřevu nebo .
Nastavený čas odpočítává pozpátku.
Přerušení ohřevu
Stiskněte jednou tlačítko zastavení 0 k přerušení
vaření. Přístroj přeruší ohřev a zastaví čas, který ještě
zbývá. Stiskněte tlačítko startu/rychlého startu q
k opětovnému pokračování vaření resp.ohřevu.
Ukončení ohřevu
Stiskněte dvakrát tlačítko zastavení 0 k přerušení
ohřevu resp. vaření. Přístroj se znovu vrátí do režimu
stand-by.
Proces ohřevu je ukončen
Jakmile je ukončen proces ohřevu, objeví se na
dis-pleji 1 „End“ a zazní 4 signální tóny. Pokud
se neotevřou dveře mikrovlnky, zazní signální tóny
po cca. 2 minutách ještě jednou.
Rychlý start
Touto funkcí můžete ihned začít na 30 sekund (nebo
déle, až do 12 minut) při 800 W výkonu s ohřevem.
• Stiskněte jednou tlačítko startu/rychlého startu q
. Na displeji 1 se objeví symboly provozu
mikrovlnky a ohřevu , jakož i „:30“.
Mikrovlnka spustí proces ohřevu na 30 sekund.
Čas se odečítá.,
Pokud chcete proces ohřevu prodloužit, stiskněte tak
často tlačítko startu/rychlého startu q , dokud
nedosáhnete požadovaného času.
Grilování
Grilovací funkci můžete využít u tenkých plátků masa,
steaků, karbanátků, klobásek či dílků kuřete. Hodí
se také výborně pro propečení sendvičů a pro
zapékání.
Ke grilování používejte vždy grilovací stojan t.
Tak dosáhnete optimálního grilovacího výsledku.
Postavte grilovací stojan t vždy na skleněný talíř 3.
1. K aktivování grilovací funkce stiskněte tlačítko
grilu 6 .
Na displeji 1 se objeví symbol pro grilovací
funkci a „:10“.
2. Otočným regulátorem q nastavte požadovanou
dobu ohřevu. Maximální nastavitelná doba
ohřevu činí 95 minut.
3. Pro spuštění grilovací funkce stiskněte tlačítko
start/ rychlý start q .
4. Po uplynutí cca. poloviny času masu obraťte.
Kombinovaný proces vaření
Tato funkce sdružuje grilovací funkci s běžným provozem mikrovlnné trouby. Během kombinovaného
postupu se část doby využívá pro vaření a zbývající
čas pro grilování, a to automaticky během jednoho
postupu. Okamžik přepnutí přístroje zaznamenáte
díky lehkému kliknutí přístroje.
- 78 -

Pozor:
Nikdy nepoužívejte grilovací stojan t nebo jiné kovové předměty, když používáte mikrovlnnou troubu v
kombinovaném postupu. Kov reflektuje mikrovlnné
záření a vede tak k tvorbě jisker. To může vést k požáru a neopravitelnému poškození přístroje!
Kombinace 1
U kombinace 1 je výkon mikrovlnné trouby 30 %
a výkon grilu 70 % doby vaření. To je vhodné např.
pro ryby, brambory nebo zapékané pokrmy.
1. K aktivování kombinace 1 stiskněte jednou
tlačítko kombinace e . Na displeji 1
se objeví jakož i „:10“.
2. Pomocí otočného q knoflíku nastavte požado-
vanou dobu ohřevu. Maximální nastavitelná
doba ohřevu činí 95 minut.
3. Ke spuštění stiskněte tlačítko startu/rychlého
startu q .
Upozornění
Mikrovlnná trouba vypočítá dobu/stupeň výkonu
pro čerstvé potraviny. Zamražené potraviny se
časem, zadaným mikrovlnkou neuvaří.
Rozmražte popřípadě zamražené potraviny předem
odmrazovacím programem (viz kapitolu „rozmrazování“).
Spustit automatické menu
1. Otáčejte pomalu otočným regulátorem q do
leva. Na displeji1 se objeví číslo (např. „3“
pro autoprogram 3 (ryba)), symbol „ryba“
a zvolte vhodné menu automatiky
k Vašemu jídlu (od 1 po 9).
č. Symbol Potraviny
1 Nápoje 1 - 3
Hmotnost
(porce)
Kombinace 2
U kombinace 2 je výkon mikrovlnné trouby 55 %
a výkon grilu 45 % doby vaření. Toto je vhodné například pro puding, omelety, drůbeží jídla nebo Lasagne.
1. K aktivování kombinace 2 e stiskněte
dvakrát tlačítko kombinace. Na displeji 1 se
objeví jakož i „:10“.
2. Pomocí otočného q knoflíku nastavte požado-
vanou dobu ohřevu. Maximální nastavitelná
doba ohřevu činí 95 minut.
3. Ke spuštění stiskněte tlačítko startu/rychlého
startu q .
Automatické menu
Pro jídla, která se mají připravovat v automatickém
modusu menu, není potřebné, zadat dobu vaření/
ohřevu a také stupeň výkonu. Je dostačující, pokud
zadáte, jaký typ potravin má být ohříván/vařen,
a dále uvedete hmotnost této potraviny.
2 Těstoviny 100 - 300g
3 Ryby 100 - 1000g
4 Rýže 100 - 1000g
5 Kuře 800 - 1400g
6 Ohřívání 100 - 1000g
7 Brambory 150 - 600g
8 Pečeně 300 - 1300g
9 Maso na rožni 100 - 700g
- 79 -

2. Stiskněte, popř opakovaně, tlačítko hmotnosti/
množství 7 , dokud se na displeji 1 ne-
objeví požadovaný počet porcí resp. požadovaná hmotnost. Symbol bliká.
3. Stiskněte tlačítko start/rychlý start q
pro spuštění vaření.
Upozornění
K dosažení rovnoměrného vaření a ohřevu by se měla
jídla u programech 5, 8 a 9 zhruba po 2/3 doby
ohřevu obrátit.Mirkovlnka přeruší po této době
automaticky program: „turn“ se objeví na displeji 1
a zazní signální tóny, které Vám připomenou obrácení
jídel.
• Otevřete dvířka a obraťte pokrmy. S už připadně
horkými jídly zacházejte opatrně.
• Stiskněte tlačítko startu/ rychlého startu q
k opětovnému pokračování vaření resp.ohřevu.
Upozornění:
Chcete-li se obracení pokrmů vyhnout, vyčkejte
jednoduše na odeznění signálního tónu. Mikrovlnka
spustí její program opět automaticky po cca. 30
sekundách.
Upozornění
Pokud není jídlo po ukončení automatického režimu
správně ohřátu resp. uvařeno, dovařte ho ještě
několik minut programem rychlého startu. U programů, které probíhají za použití grilovací funkce (program číslo 5, 8 a 9), můžete jídla dovařit také
i grilovací funkcí. Při dodatečném dovaření/ohřevu
grilovací funkcí se zvýší také stupeň zhědnutí jídel.
POZOR
U programů s dodatečně zapojenou grilovací funkcí
nepoužívejte v žádném případě kryty nebo ne žáruvzdorné nádobí, protože by se mohla tato roztavit
nebo začít hořet!
NEBEZPEČÍ PORANĚNÍ!
Skleněný talíř 3 je po ukončení vaření s grilem velice
horký! Používejte proto bezpodmínečně chňapku
nebo žáruvzdorné rukavice, když jej vyberete
z mikrovlnky.
Poznámka:
Dbejte laskavě na to, že velikost, forma a druhy
potravin určí také výsledek vaření.
Programy v detailu
Program 1: Nápoje
Tento program běží pouze za použití výkonu
mikrovlnné trouby. Dle nastaveného počtu porcí
běží program mezi 1:30 a 3:50 minutami.
• Postavte nápoj, který chcete ohřát, na skleněný
talíř 3 do mikrovlnné trouby. Když postavíte
více sklenic resp. šálků do mikrovlnky, dbejte
na to, aby se tyto o sebe neodíraly.
Upozornění
K zabránění náhlého vření:
• Postavte dle možnosti do tekutiny skleněnou
tyč po celou dobu ohřevu nápoje.
• Tekutinu po ohřívání nechte 20 sekund odstát
v mikrovlnné troubě, čímž se vyhnete náhlému
vření.
Program 2: Těstoviny
Tento program běží pouze za použití výkonu
mikrovlnné trouby.
Dle nastavené hmotnosti běží program mezi 25
a 35 minutami.
• K vaření těstovin používejte vysoký hrnec, protože
hroží nebezpečí překypění.
• Vemte tolik vody, jako při konvenčním vaření.
• Nechte nejdříve v zakryté nádobě svařit vodu.
Až poté dejte do toho nudle. Potom můžete
spustit automatické menu pro nudle.
• Vzápetí enchte nudle cca. 3 minuty odstát.
- 80 -

Program 3: Ryby
Tento program běží pouze za použití výkonu
mikrovlnné trouby.
Dle nastavené hmotnosti běží program mezi cca.
3:30 a 16 minutami.
• Položte kusy ryby na talíř, vhodný pro mikrovlnnou
troubu, přidejte trochu másla nebo jiného tuku,
rybu dle chuti okořeňte a spusťte automatické
menu pro ryby.
Program 4: Rýže
Tento program běží pouze za použití výkonu
mikrovlnné trouby.
Dle nastavené hmotnosti běží program mezi 16
a 36 minutami.
• K vaření rýže používejte vysoký hrnec, protože
hroží nebezpečí překypění. Vemte např. pro
200 g rýže cca. 400 ml vody.
• Dejte rýži do nádoby, doplňte zbývající vodu
a nechte rýži cca. 3 minuty nabobtnat.
• Nádobu přikryjte. Dbejte na to, aby nebyla
hermeticky uzavřená.Poté můžete spustit automatické menu pro rýži.
Program 5: Kuře
Tento program běží ve více stupních vaření za použití
výkonu mikrovlnné trouby a grilovací funkce. Dle
nastavené hmotnosti běží program mezi 39 a 50
minutami.
• Položte kuře na talíř, který je vhodný pro
mikrovlnnou troubu.
• Podle chuti okořenit a spusťte pak automatické
menu pro kuře.
• Celé kuře se musí obracet, protože strana, obrácená nahoru, mohla jinak vyschnout. K tomuto
účelu se automaticky mikrovlnnou troubou po
cca. 2/3 času přeruší program a zazní signál.
Kuře obraťte a stiskněte tlačítko startu/rychlého
startu q k pokračování běhu programu.
Program 6: Ohřívání
Tento program běží pouze za použití výkonu
mikrovlnné trouby.
Dle nastavené hmotnosti běží program mezi 1:00
a 6:20 minutami.
• Postavte talíř s jídlem, které chcete ohřát, na
skleněný talíř 3 do mikrovlnné trouby a spusťte
automatické menu pro ohřívání.
Program 7: Brambory
Tento program běží pouze za použití výkonu
mikrovlnné trouby.
Dle nastavené hmotnosti běží program mezi 3:50
a 11 minutami.
Tip
Pro tento proces vaření používejte neoloupané
brambory. Tyto několikrát naslupce propíchněte.
• Položte neoloupané brambory na talíř nebo nádobu, které jsou vhodné pro vaření v mikrovlnné
troubě. Dle možnosti použijte brambory stejné
velikosti. Pokud je možné měly by brambory
ležet v mikrovlnce volně a neměly by se vzájemně
dotýkat.
Program 8: pečeně
Tento program běží ve více stupních vaření za použití
výkonu mikrovlnné trouby a grilovací funkce. Dle
nastavené hmotnosti běží program mezi 16 a 60
minutami.
• Položte pečeni na talíř, který je vhodný pro
mikrovlnnou troubu. Podle chuti maso okořenit
a spusťte pak automatické menu pro pečeni.
• Musí se obrátit celá pečeně, protože strana,
obrácená nahoru, by mohla jinak vyschnout.
K tomuto účelu se automaticky mikrovlnnou troubou po cca. 2/3 času přeruší program a zazní
signál.
Obraťte pečeni a stiskněte tlačítko startu/rychlého
startu q k pokračování běhu programu.
- 81 -

Program 9: Maso na rožni
Tento program běží ve více stupních vaření za použití
výkonu mikrovlnné trouby a grilovací funkce. Dle
nastavené hmotnosti běží program mezi mezi 9
a 27 minutami.
• Položte maso na rožni na talíř, který je vhodný
pro mikrovlnnou troubu. Podle chuti maso okořenit a spusťte pak automatické menu pro maso na
rožni.
• Pro stejnoměrné vaření se musí toto maso obracet.
K tomuto účelu se automaticky mikrovlnnou troubou po cca. 2/3 času přeruší program a zazní
signál. Obraťte špízy a stiskněte tlačítko
startu/rychlého startu q k pokračování
běhu programu.
Rozmrazování
Pomocí této funkce můžete bez problémů rozmrazovat
maso, drůbež a ryby. Doba rozmrazování a stupeň
výkonu se automaticky vypočítají a nastaví po zadání
hmotnosti.
1. Stiskněte tlačítko 8 rozmrazování. Na
displeji 1 se objeví a . Symbol
bliká.
2. Pomocí otočného regulátoru q zvolte hmotnost
potravin, které se mají rozmrazit. Můžete
nastavit hmotnost mezi 100 g a 1800 g.
3. Stiskněte tlačítko startu/rychlého startu q .
Zařízení zadá automaticky dobu rozmrazení. Tato
se objeví na displeji 1 a začne běžet.
K tomuto účelu se automaticky mikrovlnnou troubou
po cca. 1/2 času přeruší program a zazní signál.
Otočte rozmražená jídla a stiskněte tlačítko startu/
rychlého startuq k pokračování programu
rozmrazování.
Upozornění:
Chcete-li se obracení pokrmů vyhnout, vyčkejte
jednoduše na odeznění signálního tónu. Mikrovlnka
spustí její program opět automaticky po cca. 30
sekundách.
Nastavit předem dobu spuštění
Tímto programem můžete naprogramovat předem
určitou dobu spuštění dušení nebo grilování jídel.
Pokud jste provedli správně všechna nastavení,
spustí se přístroj automaticky v nastaveném čase.
Upozornění:
Pro volbu funkce "nastavit předem dobu spuštění"
musí být hodiny nastavené.
1. Nastavte požadovanou funkci mikrovlnky (dušení,
grilování nebo menu automatiky (vyjímaje autoprogram 6)):
Pro provoz mikrovlnky: Stiskněte přiměřeně často
tlačítko výkonu r pro volbu stupně výkonu.
Dobu ohřevu nastavte otočným regulátorem q.
Pro grilovací provoz: K aktivování grilovací funkce
stiskněte tlačítko grilu 6 .
Otočným regulátorem q nastavte požadovanou
dobu grilování.
Pro menu automatiky: Otočným regulátorem q
zvolte vhodný program pro Vaše jídlo (vyjímaje
autoprogram 6). Stiskněte tlačítko hmotnost/
množství 7 tak často, dokud se neobjeví
na displeji 1 požadované množství.
2. Stiskněte tlačítko hodin 9 . Na displeji 1
bliká „01: “ a objeví se symbol přesýpacích
hodin .
3. Pro nastavení hodiny otočte otočným regulátorem q.
4. Stiskněte tlačítko hodin 9 , nyní se objeví
čísla minut.
5. Pro nastavení otočte otočným regulátorem q.
6. Stiskněte tlačítko start/rychlý start q .
Symbol přesýpacích hodin bliká. Zobrazí
se počáteční čas. Mikrovlnná trouba spustí proces
v nastavenou dobu automaticky. Při startu zazní
signál.
- 82 -

Upozornění:
Pro vymazání počátečního času, uloženého do paměti,
a tím tak k přerušení procesu, taktéž uloženého do
paměti, stiskněte tlačítko Stop 0 . Symbol pře-
sýpacích hodin zmizí a zobrazí se hodiny.
Čištění a údržba
Nebezpečí poranění!
Před čištěním vypněte mikrovlnnou troubu a vytáhněte
zástrčku ze zásuvky.
• Grilovací stojan t omyjte v teplé vodě a dobře
jej vysušte.
• Pravidelně odstraňujte pachy. Do mikrovlnné
trouby umístěte hlubokou mísu vhodnou do
mikrovlnné trouby naplněnou šálkem vody
a šťávou a kůrou citrónu. Po dobu 5 minut ji zahřívejte. Troubu důkladně vytřete a vysušte
měkkým hadříkem.
• V případě potřeby výměny žárovky v mikrovlnné
troubě, nechte tuto provést odborníkem nebo
v obchodě, kde jste mikrovlnku zakoupili, nebo
kontaktujte náš servis.
V žádném případě nesmí být přístroj potápěn
do vody nebo jiných tekutin! Vzniklo by tak
ohrožení života v důsledku úrazu elektrickým
proudem a spotřebič by se mohl poškodit.
• Udržujte vnitřek mikrovlnné trouby vždy v čistotě.
• Pokud na stěnách mikrovlnné trouby zůstanou
uchyceny části pokrmů nebo vystříknuté tekutiny, očistěte je vlhkým hadříkem.
• Pokud se v mikrovlnné troubě vyskytnou hrubší
nečistoty, použijte jemný čisticí prostředek.
• Vyhněte se používání čisticích sprejů a jiných
agresivních čisticích prostředků, jelikož mohou
způsobit skvrny, pruhy nebo zmatnění povrchu
dvířek.
• Vnější stěny očistěte vlhkým hadříkem.
• K zabránění poškození funkčních částí vnitřku
mikrovlnné trouby nedovolte vniknutí vody do
větracích otvorů 5.
• Pravidelně odstraňujte stříkance nebo nečistoty. Vyčistěte vždy dveře, průhledné okno oboustranně, těsnění dveří a sousední části vlhkým
hadrem. Nepoužívejte abrazivní čisticí prostředky.
• Usadí-li se ve dveřích nebo kolem vnější strany
dveří výpary, omyjte je měkkým hadrem.
K tomuto jevu dochází, je-li mikrovlnná trouba
provozována ve velmi vlhkém prostředí.
• Také skleněný talíř 3 umývejte pravidelně.
Umyjte jej v teplé mýdlové vodě nebo v myčce.
Odstranění závad
Na displeji 1 se nic nezobrazí.
• Zástrčka není zastrčená do zásuvky. Zkontrolujte
zástrčku.
• Síťová zásuvka je rozbitá. Vyzkoušejte jinou
zásuvku.
• Displej 1 je závadný. Kontaktujte servis.
Přístroj nereaguje na stisknutí tlačítka.
• Aktivované je zabezpečení před dětmi. Deaktivujte toto zabezpečení (viz kapitolu „Obsluha“).
Přístroj nespustí proces vaření/ ohřevu.
• Dveře nejsou správně zavřená. Zavřete správně dveře.
Skleněný talíř 3 vydává při otáčení hlasité
zvuky.
• Skleněný talíř 3 neleží správně na otáčivé
hvězdici 4.
Položte skleněný talíř 3 správně do prostoru
vaření/ohřevu.
• Otáčivá hvězdice 4 a/nebo dno prostoru ohřevu
jsou znečištěné.Vyčistěte otáčivou hvězdici 4
a dno.
- 83 -

Likvidace
Přístroj v žádném případě nevhazujte
do běžného domovního odpadu. Tento
výrobek podléhá evropské směrnici
2002/96/EC.
Záruční doba se zárukou neprodlouží. Toto platí
také pro náhradní díly a opravené součásti. Případné škody a vady, existující už při koupi, se musí hlásit ihned po vybalení, nejpozději však
do dvou dnů od data nákupu. Po uplynutí záruční
doby se provedené opravy musí zaplatit.
Přístroj předejte k likvidaci odborné firmě či jej
odevzdejte ve Vašem místním recyklačním zařízení.
Dodržujte aktuálně platné předpisy.
V případě pochyb se poraďte s recyklační firmou.
Také všechny obalové materiály zlikvidujte
v souladu s ekologickými předpisy.
Záruka a servis
Na tento přístroj platí tříletá záruka od data zakoupení. Přístroj byl vyroben s nejvyšší pečlivostí a před
odesláním prošel výstupní kontrolou. Uschovejte si,
prosím, pokladní
lístek jako doklad o nákupu. V případě uplatňování
záruky kontaktujte telefonicky
Vaší servisní službu. Pouze tak může být zajištěno
bezplatné zaslání Vašeho zboží.
Záruka se vztahuje pouze na chyby materiálu nebo
výrobní závady, ale ne na škody,vzniklé při přepravě, ne na součásti, podléhající rychlému opotřebení
nebo na poškození křehkých dílů, jako jsou např.
spínače nebo akumulátory. Výrobek je určen pouze
pro privátní použití, ne průmyslové.
Při nesprávném a neodborném využívání, při použití
násilí a při zásazích, které nebyly provedeny našimi
autorizovanými servisními provozovnami, záruční
nároky zanikají.
Vaše práva vyplývající ze zákona touto zárukou
nejsou omezena.
Ing. Martin Šimák, zprostředkovatel
servisu výrobků Kompernass
Hotline: 800 400 235
Fax: 271 722 939
e-mail: support.cz@kompernass.com
Dovozce
KOMPERNASS GMBH
BURGSTRASSE 21
44867 BOCHUM, GERMANY
www.kompernass.com
- 84 -

OBSAH STRANA
Používanie primerané účelu 86
Bezpečnostné pokyny 86
Obsah dodávky 89
Technické údaje 89
Skôr než začnete 90
Základné princípy varenia v mikrovlnnej rúre . . . . . . . . . . . . . . . . . . . . . . . . . . . . . . . . . . . .90
Používanie vhodného kuchynského riadu . . . . . . . . . . . . . . . . . . . . . . . . . . . . . . . . . . . . . . .90
Opis prístroja 91
Prvé uvedenie do prevádzky 91
Umiestnenie prístroja . . . . . . . . . . . . . . . . . . . . . . . . . . . . . . . . . . . . . . . . . . . . . . . . . . . . . . . .91
Príprava prístroja . . . . . . . . . . . . . . . . . . . . . . . . . . . . . . . . . . . . . . . . . . . . . . . . . . . . . . . . . . .91
Nasadenie príslušenstva . . . . . . . . . . . . . . . . . . . . . . . . . . . . . . . . . . . . . . . . . . . . . . . . . . . . .92
Ovládanie 92
Nastavenie hodín . . . . . . . . . . . . . . . . . . . . . . . . . . . . . . . . . . . . . . . . . . . . . . . . . . . . . . . . . .92
Nastavenie kuchynského časovača . . . . . . . . . . . . . . . . . . . . . . . . . . . . . . . . . . . . . . . . . . . .92
Detská poistka . . . . . . . . . . . . . . . . . . . . . . . . . . . . . . . . . . . . . . . . . . . . . . . . . . . . . . . . . . . . .93
Dotazovacie funkcie . . . . . . . . . . . . . . . . . . . . . . . . . . . . . . . . . . . . . . . . . . . . . . . . . . . . . . . .93
Spôsoby prípravy jedla (varenia) 93
Režim mikrovlnnej rúry . . . . . . . . . . . . . . . . . . . . . . . . . . . . . . . . . . . . . . . . . . . . . . . . . . . . . .93
Režim grilu . . . . . . . . . . . . . . . . . . . . . . . . . . . . . . . . . . . . . . . . . . . . . . . . . . . . . . . . . . . . . . . .94
Kombinované varenie . . . . . . . . . . . . . . . . . . . . . . . . . . . . . . . . . . . . . . . . . . . . . . . . . . . . . . .94
Menu automatiky 95
Spustenie menu automatiky . . . . . . . . . . . . . . . . . . . . . . . . . . . . . . . . . . . . . . . . . . . . . . . . . .95
Programy podrobne . . . . . . . . . . . . . . . . . . . . . . . . . . . . . . . . . . . . . . . . . . . . . . . . . . . . . . . .96
Rozmrazovanie 98
Nastavenie času začatia 98
Čistenie a údržba 99
Odstraňovanie porúch 99
Likvidácia 100
Záruka a servis 100
Dovozca 100
Uschovajte si tento návod na použitie v budúcnosti – a pri odovzdávaní prístroja tretej osobe odovzdajte aj
návod!
- 85 -

MIKROVLNNÁ RÚRA
Používanie primerané účelu
• Nič nenalepujte medzi predok prístroja a dvierka
a zabezpečte, aby žiadne nečistoty ani zvyšky
čistiacich prostriedkov nezostali na tesniacich
plochách.
Tento prístroj je určený na zohrievanie a prípravu
potravín podľa uvedeného postupu.
Akákoľvek úprava prístroja platí za neoprávnenú
a predstavuje významné riziko úrazu.
Za škody vzniknuté používaním, ktoré je v rozpore
s deklarovaným účelom, nepreberá výrobca žiadnu
záruku.
Tento prístroj nie je určený na priemyselné využitie.
Bezpečnostné pokyny
Pozor!
Varovanie pred poškodením prístroja.
Pozor! Nebezpečenstvo
poranenia!
Varovanie pred poraneniami a úrazmi elektrickým
prúdom!
Nebezpečenstvo požiaru!
Varovanie pred nebezpečenstvom požiaru.
Upozornenie!
Pokyny a rady pre manipuláciu s mikrovlnnou rúrou.
Bezpečnostné opatrenia na zamedzenie možného
nadmerného styku s mikrovlnnou energiou
• Nepokúšajte sa používať prístroj s otvorenými
dvierkami, pretože prevádzka pri otvorených
dvierkach môže viesť k styku so škodlivým
množstvom mikrovlnného žiarenia. Dôležité je
tiež nevylomiť bezpečnostné poistky a nemanipulovať s nimi .
Nebezpečenstvo poranenja!
• V prípade, ak sú dvierka alebo tesnenie dvierok
poškodené, v žiadnom prípade mikrovlnnú rúru
ďalej nepoužívajte. Najprv ju dajte opraviť
kvalifikovanému odbornému personálu.
• Nikdy sa nepokúšajte prístroj opraviť sami.
Po odložení krytu prístroja sa môže uvoľniť
mikrovlnná energia. Opravy zverte len do rúk
kvalifikovaného odborného personálu.
• Tento prístroj nie je určený na to, aby ho používali
osoby (vrátane detí) s obmedzenými fyzickými,
zmyslovými alebo duševnými schopnosťami,
alebo s nedostatkom skúseností alebo nedostatkom
znalostí, len za predpokladu, že budú pod
dohľadom osoby zodpovednej za ich bezpečnosť,
alebo od nej dostanú pokyny, ako sa má prístroj
používať. Na deti treba dohliadať, aby sa
zabezpečilo, že sa nebudú hrať s prístrojom.
• Deťom sa smie dovoliť obsluhovať varný prístroj
bez dozoru len za predpokladu, že dostali primerané pokyny, ktoré dieťaťu umožnia používať
prístroj bezpečným spôsobom a pochopiť, aké
nebezpečenstvá hrozia pri jeho nesprávnom
používaní.
• Používajte tento prístroj len na to, na čo je podľa
tohto návodu určený. Nepoužívajte v tomto
prístroji žiadne leptavé chemikálie alebo výpary.
Táto mikrovlnná rúra je skonštruovaná špeciálne
na zohrievanie, varenie, grilovanie alebo sušenie
potravín.
Nie je určená na použitie v priemyselnej alebo
laboratórnej oblasti.
• Nepoužívajte mikrovlnnú rúru, keď je sieťová šnúra
alebo jej zástrčka poškodená. Poškodenú sieťovú
šnúru alebo zástrčku nechajte vymeniť odborníkovi,
aby ste sa vyhli možným rizikám.
• Počas prevádzky mikrovlnnej rúry držte deti ďaleko
od jej dvierok. Nebezpečenstvo popálenia!
- 86 -

• V žiadnom prípade neodstráňte plášť mikrovlnnej
rúry.
• Lampu vo vnútri mikrovlnnej rúry dajte vymeniť
len kvalifikovanému odborníkovi.
• Nedotýkajte sa dvierok, plášťa, vetracích otvorov
a príslušenstva mikrovlnnej rúry, ani riadu hneď
po príprave jedla grilom, kombi alebo automatikou.
Tieto časti sú veľmi horúce. Pred čistením ich
nechajte vychladnúť.
• Dajte pozor na to, aby bola zástrčka vždy dobre
prístupná, aby ste ju mohli v prípade nutnosti
rýchlo vytiahnuť.
• Osoby, ktoré používajú kardiostimulátor, by sa
mali pred uvedením mikrovlnnej rúry do prevádzky
informovať u svojho lekára o možných rizikách.
• Nikdy nenechajte sieťovú šnúru visieť zo stola
alebo pracovnej plochy. Deti by za ňu mohli ťahať.
• Plechovky, vrecká s pukancami apod. otvárajte
po zohriatí vždy tak, aby otvor smeroval preč
od vášho tela. Vychádzajúca para môže spôsobiť
popáleniny.
• Pri otváraní dvierok nestojte priamo pred mikrovlnnou rúrou. Vychádzajúca para môže spôsobiť
popáleniny.
• Nefritujte v mikrovlnnej rúre. Horúci olej môže
poškodiť súčasti prístroja a náradie a spôsobiť
popáleniny.
• V každom prípade potraste alebo premiešajte
obsah zohriatych detských pohárov alebo fliaš!
Ich obsah sa môže nerovnomerne zohriať a dieťa
by sa mohlo pri jedení alebo pití popáliť. V každom
prípade najprv skontrolujte teplotu, než začnete
dieťa kŕmiť!
• Neobostavajte mikrovlnnú rúru.
• Pred kŕmením skontrolujte teplotu, aby ste zabránili
životunebezpečným popáleninám kojencov
a malých detí.
Kuchynský riad sa môže teplom z horúceho jedla
natoľko rozpáliť, že ho prípadne treba chytať
chňapkou. Pri kuchynskom riade si musíte overiť,
či je vhodný pre mikrovlnnú rúru.
Pozor! Horúci povrch!
Nebezpečenstvo požiaru
• Nenechávajte mikrovlnnú rúru bez dozoru, keď
zohrievate potraviny v plastových alebo papierových obaloch.
• Neklaďte žiadne horľavé materiály do blízkosti
mikrovlnnej rúry ani na jej vetracie otvory.
• Odstráňte všetky kovové uzávery z balení potravín,
ktoré chcete zohriať. Hrozí nebezpečenstvo požiaru!
• Na výrobu pukancov používajte len vrecká na
pukance vhodné pre mikrovlnné rúry.
• Nepoužívajte mikrovlnnú rúru na zohrievanie
vankúšov naplnených zrnami, čerešňovými kôstkami
alebo gélom. Hrozí nebezpečenstvo požiaru!
• Nepoužívajte mikrovlnnú rúru na skladovanie
potravín alebo iných vecí.
• Nikdy neprekračujte výrobcom udávané doby
varenia.
• Počas prevádzky mikrovlnnej rúry na ňu neklaďte
žiadne predmety. Zakryli by ste tým vetracie
otvory!
• Nikdy nedávajte mikrovlnnú rúru do blízkosti iných
teplo vyžarujúcich prístrojov, ako je napríklad
rúra a pod.
• Mikrovlnné žiarenie je nebezpečné! Prenechajte
údržbu a opravy, pri ktorých treba sňať kryty
chrániace pred stykom s mikrovlnným žiarením,
len školenému odbornému personálu.
- 87 -

• Poriadne vyčistite mikrovlnnú rúru po zohrievaní
mastnotu obsahujúcich jedál, hlavne ak neboli
prikryté. Po použití nechajte prístroj celkom
vychladnúť než ho začnete čistiť. Na vyhrievacích
špirálach grilu nesmú zostať žiadne zvyšky, ako
je napríklad tuk. Mohli by sa prehriať a zapáliť.
• V mikrovlnnej rúre neroztápajte zamrznutú masť
ani olej. Masť alebo olej sa môžu zapáliť.
• Na zapínanie a vypínanie prístroja nepoužívajte
žiadne externé spínacie hodiny ani samostatný
systém diaľkového ovládania.
Nebezpečenstvo
• Nikdy neponárajte sieťovú šnúru ani zástrčku
do vody alebo iných tekutín.
• Majte sieťovú šnúru ďaleko od zdrojov tepla.
Nikdy ju neveďte pred dvierkami mikrovlnnej
rúry. Horúčava by mohla šnúru poškodiť.
• Nikdy nelejte tekutiny do vetracích otvorov ani
do bezpečnostnej aretácie dvierok. Ak by sa
tam tekutina napriek tomu dostala, ihneď odstavte
mikrovlnnú rúru a vytiahnite zástrčku zo zásuvky.
Nechajte mikrovlnnú rúru preskúšať kvalifikovaným odborníkom.
Pozor! Poškodenia prístroja!
• Nepoužívajte mikrovlnnú rúru, keď je prázdna.
Výnimkou z tohto pravidla je jej prvé uvedenie
do prevádzky (pozri kapitola „Prvé uvedenie
do prevádzky“).
• Nikdy nedávajte žiadne predmety do vetracích
otvorov ani do bezpečnostnej aretácie dvierok.
• Nepoužívajte žiadne kovové pomôcky, ktoré
odrážajú mikrovlny a vedú k vzniku iskier.
Nedávajte do mikrovlnnej rúry žiadne plechovky.
• Nedávajte žiadne plastové nádoby do mikrovlnnej
rúry ihneď po varení grilom, kombi alebo automatikou. Plast sa môže roztaviť.
• Mikrovlnná rúra nesmie byť na miestach, kde je
vysoká vlhkosť vzduchu alebo kde sa zhromažďuje
vlhkosť.
• Tekutiny a iné potraviny sa nesmú zohrievať vo
vzduchotesne zatvorených nádobách, lebo môžu
vybuchnúť a poškodiť prístroj.
• Neopierajte sa o dvierka mikrovlnnej rúry.
• Nedostatočná čistota prístroja môže viesť
k zničeniu povrchu, čo ovplyvňuje životnosť
a môže viesť aj k nebezpečným situáciám.
Tipy pre bezpečnosť
• Na zníženie rizika požiaru v mikrovlnnej rúre:
Keď ohrievate jedlá v umelohmotných alebo
papierových nádobách, dohliadajte stále na
mikrovlnnú rúru, lebo tieto materiály sa prípadne
môžu zapáliť.
• Pri zohrievaní nápojov v mikrovlnnej rúre môže
dôjsť k časovo oneskorenému bublaniu, keď nápoj
vrie. Buďte preto opatrní pri zaobchádzaní
s nádobou. Ak chcete zabrániť náhlemu zovretiu:
- Ak je to možné, postavte sklenú paličku do
tekutiny, len čo sa zohreje.
- Po zohratí ponechajte tekutinu 20 sekúnd stáť
v mikrovlnnej rúre, aby ste zamedzili neočakávanému bublaniu.
• Prepichnite šupku zemiakov, klobás a podobných
potravín. Inak by mohli vybuchnúť.
• Pri zohrievaní tekutín zachovajte opatrnosť.
Používajte len otvorené nádoby, aby vzniknuté
bubliny mohli uniknúť.
• Ak zacítite dym, vypnite prístroj alebo vytiahnite
zástrčku a ponechajte dvierka zatvorené, aby
sa prípadné plamene zadusili.
- 88 -

• Vajcia v škrupine a natvrdo uvarené vajcia sa
nemajú zohrievať v mikrovlnnej rúre, pretože
môžu aj po skončení zohrievania v mikrovlnnej
rúre vybuchnúť. Potraviny s hrubou šupkou, ako
napr. zemiaky, celé tekvice, jablká a gaštany
treba pred varením prepichnúť.
• Nepohybujte mikrovlnnou rúrou, keď je
v prevádzke.
Pokyny pre uzemnenie, inštalácia podľa predpisu
Tento prístroj musí byť uzemnený. Tento prístroj sa
smie pripojiť len k predpisovo uzemnenej zásuvke.
Odporúčame použiť samostatný elektrický okruh
len pre túto mikrovlnnú rúru.
• Zapojiť mikrovlnnú rúru do inej zásuvky.
Mikrovlnná rúra a prijímač by mali byť zapojené
v rôznych elektrických obvodoch.
Obsah dodávky
Mikrovlnná rúra
Sklený tanier
Grilovací stojan
Valčeková hviezdica
Návod na používanie
Stručný návod
Nebezpečenstvo: Nesprávne zaobchádzanie
s uzemnenou zástrčkou môže niesť so sebou
riziko úrazu elektrickým prúdom.
Upozornenie: Ak máte otázky ohľadne uzemnenia
alebo pokynov v elektrických záležitostiach,
opýtajte sa odborníka v oblasti elektro.
Ani výrobca, ani predajca nepreberajú záruku za
poškodenia mikrovlnnej rúry alebo za poranenia
osôb, ktoré boli vyvolané nedodržaním pokynov
pre elektrické pripojenie.
Rušenie iných zariadení
Prevádzka mikrovlnnej rúry môže vyvolať rušenie
rozhlasového alebo televízneho prijímača alebo
podobných zariadení.
Ak sa takéto rušenia vyskytnú, skúste ich nasledujúcimi
opatreniami znížiť alebo odstrániť:
• Vyčistiť dvierka a tesniace plochy mikrovlnnej
rúry.
• Presmerovať prijímaciu anténu rádia alebo
televízora.
• Premiestniť mikrovlnnú rúru na iné miesto než
kde je prijímač.
• Oddialiť mikrovlnnú rúru od prijímača.
Technické údaje
Menovité napätie: 230 - 240 V,
50 Hz
Maximálny príkon: 1200 W
Maximálny dodávaný
výkon
Mikrovlnná rúra: 800 W
Maximálny príkon
Gril: 1000 W
Kmitočet mikrovlnnej rúry: 2450 MHz
- 89 -

Skôr než začnete
Základné princípy varenia v mikrovlnnej
rúre
• Rozvážne usporiadajte jedlá.
• Najhrubšie miesta patria na okraj taniera.
• Dajte pozor na doby varenia. Zvoľte si najkratšiu
uvádzanú dobu varenia a v prípade potreby ju
predlžujte. Príliš dlho varené jedlá môžu začať
dymiť alebo sa zapália.
• V priebehu varenia prikryte jedlá krytom vhodným
pre mikrovlnnú rúru. Kryt zabraňuje vystrekovaniu
a okrem toho prispieva k rovnomernému vareniu
pokrmu.
• Obráťte jedlá jedenkrát v priebehu prípravy
v mikrovlnnej rúre, aby sa pokrmy, ako hydina
alebo hamburgery rýchlejšie „prehriali“.
• Veľké kusy jedál, ako napr. pečené mäso, sa
musia aspoň raz obrátiť.
• Popremiestňujte kúsky jedál, ako sú napr. guľky z mletého mäsa, po polčase varenia. Obráťte ich a preložte guľky zo stredu taniera na
okraj.
• Odporúčame používať radšej okrúhly/oválny
riad namiesto hranatého/podlhovastého, lebo
jedlá v rohoch sa mierne prevaria.
Nasledujúci zoznam je všeobecnou pomôckou
pre výber správneho riadu.
Riad
Sklo odolávajúce
teplu
Sklo neodolávajúce
teplu
Teplu odolná
keramika
Plastový riad vhodný pre mikrovlnnú
rúru
Papierové kuchynské
utierky
Kovový podnos
alebo platňa
Mikro
vlnná rúra
Áno Áno Áno
Nie Nie Nie
Áno Áno Áno
Áno Nie Nie
Áno Nie Nie
Nie Áno Nie
Gril
Kombinácia
Používanie vhodného kuchynského riadu
• Ideálny materiál pre mikrovlnnú rúru prepúšťa
mikrovlny, takže prepúšťa energiu do nádoby,
čím sa jedlá ohrievajú.
Mikrovlny nedokážu prejsť cez kovy. Preto
nepoužívajte žiadne kovové nádoby a žiadny
kovový riad.
• Pri zohrievaní v mikrovlnnej rúre nepoužívajte
žiadne výrobky z recyklovaného papiera.
Môžu obsahovať jemné kovové čiastočky, ktoré
potom iskria a/alebo spôsobia požiar.
Grilovací stojan Nie Áno Nie
Hliníková fólia &
Zásobník fólie
Nie Áno Nie
Upozornenie:
Nikdy nepoužívajte grilovací stojan ani iné kovové
predmety, ak používate mikrovlnnú rúru v mikrovlnnom
režime alebo na varenie v režime kombi. Kovy odrážajú
mikrovlnné žiarenie, čo spôsobuje iskrenie. To môže
viesť až k požiaru a neopraviteľným poškodeniam
prístroja!
- 90 -

Opis prístroja
1 Displej
2 Tlačidlo otvárania dvierok
3 Sklený tanier
4 Valčeková hviezdica
5 Vetracie otvory
6 Tlačidlo Gril
7 Tlačidlo Hmotnosť/Množstvo
8 Tlačidlo Rozmrazovanie
9 Tlačidlo Hodiny
0 Tlačidlo Stop
q Otočný regulátor / Štart/Rýchly štart
w Tlačidlo Kuchynský časovač
e Tlačidlo Kombinácia
r Tlačidlo Výkon
t Grilovací stojan
Prvé uvedenie do prevádzky
Umiestnenie prístroja
Upozornenie:
Táto mikrovlnná rúra nie je vhodná na zabudovanie
do skrinky v kuchynskej linke. V zatvorených skrinkách
nie je zabezpečené dostatočné vetranie prístroja.
Prístroj sa môže poškodiť a hrozí aj nebezpečenstvo
požiaru!
• Vyberte si rovnú plochu, ktorá ponechá dostatočný
priestor pre vstup a výstup ventilačného vzduchu
do prístroja a z neho.
Bezpodmienečne zachovajte medzi prístrojom
a okolitými stenami minimálny odstup 10 cm.
Zabezpečte, aby sa dvierka mikrovlnnej rúry dali
voľne otvárať.
Nad mikrovlnnou rúrou zachovajte odstup
aspoň 20 cm.
• Postarajte sa o to, aby bola zástrčka stále
prístupná a v prípade nebezpečenstva sa dala
ľahko vytiahnuť.
• Neodstráňte nožičky spod mikrovlnnej rúry.
• Nezablokujte vetracie otvory 5. V opačnom
prípade môže dôjsť k poškodeniu prístroja.
• Postavte prístroj čo možno najďalej od rádia
alebo televízora. Prevádzka mikrovlnnej rúry
môže spôsobiť poruchy rozhlasového alebo
televízneho príjmu.
Upozornenie:
Nedávajte mikrovlnnú rúru nad kuchynskú rúru alebo
iné teplo vyžarujúce zariadenie. Umiestnenie na takom
mieste môže viesť k poškodeniu prístroja, a tým aj
zániku záruky.
Príprava prístroja
• Odstráňte obalový materiál a prípadne na hornej
strane prístroja umiestnenú ochrannú fóliu.
Upozornenie:
Neodstraňujte svetlosivú sľudovú kryciu dosku, ktorá
je vo varnom priestore na ochranu magnetrónu.
• Zasuňte sieťovú zástrčku do zásuvky. Použite na
to zásuvku s napätím 230 - 240 V, 50 Hz,
pričom zásuvkový okruh má byť istený ističom
(poistkou) 16 A. Odporúčame, aby ste pre
mikrovlnnú rúru vyhradili samostatný napájací
okruh.
Ak ste si nie istí, ako sa má mikrovlnná rúra
pripojiť, požiadajte o radu odborníka.
Pred používaním mikrovlnnej rúry sa musí prístroj
najprv naprázdno zohriať, aby sa zvyšky z výroby
mohli odpariť.
- 91 -

Zapnite prístroj bez potravín a bez príslušenstva (sklený
tanier 3, stredová hviezdica 4 a grilovací stojan t)
do režimu grilovania:
• Raz stlačte tlačidlo Gril 6 .
Tým ste zvolili grilovací režim. Na displeji 1
sa zobrazí symbol a symbol bliká.
Tým označuje pripravenosť na zapnutie.
• Otočným regulátorom q nastavte dobu
prípravy na 10 minút.
• Stlačte tlačidlo Štart/Rýchly štart q , čím
spustíte proces grilovania.
Upozornenie:
Pri prvom uvedení do prevádzky môže dôjsť k miernemu
dymeniu a zápachu spôsobenému zvyškami z výroby.
Je to celkom neškodné. Zabezpečte však dostatočné
vetranie. Napríklad otvorte okno.
• Po 10 minútach sa prístroj sám automaticky
vypne. Zaznie akustický signál. Otvorte dvierka.
Vyčkajte, kým celkom nevychladne.
• Vytiahnite sieťovú zástrčku zo zásuvky a následne
vyčistite prístroj zvnútra vlhkou utierkou a poriadne
ho vysušte.
Nasadenie príslušenstva
• Nasaďte valčekovú hviezdicu 4 do stredu
pohonného hriadeľa v priestore na ohrievanie.
Dajte pritom pozor na to, aby celkom zapadol
na osku a pevne sedel.
• Nasaďte sklený tanier 3 do stredu na valčekovú
hviezdicu. Jej tri valčeky musia zapadnúť do
vodiacej hrany (drážky) na sklenom tanieri 3.
Ovládanie
Nastavenie hodín
Keď mikrovlnnú rúru po prvý raz uvádzate do
prevádzky alebo keď dôjde k výpadku prúdu, na
displeji 1 sa zobrazí "1 : 0 1 ".
1. Stlačte tlačidlo Hodiny 9 . Na displeji 1
sa zobrazí „Hr 12“. Ak chcete prepnúť do 24hodinového formátu zobrazovania času, znova
stlačte tlačidlo Hodiny 9 .
2. Otáčaním otočného regulátora q nastavte požadovanú hodinu. Symbol hodín na displeji
1 bliká.
3. Stlačte tlačidlo Hodiny 9 . Zobrazí sa údaj
minút.
4. Otáčaním otočného regulátora q nastavte
požadovanú minútu.
5. Keď je čas správne nastavený, stlačte tlačidlo
Hodiny 9 . Symbol hodín na displeji
1 bude trvale svietiť a dvojbodka svojím blikaním ukazuje, že hodiny idú.
Ak chcete zobraziť aktuálny čas počas chodu
mikrovlnnej rúry, stlačte tlačidlo Hodiny 9 .
Čas sa potom asi na 4 sekúnd zobrazí na displeji 1.
Nastavenie kuchynského časovača
Mikrovlnná rúra má kuchynský časovač, ktorý môžete
použiť nezávisle od prevádzky mikrovlnnej rúry.
1. Stlačte tlačidlo Kuchynský časovač w ,
keď je prístroj v pohotovostnom režime.
Na displeji 1 sa zobrazí „00:10“.
2. Teraz nastavte otočným regulátorom q
požadovaný čas.
Môžete nastaviť časy od 10 sekúnd po 95 minút.
3. Stlačte tlačidlo Štart/Rýchly štart q . Zaz-
nie akustický signál. Čas sa odpočítava dozadu.
Asi po 3 sekundách sa znova zobrazí normálny
čas. Kuchynský časovač beží v pozadí ďalej.
- 92 -

Ak chcete medzičasom skontrolovať čas na kuchynskom
časovači, stlačte tlačidlo Kuchynský časovač w .
Na krátku chvíľku sa zobrazí čas kuchynského časovača.
Len čo vyprší nastavený čas, zaznie dlhý akustický signál.
Spôsoby prípravy jedla
(varenia)
Režim mikrovlnnej rúry
Upozornenie:
Ak chcete prerušiť plynúci čas kuchynského časovača,
stlačte tlačidlo Kuchynský časovač w , aby sa
zobrazil aktuálny čas kuchynského časovača. Ešte
kým sa údaj kuchynského časovača zobrazuje na
displeji 1, stlačte tlačidlo Stop 0 . Chod
kuchynského časovača sa preruší a na displeji 1
sa zobrazí čas.
Detská poistka
Toto nastavenie zapnite, keď chcete zabrániť spusteniu
mikrovlnnej rúry malými deťmi a inými, s obsluhou
prístroja neoboznámenými ľuďmi bez dozoru.
Symbol pre detskú poistku sa zobrazí na
displeji 1, a prístroj sa nedá uviesť do prevádzky
po celú dobu, kým je táto funkcia zapnutá.
• Stlačte tlačidlo Stop 0 a držte ho stlačené
dovtedy, kým nezaznie dlhý akustický signál a na
displeji 1 sa nezobrazí symbol detskej poistky .
Tlačidlá a regulátor mikrovlnnej rúry teraz nemajú
žiadnu funkciu.
• Ak chcete detskú poistku vypnúť, stlačte tlačidlo
Stop 0 a držte ho stlačené dovtedy, kým
nezaznie dlhý akustický signál a nezhasne symbol
detskej poistky .
Dotazovacie funkcie
Zisťovanie času počas prevádzky
Počas prípravy jedla stlačte tlačidlo Hodiny 9 .
Na displeji 1 sa asi na 4 sekúnd zobrazí čas.
Zisťovanie výkonu počas prevádzky
Počas prípravy jedla stlačte tlačidlo Výkon r .
Na displeji 1 sa asi na 3 sekundy zobrazí nastavený
výkonový stupeň.
Upozornenie
Na dvierkach mikrovlnnej rúry alebo na jej telese sa
môžu počas varenia vytvárať kvapky vody. Je to
normálne a nie je to príznak poruchy. Po vychladnutí
prístroja utrite vlhkosť suchou utierkou.
Upozornenie:
Nikdy nepoužívajte grilovací stojan t ani iné kovové
predmety, ak používate mikrovlnnú rúru v mikrovlnnom
režime. Kovy odrážajú mikrovlnné žiarenie, čo spôsobuje
iskrenie. To môže viesť až k požiaru a neopraviteľným
poškodeniam prístroja!
Voľba výkonu
• Stláčajte tlačidlo Výkon r pre výber
výkonového stupňa takto.
• 1x pre výkon 800 W (P800).
• 2x pre výkon 700 W (P700).
• 3x pre výkon 600 W (P600).
• 4x pre výkon 500 W (P500).
• 5x pre výkon 400 W (P400).
• 6x pre výkon 300 W (P300).
• 7x pre výkon 200 W (P200).
• 8x pre výkon 100 W (P100).
Výkon sa zobrazí na displeji 1 (napr. P800 pri
výkone 800 W).
Nastavenie doby varenia
Po zvolení požadovaného výkonu nastavte požadovanú dobu varenia:
• Otáčajte otočný regulátor q, kým nie je na-
stavená požadovaná doba varenia.
- 93 -

Stupne nastavenia času pre otočný regulátor q
sú takéto:
• od 10 s do 5 min: v krokoch po 10 sekundách
• od 5 do 10 min: v krokoch po 30 sekundách
• od 10 do 30 min: v krokoch po 1 minúte
• od 30 do 95 min: v krokoch po 5 minútach
Prerušenie alebo ukončenie postupu zadávania
Raz stlačte tlačidlo Stop 0 , aby ste postup
zadávania prerušili a zastavili. Prístroj sa prepne
späť do pohotovostného režimu.
Spustenie varenia
Keď ste nastavili výkon a dobu varenia, a na displeji 1 bliká symbol , môžete spustiť proces
varenia:
Ak chcete začať variť, stlačte tlačidlo Štart/Rýchly
štart q . Na displeji 1 sa zobrazia symboly pre
režim mikrovlnnej rúry a varenie alebo .
Nastavený čas sa odpočítava dozadu.
Prerušenie varenia
Raz stlačte tlačidlo Stop 0 , aby ste prerušili
varenie. Prístroj preruší varenie a zastaví odpočítavanie
zvyšného času. Stlačte tlačidlo Štart/Rýchly štart q
, ak chcete vo varení opäť pokračovať.
Ukončiť varenie
Dvakrát stlačte tlačidlo Stop 0 , ak chcete varenie
prerušiť. Prístroj sa prepne späť do pohotovostného
režimu.
Proces varenia je skončený
Keď proces varenia skončí, na displeji 1 sa zobrazí
nápis „End“ a zaznejú 4 akustické signály (pípnutia).
Ak neotvoríte dvierka na mikrovlnnej rúre, akustické
signály zaznejú po dvoch minútach znova.
• Raz stlačte tlačidlo Štart/Rýchly štart q .
Na displeji 1 sa zobrazia symboly pre mikro-
vlnný režim a varenie , ako aj údaj
„:30“. Mikrovlnná rúra spustí proces varenia
na 30 sekúnd. Čas sa odpočítava dozadu.
Ak chcete proces varenia predĺžiť, dovtedy stláčajte
tlačidlo Štart/Rýchly štart q , kým nedosiahnete
požadovanú dobu.
Režim grilu
Funkciu grilovania môžete použiť na tenké plátky
mäsa, rezne, frikadely, klobásky alebo časti kureniec.
Vynikajúco sa hodí aj na prepečené sendviče a zapekané jedlá.
Na grilovanie vždy používajte grilovací stojan t.
Tým dosiahnete optimálny výsledok grilovania.
Grilovací stojan t položte vždy na sklený tanier 3.
1. Ak chcete zapnúť funkciu grilu, stlačte tlačidlo
Gril 6 .
Na displeji 1 sa zobrazí symbol funkcie grilu
a „:10“.
2. Otočným regulátorom q nastavte požadovanú
dobu prípravy jedla. Maximálna nastaviteľná
doba je 95 minút.
3. Vlastné grilovanie spustíte tým, že stlačíte tlačidlo
Štart/Rýchly štart q .
4. Po uplynutí asi polovice doby prípravy jedla
treba mäso otočiť.
Kombinované varenie
Táto funkcia spája grilovanie s normálnou prácou
mikrovlnnej rúry. Počas kombinovaného postupu sa
po určitý čas varí a zvyšný čas griluje s automatickým
prepínaním v jednom postupe. Moment prepnutia
prístroja si uvedomíte pri tichom kliknutí.
Rýchly štart
Pomocou tejto funkcie môžete ihneď začať s 30 sekundovým (alebo dlhším, až do 12 minút) varením
s 800 W výkonom.
- 94 -

Upozornenie:
Nikdy nepoužívajte grilovací stojan t ani iné kovové
predmety, ak používate mikrovlnnú rúru v kombinovanom režime. Kovy odrážajú mikrovlnné žiarenie,
čo spôsobuje iskrenie. To môže viesť až k požiaru
a neopraviteľným poškodeniam prístroja!
Kombinácia 1
V prípade kombinácie 1 predstavuje mikrovlnný režim
30 % a režim grilu 70 % doby varenia. Je to vhodné
napríklad pre ryby, zemiaky alebo zapekané jedlá.
1. Raz stlačte tlačidlo Kombinácia e ,
čím zapnete kombináciu 1. Na displeji 1
sa zobrazí , ako aj údaj „:10“.
2. Otočným regulátorom q nastavte požadovanú
dobu prípravy. Maximálna nastaviteľná doba
je 95 minút.
3. Pre začatie stlačte tlačidlo Štart/Rýchly
štart q .
Upozornenie
Mikrovlnná rúra si sama vypočíta potrebnú dobu
a výkon pre čerstvé potraviny. Zmrazené potraviny
sa mikrovlnnou rúrou vypočítanými časmi neuvaria.
V prípade potreby vopred rozmrazte mrazené potraviny
rozmrazovacím programom (pozri kapitola „Rozmrazovanie“).
Spustenie menu automatiky
1. Pomaly otáčajte otočný regulátor q doľava.
Na displeji 1 sa zobrazí číslo (napr. „3“ pre
automatický program 3 (ryby)), symbol „ryby“
a . Podľa svojho jedla si vyberte správne
menu automatiky (1 až 9).
Číslo Symbol Potravina
1 Nápoje 1 - 3
Hmotnosť
(porcie)
Kombinácia 2
V prípade kombinácie 2 predstavuje mikrovlnný režim
55 % a režim grilu 45 % doby varenia. Vhodné napríklad na pudingy, omelety, jedlá z hydiny alebo
lasagne.
1. Dvakrát stlačte tlačidlo Kombinácia e
,čím zapnete kombináciu 2. Na displeji 1 sa
zobrazí , ako aj údaj „:10“.
2. Otočným regulátorom q nastavte požadovanú
dobu prípravy. Maximálna nastaviteľná doba
je 95 minút.
3. Pre začatie stlačte tlačidlo Štart/Rýchly
štart q .
Menu automatiky
Pre jedlá, ktoré sa majú pripraviť v režime menu
automatiky, nie je potrebné nastavovať ani trvanie
varenia ani výkon. Úplne stačí nastaviť, aký druh
pokrmu sa má dusiť alebo variť, ako aj hmotnosť
tohto pokrmu.
2 Rezance 100 - 300 g
3 Ryby 100 - 1000 g
4 Ryža 100 - 1000 g
5 Kura 800 - 1400 g
6 Ohrievanie 100 - 1000 g
7 Zemiaky 150 - 600 g
8 Pečenie 300 - 1300 g
9 Mäsový špíz 100 - 700 g
- 95 -

2. Stlačte, v prípade potreby opakovane, tlačidlo
Hmotnosť/Množstvo 7 , až sa požadovaná hmotnosť resp. požadovaný počet porcií zobrazí na displeji 1. Symbol bliká.
3. Stlačte tlačidlo Štart/Rýchly štart q , čím
spustíte proces varenia.
Upozornenie
Ak chcete dosiahnuť rovnomerné varenie resp. výsledky, mali by ste jedlá v programoch 5, 8 a 9 po
uplynutí asi 2/3 doby varenia obrátiť. Mikrovlnná rúra
po uplynutí tejto doby automaticky preruší program:
Na displeji 1 sa zobrazí „turn“ (otočiť) a zaznejú
akustické signály, čím vám pripomenú potrebu otočenia jedla.
• Otvorte dvierka a obráťte jedlá. Postupujte pritom
opatrne, lebo jedlo môže byť už veľmi horúce.
• Ak chcete vo varení pokračovať ďalej, stlačte
tlačidlo Štart/Rýchly štart q .
Nebezpečenstvo poranenja!
Sklený tanier 3 je po príprave jedla pomocou grilu
veľmi horúci! Preto pri jeho vyberaní z varného
priestoru bezpodmienečne používajte chňapky alebo
teplovzdorné rukavice.
Upozornenie:
Majte na pamäti aj to, že veľkosť, tvar a druh potravín
sa tiež podieľajú na výsledku varenia.
Programy podrobne
Program 1: Nápoje
Tento program beží len s použitím mikrovlnného režimu.
Podľa nastaveného počtu porcií beží program v rozpätí
1:30 až 3:50 minút.
• Postavte nápoj, ktorý chcete zohriať, na sklený
tanier 3 vo varnom priestore. Keď dáte do
mikrovlnnej rúry viac pohárov alebo šálok, dajte
pozor na to, aby sa vzájomne nedotýkali.
Upozornenie:
Keď chcete vynechať obracanie jedla, po zaznení
signálnych tónov jednoducho čakajte. Mikrovlnná
rúra bude automaticky pokračovať v programe asi
po 30 sekundách.
Upozornenie
Ak jedlo po skončení menu automatiky nie je dosť
uvarené, dovarte ho ešte niekoľko minút v programe
rýchleho štartu. Pri programoch, ktoré prebiehajú
s použitím funkcie grilu (programy číslo 5, 8 a 9),
môžete jedlá dopiecť pomocou funkcie grilu.
Pri dopekaní pomocou grilu sa zvýši aj stupeň
zhnednutia jedál.
Pozor
Pri programoch, ktoré využívajú pripojenú funkciu
grilu, v žiadnom prípade nepoužívajte pokrievky
ani žiadny riad, ktorý neodoláva teplu, pretože
by sa mohli roztopiť alebo vzbĺknuť!
Upozornenie
Ak chcete zabrániť náhlemu zovretiu:
• Ak je to možné, dajte sklenú paličku do tekutiny,
kým sa zohrieva.
• Po zohriatí ponechajte tekutinu 20 sekúnd stáť
v mikrovlnnej rúre, aby ste zamedzili neočakávanému bublaniu.
Program 2: Rezance
Tento program beží len s použitím mikrovlnného režimu.
Podľa nastavenej hmotnosti beží program v rozmedzí
od 25 do 35 minút.
• Na varenie rezancov používajte vysoké nádoby,
pretože hrozí nebezpečenstvo prekypenia.
• Používajte toľko vody, ako pri bežnom varení.
• Najprv zovrite vodu v zakrytej nádobe.
Potom do nej pridajte rezance. Potom môžete
spustiť menu automatiky pre rezance.
• Následne nechajte rezance asi 3 minúty odstáť.
Program 3: Ryby
Tento program beží len s použitím mikrovlnného režimu.
Podľa nastavenej hmotnosti beží program v rozmedzí
od asi 3:30 do 16 minút.
- 96 -

• Položte kúsky ryby na tanier vhodný do mikrovlnnej
rúry, dajte na ne trochu masla alebo iného tuku,
okoreňte podľa chuti a spusťte menu automatiky
pre ryby.
Program 4: Ryža
Tento program beží len s použitím mikrovlnného režimu.
Podľa nastavenej hmotnosti beží program v rozmedzí
od 16 do 36 minút.
• Na varenie ryže používajte vysoké nádoby,
pretože hrozí nebezpečenstvo vykypenia.
Napríklad na 200 g ryže dajte asi 400 ml
vody.
• Dajte ryžu do nádoby, pridajte potrebné množstvo
tekutiny a nechajte ryžu asi 3 minúty nabobtnať.
• Zakryte nádobu. Dajte pozor na to, aby ste ju
nezakryli vzduchotesne. Potom môžete spustiť
menu automatiky pre ryžu.
Program 7: Zemiaky
Tento program beží len s použitím mikrovlnného režimu.
Podľa nastavenej hmotnosti beží program v rozmedzí
od asi 3:50 do 11 minút.
Tip
Na varenie používajte zemiaky v šupke.
Šupku na viacerých miestach prepichnite.
• Dajte zemiaky v šupke na tanier alebo do nádoby
vhodnej do mikrovlnnej rúry. Používajte podľa
možnosti rovnako veľké zemiaky. Pokiaľ je to
možné, nemali by sa zemiaky vzájomne dotýkať.
Program 8: Pečenie
Tento program beží vo viacerých stupňoch pečenia
s použitím mikrovlnného režimu aj režimu grilu. Podľa nastavenej hmotnosti beží program v rozmedzí od
16 do 60 minút.
Program 5: Kura
Tento program beží vo viacerých stupňoch varenia
s použitím mikrovlnného režimu aj režimu grilu. Podľa nastavenej hmotnosti beží program v rozmedzí od
39 do 50 minút.
• Položte kura na tanier vhodný do mikrovlnnej rúry.
• Okoreňte podľa chuti a spusťte menu automatiky
pre kura.
• Musí sa otáčať celé kura, lebo inak by sa mohla
nahor otočená strana vysušiť. Aby ste to mohli
urobiť, mikrovlnná rúra automaticky preruší program asi po 2/3 času, a zaznie zvukový signál.
Otočte kura a stlačte tlačidlo Štart/Rýchly štart q
, aby mohol program pokračovať.
Program 6: Ohrievanie
Tento program beží len s použitím mikrovlnného režimu.
Podľa nastavenej hmotnosti beží program v rozmedzí
od asi 1:00 do 6:20 minút.
• Dajte tanier s jedlom, ktoré chcete zohriať, na
sklený tanier 3 do varného priestoru a spusťte
menu automatiky na zohrievanie.
• Položte mäso na pečenie na tanier vhodný do
mikrovlnnej rúry. Podľa potreby mäso okoreňte
a spusťte menu automatiky pre pečenie.
• Musí sa otáčať celé pečené mäso, lebo inak by
sa mohla nahor otočená strana vysušiť. Aby ste
to mohli urobiť, mikrovlnná rúra automaticky preruší program asi po 2/3 času, a zaznie zvukový
signál.
Otočte pečené mäso a stlačte tlačidlo Štart/
Rýchly štart q , aby program pokračoval
ďalej.
Program 9: Mäsový špíz
Tento program beží vo viacerých stupňoch pečenia
s použitím mikrovlnného režimu aj režimu grilu. Podľa nastavenej hmotnosti beží program v rozmedzí od
9 do 27 minút.
• Položte mäsové špízy na tanier vhodný do mikrovlnnej rúry. Podľa chuti mäso okoreňte a spusťte menu
automatiky pre mäsové špízy.
- 97 -

• Špízy sa musia otáčať, aby sa rovnomerne opiekli.
Aby ste to mohli urobiť, mikrovlnná rúra automaticky preruší program asi po 2/3 času, a zaznie
zvukový signál. Otočte špízy a stlačte tlačidlo
Štart/Rýchly štart q , aby program pokračoval ďalej.
Rozmrazovanie
Touto funkciou môžete bez problémov rozmrazovať
mäso, hydinu a ryby. Doba rozmrazovania a výkon
sa po zadaní hmotnosti automaticky vypočítajú
a nastavia.
1. Stlačte tlačidlo Rozmrazovanie 8 .
Na displeji 1 sa zobrazí a .
Symbol bliká.
2. Pomocou otočného regulátora q zvoľte hmotnosť
rozmrazovaného jedla. Nastaviť môžete hmotnosť
v rozmedzí od 100 g do 1800 g.
3. Stlačte tlačidlo Štart/Rýchly štart q .
Prístroj si automaticky zvolí dobu rozmrazovania. Zobrazí sa na displeji 1 a beží.
Mikrovlnná rúra automaticky preruší program rozmrazovania asi po 1/2 času, a zaznejú zvukové
signály (pípania). Otočte rozmrazované jedlá a
stlačte tlačidlo Štart/Rýchly štart q , aby mohlo
rozmrazovanie pokračovať.
Upozornenie:
Keď chcete vynechať obracanie jedla, po zaznení
signálnych tónov jednoducho čakajte. Mikrovlnná
rúra bude automaticky pokračovať v programe asi
po 30 sekundách.
Nastavenie času začatia
Pomocou tohto programu môžete naprogramovať
konkrétny čas, kedy sa má jedlo začať variť alebo
grilovať. Ak urobíte toto nastavenie správne, spustí
sa prístroj v nastavenom čase automaticky.
Upozornenie:
Hodiny musia byť nastavené, aby ste si mohli zvoliť
funkciu „Nastavenie času začatia“.
1. Nastavte požadovanú funkciu mikrovlnnej rúry
(varenie, grilovanie alebo menu automatiky
(s výnimkou automatického programu 6)):
Pre funkciu mikrovlnnej rúry: Podľa potreby
stláčajte tlačidlo Výkon r , ktorým sa volí
výkonový stupeň. Dobu varenia (prípravy jedla)
nastavte otočným regulátorom q.
Pre funkciu grilu: Ak chcete zapnúť funkciu grilu,
stlačte tlačidlo Gril 6 .
Otočným regulátorom q nastavte požadovanú
dobu grilovania.
Pre menu automatiky: Otočným regulátorom q
zvoľte program, ktorý je vhodný pre dané jedlo
(s výnimkou automatického programu 6). Dovtedy
stláčajte tlačidlo Hmotnosť/Množstvo 7 ,
kým sa na displeji 1 nezobrazí požadované
množstvo.
2. Stlačte tlačidlo Hodiny 9 . Na displeji 1
bliká „01: “ a zobrazí sa symbol presýpacích
hodín .
3. Otáčaním otočného regulátora q nastavte
časový údaj pre hodinu.
4. Stlačte tlačidlo Hodiny 9 . Teraz sa zobrazia
číslice minút.
5. Otáčaním otočného regulátora q nastavte časový
údaj pre minúty.
6. Stlačte tlačidlo Štart/Rýchly štart q . Symbol
presýpacích hodín začne blikať. Zobrazí
sa čas spustenia. V nastavený čas začne mikrovlnná rúra pracovať so zvoleným programom
celkom automaticky. Pri spustení sa ozve zvukový
signál.
Upozornenie:
Ak chcete v pamäti uložený čas začiatku vymazať
a tým prerušiť v pamäti uložený postup, stlačte
tlačidlo Stop 0 . Symbol presýpacích hodín
zhasne a zobrazí sa údaj času.
- 98 -
 Loading...