

Page 1

OLLA MULTIFUNCIÓN 6 EN 1 SMUK 1500 A1
OLLA MULTIFUNCIÓN 6 EN 1
Instrucciones de uso
6-IN-1-MULTIKOCHER
Bedienungsanleitung
6-IN-1 COOKER
Operating instructions
IAN 90860
Page 2

Antes de empezar a leer abra la página que contiene las imágenes y, en seguida, familiarícese con todas
las funciones del dispositivo.
Before reading, unfold the page containing the illustrations and familiarise yourself with all functions of
the device.
Klappen Sie vor dem Lesen die Seite mit den Abbildungen aus und machen Sie sich anschließend mit allen
Funktionen des Gerätes vertraut.
ES Instrucciones de uso Página 1
GB / MT Operating instructions Page 21
DE / AT / CH Bedienungsanleitung Seite 41
Page 3
A
B
6 x
Page 4

Índice
Introducción . . . . . . . . . . . . . . . . . . . . . . . . . . . . . . . . . . . . . . . . . . . . . . . . . . . . . . . . . . 2
Uso previsto . . . . . . . . . . . . . . . . . . . . . . . . . . . . . . . . . . . . . . . . . . . . . . . . . . . . . . . . . . 2
Volumen de suministro . . . . . . . . . . . . . . . . . . . . . . . . . . . . . . . . . . . . . . . . . . . . . . . . . . 2
Descripción del aparato . . . . . . . . . . . . . . . . . . . . . . . . . . . . . . . . . . . . . . . . . . . . . . . . . 2
Características técnicas . . . . . . . . . . . . . . . . . . . . . . . . . . . . . . . . . . . . . . . . . . . . . . . . . 2
Indicaciones de seguridad . . . . . . . . . . . . . . . . . . . . . . . . . . . . . . . . . . . . . . . . . . . . . . . 3
Información sobre el aparato . . . . . . . . . . . . . . . . . . . . . . . . . . . . . . . . . . . . . . . . . . . . 5
Antes del primer uso . . . . . . . . . . . . . . . . . . . . . . . . . . . . . . . . . . . . . . . . . . . . . . . . . . . 5
Montaje y emplazamiento. . . . . . . . . . . . . . . . . . . . . . . . . . . . . . . . . . . . . . . . . . . . . . . 6
Manejo . . . . . . . . . . . . . . . . . . . . . . . . . . . . . . . . . . . . . . . . . . . . . . . . . . . . . . . . . . . . . . 7
Ajustes de temperatura . . . . . . . . . . . . . . . . . . . . . . . . . . . . . . . . . . . . . . . . . . . . . . . . . . . . . . . . . . . . . 7
Mantener caliente/rehogar/cocer/asar . . . . . . . . . . . . . . . . . . . . . . . . . . . . . . . . . . . . . . . . . . . . . . . 7
Fondue . . . . . . . . . . . . . . . . . . . . . . . . . . . . . . . . . . . . . . . . . . . . . . . . . . . . . . . . . . . . . . . . . . . . . . . . . 8
Cocer al vapor . . . . . . . . . . . . . . . . . . . . . . . . . . . . . . . . . . . . . . . . . . . . . . . . . . . . . . . . . . . . . . . . . . . 8
Saltear/asar . . . . . . . . . . . . . . . . . . . . . . . . . . . . . . . . . . . . . . . . . . . . . . . . . . . . . . . . . . . . . . . . . . . . . 9
Freír . . . . . . . . . . . . . . . . . . . . . . . . . . . . . . . . . . . . . . . . . . . . . . . . . . . . . . . . . . . . . . . . . . . . . . . . . . . . 9
Limpieza y mantenimiento . . . . . . . . . . . . . . . . . . . . . . . . . . . . . . . . . . . . . . . . . . . . . 10
Almacenamiento . . . . . . . . . . . . . . . . . . . . . . . . . . . . . . . . . . . . . . . . . . . . . . . . . . . . . . 10
Eliminación de fallos . . . . . . . . . . . . . . . . . . . . . . . . . . . . . . . . . . . . . . . . . . . . . . . . . . . 11
Garantía y asistencia técnica . . . . . . . . . . . . . . . . . . . . . . . . . . . . . . . . . . . . . . . . . . . . 12
Desecho . . . . . . . . . . . . . . . . . . . . . . . . . . . . . . . . . . . . . . . . . . . . . . . . . . . . . . . . . . . . . 12
Importador . . . . . . . . . . . . . . . . . . . . . . . . . . . . . . . . . . . . . . . . . . . . . . . . . . . . . . . . . . 12
Recetas . . . . . . . . . . . . . . . . . . . . . . . . . . . . . . . . . . . . . . . . . . . . . . . . . . . . . . . . . . . . . 13
ES
SMUK 1500 A1
1
Page 5

OLLA MULTIFUNCIÓN 6 EN 1
ES
SMUK 1500 A1
Introducción
Felicidades por la compra de su aparato nuevo.
Ha adquirido un producto de alta calidad. Las
instrucciones de uso forman parte del producto
y contienen indicaciones importantes acerca de
la seguridad, el uso y el desecho de este aparato.
Antes de usar el producto, familiarícese con todas
las indicaciones de manejo y de seguridad. Utilice
el producto únicamente como se describe y para
los ámbitos de aplicación indicados. Entregue todos los documentos cuando transfi era el producto
a terceros.
Uso previsto
Este aparato se ha diseñado exclusivamente para
la preparación de alimentos. Este aparato está
previsto exclusivamente para su uso doméstico
privado. No lo utilice con fi nes comerciales.
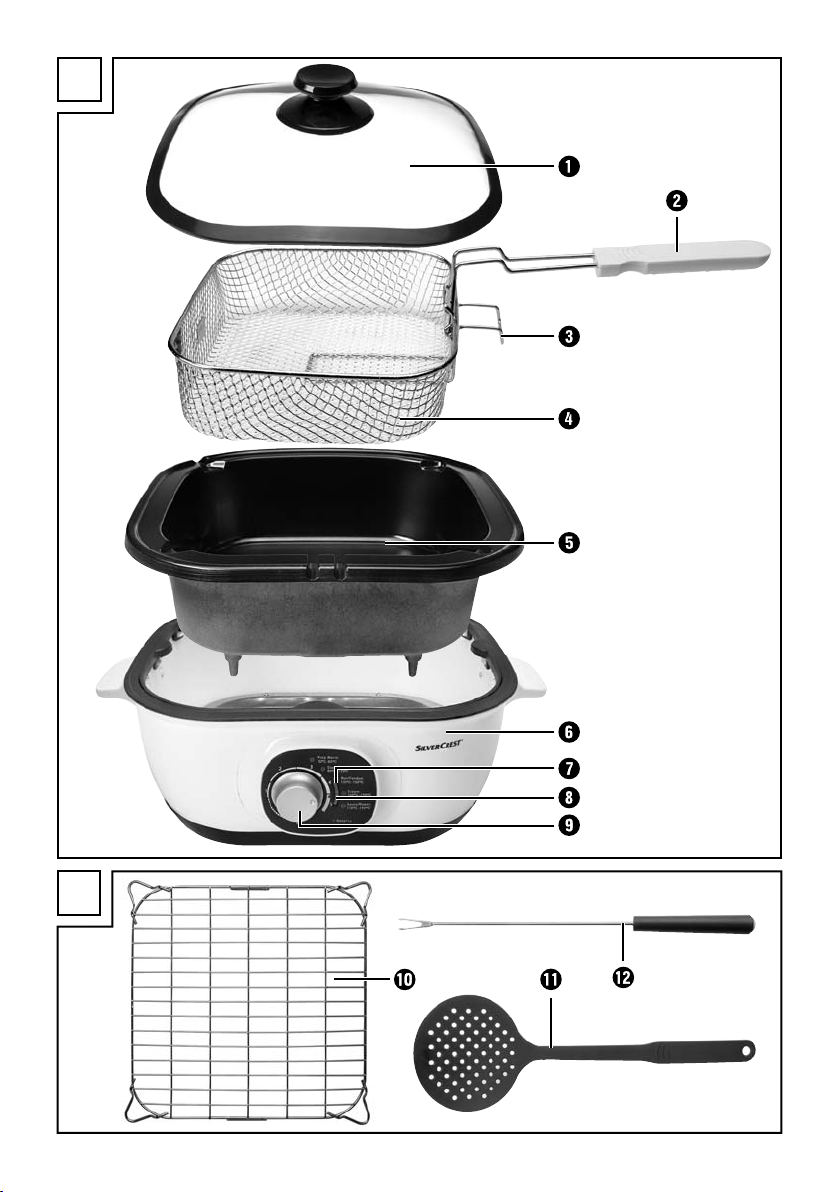
Volumen de suministro
Olla multifunción (base) con bandeja interna y tapa
Cesta de freidora
Rejilla de cocción al vapor
6 tenedores de fondue
Espumadera
Mango
Instrucciones de uso
Descripción del aparato
Figura A:
1 Tapa
2 Mango
3 Ganchos para la cesta de freidora
4 Cesta de freidora
5 Bandeja interna
6 Base
7 Piloto de control de funcionamiento
8 Piloto de control de calentamiento
9 Regulador de temperatura
Figura B:
0 Rejilla de cocción al vapor
q Espumadera
w Tenedores de fondue
Características técnicas
Tensión nominal: 220 - 240 V ~, 50 Hz
Máx. consumo de potencia: 1500 W
INDICACIÓN
Compruebe que el volumen de suministro esté
completo y que carezca de daños después de
desembalarlo. En caso necesario, póngase en
contacto con el servicio de asistencia técnica.
2
SMUK 1500 A1
Page 6

Indicaciones de seguridad
¡PELIGRO DE DESCARGA ELÉCTRICA!
► No utilice el aparato a la intemperie.
► Si la clavija de red o el cable de red están dañados, encomiende su sustitu-
ción al personal técnico autorizado o al servicio de asistencia técnica con
el fi n de evitar riesgos.
► No doble ni aplaste el cable de red. Mantenga el cable de red alejado de
fuentes de calor.
► No toque nunca la clavija ni el cable de red con las manos húmedas.
► Retire la bandeja 5 de la base 6 antes de limpiarla con agua.
No sumerja nunca el aparato en agua ni en otros líquidos.
¡ADVERTENCIA! ¡PELIGRO DE LESIONES!
► Los niños con edades comprendidas entre los 0 y los 8 años no deben
utilizar el aparato.
► Este aparato puede ser utilizado por niños a partir de 8 años siempre que
estén bajo supervisión constante.
► Este aparato puede ser utilizado por personas cuyas facultades físicas, sen-
soriales o mentales sean reducidas o carezcan de los conocimientos y de
la experiencia necesaria siempre que sean vigiladas o hayan sido instruidas correctamente sobre el uso seguro del aparato y hayan comprendido
los peligros que entraña.
ES
► Los niños no deben realizar las tareas de limpieza y mantenimiento.
► Los aparatos deben colocarse sobre una superfi cie estable y asirse por las
asas para evitar un derrame del líquido caliente.
► Los niños no deben jugar con el aparato.
► El aparato y el cable de conexión deben mantenerse fuera del alcance de
los niños menores de 8 años.
► No utilice prolongadores de cable, ya que, en caso de emergencia, debe
poder accederse rápidamente a la clavija de red.
SMUK 1500 A1
3
Page 7

ES
¡ADVERTENCIA! ¡PELIGRO DE LESIONES!
► Si el aparato se cae o está dañado, no debe seguir utilizándose. Enco-
miende la revisión del aparato y su reparación al personal especializado
cualifi cado.
► Al cocer, cocer al vapor, saltear o freír los alimentos se libera vapor caliente,
especialmente al abrir la tapa 1. Mantenga una distancia de seguridad
ante el vapor.
► Asegúrese de que todas las piezas estén completamente secas antes de
introducir aceite o grasa líquida en la freidora. De lo contrario, el aceite
o la grasa caliente salpicarán.
► Seque cuidadosamente todos los alimentos antes de introducirlos en la
cesta de freidora. De lo contrario, el aceite o la grasa caliente salpicarán.
► Utilice la bandeja interna 5 exclusivamente con la base
► Antes de poner en funcionamiento el aparato, asegúrese de que todas las
6
suministrada.
piezas estén totalmente secas. Seque todas las piezas adecuadamente
después de la limpieza.
► Proceda con especial cautela con los alimentos congelados. Elimine todos
los pedazos de hielo. Cuanto más hielo se encuentre todavía en el alimento,
más salpicará el aceite o la grasa caliente.
► Algunas partes del aparato se calientan durante su utilización. Evite su
contacto para evitar quemaduras.
► ¡No vierta nunca líquidos directamente en la base 6 del aparato! Coloque
siempre primero la bandeja interna 5.
¡ADVERTENCIA! ¡PELIGRO DE INCENDIO!
► No utilice el aparato en la proximidad de superfi cies calientes.
► No deje nunca el aparato desatendido durante su funcionamiento.
► No utilice ningún tipo de reloj programador externo ni un sistema de control
remoto aparte para accionar el aparato.
4
SMUK 1500 A1
Page 8

¡ATENCIÓN! ¡PELIGRO DE DAÑOS MATERIALES!
► No coloque el aparato cerca de llamas abiertas ni otras fuentes de calor
(calefacción, luz directa del sol, hornos de gas, etc.).
► No coloque nunca el aparato en un armario empotrado, en huecos, ni en
espacios similares.
► Al añadir líquidos, no supere nunca la marca MAX ni rellene por debajo
de la marca MIN del aparato. Antes de encender el aparato, asegúrese
de que se haya llenado con sufi ciente líquido.
► Si utiliza utensilios metálicos, puntiagudos o afi lados para extraer los ali-
mentos del aparato, proceda con cuidado. ¡Podrían dañar el revestimiento!
► ¡No corte los alimentos dentro de la bandeja interna 5! De lo contrario,
podría dañarse el revestimiento.
ES
Información sobre el aparato
Este aparato es multiusos. Con sus distintos accesorios y posibilidades de ajuste, pueden realizarse
las siguientes tareas:
– Mantener la comida caliente
– Hervir
– Rehogar
– Saltear/asar
– Cocer al vapor
– Freír
– Preparar una fondue
Antes del primer uso
■ Extraiga todas las piezas de la caja y deseche
el material de embalaje, las láminas protectoras
y los adhesivos.
■ Limpie todas las piezas tal y como se describe en
el capitulo "Limpieza y mantenimiento". Asegúrese
de que todas las piezas estén totalmente secas.
■ Inserte la bandeja interna 5 de forma que los
3 contactos de la parte inferior encajen en los
conectores de la base 6. Presione cuidadosa-
mente la bandeja interna 5 hacia abajo para
que quede totalmente encajada en la base 6.
■ Inserte la clavija de red en una base de enchufe.
Tras esto, se encienden el piloto de control de
funcionamiento 7 y el piloto de control de
calentamiento 8.
■ Ajuste el regulador de temperatura 9 en el
nivel 4 y espere 3 minutos. Vuelva a ajustar el
regulador de temperatura 9 en el nivel 0 y des-
enchufe la clavija de red. Deje que el aparato
se enfríe.
INDICACIÓN
Al calentar el aparato por primera vez, es
posible que se genere un poco de humo y olor
debido a los restos derivados de su fabricación.
Esto es perfectamente normal e inofensivo.
Procure que haya sufi ciente ventilación; por
ejemplo, abra una ventana.
SMUK 1500 A1
5
Page 9
Montaje y emplazamiento
ES
■ Coloque el aparato sobre una superfi cie termo-
rresistente, limpia y plana.
■ Inserte la bandeja interna 5 de forma que los
3 contactos de la parte inferior de la bandeja
interna 5 encajen en los conectores de la
base 6. Presione cuidadosamente la bandeja
interna 5 hacia abajo para que quede totalmente encajada en la base 6.
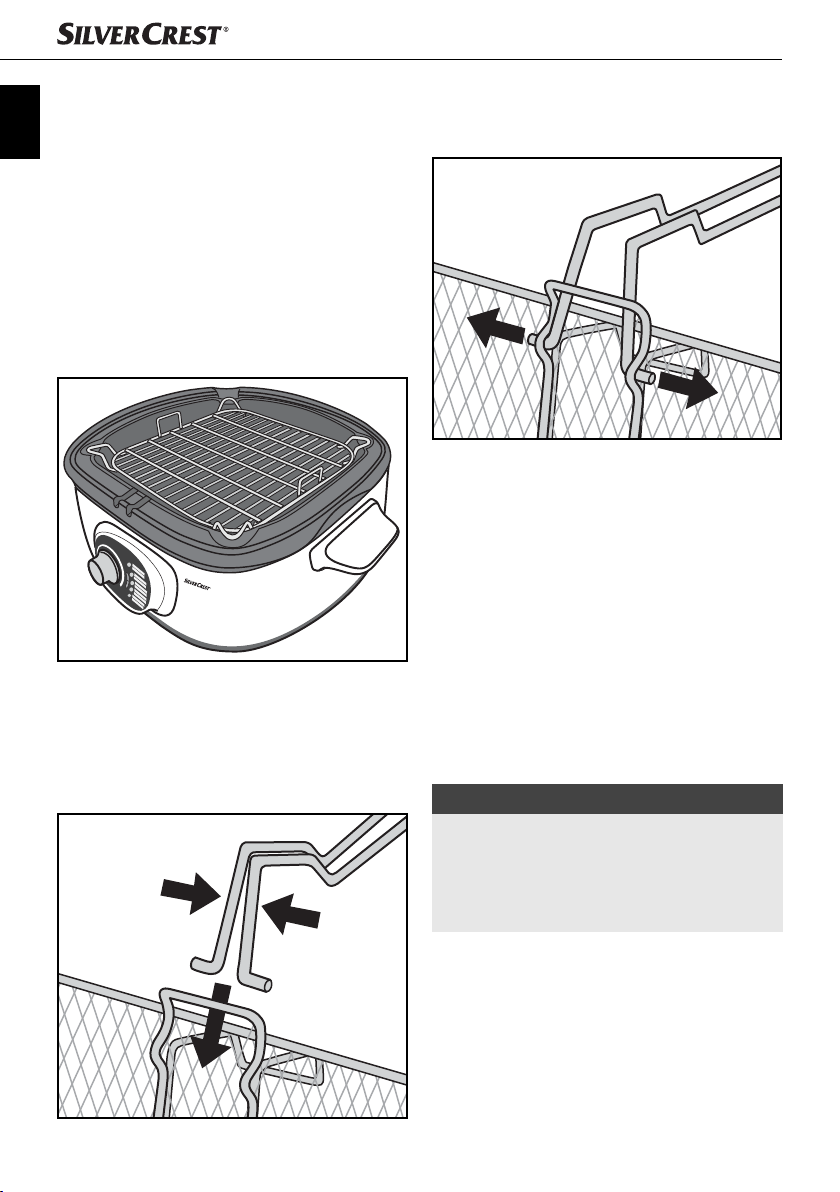
■ Para cocer al vapor, coloque la rejilla de cocción
al vapor 0 en la bandeja interna 5 de forma
que quede colgando de la bandeja interna 5:
■ Para freír, se necesitan la cesta de freidora 4
y el mango 2:
– Presione las barras del mango 2 para jun-
tarlas de forma que los salientes de soporte
puedan introducirse en los orifi cios de la
cesta de freidora 4 desde el interior:
– Tras esto, suelte las barras presionadas del
mango 2 de modo que los salientes de
soporte queden encajados en los orifi cios:
– El mango 2 queda fi jado en la cesta de
freidora 4.
■ Coloque la tapa 1 sobre la bandeja interna 5.
■ Inserte la clavija de red en una base de enchufe.
Tras esto, se enciende el piloto de control de
funcionamiento 7 y el aparato se calienta hasta
alcanzar el nivel de temperatura ajustado.
■ Una vez alcanzado el nivel de temperatura
ajustado, abra la tapa 1 y coloque cuidadosamente la cesta de freidora 4 en el fondo de
la bandeja interna 5. Las barras del mango 2
deben quedar insertadas en los orifi cios de la
bandeja interna 5.
■ Cierre la tapa 1.
INDICACIÓN
Puede colgar la cesta de freidora 4 con la tapa 1
abierta por medio del gancho 3 en el borde la
bandeja interna 5.
Esto resulta especialmente útil cuando el alimento
ya esté listo y deba escurrirse el aceite sobrante.
6
SMUK 1500 A1
Page 10

Manejo
Ajustes de temperatura
Nivel de
temperatura
1
2
3
4
5
Tipo de preparación
Mantener caliente
(aprox. 50 - 80 °C)
Cocinar lentamente (rehogar)
(aprox. 80 - 120 °C)
Hervir/fondue
(aprox. 120 - 150 °C)
Asar al vapor
(aprox. 150 - 170 °C)
Saltear/asar
(aprox. 170 - 190 °C)
Mantener caliente/rehogar/cocer/asar
Tras instalar el aparato de la forma descrita en el
capítulo "Montaje y emplazamiento":
1) Ajuste el regulador de temperatura 9 en el nivel
deseado (1, 2, 3 o 5). El piloto de control de calentamiento 8 se enciende en cuanto el aparato
alcanza el nivel de temperatura ajustado.
2) Introduzca el alimento en la bandeja interna 5.
3) Cierre la tapa 1.
4) Si desea desconectar el aparato, ajuste el
regulador de temperatura 9 en el nivel 0.
¡ATENCIÓN!
¡PELIGRO DE DAÑOS MATERIALES!
Utilice exclusivamente la espumadera q
►
suministrada u otro utensilio termorresistente
de plástico o de madera para extraer los alimentos del aparato. De lo contrario, puede
dañarse el revestimiento del accesorio de
forma que el aparato quede inutilizable.
5) Extraiga la clavija de red de la base de
enchufe.
ES
•
INDICACIÓN
Los valores de la tabla son solo orientativos.
►
El nivel de temperatura puede variar según el
tipo y la cantidad de los alimentos.
INDICACIÓN
El piloto de control de funcionamiento 7 se
►
enciende en cuanto la clavija de red está
conectada en la base de enchufe.
El piloto de control de calentamiento 8 se
enciende en cuanto el aparato alcanza el
nivel de temperatura ajustado.
No obstante, puede volver a encenderse y
apagarse, lo que signifi ca que la temperatura ajustada ha descendido un poco y el
aparato ha vuelto a calentarse.
Freír
(aprox. 170 °C)
SMUK 1500 A1
7
Page 11

Fondue
Tras instalar el aparato de la forma descrita en el
ES
capítulo "Montaje y emplazamiento":
1) Añada aceite u otra grasa adecuada para
la fondue en la bandeja interna 5. Vierta
aceite/grasa en la bandeja interna 5 hasta
alcanzar la marca MAX. ¡Pero sin superar
nunca la marca MAX!
2) Cierre la tapa 1.
3) Ajuste el regulador de temperatura 9 en el nivel
3. El piloto de control de calentamiento 8 se
enciende en cuanto se alcanza la temperatura
ajustada.
4) Retire la tapa 1.
5) Pinche pequeños trozos de carne con los tenedores de fondue w y colóquelos cuidadosamente en la grasa caliente.
6) Los trozos de carne estarán listos en pocos
minutos. Sáquelos de la grasa.
7) Si no desea seguir utilizando la fondue, gire el
regulador de temperatura hasta ajustarlo en el
nivel 0 y extraiga la clavija de red de la base
de enchufe.
INDICACIÓN
Tras enfriarse, vierta el aceite o la grasa so-
►
brante (la grasa debe seguir en estado líquido) en un recipiente adecuado; por ejemplo,
un frasco. Para ello, utilice el surco situado en
la esquina de la bandeja interna 5.
► En cada municipio o ciudad, el desecho de
aceites y grasas de cocina está regulado
de diferente manera. Generalmente, no
suele permitirse el desecho de este tipo de
aceites o grasas con la basura doméstica
normal. Infórmese sobre las posibilidades de
desecho en la administración de su ciudad o
localidad.
Cocer al vapor
Tras instalar el aparato de la forma descrita en el
capítulo "Montaje y emplazamiento":
1) Vierta aprox. 1 litro de agua en la bandeja
interna 5. 1 litro de agua es sufi ciente para
aprox. 30 minutos de cocción al vapor. Si desea
cocinar al vapor durante más tiempo, vierta
más agua. El aparato solo puede llenarse
hasta un máximo de 2,5 litros de agua. De
lo contrario, puede suceder que el agua en
ebullición moje los alimentos.
INDICACIÓN
¡Las marcas MIN y MAX de la bandeja
►
interna 5 solo son relevantes para el llena-
do con grasa/aceite! No deben tenerse en
cuenta para el llenado con agua.
► La cantidad de agua depende de la duración
deseada para la cocción con vapor. Cuanto
más tiempo necesite el alimento, más agua
debe usarse.
► Cuanto más se levante la tapa 1 durante la
cocción, más durará el tiempo de cocción.
Cada vez que se levanta la tapa, se escapa
el vapor caliente.
Si levanta mucho la tapa, es posible que necesite más agua, ya que, cada vez que lo hace,
se escapa una parte del vapor de agua.
► Si se evapora el agua durante el proceso de
cocción al vapor, levante cuidadosamente
la tapa 1 y llene el aparato con más agua.
Para ello, procure que el agua no moje los
alimentos cuando rellene el aparato. Una vez
rellenado el aparato, el agua tarda un poco
en calentarse y volver a generar vapor.
2) Cuelgue la rejilla de cocción al vapor 0 en
la bandeja interna 5 de la manera descrita
en el capítulo "Montaje y emplazamiento".
3) Ajuste el regulador de temperatura 9 en el
nivel 4.
4) Espere hasta que se forme el vapor.
5) Coloque los alimentos sobre la rejilla de cocción
al vapor 0.
6) Cierre la tapa 1.
8
SMUK 1500 A1
Page 12

7) Cuando la comida esté lista, utilice unas
pinzas o un instrumento similar para extraer los
alimentos de la rejilla de cocción al vapor 0.
¡ADVERTENCIA!
¡PELIGRO DE LESIONES!
► ¡La rejilla de cocción al vapor 0 está muy
caliente! Maneje cuidadosamente la rejilla
de cocción al vapor 0.
8) Ajuste el regulador de temperatura en la
posición 0.
9) Extraiga la clavija de red de la base de enchufe.
INDICACIÓN
Una vez el aparato y el agua sobrante estén
►
fríos, extraiga el agua a través del surco situado en la esquina de la bandeja interna 5.
Saltear/asar
Tras instalar el aparato de la forma descrita en el
capítulo "Montaje y emplazamiento":
1) Vierta un poco de aceite en la bandeja
interna 5.
2) Ajuste el regulador de temperatura 9 en el
nivel 5. El piloto de control de calentamiento 8
se enciende en cuanto se alcanza la temperatura ajustada.
3) Introduzca el alimento en la bandeja interna 5.
4) Dé la vuelta a los alimentos de vez en cuando
y extráigalos cuando estén listos.
¡ATENCIÓN!
¡PELIGRO DE DAÑOS MATERIALES!
Utilice exclusivamente la espumadera q
►
suministrada u otro utensilio termorresistente
de plástico o de madera para extraer los
alimentos de la bandeja interna 5. De lo
contrario, puede dañarse el revestimiento
de la bandeja interna 5 de forma que el
aparato quede inutilizable.
5) Una vez extraídos los alimentos, gire el regulador de temperatura 9 hasta la posición 0.
6) Extraiga la clavija de red de la base de
enchufe.
Freír
Tras instalar el aparato de la forma descrita en el
capítulo "Montaje y emplazamiento":
1) Añada aceite u otra grasa adecuada para frituras en la bandeja interna 5. Vierta aceite/
grasa en la bandeja interna 5 hasta alcanzar
la marca MAX. ¡Pero sin superar nunca la
marca MAX!
2) Cierre la tapa 1.
3) Ajuste el regulador de temperatura 9 en el
. El nivel • se encuentra entre los nú-
nivel
•
meros 4 y 5 en el regulador de temperatura 9.
El piloto de control de calentamiento 8
se enciende en cuanto el aparato alcanza el
nivel de temperatura ajustado.
4) Introduzca los alimentos que desee freír en la
cesta de freidora 4. Para ello, asegúrese de
que los alimentos contengan la menor cantidad
de agua o de hielo posible. No supere nunca
la marca MAX de la cesta de freidora 4. De lo
contrario, los alimentos no se fríen bien, ya que
la grasa caliente no los envuelve.
5) Retire la tapa 1 e introduzca la cesta de freidora 4 cuidadosamente en la grasa caliente.
Las barras del mango 2 deben quedar insertadas en los orifi cios de la bandeja interna 5.
6) Coloque la tapa 1.
INDICACIÓN
► ¡El mango 2 debe seguir montado en la
cesta de freidora 4 durante la fritura!
¡ADVERTENCIA!
¡PELIGRO DE LESIONES!
► La grasa puede saltar y causar quemaduras
si entra en contacto con alimentos húmedos.
Proceda cuidadosamente con la grasa
caliente.
7) Cuando los alimentos estén bien fritos, retire
la tapa 1 y eleve la cesta de freidora 4 para
sacarla de la grasa. Utilice el gancho 3 para
colgarla del borde de la bandeja interna 5.
De esta manera, puede escurrirse la grasa
sobrante.
ES
SMUK 1500 A1
9
Page 13

8) Si no desea seguir utilizando la freidora, gire
ES
el regulador de temperatura hasta ajustarlo
en el nivel 0 y extraiga la clavija de red de la
base de enchufe.
INDICACIONES
Tras enfriarse, vierta el aceite o la grasa so-
►
brante (la grasa debe seguir en estado líquido) en un recipiente adecuado; por ejemplo,
un frasco. Para ello, utilice el surco situado en
la esquina de la bandeja interna 5.
► En cada municipio o ciudad, el desecho de
aceites y grasas de cocina está regulado de
diferente manera. Generalmente, no suele
permitirse el desecho de este tipo de aceites o
grasas con la basura doméstica normal. Infórmese sobre las posibilidades de desecho en la
administración de su ciudad o localidad.
INDICACIÓN
También pueden freírse alimentos sin la cesta
►
de freidora 4. Para ello, basta con introducir los alimentos en la grasa caliente de la
bandeja interna 5. Utilice la espumadera q
para extraer los alimentos fritos de la bandeja
interna 5.
Limpieza y mantenimiento
¡PELIGRO DE DESCARGA ELÉCTRICA!
¡Antes de limpiar el aparato, extraiga siem-
►
pre la clavija de red de la base de enchufe!
¡Existe riesgo de descarga eléctrica!
¡No sumerja nunca la base 6 en agua ni
en otros líquidos!
¡ADVERTENCIA!
¡PELIGRO DE LESIONES!
► Deje que el aparato se enfríe antes de lim-
piarlo. De lo contrario, existe peligro de
quemaduras.
¡ATENCIÓN!
¡PELIGRO DE DAÑOS MATERIALES!
No utilice productos de limpieza abrasi-
►
vos ni agresivos, ya que podrían dañar la
superfi cie.
■ Limpie la base 6 con un paño húmedo.
En caso de suciedad persistente, añada un
producto de limpieza suave al paño.
Asegúrese de que la base 6 esté totalmente
seca antes de utilizarla.
■ Limpie la bandeja interna 5, los tenedores
de fondue w, la espumadera q, la cesta de
freidora 4, la rejilla de cocción al vapor 0,
la tapa 1 y el mango 2 con agua caliente.
Añada un producto de limpieza suave.
Enjuague todas las piezas con agua limpia.
Tras el aclarado, seque todas las piezas concienzudamente con un paño seco.
Asegúrese de que todas las piezas estén secas
antes de volver a utilizar el aparato.
INDICACIÓN
También pueden limpiarse la cesta de
►
freidora 4, la tapa 1, la espumadera q y
los tenedores de fondue w en el lavavajillas.
No obstante, asegúrese de que todo esté
bien seco antes de volver a montar y utilizar
el aparato.
10
Almacenamiento
■ Guarde el aparato limpio en un lugar limpio,
seco y sin polvo.
SMUK 1500 A1
Page 14

Eliminación de fallos
Error Causa Solución
ES
La clavija de red no está conectada a la
red eléctrica.
El aparato no
funciona.
El alimento no se
calienta.
No se genera vapor
durante el proceso
de cocción.
El piloto de control
de calentamiento 8
vuelve a encenderse
y apagarse.
Si no logra solucionar los fallos siguiendo las instrucciones de eliminación de fallos mencionadas o
comprueba la existencia de otras anomalías, póngase en contacto con nuestro servicio de asistencia
técnica.
La base de enchufe está defectuosa.
El aparato está defectuoso.
Se ha ajustado un nivel de temperatura
inadecuado.
Se ha ajustado un nivel de temperatura
inadecuado.
El agua se ha evaporado. Vierta más agua.
No hay ninguna avería. El aparato
mantiene el nivel de temperatura ajustado.
Por este motivo, es necesario que vuelva
a calentarse brevemente de cuando en
cuando.
Inserte la clavija de red en una
base de enchufe.
Utilice una base de enchufe
distinta.
Póngase en contacto con el
servicio postventa.
Seleccione un nivel
de temperatura superior.
Seleccione el nivel
de temperatura adecuado.
No hay ninguna avería.
SMUK 1500 A1
11
Page 15

Garantía y asistencia técnica
ES
Este aparato tiene 3 años de garantía desde la
fecha de compra. El aparato ha sido fabricado
cuidadosamente y examinado en profundidad
antes de su entrega. Guarde el comprobante de
caja como justifi cante de compra. Si necesitara
hacer uso de la garantía, póngase en contacto
por teléfono con su punto de servicio habitual.
Este es el único modo de garantizar un envío
gratuito.
La garantía cubre los defectos de fabricación o
del material, pero no los daños de transporte, las
piezas sujetas a desgaste ni los daños sufridos por
las piezas frágiles (p. ej., interruptores o pilas). Este
producto ha sido diseñado exclusivamente para el
uso particular y no para el uso industrial.
En caso de manipulación indebida e incorrecta,
uso de la fuerza y apertura del aparato por personas ajenas a nuestros centros de asistencia técnica
autorizados, la garantía pierde su validez.
Sus derechos legales no se ven limitados por esta
garantía.
La duración de la garantía no se prolonga por
hacer uso de ella. Este principio rige también para
las piezas sustituidas y reparadas. Si después de
la compra del aparato, se detecta la existencia
de daños o de defectos al desembalarlo, deben
notifi carse de inmediato o, como muy tarde, dos
días después de la fecha de compra. Cualquier
reparación que se realice una vez fi nalizado el
plazo de garantía está sujeta a costes.
Servicio España
Tel.: 902 59 99 22
(0,08 EUR/Min. + 0,11 EUR/llamada
(tarifa normal))
(0,05 EUR/Min. + 0,11 EUR/llamada
(tarifa reducida))
E-Mail: kompernass@lidl.es
IAN 90860
Desecho
No deseche nunca el aparato
con la basura doméstica. Este
aparato está sujeto a la Directiva europea 2012/19/EU.
Deseche el aparato en un centro de residuos autorizado a través de las instalaciones de desecho
de residuos comunitarias. Observe las normas
vigentes. En caso de duda, póngase en contacto
con las instalaciones municipales de desecho de
residuos.
El embalaje consta de materiales ecoló-
gicos que pueden desecharse a través
de los centros de reciclaje locales.
Importador
KOMPERNASS HANDELS GMBH
BURGSTRASSE 21
44867 BOCHUM
GERMANY
www.kompernass.com
Disponibilidad de la línea de atención al
cliente:
de lunes a viernes de 8.00 a 20.00 h (CET)
12
SMUK 1500 A1
Page 16

Recetas
INDICACIÓN
Recetas sin garantía. Todas las indicaciones
►
de ingredientes y de preparación son valores
orientativos. Complete estas recetas recomendadas con su experiencia personal.
Fondue de chocolate
♦ 150 g de chocolate con leche de cobertura
♦ 150 g de chocolate amargo de cobertura
♦ 300 ml de leche evaporada
1) Coloque el chocolate y la leche evaporada
en la bandeja interna 5.
2) Ajuste el regulador de temperatura 9 en el
nivel 2.
3) Remueva la mezcla durante el calentamiento
hasta que se genere una crema de chocolate
untuosa.
4) Ajuste el regulador de temperatura 9 en el
nivel 1.
Une la fruta, los frutos secos o los malvaviscos en
la crema de chocolate.
Salsa de queso para untar
♦ 120 g de queso para fundir
♦ 240 ml de salsa (en envase/frasco)
♦ 1 pimiento verde
♦ Pimienta, sal, cayena molida
1) Limpie y extraiga las pepitas del pimiento.
Córtelo en trozos pequeños.
2) Añada todos los ingredientes en la bandeja
interna 5 y cierre la tapa 1.
3) Ajuste el regulador de temperatura 9 en el
nivel 2.
4) Cocine todo durante aprox. 20-25 minutos
para que el queso se derrita y remueva de vez
en cuando la mezcla de queso.
5) Condimente la mezcla.
6) Tras esto, ajuste el regulador de temperatura 9
en el nivel 1 y sirva la salsa caliente directamente desde el aparato.
Unte patatas, nachos o trozos de pan en la salsa.
Gachas de avena
♦ 250 g de copos de avena
♦ 600 ml de leche
♦ 1 paquetito de azúcar de vainilla
1) Añada todos los ingredientes en la bandeja
interna 5 y cierre la tapa 1.
2) Ajuste el regulador de temperatura 9 en el
nivel 2.
3) Cocine todo durante 12-15 minutos y remueva
las gachas de vez en cuando.
Gambas con salsa de nata
♦ Aprox. 1000 g de gambas crudas
y grandes (limpias)
♦ 2 dientes de ajo grandes (picados)
♦ 150 ml de nata
♦ 100 g de mantequilla
♦ 2 cucharadas soperas de jerez o vino blanco
♦ Sal, pimienta, cayena molida
♦ En caso necesario, 3 cucharaditas
de espesante para salsas
1) Ajuste el regulador de temperatura 9 en el
nivel 3.
2) Introduzca la mantequilla y el ajo picado en la
bandeja interna 5 y espere a que la mantequilla se derrita.
3) Añada las gambas.
4) Cuando las gambas estén rosadas, añada
el jerez o el vino blanco y cocínelas durante
1minuto.
5) Tras esto, vierta la nata, deje que reduzca
brevemente y condimente con la sal, la cayena
molida y la pimienta.
6) Si la salsa de nata es demasiado líquida, puede añadir un poco de espesante para salsas.
ES
SMUK 1500 A1
13
Page 17

Crema de sémola
ES
♦ 80 g de sémola de trigo duro
♦ 500 ml de leche
♦ 100 ml de nata
♦ 2 paquetitos de azúcar de vainilla
1) Añada todos los ingredientes en la bandeja
interna 5 y cierre la tapa 1.
2) Ajuste el regulador de temperatura 9 en el
nivel 2.
3) Cocine todos los ingredientes durante
aprox. 10 minutos y remueva constantemente.
INDICACIÓN
Si prefi ere que la crema esté un poco más
►
líquida, añada más leche y deje que se
cocine durante un rato más.
Langostinos al ajillo
♦ Aprox. 10 langostinos crudos (limpios)
♦ 1 diente de ajo (picado)
♦ Un poco de aceite de oliva
1) Vierta el aceite de oliva en la bandeja
interna 5.
2) Ajuste el regulador de temperatura 9 en el
nivel 2 - 3.
3) Cuando se caliente el aparato, añada el ajo
picado y los langostinos.
4) Dé la vuelta a los langostinos de vez en cuando
hasta que estén en su punto.
Se recomienda acompañar los langostinos con un
trozo de pan.
Huevos revueltos con espinacas
♦ 350 g de hojas de espinaca
♦ 1/4 de taza de cebolla picada
♦ 2 cucharadas soperas de aceite de oliva
♦ 200 ml de nata
♦ 5 huevos
♦ Sal y pimienta
1) Ajuste el regulador de temperatura 9 en el
nivel 3.
2) Pique bien las espinacas.
3) Vierta un poco de aceite de oliva en la bandeja
interna 5 y rehogue la cebolla hasta que
quede pochada.
4) Añada las espinacas, remueva todo, vierta
lentamente la nata y deje que se cocine durante
aprox. 5–7 minutos sin dejar de remover. Tras
esto, las espinacas deben estar blandas.
5) Bata los huevos hasta que queden espumosos
y añádalos sin dejar de remover.
6) Siga removiendo hasta que cuajen los huevos
(aprox. 4–5 minutos).
7) Condimente todo con sal y pimienta.
Compota de manzana con amaretto
♦ 5 manzanas
♦ 10 cucharadas soperas de amaretto
♦ 2 cucharadas soperas de azúcar
♦ 1 cucharadita de canela
♦ 1 paquetito de azúcar de vainilla
1) Pele y descorazone las manzanas.
2) Corte las manzanas en trozos pequeños.
3) Ajuste el regulador de temperatura 9 en el
nivel 3.
4) Añada los trozos de manzana y el resto de los
ingredientes en la bandeja interna 5 y cierre
la tapa 1.
5) Remueva la mezcla de vez en cuando.
6) Espere unos 40-50 minutos. Cuando los trozos
de manzana aún no se hayan deshecho,
aplástelos con un utensilio adecuado de forma
que quede una consistencia de compota.
14
SMUK 1500 A1
Page 18

Ensalada de espárragos y alcachofas
♦ 2 manojos de espárragos
♦ 1 bote de corazones de alcachofa de aprox.
450 ml con agua
♦ 3 pimientos
♦ 3 cebollas
♦ Vinagre balsámico
1) Ajuste el regulador de temperatura 9 en el
nivel 4.
2) Vierta agua para cocer al vapor en la bandeja
interna 5.
3) Coloque la rejilla de cocción al vapor 0 en
la bandeja interna 5 y añada los espárragos
pelados.
4) Cierre la tapa 1.
5) Según el grosor de los espárragos, estarán
listos tras unos 10 - 20 minutos.
6) Escurra los corazones de alcachofa y córtelos
en 4 trozos.
7) Pique los pimientos y las cebollas.
8) Corte los espárragos en trozos pequeños y
deje que se enfríen.
9) Mézclelo todo en un bol y añada un poco
de vinagre balsámico.
Salsa picante para untar
♦ 1 vaina de chile
♦ 1/2 pimiento
♦ 1 diente de ajo
♦ 1 vaso de salsa de tomate (aprox. 250 g)
♦ 1 cucharada sopera de aceite
♦ 1/2 cucharadita de cayena molida
♦ 1 pizca de pimentón picante
♦ 1/2 cucharadita de pimienta molida en frag-
mentos grandes
1) Pele el ajo y córtelo en rodajas.
2) Vierta el aceite en la bandeja interna 5 y
ajuste el regulador de temperatura 9 en el
nivel 4.
3) Rehogue brevemente el ajo.
4) Quite las semillas de la vaina de chile y del
pimiento y córtelos en tiras fi nas.
5) Añada el chile y el pimiento en la bandeja
interna 5 y rehóguelos brevemente.
6) Añada la salsa de tomate y deje que se reduzca
la mezcla.
7) Condimente la mezcla.
Unte patatas, nachos o trozos de pan en la salsa.
ES
SMUK 1500 A1
15
Page 19

Guiso de salmón al vapor
ES
♦ Aprox. 500 g de fi letes de salmón
♦ Aprox. 470 g de arroz
♦ 400 ml de agua
♦ 400 ml de caldo de pollo
♦ 225 g de guisantes (congelados)
♦ 1/4 de taza de escamas de almendras
♦ Un poco de mantequilla
1) Añada el caldo de pollo, el agua, el arroz, las
escamas de almendras y los guisantes en la
bandeja interna 5.
2) Cierre la tapa 1.
3) Ajuste el regulador de temperatura 9 en el
nivel 3 y espere 5 minutos.
4) Abra la tapa 1, coloque la rejilla de cocción
al vapor 0 en la bandeja interna 5 y coloque
los fi letes de salmón sobre la rejilla. Si utiliza
fi letes de salmón congelados, descongélelos primero. Coloque un trocito de mantequilla sobre
cada fi lete de salmón.
5) Cierre la tapa 1 y cocínelo todo durante
aprox. 10 minutos en el nivel 3.
INDICACIÓN
En función de los gustos personales, el tiempo
►
de cocción del arroz puede variar:
Si le gusta el arroz muy blando, aumente un
poco el tiempo de cocción. Para ello, añada
algo más de agua para evitar que se queme
la base de la bandeja interna 5.
Si prefi ere el arroz más duro, puede reducir
algo el tiempo de cocción. Reduzca también
la cantidad de agua, de lo contrario, quedará
líquido en la bandeja interna 5.
6) Tras esto, ajuste el regulador de temperatura 9
en el nivel 2 y espere 5 minutos.
7) A continuación, ajuste el regulador de temperatura 9 en el nivel "0" y apague el aparato.
8) Abra la tapa 1, retire con cuidado los fi letes
de salmón de la rejilla de cocción al vapor 0
y extráigala. Remueva una vez el arroz y deje
que repose durante aprox. 5 minutos con la
tapa cerrada.
9) Tras esto, podrá servir el salmón con el arroz.
Patatas panadera
♦ 5 patatas
♦ 2 cebollas
♦ Sal y pimienta
♦ Aceite de oliva
1) Pele las patatas y córtelas en rodajas fi nas.
2) Pele las cebollas y córtelas en dados.
3) Vierta el aceite de oliva en la bandeja
interna 5 hasta formar una fi na capa.
4) Ajuste el regulador de temperatura 9 en el
nivel 5 y espere a que el aparato se caliente.
5) Añada las rodajas de patata y las cebollas
y dórelas. Dé la vuelta a las patatas de vez
en cuando.
6) Salpimente las patatas panadera.
Costillas a la barbacoa
♦ 1500-2500 g de costillas (costillas de cerdo)
♦ 1 bote de salsa barbacoa
♦ 1 sobre de sopa de cebolla
♦ 1 cebolla mediana
♦ 100 ml de salsa de tomate
♦ 1 taza y 1/2 de agua
♦ 2 patatas
1) Corte las costillas y quite la grasa.
2) Pele las patatas y las cebollas y córtelas en
dados.
16
SMUK 1500 A1
Page 20

3) Ajuste el regulador de temperatura 9 en el
nivel 4 y espere a que el aparato se caliente.
4) Mezcle la sopa de cebolla con agua.
5) Añada las cebollas, la salsa barbacoa y la
sopa de cebolla en la bandeja interna 5
y remuévalo todo.
6) Añada ahora las costillas y las patatas.
7) Rehogue todos los ingredientes durante aprox.
1–1,5 horas (según el grosor de las costillas).
8) Tras esto, ajuste el regulador de temperatura 9
en el nivel 2 y deje que los alimentos se cocinen
durante aprox. 2 horas.
Sándwiches
♦ 2 rebanadas de pan de molde (o pan de
hamburguesa)
♦ Corned beef (ternera en lata)
♦ Queso (por ejemplo, cheddar)
♦ Chucrut escurrido
♦ Mayonesa/salsa remoulade
♦ Mantequilla
1) Ajuste el regulador de temperatura 9 en el
nivel 5 y espere a que el aparato se caliente.
2) Unte las rebanadas de pan con mantequilla y
tuéstelas en la bandeja interna 5.
3) Extraiga las tostadas de la bandeja interna 5
y rellénelas con el corned beef, el chucrut, la
mayonesa/salsa remoulade y el queso.
4) Cuelgue la rejilla de cocción al vapor 0 en
el aparato.
5) Coloque las tostadas con todos los ingredientes
sobre la rejilla de cocción al vapor 0 y cierre
la tapa 1.
6) Espere hasta que el queso se funda.
Chili con carne
♦ 800 g de carne picada
(mitad ternera y mitad cerdo)
♦ 2 cebollas
♦ 2 latas de tomate cortado en trozos
(aprox. 800 ml)
♦ 2 pimientos
♦ 1 cucharada sopera de cayena molida
♦ 5 vainas de chile
♦ 1 cucharadita de comino molido
♦ 1 lata de alubias rojas
♦ 1 lata de maíz
1) Ajuste el regulador de temperatura 9 en el
nivel 5 y espere a que el aparato se caliente.
2) Añada la carne picada en la bandeja
interna 5 y saltéela.
3) Limpie los pimientos y las vainas de chile,
quite las pepitas y píquelos.
4) Corte las cebollas en trozos pequeños.
5) Escurra las alubias y el maíz. Limpie las
alubias y el maíz con agua limpia.
6) Coloque todos los ingredientes en la bandeja
interna 5.
7) Ajuste el regulador de temperatura 9 en
el nivel 2-3.
8) Cierre la tapa 1 y deje que los ingredientes
se cocinen durante aprox. 2-3 horas hasta que
las alubias estén blandas.
ES
SMUK 1500 A1
17
Page 21

Pavo con arándanos rojos
ES
♦ Aprox. 660 g de pechuga de pavo
♦ Aprox. 500 ml de caldo (caldo de pavo)
♦ 375 g de arándanos rojos
1) Quite la piel de la pechuga de pavo.
2) Ajuste el regulador de temperatura 9 en el
nivel 5 y espere a que el aparato se caliente.
3) Cocine la carne por los dos lados.
4) Añada el resto de los ingredientes y cierre la
tapa 1.
5) Ajuste el regulador de temperatura 9 en el
nivel 3.
6) Cocine la carne durante 3 horas.
7) Para servir, corte la carne en tiras y vierta la
salsa sobre esta.
Carne guisada
♦ Aprox. 1350 g de ternera sin huesos
♦ 1 sobre de sopa de cebolla
♦ 300 ml de agua
♦ Aprox. 800 ml de tomates pelados (lata)
♦ 2 zanahorias grandes
♦ 3 patatas
♦ Sal y pimienta
1) Ajuste el regulador de temperatura 9 en el
nivel 5 y espere a que el aparato se caliente.
2) Dore la carne en la bandeja interna 5.
3) Mezcle la sopa de cebolla con agua.
4) Vierta la sopa de cebolla y el tomate sobre la
carne en la bandeja interna 5.
5) Deje que todo hierva y, tras esto, ajuste el
regulador de temperatura 9 en el nivel 3.
6) Cierre la tapa 1 y cocínelo todo durante
aprox. 1 hora y 1/2. Dé la vuelta a la carne
de vez en cuando.
INDICACIÓN
Si se evapora el líquido de la bandeja
►
interna 5 añada un poco de agua.
7) Pele las zanahorias y las patatas y córtelas en
tiras.
8) Una vez transcurrida la hora y media especifi cada, añada las patatas y las zanahorias y
deje que se cocinen durante otros 40 minutos
hasta que la carne y las verduras estén blandas.
18
SMUK 1500 A1
Page 22

Aros de cebolla
♦ 3 cebollas amarillas grandes
♦ 2 tazas de cerveza (a temperatura ambiente)
♦ 1 taza y 1/2 de harina
♦ Sal y pimienta
♦ Aceite para freír
1) Mezcle la harina y la cerveza en un bol,
cúbralo y déjelo reposar durante 3 horas a
temperatura ambiente.
2) Llene la bandeja interna 5 con un aceite
adecuado para frituras y ajuste el regulador
de temperatura 9 en el nivel
que el aparato se caliente.
3) Corte las cebollas en rodajas de aprox.
1/2 cm de ancho y separe los aros.
4) Sumerja los aros de cebolla en la masa de
harina y cerveza e introdúzcalos cuidadosamente en la grasa caliente. Para ello, utilice
pinzas termorresistentes.
INDICACIÓN
No utilice la cesta de freidora 4 para
►
introducir los aros de cebolla en la grasa. El
rebozado se pega en la cesta y se rompe al
extraer los aros de cebolla.
5) Fría los aros de cebolla durante aprox. 2 minutos. Dé la vuelta a los aros de cebolla para
que se doren por ambos lados.
. Espere hasta
•
Filete de pollo
♦ Filete de pollo
♦ 3 tazas de harina
♦ 2 cucharadas soperas de pimentón (molido)
♦ 2 huevos
♦ 1 taza de leche
♦ Sal y pimienta
♦ Aceite para freír
1) Bata los huevos, la leche y los condimentos.
2) Llene la bandeja interna 5 con un aceite ade-
cuado para frituras y ajuste el regulador de
temperatura 9 en el nivel
que el aparato se caliente.
3) Reboce el fi lete de pollo en la harina, después
en el huevo y, tras esto, otra vez en la harina.
4) Introduzca el fi lete de pollo rebozado en la
cesta de freidora 4 y, seguidamente, la cesta
de freidora 4 en el aceite caliente y fría el
fi lete de pollo durante aprox. 3-5 minutos.
5) Tras esto, vuelva a ajustar el regulador de temperatura 9 en el nivel 4 y deje que el fi lete
de pollo se cocine en la grasa durante aprox.
18-20 minutos con la tapa 1 cerrada. Dé la
vuelta al fi lete de pollo de vez en cuando.
6) Una vez transcurridos los 20 minutos, vuelva
a ajustar el regulador de temperatura 9 en el
y espere 4-5 minutos.
nivel
•
7) Extraiga cuidadosamente el fi lete de pollo del
aceite caliente y deje que escurra.
. Espere hasta
•
ES
SMUK 1500 A1
19
Page 23

Patatas fritas
ES
♦ Aprox. 4 patatas
♦ Sal
♦ Aceite para freír
1) Pele las patatas.
2) Corte las patatas en pequeños bastones (forma
de patatas fritas).
3) Llene la bandeja interna 5 con un aceite
adecuado para frituras y ajuste el regulador
de temperatura 9 en el nivel
hasta que el aparato se caliente.
4) Introduzca las patatas fritas en la cesta de
freidora 4.
5) Sumerja la cesta de freidora 4 cuidadosamente en el aceite caliente y fría las patatas
durante aprox. 25 – 30 minutos.
6) Eleve la cesta de freidora 4 cuidadosamente
para extraerla del aceite caliente y cuélguela
del borde para escurrir el aceite sobrante.
•
. Espere
20
SMUK 1500 A1
Page 24

Contents
Introduction . . . . . . . . . . . . . . . . . . . . . . . . . . . . . . . . . . . . . . . . . . . . . . . . . . . . . . . . . . 22
Intended use . . . . . . . . . . . . . . . . . . . . . . . . . . . . . . . . . . . . . . . . . . . . . . . . . . . . . . . . . 22
Package contents . . . . . . . . . . . . . . . . . . . . . . . . . . . . . . . . . . . . . . . . . . . . . . . . . . . . . 22
Appliance description . . . . . . . . . . . . . . . . . . . . . . . . . . . . . . . . . . . . . . . . . . . . . . . . . . 22
Technical data . . . . . . . . . . . . . . . . . . . . . . . . . . . . . . . . . . . . . . . . . . . . . . . . . . . . . . . . 22
Safety guidelines . . . . . . . . . . . . . . . . . . . . . . . . . . . . . . . . . . . . . . . . . . . . . . . . . . . . . 23
Information about this appliance . . . . . . . . . . . . . . . . . . . . . . . . . . . . . . . . . . . . . . . . 25
Before fi rst use . . . . . . . . . . . . . . . . . . . . . . . . . . . . . . . . . . . . . . . . . . . . . . . . . . . . . . . 25
Assembly and setting up . . . . . . . . . . . . . . . . . . . . . . . . . . . . . . . . . . . . . . . . . . . . . . . 26
Operation . . . . . . . . . . . . . . . . . . . . . . . . . . . . . . . . . . . . . . . . . . . . . . . . . . . . . . . . . . . 27
Temperature settings . . . . . . . . . . . . . . . . . . . . . . . . . . . . . . . . . . . . . . . . . . . . . . . . . . . . . . . . . . . . . . 27
Keeping warm/slow cooking/boiling/roasting . . . . . . . . . . . . . . . . . . . . . . . . . . . . . . . . . . . . . . . . . 27
Fondue . . . . . . . . . . . . . . . . . . . . . . . . . . . . . . . . . . . . . . . . . . . . . . . . . . . . . . . . . . . . . . . . . . . . . . . . 28
Steaming . . . . . . . . . . . . . . . . . . . . . . . . . . . . . . . . . . . . . . . . . . . . . . . . . . . . . . . . . . . . . . . . . . . . . . . 28
Sautéing/roasting . . . . . . . . . . . . . . . . . . . . . . . . . . . . . . . . . . . . . . . . . . . . . . . . . . . . . . . . . . . . . . . . 29
Deep frying . . . . . . . . . . . . . . . . . . . . . . . . . . . . . . . . . . . . . . . . . . . . . . . . . . . . . . . . . . . . . . . . . . . . . 29
Cleaning and care . . . . . . . . . . . . . . . . . . . . . . . . . . . . . . . . . . . . . . . . . . . . . . . . . . . . . 30
Storage . . . . . . . . . . . . . . . . . . . . . . . . . . . . . . . . . . . . . . . . . . . . . . . . . . . . . . . . . . . . . 30
Troubleshooting . . . . . . . . . . . . . . . . . . . . . . . . . . . . . . . . . . . . . . . . . . . . . . . . . . . . . . 31
Warranty and service . . . . . . . . . . . . . . . . . . . . . . . . . . . . . . . . . . . . . . . . . . . . . . . . . 32
Disposal . . . . . . . . . . . . . . . . . . . . . . . . . . . . . . . . . . . . . . . . . . . . . . . . . . . . . . . . . . . . . 32
Importer . . . . . . . . . . . . . . . . . . . . . . . . . . . . . . . . . . . . . . . . . . . . . . . . . . . . . . . . . . . . 32
Recipes . . . . . . . . . . . . . . . . . . . . . . . . . . . . . . . . . . . . . . . . . . . . . . . . . . . . . . . . . . . . . . 33
GB
MT
SMUK 1500 A1
21
Page 25

6-IN-1 COOKER SMUK 1500 A1
Introduction
Congratulations on the purchase of your new
GB
appliance.
MT
You have selected a high-quality product.
The operating instructions are part of this product.
They contain important information on safety, usage
and disposal. Before using the product, familiarise
yourself with all handling and safety guidelines. Use
the product only as described and for the range of
applications specifi ed. Upon cession of the product
to any future owner(s) also hand over all documents.
Appliance description
Figure A:
1 Lid
2 Grab handle
3 Frying basket hook
4 Frying basket
5 Inner bowl
6 Base
7 Indicator lamp
8 Heat-up indicator lamp
9 Temperature control
Intended use
This appliance is intended exclusively for preparing food. This appliance is intended solely for use
in private homes. Not to be used for commercial
purposes.
Package contents
Multi-cooker (base) with inner bowl and lid
Frying basket
Steamer grill
6 fondue forks
Skimmer
Grab handle
Operating instructions
NOTE
Check contents for completeness and damage
immediately after unpacking. Contact Customer
Services if necessary.
Figure B:
0 Steamer grill
q Skimmer
w Fondue forks
Technical data
Rated voltage: 220 - 240 V ~, 50Hz
Max. power consumption: 1500 W
22
SMUK 1500 A1
Page 26

Safety guidelines
DANGER – ELECTRIC SHOCK!
► Do not use the appliance outdoors.
► To prevent accidents, have defective plugs and/or power cables replaced
immediately by a qualifi ed specialist technician or our Customer Service
department.
► Do not kink or crush the power cable. Keep the power cable well away
from sources of heat.
► Never touch the power plug or the power cable with wet hands.
► Remove the inner bowl 5 from the base 6 before rinsing with water!
Never immerse the appliance in water or any other liquid!
WARNING! RISK OF INJURY!
► This appliance is not to be used by children under the age of 8.
► This appliance may be used by children aged 8 and above if they are
under constant supervision.
► This appliance can be used by persons with limited physical, sensory or
mental capabilities or lack of experience and knowledge if they have been
given supervision or instruction concerning safe use of the appliance, and
if they are aware of the potential risks.
GB
MT
► Cleaning and maintenance may not be carried out by children.
► Cooking appliances should be set up in a stable position using the grab
handles to avoid spillage of hot liquids.
► Children must not use the appliance as a plaything.
► Children younger than 8 years of age must be kept away from the appliance
and the power cable.
► To ensure that you can disconnect the appliance quickly in the event of an
emergency, do not use extension cables.
SMUK 1500 A1
23
Page 27

GB
MT
WARNING! RISK OF INJURY!
► Do not operate the appliance if it has been dropped or is damaged in any
way. Have the appliance checked and/or repaired by qualifi ed technicians
if necessary.
► Hot steam is given off during cooking, steaming, sautéing and frying, espe-
cially if you open the lid
► Ensure that all parts are completely dry before pouring oil or liquid fat into
1 . Maintain a safe distance from the steam.
the deep fat fryer. Otherwise, hot oil or fat could splatter out.
► Carefully pat all foodstuff s dry before placing them in the frying basket for
deep frying. Otherwise, hot oil or fat could splatter out.
► Use the inner bowl 5 exclusively with the base
► Ensure that all parts are completely dry before operating the appliance.
6
that is supplied with it!
Dry all parts properly after cleaning.
► Be especially careful with frozen foodstuff s. Remove all ice particles. The
more ice there is on the foodstuff , the more the hot oil or fat will splatter.
► Some parts of the appliance become very hot during operation. Touching
these may cause serious burns.
► Never pour liquids directly into the base! Always insert the inner bowl 5 fi rst.
WARNING! RISK OF FIRE!
► Do not use the appliance near hot surfaces.
► Never leave the appliance unattended while it is being used.
► Do not use an external timing switch or a separate remote control system to
operate the appliance.
24
SMUK 1500 A1
Page 28

ATTENTION! MATERIAL DAMAGE!
► Do not place the appliance close to open fl ames or other sources of heat
(heating, direct sunlight, gas stoves, etc.).
► Never place the appliance in a fi tted cupboard, recesses or similar.
► Never fi ll the appliance to above the MAX marking or to below the MIN
marking. Ensure that enough liquid is in the appliance before switching it on.
► Be careful when using metallic, pointed or sharp objects to remove food
from the appliance. These may damage the coating.
► Do not pare food in the inner bowl 5! This may damage the coating!
GB
MT
Information about this
appliance
This appliance can be used for a number of purposes. This versatility and the various settings that
are available, allow it to be used for:
– keeping warm,
– cooking,
– slow cooking,
– sautéing/roasting,
– steaming,
– deep frying
– and as a fondue.
Before fi rst use
■ Take all the parts out of the box and remove the
packaging material and any protective wrapping
or stickers.
■ Clean all components as described in the
section "Cleaning and Care". Ensure that all
parts are completely dry.
■ Insert the inner bowl 5 so that the 3 power con-
tacts on the base connect with the sockets in the
base 6. Press the inner bowl 5 down carefully
so that it sits fi rmly in the base 6.
■ Insert the plug into a mains power socket. The
indicator lamp 7 and the heat-up indicator
lamp 8 light up.
■ Set the temperature control 9 to level 4. Wait
3 minutes. Turn the temperature control 9 to
level 0 again and then disconnect the power
plug from the mains. Allow the appliance to
cool down.
NOTE
The fi rst time the appliance heats up, a small
amount of smoke and odour may be generated
due to production-related residue. This is normal
and is completely harmless. Provide suffi cient
ventilation by opening a window, for example.
SMUK 1500 A1
25
Page 29

Assembly and setting up
■ Place the appliance on a clean and level heat-
resistant surface.
GB
MT
■ Insert the inner bowl 5 so that the 3 power con-
tacts on the base of the inner bowl 5 connect
with the sockets in the base 6. Press the inner
bowl 5 down carefully so that it sits fi rmly in
the base 6.
■ For steaming, insert the steamer grill 0 into the
inner bowl 5 so that it hangs within the inner
bowl 5:
■ For frying, you will need the frying basket 4
and the handle 2:
– Press the rods of the handle 2 together so
that the holding pins can be inserted into the
eyelets on the frying basket 4:
– Loosen your grip on the pressed together rods
of the handle 2 so that the rods move apart
and the holding pins project into the holes:
– The handle 2 now sits fi rmly on the frying
basket 4.
■ Place the lid 1 on the inner bowl 5.
■ Insert the plug into a mains power socket. The
indicator lamp 7 lights up and the appliance
heats up to the defi ned temperature level.
■ Once the temperature level defi ned has been
reached, open the lid 1 and place the frying
basket 4 carefully onto the fl oor of the inner
bowl 5. The rods on the grab handle 2 are
now positioned within the notches of the inner
bowl 5.
■ Now close the lid 1.
NOTE
If the lid 1 is open, you can hang the frying
basket 4 on the rim of the inner bowl 5 using
the hook 3.
For instance, if the fried food is ready and the
excess fat is to be allowed to drain.
26
SMUK 1500 A1
Page 30

Operation
Temperature settings
Temperature
level
1
2
3
4
5
•
Mantener caliente
(approx. 50 °C - 80 °C)
Cocinar lentamente (rehogar)
(approx. 80 °C - 120 °C)
(approx. 120 °C - 150 °C)
(approx. 150 °C - 170 °C)
(approx. 170 °C - 190 °C)
(approx. 170 °C)
Cooking type
Keep Warm
Slow Cook
Boil/Fondue
Hervir/fondue
Steam
Asar al vapor
Saute/Roast
Saltear/asar
Deep Fry
Freír
Keeping warm/slow cooking/boiling/
roasting
After you have assembled the appliance as described in the chapter "Assembly and setting up":
1) Set the temperature control 9 to the required
level (1, 2, 3 or 5). The heat-up indicator
lamp 8 lights up as soon as the desired
temperature has been reached.
2) Place the food in the inner bowl 5.
3) Now close the lid 1.
4) When you no longer need to use the appliance,
turn the temperature control 9 to 0.
ATTENTION! MATERIAL DAMAGE!
Use the supplied skimmer q or another heat-
►
resistant plastic or wooden utensil to remove
food from the appliance. Otherwise the coating of the insert could be damaged and the
appliance will be usable.
5) Remove the plug from the mains power socket.
GB
MT
NOTE
The fi gures in the table are only reference val-
►
ues. The temperature level can vary depending
on the type and quantity of food being cooked.
NOTE
The indicator lamp 7 lights up as soon as
►
the power plug is connected to a mains
power socket.
The heat-up indicator lamp 8 lights up as
soon as the appliance has heated up to the
set temperature level.
However, the lamp may go out and on again
at any time. This indicates that the set temperature has briefl y fallen and the appliance
is heating itself back up.
SMUK 1500 A1
27
Page 31

Fondue
After you have assembled the appliance as described in the chapter "Assembly and setting up":
1) Add some oil or another fat suitable for fondue
GB
MT
to the inner bowl 5. Add oil/fat to the inner
bowl 5 until the MAX marking is reached. Do
not exceed the MAX marking!
2) Close the lid 1.
3) Set the temperature control 9 to level 3. The
heat-up indicator lamp 8 lights up as soon as
the desired temperature has been reached.
4) Remove the lid 1.
5) Skewer small pieces of meat onto the fondue
forks w and lower these carefully into the hot
fat.
6) The pieces of meat will be ready in just a few
minutes. Remove them from the fat.
7) Once you are fi nished using the fondue, turn
the temperature to 0 and remove the plug from
the mains power socket.
NOTE
After the oil or fat has cooled down (fat must
►
still be warm enough that it is still liquid),
pour it into suitable containers, for example,
bottles. Use the pouring spout at the corner of
the inner bowl 5.
► The disposal of cooking oils and fats is regu-
lated diff erently in every community or town.
Disposal of such oils or fats in normal domestic waste is often prohibited. Make enquiries
at your local community administration offi ce
about suitable disposal sites.
Steaming
After you have assembled the appliance as described in the chapter "Assembly and setting up":
1) Add about 1 litre of water to the inner bowl 5.
1 litre of water is suffi cient for about 30 minutes
of steaming. If you wish to steam for a longer
period, add more water accordingly. Pour a
maximum of 2.5 litres of water into the appliance. Otherwise, the boiling water may spray
onto the food from below.
NOTE
The MIN and MAX markings on the inner
►
bowl 5 only apply to fat/oil levels! They are
not to be observed when adding water!
► The volume of water depends upon the dura-
tion for which you wish to steam. The longer
the food needs to cook, the more water you
will need to add.
► The more frequently the lid 1 is raised
during cooking, the longer the cooking duration. Hot steam escapes every time the lid is
raised! You may then require more water as
a portion of the steam escapes each time the
lid is raised.
► If, during cooking, the water is used up,
carefully lift the lid 1 and add fresh water to
the appliance. While re-adding water, ensure
that it does not fl ow onto the food. After readding the water, it will take a while before
the water is heated and steam re-forms.
2) Hang the steamer grill 0 in the inner bowl 5
as described in the chapter "Assembly and
setting up".
3) Set the temperature control 9 to level 4.
4) Wait until steam is perceptibly emitted.
5) Place the food onto the steamer grill 0.
6) Now close the lid 1.
28
SMUK 1500 A1
Page 32

7) When the food is ready, use a pair of tongs or
similar to remove it from the steamer grill 0.
WARNING! RISK OF INJURY!
► The steamer grill 0 is very hot! Be careful
when handling the steamer grill 0.
8) Set the temperature control to 0.
9) Remove the plug from the mains power socket.
NOTE
When the appliance and remaining water
►
have cooled down, pour out the water via
the pouring runnel on the corner of the inner
bowl 5.
Sautéing/roasting
After you have assembled the appliance as described in the chapter "Assembly and setting up":
1) Add some oil to the inner bowl 5.
2) Set the temperature control 9 to level 5. The
heat-up indicator lamp 8 lights up as soon as
the desired temperature has been reached.
3) Place the sautéed/roasted food in the inner
bowl 5.
4) Turn the food occasionally and remove it as
soon as it is ready.
ATTENTION! MATERIAL DAMAGE!
Use the supplied skimmer q or another heat-
►
resistant plastic or wooden utensil to remove
food from the inner bowl 5. Otherwise
the coating of the inner bowl 5 may be
damaged and the appliance may become
unusable.
5) When you have removed the sautéed/roasted
food, turn the temperature controller 9 to 0.
6) Remove the plug from the mains power socket.
Deep frying
After you have assembled the appliance as described in the chapter "Assembly and setting up":
1) Add some oil or another fat suitable for deepfat frying to the inner bowl 5. Add oil/fat to
the inner bowl 5 until the MAX marking is
reached. Do not exceed the MAX marking!
2) Close the lid 1.
3) Set the temperature control 9 to the level
The level • is to be found between the numbers
4 and 5 on the temperature control 9. The heatup indicator lamp 8 lights up as soon as the
desired temperature has been reached.
4) Add the food that is to be deep-fried into the
frying basket 4. Ensure that the food is as
dry as possible and remove any excess ice
particles. Do not fi ll the frying basket 4 up to
more than the MAX marking. Otherwise the
food will not be cooked properly as it will not
be properly immersed in the hot fat.
5) Remove the lid 1 and lower the frying basket
4 carefully into the hot fat. The rods on the
grab handle 2 are now positioned within the
notches of the inner bowl 5.
6) Replace the lid 1.
NOTE
The grab handle 2 remains attached to the
►
frying basket 4 during the frying process!
WARNING! RISK OF INJURY!
► Fat can splash and cause burns if it comes
into contact with wet food. Be careful when
handling hot fat!
7) When the fried food is ready, remove the lid 1
and lift the frying basket 4 out of the hot fat.
Using the hook 3 , hang it on the rim of the inner bowl 5. This allows the excess fat to drain.
•
.
GB
MT
SMUK 1500 A1
29
Page 33

8) Once you are fi nished frying, turn the temperature to 0 and remove the plug from the mains
power socket.
TIPS
GB
MT
After the oil or fat has cooled down (fat must
►
still be warm enough that it is still liquid),
pour it into suitable containers, for example,
bottles. Use the pouring spout at the corner of
the inner bowl 5.
► The disposal of cooking oils and fats is regu-
lated diff erently in every community or town.
Disposal of such oils or fats in the normal
domestic waste is often prohibited. Make
enquiries at your local community administration offi ce about suitable disposal sites.
NOTE
You can also fi nish off deep-fried pastries with-
►
out using the frying basket 4. Simply add the
food to the hot fat in the inner bowl 5. Remove
the cooked food from the inner bowl 5 using
the skimmer q .
Cleaning and care
DANGER – ELECTRIC SHOCK!
Before cleaning the appliance, disconnect
►
the plug from the mains power socket! Risk of
electric shock!
Never submerse the base 6 in water or
other fl uids!
WARNING! RISK OF INJURY!
► Always allow the appliance to cool down
before cleaning it. Otherwise there is a risk
of burns!
ATTENTION! MATERIAL DAMAGE!
Do not use abrasive or aggressive cleaning
►
materials. These could damage the surface of
the appliance!
■ Clean the base 6 with a moist cloth.
For stubborn dirt use a mild detergent on the cloth.
Ensure that the base 6 is completely dry before
operating it again.
■ Rinse the inner bowl 5, the fondue forks w, the
skimmer q, the frying basket 4, the steamer
grill 0, the lid 1 and the grab handle 2 in
warm water. Add a little mild detergent.
Rinse all the parts off using clean water.
After rinsing, dry all pieces thoroughly with
a drying cloth.
Ensure that all parts are dry before reusing.
NOTE
The frying basket 4, the lid 1, the skimmer q
►
and the fondue forks w can also be washed in
the dishwasher. Always ensure, however, that
everything is completely dry before re-assembling and using the appliance.
Storage
■ Store the cleaned appliance in a clean, dust-free
and dry location.
30
SMUK 1500 A1
Page 34

Troubleshooting
Fault Cause Solution
The mains plug is not connected to the
mains power.
GB
MT
Insert the plug into a mains
power socket.
The appliance is not
working.
The food does not
get hot.
No steam is gener-
ated during cooking.
The heat-up indicator
lamp 8 is illuminating
and going out again
frequently.
If the malfunction cannot be corrected with the above suggestions, or if you have found some other
kind of malfunction, please contact our Customer Service.
The mains power socket is defective. Use a diff erent mains power socket.
The appliance is defective.
The wrong temperature level has been set. Select a higher temperature level.
The wrong temperature level has been set. Select the temperature level 4.
The water is used up. Re-fi ll the appliance with water.
This is not a defect. The appliance is maintaining the set temperature level. To do this,
it has to heat up briefl y every so often.
In this case, contact the
ustomer Service.
This is not a defect.
SMUK 1500 A1
31
Page 35

Warranty and service
You are provided a 3-year warranty on this device,
valid from the date of purchase. This appliance
has been manufactured with care and inspected
GB
meticulously prior to delivery. Please retain your
MT
receipt as proof of purchase. In the event of a
warranty claim, please contact your Customer
Service centre by telephone. This is the only way
to guarantee free return of your goods.
The warranty only covers claims for material and
manufacturing defects, not for damage sustained
during carriage, components subject to wear and
tear or damage to fragile components such as
switches or batteries. This appliance is intended solely for private use and not for commercial purposes.
The warranty shall be deemed void in the case of
misuse or improper handling, use of force and
repairs or modifi cations which have not been carried out by one of our authorised Service centres.
Your statutory rights are not restricted by this warranty.
The warranty period is not prolonged by repairs
eff ected under the warranty. This also applies to
replaced and repaired components. Any damage
and defects present at the time of purchase must be
reported immediately after unpacking, but no later
than 2 days after the date of purchase. Repairs
eff ected after expiry of the warranty period shall
be subject to charge.
Disposal
Under no circumstances
should the appliance be disposed of in standard domestic
waste. This product is subject
to the provisions of European
Directive 2012/19/EU.
Dispose of the device via an approved waste disposal company or your municipal waste disposal
facility. Please observe all currently applicable
regulations. Please contact your local waste disposal facility if you are in any doubt.
The packaging is made from environ-
mentally friendly material and can be
disposed of at your alocal recycling unit.
Importer
KOMPERNASS HANDELS GMBH
BURGSTRASSE 21
44867 BOCHUM
GERMANY
www.kompernass.com
Service Great Britain
Tel.: 0871 5000 720 (£ 0.10/Min.)
E-Mail: kompernass@lidl.co.uk
IAN 90860
Service Malta
Tel.: 80062230
E-Mail: kompernass@lidl.com.mt
IAN 90860
Hotline availability:
Monday to Friday 08:00 - 20:00 (CET)
32
SMUK 1500 A1
Page 36

Recipes
NOTE
These recipes are provided without guarantee.
►
All ingredients and preparation information
are guidelines. Enhance these recipe suggestions in line with your own experience.
Chocolate fondue
♦ 150 g milk chocolate couverture
♦ 150 g plain chocolate couverture
♦ 300 ml condensed milk
Porridge
♦ 250 g porridge oats
♦ 600 ml milk
♦ 1 packets of vanilla sugar
1) Add all the ingredients to the inner bowl 5
and close the lid 1.
2) Set the temperature control 9 to level 2.
3) Simmer everything for about 12–15 minutes,
stirring the porridge occasionally.
GB
MT
1) Add the chocolate and the condensed milk to
the inner bowl 5.
2) Set the temperature control 9 to level 2.
3) Stir the ingredients until a smooth chocolate
paste is formed.
4) Now set the temperature control 9 to level 1.
You can now dip fruit, nuts or marshmallows in the
liquid chocolate.
Cheese dip
♦ 120 g processed cheese
♦ 240 ml salsa (in jar/tin)
♦ 1 green pepper
♦ Pepper, salt, chilli powder
1) Wash and core the pepper. Cut it into small
cubes.
2) Add all the ingredients to the inner bowl 5
and close the lid 1.
3) Set the temperature control 9 to level 2.
4) Simmer the ingredients for about 20–25
minutes so that the cheese melts and stir the
cheesy mix occasionally.
5) Season the dip to taste with the spices.
6) Then turn the temperature control 9 down
to 1 and serve the dip warm direct from the
appliance.
You can dip crisps, nachos or bread in the mix.
Prawns in cream sauce
♦ Approx. 1000 g large prawns (cleaned)
♦ 2 large cloves of garlic (fi nely chopped)
♦ 150 ml cream
♦ 100 g butter
♦ 2 tbsp dry sherry or white wine
♦ Salt, pepper, chilli
♦ Possibly 3 tsp sauce thickener
1) Set the temperature control 9 to level 3.
2) Add the butter and the chopped garlic to the
inner bowl 5 and wait until the butter has
melted.
3) Then add the prawns.
4) Once the prawns have turned pink, add the
sherry or white wine and cook everything for
about one minute.
5) Add the cream and allow everything to simmer
for a short while and add salt, chilli and pepper
to taste.
6) If the cream sauce is too runny, you can add
a little sauce thickener.
SMUK 1500 A1
33
Page 37

Semolina pudding
♦ 80 g semolina (durum wheat)
♦ 500 ml milk
GB
MT
♦ 100 ml cream
♦ 2 packets of vanilla sugar
1) Add all the ingredients to the inner bowl 5
and close the lid 1.
2) Set the temperature control 9 to level 2.
3) Simmer everything for around 10 minutes, stirring constantly.
NOTE
If you prefer your semolina pudding a little
►
more runny, simply add a little more milk and
simmer a little while longer.
Garlic king prawns
♦ Approx. 10 raw king prawns (cleaned)
♦ 1 clove of garlic (fi nely chopped)
♦ A little olive oil
1) Add the olive oil to the inner bowl 5.
2) Set the temperature control 9 to the level 2 - 3.
3) Once the appliance has heated up, add the
fi nely chopped garlic and the king prawns.
4) Turn the prawns occasionally until they are
cooked.
The prawns taste especially good eaten with a piece
of fresh bread.
Scrambled eggs with spinach
♦ 350 g spinach leaves
♦ 1/4 cup of fi nely chopped onion
♦ 2 tbsp olive oil
♦ 200 ml cream
♦ 5 eggs
♦ Salt and pepper
1) Set the temperature control 9 to level 3.
2) Finely chop the spinach.
3) Add the olive oil to the inner bowl 5 and fry
the onions until they are soft.
4) Add the spinach and stir everything while
adding the cream for about 5–7 minutes. The
spinach should then be soft.
5) Beat the eggs into a foamy consistency and
add them while stirring constantly.
6) Keep stirring until the egg mix hardens
(approx. 4–5 minutes).
7) Add salt and pepper to taste.
Amaretto apple sauce
♦ 5 apples
♦ 10 tbsp Amaretto
♦ 2 tbsp sugar
♦ 1 tsp. cinnamon
♦ 1 packets of vanilla sugar
1) Peel and core the apples.
2) Chop the apples into small pieces.
3) Set the temperature control 9 to level 3.
4) Add apple pieces and other ingredients to the
inner bowl 5 and close the lid 1.
5) Stir the apple sauce occasionally.
6) Wait for 40–50 minutes. If the apple pieces
have not disintegrated, you can mash them into
a paste using a potato masher or similar.
34
SMUK 1500 A1
Page 38

Asparagus and artichoke salad
♦ 2 bunches of asparagus
♦ 1 tin of artichoke hearts, approx 450 ml in
water
♦ 3 peppers
♦ 3 onions
♦ Balsamic vinegar
1) Set the temperature control 9 to level 4.
2) Add water for steaming to the inner bowl 5.
3) Insert the steamer grill 0 in the inner bowl 5
and lay the peeled asparagus on it.
4) Close the lid 1.
5) After about 10 - 20 minutes, depending on the
thickness of the asparagus, the asparagus will
be cooked.
6) Drain the artichoke hearts and chop each one
into 4 pieces.
7) Finely chop the peppers and onions.
8) Cut the asparagus into small pieces and let it
cool down.
9) Mix everything in a bowl and add a little
balsamic vinegar.
Spicy dip
♦ 1 chilli pepper
♦ 1/2 bell pepper
♦ 1 clove of garlic
♦ 1 jar tomato sauce (approx. 250 g)
♦ 1 tbsp cooking oil
♦ 1/2 tsp chilli powder
♦ 1 pinch of paprika powder, spicy
♦ 1/2 tsp pepper, roughly ground
1) Peel the garlic and cut it into slices.
2) Add the oil to the inner bowl 5 and set the
temperature control 9 to level 4.
3) Fry the garlic for a short time.
4) Core the chilli and the bell pepper and cut
them into thin strips.
5) Add the chilli and the bell pepper to the inner
bowl 5 and stew these for a little while.
6) Add the tomato sauce and allow the dip to
cook for a little while.
7) Season the dip to taste with the spices.
You can dip crisps, nachos or bread in the mix.
GB
MT
SMUK 1500 A1
35
Page 39

Steamed salmon
♦ Approx. 500 g salmon fi llet
♦ Approx. 470 g rice
GB
MT
♦ 400 ml water
♦ 400 ml chicken stock
♦ 225 g peas (frozen)
♦ 1/4 cup of almond slivers
♦ A little butter
1) Add the chicken stock, water, peas, rice and
almond slivers to the inner bowl 5.
2) Now close the lid 1.
3) Set the temperature control 9 to level 3 and
wait 5 minutes.
4) Open the lid 1, insert the steamer grill 0 into
the inner bowl 5 and place the salmon fi llets
onto it. Deep-frozen salmon fi llets should be
allowed to thaw prior to cooking. Dab each
salmon fi llet with a knob of butter.
5) Close the lid 1 and let the whole thing cook
for around 10 minutes at level 3.
NOTE
The cooking time of the rice can vary depen-
►
ding on personal preference:
If you like your rice extremely soft, increase
the cooking time somewhat. If so, add a little
more water to prevent the rice from sticking to
the bottom of the inner bowl 5.
If you prefer harder rice, reduce the cooking
time a little. However, if you do this the quantity
of water must be reduced, otherwise liquid
will be left inside the inner bowl 5.
6) Set the temperature control 9 to level 2 and
wait another 5 minutes.
7) Then turn the temperature control 9 to 0 and
switch off the appliance.
8) Open the lid 1, carefully remove the salmon
fi llets from the steamer grill 0 and place to
one side. Stir the rice once and allow it to simmer for approx. 5 minutes with the lid closed.
9) You can now serve the salmon with the rice.
Fried potatoes
♦ 5 potatoes
♦ 2 onions
♦ Salt and pepper
♦ Olive oil
1) Peel the potatoes and cut them into thin slices.
2) Peel the onions and dice them.
3) Add a thin layer of olive oil to the inner bowl 5.
4) Set the temperature control 9 to level 5 and
wait until the appliance has heated up.
5) Then add the potato slices and onions and
fry them until they are golden brown. Turn the
potato slices occasionally.
6) Season the fried potatoes with salt and pepper.
Barbecued ribs
♦ 1500 -2500 g ribs (spare ribs)
♦ 1 bottle of barbecue sauce
♦ 1 packet of onion soup
♦ 1 medium-sized onion
♦ 100 ml tomato sauce
♦ 1 1/2 cups of water
♦ 2 potatoes
1) Clean the ribs and remove the fat.
2) Peel the potatoes and onions and dice them.
36
SMUK 1500 A1
Page 40

3) Set the temperature control 9 to level 4 and
wait until the appliance has heated up.
4) Mix the onion soup with the water.
5) Add the onion, barbecue sauce and the onion
soup to the inner bowl 5 and stir the mixture.
6) Then add the ribs and potatoes.
7) Braise everything for about 1–1.5 hours
(depending on the thickness of the ribs).
8) Afterwards, set the temperature control 9 to
level 2–3 and simmer everything for about
2hours.
Sandwiches
♦ 2 slices of bread (or hamburger bap)
♦ Corned beef
♦ Cheese (e.g. cheddar)
♦ Drained sauerkraut
♦ Mayonnaise/remoulade
♦ Butter
1) Set the temperature control 9 to level 5 and
wait until the appliance has heated up.
2) Butter the bread and fry it in the inner bowl 5.
3) Remove the bread from the inner bowl 5 and
place the corned beef, sauerkraut, mayonnaise/
remoulade and cheese on it.
4) Hang the steamer grill 0 in the appliance.
5) Lay the bread and ingredients on the steamer
grill 0 close the lid 1.
6) Wait until the cheese has melted.
Chilli con carne
♦ 800 g minced meat (half beef, half pork)
♦ 2 onions
♦ 2 tins of tomato pieces (approx. 800 ml)
♦ 2 peppers
♦ 1 tbsp ground chilli
♦ 5 chilli peppers
♦ 1 tsp caraway, ground
♦ 1 tin of kidney beans
♦ 1 tin of sweetcorn
1) Set the temperature control 9 to level 5 and
wait until the appliance has heated up.
2) Place the mince in the inner bowl 5 and
brown.
3) Wash, core and slice the peppers and the
chillies.
4) Chop the onions into small pieces.
5) Drain the beans and the sweetcorn. Wash
the beans and sweetcorn under clear running
water.
6) Add all the ingredients into the inner bowl 5.
7) Set the temperature control 9 to level 2 - 3.
8) Close the lid 1 and allow everything to
simmer for about 2 - 3 hours so that the beans
are soft.
GB
MT
SMUK 1500 A1
37
Page 41

Cranberry turkey
♦ Approx. 660 g turkey breast
♦ Approx. 500 ml stock (turkey stock)
GB
♦ 375 g cranberries
MT
1) Skin the turkey breasts.
2) Set the temperature control 9 to level 5 and
wait until the appliance has heated up.
3) Sear the meat on both sides.
4) Add the remaining ingredients and close the
lid 1.
5) Set the temperature control 9 to level 3.
6) Leave the meat to simmer for 3 hours.
7) To serve, cut the meat into strips and garnish
with the sauce.
Braised beef
♦ Approx. 1350 g beef without bones
♦ 1 packet of onion soup
♦ 300 ml water
♦ Approx. 800 ml peeled tomatoes (tinned)
♦ 2 large carrots
♦ 3 potatoes
♦ Salt, pepper
1) Set the temperature control 9 to level 5 and
wait until the appliance has heated up.
2) Sear the meat in the inner bowl 5.
3) Mix the onion soup with the water.
4) Add the onion soup and the tomatoes to the
meat in the inner bowl 5.
5) Bring the mixture to the boil ad then set the
temperature control 9 to level 3.
6) Close the lid 1 and leave everything to sim-
mer for around 1 1/2 hours. Turn the meat
occasionally.
NOTE
If, during this process, the liquid in the inner
►
bowl 5 gets used up, add a little water.
7) Peel the carrots and potatoes and cut them into
strips.
8) After 1 1/2 hours, add the potatoes and carrots and simmer for a further 40 minutes until
the meat and the vegetables are soft.
38
SMUK 1500 A1
Page 42

Onion rings
♦ 3 large yellow onions
♦ 2 cups of beer (room temperature)
♦ 1 1/2 cups of fl our
♦ Salt and pepper
♦ Cooking oil
1) Mix the fl our and beer in a bowl and leave it
to stand for 3 hours covered at room temperature.
2) Add oil (suitable for frying) to the inner
bowl5 and set the temperature control 9
to the level
heated up.
3) Cut the onions into slices around 1/2 cm thick
and separate out the rings.
4) Dip the onion rings into the fl our-beer dough
and then lower them carefully into the hot fat.
Use heat-resistant tongs for this.
NOTE
Do not use the frying basket 4 to lower the
►
onion rings into the fat. The dough will stick
to the basket and then tear off when you
remove the onion rings.
5) Fry the onion rings for about 2 minutes. During
this time, turn the onion rings once so that they
acquire an even brown colour.
. Wait until the appliance has
•
Chicken fi llet
♦ Chicken fi llet
♦ 3 cups of fl our
♦ 2 tbsp ground paprika
♦ 2 eggs
♦ 1 cup of milk
♦ Salt and pepper
♦ Cooking oil
1) Whisk together the eggs, the milk and the
water.
2) Add oil (suitable for frying) to the inner
bowl5 and set the temperature control 9
to the level
heated up.
3) Roll the chicken fi llet in the fl our and the egg
mixture and then in the fl our again.
4) Add the coated chicken fi llet to the frying
basket 4 and then carefully lower the frying
basket 4 into the hot oil and fry the chicken
fi llet for about 3 - 5 minutes.
5) Then turn the temperature control 9 down
to level 4 and leave the chicken in the fat for
about 18–20 minutes with the lid 1 closed.
Turn the chicken fi llet occasionally.
6) After 20 minutes, set the temperature
control9 back up to level
minutes.
7) Remove the chicken fi llet carefully from the hot
oil and allow it to drain.
. Wait until the appliance has
•
and wait 4–5
•
GB
MT
SMUK 1500 A1
39
Page 43

Chips
♦ Approx. 4 potatoes
♦ Salt
GB
♦ Cooking oil
MT
1) Peel the potatoes.
2) Cut the potatoes into narrow strips (chips).
3) Add oil (suitable for frying) to the inner
bowl5 and set the temperature control 9
to the level
heated up.
4) Add the chips to the frying basket 4.
5) Lower the frying basket 4 carefully into the
hot oil and fry the chips for around 25–30
minutes.
6) Lift the frying basket 4 carefully out of the hot
oil and hang it on the rim to allow any excess
fat to drain.
. Wait until the appliance has
•
40
SMUK 1500 A1
Page 44

Inhaltsverzeichnis
Einleitung . . . . . . . . . . . . . . . . . . . . . . . . . . . . . . . . . . . . . . . . . . . . . . . . . . . . . . . . . . . . 42
Bestimmungsgemäßer Gebrauch . . . . . . . . . . . . . . . . . . . . . . . . . . . . . . . . . . . . . . . . 42
Lieferumfang . . . . . . . . . . . . . . . . . . . . . . . . . . . . . . . . . . . . . . . . . . . . . . . . . . . . . . . . . 42
Gerätebeschreibung. . . . . . . . . . . . . . . . . . . . . . . . . . . . . . . . . . . . . . . . . . . . . . . . . . . 42
Technische Daten . . . . . . . . . . . . . . . . . . . . . . . . . . . . . . . . . . . . . . . . . . . . . . . . . . . . . 42
Sicherheitshinweise . . . . . . . . . . . . . . . . . . . . . . . . . . . . . . . . . . . . . . . . . . . . . . . . . . . 43
Informationen zu dem Gerät . . . . . . . . . . . . . . . . . . . . . . . . . . . . . . . . . . . . . . . . . . . . 45
Vor dem ersten Gebrauch . . . . . . . . . . . . . . . . . . . . . . . . . . . . . . . . . . . . . . . . . . . . . . 45
Zusammenbauen und Aufstellen . . . . . . . . . . . . . . . . . . . . . . . . . . . . . . . . . . . . . . . . 46
Bedienen . . . . . . . . . . . . . . . . . . . . . . . . . . . . . . . . . . . . . . . . . . . . . . . . . . . . . . . . . . . . 47
Temperatureinstellungen . . . . . . . . . . . . . . . . . . . . . . . . . . . . . . . . . . . . . . . . . . . . . . . . . . . . . . . . . . . 47
Warmhalten / Schmoren / Kochen /Braten . . . . . . . . . . . . . . . . . . . . . . . . . . . . . . . . . . . . . . . . . . . . . 47
Fondue . . . . . . . . . . . . . . . . . . . . . . . . . . . . . . . . . . . . . . . . . . . . . . . . . . . . . . . . . . . . . . . . . . . . . . . . 48
Dampfgaren . . . . . . . . . . . . . . . . . . . . . . . . . . . . . . . . . . . . . . . . . . . . . . . . . . . . . . . . . . . . . . . . . . . . 48
Braten/Rösten . . . . . . . . . . . . . . . . . . . . . . . . . . . . . . . . . . . . . . . . . . . . . . . . . . . . . . . . . . . . . . . . . . . 49
Frittieren . . . . . . . . . . . . . . . . . . . . . . . . . . . . . . . . . . . . . . . . . . . . . . . . . . . . . . . . . . . . . . . . . . . . . . . 49
Reinigung und Pfl ege . . . . . . . . . . . . . . . . . . . . . . . . . . . . . . . . . . . . . . . . . . . . . . . . . . 50
Aufbewahrung . . . . . . . . . . . . . . . . . . . . . . . . . . . . . . . . . . . . . . . . . . . . . . . . . . . . . . . 50
Fehlerbehebung . . . . . . . . . . . . . . . . . . . . . . . . . . . . . . . . . . . . . . . . . . . . . . . . . . . . . . 51
Garantie und Service . . . . . . . . . . . . . . . . . . . . . . . . . . . . . . . . . . . . . . . . . . . . . . . . . . 52
Entsorgung . . . . . . . . . . . . . . . . . . . . . . . . . . . . . . . . . . . . . . . . . . . . . . . . . . . . . . . . . . 52
Importeur . . . . . . . . . . . . . . . . . . . . . . . . . . . . . . . . . . . . . . . . . . . . . . . . . . . . . . . . . . . 52
Rezepte . . . . . . . . . . . . . . . . . . . . . . . . . . . . . . . . . . . . . . . . . . . . . . . . . . . . . . . . . . . . . 53
DE
AT
CH
SMUK 1500 A1
41
Page 45

6-IN-1-MULTIKOCHER
SMUK 1500 A1
Einleitung
Herzlichen Glückwunsch zum Kauf Ihres neuen
Gerätes.
Sie haben sich damit für ein hochwertiges Produkt
DE
entschieden. Die Bedienungsanleitung ist Bestand-
AT
teil dieses Produkts. Sie enthält wichtige Hinweise
CH
für Sicherheit, Gebrauch und Entsorgung. Machen
Sie sich vor der Benutzung des Produkts mit allen
Bedien- und Sicherheitshinweisen vertraut. Benutzen Sie das Produkt nur wie beschrieben und für
die angegebenen Einsatzbereiche. Händigen Sie
alle Unterlagen bei Weitergabe des Produkts an
Dritte mit aus.
Bestimmungsgemäßer
Gebrauch
Dieses Gerät dient ausschließlich dem Zubereiten
von Lebensmitteln. Dieses Gerät ist ausschließlich
für die Benutzung in privaten Haushalten bestimmt.
Benutzen Sie es nicht gewerblich.
Lieferumfang
Multikocher (Basis) mit Innenschale und Deckel
Frittierkorb
Dampfgarrost
6 Fonduegabeln
Schaumlöff el
Haltegriff
Bedienungsanleitung
Gerätebeschreibung
Abbildung A:
1 Deckel
2 Haltegriff
3 Haken Frittierkorb
4 Frittierkorb
5 Innenschale
6 Basis
7 Betriebskontrollleuchte
8 Aufheizkontrollleuchte
9 Temperaturregler
Abbildung B:
0 Dampfgarrost
q Schaumlöff el
w Fonduegabeln
Technische Daten
Nennspannung: 220 - 240 V ~, 50 Hz
max. Leistungsaufnahme: 1500 W
HINWEIS
Kontrollieren Sie den Lieferumfang direkt nach
dem Auspacken auf Vollständigkeit und Beschädigungen. Wenden Sie sich, wenn nötig, an den
Service.
42
SMUK 1500 A1
Page 46

Sicherheitshinweise
GEFAHR – ELEKTRISCHER SCHLAG!
► Benutzen Sie das Gerät nicht im Freien.
► Lassen Sie beschädigte Netzstecker oder Netzkabel sofort von autorisiertem
Fachpersonal oder dem Kundenservice austauschen, um Gefährdungen zu
vermeiden.
► Knicken oder quetschen Sie das Netzkabel nicht. Halten Sie das Netzkabel
von Hitzequellen fern.
► Fassen Sie Netzstecker oder Netzkabel nie mit nassen Händen an.
► Nehmen Sie die Innenschale 5 erst von der Basis 6 ab, bevor Sie diesen
in Wasser reinigen!
Tauchen Sie das Gerät niemals in Wasser oder andere Flüssigkeiten!
WARNUNG! VERLETZUNGSGEFAHR!
► Dieses Gerät darf nicht von Kindern im Alter zwischen 0 und 8 Jahren be-
nutzt werden.
► Dieses Gerät kann von Kindern ab 8 Jahren und darüber benutzt werden,
wenn sie ständig beaufsichtigt werden.
► Dieses Gerät kann von Personen mit reduzierten physischen, sensorischen
oder mentalen Fähigkeiten oder Mangel an Erfahrung und/oder Wissen benutzt werden, wenn sie beaufsichtigt oder bezüglich des sicheren Gebrauchs
des Gerätes unterwiesen wurden und die daraus resultierenden Gefahren
verstanden haben.
DE
AT
CH
► Reinigung und die Wartung durch den Benutzer dürfen nicht von Kindern
durchgeführt werden.
► Kochgeräte sollten in einer stabilen Lage mit den Handgriff en aufgestellt
werden, um das Verschütten der heißen Flüsigkeit zu vermeiden.
► Kinder dürfen nicht mit dem Gerät spielen.
► Kinder jünger als 8 Jahre sind vom Gerät und der Anschlussleitung fernzuhalten.
► Benutzen Sie kein Verlängerungskabel, im Notfall muss der Netzstecker
schnell zu erreichen sein.
SMUK 1500 A1
43
Page 47

WARNUNG! VERLETZUNGSGEFAHR!
► Falls das Gerät heruntergefallen oder beschädigt ist, dürfen Sie es nicht
mehr in Betrieb nehmen. Lassen Sie das Gerät von qualifi ziertem Fachpersonal überprüfen und gegebenenfalls reparieren.
DE
AT
CH
► Während des Koch-/Dämpf-/Brat- oder Frittiervorgangs wird heißer Dampf
freigesetzt, insbesonders, wenn Sie den Deckel
1 öff nen. Halten Sie einen
sicheren Abstand zum Dampf.
► Stellen Sie sicher, dass alle Teile vollständig trocken sind, bevor Sie Öl oder
fl üssiges Fett in die Fritteuse geben. Heißes Öl oder heißes Fett spritzt sonst.
► Trocknen Sie alle Lebensmittel sorgfältig ab, bevor Sie sie in den Frittierkorb
zum Frittieren geben. Heißes Öl oder heißes Fett spritzt sonst.
► Betreiben Sie die Innenschale 5 ausschließlich mit der mitgelieferten Basis
► Sorgen Sie dafür, dass alle Geräteteile vollständig getrocknet sind, bevor
6
Sie das Gerät in Betrieb nehmen. Trocknen Sie alle Teile nach dem Reinigen gut ab!
► Gehen Sie insbesonders mit gefrorenen Lebensmitteln vorsichtig um. Entfer-
nen Sie alle Eisstücke. Je mehr Eis sich noch an den Lebensmitteln befi ndet,
umso mehr spritzt das heiße Öl oder das heiße Fett.
► Teile des Gerätes werden während des Gebrauchs heiß. Berühren Sie
diese nicht, um Verbrennungen zu vermeiden.
► Füllen Sie niemals Flüssigkeiten direkt in die Basis 6! Setzen Sie immer
zuerst die Innenschale 5 ein.
!
WARNUNG! BRANDGEFAHR!
► Benutzen Sie das Gerät nicht in der Nähe von heißen Oberfl ächen.
► Lassen Sie das Gerät während des Betriebs niemals unbeaufsichtigt.
► Benutzen Sie keine externe Zeitschaltuhr oder ein separates Fernwirksystem
um das Gerät zu betreiben.
44
SMUK 1500 A1
Page 48

ACHTUNG! SACHSCHADEN!
► Stellen Sie das Gerät nicht in die Nähe von off enen Flammen oder anderen
Wärmequellen (Heizung, direktes Sonnenlicht, Gasöfen etc.).
► Stellen Sie das Gerät keinesfalls in einen Einbauschrank, Nischen o.Ä.
► Füllen Sie nie mehr Flüssigkeit als bis zur MAX-Markierung und nie weniger
als bis zur MIN-Markierung in das Gerät ein. Achten Sie bei jedem Einschalten darauf, dass genügend Flüssigkeit eingefüllt ist.
► Seien Sie vorsichtig, wenn Sie metallische, spitzen oder scharfen Gegen-
stände benutzen, um die Lebensmittel aus dem Gerät zu entnehmen. Diese
können die Beschichtung beschädigen!
► Scheiden Sie keine Lebensmittel in der Innenschale 5! Dabei könnte die
Beschichtung beschädigt werden!
Informationen zu dem Gerät
Dieses Gerät ist vielseitig einsetzbar. Durch die
variablen Einsätze und die verschiedenen Einstellungsmöglichkeiten kann es:
– Warmhalten,
– Kochen,
– Schmoren,
– Rösten/Anbraten,
– Dampfgaren,
– Frittieren
– und als Fondue genutzt werden.
Vor dem ersten Gebrauch
■ Entnehmen Sie alle Teile aus dem Karton und
entfernen Sie das Verpackungsmaterial und
eventuelle Schutzfolien und Aufkleber.
■ Reinigen Sie alle Teile, wie im Kapitel „Reini-
gung und Pfl ege“ beschrieben. Stellen Sie sicher,
dass alle Teile vollständig getrocknet sind.
■ Setzen Sie die Innenschale 5 ein, so dass die 3
Steckkontake an der Unterseite in die Buchse in
der Basis 6 greifen. Drücken Sie die Innenschale 5 vorsichtig herunter, so dass diese ganz in
der Basis 6 sitzt.
■ Stecken Sie den Netzstecker in eine Netzsteck-
dose. Die Betriebskontrollleuchte 7 und die
Aufheizkontrollleuchte 8 leuchten.
■ Stellen Sie den Temperaturregler 9 auf Stufe
4. Warten Sie 3 Minuten ab. Drehen Sie den
Temperaturregler 9 wieder auf Stufe 0 und
ziehen Sie dann den Netzstecker. Lassen Sie
das Gerät abkühlen.
HINWEIS
Beim erstmaligen Aufheizen des Gerätes kann es
durch fertigungsbedingte Rückstände zu leichter
Rauch- und Geruchsentwicklung kommen. Das
ist normal und völlig ungefährlich. Sorgen Sie für
ausreichende Belüftung, öff nen Sie zum Beispiel
ein Fenster.
DE
AT
CH
SMUK 1500 A1
45
Page 49

Zusammenbauen und
Aufstellen
■ Stellen Sie das Gerät auf eine hitzebeständige,
saubere und ebene Fläche.
■ Setzen Sie die Innenschale 5 ein, so dass die 3
DE
AT
CH
Steckkontake an der Unterseite der Innenschale 5
in die Buchse in der Basis 6 greifen. Drücken
Sie die Innenschale 5 vorsichtig herunter, so dass
diese ganz in der Basis 6 sitzt.
■ Zum Dampfgaren setzen Sie das Dampfgarrost 0
so in die Innenschale 5, dass dieses in der
Innenschale 5 hängt:
■ Zum Frittieren benötigen Sie den Frittierkorb 4
und den Haltegriff 2:
– Drücken Sie die Stäbe des Haltegriff s 2
etwas zusammen, so dass sich die Haltebolzen von innen in die Ösen am Frittierkorb 4
schieben lassen:
– Lösen Sie dann die zusammengedrückten
Stäbe des Haltegriff s 2, so dass die Halte-
bolzen durch die Löcher ragen:
– Der Haltegriff 2 sitzt nun fest am Frittier-
korb 4.
■ Setzen Sie den Deckel 1 auf die Innenschale 5.
■ Stecken Sie den Netzstecker in eine Netzsteck-
dose. Die Betriebskontrollleuchte 7 leuchtet und
das Gerät heizt auf die eingestellte Temperaturstufe auf.
■ Wenn die eingestellte Temperaturstufe erreicht
ist, öff nen Sie den Deckel 1 und stellen Sie den
Frittierkorb 4 vorsichtig auf den Boden der Innenschale 5. Die Stäbe des Haltegriff s 2 liegen
dabei in den Aussparungen der Innenschale 5.
■ Schließen Sie den Deckel 1.
HINWEIS
Sie können den Frittierkorb 4 bei geöff netem
Deckel 1 mit Hilfe des Hakens 3 an den Rand
der Innenschale 5 hängen.
Zum Beispiel, wenn das Frittiergut fertig ist und
das überschüssige Fett abtropfen soll.“
46
SMUK 1500 A1
Page 50

Bedienen
Temperatureinstellungen
Temperatur-
stufe
1
2
3
4
5
•
Zubereitungsart
Warmhalten
Mantener caliente
(ca. 50 - 80°C)
Langsames Kochen (Schmoren)
Cocinar lentamente (rehogar)
(ca. 80 - 120°C)
Kochen/Fondue
Hervir/fondue
(ca. 120 - 150°C)
Dampfgaren
Asar al vapor
(ca. 150 - 170°C)
Braten/Rösten
Saltear/asar
(ca. 170 - 190°C)
Frittieren
(ca. 170°C)
Freír
Warmhalten / Schmoren / Kochen /
Braten
Nachdem Sie das Gerät wie im Kapitel „Zusammenbauen und Aufstellen“ vorbereitet haben:
1) Stellen Sie den Temperaturregler 9 auf
die gewünschte Stufe (1, 2, 3 oder 5). Die
Aufheizkontrollleuchte 8 leuchtet sobald die
eingestellte Temperatur erreicht ist.
2) Geben Sie das Lebensmittel in die Innenschale 5.
3) Schließen Sie den Deckel 1.
4) Wenn Sie das Gerät nicht mehr benötigen, drehen Sie den Temperaturregler 9 auf 0.
ACHTUNG! SACHSCHADEN!
Benutzen Sie nur den mitgelieferten Schaum-
►
löff el q oder anderes hitzebeständiges Plastik- oder Holzbesteck um die Lebensmittel aus
dem Gerät zu entnehmen. Ansonsten kann
die Beschichtung des Einsatzes beschädigt
und das Gerät unbrauchbar werden.
5) Ziehen Sie den Netzstecker aus der Netzsteckdose.
DE
AT
CH
HINWEIS
Die Angaben in der Tabelle sind nur Richtwer-
►
te. Die Temperaturstufe kann, je nach Art und
Menge des Lebensmittels variieren.
HINWEIS
Die Betriebskontrollleuchte 7 leuchtet, so-
►
bald der Netzstecker mit einer Netzsteckdose
verbunden ist.
Die Aufheizkontrollleuchte 8 leuchtet sobald
das Gerät auf die eingestellte Temperaturstufe aufgeheizt ist.
Jedoch kann diese immer wieder erlöschen
und aufl euchten. Das bedeutet, dass die eingestellte Temperatur kurzzeitig unterschritten
war und das Gerät wieder aufgeheizt hat.
SMUK 1500 A1
47
Page 51

Fondue
Nachdem Sie das Gerät wie im Kapitel „Zusammenbauen und Aufstellen“ vorbereitet haben:
1) Geben Sie Öl oder anderes für Fondue
geeignetes Fett in die Innenschale 5. Geben
Sie soviel Öl/Fett in die Innenschale 5, bis die
DE
AT
CH
Markierung MAX erreicht wird. Überschreiten
Sie die Markierung MAX jedoch nicht!
2) Schließen Sie den Deckel 1.
3) Stellen Sie den Temperaturregler 9 auf die
Stufe 3. Die Aufheizkontrollleuchte 8 leuchtet
sobald die eingestellte Temperatur erreicht ist.
4) Nehmen Sie den Deckel 1 ab.
5) Spießen sie kleine Fleischstücke auf die Fonduegabeln w und legen sie diese vorsichtig in
das heiße Fett.
6) Nach wenigen Minuten sind die Fleischstücke
gar. Nehmen Sie diese aus dem Fett.
7) Wenn Sie das Fondue nicht mehr benötigen,
stellen Sie den Temperaturrgler auf 0 und
ziehen Sie den Netzstecker aus der Netzsteckdose.
HINWEIS
Gießen Sie das Öl oder Fett nach dem Erkal-
►
ten (Fett muss noch gerade fl ießfähig sein) in
geeignete Behältnisse, zum Beispiel Flaschen.
Nutzen Sie dafür die Ausgießrinne an der
Ecke der Innenschale 5.
► In jeder Gemeinde oder Stadt ist die Ent-
sorgung von Speiseölen oder -fetten anders
geregelt. Oft ist es nicht erlaubt solche
Öle oder Fette im normalen Hausmüll zu
entsorgen. Bitte informieren Sie sich bei Ihrer
Gemeinde- oder Stadtverwaltung nach den
Entsorgungsmöglichkeiten.
Dampfgaren
Nachdem Sie das Gerät wie im Kapitel „Zusammenbauen und Aufstellen“ vorbereitet haben:
1) Geben Sie ca. 1 Liter Wasser in die Innenschale 5. 1 Liter Wasser reichen für ca.
30 Minuten Dampfgaren. Wenn Sie länger
Dampfgaren wollen, füllen Sie entsprechend
mehr Wasser ein. Füllen Sie maximal 2,5 Liter
Wasser in das Gerät. Ansonsten kann es passieren, dass das kochende Wasser von unten
an das Gargut spritzt.
HINWEIS
Die MIN- und MAX-Markierung in der Innen-
►
schale 5 sind nur für das Einfüllen von Fett/
Öl relevant! Sie müssen nicht beim Einfüllen
von Wasser beachtet werden!
► Die Wassermenge hängt davon ab, wie lan-
ge Sie das Gargut dämpfen wollen. Je länger
das Gargut benötigt um gar zu werden,
desto mehr Wasser müssen Sie einfüllen.
► Je öfter der Deckel 1 während des Garens
angehoben wird, um länger dauert die
Garzeit. Bei jedem Anheben entweicht heißer
Dampf! Eventuell benötigen Sie dann mehr
Wasser, da ein Teil des Wasserdampfes bei
jedem Anheben entweicht!
► Wenn das Wasser während des Garvorgan-
ges aufgebraucht ist, heben Sie vorsichtig
den Deckel 1 an und füllen Sie neues Was-
ser in das Gerät. Achten Sie dabei darauf,
dass das Wasser nicht beim Nachfüllen über
das Gargut läuft. Nach dem Nachfüllen
dauert es einige Zeit bis das Wasser erhitzt
ist und neuer Dampf erzeugt wird.
2) Hängen Sie das Dampfgarrost 0 in die Innenschale 5, wie im Kapitel „Zusammenbauen
und Aufstellen“ beschrieben.
3) Stellen Sie den Temperaturregler 9 auf die
Stufe 4.
4) Warten Sie bis deutlich Dampf aufsteigt.
5) Legen Sie die Lebensmittel auf den Dampfgarrost 0.
6) Schließen Sie den Deckel 1.
48
SMUK 1500 A1
Page 52

7) Wenn das Gargut fertig ist, nehmen Sie es mit
Hilfe einer Zange o.ä. vom Dampfgarrost 0.
WARNUNG! VERLETZUNGSGEFAHR!
► Das Dampfgarrost 0 ist sehr heiß! Seien Sie
vorsichtig im Umgang mit dem Dampfgarrost 0.
8) Stellen Sie den Temperaurregler auf 0.
9) Ziehen Sie den Netzstecker aus der Netzsteckdose.
HINWEIS
►
Wenn das Gerät und das übrige Wasser
erkaltet sind, gießen Sie das Wasser mit Hilfe
der Ausgießrinne an der Ecke der Innenschale 5 aus.
Braten/Rösten
Nachdem Sie das Gerät wie im Kapitel „Zusammenbauen und Aufstellen“ vorbereitet haben:
1) Geben Sie etwas Öl in die Innenschale 5.
2) Stellen Sie den Temperaturregler 9 auf die
Stufe 5. Die Aufheizkontrollleuchte 8 leuchtet
sobald die eingestellte Temperatur erreicht ist.
3) Geben Sie dann das Brat-/Röstgut in die Innenschale 5.
4) Wenden Sie das Brat-/Röstgut zwischendurch
und entnehmen Sie es, wenn es fertig ist.
ACHTUNG! SACHSCHADEN!
Benutzen Sie nur den mitgelieferten Schaum-
►
löff el q oder anderes hitzebeständiges Plastik- oder Holzbesteck um die Lebensmittel aus
der Innenschale 5 zu entnehmen. Ansonsten
kann die Beschichtung der Innenschale 5
beschädigt und das Gerät unbrauchbar
werden.
5) Wenn Sie das Brat-/Röstgut entnommen haben,
drehen Sie den Temperaturregler 9 auf 0.
6) Ziehen Sie den Netzstecker aus der Netzsteckdose.
Frittieren
Nachdem Sie das Gerät wie im Kapitel „Zusammenbauen und Aufstellen“ vorbereitet haben:
1) Geben Sie Öl oder anderes für Fritteusen
geeignetes Fett in die Innenschale 5. Geben
Sie soviel Öl/Fett in die Innenschale 5, bis die
Markierung MAX erreicht wird. Überschreiten
Sie die Markierung MAX jedoch nicht!
2) Schließen Sie den Deckel 1.
3) Stellen Sie den Temperaturregler 9 auf Stufe
Die Stufe • befi ndet sich zwischen den Ziff ern 4
und 5 am Temperaturregler 9. Die Aufheizkontrollleuchte 8 leuchtet sobald die eingestellte
Temperatur erreicht ist.
4) Legen Sie die zu frittierenden Lebensmittel in
den Frittierkorb 4. Achten Sie dabei darauf,
dass möglichst wenig Wasser oder Eis an den
Lebensmitteln haftet. Füllen Sie niemals mehr
als bis zur Markierung MAX am Frittierkorb 4
ein. Ansonsten werden die Lebensmittel nicht
gar, da diese nicht von dem heißen Fett umschlossen werden.
5) Nehmen Sie den Deckel 1 ab und lassen Sie
den Frittierkorb 4 vorsichtig in das heiße Fett
gleiten. Die Stäbe des Haltegriff s 2 liegen da-
bei in den Aussparungen der Innenschale 5.
6) Legen Sie den Deckel 1 auf.
HINWEIS
Der Haltegriff 2 bleibt auch während des
►
Frittiervorganges mit dem Frittierkorb 4
verbunden!
WARNUNG! VERLETZUNGSGEFAHR!
► Das Fett kann spritzen und zu Verbrennungen
führen, wenn es mit feuchten Lebensmitteln in
Berührung kommt! Seien Sie vorsichtig beim
Umgang mit dem heißen Fett!
7) Wenn das Frittiergut fertig ist, nehmen Sie den
Deckel 1 ab und heben Sie den Frittierkorb 4
aus dem heißen Fett heraus. Hängen Sie ihn
mit Hilfe des Hakens 3 an den Rand der
Innenschale 5. So kann überschüssiges Fett
abtropfen.
•
DE
AT
CH
.
SMUK 1500 A1
49
Page 53

8) Wenn Sie mit dem Frittieren fertig sind, stellen
Sie den Temperaturrgler auf 0 und ziehen Sie
den Netzstecker aus der Netzsteckdose.
HINWEISE
Gießen Sie das Öl oder Fett nach dem Erkal-
►
ten (Fett muss noch gerade fl ießfähig sein) in
DE
AT
CH
geeignete Behältnisse, zum Beispiel Flaschen.
Nutzen Sie dafür die Ausgießrinne an der
Ecke der Innenschale 5.
► In jeder Gemeinde oder Stadt ist die Ent-
sorgung von Speiseölen oder -fetten anders
geregelt. Oft ist es nicht erlaubt solche
Öle oder Fette im normalen Hausmüll zu
entsorgen. Bitte informieren Sie sich bei Ihrer
Gemeinde- oder Stadtverwaltung nach den
Entsorgungsmöglichkeiten.
HINWEIS
Sie können auch ohne den Frittierkorb 4
►
Fettgebackenes ausbacken. Geben Sie die
Lebensmittel hierzu einfach in das heiße Fett
in die Innenschale 5. Nehmen Sie die fertigen
Lebensmittel mit Hilfe des Schaumlöff els q aus
der Innenschale 5 heraus.
Reinigung und Pfl ege
GEFAHR - ELEKTRISCHER SCHLAG!
Ziehen Sie vor jeder Reinigung den Netzste-
►
cker aus der Netzsteckdose! Es besteht die
Gefahr eines elektrischen Schlages!
Tauchen Sie die Basis 6 niemals in Wasser
oder andere Flüssigkeiten!
WARNUNG! VERLETZUNGSGEFAHR!
► Lassen Sie das Gerät immer erst abkühlen,
bevor Sie es reinigen. Es besteht sonst Verbrennungsgefahr!
ACHTUNG! SACHSCHADEN!
Verwenden Sie keine scheuernden oder
►
aggressiven Reinigungsmittel. Diese können
die Oberfl äche beschädigen!
■ Reinigen Sie die Basis 6 mit einem feuchten
Tuch.
Bei hartnäckigen Verschmutzungen geben Sie
ein mildes Spülmittel auf das Tuch.
Stellen Sie sicher, dass die Basis 6 vollkom-
men trocken ist, bevor diese wieder in Betrieb
genommen wird.
■ Reinigen Sie die Innenschale 5, die Fonduega-
beln w, den Schaumlöff el q,den Frittierkorb 4,
das Dampfgarrost 0, den Deckel 1 und den
Haltegriff 2 in warmem Wasser. Geben Sie ein
mildes Spülmittel hinzu.
Spülen Sie alle Teile mit klarem Wasser ab.
Trocknen Sie nach dem Abspülen alle Teile
gründlich mit einem Trockentuch ab.
Stellen Sie sicher, dass alle Teile vor der erneuten Verwendung trocken sind.
HINWEIS
Den Frittierkorb 4, den Deckel 1, den
►
Schaumlöff el q und die Fonduegabeln w
können Sie auch in der Spülmaschine reinigen.
Stellen Sie jedoch sicher, dass alles wieder
vollkommen trocken ist, bevor Sie das Gerät
wieder zusammenbauen und benutzen.
50
Aufbewahrung
■ Bewahren Sie das gereinigte Gerät an einem
sauberen, staubfreien und trockenem Ort auf.
SMUK 1500 A1
Page 54

Fehlerbehebung
Fehler Ursache Lösung
Der Netzstecker ist nicht mit dem Stromnetz
verbunden.
Das Gerät funktio-
niert nicht.
Das Gargut wird
nicht heiß.
Es wird kein Dampf
erzeugt während des
Garvorganges.
Die Aufheizkontroll-
leuchte 8 leuchtet
immer wieder auf
und erlischt dann
wieder.
Sollten sich die Störungen nicht mit oben stehenden Fehlerbehebungen beheben lassen, oder wenn
Sie andere Arten von Störungen feststellen, wenden Sie sich bitte an unseren Service.
Die Netzsteckdose ist defekt.
Das Gerät ist defekt.
Es ist die falsche Temperaturstufe eingestellt.
Es ist die falsche Temperaturstufe eingestellt. Wählen Sie die Temperaturstufe 4.
Das Wasser ist aufgebraucht. Füllen Sie neues Wasser ein.
Es liegt kein Fehler vor. Das Gerät hält die
eingestellte Temperaturstufe. Dafür ist es
nötig, dass das Gerät immer wieder kurz
aufheizt.
Stecken Sie den Netzstecker in
eine Netzsteckdose.
Benutzen Sie eine andere Netzsteckdose.
Wenden Sie sich an den Kundendienst.
Wählen Sie eine höhere Temperaturstufe.
Es liegt kein Fehler vor.
DE
AT
CH
SMUK 1500 A1
51
Page 55

Garantie und Service
Sie erhalten auf dieses Gerät 3 Jahre Garantie
ab Kaufdatum. Das Gerät wurde sorgfältig
produziert und vor Anlieferung gewissenhaft
geprüft. Bitte bewahren Sie den Kassenbon als
Nachweis für den Kauf auf. Bitte setzen Sie sich
im Garantiefall mit Ihrer Servicestelle telefonisch
DE
in Verbindung. Nur so kann eine kostenlose
AT
Einsendung Ihrer Ware gewährleistet werden.
CH
Die Garantieleistung gilt nur für Material- oder
Fabrikationsfehler, nicht aber für Transportschäden,
Verschleißteile oder für Beschädigungen an zerbrechlichen Teilen, z. B. Schalter oder Akkus. Das Produkt
ist lediglich für den privaten und nicht für den
gewerblichen Gebrauch bestimmt.
Bei missbräuchlicher und unsachgemäßer Behandlung, Gewaltanwendung und bei Eingriff en, die
nicht von unserer autorisierten Service-Niederlassung vorgenommen wurden, erlischt die Garantie.
Ihre gesetzlichen Rechte werden durch diese Garantie nicht eingeschränkt.
Die Garantiezeit wird durch die Gewährleistung
nicht verlängert. Dies gilt auch für ersetzte und reparierte Teile. Eventuell schon beim Kauf vorhandene
Schäden und Mängel müssen sofort nach dem
Auspacken gemeldet werden, spätestens aber zwei
Tage nach Kaufdatum. Nach Ablauf der Garantiezeit anfallende Reparaturen sind kostenpfl ichtig.
Service Deutschland
Tel.: 0800 5435 111 (Kostenfrei aus dem
dt. Festnetz/Mobilfunknetz)
E-Mail: kompernass@lidl.de
IAN 90860
Service Österreich
Tel.: 0820 201 222 (0,15 EUR/Min.)
E-Mail: kompernass@lidl.at
IAN 90860
Service Schweiz
Tel.: 0842 665566 (0,08 CHF/Min.,
Mobilfunk max. 0,40 CHF/Min.)
E-Mail: kompernass@lidl.ch
IAN 90860
Erreichbarkeit Hotline: Montag bis Freitag von
8:00 Uhr – 20:00 Uhr (MEZ)
Entsorgung
Werfen Sie das Gerät kei-
nesfalls in den normalen
Hausmüll. Dieses Produkt
unterliegt der europäischen
Richtlinie 2012/19/EU.
Entsorgen Sie das Gerät über einen zugelassenen
Entsorgungsbetrieb oder über Ihre kommunale
Entsorgungseinrichtung. Beachten Sie die aktuell
geltenden Vorschriften. Setzen Sie sich im Zweifelsfall mit Ihrer Entsorgungseinrichtung in Verbindung.
Die Verpackung besteht aus umwelt-
freundlichen Materialien, die Sie über
die örtlichen Recyclingstellen entsorgen
können.
Importeur
KOMPERNASS HANDELS GMBH
BURGSTRASSE 21
44867 BOCHUM
GERMANY
www.kompernass.com
52
SMUK 1500 A1
Page 56

Rezepte
HINWEIS
Rezepte ohne Gewähr. Alle Zutaten- und
►
Zubereitungsangaben sind Anhaltswerte.
Ergänzen Sie diese Rezeptvorschläge um Ihre
persönlichen Erfahrungswerte.
Schokoladen-Fondue
♦ 150 g Vollmilch-Kuvertüre
♦ 150 g Zartbitter-Kuvertüre
♦ 300 ml Kondensmilch
1) Geben Sie die Schokolade und die Kondensmilch in die Innenschale 5.
2) Stellen Sie den Temperaturregler 9 auf die
Stufe 2.
3) Rühren Sie während des Erhitzens die Masse um,
bis eine geschmeidige Schokoladenmasse entsteht.
4) Stellen sie nun den Temperaturregler 9 auf
die Stufe 1.
Dippen Sie nun Obst, Nüsse oder Marshmallows
in die Schokoladenmasse.
Käse-Dip
♦ 120 g Schmelzkäse
♦ 240 ml Salsa (in Dosen/Gläsern)
♦ 1 grüne Paprika
♦ Pfeff er/Salz/Chilipulver
1) Waschen und entkernen Sie die Paprika.
Schneiden Sie sie in kleine Würfel.
2) Geben Sie alle Zutaten in die Innenschale 5
und schließen Sie den Deckel 1.
3) Stellen Sie den Temperaturregler 9 auf die
Stufe 2.
4) Lassen Sie alles ca. 20 - 25 Minuten köcheln,
so dass der Käse schmilzt, und rühren Sie die
Käsemischung ab und zu um.
5) Schmecken Sie den Dip mit den Gewürzen ab.
6) Stellen Sie den Temperaturregler 9 dann auf
die Stufe 1 zurück und servieren Sie den Dip
warm direkt aus dem Gerät.
Sie können nun Chips, Nachos oder Brot in den
Dip tauchen.
Haferfl ocken-Brei
♦ 250 g Haferfl ocken
♦ 600 ml Milch
♦ 1 Päckchen Vanillezucker
1) Geben Sie alle Zutaten in die Innenschale 5
und schließen Sie den Deckel 1.
2) Stellen Sie den Temperaturregler 9 auf die
Stufe 2.
3) Lassen Sie alles 12 - 15 Minuten köcheln und
rühren Sie dabei den Brei immer wieder um.
Garnelen in Sahnesoße
♦ ca. 1000 g rohe, große Garnelen (gesäubert)
♦ 2 große Knoblauchzehen (zerkleinert)
♦ 150 ml Sahne
♦ 100 g Butter
♦ 2 EL trockner Sherry oder Weißwein
♦ Salz, Pfeff er, Chili
♦ eventuell 3 TL Soßenbinder
1) Stellen Sie den Temperaturregler 9 auf die
Stufe 3.
2) Geben Sie die Butter und den zerhackten
Knoblauch in die Innenschale 5 und warten
Sie bis die Butter zerlaufen ist.
3) Geben Sie dann die Garnelen hinzu.
4) Wenn die Garnelen rosa werden, geben Sie
den Sherry oder Weißwein hinzu und kochen
das ganze für 1 Minute.
5) Fügen Sie dann die Sahne hinzu, lassen Sie
alles kurz köcheln und schmecken Sie mit Salz,
Chili und Pfeff er ab.
6) Falls die Sahnesoße zu fl üssig ist, können Sie
noch etwas Soßenbinder hinzugben.
DE
AT
CH
SMUK 1500 A1
53
Page 57

Grießbrei
♦ 80 g Hartweizengrieß
♦ 500 ml Milch
♦ 100 ml Sahne
♦ 2 Päckchen Vanillezucker
DE
1) Geben Sie alle Zutaten in die Innenschale 5
AT
CH
und schließen Sie den Deckel 1.
2) Stellen Sie den Temperaturregler 9 auf die
Stufe 2.
3) Lassen Sie alles ca. 10 Minuten unter ständigem Rühren köcheln.
HINWEIS
Wenn Sie den Grießbrei etwas fl üssiger mö-
►
gen, geben Sie einfach mehr Milch hinzu und
lassen Sie alles noch einen Moment köcheln.
Knoblauch-Riesen-Garnelen
♦ ca. 10 rohe Riesen-Garnelen (King Prawns)
(gesäubert)
♦ 1 Knoblauchzehen (zerkleinert)
♦ etwas Olivenöl
1) Geben Sie das Olivenöl in die Innenschale 5.
2) Stellen Sie den Temperaturregler 9 auf Stufe
2 - 3.
3) Nachdem das Gerät aufgeheizt ist, geben Sie
den klein geschnittenen Knoblauch und die
Riesen-Garnelen hinein.
4) Wenden Sie die Garnelen zwischendurch, bis
diese gar sind.
Essen Sie zu den Garnelen am besten ein frisches
Stück Brot.
Rührei mit Spinat
♦ 350 g Blattspinat
♦ 1/4 Tasse zerhackte Zwiebeln
♦ 2 EL Olivenöl
♦ 200 ml Sahne
♦ 5 Eier
♦ Salz und Pfeff er
1) Stellen Sie den Temperaturregler 9 auf die
Stufe 3.
2) Schneiden Sie den Spinat klein.
3) Geben Sie das Olivenöl in die Innenschale 5 und
braten Sie die Zwiebeln an, bis diese weich sind.
4) Geben Sie den Spinat hinzu und rühren Sie
alles, unter der Zugabe der Sahne, ca. 5 - 7
Minuten. Der Spinat sollte dann weich sein.
5) Schlagen Sie die Eier zu einer schaumigen
Masse und geben Sie diese unter ständigem
Rühren hinzu.
6) Rühren Sie solange weiter, bis das Ei fest wird
(ca. 4 - 5 Minuten).
7) Schmecken Sie mit Salz und Pfeff er ab.
Amaretto-Apfelmus
♦ 5 Äpfel
♦ 10 EL Amaretto
♦ 2 EL Zucker
♦ 1 TL Zimt
♦ 1 Päckchen Vanillezucker
1) Schälen und entkernen Sie die Äpfel.
2) Schneiden sie die Äpfel in kleine Stücke.
3) Stellen Sie den Temperaturregler 9 auf die
Stufe 3.
4) Geben Sie die Apfelstücke und alle Zutaten in die
Innenschale 5 und schließen Sie den Deckel 1.
5) Rühren Sie das Apfelmus ab und zu um.
6) Warten Sie 40 - 50 Minuten. Wenn die Apfelstücke noch nicht zerfallen sind, können Sie
diese mit einem Kartoff elstampfer o.ä. zu Mus
zerdrücken.
54
SMUK 1500 A1
Page 58

Spargel-Artischockensalat
♦ 2 Bund Spargel
♦ 1 Dose Artischockenherzen ca. 450 ml,
auf Wasser
♦ 3 Paprika
♦ 3 Zwiebeln
♦ Balsamico-Essig
1) Stellen Sie den Temperaturregler 9 auf die
Stufe 4.
2) Geben Sie Wasser zum Dampfgaren in die
Innenschale 5.
3) Setzen Sie das Dampfgarrost 0 in die
Innenschale 5 und legen Sie den geschälten
Spargel darauf.
4) Schließen Sie den Deckel 1.
5) Nach ca. 10 - 20 Minuten, je nach Dicke des
Spargels, ist der Spargel gar.
6) Lassen Sie die Artischockenherzen abtropfen
und teilen Sie diese in je 4 Stücke.
7) Zerkleinern Sie die Paprika und die Zwiebel.
8) Schneiden Sie den Spargel in kleine Stücke
und lassen Sie ihn erkalten.
9) Vermischen Sie alles in einer Schüssel und
geben Sie ein wenig Balsamico-Essig darüber.
Scharfer Dip
♦ 1 Chilischote
♦ 1/2 Paprikaschote
♦ 1 Knoblauchzehe
♦ 1 Glas Tomatensoße (ca. 250 g)
♦ 1 EL Öl
♦ 1/2 TL Chilipulver
♦ 1 Prise Paprikapulver, scharf
♦ 1/2 TL Pfeff er, grob geschrotet
1) Schälen Sie den Knoblauch und schneiden Sie
ihn in Scheiben.
2) Geben Sie das Öl in die Innenschale 5 und
stellen Sie den Temperaturregler 9 auf die
Stufe 4.
3) Braten Sie den Knoblauch kurz an.
4) Entkernen Sie die Chili und die Paprikaschote
und schneiden Sie sie in dünne Streifen.
5) Geben Sie die Chili und die Paprika auch in
die Innenschale 5 und dünsten Sie diese kurz
mit an.
6) Geben Sie die Tomatensoße hinzu und lassen
Sie den Dip etwas einkochen.
7) Schmecken Sie den Dip mit den Gewürzen ab.
Sie können nun Chips, Nachos oder Brot in den
Dip tauchen.
DE
AT
CH
SMUK 1500 A1
55
Page 59

Gedünsteter Lachs
♦ ca. 500 g Lachsfi let
♦ ca. 470 g Reis
♦ 400 ml Wasser
♦ 400 ml Hühnerbrühe
♦ 225 g Erbsen (aus der Tiefkühltruhe)
DE
AT
CH
♦ 1/4 Tasse Mandelsplitter
♦ etwas Butter
1) Geben Sie die Hühnerbrühe, das Wasser, den
Reis, die Mandelsplitter und die Erbsen in die
Innenschale 5.
2) Schließen Sie den Deckel 1.
3) Stellen Sie den Temperaturregler 9 auf die
Stufe 3 und warten Sie 5 Minuten.
4) Öff nen Sie den Deckel 1, setzen Sie das
Dampfgarrost 0 in die Innenschale 5 und
legen Sie die Lachsfi lets darauf. Bei Lachsfi let
aus der Tiefkühltruhe lassen Sie dieses vorher
auftauen. Geben Sie auf jedes Lachsfi let ein
Stückchen Butter.
5) Schließen Sie den Deckel 1 und lassen Sie
alles ca. 10 Minuten auf Stufe 3 garen.
HINWEIS
Je nach persönlichem Geschmack kann man
►
die Garzeit des Reises variieren:
Wenn Sie besonders weichen Reis mögen,
erhöhen Sie die Garzeit etwas. Füllen Sie
dann jedoch auch etwas mehr Wasser ein um
ein Anbrennen am Boden der Innenschale 5
zu vermeiden.
Wenn Sie körnigen Reis bevorzugen, kann
die Garzeit etwas verkürzt werden. Reduzieren Sie jedoch dann auch die Wassermenge,
da ansonsten Flüssigkeit in der Innenschale 5
zurückbleibt.
6) Stellen Sie dann den Temperatrurregler 9 auf
die Stufe 2 und warten Sie weitere 5 Minuten.
7) Drehen Sie dann den Temperaturregler 9 auf
„0“ und stellen Sie das Gerät aus.
8) Öff nen Sie den Deckel 1, entnehmen Sie
vorsichtig die Lachsfi lets vom Dampfgarrost 0
und entfernen Sie dieses. Rühren Sie den Reis
einmal um und lassen Sie ihn ca. 5 Minuten
bei geschlossenem Deckel ziehen.
9) Sie können nun den Lachs mit dem Reis
servieren.
Bratkartoff eln
♦ 5 Kartoff eln
♦ 2 Zwiebeln
♦ Salz und Pfeff er
♦ Olivenöl
1) Schälen Sie die Kartoff eln und schneiden Sie
dünne Scheiben daraus.
2) Schälen Sie die Zwiebeln und würfeln Sie sie.
3) Geben Sie eine dünne Schicht Olivenöl in die
Innenschale 5.
4) Stellen Sie den Temperaturregler 9 auf die
Stufe 5 und warten Sie, bis das Gerät aufgeheizt hat.
5) Geben Sie dann die Kartoff elscheiben und die
Zwiebeln hinein und lassen Sie sie goldbraun
braten. Wenden Sie die Kartoff elscheiben
zwischendurch.
6) Würzen Sie die Bratkartoff eln mit Salz und
Pfeff er.
Barbecue-Rippchen
♦ 1500 - 2500 g Rippchen (Sparerips)
♦ 1 Flasche Barbecuesoße
♦ 1 Päckchen Zwiebelsuppe
♦ 1 mittelgroße Zwiebel
♦ 100 ml Tomatensoße
♦ 1 1/2 Tasse Wasser
♦ 2 Kartoff eln
1) Schneiden Sie die Rippchen und entfernen Sie
das Fett.
2) Schälen Sie die Kartoff eln und die Zwiebel und
schneiden Sie sie in Würfel.
56
SMUK 1500 A1
Page 60

3) Stellen Sie den Temperaturregler 9 auf die
Stufe 4 und warten Sie, bis das Gerät aufgeheizt hat.
4) Mischen Sie die Zwiebelsuppe mit dem
Wasser an.
5) Geben Sie die Zwiebel, die Barbecuesoße und
die Zwiebelsuppe in die Innenschale 5 und
verrühren Sie alles.
6) Geben Sie dann die Rippchen und die Kartoffeln hinein.
7) Lassen Sie alles ca. 1 - 1,5 Stunden schmoren
(abhängig von der Dicke der Rippchen).
8) Stellen Sie danach den Temperaturregler 9
auf die Stufe 2-3 und lassen Sie alles ca. 2
Stunden köcheln.
Sandwiches
♦ 2 Toastscheiben (oder Hamburgerbrötchen)
♦ Corned Beef
♦ Käse (zum Beispiel Cheddar)
♦ abgetropftes Sauerkraut
♦ Mayonnaise/Remoulade
♦ Butter
1) Stellen Sie den Temperaturregler 9 auf die
Stufe 5 und warten Sie, bis das Gerät aufgeheizt hat.
2) Buttern Sie den Toast und rösten Sie diesen in
der Innenschale 5.
3) Nehmen Sie den Toast aus der Innenschale 5
und belegen Sie ihn mit Corned Beef, Sauerkraut, Mayonnaise/Remoulade und Käse.
4) Hängen Sie den Dampfgarrost 0 in das
Gerät.
5) Legen Sie den belegten Toast auf den Dampfgarrost 0 und schließen Sie den Deckel 1.
6) Warten Sie, bis der Käse geschmolzen ist.
Chili-Gericht
♦ 800 g Hackfl eisch (halb Rind, halb Schwein)
♦ 2 Zwiebeln
♦ 2 Dosen Tomatenstücke (ca. 800 ml)
♦ 2 Paprika
♦ 1 EL Chili, gemahlen
♦ 5 Chili-Schoten
♦ 1 TL Kümmel, gemahlen
♦ 1 Dosen rote Bohnen
♦ 1 Dose Mais
1) Stellen Sie den Temperaturregler 9 auf die
Stufe 5 und warten Sie, bis das Gerät aufgeheizt hat.
2) Geben Sie das Hackfl eisch in die Innenschale
5 und braten Sie es an.
3) Waschen, entkernen und schneiden Sie die
Paprika und die Chili-Schoten.
4) Schneiden Sie die Zwiebeln in kleine Stücke.
5) Tropfen Sie die Bohnen und den Mais ab.
Spülen Sie die Bohnen und den Mais einmal
unter klarem Wasser ab.
6) Geben Sie alle Zutaten in die Innenschale 5.
7) Stellen Sie den Temperaturregler 9 auf die
Stufe 2-3.
8) Schließen Sie den Deckel 1 und lassen Sie
alles ca. 2-3 Stunden köcheln, so dass die
Bohnen weich sind.
DE
AT
CH
SMUK 1500 A1
57
Page 61

Cranberry-Pute
♦ ca. 660 g Putenbrust
♦ ca. 500 ml Brühe (Putenbrühe)
♦ 375 g Cranberrys
1) Häuten Sie die Putenbrust.
DE
2) Stellen Sie den Temperaturregler 9 auf die
AT
CH
Stufe 5 und warten Sie, bis das Gerät aufgeheizt hat.
3) Braten Sie das Fleisch von beiden Seiten an.
4) Geben Sie dann die restlichen Zutaten hinzu
und schließen Sie den Deckel 1.
5) Stellen Sie den Temperaturregler 9 auf die
Stufe 3.
6) Lassen Sie das Fleisch 3 Stunden köcheln.
7) Zum Servieren schneiden Sie das Fleisch in
Streifen und garnieren Sie es mit der Soße.
Schmorbraten
♦ ca. 1350 g Rindfl eisch ohne Knochen
♦ 1 Päckchen Zwiebelsuppe
♦ 300 ml Wasser
♦ ca. 800 ml geschälte Tomaten (Dose)
♦ 2 große Karotten
♦ 3 Kartoff eln
♦ Salz, Pfeff er
1) Stellen Sie den Temperaturregler 9 auf die
Stufe 5 und warten Sie, bis das Gerät aufgeheizt ist.
2) Braten Sie das Fleisch in der Innenschale 5
an.
3) Mischen Sie die Zwiebelsuppe mit dem
Wasser.
4) Geben Sie die Zwiebelsuppe und die Tomaten
zu dem Fleisch in der Innenschale 5 hinzu.
5) Bringen Sie alles zum Kochen und stellen Sie
dann den Temperaturregler 9 auf die Stufe 3.
6) Schließen Sie den Deckel 1 und lassen Sie
alles ca. 1 1/2 Stunden köcheln. Drehen Sie
das Fleisch zwischendurch um.
58
HINWEIS
Wenn zwischendurch die Flüssigkeit in der
►
Innenschale 5 aufgebraucht ist, geben Sie
etwas Wasser hinzu.
7) Schälen Sie die Karotten und die Kartoff eln
und schneiden Sie sie in Streifen.
8) Geben Sie nach den 1 1/2 Stunden die Kartoff eln und die Karotten hinzu und lassen Sie
alles nocheinmal für 40 Minuten köcheln, so
dass das Fleisch und das Gemüse weich ist.
SMUK 1500 A1
Page 62

Zwiebelringe
♦ 3 große gelbe Zwiebeln
♦ 2 Tassen Bier (Zimmertemperatur)
♦ 1 1/2 Tassen Mehl
♦ Salz und Pfeff er
♦ Öl zum Frittieren
1) Mischen Sie das Mehl und das Bier in einer
Schüssel und lassen Sie es für 3 Stunden abgedeckt bei Zimmertemperatur stehen.
2) Füllen Sie zum frittieren geeignetes Öl in den
Innenschale 5 ein und stellen Sie den Temperaturregler 9 auf die Stufe
das Gerät aufgeheizt hat.
3) Schneiden Sie die Zwiebeln in ca. 1/2 cm
breite Scheiben und trennen Sie die Ringe.
4) Tauchen Sie die Zwiebelringe in den MehlBier-Teig und lassen Sie die Zwiebelringe dann
vorsichtig in das heiße Fett gleiten. Benutzen
Sie dafür eine hitzebeständige Zange.
HINWEIS
Benutzen Sie nicht den Frittierkorb 4 um die
►
Zwiebelringe in das Fett zu legen. An diesem
klebt die Panade beim Ausbacken fest und
reißt beim Herausnehmen vom Zwiebelring ab.
5) Frittieren Sie die Zwiebelringe ca. 2 Minuten.
Drehen Sie währenddessen die Zwiebelringe
einmal um, damit diese gleichmäßig braun
werden.
. Warten Sie, bis
•
Hähnchenfi let
♦ Hähnchenfi let
♦ 3 Tassen Mehl
♦ 2 EL Paprika (gemahlen)
♦ 2 Eier
♦ 1 Tasse Milch
♦ Salz und Pfeff er
♦ Öl zum Frittieren
1) Vermischen Sie die Eier, die Milch und die
Gewürze.
2) Geben Sie zum frittieren geeignetes Öl in die
Innenschale 5 und stellen Sie den Temperaturregler 9 auf die Stufe
Gerät aufgeheizt hat.
3) Rollen Sie das Hähnchenfi let erst in dem Mehl,
dann in der Ei-Mischung und dann nocheinmal
in dem Mehl.
4) Geben Sie das panierte Hähnchenfi let in den
Frittierkorb 4 und dann den Frittierkorb 4
vorsichtig in das heiße Öl und frittieren Sie das
Hähnchenfi let ca. 3 - 5 Minuten.
5) Stellen Sie dann den Temperaturregler 9
zurück auf die Stufe 4 und belassen Sie das
Hähnchenfi let für ca. 18 - 20 Minuten bei
geschlossenem Deckel 1 im Fett. Wenden Sie
das Hähnchenfi let zwischendurch.
6) Nach den 20 Minuten stellen Sie den Temperaturregler 9 wieder auf die Stufe
warten 4 - 5 Minuten.
7) Nehmen Sie dann das Hähnchenfi let vorsichtig
aus dem heißen Öl und lassen Sie es abtropfen.
. Warten Sie, bis das
•
•
und
DE
AT
CH
SMUK 1500 A1
59
Page 63

Pommes Frites
♦ ca. 4 Kartoff eln
♦ Salz
♦ Öl zum Frittieren
1) Schälen Sie die Kartoff eln.
DE
2) Schneiden Sie die Kartoff eln in schmale Stäb-
AT
CH
chen (Pommes Frites).
3) Geben Sie zum frittieren geeignetes Öl in die
Innenschale 5 und stellen Sie den Temperaturregler 9 auf die Stufe
Gerät aufgeheizt hat.
4) Geben Sie die Pommes Frites in den Frittierkorb 4.
5) Senken Sie den Frittierkorb 4 vorsichtig in das
heiße Öl und frittieren Sie die Pommes Frites
ca. 25 - 30 Minuten.
6) Heben Sie dann den Frittierkorb 4 vorsichtig
aus dem heißen Öl und hängen Sie diesen
am Rand ein, so dass überschüssiges Fett
abtropfen kann.
. Warten Sie, bis das
•
60
SMUK 1500 A1
Page 64

KOMPERNASS HANDELS GMBH
BURGSTRASSE 21
44867 BOCHUM
DEUTSCHLAND / GERMANY
www.kompernass.com
Estado de las informaciones
Last Information Update · Stand der Informationen:
07 / 2014 · Ident.-No.: SMUK1500A1-062014-3
IAN 90860
 Loading...