


CAR RADIO SAR 28 A1
CAR RADIO
Operating instructions
AUTORADIO
Bedienungsanleitung
IAN 106770
AUTORÁDIO
Návod na obsluhu

Before reading, unfold both pages containing illustrations and familiarise yourself with all functions of the
device.
Pred čítaním si odklopte obidve strany s obrázkami a potom sa oboznámte so všetkými funkciami prístroja.
Klappen Sie vor dem Lesen die beiden Seiten mit den Abbildungen aus und machen Sie sich anschließend
mit allen Funktionen des Gerätes vertraut.
GB Operating instructions Page 1
SK Návod na obsluhu Strana 29
DE / AT / CH Bedienungsanleitung Seite 57

A
B
C

D
33

Table of contents
Introduction . . . . . . . . . . . . . . . . . . . . . . . . . . . . . . . . . . . . . . . . . . . . . . . . .2
Preface . . . . . . . . . . . . . . . . . . . . . . . . . . . . . . . . . . . . . . . . . . . . . . . . . . . . . . . . . . . . . . . 2
Copyright . . . . . . . . . . . . . . . . . . . . . . . . . . . . . . . . . . . . . . . . . . . . . . . . . . . . . . . . . . . . . 2
Limitation of liability . . . . . . . . . . . . . . . . . . . . . . . . . . . . . . . . . . . . . . . . . . . . . . . . . . . . . 2
Notes on trademarks . . . . . . . . . . . . . . . . . . . . . . . . . . . . . . . . . . . . . . . . . . . . . . . . . . . . 2
Warnings . . . . . . . . . . . . . . . . . . . . . . . . . . . . . . . . . . . . . . . . . . . . . . . . . . . . . . . . . . . . . 3
Intended use . . . . . . . . . . . . . . . . . . . . . . . . . . . . . . . . . . . . . . . . . . . . . . . . . . . . . . . . . . . 3
Safety . . . . . . . . . . . . . . . . . . . . . . . . . . . . . . . . . . . . . . . . . . . . . . . . . . . . . . . . . . . . . . . . 4
Basic safety instructions . . . . . . . . . . . . . . . . . . . . . . . . . . . . . . . . . . . . . . . . . . . . . . . . . . 4
Package contents (see fold-out pages) . . . . . . . . . . . . . . . . . . . . . . . . . . . . . . . . . . . . . . . 5
Disposal of packaging . . . . . . . . . . . . . . . . . . . . . . . . . . . . . . . . . . . . . . . . . . . . . . . . . . . 5
Controls . . . . . . . . . . . . . . . . . . . . . . . . . . . . . . . . . . . . . . . . . . . . . . . . . . . . .6
Installation . . . . . . . . . . . . . . . . . . . . . . . . . . . . . . . . . . . . . . . . . . . . . . . . . .7
Connection . . . . . . . . . . . . . . . . . . . . . . . . . . . . . . . . . . . . . . . . . . . . . . . . . . . . . . . . . . . . 7
Installation . . . . . . . . . . . . . . . . . . . . . . . . . . . . . . . . . . . . . . . . . . . . . . . . . . . . . . . . . . . . 9
Removing the device . . . . . . . . . . . . . . . . . . . . . . . . . . . . . . . . . . . . . . . . . . . . . . . . . . . . 11
Using the device . . . . . . . . . . . . . . . . . . . . . . . . . . . . . . . . . . . . . . . . . . . . 12
Face plate . . . . . . . . . . . . . . . . . . . . . . . . . . . . . . . . . . . . . . . . . . . . . . . . . . . . . . . . . . . . 12
Handling and use . . . . . . . . . . . . . . . . . . . . . . . . . . . . . . . . . . . . . . . . . . . 13
Switching on and off . . . . . . . . . . . . . . . . . . . . . . . . . . . . . . . . . . . . . . . . . . . . . . . . . . . 13
Settings . . . . . . . . . . . . . . . . . . . . . . . . . . . . . . . . . . . . . . . . . . . . . . . . . . . . . . . . . . . . . . 13
Radio reset (RESET) . . . . . . . . . . . . . . . . . . . . . . . . . . . . . . . . . . . . . . . . . . . . . . . . . . . . 14
Radio functions . . . . . . . . . . . . . . . . . . . . . . . . . . . . . . . . . . . . . . . . . . . . . . . . . . . . . . . . 17
USB port . . . . . . . . . . . . . . . . . . . . . . . . . . . . . . . . . . . . . . . . . . . . . . . . . . . . . . . . . . . . . 19
Card reader . . . . . . . . . . . . . . . . . . . . . . . . . . . . . . . . . . . . . . . . . . . . . . . . . . . . . . . . . . 19
MP3 / WMA playback functions . . . . . . . . . . . . . . . . . . . . . . . . . . . . . . . . . . . . . . . . . . 20
Connecting an external audio device to the device . . . . . . . . . . . . . . . . . . . . . . . . . . . . 22
Cleaning . . . . . . . . . . . . . . . . . . . . . . . . . . . . . . . . . . . . . . . . . . . . . . . . . . 22
Safety instructions . . . . . . . . . . . . . . . . . . . . . . . . . . . . . . . . . . . . . . . . . . . . . . . . . . . . . . 22
Cleaning the display. . . . . . . . . . . . . . . . . . . . . . . . . . . . . . . . . . . . . . . . . . . . . . . . . . . . 22
Disposal . . . . . . . . . . . . . . . . . . . . . . . . . . . . . . . . . . . . . . . . . . . . . . . . . . . 22
Disposal of the device . . . . . . . . . . . . . . . . . . . . . . . . . . . . . . . . . . . . . . . . . . . . . . . . . . 22
Fault rectifi cation . . . . . . . . . . . . . . . . . . . . . . . . . . . . . . . . . . . . . . . . . . . 23
Safety instructions . . . . . . . . . . . . . . . . . . . . . . . . . . . . . . . . . . . . . . . . . . . . . . . . . . . . . . 23
Fault causes and rectifi cation . . . . . . . . . . . . . . . . . . . . . . . . . . . . . . . . . . . . . . . . . . . . . 23
Appendix . . . . . . . . . . . . . . . . . . . . . . . . . . . . . . . . . . . . . . . . . . . . . . . . . 24
Technical details . . . . . . . . . . . . . . . . . . . . . . . . . . . . . . . . . . . . . . . . . . . . . . . . . . . . . . . 24
EC Declaration of Conformity information . . . . . . . . . . . . . . . . . . . . . . . . . . . . . . . . . . . 25
Warranty . . . . . . . . . . . . . . . . . . . . . . . . . . . . . . . . . . . . . . . . . . . . . . . . . . . . . . . . . . . .26
Importer . . . . . . . . . . . . . . . . . . . . . . . . . . . . . . . . . . . . . . . . . . . . . . . . . . . . . . . . . . . . . 26
GB
SAR 28 A1
1

GB
Introduction
Preface
Congratulations on the purchase of your new device.
You have decided to purchase a high-quality product. These operating instructions
are part of the SAR 28 A1 car radio (hereafter referred to as the device) and
provide you with important instructions pertaining to the intended use, safety,
installation, connection and operation of the device.
The operating instructions must be kept near to the device at all times. They are
to be read and applied by all those working on installation, servicing and fault
rectifi cation of the device.
Keep these operating instructions in a safe place and pass them on to any future
owner together with the device.
Copyright
This documentation is subject to copyright protection.
Any copying or reproduction, including in the form of extracts, or any reproduction
of images (even in a modifi ed state), is permitted only with the written authorisation of the manufacturer.
Limitation of liability
All technical information, data and information in these operating instructions
pertaining to installation, connection and operation correspond to the latest
versions at the time of printing and to the best of our knowledge take into due
consideration our previous experience and expertise.
No claims can be derived from the details, illustrations and descriptions in these
instructions.
The manufacturer assumes no liability for damage caused by failure to observe
these instructions, non-intended use, improper repairs, making unauthorised modifi cations or using non-approved replacement parts.
Notes on trademarks
- USB® is a registered trademark of USB Implementers Forum, Inc.
All other names and products may be trademarks or registered trademarks of
their respective owners.
2
SAR 28 A1

Warnings
The following warnings are used in these operating instructions:
WARNING
A warning of this risk level indicates a potentially hazardous
situation.
Failure to avoid this hazardous situation could result in physical injury or death.
► Follow the instructions in this warning to prevent physical injury.
CAUTION
A warning of this risk level indicates potential material damage.
Not averting this situation could result in material damage
► Follow the instructions in this warning to prevent material damage.
NOTE
A notice indicates additional information that will assist you in handling the
►
device.
Intended use
This device is an entertainment electronics device intended solely for the reception
of FM radio stations, and also for the playback of MP3/WMA fi les from USB
data media and SD/MMC memory cards as well as audio signals from external
audio devices. The device is intended for installation into a vehicle. The device is
not intended for any other use or for uses extending beyond those stated.
GB
SAR 28 A1
WARNING
Risks from non-intended use!
Risks can arise if the device is used for non-intended purposes and/or other
types of usage.
► Only use the device for its intended purpose.
► Observe the procedures described in these operating instructions.
Claims of any kind for damage arising as a result of non-intended use are
excluded. The user is the sole bearer of the risk.
3

GB
Safety
This section provides you with important safety information regarding the handling of the device.
The device complies with statutory safety regulations. However, incorrect use can
result in injury and material damage.
Basic safety instructions
For safe handling of the device, follow the safety information below:
■ Before use, check the device for visible external damage. Do not use a
damaged device or one that has been dropped.
■ If the cables or connections are damaged, arrange for them to be exchanged
by an authorised specialist or customer service.
■ Those who, due to their physical, intellectual or motor abilities, are incapable
of using the device safely, may only use it whilst under the supervision or
direction of a person responsible.
■ Only permit children to use the device when under supervision.
■ Only have repairs carried out by authorised specialist companies or customer
service. Improper repairs can pose signifi cant risks to the user. Warranty
claims also become void.
■ Repairs to the device during the warranty period may only be carried out by
a customer service department authorised by the manufacturer. Otherwise
no additional warranty claims can be considered for subsequent damage.
■ Defective components may only be replaced with original replacement parts.
Only by using original replacement parts can it be guaranteed that safety
requirements are being complied with.
■ Protect the device from moisture and liquid penetration.
■ Packaging material must not be used as a play thing since it poses a risk of
suff ocation.
Traffi c safety
WARNING
Road traffi c safety has the highest priority!
Observe the following safety instructions so as not to endanger yourself or others:
► Before starting your journey, familiarise yourself with how to use the device.
► Only use the device when the traffi c situation allows it! Stop at a suitable
place if you wish to perform major confi gurations.
► Only remove or insert the face plate when the vehicle is parked.
► Set the volume to a moderate level so that the acoustic sirens of police vehicles,
fi re trucks and other emergency service vehicles can be heard in good time.
4
SAR 28 A1

Package contents (see fold-out pages)
WARNING
Risk of suff ocation!
► Packaging material must not be used as a play thing since it poses a risk of
suff ocation.
The following components are included in delivery:
▯ Car Radio (including face plate)
▯ Installation bracket (attached)
▯ Fixture plate (including securing material)
▯ Keys for installation frame (2x)
▯ Case for face plate
▯ Adapter cable for ISO Block A
▯ This operating manual
NOTE
Check the contents for completeness and for signs of visible damage.
►
► If the contents are not complete or are damaged due to defective packaging
or transportation, contact the service hotline (see warranty card).
Disposal of packaging
The packaging protects the device from damage caused during transit. The
packaging materials are selected according to their environmental friendliness
and disposal attributes - and are therefore recyclable.
Recirculation of packaging into the material fl ow saves on raw material and reduces the amount of waste generated. Dispose of packaging material no longer
needed in line with applicable local regulations.
GB
SAR 28 A1
NOTE
If possible, keep the device's original packaging during the warranty period
►
so that, in the event of a warranty claim, you can package the device
properly for its return.
5

GB
Controls
Car radio (see front fold out fl ap)
Figure A:
Button : Unlocking the face plate
2
Button /MU: Switching the device on and off / turning the sound off (MUTE)
3
MD/PTY button: Setting the operating mode / setting the PTY function
4
Button ▸▸I: Title / Station search forwards
5
Display
6
USB port
7
BD/DISP: Select memory level FM 1–3 / showing display information
8
AUX: 3.5 mm stereo input socket for the connection of an external audio device
9
6/FL+ button: Station memory location 6 / directory forwards during MP3/WMA playback
10
5/FL- button: Station memory location 5 / directory backwards during MP3/WMA playback
11
4/RDM button: Station memory location 4 / random play during MP3/WMA playback
12
3/INT button: Station memory location 3 / intro function during MP3/WMA playback
2/RPT button: Station memory location 2 / repeat function during MP3/WMA playback
13
14
1/PAU button: Station memory location 1 / pause playback (Pause)
15
I◂◂: Title / Station search backwards
16
A/PS : Automatic station memory / search function during MP3/WMA playback
17
Multi-controller: Turn to set values/volume
18
SEL (EQ/LD TA/AF) button: Call up Settings menu
Figure B:
19
Locking the face plate
20
Holder for face plate
21
Card reader for SD/MMC cards
22
RESET: Resetting the device
Figure C:
ISO block connection B
23
24
Automotive blade type fuse 7.5 A
25
ISO block connection A
26
SUBW: Audio cinch output for subwoofer
27
LINE OUT: Audio cinch output L/R for amplifi er
28
Antenna socket for DIN antenna plug
6
SAR 28 A1

Accessories (see rear fold out fl ap)
Figure D:
29
Case for face plate
30
Installation bracket
31
Key for installation bracket
32
Anchoring plate (including securing material)
33
Adapter cable for ISO Block A
Installation
WARNING
Damage can be caused when installing the device!
► If possible, have the device installed by a qualifi ed technician.
► If you wish to install the device yourself, follow the instructions for connec-
tion and installation for safe, fault-free use of the device. Incorrect installa-
tion can cause a fi re hazard!
Connection
CAUTION
Using incorrect connections can cause damage to the device.
► For installation, use the device's ISO connections. The vehicle-specifi c ISO
adapters you may require can be sourced from a specialist workshop, from
a local dealer or from a general store's technical department. Using other
connector types voids the warranty.
GB
SAR 28 A1
Assignment of the ISO connections
The view of the plug connector is from behind.
1357
2468
ISO A
(power supply
assignment)
Assignment
1 Not used
2 Not used
3 Not used
Steady plus 12 V
4
(terminal 30)
5 Antenna control voltage
6 Not used
Ignition circuit positive 12 V
7
(terminal 15)
Negative (-)
8
ground (terminal 31)
7

GB
Assignment
1 Rear right +
2 Rear right -
1357
2468
To connect the device to two speakers, only use the cables for the front speakers.
NOTE
Ensure that a steady plus connection is applied to the station memory of
►
connector 4 in ISO Block A.
► In some vehicle models, the default assignment of connectors [4] and [7] in
ISO Block A are interchanged at the factory. If this is the case, the station
memory can be lost. To remedy this, connectors 7 (ignition positive) and 4
(permanent plus) in ISO Block A must be swapped. To do this, connect the
supplied adapter cable 33 between the ISO Block A on the car stereo and
the car wiring harness.
Use the adapter cable to connect the red wire of the ISO plug to the yellow
wire in the ISO socket, and the yellow wire of the ISO plug to the red wire
in the ISO socket (see also back fold-out page).
CAUTION
When using the adapter cable for the ISO Block A, both connections
►
(red and yellow wires) must be connected together. Otherwise there is a
risk of a short circuit!
ISO B
(speaker connection assignment)
3 Front right +
4 Front right 5 Front left +
6 Front left 7 Rear left +
8 Rear left -
Antenna control voltage connection
CAUTION
Never load the antenna control voltage with the motor power cable or
►
other power consumers.
NOTE
If you want to use the antenna control system and the supplied adapter
►
33
cable
cable (blue) and push the contact into the appropriate duct of the ISO
Block A socket. For more information on wiring, refer to the instruction
manual of your vehicle.
8
you must remove the shrink tubing on the antenna control voltage
SAR 28 A1

The connector for the antenna control voltage is available for a relay-controlled
A
antenna. The relay then automatically extends the antenna out when the device is
switched on. When switched off , the antenna retracts back in. This connector can
also be used to control an external amplifi er. For exact connector information,
please consult the operating instructions for the amplifi er.
Connection of an external amplifi er
Use the LINE OUT 27 audio cinch output to connect an external amplifi er.
To do this, following the operating instructions for the external amplifi er.
Connection of an external subwoofer
Use the orange SUBW 26 cinch output to connect an external subwoofer.
To do this, follow the operating instructions for the external subwoofer.
Connection diagram
1234
5678
1234
5678
GB
ISO B
ISO
Installation
SAR 28 A1
The device can be installed into any standard ISO mounting bay. In the event that
your vehicle does not have an ISO mounting bay, contact your local specialist
workshop, local dealer or the technical department of a general store.
NOTE
Connect up the cables before fi nally installing the device.
►
Ensure that it is plugged in properly and that the system works correctly.
9
GB
Installation instructions
■ Install the device in the bay provided or select the installation location so
that all buttons can be reached easily without the driver being impeded.
■ Only connect the device to a 12 V car battery that is installed properly.
■ Only connect up the device within the vehicle via the ISO plugs.
■ Install the device in such a way as to prevent heat build-up and so that the
device is adequately ventilated.
■ Do not install the device where it is subjected to high temperatures (i.e. direct
sunlight or heating vents), heavy contamination or strong vibrations.
■ Should modifi cations to the vehicle be necessary, contact your vehicle dealer
or specialist workshop.
Installing the device into the ISO bay
♦ Remove the installation bracket 30 from the device housing. Use the
spanner supplied (see also chapter “Removing the device”).
♦ Place the installation bracket into the ISO mounting bay.
♦ Bend the tabs on the installation bracket with a screwdriver so that the
bracket is fi xed fi rmly into the mounting bay (see diagram).
31
10
♦ Check to ensure the bracket is securely fi xed.
♦ Connect the ISO socket block of the device to the two ISO plugs on your
vehicle.
♦ Connect the cable from the vehicle antenna to the antenna socket 28 on the
device. The vehicle-specifi c ISO adapters you may require can be sourced
from a specialist workshop, from a local dealer or from a general store’s
technical department.
♦ If required, connect the audio cinch cable of an external amplifi er to the
27
LINE OUT
socket on the device.
SAR 28 A1

♦ If required, connect the audio cinch cable of an external subwoofer to the
orange SUBW
♦ Protect your device against theft with additional measures as required.
Attach the securing screw with the anchoring plate 32 and the securing
material to the engine fi rewall of the vehicle.
CAUTION
Possible damage to the cable!
► To avoid damage, observe the position of the cables when sliding the
device into the bay. There is a fi re hazard if cables are damaged!
♦ Carefully push the device into the installation bracket 30 until it locks into
place.
♦ After all the connections have been established, press the RESET 22 button
for about 6 seconds with a ballpoint pen or other sharp object.
♦ Attach the face plate as described under “Installing the face plate”.
26
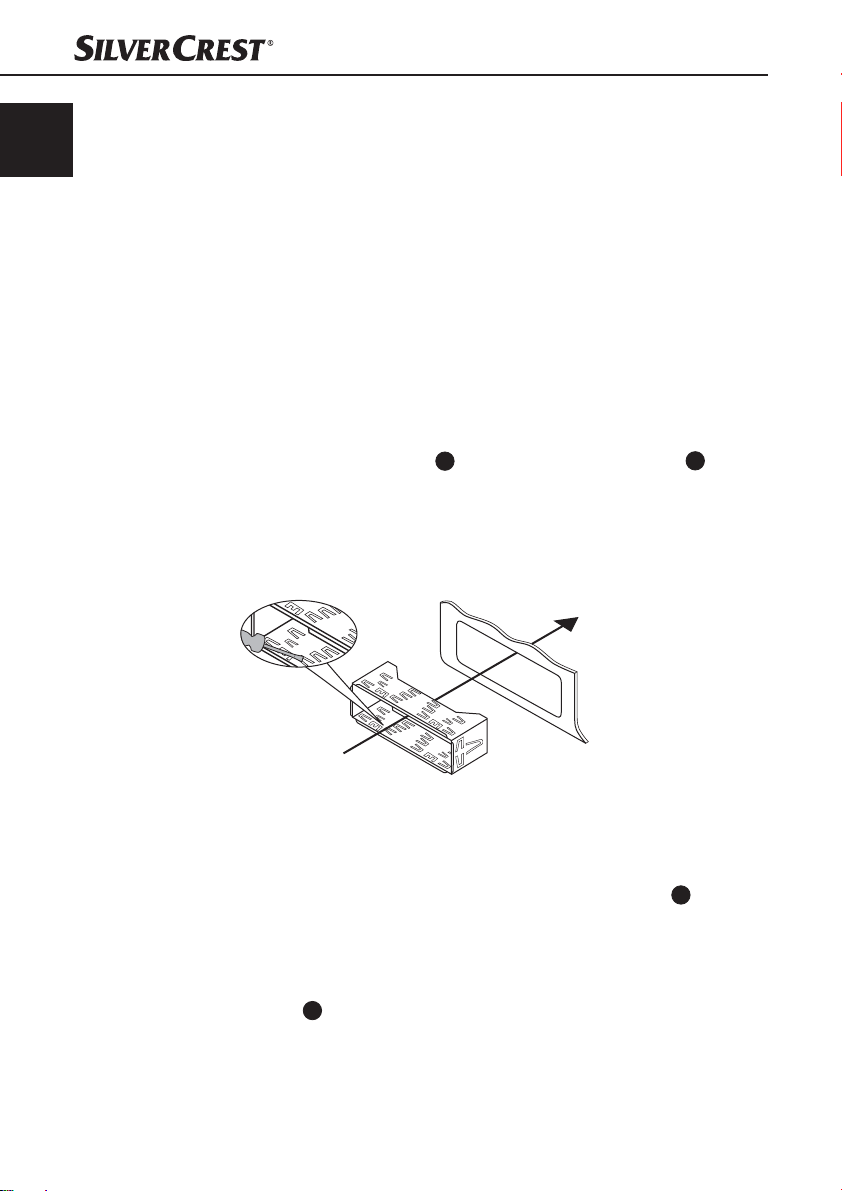
Removing the device
To remove the installed device, proceed as follows:
♦ Insert the right and left keys
device. Ensure that the elevations on the spanners are facing outwards
(The tabs are now bent back).
cinch socket on the device.
31
into their respective slots on the sides of the
GB
SAR 28 A1
♦ Pull the device out.
11

GB
Using the device
Face plate
You are able to remove the face plate from your device as an anti-theft measure.
Do not keep the face plate in your vehicle after removal.
NOTE
Always keep the face plate in its case 29 to protect it.
►
Inserting the face plate
♦ First, place the face plate with its right-hand
side against the holder
♦ Then press the left-hand side into the frame until
the locking mechanism
Check to ensure that the face plate is fi tted correctly
and is securely connected to the main device. Not
installing the face plate correctly can result in malfunctions when using the device.
Removing the face plate
♦ Press the button to unlock the face
plate. The left-hand side of the face plate jumps
forwards slightly.
♦ Remove the face plate by its left-hand side fi rst,
then by its right-hand side.
20
.
19
engages.
2.
1.
12
SAR 28 A1

Handling and use
This section provides you with important information on handling and using the
device.
NOTE
If no setting is confi gured and/or no button pushed within about 5 seconds,
►
the device returns to its previous operating mode. Settings changed are saved.
Switching on and off
♦ Press the /MU 2 button to switch the device on. The WELCOME display
is shown.
♦ To switch off , keep the /MU button pressed. The GOODBYE display is
shown.
Settings
WARNING
Hearing damage as a result of too high a volume!
Setting the volume too high can result in permanent hearing damage.
► Set the volume to moderate levels only.
Volume
♦ Turn the multi-controller 17 to set the volume.
GB
Switching mute on / off
Operating mode
SAR 28 A1
♦ Press the /MU button briefl y to turn the sound off . The MUTE ON message
appears in the display.
♦ Press the /MU button again to turn the sound on again. Muting is can-
celled when receiving a PTY or TA station or if you change station or source.
♦ Press the MD/PTY 3 button to switch between radio reception (TUNER),
card reader (CARD), USB port (USB) and audio input (AUX).
NOTE
The CARD and USB operating modes can only be enabled once the appro-
►
priate medium has been inserted.
13

GB
Display
♦ Press and hold the BD/DISP 7 button until the time (CT) is shown on the
display 5. Now keep pressing the BD/DISP button to have the following
information displayed in turn:
Radio station, time (automatically set with RDS reception), frequency and PTY settings (these RDS functions are sent by broadcasting services in various volumes;
also refer to Section “Radio functions”).
NOTE
►
If you are not receiving any RDS or PTY information, PTY NONE is shown on
the display.
► The radio switches back to standard operation after around 5 seconds
without user input.
Radio reset (RESET)
To reset the device to its default factory settings, keep the RESET 22 button
pressed for about 6 seconds with a sharp object, such as a pen.
NOTE
To access the RESET button, the face plate must be completely removed,
►
see also Section "Removing the face plate".
Reset the device:
▯ when using for the fi rst time,
▯ after connecting the cables,
▯ when not all function buttons are working,
▯ when an error message is shown on the display,
▯ if there is an obvious malfunction in the device.
14
SAR 28 A1

Settings using the SEL button (EQ/LD/TA/AF)
♦ Press the SEL 18 button on the device. The current bass setting is shown.
Each further press of the SEL button accesses the next setting.
The following settings are possible:
BAS - Bass (from -7 to +7)
TRE - Treble (from -7 to +7)
BAL - Balance (sound distribution between the right and left speakers),
from 0L to 9L and 0R to 9R
FAD - Fader (sound distribution between the front and rear speakers),
from 0F to 9F and 0R to 9R
VOL - Volume (from 0 to 20)
♦ Turn the multi-controller 17 to change the settings of the menu item
displayed.
Further settings using the SEL button (EQ/LD/TA/AF)
♦ Hold down the SEL button for about 2 seconds and then keep pressing the
SEL button until the required function is shown on the display.
♦ Turn the multi-controller to change the settings of the menu item displayed.
TA - Enabling / disabling Traffi c Announcement (traffi c information)
TA ON: If TA mode is enabled, the device immediately switches from other stations or operating modes to the radio station that is currently transmitting traffi c
information. TA is shown on the display.
GB
SAR 28 A1
NOTE
When the TA function is enabled, you can only search for or save stations
►
that are transmitting traffi c information. Stations that are transmitting traffi c
information signals are denoted in the display by TP.
TA OFF: The TA function is disabled.
AF - Enabling / disabling Alternative Frequencies
AF ON: When the AF function is enabled, the device searches for the current
station’s optimum frequency.
AF OFF: The AF function is disabled.
EQ - Equaliser
♦ Turn the multi-controller to select one of the FLAT, CLASSIC, ROCK, POP or
EQ OFF settings. No equaliser is enabled if EQ OFF is set. The equaliser
setting is shown at the bottom of the display.
15

GB
SUBW - Subwoofer
You can connect an active external subwoofer to produce a more powerful bass
eff ect.
♦ Turn the multi-controller 17 to enable the bass eff ect (SUBW ON) or disable it
(SUBW OFF).
AVOL - Set the volume when radio is switched on
♦ Turn the multi-controller to set the volume level used when the radio is turned on.
STEREO / MONO - Set the audio output
♦ Turn the multi-controller to set the audio output in radio mode to stereo (STE -
REO) or mono (MONO). If you are receiving a stereo station, the stereo symbol
appears on the display.
LOUD - Enable / disable the loudness function
♦ Turn the multi-controller to increase base or treble levels (LOUD ON) or to
disable the function (LOUD OFF). When the loudness function is enabled,
LOUD is shown on the right of the display.
Dx / LOCAL - Set reception sensitivity
♦ Turn the multi-controller to align the reception sensitivity to national stations
(DX) or regional stations (LOCAL).
Please note that only stations with good reception quality will be played under
the LOCAL setting.
CT - Set the time
NOTE
The device has an RDS-controlled clock. The clock sets itself automatically
►
when the RDS function is enabled and continues to run when the radio is
switched off . If you do not receive any RDS signal, you can set the time of
day manually.
16
♦ Turn the multi-controller to the right to set the minutes and to the left to set
the hours.
Adjust volume level for traffi c announcement transmission
HINWEIS
If a radio station with traffi c announcements is being received, the volume
►
level for traffi c announcement transmission can be set by rotating the multicontroller.
► The radio cannot be operated while you receive traffi c announcements
(display TRAFFIC). Only the „Volume“, „Mute“ and „Switch on/off “ functions can be selected.
SAR 28 A1

♦ Whilst you are receiving traffi c announcements (TA + TP appear at bottom
left of the display
TAVOL appears on the display, together with the current volume level setting.
♦ Use the multi-controller to set the desired volume level. The setting is saved
automatically after approx. 5 seconds.
Radio functions
Select memory level
♦ Press the BD/DISP 7 button to switch between station memory bands
(FM1, FM2, FM3).
Each station memory band covers the same frequency range (87.5 - 108 MHz)
and has 6 memory locations. The memory level is not displayed if the station
name is being displayed.
Automatic station search
♦ Keep the ▸▸I 4 or I◂◂ 15 button pressed to start automatic station search.
The search stops when a station is found.
Manual station selection
♦ Press the ▸▸I or I◂◂ button briefly to change the frequency in
0.05 MHz (FM) increments until the required frequency is set.
Storing radio stations
♦ Keep one of the 1 to 6 buttons pressed for about 2 seconds to store the
station currently selected. The showing of numbers 1 to 6 on the display
indicates a successful store.
5
), rotate the multi-controller 17 clockwise or anticlockwise.
GB
Selecting stations stored
Automatic storing
SAR 28 A1
♦ Use the BD/DISP button to select the memory level (FM1, FM2, FM3).
♦ Press one of the 1 to 6 buttons to select the station stored.
♦ Keep the A/PS 16 button pressed for 3 seconds. After the channel
search, the 6 saved stations are played successively for around 5 seconds,
and at the same time the memory slot number blinks. The search continues
automatically when weak stations are found.
17

GB
Run through the stations stored
♦ Press the A/PS 16 button briefl y. All saved stations for the current
memory level are played briefl y.
♦ When you hear the required station, press the A/PS button.
The station chosen remains selected.
Programme type (PTY)
You can use this function to search for a particular type of station. The following
settings are available:
POP M
ROCK M
NEWS
AFFAIRS
INFO
EASY M
LIGHT M
NOTE
Please note that this information is dependent on region, broadcasting
►
corporation and station.
Setting the PTY ID
♦ Keep pressing the MD/PTY 3 button until the PTY message is shown at
the bottom of the display.
♦ Then press one of the 1 to 6 buttons to select the required PTY entry.
♦ To change between the “Musical style” and “Vocal style” PTY entries, press
the MD/PTY button briefl y again when the fi rst PTY entry is displayed.
Buttons 1 to 6 are assigned as follows:
Button Musical genre Vocal style
1 POP M, ROCK M NEWS, AFFAIRS, INFO
2 EASY M, LIGHT M SPORT, EDUCATE, DRAMA
3 CLASSICS, OTHER M CULTURE, SCIENCE, VARIED
4 JAZZ, COUNTRY WEATHER, FINANCE, CHILDREN
5 NATION M SOCIAL, PHONE IN
6 FOLK M TRAVEL, LEISURE, DOCUMENT
SPORT
EDUCATE
DRAMA
CLASSICS
OTHER M
CULTURE
SCIENCE
VARIED
JAZZ
COUNTRY
WEATHER
FINANCE
CHILDREN
NATION M
SOCIAL
PHONE IN
FOLK M
TRAVEL
LEISURE
DOCUMENT
18
SAR 28 A1

If there is no further input for 2 seconds, an automatic search for stations matching
the PTY entry starts. The search stops when the fi rst station is found. The selected
PTY entry blinks in the display
Disabling / enabling the PTY function
♦ Press the MD/PTY 3 button to activate the PTY search.
The PTY symbol is shown on the display with the last PTY entry selected
(e.g. POP M).
Only stations with the PTY ID currently selected are included in the station search.
♦ Press the MD/PTY button again to disable the PTY search. PTY is no longer
shown on the display.
Station search by PTY ID
♦ If you do not input anything for 2 seconds whilst a PTY ID is being dis-
played, an automatic search for stations matching this PTY ID is started.
If no stations matching this PTY ID are found, PTY NONE is shown briefl y and the
search then ends at the station last set.
USB port
The device can process USB data carriers up to 16 GB.
Connecting data carriers
♦ Push the USB port protective cap to the right.
♦ Connect your USB device to the port.
♦ To protect against dirt, replace the protective cap on the USB port when no
USB device is connected.
5
during the channel search.
GB
Card reader
Connecting data carriers
SAR 28 A1
The device can process SD/MMC memory cards up to 2 GB, and SDHC
memory cards up to 32 GB.
♦ Press the button to unlock the face plate and remove it from the
device (see also Section “Removing the face plate”).
♦ Push a memory card into the memory card slot with the lettering pointing
upwards until it engages.
19

GB
MP3 / WMA playback functions
Playback
■ The device can play back fi les in the MP3 and WMA formats.
■ A mixture of titles and directories on the same level can cause problems
when playing back.
■ During playback, the information from the MP3 fi le ID3 tag is read and
shown in turn on the display.
♦ Playback of the MP3 or WMA title on the USB device or memory card
begins automatically.
Stop playback
♦ Press the 1/PAU 14 button to stop playback. The current title play time
5
.
♦ Press the 1/PAU button again to continue playback.
NOTE
►
Skip title
♦ Press the ▸▸I 4 or I◂◂ 15 button to select the next or previous title.
blinks in the display
Keep the 1/PAU button pressed to play the first title on the storage
medium.
The title number is shown on the display.
20
Fast forward/backward
♦ Hold down the ▸▸I or I◂◂ button for longer to start fast forward or backward.
Repeat function (RPT - Repeat)
♦ Press the RPT/2 13 button several times to switch between the repeat
functions. The following settings are available:
– RPT ONE: The current title is repeated.
– RPT DIR: All titles in the current directory are repeated.
– RPT ALL: All titles on the storage medium are repeated.
If the RPT ONE or RPT DIR function is enabled, RPT is shown on the display.
SAR 28 A1

Title sampling
♦ Press the 3/INT 12 button. INT ON appears briefl y on the display. All titles
are played back one after the other for approximately 10 seconds.
♦ Press the 3/INT button again to commence playback of the title currently
selected. INT OFF appears briefl y on the display.
Random playback of all titles (RDM - Random)
♦ Press the 4/RDM 11 button. RDM ON appears briefl y on the display. A
randomly controlled playback is started. The notifi cation RDM also appears
on the display.
♦ Press the 4/RDM button to commence normal playback again. RDM OFF
appears briefl y on the display and the notifi cation RDM disappears.
Skip directory
♦ Press the 6/FL+ 9 button to skip to the next directory or the 5/FL- 10
button to skip to the previous directory. Playback starts automatically.
Search functions
Title number search
GB
SAR 28 A1
♦ Press the A/PS
♦ Turn the multi-controller 17 to set the fi rst digit of the title number required.
♦ Press the SEL 18 button to confi rm the entry and to skip to entry of the
second, third or fourth digit.
♦ Press the 1/PAU 14 button to commence playback of the selected title.
Title name search
♦ Press the A/PS button twice. A-SEARCH is shown on the display. The
search for title names starts immediately. If no title starting with the digit set
is found, NONE is displayed.
♦ Turn the multi-controller until the desired character or digit appears.
♦ Press the ▸▸I 4 or I◂◂ 15 button to confi rm the character set and to display
all titles beginning with the required character.
♦ Press the 1/PAU button to commence playback of the title displayed.
16
button.
21

GB
Search for directories
♦ Press the A/PS 16 button three times. The directory currently being
played back is shown.
♦ Turn the multi-controller 17 to switch between the available directories.
♦ Press the 1/PAU 14 button to select the directory currently being displayed.
Playback of the fi rst title from the selected directory starts immediately.
Connecting an external audio device to the device
♦ Connect the audio output of an external audio device (e.g. an MP3 player)
via a 3.5 mm stereo jack plug to the AUX 8 socket on the front panel of
the device.
♦ Select audio input playback by repeatedly pressing the MD/PTY 3
button until AUX is shown on the display.
Cleaning
Safety instructions
CAUTION
Possible damage to the device
► To avoid irreparable damage, ensure that no moisture penetrates into the
device whilst it is being cleaned.
Cleaning the display
■ Only clean the front panel of the device / the display with a soft, moist,
lint-free cloth and mild dish washing liquid.
Disposal
Disposal of the device
Never dispose of the device in your normal domestic waste.
This product is subject to the provisions of European Directive
2012/19/EU-WEEE (Waste Electrical and Electronic Equipment).
Dispose of the device through an approved disposal centre or at your community
waste facility. Please observe currently applicable regulations. Please contact
your waste disposal centre should you be in any doubt.
22
SAR 28 A1

Fault rectifi cation
This section contains important information on fault localisation and rectifi cation.
Follow the instructions to avert hazards and damage.
Safety instructions
WARNING
Observe the following safety instructions to avert hazards and material
damage:
► Repairs to electrical devices may only be carried out by specialists trained
by the manufacturer. Improper repairs can represent considerable risk to
users and can cause damage to the device.
Fault causes and rectifi cation
The following table can help with localising and rectifying minor faults:
Defect Possible cause Rectifi cation
GB
The device will
not switch on
No sound
The Function
buttons are not
working
The radio and/
or automatic
station store
function are/is
not working
The station
memory is not
working
The ignition is not switched on. Switch the ignition on by turning the key.
The fuse is defective. Replace the fuse.
The volume is set to minimum. Increase the playback volume.
The cables are not connected
correctly.
The sound is turned off .
There is a fault with the
device.
The faceplate has not been
mounted.
The antenna cable is not connected correctly.
The station signals are too
weak.
Connector 4 in ISO Block A
(steady plus) is not connected correctly.
Check the cable connections.
Press the
sound back on.
Press the RESET button.
Check that the face plate is installed
correctly.
Check the antenna cable for correct
connection.
Set the station manually.
Check the cable connections. Please
refer to the "Connections" section.
/MU button to turn the
SAR 28 A1
23

GB
Defect Possible cause Rectifi cation
The USB port is intended for
devices working in accord-
The device on
the USB port is
not working
The card reader
cannot read the
card
NOTE
►
ance with the USB standard.
Not all devices available on
the marketplace conform to
this standard. It is a possibility that a device not working
in accordance with the USB
standard is connected.
The card may be defective,
dirty or not properly inserted.
Please contact Customer Service (see warranty card) if you are unable to
resolve the problem with any of the above actions.
Connect a device that works in accordance with the USB standard. Check that
the data carrier is formatted with the
FAT32 fi le system.
Check the card. Slide it in with the lettered side pointing upwards. Check that
the data carrier is formatted with the
FAT32 fi le system.
Appendix
Technical details
General
24
Input voltage 12 V DC
Input current max. 7.5 A
Rated power 4 x 7 W
Operating temperature +5 - +40 °C
Storage temperature 0 - +50 °C
Humidity (no condensation) ≤ 75 %
Dimensions (L x W x H) approx. 18.6 x 12.7 x 5.7 cm
Weight including accessories approx. 700 g
Device fuse
Automotive blade type fuse
7.5 A
SAR 28 A1

Radio frequency range*
Frequency FM (VHF) 87.5 - 108 MHz
Station memory locations FM (VHF) 18 locations
Audio input (AUX)
Stereo jack plug 3.5 mm
Audio output
2 x cinch socket for external amplifi er (L/R)
1 x cinch socket for external subwoofer
USB port
USB 1.1 and 2.0 compatible data carrier (to 16 GB)
Card slot
SD/MMC memory card connector (SD/MMC to 2 GB, SDHC to 32 GB)
* The technical features of this device enable an adjustable frequency range of
FM 87.5 –108 MHz. In some countries, diff erent national regulations may
apply to the assigned radio frequency ranges. Please note that information
received outside of the assigned radio frequency ranges may not be exploited,
passed on to third parties or otherwise misused.
GB
EC Declaration of Conformity information
This device satisfi es the fundamental requirements and other
relevant regulations of Vehicle Directive 2004/104/EC.
The full original Declaration of Conformity is available from
the importer.
SAR 28 A1
25

GB
Warranty
The warranty for this appliance is for 3 years from the date of purchase. The
appliance has been manufactured with care and meticulously examined before
delivery.
Please retain your receipt as proof of purchase. In the case of a warranty claim,
please make contact by telephone with our Customer Service Department. Only
in this way can a post-free despatch for your goods be assured.
NOTICE
►
This product is for domestic use only and is not intended for commercial use. The
warranty is void in the case of abusive and improper handling, use of force and
internal tampering not carried out by our authorised service branch.
Your statutory rights are not restricted in any way by this warranty. The warranty
period is not extended by repairs made under the warranty. This applies also to
replaced and repaired parts.
Damages and defects extant at the time of purchase must be reported immediately after unpacking, resp. no later than two days after the date of purchase.
Repairs made after the lapse of the warranty period are subject to charge.
Importer
KOMPERNASS HANDELS GMBH
BURGSTRASSE 21
44867 BOCHUM
GERMANY
www.kompernass.com
The warranty covers only claims for material and manufacturing defects,
but not for transport damage, wearing parts or for damage to fragile
components, e.g. buttons or batteries.
26
SAR 28 A1
Car Radio
SAR 28 A1
Please contact the Service hotline
to guarantee free repair. Ensure you
have your sales receipt handy.
Sender, please write clearly:
Last name
First name
Street
Post code/Town
Country
Warranty
Service Great Britain
Tel.: 0871 5000 720 (£ 0.10/Min.)
E-Mail: kompernass@lidl.co.uk
IAN 106770
Hotline availability:
Monday to Friday 08:00 - 20:00 (CET)
Telephone
Complete this section and include it with the device!
Date/Signature
Fault description:


Obsah
Úvod . . . . . . . . . . . . . . . . . . . . . . . . . . . . . . . . . . . . . . . . . . . . . . . . . . . . . 30
Predhovor . . . . . . . . . . . . . . . . . . . . . . . . . . . . . . . . . . . . . . . . . . . . . . . . . . . . . . . . . . . .30
Autorské práva . . . . . . . . . . . . . . . . . . . . . . . . . . . . . . . . . . . . . . . . . . . . . . . . . . . . . . . . 30
Obmedzenie ručenia . . . . . . . . . . . . . . . . . . . . . . . . . . . . . . . . . . . . . . . . . . . . . . . . . . . 30
Upozornenia pre ochranné známky . . . . . . . . . . . . . . . . . . . . . . . . . . . . . . . . . . . . . . . . 30
Varovania . . . . . . . . . . . . . . . . . . . . . . . . . . . . . . . . . . . . . . . . . . . . . . . . . . . . . . . . . . . .31
Používanie podľa účelu . . . . . . . . . . . . . . . . . . . . . . . . . . . . . . . . . . . . . . . . . . . . . . . . . 31
Bezpečnosť . . . . . . . . . . . . . . . . . . . . . . . . . . . . . . . . . . . . . . . . . . . . . . . . . . . . . . . . . . .32
Základné bezpečnostné pokyny . . . . . . . . . . . . . . . . . . . . . . . . . . . . . . . . . . . . . . . . . . 32
Rozsah dodávky (pozri výklopné strany) . . . . . . . . . . . . . . . . . . . . . . . . . . . . . . . . . . . . 33
Likvidácia obalových materiálov . . . . . . . . . . . . . . . . . . . . . . . . . . . . . . . . . . . . . . . . . . 33
Ovládacie prvky. . . . . . . . . . . . . . . . . . . . . . . . . . . . . . . . . . . . . . . . . . . . 34
Inštalácia . . . . . . . . . . . . . . . . . . . . . . . . . . . . . . . . . . . . . . . . . . . . . . . . . . 35
Pripojenie . . . . . . . . . . . . . . . . . . . . . . . . . . . . . . . . . . . . . . . . . . . . . . . . . . . . . . . . . . . . 35
Montáž . . . . . . . . . . . . . . . . . . . . . . . . . . . . . . . . . . . . . . . . . . . . . . . . . . . . . . . . . . . . . . 37
Vymontovanie prístroja . . . . . . . . . . . . . . . . . . . . . . . . . . . . . . . . . . . . . . . . . . . . . . . . . . 39
Uvedenie do prevádzky . . . . . . . . . . . . . . . . . . . . . . . . . . . . . . . . . . . . . 40
Ovládací diel . . . . . . . . . . . . . . . . . . . . . . . . . . . . . . . . . . . . . . . . . . . . . . . . . . . . . . . . . 40
Obsluha aprevádzka . . . . . . . . . . . . . . . . . . . . . . . . . . . . . . . . . . . . . . . 41
Zapnutie a vypnutie . . . . . . . . . . . . . . . . . . . . . . . . . . . . . . . . . . . . . . . . . . . . . . . . . . . . 41
Nastavenia . . . . . . . . . . . . . . . . . . . . . . . . . . . . . . . . . . . . . . . . . . . . . . . . . . . . . . . . . . .41
Resetovanie rádia (RESET) . . . . . . . . . . . . . . . . . . . . . . . . . . . . . . . . . . . . . . . . . . . . . . . 42
Funkcie rádia . . . . . . . . . . . . . . . . . . . . . . . . . . . . . . . . . . . . . . . . . . . . . . . . . . . . . . . . . 45
Prípojka USB . . . . . . . . . . . . . . . . . . . . . . . . . . . . . . . . . . . . . . . . . . . . . . . . . . . . . . . . . .47
Čítačka kariet . . . . . . . . . . . . . . . . . . . . . . . . . . . . . . . . . . . . . . . . . . . . . . . . . . . . . . . . .47
Prehrávanie súborov MP3 a WMA . . . . . . . . . . . . . . . . . . . . . . . . . . . . . . . . . . . . . . . . 48
Pripojenie externého zvukového zariadenia k prístroju . . . . . . . . . . . . . . . . . . . . . . . . . 50
Čistenie . . . . . . . . . . . . . . . . . . . . . . . . . . . . . . . . . . . . . . . . . . . . . . . . . . . 50
Bezpečnostné pokyny . . . . . . . . . . . . . . . . . . . . . . . . . . . . . . . . . . . . . . . . . . . . . . . . . . 50
Čistenie displeja . . . . . . . . . . . . . . . . . . . . . . . . . . . . . . . . . . . . . . . . . . . . . . . . . . . . . . . 50
Likvidácia . . . . . . . . . . . . . . . . . . . . . . . . . . . . . . . . . . . . . . . . . . . . . . . . . 50
Likvidácia prístroja . . . . . . . . . . . . . . . . . . . . . . . . . . . . . . . . . . . . . . . . . . . . . . . . . . . . . 50
Odstraňovanie porúch . . . . . . . . . . . . . . . . . . . . . . . . . . . . . . . . . . . . . . . 51
Bezpečnostné pokyny . . . . . . . . . . . . . . . . . . . . . . . . . . . . . . . . . . . . . . . . . . . . . . . . . . 51
Príčiny aodstraňovanie porúch . . . . . . . . . . . . . . . . . . . . . . . . . . . . . . . . . . . . . . . . . . . 51
Dodatok . . . . . . . . . . . . . . . . . . . . . . . . . . . . . . . . . . . . . . . . . . . . . . . . . . 52
Technické údaje . . . . . . . . . . . . . . . . . . . . . . . . . . . . . . . . . . . . . . . . . . . . . . . . . . . . . . . 52
Vyhlásenie ozhode . . . . . . . . . . . . . . . . . . . . . . . . . . . . . . . . . . . . . . . . . . . . . . . . . . . . 53
Záruka . . . . . . . . . . . . . . . . . . . . . . . . . . . . . . . . . . . . . . . . . . . . . . . . . . . . . . . . . . . . . . 54
Dovozca . . . . . . . . . . . . . . . . . . . . . . . . . . . . . . . . . . . . . . . . . . . . . . . . . . . . . . . . . . . . .54
SK
SAR 28 A1
29

SK
Úvod
Predhovor
Srdečne vám gratulujeme ku kúpe tohto nového prístroja.
Rozhodli ste sa tým pre vysokokvalitný výrobok. Tento návod na obsluhu je
súčasťou autorádia SAR 28 A1 (ďalej uvedeného len ako prístroj) a poskytuje
dôležité pokyny pre používanie v súlade s jeho určením, pre bezpečnosť,
zabudovanie a pripojenie, ako aj pre obsluhu prístroja.
Návod na obsluhu musí byť trvale kdispozícii vblízkosti prístroja. Musí si ho
prečítať a riadiť sa ním každá osoba, ktorá vykonáva zabudovanie, obsluhu
a odstraňovanie porúch prístroja.
Uschovajte si tento návod na obsluhu aodovzdajte ho ďalšiemu majiteľovi spolu
sprístrojom.
Autorské práva
Táto dokumentácia je chránená podľa zákona oautorských právach.
Akékoľvek rozmnožovanie alebo dotlač, aj čiastková, ako aj reprodukcia obráz-
kov, aj v zmenenej podobe, je povolená len s písomným súhlasom výrobcu.
Obmedzenie ručenia
Všetky technické ifnormácie, uvedené v tomto návode na obsluhu, ako aj údaje
a pokyny na zabudovanie, pripojenie a obsluhu, zodpovedajú najnovšiemu stavu
pri odovzdávaní do tlače a zohľadňujú s najlepším vedomím naše doterajšie
skúsenosti a znalosti.
Zúdajov, zobrazení apopisov vtomto návode nemožno odvodzovať žiadne
nároky.
Výrobca nepreberá ručenie za škody, ktoré vzniknú nedodržaním tohto návodu,
nesprávnym používaním, neodbornými opravami, nepovolenými zmenami alebo
použitím nepovolených náhradných dielov.
Upozornenia pre ochranné známky
- USB® je registrovaná ochranná známka spoločnosti USB Implementers Forum, Inc..
Všetky ďalšie názvy a výrobky môžu byť ochrannými známkami alebo registrova-
nými ochrannými známkami ich vlastníkov.
30
SAR 28 A1

Varovania
Vtomto návode na obsluhu sú uvedené nasledujúce varovania:
VAROVANIE
Varovanie s týmto stupňom nebezpečenstva označuje možnú
nebezpečnú situáciu.
Ak sa nezabráni nebezpečnej situácii, môže to mať za následok zranenie
alebo smrť.
► Riaďte sa pokynmi vtomto varovaní, aby ste zabránili zraneniu osôb.
POZOR
Varovanie stýmto stupňom nebezpečenstva označuje možné
vecné škody.
Ak sa nevyhnete nebezpečnej situácii, môže to viesť kvecným škodám.
► Riaďte sa pokynmi vtomto varovaní, aby ste zabránili vecným škodám.
UPOZORNENIE
Upozornenie obsahuje dodatočné informácie, ktoré uľahčujú zaobchádzanie
►
sprístrojom.
Používanie podľa účelu
Tento prístroj je prístroj zábavnej technológie je určený len na príjem rozhlasových staníc v pásme FM, ako aj na prehrávaniesúborov MP3/WMA na
dátových nosičoch USB a pamäťových kartách SD/MMCa zvukových signálov
z externých audiozariadení. Tento prístroj je určený na zabudovanie do vozidla.
Akékoľvek iné používanie platí ako nezodpovedajúce určeniu prístroja.
SK
SAR 28 A1
VAROVANIE
Nebezpečenstvo pri používaní nezodpovedajúcom určeniu!
Pri nesprávnom alebo akomkoľvek inom používaní prístroja môže dôjsť ku
vzniku nebezpečenstiev.
► Tento prístroj používajte výlučne vzmysle jeho určenia.
► Dodržte vtomto návode na obsluhu opísané postupy obsluhy.
Nároky akéhokoľvek druhu za škody, spôsobené používaním nezodpovedajúcim
určeniu, sú vylúčené. Riziko nesie výlučne používateľ.
31

SK
Bezpečnosť
Vtejto kapitole získate dôležité bezpečnostné pokyny ozaobchádzaní sprístrojom.
Tento prístroj zodpovedá príslušným bezpečnostným predpisom. Jeho neodborné
používanie však môže viesť k poraneniu osôb a vecným škodám.
Základné bezpečnostné pokyny
Pre bezpečné zaobchádzanie sprístrojom dodržiavajte nasledujúce bezpečnostné
pokyny:
■ Skontrolujte prístroj pred použitím, či nemá zvonka viditeľné poškodenia.
Poškodený alebo spadnutý prístroj neuvádzajte do prevádzky.
■ Ak dôjde kpoškodeniu káblov alebo prívodov, nechajte ich vymeniť autori-
zovaným odborníkom alebo vzákazníckom servise.
■ Osoby, ktoré kvôli svojim telesným, duševným alebo motorickým schopnos-
tiam nie sú schopné prístroj bezpečne obsluhovať, smú prístroj používať len
pod dozorom alebo podľa príkazov zodpovednej osoby.
■ Deťom dovoľte prístroj používať len ak sú pod dozorom.
■ Opravy prístroja smie vykonávať iba autorizovaný odborník alebo zákaz-
nícky servis. Neodbornými opravami môžu pre používateľa vzniknúť značné
nebezpečenstvá. Okrem toho zaniknú nároky na záruku.
■ Opravy prístroja vpriebehu záručnej doby smie vykonávať len výrobcom
autorizovaný zákaznícky servis, inak pri následných škodách záruka stráca
platnosť.
■ Chybné diely sa smú vymeniť len za originálne náhradné diely. Len pri
takýchto dieloch je zabezpečené, že budú splnené požiadavky na bezpečnosť.
■ Chráňte prístroj pred vlhkosťou avniknutím tekutín dovnútra.
■ Obalové materiály sa nesmú používať na hranie. Hrozí nebezpečenstvo
udusenia.
32
Bezpečnosť dopravy
VAROVANIE
Bezpečnosť v cestnej premávke má najvyššiu prioritu!
Dodržte nasledujúce bezpečnostné pokyny, aby ste seba ani iných neohrozili:
► Pred začiatkom jazdy sa oboznámte s obsluhou prístroja.
► Autorádio obsluhujte len vtedy, keď to dopravná situácia umožňuje. Zastavte
na vhodnom mieste, ak potrebujete urobiť rozsiahlejšie ovládanie.
► Ovládací diel snímajte alebo nasadzujte len vtedy, keď je vozidlo zastavené.
► Nastavte primeranú hlasitosť tak, aby ste mohli včas počuť akustické signály
polície, hasičov a iných záchranných služieb.
SAR 28 A1

Rozsah dodávky (pozri výklopné strany)
VAROVANIE
Nebezpečenstvo udusenia!
► Obalové materiály sa nesmú používať na hranie. Hrozí nebezpečenstvo
udusenia.
Dodávka sa skladá z nasledujúcich komponentov:
▯ Autorádio (vrátane ovládacieho dielu)
▯ Montážny rám (nasunutý)
▯ Kotviaci plech (vrátane upevňovacieho materiálu)
▯ Kľúč k montážnemu rámu (2 ks)
▯ Puzdro na ovládací diel
▯ Kábel adaptéra ISO bloku A
▯ Tento návod na obsluhu
UPOZORNENIE
Skontrolujte dodávku, či je kompletná abez viditeľných poškodení.
►
► V prípade nekompletnej dodávky alebo poškodení, spôsobených zlým
balením alebo prepravou, sa obráťte na zákaznícku linku servisu (pozri
záručný list).
Likvidácia obalových materiálov
Obal chráni prístroj pred poškodením pri preprave. Voľba obalových materiálov
zohľadňuje ekologické alikvidačno-technické hľadiská, apreto sú tieto materiály
recyklovateľné.
Vrátenie obalových materiálov späť do obehu šetrí surovinami aznižuje náklady
na odpad. Nepotrebné obalové materiály zlikvidujte podľa miestne platných
predpisov.
SK
SAR 28 A1
UPOZORNENIE
Podľa možnosti si odložte obalové materiály počas záručnej doby prístroja,
►
aby ste mohli prístroj vprípade uplatňovania záruky správne zabaliť.
33

SK
Ovládacie prvky
Autorádio (pozri prednú výklopnú stranu)
Obrázok A:
Tlačidlo : Odistenie ovládacieho dielu
2
Tlačidlo /MU: Zapnutie a vypnutie prístroja/vypnutie zvuku (MUTE)
3
Tlačidlo MD/PTY: Nastavenie prevádzkového režimu/nastavenie funkcie PTY
4
Tlačidlo ▸▸I: Vyhľadávanie skladieb alebo rozhlasových staníc vpred
5
Displej
6
Zásuvka USB
7
BD/DISP: Voľba rozsahu pamäťových miest FM 1 - 3/zobrazenie informácií na
displeji
8
AUX: 3,5 mm stereofónny vstupný konektor pre pripojenie externého
zvukového zariadenia
9
Tlačidlo 6/FL+: Pamäťové miesto 6 na stanice/
adresár vpred pri prehrávaní súborov MP3 alebo WMA
10
Tlačidlo 5/FL-: Pamäťové miesto 5 na stanice/
adresár vzad pri prehrávaní súborov MP3 alebo WMA
11
Tlačidlo 4/RDM: Pamäťové miesto 4 na stanice/
náhodné poradie pri prehrávaní súborov MP3 alebo WMA
12
Tlačidlo 3/INT: Pamäťové miesto 3 na stanice/
funkcia intro pri prehrávaní súborov MP3 alebo WMA
Tlačidlo 2/RPT: Pamäťové miesto 2 na stanice/
13
opakovanie pri prehrávaní súborov MP3 alebo WMA
14
Tlačidlo 1/PAU: Pamäťové miesto 1 na stanice/pozastavenie prehrávania (pauza)
15
I◂◂: Vyhľadávanie skladieb/rozhlasových staníc vzad
16
A/PS : Automatické ukladanie staníc do pamäte/
vyhľadávanie pri prehrávaní súborov MP3 alebo WMA
17
Viacúčelový regulátor: Otáčaním sa nastavujú hodnoty alebo hlasitosť
18
Tlačidlo SEL (EQ/LD TA/AF): Vyvolanie menu nastavení
Obrázok B:
19
Zaistenie ovládacieho dielu
20
Záchytný bod ovládacieho dielu
21
Čítačka kariet SD alebo MMC
22
RESET: Resetovanie prístroja
Obrázok C:
Prípojka B bloku ISO
23
24
7,5 A plochá automobilová poistka
25
Prípojka A bloku ISO
26
SUBW: Audio výstup cinch pre subwoofer
27
LINE OUT: Audio výstup cinch L/R pre zosilňovač
28
Prípojka antény pre anténový konektor DIN
34
SAR 28 A1

Príslušenstvo (pozri zadnú výklopnú stranu)
Obrázok D:
29
Puzdro na ovládací diel
30
Montážny rám
31
Kľúč kmontážnemu rámu
32
Kotviaci plech (vrátane upevňovacieho materiálu)
33
Kábel adaptéra ISO bloku A
Inštalácia
VAROVANIE
Pri inštalácii prístroja môže dôjsť kvecným škodám!
► Podľa možnosti si nechajte autorádio zabudovať do auta vodbornej dielni.
► Keď si chcete prístroj zabudovať sami, dodržte pokyny pre pripojenie a zabu-
dovanie prístroja, aby ste zabezpečili bezchybnú abezpečnú prevádzku
prístroja. Pri neodbornej montáži hrozí nebezpečenstvo požiaru!
Pripojenie
POZOR
Používanie nesprávnych pripojení môže viesť kpoškodeniu
prístroja.
► Pri montáži použite prípojky ISO na autorádiu. Adaptéry ISO, špecifi cké
pre niektoré vozidlá, ktoré prípadne budete potrebovať, dostanete vodborných
servisoch, všpecializovaných predajniach alebo vodborných oddeleniach
obchodných domov. Pri použití iných spôsobov pripojenia zaniká záruka!
SK
SAR 28 A1
Rozloženie prívodov na prípojke ISO
Pohľad na zástrčky zozadu.
1357
2468
ISO A (rozloženie napájania)
Obsadenie
1 neobsadené
2 neobsadené
3 neobsadené
Trvalý kladný pól (+)12 V
4
(svorka 30)
5 Riadiace napätie antény
6 neobsadené
Kladný pól (+) zapaľovania
7
12 V (svorka 15)
Záporný pól (-)
8
kostra (svorka 31)
35

SK
Obsadenie
1 Zadný pravý +
1357
2468
Ak chcete prístroj zapojiť do dvoch reproduktorov, použite kábel iba predných
reproduktorov.
UPOZORNENIE
Myslite na to, že pre ukladanie staníc do pamäte musí byť pripojený prípoj
►
4 vbloku ISO A na trvalý plus.
► Vniektorých modeloch áut je štandardné rozloženie prípojok [4] a[7] v
bloku ISO A zvýroby vzájomne prehodené. Ak ide o takýto prípad, môžu
sa stratiť údaje ouložených vysielačoch. Pomôcť si môžete tak, že prípojky
7 (kladný pól zapaľovania) a4 (trvalý kladný pól) vbloku ISO A vymeníte.
Za tým účelom zastrčte dodaný kábel adaptéra 33 medzi ISO block A
rádia a káblový zväzok motorového vozidla.
Zapojte na kábli adaptéra červenú žilu konektora ISO do žltej žily zásuvky
ISO a žltú žilu konektora ISO do červenej žily zásuvky ISO (pozri tiež
zadnú vyklápaciu stranu).
ISO B
(rozloženie
pripojenia reproduktorov)
2 Zadný pravý 3 Predný pravý +
4 Predný pravý 5 Predný ľavý +
6 Predný ľavý 7 Zadný ľavý +
8 Zadný ľavý -
36
POZOR
Ak používate kábel adaptéra ISO bloku A, tak oba prípoje (červené a žlté
►
žily) musia byť prepojené. Inak hrozí nebezpečenstvo skratu!
Pripojenie riadiaceho napätia pre anténu
POZOR
Nikdy nezapájajte prípojku riadiaceho napätia pre anténu dokábla pre
►
motor antény alebo do iných spotrebičov.
UPOZORNENIE
Ak chcete použiť riadenie antény a dodaný kábel adaptéra 33, musíte
►
odstrániť na kábli riadiaceho napätia antény (modrá) zmršťovaciu hadičku
a kontakt zastrčiť do príslušného vedenia ISO bloku A zásuvky. Ďalšie
informácie o obsadení získate v návode na obsluhu vášho vozidla.
SAR 28 A1

Prípojka riadiaceho napätia antény je kdispozícii pre anténu, ktorá je ovládaná
A
pomocou relé. Relé automaticky vysunie anténu, keď zapnete autorádio. Pri
vypnutí autorádia sa anténa znova zasunie. Táto prípojka sa dá použiť aj na
ovládanie externého zosilňovača. Presné pripojenie nájdete vnávode na obsluhu zosilňovača.
Pripojenie externého zosilňovača
Na pripojenie externého zosilňovača použite zvukový výstup cinch LINE OUT 27.
Dodržte pritom pokyny vnávode na obsluhu externého zosilňovača.
Pripojenie externého subwoofera
Na pripojenie externého subwoofera použite oranžový výstup cinch SUBW 26.
Dodržte pritom pokyny vnávode na obsluhu externého subwoofera.
Montážna schéma
SubwooferAnténa
1234
5678
1234
5678
SK
ISO B
ISO
Montáž
SAR 28 A1
Externý zosilňovač
Prístroj sa dá vložiť do každej bežnej montážnej šachty ISO. Ak vaše auto nemá
montážnu šachtu ISO, obráťte sa na odborný servis, predajcu alebo odborné
oddelenie obchodného domu.
UPOZORNENIE
Pred konečným zabudovaním prístroja nakrátko pripojte káble.
►
Skontrolujte, či sú správne zasunuté ači systém správne funguje.
37

SK
Pokyny na montáž
■ Nasaďte prístroj do preň určenej šachty alebo si zvoľte miesto na zabudo-
vanie tak, aby ste pohodlne dosiahli na všetky tlačidlá aaby vodič nebol
obmedzovaný.
■ Prístroj pripojte len k12V automobilovej batérii, ktorá je nainštalovaná
podľa predpisov.
■ Prístroj pripojte iba prostredníctvom konektora ISO v aute.
■ Prístroj zabudujte tak, aby sa v jeho okolí nezhromažďoval teplý vzduch
a aby bol dobre vetraný.
■ Nezabudovávajte prístroj na miesta, ktoré sú vystavené vysokým teplotám
(napr. priame slnečné žiarenie alebo vyhrievací vzduch), silnému znečisteniu
alebo silným otrasom.
■ Ak sú na vozidle potrebné nejaké úpravy, obráťte sa na predajcu áut alebo
na odborný servis.
Zabudovanie prístroja do šachty ISO
♦ Stiahnite ztelesa prístroja montážny rám 30. Na tento účel použite kľúč
ktorý je v rozsahu dodávky (pozri tiež kapitolu „Vymontovanie prístroja“).
♦ Zastrčte montážny rám do montážnej šachty ISO.
♦ Ohnite sponu na montážnom ráme skrutkovačom tak, aby rám pevne sedel
vmontážnej šachte (pozri obrázok).
31
,
38
♦ Skontrolujte, či rám pevne sedí.
♦ Spojte blok konektorov ISO na prístroji soboma konektormi ISO vo vozidle.
♦ Zastrčte kábel zautomobilovej antény do zásuvky pre anténu 28 na prístroji.
Adaptér DIN-ISO pre špecifi cké vozidlá, ktorý prípadne budete potrebovať,
dostanete vodborných servisoch, všpecializovaných predajniach alebo
vodborných oddeleniach obchodných domov.
♦ Vprípade potreby pripojte zvukový kábel cinch externého zosilňovača do
zásuviek LINE OUT
27
na prístroji.
SAR 28 A1

♦ V prípade potreby pripojte zvukový kábel cinch externého subwoofera do
oranžovej zásuvky cinch SUBW
♦ Prípadne ešte zaistite prístroj proti možnému odcudzeniu. Pripevnite
upevňovaciu skrutku skotviacim plechom
motorovú prepážku auta.
POZOR
Možné poškodenie káblov!
► Pri zasúvaní dodržte správne vedenie káblov, aby ste zabránili ich poškodeniu.
V prípade poškodenia káblov hrozí nebezpečenstvo požiaru!
♦ Zastrčte prístroj opatrne do montážneho rámu 30, až zaklapne.
♦ Keď dokončíte všetky prepojenia, guľôčkovým perom alebo iným špicatým
predmetom stlačte tlačidlo RESET 22 asi na 6sekúnd.
♦ Nasaďte ovládací diel tak, ako je uvedené v časti „Nasadenie ovládacieho
dielu“.
Vymontovanie prístroja
Ak chcete prístroj vymontovať, postupujte takto:
♦ Zaveďte pravý a ľavý kľúč
Dbajte na to, aby vyvýšené miesta na kľúčoch smerovali von. (Spony sú
teraz ohnuté vzad.)
26
na prístroji.
32
aupevňovacím materiálom na
31
do príslušného zárezu na bokoch prístroja.
SK
SAR 28 A1
♦ Vytiahnite prístroj.
39

SK
Uvedenie do prevádzky
Ovládací diel
Na ochranu pred odcudzením môžete ovládací diel prístroja sňať. Odmontovaný
ovládací diel neuskladňujte v aute.
UPOZORNENIE
Ovládací diel skladujte pre dobrú ochranu vždy vpuzdre 29.
►
Nasadenie ovládacieho dielu
♦ Nasaďte ovládací diel najprv pravou stranou
19
20
.
.
na záchytný bod
♦ Potom vtlačte ľavú stranu do rámu, až zaklapne
na poistke
Skontrolujte, či je ovládací diel správne a pevne
spojený s hlavným prístrojom. Ak nie je ovládací diel
správne zabudovaný, môže pri ovládaní prístroja
dochádzať k poruchám funkcií.
Odmontovanie ovládacieho dielu
♦ Stlačením tlačidla odistíte ovládací diel.
Ovládací diel vyskočí na ľavej strane mierne
vpred.
♦ Stiahnite ovládací diel najprv na ľavej a potom
aj na pravej strane.
2.
1.
40
SAR 28 A1

Obsluha aprevádzka
Vtejto kapitole získate dôležité pokyny pre ovládanie aprevádzku prístroja.
UPOZORNENIE
Ak v priebehu asi 5 sekúnd neurobíte žiadne nastavenie príp. nestlačíte
►
tlačidla, vráti sa prístroj do predchádzajúceho prevádzkového režimu.
Zmenené nastavenia sa uložia do pamäte.
Zapnutie a vypnutie
♦ Stlačením tlačidla /MU 2 prístroj zapnete. Na displeji sa zobrazí
nápis WELCOME (Vitajte).
♦ Keď chcete prístroj vypnúť, podržte tlačidlo /MU dlhšie stlačené.
Na displeji sa zobrazí nápis GOODBYE (Dovidenia).
Nastavenia
VAROVANIE
Nedoslýchavosť vysokou hlasitosťou!
Príliš vysoká hlasitosť môže viesť k nedoslýchavosti.
► Nastavujte len miernu hlasitosť.
Hlasitosť
♦ Otáčaním viacúčelového regulátora 17 meníte hlasitosť.
Zapnutie/vypnutie stlmenia
♦ Ak chcete zvuk vypnúť (stlmiť), stlačte tlačidlo /MU. Na displeji sa
zobrazí nápis MUTE ON (stlmenie zapnuté).
♦ Ďalším stlačením tlačidla /MU zvuk znova zapnete. Pri príjme vysielača
PTY alebo TA a pri zmene vysielača alebo zdroja je funkcia stlmenia zrušená.
SK
Druh prevádzky
SAR 28 A1
♦ Stlačením tlačidla MD/PTY 3 prepínate medzi príjmom rozhlasu (TUNER),
čítačkou kariet (CARD), prípojkou USB (USB) a vstupom externého zvukového
signálu (AUX).
UPOZORNENIE
Prevádzkové režimy CARD a USB sa dajú zapnúť len vtedy, keď je vložené
►
príslušné médium.
41

SK
Displej
♦ Stlačte a podržte tlačidlo BD/DISP 7 , dokiaľ sa na displeji 5 nezobrazí
čas (CT). Teraz niekoľkokrát stlačte tlačidlo BD/DISP, aby sa Vám postup-
ne zobrazili nasledujúce informácie:
Vysielač, čas (pri príjme RDS sa automaticky nastaví), kmitočet a nastavenia PTY
(tieto funkcie RDS vysielajú stanice v rôznom rozsahu, pozri tiež kapitolu „Funkcie
rádia“).
UPOZORNENIE
Ak sa neprijímajú žiadne informácie RDS alebo PTY, na displeji sa zobrazí
►
nápis PTY NONE.
► Po ca. 5 sekundách bez obsluhy sa rádio znova prepne do štandardnej
prevádzky.
Resetovanie rádia (RESET)
Ak chcete prístroj nastaviť do stavu z výroby, špicatým predmetom, napr. guľôčkovým perom stlačte tlačidlo RESET
UPOZORNENIE
►
Ak sa chcete dostať k tlačidlu RESET, musíte ovládací diel úplne vybrať,
pozri tiež kapitolu „Odmontovanie ovládacieho dielu“.
Prístroj resetujte:
▯ pri prvom uvedení do prevádzky,
▯ po pripojení káblov,
▯ keď nefungujú všetky tlačidlá funkcií,
▯ keď sa na displeji objaví chybové hlásenie,
▯ pri zjavných chybných funkciách prístroja.
22
asi na 6 sekúnd.
42
SAR 28 A1

Nastavenia tlačidlom SEL (EQ/LD/TA/AF)
♦ Stlačte tlačidlo SEL 18 na prístroji. Zobrazí sa aktuálne nastavenie hĺbky.
Každým ďalším stlačením tlačidla SEL vyvoláte nasledujúci nastavovací bod.
Možné sú tieto nastavenia:
BAS - hĺbky (od -7 do +7),
TRE - výšky (od -7 do +7),
BAL - stereováha (rozdelenie zvuku medzi pravými a ľavými reproduktormi)
(od 0L do 9L a od 0R do 9R),
FAD - prelínač (rozdelenie zvuku medzi zadnými a prednými reproduktormi)
(od 0F do 9F a od 0R do 9R),
VOL - hlasitosť (od 0 do 20)
♦ Otáčaním viacúčelového regulátora 17 zmeníte nastavenia zobrazenej
položky menu.
Ďalšie nastavenia tlačidlom SEL (EQ/LD/TA/AF)
♦ Podržte tlačidlo SEL stlačené asi 2 sekundy a potom stláčajte tlačidlo SEL
dovtedy, dokiaľ sa na displeji nezobrazí požadovaná funkcia.
♦ Otáčaním viacúčelového regulátora zmeníte nastavenia zobrazenej položky
menu.
Zapnutie a vypnutie TA Traffi c Announcement
(dopravné informácie)
TA ON: Pri zapnutej funkcii TA dôjde ihneď k prepnutiu z inej stanice alebo
iného režimu prevádzky na rozhlasový vysielač, ktorý práve vysiela dopravné
informácie. Na displeji sa zobrazí nápis TA.
SK
SAR 28 A1
UPOZORNENIE
Pri zapnutej funkcii TA sa môže stať, že sa nájdu alebo do pamäte uložia
►
len vysielače, ktoré vysielajú signál dopravných informácií. Vysielače, ktoré
prenášajú signál dopravných informácií, sú na displeji označené nápisom TP.
TA OFF: Funkcia TA je vypnutá.
Zapnutie a vypnutie AF (alternatívne kmitočty)
AF ON: Pri zapnutej funkcii AF prístroj vyhľadá optimálne kmitočty
nastavenej stanice.
AF OFF: Funkcia AF je vypnutá.
EQ - ekvalizér
♦ Otáčaním viacúčelového regulátora prepínate medzi nastaveniami FLAT,
CLASSIC, ROCK, POP a EQ OFF. Pri nastavení EQ OFF je ekvalizér vypnutý.
Nastavenie ekvalizéra sa zobrazí na displeji dole.
43

SK
SUBW - subwoofer
Môžete pripojiť externý aktívny subwoofer, aby ste získali silnejšie basy.
♦ Otáčaním viacúčelového regulátora 17 efekt basov zapnete (SUBW ON)
alebo vypnete (SUBW OFF).
AVOL - nastavenie hlasitosti pri zapnutí rádia
♦ Otáčaním viacúčelového regulátora nastavte hlasitosť, s ktorou sa má rádio
zapnúť.
STEREO/MONO - nastavenie výstupu zvuku
♦ Otáčaním viacúčelového regulátora nastavíte výstup zvuku v režime rádia
na stereofónny (STEREO) alebo monofónny (MONO). Pri príjme stanice so
stereofónnym zvukom sa na displeji zobrazí symbol pre stereo
LOUD - zapnutie a vypnutie fyziologickej regulácie hlasitosti
♦ Otáčaním viacúčelového regulátora zapnete zvýraznenie basov a výšok
(LOUD ON) alebo ho vypnete (LOUD OFF). Ak je funkcia fyziologickej regulácie
zapnutá, vpravo na displeji sa zobrazí LOUD.
Dx/LOCAL - nastavenie citlivosti príjmu
♦ Otáčaním viacúčelového regulátora nastavíte citlivosť príjmu na vzdialené
(DX) alebo miestne stanice (LOCAL).
Nezabudnite, že pri nastavení LOCAL sa prehrávajú len vysielače s dobrou
kvalitou príjmu.
CT - nastavenie času
UPOZORNENIE
Tento prístroj je vybavený hodinami, ovládanými signálmi RDS. Hodiny sa
►
nastavujú pri zapnutej funkcii RDS automaticky a bežia ďalej, aj keď je
rádio vypnuté. Keď neprijímate signál RDS, môžete tu nastaviť čas aj ručne.
.
44
♦ Otáčaním viacúčelového regulátora doprava nastavíte minúty a doľava
hodiny.
Nastavenie hlasitosti pri prenose dopravných informácií
HINWEIS
Pri príjme rozhlasového vysielača, ktorý vysiela dopravné informácie,
►
možno otáčaním viacúčelového regulátora nastaviť hlasitosť dopravných
informácií.
► Počas príjmu dopravných informácií (oznam TRAFFIC) nie je možné ovládať
rádio. Môžete zvoliť iba funkcie „Hlasitosť“, „Stlmenie“ a „Zapnúť/Vypnúť“.
SAR 28 A1

♦ Počas príjmu dopravných informácií (údaje TA aTP sa zobrazia vľavo dole
na displeji
va. Na displeji sa zobrazí nápis TAVOL aaktuálne nastavená hlasitosť.
♦ Viacúčelovým regulátorom nastavte požadovanú hlasitosť. Nastavenie sa
po asi 5sekundách automaticky uloží do pamäte.
5
), otáčajte viacúčelovým regulátorom 17 doprava alebo doľa-
Funkcie rádia
Voľba rozsahu pamäťových miest na stanice
♦ Stláčaním tlačidla BD/DISP 7 prepínate medzi , rozsahmi pamäťových
miest na stanice (FM1, FM2, FM3).
Každý rozsah pamäťových miest pokrýva rovnaké kmitočtové pásmo (87,5 108 MHz) a má 6 pamäťových miest na stanice. Rozsah pamäťových miest sa
nezobrazuje, ak je na displeji zobrazený názov vysielača.
Automatické vyhľadávanie staníc
♦ Stlačte a podržte tlačidlá ▸▸I 4 alebo I◂◂ 15 pre spustenie vyhľadávania
staníc. Keď prístroj nájde stanicu, vyhľadávanie sa zastaví.
Ručné naladenie stanice
♦ Krátko stláčajte tlačidlá ▸▸I alebo I◂◂, aby sa kmitočet menil v krokoch po
0,05 MHz (VKV), pokiaľ nenastavíte požadovaný kmitočet.
Uloženie vysielača do pamäte
♦ Podržte niektoré z tlačidiel staníc 1 až 6 stlačené asi 2 sekundy, aby sa
aktuálne naladený vysielač uložil do pamäte. Úspešné uloženie do pamäte
sa signalizuje zobrazením číslic 1 až 6 na displeji.
SK
Vyvolanie uložených vysielačov
Automatické uloženie do pamäte
SAR 28 A1
♦ Tlačidlom BD/DISP zvoľte rozsah pamäťových miest (FM1, FM2, FM3).
♦ Stlačením niektorého z tlačidiel staníc 1 až 6 vyvoláte uložený vysielač.
♦ Podržte tlačidlo A/PS 16 stlačené po dobu 3 sekúnd. Po vyhľadávaní
sa postupne za sebou zapne 6 uložených vysielačov počas ca. 5 sekúnd,
súčasne bliká príslušné číslo miesta v pamäti. Pri slabých vysielačoch pokra-
čuje vyhľadávanie automaticky ďalej.
45

Prehranie uložených vysielačov
SK
♦ Nakrátko stlačte tlačidlo A/PS
rozsahu pamäťových miest sa krátko zapnú.
♦ Keď začujete požadovaný vysielač, stlačte tlačidlo A/PS . Zvolený
vysielač zostane hrať.
16
. Všetky uložené vysielače aktuálneho
Typ programu (PTY)
Pomocou tejto funkcie môžete vyhľadávať stanice podľa žánrov vysielaného
programu. Možné sú tieto nastavenia:
POP M
ROCK M
NEWS
AFFAIRS
INFO
EASY M
LIGHT M
UPOZORNENIE
Majte na pamäti, že tieto informácie sú závislé od oblasti, vysielacej orga-
►
nizácie a vysielača.
Nastavenie rozpoznávania PTY
♦ Stlačte a podržte tlačidlo MD/PTY 3, až sa dole na displeji zobrazí
PTY.
♦ Potom opakovane stláčajte niektoré z tlačidiel 1 až 6, až si vyberiete
požadovaný druh PTY.
♦ Ak chcete prepínať medzi možnosťami PTY „Hudba“ a „Reč“, znova stlačte
pri údaji prvej možnosti PTY krátko tlačidlo MD/PTY.
Tlačidlá 1 až 6 sú obsadené takto:
SPORT
EDUCATE
DRAMA
CLASSICS
OTHER M
CULTURE
SCIENCE
VARIED
JAZZ
COUNTRY
WEATHER
FINANCE
CHILDREN
NATION M
SOCIAL
PHONE IN
FOLK M
TRAVEL
LEISURE
DOCUMENT
46
Tlačidlo Hudba Reč
1 POP M, ROCK M NEWS, AFFAIRS, INFO
2 EASY M, LIGHT M SPORT, EDUCATE, DRAMA
3 CLASSICS, OTHER M CULTURE, SCIENCE, VARIED
4 JAZZ, COUNTRY WEATHER, FINANCE, CHILDREN
5 NATION M SOCIAL, PHONE IN
6 FOLK M TRAVEL, LEISURE, DOCUMENT
SAR 28 A1

Ak v priebehu 2 sekúnd neurobíte žiadne ďalšie zadanie, spustí sa automatické
vyhľadávanie staníc so zodpovedajúcim signálom PTY. Zvolená možnosť PTY
bliká počas vyhľadávania na displeji
nájdenom vysielači.
Zapnutie a vypnutie funkcie PTY
♦ Ak chcete zapnúť hľadanie PTY, stlačte tlačidlo MD/PTY 3. Na displeji
sa zobrazí údaj PTY a naposledy zvolený druh PTY (napr. POP M).
Pri vyhľadávaní staníc sa zohľadnia len vysielače s aktuálne zvoleným druhom
PTY.
♦ Ak chcete vypnúť hľadanie PTY, znova stlačte tlačidlo MD/PTY.
Na displeji zhasne údaj PTY.
Vyhľadávanie vysielačov podľa skupín PTY
♦ Ak počas zobrazovania druhu PTY neurobíte počas 2 sekúnd žiadne ďalšie
zadanie, spustí sa ihneď vyhľadávanie vysielačov, ktoré zodpovedajú
tomuto druhu PTY.
Ak sa nenájde žiadny vysielač s programom, ktorý by zodpovedal tomuto druhu
PTY, nakrátko sa zobrazí údaj PTY NONE (nenájdené PTY), a potom skončí vyhľadávanie pri poslednej nastavenej stanici.
Prípojka USB
Prístroj dokáže spracovať dátové nosiče USB až do kapacity 16 GB.
Pripojenie dátového nosiča
♦ Posuňte ochranný kryt z prípojky USB doprava.
♦ Zapojte prístroj USB do prípojky.USB.
♦ Ak nie je pripojený žiadny prístroj USB, znova posuňte ochranný kryt na
prípojku USB, aby ste zabránili vniknutiu nečistôt do nej.
5
. Vyhľadávanie sa zastaví pri prvom
SK
Čítačka kariet
Pripojenie dátového nosiča
SAR 28 A1
Prístroj dokáže spracovať pamäťové karty SD/MMC s kapacitou do 2 GB
a SDHC až do 32 GB.
♦ Stlačením tlačidla odistite ovládací diel a vyberte ho z prístroja
(pozri tiež kapitolu „Odmontovanie ovládacieho dielu“).
♦ Do otvoru na pamäťovú kartu zastrčte pamäťovú kartu popísanou stranou
nahor, až zaklapne.
47

SK
Prehrávanie súborov MP3 a WMA
Prehrávanie
■ Prístroj dokáže prehrávať súbory vo formáte MP3 a WMA.
■ Miešanie skladieb a adresárov v jednej úrovni môže viesť k problémom pri
prehrávaní.
■ Počas prehrávania sa prečítajú informácie z tagu ID3 v súbore MP3
a postupne sa zobrazia na displeji.
♦ Prehrávanie skladieb MP3 alebo WMA z prístroja USB alebo pamäťovej
karty začne automaticky.
Prerušenie prehrávania
♦ Ak chcete prerušiť prehrávanie, stlačte tlačidlo 1/PAU 14. Aktuálny čas
prehrávania skladby bliká na displeji
♦ Ak chcete v prehrávaní pokračovať, ešte raz stlačte tlačidlo 1/PAU.
UPOZORNENIE
Stlačením a podržaním tlačidla 1/PAU prehráte prvú skladbu na pamäťo-
►
vom médiu.
Preskočenie skladby
♦ Ak si chcete zvoliť nasledujúcu alebo predchádzajúcu skladbu, stlačte
4
tlačidlo ▸▸I
alebo I◂◂ 15. Číslo skladby sa zobrazí na displeji.
5
.
48
Rýchly beh vpred a vzad
♦ Dlhým stlačením a podržaním tlačidla ▸▸I alebo I◂◂ spustíte rýchly beh
vpred alebo vzad.
Opakovanie (RPT - Repeat)
♦ Viacnásobným stlačením tlačidla 2/RPT 13 prepínate medzi funkciami
opakovania. Možné sú tieto nastavenia:
– RPT ONE: Zopakuje sa aktuálna skladba.
– RPT DIR: Zopakujú sa všetky skladby v aktuálnom adresári.
– RPT ALL: Zopakujú sa všetky skladby na pamäťovom médiu.
Ak sú zapnuté funkcie RPT ONE alebo RPT DIR, na displeji sa zobrazí RPT.
SAR 28 A1

Krátka ukážka skladby
♦ Stlačte tlačidlo 3/INT 12. Na displeji sa nakrátko zobrazí INT ON. Postupne
sa prehrajú všetky skladby tak, že z každej sa prehrá asi 10 sekúnd.
♦ Ďalším stlačením tlačidla 3/INT spustíte prehrávanie práve hranej skladby.
Na displeji sa nakrátko zobrazí INT OFF.
Prehrávanie všetkých skladieb v náhodnom poradí
(RDM - Random)
♦ Stlačte tlačidlo 4/RDM 11. Na displeji sa nakrátko zobrazí RDM ON.
Spustí sa prehrávanie skladieb v náhodnom poradí. Dodatočne sa na
displeji zobrazí nápis RDM.
♦ Ďalším stlačením tlačidla 4/RDM spustíte normálne prehrávanie.
Na displeji sa krátko zobrazí RDM OFF a nápis RDM.
Preskočenie adresára
♦ Po stlačení tlačidla stanice 6/FL+ 9 sa prehrá nasledujúci adresár, po
stlačení tlačidla 5/FL-
automaticky.
10
predchádzajúci adresár. Prehrávanie začne
Funkcie vyhľadávania
Vyhľadávanie čísla skladby
SK
SAR 28 A1
♦ Stlačte tlačidlo A/PS
♦ Otáčaním viacúčelového regulátora 17 zadajte prvú číslicu čísla skladby.
♦ Stlačením tlačidla SEL 18 potvrďte toto zadanie a prejdite k zadávaniu
druhej, tretej alebo štvrtej číslice.
♦ Stlačením tlačidla 1/PAU 14 spustíte prehrávanie nastavenej skladby.
Vyhľadávanie názvu skladby
♦ Dvakrát stlačte tlačidlo A/PS . Na displeji sa zobrazí nápis A-SEARCH.
Ihneď začne hľadanie podľa názvu skladby. Ak sa nenájde žiadna
skladba, začínajúca nastaveným znakom, zobrazí sa nápis NONE.
♦ Otáčajte viacúčelovým regulátorom, dokiaľ sa nezobrazí požadované
písmeno alebo číslica.
♦ Stlačením tlačidiel ▸▸I 4 alebo I◂◂ 15 potvrdíte nastavený znak, a potom
sa zobrazia všetky skladby, ktoré týmto znakom začínajú.
♦ Stlačením tlačidla 1/PAU spustíte prehrávanie zobrazenej skladby.
16
.
49

SK
Vyhľadávanie podľa adresárov
♦ Trikrát stlačte tlačidlo A/PS 16. Zobrazí sa adresár, ktorý sa práve
prehráva.
♦ Otáčaním viacúčelového regulátora 17 prepínate medzi existujúcimi
adresármi.
♦ Stlačením tlačidla 1/PAU 14 zvolíte aktuálne zobrazený adresár.
Prehrávanie prvej skladby zo zvoleného adresára začne ihneď.
Pripojenie externého zvukového zariadenia k prístroju
♦ Zapojte výstup externého zvukového zariadenia (napr. prehrávača MP3)
8
pomocou 3,5 mm stereofónneho konektora do zásuvky AUX
strane prístroja.
♦ Zvoľte prehrávanie zo zvukového vstupu tak, že niekoľkokrát stlačíte tlačidlo
MD/PTY
3
, až sa na displeji zobrazí nápis AUX.
na prednej
Čistenie
Bezpečnostné pokyny
POZOR
Možné poškodenia prístroja
► Zabezpečte, aby sa pri čistení nedostala do prístroja žiadna vlhkosť,
pretože by mohla spôsobiť neopraviteľné poškodenie prístroja.
Čistenie displeja
■ Prednú stranu prístroja a displej čistite výlučne mierne navlhčenou handričkou,
ktorá nepúšťa vlákna, a jemným prostriedkom na umývanie riadu.
Likvidácia
Likvidácia prístroja
Prístroj v žiadnom prípade nevyhadzujte do normálneho domového odpadu.
Na tento výrobok sa vzťahuje európska smernica 2012/19/EU
oopotrebovaných elektrických aelektronických spotrebičoch.
Prístroj zlikvidujte prostredníctvom autorizovaného likvidačného podniku alebo
vašej komunálnej inštitúcie pre likvidáciu odpadov. Dodržte pritom aktuálne
platné predpisy. V prípade pochybností sa obráťte na inštitúcie na likvidáciu
odpadu.
50
SAR 28 A1

Odstraňovanie porúch
Vtejto kapitole sa dozviete dôležité pokyny pre lokalizovanie aodstraňovanie
porúch. Dodržte pokyny, aby ste sa vyhli nebezpečenstvám a poškodeniam.
Bezpečnostné pokyny
VAROVANIE
Dodržte nasledujúce bezpečnostné pokyny, aby ste sa vyhli nebezpečenstvám
a vecným škodám:
► Opravy elektrických prístrojov smú robiť len odborníci, ktorí boli vyškolení
výrobcom. Neodborné opravy predstavujú výrazné nebezpečenstvo pre
užívateľa ahrozia pri nich aj poškodenia prístroja.
Príčiny aodstraňovanie porúch
Nasledujúca tabuľka je pomôckou pri lokalizovaní aodstraňovaní menších
porúch:
Chyba Možná príčina Odstránenie
Prístroj sa nedá
zapnúť
Žiadny zvuk
Zapaľovanie nie je zapnuté.
Poistka je chybná. Vymeňte poistku.
Hlasitosť je nastavená na
minimum.
Káble nie sú správne
pripojené.
Zapnite zapaľovanie otočením kľúčika
zapaľovania.
Zvýšte hlasitosť.
Skontrolujte káblové prepojenia.
SK
Tlačidlá funkcií
nefungujú
Rádio alebo
automatické
ukladanie staníc
do pamäte
nefungujú
Pamäť staníc
nefunguje
SAR 28 A1
Zvuk je vypnutý.
Prístroj má poruchu. Stlačte tlačidlo RESET.
Ovládací diel nie je namon-
tovaný.
Anténový kábel nie je
správne pripojený.
Signál z vysielača je príliš
slabý.
Prípojka 4 v bloku ISO A
(trvalý kladný pól) nie je
správne pripojená.
Stlačením tlačidla
zapnite zvuk.
Skontrolujte správne vloženie
ovládacieho dielu.
Skontrolujte, či je anténový kábel
správne pripojený.
Nalaďte požadovaný vysielač ručne.
Skontrolujte káblové prepojenia. Riaďte
sa pritom kapitolou „Pripojenie“.
/MU znova
51

SK
Chyba Možná príčina Odstránenie
Prípojka USB je určená pre
Prístroj zapojený
v prípojke USB
nefunguje
Čítačka kariet
neprečíta kartu
UPOZORNENIE
►
prístroje, ktoré pracujú podľa
normy USB. Nie všetky na
trhu dostupné prístroje spĺňajú túto normu. Je možné,
že je pripojený prístroj, ktorý
nepracuje podľa normy USB.
Karta môže byť chybná,
zašpinená alebo nesprávne
vložená.
Ak vyššie uvedenými postupmi nemôžete problém odstrániť, obráťte sa na
zákaznícky servis (pozri záručný list).
Pripojte prístroj, ktorý pracuje podľa
normy USB. Uistite sa, či bol dátový
nosič naformátovaný súborovým
systémom FAT32.
Skontrolujte kartu. Zastrčte ju popísanou
stranou nahor. Uistite sa, či bol dátový
nosič naformátovaný súborovým systémom FAT32.
Dodatok
Technické údaje
Všeobecne
Vstupné napätie 12 V DC
52
Vstupný prúd max. 7,5 A
Menovitý výkon 4 x 7 W
Prevádzková teplota +5 - +40 °C
Teplota skladovania 0 - +50 °C
Vlhkosť (bez kondenzácie) ≤ 75 %
Rozmery (d x š x v): asi 18,6 x 12,7 x 5,7 cm
Hmotnosť s príslušenstvom asi 700 g
Istenie prístroja
plochou automobilovou poistkou
7,5 A
SAR 28 A1

Kmitočtový rozsah rádia*
Rozsah FM (VKV) 87,5 - 108 MHz
Počet pamäťových miest pre FM
(VKV)
Vstup zvuku (AUX)
Stereofónny zástrčkový konektor 3,5 mm
Výstup zvuku
2 zásuvky cinch pre externý zosilňovač (L/R)
1 zásuvka cinch pre externý subwoofer
Prípojka USB
Dátové nosiče kompatibilné s USB 1.1 a 2.0 (do 16 GB)
Zásuvka na kartu
Otvor pre pamäťové karty SD/MMC (SD/MMC do 2 GB, SDHC do 32 GB)
* Technické vlastnosti prístroja umožňujú využiť nastaviteľný kmitočtový rozsah
v pásme 87,5 – 108 MHz. V rôznych krajinách môžu platiť odlišné národné
predpisy pre pridelené kmitočtové pásma. Dajte pozor na to, aby ste informácie prijaté mimo prideleného rozhlasového kmitočtového pásma nezužitkovali,
neodovzdali tretím osobám, ani inak nezneužili.
18 miest
SK
Vyhlásenie ozhode
Tento prístroj je v súlade so základnými požiadavkami
a inými relevantnými predpismi smernice č. 2004/104/EC
o motorových vozidlách.
Kompletný originál Vyhlásenia ozhode je kdispozícii
udovozcu.
SAR 28 A1
53

SK
Záruka
Na tento prístroj máte 3 ročnú záruku od dátumu nákupu. Prístroj bol starostlivo
vyrobený a pred expedíciou dôkladne vyskúšaný.
Uschovajte si, prosím, účtenku ako dôkaz o nákupe. V prípade uplatnenia záruky
sa spojte s opravovňou telefonicky. Len tak sa dá zabezpečiť bezplatné zaslanie
tovaru.
POZNÁMKA
Výrobok je určený len na súkromné používanie a nie na podnikateľské účely.
Záruka prestáva platiť pri zaobchádzaní nezodpovedajúcom účelu a pri neprimeranom zaobchádzaní, pri použití násilia a pri zásahoch, ktoré neurobil nami
autorizovaný servis.
Práva vyplývajúce zo zákona nie sú touto zárukou obmedzené. Záručná doba
sa nepredlžuje o dobu trvania záručných opráv. To platí aj na vymenené alebo
opravené diely.
Prípadné poškodenia alebo nedostatky zistené už pri kúpe musíte nahlásiť ihneď
po vybalení, najneskoršie však do dvoch dní po dátume kúpy.
Opravy, ktoré spadajú do obdobia po skončení záručnej doby, si musíte zaplatiť.
Dovozca
KOMPERNASS HANDELS GMBH
BURGSTRASSE 21
44867 BOCHUM
GERMANY
www.kompernass.com
Záruka platí len na chyby materiálu a výroby, nie na škody spôsobené
►
prepravou, opotrebením, ani na poškodenia krehkých častí, ako sú spínače
alebo akumulátory.
54
SAR 28 A1

Autorádio
SAR 28 A1
Pre zabezpečenie bezplatného priebehu opravy sa spojte so zákazníckou linkou servisu. Pripravte si preto
doklad o zakúpení.
Prosím, odosielateľa napíšte čitateľne:
Priezvisko
Meno
Ulica
PSČ/obec
Krajina
Záruka
Servis Slovensko
Tel. 0850 232001
E-Mail: kompernass@lidl.sk
IAN 106770
Dostupnosť hotline: pondelok až piatok
od 8:00 hod. – 20:00 hod. (SEČ)
Telefón
Túto časť kompletne vyplňte a priložte k zariadeniu!
Dátum a podpis
Opis poruchy:


Inhaltsverzeichnis
Einführung . . . . . . . . . . . . . . . . . . . . . . . . . . . . . . . . . . . . . . . . . . . . . . . . . 58
Vorwort . . . . . . . . . . . . . . . . . . . . . . . . . . . . . . . . . . . . . . . . . . . . . . . . . . . . . . . . . . . . . . 58
Urheberrecht. . . . . . . . . . . . . . . . . . . . . . . . . . . . . . . . . . . . . . . . . . . . . . . . . . . . . . . . . . 58
Haftungsbeschränkung . . . . . . . . . . . . . . . . . . . . . . . . . . . . . . . . . . . . . . . . . . . . . . . . . . 58
Hinweise zu Warenzeichen . . . . . . . . . . . . . . . . . . . . . . . . . . . . . . . . . . . . . . . . . . . . . . 58
Warnhinweise . . . . . . . . . . . . . . . . . . . . . . . . . . . . . . . . . . . . . . . . . . . . . . . . . . . . . . . . . 59
Bestimmungsgemäße Verwendung . . . . . . . . . . . . . . . . . . . . . . . . . . . . . . . . . . . . . . . . 59
Sicherheit . . . . . . . . . . . . . . . . . . . . . . . . . . . . . . . . . . . . . . . . . . . . . . . . . . . . . . . . . . . . 60
Grundlegende Sicherheitshinweise . . . . . . . . . . . . . . . . . . . . . . . . . . . . . . . . . . . . . . . . 60
Lieferumfang (siehe Ausklappseiten) . . . . . . . . . . . . . . . . . . . . . . . . . . . . . . . . . . . . . . . 61
Entsorgung der Verpackung . . . . . . . . . . . . . . . . . . . . . . . . . . . . . . . . . . . . . . . . . . . . . . 61
Bedienelemente . . . . . . . . . . . . . . . . . . . . . . . . . . . . . . . . . . . . . . . . . . . . 62
Installation . . . . . . . . . . . . . . . . . . . . . . . . . . . . . . . . . . . . . . . . . . . . . . . . 63
Anschluss . . . . . . . . . . . . . . . . . . . . . . . . . . . . . . . . . . . . . . . . . . . . . . . . . . . . . . . . . . . .63
Einbau . . . . . . . . . . . . . . . . . . . . . . . . . . . . . . . . . . . . . . . . . . . . . . . . . . . . . . . . . . . . . . 65
Das Gerät ausbauen . . . . . . . . . . . . . . . . . . . . . . . . . . . . . . . . . . . . . . . . . . . . . . . . . . . 67
Inbetriebnahme . . . . . . . . . . . . . . . . . . . . . . . . . . . . . . . . . . . . . . . . . . . . 68
Bedienteil . . . . . . . . . . . . . . . . . . . . . . . . . . . . . . . . . . . . . . . . . . . . . . . . . . . . . . . . . . . . 68
Bedienung und Betrieb . . . . . . . . . . . . . . . . . . . . . . . . . . . . . . . . . . . . . . 69
Ein-/Ausschalten . . . . . . . . . . . . . . . . . . . . . . . . . . . . . . . . . . . . . . . . . . . . . . . . . . . . . . . 69
Einstellungen . . . . . . . . . . . . . . . . . . . . . . . . . . . . . . . . . . . . . . . . . . . . . . . . . . . . . . . . . .69
Radio zurücksetzen (RESET) . . . . . . . . . . . . . . . . . . . . . . . . . . . . . . . . . . . . . . . . . . . . . . 70
Radiofunktionen . . . . . . . . . . . . . . . . . . . . . . . . . . . . . . . . . . . . . . . . . . . . . . . . . . . . . . . 73
USB-Anschluss . . . . . . . . . . . . . . . . . . . . . . . . . . . . . . . . . . . . . . . . . . . . . . . . . . . . . . . . 75
Kartenleser . . . . . . . . . . . . . . . . . . . . . . . . . . . . . . . . . . . . . . . . . . . . . . . . . . . . . . . . . . .75
Funktionen MP3/WMA-Wiedergabe . . . . . . . . . . . . . . . . . . . . . . . . . . . . . . . . . . . . . . 76
Ein externes Audiogerät an das Gerät anschließen . . . . . . . . . . . . . . . . . . . . . . . . . . . . 78
Reinigung . . . . . . . . . . . . . . . . . . . . . . . . . . . . . . . . . . . . . . . . . . . . . . . . . 78
Sicherheitshinweise . . . . . . . . . . . . . . . . . . . . . . . . . . . . . . . . . . . . . . . . . . . . . . . . . . . . . 78
Display reinigen . . . . . . . . . . . . . . . . . . . . . . . . . . . . . . . . . . . . . . . . . . . . . . . . . . . . . . . 78
Entsorgung . . . . . . . . . . . . . . . . . . . . . . . . . . . . . . . . . . . . . . . . . . . . . . . . 78
Gerät entsorgen . . . . . . . . . . . . . . . . . . . . . . . . . . . . . . . . . . . . . . . . . . . . . . . . . . . . . . . 78
Fehlerbehebung . . . . . . . . . . . . . . . . . . . . . . . . . . . . . . . . . . . . . . . . . . . . 79
Sicherheitshinweise . . . . . . . . . . . . . . . . . . . . . . . . . . . . . . . . . . . . . . . . . . . . . . . . . . . . . 79
Fehlerursachen und -behebung . . . . . . . . . . . . . . . . . . . . . . . . . . . . . . . . . . . . . . . . . . . 79
Anhang . . . . . . . . . . . . . . . . . . . . . . . . . . . . . . . . . . . . . . . . . . . . . . . . . . . 80
Technische Daten . . . . . . . . . . . . . . . . . . . . . . . . . . . . . . . . . . . . . . . . . . . . . . . . . . . . . . 80
Hinweise zur EU-Konformitätserklärung . . . . . . . . . . . . . . . . . . . . . . . . . . . . . . . . . . . . . 81
Garantie . . . . . . . . . . . . . . . . . . . . . . . . . . . . . . . . . . . . . . . . . . . . . . . . . . . . . . . . . . . . . 82
Importeur . . . . . . . . . . . . . . . . . . . . . . . . . . . . . . . . . . . . . . . . . . . . . . . . . . . . . . . . . . . .82
DE
AT
CH
SAR 28 A1
57

DE
AT
CH
Einführung
Vorwort
Herzlichen Glückwunsch zum Kauf Ihres neuen Gerätes.
Sie haben sich damit für ein hochwertiges Produkt entschieden. Diese Bedienungs-
anleitung ist Bestandteil des Autoradios SAR 28 A1 (nachfolgend als Gerät
bezeichnet) und gibt Ihnen wichtige Hinweise für den bestimmungsgemäßen
Gebrauch, die Sicherheit, den Einbau und Anschluss, sowie die Bedienung des
Gerätes.
Die Bedienungsanleitung muss ständig in der Nähe des Gerätes verfügbar sein.
Sie ist von jeder Person zu lesen und anzuwenden, die mit dem Einbau, der Bedienung und Störungsbehebung des Gerätes beschäftigt ist.
Bewahren Sie diese Bedienungsanleitung auf und geben Sie diese mit dem Gerät
an Nachbesitzer weiter.
Urheberrecht
Diese Dokumentation ist urheberrechtlich geschützt.
Jede Vervielfältigung, bzw. jeder Nachdruck, auch auszugsweise, sowie die
Wiedergabe der Abbildungen, auch im veränderten Zustand ist nur mit schriftlicher Zustimmung des Herstellers gestattet.
Haftungsbeschränkung
Alle in dieser Bedienungsanleitung enthaltenen technischen Informationen, Daten
und Hinweise für den Einbau und Anschluss und die Bedienung, entsprechen dem
letzten Stand bei Drucklegung und erfolgen unter Berücksichtigung unserer bisherigen Erfahrungen und Erkenntnisse nach bestem Wissen.
Aus den Angaben, Abbildungen und Beschreibungen in dieser Anleitung können
keine Ansprüche hergeleitet werden.
Der Hersteller übernimmt keine Haftung für Schäden aufgrund von Nichtbeachtung der Anleitung, nicht bestimmungsgemäßer Verwendung, unsachgemäßen
Reparaturen, unerlaubt vorgenommener Veränderungen oder Verwendung nicht
zugelassener Ersatzteile.
Hinweise zu Warenzeichen
- USB® ist ein eingetragenes Warenzeichen von USB Implementers Forum, Inc..
Alle weiteren Namen und Produkte können die Warenzeichen oder eingetragene
Warenzeichen ihrer jeweiligen Eigentümer sein.
58
SAR 28 A1

Warnhinweise
In der vorliegenden Bedienungsanleitung werden folgende Warnhinweise verwendet:
WARNUNG
Ein Warnhinweis dieser Gefahrenstufe kennzeichnet eine
mögliche gefährliche Situation.
Falls die gefährliche Situation nicht vermieden wird, kann dies zu Verletzungen
oder zum Tode führen.
► Die Anweisungen in diesem Warnhinweis befolgen, um Verletzungen von
Personen zu vermeiden.
ACHTUNG
Ein Warnhinweis dieser Gefahrenstufe kennzeichnet einen
möglichen Sachschaden.
Falls die Situation nicht vermieden wird, kann dies zu Sachschäden führen.
► Die Anweisungen in diesem Warnhinweis befolgen, um Sachschäden zu
vermeiden.
HINWEIS
Ein Hinweis kennzeichnet zusätzliche Informationen, die den Umgang mit
►
dem Gerät erleichtern.
Bestimmungsgemäße Verwendung
Dieses Gerät ist ein Gerät der Unterhaltungselektronik und nur zum Empfang von
FM-Radiosendern, sowie zur Wiedergabe von MP3-/WMA-Dateien von USBDatenträgern und SD/MMC-Speicherkarten, sowie Audiosignalen externer Audiogeräte bestimmt. Das Gerät ist zum Einbau in ein Fahrzeug vorgesehen. Eine
andere oder darüber hinausgehende Benutzung gilt als nicht bestimmungsgemäß.
DE
AT
CH
SAR 28 A1
WARNUNG
Gefahr durch nicht bestimmungsgemäße Verwendung!
Von dem Gerät können bei nicht bestimmungsgemäßer Verwendung und/oder
andersartiger Nutzung Gefahren ausgehen.
► Das Gerät ausschließlich bestimmungsgemäß verwenden.
► Die in dieser Bedienungsanleitung beschriebenen Vorgehensweisen einhalten.
Ansprüche jeglicher Art wegen Schäden aus nicht bestimmungsgemäßer
Verwendung sind ausgeschlossen. Das Risiko trägt allein der Benutzer.
59

DE
AT
CH
Sicherheit
In diesem Kapitel erhalten Sie wichtige Sicherheitshinweise im Umgang mit dem Gerät.
Dieses Gerät entspricht den vorgeschriebenen Sicherheitsbestimmungen. Ein unsach-
gemäßer Gebrauch kann jedoch zu Personen- und Sachschäden führen.
Grundlegende Sicherheitshinweise
Beachten Sie für einen sicheren Umgang mit dem Gerät die folgenden Sicherheitshinweise:
■ Kontrollieren Sie das Gerät vor der Verwendung auf äußere sichtbare Schäden.
Nehmen Sie ein beschädigtes oder heruntergefallenes Gerät nicht in Betrieb.
■ Bei Beschädigung der Kabel oder Anschlüsse lassen Sie diese von autorisiertem
Fachpersonal oder dem Kundenservice austauschen.
■ Personen, die aufgrund ihrer körperlichen, geistigen oder motorischen Fähigkeiten
nicht in der Lage sind, das Gerät sicher zu bedienen, dürfen das Gerät nur
unter Aufsicht oder Anweisung durch eine verantwortliche Person benutzen.
■ Gestatten Sie Kindern die Benutzung des Gerätes nur unter Aufsicht.
■ Lassen Sie Reparaturen am Gerät nur von autorisierten Fachbetrieben oder
dem Kundenservice durchführen. Durch unsachgemäße Reparaturen können
erhebliche Gefahren für den Benutzer entstehen. Zudem erlischt der Garantieanspruch.
■ Eine Reparatur des Gerätes während der Garantiezeit darf nur von einem
vom Hersteller autorisierten Kundendienst vorgenommen werden, sonst
besteht bei nachfolgenden Schäden kein Garantieanspruch mehr.
■ Defekte Bauteile dürfen nur gegen Original-Ersatzteile ausgetauscht werden.
Nur bei diesen Teilen ist gewährleistet, dass sie die Sicherheitsanforderungen
erfüllen.
■ Schützen Sie das Gerät vor Feuchtigkeit und dem Eindringen von Flüssigkeiten.
■ Verpackungsmaterialien dürfen nicht zum Spielen verwendet werden. Es
besteht Erstickungsgefahr.
60
Verkehrssicherheit
WARNUNG
Sicherheit im Straßenverkehr hat höchste Priorität!
Beachten Sie die folgenden Sicherheitshinweise, um sich oder andere nicht zu
gefährden:
► Machen Sie sich vor Fahrtantritt mit der Bedienung des Gerätes vertraut.
► Bedienen Sie das Gerät nur, wenn es die Verkehrslage zulässt! Halten Sie
an geeigneter Stelle an, um umfangreiche Bedienungen durchzuführen.
► Entfernen oder bringen Sie das Bedienteil nur bei stehendem Fahrzeug an.
► Stellen Sie eine angemessene Lautstärke ein, damit Sie akustische Signale der
Polizei, Feuerwehr und anderen Rettungsdiensten rechtzeitig wahrnehmen.
SAR 28 A1

Lieferumfang (siehe Ausklappseiten)
WARNUNG
Erstickungsgefahr!
► Verpackungsmaterialien dürfen nicht zum Spielen verwendet werden.
Es besteht Erstickungsgefahr.
Der Lieferumfang besteht aus folgenden Komponenten:
▯ Autoradio (inklusive Bedienteil)
▯ Einbaurahmen (aufgesteckt)
▯ Verankerungsblech (inkl. Befestigungsmaterial)
▯ Schlüssel für Einbaurahmen (2x)
▯ Etui für Bedienteil
▯ Adapterkabel für ISO-Block A
▯ Diese Bedienungsanleitung
HINWEIS
Prüfen Sie die Lieferung auf Vollständigkeit und auf sichtbare Schäden.
►
► Bei einer unvollständigen Lieferung oder Schäden infolge mangelhafter
Verpackung oder durch Transport wenden Sie sich an die Service-Hotline
(siehe Garantiekarte).
Entsorgung der Verpackung
Die Verpackung schützt das Gerät vor Transportschäden. Die Verpackungsmaterialien sind nach umweltverträglichen und entsorgungstechnischen Gesichtspunkten ausgewählt und deshalb recyclebar.
Die Rückführung der Verpackung in den Materialkreislauf spart Rohstoff e und
verringert das Abfallaufkommen. Entsorgen Sie nicht mehr benötigte Verpackungsmaterialien gemäß den örtlich geltenden Vorschriften.
DE
AT
CH
SAR 28 A1
HINWEIS
Heben Sie wenn möglich die Originalverpackung während der Garantiezeit
►
des Gerätes auf, um das Gerät im Garantiefall ordnungsgemäß verpacken
zu können.
61

DE
AT
CH
Bedienelemente
Autoradio (siehe vordere Ausklappseite)
Abbildung A:
Taste : Entriegelung Bedienteil
2
Taste /MU: Gerät ein- und ausschalten/Ton ausschalten (MUTE)
3
Taste MD/PTY: Betriebsmodus einstellen/PTY-Funktion einstellen
4
Taste ▸▸I: Titel-/Sendersuchlauf vorwärts
5
Display
6
USB-Anschluss
7
BD/DISP: Speicherebene FM 1-3 wählen/Displayinformationen anzeigen
8
AUX: 3,5 mm Stereo-Eingangsbuchse für den Anschluss eines externen Audiogerätes
9
Taste 6/FL+: Senderspeicherplatz 6/Ordner vorwärts bei MP3-/WMA-Wiedergabe
10
Taste 5/FL-: Senderspeicherplatz 5/Ordner rückwärts bei MP3-/WMA-Wiedergabe
11
Taste 4/RDM: Senderspeicherplatz 4/ Zufallswiedergabe bei MP3-/WMA-Wiedergabe
12
Taste 3/INT: Senderspeicherplatz 3/Introfunktion bei MP3-/WMA-Wiedergabe
Taste 2/RPT: Senderspeicherplatz 2/Wiederholfunktion bei MP3-/WMA-Wiedergabe
13
14
Taste 1/PAU: Senderspeicherplatz 1/Wiedergabe anhalten (Pause)
15
I◂◂: Titel-/Sendersuchlauf rückwärts
16
A/PS : Automatische Senderspeicherung/Suchfunktion bei MP3-/WMA-
Wiedergabe
17
Multiregler: Drehen, um Werte/Lautstärke einzustellen
18
Taste SEL (EQ/LD TA/AF): Einstellmenü aufrufen
62
Abbildung B:
19
Verriegelung Bedienteil
20
Haltepunkt für Bedienteil
21
Kartenleser für SD/MMC-Karten
22
RESET: Gerät zurücksetzen
Abbildung C:
ISO-Block Anschluss B
23
24
Kfz-Flachstecksicherung 7,5 A
25
ISO-Block Anschluss A
26
SUBW: Audio-Cinch-Ausgang für Subwoofer
27
LINE OUT: Audio-Cinch-Ausgang L/R für Verstärker
28
Antennenanschluss für DIN-Antennenstecker
SAR 28 A1

Zubehör (siehe hintere Ausklappseite)
Abbildung D:
29
Etui für Bedienteil
30
Einbaurahmen
31
Schlüssel für Einbaurahmen
32
Verankerungsblech (inkl. Befestigungsmaterial)
33
Adapterkabel für ISO-Block A
Installation
WARNUNG
Bei der Installation des Gerätes können Sachschäden auftreten!
► Lassen Sie das Gerät nach Möglichkeit von einem Fachbetrieb einbauen.
► Wenn Sie das Gerät selbst einbauen möchten, beachten Sie für einen
sicheren und fehlerfreien Betrieb des Gerätes die Anweisungen für den
Anschluss und Einbau. Bei unsachgemäßer Montage besteht Brandgefahr!
Anschluss
ACHTUNG
Die Verwendung von falschen Anschlüssen kann zu Beschädigungen am Gerät führen.
► Benutzen Sie beim Einbau die ISO-Anschlüsse des Gerätes. Die fahrzeugspe-
zifi schen ISO-Adapter, die Sie gegebenenfalls benötigen, erhalten Sie in Fach-
werkstätten, im Fachhandel oder in den Fachabteilungen der Warenhäuser.
Bei Verwendung anderer Anschlussarten erlischt der Garantieanspruch!
DE
AT
CH
SAR 28 A1
Belegung der ISO-Anschlüsse
Die Ansicht erfolgt von hinten auf die Stecker.
1357
2468
ISO A (Belegung
Stromversorgung)
Belegung
1 unbelegt
2 unbelegt
3 unbelegt
4 Dauerplus 12 V (Kl. 30)
5 Antennen-Steuerspannung
6 unbelegt
7 Zündungsplus 12 V (Kl. 15)
8 Minus (-) Masse (Kl. 31)
63

DE
AT
CH
Belegung
1 Hinten rechts +
2 Hinten rechts -
1357
2468
Um das Gerät an zwei Lautsprecher anzuschließen, verwenden Sie nur die
Kabel für die vorderen Lautsprecher.
HINWEIS
Beachten Sie, dass zur Senderspeicherung der Anschluss 4 im ISO-Block A
►
an Dauerplus angeschlossen sein muss.
► In einigen Fahrzeugmodellen ist die standardmäßige Belegung der Anschlüsse
[4] und [7] im ISO-Block A werkseitig vertauscht. Wenn dies der Fall ist, kann
die Senderspeicherung verloren gehen. Zur Abhilfe müssen die Anschlüsse 7
(Zündungsplus) und 4 (Dauerplus) im ISO-Block A getauscht werden. Stecken
Sie hierzu das mitgelieferte Adapterkabel 33 zwischen den ISO-Block A des
Radios und dem KFZ-Kabelbaum.
Verbinden Sie am Adapterkabel die rote Ader des ISO-Steckers mit der gelben
Ader der ISO-Buchse und die gelbe Ader des ISO-Steckers mit der roten Ader
der ISO-Buchse (siehe auch hintere Ausklappseite).
ISO B (Belegung
Lautsprecheranschlüsse)
3 Vorne rechts +
4 Vorne rechts 5 Vorne links +
6 Vorne links 7 Hinten links +
8 Hinten links -
64
ACHTUNG
Bei Verwendung des Adapterkabels für den ISO-Block A müssen beide
►
Anschlüsse (rote und gelbe Adern) miteinander verbunden sein. Ansonsten
besteht Kurzschlussgefahr!
Antennen-Steuerspannungsanschluss
ACHTUNG
Belasten Sie den Anschluss für die Antennens-Steuerspannung niemals mit
►
dem Motorstromkabel der Antenne oder mit anderen Verbrauchern.
HINWEIS
Wenn Sie die Antennensteuerung nutzen möchten und das mitgelieferte
►
33
Adapterkabel
nung (blau) den Schrumpfschlauch entfernen und den Kontakt in die entspre-
chende Führung der ISO-Block A Buchse stecken. Weitere Informationen zur
Belegung erhalten Sie in der Bedienungsanleitung Ihres Fahrzeuges.
verwenden, müssen Sie am Kabel der Antennen-Steuerspan-
SAR 28 A1

Der Anschluss für die Antennen-Steuerspannung steht für eine relaisgesteuerte
A
Antenne zur Verfügung. Das Relais fährt die Antenne dann automatisch aus,
wenn das Gerät eingeschaltet wird. Beim Ausschalten fährt die Antenne wieder
ein. Dieser Anschluss kann auch zum Steuern eines externen Verstärkers benutzt
werden. Zum genauen Anschluss ziehen Sie bitte die Bedienungsanleitung des
Verstärkers hinzu.
Anschluss eines externen Verstärkers
Für den Anschluss eines externen Verstärkers benutzen Sie den Audio-CinchAusgang LINE OUT 27. Beachten Sie hierzu die Bedienungsanleitung des
externen Verstärkers.
Anschluss eines externen Subwoofers
Für den Anschluss eines externen Subwoofers benutzen Sie den orangen CinchAusgang SUBW
26
. Beachten Sie hierzu die Bedienungsanleitung des externen
Subwoofers.
Anschlussschema
SubwooferAntenne
1234
5678
1234
5678
Externer Verstärker
DE
AT
CH
ISO B
ISO
Einbau
SAR 28 A1
Das Gerät kann in jeden Standard-ISO-Einbauschacht eingesetzt werden. Sollte
Ihr Kraftfahrzeug keinen ISO-Einbauschacht besitzen, wenden Sie sich an Ihre
Fachwerkstatt, den Fachhandel oder die Fachabteilungen der Warenhäuser.
HINWEIS
Schließen Sie die Kabel an, bevor Sie das Gerät endgültig einbauen.
►
Stellen Sie sicher, dass diese richtig eingesteckt sind und das System richtig
funktioniert.
65

DE
AT
CH
Einbauhinweise
■ Setzen Sie das Gerät in den dafür vorgesehenen Schacht ein oder wählen
Sie den Einbauplatz so, dass Sie alle Tasten bequem erreichen können und
der Fahrer nicht behindert wird.
■ Schließen Sie das Gerät nur an eine vorschriftsmäßig installierte 12V
Autobatterie an.
■ Schließen Sie das Gerät nur über die ISO-Stecker im Auto an.
■ Bauen Sie das Gerät so ein, dass kein Hitzestau entstehen kann und das
Gerät gut belüftet ist.
■ Bauen Sie das Gerät nicht an einem Platz ein, wo es hohen Temperaturen
(z.B. direkte Sonneneinstrahlung oder Heizungsluft), starker Verschmutzung
und starken Erschütterungen ausgesetzt ist.
■ Falls Änderungen am Fahrzeug erforderlich sind, wenden Sie sich an Ihren
Fahrzeughändler/eine Fachwerkstatt.
Einbau des Gerätes in den ISO-Schacht
♦ Ziehen Sie den Einbaurahmen 30 vom Gehäuse des Gerätes ab. Verwenden
Sie hierzu die mitgelieferten Schlüssel
ausbauen“).
♦ Stecken Sie den Einbaurahmen in den ISO-Einbauschacht.
♦ Biegen Sie die Laschen des Einbaurahmens mit einem Schraubendreher um,
so dass dieser fest im Einbauschacht fi xiert ist (s. Abbildung).
31
(siehe auch Kapitel „Das Gerät
66
♦ Überprüfen Sie den Einbaurahmen auf festen Halt.
♦ Verbinden Sie den ISO-Buchsen-Block des Gerätes mit den beiden ISO-
Steckern Ihres Fahrzeugs.
♦ Verbinden Sie das Antennenkabel der Fahrzeugantenne mit der Antennen-
buchse 28 des Gerätes. Den fahrzeugspezifi schen DIN-ISO-Adapter, den
Sie gegebenenfalls benötigen, erhalten Sie in Fachwerkstätten, im Fachhan-
del oder in den Fachabteilungen der Warenhäuser.
♦ Schließen Sie eventuell das Audio-Cinchkabel eines externen Verstärkers an
die LINE OUT Buchsen 27 des Gerätes an.
SAR 28 A1

♦ Schließen Sie eventuell das Audio-Cinchkabel eines externen Subwoofers
an die orange Cinch-Buchse SUBW
♦ Sichern Sie Ihr Gerät ggf. zusätzlich gegen Diebstahl. Befestigen Sie die
Befestigungsschraube mit dem Verankerungsblech 32 und dem Befestigungs-
material an der Motor-Feuerwand des KFZ.
ACHTUNG
Mögliche Beschädigung der Kabel!
► Beachten Sie beim Einschieben die Verlegung der Kabel, um eine Beschädigung
zu vermeiden. Bei beschädigten Kabeln besteht Brandgefahr!
♦ Schieben Sie das Gerät vorsichtig in den Einbaurahmen 30, bis es einrastet.
♦ Nachdem alle Verbindungen hergestellt sind, betätigen Sie die Taste RESET
22
für ca. 6 Sekunden mit einem Kugelschreiber oder anderem spitzen
Gegenstand.
♦ Setzen Sie das Bedienteil ein, wie unter „Bedienteil einsetzen“ beschrieben.
Das Gerät ausbauen
Um das Gerät wieder auszubauen, gehen Sie wie folgt vor:
♦ Führen Sie den rechten un den linken Schlüssel
den Seiten des Gerätes ein. Achten Sie darauf, dass die Erhöhungen an den
Schlüsseln nach außen zeigen (Die Laschen sind nun zurückgebogen.).
26
des Gerätes an.
31
in den jeweiligen Schlitz an
DE
AT
CH
SAR 28 A1
♦ Ziehen Sie das Gerät heraus.
67

Inbetriebnahme
Bedienteil
Zum Schutz vor Diebstahl, können Sie das Bedienteil Ihres Gerätes abnehmen.
Bewahren Sie das abgenommene Bedienteil nicht in Ihrem Fahrzeug auf.
DE
AT
CH
HINWEIS
Bewahren Sie das Bedienteil zum Schutz immer im Etui 29 auf.
►
Bedienteil einsetzen
♦ Setzen Sie das Bedienteil zuerst mit der rechten
Seite auf den Haltepunkt
♦ Drücken Sie dann die linke Seite in den
Rahmen, bis sie an der Verriegelung
einrastet.
Überprüfen Sie, ob das Bedienteil richtig und fest
mit dem Hauptgerät verbunden ist. Ist das Bedienteil
nicht richtig eingebaut, kann es zu Fehlfunktionen bei
der Bedienung des Gerätes kommen.
20
.
Bedienteil abnehmen
♦ Drücken Sie die Taste zum Entriegeln
des Bedienteils. Das Bedienteil springt an der
linken Seite leicht nach vorne.
♦ Ziehen Sie das Bedienteil erst an der linken, dann
an der rechten Seite ab.
19
2.
1.
68
SAR 28 A1

Bedienung und Betrieb
In diesem Kapitel erhalten Sie wichtige Hinweise zur Bedienung und Betrieb des
Gerätes.
HINWEIS
Erfolgt innerhalb von etwa 5 Sekunden keine Einstellung bzw. kein Tasten-
►
druck, kehrt das Gerät in die vorherige Betriebsart zurück. Geänderte
Einstellungen werden gespeichert.
Ein-/Ausschalten
♦ Drücken Sie die Taste /MU 2 zum Einschalten des Gerätes.
Im Display erscheint die Anzeige WELCOME.
♦ Zum Ausschalten halten Sie die Taste /MU länger gedrückt. Im Display
erscheint die Anzeige GOODBYE.
Einstellungen
WARNUNG
Gehörschäden durch zu hohe Lautstärke!
Eine zu hohe Lautstärke kann Ihr Gehör dauerhaft schädigen.
► Stellen Sie nur eine mäßige Lautstärke ein.
Lautstärke
♦ Drehen Sie den Multiregler 17, um die Lautstärke einzustellen.
DE
AT
CH
Stummschaltung ein- / ausschalten
Betriebsart
SAR 28 A1
♦ Drücken Sie kurz die Taste /MU, um den Ton auszuschalten. Im Display
erscheint die Anzeige MUTE ON.
♦ Drücken Sie die Taste /MU erneut, um den Ton wieder einzuschalten.
Beim Empfang eines PTY- oder TA-Senders und beim Sender- oder Quellen-
wechsel wird die Stummschaltung aufgehoben.
♦ Drücken Sie die Taste MD/PTY 3, um zwischen Radioempfang (TUNER),
Kartenleser (CARD), USB-Anschluss (USB) und Audioeingang (AUX) zu
wechseln.
HINWEIS
Die Betriebsarten CARD und USB lassen sich nur aufrufen, wenn das
►
entsprechende Medium eingelegt ist.
69

DE
AT
CH
Display
♦ Drücken und halten Sie die Taste BD/DISP 7, bis im Display 5 die Uhrzeit
(CT) angezeigt wird. Drücken Sie nun mehrmals die Taste BD/DISP, um sich
nacheinander folgende Informationen anzeigen zu lassen:
Radiosender, Uhrzeit (wird bei RDS-Empfang automatisch eingestellt), Frequenz
und PTY-Einstellungen (diese RDS-Funktionen werden von den Sendeanstalten in
unterschiedlichem Umfang gesendet; siehe auch Kapitel „Radiofunktionen”).
HINWEIS
Wenn Sie keine RDS oder PTY-Informationen empfangen, erscheint
►
PTY NONE im Display.
► Nach ca. 5 Sekunden ohne Bedienung wechselt das Radio wieder in den
Standardbetrieb.
Radio zurücksetzen (RESET)
Um das Gerät in den Auslieferungszustand zurückzusetzen, drücken und halten
Sie die Taste RESET
einem Kugelschreiber.
HINWEIS
►
Um an die Taste RESET zu gelangen, muss das Bedienteil vollständig
abgenommen werden, siehe auch Kapitel „Bedienteil abnehmen“.
Setzen Sie das Gerät zurück:
▯ bei der Erstinbetriebnahme,
▯ nach Anschluss der Kabel,
▯ wenn nicht alle Funktionstasten funktionieren,
▯ bei Erscheinen einer Fehlermeldung im Display,
▯ bei off ensichtlichen Fehlfunktionen des Gerätes.
22
für ca. 6 Sekunden mit einem spitzen Gegenstand, z.B.
70
SAR 28 A1

Einstellungen über die Taste SEL (EQ/LD/TA/AF)
♦ Drücken Sie die Taste SEL 18 am Gerät. Die aktuelle Basseinstellung wird
angezeigt. Jeder weitere Druck der Taste SEL ruft den nächsten Einstellungs-
punkt auf.
Folgende Einstellungen sind möglich:
BAS - Bässe (von -7 bis +7),
TRE - Höhen (von -7 bis +7),
BAL - Balance (Klangverteilung zwischen den rechten und linken Lautsprechern)
(von 0L bis 9L und 0R bis 9R),
FAD - Fader (Klangverteilung zwischen den hinteren und vorderen Lautsprechern)
(von 0F bis 9F und 0R bis 9R),
VOL - Lautstärke (von 0 bis 20)
♦ Drehen Sie den Multiregler 17, um die Einstellungen des angezeigten
Menüpunktes zu ändern.
Weitere Einstellungen über die Taste SEL (EQ/LD/TA/AF)
♦ Halten Sie die Taste SEL ca. 2 Sekunden lang gedrückt und drücken Sie
danach so oft die Taste SEL, bis die gewünschte Funktion im Display ange-
zeigt wird.
♦ Drehen Sie den Multiregeler, um die Einstellungen des angezeigten Menü-
punktes zu ändern.
TA - Traffi c Announcement (Verkehrsfunk) ein-/ausschalten
TA ON: Bei eingeschalteter TA-Funktion wird von anderen Sendern oder
Betriebsarten sofort auf den Radiosender umgeschaltet, der gerade Verkehrsfunk
überträgt. Im Display erscheint die Anzeige TA.
DE
AT
CH
SAR 28 A1
HINWEIS
Bei eingeschalteter TA-Funktion können während der Sendersuche nur
►
Sender gefunden bzw. gespeichert werden, die ein Verkehrsfunksignal
ausstrahlen. Sender, die ein Verkehrsfunksignal übertragen, sind im Display
durch TP gekennzeichnet.
TA OFF: TA-Funktion ist deaktiviert.
AF - Alternative Frequenzen ein-/ausschalten
AF ON: Bei eingeschalteter AF-Funktion sucht das Gerät nach der optimalen
Frequenz des eingestellten Senders.
AF OFF: AF-Funktion ist deaktiviert.
EQ - Equalizer
♦ Drehen Sie den Multiregler, um eine der Einstellungen FLAT, CLASSIC, ROCK ,
POP oder EQ OFF zu wählen. Bei der Einstellung EQ OFF ist kein Equalizer
zugeschaltet. Die Equalizer Einstellung wird unten im Display angezeigt.
71

DE
AT
CH
SUBW - Subwoofer
Sie können einen externen aktiven Subwoofer anschließen, um einen kräftigeren
Basseff ekt zu erzeugen.
♦ Drehen Sie den Multiregler 17, um den Basseff ekt ein- (SUBW ON) oder
auszuschalten (SUBW OFF).
AVOL - Lautstärke beim Einschalten des Radios einstellen
♦ Drehen Sie den Multiregler, um den Lautstärkepegel einzustellen, mit dem
sich das Radio einschalten soll.
STEREO/MONO - Audioausgabe einstellen
♦ Drehen Sie den Multiregler, um die Audioausgabe bei Radiobetrieb in
Stereo- (STEREO) oder Monoton (MONO) einzustellen. Beim Empfang eines
Stereo-Senders erscheint im Display das Stereosymbol .
LOUD - Loudness-Funktion ein-/ausschalten
♦ Drehen Sie den Multiregler, um Bässe und Höhen anzuheben (LOUD ON)
oder ausschalten (LOUD OFF). Bei eingeschalteter Loudness-Funktion wird
rechts im Display LOUD eingezeigt.
Dx/LOCAL - Empfangsempfi ndlichkeit einstellen
♦ Drehen Sie den Multiregler, um die Empfangsempfi ndlichkeit auf überregio-
nale Sender (DX) oder auf regionale Sender (LOCAL) auszurichten.
Beachten Sie, dass bei der Einstellung LOCAL nur Sender mit guter Empfangsqualität wiedergegeben werden.
CT - Uhrzeit einstellen
72
HINWEIS
Das Gerät ist mit einer RDS-gesteuerten Uhr ausgestattet. Die Uhr stellt sich
►
bei eingeschalteter RDS-Funktion automatisch und läuft auch bei ausgeschaltetem Radio weiter. Wenn Sie kein RDS-Signal empfangen, können Sie hier
die Uhrzeit auch manuell einstellen.
♦ Drehen Sie den Multiregler nach rechts, um die Minuten einzustellen und
nach links, um die Stunden einzustellen.
Lautstärkepegel für Verkehrsfunkübertragung einstellen
HINWEIS
Wird ein Radiosender mit Verkehrsfunk empfangen, kann durch Drehen des
►
Multireglers der Lautstärkepegel für die Verkehrsfunkübertragung eingestellt
werden.
► Während Sie Verkehrsfunk empfangen (Anzeige TRAFFIC) kann das Radio
nicht bedient werden. Nur die Funktionen „Lautstärke“, „Stummschaltung“
und „Ein-/Ausschalten“ können gewählt werden.
SAR 28 A1

♦ Drehen Sie, während Sie Verkehrsfunk empfangen (TA + TP werden links
unten im Display
Im Display erscheint Tavol und der aktuell eingestellte Lautstärkepegel.
♦ Stellen Sie mit dem Multiregler den gewünschten Lautstärkepegel ein.
Die Einstellung wird nach ca. 5 Sekunden automatisch gespeichert.
5
angezeigt), den Multiregler 17 nach rechts oder links.
Radiofunktionen
Speicherebene wählen
♦ Drücken Sie kurz die Taste BD/DISP 7, um zwischen den Speicherebenen
(FM1, FM2, FM3) zu wechseln.
Jede Speicherebene deckt den selben Frequenzbereich (87,5 - 108 MHz) ab
und verfügt über 6 Speicherplätze. Die Speicherebene wird nicht angezeigt,
wenn der Sendername im Display angezeigt wird.
Sender automatisch suchen
♦ Drücken und halten Sie die Tasten ▸▸I 4 oder I◂◂ 15, um einen Sendersuch-
lauf zu starten. Bei einem gefundenen Sender wird die Suche angehalten.
Sender manuell einstellen
♦ Drücken Sie kurz die Tasten ▸▸I oder I◂◂, um die Frequenz in Schritten von
0,05 MHz (UKW) zu ändern, bis die gewünschte Frequenz eingestellt ist.
Sender speichern
♦ Halten Sie für ca. 2 Sekunden eine der Tasten 1 bis 6 gedrückt, um den
aktuell eingestellten Sender zu speichern. Die erfolgreiche Speicherung wird
durch das Anzeigen der Nummer 1 bis 6 im Display signalisiert.
Gespeicherten Sender aufrufen
♦ Wählen Sie mit BD/DISP die Speicherebene (FM1, FM2, FM3).
♦ Drücken Sie eine der Tasten 1 bis 6, um den gespeicherten Sender aufzurufen.
DE
AT
CH
Automatisches Speichern
SAR 28 A1
♦ Halten Sie die Taste A/PS 16 für 3 Sekunden gedrückt. Nach dem Such-
lauf werden die 6 gespeicherten Sender nacheinander für ca. 5 Sekunden
angespielt, zeitgleich blinkt die jeweilige Speicherplatznummer. Bei schwa-
chen Sendern läuft der Suchlauf automatisch weiter.
73

Gespeicherte Sender durchlaufen
DE
AT
CH
♦ Drücken Sie kurz die Taste A/PS
aktuellen Speicherebene werden kurz angespielt.
♦ Wenn Sie den gewünschten Sender hören, drücken Sie die Taste A/PS .
Der gewählte Sender bleibt ausgewählt.
16
. Alle gespeicherten Sender der
Programmtyp (PTY)
Mit Hilfe dieser Funktion können Sie nach Sendern eines bestimmten Genres
suchen. Folgende Einstellungen sind möglich:
POP M
ROCK M
NEWS
AFFAIRS
INFO
EASY M
LIGHT M
HINWEIS
Bitte beachten Sie, dass diese Informationen von der Region, der Rundfunk-
►
anstalt und dem Sender abhängig sind.
PTY-Kennung einstellen
♦ Drücken und halten Sie die Taste MD/PTY 3, bis unten im Display die
Anzeige PTY erscheint.
♦ Drücken Sie anschließend wiederholt eine der Tasten 1 bis 6, um den
gewünschten PTY-Eintrag zu wählen.
♦ Um zwischen den PTY-Einträgen „Musikrichtung“ und „Sprachbeiträge“ zu
wechseln, drücken Sie, bei der Anzeige des ersten PTY-Eintrags, kurz die
Taste MD/PTY erneut.
Die Tasten 1 bis 6 sind wie folgt belegt:
SPORT
EDUCATE
DRAMA
CLASSICS
OTHER M
CULTURE
SCIENCE
VARIED
JAZZ
COUNTRY
WEATHER
FINANCE
CHILDREN
NATION M
SOCIAL
PHONE IN
FOLK M
TRAVEL
LEISURE
DOCUMENT
74
Taste Musikrichtung Sprachbeiträge
1 POP M, ROCK M NEWS, AFFAIRS, INFO
2 EASY M, LIGHT M SPORT, EDUCATE, DRAMA
3 CLASSICS, OTHER M CULTURE, SCIENCE, VARIED
4 JAZZ, COUNTRY WEATHER, FINANCE, CHILDREN
5 NATION M SOCIAL, PHONE IN
6 FOLK M TRAVEL, LEISURE, DOCUMENT
SAR 28 A1

Wenn für 2 Sekunden keine weitere Eingabe erfolgt, startet ein automatischer
Suchlauf nach Sendern, die dem PTY-Eintrag entsprechen. Der gewählte PTY-Eintrag blinkt während des Suchlaufs im Display
hält der Suchlauf an.
PTY-Funktion ein-/ausschalten
♦ Um die PTY-Suche zu aktivieren, drücken Sie die Taste MD/PTY 3.
Im Display erscheint die Anzeige PTY und der zuletzt gewählte PTY-Eintrag
(z.B. POP M).
Bei der Sendersuche werden nur Sender der aktuell gewählten PTY-Kennung
berücksichtigt.
♦ Um die PTY-Suche zu deaktivieren, drücken Sie die Taste MD/PTY erneut.
Im Display erlischt die Anzeige PTY.
Sender nach PTY-Kennung suchen
♦ Wenn Sie während der Anzeige einer PTY-Kennung für 2 Sekunden keine
weitere Eingabe vornehmen, startet sofort ein Suchlauf nach Sendern, die
dieser PTY-Kennung entsprechen.
Wird kein Sender gefunden, der dieser PTY-Kennung entspricht, erscheint kurz
die Anzeige PTY NONE und danach endet der Suchlauf beim zuletzt eingestellten
Sender.
USB-Anschluss
Das Gerät kann USB-Datenträger bis zu 16 GB verarbeiten.
Datenträger anschließen
♦ Schieben Sie die Schutzkappe vom USB-Anschluss nach rechts.
♦ Verbinden Sie Ihr USB-Gerät mit dem USB-Anschluss.
♦ Schieben Sie die Schutzkappe wieder über den USB-Anschluss, wenn kein
USB-Gerät angeschlossen ist, um Verunreinigungen zu vermeiden.
5
. Beim ersten gefundenen Sender
DE
AT
CH
Kartenleser
Datenträger einlegen
SAR 28 A1
Das Gerät kann SD/MMC Speicherkarten bis zu 2 GB und SDHC Speicherkarten
bis zu 32 GB verarbeiten.
♦ Drücken Sie die Taste zum Entriegeln des Bedienteils und nehmen
Sie es vom Gerät ab (siehe auch Kapitel „Bedienteil abnehmen“).
♦ Schieben Sie eine Speicherkarte mit der Beschriftung nach oben zeigend in
das Kartenfach ein, bis diese einrastet.
75

DE
AT
CH
Funktionen MP3/WMA-Wiedergabe
Wiedergabe
■ Das Gerät kann Dateien im Format MP3 und WMA abspielen.
■ Ein Vermischen von Titeln und Verzeichnissen auf derselben Ebene kann zu
Problemen beim Abspielen führen.
■ Während der Wiedergabe werden die Informationen aus dem ID3-Tag der
MP3-Datei ausgelesen und nacheinander im Display angezeigt.
♦ Die Wiedergabe der MP3- oder WMA-Titel auf dem USB-Gerät bzw. der
Speicherkarte beginnt automatisch.
Wiedergabe unterbrechen
♦ Drücken Sie die Taste 1/PAU 14, um die Wiedergabe zu unterbrechen.
Die aktuelle Abspielzeit des Titels blinkt im Display
♦ Um die Wiedergabe fortzusetzen, drücken Sie die Taste 1/PAU noch einmal.
HINWEIS
Drücken und halten Sie die Taste 1/PAU, um den ersten Titel auf dem
►
Speichermedium wiederzugeben.
Titel überspringen
♦ Drücken Sie die Tasten ▸▸I 4 oder I◂◂ 15, um den nächsten bzw. den
vorherigen Titel zu wählen. Die Titelnummer wird im Display angezeigt.
5
.
76
Schneller Vor-/Rücklauf
♦ Halten Sie die Tasten ▸▸I oder I◂◂ länger gedrückt, um einen schnellen Vor-
oder Rücklauf zu starten.
Wiederholungsfunktion (RPT - Repeat)
♦ Drücken Sie mehrmals die Taste 2/RPT 13, um zwischen den Wiederholungs-
funktionen umzuschalten. Folgende Einstellungen sind möglich:
– RPT ONE: Der aktuelle Titel wird wiederholt.
– RPT DIR: Alle Titel im aktuellen Verzeichnis werden wiederholt.
– RPT ALL: Alle Titel auf dem Speichermedium werden wiederholt.
Sind die Funktionen RPT ONE oder RPT DIR aktiviert, wird RPT im Display angezeigt.
SAR 28 A1

Titel kurz anspielen
♦ Drücken Sie die Taste 3/INT 12. Im Display erscheint kurz INT ON.
Es werden nacheinander alle Titel für ca. 10 Sekunden angespielt.
♦ Drücken Sie die Taste 3/INT erneut, um die Wiedergabe des aktuell
angespielten Titels zu starten. Im Display erscheint kurz INT OFF.
Zufallswiedergabe aller Titel (RDM - Random)
♦ Drücken Sie die Taste 4/RDM 11. Im Display erscheint kurz RDM ON.
Es wird eine zufallsgesteuerte Wiedergabe gestartet. Zusätzlich erscheint im
Display die Anzeige RDM.
♦ Drücken Sie die Taste 4/RDM erneut, um die normale Wiedergabe zu star-
ten. Im Display erscheint kurz RDM OFF und die Anzeige RDM verschwindet.
Verzeichnis überspringen
♦ Drücken Sie die Taste 6/FL+ 9, um das nächste Verzeichnis bzw. die
10
Taste 5/FL-
gabe beginnt automatisch.
, um das vorherige Verzeichnis wiederzugeben. Die Wieder-
Suchfunktionen
Titelnummer suchen
♦ Drücken Sie die Taste A/PS
♦ Drehen Sie den Multiregler 17, um die erste Stelle der gewünschten
Titelnummer einzustellen.
♦ Drücken Sie die Taste SEL 18, um die Eingabe zu bestätigen und zur
Eingabe der zweiten, dritten oder vierten Stelle zu gelangen.
♦ Drücken Sie die Taste 1/PAU 14, um die Wiedergabe des eingestellten
Titels zu starten.
Titelnamen suchen
16
.
DE
AT
CH
SAR 28 A1
♦ Drücken Sie die Taste A/PS
A-SEARCH. Die Suche nach Titelnamen startet sofort. Wurden keine Titel gefun-
den, die mit dem eingestellten Zeichen beginnen, wird NONE angezeigt.
♦ Drehen Sie den Multiregler, bis der gewünschte Buchstabe bzw. die Zahl
erscheint.
♦ Drücken Sie die Tasten ▸▸I 4 oder I◂◂ 15, um das eingestellte Zeichen
zu bestätigen und um alle Titel anzuzeigen, die mit den gesuchten Zeichen
beginnen.
♦ Drücken Sie die Taste 1/PAU, um die Wiedergabe des angezeigten Titels
zu starten.
zweimal. Im Display erscheint die Anzeige
77

DE
AT
CH
Suche nach Verzeichnissen
♦ Drücken Sie die Taste A/PS 16 dreimal. Das aktuell wiedergegebene
Verzeichnis erscheint.
♦ Drehen Sie den Multiregler 17, um zwischen den vorhandenen Verzeichnissen
umzuschalten.
♦ Drücken Sie die Taste 1/PAU 14, um das aktuell angezeigte Verzeichnis
auszuwählen. Die Wiedergabe des ersten Titels des ausgewählten Verzeich-
nisses startet sofort.
Ein externes Audiogerät an das Gerät anschließen
♦ Verbinden Sie den Audio-Ausgang eines externen Audio-Gerätes (z. B. ein
MP3-Player) über einen 3,5 mm Stereo-Klinkenstecker mit der Buchse AUX
8
an der Vorderseite des Gerätes.
♦ Wählen Sie die Wiedergabe des Audioeingangs aus, indem Sie mehrmals
die Taste MD/PTY 3 drücken, bis im Display AUX angezeigt wird.
Reinigung
Sicherheitshinweise
ACHTUNG
Mögliche Beschädigung des Gerätes
► Stellen Sie sicher, dass bei der Reinigung keine Feuchtigkeit in das Gerät
eindringt, um eine irreparable Beschädigung des Gerätes zu vermeiden.
Display reinigen
Entsorgung
Gerät entsorgen
Werfen Sie das Gerät keinesfalls in den normalen Hausmüll.
Dieses Produkt unterliegt der europäischen Richtlinie
2012/19/EU WEEE (Waste Electrical and Electronic Equipment).
Entsorgen Sie das Gerät über einen zugelassenen Entsorgungsbetrieb oder über
Ihre kommunale Entsorgungseinrichtung. Beachten Sie die aktuell geltenden
Vorschriften. Setzen Sie sich im Zweifelsfall mit Ihrer Entsorgungseinrichtung in
Verbindung.
78
■ Reinigen Sie die Vorderseite des Gerätes / das Display ausschließlich mit
einem leicht feuchten, fusselfreien Tuch und einem milden Spülmittel.
SAR 28 A1

Fehlerbehebung
In diesem Kapitel erhalten Sie wichtige Hinweise zur Störungslokalisierung und
Störungsbehebung. Beachten Sie die Hinweise um Gefahren und Beschädigungen
zu vermeiden.
Sicherheitshinweise
WARNUNG
Beachten Sie die folgenden Sicherheitshinweise um die Gefahren und Sachschäden zu vermeiden:
► Reparaturen an Elektrogeräten dürfen nur von Fachleuten durchgeführt werden,
die vom Hersteller geschult sind. Durch unsachgemäße Reparaturen können
erhebliche Gefahren für den Benutzer und Schäden am Gerät entstehen.
Fehlerursachen und -behebung
Die nachfolgende Tabelle hilft bei der Lokalisierung und Behebung kleinerer
Störungen:
Fehler Mögliche Ursache Behebung
Das Gerät
lässt sich nicht
einschalten.
Kein Ton.
Funktionstasten
funktionieren
nicht.
Radio und/oder
die Automatische
Senderspeicherung funktionieren nicht.
Senderspeicher
funktioniert nicht.
Die Zündung ist nicht eingeschaltet.
Sicherung ist defekt. Ersetzen Sie die Sicherung.
Die Lautstärke ist auf
Minimum eingestellt.
Die Kabel sind nicht richtig
angeschlossen.
Der Ton ist ausgeschaltet.
Am Gerät liegt eine Störung
vor.
Das Bedienteil ist nicht
montiert.
Das Antennenkabel ist nicht
korrekt angeschlossen.
Die Sendersignale sind zu
schwach.
Der Anschluss 4 im ISOBlock A (Dauerplus) ist nicht
richtig angeschlossen.
Schalten Sie die Zündung durch Drehen
des Schlüssels ein.
Erhöhen Sie die Lautstärke.
Überprüfen Sie die Kabelverbindungen.
Drücken Sie die Taste
Ton wieder einzuschalten.
Drücken Sie die Taste RESET.
Überprüfen Sie den korrekten Sitz des
Bedienteils.
Überprüfen Sie das Antennenkabel auf
korrekten Sitz.
Stellen Sie die Sender manuell ein.
Überprüfen Sie die Kabelverbindungen.
Beachten Sie hierzu das Kapitel
„Anschluss“.
DE
AT
CH
/MU, um den
SAR 28 A1
79

DE
AT
CH
Fehler Mögliche Ursache Behebung
Der USB-Anschluss ist für Geräte, die nach der USB-Norm
Gerät am
USB-Anschluss
funktioniert nicht.
Kartenlesegerät
liest die Karte
nicht.
HINWEIS
funktionieren, bestimmt. Nicht
alle am Markt erhältliche Geräte erfüllen diese Norm. Unter Umständen ist ein Gerät,
das nicht nach USB-Norm
funktioniert, angeschlossen.
Eventuell ist die Karte defekt,
verschmutzt oder nicht richtig
eingelegt.
Wenn Sie mit den vorstehend genannten Schritten das Problem nicht lösen
►
können, wenden Sie sich bitte an den Kundendienst (siehe Garantiekarte).
Schließen Sie ein Gerät an, das nach
USB-Norm funktioniert. Stellen Sie
sicher, das der Datenträger mit dem
Dateisystem FAT32 formatiert ist.
Überprüfen Sie die Karte. Schieben
Sie sie mit der beschrifteten Seite nach
oben zeigend ein. Stellen Sie sicher,
dass der Datenträger mit dem Dateisystem FAT32 formatiert ist.
Anhang
Technische Daten
Allgemeines
80
Eingangsspannung 12 V DC
Eingangsstrom max. 7,5 A
Nennleistung 4 x 7 W
Betriebstemperatur +5 - +40 °C
Lagertemperatur 0 - +50 °C
Feuchtigkeit (keine Kondensation) ≤ 75 %
Abmessungen (L x B x H) ca. 18,6 x 12,7 x 5,7 cm
Gewicht inkl. Zubehör ca. 700 g
Gerätesicherung
KFZ-Flachsteckersicherung
7,5 A
SAR 28 A1

Frequenzbereich Radio*
Frequenz FM (UKW) 87,5 - 108 MHz
Senderspeicherplätze FM (UKW) 18 Plätze
Audioeingang (AUX)
Stereo-Klinkenbuchse 3,5 mm
Audioausgang
2 x Cinch-Buchse für externen Verstärker (L/R)
1 x Cinch-Buchse für externen Subwoofer
USB-Anschluss
USB 1.1 und 2.0 kompatible Datenträger (bis 16 GB)
Kartenfach
SD/MMC Speicherkartenanschluss (SD/MMC bis 2 GB, SDHC bis 32 GB)
* Die technischen Gegebenheiten des Gerätes ermöglichen einen einstellbaren
Frequenzbereich von 87,5–108 MHz. In verschiedenen Ländern können
abweichende nationale Regelungen zu den zugewiesenen Rundfunkfrequenzbereichen bestehen. Beachten Sie, dass Sie die außerhalb des zugewiesenen
Rundfunkfrequenzbereiches empfangenen Informationen nicht verwerten, an
Dritte weiterleiten oder zweckentfremdet missbräuchlich verwenden dürfen.
DE
AT
CH
Hinweise zur EU-Konformitätserklärung
Dieses Gerät entspricht hinsichtlich Übereinstimmung mit
den grundlegenden Anforderungen und den anderen relevanten Vorschriften der Kfz-Richtlinie 2004/104/EC.
Die vollständige Original-Konformitätserklärung ist beim
Importeur erhältlich.
SAR 28 A1
81

DE
AT
CH
Garantie
Sie erhalten auf dieses Gerät 3 Jahre Garantie ab Kaufdatum. Das Gerät wurde
sorgfältig produziert und vor Auslieferung gewissenhaft geprüft. Bitte bewahren Sie den Kassenbon als Nachweis für den Kauf auf. Bitte setzen Sie sich im
Garantiefall mit Ihrer Servicestelle telefonisch in Verbindung. Nur so kann eine
kostenlose Einsendung Ihrer Ware gewährleistet werden.
HINWEIS
Die Garantieleistung gilt nur für Material- oder Fabrikationsfehler, nicht
►
aber für Transportschäden, Verschleißteile oder für Beschädigungen an
zerbrechlichen Teilen, z.B. Schalter oder Akkus.
Das Produkt ist nur für den privaten und nicht für den gewerblichen
Gebrauch bestimmt.
Bei missbräuchlicher und unsachgemäßer Behandlung, Gewaltanwendung und
bei Eingriff en, die nicht von unserer autorisierten Service-Niederlassung vorgenommen wurden, erlischt die Garantie. Ihre gesetzlichen Rechte werden durch
diese Garantie nicht eingeschränkt.
Die Garantiezeit wird durch die Gewährleistung nicht verlängert. Dies gilt auch
für ersetzte und reparierte Teile. Eventuell schon beim Kauf vorhandene Schäden
und Mängel müssen sofort nach dem Auspacken gemeldet werden, spätestens
aber zwei Tage nach Kaufdatum. Nach Ablauf der Garantiezeit anfallende
Reparaturen sind kostenpfl ichtig.
Importeur
KOMPERNASS HANDELS GMBH
BURGSTRASSE 21
44867 BOCHUM
GERMANY
www.kompernass.com
82
SAR 28 A1

Autoradio
SAR 28 A1
Um einen kostenlosen Reparaturablauf zu gewährleisten, setzen Sie
sich bitte mit der Service-Hotline in
Verbindung. Halten Sie hierfür Ihren
Kassenbeleg bereit.
Garantie
Service Deutschland
Tel.: 0800 5435 111 (Kostenfrei aus
dem dt. Festnetz/Mobilfunknetz)
E-Mail: kompernass@lidl.de
IAN 106770
Absender bitte deutlich schreiben:
Name
Vorname
Straße
PLZ/Ort
Land
Telefon
Diesen Abschnitt vollständig ausfüllen und dem Gerät beilegen!
Datum/Unterschrift
Fehlerbeschreibung:
Service Österreich
Tel.: 0820 201 222 (0,15 EUR/Min.)
E-Mail: kompernass@lidl.at
IAN 106770
Service Schweiz
Tel.:0842 665566 (0,08 CHF/Min.,
Mobilfunk max. 0,40 CHF/Min.)
E-Mail: kompernass@lidl.ch
IAN 106770
Erreichbarkeit Hotline: Montag bis Freitag
von 8:00 Uhr – 20:00 Uhr (MEZ)


KOMPERNASS HANDELS GMBH
BURGSTRASSE 21
44867 BOCHUM
DEUTSCHLAND / GERMANY
www.kompernass.com
Last Information Update · Stav informácií · Stand der
Informationen: 11/ 2014 · Ident.-No.: SAR28A1-092014-2
IAN 106770
4
 Loading...