

7
Bluetooth Car Radio SAB 160 A1
KOMPERNASS GMBH
BURGSTRASSE 21 · D-44867 BOCHUM
www.kompernass.com
ID-Nr.: SAB160A1-05/11-V3
IAN: 66837
Bluetooth Car Radio
CY
Operating instructions
R
Radio auto cu bluetooth
Instrucţiuni de utilizare
Ραδιόφωνο αυτοκινήτου-
CY
Bluetooth
Οδηүίες χρήσης
Bluetooth-autoradio
Upute za upotrebu
Aвто CD-плейър с Bluetooth
Ръководство за експлоатация
28
27
26
25
24
2
3
5 76
4
8
45
44
23
22
131415161718192021
29
32 32
33
30
31
43
42
9
101112
46
47
34
35
36
394041
37
48
49
50
38
Index
Introduction . . . . . . . . . . . . . .2
Preface . . . . . . . . . . . . . . . . . . . . . . . 2
Information for these operating
instructions . . . . . . . . . . . . . . . . . . . . 2
Copyright . . . . . . . . . . . . . . . . . . . . . 2
Limited liability . . . . . . . . . . . . . . . . . 3
Warnings . . . . . . . . . . . . . . . . . . . . . 3
Proper use. . . . . . . . . . . . . . . . . . . . . 4
Safety . . . . . . . . . . . . . . . . . . . . . . . .4
Basic Safety Instructions . . . . . . . . . .4
Package contents and transport
inspection . . . . . . . . . . . . . . . . . . . . .6
Disposal of the packaging . . . . . . . . 6
Operating components . . . . .7
Installation . . . . . . . . . . . . . . .9
Connection . . . . . . . . . . . . . . . . . . . . 9
Installation . . . . . . . . . . . . . . . . . . . 11
Uninstalling the device . . . . . . . . . .13
Initial use . . . . . . . . . . . . . . . .14
Face plate . . . . . . . . . . . . . . . . . . . .14
GB
CY
Cleaning . . . . . . . . . . . . . . . .33
Safety instructions . . . . . . . . . . . . . .33
Display cleaning . . . . . . . . . . . . . . . 33
Disposal . . . . . . . . . . . . . . . . .33
Disposal of the device . . . . . . . . . . 33
Troubleshooting . . . . . . . . . .34
Safety instructions . . . . . . . . . . . . . .34
Malfunction causes and remedies . 34
Appendix . . . . . . . . . . . . . . .36
Technical data . . . . . . . . . . . . . . . .36
Information regarding the EG
conformity declaration . . . . . . . . . .37
Warranty . . . . . . . . . . . . . . . . . . . .37
Importer . . . . . . . . . . . . . . . . . . . . .37
Handling and operation . . .15
Switching On and Off . . . . . . . . . .15
Settings . . . . . . . . . . . . . . . . . . . . . .15
Radio reset (RESET) . . . . . . . . . . . .19
Radio functions . . . . . . . . . . . . . . . . 19
General CD functions . . . . . . . . . . .23
MP3 CDs functions . . . . . . . . . . . . . 25
USB port . . . . . . . . . . . . . . . . . . . . .26
Card reader (SD/MMC) . . . . . . . .27
Record function . . . . . . . . . . . . . . . .27
Connecting an external audio
device to the device . . . . . . . . . . . .29
Bluetooth operation . . . . . . . . . . . .29
SAB 160 A1
1

Introduction
GB
CY
Introduction
Preface
Dear customer,
by purchasing the Bluetooth car radio SAB 160 A1 you have decided on a quality
product from SilverCrest, which, in terms of technology and functionality, meets
the most up-to-date development standards.
Read the information included here so that you can quickly familiarize yourself
with your device and thus make full use of its functions.
We wish you a great deal of enjoyable use.
Information for these operating instructions
These operating instructions are a component of the Bluetooth car radio SAB 160 A1
(hereafter referred to as the device) and supplies you with important information
regarding proper use, safety, installation and connection as well as how to operate
the device.
The operating instructions must be constantly kept available close to the device.
They are to be read and used by anyone assigned to install, service and repair
faults in the device.
Keep these operating instructions and hand them over with the device to any future
owners.
Copyright
2
This documentation is copyright protected.
All rights including those of photographic reproduction, duplication and distribution
by means of particular methods (for example data processing, data carriers and
data networks), wholly or partially as well as substantive and technical changes
are reserved.
SAB 160 A1
Introduction
Limited liability
All technical information, data and information for installation, connection and
operation contained in these operating instructions correspond to the latest at
time of printing and, to the best of our knowledge, take into account our previous
experience and know-how.
No claims can be derived from the details, illustrations and descriptions in these
instructions.
The manufacturer assumes no responsibility for damage caused by failure to
observe the instructions, improper use, inappropriate repairs, making unauthorized
changes or for using unapproved replacement parts.
Warnings
In the current operating instructions the following warnings are used:
WARNING
A warning of this danger level signifi es a possible dangerous
situation.
If the dangerous situation is not avoided it can lead to injuries.
The directives in this warning are there to avoid personal injuries. ►
IMPORTANT
A warning of this danger level signifi es possible propert
damage.
If the situation is not avoided it can lead to property damage.
The directives in this warning are there to avoid property damage. ►
GB
CY
y
SAB 160 A1
NOTICE
A notice signifi es additional information that assists in the handling of the ►
device.
3
Introduction
GB
CY
Proper use
This device is intended only for reception of FM/AM radio stations as well as
for the playback of audio and MP3 CDs, MP3 fi les from USB data carriers and
SD/MMC memory cards as well as audio signals of external audio devices. In
addition you can couple the device with a Bluetooth mobile phone and with the
microphone unit use the device as a hands free facility. The device is intended for
installation into a vehicle.
This device is not intended for any other use or for uses beyond those mentioned.
WARNING
Danger from unintended use!
Danger can come from the device if used for unintended purposes and/or
other types of use.
Use the device exclusively for intended purposes. ►
Observe the procedures described in these operating instructions. ►
Claims of any kind for damage resulting from unintended use will not be excepted.
The oper
Safety
In this chapter you receive important safety information regarding handling of the
device.
This device complies with the statutory safety regulations. Incorrect usage can,
however, lead to personal injury and property damage.
ator alone bears liability
.
Basic Safety Instructions
For safe handling of the device observe the following safety information:
Before use check the device for visible external damage. Do not put into ■
operation a device that is damaged or has been dropped.
Damaged cables or connections should be replaced by authorized qualifi
persons or by the customer service department.
Persons who, due to their phy
of operating the device safely may only use the device under supervision or
direction from a responsible per
Only permit children to use the device under supervision. ■
4
ed ■
sical, intellectual or motor abilities, are incapable ■
son.
SAB 160 A1
Introduction
Repairs should only be carried out by authorized specialist companies or by ■
the customer service department. Incorrect repairs can result in signifi cant
dangers for the user. In addition warranty claims become void.
A repair to the device during the warranty period may only be carried out ■
by a customer service department authorized by the manufacturer otherwise
no additional warranty claims can be consider
Defective components may only be replaced with original replacement parts. ■
Only by using original replacement parts can you guarantee that the safety
requirements are complied with.
Pr
otect the device from moisture and liquid penetration. ■
Danger from laser radiation
WARNING
The device is equipped with a class 1 laser.
Laser radiation is dangerous to the eyesight!
Observe the following safety instructions to avoid exposure
of yourself or others to laser radiation:
Never open the device. ►
Have the device repaired only by a specialist. ►
Do not make any modifi cations to the device. ►
Traffi c safety
GB
CY
ed for subsequent damages.
SAB 160 A1
WARNING
Safety in traffi c has the highest priority!
Observe the following safety instructions so that you do not put yourself or
others in danger:
Before travel commencement familiarize yourself with the operation of the ►
device.
Only operate the device when the traffi
place to carry out comprehensive operations.
Only remove or inser
Set the volume to a moderate level so that acoustical signals from police ►
vehicles, fi re trucks and other emergency services can be perceived in
good time.
t the face plate when the vehicle is parked. ►
c situation allows. Stop in a suitable ►
5
Introduction
GB
CY
Package contents and transport inspection
WARNING
Risk of suff ocation!
Packaging material should not be used as a play thing. ►
There is a risk of suff ocation!
The device is delivered with the follo
Car radio (incl. face plate) ▯
Installation bracket (Attached) ▯
Bezel frame (Attached) ▯
Fixture plate (incl. securing material) ▯
Keys for installation frame (2x) ▯
Case for face plate ▯
Microphone unit with adhesive strip ▯
Operating instructions ▯
NOTICE
Check the contents to make sure everything is there and for visible damage. ►
If the contents are not complete or are damaged due to defective packaging ►
or through transportation contact the service hotline (see warranty card).
wing components as standard:
Disposal of the packaging
The packaging protects the device from transport damage. The packaging materials
are selected from the point of view of their environmental friendliness and disposal
technology and are therefore recyclable.
The recirculation of packaging into the material circuit saves on raw material
and reduces generated waste. Dispose of packaging material that is no longer
needed according to the regionally established regulations.
NOTICE
If possible preserve the device's original packaging during the warranty ►
period so that in the case of a warranty claim you can package the device
properly for return.
6
SAB 160 A1
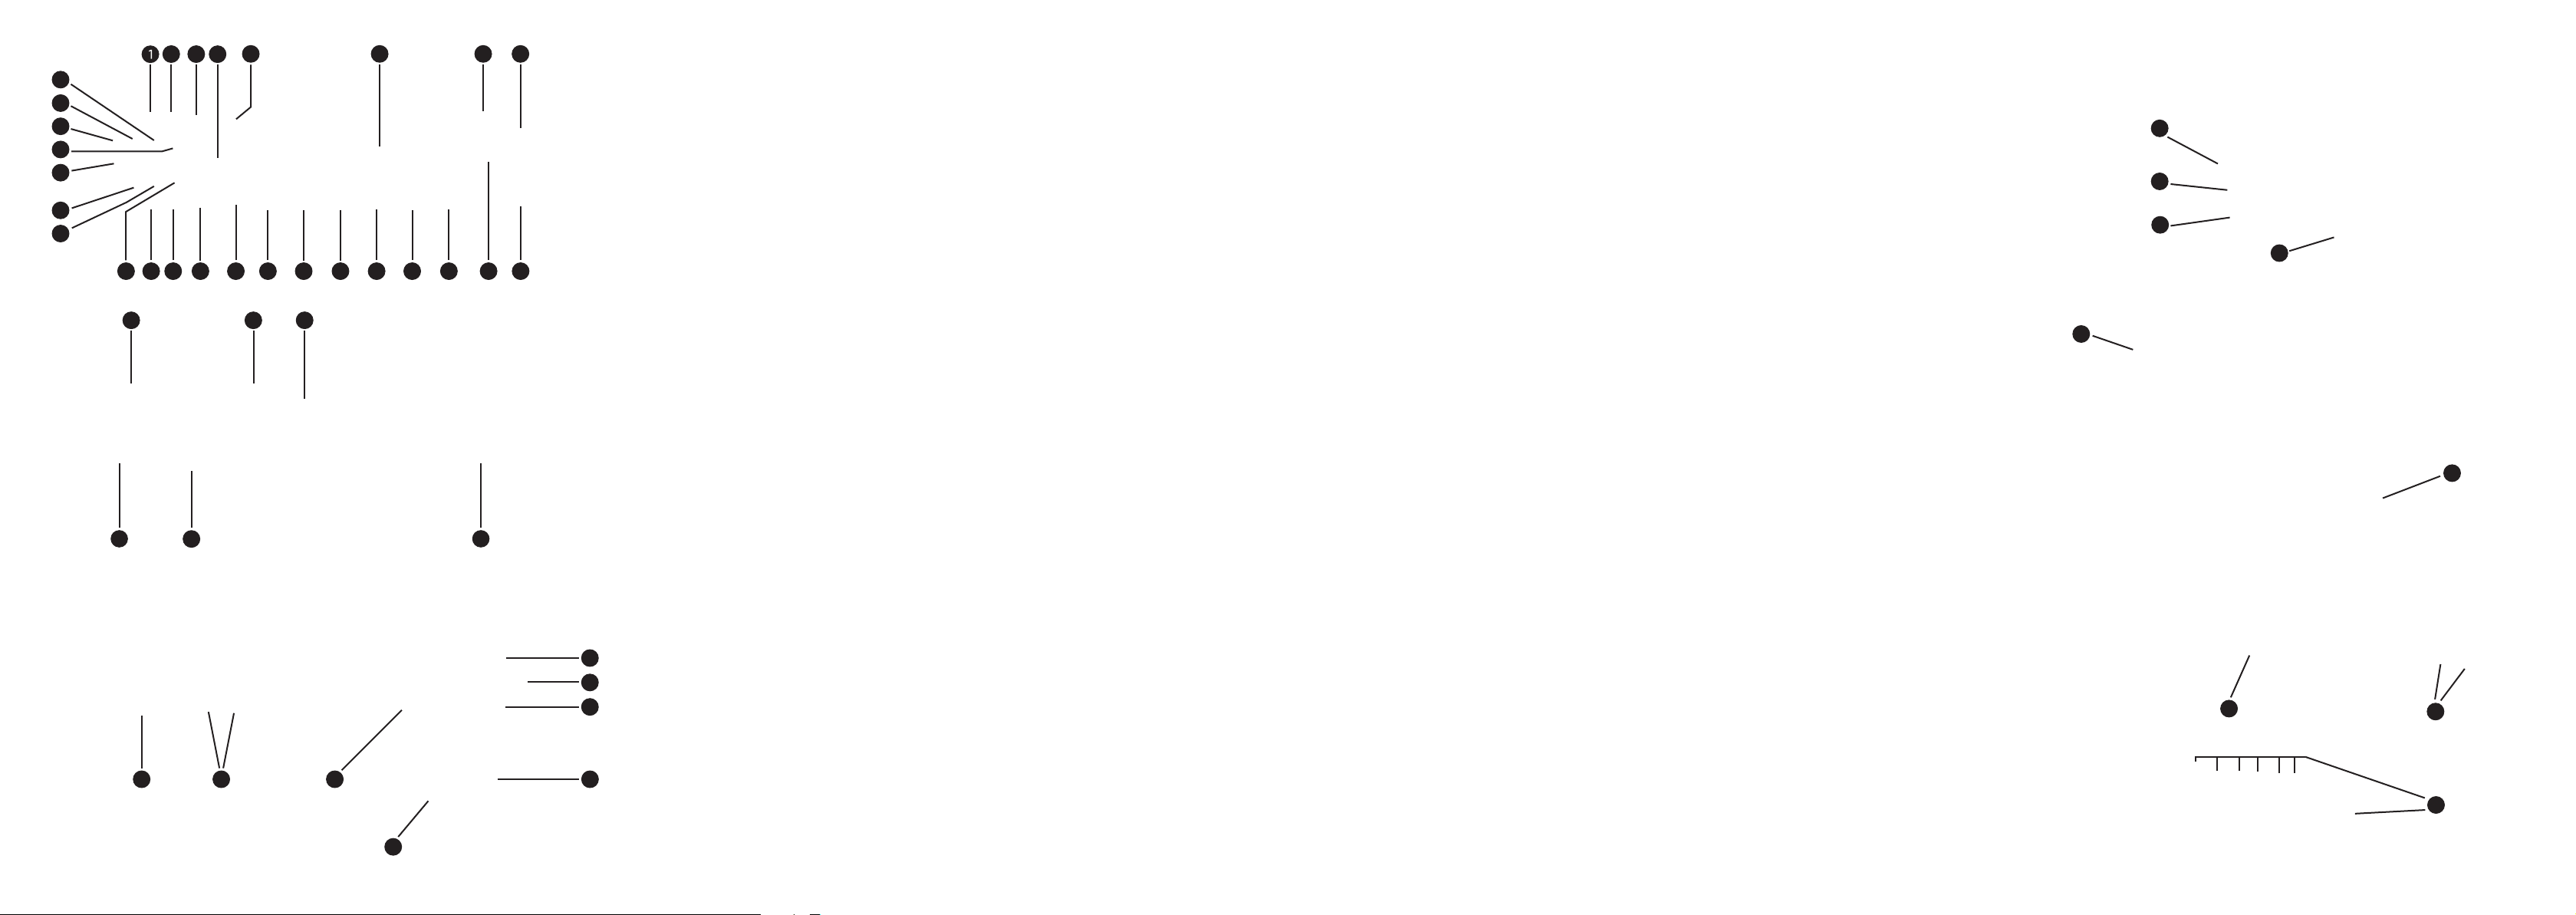
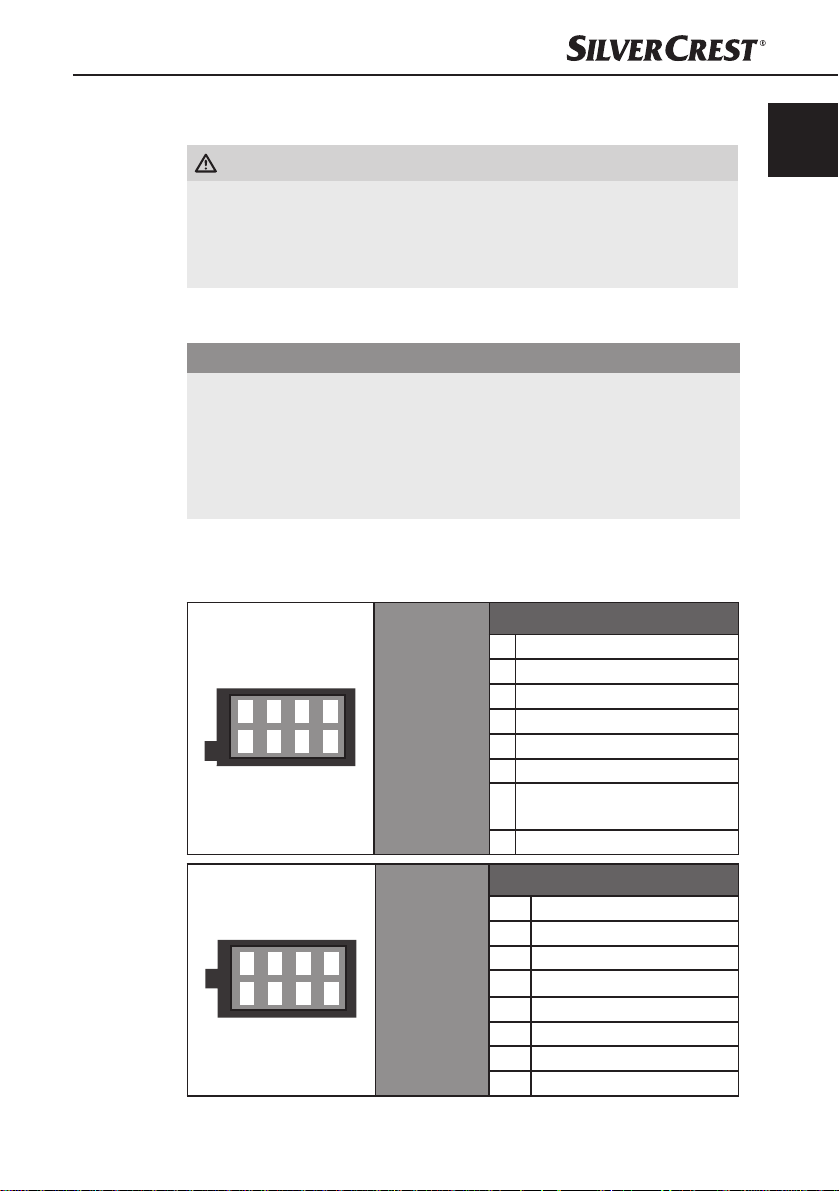
Operating components
Operating components
Car radio (see front fold out fl ap)
1: Number button 1
2
RPT/2: Repeat function in the CD/MP3 operation mode, number button 2
3
INT/3: Intro function in the CD/MP3 operation mode, number button 3
4
Multi controller: Turn to set value/volume
5
button: Accept call
6
Display
7
Unlocking the face plate
8
Card slot for SD/MMC cards
9
USB port
10
AUX : 3.5 mm stereo input socket for the connection of an external audio device
11
▸▸I: Title / Station search forwards
12
I◂◂: Title / Station search backwards
SCAN/REC: Automatic station search/Record to a data carrier at the USB port
13
or the SD/MMC card slot
14
AS/PS: Automatic station saving
15
BD/ENT: Select band range/confi rm selection
16
PHONE: Access telephone function
17
button: End call
18
DISP/#: Show display information, # button
19
MODE/0: Set operational mode, number button 0
20
*: Button*
21
TA/9: Activate traffi c radio station, number button 9
22
AF/8: Alternative Frequency search/regional programme activation, number
button 8
PTY/7: Station search by PTY group, number button 7
23
24
/DIM: Switch device on and off /dim display illumination
25
6: Number button 6
26
button: Switching off the sound
27
RDM/4: Random playback in the CD/MP3 operation mode, number button 4
28
5: Number button 5
29
button: Eject disc
30
CD compartment
GB
CY
SAB 160 A1
7
GB
CY
Operating components
31
Theft protection LED/ CD compartment position LED
32
Holder for the face plate
33
RESET: Resetting the device
ISO-Block connection B
34
Automotive blade type fuse 10 A
35
36
ISO block connection A
Bluetooth antenna
37
SUBWOOFER: Connection cable with cinch connector for subwoofer
38
39
Socket for microphone unit
LINE OUT: Audio cinch output L/R for amplifi er
40
41
Antenna connection for DIN antenna plug
Accessories (see rear fold out fl ap)
42
Microphone unit plug
Microphone
43
44
TALK button
45
green LED for connection status
46
Case for face plate
47
Bezel frame
48
Installation bracket
49
Key for installation bracket
50
Fixture plate (incl. securing material)
8
SAB 160 A1
Installation
Installation
WARNING
With the installation of the device damage can occur!
If possible have the device installed by a qualifi ed technician. ►
If you want to install the device yourself, for safe and fl awless operation of ►
the device follow the instructions for connection and installation.
Connection
IMPORTANT
The use of incorrect connections can lead to damage to the
device.
For installation use the device's ISO connections. The v
adapter that you may possibly require can be obtained from a specialist
establishment, from a local dealer or from the store's technical depar
When using other connection types the warranty becomes void!
Confi guration of the ISO connections
The view of the plug connector is from behind.
1357
2468
ISO A (power
supply confi guration)
ehicle specifi c ISO ►
tment.
Confi guration
1 unconfi gured
2 unconfi gured
unconfi gured
3
4 Permanent positive 12 V (Tc. 30)
5 Antenna power
6 unconfi gured
Ignition circuit positive 12 V
7
(Tc. 15)
8 Negtative (-) chassis (Tc. 31)
GB
CY
SAB 160 A1
1357
2468
ISO B (speaker connection
confi guration)
Confi guration
1 Rear right +
2 Rear right -
ront right +
3 F
4 Front right 5 Front left +
6 Front left 7 Rear left +
8 Rear left -
9
Installation
GB
CY
To connect the device to two speakers use only the cables for the front speakers.
NOTICE
Make sure that a permanent positive connection is applied to the station ►
memory of connection 4 in the ISO block A.
In some automobile models the standard confi gur
[4] and [7] in ISO block A are interchanged at the factory. If this is the
case the station memory can be lost. To correct this, the connections 7
(Ignition positiv
swapped.
You can connect an external amplifi er to the audio cinch output. For this ►
follow the operating instructions for the external amplifi er.
e) and 4 (Permanent positive) in the ISO Block A must be
ation of the connections ►
Antenna power connection
IMPORTANT
Possible damage to the device!
Never attach the antenna pow
power cable.
The connection for the antenna power is available for a r
The relay then automatically extends the antenna when the device is switched
on. When switched off the antenna retracts. This connection can also be used to
control an external amplifi er. For exact connection information please consult the
amplifi er’s operating instructions.
er connection with the antenna's motor ►
elay controlled antenna.
Connection of an external amplifi er
For the connection of an external amplifi er use the audio cinch output LINE OUT 40.
For this follow the operating instructions for the external amplifi er.
10
Connection of an external subwoofer
For the connection of an external subwoofer use the yellow cinch connector
SUBWOOFER
subwoofer.
. For this follow the operating instructions for the external
38
Connecting the microphone unit
For connection of the microphone unit use the microphone unit socket 39.
SAB 160 A1
Installation
A
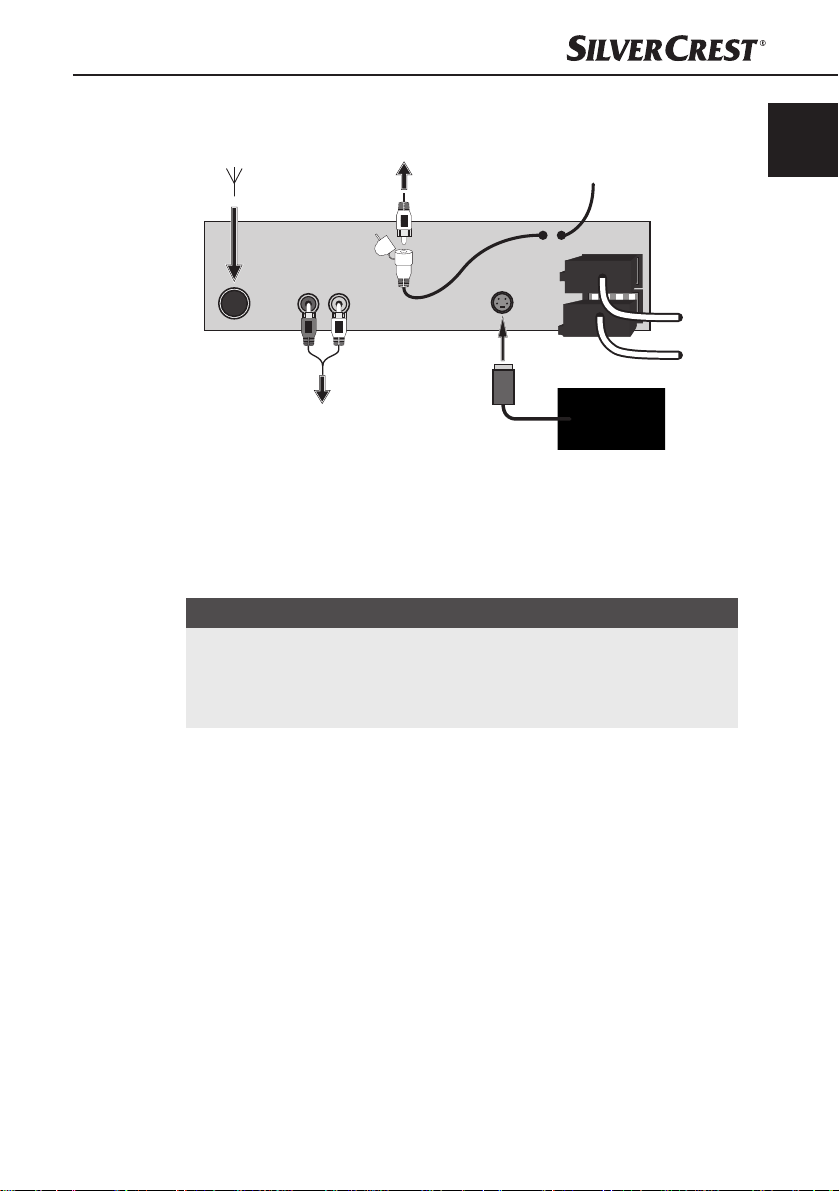
Connection schematic
Antenna
External amplifi
Installation
The device can be installed into any standard ISO mounting duct. In the event that
your vehicle does not have an ISO mounting duct contact your local specialist
establishment, local dealer or the technical department of the store.
NOTICE
Before installation remove, without fail, the two transport securing screws ►
on the top of the housing (marked with a red sticker)!
Connect the cable before fi nally installing the de
plugged in properly and that the system functions correctly.
Subwoofer
er
Bluetooth antenna
1 3
Microphone unit
vice. Make sure that it is ►
GB
CY
ISO B
ISO
Installation instructions
SAB 160 A1
Install the device in the duct provided for it or select the installation location so ■
that all buttons can be comfortably reached and the driver is not impeded.
Only connect the device to a properly installed 12 V automotive batter
Only connect the device in the vehicle via an ISO plug. ■
Install the device in such a way as to avoid the development of heat accumu- ■
lation and so that the device is suffi ciently
ventilated.
y. ■
11
Installation
GB
CY
To avoid function disturbances the installation angle should be less than 30°. ■
Do not install the device in a location where it will be subjected to high ■
temperatures (i. e. direct sunlight or heating vents), heavy contamination and
strong vibrations.
In the ev
ent that changes to the vehicle are necessary contact your vehicle ■
dealer/qualifi ed radio installation facility.
Installing the device into the ISO duct
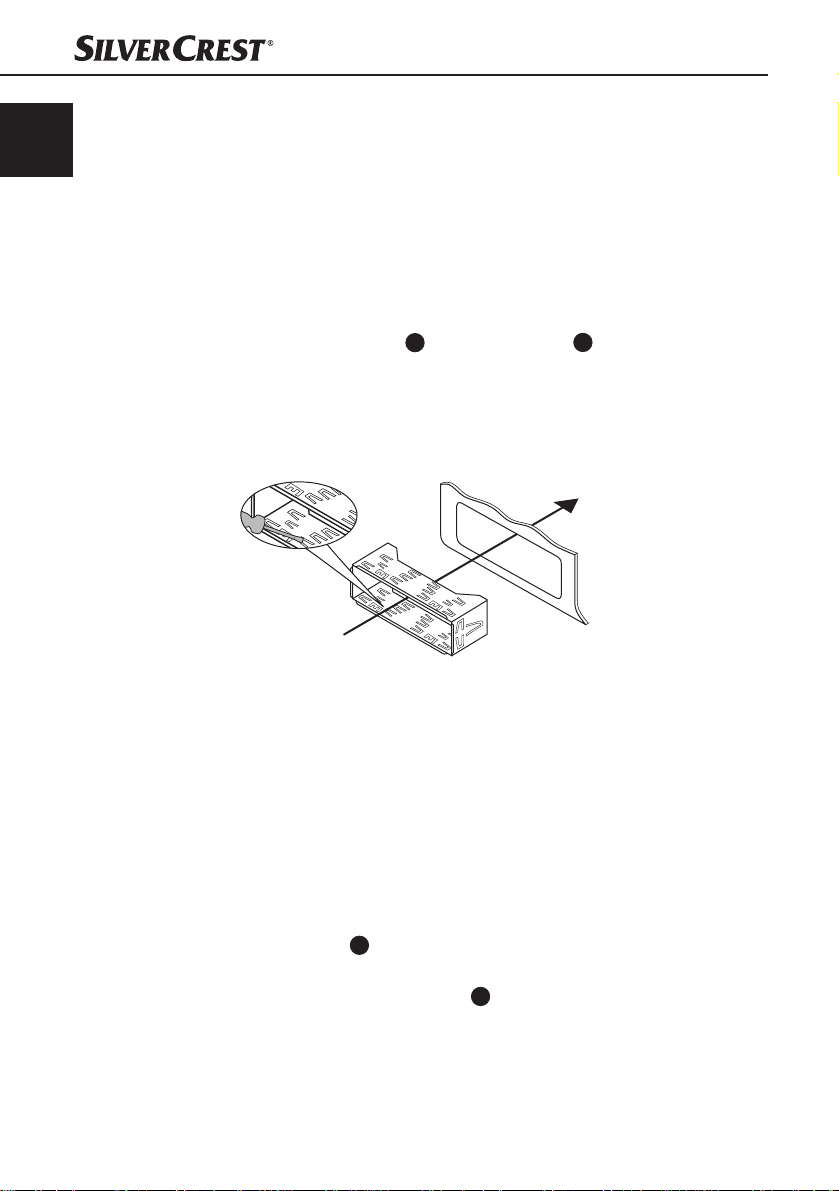
Pull the installation bracket ♦
housing.
Place the installation bracket into the ISO mounting duct. ♦
Bend the tabs on the installation bracket with a scr
bracket is fi xed fi rmly into the mounting duct (see diagram).
48
and the bezel frame 47 from the device’s
ew driv
er so that the ♦
12
Check to make sure that the bracket is securely fi xed. ♦
Connect the ISO socket block of the device with the two ISO plugs on your ♦
vehicle.
Connect the antenna cable from the vehicle antenna to the antenna socke
on the device.
Feed the microphone unit cable into the apertur
microphone unit socket. Run the cable in such a way that the microphone
unit can be secured in the vehicle interior later, see also the section “Using
the micr
ophone”.
Contingently connect the audio cinch cable of an external amplifi er to the ♦
LINE OUT socket
Contingently connect the audio cinch cable of an external subwoofer to the ♦
yellow cinch socket SUBWOOFER
on the device.
40
38
e and connect it to the ♦
on the device.
SAB 160 A1
t ♦
Installation
If necessary secure your device against theft with additional measures. ♦
Attach the securing screw with the anchoring plate 50 and the securing
material to the engine fi rewall of the vehicle.
Carefully push the device into the mounting duct until it locks into place. ♦
After all connections have been made activate the ♦ RESET button with a ball
point pen or other pointed object.
Attach the face plate as described under “Installing the face plate”. ♦
IMPORTANT
Possible damage to the cable!
Observe the position of the cable when sliding the device into the duct so
►
as to avoid damaging it.
Finally put on the bezel frame. ♦
Uninstalling the device
To remove the installed device proceed as follows:
Remove the bezel frame ♦
Insert the right and left keys ♦
device. (The tabs are now bent back.)
.
47
into their respective slots on the sides of the
49
GB
CY
SAB 160 A1
Pull the device out. ♦
13

Initial use
GB
CY
Initial use
Face plate
To protect against theft you can remove the face plate from your device. Do not
store the removed face plate in your vehicle.
NOTICE
When the face plate is not inserted into the frame the theft protection ►
31
on the device blinks.
LED
To safeguard the face plate always keep it stored in its case. ►
Installing the face plate
Place the face plate with the left side in the ♦
frame fi rst.
Then fi rmly press the right side until it locks into ♦
place.
Subsequently fl ip the face plate upwar
locks into place.
Check to make sure that the face plate is fi
correctly installed in the frame. If the face plate
is incorrectly installed it can result in malfunctions
when operating the device.
Removing the face plate
Press the ♦ button to unlock the face plate.
The face plate tilts automatically forward.
Slide the face plate to the left and then pull fi rst ♦
the right and then the left side away.
ds until it ♦
rmly and
14
SAB 160 A1
Handling and operation
Handling and operation
In this chapter you receive important information for the handling and operation
of the device.
NOTICE
If no setting is made and/or no button pushed within approx. 5 seconds the ►
device returns to its previous operating mode. Changed settings are saved.
Switching On and Off
Press briefl y the ♦ /DIM button to switch the device on. In the display the
notice WELCOME appears.
Briefl y tap the ♦
Briefl y tap the ♦
AUTO DIM: The display illumination will, depending on the lighting conditions,
set automatically.
MAN DIM: The display illumination can be set in two stages (H = High and
L = Low) by turning the multi controller.
To switch off hold down the ♦
Settings
WARNING
Hearing damage as a result of too high a volume!
If the volume is set too high it can lead to permanent hearing damage.
Set the volume to moderate levels only. ►
/DIM button. In the display appears AUTO DIM.
/DIM button again. In the display appears MAN DIM.
GB
CY
/DIM button longer.
Volume
Switching mute on and off
SAB 160 A1
Turn the multi controller to set the volume. ♦
Press the ♦ button to switch the sound off . “MUTE” blinks in the display.
To switch the sound on again press the ♦
switching is rescinded when receiving a PTY or TA station.
button once more. The mute
15

Handling and operation
GB
CY
Bass/Treble/Balance/Fader
Press the multi controller on the device. The current volume level is shown. ♦
Each additional press of the multi controller accesses the next setting point.
The following settings are possible:
VOL - Volume (from 0 to 50),
BAS - Bass (from -10 to 10),
TRB - Treble (from -10 to 10)
BAL - Balance (sound distribution between the right and left speakers)
(from 10L to 10R)
FAD - Fader (sound distribution between the rear and front speakers)
(from 10F to 10R)
Turn the multi controller to change the settings of the displayed menu items. ♦
further settings via the multi controller
Hold down the multi controller for approx. 2 seconds and then press the ♦
multi controller repeatedly until the desired function appears in the display.
INVOL - switch on volume
Turn the multi controller to set the volume level, with which the device is to ♦
be set when turned on.
REC - Recording f
Turn the multi controller to set the record format for recording on SD/MMC ♦
and/or USB data carriers, MP3 (MP3 data) or WMA (Windows Media
Audio).
SUBW - Sub
You can connect an active external subwoofer to produce a more powerful bass
eff ect.
Turn the multi controller to turn the bass eff ect on (SUBW ON) or off ♦
(SUBW OFF).
ADJ - Time of day
ormat
woofer
16
NOTICE
The device is equipped with an RDS controlled clock. The clock sets itself ►
automatically when the EON function is switched on and also continues to
run when the radio is switched off . If y
can also set the time of day manually.
Turn the multi controller to the right to set the hours and to the left to set the ♦
minutes.
ou do not receive any RDS signal you
SAB 160 A1

Handling and operation
TAVOL - Volume for traffi c radio
Turn the multi controller to set the volume level, with which traffi c reports are ♦
to be played back.
EON - Information from ot
When the EON function is switched on the radio switches to traffi c radio or PTY
groups if the TA or PTY function has been activated.
Turn the multi controller in order to switch the EON function on (EON ON) ♦
or off (EON OFF).
DSP - Eq
TA - Traffi c Announcement (traffi c radio)
TA SEEK: As soon as the reception signal for traffi c announcements becomes
weak
for the strongest TA station.
TA ALARM: As soon as the reception signal for traffi c announcements becomes
weaker or you leave the reception area an alarm tone sounds.
PI - Program Identifi cation (Sound with the station search)
The programme identifi cation code (PI) is a built-in transmission identifi cation
code, which is used for, among other things, the search of alternative frequencies.
It consists of a 16 bit rate which allows for a positive identifi cation of the station.
PI SOUND: Station search with sound.
PI MUTE: Station sear
RETUNE (Search times of st
RETUNE L: The search process for a station with the correct PI recognition runs
for 90 seconds.
RETUNE S: The sear
for 30 seconds.
ualizer (Digital Sound Processing)
T
urn the multi controller to select one of the settings ♦ CLASSICS, ROCK M,
, FLAT or DSP NONE. In the setting DSP NONE no DSP is
POP M
switched on. The DSP equalizer setting is shown to the right in the display.
Turn the multi controller to perform the following settings: ♦
er or you leave the reception area the search function starts and will look
Turn the multi controller to perform the following settings: ♦
ch without sound.
Turn the multi controller to perform the following settings: ♦
ch process for a station with the correct PI r
her stations
ations with PI recognition)
ecognition runs
GB
CY
SAB 160 A1
17
Handling and operation
GB
CY
MASK (Conceal specifi c stations)
Turn the multi controller to perform the following settings: ♦
MASK DPI: Conceals the AF stations which have another PI recognition.
MASK ALL: Conceals the AF stations which have another PI recognition and all
annoying non-PI stations that hav
e the same station frequency.
Loudness
Hold down the ♦ MODE button to switch the loudness function on or off .
In the display appears LOUD ON and/or LOUD OFF.
Operating mode
Press the ♦ MODE button to switch between radio reception (frequency indi-
cator), CD/MP3 operation (CD), memory card slot (SD/MMC), USB port
(USB), audio streaming (BT MUSIC or A2DP) and audio input (AUX).
NOTICE
The operational modes CD, SD/MMC, USB and BT MUSIC can only be ►
accessed when the corresponding medium is inserted and/or a mobile
telephone is connected.
Display
Press repeatedly the ♦ DISP button to display successively the following
information:
Radio station, time of day (automatically set with RDS reception), frequency and
PTY settings (these RDS functions are sent by the broadcasting services in various
volumes; see also the section “Radio functions”).
18
NOTICE
When you are not receiving any RDS or PTY information, "PS NONE“ or ►
"PTY NONE“ is shown in the display.
SAB 160 A1

Handling and operation
Radio reset (RESET)
To reset the device to its factory default settings, press the RESET button with a
pointed object, such as a pen.
NOTICE
To access the ► RESET button the face plate must be completely detached,
see also the section "Removing the face plate".
Reset the de
vice:
when operating for the fi rst time, ▯
after the cable connection, ▯
if not all function buttons are working ▯
when an error message appears in the display. ▯
Radio functions
Select frequency range
Press the ♦ BD/ENT button to switch between VHF (F1, F2, F3) and medium
wave (M1, M2).
Automatic station search
Press briefl y the buttons I◂◂ or ▸▸I to start a station search. The search will ♦
stop when a station is found.
GB
CY
Manual station selection
Saving radio stations
SAB 160 A1
Hold down one of the buttons I◂◂ or ▸▸I for two seconds, in the display ♦
appears MANUAL.
Now pr
ess the buttons I◂◂ or ▸▸I to change the frequency in steps of ♦
0.05 MHz (VHF) and/or 9 kHz (MW) until the desired frequency is set.
If no button is pressed for approx. tw
again. AUTO appears in the display.
For each frequency range 6 stations can be saved.
Hold down for approx. 3 seconds one of the station buttons ♦ 1 to 6 to save
the currently set station. The successful saving is signalised by the showing
of the numbers 1 to 6 in the display.
o seconds the automatic station search is set
19

Handling and operation
GB
CY
Search for stations with alternative frequencies
Press the ♦ SCAN/REC button to search for stations with an AF signal in the
VHF band range.
The search stops with each found station for 5 seconds and then continues
searching.
If you want to listen to and save the station press the ♦ SCAN/REC button to
stop the search.
Hold down for appro
the currently set station. The successful saving is signalised by the sho
of the numbers 1-6 in the display.
x. 3 seconds one of the station buttons ♦ 1 to 6 to save
Accessing saved stations
Select with ♦ BD/ENT the frequency range.
Press one of the station buttons ♦ 1 to 6, to access the saved station.
Automatic saving
Hold down the ♦ AS/PS button for 3 seconds . A search immediately starts
whereby each found station remains for approx. fi ve seconds. The station
indicator and/or the station frequency blinks and the memory slot is displayed. With weak stations the search will automatically continue.
Running through saved stations
Press briefl y the ♦ AS/PS button. All stations will be briefl y selected.
When you hear the desired station press the ♦ AS/PS button. The chosen
station remains selected.
wing
20
Switching alternative frequencies (AF) on / off
You can search for alternative frequencies of a station so that it will always have
optimal reception.
Press the ♦ AF button. In the display appears the indicator AF. The device now
constantly searches for the optimal frequency of the currently set station.
Press the ♦ AF button again to switch the function off . In the display the
indicator AF
disappears.
Regional programmes
A few stations broadcast regional programmes.
In order to playback only the station’s regional programme hold down the ♦
AF button until the notice REG ON appears in the display.
To again playback the national programme hold down the ♦ AF button until
the notice REG OFF appears in the display.
SAB 160 A1
Handling and operation
Programme mode (PTY)
With the help of this function you can search for stations in a designated genre.
The following settings are possible:
POP M
ROCK M
NEWS
AFFAIRS
INFO
EASY M
LIGHT M
NOTICE
Please note that this information is dependent on the region, the broadcasting ►
corporation and the station.
For this function the ► EON function must be switched on.
Setting t
The number buttons are r
If no further input occurs for 2 seconds an automatic search for stations that
correspond to the PTY input starts The search stops with the fi rst found station.
he PTY identifi cation
Press the ♦ PTY button and subsequently press repeatedly one of the number
buttons 1
To switch between the PTY inputs “Musical genre” and “Talk contributions” ♦
by the indicator of the fi rst PTY input press the PTY button again.
Button Musical genre Talk contributions
1 POP M, ROCK M NEWS, AFFAIRS, INFO
2 EASY M, LIGHT M SPORT, EDUCATE, DRAMA
3 CLASSICS, OTHER M CULTURE, SCIENCE, VARIED
4 JAZZ, COUNTRY WEATHER, FINANCE, CHILDREN
5 NATION M, OLDIES SOCIAL, RELIGION, PHONE IN
6 FOLK M TRAVEL, LEISURE, DOCUMENT
SPORT
EDUCATE
DRAMA
CLASSICS
OTHER M
CULTURE
SCIENCE
to 6 to select the desired PTY input.
eserved as follows:
VARIED
JAZZ
COUNTRY
WEATHER
FINANCE
CHILDREN
NATION M
OLDIES
SOCIAL
RELIGION
PHONE IN
FOLK M
TRAVEL
LEISURE
DOCUMENT
GB
CY
SAB 160 A1
21

Handling and operation
GB
CY
Switching the PTY function on/off
To activate the PTY search press the ♦ PTY button. In the display the notice
PTY appears.
With the station sear
will be considered.
To deactivate the PTY search press the ♦ PTY button again.
Station search b
During the display of a PTY identifi cation if you press briefl y the ♦ PTY button
or the buttons I◂◂ and/or ▸▸I a search immediately starts for stations, which
correspond to this PT
If no station is found that corresponds with this PTY identifi cation the indicator
PTY NONE appears briefl y and subsequently the search ends with the last
preset station.
ch only stations of the currently selected PTY identifi cation
y PTY identifi cation
Y identifi cation.
Traffi c radio (TA - “Traffi c Announcement”)
For this function the EON function must be switched on.
Press the ♦ TA button to switch this mode on or off .
In the TA mode the de
modes to the radio station, which is currently broadcasting traffi c information.
With this the volume level entered under TAVOL will be set.
During the playback of traffi c radio press the TA button to stop the TA function
without switching off this function.
vice will immediately switch from other stations or operation
22
SAB 160 A1
Handling and operation
General CD functions
NOTICE
Dampness and high humidity can cause the CD player to malfunction. ►
In this case switch on the vehicle heating to dissipate the dampness before
using the device. Do not subject the device to any e
temperatures.
Anti-Shock function (ESP - “Electronic Shock Protection”)
The device is equipped with an anti shock function. This function serves to compensate for vibrations, for example on uneven streets, and to provide an uninterrupted
playback even with device movement. When the device is switched on the memory
automatically fi lls with data:
with audio CDs for 12 seconds; ■
with MP3 CDs for 75 seconds. ■
Inserting and removing CDs
Press the button ♦ to unlock the face plate. The face plate tilts automati-
cally forward.
Push the CD into the CD slot with the inscribed side facing up. ♦
Lock the face plate back into place by folding it upwards. Playback of the ♦
CD begins. In the display appears CD PL
o remove the CD open the face plate again. Press the ♦
T
The CD will be ejected. The device switches to radio mode.
Immediately remove the CD from the CD slot. If an ejected CD is not removed ♦
within approx. 5 seconds the device will draw it back in, however playback
of the CD will not start.
AY.
xtremely high or low
button.
GB
CY
Title skip
Fast forward/backward
SAB 160 A1
Press the buttons ▸▸I or I◂◂ to select the next and/or previous title. ♦
The title number will be shown in the display.
Hold down the buttons ▸▸I or I◂◂ longer to start fast forward or backward. ♦
23

Handling and operation
GB
CY
Stop playback
Press the button ♦ 1, to pause playback. S-PAUSE blinks in the display.
To continue playback press the ♦ 1 button once more.
Repeat function (RPT - Repeat)
Press several times the ♦ RPT button to switch between the repeat functions. The
following settings are possible:
RPT ONE: The current title is repeated. –
RPT ALL: The entire CD will be repeated. – RPT will not be displayed.
Additionally with MP3 CDs:
RPT DIR: All titles in the current director
If the functions RPT ONE or RPT DIR are activated RPT
y will be repeated. –
will appear in the display.
Title sampling
Press the ♦ INT button. In the display INT is shown. Approx. 10 seconds from
all titles will playback one after the other.
Press the ♦ INT button once more to activate normal playback.
Random playback of all titles (RDM - Random)
Press the ♦ RDM button. The display shows RDM. A random controlled play-
back is started. A repeat pressing launches the normal playback.
24
SAB 160 A1
Handling and operation
MP3 CDs functions
Playback
The device can playback fi les in the MP3 and WMA formats. ■
A mixture of titles and directories on the same level can result in problems ■
when playing back.
During playback the information from the ID3 tag of the MP3 fi les ar
and are shown successively in the display.
Skip directory
Pr
ess the number button ♦ 6 to playback the next directory and/or the number
button 5 to playback the previous directory. The name of the directory will
appear briefl y in the display after which playback begins automatically.
NOTICE
If fi les are located in the CD's main directory the directory name ► ROOT
will be shown in the display.
Search functions
Title number search
Press the ♦ AS/PS button. The notice MP3* appears in the display.
Turn the multi controller or press the numbers on the device to set the ♦
desired title number.
Press the multi controller or wait 3 seconds to star
GB
CY
e read ■
t playback of the set title. ♦
SAB 160 A1
NOTICE
If a title number is selected that does not exist the title with the largest title ►
number will playback.
Title name search
♦ AS/PS button twice. In the display the notice* appears.
Press the
Turn the multi controller until the desir
Press the multi controller to confi rm the letter and to switch to the second letter ♦
of the title name. In this way up to 16 letters/characters can be entered.
When y
ou have set the desired char
all titles that begin with the sought after character
ed letter appears. ♦
acter press the ♦ BD/ENT button to show
.
25

Handling and operation
GB
CY
NOTICE
If no titles are found that begin with the set character ► NO MEDIA will be
shown briefl y and y
Turn the multi controller to select a title and start playback with ♦ BD/ENT.
Search for direct
Press the ♦ AS/PS button three times. The directory that is curr
playing back appears.
Turn the multi controller to switch between the available directories. ♦
Press the ♦ BD/ENT button to select the curr
Playback of the fi rst title from the selected directory starts immediately.
ories
USB port
The device can process USB data carriers up to 16 GB. With this the directory
structure may contain a maximum of 1024 folders, 4096 fi les and a directory
depth of 8 levels.
Connecting data carriers
Open the protective cap from the USB port. ♦
Connect your USB device to the port. The device searches for MP3 or ♦
WMA fi les on the data carrier and the notice USB PLAY appear
display.
Place the protective cap back on the USB port when no USB device is ♦
connected to avoid contamination.
ou can carry out the setting again.
ently shown director
ently
y.
s in the
26
SAB 160 A1

Handling and operation
Playback and search functions
The operations for playing fi les on the external data carrier as well as the ■
search function are exactly the same as with MP3 CDs.
If the device is in a diff er
select the USB data carrier with the MODE button.
ent mode ( ■ CD, R
Card reader (SD/MMC)
The device can process SD/MMC memory cards up to 2 GB and SDHC memory
cards up to 32 GB. With this the directory structure may contain a maximum of
1024 folders, 4096 fi les and a directory depth of 8 levels.
Connecting data carriers
Slide a memory card into the memory card slot with the marking pointing ♦
to the right. Playback of the MP3 or WMA title on the memory card begins
automatically.
Playback and search functions
The operations for playing fi les on the external data carrier as well as the ■
search function are exactly the same as with MP3 CDs.
If the device is in a diff erent mode ( ■ CD, Radio, AUX or USB) y
select the card reader with the MODE button.
Record function
NOTICE
Please observe the legal regulations valid in your place of residence ►
regarding the duplication of copyrighted works. In case of doubt please
consult a specialist in your area.
adio, AUX or MMC)
GB
CY
you can
ou can
SAB 160 A1
With your de
devices onto USB or SD/MMC data carriers and copy MP3 and/or WMA data
from an MP3 CD onto USB or SD/MMC data carriers.
The data will be saved with the following notations:
Title of audio CDs: Track_001, Track_002, ... ■
Data from MP3 CDs: Copy_001, Copy_002, ... ■
Radio recordings: Tuner_001, Tuner_002, ... ■
Recordings have a bitrate of 128 kbps and a sampling frequency of 44 kHz.
vice you can record data from audio CDs, radio or external audio
27

Handling and operation
GB
CY
Recording
Place a memory medium into the card slot or connect a data carrier to the ♦
USB port.
Insert the CD, if necessary, and/or switch on the e
With the ♦ MODE button set the desired operation mode (CD,
If necessary start playback of the external audio device. ♦
Hold down the ♦ SCAN/REC button until RE
In the operation mode CD, MMC ALL or USB ALL will be diplayed. If no
data carrier is connected, on which recordings can be made NO MEDIA
will be displayed.
Press the ♦ SCAN/REC button repeatedly until the desired recor
is displayed. When recording an audio CD you can make an additional
setting depending on whether you want to record all titles from the CD
(USB/MMC ALL) or only the current title (USB/MMC ONE).
Start the recording by pressing the ♦ BD/ENT button.
The audio data is now saved on the data carrier in the format that was set
(MP3 or WMA). The pr
NOTICE
When the selected data carrier is full recording automatically moves to the ►
other data carrier as long as a corresponding data carrier is connected.
To end the recording pr
After which W
eceding blinking “R” signals the recording.
ess briefl y the ♦ BD/ENT button once more.
AIT is shown briefl y in the display, the recording is saved.
xternal audio device. ♦
C MMC or RE
Radio, AUX).
C USB is displayed.
ding option
28
Copying data from an MP3 CD
You can copy individual titles from an MP3 CD to an external USB data carrier
or an SD/MMC memory card.
Place a memory medium into the card slot or connect a data carrier to the ♦
USB port.
Hold down, during playback of a title from an MP3 CD, the ♦ SCAN/REC
button. The notice COPY MMC and/or
carrier is connected, on which recordings can be made NO MEDIA will
be displayed.
COPY USB appears. If no data
SAB 160 A1

Handling and operation
Press the ♦ SCAN/REC button several times to select either the copying option
COPY USB (copying on USB data carriers) or COPY MMC (copying on
SD/MMC cards).
Start the copy process by pressing the ♦ BD/ENT button.
During the copy process COP
from 01 - 100 shows the copying progress. After the notice COPY 100 the
copying process is ended and playback of the MP3 title continues.
Y appears in the display and a percentage indicator
Connecting an external audio device to the device
Connect the audio output of an external audio device (i.e. an MP3 player) ♦
via a 3.5 mm stereo jackplug to the socket AUX IN on the front panel of
the device.
Select playback of the audio input by pressing, several times, the ♦ MODE
button until AUX is shown in the display.
Bluetooth operation
The microphone unit must be connected to the device in order to use the Bluetooth
functions. In addition a mobile phone is required that supports the Bluetooth data
transmission.
Connecting the telephone to the device
Activate the Bluetooth function on your mobile phone and conduct a search ♦
for Bluetooth devices.
After a successful search the entry CarBT appears for the device in the display
of the mobile phone.
Select this entry for the connection and for the subsequent password request ♦
enter the password 1234 for the device. You may possibly have to confi
the connection structure once more.
After a successful coupling CONN OK appears briefl y in the device’s display
and the green LED on the microphone unit lights up.
GB
CY
rm
Using the microphone
SAB 160 A1
During the telephone call you will hear the caller via the speaker connected to
the device.
For optimal transmitting of your voice place the microphone unit close to you. ♦
Attach the microphone unit, for example, to the dashboard. For this purpose ♦
you can use the supplied sticky tape. In this case clean beforehand dust and
grease from the surface. The sticky tape can be used for securing on almost
all smooth sur
faces.
29

Handling and operation
GB
CY
NOTICE
Do not mount the microphone in the vicinity of speakers otherwise the voice ►
quality may deteriorate.
Call accept/end
With an incoming call you will hear the call signal via the speakers attached
to the device and via your mobile telephone. The call number is shown in the
device’s display.
You accept an incoming call by pressing the ♦ TALK button on the micro-
phone unit or the
You end the call by pressing the ♦ TALK button on the microphone unit again
or by pressing the button on the device.
button on the device.
Rejecting a call
With an incoming call press the ♦ button to reject that call.
To call
Press the button ♦ . DIAL appears in the display.
With the number buttons on the device enter the phone number that you ♦
want to call.
Press the ♦
in the display.
NOTICE
If you make a mistake when entering the phone number press the ►
of the
button again. The number is dialled and CALLING appears
button to delete the last number entered. Each additional press
button deletes the last number respectively.
30
Redial
Hold down the ♦ TALK button on the microphone unit or the button on
the device for approx. 2 seconds.
If previously no call number was selected via the number buttons on the –
device the last selected mobile phone call number is dialled.
If previously a call number was selected via the number buttons on the
–
device this call number is dialled.
SAB 160 A1

Handling and operation
Caller lists
Press the ♦ PHONE button on the device. CALL LIST appears in the display
Press the ♦ PHONE button again. IN CALL appears in the display
Turn the multi controller to select between the following displays: ♦
IN CALL – : Shows the last 20 incoming calls.
OUT C
ALL – : Shows the last 20 outgoing calls.
ess the ♦ PHONE button again. READIN
Pr
subsequently shows the last incoming (IN CALL) and/or dialled (OUT CALL)
call number.
Turn the multi controller to show the last 20 received and/or dialled call ♦
numbers one after the other.
Press the ♦
Press the ♦ button to end redialling and exit the caller list.
button to dial the selected call number.
G appears in the display and
Telephone book function
You can transfer up to 20 contacts (Telephone book entries) from the connected
mobile phone to the device and thus dial and call the contact from the device.
NOTICE
Details for the transference of the contact via Bluetooth can be obtained ►
from the operating instructions of your mobile phone.
Each transfered contact is fi
eady been transfered are automatically fi led one memory slot
have alr
further (PB02, etc).
led in the memory slot ► PB01. The contacts that
GB
CY
.
SAB 160 A1
Press the ♦ PHONE button on the device. CALL LIST appear
Turn the multi controller to select the display ♦ PH BOOK.
Press the ♦ PHONE button again. READIN
Subsequently PB01 appears and the name and call number of the fi rst
memory slot is shown.
Turn the muti controller to select additional telephone book entries. ♦
Press the ♦
Press the ♦ button to end the call and exit the directory function.
button to dial the selected call number.
G appears in the display
s in the display
.
31

Handling and operation
GB
CY
Deleting the caller lists and telephone book entries
Press and hold the ♦ button until RESET appears in the display. The
Bluetooth connection to the mobile phone is disconnected and all directory
entries and caller lists on the device are deleted.
Audio streaming (A2DP)
The device uses the A2DP profi le (Advanced Audio Distribution Profi le) and
therefore can playback your mobile phone’s audio data.
Select an audio fi le from your mobile phone and start the playback. ♦
In the device’s display appears the entry A2DP and the audio data will be
played back via the speakers connected to the de
NOTICE
On the mobile phone it may possibly be necessary to switch playback via ►
the Bluetooth stereo headset. Consult the operating manual of your mobile
phone for more information.
►
With a few mobile phones the device does not automatically switch to the
A2DP mode. In this case you switch to the A2DP mode by pressing the
MODE button several times until the notice
in the display.
vice.
BT MUSIC or A2DP appears
AVRCP (Audio Video Remote Control Profi le)
The device uses the AVRCP profi le thus facilitating the control of audio devices.
With the ♦ 1 button on the device you can pause and/or re-start playback of
the audio fi les on the mobile phone.
With the I◂◂ or ▸▸I buttons on the device you can access the previous or ♦
next audio fi le on the mobile phone.
32
SAB 160 A1

Cleaning/Disposal
Cleaning
Safety instructions
IMPORTANT
Possible damage to the device
Make sure when you ar
order to avoid irreparable damage to it.
Display cleaning
Clean the front panel of the device / the display exclusively with a soft, ■
moist, lint-free cloth and a mild dish washing liquid.
Disposal
Disposal of the device
Do not dispose of the device in your normal domestic waste.
This product is subject to the European directive 2002/96/EC-WEEE
(Waste Electrical and Electronic Equipment).
Dispose of the device through an approved disposal centre or at your community
waste facility. Observe the currently applicable regulations. In case of doubt,
please contact your waste disposal centre.
GB
CY
e cleaning the device that no moisture gets inside in ►
SAB 160 A1
33

Troubleshooting
GB
CY
Troubleshooting
In this chapter you will receive important information for malfunction localization
and remedies. Observe the instructions in order to avoid danger and damage.
Safety instructions
WARNING
Observe the following safety information to avoid danger and property damage:
Repairs to electronic devices may only be carried out by specialists who have ►
been trained by the manufacturer. Considerable danger to the consumer and
damage to the device can occur as a result of incorrect r
Malfunction causes and remedies
The following table will help with localizing and remedying minor malfunctions:
Defect Possible cause Solution
The device will
not switch on
No sound
The CD will not
load or eject
Function buttons are not
functioning
The ignition is not switched on. Switch the ignition on by turning the key.
The fuse is defective. Replace the fuse.
The volume is set to minimum. Increase the volume.
The cables are not connected
correctly.
The sound is switched off .
A CD is already inserted into
the device.
The CD has been inserted
the wrong way up.
The CD is dirty or defective. Clean the CD or insert a diff erent CD.
The temperature in the
vehicle is too high.
Condensation on the laser
lens
There is a malfunction
with the device.
The face plate is not
correctly installed.
Check the cable connections.
Press the
the sound back on.
Remove the CD.
Insert the CD with the inscripted
side up.
Allow the vehicle to air out until the
temperature has again dropped to the
operational temperature.
Switch the device off for a few hours
and then try it again.
Press the RESET button.
Check to see that the face plate is
installed correctly.
epairs.
button to switch
34
SAB 160 A1

Troubleshooting
Defect Possible cause Solution
The CD jumps
Failure with
burnt CDs
The radio and/
or the automatic
station saving is
not functioning
Station memory
is not functioning
The device's USB
port does not
function
The card reading
device does not
read the cards
The Bluetooth
connection does
not function
The mounting angle exceeds
30°.
The CD is very dirty or
defective.
The antenna cable is not
connected correctly.
The station signals are too
weak.
The connection 4 in the ISO
block A (Permanent positive)
is not connected correctly.
The USB port is intended for
devices that function according to the USB standard. Not
all market available devices
conform to this standard. It
is possible that a device is
connected that does not function according to the USB
standard.
The card is possibly defective, dirty or not properly
inserted.
The mobile phone does not
support Bluetooth transmissions.
The mobile phone is not
coupled with the device.
Correct the mounting angle.
Clean the CD or insert a diff erent CD.
Check the burnt CD in another
playback device.
Check the antenna cable for correct
connection.
Set the station manually.
Check the cable connections. For this
consult the chapter "Connections".
Connect a device that functions according to the USB standard. Make sure
that the data carrier is formatted for the
FAT32 fi le system.
Check the card. Slide it in with the
inscribed side facing to the right. Make
sure that the data carrier has been
formatted to the FAT32 fi le system.
Reconnect the mobile phone and the
device. For this also read, without fail,
your mobile phone's instructions.
GB
CY
SAB 160 A1
NOTICE
If you cannot solve the problem with the aforementioned methods, please ►
contact Customer Service.
35

Appendix
GB
CY
Appendix
Technical data
General
Input voltage 12 VDC
Input current max. 10 A
Max. Impulse output 4 x 40 W
Power rating
(with 1% distortion factor)
Operating temperature +5 - +40 °C
Humidity (no condensation) 5 - 90 %
Dimensions (L x D x H): 18.6 x 20.6 x 5.7 cm
Weight incl. accessories approx. 1550 g
Device fuse
Automotive blade type fuse
Radio frequency range
Frequency FM (VHF) 87.5 - 108 MHz
Frequency AM (MW) 522 - 1620 kHz
4 x 13.5 W
10 A
36
Station memory slots FM (VHF) 18 Slots
Station memory slots AM (MW) 12 Slots
Audio input (AUX)
Stereo jackplug 3.5 mm
USB port
USB 1.1 and 2.0 compatible data carrier (up to 16 GB)
Card slot
SD/MMC memory card slot (SD up to 2 GB, SDHC up to 32 GB)
SAB 160 A1

Appendix
Information regarding the EG conformity declaration
This device complies in regard to conformity with the
basic requirements and other relevent regulations of the
vehicle directive 2004/104/EC and the R&TTE directive
1999/5/EC.
The complete original declaration of conformity can be
obtained from the importer.
Warranty
You receive a 3-year warranty for this device as of the purchase date. This device
has been manufactured with care and meticulously examined before delivery.
Please retain your receipt as proof of purchase. In the case of a warranty claim,
please get in touch by telephone with our service department. Only in this way
can a post-free dispatch for your goods be assured.
NOTICE
The warranty adjustment is valid only for material or manufacturing defects ►
not, however, for transport damage, wear and tear or for damage to
breakable parts, i.e. switches or r
The product is intended merely for private use and not for
commercial purposes.
In the event of misuse and improper handling, use of force and interference not
carried out by our authorized service branch, the warranty will become void.
This warranty does not aff ect your statutory rights.
The warranty period is not extended by repairs eff ected under warranty. This
applies also to replaced and repaired parts. Damages or defects discovered
after purchase are to be reported directly after unpacking, at the latest two days
after the purchase date. After expiry of the warranty period incidental repairs
are subject to payment.
echargeable batteries.
GB
CY
Importer
SAB 160 A1
KOMPERNASS GMBH
BURGSTRASSE 21
44867 BOCHUM, GERMANY
www.kompernass.com
37

GB
CY
38
SAB 160 A1

Bluetooth Car Radio
SAB 160 A1
In order to guarantee a cost free
repair procedure please get in touch
with the service hotline. Ensure you
have your sales slip handy.
Sender, please write clearly:
Last name
First name
Street
City/Town
Country
Warranty
Service Great Britain
Tel.: 0871 5000 720 (£ 0.10/Min.)
E-Mail: kompernass@lidl.co.uk
IAN 66837
Service Ireland
Tel.: 1890 930 034
(0,08 EUR/Min., (peak))
(0,06 EUR/Min., (off peak))
E-Mail: kompernass@lidl.ie
IAN 66837
CY
Service Cyprus
Tel.: 8009 4409
E-Mail: kompernass@lidl.com.cy
IAN 66837
Telephone
Fill in this section and submit it with the device!
Date/Signature
Description of the defect:


Sadržaj
Uvod . . . . . . . . . . . . . . . . . . .42
Predgovor . . . . . . . . . . . . . . . . . . . . 42
Informacije u vezi sa ovim uputama
za rukovanje . . . . . . . . . . . . . . . . . .42
Autorsko pravo . . . . . . . . . . . . . . . .42
Ograničenje odgovornosti . . . . . . .43
Upozoravajuće napomene . . . . . . .43
Uporaba u skladu sa namjenom . . 44
Sigurnost . . . . . . . . . . . . . . . . . . . . .44
Opće sigurnosne napomene . . . . .44
Obim isporuke i transportna
inspekcija . . . . . . . . . . . . . . . . . . . .46
Zbrinjavanje ambalaže . . . . . . . . . 46
Element za posluživanje . . .47
Instalacija . . . . . . . . . . . . . . .49
Priključak . . . . . . . . . . . . . . . . . . . .49
Ugradnja . . . . . . . . . . . . . . . . . . . . 51
Izgradnja uređaja . . . . . . . . . . . . . . 53
Puštanje u rad . . . . . . . . . . . .54
Konzola za posluživanje . . . . . . . .54
Posluživanje i pogon . . . . . .55
Uključivanje/Isključivanje . . . . . . . . 55
Podešenja . . . . . . . . . . . . . . . . . . . .55
Resetiranje radija (RESET) . . . . . . . . 59
Radio-funkcije . . . . . . . . . . . . . . . . .59
Opće CD-funkcije . . . . . . . . . . . . . . 63
Funkcije MP3-CD-diskovi. . . . . . . . .65
USB-priključak . . . . . . . . . . . . . . . .66
Čitač karti (SD/MMC) . . . . . . . . . . 67
Funkcija snimanja . . . . . . . . . . . . . .67
Priključivanje eksternog
audio-uređaja na uređaj . . . . . . . . .69
Bluetooth-pogon . . . . . . . . . . . . . . . 69
Čišćenje . . . . . . . . . . . . . . . . .73
Sigurnosne upute . . . . . . . . . . . . . . 73
Čišćenje displaya . . . . . . . . . . . . . .73
Zbrinjavanje . . . . . . . . . . . . .73
Zbrinjavanje uređaja . . . . . . . . . . .73
Otklanjanje grešaka . . . . . .74
Sigurnosne upute . . . . . . . . . . . . . . 74
Uzroci i načini otklanjanja smetnji .74
Prilog . . . . . . . . . . . . . . . . . . .76
Tehnički podaci. . . . . . . . . . . . . . . .76
Napomene u vezi sa EU-izjavom o
konformitetu . . . . . . . . . . . . . . . . . . 77
Jamstvo . . . . . . . . . . . . . . . . . . . . . .77
Uvoznik. . . . . . . . . . . . . . . . . . . . . .77
HR
SAB 160 A1
41

HR
Uvod
Uvod
Predgovor
Poštovani kupci,
kupnjom Bluetooth-autoradija SAB 160 A1 ste se odlučili za kvalitativno viso-
kovrijedan proizvod fi rme SilverCrest, koji u pogledu tehnike i funkcionalnosti
odgovara najmodernijim razvojnim standardima.
Pročitajte ovdje sadržane informacije, kako biste se brzo naučili rukovati uređajem
i kako biste sve njegove funkcije mogli sveobuhvatno koristiti.
Želimo Vam ugodno korištenje uređaja.
Informacije u vezi sa ovim uputama za rukovanje
Ove upute za rukovanje predstavljaju sastavni dio Bluetooth-autoradija SAB 160 A1
(u nastavku označen kao uređaj) i daje Vam važne napomene za namjensku
uporabu, sigurnost, ugradnju i priključivanje, kao i posluživanje uređaja.
Upute za rukovanje moraju stajati stalno na raspolaganju u blizini uređaja.
Mora ih pročitati i primijeniti svaka osoba zadužena za ugradnju, posluživanje,
i otklanjanje grešaka uređaja.
Upute za rukovanje sačuvajte i predajte ih slijedećem vlasniku zajedno sa
uređajem.
Autorsko pravo
Ova dokumentacija je zaštićena autorskim pravom.
Sva prava, uključujući pravo na fotomehaničku reprodukciju, umnožavanje i
distribuciju posebnim postupcima (na primjer obradom podataka, medijima sa
podacima i podatkovnim mrežama), i djelomično, kao i pravo na sadržajne i
tehničke promjene ostaju pridržana.
42
SAB 160 A1

Uvod
Ograničenje odgovornosti
Sve tehničke informacije, svi podaci i svi napuci za ugradnju i priključivanje i
rukovanje odgovaraju najaktualnijom stanju u trenutku pripreme za tisak i daju
se uz uzimanje u obzir naših dosadašnjih iskustava i saznanja.
Iz navoda, slika i opisa sadržanih u ovim uputama za rukovanje ne mogu biti
izvedena nikakva potraživanja.
Proizvođač ne preuzima jamstvo za štete nastale uslijed neuvažavanja uputa,
nenamjenskog rukovanja, nestručnih popravki, neovlaštenih preinaka ili korištenja
nedopuštenih zamjenskih dijelova.
Upozoravajuće napomene
U ovim uputama za rukovanje korištene su slijedeće upozoravajuće napomene:
UPOZORENJE
Upozoravajuća napomena ovog stupnja opasnosti označava
moguću opasnu situaciju.
Ukoliko opasna situacija ne bude izbjegnuta, to može dovesti do ozljeda.
Slijedite naputke navedene u ovoj upozoravajućoj napomeni, kako biste ►
izbjegli nastanak ozljeda.
HR
SAB 160 A1
PAŽNJA
Upozoravajuća napomena ovog stupnja opasnosti označava
moguću predmetnu štetu.
Uk
oliko ova situacija ne bude izbjegnuta, to može dovesti do nastanka pred-
metne štete.
Slijedite naputke navedene u ovoj upozoravajućoj napomeni, kako biste ►
izbjegli nastanak predmetne štete.
NAPOMENA
Napomena označava dodatne informacije, koje olakšavaju rukovanje ►
uređajem.
43

HR
Uporaba u skladu sa namjenom
Ovaj uređaj je namijenjen isključivo za prijem FM/AM-radio-postaja, za reprodukciju audio- i MP3-diskova, MP3-datoteka i USB-medija, SD/MMC-memorijskih
kartica,kao i audio-signala eksternih audio-uređaja. Osim toga uređaj možete
povezati sa Bluetooth-mobitelom i uređaj sa mikrofonskom jedinicom koristiti kao
uređaj za slobodnoručni razgovor. Uređaj je predviđen za ugradnju u vozilo.
Svaki drugi način uporabe i svaki način uporabe, koji prelazi navedene okvire,
smatra se nenamjenskim.
UPOZORENJE
Opasnost uslijed nenajmenske uporabe!
Od uređaja u slučaju nenamjenske uporabe i/ili drugih načina korištenja
mogu polaziti razne opasnosti.
Uređaj koristite isključivo na namjenski način. ►
Pridržavajte se načina postupanja opisanih u ovim uputama za rukovanje. ►
Potraživanja svake vrste na temelju nastale štete uslijed nenamjenske uporabe
ur
eđaja su isključena.
Rizik nosi isključivo k
orisnik uređaja.
Sigurnost
U ovom poglavlju ćete primiti važne sigurnose napomene u vezi rukovanja
uređajem.
Ovaj uređaj odgovara propisanim sigurnosnim odredbama. Nenamjenska uporaba međutim može dovesti do ozljeda osoba i do predmetne štete.
Uvod
Opće sigurnosne napomene
U svrhu sigurnog rukovanja sa uređajem uvažite slijedeće sigurnosne napomene:
Kontrolirajte uređaj prije korištenja i provjerite, da li postoje vidljiva oštećenja. ■
Uređaj koji je oštećen ili koji je pao ne pustite u rad.
U slučaju oštećenja kablova ili priključak
stručnog osoblja ili od strane servisa za kupce.
Osobe, koje zbog svojih tjelesnih, duše
stanju sigurno posluživati uređaj, isti smiju koristiti isključivo pod nadzorom ili
po napucima odgovorne treće osobe.
Djeci dopustite ruk
44
a iste dajte zamijeniti od ovlaštenog ■
vnih ili motoričnih sposobnosti nisu u ■
ovanje uređajem isključivo pod nadzorom. ■
SAB 160 A1

Uvod
Opasnost uslijed laserskog zračenja
Popravke uređaja smiju vršiti isključivo ovlaštena stručna poduzeća ili servis za ■
kupce. Nestručne popravke mogu dovesti do znatnih opasnosti za korisnika.
Osim toga pravo na jamstvo propada.
Popravak uređaja unutar jamstvenog roka smije izvršiti isključivo servis za ■
kupce ovlašten od strane proizvođača, jer u protivnom za nastale posljedične
štete više ne postoji prav
Defektni gradbeni dijelovi smiju biti zamijenjeni isključivo originalnim ■
zamjenskim dijelovima. Samo kod takvih dijelova je zajamčeno ispunjenje
sigurnosnih zahtjeva.
Uređaj zaštitite od vlage i od pr
UPOZORENJE
Uređaj je opremljen laserom klase 1. Laserske zrake
su opasne za oči!
Obratite pažnju na slijedeće sigurnosne napomene, da sebe i
druge osobe ne biste izložili laserskom zračenju:
Nikada ne otvarajte uređaj. ►
Popravke uređaja smije vršiti isključivo stručna osoba. ►
Ne vršite nikakve promjene uređaja. ►
o na jamstvo.
odiranja tekućina. ■
HR
Prometna sigurnost
SAB 160 A1
UPOZORENJE
Sigurnost u prometu ima najviši prioritet!
Obratite pažnju na slijedeće sigurnosne napomene, kako biste izbjegli ugrožavanje Vas ili drugih osoba:
Prije početka vožnje se upoznajte sa posluživanjem uređaja. ►
Uređaj poslužujte samo onda, kada prometna situacija to dopušta! ►
Stanite na prikladnom mjestu, ukoliko trebate izvršiti složenije komande.
Element za posluživanje uklonite ili postavite samo kada vozilo miruje.
►
Podesite prikladnu glasnoću, da biste akustične signale policije, vatrogasne ►
službe ili drugih spasilačkih službi blagovremeno primijetili.
45

HR
Obim isporuke i transportna inspekcija
UPOZORENJE
Opasnost od gušenja!
Materijali pakiranja ne smiju biti korišteni za igru. ►
Postoji opasnost od gušenja.
Uređaj se standardno isporučuje sa slijedećim komponentama:
Auto-r
adio (uključujući konzolu za posluživanje) ▯
Ugradbeni okvir (nataknut) ▯
Ukrasni okvir (nataknut) ▯
Lim za učvršćavanje (uklj. materijal za učvršćenje) ▯
Ključ za ugradbeni okvir (2x) ▯
Etui konzole za posluživanje ▯
Mikrofonska jedinica sa ljepljivom trakom ▯
Upute za uporabu ▯
NAPOMENA
Prekontrolirajte cjelovitost obima isporuke i provjerite, da li postoje vidljiva ►
oštećenja.
►
U slučaju nepotpune isporuke ili oštećenja uslijed oskudnog pakiranja ili
transportnih oštećenja se obratite dežurnoj telefonskoj liniji (vidi jamstvenu
karticu).
Uvod
Zbrinjavanje ambalaže
Pakiranje (ambalaža) uređaj štiti od transportnih oštećenja. Materijali ambalaže
su izabrani u skladu sa načelima za očuvanje okoliša i načelima tehnologije
zbrinjavanja otpada, te su zbog toga prikladni za recikliranje.
Povrat pakiranja u kružni tok materijala štedi sirovine i smanjuje količinu nastalog
otpada. Materijale pakiranja, koji Vam više nisu potrebni, zbrinite u skladu sa
važećim mjesnim propisima.
NAPOMENA
Ako je moguće, sačuvajte originalno pakiranje za vrijeme jamstvenog roka ►
uređaja, kako biste uređaj u slučaju korištenja prava na jamstvo mogli
uredno zapakirati.
46
SAB 160 A1

Element za posluživanje
Element za posluživanje
Autoradio (vidi prednju isklopnu stranicu)
1: Brojčana tipka 1
2
RPT/2: Funkcija ponavljanja u CD/MP3-pogonu, brojčana tipka 2
3
INT/3: Intro-funkcija u CD/MP3-pogonu, brojčana tipka 3
4
Multiregulator: Okrenite da biste podesili vrijednosti/glasnoću
5
Tipka : Prihvat telefonskog razgovora
6
Display
7
Deblokada elementa za posluživanje
8
Pretinac za SD/MMC-karte
9
USB-priključak
10
AUX: 3,5 mm stereo-ulazna utičnica za priključak eksternog audio-uređaja
11
▸▸I: Traženje naslova/postaje prema naprijed
12
I◂◂: Traženje naslova/postaje prema natrag
SCAN/REC: automatsko traženje postaja/ prihvati na mediju za podatke na
13
USB-priključku ili SD/MMC-pretincu za karte
14
AS/PS: Automatsko memoriranje odašiljača
15
BD/ENT: Izbor pojasa/potvrda odabira
16
PHONE: Pozivanje funkcije telefona
17
Tipka : Završavanje telefonskog razgovora
18
DISP/#: Prikaz informacije displaya, tipka #
19
MODE/0: Podešavanje pogonskog modusa, brojčana tipka 0
20
*: Tipka*
21
TA/9: Aktiviranje prometnog odašiljača, brojčana tipka 9
22
AF/8: Traženje alternativne frekvencije/aktiviranje regionalnih programa,
brojčana tipka 8
PTY/7: Traženje odašiljača prema PTY-grupi, brojčana tipka 7
23
24
/DIM: Uključivanje i isključivanje uređaja/ prigušivanje osvijetljenja displaya
25
6: Brojčana tipka 6
26
Tipka : Isključivanje tona
27
RDM/4: Slučajna reprodukcija u CD/MP3-pogonu, brojčana tipka 4
28
5: Brojčana tipka 5
29
Tipka : Izbacivanje diska
30
CD-pretinac
HR
SAB 160 A1
47

HR
Element za posluživanje
31
LED zaštite od krađe / LED za označavanje položaja CD-pretinca
32
Držač elementa za posluživanje
33
RESET: Resetiranje uređaja
ISO-blok priključak B
34
Automobilski utični osigurač 10 A
35
36
ISO-blok priključak A
Bluetooth-antena
37
SUBWOOFER: Priključni kabel sa cinch-utičnicom za subwoofer
38
39
Utičnica za mikrofonsku jedinicu
LINE OUT: Audio-cinch-izlaz L/D za pojačalo
40
41
Antenski priključak za DIN-antenski utikač
Oprema (vidi stražnja isklopna stranica)
42
Utikač mikrofonske jedinice
Mikrofon
43
44
TALK-tipka
45
zeleni LED za status veze
46
Etui konzole za posluživanje
47
Ukrasni okvir
48
Ugradbeni okvir
49
Ključ za ugradbeni okvir
50
Lim za učvršćavanje (uklj. materijal za učvršćenje)
48
SAB 160 A1

Instalacija
Instalacija
Prilikom instalacije uređaja može doći do nastanka predmetne
štete!
Priključak
PAŽNJA
Uporaba pogrešnih priključaka može dovesti do oštećenja
uređaja.
Raspored ISO-priključaka
Pogled sa stražnje strane na utikače.
UPOZORENJE
Po mogućnosti uređaj treba ugraditi stručni pogon. ►
Ukoliko sami želite ugraditi uređaj, onda u cilju sigurnog i besprijekornog ►
rada uređaja obratite pažnju na naputke za priključivanje i ugradnju.
Prilikom ugr
za vozilo, koji će Vam eventualno biti potrebni, možete nabaviti u specijaliziranim trgovinama ili u stručnim odjelenjima r
uporabe drugih vrsti priključaka pravo na jamstvo prestaje važiti!
adnje koristite ISO-priključke uređaja. ISO-adaptere specifi čne ►
1357
2468
ISO A (raspored napajanja
strujom)
obnih kuća. U slučaju
Raspored
1 slobodan
2
slobodan
3 slobodan
rajni plus 12 V (Kl. 30)
4 T
5 Antenski napon
6 slobodan
7 Plus paljenja 12 V (Kl. 15)
8 Minus (-) masa (Kl. 31)
HR
SAB 160 A1
1357
2468
ISO B (Raspored priključaka
zvučnika)
Raspored
1 Stražnja desna strana +
2 Stražnja desna str
3 Prednja desna strana +
4 Prednja desna strana 5 Prednja lijeva strana +
6 Prednja lijeva strana 7 Stražnja lijeva strana +
8 Stražnja lijeva strana -
ana -
49

HR
Da biste uređaj priključili na dva zvučnika, koristite isključivo kabele za prednje
zvučnike.
NAPOMENA
Obratite pažnju na to, da za memoriranje postaja priključak 4 u ISO-bloku ►
A na stalni plus mora biti izvršen.
U nekim modelima vozila je standardni raspor
ISO-bloku A tvornički zamijenjen. U tom slučaju može doći do gubljenja
memoriranih postaja. Za rješenje ovog problema moraju priključci 7 (plus
paljenja) i 4 (trajni plus) u ISO-bloku A biti zamijenjeni
Možete priključiti eksterno pojačalo na audio-cinch-izlaz. U tu svrhu molimo ►
da uzmete u obzir upute za rukovanje eksternog pojačala.
ed priključaka [4] i [7] u ►
Priključak struje za antenu
PAŽNJA
Moguća oštećenja uređaja!
Priključak za antensku struju nikada ne pov
motornu struju.
Priključak struje za antenu na raspolaganju stoji za antene, sa kojom se upr
vrši pomoću releja. Relej onda antenu automatski izvozi, kada uključite uređaj.
Prilikom isključivanja radio-uređaja antena se automatski ponovo uvlači. Ovaj
priključak može biti korišten i za upravljanje eksternim pojačalom. Za točan
priključak molimo pročitajte upute za uporabu pojačala.
ežite sa kabelom antene za ►
Instalacija
avljane
50
Priključak eksternog pojačala
Za priključak eksternog pojačala koristite audio-cinch-izlaz LINE OUT 40.
U tu svrhu molimo da uzmete u obzir upute za rukovanje eksternog pojačala.
Priključak eksternog subwoofera
Za priključak eksternog subwoofera koristite žutu cinch-utičnicu SUBWOOFER 38.
U tu svrhu obratite pažnju na upute za korištenje eksternog subwoofera.
Priključak mikrofonske jedinice
Za priključak mikrofonske jedinice koristite utičnicu za mikrofonsku jedinicu 39.
SAB 160 A1

Instalacija
A
Priključna shema
Antena
Sub
woofer
Bluetooth-antena
HR
Ek
sterno pojačalo
Ugradnja
Uređaj može biti upotrijebljen u svakom standardnom ISO-ugradbenom otvoru.
Ukoliko Vaše vozilo ne raspolaže sa ISO-otvorom, molimo da se obratite stručnoj
radionici, stručnoj trgovini ili stručnim odjeljcima trgovina.
NAPOMENA
Obavezno prije montaže uklonite dva vijka za transportno osiguranje na ►
gornjem kućištu (označeno crvenim naljepnicama)!
Priključite ova dva k
kablovi budu ispravno utaknuti i da sustav ispravno funkcionira.
Napomene za ugradnju
Umetnite uređaj u predviđeni otvor ili izaberite mjesto za ugradnju tako, da ■
sve tipke budu komotno dostupne i da vozač ne bude ometan.
Uređaj priključite isključivo na propisno instalir
Uređaj priključite isključivo preko ISO-utikača u automobilu. ■
Uređaj ugradite tako, da ne može doći do toplinskog zastoja i da uređaj ■
bude dobro prozračen.
1 3
ISO B
ISO
Mikrofonska jedinica
abela prije konačne ugradnje uređaja. Osigurajte, da ►
anu 12 V auto-bateriju. ■
SAB 160 A1
51

HR
U svrhu izbjegavanja funkcionalnih smetnji kut ugradnje treba biti manji od 30°. ■
Ne ugradite uređaj na mjestu, na kojem je izložen visokim temperaturama ■
(npr. neposrednom utjecaju sunčeve svjetlosti ili zagrijanom zraku), onečišćenju
i snažnim potresima.
Ukoliko su potr
lima / stručnoj radionici.
ebne promjene vozila, obratite se Vašem trgovcu automobi- ■
Ugradnja uređaja u ISO-otvor
Povlačenjem skinite ugradbeni okvir ♦
Utaknite ugradbeni okvir u ISO-ugradbeni otvor. ♦
Savijte ispuste ugradbenog okvira odvijačem, tako da isti bude čvrsto fi ksiran ♦
u ugradbenom otvoru (vidi sliku).
Instalacija
48
i ukrasni okvir 47sa kućišta uređaja.
52
Prekontrolirajte čvrst položaj okvira. ♦
Povežite ISO-blok utičnica uređaja sa dva ISO-utikača Vašeg vozila. ♦
Povežite antenski kabel antene vozila sa antenskom utičnicom uređaja. ♦
Uvedite kabel jedinice mikrofona u ugradbeni otvor i priključite ga na ♦
utičnicu jedinice mikrofona. Vodite kabel tako, da jedinica mikrofona kasnije
mo
že biti učvršćena u unutrašnjosti v
mikrofona”.
Po potrebi priključite i audio-cinch-kabel eksternog pojačala na ♦ LINE OUT-
utičnice
Po potrebi piključite audio-cinch-kabel eksternog subwoofera na žutu chinch- ♦
utičnicu SUBWOOFER
uređaja.
40
38
ozila, vidi i poglavlje “Korištenje
.
SAB 160 A1

Instalacija
♦
PAŽNJA
Moguća oštećenja kabela!
Priilikom umetanja obratite pažnju na položaj k
nastanak oštećenja.
Izgradnja uređaja
Ako uređaj ponovo želite izgraditi, postupite na slijedeći način:
Osigurajte Vaš uređaj po potrebi dodatno od krađe. Učvrstite vijak sa ♦
limom za usidrenje i sa materijalom za učvršćenje 50 na motornoj stjenci
motornog vozila.
Gurnite uređaj oprezno u ugradbeni okvir, sve dok ne ulegne. ♦
Kada dovršite sva spajanja, aktivirajte tipku ♦ RESET sa k
nekim drugim šiljatim predmetom.
Element za posluživanje umetnite na način opisan u poglavlju “Umetanje
elementa za posluživanje”.
abela, kako biste izbjegli ►
Nakon toga nataknite ukrasni okvir. ♦
Uklonite ukrasni okvir ♦
Uvedite desni i lijevi ključ u otvor na strani uređaja ♦
savijeni prema natrag.)
47
.
emijskom olovkom ili
. (Ispusti su sada
49
HR
SAB 160 A1
Povlačenjem izvadite uređaj. ♦
53

HR
Puštanje u rad
Konzola za posluživanje
U svrhu zaštite od krađe možete skinuti element za posluživanje uređaja. Skinuti
element za posluživanje ne čuvajte u vozilu.
NAPOMENA
Ako element za posluživanje nije umetnut u okvir, na uređaju trepti LED za ►
31
zaštitu od krađe
Za zaštitu konzolu za posluživanje uvijek čuvajte u etuiu. ►
Umetanje konzole za posluživanje
Umetnite element za posluživanje prvo sa ♦
lijevom stranom u okvir.
Zatim pritisnite desnu stranu, dok ne ulegne. ♦
Nakon toga element za posluživanje preklopite ♦
prema gore, sve dok ne ulegne.
Pr
ovjerite, da li element za posluživ
i čvrsto stoji u okviru. Ako element za posluživanje
nije ispravno ugrađen, onda može doći do funkcionalnih smetnji prilikom rukovanja uređajem.
.
Puštanje u rad
anje ispravno
54
Skidanje konzole za posluživanje
Pritisnite tipku za deblokadu elementa za ♦
posluživanje
automatski naginje prema naprijed.
Gurnite element za posluživanje u lijevu stranu ♦
i povlačenjem skinite prvo desnu, a onda lijevu
stranu.
. Element za posluživanje se
SAB 160 A1

Posluživanje i pogon
Posluživanje i pogon
U ovom poglavlju primate važne napomene u vezi sa posluživanjem i pogonom
uređaja.
NAPOMENA
Ukoliko u roku od 5 sekundi ne uslijedi podešenje, odnosno pritiskanje tipke, ►
uređaj se vraća u prethodni pogonski modus. Promijenjena podešenja će
biti pohranjena.
Uključivanje/Isključivanje
Nakratko pritisnite tipku ♦ /DIM za uključivanje uređaja.
Na displayu se pojavljuje dojava WELCOME.
Vrhom prsta pritisnite nakratko tipku ♦
AUTO DIM.
Ponovo vrhom prsta nakratko pritisnite blago tipku ♦
se pojavljuje MAN DIM.
AUTO DIM: Osvjetljenje displaya će ovisno o vanjskoj svjetlosti biti automatski
podešeno.
MAN DIM: Osvjetljenje displaya može u dva stupnja (H = High i L = Low)
biti podešeno okretanjem multiregulatora.
Za isključivanje tipku ♦
HR
/DIM. Na displayu se pojavljuje
/DIM. Na displayu
/DIM držite duže pritisnutu.
Podešenja
Glasnoća
Uključivanje/isključivanje potpunog utišavanja glasnoće
SAB 160 A1
UPOZORENJE
Oštećenje sluha zbog prevelike glasnoće!
Prevelika glasnoća može dovesti do trajnog oštećenja Vašeg sluha.
Podesite samo umjerenu glasnoću. ►
Okrenite multiregulator, da biste podesili glasnoću. ♦
Pritisnite tipku ♦ , da biste isključili zvuk. Na displayu trepti “MUTE”.
Ponovo pritisnite tipku ♦
TA-odašiljača će potpuno stišavanje zvuka biti ukinuto.
, da biste zvuk opet uključili. Kod prijema PTY- ili
55

HR
Posluživanje i pogon
Bas/Visokotonci/Balans/Fader
Pritisnite multiregulator na uređaju. Biti će prikazana aktualna glasnoća. ♦
Svako dodatno pritiskanje multiregulatora dovodi do pozivanja slijedeće
točke podešavanja.
Slijedeća podešenja su moguća:
VOL - glasnoća (od 0 do 50),
BAS - basovi (od -10 do 10),
TRB - visokotonci (od -10 do 10)
BAL - balans (raspodjela zvuka između desnih i lijevih zvučnika) (od 10L do
10R)
FAD - fader (raspodjela zvuka između stražnjih i prednjih zvučnika) (od 10F
do 10R)
Okrenite multiregulator, da biste promijenili podešenja prikazane točke ♦
izbornika.
Daljnja podešenja preko multiregulatora
Držite mutliregulator ca. 2 sekunde pritisnut i nakon toga toliko puta pritisnite ♦
mutliregulator, dok se ne pojavi željena funkcija na displayu.
INVOL - Glasnoća prilikom uključivanja
Okrenite multiregulator, da biste podesili stupanj glasnoće, sa kojim uređaj ♦
treba biti uključen.
REC - Format snimanja
enite multiregulator, da biste format snimanja za snimak na SD/MMC ♦
Okr
odnosno USB-medije podesili na MP3 (MP3-datoteke) ili WMA (Window
Media-Audio).
SUBW - Subwoofer
Možete priključiti eksterni aktivni subwoofer, da biste postigli snažniji efekt
basova.
Okrenite multiregulator, da biste efekt basova uključili (SUBW ON) ili ♦
isključili (SUBW OFF).
ADJ - Točno vrijeme
s-
56
NAPOMENA
Uređaj je opremljen satom sa RDS-upravljanjem. Ovaj sat se automatski ►
podešava pri uključenoj EON-funkciji, a on radi i kada je radio-uređaj
isključen. Ukoliko ne primate RDS-signal, točno vrijeme mo
podesiti.
Okrenite multiregulator u desnu stranu, da biste podesili sate, odnosno u ♦
lijevu stranu, da biste podesili minute.
žete i ručno
SAB 160 A1

Posluživanje i pogon
TAVOL - Glasnoća prometnog programa
Okrenite multiregulator, da biste podesili stupanj glasnoće, sa kojim prometne ♦
vijesti želite slušati.
EON - Informacije drugih odašil
Kod uključene EON-funkcije radio prebacuje na prometni program ili PTY-tipove,
ako je aktivirana TA- ili PTY-funkcija.
Okrenite multiregulator, da biste EON-funkciju uključili (EON ON) ili isključili ♦
(EON OFF).
DSP - Eq
TA - Traffi c Announcement (prometni program)
TA SEEK: Čim prijemni signal prometnih vijesti oslabi ili napuštate područje prijema,
kreće automatska pr
TA ALARM: Čim prijemni signal prometnih vijesti oslabi ili napuštate područje
prijema, oglašava se alarmni zvuk.
PI - Program Identifi cation (zvuk kod automatske pretrage
odašiljača)
Der Program Identifi cation Code (PI) je interna identifi kacijska šifra, koja između
ostalog nalazi primjenu kod pretrage alternativnih frekvencija. Sastoji se od
16-bit-broja, koji omogućava nedvojbenu identifi kaciju odašiljača.
PI SOUND: Pretraga odašiljača sa zvukom.
PI MUTE: K
RETUNE (vr
RETUNE L: Traženje odašiljača sa ispravnom PI-oznakom traje 90 sekundi.
RETUNE S: T
ualizer (Digital Sound Processing)
Okr
enite multiregulator, da biste izabrali jedno od podešenja ♦ CLASSICS,
ROCK M,
nije uključen DSP. DSP-equalizer podešenje se pojavljuje na desnoj strani
displaya.
Okrenite multiregulator, da biste izvršili slijedeća podešenja: ♦
Okrenite multiregulator u svrhu izvršenja slijedećih podešenja: ♦
Okrenite multiregulator, da biste izvršili slijedeća podešenja: ♦
POP M, FLAT ili DSP NONE. U podešenju DSP NONE
etraga i najsnažnija TA-postaja će biti tražena.
od pretrage odašiljača je zvuk potpuno utišan.
emena pretrage odašiljača sa PI-oznakom)
raženje odašiljača sa ispr
jača
HR
avnom PI-oznakom traje 30 sekundi.
SAB 160 A1
57

HR
Posluživanje i pogon
MASK (skrivanje određenih odašiljača)
Okrenite multiregulator, da biste izvršili slijedeća podešenja: ♦
MASK DPI: Skriva AF-odašiljače, koji imaju drugu PI-oznaku.
MASK ALL: Skriva AF-odašiljače, k
ne-PI-odašiljače, koji imaju jednaku odašiljačku frekvenciju.
Dodatna glasnoća (Loudness)
Držite tipku ♦ MODE pritisnutu, da biste funkciju dodatne glasnoće uključili ili
isključili. Na displayu se pojavljuje LOUD ON odnosno LOUD OFF.
Način rada
Pritisnite tipku ♦ MODE, da biste prebacivali između radio-prijema (prikaz
frekvencije), CD/MP3-pogona (CD), pretinca karte (SD/MMC), USB-priključka (USB), audio-streaminga (BT MUSIC ili A2DP) i audio-ulaza (AUX).
NAPOMENA
Načini rada CD, SD/MMC, USB i BT MUSIC mogu biti pozvani samo ►
onda, kada je odgovarajući medij umetnut odnosno priključen mobitel.
Display
Pritisnite u više navrata tipku ♦ DISP, da biste redom pozvali prikaz slijedećih
informacija:
Radio-odašiljač, točno vrijeme (automatsko podešavanje u slučaju RDS-prijema),
frekvencija i PTY-podešenja (ove RDS-funkcije emitirajuće stanice šalju u različitom
obimu; takođe vidi poglavlje “Radio-funkcije”).
oji imaju drugu PI-oznaku i sve ometajuće
58
NAPOMENA
Ukoliko ne primate RDS ili PTY-informacije, pojaviti će se “PS NONE” ili ►
“PTY NONE” na displayu.
SAB 160 A1

Posluživanje i pogon
Resetiranje radija (RESET)
Da biste uređaj vratili u isporučeno stanje, pritisnite tipku RESET šiljatim predmetom,
npr. kemijskom olovkom.
NAPOMENA
Da biste došli do tipke ► RESET, element za posluživanje morate sasvim
skinuti; vidi poglavlje “Skidanje elementa za posluživanje”.
R
esetirajte uređaj:
prilikom prvog puštanja u pogon, ▯
nakon priključivanja kablova, ▯
ako ne funkcioniraju sve funkcionalne tipke, ▯
u slučaju dojave greške u displayu. ▯
Radio-funkcije
Odabir frekvencijskog područja
Pritisnite tipku ♦ BD/ENT, da biste prebacivali između UKW (F1, F2, F3) i
srednjevalnog pojasa (M1, M2).
Automatsko traženje postaje
Nakratko pritisnite tipke I◂◂ ili ▸▸I, da biste pokrenuli automatsko traženje ♦
postaje. Nakon pronalaska stanice traženje se zaustavlja.
Ručno podešavanje postaje
Držite jednu od tipki I◂◂ ili ▸▸I pritisnutu dvije sekunde. Na displayu se ♦
pojavljuje MANUAL.
Sada pritisnite tipke I◂◂ ili ▸▸I, da biste frekvenciju u koracima od 0,05 ♦
MHz (UKW) odnosno 9 kHz (MW) mijenjali, sve dok ne bude podešena
željena frekvencija.
Uk
oliko približno dvije sekunde ne pritisnete niti jednu tipku, ponovo će biti pode-
šeno automatski traženje postaje. Na displayu se pojavljuje AUTO.
HR
Memoriranje postaje
SAB 160 A1
Za svako frekvencijsko područje možete memorirati 6 postaja.
Držite približno 3 sekunde jednu od tipki stanica ♦ 1 do 6 pritisnutu, da biste
aktualno podešenu postaju memorirali. Uspješno memoriranje će biti signalizirano prik
azom broja 1 do 6 na displayu.
59

HR
Posluživanje i pogon
Traženje postaja sa alternativnom frekvencijom
Pritisnite tipku ♦ SCAN/REC, da biste UKW-frekvencijsko područje pretražili
i pronašli odašiljače sa AF-signalom.
Traženje staje kod svake pronađene postaje na 5 sekundi i zatim nastavlja teći.
Kada čujete postaju i želite istu memorirati, pritisnite tipku ♦ SCAN/REC,
kako biste zaustavili traž
Držite približno 3 sekunde pritisnutu jednu od tipki za stanice ♦ 1 do 6, kako
biste memorirali aktualno podešenu postaju. Uspješno memoriranje će biti
signalizir
ano prikazom broja 1-6 na displayu.
Pozivanje memoriranih postaja
Izaberite sa tipkom ♦ BD/ENT frekvencijsko područje.
Pritisnite jednu od tipki za stanice ♦ 1 do 6, kako biste pozvali memoriranu
postaju.
Automatsko memoriranje
Držite tipku ♦ AS/PS pritisnutu 3 sekunde. Trenutno će biti pokrenuto traženje,
koje će se zaustaviti kod svake pronađene postaje u trajanju od ca. pet
sekundi. Prikaz postaje, odnosno frekvencije odašiljača trepti i pojavljuje se
prikaz memorijskog mjesta. Kod slabih odašiljača (slabog signala) pretraga
se ne zaustavlja nego automatski nastavlja.
enje.
60
Prolazak kroz memorirane stanice
Nakratko pritisnite tipku ♦ AS/PS. Sve postaje će nakratko biti pozvane.
Kada čujete željenu postaju, nakratko pritisnite tipku ♦ AS/PS.
Izabrana postaja ostaje odabrana.
Uključivanje/isključivanje alternativnih frekvencija (AF)
Možete potražiti alternativne frekvencije odašiljača, kako biste signal u svakom
trenutku mogli primati na optimalan način.
Pritisnite tipku ♦ AF. Na displayu se pojavljuje prikaz AF. Uređaj sada stalno
traži optimalnu frekvenciju aktualno podešene postaje.
Ponovo pritisnite tipku ♦ AF, da biste isključili ovu funkciju. Na displayu se
gasi prikaz AF
.
Regionalni programi
Neki odašiljači emitiraju regionalne programe.
Da bi samo regionalni programi odašiljača bili emitirani, držite tipku ♦ AF
pritisnutu, sve dok se na displayu ne pojavi prikaz REG ON.
SAB 160 A1

Posluživanje i pogon
Da biste ponovo slušali nadregionalne programe, držite tipku ♦ AF pritisnutu,
sve dok se na displayu ne pojavi prikaz REG OFF.
Tip programa (PTY)
Uz pomoć ove funkcije možete tražiti odašiljače određenog žanra. Slijedeća
podešenja su moguća:
HR
POP M
ROCK M
NEWS
AFFAIRS
INFO
EASY M
LIGHT M
NAPOMENA
Molimo uzmite u obzir, da su ove informacije ovisne o regiji, postaji i ►
odašiljaču.
Za ovu funkciju mora biti uključ
Podešav
Raspor
Ako u roku od 2 sekunde ne uslijedi daljnji unos, započinje automatsko traženje
postaja, koje odgovaraju PTY-unosu. Kod prve pronađene postaje traženje će se
zaustaviti.
anje PTY-oznake
Pritisnite tipku ♦ PTY i nakon toga u više navrata pritisnite jednu brojčanu
do 6, da biste odabrali željeni PTY-unos.
tipku 1
Da biste birali između unosa “Vrsta glazbe” i “Govor”, kod prikaza prvog ♦
PTY-unosa ponovo pritisnite tipku PTY.
ed brojčanih tipki je slijedeći:
Tipka Vrsta glazbe Govor
1 POP M, ROCK M NEWS, AFFAIRS, INFO
2 EASY M, LIGHT M SPORT, EDUCATE, DRAMA
3 CLASSICS, OTHER M CULTURE, SCIENCE, VARIED
4 JAZZ, COUNTRY WEATHER, FINANCE, CHILDREN
5 NATION M, OLDIES SOCIAL, RELIGION, PHONE IN
6 FOLK M TRAVEL, LEISURE, DOCUMENT
SPORT
EDUCATE
DRAMA
CLASSICS
OTHER M
CULTURE
SCIENCE
VARIED
JAZZ
COUNTRY
WEATHER
FINANCE
CHILDREN
NATION M
ena ► EON-funkcija.
OLDIES
SOCIAL
RELIGION
PHONE IN
FOLK M
TRAVEL
LEISURE
DOCUMENT
SAB 160 A1
61

HR
Posluživanje i pogon
Uključivanje/isključivanje PTY-funkcije
Za aktiviranje PTY-pretrage pritisnite tipku ♦ PTY. Na displayu se pojavljuje
prikaz PTY.
od traženja postaje se uzimaju u obzir isključivo postaje aktualno izabrane
K
PTY-oznake.
Za deaktiviranje PTY-traženja ponovo pritisnite tipku ♦ PTY.
Traženje pos
Kada za vrijeme prikaza PTY-oznake nakratko pritisnete tipku ♦ PTY ili tipke
I◂◂ odnosno ▸▸I, smjesta kreće traž
PTY-oznaci.
Ukoliko ne bude pronađena postaja koja odgovara dotičnoj PTY-oznaci, nakratko
se pojavljuje prikaz PTY NONE, nakon čega traženje prestaje sa zadnjom
podešenom postajom.
Prometne vijesti (TA - “Traffi c Announcement”)
Za ovu funkciju mora biti uključena EON-funkcija.
Pritisnite tipku ♦ TA, da biste ovaj modus uključili ili isključili.
-modusu će sa drugih postaja ili vrsti pogona odmah biti prebačeno na ra-
U TA
dio-postaju, koja upravo prenosi prometne vijesti. Pritom će biti aktiviran stupanj
glasnoće unesen u opciji TAVOL.
Za vrijeme reprodukcije prometnih obavjesti pritisnite tipku TA, da biste funkciju
TA prekinuli, bez da isključite ovu funkciju.
taje prema PTY-oznaci
enje postaja, koje odgovaraju dotičnoj
62
SAB 160 A1

Posluživanje i pogon
Opće CD-funkcije
NAPOMENA
Vlaga i visok stupanj vlage u zraku mogu dovesti do funkcionalnih smetnji ►
CD-playera. U tom slučaju uključite grijanje u vozilu, kak
ispariti prije uporabe radio-uređaja. Uređaj ne izložite ekstremno visokim ili
ekstremno niskim temperaturama.
Anti-šok-funkcija (ESP - “Electronic Shock Protection”)
Uređaj je opremljen sa anti-shock-funkcijom. Ova funkcija služi za to, da se potresi,
na primjer na neravnom kolniku, izjednače. Na taj način je osigurana neprekidna
reprodukcija i za vrijeme kretanja uređaja. Prilikom uključivanja uređaja memorija
se automatski puni sa podacima:
kod audio-CD-diskova za 12 sekundi; ■
kod MP3-CD-diskova za 75 sekundi. ■
Umetanje CD-diskova i njihovo vađenje
Pritisnite tipku za deblokadu elementa za posluživanje ♦ . Element za
posluživanje se automatski naginje prema naprijed.
Gurnite CD disk sa stranom sa napisom okrenutom prema gore u pretinac ♦
za CD.
Element za posluživanje ponovo zatv
gore. Započinje reprodukcija CD-diska. Na displayu se pojavljuje CD PLAY.
Za v
ađenje CD diska opet otvorite element za posluživanje. ♦
Pritisnite tipku
CD-disk odmah izvadite iz CD-pretinca. Ako izbačeni CD disk ne izvadite ♦
nakon približno 5 sekundi, uređaj će ga ponovo uvući, ali reprodukcija
neće biti pokrenuta.
. CD-disk se izbacuje. Uređaj prebacuje u radio-modus.
o bi vlaga mogla
orite tako, što ćete ga preklopiti prema ♦
HR
Preskakanje pjesama
Brzo motanje prema naprijed/nazad
SAB 160 A1
Pritisnite tipke ▸▸I ili I◂◂, da biste izabrali slijedeću, odnosno prethodnu ♦
pjesmu. Broj pjesme je prikazan u displayu.
Držite tipke ▸▸I ili I◂◂ duže pritisnute, da biste pokrenuli brzo premotavanje ♦
prema naprijed ili natrag.
63

Prekidanje reprodukcije
Pritisnite tipku ♦ 1, da biste prekinuli reprodukciju. Na displayu trepti S-PAUSE.
Za nastavak reprodukcije pritisnite tipku ♦ 1 još jednom.
Posluživanje i pogon
HR
Funkcija ponavljanja (RPT - Repeat)
U više navrata pritisnite tipku ♦ RPT, da biste izvršili prebacivanje između
funkcija ponavljanja. Slijedeća podešenja su moguća:
RPT ONE: Aktualna pjesma se ponavlja. –
RPT ALL: Ponavlja se cijeli CD disk. – RPT se ne prikazuje.
Dodatno kod MP3-CD-disko
RPT DIR: Sve pjesme u aktualnom direktoriju se ponavljaju. –
Kada su funkcije RPT ONE ili RPT DIR aktivirane, na displayu se prikazuje RPT.
va:
Reprodukcija početka pjesme
Pritisnite tipku ♦ INT. Na displayu se prikazuje INT. Redom će biti reproduciran
početak svake pjesme u trajanju od ca. 10 sekundi.
Pritisnite tipku ♦ INT još jednom, da biste aktivirali normalnu reproduk
Slučajna reprodukcija svih pjesama (RDM - Random)
Pritisnite tipku ♦ RDM. Na displayu se prikazuje RDM. Započinje reprodukcija
slučajnim redosljedom. Ponovno pritiskanje će opet pokrenuti normalnu
reprodukciju.
ciju.
64
SAB 160 A1

Posluživanje i pogon
Funkcije MP3-CD-diskovi
Reprodukcija
Uređaj može reproducirati datoteke u formatu MP3 i WMA. ■
Pomiješano memoriranje pjesama i direktorija na istoj razini moglo bi dovesti ■
do problema prilikom reprodukcije.
Za vrijeme reprodukcije se učitav
redom prikazuju na displayu.
Preskak
NAPOMENA
Funkcije traženja
Traženje broja pjesme
anje direktorija
Pritisnite brojčanu tipku ♦ 6, da biste reproducirali slijedeći direktorij, odnosno
brojčanu tipku 5
nakratko pojavljuje naziv direktorija, a nakon toga započinje reprodukcija
automatski.
Ako se datoteke nalaze u glavnom direktoriju CD-diska, onda se na displayu ►
pojavljuje prikaz naziva direktorija ROOT.
Pritisnite tipku ♦ AS/PS. Na displayu se pojavljuje prikaz MP3*.
Okrenite multir
željeni broj pjesme.
Pritisnite multiregulator ili pričekajte 3 sek
podešene pjesme.
, da biste reproducirali prethodni direktorij. Na displayu se
egulator ili pritisnite brojeve na uređaju, da biste podesili ♦
HR
aju informacije iz ID3-taga MP3-datoteke i ■
unde, da biste pokrenuli reprodukciju ♦
SAB 160 A1
NAPOMENA
U slučaju izbora broja nepostojeće pjesme biti će reproducirana pjesma sa ►
najvećim brojem.
Traženje naziv
Pritisnite tipku ♦ AS/PS dva puta. Na displayu se pojavljuje prikaz *.
Okrenite multir
Pritisnite multiregulator da biste potvrdili odabir slova i da biste prebacili ♦
na drugo mjesto naziva pjesme. Na taj način možete unijeti do 16 slova/
znak
on što ste podesili željene znakove, pritisnite tipku ♦ BD/ENT, da biste
Nak
pozvali prikaz svih pjesama ko
a pjesme
egulator, sve dok se ne pojavi željeno slovo. ♦
ova.
je započinju sa traženim znakom.
65

Posluživanje i pogon
NAPOMENA
Ako se ne pronađu pjesme koje počinju sa podešenim znakom, nakratko ►
će se pojaviti prikaz NO MEDIA i podešenje mož
ete ponovo izvršiti.
HR
Okrenite multiregulator, da biste izabrali pjesmu i pokrenite reprodukciju sa ♦
BD/ENT.
Pretraga dir
Pritisnite tipku ♦ AS/PS tri puta. Aktualno reproducirani dir
Okrenite multiregulator, da biste izvršili prebacivanje između postojećih ♦
direktorija.
Pritisnite tipku ♦ BD/ENT, da biste izabr
R
eprodukcija prve pjesme izabranog direktorija započinje odmah.
ektorija
USB-priključak
Uređaj može obrađivati USB-nosače podataka do 16 GB. Pritom struktura direktorija
smije sadržati maksimalno 1024 direktorija, 4096 datoteka i 8 razina direktorija.
Priključivanje nosača podataka
Otvorite zaštitnu kapu USB-priključka. ♦
Povežite USB-uređaj sa priključkom. Uređaj traži MP3- ili WMA-datoteke ♦
na nosaču podataka i na displayu se pojavljuje dojava USB PLAY.
P
ostavite zaštitnu kapu ponovo na USB-priključak, ako nije priključen USB- ♦
uređaj, kako biste izbjegli onečišćenja.
ektorij se pojavljuje.
ali aktualno prikazani direktorij.
66
SAB 160 A1

Posluživanje i pogon
Reprodukcija i funkcije traženja
Posluživanje sa ciljem reprodukcije datoteka sa eksternog nosača podataka, ■
kao i funkcije traženja rade na isti način kao kod MP3-CD-diskova.
Ako je uređaj podešen u drugom modusu ( ■ CD
mo
žete USB-nosač podataka izabrati sa tipkom MODE.
Čitač karti (SD/MMC)
Uređaj može SD/MMC memorijske kartice do 2 GB i SDHC memorijske kartice
do 32 GB obrađivati. Pritom struktura direktorija smije sadržati maksimalno
1024 direktorija, 4096 datoteka i 8 razina direktorija.
Priključivanje nosača podataka
Gurnite memorijsku karticu sa napisom na desnoj strani u pretinac za karte. ♦
Reprodukcija MP3-, ili WMA-pjesama sa memorijske kartice započinje
automatski.
Reprodukcija i funkcije traženja
Posluživanje sa ciljem reprodukcije datoteka sa eksternog nosača podataka ■
i funkcija traženja funkcioniraju na isti način kao kod MP3-CD-diskova.
Ako je uređaj u drugom modusu ( ■ CD, Radio, AUX ili USB), mo
karte izabrati sa tipkom MODE.
adio, AUX ili MMC),
, R
HR
žete čitač
Funkcija snimanja
NAPOMENA
Sa V
eksternih audio-uređaja na USB- ili SD/MMC-nosače podataka i MP3- odnosno
WMA-datoteke kopirati sa MP3-CD-diska na USB-ili SD/MMC-nosače podataka.
Datoteke se pohranjuju pod slijedećim nazivima:
Snimci se izrađuju sa bit-ratom od 128 kbps i sampling-frekvencijom od 44 kHz.
SAB 160 A1
Molimo obratite pažnju na pravne odredbe koje važe na Vašem mjestu ►
boravka, i to u vezi sa izradom kopija autorski zaštićenih djela. U slučaju
dvojbe molimo da se obratite stručnoj osobi u Vašoj blizini.
ašim uređajem možete snimati podatke sa audio-CD-diskova, radija ili
Nazivi audio-CD-diskova: Track_001, Track_002, ... ■
Datoteke MP3-CD-diskova: Copy_001, Copy_002, ... ■
Radio-snimci: Tuner_001, Tuner_002, ... ■
67

HR
Posluživanje i pogon
Snimanje
Umetnite memorijski medij u pretinac za karte ili priključite nosač podataka ♦
na USB-priključak.
Po potrebi umetnite CD-disk i priključite eksterni audio-ur
Sa tipkom ♦ MODE podesite željeni način rada (CD
Eventualno pokrenite reprodukciju eksternog audio-uređaja. ♦
Držite tipku ♦ SCAN/REC pritisnutu, sv
USB ne pojave. U načinu rada CD biti će prikazana dojava MMC ALL ili
USB ALL. Ako nije priključen nosač podataka, na koji možete vršiti snimanje,
pojavljuje se dojava NO MEDIA.
Pritisnite toliko puta tipku ♦ SCAN/REC, dok se ne pojavi željena opcija
snimanja. Kod snimanja audio-CD-disko
želite sve pjesme sa CD-diska (USB/MMC ALL) ili samo aktualnu pjesmu
(USB/MMC ONE) snimiti.
Pokrenite snimanje pritiskanjem tipke ♦ BD/ENT.
Audio-podaci će sada u podešenom formatu (MP3 ili WMA) biti pohranjeni na
nosaču podataka. Tr
NAPOMENA
Kada se izabran nosač podataka napuni, snimanje automatski prebacuje na ►
drugi nosač podataka, ukoliko je priključen.
eptuća oznaka “R” signalizira snimanje.
e dok se dojava RE
va dodatno možete podesiti, da li
eđaj. ♦
, Radio, AUX).
C MMC ili REC
68
Za okončanje snimanja još jednom nakratko pritisnite tipk
Nakon što se na displayu nakratko pojavljuje prik
je pohranjen.
u ♦ BD/ENT.
az dojave WAIT, snimak
Kopiranje datoteka sa MP3-CD-diska
Možete pojedine pjesme sa MP3-CD-diska kopirati na eksterni USB-mediji ili na
SD/MMC-kartu.
Umetnite memorijski medij u pretinac za karte ili priključite nosač podataka ♦
na USB-priključak.
Za vrijeme reprodukcije pjesme sa MP3-CD-diska držite pritisnutu tipku ♦
SCAN/REC. Prikaz dojave C
ljuje. Ako nije priključen nosač podataka, na koji možete snimati, pojaviti će
se prikaz NO MEDIA.
OPY MMC odnosno COPY USB se pojav-
SAB 160 A1

Posluživanje i pogon
Pritisnite tipku ♦ SCAN/REC u više navrata, da biste opciju kopiranja COPY
USB (kopiranje na USB-nosač podataka) ili opciju COPY MMC (kopiranje
na SD/MMC-kartu) izabrali.
Pokrenite postupak kopiranja pritiskanjem tipke ♦ BD/ENT.
Za vrijeme postupka kopiranja se na displayu pojavljuje dojav
tualni navod vrijednosti između 01 - 100, koja označava progresiju kopiranja.
Nakon prikaza COPY 100 postupak kopiranja je dovršen i reprodukcija MP3pjesme se nastavlja.
Priključivanje eksternog audio-uređaja na uređaj
Povežite audio-izlaz eksternog audio-uređaja (npr. MP3-playera) preko ♦
3,5 mm utikača sa utičnicom AUX IN na prednjoj str
Izaberite reprodukciju audio-ulaza tako, što ćete u više navrata pritisnuti ♦
tipku MODE, sve dok se na displayu ne pojavi dojava AUX.
Bluetooth-pogon
Za korištenje Bluetooth-funkcija mikrofonska jedinica mora biti priključena na uređaju. Osim toga je potreban mobitel, koji podržava Bluetooth-prijenos podataka.
Povezivanje telefona sa uređajem
Na Vašem mobitelu aktivirajte Bluetooth-funkciju i izvršite traženje Bluetooth- ♦
uređaja.
Nakon uspješne pretrage za ur
mobitela.
Izaberite ovaj unos za spajanje i na upit unesite lozinku ♦ 1234 za uređaj.
Eventualno ćete još jednom mor
Nakon uspješnog spajanja na displayu uređaja se nakratko pojavljuje CONN OK i
zelena LED-svjetiljka na mikrofonskoj jedinici svijetli.
eđaj se pojavljuje unos CarBT na displayu
ati potvrditi uspostavljanje veze.
a COPY i procen-
ani uređaja.
HR
Korištenje mikrofona
SAB 160 A1
Za vrijeme telefonata možete čuti osobu koja naziva preko zvučnika priključenih
na uređaj.
Za optimalan prijenos Vašeg glasa postavite mikrofonsku jedinicu u Vašoj ♦
blizini.
Postavite mikrofonsku jedinicu, na primjer na armaturnoj ploči v
tu svrhu možete koristiti priloženu ljepljivu traku. U tom slučaju prethodno
očistite površine od prašine i masnoće. Ljepljiva tr
za pričvršćavanje na gotovo svim glatkim podlogama.
aka može biti korištena
ozila. U ♦
69

Posluživanje i pogon
NAPOMENA
Mikrofon ne montirajte u blizini zvučnika, jer će u protivnom kvaliteta ►
zvuka prijenosa glasa biti znatno pogoršana.
HR
Primanje poziva/završavanje poziva
Kada primate poziv, pozivni signal ćete čuti preko zvučnika priključenih na Vaš
uređaj i preko Vašeg mobitela. Na displayu uređaja se pojavljuje prikaz broja
osobe koja poziva.
Prihvatite ulazni poziv tako, što ćete pritisnuti tipku ♦ TALK na mikrofonskoj
jedinici ili tipku na uređaju.
Okončajte telefonski razgovor ponovnim pritiskom tipke ♦ TALK na mikrofon-
sko
j jedinici ili pritiskom tipke
na uređaju.
Odbijanje poziva
U slučaju ulaznog poziva pritisnite tipku ♦ , ako želite odbiti poziv.
Pozivanje
Pritisnite tipku ♦ . Na displayu se pojavljuje DIAL.
Sa brojčanim tipkama na uređaju unesite telefonski broj, koji želite pozvati. ♦
Pritisnite tipku ♦
CALLING.
NAPOMENA
Ako ste pogriješili prilikom biranja broja, pritisnite tipku ►
biste poništili zadnju znamenku. Svako daljnje pritiskanje tipke
poništava zadnju znamenku broja.
još jednom. Broj se bira, a na displayu se pojavljuje
, da
70
Ponavljanje biranja
Držite tipku ♦ TALK na mikrofonskoj jedinici ili tipku na uređaju pritisnutu
u trajanju od približno 2 sekunde.
Ako prethodno niste birali broj sa brojčanim tipkama na uređaju, biti će –
pozvan zadnji birani broj na mobitelu.
Ako je prethodno biran br
ponovo bira isti taj broj.
oj sa brojčanim tipkama na uređaju, onda se –
SAB 160 A1

Posluživanje i pogon
Spiskovi osoba za poziv
Pritisnite tipku ♦ PHONE na uređaju. Na displayu se pojavljuje CALL LIST.
Ponovo pritisnite tipku ♦ PHONE. Na displayu se pojavljuje IN CALL.
Okrenite multir
IN CALL – : Prikaz posljednjih 20 ulaznih poziva.
OUT C
onovo pritisnite tipk
P
nakon toga će zadnji ulazni (IN CALL) odnosno izlazni (OUT CALL) brojevi
biti prikazani.
Okrenite multiregulator, da biste redom vidjeli zadnjih 20 biranih, odnosno ♦
ulaznih brojeva.
Pritisnite tipku ♦
Pritisnite tipku ♦ , da biste okončali ponovljeno biranje i izašli iz spiska
osoba za poziv.
Funkcija telefonskog imenika
Možete do 20 kontakata (unosa u telefonskom imeniku) spojenog mobitela
prenijeti na uređaj i tako sa uređaja izabrati kontakte i ponovo pozvati.
NAPOMENA
Pojedinosti u vezi sa prijenosom kontakata preko Bluetootha molimo potra- ►
žite u uputama za rukovanje Vašim mobitelom.
Svaki preneseni k
preneseni kontakti se automatski pohranjuju na slijedećem memorijskom
mjestu (PB02, itd).
egulator, da biste birali između slijedećih prikaza: ♦
ALL – : Prikaz posljednjih 20 izlaznih poziva.
u ♦ PHONE. Na displayu se pojavljuje READING i
, da biste birali izabran telefonski broj.
ontakt se prebacuje na memorijsko mjesto ► PB01. Već
HR
SAB 160 A1
Pritisnite tipku ♦ PHONE na uređaju. Na displayu se pojavljuje CALL LIST
Okrenite multiregulator, da biste izabrali prikaz dojave ♦ PH BOOK.
Ponovo pritisnite tipk
Nakon toga se pojavljuje
biti prikazani.
Okrenite multiregulator, da biste izabrali daljnje unose telefonskog imenika. ♦
Pritisnite tipku ♦
Pritisnite tipku ♦ , da biste okončali poziv i izašli iz funkcije telefonskog
imenika.
u ♦ PHONE. Na displayu se pojavljuje READING.
PB01 i ime i broj prvog memorijskog mjesta će
, da biste birali izabrani telefonski broj.
.
71

HR
Posluživanje i pogon
Brisanje spisaka osoba za poziv i unosa u telefonski imenik
Pritisnite i držite tipku ♦ , dok se na displayu ne pojavi dojava RESET.
Bluetooth-veza sa mobitelom se razdvaja i svi unosi u telefonskom imeniku i
svi spiskovi za poziv na uređaju se brišu.
Audio-Streaming (A2DP)
Uređaj koristi A2DP-profi l (Advanced Audio Distribution Profi le) i na taj način
može reproducirati audio-podatke Vašeg mobitela.
Na Vašem mobitelu izaberite audio-datoteku i pokrenite reprodukciju. ♦
Na displayu uređaja se pojavljuje unos A2DP i audio-datoteka će biti reproduci-
ana preko zvučnika priključenih na Vaš uređaj.
r
NAPOMENA
Na mobitelu eventualno mora biti podešena reprodukcija preko Bluetooth ►
Stereo-slušalica. Sa time u vezi obratite pažnju na upute za rukovanje
Vašim mobitelom.
Kod nekih malobrojnih mobitela ur
modus. U tom slučaju prijeđite u A2DP-modus tako što ćete u više navrata
pritisnuti tipku MODE, sve dok se na displayu ne pojavljuje prik
BT MUSIC ili A2DP.
AVRCP (Audio Video Remote Control Profi le)
Uređaj koristi AVRCP-profi l i time omogućava upravljanje audio-uređajima.
Sa tipkom ♦ 1 na uređaju možete zaustaviti i ponovo pokrenuti reprodukciju
audio-datoteke na Vašem mobitelu.
ama I◂◂ ili ▸▸I na uređaju možete pozvati prethodnu ili slijedeću ♦
Sa tipk
audio-datoteku na mobitelu.
eđaj ne prebacuje automatski u A2DP- ►
az dojave
72
SAB 160 A1

Čišćenje/Zbrinjavanje
Čišćenje
Sigurnosne upute
PAŽNJA
Moguće oštećenje uređaja
Osigurajte, da prilikom čišćenja ne dođe do prodir
kako biste izbjegli nepopravljivo oštećenje uređaja.
Čišćenje displaya
Čistite prednju stranu uređaja/display isključivo sa blago navlaženom krpom ■
koja ne ispušta vlakna i blagim sredstvom za pranje.
Zbrinjavanje
Zbrinjavanje uređaja
Uređaj nikako ne bacajte u obično kućno smeće.
Ovaj proizvod podliježe europskoj smjernici 2002/96/EC-WEEE
(Waste Electrical and Electronic Equipment).
Uređaj zbrinite preko ovlaštenog poduzeća za otklanjanje otpada ili preko
vašeg komunalnog poduzeća za zbrinjavanje otpada. Obratite pažnju na
aktualno važeće propise. U slučaju dvojbe se povežite sa Vašom mjesnom
ustanovom za zbrinjavanje otpada.
HR
anja tekućine u uređaj, ►
SAB 160 A1
73

HR
Otklanjanje grešaka
U ovom poglavlju možete pronaći važne napomene za lokaliziranje smetnji i
njihovo otklanjanje. Uvažite ove napomene, kako biste opasnosti i oštećenja
izbjegli.
Sigurnosne upute
UPOZORENJE
Uvažite slijedeće sigurnosne napomene, kako biste izbjegli opasnosti i nastanak
predmetne štete:
Popravke električnih uređaja smiju vršiti isključivo stručnjaci podučeni od ►
proizvođača. Nestručno izvedene popravke mogu izazvati znatne opasnosti
za korisnika i dov
Uzroci i načini otklanjanja smetnji
Slijedeća tablica pomaže u lokaliziranju i otklanjanju sitnijih smetnji:
esti do oštećenja uređaja.
Otklanjanje grešaka
Pogreška
Uređaj se ne
može uključiti
Nema tona
CD-disk ne može
biti učitan ili
izbačen
Mogući uzrok Otklanjanje
Kontakt nije uključen. Dajte kontakt okretanjem ključa.
Osigurač je defektan. Zamijenite osigurač.
Glasnoća je postavljena na
minimalnu vrijednost.
Kabeli nisu ispravno priklju-
čeni.
Ton je isključen.
Već se nalazi CD-disk u
uređaju.
CD-disk je obrnuto umetnut.
CD-disk je onečišćen ili
defektan.
Temperatura u vozilu je
previsoka.
Kondenzacija na laserskoj
leći
Povećajte glasnoću.
Prekontrolirajte kabelske spojeve.
Pritisnite tipku
uključili.
Izvadite CD-disk.
Umetnite CD-disk sa napisom okrenutim
prema gore.
Očistite CD-disk ili umetnite drugi CDdisk.
Prozračite vozilo, dok temperatura ne
spadne na radnu temperaturu.
Uređaj isključite nekoliko sati i pokušajte
ponovo.
, da biste ton ponovo
74
SAB 160 A1

Otklanjanje grešaka
Pogreška
Funkcijske tipke
ne funkcioniraju
CD preskače.
Pogreška kod
CD-diska, koji ste
sami spržili
Radio i/ili automatsko pohranjivanje postaje ne
funkcioniraju.
Memorija
odašiljača ne
funkcionira
Uređaj na USBpriključku ne
funkcionira
Uređaj za učitavanje kartice ne
učitava karticu
Bluetooth-spoj ne
funkcionira
Mogući uzrok Otklanjanje
Postoji smetnja na uređaju. Pritisnite tipku RESET.
Konzola za posluživanje nije
ispravno postavljena.
Kut ugradnje je veći od 30°. Korigirajte kut ugradnje.
CD-disk je onečišćen ili
defektan.
Antenski kabel nije ispravno
priključen.
Signali odašiljača su preslabi.
Priključak 4 u ISO-bloku A
(trajni plus) nije ispravno
izvršen.
USB-priključak je namijenjen za uređaje, koji rade
u skladu sa USB-normom.
Ovu normu ne ispunjavaju
svi uređaji koji su na tržištu.
Eventualno je priključen
uređaj, koji ne funkcionira u
skladu sa USB-normom.
Eventualno je kartica defektna, onečišćena ili neispravno
umetnuta.
Mobitel ne podržava
Bluetooth-prijenos.
Mobitel nije spojen sa
uređajem.
Prekontrolirajte ispravan položaj
elementa za posluživanje.
Očistite CD ili umetnite drugi CD-disk.
Prekontrolirajte CD-disk vlastite izrade
pomoću drugog uređaja.
Prekontrolirajte ispravnu poziciju antenskog kabela.
Ručno podesite odašiljač.
Provjerite kabelske spojeve. U tu svrhu
uzmite u obzir poglavlje “Priključak”.
Priključite uređaj, koji funkcionira prema
USB-normi. Osigurajte, da nosač
podataka bude formatiran sa sustavom
datoteka FAT32.
Prekontrolirajte kartu. Umetnite je tako,
da strana sa napisom bude usmjerena
u desnu stranu. Osigurajte da nosač
podataka bude formatiran sa sustavom
datoteka FAT32.
Ponovo izvršite spajanje mobitela i
uređaja. U tu svrhu obavezno pročitajte
upute za rukovanje Vašeg mobitela.
HR
SAB 160 A1
NAPOMENA
Ukoliko sa naprijed navedenim mjerama niste uspjeli riješiti problem, ►
molimo da se obratite servisu za kupce.
75

Prilog
Tehnički podaci
Prilog
HR
Općenito
Ulazni napon 12 VDC
Ulazna struja maks. 10 A
maks. snaga impulsa 4 x 40 W
Nominalna snaga
(pri 1% faktor šuma)
Pogonska temperatura +5 - +40 °C
Vlaga (bez kondenzacije) 5 - 90 %
Dimenzije (D x Š x V) 18,6 x 20,6 x 5,7 cm
Težina uklj. opremu ca. 1550 g
Osigurač uređaja
KFZ-plosnati osigurač
Frekvencijsko područje radio prijemnika
Frekvencija FM (UKW) 87,5 - 108 MHz
Frekvencija AM (MW) 522 - 1620 kHz
Memorijska mjesta odašiljača
FM (UKW)
Memorijska mjesta odašiljača
AM (MW)
4 x 13,5 W
10 A
18 Mjesta
12 Mjesta
76
Audio-ulaz (AUX)
Stereo-cinch utičnica 3,5 mm
USB-priključak
USB 1.1 i 2.0 kompatibilni nosači podataka (do 16 GB)
Pretinac za kartu
SD/MMC priključak memorijske karte (SD do 2 GB, SDHC do 32 GB)
SAB 160 A1

Prilog
Napomene u vezi sa EU-izjavom o konformitetu
Ovaj uređaj odgovara osnovnim zahtjevima i drugim
relevantnim propisima smjernice o vozilima 2004/104/EC
i smjernici R&TTE 1999/5/EC.
Izjava o sukladnosti za ovaj proizvod dostupna je na
internet stranici www.lidl.hr.
Jamstvo
Na ovaj uređaj vrijedi jamstvo u trajanju od 3 godine od datuma kupovine. Uređaj je pažljivo proizveden i prije isporuke brižljivo kontroliran. Molimo sačuvajte
blagajnički račun kao dokaz o kupnji. Molimo vas, da se u slučaju garancije
telefonski povežete sa svojom servisnom ispostavom. Samo na taj način vaša
roba može biti besplatno uručena.
NAPOMENA
Garancija vrijedi samo za greške u materijalu i izradi, a ne za transportna ►
oštećenja, potrošne dijelove ili za oštećenja lomljivih dijelova, na primjer
prekidača ili baterija.
Proizvod je namijenjen isključiv
U slučaju zlouporabe ili nenamjenske uporabe, primjene sile i u slučaju zahvata,
koji nisu izvršeni od strane naše autorizirane servisne ispostave, jamstvo prestaje
važiti. Vaša zakonska prava ovim jamstvom ostaju netaknuta.
Jamstveni rok se ne produžava korištenjem prava na jamstvo. To vrijedi i za
zamijenjene i popravljene dijelove. Eventualno već prilikom kupovine postojeće
štete i nedostaci moraju biti javljeni odmah nakon raspakiranja, ali najkasnije dva
dana nakon datuma kupovine. Popravke vršene nakon isteka jamstvenog roka
podliježu obavezi plaćanja.
o za privatnu, a ne za gospodarstvenu uporabu.
HR
Uvoznik
SAB 160 A1
Lidl Hrvatska d.o.o. k.d.,
p.p. 61
10020 Novi Zagreb
Proizvođač:
KOMPERNASS GMBH
BURGSTRASSE 21
D-44867 BOCHUM, Njemačka
www.kompernass.com
77

HR
78
SAB 160 A1

Bluetooth-autoradio
SAB 160 A1
Za osiguranje besplatne popravke
molimo da se povežete sa dežurnom
servisnom telefonskom linijom. U tu
svrhu držite pripremljen blagajnički
račun.
Molimo jasno napišite pošiljatelja:
Pr
ezime
Ime
Ulica
P.BR./MJESTO
Država
Servis Hrvatska
Tel.: 0800 777 999
E-Mail: kompernass@lidl.hr
IAN 66837
Jamstvo
Telefon
Ovaj odrezak potpuno ispunite i priložite uređaju.
Datum/Potpis
Opis pogreške:


Cuprins
Introducere . . . . . . . . . . . . . .82
Cuvânt înainte. . . . . . . . . . . . . . . . .82
Informaţii despre aceste instrucţiuni
de utilizare . . . . . . . . . . . . . . . . . . .82
Dreptul de autor . . . . . . . . . . . . . . .82
Limitarea responsabilităţii . . . . . . . .83
Indicaţii de avertizare . . . . . . . . . . . 83
Utilizarea conform destinaţiei . . . . .84
Siguranţa . . . . . . . . . . . . . . . . . . . .84
Indicaţii fundamentale de siguranţă 84
Furnitura / inspecţia la livrare . . . . . 86
Eliminarea ambalajelor . . . . . . . . .86
Elemente de operare . . . . . .87
Instalare . . . . . . . . . . . . . . . .89
Conectare . . . . . . . . . . . . . . . . . . . .89
Montaj . . . . . . . . . . . . . . . . . . . . . . 91
Demontarea aparatului . . . . . . . . . 93
Punerea în funcţiune . . . . . .94
Interfaţa de operare . . . . . . . . . . . .94
Deservirea şi funcţionarea .95
Pornirea / oprirea. . . . . . . . . . . . . .95
Reglaje . . . . . . . . . . . . . . . . . . . . . .95
Resetarea radio-ului (RESET) . . . . . . 99
Funcţii radio . . . . . . . . . . . . . . . . . .99
Funcţii generale CD . . . . . . . . . . .103
Funcţii CD-uri cu MP3-uri . . . . . . .105
Conexiune USB . . . . . . . . . . . . . .106
Cititor de carduri (SD/MMC) . . .107
Funcţie de înregistrare. . . . . . . . . .107
Conectarea unui dispozitiv audio
extern la aparat . . . . . . . . . . . . . .109
Operare Bluetooth . . . . . . . . . . . .109
Curăţarea . . . . . . . . . . . . . 113
Indicaţii de siguranţă . . . . . . . . . .113
Curăţarea afi şajului . . . . . . . . . . .113
Eliminarea . . . . . . . . . . . . . 113
Eliminarea aparatelor uzate . . . . .113
Remedierea defecţiunilor 114
Indicaţii de siguranţă . . . . . . . . . .114
Cauzele şi remedierea defecţiunilor 114
Anexă . . . . . . . . . . . . . . . . 116
Date tehnice . . . . . . . . . . . . . . . . .116
Indicaţii privind declaraţia de
conformitate CE . . . . . . . . . . . . . .117
Garanţia . . . . . . . . . . . . . . . . . . . .117
Importator . . . . . . . . . . . . . . . . . . .117
RO
SAB 160 A1
81

RO
Introducere
Introducere
Cuvânt înainte
Stimaţi clienţi,
prin achiziţionarea radio-ului auto cu Bluetooth SAB 160 A1 v-aţi decis pentru
produs de calitate al SilverCrest care corespunde din punct de vedere al
tehnicii şi funcţionalităţii celor mai moderne standarde de dezvoltare.
Citiţi informaţiile din acest manual de utilizare, pentru a vă familiariza repede
cu aparatul şi pentru a putea utiliza toate funcţiile de care dispune acesta.
Vă dorim să-l utilizaţi cu plăcere!
Informaţii despre aceste instrucţiuni de utilizare
Prezentele instrucţiuni de utilizare reprezintă o parte componentă a radio-ului
auto cu Bluetooth SAB 160 A1 (denumit în continuare aparat) şi vă oferă indicaţii
importante privind utilizarea conform destinaţiei, siguranţa, structura şi modul de
operare al aparatului.
Aceste instrucţiuni trebuie să fi e disponibile în orice moment în apropierea aparatului. Acestea trebuie citite şi aplicate de către orice persoană care operează
aparatul sau care este însărcinată cu montajul şi remedierea defecţiunilor.
Păstraţi aceste instrucţiuni de utilizare şi predaţi-le împreună cu aparatul posesorilor ulteriori.
Dreptul de autor
Această documentaţie este protejată de legea privind drepturile de autor.
Toate drepturile, inclusiv acelea de reproducere fotomecanică, de multiplicare
şi răspândire prin procedee speciale (de exemplu, prelucrarea datelor, suporturi
de date şi reţele de date), chiar şi parţial, precum şi dreptul de modifi cări tehnice,
sunt rezervate.
82
SAB 160 A1

Introducere
Limitarea responsabilităţii
Toate informaţiile tehnice, datele şi indicaţiile pentru montaj şi conectare din prezentele instrucţiuni de utilizare corespund stadiului tehnic din momentul tipăririi şi
refl ectă experienţa şi cunoştinţele noastre de până acum.
Din specifi caţiile, imaginile şi descrierile din acest manual nu pot fi derivate
niciun fel de pretenţii.
Producătorul nu este responsabil pentru pagubele rezultate în urma nerespectării
informaţiilor din acest manual, a utilizării neconforme, a reparaţiilor necorespunzătoare, a modifi cărilor efectuate fără autorizare sau a utilizării de piese de
schimb nepermise.
Indicaţii de avertizare
În prezentele instrucţiuni sunt utilizate următoarele indicaţii de avertizare:
AVERTIZARE
Indicaţiile de avertizare pentru acest grad de pericol marchează
o situaţie posibil periculoasă.
Dacă situaţia periculoasă nu este evitată, aceasta poate provoca răniri.
Urmaţi indicaţiile oferite prin această avertizare pentru a evita rănirea ►
persoanelor.
RO
SAB 160 A1
ATENŢIE
Indicaţiile de avertizare pentru acest grad de pericol marchează
posibile pagube materiale.
Dacă situaţia periculoasă nu este e
materiale.
Urmaţi indicaţiile oferite prin această avertizare pentru a evita daunele ►
materiale.
INDICAŢIE
Indicaţiile vă oferă informaţii suplimentare cu scopul de a facilita utilizarea ►
aparatului.
vitată, aceasta poate provoca daune
83

RO
Utilizarea conform destinaţiei
Aparatul este destinat doar recepţiei staţiilor de emisie radio FM/AM, precum şi
redării de CD-uri audio şi cu MP3-uri, de fi şiere MP3 de pe dispozitive USB de
stocare a datelor, precum şi a semnalelor audio de pe dispozitive audio externe.
În plus puteţi conecta aparatul cu un telefon mobil cu Bluetooth şi să îl utilizaţi,
prin intermediul microfonului, ca unitate hands-free. Aparatul este prevăzut pentru
montarea într-un autovehicul.
Un alt mod de utilizare este considerat în neconformitate cu destinaţia de utilizare
pentru care a fost conceput.
AVERTIZARE
Pericol cauzat de utilizarea neconformă!
Aparatul poate genera pericole în cazul în care nu este utilizat conform destinaţiei şi/sau dacă este utilizat în alt mod decât cel descris.
A se utiliza numai conform destinaţiei. ►
Respectaţi procedurile de lucru descrise în aceste instrucţiuni de utilizare. ►
Sunt excluse orice fel de pretenţii pentru pagubele rezultate în urma utilizării
neconforme.
Riscul este supor
tat numai de către benefi
Introducere
ciar.
Siguranţa
În acest capitol sunt oferite indicaţii importante de siguranţă în vederea manipulării
aparatului.
Acest aparat corespunde dispoziţiilor de siguranţă prevăzute de lege. Utilizarea
necorespunzătoare poate provoca răniri sau pagube materiale.
Indicaţii fundamentale de siguranţă
Pentru utilizarea în siguranţă a aparatului, respectaţi următoarele indicaţii de
siguranţă:
Înainte de utilizare, verifi caţi aparatul în privinţa deteriorărilor exterioare ■
vizibile. Nu puneţi în funcţiune aparatele deteriorate sau care au căzut jos.
■
Cablurile sau conexiunile defecte trebuie înlocuite de către un specialist
autorizat sau de către serviciul pentru clienţi.
Persoanelor care din cauza capacităţilor fi
permisă operarea aparatul, pot utiliza aparatul numai sub supravegherea
sau la indicaţiile unei persoane responsabile.
Copiilor le este permisă utilizarea apar
adult.
84
zice, psihice sau motorii nu le este ■
atului numai sub supravegherea unui ■
SAB 160 A1

Introducere
Reparaţia aparatului este permisă numai fi rmelor autorizate sau serviciului ■
pentru clienţi. În cazul reparaţiilor necorespunzătoare pot apărea pericole
considerabile pentru utilizator. În plus, se pierde dreptul la garanţie.
În timpul perioadei de garanţie reparaţia aparatului este permisă numai ■
serviciului pentru clienţi autorizat de către producător, deoarece în cazul
defecţiunilor ulterioare se pierde garanţia.
Componentele defecte pot fi
Numai prin utilizarea acestor piese este garantată îndeplinirea cerinţelor de
siguranţă.
Protejaţi aparatul împotriv
Pericol din cauza razei laser
AVERTIZARE
înlocuite numai cu piese de schimb originale. ■
a umezelii şi infi ltrării lichidelor. ■
Aparatul este dotat cu un laser de clasa 1.
Radiaţiile laser sunt periculoase pentru ochi!
Respectaţi următoarele instrucţiuni de siguranţă pentru a nu vă
expune pe dumneavoastră sau alte persoane la radiaţiile laser:
Nu deschideţi niciodată aparatul. ►
Lucrările de reparaţie ale aparatului se vor executa numai de ►
către un specialist.
►
Nu aduceţi modifi cări aparatului.
RO
Siguranţa circulaţiei
SAB 160 A1
AVERTIZARE
Siguranţa în trafi c are cea mai mare prioritate!
Respectaţi următoarele instrucţiuni de siguranţă pentru a nu periclita siguranţa
dumneavoastră sau a altor persoane:
Înainte de începerea deplasării familiarizaţi-vă cu operarea aparatului. ►
Operaţi aparatul numai atunci când condiţiile de trafi c permit acest lucru! ►
Opriţi într-un loc corespunzător pentru a efectua operaţiuni complexe.
Îndepărtaţi sau montaţi interfaţa de operar
autovehiculului.
Reglaţi o intensitate sonoră adecvată pentru a putea auzi în timp util ►
semnalele acustice ale poliţiei, pompierilor şi ale altor servicii de salvare.
e numai în timpul staţionării ►
85

RO
Furnitura / inspecţia la livrare
AVERIZARE
Pericol de asfi xiere!
Este interzisă utilizarea ambalajelor ca jucării. ►
Pericol de asfi xiere.
Standard, aparatul este livrat împr
Radio auto (inclusiv interfaţă de operare) ▯
Cadru de montaj (fi xat) ▯
Cadru de etanşare (fi xat) ▯
Placă de ancorare (inclusiv material de fi xare) ▯
Cheie pentru cadru de montaj (2x) ▯
Toc pentru interfaţa de operare ▯
Microfon cu bandă adezivă ▯
Instrucţiuni de utilizare ▯
INDICAŢIE
Verifi caţi dacă furnitura este completă şi dacă prezintă deteriorări vizibile. ►
În cazul în care nu au fost livrate toate componentele sau dacă s-au defectat ►
din cauza ambalării defectuoase sau în timpul transportului apelaţi linia de
service directă (vezi gar
eună cu următoarele componente:
anţia).
Introducere
Eliminarea ambalajelor
Ambalajul protejează aparatul împotriva deteriorărilor din timpul transportului.
Ambalajele sunt selectate în funcţie de compatibilitatea lor cu mediul şi pe considerente privind metodele de eliminare fi ind astfel sunt reciclabile.
Reintroducerea ambalajelor în circuitul de materiale contribuie la economia de
materie primă şi reduce cantitatea de deşeuri. Eliminaţi ambalajele de care nu
mai aveţi nevoie conform prevederilor locale în vigoare.
INDICAŢIE
Dacă este posibil păstraţi ambalajul original pe toată perioada de garanţie ►
a aparatului pentru a-l putea ambala corespunzător în cazul în care tr
expediat pentru reparare.
86
ebuie
SAB 160 A1

Elemente de operare
Elemente de operare
Radio auto (vezi partea rabatabilă frontală)
1: Tasta 1
2
RPT/2: Funcţie de repetare în modul de operare CD/MP3, tasta 2
3
INT/3: Funcţie de intro în modul de operare CD/MP3, tasta 3
4
Controler multifuncţional: Rotiţi pentru a regla valori / intensitatea sonoră
5
Tasta : Acceptarea unui apel
6
Ecran
7
Deblocare interfaţă de operare
8
Slot pentru carduri SD/MMC
9
Conexiune USB
10
AUX: mufă stereo de 3,5 mm pentru conectarea unui dispozitiv audio extern
11
▸▸I: Căutare titlu / post de radio înainte
12
I◂◂: Căutare titlu / post de radio înapoi
SCAN/REC: Căutare automată a posturilor de radio/înregistrarea pe mediul
13
de stocare a datelor conectat prin USB sau în slotul pentru card SD/MMC
14
AS/PS: Salvare automată a posturilor de radio
15
BD/ENT: Selectarea lungimii de undă/confi rmarea selecţiei
16
PHONE: Accesarea funcţiei de telefon
17
Tasta : Încheierea convorbirii telefonice
18
DISP/#: Afi şarea informaţiilor de pe ecran, tasta #
19
MODE/0: Setarea modului de operare, tasta 0
20
*: Tasta*
21
TA/9: Activarea transmisiei de informaţii din trafi c, tasta 9
22
AF/8: Căutare frecvenţă alternativă/activarea programelor regionale, tasta 8
PTY/7: Căutare post radio în funcţie de grupa PTY, tasta 7
23
24
/DIM: Pornire/oprire aparat/reducerea luminozităţii ecranului
25
6: Tasta 6
26
Tasta : Întrerupere sunet
27
RDM/4: Redare aleatorie în modul de operare CD/MP3, tasta 4
28
5: Tasta 5
29
Tasta : Ejectare disc
30
Fantă pentru introducere CD
RO
SAB 160 A1
87

RO
Elemente de operare
31
LED protecţie antifurt/ LED de poziţie al fantei CD
32
Suport pentru interfaţa de operare
33
RESET: Resetare aparat
Conexiune B bloc ISO
34
Siguranţă plată cu fi şe 10 A
35
36
Conexiune A bloc ISO
Antenă Bluetooth
37
SUBWOOFER: Cablu de conexiune cu mufa RCA pentru subwoofer
38
39
Mufă pentru microfon
LINE OUT: Ieşire audio RCA stânga/dreapta pentru amplifi cator
40
41
Conexiune antenă pentru conector DIN antenă
Accesorii (vezi partea rabatabilă posterioară)
42
Ştecher microfon
Microfon
43
44
Tasta TALK
45
LED verde pentru stare conexiune
46
Toc pentru interfaţa de operare
47
Cadru de etanşare
48
Cadru de montaj
49
Cheie pentru cadru de montaj
50
Placă de ancorare (inclusiv material de fi xare)
88
SAB 160 A1

Instalare
Instalare
Conectare
Alocarea conexiunilor ISO
Vedere din spate către ştecher.
AVERTIZARE
La instalarea aparatului pot apărea pagube materiale!
În măsura posibilităţilor aparatul trebuie montat de către o unitate specializată. ►
Dacă doriţi să montaţi personal aparatul, pentru a vă asigura de funcţionarea ►
sigură şi fără erori a aparatului respectaţi instrucţiunile privind conectarea şi
montajul.
ATENŢIE
Utilizarea unor conexiuni greşite poate duce la defectarea
aparatului.
La montaj utilizaţi conexiunile ISO ale aparatului. Adaptoar
fi ce autovehiculului, de care este posibil să aveţi nevoie, sunt disponibile în
ele de specialitate, magazinele de specialitate sau în departamentele
atelier
de specialitate ale magazinelor universale. În cazul utilizării altor tipuri de
conexiuni nu mai au valabilitate pretenţiile de acordare a garanţiei!
1 Nealocat
Nealocat
2
3 Nealocat
1357
2468
ISO A (Alocare
alimentare cu
curent)
Plus permanent 12 V
4
(Kl. 30)
5 Tensiune antenă
6 Nealocat
Plus activat la aprindere
7
12 V (Kl. 15)
8 Minus (-) Masă (Kl. 31)
ele ISO speci- ►
Alocare
RO
SAB 160 A1
1357
2468
ISO B (Alocare
conexiuni boxe)
Alocare
1 Spate dreapta +
2 Spate dreapta 3 Faţă dreapta ˘+
4 Faţă dreapta 5 Faţă stânga +
6 Faţă stânga 7 Spate stânga +
8 Spate stânga -
89

RO
Pentru a conecta aparatul la două boxe utilizaţi doar cablul pentru boxele
frontale.
INDICAŢIE
Ţineţi seama de faptul pentru salvarea posturilor de radio este necesar ►
ca conexiunea 4 din blocul ISO A să fi e conectată la plusul permanent.
În cazul anumitor autovehicule alocarea standar
[7] în blocul ISO A este inversată din fabrică. În acest caz este posibil ca
posturile de r
7 (plus activat la aprindere) şi 4 (plus permanent) în blocul ISO A.
Puteţi conecta un amplifi cator extern la ieşirea audio RCA. Respectaţi în ►
acest sens instrucţiunile de utilizare ale amplifi catorului extern.
adio salvate să se piardă. Soluţia este înlocuir
d a conexiunilor [4] şi ►
ea conexiunilor
Racord curent antenă
ATENŢIE
Posibilă deteriorare a aparatului!
Nu conectaţi niciodată racordul de curent pentru antenă cu cablul de
►
curent de la motor al antenei.
acordul pentru curent antenă este destinat unei antene contr
R
Releul extinde apoi automat antena în momentul pornirii aparatului. La oprirea
aparatului antena este retractată. Acest racord poate fi utilizat şi pentru controlul
unui amplifi cator extern. Pentru o conectare exactă vă rugăm să consultaţi
instrucţiunile de utilizare ale amplifi catorului.
olată cu releu.
Instalare
90
Conectarea unui amplifi cator extern
Pentru conectarea unui amplifi cator extern utilizaţi ieşirea audio RCA LINE OUT 40.
Respectaţi în acest sens instrucţiunile de utilizare ale amplifi catorului extern.
Conectarea unui subwoofer extern
Pentru conectarea unui subwoofer extern se va utiliza mufa RCA galbenă
SUBWOOFER 38. Respectaţi în acest sens instrucţiunile de utilizare ale
subwoofer-ului extern.
Conectarea microfonului
Pentru conectare microfonului utilizaţi mufa pentru microfon 39.
SAB 160 A1

Instalare
A
Schemă de conectare
Montaj
Aparatul poate fi introdus în orice in orice locaş de instalare standard ISO. În
cazul în care autovehiculul dumneavoastră nu este dotat cu un locaş de instalare
standard ISO apelaţi la un atelier de specialitate, un magazin de specialitate
sau un departament de specialitate al unui magazin universal.
Antenă
Amplifi
cator extern
INDICAŢIE
Înainte de montaj îndepărtaţi neapărat cele două şuruburi de asigurare ►
pe timpul transportului, afl ate pe carcasa superioară (marcate cu etichetă
adezivă de culoare roşie)!
Conectaţi cablurile înainte de montarea defi
că acestea sunt introduse corespunzător şi că sistemul funcţionează corect.
Subwoofer
Antenă Bluetooth
nitivă a aparatului. Asiguraţi-vă ►
1 3
Micr
ofon
RO
ISO B
ISO
Instrucţiuni de montaj
SAB 160 A1
Plasaţi aparatul în locaşul prevăzut în acest sens sau alegeţi un loc de ■
montaj în aşa fel încât să puteţi ajunge în mod comod la toate tastele şi să
nu incomodaţi şoferul.
Conectaţi aparatul numai la o baterie auto de 12 V instalată regulamentar.
■
În autovehicul conectaţi aparatul numai prin intermediul ştecherelor ISO. ■
Montaţi aparatul astfel încât să evitaţi acumulările de căldură şi să asiguraţi ■
aerisirea corespunzătoarea a acestuia.
91

RO
Pentru a evita deranjamentele în funcţionare unghiul de montaj ar trebui să ■
fi e mai mic de 30°.
Nu montaţi aparatul într-un loc în care este expus temperaturilor înalte (de ■
ex. efectul direct al razelor soarelui sau al instalaţiei de încălzire), murdăririi
puternice şi şocurilor puternice.
În cazul în care sunt necesare modifi
dealerului auto / unui atelier de specialitate.
cări ale autovehiculului, adresaţi-vă ■
Montarea aparatului în locaşul de instalare ISO
Extrageţi cadrul de montaj ♦
Introduceţi cadrul de montaj în locaşul de instalare ISO. ♦
Îndoiţi urechile de prindere ale cadrului de montaj cu o şurubelniţă, în aşa ♦
fel încât acesta să fi e montat fi x în locaşul de instalare (vezi imaginea).
48
şi cadrul de etanşare 47 din carcasa aparatului.
Instalare
92
Verifi caţi fi xarea corespunzătoare a cadrului. ♦
Conectaţi blocul de mufe ISO ale aparatului cu cele două ştechere ISO ale ♦
autovehiculului.
Conectaţi cablul de antenă al antenei autovehiculului la mufa pentru antenă ♦
a apar
atului.
Introduceţi cablul microfonului în locaşul de instalare şi conectaţi-l la mufa
♦
pentru microfon. Pozaţi cablul în aşa fel încât microfonul să poată fi fi xat
ulterior în spaţiul autovehiculului, vezi şi capitolul “Utilizar
Eventual conectaţi cablul audio RCA al unui amplifi cator extern la mufele ♦
LINE OUT
Eventual conectaţi cablul audio RCA al unui subwoofer extern la mufa RCA ♦
de culoare galbenă SUBWOOFER
ale aparatului.
40
a aparatului.
38
ea microfonului”.
SAB 160 A1

Instalare
Eventual protejaţi-vă aparatul şi împotriva furturilor. Fixaţi şurubul de fi xare ♦
de peretele antifoc al motorului cu placa de ancorare 50 şi materialul de fi xare.
Împingeţi cu atenţie aparatul în cadrul de montaj până când se blochează ♦
pe poziţie.
După ce aţi realizat toate conexiunile apăsaţi tasta ♦ RESET
un alt obiect ascuţit.
Montaţi interfaţa de operare conform descrierii de mai jos din secţiunea
♦
“Montarea interfeţei de operare”.
ATENŢIE
Posibilă deteriorare a cablurilor!
În momentul împingerii acordaţi atenţiei poziţiei cablurilor pentru a evita ►
deterior
area lor.
Plasaţi apoi cadrul de etanşare. ♦
Demontarea aparatului
Pentru a demonta aparatul procedaţi după cum urmează:
Îndepărtaţi cadrul de etanşare ♦
Introduceţi cheia dreapta şi cheia stângă ♦
pe laturile aparatului. (Urechile de prindere sunt acum îndoite spre spate.)
47
cu un pix sau cu
RO
.
în fanta corespunzătoare de
49
SAB 160 A1
Extrageţi aparatul. ♦
93

Punerea în funcţiune
Interfaţa de operare
Pentru a preveni furturile puteţi îndepărta interfaţa de operare a aparatului. Nu
păstraţi interfaţa de operare în interiorul autovehiculului.
Punerea în funcţiune
RO
INDICAŢIE
Dacă interfaţa de operare nu este introdusă corect în cadru, va clipi LED-ul ►
pentru protecţia antifurt de pe aparat
Pentru a asigura protecţia interfeţei de operare păstraţi-o întotdeauna în ►
tocul prevăzut în acest sens.
31
Montarea intefeţei de operare
Introduceţi întâi partea stângă a interfeţei de ♦
operare în cadru.
Apăsaţi apoi ferm partea dreaptă până la ♦
blocarea pe poziţie.
Împingeţi apoi în sus interfaţa de operare până
♦
când aceasta se blochează pe poziţie.
Verifi caţi dacă inter
corect în cadru. Dacă interfaţa de operare nu este
corect montată pot apărea erori în funcţionarea
aparatului.
faţa de operare este fi xată
Îndepărtarea interfeţei de operare
Apăsaţi tasta ♦ pentru deblocarea interfeţei
de operare. Interfaţa de operare basculează
automat în faţă.
Împingeţi interfaţa de operare către stânga ♦
şi extrageţi întâi partea stângă, apoi pe cea
dreaptă.
.
94
SAB 160 A1

Deservirea şi funcţionarea
Deservirea şi funcţionarea
În acest capitol sunt prezentate indicaţii importante privind funcţionarea şi operarea
aparatului.
INDICAŢIE
Dacă în decurs de aproximativ 5 secunde nu se efectuează nici o setare, ►
respectiv nu este apăsată nici o tastă, aparatul revine în modul de operare
anterior. Sunt salvate setările modifi
Pornirea / oprirea
Apăsaţi scurt tasta ♦ /DIM pentru pornirea aparatului. Pe ecran este
afi şat WELCOME.
Apăsaţi scurt tasta ♦
Apăsaţi din nou scurt tasta ♦
AUTO DIM: Iluminarea afi şajului este reglată automat în funcţie de luminozitatea
mediului ambiant.
MAN DIM: Iluminarea afi şajului poate fi reglată în două trepte (H = High şi
L = Low) prin rotirea controlerului multifuncţional.
Pentru întrerupere ţineţi apăsată tasta ♦
/DIM. Pe display este afi şat AUTO DIM.
/DIM . Pe display este afi şat MAN DIM.
cate.
RO
/DIM.
Reglaje
Intensitatea sonoră
Activarea / dezactivarea funcţiei mute
SAB 160 A1
AVERTIZARE
Afectarea auzului datorită unui nivel sonor prea ridicat!
Un nivel sonor prea ridicat vă poate afecta auzul în mod permanent.
Reglaţi o intensitate moderată a sunetului. ►
Rotiţi controlerul multifuncţional pentru a seta intensitatea sonoră. ♦
Apăsaţi tasta ♦ , pentru a întrerupe sunetul. Pe afi şaj clipeşte mesajul
“MUTE”.
Apăsaţi din nou tasta ♦
de radio PTY sau TA funcţia mute este întreruptă.
pentru a reporni sunetul. La recepţia unui post
95

RO
Deservirea şi funcţionarea
Bass/Înalte/Balans/Fader
Apăsaţi controlerul multifuncţional de pe aparat. Este afi şată intensitatea ♦
sonoră curentă. Fiecare următoare apăsare a controlerului multifuncţional
accesează următorul punct de setări.
Sunt posibile următoarele setări:
VOL - intensitate sonoră (de la 0 până la 50),
BAS - başi (de la -10 până la 10),
TRB - înalte (de la -10 până la 10)
BAL - balans (repartizarea sunetului între boxa stângă şi boxa dreaptă)
(de la 10L până la 10R)
FAD - fader (repartizarea sunetului între boxele din faţă şi cele din spate)
(de la 10F până la 10R)
Rotiţi controlerul multifuncţional pentru a modifi ca setările punctului de ♦
meniu afi şat.
alte setări prin intermediul controlerului multifuncţional
Apăsaţi controlerul multifuncţional pentru circa 2 secunde şi apăsaţi-l apoi ♦
până când pe display este afi şată funcţia dorită.
INVOL - nivelul sonor la pornire
Rotiţi controlerul multifuncţional pentru a seta nivelul sonor cu care va porni ♦
aparatul.
REC - format de înregis
Rotiţi controlerul multifuncţional pentru a seta formatul înregistrării pe SD/ ♦
MMC respectiv dispozitive USB de stocare a datelor, şi anume MP3 (fi şiere
MP3) sau WMA (WindowsMedia-Audio).
SUBW - subwoofer
Puteţi conecta un subwoofer activ extern pentru a obţine un efect de bass mai
puternic.
Rotiţi controlerul multifuncţional pentru a activa (SUBW ON) sau dezactiva ♦
(SUBW OFF) efectul de bass.
ADJ - ora
trare
96
INDICAŢIE
Aparatul este dotat cu un ceas controlat prin RDS. Ceasul se reglează ►
automat dacă funcţia EON este activată şi continuă să funcţioneze şi în
timp ce radio-ul este pornit. Dacă nu recepţionaţi semnal RDS de aici puteţi
a manual.
rega or
Rotiţi controlerul multifuncţional spre dreapta pentru a seta ora şi spre stânga ♦
pentru a seta minutele.
SAB 160 A1

Deservirea şi funcţionarea
TAVOL - nivel sonor la transmitere informaţii din trafi c
Rotiţi controlerul multifuncţional pentru a seta nivelul sonor cu care vor fi ♦
redate informaţiile din trafi c.
EON - informaţii ale altor emiţăt
Dacă funcţia EON este activată radio-ul va trece în modul de transmitere informaţii
din trafi c sau tipuri PTY, dacă a fost activată funcţia TA sau PTY.
Rotiţi controlerul multifuncţional pentru a activa (EON ON) sau dezactiva ♦
(EON OFF) funcţia EON.
DSP - eg
TA - Traffi c Announcement (informaţii din trafi c)
TA SEEK: În momentul în care semnalul de recepţie pentru informaţiile din trafi c
scade în intensitate sau este părăsită zona de recepţie începe căutarea şi este
căutat postul de emiter
TA ALARM: În momentul în care semnalul de recepţie pentru informaţiile din trafi c
scade în intensitate sau este părăsită zona de recepţie este emis un semnal de
alarmă.
PI - Program Identifi cation (sunet la căutarea posturilor de emisie)
Program Identifi cation Code (PI) este un cod intern de identifi care, care este
utilizat printre altele pentru căutarea de frecvenţe alternative. Constă dintr-o cifră
de 16 bit care permite o identifi care precisă a postului de emisie.
PI SOUND: Căutare a posturilor de emisie cu sunet.
PI MUTE: În timpul căutării posturilor de emisie sunetul este oprit.
RETUNE (int
RETUNE L: Procesul de căutare al unui post de emisie cu identifi carea PI corectă
durează 90 de secunde.
RETUNE S: Procesul de căutare al unui post de emisie cu identifi
durează 30 secunde.
alizor (Digital Sound Pr
Rotiţi controlerul multifuncţional pentru a alege una dintre setările ♦ CLASSICS,
ROCK M,
este activat nici un DSP. Setarea egalizorului DSP este afi şată în partea
dreaptă a display-ului.
Rotiţi controlerul multifuncţional pentru a efectua următoarele setări: ♦
Rotiţi controlerul multifuncţional pentru a efectua următoarele setări: ♦
Rotiţi controlerul multifuncţional pentru a efectua următoarele setări: ♦
POP M, FLAT sau DSP NONE. În setarea DSP NONE nu
e a informaţiilor din trafi c cu cel mai puternic semnal.
ervale de căut
ocessing)
are a posturilor de emisie cu identifi care PI)
ori
RO
carea PI corectă
SAB 160 A1
97

RO
Deservirea şi funcţionarea
MASK (ascunderea anumitor posturi)
Rotiţi controlerul multifuncţional pentru a efectua următoarele setări: ♦
MASK DPI: Ascunde posturile AF care au o altă identifi care PI.
MASK ALL: Ascunde toate posturile AF care au o altă identifi car
posturile perturbatoare non-PI care au aceeaşi frecvenţă de emisie.
Loudness
Ţineţi apăsată tasta ♦ MODE pentru a activa sau dezactiva funcţia Loudness.
Pe display este afi şat LOUD ON respectiv LOUD OFF.
Mod de operare
Apăsaţi tasta ♦ MODE, pentru a trece la de la recepţie radio (afi şarea
frecvenţei), la redare CD/MP3 (CD), slot card (SD/MMC), conexiune USB
(USB), Audio-Streaming (BT MUSIC sau A2DP) şi intrare audio (AUX).
INDICAŢIE
Modurile de operare CD, SD/MMC, USB şi BT MUSIC pot fi apelate ►
numai dacă este introdus mediul de stocare a datelor corespunzător,
respectiv dacă este conectat un telefon mobil.
Ecran
Apăsaţi de mai multe ori tasta ♦ DISP, pentru a determina afi şarea una după
cealaltă a următoarelor informaţii:
post de radio, ora (este reglată automat în cazul recepţiei RDS), frecvenţă şi
setări PTY (aceste funcţii RDS sunt emise de către companiile de radiodifuziune în
volume diferite; vezi şi capitolul “Funcţii radio”).
e PI şi toate
98
INDICAŢIE
În cazul în care nu recepţionaţi RDS sau informaţii PTY pe display este ►
afi şat “PS NONE” sau “PTY NONE”.
SAB 160 A1
 Loading...