

Siemens HKW-600 Installation Manual
-
Compatibility
The Car Kit Bluetooth (hereafter
referred to as "Car Kit") is intended for the following phones:
• Siemens mobile phones with
a Bluetooth interface.
• Siemens mobile phones S55,
SX1 and mobile phones with
a Bluetooth interface from
other manufacturers can
also be used with limited
functionality.
• Siemens mobile phones of the
65 Series or later without a
Bluetooth interface (use with
optional holder possible).
These installation instructions only
provide basic information. Because
the different car makes and car radio
connections require different installations, the assembly must be performed in line with the individual
circumstances.
Safety precautions
Please read the operating instructions
and the safety precautions carefully
before use!
Remember to comply with
legal requirements and local restrictions when using
the phone. This could apply e.g. when driving or at
petrol stations.
General and vehicle-specific guidelines for the installation of add-on
devices must be observ ed;
where applicable, professional assistance should
be sought (in the case of
electrical fusing, wiring,
contact with hot components, contact with fuel,
etc.).
The installation of the components must not impede:
• The driver's freedom of
movement, safety or line
of vision
• The safety of any passenger (especially in the
event of an accident)
• The vehicle's safety
mechanisms (airbag,
seat belts, etc.)
Take care during installation! Young children may
choke on small parts.
1Car Kit Bluetooth (en)
Car Kit Bluetooth (en)2
Please note:
The device is only suitable
for 12V operation.
Do not install the device in
environments where there
is danger of explosion.
If your car is fitted with m etallised windows, this may
impair the reception of the
phone. For optimum signal
reception, always use an
external antenna. Your
phone and the Car Kit must
be equipped with an external antenna for installation.
Improper use and opening
of the components invalidates the warranty.
Please dispose of unwanted telephones and accessories in accordance with
the relevant legislation.
Only use Siemens original
accessories. In this way
you will avoid possible
health risks and damage to
the product and ensure
compliance with the relevant provisions.
For further details, please refer to
the operating instructions for your
mobile phone.
3Car Kit Bluetooth (en)
Installation
m
c
0
8
‹
m
c
0
5
>
*
>1 m
*
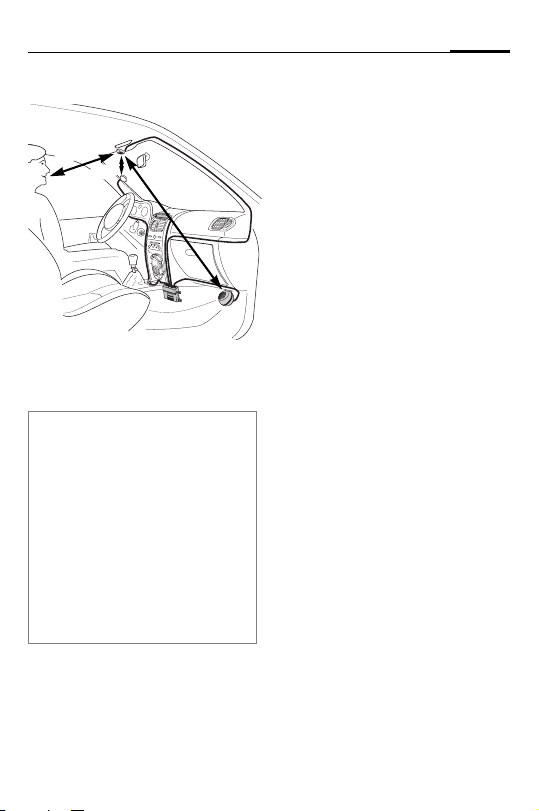
Microphone, Display,
Loudspeaker
When performing the installation,
please note the following:
• Distance from the microphone
to the loudspeaker 8 preferably
>1 m
• Distance from microphone
microphone cable to the phone
>50cm
• Distance from the microphone
to the user's mouth < 80 cm
Avoid installing the microphone directly in the air flow of the sunroof,
window or ventilation.
:/
:
:
Run the cable for the external
microphone
and the loudspeaker
to suit the individual requirements of your vehicle.
Avoid damaging, bending or
squashing the cables.
Microphone
First clean the area where you
want to attach the external microphone
grease-dissolving cleaning
agent. The adhesive pad will only adhere permanently to a
grease-free surface.
Secure the external
microphone
the speaker at the required location using the adhesive pads.
Display
Make sure you mount the display
the driver optimal visual contact
and access.
You can attach the display
directly to the dashboard or fix it
with the help of the display
holder
:, the display 6
8 correctly
: using a suitable
: pointing towards
6 in a position that allows
6
7.
* Antenna and mobile holder are not
included in the scope of supply.

Car Kit Bluetooth (en)4
Direct installation of the display
First clean the area where you
want to attach the display
ing a suitable grease-dissolving
cleaning agent. The adhesive
pad will only adhere permanently to a grease-free surface.
Mount the display
adhesive pads.
Installation using the display holder
Mount the display holder
to the dashboard with the adhesive pad supplied or with appropriate screws*.
Then press the display
the display holder
clicks into place.
Loudspeaker
The inclination and the rotation
of the loudspeaker
adjusted. Loosen the set
screw in the base, install the
loudspeaker
the screw.
8 and tighten
6 us-
6 using the
7 on-
6 into
7 until it
8 can be
Secure the loudspeaker
suitable location (such as the
passenger-side footwell).
The screws can be found in the
base of the loudspeaker
8 in a
8.
Wiring loom
Electrical connections
When connecting the Car Kit to
the wiring loom
the function and operation of
other devices are not compromised (e.g. voltage drop).
Disconnect the car battery correctly before installing the wiring loom
box
1.
Connect the
to the positive terminal of the
car battery.
Connect the
the negative terminal of the
car battery.
3 ensure that
3 and the electronics
§B§ 12V+ line (red)
§D§ line (brown) to
* Not included in the Siemens standard
scope of supply.

5Car Kit Bluetooth (en)
Connect the
§C§ line (violet) to the
vehicle electrical system so that
12V+ or 24 V+ are applied when
the ignition is switched on.
Only use spade fuse connectors
for connecting the cable and then insert 3A spade fuses 5 into the spade
fuse connectors
To safeguard the wiring loom professionally, the fuses must be mounted
between the end of the wiring loom
supplied and the connector from the
vehicle.
4.
4
Connecting the loudspeaker cable to
the wiring loom
Connect the white/black loudspeaker cable +
green/black
§G§ to the
§E§ loudspeaker con-
nection using a cable
connector
9.
Connect the black loudspeaker
§H§ to the green loud-
cable
speaker cable
connector
§F§ using a cable
9.
Connecting the radio*
The Car Kit can be connected to
your car's audio system via the
phone-in connection of your car
radio. The loudspeakers of the
audio system are then used as a
play-back system for the Car Kit.
Please use the optional phone-in
adapter cable to ensure an optimal connection to the radio.
Connect the connector cable
of the wiring loom
3 to the
§H§
phone-in connection of your car
radio via the optional phone-in
adapter.
Then connect the connector cable
§G§ directly to the signal-con-
ducting pole of the phone-in
connection of your car radio.
If the voltage levels of the Car Kit
and phone-in connection differ,
the voltage levels can be adjusted with the phone-in adapter
cable.
* For vehicles with car radios with
phone-in connections. The car radio
is not included in the Siemens
standard scope of supply.
Car Kit Bluetooth (en)6
There is a wiring diagram and
further information on the
phone-in adapter cable on the
Siemens website:
www.siemens-mobile.com/
phoneinadapter
Radio Muting*
Please refer to the car radio manufacturer's instructions.
The radio signal can be switched
automatically to mute during
phone calls. Connect the radio
mute control line
input of the car radio.
§A§ to the mute
Electronics box
Please make sure that the electronics
box
1 is not mounted on or between
metal objects. Only then can good radio communication be ensured.
Make sure that the electronics box
is securely mounted.
Ensure that the ventilation slots on the
electronics box
least 2 cm space) and the installation
does not cause interference with any
other devices.
1 are not covered (at
1
Do not place the connector cable behind the electronics box 1 or wrap it
around the electronics box
may lead to interference.
Insulate any unused cable ends with
insulating tape.
Feed the lines for the following
components carefully to the
electronics box
aging them and then connect
them with the electronics
box
1:
• Wiring loom
• Display
• External microphone
• Mobile holder cable (optional)
6,
1 as this
1 without dam-
3,
:,
* For vehicles with car radios with
mute connections. The car radio is
not included in the Siemens
standard scope of supply.
7Car Kit Bluetooth (en)
Ensure the connectors are securely plugged in.
Feed the cable of the external
microphone
provided for strain relief (see diagram).
Secure the electronics box
the passenger-side footwell (for
example) with two screws
Reconnect the car battery following installation.
: around the clip
1 in
2.
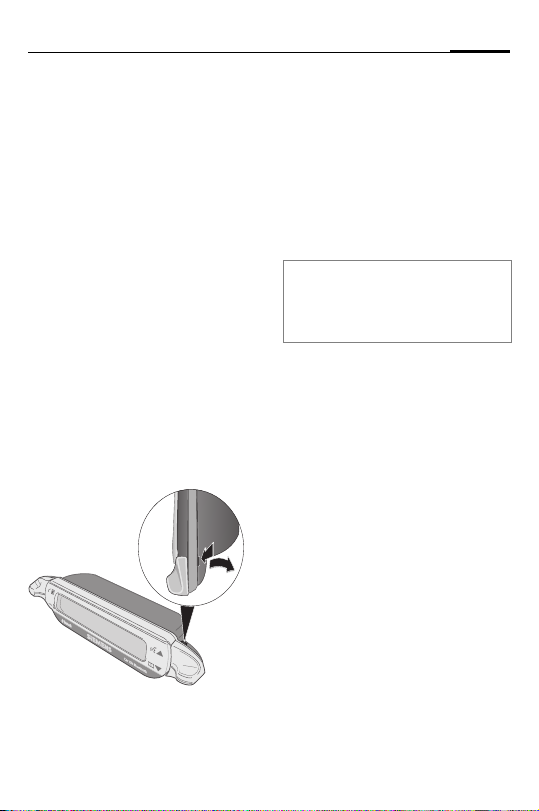
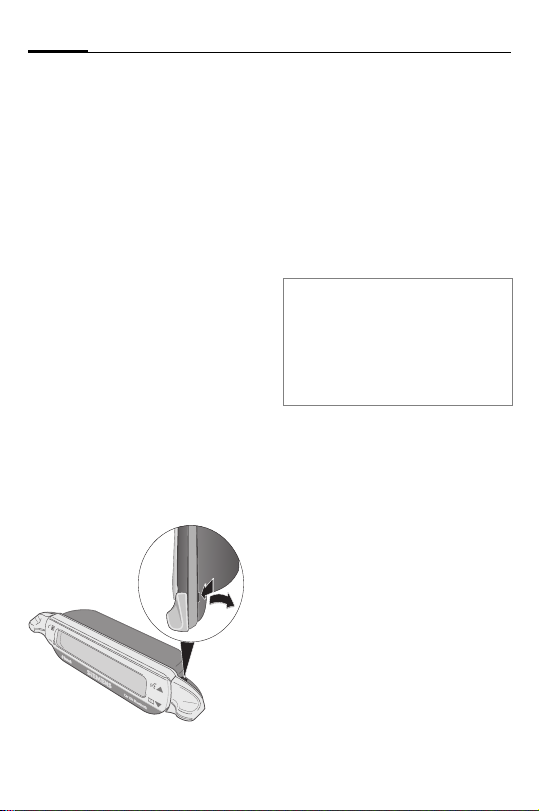
Dismantling the display
To detach the display 6 from
the display holder
screwdriver into the narrow
opening between the two elements.
Press the display
the display holder
move the display.
7 insert a
6 gently out of
7 and re-
Features
With the Car Kit Bluetooth you
can enjoy optimal communication in your car with full-duplex
handsfree talking and superb
ease of use. You can speak on
the phone as if you were talking
to the passenger next to you.
Bluetooth™ technology
The Bluetooth word mark and logos are
owned by the Bluetooth SIG, Inc. and any
use of such marks by Siemens is under license. Other trademarks and trade names
are those of their respective owners.
The Car Kit communicates with
the phone via Bluetooth™, a
short range radio link.
To make this communication
possible, the Car Kit and the
phone must be linked with each
other. For more information
please read "Establishing the
first connection with the telephone", p. 9.
Car Kit Bluetooth (en)8
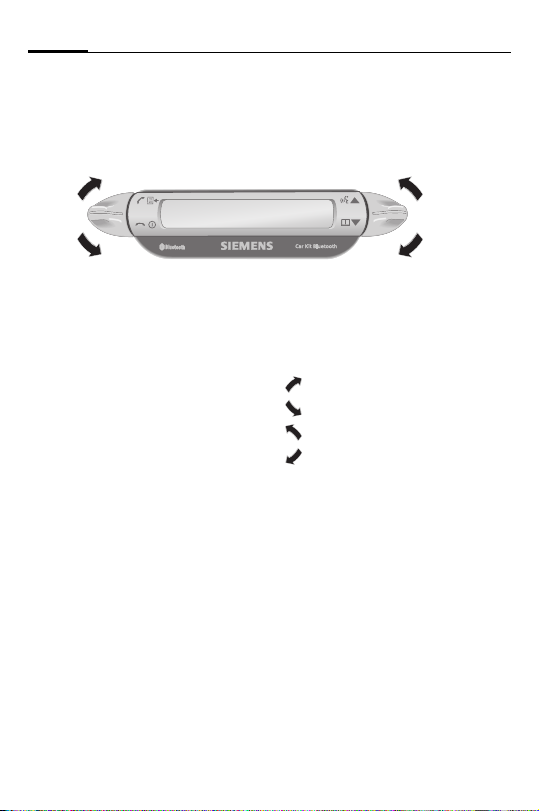
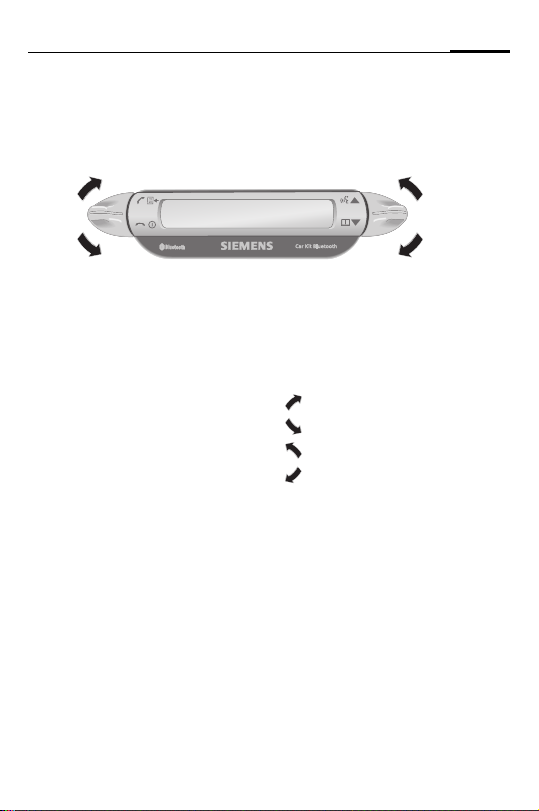
Display –
functionality of the keys
yes/accept
no/reject
The Car Kit is operated by the
display keys which can be
pressed both upwards and
downwards.
•The key on the left is for con-
firming/rejecting
•The key on the right allows you
to browse through the lists.
up
down
The symbols below are used to
represent the four different actions.
yes/accept
no/reject
up
down
When a long press is required,
"long press" is written in the user
guide.
In all other cases, pressing the
key briefly is enough.

9Car Kit Bluetooth (en)
Initial operation
Establishing the first
connection with the
telephone
Note
For details of how to establish a Bluetooth connection, please refer to the
operating instructions for your phone.
• Activate the Car Kit's log-on
mode by a long press of the
key.
• Activate your phone's Bluetooth interface and begin a
search on your phone for
Bluetooth devices in the area
that are ready to receive.
•When the Car Kit is found,
your phone will ask you to
type in a PIN number as confirmation
• The PIN number is shown on
the Car Kit's display.
• After the confirmation the Car
Kit shows the identification of
the phone on the display and
then switches into stand-by
mode. For phones from other
manufacturers it is likely that
confirmation on the phone
will be required before the
switch to stand-by mode.
From then on, the Car Kit is
ready for use. The Car Kit and the
phone can communicate with
each other and will recognise
each other in the future.
Use with multiple phones
The Car Kit memorises the connection of a maximum of four
phones with which it can be operated alternately.
If a fifth phone is connected, the
entry for the phone which has
not been in contact with the Car
Kit for the longest period will be
deleted.
When the Car Kit is activated, it
searches for the last phone it
was connected with. If this is not
found, it searches for other
saved phones. Those it finds are
shown on the display. The user
can then select one of these.

Car Kit Bluetooth (en)10
Using the Car Kit with a different
phone
• Switch off the Car Kit by pressing with a long press.
• Deactivate the Bluetooth interface of the last phone that
was connected.
• Switch on the Car Kit by pressing with a long press. It
searches for the last active
phone but does not find it.
• The Car Kit will now search for
other saved phones and show
them in the display.
• Choose the desired device:
Shows the next
phone found (if available).
Shows the previous
phone in the list (if
available).
The phone indicated
will be connected.
Use with an optional mobile
holder
Note
For details, please refer to the operating instructions for your mobile holder.
You can equip the Car Kit with an
optional mobile holder. This will
enable more functions:
• Use with an optional external
antenna is possible.
• Charging the phone after
inserting into the mobile
holder.
• Use of the Car Kit with a Siemens phone which does not
have Bluetooth functionality.
When you insert the phone into
the mobile holder, the phone
and Car Kit connect via the mobile holder's connector.

11Car Kit Bluetooth (en)
First steps
Switching on the Car Kit
• Start the Car Kit by switching
on your car's ignition or by
pressing with a long press.
• The Car Kit searches for the
last phone to be used. This
will be shown in the display.
From then on, the Car Kit is
ready for use.
Accepting a call
accepts the call.
Rejecting a call
rejects the call.
Ending a call
ends the call.
Functions
Valid for all functions unless
stated otherwise:
Tap/long press: Car Kit
switches to stand-by
mode.
Stand-by mode
In stand-by mode, the Car Kit offers the following functions:
Call lists
Long press: log-on
mode
Long press: switches
off the Car Kit
Phonebook
Voice recognition (if
supported by phone)
Making a call from the
phonebook
Phonebook
Shows the phone's phonebook.
Access the phonebook.
, Select entry.

Car Kit Bluetooth (en)12
Multiple phone numbers can be
saved under one entry in the address book.
, Select entry.
Begin the call.
Other phonebook functions
Moves up one entry.
Long press: moves up
10 entries.
Moves down one en-
try.
Long press: moves
down 10 entries.
Making a call from the call
lists
Call lists
Shows the phone's call lists.
There is a choice of three call
lists:
• Dialled numbers
• Missed calls
• Accepted calls
The call lists are only shown if
there is at least one entry in
them.
, Select call list.
Activate call list.
, Select entry. (For fur-
ther functions see
“Other phonebook
functions“)
Start call.
During a call
Louder.
Quieter.
Hold call.
Long press: Acti-
vate/deactivate the
microphone muting.
End call.
Second call
End current call.
Put current call on
hold and accept
second call.
Toggle between
two calls.
Long press:
end all calls.
Transferring a call
Long press: transfer
current call to the
Car Kit.
To continue the call on the
phone, press the corresponding
display key on the phone (if supported by the phone).
Display symbols
Signal strength
Phone's charging status
Log-on mode (Pairing)
Dialled numbers
Missed calls
Accepted calls
Incoming call
Outgoing call
Current call
Call on hold
Toggle between two calls
Interface error (if supported
by phone)
List selections
Home phone number
Work phone number
Mobile phone number
Louder
Quieter
Microphone muting
active/inactive
13Car Kit Bluetooth (en)
Current call/second call

Car Kit Bluetooth (en)14
Troubleshooting
Car Kit does not work
• Check line connections
• No operating voltage, check
line connection
• Phone not on or connection to
Car Kit not active
•Check fuses
• Operating voltage too high or
too low
Loud background noise at called
party's end
• Microphone installed in the
air flow of the sunroof, window or ventilation
• Distance from microphone/microphone cable
to phone < 50 cm
Poor voice and audio quality
• Car Kit outside permitted
operating temperature
• Volume too low (adjust volume via phone)
• Connection to radio (phone-in
mode): Phone volume too
high (reduce volume via
phone and then increase it if
necessary via radio)
Loud echo
• Distance between the microphone and loudspeaker < 1m
Weak microphone signal (your partner on the phone barely hears you)
• Distance from microphone to
the user's mouth > 80 cm
• Microphone not pointed at
speaker
Poor reception quality
• No network available
• Alter the phone's position
• If your car is fitted with metallised windows, this may impair the reception of the
phone. Observe the vehicle
manufacturer's recommendations and install the relevant
(external) antenna or an optional mobile holder.

15Car Kit Bluetooth (en)
Phone is not found/problems with
Bluetooth connection
• Establishing the first connection with the phone, see p. 9
• Since the last time the phone
was used with the Car Kit, at
least four other phones have
been used. Log the phone on
again.
• Make sure that the electronics
box is not mounted on or between metal objects
• Reduce the distance between
the electronics box and the
phone
Car radio is permanently switched to
mute
• The radio mute control line
connector may be reversed
with the chassis
Automatic Car Kit switch-on/off does
not work/ the Car Kit does not switch
itself off
• Check that the ignition line is
connected to the car ignition
Technical data and
approval
Power supply 10.8 V+ to 16 V+
Car ignition adapter
cable, optionally also
to 24V
Current input max. 2 A max. 1 mA
Operating
temperature
Loudspeaker
output power
Weight (electronics box)
Housing dimensions
(electronics
box)
89/336/EC "Electromagnetic
Compatibility"
92/59/EC "Guideline for General
Product Safety"
e1
023752
amended by Directive 95/54/EC
"Electromagnetic Compatibility
in Automobiles".
(idle current)
-25 C to +70 C
max. 7 W
(into 4 Ohm)
approx. 110 g
ca. 110 x 120 x 30
mm (LxWxH)
Car Kit complies with the
following EU directives:
Model approved in accordance with Directive 72/245/EC and as
Car Kit Bluetooth (en)16
Declaration of conformity
CE
Siemens Information and Communication mobile hereby declares that the phone described
in this user guide is in compliance with the essential requirements and other relevant provisions of European Directive
1999/5/EC (R&TTE). The declaration of conformity (DoC) concerned has been signed. Please
call the company hotline if you
require a copy of the original or:
www.siemens-mobile.com/
conformity
FCC
This equipment complies with
Part 15 of the FCC Rules. Operation is subject to the following
conditions: (1) This device may
not cause harmful interference,
and (2) this device must accept
any interference received, including interference that may
cause undesired operation.
Maintenance
The product should be cleaned
with a soft, slightly damp (not
wet) cloth.
Do not use cleaning agents,
colourants or other chemical
substances.
Accessories
Mobile holder with electrical connections, comprising:
• Car Kit Upgrade (Base module for
mobile holder/mobile holder antenna
with cable for electronics box)
• Mobile Holder Antenna/
Mobile Holder
With these additions, the following extra
functions are available: antenna connection, phone charging, safer storage
of the phone in the car. Phones without
Bluetooth functionality from the 65th
generation or above can be used.
For connecting to the car radio:
• Phone-In adapter cable
Products are available from specialist
dealers or visit our online shop at:
Siemens Original
Accessories
www.siemensmobile.com/shop

17Car Kit Bluetooth (en)
Customer Care
We offer fast, individual advice!
You have several options:
Our online support on the Internet:
www.siemens-mobile.com/
customercare
We can be reached any time, any
place. You are given 24 hour support
on all aspects of our products. Here
you will find an interactive fault-finding
system, a compilation of the most frequently asked questions and answers, plus user guides and current
software updates to download.
When calling customer service,
please have ready your receipt and
your car kit, and if available, your
Siemens Service customer number.
You can also get personal advice about
our range of products on our Premium
Hotline:
United Kingdom ................... 0906 9597500
(0.75 £ per minute)
Qualified Siemens employees are waiting to offer you expert information about
our products and installation.
In some countries repair and replace
services are impossible where the
products are not sold through our
authorised dealers.
If repair work is necessary, please contact one of our service centres:
Abu Dhabi ................................0 26 42 38 00
Argentina ............................0 80 08 88 98 78
Australia.................................13 00 66 53 66
Austria....................................05 17 07 50 04
Bahrain ............................................40 42 34
Bangladesh.............................. 0 17 52 74 47
Belgium....................................0 78 15 22 21
Bolivia ......................................0 21 21 41 14
Bosnia Herzegovina................. 0 33 27 66 49
Brazil...................................0 80 07 07 12 48
Brunei .........................................02 43 08 01
Bulgaria.......................................02 73 94 88
Cambodia ...................................12 80 05 00
Canada ...............................1 88 87 77 02 11
China ..................................0 21 38 98 47 77
Croatia .....................................0 16 10 53 81
Czech Republic........................2 33 03 27 27
Denmark .....................................35 25 86 00
Dubai .......................................0 43 96 64 33
Egypt........................................0 23 33 41 11
Estonia........................................06 30 47 97
Finland...................................09 22 94 37 00
France....................................01 56 38 42 00
Germany.............................0 18 05 33 32 26
Greece................................0 80 11 11 11 16
Hong Kong..................................28 61 11 18
Hungary .................................06 14 71 24 44
Iceland ..........................................5 11 30 00
India.................... 22 24 98 70 00 Extn: 70 40
Indonesia ............................0 21 46 82 60 81
Ireland....................................18 50 77 72 77
Italy .......................................02 24 36 44 00
Ivory Coast..................................05 02 02 59
Jordan......................................0 64 39 86 42
Kenya............................................2 72 37 17
Kuwait...........................................2 45 41 78
Latvia ............................................7 50 11 18
Lebanon......................................01 44 30 43
Libya ......................................02 13 50 28 82
Lithuania ..................................8 52 74 20 10
Luxembourg............................... 43 84 33 99
Macedonia ..................................02 13 14 84
Malaysia...........................+ 6 03 77 12 43 04
Malta..............................+ 35 32 14 94 06 32
Mauritius .......................................2 11 62 13
Mexico ..............................01 80 07 11 00 03
Morocco......................................22 66 92 09
Netherlands ........................0 90 03 33 31 00
New Zealand..........................08 00 27 43 63
Nigeria .....................................0 14 50 05 00
Norway........................................22 70 84 00
Oman ...............................................79 10 12

Car Kit Bluetooth (en)18
Pakistan.................................02 15 66 22 00
Paraguay .................................8 00 10 20 04
Philippines ...............................0 27 57 11 18
Poland....................................08 01 30 00 30
Portugal ...................................8 08 20 15 21
Qatar...........................................04 32 20 10
Romania ................................02 12 04 60 00
Russia.................................8 80 02 00 10 10
Saudi Arabia ............................0 22 26 00 43
Serbia ....................................01 13 80 95 50
Singapore ...................................62 27 11 18
Slovak Republic .....................02 59 68 22 66
Slovenia...................................0 14 74 63 36
South Africa ...........................08 60 10 11 57
Spain........................................9 02 11 50 61
Sweden....................................0 87 50 99 11
Switzerland ............................08 48 21 20 00
Taiwan ...................................02 23 96 10 06
Thailand...................................0 27 22 11 18
Tunisia ........................................71 86 19 02
Turkey.................................0 21 65 79 71 00
Ukraine ...............................8 80 05 01 00 00
United Arab Emirates...............0 43 66 03 86
United Kingdom ..................0 87 05 33 44 11
USA ....................................1 88 87 77 02 11
Vietnam..................................84 89 30 01 21
Zimbabwe ...................................04 36 94 24

Car Kit Bluetooth (de)
19Car Kit Bluetooth (de)
Lieferumfang
1 Elektronikbox mit Anschluss-
buchsen für:
• Bordnetzkabel
• Display
• Mikrofon
• Telefonhalterung (optional, nicht
im Lieferumfang enthalten)
2 Schrauben zur Befestigung der
Elektronikbox
3 Bordnetzkabel mit Lautsprecher-
anschlüssen
•
§A§ Radiostummschaltung
(Radio Mute) (schwarz)
•
§B§ Batterie 12V+ (rot)
•
§C§ Kfz-Zündung 12V+/24V+
(violett)
•
§D§ Masse (braun)
•
§E§ Lautsprecheranschluss +
(grün/schwarz)
•
§F§ Lautsprecheranschluss -
(grün)
4 3 Stück Sicherungsklemmverbin-
der für das Bordnetz
5 3 Stück Flachstecksicherungen
(3 A violett) für die Sicherungsklemmverbinder
* Nicht im Siemens Standard Lieferumfang enthalten.
Die Marke Bluetooth und die zugehörigen Logos sind Eigentum von Bluetooth SIG, Inc. (Special Interest Group). Jegliche Benutzung dieser Marken durch Siemens erfolgt unter Lizenz.
Andere erwähnte Handelsmarken und Markennamen sind geschützte Marken oder eingetragene Warenzeichen des jeweiligen Eigentümers.
6 Display mit Klebepad
7 Display-Halterung
8 Lautsprecher mit Anschlusskabel
•
§G§ Lautsprecheranschluss +
(weiß/schwarz)
•
§H§ Lautsprecheranschluss -
(schwarz)
(Schrauben zur Befestigung sind
im Sockel integriert)
9 2 Stück Kabelverbinder für die
Lautsprecherkabel
: Externes Mikrofon mit Klebepad
Zubehör siehe S. 35
Car Kit Bluetooth (de)20
Kompatibilität
Die Kfz-Freisprecheinrichtung
Car Kit Bluetooth (nachfolgend
bezeichnet als „Car Kit“) ist geeignet für folgende Telefone:
• Siemens-Mobiltelefone mit
Bluetooth-Schnittstelle
• Siemens-Mobiltelefone S55
und SX1 sowie Mobiltelefone
anderer Hersteller, welche
über eine Bluetooth-Schnittstelle verfügen, können mit
evtl. eingeschränkter Funktionalität betrieben werden.
• Siemens-Mobiltelefone ab
65er-Serie ohne BluetoothSchnittstelle (Einsatz mit
optionaler Telefonhalterung
möglich)
Diese Installationsanleitung kann nur
die grundsätzlichen Informationen
vermitteln. Da die verschiedenen KfzFabrikate und Anschlüsse der Autoradios unterschiedliche Installationen verlangen, ist die Montage
nach jeweiliger Gegebenheit
vorzunehmen.
Sicherheitshinweise
Lesen Sie vor Gebrauch die Bedienungsanleitung und die Sicherheitshinweise genau!
Beachten Sie bei der Benutzung des Telefons gesetzliche Vorschriften und
lokale Einschränkungen.
Diese können z. B. gelten
beim Autofahren oder an
Tankstellen.
Allgemein gültige und fahrzeugtypspezifische Richtlinien für den Einbau von
Zusatzgeräten sind einzuhalten; ggf. ist fachkundige
Hilfe in Anspruch zu nehmen (Elektrische Absicherung, Kabelverlegung,
Berührung mit heißen Teilen, Berührung mit Kraftstoff etc.).
Durch den Einbau der
Komponenten dürfen nicht
beeinträchtigt werden:
• die Bewegungsfreiheit,
die Sicherheit und das
Sichtfeld des Fahrers
• die Sicherheit der
Fahrzeuginsassen
(auch bei Unfall)
• die Sicherheitsvorrichtungen im Kfz (Airbag,
Sicherheitsgurte etc.)
Vorsicht beim Einbau!
Kleinkinder könnten Kleinteile verschlucken.
21Car Kit Bluetooth (de)
Das Gerät ist nur für den
12V-Betrieb bestimmt.
Das Gerät darf nicht in
explosionsgefährdeten
Räumen betrieben
werden.
Wenn Ihr Auto mit einer
metallbedampften Verglasung ausgestattet ist, kann
das die Empfangsqualität
Ihres Telefons beeinträchtigen. Eine externe Antenne gewährleistet optimalen
Empfang. Zur Installation
müssen Ihr Telefon und
das Car Kit zum Betrieb mit
einer externen Antenne
ausgestattet sein.
Unsachgemäßer Gebrauch und Öffnen der
Komponenten schließt jegliche Gewährleistung aus.
Bitte beachten:
Entsorgen Sie unbrauchbare Telefone und deren
Zubehör den gesetzlichen
Bestimmungen entsprechend.
Verwenden Sie nur Siemens-Original-Zubehör.
So vermeiden Sie mögliche Gesundheits- und
Sachschäden und stellen
sicher, dass alle relevanten Bestimmungen eingehalten werden.
Weitere Hinweise entnehmen Sie
bitte der Bedienungsanleitung Ihres
Mobiltelefons.

Car Kit Bluetooth (de)22
Montage
m
c
0
8
<
m
c
0
5
>
*
>1 m
*
Mikrofon, Display,
Lautsprecher
Bitte beachten Sie bei der Montage:
• Abstand Mikrofon
Lautsprecher
• Abstand Mikrofon
Mikrofonkabel – Telefon > 50 cm
• Abstand Mikrofon
Benutzers < 80 cm
Montage des Mikrofons im Luftstrom
des Schiebedaches, des Fensters
oder der Lüftung vermeiden.
* Antenne und Telefonhalterung sind
nicht im Lieferumfang enthalten.
: –
8 möglichst > 1 m
:/
: – Mund des
Verlegen Sie die Kabel für das
externe Mikrofon
Display
6 und den
Lautsprecher
den Gegebenheiten Ihres Fahrzeugs entsprechend.
Vermeiden Sie die Kabel zu beschädigen, zu knicken oder zu
quetschen.
Mikrofon
Reinigen Sie die Stelle, an der Sie
das externe Mikrofon
gen wollen, mit einem geeigneten fettlösenden Reinigungsmittel. Nur auf einer fettfreien
Oberfläche kann das Klebepad
dauerhaft befestigt werden.
Das externe Mikrofon
gewünschten Stelle mit Hilfe des
Klebepads in Richtung des Sprechers befestigen.
Display
Achten Sie darauf, das
Display
6 so anzubringen, dass
der Fahrer optimalen Sichtkontakt und Zugriff darauf hat.
Sie können das Display
an der Armatur anbringen oder
unter Zuhilfenahme der DisplayHalterung
:, das
8 fachgerecht
: befesti-
: an der
6 direkt
7 befestigen.

23Car Kit Bluetooth (de)
Direkt-Montage des Displays
Reinigen Sie die Stelle, an der Sie
das Display
len, mit einem geeigneten fettlösenden Reinigungsmittel. Nur
auf einer fettfreien Oberfläche
kann das Klebepad dauerhaft
befestigt werden.
Befestigen Sie dann das
Display
Klebepads.
Montage mittels Display-Halterung
Befestigen Sie die DisplayHalterung
den Klebepad oder geeigneten
Schrauben* an der Armatur.
Drücken Sie dann das Display
in die Vorrichtung der DisplayHalterung
Lautsprecher
Die Neigung und der Drehwinkel
des Lautsprechers
stellbar. Dazu Einstellschraube
im Sockel lösen, Lautsprecher
einstellen, Schraube festziehen.
6 befestigen wol-
6 mit Hilfe des
7 mit dem beiliegen-
6
7 bis es einrastet.
8 sind ver-
8
Den Lautsprecher
eigneten Stelle (z. B. im Beifahrerfußraum) anschrauben.
Die Schrauben befinden sich im
Sockel des Lautsprechers
8 an einer ge-
8.
Bordnetzkabel
Elektrische Anschlüsse
Achten Sie bei Anschluss des
Car Kits an das Bordnetzkabel
darauf, dass die Funktion und
der Betrieb anderer Geräte
nicht beeinträchtigt wird
(z. B. Spannungsabfall).
Die Kfz-Batterie vor Beginn der
Montage des Bordnetzkabels
und der Elektronikbox
gerecht abklemmen.
Das Kabel
Pluspol der Autobatterie verbinden.
Das Kabel
Minuspol der Autobatterie verbinden.
§B§ (rot) 12V+ mit dem
§D§ (braun) mit dem
3
1 fach-
3
* Nicht im Siemens Standard Lieferum-
fang enthalten.

Car Kit Bluetooth (de)24
Das Kabel
§C§ (violett) mit der
Fahrzeugelektrik verbinden, so
dass bei eingeschalteter Zündung 12V+ oder 24 V+ anliegen.
Die Kabel ausschließlich mit den
Sicherungsklemmverbindern
verbinden und dann die 3A-Flachstecksicherungen
Sicherungsklemmverbinder 4 einstecken.
Zur fachgerechten Absicherung
des Bordnetzkabels müssen die
Sicherungen zwischen dem Ende
des mitgelieferten Bordnetzkabels
und der Kfz-seitigen Anschlusstelle
angebracht werden.
5 in die
4
Lautsprecherkabel an Bordnetzkabel anschließen
Lautsprecherkabel +
schwarz) und
§G§ (weiß-
§E§ (grün-schwarz)
unter Verwendung eines
Kabelverbinders
Lautsprecherkabel und
§F§ (grün) unter Verwendung
eines Kabelverbinders
9 verbinden.
§H§ (schwarz )
9 ver-
binden.
Verbindung zum Radio*
Das Car Kit kann über den
Phone-In-Eingang des Autoradios an das Audiosystem Ihres
Autos angeschlossen werden.
Dann werden die Lautsprecher
des Audiosystems als Wiedergabegerät für das Car Kit benutzt.
Verwenden Sie bitte das optionale Phone-In-Adapter Cable zur
optimalen Anbindung an das
Radio.
Schließen Sie hierzu vom
Bordnetzkabel
kabel
§H§ über den optionalen
3 das Anschluss-
Phone-In-Adapter an den PhoneIn-Eingang Ihres Autoradios an.
Verbinden Sie dann das Anschlusskabel
§G§ direkt mit dem
signalführenden Pol des PhoneIn-Eingangs Ihres Autoradios.
Unterschiedliche Spannungspegel von Car Kit und Phone-InEingang können mit dem PhoneIn Adapter Cable angeglichen
werden.
* Falls ein Autoradio mit Phone-In-
Eingang vorhanden ist.
Das Autoradio ist nicht im Siemens
Standard Lieferumfang enthalten.
25Car Kit Bluetooth (de)
Einen Schaltplan und weitere
Informationen zum Phone-In
Adapter Cable finden Sie auf
der Siemens-Homepage:
www.siemens-mobile.com/
phoneinadapter
Radiostummschaltung (Mute)*
Bitte beachten Sie die Angaben des
Autoradioherstellers.
Das Radiosignal kann während
des Telefonierens automatisch
stumm geschaltet werden. Dazu
verbinden Sie das Steuerkabel
der Radiostummschaltung mit
dem Mute-Eingang des Autoradios.
Elektronikbox
Bitte achten Sie darauf, dass die
Elektronikbox
schen metallischen Gegenständen
montiert wird. Nur so ist eine gute
Funkkomunikation gesichert.
Stellen Sie sicher, dass die
Elektronikbox
1 nicht auf oder zwi-
1 sicher befestigt ist.
Achten Sie darauf, dass die Kühlschlitze der Elektronikbox 1 nicht
abgedeckt werden (mind. 2 cm Freiraum) und dass die Montage keine
Störungen an anderen Geräten verursacht.
Anschlusskabel bitte nicht hinter der
Elektronikbox
die Elektronikbox 1 wickeln, da dies
zu Störungen führen kann.
Alle Kabelenden, die nicht gebraucht
werden, mit Klebeband isolieren.
Führen Sie die Kabel folgender
§A§
Komponenten vorsichtig und
ohne Beschädigung zur
Elektronikbox
Sie die Steckverbinder mit der
Elektronikbox
• Bordnetzkabel
• Display
• Externes Mikrofon
• Kabel der Telefonhalterung
(optional)
1 verlegen oder um
1 und verbinden
1 :
6,
3,
:.
* Falls ein Autoradio mit Mute-Ein-
gang vorhanden ist.
Das Autoradio ist nicht im Siemens
Standard Lieferumfang enthalten.
Car Kit Bluetooth (de)26
Lassen Sie die Steckverbinder
sicher einrasten.
Führen Sie das Kabel des externen Mikrofons
tung um die dafür vorgesehene
Klemmnase (siehe Bild).
Die Elektronikbox
Beifahrerfußraum mit
Schrauben
Schließen Sie die Kfz-Batterie
nach der Montage wieder fachgerecht an.
: zur Zugentlas-
1 z. B. im
2 befestigen.
Demontage Display
Zum Lösen des Displays 6 von
der Display-Halterung
Sie einen Schraubendreher in
die schmale Öffnung zwischen
den beiden Elementen.
Drücken Sie mit mäßiger Kraft
das Display
Halterung
das Display
6 aus der Display-
7 und nehmen sie
6 ab.
7 führen
Leistungsmerkmale
Mit dem Car Kit Bluetooth erleben Sie durch Vollduplex-Freisprechen und besten Bedienkomfort ein optimales
Kommunikationsgefühl im Fahrzeug. Sie telefonieren so, als
würden Sie sich mit dem Beifahrer unterhalten.
Bluetooth™-Technologie
Die Marke Bluetooth und die zugehörigen
Logos sind Eigentum von Bluetooth SIG,
Inc. (Special Interest Group). Jegliche Benutzung dieser Marken durch Siemens erfolgt unter Lizenz. Andere erwähnte
Handelsmarken und Markennamen sind geschützte Marken oder eingetragene Warenzeichen des jeweiligen Eigentümers.
Das Car Kit und das Telefon
kommunizieren mittels Bluetooth™, einer Kurzstreckenfunkverbindung.
Um diese Kommunikation zu ermöglichen, müssen Car Kit und
Telefon miteinander verbunden
werden. Lesen Sie hierzu "Erste
Verbindung mit dem Telefon
herstellen", S. 28.
Display –
Funktionalität der Tasten
27Car Kit Bluetooth (de)
ja/annehmen
nein/auflegen
Die Bedienerführung Ihres Car
Kits erfolgt über die Tasten des
Displays, die jeweils nach oben
und unten gedrückt werden
können.
•Die linke Taste dient der Bestä-
tigung/Ablehnung.
•Die rechte Taste ermöglicht ein
Blättern in Listen.
nach oben
nach unten
Nachfolgend werden Symbole
verwendet, um die vier unterschiedlichen Aktionen darzustellen:
ja/annehmen
nein/auflegen
nach oben
nach unten
Wenn langes Drücken erforderlich
ist, steht in der Bedienungsanleitung "lang drücken".
In allen anderen Fällen genügt
es, die Tasten kurz anzutippen.

Car Kit Bluetooth (de)28
Inbetriebnahme
Erste Verbindung mit dem
Telefon herstellen
Hinweis
Details über die Herstellung einer
Bluetooth-Verbindung lesen Sie bitte
in der Bedienungsanleitung Ihres Telefons nach.
• Aktivieren Sie den Anmeldemodus vom Car Kit, indem Sie
lang drücken.
• Aktivieren Sie die BluetoothSchnittstelle Ihres Telefons
und starten Sie am Telefon
die Suche nach emfangsbereiten Bluetooth-Geräten
in der Umgebung.
• Wenn das Car Kit gefunden
wird, fordert das Telefon Sie
auf, die Verbindung durch
Eingabe einer PIN-Nummer
zu bestätigen.
• Die PIN-Nummer wird im Display des Car Kits angezeigt.
• Nach der Bestätigung zeigt
das Car Kit die Identifikation
des Telefons im Display an
und schaltet anschließend in
den Bereitschaftsmodus um.
Bei Telefonen anderer Hersteller ist möglicherweise eine Bestätigung am Telefon
notwendig, um in den Bereitschaftsmodus zu gelangen.
Ab diesem Moment ist das Car
Kit betriebsbereit. Das Car Kit
und das Telefon können miteinander kommunizieren und
werden sich künftig wieder
erkennen.
Betrieb mit mehreren
Telefonen
Das Car Kit speichert die Verbindung von insgesamt vier Telefonen, mit denen es wahlweise betrieben werden kann.
Wenn ein fünftes Telefon verbunden wird, wird der Eintrag
für das Telefon gelöscht, welches am längsten nicht mehr in
Verbindung mit dem Car Kit genutzt wurde.
Wenn das Car Kit aktiviert wird,
sucht es nach dem zuletzt verbundenen Telefon. Wird dieses
nicht gefunden, sucht es nach
weiteren gespeicherten Telefonen. Die gefundenen Telefone
werden im Display angezeigt.
Der Benutzer kann eines der
Geräte auswählen.

29Car Kit Bluetooth (de)
Car Kit mit einem anderen Telefon
nutzen
• Schalten Sie das Car Kit aus,
indem Sie lang drücken.
• Deaktivieren Sie die Bluetooth-Schnittstelle des zuletzt
verbundenen Telefons.
• Schalten Sie das Car Kit ein, indem Sie lang drücken.
Es sucht nach dem zuletzt aktiven Telefon und findet dieses nicht.
• Nun wird das Car Kit nach weiteren gespeicherten Telefonen suchen und diese im
Display anzeigen.
•Wählen Sie das gewünschte
Gerät aus:
Zeigt das nächste gefundene Telefon (falls
vorhanden).
Zeigt das vorherige
Telefon in der Liste
(falls vorhanden).
Das angezeigte Telefon wird verbunden.
Betrieb mit optionaler
Telefonhalterung
Hinweis
Details lesen Sie bitte in der Bedienungsanleitung der Telefonhalterung
nach.
Sie können das Car Kit mit einer
optionalen Telefonhalterung
ausstatten. Sie gewinnen
dadurch weitere Funktionen:
• Betrieb mit einer optionalen
externen Antenne möglich.
• Laden des Telefons nach Einführen in die Telefonhalterung.
• Benutzung des Car Kits mit einem Siemens-Telefon ohne
Bluetooth-Funktionalität.
Wenn Sie das Telefon in die Telefonhalterung einstecken, erfolgt
die Verbindung von Telefon und
Car Kit über die Steckverbindung
der Telefonhalterung.

Car Kit Bluetooth (de)30
Erste Schritte
Car Kit einschalten
• Starten Sie das Car Kit, indem
Sie die Kfz-Zündung Ihres Autos einschalten oder lang
drücken.
• Das Car Kit sucht nach dem
zuletzt benutzten Telefon.
Dieses wird im Display angezeigt.
Ab diesem Moment ist das Car
Kit betriebsbereit.
Anruf annehmen
Anruf annehmen.
Anruf ablehnen
Anruf ablehnen.
Gespräch beenden
Gespräch beenden.
Funktionen
Wenn nicht anders beschrieben
gilt für alle Funktionen:
Antippen/lang
drücken: Car Kit wechselt in den Bereitschaftsmodus.
Bereitschaftsmodus
Das Car Kit verfügt im Bereitschaftsmodus über folgende
Funktionen:
Ruflisten
Lang drücken:
Anmeldemodus
Lang drücken: Das
Car Kit wird ausgeschaltet
Telefonbuch
Spracherkennung
(falls vom Telefon
unterstützt)
Anrufen aus dem
Telefonbuch
Telefonbuch
Zeigt das Telefonbuch des Telefons an.
Telefonbuch aufrufen.
, Eintrag auswählen.
 Loading...