


s
Version: 23-06-2009
A31008- M1729- R401- 1- 5819
Issued by
Gigaset Communications GmbH
Schlavenhorst 66, D-46395 Bocholt
Gigaset Communications GmbH is a trademark licensee of Siemens AG
© Gigaset Communications GmbH 2009
All rights reserved.
Subject to availability. Rights of modifications reserved.
www.gigaset.com
Gigaset S185
Gigaset
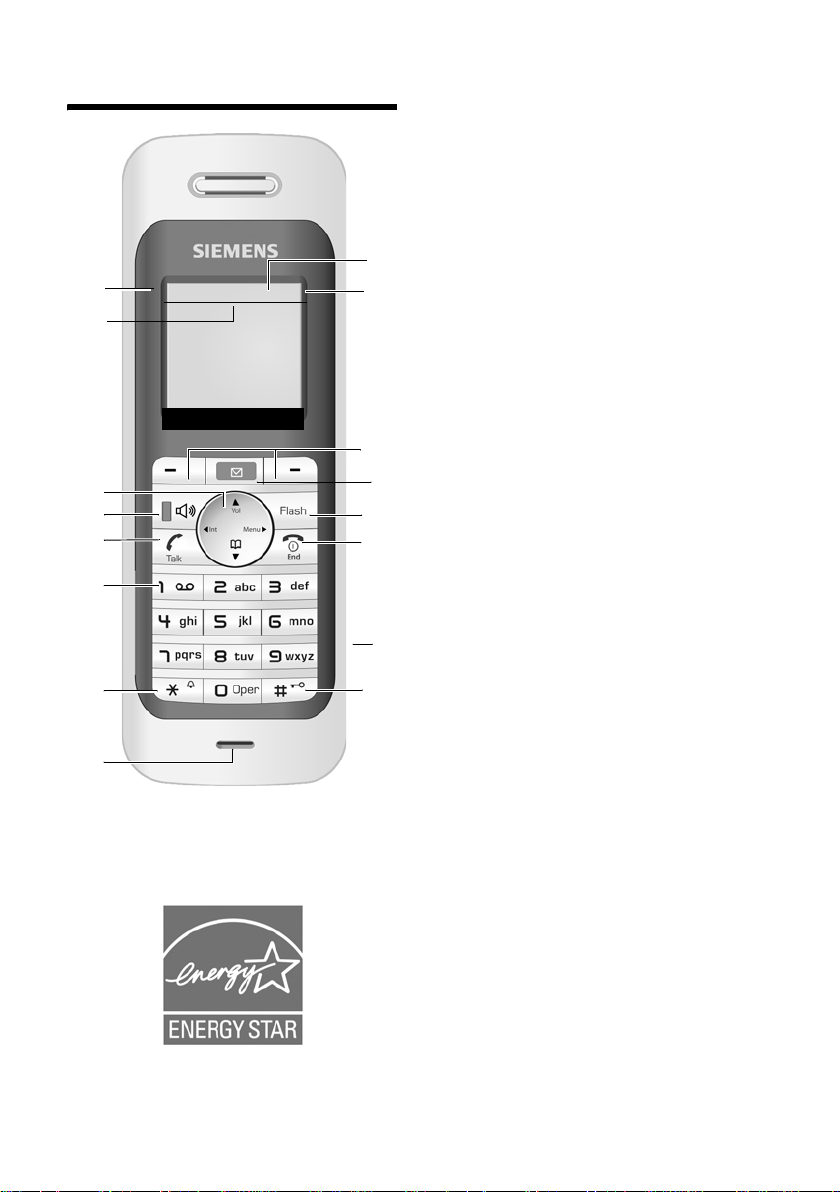
The handset at a glance
The handset at a glance
16
15
14
13
12
11
10
9
Ð × V
INT 1
01.31.08 9:45am
• Menu
1 Display in idle status
2 Charge status of the batteries
= e V U (empty to full)
= flashes: batteries almost empty
e V U flashes: batteries charging
3 Display keys (page 16)
4 Message key
Access to calls and message lists;
Flashes: new message
1
2
3
4
5
6
7
8
5Flash key
- Confer (Flash)
- Insert a dialing pause (press and hold)
6 End call key, On/Off key
End call, cancel function, go back one menu
level (press briefly), back to idle status (press
and hold), activate/deactivate handset
(press and hold in idle status)
7 2.5 mm socket for headset (mono)
8 Pound (#) key
Key lock on/off (press and hold in idle status)
Toggle between upper/lower case and digits
9 Microphone
10 Star (*) key
Ringtones on/off (press and hold)
Open table of special characters
11 Key 1
Fast access to answering machine/network
mailbox (press and hold)
12 Talk key
Answer a call, start dialing
13 Handsfree key
Switch between earpiece and handsfree
mode;
Lights up: handsfree activated;
Key flashes: incoming call
14 Control key (page 15)
15 Answering machine symbol
Answering machine switched on.
Flashes: answering machine is recording a
message or is being operated by another
caller.
16 Signal strength
Ð i Ñ Ò (high to low)
| flashes: Out of Range
1

Base station at a glance
Base station at a glance
3
4
5
2
1
You can use the keys on the base station to
operate the integrated answering
machine and register the handset to the
base station.
1 Registration/paging key
Press briefly: search for handsets "Paging",
see page 31.
Register handsets and DECT devices (press
and hold), see page 30.
2 On/Off key: activate/deactivate answering
machine.
Lights up: answering machine is activated.
Flashes: at least one new message is
present.
6
7
Please remember:
u If the answering machine is being oper-
ated from a handset or if it is recording
a message, it cannot be operated from
the base station.
u If the On/Off key flashes although the
answering machine is switched off, it
means that there is still at least one
new message that has not been played
back yet.
During message playback:
3 Skip back to beginning of message (press
once) or to previous message (press twice).
4 Play/stop key:
Play back new messages from the answering
machine (see also page 23) or cancel the
playback (press briefly).
Play back new and old messages (press and
hold).
5 Skip to next message (press once) or skip
ahead two messages (press twice).
6 Delete current message.
7 Adjust volume during message playback:
ð = softer; ñ = louder.
While an external call is being signaled:
adjust ringtone volume.
2

Contents
Contents
The handset at a glance . . . . . . . 1
Base station at a glance . . . . . . . 2
Safety precautions . . . . . . . . . . . 5
Notes on the
operating instructions . . . . . . . . . 7
Symbols used . . . . . . . . . . . . . . . . . . . . 7
Example: menu input . . . . . . . . . . . . . . 7
Example: multiple line input . . . . . . . . 8
Gigaset S185 –
more than just a telephone . . . . . 9
First Steps . . . . . . . . . . . . . . . . . . . 9
Package contents . . . . . . . . . . . . . . . . . 9
Installing the base station . . . . . . . . . . 9
Setting up the handset for use . . . . . . 10
Area codes . . . . . . . . . . . . . . . . . . . . . 13
Making calls . . . . . . . . . . . . . . . . 14
Making an external call . . . . . . . . . . . 14
Ending a call . . . . . . . . . . . . . . . . . . . . 14
Answering a call . . . . . . . . . . . . . . . . . 14
Caller ID . . . . . . . . . . . . . . . . . . . . . . . 14
Handsfree operation . . . . . . . . . . . . . 15
Muting . . . . . . . . . . . . . . . . . . . . . . . . 15
Operating the handset . . . . . . . . 15
Control key . . . . . . . . . . . . . . . . . . . . . 15
Display keys . . . . . . . . . . . . . . . . . . . . 16
Returning to idle status . . . . . . . . . . . 16
Menu guidance . . . . . . . . . . . . . . . . . 16
Correcting incorrect entries . . . . . . . . 17
CID 2.5 services (network services) . . 17
Using the directory and lists . . . 18
Directory . . . . . . . . . . . . . . . . . . . . . . . 18
Last number redial list . . . . . . . . . . . . 20
Opening lists with the
message key . . . . . . . . . . . . . . . . . . . . 20
Writing and editing names . . . . . . . . . 21
Operating the answering
machine . . . . . . . . . . . . . . . . . . . . 23
Operation via the handset . . . . . . . . . 23
Activating/deactivating listen in . . . . . 26
Setting up the answering machine . . 26
Resetting fast access on the answering
machine to Network Voice Mail . . . . . 27
Operating when on the move
(remote operation) . . . . . . . . . . . . . . . 27
Using the network mailbox . . . . 29
Configuring the network mailbox
for fast access . . . . . . . . . . . . . . . . . . . 29
Viewing the network mailbox
message . . . . . . . . . . . . . . . . . . . . . . . 29
Using several handsets . . . . . . . 30
Registering handsets . . . . . . . . . . . . . . 30
De-registering handsets . . . . . . . . . . . 30
Locating a handset ("paging") . . . . . . 31
Changing the base station . . . . . . . . . 31
Making internal calls . . . . . . . . . . . . . . 31
Linking internal callers to
an external call . . . . . . . . . . . . . . . . . . 32
Changing the name of a handset . . . . 32
Changing a handset's internal
number . . . . . . . . . . . . . . . . . . . . . . . . 33
Using a handset as a room
monitor . . . . . . . . . . . . . . . . . . . . . . . . 33
Handset settings . . . . . . . . . . . . . 34
Changing the display language . . . . . 34
Setting the display . . . . . . . . . . . . . . . 35
Setting the screen picture . . . . . . . . . . 35
Setting lighting . . . . . . . . . . . . . . . . . . 35
Activating/deactivating
auto answer . . . . . . . . . . . . . . . . . . . . 35
Adjusting the loudspeaker volume . . . 36
Changing ringtones . . . . . . . . . . . . . . 36
Activating/deactivating
advisory tones . . . . . . . . . . . . . . . . . . . 37
Setting the alarm clock . . . . . . . . . . . . 37
Restoring the handset
default settings . . . . . . . . . . . . . . . . . . 38
3

Contents
Base station settings . . . . . . . . . 38
Protecting against unauthorized
access . . . . . . . . . . . . . . . . . . . . . . . . . 38
Changing ringtones . . . . . . . . . . . . . . 38
Activating/deactivating the
hold melody . . . . . . . . . . . . . . . . . . . . 39
Restoring default settings to
base station . . . . . . . . . . . . . . . . . . . . 39
Shortcuts . . . . . . . . . . . . . . . . . . . 40
Connecting the base station
to the PABX . . . . . . . . . . . . . . . . . 42
Dialing modes and flash time . . . . . . 42
Setting pauses . . . . . . . . . . . . . . . . . . 42
Switching temporarily to
tone dialing (DTMF) . . . . . . . . . . . . . . 42
Appendix . . . . . . . . . . . . . . . . . . . 43
Care . . . . . . . . . . . . . . . . . . . . . . . . . . 43
Contact with liquid . . . . . . . . . . . . . . 43
Questions and answers . . . . . . . . . . . 43
Troubleshooting . . . . . . . . . . . . . . . . . 43
Specifications . . . . . . . . . . . . . . . . . . . 44
Industry Canada Certification . . . . . . 45
Safety precautions . . . . . . . . . . . . . . . 45
Service (Customer Care) . . . . . . . . . . 47
End-user limited warranty . . . . . . . . . 47
Index . . . . . . . . . . . . . . . . . . . . . . 50
4
Safety precautions
Safety precautions*
Only use the power supply unit supplied as indicated on the underside of the
$
‹
Œ
device.
Power Outage:
In the event of a power outage, your cordless telephone will not operate. The cordless telephone requires electricity for operation. You should have a telephone that does not
require electricity available for use during power outages.
Only insert approved rechargeable batteries of the same type.
Never use ordinary (non-rechargeable) batteries as they may pose a health
hazard or cause injury.
Do not charge the handset in charging unit or base station while the headset is
connected.
Make sure the rechargeable battery is inserted the right way round.
Use the battery specified in these operating instructions.
The phone may affect medical equipment so always switch your phone off
before entering hospitals or doctors’ practices.
To ma in ta in com pl ianc e w ith th e I ndust ry C an ad a’s RF ex posur e g uide li ne , pla ce
the base station at least 20 cm from nearby persons.
Notice to Hearing Aid Wearers:
This phone system is compatible with inductively coupled hearing aids.
!
Do not operate the phone in places where there is a risk of explosion
(such as paint workshops).
Do not install the base station in bathrooms or shower rooms. The handset and
base station are not splash-proof (see page 43).
Drivers must not use the phone while driving.
* see also page 45
5

Safety precautions
The phone must be switched off at all times in an aircraft. Make sure it cannot
be switched on accidentally.
ƒ
Privacy of communications may not be ensured when using this telephone.
If you give your Gigaset S185 to someone else you should also give them the
operating instructions.
Dispose of batteries and the phone carefully. Do not pollute the environment.
Emergency numbers cannot be dialed if the keypad lock is activated!
6
Notes on the operating instructions
Notes on the
operating instructions
This section explains the meaning of certain symbols and typographical conventions that are used in this user guide.
Symbols used
Copy Entry / Copy List (example)
Select one of the two menu
functions specified.
~ Enter digits or letters.
§Save§ The display keys' current func-
tions are shown reverse highlighted in the bottom display
line. Press the display key
below to launch the function.
q Press the top or the bottom of
the control key: scroll up or
down.
r Press the right or left of the
control key: for example select
setting.
c / Q / * etc.
Press the corresponding key
on the handset.
¢ Ð ¢ Display
v
¤ With the handset in idle status, press
on the right of the control key to open
the main menu.
¤ Select the Ð icon using the control key
– press the control key at the top or
bottom.
In the display header, Settings is displayed.
¤ Press the §OK§ display key to confirm the
function Settings .
The Settings submenu is displayed.
¤ Press the bottom of the control key
repeatedly until Display is selected.
¤ Press the §OK§ display key to confirm the
function.
Contrast Select and press
§OK§.
¤ Press the bottom of the control key
repeatedly until Contrast is selected.
¤ Press the §OK§ display key to confirm the
function.
r Select contrast and press
§OK§.
Example: menu input
In the user guides, the steps you need to
perform are shown in abbreviated form.
This is illustrated below using the example
of "Setting the contrast for the display".
The things you need to do are explained in
the boxes.
¤ Press on the right or left of the control
key to select the contrast.
¤ Press the §Save§ display key to confirm
the function.
a Press and hold (idle status).
¤ Press and hold the end call key until the
handset returns to idle status.
7
Notes on the operating instructions
Example: multiple line input
There are many situations in which you
can change the settings of a display or
enter data in several lines.
In this user guide symbols are used to
guide you step by step through multiple
line input. This is illustrated below using
the example of "Setting the date and
time". The things you need to do are
explained in the boxes.
To change the time, open the input field
with:
¢ Ð ¢ Date/Time
v
You will see the following display
(example):
Date/Time
Date: 12.23.08
Time: [11:11]am
Time mode: 12 h
am/pm Save
Time mode:
Select 12-hour or 24-hour time format.
¤ Press the s key.
The time format is marked with [ ] to
show it is active.
¤ Select time format.
¤ With 12-hour time format, use the dis-
play key
and pm.
§am/pm§ to switch between am
¤ Save changes.
¤ Press the §Save§ display key.
¤ Then press and hold the a key.
The handset changes to idle status.
Date:
Enter month, day and year in 6-digit
format.
The date in the first line is marked with
[ ] to show it is active.
¤ Enter the date using the digit keys.
Time:
Enter hours/minutes in 4-digit format.
¤ Press the s key.
The time in the second line is marked with
[ ] to show it is active.
¤ Enter the date using the digit keys.
8

Gigaset S185 – more than just a telephone
Gigaset S185 –
more than just a telephone
Your phone not only enables you to store
up to 150 telephone numbers (page 18) –
it can do a whole lot more:
u You can designate important people as
VIPs so you can identify important calls
from the ringtone (page 19).
u You can store anniversary dates
(page 19) in your phone and it will
remind you of them.
u Select frequently used phone numbers
at the press of a single key (page 18).
u View missed calls on your phone
(page 21).
u Select 12 or 24-hour format for display-
ing the time (page 13).
u ECO DECT reduces power consumption
by using a power supply with low
power consumption. Your handset
reduces the transmitting power
depending on the distance to the base
station (close-up range).
Note:
The transmitting power of the base station is
reduced to almost zero when the handset is
docked and only one handset is registered on
the base station (not applicable for
Gigaset S185 Duo).
Have fun using your new telephone!
First Steps
Package contents
u one Gigaset S185 base station,
u one AC adapter for base station,
u one telephone line cord,
u one user guide.
For Gigaset S185:
u one Gigaset handset,
u two batteries,
u one battery cover,
u one belt clip.
For Gigaset S185 Duo:
u two Gigaset handsets and one charger,
u one AC adapter for charger,
u four batteries,
u two battery covers,
u two belt clips.
Installing the base station
The base is designed for use in in dry
rooms with a temperature range of +5°C
to +45°C.
Set up the base station at a central point in
the building away from any appliance that
may cause electrical interference to the
phone.
Please note:
u Never expose the telephone to heat
sources, direct sunlight, other electrical
appliances.
u Protect your phone from moisture,
dust, corrosive liquids and vapors.
9
First Steps
Range and reception strength
Range:
u Up to 300 meters in the open
u Up to 50 meters in buildings
Reception strength:
The display shows the quality of the radio
contact between the base station and
handset:
u Good to poor: ÐiÑÒ
u No reception: | flashes
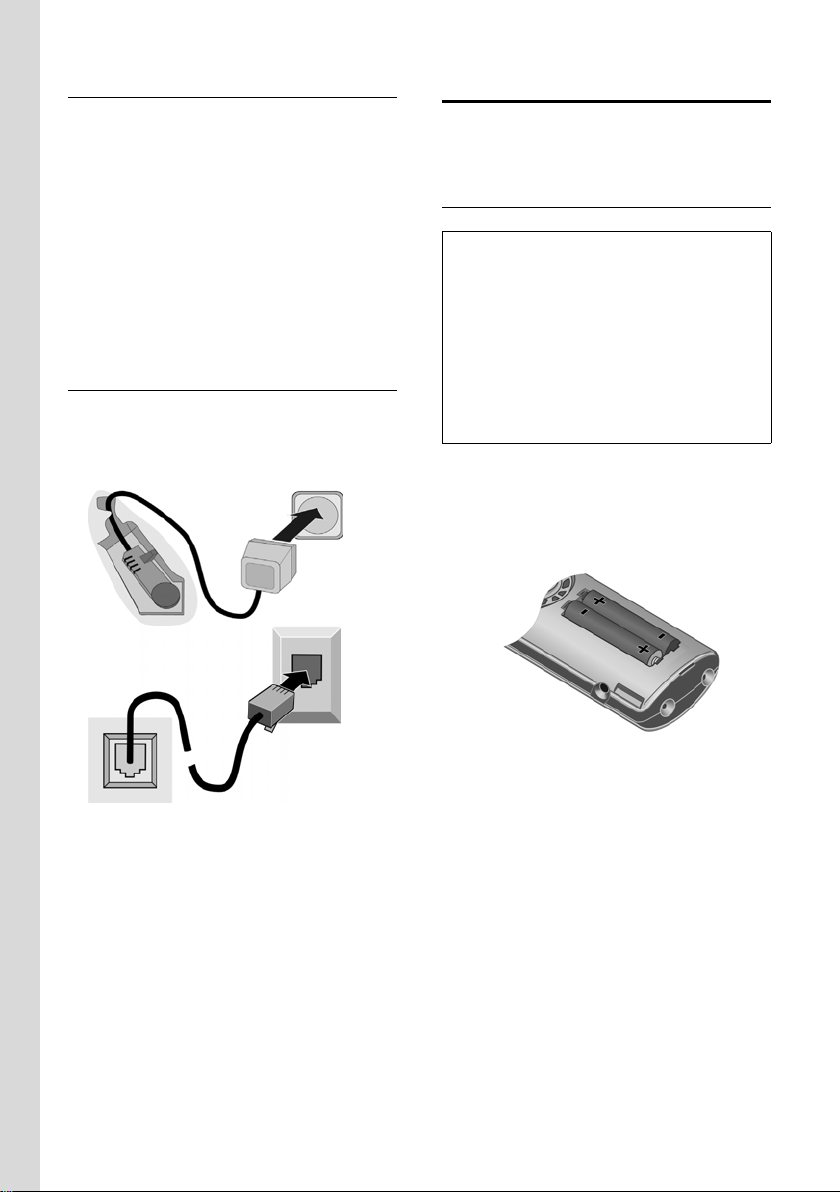
Connecting the base station
¤ First connect the power adapter and
then the phone jack as shown below
and place the cables in the cable
recesses.
2
1
1
Setting up the handset for use
Carry out the following steps for each
handset.
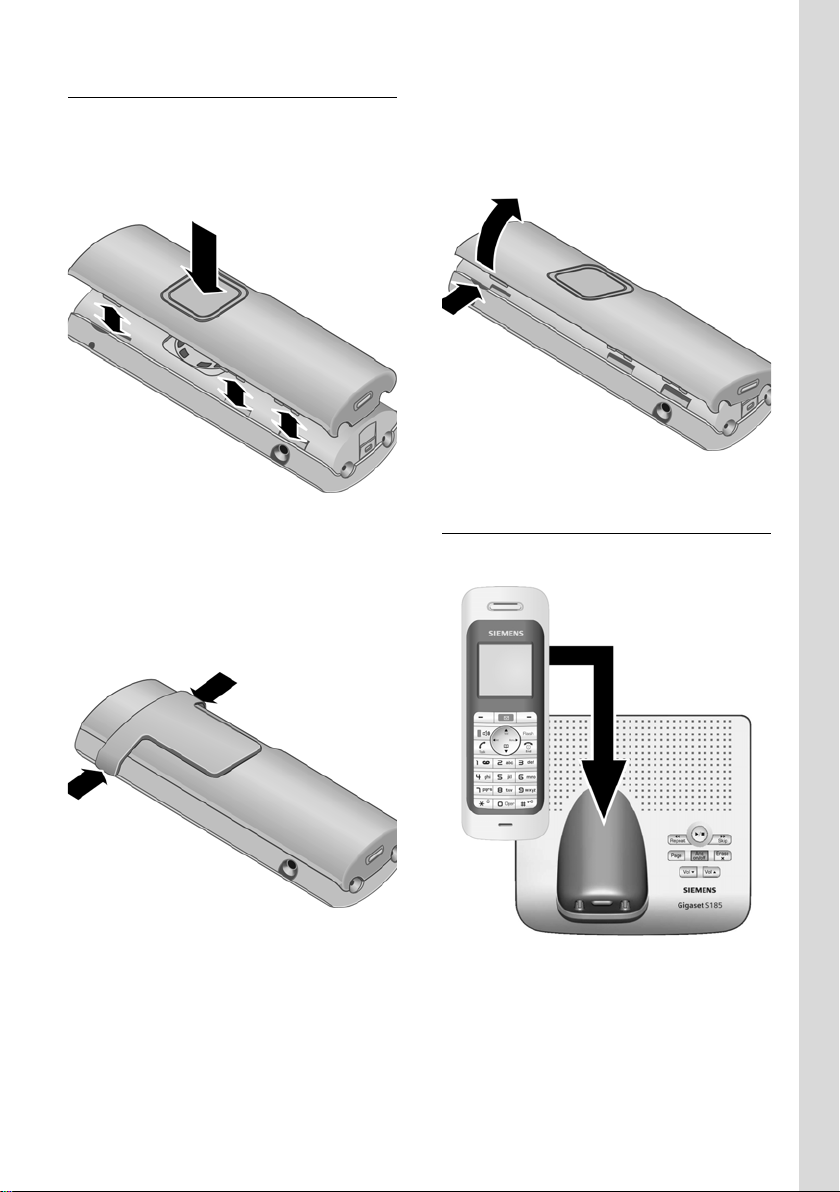
Inserting the batteries
Caution:
Use only rechargeable nickel-metal hydride
(NiMH) UL-approved AAA batteries. Never use
conventional (non-rechargeable) batteries or
other battery types as this may cause significant damage to health and property. For
example, the outer casing of the batteries
could be destroyed or the batteries could
explode. The phone could also malfunction or
be damaged as a result of using batteries that
are not of the recommended type.
¤ Fit the batteries with the correct polar-
ity (see diagram).
The polarity is indicated in/on the battery
compartment.
3
1
1
1 Underside of the base station (detailed
view)
2 Power adapter 110 V
3 Phone jack with phone cord
Please note:
u Minimum No. 26 AWG telecommunica-
tion line cord must be used with this
phone.
u The power adapter must be always
connected, as the phone will not oper-
ate without an electrical connection.
10
First Steps
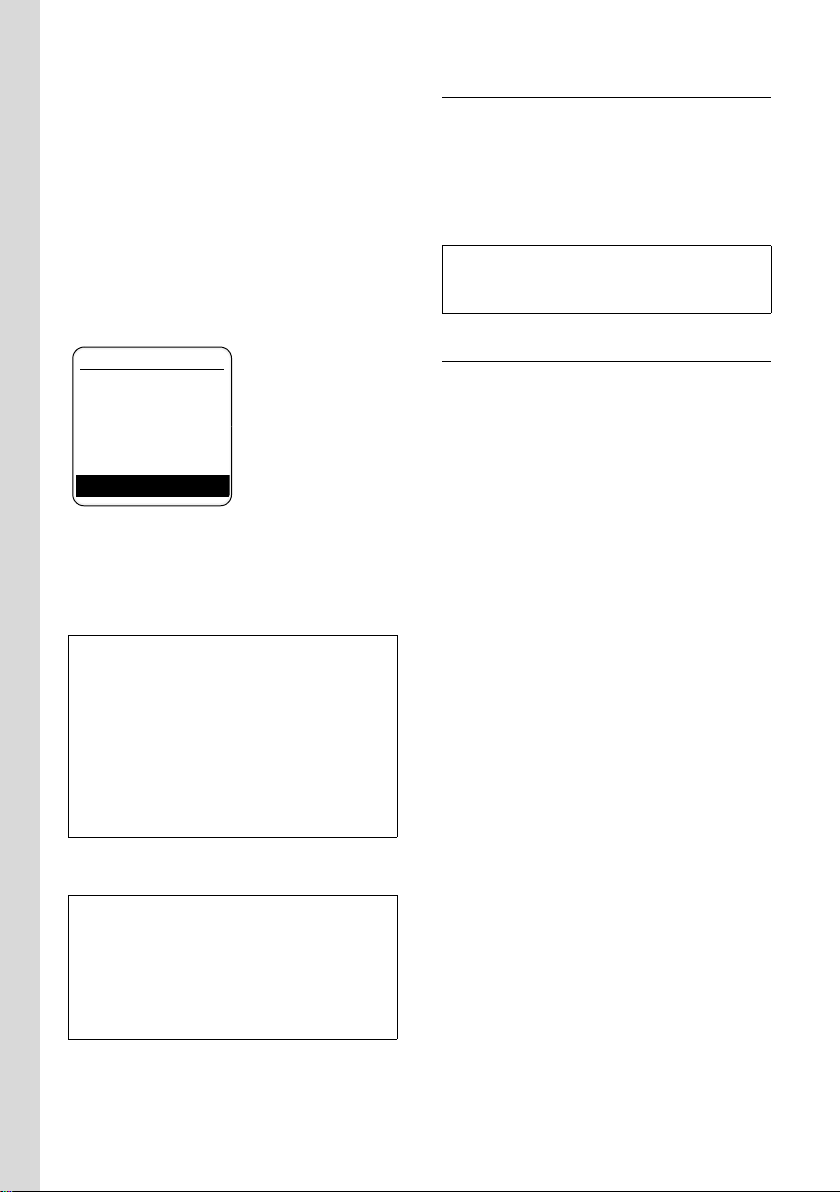
Closing the battery cover
¤ First align the notches on the side of
the battery cover with the clips on the
inside of the casing.
¤ Then close the cover, press on the top
so that it clicks into place.
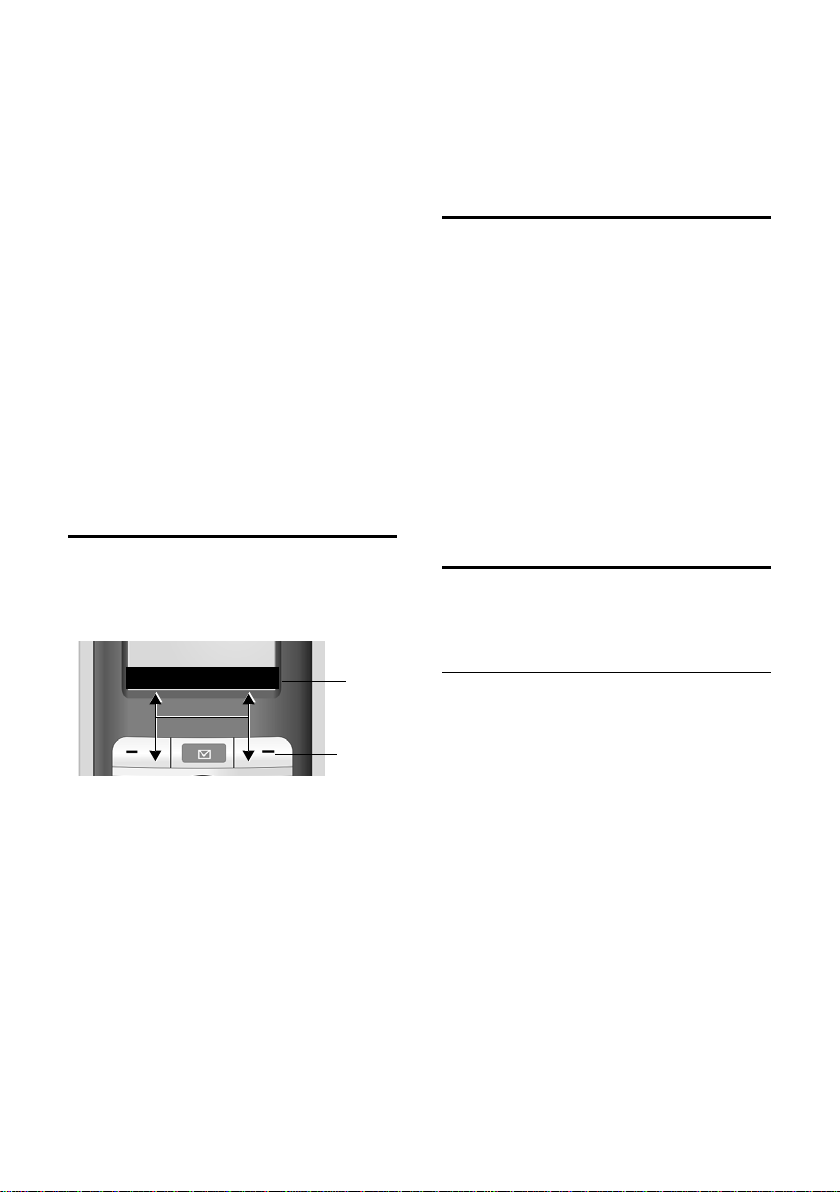
Attaching the belt clip
There are notches for attaching the belt
clip on the side of the handset just above
the display.
Press the belt clip onto the back of the
handset so that the protrusions on the belt
clip engage with the notches.
Opening the battery cover
¤ If fitted, remove belt clip.
¤ Insert your fingernail into the headset
socket notch and pull the battery cover
upwards.
Placing the handset in the base station and registering
¤ To start the automatic registration of
your handset, please place the handset
in the base with the display facing
outwards.
11
First Steps
¤ The handset registers automatically.
Please do NOT remove your handset
from the base station during the regis-
tration procedure.
The registration can take up to 5 minutes.
During this time Regstr.Procedure appears
in the display and the name of the base
station flashes, e.g. Base 1. The handset
will be assigned the lowest unassigned
internal intercom number (1–6).
This will appear in the display when regis-
tration is complete, for example INT 1.
ÐV
INT 1
Time Menu
This means that the number 1 has been
assigned. If the internal numbers 1–6 are
already assigned to other units, the
number 6 is overwritten.
Note:
– Automatic registration is only possible if no
one is making calls using the base station.
– Each key press interrupts the automatic
registration.
– If automatic registration does not work the
handset will need to be registered manually
(page 30).
– You can change the name of the handset
(page 32).
Headset socket
Which headsets are compatible?
The following headsets have been tested
with the Gigaset S185:
u Plantronics MX200
u Plantronics MX250
u Top-Nice EP-21-RS (C39453-Z5-C361)
Caution:
Do not charge the handset in charging unit or
base station while the headset is connected.
Initial charging of batteries
To charge the batteries, leave the handset
in the base or charging cradle continu-
ously for ten hours.
The flashing battery icon e in the top
right of the display indicates that the batteries are being charged.
During handset operation, the battery
icon indicates the charge status of the batteries (page 1).
Please remember:
u The batteries may feel warm as they are
charging. This is normal.
To charge the batteries, leave the handset
in the base station.
Note:
– If the handset has switched itself off
because the batteries have no charge and is
then placed in the base station, it will
switch itself on automatically.
– Only place the handset in the base or
charging cradle that is intended for it.
For questions and problems see page 43.
12

First Steps
Setting the date and time
¤ To set the date and time, press the dis-
play key
To change the time, open the input field
via:
¢ Ð ¢ Date/Time
v
§Time§ to open the input menu.
¤ Change multiple line input:
Date:
Enter month, day and year in 6-digit
format.
Time:
Enter hours and minutes with 4 digits,
e.g. Q M 1 5 for 7:15 am.
§Save§ Press the display key.
Time mode:
Select 12-hour or 24-hour time format.
¤ With 12-hour time format, use the dis-
play key
and pm.
Your answering machine is set with a
standard announcement.
§am/pm§ to switch between am
¤ Set the date and the time, for example
to ensure the correct time of incoming
calls is recorded.
Extra Codes
v ¢ Ð ¢ Base
Extra Codes
Select and press
~ Enter extra area code.
§Save§ Press the display key.
a Press and hold (idle status).
Repeat the above steps until all extra area
codes for your area have been entered. A
maximum of 5 extra codes can be stored.
§OK§.
Display in idle status
Once the phone is registered and the time
set, the idle display looks as shown here
(example). If the answering machine is
activated, the answering machine symbol
× will also be displayed in the header.
ÐV
INT 1
01.31.08 07:15
• Menu
Area codes
In order to call back a caller using the
incoming caller ID list (page 21), your
phone's area code ("local area code")
must be stored. If your phone is in a "multiple area code" area, the extra codes for
this area must also be stored.
Local Area Code
v ¢ Ð ¢ Base
Local Area Code
Select and press
~ Enter local area code.
§Save§ Press the display key.
a Press and hold (idle status).
§OK§.
Your phone is now ready to use.
13
Making calls
Making calls
Making an external call
External calls are calls using the public
telephone network.
~c Enter the number and press
the talk key.
Or:
c~ Press briefly the talk key c
and then enter the number.
In addition to using the talk key c, the
user can initiate the call using the handsfree key d.
To cancel the dialing operation, press the
end call key a.
You are shown the duration of the call
while the call is in progress.
Note:
– Dialing using the directory (page 18) or
calls list (page 21) saves time re-entering
numbers and network provider prefixes
("call-by-call numbers").
Ending a call
a Press the end call key.
Answering a call
The handset indicates an incoming call in
three ways: by ringing, by a display on the
screen and by the flashing handsfree
key d.
You can accept the call by:
¤ Pressing the talk key c.
¤ Pressing the handsfree key d.
¤ Pressing the display key Ÿ to
divert the call to the answering
machine (page 25).
If the handset is in the base or charger and
the Auto Answer function is activated
(page 35), the call will be answered auto-
matically when you lift the handset from
the base or charger.
Press the display key
ringer without answering the call. You can
answer the call as long the call is displayed
on the screen.
§Silence§ to mute the
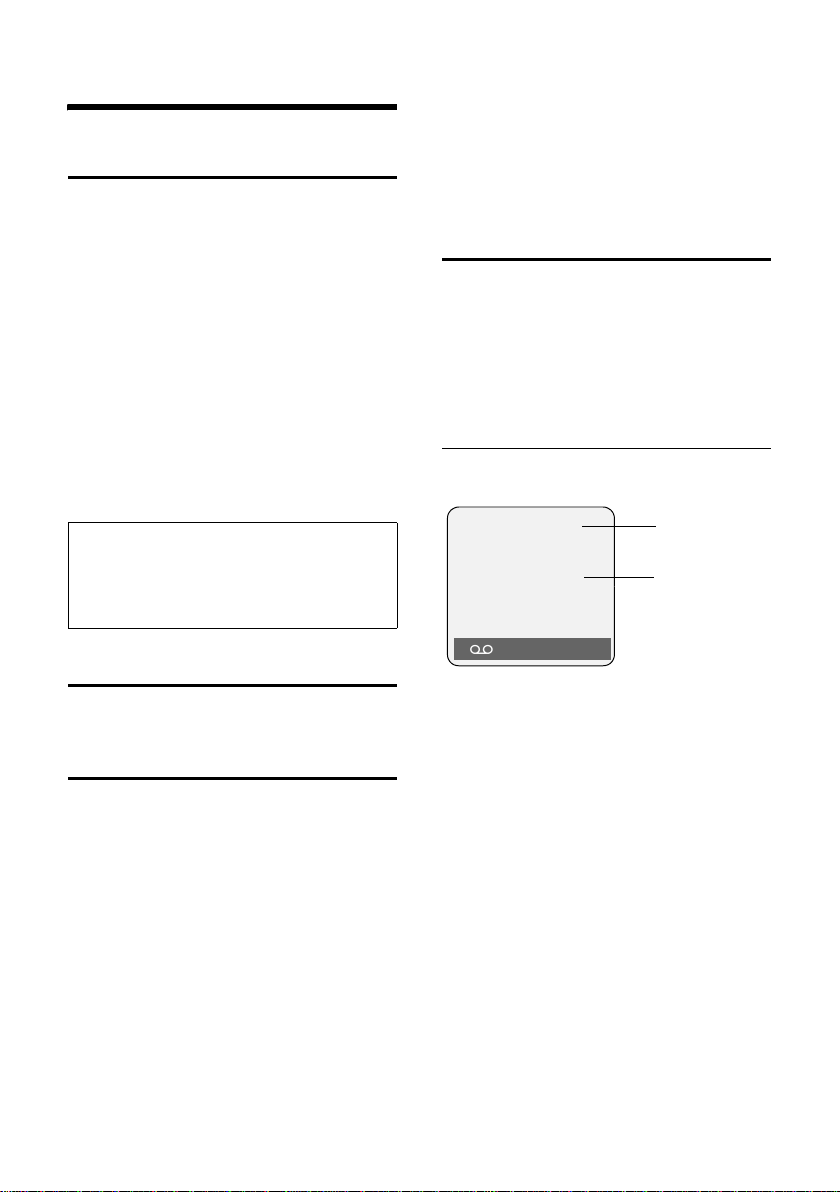
Caller ID
Caller ID (CID) and Caller Name ID (CNID)
are optional subscription services provided by your telephone service provider.
These features supply incoming caller
identification information that will be displayed on your handset
Call display with Caller ID/ Name
If the number of the caller is stored in your
directory, you will see their name.
Å
1234567890
Silence
1Ring symbol
2 Number or name of caller
The following is displayed in place of the
number:
u External, if the user has not arranged
caller ID.
u Unavailable, if no number has been
received.
u Withheld, if caller has blocked his/her
caller ID.
1
2
14

Operating the handset
Handsfree operation
You can activate the speakerphone at any
time to provide handsfree operation during a call.
Activating/deactivating handsfree
Activating while dialing
~d Enter the number and press
the handsfree key.
¤ You should inform your caller before
you use the handsfree function so that
they know someone else may be listen-
ing.
Switching between earpiece and
handsfree mode
d Press the handsfree key.
During a call and when listening to the
answering machine, switch handsfree on
or off.
If you wish to place the handset in the
charging cradle during a call:
¤ Press and hold the handsfree key d
while placing the handset in the base
station. If the handsfree key d does
not light up, press the key again.
For how to adjust the volume, see
page 36.
Muting
You can deactivate the microphone in
your handset during an external call:
Mute Press the display key on the
left to mute the handset.
Unmute Press the display key to reacti-
vate the microphone.
Operating the handset
Activating/deactivating the handset
a Press and hold the end call
key. You will hear the confirmation beep.
Activating/deactivating the keypad lock
# Press and hold the pound key.
You will hear the confirmation beep. The
icon Ø appears in the display when the
keypad lock is activated.
The keypad lock is deactivated automatically if someone calls you. It is re-activated
when the call is finished.
Control key
In the description below, the side of the
control key (up, down, right, left) which
you have to press in the different operating situations is marked in black, for
example v for "press right on the control
key".
The control key has a number of different
functions:
When the handset is in idle status
s Open the directory.
v Open main menu.
u Open list of handsets.
t Set the ringtones on the hand-
set (page 36).
15
Operating the handset
In the main menu and in input fields
You can use the control key to move the
cursor up t, down s, right v or
left u.
In lists and submenus
t / s Scroll up/down line by line.
v Open submenu or confirm
selection.
u Go back one menu level, or
cancel.
During an external call
s Open the directory.
u Hold with simultaneous inter-
nal call.
t Adjust loudspeaker volume for
earpiece and handsfree mode.
Display keys
The function of the display keys changes
depending on the particular operating situation. Example:
• Menu
1 The display keys' current functions are
shown in the bottom display line.
2Display keys
The most important display symbols are:
§§§§§Menu§§§§ Open the main menu.
§Options§ Open a context-dependent
menu.
W Delete key: deletes one char-
acter at a time from right to
left.
u Go back one menu level, or
cancel.
Ó Copy number into directory.
1
2
Ÿ Divert external call to answer-
ing machine.
• Open the last number redial
list.
Returning to idle status
You can go back to idle status from anywhere in the menu as follows:
¤ Press and hold the end call key a.
Or:
¤ Do not press any key: after 2 minutes
the display will automatically revert to
idle status.
Changes that you have not confirmed or
saved by pressing
Save Entry
An example of the display in idle status is
shown on page 13.
§OK§ will be lost.
§OK§, §Yes§, §Save§, §Send§ or
Menu guidance
Your telephone's functions are accessed
using a menu that has a number of levels.
Main menu (first menu level)
¤ Press v with the handset in idle status
to open the main menu.
The main menu functions are shown in
the display as a list with icon and name.
To access a function, so that you open the
corresponding submenu (next menu
level):
¤ Navigate to the function using the con-
trol key q. Press the display key
§OK§.
16

Operating the handset
Submenus
The functions in the submenus are displayed as lists.
To access a function:
¤ Scroll to the function with the control
key q and press
Or:
§OK§.
¤ Enter the corresponding shortcut digit
combination (page 40).
Pressing briefly on the end call key a
returns you to the previous menu level /
cancels the operation.
Correcting incorrect entries
You can correct incorrect characters in the
text by navigating to the incorrect entry
using the control key. You can then:
u press X to delete the character to the
left of the cursor,
u insert characters to the left of the cur-
sor,
u overwrite the (flashing) character
when entering the time and date etc.
You will find examples of symbols used,
menu entries and multiple line input in the
"Notes on the operating instructions",
page 7.
CID 2.5 services (network services)
If CID is activated and a waiting call is displayed, 4 different CID 2.5 services (network services) are selected.
During a call:
§Options§ Press the display key
Select with q:
TAKE MSG
The waiting caller is forwarded to the
central office mailbox.
HOLD MSG
The waiting caller is put on hold and
hears a message to this effect from the
central office.
CALL BACK
The waiting caller is prompted by the
central office to call again at a later
time.
ADD 2ND
The central office is prompted to initiate a conference call.
Note:
When the handset is muted and ADD 2ND
selected, the microphone will be automatically
unmuted.
17

Using the directory and lists
Using the directory and lists
The options are:
u Directory,
u Last number redial list,
u Calls list,
u Answering machine list.
You can store a maximum of 150 entries in
the directory (the actual number depends
on the size of the individual entries).
You create the directory for your own individual handset. You can also send lists/
entries to other handsets (page 19).
Directory
In the directory, you can store numbers
and names associated with them.
¤ With the handset in idle status, open
the directory by pressing the s key.
Length of entries
Number: max. 32 digits
Name: max. 16 characters
Note:
For one-touch quick access to a number from
the directory, you can assign the number to a
key (see
Storing a number in the directory
s ¢ New Entry
¤ Change multiple line input:
Number:
Name:
Annivers.:
Speed Dial:
¤ Save changes.
Speed Dial below).
Enter number.
Enter name.
Enter anniversary if required (page 19).
Select key for quick dial.
Selecting entries in the directory
s Open directory.
You have the following options:
u Use s to scroll through the entries
until the required name is selected.
u Enter the first character of the name, or
scroll to the entry with s if required.
Dialing with the directory
s ¢ s (select entry)
c Press the talk key. The number
is dialed.
Managing entries in the directory
s ¢ s (select entry)
Viewing an entry
§View§ Press the display key.
The entry is displayed.
Back with
§OK§.
Editing entries
§View§ §Edit§ Press display keys one after the
other.
¤ Carry out changes and save.
Using other functions
s ¢ s (select entry)
¢ §Options§ (open menu)
The following functions can be selected
with q:
Display Number
Edit or complete a stored number. Then
dial or copy the number to the directory
by pressing Ó.
Edit Entry
Edit selected entry.
Delete Entry
Delete selected entry.
18

Using the directory and lists
VIP Entry (directory only)
Mark a directory entry as VIP
(Very Important Person) and assign it
a particular ringtone. You can then
identify VIP calls by their ringtones.
Requirement: Caller ID (page 14).
Copy Entry
Send a single entry to a handset
(page 19).
Delete List
Delete all entries in the directory.
Copy List
Send complete list to a handset
(page 19).
Available Memory
Display the available entries in the
directory (page 18).
Using quick dial keys
¤ Press and hold the required quick dial
key (page 18).
Sending the directory to another handset
Requirements:
u The sending and receiving handsets
must both be registered to the same
base station.
u The other handset and base station can
send and receive directory entries.
¢ s (select entry)
s
¢ §Options§ (open menu)
¢ Copy Entry / Copy List
~ Enter the internal number of
the receiver handset. You see
Copying entry.
§Yes§ / §No§ Press the display key.
A successful transfer is confirmed by a
message and confirmation tone on the
receiver handset.
Please remember:
u Entries with identical numbers are not
overwritten on the receiver handset.
u The transfer is canceled if the phone
rings or if the memory of the receiver
handset is full.
Adding a displayed number to the directory
Numbers that appear in a list such as the
calls list or the last number redial list, or
displayed during a call can be added to the
directory.
A number is displayed:
§Options§ ¢ Copy to Directory
¤ Complete the entry, see page 18.
While the number is being transferred
from the answering machine list, message
playback is interrupted.
Copying a number from the directory
There are many operating situations in
which you can open the directory, such as
copying a number. Your handset need not
be in idle status.
¤ Depending on the operating situation,
open the directory with s or Ó.
q Select an entry (page 18).
Storing anniversaries in the directory
You can store an anniversary for every
number in the directory and specify a time
when you will receive a reminder call on
the anniversary.
¢ s (Select entry; page 18)
s
§View§ §Edit§ Press display keys one after the
other.
s Scroll to the Annivers.: line.
§Edit§ Press the display key.
¤ Change multiple line input:
Date:
Enter the month/day in 4-digit format.
Time:
Enter the hour/minute for the reminder
call in 4-digit format.
19

Using the directory and lists
Prompt:
Select the type of signal for the
reminder and press
§OK§.
¤ Save changes (page 8).
Note:
Reminder calls require a time stamp. If you
select a visual signal, then a time stamp is not
required and is automatically set to 12:00 a.m.
Deleting anniversaries
s ¢ s (Select entry; page 18)
§View§ §Edit§ Press display keys one after the
other.
s Scroll to the Annivers.: line.
§Edit§ §Delete§ §Save§
Press display keys one after the
other.
Reminder call on an anniversary
A reminder call is signaled on the handset
using the selected ring tone.
§Off§ Press the display key to stop
the reminder call.
Last number redial list
The last number redial list contains the ten
numbers last dialed with the handset
(max. 32 digits). If one of the numbers is
in the directory, then the corresponding
name will be displayed.
Manual last number redial
• Press the display key.
s Select entry.
c Press the talk key.
The number is dialed.
When displaying a name, you can have the
respective phone number displayed by
using the display key
§View§.
Managing entries in the last number redial list
• Press the display key.
s Select entry.
§Options§§ Open menu.
The following functions can be selected
with q:
Display Number (as in the directory,
page 18)
Copy to Directory
Copy an entry to the directory
(page 19)
Delete Entry (as in the directory, page 18)
Delete List (as in the directory, page 19)
Opening lists with the message key
The message key will flash if a caller left a
voice mail message. You can use the message key f to open the following lists:
u Answering machine list
u Network mailbox
If your network provider supports this
function and the network mailbox is
configured for fast access (page 29).
u Calls list
An advisory tone sounds as soon as a new
entry appears on a list. The f key
flashes (it will go off when the key is
pressed). In idle status, the display shows
an icon for the new entry.
Icon New entry...
Ã
Á
The number of new entries is shown
beneath the corresponding icon.
Only the lists that contain messages are
shown (exception: network mailbox). Lists
with new messages are shown first and
identified in bold. The number of new or
old messages contained are each shown
in brackets.
... in answering machine list or
network mailbox
... in calls list
20

Using the directory and lists
Select the list with q. To open, press
§OK§.
Note:
The answering machine, network mailbox,
and/or calls list can only be active on one handset at a time.
Calls list
Requirement: Caller ID Presentation (CIP,
page 14)
The numbers of the last 30 incoming calls
are stored.
Setting list type for calls list
v ¢ Ð ¢ Base ¢ Calls List Type
Missed Calls / All Calls
‰
Select and press
§OK§ (=on).
a Press and hold (idle status).
The entries in the calls list are retained
when you change the list type.
List entry
New messages are at the top.
Example of list entries:
All Calls
J. Smith
5555551234
01.29.08 11:15 am
Delete Options
u List type (in header)
u Status of entry
u Number and name of caller
You can add the number of the caller to
the directory (page 19)
u Date and time of call (if set, page 13)
u Type of entry
according to list type All Calls:
– accepted calls ( )
– missed calls
– calls recorded by the answering
machine (Ã)
‰
‰
according to list type Missed Calls:
– missed calls (if [3] is displayed: 3rd
entry in the list)
Pressing the display key
§Delete§ deletes the
marked entry.
After pressing the display key
§Options§ you
can select more functions with q:
Copy to Directory
Add a number to the directory.
Information
Complete caller information is displayed.
Delete Calls List
Delete complete list.
When you leave the calls list all entries are
set to the status "old", so that the next
time you ca ll up the lis t they wi ll no l onger
be shown in bold.
Answering machine list
You can use the answering machine list
to listen to the messages that are on the
answering machine.
Writing and editing names
The following rules apply when creating
an entry:
u Control the cursor with u v t s.
u Characters are added to the left of the
cursor.
u Press the star key
table of special characters.
u Press and hold the pound key # to
switch from "Abc" mode to "123" and
from "123" to "abc" and from "abc" to
"Abc" (upper case: 1st letter upper
case, all others lower case). Press the
pound key # before entering the
letter.
u The first letter of the name of directory
entries is automatically capitalized, followed by lower case letters.
to show the
*
21

Using the directory and lists
Entering special characters
You can call up the table of special characters using the * key. Select the
required character and insert it with
§Insert§.
Order of directory entries
Directory entries are usually sorted in
alphabetical order. Spaces and digits take
first priority. The sort order is as follows:
1. Space
2. Digits (0–9)
3. Letters (alphabetical)
4. Other characters
To get around the alphabetical ordering of
the entries, insert a space or a digit in
front of the name. These entries will then
move to the beginning of the directory.
Names which you have preceded with an
asterisk will move to the end of the directory.
22

Operating the answering machine
Operating the answering
machine
You can operate the answering machine
that is integrated in the base station via
the handset, via the keypad of the base
station (page 2) or via remote operation
(from another phone/cell phone). You can
also listen to messages via remote operation using voice commands (page 28).
Announcement mode
You can use the answering machine in
two different modes.
u In Ans. & Record mode, the caller hears
the announcement and can then leave
a message.
u In Announce Only mode, the caller hears
your announcement but cannot leave a
message.
Operation via the handset
The handset loudspeaker activates automatically if you receive an acoustic
prompt or message while operating.
You can switch it off with the handsfree
key d.
Switching answering machine on/off
v ¢ Ð ¢ Voice Mail ¢ Ans Machine
‰
(=on)
After switching on, the remaining memory time is announced. If the time has not
yet been set (page 13), an appropriate
announcement is then made. The × icon
is displayed on the screen.
The phone is supplied with a pre-recorded
announcement for the answer and record
mode or announce only mode. If a personal announcement has not been
recorded, the corresponding pre-recorded
announcement is used.
Recording a personal announcement/ announce only
v ¢ Ð ¢ Voice Mail ¢ Announcements
¢ Record Announce / Record Anc Only
§OK§ Press the display key to start
the recording.
You hear the ready tone (short tone).
¤ Now speak your announcement (must
be at least 3 secs. long).
Note:
Announcements must be made speaking
directly into the microphone of the handset
as if making a call.
§End§ Press the display key to end
the recording.
Cancel the recording with a or ”.
Restart the recording with
After recording, the announcement is
played back for you to check. You can rerecord the announcement with
§OK§.
§New§.
Please note:
u Recording ends automatically if the
maximum recording time of 170 seconds is exceeded or there is a break in
speech for more than 2 seconds.
u If you cancel the recording, the pre-
recorded announcement is then used.
u The recording is canceled if the answer-
ing machine memory is full.
¤ Delete old messages and repeat
recording if required.
Playing back announcements
v ¢ Ð ¢ Voice Mail ¢ Announcements
¢ Play Announcement / Play Anc Only
If a personal announcement has not been
recorded, the corresponding pre-recorded
announcement is used.
Record a new announcement while playing back announcement:
§New§ Press the display key.
The recording is canceled if the answering
machine memory is full.
23

Operating the answering machine
¤ Delete old messages and repeat record-
ing if required.
Deleting announcements
v ¢ Ð ¢ Voice Mail ¢ Announcements
¢ Del Announce / Del Anc Only
§Yes§ Press the display key to con-
firm the prompt.
a Press and hold (idle status).
After deletion, the corresponding pre-
recorded announcement is then used.
Selecting announcement mode
You can choose between Ans. & Record and
Announce Only.
¢ Ð ¢ Voice Mail ¢ Announcements
v
¢ Set Ans. Mode ¢ Ans. & Record /
Announce Only (=on)
a Press and hold (idle status).
The selected mode is saved even after the
answering machine is deactivated.
If in Ans. & Record mode the memory for
messages is full the selection is interrupted and you will receive an instruction
to delete old messages.
‰
¤ Delete old messages.
The answering machine automatically
switches back to the set mode once deletion is complete, or you can reselect the
required recording mode.
Setting 'answer and record' or 'announce
only' by toggling
You can use the Ans Mode Time setting to
change over the announcement mode for
a specific period.
Example: The Ans. & Record mode is set.
If you activate Ans Mode Time and set a
period (e.g. 6:00 pm to 8:00 am) the
answering machine switches to Announce
Only mode for this period. Outside this
period (8:01 am to 5:59 pm), the Ans. &
Record is active.
¢ Ð ¢ Voice Mail ¢ Announcements
v
¢ Set Ans. Mode ¢ Ans Mode Time
(=on)
‰
¤ Change multiple line input:
From:
Enter hours/minutes for the start of the
period in 4-digit format/24 hrs mode!
Until:
Enter hours/minutes for the end of the
period in 4-digit format/24 hrs mode!
Activation:
Select On or Off.
¤ Save changes with §Save§.
If the memory for messages is full and
Activation: On has been selected, saving
is interrupted and you will receive an
instruction to delete old messages.
¤ Delete old messages and repeat the set-
ting.
As soon as you change the announcement
mode (page 24), the function Ans Mode
Time is automatically deactivated.
Playing back messages
The date and time of each message is
logged (provided this has been set,
page 13) and displayed during the playback. If Caller ID is activated, then the
caller's number is displayed. If the caller's
number is stored in the directory, the
respective name is displayed.
Playing back new messages
New messages that have not yet been
heard are indicated by the à icon in the
display and by the f key flashing on
the handset.
f Press the message key.
Ans M.: Select and press
An announcement informs you if there are
new messages or just old ones or no messages.
If there are new messages playback then
begins with the first new message. After
the last new message you will hear the
§OK§.
24

Operating the answering machine
end tone and an announcement about
how much recording time remains.
If the message concerned has been saved
with the date and time you will hear an
appropriate announcement before playback begins.
Playing back old messages
You can listen to old messages if there are
no more new messages. Start the playback as described under "Playing back new
messages", page 24.
After the entry time and date have been
played back (after approx. 3 seconds) a
new message assumes the status "old".
Stopping and controlling playback
During message playback:
2 Pause playback. Press 2
again to resume
t or 1
To previous message.
s or I
To next mess age.
After an interruption of over one minute,
the answering machine returns to idle status.
Marking a message as "new"
A previously played back "old" message is
displayed as a "new" message again.
During message playback:
* Press the star key.
An announcement informs you of the
message's new status.
Or:
§Options§ Open menu.
Mark as New
Select and press
Playback of the current message is
canceled. Playback of next message starts,
if applicable.
The f key on the handset flashes.
§OK§.
Adding the telephone number of a
message to the directory
See also "Adding a displayed number to
the directory", page 19.
Deleting messages
You can delete old messages either all at
once or individually.
Deleting all old messages
During playback or pause:
§Options§ Press the display key.
Del All Old Msgs
Select and press
§Yes§ Press the display key to con-
firm the prompt.
§OK§.
Deleting individual old messages
During playback or pause:
§Delete§ Press the display key.
Picking up a call from the answering machine
You can pick up a call while the answering
machine is recording it or being operated
via remote operation:
§Accept§
c /
Press the talk or display key.
Recording stops and you can speak to the
caller.
If 2 seconds of the call have already been
recorded when you pick it up, the call will
be displayed as a new message. The f
key on the handset flashes.
You can accept the call even if it is not signaled on the handset.
Diverting an external call to the answering machine
You can divert an incoming external call to
the answering machine even if it is
switched off.
Requirement: Sufficient storage space is
available on the answering machine.
25

Operating the answering machine
An e xt er na l c al l i s s ig na le d o n t he ha nd set:
Ÿ Press the display key.
The answering machine starts immediately in recording mode and records the
call. The set time for the call acceptance
(page 26) is ignored.
Activating/deactivating two-way recording
You can record an external call with the
answering machine.
¤ Inform the caller that the call is being
recorded.
§Options§ Open menu.
Two Way Record
Select and press
The two-way recording is indicated on the
display by an advisory text and is added to
the answering machine list as a new message.
§End§ Press the display key to stop
the two-way recording.
The max. recording time depends on the
available memory of the answering
machine. If the memory is full you will
hear an end tone, the recording is
aborted, and the call recorded up to that
point is listed in the answering machine
list as a new message.
§OK§.
Activating/deactivating listen in
During recording of a message you can listen in via the loudspeaker of registered
handsets and the base station.
Activating/deactivating listen in
v ¢ Ð ¢ Voice Mail ¢ Call Screening
¢ Handset and/or Base
‰
(=on)
a Press and hold (idle status).
You can switch off the Call Screening func-
tion on the handset during the recording.
Switching off listen in for the current recording
a Press the end call key.
Setting up the answering machine
The answering machine has already been
preset at the factory. Set up individual settings using the handset.
Toll-Saver Mode - Call acceptance/ charge saving function for remote operation
You can set when you want the answering
machine to accept a call.
The options are: 0 sec., after 10 sec., 20 sec.
or 30 sec. and the cost-saving setting Auto.
On Auto the following applies for call
acceptance:
u If no new messages are present, the
answering machine accepts a call after
20 seconds.
u If new messages are present, the
answering machine accepts a call after
10 seconds.
When operating remotely you then know
after approx. 15 seconds that there are no
new messages (otherwise the answering
machine would already have accepted
your call). There will be no call charges if
you hang up now.
¢ Ð ¢ Voice Mail ¢ Ring Delay
v
Select r Auto / 10 sec. / 20 sec. / 30 sec. / 0
sec..
§Save§ Press the display key.
a Press and hold (idle status).
Setting the recording time
You can set the maximum recording time
for a message. The options are: 30, 60,
120 seconds or Maximum.
26

¢ Ð ¢ Voice Mail ¢ Message Length
v
r Select recording time.
§Save§ Press the display key.
Setting recording quality
Set the quality you require for your recordings. The options are: Standard, High,
Excellent. If the quality is higher the
max. recording time is reduced.
¢ Ð ¢ Voice Mail ¢ Record Quality
v
r Select the recording quality.
§Save§ Press the display key.
Changing language for voice prompt and pre-recorded announcement
v55O2
Enter the digits.
1 Set English.
2 Set French.
I Set Spanish.
Resetting fast access on the answering machine to Network Voice Mail
The integrated answering machine is factory-set for fast access. However if you
have set the network mailbox for fast
access (page 29) you can reset this setting.
¢ Ð ¢ Voice Mail ¢ Set Key 1
v
¢ Answer Machine / Network Mailb.
Select and press
a Press and hold (idle status).
After you have selected the network mail-
box or the answering machine, press and
hold key 1. You will be connected
directly.
The setting for fast access applies to all
handsets.
§OK§.
Operating the answering machine
Operating when on the move (remote operation)
You can check or activate the answering
machine from any other telephone (hotel,
pay phone, etc).
Requirements:
u You must set a system PIN to a 4-digit
number other than factory default of
0000 (page 38).
u The phone you are using for remote
operation has tone dialing (DTMF),
such that you hear different tones
when you press the keys.
Calling the answering machine and playing back messages
~ Dial your own number.
9~ While you listen to your
announcement, press the
key and enter the system PIN.
You will be informed whether any new
messages have been recorded. The messages are then played back. You can now
operate the answering machine via the
keypad or by voice prompts, page 28.
Operating the answering machine via the
keypad
The following keys are used for operation:
A Go to the start of the previous
message.
B Stop playback. Press 2 again to
resume.
3 Go to the next message.
: Mark message as "new".
0 Delete current message.
Note:
After message playback, the call will be
terminated.
9
27

Operating the answering machine
Operating the answering machine with
voice prompts
You can control message playback using
the voice commands "BACK" and "FOR-
WARD". You can delete individual messages during playback using the voice
command "DELETE".
¤ Before each voice command, press 9
and then speak the command when
you hear the 'ready' tone.
When deleting a message you are
prompted to repeat the command.
¤ Repeat "DELETE", without first press-
ing the 9.
Activating the answering machine
Phone home and allow the phone to ring
until you hear: "Please enter PIN".
~
Your answering machine is activated. It
tells you how much memory time is left.
The messages are then played back.
The answering machine cannot be deacti-
vated remotely.
Enter system PIN.
28

Using the network mailbox
Using the network mailbox
The network mailbox is your network provider's answering machine within the network. You cannot use the network mailbox unless you have requested it from
your network provider.
Configuring the network mailbox for fast access
With fast access, you can dial either the
network mailbox or your integrated
answering machine directly.
The integrated answering machine is preconfigured for fast access. You can configure the network mailbox instead. Ask your
network provider about this.
Configuring the network mailbox for fast
access and entering the network mailbox
number
v ¢ Ð ¢ Voice Mail ¢ Set Key 1 ¢
Network Mailb.
Select and press
~ Enter the number for the
network mailbox.
Save§ Press the display key to save
the input.
a Press and hold (idle status).
The setting for fast access applies to all
Gigaset handsets.
If your network mailbox requires a pass-
word for access, it is possible to add a password by entering pauses (see Flash key on
page 1) immediately after entering the
mailbox access number, then enter your
password.
The Gigaset S185 will dial the mailbox
number, wait a few seconds until the mailbox is accessed, then dial your password.
If more time is needed for your mailbox to
answers before the network mailbox password is dialed, simply add an additional
pause (P).
‰
§OK§ (=on).
Calling the network mailbox
1 Press and hold.
You are connected directly to
the network mailbox.
d Press handsfree key d if
required. You hear the network mailbox announcement.
Viewing the network mailbox message
If a message arrives for you, you receive a
call from the network mailbox. If you have
requested Caller ID, the display shows the
network mailbox number. If you accept
the call, the new messages are played
back. If you do not accept the call, the network mailbox number will be stored in the
missed calls list and the message key will
flash (page 20).
29

Using several handsets
Using several handsets
Registering handsets
You can register up to a total of six handsets on your base station.
A Gigaset handset can be registered on up
to four base stations.
Automatic registration: Gigaset handset to Gigaset S185 base station
Important: The handset must not yet be
registered to any base station.
Registering the handset to the
Gigaset S185 base station occurs automatically.
¤ Place the handset in the base with its
display facing outwards.
Registration takes around 1 minute. During this process, Regstr.Procedure appears
in the display and the name of the base
station flashes, for example Base 1. When
the handset has been registered, its
screen displays its internal number, for
example INT 2 for internal number 2. The
handset is assigned the lowest available
internal number (1-6). If all internal numbers 1-6 have been assigned, number 6 is
overwritten, assuming that the handset
with the internal number 6 is in idle status.
Note:
– Automatic registration is not possible when
the base station on which you wish to register the handset is being used to make a
call.
– Each key press interrupts the automatic
registration.
– If automatic registration does not work,
you will have to register the handset manually.
– You can change the name of the handset
(page 32).
Manual registration: Gigaset handset to Gigaset S185 base station
You must activate manual registration of
the handset at both the handset and the
base station.
After it has been registered, the handset
returns to idle status. The internal number
of the handset appears in the display, for
example INT 1. If it does not, repeat the
procedure.
On the handset
v ¢ Ð ¢ Handset ¢ Register H/Set
s Select base station, for exam-
ple Base 1 and press
~ Enter the system PIN of the
base station (the default is
0000) and press
screen will display the
number, for example Base 1.
§OK§.
§OK§. The
On the base station
Within 60 secs. press and hold the registration/paging key on the base station
(page 2) (approx. 3 secs.).
De-registering handsets
You can de-register any registered handset
from any registered Gigaset handset.
u Open list of internal users.
The handset you are currently
using is indicated by <.
s Select the internal user you
wish to de-register.
§Options§ Open menu.
De-reg. H/Set No.
Select and press
~ Enter current System PIN and
§OK§.
press
§Yes§ Press the display key.
§OK§.
30

Using several handsets
Locating a handset ("paging")
You can locate your handset using the
base station.
¤ Press the registration/paging key ÷ on
the base station briefly.
¤ All handsets will ring at the same time
("paging"), even if the ringers are
switched off.
Ending paging
¤ Briefly press the registration/paging
key on the base station or press the talk
key c or the
handset.
Changing the base station
If your handset is registered to more than
one base station, you can set it to a particular base station or to the base station
that has the best reception (Best Base).
¢ Ð ¢ Handset ¢ Select Base
v
s Select one of the registered
Making internal calls
Internal calls to other handsets registered
on the same base station are free.
Calling a specific handset
u Initiate internal call.
~ Enter the number of the hand-
Or:
u Initiate internal call.
s Select handset.
c Press the talk key.
Calling all handsets ("group call")
u Initiate internal call.
* Press the star key. All handsets
Silence display key on any
base stations or Best Base and
§OK§.
press
set.
are called.
Ending a call
a Press the end call key.
Transferring a call to another handset
You can transfer an external call to
another handset.
u Open list of handsets.
The external caller hears the
hold melody if activated (see
page 39).
s Select a handset or Call All and
§OK§.
press
When the internal participant answers:
¤ If necessary announce the external call.
a Press the end call key.
The external call is transferred to the other
handset.
If the internal participant does not answer
or is busy, press the display key
return to the external call.
When diverting a call you can also press
the end call key a before the internal
participant lifts the receiver.
Then, if the internal participant does not
answer or is busy, the call will automatically return to you (the display will show
Recall).
Hold with simultaneous internal call
When you are speaking to an external
participant you can simultaneously call an
internal participant for consultation.
u Open list of handsets.
The external caller hears the
hold melody if activated (see
page 39).
s Select handset and press
Ending an inquiry call
§End§ Press the display key.
You are reconnected with the external
caller.
§End§, to
§OK§.
31

Using several handsets
Accepting/rejecting call waiting
If you get an external call while conducting an internal call, you will hear the call
waiting tone (short tone). The caller's
number will appear in the display if caller
ID is enabled.
Ending an internal call, accepting an
external call
§Accept§ Press the display key.
The internal call is ended. You are connected to the external caller.
Rejecting external call
§Reject§ Press the display key.
The call waiting tone is turned off. You
remain connected with the internal participant. The ringtone can still be heard at
other registered handsets.
Linking internal callers to an external call
Important: The Listening In function must
be activated.
You are conducting an external call. An
internal caller can listen in on this call and
take part in the conversation (internal
conference). The other parties are made
aware of additional listeners by a signal
tone.
Activating/deactivating internal listening
in
¢ Ð ¢ Base ¢ Add. Features
v
¢ Listening In
a Press and hold (idle status).
Internal listening in
The line is engaged with an external call.
Your screen will display information to
that effect You want to listen in to the
existing external call.
c Press briefly the talk key.
You are linked into the call. All participants
hear a signal tone. During this time, this
handset only displays
tion can be made from this handset.
Conference; no selec-
Ending listening in
a Press the end call key.
All participants hear a signal tone.
If the first internal participant presses the
end call key a, the handset that has 'listened-in' remains connected to the external caller.
Changing the name of a handset
The names "INT 1", "INT 2" etc. are
assigned automatically at registration.
You can change these names. The name
must be no more than 10 characters. The
changed name is displayed in every handset's list.
u Open list of handsets. Your
own handset is indicated by <.
s Select handset.
§Edit§ Press the display key.
~ Enter name.
§Save§ Press the display key.
32

Using several handsets
Changing a handset's internal number
A handset is automatically assigned the
lowest unassigned number when it is registered. If all the numbers have been
assigned, number 6 is overwritten, assuming the handset is in idle status. You can
change the internal number of all registered handsets (1–6).
u Open list of handsets. Your
own handset is indicated by <.
§Options§ Open menu.
Edit H/Set No.
Select and press
handsets is displayed.
s The current number flashes.
Select a handset.
~ Enter the new intern al number
(1–6). The handset's old
number is overwritten.
§Save§ Press the display key to save
the input.
a Press and hold (idle status).
You will hear the error tone (descending
tone sequence) if you assign an internal
number twice.
§OK§. The list of
¤ Repeat the process with an unused
number.
Using a handset as a room monitor
If the room monitor is activated, a previously stored destination number is called
as soon as a set noise level is reached. You
can store an internal or external number
in your handset as the destination
number.
The room monitor call to an external
number stops after approx. 90 seconds.
The room monitor call to an internal
number (handset) stops after approx.
3 minutes (depending on the base station). While the room monitor is activated,
all keys are locked except the end call key.
The handset's speaker is muted.
When the room monitor is activated,
incoming calls to the handset are indicated without a ringtone and are only
shown on the screen. The display and keypad are not illuminated and advisory
tones are also turned off.
If you accept an incoming call, the room
monitor mode is suspended for the duration of the call, but the function remains
activated.
If you switch off the handset, the room
monitor mode is deactivated. You will
need to reactivate the function after
switching on the handset again.
Caution:
– You should always check the operation
of the room monitor before use. For
example, test its sensitivity. Check the
connection if you are diverting the room
monitor to an outside number.
– When the function is switched on the hand-
set's operating time is severely reduced. If
necessary, place the handset in the base.
This ensures that the batteries do not run
down.
– Ideally the handset should be positioned
1 to 2 meters away from the sound being
monitored. The microphone must be
directed towards the monitored sound.
– The connection to which the room monitor
is diverted must not be blocked by an activated answering machine.
Activating the room monitor and entering the number to be called
v ¢ í ¢ Room Monitor
¤ Change multiple line input:
Room M.:
Select On to activate.
Call to:
Press the display key
tination number.
External number: select number from
the directory or enter directly. Only the
last 4 digits are displayed.
§Edit§ and enter des-
33

Handset settings
Internal number: delete any stored
external number.
set or Call All, if all registered handsets
are to be called)
Store number with
Level:
Set noise level sensitivity (Low or High).
§INT§ s (select hand-
§OK§.
§Save§.
¤ Save changes (page 8).
The function is now activated. With
Options, you can move directly to settings.
Changing previously set external destination number
v ¢ í ¢ Room Monitor
s Scroll to the Call to: line.
§Edit§ Press the display key.
X Delete existing number.
¤ Enter number as described in "Activat-
ing the room monitor and entering the
number to be called" (page 33).
¤ Save changes (page 8).
Changing previously set internal destination number
v ¢ í ¢ Room Monitor
s Scroll to the Call to: line.
§Edit§ Press the display key.
§Yes§ Press the display key to con-
firm the prompt.
¤ Enter number as described in "Activat-
ing the room monitor and entering the
number to be called" (page 33).
¤ Save changes (page 8).
The external caller will hear a deactivation
signal tone and then the call will end.
There will be no further room monitor
calls. But the other room monitor settings
on the handset (such as no ringtone) will
remain activated until you press the display key
To reactivate the room function with the
same phone number:
§OFF§ on the handset.
¤ Turn on the activation again and save
(page 33) with
§Save§.
Handset settings
Your handset is preconfigured, but you
can change these settings to suit your
individual requirements.
Changing the display language
You can view the display texts in different
languages.
¢ Ð ¢ Handset ¢ Language
v
The current language is indicated by .
s Select a language and
§OK§.
press
a Press and hold (idle status).
If you accidentally choose a language you
do not understand:
v 5 41
Press display keys one after the
other.
s Select the correct language
and press
§OK§.
‰
Deactivating the room monitor remotely
Important: The destination phone must
support touch tone dialing and the room
monitor must be set for an external destination number.
¤ Take the call from the room monitor
and press keys 9 ;.
34

Handset settings
Setting the display
You have a choice of four color schemes
and several different contrasts.
¢ Ð ¢ Display ¢ Color Scheme
v
Select and press §OK§.
s Select a color scheme and
press
a Press briefly.
s Scroll to the Contrast line.
Contrast Select and press §OK§.
r Select contrast.
§Save§ Press the display key.
a Press and hold (idle status).
‰
§OK§ ( = current color).
Setting the screen picture
You can display a screen picture (picture or
digital clock) when the handset is in idle
status. This will replace the idle status display. It may conceal the date, time and
name.
The screen picture is not displayed in certain situations, e.g. during a call or when
the handset has been de-registered.
If a screen picture has been activated,
the menu item Screen Saver is marked
‰
with .
¢ Ð ¢ Display ¢ Screen Saver
v
The current setting is displayed.
¤ Change multiple line input:
Activation:
Select On (screen picture is displayed)
or Off (no screen picture).
Selection:
Change screen picture if necessary (see
below).
¤ Save changes.
If the screen picture conceals the display,
press the end call key briefly to show the
idle display with time and date.
Changing the screen picture
v ¢ Ð ¢ Display ¢ Screen Saver
s Scroll to the Selection line.
§View§ Press the display key.
The active screen picture
is displayed
s Select picture/Clock.
§Save§ Press the display key.
¤ Save changes.
Setting lighting
Depending on whether or not the handset
is in the base station you can set different
levels of lighting. If it is switched on, the
display is permanently dimmed.
¢ Ð ¢ Display ¢ Backlight
v
The current setting is displayed.
¤ Change multiple line input:
In Charger
Select On or Off.
without Charger
Select On or Off.
§Save§ Press the display key.
a Press and hold (idle status).
Note:
When the lighting is switched on, the standby
time of the handset is reduced to approx. 30
hours.
Activating/deactivating auto answer
If you have activated this function, when
you get a call you can simply lift the handset out of the base station or charger without having to press the talk key c.
¢ Ð ¢ Handset
v
Auto Answer
Select and press
a Press and hold (idle status).
‰
§OK§ (=on).
35

Handset settings
Adjusting the loudspeaker volume
You can set the loudspeaker volume for
handsfree speaking to five different levels
and the earpiece volume to three different
levels. You can only make these adjustments during a call.
The handsfree volume can only be
adjusted with this procedure.
You are conducting an external call.
t Open menu.
r Select volume.
§Save§ Press display key if necessary
to save the setting permanently.
If t is assigned a different function,
e.g. when toggling (page 17):
§Options§ Open menu.
Vol ume Select and press §OK§.
Configure setting (see above).
Changing ringtones
u Volume:
You can choose between five volumes
(1–5; e.g. volume 2 = ˆ) and
the "Crescendo" ring (6; volume
increases with each ring =
‰).
u Ringtones:
You can choose between 15 different
melodies.
You can configure the following functions
with different ringtones:
u Ext. Calls: for external calls
u Internal Calls: for internal calls
u All: the same for all functions
For how to set the ringtones for the base
station, see page 38.
Settings for individual functions
Set the volume and melody depending on
the type of signaling required.
¢ Ð ¢ Audio Settings ¢
v
Ringer Settings
q Set, for example select
Ext. Calls and press
§OK§.
¤ Change multiple line input:
r Set volume (1–6).
s Scroll to the next line.
r Select melody.
§Save§ Press the display key.
In idle status, you can also open the menu
Ringer Settings by pressing t briefly.
Settings for all functions to ring the same
v ¢ Ð ¢ Audio Settings ¢
Ringer Settings ¢ All
¤ Set volume and ringtone (see "Settings
for individual functions").
§Save§ Press the display key.
a Press and hold (idle status).
Activating/deactivating the ringtone
You can deactivate the ringtone on your
handset before you answer a call or when
the handset is in idle status; the ringtone
can be deactivated permanently or just for
the current call. The ringtone cannot be
re-activated while an external call is in
progress.
Deactivating the ringtone permanently
* Press the star key and hold
until you can no longer hear
the ringtone.
The Ú icon appears in the display.
Re-activating the ringtone
* Press and hold the star key.
36

Handset settings
Deactivating the ringtone for the
current call
§Silence§ Press the display key.
Activating/deactivating the alert tone
You can activate an alert tone in place of a
ringtone. When you get a call, you will
hear a short tone ("Beep") instead of the
ringtone.
* Press and hold the star key
and within 3 seconds:
§Beep§§ Press the display key. A call is
now signaled by one brief
alert tone. You will now see
º
in the display.
Activating/deactivating advisory tones
Your handset uses 'advisory tones' to tell
you about different activities and statuses.
The following advisory tones can be activated and deactivated independently of
each other:
u Key beep: Each key press is acknowl-
edged.
u Acknowledge tones:
– Confirmation tone (ascending tone
sequence): at the end of an entry/
setting and when a new entry
arrives in the answering machine list
or calls list
– Error beep (descending tone
sequence): when you make an
incorrect entry
– Menu end tone: when scrolling at
the end of a menu
u Battery tone: The batteries need to be
charged.
¢ Ð ¢ Audio Settings
v
¢ Advisory Tones
¤ Change multiple line input:
Key Tones:
Select On or Off.
Confirm.:
Select On or Off.
Battery:
Select On, Off or In Call. The battery
warning tone is activated/deactivated
or only sounds during a call.
¤ Save changes (page 8).
You cannot deactivate the confirmation
tone for placing the handset in the base
station.
Setting the alarm clock
Requirement: The date and time have
already been set (page 13).
Activating/deactivating and setting the alarm clock
v ¢ ì
¤ Change multiple line input:
Activation:
Select On or Off.
Time:
Enter the wake-up time in 4-digit
format. Select 12-hour or 24-hour time
format.
¤ With 12-hour time format, use the dis-
play key
and pm.
Melody:
Select melody.
Vol ume :
Set the volume (1-6).
§am/pm§ to switch between am
¤ Save changes (page 8).
You will see the icon ¼.
A wake-up call with the selected ringer
melody is signaled on the handset. The
wake up call sounds for 60 seconds. The
display shows Alarm Clock . If no key is
pressed the wake-up call is repeated twice
at five minute intervals and then switched
off.
During a call, the wake-up call is signaled
by a short tone.
37

Base station settings
Deactivating the wake-up call/ repeating after a pause (sleep mode)
Requirement: A wake-up call is sounding.
§OFF§ Press the display key. The
wake-up call is deactivated.
Or:
§Snooze§ Press the display key or any
key. The wake-up call is deactivated and then repeated after
5 minutes. After the second
repetition the wake-up call is
deactivated completely.
Restoring the handset default settings
You can reset any individual settings and
changes you have made. This will not
affect entries in the directory, calls list or
the handset's registration to the base station.
¢ Ð ¢ Handset ¢ Reset Handset
v
§Yes§ Press the display key.
a Press and hold (idle status).
Cancel the restoring process by pressing
a or the display key
§No§.
Base station settings
The base station settings are carried out
using a registered Gigaset handset.
Protecting against unauthorized access
Changing the system PIN
You can change the 4-digit system PIN set
on the base station (default setting: 0000)
to a 4-digit PIN known only to yourself.
Caution:
Memorize the new system PIN well! If you
forget it, the phone will require specialist
attention. If this happens, contact the support
helpdesk at 1-866-247-8758 (page 47).
Setting a system PIN facilitates remote
operation of the answering machine
(page 27).
¢ Ð ¢ Base ¢ System PIN
v
~ Enter current System PIN and
§OK§.
press
~ Enter new system PIN. For
security the PIN is shown as
four stars (
s~ Scroll to the next line, re-enter
new system PIN and press
a Press and hold (idle status).
****
).
§OK§.
Changing ringtones
u Volume:
You can choose between five volumes
and the "crescendo" ring, see page 36.
Select "0" to deactivate the ringtone of
the base station.
u Ringtones:
You can set a ringtone melody for
external calls, see page 36.
¢ Ð ¢ Base ¢ Ringer Settings
v
For how to adjust the settings, see
page 36.
Protect the system settings of the base station with a PIN known only to yourself.
The system PIN must now be entered
when, for example, registering/de-registering a handset to/from the base station
or when restoring the default base station
settings.
38

Activating/deactivating the hold melody
v ¢ Ð ¢ Base ¢ Music on hold
Press §OK§ to activate or deactivate the hold
melody ( = on).
‰
Restoring default settings to base station
When resetting, all handsets remain registered. The following settings are not reset:
u System PIN
u Setting "First ringtone suppressed"
v ¢ Ð ¢ Base ¢ Base Reset
~ Enter the system PIN and
§OK§.
press
§Yes§ Press the display key.
Cancel the restoring process by pressing
a or the display key
a Press and hold (idle status).
§No§.
Base station settings
39

Shortcuts
Shortcuts
Instead of scrolling to locate a menu function, you can select a menu function more
quickly by opening the menu and keying in the digit combination ("shortcut").
Example: v 5 2 1 1 for "Set ringtone for external calls".
With the telephone in idle status, press v (open main menu):
3 Alarm Clock ì
4 Add. Features
4-3 Room Monitor (page 33)
í
5 Settings
5-1 Date/Time
5-2 Audio Settings 5-2-1 Ringer Settings (page 36)
5-3 Display 5-3-1 Screen Saver (page 35)
5-4 Handset 5-4-1 Language (page 34)
5-5 Base 5-5-1 Ringer Settings (page 38)
Ð
5-2-2 Advisory Tones (page 37)
5-3-2 Color Scheme (page 35)
5-3-3 Contrast (page 35)
5-3-4 Backlight (page 35)
5-4-2 Auto Answer (page 35)
5-4-3 Register H/Set (page 30)
5-4-4 Select Base (page 31)
5-4-5 Reset Handset (page 38)
5-5-2 Music on hold (page 39)
5-5-3 System PIN (page 38)
5-5-4 Base Reset (page 39)
5-5-5 Add. Features (page 32, page 42)
5-5-6 Local Area Code (page 13)
5-5-7 Extra Codes (page 13)
5-5-8 Calls List Type (page 21)
40

5-6 Voice Mail 5-6-1 Set Key 1 (page 29)
5-6-2 Ans Machine (page 23)
5-6-3 Call Screening (page 26)
5-6-4 Announcements (page 23)
5-6-5 Message Length (page 26)
5-6-6 Record Quality (page 27)
5-6-7 Ring Delay (page 26)
Shortcuts
41

Connecting the base station to the PABX
Connecting the base station
to the PABX
The following settings are only needed
when your PABX requires them. Please
refer to the user guide for your PABX.
Dialing modes and flash time
The current setting is indicated by .
Changing the dialing mode
The following dialing modes can be
selected:
u Tone dialing (DTMF),
u Pulse dialing (DP).
v ¢ Ð ¢ Base ¢ Add. Features
¢ Dialing Mode
s Select dialing mode ( = on)
and press
a Press and hold (idle status).
§OK§.
Setting the flash time
v ¢ Ð ¢ Base ¢ Add. Features
¢ Flash
s Select flash time ( = on)
and press
a Press and hold (idle status).
Setting pauses
Changing pause after line seizure
You can change the length of pause that is
inserted between pressing the talk key
c and sending the number.
v Open menu.
5 5 O 1 L
Press keys.
~ Enter digit for the pause
length (1 = 1 sec.; 2 = 3 secs.;
3 = 7 secs.) and press
§OK§.
‰
‰
‰
§OK§.
Changing the pause after the flash key
You can change the length of the pause if
your PABX requires this (refer to the user
guide for your PABX).
v Open menu.
5 5 O 1 2
Press keys.
~ Enter a digit for the length of
the pause (1 = 800 ms;
2 = 1600 ms; 3 = 3200 ms)
and press
§OK§.
Changing the dialing pause
v Open menu.
5 5 O 1 1
Press keys.
~ Enter a digit for the length of
the pause (1 = 1 sec.;
2 = 2 secs.; 3 = 3 secs.;
4 = 6 secs.) and press
To insert a dialing pause: press S for
2seconds. A P appears in the display.
§OK§.
Switching temporarily to tone dialing (DTMF)
If your PABX still operates with dial pulsing
(DP), but you need tone dialing (DTMF) for
a connection (for example to listen to the
network mailbox) you must switch to tone
dialing for the call.
Requirement: You are conducting a call
or have already dialed an external
number.
§Options§ Open menu.
Tone Dialing
Select and press
Tone dialing is now activated
for this call only.
§OK§.
42

Appendix
Appendix
Care
¤ Wipe the base station and handset with
a damp cloth (do not use solvent) or an
antistatic cloth.
Never use a dry cloth. This can cause
static.
Contact with liquid
If the handset has come into contact with
liquid:
1. Switch the handset off and remove
the batteries immediately.
2. Allow the liquid to drain from the handset.
3. Pat all parts dry, then place the handset
with the battery compartment open
and the keypad facing down in a dry,
warm place for at least 72 hours (not
in a microwave, oven etc.).
4. Do not switch on the handset again
until it is completely dry.
When it has fully dried out, you will normally be able to use it again.
Questions and answers
If you have any questions about the use of
your telephone, you can contact us at any
time at
www.gigaset.com/customercare
The table below (page 43) contains a list
of common problems and possible solutions.
!
Troubleshooting
The display is blank.
1. The handset is not switched on.
¥ Press a and hold the end call key.
2. The batteries are empty.
¥ Charge or replace the batteries
(page 12).
The handset does not respond to a key
press.
The keypad lock is activated.
¥ Press and hold the pound key
(page 15).
"Base station x" is flashing in the display.
1. The handset is outside the range of the
base station.
#
¥ Reduce the distance between handset/
base station.
2. The handset has been de-registered.
¥ Register the handset (page 30).
3. The base station is not switched on.
¥ Check the base station power adapter
(page 10).
Base Search is flashing in the display.
The handset is set for Best Base and no base
station is switched on or within range.
¥ Reduce the distance between handset/base
station.
¥ Check the base station mains adapter
(page 10).
Handset does not ring.
The ringtone is switched off.
¥ Activate the ringtone (page 36).
You cannot hear a ringtone/dialing tone.
Base station's phone cord has been replaced.
¥ When purchasing a new cord, ensure that it
has the correct pin connections.
¥ Correct phone jack assignment
3
2
1
4
5
6
1unused
2unused
3a
4b
5unused
6unused
43

Appendix
The other party cannot hear you.
1. You have pressed the
u (INT) key.
¥ Take the external caller off hold by end-
ing the internal call (page 31).
2. The handset is muted.
¥ Switch on the microphone again
(page 15).
The incoming call number is not displayed
although CIP is set.
Caller ID is not enabled.
¥ The user must ask the telephone network
provider to activate Caller ID (CID).
You hear an error tone when keying an
input
(a descending sequence of tones).
Action has failed/invalid input.
¥ Repeat the operation.
Watch the display and refer to the operating instructions if necessary.
You cannot listen to messages on the network mailbox.
Your phone system is set for pulse dialing.
¥ Set your phone system to tone dialing.
The calls list does not indicate a time for a
message.
Date/time are not set.
¥ Set the date/time (page 13).
The answering machine reports "PIN is
incorrect" during remote operation.
1. System PIN entered is incorrect
¥ Repeat input of system PIN,
2. System PIN is still set to 0000.
¥ Change system PIN to a number other
than 0000 (page 38).
The answering machine does not record
any messages/has switched over to
'announce only'.
Its memory is full.
¥ Delete old messages.
¥ Play back new messages and delete.
Specifications
Recommended batteries
Nickel-metal-hydride (NiMH):
The handset is supplied with UL-approved
AAA batteries..
Caution:
Use only UL-approved nickel-metal-hydride
(NiMH) batteries in the handset; do not use
non-rechargeable batteries.
Handset operating times/charging times
Capacity 650 mAh
Standby time Approx. 170 hours (7 days)
Calling time Approx. 13 hours
Charging time approx. 6 hours
The operating and charging times apply
only when using the recommended batteries.
Note:
When the lighting is switched on, the standby
time of the handset is reduced to approx.
30 hours.
Base station power consumption
In standby mode: approx. 2 watts
During a call: approx. 3 watts.
44

Appendix
General specifications
DECT 6.0 is supported
No. of channels 30 duplex channels
Radio frequency
range 1920 – 1930 MHz
Duplex method Time multiplex,
Channel grid 1728 kHz
Bit rate 1152 kbit/s
Modulation GFSK
Language code 32 kbit/s
Transmission
power
Range up to 300 m outdoors,
Power supply
input 110 V ~/60 Hz
Environmental
conditions for
operation
Dialing mode DTMF (tone dialing)/
10 ms frame length
10 mW, average power
per channel
up to 50 m indoors
+5°C to +45°C;
20 % to 75 % relative
humidity
DP (pulse dialing)
Industry Canada Certification
Operation is subject to the following two conditions (1) this device may not cause interference, and (2) this device must accept any interference, including interference that may cause
undesired operation of the device.
NOTICE: The Industry Canada label identifies
certified equipment. This certification means
that the equipment meets certain telecommunications network, protective, operational and
safety requirements as prescribed in the appropriate Terminal Equipment Technical Requirements document(s). The Department does not
guarantee the equipment will operate to the
user’s satisfaction.
Before installing this equipment, users should
ensure that it is permissible to be connected to
the facilities of the local telecommunications
company. The equipment must also be
installed using an acceptable method of connection. The customer should be aware that
compliance with the above conditions may not
prevent degradation of service in some situations.
Repairs to certified equipment should be coordinated by a representative designated by the
supplier. Any repairs or alterations made by the
user to this equipment, or equipment malfunctions, may give the telecommunications company cause to request the user to disconnect
the equipment.
Users should ensure for their own protection
that the electrical ground connections of the
power utility, telephone lines and internal
metallic water pipe system, if present, are
connected together.
This precaution may be particularly important
in rural areas
NOTE: Users should not attempt to make such
connections themselves, but should contact
the appropriate electric inspection authority,
or electrician, as appropriate.
This product meets the applicable Industry
Canada technical specifications.
A copy of the supplier's Declaration of Conformity (SDoC) is available at this Internet address:
http://www.gigaset.com/docs.
The Ringer Equivalence Number is an indication
of the maximum number of devices allowed to
be connected to a telephone interface. The termination of an interface may consist of any
combination of devices subject only to the
requirement that the sum of the RENs of all
devices does not exceed five.
This Class B digital apparatus complies with
Canadian ICES-003.
Cet appareil numérique de la classe B est conforme à la norme NMB-003 du Canada.
Safety precautions
Before using your telephone equipment, basic
safety instructions should always be followed
to reduce the risk of fire, electric shock and
injury to persons.
1. Read and understand all instructions.
2. Follow all warnings and instructions marked
on the product.
3. Unplug this product from the wall telephone
jack and power outlet before cleaning. Do not
use liquid cleaners or aerosol cleaners. Use
damp cloth for cleaning.
4. Do not use this product near water, for example, near a bathtub, wash bowl, kitchen sink, or
laundry tub, in a wet basement or near a swimming pool.
5. Place this product securely on a stable surface. Serious damage and/or injury may result if
the unit falls.
6. Slots or openings in the cabinet and the back
and bottom are provided for ventilation, to pro-
45

Appendix
tect it from overheating. These openings must
not be blocked or covered. This product should
never be placed near or over a radiator or heat
register, or in a place where proper ventilation
is not provided.
7. This product should be operated only from
the type of power source indicated on the
marking label. If you are not sure of the type of
AC line power to your home, consult your
dealer or local power company.
8. Do not place objects on the power cord.
Install the unit where no one can step or trip on
the cord.
9. Do not overload wall outlets and extension
cords as this can result in the risk of fire or electric shock.
10. Never push objects of any kind into this
product through cabinet slots as they may
touch dangerous voltage points or short out
parts that could result in the risk of fire or electric shock. Never spill liquid of any kind on this
product.
11. To reduce the risk of electric shock or burns,
do not disassemble this product. Take it to a
qualified service center when service is
required. Opening or removing covers may
expose you to dangerous voltages, dangerous
electrical current or other risks. Incorrect reassembly can cause electric shock when the appliance is subsequently used.
12. Unplug the product from the wall outlet
and refer servicing to qualified service personnel under the following conditions:
a.) When the power cord is damaged or frayed.
b.) If liquid has been spilled into the product.
c.) If the product has been exposed to rain or
water.
d.) If the product does not operate normally by
ing the operating instructions. Adjust only
follow
those controls
instructions because improper adjustment of
other controls may result in damage and may
require extensive work by a qualified technician
to restore the product to normal operation.
e.) If the product has been dropped or physically has been damaged.
f.) If the product exhibits a distinct change in
performance.
13. Avoid using a telephone (other than a cordless type) during a thunderstorm. There may be
a remote risk of electrical shock from lightning.
Therefore we suggest a surge arrestor.
14. Do not use the telephone to report a gas
leak in the vicinity of the leak.
15. Emergency/911 numbers may not be dialed
if the keypad is locked.
that are covered by the operating
BATTERY SAFETY PRECAUTIONS
To reduce the risk of fire, injury or electric
shock, and to properly dispose of batteries,
please read and understand the following
instructions.
CONTAINS NICKEL METAL HYDRIDE BATTERY.
BATTERY MUST BE RECYCLED OR DISPOSED OF
PROPERLY. DO NOT DISPOSE OF IN MUNICIPAL
WASTE.
1. Only use the batteries specified for use with
this product.
2. DO NOT USE NICKEL CADMIUM OR LITHIUM
BATTERIES, or mix batteries of different sizes or
from different manufacturers in this product.
DO NOT USE NONRECHARGEABLE BATTERIES.
3. Do not dispose of the batteries in a fire; the
cells may explode. Do not expose batteries to
water. Check with local codes for special disposal instructions.
4. Do not open or mutilate the batteries.
Released electrolyte is corrosive and may cause
damage to the eyes or skin. The electrolyte may
be toxic if swallowed.
5. Exercise care in handling the batteries in
order not to short the batteries with conducting
materials such as rings, bracelets, and keys. The
batteries or conducting material may overheat
and cause burns or fire.
6. Charge the batteries provided with, or identified for use with, this product only in accordance with the instructions and limitations specified in the user’s manual. Do not attempt to
charge the batteries with any means other than
that specified in the users manual.
7. Periodically clean the charge contacts on
both the charger and handset.
46

Service (Customer Care)
Customer Care Warranty for Cordless Products
To obtain Customer Care Warranty service,
product operation information, or for problem resolution, call:
Toll Free: 1-866-247-8758
www.gigaset.com/customercare
Appendix
End-user limited warranty
This product is covered by a one year limited
warranty. Any repair replacement or warranty
service, and all questions about this product
should be directed to: 1-866-247-8758.
This limited, non-transferable warranty is provided to the original buyer/end-consumer
("you") for systems, handsets and accessories
(collectively, "Product") provided by Gigaset
Communications USA LLC or Gigaset Communications Canada Inc. (collectively "Gigaset
NAM"). Gigaset NAM warrants to you that at
the date of purchase, the Product is free of
defects in workmanship and materials and the
software included in the Product will perform in
substantial compliance to its program specifications.
1. WARRANTY PERIOD
The Product warranty period is one (1) year
from the original date of purchase by you. Proof
of purchase (e.g., sales slip or invoice) must be
provided with any Product returned during the
warranty period. Batteries supplied with the
Products are warranted to be free from defects
at the time of purchase only.
2. EXCLUSIVE REMEDY
Gigaset NAM's entire liability and your exclusive
remedy if the Product is defective in materials
or workmanship during the warranty period
and is returned shall be that the Product will be
repaired or replaced as set forth in Section 4
below. Reconditioned replacement components, parts or materials may be used in the
replacement or repair. Data in the memory of
the Product may be lost during repair.
3. THIS LIMITED WARRANTY DOES NOT
COVER AND IS VOID WITH RESPECT TO
THE FOLLOWING:
– Cosmetic damage, physical damage to the
surface of the Product, including, without
limitation, breakage, cracks, dents,
scratches or adhesive marks on the LCD
screen or outside casing of the Product.
– Products which have been repaired, main-
tained or modified (including the antenna)
by anyone other than Gigaset NAM or a
Gigaset NAM-approved repair facility, or
that have been improperly installed.
– Cost of installation, removal or reinstalla-
tion.
– Damage due to any telephone, electronic,
hardware or software program, network,
Internet or computer malfunctions, failures,
or difficulties of any kind, including without
limitation, server failure or incomplete,
incorrect, garbled or delayed computer
transmissions.
– Equipment and components not manufac-
tured, supplied or authorized by Gigaset
NAM.
– Modification of the Product's components,
or operation of the Product in an unsuitable
environment or in a manner for which it is
not intended, including but not limited to
failures or defects caused by misuse, abuse,
accidents, physical damage, abnormal operation, improper handling or storage,
neglect, alterations, unauthorized installation, removal or repairs, failure to follow
instructions, problems caused by the carrier's network coverage, exposure to fire,
water or excessive moisture or dampness,
floods, or extreme changes in climate or
temperature, acts of God, riots, acts of terrorism, spills of food or liquids, viruses or
other software flaws introduced into the
Product or other acts which are not the fault
of Gigaset NAM and which the Product is
not specified to tolerate, including damage
caused by mishandling or blown fuses.
– Products which have had warranty stickers,
electronic serial number and/or serial
number label removed, altered, rendered
illegible or fraudulently applied to other
equipment.
– Signal reception problems (unless caused by
defect in material or workmanship in the
Product).
47

Appendix
– Products operated outside published maxi-
mum ratings.
– Performance of the Products when used in
combination with other products or equipment not manufactured, supplied or author-
ized by Gigaset NAM.
– Consumables (such as batteries and fuses).
– Payments for labor or service to representa-
tives or service centers not authorized to
perform product maintenance by Gigaset
NAM.
– Loss of data.
– Testing and examination discloses that the
alleged defect or malfunction in the Product
does not exist.
This warranty does not cover customer education, instruction, installation or removal, set up
adjustments, problems related to service(s)
provided by a carrier or other service provider,
and/or signal reception problems. Gigaset NAM
shall not be responsible for software, firmware,
information, or memory data contained in,
stored on, or integrated with any Products
returned for repair, whether under warranty or
not. This warranty is valid only in the country in
which it is purchased (i.e., the United States of
America or Canada respectively, but not both).
USE WITH ACCESSORIES NOT SUPPLIED BY
GIGASET NAM OR NOT OTHERWISE
EXPRESSLY AUTHORIZED BY GIGASET NAM
MAY VOID WARRANTY.
4. WARRANTY CLAIM PROCEDURE
All warranty claims must be made by notifying
Gigaset NAM prior to the expiration of the warranty period. Gigaset NAM's obligation to provide warranty support shall not extend past the
end of the warranty period, except that any
product repaired or replaced during the warranty period shall continue to be warranted for
the balance of such warranty period or thirty
(30) days, whichever is greater.
Support service will be provided for you by
accessing the toll free customer service number:
1-866-247-8758
5. LIMITATION OF WARRANTY
Gigaset NAM makes no warranty or representation that the software in the Products will meet
your requirements or will work in combination
with any hardware or applications software
products provided by third parties, that the
operation of the software will be uninterrupted
or error free, or that all defects in the software
products will be corrected.
6. LIMITATION ON REMEDIES; NO
CONSEQUENTIAL OR OTHER
DAMAGES
Your exclusive remedy for any breach of this
limited warranty is as set forth above. Except
for any refund elected by Gigaset NAM, YOU
ARE NOT ENTITLED TO ANY DAMAGES,
INCLUDING BUT NOT LIMITED TO CONSEQUENTIAL DAMAGES, if the Product does not
meet the limited warranty , and, to the maximum extent allowed by applicable law, even if
any remedy fails of its essential purpose. The
terms below ("Exclusion of Incidental, Consequential and Certain Other Damages") are also
incorporated into this limited warranty . Some
states/jurisdictions/provinces do not allow the
exclusion or limitation of incidental or consequential damages, so the above limitation or
exclusion may not apply to you. This limited
warranty gives you specific legal rights. You
may have others which vary from state/jurisdiction/province to state/jurisdiction/province.
7. DISCLAIMER OF WARRANTIES
GIGASET NAM AND ITS SUPPLIERS PROVIDE THE
PRODUCT AND SUPPORT SERVICES (IF ANY) AS
IS AND WITH ALL FAULTS. THE LIMITED WARRANTY IS IN LIEU OF ANY OTHER EXPRESS WARRANTIES (IF ANY) CREATED BY ANY DOCUMENTATION OR PACKAGING EXCEPT FOR THE LIMITED WARRANTY, AND TO THE MAXIMUM
EXTENT PERMITTED BY APPLICABLE LAW IS IN
LIEU OF ANY IMPLIED OR STATUTORY WARRANTIES, INCLUDING, BUT NOT LIMITED TO, THE
IMPLIED WARRANTIES OF MERCHANTABILITY
AND FITNESS FOR A PARTICULAR PURPOSE, OF
ACCURACY OR COMPLETENESS OR RESPONSES,
OF RESULTS, OF WORKMANLIKE EFFORT, OF
LACK OF VIRUSES AND OF LACK OF NEGLIGENCE, ALL WITH REGARD TO THE PRODUCT,
AND THE PROVISION OF OR FAILURE TO PROVIDE SUPPORT SERVICES. ALSO, THERE IS NO
WARRANTY OR CONDITION OF TITLE, QUIET
ENJOYMENT, QUIET POSSESSION, OR CORRESPONDENCE TO DESCRIPTION OR NONINFRINGEMENT WITH REGARD TO THE PRODUCT.
Some states/jurisdictions/provinces do not
allow limitations on how long an implied warranty lasts or the exclusion or limitation of incidental or consequential damages, so the above
exclusions or limitations may not apply to you.
If an implied warranty or condition is created by
48

Appendix
your state/province and federal or state/provincial law prohibits disclaimer of it, you also have
an implied warranty or condition, BUT ONLY AS
TO DEFECTS DISCOVERED DURING THE PERIOD
OF THIS LIMITED WARRANTY (ONE YEAR). AS
TO ANY DEFECTS DISCOVERED AFTER THE ONE
YEAR PERIOD, THERE IS NO WARRANTY OR CONDITION OF ANY KIND. This limited warranty
gives you specific legal rights, and you may also
have other rights which vary from state to
state/province to province. In no event shall
Gigaset NAM's liability exceed the cost of
repairing or replacing defective Products as
provided herein, and any such liabilities will terminate upon expiration of the warranty period.
Any supplements or updates to the Product or
the software in the Product, including without
limitation, any (if any) software fixes or
upgrades or bug fixes provided to you after the
expiration of the one year limited warranty
period are not covered by any warranty or condition, express, implied or statutory.
8. EXCLUSION OF INCIDENTAL,
CONSEQUENTIAL AND CERTAIN
OTHER DAMAGES
TO THE MAXIMUM EXTENT PERMITTED BY
APPLICABLE LAW, IN NO EVENT SHALL GIGASET
NAM, SELLER OR THEIR SUPPLIERS BE LIABLE
FOR ANY SPECIAL, INCIDENTAL, INDIRECT, OR
CONSEQUENTIAL DAMAGES WHATSOEVER
(INCLUDING, BUT NOT LIMITED TO, DAMAGES
FOR LOSS OF PROFITS OR CONFIDENTIAL OR
OTHER INFORMATION, FOR BUSINESS INTERRUPTION, FOR PERSONAL INJURY, FOR LOSS OF
PRIVACY, FOR FAILURE TO MEET ANY DUTY
INCLUDING OF GOOD FAITH OR OF REASONABLE CARE, FOR NEGLIGENCE, AND FOR ANY
OTHER PECUNIARY OR OTHER LOSS WHATSOEVER) ARISING OUT OF OR IN ANY WAY
RELATED TO THE USE OF OR INABILITY TO USE
THE PRODUCT, THE PROVISION OF OR FAILURE
TO PROVIDE SUPPORT SERVICES, OR OTHERWISE UNDER OR IN CONNECTION WITH ANY
PROVISION OF THIS LIMITED WARRANTY, EVEN
IN THE EVENT OF THE FAULT, TORT (INCLUDING
NEGLIGENCE), STRICT LIABILITY, BREACH OF
CONTRACT OR BREACH OF WARRANTY OF
GIGASET NAM OR SELLER OR ANY SUPPLIER,
AND EVEN IF GIGASET NAM OR SELLER OR ANY
SUPPLIER HAS BEEN ADVISED OF THE POSSIBILITY OF SUCH DAMAGES. REPAIR OR REPLACEMENT, AS PROVIDED UNDER THE WARRANTY, IS
YOUR SOLE AND EXCLUSIVE REMEDY FOR
BREACH OF THE LIMITED WARRANTY.
9. LIMITATION OF LIABILITY AND
REMEDIES
NOTWITHSTANDING ANY DAMAGES THAT YOU
MIGHT INCUR FOR ANY REASON WHATSOEVER
(INCLUDING, WITHOUT LIMITATION, ALL DAMAGES REFERENCED ABOVE AND ALL DIRECT OR
GENERAL DAMAGES), THE ENTIRE LIABILITY OF
GIGASET NAM, SELLER AND ANY OF THEIR SUPPLIERS UNDER ANY PROVISION OF THIS LIMITED
WARRANTY AND YOUR EXCLUSIVE REMEDY FOR
ALL OF THE FOREGOING (EXCEPT FOR ANY
REMEDY OF REPAIR OR REPLACEMENT ELECTED
BY GIGASET NAM OR SELLER OR SUPPLIER WITH
RESPECT TO ANY BREACH OF THE LIMITED WARRANTY) SHALL BE LIMITED TO THE GREATER OF
THE AMOUNT ACTUALLY PAID BY YOU FOR THE
PRODUCT OR FIVE DOLLARS ($5.00 USD/CAN).
THE FOREGOING LIMITATIONS, EXCLUSIONS
AND DISCLAIMERS SHALL APPLY TO THE MAXIMUM EXTENT PERMITTED BY APPLICABLE LAW,
EVEN IF ANY REMEDY FAILS ITS ESSENTIAL PURPOSE.
10. GOVERNING LAW
If this Product was purchased in the United
States of America this limited warranty will be
governed by the laws of Texas, and exclude the
United Nations Convention on Contracts for the
International Sale of Goods. If this Product was
purchased in Canada this limited warranty will
be governed by the laws of the Province of
Ontario and the federal laws of Canada applicable therein, and exclude the United Nations
Convention on Contracts for the
International Sale of Goods.
If you want to learn more about Gigaset Service
or for Support on your Gigaset phone, visit our
web site at http://www.gigaset.com
call
1-866-247-8758.
Issued by
Gigaset Communications GmbH
Schlavenhorst 66, D-46395 Bocholt
Gigaset Communications GmbH is a licensee of
the Siemens trademark.
© Gigaset Communications GmbH 2009
All rights reserved.
Subject to availability. Rights of modifications
reserved.
Product attributes subject to change.
We reserve the right, to make changes without
notice in equipment design and/or components.
Part Number:A31008-M1729-R401-1-5819
© Copyright 2009.
or please
49

Index
Index
A
Access protection . . . . . . . . . . . . . . . 38
Acknowledge tones
Activating
advisory tones
answering machine
answering machine
(remote operation)
auto answer
handset
internal listening in
keypad lock
room monitor
two-way recording of call
Adjusting
loud speaker volume
Advisory tones
Alarm clock
Alert tone
Anniversary
storing in directory
Announcement (answering
Answering machine
activating/deactivation
deleting messages
playing back messages
recording a personal announcement/
remote operation
scrolling back
scrolling forwards
Answering machine list
Answering machine, see
Area codes
extra codes
local area code
Auto answer
. . . . . . . . . . . . . . . . . . . . . 15
. . . . . . . . . . . . . . . . . . . . 37
. . . . . . . . . . . . . . . . . . . . . 37
. . . . . . . . . . . . . . . . . . . . 19
machine)
announce only
Network mailbox
. . . . . . . . . . . . . . . . . . . . 13
B
Base station
changing
connecting and setting up
connecting the device
connecting to PABX
range
. . . . . . . . . . . . . . . . . . . . 31
. . . . . . . . . . . . . . . . . . . . . . 10
. . . . . . . . . . . . . . 37
. . . . . . . . . . . . . . . . 37
. . . . . . . . . . . . 23
. . . . . . . . . 28
. . . . . . . . . . . . . . . . . . 35
. . . . . . . . . . . . 32
. . . . . . . . . . . . . . . . . . 15
. . . . . . . . . . . . . . . . 33
. . . . . . . . 26
. . . . . . . . . . . 36
. . . . . . . . . . . . . . . . . 37
. . . . . . . . . . . . . 19
. . . . . . . . . . . . . . . 23, 24
. . . . . . . . . . . . . . 23
. . . . . . . . . . 23
. . . . . . . . . . . . . 25
. . . . . . . . . . 24
. . . . . . . . . . . . 23
. . . . . . . . . . . . . . 27
. . . . . . . . . . . . . . . . . 25
. . . . . . . . . . . . . 25
. . . . . . . . . . . 21
. . . . . . . . . . . . . . . . . . 13
. . . . . . . . . . . . . . . . 13
. . . . . . . . . . . . . . . . 14, 35
. . . . . . . . 9
. . . . . . . . . . 10
. . . . . . . . . . . . 42
restoring to factory settings . . . . . . .39
. . . . . . . . . . . . . . . . . . . . . .38
setting
system PIN
Battery
charging
display
fitting
icon
recommended batteries
tone
Best base station
Birthday, see Anniversary
. . . . . . . . . . . . . . . . . . .38
. . . . . . . . . . . . . . . . . . . . .12
. . . . . . . . . . . . . . . . . . . . . .12
. . . . . . . . . . . . . . . . . . . . . . .10
. . . . . . . . . . . . . . . . . . . . . . . .12
. . . . . . . . . .44
. . . . . . . . . . . . . . . . . . . . . . . .37
. . . . . . . . . . . . . . . .31
C
Call
answering
caller listening in
ending
external
forwarding (connecting)
internal
picking up from answering
transferring (connecting)
two-way recording
Call acceptance
Call duration
Call history
Call waiting
internal call
Caller ID.
Calling
external
Canceling (operation)
Care of the telephone
Changing
destination number
dialing mode
display language
internal number of a handset
name of handset
pause time
ringtone
Changing PIN
Character set table, see
Special characters
Charge saving function
Charge status display
CID 2.5 services (network services)
Confirmation beep
. . . . . . . . . . . . . . . . . . . .14
. . . . . . . . . . . . . . .32
. . . . . . . . . . . . . . . . . . . . . .14
. . . . . . . . . . . . . . . . . . . . .14
. . . . . . . . .31
. . . . . . . . . . . . . . . . . . . . . .31
machine
. . . . . . . . . . . . . . . . . .25
. . . . . . . . .31
. . . . . . . . . . . . .26
. . . . . . . . . . . . . .26, 35
. . . . . . . . . . . . . . . . . . .14
. . . . . . . . . . . . . . . . . . . . .20
. . . . . . . . . . . . . . . . . . .32
. . . . . . . . . . . . . . . . . . . . . .14
. . . . . . . . . . . . . . . . . . . . .14
. . . . . . . . . . . . .16
. . . . . . . . . . . . .43
. . . . . . . . . . . . .34
. . . . . . . . . . . . . . . . . .42
. . . . . . . . . . . . . . .34
. . . . . .33
. . . . . . . . . . . . . . .32
. . . . . . . . . . . . . . . . . . .42
. . . . . . . . . . . . . . . . . . . . .36
. . . . . . . . . . . . . . . . . . .38
. . . . . . . . . . . .26
. . . . . . . . . . . . . 1
. . . . . . . . . . . . . . .37
. . .17
50

Index
Connecting, base station to PABX
Control key
Correcting incorrect input
Customer Care
. . . . . . . . . . . . . . . . . . 1, 15
. . . . . . . . . 17
. . . . . . . . . . . . . . . . . 47
D
Deactivating
advisory tones
answering machine
auto answer
handset
internal listening in
keypad lock
room monitor
Delete key
Deleting
announcement for answering
machine
characters
message
De-registering (handset)
Dialing
directory
with quick dial
Dialing mode
Dialing pause
entering
Directory
Display
DP (pulse dialing)
. . . . . . . . . . . . . . . . . . . . . . 18
copying number from text
managing entries
opening
order of entries
saving entry
sending entry/list to handset
storing anniversary
using to enter numbers
changing display language
contrast
in idle status
. . . . . . . . . . . . . . . . . . . . . . 1, 16
keys
lighting
memory
network mailbox message
number (CID/CNID)
screen picture
. . . . . . . . . . . . . . . . . . . . . . 35
setting
wrong language
. . . . . . . . . . . . . . . . 37
. . . . . . . . . . . . 23
. . . . . . . . . . . . . . . . . . 35
. . . . . . . . . . . . . . . . . . . . . 15
. . . . . . . . . . . . 32
. . . . . . . . . . . . . . . . . . 15
. . . . . . . . . . . . . . . . 34
. . . . . . . . . . . . . . . . . . . . . 16
. . . . . . . . . . . . . . . . . 24
. . . . . . . . . . . . . . . . . . . 17
. . . . . . . . . . . . . . . . . . . . 25
. . . . . . . . . . 30
. . . . . . . . . . . . . . . . . . . . 18
. . . . . . . . . . . . . . . . 19
. . . . . . . . . . . . . . . . . . 42
. . . . . . . . . . . . . . . . . . 42
. . . . . . . . . . . . . . . . . . . . . 1
. . . . . . . 19
. . . . . . . . . . . . . . 18
. . . . . . . . . . . . . . . . . . 15, 16
. . . . . . . . . . . . . . . 22
. . . . . . . . . . . . . . . . . . 18
. . . . . . . . . . . . 19
. . . . . . . . . 19
. . . . . . . 34
. . . . . . . . . . . . . . . . . . . . . 35
. . . . . . . . . . . . . . . . . 16
. . . . . . . . . . . . . . . . . . . . . 35
. . . . . . . . . . . . . . . . . . . . 19
. . . . . . . 29
. . . . . . . . . . . . 14
. . . . . . . . . . . . . . . . 35
. . . . . . . . . . . . . . . 34
. . . . . . . . . . . . . . . 42
. . . . 42
. . . . . 19
E
Earpiece mode . . . . . . . . . . . . . . . . . .15
Earpiece volume
End call key
Ending, call
Ending, see Deactivate
Entry
selecting (menu)
selecting from directory
Error beep
Example
menu input
multiple line entry
External call
diverting to answering machine
Extra codes
. . . . . . . . . . . . . . . . .36
. . . . . . . . . . . . . . . . . .1, 14
. . . . . . . . . . . . . . . . . . . .14
. . . . . . . . . . . . . . . 7
. . . . . . . . . .18
. . . . . . . . . . . . . . . . . . . . .37
. . . . . . . . . . . . . . . . . . . 7
. . . . . . . . . . . . . . 8
. . . .25
. . . . . . . . . . . . . . . . . . . .13
F
Fast access
answering machine
assigning key 1
network mailbox
Flash key
Flash time
. . . . . . . . . . . . . . . . . . . . . . 1
pause after
. . . . . . . . . . . . . . . . . . .42
. . . . . . . . . . . . . . . . . . . . .42
. . . . . . . . . . . . .27
. . . . . . . . . . . . . . . . 1
. . . . . . . . . . . . . . .29
G
Group call . . . . . . . . . . . . . . . . . . . . .31
H
Handset
activating/deactivating
advisory tones
changing internal number
changing name
changing number
changing to best reception
changing to different base
station
contact with liquid
de-registering
display language
forwarding call
idle status
lighting
. . . . . . . . . . . . . . . . . . . . . .15, 16
list
loudspeaker volume
muting
. . . . . . . . . . . . . . . . . . . . . .31
paging
placing on hold
. . . . . . . . . . . . . . . .37
. . . . . . . . . . . . . . . . . . .31
. . . . . . . . . . . . . . . . .30
. . . . . . . . . . . . . . . .31
. . . . . . . . . . . . . . . . .13, 16
. . . . . . . . . . . . . . . . . . . . . .35
. . . . . . . . . . . . . . . . . . . . . .15
. . . . . . . . . .15
. . . . . . . .33
. . . . . . . . . . . . . . . .32
. . . . . . . . . . . . . .33
. . . . . . .31
. . . . . . . . . . . . .43
. . . . . . . . . . . . . . .34
. . . . . . . . . . . .36
. . . . . . . . . . . . . . . .15
51

Index
reception strength
registering
registering on another
restoring to factory settings
screen picture
setup
using room monitor
using several handsets
Handset charging times
Handset operating time
in room monitor mode
Handset settings
Handsfree
key
Handsfree talking
Headset socket
. . . . . . . . . . . . . . . . . . . . . . . . . 15
Hold
with simultaneous internal call
Hold melody
. . . . . . . . . . . . . . . . . . . 30
base station
. . . . . . . . . . . . . . . . . . . . . . . 10
. . . . . . . . . . . . . . . . . . . . . . . . . 1
. . . . . . . . . . . . . . . . . . . 39
. . . . . . . . . . . . . 10
. . . . . . . . . . . . . . . 31
. . . . . . 38
. . . . . . . . . . . . . . . . 35
. . . . . . . . . . . . 33
. . . . . . . . . . 30
. . . . . . . . . . . 44
. . . . . . . . . . . 44
. . . . . . . . . . 33
. . . . . . . . . . . . . . . . 34
. . . . . . . . . . . . . . . 15
. . . . . . . . . . . . . . . . . 12
. . . . 31
I
Icon
alarm clock
answering machine
battery
display
for new messages
keypad lock
new message
ringtone
Idle status (display)
Idle status, returning to
Incorrect input (correction)
Internal
listening in
making calls
Internal call
call waiting
. . . . . . . . . . . . . . . . . . 37
. . . . . . . . . . . . 23
. . . . . . . . . . . . . . . . . . . . . 12
. . . . . . . . . . . . . . . . . . . . . . 16
. . . . . . . . . . . . . 25
. . . . . . . . . . . . . . . . . . 15
. . . . . . . . . . . . . . . . . 24
. . . . . . . . . . . . . . . . . . . . 36
. . . . . . . . . . . . . . 13
. . . . . . . . . . . 16
. . . . . . . . 17
. . . . . . . . . . . . . . . . . . . 32
. . . . . . . . . . . . . . . . . . 31
. . . . . . . . . . . . . . . . . . . . 31
. . . . . . . . . . . . . . . . . . 32
K
Key 1 (fast access). . . . . . . . . . . . . 1, 27
Keypad lock
Keys
assigning directory entry
cancel key
control key
delete key
display keys
end call key
. . . . . . . . . . . . . . . . . . . . 15
. . . . . . . . 18
. . . . . . . . . . . . . . . . . . . 16
. . . . . . . . . . . . . . . . . 1, 15
. . . . . . . . . . . . . . . . . . . 16
. . . . . . . . . . . . . . . . 1, 16
. . . . . . . . . . . . . . . . 1, 14
fast access
flash key
handsfree key
last number redial key
menu key
message key
On/Off key
pound key
quick dial
star key
talk key
. . . . . . . . . . . . . . . . .1, 27
. . . . . . . . . . . . . . . . . . . . . 1
. . . . . . . . . . . . . . . . . 1
. . . . . . . . . . .20
. . . . . . . . . . . . . . . . . . . .16
. . . . . . . . . . . . . . . . . . 1
. . . . . . . . . . . . . . . . . . . 1
. . . . . . . . . . . . . . . . . .1, 15
. . . . . . . . . . . . . . . . .18, 19
. . . . . . . . . . . . . . . . . . . .1, 36
. . . . . . . . . . . . . . . . . . . .1, 14
L
Language, display. . . . . . . . . . . . . . . .34
Last number redial
Lighting
Liquid
List
Listening in during recording
Listening in to call
Local area code
Lock
Loudspeaker volume
. . . . . . . . . . . . . . . . . . . . . . .35
. . . . . . . . . . . . . . . . . . . . . . . .43
answering machine list . . . . . . . . . .21
call history
handsets
missed calls
activating/deactivating keypad
. . . . . . . . . . . . . . . . . . . . .15
lock
. . . . . . . . . . . . . . .20
. . . . . . . . . . . . . . . . . . .20
. . . . . . . . . . . . . . . . . .15, 16
. . . . . . . . . . . . . . . . . .21
. . . . . . .26
. . . . . . . . . . . . . . .32
. . . . . . . . . . . . . . . . .13
. . . . . . . . . . . . . .36
M
Making calls
answering a call
external
internal
Manual last number redial
Medical equipment
Memory
Menu
back one menu level
end tone
key
menu guidance
menu input
opening
overview
Message key
opening lists
Messages
deleting
. . . . . . . . . . . . . . . . . . . . .14
. . . . . . . . . . . . . . . . . . . . . .31
. . . . . . . . . . . . . . . . . . . . . . .19
. . . . . . . . . . . . . . . . . . . . . . . . .16
. . . . . . . . . . . . . . . . . .15, 16
. . . . . . . . . . . . . . . . . . . . . .23
. . . . . . . . . . . . . . . . . . . . .25
. . . . . . . . . . . . . . .14
. . . . . . . . .20
. . . . . . . . . . . . . . . 5
. . . . . . . . . . . .16
. . . . . . . . . . . . . . . . . . . . .37
. . . . . . . . . . . . . . . .16
. . . . . . . . . . . . . . . . . . . 7
. . . . . . . . . . . . . . . . . . . . .40
. . . . . . . . . . . . . . . . . .20
52

Index
icon for new message
. . . . . . . . . . . . . . . . . . . . . . . . . 1
key
marking as "new"
playing back
Microphone
Missed call
Multiple line entry
Muting
. . . . . . . . . . . . . . . . . 24
. . . . . . . . . . . . . . . . . . . . 1
. . . . . . . . . . . . . . . . . . . . 21
. . . . . . . . . . . . . . . . . . . . . . . 15
. . . . . . . . . . . 24
. . . . . . . . . . . . . . 25
. . . . . . . . . . . . . . . . 8
N
Name
of a handset
Network mailbox
Network services (CID 2.5 services)
Number
adding to directory
as destination for room monitor
copying from directory
display calling number (CIP)
entry using directory
saving in directory
. . . . . . . . . . . . . . . . . . 32
. . . . . . . . . . . . . . . . 29
. . 17
. . . . . . . . . . . . . 19
. . . 33
. . . . . . . . . . 19
. . . . . . 14
. . . . . . . . . . . 19
. . . . . . . . . . . . . 18
O
On/Off key . . . . . . . . . . . . . . . . . . . . . 1
Order of entries in directory
. . . . . . . . 22
P
PABX
connecting base station
pause times
setting dialing mode
setting flash time
switching to touch tone dialing
Pack contents
Paging
Paging, handset
. . . . . . . . . . . . . . . . . . . . . . . . 42
Pause
Placing the handset on hold
Play back
announcement (answering
machine)
Pound key
Power consumption
Power supply unit
Protecting phone from access
Pulse dialing
. . . . . . . . . . . . . . . . . . 42
. . . . . . . . . . . . . . . . . . . 9
. . . . . . . . . . . . . . . . . . . . . . . 31
. . . . . . . . . . . . . . . . 31
. . . . . . . . . . . . . 23, 24
. . . . . . . . . . . . . . . . . . . 1, 15
. . . . . . . . . . . . . . . . 5
. . . . . . . . . . . . . . . . . . . 42
. . . . . . . . . 42
. . . . . . . . . . . 42
. . . . . . . . . . . . . . 42
. . . . 42
. . . . . . . . 15
. . . . . . . . . . . . . . 44
. . . . . . 38
Q
Questions and answers . . . . . . . . . . . 43
Quick dial
. . . . . . . . . . . . . . . . . . . . . 18
R
Range . . . . . . . . . . . . . . . . . . . . . . . .10
Reception strength
Recording
two-way recording of call
Recording quality
Recording time
Redial
. . . . . . . . . . . . . . . . . . . . . . . . .20
key
Registering (handset)
Reminder call
Remote control
Ringtone
changing
. . . . . . . . . . . . . . . . . . . . . .36
setting
setting melody
setting volume
Room monitor
. . . . . . . . . . . . . . .10
. . . . . . . .26
. . . . . . . . . . . . . . . .27
. . . . . . . . . . . . . . . . . .26
. . . . . . . . . . . . .30
. . . . . . . . . . . . . . . . . . .20
. . . . . . . . . . . . . . . . . .27
. . . . . . . . . . . . . . . . . . . .36
. . . . . . . . . . . . .36, 38
. . . . . . . . . .36, 38, 39
. . . . . . . . . . . . . . . . . .33
S
Safety precautions . . . . . . . . . . . . . . . 5
Screen picture
Searching in directory
Sending
directory entry to handset
Sensitivity (room monitor)
Setting
. . . . . . . . . . . . . . . . . . . . . . . .13
date
lighting
screen picture
time
Setting melody
Setting up, base station
Setup
handset
Shortcut
Sleep mode
Sound, see Ringtone
Special characters
Specifications
Star key
System settings
. . . . . . . . . . . . . . . . . .35
. . . . . . . . . . . . .18
. . . . . . . .19
. . . . . . . . .34
. . . . . . . . . . . . . . . . . . . . . .35
. . . . . . . . . . . . . . . . .35
. . . . . . . . . . . . . . . . . . . . . . . .13
. . . . . . . . . . . . . . .36, 38
. . . . . . . . . . . 9
. . . . . . . . . . . . . . . . . . . . .10
. . . . . . . . . . . . . . . . . . . . . . .40
. . . . . . . . . . . . . . . . . . . .38
. . . . . . . . . . . . . . . .22
. . . . . . . . . . . . . . . . . . .44
. . . . . . . . . . . . . . . . . . . . .1, 36
. . . . . . . . . . . . . . . . .38
T
Talk key . . . . . . . . . . . . . . . . . . . . .1, 14
Touch tone dialing
Tro ubl eshootin g
. . . . . . . . . . . . . . .42
. . . . . . . . . . . . . . . . .43
53

Index
V
Viewing network mailbox message . . 29
VIP (directory entry)
Volume
earpiece
handset loudspeaker
loudspeaker
ringtone
setting
. . . . . . . . . . . . . . . . . . . . 36
. . . . . . . . . . . . . . 36, 38, 39
. . . . . . . . . . . . . . . . . . . . . . 36
. . . . . . . . . . . . . 19
. . . . . . . . . . . 36
. . . . . . . . . . . . . . . . . . 36
W
Warning beep, see Advisory tones
Writing, editing names
. . . . . . . . . . . 21
54
 Loading...