

Page 1
ELECTRONIC CASH REGISTER
ELEKTRONISCHE REGISTRIERKASSE
CAISSE ENREGISTREUSE ELECTRONIQUE
CAJA REGISTRADORA ELECTRONICA
ELEKTRONISCHE KASSA
INSTRUCTION MANUAL MANUEL D’INSTRUCTIONS
BEDIENUNGSANLEITUNG MANUAL DE INSTRUCCIONES
GEBRUIKSAANWIJZING
MODEL
MODELL
MODELE
MODELO
MODEL
XE
-A102
Page 2
CAUTION:
The cash register should be securely fitted to the supporting platforms to avoid instability
when the drawer is open.
CAUTION:
The socket-outlet shall be installed near the equipment and shall be easily accessible.
VORSICHT:
Die Netzsteckdose muß nahe dem Gerät angebracht und leicht zugänglich sein.
ATTENTION:
La prise de courant murale devra être installée à proximité de l’équipement et devra être
facilement accessible.
AVISO:
El tomacorriente debe estar instalado cerca del equipo y debe quedar bien accesible.
VARNING:
Det matande vägguttaget skall placeras nära apparaten och vara lätt åtkomligt.
LET OP:
Het stopcontact dient in de buurt van de kassa en gemakkelijk toegangbaar te zijn.
CAUTION:
For a complete electrical disconnection pull out the mains plug.
VORSICHT:
Zur vollständigen elektrischen Trennung vom Netz den Netzstecker ziehen.
ATTENTION:
Pour obtenir une mise hors-circuit totale, débrancher la prise de courant secteur.
AVISO:
Para una desconexión eléctrica completa, desenchufar el enchufe de tomacorriente.
VARNING:
För att helt koppla från strömmen, dra ut stickproppen.
LET OP:
Trek de stekker uit het stopcontact indien u de stroom geheel wilt uitschakelen.
Warning
This is a Class A product. In a domestic environment this product may cause radio interference in which case the user may
be required to take adequate measures.
Warnung
Dies ist eine Einrichtung der Klasse A. Diese Einrichtung kann im Wohnbereich Funkstörungen verursachen; in diesem Fall
kann vom Betreiber verlangt werden, angemessene Maßnahmen durchzuführen und dafür aufzukommen.
Avertissement
Ceci est un produit de Classe A. Dans un environnement domestique ce produit risque de provoquer une interférence radio,
auquel cas l’utilisateur sera obligé d’observer les mesures adéquates.
Advertencia
Este es un producto de la clase A. En un ambiente doméstico es posible que este producto cause radiointerferencia. En
este caso se solicita al usuario que tome medidas adecuadas.
Page 3

1
English
XE-A102
ELECTRONIC CASH REGISTER
Thank you for purchasing the SHARP Electronic Cash Register Model XE-A102. Please
read this manual carefully before operating your machine. Keep this manual for future
reference. It will help you solve operational problems that you may encounter.
Handling Cautions
• Be very careful when removing and replacing the printer cover, as the cutter mounted on
it is very sharp.
• Install the cash register in a location not subject to direct sunlight, unusual temperature
changes, high humidity, or splashing water.
• Never operate the cash register with wet hands. Water can cause internal component
failure.
• The cash register plugs into any standard wall outlet (official (nominal) voltage). Other
electrical devices on the same electrical circuit can cause the cash register to
malfunction.
• Clean the cash register with a dry, soft cloth. Never use volatile liquids, such as benzine
or thinner. Chemicals can discolor or damage the cabinet.
• For protection against data loss, please purchase three R6 or LR6 batteries (“AA”size),
and install them after resetting your cash register and before using it.
When handling the batteries, please observe the following. Incorrectly using
batteries can cause them to burst or leak, possibly damaging the interior of the cash
register.
• RISK OF EXPLOSION IF BATTERY IS REPLACED BY AN INCORRECT TYPE.
DISPOSED OF USED BATTERIES ACCORDING TO THE INSTRUCTIONS.
• Be sure that the positive (+) and negative (-) poles of each battery are facing in the
proper direction for the installation.
• Never mix batteries of different types for the installation.
• Never mix old batteries and new ones for the installation.
• Never leave dead batteries in the battery compartment.
• Remove the batteries if you do not plan to use the cash register for long periods.
• Should a battery leak, clean out the battery compartment immediately, taking care to
avoid letting the battery fluid come into direct contact with your skin.
• For battery disposal, follow the corresponding law in your country.
• For a complete electrical disconnection, pull out the main plug.
IMPORTANT!
Before using the cash register for the first time, you must first reset the cash register, and
then install three new R6 or LR6 batteries (“AA”size) on the register. Never fail to follow
the procedures described on “Preparing the Cash Register” section.
When you open the carton, make sure that all accessories shown on the “Specifications”
section are contained.
English
Page 4

2
Contents
Parts and their Functions ..................................................................3
When an Error Occurs .......................................................................4
Preparing the Cash Register .............................................................5
Quick Start Operations ......................................................................7
Programming Date and Time.................................................................8
Programming Tax...................................................................................8
Programming Department Status ..........................................................9
Making Basic Sales Entries (Department Entries) ................................9
Reading/Resetting Sales Data.............................................................11
Utilizing Various Features for Sales Entries..................................12
PLU Entries..........................................................................................12
Convenient Sales Entries ....................................................................12
VAT (Tax) Calculation ..........................................................................13
Discounts and Premiums Using the Percent Key ...............................13
Currency Exchange .............................................................................14
No Sale ................................................................................................14
Refund .................................................................................................14
Non-add Code Number .......................................................................14
Received-on Account and Paid-out Entries.........................................14
Corrections ..........................................................................................15
Reading and Resetting of Sales......................................................15
EURO Migration Function................................................................17
Advanced Programming ..................................................................19
Department Preset Unit Price Programming .......................................19
PLU Programming ...............................................................................19
Percent Key Programming ..................................................................19
Exchange Key Programming...............................................................20
Printing Format Programming .............................................................20
Miscellaneous Programming ...............................................................21
Consecutive Receipt Number Programming .......................................21
EURO Programming............................................................................22
Rounding Programming (For Australian tax system)...........................22
Secret Code Programming ..................................................................22
Checking the Programmed Machine Settings ...............................23
Maintenance ......................................................................................24
Drawer Handling ..................................................................................24
Replacing the Paper Roll.....................................................................24
Replacing the Batteries .......................................................................25
Replacing the Ink Roller ......................................................................25
In Case of Power Failure or Paper Jam ..............................................25
Before Calling for Service....................................................................26
Specifications.......................................................................................26
Page 5
3
Parts and their Functions
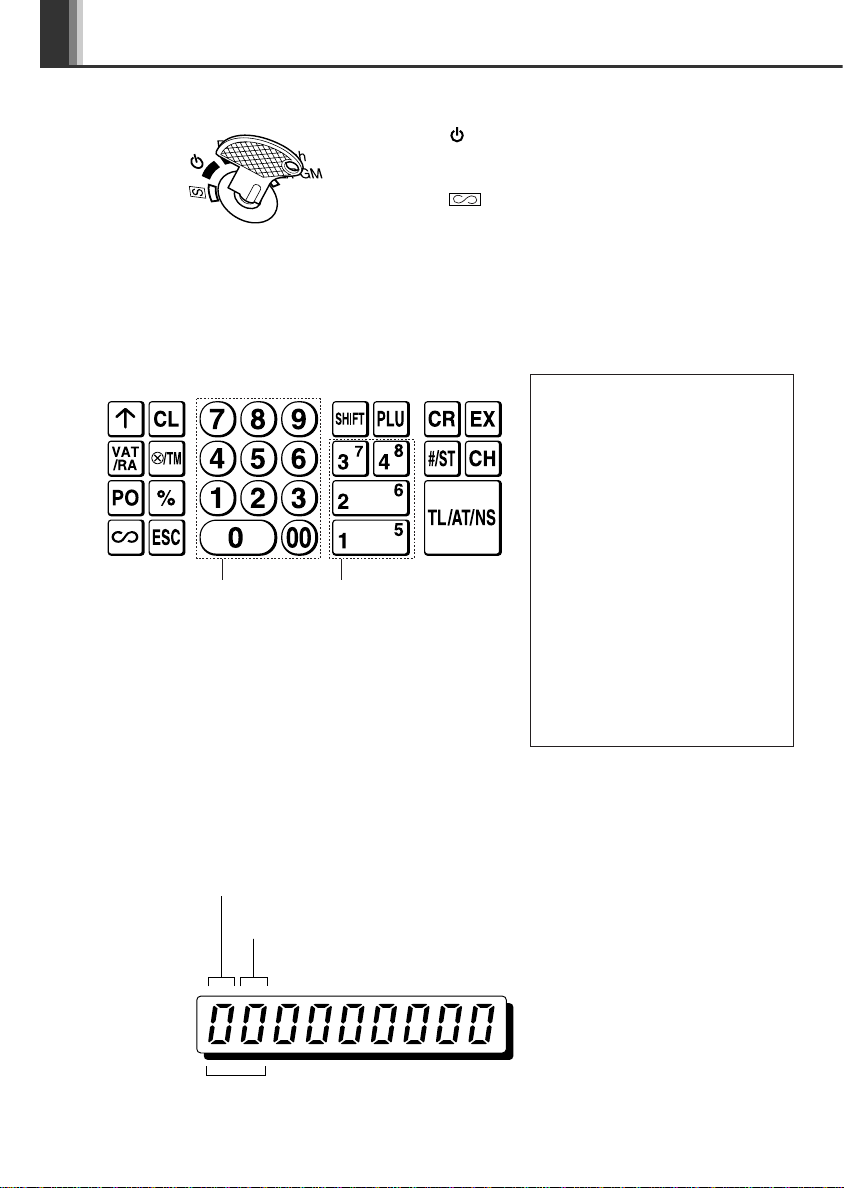
Mode Switch
Keyboard
Display
Your cash register is equipped with a front LED (Light-Emitting Diode) display that affords easy
visibility of 9 digits for the operator during transaction.
o: Paper feed key
c: Clear key
V: Value added tax/Received-on
account key
x: Multiplication/Time display key
p: Paid-out key
%: Percent key
v: Void key
e: Escape key
s: Department shift key
P: PLU (Price Look Up) key
R: Credit key
E: Exchange key
S: Non-add code/Subtotal key
C: Cheque key
t: Total/Amount tender/No sale
key
: Turns the display off. No operations are
possible.
REG: Permits transaction entry.
: Permits correction after finalizing a transaction.
X/Flash: Permits printing of sales reports and displaying
the flash reports.
Z/PGM: Permits printing and resetting of sales reports
and programming.
Insert the mode key into the mode switch and
move the key to get an appropriate mode.
Numeric keys Department key
In order to enter the
departments 5 to 8, press
s and then ! to $.
Repeat: Indicates the number of times the same department key or
PLU key is pressed repeatedly. If an entry is repeated
more than ten times, only the last digit is displayed.
PLU code: Indicates the PLU code entered.
Departments: Indicates the department entered. For example,
if department 1 was pressed, “1” would appear.
Page 6
4
Parts and their Functions
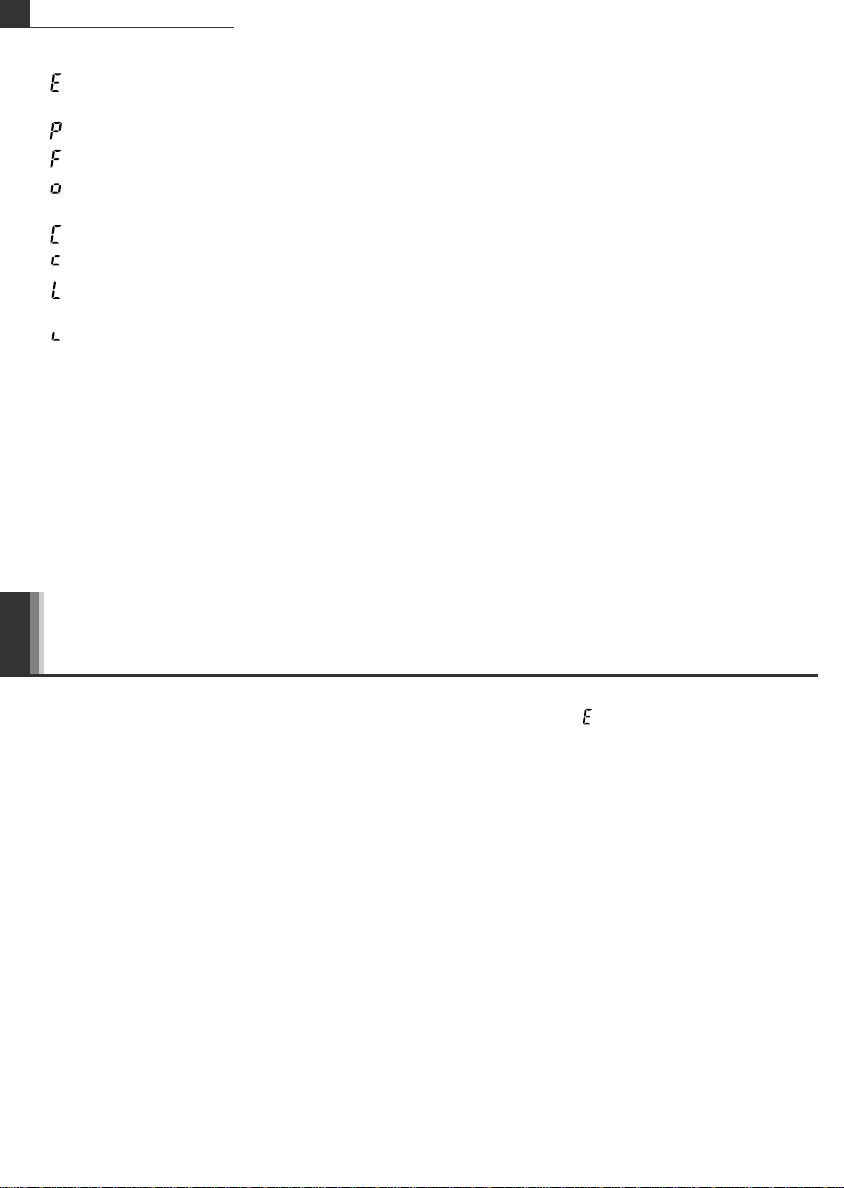
Symbols and figures appearing on the display:
Error: Appears with an alarm sound when an error is made. If this occurs during a
transaction because of an extra digit entry, simply press c and re-enter correctly.
Program: Appears when the cash register is being programmed in the “Z/PGM” mode.
Finalization: Appears when a transaction is finalized by pressing t, R or C.
Subtotal: Appears when the cash register computes a subtotal when S is pressed, and
also when an amount tendered is less than the total sales amount.
Change: Appears whenever a change due amount is displayed.
Exchange: Appears when E is pressed to calculate a subtotal in foreign currency.
Low battery: Appears when the voltage of the installed batteries is under the required level. You
need to replace the batteries with new ones very soon.
No battery: Appears when the batteries are not installed, or the installed batteries are dead.
You must immediately replace the batteries with new ones.
In addition, the following appear when appropriate:
• The minus sign (-) can appear in positions 2 to 9.
• The decimal point appears in positions 1 to 3.
To display the time and date
Set the mode switch to the REG position, and press x once to display the time or press x
twice to display the date.
Press c key to cancel the time/date display.
When an Error Occurs
When your register goes into an error state, it displays the error message “” accompanied with a
warning beep. Clear the error state by pressing c and take the appropriate action.
1. When you enter an over 7-digit number to the department or an over 8-digit number
(79999999) to RA(Received-on Account), PO(Paid-Out), credit or cheque:
Press c and make a correct entry.
2. When you make an error in key operation:
Press c and make a correct entry.
3. When you make an entry beyond a programmed entry digit limit:
Check if the entered amount is correct. If correct, check the setting of the entry digit limit.
4. When a subtotal exceeds eight digits (79999999):
Press c and then press t, R or C to finalize the transaction at that point.
5. When the number of an item exceeds 3 digits in multiplication entry:
Press c and re-enter a correct number.
Error Escape Function
When an error or something uncontrollable occurs during transaction entry and you cannot keep
the customer waiting, press e twice (following c when in the error state). You can escape the
situation and finalize the transaction as a cash sale at that time. Transaction entries until then are
registered.
Page 7

5
Preparing the Cash Register
In order for your cash register to operate properly, you must reset it before programming for the
first time. Follow this procedure.
1. Insert the mode key into the mode switch and turn the key to the REG position.
2. Insert the plug into the AC outlet. A buzzer will sound three times.
IMPORTANT: This operation must be performed without batteries loaded.
3. The register display should now show “ 0.00”.
4. Press x to confirm the clock starts from “ 0-00”.
5. Press c to cancel the time display.
Please do the following before using the register for the first time.
Step 2 Reset the Cash Register
For installing the cash register, find a stable surface near an AC outlet where the cash register will
not subject to water sources or direct sunlight, then install the register using the fixing angle
bracket provided with the register.
The fixing angle bracket prevents the register from moving when the drawer opens. By hooking the
register on the bracket, you can secure the register to the position.
Follow the procedure shown below for the installation.
How to install the fixing angle bracket
1. Thoroughly clean the location where the fixing angle
bracket (B) is to be placed.
2. Peel off the adhesive tape on the fixing angle bracket.
3. Hook the angle bracket onto the hook (A) that is
located at the bottom rear of the register.
4. Firmly stick the fixing angle bracket to the table
surface that you cleaned above.
How to remove the register from the fixing angle bracket
1. Lift up the front of the register and pull the register
towards you.
Step 1 Install the Cash Register
A
B
Page 8
6
Preparing the Cash Register
On your register, a printer is mounted, and you can print receipts or journals. For the printer, you
must install the paper roll provided with the register, even when you program the register for not
printing receipt.
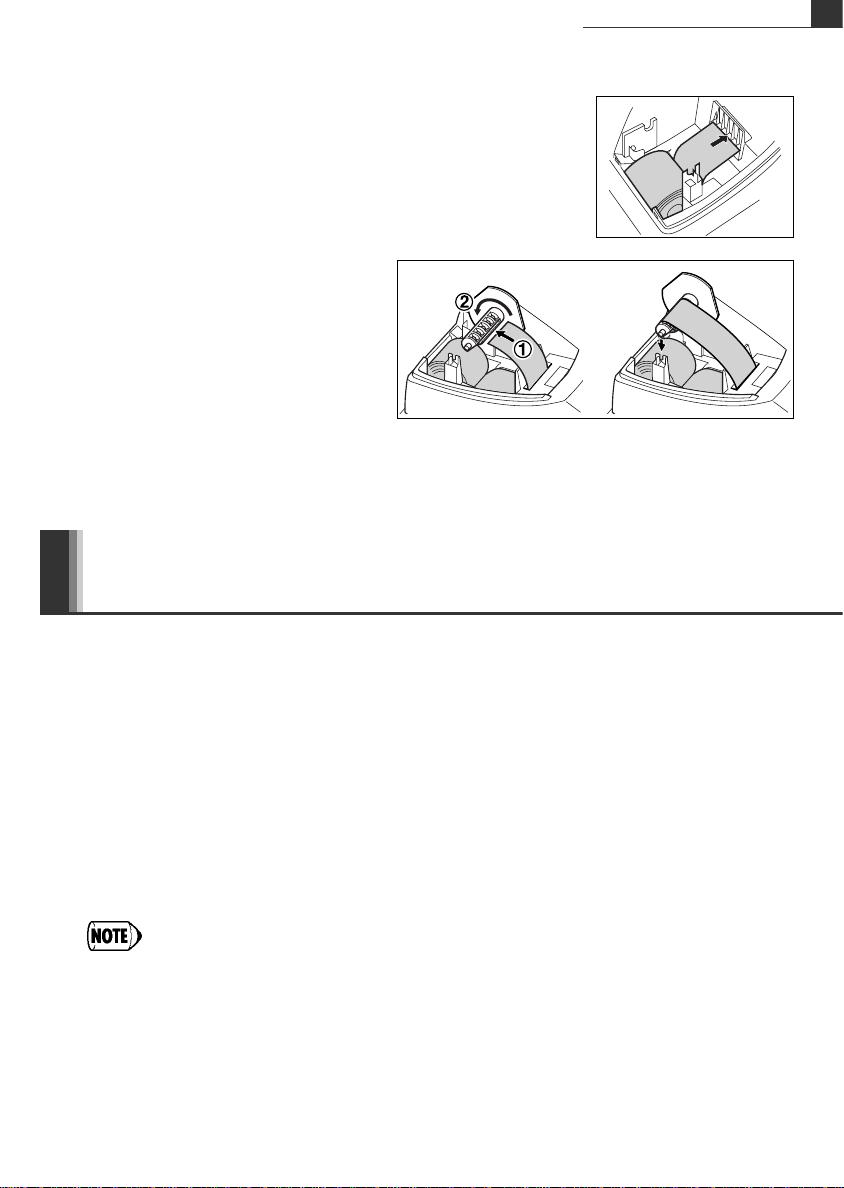
1. Set the paper roll in the paper roll cradle as shown in the
diagram.
Step 4 Install the Paper Roll
Three new R6 or LR6 batteries (“AA”size) must be installed in the cash register to prevent the data
and user-programmed settings from being erased from the memory, when the AC cord is
accidentally disconnected or in case of power failure. Once installed, the batteries will last
approximately one year before needing replacement. At this time, the “” symbol will appear on
the display to indicate that the batteries are low and that you must replace them within two days.
Install three new R6 or LR6 batteries (“AA”size) according to the procedure shown below with the
AC cord connected and set the mode switch to the REG position:
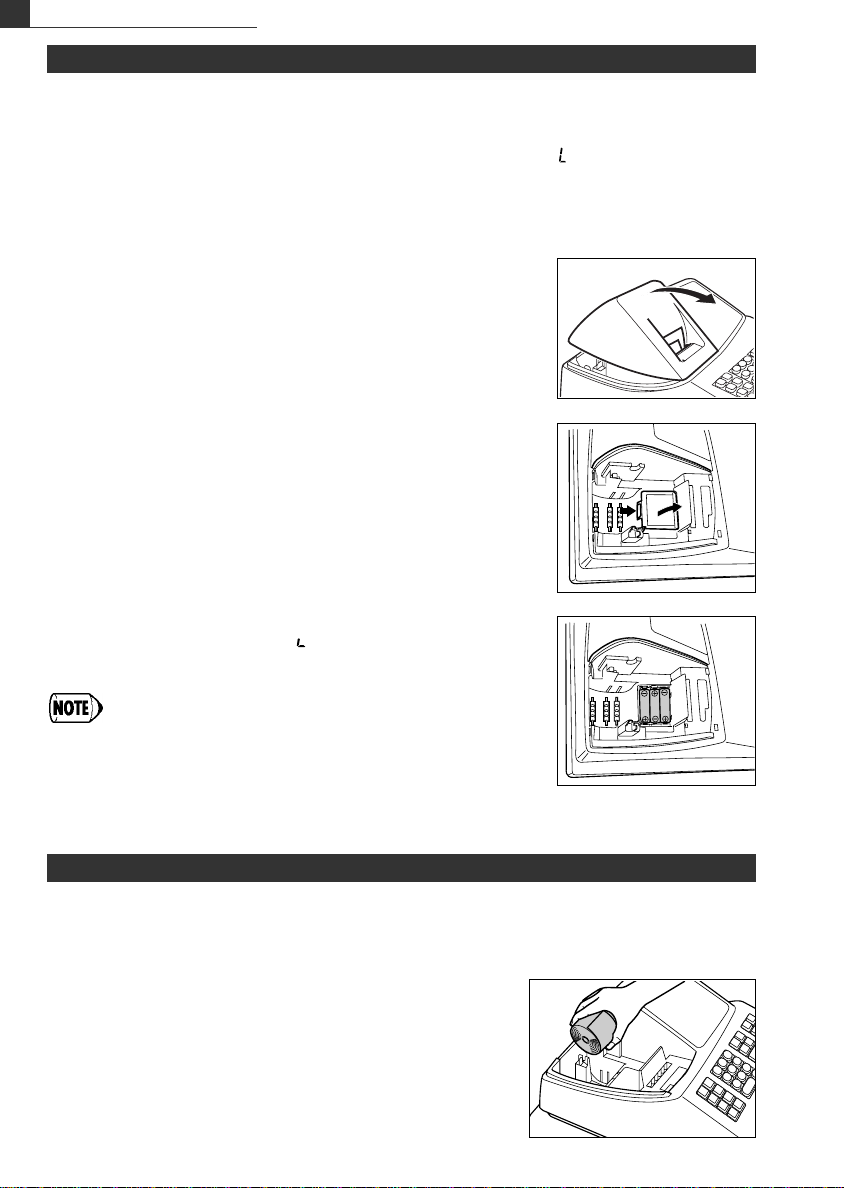
1. Push the printer cover forward and detach it.
2. Open the battery cover next to the paper roll cradle.
3. Insert three new R6 or LR6 batteries (“AA”size).
4. Confirm the no battery symbol “” lights off.
5. Close the battery cover.
Be sure to observe precautions shown on page 1 when
handling batteries.
Step 3 Install Batteries
(Views from rear)
Page 9
7
Preparing the Cash Register
Quick Start Operations
In this section, how to make basic programming which you must program before starting sales
operation and basic sales operation are explained.
Abbreviations and Terminology used in this manual
Dept.: Department; a category for merchandise classifications. Every sales item should
belongs to a department.
PLU: Price Look Up; a category for merchandise classifications. PLUs are used to call
up preset prices by a code entry (1-80).
Function keys: Function keys are listed in Keyboard section. Please refer to page 3.
VAT: Value Added Tax
X report: Report to read sales data
Z report: Report to read and reset sales data
Receipt ON/OFF function: To print or not to print receipts or journals in the REG mode.
• If your domestic currency decimal position is other than 2, you must change the setting.
For setting, please refer to Miscellaneous Programming section.
• You can continue programming (step 1 through 3 below) without printing the
programming report by not pressing S at each program step. However, to finish
programming, you must press S.
When you press S at the end of programming, the programming report will be
printed. On the report you can check the settings you did. Make sure that your
programming is correctly done.
For reading the report, please refer to Checking the Programmed Machine Settings
section.
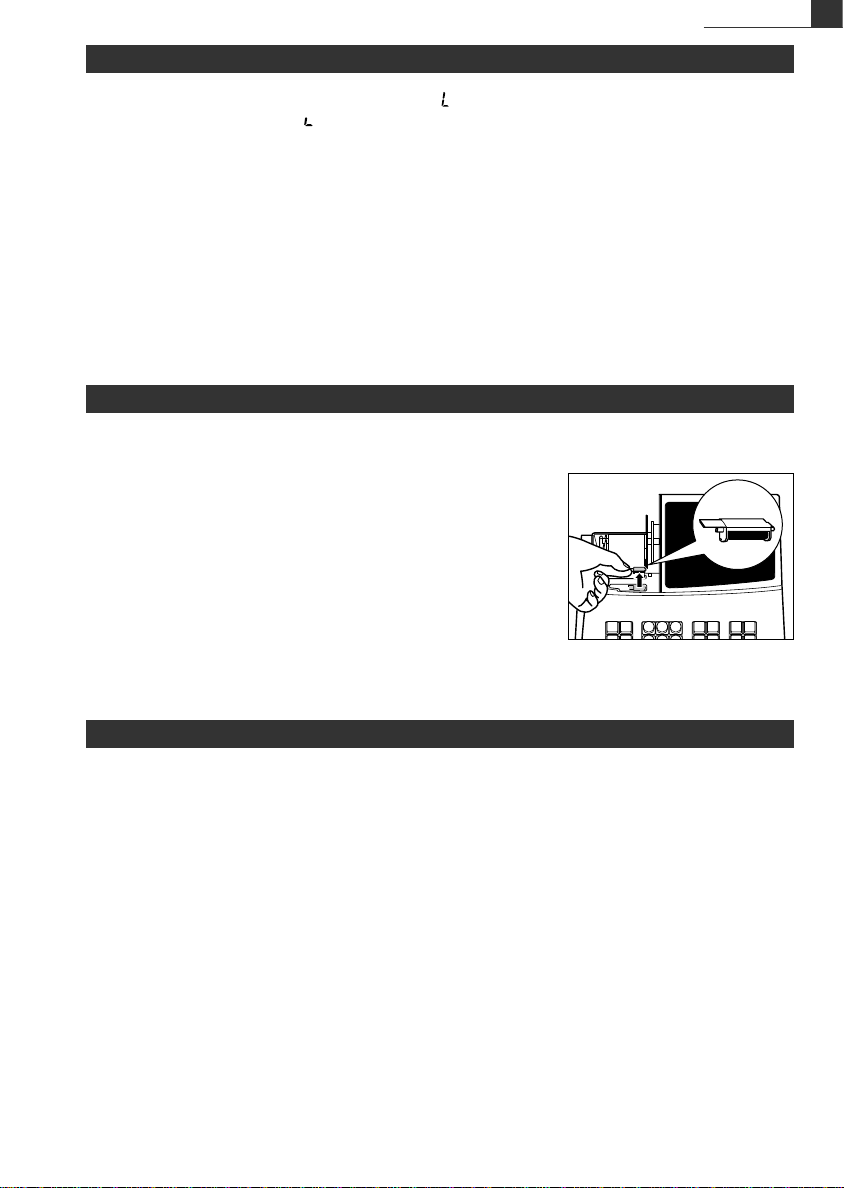
2. Insert the paper straight into the paper inlet, and press o. The
paper then feeds through and appears in the print area.
3. (For journal printing) Insert the top
end of the paper into the slit in the spool
shaft and wind the paper two or three
turns.
4. (For journal printing) Place the takeup spool on the bearing.
5. Replace the printer cover. For receipt printing, pass the paper end through the openings of
the printer cover. Be very careful not to cut yourself on the manual cutter.
Page 10

8
Quick Start Operations
For setting the date, enter the date in 6 digits using the day-month-year format. (For example, enter
260805 for 26 of August, 2005)
For setting the time, enter the time in 4 digits using the 24-hour format.
Set the mode switch to the Z/PGM position, then operate the following key sequences.
Date (DDMMYY) ➜
S(➜S
: to finish programming)
Time (max. 4 digits in 24-hour format) ➜
S(➜S
)
You can change the date format in the Z/PGM mode. If you change the format, follow the
format you changed when setting the date.
Step 1 Programming Date and Time
Your cash register comes with the the ability to program six kinds of tax system. Program a tax
system required by your region, and program tax rates (00.0000% to 99.9999%) on the tax system
you selected.
Make sure that the mode switch is at the Z/PGM position, then operate the following key
sequences.
Programming the Tax System
8➜S
➜ A ➜
S(➜S
)
Parameter A: Tax system
Manual VAT 1-4: 0 (Default) Auto VAT 1-4: 1 Auto Tax 1-4: 2
Manual VAT 1: 3 Manual Tax 1-4: 4 Auto Tax 1-3 and Auto VAT 1: 5
Programming VAT (Tax) Rate
Parameters
A: VAT (Tax) 1: 1 VAT (Tax) 2: 2 VAT (Tax) 3: 3 VAT (Tax) 4: 4
B: VAT(tax) rate in 6 digits (000000 to 999999) (Default: 000000)
C: Lower tax limit (0 to 9999) only for TAX system. (Default: 0)
9 ➜ S ➜ A ➜ x ➜ B ➜ x ➜ C ➜ S (➜ S)
When lower tax limit is not specified
Step 2 Programming Tax
Page 11

9
Quick Start Operations
In this section, the basic sales entry method using department key with simple correction (void)
method is explained. For more information such as PLU entries, VAT(tax) entries and entries using
function keys, please refer to Utilizing Various Features for Sales Entries section.
An operation example (paid by cash) is shown below.
Before starting sales entries, make sure that a paper roll is installed.
1. Set the mode switch to the REG position.
Step 4 Making Basic Sales Entries (Department Entries)
Merchandise can be classified into eight departments. Items sold with use of the department keys
can later be printed on a report that shows the quantities sold and sales amounts classified by
department. The data is useful for making purchasing decisions and other store operations. When
using a department key, you must set the parameters to specify the department status, such as
plus or minus sign and tax status.
Make sure that the mode switch is at the Z/PGM position, then operate the following key sequence.
ABCDEFG ➜
x
➜ (s➜ ) Department key (➜
S
)
(Press s to program departments 5 to 8.)
Parameters: Selection: Entry:
A Sign +/- + sign* 0
- sign 1
B Normal/SICS (Single Item Cash Sale) Normal* 0
SICS 1
C VAT4 or TAX4 No* 0
Yes 1
D VAT3 or TAX3 No* 0
Yes 1
E VAT2 or TAX2 No* 0
Yes 1
F VAT1 or TAX1 No 0
Yes* 1
G Entry digit limit (0 to 7 digits) 0 through 7 (default: 7)
*: Default
• Sign
Assign + sign to departments in which normal sale amounts are to be entered, and - sign to
departments in which payments for items such as refunds, bottle returns or other minus
transactions are to be entered.
• SICS (Single Item Cash Sale)
This allows the operator to finalize the transaction entry by entering the unit price of one item and
pressing the department key set for SICS. If the unit price is preset for the department key, you
can finalize the transaction by pressing the department key only.
• Entry digit limit
Setting this parameter for applicable departments prevents the accidental entry of too large an
amount during a sale. For example, if the highest entry to be allowed is 9.99, enter 3. If 0 is
entered you cannot enter a price and only a preset price can be entered.
Step 3 Programming Department Status
Page 12
10
Quick Start Operations
2. Enter the price for the first department item (in case of 15.00, enter 15:).
3. Press the appropriate department key.
For department 5 to department 8, press s first before pressing the department key.
4. Repeat steps 1 and 2 for all the department items.
5. Press S to display the amount due. (You can omit this step.)
6. Press V to make the tax calculation in case your tax system is manual VAT1-4 system
(default setting).
7. Enter the amount received from the customer. (You can omit this step if the amount tendered is
the same as the subtotal.)
8. Press t, and the change due is displayed and the drawer is opened.
9. Tear off the receipt and give it to the customer (in case you programmed receipt printing) with
his or her change displayed.
10.Close the drawer.
• When paid by cheque, press C instead of t.
• When paid by credit, press R instead of t.
• If you preset unit prices to departments, you can omit entering the unit price of the
department item, that is, omit the step 1 shown above. For the programming, refer to
the Department Preset Unit Price Programming section.
Direct finalization (No change)
Selling a 5.00 item (dept. 1) and an 8.00 item (dept.3) for cash, and the sales total
including tax is 13.00, and receiving the exact amount of money.
5:! 8:# St
Price and dept. Price and dept.
Amount tendered operation
Selling a 5.00 item (dept. 1) and an 8.00 item (dept. 3) for cash and receiving 20.00
from your customer.
5:! 8:# S 20: t
Price and dept. Price and dept. Amount tendered
Making tax calculation (tax system: manual VAT1-4)
Selling a 5.00 item (dept. 1) and an 8.00 item (dept. 3) for cash and receiving 20.00
from your customer.
5:! 8:# S V 20: t
To make tax calculation
When making an error entry:
Correction of entered numbers: Delete it by pressing c immediately after the entry.
Correction of the last item entry: Press v.
Correction when you found an error on earlier entries:
Void the incorrect entry using the void key, and make the correct
entry as shown in the example below.
For details, please refer to Corrections section on page 15.
Correction of earlier entries
Correcting 300 ! entry to 200 ! after another correct entry has been made
3:! 525# 3:v! 2:! t
Void for 300! Correct entry
Example
Example
Example
Example
Page 13

11
Quick Start Operations
In order to check sales, you can read a sales report. Also you should reset sales data after you
practicing your cash register.
To read a sales report, you should take an X report; set the mode switch to the X/Flash position,
and press t.
To reset sales, you should take a Z report; set the mode switch to the Z/PGM position, and press
C. The sales data accumulated and the ground total (GT) is cleared.
For reading and resetting of actual sales data, please refer to Reading and Resetting of Sales
section. You should reset sales data at the end of each day to clear sales data.
Step 5 Reading/Resetting Sales Data
Page 14
12
Utilizing Various Features for Sales Entries
Enter the PLU code of a PLU item and press P. The PLU item will be registered.
Selling a PLU1 item and a PLU15 item by credit.
1P 15P R
To use PLU item sales entry, you must program PLUs.
Example
Before making sales entries, make sure that a paper roll is installed in case receipt function is on.
Also make sure to turn the mode switch to the REG position.
PLU Entries
When selling only item by cash (Single Item Cash Sale (SICS) entry)
When a sale is for only one item paid by cash, such as a pack of cigarettes, you can use SICS
function. It is applicable only to department keys programmed for SICS or to PLUs associated with
such departments. The drawer opens after pressing the department or PLU key.
When entering more than one of the same department or PLU items
You can enter two or more of the same department or PLU item by pressing department or PLU
key repeatedly (repetitive entry), or by using the multiplication key (multiplication entry). It will
be convenient to use the multiplication key when selling the same item in bulk. For operation, refer
to the example shown below.
Repetitive entry
Selling two 2.00 items (dept. 1) and three PLU5 items for cash
2:!! 5PPP t
Multiplication entry
Selling six 1.50 items (dept. 1) and twelve PLU5 items for cheque payment
6x 150! 12x 5P S C
Mixed tender sale
When the amount tendered by cash or cheque is less than the sales amount including tax, the
display shows a deficit and “”. To compensate for the deficit, make an additional amounttendered entry or make a credit entry.
Your customer pays 8.30 in cash and 50.00 by credit for an including-tax subtotal of
58.30.
S 830 t R
Amount received Displays a
in cash deficit and “”
Example
Example
Example
Convenient Sales Entries
Page 15
13
Utilizing Various Features for Sales Entries
Your cash register provides the following six tax systems.
Your cash register is pre-programmed as manual VAT 1 to 4 system.
Auto VAT 1 to 4 system (automatic operation method using programmed percentages)
This system, at settlement, calculates VAT for taxable 1 through 4 subtotals by using the
corresponding programmed percentages.
Auto tax 1 to 4 system (automatic operation method using programmed percentages)
This system, at settlement, calculates taxes for taxable 1 through 4 subtotals by using the
corresponding programmed percentages, and also adds the calculated taxes to those subtotals,
respectively.
Manual VAT 1 to 4 system (manual entry method using programmed percentages)
This system provides the VAT calculation for taxable 1 through 4 subtotals. This calculation is
performed using the corresponding programmed percentages when V is pressed just after
S.
Manual VAT 1 system (manual entry method for subtotals that uses VAT 1 preset
percentages)
This system enables the VAT calculation for the subtotal. This calculation is performed using the
VAT 1 preset percentage when V is pressed just after S. For this system, the keyed-in VAT
rate can be used. In this case, after pressing S, enter the VAT rate and press V.
Manual tax 1 to 4 system (manual entry method using preset percentages)
This system provides the tax calculation for taxable 1 through 4 subtotals. This calculation is
performed using the corresponding programmed percentages when V is pressed just after
S. After this calculation, you must finalize the transaction.
Auto tax 1 to 3 and auto VAT 1 system
This system enables the calculation on the combination with automatic tax 1 through 3 and
automatic VAT 1. The combination can be any of VAT 1 corresponding to taxable 4 and any of tax
1 trough 3 corresponding to taxable 1 through 3 for each item. The tax amount is calculated
automatically with the percentages previously programmed for these taxes.
VAT/tax calculation for PLU items are performed according to the one set for its
associated department.
VAT (Tax) Calculation
If you want to apply a discount or a premium for an item, enter the percent rate and press the
percent key. If you want to apply a discount or premium for the subtotal, enter all the items, press
S and then press the percent key following the percent rate.
Your machine is pre-programmed as discount. If you change to premium, refer to the
percent key programming section. Also you can preset a percent rate. If a percent rate is
preset, you do not have to enter a percent rate before pressing the percent key. For the
programming, also refer to the percent key programming section.
Applying a 20.00% discount to an item belonging to department 3
8:# 20:% t
Applying a 15.00% discount to the subtotal of a transaction
8P 12P 8:! S 15:% t
Example
Example
Discounts and Premiums Using the Percent Key
Page 16
14
Utilizing Various Features for Sales Entries
Your register allows payment entries of foreign currency when you programmed a currency
exchange rate. After items entries or during tendering entries, press E, the subtotal in foreign
currency can be displayed. Then enter the tendered amount in foreign currency if not exact
amount payment, and press a finalization key (t / C or R when programmed). The change
due in domestic currency will be displayed.
• When the amount tendered is short, the deficit is shown in domestic currency.
• If you select "Yes" for cheque and credit operation when tendering in foreign currency in
EURO programming, you can finalize a sale in foreign currency using C or R.
• If you select “Yes ” for exchange amount printing for total and change in EURO
programming, you can display a change in foreign currency by pressing E when the
change is displayed in domestic currency. To return to the display in domestic currency,
press E again.
Selling a department 3 item (price 79.50) in a foreign currency. (Preset exchange rate:
1.550220
7950# E 130: t
Amount tendered in foreign currency
Example
Currency Exchange
When you need to open with no sale, for example to make changes, just press t. The drawer
will open.
No Sale
Since your cash register comes with no refund key, make a negative department (see the required
programming on page 9) and use it.
Check that the taxable status of the returned item is the same as that of the negative
department. Otherwise the tax will not be calculated correctly.
Refund
Non-add code numbers can be entered and printed on the receipt or journal during the entry of a
sale. Non-add codes can be used for a variety of things. For example: credit numbers, check
numbers, serial numbers, products codes, service charge codes, or any other numbers for later
reference to specific transactions. Enter a code number of up to 8 digits and press S.
Non-add Code Number
When you receive an account from a customer or when you pay amount to a vendor, it is a good
idea to use V or p respectively.
For the received-on-account entry, enter the amount, and press V.
For the paid-out entry, enter the amount, and press p.
The entry limit is 8 digits (79999999), though it is different if you programmed.
Receiving 60.00 on account from a customer whose code number is 12345.
12345S 60: V
Example
Received-on Account and Paid-out Entries
Page 17

15
Utilizing Various Features for Sales Entries
If you should make an error when entering an item into a sale, correct it using the following
procedures.
• Correction of entered numbers
When you enter an incorrect number, delete it by pressing c immediately after the entry.
• Correction of the last entry (direct void)
If you make a mistake when making a department entry, PLU entry, multiplication entry or
repetitive entry (the last entry only), you can correct this by pressing v.
• Correction of earlier entries (indirect void)
With this function, you can correct department or PLU entry incorrectly made during a transaction
if you find it before finalizing the transaction by pressing t, R or C.
To correct 3P entry to 4P after another correct entry has been made, enter the
following:
3P 1150! 3vP 4P t
Indirect void correct
for 3P entry
• Correction after issuance of receipt
This function allows you to reverse the entries made on an incorrect receipt. The entries are
subtracted from each totalizer and add to a void totalizer. Turn the mode key to position,
and enter the same details that are on the incorrect receipt. (If necessary, enter the secret code
and press t when you turn the mode key to position.)
Example
Corrections
All the data on all of your registrations as well as other transaction information will remain in the
memory of your cash register as long as your cash register has power (Be sure you have live
batteries installed in case of a power failure). This information can be printed in the form of a
report which can be helpful to you in running your business.
Reading and Resetting of Sales
Use this function for on-the-spot checking of individual cash register’s sales data. The sales total is
shown on the display but is not printed nor cleared from the cash register’s memory.
To display the flash report for each individual item, press the following keys in the X/Flash mode:
Individual department sales Department key
Sales total S
Cash in drawer R
Flash reports for viewing on the display
This report, when taken in the X/Flash mode, prints the accumulated information of sales.
Taking an X report is a good way to do a mid-day check on daily sales. You can take X reports any
number of times, because they do not affect the cash register’s memory.
To issue an X report, set the mode switch to the X/Flash position and press t.
X reports for reading of sales
Page 18
16
Reading and Resetting of Sales
This report, when taken in the Z/PGM mode, prints the same information as an X report. Once this
report had been printed, the cash register’s memory of daily information is cleared and all the
transaction totals are reset to zero. Be sure to issue a Z report at the end of each day.
With a Z report printing, you can also reset GT (ground total).
To issue a Z report, follow the procedure described below.
1. Set the mode switch to the Z/PGM position.
2. If necessary, enter the secret code and press t.
To issue a Z report with resetting of GT:
3. Press C.
4. If necessary, enter the secret code and press C.
To issue a Z report without resetting of GT:
3. Press t.
4. If necessary, enter the secret code and press t.
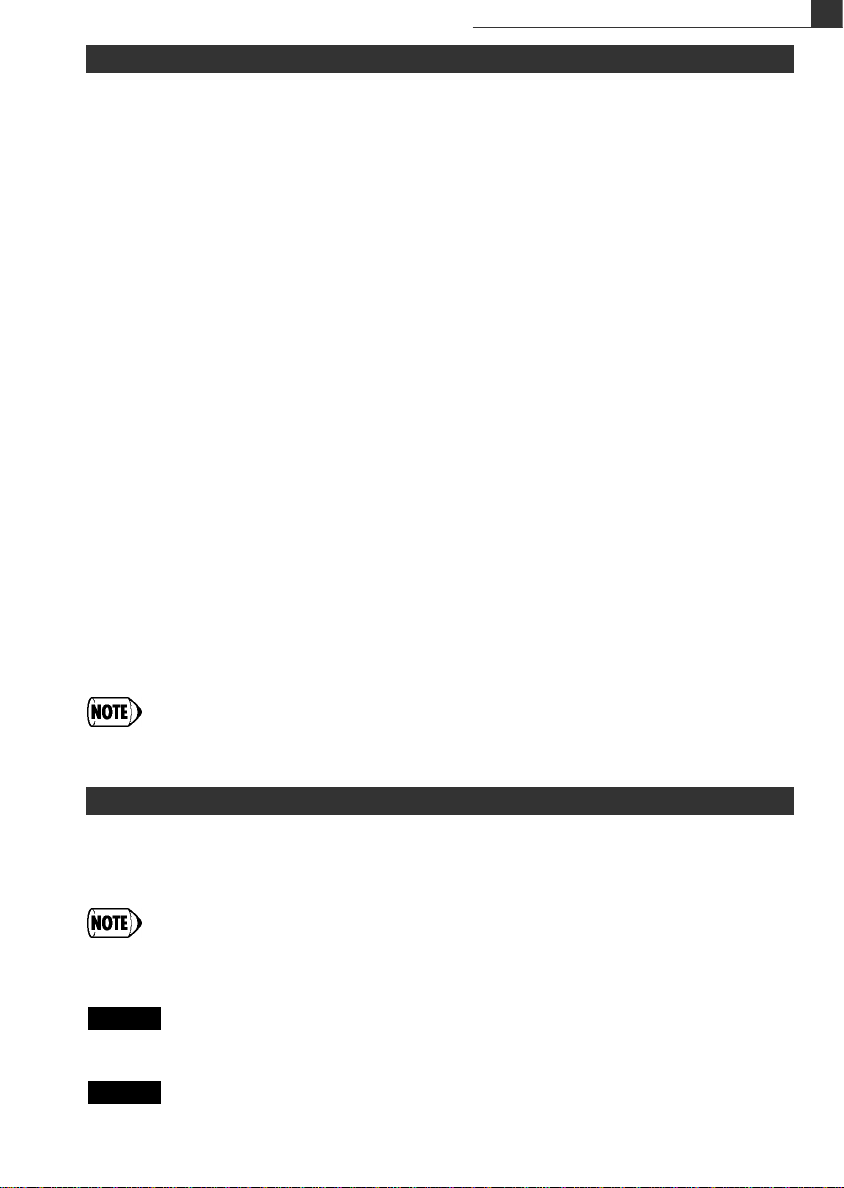
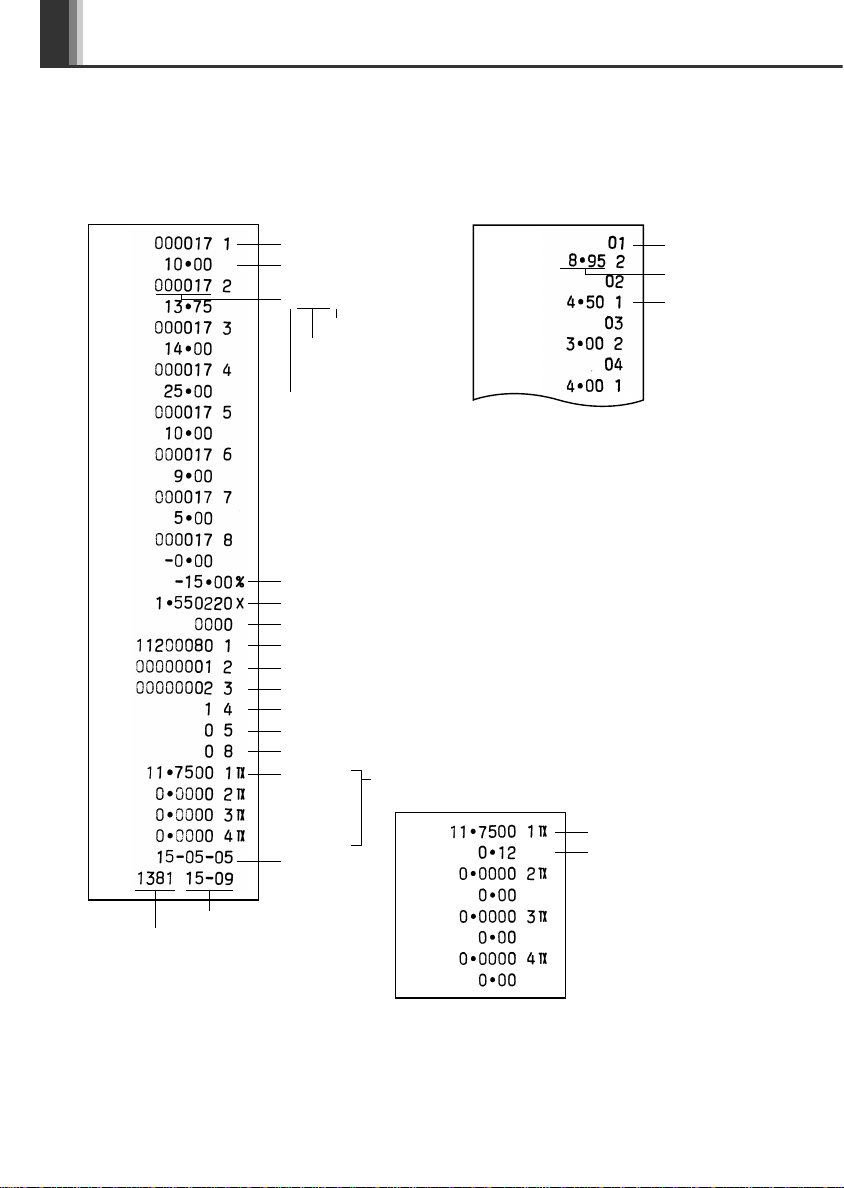
Z reports for reading and resetting of sales
Reset counter
Grand total
Quantity
Dept. counter
and total
Percent counter
and total
Item void counter
and total
Void mode counter
and total
*
2
Taxable 1 total
Tax 1 (VAT) total
Dept. code
Amount
*
1
Reset symbol
(“X” is printed
in case of
X reports.)
Count of transactions
Sales total
Cash sale counter
and total
Cheque sale counter
and total
Credit sale counter and total
Exchange counter
and total
(in cash tendering)
Exchange counter
and total
(in cheque tendering)
Exchange counter
and total
(in credit tendering)
Received-on account total
Paid-out total
No sale counter
Cash in drawer
*
3
*
4
*
4
Sample sales report
*1Printed in the Z report only.
*2Difference by rounding is printed here in case Australian rounding is applied.
*3Not printed in case that the exchange rate is set to 0.000000.
*4Not printed in case that “Cheque and credit operation when tendering in foreign currency”
is set to “No” on EURO programming, and/or the exchange rate is set to 0.000000.
Page 19

17
EURO Migration Function
Your register can be modified to correspond with each period set for the introduction of EURO, and
in your register each currency is treated as shown on the table below depending on which period
you are in.
Basically your register can be automatically modified to correspond to the introduction of EURO by
executing automatic EURO modification operation shown below in Z/PGM mode. However, there
are several options you must set depending on your need. So, please carefully conduct necessary
settings.
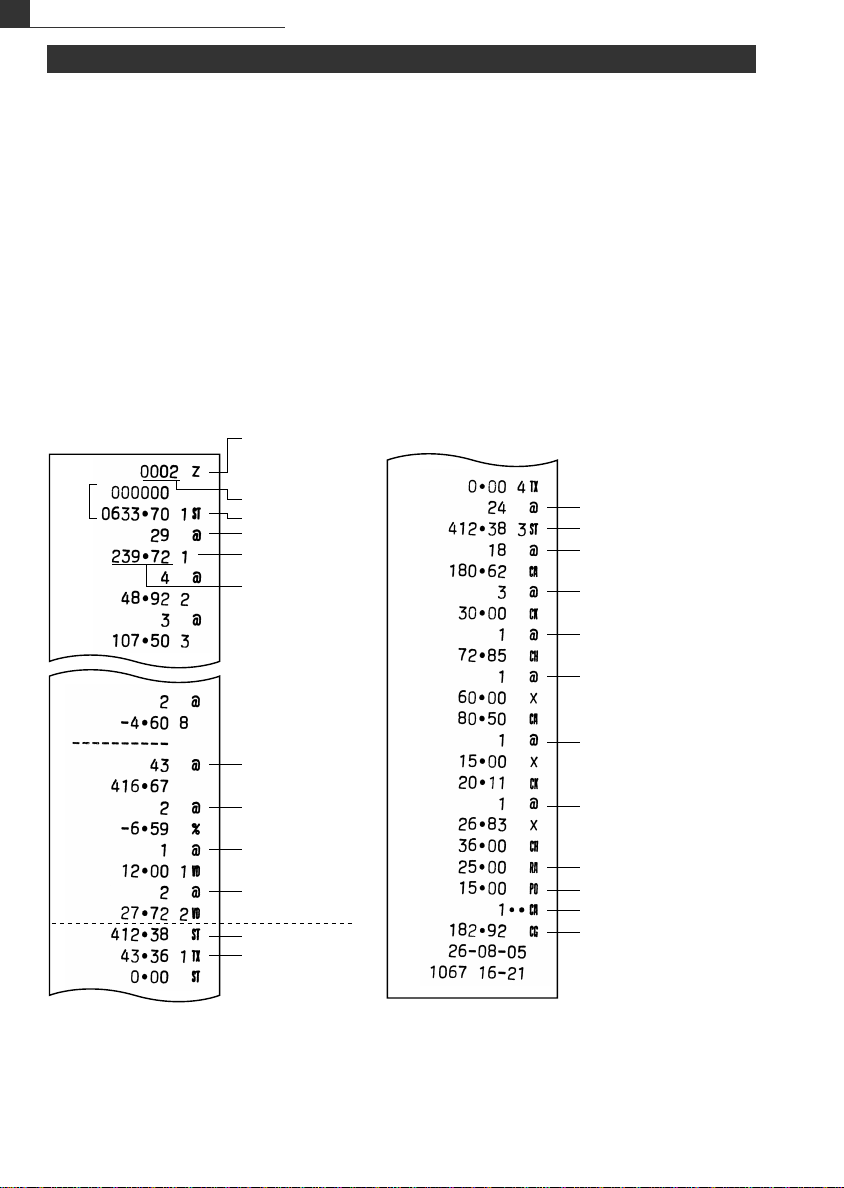
How currencies are treated in your register
Automatic EURO modification operation
Make sure the mode switch is in the Z/PGM position first, (if necessary, enter the secret code and
press t) and perform the following procedure. Please note that you can perform each
operation only once with the substitution of “A=1”, “A=2” and “A=3”. For example, if you performed
the operation with the substitution of “A=2” first, you cannot perform the operation with the
substitution of “A=1”.
8:S A* S
*A: Enter 1 for the period 1, 2 for the period 2, and 3 for the period 3.
The details of the register system modification are as shown on the following page:
Period 1
After the introduction of
EURO, and before
EURO banknotes and
coins begin to circulate
Exchange key
Domestic currency
Period 2
After EURO banknotes
and coins begin to
circulate, and before
national currency is
withdrawn from
circulation. (Coexistence of EURO and
national currency)
Domestic currency
Exchange key
Period 3
After the national
currency is withdrawn
from circulation
Domestic currency
Exchange key
EURO
National currency
(DM, F, etc.)
Foreign currency
Currency
Page 20

18
EURO Migration Function
IMPORTANT
• After the execution of the procedure with “A=1”, treat EURO as foreign currency using E. Set
the EURO conversion rate as the currency conversion rate for E.
• After the execution of the procedure with “A=2”, treat EURO as domestic currency and national
currency as foreign currency using E. Set the EURO conversion rate as the currency conversion
rate for E.
• After the execution of the procedure with “A=3”, treat EURO as domestic currency.
• As for the percent rate for % and HALO setting, the automatic conversion is not made. So, when
your domestic currency becomes EURO, you must change these settings so that they are based
on EURO currency.
• You can receive the amount of exchange (EURO or national currency) in cheque or credit. For
the programming, please refer to EURO programming on page 22.
• When “Exchange amount printing for total and change” is set to “Yes”, you can display a change
in foreign currency by pressing E when the change is displayed in domestic currency.
Checking the current EURO status
You can check the EURO status currently set on the cash register. Set the mode switch to the
Z/PGM position, (if necessary, enter the secret code and press t) and perform the following
procedure. The current EURO status will be printed on the receipt or journal.
8:SS
EURO status
Items
General Z report
GT memory
Conversion of preset prices of Dept./PLU
Exchange amount printing for total and
change
Exchange calculation method
Domestic currency symbol
Domestic currency decimal point position
Exchange currency symbol
Exchange currency decimal point position
Rounding of exchange currency
A=1
(EURO status 1)
Issue
-
Yes
Division
-
[EURO]
2
Round off
A=2
(EURO status 2)
Issue
Clear
Yes *
1
Yes
Multiplication
[EURO]
2
Previous domestic currency
symbol
Previous domestic currency
decimal point position
Round off
A=3
(EURO status 3)
Issue
Clear *
2
Yes *
1
No
Multiplication
[EURO]
2
-*
3
-
Round off
• The item marked with “-” remains the same as the previous data.
*1: If the Automatic conversion of unit prices of Depts./PLUs by automatic EURO migration
operation is set NO (default setting) in EURO Programming, or currency exchange rate is set to
0% (default setting) in Exchange Key Programming, conversion of preset prices of Dept./PLU is
not performed in the Automatic EURO modification operation.
*2: When you perform from EURO status 2, previous data remains unchanged.
*3: When you perform from EURO status 1 or 2, “space” is set.
Page 21
19
Advanced Programming
Before starting programming, set the mode switch to the Z/PGM mode. Also if necessary, enter the
secret code and press t.
• You can continue programming without printing the programming report by not pressing
S at the end of each program step. However, you must program PLUs independent
from other programming.
• Unless otherwise specified, programming options marked with * indicate factory setting.
In case of values or number settings, the factory settings are shown with the word,
“Default”.
Unit prices can be assigned directly to department keys for frequently purchased items, which
enables you to enter the prices by simply pressing the department keys.
Unit price (max. 5 digits) ➜ (s➜) Department key (➜
S
) (Default: 0.00)
(Press s to program departments 5 to 8.)
Department Preset Unit Price Programming
The PLU function allow speedy key entries whereby a preset price is automatically called up when
a code is entered. Up to 80 PLU settings are possible. Each PLU should belong to a department
in order to acquire the parameters of the department. The cash register was factory preset so that
PLU1 to 10 are assigned to department 1 and unit price 0.00.
(Press s to program departments 5 to 8.)
To disable a PLU, enter the PLU code and press P, then press v and S.
PLU code ➜ P ➜ Unit price (max. 6 digits) ➜ (s ➜) Department key ➜ S
For the next PLU code programming
When the next PLU code to be programmed does not directory follow the one just entered.
PLU Programming
% can be programmed as a discount key or premium key. As a default, % is programmed as a
discount key. Also you can program a percent rate for %.
When 00.00% is programmed, use of preset percent rate is prohibited. (factory setting)
Programming the percent key function (discount or premium)
1
for discount or
0
for premium ➜
x➜%(➜S
)
Programming the percent rate (00.00 to 99.99%)
Percent rate in 4 digits (0000 to 9999) ➜%(➜
S
)
Percent Key Programming
Page 22

20
Advanced Programming
To handle a foreign currency, you can program a currency exchange rate (000.000000% to
999.999999%) for the exchange key.
When 000.000000% is programmed, use of E is prohibited (factory preset).
Currency exchange rate in 9 digits (000000000 to 999999999) ➜E(➜
S
)
Exchange Key Programming
You can program a printing format of the receipt or journal by using the following eight kinds of
parameters.
2➜S
➜ ABCDEFGH ➜
S
(➜
S
)
Parameters: Selection: Entry:
A Currency symbol for domestic currency Space* 0
EURO 1
B Printing receipt/journal in the REG mode Yes (Receipt ON)* 0
(Receipt ON/OFF function) No (Receipt OFF) 1
C Printing format Journal format* 0
Receipt format 1
D Date printing Yes* 0
No 1
E Time printing Yes* 0
No 1
F Receipt number printing Yes* 0
No 1
G Taxable subtotal printing Yes* 0
No 1
H Subtotal printing with a press of
S
Yes 0
No* 1
• Printing format
When receipt format is selected, the take-up spool does not move.
Printing Format Programming
Page 23

21
Advanced Programming
The receipt number is printed on every receipt or journal, and report, together with the date and
time. The number is incremented each time a receipt is issued. To start from a specific
consecutive number, enter a figure one less than that number.
Receipt start number (max. 4 digits) ➜
x➜S(➜S
) (Default: 0001)
Consecutive Receipt Number Programming
You can program miscellaneous settings suitable for use.
1➜S
➜ ABCDEFGH ➜
S(➜S
)
Parameters: Selection: Entry:
A Date format MMDDYY 0
DDMMYY* 1
YYMMDD 2
B Time format 12 hour format 0
24 hour format* 1
C Decimal point position for domestic currency 0 though 3 (Default: 2)
D Resetting receipt no. when issuing Z report No* 0
Yes 1
E Amount tendered compulsory for
t
No* 0
and
C
Yes 1
F Subtotaling compulsory No* 0
Yes 1
G Entry digit limit for R, C,
V
and
p
0 though 8 (Default: 8)
H Rounding Round off* 0
Round up 1
Round down 2
• Time format
When 12 hour format is set, the a.m. time will be displayed with and printed without no mark,
and the p.m. time will be displayed with and printed with the mark @.
• Amount tendered compulsory
When set for compulsory, always enter the amount tendered by the customer before finalizing the
transaction.
• Subtotaling compulsory
When set for compulsory, always press S before finalizing the transaction.
Miscellaneous Programming
Page 24
22
Advanced Programming
For the details of EURO programming, please refer to “EURO Migration Function” on pages 16 and
17.
3➜S
➜ ABCDEFGH ➜
S
(➜
S
)
Parameters: Selection: Entry:
A
Automatic conversion of unit prices of Depts.
No* 0
/PLUs by automatic EURO migration operation
Yes 1
B Conversion rate printing No* 0
Yes 1
C Exchange amount printing for No* 0
total & change Yes 1
D Cheque & credit operation when No* 0
tendering in foreign currency Yes 1
E Exchange calculation method Multiplication* 0
Division 1
F Rounding for exchange Rounding up* 0
Rounding 1
G Currency symbol for foreign currency Space* 0
EURO 1
H Decimal point position for foreign currency 0 through 3 (Default: 2)
If you select “Yes” for exchange amount printing for total and change, you can display a
change in foreign currency by pressing E when the change is displayed in domestic
currency.
EURO Programming
A secret code is used in order to allow only those who know the secret code to operate the
machine in and Z/PGM modes or to print Z reports. When you need a secret code, program
a secret code.
Secret code (max. 4 digits) ➜
x➜t(➜S
)
(Default: 0000; no application of secret code)
How to enter a secret code:
In case that a secret code has been programmed, “----” is displayed when the mode switch is set to
or Z/PGM or when you need to issue a Z report. In this case, enter the secret code (max. 4
digits) and press t. Every time you enter a digit, the display of “-” changes to “_”.
In case you forget the secret code you programmed:
Set the mode switch to the Z/PGM position, and operate the secret code programming shown
above with the substitution of “0000” for the secret code.
Secret Code Programming
When Australian rounding is set, the sales total amount is rounded to 0 or 5 when paid in cash.
4➜S➜0
for No or 1for Yes ➜
S(➜S
)
(Default: Yes for the register shipped to Australia)
Rounding Programming (For Australian tax system)
Page 25
23
Checking the Programmed Machine Settings
Your machine allows you to print the programmed machine settings, namely, general & tax
programming report and PLU programming report.
Set the mode switch to the Z/PGM position, and press S to print a general & tax programming
report, or press P to print a PLU programming report.
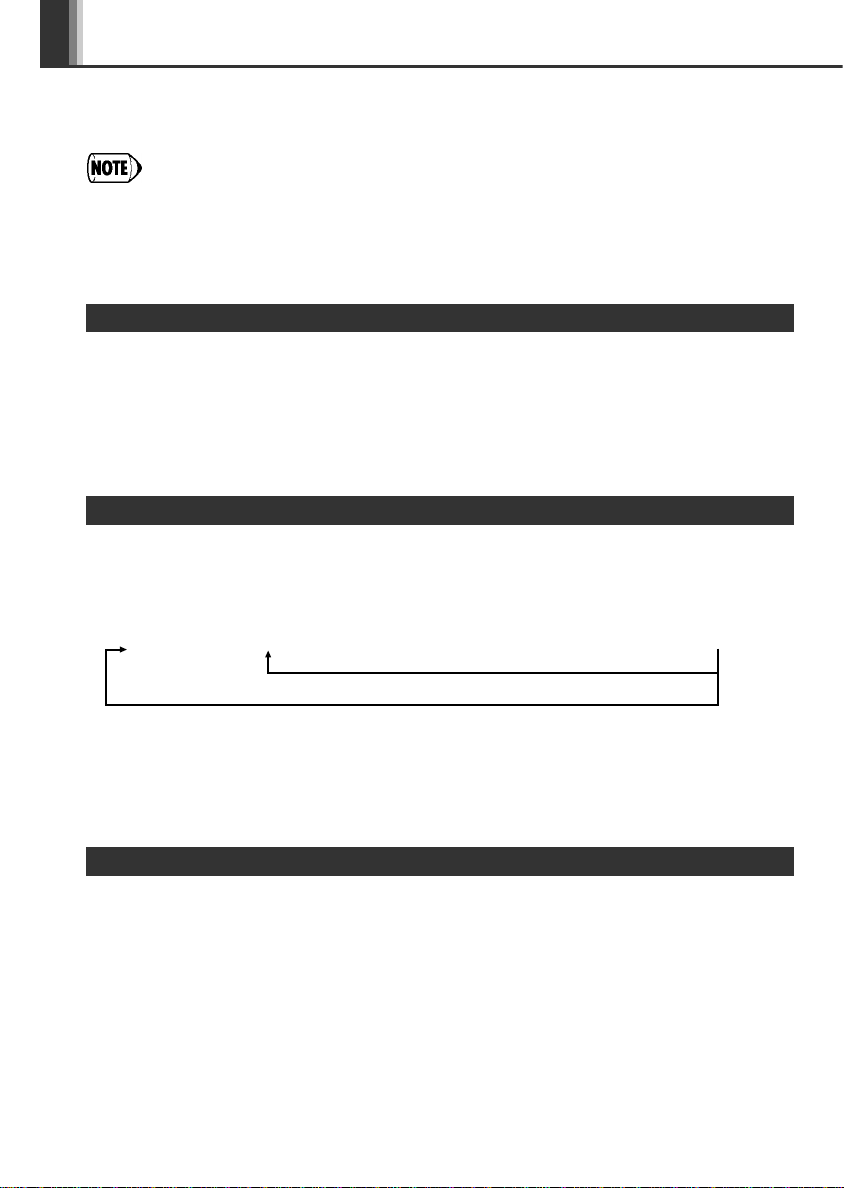
• General & tax programming report •PLU programming report
Department code
Sign and preset unit price
Sign and rate for
%
Rate for
E
Secret code
Miscellaneous programming(from the left, A to H)
Printing format programming (from the left, A to H)
EURO programming (from the left, A to H)
Australian rounding programming (for Australian tax system)
German VAT law programming (for German tax system)
VAT (tax) system
VAT rate
When a tax system is selected,
lower tax limit for each tax is printed.
Tax rate
Lower tax limit
Date
Time
000017
Entry digit limit
Tax status(from the left,
VAT(tax)4, 3, 2, 1; 0 for
not taxable; 1 for taxable)
SICS (1)/Normal (0)
Receipt number
PLU code
Sign and
preset unit price
Associated
department code
Page 26
24
Maintenance
Locking the Drawer
Develop the habit of locking the drawer when not using the register for
any extended period of time.
To lock the drawer, turn 90 degrees counter-clockwise, and to unlock
the drawer, turn 90 degrees clockwise.
Removing the Drawer
To detach the drawer, pull it forward fully, and remove it by lifting it up.
The 6-denomination coin case is detachable from the till. Also the
separators of the coin case are removable.
Manually Opening the Drawer
In case of a power failure or if the machine is out of order, slide the
lever located on the machine bottom toward the direction of the arrow
to open the drawer manually. The drawer will not open if it is locked
with a drawer lock key, though.
Using the Slit of the Drawer
You can enter bills and cheques from the slit without opening the drawer. The bills and cheques
entered are placed under the coin case.
When taking out the bills and cheques, never fail to hold tightly the both sides of the
coin case with your both hands so that the coins in the coin case will not be fallen.
Caution
Drawer Handling
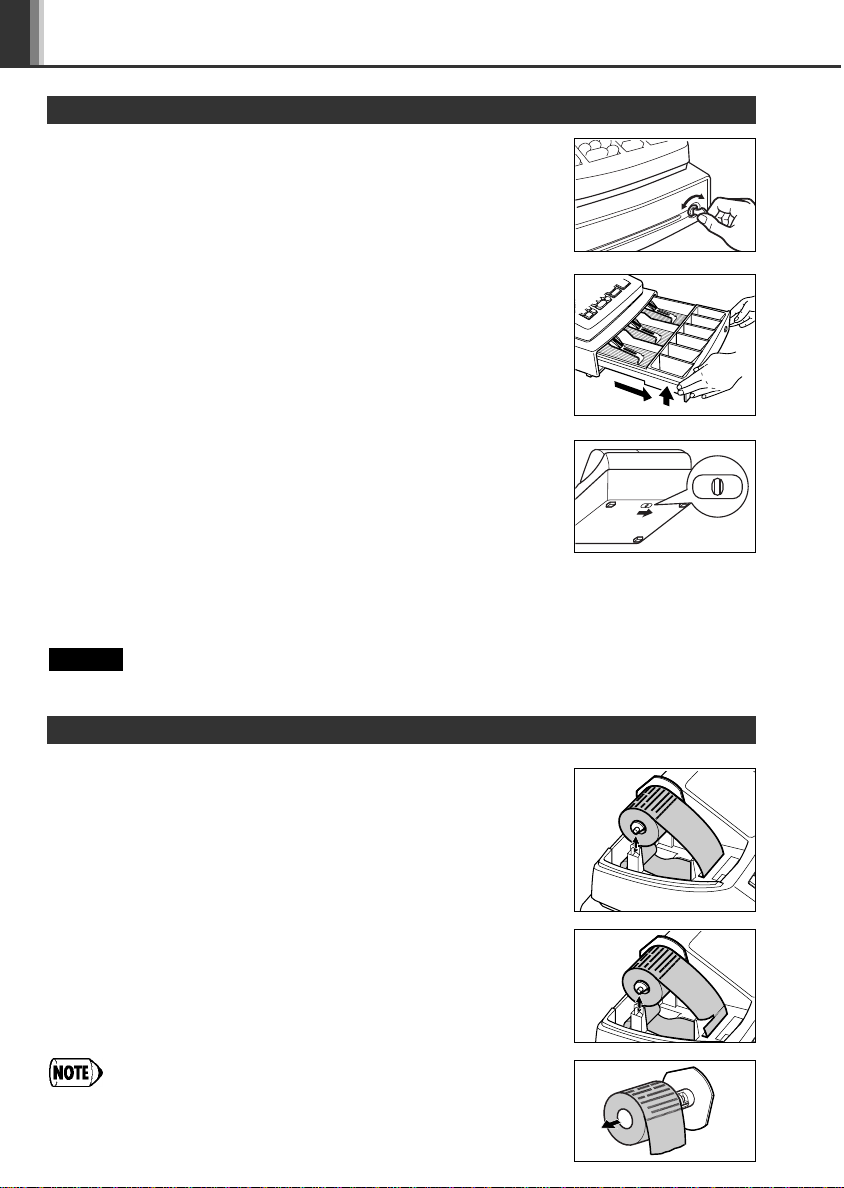
When a dye appears on the paper roll, it is time to replace the paper
roll with new one. Be sure to use the paper roll specified in
“Specification” section.
In case of journal printing
1. Set the mode switch to the REG position.
2. Remove the printer cover.
3. Press o to advance the paper by several lines and then cut it to
remove the take-up spool from the bearing.
4. After cutting the existing paper, remove the paper roll. Then remove
the remaining paper by pressing o.
5. Remove the paper roll from the take-up spool.
6. Install a new paper roll and replace the take-up spool according to
the instructions on page 6.
In case of receipt printing, do the above steps 1, 2, 4 in this
order and then install a new paper roll according to the
instructions on page 6.
Replacing the Paper Roll
Page 27
25
Maintenance
When printing becomes faded, replace the existing ink roller with a new one available from SHARP.
Precautions:
• Be sure to use an ink roller available from SHARP. The use of
any other ink rollers could cause troubles in the printer. Never
pour ink to the ink roller.
• After opening the parcel, install it soon.
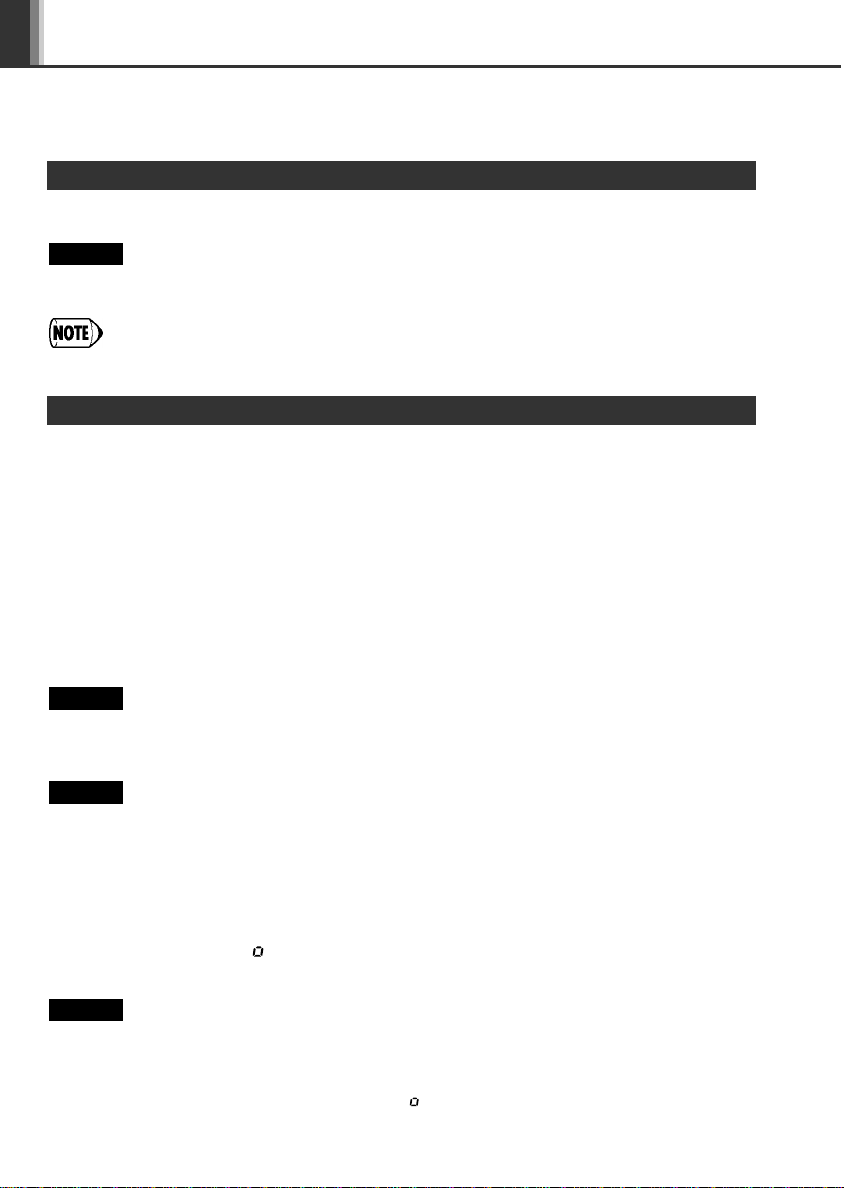
1. Remove the printer cover.
2. Pull the ink roller handle upward to remove the ink roller.
3. Install a new ink roller.
4. Replace the printer cover.
Replacing the Ink Roller
This cash register displays a low battery symbol ( ) when the batteries installed get low, and
displays a no battery symbol ( ) when batteries are extremely low or batteries are not installed.
When the low battery symbol is displayed, replace the batteries with new ones as soon as
possible. The existent batteries will be dead in about two days.
When the no battery symbol is displayed, replace the batteries immediately. Otherwise, if the
AC power cord is disconnected or a power failure occurs, all the programmed settings will be reset
to the default settings and any data stored in memory will be cleared.
For replacing the batteries, be sure that the cash register is plugged in and the mode switch is on
the REG position, then replace the batteries with new ones referring to “Install Batteries” section on
page 6.
Replacing the Batteries
Ink roller
When power failure occurs:
If power is lost, the machine retains its memory contents and all information on sales entries when
the batteries are in the proper state of charge.
• When power failure occurs in register idle state or during an entry, the machine returns to the
normal state of operation after power recovery.
• When power failure occurs during a printing cycle, the register prints “············” and then carries
out the correct printing procedure.
When printer motor locks:
If printer motor locks, printing stalls and intermittent beeping starts. First, unplug the power cord
and repair paper jam. Then plug in the power cord, feed the roll paper to the proper position and
press c. The register with then resume correct printing after printing “············”
In Case of Power Failure or Paper Jam
Page 28
26
Maintenance
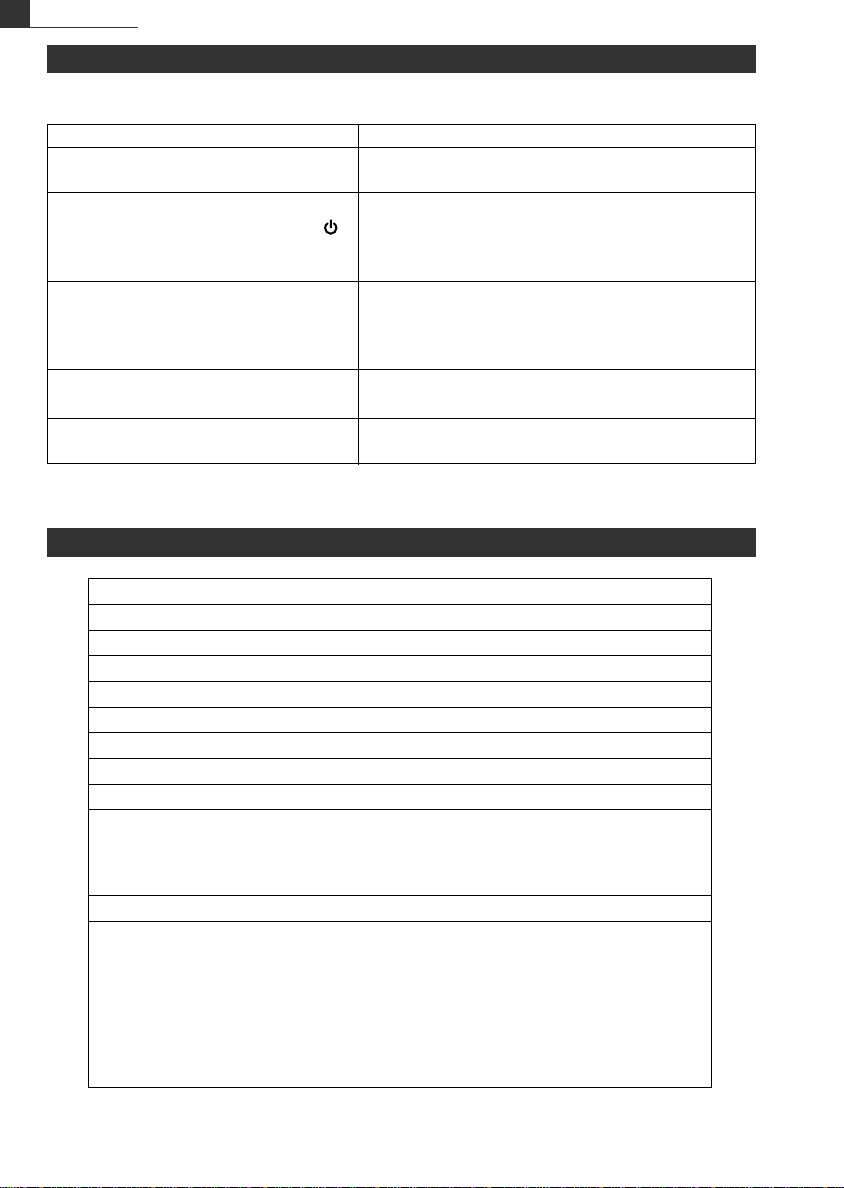
• The display shows symbols that do not
make sense.
• The display will not illuminate even
when the mode switch is not set to “”.
The machine fails to operate when any
key is pressed.
• The display is illuminated, but the
machine does not accept key entries.
• Journal paper does not feed properly in
the printer.
• Printing is faded or illegible.
• Was the machine reset in the proper way shown on
page 5?
• Is the power supplied to the electrical outlet? (Plug
in another electrical device.)
• Is the power cord firmly connected to the electrical
outlet?
• Is the mode switch properly set to the REG
position?
• Was the machine reset in the proper way shown on
page 5?
• Is the take-up spool installed properly?
• Is there a paper jam?
• Isn’t the ink roller used up?
• Is the ink roller installed properly?
Specifications
Problem Item to check
Model: XE-A102
Size: 330(W) x 363(D) x 234(H) millimeters
Weight: 5 kg
Power Source: Official (nominal) voltage and frequency
Power Consumption: Stand-by: 6.4 W Operating: 13 W
Work Temperature: 0 to 40 °C
Display: LED (Light-Emitting Diode) numeric display
Printer: 1 station print wheel selective type
Printing Capacity: Max. 13 digits
Paper Roll: Width: 57.5 mm ± 0.5 mm
Max. diameter: 80 mm
Paper quality: Bond paper
(thickness: 0.06 to 0.085 mm, weight: 47 to 64 g/m2)
Cash Drawer: 3 slots for bills, 6 for coins
Accessories (supplied):Paper roll 1 roll
Mode key 2
Drawer lock key 2
Instruction manual 1 copy (this manual)
Quick start guide 1 copy
Ink roller 1 (already installed)
Take-up spool 1
Fixing angle blacket 1
* Specifications and appearance are subject to change without notice.
If you encounter a problem, use this chart before calling for service.
Before Calling for Service
Page 29

Attention: Your product
is marked with this
symbol. It means that
used electrical and
electronic products
should not be mixed
with general household
waste. There is a
separate collection
system for these
products.
A. Information on Disposal for Users (private
households)
1. In the European Union
Attention: If you want to dispose of this equipment, please do not use
the ordinary dust bin!
Used electrical and electronic equipment must be treated separately
and in accordance with legislation that requires proper treatment,
recovery and recycling of used electrical and electronic equipment.
Following the implementation by member states, private households
within the EU states may return their used electrical and electronic
equipment to designated collection facilities free of charge*. In some
countries* your local retailer may also take back your old product free of
charge if you purchase a similar new one.
*) Please contact your local authority for further details.
If your used electrical or electronic equipment has batteries or
accumulators, please dispose of these separately beforehand according
to local requirements.
By disposing of this product correctly you will help ensure that the waste
undergoes the necessary treatment, recovery and recycling and thus
prevent potential negative effects on the environment and human health
which could otherwise arise due to inappropriate waste handling.
2. In other Countries outside the EU
If you wish to discard this product, please contact your local authorities
and ask for the correct method of disposal.
For Switzerland: Used electrical or electronic equipment can be
returned free of charge to the dealer, even if you don’t purchase a new
product. Further collection facilities are listed on the homepage of
www.swico.ch or www.sens.ch.
B. Information on Disposal for Business Users.
1. In the European Union
If the product is used for business purposes and you want to discard it:
Please contact your SHARP dealer who will inform you about the takeback of the product. You might be charged for the costs arising from
take-back and recycling. Small products (and small amounts) might be
taken back by your local collection facilities.
For Spain: Please contact the established collection system or your
local authority for take-back of your used products.
2. In other Countries outside the EU
If you wish to discard of this product, please contact your local
authorities and ask for the correct method of disposal.
Page 30

1
XE-A102
ELEKTRONISCHE REGISTRIERKASSE
Vielen Dank, daß Sie sich für den Erwerb der elektronischen Registrierkasse Modell XEA102 von SHARP entschieden haben. Lesen Sie bitte vor Inbetriebnahme des Gerätes
diese Bedienungsanleitung aufmerksam durch und bewahren Sie sie als Referenz auf.
Sie können mit ihrer Hilfe alle Probleme, die unter Umständen auftreten, lösen.
Vorsichtsmaßnahmen bei der Handhabung
• Beim Entfernen oder Anbringen der Druckwerkabdeckung vorsichtig verfahren, damit Sie
sich nicht an der manuellen Bonabschnittsvorrichtung verletzen.
• Die Registrierkasse darf nicht an einem Ort aufgestellt werden, der direkter
Sonneneinstrahlung, extremen Temperaturschwankungen, hoher Luftfeuchtigkeit oder
Spritzwasser ausgesetzt ist.
• Die Registrierkasse darf nicht mit nassen Händen bedient werden. Wasser kann zur
Beschädigung innerer Bauteile führen.
• Die Registrierkasse kann an jede normale Steckdose (offizielle (nominale) Netzspannung)
angeschlossen werden. Bei Anschluß weiterer Elektrogeräte an denselben Stromkreis
kann es zu Störungen in der Funktion der Registrierkasse kommen.
• Zum Reinigen der Registrierkasse ist ein trockenes, weiches Tuch zu verwenden.
Flüchtige Flüssigkeiten wie Benzin oder Verdünner dürfen niemals zur Reinigung
verwendet werden. Chemikalien können zur Verfärbung oder Beschädigung des
Gehäuses führen.
• Damit die im Speicher befindlichen Daten nicht verloren gehen, drei R6- oder LR6Batterien (Größe AA) einsetzen, bevor die Registrierkasse in Betrieb genommen wird.
Beim Umgang mit den Batterien muß folgendes immer berücksichtigt werden:
Falsch eingesetzte Batterien können zerbrechen oder auslaufen und so den Innenraum
der Registrierkasse beschädigen.
• Explosionsgefahr, wenn der Original-Akku gegen einen Akku des falschen Typs
ausgewechselt wird. Gebrauchte Akkus sind gemäß den vorliegenden Richtlinien zu
entsorgen.
• Batterien polrichtig einsetzen: positive (+) und negative (-) Seiten der Batterien
entsprechend in das Batteriefach legen.
• Niemals Batterien verschiedener Marken zusammen verwenden.
• Niemals alte und neue Batterien zusammen verwenden.
• Niemals verbrauchte Batterien im Batteriefach lassen.
• Batterien entnehmen, wenn die Registrierkasse längere Zeit nicht verwendet werden
soll.
• Beim Auslaufen einer Batterie, Batteriefach sofort reinigen. Darauf achten, daß
Batterieflüssigkeit nicht auf die Haut gelangt.
• Hinsichtlich der Entsorgung der Batterien sind die jeweiligen Richtlinien des Landes zu
beachten.
• Zur vollständigen elektrischen Trennung vom Netz den Netzstecker ziehen.
WICHTIG!
Bevor die Registrierkasse zum ersten Mal benutzt wird, muß diese zuerst zurückgestellt
und danach die drei neuen R6- oder LR6-Batterien (Größe AA) eingesetzt werden. Folgen
Sie immer den Bedienungsschritten, die im Abschnitt “Vorbereitung der Registrierkasse”
beschrieben sind.
Nach dem Öffnen des Verpackungskartons ist sicherzustellen, daß sämtliche im Abschnitt
“Technische Daten” aufgeführten Zubehörteile vorhanden sind.
Deutsch
Page 31

2
Inhaltsverzeichnis
Teile und ihre Funktionen..................................................................3
Bei fehlerhaften Eingaben .................................................................4
Vorbereitung der Registrierkasse .....................................................5
Schnellstart-Bedienungsschritte ......................................................7
Programmierung von Datum und Uhrzeit..............................................8
Programmierung der Mehrwertsteuer....................................................8
Programmierung der Warengruppen.....................................................9
Ausführung allgemeiner Verkaufsregistrierungen
(Warengruppenregistrierungen)
.............................................................9
Abruf/Nullstellung von Verkaufsdaten..................................................11
Verschiedene Markmale für Verkaufsregistrierungen ..................12
PLU-Artikel-Registrierungen ................................................................12
Praktische Verkaufsregistrierungen.....................................................12
MWSt-Berechnung ..............................................................................13
Verwendung der Prozenttaste bei Aufschlägen und Abschlägen........13
Fremdwährungsumrechnung...............................................................14
Kein-Verkauf .......................................................................................14
Retouren ..............................................................................................14
Nicht-addierender Nummerncode........................................................14
Registrierung von bezahlten Rechnungen und Ausgaben..................14
Korrekturen ..........................................................................................15
Abruf und Nullstellung der Umsätze ..............................................15
EURO-Übergangsfunktion ...............................................................17
Weiterführende Programmierung ...................................................19
Programmierung eines vorgewählten Einzelpreises für jede
Warengruppe .......................................................................................19
PLU-Programmierung..........................................................................19
Programmierung der Prozenttaste ......................................................19
Programmierung der Fremdwährungs-Umrechnungstaste .................20
Druckformat-Programmierung .............................................................20
Verschiedene Programmierungen.......................................................21
Programmierung der fortlaufenden Kassenbonnummer .....................21
EURO-Programmierung ......................................................................22
Programmierung der Rundung (für australisches Steuersystem) .......22
Programmierung des Geheimcodes....................................................22
Programmierung zum Ausdruck des MWSt-Satzes und
Nettobetrages auf dem Kassenbon.....................................................23
Überprüfen der programmierten Registrierkassen-
einstellungen.....................................................................................24
Wartung .............................................................................................25
Handhabung der Schublade................................................................25
Austausch der Papierrolle ...................................................................25
Austausch der Batterien ......................................................................26
Austausch des Druckfarbrollers...........................................................26
Bei Stromausfall oder Papierstau........................................................26
Bevor Sie den Kundendienst anfordern ..............................................27
Technische Daten ................................................................................27
Deutsch
Page 32

3
Teile und ihre Funktionen
Funktionsschloß
Tastatur
Anzeige
Die Registrierkasse ist mit einer LED-Bedieneranzeige auf der Vorderseite ausgestattet (LED =
Lichtemittierende Diode), die dem Bediener während der Transaktion neun Stellen gut sichtbar
anzeigt.
o: Papiervorschubtaste
c: Löschtaste
V: MWSt-Taste/Taste für bezahlte
Rechnungen
x: Multiplikationstaste/Uhrzeit-
anzeigetaste
p: Ausgabentaste
%: Prozenttaste
v: Stornotaste
e: Aufhebungstaste
s: Warengruppen-Umschalttaste
P: Artikel-Taste
R: Kredittaste
E: Fremdwährungs-Umrech-
nungstaste
S: Nichtaddierende Nummern-
taste/Zwischensummentaste
C: Schecktaste
t: Total-/Betragseingabe-/Kein-
Verkauf-Taste
: Ausschalten der Anzeige. Keine Eingaben
möglich.
REG: Ermöglicht die Registrierung von Transaktionen.
: Ermöglicht die Korrektur nach dem Abschluß
einer Transaktion.
X/Flash: Ermöglicht das Ausdrucken von Umsätzen und
die Anzeige von Umsätzen.
Z/PGM: Ermöglicht das Ausdrucken und Nullstellen der
Umsätze sowie das Programmieren.
Den Funktionsschlüssel in das Funktionsschloß stecken und ihn drehen, um die
gewünschte Betriebsart zu wählen.
Zehnertastatur Warengruppentasten
Um die Warengruppen 5
bis 8 anzuwählen, zuerst
die Taste s und dann die
Tasten ! bis $
drücken.
Wiederholung: Zeigt an, wie oft dieselbe Warengruppentaste oder Artikel-
Taste nacheinander gedrückt wurde. Wird eine Registrierung
mehr als zehnmal wiederholt, erscheint nur die letzte Stelle.
PLU-Artikel-Code: Zeigt den eingegebenen PLU-Artikel-Code an.
Warengruppe: Zeigt die eingegebene Warengruppe an. Wenn z.B. die
Warengruppentaste 1 gedrückt wird, erscheint “1” in der Anzeige.
Page 33

4
Teile und ihre Funktionen
Symbole in der Bedieneranzeige:
Fehler: Erscheint mit einem Piepton, wenn ein Fehler auftritt. Tritt diese Fehlermeldung
während einer Transaktion auf, weil zu viele Zahlen eingegeben wurden, die
Löschtaste c drücken und eine richtige Zahl erneut eingeben.
Programm: Erscheint, wenn die Registrierkasse in der Betriebsart “Z/PGM” programmiert wird.
Abschluß: Erscheint, wenn eine Transaktion durch Drücken der Tasten t, R oder C
abgeschlossen wird.
Zwischensumme: Erscheint, wenn die Registrierkasse durch Drücken der Taste S die
Zwischensumme errechnet, sowie wenn der bezahlte Betrag geringer ist als der
zu zahlende Gesamtbetrag.
Wechselgeld
: Erscheint, wenn der auszugebende Betrag des Wechselgelds angezeigt wird.
Umrechnung
: Erscheint, wenn die Taste E gedrückt wird, um eine Zwischensumme in einer
Fremdwährung zu berechnen.
Batterie ist
schwach: Erscheint, wenn der Spannungspegel der eingesetzten Batterien unter dem
erforderlichen Wert ist. Die Batterien müssen durch Neue ersetzt werden.
Batterie ist
leer: Erscheint, wenn keine Batterien eingesetzt oder die eingesetzten Batterien
erschöpft sind. Die Batterien müssen durch neue sofort ersetzt werden.
Zusätzlich können die folgenden Anzeigen erscheinen:
• Das Minuszeichen (-) kann in den Positionen 2 bis 9 erscheinen.
• Die Dezimalkommastelle erscheint in den Positionen 1 bis 3.
Anzeigen des Datums und der Uhrzeit
Das Funktionsschloß auf die Position REG drehen und die Taste x einmal drücken, um die
Uhrzeit anzuzeigen oder dieselbe Taste zweimal drücken, um das Datum anzuzeigen.
Die Taste c drücken, um die Uhrzeit/Datum-Anzeige aufzuheben.
Bei fehlerhaften Eingaben
Tritt in der Registrierkasse ein Fehler auf, erscheint die Fehlermeldung “ ” in der Anzeige und ein
Warnsignal ertönt. Fehler durch Drücken der Taste c löschen und entsprechend korrigieren.
1. Bei Eingabe einer siebenstelligen Zahl in eine Warengruppe oder einer Zahl mit mehr als
8 Stellen (79999999) bei bezahlten Rechnungen, Auszahlungen, sowie Kredit- oder
Scheckzahlung:
Taste c drücken und richtige Zahl eingeben.
2. Beim Drücken einer falschen Taste:
Taste c drücken und richtige Taste drücken.
3. Bei Eingabe von mehr Stellen, als für eine bestimmte Eingabe programmiert wurden:
Überprüfen, ob die eingegebene Zahl richtig ist. Überprüfen, ob die Einstellung für die
Eingabebegrenzung richtig ist.
4. Bei einer Zwischensumme von mehr als 8 Stellen (79999999):
Taste c drücken, dann t, R oder C drücken, um die Transaktion an dieser Stelle zu
beenden.
5. Bei Multiplikation des Preises mit einer Zahl von mehr als 3 Stellen:
Taste c drücken und richtige Zahl eingeben.
Korrekturfunktion
Tritt während einer Transaktionsregistrierung ein Fehler oder etwas Unvorhergesehenes auf, und
soll der Kunde nicht warten müssen, ist zweimal die Taste e zu drücken (bei Fehlern
anschließend c drücken). Damit kann der Vorgang abgebrochen und die Transaktion als
Barverkauf zu diesem Zeitpunkt abgeschlossen werden. Alle bis zu diesem Zeitpunkt
eingegebenen Registrierungen der Transaktion sind gespeichert.
Page 34

5
Vorbereitung der Registrierkasse
Um sicherzustellen, daß die Registrierkasse fehlerfrei funktioniert, ist das folgende Initialisierungsverfahren anzuwenden.
1. Den Funktionsschlüssel in das Funktionsschloß stecken und ihn auf die Position REG drehen.
2. Den Netzstromstecker in eine Steckdose stecken. Ein Summton ertönt dreimal.
WICHTIG: Diese Bedienung muß ohne eingesetzte Batterien durchgeführt werden.
3. Auf der Anzeige muß nun “ 0.00” erscheinen.
4. Taste x drücken, um zu bestätigen, daß die Uhr bei “ 0-00” startet.
5. Taste c drücken, um die Uhrzeitanzeige aufzuheben.
Führen Sie bitte die folgenden Vorgänge aus, bevor Sie die Registrierkasse in Betrieb nehmen.
Schritt 2 Rücksetzung der Registrierkasse
Bei der Installation der Registrierkasse stellen Sie die Registrierkasse auf einer stabilen Fläche in
der Nähe einer Netzsteckdose auf, die gegen Spritzwasser und direkte Sonneneinstrahlung
geschützt ist. Befestigen Sie danach die Registrierkasse mit dem beigelegten Haltewinkel. Der
Haltewinkel verhindert, daß sich die Registrierkasse beim Öffnen der Schublade bewegt. Sie
können die Registrierkasse in den Haltewinkel einhaken. Die Registrierkasse sitzt danach stabil
auf.
Befolgen Sie dabei die folgenden Schritte.
Anbringen des Haltewinkels
1. Die Anbringstelle des Haltewinkels (B) sorgfätig
reinigen.
2. Die Klebeschutzfolie vom Haltewinkel abziehen.
3. Den Haltewinkel in den Haken (A) an der Unterseite
der Registrierkasse einhaken.
4. Den Haltewinkel fest an die zuvor gesäuberte Stelle
andrücken.
Entfernen der Registrierkasse vom Haltewinkel
1. Die Vorderseite der Registrierkasse anheben und diese
dann gegen den eigenen Körper ziehen.
Schritt 1 Installation der Registrierkasse
A
B
Page 35

6
Vorbereitung der Registrierkasse
Ihre Registrierkasse ist mit einem Druckwerk ausgestattet, auf dem Kassenbons oder Journalstreifen ausgedruckt werden können. Es muß die für den Drucker erforderliche Papierrolle
eingesetzt werden. Dies gilt auch für den Fall, daß die Registrierkasse für “Kein Bonausdruck”
programmiert wird.
1. Die Papierrolle in die Papierrollenhalterung einsetzen (siehe
Abbildung).
Schritt 4 Einsetzen der Papierrolle
Drei neue R6- oder LR6-Batterien (Größe AA) müssen in die Registrierkasse eingesetzt werden,
um zu verhindern, daß die im Speicher befindlichen Daten und Benutzereinstellungen gelöscht
werden, wenn das Netzstromkabel versehentlich abgezogen wird oder der Strom ausfällt.
Die Lebensdauer der Batterien beträgt ca. ein Jahr. Sobald die Batterien schwach werden,
erscheint das Symbol “” in der Anzeige. Dann müssen die Batterien innerhalb von zwei Tagen
ersetzt werden.
Die drei neuen R6- oder LR6-Batterien (Größe AA) sind nach folgendem Verfahren einzusetzen.
Dabei muß das Netzkabel angeschlossen sein und sich das Funktionsschloß in der Position REG
befinden.
1. Die Druckwerkabdeckung nach vorne ziehen und abnehmen.
2. Den Batteriendeckel neben der Papierrollenhalterung öffnen.
3. Die drei neuen R6- oder LR6-Batterien (Größe AA) einsetzen.
4. Darauf achten, daß das Batteriesymbol “” erlischt.
5. Batteriendeckel schließen.
Beim Umgang mit den Batterien sind die auf Seite 1
beschriebenen Vorsichtsmaßnahmen zu beachten.
Schritt 3 Einsetzen der Batterien
(Rückansicht)
Page 36

7
Vorbereitung der Registrierkasse
In diesem Abschnitt werden die Grundprogrammierschritte erklärt, die vor der Ausführung von
Verkaufstransaktionen vorgenommen werden müssen.
Abkürzungen und Fachausdrücke in dieser Anleitung
Warengruppe: Die einfachste Art zur Warenklassifikation. Eine Postenregistrierung wird
über eine Warengruppe erfaßt.
PLU-Artikel: Preisabruf: Eine detaillierte Art zur Warenklassifikation. PLU-Artikel-
Einzelpreisabruf durch Eingabe eines entsprechenden PLU-Artikel-Codes
(1-80) und Umsatzerfassung durch entsprechend zugordneter Warengruppe.
Funktionstasten: Die Funktionstasten werden im Tastaturabschnitt aufgeführt. Nehmen Sie
hierfür auf Seite 3 Bezug.
MWSt: Mehrwertsteuer
X-Bericht: Bericht für Umsatzdatenabruf
Z-Bericht: Bericht für Umsatzdatenabruf und -nullstellung
Bon-Ein/Aus-Funktion: Um Kassenbons oder Journalstreifen in der REG-Betriebsart auszudrucken
oder nicht auszudrucken.
• Wenn es sich nicht um 2 Nachkommastellen bei Ihrer Landeswährung handelt, muß
die Einstellung verändert werden. Für diesen Schritt ist auf den Programmierabschnitt
“Verschiedene Programmierungen” Bezug zu nehmen.
• Sie können die Programmierung (nachfolgende Schritte 1 bis 3) fortsetzen, ohne daß
Sie dabei bei jedem Programmschritt die Taste S drücken müssen. Um die
Programmierung abzuschließen, muß die Taste S jedoch betätigt werden.
Wenn die Taste S am Ende der Programmierung gedrückt wird, so wird ein
Programmierbericht ausgedruckt. Auf diesem Bericht können die vorgenommenen
Programmierungen überprüft werden. Stellen Sie deshalb sicher, daß die Programmierung korrekt ausgeführt wird.
Um den Bericht abzurufen, ist auf den Abschnitt “Überprüfen der programmierten
Registrierkasseneinstellungen” Bezug zu nehmen.
2. Papier gerade in die Papiereinlaßöffnung einführen und die Taste
o drücken. Das eingelegte Papierende erscheint im Druckbereich.
3. (Für das Drucken auf dem
Journalstreifen) Obere Kante das
Papiers in den Schlitz an der Welle
der Aufwickelspule einführen und das
Papier zwei- bis dreimal um die Welle
wickeln.
4. (Für das Drucken auf dem
Journalstreifen) Aufwickelspule auf
die Halterung auflegen.
5. Druckwerkabdeckung wieder anbringen. Für den Bonausdruck ist das Papier durch den Schlitz
in der Druckwerkabdeckung durchzuführen. Dabei unbedingt darauf achten, daß Sie sich
nicht an der Abtrennvorrichtung verletzen.
Schnellstart-Bedienungsschritte
Page 37

8
Schnellstart-Bedienungsschritte
Das Datum in der Reihenfolge Tag- Monat- Jahr mit 6 Ziffern eingeben.
Zum Beispiel, wenn das Datum auf den 26. August 2005 eingestellt werden soll, 260805
einzugeben.
Für die Uhrzeiteinstellung ist diese mit 4 Stellen im 24-Stundenformat einzugeben.
Stellen Sie das Funktionsschloß mit dem Funktionsschlüssel in die Z/PGM Position und führen Sie
die nachfolgenden Tasteneingaben aus.
Datum (TTMMJJ) ➜
S(➜S
: für die Beendigung der Programmierung)
Uhrzeit (max. 4 Stellen im 24-Stundenformat) ➜
S(➜S
)
Das Datumsformat kann in der Betriebsart “Z-PGM” geändert werden. Wird das Format
in der Betriebsart “Z-PGM” geändert, muß beim Einstellen des Datums das gewünschte
Format beachtet werden.
Schritt 1 Programmierung von Datum und Uhrzeit
Ihre Registrierkasse sieht die Auswahl von manueller oder automatischer MWSt-Berechnung vor
und ist für die manuelle MWSt-Berechnung für die Steuersätze 1 bis 4 eingestellt.
Insgesamt ist die Registrierkasse für die Programmierung von sechs unterschiedlichen Steuersystemen ausgerüstet. Wählen Sie das in Ihrem Bereich anwendbare Steuersystem und
programmieren Sie die Steuersätze (00.0000% bis 99.9999%) für das gewählte Steuersystem.
Stellen Sie das Funktionsschloß mit dem Funktionsschlüssel in die Z/PGM Position und führen Sie
die nachfolgenden Tasteneingaben aus.
Programmierung des Mehrwertsteuersystems
8➜S
➜ A ➜
S(➜S
)
Parameter A: Manuell herausrechnende MWSt 1 bis 4: 0 (Werksseitige Einstellung)
Automatisch herausrechnende MWSt 1 bis 4: 1 (Dieses MWSt-System sollte
alternativ zum obigen werksseitig eingestellten MWSt-System eingestellt werden.)
Automatisch aufschlagende MWSt 1 bis 4: 2
Manuell herausrechnende MWSt 1: 3
Manuell aufschlagende MWSt 1 bis 4: 4
Automatisch aufschlagende MWSt 1 bis 3 und Automatisch herausrechnende MWSt
1: 5
Programmierung des Mehrwertsteuersatzes
Parameter
A: Für MWSt 1: 1 eingeben Für MWSt 2: 2 eingeben Für MWSt 3: 3 eingeben
Für MWSt 4: 4 eingeben
B: MWSt-Satz mit 6 Stellen (000000 bis 999999) eingeben (Standardmäßig: 000000)
Bitte immer die nachfolgenden Nullen eingeben, z.B. für den MWSt-Satz von 16% ist 160000
einzugeben, für den MWSt-Satz von 7% ist 70000 einzugeben.
Programmierung zum Ausdruck des MWSt-Satzes und Nettobetrages auf dem
Kassenbon
5➜S➜0
für Nein oder1für Ja
➜
S(➜S
) (
Standardmäßig: Nein
)
9 ➜ S ➜ A ➜ x ➜ B ➜ S (➜ S)
Schritt 2 Programmierung der Mehrwertsteuer
Page 38

9
Schnellstart-Bedienungsschritte
In diesem Abschnitt werden die generellen Umsatzregistrierungen, sowie die Stornierung von
Eingaben mit der Warengruppentaste erklärt. Für detaillierte Informationen wie z.B. PLU-ArtikelRegistrierungen, MWSt-Registrierungen und Registrierungen mit den Funktionstasten, beziehen
Sie sich bitte auf den Abschnitt “Verschiedene Merkmale für Verkaufsregistrierungen”.
Als Beispiel wird ein Barkauf nachfolgend aufgezeigt.
Sicherstellen, daß die Papierrolle eingelegt ist.
1. Das Funktionsschloß auf die Position REG stellen.
Schritt 4 Ausführung allgemeiner Verkausfsregistrierungen (Warengruppenregistrierungen)
Verkaufsartikel lassen sich in acht Warengruppen klassifizieren. Artikel, die durch den Einsatz von
Warengruppentasten verkauft wurden, lassen sich zu einem späteren Zeitpunkt auf einem Bericht
ausdrucken, der die Verkaufsmengen und Umsatzsummen je nach Warengruppe auflistet. Die
ausgedruckten Daten sind für verwaltungstechnische Entscheidungen und andere Geschäftsfunktionen von großer Wichtigkeit.
Wenn eine Warengruppentaste benutzt wird, müssen die Parameter eingestellt werden, um den
Warengruppenstatus zu spezifizieren (Plus- oder Minussymbol sowie den MWSt-Status).
Stellen Sie sicher, daß sich das Funktionsschloß in der Z/PGM-Stellung befindet und folgen Sie
danach der aufgeführten Tastenfolge.
ABCDEFG ➜
x
➜ (s➜ ) Warengruppentaste (➜
S
)
(Die Taste s drücken, um die Warengruppen 5 bis 8 zu programmieren.)
Positionen: Auswahl: Eingabe:
A +/- Vorzeichen + Vorzeichen* 0
- Vorzeichen 1
B Normal/SICS (Einzelposten-Barverkauf) Normal* 0
SICS 1
C Herausrechnende MWSt 4 Nein* 0
Ja 1
D Herausrechnende MWSt 3 Nein* 0
Ja 1
E Herausrechnende MWSt 2 Nein* 0
Ja 1
F Herausrechnende MWSt 1 Nein 0
Ja* 1
G Eingabebegrenzung 0 bis 7
(0 bis 7 Stellen) (Standardmäßig: 7)
*: Standardmäßig
• Vorzeichen
Das Pluszeichen gilt für alle Warengruppen, in die normale Verkaufsumsätze eingegeben werden,
und das Minuszeichen gilt für alle Warengruppen, in die Zahlungen wie Retouren, Pfandflaschenrückgaben oder andere Erstattungen und Auszahlungen eingegeben werden.
• SICS (Einzelposten-Barverkauf)
Der Bediener kann die Transaktion beenden, indem er einfach den Einzelpreis eines zu
bezahlenden Artikels eingibt und die auf den Einzelposten-Barverkauf eingestellte Warengruppentaste drückt. Ist darüber hinaus noch ein vorgewählter Einzelpreis auf dieser Warengruppentaste
gespeichert, kann die Transaktion nur durch Drücken der Warengruppentaste beendet werden.
• Eingabebegrenzung
Wird dieser Parameter eingestellt, kann während eines Verkaufs nicht versehentlich eine zu
große Summe eingegeben werden. Soll beispielsweise die Registrierung in einer bestimmten
Warengruppe maximal 9.99 betragen, 3 eingeben. Wird 0 eingegeben, kann während der
Transaktion in dieser Warengruppe kein Preis eingegeben werden. Dann kann nur der
vorgewählte Einzelpreis verwendet werden.
Schritt 3 Programmierung der Warengruppen
Page 39

10
Schnellstart-Bedienungsschritte
2. Preis für den ersten Artikel eingeben (für 15.00 EURO muß 15: eingegeben werden).
3. Gewünschte Warengruppentaste drücken.
Für die Warengruppen 5 bis 8 ist die Taste s vor Betätigung der Warengruppentaste zu
drücken.
4. Schritte 1 und 2 bei jedem weiteren Artikel wiederholen.
5. Taste S zur Anzeige der zu bezahlenden Summe drücken (dieser Schritt kann ausgelassen
werden).
6. Zur Ermittlung der Mehrwertsteuer die V-Taste drücken, falls Ihre Kasse für die manuelle
MWSt-Berechnung für die Steuersätze 1 bis 4 (werksseitige Einstellung) eingestellt ist und nicht
von Ihnen für die automatische MWSt-Berechnung für die Steuersätze 1 bis 4 geändert wurde.
7. Vom Kunden erhaltenen Betrag eingeben (dieser Schritt kann ausgelassen werden, wenn der
vom Kunden gegebene Geldbetrag passend ist).
8. Taste t drücken. Der Wechselgeldbetrag oder Restbetrag erscheint in der Anzeige, und die
Schublade wird geöffnet.
9. Den Bon (wenn auf Bonausdruck eingestellt) abreißen und mit dem angezeigten Wechselgeld
dem Kunden aushändigen.
10.Schublade schließen.
• Wenn mit Scheck bezahlt wird, ist C anstatt t zu drücken.
• Wenn mit Kredit bezahlt wird, ist die Taste R anstatt t zu drücken.
• Wenn die Festpreise für die einzelnen Warengruppen vorprogrammiert werden, kann
die Eingabe des Einzelpreises für den Warengruppenartikel übersprungen werden.
Das heißt, der obige Schritt 1 erübrigt sich. Für die Programmierung ist auf den
Abschnitt “Programmierung eines vorgewählten Einzelpreises für jede Warengruppe”
Bezug zu nehmen.
Direktabschluß (kein Wechselgeld)
Sie verkaufen einen Artikel der Warengruppe 1 im Wert von 5.00 EURO und einen
Artikel der Warengruppe 3 für 8.00 EURO mit Barzahlung. Die Gesamtsumme
einschließlich MWSt ist 13.00, und der Kunde zahlt den exakten Betrag.
5:! 8:# St
Preis und Preis und
Warengruppe Warengruppe
Registrierung mit Zahlgeldeingabe
Sie verkaufen einen Artikel der Warengruppe 1 im Wert von 5.00 EURO und einen
Artikel der Warengruppe 3 für 8.00 EURO und erhalten 20.00 EURO vom Kunden.
5:! 8:# S 20: t
Preis und Preis und Zahlgeld
Warengruppe Warengruppe
Der Wechselgeldbetrag wird im Display angezeigt.
Ermittlung der Mehrwertsteuer (manuelle MWSt-Berechnung für die Steuersätze
1 bis 4)
Sie verkaufen einen Artikel der Warengruppe 1 im Wert von 5.00 EURO und einen
Artikel der Warengruppe 3 für 8.00 EURO mit Barzahlung und erhalten 20.00 EURO
vom Kunden.
5:! 8:# S V 20: t
MWSt-Berechnung
Den Warengruppen 1 und 3 ist jeweils die MWSt 1 werksseitig zugeordnet.
Beispiel
Beispiel
Beispiel
Page 40

11
Schnellstart-Bedienungsschritte
Um den Umsatz zu überprüfen, kann ein Umsatzbericht erstellt werden. Es wird auch eine
Nullstellung der Umsatzdaten empfohlen, während Sie sich mit der Registrierkasse vertraut
machen.
Um einen Umsatzbericht abzurufen, muß ein X-Bericht erstellt werden: Hierfür das
Funktionsschloß in die Position X/Flash stellen und die Taste t drücken.
Für die Umsatznullstellung ist ein Z-Bericht zu erstellen: Hierfür das Funktionsschloß in die Position
Z/PGM stellen und die Taste C drücken. Die gespeicherten Daten und die Gesamtsumme (GT)
werden gelöscht.
Für den Abruf und die Nullstellung der tatsächlichen Umsatzdaten ist auf den Abschnitt “Abruf und
Nullstellung der Umsätze” Bezug zu nehmen. Die Umsatzdaten sollten am Ende jeden Tages
nullgestellt werden, um die Umsatzdaten zu löschen.
Schritt 5 Abruf/Nullstellung von Verkaufsdaten
Wenn eine Fehleingabe gemacht wird:
Korrektur einer eingegebenen Zahl: Die Zahl löschen, in dem unmittelbar nach der Fehleingabe c
gedrückt wird.
Korrektur der letzten Postenregistrierung (Direkter Storno): v drücken.
Korrektur früherer Postenregistrierungen (Indirekter Storno): Mit Hilfe der Taste v die falsche
Registrierung stornieren und die
richtige Registrierung ausführen
(siehe das nachstehende Beispiel).
Für Einzelheiten, beziehen Sie sich
bitte auf “Korrekturen” auf Seite 15.
Korrektur früherer Postenregistrierungen
Korrektur der Registrierung 300 ! auf 200 ! nach der Ausführung einer
weiteren korrekten Registrierung
3:! 525# 3:v! 2:! t
Storno für Korrekte
300! Registrierung
Beispiel
Page 41

12
Verschiedene Merkmale für Verkaufsregistrierungen
Den PLU-Artikel-Code eines Artikels eingeben und die P Taste drücken.
Sie verkaufen PLU-Artikel 1 und PLU-Artikel 15 durch Kreditzahlung.
1P 15P R
Um PLU-Artikel-Verkäufe registrieren zu können, müssen diese PLU-Artikel
programmiert werden.
Beispiel
Vor den Verkaufsregistrierungen sicherstellen, daß die Papierrolle eingelegt ist, wenn die
Bondruckfunktion eingestellt ist. Ebenfalls sicherstellen, daß das Funktionsschloß auf der Position
REG steht.
PLU-Artikel-Registrierungen
Wenn nur Barverkauf eines Artikels besteht [Registrierung von Einzelposten-Barverkauf
(SICS)]
Wenn ein Verkauf eines Einzelartikels (z.B. eine Packung Zigaretten) durchgeführt wird, kann die
SICS-Funktion angewendet werden. Diese Funktion ist ausschließlich für Warengruppentasten
anwendbar, die für SICS programmiert wurden, bzw. für PLU-Artikel, die solchen Warengruppen
zugeordnet sind. Die Schublade öffnet sich, nachdem die Warengruppen- oder PLU-Taste gedrückt
wird.
Wenn mehrere Artikel der gleichen Warengruppe oder des gleichen PLU eingegeben werden
Sie können zwei oder mehrere des gleichen Warengruppen- oder PLU-Artikels eingeben, indem
die Warengruppen- oder PLU-Taste mehrfach betätigt wird (Wiederholungsregistrierung) oder
die Multiplikationstaste gedrückt wird (Multiplikationsregistrierung). Wenn der gleiche Artikel in
größeren Mengen verkauft wird, ist die Benutzung der Multiplikationstaste eine praktische Lösung.
Zur Bedienung ist auf das nachfolgende Beispiel Bezug zu nehmen.
Wiederholung
Verkauf von 2 Artikeln zu 2,00 EURO (Warengruppe 1) und 3 Artikeln des PLU-Artikels
5 in bar.
2:!! 5PPP t
Multiplikation
Verkauf von 6 Artikeln zu 1,50 EURO (Warengruppe 1) und 12 Artikeln des PLUArtikels 5 für Scheckzahlung.
6x 150! 12x 5P S C
Gemischte Zahlung
Ist der per Scheck oder bar bezahlten Betrag geringer als die Summe inklusive Mehrwertsteuer,
erscheint in der Anzeige ein Restbetrag und “”. Um den Restbetrag auszugleichen, muß ein
weiterer vom Kunden zu zahlender Betrag eingegeben oder eine Kreditzahlung vorgenommen
werden.
Ihr Kunde bezahlt 8,30 EURO in bar und 50,00 EURO per Kredit für eine
Zwischensumme inklusive MWSt von 58,30 EURO.
S 830 t R
Bezahlter Betrag Zeigt Restbetrag
und “”
Beispiel
Beispiel
Beispiel
Praktische Verkaufsregistrierungen
Page 42

13
Verschiedene Merkmale für Verkaufsregistrierungen
Ihre Registrierkasse ist mit den folgenden sechs Steuersystemen ausgerüstet.
Ihre Registrierkasse ist für das manuell herausrechnende MWSt-System 1 bis 4 vorprogrammiert.
Automatisch herausrechnendes MWSt-System 1 bis 4 (Automatische Berechnungsmethode
mit programmierten Prozentsätzen)
Dieses System berechnet bei der Saldierung die MWSt für die steuerpflichtigen Zwischensummen
1 bis 4, wobei die entsprechenden Prozentsätze eingesetzt werden.
Dieses System sollte alternativ zu dem manuell herausrechnenden MWSt-System eingestellt
werden.
Automatisch aufschlagendes MWSt-System 1 bis 4 (Automatische Berechnungsmethode mit
programmierten Prozentsätzen)
Dieses System berechnet bei der Saldierung die Steuern für die steuerpflichtigen Zwischensummen 1 bis 4, wobei die entsprechenden Prozentsätze eingesetzt und die berechneten Steuern
den Zwischensummen zugeschlagen werden.
Manuell herausrechnendes MWSt-System 1 bis 4 (Manuelle Eingabemethode mit programmierten Prozentsätzen)
Dieses System ermöglicht die Berechnung der MWSt für die steuerpflichtigen Zwischensummen 1
bis 4. Diese Berechnung wird mit den entsprechenden programmierten Prozentsätzen ausgeführt,
wenn die V Taste unmittelbar nach Drücken der S Taste betätigt wird.
Manuell herausrechnendes MWSt-System 1 (Manuelle Eingabemethode für Zwischensummen bei Verwendung des programmierten MWSt-1-Prozentsatzes)
Dieses System ermöglicht die MWSt-Berechnung für die Zwischensumme. Diese Berechnung wird
mit dem programmierten MWSt-1-Prozentsatz ausgeführt, wenn die V Taste unmittelbar nach
Drücken der S Taste betätigt wird. Dieses System erlaubt die manuelle Eingabe eines MWStSatzes. In diesem Fall S Taste drücken. Danach den MWSt-Satz eingeben und Taste V
drücken.
Manuell aufschlagendes MWSt-System 1 bis 4 (Manuelle Eingabemethode mit programmierten Prozentsätzen)
Dieses System ermöglicht die Berechnung der Steuer für die steuerpflichtigen Zwischensummen 1
bis 4. Diese Berechnung wird mit den entsprechenden programmierten Prozentsätzen ausgeführt,
wenn die V Taste unmittelbar nach Drücken der S Taste betätigt wird. Nach der Berechnung
muß die Transaktion abgeschlossen werden.
Automatisch aufschlagendes MWSt-System 1 bis 3 und automatisch herausrechnendes
MWSt-System 1
Dieses System ermöglicht die Berechnung der Steuer in Kombination mit dem automatisch
aufschlagenden MWSt-System 1 bis 3 und dem automatisch herausrechnenden MWSt-System 1.
Die Kombination besteht aus der MWSt 1 sowie der MWSt 1 bis 3 zugeordnet für jeden Posten.
Der Steuerbetrag errechnet sich automatisch aus den zuvor programmierten Prozentsätzen für
diese Steuern.
Die MWSt-Berechnung für PLU-Artikel wird gemäß der Voreinstellung für ihre
zugeordnete Warengruppe ausgeführt.
MWSt-Berechnung
Soll ein Auf- oder Abschlag für einen bestimmten Artikel eingegeben werden, den Prozentsatz
eingeben und anschließend die Prozenttaste drücken. Soll ein Auf- oder Abschlag für die
Zwischensumme eingegeben werden, alle Artikel eingeben, dann die S Taste drücken,
anschließend die Prozenttaste drücken und den Prozentsatz eingeben.
Ihre Registrierkasse ist für Preisnachlässe vorprogrammiert. Wenn Sie einen
Preiszuschlag einstellen möchten, ist auf den Abschnitt “Programmierung der
Prozenttaste” Bezug zu nehmen. Es kann ein Prozentsatz programmiert werden. Wenn
ein Prozentsatz programmiert wurde, braucht vor dem Betätigen der Prozenttaste kein
Prozentsatz eingegeben werden. Für diese Programmierung ist auf den Abschnitt
“Programmierung der Prozenttaste” Bezug zu nehmen.
Gewährung eines 20,00%igen Rabatts auf einen Artikel der Warengruppe 3.
8:# 20:% t
Gewährung eines 15,00%igen Rabatts auf die Zwischensumme der Transaktion.
8P 12P 8:! S 15:% t
Beispiel
Beispiel
Verwendung der Prozenttaste bei Aufschlägen und Abschlägen
Page 43

14
Verschiedene Merkmale für Verkaufsregistrierungen
Ihre Registrierkasse ermöglicht Zahlgeldregistrierungen in Fremdwährung, wenn der Umrechnungskurs programmiert wurde. Nach Artikelregistrierungen oder während der Zahlgeldregistrierung ist die E Taste zu drücken. Daraufhin wird die Zwischensumme in Fremdwährung
angezeigt. Danach das Zahlgeld (in Fremdwährung) eingeben, wenn die Summe nicht dem
tatsächlichen Zahlgeld entspricht, und die Abschlußtaste (t / C oder R) drücken. Das
Wechselgeld wird daraufhin in Landeswährung angezeigt.
• Wenn der eingegebene Zahlgeldbetrag zu gering ist, wird der restliche zu zahlende
Betrag in Landeswährung angezeigt.
• Wenn “Ja” für die Scheck- und Kreditzahlung in Fremdwährung in der EUROProgrammierung ausgewählt wurde, kann eine Verkaufsregistrierung in Fremdwährung
mit Hilfe der Taste C oder R abgeschlossen werden.
• Wenn “Ja” für den Ausdruck des Gesamtbetrags und für Wechselgeld in der EUROProgrammierung ausgewählt wurde, kann das Wechselgeld in Fremdwährung durch
Drücken der E Taste angezeigt werden, während das Wechselgeld in Landeswährung angezeigt wird. Um zur Anzeige der Landeswährung zurückzukehren, muß
die E Taste erneut gedrückt werden.
Verkauf eines Artikels in Warengruppe 3 (Preis 79,50) in einer Fremdwährung.
(Programmierter Umrechnungskurs: 1,550220)
7950# E 130: t
Zahlgeldeingabe in der Fremdwährung
Beispiel
Fremdwährungsumrechnung
Wenn die Schublade ohne Verkaufsregistrierung geöffnet werden muß (z.B. bei Geldwechsel),
einfach die t Taste drücken. Die Schublade öffnet sich danach.
Kein-Verkauf
Da die Registrierkasse nicht über eine Retourentaste verfügt, kann eine Warengruppe subtrahierend
eingerichtet und als Retourentaste verwendet werden (Für Programmierung siehe Seite 9).
Überprüfen Sie, ob die Mehrwertsteuerberechnung beim retournierten Artikel der
Einstellung für die Warengruppentaste entspricht, sonst wird die Mehrwertsteuer
eventuell falsch berechnet.
Retouren
Nicht-addierende Nummerncodes können während eines Verkaufsvorgangs registriert und auf dem
Kassenbon oder Journal ausgedruckt werden. Sie sind für viele Verwendungszwecke geeignet,
zum Beispiel für Kreditkartennummern, Schecknummern, Seriennummern, Produktcodes,
Servicegebührencodes oder viele andere Nummerncodes, die als Referenz für eine bestimmte
Transaktion benötigt werden. Einen Nummerncode von bis zu 8 Stellen eingeben und die S
Taste drücken.
Nicht-addierender Nummerncode
Wenn eine Kundenzahlung empfangen wird oder wenn Sie eine Auszahlung an einen Zulieferer
vornehmen, ist die Verwendung der V bzw. p Tasten empfehlenswert.
Bei der Registrierung bezahlter Rechnungen Betrag eingeben, dann die V Taste drücken.
Bei der Registrierung der Ausgaben Betrag eingeben, dann die p Taste drücken.
Die Eingabebegrenzung beträgt 8 Stellen (79999999), außer wenn eine unterschiedliche
Programmierung vorliegt.
Bezahlte Rechnung über den Betrag von 60,00 EURO von einem Kunden mit der
Kontonummer 12345.
12345S 60: V
Beispiel
Registrierung von bezahlten Rechnungen und Ausgaben
Page 44

15
Verschiedene Merkmale für Verkaufsregistrierungen
Bei einer Falscheingabe während der Registrierung eines Artikels kann nach den folgenden
Verfahren vorgegangen werden.
• Korrektur einer eingegebenen Zahl
Bei der Eingabe einer falschen Zahl kann diese durch Drücken der Taste c sofort nach der
Eingabe gelöscht werden.
• Korrektur der letzten Postenregistrierung (Direkter Storno)
Ein Fehler bei der Warengruppen-, PLU-, Multiplikations- oder Wiederholungsregistrierung (nur
der letzten Registrierung) kann durch Drücken der Taste v gelöscht werden.
• Korrektur früherer Postenregistrierungen (Indirekter Storno)
Mit dieser Funktion können falsche und richtige Registrierungen einer Transaktion korrigiert
werden, bevor die Transaktion durch Drücken der Taste t, R oder C abgeschlossen wird.
Um die Eingabe 3P auf 4P zu verändern, nachdem eine weitere korrekte PLURegistrierung ausgeführt wurde, muß folgendes eingegeben werden:
3P 1150! 3vP 4P t
Indirekter Korrekte
Storno für Registrierung
3P
• Korrektur nach der Kassenbonausstellung
Diese Funktion gestattet die Stornierung der Registrierungen auf fehlerhaften Kassenbons. Die
Eingabesummen werden von jedem Summenspeicher abgezogen und dann einem StornoSummenspeicher zugeschlagen. Das Funktionsschloß nun auf stellen und die gleichen
Details eingeben, wie jene auf dem fehlerhaften Kassenbon (nötigenfalls den Geheimcode
eingeben und die Taste t drücken).
Beispiel
Korrekturen
Alle Daten der Registrierungen und anderer Transaktionen werden im Speicher der Registrierkasse
so lange gespeichert, wie die Registrierkasse mit Strom versorgt wird (achten Sie darauf, daß die
eingelegten Batterien voll sind, falls der Strom ausfällt). Diese Informationen können als Bericht
ausgedruckt werden, der wertvolle Entscheidungsgrundlagen für Ihr Unternehmen liefern kann.
Verwenden Sie diese Funktion zur sofortigen Kontrolle von im Speicher enthaltenen Umsätzen. Die
Umsätze werden zwar in der Anzeige angezeigt, aber weder ausgedruckt noch aus dem Speicher
gelöscht.
Zur Anzeige der Umsätze für einzelne Positionen das Funktionsschloß in die Position “X/Flash”
stellen und die folgenden Tasten drücken:
Einzelner Warengruppenumsatz Warengruppentaste
Gesamtumsatz S
Kassensoll (bar) R
Anzeige von Umsätzen im Bedienerdisplay
In diesem Bericht werden in der Position “X/Flash” die Gesamtumsätze akkumuliert ausgedruckt.
Mit Hilfe eines X-Berichtes können so tagsüber die Tagesumsätze überprüft werden.
X-Berichte können beliebig oft ausgedruckt werden und haben keinen Einfluß auf den Speicher der
Registrierkasse.
Zum Ausdrucken eines X-Berichts muß daß Funktionsschloß auf die Position “X/Flash” gestellt sein
und die Taste t gedrückt werden.
X-Umsatzbericht
Abruf und Nullstellung der Umsätze
Page 45

16
Abruf und Nullstellung der Umsätze
In diesem Bericht werden in der Position “Z/PGM” dieselben Informationen ausgedruckt wie bei
einem X-Bericht. Nach dem Ausdrucken wird der Tagesspeicher der Registrierkasse gelöscht und
die Transaktionssumme auf Null zurückgestellt. Es empfiehlt sich, am Ende eines Geschäftstages
einen Z-Bericht auszudrucken.
Beim Ausdruck eines Z-Berichts kann ebenso die Gesamtsumme (GT) nullgestellt werden.
Um einen Z-Bericht auszustellen, das untenstehende Verfahren durchführen.
1. Das Funktionsschloß auf die Position Z/PGM einstellen.
2. Nötigenfalls den Geheimcode eingeben und die Taste t drücken.
Um einen Z-Bericht mit Gesamtsummen (GT)-Nullstellung auszustellen:
3. Die Taste C drücken.
4. Nötigenfalls den Geheimcode eingeben und die Taste C drücken.
Um einen Z-Bericht ohne Gesamtsummen-Nullstellung auszustellen:
3. Die Taste t drücken.
4. Nötigenfalls den Geheimcode eingeben und die Taste t drücken.
Z-Umsatzbericht und Nullstellung
Nullstellzähler
Gesamtsumme (GT)
Menge
Warengruppenzähler und
Gesamtbetrag
Prozentzähler und
Gesamtbetrag
Postenstornozähler und
Gesamtbetrag
Stornomoduszähler
und Gesamtbetrag
*
2
Zu versteuernder
Umsatz 1
Gesamtbetrag
MWSt 1
Gesamtbetrag
Warengruppencode
Betrag
*
1
Rückstellsymbol
(Bei einem XBericht steht hier
“X”.)
Transaktionszähler
Gesamtumsatz
Barverkaufszähler und
Gesamtbetrag
Scheckverkaufszähler
und Gesamtbetrag
Kreditverkaufszähler
und Gesamtbetrag
Fremdwährungszähler
und Gesamtbetrag
(Bar)
Fremdwährungszähler
und Gesamtbetrag
(Scheck)
Fremdwährungszähler
und Gesamtbetrag
(Kredit)
Bezahlte Rechnungen
Gesamt
Ausgaben Gesamt
Kein-Verkauf-Zähler
Bargeld in der Schublade
*
3
*
4
*
4
Verkaufsberichtbeispiel
*1Diese Ausdrucke erfolgen nur auf dem Z-Bericht.
*2Die durch Rundung erzeugte Differenz wird hier ausgedruckt, falls die australische Rundung
angewendet ist.
*3Die Ausdrucke erfolgen nicht, falls der Währungsumrechnungskurs auf 0,000000 eingestellt ist.
*4Die Ausdrucke erfolgen nicht, falls “Nein” für “Scheck- und Kreditabschluß bei Zahlgeldeingabe
in Fremdwährung” bei der EURO-Programmierung ausgewählt und/oder der Währungs-
umrechnungskurs auf 0,000000 eingestellt ist.
Page 46

17
EURO-Übergangsfunktion
Ihre Registrierkasse kann für jeden einzelnen Zeitraum bei der Einführung des EURO modifiziert
werden. Je nach dem Zeitpunkt der EURO-Einführung werden in der nachfolgenden Tabelle drei
Zeiträume festgelegt.
Grundsätzlich läßt sich Ihre Registrierkasse für die EURO-Einführung durch Ausführung der
nachfolgenden Modifikation in der Betriebsart Z/PGM automatisch modifizieren. Je nach den
Erfordernissen sind jedoch zuvor einige Optionen einzustellen. Bitte sorgfältig prüfen, welche
Einstellungen dabei erforderlich sind.
Verarbeitung der einzelnen Währungen in Ihrer Registrierkasse
Automatische EURO-Modifikation
Sicherstellen zuerst, daß das Funktionsschloß auf die Z/PGM-Position gestellt ist. (Nötigenfalls den
Geheimcode eingeben und die Taste t drücken.) Danach das folgende Verfahren durchführen.
Jeder einzelne Vorgang läßt sich nur einmal durch den Ersatz von “A=1", “A=2” und “A=3”
durchführen. Wenn der Vorgang mit dem Ersatz von “A=2” zuerst durchgeführt wurde, läßt sich der
Vorgang mit dem Ersatz von “A=1” nicht mehr erzielen.
8:S A* S
*A: 1 für den Zeitraum 1, 2 für den Zeitraum 2, 3 für den Zeitraum 3 eingeben.
Die näheren Einzelheiten für die automatisch erfolgende Modifikation des Registrierkassensystems
sind auf der nachfolgenden Seite angegeben.
Zeitraum 1
Nach der Einführung des
EURO und vor der
Zirkulation von EUROBanknoten und -Münzen.
Fremdwährungstaste
Inlandswährung
Zeitraum 2
Nach der Zirkulation von
EURO-Banknoten und
-Münzen und bevor die
nationale Währung aus
dem Verkehr gezogen
wird. (Koexistenz von
EURO und nationaler
Währung)
Inlandswährung
Fremdwährungstaste
Zeitraum 3
Nachdem die nationale
Währung aus dem
Verkehr gezogen ist.
Inlandswährung
Fremdwährungstaste
EURO
Nationale Währung
(DM, F usw.)
Fremdwährung
Währung
Page 47

18
EURO-Übergangsfunktion
WICHTIG
• Nach der Ausführung des Verfahrens mit “A=1” ist der EURO als Fremdwährung zu behandeln
(E benutzen). Den EURO-Umrechnungskurs als Währungsumrechnungskurs für die E Taste
verwenden.
• Nach der Ausführung des Verfahrens mit “A=2” ist der EURO als Landeswährung und die
nationale Währung als Fremdwährung zu behandeln (E Taste benutzen). Den EUROUmrechnungskurs als Währungsumrechnungskurs für die Taste E verwenden.
• Nach der Ausführung des Verfahrens mit “A=3” ist der EURO als Landeswährung zu behandeln.
• Die automatische Wechselkursumrechnung wird beim Prozentsatz für die Prozenttaste und obere
Betragseingabegrenze (HALO) nicht vorgenommen. Wenn Ihre Landeswährung zum EURO wird,
müssen diese Einstellungen geändert werden, um sie an den EURO anzugleichen.
• Der Fremdwährungsbetrag kann in EURO oder Nationalwährung mit Scheck oder Kredit
empfangen werden. Für die Programmierung beziehen Sie sich bitte auf den Abschnitt “EUROProgrammierung” auf Seite 22.
• Wenn “Ausdruck des Fremdwährungs- und Wechselgeldbetrages” auf “Ja” eingestellt ist, kann
das Wechselgeld durch Drücken der Taste E in Fremdwährung angezeigt werden (wenn das
Wechselgeld in Landeswährung im Display sichtbar ist).
Überprüfen des vorliegenden EURO-Status
Der augenblicklich vorliegende EURO-Status in der Registrierkasse kann überprüft werden. Das
Funktionsschloß hierfür in die Z/PGM-Position stellen (nötigenfalls den Geheimcode eingeben und
die Taste t drücken) und das folgende Verfahren durchführen. Der gegenwärtige EURO-Status
wird auf dem Kassenbon oder Journalstreifen ausgedruckt.
8:SS
EURO-Status
• Bei den durch “-” markierten Posten handelt es sich um die verbleibenden vorliegenden Daten.
*1: Falls die automatische Konvertierung von Einzelpreisen für Warengruppen/PLUs durch die
automatische EURO-Modifikation auf NO (standardmäßige Einstellung) in der EUROProgrammierung eingestellt oder der Währungsumrechnungskurs auf 0% (standardmäßige
Einstellung) in der Programmierung der Fremdwährungs-Umrechnungstaste eingestellt wird,
erfolgt nicht die Konvertierung von Festpreisen für Warengruppen/PLUs in der automatischen
EURO-Modifikation.
*2: Wenn im EURO-Status 2 gearbeitet wird, verbleiben die vorliegenden Daten.
*3: Wenn im EURO-Status 1 oder 2 gearbeitet wird, wird das Währungssymbol durch eine
Leerstelle ersetzt.
Posten
Allgemeiner Z-Bericht
Speicher für Gesamtsumme
Konvertierung von Festpreisen für
Warengruppen/PLUs
Ausdruck des Fremdwährungs- und
Wechselgeldbetrages
Fremdwährungs-Berechnungsmethode
Inlandswährungssymbol
Inlandswährungs-Tabulator
(Dezimalpunktposition)
Fremdwährungssymbol
Fremdwährungs-Tabulator
(Dezimalpunktposition)
Rundung der Fremdwährung
A=1
(
EURO-Status 1)
Erstellt
-
-
Ja
Division
-
-
[EURO]
2
Abrunden
A=2
(EURO-Status 2)
Erstellt
Gelöscht
Ja *
1
Ja
Multiplikation
[EURO]
2
Vorheriges Inlandswährungssymbol
Vorheriger InlandswährungsTabulator
Abrunden
A=3
(EURO-Status 3)
Erstellt
Gelöscht *
2
Ja *
1
Nein
Multiplikation
[EURO]
2
-*
3
-
Abrunden
Page 48

19
Weiterführende Programmierung
Vor der Programmierung das Funktionsschloß auf die Position Z/PGM drehen. Falls erforderlich,
den Geheimcode eingeben und die t Taste drücken.
• Sie können mit der Programmierung ohne Ausdruck des Programmierberichts
fortfahren, indem die S Taste nicht nach jedem Programmierschritt gedrückt wird.
Die PLU-Artikel müssen jedoch unabhängig von anderen Programmierungen
eingestellt werden.
• Die Programmieroptionen, die mit einem Stern (*) gekennzeichnet sind, weisen auf die
Werkseinstellung hin (wenn nicht anderweitig spezifiziert). Wenn es sich um Werte
oder Zifferneinstellungen handelt, werden die Werkseinstellungen mit dem Zusatz
“Voreinstellung” angeführt.
Einzelpreise von häufig gekauften Artikeln können direkt den Warengruppen zugeordnet werden.
Dies ermöglicht es, die Preise einfach durch Drücken der Warengruppentasten einzugeben.
Einzelpreis (max. 5 Stellen) ➜ (s➜) Warengruppentaste (➜
S
)
(Standardmäßig: 0,00)
(Taste s drücken, um die Warengruppen 5 bis 8 zu programmieren.)
Programmierung eines vorgewählten Einzelpreises für jede Warengruppe
Die PLU-Funktion ermöglicht schnelle Tasteneingaben, wobei bei einer Codeeingabe ein Festpreis
automatisch abgerufen wird. Es lassen sich bis zu 80 PLU-Einstellungen vornehmen. Jedes
einzelne PLU gehört einer Warengruppe an, um die gleichen Parameter wie jene der Warengruppe
zu besitzen. Die Registrierkasse wurde vor der Auslieferung werkseitig so voreingestellt, daß PLU1
bis 10 der Warengruppe 1 zugeordnet sind und dem Einzelpreis 0,00 entsprechen.
(Taste s drücken, um die Warengruppen 5 bis 8 zu programmieren.)
Um ein PLU zu sperren, den PLU-Code eingeben und die Taste P drücken, dann die Tasten v
und S drücken.
PLU-Code
➜ P ➜
Einzelpreis (max. 6 Stellen)
➜ (s ➜)
Warengruppentaste ➜ S
Um den nächsten PLU-Code zu programmieren
Wenn der nächste zu programmierende PLU-Code nicht unmittelbar dem gerade eingegebenen PLU-Code folgt.
PLU-Programmierung
Die Taste % kann für Aufschläge oder für Abschläge programmiert werden. Standardmäßig ist die
Taste % als Abschlag programmiert. Ein Prozentsatz kann für die Taste % programmiert werden.
Wenn 00,00% programmiert wird, ist die Verwendung eines Festsatzes gesperrt (werkseitige
Vereinstellung).
Programmieren der Prozenttaste (Abschlag oder Aufschlag)
1
für Abschlag oder
0
für Aufschlag ➜
x➜%(➜S
)
Programmieren des Prozentsatzes (00,00 bis 99,99%)
Prozentsatz mit 4 Stellen (0000 bis 9999) ➜%(➜
S
)
Programmierung der Prozenttaste
Page 49

20
Weiterführende Programmierung
Um mit Fremdwährungen zu arbeiten, können Sie einen Währungsumrechnungskurs zwischen
000,000000 bis 999,999999 für die Fremdwährungs-Umrechnungstaste programmieren.
Wenn 000,000000 programmiert wird, wird die Verwendung der Taste E gesperrt (werkseitige
Voreinstellung).
Währungsumrechnungskurs mit 9 Stellen (000000000 bis 999999999)
➜E(➜
S
)
Programmierung der Fremdwährungs-Umrechnungstaste
Das Druckformat für Kassenbondruck oder Journalstreifendruck kann durch Auswahl der
nachfolgenden 8 Arten von Parametern programmiert werden.
2➜S
➜ ABCDEFGH ➜
S(➜S
)
Positionen: Auswahl: Eingabe:
A Währungssymbol für Inlandswährung Leerstelle* 0
EURO 1
B Kassenbondruck/Journalstreifendruck in Ja (Kassenbon Ein)* 0
der Position REG (Kassenbon-Ein/Aus- Nein (Kassenbon Aus) 1
Funktion)
C Druckformat Journalformat* 0
Kassenbonformat 1
D Ausdruck des Datums Ja* 0
Nein 1
E Ausdruck der Uhrzeit Ja* 0
Nein 1
F Ausdruck der Kassenbonnummer Ja* 0
Nein 1
G Ausdruck der zu versteuernden Ja* 0
Zwischensumme Nein 1
H Ausdruck der Zwischensumme durch Ja 0
Betätigen der
S
Taste
Nein* 1
• Druckformat
Wenn das Kassenbonformat gewählt wird, funktioniert die Journalaufwickelspule nicht.
Druckformat-Programmierung
Page 50

21
Weiterführende Programmierung
Die Bonnummer kann zusammen mit Datum und Uhrzeit auf jedem Kassenbon, Journal oder
Bericht ausgedruckt werden. Die Nummer erhöht sich jeweils um einen Wert, wenn ein Kassenbon
ausgestellt wird. Beim Start ab einer bestimmten Nummer muß diese Zahl minus 1 eingegeben
werden.
Kassenbonanfangsnummer (max. 4 Stellen) ➜
x➜S(➜S
)
(Standardmäßig: 0001)
Programmierung der fortlaufenden Kassenbonnummer
Verschiedene weitere Einstellungen können für bestimmte Anforderungen programmiert werden.
1➜S
➜ ABCDEFGH ➜
S
(➜
S
)
Positionen: Auswahl: Eingabe:
A Datumformat MMTTJJ 0
TTMMJJ* 1
JJMMTT 2
B Uhrzeitformat 12-Stunden-Format 0
24-Stunden-Format* 1
C Position der Dezimalkommastelle für 0 bis 3
Inlandswährung (
Werkseitige Einstellung: 2
)
D Rücksetzen der Kassenbonnummer bei Nein* 0
Ausgabe eines Z-Berichts Ja 1
E Zwangsweise Zahlgeldeingabe für die Nein* 0
Tasten
t
und
C
Ja 1
F Zwangsweise Zwischensummenbildung Nein* 0
Ja 1
G Eingabebegrenzung für die Tasten R, C, 0 bis 8
V
und
p
(
Werkseitige Einstellung: 8
)
H Rundung Abrunden* 0
Aufrunden 1
Ignorieren 2
• Uhrzeitformat
Wenn das 12-Stundenformat gewählt wird, wird die vormittägliche Uhrzeit mit angezeigt und
mit keinen Symbol ausgedruckt. Die nachmittägliche Uhrzeit wird dabei mit angezeigt und mit
dem Symbol @ ausgedruckt.
• Zwangsweise Zahlgeldeingabe
Wenn auf zwangsweise gesetzt (Auswahl von 1), muß der vom Kunden erhaltene Zahlgeldbetrag
unbedingt eingegeben werden, bevor die Transaktion beendet wird.
• Zwangsweise Zwischensummenbildung
Wenn auf zwangsweise gesetzt (Auswahl von 1), muß immer die Taste S gedrückt werden,
bevor die Transaktion abgeschlossen werden kann.
Verschiedene Programmierungen
Page 51

22
Weiterführende Programmierung
Für die Einzelheiten der EURO-Programmierung siehe “EURO-Übergangsfunktion” auf den Seiten
17 und 18.
3➜S
➜ ABCDEFGH ➜
S(➜S
)
Positionen: Auswahl: Eingabe:
A Automatische Umrechnung des Nein* 0
Einzelpreises der Warengruppen/PLUs Ja 1
bei Änderung des EURO-Status auf “2”
B Ausdruck des Umrechnungskurses Nein* 0
Ja 1
C Ausdruck des Fremdwährungsbetrags Nein* 0
für Gesamtsumme und Wechselgeld Ja 1
D Scheck- und Kreditabschluß bei Nein* 0
Zahlgeldeingabe in Fremdwährung Ja 1
E Fremdwährungs-Berechnungsmethode Multiplikation* 0
Division 1
F Rundung für Fremdwährung Aufrunden* 0
Runden 1
G Währungssymbol für Fremdwährung Leerstelle* 0
EURO 1
H Dezimalkommastelle für Fremdwährung 0 bis 3
(Standardmäßig: 2)
Wenn “Ja” für den Ausdruck der Gesamtsumme und des Wechselgeldbetrags
ausgewählt wurde, läßt sich das Wechselgeld durch Drücken der Taste E in
Fremdwährung anzeigen, wenn das Wechselgeld in Inlandswährung im Display
erscheint.
EURO-Programmierung
Ein Geheimcode wird benutzt, um nur bestimmten Personen den Zugang zu den Operationen
unter den Positionen und Z/PGM zu gestatten oder um den Z-Bericht (Nullstellungsbericht)
ausdrucken zu können. Wenn ein Geheimcode erforderlich ist, muß dieser programmiert werden.
Geheimcode (max. 4 Stellen) ➜
x➜t(➜S
)
(Standardmäßig: 0000, Nichtverwendung des Geheimcodes)
Eingabe eines Geheimcodes:
Falls ein Geheimcode programmiert wurde, wird “----” angezeigt, wenn das Funktionsschloß auf
oder Z/PGM gestellt wird, bzw. wenn ein Z-Bericht ausgedruckt werden soll. In diesem Fall
ist der Geheimcode (4stellig) einzugeben und die t Taste zu drücken. Bei jeder einzelnen
Tastenbedienung während der Geheimcodeeingabe verändert sich die Anzeige von “-” zu “_”.
Wenn Sie den programmierten Geheimcode vergessen haben:
Das Funktionsschloß auf die Position Z/PGM bringen, dann die zuvor beschriebene
Geheimcodeprogrammierung ausführen und “0000” für den Geheimcode eingeben.
Programmierung des Geheimcodes
Wenn das australische Rundungssystem gewählt wurde, wird der Gesamtverkaufsbetrag auf 0
oder 5 bei Barzahlung gerundet.
4➜S➜0
für Nein oder 1für Ja ➜
S(➜S
)
(Standardmäßig: Ja für australisches Modell)
Programmierung der Rundung (für australisches Steuersystem)
Page 52

23
Weiterführende Programmierung
Wenn bei dieser Programmierung “Ja” eingestellt wird, so werden der MWSt-Satz und Nettobetrag
in den Positionen REG und VOID (Storno) ausgedruckt.
5➜S➜0
für Nein oder1für Ja
➜
S(➜S
) (
Standardmäßig: Nein
)
• Bei der Wahl von “Ja” muß das Druckformat in der Druckformat-Programmierung auf
“Kassenbonformat” eingestellt werden. Stellen Sie ebenso sicher, daß der Ausdruck
des Datums, der Uhrzeit, der Kassenbon-Nr. und der zu versteuernden
Zwischensumme auf “Ja” eingestellt ist. Beziehen Sie sich bitte für alle obigen
Einstellungen auf die Seite 20.
• Der Name Ihres Geschäfts und die Geschäftsadresse, der Kundenname und die
Kundenadresse sowie die Steuer-Kennummer müssen von Hand geschrieben werden.
Führen Sie deshalb den Kassenbon vor dem Abtrennen durch Betätigen der PapierVorschubtaste vor, um einen Leerbereich für diese Daten zu erzeugen.
• Bei Einzelposteneingaben wird die Menge nicht ausgedruckt.
• Die Art der verkauften Artikel wird als Warengruppen- und/oder PLU-Artikel-Codes
ausgedruckt.
Kassenbonmuster
• Falls das manuell
herausrechnende MWStSystem gewählt ist, müssen
Sie die Tasten S und
V drücken.
Menge
Art
Art (Menge: 1)
MWSt-Satz
MWSt-Betrag
Nettobetrag
Datum
Fortlaufende Nummer/Uhrzeit
Papiervorschub
Programmierung zum Ausdruck des MWSt-Satzes und
Nettobetrages auf dem Kassenbon
Page 53

24
Überprüfen der programmierten Registrierkasseneinstellungen
Ihre Registrierkasse gestattet Ihnen den Ausdruck der programmierten Registrierkasseneinstellungen, nämlich des allgemeinen und Steuerprogrammierungsberichts sowie des PLUProgrammierungsberichts.
Das Funktionsschloß auf Z/PGM stellen und die S Taste betätigen, um den allgemeinen und
Steuerprogrammierungsbericht auszudrucken. Für das Ausdrucken des PLU-Programmierungsberichts ist die P Taste zu drücken.
• Allgemeiner und Steuerprogrammierungs- • PLU-Programmierungsbericht
bericht
Vorzeichen und
voreingestellter Einzelpreis
Vorzeichen und Satz für
%
Satz für
E
Geheimcode
Verschiedene Programmierung (von links, A bis H)
Druckformat-Programmierung (von links, A bis H)
EURO-Programmierung (von links, A bis H)
Programmierung der Rundung (für australisches Steuersystem)
Programmierung zum Ausdruck des MWSt-Satzes und Nettobetrages auf dem Kassenbon
Steuersystem
MWSt-Satz
Datum
Uhrzeit
000017
Einzelposten-Barverkauf (1)/
Normal (0)
Steuerstatus (von links,
herausrechnende
MWSt 4, 3, 2, 1; 0 für
ohne MWSt; 1 für
MWSt)
Zifferneingabebegrenzung
Kassenbonnummer
Warengruppencode
PLU-Artikel-Code
Vorzeichen und
voreingestellter
Einzelpreis
Zugeordneter
Warengruppencode
Page 54

25
Wartung
Verschließen der Schublade
Gewöhnen Sie sich daran, die Schublade zu verschließen, wenn die
Registrierkasse für längere Zeit nicht verwendet werden soll.
Zum Verschließen um 90 Grad nach links drehen. Zum Aufschließen
um 90 Grad nach rechts drehen.
Entnehmen der Schublade
Um die Schublade abzunehmen, zuerst den Schubladeneinsatz
entfernen und danach die Schublade nach vorne ziehen und
hochklappen, um sie zu entfernen.
Das Münzfach für 6 Einheiten kann herausgenommen werden. Die
Fachunterteiler sind ebenso abnehmbar.
Öffnen der Schublade von Hand
Bei Stromausfall oder Störungen des Gerätes den Hebel am Boden der
Registrierkasse ergreifen und in Pfeilrichtung ziehen. Dadurch läßt sich
die Schublade öffnen. Die Schublade kann nicht geöffnet werden, wenn
sie mit dem Schlüssel abgeschlossen wurde.
Verwendung des Schlitzes in der Schublade
Banknoten und Schecks können durch den Schlitz in die Schublade eingelegt werden, ohne diese
zu öffnen. Die eingelegten Banknoten und Schecks werden unter das Münzfach eingesetzt.
Beim Herausnehmen der Banknoten und Schecks die beiden Seiten des Münzfaches
festhalten.
Achtung
Handhabung der Schublade
Erscheinen Farbflecken am Rand der Papierrolle, muß die Papierrolle
ausgetauscht werden. Verwenden Sie das Papier, das unter
“Technische Daten” angegeben ist.
Beim Journalstreifendruck
1. Funktionsschloß auf die Position “REG” drehen.
2. Druckwerkabdeckung entfernen.
3. Taste o drücken, um das Papier einige Zeile zu transportieren und
das Papier abschneiden. Dann die Aufwickelspule aus der Halterung
entfernen.
4. Vorhandenes Papier abschneiden und Papierrolle entnehmen. Dann
das verbliebene Papier durch Drücken der Taste o entfernen.
5. Verbrauchte Papierrolle aus der Aufwickelspule entfernen.
6. Neue Papierrolle einlegen und Aufwickelspule gemäß den Angaben
auf Seite 6 wieder einsetzen.
Beim Kassenbonausdruck die Schritte 1, 2 und 4
ausführen und dann die neue Papierrolle gemäß den
Angaben auf Seite 6 einlegen.
Austausch der Papierrolle
Page 55

26
Wartung
Wenn die Druckfarbe schwächer wird, muß der Druckfarbroller gegen einen neuen, bei SHARP
erhältlichen Druckfarbroller ausgetauscht werden.
Vorsichtsmaßnahmen:
• Unbedingt einen Druckfarbroller von SHARP verwenden. Die
Verwendung anderer Druckfarbroller kann zu Druckerstörungen
führen. Niemals Druckfarbe in den Druckfarbroller gießen.
• Sofort nach Öffnen der Verpackung den Druckfarbroller
einbauen.
1. Druckwerkabdeckung entnehmen.
2. Druckfarbroller nach oben ziehen und den Druckfarbroller
entnehmen.
3. Neuen Druckfarbroller einsetzen.
4. Druckwerkabdeckung wieder aufsetzen.
Austausch des Druckfarbrollers
Diese Registrierkasse zeigt ein ( ) an, wenn sich die eingesetzten Batterien erschöpfen. Bei einer
Batterie, die nahezu vollständig entleert ist oder wenn sich keine Batterien in der Registrierkasse
befinden, wird ein kleineres ( )-Symbol angezeigt.
Bei Anzeige des ( )-Symbols sind die Batterien sobald wie möglich gegen neue auszuwechseln.
Die alten Batterien sind nach 2 Tagen vollständig erschöpft.
Wenn das kleinere ( )-Symbol angezeigt wird, müssen die Batterien unverzüglich
ausgewechselt werden. Wenn bei leeren Batterien das Netzkabel abgezogen wird, oder wenn es
zu einem Stromausfall kommt, werden sämtliche programmierten Werte auf die originale
Werkseinstellung zurückgestellt und sämtliche im Speicher befindliche Daten gelöscht.
Beim Auswechseln der Batterien immer darauf achten, daß die Registrierkasse am Netz
angeschlossen ist und das Funktionsschloß auf REG eingestellt ist. Erst danach die Batterien
auswechseln. Beziehen Sie sich hierfür auf den Abschnitt “Einsetzen der Batterien” auf Seite 6.
Austausch der Batterien
Druckfarbroller
Bei Stromausfall:
Auch bei einem Stromausfall während der Geschäftsstunden bleiben die Speicherinhalte sowie alle
registrierten Umsatzdaten erhalten.
• Wenn während des Stillstands der Registrierkasse bzw. während einer Registrierung ein
Stromausfall eintritt, kehrt die Registrierkasse nach erneuter Stromzufuhr wieder in den
Normalzustand zurück.
• Wenn während eines Ausdrucks ein Stromausfall auftritt, druckt die Registrierkasse “············” auf
dem Kassenbon oder Journalstreifen aus und setzt nach erneuter Stromzufuhr mit dem korrekten
Ausdruck fort.
Bei Blockierung des Druckwerkmotors:
Bei Blockierung des Druckwerkmotors stoppt der Ausdruckvorgang und ein Piepton ertönt
wiederholt. Erst das Netzkabel abziehen und den Papierstau beheben. Dann das Netzkabel wieder
einstecken, die Papierrolle an die richtige Stelle vorschieben und die Taste c drücken. Die
Registrierkasse setzt nach dem Ausdruck von “············” an der unterbrochenen Stelle fort.
Bei Stromausfall oder Papierstau
Page 56

27
Wartung
Technische Daten
Falls ein Problem auftaucht, sehen Sie bitte zuerst in dieser Tabelle nach, bevor Sie den
Kundendienst zu Rate ziehen.
Bevor Sie den Kundendienst anfordern
• Auf der Anzeige erscheinen Symbole,
die keinen Sinn ergeben.
• Die Anzeige leuchtet nicht, selbst wenn
das Funktionsschloß auf einer anderen
Stelle als “” steht. Das Gerät
funktioniert nicht, wenn eine beliebige
Taste gedrückt wird.
• Die Anzeige leuchtet, das Gerät nimmt
aber keine Tasteneingaben an.
• Das Journalpapier wird nicht richtig in
das Druckwerk eingezogen.
• Die Druckfarbe verbleicht oder der
Ausdruck wird unleserlich.
• Wurde das Gerät gemäß den Angaben auf Seite 5
richtig zurückgestellt?
• Ist die Steckdose ohne Strom? (Anderes
elektrisches Gerät einstecken und ausprobieren)
• Ist das Netzstromkabel richtig in der Steckdose
eingesteckt?
• Ist das Funktionsschloß richtig auf “REG” gestellt?
• Wurde das Gerät gemäß den Angaben auf Seite 5
richtig zurückgestellt?
• Ist die Aufwickelspule richtig installiert?
• Liegt ein Papierstau vor?
• Ist der Druckfarbroller verbraucht?
• Ist der Druckfarbroller richtig angebracht?
Problem Zu überprüfen
Modell: XE-A102
Außenabmessungen: 330(B) x 363(T) x 234(H) mm
Gewicht: 5 kg
Stromversorgung: Netzstrom, Ortsspannung und -frequenz
Leistungsaufnahme: Bereitschaft: 6,4 W, Betrieb: 13 W
Betriebstemperatur: 0 bis 40°C
Anzeige: Numerische LED-Anzeige (Lichtemittierende Diode)
Druckwerk: 1-Stationen-Typenraddruckwerk
Druckkapazität: Max. 13 Stellen
Papierrolle: Breite: 57,5 mm ± 0,5 mm
Max. Außendurchmesser: 80 mm
Papierqualität: holzfreies Papier
(Stärke: 0,06 bis 0,085 mm,
Gewicht: 47 bis 64 g/m
2
)
Geldschublade: 3 Fächer für Geldscheine, 6 Fächer für Münzen
Zubehör (im Papierolle 1 Rolle
Lieferumfang Funktionsschlüssel 2
enthalten): Schubladenschlüssel 2
Bedienungsanleitung 1 Exemplar (diese Anleitung)
Schnellstartanleitung 1 Exemplar
Druckfarbroller 1 (bereits installiert)
Aufwickelspule 1
Haltewinkel 1
* Änderungen vorbehalten.
Page 57

Achtung: Ihr Produkt
trägt dieses Symbol. Es
besagt, dass Elektround Elektronikgeräte
nicht mit dem
Haushaltsmüll entsorgt,
sondern einem
getrennten
Rücknahmesystem
zugeführt werden
sollten.
A. Entsorgungsinformationen für Benutzer aus
Privathaushalten
1. In der Europäischen Union
Achtung: Werfen Sie dieses Gerät zur Entsorgung bitte nicht in den
normalen Hausmüll!
Gemäß einer neuen EU-Richtlinie, die die ordnungsgemäße
Rücknahme, Behandlung und Verwertung von gebrauchten Elektro- und
Elektronikgeräten vorschreibt, müssen elektrische und elektronische
Altgeräte getrennt entsorgt werden.
Nach der Einführung der Richtlinie in den EU-Mitgliedstaaten können
Privathaushalte ihre gebrauchten Elektro- und Elektronikgeräte nun
kostenlos an ausgewiesenen Rücknahmestellen abgeben*.
In einigen Ländern* können Sie Altgeräte u.U. auch kostenlos bei Ihrem
Fachhändler abgeben, wenn Sie ein vergleichbares neues Gerät kaufen.
*) Weitere Einzelheiten erhalten Sie von Ihrer Gemeindeverwaltung.
Wenn Ihre gebrauchten Elektro- und Elektronikgeräte Batterien oder
Akkus enthalten, sollten diese vorher entnommen und gemäß örtlich
geltenden Regelungen getrennt entsorgt werden.
Durch die ordnungsgemäße Entsorgung tragen Sie dazu bei, dass
Altgeräte angemessen gesammelt, behandelt und verwendet werden.
Dies verhindert mögliche schädliche Auswirkungen auf Umwelt und
Gesundheit durch eine unsachgemäße Entsorgung.
2. In anderen Ländern außerhalb der EU
Bitte erkundigen Sie sich bei Ihrer Gemeindeverwaltung nach dem
ordnungsgemäßen Verfahren zur Entsorgung dieses Geräts.
Für die Schweiz: Gebrauchte Elektro- und Elektronikgeräte können
kostenlos beim Händler abgegeben werden, auch wenn Sie kein neues
Produkt kaufen. Weitere Rücknahmesysteme finden Sie auf der
Homepage von www.swico.ch oder www.sens.ch.
B. Entsorgungsinformationen für gewerbliche Nutzer
1. In der Europäischen Union
Wenn Sie dieses Produkt für gewerbliche Zwecke genutzt haben und
nun entsorgen möchten:
Bitte wenden Sie sich an Ihren SHARP Fachhändler, der Sie über die
Rücknahme des Produkts informieren kann. Möglicherweise müssen Sie
die Kosten für die Rücknahme und Verwertung tragen. Kleine Produkte
(und kleine Mengen) können möglicherweise bei Ihrer örtlichen
Rücknahmestelle abgegeben werden.
Für Spanien: Bitte wenden Sie sich an das vorhandene
Rücknahmesystem oder Ihre Gemeindeverwaltung, wenn Sie Fragen zur
Rücknahme Ihrer Altgeräte haben.
2. In anderen Ländern außerhalb der EU
Bitte erkundigen Sie sich bei Ihrer Gemeindeverwaltung nach dem
ordnungsgemäßen Verfahren zur Entsorgung dieses Geräts.
Page 58

1
XE-A102
CAISSE ENREGISTREUSE ELECTRONIQUE
Merci pour votre achat de la Caisse Enregistreuse Electronique SHARP, Modèle XE-A102.
Veuillez lire attentivement ce Manuel d’Instructions avant d’utiliser votre machine.
Conservez ce Manuel pour vous y référer par la suite. Cela vous aidera si vous rencontrez
n’importe quel problème opérationnel.
Précautions concernant la manipulation
• Faites très attention lors de l’enlèvement ou de la remise en place du couvercle de
l’imprimante, du fait que le coupoir qui y est installé est très aiguisé.
• Installez la caisse enregistreuse dans un endroit qui ne soit pas exposé à un
ensoleillement direct, à des changements anormaux de températures, à une humidité
élevée ou à des éclaboussures d’eau.
• Ne faites jamais fonctionner la caisse enregistreuse avec des mains humides. De l’eau
risque de provoquer une panne des éléments internes.
• La caisse enregistreuse peut être branchée sur n’importe quelle prise de courant murale
ordinaire [tension (nominale) officielle]. D’autres dispositifs électriques utilisés sur le
même circuit risquent d’entraîner un fonctionnement défectueux de la caisse
enregistreuse.
• Nettoyez la caisse enregistreuse avec un tissu sec et doux. N’utilisez jamais de liquides
volatils, tels que de la benzine ou un diluant pour peinture. Des produits chimiques
peuvent entraîner la décoloration ou la détérioration du boîtier.
• Pour une protection contre une perte des données, veuillez acheter trois piles R6 ou LR6
(format “AA”), et les installer après avoir remis votre caisse enregistreuse à zéro et avant
de l’utiliser.
Lors de la manipulation des piles, veuillez observer les points suivants. Une
utilisation incorrecte des piles peut provoquer leur explosion ou des fuites,
endommageant éventuellement l’intérieur de la caisse enregistreuse.
• Risque d'explosion si la batterie est remplacée par un type incorrect.
Mette au rebut les batteries usées selon les instructions données.
• Pour l’installation, assurez-vous que les pôles positif (+) et négatif (-) de chaque pile
soient orientés dans la direction appropriée.
• De même, pour l’installation, ne mélangez jamais des piles de types différents.
• Pour l’installation, ne mélangez jamais des piles usagées avec des neuves.
• Ne laissez jamais des piles épuisées dans le compartiment de la batterie.
• Retirez les piles si vous pensez ne pas utiliser la caisse enregistreuse pendant une
période de temps prolongée.
• Dans le cas de la fuite d’une pile, nettoyez immédiatement le compartiment de la
batterie, en prenant garde de ne pas laisser le liquide de la pile entrer en contact avec
votre peau.
• Pour la mise au rebut des piles, suivez la législation correspondant à votre pays.
• Pour un débranchement électrique total, retirez la fiche principale.
IMPORTANT!
Avant d’utiliser la caisse enregistreuse pour la première fois, vous devez tout d’abord la
remettre à zéro, puis y installer trois piles R6 ou LR6 (format “AA”). N’oubliez jamais de
suivre les procédures décrites dans la section “Préparation de la caisse enregistreuse”.
Lorsque vous ouvrez le carton d’emballage, assurez-vous que tous les accessoires
indiqués dans la section des “Données techniques” y soient.
Français
Page 59

2
Table des matières
Composants et leurs fonctions.........................................................3
Lorsqu’une erreur se produit ............................................................4
Préparation de la caisse enregistreuse............................................5
Opérations pour un démarrage rapide.............................................7
Programmation de la date et de l’heure ................................................8
Programmation de taxes .......................................................................8
Programmation du statut d’un rayon .....................................................9
Opérations de base pour des entrées de ventes (Entrées de
rayons)...................................................................................................9
Lecture/Remise à zéro de données de ventes....................................11
Utilisation de différentes fonctions pour des entrées de
ventes ................................................................................................12
Entrées de PLU ...................................................................................12
Entrées de ventes pratiques................................................................12
Calcul d’une T.V.A. (Taxe)....................................................................13
Rabais et primes en utilisant la touche de pourcentage .....................13
Change d’une monnaie .......................................................................14
Pas de vente .......................................................................................14
Remboursement ..................................................................................14
Numéro d’un code non-additif .............................................................14
Entrées de comptes admis et de décaissements................................14
Rectifications .......................................................................................15
Lecture et remise à zéro des ventes ..............................................15
Fonction de transition de l’EURO ...................................................17
Programmation avancée..................................................................19
Programmation de prix unitaires préréglés par rayons .......................19
Programmation d’un PLU ....................................................................19
Programmation de la touche de pourcentage .....................................19
Programmation de la touche de change .............................................20
Programmation de la disposition d’impression....................................20
Programmations diverses ....................................................................21
Programmation du numéro consécutif d’un reçu.................................21
Programmation de l’EURO ..................................................................22
Programmation d’un arrondissement (Pour le système de taxes
australien) ............................................................................................22
Programmation d’un code secret.........................................................22
Vérification des réglages de la machine programmée.................23
Entretien ............................................................................................24
Manipulation du tiroir ...........................................................................24
Remplacement du rouleau de papier ..................................................24
Remplacement des piles .....................................................................25
Remplacement du rouleau encreur .....................................................25
Dans le cas d’une panne de courant ou d’un bourrage du papier ......25
Avant d’appeler pour un dépannage ...................................................26
Données techniques ............................................................................26
Français
Page 60

3
Composants et leurs fonctions
Commutateur de mode
Clavier
Affichage
Votre caisse enregistreuse est équipée d’un écran frontal à DEL (diode électro-luminescente) qui
présente pour l’opérateur une lisibilité aisée de 9 chiffres lors d’une opération.
o:
Touche d’alimentation en papier
c: Touche d’effacement
V: Touche de taxe à la valeur
ajoutée/Compte admis
x: Touche de multiplication/
Affichage de l’heure
p: Touche de décaissement
%: Touche de pourcentage
v: Touche d’annulation
e: Touche d’échappement
s: Touche de changement d’un
rayon
P: Touche de PLU (Prix par article
déjà programmé)
R: Touche de crédit
E: Touche de change
S: Touche de code non-
additif/Total partiel
C: Touche de chèque
t: Touche de total/Offre d’une
somme/Pas de vente
: Met l’affichage hors circuit. Aucune opération
n’est possible.
REG: Permet l’entrée d’opérations.
: Permet une rectification après l’achèvement
d’une opération.
X/Flash: Permet d’imprimer des rapports sur les ventes
et d’afficher des rapports immédiats.
Z/PGM: Permet d’imprimer et de remettre à zéro des
rapports sur les ventes et de programmer.
Insérez la clé du mode dans le commutateur
de mode et déplacez la clé sur le mode
approprié.
Touches numériques Touches de rayons
De manière à introduire les
rayons 5 à 8, appuyez sur
s et ensuite sur les
touches ! à $.
Répétition: Indique le nombre de fois que l’on appuie de façon répétée
sur la même touche d’un rayon ou d’un PLU. Si une entrée
est répétée plus de dix fois, seul le dernier chiffre est affiché.
Code PLU: Indique le code du PLU introduit.
Rayons: Indique le rayon introduit. Par exemple, si l’on appuie sur la
touche du rayon 1, “1” apparaîtra sur l’affichage.
Page 61

4
Composants et leurs fonctions
Symboles et chiffres apparaissant sur l’affichage:
Erreur: Apparaît accompagné d’un signal sonore lorsqu’une erreur est faite. Si cela se
produit pendant une opération du fait de l’entrée supplémentaire d’un chiffre,
appuyez simplement sur la touche c et réintroduisez correctement.
Programme: Apparaît lorsque la caisse enregistreuse est programmée sur le mode “Z/PGM”.
Achèvement: Apparaît lorsqu’une opération est achevée en appuyant sur la touche t, R ou
C.
Total partiel: Apparaît lorsque la caisse enregistreuse calcule un total partiel quand on appuie
sur la touche S, et aussi lorsque la somme présentée est inférieure au
montant total des ventes.
Rendu: Apparaît chaque fois que le montant requis d’un rendu est affiché.
Change: Apparaît lorsque l’on appuie sur la touche E pour calculer un total partiel dans
une monnaie étrangère.
Piles faibles: Apparaît lorsque la tension des piles installées est inférieure au niveau prescrit.
Dans ce cas, les piles doivent être remplacées le plus tôt possible par des
neuves.
Pas de piles: Apparaît lorsque les piles ne sont pas installées ou que les piles installées sont
épuisées. Dans ce cas, il est nécessaire de remplacer immédiatement les piles
par des neuves.
En outre, les affichages suivants peuvent apparaître au besoin:
• Le signe soustractif (-) peut apparaître aux positions 2 à 9.
• Le point de décimalisation apparaît aux positions 1 à 3.
Pour afficher la date et l’heure
Régler le commutateur de mode sur la position REG et appuyez une fois sur la touche x pour
afficher l’heure ou appuyez deux fois sur la touche x pour afficher la date.
Appuyez sur la touche c pour annuler l’affichage de l’heure et de la date.
Lorsqu’une erreur se produit
Lorsque votre enregistreuse entre dans une condition d’erreur, elle affiche le message d’erreur “ ”
accompagné d’un signal sonore d’avertissement. Supprimez la condition d’erreur en appuyant sur
la touche c et effectuez l’opération adéquate.
1. Lorsque vous introduisez un nombre de plus de 7 chiffres à un rayon ou un nombre de
plus de 8 chiffres (79999999) à un compte admis (RA), un décaissement (PO) un crédit ou
un chèque:
Appuyez sur la touche c effectuez une entrée correcte.
2. Lorsque vous effectuez une erreur dans la manipulation des touches:
Appuyez sur la touche c et effectuez une entrée correcte.
3.
Lorsque vous effectuez une entrée au-delà de la limitation programmée du chiffre d’entrée:
Vérifiez si le montant introduit est correct. S’il l’est, vérifiez le réglage de la limitation du chiffre
d’entré.
4. Lorsqu’un total partiel excède huit chiffres (79999999)
:
Appuyez sur la touche c, puis appuyez sur la touche t, R ou C pour achever l’opération
à ce point.
5. Lorsque le nombre d’un article dépasse 3 chiffres dans une entrée multiplicative:
Appuyez sur la touche c et réintroduisez le nombre correct.
Fonction d’échappement à une erreur
Lorsqu’une erreur ou un problème incontrôlable se produit pendant l’entrée d’une opération et si
votre client ne peut attendre, appuyez deux fois sur la touche e (suivant c dans une condition
d’erreur). Vous pouvez alors quitter cette situation et achever à ce moment l’opération en tant que
vente au comptant. Les entrées d’opérations effectuées avant sont enregistrées.
Page 62

5
Préparation de la caisse enregistreuse
De manière à ce que votre caisse enregistreuse fonctionne correctement, vous devez la remettre à
zéro avant de la programmer pour la première fois. Suivez la procédure suivante.
1. Insérez la clé de mode dans le commutateur de mode et tournez la clé sur la position REG.
2. Insérez la fiche du câble d’alimentation dans une prise de courant secteur. Un avertissement
sonore retentira trois fois.
IMPORTANT: Cette opération devra être effectuée sans avoir installé les piles.
3. L’enregistreuse devra afficher alors “ 0.00”.
4. Appuyez sur la touche x pour confirmer le démarrage de l’horloge à partir de “ 0-00”.
5. Appuyez sur la touche c pour annuler l’affichage de l’heure.
Veuillez effectuer les opérations suivantes avant d’utiliser la caisse enregistreuse pour la première
fois.
Etape 2 Remise à zéro de la caisse enregistreuse
Pour l’installation de la caisse enregistreuse, utilisez une surface stable à proximité d’une prise de
courant secteur et dans un endroit où l’enregistreuse ne soit pas soumise à des éclaboussures
d’eau ou à un ensoleillement direct. Puis, installez l’enregistreuse en utilisant le support-cornière
de fixation fourni avec elle.
Le support-cornière de fixation empêche le déplacement de l’enregistreuse lorsque le tiroir s’ouvre.
En accrochant l’enregistreuse à ce support, vous pourrez la fixer dans la position appropriée.
Suivez la procédure indiquée ci-dessous.
Comment installer le support-cornière de fixation
1. Nettoyez entièrement l’emplacement où le support-
cornière de fixation (B) doit être installé.
2. Dénudez le ruban adhésif sur le support-cornière de
fixation.
3. Accrochez le support-cornière de fixation au crochet
(A) situé à la partie inférieure de l’enregistreuse.
4. Attachez fermement le support-cornière de fixation à
la surface de la table, nettoyée ci-dessus.
Comment retirer l’enregistreuse du support-cornière de fixation
1. Soulevez l’avant de l’enregistreuse et tirez-la vers vous.
Etape 1 Installation de la caisse enregistreuse
A
B
Page 63

6
Préparation de la caisse enregistreuse
Une imprimante est installée sur votre enregistreuse, et vous pouvez imprimer des reçus ou des
bandes de détails quotidiens. Pour l’imprimante, vous devez installer le rouleau de papier fourni
avec l’enregistreuse, même lorsque vous programmez l’enregistreuse pour ne pas imprimer de
reçus.
1. Installez le rouleau de papier dans le berceau du rouleau de
papier, comme il est montré sur l’illustration.
Etape 4 Installation du rouleau de papier
Trois piles neuves R6 ou LR6 (format “AA”) doivent être installées dans la caisse enregistreuse
pour éviter que les données et les réglages programmés par l’utilisateur ne soient effacés de la
mémoire lorsque le câble d’alimentation secteur est débranché accidentellement ou dans le cas
d’une panne de courant. Une fois installées, les piles durent environ un an avant de nécessiter leur
remplacement. A ce moment, le symbole “” apparaîtra sur l’affichage pour indiquer que les piles
sont devenues faibles et qu’elles doivent être remplacées avant deux jours.
Installez trois piles neuves R6 ou LR6 (format "AA") selon la procédure montrée ci-dessous avec le
câble d’alimentation secteur branché et réglez le commutateur de mode sur la position REG:
1. Poussez le capot de l’imprimante vers l’avant et retirez-le.
2. Ouvrez le couvercle de la batterie situé près du berceau du rouleau
de papier.
3. Insérez les trois piles neuves R6 ou LR6 (format “AA”).
4. Vérifiez que le symbole de piles faibles “” ne soit pas allumé.
5. Refermez le couvercle de la batterie.
Assurez-vous d’observer les précautions indiquées à la page
1, lors de la manipulation des piles.
Etape 3 Installation des piles
(Vue à partir de l’arrière)
Page 64

7
Préparation de la caisse enregistreuse
Dans cette section, sont expliquées comment effectuer une programmation de base avant de
commencer une opération de ventes et une opération de ventes de base.
Abréviations et terminologie utilisées dans ce manuel
Dept.: Rayon; une catégorie pour les classifications des marchandises. Chaque
article d’une vente doit relever d’un rayon.
PLU: Prix par article déjà programmé; une catégorie pour les classifications des
marchandises. Les PLU sont utilisés pour appeler des prix préréglés par
l’entrée d’un code (1 ~ 80).
Touches de fonctions: Les touches de fonctions sont énumérées dans la section du clavier.
Veuillez vous référer à la page 3.
VAT: Taxe à la valeur ajoutée
Rapport X: Rapport pour lire des données sur les ventes.
Rapport Z: Rapport pour lire et remettre à zéro des données sur les ventes.
Fonction en circuit/hors circuit des reçus: Pour imprimer ou ne pas imprimer des reçus ou des
bandes de détails quotidiens sur le mode REG.
• Si la position décimale de votre monnaie nationale est autre que 2, vous devez changer
le réglage. Pour le réglage, veuillez vous référer à la section “Programmations diverses”.
• Vous pouvez continuer la programmation (étape 1 à 3 ci-dessous) sans devoir imprimer
un rapport de programmation en n’appuyant pas sur la touche S à chaque étape de
la programmation. Cependant, pour achever la programmation, vous devrez appuyer sur
la touche S.
Lorsque vous appuyez sur la touche S à la fin d’une programmation, un rapport sur
la programmation sera imprimé. Sur le rapport, vous pouvez vérifier les réglages
effectués. Assurez-vous que votre programmation a été correctement effectuée.
Pour la lecture du rapport, veuillez vous référer à la section “Vérification des réglages de
la machine programmée”.
2. Insérez le papier tout droit dans la fente d’insertion et appuyez sur
la touche o. L’extrémité du papier apparaîtra dans la zone
d’impression.
3. (Pour l’impression de la bande de
détails quotidiens) Insérez
l’extrémité supérieure du rouleau de
papier dans l’encoche de l’axe de la
bobine et enroulez le papier de deux
ou trois tours.
4. (Pour l’impression de la bande de
détails quotidiens) Placez la bobine
enrouleuse sur le support.
5. Remettez en place le capot de l’imprimante. Pour l’impression de reçus, passez l’extrémité du
papier à travers les ouvertures du capot de l’imprimante. Faites très attention de ne pas vous
couper avec le coupoir manuel.
Opérations pour un démarrage rapide
Page 65

8
Opérations pour un démarrage rapide
Pour le réglage de la date, introduisez la date avec 6 chiffres en utilisant la disposition de jourmois-année. (Par exemple, introduisez 260805 pour 26 août 2005.)
Pour le réglage de l’heure, introduisez l’heure avec 4 chiffres en utilisant le système de 24 heures.
Réglez le commutateur de mode sur la position Z/PGM, puis opérez les séquences de touches
suivantes.
Date (JJMMAA) ➜
S(➜S
: pour achever la programmation)
Heure (4 chiffres max. dans le système de 24 heures) ➜
S
(➜
S
)
Vous pouvez changer la disposition de la date sur le mode Z/PGM. Si vous modifiez la
disposition, suivez la disposition que vous avez changée lors du réglage de la date.
Etape 1 Programmation de la date et de l’heure
Votre caisse enregistreuse se présente avec la possibilité de programmer six sortes de système de
taxes. Programmez un système de taxes correspondant à votre région et programmez des taux de
taxes (00,0000% à 99,9999%) selon le système de taxe que vous avez choisi.
Assurez-vous que le commutateur de mode est sur la position Z/PGM, puis effectuez les
séquences de touches suivantes.
Programmation du système de taxes
8➜S
➜ A ➜
S(➜S
)
Paramètre A: Système de taxes
T.V.A. manuelle 1-4: 0 T.V.A. automatique 1-4: 1 Taxe automatique 1-4: 2
(Implicitement)
T.V.A. manuelle 1: 3 Taxe manuelle 1-4: 4 Taxe automatique 1-3 et
T.V.A. automatique 1: 5
Programmation du taux de la T.V.A. (taxe)
Paramètres
A: T.V.A. (taxe) 1:1 T.V.A. (taxe) 2:2 T.V.A. (taxe) 3:3 T.V.A. (taxe) 4:4
B: Taux de T.V.A. (taxe) de 6 chiffres (000000 à 999999) (Implicitement: 000000)
C: Limitation d’une taxe inférieure (0 à 9999) seulement pour le système de taxes
(Implicitement: 0)
9 ➜ S ➜ A ➜ x ➜ B ➜ x ➜ C ➜ S (➜ S)
Lorsqu’une limitation de taxe inférieure n’est pas spécifiée.
Etape 2 Programmation de taxes
Page 66

9
Opérations pour un démarrage rapide
Dans cette section, la méthode de base pour des entrées de ventes, en utilisant une touche de rayon
avec une simple rectification (annulation), est expliquée. Pour plus d’informations, telles que des
entrées de PLU, des entrées de T.V.A. (taxes) et des entrées en utilisant les touches de fonctions,
veuillez vous référer à la section “Utilisation de différentes fonctions pour des entrées de ventes”.
Un exemple d’opération (payement au comptant) est montré cidessous.
Avant de commencer des entrées de ventes, assurez-vous qu’un
rouleau de papier soit installé.
1. Réglez le commutateur de mode sur la position REG.
Etape 4 Opérations de base pour des entrées de ventes (Entrées de rayons)
Les marchandises peuvent être classées dans huit rayons. Les articles vendus en utilisant les
touches de rayons peuvent être ultérieurement imprimés sur un rapport qui indique les quantités
vendues et les montants des ventes classés par rayon. Ces données peuvent être utiles pour
prendre différentes décisions concernant l’achat et d’autres opérations en magasin. Lorsqu’on
utilise une touche de rayon, vous devez régler les paramètres pour spécifier le statut du rayon, tels
que le signe additif ou soustractif et le statut de la taxe.
Assurez-vous que le commutateur de mode est sur la position Z/PGM, puis opérez avec la
séquence de touches suivante.
ABCDEFG ➜
x
➜ (s➜ ) Touche de rayon (➜
S
)
(Appuyez sur s pour programmer les rayons 5 à 8.)
Paramètres: Sélection: Entrée:
A Signe +/- Signe +* 0
Signe - 1
B Normal/SICS (Vente au comptant d’un Normal* 0
seul article) SICS 1
C T.V.A. 4 ou TAXE 4 Non* 0
Oui 1
D T.V.A. 3 ou TAXE 3 Non* 0
Oui 1
E T.V.A. 2 ou TAXE 2 Non* 0
Oui 1
F T.V.A. 1 ou TAXE 1 Non 0
Oui* 1
G Entrée limitée de chiffres 0 à 7 (implicitement 7)
(0 à 7 chiffres)
*: Implicitement
• Signe
Affectez le signe “+” aux rayons pour lesquels des montants de ventes normales doivent être
introduits, et le signe “-” aux rayons pour lesquels des payements pour des articles tels des
remboursements, des retours de bouteilles consignées ou d’autres opérations soustractives
doivent être introduits.
• SICS (Vente au comptant d’un seul article)
Ceci permet à l’opérateur d’achever l’entrée d’une opération en introduisant le prix unitaire d’un
article et en appuyant sur la touche du rayon réglé pour SICS. Si le prix unitaire est préréglé pour
la touche du rayon, vous pouvez achever l’opération en n’appuyant que sur la touche du rayon.
• Limitation des chiffres d’entrée
Le réglage de ce paramètre pour les rayons applicables empêche l’entrée accidentelle d’un trop
grand montant pendant une vente. Par exemple, si l’entrée autorisée la plus élevée doit être de
9,99, introduisez 3. Si 0 est introduit, vous ne pouvez faire entrer un prix et seul un prix préréglé
peut être introduit.
Etape 3 Programmation du statut d’un rayon
Page 67

10
Opérations pour un démarrage rapide
2. Introduisez le prix pour l’article du premier rayon (dans le cas de 15,00, introduisez 15:).
3. Appuyez sur la touche du rayon approprié.
Pour les rayons 5 à 8, appuyez tout d’abord sur la touche s avant d’appuyer sur la touche du
rayon.
4. Répétez les étapes 1 et 2 pour tous les articles du rayon.
5. Appuyez sur la touche S
pour faire afficher le montant dû. (Vous pouvez omettre cette étape.)
6. Appuyez sur la touche V pour le calcul d’une taxe si votre système de taxe est le système
de T.V.A. 1 à 4 manuelle (implicitement).
7. Introduisez le montant reçu du client. (Vous pouvez omettre cette étape si le montant reçu est
identique au total partiel.)
8. Appuyez sur la touche t, le montant requis du rendu est affiché et le tiroir s’ouvre.
9. Détachez le reçu et donnez-le au client (dans le cas où vous avez programmé pour une
impression de reçus) avec son rendu affiché.
10.Refermez le tiroir.
• Lors d’un payement avec un chèque, appuyez sur la touche C au lieu de la touche
t.
• Lors d’un payement à crédit, appuyez sur la touche R à la place de la touche t.
• Si vous préréglez des prix unitaires à des rayons, vous pouvez omettre d’introduire le
prix unitaire de l’article du rayon, c’est-à-dire, omettre l’étape 1 montrée ci-dessus. Pour
la programmation, référez-vous à la section “Programmation de prix unitaires préréglés
par rayons”.
Achèvement direct (Pas de rendu)
Vente au comptant d’un article à 5,00 (rayon 1) et d’un article à 8,00 (rayon 3), le total
des ventes comprenant la taxe est de 13,00 et réception du montant exact de la
somme.
5:! 8:# St
Prix et rayon Prix et rayon
Opération de l’offre d’une somme
Vente au comptant d’un article à 5,00 (rayon 1) et d’un article à 8,00 (rayon 3) et
réception d’une somme de 20,00 de votre client.
5:! 8:# S 20: t
Prix et rayon Prix et rayon Somme présentée
Calcul d’une taxe (Système de taxe: Système de T.V.A. 1 à 4 manuelle)
Vente au comptant d’un article à 5,00 (rayon 1) et d’un article à 8,00 (rayon 3) et
réception d’une somme de 20,00 de votre client.
5:! 8:# S V 20: t
Calcul d’une taxe
Exemple
Exemple
Exemple
Page 68

11
Opérations pour un démarrage rapide
De manière à vérifier les ventes, vous pouvez lire un rapport sur les ventes. De même, vous
devrez remettre à zéro les données de ventes après vous être entraîné sur votre caisse
enregistreuse.
Pour lire un rapport sur les ventes, vous devrez obtenir un rapport X; réglez le commutateur de
mode sur la position X/Flash et appuyez sur la touche t.
Pour remettre les ventes à zéro, vous devrez obtenir un rapport Z; réglez le commutateur de mode
sur la position Z/PGM et appuyez sur la touche C. Les données sur les ventes accumulées et le
total général (GT) seront remis à zéro.
Pour une lecture et une remise à zéro des données effectives sur les ventes, veuillez vous référer
à la section “Lecture et remise à zéro des ventes”. Vous devrez remettre à zéro les données sur
les ventes à la fin de chaque journée pour supprimer les données sur les ventes.
Etape 5 Lecture/Remise à zéro de données de ventes
Lorsqu’on effectue une entrée erronée:
Rectification des nombres introduits: Annules-les en appuyant sur la touche c, immédiatement
après l’entrée.
Rectification de l’entrée du dernier article: Appuyez sur la touche v.
Rectification d’entrées antérieures: Annulez l’entrée incorrecte en utilisant la touche v et effectuez
l’entrée correcte, comme il est montré sur l’exemple cidessous.
Pour les détails, veuillez vous référer à “Rectifications” à la
page 15.
Rectification d’entrées antérieures
Correction de l’entrée de 300 ! à 200 ! après qu’une autre entrée correcte a
été faite
3:! 525# 3:v! 2:! t
Annulation pour Entrée correcte
300 !
Exemple
Page 69

12
Utilisation de différentes fonctions pour des entrées de ventes
Introduisez le code PLU d’un article PLU et appuyez sur la touche P. L’article PLU sera
enregistré.
Vente à crédit d’un article du PLU 1 et d’un article du PLU 15.
1P 15P R
Pour utiliser une entrée de ventes d’articles PLU, vous devez programmer les PLU.
Exemple
Avant d’effectuer des entrées de ventes, assurez-vous qu’un rouleau de papier soit installé dans le
cas où la fonction pour reçus est mise en marche.
Assurez-vous aussi de tourner le commutateur de mode sur la position REG.
Entrées de PLU
Lorsqu’on vend un seul article au comptant [entrée de la vente au comptant d’un seul
article (SICS)]
Lorsqu’une vente pour un seul article est payée au comptant, tel qu’un paquet de cigarettes, vous
pouvez utiliser la fonction SICS. Elle n’est applicable que pour les touches de rayons programmées
pour des SICS ou des PLU associés avec de tels rayons. Le tiroir s’ouvre après avoir appuyé sur
la touche du rayon ou du PLU.
Lorsqu’on introduit plus d’un article du même rayon ou PLU
Vous pouvez introduire deux ou davantage d’articles d’un même rayon ou PLU en appuyant de
manière répétée sur la touche du rayon ou du PLU (entrée répétée) ou en utilisant la touche de
multiplication (entrée multiplicative). Il est plus commode d’utiliser la touche de multiplication
lorsqu’on vend le même article en vrac. Pour l’opération, référez-vous à l’exemple montré cidessous.
Entrée répétée
Vente au comptant de deux articles à 2,00 (rayon 1) et de trois articles PLU5.
2:!! 5PPP t
Entrée multiplicative
Vente de six articles à 1,50 (rayon 1) et de douze articles PLU5 avec un payement par
chèque.
6x 150! 12x 5P S C
Vente contre une offre mixte
Lorsque la somme présentée au comptant ou par chèque est inférieure au montant des ventes
comprenant la taxe, l’écran affiche un déficit et “”. Pour compenser le déficit, effectuez une
entrée additionnelle de la somme présentée ou exécutez une entrée de crédit d’achats.
Votre client paye comptant 8,30 et 50,00 avec une carte de crédit pour un total partiel
de 58,30, taxe comprise.
S 830 t R
Somme reçue Affiche un
au comptant déficit et “”
Exemple
Exemple
Exemple
Entrées de ventes pratiques
Page 70

13
Utilisation de différentes fonctions pour des entrées de ventes
Votre caisse enregistreuse permet les six systèmes de taxes suivants.
Votre caisse enregistreuse est préprogrammée pour un système de T.V.A. manuelle de 1 à 4.
Système de T.V.A. 1 à 4 automatique (méthode d’opération automatique utilisant des
pourcentages programmés)
Ce système, en tant qu’arrangement, calcule la T.V.A. pour des totaux partiels taxables 1 à 4 en
utilisant des pourcentages programmés correspondants.
Système de taxes 1 à 4 automatique (méthode d’opération automatique utilisant des
pourcentages programmés)
Ce système, en tant qu’arrangement, calcule les taxes pour des totaux partiels taxables 1 à 4 en
utilisant des pourcentages programmés correspondants, et ajoute aussi respectivement les taxes
calculées à ces totaux partiels.
Système de T.V.A. 1 à 4 manuelle (méthode d’entrée manuelle utilisant des pourcentages
programmés)
Ce système permet le calcul d’une T.V.A. pour des totaux partiels 1 à 4 taxables. Ce calcul est
effectué en utilisant des pourcentages programmés correspondants lorsque la touche V est
enfoncée, juste après S.
Système de T.V.A. 1 manuelle (méthode d’entrée manuelle pour des totaux partiels qui
utilisent des pourcentages préréglés de T.V.A. 1)
Ce système permet le calcul d’une T.V.A. pour un total partiel. Ce calcul est effectué en utilisant le
pourcentage préréglé de la T.V.A. 1 lorsque l’on appuie sur la touche V juste après S. Pour
ce système, un taux de T.V.A. introduit manuellement peut être utilisé. Dans ce cas, après avoir
appuyé sur S, introduisez le taux de la T.V.A. et appuyez sur la touche V.
Système de taxe 1 à 4 manuelle (méthode d’entrée manuelle utilisant des pourcentages
préréglés)
Ce système permet le calcul de la taxe pour des totaux partiels 1 à 4 taxables. Ce calcul est
effectué en utilisant les pourcentages programmés correspondants lorsque l’on appuie sur la
touche V, juste après S. Après ce calcul, vous devez achever l’opération.
Système de taxe 1 à 3 automatique et système de T.V.A. 1 automatique
Ce système permet un calcul en combinant une taxe 1 à 3 automatique et une T.V.A. 1
automatique. La combinaison peut être de n’importe quelle T.V.A. 1 correspondant à taxable 4 et
de n’importe quelle taxe 1 à 3 correspondant de taxable 1 à taxable 3 pour chaque article. Le
montant de la taxe est calculé automatiquement avec les pourcentages précédemment
programmés pour ces taxes.
Le calcul d’une T.V.A./taxe pour des articles PLU est effectué selon celle réglée pour son
rayon associé.
Calcul d’une T.V.A. (Taxe)
Si vous désirez appliquer un rabais ou une prime à un article, introduisez le taux du pourcentage et
appuyez sur la touche de pourcentage. Si vous désirez appliquer un rabais ou une prime à un total
partiel, introduisez tous les articles, appuyez sur la touche S et appuyez ensuite sur la touche
de pourcentage suivant le taux de pourcentage.
Votre machine est préprogrammée pour un rabais. Si vous désirez changer sur une prime,
référez-vous à la section de Programmation de la touche de pourcentage. Vous pouvez aussi
prérégler un taux de pourcentage. Si un taux de pourcentage est préréglé, vous ne devez pas
introduire un taux de pourcentage avant d’appuyer sur la touche de pourcentage. Pour la
programmation, référez-vous aussi à la section de Programmation de la touche de pourcentage.
Application d’un rabais de 20,00% à un article relevant du rayon 3.
8:# 20:% t
Application d’un rabais de 15,00% au total partiel d’une opération.
8P 12P 8:! S 15:% t
Exemple
Exemple
Rabais et primes en utilisant la touche de pourcentage
Page 71

14
Utilisation de différentes fonctions pour des entrées de ventes
Votre enregistreuse permet des entrées de payements dans une monnaie étrangère lorsque vous
avez programmé le taux de change d’une monnaie. Après l’entrée des articles ou pendant des
entrées d’offres, appuyez sur la touche E et le total partiel dans la monnaie étrangère pourra être
affiché. Puis, introduisez la somme offerte dans la monnaie étrangère si le montant du payement
n’est pas exact, et appuyez sur une touche d’achèvement (t / C ou R lorsque l’une d’elles
est programmée). Le change dû dans la monnaie du pays sera alors affiché.
• Lorsque la somme présentée est insuffisante, le déficit est indiqué dans la monnaie du
pays.
• Si vous choisissez “Oui” pour une opération concernant un chèque ou un crédit lors
d’une offre dans une monnaie étrangère dans une programmation EURO, vous pouvez
achever une vente dans une monnaie étrangère en utilisant la touche C ou R.
• Si vous choisissez “Oui” pour l’impression du montant d’un change pour un total et le
change dans une programmation de l’EURO, vous pouvez afficher le change dans la
monnaie étrangère en appuyant sur la touche E lorsque le change est affiché dans la
monnaie du pays. Pour revenir à l’affichage de la monnaie du pays, appuyez à nouveau
sur la touche E.
Vente d’un article du rayon 3 (prix 79,50) dans une monnaie étrangère. (Taux de
change préréglé: 1,550220)
7950# E 130: t
Somme offerte dans une monnaie étrangère
Exemple
Change d’une monnaie
Lorsque vous avez besoin d’ouvrir le tiroir de la caisse enregistreuse sur aucune vente, par
exemple pour effectuer des rendus, appuyez seulement sur la touche t. Le tiroir s’ouvrira.
Pas de vente
Etant donné que votre caisse enregistreuse ne possède pas de touche de remboursement, créez
un rayon négatif (voyez la programmation requise aux page 9) et utilisez-le.
Vérifiez que le statut taxable de l’article remboursé est le même que celui du rayon
négatif. Sinon, la taxe ne sera pas calculée correctement.
Remboursement
Des numéros de codes non-additifs peuvent être introduits et imprimés sur le reçu ou la bande de
détails quotidiens pendant l’entrée d’une vente. Des codes non-additifs peuvent être utilisés pour
une variété de choses. Par exemple, des numéros de cartes de crédit, des numéros de vérification,
des numéros de série, des codes de produits, des codes de taxes de service ou n’importe quels
autres numéros pour une référence ultérieure concernant des opérations spécifiques. Introduisez
un numéro de code jusqu’à 8 chiffres et appuyez sur la touche S.
Numéro d’un code non-additif
Lorsque vous recevez un acompte d’un client ou lorsque vous payez une somme à un vendeur, il
est pratique d’utiliser respectivement la touche V ou p.
Pour l’entrée d’un compte admis, introduisez le montant et appuyez sur la touche V.
Pour l’entrée d’un décaissement, introduisez le montant et appuyez sur la touche p.
La limite d’entrée est de 8 chiffres (79999999), même si elle est différente de ce que vous avez
programmé.
Réception d’un acompte de 60,00 d’un client dont le numéro de code est 12345.
12345S 60: V
Exemple
Entrées de comptes admis et de décaissements
Page 72

15
Utilisation de différentes fonctions pour des entrées de ventes
Si vous avez fait une erreur lors de l’entrée d’un article dans une vente, corrigez-la en utilisant les
procédures suivantes.
• Rectification de nombres introduits
Lorsque vous avez introduit un nombre incorrect, annulez-le en appuyant sur la touche c,
immédiatement après l’entrée.
• Rectification de la dernière entrée (annulation directe)
Si vous avez fait une erreur en effectuant une entrée de rayon, une entrée de PLU, une entrée
multiplicative ou une entrée répétée (pour la dernière entrée seulement), vous pouvez la corriger
en appuyant sur la touche v.
• Rectification d’entrées antérieures (annulation indirecte)
Avec cette fonction, vous pouvez corriger l’entrée d’un rayon ou d’un PLU effectuée
incorrectement lors d’une opération si vous la découvrez avant l’achèvement de l’opération en
appuyant sur la touche t, R ou C.
Pour corriger l’entrée de 3P à 4P après qu’une autre entrée correcte a été faite,
introduisez ce qui suit:
3P 1150! 3vP 4P t
Annulation Entrée
indirecte pour correcte
3P
• Rectification après l’établissement d’un reçu
Cette fonction vous permet d’inverser les entrées faites sur un reçu incorrect. Les entrées sont
soustraites de chaque totalisateur et ajoutées à un totalisateur d’annulation. Tournez le
commutateur de mode sur la position et introduisez les mêmes détails qui se trouvent sur le
reçu incorrect. (Si c’est nécessaire, introduisez le code secret et appuyez sur la touche t
lorsque vous tournez le commutateur de mode sur la position .)
Exemple
Rectifications
Toutes les données sur l’ensemble de vos enregistrements aussi bien que d’autres informations
sur les opérations resteront dans la mémoire de votre caisse enregistreuse aussi longtemps que
cette dernière est sous tension. (Assurez-vous que vous avez des piles chargées dans le cas
d’une panne de courant.) Cette information peut être imprimée sous forme d’un rapport qui peut
vous être utile lors du déroulement de vos affaires.
Utilisez cette fonction pour une vérification immédiate de chaque données de ventes de la caisse
enregistreuse. Le total des ventes est montré sur l’écran mais n’est pas imprimé ni effacé de la
mémoire de la caisse enregistreuse.
Pour afficher un rapport immédiat de chaque article individuel, appuyez sur les touches suivantes
sur le mode X/Flash:
Ventes sur un rayon individuel Touche du rayon
Total des ventes S
Liquidités en caisse R
Rapports immédiats pour une visualisation sur l’écran
Cette sorte de rapport, lorsqu’il est effectué sur le mode X/Flash, imprime les informations
accumulées sur les ventes.
L’établissement d’un rapport X peut être pratique pour obtenir une vérification à la mi-journée des
ventes quotidiennes. Vous pouvez établir un rapport X n’importe quel nombre de fois, cela
n’affectant pas la mémoire de la caisse enregistreuse.
Pour établir un rapport X, réglez le commutateur de mode sur la position X/Flash et appuyez sur la
touche t.
Rapports X pour une lecture des ventes
Lecture et remise à zéro des ventes
Page 73

16
Lecture et remise à zéro des ventes
Ce rapport, lorsqu’il est effectué sur le mode Z/PGM, imprime les mêmes informations que sur un
rapport X. Une fois que ce rapport a été imprimé, la mémoire des informations journalières de la
caisse enregistreuse est effacée et tous les totaux des opérations sont remis à zéro. Assurez-vous
d’établir un rapport Z à la fin de chaque journée.
Avec l’impression d’un rapport Z, vous pouvez aussi remettre à zéro le TG (total général).
Pour établir un rapport Z, suivez la procédure décrite ci-dessous.
1. Réglez le commutateur de mode sur la position Z/PGM.
2. Si c’est nécessaire, introduisez le code secret et appuyez sur la touche t.
Pour établir un rapport Z avec la remise à zéro du TG:
3. Appuyez sur la touche C.
4. Si c’est nécessaire, introduisez le code secret et appuyez sur la touche C.
Pour établir un rapport Z sans remise à zéro du TG:
3. Appuyez sur la touche t.
4. Si c’est nécessaire, introduisez le code secret et appuyez sur la touche t.
Rapports Z pour une lecture et une remise à zéro des ventes
Compteur de
remise à zéro
Total général
Quantité
Compteur du
rayon et total
Compteur du
pourcentage et total
Compteur
d’annulation
d’articles et total
Compteur du mode
d’annulation et total
*
2
Total taxable 1
Total de la taxe 1
(T.V.A.)
Code du rayon
Montant
*
1
Symbole de remise
à zéro (“X” est
imprimé dans le
cas de rapports X.)
Compte des opérations
Total des ventes
Compteur de ventes au
comptant et total
Compteur de ventes
contre chèques et total
Compteur de ventes à
crédit et total
Compteur de changes et
total
(dans l’offre d’une somme
au comptant)
Compteur de changes et
total
(dans l’offre d’un
chèque)
Compteur de changes et
total
(dans l’offre d’un crédit
d’achats)
Total de comptes admis
Total de décaissements
Compteur de non-ventes
Liquidités en caisse
*
3
*
4
*
4
Exemple d’un rapport sur les ventes
*1Imprimé seulement sur un rapport Z.
*2La différence par arrondi est imprimée ici, dans le cas où un arrondi australien est appliqué.
*3N’est pas imprimé dans le cas où le taux de change est réglé sur 0,000000.
*4N’est pas imprimé dans le cas où “Opération concernant un chèque ou un crédit lors d’une offre
dans une monnaie étrangère” est réglée sur “Non” sur une programmation EURO, et que/ou le
taux de change est réglé sur 0,000000.
Page 74

17
Fonction de transition de l’EURO
Votre enregistreuse peut être modifiée pour correspondre avec chaque période réglée pour
l’introduction de l’EURO, et dans votre enregistreuse chaque monnaie est traitée comme il est
montré sur le tableau ci-dessous, selon la période dans laquelle vous vous trouvez.
Dans son principe, votre enregistreuse peut être modifiée automatiquement pour correspondre à
l’introduction de l’EURO en exécutant l’opération de modification automatique de l’EURO montrée
ci-dessous sur le mode Z/PGM. Cependant, il y a plusieurs options que devez régler selon vos
besoins. Aussi, veuillez effectuer attentivement les réglages nécessaires.
Comment les monnaies sont traitées dans votre enregistreuse
Opération de modification automatique de l’EURO
Assurez-vous de régler tout d’abord le commutateur de mode sur la position Z/PGM (si c’est
nécessaire, introduisez le code secret et appuyez sur la touche t) et d’effectuer la procédure
suivante. Veuillez noter que vous ne pouvez effectuer chaque opération qu’une seule fois avec la
substitution de “A= 1”, “A= 2” et “A= 3”. Par exemple, si vous exécutez d’abord l’opération avec la
substitution de “A= 2”, vous ne pouvez effectuer l’opération de “A= 1”.
8:S A* S
*A: Introduisez 1 pour la période 1, 2 pour la période 2 et 3 pour la période 3.
Les détails concernant la modification du système de l’enregistreuse sont indiqués à la page
suivante:
Période 1
Après l’introduction de
l’EURO et avant que les
billets de banque et les
pièces de monnaie
EURO ne commencent à
circuler.
Touche de change
Monnaie domestique
Période 2
Après que les billets de banque
et les pièces de monnaie
EURO commencent à circuler
et avant que la monnaie
nationale ne soit retirée de la
circulation. (Coexistence de
l’EURO et de la monnaie
nationale)
Monnaie domestique
Touche de change
Période 3
Une fois que la monnaie
nationale est retirée de la
circulation.
Monnaie domestique
Touche de change
EURO
Monnaie nationale
(DM, F, etc.)
Monnaie étrangère
Monnaie
Page 75

18
Fonction de transition de l’EURO
IMPORTANT
• Après l’exécution de la procédure avec “A= 1”, traitez l’EURO en tant que monnaie étrangère en
utilisant la touche E. Réglez le taux de conversion de l’EURO en tant que taux de conversion
de la monnaie pour E.
• Après l’exécution de la procédure avec “A= 2”, traitez l’EURO en tant que monnaie domestique
et la monnaie domestique en tant que monnaie étrangère en utilisant la touche E. Réglez le
taux de conversion de l’EURO en tant que taux de conversion de la monnaie pour E.
• Après l’exécution de la procédure avec “A= 3”, traitez l’EURO en tant que monnaie domestique.
• Quant au taux de pourcentage pour % et le réglage de l’interdiction d’un montant élevé (HALO),
une conversion automatique n’est pas effectuée. Aussi, lorsque votre monnaie domestique
devient l’EURO, vous devez changer ces réglages de telle sorte qu’ils soient établis sur la
monnaie EURO.
• Vous pouvez recevoir le montant d’un change (monnaie EURO ou domestique) avec un chèque
ou une carte de crédit. Pour la programmation, veuillez vous référer à la programmation de
l’EURO, page 22.
• Lorsque “Impression du montant d’un change pour un total et un rendu” est réglé sur “Oui”, vous
pouvez faire afficher un rendu dans une monnaie étrangère en appuyant sur E lorsque le rendu
est affiché dans la monnaie domestique.
Vérification du statut EURO en cours
Vous pouvez vérifier le statut EURO en cours, réglé sur la caisse enregistreuse. Placez le
commutateur de mode sur la position Z/PGM, (si c’est nécessaire, introduisez le code secret et
appuyez sur la touche t) et effectuez la procédure suivante. Le statut EURO en cours sera
imprimé sur le reçu ou la bande de détails quotidiens.
8:SS
Statut EURO
• L’article marqué “-” reste le même que les données précédentes.
*1: Si la conversion automatique de prix unitaires de rayons/PLU par la opération de modification
automatique de l'EURO est réglé sur NO (Implicitement) dans la programmation de l'EURO ou
si le taux de conversion de la monnaie est réglé sur 0% (Implicitement) dans la programmation
de la touche de change, la conversion des prix préréglés de rayons/PLU n'est pas exécutée
dans la opération de modification automatique de l'EURO.
*2: Lorsque vous exécutez à partir du statut 2 EURO, les données précédentes restent inchangées.
*3: Lorsque vous exécutez à partir du statut EURO 1 ou 2, “espacement” est réglé.
Articles
Rapport Z général
Mémoire TG
Conversion des prix préréglés de rayons/
PLU
Impression du montant d’un change pour un
total et un rendu
Méthode de calcul du change
Symbole de la monnaie domestique
Position du point de décimalisation de la
monnaie domestique
Symbole de la monnaie du change
Position du point de décimalisation de la
monnaie du change
Arrondissement de la monnaie du change
A=1
(
Statut 1 EURO)
Publication
-
-
Oui
Division
-
-
[EURO]
2
Arrondi
A=2
(Statut 2 EURO)
Publication
Suppression
Oui *
1
Oui
Multiplication
[EURO]
2
Symbole de la monnaie
domestique en cours
Position du point de
décimalisation de la monnaie
domestique
en cours
Arrondi
A=3
(Statut 3 EURO)
Publication
Suppression *
2
Oui *
1
Non
Multiplication
[EURO]
2
-*
3
-
Arrondi
Page 76

19
Programmation avancée
Avant de commencer la programmation, réglez le commutateur de mode sur la position Z/PGM. Si
c’est nécessaire, introduisez le code secret et appuyez sur la touche t.
• Vous pouvez continuer la programmation sans l’impression d’un rapport de programma-
tion en n’appuyant pas sur la touche S à la fin de chaque étape de la programmation. Cependant, vous devez programmer les PLU indépendants provenant d’une autre
programmation.
• Sauf une indication différente spécifiée, les options de programmations marquées d’un *
indiquent un réglage effectué à l’usine. Dans le cas de réglages de valeurs ou de
nombres, les réglages faits à l’usine sont indiqués par le mot “Default” (implicite).
Les prix unitaires peuvent être affectés directement aux touches des rayons pour des articles que
l’on achète fréquemment, ce qui vous permet d’introduire les prix en appuyant simplement sur les
touches de rayons.
Prix unitarie (5 chiffres max.) ➜ (s➜) Touche du rayon (➜
S
) (Implicite-
ment: 0,00)
(Appuyez sur s pour programmer les rayons 5 à 8.)
Programmation de prix unitaires préréglés par rayons
La fonction PLU permet des entrées de touches rapides grâce à laquelle un prix préréglé est
automatiquement appelé lorsqu’un code est introduit. Jusqu’à 80 réglages de PLU sont possibles.
Chaque PLU relève d’un rayon, de manière à acquérir les paramètres du rayon. La caisse
enregistreuse a été préréglée en usine, de telle sorte que les PLU 1 à 10 sont affectés au rayon 1
et au prix unitaire de 0,00.
(Appuyez sur s pour programmer les rayons 5 à 8.)
Pour interdire un PLU, introduisez le code du PLU et appuyez sur la touche P, puis sur v et
S.
Code du PLU
➜ P ➜
Prix unitaire (6 chiffres max.)
➜ (s ➜)
Touche du rayon
➜ S
Pour la programmation du code du PLU suivant
Lorsque le code du PLU suivant qui doit être programmé ne suit pas directement celui qui vient d’être introduit.
Programmation d’un PLU
% peut être programmé en tant que touche de rabais ou touche de prime. Implicitement, % est
programmé en tant que touche de rabais. Vous pouvez aussi programmer un taux de pourcentage
pour %.
Lorsque 00,00% est programmé, l’utilisation d’un taux de pourcentage préréglé est interdite
(réglage en usine).
Programmation de la fonction de la touche de pourcentage (rabais ou prime)
1
pour rabais ou
0
pour prime ➜
x➜%(➜S
)
Programmation du taux d’un pourcentage (00,00 à 99,99%)
Taux du pourcentage de 4 chiffres (0000 à 9999) ➜%(➜
S
)
Programmation de la touche de pourcentage
Page 77

20
Programmation avancée
Pour traiter une monnaie étrangère, vous pouvez programmer un taux de change de la monnaie
(000,000000% à 999,999999%) pour la touche de change.
Lorsque 000,000000% est programmé, l’utilisation de la touche E est interdite (réglage en usine).
Taux de change de la monnaie de 9 chiffres (000000000 à 999999999)
➜E(➜
S
)
Programmation de la touche de change
Vous pouvez programmer la disposition d’impression d’un reçu ou d’une bande de détails
quotidiens en utilisant les huit sortes de paramètres suivants.
2➜S
➜ ABCDEFGH ➜
S(➜S
)
Paramètre: Sélection: Entrée:
A Symbole de la monnaie pour la monnaie Espacement* 0
nationale EURO 1
B Impression du reçu/bande de détails sur Oui (Reçu en circuit)* 0
le mode REG (fonction en circuit/hors Non (Reçu hors circuit) 1
circuit du reçu)
C Disposition d’impression Disposition de la bande de 0
détails*
Disposition du reçu1
D Impression de la date Oui* 0
Non 1
E Impression de l’heure Oui* 0
Non 1
F Impression du numéro d’un reçu Oui* 0
Non 1
G Impression d’un total partiel taxable Oui* 0
Non 1
H Impression d’un total partiel en appuyant Oui 0
sur
S Non* 1
• Disposition d’impression
Lorsque la disposition d’un reçu est choisie, la bobine d’enroulement ne fonctionne pas.
Programmation de la disposition d’impression
Page 78

21
Programmation avancée
Le numéro d’un reçu est imprimé sur chaque reçu ou bande de détails quotidiens, ainsi que sur le
rapport, en même temps qu’avec la date et l’heure. Le numéro est augmenté d’un chiffre chaque
fois qu’un reçu est établi. Pour démarrer à partir d’un numéro consécutif spécifique, introduisez un
nombre inférieur d’un chiffre à celui du numéro consécutif.
Numéro de démarrage d’un reçu (4 chiffres max.) ➜
x➜S(➜S
)
(Implicitement: 0001)
Programmation du numéro consécutif d’un reçu
Vous pouvez programmer divers réglages adéquats pour l’utilisation.
1➜S
➜ ABCDEFGH ➜
S
(➜
S
)
Paramètres: Sélection: Entrée:
A Disposition de la date MMJJAA 0
JJMMAA* 1
AAMMJJ 2
B Disposition de l’heure Format de 12 heures 0
Format de 24 heures* 1
C Position du point de décimalisation 0 à 3
pour la monnaie nationale (Implicitement: 2)
D Remise à zéro du No du reçu lors de Non* 0
l’établissement d’un rapport Z Oui 1
E Somme présentée obligatoire pour
t
Non* 0
et
C
Oui 1
F Total partiel obligatoire Non* 0
Oui 1
G Limite des chiffres d’entrée pour R, C,0 à 8
V
et
p
(Implicitement: 8)
H Arrondissement Arrondissement* 0
Arrondissement vers le haut 1
Arrondissement vers le bas 2
• Disposition de l’heure
Lorsqu’une disposition de 12 heures est réglée, l’heure du matin sera affichée avec et
imprimée sans symbole. L’heure de l’après-midi sera affichée avec et imprimée avec le
symbole @.
• Somme présentée obligatoire
Lorsqu’on règle pour une fonction obligatoire, introduisez toujours la somme présentée par le
client avant d’achever l’opération.
• Total partiel obligatoire
Lorsqu’on règle pour une fonction obligatoire, appuyez toujours sur S avant d’achever
l’opération.
Programmations diverses
Page 79

22
Programmation avancée
Pour les détails d’une programmation EURO, veuillez vous référer à “Fonction de transition de
l’EURO” aux pages 17 et 18.
3➜S
➜ ABCDEFGH ➜
S(➜S
)
Paramètres: Sélection: Entrée:
A Conversion automatique de prix unitaires Non* 0
de rayons/PLU par opération de transition Oui 1
automatique de l’EURO
B Impression du taux de conversion Non* 0
Oui 1
C Impression du montant d’un change Non* 0
pour un total & un rendu Oui 1
D Opération chèque & crédit lors d’une offre Non* 0
en monnaie étrangère Oui 1
E Méthode de calcul d’un change Multiplication* 0
Division 1
F Arrondissement d’un change Arrondi vers le haut* 0
Arrondissement 1
G Symbole de la monnaie pour une Espacement* 0
monnaie étrangère EURO 1
H Position du point de décimalisation pour 0 à 3 (Implicitement: 2)
une monnaie étrangère
Si vous choisissez “Oui” pour l’impression du montant d’un change pour un total et un
rendu, vous pouvez afficher le rendu en monnaie étrangère en appuyant sur la touche E
lorsque le rendu est affiché dans la monnaie nationale.
Programmation de l’EURO
Un code secret est utilisé de manière à ce que seules les personnes le connaissant puissent
utiliser la machine sur les modes et Z/PGM ou pour imprimer des rapports Z. Lorsque vous
avez besoin d’un code secret, programmez-le de la manière suivante.
Code secret (4 chiffres max.) ➜
x➜t(➜S
)
(Implicitement: 0000; pas d’application d’un code secret)
Comment introduire un code secret:
Dans le cas où un code secret a été programmé, “----” est affiché lorsque le commutateur de mode
est réglé sur ou Z/PGM, ou lorsque vous avez besoin d’établir un rapport Z. Dans ce cas,
introduisez le code secret (4 chiffres max.) et appuyez sur t. Chaque fois que vous introduisez
un chiffre, l’affichage de “-” change sur “_”.
Dans le cas où vous avez oublié le code secret que vous avez programmé:
Réglez le commutateur de mode sur la position Z/PGM, et opérez la programmation du code
secret montré ci-dessus avec la substitution de “0000” pour le code secret.
Programmation d’un code secret
Lorsqu’un arrondissement australien est réglé, le montant total des ventes est arrondi de 0 à 5 lors
d’un payement au comptant.
4➜S➜0
pour Non ou 1pour Oui ➜
S
(➜
S
)
(Implicitement: “Oui” pour l’enregistreuse expédiée en Australie.)
Programmation d’un arrondissement (Pour le système de taxes australien)
Page 80

23
Vérification des réglages de la machine programmée
Votre machine vous permet d’imprimer les réglages de la machine programmée, c’est-à-dire, un
rapport de programmation général et de taxes et un rapport de programmation de PLU.
Réglez le commutateur de mode sur la position Z/PGM et appuyez sur la touche S pour
imprimer un rapport de programmation général et de taxes, ou bien appuyez sur la touche P pour
imprimer un rapport de programmation de PLU.
• Rapport de programmation général et de • Rapport de programmation de PLU
taxes
Code du rayon
Signe et prix unitaire
préréglé
Signe et taux pour
%
Taux pour
E
Code secret
Programmation diverse (à partir de la gauche, A à H)
Programmation de la disposition d’impression (à partir de la gauche, A à H)
Programmation EURO (à partir de la gauche, A à H)
Programmation d’arrondissement australien (pour le système de taxe australien)
Programmation juridique de la T.V.A. allemande (pour le système de taxe allemand)
Système de T.V.A. (taxe)
Taux de T.V.A.
Lorsqu’un système de taxes est
choisi, la limite de la taxe inférieure
pour chaque taxe est imprimée.
Taux de la taxe
Limite de la taxe inférieure
Date
Heure
000017
Limite d’entrée des
chiffres
Statut de la taxe [à
partir de la gauche,
T.V.A. (taxe) 4, 3, 2, 1; 0
pour non taxable; 1 pour
taxable]
SICS (1)/Normal (0)
Numéro du reçu
Code du PLU
Signe et prix
unitaire préréglé
Code du rayon
associé
Page 81

24
Entretien
Verrouillage du tiroir
Prenez l’habitude de verrouiller le tiroir lorsque la caisse enregistreuse
ne doit pas être utilisée pendant une période de temps prolongée.
Pour verrouiller le tiroir, tournez la clé de 90° dans le sens inverse des
aiguilles d’une montre, et pour déverrouiller le tiroir, tournez la clé de
90° dans le sens des aiguilles d’une montre.
Enlèvement du tiroir
Pour retirer le tiroir, tirez-le complètement vers l’avant et sortez-le en le
soulevant. Le compartiment pour 6 monnaies différentes est séparable
du casier pour l’argent. De même, les séparateurs du casier pour
l’argent peuvent être retirés.
Ouverture manuelle du tiroir
Dans le cas d’une panne de courant ou si la caisse enregistreuse est
en dérangement, déplacez la manette située sous la machine dans la
direction de la flèche pour ouvrir le tiroir manuellement. Cependant, le
tiroir ne s’ouvrira pas s’il est fermé avec la clé de verrouillage.
Utilisation de la fente du tiroir
Vous pouvez introduire les billets de banque et les chèques à partir de la fente, sans ouvrir le tiroir.
Les billets de banque et les chèques introduits sont placés sous le compartiment pour la monnaie.
Lorsqu’on retire des billets de banque ou des chèques, n’oubliez jamais de tenir
légèrement les deux côtés du compartiment pour la monnaie, de manière à ce
que les pièces de monnaie ne risquent pas de tomber.
Avertissement
Manipulation du tiroir
Lorsqu’une teinte rouge apparaît sur le rouleau de papier, il est temps
de remplacer le rouleau de papier par un neuf. Assurez-vous d’utiliser
le rouleau de papier spécifié dans la section des “Données techniques”.
Dans le cas de l’impression de la bande de détails quotidiens
1. Réglez le commutateur de mode sur la position REG.
2. Retirer le capot de l’imprimante.
3. Appuyez sur la touche o pour faire avancer le papier de plusieurs
lignes. Puis, coupez-le pour retirer la bobine d’enroulement de son
support.
4. Après avoir coupé le papier existant, retirez le rouleau de papier.
Puis, enlevez le papier restant en appuyant sur la touche o.
5. Retirez le rouleau de papier de la bobine d’enroulement.
6. Installez un rouleau de papier neuf ainsi que la bobine
d’enroulement, selon les instructions indiquées à la page 6.
Dans le cas de l’impression de reçus, exécutez dans
l’ordre les étapes 1, 2 et 4 ci-dessus et installez ensuite un
rouleau de papier neuf selon les instructions de la page 6.
Remplacement du rouleau de papier
Page 82

25
Entretien
Lorsque l’impression devient affaiblie, remplacez le rouleau encreur existant par un neuf,
disponible auprès de SHARP.
Précautions:
• Assurez-vous d’utiliser un rouleau encreur, disponible auprès de
SHARP. L’utilisation de n’importe quel autre rouleau encreur
risque de provoquer un dérangement dans l’imprimante. Ne
versez jamais de l’encre sur le rouleau encreur.
• Après l’ouverture du paquet, installez-le directement.
1. Retirez le capot de l’imprimante.
2. Tirez la poignée du rouleau encreur vers le haut pour retirer le
rouleau encreur.
3. Installez le rouleau encreur neuf.
4. Remettez en place le capot de l’imprimante.
Remplacement du rouleau encreur
La caisse enregistreuse affiche le symbole ( ) de piles affaiblies lorsque les piles installées
deviennent faibles et le symbole ( ) de manque de piles, lorsque les piles sont extrêmement
usées ou qu’elles ne sont pas installées.
Lorsque le symbole de piles affaiblies est affiché, remplacez le plus tôt possible les piles par
des neuves. Les piles existantes ne fonctionneront plus après deux jours environ.
Lorsque le symbole de manque de piles est affiché, remplacez immédiatement les piles par
des neuves. Sinon, si le câble d’alimentation secteur est débranché ou si une panne de courant
survient, tous les réglages programmés seront remis à zéro sur les réglages implicites et toutes les
données stockées dans la mémoire seront annulées.
Pour le remplacement des piles, assurez-vous que la caisse enregistreuse est enfichée et que le
commutateur de mode est sur la position REG. Puis, remplacez les piles par des neuves en vous
référant à la section “Installation des piles” à la page 6.
Remplacement des piles
Rouleau
encreur
Lorsqu’une panne de courant survient:
S’il n’y a plus d’énergie, la machine conserve les contenus de sa mémoire et toutes les informations sur des entrées de ventes lorsque les piles sont dans une condition de charge appropriée.
• Lorsqu’une panne de courant survient dans l’enregistreuse se trouvant dans une condition
d’attente ou pendant une entrée, la machine revient à une condition de fonctionnement normal
une fois le courant rétabli.
• Lorsqu’une panne de courant survient pendant un cycle d’impression, l’enregistreuse imprime
“············” et reprend ensuite une procédure d’impression correcte.
Lorsque le moteur de l’imprimante se bloque:
Si le moteur de l’imprimante se bloque, l’impression s’arrête et un signal sonore intermittent
retentit. Tout d’abord, débranchez le câble d’alimentation et supprimez le bourrage du papier. Puis,
enfichez à nouveau le câble d’alimentation, installez le rouleau de papier dans une position
correcte et appuyez sur la touche c. L’enregistreuse reprendra alors une impression correcte
après avoir imprimé “············”.
Dans le cas d’une panne de courant ou d’un bourrage du papier
Page 83

26
Entretien
Données techniques
Si vous rencontrez un problème, utilisez tout d’abord ce tableau avant de faire appel à un
dépanneur.
Avant d’appeler pour un dépannage
• Les symboles montrés sur l’écran n’ont
aucun sens.
• L’écran ne peut s’éclairer, même
lorsque le commutateur de mode n’est
pas réglé sur “”.
La machine ne peut fonctionner lorsque
l’on appuie sur n’importe quelle touche.
• L’écran est éclairé, mais la machine ne
peut accepter des entrées de touches.
• Le rouleau de papier n’avance pas
correctement dans l’imprimante.
• L’impression est pâle ou illisible.
• Est-ce que la machine a été correctement remise à
zéro, tel qu’il est indiqué à la page 5?
• Le courant est-il fourni à la prise de courant
électrique? (Branchez sur un autre appareil
électrique.)
• Le câble d’alimentation est-il correctement raccordé
à la prise de courant électrique?
• Le commutateur de mode est-il correctement réglé
sur la position REG?
• Est-ce que la machine a été correctement remise à
zéro, tel qu’il est indiqué à la page 5?
•
La bobine enrouleuse est-elle correctement installée?
• N’y a-t-il pas un bourrage du papier?
• Le rouleau encreur n’est-il pas usé?
• Le rouleau encreur est-il correctement installé?
Problème Point à vérifier
Modèle: XE-A102
Dimensions: 330 (L) x 363 (P) x 234 (H) millimètres
Poids: 5 kg
Source d’énergie: Tension et fréquence officielles (nominales)
Consommation: Attente: 6,4 W Fonctionnement: 13 W
Température de 0 à 40°C
fonctionnement:
Affichage: Affichage numérique à DEL (diode électro-luminescente)
Imprimante: Type sélectif à roue d’impression à 1 station
Capacité d’impression:13 chiffres max.
Rouleau de papier: Largeur: 57,5 mm ± 0,5 mm
Diamètre max.: 80 mm
Qualité du papier: Papier filigrané
(épaisseur: 0,06 à 0,085 mm, poids: 47 à 64 g/m2)
Tiroir-caisse: 3 compartiments pour les billets, 6 pour la monnaie
Accessoires Rouleau de papier: 1 rouleau
(fournis): Clé du mode: 2
Clé de verrouillage du tiroir: 2
Manuel d’instructions: 1 exemplaire (ce manuel)
Guide de démarrage rapide: 1 exemplaire
Rouleau encreur: 1 (déjà installé)
Bobine d’enroulement: 1
Support-cornière de fixation: 1
* Les données techniques et l’apparence peuvent être sujettes à des modifications
sans avertissement préalable.
Page 84

Attention : votre produit
comporte ce symbole. Il
signifie que les produits
électriques et
électroniques usagés ne
doivent pas être
mélangés avec les
déchets ménagers
généraux. Un système
de collecte séparé est
prévu pour ces produits.
A. Informations sur la mise au rebut à l’intention des
utilisateurs privés (ménages)
1. Au sein de l’Union européenne
Attention : si vous souhaitez mettre cet appareil au rebut, ne le jetez pas
dans une poubelle ordinaire!
Les appareils électriques et électroniques usagés doivent être traités
séparément et conformément aux lois en vigueur en matière de
traitement, de récupération et de recyclage adéquats de ces appareils.
Suite à la mise en oeuvre de ces dispositions dans les Etats membres,
les ménages résidant au sein de l’Union européenne peuvent désormais
ramener gratuitement* leurs appareils électriques et électroniques
usagés sur des sites de collecte désignés.
Dans certains pays*, votre détaillant reprendra également gratuitement
votre ancien produit si vous achetez un produit neuf similaire.
*) Veuillez contacter votre administration locale pour plus de
renseignements.
Si votre appareil électrique ou électronique usagé comporte des piles ou
des accumulateurs, veuillez les mettre séparément et préalablement au
rebut conformément à la législation locale en vigueur.
En veillant à la mise au rebut correcte de ce produit, vous contribuerez à
assurer le traitement, la récupération et le recyclage nécessaires de ces
déchets, et préviendrez ainsi les effets néfastes potentiels de leur
mauvaise gestion sur l’environnement et la santé humaine.
2. Pays hors de l’Union européenne
Si vous souhaitez mettre ce produit au rebut, veuillez contacter votre
administration locale qui vous renseignera sur la méthode d’élimination
correcte de cet appareil.
Suisse : les équipements électriques ou électroniques usagés peuvent
être ramenés gratuitement au détaillant, même si vous n’achetez pas un
nouvel appareil. Pour obtenir la liste des autres sites de collecte, veuillez
vous reporter à la page d’accueil du site www.swico.ch ou www.sens.ch.
B. Informations sur la mise au rebut à l’intention des
entreprises
1. Au sein de l’Union européenne
Si ce produit est utilisé dans le cadre des activités de votre entreprise et
que vous souhaitiez le mettre au rebut:
Veuillez contacter votre revendeur SHARP qui vous informera des
conditions de reprise du produit. Les frais de reprise et de recyclage
pourront vous être facturés. Les produits de petite taille (et en petites
quantités) pourront être repris par vos organisations de collecte locales.
Espagne: veuillez contacter l’organisation de collecte existante ou votre
administration locale pour les modalités de reprise de vos produits
usagés.
2. Pays hors de l’Union européenne
Si vous souhaitez mettre ce produit au rebut, veuillez contacter votre
administration locale qui vous renseignera sur la méthode d’élimination
correcte de cet appareil.
Page 85

1
XE-A102
CAJA REGISTRADORA ELECTRONICA
Le felicitamos por haber comprado una caja registradora electrónica de SHARP modelo
XE-A102. Lea cuidadosamente este manual antes de usar la máquina. Mantenga este
manual a mano para futuras consultas, pues le ayudará a resolver cualquier problema que
encuentre.
Precauciones para el uso
• Tenga mucho cuidado con el cortador manual que está montado en la cubierta de la
impresora al sacar o volver a colocar la cubierta, para no cortarse por accidente.
• Coloque la caja registradora en un lugar alejado de los rayos directos del sol, las
variaciones extremas de temperatura, humedad alta o salpicaduras de agua.
• No use la caja registradora con las manos mojadas. El agua puede causar daños
internos.
• Enchufe la caja registradora a una toma de corriente (voltaje oficial (nominal)). Si conecta
otros aparatos eléctricos en el mismo circuito eléctrico, la caja registradora podría
funcionar mal.
• Limpie la caja registradora con un paño suave y seco. Nunca use líquidos volátiles, como
bencina o diluyentes. Los productos químicos pueden manchar o dañar el exterior de la
caja registradora.
• Para protegerse contra la pérdida de datos, compre tres pilas R6 o LR6 (tamaño “AA”), e
instálelas después de efectuar la reposición de la caja registradora y antes de usarla.
Cuando manipule las pilas, no se olvide nunca de observar lo siguiente. Las pilas
usadas incorrectamente pueden reventar o provocar pérdidas y dañar posiblemente el
interior de la caja registradora.
• Peligro de explosión si se reemplaza la pila por otra de un tipo incorrecto.
Deshágase de las pilas gastadas de acuerdo con las instrucciones.
• Asegúrese de que los polos positivo (+) y negativo (-) de cada pila estén colocados en
el sentido correcto para la instalación.
• No mezcle nunca pilas de diferentes tipos para la instalación.
• No mezcle nunca pilas nuevas y usadas para la instalación.
• No deje nunca pilas agotadas en el compartimiento de las pilas.
• Saque las pilas, si no piensa usar la caja registradora durante mucho tiempo.
• Si una pila perdiera, limpie inmediatamente el compartimiento de las pilas, teniendo
cuidado de que el líquido que sale de la pila no entre en contacto directo con la piel.
• Para deshacerse de las pilas, siga las leyes vigentes en su país.
• Para desconectar por completo la alimentación eléctrica, desenchufe la clavija del
tomacorriente.
¡IMPORTANTE!
Antes de emplear la caja registradora por primera vez, deberá efectuar la reposición de la
caja registradora, y deberá instalar entonces tres pilas nuevas R6 o LR6 (tamaño “AA”) en
la caja registradora. No se olvide nunca de seguir los procedimientos descritos en la
sección “Preparación de la caja registradora”.
Cuando abra la caja de cartón, asegúrese de que no falte ninguno de los accesorios
indicados en la sección “Especificaciones”.
Español
Español
Page 86

2
Indice
Partes y sus funciones ......................................................................3
Si se comete un error.........................................................................4
Preparación de la caja registradora .................................................5
Operaciones para empezar con rapidez ..........................................7
Programación de la fecha y de la hora .................................................8
Programación de los impuestos ............................................................8
Programación del estado de sección ....................................................9
Registros básicos de ventas (registros de sección)..............................9
Lectura/reposición de los datos de ventas ..........................................11
Utilización de las diversas características para los registros
de ventas ...........................................................................................12
Registros de PLU ................................................................................12
Convenientes registros de ventas .......................................................12
Cálculo del IVA (impuestos).................................................................13
Descuentos y recargos usando la tecla de porcentaje .......................13
Cambio de divisas ...............................................................................14
Sin venta .............................................................................................14
Devolución ...........................................................................................14
Números de código de no suma .........................................................14
Registros de recibidos a cuenta y pagos ............................................14
Correcciones........................................................................................15
Lectura y reposición de las ventas ................................................15
Función de migración del EURO ....................................................17
Programación avanzada ..................................................................19
Programación del precio unitario de preajuste de sección .................19
Programación de PLU .........................................................................19
Programación de la tecla de porcentaje..............................................19
Programación de la tecla de cambio de divisas..................................20
Programación del formato de impresión .............................................20
Programación miscelánea ...................................................................21
Programación del número de recibo consecutivo ...............................21
Programación del EURO .....................................................................22
Programación de redondeo (para el sistema de impuestos de
Australia)..............................................................................................22
Programación del código secreto ........................................................22
Comprobación de los ajustes programados en la máquina........23
Mantenimiento ..................................................................................24
Uso del cajón.......................................................................................24
Reemplazo del rollo de papel..............................................................24
Reemplazo de las pilas .......................................................................25
Reemplazo del rodillo entintador .........................................................25
En caso de un corte de corriente o un atasco de papel .....................25
Antes de solicitar el servicio técnico....................................................26
Especificaciones ..................................................................................26
Page 87

3
Partes y sus funciones
Selector de modo
Teclado
Visor
Su caja registradora está equipada con un visor LED (diodo emisor de luz) delantero, para facilitar
al operador la lectura con 9 dígitos durante una transacción.
o: Tecla de suministro del papel
c: Tecla de borrado
V: Tecla de impuesto al valor
añadido/recibido a cuenta
x: Tecla de multiplicación/
visualización de la hora
p: Tecla de pagos
%: Tecla de porcentaje
v: Tecla de cancelación
e: Tecla de escape
s: Tecla de cambio de sección
P: Tecla de PLU (codificación de
precios)
R: Tecla de crédito
E: Tecla de cambio de divisas
S: Tecla de código de no suma/
subtotal
C: Tecla de cheques
t: Tecla de total/importe recibido/
no venta
: Apaga el visor. No es posible el
funcionamiento.
REG: Permite registrar una transacción.
: Permite la corrección después de haber
finalizado una transacción.
X/Flash: Permite imprimir informes de ventas,
mostrando los informes rápidos en el visor.
Z/PGM: Permite imprimir y reponer los informes de
ventas y programar.
Inserte la llave de modo en el selector de
modo y mueva la llave para establecer un
modo apropiado.
Teclas numéricas Tecla de sección
Para la entrada de la
sección 5 a 8, presione s
y luego las teclas ! a
$.
Repetición: Indica el número de veces que se presionó la misma
tecla de sección o de PLU. Si se repitió una entrada
más de diez veces, sólo se visualizará el último dígito.
Código de PLU: Indica el código de PLU registrado.
Secciones: Indican la sección registrada. Por ejemplo, si presiona la
tecla de sección 1, “1” aparecerá.
Page 88

4
Partes y sus funciones
Símbolos y números que aparecen en el visor:
Error: Aparece con un sonido de alarma cuando se comete un error. Si esto ocurre
durante una transacción debido a que el número registrado es demasiado grande,
presione simplemente c y vuelva a registrar correctamente.
Programa: Aparece cuando está programado la caja registradora en el modo “Z/PGM”.
Finalización: Aparece cuando se finaliza una transacción presionando t, R o C.
Subtotal: Aparece cuando la caja registradora calcula un subtotal al presionar S y
también cuando la cantidad entregada es menor que la cantidad total de venta.
Cambio: Aparece cuando se visualiza el importe del cambio.
Cambio de divisas: Aparece cuando se presiona E para calcular un subtotal en moneda
extranjera.
Poca carga de las pilas: Aparece cuando la tensión de las pilas instaladas está por debajo del
nivel necesario. Deberá cambiar pronto las pilas por otras nuevas.
Sin pilas: Aparece cuando las pilas no están instaladas, o cuando las pilas instaladas están
gastadas. Deberá cambiar inmediatamente las pilas por otras nuevas.
Además, pueden aparecer los siguientes indicadores:
• El signo de menos (-) puede aparecer en las posiciones 2 a 9.
• El punto decimal puede aparecer en las posiciones 1 a 3.
Para visualizar la hora y la fecha
Ponga el selector de modo en la posición REG y presione una vez x para visualizar la hora, o
presione dos veces x para visualizar la fecha.
Presione la tecla c para cancelar la visualización de la hora/fecha.
Si se comete un error
Si su caja registradora comete un error, se visualiza el aviso de error “ ” acompañado de un
sonido de alarma. Borre el error, presionando c, y realice la acción correcta.
1. Si ha registrado un número mayor de 7 dígitos en la sección o un número mayor de 8
dígitos (79999999) para la operación de RA (Recibido a cuenta), PO (Pagado), crédito o
cheque:
Presione c y vuelva a registrar el número correcto.
2. Si comete un error en la operación de tecla:
Presione c y teclee correctamente.
3. Si realiza un registro, habiendo un límite de dígitos de entrada programado:
Verifique, si el importe registro es correcto. Si lo es, verifique el ajuste del límite de dígitos de
entrada.
4. Si un subtotal sobrepasa los ocho dígitos (79999999):
Presione c y después t, R o C para finalizar la transacción en este punto.
5. Si el número de un artículo sobrepasa los 3 dígitos en registro de multiplicación:
Presione c y vuelva a introducir un número correcto.
Función de escape de errores
Si se comete un error u ocurre algo incontrolable durante el registro de transacción y el cliente no
puede seguir esperando, presione e dos veces (seguido de c si aparece en el error). Puede
salir de la situación y finalizar la transacción como una venta en metálico en este momento. Se
registran los registros de transacción hasta entonces introducidos.
Page 89

5
Preparación de la caja registradora
Para que la caja registradora funcione correctamente, deberá reponerla antes de programarla por
primera vez. Realice el siguiente procedimiento.
1. Inserte la llave de modo en el selector de modo y gire la llave a la posición REG.
2. Enchufe la clavija a la toma de corriente de CA. Sonará una alarma tres veces.
IMPORTANTE: Esta operación debe efectuarse antes de haber insertado las pilas.
3. El visor de la máquina indica ahora “ 0.00”.
4. Presione x para confirmar que el reloj empieza desde “ 0-00”.
5. Presione c para cancelar la visualización de la hora.
Antes de usar la caja registradora por primera vez, haga lo siguiente.
Paso 2 Reposición de la caja registradora
Para instalar la caja registradora, busque una superficie estable cerca de una toma de corriente de
CA donde la caja registradora no pueda quedar expuesta al agua ni a la luz directa del sol, y luego
instale la caja registradora empleando la ménsula angular de fijación suministrada con la caja
registradora.
La ménsula angular de fijación impide que se mueva la caja registradora cuando se abre el cajón.
Enganchando la caja registradora a la ménsula, podrá fijar la caja registradora en su posición.
Siga el procedimiento mostrado a continuación para la instalación.
Cómo instalar la ménsula angular de fijación
1. Limpie completamente el lugar donde deba colocarse
la ménsula angular de fijación (B).
2. Pele la cinta adhesiva de la ménsula angular de
fijación.
3. Acople la ménsula angular al gancho (A) que está
situado en el fondo de la parte posterior de la caja
registradora.
4. Pegue firmemente la ménsula angular de fijación a la
superficie de la mesa que limpió arriba.
Cómo extraer la caja registradora de la ménsula angular
de fijación
1. Levante la parte delantera de la caja registradora y tire de
la caja registradora hacia usted.
Paso 1 Instalación de la caja registradora
A
B
Page 90

6
Preparación de la caja registradora
Su caja registradora tiene montada una impresora que podrá utilizar para imprimir recibos y el
registro diario. Deberá instalar en la impresora el rollo de papel suministrado con la caja
registradora aunque programe la caja para que no imprima recibos.
1. Ponga un rollo de papel en el soporte del rollo de papel como
se muestra en la ilustración.
Paso 4 Instalación del rollo de papel
Las tres pilas nuevas R6 o LR6 (tamaño “AA”) se deben colocar en la caja registradora para evitar
que los datos y ajustes de programación se borren de la memoria, cuando se desconecte
accidentalmente el cable de alimentación de CA, o en caso de un corte de corriente. Una vez
colocadas, las pilas durarán aproximadamente un año, antes de que deban ser cambiadas. En ese
momento, el símbolo “” aparecerá en el visor para indicar que las pilas están agotadas y deben
ser cambiadas en menos de dos días.
Instale las tres pilas nuevas R6 o LR6 (tamaño “AA”) de acuerdo con el siguiente procedimiento
con el cable de CA enchufado y ponga el selector de modo en la posición REG:
1. Empuje hacia delante la cubierta de la impresora y sepárela.
2. Abra la cubierta de las pilas que se encuentra al lado del soporte
del rollo de papel.
3. Coloque las tres pilas nuevas R6 o LR6 (tamaño “AA”).
4. Compruebe que se apaga el símbolo “” de pila agotada.
5. Cierre la cubierta de las pilas.
Asegúrese de observar las precauciones indicadas en la
página 1 sobre la manipulación de las pilas.
Paso 3 Instalación de las pilas
(Vistas desde detrás)
Page 91

7
Preparación de la caja registradora
Operaciones para empezar con rapidez
En esta sección se explican el modo de realizar la programación básica, que debe programarse
antes de poder empezar las operaciones de ventas, y la operación básica de ventas.
Abreviaturas y terminología empleadas en este manual
Dept.: Sección: una categoría para clasificaciones de mercancías. Todos los artículos
de venta deben pertenecer a una sección.
PLU: Codificación de precios: una categoría para clasificaciones de mercancías. Las
PLU se emplean para llamar precios preajustados mediante la introducción de
un código (1-80).
Teclas de función: Las teclas de función se enumeran en la sección del Teclado. Consulte la
página 3.
VAT: Impuesto al valor añadido
Informe X: Informe para lectura de datos de ventas
Informe Z: Informe para lectura y reposición de datos de ventas
Función de emisión/no emisión de recibos: Para imprimir o no imprimir los recibos o registros
diarios en el modo REG.
• Si la posición del punto decimal de su moneda nacional no es la 2, deberá cambiar el
ajuste. Para realizar el ajuste, consulte la sección de Programación Miscelánea.
• Podrá continuar la programación (pasos 1 al 3 de abajo) sin imprimir el informe de
programación si no presiona S en cada paso de la programación. No obstante, para
terminar la programación, deberá presionar S.
Cuando presione S al final de la programación, se imprimirá el informe de
programación. En el informe podrá comprobar los ajustes que ha realizado. Asegúrese
de haber hecho correctamente la programación.
Para leer el informe, consulte la sección de Comprobación de los ajustes programados
en la máquina.
2. Inserte el papel recto en la entrada del papel y presione o.
Entonces, el papel avanza y aparece en el área de impresión.
3. (Para imprimir el registro diario)
Introduzca el extremo superior del
papel en la ranura del eje del carrete
y enrolle el papel dos o tres vueltas.
4. (Para imprimir el registro diario)
Coloque el carrete de toma en el
rodamiento.
5. Vuelva a colocar la cubierta de la impresora. Para imprimir recibos, pase el extremo del papel
por las aberturas de la cubierta de la impresora. Tenga mucho cuidado de no cortarse con el
cortador manual.
Page 92

8
Operaciones para empezar con rapidez
Para ajustar la fecha, introduzca la fecha con 6 dígitos empleando el formato de día-mes-año. (Por
ejemplo, introduzca 260805 para el 26 de agosto de 2005)
Para ajustar la hora, introduzca la hora con 4 dígitos empleando el formato de 24 horas.
Ajuste el selector de modo en la posición Z/PGM, y opere entonces las siguientes secuencias de
teclas.
Fecha (DDMMAA) ➜
S(➜S
: para finalizar la programación)
Hora (máx. de 4 dígitos en el formato de 24 horas) ➜
S
(➜
S
)
Podrá cambiar el formato de la fecha en el modo Z/PGM. Si cambia el formato, deberá
seguir el formato que haya cambiado cuando ajuste la fecha.
Paso 1 Programación de la fecha y de la hora
En la caja registradora pueden programarse seis tipos de sistemas de impuestos. Programe el
sistema de impuestos necesario para su región, y programe las tasas de impuestos (00,0000% a
99,9999%) en el sistema de impuestos que haya seleccionado.
Asegúrese de que el selector de modo esté en la posición Z/PGM, y opere entonces las siguientes
secuencias de teclas.
Programación del sistema de impuestos
8➜S
➜ A ➜
S(➜S
)
Parámetro A: Sistema de impuestos
IVA manual 1-4: 0 IVA automático 1-4: 1 Impuestos automáticos 1-4: 2
(Ajuste de fábrica)
IVA manual 1: 3 Impuestos manuales 1-4: 4 Impuestos automáticos 1-3 e
IVA automático 1: 5
Programación de la tasa del IVA (impuestos)
Parámetros
A: IVA (impuestos) 1: 1 IVA (impuestos) 2: 2 IVA (impuestos) 3: 3 IVA (impuestos) 4: 4
B: Tasa del IVA (impuestos) con 6 dígitos (000000 a 999999) (Ajuste de fábrica: 000000)
C: Límite inferior de impuestos (0 a 9999) sólo para el sistema de impuestos. (Ajuste de fábrica:
0)
9 ➜ S ➜ A ➜ x ➜ B ➜ x ➜ C ➜ S (➜ S)
Cuando no se especifique el limite inferior de impuestos
Paso 2 Programación de los impuestos
Page 93

9
Operaciones para empezar con rapidez
En esta sección se explica el método de los registros básicos de ventas empleando la tecla de
sección con corrección sencilla (cancelación). Para encontrar más información sobre los registros
de PLU, los registros de IVA (impuestos) y los registros con las teclas de función, consulte la
sección Utilización de las diversas características para los registros de ventas.
A continuación mostraremos una operación de ejemplo (pagada en
metálico).
Antes de iniciar los registros de ventas, asegúrese de que se haya
instalado un rollo de papel.
1. Ponga el selector de modo en la posición REG.
Paso 4 Registros básicos de ventas (registros de sección)
La mercadería se puede clasificar hasta en ocho secciones. Los artículos vendidos usando las
teclas de secciones se pueden imprimir en un informe que indica las cantidades vendidas y los
importes de las ventas clasificados por secciones. Estos datos son útiles para la reposición de
artículos y otras tareas de administración. Cuando emplee una tecla de sección, deberá ajustar los
parámetros que especifiquen el estado de la sección, como por ejemplo el signo de más o el signo
de menos y el estado de impuestos.
Asegúrese de que el selector de modo esté en la posición Z/PGM, y opere entonces las siguientes
secuencias de teclas.
ABCDEFG ➜
x
➜ (s➜ ) Tecla de sección (➜
S
)
(Presione s para programar las secciones 5 a 8.)
Parámetros: Selección: Registro:
A Signo +/- Signo de más* 0
Signo de menos 1
B Normal/SICS (venta en metálico de un Normal* 0
solo artículo) SICS 1
C IVA 4 o IMPUESTOS 4 No* 0
Sí 1
D IVA 3 o IMPUESTOS 3 No* 0
Sí 1
E IVA 2 o IMPUESTOS 2 No* 0
Sí 1
F IVA 1 o IMPUESTOS 1 No 0
Sí*1
G Límite de dígitos de entrada 0 a 7 (ajuste de fábrica: 7)
(0 a 7 dígitos)
*: Ajuste de fábrica
• Signo
Asigne el signo de más a las secciones en que se registran los importes de las ventas, y el signo
de menos a las secciones en que se registran pagos de artículos como devoluciones,
devoluciones de envases u otras transacciones negativas.
• SICS (venta en metálico de un solo artículo)
Este le permite al operario finalizar el registro de transacción, introduciendo el precio unitario de
un solo atículo y presionando la tecla de sección ajustada para la venta en metálico de un solo
artículo. Si el precio unitario está preajustado a una tecla de sección, puede finalizar la
transacción, sólo presionando la tecla de sección.
• Límite de dígitos de entrada
Ajustado este parámetro de acuerdo a las secciones previene el registro accidental de un importe
demasiado grande durante una venta. Por ejemplo, si el registro máximo permitido es 9,99,
introduzca 3. Si introduce 0, no podrá registrar un precio y sólo se podrá registrar un precio
preajustado.
Paso 3 Programación del estado de sección
Page 94

10
Operaciones para empezar con rapidez
2. Introduzca el precio del primer artículo de la sección (en el caso de 15,00, introduzca 15:).
3. Presione la tecla de la sección adecuada.
Para la sección 5 a la sección 8, presione primero s antes de presionar la tecla de sección.
4. Repita los pasos 1 y 2 para todos los artículos de la sección.
5. Presione S para mostrar el importe debido (este paso puede omitirse).
6. Presione V para hacer el cálculo de los impuestos en caso de que su sistema de impuestos
sea el sistema IVA 1-4 manual (ajuste predeterminado).
7. Registre el importe recibido del cliente (puede omitirse este paso, si el importe entregado es el
mismo que el subtotal).
8. Presione t, se mostrará el cambio debido y se abrirá el cajón.
9. Corte el recibo y déselo al cliente (en el caso de haber programado la impresión de recibos) con
el cambio mostrado.
10.Cierre el cajón.
• Cuando el pago se realice con un cheque, presione C en lugar de t.
• Cuando el pago se realice con crédito, presione R en lugar de t.
• Si preajuste precios unitarios para secciones, podrá omitir la entrada del precio unitario
del artículo de la sección, es decir, podrá omitir el paso 1 de arriba. Para la
programación, consulte la sección de Programación del precio unitario de preajuste de
sección.
Finalización directa (sin cambios)
Venta de un artículo de 5,00 (sección 1) y de un artículo de 8,00 (sección 3) en
efectivo, y el total de la venta incluyendo los impuestos es de 13,00, y recibiendo el
importe exacto de dinero.
5:! 8:# St
Precio y sección Precio y sección
Operación del importe recibido
Venta en metálico de un artículo de 5,00 (sección 1) y de un artículo de 8,00 (sección
3) recibiendo del cliente un importe de 20,00.
5:! 8:# S 20: t
Precio y sección Precio y sección Importe entregado
Cálculo de impuestos (sistema de impuestos: IVA1-4 manual)
Venta en metálico de un artículo de 5,00 (sección 1) y de un artículo de 8,00 (sección
3) recibiendo del cliente un importe de 20,00.
5:! 8:# S V 20: t
Cálculo de impuestos
Ejemplo
Ejemplo
Ejemplo
Page 95

11
Operaciones para empezar con rapidez
Para poder verificar las ventas, podrá leer un informe de ventas. También deberá reponer los
datos de las ventas después de haber realizado prácticas con la caja registradora.
Para leer un informe de ventas, deberá sacar un informe X; ponga el selector de modo en la
posición X/Flash y presione t.
Para reponer las ventas, deberá sacar un informe Z; ponga el selector de modo en la posición
Z/PGM y presione C. Se borran los datos de ventas acumulados y el total (GT).
Para la lectura y reposición de los datos de ventas reales, consulte la sección de Lectura y
reposición de las ventas. Deberá efectuar la reposición de datos de ventas al final de cada jornada
para borrar los datos de las ventas.
Paso 5 Lectura/reposición de los datos de ventas
Cuando se hace un registro erróneo:
Corrección de los números introducidos: Bórrelos presionando c inmediatamente después de la
introducción.
Corrección de la introducción del último artículo: Presione v.
Corrección de registros anteriores: Anule el registro incorrecto empleando la tecla de
cancelación, y realice el registro correcto como se muestra en
el ejemplo siguiente.
Para más detalles, consulte la sección de Correcciones en la
página 15.
Corrección de registros anteriores
Corrección de la entrada de 300 ! por la de 200 ! después de haber realizado
otra entrada correcta
3:! 525# 3:v! 2:! t
Anulación para Entrada correcta
300 !
Ejemplo
Page 96

12
Utilización de las diversas características para los registros de ventas
Introduzca el código de PLU de un artículo de PLU y presione P. Se registrará el artículo de
PLU.
Venta de un artículo de PLU1 y un artículo de PLU15 a crédito.
1P 15P R
Para emplear el registro de ventas de artículos de PLU, deberá haber programado las
PLU.
Ejemplo
Antes de efectuar registros de ventas, asegúrese de que se haya instalado un rollo de papel por si
se activa la función de emisión de recibos.
Asegúrese también de girar el selector de modo en la posición REG.
Registros de PLU
Para vender un solo artículo en metálico (registro de venta en metálico de un solo artículo
(SICS))
Cuando la venta es de un solo artículo pagado en metálico, como por ejemplo un paquete de
cigarrillos, podrá emplear la función SICS. Sólo puede aplicarse a las teclas de sección
programadas para SICS o a las PLU asociadas con estas secciones. El cajón se abre después de
presionar la tecla de la sección o de la PLU.
Para registrar más de un artículo de la misma sección o PLU
Podrá registrar dos o más artículos de la misma sección o PLU presionando repetidamente la tecla
de la sección o PLU (entrada repetitiva), o empleando la tecla de multiplicación (entrada de
multiplicación). La tecla de multiplicación es conveniente cuando se venden varias unidades del
mismo artículo. Para ver la operación, consulte el ejemplo siguiente.
Entrada repetitiva
Venta en metálico de dos artículos a 2,00 (sección 1) y de tres artículos de la PLU5
2:!! 5PPP t
Entrada de multiplicación
Venta pagada con cheque de seis artículos a 1,50 (sección 1) y de doce artículos de
la PLU5
6x 150! 12x 5P S C
Venta de pago mixto
Si el importe entregado en metálico o con cheque es menor que el importe total de la venta con
impuesto incluido, el visor mostrará un déficit y “”. Para compensar el déficit, deberá registrar el
importe adicional recibido o deberá registrar un crédito.
Su cliente paga 8,30 en metálico y 50,00 a crédito para un subtotal de 58,30 con los
impuestos incluidos.
S 830 t R
Importe recibido Se visualiza un
en metálico déficit y “”
Ejemplo
Ejemplo
Ejemplo
Convenientes registros de ventas
Page 97

13
Utilización de las diversas características para los registros de ventas
La caja registradora incorpora los seis sistemas de impuestos siguientes.
La caja registradora está programada con el sistema de IVA 1 a 4 manual.
Sistema IVA 1 - 4 automático (método de operación automática usando los porcentajes
programados)
Este sistema, en la operación de pago, calcula el IVA de los subtotales imponibles 1 a 4 usando
los porcentajes programados correspondientes.
Sistema de impuestos 1 - 4 automático (método de operación automática usando los
porcentajes programados)
Este sistema, en la operación de pago, calcula los impuestos de los subtotales imponibles 1 a 4
usando los porcentajes programados correspondientes y añade además los impuestos calculados
a los subtotales respectivamente.
Sistema IVA 1 - 4 manual (método de registro manual usando los porcentajes programados)
Este sistema proporciona el cálculo del IVA de los subtotales imponibles 1 a 4. Este cálculo se
realiza usando los porcentajes programados correspondientes cuando se presiona V después
de S.
Sistema IVA 1 manual (método de registro manual para los subtotales que usan los
porcentajes preajustados de IVA 1)
Este sistema hace posible el cálculo del IVA para el subtotal. Este cálculo se realiza usando el
porcentaje preajustado del IVA 1 cuando se presiona V después de S. Para este sistema
se puede usar la tasa de IVA introducida con el teclado. En este caso, después de S,
introduzca la tasa del IVA y presione V.
Sistema de impuestos 1 - 4 manual (método de registro manual usando porcentajes
preajustados)
Este sistema proporciona el cálculo de los impuestos para los subtotales imponibles 1 a 4. Este
cálculo se realiza usando los porcentajes programados correspondientes cuando se presiona V
después de S. Después de este cálculo, deberá finalizar la transacción.
Sistema de IVA 1 automático y de impuestos 1 - 3 automático
Este sistema permite el cálculo en combinación con IVA 1 automático e impuesto 1 a 3 automático.
La combinación puede ser de cualquier IVA 1 correspondiente a imponible 4 y cualquier impuesto
1 a 3 correspondiente a imponible 1 a 3 para cada artículo. El importe de impuestos se calcula
automáticamente con los porcentajes programados previamente para esos impuestos.
El cálculo del IVA/impuestos para los artículos de PLU se realiza de acuerdo con el que
se ha ajustado para esta sección asociada.
Cálculo del IVA (impuestos)
Si desea aplicar un descuento o un recargo a un artículo, registre la tasa de porcentaje y presione
la tecla de porcentaje. Si desea aplicar un descuento o un recargo al subtotal, introduzca todos los
artículos, presione S y luego presione la tecla de porcentaje seguido de la tasa de porcentaje.
Esta caja registradora viene programada para descuento. Para cambiar el ajuste al de
recargo, consulte la sección de Programación de la tecla de porcentaje. También podrá
preajustar una tasa porcentual. Si preajusta una tasa porcentual, no será necesario
introducir la tasa porcentual antes de presionar la tecla de porcentaje. Para realizar la
programación, consulte también la sección de Programación de la tecla de porcentaje.
Para aplicar un descuento del 20,00% a un artículo perteneciente a la sección 3
8:# 20:% t
Para aplicar un descuento del 15,00% al subtotal de una transacción
8P 12P 8:! S 15:% t
Ejemplo
Ejemplo
Descuentos y recargos usando la tecla de porcentaje
Page 98

14
Utilización de las diversas características para los registros de ventas
Esta caja registradora permite registros de pago en moneda extranjera cuando se ha programado
una tasa de cambio de divisas. Después del registro de los artículos o durante los registros del
importe recibido, presione E y podrá visualizar el subtotal en la moneda extranjera. Entonces,
introduzca el importe recibido en la moneda extranjera si no es un pago exacto, y presione la tecla
de finalización (t / C o R cuando se ha programado). Se visualizará el cambio en la moneda
nacional.
• Cuando el importe recibido es insuficiente, el déficit se mostrará en la moneda nacional.
• Si selecciona “Sí” para la operación de cheque y de crédito al recibir el importe en
moneda extranjera en la programación del EURO, podrá finalizar la venta en la moneda
extranjera usando C o R.
• Si ha seleccionado “Sí” para impresión del importe de cambio de divisas para el total y
para el cambio en la programación del EURO, podrá visualizar un cambio en moneda
extranjera presionando E cuando se visualice el cambio en la moneda nacional. Para
volver a la visualización en moneda nacional, presione de nuevo E.
Venta de un artículo de la sección 3 (precio de 79,50) en una moneda extranjera.
(Tasa de cambio de divisas preajustada: 1,550220)
7950# E 130: t
Importe recibido en moneda extranjera
Ejemplo
Cambio de divisas
Cuando deba abrir el cajón sin realizar ninguna venta, como pueda ser para efectuar cambios,
presione t. Se abrirá el cajón.
Sin venta
Puesto que su caja registradora no viene con una tecla de devolución, realice una sección
negativa (véase la programación requerida en la página 9) y úsela.
Asegúrese de que el estado imponible del artículo devuelto sea el mismo que el de la
sección negativa. De otra manera no se calculará el impuesto de forma correcta.
Devolución
Pueden introducirse e imprimirse números de código de no suma en el recibo o registro diario
durante el registro de una venta. Los números de código de no suma pueden utilizarse para
muchas cosas. Por ejemplo: números de tarjeta de crédito, de cheque, de serie, códigos de
productos, códigos de cargo por el servicio y como cualquier otro número que pueda servir
posteriormente como referencia para transacciones específicas. Introduzca un número de código
de hasta 8 dígitos y presione S.
Números de código de no suma
Cuando reciba un importe de un cliente o para pagar cierto importe a un abastecedor, es
aconsejable emplear V o p respectivamente.
Para el registro de recibido a cuenta, registre el importe y presione V.
Para el registro de pago, registre el importe y presione p.
El límite de entrada es de 8 dígitos (79999999), aunque puede programarse de forma distinta.
Entrega de 60,00 a cuenta de un cliente cuyo código es 12345.
12345S 60: V
Ejemplo
Registros de recibidos a cuenta y pagos
Page 99

15
Utilización de las diversas características para los registros de ventas
Si cometiera un error al registrar un artículo en una venta, corríjalo usando los siguientes
procedimientos.
• Corrección de los números registrados
Si registra un número incorrecto, bórrelo presionando c inmediatamente después de haberlo
introducido.
• Corrección del último registro (anulación directa)
Si comete un error cuando efectúa una entrada de sección, entrada de PLU, entrada de
multiplicación, o entrada repetitiva (sólo la última entrada), podrá corregirla presionando v.
• Corrección de registros anteriores (anulación indirecta)
Con esta función, podrá corregir un registro de sección o de PLU realizado incorrectamente
durante una transacción, si lo descubre antes de finalizar la transacción, presionando t, R o
C.
Para corregir la entrada de 3P por la de 4P después de haber realizado otra
entrada correcta, introduzca lo siguiente:
3P 1150! 3vP 4P t
Anulación Entrada
indirecta para correcta
3P
• Corrección después de imprimir el recibo
Esta función le permite corregir los registros realizados en un recibo incorrecto. Los registros se
restan de cada total y se suman a un total exclusivo. Gire la llave de modo a la posición , y
registre los mismos detalles que se encuentran en el recibo incorrecto. (Si es necesario,
introduzca el código secreto y presione t cuando haya girado la llave de modo a la posición
.)
Ejemplo
Correcciones
Todos los datos en todos sus registros así como otras informaciones de transacción permanecen
en la memoria de su máquina mientras su caja registradora esté activada (asegúrese de que las
pilas instaladas estén cargadas para un caso de corte de corriente). Esta información se puede
imprimir como un informe que le puede servir de ayuda en el curso de sus negocios.
Lectura y reposición de las ventas
Esta función es útil para verificar al instante los datos de ventas de la caja registradora individual.
El total de ventas aparece en el visor pero no se imprime ni se borra de la memoria de la máquina.
Para visualizar el informe rápido para cada artículo individual, presione las siguientes teclas en el
modo X/Flash:
Ventas de sección individual Tecla de sección
Total de ventas S
Metálico en el cajón R
Informes rápidos para ver en el visor
Este informe, cuando se hace en el modo X/Flash, imprime la información acumulada de ventas.
La impresión de un informe X es una buena manera de verificar a mitad de la jornada las ventas
del día. Puede imprimir informes X tantas veces como sea necesario, pues no afectan a la
memoria de la caja registradora.
Para imprimir un informe X, ponga el selector de modo en la posición X/Flash y presione t.
Informes X para la lectura de ventas
Page 100

16
Lectura y reposición de las ventas
Este informe, cuando se hace en el modo Z/PGM, imprime toda la información como un informe X.
Una vez haya sido imprimido este informe, se borra de la caja registradora la memoria de
información de ventas del día y se reponen todos los totales de transacción. Asegúrese de
imprimir un informe Z al final de cada día.
Con la impresión de un informe Z, también podrá reponer el GT (gran total).
Para emitir un informe Z, siga el procedimiento descrito abajo.
1. Ponga el selector de modo en la posición Z/PGM.
2. Si es necesario, introduzca el código secreto y presione t.
Para emitir un informe Z con reposición del GT:
3. Presione C.
4. Si es necesario, introduzca el código secreto y presione C.
Para emitir un informe Z sin reponer el GT:
3. Presione t.
4. Si es necesario, introduzca el código secreto y presione t.
Informes Z para lectura y reposición de ventas
Contador de
reposición
Gran total
Cantidad
Contador y total
de sección
Contador y total
de porcentaje
Contador y total
de anulación de
artículos
Contador y total del
modo de anulación
*
2
Total imponible 1
Total de impuestos
(IVA) 1
Código de sección
Importe
*
1
Símbolo de
reposición (“X” se
imprime en caso
de informes X.)
Cuenta de transacciones
Total de ventas
Contador y total de venta
en metálico
Contador y total de venta
con cheque
Contador y total de venta
a crédito
Contador y total de cambio
de divisas
(al recibir el importe en
metálico)
Contador y total de cambio
de divisas
(al recibir el importe en
cheque)
Contador y total de cambio
de divisas
(al recibir el importe en
crédito)
Total de recibido a cuenta
Total de pago
Contador de sin venta
Metálico en el cajón
*
3
*
4
*
4
Informe de ventas de muestra
*1Sólo se imprime en el informe Z.
*2Se imprime aquí la diferencia por redondeo en caso de que se aplique el redondeo de Australia.
*3No se imprime en caso de que la tasa de cambio esté ajustada en 0,000000.
*4No se imprime en caso de que la “Operación de cheque y crédito al recibir el importe en la
moneda extranjera” esté ajustada en “No” en la programación del EURO, y/o esté ajustada la
tasa de cambio en 0,000000.
 Loading...