

CD-CH1000H/CD-CH1000W
OPERATION MANUAL
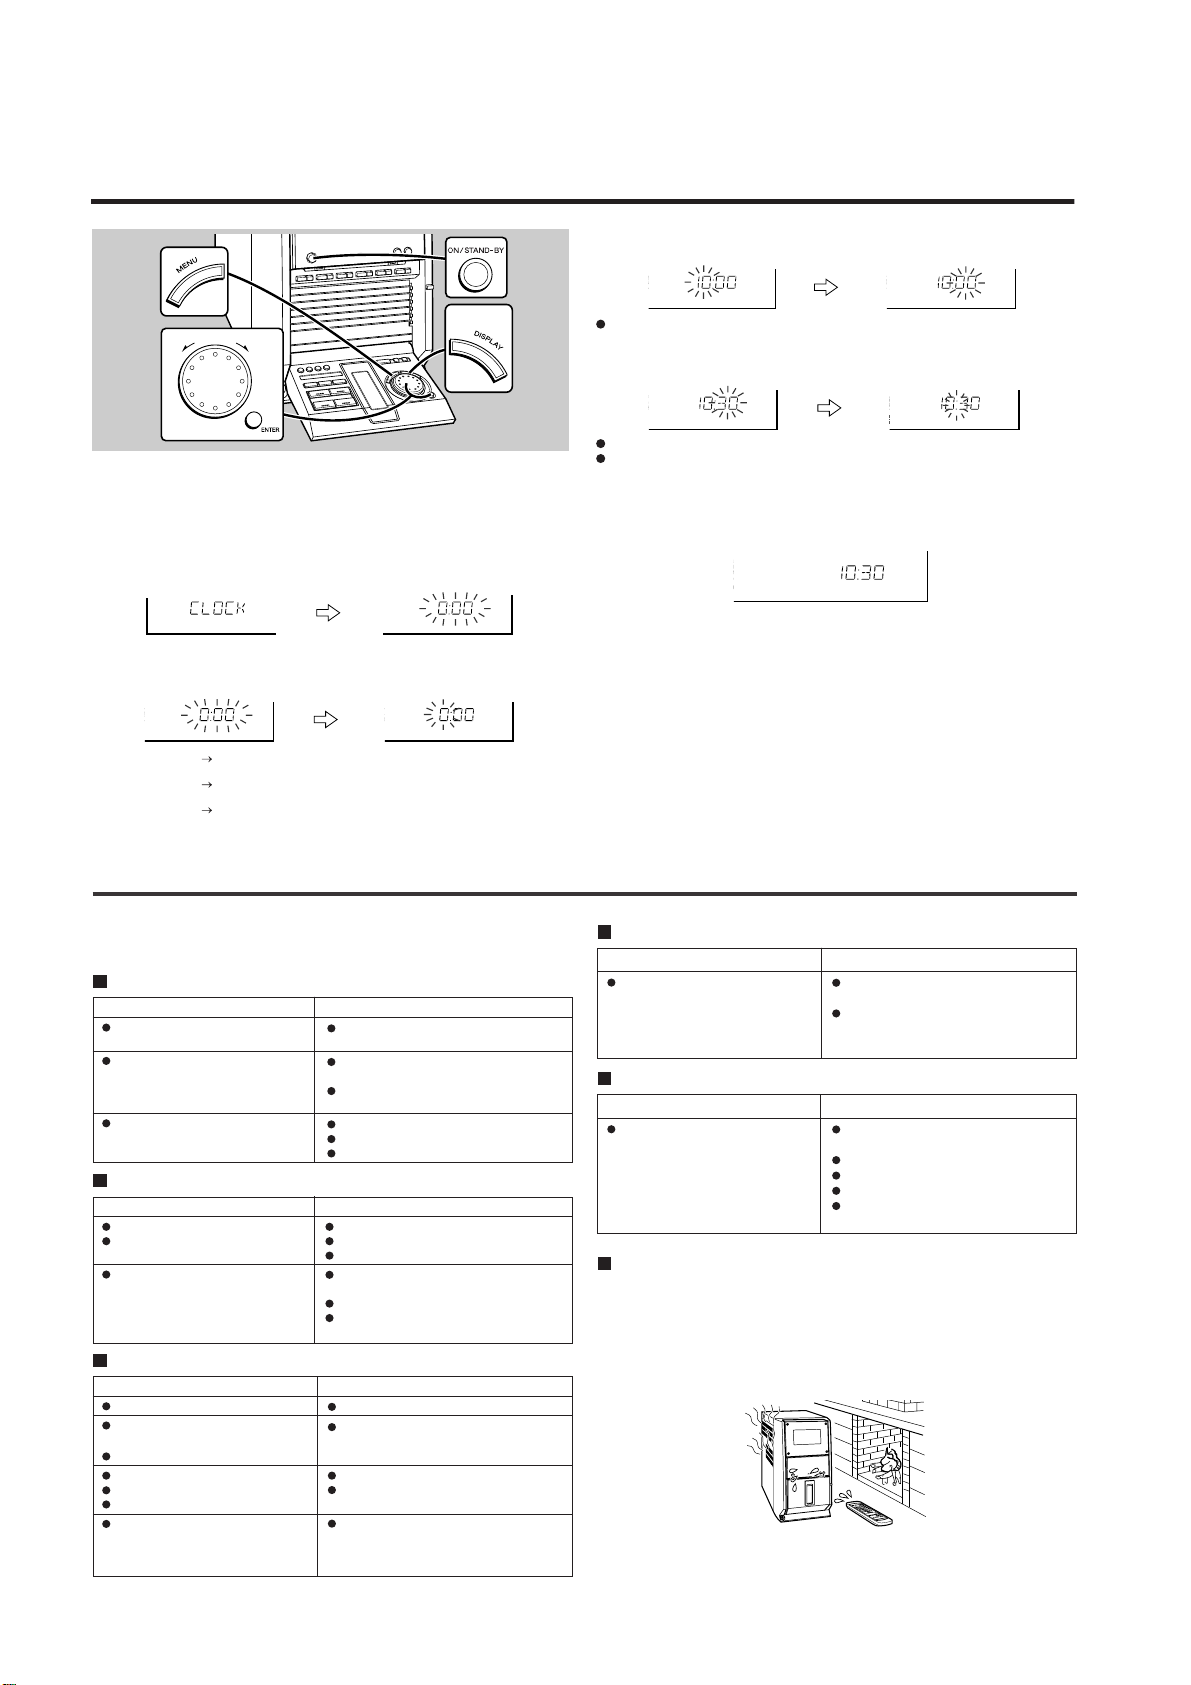
Setting the Clock
In this example, the clock is set for the 24-hour (0:00) display.
1
Press the ON/STAND-BY button to turn the power on.
2
Press the MENU button.
3
Turn the jog dial to select "CLOCK" and within 10 seconds, press
the ENTER button.
4
Turn the jog dial to select the 24-hour or 12-hour display and within
2 minutes, press the ENTER button.
"0:00" The 24-hour display will appear.
"AM 12:00" The 12-hour display will appear.
"AM 0:00" The 12-hour display will appear.
(0:00 - 23:59)
(AM 12:00 - PM 11:59)
(AM 0:00 - PM 11:59)
5
Turn the jog dial to adjust the hour and within 2 minutes, press the
ENTER button.
When the 12-hour display is selected, "AM" will change automatically to "PM".
6
Turn the jog dial to adjust the minutes and within 2 minutes, press
the ENTER button.
The hour will not advance even if minutes advance from "59" to "00".
The clock starts from "0" second. (Seconds are not displayed.) The time display
will disappear after a few seconds.
To confirm the time display:
Press the DISPLAY button. The time display will appear for about 3 seconds.
Note:
"CLOCK" will appear or time will flash at the push of the DISPLAY button when the
AC power supply is restored after a power failure or after unplugging the unit. Reset
the clock as follows.
To reset the clock:
Perform "Setting the Clock" from the beginning. At this time, step 4 (for selecting the
24-hour or 12-hour display) will be skipped.
To change the 24-hour or 12-hour display:
Clear all the programmed contents. [Refer to "If trouble occurs (reset)" for details.]
Perform "Setting the Clock" from the beginning.
Troubleshooting Chart
Many potential “problems” can be resolved by the owner without calling a service technician. If something is wrong with this product, check the following before calling your
authorised SHARP dealer or service centre.
General
The clock is not on time.
When a button is pressed, the unit
does not respond.
No sound is heard.
Symptom
CD player
Playback does not start.
Playback stops in the middle or is
not performed properly.
Playback sounds are skipped, or
stopped in the middle of a track.
Symptom
Cassette deck
Cannot record.
Cannot record tracks with proper
sound quality.
Cannot erase completely.
Sound skipping.
Cannot hear treble.
Sound fluctuation.
Cannot remove the tape.
Symptom
Possible cause
Did a power failure occur?
Reset the clock.
Set this unit to the power stand-by mode
and then turn it back on.
If the unit still malfunctions, reset it.
Is the volume level set to “0”?
Are the headphones connected?
Are the speaker wires disconnected?
Possible cause
The disc is loaded up-side down.
The disc does not satisfy the standards.
The disc is distorted or scratched.
Is the unit located near excessive vibrations?
The disc is very dirty.
Has condensation formed inside the
unit?
Possible cause
Is the erase-protection tab removed?
Is it a normal tape?
(You cannot record on a metal or CrO
tape.)
Is there any slack? Is the tape stretched?
Are the capstan, pinch roller, or heads
dirty?
If a power failure occurs during playback,
the heads remain engaged with the tape.
Do not open the compartment forcibly.
Wait until electricity resumes.
Tuner
Symptom
Radio makes unusual noise consecutively.
Possible cause
The stereo system is placed near the TV
or computer.
FM/AM loop aerial is not placed properly. Move the AC power lead away from
the aerial if located near.
Remote control
Symptom
The remote control does not operate.
Possible cause
Is the AC power lead of the stereo system plugged in?
The battery polarity is not respected.
The batteries are dead.
Incorrect distance or angle.
Does the remote control sensor receive
strong light?
Condensation
Sudden temperature changes, storage or operation in an extremely humid environment may cause condensation inside the cabinet (CD pickup, tape heads, etc.) or on
the transmitter light-emitting diode on the remote control.
Condensation can cause the unit to malfunction.
If this happens, leave the power on with no disc (or cassette) in the unit until normal
playback is possible (about 1 hour). Wipe off any condensation on the transmitter lightemitting diode with a soft cloth before operating the unit.
2
– 8 –
CD-CH1000H/CD-CH1000W
Troubleshooting Chart
If trouble occurs (reset)
When this product is subjected to strong external interference (mechanical shock, excessive static electricity, abnormal supply voltage due to lightning, etc.) or if it is operated incorrectly, it may malfunction.
If such a problem occurs, do the following:
1. Press the ON/STAND-BY button to enter the power stand-by mode.
2. Whilst pressing down the VOLUME button, press the ON/STAND-BY button until “ALL CLEAR” appears.
Caution:
This operation will erase all data stored in memory including clock and timer settings,
and tuner and CD presets.
Before transporting the unit
Remove all CDs from the unit. Your unit checks whether there are any discs inside the
unit when the tray is closed. “CD NO DISC” appears if no disc is left. Then, set the unit
to the power stand-by mode. Carrying the unit with discs left inside can damage it.
Remote Control
Test of the remote control
Face the remote control directly to the remote sensor on the unit.
The remote control can be used within the range shown below:
Press the ON/STAND-BY button. Does the power turn on? Now, you can enjoy the
music.
Remote sensor
For CD-CH1000W Only
m - 6 m (8" - 20')
0.2
Notes concerning use:
Replace the batteries if the operating distance is reduced or if the operation
becomes erratic. Purchase 2 "AA" size batteries (UM/SUM-3, R6, HP-7 or similar).
Periodically clean the transmitter on the remote control and the sensor on the stereo system with a soft cloth.
Exposing the sensor on the stereo system to strong light may interfere with operation. Change the lighting or the direction of the stereo system.
Keep the remote control away from moisture, heat, shock, and vibrations.
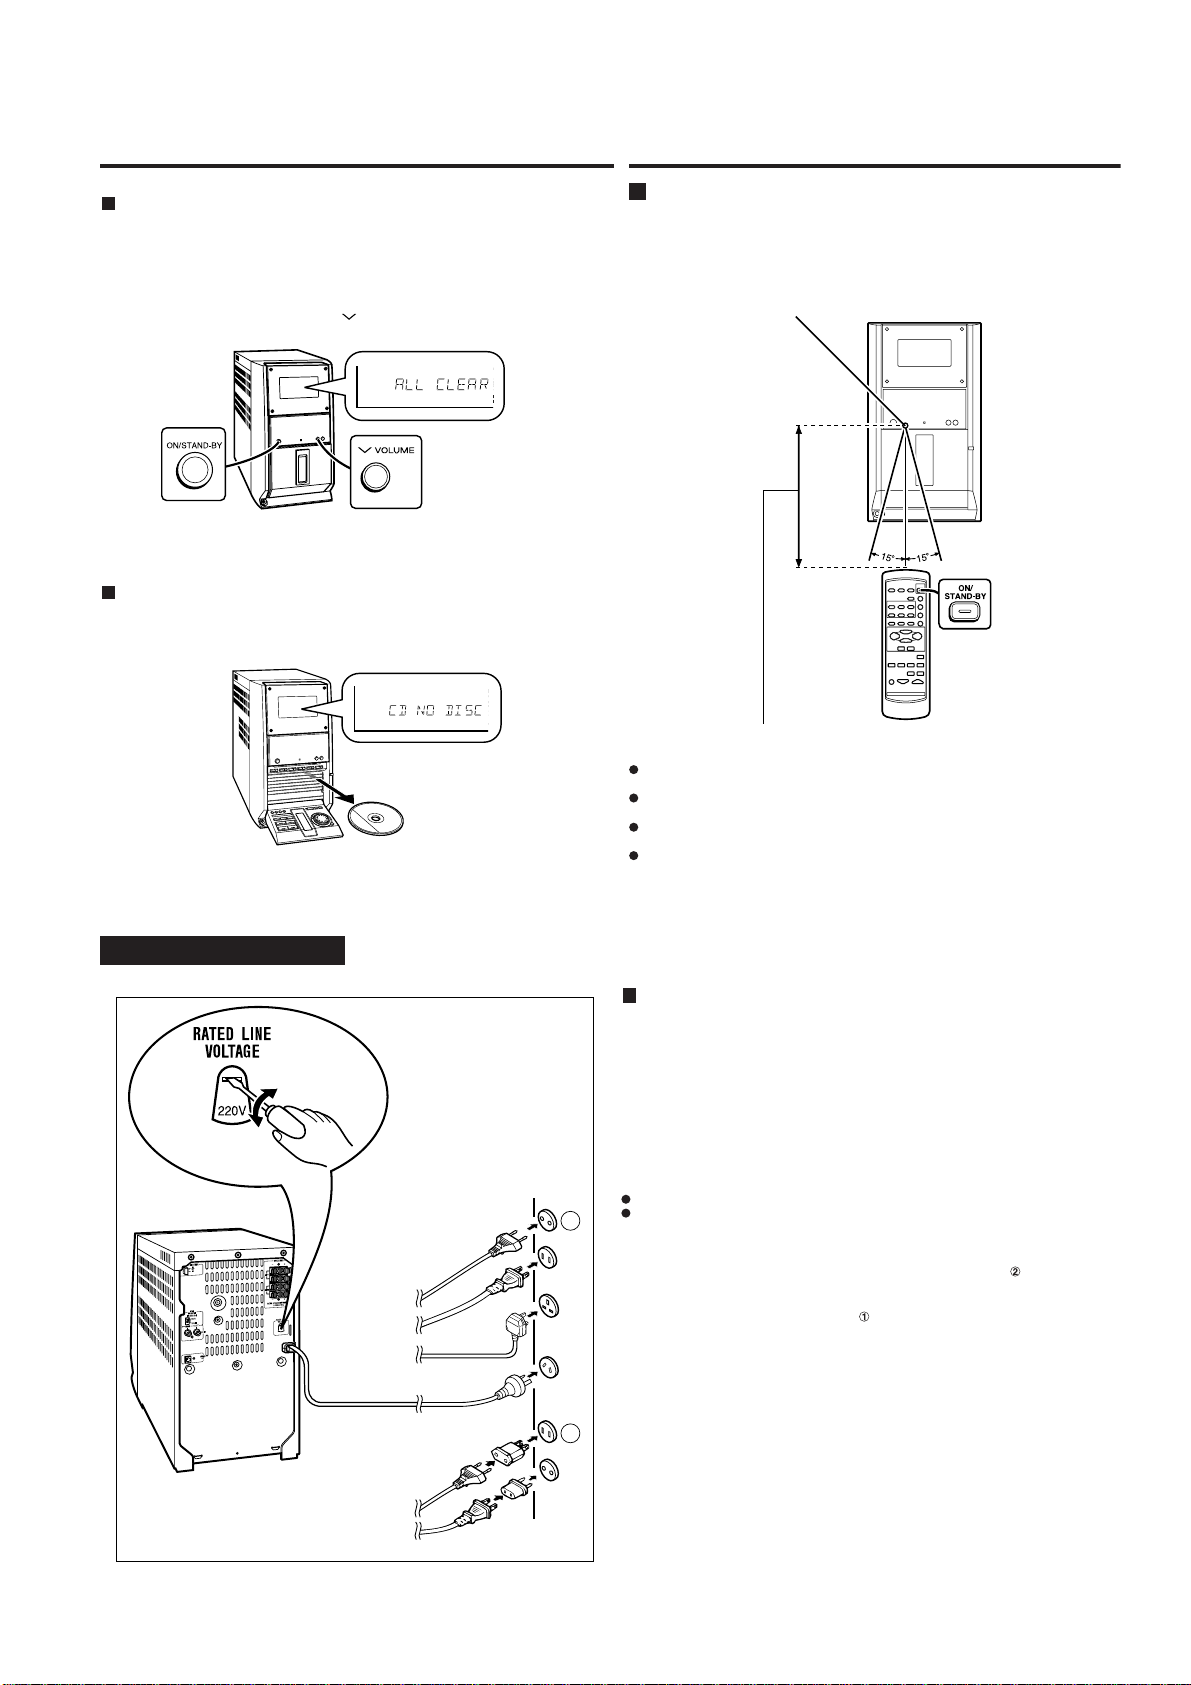
Connecting the AC power lead
Check the setting of the AC voltage selector located on the rear panel before plugging the unit into an AC socket. If necessary, adjust the selector to correspond to the
AC power voltage used in your area.
Selector adjustment:
Turn the selector with a screwdriver until the appropriate voltage number appears in
the window (110 V, 127 V, 220 V or 230 V - 240 V AC).
After making all connections, plug the unit. If you plug the unit first, the unit will enter
the demonstration mode.
Notes:
Plug the AC power lead into an AC socket, after any connections.
1
Unplug the AC power lead from the AC socket if the unit will not be in use for a prolonged period of time.
AC Plug Adaptor
In areas (or countries) where an AC socket as shown in illustration is used, connect the unit using the AC plug adaptor supplied with the unit, as illustrated. The AC
plug adaptor is not included in areas where the AC wall socket and AC power plug
can be directly connected (see illustration ).
Note for users in Australia and New Zealand:
An AC plug adaptor is not supplied if the lead has an Australian Standard plug.
2
– 9 –

CD-CH1000H/CD-CH1000W
For CD-CH1000W Only
AM/FM interval (span)
The International Telecommunication Union (ITU) has established that member countries should maintain either a 10 kHz or a 9 kHz interval between broadcasting frequencies of any AM station. The illustration shows the 9 kHz interval zones (regions
1 and 3), and the 10 kHz interval zone (region 2).Before using the unit, set the SPAN
SELECTOR switch (on the rear panel) to AM tun-ing interval (span) of your area.
To change the tuning zone:
1
Press the ON/STAND-BY button to enter the stand-by mode.
2
Set the SPAN SELECTOR switch to "50/9" for 9 kHz AM interval (50
kHz FM interval), and "100/10" for 10 kHz AM interval (100 kHz FM
interval).
3
Whilst pressing down the VOLUME button, press the ON/STANDBY button until "ALL CLEAR" appears.
Caution:
This operation will erase all data stored in memory including clock and timer settings,
and tuner and CD presets.
– 10 –

CD-CH1000H/CD-CH1000W
Listening to a CD (CDs)
1
2
3
4
5
Press the CD button.
Press the DISC 1 button to open the
disc tray 1.
Place the CD on the disc tray 1, label
side up.
Press the DISC 1 button to close the
disc tray 1.
You can place discs on the trays 2 - 6
by following steps 2 - 4.
Listening to a Cassette Tape
1
2
PUSH EJECT
3
Press the TAPE button.
Open the cassette door by pushing the
area marked “PUSH EJECT ”.
Load the cassette into the cassette
compartment.
Face the desired side toward you and load
the cassette as shown.
6
Press the button to start playback.
Listening to the Radio
1
2
3
Press the TUNER (BAND) button to select the desired frequency band (FM or
AM).
Press the TUNING ( or ) button to
tune into the desired station.
When the TUNING button is pressed for more
than 0.5 seconds, scanning will start automatically and the tuner will stop at the first receivable broadcast station.
To receive an FM stereo transmission,
press the ST-MODE button on the remote control. The “ST” indicator lights
up.
“ ” will appear when an FM broadcast is in
stereo.
ST
4
Press the button to start playback.
If trouble occurs (reset)
When this product is subjected to strong external interference (mechanical shock, excessive static electricity, abnormal supply voltage due to lightning, etc.) or if it is operated incorrectly, it may malfunction.
If such a problem occurs, do the following:
1. Press the ON/STAND-BY button to enter the power stand-by mode.
2. Whilst pressing down the VOLUME button, press the ON/STANDBY button until “ALL CLEAR” appears.
Maintenance
Dirty heads, capstan or pinch roller can cause poor sound and tape
jams. Clean these parts with a cotton swab moistened with commercial
head/pinch roller cleaner or isopropyl alcohol.
When cleaning the heads, pinch roller, etc., unplug the unit which contains high voltages.
After long use, the deck’s heads and capstan may become magnetised,
causing poor sound. Demagnetise these parts once every 30 hours of
playing/recording time by using a commercial tape head demagnetiser.
Read the demagnetiser’s instructions carefully before use.
Clean the dust or stain on the CD pickup lens using a commercial cleaning disc (brush type).
A
A Erase head C Capstan
Recording/Playback head D Pinch roller
B
Cleaning disc
C
B
D
– 11 –
 Loading...