


NV800ANZMN
Series
INSTRUCTIONS
AUST: 1800 890 840
NZ: 0800 002 999
THANK YOU
for purchasing the Shark® Powered Lift-Away™ DuoClean™


 TIP: You can find the model number on the rating label located on the back of your unit.


 TIP: You can locate the date code on one of the prongs of the power cord plug.
GMA-501823-EA
RECORD THIS INFORMATION
Model Number:
Date Code:
Date of Purchase (Keep receipt):
Store of Purchase:
TECHNICAL SPECIFICATIONS
Voltage: |
220-240V~, 50-60Hz |
Watts: |
850W |
Power Nozzle: 80W
PLEASE READ CAREFULLY AND KEEP FOR FUTURE REFERENCE.
This Owner’s Guide is designed to help you get a complete understanding of your new Shark Powered Lift-Away DuoClean.
If you have any questions, please call the customer service line at AUST: AUST: 1800 099 385 or NZ 0800 112 660.
1 AUST: 1800 099 385

CONTENTS
Important Safety Instructions 3
Getting to Know Your Shark® Powered
Lift-Away™ DuoClean™ 5 Assembling Your Vacuum 7
Using Your Vacuum in Upright Mode 9
What Does the Brushroll Indicator Light Mean? 9
Using Your Vacuum in Above-Floor Mode 11
The Benefits of Suction Control 11
Using Your Vacuum in Powered Lift-Away™ Mode 13
Powered Lift-Away Cleaning 13 Lift-Away Cleaning 14
Compatible Accessories 15
Maintenance 17
Emptying the Dust Cup 17 Cleaning the Filters 18 Cleaning the Brushroll 19 Cleaning the Soft Roller 20 Checking the Nozzle for Blockages 20
Troubleshooting Guide 21 Warranty 22
NZ: 0800 112 660 2
IMPORTANT SAFETY INSTRUCTIONS
FOR HOUSEHOLD USE ONLY
 WARNING
This appliance is not intended for use by persons (including children) with reduced physical, sensory or mental capabilities, or lack of experience and knowledge, unless they have been given supervision or instruction concerning use of the appliance by a person responsible for their safety. Children should be supervised to ensure that they do not play with the appliance.
CAUTION: THE MOTORIZED FLOOR NOZZLE, WAND, AND HANDLE CONTAIN ELECTRICAL CONNECTIONS:
•These are not serviceable parts.
•Do not use to suck up water.
•Do not immerse in water for cleaning.
•The handle/wand should be checked regularly and must not be used if damaged.
1Inspect supply cord and plug for any damage before use. If the supply cord is damaged, it must be replaced by the
manufacturer, its service agent or similarly qualified persons in order to avoid a hazard. DO NOT use vacuum cleaner with a damaged with a damaged cord or plug. Turn off all controls before plugging in or unplugging the vacuum cleaner. Store your vacuum cleaner with the supply cord secured around the two cord hooks.
2DO NOT use outdoors or on wet surfaces. Use only on dry surfaces.
3The plug must be removed from the socket-outlet before cleaning or maintaining the appliance.
4If vacuum cleaner is not working as it should, or has been dropped, damaged, left outdoors, or dropped into water, return it to the manufacturer for examination, repair, or adjustment.
5DO NOT pull or carry vacuum cleaner by the cord or use the cord as a handle.
6DO NOT unplug by pulling on cord. Grasp the plug, not the cord.
7DO NOT handle plug or vacuum cleaner with wet hands.
8DO NOT run the vacuum cleaner over the power cord, close a door on the cord or pull the cord around sharp corners.
9The use of an extension cord is NOT recommended.
10DO NOT leave vacuum cleaner unattended when plugged in.
11Keep cord away from heated surfaces.
12Always turn off this appliance before connecting or disconnecting motorized nozzle.
GENERAL USE
13Hair removal tool has a sharp edge. Take care when using and keep tool away from children.
14Use only as described in this manual.
15Keep your work area well lit.
16Keep the vacuum cleaner moving over the carpet surface at all times to avoid damaging the carpet fibers.
17DO NOT place vacuum cleaner on unstable surfaces such as chairs or tables.
18DO NOT put any objects into openings. DO NOT use with any opening blocked; keep free of dust, lint, hair, and anything that may reduce airflow.
3 AUST: 1800 099 385

SAVE THESE INSTRUCTIONS
PLEASE READ CAREFULLY BEFORE USE
19DO NOT allow the appliance to be used by children. Close supervision is necessary when used near children. This is not a toy.
20DO NOT use without brushroll, Soft Roller, dust cup, and all filters in place.
21DO NOT use if airflow is restricted; if the air paths or the motorized floor nozzle become blocked, turn the vacuum cleaner off and unplug from electrical outlet. Remove
all obstructions before you turn on the unit again.
22Keep nozzle away from hair, face, fingers, uncovered feet, or loose clothing.
23Only use manufacturer’s recommended attachments.
DUST CUP/FILTERS/ACCESSORIES
Before turning on the vacuum:
24 Make sure that all filters are thoroughly dry after routine cleaning.
25 Make sure brushroll, Soft Roller, dust cup, and all filters are in place after routine maintenance.
26 Make sure accessories are free of blockages and keep openings away from face and body.
27Only use Shark®-brand filters and accessories (failure to do so will void the warranty).
GENERAL CLEANING
28 DO NOT vacuum up hard or sharp objects such as glass, nails, screws, or coins that could damage the vacuum cleaner.
29 DO NOT vacuum up drywall dust, fireplace ash, or embers. DO NOT use as an attachment to power tools for dust collection.
30 DO NOT vacuum up smoking or burning objects such as hot coals, cigarette butts, or matches.
31DO NOT vacuum up flammable or combustible materials (e.g., lighter fluid, gasoline, or kerosene) or use vacuum in areas where they may be present.
32DO NOT vacuum up toxic solutions (e.g., chlorine bleach, ammonia, or drain cleaner).
33DO NOT use in an enclosed space where vapors are present from paint, paint thinner, moth-proofing substances,
flammable dust, or other explosive or toxic materials.
34DO NOT vacuum up any liquids.
35DO NOT immerse vacuum cleaner in water or other liquids.
36Use extra care when cleaning on stairs.
NZ: 0800 112 660 4

GETTING TO KNOW YOUR SHARK® POWERED LIFT-AWAY™ DUOCLEAN™
WELCOME!
Congratulations on your purchase. Use this instruction manual to learn about your new vacuum’s great features. From assembly to use to maintenance, you will find it all in here.
MAIN UNIT
A Surface Selector
B Handle Release Button
C Suction Control Slide
D Power Switch
E Hose Clip
F Hose
G Upper Cord Hook
H Lift-Away Button
I Wand Release Button
J Dust-Cup Release Latch
K Lift-Away Pod
L Wand
M Dust-Cup Empty Buttons
N Lower Cord Hook
O Motorized Floor Nozzle
P Brushroll Indicator Light
Q Headlights
R Brushroll Garage
S Soft Roller
5 AUST: 1800 099 385

A B
|
C |
D |
E |
|
|
|
F |
H |
G |
|
|
|
I |
Wand Release
J
K 
 L
L
M 
N |
|
|
O |
P |
|
Q |
|
S |
R |
|
NZ: 0800 112 660 6
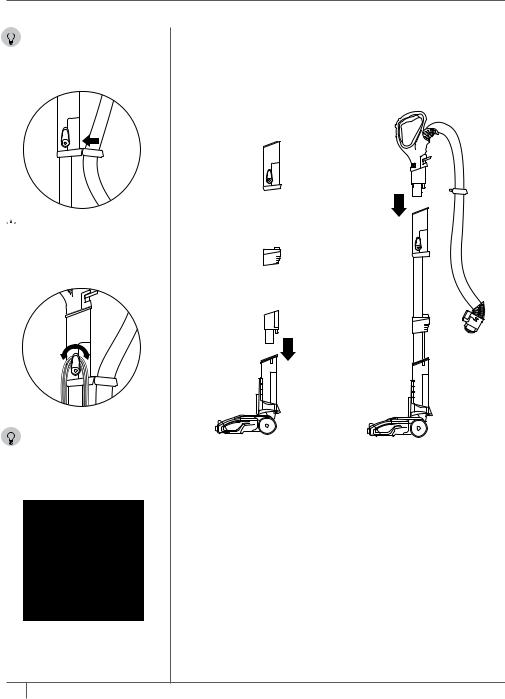
ASSEMBLING YOUR VACUUM


 TIP: Push hose clip into back of wand for convenience.
 TIP: For quick cord access, rotate upper hook down and remove cord.


 TIP: Use cord clip located on the side of wand to hold cord in place while vacuuming.
STEP 1 |
STEP 2 |
||
|
|
|
|
|
|
|
|
|
|
|
|
|
|
|
|
|
|
|
|
|
|
|
|
1 Place motorized floor |
2 Insert handle into wand. |
nozzle on floor and insert |
|
wand. |
|
7 AUST: 1800 099 385
 Loading...