


Shark SGP-3030, SGP-3025, SGP-4035E, SGP-3020, SGP-3530E User Manual
...SGP
OPERATOR’S MANUAL
SGP-3020 |
SGP-3025 |
SGP-3030 |
||
SGP-3530 |
SGP-3530E |
SGP-4035E |
||
|
|
|
|
|
|
|
|
|
|
|
|
|
|
|
|
|
|
|
|
®
For technical assistance or the SHARK dealer nearest you, call 1-360-833-9100, 1-800-771-1881 or visit our website at www.shark-pw.com
97-6132

CONTENTS
Introduction & Important Safety Instructions |
4-5 |
Component Identification |
6 |
Assembly Instructions |
7 |
Operating Instructions |
8-9 |
Detergents and Cleaning Tips |
10 |
Shut-Down and Clean Up |
11 |
Storage |
11 |
Maintenance |
12-14 |
Troubleshooting |
15-17 |
Maintenance & Oil Change Charts |
18 |
Exploded View3020, 3025 |
19 |
Exploded View3030, 3530, 3530E, 4030E |
20-21 |
Exploded View Parts Lists |
22-24 |
Control Panel3020, 3025 & Parts List |
25 |
Control Panel3030, 3530, 3530E, 4030E & Parts List |
26-27 |
Hose & Spray Gun Assembly |
28 |
Downstream Injector Assembly |
29 |
Hose Reel Option |
30 |
Burner Specifications |
31 |
Warranty |
|
Model Number ______________________________________
Serial Number ______________________________________
Date of Purchase ____________________________________
The model and serial numbers will be found on a decal attached to the pressure washer.You should record both serial number and date of purchase and keep in a safe place for future reference.
3
97-6132, 97-6151 • REV. 11/04

OPERATOR’S MANUAL PRESSURE WASHER
4
INTRODUCTION
Thank you for purchasing a Hot Water Pressure Washer.
All information in this manual is based on the latest product information available at the time of printing.
We reserves the right to make changes at any time without incurring any obligation.
This series was designed for maximum use of 4 hours per day, 5 days per week.
Owner/User Responsibility:
The owner and/or user must have an understanding of the manufacturer’s operating instructions and warnings before using this pressure washer.Warning information should be emphasized and understood. If the operator is not fluent in English, the manufacturer’s instructions and warnings shall be read to and discussed with the operator in the operator’s native language by the purchaser/owner, making sure that the operator comprehends its contents.
Owner and/or user must study and maintain for future reference the manufacturers’ instructions.
This manual should be considered a permanent part of the machine and should remain with it if machine is resold.
When ordering parts, please specify model and serial number.
IMPORTANT SAFETY
INSTRUCTIONS
WARNING: When using this machine basic precautions should always be followed, including the following:
 CAUTION
READ OPERATOR’S MANUAL THOROUGHLY PRIOR TO USE.
CAUTION: To reduce the risk of injury, read operating instructions carefully before using.
1. Read the owner's manual thoroughly. Failure to follow instructions could cause malfunction and result in death, serious bodily injury and/or property damage.
2.Know how to stop the machine and bleed pressures quickly. Be thoroughly familiar with the controls.
3.Stay alert - watch what you are doing.
4.All installations must comply with local codes.Contact your electrician, plumber, utility company or the selling distributor for specific details.
 WARNING
RISK OF EXPLOSION: DO NOT SPRAY FLAMMABLE LIQUIDS.
WARNING: Flammable liquids can create fumes which can ignite causing property damage or severe injury.
5.Risk of explosion - do not spray flammable liquids or operate in an explosive location.Operate only where open flame or torch is permitted.
WARNING: Do not place machine near flammable objects when the engine is hot.
 WARNING
KEEP WATER SPRAY
AWAY FROM
ELECTRICAL WIRING.
 WARNING
RISK OF EXPLOSION: USE CAUTION WHEN REFUELING.
WARNING: Keep water spray away from electrical wiring or fatal electric shock may result.
WARNING: Spray gun kicks back. Hold with both hands.
6.Grip cleaning wand securely with both hands before starting the cleaner. Failure to do this could result in injury from a whipping wand.
WARNING: Risk of fire. Do not add fuel when the machine is operating.
7.Allow engine to cool for 2 minutes before refueling. If any fuel is spilled, make sure area is dry before testing spark plug or starting the engine. (Fire and/or explosion may occur if this is not done.)
Gasoline engines on mobile or portable equipment shall be refueled:
a.Outdoors;
b.With the engine on the equipment stopped;
c.With no source of ignition within 10 feet of the dispensing point;
d.With an allowance made for expansion of the fuel should the equipment be exposed to a higher ambient temperature.
In an overfilling situation, additional precautions are necessary to ensure that the situation is handled in a safe manner.
 WARNING
HIGH PRESSURE STREAM CAN PIERCE SKIN AND TISSUES.
WARNING: Risk of injection or severe injury to persons - Keep clear of nozzle - Do not touch or direct discharge stream at persons.This machine is to be used only by trained operators.
CAUTION: Hot discharge fluid. Do not touch or direct discharge stream at persons.
97-6132, 97-6151 • REV. 11/04

8.High pressure developed by these machines can cause personal injury or equipment damage. Use caution when operating. Do not direct discharge stream at people, or severe injury and/ or death may result.
WARNING: High pressure can cause paint chips or other particles to become airborne and fly at high speeds.
9.Eye safety devices and foot protection must be worn when
using this equipment.
10. Never make adjustments on machine while in operation.
WARNING: Use only in well ventilated areas. Failure to observe this warning could cause a loss of consciousness or death.This machine was designed for outdoor use only.Use high pressure extension hose to clean indoors.
Store indoors.
11. Avoid installing in small areas or near exhaust fans.Exhaust containspoisonouscarbonmonoxidegas;exposure
may cause loss of consciousness and may lead to death. It also contains chemicals known, in certain quantities, to cause cancer, birth defects or other reproductive harm.
12.Do not operate with the spray gun in the off position for more than five minutes as this may cause damage to the pump.
13.The best insurance against an accident is precaution and knowledge of the machine.
14.We will not be liable for any changes made to our standard machines, or any components not purchased from us.
15.Read engine safety instructions provided.
16.Never run pump dry or leave spray gun closed longer than 5 minutes.
17.Inlet water must be from a cold, clean fresh city water supply.
WARNING: Only use recommended fuel. Using other fuels mayresultinaseriousexplosion causingpersonalinjury,property
damage or loss of life.
18. Use No. 1 or No. 2 heating oil (ASTM D306) only. NEVER use gasoline in your fuel oil tank. Gasoline is more combustible than fuel oil
and could result in a serious explosion.NEVER use crankcase or waste oil in your burner assembly. Fuel pump malfunction could result from contamination.
19.Do not confuse gasoline and fuel oil tanks. Keep proper fuel in proper tank.
20.Protect machine from freezing.
21.Be certain all quick coupler fittings are secured before using pressure washer.
22.Do not allow acids, caustic or abrasive fluids to pass through the pump.
23.To reduce the risk of injury, close supervision is necessary when a product is used near children.Do not allow children to operate the pressure washer.This machine must be attended during operation.
24.Do not operate this product when fatigued or under the influence of alcohol or drugs. Keep operating area clear of all persons.
25.Protect high pressure hose from vehicle traffic and sharp objects.
26.Before disconnecting high pressure hose from water outlet, turn burner off and pull the trigger on the spray gun allowing water to cool to below 100° F before stopping machine.Then open the spray gun to relieve pressure. Failure to properly cool down or maintain the heating coil may result in a steam explosion and/or heating coil damage.
27.Do not overreach or stand on unstable support. Keep good footing and balance at all times.
28.This machine must be attended during operation.
29.CAUTION: Risk of injury. Disconnect battery ground terminal before servicing.
30.CAUTION: Moving this machine on a slope causes instability and may result in machines tipping over. Use lifting bar provided on the center top of frame.
97-6132, 97-6151 • REV. 11/04
MANUAL OPERATOR’S WASHER PRESSURE
5

OPERATOR’S MANUAL PRESSURE WASHER
6
COMPONENT IDENTIFICATION
|
|
Gasoline |
|
|
|
Tank |
|
|
Detergent |
|
|
|
Injector |
|
|
|
|
Pressure |
|
|
|
Switch |
|
Collar |
Discharge |
Unloader |
|
Nipple |
|||
|
|||
|
Quick |
|
|
|
Coupler |
Water Supply |
|
|
|
||
|
|
Hose |
|
|
|
(not included) |
Pump
|
|
Battery Box |
|
Wand |
|
|
Coupler |
|
Spray Gun |
|
Nozzle |
|
|
Quick |
|
|
Coupler |
Swivel |
|
Brass |
Connector |
|
|
|
Variable Pressure |
Soap |
|
Control wand |
Nozzle |
|
Trigger |
|
High Pressure |
Control Wand |
|
Hose |
|
|
|
Handle |
|
Pump — Develops high pressure.
Starter Grip — (Not Shown) Used for starting the engine manually.
Spray Gun — Controls the application of water and detergent onto cleaning surface with trigger device. Includes safety latch.
Detergent Injector — Allows you to siphon and mix detergents.
Variable Pressure Control Wand — Must be connected to the spray gun. This wand handle controls dishcharge flow from one tube to both wand tubes. When water is discharged from both tubes you will have a pressure loss and allows chemical siphoning when used in combination with a detergent injector.
High Pressure Hose — Connect one end to water pump discharge nipple and the other end to spray gun.
Note: If trigger on spray gun is released for more than 2 minutes, water will leak from valve. Warm water will discharge from pump protector onto floor. This system prevents internal pump damage.
97-6132, 97-6151 • REV. 11/04
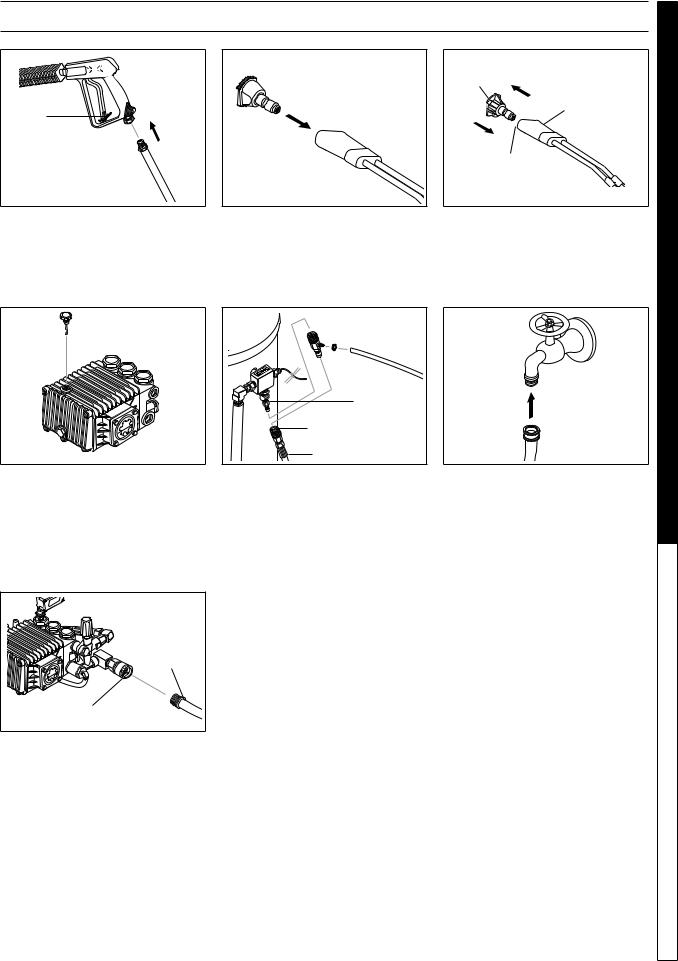
ASSEMBLY INSTRUCTIONS |
PRESSURE |
|||
Spray |
|
Coupler |
||
Gun |
Soap |
Nozzle |
|
|
|
Nozzle |
Wand |
|
|
|
|
|
||
Safety |
Wand |
|
WASHER |
|
Hose |
Coupler |
|
||
Latch |
|
|
||
|
|
Wand |
|
|
High Pressure |
|
Collar |
|
|
|
|
OPERATOR’S |
||
STEP 1: Attach the high pressure |
STEP 2: Pull the spring-loaded |
STEP 3: Release the coupler collar |
||
|
||||
hose to the spray gun using teflon |
collar of the wand coupler back |
and push the nozzle until the collar |
|
|
tape on hose threads. |
to insert your choice of pressure |
clicks.Pull the nozzle to make sure |
|
|
|
nozzle. |
it is seated properly. |
MANUAL |
|
DipStick |
|
Water |
||
|
Cold |
|
||
|
|
Source |
|
|
|
Discharge |
|
|
|
|
Fitting |
|
|
|
|
Coupler Collar |
Garden |
|
|
|
|
|
||
|
High Pressure Hose |
Hose |
|
|
|
|
|
||
STEP 4: Remove shipping cap and |
STEP 5: Connect the high pres- |
STEP 6: Connect garden hose to |
install oil dipstick. Check pump oil |
sure hose to the pump discharge |
the cold water source. |
level by using dipstick or observe |
fitting. Push coupler collar forward |
|
oil level in oil window (if equipped). |
until secure. |
|
Use 30 wt. non detergent oil. |
|
|
Garden |
Hose |
Pump |
Water Inlet |
STEP7: Connect the garden hose to pump water inlet. Inspect inlets.
CAUTION: Do not run the pump without water or pump damage will result.
7
97-6132, 97-6151 • REV. 11/04
WASHER |
|
OPERATING INSTRUCTIONS |
||
|
|
|
||
PRESSURE |
|
Oil Dipstick |
Gas |
|
|
|
Tank |
||
|
|
|
||
MANUAL |
STEP 1: Check engine oil level. Oil level should be level with the bottom |
STEP 2: Fill gas tank with unleaded |
||
OPERATOR’S |
||||
of the oil filler neck. Be sure the machine is level when checking the oil |
gasoline. Do not use leaded gas- |
|||
level. (Refer to the engine's operating manual included with machine.) |
oline. Caution: Read warnings |
|||
We recommend that the oil be changed after the first 5 hours of use, then |
on pg. 4 and engine manual. |
|||
once every 50 hours. Note: Improper oil levels will cause low oil sensor |
|
|||
to shut off engine. |
IMPORTANT! Do not run engine with high or low |
|
||
|
|
|||
|
oil levels as this will cause engine damage. |
|
||
Cold
Water
Source
Garden
Hose
STEP 3: Connect garden hose to the |
STEP 4: Trigger the spray gun to |
cold water source and turn water on |
eliminate trapped air then wait for a |
completely. Never use hot water. |
steady flow of water to emerge from |
|
the spray nozzle. |
 Choke
Choke


 Lever
Lever
Fuel |
|
Valve |
|
STEP 5: Rotate the fuel shut-off valve to the "On" po- |
STEP 6: Pull the choke lever out to the "Choke" po- |
sition. Slide the fuel valve lever to the "ON" position. |
sition (on a warm engine, leave the choke lever in, in |
When the engine is not in use, leave the fuel valve in |
the run position). Push the choke lever to the "Closed" |
the "OFF" position. |
position. To restart a warm engine, leave the choke |
|
lever in the "Open" position. |
8 |
|
97-6132, 97-6151 • REV. 11/04 |
|
OPERATING INSTRUCTIONS
Throttle |
STEP 7: Turn the engine to "Run" position. |
STEP 8: Pull the starter grip. If the engine fails to start |
|
after 2 pulls, squeeze the trigger gun to release pres- |
|
sure and repeat step. Return starter gently. After the |
|
engine warms up enough to run smoothly, move choke |
|
to run position and throttle to fast position. |
|
CAUTION: Small engines may kick back. Do not |
|
hold pull starter grip tightly in hand. |
Temperature |
Gauge |
Burner
Switch
STEP 8: If hot water is required. Adjust temperature gauge to proper temperature (200°).Turn on Burner switch to begin heating water.
Safety |
Latch |
 WARNING! Never replace nozzles without engaging the safety latch on the spray gun trigger.
Brass Soap |
|
|
Nozzle |
Variable Pressure |
|
|
||
|
Wand (VP) |
|
High |
|
|
Pressure |
|
|
Nozzle |
|
|
Variable Pressure |
Trigger |
|
Control Handle |
||
|
NOZZLES |
The four color-coded quick connect nozzles provide a wide array of spray widths from 0° to 45° and are easily accessible when placed in the convenient rubber nozzle holder, which is provided on the front of the machine.
NOTE: For a more gentle rinse, select the white 40° or green 25° nozzle. To scour the surface, select the yellow 15° or red 0° nozzle. To apply detergent select the black nozzle.
Selection of high or low pressure is accompanied by turning the handle. Note: High pressure nozzle must be inserted at end of wand to obtain high pressure.To apply soap read operator's manual.
97-6132, 97-6151 • REV. 11/04
MANUAL OPERATOR’S WASHER PRESSURE
9
WASHER |
APPLYING DETERGENT |
THERMAL PUMP PROTECTION |
|||
AND GENERAL OPERATING |
If you run the engine on your pressure washer for 3-5 |
||||
|
|||||
|
TECHNIQUES |
minutes without pressing the trigger on the spray gun, |
|||
|
circulating water in the pump can reach high tempera- |
||||
|
|
|
|
||
PRESSURE |
WARNING |
WARNING: Some detergents |
tures. When the water reaches this temperature, the |
||
STEP |
1: Connect detergent |
Pre-rinse cleaning surface with fresh water. Place de- |
|||
|
may be harmful if inhaled or in- |
pump protector engages and cools the pump by dis- |
|||
|
|
gested, causing severe nausea, |
charging the warm water onto the ground.This thermal |
||
|
|
fainting or poisoning.The harm- |
device prevents internal damage to the pump. |
||
|
|
ful elements may cause property |
CLEANING TIPS |
||
|
|
damage or severe injury. |
|||
|
|
|
|||
|
|
injector to discharge nipple on |
tergent suction tube directly into cleaning solution and |
||
MANUAL |
|
machine, Connect high pressure |
apply to surface at low pressure (for best results, limit |
||
hose to injector with quick coupler (check to make sure |
your work area to sections approximately 6 feet square |
||||
locking coupler sleeves are in proper position before |
and always apply detergent from bottom to top). Allow |
||||
applying water pressure. |
|
detergent to remain on surface 1-3 minutes. Do not al- |
|||
OPERATOR’S |
Detergent |
Pressure |
low detergent to dry on surface. If surface appears to |
||
motion keeping the spray nozzle approximately 1 foot |
|||||
|
Disharge Nipple |
|
be drying, simply wet down surface with fresh water. If |
||
|
|
|
|
needed, use brush to remove stubborn dirt. Rinse at |
|
|
Detergent Injector |
High |
high pressure from top to bottom in an even sweeping |
||
|
|
|
|
||
|
Suction |
|
Hose |
from cleaning surface. Use overlapping strokes as you |
|
|
Hose |
|
|
clean and rinse any surface. For best surface cleaning |
|
|
|
|
|
action spray at a slight angle. |
|
|
|
|
|
Recommendations: |
|
|
|
|
|
• Before cleaning any surface, an inconspicuous |
|
|
|
|
|
area should be cleaned to test spray pattern and |
|
|
|
|
|
distance for maximum cleaning results. |
|
|
|
STEP 2: Use detergent designed |
• If painted surfaces are peeling or chipping, use |
||
|
|
extreme caution as pressure washer may remove |
|||
|
|
specifically for pressure washers. |
|||
|
|
the loose paint from the surface. |
|||
|
|
Household detergents could dam- |
|||
|
|
• Keep the spray nozzle a safe distance from the |
|||
|
|
age the pump. Prepare detergent |
|||
|
|
surface you plan to clean. High pressure wash a |
|||
|
|
solution as required by the manu- |
|||
|
|
small area, then check the surface for damage.If |
|||
|
|
facturer. Fill a container with pres- |
|||
|
|
no damage is found, continue to pressure wash- |
|||
|
|
sure washer detergent. Place the |
|||
|
|
ing. |
|||
|
|
filter end of detergent suction hose |
|||
|
|
CAUTION - Never use: |
|||
|
into the detergent container. |
||||
|
• Bleach, chlorine products and other corrosive |
||||
|
STEP 3: Apply safety latch to spray gun trigger. Turn |
||||
|
chemicals |
||||
|
variable pressure control handle until discharge water |
• Liquids containing solvents (i.e., paint thinners, |
|||
|
exits both tubes. Secure black detergent nozzle into |
||||
|
gasoline, oils) |
||||
|
quick coupler if you have a single wand. NOTE: De- |
• Tri-sodium phosphate products |
|||
|
tergent cannot be applied using Red, Yellow, Green or |
||||
|
• Ammonia products |
||||
|
White nozzles. |
|
|
||
|
|
|
• Acid-based products |
||
|
|
STEP 3: With the engine running, |
|||
|
|
These chemicals will harm the machine and will dam- |
|||
|
|
pull trigger to operate machine. |
|||
|
|
Liquid detergent is drawn into the |
age the surface being cleaned. |
||
|
|
machine and mixed with water. |
RINSING |
||
|
|
|
|||
|
|
Apply detergent to work area. |
It will take a few seconds for the detergent to clear. |
||
|
|
Do not allow detergent to dry on |
|||
|
|
surface. |
Apply safety latch to spray gun. Remove black soap |
||
|
IMPORTANT:You must flush the detergent injection |
nozzle from the quick coupler. Select and install the |
|||
|
system after each use by placing the suction tube |
desired high pressure nozzle.NOTE: You can also stop |
|||
|
into a bucket of clean water, then run the pressure |
detergent from flowing by simply removing detergent |
|||
|
washer in low pressure for 1-2 minutes. |
siphon tube from bottle. |
|||
|
|
||||
10 |
|
|
|
|
|
|
|
|
97-6132, 97-6151 • REV. 11/04 |
||
SHUTTING DOWN AND CLEAN-UP
STEP 1: Remove detergent suction |
STEP 2: Turn off the engine. |
STEP 3: Turn off water |
tube from container and insert into |
|
supply. |
1 gallon of fresh water.Turn variable |
|
|
pressure wand handle for low pres- |
|
|
sure or connect the black detergent |
|
|
nozzle.Pull trigger on spray gun and |
|
|
siphon water for one minute. |
|
|
STEP 4: Press trigger to release water pressure.
Water Inlet |
STEP 5: Disconnect the garden hose from the water inlet on the machine.
High Pressure
Outlet
STEP 6: Disconnect the high pressure hose from high pressure outlet.
Safety |
Latch |
STEP 7: Engage the spray gun safety lock.
STORAGE
CAUTION: Always store your pressure washer in a location where the temperature will not fall below 32°F (0°C).The pump in this machine is susceptible to permanent damage if frozen. FREEZE DAMAGE IS NOT COVERED BY WARRANTY.
1.Stop the pressure washer, squeeze spray gun trigger to release pressure.
2.Detach water supply hose and high pressure hose.
3.Turn on the machine for a few seconds, until remaining water exits.Turn engine off immediately.
4.Drain the gas and oil from the engine.
5.Do not allow high pressure hose to become kinked.
6.Store the machine and accessories in a room which does not reach freezing temperatures.
CAUTION:Failure to follow the above directions will result in damage to your pressure washer.
times and replace the plug. Then pull the starter grip slowly until you feel increased pressure which indicates the piston is on its compression stroke and leave it in that position.This closes both the intake and exhaust valves to prevent rusting of cylinder.
4.Cover the pressure washer and store in a clean, dry place that is well ventilated away from open flame or sparks. NOTE: The use of a fuel additive, such as STA-BIL®, or an equivalent, will minimize the formulation of fuel deposits during shortage.Such additives may be added to the gasoline in the fuel tank of the engine, or to the gasolinee in a storage container.
After Extended Storage
CAUTION: Prior to restarting, thaw out any possible ice from pressure washer hoses, spray gun or wand.
When the pressure washer is not being operated or is |
Engine Maintenance |
|
being stored for more than one month, follow these |
During the winter months, rare atmosheric conditions |
|
instructions: |
may develop which will cause an icing condition in the |
|
|
|
|
1. |
Replenish engine oil to upper level. |
carburetor. If this develops, the engine may run rough, |
2. |
Drain gasoline from fuel tank, fuel line, fuel valve |
lose power and may stall. This temporary condition can |
|
and carburetor. |
be overcome by deflecting some of the hot air from the |
3. |
Pour about one teaspoon of engine oil through |
engine over the carburetor area. NOTE: Refer to the |
|
the spark plug hole, pull the starter grip several |
engine manufacturer's manual for service and mainte- |
|
|
nance of the engine. |
97-6132, 97-6151 • REV. 11/04
MANUAL OPERATOR’S WASHER PRESSURE
11
 Loading...