


OWNER’S GUIDE
SC630W
U.S.: |
EURO-PRO Operating LLC |
|
Boston, MA 02465 |
Canada: EURO-PRO Operating LLC
4400 Bois Franc
Ville St. Laurent, Québec H4S 1A7
1-800-798-7398
www.sharkclean.com
COPYRIGHT© EURO-PRO OPERATING LLC 2009
PRINTED IN CHINA |
REV. 090727 |
Illustrations may differ with actual product.

IMPORTANT SAFETY INSTRUCTIONS SAVE THESE INSTRUCTIONS
For Household Use Only
WHEN USING YOUR SHARK® PORTABLE STEAM POCKET, BASIC SAFETY PRECAUTIONS SHOULD ALWAYS BE FOLLOWED, INCLUDING THE FOLLOWING:
READ ALL INSTRUCTIONS BEFORE USING YOUR PORTABLE STEAM POCKET.
DANGER OF SCALDING
Please use caution when using the steam bottle directly or with the hose and tool attachments and cleaning pockets. The steam emitted is very hot.
POLARIZED PLUG:
This appliance has a polarized plug (one blade is wider than the other). As a safety feature, this plug will fit into a polarized outlet only one way. If the plug does not fit fully into the outlet, reverse the plug. If it still does not fit, contact a qualified electrician. Do not attempt to defeat this safety feature.
1.USE THE SYSTEM ONLY FOR ITS INTENDED USE AS DESCRIBED IN THIS MANUAL.
2.ONLY USE WATER. To extend the life of your Portable Steam Pocket, we recommend using distilled water. If you live in an area with hard tap water, we recommend using distilled water.
3.DO NOT add cleaning solutions, scented perfumes, oils, or any other chemicals to the water used in this appliance as this may damage the unit or make it unsafe for use. Use of any substances other than manufacturer’s recommended accessories will automatically void your warranty.
4.DO NOT use outdoors.
5.DO NOT leave the appliance unattended when plugged in.
6.Always unplug the power cord from the electrical outlet when not in use, when filling the water tank and before servicing.
7.DO NOT allow to be used by children. Close attention is necessary when used by or near children, pets or plants.
8.DO NOT put any objects into openings or operate with any opening blocked
9.DO NOT use on leather, wax polished furniture or floors, painted surfaces, synthetic fabrics, velvet, or other delicate, steam sensitive materials.
10.Carefully remove the steam cleaning pocket immediately after you have unplugged and allowed the portable steam pocket to cool.
11.Always unplug and allow the portable steam pocket to cool before removing cleaning fabric or changing cleaning tools and hose.
TOLL FREE: 1-800-798-7398
12.NEVER store the appliance with a damp/wet cleaning pocket
attached. If left in a single spot for a period of time with a damp/wet pocket attached, the moisture may cause surface damage.
13.When cleaning the portable steam pocket, unplug the power cord and clean with a dry or damp cloth.
Do not pour water or use alcohol, benzene or paint thinner on the unit.
14.NEVER use the cleaning pocket wedge or cylinder tools without the cleaning pocket fabric attached.
15.To protect against a risk of fire, electric shock, or injury:
a.To avoid circuit overload, DO NOT operate another appliance on the same socket (circuit)
as the portable steam pocket cleaning system.
b.DO NOT immerse any part of the system in water or other liquids.
c.DO NOT pull power cord to disconnect from outlet;
instead, grasp plug and pull to disconnect.
d.DO NOT use extension cords or outlets with inadequate current carrying capacity.
e.DO NOT operate the system with a damaged cord or plug, or if the appliance or any other part of the system has been dropped or damaged.
f.DO NOT disassemble or attempt to repair the Steam Bottle. Return the system to
EURO-PRO Operating LLC for examination and repair. Incorrect reassembly or repair can cause a risk of electrical
shock or injury to persons when the Steam Bottle is used.
g.DO NOT handle plug or portable steam pocket with wet hands or operate without shoes.
h.DO NOT pull or carry by power cord, power cord as a handle, close a door on the power cord, or pull the power cord around sharp corners or edges.
i.DO NOT allow power cord to touch hot surfaces.
j.ALWAYS disconnect system from electrical outlet when filling with water or emptying and when not in use.
k.NEVER attempt to fill this unit under a water faucet. Always use the filling flask that is provided.
l.NEVER turn the appliance over or on its side when in use.
m.NEVER aim or direct steam towards people, animals, or plants. The steam is very hot and can cause burns. Burns can occur from touching hot metal parts, hot water, steam or steam pockets.
n.DO NOT operate the steam cleaner while under the influence of drugs, alcohol or medications.
o.DO NOT operate in the presence of explosive and/or flammable fumes.
p.Store your appliance indoors in a cool, dry area.
q.Keep your work area well lit.
r.Let the system cool completely before putting away. Wrap cord loosely around system when storing, using the cord clip to secure.
s.Keep out of the reach of children.
www.sharkclean.com
Quick Start
Your portable steam pocket is designed to clean surfaces that will withstand high heat and moisture. Do not use on unsealed wood surfaces (especially wooden antique furniture), unglazed ceramic tile, painted surfaces or surfaces that have been treated with wax, oils, varnishes, or shellac. The sheen may be removed by the heat, steam, and friction of the cleaning tools. Lacquer and polyurethane coatings provide a hard durable protective finish that withstands moisture but it is always recommended
to test an isolated area of the surface to be cleaned before proceeding. We also recommend you check the use and care instructions from the surface manufacturer.
When cleaning finished wood surfaces, use broad, continuous cleaning strokes. To prevent surface damage, avoid focusing steam or alowing the cleaning tools to sit in one spot for any amount of time.
When assembling your portable steam pocket, there may be a little water in the water tank. This is because we test all our portable steam pocket cleaning systems 100% before you buy them, so you get a quality Shark Steam product.
2
ASSEMBLY
1Safely remove contents of the Portable Steam Pocket Cleaning System and lay them out on a flat surface to see that you have all the components to complete the assembly (Refer to page 2).
FILL
2Turn the water tank cap counterclockwise and remove to fill, using the filling flask provided. Be careful not to overfill. Replace the cap by turning clockwise. The water tank does not have to be completely full for the steam bottle to generate steam. Steam will stop when the water tank is empty. You can refill at any time.
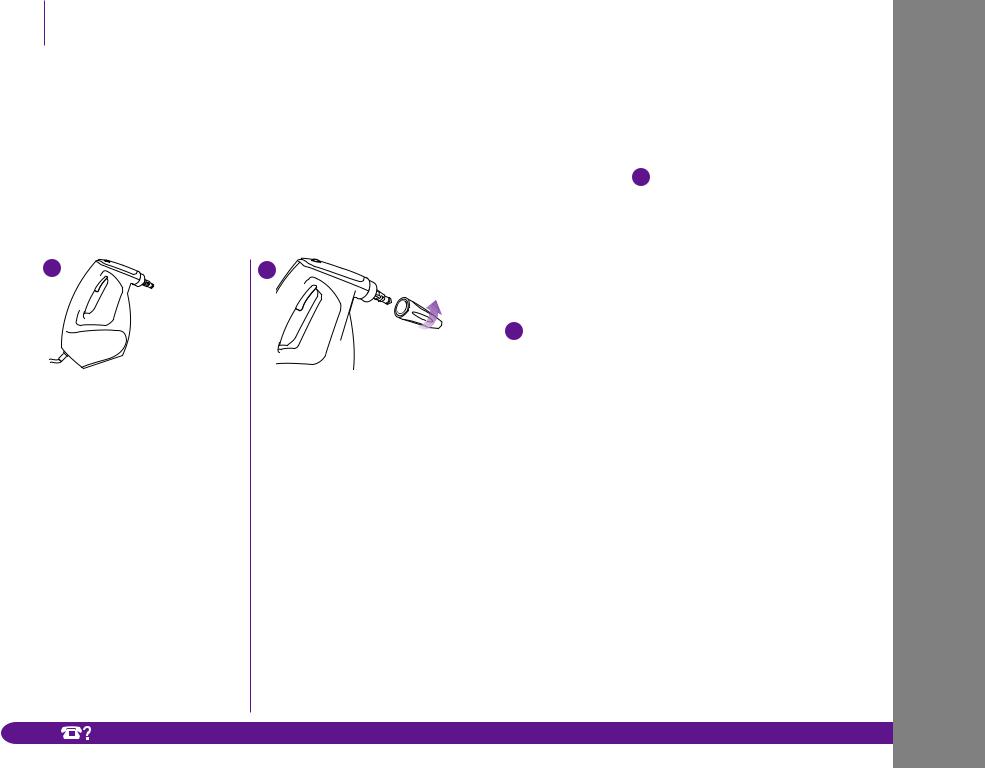
DIRECT SPRAY STEAM BOTTLE USE
3Attach the steam bottle nozzle. Aligning the arrow located on the steam bottle nozzle with the un-lock symbol located on the
nozzle connector. Press in and turn clockwise to secure into place. The arrow on the nozzle will align with the lock symbol.
3
HOSE & CLEANING TOOL
ATTACHMENT USE
4Attach the hose connector. Aligning the arrow located on the hose connector with the un-lock symbol located on the nozzle connector. Press in and turn clockwise to secure into place. The arrow on the hose connector will align with the lock symbol.
5Select the desired cleaning tool for use. Follow the cleaning tool sub assembly Instructions for the selected tool.
6Attach the cleaning tool by inserting the hose stem into the handle of the cleaning tool. Press in and turn clockwise at the same time to
secure and press in and turn counter clockwise to release. Check for proper connection by turning the handle counter-clockwise a few turns. The handle should remain connected.
TOLL FREE: 1-800-798-7398
(Note for reference: This connection method is the same design used with most over the counter prescription bottles). The design of this connection is to prevent the hose from twisting and kinking during use.
4
6
WEDGE CLEANING TOOL ASSEMBLY
7Slide the wedge shaped cleaning pocket over the wedge cleaning tool frame until it is completely on.
8Close the cinch by pulling on the elastic band and sliding the locking bean to tighten.
CYLINDER CLEANING TOOL
ASSEMBLY
9Squeeze “chopsticks” together and slide the cylinder shaped cleaning pocket over the cylinder cleaning tool frame until it is completely on.
10Close the cinch by pulling on the elastic band and sliding the locking bean to tighten.
7
8
9
11
DETAIL CLEANING TOOL
ASSEMBLY
11Press fit the scrubbing detail brush onto the detail cleaning tool handle.
12
13
GARMENT STEAMER
ASSEMBLY
12Press fit the garment steamer onto the bottle nozzle.
13Stretch the garment steamer bonnet over the garment steamer diffuser. Attach
the garment brush onto the garment steamer diffuser by aligning the bottom of the diffuser with the back of the garment brush attachment. Gently push the top of the garment brush up into place until the attachment snaps into place.
www.sharkclean.com
Start Quick

Contents
Thank you for |
GETTING STARTED................................................................. |
2 |
purchasing |
USING YOUR PORTABLE STEAM POCKET.................... |
4 |
the Shark® |
CARE OF YOUR PORTABLE STEAM POCKET.............. |
9 |
Portable |
SUGGESTED USES................................................................. |
10 |
Steam Pocket |
TROUBLESHOOTING GUIDE.............................................. |
12 |
Cleaning |
REPLACEMENT PARTS........................................................ |
16 |
System. |
WARRANTY AND REGISTRATION................................... |
17 |
TECHNICAL SPECIFICATIONS
Voltage: 120V., 60Hz.
Power: 1550 Watts
Water Capacity: 450 ml (15 fl. oz.)
TOLL FREE: 1-800-798-7398
 Loading...