


OWNER’S GUIDE
SV1100
www.sharkclean.com
SV1100_ENG_110503_2.indd 1 |
11-05-06 3:46 PM |

WARNINGS
IMPORTANT SAFETY INSTRUCTIONS
For Household Use Only
WHEN USING YOUR SHARK® CORDLESS VACUUM, BASIC SAFETY PRECAUTIONS SHOULD ALWAYS BE FOLLOWED, INCLUDING THE FOLLOWING:
READ ALL INSTRUCTIONS BEFORE USING YOUR SHARK® CORDLESS VACUUM.
GENERAL ELECTRICAL SAFETY:
WARNING: TO REDUCE THE RISK OF ELECTRIC SHOCK OR INJURY DO NOT USE OUTDOORS OR ON WET SURFACES.
1DO NOT use or charge the unit outdoors.
2DO NOT use or charge the unit on wet surfaces.
3DO NOT immerse vacuum cleaner, charging base or charging adapter in water or other liquids.
4DO NOT handle vacuum, charging base or charging adapter with wet hands.
5DO NOT use charging adapter if power cord has been damaged.
6DO NOT abuse the charging adapter cord.
NEVER carry the charging adapter or charging base by the cord.
7DO NOT unplug the charging adapter by pulling on cord; to unplug, grasp the plug, not the cord.
8DO NOT use charging adapter with an extension cord. Plug adapter directly and only in a standard (120V., 60Hz) electrical outlet.
9DO NOT run the vacuum over the charging adapter cord.
10Keep charging adapter cord away from heated surfaces.
11DO NOT attempt to use this charging adapter with any other product nor attempt to charge this product with another charging adapter.
12Only use charging adapter provided with the vacuum. It is marked “For SV1100 models only”.
13Always turn the vacuum off before connecting or disconnecting the motorized floor brush.
GENERAL USE:
14Use only on dry, indoor surfaces.
15Store the cordless vacuum indoors. Put the cordless vacuum away after use to prevent accidents.
16Use only as described in this manual. DO NOT use for any purpose other than described in this user’s guide.
17Use only cleaning attachments supplied with this unit.
18Keep your work area well lit.
19Keep the vacuum moving over the carpet surface at all times to avoid damaging the carpet fibers.
20DO NOT put any objects into openings.
21DO NOT use with any opening blocked; keep free of dust, lint, hair and anything that may reduce airflow.
22DO NOT use the vacuum cleaner without dust cup and filter in place.
23DO NOT vacuum up any liquids.
24DO NOT pick up anything that is burning or smoking such as cigarettes, matches or hot ashes.
25DO NOT use to pick up flammable or combustible liquids such as gasoline or use vacuum in areas where their fumes may be present.
26DO NOT pick up toxic solutions such as chlorine bleach, ammonia or drain cleaner.
27DO NOT use in an enclosed space where vapors are present from paint, paint thinner, moth-proofing substances, flammable dust or other explosive or toxic materials.
28DO NOT run the vacuum over large-sized objects.
29DO NOT pick up hard or sharp objects such as glass, nails, screws or coins that could damage the vacuum cleaner.
30DO NOT place vacuum on unstable surfaces such as chairs or tables.
31Use extra care when cleaning on stairs.
32DO NOT allow the vacuum to be used as a toy.
33Close attention is necessary when used by or near children.
2 |
TOLL FREE: 1-800-798-7398 |
SV1100_ENG_110503_2.indd 2 |
11-05-06 3:46 PM |
CONTENTS
34DO NOT use cordless vacuum cleaner, charging base or charging adapter if it has been dropped, damaged, left outdoors or submerged in water. Return to EURO-PRO Operating LLC for examination, repair or adjustment.
35Keep hair, face, loose clothing, fingers and all body parts away from openings and moving parts.
36This product includes rechargeable nickel metal hydride batteries. Batteries must be recycled or disposed of properly. Do not incinerate batteries or expose to high temperatures as they may explode.
37Leaks from battery cells can occur under extreme conditions. If the liquid gets on the skin, wash immediately with soap and water. If the liquid gets into the eyes, flush them immediately with clean water for a minimum of 10 minutes and seek medical attention.
38The battery must be removed from the appliance before the appliance is discarded.
39Batteries are to be recycled or disposed of safely.
DUST CUP/FILTER:
40Before turning on the vacuum:
•Make sure that the dust cup and filter are securely in place after routine maintenance.
•Make sure that all components and filters are thoroughly dry after routine cleaning.
•Only use filters and accessories provided by EUROPRO Operating LLC. [Failure to do so will void the warranty.]
SAVE THESE
INSTRUCTIONS
Assembly |
4 |
Using your Cordless Vacuum |
5 |
Maximizing the Life of your Battery |
5 |
Care and Maintenance |
6 |
Troubleshooting Guide |
9 |
Replacement Parts |
9 |
Warranty and Registration |
11 |
Thank you
for purchasing the Shark® Cordless Vac
www.sharkclean.com 3
SV1100_ENG_110503_2.indd 3 |
11-05-06 3:46 PM |
ASSEMBLY
C 
 B
B
A
E
F
|
D |
G |
J |
|
H |
|
I |
|
K |
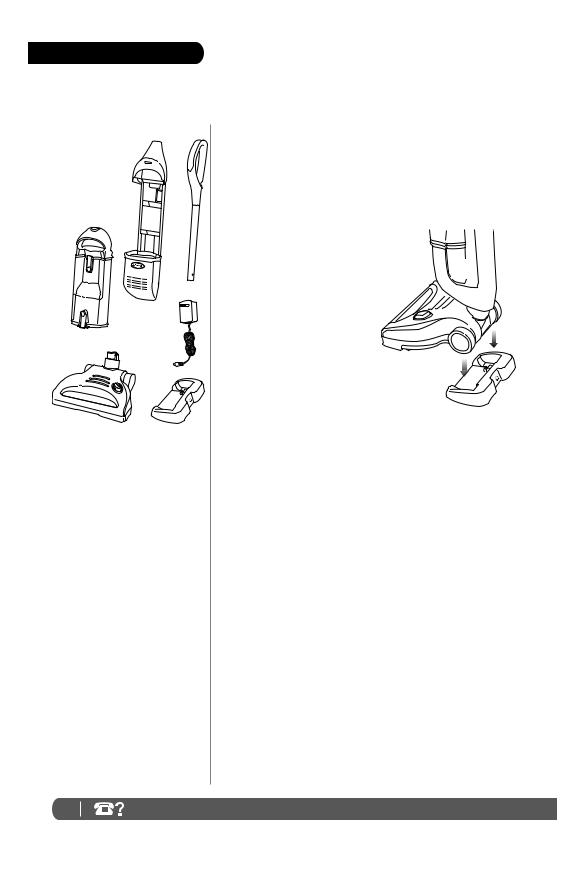
VACUUM COMPONENTS
AMain Body
BHandle
CScrew
DDust Cup
EDust Cup Release
FUpper Dust Cup Door Release
GLower Dust Cup Door Release
HMotorized Brush
IPower Button
JCharging Adapter
KCharging Base
TECHNICAL SPECIFICATIONS:
Volts: 14.4
b |
fig. 2 |
|
c
d
|
a |
Charging |
|
|
|
|
|
|
|
Charge |
fig. 3 |
|
|
Complete |
|
fig. 1 |
|
fig. 4 |
|
ASSEMBLY
1Insert the vacuum body into the motorized brush. (fig. 1a)
2Insert the handle pole into the top of the main body. (fig. 1b)
3Use a screwdriver to secure the handle assembly in place with the bolt (included). (fig. 1c)
4Ensure that the dust cup is securely in place. (fig. 1d)
CHARGING
1The charge adapter plug will fit into the charging base only one way. Insert the charging adapter plug by aligning the arrow on the plug with the arrow next to the charging jack on the back of the charging base. (fig. 2)
2Place the vacuum on the charging base to charge. Charge the unit for 6 hours before using the vacuum for the first time. (fig. 3)
3This unit is equipped with a precision charger that monitors the batteries to ensure a full charge for every use and to extend the life of the batteries. Depending on usage, the time for a full charge is 3 to 6 hours.
4One half of the blue LED light around the power button will illuminate while the unit is charging. When the charge is complete, the complete oval will be illuminated. (fig. 4)


 If the charging light does not illuminate, ensure that the charging adapter is plugged in properly to the wall outlet
and to the back of the charging base. Also ensure that the
unit is properly seated in the charging base.
4 |
TOLL FREE: 1-800-798-7398 |
SV1100_ENG_110503_2.indd 4 |
11-05-06 3:46 PM |
 Loading...