


 IMPORTANT
Cordless Sweeper Barredora Electrónica
Model/Modelo: V1900W
7.2 Volt d.c – 7,2 Voltios c.c
To Maximize the life of your NiCd batteries:
1.Charge for a minimum of 20 hours before initial use.
Failure to do so will reduce the product’s battery life significantly.
2.Do not store unit with the charging adapter attached and plugged in.
3.Only recharge when the batteries are fully discharged (or as close to fully discharged as possible).
4.Do not store in areas of high temperature or humidity.
5.After 3 months of non-use, the product should be fully discharged and then recharged to maximize battery power.
6.Use only the charger supplied with the product. If other chargers are used, the batteries can fail causing damage to the battery, product, or personal property.
NiCd batteries have a long useful life but at some time they will need to be replaced. To purchase replacement batteries, visit www.sharkvac.com
Note: 1. The On/Off switch must be in the “Off” position in order to charge the unit. If the charging indicator does not light, depress the On/Off switch once.
2.If the product has never been used or has been stored for an extended period of time without use – it will take several complete charge and discharge cycles to realize the full operational time of your product.
Copyright © EURO-PRO OPERATING LLC 2007

Modelo
V1900W
GARANTÍA LIMITADA DE UN (1) AÑO
EURO-PRO Operating LLC garantiza este producto contra defectos de materiales y mano de obra por el término de un (1) año a partir de la fecha de compra original, siempre que sea utilizado para uso doméstico normal, sujeto a las siguientes condiciones, exclusiones y excepciones.
Si su artefacto no funciona correctamente al utilizarlo bajo condiciones domésticas normales dentro del período de garantía, devuelva el artefacto completo y los accesorios, pagando el envío, a:
En los EE.UU.:EURO-PRO Operating LLC, 94 Main Mill Street, Door 16, Plattsburgh, N.Y. 12901 En Canadá: EURO-PRO Operating LLC, 4400 Bois Franc, St Laurent Qc H4S 1A7
Si el artefacto presenta un defecto de materiales o mano de obra, EURO-PRO Operating LLC lo reparará o remplazará sin cargo. El envío debe incluir un comprobante de la fecha de compra y $ 7,95 para cubrir los gastos de envío. *
Los insumos tales como, sin limitación, filtros y cepillos los que normalmente necesitan ser reemplazados son explícitamente excluidos de la garantía.
La responsabilidad de EURO-PRO Operating LLC se limita únicamente al costo de reparación o reemplazo de la unidad, a nuestro criterio. Esta garantía no cubre el desgaste normal de las partes y no cubre ninguna unidad que haya sido alterada o utilizada con fines comerciales. Esta garantía limitada no cubre daños ocasionados por uso inadecuado, abuso, negligencia o daños causados por embalaje inapropiado o maltrato durante el transporte. Esta garantía no cubre daños o defectos causados o resultantes durante el transporte para su reparación o alteraciones del producto o cualquiera de sus partes, realizadas por una persona no autorizada por EURO-PRO Operating LLC.
Esta garantía es válida para el comprador original del producto y excluye cualquier otra garantía legal y/o convencional. La responsabilidad de EURO-PRO Operating LLC, de existir, se limita a las obligaciones específicas asumidas expresamente bajo los términos de esta garantía limitada. Bajo ninguna circunstancia EURO-PRO Operating LLC será responsable por daños incidentales o indirectos de ninguna clase. Algunos estados/provincias no permiten la exclusión o limitación de daños consiguientes o incidentales, por lo tanto lo anterior puede no ser válido para usted.
Esta garantía le otorga derechos legales específicos, y usted puede también tener otros derechos los que varían de estado a estado o de provincia a provincia.
*Importante: Embale el producto cuidadosamente para evitar daños durante el transporte. Asegúrese de incluir un comprobante de la fecha de compra y de colocarle una etiqueta al producto con su nombre, dirección completa y número de teléfono, una nota proporcionando información de la compra, número de modelo y una descripción del problema. Le recomendamos asegurar el paquete (puesto que la garantía no cubre daños de envío). Escriba en el exterior del paquete “ATTENTION CUSTOMER SERVICE”. Nosotros nos esforzamos constantemente en mejorar nuestros productos, por lo tanto las especificaciones aquí indicadas pueden cambiar sin previo aviso.
yyyyyyyyyyyyyyyyyyyyyyyyyyyyyyyyyyyyyyyyyyyyyyyyyyyyyyyyyyyyyyyyy
Para Consumidores Canadienses Solamente
TARJETA DE REGISTRO DEL CLIENTE
Complete y envíe la tarjeta de registro del producto dentro de los diez (10) días posteriores a la compra. El registro nos permitirá contactarnos con usted en caso de existir alguna notificación de seguridad con respecto al producto. Retornando esta tarjeta usted reconoce haber leído y entendido las instrucciones de uso y advertencias incluidas en estas instrucciones.
ENVIAR A: EURO-PRO Operating LLC, 4400 Bois Franc, St Laurent Qc H4S 1A7
V1900W
_______________________________________________________________________________
Modelo del Artefacto
_______________________________________________________________________________
Fecha de compra Nombre del Negocio
_______________________________________________________________________________
Nombre del Dueño
_______________________________________________________________________________
Dirección |
Ciudad |
Provincia |
Código Postal |
Impreso en China |
|
24 |
|
|
|
|
IMPORTANT SAFEGUARDS
When using an electrical appliance, basic safety precautions should always be observed, including the following
READ ALL INSTRUCTIONS BEFORE USING YOUR CORDLESS SWEEPER.
WARNING: To reduce the risk of fire, electrical shock, or injury:
1.Do not charge this unit outdoors.
2.Do not use outdoors or on wet surfaces.
3.Do not allow to be used as a toy. Close attention is necessary when used by or near children.
4.Use only as described in this manual. Use only manufacturer’s recommended attachments.
5.Do not use with damaged cord or plug. Do not use cordless sweeper if it has been dropped, damaged, left outdoors, or dropped in water. Return it to EUROPRO Operating LLC for examination, repair or adjustment.
6.Do not abuse the charger cord. Never carry the charger or base by the cord or yank to disconnect from an outlet; instead grasp the charger and pull to disconnect.
7.Keep charger cord away from heated surfaces.
8.This product includes rechargeable nickel cadmium batteries. Batteries must be recycled or disposed of properly. Do not incinerate batteries or expose to high temperatures, as they may explode.
9.Do not handle plug or appliance with wet hands.
10.Do not put any object into openings. Do not use with any opening blocked; keep free of dust, lint, hair and anything that may reduce air flow.
11.Keep hair, loose clothing, fingers, and all parts of body away from openings and moving parts.
12.Do not pick up anything that is burning or smoking, such as cigarettes, matches, or hot ashes.
13.Do not attempt to change accessories while unit is running.
14.Use extra care when cleaning on stairs.
15.Do not use to pick up flammable or combustible liquids such as gasoline or use in areas where they may be present.
16.Read and follow all label, operational and marking instructions.
17.Do not use charger with an extension cord. Plug charger directly into an electrical outlet. Use charger only in a standard (120V ~ 60Hz) electrical outlet.
18.Do not use the cordless sweeper without dust container in place.
19.Store the cordless sweeper indoors. Store after use to prevent accidents.
20.Leaks from battery cells can occur under extreme conditions. If the liquid, which is 20-35% solution of potassium hydroxide, gets on the skin – wash immediately with soap and water or neutralize with a mild acid such as lemon juice or vinegar. If the liquid gets into the eyes, flush them immediately with clean water for a minimum of 10 minutes and seek medical attention.
21.Use only on dry, indoor surfaces.
22.Do not use for any purpose other than described in this user’s guide.
23.Do not attempt to use the charger with any other product or attempt to charge this product with another charger. Use only charger model Kuantech
KA12D120015023U supplied with this appliance.
24.The appliance must be disconnected from the supply when removing the battery.
SAVE THESE INSTRUCTIONS
FOR HOUSEHOLD USE ONLY
1 |
Rev. 07/07 |
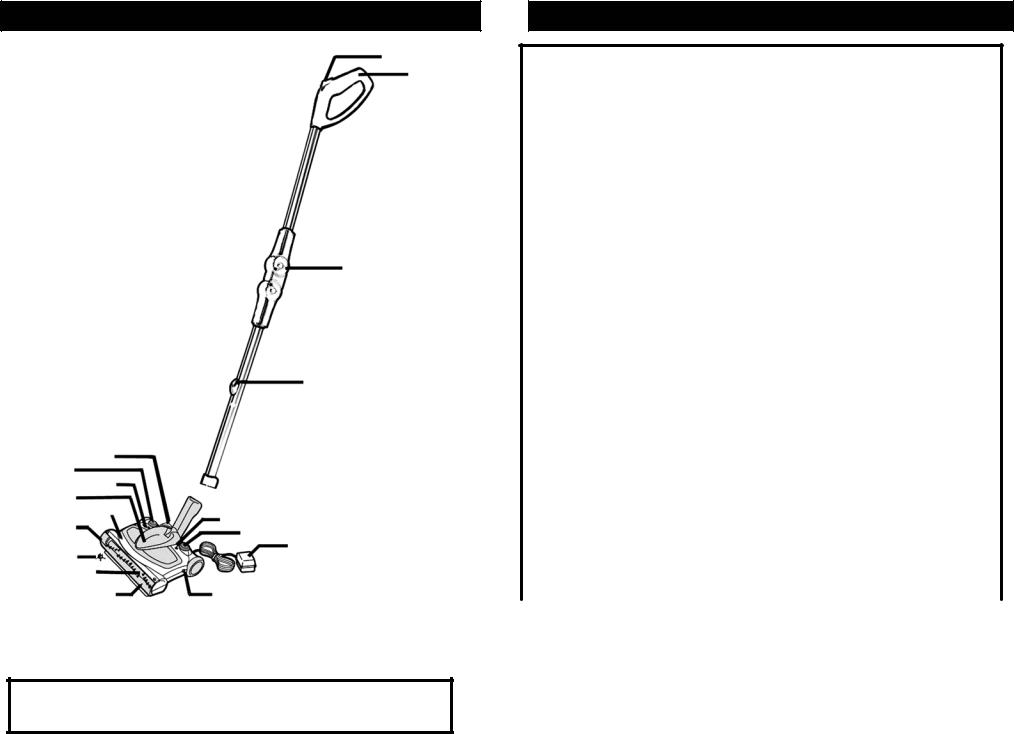
PARTS AND COMPONENTS
1.Handle Release
2.Upper Handle
3.Forward Folding Hinge
4.No Touch Empty Button
5.Charging Light Indicator
6.On/Off Switch
7.Charging Adapter: Only Use Kuantech KA12D120015023U
8.Charging Jack
9.Transparent Brush Cover
10.Rotating Brush
11.Edging Tool
12.Gear Box
13.Sweeper Power Head
14.Dust Cup Container
15.Speed Indicator Lights
16.Speed Control
17.Dust Container Release Lever
17
16
15
14
13
12
11
10
9
1
2
3
4
5
6 7
8
* Illustrations may differ from actual product.
NOTE: The cordless sweeper is shipped with the batteries uncharged. Charging of the unit for 20 hours prior to first use is required. Use replacement battery # xb1918only.
2
INSTRUCCIONES DE USO
GUÍA PARA EL DIAGNÓSTICO DE PROBLEMAS
PROBLEMA |
POSIBLE CAUSA |
|
POSIBLE SOLUCIÓN |
||
|
|
|
1. |
Recargue la unidad. |
|
|
1. |
Batería descargada. |
2. |
Verifique el fusible o la llave |
|
|
|
general. Reemplace el |
|||
|
2. |
El tomacorriente donde |
|
||
|
|
fusible/encienda la llave general. |
|||
|
|
enchufa el cargador no |
|
||
|
|
3. |
Llame al Servicio al Cliente al 1 |
||
BARREDORA NO |
|
funciona. |
|||
|
|
(800) 798-7398. |
|||
3. |
La unidad necesita ser |
|
|||
FUNCIONA |
4. |
Verifique que los conectores de |
|||
|
reparada. |
||||
|
4. |
Batería mal colocada. |
|
los cables estén bien conectados. |
|
|
5. |
Limpie cualquier obstrucción del |
|||
|
5. |
Cepillo giratorio |
|||
|
|
cepillo giratorio. Apague la unidad |
|||
|
|
atascado. |
|
||
|
|
|
por 10 segundos y enciéndala |
||
|
|
|
|
||
|
|
|
|
nuevamente. |
|
|
|
|
|
|
|
LA BARREDORA |
1. |
Recipiente para la |
1. |
Vacíe el recipiente para la tierra. |
|
|
tierra está lleno. |
||||
NO RECOGE |
2. La unidad necesita una |
2. |
Recargue la unidad. |
||
|
|
recarga. |
|
|
|
SALE TIERRA DE |
1. Recipiente para la |
1. |
Vacíe el recipiente para la tierra. |
||
LA BARREDORA |
|
tierra está lleno. |
|||
|
|
|
|||
|
|
|
|
|
|
|
|
|
1. |
Verifique que no haya material |
|
CEPILLO |
1. Unidad tapada. |
|
acumulado en el cepillo o debajo |
||
|
de la barredora. Quite las |
||||
GIRATORIO NO |
2. Recipiente para la |
|
obstrucciones del cepillo y/o de la |
||
RECOGE |
|
tierra está lleno. |
2. |
barredora. |
|
|
|
|
Vacíe y limpie el recipiente para la |
||
|
|
|
|
tierra. |
|
|
|
|
|
|
|
|
1. |
El tomacorriente donde |
1. |
Verifique que el tomacorriente |
|
|
|
enchufa el cargador no |
|||
|
|
funciona. |
|
funcione correctamente. |
|
BARREDORA NO |
2. |
El Cargador no |
|
(Verifíquelo fácilmente |
|
|
funciona. |
|
enchufando otro artefacto). |
||
SE RECARGA |
|
|
|||
3. La batería no funciona |
2. |
Reemplace el cargador. |
|||
|
|
más. |
3. |
Vea como desechar la batería. |
|
|
4. Ha dejado la unidad |
4. |
Apague la unidad. |
||
|
|
encendida. |
|
|
|
|
|
|
|
|
|
23
INSTRUCCIONES DE USO
8.Deslice la correa sobre el cepillo.
9.Inserte el otro extremo del cepillo en la ranura. (Fig. 15)
10.Inserte las pestañas de los engranajes en las ranuras correspondientes y presione hasta que encaje en su lugar.
11.Para reemplazar la escobilla de goma, siga las instrucciones anteriores para quitar los engranajes y remueva la escobilla de goma deslizándola de izquierda a derecha. (Fig. 17)
Fig. 17
Reemplazo de la Correa
Si la correa se ha roto y necesita ser reemplazada:
1.Quite la cubierta del cepillo. (Fig. 12)
2.Presione en la traba de los engranajes y levántelos para removerlos. (Fig. 13 y Fig. 14)
3.Presione en la traba del panel de acceso de la correa y levántelo para removerlo. (Fig. 17)
Panel de Acceso a la Correa
Fig. 18
4.Usando una pinza, quite cualquier trozo remanente que haya quedado de la correa.
5.Tire del cepillo para sacarlo. (Fig. 15)
6.Tome la correa nueva e insértela por la abertura hasta que entre completamente.
7.Con una pinza, colóquelo dentro del panel de acceso de la correa y levante la correa nueva sobre el engranaje posterior.
8.Deslice la correa sobre la cubierta del cepillo giratorio y vuelva a insertar el rodillo en la ranura. (Fig. 15)
9.Inserte las pestañas de los engranajes en las ranuras correspondientes y presione hasta que encaje en su lugar.
10.Presione sobre el panel de acceso de la correa hasta que encastre en su lugar.
11.Vuelva a colocar la cubierta del cepillo (Fig. 12)
Cuidado y Mantenimiento
Para mantener el rendimiento y la vida útil de su unidad, le recomendamos lo siguiente:
1.Limpie la unidad con un trapo seco una vez por mes, incluyendo el compartimiento donde se coloca el recipiente para la tierra. Quite los pelos, fibras y cualquier otro material que se haya acumulado en el compartimiento o en el cepillo giratorio.
2.No utilice materiales abrasivos para limpiar la barredora. No sumerja la unidad en agua.
3.No la use para recoger líquidos o sobre pisos mojados.
4.No la use en concreto, alquitrán o superficies ásperas similares.
5.No recoja trozos de soga o tela con la barredora.
6.No limpie alfombras adornadas con borlas o deshilachadas con la barredora.
22
OPERATING INSTRUCTIONS
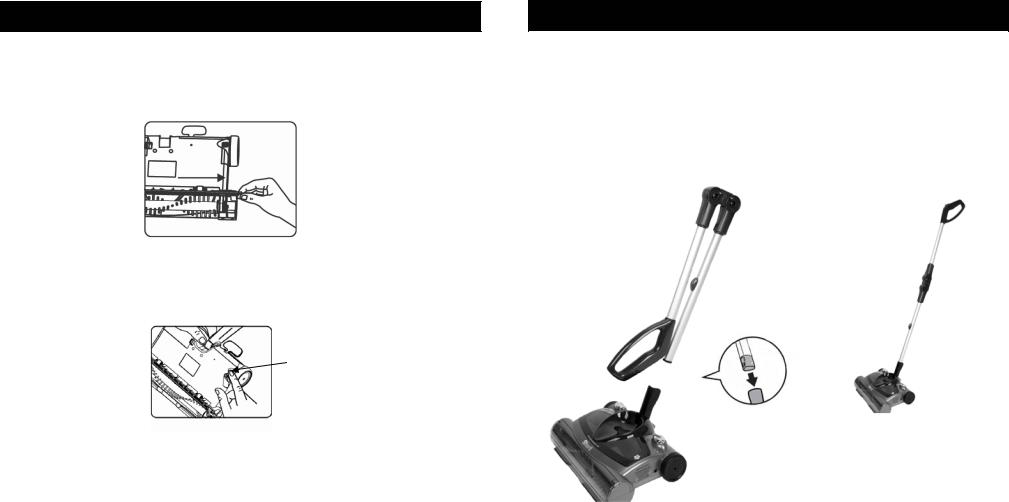
Assembling Your Cordless Sweeper
Your cordless sweeper will require very little assembly. You should remove it from the carton and familiarize yourself with all the components listed per the exploded view drawing. (Pg. 2) This will help you in the assembly and operation of your cordless sweeper.
Note: The charging adapter will be shipped inside the packaging.
1.To assemble your sweeper, push the handle into the base. It will snap into place firmly. (Fig. 1a)
Fig. 1a
Fig. 1b
Fig. 1
2.To straighten the handle, simply lift the upper handle. The forward folding hinges will click into the straightened position as shown in Figure 1b.
3.To fold the handle, press on the handle release button firmly while bending the handle forward. The forward folding hinges will click into the bent position as shown in Figure 1.
3
 Loading...