

Page 1
INTERBUS UFI11A Fieldbus Interface
Phone: 800.894.0412 - Fax: 888.723.4773 - Web: www.clrwtr.com - Email: info@clrwtr.com
Edition
06/2002
Manual
1052 5114 / EN
Page 2

Phone: 800.894.0412 - Fax: 888.723.4773 - Web: www.clrwtr.com - Email: info@clrwtr.com
Page 3

1 Overview of the System.................................................................................... 4
Phone: 800.894.0412 - Fax: 888.723.4773 - Web: www.clrwtr.com - Email: info@clrwtr.com
2 Unit Structure ....................................................................................................5
2.1 Front view ................................................................................................. 5
3 Installation and Operation with Autosetup.....................................................6
3.1 Installation notes ....................................................................................... 6
3.2 Setting the inverter parameters............................................................... 10
3.3 Autosetup................................................................................................ 10
3.4 Configuring the fieldbus master .............................................................. 11
3.5 Starting the inverters............................................................................... 12
4 Installation and Operation with a PC............................................................. 13
4.1 Installation notes ..................................................................................... 13
4.2 PC connection......................................................................................... 17
4.3 Setting the inverter parameters............................................................... 17
4.4 Startup software...................................................................................... 17
4.5 Configuring the fieldbus master .............................................................. 18
4.6 Starting the inverters............................................................................... 19
5 INTERBUS Interface........................................................................................20
5.1 Startup of the INTERBUS master ........................................................... 20
5.2 Configuring the INTERBUS interface...................................................... 28
5.3 Examples of DIP switch settings for process data and
PCP communication in Autosetup mode................................................. 31
5.4 Control via INTERBUS............................................................................ 34
5.5 PCP interface.......................................................................................... 35
5.6 Return codes for parameter setting......................................................... 44
5.7 Autosetup................................................................................................ 46
6 Error Response ...............................................................................................48
6.1 Fieldbus timeout...................................................................................... 48
6.2 SBus timeout........................................................................................... 48
6.3 Unit errors ............................................................................................... 48
7 Diagnostic LEDs.............................................................................................. 49
7.1 States of the LEDs UL, RC, BA, TR and RD........................................... 49
8 DIP Switches.................................................................................................... 51
9 Application examples .....................................................................................52
9.1 Control via process data ......................................................................... 52
9.2 Parameter setting via the PCP interface................................................. 52
9.3 Representation of the coding examples.................................................. 53
9.4 Sequence of a parameter setting process .............................................. 53
9.5 Reading of an UFI parameter.................................................................. 54
9.6 Writing of UFI11A or drive parameters via object 8288 .......................... 55
9.7 Reading of UFI11A or drive parameters via object 8288 ........................ 56
10 Parameter List ................................................................................................. 58
11 List of Errors....................................................................................................59
12 Technical Data................................................................................................. 61
13 Dimensions...................................................................................................... 62
14 Index................................................................................................................. 63
Manual – Fieldbus Interface INTERBUS UFI11A
3
Page 4

1
Phone: 800.894.0412 - Fax: 888.723.4773 - Web: www.clrwtr.com - Email: info@clrwtr.com
Overview of the System
1 Overview of the System
The UFI11A INTERBUS fieldbus interface serves as a gateway for connecting one or
more MOVIDRIVE, MOVIDRIVEcompact or MOVITRAC 07 inverters to INTERBUS. Several inverters can be connected to the INTERBUS UFI11A interface via the SBus. The
INTERBUS UFI11A interface provides the translation between the INTERBUS and the
SBus.
Copying data
4
Fig. 1: Overview of the system: INTERBUS master – UFI11A – inverter
The UFI11A settings can be copied with the UBP11A parameter module from UFI11A
to UFI11A. For safety reasons, all inverters connected to the UFI11A must be turned off
when writing data.
Manual – Fieldbus Interface INTERBUS UFI11A
05373AXX
Page 5

2Unit Structure
Phone: 800.894.0412 - Fax: 888.723.4773 - Web: www.clrwtr.com - Email: info@clrwtr.com
2.1 Front view
Unit Structure
2
Fig. 2: Arrangement of LEDs, connectors and DIP switches
X1 SBus and 24 V connection
X2 Diagnostic interface
X3 INTERBUS remote in (incoming remote bus)
X4 INTERBUS remote out (outgoing remote bus)
S1 DIP switches
UL Logic voltage
RC Incoming remote bus OK
BA Bus mode active
RD Outgoing remote bus switched off
TR Parameter data exchange via PCP channel
SYS-F System fault
USER Expert mode
Manual – Fieldbus Interface INTERBUS UFI11A
05405AXX
5
Page 6
3
Phone: 800.894.0412 - Fax: 888.723.4773 - Web: www.clrwtr.com - Email: info@clrwtr.com
Installation and Operation with Autosetup
3 Installation and Operation with Autosetup
3.1 Installation notes
Mounting
Pin assignment
The unit can be mounted using the integrated DIN rail mounting option or directly onto
a switch cabinet wall using the four holes integrated into the back wall of the housing. In
the latter case, the two retaining screws for the DIN rail mounting must be removed.
Basically, there are no restrictions regarding positioning in relation to the inverters to be
connected (e.g. MOVITRAC
length and the fact that the UFI11A must be the first or last node on the system bus
(SBus).
The UFI11A must have additional HF-compliant grounding if the DIN rail mounting option is used in conjunction with SBus cables more than 1 m in length.
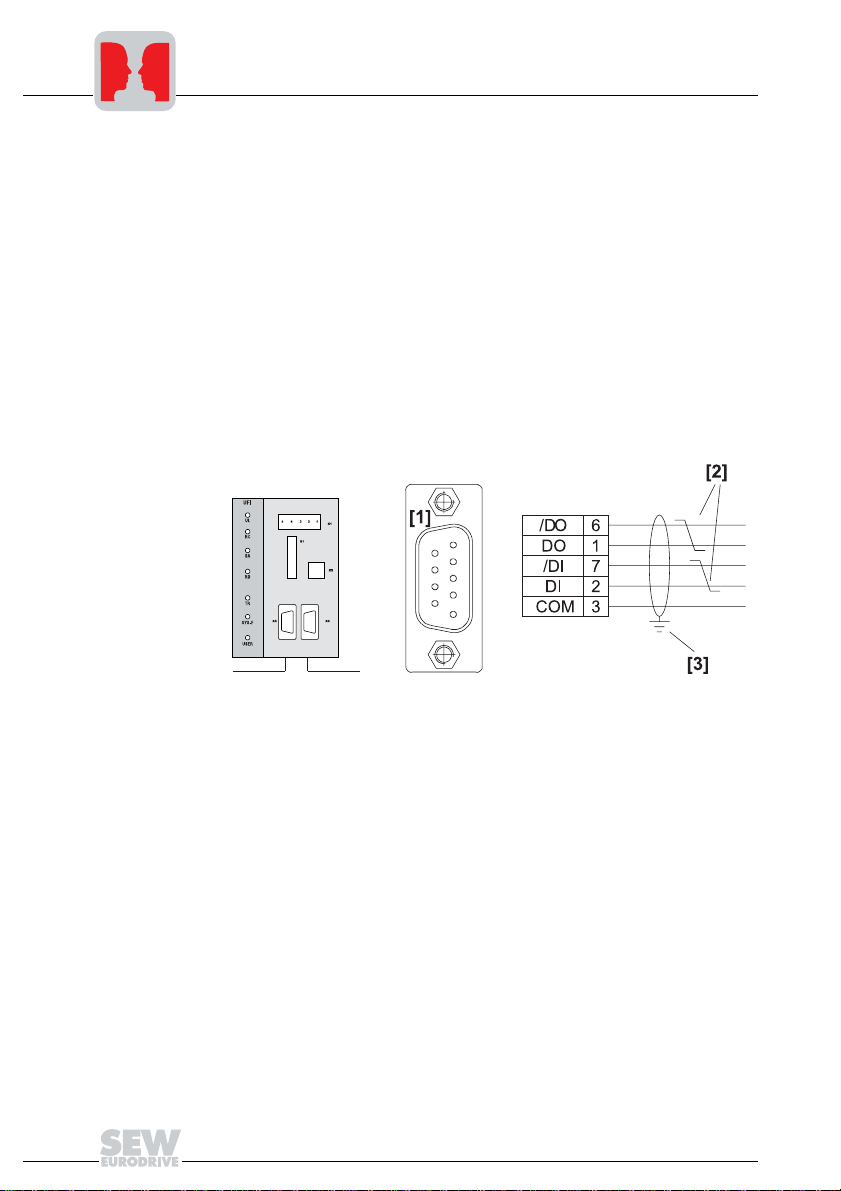
The UFI11A fieldbus interface is equipped with a 9-pin sub D male connector for the incoming bus signal and a 9-pin sub D female connector for the outgoing bus signal according to EN 50170.
®
07). In laying out the system, consider the maximum cable
Fig. 3: Pinout of the 9-pin sub D male connector X3 to EN 50170 ([1] = 9-pin sub D male
connector; [2] = Signal lines twisted pair; [3] = Conductive connection between the
connector housing and the shield)
6
Manual – Fieldbus Interface INTERBUS UFI11A
05406AXX
Page 7

Installation and Operation with Autosetup
Phone: 800.894.0412 - Fax: 888.723.4773 - Web: www.clrwtr.com - Email: info@clrwtr.com
3
Fig. 4: Pinout of the 9-pin sub D female connector X4 to EN 50170 ([1] = 9-pin sub D female
connector; [2] = Signal lines twisted pair; [3] = Conductive connection between the
connector housing and the shield; [4] = Jumper)
As a rule, the fieldbus interface is connected to the INTERBUS system using a twisted,
shielded cable. The shield of the INTERBUS cable must be connected on both ends, for
example on the plug housing. Note the maximum supported transmission rate when you
are selecting the bus connector.
The cable is connected to the INTERBUS plug using pins 6 and 1 (/DO and DO) and
pins 7 and 2 (/DI and DI). Communication takes place via these contacts. The RS-485
signals /DO and DO as well as /DI and DI must have the same contacts on all INTERBUS stations. Otherwise, communication via the bus will not function.
05374AXX
Manual – Fieldbus Interface INTERBUS UFI11A
7
Page 8
3
Phone: 800.894.0412 - Fax: 888.723.4773 - Web: www.clrwtr.com - Email: info@clrwtr.com
Installation and Operation with Autosetup
Connection
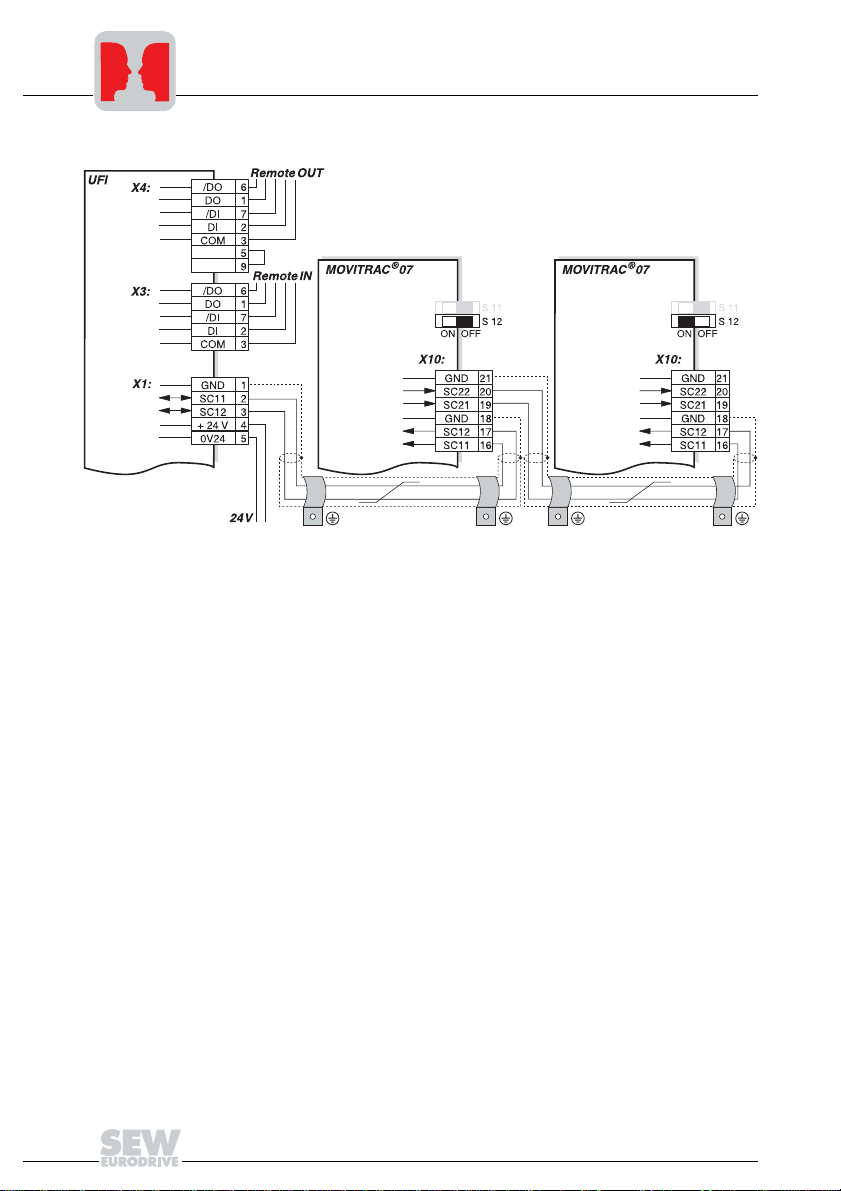
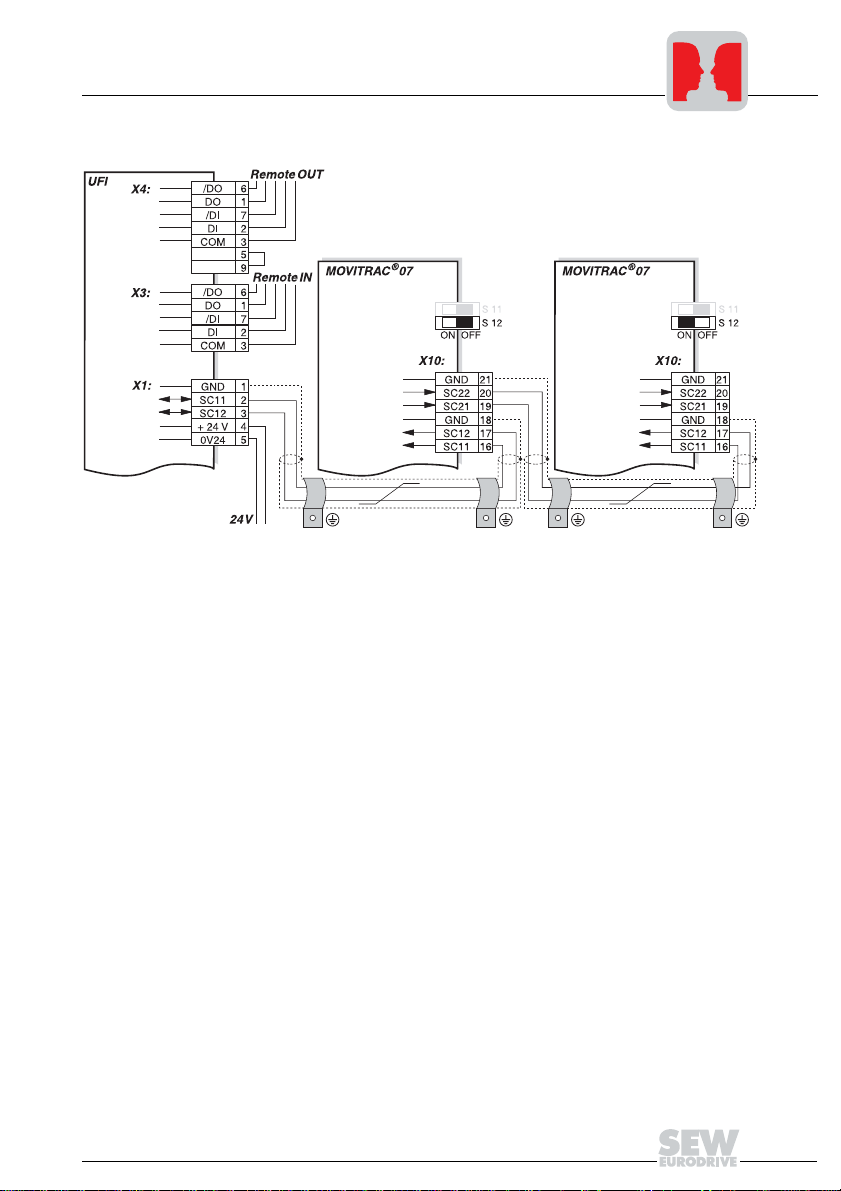
Fig. 5: System bus connection
UFI11A
COM = RS-485 reference
/DO = Data out inverted
DO = Data out
/DI = Data in inverted
DI = Data in
GND = System bus reference
SC11 = System bus high
SC12 = System bus low
Notes on SBus configuration:
• Use a twisted and shielded copper cable (data transmission cable with braided cop-
• The permitted total cable length depends on the baud rate setting of the SBus:
05375AXX
MOVITRAC® 07
GND = System bus reference
SC22 = System bus outgoing low
SC21 = System bus outgoing high
SC12 = System bus incoming low
SC11 = System bus incoming high
S12 = System bus terminating resistor
per shield). Connect the shield at both ends to the electronics shield clamp of MOVI-
®
07 or the UFI11A and ensure a large area of contact between the shield and
TRAC
clamp. Also connect the ends of the shield to GND. The cable must meet the following specifications (CAN bus or DeviceNet cables are suitable, for example):
2
–Conductor cross section 0.75 mm
(AWG18)
–Cable resistance 120 Ω at 1 MHz
–Capacitance per unit length ≤ 40 pF/m (12 pF/ft) at 1 kHz
–250 kbaud: 160 m (528 ft)
–500 kbaud: 80 m (264 ft)
–1000 kbaud: 40 m (132 ft)
8
Manual – Fieldbus Interface INTERBUS UFI11A
Page 9
Installation and Operation with Autosetup
Phone: 800.894.0412 - Fax: 888.723.4773 - Web: www.clrwtr.com - Email: info@clrwtr.com
• Switch on the system bus terminating resistor (S1 2 = ON) of the node end of the system bus. Switch off the terminating resistor on the other units (S12 = OFF). The
UFI11A fieldbus interface must always be the first or last node on the system bus. It
has an integrated terminating resistor.
• There must not be any potential difference between the units connected to the SBus.
Take suitable measures such as connecting each unit’s ground lug to a central
grounding point in the cabinet to avoid potential differences.
• Point-to-point cabling is not permitted.
3
24 V connection
Shielding and
routing of the bus
cables
An external 24 VDC voltage supply must be connected to terminals X1:4 and X1:5.
The voltage range for the 24 VDC voltage supply is 18 – 30 V. The current consumption
of the UFI11A fieldbus interface is 300 mA.
The INTERBUS interface supports RS-485 transmission technology and requires the
cable type specified as the physical medium for INTERBUS. This cable must be a shielded, twisted-pair cable with 3 x 2 cores.
Having the bus cable correctly shielded eliminates parasitic interference which can occur in an industrial environment. The following measures ensure the best possible shielding:
• Finter-tighten the retaining screws of plugs, modules and equipotential bonding conductors.
• Use only connectors with a metal housing or a metallized housing.
• Maximize the contact area between the shield and the connector housing.
• Shield the bus cable on both ends.
• Do not route the signal and bus cables in parallel with the power cables (motor
leads); use separate cable ducts if possible.
• Only use grounded-metal cable trays in industrial environments.
• Join the signal cables and the associated equipotential bonding together at closely
spaced intervals by the shortest route.
• Avoid using plug connectors to extend bus cables.
• Route the bus cables closely adjacent to available grounding surfaces.
In the event of fluctuations in the ground potential, a compensating current may flow
along the shield which is connected at both ends and to the ground potential (PE). In this
case, make adequate provision for equipotential bonding in accordance with the relevant VDE regulations.
Manual – Fieldbus Interface INTERBUS UFI11A
9
Page 10

3
Phone: 800.894.0412 - Fax: 888.723.4773 - Web: www.clrwtr.com - Email: info@clrwtr.com
Installation and Operation with Autosetup
3.2 Setting the inverter parameters
The settings can be entered using the inverter control panel. Refer to the inverter operating instructions for more information.
• Switch on the voltage supply for the UFI11A and all connected inverters.
• Set an individual SBus address (P813) on the inverters. Recommendation: Assign
the addresses starting from address 1 and working in ascending order according to
the arrangement of inverters in the switch cabinet. Do not assign address 0 since this
is used by the UFI11A.
• Check the SBus baud rate (P816, factory setting = 500 kbaud).
• Set the Setpoint source (P100) to SBus (value 10).
• Set the Control signal source (P101) to SBus (value 3).
• Set the terminal assignment of the binary inputs. The value 0 is recommended for
P60- in MOVITRAC
–DI01 CW/STOP (applied to 24 V, enable CW direction of rotation)
–DI02 CCW/STOP (applied to 24 V, enable CCW direction of rotation)
–DI03 FIX SETPT SW.OV(not connected)
–DI04 n11/n21 (not connected)
–DI05 n12/n22 (not connected)
–Program the unused terminals to "NO FUNCTION" if you are using a MOVIDRIVE
or MOVIDRIVE compact.
• Important: If you need to set P815 SBus timeout delay for MOVITRAC
only possible using a PC. The default value is 0, which means timeout monitoring is
switched off. Set P815 to the value 1 s.
3.3 Autosetup
Switch on the Autosetup function using the DIP switch on the UFI11A. The function is
active for as long as the SYS-FLT LED is flashing briefly with a long interval between
flashes. The LED stays off after the scanning process if at least one inverter has been
detected.
ted by switching the DIP switch off and on again. The SYS-FLT LED remains on following Autosetup if no inverter is detected. In this case, check the cabling of the SBus, the
terminating resistors of the SBus, the voltage supply to the inverters and the SBus
address settings (P813).
The Autosetup DIP switch must stay switched on.
®
07. This corresponds to the following assignment:
Autosetup can be reactiva-
®
07, this is
®
10
Manual – Fieldbus Interface INTERBUS UFI11A
Page 11
Installation and Operation with Autosetup
Phone: 800.894.0412 - Fax: 888.723.4773 - Web: www.clrwtr.com - Email: info@clrwtr.com
3.4 Configuration of the fieldbus master
You will find detailed information in the section "INTERBUS interface."
• Set the required process data length via DIP switches 1 ... 5. You will need three process data words for each drive inverter connected to the UFI11A. That means you
will have to set 9 words in case you are operating three MOVITRAC
change in the DIP switch settings will become active after turning the UFI11A off and
on again.
• Start the "CMD Tool" project planning software for your INTERBUS interface.
• Enter the bus setup via "Configuration frame / Read in" or "Read in configuration
frame."
• Assign program addresses of the control program to the INTERBUS process data of
the inverters. This assignment takes place via the context menu "Process data" or
"Process data manager."
• Enhance the control program by the data exchange with the UFI11A.
®
07 units. A
3
Manual – Fieldbus Interface INTERBUS UFI11A
11
Page 12
3
Phone: 800.894.0412 - Fax: 888.723.4773 - Web: www.clrwtr.com - Email: info@clrwtr.com
Installation and Operation with Autosetup
3.5 Starting the inverters
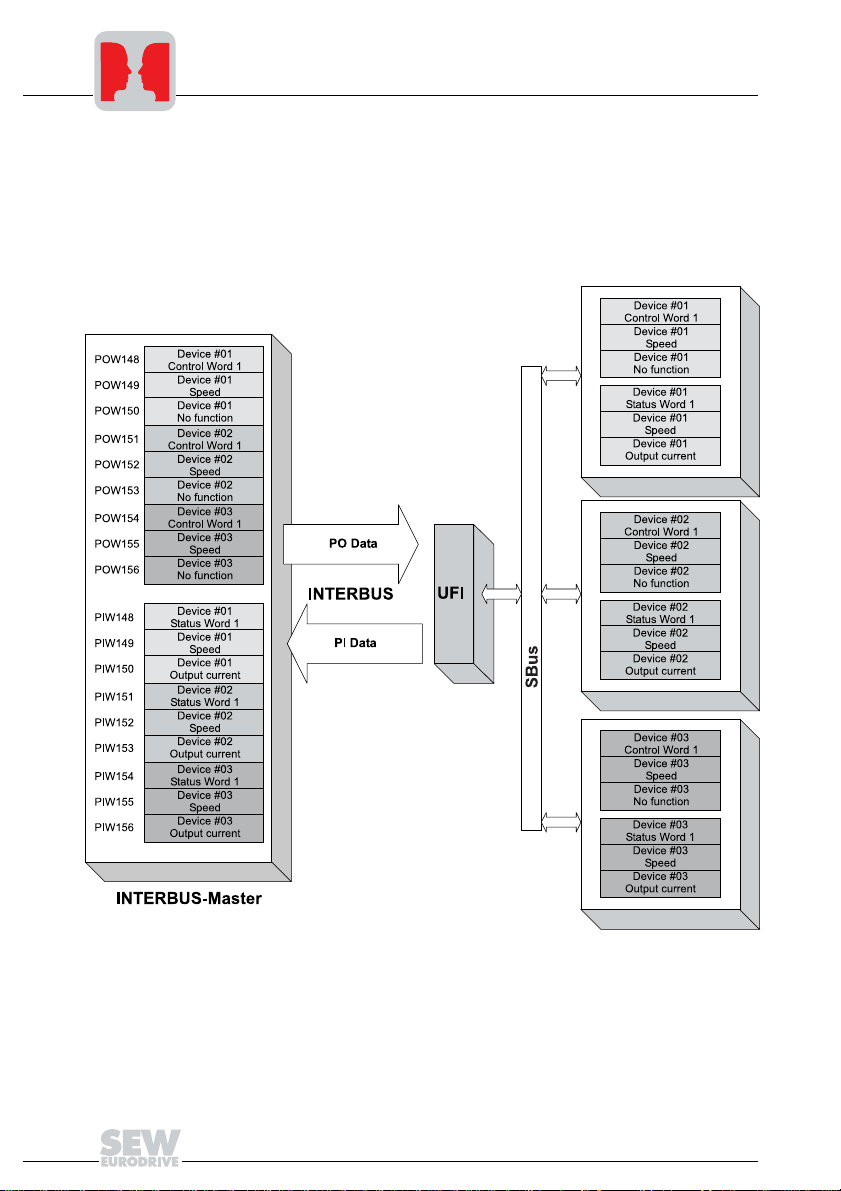
You can operate up to eight inverters on the INTERBUS via one UFI11A. The INTERBUS master and the UFI11A will exchange setpoints and actual values of all inverters
connected to the UFI11A in contiguous data packages. It is important for you to know
where a particular inverter is located in the data package (process image). The relationship is shown in the following illustration:
Fig. 6: Data exchange INTERBUS master – UFI11A – inverter
You can enable the inverter by writing the value 0006h in the corresponding control
word. You can enter the speed setpoint in the following word; it is scaled with 0.2 1/min
per digit.
12
05431AXX
Manual – Fieldbus Interface INTERBUS UFI11A
Page 13

Installation and Operation with a PC
Phone: 800.894.0412 - Fax: 888.723.4773 - Web: www.clrwtr.com - Email: info@clrwtr.com
4 Installation and Operation with a PC
4.1 Installation notes
Mounting
Pin assignment
The unit can be mounted using the integrated DIN rail mounting option or directly onto
a switch cabinet wall using the four holes integrated into the back wall of the housing. In
the latter case, the two retaining screws for the DIN rail mounting must be removed.
Basically, there are no restrictions regarding positioning in relation to the inverters to be
connected (e.g. MOVITRAC
length and the fact that the UFI11A must be the first or last node on the system bus
(SBus).
The UFI11A must have additional HF-compliant grounding if the DIN rail mounting option is used in conjunction with SBus cables more than 1 m in length.
The UFI11A fieldbus interface is equipped with a 9-pin sub D male connector for the incoming bus signal and a 9-pin sub D female connector for the outgoing bus signal.
®
07). In laying out the system, consider the maximum cable
4
Fig. 7: Pinout of the 9-pin sub D male connector X3 to EN 50170 ([1] = 9-pin sub D male
connector; [2] = Signal lines twisted pair; [3] = Conductive connection between the
connector housing and the shield)
Manual – Fieldbus Interface INTERBUS UFI11A
05406AXX
13
Page 14

4
Phone: 800.894.0412 - Fax: 888.723.4773 - Web: www.clrwtr.com - Email: info@clrwtr.com
Installation and Operation with a PC
Fig. 8: Pinout of the 9-pin sub D female connector X4 to EN 50170 ([1] = 9-pin sub D female
connector; [2] = Signal lines twisted pair; [3] = Conductive connection between the
connector housing and the shield; [4] = Jumper)
As a rule, the fieldbus interface is connected to the INTERBUS system using a twisted,
shielded cable. The shield of the INTERBUS cable must be connected on both ends, for
example on the plug housing. Note the maximum supported transmission rate when you
are selecting the bus connector.
The cable is connected to the INTERBUS plug using pins 6 and 1 (/DO and DO) and
pins 7 and 2 (/DI and DI). Communication takes place via these contacts. The RS-485
signals /DO and DO as well as /DI and DI must have the same contacts on all INTERBUS stations. Otherwise, communication via the bus will not function.
05374AXX
14
Manual – Fieldbus Interface INTERBUS UFI11A
Page 15
Connection
Phone: 800.894.0412 - Fax: 888.723.4773 - Web: www.clrwtr.com - Email: info@clrwtr.com
Installation and Operation with a PC
4
Fig. 9: System bus connection
UFI11A
COM = RS-485 reference
/DO = Data out inverted
DO = Data out
/DI = Data in inverted
DI = Data in
GND = System bus reference
SC11 = System bus high
SC12 = System bus low
Notes on SBus configuration:
• Use a twisted and shielded copper cable (data transmission cable with braided cop-
• The permitted total cable length depends on the baud rate setting of the SBus:
05375AXX
MOVITRAC® 07
GND = System bus reference
SC22 = System bus outgoing low
SC21 = System bus outgoing high
SC12 = System bus incoming low
SC11 = System bus incoming high
S12 = System bus terminating resistor
per shield). Connect the shield at both ends to the electronics shield clamp of MOVI-
®
07 or the UFI11A and ensure a large area of contact between the shield and
TRAC
clamp. Also connect the ends of the shield to GND. The cable must meet the following specifications (CAN bus or DeviceNet cables are suitable):
2
–Conductor cross section 0.75 mm
(AWG18)
–Cable resistance 120 Ω at 1 MHz
–Capacitance per unit length ≤ 40 pF/m (12 pF/ft) at 1 kHz
–250 kbaud: 160 m (528 ft)
–500 kbaud: 80 m (264 ft)
–1000 kbaud: 40 m (132 ft)
Manual – Fieldbus Interface INTERBUS UFI11A
15
Page 16

4
Phone: 800.894.0412 - Fax: 888.723.4773 - Web: www.clrwtr.com - Email: info@clrwtr.com
Installation and Operation with a PC
• Switch on the system bus terminating resistor (S1 2 = ON) of the node end of the system bus. Switch off the terminating resistor on the other units (S12 = OFF). The
UFI11A fieldbus interface must always be the first or last node on the system bus. It
has an integrated terminating resistor.
• There must not be any potential difference between the units connected to the SBus.
Take suitable measures such as connecting each unit’s ground lug to a central
grounding point in the cabinet to avoid potential differences.
• Point-to-point cabling is not permitted.
24 V connection
Shielding and
routing of the bus
cables
An external 24 VDC voltage supply must be connected to terminals X1:4 and X1:5.
The voltage range for the 24 VDC voltage supply is 18 – 30 V. The current consumption
of the UFI11A fieldbus interface is 300 mA.
The INTERBUS interface supports RS-485 transmission technology and requires the
cable type specified as the physical medium for INTERBUS. This cable must be a shielded, twisted-pair cable with 3 x 2 cores.
Having the bus cable correctly shielded eliminates parasitic interference which can occur in an industrial environment. The following measures ensure the best possible shielding:
• Finter-tighten the retaining screws of plugs, modules and equipotential bonding conductors.
• Use only connectors with a metal housing or a metallized housing.
• Maximize the contact area between the shield and the connector housing.
• Shield the bus cable on both ends.
• Do not route the signal and bus cables in parallel with the power cables (motor
leads); use separate cable ducts if possible.
• Only use grounded-metal cable trays in industrial environments.
• Join the signal cables and the associated equipotential bonding together at closely
spaced intervals by the shortest route.
• Avoid using plug connectors to extend bus cables.
• Route the bus cables closely adjacent to available grounding surfaces.
In the event of fluctuations in the ground potential, a compensating current may flow
along the shield which is connected at both ends and to the ground potential (PE). In this
case, make adequate provision for equipotential bonding in accordance with the relevant VDE regulations.
16
Manual – Fieldbus Interface INTERBUS UFI11A
Page 17

Installation and Operation with a PC
Phone: 800.894.0412 - Fax: 888.723.4773 - Web: www.clrwtr.com - Email: info@clrwtr.com
4.2 PC connection
The UFI11A is equipped with a 4-pole RJ12 socket on the front. The option UWS21A
with item no. 8230773 establishes the connection to a COM interface on your PC. Connect the desired COM of the PC with the UWS21A via the enclosed serial cable. The
UWS21A will be connected with the UFI11A via the enclosed RJ11 cable.
4.3 Setting the inverter parameters
The settings can be entered using the inverter control panel. Refer to the inverter operating instructions for more information.
• Switch on the voltage supply for the UFI11A and all connected inverters.
• Set an individual SBus address (P813) on the inverters. Recommendation: Assign
the addresses starting from address 1 and working in ascending order according to
the arrangement of inverters in the switch cabinet. Do not assign address 0 since this
is used by the UFI11A.
4.4 Startup software
• Install the MOVITOOLS software package as of version 2.70 on your PC.
• Start the software. Select the COM to which the UFI11A has been connected and
press the "Update“ button. The UFI11A should appear at address 0 and the connected inverters on the following addresses. In case you do not see an entry in the window, please check the COM interface and the connection via the UWS21. If you only
see the UFI11A as an entry in the window, please check the SBus cabling and the
terminating resistors.
• Select the UFI11A and start the UFx Configurator.
• Select the menu item "New configuration of fieldbus node.“
• Select your project path and name. Press the "Next" button.
• Press the "Update“ button. You should now see all inverters connected to the
UFI11A. You can customize the configuration with the "Insert“, "Edit“ and "Delete“
buttons. Press the "Next" button.
• Press the "Autoconfiguration“ button. You will now see the process image for the
UFI11A in your control. The process data length is displayed at the bottom. This value is important for the configuration of the fieldbus master. Press the "Next" button."
• Save the project data and press the "Download“ button. If you experience problems
with the download, you have probably set the DIP switch to AUTOSETUP. You need
to turn off the autosetup feature when configuring with a PC.
4
Manual – Fieldbus Interface INTERBUS UFI11A
17
Page 18

4
Phone: 800.894.0412 - Fax: 888.723.4773 - Web: www.clrwtr.com - Email: info@clrwtr.com
Installation and Operation with a PC
• You can see the data being exchanged between fieldbus master and UFI11A with
the process data monitor.
• You will have to enable the unit via the terminals to control the inverter via fieldbus.
You have already connected the terminals. Select the first inverter with address 1 in
the window "Connected units" to check the pinout and start "Shell." Make the following settings for the pinout of the MOVITRAC
• Repeat this step for all inverters listed in the window "Connected units."
4.5 Configuration of the fieldbus master
You will find detailed information in the section "INTERBUS interface."
• Set the required process data length via DIP switches 1 ... 5. You will need three process data words for each drive inverter connected to the UFI11A. That means you
will have to set 9 words in case you are operating three MOVITRAC
change in the DIP switch settings will become active after turning the UFI11A off and
on again.
®
07:
®
07 units. A
• Start the "CMD Tool" project planning software for your INTERBUS interface.
• Enter the bus setup via "Configuration frame / Read in" or "Read in configuration
frame."
• Assign program addresses of the control program to the INTERBUS process data of
the inverters. This assignment takes place via the context menu "Process data" or
"Process data manager."
• Enhance the control program by the data exchange with the UFI11A.
18
Manual – Fieldbus Interface INTERBUS UFI11A
Page 19

4.6 Starting the inverters
Phone: 800.894.0412 - Fax: 888.723.4773 - Web: www.clrwtr.com - Email: info@clrwtr.com
You can operate up to eight inverters on the INTERBUS via one UFI11A. The INTERBUS master and the UFI11A will exchange setpoints and actual values of all inverters
connected to the UFI11A in contiguous data packages. It is important for you to know
where a particular inverter is located in the data package (process image). The relationship can be seen in the process data monitor of the UFx Configurator.
You can enable the inverter by writing the value 0006h in the corresponding control
word. You can enter the speed setpoint in the following word; it is scaled with 0.2 1/min
per digit.
Installation and Operation with a PC
4
Manual – Fieldbus Interface INTERBUS UFI11A
19
Page 20
5
Phone: 800.894.0412 - Fax: 888.723.4773 - Web: www.clrwtr.com - Email: info@clrwtr.com
INTERBUS Interface
5 INTERBUS Interface
5.1 Startup of the INTERBUS master
Project planning of the UFI11A in the INTERBUS interface module with the "CMD Tool"
(CMD = Configuration-Monitoring-Diagnostics) project planning software takes place in
two steps. In the first step, you will set up the bus structure. The second step involves a
station description and address entry of process data.
Configuring the
bus structure
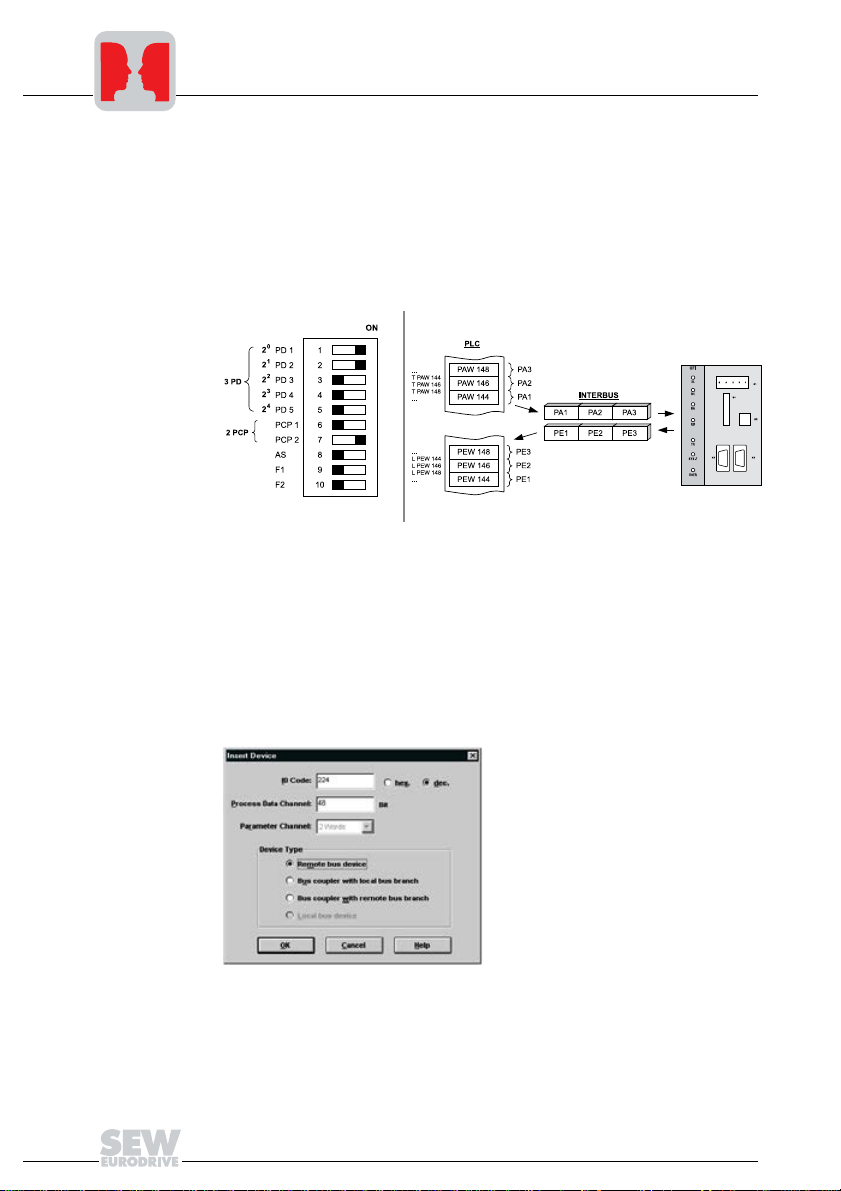
Fig. 10: Project planning example for 3PD + 2PCP
The following illustrations show the CMD Tool settings for a UFI11A configured with 3PD
+ 2PCP according to Fig. 10 on the input/output addresses 144...149 of the control.
Off-line configuration: Insert with ID code
You can configure the bus structure with the CMD Tool on-line or off-line. In the off-ine
status, the drive inverter will be configured with the menu item "Edit / Insert with ID code"
in the CMD tool. In this mode, you will have to enter the ID code, process data channel
and device type according to Fig. 11.
Fig. 11: Off-line configuration with the CMD Tool
05654AXX
05653AXX
20
Manual – Fieldbus Interface INTERBUS UFI11A
Page 21

INTERBUS Interface
Phone: 800.894.0412 - Fax: 888.723.4773 - Web: www.clrwtr.com - Email: info@clrwtr.com
Not all combinations are available. You will find the valid settings in the following table.
The insert with ID Code has to correspond to the setting of DIP switches 6 and 7. The
process data channel setting has to correspond to the setting of DIP switches 1-5. Any
conflicting settings will prevent operation of the INTERBUS. See also the section on configuration of the Interbus interface via DIP switches.“
5
ID Code 3 dez (03 hex) No parameter channel PCP
Process data
channel:
ID Code 227 dez (E3 hex) Parameter channel PCP: 1 word
Process data
channel:
Program setting Function
16 Bit 1 process data word (1 PD)
32 Bit 2 process Data Words (2 PD)
48 Bit 3 process data words (3 PD)
64 Bit 4 process data words (4 PD)
80 Bit 5 process data words (5 PD)
96 Bit 6 process data words (6 PD)
112 Bit 7 process data words (7 PD)
128 Bit 8 process data words (8 PD)
144 Bit 9 process data words (9 PD)
160 Bit 10 process data words (10 PD)
192 Bit 12 process data words (12 PD)
224 Bit 14 process data words (14 PD)
256 Bit 16 process data words (16 PD)
384 Bit 24 process data words (24 PD)
16 Bit 1 process data word (Param + 1 PD)
32 Bit 2 process data words (Param + 2 PD)
48 Bit 3 process data words (Param + 3 PD)
64 Bit 4 process data words (Param + 4 PD)
80 Bit 5 process data words (Param + 5 PD)
96 Bit 6 process data words (Param + 6 PD)
112 Bit 7 process data words (Param + 7 PD)
128 Bit 8 process data words (Param + 8 PD)
144 Bit 9 process data words (Param + 9 PD)
176 Bit 11 process data words (Param + 11PD)
218 Bit 13 process data words (Param + 13 PD)
240 Bit 15 process data words (Param + 15 PD)
368 Bit 23 process data words (Param + 23 PD)
Manual – Fieldbus Interface INTERBUS UFI11A
21
Page 22

5
Phone: 800.894.0412 - Fax: 888.723.4773 - Web: www.clrwtr.com - Email: info@clrwtr.com
INTERBUS Interface
ID Code 224 dez (E0 hex) Parameter channel PCP: 2 words
Process data
channel:
ID Code 225 dez (E1 hex) Parameter channel PCP: 4 words
Process data
channel:
Program setting Function
16 Bit 1 process data word (Param + 1 PD)
32 Bit 2 process data words (Param + 2 PD)
48 Bit 3 process data words (Param + 3 PD)
64 Bit 4 process data words (Param + 4 PD)
80 Bit 5 process data words (Param + 5 PD)
96 Bit 6 process data words (Param + 6 PD)
112 Bit 7 process data words (Param + 7 PD)
128 Bit 8 process data words (Param + 8 PD)
160 Bit 10 process data words (Param + 10 PD)
192 Bit 12 process data words (Param + 12 PD)
224 Bit 14 process data words (Param + 14 PD)
352 Bit 22 process data words (Param + 22 PD)
384 Bit 24 process data words (Param + 24 PD)
16 Bit 1 process data word (Param + 1 PD)
32 Bit 2 process data words (Param + 2 PD)
48 Bit 3 process data words (Param + 3 PD)
64 Bit 4 process data words (Param + 4 PD)
80 Bit 5 process data words (Param + 5 PD)
96 Bit 6 process data words (Param + 6 PD)
128 Bit 8 process data words (Param + 8 PD)
160 Bit 10 process data words (Param + 10 PD)
192 Bit 12 process data words (Param + 12 PD)
320 Bit 20 process data words (Param + 20 PD)
352 Bit 22 process data words (Param + 22 PD)
On-line configuration: Configuration frame / Read in
You can initially install the INTERBUS system completely and then set the DIP switches
of the UFI11A. The entire bus structure (configuration frame) can then be read in via the
CMD Tool. All stations will be automatically identified with their set data length.
22
Manual – Fieldbus Interface INTERBUS UFI11A
Page 23

INTERBUS Interface
Phone: 800.894.0412 - Fax: 888.723.4773 - Web: www.clrwtr.com - Email: info@clrwtr.com
5
Insert device
description
You can create an individual device description for the UFI11A in the INTERBUS system
to clearly identify and describe the INTERBUS stations. The following entries are of importance in this instance:
In the fields "Manufacturer Name" and "Device Type" you must enter the
– Manufacturer Name: SEW-EURODRIVE
– Device Type: UFI
so that the drive can be configured via the INTERBUS interface module (Fig. 12) with a
management PC from the management level.
Fig. 12: Device description for UFI
05655AXX
Select "Remote Bus" as interface type.
Manual – Fieldbus Interface INTERBUS UFI11A
23
Page 24

5
Phone: 800.894.0412 - Fax: 888.723.4773 - Web: www.clrwtr.com - Email: info@clrwtr.com
INTERBUS Interface
As of CMD Tool version 4.50, you can copy your own ICO files in the directory
".\IBSCMD\Pict32\" (Fig. 13) for easier identification of the drive inverter. You will find
the "INTERBUS description files for CMD Tool" under "Software / Movitrac" on the SEW
homepage.
Fig. 13: Linking device description with ICO files
03716AXX
24
Manual – Fieldbus Interface INTERBUS UFI11A
Page 25

INTERBUS Interface
Phone: 800.894.0412 - Fax: 888.723.4773 - Web: www.clrwtr.com - Email: info@clrwtr.com
5
Parameter
channel
Assigning process data
The following settings of the parameter channel will become necessary if you want to
use the PCP channel for configuring the UFI11A or a drive inverter connected to the
UFI11A:
• Message Lengths / Transmit / Receive: 243 bytes each
• Supported Parameter Channel Services (Standard): Read / Write
Fig. 14: Setting the parameter channel (PCP)
You assign the INTERBUS process data of the drive inverters to the program addresses
of the control system with the context menu "Process Data."
03717AXX
Fig. 15: Assignment of INTERBUS process data and PLC program addresses
Manual – Fieldbus Interface INTERBUS UFI11A
05657AXX
25
Page 26

5
Phone: 800.894.0412 - Fax: 888.723.4773 - Web: www.clrwtr.com - Email: info@clrwtr.com
INTERBUS Interface
Testing the PCP
connection
You can use the MONITOR mode of the CMD Tool to test the PCP connection to the
UFI. The following illustrations demonstrate the PCP test. You are basically establishing
a PCP connection with this method and read the parameter list (object directory) stored
in the device. Change the CMD Tool to the "Monitoring" operating state.
Fig. 16: Change the CMD Tool to the "MONITO-
RING“ operating state
Click on the UFI to which you would like to establish a PCP connection. Open the context menu with the right mouse button and select the menu item "Device Parameterization".
05658AXX
Fig. 17: Testing the PCP device parameterization
26
Manual – Fieldbus Interface INTERBUS UFI11A
Page 27

INTERBUS Interface
Phone: 800.894.0412 - Fax: 888.723.4773 - Web: www.clrwtr.com - Email: info@clrwtr.com
Activate the menu item "Device / Read Parameter List" in the window "Device Parameterization.“
5
Fig. 18: Window for device parameterization via CMD Tool
The configuration of the PCP channel is correct if the device parameters are now read
in. You can cancel the read-in process. If you receive an error message instead of the
progression bar, check the PCP configuration and assignment of the CRs. You may
want to format the parameterization memory of the interface module once again and write the current project once again into the parameterization memory. Repeat the configuration of the interface module and the sequence for testing the PCP connection.
Fig. 19: CMD Tool reads in device parameters, indicating that the
PCP communication is ok
03713AXX
03722AXX
Manual – Fieldbus Interface INTERBUS UFI11A
27
Page 28

5
Phone: 800.894.0412 - Fax: 888.723.4773 - Web: www.clrwtr.com - Email: info@clrwtr.com
INTERBUS Interface
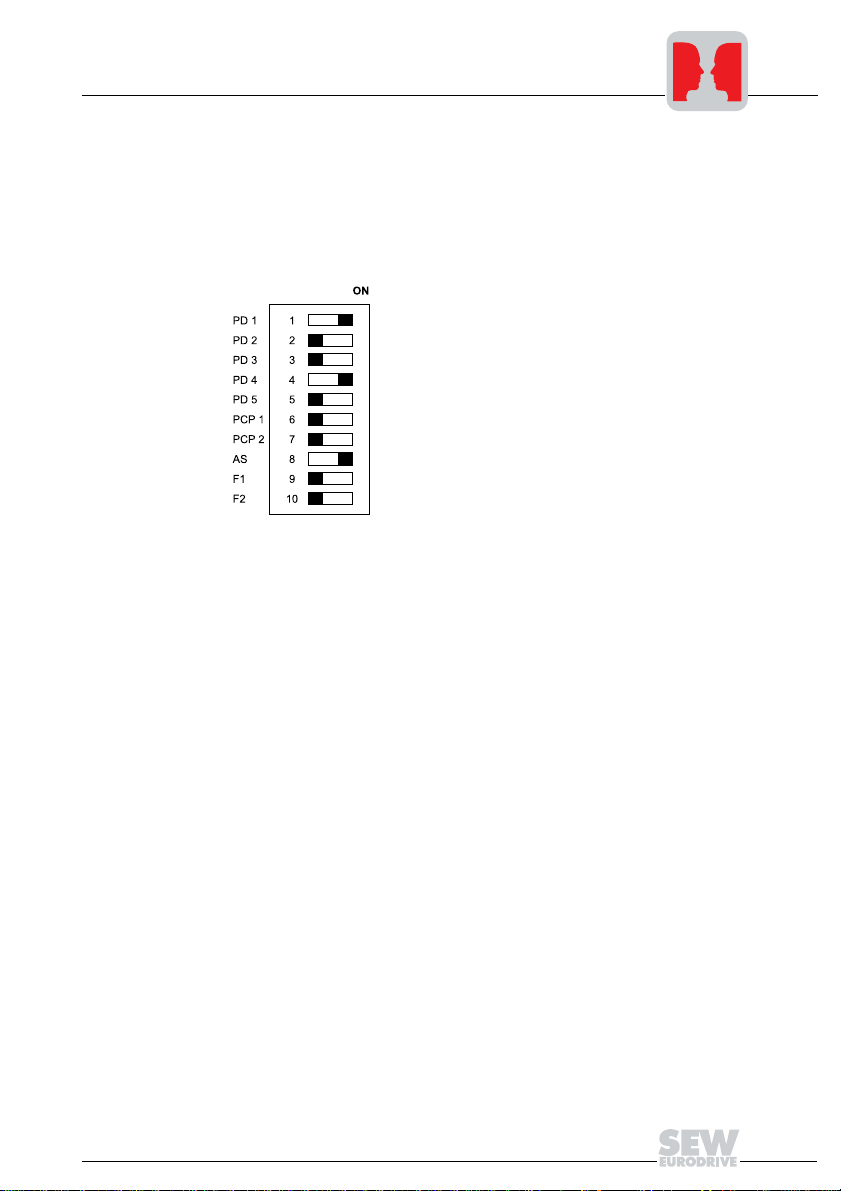
5.2 Configuration of the INTERBUS interface
Under the cover plate, there is a DIP switch for setting the INTERBUS data length of the
fieldbus interface. The process data length can be set to a maximum of 24 words using
switches S1-1 to S1-5. The PCP length can be set using switches S1-6 and S1-7. PCP
is the parameter channel of the INTERBUS and is used for setting the parameters of the
UFI11A and the connected inverters.
Fig. 20: UFI11A DIP
switches
The process data channel is the means by which the connected inverters are controlled
and their status read. Since all data of the connected inverters are transmitted by the
INTERBUS, you will have to enter the sum of the process data lengths of all individual
inverters. In Autosetup, this means three words per inverter.
Fig. 21 shows an example setting of six process data words for two inverters. The value
of each switch in determining the process data length is shown on the right.
Fig. 21: Process data words
05376AXX
05377AXX
28
Manual – Fieldbus Interface INTERBUS UFI11A
Page 29

INTERBUS Interface
Phone: 800.894.0412 - Fax: 888.723.4773 - Web: www.clrwtr.com - Email: info@clrwtr.com
A maximum of 3PDs can be assigned to one station on the SBus.
The PCP channel can be set to 0, 1, 2, or 4 words. At least one word must be set to
enable parameter data to be exchanged. Higher settings increase the transmission
speed. Fig. 8 shows the possible settings for the PCP channel.
5
Fig. 22: Possible settings for PCP words
Note that if the total of process data and PCP words exceeds 10 words , you must select
a value equal to or greater than your required data length from the following settings:
0 – 10 words set directly, 12 words, 14 words, 16 words, 24 words and 26 words.
Manual – Fieldbus Interface INTERBUS UFI11A
05378AXX
29
Page 30

5
Phone: 800.894.0412 - Fax: 888.723.4773 - Web: www.clrwtr.com - Email: info@clrwtr.com
INTERBUS Interface
Use the following table for the valid settings. You can also refer to the example settings
given below if you are operating the fieldbus interface in Autosetup mode.
Number of process data words 0 PCP words 1 PCP word 2 PCP words 4 PCP words
1 XXXX
2 XXXX
3 XXXX
4 XXXX
5 XXXX
6 XXXX
7 XXX
8 XXXX
9XX
10 X X X
11 X
12 X X X
13 X
14 X X
15 X
16 X
17
18
19
20 X
21
22 XX
23 X
24 X X
De-energize the UFI11A before adjusting the DIP switch settings. The settings of DIP
switches S1-1 to S1-7 are only read during the power-up initialization.
The UFI11A signals the "Microprocessor not ready" ID code (38h) if the settings of DIP
switches S1-1 to S1-7 are invalid.
30
Manual – Fieldbus Interface INTERBUS UFI11A
Page 31

INTERBUS Interface
Phone: 800.894.0412 - Fax: 888.723.4773 - Web: www.clrwtr.com - Email: info@clrwtr.com
5.3 Examples of DIP switch settings for process data and PCP communication in
Autosetup mode
1 inverter
(3 process data
words)
3 process data words are set. 0, 1, 2 and 4 PCP words can be set using DIP switches
PCP1 and PCP2.
5
2 inverters
(6 process data
words)
3 inverters
(9 process data
words)
6 process data words are set. 0, 1, 2 and 4 PCP words can be set using DIP switches
PCP1 and PCP2.
9 process data words are set. 0 and 1 PCP word can be set using DIP switches PCP1
and PCP2.
Manual – Fieldbus Interface INTERBUS UFI11A
31
Page 32

5
Phone: 800.894.0412 - Fax: 888.723.4773 - Web: www.clrwtr.com - Email: info@clrwtr.com
INTERBUS Interface
4 inverters
(12 process data
words)
5 inverters
(15 process data
words)
6 inverters
(18 process data
words)
12 process data words are set. 0, 2 and 4 PCP words can be set using DIP switches
PCP1 and PCP2.
15 process data words are set. Only 1 PCP word can be set using DIP switches PCP1
and PCP2.
20 process data words are set. 4 PCP words must be set using DIP switches PCP1 and
PCP2.
32
Manual – Fieldbus Interface INTERBUS UFI11A
Page 33

INTERBUS Interface
Phone: 800.894.0412 - Fax: 888.723.4773 - Web: www.clrwtr.com - Email: info@clrwtr.com
5
7 inverters
(21 process data
words)
8 inverters
(24 process data
words)
22 process data words are set. 2 and 4 PCP words can be set using DIP switches PCP1
and PCP2.
24 process data words are set. 0 and 2 PCP words can be set using DIP switches PCP1
and PCP2.
Manual – Fieldbus Interface INTERBUS UFI11A
33
Page 34

5
Phone: 800.894.0412 - Fax: 888.723.4773 - Web: www.clrwtr.com - Email: info@clrwtr.com
INTERBUS Interface
5.4 Control via INTERBUS
Data exchange between the INTERBUS master and the UFI11A takes place using the
I/O area. The process data for all inverters connected to the UFI11A are located in a
contiguous block in this area.
If there is more than one inverter, the associated process data words are appended at
the end (see Fig. 23). The number of process data words per inverter is 3 words with
Autosetup.
The inverters are located in ascending (SBus) address sequence with their associated
process data lengths in the process image, for example an inverter with address 1 and
3 words, then an inverter with address 2 and 3 words, then an inverter with address 3
and 2 words, etc.
POW318
POW316
POW314
POW312
POW310
POW308
[1]
PIW318
PIW316
PIW314
PIW312
PIW310
PIW308
Fig. 23: Representation of the INTERBUS data in the PLC address area ([1] = PLC address area
/ U/f = Inverter)
PO 3
PO 2
PO 1
PO 3
PO 2
PO 1
UFI
PI 3
PI 2
PI 1
PI 3
PI 2
PI 1
PO 1
PO 2
PO 3
U/f!1 U/f!2
PI 2
PI 1
PI 3
PO 1
PI 1
PO 2
PI 2
PO 3
PI 3
50394AXX
34
Manual – Fieldbus Interface INTERBUS UFI11A
Page 35

5.5 PCP interface
Phone: 800.894.0412 - Fax: 888.723.4773 - Web: www.clrwtr.com - Email: info@clrwtr.com
The UFI11A fieldbus interface offers a standardized interface for parameter setting
using the "Peripherals Communication Protocol" (PCP). This communications channel
gives you full access to the parameters of the UFI11A fieldbus interface and the drive
parameters of the inverters connected to the UFI11A.
Overview of basic
structure
PCP services
The PCP channel must be set to one, two or four words using the DIP switches on the
UFI11A to enable access to the parameter values of the UFI11A fieldbus interface or the
inverter. Changing the number of PCP words varies the access speed to parameter values via the PCP channel. The PCP interface is implemented using PCP version 3.0 in
the UFI11A.
The UFI11A fieldbus interface supports the PCP services shown in Fig. 10. However,
only the following services are relevant for setting parameters:
• Establishing the connection (Initiate)
• Reading of parameter values (Read)
• Writing of parameter values (Write)
• Cancelling the connection (Abort)
INTERBUS Interface
5
Fig. 24: PCP services supported by the UFI11A fieldbus interface
Manual – Fieldbus Interface INTERBUS UFI11A
05389AXX
35
Page 36

5
Phone: 800.894.0412 - Fax: 888.723.4773 - Web: www.clrwtr.com - Email: info@clrwtr.com
INTERBUS Interface
Establishing the
communications
link with "Initiate"
Canceling the
communications
link with "Abort"
Reading parameter values with
"Read"
Writing parameter
values with "Write"
Parameters in the
object list
The "Initiate" PCP service establishes a communication link for exchanging parameters
between an INTERBUS master and the UFI11A fieldbus interface. The connection is always established from the INTERBUS master. Various arrangements relating to the
communication link are checked during establishment of the connection, such as supported PCP services, user data length, etc. The fieldbus interface responds with a positive initiate response if the connection is established successfully. If the connection can
not be established, then the arrangements for the communications link on the INTERBUS master do not match those on the fieldbus interface. The fieldbus interface responds with an initiate error response. In this case, compare the configured communications relationship list in the INTERBUS master with that in the fieldbus interface.
As a rule, an attempt to re-establish an existing communication link leads to an abort.
The communication link is then dropped, which means the "Initiate" PCP service must
be run a third time in order to re-establish the communication connection.
The "Abort" PCP service cancels an existing communications link between the INTERBUS master and the fieldbus interface. Abort is an unconfirmed PCP service and can be
triggered either from the INTERBUS master or from the fieldbus interface.
The "Read" PCP service gives the INTERBUS master read access to all communication
objects (drive parameters) of the fieldbus interface. All drive parameters and their coding
are presented in detail in the Fieldbus Unit Profile documentation and the list of MOVID-
®
parameters.
RIVE
The "Write" PCP service gives the INTERBUS master write access to all parameters of
the fieldbus interface. The fieldbus interface generates a write error response if incorrect
access is made to a parameter (e.g. the value written is too large). Precise information
is given relating to the cause of the error.
The "Read" and "Write" PCP services give the INTERBUS master access to all parameters defined in the object list of the UFI11A. All the parameters of the fieldbus interface
which can be accessed via the bus system are described as communication objects in
the static object list of the UFI11A. All objects in the static object list are addressed using
indices. The following table shows the structure of the object list of the UFI11A.
36
Manual – Fieldbus Interface INTERBUS UFI11A
Page 37

INTERBUS Interface
Phone: 800.894.0412 - Fax: 888.723.4773 - Web: www.clrwtr.com - Email: info@clrwtr.com
The index range is subdivided into three logical areas. The UFI11A parameters are
addressed using indices 8300 – 8313dec. Indices below 8300dec can be used for accessing parameters which are not contained in the object list, or for addressing parameters which are found on an inverter connected to the UFI11A.
Parameter index
(decimal)
8288 Variable data channel with acyclical routing (UFI11A and parameters of the con-
8296 Download parameter block
8297 Last PCP index
8299 MOVILINK parameter channel acyclical (only UFI11A parameters can be rea-
8300 – 8313 UFI11A parameters
8314 – 9999 Parameters of the UFI11A or of an inverter connected to the UFI11A which can
> 10000 Table, program and variable memory of the UFI11A or an inverter connected to
Name of the communication object
nected inverters can be reached)
ched)
be addressed via object 8288.
the UFI11A. These parameters can be addressed with object 8288.
5
Object description
of the UFI11A or
drive parameters
The parameters of the connected inverters are described in detail in the SEW document
"Parameter List." In addition to the parameter index, additional information about coding,
the range of values and the meaning of the parameter data is provided. The object description in the object list is identical for all parameters. Even read-only parameters are
given the Read all/Write all attribute in the object list because the inverter undertakes
the corresponding check itself and sends back a return code if necessary. The following
table shows the object description of all parameters.
Index: 8300 ... 8313
Object code: 7 (simple variable)
Data type index : 10 (octet string)
Length: 4
Local address:
Password:
Access groups:
Access rights: Read all/Write all
Name[16]: -
Extension length: -
Manual – Fieldbus Interface INTERBUS UFI11A
37
Page 38

5
Phone: 800.894.0412 - Fax: 888.723.4773 - Web: www.clrwtr.com - Email: info@clrwtr.com
INTERBUS Interface
"Variable data
channel with acyclical routing"
object
This object enables you to address all the parameters of the UFI11A itself and the connected inverters. The object contains a selection option for the subchannel and address
information for selecting the target unit. It contains information about the data length and
frame type and an acyclical MOVILINK parameter channel. The required service and
data value are specified here. The length is fixed at 12 bytes.
Octet 0 1 2 3 4 5 6 7 8 9 10 11
Meaning Subchan-
Fine structure Subchan-
Coarse structure
nel
nel
Routing information MOVILINK parameter channel acyclical
Subaddress
Subaddress
Frame
type
Frame
type
Data
length
Data
length
Admin Re-
served
Admin Re-
served
Index
Index
Low
Data
MSB
High
Parameter index 4 bytes data
Data Data Data
The subchannel determines to which interface the data will be directed. The setting 0
addresses the parameters of the UFI11A and the subaddress is of no importance. The
setting 1 on the subchannel addresses the standard interface (the SBus in case of the
UFI11A).
The subaddress byte allows selection of the target unit. If you want to address the parameters of a drive inverter connected to the UFI11A via SBus, you will enter the SBus
address of the respective drive inverter.
The frame type must be set to 86hex (only acyclical parameter data). The data length
for this frame type is fixed at 8 bytes.
Variable data
channel performs a
write service
If a write service is performed via the data channel (e.g. write parameter or write parameter volatile), the UFI11A responds with the current service confirmation when the service has been performed. The corresponding error code is returned if the write service
is not successful.
This method offers the advantage that the write services are processed simply by sending a WRITE "MOVILINK parameter channel" once and evaluating the "write confirmation." The following table shows how write services are performed via the variable data
channel.
Control (master) UFI11A fieldbus interface
1. Initiate the service coded in the parameter channel by means of a WRITE to the "MOVILINK parameter
channel cyclical" object.
WRITE 8288 (parameter channel)
LSB
Service confirmation (OK/error code)
The WRITE service coded in the parameter channel is performed and the service confirmation is returned directly as the response.
38
Manual – Fieldbus Interface INTERBUS UFI11A
Page 39

INTERBUS Interface
Phone: 800.894.0412 - Fax: 888.723.4773 - Web: www.clrwtr.com - Email: info@clrwtr.com
5
Variable data
channel performs a
read type service
A PCP WRITE service has to be performed before a parameter can be read via the data
channel. The PCP WRITE service defines where the UFI11A data should be available.
A read service must take place on the variable data channel in order for these data to
get to the master. As a result, a PCP WRITE and a PCP READ are always required for
performing read services via the variable data channel. The following table shows how
read services are performed via the variable data channel.
Control (master) UFI11A fieldbus interface
1. Initiate the service coded in the parameter channel by means of a WRITE to the "MOVILINK parameter
channel cyclical" object.
2. READ "MOVILINK parameter channel cyclical" and evaluation of the service confirmation in the parameter channel.
WRITE 8288 (parameter channel)
OK
READ 8288 (parameter channel)
Data = Parameter channel with result
1. Reception is confirmed immediately, the data channel is evaluated and the requested service performed.
2. Service confirmation is entered in the data channel and can be evaluated by READ
access in the master.
The "variable data channel with acyclical routing" object is only handled locally on the
fieldbus interface and is defined as in the following table.
Index: 8288
Object code: 11 (string variable)
Data type index : 10 (octet string)
Length: 11
Local address:
Password:
Access groups:
Access rights: Read all/Write all
Name[16]: -
Extension length: -
Manual – Fieldbus Interface INTERBUS UFI11A
39
Page 40

5
Phone: 800.894.0412 - Fax: 888.723.4773 - Web: www.clrwtr.com - Email: info@clrwtr.com
INTERBUS Interface
"Download parameter block"
object
The "download parameter block" object enables up to 38 drive parameters of the
UFI11A or an inverter connected to the UFI11A to be written at the same time with only
one write service. This object gives you the opportunity to set the parameters of the inverter in the startup phase, by calling the write service only once. In general, only a few
parameters vary from application to application so that this parameter block with its max.
38 parameters is sufficient for almost all applications. The user data area is defined as
38 x 6 + 2 bytes = 230 bytes (byte format). The following table shows the structure of
the "download parameter block" object.
Octet Meaning Note
0 Address Target address: 0 or 254 for the UFI11A or SBus address of the
1 Number of parameters 1 – 38 parameters
2 Index high
3 Index low
4 Data MSB
5Data
6Data
7 Data LSB
8 Index high
223 Data LSB
224 Index high
225 Index low
226 Data MSB
227 Data
228 Data
229 Data LSB
target inverter
1st parameter
2nd parameter... ...
38th parameter
The "download parameter block" object is only handled locally on the fieldbus interface
and is defined as in the following table.
Index: 8296
Object code: 7 (simple variable)
Data type index : 10 (octet string)
Length: 230
Local address:
Password:
Access groups:
Access rights: Write all
Name[16]: -
Extension length: -
40
Manual – Fieldbus Interface INTERBUS UFI11A
Page 41

Example
Phone: 800.894.0412 - Fax: 888.723.4773 - Web: www.clrwtr.com - Email: info@clrwtr.com
"Last PCP index"
object
INTERBUS Interface
The WRITE service on the "download parameter block" object starts a parameterization
mechanism on the UFI11A. This writes all the parameters specified in the user data area
of the object one after the other in the UFI11A itself or a connected inverter and therefore
sets the parameters of the UFI11A or the inverter. The UFI11A is addressed using
address 0. An inverter connected to the UFI11A is addressed using its SBus address.
The write service is terminated with a positive write response once the download parameter block has been processed successfully (i.e. all parameters transferred by the INTERBUS fieldbus interface have been written). A negative write response is returned in
case of an error. The return code contains more detailed information about the type of
error, as well as the number of the parameter (no. 1 – 38) where the error occurred (see
example).
Write error response for an error when writing the 11th parameter:
Error class: 8 Other
Error code: 0 Other
Additional code high: 11dec Error when writing parameter 11
Additional code low: 15hex Value too large
Note the following points when using the download parameter block:
• Do not perform a factory setting within the download parameter block!
• All parameters written after the parameter lock has been activated will be rejected.
This object is 4 bytes long and, when read access is executed, it returns the numerical
value of the last index which can be addressed directly using the PCP services. PCP
accesses to indices greater than this numerical value must be made using the "MOVILINK parameter channel with acyclical routing" object. Access is also possible using object 8299 "MOVILINK parameter channel acyclical" if the parameters of the UFI11A are
to be addressed.
Index: 8297
Object code: 7 (simple variable)
Data type index : 10 (octet string)
Length: 4
Local address:
Password:
Access groups:
Access rights: Read all
Name[16]: -
Extension length: -
5
Manual – Fieldbus Interface INTERBUS UFI11A
41
Page 42

5
Phone: 800.894.0412 - Fax: 888.723.4773 - Web: www.clrwtr.com - Email: info@clrwtr.com
INTERBUS Interface
MOVILINK parameter channel
acyclical
Parameter channel performs a
write service
The "MOVILINK parameter channel acyclical" object is 8 bytes long and contains the
MOVILINK parameter channel. This object can be used for acyclical parameter accesses, i.e. the inverter processes the service coded in the parameter channel every time
a WRITE service is received on this object.
The handshake bit is not evaluated! The following table shows the structure of the "MOVILINK parameter channel acyclical."
Octet 01234567
Meaning Admin Re-
Note Admin Re-
served
served
Index
Index
Data
high
Parameter index 4 bytes data
low
Data Data Data
MSB
LSB
There are two different procedures involved in setting the drive inverter parameters via
the acyclical MOVILINK parameter channel:
• Parameter channel performs a write service
• Parameter channel performs a read service
If a write service is performed via the acyclical parameter channel (e.g. write parameter
or write parameter volatile), the UFI11A responds with the current service confirmation
when the service has been performed. The appropriate error code is returned if the write
access is not successful.
This method offers the advantage that the write services are processed simply by sending a WRITE "MOVILINK parameter channel" once and evaluating the "write confirmation". The following table shows how write services are performed via the acyclical MOVILINK parameter channel.
Control (master) UFI11A fieldbus interface
1. Initiate the service coded in the parameter channel by means of a WRITE to the "MOVILINK parameter
channel cyclical" object.
WRITE 8299 (parameter channel)
Service confirmation (OK/error code)
The WRITE service coded in the parameter channel is performed and the service confirmation is returned directly as the response.
42
Manual – Fieldbus Interface INTERBUS UFI11A
Page 43

INTERBUS Interface
Phone: 800.894.0412 - Fax: 888.723.4773 - Web: www.clrwtr.com - Email: info@clrwtr.com
5
Parameter channel performs a
read type service
A PCP WRITE service must be performed before a parameter can be read via the parameter channel. The PCP WRITE service defines where the UFI11A data should be
available. A read service must take place on the acyclical parameter channel in order
for these data to get to the master. As a result, a PCP WRITE and a PCP READ are
always required for performing read services via the parameter channel. The following
table shows how read services are performed via the acyclical MOVILINK parameter
channel.
Control (master) UFI11A fieldbus interface
1. Initiate the service coded in the parameter channel by means of a WRITE to the "MOVILINK parameter
channel cyclical" object.
2. READ "MOVILINK parameter channel cyclical" and evaluation of the service confirmation in the parameter channel.
WRITE 8299 (parameter channel)
OK
READ 8299 (parameter channel)
Data = Parameter channel with result
1. Reception is confirmed immediately, the parameter channel is evaluated and the requested service performed.
2. Service confirmation is entered in the parameter channel and can be evaluated by
READ access in the master.
The acyclical MOVILINK parameter channel is only handled locally on the fieldbus interface and is defined as in the following table.
Index: 8299
Object code: 7 (simple variable)
Data type index : 10 (octet string)
Length: 8
Local address:
Password:
Access groups:
Access rights: Read all/Write all
Name[16]: -
Extension length: -
Manual – Fieldbus Interface INTERBUS UFI11A
43
Page 44

5
Phone: 800.894.0412 - Fax: 888.723.4773 - Web: www.clrwtr.com - Email: info@clrwtr.com
INTERBUS Interface
5.6 Return codes for parameter setting
Different return codes will be sent back to the master used for parameter setting in case
of inccorrect parameters. These codes will give the user a detailed insight into the reason for an error. The return codes are usually structured according to EN 50170 with
the following elements:
•Error class
•Error code
• Additional code
These return codes apply to all communication interfaces of the UFI11A.
Error class
Error code
The element "Error class" classifies the type of error. The following error classes are
listed according to EN 50170.
Class (hex) Designation Meaning
1 vfd-state Status error of the virtual field device
2 application-reference Error in application program
3 definition Definition error
4 resource Resource error
5 service Error during service execution
6 access Access error
7 ov Error in object directory
8 other Other error (see Additional code)
Except for error class 8 = Other error, the error class is generated by the communication
software of the fieldbus card in case of communication problems. Return codes generated by the inverter system are all classified as error class 8 = Other error. You will get a
more detailed analysis of the error with the element "Additional code."
The element "Error code" gives you more detailed information on the reason for the error
within the "Error class" and is generated by the communication software of the fieldbus
card in case of communication problems. Error code = 0 (other error code) is the only
error code that has been defined for error class 8 = Other error. You will find detailed
information for this error in "Additional code."
44
Manual – Fieldbus Interface INTERBUS UFI11A
Page 45

INTERBUS Interface
Phone: 800.894.0412 - Fax: 888.723.4773 - Web: www.clrwtr.com - Email: info@clrwtr.com
5
Additional code
Special case
"Internal
communication
error"
The "Additional code" contains all SEW-specific return codes for incorrect parameter
setting of the drive inverters. These codes are sent back to the master as "Error class 8
= Other error." Table 2 lists all possible codes for the additional code.
Add. code
high (hex)
00 00 No error
00 10 Incorrect parameter index
00 11 Function/parameter not available
00 12 Read access only
00 13 Parameter block is active
00 14 Factory setting is active
00 15 Value too large for parameter
00 16 Value too small for parameter
00 17 No option card available for this function/parameter
00 18 Error in system software
00 19 Parameter access via RS485 process interface on X13 only
00 1A Parameter access via RS485 diagnostics interface only
00 1B Limited-access parameter
00 1C Requires controller inhibit
00 1D Invalid parameter value
00 1E Factory setting has been activated
00 1F Parameter was not saved in EEPROM
00 20 Parameter cannot be changed with enabled output stage
Add. code low
(hex)
Meaning
The return code listed in the following table will be generated in case of a communication
error between option card and inverter system. The PCP service transmitted via fieldbus
may not have been executed and should be repeated. In case this error occurs frequently, the drive inverter will have to be turned off and on again to start a new initialization.
Error class: 6 Access
Error code: 2 Hardware problem
Add. code high: 0 -
Add. code low: 0 -
Code (dez) Meaning
Manual – Fieldbus Interface INTERBUS UFI11A
45
Page 46

5
Phone: 800.894.0412 - Fax: 888.723.4773 - Web: www.clrwtr.com - Email: info@clrwtr.com
INTERBUS Interface
Error correction
Extension of the
Additional code
Extension of the
special return
codes
5.7 Autosetup
Repeat the read or write service. If the error occurs once again, turn off the drive inverter
completely and turn it on again. Please consult the SEW Electronics Service If this error
occurs permanently.
00 23h Parameter may only be changed in IPOS program "Stop"
00 24h Parameter may only be changed with Autosetup turned off
Error class: 06 Access
Error code: 01 Object does not exist
Add. code high: 0 -
Add. code low: 0 -
Remedy: You are trying to exchange parameters with a drive inverter and have not configured a parameter channel.
You can start up the UFI11A without a PC with the Autosetup function. It is activated with
the Autosetup DIP switch. Turning on the Autosetup DIP switch will execute the function
The DIP switch will have to stay turned on afterwards.
once.
cuted once again by turning the switch off and on again. Upon activation of the
Autosetup feature, the UFI11A automatically searches for inverters on the lower-level
SBus and indicates this activity with a brief blinking of the SYS-FLT LED. Each inverter
on the SBus must be assigned a unique SBus address (P813). To avoid confusion with
data assignments, it is recommended to assign the addresses from address 1 ans working in ascending order according to the arrangement of inverters in the control cabinet.
The process image on the fieldbus side will be extended by three words for each located
inverter. The SYS-FLT LED stays on if no inverters are found. A maximum of eight inverters can be configured. The figure shows the process image for three inverters with
three words in the process output data and process input data. Following the search, the
UFI11A cyclically exchanges three process data words with each connected inverter.
The process output data are collected from the fieldbus, divided into blocks of three and
sent. The process input data are read by the inverters, assembled and sent to the fieldbus master.
Autosetup has to be executed only once. The detected configuration will be saved in the
non-volatile memory. See section "Installation and operation without PC."
Important: Execute Autosetup again in case you change the process data assignment
of the inverters connected to the UFI11A, because the UFI11A saves these values once
only during Autosetup. Likewise, the process data assignments (P860 ... P865) of the
connected inverters must not be altered dynamically either, for example by an IPOS program, following Autosetup.
Code (dez) Meaning
The function can be exe-
46
Manual – Fieldbus Interface INTERBUS UFI11A
Page 47

INTERBUS Interface
Phone: 800.894.0412 - Fax: 888.723.4773 - Web: www.clrwtr.com - Email: info@clrwtr.com
5
Fig. 25: Data exchange INTERBUS master – UFI11A – inverter
Manual – Fieldbus Interface INTERBUS UFI11A
05431AXX
47
Page 48

6
Phone: 800.894.0412 - Fax: 888.723.4773 - Web: www.clrwtr.com - Email: info@clrwtr.com
6 Error Response
6.1 Fieldbus timeout
6.2 SBus timeout
6.3 Unit errors
Error Response
Switching off the fieldbus master or a wire break in the fieldbus cabling leads to a fieldbus timeout in the UFI11A. The connected inverters are set to a safe status by zeros
being sent on the process output data. This corresponds to a rapid stop on control word
1. The fieldbus timeout error is self-resetting, meaning the inverters will begin receiving
the current process output data from the master immediately after fieldbus communication is re-established. This error response can be deactivated using P831 on the
UFI11A.
If one or more inverters on the Sbus can no longer be addressed by the UFI11A, the
UFI11A enters error code 91, "System error," in status word 1 of the corresponding inverter. The SYS-FLT LED lights up and the error is also displayed via the diagnostic interface. P815 SBus timeout delay must be set to a value other than 0 on the inverter if
it is to stop. The error is self-resetting on the UFI11A, meaning the current process data
are exchanged again immediately after communication resumes.
UFI11A fieldbus interfaces detect a range of hardware defects and respond with an inhibit condition. Refer to the list of errors for the exact error responses and measures to
remedy the problem. A hardware defect means error 91 is entered in the process input
data of the fieldbus in status word 1 of all inverters. The SYS-FLT LED on the UFI11A
then flashes evenly. The exact error code is displayed in the status of the UFI11A using
the diagnostic interface of MOVITOOLS.
48
Manual – Fieldbus Interface INTERBUS UFI11A
Page 49

7 Diagnostic LEDs
Phone: 800.894.0412 - Fax: 888.723.4773 - Web: www.clrwtr.com - Email: info@clrwtr.com
The UFI11A INTERBUS interface has 7 diagnostic LEDs.
• LED "UL" (green) Logic voltage
• LED "RC" (green) Incoming remote bus OK
• LED "BA" (green) Bus mode active
• LED "RD" (yellow) Outgoing remote bus switches off
• LED "TR" (green) Parameter data exchange via PCP channel
• LED "SYS-FAULT"(red) for displaying system errors and operating conditions of the
• LED "USER" (green) for application-specific diagnostics in expert mode
7.1 States of the LEDs UL, RC, BA, TR and RD
LED UL "U-Logic"
(green)
LED RC "Cable
Check" (green)
LED BA "Bus
Active" (green)
LED RD "Remote
Bus Disable"
(red)
Status Meaning Remedy
on Supply voltage of bus electro-
off Supply voltage of bus electro-
Status Meaning Remedy
on Incoming remote bus connec-
off Incoming remote bus connec-
Status Meaning Remedy
on Data transmission via INTER-
off No data transmission; INTER-
Status Meaning Remedy
on Outgoing remote bus turned off -
off Outgoing remote bus not turned off -
nics is present
nics is missing
tion is ok
tion is faulty
BUS active
BUS has been stopped
UFI11A
-
Check the 24V voltage supply of the UFI11A.
-
Check the incoming remote bus connection.
-
Check the incoming remote bus cable. Use the diagnostics
display of the INTERBUS interface module (master) for
additional error localization.
Diagnostic LEDs
7
Manual – Fieldbus Interface INTERBUS UFI11A
49
Page 50

7
Phone: 800.894.0412 - Fax: 888.723.4773 - Web: www.clrwtr.com - Email: info@clrwtr.com
LED TR "Transmit" (green)
LED TR "Transmit" (yellow or
red)
LED "SYSFAULT" (red)
LED "USER"
(green)
Diagnostic LEDs
Status Meaning Remedy
The LED TR corresponds in the color green according to the Interbus standard.
off No PCP communication -
green PCP communication active or INTERBUS start (parameter access via
Status Meaning Remedy
The LED TR signals system-internal states with the colors yellow and red that usually do not occur during
INTERBUS operation.
off or
green
flashing
yellow
steady red Incorrect DIP switch configuration selected,
flashing
red
Status Meaning
OFF Standard operating status. The UFI11A is exchanging data with the connected inver-
FLASHES 1 x
briefly with long
pause
FLASHES regularly UFI11A is in error status. If you started the UFI11A using the Autosetup DIP switch,
ON The UFI11A is not exchanging data with the connected inverters. Either is has not
Statuts Meaning
OFF Standard operating status. The "USER“ LED is reserved for expert mode.
INTERBUS PCP channel)
Standard operation (see table for TR = green) -
Inverter is in initialization phase -
no INTERBUS operation possible.
Incorrect DIP switch configuration or defective INTERBUS option card, no INTERBUS
operation possible.
ters.
Autosetup has been selected using the DIP switch and the UFI11A is currently setting up its configuration. If this status lasts for more than one minute, turn off the
Autosetup mode and turn it on again. Replace the module if the behavior persists.
turn the UFI11A off and on again. If the LED is still on, restart Autosetup by turning
the DIP switch off and on again. If you started the UFI11A with MOVITOOLS, you
will see an error message in the status window. Consult the corresponding error
description.
been configured or one or more of the connected inverters are not responding.
Reconfigure the UFI11A. If you started up the UFI11A using Autosetup, please
switch the Autosetup DIPswitch off and on again. If the LED stays on after Autosetup, please check the cabling and the terminating resistors of the SBus as well as
the inverter voltage supply. If you started up the UFI11A using MOVITOOLS, click
the "Update" button in the Movitools Manager. All the inverters should be displayed
in the "Connected Inverters" window. If this is not the case, please check the cabling
and the terminating resistors of the SBus as well as the inverter voltage supply.
Reconfigure the UFI11A with MOVITOOLS if necessary.
Check the settings of DIP switch S1. Correct
the settings of the DIP switches and turn the
unit on again.
Check the setting of DIP switch S1. If the setting is correct, contact SEW Electronics Service.
-
50
Manual – Fieldbus Interface INTERBUS UFI11A
Page 51

8 DIP Switches
Phone: 800.894.0412 - Fax: 888.723.4773 - Web: www.clrwtr.com - Email: info@clrwtr.com
DIP Switches
8
PD1 – PD5
PCP 1, 2
Process data
length
Fig. 26: DIP switches
05376AXX
Binary setting of the process data length
The following example shows how the DIP switch settings are determined for a process
data length of 17. Divide each required process data length by the number two and
make a note of the remainder. The remainder can only be 0 or 1. This corresponds to
the setting of the DIP switches.
Table 1: Example for determining the DIP switch settings for process data width 17
Calculation Remainder DIP switch setting Significance
17 ÷ 2 = 8 1 X1 = 20 = ON 1
8 ÷ 2 = 4 0 X2 = 21 = OFF 2
4 ÷ 2 = 2 0 X3 = 22 = OFF 4
2 ÷ 2 = 1 0 X4 = 23 = OFF 8
1 ÷ 2 = 0 1 X5 = 24 = ON 16
You can set the lengths of the PCP channel in words using these two DIP switches. Possible values are 0, 1, 2 and 4 words.
PCP 1 PCP 2
OFF OFF 0
ON OFF 1
OFF ON 2
ON ON 4
Please note that INTERBUS does not support all data lengths which can be set. The total data length of process data and PCP words can be 1 – 10, 12, 14, 16, 24, 26 and 36
words.
If you require a number of words which lies between these settings, the next higher number must be used. For example, 9PD + 4 words PCP results in 14 words.
AUTO SETUP: See Sec. Quickstart without PC
Manual – Fieldbus Interface INTERBUS UFI11A
51
Page 52

9
Phone: 800.894.0412 - Fax: 888.723.4773 - Web: www.clrwtr.com - Email: info@clrwtr.com
Application examples
9 Application examples
This section describes small application examples for the exchange of process data and
configuration of the UFI11A or a drive inverter connected to the UFI11A via the PCP interface.
9.1 Control via process data
Control of the drive inverters via process data takes place by simple reading/writing of
the program addresses to which the INTERBUS process data of the drive inverters have
been written. A simple STEP7 program for the Simatic S7 looks as follows:
L W#16#0006
T PAW 144 //write 6hex to PO1 (control word = enable)
L 1500
T PAW 146 //write 1500dez to PO2 (speed setpoint = 300 1/min)
L W#16#0000
T PAW 148 //write 0hex to PO3 (has no function after factory setting)
You will find additional information concerning control of the drive inverters via the process data channel, especially coding of the control and status word, in the manual for
the fieldbus unit profile of the corresponding drive inverter.
9.2 Parameter setting via the PCP interface
This section describes how you can read or write parameters and IPOS variables via the
standardized INTERBUS PCP services "Read" and "Write." The example is valid for all
INTERBUS interface modules of generation 4 (G4) and is explained in the PHOENIX
nomenclature. The coding examples described in the following sections are represented
in the same manner as described in the INTERBUS user manual "Peripherals Communication Protocol (PCP)" published by Phoenix Contact.
Prerequisites
You should have access to the following user manuals:
• INTERBUS user manual "Peripherals Communication Protocol (PCP)", PHOENIX
CONTACT, IBS SYS PCP G4 UM
• Manual for the fieldbus unit profile of the drive inverter connected to the UFI11A
52
Manual – Fieldbus Interface INTERBUS UFI11A
Page 53

9.3 Representation of the coding examples
Phone: 800.894.0412 - Fax: 888.723.4773 - Web: www.clrwtr.com - Email: info@clrwtr.com
All information of a PCP service is represented in a word-by-word manner with one word
listed below the other. This means you can consider a word as an PLC word (for example Simatic data word). You will find a coding example for the UFI11A in the right table
column.
Select the UFI11A to be configured with the "Communication Reference (CR)." In the
following examples, the UFI11A has been assigned the CR = 02 hex in the CMD tool.
The index defines the parameter that is to be accessed.
Before you can use the PCP channel of the UFI11A, you will have to configure the device description for the inverter in the CMD Tool.
9.4 Sequence of a parameter setting process
The Peripherals Communication Protocol (PCP) of the INTERBUS standardizes the access to parameter data of INTERBUS stations and establishes the following sequence:
• Establishing the PCP connection with the "Initiate" service.
• Reading or writing parameters with the "Read" and "Write" services.
• If the communication connection is no longer necessary, it can be disconnected with
the "Abort" service (not explained here since it often is not necessary, see PCP manual).
• Initialization of the PCP connection with the "Initiate" service.
Access to the parameters of the Interbus station takes place only after the PCP connection has been established with "Initiate_Request." This step can be established during
the initial startup of the system.
Word Meaning Coding (hex)
1 Command_Code = Initiate_Request 00 8B
2 Parameter_Count 00 02
3 - Comm._Reference 00 02
4 Password Access_Groups 00 00
Bits 15 ... 8 7 ... 0
After sending the service, you should receive a confirmation with "Initiate_Confirmation"
(see PCP manual in case of a non-confirming message).
Application examples
9
Manual – Fieldbus Interface INTERBUS UFI11A
53
Page 54

9
Phone: 800.894.0412 - Fax: 888.723.4773 - Web: www.clrwtr.com - Email: info@clrwtr.com
Application examples
9.5 Reading of an UFI parameter
You read an UFI11A parameter with the "Read" service. The parameters are typically 4
bytes long (1 double word). This read service accesses only those parameters with indices between 8300dez and 8310dez. Parameter access to all other parameters of the
UFI11A or a drive inverter connected to the UFI11A takes place via object 8288 "Variable data channel with acyclical routing." The access is decribed in the next section.
Example
Reading of index 8301 unit type (Index 8301dez = 206Dhex)
Word Meaning Coding (hex)
1 Command_Code = Read_Request 00 81
2 Parameter_Count 00 03
3 Invoke_ID Comm._Reference 00 02
4 Index 20 6D
5 Subindex - 00 00
Bits 15 ... 8 7 ... 0
After sending the service, you should receive a confirmation with "Read_Confirmation."
Word Meaning Coding (hex)
1 Message_Code = Read_Confirmation (+) 80 81
2 Parameter_Count 00 05
3 Invoke_ID Comm._Reference 00 02
4 Result (+) 00 00
5 - Length 00 04
6 Data [1] Data [2] 00 28
7 Data [3] Data [4] 01 00
Bits 15 ... 8 7 ... 0
The parameter data are displayed as follows in the Motorola format (Simatic format):
Data [1] = High Byte Data [2] = Low Byte Data [3] = High Byte Data [4] = Low Byte
00 hex 28 hex 01 hex 00 hex
00 28 01 00 hex = Identification for UFI11A
You will find additional information on the UFI11A parameters in the section "Parameter
List."
54
Manual – Fieldbus Interface INTERBUS UFI11A
Page 55

Application examples
Phone: 800.894.0412 - Fax: 888.723.4773 - Web: www.clrwtr.com - Email: info@clrwtr.com
9.6 Writing of UFI11A or drive parameters via object 8288
The UFI offers a special parameter access via the object 8288 "variable data channel
with acyclical routing" for the universal write access to all data of the UFI or a drive inverter connected to the UFI (parameters, IPOS variables, IPOS program code, etc.).
The following description is the mechanism that can be used to change IPOS variables
or other variables via the parameter channel. The "variable data channel with acyclical
routing“ is available via index 8288 dez (2060 hex).
Example
Writing the value 74565 of the IPOS variable H0 = Index 11000 dez (2AF8 hex). The
value 74565 dez (0001 2345 hex) has to be written to the drive inverter with SBus
address 1.
Word Meaning Coding (hex)
1 Command_Code = Write_Request 00 82
2 Parameter_Count 00 09
3 Invoke_ID Comm._Reference 00 02
4 Index = 8288 20 60
5 Subindex Length 00 0C
6 Data[1] = Subkanal Data[2] = Subadresse 01 01
7 Data[3] = Frametyp Data[4] = Datenlänge 86 08
8 Data[5] = Verwaltung Data[6] = Reserviert 32 00
9 Data[7] = Index High Data[8] = Index Low 2A F8
10 Data[9] Data[10] 00 01
11 Data[11] Data[12] 23 45
Bits 15 ... 8 7 ... 0
After sending this service, you will receive the "Write_Confirmation." You can once again
use the return codes for the evaluation of a negative message.
9
Manual – Fieldbus Interface INTERBUS UFI11A
55
Page 56

9
Phone: 800.894.0412 - Fax: 888.723.4773 - Web: www.clrwtr.com - Email: info@clrwtr.com
Application examples
9.7 Reading of UFI11A or drive parameters via object 8288
The UFI offers a special parameter access via the object 8288 "variable data channel
with acyclical routing" for the universal read access to all data of the UFI or a drive inverter connected to the UFI (parameters, IPOS variables, IPOS program code, etc.).
The following description is the mechanism that can be used to read the IPOS variables
or other variables via the parameter channel of a drive inverter connected to the UFI
(with SBus address 1). This process requires a two-setp sequence:
• Writing the "variable data channel with acyclical routing“ with the order "Read IPOS
variable H0 to sub channel 1, sub address 1“
• Reading of the "variable data channel with acyclical routing“
The "variable data channel with acyclical routing“ is available via index 8288 dez (2060
hex).
Example
Reading the IPOS variable H0 = Index 11000 dez (2AF8 hex) of the drive inverter with
SBus address 1.
Word Meaning Coding (hex)
1 Command_Code = Write_Request 00 82
2 Parameter_Count 00 09
3 Invoke_ID Comm._Reference 00 02
4 Index = 8288 20 60
5 Subindex Length 00 0C
6 Data[1] = Subkanal Data[2] = Subadresse 01 01
7 Data[3] = Frametyp Data[4] = Datenlänge 86 08
8 Data[5] = Verwaltung Data[6] = Reserviert 31 00
9 Data[7] = Index High Data[8] = Index Low 2A F8
10 Data[9] Data[10] 00 00
11 Data[11] Data[12] 00 00
Bits 15 ... 8 7 ... 0
After receiving the positive "Write_Confirmation (+)," there will be a read access to the
"variable data channel with acyclical routing“ that will read in the data read with the read
order defined in the "Write_Request" into the interface module.
Word Meaning Coding (hex)
1 Command_Code = Read_Request 00 81
2 Parameter_Count 00 03
3 Invoke_ID Comm._Reference 00 02
4 Index = 8288 20 60
5 Subindex - 00 00
Bits 15 ... 8 7 ... 0
56
Manual – Fieldbus Interface INTERBUS UFI11A
Page 57

Application examples
Phone: 800.894.0412 - Fax: 888.723.4773 - Web: www.clrwtr.com - Email: info@clrwtr.com
After sending this service, you should receive a positive "Read_Confirmation."
Word Meaning Coding (hex)
1 Command_Code = Read_Confirmation (+) 80 81
2 Parameter_Count 00 09
3 Invoke_ID Comm._Reference 00 02
4 Result (+) 00 00
5 - Length 00 0C
6 Data[1] = Subkanal Data[2] = Subadresse 01 01
7 Data[3] = Frametyp Data[4] = Datenlänge 86 08
8 Data[5] = Verwaltung Data[6] = Reserviert 31 00
9 Data[7] = Index High Data[8] = Index Low 2A F8
10 Data[9] Data[10] 00 01
11 Data[11] Data[12] 23 45
Bits 15 ... 8 7 ... 0
You can use the return codes for the evaluation of negative messages.
Word Meaning Coding (hex)
1 Command_Code = Read_Confirmation 80 81
2 Parameter_Count 00 03
3 Invoke_ID Comm._Reference 00 02
4 Error_Class Error_Code 08 00
5 Additional_Code 00 10
Bits 15 ... 8 7 ... 0
9
Manual – Fieldbus Interface INTERBUS UFI11A
57
Page 58

10
Phone: 800.894.0412 - Fax: 888.723.4773 - Web: www.clrwtr.com - Email: info@clrwtr.com
Parameter List
10 Parameter List
Par.
Parameter Index Unit Access Default Meaning / Value range
no.
010 Unit status 8310 RO 0
011 Operating status 8310 RO 0
012 Error status 8310 RO 0
013 Current parameter set 8310 RO 0
015 Operating hours 8328 s RO/N 0
070 Device type 8301 RO 0
076 Firmware basic unit 8300 RO 0
090 PD – configuration 8451 RO 4
091 Fieldbus type 8452 RO 2
092 Baud rate fieldbus 8453 RO 0
093 Fieldbus address 8454 RO 0
094 PO1 setpoint 8455 RO 0
095 PO2 setpoint 8456 RO 0
096 PO3 setpoint 8457 RO 0
097 PI1 actual value 8458 RO 0
098 PI2 actual value 8459 RO 0
099 PI3 actual value 8460 RO 0
802 Factory setting 8594 R/RW 0 0: NO
810 RS485 address 8597 R0 0
812 RS485 timeout delay 8599 s R/RW 1
816 SBUS Baud rate 8603 R/RW 0 0: 125 kBaud
819 Fieldbus timeout delay 8606 s RO 0.630
831 RESPONSE fieldbus timeout 8610 R/RW 10 0: NO RESPONSE
840 Manual reset 8617 R/RW
870 Setpoint description PO1 8304 RO 12 IPOS PO DATA
871 Setpoint description PO2 8305 RO 12 IPOS PO DATA
872 Setpoint description PO3 8306 RO 12 IPOS PO DATA
873 Acutal value description PI1 8307 RO 9 IPOS PI DATA
874 Actual value description PI2 8308 RO 9 IPOS PI DATA
875 Actual value description PI3 8309 RO 9 IPOS PI DATA
1: YES
2: DELIVERY STATUS
1: 250 kBaud
2: 500 kBaud
3: 1000 kBaud
10: PO DATA = 0 / WARN
58
Manual – Fieldbus Interface INTERBUS UFI11A
Page 59

11 List of Errors
Phone: 800.894.0412 - Fax: 888.723.4773 - Web: www.clrwtr.com - Email: info@clrwtr.com
Error
Name Response Cause Action
code
10 IPOS ILLOP IPOS program
17 Stack overflow SBus communi-
18 Stack under-
flow
19 NMI SBus communi-
20 Undefined
opcode
21 Protection
error
22 Illegal word
operand
access
23 Illegal instruc-
tion access
24 Illegal exter-
nal bus access
25 EEPROM SBus communi-
28 Fieldbus time-
out
32 IPOS index
overflow
37 Watchdog
error
45 Initialization
error
77 Invalid IPOS
control word
stop
cation stopped
SBus communication stopped
cation stopped
SBus communication stopped
SBus communication stopped
SBus communication stopped
SBus communication stopped
SBus communication stopped
cation stopped
Connected inverters stopped
(control word = 0)
IPOS program
stop
SBus communication stopped
SBus communication stopped
IPOS program
stopped
List of Errors
Error in IPOS program, see IPOS
variable H469 for more information
Inverter electronics disrupted, possibly due to effect of EMC
""
""
""
""
""
""
""
Error when accessing EEPROM Call up default setting, perform
No master-slave communication
took place within the configured
response monitoring period.
Basic programming rules violated
causing stack overflow in system.
Error in system software procedure Check ground connections and
Error after self-test in reset Ensure DIP switches F1 and F2
Attempt was made to set an invalid
automatic mode (via external control).
Correct the IPOS program, load
and reset
Check ground connections and
shields; improve them if necessary. Contact SEW Service for
advice if this reoccurs.
reset and set parameters of
UFI11A again. Contact SEW Service for advice if this reoccurs.
• Check master communication
routine
• Extend the fieldbus timeout
delay (response monitoring) in
the master configuration or turn
off monitoring
Check IPOS user program and
correct if necessary
shields; improve them if necessary. Contact SEW Service for
advice if this reoccurs.
are off. Perform reset. Contact
SEW Service for advice if problem
persists.
Check write values of external
control
11
Manual – Fieldbus Interface INTERBUS UFI11A
59
Page 60

11
Phone: 800.894.0412 - Fax: 888.723.4773 - Web: www.clrwtr.com - Email: info@clrwtr.com
Error
code
91 System error None Please check the red SYS-FLT LED
97 Copy data SBus communi-
List of Errors
Name Response Cause Action
on the UFI11A. If this LED is on,
then one or more stations on the
SBus could not be addressed within
the timeout delay. If the red SYSFLT LED is flashing, then the
UFI11A itself is in error status. In
this instance, error 91 alone was
transmitted to the control via the
fieldbus.
cation stopped
An error occurred while the data
record was being copied. The data
are not consistent.
Check the voltage supply and the
SBus cabling, check the SBus terminating resistors. Check the configuration if the UFI11A was
configured with the PC. Switch the
UFI11A off and on again. Check
the error code using the diagnostic
interface if the error remains, and
take the action described in this
table.
Carry out the "delivery condition"
factory setting, perform a reset and
then try to copy the data again.
60
Manual – Fieldbus Interface INTERBUS UFI11A
Page 61

12 Technical Data
Phone: 800.894.0412 - Fax: 888.723.4773 - Web: www.clrwtr.com - Email: info@clrwtr.com
Part number: 823 898 7
Startup utility: MOVITOOLS V 2.70 or later
Voltage supply: 24 V
Parameter setting and diagnostic interface: RS-485
Parameter setting: Autoconfiguration
Diagnostics: LEDs on the front panel of the unit
Mounting: Screw mounting or support rail
Ambient temperature: -10 °C...+50 °C
Technical Data
, external supply
DC
Using MOVITOOLS from V 2.70 or later
MOVITOOLS
12
SBus
Maximum transmission speed: 1 MBaud
Transfer protocol: MOVILINK
Number of units on SBus: max. 8
Process data words per unit: max. 3 PD
Connection technology: Disconnectable screw terminals
Manual – Fieldbus Interface INTERBUS UFI11A
61
Page 62

13
Phone: 800.894.0412 - Fax: 888.723.4773 - Web: www.clrwtr.com - Email: info@clrwtr.com
13 Dimensions
Dimensions
Fig. 27: Dimension drawing
62
Manual – Fieldbus Interface INTERBUS UFI11A
05114AXX
Page 63

14 Index
Phone: 800.894.0412 - Fax: 888.723.4773 - Web: www.clrwtr.com - Email: info@clrwtr.com
A
Abort 36
Additional code 45
Additional codes, extension 46
Address information 38
Application examples 52
Autosetup 46
B
BA 49
Baud rate 8, 15
Bus Active 49
Bus configuration 20
Bus structure 20
Bus termination 9, 16
C
Cable Check 49
CC 49
Communication error 45
Communications link, breaking off 36
Communications link, establishing 36
Configuration 18, 28
Configuration of the fieldbus master 11
Configuring the fieldbus master 11, 18
Connection 7, 8, 14, 15
Connection, breaking off 36
Connection, establishing 36
Control via process data 52
D
Device description 23
Diagnostic interface 5
Diagnostic LEDs 49
Dimension drawing 62
DIP switches 5, 11, 18, 51
Display elements 49
Download parameter block 40
E
Error class 44
Error code 44
F
Fieldbus timeout 48
Front view 5
I
ICO files 24
Initiate 36
Installation notes 6, 13
Internal communication error 45
Inverter parameters 10, 17
L
Last PCP index 41
LED BA 49
LED CC 49
LED RD 49
LED SYS-FAULT 50
LED TR 50
LED UL 49
LEDs 49
List of errors 59
M
MOVILINK parameter channel acyclical 42
O
Object description 37
P
Parameter channel 25
Parameter list 58
Parameter module 4
Parameter setting via the PCP interface 52
Parameter setting, Return codes 44
PC connection 17
PCP configuration 27
PCP connection 26
PCP interface 35
PCP services 35
Pin assignment 6, 13
Process data 25
PROFIBUS address 11, 18
Program addresses 25
R
RD 49
Read 36
Read parameter values 36
Reading of an UFI parameter 54
Reading of UFI11A or drive parameters via object
8288 56
Remote Bus Disable 49
Representation of the coding examples 53
Return codes 44
Return codes, extension 46
S
SBus timeout 48
Sequence of a parameter setting process 53
Setting the inverter parameters 10, 17
Shielding 7, 8, 9, 14, 15, 16
Starting the inverters 12, 19
Startup 10, 17, 20
Subchannel 38
SYS-FAULT 50
Manual – Fieldbus Interface INTERBUS UFI11A
63
Page 64

T
Phone: 800.894.0412 - Fax: 888.723.4773 - Web: www.clrwtr.com - Email: info@clrwtr.com
Technical data 61
TR 50
Transmit 50
U
UL 49
U-Logic 49
Unit errors 48
Unit structure 5
UWS21A 17
V
Variable data channel with acyclical routing object
38
W
Write 35, 36, 38, 42
Write parameter values 35, 36, 38, 42
Writing of UFI11A or drive parameters via object
8288 55
64
Manual – Fieldbus Interface INTERBUS UFI11A
 Loading...