


SmartLabel Printers®
Series
Quick Start
Démarrage Rapide
Guida Introduttiva
Kurzanleitung
Inicio Rápido
Snel Starten

QuickUsingStartyour SLP 410, 420, 430, 440, and 450 GB with Windows® 2000 and XP or Mac OS® X 10.2 or later.
Install the software before connecting the SLP printer to your computer.
Installing the Smart Label Program for Mac OS X
1Insert the Smart Label CD. If the installer does not appear automatically, double-click the CD on your desktop or in the left pane of a new Finder window.
2Double-click the file SIISmartLabelPrinter.mpkg. The installer will appear. Follow the on-screen instructions.
3For Mac OS X 10.2: After installation is complete, open Print Centre and select your SLP printer. Mac OS X 10.3 or 10.4 will automatically set up your printer.
Installing the Smart Label Program for Windows
1Insert the Smart Label CD. The installation wizard starts automatically on most systems. If the introductory screen doesn’t appear after a few seconds, continue with the following steps.
2Click the Windows Start button then point to Settings and choose Control Panel.
3Double-click Add/Remove Programs then click the Install button. Follow the install wizard to assist with installation.
Preparing the SLP
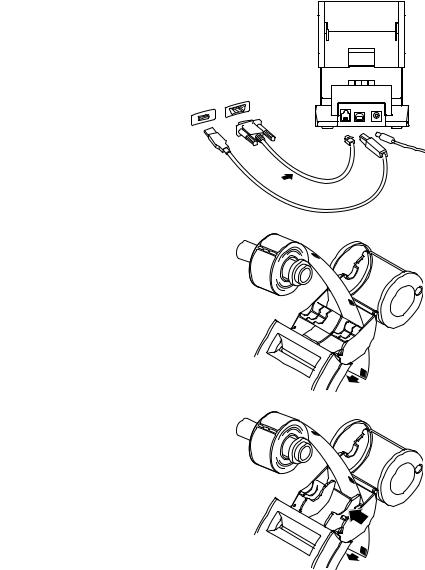
1 Install the software, then connect the printer to your PC or Mac.
•The SLP can be connected to either the Serial or USB port on your PC. Do not use both cables. On your Mac use the USB port.
• Connect the other end of the cable into the appropriate port on the back of the SLP.
2Connect the supplied AC adapter to the back of the SLP and to a power outlet.
3Press the  button to turn the printer on.
The status light will flash until the labels are loaded.
4Lift the label cover.
5Load a roll of standard labels.
•Remove the sticker from the roll, and then place the roll on the spindle as illustrated. If using an SLP 420, 430, 440 or 450, adjust the label guides to fit against the roll.
•Feed the labels into the slot on the back of the printer. The labels automatically feed to the exit slot, then stop.
•Close the label cover.
6Start your SLP software and begin using your new SLP. If you want to run a test label, please refer to the FAQ “Test Labels” on our website: www.siibusinessproducts.com.
 or
or
SLP 410
Label guides 
SLP 420/430/440/450

Your First Address Label (Mac OS X)
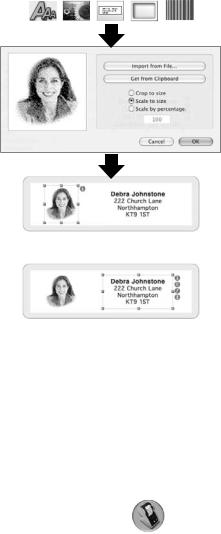
1Double-click the Smart Label Printer Application.
2The default address label will appear. (Screen at right.)
To clear this template, press Delete.
•To change your label template, select a label from the Templates or select New from the File menu.
•To change the font or text, select 
•To add a bar code, select 
3 Click |
to print the label. |
4Select Save from the File menu to save the label.
Your First Address Label (Windows)
1Click the Windows Start button then point to Programs and choose the Smart Label program, or select the Smart Label icon on your desktop.
2Click  to begin a new label.
Note: The address is automatically entered into fields in the Contact information window.
3Type the address.
To customize the label, click one of the
Smart Label Icons™.
Click  to add additional information.
4Click  to print the label.
5Click  to Save the label.
Quick Tour
Label Objects for Mac OS X
Object buttons are used to add different elements to the labels. The object buttons appear in the layout palette at the bottom of the Main Window.
• Click an object button, define its attributes in the drop down sheet and click OK.
•To modify an object on the label, click the
 button to the right of the object.
•To change the import characteristics, double-click the object.
•Drag handles to resize the object or drag the object to move it.
• To adjust text objects, click one of the following buttons to the right of the handles:
 Text object properties sheet will appear.
 A pop-up menu for text alignment will appear.
 A pop-up menu for fonts will appear.
 A pop-up menu for font size will appear.
How To’s
Create a New Label. Click a Smart Label Icon in the Templates list or create a new format by adding objects. Click  to add an address or
  to add a picture, for instance.
Save Labels in Folders. Click in the Saved Labels list. Click the  button and name the folder. Drag saved labels to this folder.
Save a Template. Choose Save Template... from the File menu. Name the template and click OK.
Edit a Saved Label. Click the label in the the Saved Labels list and edit as shown above.
Print Saved Labels. Click the label in the the Saved Labels list then click the |
button. |
Print Labels from Another Application. Click on Advanced button located near the bottom of the window. Choose the program from which to print the labels. Select the labels from the list and click OK.
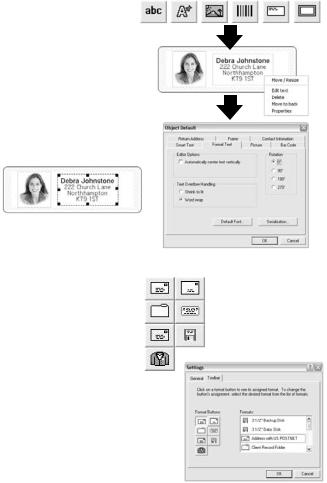
Label Objects for Windows
Object buttons are used to add different elements to the labels. Choose from six different elements: Smart Text, Format Text, Picture, Bar Code, Return Address, Frame.
To use the object buttons:
• Click one of the object buttons, then position pointer at desired location on label. Left click and hold the mouse to draw the object box on the label.
•Position the pointer over an object and right click the mouse to open the object’s shortcut menu.
• Choose Properties to open the Properties dialog box.
•For text objects, choose Move/Resize to adjust the object.
•Drag handles to resize the object or drag the object to move it.
To change the default properties of any objects, go to
Options then Object Defaults.
Smart Label Icons
Smart label icons are shortcuts to popular label templates.
Twelve preset template can be used for the seven icons.
•To use a icon, simply click on the icon and the label template will be changed.
•To customize your icons, go to Options, Settings, Click on the Toolbar tab. Click on the Format button you would like to change, and click the desired icon from the Formats menu.
How To’s
Create a New Label. Click  . To change the format, click a smart label icon or select New from the Label menu.
Save Labels in Categories. Select the category when you save the label. To add new categories or modify the existing names, choose Library then Define category names from the Label menu.
Print Saved Labels. Choose Print selected... from the Label menu and select the label you want to print.
Open a Saved Label. Click  and select the label that you want to open. The label may be edited and printed. To access or change the contact information (e.g., add phone numbers, etc.) click
  .
.
Save Changes to the Label Format. From the Format menu, select Save Format. The Save Format Wizard appears where you can assign a name and icon to the format.
Capturing Addresses and Copying Text. Click on the SmartCapture™ icon  in the notification area of the Windows Taskbar to capture addresses or SmartCopy™ selected text from other programs. Some programs may require you to highlight the text to be captured and then click on the SmartCapture icon.
Changing Labels
•Tear off any printed labels so the labels are flush with the exit slot. Press and hold the
 button to reverse the labels out the back of the printer. DO NOT pull the labels out of the printer. Load the new roll as described on the front of this card.
•To select a different label type in the Smart Label program:
Windows: Choose Properties from the Label menu or select the label type from the pull-down list at the bottom of the window.
Mac: Choose the label from Templates menu
•The print margins can be adjusted if the printing isn't positioned properly when the label is printed, particularly on small labels. To adjust the margins, choose Print from the Label menu then click the Setup button. Click the Advanced tab to adjust the print margins.
About Your Labels
•The SLP 420, 430, 440 and 450 can use any of the SmartLabels™ provided by Seiko Instruments. The SLP 410 can use labels up to 1-1/8 inches (28mm) wide. The default settings for the Smart Label Icons provide examples of how you might use the different label types.
Important: For best results we recommend the use of Seiko Instruments SmartLabels. Other brands may not be engineered to provide optimum, trouble-free results, they may not work with your SLP or they may damage it and void your warranty.
•SmartLabels are available from your local Seiko Instruments dealer or they may be ordered from Seiko Instruments. For information call:
+49-4105-58-57-94
Or visit our website at www.siibusinessproducts.com
What to do if...
Refer to your Smart Label Printer User Guide or the on-line help if you have a problem or need additional information when using your SLP.
To access on-line help, choose Help Topics from the Help menu.

DémarrageUtilisation de votre imprimanteRapideSLP 410, 420 ou 430, 440 ou 450 FR sous Windows® 2000 et XP ou Mac OS® X 10.2 ou supérieur.
Installez le logiciel avant de connecter l’imprimante SLP à votre ordinateur.
Installation du programme Smart Label sous Mac OS X
1Insérez le CD Smart Label. Si le programme d’installation n’apparaît pas automatiquement, double-cliquez sur l’icône CD sur votre bureau ou sur le volet gauche de la nouvelle fenêtre Finder.
2Double-cliquez sur le fichier SIISmartLabelPrinter.pkg. Le programme d’installation apparaît alors. Suivez les instructions qui apparaissent à l'écran.
3Pour Mac OS X 10.2 : Une fois l’installation terminée, ouvrez le Centre d’impression et sélectionnez votre imprimante SLP. Mac OS X 10.3 ou 10.4 configure votre imprimante automatiquement.
Installation du programme Smart Label sous Windows
1Insérez le CD Smart Label. L’Assistant d’installation démarre automatiquement sur la plupart des systèmes. Si l'écran d'introduction n'apparaît par après quelques secondes, continuez en procédant comme suit :
2Cliquez sur le bouton Démarrer de Windows, puis cliquez sur Paramètres et choisissez Panneau de configuration.
3Double-cliquez sur Ajout/Suppression de programmes, puis cliquez sur le bouton Installer. Suivez les instructions de l’assistant d’installation.

Préparation de l’imprimante SLP
1Installez le logiciel, puis connectez l’imprimante à votre ordinateur (PC ou Mac).
•L'imprimante SLP peut être branchée soit au port série, soit au port USB de votre PC. N’utilisez pas les deux
câbles à la fois. Sur un Mac, utilisez le port USB. 
• Branchez l'autre extrémité du câble dans le
port approprié à l’arrière de votre imprimante SLP.
2Connectez l'adaptateur de courant alternatif fourni à l’arrière de l'imprimante SLP, puis à une prise de courant.
N’UTILISEZ PAS
les deux câbles  ou à la fois
3 Appuyez sur le bouton  pour allumer l'imprimante. Le voyant lumineux d'état clignote jusqu'à ce que les étiquettes soient chargées.
4 Soulevez le couvercle des étiquettes.
5 Chargez un rouleau d'étiquettes standard.
•Enlevez l'autocollant du rouleau, puis placez celui-ci sur l'axe de l'imprimante, tel qu'illustré. Si vous utilisez
une imprimante SLP 420, 430, 440 ou 450, ajustez |
SLP 410 |
les guides en fonction de la taille des étiquettes. |
|
• Placez la bande d'étiquettes dans l'ouverture à l'arrière de l'imprimante. Les étiquettes s'engagent automatiquement dans l'ouverture de sortie, puis elles s'immobilisent.
|
Guides des étiquettes |
• Refermez le couvercle des étiquettes. |
|
6 Lancez le logiciel SLP : vous pouvez |
|
maintenant commencer à utiliser |
|
votre nouvelle imprimante SLP. |
SLP 420/430/440/450 |
Si vous souhaitez imprimer une |
|
étiquette de test, veuillez vous reporter |
|
à la section « Test labels » de notre |
|
Foire Aux Questions, sur notre site Web : |
|
www.siibusinessproducts.com. |
|

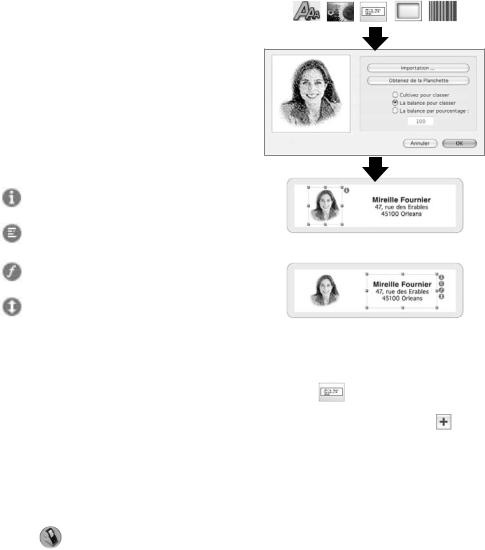
Votre première étiquette d’adresse (Mac OS X)
1Double-cliquez sur l’application Smart Label Printer.
2L’étiquette d’adresse par défaut apparaît (écran de droite). Pour effacer ce modèle, appuyez sur la touche Supprimer.
•Pour changer de modèle d’étiquette, choisissez une étiquette dans le menu Modèles, ou sélectionnez Saisir mes... dans le menu Fichier.
•Pour changer la police de
caractères ou modifier le texte, sélectionnez 
•Pour ajouter un code-barres, sélectionnez 
3 |
Cliquez sur |
pour imprimer |
|
l'étiquette. |
|
4 |
Sélectionnez Enregistrer dans le menu Fichier pour enregistrer l’étiquette. |
|
Votre première étiquette d'adresse (Windows)
1Cliquez sur le bouton Démarrer de Windows, puis sélectionnez Programmes et choisissez le programme Smart Label.
2Cliquez sur  pour commencer une nouvelle étiquette.
Remarque : L'adresse est automatiquement entrée dans les champs correspondants de la fenêtre Informations sur le contact.
3Entrez l'adresse.
Pour personnaliser l'étiquette, cliquez sur l’une des icônes de Smart Label™.
Cliquez sur pour ajouter des informations supplémentaires.
4Cliquez sur  pour imprimer l'étiquette.
5Cliquez sur  pour enregistrer l'étiquette.
Visite Rapide
Objets d’étiquette pour Mac OS X
Les boutons d’objets servent à ajouter différents éléments aux étiquettes. Les boutons d’objet apparaissent sur la palette de mises en page au bas de la fenêtre principale.
•Cliquez sur un bouton d’objet, définissez ses attributs dans la liste déroulante et cliquez sur OK.
•Pour modifier un objet sur l’étiquette, cliquez sur le bouton à droite de l’objet.
•Pour déplacer ou redimensionner d’autres objets, cliquez sur chacun d’eux.
•Faites glisser les poignées pour redimensionner l’objet ou faites glisser l’objet pour le déplacer.
•Pour ajuster les objets texte, cliquez sur l’un des
boutons suivants à droite des poignées :
La feuille de propriétés de l’objet texte apparaîtra.
Un menu instantané pour l’alignement du texte apparaîtra.
Un menu instantané pour les polices de caractère apparaîtra.
Un menu instantané pour la taille des polices de caractère apparaîtra.
Instructions rapides
Création d’une nouvelle étiquette : Cliquez sur une icône Smart Label dans la liste des Modèles, ou créez une nouvelle mise en forme en ajoutant des objets. Cliquez sur pour ajouter une adresse ou sur  pour ajouter une image, par exemple.
Enregistrement d’étiquettes dans des dossiers : Cliquez dans la liste des Etiquettes. Cliquez sur |
et |
nommez le dossier. Faites glisser les étiquettes enregistrées vers ce dossier. |
|
Enregistrement d’un modèle : Sélectionnez Enregistrer le modèle dans le menu Fichier. Nommez le modèle et cliquez sur OK.
Modification d’une étiquette enregistrée : Cliquez sur l’étiquette dans la liste des Etiquettes et modifiezla comme indiqué ci-dessous.
Impression d’étiquettes enregistrées : Cliquez sur l’étiquette dans la liste des Etiquettes puis cliquez sur le bouton .
Impression d'étiquettes à partir d'autres applications : Cliquez sur le bouton Expert situé au bas de la fenêtre. Choisissez le programme à partir duquel vous souhaitez imprimer les étiquettes. Sélectionnez les étiquettes dans la liste, puis cliquez sur OK.
 Loading...