


You are now the proud owner of a SEIKO Analogue Quartz Watch Cal. 7T84. For best results, please read the instructions in this booklet carefully before using your SEIKO Analogue Quartz Watch. Please keep this manual handy for ready reference.
Sie sind jetzt Besitzer einer SEIKO Analog-Quarzuhr Kal. 7T84. Bitte lesen Sie diese Bedienungsanleitung vor Verwendung der Uhr sorgfältig durch und heben Sie sie gut auf.
Vous voici l’heureux propriétaire d’une montre quartz analogique SEIKO Cal. 7T84. Pour obtenir d’excellentes performances de cet article SEIKO, veuillez lire attentivement cette brochure que vous conserverez pour toute référence ultérieure.
Grazie di aver aquistato questo orologio SEIKO Analogico al Quarzo Cal. 7T84. Per ottenere i migliori possibili risultati da questo orologio, leggere attentamente le istruzioni di questo manuale prima di utilizzare l'orologio stesso. Conservare poi il manuale stesso per ogni qualsiasi eventuale futura consultazione.
Enhorabuena por su adquisición de un reloj SEIKO analógico de cuarzo Cal. 7T84. Para óptimo resultado, lea detenidamente las instrucciones de este folleto antes de usar el reloj. Guarde este manual para consulta posterior.
Você pode sentir-se orgulhoso de possuir um Relógio SEIKO Quartz Análogo Cal. 7T84. Para obter os melhores resultados, leia atentamente as instruções contidas neste opúsculo antes de usar o seu Relógio SEIKO Quartz Análogo. Queira conservar este manual para referências futuras.


 7T84
7T84 


CONTENTS |
|
FEATURES..................................................................................................... |
4 |
DISPLAY & BUTTONS.................................................................................. |
5 |
SCREW LOCK TYPE CROWN...................................................................... |
6 |
Crown with driving wheel ................................................................ |
7 |
MODE CHANGE............................................................................................ |
8 |
TIME MODE.................................................................................................. |
10 |
YACHT TIMER MODE................................................................................... |
13 |
TIMER MODE................................................................................................ |
22 |
STOPWATCH mode.................................................................................... |
24 |
ALARM mode.............................................................................................. |
26 |
LOCAL TIME mode..................................................................................... |
31 |
BATTERY CHANGE....................................................................................... |
32 |
Necessary procEdure after battery change............................ |
34 |
HAND POSITION ADJUSTMENT ............................................................... |
35 |
TROUBLESHOOTING................................................................................... |
38 |
SPECIFICATIONS.......................................................................................... |
40 |
ΙFor the care of your watch, see TO PRESERVE THE QUALITY OF YOUR WATCH in the attached Worldwide Guarantee and Instruction Booklet.
ENGLISH

English
CAL. 7T84
FEATURES
ν TIME mode
Time is indicated by the hour, minute and small second hands.
ν YACHT TIMER mode
Yacht timer combines the functions of a count down timer and a stop watch that starts operating automatically when the timer finishes counting down. This function is particularly useful in yacht racing. 5-, 6- & 10-minute preset timers are available.
ν TIMER mode
The timer can be set to a maximum of 15 minutes in 1-minute increments.
ν STOPWATCH mode
The stopwatch can measure 12 hours in 1/5-second increments. When the measurement reaches 12 hours, the stopwatch automatically stops.
νALARM mode
•Single time alarm: sounds only once at a designated alarm time within 12 hours.
•Regular alarm: set to sound at a designated time everyday on a 12-hour basis.
νLOCAL TIME mode
The time in another time zone area can be shown in 1-minute increments, offering a dual time display.
DISPLAY & BUTTONS
Mode indicator
14
Hour hand |
13 |
|
|
|
12 |
Center hand
15 |
|
1 |
||
|
|
|
0 |
C |
|
|
1 |
HR |
|
|
|
6 |
|
L |
|
5 |
|
|
A |
E |
|
|
|
|
|
|
|
|
|
IM |
|
|
|
|
T |
|
|
|
|
Minute hand
A
2
3
 4
4
11 |
|
10 |
|
|
5 |
a |
|
|
|
2 |
|
|
|||
|
|
|
|
|
|
||
10 |
|
|
6 |
5 |
6 |
|
B |
|
9 |
|
8 |
7 |
|
|
|
Small second hand |
|
|
|
|
|||
|
|
Small watch |
|
||||
|
|
|
|
|
|||
English
CROWN
bc
a:Normal position
b:First click
mode selection, date setting
c: Second click time setting,
hand position adjustment
*Some models may have a screw lock type crown. If your watch has a screw lock type crown, refer to SCREW LOCK TYPE CROWN.
*The illustrations in the following sections of this manual may be simplified for the purpose of explanation.

English
SCREW LOCK TYPE CROWN
υSome models may have a screw-lock mechanism that can securely lock the crown by screw when they are not being operated.
υLocking the crown will help to prevent any operational errors and enhance the water resistant quality of the watch.
υIt is necessary to unlock the screw lock type crown before operating it. Once you have finished operating the crown, make sure to relock it.
λHow to use the screw lock type crown
Keep the crown securely locked unless you need to operate it.
[How to unlock the screw lock type crown] Turn the crown counterclockwise.
The crown is unlocked and can be operated.
[How to lock the screw lock type crown]
Once you have finished operating the crown, turn it clockwise while gently pressing it in toward the watch body until it stops.
* When locking the crown, turn it slowly with care, ensuring that the screw is properly engaged. Be careful not to forcibly push it in, as doing so may damage the screw hole in the case.
Crown with driving wheel
υ Some models may have a crown with a special structure as illustrated |
English |
||
|
|||
below. Refer to the following instructions when operating this type of |
|
||
crown, as it should be operated in a different way from that of ordinary |
|
||
ones. |
|
|
|
Normal position |
First click position |
Second click position |
|
Crown |
|
|
|
B |
A |
B |
A |
Driving wheel
To pull out the crown, pull out the A portion (crown).
To turn the crown, turn the B portion (driving wheel).

MODE CHANGE
English |
Mode indicator |
|
|
|
|
|
A |
CROWN Pull out to first click. |
E |
5 |
|
|
IM |
|
T |
|
610TMR
CHR
A
L
M
L
O
C
APress to set the mode indicator pointing at your desired mode.
CROWN |
Upon completion of selecting the |
|
desired mode, push back in to normal |
|
position. |
With each press of button A, the mode indicator turns in the following |
English |
|||
order to show the selected mode. |
|
|
||
TIME mode |
YACHT TIMER mode |
YACHT TIMER mode |
YACHT TIMER mode |
|
(5-minute timer) |
(6-minute timer) |
(10-minute timer) |
|
|
|
|
|||
|
|
|
|
M |
|
|
|
|
|
M |
|
|
|
|
|
M |
|
|
|
|
0T RC |
|
|
|
0T RC |
|
|
|
0T RC |
||||||
|
|
1 |
|
HR |
|
|
1 |
|
HR |
|
|
1 |
|
HR |
|||
|
|
6 |
|
|
L |
|
|
6 |
|
|
L |
|
|
6 |
|
|
L |
|
5 |
|
|
|
A |
|
5 |
|
|
|
A |
|
5 |
|
|
|
A |
E |
|
|
|
M |
E |
|
|
|
M |
E |
|
|
|
M |
|||
|
|
|
|
L |
|
|
|
|
L |
|
|
|
|
L |
|||
IM |
|
|
|
O |
MI |
|
|
|
O |
MI |
|
|
|
O |
|||
T |
|
|
|
C |
T |
|
|
|
C |
T |
|
|
|
C |
|||
*When the mode changes to the TIME mode from the LOCAL TIME mode, the mode indicator turns counterclockwise.
|
|
|
|
M |
|
|
|
|
0T RC |
||
|
|
1 |
|
HR |
|
|
|
6 |
|
|
L |
|
5 |
|
|
|
A |
E |
|
|
|
M |
|
|
|
|
|
L |
|
IM |
|
|
|
O |
|
T |
|
|
|
C |
|
LOCAL TIME mode
|
|
|
|
M |
|
|
|
|
|
M |
|
|
|
|
0T RC |
|
|
|
0T RC |
||||
|
|
1 |
|
HR |
|
|
1 |
|
HR |
||
|
|
6 |
|
|
L |
|
|
6 |
|
|
L |
|
5 |
|
|
|
A |
|
5 |
|
|
|
A |
E |
|
|
|
M |
E |
|
|
|
M |
||
|
|
|
|
L |
|
|
|
|
L |
||
MI |
|
|
|
O |
MI |
|
|
|
O |
||
T |
|
|
|
C |
T |
|
|
|
C |
||
ALARM mode |
STOPWATCH mode |
||||||||||
|
|
|
|
|
M |
|
|
|
|
|
|
0T |
RC |
||
|
|
|
1 |
|
|
HR |
|
|
|
|
6 |
|
|
|
L |
|
|
5 |
|
|
|
|
A |
E |
|
|
|
|
M |
||
|
|
|
|
|
L |
||
MI |
|
|
|
|
O |
||
T |
|
|
|
|
C |
||
|
|
|
|
|
M |
|
|
|
|
|
|
0T RC |
|||
|
|
|
1 |
|
|
HR |
|
|
|
|
6 |
|
|
|
L |
|
5 |
|
|
|
|
|
A |
E |
|
|
|
|
|
M |
|
|
|
|
|
|
|
L |
|
MI |
|
|
|
|
|
O |
|
T |
|
|
|
|
|
C |
|
TIMER mode
*While any one of the timers among 5-minute, 6-minute, 10-minue in the YACHT TIMER mode or the timer in TIMER mode is measuring, you cannot use another timer at the same time. Therefore, the mode indicator will not move to indicate any other timer modes unless it is stopped.
TIME MODE
English |
λ |
Time setting procedures include hand settings of the main watch and small |
watch to the current time.
λ The hands should be correctly aligned to the 0 position (initial position) before starting to set the time. If they are not correctly aligned to the 0 position, it is necessary to correct their alignment before setting the time. To correct the hand alignment, refer to HAND POSITION ADJUSTMENT.
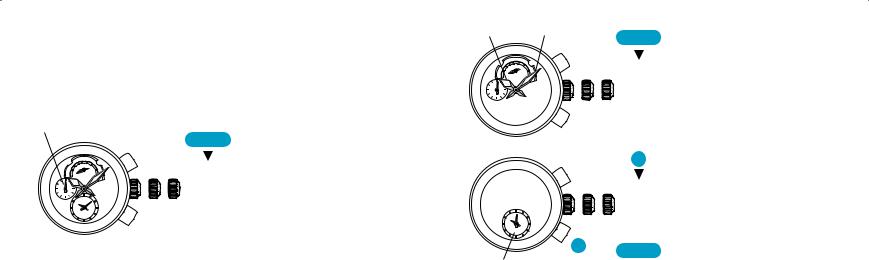
λ How to set the time (main watch and small watch)
Small second hand
E |
5 |
|
|
IM |
|
T |
|
610TMR
CHR A L
CROWN |
Pull out to second click when the |
|
small second hand is at the 12 o’clock |
|
position. |
The small second hand will stop on the spot.
*If the crown is pulled out while the timer or stopwatch is measuring time, the measurement will be forcibly terminated and the timer or the stopwatch will be reset.
10
Hour hand
|
|
TMR |
|
|
10 |
|
5 |
6 |
E |
|
|
|
|
|
MI |
|
|
T |
|
|
CHR A L
Minute hand |
Turn to set the time of the main |
CROWN |
|
|
watch. |
* The moment the date changes is midnight. When setting the hour hand, be sure that AM/PM is set correctly.
* While doing so, set the minute hand 4 to 5 minutes ahead of the correct time, and then slowly move it back to the exact minute(s).
English
B
B CROWN
Small watch
Press to set the time for the small watch.
With each press of button B the small watch hands will advance 1 minute. Pressing and holding button B will advance the small watch hands rapidly.
Upon completion of all settings, push back in to normal position simultaneously with a time signal.
11

English |
λ How to set the date |
|
||
υ |
Date setting should always be carried out after the time is correctly set. |
|||
|
||||
|
υ Manual date adjustment is required on the first day after a month that has |
|||
|
|
less than 31 days: February, April, June, September and November. |
||
|
|
|
CROWN Pull out to first click. |
|
|
|
|
CROWN Turn clockwise to set the date. |
|
|
|
|
* While you are setting the date, do not |
|
|
|
2 |
press either button A or B, as pressing |
|
button A or B while the crown is at the first click position can change the mode and the settings in some modes.
* Do not set the date during any time between 9:00 P.M. and 1:00 A.M. Date setting during this time period may cause failure of date change on the following day.
CROWN Push back in to normal position.
YACHT TIMER MODE
υYacht timer combines the functions of a count down timer and a stop watch that starts operating automatically when the timer finishes counting down. This function is particularly useful in yacht racing.
λYacht timer operation
•There are 3 pre-set yachting timer modes: 5-minute, 6-minute and 10-minute timers.
•Upon activating the yacht timer function, the selected yacht timer starts counting down in 1-second increments.
•The remaining time is indicated by the center hand and the two hands of the small watch, which turn counterclockwise while the yacht timer is counting down.
•When the yacht timer finishes counting down, the beep will sound indicating that time is up and the measurement is automatically switched to the stopwatch.
•The stopwatch can measure 12 hours in 1-second increments. When the measurement reaches 12 hours, the stopwatch automatically stops.
English
12 |
13 |
 Loading...