

Schneider Electric AP7800B, AP7801B, AP7802B, AP7802BJ, AP7811B Installation Instructions
...
pd
pdu0498a
pdu0502a
pdu0353a
pdu0369a
10/
100
Status
Reset
Press to
select bank.
Press and hold
to in vert disp lay.
- Warning
- OK
- Overload
B1B2B3
Amps
Amps
pdu0128c
Rack Power Distribution Unit
Installation Instructions
© 2016 Schneider Electric. APC, the APC logo and NetShelter are owned by
Schneider Electric Industries, S.A.S. All rights reserved.
pdu0501a
The Display Interface
Configuring network settings and accessing the Rack PDU
The Rack PDU is DHCP compatible. Connect the network cable to the
(
network port
(
LED
) for the network connection is solid green, perform the
) and then apply power to the unit. When the status
following to display the IP address.
If your network does not use a DHCP server, see the user’s guide for
your Rack PDU for details on other methods for configuring the TCP/
IP settings.
Press and hold the Control button until “IP” appears on the
•
display .
•
Release the C
scrolled across
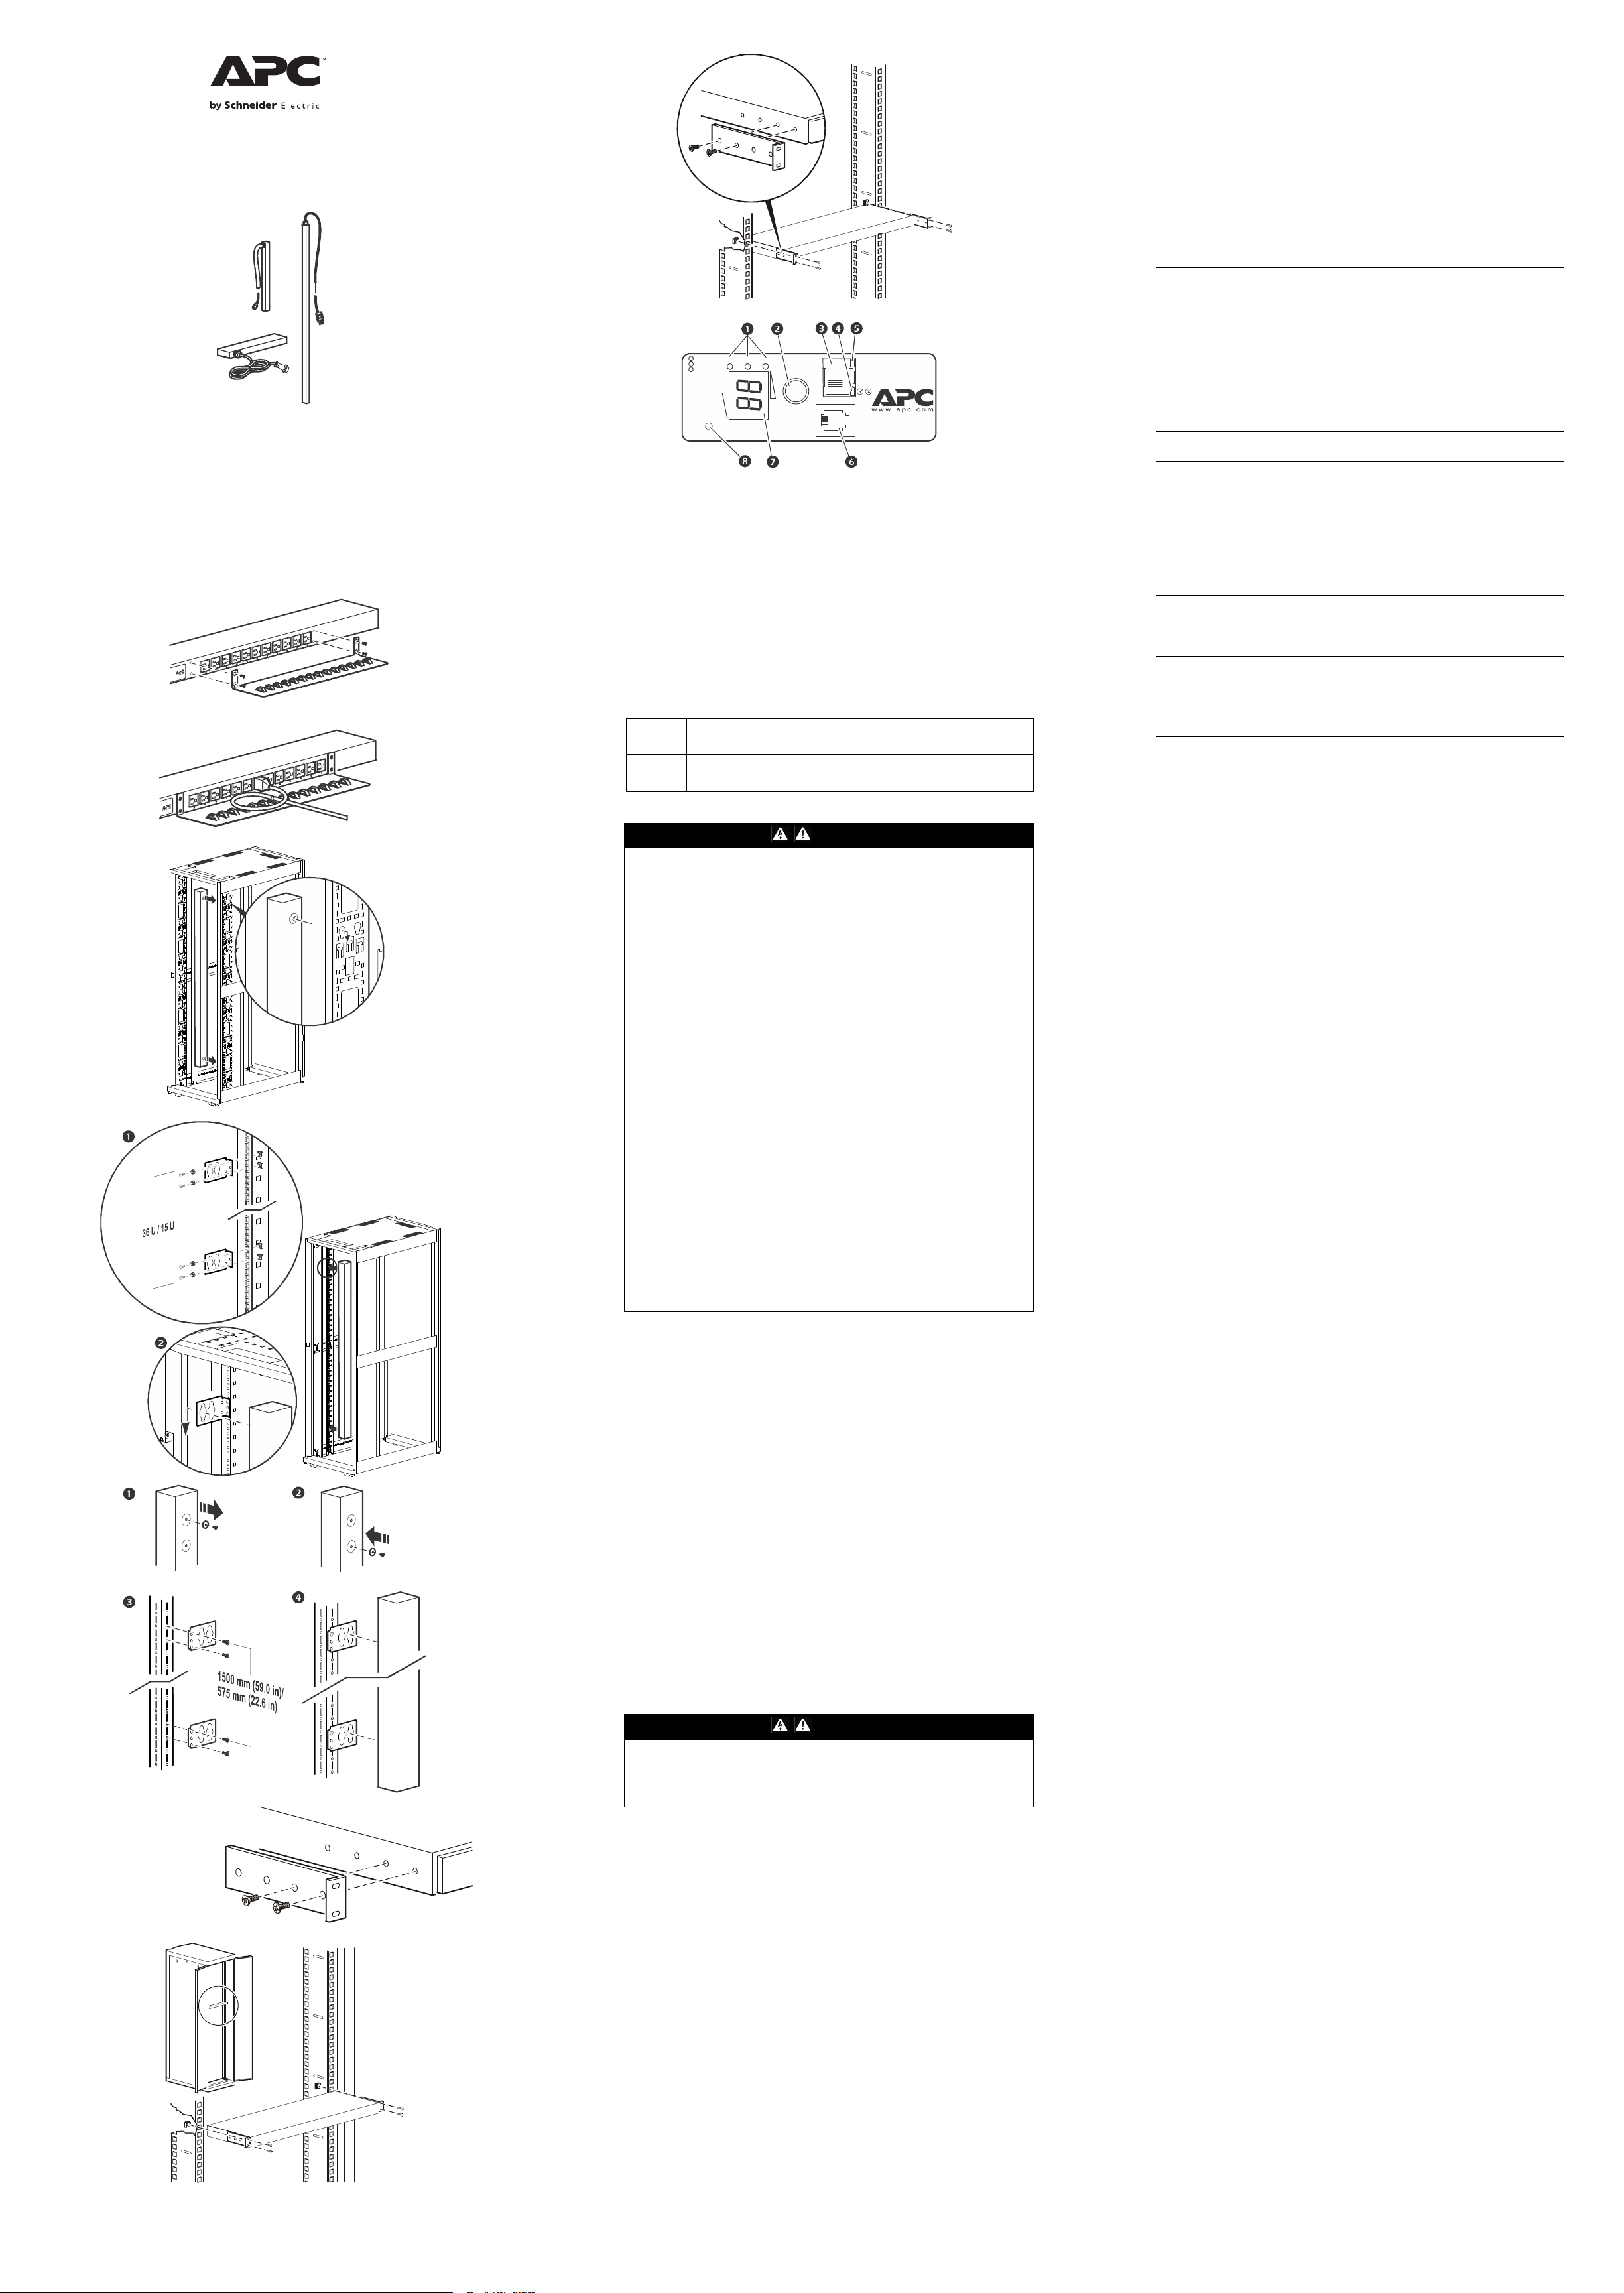
Bank/phase indicator LEDs:
• Indicate the bank/phase corresponding to the current listed in the
digital display.
• Indicate normal (green), warning (yellow), or alarm (red) condition.
N
OTE: If all indicator LEDs are lit, the Rack PDU is in use at its
Link - Rx/Tx
Switched Rack PDU
Serial Port
General Information
990-
9944-001
6/2016
This section contains installation information for the following
equipment: AP7800B, AP7801B, AP7802B, AP7802BJ, AP7811B,
AP7820B, AP7821B, AP7822B, AP7850B, AP7869B, AP7899B,
AP7900B, AP7901B, AP7902B, AP7902BJ, AP7911B, AP7920B,
AP7921B, AP7922B, AP7950B, AP7968B, AP7998B
Additional Resources
u0123b
The Rack PDU User Guide contains complete operation and
configuration information. Additional documentation and
downloadable software and firmware is available on the applicable
product page on the website www.apc.com. To quickly find a pr od uct
page, enter the product name or part numbe r in the Search field.
Inventory
Quantity Item
Configuration Cable
pdu0127b
Safety
1
Cable retention trays with 12 flat head screws and 24 wire ties
3
Vertical mounting brackets with 4 pan head screws
2
Two-Year Factory Warranty
Terms of warranty
DANGER
HAZARD OF ELECTRIC SHOCK, EXPLOSION, OR ARC FLASH
• This PDU is intended for indoor use only.
• Do not install this PDU where excessive moisture or heat is present.
• Never install any wiring, equipment, or PDUs during a lightning storm.
• Plug this PDU into a three-wire, grounded power outlet only. The power
outlet must be connected to appropriate branch circuit/mains protection
(fuse or circuit breaker). Connection to any other type of power outlet may
result in a shock hazard.
• Use only the supplied brackets for mounting, and use only the supplied
hardware to attach the mounting brackets.
• Do not use extension cords or adapters with this PDU.
• If a socket-outlet is not accessible to the equipment, a socket-outlet shall be
installed.
• Do not work alone under hazardous conditions.
• Che
ck that the power cord, plug, and socket are in good condition.
• Disconnect the PDU from the power outlet before you install or connect
equipment to reduce the risk of electric shock when you cannot verify
grounding. Reconnect the PDU to the power outlet only after you make all
connections.
• Use a protective earth connector with equipment. This type of connector
carries the leakage current from the load devices (computer equipment).
Do not exceed a total leakage current of 3.5 mA.
• Do not handle any kind of metallic connector before the power has been
removed.
• Use one hand, whenever possible, to connect or disconnect signal cables
to avoid a possible shock from touching two surfaces with different
grounds.
• This unit does not have any user-serviceable parts. Repairs are to be
performed only by factory-trained service personnel.
Failure to follow these instructions will result in death or serious injury.
Non-transferable warranty
Exclusions
Installation
Attach the cord retention trays
Attach the cord retention trays to the PDU, u sing four flat-h ead screws
(provided) per tray.
Attach cords to the tray
Attach a cord to the tray by lo oping th e cord and securing it to the tray,
using a wire tie (provided). Secure each cord to the tray so that you
can unplug it from the PDU without removing the wire tie.
maximum capacity.
Control button:
• Press to change the bank/phase of the current displayed on the digital
display.
• Press and hold for ten seconds to view the orientation of the display;
hold for an additional five seconds to change the orientation.
Ethernet port: Connects the PDU to your network, using a CAT5
network cable.
Status LED: Indicates the status of the Ethernet LAN connection and
the state of the PDU.
• Off–The PDU has no power.
• Solid green–The PDU has valid TCP/IP settings.
• Flashing green–The PDU does not have valid TCP/IP settings.
• Solid orange–A hardware failure has been detected in the PDU.
Contact Customer Support at a phone number on the back cover of
this manual.
• Flashing orange–The PDU is making BOOTP requests.
Link LED: Indicates whether there is activity on the network.
Serial port: Access internal menus by connecting this port (RJ-11
modular port) to a serial port on your computer, using the supplied
serial cable (part number 940-0144).
Display of the current used by the PDU and attached devices:
• Shows the aggregate current for the bank/phase corresponding to the
Bank/Phase Indicator LED that is illuminated.
• Cycles through the banks/phases in 3-second intervals.
Reset switch: Resets the PDU without affecting the outlets.
This warranty applies only to the products you purchase fo r you r use
in accordance with this manual.
APC by Schneider Electric warrants its products to be free from
defects in materials and workmanship for a period of two years from
the date of purchase. APC by Schneider Electric will repair or replace
defective products covered by this warranty. This warranty does not
apply to equipment that has been damaged by accident, negligence or
misapplication or has been altered or modified in any way. Repair or
replacement of a defective product or part thereof does not extend the
original warranty period. Any parts furnished un der this warranty may
be new or factory-remanufactured.
This warranty extends only to the original purchaser who must have
properly registered the product. The product may be registered at
www.apc.com.
APC by Schneider Electric shall not be liable under the warranty if its
testing and examination disclose that the alleged defect in the product
does not exist or was caused by end user’s or any third person’s
misuse, negligence, improper installation or testing. Further, APC by
Schneider Electric shall not be liable under the warranty for
unauthorized attempts to repair or modify wrong or inadequate
electrical voltage or connection, inappropriate on-site operation
conditions, corrosive atmosphere, repair, installation, exposure to the
elements, Acts of God, fire, theft, or installation contrary to APC by
Schneider Electric recommendations or specifications or in any event
if the APC by Schneider Electric serial number has been altered,
defaced, or removed, or any other cause beyond the range of the
intended use.
THERE ARE NO WARRANTIES, EXPRESSED OR IMPLIED, BY
OPERATION OF LAW OR OTHERWISE, OF PRODUCTS SOLD,
SERVICED OR FURNISHED UNDER THIS AGREEMENT OR IN
CONNECTION HEREWITH. APC by SCHNEIDER ELECTRIC
DISCLAIMS ALL IMPLIED WARRANTIES OF MERCHANTABILITY,
SATISFACTION AND FITNESS FOR A PARTICULAR PURPOSE.
APC by SCHNEIDER ELECTRIC EXPRESS WARRANTIES WILL
NOT BE ENLARGED, DIMINISHED, OR AFFECTED BY AND NO
OBLIGATION OR LIABILITY WILL ARISE OUT OF, APC by
SCHNEIDER ELECTRIC RENDERING OF TECHNICAL OR OTHER
ADVICE OR SERVICE IN CONNECTION WITH THE PRODUCTS.
THE FOREGOING WARRANTIES AND REMEDIES ARE
EXCLUSIVE AND IN LIEU OF ALL OTHER WARRANTIES AND
ontrol Button and the IPv4 address
the display twice.
will be
REMEDIES. THE WARRANTIES SET FORTH ABOVE
Vertical Mounting
Toolless mounting:
NetShelter™ cabinet. In one vertical 0U accessory channel, you can
mount two full-length Rack PDUs or four half-length Rack PDUs
Brackets:
Standard EIA-310 cabinet. Secure brackets to the back of the rear
vertical rails using hardware included with your cabinet. Required Uspace for brackets:
Full-length Rack
•
Half-length Rac
•
PDU: 36 U
k PDU: 15 U
CONSTITUTE APC by SCHNEIDER ELECTRIC’S SOLE LIABILITY
AND PURCHASER’S EXCLUSIVE REMEDY FOR ANY BREACH
OF SUCH WARRANTIES. APC by SCHNEIDER ELECTRIC
WARRANTIES EXTEND ONLY TO PURCHASER AND ARE NOT
EXTENDED TO ANY THIRD PARTIES.
IN NO EVENT SHALL APC by SCHNEIDER ELECTRIC, ITS
OFFICERS, DIRECTORS, AFFILIATES OR EMPLOYEES BE
LIABLE FOR ANY FORM OF INDIRECT, SPECIAL,
CONSEQUENTIAL OR PUNITIVE DAMAGES, ARISING OUT OF
THE USE, SERVICE OR INSTALLATION, OF THE PRODUCTS,
WHETHER SUCH DAMAGES ARISE IN CONTRACT OR TORT,
IRRESPECTIVE OF FAULT, NEGLIGENCE OR STRICT LIABILITY
Mounting the Rack PDU in a third-party enclosure
OR WHETHER APC by SCHNEIDER ELECTRIC HAS BEEN
ADVISED IN ADVANCE OF THE POSSIBILITY OF SUCH
DANGER
HAZARD OF ELECTRIC SHOCK, EXPLOSION, OR ARC FLASH
To avoid possible electrical shock and equipment damage, use only the
supplied hardware.
Failure to follow these instructions will result in death or serious injury.
DAMAGES. SPECIFICALLY, APC by SCHNEIDER ELECTRIC IS
NOT LIABLE FOR ANY COSTS, SUCH AS LOST PROFITS OR
REVENUE, LOSS OF EQUIPMENT, LOSS OF USE OF
EQUIPMENT, LOSS OF SOFTWARE, LOSS OF DATA, COSTS OF
SUBSTITUENTS, CLAIMS BY THIRD PARTIES, OR OTHERWISE.
NO SALESMAN, EMPLOYEE OR AGENT OF APC by SCHNEIDER
Bracket spacing:
•
Full-length Rack
Half-length Rac
•
pdu0352a
Horizontal Mounting
PDU: 1500 mm (59.0 in)
k PDU: 575 mm (22.6 in)
You can mount the PDU in a 19-inch NetShelter or other EIA-310-D
standard 19-inch rack:
oose a mounting position for the PDU with either the
Ch
•
•
rear facing out of the enclosure.
or the
Attach the mounting brackets to the PDU, using the flat-
display
head screws (provided).
•
Choose a location for the unit: The unit occupies one U-
ELECTRIC IS AUTHORIZED TO ADD TO OR VARY THE TERMS
OF THIS WARRANTY. WARRANTY TERMS MAY BE MODIFIED, IF
AT ALL, ONLY IN WRITING SIGNED BY AN APC by SCHNEIDER
ELECTRIC OFFICER AND LEGAL DEPARTMENT.
Warranty claims
Customers with warranty claims issues may access the APC by
Schneider Electric customer support network through the Support
page of the APC by Schneider Electric website, www.apc.com/
support. Select your country from the country selection pull-down
menu at the top of the page. Select the Support tab to obtain contact
information for customer support in your region.
space. A notched hole (or a number, on newer enclosures) on
the enclosure’s vertical rail indicates the middle of a U-space.
– Insert cage nuts (provided with the
enclosure) above and below a notched hole on each vertical
mounting rail in your chosen location.
– Align the mounting holes of the brackets with the installed
ge nuts. Insert and tighten screws.
ca
Recessed horizontal mounting
You can mount the PDU in a recessed configuration by attaching the
brackets as shown in the illustration.
 Loading...