


 Loading...
MT-101/MT-200
Microvit MT-101 Holter and
MT-200 Evaluation Software
*2.510492*
ECG CHANNEL 1
SPEED x1 CHAN2
m |
e |
|
s .
A |
ll |
|
i
n
d
|
|
|
y |
|
|
|
ert |
|
|
p |
|
|
|
ro |
|
|
|
lp |
|
|
|
ia |
|
|
|
rc |
|
|
|
e |
|
|
|
m |
|
|
|
m |
|
|
o |
|
|
|
c |
|
|
|
d |
|
|
|
n |
|
|
|
la |
|
|
|
ia |
|
|
|
tr |
|
|
s |
|
|
|
u |
|
|
|
rights
for
LER Software |
on this |
|
|
|
|
SCHIL |
|
|
|
||
|
|
CD bel |
|
|
|
|
|
on |
|
|
|
|
|
g t |
|
|
|
|
|
o |
|
|
|
|
|
S |
|
|
|
|
|
C |
|
|
|
|
|
H |
|
|
|
|
|
IL |
|
|
|
|
|
LER |
A |
|
|
|
|
|
G, |
|
|
|
|
|
S |
||
|
|
|
|
wi |
|
|
|
|
|
t |
|
SCHILLER |
z |
||||
|
l |
||||
|
|
|
|
e |
|
|
|
|
|
r |
|
|
|
|
|
l |
|
|
|
|
|
a |
|
|
|
|
|
n |
|
|
|
|
|
d |
|
|
|
|
|
. |
|
|
|
|
|
A |
|
|
|
|
|
|
l |
|
|
|
|
|
r |
|
|
|
|
|
i |
|
|
|
|
|
g |
|
|
|
|
|
h |
S W I T Z E R L A N D |
|
t |
|||
|
r |
||||
|
|
|
|
|
s |
|
|
|
|
|
e |
|
|
|
|
|
s |
|
|
|
|
|
e |
|
|
|
|
|
r |
|
|
|
|
|
v |
|
|
|
|
|
e |
|
SDS-200 2.01 |
|
|
|
|
|
|
|
|
|
|
|
|
|
|
|
|
|
|
|
|
|
|
|
|
|
|
|||
|
|
|
|
|
|
|
|
|
|
|
|
|
|
|
|
|
|
|
|
|
|
|
|
|
|
|
|
d |
||
|
|
|
|
|
|
|
|
|
|
|
|
|
|
|
|
|
|
|
|
|
|
|
|
|
|
|
|
|
. |
|
|
SDS-104 2.01 |
|
|
|
|
|
|
|
|
|
|
|
|
|
|
|
|
|
|
|
|
|
|
|
|
|
C |
|||
|
SEMA-200 1.81 |
|
|
|
|
|
|
|
|
|
|
|
|
|
|
|
|
|
|
|
|
|
|
|
|
|
S |
|||
|
|
|
|
|
|
|
|
|
|
|
|
|
|
|
|
|
|
|
|
|
|
|
|
|
|
L |
||||
|
|
|
|
|
|
|
|
|
|
|
|
|
|
|
|
|
|
|
|
|
|
|
|
|
|
|
|
|
|
H |
|
|
|
|
|
|
|
|
|
|
|
|
|
|
|
|
|
|
|
|
|
|
|
|
|
|
|
|
|
|
I |
|
SEMA-COMM 1.80 |
|
|
|
|
|
|
|
|
|
|
|
|
|
|
|
|
|
|
|
|
|
|
|
L |
|||||
|
|
|
|
|
|
|
|
|
|
|
|
|
|
|
|
|
|
|
|
|
|
|
|
R |
||||||
|
|
|
|
|
|
|
|
|
|
|
|
|
|
|
|
|
|
|
|
|
|
|
|
|
|
|
|
|
|
E |
|
MT-190/200 1.80 |
|
|
|
|
|
|
|
|
|
|
|
|
|
|
|
|
|
|
|
|
|
|
|
|
A |
||||
|
|
|
|
|
|
|
|
|
|
|
|
|
|
|
|
|
|
|
|
|
|
|
|
|
, |
|||||
|
MS-3 2.03 |
|
|
|
|
|
|
|
|
|
|
|
|
|
|
|
|
|
|
|
|
|
|
|
|
|
|
|
G |
|
|
|
|
|
|
|
|
|
|
|
|
|
|
|
|
|
|
|
|
|
|
|
|
|
|
|
|
|
C |
||
r |
BR-102 2.40 |
|
|
|
|
|
|
|
|
|
|
|
|
|
|
|
|
|
|
|
|
|
|
|
|
|
|
|
H |
|
d |
|
|
|
|
|
|
|
|
|
|
|
|
|
|
|
|
|
|
|
|
|
|
|
|
|
|
|
3 |
||
T |
|
|
|
|
|
|
|
|
|
|
|
|
|
|
|
|
|
|
|
|
|
|
|
|
|
|
|
|
|
- |
|
|
|
|
|
|
|
|
|
|
|
|
|
|
|
|
|
|
|
|
|
|
|
|
|
|
|
|
|
|
6 |
e |
|
|
|
|
|
|
|
|
|
|
|
|
|
|
|
|
|
|
|
|
|
|
|
|
|
|
|
|
|
4 |
s |
Demo Sema-200 |
|
|
|
|
|
|
|
|
Part No. 2.100256 B |
||||||||||||||||||||
t |
|
|
|
|
|
|
|
|
|
|
|
|
|
|
|
|
|
|
|
|
|
|
|
|
|
|||||
r |
|
|
|
|
|
|
|
|
|
|
|
|
|
|
|
|
|
|
|
|
|
|
|
|
|
|
|
|
|
1 |
e |
Demo MT-200 |
|
|
|
|
|
|
|
|
|
|
|
|
|
|
|
|
|
|
|
|
|
|
|
|
|
|
|||
g |
|
|
|
|
|
|
|
|
|
|
|
|
|
|
|
|
|
|
|
|
|
|
|
|
|
|
a |
|||
i |
|
|
|
|
|
|
|
|
|
|
|
|
|
Version x.xx |
|
|
|
|
|
, |
||||||||||
r |
|
|
|
|
|
|
|
|
|
|
|
|
|
|
|
|
|
|
||||||||||||
e |
|
|
|
|
|
|
|
|
|
|
|
|
|
|
|
|
|
|
|
|
|
|
|
|
|
|
|
|
|
a |
System Software |
|
|
|
|
|
|
|
|
|
|
|
|
|
|
|
|
|
|
|
|
|
|
|
|
r |
|||||
e |
|
|
|
|
|
|
|
|
|
|
|
|
|
|
|
|
|
|
|
|
|
|
|
|
S |
|||||
r |
Release Notes |
|
|
|
|
|
|
|
|
|
|
|
|
|
|
|
|
|
|
|
|
|
|
|
|
|
w |
|||
E |
|
|
|
|
|
|
|
|
|
|
|
|
|
|
|
|
|
|
|
|
|
|
|
|
|
z |
||||
a |
|
|
|
|
|
|
|
|
|
|
|
|
|
|
|
|
|
|
|
|
|
|
|
|
|
|
|
|
|
i |
|
|
|
|
|
|
|
|
|
|
|
|
|
|
|
|
|
|
|
|
|
|
|
|
|
|
|
|
|
t |
|
P |
|
|
|
|
|
|
|
|
|
|
|
|
|
|
|
|
|
|
|
|
|
|
|
|
|
|
|
|
|
e |
Acrobat Reader 4.0 |
|
|
|
|
|
|
|
|
|
|
|
|
|
|
|
|
|
|
|
|
|
|
|
r |
||||||
O |
|
|
|
|
|
|
|
|
|
|
|
|
|
|
|
|
|
|
|
|
|
|
|
a |
||||||
|
|
|
|
|
|
|
|
|
|
|
|
|
|
|
|
|
|
|
|
|
|
|
|
|
|
|
|
|
|
l |
C |
|
|
|
|
|
|
|
|
|
|
|
|
|
|
|
|
|
|
|
|
|
|
|
|
|
|
|
|
|
n |
I |
|
|
|
|
|
|
|
|
|
|
|
|
|
|
|
|
|
|
|
|
|
|
|
|
|
|
|
|
|
d |
S |
|
|
|
|
|
|
|
|
|
|
|
|
|
|
|
|
|
|
|
|
|
|
|
|
|
|
|
|
|
. |
I |
|
|
|
|
|
|
|
|
|
|
|
|
|
|
|
|
|
|
|
|
|
|
|
|
|
|
|
|
|
A |
N |
|
|
|
|
|
|
|
|
|
|
|
|
|
|
|
|
|
|
|
|
|
|
|
|
|
|
|
|
|
l |
M |
|
|
|
|
|
|
|
|
|
|
|
|
|
|
|
|
|
|
|
|
|
|
|
|
|
|
|
|
|
|
|
|
|
|
|
|
|
|
|
|
|
|
|
|
|
|
|
|
|
|
|
|
|
|
|
|
|
|
|
l |
|
d |
|
|
|
|
|
|
|
|
|
|
|
|
|
|
|
|
|
|
|
|
|
|
|
|
|
|
|
|
|
to |
n |
|
|
|
|
|
|
|
|
|
|
|
|
|
|
|
|
|
|
|
|
|
|
|
|
|
|
|
|
e |
h |
a |
|
|
|
|
|
|
|
|
|
|
|
|
|
|
|
|
|
|
|
|
|
|
|
|
|
|
|
|
|
|
|
|
For further information please visit our homepage |
|
|
|
|
|
|
|
|
|
|
|
|
|
t |
r |
|
||||||||||||
M |
|
|
|
|
|
|
|
|
|
|
|
|
|
|
|
|
||||||||||||||
A |
|
|
|
|
|
|
|
|
|
|
|
|
|
|
|
|
|
|
|
|
|
|
|
|
|
|
a |
s |
|
|
E |
|
|
|
|
|
|
|
|
|
|
|
|
|
|
|
|
|
|
|
|
|
|
|
e |
t |
|
|
|
||
S |
www.schiller.ch or send an e-mail to sales@schiller.ch |
|
|
|
|
|
|
|
|
m |
|
|
|
|
|
|||||||||||||||
S |
|
|
|
|
|
|
|
|
|
|
|
|
|
|
||||||||||||||||
, |
|
|
|
|
|
|
|
|
|
|
|
|
|
|
|
|
|
|
|
|
|
e |
|
|
|
|
|
|
|
|
|
U |
|
|
|
|
|
|
|
|
|
|
|
|
|
|
|
|
|
|
|
st |
n |
|
|
|
|
|
|
|
|
|
G |
|
|
|
|
|
|
|
|
|
|
|
|
|
|
|
|
|
|
|
|
|
|
|
|
|
|
|
||
|
R |
|
|
|
|
|
|
|
|
|
|
|
|
|
|
|
|
|
|
a |
|
|
|
|
|
|
|
|
|
|
|
A |
|
|
|
|
|
|
|
|
|
|
|
|
|
|
|
|
d |
n |
|
|
|
|
|
|
|
|
|
|
|
|
T |
|
|
|
|
|
|
|
|
|
|
|
|
|
|
|
|
|
|
|
|
|
|
|
|
|
|
|
||
|
V |
|
|
|
|
|
|
|
|
|
|
|
|
|
|
|
|
|
|
|
|
|
|
|
|
|
|
|
||
|
, |
|
|
|
|
|
|
|
|
|
|
|
|
|
|
|
|
|
|
|
|
|
|
|
|
|
|
|
|
|
|
I |
|
|
|
|
|
|
|
|
|
|
|
|
|
|
|
rt |
|
|
|
|
|
|
|
|
|
|
|
|
|
|
|
O |
|
|
|
|
|
|
|
|
|
|
|
|
|
|
|
|
|
|
|
|
|
|
|
|
|
|
|
|
|
|
N |
|
|
|
|
|
|
|
|
|
|
|
|
|
d |
a |
|
|
|
|
|
|
|
|
|
|
|
|
|
|
|
O |
|
|
|
|
|
|
|
|
|
|
|
|
n |
e |
|
|
|
|
|
|
|
|
|
|
|
|
|
|
|
|
, |
|
|
|
|
|
|
|
|
|
|
|
|
|
|
|
|
|
|
|
|
|
|
|
|
|
|
|
|
|
|
S |
|
|
|
|
|
|
|
|
|
|
|
a |
|
|
|
|
|
|
|
|
|
|
|
|
|
|
|
|
|
|
T |
|
|
|
|
|
|
|
|
|
|
|
|
|
|
|
|
|
|
|
|
|
|
|
|
|
|
||
|
|
V |
|
|
|
|
|
|
|
|
|
|
|
m |
|
|
|
|
|
|
|
|
|
|
|
|
|
|
|
|
|
|
I |
|
|
|
|
|
|
|
|
|
|
|
|
|
|
|
|
|
|
|
|
|
|
|
|
|
|
|
|
|
|
O |
|
|
|
|
|
|
|
|
|
|
|
e |
|
|
|
|
|
|
|
|
|
|
|
|
|
|
|
|
|
|
R |
|
|
|
|
|
|
|
|
|
|
|
s |
|
|
|
|
|
|
|
|
|
|
|
|
|
|
|
|
|
|
CI |
|
|
|
|
|
|
|
|
|
|
|
e |
|
|
|
|
|
|
|
|
|
|
|
|
|
|
|
|
|
|
M |
|
|
|
|
|
|
|
|
|
|
|
b |
|
|
|
|
|
|
|
|
|
|
|
|
|
|
|
|
|
|
, |
|
|
|
|
|
|
|
|
|
ol |
|
|
|
|
|
|
|
|
|
|
|
|
|
|
|
|
||
|
|
|
|
|
|
|
|
|
|
|
|
n |
|
|
|
|
|
|
|
|
|
|
|
|
|
|
|
|
||
|
|
|
|
TI |
|
|
|
|
|
|
|
|
|
|
|
|
|
|
|
|
|
|
|
|
|
|
|
|
|
|
|
|
|
|
V |
|
|
|
|
|
|
|
|
g |
|
|
|
|
|
|
|
|
|
|
|
|
|
|
|
|
|
|
|
|
|
|
O |
RI |
|
|
|
|
|
|
|
ot |
|
|
|
|
|
|
|
|
|
|
|
|
|
|
|
|
|
|
|
|
|
|
|
|
|
|
|
|
|
ht |
|
|
|
|
|
|
|
|
|
|
|
|
|
|
|
|
|
|
|
|
|
|
|
PS |
, |
|
|
|
|
|
e |
|
|
|
|
|
|
|
|
|
|
|
|
|
|
|
|
|
|
|
|
|
|
|
|
TIV |
OI |
|
|
|
er |
|
|
|
|
|
|
|
|
|
|
|
|
|
|
|
|
|
|
|
|
|
|
|
|
|
|
|
DR |
AC , |
ce |
|
|
|
|
|
|
|
|
|
|
|
|
|
|
|
|
|
|
|
|
|
|
|
|
|
|
|
|
|
oh evit |
|
|
|
|
|
|
|
|
|
|
|
|
|
|
|
|
|
|
|
|
|
|
|
|
|
|
|
|
|
|
RELLIHCS |
.sredl |
|
|
|
|
|
|
|
|
|
|
|
|
|
|
|
|
|
|
|
Art. no.: 2.510492 rev.: b
User Guide

Sales and Service Information
The SCHILLER sales and service centre network is world-wide. For the address of your local distributor, contact your nearest SCHILLER subsidiary. A complete list of all distributors and subsidiaries is provided on our Internet site: http:// www.schiller.ch
Sales information can also be obtained from: sales@schiller.ch
Headquarters Address
SCHILLER AG |
Phone: +41 (0) 41 766 42 42 |
Altgasse 68 |
Fax: +41 (0) 41 761 08 80 |
CH-6341 Baar, Switzerland |
E-mail: sales@schiller.ch |
Web: |
www.schiller.ch |
Article no.: 2.510492 rev.: b
Issue date: 29.07.04

Art. no.: 2.510492 rev.: b
MT-101/MT-200 |
User Guide |
|
|
Content |
|
|
1 |
General and Safety Notes ........................ |
5 |
1.1 |
Physician's Responsibility ................................................. |
5 |
1.2 |
Intended Use ......................................................................... |
5 |
1.3 |
Organisational Measures..................................................... |
5 |
1.4 |
Operational Precautions ...................................................... |
6 |
1.5 |
Safety Equipment ................................................................. |
6 |
1.6 |
Precautions for Operation with other Devices .................. |
6 |
1.7 |
Maintenance.......................................................................... |
6 |
1.8 |
Safety Symbols and Pictograms......................................... |
7 |
2 |
Introduction .............................................. |
8 |
2.1 |
MT-101/200 Range of Application ....................................... |
8 |
2.2 |
MT-101 Components and Operation................................. |
10 |
2.3 |
Operating and Display Elements ...................................... |
11 |
2.3.1 |
Switching on..................................................................................... |
11 |
2.3.2 |
Switching off..................................................................................... |
11 |
2.3.3 |
Battery display.................................................................................. |
11 |
2.3.4 |
Status display................................................................................... |
11 |
2.4 |
MT-101 Menu Structure...................................................... |
12 |
2.4.1 |
Menu Overview ................................................................................ |
12 |
2.5 |
Initial Operation .................................................................. |
13 |
2.5.1 |
Unpacking ........................................................................................ |
13 |
2.5.2 |
Inserting/changing the battery.......................................................... |
13 |
3 |
Preparing a Holter Recording ............... |
14 |
3.1 |
Position of the Electrodes ................................................. |
14 |
3.2 |
Commencing a Holter Recording...................................... |
16 |
3.2.1 During the Recording and Patient Information ................................. |
17 |
|
3.3Taking an Extended Recording (Longer than 24 hours). 17
4 |
|
Transferring a Recording to the PC ...... |
18 |
4.1 |
Data Transmission to PC from MT-101............................. |
18 |
|
4.2 |
Data transmission to PC with Memory Card Reader....... |
18 |
|
5 |
|
Displaying an ECG Signal ..................... |
19 |
5.1 |
Starting a Recording from the MT-200 Program.............. |
19 |
|
5.1.1 |
Pacemaker ....................................................................................... |
21 |
|
5.2 |
|
Transmission Problems..................................................... |
22 |
5.2.1 |
Checking the connection.................................................................. |
23 |
|
6 |
|
Viewing and Editing a Recording ......... |
24 |
6.1 |
|
Icons .................................................................................... |
24 |
6.1.1 |
View icons ........................................................................................ |
25 |
|
6.1.2 |
Function icons .................................................................................. |
26 |
|
Page 1

Art. no.: 2.510492 rev.: b
MT-101/MT-200 |
User Guide |
|
|
|
|
|
|
|
6.1.3 |
Tool icons in rhythm and zoom views .............................................. |
27 |
|
6.2 |
Accessing and Opening Files ........................................... |
28 |
|
6.3 |
Event & Zoom Views .......................................................... |
29 |
|
6.4 |
Analysis Summary ............................................................. |
31 |
|
6.5 |
Event Samples View........................................................... |
33 |
|
6.6 |
ECG View............................................................................. |
35 |
|
6.6.1 |
Selecting Channels for Display ........................................................ |
36 |
|
6.6.2 |
Selecting Channels for Analysis....................................................... |
36 |
|
6.6.3 |
Auto Scrolling ................................................................................... |
36 |
|
6.7 |
Event Chart ......................................................................... |
37 |
|
6.8 |
Heart Rate View .................................................................. |
38 |
|
6.9 |
ST Trend View..................................................................... |
39 |
|
6.10 |
Template Matching ............................................................. |
41 |
|
6.10.1 |
Detailed Overview of the Template Classes .................................... |
43 |
|
6.11 |
Pacemaker Templates........................................................ |
45 |
|
6.11.1 |
Template classes ............................................................................. |
46 |
|
6.12 |
Heart Rate Variability ......................................................... |
49 |
|
6.13 |
Heart Rate Trend................................................................. |
51 |
|
6.13.1 |
Jumping to the max/min Heart Rate or max/min NN Interval........... |
51 |
|
6.13.2 |
Redefining the Max/Min Heart Rate and NN Interval ....................... |
51 |
|
6.14 Reclassifying/Editing a QRS Complex ............................. |
52 |
|
|
6.15 |
Analysing/Re-analysing the Recording............................ |
54 |
|
6.16 |
Analysing Options.............................................................. |
56 |
|
6.16.1 |
Arrhythmias ...................................................................................... |
56 |
|
6.16.2 |
Manually Defining Arrhythmias ........................................................ |
56 |
|
6.16.3 |
ST-episodes ..................................................................................... |
57 |
|
6.16.4 |
Templates ........................................................................................ |
57 |
|
6.16.5 |
Mode ................................................................................................ |
57 |
|
6.17 |
Editing Patient Data/Recording......................................... |
58 |
|
6.18 |
Printing ................................................................................ |
61 |
|
6.18.1 |
Print preview / Printing a specific page ............................................ |
61 |
|
6.18.2 |
Obtaining a printout:......................................................................... |
62 |
|
6.18.3 |
Printing a selected half hour ECG segment ..................................... |
62 |
|
7 |
Miscellaneous Functions ....................... |
63 |
|
7.1 |
E-Mail and PDF Functions ................................................. |
63 |
|
7.1.1 |
PDF files with Acrobat Reader ......................................................... |
63 |
|
7.1.2 |
Editing PDF files............................................................................... |
63 |
|
7.2 |
Saving a Recording ............................................................ |
64 |
|
7.2.1 |
Saving a recording in MT-200 or PDF format .................................. |
64 |
|
7.2.2 |
Sending a recording by e-mail ......................................................... |
65 |
|
7.2.3 |
Importing recordings ........................................................................ |
65 |
|
7.2.4 |
Exporting recordings ........................................................................ |
65 |
|
7.3 |
Deleting a Recording.......................................................... |
66 |
|
7.4 |
Accelerator Keys ................................................................ |
67 |
|
8 |
System Settings and Options ............... |
68 |
|
8.1 |
Print Formats ...................................................................... |
68 |
|
8.1.1 |
Templates ........................................................................................ |
68 |
|
8.1.2 |
Event samples.................................................................................. |
69 |
|
8.1.3 |
Full disclosure (1, 2 or 3 channel) .................................................... |
69 |
Page 2

Art. no.: 2.510492 rev.: b
MT-101/MT-200 |
User Guide |
|
|
|
|
|
|
|
8.1.4 |
User-defined print formats................................................................ |
70 |
|
8.2 |
Heart Rate Trend................................................................. |
72 |
|
8.3 |
Amplitude/Speed ................................................................ |
73 |
|
8.4 |
Pacemaker Templates........................................................ |
74 |
|
8.5 |
System Settings.................................................................. |
75 |
|
8.5.1 |
Print setup........................................................................................ |
75 |
|
8.5.2 |
Units and language .......................................................................... |
75 |
|
8.5.3 |
Directories ........................................................................................ |
76 |
|
8.5.4 Data storage mode (auto delete) ..................................................... |
76 |
|
|
8.5.5 USB / AT-card Connection and Test transmission Mode................. |
76 |
|
|
8.5.6 |
GDT.................................................................................................. |
77 |
|
8.5.7 |
Office Address.................................................................................. |
77 |
|
8.6 |
User Identification .............................................................. |
78 |
|
9 |
Maintenance ............................................ |
79 |
|
9.1 |
Visual Inspection ................................................................ |
79 |
|
9.2 |
Cleaning the device and cable assemblies...................... |
80 |
|
9.2.1 Cleaning the device, electrode cable, and USB cable ..................... |
80 |
|
|
10 |
Installation .............................................. |
81 |
|
10.1 |
System Requirements........................................................ |
81 |
|
10.2 |
Installation of MT-200 General Network License............. |
81 |
|
10.3 |
Network Licence Option .................................................... |
81 |
|
10.4 |
Unpacking ........................................................................... |
81 |
|
10.5 |
Installing the Hard-Lock Key ............................................. |
83 |
|
10.6 |
Installing the MT-200 Program from the CD..................... |
84 |
|
10.7 |
Installing a USB Driver....................................................... |
84 |
|
11 |
Technical Data ........................................ |
85 |
|
11.1 |
Microvit MT-101 .................................................................. |
85 |
|
11.2 |
MT-200 Software ................................................................. |
86 |
|
12 Options, Accessories and Disposables 87 |
||
|
12.1 |
Complete Systems ............................................................. |
87 |
|
12.1.1 Software and Hardware Options ...................................................... |
87 |
|
|
12.1.2 Accessories ECG Holter system ...................................................... |
88 |
|
|
13 |
Patient Diary ........................................... |
89 |
|
13.1 |
Schiller CD .......................................................................... |
89 |
|
14 |
Index ........................................................ |
93 |
Page 3

MT-101/MT-200
Art. no.: 2.510492 rev.: b
Page 4
Art. no.: 2.510492 rev.: b
MT-101/MT-200 |
User Guide |
General and Safety Notes |
1 |
|
Physician's Responsibility |
1.1 |
|||
|
|
|
|
|
1 General and Safety Notes
1.1Physician's Responsibility
V This Holter Recorder and PC program is provided for the exclusive use of qualified physicians or trained personnel under their direct supervision.
V The numerical and graphical results as well as any interpretation suggested by the device must be examined with respect to the patient's overall clinical condition and the quality of the recorded data.
VThe responsibilities of the personnel for the operation and maintenance of the device must be specified.
VMake sure that the personnel have read and understood the user guide, and especially these safety notes.
VDamaged or missing parts must be replaced immediately.
VIt is the owner's responsibility that the valid regulations for safety and prevention of accidents are observed.
1.2Intended Use
V The MT-101/MT-200 Holter and evaluation software is designed to record longterm electrocardiograms for the diagnosis of symptomatic and asymptomatic arrhythmias, i.e. bradycardia or tachycardia, and for patients after resuscitation or suffering from diseases such as cardiomyopathy, high blood pressure or long QT syndrome.
VThere is no danger when using the device for a patient with a pacemaker fitted.
VAlways observe the indicated technical data when operating the device.
VThe device is not designed for sterile use.
VDo not use the device in areas where there is any danger of explosion or in the presence of flammable gases such as anaesthetic agents.
V


 The device is CF classified. It is defibrillation protected when the original SCHILLER patient cable is used. However, as a safety precaution when possible, remove the electrodes before defibrillation.
VThe device is not designed for direct cardiac application.
1.3Organisational Measures
V Before using the device, ensure that an introduction regarding its functions and the safety precautions has been provided by a product representative.
V Always store the user guide near the device. Make sure that the user guide is always complete and readable.
VObserve the safety notes for devices connected to the MT-101/MT-200.
VIn addition to this user guide, also legal and other binding regulations for the prevention of accidents and for environment protection must be observed.
Page 5

1 |
General and Safety Notes |
|
|
1.4 |
Operational Precautions |
MT-101/MT-200 |
|
|
|
|
|
1.4Operational Precautions
V This user guide, and especially these safety notes, must be read and observed. V Do not touch the unit casing during defibrillation.
V It must be ensured that neither the patient nor the electrodes come into contact with other persons or conducting objects (even if these are earthed).
VChanges, including operators behaviour, affecting safety must be immediately reported to the responsible person.
1.5Safety Equipment
V Operating this device without safety equipment or with damaged cables can endanger the health or life of the patient or the person operating the device! For this reason:
–Damaged cables and connections must immediately be replaced.
1.6Precautions for Operation with other Devices
V Use only accessories and other parts recommended or supplied by SCHILLER AG. The use of other than recommended or supplied parts may result in injury, inaccurate information and/or damage to the device.
VAccessory equipment connected to the analogue and digital interfaces must be certified according to the respective IEC standards (e.g. IEC/EN 60950 for data processing equipment and IEC/EN 60601-1 for medical equipment).
Furthermore, all configurations shall comply with the valid version of the system standard IEC/EN 60601-1-1. Everyone who connects additional equipment to the signal input part or signal output part configures a medical system, and is therefore responsible that the system complies with the requirements of the valid version of the system standard IEC/EN 60601-1-1. If in doubt, consult the technical service department or your local representative.
VSpecial care must be exercised when the unit is used with high frequency equipment. To prevent the display of incorrect ECG signals, only use special SCHILLER ECG cables protected against high frequency radiation.
VThere is no danger when using this device simultaneously with electrical stimulation equipment. However, the stimulation units should only be used at a sufficient distance from the electrodes. If in doubt, disconnect the patient from the recorder.
1.7Maintenance
V Do not use high temperature sterilisation processes (such as autoclaving). Do not use e-beam or gamma radiation sterilisation.
V Do not use aggressive or abrasive cleaners.
VDo not, under any circumstances, immerse the device or cable assemblies in liquid.
Page 6
Art. no.: 2.510492 rev.: b
MT-101/MT-200 |
User Guide |
General and Safety Notes |
1 |
|
Safety Symbols and Pictograms |
1.8 |
|||
|
|
|
|
|
1.8Safety Symbols and Pictograms
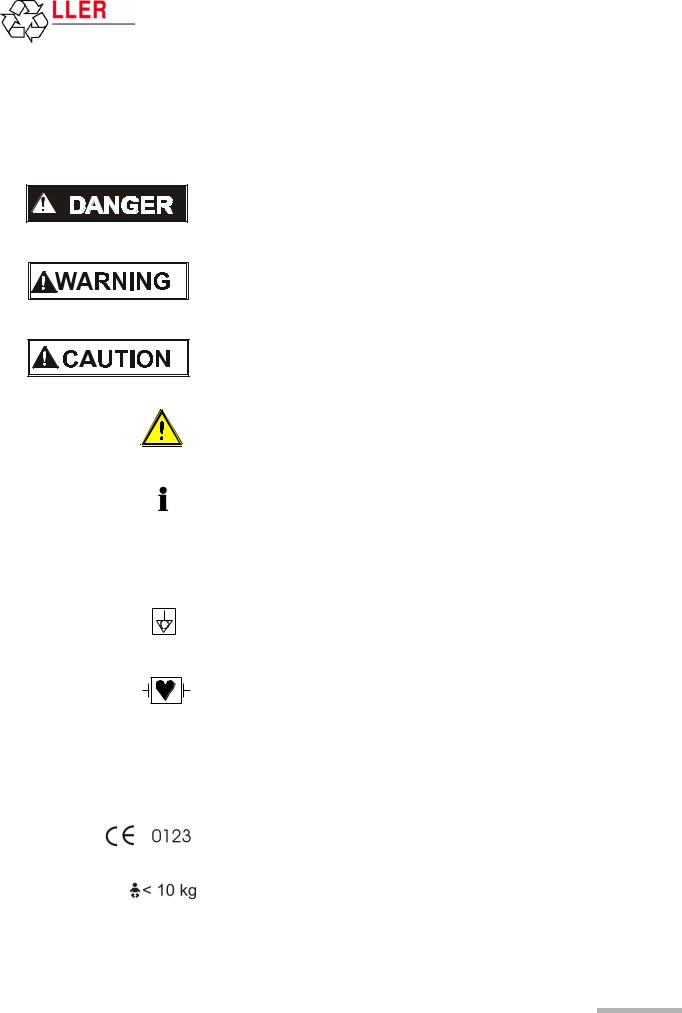
The safety level is classified according ANSI Z535.4. The following overview shows the safety symbols and pictograms used in this handbook.
For a direct danger which could lead to severe personal injury or to death.
For a possibly dangerous situation, which could lead to bodily injury or to death.
For a possibly dangerous situation which could lead to personal injury. This symbol is also used to indicate possible damage to property.
For general safety notes as listed in this chapter. When this symbol is displayed on the unit, it means that the user should refer to the user guide.
Note for possible dangerous situations which could lead to damage to property or system failure. Important or helpful user information.
Reference to other guidelines.
Potential equalization.
CF symbol. This unit is classified safe for direct cardiac application. Only defibrillation protected when used with the original SCHILLER patient cable.
The unit/component can be recycled.
Notified body of the CE certification (TÜV P.S.).
Is intended for infants weighing less then 10 kg.
Page 7

2 |
Introduction |
|
|
2.1 |
MT-101/200 Range of Application |
MT-101/MT-200 |
|
|
|
|
|
2 Introduction
The SCHILLER Holter system comprises two main parts. The MT-101 Holter recorder and the MT-200 program. Recordings made by the MT-101 unit are downloaded to the MT-200 for display, storage and analysis.
2.1MT-101/200 Range of Application
|
|
|
|
|
|
|
|
|
|
|
|
|
|
|
|
|
HILLER |
Software on |
this CD |
|
|
|
|
|
|
|
|
|
|
|
|
|
|
|
|
|
||
|
|
|
|
|
|
|
|
|
|
|
|
|
|
|
rights |
for SC |
|
|
belo |
ng |
|
|
|
|
|
|
|
|
|
|
|
|
|
|
|
|||
|
|
|
|
|
|
|
|
|
|
|
|
|
|
rty |
|
|
|
|
|
to |
|
|
|
|
|
|
|
|
|
|
|
|
|
|
||||
|
|
|
|
|
|
|
|
|
|
|
|
|
pe |
|
|
|
|
|
|
|
|
|
SC |
|
|
|
|
|
|
|
|
|
|
|
|
|
||
|
|
|
|
|
|
|
|
|
|
|
|
|
pro |
|
|
|
|
|
|
|
|
|
|
|
|
|
|
|
|
|
|
|
|
|
|
|
|
|
|
|
|
|
|
|
|
|
|
|
|
|
|
ial |
|
|
|
|
|
|
|
|
|
|
|
HIL |
|
|
|
|
|
|
|
|
|
|
|
|
|
|
|
|
|
|
|
|
|
|
|
|
|
|
rc |
|
|
|
|
|
|
|
|
|
|
|
LER |
A |
|
|
|
|
|
|
|
|
|
|
|
|
|
|
|
|
|
|
|
|
|
|
|
|
|
e |
|
|
|
|
|
|
|
|
|
|
|
|
|
|
|
|
|
|
|
|
|
|
|
|
|
|
|
|
|
|
|
|
|
|
|
|
|
|
m |
|
|
|
|
|
|
|
|
|
|
|
|
G, |
|
|
|
|
|
|
|
|
|
|
|
|
|
|
|
|
|
|
|
|
|
|
|
|
|
om |
|
|
|
|
|
|
|
|
|
|
|
|
S |
|
|
|
|
|
|
|
|
|
|
|
|
|
|
|
|
|
|
|
|
|
|
|
|
|
c |
|
|
|
|
|
|
|
|
|
|
|
|
|
wi |
|
|
|
|
|
|
|
|
|
|
|
|
|
|
|
|
|
|
|
|
|
|
|
|
d |
|
|
|
|
|
|
|
|
|
|
|
|
|
t |
|
|
|
|
|
|
|
|
|
|
|
|
|
|
|
|
|
|
|
|
|
|
|
|
n |
|
|
|
SCHILLER |
er |
|
l |
|
|
|
|
|
|
|
|||||||||||
|
|
|
|
|
|
|
|
|
|
|
|
|
a |
|
|
|
|
|
|
|
|
|
|
|
|
|
|
a |
|
|
|
|
|
|
|
|
|
|
|
|
|
|
|
|
|
|
|
|
|
|
l |
|
|
|
|
|
|
|
|
|
|
|
|
|
|
l |
|
|
|
|
|
|
|
|
|
|
|
|
|
|
|
|
|
|
|
|
|
|
|
|
|
|
|
|
|
|
|
|
|
|
|
|
|
n |
|
|
|
|
|
|
|
|
|
|||
|
|
|
|
|
|
|
|
|
|
|
|
ia |
|
|
|
|
|
|
|
|
|
|
|
|
|
|
|
|
d |
|
|
|
|
|
|
|
|
|
|
|
|
|
|
|
|
|
|
|
|
|
str |
|
|
|
|
|
|
|
|
|
|
|
|
|
|
|
|
A |
|
|
|
|
|
|
|
||
|
|
|
|
|
|
|
|
|
|
|
|
u |
|
|
|
|
|
|
|
|
|
|
|
|
|
|
|
|
. |
|
|
|
|
|
|
|
|
|
|
|
|
|
|
|
|
|
|
|
in |
d |
|
|
|
|
|
|
|
|
|
|
|
|
|
|
|
|
|
l |
|
|
|
|
|
|
|
||
|
|
|
|
|
|
|
|
|
|
|
|
|
|
|
|
|
|
|
|
|
|
|
|
|
|
|
|
|
i |
|
|
|
|
|
|
|||
|
|
|
|
|
|
|
|
|
|
|
|
|
|
|
|
|
|
|
|
|
|
|
|
|
|
|
|
|
|
|
h |
|
|
|
|
|
||
|
|
|
|
|
|
|
|
|
ll |
|
|
|
|
|
|
|
|
|
|
|
|
|
|
|
|
|
|
|
|
|
r |
t |
|
|
|
|
|
|
|
|
|
|
|
|
|
|
A |
|
|
|
|
|
|
|
|
|
|
|
|
|
|
|
|
|
|
|
|
|
|
g |
|
|
|
|
|
||
|
|
|
|
|
|
s |
. |
|
|
|
|
|
|
|
|
S W I T Z E R L A N D |
|
|
|
|
|
|
s |
|
|
|
|
|||||||||||
|
|
|
|
|
e |
|
|
|
|
|
|
|
|
|
|
|
|
|
|
|
|
r |
|
|
|
|
||||||||||||
|
|
|
|
m |
|
|
|
|
|
|
|
|
|
|
|
|
|
|
|
|
|
|
|
|
|
|
|
|
|
|
|
|
e |
|
|
|||
|
|
|
|
|
|
|
|
|
|
|
|
|
|
|
|
|
|
|
|
|
|
|
|
|
|
|
|
|
|
|
|
|
|
v |
|
|||
|
|
|
a |
|
|
|
|
|
|
|
|
|
|
|
|
|
|
|
|
|
|
|
|
|
|
|
|
|
|
|
|
|
|
s |
|
|
|
|
|
|
|
|
|
|
|
|
|
|
|
|
|
|
|
|
|
|
|
|
|
|
|
|
|
|
|
|
|
|
|
|
|
|
e |
|
|||
|
|
N |
|
|
|
|
|
|
|
|
|
|
|
|
|
|
|
|
|
|
|
|
|
|
|
|
|
|
|
|
|
|
|
|
r |
|
|
|
|
d e |
|
|
|
|
SDS-200 2.01 |
|
|
|
|
|
|
|
|
|
|
|
|
|
|
|
|
|
|
|
|
|
|
|
d |
|
|||||||
|
|
|
|
|
|
|
|
|
|
|
|
|
|
|
|
|
|
|
|
|
|
|
|
|
|
|
|
|
|
|||||||||
|
|
|
|
|
|
|
|
|
|
|
|
|
|
|
|
|
|
|
|
|
|
|
|
|
|
|
|
|
|
|
|
|
|
|
|
|
. |
|
ra |
|
|
|
|
|
|
SDS-104 2.01 |
|
|
|
|
|
|
|
|
|
|
|
|
|
|
|
|
|
|
|
|
|
|
|
|
S |
||||||
T |
|
|
|
|
|
|
|
|
|
|
|
|
|
|
|
|
|
|
|
|
|
|
|
|
|
|
|
|
|
|
C |
|||||||
d |
|
|
|
|
|
|
SEMA-200 1.81 |
|
|
|
|
|
|
|
|
|
|
|
|
|
|
|
|
|
|
|
|
|
|
|
|
H |
||||||
a |
|
|
|
|
|
|
|
|
|
|
|
|
|
|
|
|
|
|
|
|
|
|
|
|
|
|
|
|
|
|
L |
|||||||
n |
|
|
|
|
|
|
|
|
|
|
|
|
|
|
|
|
|
|
|
|
|
|
|
|
|
|
|
|
|
|
|
|
|
|
|
|
|
L |
|
|
|
|
|
|
|
|
|
|
|
|
|
|
|
|
|
|
|
|
|
|
|
|
|
|
|
|
|
|
|
|
|
|
|
|
|
|
I |
ks |
|
|
|
|
|
|
SEMA-COMM 1.80 |
|
|
|
|
|
|
|
|
|
|
|
|
|
|
|
|
|
|
|
|
|
|
|
|
E |
||||||
r |
|
|
|
|
|
|
|
|
|
|
|
|
|
|
|
|
|
|
|
|
|
|
|
|
|
|
|
|
|
|
R |
|||||||
a |
|
|
|
|
|
|
MT-190/200 1.80 |
|
|
|
|
|
|
|
|
|
|
|
|
|
|
|
|
|
|
|
|
|
|
|
|
A |
||||||
M |
|
|
|
|
|
|
|
|
|
|
|
|
|
|
|
|
|
|
|
|
|
|
|
|
|
|
|
|
|
|
, |
|||||||
|
|
|
|
|
|
|
|
|
|
|
|
|
|
|
|
|
|
|
|
|
|
|
|
|
|
|
|
|
|
|
|
|
|
|
|
|
G |
|
e |
|
|
|
|
|
|
MS-3 2.03 |
|
|
|
|
|
|
|
|
|
|
|
|
|
|
|
|
|
|
|
|
|
|
|
|
H |
||||||
a |
|
|
|
|
|
|
|
|
|
|
|
|
|
|
|
|
|
|
|
|
|
|
|
|
|
|
|
|
|
|
||||||||
d |
|
|
|
|
|
|
|
|
|
|
|
|
|
|
|
|
|
|
|
|
|
|
|
|
|
|
|
|
|
|
|
|
|
|
|
|
|
C |
r |
|
|
|
|
|
|
BR-102 2.40 |
|
|
|
|
|
|
|
|
|
|
|
|
|
|
|
|
|
|
|
|
|
|
|
|
- |
||||||
d |
|
|
|
|
|
|
|
|
|
|
|
|
|
|
|
|
|
|
|
|
|
|
|
|
|
|
|
|
|
|
3 |
|||||||
T |
|
|
|
|
|
|
|
|
|
|
|
|
|
|
|
|
|
|
|
|
|
|
|
|
|
|
|
|
|
|
|
|
|
|
|
|
|
6 |
e |
|
|
|
|
|
|
|
|
|
|
|
|
|
|
|
|
|
|
|
|
|
|
|
|
|
|
|
|
|
|
|
|
|
|
|
|
|
4 |
s |
|
|
|
|
|
|
Demo Sema-200 |
|
|
|
|
|
|
|
|
|
|
Part No. 2.100256 B |
||||||||||||||||||||
t |
|
|
|
|
|
|
|
|
|
|
|
|
|
|
|
|
|
|
|
|
|
|
|
|
|
|
|
|
|
|
|
|||||||
r |
|
|
|
|
|
|
|
|
|
|
|
|
|
|
|
|
|
|
|
|
|
|
|
|
|
|
|
|
|
|
|
|
|
|
|
|
|
1 |
e |
|
|
|
|
|
|
Demo MT-200 |
|
|
|
|
|
|
|
|
|
|
|
|
|
|
|
|
|
|
|
|
|
|
|
|
|||||||
g |
|
|
|
|
|
|
|
|
|
|
|
|
|
|
|
|
|
|
|
|
|
|
|
|
|
|
|
|
|
|
a |
|||||||
i |
|
|
|
|
|
|
|
|
|
|
|
|
|
|
|
|
|
|
|
|
|
|
|
|
Version x.xx |
|
|
|
a |
|||||||||
r |
|
|
|
|
|
|
|
|
|
|
|
|
|
|
|
|
|
|
|
|
|
|
|
|
|
|
|
, |
||||||||||
e |
|
|
|
|
|
|
System Software |
|
|
|
|
|
|
|
|
|
|
|
|
|
|
|
|
|
|
|
|
|
|
|
|
r |
||||||
e |
|
|
|
|
|
|
|
|
|
|
|
|
|
|
|
|
|
|
|
|
|
|
|
|
|
|
|
|
|
|
S |
|||||||
r |
|
|
|
|
|
|
Release Notes |
|
|
|
|
|
|
|
|
|
|
|
|
|
|
|
|
|
|
|
|
|
|
|
|
w |
||||||
E |
|
|
|
|
|
|
|
|
|
|
|
|
|
|
|
|
|
|
|
|
|
|
|
|
|
|
|
|
|
|
z |
|||||||
a |
|
|
|
|
|
|
|
|
|
|
|
|
|
|
|
|
|
|
|
|
|
|
|
|
|
|
|
|
|
|
|
|
|
|
|
|
|
i |
|
|
|
|
|
|
|
|
|
|
|
|
|
|
|
|
|
|
|
|
|
|
|
|
|
|
|
|
|
|
|
|
|
|
|
|
|
t |
|
P |
|
|
|
|
|
|
|
|
|
|
|
|
|
|
|
|
|
|
|
|
|
|
|
|
|
|
|
|
|
|
|
|
|
|
|
|
|
e |
O |
|
|
|
|
|
|
Acrobat Reader 4.0 |
|
|
|
|
|
|
|
|
|
|
|
|
|
|
|
|
|
|
|
|
|
|
|
|
a |
||||||
|
|
|
|
|
|
|
|
|
|
|
|
|
|
|
|
|
|
|
|
|
|
|
|
|
|
|
|
|
|
|
|
|
|
|
|
|
|
l |
S |
|
|
|
|
|
|
|
|
|
|
|
|
|
|
|
|
|
|
|
|
|
|
|
|
|
|
|
|
|
|
|
|
|
|
|
|
|
n |
C |
|
|
|
|
|
|
|
|
|
|
|
|
|
|
|
|
|
|
|
|
|
|
|
|
|
|
|
|
|
|
|
|
|
|
|
|
|
.d |
N |
|
|
|
|
|
|
|
|
|
|
|
|
|
|
|
|
|
|
|
|
|
|
|
|
|
|
|
|
|
|
|
|
|
|
|
|
|
|
I |
|
|
|
|
|
|
|
|
|
|
|
|
|
|
|
|
|
|
|
|
|
|
|
|
|
|
|
|
|
|
|
|
|
|
|
|
|
llA |
M |
|
|
|
|
|
|
|
|
|
|
|
|
|
|
|
|
|
|
|
|
|
|
|
|
|
|
|
|
|
|
|
|
|
|
|
|
||
I |
|
|
|
|
|
|
|
|
|
|
|
|
|
|
|
|
|
|
|
|
|
|
|
|
|
|
|
|
|
|
|
|
|
|
|
|
|
|
d |
|
|
|
|
|
|
|
|
|
|
|
|
|
|
|
|
|
|
|
|
|
|
|
|
|
|
|
|
|
|
|
|
|
|
|
|
o |
|
n |
|
|
|
|
|
|
|
|
|
|
|
|
|
|
|
|
|
|
|
|
|
|
|
|
|
|
|
|
|
|
|
|
|
|
|
t |
||
|
a |
|
|
|
|
|
|
|
|
|
|
|
|
|
|
|
|
|
|
|
|
|
|
|
|
|
|
|
|
|
|
|
|
|
re |
|
||
|
|
M |
|
|
|
|
|
|
|
For further information please visit our homepage |
|
|
|
|
|
|
|
|
|
|
|
|
||||||||||||||||
|
A |
|
|
|
|
|
|
|
|
|
|
|
|
|
|
|
|
|
|
|
|
|
|
|
|
|
|
|
|
|
|
|
a |
|
|
|||
|
|
|
|
E |
|
|
|
|
|
|
|
|
|
|
|
|
|
|
|
|
|
|
|
|
|
|
|
|
|
|
|
|
t |
|
|
|||
|
|
|
|
S |
|
|
|
|
|
www.schiller.ch or send an e-mail to sales@schiller.ch |
|
|
|
|
|
|
m |
e |
|
|
|
|||||||||||||||||
|
|
|
|
|
S |
|
|
|
|
|
|
|
|
|
|
|
|
|
||||||||||||||||||||
|
|
|
|
|
, |
|
|
|
|
|
|
|
|
|
|
|
|
|
|
|
|
|
|
|
|
|
|
|
|
|
|
|
|
|
|
|
||
|
|
|
|
|
|
|
U |
|
|
|
|
|
|
|
|
|
|
|
|
|
|
|
|
|
|
|
|
|
|
st |
n |
|
|
|
|
|
||
|
|
|
|
|
|
|
|
G |
|
|
|
|
|
|
|
|
|
|
|
|
|
|
|
|
|
|
|
|
|
|
|
|
|
|||||
|
|
|
|
|
|
|
|
|
R |
|
|
|
|
|
|
|
|
|
|
|
|
|
|
|
|
|
|
|
a |
|
|
|
|
|
|
|||
|
|
|
|
|
|
|
|
|
|
|
, |
|
|
|
|
|
|
|
|
|
|
|
|
|
|
|
|
|
n |
|
|
|
|
|
|
|
||
|
|
|
|
|
|
|
|
|
|
|
|
T |
|
|
|
|
|
|
|
|
|
|
|
|
|
|
|
|
|
|
|
|
|
|
|
|
|
|
|
|
|
|
|
|
|
|
|
|
A |
|
|
|
|
|
|
|
|
|
|
|
|
|
|
|
|
|
|
|
|
|
|
|
|
|
|
||
|
|
|
|
|
|
|
|
|
|
|
|
V |
|
|
|
|
|
|
|
|
|
|
|
|
|
|
|
|
|
|
|
|
|
|
|
|
|
|
|
|
|
|
|
|
|
|
|
|
|
|
I |
|
|
|
|
|
|
|
|
|
|
|
|
|
|
|
|
rt |
|
|
|
|
|
|
|
|
|
|
|
|
|
|
|
|
|
|
|
|
|
O |
|
|
|
|
|
|
|
|
|
|
|
|
|
|
|
|
|
|
|
|
|
|
|
|
||
|
|
|
|
|
|
|
|
|
|
|
|
N |
|
|
|
|
|
|
|
|
|
|
|
|
|
|
d |
a |
|
|
|
|
|
|
|
|
|
|
|
|
|
|
|
|
|
|
|
|
|
|
|
O |
|
|
|
|
|
|
|
|
|
|
|
|
|
|
|
|
|
|
|
|
|
|
|
|
|
|
|
|
|
|
|
|
|
|
|
|
|
|
S |
|
|
|
|
|
|
|
|
|
|
|
|
|
an |
e |
|
|
|
|
|
|
|
|
|
|
|
|
|
|
|
|
|
|
|
|
|
|
|
T |
|
|
|
|
|
|
|
|
|
|
|
|
|
|
|
|
|
|
|
|
|
|
|
|
|
|
|
|
|
|
|
|
|
|
|
|
|
|
, |
|
|
|
|
|
|
|
|
|
|
|
|
|
m |
|
|
|
|
|
|
|
|
|
|
|
|
|
|
|
|
|
|
|
|
|
|
|
|
IV |
|
|
|
|
|
|
|
|
|
|
|
|
|
|
|
|
|
|
|
|
|
|
|
|
|
|
|
|
|
|
|
|
|
|
|
|
|
|
OR |
|
|
|
|
|
|
|
|
|
|
|
|
se |
|
|
|
|
|
|
|
|
|
|
|
|
|
|
|
|
|
|
|
|
|
|
|
|
|
CI |
|
|
|
|
|
|
|
|
|
|
|
eb |
|
|
|
|
|
|
|
|
|
|
|
|
|
|
|
|
|
|
|
|
|
|
|
|
|
|
M, |
|
|
|
|
|
|
|
|
|
|
|
nol |
|
|
|
|
|
|
|
|
|
|
|
|
|
|
|
|
|
|
|
|
|
|
|
|
|
|
TIV |
|
|
|
|
|
|
|
|
|
|
|
g |
|
|
|
|
|
|
|
|
|
|
|
|
|
|
|
|
|
|
|
|
|
|
|
|
|
|
ORI |
|
|
|
|
|
|
|
|
|
|
|
ot |
|
|
|
|
|
|
|
|
|
|
|
|
|
|
|
|
|
|
|
|
|
|
|
|
|
|
PS |
,TIV |
|
|
|
|
|
|
|
|
|
eht |
|
|
|
|
|
|
|
|
|
|
|
|
|
|
|
|
|
|
|
|
|
|
|
|
|
|
|
|
OID |
RAC , |
|
|
|
ceps |
erri |
|
|
|
|
|
|
|
|
|
|
|
|
|
|
||||
|
|
|
|
|
|
|
|
|
|
|
|
|
|
|
|
|
RELLIHC S |
|
.sr ed loh |
|
|
|
|
|
|
|
|
|
|
|
|
|
|
|
|
|
|
|
The MICROVIT MT-101 Holter is designed to record long-term electrocardiograms for the diagnosis of symptomatic and asymptomatic arrhythmias, i.e. bradycardia and tachycardia, and for patients after resuscitation or suffering from diseases such as cardiomyopathy, high blood pressure or long QT syndrome.
The recording can also be used to help examine palpitations or syncopes and dizziness, to verify medical therapies, and to carry out subsequent treatments after a bypass operation or a PTCA. The ST segment analysis of an ECG recording allows the detection of a symptomatic or asymptomatic ischemia.
Good signal quality is vital for the success of a recording. The built-in Holter display, enables the ECG signal quality to be checked before starting, and the recording commenced directly from the device. This gives a high degree of reliability.
At the end of a recording, the data is transferred from the Holter recorder to a PC. The transfer of a recording typically only requires a few minutes.
The MT-200 is a PC based ECG evaluation program. An ECG is recorded using the SCHILLER MICROVIT MT-101 Holter. Two or 3-channel ECG recordings can be recorded over a period up to 72 hours. After the transfer of the recording data into the MT-200 program, the data can be displayed, saved, analysed and printed. The MT200 program enables quick access to the recording data and displays the ECG and analysis data in a logical and understandable way for diagnosis.
Page 8
MT-101/MT-200 |
User Guide |
Introduction |
2 |
|
MT-101/200 Range of Application |
2.1 |
|||
|
|
|
|
|
The MT-200 includes analysis of the following:
Supraventricular Arrhythmias |
• |
supraventricular extrasystoles |
|
• |
couplets |
|
• |
triplets |
|
• chain of four or more SVES |
|
|
• |
(SV tach) |
|
• |
bigeminy |
|
• |
trigeminy |
Sinus Rhythm Alterations |
• |
tachycardia |
|
• |
bradycardia |
|
• |
pause |
|
• |
abs. arrhythmias |
Ventricular Arrhythmias |
• |
ventricular extrasystoles |
|
• |
couplets (VES chain) |
|
• |
triplets |
|
• chain of four or more VES |
|
|
• |
(V tach) |
|
• |
bigeminy |
|
• |
trigeminy |
|
• |
R on T |
Heart Rate Trend |
• |
calculated over 4, 8 or 16 beats and |
|
• averaged over 1 to 10 minutes |
|
ST Trend |
• |
setting of the distance from J-point for ST measurement (J-point + 10 to 100 ms) |
|
• episodes detected separately for channel 1, and/or channel 2, and/or channel 3 |
|
|
|
when ST level is exceeded (1 to 3 mm) |
Pacemaker |
• |
6 pacemaker templates |
|
• |
heart rate variability |
|
• tachograms and tabular presentation after analysis of the recording |
|
Art. no.: 2.510492 rev.: b
Page 9
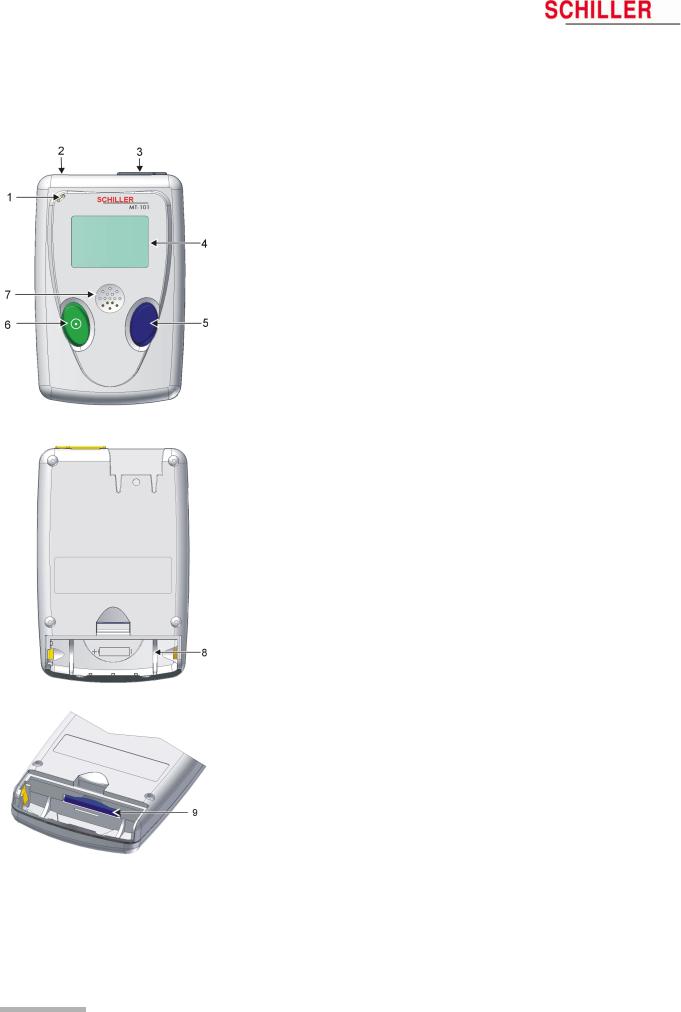
2 |
Introduction |
|
|
2.2 |
MT-101 Components and Operation |
MT-101/MT-200 |
|
|
|
|
|
2.2MT-101 Components and Operation
Front
(1)Microphone for patient identification
(2)Patient cable connection
(3)USB-cable connection
(4)LCD display
(5)Programming button
(6)On/off and programming button
(7)Loudspeaker
Back
(8)Battery housing
(9)SD memory card
Programming
The MT-101 Holter can be programmed simply using the two keys following the menu guidance on the LCD display.
Data transmission
The ECG data transmission to the PC can be realised in two ways:
–directly via standard USB connection (3)
–by removing the memory card (9) from the battery housing and transmitting the data to the PC by means of a memory card reader. The advantage resulting from this procedure is that the Holter can be equipped with a new memory card and is immediately available for the next patient.
Page 10
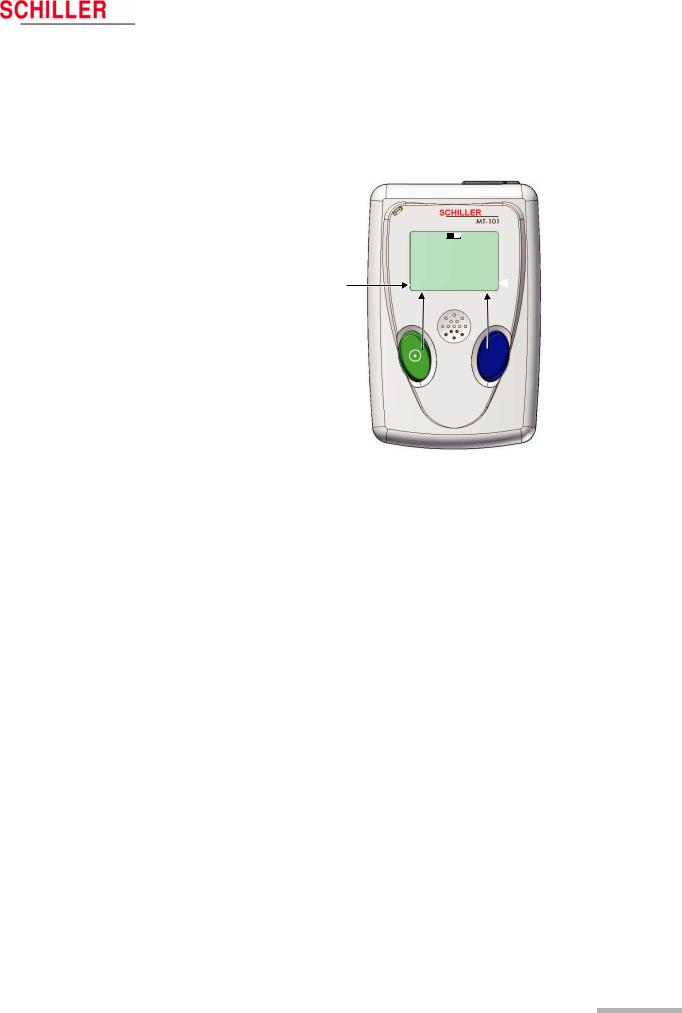
MT-101/MT-200 |
User Guide |
Introduction |
2 |
|
Operating and Display Elements |
2.3 |
|||
|
|
|
|
|
2.3Operating and Display Elements
The Microvit MT-101 is operated with the two buttons and the menu guidance on the LCD. The green key with the switching-on symbol is used additionally to switch the device on and off.
Functions green button:
On/off
NEXT
EVENT SPEED 1x - 3x NO
Status 
 15:45
15:45
NEXT OK 
Functions of the blue button:
OK CHANGE EVENT YES CHANN2/3
Art. no.: 2.510492 rev.: b
2.3.1Switching on
Press the green button. The display shows the name and version number of the device before the main menu is displayed.
2.3.2Switching off
Keep the green button pressed for five seconds. When the button is released, the device is switched off. If an ECG recording is running, first stop it following the same procedure.
If no recording is running, the device will be switched off automatically after five minutes.
2.3.3Battery display
The battery symbol indicates the battery's load status. If the battery is full, the symbol is solid - also see para. 2.5.2 Inserting/changing the battery, page 13.
2.3.4Status display
The operating status is displayed in the left upper corner of the LCD. REC for recording, USB if the MT-101 is connected to a PC, USB* for data transmission to a PC.
Page 11

2 |
Introduction |
|
|
2.4 |
MT-101 Menu Structure |
MT-101/MT-200 |
|
|
|
|
|
2.4MT-101 Menu Structure
The menus are selected with the green button (NEXT). A selected menu is opened with the blue button. Depending on the called menu, the button functions may change.)
MAIN 
 15:45
15:45
RECORD START
RECORD SETUP
LAST RECORD
SYSTEM INFO
SYSTEM SETUP
NEXT |
OK |
2.4.1Menu Overview
Main Menu |
Sub-Menu 1 |
Value/Info |
|
Sub-Menu 2 |
Value/Info |
Sub-Menu 3 |
Value/Info |
RECORD START |
ECG Signal |
Chan1 |
|
speed |
x1, x2 or x3 |
|
|
|
ECG Signal |
Chan2 |
|
speed |
x1, x2 or x3 |
|
|
|
ECG Signal |
Chan3 |
|
speed |
x1, x2 or x3 |
|
|
|
Start record? |
Yes/No |
|
|
|
|
|
|
ECG-recording start- |
Yes |
> |
Event button |
Event saved! |
|
|
|
ed! |
|
|
|
|
|
|
|
|
|
> |
Record info |
|
|
|
|
|
|
> |
Stop recording? |
ECG recording |
Main |
|
|
|
|
|
|
stopped |
|
|
RECORD SETUP |
Patient ID |
|
> |
Voice-record |
> |
Start |
Start Recording |
|
|
|
|
|
|
||
|
|
|
|
|
|
Stop |
Stop Recording |
|
|
|
> |
Play ID |
> |
Stop |
Stop Playing |
|
|
|
|
|
|
|
|
|
PM Det.* |
On/off |
|
|
|
|
|
|
Duration |
24, 48, 72 |
|
|
|
|
|
|
Sampling 125 Hz |
|
|
|
|
|
|
LAST RECORD |
Patient ID* |
|
|
|
|
|
|
|
Events* |
|
|
> |
Events |
|
|
|
|
|
|
|
|
|
|
SYSTEM INFO |
|
SerNo. |
|
|
|
|
|
|
|
Version |
|
|
|
|
|
|
|
Bat Type |
|
|
|
|
|
|
|
SD-Card |
|
|
|
|
|
SYSTEM SETUP |
Contrast |
1...8 |
|
|
|
|
|
|
Language |
ENG ... |
|
|
|
|
|
|
Bat |
Alkaline |
|
|
|
|
|
|
NiMH2100 |
|
|
|
|
|
|
|
|
|
|
|
|
|
|
|
Date/time |
|
> |
Year |
2000....2099 |
|
|
|
|
|
> |
Month |
01....12 |
|
|
|
|
|
> |
Day |
01....31 |
|
|
|
|
|
> |
Hour |
00.23 |
|
|
|
|
|
> |
Minute |
00....59 |
|
|
|
|
|
|
|
|
|
|
* To record pacemaker pulses it is important that ‘PM Det‘ is set to on - see para. 5.1.1 Pacemaker, page 21.
Page 12

Art. no.: 2.510492 rev.: b
MT-101/MT-200 |
User Guide |
Introduction |
2 |
|
Initial Operation |
2.5 |
|||
|
|
|
|
|
2.5Initial Operation
2.5.1Unpacking
Check that all ordered items are present and free of shipping damage. Immediately report any damage to SCHILLER AG.
2.5.2Inserting/changing the battery
Open the battery compartment and insert the supplied battery or accumulator. Observe the polarity!
Note
The delivered battery is of alkaline type AA/LR6. If you use an NiMH 2100 mAh accumulator, make sure that BAT NiHM is selected in the SYSTEM SETUP menu. If the wrong type is selected, the battery capacity will not be displayed correctly.
On closing the battery cover, pay attention that the two lugs (A) are inserted correctly. The cover is closed in the direction indicated by the arrow (B). In order to engage the cover, press it down (at position C) until it clicks in place.
|
|
|
|
|
|
V Attention - danger of explosion Do not dispose of batteries by fire or incinera- |
|
|
|
|
|
|
|
|
|
|
|
|
|
tor. |
|
|
|
|
|
|
|
|
|
|
|
|
|
V Attention - danger of acid burn Do not open the battery casing. |
|
|
|
|
|
|
|
|
|
|
|
|
|
|
|
|
|
|
|
|
|
|
|
|
|
|
|
Only dispose of batteries in official recycling centres or municipally approved areas. |
|
|
|
|
|
|
Switch on the device and check the battery charge capacity. The battery symbol must |
|
|
|
|
Full |
be fully black. This corresponds to a maximum recording time of 24 hours. |
|
|
|
|
|
|||
|
|
|
|
Half full |
An audible and visual indication is given during recording when battery capacity is |
|
|
|
|
|
|||
|
|
|
|
Empty |
||
|
|
|
|
limited. The time will vary according to the type of battery installed (alkaline or |
||
|
|
|
|
|
|
|
|
|
|
|
|
|
NiMH2100) - but is normally between 1 and 2 hours. When the alarm is given and |
|
|
|
|
|
|
recording is to be continued, we recommend that the battery is replaced at the first |
|
|
|
|
|
|
opportunity - see para. 2.5.2 Inserting/changing the battery, page 13 |
|
|
|
|
|
|
When recording is stopped because of low battery capacity, and the battery is |
|
|
|
|
|
|
replaced within 5 hours of the unit switching off, the recording will continue - see para. |
|
|
|
|
|
|
3.2.1 During the Recording and Patient Information, page 17. |
Page 13

3 |
Preparing a Holter Recording |
|
|
3.1 |
Position of the Electrodes |
MT-101/MT-200 |
|
|
|
|
|
3Preparing a Holter Recording
3.1Position of the Electrodes
Typical electrode position for a 4-lead cable (2-channel recording)
The recommended electrode placement for a 2-channel recording is shown below.
Channel 1 positive (K1+) = green
Channel 1 negative (K1-) = red
Channel 2 positive (K2+) = white
Channel 2 negative (K2-) = yellow
K1- |
1 |
K2 - |
|
K2 + |
2 |
|
|
3 |
K3 + |
||
|
|||
K3 - |
4 |
|
|
5 |
|
||
|
|
K1 + |
Typical electrode placement for a 6-lead cable (3-channel recording)
The recommended electrode placement for a 3-channel recording is shown below.
Channel 1 positive (K1+) = green Channel 1 negative (K1-) = red Channel 2 positive (K2+) = white Channel 2 negative (K2-) = yellow
Channel 3 positive (K3+) = orange (positioned on the patient’s back) Channel 3 negative (K3-) = blue
Page 14
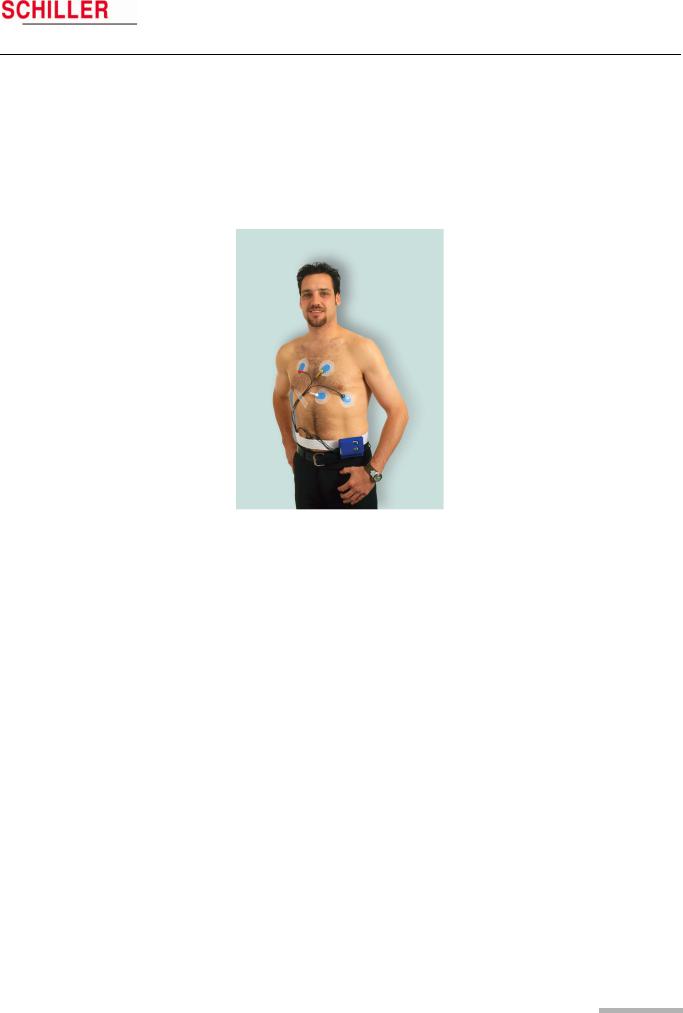
MT-101/MT-200
Channel 1
Channel 2
Channel 3
Art. no.: 2.510492 rev.: b
User Guide |
Preparing a Holter Recording |
3 |
Position of the Electrodes |
3.1 |
Electrode Placement
Form a stress loop in every cable and secure them with adhesive strips to relieve the electrodes (strain relief). In order to ensure good data evaluation, the ECG amplitudes should be examined in the sitting, lying and standing position of the patient.
Holter ECGs use a bipolar lead system (one positive and one negative lead) for each channel. Channel 1 approximates to modified lead V5, channel 2 approximates to modified lead V2 and channel 3 approximates to modified lead V3.
Place the RED negative electrode under the clavicle on the right Sternal margin. Place the GREEN positive electrode in the fifth left intercostal space on the anterior axillary line (position approximately equates to V5).
Place the YELLOW negative electrode under the clavicle on the left sternal margin. Place the WHITE positive electrode in the fourth left intercostal space on the anterior axillary line (position approximately equates to V2).
Place the BLUE negative electrode in the fourth left intercostal space near the sternum.
Place the ORANGE positive electrode on the back in the fifth left intercostal space, between the spine and the scapula (position approximately equates to V3).
•The above electrode placement is suggested; other electrode configurations are possible.
•Ensure that the QRS complex is bigger than the T wave.
•Ensure that the trace is larger than 1mV. See 1mV reference (4) on following page.
•To avoid artifacts in women patients, the red and white electrodes can be placed lower if necessary.
Page 15

3 |
Preparing a Holter Recording |
|
|
3.2 |
Commencing a Holter Recording |
MT-101/MT-200 |
|
|
|
|
|
3.2Commencing a Holter Recording
3
ECG
4 |
|
|
|
|
|
|
|
|
|
|
|
|
|
|
|
|
|
|
|
|
|||||||
|
|
|
|
|
|
|
|
|
|
|
|
|
|
|
|
|
|
|
|
|
|
|
|
|
|||
5 |
|
|
|
|
|
SPEED |
|
|
x1 |
||||
|
|
|
|
|
|
|
|
|
|
|
|
|
|
1 |
|
|
|
|
|
|
|
|
2 |
||||
|
|
|
|
|
|
|
|
||||||
The ECG recording can be started without the MT-200 PC software. The most important data can be entered in the MT-101 directly, and the ECG signal examined directly on the LCD.
A recording can also be started from the MT-200 program where all channels can be viewed simultaneously before commencing - see para. 5.1 Starting a Recording from the MT-200 Program, page 19.
Preparing the patient
1.Attach electrodes to patient.
Setting up the Holter MT-101
2.Press button (1) to switch on MT-101. Check battery charge capacity. If the symbol is only half filled out, change battery.
3.Choose NEXT (1) to select RECORD SETUP menu to make recording settings:
–Patient ID - record patient ID using the microphone and playback facility
–Select Pacemaker detection on or off - see para. 5.1.1 Pacemaker, page 21
–Define period of recording - 24, 48 or 72 hours
Checking the ECG signal
4.Connect patient cable to MT-101 (3).
5.Confirm RECORD START menu with “OK” (2) and check ECG signal Channel 1. Press CHAN2/3 to select and check channel 2/3. Press “OK” (2) to access START RECORDING panel.
The signal's max. amplitude corresponds to the height of the moving line (5). The 1mV amplitude reference is the vertical line on the left (4). Ensure the signal amplitude is greater than 1mV.
Starting an ECG recording
6.Confirm the start of the recording with YES (2).
Stopping the ECG recording
7.Press and hold button (1) for 5 seconds. You will be prompted if you wish to stop the recording. Confirm with YES (2).
NOTE: If no confirmation is received to cease recording (button (2) pressed), within 15 seconds, the unit returns to recording mode.
Switching off the MT-101
8.If the unit is recording, first stop the recording step (7).
9.Ensure the main menu is displayed and that the cursor is at the RECORD START position.
10.Press and hold button (1) for 5 seconds to switch the device off.
Page 16

Art. no.: 2.510492 rev.: b
MT-101/MT-200 |
Preparing a Holter Recording |
3 |
|
User Guide Taking an Extended Recording (Longer than 24 hours) |
3.3 |
||
|
|
|
|
REC 

 8:56
8:56
ECG recording (00:02)
1 2
3.2.1During the Recording and Patient Information
Inform the patient about the use of the MT-101.
Event record
•Every event should be entered in the diary, together with the time, the activities at the time of occurrence and the symptoms.
•Instruct the patient to press the EVENT button at any time during the recording to register an event as follows:
1.Press button (1 or 2).
2.Record event in the patient diary. Note:
The template for the patient diary is stored on the software CD as Word or pdf file. An example is given at the end of the book - see para. 13 Patient Diary, page 89.
No ECG signal or lead-off
1.Check cable connection on device.
2.Check cable connection on electrodes.
3.Re-attach electrodes to body.
General information
The device is not waterproof. The patient should be advised not to take a bath or shower during the recording.
Battery replacement during the recording.
Change battery when an audible indication is given and the message ‘BATTERY LOW - change battery’ is displayed the MT-101. - this will occur approximately 1-2 hours before switch off (dependent on battery type). Proceed as follows:
1.Press EVENT button (1 or 2) and make an entry in your diary.
–DO NOT SWITCH THE DEVICE OFF
2.Open battery compartment and replace battery with a new one of the same type. Observe correct polarity, and replace battery cover - see para. 2.5.2 Inserting/ changing the battery, page 13.
3.Switch the device on by pressing button (1). After a few seconds the message ‘ECG recording restart’ is displayed while the unit re-initialises. This is followed by the message ‘ECG recording’ and ECG recording automatically resumes.
When a recording is stopped (because of low battery capacity or because of battery removal), the battery must be replaced within 5 hours of the unit switching off for the recording to continue.
3.3Taking an Extended Recording (Longer than 24 hours)
The MT-101 can record up to 72 hours of Holter data if required. To make a recording longer than 24 hours, the battery in the MT-101 must be changed as detailed above. An audible alarm and visual indication will be given when the battery must be changed.
Page 17

4 |
Transferring a Recording to the PC |
|
|
4.1 |
Data Transmission to PC from MT-101 |
MT-101/MT-200 |
|
|
|
|
|
4Transferring a Recording to the PC
4.1Data Transmission to PC from MT-101
1.Connect the USB cable between the MT-101 and PC (see picture below - the rubber cover on the MT-101 must be removed - the message "MT-101 connected to PC" appears.
2.Start MT-200 software on PC.
3. Click on the data transfer icon and select "Request Holter Data". The dialogue box shows the transferred data in per cent.
The data is stored automatically. If no patient data is entered, the file will be saved with the date and time.
4.2Data transmission to PC with Memory Card Reader
1.Connect the card reader to the USB. The memory card reader appears as a physical drive on your desktop.
2.The path name for this drive must be entered in the menu Option/System/Path/ SD-Card path - see para. 8.5.3 Directories, page 76.
3.Insert the memory card in the card reader or PCMCIA adapter.
4.Execute the function “Read SD-Card”. The data is read into the indicated path (for path location see point 2)
Data can also be imported from an SD card - see para. 7.2.3 Importing recordings, page 65
Page 18
Art. no.: 2.510492 rev.: b
MT-101/MT-200 |
User Guide |
Displaying an ECG Signal |
5 |
|
Starting a Recording from the MT-200 Program |
5.1 |
|||
|
|
|
|
|
5Displaying an ECG Signal
5.1Starting a Recording from the MT-200 Program
1. Start the MT-200 program on your PC /CS-200. The welcome page is displayed.
1
2.Click on the “New recording” icon (1). The patient data screen is displayed:
1
3.Enter the patient data and confirm with the "OK" button. To enter the data, click with the mouse cursor into the fields or jump from entry field to entry field using the tab key.
4.If pacemaker detection is required check the pacemaker box (1) - see para. 5.1.1 Pacemaker, page 21 for notes on pacemaker detection
Page 19

5 |
Displaying an ECG Signal |
|
|
5.1 |
Starting a Recording from the MT-200 Program |
MT-101/MT-200 |
|
|
|
|
|
5.When the patient data has been entered and Ok is clicked, enter the duration of the recording
Note: The data displayed or entered on the other pages of patient information - selected by clicking on the tabs at the top of this window (Recording data, Assignment etc.) - are only available after a recording has been made.
6.Place the electrodes as indicated in the dialogue box.
If a 4-lead patient cable was used for the Holter recording, only two channels will be displayed in the MT-200.
7.Check the signal and re-apply the electrodes if necessary.
Page 20

Art. no.: 2.510492 rev.: b
MT-101/MT-200 |
User Guide |
Displaying an ECG Signal |
5 |
|
Starting a Recording from the MT-200 Program |
5.1 |
|||
|
|
|
|
|
8.Click on START RECORDING to commence the recording. The dialogue box reminds you to check the battery load capacity.
The recording has now commenced. The LCD of the MT-101 indicates that ECG recording has been started.
Remove the USB from the MT-101 Holter recorder and close the connector again with the protective cover.
5.1.1Pacemaker
The MT-200 cannot determine pacemaker spikes itself and it is not possible to detect pacemaker signals by later analysing the recording in the program if the pacemaker detection function was not enabled during the original recording. So that the MT-200 can detect pacemaker spikes, pacemaker detection must be activated before the start of the recording.
Activating Pacemaker Detection
Pacemaker detection can be activated in either the MT-200 program or the MT-101:
«If the recording is started from the MT-200 program, then pacemaker activation can be carried out in the MT-200 by ticking the pacemaker box in the patient data window - see para. 5 Displaying an ECG Signal, page 19.
«If the recording is started from the MT-101 itself, then pacemaker activation must be carried out in the MT-101 menu > RECORD SETUP > PM Detection > ON, -
see para. 2.4.1 Menu Overview, page 12.
«
Detection and Recording of Pacemaker Spikes
The MT-101 only detects pacemaker signals in long-term ECG recordings when the slopes and amplitudes of the signal exceed the preset limits and when pacemaker detection is enabled. As the MT-101 uses a sampling frequency of 500 Hz for a recording (i.e. a digitalisation interval of 2 ms), complete digital processing is impossible due to the short duration of some pacemaker signals (less than 1 ms). Therefore, analogue processing of the ECG signals is applied by the MT-101 for pacemaker detection.
Analogue Pacemaker Detection in Channel 1
Analogue pacemaker detection is confined to the first channel of the MT-101. It is therefore optimal when the amplitude of the pacemaker signal for the first ECG channel is greater than that for the second channel. In some instances, this is not the case. In this case, it is recommended that the real-time ECG traces are viewed on the screen before starting the long-term recording. Pacemaker detection is automatically enabled on the real-time display. The pacemaker signals, however, are not always detected. If this is the case and the amplitude of the pulse is greater in the second channel, simply exchange the electrodes of channels 1 and 2. After the real-time display, pacemaker detection must be enabled for long-term recording in the MT-200!
Evaluation and Display of Pacemaker Spikes in the MT-200 Program
Pacemaker signals are marked in the MT-200 program by vertical lines in the ECG after evaluation of the recording. Note that these lines are correctly positioned in relation to time but are not proportional in either amplitude (voltage) or duration of the pacemaker pulse, nor do they indicate the polarity. The pacemaker representation is always positive but the actual pacemaker spike may be positive or negative.
Page 21
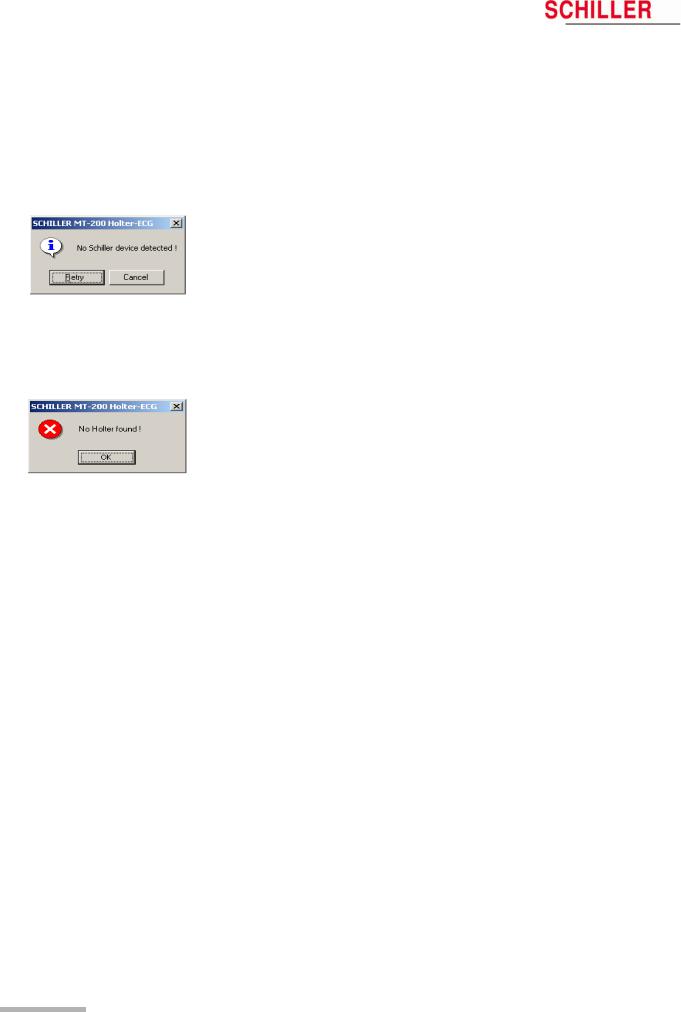
5 |
Displaying an ECG Signal |
|
|
5.2 |
Transmission Problems |
MT-101/MT-200 |
|
|
|
|
|
5.2Transmission Problems
If an error message appears either before starting a recording or when attempting to transfer a recording from the MT-101 to the PC, possible causes are as follows:
Error |
Cause |
Remedy |
|
|
|
|
|
|
|
• The USB cable assembly is not inserted |
« Check that both the cable connectors |
|
|
||
|
|
correctly in either the MT-101 or the PC. |
are securely placed. |
|
|
• The SCHILLER USB driver has not been |
« Install USB driver (on SCHILLER soft- |
|
|
installed |
ware CD. |
|
|
|
|
|
|
|
|
Communication Error (error |
• The device is not connected. |
« Connect the device. |
|
message displayed) |
• The SD memory card is not inserted. |
« Check the memory card. |
|
|
|
• Unit not switched on |
« Switch unit on |
|
|
• Battery exhausted. |
« Change batteries |
|
|
|
|
|
|
• Another device is connected to the USB. |
« Disconnect the device and connect the |
|
|
||
|
|
|
MT-101. |
|
|
|
|
|
|
|
|
Display of DEMO VERSION |
• The hard-lock key is not present or incor- |
« |
Check the hard-lock key on the PC. |
|
rectly inserted. |
« |
Contact SCHILLER for network license |
|
• There is no license. |
|
|
|
|
|
|
No error message. The program |
• With an USB installation, the program can |
1. |
Close the MT-200 program. |
cannot find the Holter. |
occasionally "hang" and not recognise |
2. |
Disconnect the USB connector to your |
|
the USB connection. |
|
PC. Wait circa three seconds and re- |
|
|
|
place the connector. |
|
|
3. |
Open the MT-200 program again. |
|
|
|
|
Page 22

Art. no.: 2.510492 rev.: b
MT-101/MT-200 |
User Guide |
Displaying an ECG Signal |
5 |
|
Transmission Problems |
5.2 |
|||
|
|
|
|
|
5.2.1Checking the connection
A test function is available to check the integrity of the connection between the MT101 and the PC. To carry out the test function, proceed as follows:
1.In the "Options" menu, select "System".
2.Click the "Holter" tab.
3.Check the correct box for your installation (USB or AT card), and click the "Test Connection" icon. Follow the instructions on the screen.
4.When "OK" is clicked, the software sends a test message to/from the MT-101.
5.A message box indicates the success of the transmission.
If the problem could not be solved, check all connections, ensure the MT-101 is switched on, close the MT-200 application and restart the software.
Page 23
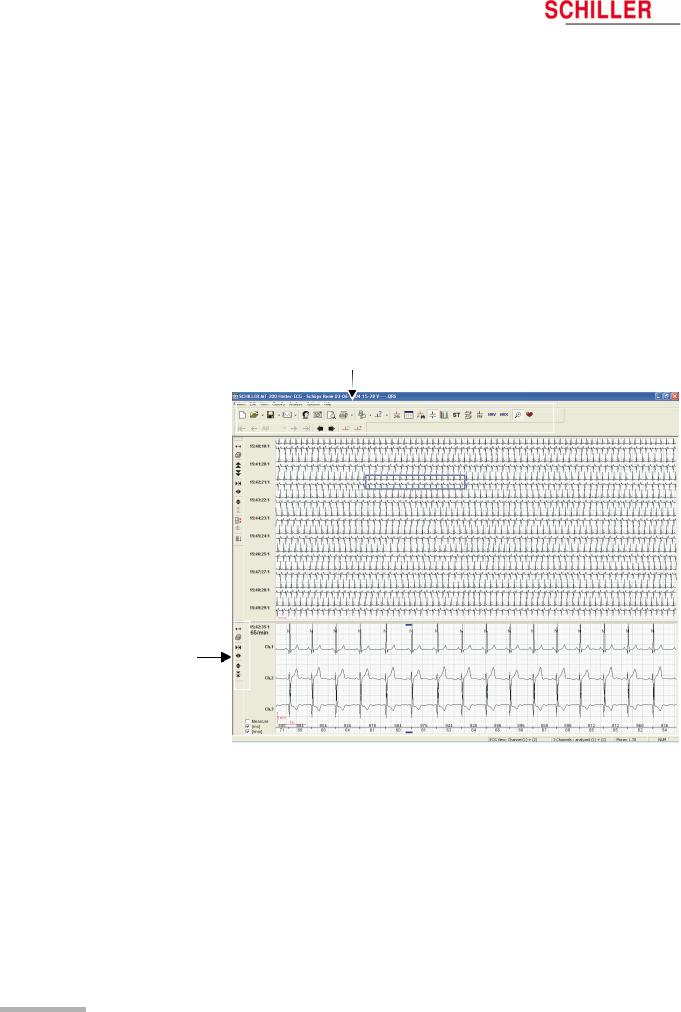
6 |
Viewing and Editing a Recording |
|
|
6.1 |
Icons |
MT-101/MT-200 |
|
|
|
|
|
6Viewing and Editing a Recording
6.1Icons
The MT-200 program gives different views for the presentation of a Holter recording. Every view offers various data and analytical information. Besides display icons, the toolbar contains additional function icons enabling the quick and easy activation of the most frequently used functions. All icons can be activated any time and in any view. In the ECG and zoom views, additional function icons are given to the left of the screen to change the size of the traces and/or the time segment of the recording.
Function and View icons
Function and View icons in the ECG overview
All icons are selected by mouse-click (position the cursor on the icon and click with the left mouse button).
When an icon is dimmed, it means that this function is not available for the currently displayed screen and cannot be selected. For example, the zoom function is not available in the ST view so the "Zoom" icon is dimmed. The patient name is always displayed at the top of the page when an ECG recording is displayed.
Page 24
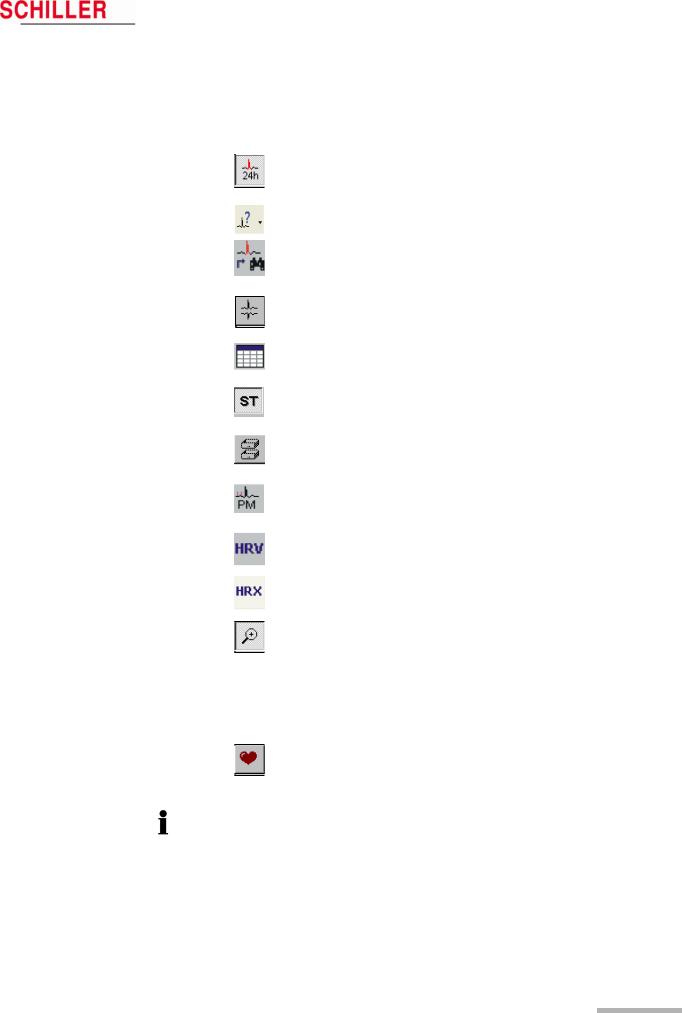
Art. no.: 2.510492 rev.: b
MT-101/MT-200 |
User Guide |
Viewing and Editing a Recording |
6 |
|
Icons |
6.1 |
|||
|
|
|
|
|
6.1.1View icons
The function and view icons are only active (selectable) when a patient recording is displayed. When an icon function cannot be selected, the icon is dimmed.
Event View* |
This gives an overview of all events in the 24 hour |
|
period. Use this view to quickly identify and select |
|
a specific time segment for display. |
Analysis Summary View |
This provides a tabular overview of all important |
|
measurements for the entire 24 hour period. |
Event Samples View |
This allows three event samples from every event |
|
category to be displayed, i.e. selected or replaced. |
|
The user event samples can also be selected for |
ECG View* |
printing in this view. |
This zooms in on a specific time segment of ECG |
|
|
for closer analysis. The next page can also be |
|
displayed using the automatic scrolling function. |
Analysis Summary |
This provides a Tabular overview of the recording. |
ST Trend View |
(Option) This provides a graphical overview of the |
|
ST trend with tabular measurements for ST |
|
episodes. |
Template View |
(Option) This provides a graphical overview of the |
|
different types of averaged QRS waveforms with |
|
classification, detected over the entire recording. |
Pacemaker View |
(Option) This provides a graphical overview of |
|
QRS templates measured in relation to the |
|
pacemaker pulse. |
Heart Rate Variability |
(Option) This provides a graphical overview of the |
|
heart rate variability. |
Heart Rate Trend |
This provides a graphical overview of the heart |
|
rate trend. The maximum/minimum HR and NN |
|
interval can be manually defined |
Zoom View |
This gives a zoom view of a selected ECG |
|
segment. Specific QRS complexes can also be |
|
reclassified in this view. See "Reclassifying/Editing |
|
a QRS complex" later in this section. The two leads |
|
displayed in the zoom view are the two leads that |
|
have been analysed. The display will always |
|
contain two channels, even if only one channel has |
|
been analysed. |
HR Trend |
This displays the heart rate trend over the entire |
|
recording. |
If only one lead has been analysed, channel 1 is the second lead in the display. If channel 1 has been analysed, channel 2 is the second lead displayed.
Options
All options are enabled with a programmed hard-lock key. This hard-lock key can be obtained from SCHILLER AG.
*In event and ECG view modes, the lower part of the display is divided to give either ECG zoom or heart rate trend.
Page 25
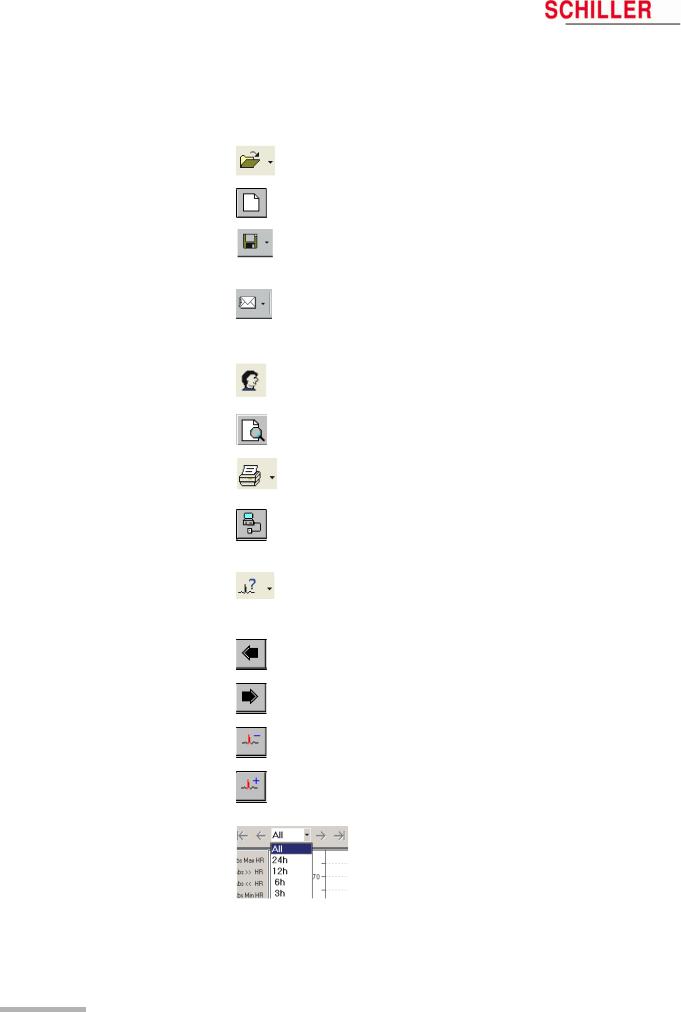
6 |
Viewing and Editing a Recording |
|
|
6.1 |
Icons |
MT-101/MT-200 |
|
|
|
|
|
6.1.2Function icons
The following function icons are available when a patient recording is viewed:
|
Open Recording |
Open a recording. Click the icon to list all available |
||
|
|
|
|
files.Click the arrow to the right of the icon, to list |
|
|
|
|
the last four opened recordings. |
|
New Recording |
Enter the data of a new patient and start a new |
||
|
|
|
|
recording. |
|
Save Recording |
Save the current recording. Click the arrow to the |
||
|
|
|
|
right of the icon, to display further options to save |
|
|
|
|
as a pdf file. If saved as PDF file, it is possible to |
|
|
|
|
delete the original if desired. |
|
Send the currently displayed recording by e-mail. |
|||
|
|
|
|
Click the arrow to the right of the icon, to give |
|
|
|
|
further options to send as a pdf file. If “Send EMail |
|
|
|
|
as PDF File” is selected, a pdf is generated and |
|
|
|
|
automatically attached to the e-mail. |
|
Patient and Recording View / edit patient and recording data. View |
|||
|
Data |
analysis settings and diagnosis. General recording |
||
|
|
|
|
settings and options. |
|
Print Preview |
Select and display the pages to be printed (before |
||
|
|
|
|
printing) |
|
Print (user defined) recording data. Click the arrow |
|||
|
|
|
|
to the right of the icon to select specific data for |
|
|
|
|
print. |
|
Request Holter Data |
Load data from the connected MT-101 Holter |
||
|
|
|
|
recorder or via a memory card reader by selecting |
|
|
|
|
"Read SD Card". In Win 95/98, a third function is |
|
|
|
|
available to load data from a tape. |
|
Analyse |
Click the Analyse icon to analyse the currently |
||
|
|
|
|
displayed recording to the defined analysis |
|
|
|
|
parameters. Click the arrow to the right of the icon |
|
|
|
|
to analyse multiple recordings. |
|
Scroll Back |
Scroll backwards (in time) of the zoom ECG |
||
|
|
|
|
currently displayed. |
|
Scroll Forward |
Scroll forwards (in time) of the zoom ECG currently |
||
|
|
|
|
displayed. |
|
Scroll Event Back |
Go to previous event. |
||
|
Scroll Event Forward |
Go to next event. |
||
|
Time Scale for View |
Display 3, 6, 12, 24 hours of analysed data or, for |
||
|
|
|
|
recordings longer than 24 hours, all the data. |
|
|
|
|
When 3, 6, 12, or 24 hour is selected, the arrow |
|
|
|
|
|
|
|
|
|
icons at the side of the box, enable the user to |
|
|
|
|
jump to the next time segment. |
|
|
|
|
|
|
|
|
|
|
Page 26
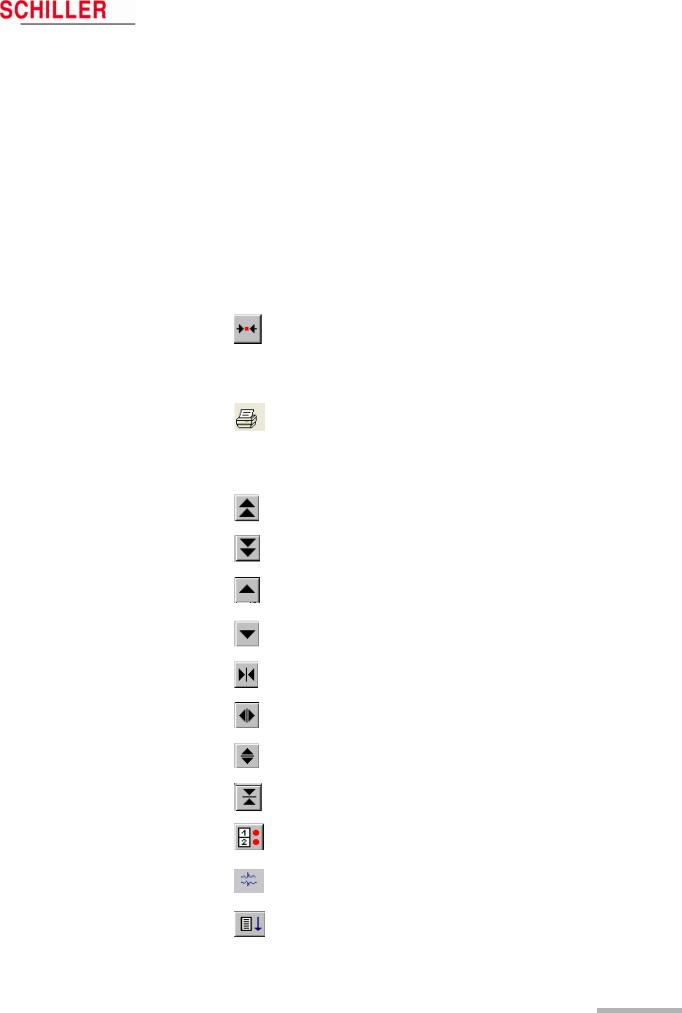
Art. no.: 2.510492 rev.: b
MT-101/MT-200 |
User Guide |
Viewing and Editing a Recording |
6 |
|
Icons |
6.1 |
|||
|
|
|
|
|
6.1.3Tool icons in rhythm and zoom views
The tool icons are displayed in the rhythm and zoom views on the left hand side. Use these icons to:
•decrease or increase the amplitude and speed
•move up or down a line and page
•immediately print a selected half hour segment of the recording
•change the channel (ECG view)
•select and analyse specific channels (ECG view)
•select a zoom section of the recording for printing
The page up/down and line up/down icons are not applicable and not displayed in the zoom view
|
|
Centre |
In the ECG view, centres the selected (highlighted) |
|
|
|
ECG section in the middle of the screen. |
|
|
|
In the zoom view, positions the selected QRS |
|
|
|
complex (cursor above and below QRS complex) |
|
|
slightly to the left of centre in the zoom screen. |
|
|
|
In the ECG view , immediately prints a 30 min. |
|
|
|
|
segment of the recording (1/4 hour before and 1/4 |
|
|
|
after the selected section). |
|
|
|
In the zoom view, marks the displayed zoom |
|
|
|
section as "selected". |
|
|
Page Up |
Moves to the previous page. Each page displays |
|
|
|
between approximately 1 and 24 minutes of |
|
|
Page Down |
recording dependent on the speed selected. |
|
|
Moves to the next page |
|
|
|
Line Up |
Shifts the display up one line) |
|
|||
|
|
Line Down |
Shifts the display down one line |
|
|
||
|
|
Decrease Speed |
Decreases the ECG scale (curves closer). |
|
|
Increase Speed |
Increases the ECG scale (curves wider). |
|
|
Increase Amplitude |
Curves bigger |
|
|
Decrease Amplitude |
Curves smaller |
|
|
||
|
|
Select Channel |
Select any combination of one, two or three |
|
|
||
|
|
|
channels (for display) |
|
|
Select Channel for |
Select and analyse one or two channel |
|
|
Analysis |
|
|
|
Auto Scroll Down |
Automatically scrolls down through the recording. |
|
|
|
Subsequent time segments are displayed |
|
|
|
automatically |
Page 27
Loading...