

Page 1

IMPORTANT INFORMATION
When working on the engi ne, for example adjusting drive belts, oil change or adjusting the clutch,
it is important not to start the engine. The engine may be damaged and there is
SERIOUS RISK OF INJURY
For this reason, always secure the starting device or disconnect a battery cable
before working on the engine.
This is especially important if the engine has a remote starter or automatic starting.
This warning symbol and text is reproduced beside those maintenance points where it is
especially important to consider the risk of injury.
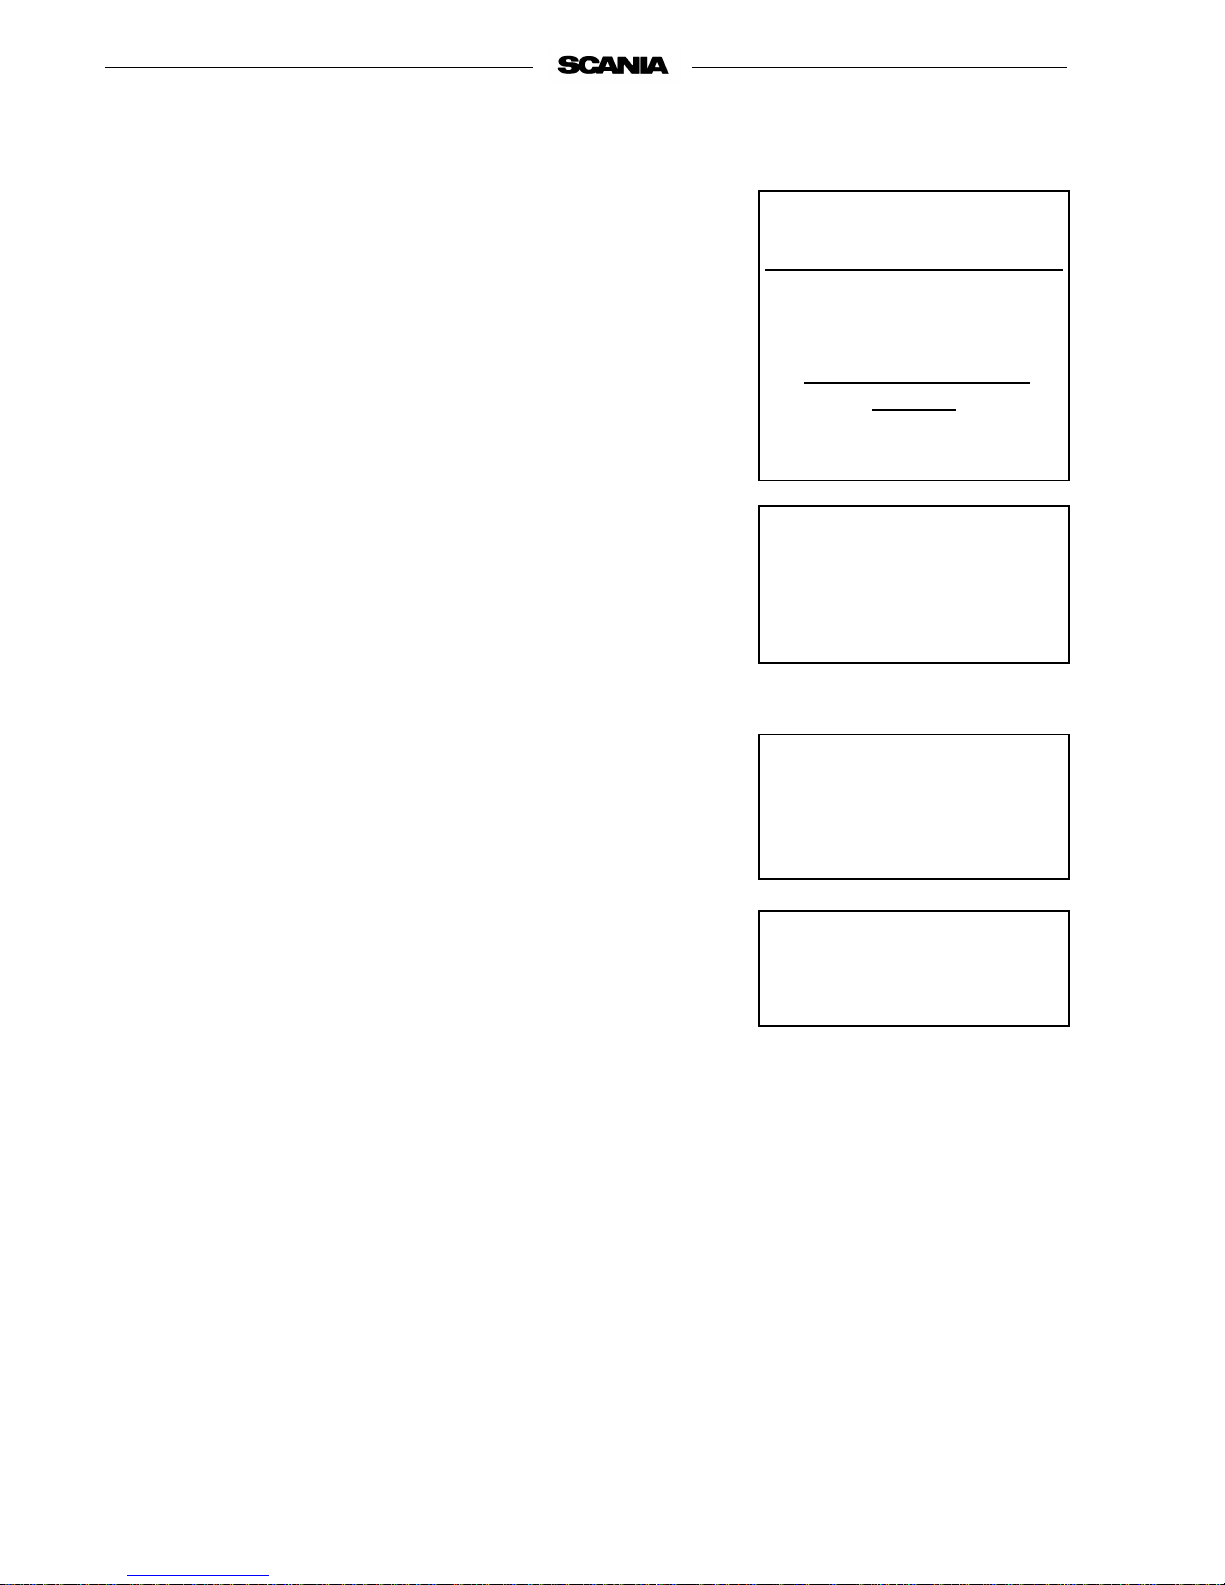
START-UP REPORT - WARRANTY
When the start-up report has been filled in and sent to Scania, you have a 1-year warranty from the date of
start-up. Also fill in the particulars below as this can make things easier if you need to contact for example a
service workshop.
Operator’s Manual
D11 DC11 DI1 1
Industrial engine
opm96-11a en 1 588 293
1997-11:2
Engine number
Start-up date
User’s name and address
Signature
Engine type
Variant
Engine type and variant are indicated on the engine type plate
!
Industrial & Marine Engines
Page 2

2 © Scania Industrial & Marine Engines 1997-11:2
FOREWORD
This instruction manual describes the operation and maintenance of the
Scania D11, DC11 and DI11 Industrial Engines. These instructions apply to
engines in program 96 from engine number 5 364 870.
The engines are direc t inj ection, fluid-cooled, f our-stroke diesel e ngi nes with
6 cylinders in line. The engines are available with or without charge air
cooler, see page 4.
Common applications are construction machinery and gensets, in agricultural, railw ay and forestry machinery and as power fo r irrigation installations.
The engines may have different powers and speed settings.
The normal power setting of the engine (performance code) is indicated on
the type plate, see page 4.
Note! Only standard components are described in the instruction man-
ual. For special equipment, refer to the instructions issued by the
manufacturer.
In order to obtain the best value and service life from your engine, there are
several points to bear in mind:
- Read through the Instruction Manual before starting to use your engine.
Even those experienced with Scania engines may find new information
in this manual.
- Follow the maintenance instructions. Maintenance according to the
instructions forms the basis of good function and service life.
- Get to know your engine so that you know what it can do and how it
works.
- When necessary, always turn to an authorised Scania workshop. These
have special tools, genuine parts and staff with training and practical
experience of Scania engines.
The information in this manual was correct at the time of going to press.
However, we retain the right to make alterations without prior notice.
Scania CV AB
Industrial and Marine Engines
S-151 87 Södertälje
Page 3

1997-11:2 © Scania Industrial & Marine Engines 3
FOREWORD . . . . . . . . . . . . . . . . . . . . . . . . . . 2
TYPE DESIGNATIONS . . . . . . . . . . . . . . . 4
STARTING AND RUNNING . . . . . . . . . . . . 6
AT FIRST START . . . . . . . . . . . . . . . . . . . . . . . .6
CHECKS BEFORE RUNNING . . . . . . . . . . . . . .7
STARTING THE ENGINE . . . . . . . . . . . . . . . . .7
At temperatures below 0 °C: . . . . . . . . . . . . . . .8
RUNNING . . . . . . . . . . . . . . . . . . . . . . . . . . . . . .9
Speed . . . . . . . . . . . . . . . . . . . . . . . . . . . . . . . . .9
Coolant temperature . . . . . . . . . . . . . . . . . . . . .9
Oil pressure . . . . . . . . . . . . . . . . . . . . . . . . . . .10
STOPPING THE ENGINE . . . . . . . . . . . . . . . . .10
Emergency stop . . . . . . . . . . . . . . . . . . . . . . . .10
Clutch . . . . . . . . . . . . . . . . . . . . . . . . . . . . . . .11
CHECKS AFTER RUNNING . . . . . . . . . . . . . .11
MAINTENANCE . . . . . . . . . . . . . . . . . . . . . 12
ENGINES WITH FEW HOURS OF
OPERATION . . . . . . . . . . . . . . . . . . . . . . . . . . .12
MAINTENANCE SCHEDULE . . . . . . . . . . . . . 1 3
LUBRICATION OIL SYSTEM . . . . . . . . . 14
OIL GRADE . . . . . . . . . . . . . . . . . . . . . . . . . . . .14
Oil analysis . . . . . . . . . . . . . . . . . . . . . . . . . . .14
CHECKING OIL LEVEL . . . . . . . . . . . . . . . . . .15
Checking oil level during operation . . . . . . . .15
OIL CHANGE . . . . . . . . . . . . . . . . . . . . . . . . . .15
Maximum angle of inclination during
operation . . . . . . . . . . . . . . . . . . . . . . . . . . . .15
CLEANING THE OIL CLEANER . . . . . . . . . .16
CHANGING THE TURBO FILTER . . . . . . .18
COOLING SYSTEM . . . . . . . . . . . . . . . . . . 18
CHECKING COOLANT LEVEL . . . . . . . . . . .18
CHECKING COOLANT . . . . . . . . . . . . . . . . . .19
Checking protection against corrosion . . . . . .2 1
Changing coolant . . . . . . . . . . . . . . . . . . . . .21
CLEANING COOLING SYSTEM . . . . . . . . . . .22
Internal cleaning . . . . . . . . . . . . . . . . . . . . . . .23
AIR CLEANER . . . . . . . . . . . . . . . . . . . . . . . 24
TEST READING
LOW PRESSURE INDICATOR . . . . . . . . . . . .24
CLEANING THE AIR CLEANER
COARSE CLEANER . . . . . . . . . . . . . . . . . . . . .24
CLEANING OR CHANGING
FILTER INSERT . . . . . . . . . . . . . . . . . . . . . . . .24
CHANGING THE SAFETY CARTRIDGE . . . .25
FUEL SYSTEM . . . . . . . . . . . . . . . . . . . . . . . 26
CHECKING FUEL LEVEL . . . . . . . . . . . . . . . .26
CHANGING THE FUEL FILTER . . . . . . . . . . .26
CHECKING INJECTORS . . . . . . . . . . . . . . . . .27
ELECTRICAL SYSTEM . . . . . . . . . . . . . . . 28
CHECKING ELECTROLYTE LEVEL
IN BATTERIES . . . . . . . . . . . . . . . . . . . . . . . . .28
CHECKING CHARGE
STATE IN THE BATTERIES . . . . . . . . . . . . . .28
CLEANING BATTERIES . . . . . . . . . . . . . . . . .28
CHECKING COOLANT
LEVEL MONITOR . . . . . . . . . . . . . . . . . . . . . .29
CHECKING TEMPERATURE MONITOR . . .30
CHECKING TEMPERATURE SENSOR . . . . .30
CHECKING THE OIL PRESSURE MONITOR 31
CHECKING OIL PRESSURE SENSOR . . . . . .31
CHECKING THE STOP FEATURE . . . . . . . . .31
CHANGING BATTERY . . . . . . . . . . . . . . 33
MISCELLANEOUS . . . . . . . . . . . . . . . . . . . 33
CHECK/TENSION
V-BELTS . . . . . . . . . . . . . . . . . . . . . . . . . . . . .33
LOOK FOR LEAKAGE,
REMEDY AS NECESSARY . . . . . . . . . . . . . .34
CHECK/ADJUST
VALVE CLEARANCE . . . . . . . . . . . . . . . . . . .35
CHANGING (
OR CLEANING) VALVE
FOR CLOSED CRANKCASE VENTILATION 36
LONG-TERM STORAGE . . . . . . . . . . . . . . 37
Preservative fuel . . . . . . . . . . . . . . . . . . . . . . .37
Preservative oil . . . . . . . . . . . . . . . . . . . . . . . .38
Preparations for storage . . . . . . . . . . . . . . . . .38
Batteries . . . . . . . . . . . . . . . . . . . . . . . . . . . . .39
Storage . . . . . . . . . . . . . . . . . . . . . . . . . . . . . .39
Taking out of storage . . . . . . . . . . . . . . . . . . . 39
TECHNICAL DATA . . . . . . . . . . . . . . . . . . 40
FUEL . . . . . . . . . . . . . . . . . . . . . . . . . . . . . . . . . .42
ALHPABETIC INDEX . . . . . . . . . . . . . . . . 44
LIST OF CONTENTS
Page 4

4 © Scania Industrial & Marine Engines 1997-11:2
TYPE DESIGNATIONS
The engine designation indicates, in the form of a code: Engine type, size,
application etc.
The type designation and engi ne number ar e indic ated on a type plate l ocated
on the right-hand f ront s ide o f the eng ine. The engin e number is a lso st amped
in the engine block above the type plate.
Engines which are certified for smoke and emissions are equipped with a
plate which indicates which documents they are certified to. This plate is
located on th e forward rocker cover behind the oil fi ller.
Certification plate
DI 11 71 A 31 S
Type
D Supercharged diesel engine (with turbo)
DC like D but with air-cooled charge air cooler
DI like D but with fluid-cooled charge air cooler
Stroke in whole dm
3
Performance and certification code
Indicates, together with the application code, the normal gross engine
output.
The actual output setting of the engine is indicated on the engine card.
Application
A For general industrial use
Variant 01-99
Governor type
D Electronically controlled auxiliary governor
S RSV, all-speed and single-speed governor
T RQ, single-speed governor
Page 5

1997-11:2 © Scania Industrial & Marine Engines 5
1. Typskylt
2. Engine number,
stamped in engine block
3. Oil cooler
4. Oil dipstick
5. Oil cleaner
6. Turbo filter
7. Draining, engine oil
8. Coolant pump
9. Charge air cooler
10. Turbocharger
11. Injection pump
12. Fuel filter
13. Starter motor
14. Alternator
15. Fan belt, adjutstment
16. Draining, coolant
17. Oil filling
The drawings illustrate a common type of DI 11 engine.
Your engine may have other equipment not shown here.
3
5 13
6
4
1, 2
12 14
15
8
17
7 11
10
9
16
Page 6
6 © Scania Industrial & Marine Engines 1997-11:2
STARTING AND RUNNING
AT FIRST START
When the engine is started for the first time, the maintenance points listed
under ”First start” in the maintenance schedule should be followed,
see page 13.
Since these points are important for the engine to work satisfactorily right
from the start, they are also listed below.
1. Checking oil level (see page 15).
6. Checking coolant (see page 19).
The coolant should contain anti-corrosive to protect the cooling system
from corrosion.
If there is a danger of freezing:
- Only glycol anti-freeze should be used in the coolant as protection
against corrosion. We recommend only nitrite-free glycol anti-freeze
with the following supplier designations:
BASF G48 or BASF D542
- The concentration of glycol should be 30 - 60% by volume depending
on ambient temperature. 30% by volume offers protection down to
-18 °C. See page 19.
- Never top up with water only or glycol only. Lost fluid should always
be replaced with pre-mixe d coolant wi th the same gl ycol cont ent as the
coolant in the engine. If the concentration of glycol drops, both antifreeze and corrosion protection will suffer.
Note! A glycol concentration below 30% by vol ume will no t provide suf-
ficient protection against corrosion. A glycol concentration
greater than 60% will not increase anti-freeze protection and
reduces engine cooling capacity.
If there is no danger of freezing:
- Only Scania Anti-corrosive should be used in the coolant to protect
against corrosion. The correct level of anti-corrosive is 7-12% by volume and this must never drop below 7% by volume. The inhibitor in
Scania Anti-corrosive is nitrate- free.
- First fill: Fill with Scania Anti-corrosive as indicated on the packaging.
- Never top up with water only or anti-corrosive only. Lost fluid should
always be replaced with pre-mixed coolant:
water + 10% Scania Anti-corrosive by volume.
- Only coolant filter without inhibitor may be used. The use of a coolant
filter increases the life of the coolant and reduces the risk of deposit corrosion.
Coolant should be topped up
when the engine is stopped
after the first start
The recommended glycols
may not be mixed with glycol
which has a nitrite-based
anti-corrosive or with
Scania Anti-corrosive
Scania Anti-corrosive must not
be mixed with glycol.
Mixing or over concentration
can cause sludging
Coolant composition:
If there is a danger of freezing:
at least 30% glycol by volume
Max. 60% glycol by volume
If there is no danger of
freezing:
7-12% by volume
Scania Anti-corrosive
Page 7

1997-11:2 © Scania Industrial & Marine Engines 7
12. Checking fuel level (see page 26).
15. Checking electrolyte level in batteries (see page 28).
16. Checking battery charge (see page 28)
18. Checking coolant level monitor (see page 29).
19. Checking temperature monitor (see page 30).
20. Checking oil pressure monitor (see page 31).
21. Checking stop feature (see page 31).
22. Checking v-belt tension (see page 33).
CHECKS BEFORE RUNNING
Before running, ”Daily maintenance” as described in the maintenance schedule should be carried out, see page 13.
STARTING THE ENGINE
If the fuel tank has been run dry or if the engine has not been used for a long
time, bleed the fuel system, see page 26.
Out of consideration to our common environment, your new Scania engine
has been designed to be s tarted wi th less fuel . Unnecessar ily large f uel suppl y
at start will always result in the release of uncombusted fuel.
- Engines w ith mechani cal stop control: Set the stop control to operating
position.
- Open fuel valve (if fitted).
- Declutch the engine (does not apply to engines with a fixed clutch, e.g.
gensets).
- Engines with battery master switch: Switch on the power using the battery master switch.
- Set the speed control to raised idling. (Does not apply to gensets)
- Start the engine.
Important!A maximum of 3 start attempts per minute may be made when
the stop solenoid is a ctiva ted at s t art. The timer modu le can be
damaged resulting in the loss of the stop feature.
Starting at low temperatures
Local environmental requirements should be complied with. Start aids,
engine heater and/or flame start should be used to avoid starting problems
and white smoke.
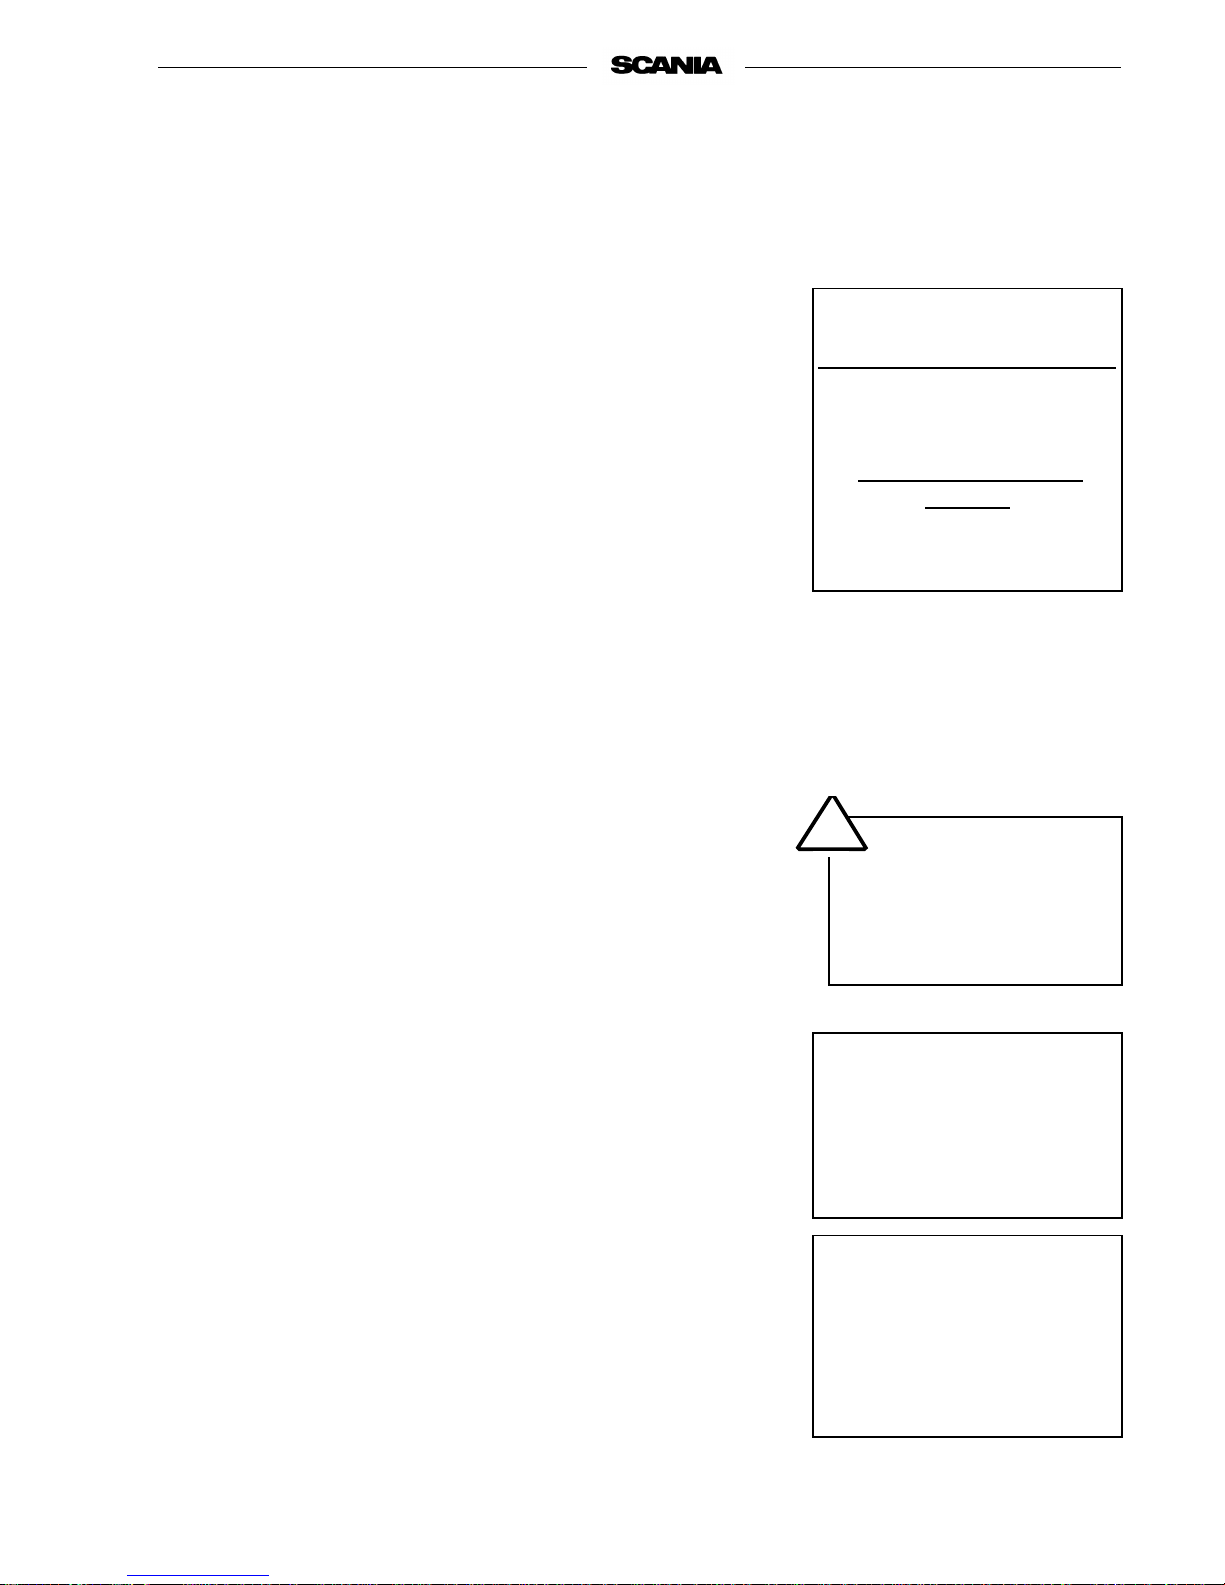
WARNING
Block the starter device
when working on the engine.
If the engine starts out of
control, there is a
SERIOUS RISK OF
INJURY
!
Page 8

8 © Scania Industrial & Marine Engines 1997-11:2
At temperatures below 0 °C:
Note! Use only start aids recommended by Scania.
- The starter motor may only be used for 30 seconds, after which it must
rest for 2 minutes.
If the engine has flame start:
- Operating flame start without timer relay: Press the control button
which also acts as a pre-glow button (max. 20 s). The glow plug continues to glow as long as t he bu tton i s held down aft er th e engin e is s tarte d.
Max. time is 5 minutes.
- Operating flame start with timer relay: Press the pre-glow button (max.
20 s). Release the pre-glow button after the engine starts. The timer
relay keeps the glow plug working for 5 minutes. If a shorter on-time is
required, press the release button. The key must be set to 0 of the start
attempt fails.
Note! If the engine is equipped with an INTERLOCK switch, this
should be held depressed until sufficient oil pressure has been
achieved. If the INTERLOCK switch is released too early, the
engine will stop.
- Gensets should be placed und er load directly after start to avoid the risk
of white smoke. This applies especially to engines which are installed
without heating aids or addition of base load.
- Set the appropriate idle spee d before the eng ine reach es 1,000 rpm ( does
not apply to gensets).
- Run the engine until warm with a light load. A light load on a cold
engine gives better c ombusti on and f aster heati ng tha n warming u p with
no load.
Page 9

1997-11:2 © Scania Industrial & Marine Engines 9
RUNNING
Check instruments and warning lamps at regular intervals.
Speed
The Scania tachometer is divided into different coloured sections as follows.
0 - 500 rpm red area: prohibited speed, passed when
starting and stopping.
500 - 700 rpm yellow area: low idle.
700 - 2200 rpm green area: normal operating speed.
Highest torque and lowest
fuel consumption at
1400 - 1600 rpm.
Low operating speed gives less
engine wear.
2200 - 2600 rpm yellow/green
striped: unsuitable operating speed. Can
arise when switching off and
when using engine brake downhill.
2600 - 3000 rpm red area: prohibited speed.
Coolant temperature
Correct coolant temperature during operation:
70 - 93 °C for system a t atmospheri c pressure.
70 - about 100 °C for system with positive pressure.
High coolant temperature leads to engine damage. Reduce the load on the
engine in order to lower the temperature. If the temperature does not drop,
stop the engine and look for the fault.
During long periods of operation with very low power take-off, the engine
may have difficulty i n r eac hin g 70 °C. However, if the load is increased, temperature will rise.
Cooling systems with a
Scania radiator and plastic
expansion tank must not
have positive pressure in
the system, i.e. a pressure
cap must not be used on
the expansion tank.
Page 10

10 © Scania Industrial & Marine Engines 1997-11:2
Oil pressure
Max. oil pressure:
warm engine at speed above 800 rpm 6 bar
Normal oil pressure:
warm engine at operating speed 3 - 6 bar
Min. oil pressure:
warm engine at 800 rpm 0.7 bar
At speeds below 800 rpm, the gauge may show low oil pr essure wit hout there
being a fault.
Oil pressure below 0.7 bar at speeds above 800 rpm will cause engine damage. The engine must be stopped immediately.
Charge test lamp
If the lamp lights during operation:
- Check/adjust the alternator drive belts as described under maintenance
point See page 33.
- If the charge test lamp is still lit, there may be a fault in the alternator or
in the electrical system.
STOPPING THE ENGINE
1. Allow the engine to run without load for a few minutes if it has been run
with a high continuous load.
2. Stop the engine using the stop control. Engines with a stop solenoid are
stopped using the stop button. Hold the stop button depressed until the
engine has fully stopped.
3. Engines with battery master switch: Cut the power using the battery
master switch. (Does not apply to emergency power back-up units).
4. Set the control switch to 0. (Does not apply to emergency power back-
up units).
Emergency stop
The stop solenoid linkage system has a knob marked ”STOP”. Pull the linkage system to the stop position using this knob if it is not possible to stop the
engine using the stop solenoid.
Danger of turbo damage or
boiling over if the engine is
stopped without cooling off.
The power must not be cut
until the engine has stopped.
High lubrication oil pressure
(above 6 bar) is normal when
starting a cold engine.
Page 11

1997-11:2 © Scania Industrial & Marine Engines 1 1
Clutch
- See the manufacturer’s instructions for handling and operating the
clutch.
WARNING!If the clutch output shaft is rotating (e.g. in multiple
engine installations where other engines are running) the
clutch can, under its own power, be drawn to engaged position.
THIS CAN CAUSE INJURY and engine damage. Always
secure the clutch in disengaged position if there is a risk of
the output shaft starting to rotate.
CHECKS AFTER RUNNING
- Check that the power is cut from the battery master switch and that the
control switch is set to ”0”.
- Fill the fuel tank. Make sure that the cap and the area around the filler
opening are clean to avoid contamination of the fuel.
- If there is a risk of freezing, the cooling system must be drained if it
does not contain sufficient anti-freeze, see page 19.
- At temperatures below 0 °C: Prepare for the next star t by c onnecti ng the
engine heater (if fitted).
WARNING
Always secure the clutch in
disengaged position if there is
a risk of the output shaft
starting to rotate.
If the engine is started
during e.g. service work,
there is a
SERIOUS RISK OF
INJURY
!
Page 12

12 © Scania Industrial & Marine Engines 1997-11:2
MAINTENANCE
The maintenance programme covers 25 points, divided into the following
main groups:
Lubrication oil system . . . . . . . . . . . . . . . . .page 14
Cooling system. . . . . . . . . . . . . . . . . . . . . . .page 18
Air cleaner . . . . . . . . . . . . . . . . . . . . . . . . . .page 24
Fuel system. . . . . . . . . . . . . . . . . . . . . . . . . .page 26
Electrical system, monitors, batteries etc. . .page 28
Miscellaneous. . . . . . . . . . . . . . . . . . . . . . . .page 33
The maintenance points are divided into intervals as follows:
Daily maintenance
Maintenance before first start
Maintenance after the first 400 hours of operation
Periodic maintenance every 200 hours of operation (carried out after 200,
400, 600, 800 etc. hours)
Periodic maintenance after every 400 hours of operation (carried out after
400, 800, 1200, 1600 etc. hours)
Periodic maintenance after every 1,200 hours of operation (carried out after
1,200, 2,400, 3,600 etc. hours)
Periodic maintenance after every 2,400 hours of operation (carried out after
2,400, 4,800 etc. hours)
Periodic maintenance after every 4,800 hours of operation (carried out after
4,800, 9,600 etc. hours)
Maintenance every year
Maintenance every 5th year
ENGINES WITH FEW HOURS OF
OPERATION
Emergency back-up power units and the like which are not used regularly
should be test run and checked according to the unit manufacturer’s instructions.
The engine is run to operating temperat ure and t he mainten ance poi nts bel ow
should be carried out:
1. Checking oil level.
5. Checking coolant level.
8. Checking low pressure indicator.
12. Checking fuel level.
15. Checking electrolyte level in batteries.
16. Checking battery charge.
17. Cleaning batteries.
23. Look for leaks. Remedy as necessary
For engines with few operating
hours which do not receive
periodic maintenance
according to the maintenance
schedule on page 13,
maintenance should be carried
out according to the schedules
for:
“Every year”
“Every 5th year”
Page 13

1997-11:2 © Scania Industrial & Marine Engines 13
MAINTENANCE SCHEDULE
1. More often if required
2. For engines with few operating hours, see page 12.
3. Earlier if low pressure indicator shows red.
4. If inhibitor has not been topped up for five years, coolant should be changed.
Daily
First
time at
Interval At least
At first start
400 h
200 h
400 h
1200 h
2400 h
4800 h
Every year
Every 5th year
LUBRICATION OIL SYSTEM, page 14
1. Checking oil level
l l
2. Oil change
l1 l
3. Cleaning the lubrication oil cleaner
l1 l
4. Changing the turbo filter
l1 l
COOLING SYSTEM, page 18
5. Checking coolant level
l
6. Checking coola nt
l l4 l
7. Cleaning cooling system
l1 l
AIR CLEANER, page 24
8. Test reading low pressure indicator
l
9. Cleaning coarse cleaner
l1 l
10. Cleaning or changing filter insert
l3 l
11. Chang ing saf et y cart ri dge
l l
FUEL SYSTEM, page 26
12. Checking fuel level
l l
13. Changing main filter
l1 l
14. Checking injectors
l l
ELECTRICAL SYSTEM, page 28
15. Checking electrolyte level in batteries
l l2 l
16. Chec king charge state of batteries
l l2 l
17. Cleaning batteries
l2 l
18. Checking level monitor
l l l
19. Chec king temperature moni tor
l l l
20. Checking oil pressure monitor
l l l
21. Checking stop function
l l l
MISCELLANEOUS, page 33
22. Checking v-belts
l l l
23. Look for leakage. Remedy as necessary
l
24. Checking/adjusti ng val ve cle arance
l l
25. Changing (or cleaning) valve for closed crankcase
ventilation
l
Page 14

14 © Scania Industrial & Marine Engines 1997-11:2
LUBRICATION OIL SYSTEM
OIL GRADE
The engine oil shoul d at least meet the requi re me nt s f or one of the following
oil classifications:
-Service CE or CF as per API
-CMC - D5
-Acea E3-96
- Check with your oil supplier if the oil meets these requirements.
- Specified oil change interv als appl y under th e prov ision that the sulp hur
content of the fuel does not exceed 0.3% by weight.
- Viscosities as illustrated.
- At very low outside temperatures: Consult your nearest Scania representative to avoid difficulties.
Oil analysis
Some oil companies can offer analysis of the engine oil. This analysis measures the oil’s total base nu mber (TBN), total acid number (TAN), fuel dilution, water content, viscosi ty and the con tent of wear partic les and soo t in the
oil.
The result of a series of anal ys es f orms the basis of establishing a s uit abl e oi l
change interval.
If the conditions are changed, a new oil a nalysi s progr am must be un derta ken
to establish a new change in terval.
-40 -30 -20 -10 0 10 20 30 40
°C
SAE 10W-30
SAE 20W-30
SAE 30
SAE 40
SAE 50
SAE 5W-30
SAE 15W-40
Additives must not be used.
The oil should be able to cope
with all temperature
variations up until the next
oil change.
Page 15

1997-11:2 © Scania Industrial & Marine Engines 15
1. Daily:
CHECKING OIL LEVEL
Before checking oil level: Let the engine remain stationary for at
least 1 minute.
- The correct level is between the marks on the dipstick. Top up when the
level is at the lower mark.
- Correct type, see ”Oil grade”, page 14.
Checking oil level during operation
On some engines, oil level can be checked during operation.
- Remove the oil filler cap to release the pressure in the crankcase.
- Check the l evel on the dipstick. Correct o il level: 10 mm below Min. or
Max. mark.
2. Every 400 hours:
OIL CHANGE
If the engine is used for particularly demanding operation,
especially in a dusty environment or if the deposits in the
centrifugal cleaner are thicker than 20 mm: Change the oil more
often.
- Unscrew the plug and drain the oil when the engine is warm.
- In certain engines, the oil is pumped out using a bilge pump.
- Clean the magnet on the plug.
- Refit the plug.
- Fill with oil.
- Check the level on the dipstick.
1 dm3 = 1 litre
Maximum angle of inclination during operation
Maximum permitted angles during operation vary depending on the type of
oil sump, see drawing.
Note! Given angles may only be used intermittently.
30°
20°
35°
30°
15° (or 20°)
30°
WARNING
The oil may be hot.
Wear protective gloves
and eye protection
!
10 mm
10 mm
Page 16

16 © Scania Industrial & Marine Engines 1997-11:2
3. Every 400 hours:
CLEANING THE OIL CLEANER
(at same time as oil change)
- Unscrew the nut and remove the cover.
- Lift out the rotor and slacken the nut for the rotor cover three turns.
- If the nut is stuck:
Secure the nut, absolutely not the ro tor, in a vice and turn the rotor three
turns by hand or using a screwdriver.
- Gently tap the nut using your hand or a plastic hammer so that the rotor
bowl becomes detached from the bottom plate.
- Undo the nut and remove the rotor bowl.
- Carefully prise the strainer loose from the bottom plate.
- Scrape away deposits from the inside of the rotor bowl. If there are no
deposits, this shows that the cleaner is not working.
- If the deposits are thicker than 20 mm: Clea n more often.
WARNING
Open the bowl with care.
The oil may be hot.
!
Page 17

1997-11:2 © Scania Industrial & Marine Engines 17
- Wash all parts in diesel.
- Place the O-ring in position in the rotor bowl. This must not be
damaged.
Change if necessary.
- Assemble the rotor
- Tighten the rotor nut hard by hand.
- Refit the rotor.
- Check that it turns easily.
- Check that the O-ring in the bowl is not damaged.
A hardened or damaged O-ring should be replaced.
- Screw down the bowl hard by hand.
If the nut is tightened using a tool, the rotor shaft, nut or bowl may be
damaged.
Operational test
The rotor turns very quickly and should continue to rotate when the engine
has stopped.
- Stop the engine when it is warm.
- Listen for the whirring from the rotor or feel whether the cleaner housing is vibrating.
The rotor normally rotates 30 - 60 seconds after the engine has stopped.
If not: Dismantle and check.
Page 18

18 © Scania Industrial & Marine Engines 1997-11:2
4. Every 400 hours:
CHANGING THE TURBO FILTER
(at the same time as the oil change)
- Remove the old filter and discard it according to environmental requirements.
- Oil the rubber gasket a fit a new Scan ia genuine filter.
- Tighten the filter by hand.
Never use tools as the fi lter may sustain damage, interfering with circulation.
- Start the engine and check for leaks.
If the deposits in the centrifugal cleaner exceed 20 mm, the turbo filter
must be changed more often, at the same time as cleaning the centrifugal
filter and changing the oil.
COOLING SYSTEM
5. Daily:
CHECKING COOLANT LEVEL
- Open the expansion tank cap and check coolant level.
- Correct level: (Scania plastic expansion tank).
- Cold engine: The coolant level should be level with the lower edge
of the filler neck.
- Warm engine:The coolant level should be about 25 mm above the
lower edge of the filler hole.
- Other types of expansion tank according to the installer’s instructions.
- Top up coolant as necessary, see point 6.
Note! When filling large amounts of coolant:
Never pour cold coolant into a warm engine.
This could crack the cylinder block and head.
Always top up using pre-
mixed coolant.
WARNING
Open the cover carefully.
water and steam can
spray out.
!
Page 19
1997-11:2 © Scania Industrial & Marine Engines 19
6. Every 2,400 hours:
CHECKING COOLANT
Coolant should be checked as follows:
a) Check the appearance of the coolant.
b) Coolant with glycol only: Check the glycol content.
c) Coolant with only Scania Anti-corr osive:
Check the protection against corrosion.
The composition of the coolant is described in more detail under
“Starting and running”
a)
Checking the appearance of the coolant
- Take a little coolant in a vessel and check that it is clean and clear.
- If the coolant is contaminated or cloudy: Consider changing the coolant
- The water for the coolant should be free of dirt.
- Use drinking water with a pH of 6 - 9.
b)
Checking glycol content
If there is a dang er of f reezing, use only glycol as protect ion agai nst cor rosion
in the coolant.
- Cooling systems with glycol must contain at least 30% glycol by volume to offer sufficient protection against corrosion.
- 30% glycol by volume provides anti-freeze protection down to -18 °C.
If more protection is r equir ed, see t he tabl e on the next pa ge for c alcul ating the necessary amount of glycol.
We recommend only nitrite-free glycol anti-freeze with the followin g sup-
plier designations:
BASF G48 or BASF D542
- Always top up the anti-freeze if the content drops below 30% b y volume. A glycol content above 60% by volume will not improve the protection against corrosion.
- The table below shows the temperature at which ice starts to form. The
engine freezes and breaks at signi ficantly lowe r temperatures , see graph.
- Ice forming in the coolant often causes malfunction without any risk of
damage. The engine must not be loaded hard when ice is forming.
Note! The coolant should be changed when the cooling system is
cleaned: Every 4,800 hours or at least every 5th year.
Important! If a coolant filter is used in the cooling system, it must no t
contain an inhibitor.
The coolant should be mixed
before it is poured into the
cooling system.
Never top up with only water
or only glycol.
WARNING
Ethylene glycol is
toxic if ingested.
Avoid contact with the skin.
!
The recommended glycols
must not be mixed with glycol
which has nitrite-based anti-
corrosive.
This could cause sludging and
reduced cooling capacity.
Coolant composition:
If there is a danger of freezing:
at least 30% glycol by volume
Max. 60% glycol by volume
If there is no danger of
freezing:
7-12 % by volume
Scania Anti-corrosive
Page 20

20 © Scania Industrial & Marine Engines 1997-11:2
A
A= Range to be avoided. Only for calculation of glycol mix.
Freezing point of coolant when ice slush starts to form at different glycol mixes
% Glycol by
volume
15 20 25 30 35 40 45 50
Cooling
system
capacity, dm
3
Ice slush start s
to form at °C
-7
-10 -14 -18 -24 -30 -38 -40
Glycol dm
3
(litres)
5 6 8 9 11 12 14 15 30
6 8 10 12 14 16 18 20 40
8 10 13 15 18 20 23 25 50
9 12 15 18 21 24 27 30 60
11 14 18 21 25 28 32 35 70
12 16 20 24 28 32 36 40 80
14 18 23 27 32 36 41 45 90
15 20 25 30 35 40 45 50 100
17 22 28 33 39 44 50 55 110
18 24 30 36 42 48 54 60 120
20 26 33 39 46 52 59 65 130
21 28 35 42 49 56 63 70 140
23 30 38 45 53 60 68 75 150
24 32 40 48 56 64 72 80 160
26 34 43 51 60 68 77 85 170
27 36 45 54 63 72 81 90 180
29 38 48 57 67 76 86 95 190
30 40 50 60 70 80 90 100 200
Line A: Ice starts to form (slush)
Line B: Temperature at whic h engine freezes and breaks
1. Safe range
2. Malfunction can arise (ice slush)
3. Coolant frozen
Cold characteristics of glycol:
- Example with 30% glycol by volume
- Ice slush starts to form at -18 °C.
- At -30 °C there is a risk of malfunction
- The engine cannot be damaged if there is at
least 30% glycol by volume
% glycol by volume
Page 21

1997-11:2 © Scania Industrial & Marine Engines 21
c)
Checking protection against corrosion
There must always be sufficient anti-corrosive (inhibitor) in the coolant to
protect the cooling system against corrosion.
If there is no danger of freezing use only Scania Anti-corrosive.
The inhibitor in Scania Anti-corrosive is nitrite-free.
The correct level of anti -corrosive is 7-12% by volume.
- Fill with Scania Anti-corrosive as indicated on the packaging.
- Topping up with 1.0% by volume of Scania Anti-corrosive should be
done after every 2,400 operating hours.
- Never top up with water only or anti-corrosive only. Lost fluid should
always be replaced with pre-mixed coolant:
water + 10% Scania Anti-corrosive by volume.
Note! The coolant should be changed when the cooling system is
cleaned: every 4,800 hours or at least every 5th year.
Changing coolant
1. Remove the filler cap from the expansion tank.
2. The coolant is drained at two points:
-the ”lowest point” of the engine block, see drawing
-the ”lowest point” of the cooling system.
3. Close the valves.
4. Fill coolant through the expansion tank filler hole.
Mix coolant as described on page 19.
Scania Anti-corrosive must not
be mixed with glycol.
Mixing or over concentration
can cause sludging and
reduced cooling capacity.
Any coolant filter must not
contain inhibitor.
Page 22

22 © Scania Industrial & Marine Engines 1997-11:2
7. Every 4,800 hours:
CLEANING COOLING SYSTEM
Note! If necessary, the cooling system should be cleaned more often.
External cleaning
Radiator
- Check that the ra diator is n ot blo cked on the air side and tha t the fins are
not damaged.
- Carefully scrape the deposit away from the radiator fins. If necessary a
paraffin-based engine cleaner may be used.
- Bent fins can be carefully straightened, e.g. using a steel wire brush.
Charge air cooler (DSI engine)
1. Drain the coolant from the engine, see “Changing coolant”.
2. Detach the upper part of the intake manifold.
3. Detach the charge air cooler hose and pipe connections.
4. Dismantle the charge air cooler as illustrated.
Take care not to damage the element’s water connections.
5. Clean the out side of the element. This is especially important if the
engine is equipped with closed crankcase ventilation. Use a paraffinbased engine cleaner.
6. Assemble the charge air cooler. Change all seals and gasket s.
7. Refit hose and pipe connections.
8. Fill coolant as described on page 19.
9. Connect the intake manifold from the turbo.
1. Intake manifold, lower
part
2. Gasket
3. Radiator element
4. Gasket
5. Intake manifold, upper
part
The cooling system must not
be cleaned using caustic soda.
Risk of damaging
aluminium parts.
Page 23

1997-11:2 © Scania Industrial & Marine Engines 23
Internal cleaning
Removing oils and greases
- If possible, run the engine until it is warm and then drain the cooling
system.
- Remove the thermostats.
- Fill the system with clean, hot water mixed with liquid dishwasher
detergent designed for household machines.
Mix 1% (0.1/10 l).
- Run the engine until warm (about 20 or 30 minutes). Do not forget any
cab heating system.
- Drain the cooling system.
- Fill the system again using cl ean, hot wat er and ru n the engi ne fo r about
20-30 minutes.
- Drain the water from the system.
- Refit the thermostats.
- Fill the system with coolant as described in the specifications on
page 19.
Removing deposits
- If possible, run the engine until it is warm and then drain the cooling
system.
- Remove the thermostats.
- Fill the system with clean, hot water mixed with one of the commercially available radiator cleaners based on sulphamin acid and containing dispersing agents. Follow the manufacturer’s instructions for mix
ratios and cleaning times.
- Run the engine for the for the specified time and then drain the cooling
system.
- Fill the system again with hot water and run the engine for about 20 or
30 minutes.
- Drain the water from the system.
- Refit the thermostats.
- Fill the system with coolant as described in the specifications on
page 19.
WARNING
When handling cleaners for
the cooling system:
Study the warning on the
packaging.
!
Page 24

24 © Scania Industrial & Marine Engines 1997-11:2
AIR CLEANER
8. Daily:
TEST READING
LOW PRESSURE INDICATOR
If the indicat or’s red plunger is fully visible, change or clean the air cleaner
filter insert, point 10.
9. Every 200 hours:
CLEANING THE AIR CLEANER
COARSE CLEANER
1. Detach the eccentric catch and remove the coarse cleaner.
2. Remove the plastic cover from the coarse cleaner and clean the parts.
3. Check that the plastic cover is intact and that it makes a seal against the
air cleaner housing during assembly.
4. Assemble the air cleaner.
1. Pre-filter with cover
2. Filter insert
3. Low pressure indicator
4. Safety cartridge
Air cleaner with pre-filter
The coarse cleaner should be
fitted with the marking
”TOP” facing up.
10. Every 1,200 hours
CLEANING OR CHANGING
FILTER INSERT
Note! Earlier if low pressure indicator shows red
Dismantling
1. Remove and clean the coarse cleaner, see point 9.
2. Undo the nut securing the filter insert and remove it.
3. Change or cl ean the insert.
Note! Cleaning the insert always means a risk of damage. The insert
may only be cleaned no more than four times. After cleaning, it
has a lower dust capacity than a new insert.
4. Mark the filter when it has been cleaned.
Cleaning insert
- Carefully blow the filter insert clean using dry compressed air from the
inside.
Note! This insert must not be washed using water.
Use only Scania genuine
air filter.
Change damaged filter
inserts.
Major risk of engine
damage if the filter insert is
damaged.
Page 25

1997-11:2 © Scania Industrial & Marine Engines 25
Test
- Insert a flashlamp into the insert and check from the outside that there
are no holes or cracks in the filter paper.
- Change the filter inse rt if there is any damage at all. Danger of engine
damage.
Assembly
1. Assemble the air cleaner in reverse order.
2. Reset the red plunger in the low pressure indicator by pressing in the
button.
11. Every 2,400 hours:
CHANGING THE SAFETY CARTRIDGE
1. Remove and clean the coarse cleaner, see point 9.
2. Undo the nut securing the filter insert and remove it.
3. Change or clean the filter insert, see point 10.
4. Undo the nut securing the safety cartridge and remove it.
5. Fit a new Scania genuine safety cartridge.
6. Assemble the air cleaner.
1. Pre-filter with cover
2. Filter insert
3. Low pressure indicator
4. Safety cartridg e
Air cleaner with pre-filter
Never clean the safety
cartridge.
Do not remove the safety
cartridge unnecessarily.
Page 26

26 © Scania Industrial & Marine Engines 1997-11:2
FUEL SYSTEM
12. Daily:
CHECKING FUEL LEVEL
- Top up fuel if necessary.
- If the tank is run dry, bleed the fuel system, see point 13.
13. Every 1,200 hours:
CHANGING THE FUEL FILTER
Fuel tanks
- Drain any water from the fuel tanks.
Filter
The filter con sists of a filte r unit.
- Wash the outside of the filter and unscrew it. Discard the filter
according the environmental requirements.
- Do up the new filter by hand.
Never use tools. The filters may be damaged, inhibiting circulation.
- Bleed th e fuel system as below.
- Start the engine and check for leaks.
Bleeding the fuel system
- Open the bleed screw 1 on the main filter.
- Pump the hand pump 2 until air-free fuel flows out at the maim
bleed screw.
- Close the bleed screw. Pump a few times using the hand pump.
If the engine is difficult to start after bleeding . . . . .
- Slacken the injection pump overflow valve 3 one half turn
and try starting again. On the 8000 pump, the overflow valve is
located on the fuel shut-off valve.
If the engine still won’t start . . . . . . .
- Pump the hand pump until bubble-free fuel flows from the overflow
valve.
Tighten the overflow valve when the engine has started.
Use only Scania genuine
fuel filter.
1 2 3
Be extremely careful with
cleanliness when wo rkin g on
the fuel system.
Malfunctions
can easily arise and the
injection equipment
can be damaged.
Page 27

1997-11:2 © Scania Industrial & Marine Engines 27
14. Every 2,400 hours:
CHECKING INJECTORS
Injectors should b e inspe cted by trai ned per sonnel with acces s to th e requi red
equipment, at least once every year or every 2,400 hours.
Removal
1. Clean around the injectors and connections including the clamps and
brackets.
2. Detach the delivery pipe bundle and the leak-off fuel lines.
3. Unscrew the injector.
4. Place protective plugs on the injector and delivery pipe.
5. Lift the seal from the bottom of the injector seat if it does not come out
together with the injector.
6. Place a seal plug in the injector seat in the cylinder head.
7. Clean the injectors and check/adjust in an injector tester.
Correct opening pressure, see Technical data, page 40.
Fitting
1. Check that there is no old seal in place and fit a new seal in the bottom
of the injector seat.
2. Fit a new O-ring in the socket nut and a new seal under it.
3. Fit the injector.
4. Tighten the socket nut to 70 Nm (7.0 kpm).
5. Fit the delivery pipe and tighten the cap nuts to 20 Nm
(2.0 kpm). Fit clamps and brackets.
Take care to fit the delivery pipe without tension and make sure that
the cone on the delivery pipe is correctly positioned in the connector.
6. Fit the leak-off fuel line. Tighten the bolts to 11 Nm (1.1 kpm).
1. Delivery pipes
2. Cap nut
3. Washer
4. Cone
5. Connector on injector or
injection pump
Delivery pipe connection
1. Socket nut
2. O-ring
3. O-ring
4. Stop ring
5. Guide pin
6. Seal
The delivery pipes must not
be bent.
All clamps must be refitted.
Page 28

28 © Scania Industrial & Marine Engines 1997-11:2
ELECTRICAL SYSTEM
15. Every 200 hours:
CHECKING ELECTROLYTE LEVEL
IN BATTERIES
1. Undo the plugs and check the electrolyte level in all cells.
2. Top up using distilled wat er until the leve l is 10-15 mm above th e plates.
16. Every 200 hours:
CHECKING CHARGE
STATE IN THE BATTERIES
Note! Every 200 hours applies to gensets and the like.
Other installations every 1,200 hours.
- Check specific gravity using a battery electrolyte tester.
In a fully charged battery it should b e:
1,280 at +20°C
1,294 at 0°
1,308 at -20°C
- If the specific gravity is below 1.20, the battery must be charged.
A discharged battery freezes at -5 °C.
Avoid boost charging. This will damage the battery in the long term.
17. Every 200 hours:
CLEANING BATTERIES
Note! Every 200 hours applies to gensets and the like.Other installa-
tions every 1,200 hours.
1. Clean batteries, cables and cable terminals.
2. Check that all cable terminals are well tightened.
3. Grease posts and cable terminals using petroleum jelly.
Page 29

1997-11:2 © Scania Industrial & Marine Engines 29
18. Every 1,200 hours:
CHECKING COOLANT
LEVEL MONITOR
(optional equipment)
1. Start the engine.
2. Lower the coolant level in the expansion tank.
3. Automatic stop in case of fault: Engine stops, warning lamp lights and
buzzer sounds if there is no fault in the level monitor.
4. No automatic stop in case of fault: Warning lamp lights, buzze r sounds
if there is no fault in the level monitor.
5. Top up coolant to correct level, see page 18.
2-pole level monitor installed in
expansion tank for radiator deliv-
ered by Scania
Page 30

30 © Scania Industrial & Marine Engines 1997-11:2
19. Every 1,200 hours:
CHECKING TEMPERATURE MONITOR
1. Drain sufficient coolant for the temperature monitor to be removed.
2. Remove the temperature monitor cable(s).
3. Unscrew the monitor.
4. Refit the cable(s) to the m onitor.
5. Dip the monitor sensor in water. Slowly heat the water (about 1° per
minute) using e.g. an immersion heater.
6. Set the control switch to ”ON”. Use a thermometer to check that the
warning lamp lights when the alarm is given at the correct temperature.
Correct temperature is stamped on the monitor’s hexagon.
Tolerance is ± 3° for the monitor.
CHECKING TEMPERATURE SENSOR
1. Drain sufficient coolant for the temperature sensor to be removed.
2. Remove the temperature sensor cable(s).
3. Unscrew the sensor.
4. Connect an ohmmeter to the temperature sensor.
5. Dip the sensor body into water. Slowly heat the water (about 1° per
minute) using e.g. an immersion heater.
6. Check the re sistance at the temperatures given below.
7. The sensor should give the following readings:
At
temp.
°C
Resistance Ω
Tolerance
°C
60 134 ± 13.5
±4
90 51.2 ± 4.3
±3
100 38.5 ± 3
±3
2-pole temperature sensor
C = Common connection
1 = Connection C -1 closes at
stamped temperature
2 = Connection C -2 opens at
stamped temperature
2-pole temperature monitor
Page 31

1997-11:2 © Scania Industrial & Marine Engines 31
20. Every 1,200 hours:
CHECKING THE OIL PRESSURE
MONITOR
Alternative 1
Connect an ohmmeter to the oil pressure monitor and check that the monitor
opens/closes at the correct pressure when the engine is started and stopped.
Alternative 2
Monitor coupled for automatic stop in case of fault:
1. Start the engine.
2. Check on the oil pressure gauge that oil pressure rises.
3. Stop the engine manually (using the emergency stop).
4. Check on the oil pressure gauge at what pressure the stop solenoid oper-
ates and the monitor opens. Correct pressure: 0.7 ± 0.15 bar.
Monitor coupled to buzzer:
1. Main switch in operate position, check that buzzer sounds.
2. With the engine running, check that the buzzer stops sounding when oil
pressure is above 1.1 ± 0.15 bar and the monitor closes.
CHECKING OIL PRESSURE SENSOR
- Connect an ohmmeter to the oil pressure sensor and check the resistance.
- The sensor should give the following readings:
0 bar - 10 ± 3 Ω
2 bar - 56 ± 6 Ω
4 bar - 88 ± 6 Ω
6 bar - 124 ± 6 Ω
7 bar - 140 ± 6 Ω
21. Every 400 hours:
CHECKING THE STOP FEATURE
Check that the stop solenoid is activated and stops the engine when the stop
signal is given by the button, temperature monitor, coolant level monitor and
oil pressure monitor if these are coupled for automatic stop in the case of
fault.
Important! Stop solenoids with a timer module may be activated for start
and stop a maximum of 3 times per minute. Otherwise, the
timer module may be damaged and the stop feature cease.
2-pole oil pressure sensor
2-pole oil pressure monitor
Page 32

32 © Scania Industrial & Marine Engines 1997-11:2
CHECKING STOP SOLENOID STOP POSITION
When changing the stop solenoi d, or if the stop fea ture i s not sat isfact ory, the
following should be done (the figures show the stop control with the engine
in stop position):
The stop position at “Pull to stop”.
- Check and/or set the length of the link rod so that the distance between
the locknuts (nut height 5.2 mm) is 21.0 ±
0.1 mm when the nuts are
tightened.
- Fit the stop solenoid in the bracket as in the figure.
- Connect the stop solen oid electrically, red to
+ and black to -, and acti-
vate so that it is fully drawn. Note: The timer module is damaged if
the poles are reversed.
- Screw the clevis onto the st op lever using th e link pi n and chec k, in s top
position, that there is a small clearance (0.2-0.3 mm) between the stop
lever and the operating point on the governor
- Check the stop feature by starting the engine and then stopping it by
activating the stop so lenoid.
Important!The stop solenoid must n ot b e ac tivated more than 3 times per
minute as the timer module can be damaged.
Stop position at “Pulled during operation”.
- Check and/or set the length of the link rod so that the distance between
the locknuts (nut height 5.2 mm) is 26.0 ±0.1 mm when the nuts are
tightened.
- Fit the stop solenoid in the bracket as in the figure.
- Connect the stop solen oid electrically, red to
+ and black to - and acti-
vate it so that it is fully pulled. Note: The timer module is damag ed if
the poles are reversed.
- Turn the stop lever to operating position and screw the clevis onto the
stop lever using the link pin and check, in operating position, that there
is a small clearance (0.2-0.3 mm) between the stop lever and the operating point on the governor
- Activete the stop solenoid and start the engine. Stop the engine by cutting the pow er to the stop solenoid.
Important!The stop solenoid must n ot b e ac tivated more than 3 times per
minute as the timer module can be damaged.
Installation “Pull to stop”
Installation “Pulled during
operation”
Page 33

1997-11:2 © Scania Industrial & Marine Engines 33
CHANGING BATTERY
Removal
1. Detach the negative lead (-) from the battery (cable to engine casing).
2. Detach t he positive le ad (+) from the battery (cable to starte r motor).
Fitting
1.
Connect the positive lead (+) to the battery (cable to starter motor).
2. Connect the negative lead (-) to the battery (cable to engine casing).
MISCELLANEOUS
22. Every 200 hours:
CHECK/TENSION
V-BELTS
Correctly tensioned drive belts should be possible to depress
about 10 mm with a force of 35-50 N (depending on the
free length of the belt) when pressing on one belt.
Change worn or damaged belts.
1. Detach the securing screws.
2. Set the correct tension using the adjusting screw.
Do not over-tighten the belts.
Measurement using belt tension gauge Krikit
(Part. No. 587 495)
1. Zero the gauge by pressing the measuring arm.
2. Place the gauge on the V-belt at an equal distance from two pulleys.
3. Press until the gauge clicks.
4. Read the gauge.
- Recommended tension in Scania genuine belts
at test is 300 N.
- When changing belts, slightly higher (10-15%) tension should be used.
Page 34

34 © Scania Industrial & Marine Engines 1997-11:2
23. Daily:
LOOK FOR LEAKAGE,
REMEDY AS NECESSARY
- Start the en gine.
- Look for leakage of oil, coolant, fuel, air and exhaust.
- Tighten or change leaking connections. Check the overflow holes (1)
which show whether the O-rings between the cylinder liner and crankcase are leaking, see drawing.
a) If coolant is leaking out, the two upper O-rings are leaking.
b) If oil is leaking out, the lower O-ring is leaking.
- Check that the drain hole (2) on the coolant pump is not blocked, see
drawing. If there is leakage, change the pump seal.
A small amount of leakage from t he over flow hol es when runnin g in t he
engine is normal. (Seals and O-rings are fitted lubricated with soap or
oil).
This leakage normally stops after a time.
If there is a large amount of leakage - contact your nearest Scania
workshop.
1
1 1 1
1
1
2
Page 35

1997-11:2 © Scania Industrial & Marine Engines 35
24. Every 2,400 hours:
CHECK/ADJUST
VALVE CLEARANCE
Checking/adjusting valve cle arance can also be done aft er t he f ir st
400 hours of operation.
Valves should be adjusted when the engine is cold, at least 30 minutes after
operation.
Rocker cover gaskets should be changed as necessary. Tightening torque:
25 Nm.
Alternative 1
- Set No. 1 cylinder to TDC by turning the engine in its direction of rotation until both valves are closed.
- Adjust the following valves. Correct valve clearance is indicated on the
instruction plate on one of the rocker covers:
Cylinder 1 Intake and exhaust
2In
3Ex
4In
5Ex
- Set No. 6 cylinder to TDC by turning the engine one revolution in its
direction of rotation and adjust the following valves:
Cylinder 2 Ex
3In
4Ex
5In
6 In and ex
Covers for reading
on flywheel casing
Note
On silumin casings readings can be
taken either from the top or from
underneath, depending on which
flywheel is used.
The cover not b eing used is covered
with a seal and an instruction
plate.
On cast iron casings readings can
be taken from either the top or
from the side (60o) according to
the accessibility.
FLYWHEEL
TDC
No. 6 cyl
TDC
No. 1 cyl
Intake valve
Exhaust valve
5
4
3
2
1
6
Cylinder numbering
FLYWHEEL
WARNING
Block the starter device
when working on the engine.
If the engine starts out of
control, there is a
SERIOUS RISK OF
INJURY
!
Page 36

36 © Scania Industrial & Marine Engines 1997-11:2
Alternative 2
- Set the No. 1 cylinder to TDC by turning the engine in its direction of
rotation until both valves are closed.
- Adjust bo th the valves f or the No.1 cylinder. Correct valve clearance is
indicated on the instruction plate on one of the rocker covers.
- Repeat this procedure with the remaining cylin ders in the order
5 - 3 - 6 - 2 - 4 (firing sequence) by turning the engine 1/3 revolution in
its direction of rotation between each adjustment.
25. Every 2,400 hours:
CHANGING (or CLEANING) VALVE
FOR CLOSED CRANKCASE
VENTILATION
Alternative 1:
Change the valve at the sp ecified inter val.
Alternative 2:
- Remove the valve after the specified interval.
- Clean the valve by placing it in a bath of diesel fuel oil overnight.
Then rinse it several times in diesel an d let it drip off.
- Refit the valve.
- The valve may be reused (cleaned) a maximum of two times
after the first 2,400 hours of use. Take care to mark the valve
after cleaning it.
Page 37

1997-11:2 © Scania Industrial & Marine Engines 37
LONG-TERM STORAGE
If the engine is not to be used for a long period of time, special measures
should be taken to protect against corrosion in the cooling system, fuel system and combustion chamber and to protect against external corrosion.
The engine can normally stand idle for up to six months. If disuse is longer,
the following measures should be taken, providing protection for about four
years. An alternative to long-term storasge is to start the engine and run it
until warm every 6 months.
Preparing the the engine for long-term storage means:
- Thoroughly cleaning the engine
- Running the engine for a certain time with special preservative fuel, oil
and coolant.
- Otherwise preparing the engine for storage
(filter changes, lubrication etc.).
Preservative coolant
If the engine is to be s tore d with a f ull c ooling syste m, use 50% glycol by vol ume. If the engine is to be stored with an empty cooling system, use glycol
without nitrite-based inhibitor, such as BASF G48 or BASF D542.
Note! Only glycol, no water.
Nitrite-based inhibitors in an empty cooling system give rise to
ammonia vapour which can damage brass components such as
monitors and sensors.
Preservative fuel
- Use diesel fuel oil mixed with Lubrizol 560A or equivalent.
-Mix 1 cm
3
(ml) Lubrizol 560A in 10 dm3 (l) fuel.
HANDLING LUBRIZOL 560A
Hazardous!
Contains aromatic hydrocarbons
Use extractors where there is a risk of vapour build-up.
Wear eye protection and protective gloves when handling. Do not use contaminated clothing.
In case of contact with e yes: Rinse with a g entle stream of water (at least 15 minutes).
Seek medical attention.
In case of contact with skin: Wash with soap and water
In case of inhalation: Fresh air, rest and keep warm
Flammable: Fire class 2A. Flash point + 27°.
In case of fire: Extinguish using carbon dioxide, powder or foam
Storage: In well sealed vessel in dry, cool place. Keep out of reach of children.
!
Page 38

38 © Scania Industrial & Marine Engines 1997-11:2
Preservative oil
Suitable preservative oil can be supplied by most oil companies.
E.g. Dinitrol 40 or equivalent.
Preparations for storage
- Drain and flush the cooling system. Fill with preservative coolant.
- Run the engine until warm with ordin ary fuel. Stop the engine and drain
the oil.
- Change fuel filter and turbo filter.
- Fill the engine with preservative oil to the minimum level on the dipstick.
- Mix the preservati ve fuel in a ca n. Detac h the f uel pi pe at t he fee d pump
suction line and connect a hose from the can.
- Detach the fuel pipe at the overflow valve and connect a return hose to
the can.
- Start the engine and run it at about 1,000 rpm (does not apply to singlespeed engines) for 20 - 25 minutes.
- Stop the engine, remove the hoses and connect the normal fuel lines.
- Oil the valve mechanism with plenty of preservative oil.
- Remove the injectors and spray preservative oil into each cylinder
max. 30 cm
3
(ml).
Crank the engine several revolutions using the starter motor.
Spray a little more into each cylinder.
The engine must not then be cranked. Refit the injectors.
- Drain the preservative oil from the engine. New engine oil can be filled
directly or when taking out of storage.
- Drain the coolant if th e engine is not to be stored with a full cooling system. Plug and tape over a ll co ola nt connections (if the cooling system is
not completely assembled).
- Air cleaner: Clean and change the filter insert.
- Cover air intakes and exhaust pipes.
- Alternato r and starter m otor:
- Spray with water-repel lent a nti- corros ive oil, CRC 226 , LPS1 or equ ivalent.
- Spray the outside of shiny engine parts, first using penetrating preservative oil such as Dinitrol 25B and then using Dinitrol 112 or equivalent.
Page 39

1997-11:2 © Scania Industrial & Marine Engines 39
- Equip the engine with a clear notice giving the date of preservation
and stating that the engine must not be started or cranked.
Batteries
Remove the batteries f or ma inten ance c har ging i n the c hargi ng sta tion. ( Does
not apply to batteries which, according to the manufacturer, are maintenancefree). The same applies even for short periods of disuse, even if the engine is
not stored as above.
Storage
After the preparations, the engine should be stored in a dry, warm environment (room temperature).
Taking out of storage
(action when the engine is taken into operation)
- Remove plugs and tape from coolant connections, air intakes and
exhaust pipes.
- Fill the cooling system with coolant, see page 6.
- Check the oil level in the engine and top up with new oil.
- Crank the engine several revolutions with the injectors removed, oiling
the valve mechanism, pushrods and tappets with plenty of oil.
Important! The engine must be cranked with th e injectors re moved so that
excess preservative oil can be forced out of the cylinders.
- Fit the inje ctors.
- Drain the fuel system’s main filter of preservative fuel.
- Bleed the fuel system.
- Wash off externally applied preservative oil using white s pirit.
STORED ENGINE
Date . . . . . . . . . . . .
Must not be started or cranked.
Page 40

40 © Scania Industrial & Marine Engines 1997-11:2
TECHNICAL DATA
GENERAL D11 DC11 DI11
Number of cylinders
6 in line
Cylinder bore mm
127
Stroke mm
145
Swept volume dm
3
(litres)
11.0
Number of main bearings
7
Firing sequence
1 - 5 - 3 - 6 - 2 - 4
Compression ratio
15:1
Engine direction of rotation viewed from rear
Anti-clockwise
Fan direction of rotation viewed from the front
Clockwise
Cooling
Fluid
Va lve clearance, cold engin e
intake valve mm
exhaust valve mm
0.45
0.80
Weight, without coolant and oil kg
*With charge air cooler, radiator,
expansion tank and pipes
930 1020* 950
Output
see “Engine record card”
LUBRICATION SYSTEM
Max. oil pressure
(warm engine at speed above 800 rpm) bar (kp/cm
2
)
6
Normal oil pressure
(warm engine at operating speed) bar (kp/cm
2
)
3 - 6
Min. oil pressure
(warm engine 800 rpm) bar (kp/cm
2
)
0.7
Oil capacity, see page 15
Crankcase pressure with closed crankcase
ventilation mm VP
-55 - +20
Page 41

1997-11:2 © Scania Industrial & Marine Engines 41
FUEL SYSTEM D11 DC11 DI11
Pump setting BTDC
See plate on rocker cover
Injectors, opening pressure bar (kp/cm
2
)
300
Low idle rpm
700
Maximum full load speed
See engine card
Fuel
Diesel fuel oil
1
Tightening torques:
Socket nut for injectors Nm
Cap nut for delivery pipe Nm
Oil leakage connection Nm
70
20
11
1
see page 42
COOLING SYSTEM
Number of thermostats
2
Thermostat, opening tempera tu re
°C
79
Coolant temperature:
system with atmospheric pressure
°C
system with positive pressure
°C
70 - 93
70 - about 100
Capacity including radiator, engine and expansion tank
and for DSI11 incl uding charge air cooler
with 0.75 m
2
radiator dm3 (litres)
with 1.00 m
2
radiator dm3 (litres)
53 55 58 58 60
ELECTRICAL SYSTEM
System voltage V
24
Alternator, current A
65 or 90
Starter motor power kW (hp)
6.6 or 6.7 (9.0 or 9.1)
Monitors, alarm values:
oil pressu re monitor bar (kp/cm
2
)
temperature monitor °C
0.7
± 0.15
Stamped on monitor hexagon
Page 42

42 © Scania Industrial & Marine Engines 1997-11:2
FUEL
Diesel fuel oil
The composition of the diesel fuel oil is extremely important for engine and
injection pump function and service life. Even engine output and exhaust
emissions are dependent on fuel quality. The requirements and testing norms
for the most important properties are described in the service manual in sections which can be ordered from your Scania dealer or directly from Scania.
The address for Scania is printed on the cover.
The table below shows the r equir ements for some of t he most importa nt pro perties:
Environmentally-friendly fuels (low sulphur fuels)
There are three classes of so-cal led envi ronment ally- frie ndly fuel s. Class 1 is
sulphur-free and class 2 is low in sulphur. Compared with class 3 (normal
fuel), these fuels are less dense and this reduces engine output. Only class 1
fuel should be used with a catalytic converter.
Property Requirement
Viscosity at 40 °C 2.0 - 4.5 mm
2
/s (cSt)
Density at 15
°C 0.80 - 0.86 kg/dm
3
Sulphur (concentration by mass) max 0.3 %
Ignition characteristic
(cetane number)
min 49
flash point 56 °C
Page 43

1997-11:2 © Scania Industrial & Marine Engines 43
Additives
At low temperatures, paraffin can pr ec ipi ta te and bl ock fil t ers and l ine s. Thi s
can cause t he engine to lose power or stop.
Winter fuel is usually available i n cold climates. If necessary, the properties
of this can be improved before operating at low temperatures. However,
extremely low temperatures can cause problems.
The properties of the fuel when cold can be impr oved by doing one of the following before the temperature drops:
1. Lamp paraffin or heating oil: Max 50% may be added. Add the paraf-
fin first so that the fue l is blended full y. In a number of countr ies, the use
of paraffin as an engine fuel is prohibited.
2. Petrol: Only in emergencies and then no more than 30%. Petrol lowers
the ignition characteristics (cetane number) which can lead to difficulty
starting. There will also be emissions of blue smoke and fuel consumption will be higher. Even very small quantities of petrol will lower the
flash point of the fuel which can mean the risk of fire.
3. Alcohol: 0.5 - 2% to prevent water in the fuel freezing to form ice.
4. Light diesel: Can be used for Scani a engines in pure for m or in the same
way as lamp paraffin to improve the properties of the fuel when cold.
Light diesel is paraffin with a suitable ignition characteristic and with a
lubricating additive. Without this, the injection pump would seize.
Drain fuel tank, drain fuel filter, clean the pre-filter and change
fuel filter regularly.
Page 44

1997-11:2 © Scania Industrial & Marine Engines 44
Air cleaner . . . . . . . . . . . . . . . . . . . . . . . . . . . . 24
Air cleaner, low pressure indicator . . . . . . . . . 24
Air cleaner, pre-filter . . . . . . . . . . . . . . . . . . . 24
Air cleaner, safety cartridge . . . . . . . . . . . . . . 25
Air filter, insert . . . . . . . . . . . . . . . . . . . . . . . . 24
Batteries . . . . . . . . . . . . . . . . . . . . . . . . . . . . . 28
Battery, changing . . . . . . . . . . . . . . . . . . . . . . 33
Bleeding, fuel system . . . . . . . . . . . . . . . . . . . 26
Checks after running . . . . . . . . . . . . . . . . . . . . 11
Checks before running . . . . . . . . . . . . . . . . . . . 7
Clutch . . . . . . . . . . . . . . . . . . . . . . . . . . . . . . . 11
Coolant . . . . . . . . . . . . . . . . . . . . . . . . . . . . . . 19
Coolant level . . . . . . . . . . . . . . . . . . . . . . . . . . 18
Coolant level monitor . . . . . . . . . . . . . . . . . . . 29
Coolant temperature . . . . . . . . . . . . . . . . . . . . . 9
Coolant temperature monitor . . . . . . . . . . . . . 30
Coolant, hanging . . . . . . . . . . . . . . . . . . . . . . . 21
Cooling system . . . . . . . . . . . . . . . . . . . . . . . . 18
Cooling system, cleaning . . . . . . . . . . . . . . . . 22
Electrical system . . . . . . . . . . . . . . . . . . . . . . . 28
Emergency stop . . . . . . . . . . . . . . . . . . . . . . . . 10
Filter, air cleaner . . . . . . . . . . . . . . . . . . . . . . . 24
Filter, fuel . . . . . . . . . . . . . . . . . . . . . . . . . . . . 26
First start . . . . . . . . . . . . . . . . . . . . . . . . . . . . . . 6
Foreword . . . . . . . . . . . . . . . . . . . . . . . . . . . . . . 2
Fuel filter, changing . . . . . . . . . . . . . . . . . . . . 26
Fuel level . . . . . . . . . . . . . . . . . . . . . . . . . . . . . 26
Fuel specification . . . . . . . . . . . . . . . . . . . . . . 42
Fuel system . . . . . . . . . . . . . . . . . . . . . . . . . . . 26
Fuel system, bleeding . . . . . . . . . . . . . . . . . . . 26
Glycol . . . . . . . . . . . . . . . . . . . . . . . . . . . . . . . 19
Injectors . . . . . . . . . . . . . . . . . . . . . . . . . . . . . . 27
Leakage . . . . . . . . . . . . . . . . . . . . . . . . . . . . . . 34
Long-term storage . . . . . . . . . . . . . . . . . . . . . . 37
Low pressure indicator . . . . . . . . . . . . . . . . . . 24
Lubrication oil pressure . . . . . . . . . . . . . . . . . 10
Lubrication oil pressure monitor . . . . . . . . . . . 31
Lubrication oil system . . . . . . . . . . . . . . . . . . . 14
Maintenance . . . . . . . . . . . . . . . . . . . . . . . . . . 12
Maintenance schedule . . . . . . . . . . . . . . . . . . . 13
Oil analysis . . . . . . . . . . . . . . . . . . . . . . . . . . . 14
Oil capacity . . . . . . . . . . . . . . . . . . . . . . . . . . . 15
Oil change . . . . . . . . . . . . . . . . . . . . . . . . . . . . 15
Oil cleaner . . . . . . . . . . . . . . . . . . . . . . . . . . . . 16
Oil grade . . . . . . . . . . . . . . . . . . . . . . . . . . . . . 14
Oil level . . . . . . . . . . . . . . . . . . . . . . . . . . . . . . 15
Oil pressure . . . . . . . . . . . . . . . . . . . . . . . . . . . 10
Oil pressure monitor . . . . . . . . . . . . . . . . . . . . 31
Pre-filter, air cleaner . . . . . . . . . . . . . . . . . . . . 24
Protection against corrosion . . . . . . . . . . . . . . 21
Running . . . . . . . . . . . . . . . . . . . . . . . . . . . . . . . 9
Safety cartridge, air cleaner . . . . . . . . . . . . . . . 25
Speed . . . . . . . . . . . . . . . . . . . . . . . . . . . . . . . . . 9
Starting the engine . . . . . . . . . . . . . . . . . . . . . . . 7
Start-up report . . . . . . . . . . . . . . . . . . . . . . . . . . 1
Stopping the engine . . . . . . . . . . . . . . . . . . . . . 10
Storage . . . . . . . . . . . . . . . . . . . . . . . . . . . . . . . 39
Taking out of storage . . . . . . . . . . . . . . . . . . . 39
Technical data . . . . . . . . . . . . . . . . . . . . . . . . . 40
Temperature monitor . . . . . . . . . . . . . . . . . . . . 30
Turbo filter . . . . . . . . . . . . . . . . . . . . . . . . . . . 18
Type designations . . . . . . . . . . . . . . . . . . . . . . . 4
Valve clearance . . . . . . . . . . . . . . . . . . . . . . . . 35
Warranty . . . . . . . . . . . . . . . . . . . . . . . . . . . . . . 1
ALHPABETIC INDEX
 Loading...